1
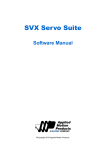
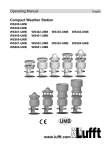
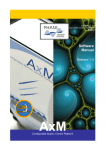
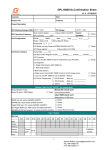
CANopen User Manual Rev. 1.1 AMP & MOONS’ Automation CANopen User Manual Introduction This manual describes MOONS’ CANopen implementation of CiA DS301 and CiA DSP402 specifications. It is expected that the user fully understands both CiA standards. That understanding, along with this specification, will enable the user to develop a distributed motion control system. The intent of this manual is to highlight manufacturer specific requirements as they pertain to MOONS’ drives. Information and standards may be obtained from the CiA website at http://www.can-cia. com/. Information and software relating directly to the MOONS’ CANopen drives, including an open-source example program, may be obtained from our website at http://www.moons.com. Rev. 1.1 12/1/2010 2 CANopen User Manual Contents Introduction................................................................................................................................... 2 Reference Documents............................................................................................................ 7 Commonly Used Acronyms..................................................................................................... 7 CANopen Network Topology Overview .................................................................................. 8 Drive Setup................................................................................................................................... 8 Wiring the Power and Motor................................................................................................... 8 Wiring the CANopen Connector for MSST5-C Drives............................................................ 9 CANopen Bitrate..................................................................................................................... 9 Drive Configuration............................................................................................................... 10 Supported DSP402 Modes of Operation.................................................................................... 11 Object Dictionary........................................................................................................................ 12 Electronic Data Sheet........................................................................................................... 12 Compatibility Issues.............................................................................................................. 12 Global Control Word and Status Word.................................................................................. 15 General Purpose Registers........................................................................................................ 16 Appendix A - Parameter Unit Scaling......................................................................................... 17 Appendix B - Response Codes.................................................................................................. 18 Appendix C - Profile Position Mode............................................................................................ 19 General Mode Description.................................................................................................... 19 Enable Profile Position Mode................................................................................................ 19 Set Running Parameters....................................................................................................... 19 Starting/Stopping Motion....................................................................................................... 19 Appendix D - Profile Velocity Mode............................................................................................ 24 General Mode Description.................................................................................................... 24 Enable Profile Velocity Mode................................................................................................ 24 Set Running Parameters....................................................................................................... 24 Enable Drive Operation......................................................................................................... 24 Starting/Stopping Motion....................................................................................................... 24 Appendix E - Homing Methods................................................................................................... 26 Set Running Parameters....................................................................................................... 26 Enable Homing Mode........................................................................................................... 26 Starting the Homing Procedure............................................................................................. 26 Homing Method Diagrams.................................................................................................... 26 Homing Method 1.................................................................................................................. 26 Homing Method 2.................................................................................................................. 27 Homing Method 3.................................................................................................................. 27 Homing Method 4.................................................................................................................. 28 Homing Method 5.................................................................................................................. 28 Homing Method 6.................................................................................................................. 29 3 Rev. 1.1 12/1/2010 CANopen User Manual Homing Method 7..................................................................................................................29 Homing Method 8..................................................................................................................30 Homing Method 9..................................................................................................................30 Homing Method 10................................................................................................................31 Homing Method 11................................................................................................................31 Homing Method 12................................................................................................................32 Homing Method 13................................................................................................................32 Homing Method 14................................................................................................................33 Homing Methods 15 and 16..................................................................................................33 Homing Method 17................................................................................................................34 Homing Method 18................................................................................................................34 Homing Methods 19 and 20..................................................................................................35 Homing Methods 21 and 22..................................................................................................36 Homing Methods 23 and 24..................................................................................................37 Homing Methods 25 and 26..................................................................................................38 Homing Methods 27 and 28..................................................................................................39 Homing Methods 29 and 30..................................................................................................40 Homing Methods 31 and 32..................................................................................................41 Homing Method 33................................................................................................................41 Homing Method 34................................................................................................................42 Homing Method 35................................................................................................................42 Appendix F - Profile Torque Mode (Servo Only).........................................................................43 General Mode Description....................................................................................................43 Enable Profile Torque Mode..................................................................................................43 Set Running Parameters.......................................................................................................43 Enable Drive Operation.........................................................................................................43 Starting/Stopping Torque.......................................................................................................44 Parameter Calculations - Example.......................................................................................44 Current Verification - Example..............................................................................................44 Appendix G - Q Program Mode..................................................................................................46 General Mode Description....................................................................................................46 Loading a Q Program............................................................................................................46 Normal Q Program Execution...............................................................................................46 Synchronous Q Program Execution......................................................................................47 More Information...................................................................................................................47 Appendix H - Understanding NMT States..................................................................................48 Building a CANopen NMT Data Frame - Example................................................................48 Appendix I - SDO and PDO Access...........................................................................................49 Enable SDO Use........................................................................................................................49 Building an SDO Read Data Frame - Example.....................................................................49 Rev. 1.1 12/1/2010 4 CANopen User Manual PDO Access...............................................................................................................................49 Enable PDO Use...................................................................................................................49 TPDO Transmission Types...................................................................................................50 PDO Mapping - Stepper........................................................................................................50 PDO Mapping - Servo...........................................................................................................50 PDO COB-ID.........................................................................................................................51 Building an RPDO Data Frame - Example............................................................................51 Appendix J - Operation Mode Specific Control and Status Word...............................................52 Control Word of Profile Position Mode..................................................................................52 Status Word of Profile Position Mode...................................................................................52 Control Word of Profile Velocity Mode..................................................................................53 Status Word of Profile Velocity Mode....................................................................................53 Control Word of Homing Mode..............................................................................................53 Status Word of Homing Mode...............................................................................................53 Control Word of Q Mode.......................................................................................................54 Status Word of Q Mode.........................................................................................................54 Appendix K – Example Programs..............................................................................................55 Profile Position Mode............................................................................................................55 Profile Velocity Mode............................................................................................................56 Homing Mode........................................................................................................................56 Normal Q Mode.....................................................................................................................57 Sync Q Mode........................................................................................................................57 5 Rev. 1.1 12/1/2010 CANopen User Manual List of Tables Table 1: Bit Rate Switch Settings................................................................................... 10 Table 2: Modes of Operation...........................................................................................11 Table 3: Object Dictionary Compatibility Issues............................................................. 12 Table 4: DS301 Object Descriptions............................................................................... 13 Table 5: DSP402 Objects............................................................................................... 14 Table 6: Manufacturer Specific Objects.......................................................................... 15 Table 7: User Defined Registers in CANopen and Q Programmer................................ 16 Table 8: Parameter Scaling Chart.................................................................................. 17 Table 9: Object 603Fh DSP402 Error Codes.................................................................. 18 Table 10: Object 700Bh DSP Status Codes.................................................................... 18 Table 11: Single Set-Point Profile Position Move........................................................... 20 Table 12: Multiple Set-Point Profile Position Move with Stopping Between Moves........ 21 Table 13: Multiple Set-Point Profile Position Move with Continuous Motion.................. 22 Table 14: Multi-Set-Point Profile Position Move with Immediate Change in Motion....... 23 Table 15: Profile Velocity Mode Example....................................................................... 25 Table 16: Profile Torque Mode Example......................................................................... 45 Table 17: Understanding NMT States............................................................................ 48 Table 18: Example - NMT Data Frame........................................................................... 48 Table 19: Enable SDO Use............................................................................................ 49 Table 20: TPDO Transmission Types............................................................................. 50 Table 21: PDO Mapping - Stepper................................................................................. 50 Table 22: PDO Mapping - Servo..................................................................................... 50 Table 23: PDO COB-IDs................................................................................................. 51 List of Figures Figure 1: CANopen Network Topology Overview ........................................................... 8 Figure 2: The CANopen Connector................................................................................. 9 Figure 3: Wiring Schematic............................................................................................. 9 Figure 4: CANopen Drive - Motion Control Modes........................................................11 Figure 5: Global Control Word and Status Word........................................................... 15 Figure 6: Single Set-Point............................................................................................. 20 Figure 7: Multiple Set-Points, Stopping Between Moves.............................................. 21 Figure 8: Multiple Set-Points, Continuous Motion ........................................................ 22 Figure 9: Multiple Set-Points, Immediate Change in Motion......................................... 23 Figure 10: Profile Velocity Mode .................................................................................. 25 Figure 11: Set Running Parameters.............................................................................. 43 Figure 12: Profile Torque Mode..................................................................................... 45 Rev. 1.1 12/1/2010 6 CANopen User Manual Reference Documents MOONS’ MSST5/10-C Data Sheet MOONS’ SV7-C Data Sheet MOONS’ MSSTAC6-C Data Sheet CiA DS301 CiA DR303 CiA DSP402 Bosch CAN Physical Layer Specifications 2.0B MOONS’ Q Command Reference Commonly Used Acronyms CAN CiA COB-ID DR DS DSP EDS NMT OD PDS PDO RPDO SDO TPDO Controller Area Network CAN in Automation Group (Standards Body) Communication Object Identification CiA Draft Recommendation CiA Draft Standard CiA Draft Standard Proposal Electronic Data Sheet Network Management Object Dictionary Power Drive System Process Data Object Receive (incoming) PDO Service Data Object Transmit (outgoing) PDO 7 Rev. 1.1 12/1/2010 CANopen User Manual CANopen Network Topology Overview MOONS’ CANopen drives can be integrated into a CANopen system with other device types as shown below. Figure 1: CANopen Network Topology Overview Drive Setup There are four phases to setting up a MOONS’ CANopen Drive: Wiring the power and motor Wiring the CANopen connector to the drive Setting the Bit Rate and Node ID Configuring the Drive Wiring the Power and Motor Please refer to the drive’s hardware manual for this step. The appropriate manual can be found on the CD that was included with the drive, or by visiting www.moons.com. Rev. 1.1 12/1/2010 8 CANopen User Manual Wiring the CANopen Connector for MSST5-C Drives MOONS’ MSST5-C drive uses a four-pin spring connector, shown in Figure 2 below, and conforms to DR303 specification. The connector should be wired in a daisy-chain configuration, as shown in Figure 3 below, with a 120 ohm resistor used to terminate each end. Other wiring topologies, such as star networks, are not recommended due to wave reflection problems. Please reference specific hardware manuals for your drive’s wiring configuration. GND CAN_L SHLD CAN_H Figure 2: The CANopen Connector Figure 3 shows a CANopen network with two MOONS’ MSST5-C drive connectors wired to a Kvaser Leaf USB to CANopen Adapter. Figure 3: Wiring Schematic CANopen Bitrate MOONS’ CANopen drives have three settings, one for Bit Rate and two for Node-ID. The Bit Rate is configured using an 8-position switch. See Table 1 for the Bit Rate settings. Please reference the drive’s hardware manual for the location of the Bit Rate switch. The Node-ID is configured using a 16-position switch to set the lower 4 bits of the NodeID and a 8 position switch to set the upper 3 bits of the Node-ID. In some cases, the upper 3 9 Rev. 1.1 12/1/2010 CANopen User Manual bits of the Node-ID are configured using ST Configurator, STAC Configurator or Quick Tuner. Please reference the drive’s hardware manual for Node-ID switch configuration and setup. Valid ranges for the Node-ID are 01h through 7Fh. Node-ID 00h is reserved in accordance with the DS301 specification. Note: The Node-ID and Bit Rate are captured only after a power cycle, or after a network reset command has been sent. Changing the switches while the drive is powered on will NOT change the Node-ID until one of those conditions has also been met. Switch Setting 0 1 2 3 4 5 6 7 Resultant Bit Rate 1 Mbps 800 kbps 500 kbps 250 kbps 125 kbps 50 kbps 20 kbps 12.5 kbps Table 1: Bit Rate Switch Settings Drive Configuration Once the CAN connector has been wired to the drive, and the Node-ID and Bit Rate have been set, the drive can be configured. Drive configuration for MSST stepper drives and STM Integrated Motors is accomplished using the ST Configurator software, which can be found on the CD that was included with the drive. To configure an MSSTAC6, STAC Configurator is used. Drive configuration and tuning for servo drives are performed using Quick Tuner. In all cases the drive will need to be connected to a Windows PC using the included RS-232 serial cable. Please refer to the appropriate software manual or built-in help screens for details. Note: When the CANopen drive is first powered on, the drive will automatically send a power-up packet over the RS-232 port. If a MOONS’ application is present, it will send a response back to the drive over RS-232 and the drive will hold the CAN node in the Initialization state until the application is closed. If no response is detected, the drive will continue the normal CANopen startup procedure: the drive will power up into the Initialization state, send out a boot-up packet, move into the Pre-Operational state, and start sending out heartbeats with the Pre-Operational state as a status code. Rev. 1.1 12/1/2010 10 CANopen User Manual Supported DSP402 Modes of Operation Mode Profile Velocity Profile Position Homing MSST STM MSSTAC6 SV7 • • • • • • • • • • • • • • • • • Profile Torque Interpolated Position Q Program Table 2: Modes of Operation For detailed information on each mode see the corresponding appendix: Profile Position Mode - Appendix C Profile Velocity Mode - Appendix D Homing Modes - Appendix E Profile Torque Mode - Appendix F Q Program Mode - Appendix G Figure 4: CANopen Drive - Motion Control Modes 11 Rev. 1.1 12/1/2010 CANopen User Manual Object Dictionary The Object Dictionary (OD) is the core of any CANopen node. It provides links to all the communication and running parameters of a node. The Object Dictionary is defined in the Electronic Data Sheet (EDS), which lists all supported objects, along with any sub-objects. Any OD Entry may be accessed using the standard Service Data Object (SDO) protocol, while some may be accessed using the low-overhead Process Data Object (PDO) protocol. For more information: see Appendix I for a description of SDO and PDO Access Electronic Data Sheet The EDS, available on the CD that came with the drive or on MOONS’ website, lists all the properties of every supported object in the OD. Compatibility Issues To maintain compatibility with the DSP402 spec, the following OD entries are defined as 32-bit values, but not all the bits will be used by the drive. The entries below should be written and read as per the CANopen Spec Length but only the Effective MOONS’ Length will be used. For example, OD entry 606Ch (Velocity_Target_Value) is defined as a 32-bit number, but only the lower 16 bits will be used by the drive. The upper 16 bits will be ignored, and should be left as zero when issuing a write command. For more information: see Appendix A for a description of Parameter Unit Scaling. Object Dictionary Entry Velocity_Target_Value Profile_Velocity Profile_Acceleration Profile_Deceleration Homing Speeds (multiple) Homing_Acceleration Drive Inputs Drive Outputs Target_Velocity Object Dictionary Index 606Ch 6081h 6083h 6084h 6099h subs 1,2 609Ah 7003h 60FEh 60FFh CANopen Spec Length 32 32 32 32 32 32 32 32 32 Table 3: Object Dictionary Compatibility Issues Rev. 1.1 12/1/2010 12 Effective MOONS’ Length 16 16 16 16 16 16 8 8 16 CANopen User Manual DS301 Object Descriptions Comment Fields 1000h Device Type 1001h Error Register 1005h COB-ID Sync 1008h Manufacturer Device Name 100Ah Manufacturer Software Revision 100Ch Guard Time 100Dh Life Time Factor 1017h Producer Heart Beat 1018h Identity Object 1200h Server SDO Parameter 0 1400h Receive PDO Communications Parameter 0 1401h Receive PDO Communications Parameter 1 1402h Receive PDO Communications Parameter 2 1403h Receive PDO Communications Parameter 3 1600h Receive PDO Mapping Parameter 0 1601h Receive PDO Mapping Parameter 1 1602h Receive PDO Mapping Parameter 2 1603h Receive PDO Mapping Parameter 3 1800h Transmit PDO Communications Parameter 0 1801h Transmit PDO Communications Parameter 1 1802h Transmit PDO Communications Parameter 2 1803h Transmit PDO Communications Parameter 3 1A00h Transmit PDO Mapping Parameter 0 1A01h Transmit PDO Mapping Parameter 1 1A02h Transmit PDO Mapping Parameter 2 1A03h Transmit PDO Mapping Parameter 3 Table 4: DS301 Object Descriptions For more information: see DS301 for a complete description 13 Rev. 1.1 12/1/2010 CANopen User Manual DSP402 Objects Comment Field 603Fh Error Code - see Appendix B, Table 9, DSP Error Codes 6040h Controlword 6041h Statusword 605Ah Quick Stop option code 2 & 6 only 6060h See section: Modes of Operation 6061h Modes of Operation Display 6064h Position Target value calculated 606Ch Velocity Target value calculated 6071h Target Torque (servos only) 6073h Running Current - see Appendix A, Parameter Unit Scaling 607Ah Target Position 607Ch Home Offset 6081h Profile Velocity - see Appendix A, Parameter Unit Scaling 6083h Profile Acceleration - see Appendix A, Parameter Unit Scaling 6084h Profile Deceleration - see Appendix A, Parameter Unit Scaling 6085h Quick Stop Deceleration - see Appendix A, Parameter Unit Scaling 6098h Homing Method 6099h Homing Speeds - see Appendix E, Homing Methods 609Ah Homing Acceleration - see Appendix E, Homing Methods 60FEh Drive Outputs 60FFh Target Velocity - see Appendix D, Profile Velocity Mode 6502h Supported Drive Modes Table 5: DSP402 Objects Rev. 1.1 12/1/2010 14 CANopen User Manual Manufacturer Specific Objects Comment Field 7001h Home Switch Select 01h thru 06h 7002h Idle Current - See Appendix A: (For Scaling) 7003h Display Drive Inputs 7007h Q Sequence Number Select 1 thru 12 7009h Velocity Actual Value - Calculated via Motor Encoder - Appendix A 700Ah Position Actual Value - Calculated via Motor Encoder 700Bh DSP Status Code - see Appendix B, Table 10 700Ch Acceleration_Current - See Appendix A: (For Scaling) 700Eh Analog Input 1 700Fh Analog Input 2 Table 6: Global Control Word and Status Word Global Control Word and Status Word Byte # Bit # Control Word Homing Position Velocity Status Word Torque Q Homing Position Velocity 15 13 Reserved 12 11 Reserved Set Point Error Error Homing Set Point Attained Ack Reserved Reserved Speed Reserved Reserved Reserved Halt 7 Reserved Reserved Reserved Reserved 5 Reserved Homing Operation Start Abs/Rel Warning Reserved Reserved Reserved Change Set Point Reserved Reserved Reserved Immediately New Set Point Remote Reserved Fault Reset 6 4 Following Target Reached Change of 8 2 Homing Internal Limit Active 10 9 Q Reserved 14 1 Torque Switch On Disabled Quick Stop Q Reserved Reserved Program Voltage Enabled Start 3 Enable Operation Fault 2 Quick Stop Operation Enabled 1 Enable Voltage Switched On 0 Switch On Ready to Switch On Figure 5: Global Control Word and Status Word 15 Rev. 1.1 12/1/2010 CANopen User Manual General Purpose Registers MOONS’ CANopen products provide 23 general purpose registers. These registers are 32 bit read/write registers. They are volatile, so the information sent there will not be saved after a power cycle. These registers may also be accessed and manipulated via a stored Q Program, if de sired. The table below cross-references the CANopen OD entries and the Q Programmer register addresses. For more information on using these general purpose registers in a Q Program, please see the Q Command Reference, available at www.moons.com. For more information about the Q Program Mode: see Appendix G Register Name OD Address Q Register Address User Defined Register 0 4000h 0 User Defined Register 1 4001h 1 User Defined Register 2 4002h 2 User Defined Register 3 4003h 3 User Defined Register 4 4004h 4 User Defined Register 5 4005h 5 User Defined Register 6 4006h 6 User Defined Register 7 4007h 7 User Defined Register 8 4008h 8 User Defined Register 9 4009h 9 User Defined Register 10 400Ah : User Defined Register 11 400Bh ; User Defined Register 12 400Ch < User Defined Register 13 400Dh = User Defined Register 14 400Eh > User Defined Register 15 400Fh ? User Defined Register 16 4010h @ User Defined Register 17 4011h [ User Defined Register 18 4012h \ User Defined Register 19 4013h ] User Defined Register 20 4014h ^ User Defined Register 21 4015h _ User Defined Register 22 4016h ` Table 7: User Defined Registers in CANopen and Q Programmer Rev. 1.1 12/1/2010 16 CANopen User Manual Appendix A - Parameter Unit Scaling The table below shows conversions from physical units to internal drive units. Use this table to scale parameters before they are sent to the drive. Units must be rounded to the nearest whole number and represented in hexadecimal. Negative numbers should be expressed using two’s complement notation. Parameter Type Multiplier Current 0.01 Units A Velocity 0.0042 rps Acceleration 0.1667 rps/s Distance 1 step Table 8: Parameter Scaling Chart Querying the Point to Point Profile Acceleration from the drive: An SDO read from OD 6083h returns a value of 226h, or 550 decimal. Using the acceleration multiplier this yields an acceleration of 91.685 rps/s. 550 * 0.1667 RPS = 91.685 rps/s Set the Point to Point Acceleration to 10 rps: When setting a known rps, divide the rps by the acceleration multiplier to obtain the hexadecimal number. 10 rps / 0.1667 = 59.988 Using the formula above, and rounding to the nearest whole number, results in a value of 60 decimal, or 3Ch to send as an SDO Write to OD 6083h. Set the Target Position to -2000 steps: Because the relationship between physical steps and internal steps is one-to-one, the value -2000 can be sent to OD 607Ah. Sending a negative number must be done in two’s complement notation. To find the two’s complement, subtract the value 2000 from 232, since the Target Position is a 32 bit number. 232 - 2000 = 4,294,965,296 = FFFFF830h 17 Rev. 1.1 12/1/2010 CANopen User Manual Appendix B - Response Codes Hex Value SV7 MSSTAC6 MSST 0001 Position Limit 0002 CCW Limit 0004 CW Limit 0008 Over Temp 0010 Internal Voltage Excess Regen Under Voltage Under Voltage 0020 0040 Internal Voltage Over Voltage 0080 0100 Internal Voltage STM Under Voltage Under Voltage Over Current Bad Hall Sensor 0200 Open Motor Winding Not Used Bad Encoder 0400 Comm Error 0800 Bad Flash 1000 Wizard Failed 2000 Current Foldback No Move Motor Resistance Out of Range 4000 Not Used Not Used Blank Q Segment 8000 No Move Not Used Note: Items in bold italic represent Drive Faults, which automatically disable the motor. Use the OF command in a Q Program to branch on a Drive Fault. Table 9: Object 603Fh DSP402 Error Codes Hex Value Status Code Bit Definition 0001 Motor Enabled - motor disabled is this bit = 0 0002 Sampling - for Quick Tuner 0004 Drive Fault - check alarm code 0008 In Position - motor is in position 0010 Moving - motor is moving 0020 Jogging - currently in jog mode 0040 Stopping - in the process of stopping from a stop command 0080 Waiting - for an input 0100 Saving - parameter data is being saved 0200 Alarm present - check alarm code 0400 Homing - executing an SH command 0800 Wait Time - executing a WT command 1000 Wizard running - timing wizard is running 2000 Checking encoder - timing wizard is running 4000 Q Program is running 8000 Initializing Table 10: Object 700Bh DSP Status Codes Rev. 1.1 12/1/2010 18 CANopen User Manual Appendix C - Profile Position Mode General Mode Description Profile Position Mode is a point-to-point operating mode using set-points which consist of velocity, acceleration, deceleration, and target position. Once all these parameters have been set, the drive buffers the commands and begins executing the set-point. When using a set of set-points method, a new set-point can be sent to the drive while a previously sent set-point is still executing. Enable Profile Position Mode To enable the Profile Position Mode, the value 0001h must be written to the mode of operation OD entry, located at dictionary address 6060h. The mode of operation can be verified using OD 6061h mode of operation display - which is updated when the current operation mode is accepted. Set Running Parameters Set the distance, velocity, acceleration, and deceleration using OD entries 607Ah, 6081h, 6083h, and 6084h respectively. Starting/Stopping Motion After power up or node reset, the drive is in disabled state. The value 0006h must be written to the control word OD entry, located at dictionary address 6040h. This will put the drive into “ready to switch on” state and is ready to enable drive operation. If the value 0006h is not written to the control word first, the drive operation can not be enabled. To indicate a new set-point and start motion, toggle bit 4 by sending 001Fh to controlword OD entry 6040h. To enable drive operation, the value 001Fh must be written to the controlword OD entry, located at dictionary address 6040h. This will also signal that there is a new set-point ready. The drive acknowledges the receipt of a valid set-point using bit 12 of the statusword at OD 6041h. Because the set-point is edge-triggered, once the drive receives and processes the set-point, the new set-point of the controlword must be cleared by writing 000Fh to the controlword register. While the drive is acting on a set-point, a new set-point may be entered and triggered using the new set-point. The second set-point will be received as soon as it is processed, or at the end of the previous set-point, which ever is later. Controlword Bits New Set-point (bit 4) - set this bit high to clock in a new set-point. Once the drive has accepted the set-point, it will respond by setting statusword bit 12 high. Controlword bit 4 should then be taken low. Change of Set-point (bit 9) - if this bit is low, the previous set-point will be completed and the motor will come to rest before a new set-point is processed. If bit 9 is high, the motor will continue at the speed commanded by the previous set-point until it has reached the position commanded by the previous set-point, then transition to the speed of the new set-point. Change Set-point Immediately (bit 5) - if this bit is high, the new set-point will take effect immediately. The motor speed will transition to the speed and position commanded by the new set-point. Abs/rel (bit 6) - if this bit is high, the set-point distance is relative. For example, if the previous motor position was 10,000 steps and a new set-point is issued with a distance of 20,000, the final position will be 30,000. If bit 6 is low, the distance is absolute. If the previous motor position was 10,000 and a new set-point is issued with a distance of 20,000, the new position will be 20,000. (The distance travelled from the previous position to the new position will be 10,000 steps.) For best results, do not 19 Rev. 1.1 12/1/2010 CANopen User Manual change this bit while the motor is moving. Note: Two set-points can be set up, but if status bit 12 is high, then the buffer is full and another set-point will be ignored. For more information: See DSP402 - 2, Profile Position Mode PROFILE POSITION MODE, Single Set Point Actual Speed 0 t New Set Point Ready Bit(4) 0 Set Point Ack Bit(12) t 0 t Target Reached Bit(10) 0 t A B C D E Figure 6: Single Set-Point Graph Point New Set-Point Set-Point Target Reached Ready Bit Acknowledge Bit Bit What’s Going On Start 0 0 0 Drive waiting for set-point A 0 -> 1 0 0 User tells drive a set-point is ready B 1 0 -> 1 0 Drive acknowledges set-point, starts executing set-point C 1 -> 0 1 0 User pulls new set-point ready bit low D 0 1 -> 0 0 Drive pulls set-point ack bit low, indicating ready to receive another set-point E 0 0 1 The set-point is finished, and the Target Reached bit is set Table 11: Single Set-Point Profile Position Move Rev. 1.1 12/1/2010 20 CANopen User Manual PROFILE POSITION MODE, Set of Set Points Actual Speed 0 t New Set Point Ready Bit(4) 0 Set Point Ack Bit(12) t 0 t Target Reached Bit(10) 0 t A B C D E F G H I Figure 7: Multiple Set-Points, Stopping Between Moves In this example, controlword bits 9 (Change of Set-point) and 5 (Change Set Immediately) are 0. The motor comes to rest between moves. Graph Point New Set-Point Set-Point Target Reached Ready Bit Acknowledge Bit Bit What’s Going On Start 0 0 0 Drive waiting for set-point A 0 -> 1 0 0 User tells drive a set-point is ready B 1 0 -> 1 0 Drive acknowledges set-point, starts executing set-point C 1 -> 0 1 0 User pulls new set-point ready bit low D 0 1 -> 0 0 Drive pulls set-point ack bit low, indicating ready to receive another set-point E 0 -> 1 0 0 User tells drive another set-point is ready F 1 0 -> 1 0 Drive acknowledges set-point, buffers it as another set-point is still in progress G 1 -> 0 1 0 User pulls new set-point ready bit low H 0 1 -> 0 0 Drive pulls set-point ack bit low, starts executing new set-point as soon as old one is finished I 0 0 1 The set-point is finished, no set-points in buffer, so Target Reached bit is set Table 12: Multiple Set-Point Profile Position Move with Stopping Between Moves 21 Rev. 1.1 12/1/2010 CANopen User Manual PROFILE POSITION MODE, Set of Set Points Actual Speed 0 t New Set Point Ready Bit(4) 0 Set Point Ack Bit(12) t 0 t Target Reached Bit(10) 0 t A B C D E F G H Figure 8: Multiple Set-Points, Continuous Motion I In this example, controlword bit 9 (Change of Set-point) is 1 and controlword bit 5 (Change Set Immediately) is 0. The motor continues at the speed of the first set-point until is reaches the distance of the first set-point, then changes to the new set-point speed. The motion is continuous. Graph Point New Set-Point Set-Point Target Reached Ready Bit Acknowledge Bit Bit What’s Going On Start 0 0 0 Drive waiting for set-point A 0 -> 1 0 0 User tells drive a set-point is ready B 1 0 -> 1 0 Drive acknowledges set-point, starts executing set-point C 1 -> 0 1 0 User pulls new set-point ready bit low D 0 1 -> 0 0 Drive pulls set point ack bit low, indicating ready to receive another set-point E 0 -> 1 0 0 User tells drive another set-point is ready F 1 0 -> 1 0 Drive acknowledges set-point, buffers it, as another set-point is still in progress G 1 -> 0 1 0 User pulls new set-point ready bit low H 0 1 -> 0 0 Drive pulls set-point ack bit low, starts executing new set-point as soon as the old one is finished I 0 0 1 The set-point is finished, no set-points in buffer, so Target Reached bit is set Table 13: Multiple Set-Point Profile Position Move with Continuous Motion Rev. 1.1 12/1/2010 22 CANopen User Manual PROFILE POSITION MODE, Set of Set Points Actual Speed 0 t New Set Point Ready Bit(4) 0 Set Point Ack Bit(12) t 0 t Target Reached Bit(10) 0 t A B C D E F G H I Figure 9: Multiple Set-Points, Immediate Change in Motion In this example, controlword bit 9 (Change of Set-point) is 1 and controlword bit 5 (Change Set Immediately) is 1. The motor immediately changes to the new set-point speed without completing the first set-point. The motion is continuous. Graph Point New Set Point Set-Point Target Reached Ready Bit Acknowledge Bit Bit What’s Going On Start 0 0 0 Drive waiting for set-point A 0 -> 1 0 0 User tells drive a set-point is ready B 1 0 -> 1 0 Drive acknowledges set-point, starts executing set-point C 1 -> 0 1 0 User pulls new set-point ready bit low D 0 1 -> 0 0 Drive pulls set point ack bit low, indicating ready to receive another set-point E 0 -> 1 0 0 User tells drive another set-point is ready F 1 0 -> 1 0 Drive acknowledges set-point, immediately executes it, beginning transition to new set-point speed and position G 1 -> 0 1 0 User pulls new set-point ready bit low H 0 1 -> 0 0 Drive pulls set-point ack bit low I 0 0 1 The set-point is finished, no set-points in buffer, so Target Reached bit is set Table 14: Multi-Set-Point Profile Position Move with Immediate Change in Motion 23 Rev. 1.1 12/1/2010 CANopen User Manual Appendix D - Profile Velocity Mode General Mode Description Profile Velocity Mode is a relatively simple operating mode. Once the velocity, acceleration, and deceleration are set, the drive will either command the motor to accelerate to the running velocity according to the acceleration parameter, or to halt movement according to the deceleration parameter. The figure below shows an example of Profile Velocity Mode. The top graph shows the actual speed of the motor, the middle graph the target speed value, and the bottom graph the halt bit in the controlword. The table below explains how the halt bit and target velocity may be used together to affect motor speed. Between points B and C, the motor does not come to a complete stop, but decelerates according to the profile deceleration value starting at point B. When the halt bit transitions at point C, it accelerates immediately back to the target speed. At Point E, reducing the target speed to zero has the same effect as enabling the halt bit, since the drive is commanding the motor to move at zero speed. It should be noted that both enabling the halt bit and setting the target velocity to zero keep torque applied to the motor. In order to allow the shaft to move freely, the NMT state must be put in the Drive Disabled state. Enable Profile Velocity Mode To enable the profile velocity mode, the value 0003h must be written to the mode of operation OD entry, located at dictionary address 6060h. The mode of operation can be verified using OD 6061h - mode of operation display - which is updated when the current operation mode is accepted. Set Running Parameters Set the velocity, acceleration, and deceleration using OD entries 60FFh, 6083h, and 6084h respectively. Enable Drive Operation After power up or node reset, the drive is in disabled state. The value 0006h must be written to the control word OD entry, located at dictionary address 6040h. This will put the drive into “ready to switch on” state and is ready to enable drive operation. If the value 0006h is not written to the control word first, the drive operation can not be enabled. To enable drive operation, the value 010Fh must be written to the controlword OD entry, located at dictionary address 6040h. This puts the drive into Operation Enabled state, with the motion halted. Starting/Stopping Motion To start and stop motion, toggle the controlword halt bit (bit 8). When the halt bit is set to 0, motion will start or continue; when the halt bit is set to 1, motion will stop. The bit can be toggled by writing 010Fh and 000Fh to controlword OD entry 6040h. Rev. 1.1 12/1/2010 24 CANopen User Manual Figure 10: Profile Velocity Mode Graph Point Target Speed Halt Bit Drive command to Motor Start 0 1 Motor stopped A V1 1 -> 0 Motor accelerates to speed V1 B V1 0 -> 1 Motor decelerates to stopped C V1 1 -> 0 Motor accelerates to V1 D V1 -> V2 0 Motor accelerates from V1 to V2 E V2 -> 0 0 Motor decelerates from V2 to 0 F 0 0 -> 1 Motor remains stopped G 0 -> V1 1 Motor remains stopped Table 15: Profile Velocity Mode Example 25 Rev. 1.1 12/1/2010 CANopen User Manual Appendix E - Homing Methods Set Running Parameters Set the homing and index velocities, acceleration/deceleration, offset and home sensor (if required) using OD entries 6099h, 609Ah, 607Ch, and 7001h respectively. Note: It is important that the limit switch settings have been defined in ST Configurator or Quick Tuner prior to using the CANopen Homing Mode. Enable Homing Mode To enable Homing Mode, the value 0006h must be written to the mode of operation OD entry, located at dictionary address 6060h. The mode of operation can be verified using OD 6061h - mode of operation display - which is updated when the current operation mode is accepted. After power up or node reset, the drive is in disabled state. The value 0006h must be written to the control word OD entry, located at dictionary address 6040h. This will put the drive into “ready to switch on” state and is ready to enable drive operation. If the value 0006h is not written to the control word first, the drive operation can not be enabled. To put the drive into Operation Enabled Mode, write 000Fh to the controlword OD entry, located at dictionary address 6040h. Starting the Homing Procedure Set the Homing Method required using OD entry 6098h. To start the homing procedure, bit 4 of the controlword OD entry located at dictionary address 6040h, must transition from 0 to 1. The status of the homing procedure can be monitored using the statusword OD entry 6041h. Homing Method Diagrams Homing Method 1 Homes to the first index CCW after the CW limit switch is reached. Rev. 1.1 12/1/2010 26 CANopen User Manual Homing Method 2 Homes to the first index CW after the CCW limit switch is reached. Homing Method 3 Homes to the first index CW after the positive home switch changes state; the initial direction of motion is dependent on the state of the home switch. 27 Rev. 1.1 12/1/2010 CANopen User Manual Homing Method 4 Homes to the first index CCW after the positive home switch changes state; the initial direction of motion is dependent on the state of the home switch. Homing Method 5 Homes to the first index CCW after the negative home switch changes state; the initial direction of motion is dependent on the state of the home switch. Rev. 1.1 12/1/2010 28 CANopen User Manual Homing Method 6 Homes to the first index CW after the negative home switch changes state; the initial direction of motion is dependent on the state of the home switch. Homing Method 7 Starts moving CCW (or CW if the home switch is active), and homes to the first index CW of the home switch transition. 29 Rev. 1.1 12/1/2010 CANopen User Manual Homing Method 8 Starts moving CCW (or CW if the home switch is active), and homes to the first index CCW of the home switch transition. Homing Method 9 Starts moving CCW and homes to the first index CW of the home switch transition. Rev. 1.1 12/1/2010 30 CANopen User Manual Homing Method 10 Starts moving CCW and homes to the first index CCW of the home switch transition. Homing Method 11 Starts moving CW (or CCW if the home switch is active), and homes to the first index CCW of the home switch transition. 31 Rev. 1.1 12/1/2010 CANopen User Manual Homing Method 12 Starts moving CW (or CCW if the home switch is active), and homes to the first index CW of the home switch transition. Homing Method 13 Starts moving CW and homes to the first index CCW of the home switch transition. Rev. 1.1 12/1/2010 32 CANopen User Manual Homing Method 14 Starts moving CW and homes to the first index CW of the home switch transition shown above. Homing Methods 15 and 16 Homing Methods 15 and 16 are reserved for future expansion. 33 Rev. 1.1 12/1/2010 CANopen User Manual Homing Method 17 Homes to the CW limit switch. Homing Method 18 Homes to the CCW limit switch. Rev. 1.1 12/1/2010 34 CANopen User Manual Homing Methods 19 and 20 Home to the home switch transition. 35 Rev. 1.1 12/1/2010 CANopen User Manual Homing Methods 21 and 22 Home to the home switch transition. Rev. 1.1 12/1/2010 36 CANopen User Manual Homing Methods 23 and 24 Home to the home switch transition shown below, and “bounce off” the CCW limit, if required. 37 Rev. 1.1 12/1/2010 CANopen User Manual Homing Methods 25 and 26 Home to the home switch transition shown below, and “bounce off” the CCW limit, if required. Rev. 1.1 12/1/2010 38 CANopen User Manual Homing Methods 27 and 28 Home to the home switch transition shown below, and “bounce off” the CW limit, if required. 39 Rev. 1.1 12/1/2010 CANopen User Manual Homing Methods 29 and 30 Home to the home switch transition shown below, and “bounce off” the CW limit, if required. Rev. 1.1 12/1/2010 40 CANopen User Manual Homing Methods 31 and 32 Homing Methods 31 and 32 are reserved for future expansion. Homing Method 33 Homes to the next index pulse CW from the current position. If the CW limit is hit, the drive resets to the CCW limit, and continues searching for a limit in the CW direction. 41 Rev. 1.1 12/1/2010 CANopen User Manual Homing Method 34 Homes to the next index pulse CCW from the current position. If the CCW limit is hit, the drive resets to the CW limit, and continues searching for a limit in the CCW direction. Homing Method 35 Takes the current position to be the home position; the Home Offset value is ignored, and the motor does not move at all. Rev. 1.1 12/1/2010 42 CANopen User Manual Appendix F - Profile Torque Mode (Servo Only) General Mode Description Profile Torque mode is a servo-control torque operating mode. It requires knowledge of the Torque Constant of the motor in Nm/A. This information can be found in the motor print. Enable Profile Torque Mode To enable Profile Torque Mode, the value 0004h must be written to the mode of operation OD entry, located at dictionary address 6060h. The mode of operation can be verified using OD 6061h - mode of operation display - which is updated when the current operation mode is accepted. Set Running Parameters To operate in Profile Torque mode, the following parameters must be set: Parameter Name Object Dictionary Entry Length (in bytes) Units Description Torque Constant 7005h 2 m • Nm a Motor paramter, found on the motor print Target Torque 6071h 2 m • Nm Torque to be applied to the motor Torque Slope 6087h 4 m • Nm sec Rate at which to ramp torque to new target Figure 11: Set Running Parameters Enable Drive Operation After power up or node reset, the drive is in disabled state. The value 0006h must be written to the control word OD entry, located at dictionary address 6040h. This will put the drive into “ready to switch on” state and is ready to enable drive operation. If the value 0006h is not written to the control word first, the drive operation can not be enabled. To enable drive operation, the value 000Fh must be written to the controlword OD entry, located at dictionary address 6040h. This puts the drive into the Operation Enabled state with no torque applied. It should be noted that both enabling the halt bit and setting the target torque to zero will ramp down the torque applied to the motor according to the torque slope. At the end of the slope no torque will be applied to the motor, allowing the shaft to move freely. 43 Rev. 1.1 12/1/2010 CANopen User Manual Starting/Stopping Torque To start and stop motion, toggle the controlword halt bit (bit 8). When the halt bit is set to 0, motion will start or continue; when the halt bit is set to 1, motion will stop. The bit can be toggled by writing 010Fh and 000Fh to controlword OD entry 6040h. Parameter Calculations - Example An application requires a torque of 50 oz-in. and a torque slope of 25 oz-in/sec. The motor print lists the Torque Constant of the motor as 0.07Nm/A. The Nm/A constant given must first be converted into mNm/A, as required by the Torque Constant OD entry. The formula used for this is: Nm mA m • Nm 0.07 A • 1000 A = 70 A As the drive works primarily in Nm, the desired 50 oz-in of torque must also be converted into Nm, using the conversion factor 141.6 oz-in/Nm. 50 oz-in = 0.3531 Nm 141.6 oz-in Nm Now, the resultant torque of 0.3531Nm must be converted into mNm, as required by the Target Torque OD entry. 0.3531 Nm • 1000 m•Nm = 353.1 m•Nm Nm The result is a value of 353 mNm, rounded to the nearest whole number, for the Target Torque OD Entry. Finally, the desired slope must be converted from the given units of oz-in/sec into the required units of mNm/sec. (25 oz-in ) ( 1 Nm ) (10001 m•Nm ) = 176.55 m•Nm sec * 141.6 oz-in * Nm sec Rounding to the nearest whole number results in a Torque Slope of 177 mNm/sec. Current Verification - Example It is important to check that the current required of the drive is within the limits of the servo amplifier. The drive being used, for example, has a continuous rating of 7 amps, and a peak current of 14 amps, which may be held continuously for 2 seconds. This means that a current of 7 amps can be held indefinitely, and currents between 7 and 14 amps may be used in short Rev. 1.1 12/1/2010 44 CANopen User Manual bursts. Using the target torque and torque constant from the example above the current draw can be checked, as shown: 0.3531 Nm = 5.0443 A 0.07 Nm A The resultant current, 5.0443A, is below the 7A continuous current rating of the drive, and well below the peak current rating of 14A. It is possible for the drive to maintain a current of 7A indefinitely, and peak up to 14A for up to two seconds continuously. Values between 7A and 14A may be held proportionally long. For more information: see DSP402 - 2, Profile Torque Mode Figure 12: Profile Torque Mode Graph Point Target Torque Halt Bit Drive command to Motor Start T1 0 Ramp torque to T1 A T1 0 Maintain torque at T1 B T1 0 -> 1 Ramp torque to zero C T1 -> T2 1 -> 0 Ramp torque to T2 D T2 -> 0 0 Ramp torque to zero E 0 0 Maintain torque at zero Table 16: Profile Torque Mode Example 45 Rev. 1.1 12/1/2010 CANopen User Manual Appendix G - Q Program Mode General Mode Description In order to expand the functionality of MOONS’ CANopen drives, the Q programming language may be used to execute complex motion profiles that may not be possible within the scope of DSP402. The Q program must be written and pre-loaded into the CANopen drive using Q Programmer (v1.3.5 or later). Q Programs may also access and manipulate the CANopen General Purpose registers for use in stored programs. The section above on General Purpose Registers has a chart to convert from the OD entry to the Q address. Loading a Q Program As with ST Configurator and Quick Tuner, the drive must be powered up with the RS-232 port connected, and Q Programmer running for the CANopen drive to delay the normal boot-up procedure. The CAN boot-up can be resumed by closing the Q Programmer application, or by power-cycling the drive with the RS-232 port disconnected. Once Q Programmer is in control of the drive, it may be used in the same way as any other MOONS’ Q drive. See the Q Command Reference for more information on Q programming. Normal Q Program Execution To execute a stored Q program on a single drive, a value of -1 (FFh) must be written to the mode of operation OD entry, located at dictionary address 6060h. The mode of operation can be verified using OD entry 6061h - mode of operation display - which is updated when the current operation mode is accepted. Next, the desired Q segment number, 1-12, must be written to the Q Segment Number register, located at address 7007h. After power up or node reset, the drive is in disabled state. The value 0006h must be written to the control word OD entry, located at dictionary address 6040h. This will put the drive into “ready to switch on” state and is ready to enable drive operation. If the value 0006h is not written to the control word first, the drive operation can not be enabled. To enable drive operation, a value of 000Fh must be written to the controlword OD entry, located at dictionary address 6040h. This puts the drive into Operation Enabled state and ready to run the Q program. To run the selected Q program, a value of 001Fh must be written to the controlword. The Q program will then run to completion. The Q program may be re-executed by a 0->1 transition of the Q Program start bit (bit 4) in the controlword. To halt execution of a Q program, the halt bit (bit 8) of the controlword must be set to 1. The Q program will halt immediately and start from the beginning the next time a 0->1 transition is seen on the Q Program start bit after the halt bit has been cleared. Rev. 1.1 12/1/2010 46 CANopen User Manual Synchronous Q Program Execution To execute a stored Q program on a single drive, a value of -2 (FEh) must be written to the mode of operation OD entry, located at dictionary address 6060h. The mode of operation can be verified using OD entry 6061h - mode of operation display - which is updated when the current operation mode is accepted. Next, the desired Q segment number, 1-12, must be written to the Q Segment Number register, located at address 7007h. To enable operation 001Fh must be written to the controlword OD entry 6040h. After power up or node reset, the drive is in disabled state. The value 0006h must be written to the control word OD entry, located at dictionary address 6040h. This will put the drive into “ready to switch on” state and is ready to enable drive operation. If the value 0006h is not written to the control word first, the drive operation can not be enabled. To enable drive operation, a value of 000Fh must be written to the controlword OD entry, located at dictionary address 6040h. This puts the drive into Operation Enabled state and ready to run the Q program. To run the drive based on the SYNC pulse, the pulse must be set in the COB-ID SYNC register located at OD entry 1005h. A standard value for the SYNC pulse is 80h, but any unused COB-ID may be used. Refer to DS301 for a list of reserved COB-IDs. Once the SYNC pulse has been set, and the desired Q segment has been set, the drive will execute the Q segment every time it receives a SYNC pulse. In this way, multiple drives may be instructed to start a Q program with a single, network-wide instruction. To halt execution of a Q program, set the halt bit (bit 8) of the controlword to 1. The Q program will halt immediately, and start from the beginning the next time a SYNC pulse is sent after the halt bit has been cleared. More Information For more information: see DS301, COB-IDs For more information on Q programming: see the Host Command Reference on the CD included with the MOONS’ CANopen drive 47 Rev. 1.1 12/1/2010 CANopen User Manual Appendix H - Understanding NMT States Under normal operating conditions, a Network Management (NMT) state machine will power up into an Initialization state, send out a boot-up packet, move into a Pre-Operational state, and start sending out heartbeats with the Pre-Operational state status code. NMT Mode NMT Control Command NMT Status Code (Heartbeat) Initialization/Node Reset 129 0 Pre-Operational 128 127 Operational 1 5 Stopped 2 4 Table 17: Understanding NMT States Building a CANopen NMT Data Frame - Example This example will show how to send a broadcast message to all CANopen nodes to put them into an operational NMT state. The COB-ID for NMT commands is always 0. This ensures that an NMT command has the highest priority on the bus and will never be preempted, except by another node sending out an NMT command. The first data byte of an NMT command contains the NMT Control Command, which is 1 (Operational) in this case. The second data byte contains either the Node-ID of a target Node, or, in the event that the NMT master is requesting that all nodes change their NMT Mode, a zero. To send a broadcast message, a zero is used.The completed data frame is below. COB ID 0 Data Length Data Byte 0 2 Data Byte 1 1 Table 18: Example - NMT Data Frame Rev. 1.1 12/1/2010 48 0 CANopen User Manual Appendix I - SDO and PDO Access Enable SDO Use To enable Service Data Object (SDO) use, the NMT state must be either Pre-Operational or Operational. Send an NMT message to put the node into either state. When completed, the heartbeat should return either 127 (Pre-Operational) or 5 (Operational). The drive is now ready to read and/or write all OD entries. Building an SDO Read Data Frame - Example This example will show how to read the heartbeat time of node 2Eh. An SDO read request must be sent to the drive. The default COB-ID for SDO requests is 600h (see DS301), plus the Node-ID of 2Eh. This results in a specific COB-ID for this message of 62Eh. The first data byte is reserved for the control byte, which is always 40h for an SDO Read. The next 2 bytes are reserved for the OD entry address in Little Endian format. To obtain OD entry 1017, we stuff data byte 1 with 17h and data byte 2 with 10h. Data byte 3 is reserved for the sub-index of the OD entry, which in this case is zero. The last 4 bytes are unused for SDO reads. The whole message appears as: COB-ID Data Length Data Byte 0 1 2 3 4 5 6 7 62Eh 8 40h 17h 10h 00h 00h 00h 00h 00h DATA BYTES Table 19: Enable SDO Use The drive will respond with a message with COB-ID 580h + Node ID, or 5AEh. For more information: see DS301, SDO protocol PDO Access Enable PDO Use To enable Process Data Object (PDO) use, the NMT state must be set to Operational and an NMT message sent to enable the Operational state. When completed, the heartbeat should return a 5. The drive is now ready to receive RPDOs, and will transmit TPDOs depending on the Transmission Type. 49 Rev. 1.1 12/1/2010 CANopen User Manual TPDO Transmission Types There are several triggering options for Transmit PDOs, which are controlled by OD entries 1800h to 1803h, and their associated sub-entries. Possible TPDO Triggers SYNC pulse - Node will send TPDO after receiving one or multiple SYNC pulses Event/Timer - Node will issue TPDO based on an internal event or timer Remote Request - Node will send TPDO after a remote request 0 PDO transmitted on the next SYNC pulse after the statusword has changed 1 PDO transmitted on every SYNC pulse 2-240 PDO transmitted on every n SYNC pulses 254-255 PDO transmitted every time statusword changes, or the Event Timer has expired Table 20: TPDO Transmission Types PDO Mapping - Stepper PDO Name First Mapped Parameter OD Entry # Bytes Second Mapped Parameter OD Entry # Bytes # Bytes Total TPDO1 Statusword 6041h 2 TPDO2 Statusword 6041h 2 Target Position 6064h 4 2 6 TPDO3 Statusword 6041h 2 Target Velocity 606Ch 2 4 TPDO4 Input Status 7003h 1 1 RPDO1 Controlword 6040h 2 2 RPDO2 Controlword 6040h 2 Target Distance 607Ah 4 6 RPDO3 Controlword 6040h 2 Target Velocity 60FFh 2 4 RPDO4 Output State 60FEh 1 1 Table 21: PDO Mapping - Stepper PDO Mapping - Servo PDO Name First Mapped Parameter OD Entry # Bytes Second Mapped Parameter OD Entry # Bytes # Bytes Total TPDO1 Statusword 6041h 2 2 TPDO2 Statusword 6041h 2 Actual Position 700Ah 4 6 TPDO3 Statusword 6041h 2 Actual Velocity 7009h 2 4 TPDO4 Input Status 7003h 1 RPDO1 Controlword 6040h 2 RPDO2 Controlword 6040h 2 Target Distance 607Ah 4 6 RPDO3 Controlword 6040h 2 Target Velocity 60FFh 2 4 RPDO4 Output State 60FEh 1 1 2 1 Table 22: PDO Mapping - Servo Rev. 1.1 12/1/2010 50 CANopen User Manual PDO COB-ID Because PDOs are directly mapped to OD entries, no overhead is required when working with them. RPDOs may be sent directly with the COB-ID being the default RPDO COB-ID plus the Node-ID. For example, the default RPDO1 COB-ID is 200h. Therefore, the COB-ID for RPDO1 to Node 2Eh would be 200h + 02Eh = 22Eh. The default COB-IDs for each PDO may be found in DS301 on page 78. Building an RPDO Data Frame - Example This example will show how to set the controlword of node 2Eh to 7E4Fh using RPDO1. The paragraph above shows how the COB-ID of 22Eh was determined. The mapping table above that shows that the first two message bytes will contain the controlword. According to Endianness, the first data byte will be 4Fh and the second will be 7Eh. The entire message will then read: COB ID 22Eh Data Length 2 Data Byte 0 4Fh Data Byte 1 7Eh Table 23: PDO COB-IDs For more information on PDO mapping: see DSP402-3 For more information on the PDO protocol: see DS301 51 Rev. 1.1 12/1/2010 CANopen User Manual Appendix J - Operation Mode Specific Control and Status Word Control Word of Profile Position Mode Bit # Name Value 4 New Set Point 0 5 Change Set Point Immediately 0 Positioning shall be completed (target reached) before the next one gets started 1 Next positioning shall be started immediately 0 Target position shall be an absolute value 1 Target position shall be a relative value 0 Positioning shall be executed or continued 1 Axis shall be stopped 0 The previous set-point will be completed and the motor will come to rest before a new set point is processed 1 The motor will continue at the speed commanded by the previous set point until it has reached the position commanded by the previous set point, then transition to the speed of the new set point 6 Abs/Rel 8 Halt 9 1 Change of Set Point Description Toggle this bit from 0->1 to clock in a new set point Status Word of Profile Position Mode Bit # 10 Name Target Reached 12 Set Point Ack 13 Following Error Rev. 1.1 12/1/2010 Value Description 0 Halt (Bit 8 in controlword) = 0: Target position not reached Halt (Bit 8 in controlword) = 1: Axis decelerates 1 Halt (Bit 8 in controlword) = 0: Target position reached Halt (Bit 8 in controlword) = 1: Velocity of axis is 0 0 Previous set point already processed, waiting for new set point 1 Previous set point still in process, set point overwriting shall be accepted 0 No following error 1 Following error 52 CANopen User Manual Control Word of Profile Velocity Mode Bit # Name 8 Halt Value Description 0 The motion shall be executed or continued 1 Axis shall be stopped Status Word of Profile Velocity Mode Bit # Name 10 Target Reached 12 Speed Value Description 0 Halt (Bit 8 in controlword) = 0: Target velocity not reached Halt (Bit 8 in controlword) = 1: Axis decelerates 1 Halt (Bit 8 in controlword) = 0: Target velocity reached Halt (Bit 8 in controlword) = 1: Velocity of axis is 0 0 Speed is not equal to 0 1 Speed is equal 0 Control Word of Homing Mode Bit # Name Value 4 Homing Operation Start 0 Do not start homing procedure Description 1 Start or continue homing procedure 8 Halt 0 Enable bit 4 1 Stop axis Status Word of Homing Mode Bit # 10 12 13 Name Target Reached Homing Attained Homing Error Value Description 0 Halt (Bit 8 in controlword) = 0: Home position not reached Halt (Bit 8 in controlword) = 1: Axis decelerates 1 Halt (Bit 8 in controlword) = 0: Home position reached Halt (Bit 8 in controlword) = 1: Velocity of axis is 0 0 Homing Mode not yet complete 1 Homing Mode carried out successfully 0 No homing error 1 Homeng error 53 Rev. 1.1 12/1/2010 CANopen User Manual Control Word of Q Mode Bit # Name Value 4 Q Program Start 0 8 Halt 1 Description Toggle this bit from 0->1 to run Q program 0 Enable bit 4 1 Stop axis Status Word of Q Mode Bit # Name 10 Target Reached Rev. 1.1 12/1/2010 Value Description 0 Halt (Bit 8 in controlword) = 0: Q program running Halt (Bit 8 in controlword) = 1: Axis decelerates 1 Halt (Bit 8 in controlword) = 0: Q program finishes or not started Halt (Bit 8 in controlword) = 1: Velocity of axis is 0 54 CANopen User Manual Appendix K – Example Programs Profile Position Mode **** Enable Motor Power - DSP402 State Machine **** ID DLCData $0603 $8 $2B $40 $60 $00 $06 $00 $00 $00 ‘Ready to Switch on $0603 $8 $2B $40 $60 $00 $07 $00 $00 $00 ‘Switched on $0603 $8 $2B $40 $60 $00 $0F $00 $00 $00 ‘Operation Enabled **** Set to Profile Position Mode **** $0603 $8 $2F $60 $60 $00 $01 $00 $00 $00 ‘Set to Profile Position Mode **** Set Motion Parameters **** $0603 $8 $23 $81 $60 $00 $F0 $00 $00 $00 ‘Set Profile Velocity to 1 rps $0603 $8 $23 $83 $60 $00 $58 $02 $00 $00 ‘Set Acceleration to 100 rps/s $0603 $8 $23 $84 $60 $00 $58 $02 $00 $00 ‘Set Deceleration to 100 rps/s Single Move Absolute $0603 $8 $0603 $8 $0603 $8 $23 $7A $60 $00 $40 $0D $03 $00 ‘Set Target Position to 200000 steps $2B $40 $60 $00 $1F $00 $00 $00 ‘Set New Set Point Bit to 1 $2B $40 $60 $00 $0F $00 $00 $00 ‘Clear New Set Point Bit Single Move Relative $0603 $8 $0603 $8 $0603 $8 $23 $7A $60 $00 $40 $0D $03 $00 ‘Set Target Position to 200000 steps $2B $40 $60 $00 $5F $00 $00 $00 ‘Set New Set Point Bit to 1 $2B $40 $60 $00 $4F $00 $00 $00 ‘Clear New Set Point Bit Multiple Move, Stopping between Moves $0603 $8 $23 $81 $60 $00 $B0 $04 $00 $00 ‘Set Profile Velocity to 5 rps $0603 $8 $23 $7A $60 $00 $40 $0D $03 $00 ‘Set Target Position to 200000 steps $0603 $8 $2B $40 $60 $00 $5F $00 $00 $00 ‘Set New Set Point Bit to 1 $0603 $8 $2B $40 $60 $00 $4F $00 $00 $00 ‘Clear New Set Point Bit $0603 $8 $23 $81 $60 $00 $60 $09 $00 $00 ‘Set Profile Velocity to 10 rps $0603 $8 $23 $7A $60 $00 $40 $0D $03 $00 ‘Set Target Position to 600000 steps $0603 $8 $2B $40 $60 $00 $5F $00 $00 $00 ‘Set New Set Point Bit to 1 $0603 $8 $2B $40 $60 $00 $4F $00 $00 $00 ‘Clear New Set Point Bit Multiple Move, Continuous Motion $0603 $8 $23 $81 $60 $00 $B0 $04 $00 $00 ‘Set Profile Velocity to 5 rps $0603 $8 $23 $7A $60 $00 $40 $0D $03 $00 ‘Set Target Position to 200000 steps $0603 $8 $2B $40 $60 $00 $5F $02 $00 $00 ‘Set New Set Point Bit to 1 $0603 $8 $2B $40 $60 $00 $4F $02 $00 $00 ‘Clear New Set Point Bit $0603 $8 $23 $81 $60 $00 $60 $09 $00 $00 ‘Set Profile Velocity to 10 rps $0603 $8 $23 $7A $60 $00 $40 $0D $03 $00 ‘Set Target Position to 600000 steps $0603 $8 $2B $40 $60 $00 $5F $02 $00 $00 ‘Set New Set Point Bit to 1 $0603 $8 $2B $40 $60 $00 $4F $02 $00 $00 ‘Clear New Set Point Bit 55 Rev. 1.1 12/1/2010 CANopen User Manual Multiple Move, Immediate Change in Motion $0603 $8 $23 $81 $60 $00 $B0 $04 $00 $00 ‘Set Profile Velocity to 5 rps $0603 $8 $23 $7A $60 $00 $40 $0D $03 $00 ‘Set Target Position to 200000 steps $0603 $8 $2B $40 $60 $00 $7F $02 $00 $00 ‘Set New Set Point Bit to 1 $0603 $8 $2B $40 $60 $00 $6F $02 $00 $00 ‘Clear New Set Point Bit $0603 $8 $23 $81 $60 $00 $60 $09 $00 $00 ‘Set Profile Velocity to 10 rps $0603 $8 $23 $7A $60 $00 $40 $0D $03 $00 ‘Set Target Position to 600000 steps $0603 $8 $2B $40 $60 $00 $7F $02 $00 $00 ‘Set New Set Point Bit to 1 $0603 $8 $2B $40 $60 $00 $6F $02 $00 $00 ‘Clear New Set Point Bit Profile Velocity Mode **** Enable Motor Power - DSP402 State Machine **** ID DLCData $0603 $8 $2B $40 $60 $00 $06 $00 $00 $00 ‘Ready to Switch on $0603 $8 $2B $40 $60 $00 $07 $00 $00 $00 ‘Switched on $0603 $8 $2B $40 $60 $00 $0F $01 $00 $00 ‘Operation Enabled; Motion Halted **** Set to Profile Velocity Mode **** $0603 $8 $2F $60 $60 $00 $03 $00 $00 $00 ‘Set to Profile Velocity Mode **** Set Motion Parameters **** $0603 $8 $23 $FF $60 $00 $F0 $00 $00 $00 ‘Set Target Velocity to 1 rps $0603 $8 $23 $83 $60 $00 $58 $02 $00 $00 ‘Set Acceleration to 100 rps/s $0603 $8 $23 $84 $60 $00 $58 $02 $00 $00 ‘Set Deceleration to 100 rps/s **** Start/Stop Motion **** $0603 $8 $2B $40 $60 $00 $0F $00 $00 $00 ‘Motion Starts $0603 $8 $23 $FF $60 $00 $60 $09 $00 $00 ‘Change Target Velocity to 10 rps $0603 $8 $2B $40 $60 $00 $0F $01 $00 $00 ‘Motion Halts Homing Mode **** Enable Motor Power - DSP402 State Machine **** ID DLCData $0603 $8 $2B $40 $60 $00 $06 $00 $00 $00 ‘Ready to Switch on $0603 $8 $2B $40 $60 $00 $07 $00 $00 $00 ‘Switched on $0603 $8 $2B $40 $60 $00 $0F $00 $00 $00 ‘Operation Enabled **** Set to Homing Mode **** $0603 $8 $2F $60 $60 $00 $06 $00 $00 $00 ‘Set to Homing Mode $0603 $8 $2F $98 $60 $00 $13 $00 $00 $00 ‘Set Homing Method to 19 **** Set Motion Parameters **** $0603 $8 $23 $9A $60 $00 $58 $02 $00 $00 ‘Set Homing Acceleration to 100rps/s $0603 $8 $23 $99 $60 $01 $F0 $00 $00 $00 ‘Set Homing Velocity (Search for Switch) to 1rps $0603 $8 $23 $99 $60 $02 $78 $00 $00 $00 ‘Set Index Velocity (Search for Index or Zero) to 0.5rps $0603 $8 $23 $7C $60 $00 $40 $9C $00 $00 ‘Set Homing Offset to 40000 Steps $0603 $8 $2F $01 $70 $00 $03 $00 $00 $00 ‘Set Homing Switch to Input 3 **** Start/Stop Homing **** $0603 $8 $2B $40 $60 $00 $1F $00 $00 $00 ‘Homing Starts $0603 $8 $2B $40 $60 $00 $1F $01 $00 $00 ‘Homing Stops Rev. 1.1 12/1/2010 56 CANopen User Manual Normal Q Mode **** Enable Motor Power - DSP402 State Machine **** ID DLCData $0603 $8 $2B $40 $60 $00 $06 $00 $00 $00 ‘Ready to Switch on $0603 $8 $2B $40 $60 $00 $07 $00 $00 $00 ‘Switched on $0603 $8 $2B $40 $60 $00 $0F $00 $00 $00 ‘Operation Enabled **** Set to Normal Q Mode **** $0603 $8 $2F $60 $60 $00 $FF $00 $00 $00 ‘Set to Normal Q Mode $0603 $8 $2F $07 $70 $00 $01 $00 $00 $00 ‘Set Q Segment Number to 1 **** Start/Stop Q Program **** $0603 $8 $2B $40 $60 $00 $1F $00 $00 $00 ‘Q Program Starts $0603 $8 $2B $40 $60 $00 $1F $01 $00 $00 ‘Q Program Halts Sync Q Mode **** Enable Motor Power - DSP402 State Machine **** ID DLCData $0603 $8 $2B $40 $60 $00 $06 $00 $00 $00 ‘Ready to Switch on $0603 $8 $2B $40 $60 $00 $07 $00 $00 $00 ‘Switched on $0603 $8 $2B $40 $60 $00 $0F $00 $00 $00 ‘Operation Enabled **** Set to Sync Q Mode **** $0603 $8 $2F $60 $60 $00 $FE $00 $00 $00 ‘Set to Sync Q Mode $0603 $8 $2F $07 $70 $00 $01 $00 $00 $00 ‘Set Q Segment Number to 1 $0603 $8 $23 $05 $10 $00 $80 $00 $00 $00 ‘Set Sync Pulse to 0x80 **** Start/Stop Q Program **** $80 $0 ‘Q Program Starts $0603 $8 $2B $40 $60 $00 $0F $01 $00 $00 ‘Q Program Halts Shanghai AMP & MOONS’ Automation Co. Ltd. No.168 Mingjia Road, Industrial Park North Minhang District, Shanghai 201107, P.R. China Tel: 86-21-52634688 Fax: 86-21-62968682 E-mail: [email protected] Web: www.moonsindustries.com 57 Service Center +86-400-820-9661 Rev. 1.1 12/1/2010