1
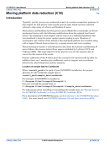
INTREPID User Manual
Library | Help | Top
Gravity field reduction and correction (C08)
1
| Back |
Gravity field reduction and correction (C08)
Top
The goal of gravity field reduction and correction is to remove from the observed
gravity data any components that would be present if we were dealing with a simple
and virtually homogenous earth. Whatever remains will be anomalous. Ideally,
anything that is left over is the result of density inhomogenities due to local geology
and perhaps of local exploration interest.
The diagram below is a conceptual flow chart for the gravity correction process,
adapted from Chapin (1996).
Observed Gravity
(corrected for drift,
earth tide, etc)
Homogenous Earth,
Static Measurement,
at surface of Datum
Moving platform
Subtract
Eötvös
correction
Static
measurement
Observed
gravity
Subtract
theoretical
gravity
Measurements
above or below
datum
Subtract
free-air
correction
Free air
anomaly
Rock above
datum
Subtract
Bouguer
correction
Simple
Bouguer
anomaly
Variable
terrain
Labels on arrows
indicate the
assumptions made.
Add terrain
correction
Complete
Bouguer
anomaly
The Gravity Corrections tool imports data from a gravimeter and applies gravity field
reduction and correction techniques. In this tutorial:
Library | Help | Top
•
Gravity field reduction and correction (C08)
•
How the INTREPID Gravity tool works
•
Notes about the worked examples
•
Gravity field reduction and correction using AGSO format data—worked example
•
Gravity field reduction and correction using Scintrex (CG-3) format data—worked
example
•
Gravity field reduction and correction using Scintrex (CG-5) format data—worked
example
•
Complete Bouguer anomaly—worked example
•
References
© 2012 Intrepid Geophysics
| Back |
INTREPID User Manual
Library | Help | Top
Gravity field reduction and correction (C08)
2
| Back |
Location of sample data for Cookbooks
Where install_path is the path of your INTREPID installation, the project
directory for the Cookbooks sample data is
install_path\sample_data\cookbooks.
For example, if INTREPID is installed in
C:\Program Files\Intrepid\Intrepid4.5,
then you can find the sample data at
C:\Program Files\Intrepid\Intrepid4.5\sample_data\cookbooks
For information about installing or reinstalling the sample data, see "Sample data for
the INTREPID Cookbooks" in Using INTREPID Cookbooks (R19).
For a description of INTREPID datasets, see Introduction to the INTREPID database
(G20). For more detail, see INTREPID database, file and data structures (R05).
Advantages of the INTREPID Gravity tool
Parent topic:
Gravity field
reduction and
correction
(C08)
The INTREPID Gravity tool has evolved from collaborative work with Geoscience
Australia (formerly AGSO, the Australian Geological Survey Organisation).
Geoscience Australia (GA) has collected data from large regional surveys performed
by many operators using many gravimeters.
Advantages
Large Surveys Sets
The Gravity tool allows you to process large gravity data sets that could involve
multiple gravimeters and operators.
Gravimeter Loop Sets (GMLS)
A key INTREPID concept is the gravimeter loop set (GMLS) that is defined as one
operator–gravimeter combination. A person may collect gravity data with a particular
gravimeter over a number of days or weeks. The operator gathers the data in gravity
loops—where the start and finish of the loop are at a station (loop tie) that has a
known observed gravity value.
The Gravity tool uses one or more main gravity base station as a control (base tie).
The gravity stations of a GMLS are tied back to this main station.
Loop drift control
All gravity meters drift. Meter drift is caused by mechanical stresses and strains in
the mechanism as the meter is moved, subjected to vibration, knocked, unclamped,
reset, subjected to heat stresses, etc.
with INTREPID’s innovative approach to drift control, you can correct:
•
The short term linear drift on each loop (This is the traditional approach.)
•
The long-term drift (polynomial or linear) for each GMLS. INTREPID corrects
this drift using a polynomial drift function calculated from a least squares fit
through drift rates obtained from tie points.
You can view and query the drift windows to identify stations with abnormal drift
data.
By appending each new week's data to the import file, you can build up long term
drift and multiple base ties. This increases the accuracy of the reduced data.
Library | Help | Top
© 2012 Intrepid Geophysics
| Back |
INTREPID User Manual
Library | Help | Top
Gravity field reduction and correction (C08)
3
| Back |
Comprehensive Processing
The gravity processing options include:
•
Gravimeter calibration
•
Earth tides (for a specified time)
•
Eötvös corrections
•
Free air anomaly
•
Simple Bouguer anomaly
•
Terrain corrections
•
Theoretical gravity options
•
Merge with master dataset
Output
The Gravity tool produces detailed processing reports that include warnings about
possible tares in your data.
It stores the corrected gravity values in an INTREPID dataset so that you can process
this data using other INTREPID tools.
Note : Gravimeters are prone to have steps in their drift curves. Some mechanical
hitch or stick catches or releases and causes the subsequent readings to be higher or
lower than before. These jumps are called tares and may be several gravity units in
magnitude. It is often difficult to determine where in the loop a tare has occurred
unless it is large enough to be obvious.
Note : Terrestrial gravity data that is available to the public in Australia is generally
accurate to 0.03 mGal. The accuracy depends on the method of acquisition.
How the INTREPID Gravity tool works
Parent topic:
Gravity field
reduction and
correction
(C08)
The Gravity tool imports a raw gravity data file, performs corrections and creates an
adjusted and corrected gravity point dataset. Three native file formats are supported
- AGSO format, Scintrex CG-3 ASCII format, and Scintrex CG-5 binary format.
In the process of creating the dataset, it performs the following adjustments and
corrections:
•
Instrument drift corrections,
•
Earth tide corrections,
•
Loop adjustments by instrument, or operator, or both
•
Adjustment by least squares to absolute readings,
•
Calculation of
•
Free air anomaly
•
Simple Bouguer anomaly
You can also use the tool to calculate standalone gravity transformations (eg: reverse
Free air, Theoretical gravity, Eotvos) as well as gravity terrain corrections, also
known as Complete Bouguer anomaly.
This tool assumes that all stations have accurate GPS locations and heights. We can
assist you to process older barometric data. Contact our technical support service for
further information.
Library | Help | Top
© 2012 Intrepid Geophysics
| Back |
INTREPID User Manual
Library | Help | Top
Gravity field reduction and correction (C08)
4
| Back |
Notes about the worked examples
Parent topic:
Gravity field
reduction and
correction
(C08)
The worked example datasets
The following worked example datasets are provided.
•
AGSO format survey of Goulburn, New South Wales, Australia.
•
Scintrex CG-3 ASCII format dataset.
•
Scintrex CG-5 format binary dataset.
See Data for gravity cookbook examples (C12) for a full description of data.
Location of sample data for Cookbooks
Where install_path is the path of your INTREPID installation, the project
directory for the Cookbooks sample data is
install_path\sample_data\cookbooks.
For example, if INTREPID is installed in
C:\Program Files\Intrepid\Intrepid4.5,
then you can find the sample data at
C:\Program Files\Intrepid\Intrepid4.5\sample_data\cookbooks
For information about installing or reinstalling the sample data, see "Sample data for
the INTREPID Cookbooks" in Using INTREPID Cookbooks (R19).
For a description of INTREPID datasets, see Introduction to the INTREPID database
(G20). For more detail, see INTREPID database, file and data structures (R05).
Use of INTREPID visualisation tools
The Gravity tool displays certain aspects of the data.
Most illustrations in this worked example show the data as displayed by the Gravity
tool.
You can also use the Visualisation tool to display the data. **
Tip: Assign the observed gravity to point colour and the elevation or an
anomaly field to point size.
Library | Help | Top
© 2012 Intrepid Geophysics
| Back |
INTREPID User Manual
Library | Help | Top
Gravity field reduction and correction (C08)
5
| Back |
Batch mode operation
As well as using the gravity tool interactively, you can also perform all operations in
these worked examples using job files in batch mode.
Here is a sample job file for the INTREPID Gravity tool.
Process Begin
Name = gravity
InputFieldData= D:/Intrepid/sample_data/cookbooks/gravity
/datasets/SCINTREXAMPLE2.DAT
ReportFile = processing_sci_1.rpt
LoopDataBase = D:/Intrepid/sample_data/cookbooks/gravity
/datasets/Survey9807_LoopDB_23
AbsoluteDataBase = D:/Intrepid/sample_data/cookbooks/gravity
/datasets/Survey9807_ControlDB_23
OutputCorrectedField = D:/Intrepid/sample_data/cookbooks/gravity
/datasets/Survey9807_23
Parameters Begin
OutputUnits= Milligals
Checking Begin
Tolerance = 0.01
Repeat_Tolerance = 0.2
Maximum_Tare= 20.0
Checking End
Terrain Begin
Cell_Size = 100.0
Density= 2.67
Max_Circles= 2
Earth_Curvature_Correction= No
Terrain End
Levelling Begin
Max_Loop_Iterations= 20
Maximum_Loop_Change= -6.277438562e+66
DriftType = Long_Term_Polynominal
IgnoreInternalRepeats= No
NodesInTime= No
Levelling End
Method Begin
RunType
= SCINTREXField
Scintrex Begin
SurveyNumber= 9807
Projection = "GEODETIC"
Datum = "WGS84"
Scintrex End
Method End
Datum Begin
Output= "AGD66"
Datum End
TerrainType= LAND_SURFACE
DatumType = IGSN71
Verbose_Report= No
Complete_DataBase_Fields= No
Parameters End
Process End
Library | Help | Top
© 2012 Intrepid Geophysics
| Back |
INTREPID User Manual
Library | Help | Top
Gravity field reduction and correction (C08)
6
| Back |
Worked example overview
This worked example demonstrates the following operations:
•
Import some data:
•
AGSO format data from a LaCoste & Romberg gravimeter
•
Scintrex CG-3 format data from a Scintrex gravimeter
•
Reduce the loop data to one record for each station. This will include observed
gravity, Free air and simple Bouguer anomalies.
•
Calculate a gravity terrain correction.
•
Use the Spreadsheet Editor to add the terrain correction to the simple Bouguer
anomaly to produce the complete Bouguer anomaly.
The following flowchart gives an overall view of the typical gravity processing steps.
Raw data
Digital Terrain
Model grid
Import
Point dataset
Reduce loop
data to final
Reduced, corrected
point dataset with
free air and simple
Bouguer anomalies
Calculate and apply
terrain correction
Complete
Bouguer anomaly
Gravity field reduction and correction using AGSO format data—worked
example
Parent topic:
Gravity field
reduction and
correction
(C08)
Library | Help | Top
In this worked example we perform the following operations:
1
Import and reduce a set of loop data (week 1)
2
Check the processing report
3
Correct the raw data as required
4
Discard the imported data (week 1) **
5
Append more raw data to the import data file (week 1&2)
6
Import, reduce and correct the complete set of data.
© 2012 Intrepid Geophysics
| Back |
INTREPID User Manual
Library | Help | Top
Gravity field reduction and correction (C08)
7
| Back |
Steps to follow
Start Gravity
Field
Reduction
1
In the INTREPID Project Manager locate the Cookbooks gravity dataset directory
(install_path\sample_data\cookbooks\gravity).
2
3
Start the Gravity tool (From the Gravity menu choose Field Reduction).
Check the following menu items in the Settings menu, and change if necessary:
•
Specify Density -> Land (2.670)
Tip: The settings menu enables you to change a variety of settings. The default
settings are appropriate for this worked example. If you need to change the settings,
do this before importing or opening a dataset. See "Gravity mode settings" in
Gravity corrections (T54) for details.
Import week 1
data file.
4
Tip: At this point you would check that the import file has a valid format. See
Gravity import file formats (R27) for specification.
From the File menu...choose Survey Import Wizard.
Specify AGSO Gravity Field Data as the file type.
Choose Next.
5
The gravity Datum, Units and Environment settings box will appear. Check the
following menu items, and change if necessary.
•
Select Gravity Datum Type -> IGSN71
•
Select Output Gravity Units -> milliGals
•
Select Gravity Acquisition Environment -> Land
Tip: INTREPID automatically adjusts its corrections for land, marine or airborne
gravity data.
Library | Help | Top
© 2012 Intrepid Geophysics
| Back |
INTREPID User Manual
Library | Help | Top
Gravity field reduction and correction (C08)
8
| Back |
Choose Next.
Choose Browse... to locate the input file AGSO_Week1.DAT
Modify the Output Report file name to include the survey number as follows:
9705_Week1_processing.rpt.
Tip: If a report of that name already exists, INTREPID will append the new
processing report to the existing file.
INTREPID saves the processing report in the directory in which the Gravity tool
was launched.
Choose Finish.
6
INTREPID imports the data
Tip: INTREPID does basic validation, data checking and field checking (see parts
1-8 in the processing report file). You can bypass this step if you start with data
that you imported in some other way, for example using the INTREPID Import
tool. Reduce Loop Data to Final also validates the data (repeats sections 5-8 in the
processing report file)
7
Library | Help | Top
INTREPID does the following:
•
Displays a message indicating that the Import has completed
•
Displays the Gravity window
•
Generates a report of the import and data checking process
•
Displays this report (the Gravity Field Data Checking Report) using a text
editor.
© 2012 Intrepid Geophysics
| Back |
INTREPID User Manual
Library | Help | Top
8
Gravity field reduction and correction (C08)
9
| Back |
View the report.
The Gravity Field Data Checking Report contains the following sections:
Section
Description
1
Report header Position
Data
Summary of the dataset characteristics
2
Control Gravity Data
List of loop network control stations
3
Gravity Meter Calibration
Loop Data
Calibration data is optional.
4
Gravity Meter Loop
Datasets
For each GMLS, this section lists
•
Gravimeter details
•
Operator details
•
A summary for each loop
5
Node List
A tie (node) is a station with readings in more than one
loop.Ties are important cross-reference points for
corrections.
6
Global Nodes
Ties (nodes) common to more than one gravimeter
7
Internal Loop repeat
stations
These are stations with multiple readings in one loop
only.These points are useful cross-reference points for
corrections
8
Data Structure Check
This section reports
•
Start and finish station
•
Ties (nodes) in the loop
•
Possible tares in the data.
See "INTREPIDINTREPIDGravity processing reports" in Gravity corrections
(T54) for annotated excerpts from a processing report.
Examine Section 8, Data Structure Check to verify that the figures and statistics
are reasonable. The report flags errors with the symbol **.
Check that
•
All loops are closed. Unclosed loops indicate an integrity problem.
•
Tares are not excessive or unexplained.
Tip: At this point you can edit the import data to restore integrity and remove
tares. See Gravity import file formats (R27) for details of import file format and
tips for editing them.
Tip: After you edit the file, repeat from Step 3 (Choose Import Wizard)
Choose Close when you have finished examining the processing report.
INTREPID saves the processing report in the directory in which the Gravity tool
was launched.
Library | Help | Top
© 2012 Intrepid Geophysics
| Back |
INTREPID User Manual
Library | Help | Top
View the
gravity dataset
map
9
Gravity field reduction and correction (C08)
10
| Back |
View the Gravity window. It shows the raw loop data that you have just imported.
INTREPID uses the following symbols to display the gravity dataset:
Gravity station (location of a gravity measurement)
Ties (nodes)—base station or station common to more than one loop
Repeated links between stations.
Click a station
to view the
station data
Library | Help | Top
© 2012 Intrepid Geophysics
| Back |
INTREPID User Manual
Library | Help | Top
Gravity field reduction and correction (C08)
11
| Back |
Click on a station to view the data for that station. INTREPID displays the
station data in a message box.
where:
Heading
Description
Station
Number
Station number
Index
GMLS number
Loop number
Reading number within loop
Dial
Raw field gravity measurement as read from the gravimeter.
The data is uncalibrated and unscaled.
Tip: Note: this numbering system begins at zero. A station with an index of (0,1,2)
is third station of the second loop in the first GMLS.
Choose OK to close the message box.
Tip: To output the gravity station diagram to a PostScript file, choose from the
View menu - Screen dump to Postscript. INTREPID saves this file in the current
directory.
Library | Help | Top
© 2012 Intrepid Geophysics
| Back |
INTREPID User Manual
Library | Help | Top
Reduce dataset
and calculate
corrections
Gravity field reduction and correction (C08)
12
| Back |
10 From the Process menu...choose Reduce Loop Data to Final.
11 The Datum/Units/Environment box will appear. These settings will be the same
as before. Click Next.
12 The database dialog box will appear. You do not need to change any of the files or
paths for this example.
Tip: In this operation, INTREPID creates the reduced and corrected gravity point
dataset from the ControlDB and LoopDB datasets. It performs meter corrections,
Earth tide corrections, gravity drift corrections, loop tie drift analysis and
levelling. It then produces a single record for each station with the following
gravity data fields:
grav
Corrected observed gravity (for stations with multiple readings,
this is the average of those readings)
FreeAir
Free air anomaly
Bouguer
Simple Bouguer anomaly
Tip: To do a loop reduction on a file you imported during an earlier session:
Tip: Step 1 Choose Reduce Loop to Final.
Tip: Step 2 Specify the two import datasets, the dataset to hold the corrected values
and the report file name.(Do not use File - Open Gravity Dataset.)
Choose Finish.
13 INTREPID does the following:
Library | Help | Top
•
Redisplays the Gravity window
•
Appends the Gravity Processing Report to the existing processing report.
•
Displays the report using a text editor
© 2012 Intrepid Geophysics
| Back |
INTREPID User Manual
Library | Help | Top
Gravity field reduction and correction (C08)
13
| Back |
14 Scroll down to view the Gravity Processing Report.
The Gravity Processing Report contains the following sections:
Section
Description
5
Node List
A tie (node) is a station with readings in more than one
loop.Ties (nodes) are important cross-reference points
for corrections.
6
Global Nodes
Ties (nodes) common to more than one Gravimeter
7
Internal Loop repeat
stations
These are stations with multiple readings in one loop
only.These points are useful cross-reference points for
corrections
8
Data Structure Check
This section reports
Start and finish station
Loop ties (nodes)
Possible tares in the data.
9
Meter Corrections
A list of each GMLS that INTREPID corrects using the
gravimeter calibration file.
10
Earth Tide
A list of each GMLS that INTREPID corrects using the
internally stored Earth tide model.
11
Gravity Drift Corrections
Adjustments within each loop:
Corrections
INTREPID finds the difference between the readings at
the start / finish station at the beginning and end of the
loop. It then interpolates a correction for each
observation in the loop to correct this discrepancy,
assumed to be instrument drift.
Precision statistics
INTREPID estimates and reports the precision
statistics for the data after the drift correction process.
It calculates this from the variations in readings for loop
ties and other stations with more than one observation.
Node values
INTREPID reports the drift results for each tie (node),
showing original and corrected values.
Node Connections Analysis
and Levelling
Adjustments within each loop:
12
Adjustments between loops within a GMLS:
INTREPID makes an interpolated correction to all
readings based on discrepancies between readings at
stations with more than one observation within each
loop.
Library | Help | Top
© 2012 Intrepid Geophysics
| Back |
INTREPID User Manual
Library | Help | Top
13
Gravity field reduction and correction (C08)
14
| Back |
Section
Description
Global Adjustment
Adjustments between loops within a GMLS:
INTREPID compares the global tie values for all pairs
of GMLS. If the corrections have been performed
properly, there should be a constant difference between
the gravimeters (or, perhaps, a difference with an
observable linear trend when the ties are arranged
chronologically).
14
Applying Meter Scale factor
to all loop data
You can specify a scale factor for each gravimeter
(usually 1). INTREPID applies this scale factor to each
set of loop data
If the scale factor value in the import file is equal to 1
and you supply calibration data in the import file,
INTREPID performs a calibration process and adjust
the scale factor.value
15
Calculating adjustments to
global nodes
Adjustments to tie each GMLS to the network control
station:
INTREPID compares the global tie (node) values to the
network control station. The global tie has a known
gravity. INTREPID adjusts all ties accordingly.
16
A reduced set of data that is the 'best estimate' of the
gravity for each station. This data is stored in the field
grav .
Final Values
See "INTREPIDINTREPIDGravity processing reports" in Gravity corrections
(T54) for annotated excerpts from a processing report.
Check that:
•
INTREPID was able to close each loop in Section 12 and that the misclosure
converged each time.
•
INTREPID identified a primary fixed tie to use for each GMLS in Section 15.
If not, INTREPID creates a reference point by averaging all ties in the GMLS.
Choose Close when you have finished examining the processing report.
INTREPID saves this processing report in the current directory.
Library | Help | Top
© 2012 Intrepid Geophysics
| Back |
INTREPID User Manual
Library | Help | Top
View the
gravity dataset
map
Gravity field reduction and correction (C08)
15
| Back |
15 View the Gravity window
It shows the reduced and corrected gravity dataset.
Click a station to
view the gravity
values
Click a station to view the station data and calculated gravity values. INTREPID
displays the station data in a message box.
Library | Help | Top
© 2012 Intrepid Geophysics
| Back |
INTREPID User Manual
Library | Help | Top
Gravity field reduction and correction (C08)
16
| Back |
16 Note: There is actually only one observed gravity record for each station in the
reduced dataset. The observed gravity for this station is the average of the
displayed values. See INTREPID gravity point datasets (R28) for details of the
gravity point dataset.
The station data records shown are from the imported loop data, where
Heading
Description
Station Number
Station number
Index
GMLS number
Loop number
Reading number within loop
View drift rates
for each
gravimeter
loop set
Dial
Raw field gravity measurement as read from the
gravimeter. The data is now calibrated and scaled.
Gravity
Corrected observed gravity field. (For stations with
multiple readings, INTREPID lists each reading although
the dataset will contain the average only.)
17 Display the Drift Rate window. (Choose Drift Rate from the View menu).
INTREPID displays the Drift Rate window. The graph shows the drift rate for
each tie in the first GMLS (of the dataset). This includes ALL ties (nodes); the ties
at the beginning and end of each loop (loop ties), and other ties within the GMLS.
Tip: The horizontal axis represents the time (days) since the survey began. The
vertical axis is the drift divided by the time difference (dial reading/hr).
Each point indicates the drift rate for a tie.
A high rate of drift may indicate a data error.
Library | Help | Top
© 2012 Intrepid Geophysics
| Back |
INTREPID User Manual
Library | Help | Top
Gravity field reduction and correction (C08)
17
| Back |
Click a point to view the station number and the dial value.
Choose OK to close the message box.
Choose Next to view the Drift Rate window for the next GMLS.
View standard
drift for each
gravimeter
loop set
When you have finished viewing drift windows, close the Drift Rate window.
18 Display the Standard Drift window. (Choose Drift Standard from the View menu.)
INTREPID displays the Standard Drift window. The graph displays the drift for
each loop in the first GMLS.
Tip: The horizontal axis represents the time (days) since the survey began.The
vertical axis is the dial reading. Each line segment represents one loop. The length
of the line segment indicates the time taken to complete the loop.
Click an end point
(tie) to view station
details
A line segment with a steep slope indicates a large drift rate between the start
and end of the loop.
Click on the 'x' at the end of a line segment to view the loop tie (node) station
number and dial reading.
Choose OK to close the message box.
Choose Next to view the standard drift for the next GMLS.
Close the Standard Drift window.
Library | Help | Top
© 2012 Intrepid Geophysics
| Back |
INTREPID User Manual
Library | Help | Top
View
normalised
drift for each
gravimeter
loop set
Gravity field reduction and correction (C08)
18
| Back |
19 Display the Normalised Drift window. (From the View menu...choose Drift
Normalised).
INTREPID displays the Normalised Drift window. The graph shows the
normalised drift for each loop in the first GMLS. The normalised graph shows
each segment shifted up or down to fit a curve. This gives some sense of a drift
continuum for the GMLS.
Tip: The horizontal axis represents the time (days) since the survey began.The
vertical axis is the normalised dial reading. INTREPID fits a polynomial to the
gradients (drift) of the line segments (loops). It then shifts all line segments up or
down so that they start on this polynomial.
A line segment that deviates significantly from the polynomial indicates an
abnormal drift rate.
Click on the 'x' at an end of a line segment view the station number at the start or
end of a loop.
Choose OK to close the message box.
Choose Next to view the Normalised Drift for the next GMLS.
Close the Normalised Drift window.
20 Now that you have examined the Week 1 data thoroughly, you can make
adjustments to the import data using a text editor if required before appending
the next week's data
21 Note: In this demonstration you won't actually append the data. We supply a
second import file containing both weeks' data.
Library | Help | Top
© 2012 Intrepid Geophysics
| Back |
INTREPID User Manual
Library | Help | Top
Repeat the
steps for Week 1
& 2 data
Gravity field reduction and correction (C08)
19
| Back |
22 Exit from the Gravity tool and repeat steps 1–16 with the week 1&2 data. Use the
following file names:
AGSO gravity field data
AGSO_Week1&2.DAT
Output Report file
9705_Week1&2_processing.rpt
After import, the Gravity window displays the Week 1&2 data as follows.
23 Exit from the Gravity tool.
Library | Help | Top
© 2012 Intrepid Geophysics
| Back |
INTREPID User Manual
Library | Help | Top
Gravity field reduction and correction (C08)
20
| Back |
Gravity field reduction and correction using Scintrex (CG-3) format data—
worked example
Parent topic:
Gravity field
reduction and
correction
(C08)
In this worked example we perform the following operations:
1
Import and reduce a set of loop data
2
Check the processing report
3
Correct the raw data as required and import again if necessary
4
Reduce the data and apply gravity corrections.
Steps to follow
Start Gravity
Field
Reduction
Import
Scintrex data
file.
1
In the INTREPID Project Manager locate the Cookbooks gravity dataset directory
(install_path\sample_data\cookbooks\gravity).
2
Start the Gravity tool (From the Gravity menu...choose Field Reduction).
3
Check the following menu items in the Settings menu, and change if necessary:
•
Specify Density -> Land (2.670)
4
Tip: The settings menu enables you to change a variety of settings. The default
settings are appropriate for this worked example. If you need to change the settings,
do this before importing or opening a dataset. See "Gravity mode settings" in
Gravity corrections (T54) for details.
From the File menu...choose Survey Import Wizard.
Specify Scintrex Gravity Field Data as the file type.
Choose Next.
Library | Help | Top
© 2012 Intrepid Geophysics
| Back |
INTREPID User Manual
Library | Help | Top
Gravity field reduction and correction (C08)
21
| Back |
5
The gravity Datum, Units and Environment settings box will appear. Check the
following menu items, and change if necessary.
•
Select Gravity Datum Type -> IGSN71
•
Select Output Gravity Units -> milliGals
•
Select Gravity Acquisition Environment -> Land
Tip: INTREPID automatically adjusts its corrections for land, marine or airborne
gravity data.
Choose Next
Specify 9807 as the Survey Number. This is the YY/MM of the survey acquisition
date.
Tip: For this worked example we chose arbitrary values for the survey number and
suffix based on the survey date (YYMMDD). GA allocates all Australian survey
numbers. Contact GA if you require more specific information.
Library | Help | Top
© 2012 Intrepid Geophysics
| Back |
INTREPID User Manual
Library | Help | Top
Gravity field reduction and correction (C08)
22
| Back |
The survey number becomes a prefix for:
•
The existing station number. (For example, station 282 will now have a station
number of 9807282.)
•
The Dataset name
Specify 23 as the Survey Suffix. This is the DD of the survey acquisition date.
INTREPID will append _23 to the dataset name.
If the gravity meter has a vertical offset you can specify it here.
Choose Browse... to locate the Scintrex gravity field data file
SCINTREXAMPLE2.DAT .
Choose Browse... to locate the GPS field data file SCINTREXAMPLE2.GPS .
Choose Browse... to change the GPS field data Projection name to MGA50. In the
Select Projection box, double click on Projection Type TransverseMercator, then
scroll down and choose Projection MGA50.
Choose Browse...to change the GPS field data Datum name to GDA94.
Tip: INTREPID will convert the data it to geodetic coordinates upon import.
Modify the Output Report file name to include the survey number as follows:
9807_processing.rpt.
Tip: If a report of that name already exists, INTREPID appends the new
processing report to the existing file.
INTREPID saves the processing report in the directory in which the Gravity tool
was launched.
Choose Next.
6
Choose Load... from the Scintrex Gravity Field Processing dialog box.
Locate SCINTREXAMPLE2.ABS in the Specify Ascii File With Control Stations ...
dialog box.
INTREPID displays the list of loop network control stations (the file contents).
Choose Finish.
Library | Help | Top
© 2012 Intrepid Geophysics
| Back |
INTREPID User Manual
Library | Help | Top
7
Gravity field reduction and correction (C08)
23
| Back |
INTREPID now imports the data.
Tip: INTREPID performs basic validation, data checking and field checking (see
parts 1-8 in the processing report file). You can bypass this step if you start with
data that you imported in some other way, for example using the INTREPID
Import tool. Reduce Loop Data to Final also validates the data (repeats sections 58 in the processing report file)
8
INTREPID does the following:
•
Displays a message indicating that the Import has completed
•
Displays the Gravity window
•
Generates a report of the import and data checking process
•
Carry out steps
7–16 from
AGSO exercise
9
Displays this report (the Gravity Field Data Checking Report) using a text
editor.
Carry out steps 7–16 from the AGSO exercise.
Notes:
•
Continue to use report file 9807_processing.rpt. INTREPID will append
the processing report data to this file
•
Scintrex data is not usually collected in GMLS.
After import, the Gravity window displays the Scintrex data as follows.
Library | Help | Top
© 2012 Intrepid Geophysics
| Back |
INTREPID User Manual
Library | Help | Top
Gravity field reduction and correction (C08)
24
| Back |
Reduce dataset
and calculate
corrections
From the Process menu, choose Reduce Loop Data to Final. You do not need to
change any of the files or paths.
View drift
windows
When you select the drift windows from the View menu, INTREPID displays the
following graphs:
Since there is only one GMLS in this survey, each drift window displays the drift
for the entire dataset.
Drift Rate window
Library | Help | Top
© 2012 Intrepid Geophysics
| Back |
INTREPID User Manual
Library | Help | Top
Gravity field reduction and correction (C08)
25
| Back |
Standard Drift window
Normalised Drift window
Library | Help | Top
© 2012 Intrepid Geophysics
| Back |
INTREPID User Manual
Library | Help | Top
Gravity field reduction and correction (C08)
26
| Back |
Gravity field reduction and correction using Scintrex (CG-5) format data—
worked example
Parent topic:
Gravity field
reduction and
correction
(C08)
In this worked example we perform the following operations:
1
Import Scintrex CG-5 format binary data.
2
Check the processing report.
Steps to follow
Start Gravity
Field data
import.
1
In the INTREPID Project Manager locate the Cookbooks gravity dataset directory
(install_path\sample_data\cookbooks\gravity).
2
Start the Gravity tool (From the Gravity menu...choose Field Reduction).
3
Check the following menu items in the Settings menu, and change if necessary:
•
Specify Density -> Land (2.670)
4
From the File menu...choose Import CG5.
The Scintrex CG5 gravity survey data import dialog box will appear.
Specify the name of the CG-5 format data file CG5_sample.sgd.
INTREPID will generate a report and display this report.
Library | Help | Top
5
Enter the Survey Number and Survey Suffix.
6
Click Browse to create an Intrepid gravity database. Enter the name of the
database and click OK.
7
Click OK on the data import dialog box. Intrepid will import the data and inform
the user that the import is complete.
© 2012 Intrepid Geophysics
| Back |
INTREPID User Manual
Library | Help | Top
Gravity field reduction and correction (C08)
27
| Back |
Complete Bouguer anomaly—worked example
Parent topic:
Gravity field
reduction and
correction
(C08)
The INTREPID complete Bouguer anomaly option calculates a terrain correction for
gravity. It uses a digital terrain model (DTM) grid to calculate the terrain correction
for each gravity station.
This correction attempts to account for local topography rather than assuming that
the gravity station is sitting on a horizontal plane. In areas of high relief these
corrections can be quite high. In Australia gravity terrain corrections can be as high
as 25 mgals.
The terrain correction is added to the simple Bouguer anomaly to produce the
Complete Bouguer anomaly.
For a complete reference to the technique(s) used to apply the terrain corrections in
the gravity module, the interested reader is referred to ‘Application of terrain
corrections in Australia’, written by N.G. Direen (with contributions from T.
Luyendyk). The Intrepid cookbook C13 contains a full reprint of this reference paper.
Steps to follow
Calculate the
terrain
correction
In this worked example we shall use AGSO Survey 9705, the Goulburn regional infill
survey which we imported and corrected in the first part of this tutorial. However it is
important to note that INTREPID cannot use geodetic data for this process.
Therefore we have prepared a copy of the dataset with projected coordinates. The
dataset is called Survey9705_1, and is in the cookbooks/gravity directory.
The DTM we will use is called goulburn_dtm.ers. It is a requirement that the DTM
and the gravity point dataset have the same Datum and Projection. Both datasets
have been converted (using the INTREPID Projection Conversion tool) to WGS84,
TMAMG55.
1
From the Gravity tool Process menu...choose Complete Bouguer anomaly (Terrain
Corr).
Specify the following
Library | Help | Top
Minimum Cell Size
150
Number of Calculation Circles
4
Gravity Database
Survey9705_1
Digital terrain model grid
goulburn_dtm.ers
Output report filename
9705_terrain.rpt
© 2012 Intrepid Geophysics
| Back |
INTREPID User Manual
Library | Help | Top
Gravity field reduction and correction (C08)
28
| Back |
For treatment of elevation observation data, select Use Elevations from Gravity
Observations.
Tip: Submarine Terrain Correction Select this check box for marine gravity
surveys. INTREPID will assume sea-level as the observation height. It will use the
Nettleton marine correction model.
Tip: Airborne Terrain Correction Select this check box for airborne gravity
surveys. INTREPID will assume GPS height as the observation height.
Tip: Earth Curvature Correction Select this check box if your survey covers a
wide area and your DTM grid is highly precise. INTREPID applies an additional
term to the correction at distances greater than 167km from the observation point.
Tip: Minimum Cell Size This controls the prism cell size which is used to model
the terrain surface. This parameter will depend on the resolution of the DTM grid.
It also controls the radius of each ring. Specify the DTM grid cell size to start with.
Increasing the size increases the ring radii. The result will be less accurate but it
will run faster.
Tip: Density Specify the density underlying the survey. The default value for
land is 2.67. For marine surveys, specify 1.64 (This is 2.67–1.03)
Tip: Number of Calculation Circles These are the rings of terrain influence
around the observation point. Specify a range between 2 and 5. Specify 2 for faster
processing but less coverage. Specify 5 for maximum coverage but slower
processing. The radius of the area processed approximately doubles for each new
ring. Keep in mind that most of the terrain influence occurs in the inner rings.
Choose Finish.
Library | Help | Top
© 2012 Intrepid Geophysics
| Back |
INTREPID User Manual
Library | Help | Top
Gravity field reduction and correction (C08)
29
| Back |
Specify the input and output fields. :
Prompt
Field
Specify the Observed Gravity Field
Bouguer
Specify optional observed gravity units field
Skip
Select the Ground Elevation Field (if not
aliased)
Elevation
Specify the Output Terrain Correction Field
terraincorr
Tip: Intrepid does not use the Observed Gravity field in the calculation. It is used
as a data flag.
Tip: If the Elevation field is defined as an Alias in the .isi file, you will not be
prompted for it.
Tip: For marine surveys, use the Bathymetry field for Ground Elevation.
INTREPID will start the processing and create the terrain correction field
(terraincorr).
Check for
errors in the
terrain
correction
2
When the process is finished, close the Gravity window.
Now examine the report file in a text editor.
Tip: If the report shows errors, adjust the parameters and repeat the calculation.
The report will give you some background information about terrain corrections,
and will summarise the parameters and files in use. It will include a table of the
circle radii for the gravity terrain correction estimates around each observation.
This is important to know, since the extent of your DTM grid will determine the
extent of the terrain correction coverage you can achieve.
Scroll down to the end of the report. A summary for the Z, Y Z, and TC parameters
for the gravity dataset are given. TC is the computed terrain correction
(terraincorr). Terrain corrections for land-base surveys should all be positive.
Library | Help | Top
© 2012 Intrepid Geophysics
| Back |
INTREPID User Manual
Library | Help | Top
Library | Help | Top
Gravity field reduction and correction (C08)
30
| Back |
3
Use either the INTREPID Project Manager or the Dataset Statistics tool to view a
histogram of the terrain correction field. Note that, while the mean value is low,
there are some high outlier values. This may indicate that there are some data
errors in the gravity point dataset.
4
Grid the terraincorr field, using the INTREPID Gridding tool and saving the
grid as terrcorrgrid. View the grid in the INTREPID Visualisation tool. It
should be coherent. You can also use the Visualisation tool to view the gravity
point dataset, and assign the value of the terrain correction to the symbol colour.
5
If you have time , rerun the terrain correction, this time using more or less circles
of influence, or try changing the prism cell size. Note the effect these new
parameters have on the computed terrain correction.
© 2012 Intrepid Geophysics
| Back |
INTREPID User Manual
Library | Help | Top
Calculate the
complete
Bouguer
anomaly
6
Gravity field reduction and correction (C08)
31
| Back |
To calculate the complete Bouguer anomaly, use the Spreadsheet Editor to add
the terrain correction to the simple Bouguer anomaly as follows:
completeBouguer = Bouguer + terraincorr
In the Project Manager, select the Survey 9705 dataset.
Choose Spreadsheet from the Editors menu.
Choose Create New Field... from the Edit menu.
Specify
•
completeBouguer as the new Field Name
•
Bouguer + terraincorr as the Initial value for the field.
Choose OK.
INTREPID displays the new completeBouguer column. If the field name does
not display properly, change the column width as follows:
Library | Help | Top
•
Choose Format Column from the Format window
•
Select the completeBouguer column
•
Specify a width of 15 characters.
© 2012 Intrepid Geophysics
| Back |
INTREPID User Manual
Library | Help | Top
View the
complete
Bouguer
anomaly
7
Gravity field reduction and correction (C08)
32
| Back |
To use the Visualisation tool to view the complete Bouguer anomaly:
Open the Visualisation tool and load the Survey 9705 dataset.
Assign the completeBouguer field to point size and colour.
References
Parent topic:
Gravity field
reduction and
correction
(C08)
N.G. Direen (with contributions from T. Luyendyk). Application of terrain corrections
in Australia. Geoscience Australia: Projects: National Gravity Databases: terrain
corrections.
Alice S. Murray, Ray M. Tracey. Best Practice in Gravity Surveying. Geoscience
Australia, 2001.
Library | Help | Top
© 2012 Intrepid Geophysics
| Back |