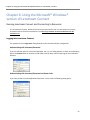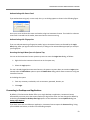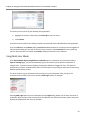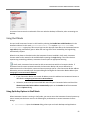
1
Connection Broker Managing User Connections to Workstations, Blades, VDI, and More Leostream™ Connect Administrator’s Guide and End User’s Manual Version 3 .5 / 3.1 October 21, 2015 Contacting Leostream Leostream Corporation 411 Waverley Oaks Rd. Suite 316 Waltham, MA 02452 USA http://www.leostream.com Telephone: +1 781 890 2019 Fax: +1 781 688 9338 To submit an enhancement request, email [email protected]. To request product information or inquire about our future direction, email [email protected]. Copyright © Copyright 2002-2015 by Leostream Corporation This software program and documentation are copyrighted by Leostream. The software described in this document is provided under a license agreement and may be used or copied only under the terms of this agreement. No part of this manual may be copied or reproduced in any form without prior written consent from Leostream. Trademarks The following are trademarks of Leostream Corporation. Leostream™ The Leostream graphical logo™ The absence of a product name or logo from this list does not constitute a waiver of the trademark or other intellectual property rights concerning that product, name, or logo by Leostream. HP is a registered trademark that belong to Hewlett-Packard Development Company, L.P. Sun, Sun Microsystems, Sun Ray, and Java are trademarks or registered trademarks of Oracle and/or its affiliates. Linux is the registered trademark of Linus Torvalds in the U.S. and other countries. Microsoft, Active Directory, SQL Server, Hyper-V, Windows, and the Windows logo are trademarks or registered trademarks of Microsoft Corporation in the United States and/or other countries. Other brand and product names are trademarks or registered trademarks of their respective holders. Leostream claims no right to use of these marks. Patents Leostream software is protected by U.S. Patent 8,417,796. Leostream Connect Administrator’s Guide Contents CONTENTS .................................................................................................................................... 3 CHAPTER 1: OVERVIEW .............................................................................................................. 6 SUPPORTED OPERATING SYSTEMS ..................................................................................................... 6 USING THIS DOCUMENT ........................................................................................................................ 7 INSTALLATION ........................................................................................................................................ 7 CHAPTER 2: LEOSTREAM CONNECT SETTINGS .................................................................... 8 CUSTOMIZING THE LEOSTREAM CONNECT USER INTERFACE ............................................................ 8 HIDING THE DOMAIN FIELD ................................................................................................................. 11 UPGRADING LEOSTREAM CONNECT .................................................................................................. 12 SPECIFYING AUTHENTICATION METHODS.......................................................................................... 13 ADDING MESSAGE TEXT ..................................................................................................................... 14 CHAPTER 3: LEOSTREAM CONNECT ROLE SETTINGS ....................................................... 15 CHAPTER 4: LEOSTREAM CONNECT POLICY SETTINGS ................................................... 19 ENABLING THE LEOSTREAM DIRECT-CONNECT OPTION .................................................................. 19 HIDING THE HOVER MENU .................................................................................................................. 20 LIMITING THE NUMBER OF ASSIGNED DESKTOPS ............................................................................. 20 EXPIRING THE USER’S SESSION ........................................................................................................ 21 Expiring the User’s Session Based on Time .......................................................................... 21 Expiring the Users Session Based on Lock Events .............................................................. 22 LISTING DESKTOPS AND APPLICATIONS ............................................................................................. 22 ALLOWING USERS TO RESTART DESKTOPS ...................................................................................... 23 RESTRICTING USERS FROM RELEASING DESKTOPS ........................................................................ 25 SETTING TIME ZONES ON REMOTE DESKTOPS................................................................................. 26 INTEGRATING WITH VMWARE VIEW CONNECTION SERVERS ........................................................... 27 BUILDING PROTOCOL PLANS FOR LEOSTREAM CONNECT ............................................................... 28 INTEGRATING WITH CISCO SYSTEMS VPN CLIENTS ......................................................................... 29 USB DEVICE MANAGEMENT............................................................................................................... 31 Installation Requirements .......................................................................................................... 31 Global Connection Broker Settings.......................................................................................... 32 Policy Settings............................................................................................................................. 32 PRINTER REDIRECTION ...................................................................................................................... 33 Redirecting USB Printers .......................................................................................................... 34 Attaching Network Printers........................................................................................................ 34 DRIVE REDIRECTION ........................................................................................................................... 34 CHAPTER 5: SMART CARD, BIOMETRIC AND PROXIMITY CARD SUPPORT .................... 36 USING SMART CARDS WITH LEOSTREAM CONNECT......................................................................... 36 Configuring the Connection Broker to Use Smart Cards ..................................................... 37 Using AET SafeSign Identity Client® Software...................................................................... 37 Using bit4id Card Manager Admin Software .......................................................................... 37 Using CAC with ActivIdentity ActivClient Security Software ................................................ 38 Contents Using IAS Middleware ............................................................................................................... 38 Using SafeNet® iKey 1000 USB Tokens ................................................................................ 38 Using Smart Cards Containing Multiple Certificates ............................................................. 38 Trouble-Shooting Smart Card Connections............................................................................ 39 USING DIGITALPERSONA® PRO WITH LEOSTREAM CONNECT ........................................................ 39 Installation Requirements .......................................................................................................... 40 Configuring DigitalPersona Pro for Active Directory Workstation Software....................... 40 Unauthenticated Fingerprint Logins......................................................................................... 42 XYLOC PROXIMITY CARD AUTHENTICATION ...................................................................................... 43 HID PROXIMITY CARD AUTHENTICATION WITH RF IDEAS PCPROX© READERS ............................. 45 Enabling Proximity Card Logins in the Connection Broker .................................................. 45 Proximity Card Logins with HID Numbers Stored Active Directory..................................... 46 Proximity Card Logins with HID Numbers Stored in Connection Broker ........................... 48 Proximity Card Logins with HID Numbers and PINs Stored in Connection Broker .......... 49 Resetting the Users Stored HID or PIN................................................................................... 51 Overriding Proximity Card Logins with Username and Password Credentials ................. 51 CHAPTER 6: USING THE MICROSOFT® WINDOWS® VERSION OF LEOSTREAM CONNECT ....................................................................................................................................................... 52 RUNNING LEOSTREAM CONNECT AND CONNECTING TO RESOURCES ............................................ 52 Logging into Leostream Connect ............................................................................................. 52 Connecting to Desktops and Applications .............................................................................. 53 USING MULTI-USER MODE ................................................................................................................. 54 USING SHELL MODE ........................................................................................................................... 55 Using Quick-Key Options in Shell Mode ................................................................................. 55 Using the Shell-Mode Hover Menu .......................................................................................... 56 Changing the Connection Broker Address ............................................................................. 56 Exiting Shell Mode ...................................................................................................................... 57 USING CLIENT-SIDE IDLE ACTIONS .................................................................................................... 57 LOCKING THE CLIENT SESSION .......................................................................................................... 58 CLIENT-SIDE CREDENTIAL PASSTHROUGH........................................................................................ 58 Example: Credential Passthrough with Shell Mode .............................................................. 59 CONFIGURING OPTIONS ON MICROSOFT® W INDOWS® OPERATING SYSTEMS ............................. 59 General Options.......................................................................................................................... 60 Connection Broker Options ....................................................................................................... 61 USB Options................................................................................................................................ 62 Log Options ................................................................................................................................. 65 About Options ............................................................................................................................. 67 USING THE LEOSTREAM CONNECT SYSTEM TRAY MENU ................................................................ 67 Connecting to Desktops and Applications Using the System Tray Menu .......................... 68 Connecting to VMware View Connection Servers................................................................. 69 Managing USB Devices Using the System Tray Menu ........................................................ 70 Managing Resources ................................................................................................................. 72 Switching Users .......................................................................................................................... 76 BRANDING LEOSTREAM CONNECT FOR W INDOWS........................................................................... 76 RUNNING LEOSTREAM CONNECT FOR W INDOWS FROM THE COMMAND LINE................................ 77 CHAPTER 7: USING THE JAVA™ VERSION OF LEOSTREAM CONNECT ........................... 79 Leostream Connect Administrator’s Guide RUNNING LEOSTREAM CONNECT AND CONNECTING TO RESOURCES ............................................ 79 Logging into Leostream Connect ............................................................................................. 79 Connecting to Desktops and Applications .............................................................................. 80 Using the Sidebar Menu ............................................................................................................ 81 Alternate Login Button Configurations .................................................................................... 82 MANAGING RESOURCES ..................................................................................................................... 83 SIMULATING SHELL MODE .................................................................................................................. 86 CONFIGURING OPTIONS ..................................................................................................................... 86 Entering the Connection Broker Address ............................................................................... 87 Specifying Remote Viewer Clients ........................................................................................... 87 Setting Log Levels ...................................................................................................................... 88 Viewing Logs ............................................................................................................................... 89 Using the Graphical Log Viewer ............................................................................................... 89 Specifying USB Device Redirection Options.......................................................................... 90 Writing lc.conf Files .................................................................................................................... 91 RUNNING LEOSTREAM CONNECT FOR LINUX® FROM THE COMMAND LINE .................................... 96 Command Line Parameters ...................................................................................................... 96 Command Line Options ............................................................................................................. 96 RUNNING LEOSTREAM CONNECT FOR LINUX® FROM A SHELL SCRIPT ........................................... 97 Chapter 1: Overview Chapter 1: Overview Supported Operating Systems The Leostream™ Connect client allows users to log into the Connection Broker and access their resources from laptops, desktops, and Windows tablets. There are two versions of Leostream Connect. 1. Leostream Connect for Microsoft® Windows® operating systems can be installed on the following operating systems: Windows Server 2008 Windows Server 2008 R2 Windows 7, including SP1 Windows Server 2012 Windows Server 2012 R2 Windows 8 and 8.1 Windows 10 Leostream Connect can also be installed on legacy Windows XP operating systems. 2. Leostream Connect for Linux operating systems can be installed on the following operating systems: Apple Mac CentOS Debian Fedora SUSE Linux Enterprise Red Hat Enterprise Linux Ubuntu Solaris Leostream Connect for Linux is a Java™ application that requires the following additional software. o o An X Window System, such as X11 R6 or X.Org A Java Run Time Environment (JRE) version 1.7 or higher 6 Leostream Connect Administrator’s Guide Using this Document This document describes configuring and using the Leostream Connect client. Administrators: o See Chapter 2: Leostream Connect General Configuration for information on general Leostream Connect options. o See Chapter 3: Leostream Connect Role Settings for information on how Connection Broker Role settings change the end user experience in Leostream Connect. o See Chapter 4: Leostream Connect Policy-Specific Settings for information on policy options found in the Connection Broker that pertain to Leostream Connect. o See Chapter 5: Authentication Methods for information about the different authentication methods supported by Leostream Connect for Windows. o For information on configuring different display protocols for use with Leostream Connect, see the Leostream Choosing and Using Display Protocols guide. End users: o See Chapter 6: Using the Microsoft® Windows® version of Leostream Connect if you are running the Windows version of Leostream Connect. o See Chapter 7: Using the Java™ version of Leostream Connect if you are running the Java version of Leostream Connect. Installation See the Leostream Installation Guide for details on installing Leostream Connect. Certain installation scenarios require extra privileges, for example: To install the Windows version of Leostream Connect with additional tasks, you must be logged into the client device as a user with Administrator privileges. To install the USB redirection feature or Desktop Experience for the Java version of Leostream Connect, you must run the installer as root. 7 Chapter 2: Leostream Connect Settings Chapter 2: Leostream Connect Settings This chapter describes the Leostream Connect options on the Connection Broker > System > Settings page that allow you to customize the appearance and behavior of the Leostream Connect clients communicating with your Connection Broker. These options apply to the Windows and Java versions of Leostream Connect, except where noted. Customizing the Leostream Connect User Interface This section describes Leostream Connect settings that are controlled globally via settings in the Connection Broker. You have additional control over the look-and-feel of each client instances, for example: You can use the lc.conf file to modify the appearance of the Java version of Leostream Connect to match your corporate standards. For a list of lc.conf parameters that control the appearance of the Java version of Leostream Connect, see Common UI Controls in “Writing lc.conf Files”. You can customize the icon displayed on the Windows version of Leostream Connect to match your corporate standard. For instructions, see Branding Leostream Connect for Windows. To open the Leostream Connect Configuration options: 1. Go to the > Systems > Settings page in the Connection Broker. 2. Scroll down to the Leostream Connect Configuration section, shown in the following figure. The options in this section are as follows: 8 Leostream Connect Administrator’s Guide Allow unauthenticated logins (hides password field): Select this option to hide the password field on the Leostream Connect login page. With this option checked, if Leostream Connect was invoked from the command line with the user’s password, the Connection Broker does not validate the user’s password. Allow multiple logins using different credentials: (Applies to the Windows version of Leostream Connect, only.) Select this option to allow a user to log into Leostream Connect with multiple sets of credentials, simultaneously. Leostream Connect displays the desktops offered to all logged in users in the same resource dialog (see Using Multi-User Mode). Allow user to select certificate for smart card login: (Applies to the Windows version of Leostream Connect, only.) Select this option if your end users have smart cards that contain multiple certificates, and they must be able to select which certificate to use during login. With this option unchecked, the Connection Broker always uses the first valid certificate on the smart card. Allow user to lock client workstation: (Applies to the Windows version of Leostream Connect, only.) Select this option if users need to use Leostream Connect to lock their client workstation session. With this option selected, the Leostream Connect hover menu contains a Lock Workstation option. If Leostream Connect is running in the client device’s shell, when the user selects this option, their remote sessions are hidden and Leostream Connect opens the Unlock Workstation dialog. If Leostream Connect is not running in the client device’s shell, Leostream Connect uses the native Windows locking mechanism to lock the client device. The user enters their credentials to unlock their session. See Locking the Session for more information. Provide client workstation idle time actions: Select this option to allow the user to automatically lock their client workstation or close all open desktop connections when the client device running Leostream Connect is idle for a specified length of time. See Using Client-Side Idle Actions for more information. Log out user after last connection is closed (opens Login dialog): (Applies to the Windows version of Leostream Connect, only.) Select this option to specify that Leostream Connect should automatically log out the user after the user closes, either by disconnecting or logging out, their last resource connection. After the user is logged out, the Leostream Connect Login dialog automatically opens. Close connection when smart card is removed from reader: (Applies to the Windows version of Leostream Connect, only.) Select this option to automatically disconnect all of the user’s connections when they remove their smart card from the reader. This setting applies only when the Smart card authentication method is selected (see Specifying Authentication Methods). Exit client after connection to resource is established: Select this option to automatically exit the user’s Leostream Connect session after the connection to their resources is established. Typically, select this option when users are logging in using Sun Secure Global Desktop software. 9 Chapter 2: Leostream Connect Settings If the user is launching a connection to a resource they are managing for another user, Leostream Connect will not automatically exit after the connection is established. This option applies only when the user launches one of their resources. Refresh offer list before displaying to user: Select this option to instructs Leostream Connect to perform an automatic refresh of the user’s offered desktops when the user opens their offer list, ensuring that any desktops that are no longer available are removed from the list. Uniquely identify clients using: Select the primary client characteristic to use when identifying unique clients on the > Clients > Clients page. You must select Device UUID if users log in from Sun Ray thin clients. Client devices that register with the Connection Broker have the option to provide one or more of the following attributes. o o o o Device UUID – An ID unique to the client hardware Client UUID – An ID unique to the software client that handles the user login MAC address – The client device MAC address Serial number – The client device serial number When a client device registers with the Connection Broker and, for example, Device UUID is selected, the Connection Broker searches the Device UUID column on the > Clients > Clients page for a client with the provided device UUID. If the Connection Broker finds the device UUID, the Connection Broker assumes a record for the registering client already exists. If the Connection Broker does not find the device UUID, the Connection Broker creates a new client record for the registering client. If clients register without providing the selected characteristic, the Connection Broker searches the Device UUID, Client UUID, MAC Address, and Serial Number columns on the > Clients > Clients page, in order. When a client registers, if the Connection Broker finds a client on the > Clients > Clients page that matches the value for any of these attributes of the registering client, the Connection Broker assumes a record for the registering client already exists. If the Connection Broker does not find a match for any of these attributes, the Connection Broker creates a new client record for the registering client. Show additional login button (Java client only): (Applies to the Java version of Leostream Connect, only.) Select an option to show or hide an additional button on the Leostream Connect Login dialog. See Alternate Login Button Configurations for a description of the actions performed by the login options described in the following list. o Do not display: Never display an additional button on the Login dialog. o Use client settings: Show or hide the Advanced Login button based on the value set for the hide_advanced_login parameter in the lc.conf file stored in each client device. 10 Leostream Connect Administrator’s Guide o Advanced Login: Display the Advanced Login button. Clicking the Advanced Login button opens the Connect dialog. On this dialog, end users with the appropriate policy and role settings can restart and connect to their desktop. The Advanced Login button is required for users with a role that allows them to manage another user’s desktops (see Managing Resources). o Restart: Display the Restart button. The behavior of the Restart button differs based on the number of desktops the user is offered, and if they have permission to restart their desktops. See Alternate Login Button Configurations for a description of how the Restart button performs. Upgrade client to latest version: Use this option to push new versions of Leostream Connect out to your client devices (see Upgrading Leostream Connect). Authentication methods: Select the types of credentials users can present to the Connection Broker for login (see Specifying Authentication Methods). HID proximity card logins: Use this option to allow users to log into the Connection Broker using an RF IDeas proximity card reader and HID proximity card (see HID Proximity Card Authentication with RF IDeas pcProx© Readers). Allow username/password override for proximity cards: Select this option to allow users with proximity cards to revert to username/password authentication. If this option is not selected, users must login using their proximity card at any client device with an attached proximity card reader. Show message at startup: Select this option to display a message to all Leostream Connect users when the client starts (see Adding Message Text). Hiding the Domain Field You can use the Add domain field to login page option on the Connection Broker > System > Settings page to toggle the visibility of the Domain field on Leostream Connect. When the Add domain field to login page option is selected, the Domain field removed and the Login dialog appears as shown in the following figure. 11 Chapter 2: Leostream Connect Settings When the Domain field is hidden, the user is unable to select which domain to log into. If your Connection Broker includes more than one authentication server, ensure that the Include domain in drop-down menu in all Edit Authentication Server forms is not set to Yes, as default. Otherwise, if you specify a default authentication server, users in other authentication servers cannot log into the Connection Broker using Leostream Connect. If you uncheck the Login name unique across domains option on the Connection Broker > System > Settings page, do not hide the Domain field on the Login dialog. If you hide the Domain field and have mutliple authentication servers, some users will not be able to log into the Connection Broker Upgrading Leostream Connect After Leostream Connect is installed on a client device, the Windows and Java version can be automatically upgraded to the version available on the Connection Broker > Status > Downloads page. To push upgrades out to all client devices that log into a particular Connection Broker, select one of the following options from the Upgrade client to latest version drop-down menu on the Connection Broker > System > Settings page. Never: Do not update Leostream Connect. In this case, you must manually update end users’ clients. Always: Always update Leostream Connect. In this case, when an end user runs Leostream Connect, they are warned that an update is in process. Leostream Connect restarts when the update is finished. Prompt user: Let the user decide if they want to update Leostream Connect. In this case, when the user launches Leostream Connect and an update is available, the client prompts the user to install the update. The user logged into the client device must have the privileges required to install Leostream Connect, for example, the user needs administrator rights if you enabled USB over IP when originally installing Leostream Connect. On client devices running a Windows operating system, if your users do not have the necessary rights on their client devices, you must include the Leostream Update service when installing Leostream Connect. The Leostream Update service is available as an additional installer task, as shown in the following figure. 12 Leostream Connect Administrator’s Guide After the client device is rebooted, if the Leostream Update service is installed, the service automatically contacts the Connection Broker to find any available updates. If the service finds an update, and the Upgrade client to latest version drop-down menu is set to Always or Prompt user, the service installs the update. If the Upgrade client to latest version drop-down menu is set to Never, the Leostream Update service ignores any available update. Specifying Authentication Methods This section applies to the Windows version of Leostream Connect, only. The Leostream Connect Configuration section on the > Systems > Settings page allows you to configure the type of identification a user can provide when authenticating with the Connection Broker. When the Authentication methods drop-down menu is set to Permit, users are always allowed to authenticate using their user name and password. By default, the Connection Broker alternatively allows the user to authenticate via a smart card. If users should not be allowed to log in using a smart card, uncheck the Smart card checkbox, as shown by the following figure. To require the user to provide their user name and password as well as a smart card: 1. Select Require from the drop-down menu in the Authentication Methods section. 2. Check the Smart card and Username/password prompt checkboxes, for example: With the Connection Broker in the previous configuration, the Leostream Connect Login dialog appears as follows. 13 Chapter 2: Leostream Connect Settings See Chapter 5: Smart Card and Biometric Support for information on integrating Leostream Connect with different types of smart cards and biometric readers. You do not need to check the Smart card option to allow authentication using proximity cards. Proximity card logins are considered a subset of username/password authentication. Use the HID proximity card logins drop-down menu to enable proximity card logins, as described in HID Proximity Card Authentication with RF IDeas pcProx© Readers. Adding Message Text To display a message to users when they launch Leostream Connect, select the Show message at startup checkbox on the Connection Broker > System > Settings page, shown in the following figure. In the Dialog title edit field, enter the text to display in the title bar of the information dialog that launches when Leostream Connect starts. Enter text in HTML format, including links, into the Message text field. When the user runs Leostream Connect, the message text appears in a dialog prior to the user being asked for their credentials. After the user clicks OK, the Login page opens. 14 Leostream Connect Administrator’s Guide Chapter 3: Leostream Connect Role Settings Roles are defined in the Connection Broker > User > Roles page. The session permissions in each role, shown in the following figure, determine the actions that users with this role are allowed to perform when they log in using Leostream Connect. Not all end-user session permissions apply to Leostream Connect logins. The session permissions that apply to Leostream Connect are as follows. See “Chapter 13: Managing User Roles and Permissions” in the Connection Broker Administrator’s Guide for a complete description of user roles. Allow user to manage another user’s resources: Select this option if a user with this role should be able to view the desktops offered to another user, and then log into those desktops. Use this option for user’s that are allowed to perform administrative tasks on another user’s desktop, or for users that need to log into their own desktop using different credentials from those they provided when logging into the Connection Broker. Allow user to manually release desktops: (This option applies to the Windows version of Leostream Connect, only.) Select this option if a user with this role should be able to manually release their desktop back to its pool. By default, when a user connects to a desktop, the Connection Broker assigns that desktop to that user. When a desktop is assigned to a user, the Connection Broker will not offer that desktop to another user. If a user manually releases one of their desktops back to its pool, the Connection Broker unassigns the desktop from that user. If the user is logged into that desktop when they release it, they remain logged in. However, because the user is no longer assigned to the desktop, the 15 Chapter 3: Leostream Connect Role Settings Connection Broker now considers them as a rogue user. In addition, because the desktop is back in its pool, the Connection Broker may offer that desktop to another user. If this new user tries to connect to the desktop, and their policy is set to log off rogue users, the new user will forcefully log out the original user. If the Allow user to manually release desktops option is selected, the user is allowed to release any of their assigned desktops. The user’s policy then indicates which of their desktops the user can actually release. If the Prevent user from manually releasing desktop option is selected for a pool in the user’s policy, the user is not able to release desktops from this pool, even though their role gives them the permission. The user can never release a desktop that is hard-assigned to them. Allow user to restart offered desktops: Select this option if a user with this role should be able to restart their desktop. If the Allow user to restart offered desktops option is selected, the user is allowed to restart any of their assigned desktops. The user’s policy then indicates which of their desktops the user can actually restart. If the Allow user to reset offered desktop option for a pool in the user’s policy is set to No, the user cannot restart the desktops in this pool, even though their role gives them the permission. Login user as: (Requires a Leostream Agent on the remote desktop.) Use this option indicate if the Connection Broker should log the user into the remote desktop using a domain account or local user account. Use local users to support, for example, LDAP or non-domain users that need to login to remote desktops. Options in the Login user as drop-down include. o Domain user: When using an Active Directory domain user account, the Connection Broker uses the domain name specified by the authentication server on the > Users > Authentication Servers page that authenticated the user when they logged into the Connection Broker. o Local user: When logging in as a local user, the Connection Broker requires an existing user account on the remote desktop. This user account must have the same login name as the user that logged into the Connection Broker. When using this option, you must manually create the appropriate account in the Users section of the Local Users and Groups node in the Computer Management dialog. If you want the Connection Broker to manage the local user account, use one of the following two options. o Local user (create on login): You can instruct the Connection Broker to automatically create local user accounts, to avoid having to manually create the accounts on each remote desktop. When this option is selected, the Connection Broker automatically creates an appropriate local user on the desktop the first time the user logs in. If an appropriate user account already exists, the Connection Broker uses that account. If a user account exists on the remote desktop, the Connection Broker uses that account. If that user account has a different password from the password used to log into the 16 Leostream Connect Administrator’s Guide Connection Broker, the Connection Broker changes the password for the local user on the remote desktop. o Local user (create on login; delete user on logout): You can instruct the Connection Broker to automatically create and delete local user accounts, to avoid having to manage the accounts on each remote desktop. When this option is selected, the Connection Broker automatically creates an appropriate local user account on the desktop the first time the user logs in. The Connection Broker removes the user account as soon as the user logs out of the desktop. The Connection Broker does not delete the profile folder associated with the user. Any information stored in the profile folder can be recovered by the desktop’s administrator. When the user subsequently logs into the desktop, the Connection Broker creates a new local user account. Because this is a new account, the Windows desktop does not associate this user with the profile created the last time the user logged in. If user’s need persistent access to their profile, use the Local user (create on login) option. o Local user (create on login; delete user and profile on logout): When this option is selected, the Connection Broker automatically creates an appropriate local user account on the desktop the first time the user logs in. The Connection Broker removes the user account and the user’s profile folder as soon as the user logs out of the desktop. Because the user’s profile folder is deleted, the user loses all information stored locally in their profile folder. Add and remove user from Remote Desktop Users group: (Requires a Leostream Agent on the remote desktop.) Use this option if your users are not already members of the Remote Desktop Users group on their offered Windows desktops. By default, Windows desktops do not provide remote access. After you enable remote access for a particular desktop, you must indicate which users are allowed to remotely log into that desktop by placing those users (one of their group memberships) in the Remote Desktop Users group, shown in the following figure. When a user is part of the Remote Desktop Users group, they can remotely log into the desktop from any client. To restrict the user to log in only through the Connection Broker, do not manually add users to the Remote Desktop Group and, instead, select the Add and remove user from Remote Desktop Users group option. With this option selected, the Connection Broker 17 Chapter 3: Leostream Connect Role Settings automatically adds the user to the Remote Desktop Users group when the log into the desktop from the Connection Broker. When the user logs out, the Connection Broker automatically removes the user from the Remote Desktop Users group. The Connection Broker takes control of the user’s membership in the Remote Desktop Users group. If the user was already a member of the Remote Desktop Users group before they logged into the desktop, the Connection Broker removes the user from that group when they log out of the desktop. The Connection Broker adds the user back to the Remote Desktop Users group the next time they log into the Connection Broker. 18 Leostream Connect Administrator’s Guide Chapter 4: Leostream Connect Policy Settings Connection Broker policy settings allow you to control the user’s experience, including: The display names for the list of resources offered by Leostream Connect How many desktops the user can connect to, and how long they can continue to connect to new desktops If the user can restart or release their desktop The remote viewer protocol used to connect to each desktop What USB device the user can connect to their remote desktop And more! Except where noted, policy settings apply to the Windows and Java versions of Leostream Connect. The following sections describe policy options that directly pertain to Leostream Connect. For a complete description of all Connection Broker policy options, see the Connection Broker Administrator’s Guide. Enabling the Leostream Direct-Connect Option This section applies to the Java version of Leostream Connect, only. In certain failure scenarios, such as the Connection Broker losing contact with the Microsoft SQL Server database, users are not able to log into the Connection Broker even though the Connection Broker is running. For these scenarios, the Leostream direct-connect option allows users to continue accessing their assigned resources until all components are online. To enable the feature, select the Instruct Leostream Connect to store assignments and connection information policy option. When this option is selected and the user connects to a desktop via Leostream Connect, Leostream Connect stores information about the user’s assigned desktops and how the connections were established, e.g., what protocol was used, the configuration file/command line parameters, etc., in a connection context file. This file is stored in the Leostream Connect installation directory and contains the information needed to re-establish the connections to the desktops launched by the user. Leostream Connect encrypts the connection context file name and contents using Blowfish and a two part key: a 64-byte key known only to Leostream and the user’s password. Both the Leostream key and the user’s password are required to decrypt the connection context file. Therefore, the user must enter their password into Leostream Connect even if the Connection Broker cannot be reached. Encrypting the configuration file provides a secure solution, while requiring the password allows Leostream to preserve single sign-on to the user’s resource in direct connect scenario. When a direct connection is made to a user’s resource, the Connection Broker does not receive notification of the login. Therefore, release and power control plans may not take effect on logout or disconnect. 19 Chapter 4: Leostream Connect Policy Settings Hiding the Hover Menu A Connection Broker policy option allows you to hide the Leostream Connect hover menu after the user locks one of their connected desktops. By hiding the hover menu, you ensure that no additional desktops can be launched after a connected desktop is locked. To enable this feature, select the Hide hover menu when any remote desktop is locked option in the General Policy Settings, shown in the following figure. The hover menu is hidden if any connected desktop is locked. The locked desktop does not need to be at the forefront or the current focus. Limiting the Number of Assigned Desktops By default, end users can be assigned to all of the desktops offered to them by Leostream Connect. To conserve resources, you can limit the number of desktops assigned to a particular user, as follows. 1. Go to the > Users > Policy page. 2. Select the Edit action for the appropriate policy. The Edit Policy form opens. 3. Select the maximum number of desktops that can be simultaneously assigned to a particular use from the Maximum number of desktops assigned drop-down menu, shown in the following figure. The <No Limit> option allows the user to connect to all of their offered resources. When the user logs into Leostream Connect, they can continue to connect to desktops until they reach the number selected in the Maximum number of desktops assigned drop-down menu. After that point, 20 Leostream Connect Administrator’s Guide when the user tries to connect to another desktop, the client issues a warning, for example: On the Windows version of Leostream Connect, the Connect options in the Leostream Connect system tray menu are disabled after the user reaches their maximum number of assigned desktops. Depending on the user’s policy settings, a desktop may remain assigned to the user after they logout or disconnect from the desktop. Leostream Connect factors in that assignment when determining if the user can connect to a new desktop. For example, consider a policy that offers two desktop, but limits the user to be assigned to one desktop. The policy also keeps the desktop assigned to the user when they disconnect from the desktop.The first time the user logs into Leostream Connect, they connect to one of their offered desktops. The user then disconnects from the desktop, and exits Leostream Connect. At this point, they remain assigned to the desktop. The next time they log into Leostream Connect, they are offered two desktops, but the only desktop Leostream Connect allows them to connect to is the desktop they are already assigned, i.e., the desktop the user disconnected from in their last Leostream Connect session. This option does not apply to applications and desktops published in a Citrix XenApp farm. The user can continue to launch these resources after their limit is reached. Expiring the User’s Session By default, end users can connect to additional desktops and applications until they exit Leostream Connect. You may, for security purposes, want to limit how long the user can launch new connections. Leostream policies allow you to expire the user’s session in two ways: after a specified length of time or when the user locks their remote desktop. After a user’s session expires, they can continue to use any desktops and applications they already launched, with the exception of attaching any additional USB devices. If the user attempts to launch a new resource or attach a USB device to any connected desktop after their session expires, Leostream Connect automatically issues a warning and logs out the user. To launch additional resources, the user must log back into the Connection Broker. Expiring the User’s Session Based on Time To expire the user’s session after a specified elapsed time: 1. Go to the > Users > Policy page. 2. Select the Edit action for the appropriate policy. The Edit Policy form opens. 21 Chapter 4: Leostream Connect Policy Settings 3. In the Expire user’s session section, shown in the following figure, select the At specified elapsed time option. 4. From the drop-down menu, select the time after which the user can no longer connect to additional resources. If you do not specify an expiration time for the user’s session, the Connection Broker automatically expires the session after two days. Expiring the Users Session Based on Lock Events To expire the user’s session after the user locks one of their remote desktops, the remote desktop must have an installed and running Leostream Agent. Then, in the user’s policy, select the When a remote desktop is locked option under Expire user’s session, as shown in the following figure. Unlocking the remote desktop reinitializes the session and the user can connect to additional desktops without logging back in to Leostream. Listing Desktops and Applications If an end user is offered multiple resources, you can define the format used to display the resource name, as follows: 22 Leostream Connect Administrator’s Guide 1. Go to the > Users > Policy page. 2. Select the Edit action for the appropriate policy. The Edit Policy form opens. 3. For all desktop and application pools, as well as for hard-assigned desktops, select an option from the Display to user as drop-down menu. You can display desktops to users as any of the following: The desktop name, as shown in the Name column on the > Resources > Desktops page. The desktop’s display name, as defined on the Edit Desktop page for the offered desktop. The desktop’s Windows machine name The name of the desktop’s pool The name of the desktop’s pool followed by the desktop’s name The name of the desktop’s pool followed by the desktop’s display name The name of the desktop’s pool followed by the desktop’s Windows machine name The display name of the desktop’s pool The display name of the desktop’s pool followed by the desktop’s name The display name of the desktop’s pool followed by the desktop’s display name The display name of the desktop’s pool followed by the desktop’s Windows machine name You can display Citrix XenApp applications as any of the following: The application name The name of the application’s pool The name of the application’s pool followed by the application’s name The display name of the application’s pool The display name of the application’s pool followed by the application’s name Allowing Users to Restart Desktops The Connection Broker allows end users to restart their remote desktops if the user is assigned a role and a policy that provide sufficient restart permissions. The user’s role tells the Connection Broker if the user is allowed to restart any of their desktops. The user’s policy then indicates which of the user’s offered desktops they can restart, and how the Connection Broker should perform the restart. To create a role that gives the user permission to restart their desktops: 1. Go to the > Users > Roles page. 2. Select Create Role to add a new role, or Edit to add this permission to an existing role. 3. In the Session Permissions section, select the Allow user to restart offered desktops option, shown in the following figure. 23 Chapter 4: Leostream Connect Policy Settings 4. Click Save. Each pool in the user’s policy indicates if desktops in that pool can be restarted, and how the Connection Broker performs the restart action, as follows. 1. Go to the > Users > Policy page. 2. Select the Edit action for the appropriate policy. The Edit Policy form opens. 3. Select an option from the Allow users to reset offered desktops drop-down menu, shown in the following figure. The Shutdown and start option attempts to gracefully shut down the user’s desktop. If the user’s desktop is a virtual machine, Shutdown and start first tries to reboot the VM’s operating system. If a reboot cannot be done, Shutdown and start performs a guest shutdown and power up. The Power off and start option forcefully shuts down the desktop. If the user’s desktop is a physical machine, select the Shutdown and start option and ensure that the 24 Leostream Connect Administrator’s Guide Leostream Agent is installed on the desktop. Users access the restart action differently for the Windows and Java version of Leostream Connect. The Windows version of Leostream Connect provides a Restart option in the Leostream Connect system tray menu. The Java version of Leostream Connect provides a Restart button on the Connect dialog. Restricting Users from Releasing Desktops This option applies to the Windows version of Leostream Connect, only. When the Connection Broker assigns a desktop to a particular user, that desktop is no longer part of any pool and, therefore, cannot be offered or assigned to another user. The Connection Broker assigns the desktop to a user as soon as the user requests a connection to that desktop. Release plans in Connection Broker policies determine how long the desktop remains assigned to the user, and when the desktop is released to its pool. You can optionally allow the user to manually release their desktop back to its pool. After the user releases their desktop, the Connection Broker considers that user as a rogue user for as long as they remain logged into the remote desktop. The user’s role tells the Connection Broker if the user is allowed to release any of their desktops. To create a role that gives the user permission to release their desktops: 1. Go to the > Users > Roles page. 2. Select Create Role to add a new role, or Edit to add this permission to an existing role. 3. In the Session Permissions section, select the Allow user to manually release desktops option, shown in the following figure. 4. Click Save. By default, a user with this role can release all of their assigned desktops using the Release or Disconnect and Release options in the Leostream Connect system tray menu. See The Leostream Connect System Tray Menu for information on these options. 25 Chapter 4: Leostream Connect Policy Settings To prohibit users from releasing desktops from a particular pool, select the Prevent user from manually releasing desktop option in the When User is Assigned to Desktop section of the Edit Policy page, shown in the following figure. Leostream Connect does not include the Release and Disconnect and Release options in the system tray menu for desktops assigned from a pool that prevents the user from manually releasing its desktops. Setting Time Zones on Remote Desktops For users connecting to Windows remote desktops – from either the Windows or Java version of Leostream Connect – you can set the time zone of the remote desktop to match that of the client device by selecting the Adjust time zone to match client check box shown in the following figure. Selecting this option changes the time zone of the remote desktop to the same time zone as on the user’s client. 26 Leostream Connect Administrator’s Guide The time zone is not reverted when the user logs out or disconnects. Therefore, if another user logs in to the same desktop with a policy that does not adjust the time zone, that user will see the time zone set for the previous user. To ensure that your end-users see the correct time zone, select this option for all policies that could assign a particular desktop. Adjusting the desktop’s time zone may adversely affect scheduled tasks. Integrating with VMware View Connection Servers If you are managing virtual machines with an installed VMware Horizon View Direct-Connection Plugin, you can use Leostream policies to assign desktops and instruct Leostream Connect to launch the VMare View client to establish a PCoIP connection. See “PCoIP Connections to VMware Virtual Machine” in the Leostream Guide for Choosing and Using Display Protocols for complete instructions. Alternatively, if you have a configured VMware Horizon View environment, you can configure Leostream to connect your end users to your View environment along with their other offered resources, as follows. 1. Install and configure the VMware View Manager to entitle your users to connect to the appropriate desktops using the desired protocol, including software PCoIP. 2. On the user’s client device, install the VMware View Client. Consult your thin client vendor to determine if your thin client ships with an installed VMware View Client. 3. Also on the user’s client device, install Leostream Connect. For installation instructions, see the Leostream Installation Guide. 4. In the Leostream Connection Broker, in the Desktop Assignment from VMware View section of the user’s policy, configure one or more VMware View Connection servers to offer to this user, in addition to any other desktops and applications the user needs to access. To configure the Desktop Assignment from VMware View section, shown in the following figure, enter a display name for the View server and the VMware View Connection Server URL. See “Configuring VMware View Policy Options” in the Connection Broker Administrator’s Guide for more information. When a user with this policy logs in to the Connection Broker, they are offered all the resources configured in their policy, including the VMware View server, as shown, for example, in the following figure. 27 Chapter 4: Leostream Connect Policy Settings Building Protocol Plans for Leostream Connect Connection Broker protocol plans determine which display protocol is used when a user logs in through Leostream Connect. Available protocol plans are displayed on the > Plans > Protocol page, shown in the following figure. You apply your protocol plans to the individual pools in each policy. The Leostream Connect and Thin Clients Writing to Leostream API section in the protocol plan defines which display protocols Leostream Connect can use to connect to a particular pool of desktops. This section contains subsections that define the configuration settings for each protocol, as follows: The Priority drop-down menu determines the order in which Leostream Connect tries to establish a connection using each protocol. Select Do not use to prohibit Leostream Connect from using a particular protocol. The Command line parameters and Configuration file fields define the settings used when establishing a connection with the selected protocol. Create protocol plans that define the experience you want to provide for different groups of users. For example, if all users connect to their desktops using RDP, create a single protocol plan that gives RDP the highest priority. If another group of users connects using HP RGS, create a second protocol plan that gives RGS the highest priority, as shown in the following figure. In the following example, Leostream Connect first tries to establish a connection to the remote desktop using HP RGS. If an RGS connection cannot be established, Leostream Connect then tries RDP, which has a priority of 2. 28 Leostream Connect Administrator’s Guide For complete information on using display protocols with Leostream Connect, see the Leostream guide for Choosing and Using Display Protocols, available on the Leostream Downloads and Documentation Web site. Integrating with Cisco Systems VPN Clients The Windows version of Leostream Connect can automatically establish a secure tunnel using the Cisco Systems VPN Client, providing seamless and secure single sign-on for end users. Leostream Connect uses the vpngui.exe to launch the tunnel and then automatically connects the user to their remote desktop using the protocol defined in the Leostream Connect and Thin Clients Writing to Leostream API section of the protocol plan. Leostream Connect does not integrate with the Cisco Anywhere VPN client. To enable this feature, check the Use Cisco VPN client to establish secure tunnel for connections option at the bottom of the Leostream Connect and Thin Clients Writing to Leostream API section of the protocol plan, shown in the following figure. 29 Chapter 4: Leostream Connect Policy Settings With this option selected, Leostream Connect attempts to establish a secure tunnel before connecting to the desktop. You can use any of the display protocol defined in the Leostream Connect and Thin Clients Writing to Leostream API section to establish the connection to the desktop. When the Cisco option is selected, as shown in the previous figure, the Profiles edit field appears. Enter a valid profile (the contents of a PCF-file) in the Profiles edit field, for example: [main] Description=Authentication to your domain Host=enter-cisco-vpn-ip AuthType=1 GroupName=dev GroupPwd= enc_GroupPwd=enter-password EnableISPConnect=0 ISPConnectType=0 ISPConnect= ISPPhonebook= ISPCommand= Username=enter-username SaveUserPassword=0 UserPassword= enc_UserPassword= NTDomain= EnableBackup=0 BackupServer= EnableMSLogon=1 MSLogonType=0 EnableNat=1 TunnelingMode=0 TcpTunnelingPort=10000 CertStore=0 CertName= CertPath= CertSubjectName= CertSerialHash= SendCertChain=0 PeerTimeout=90 EnableLocalLAN=0 After you define your protocol plan, assign it to pools of desktops used in each policy. The VPN client must be installed on the client device if the protocol plan enables login through the Cisco Systems VPN Client. After the user logs in, the Connection Broker sends Leostream Connect the PCF-file configured in the user’s protocol plan. Leostream Connect copies this PCF-file to the Profiles directory on the user’s client device, then uses the vpngui.exe command to establish the secure tunnel using this profile. If the PCF-file is not configured correctly in the protocol plan, the VPN client prompts the user for the information needed to establish the tunnel. As soon as the tunnel is established, Leostream Connect deletes the PCF-file from the client device. The Cisco VPN supports a single tunnel. Therefore, if the user launches multiple desktops, Leostream Connect reuses the existing tunnel for all desktops, as long as all desktops use the same profile. If a desktop has a different profile, the existing tunnel is closed and a new tunnel is established. Closing the 30 Leostream Connect Administrator’s Guide previous tunnel disconnects any connected desktops. To avoid inadvertently closing desktops, use the same protocol plan for all desktops connecting through the VPN. Create separate protocol plans for users that log in from clients that do not have an installed Cisco Systems VPN Client. Use these two protocol plans in different policies, and assign the policies to the user based on the user’s location. For example, in the following figure, the user is assigned the RemotePolicy when they login from home, but is assigned the OfficePolicy when they login at the office. The policy RemotePolicy uses a protocol plan that enables the Cisco Systems VPN Client feature, while the policy OfficePolicy disables Cisco VPN Client logins. For information on creating locations and assigning policies to users, see Chapter 12 and 14 in the Connection Broker Administrator’s Guide. USB Device Management The Connection Broker allows you to manage the USB devices that different users are allowed to attach to their remote desktops. You must manually install any drivers required by your particular devices on the remote desktop. Leostream Connect does not control how the device and associated applications run or perform on the remote desktop. Leostream USB redirection is available for 32- or 64-bit Windows and Linux operating systems. Leostream supports USB redirection for Linux operating systems running kernel versions up to 3.15.0. Installation Requirements The Leostream USB management feature requires functionality on the client device and remote desktop. On the client side, you must install Leostream Connect with the Enable USB over IP task is selected. On the desktop side, you must install the Leostream Agent, and the Enable USB over IP task must be selected during installation. Not all released versions of the USB drivers are backwards compatible. Leostream recommends keeping all Leostream Agents and Leostream Connect clients at their currently shipping versions in order 31 Chapter 4: Leostream Connect Policy Settings to ensure that all USB drivers are compatible. See the Leostream Downloads and Documentation page for a list of the current versions. Global Connection Broker Settings To enable USB management in the Connection Broker: 1. Go to the > System > Settings page. 2. In the Enable Features section, select the USB passthrough control option, shown in the following figure. 3. Click Save. After you enable the global USB management feature, the following additional GUI elements are available: In the Connection Broker, the USB Device Passthrough section appears at the bottom of the Edit Policy page. These controls allow you to specify how to manage USB devices for users with this policy. In Leostream Connect, the USB tab appears in the Options dialog. In addition, options for attaching and detaching USB devices appear on the Leostream Connect system tray menu. Policy Settings By default, policies do not change the USB settings of the user’s client. To override the client settings on a policy-by-policy basis, select the Allow Connection Broker to manage USB passthrough option, as shown in the following figure. Use the Mode drop-down menu to constrain which USB devices end users can assign to desktops, as follows: To pass through all USB devices to the desktop: Select Connect all USB devices. Selecting this option redirects all USB devices with the exception of USB keyboards and USB mice, which are never redirected to the remote desktop. 32 Leostream Connect Administrator’s Guide To block all USB devices from being passed through to the desktop: Select Block all USB devices. Selecting this option blocks the keyboard and mouse from passing through to PCoIP devices. If you want to block all USB devices except the keyboard and mouse from passing through to a PCoIP device, select Connect specific USB devices from the Mode drop-down and select Human Interface Devices from the Device Class drop-down menu. Alternatively, enter the Vendor ID and Product ID of specific human interface devices. To specify particular devices to pass through: Select Connect specific USB devices. Specify the USB devices the Connection Broker can passthrough, as follows: o Select an item from the Device Class drop-down menu to pass through an entire class of devices. o Enter a Vendor ID and Product ID to pass through a specific type of device. If you are upgrading from an old version of the Connection Broker, the device checkboxes convert to the new settings, as follows: External Disk = 08 - Mass Storage from the Device Class drop-downs Camera = 06 - Imaging or 0E - Video from the Device Class drop-down Printer = 07 - Printer from the Device Class drop-down Security Device = 0B - Smart Card from the Device Class drop-down Leostream Connect uses port 20020 for USB traffic. Ensure that this port is open. On Windows client devices, the Leostream Connect installer automatically adds an exception for this port to the Windows Firewall. You must manually open USB port 20020 when running Norton Antivirus™ software from Symantec Corporation.. Printer Redirection When using the Windows version of Leostream Connect, Microsoft RDP provides native printer redirection. To redirect all client printers, include the following line in the RDP configuration file found in the user’s protocol plan. redirectprinters:i:1 If you are using RDP to redirect printers, you do not need to enable printer redirection through Leostream Connect. For cases that do not use RDP or do not use RDP to redirect printers, the Connection Broker provides two methods for attaching printers to the remote desktop. 1. Redirect USB printers attached to the client 2. Assign network printers based on the client’s location 33 Chapter 4: Leostream Connect Policy Settings Redirecting USB Printers You can use Leostream Connect USB redirection to redirect USB printers from the client to the remote desktop. When redirecting printers, ensure that the appropriate printer drivers are installed on the remote desktop. To enable USB printer redirection: 1. Enable Connection Broker USB device management, as described in USB Device Management. 2. In the USB Device Passthrough section of the user’s policy, select Connect specific USB devices from the Mode drop-down 3. Select 07 - Printer from the Device Class drop-down. Alternatively, you can redirect all USB devices, or specify a particular printer by vendor and product ID. Attaching Network Printers Connection Broker Printer Plans allow you to attach network printers to the end user’s Windows remote desktops based on the location of the client device. Using this location-based printing feature, you can: Register printers in Microsoft® Active Directory® servers with the Connection Broker Manually register a network printer with the Connection Broker Create printer plans, consisting of a group of printers with one default printer Assign printer plans to clients using locations defined in the Connection Broker Provide end-users with access to the network printers physically closest to their client device, no matter what type of client device and remote viewer protocol they are using See “Attaching Network Printers” in the Connection Broker Administrator’s Guide for complete instructions. Drive Redirection The Windows version of Leostream Connect supports dynamic tags for the drivestoredirect parameter in the Microsoft RDP file, allowing you to redirect specific drive types to the remote desktop. To use these tags: 1. Go to the protocol plan that contains the RDP configuration file that should redirect drives. 2. In the Configuration file edit field for RDP, remove the following line, which redirects all printers: redirectprinters:i:1 3. Enter one of the following lines to the configuration file: drivestoredirect:s:*: Redirects all drives, including any drives that are subsequently connected drivestoredirect:s:{DRIVE:CD}: To redirect all CD drives 34 Leostream Connect Administrator’s Guide drivestoredirect:s:{DRIVE:DVD}: To redirect all DVD drives drivestoredirect:s:C:;D:;DynamicDrives: Redirects the specified drives. In this example, the C and D drives are redirected. The DynamicDrives tag indicates RDP should redirect subsequently connected. 35 Chapter 5: Smart Card, Biometric, and Proximity Card Support Chapter 5: Smart Card, Biometric and Proximity Card Support Leostream Connect supports smart card, fingerprint, and proximity card authentication methods, including: Java™ smart cards used in conjunction with AET SafeSign Identity Client® software. Italian Carta Sanitaria and Carta Operatore smart cards and ACOS5 smart cards used in conjunction with bit4id Card Manager Admin software and readers. Common Access Cards (CAC) used in conjunction with ActivIdentity® ActivClient™ security software. Smart cards compatible with the IAS (Identification, Authentification et Signature) middleware (Pilote Carte IAS), jointly developed by Dictao and Gemalto. This feature includes support for French CPS (health care professional's card) certificates. Fingerprint authentication when using the DigitalPersona® Pro for Active Directory® fingerprint identity solution from DigitalPersona, Inc. Proximity card authentication when using the XyLoc system from Ensure Technologies. Using Smart Cards with Leostream Connect Smart card authentication applies to the Windows version of Leostream Connect, only. Leostream Connect supports single sign-on using a variety of smart cards and readers. When authenticating a smart card user, the Connection Broker identifies the user by matching the information on the smart card’s certificate to a record in your authentication servers. The Connection Broker begins searching for a user based on the first certificate on the card, and continues looking through the remaining certificates until it finds a match. You can alternatively allow the user to select which certificate to use for authentication by selecting the Allow user to select certificate for smart card login option in the Leostream Connect Configuration section on the > System > Settings page. For each certification, the Connection Broker attempts to identify the user based on one of the following attributes. In order: 1. Distinguished Name (DN) 2. NT Principal Name (UPN) 3. Email address 36 Leostream Connect Administrator’s Guide If the Connection Broker does not find any of the above attributes, the Connection Broker searches the smartcard for a value in the CN string and retrieves characters up to the first forward slash (/). The Connection Broker then matches that value against the Match login name against this field value found on the > Users > Authentication Servers > Edit Authentication Server page. The Connection Broker assigns a policy and offers desktops based on the matched user’s identity. The user is prompted for their smart card PIN when they log into their desktop. Configuring the Connection Broker to Use Smart Cards By default, Leostream Connect optionally allows users to authenticate via smart cards when a smart card reader is attached to the user’s client. You can require or disallow smart card authentication using the Leostream Connect Configuration options on the > System > Settings page (see Specifying Authentication Methods). Using AET SafeSign Identity Client® Software To use Leostream Connect in conjunction with Java smart cards: 1. If necessary, install the drivers that come with your reader onto the client, to ensure that the operating system can communicate with the reader. 2. Install the client software, provided by AET, on each client and remote desktop. Leostream Connect requires this software in order to read the certificate from the card. Using the certificate, Leostream Connect identifies the user and passes that information to the Connection Broker, in order to retrieve the user’s policy and desktop. 3. If you are using SSL, install the appropriate root certificate into the Connection Broker. The Connection Broker requires a certificate from an authority that recognizes the certificate on the smart card. Obtain an appropriate root certificate from your certificate authority and use your VMware virtualization layer console to load that certificate into the Connection Broker. (Do not use the > System > Maintenance page to load this certificate.) If you are installing the AET client onto a 64-bit machine you must install the 64-bit version of the software. Using bit4id Card Manager Admin Software To use Leostream Connect in conjunction with Italian Carta Sanitaria and Carta Operatore smart card or ACOS5 smart cards: 1. Install the drivers that come with your reader onto each client, to ensure that the operating system can communicate with the reader. 2. Install the bit4id Card Manager Admin software onto each client and remote desktop. This 37 Chapter 5: Smart Card, Biometric, and Proximity Card Support software contains the SysGillo PKCS #11 software Leostream Connect requires in order to read the certificates from the card. Leostream Connect searches for this library in your client’s system directory. If you do not install this library into the system directory, Leostream Connect attempts to locate the path for the library in the registry. Using CAC with ActivIdentity ActivClient Security Software Leostream Connect currently supports Common Access Cards (CAC) when used with the ActivIdentity ActivClient security software. To use CAC in conjunction with Leostream Connect: 1. Install the drivers that come with your smart card reader onto each client, to ensure that the operating system can communicate with the reader. 2. Install the ActivClient security software on the client and remote desktop. This software provides the DLLs required by Leostream Connect to read the x.509 certificates from the CAC. Using IAS Middleware To use Leostream Connect in conjunction with smart cards compatible with IAS middleware: 1. If necessary, install the drivers that come with your reader onto the client, to ensure that the operating system can communicate with the reader. 2. Install the Pilote Carte software on each client. Leostream Connect requires this software in order to read the certificate from the card. Using the certificate, Leostream Connect identifies the user and passes that information to the Connection Broker, in order to retrieve the user’s policy and desktop. Using SafeNet® iKey 1000 USB Tokens To use Leostream Connect in conjunction with SafeNet iKey 1000 USB two-factor authentication tokens: 1. Install the drivers that come with your USB token onto the client, to ensure that the operating system can communicate with the device. 2. Install the iKey Component software on each client. Leostream Connect requires this software in order to read the certificate from the device. Using the certificate, Leostream Connect identifies the user and passes that information to the Connection Broker, in order to retrieve the user’s policy and desktop. Using Smart Cards Containing Multiple Certificates When using Microsoft Vista® operating systems, users with a smart card containing multiple certificates can select which certificate to use for authentication. To invoke this behavior in Leostream Connect, enable the Allow user to select certificate for smart card login option on the > System > Settings page. 38 Leostream Connect Administrator’s Guide With this option enabled, when a user logs into Leostream Connect using a smart card containing multiple certificates, the following dialog opens. Select one of the certificates and click Login to complete the login. When the Allow user to select certificate for smart card login option is unchecked, Leostream Connect always authenticates using the first valid certificate on the smart card. Also, If the remote desktop is not running a Vista operating system, the desktop ignores the smart card selection. Trouble-Shooting Smart Card Connections If smart card connections are not completing, consider the following. Does the smart card contain a valid certificate for the user? If the certificate does not match the domain, or the card simply does not contain a certificate, an error dialog appears. Is your smart card reader capable of reading all of the types of smart cards you are using? Perform the following simple test prior to installing Leostream Connect. Insert a smart card into a reader and then establish an RDP connection to another desktop. If your reader is functioning properly, the RDP connection redirects the smart card to the destination machine. The remote desktop reads the card and prompts the user for their credentials. Using DigitalPersona® Pro with Leostream Connect The Connection Broker supports fingerprint authentication with Leostream Connect when using the DigitalPersona® Pro for Active Directory® fingerprint identity solution from DigitalPersona, Inc. If using the Java version of Leostream Connect, you must use version 2.0 or higher. When using fingerprint authentication with the Connection Broker: 1. The user enters their username and, optionally, password into Leostream Connect. 39 Chapter 5: Smart Card, Biometric, and Proximity Card Support 2. Leostream Connect sends the username to the Connection Broker. 3. The Connection Broker responds with the desktops to offer to that user. 4. When the user selects their remote desktops and clicks Connect, Leostream Connect opens a connection to that desktop. The DigitalPersona GINA opens on the remote desktop. 5. The user swipes their fingerprint, for example, using the DigitalPersona U.are.U® fingerprint reader. 6. The DigitalPersona Pro for Active Directory Workstation software redirects the fingerprint on the client to the remote desktop, and signs the user in. If the user logs into multiple desktops, they must swipe their fingerprint on each remote desktop. Installation Requirements To use DigitalPersona Pro for Active Directory, install the following components: DigitalPersona Pro for Active Directory Server 4.2.4 on your domain controller, where your Active Directory server is installed. DigitalPersona Pro for Active Directory Workstation 4.2.5 on your remote desktops. DigitalPersona Pro for Active Directory Workstation 4.2.5 on your client desktops, where Leostream Connect is installed and the fingerprint reader is connected. Configuring DigitalPersona Pro for Active Directory Workstation Software Fingerprint support with Leostream Connect requires that you allow the client desktop to redirect the fingerprint data to the remote desktop. To allow this behavior, configure the DigitalPersona Pro for Active Directory Workstation software on the client desktops, as follows: 1. Open the Group Policy Object Editor by running the following command: gpedit.msc 2. In the left-hand panel, open the Computer Configuration node, if it is not open by default. 3. Right-click on the Administrative Templates folder. 4. Select Add/Remove Templates from the right-click menu. The following dialog opens. 40 Leostream Connect Administrator’s Guide 5. In the Current Policy Templates list, select DigitalPersonaProWKsta. This .adm file is located in C:/Windows/inf. 6. Click Add to return to the Group Policy Object Editor 7. In the Group Policy Object Editor navigate to Computer Configuration > Administrative Templates > DigitalPersonaPro > DigitalPersonaPro Workstation, as shown in the following figure. 8. In the Settings list on the right-hand side, select Allow Fingerprint Data Redirection. 9. Click the Properties link to the left of the list. The Allow Fingerprint Data Redirection Properties dialog opens. 10. In the Setting tab, select the Enabled radio button. 11. Click OK in the Fingerprint Data Redirection Properties dialog. Your Group Policy Object Editor appears, as follows: 41 Chapter 5: Smart Card, Biometric, and Proximity Card Support Leostream Connect does not require any specific setup to the DigitalPersona Pro for Active Directory Workstation software on the remote desktops. Unauthenticated Fingerprint Logins To allow a user to login using fingerprints without requiring an additional password, enable unauthenticated logins for Leostream Connect, as follows: 1. Go to the > System > Settings page. The Edit Settings page opens. 2. In the Leostream Connect Configuration section, select the Allow unauthenticated logins (hides password field) option, as shown in the following figure. 3. Click Save on the Edit Settings page. In this mode, when a user opens Leostream Connect, the Login User dialog displays only the fields for entering their username and domain, if applicable, as shown in the following figure. When the user clicks Login, the Connection Broker identifies the user based on the user name and domain, and offers the user their appropriate desktops. The remote desktop then prompts the user to swipe their fingerprint when they login. 42 Leostream Connect Administrator’s Guide XyLoc Proximity Card Authentication Leostream and Ensure Technologies have partnered to provide an integrated proximity card solution for VDI using the Leostream Connection Broker with XyLoc proximity cards. Proximity card authentication provides ease-of-use and additional security for VDI environments. The healthcare industry, in particular, uses proximity card authentication to increase HIPAA compliance. In the joint solution, the XyLoc software retrieves the user’s information from their XyLoc proximity card and unlocks the client device. On unlock, Leostream Connect automatically grabs the user identity from the XyLoc software and logs the user into the Connection Broker. The Connection Broker then authenticates the user based on those credentials and offers the user their resources. If the user is offered a single resource, Leostream Connect automatically connects the user to their resource using single sign-on. From the user’s perspective, they approach the client device and are automatically logged into their desktop. Leostream Connect uses the personal name associated with the XyLoc card as the user login name. To integrate the two products, first configure your XyLoc system independently of Leostream. When configuring your XyLoc users, you should select the Must Enter Password mode for each user. Other modes, such as the Select User mode can produce unexpected results under some conditions, for example, if the user manually disconnects from their desktop or if the user’s password expires. After the XyLoc software and sensors are installed on your client devices, you can add Leostream Connect, as follows. 1. Log into the client device as the XyLoc generic system user. This user should be different from any of the users that log in to Leostream. 2. Install Leostream Connect as described in the Leostream Installation Guide. During the installation, ensure that you do not select any of the following extra tasks: Enable Run as Shell mode Enable client-side credential passthrough Enable USB over IP – If your XyLoc device is attached to the client via a USB port. If XyLoc uses a different port, you may enable Leostream USB support. 3. Start Leostream Connect and configure your Connection Broker address in the Options dialog (see Configuring the Connection Broker Address). 4. Add Leostream Connect to the list of programs that run on logon. 5. Log out of the client device. When a user approaches the client with an active XyLoc proximity card, the client device automatically unlocks and Leostream Connect automatically logs the user into their remote desktop, if the Connection Broker offers them a single desktop. By default, when the user with the XyLoc card moves away from the 43 Chapter 5: Smart Card, Biometric, and Proximity Card Support client device, the XyLoc software locks the client device and Leostream Connect automatically disconnects the user from their desktop. The XyLoc sensor attached to the client device occasionally loses connection with the user’s XyLoc proximity card even though the user remains near the client device. In these cases, the XyLoc system locks the screen and Leostream disconnects the user’s desktop. As soon as the XyLoc sensor picks up the proximity card, the user reconnects to their desktop without losing work. However, the end-user experience suffers due to the delay in reconnecting to the session. You can improve the end-user experience by instructing Leostream to keep the desktop connection open for a pre-defined period of time, as follows. 1. Open the Registry Editor on the client device 2. Navigate to the following key: HKEY_LOCAL_MACHINE\SOFTWARE\Leostream\Leostream Connect 3. Inside of this key, add a new DWORD value 4. Name the value DisconnectOnLockTimeout 5. Set the value’s data, in decimal, to the number of seconds to keep the user’s connection open after the XyLoc system locks the users screen. You can delay the disconnect for up to one hour, or 3600 seconds. For example, with the DisconnectOnLockTimeout value set to 20, when the user turns away from the client device and blocks their XyLoc card from the sensor, the XyLoc software locks the client device, but Leostream Connect keeps the user’s desktop session open. If, within 20 seconds, the user turns back to the client device and re-establishes the connection between the proximity card and sensor, XyLoc unlocks the screen and the user instantly sees their desktop connection. If the user does not re-establish the connection between the proximity card and sensor in 20 seconds, Leostream Connect disconnects the user’s desktop session. By default, Leostream Connect operates in conjunction with XyLoc on any client device where both products are installed. You can uncouple the two products, as follows. 1. Open the Registry Editor on the client device 2. Navigate to the following key: HKEY_LOCAL_MACHINE\SOFTWARE\Leostream\Leostream Connect 3. Inside of this key, add a new DWORD value 4. Name the value XyLocSupportEnabled 5. Set the value’s data to zero. 44 Leostream Connect Administrator’s Guide HID Proximity Card Authentication with RF IDeas pcProx© Readers Leostream Connect seamlessly integrates with the RF IDeas pcProx© proximity card readers, allowing users with existing HID proximity cards to connect easily to the Leostream Connection Broker and backend resources. Leostream currently supports the USB model of the RF IDeas pcProx© readers. The serial versions of the pcProx Readers are not supported. Enabling Proximity Card Logins in the Connection Broker To allow users to log in using proximity cards, enable the feature, as follows. 1. Go to the > System > Settings page. 2. Select one of the following options from the HID proximity card logins drop-down menu, shown in the previous figure. ID stored in Active Directory: The Connection Broker identifies the user by matching the HID provided by Leostream Connect against HIDs stored in a field in Active Directory (see Proximity Card Logins with HID Numbers Stored Active Directory). Users log in by tapping their proximity card and entering their Active Directory password. ID stored in Connection Broker: The user enrolls their HID with the Connection Broker the first time they log into Leostream Connect. The Connection Broker then stores the HID to identify the user on future logins (see Proximity Card Logins with HID Numbers Stored in Connection Broker). Users subsequently log in by tapping their proximity card and entering their Active Directory password. 45 Chapter 5: Smart Card, Biometric, and Proximity Card Support ID and PIN stored in Connection Broker: The user enrolls their HID with the Connection Broker and specifies a Personal Identification Number (PIN) the first time they log into Leostream Connect. The Connection Broker then stores the user’s HID and password to identify and authenticate the user on future logins (see Proximity Card Logins with HID Numbers and PINs Stored in Connection Broker). Users subsequently log in by tapping their proximity card and entering their PIN. 3. If users are allowed to bypass proximity card authentication and, instead, provide their username and password to log in to Leostream, select the Allow username/password override for proximity cards option. If this option is not selected, the user must present a proximity card to log in to Leostream from a client device with an attached proximity card reader. 4. If you want users to log out when they tap their proximity card a second time, select the following options. Close connections when smart card is removed from reader: With this option selected, Leostream Connect interprets the second tap as a “smart card removal” and automatically disconnects the user from all their open desktops. Log out user after last connection is closed (opens Login dialog): With this option selected, after the Close connections when smart card is removed from reader option disconnects from all desktops, Leostream Connect automatically logs out the user. 5. Click Save on the Edit Settings form. You do not need to select the Smart card authentication method to allow users to login using proximity cards. The Connection Broker considers the proximity card login as a form of username and password login. Proximity Card Logins with HID Numbers Stored Active Directory If you select ID stored in Active Directory from the HID proximity card logins drop-down menu, you must add a custom Active Directory attribute to your authentication server and register each user’s ID in that attribute. You can use the Active Directory Schema editor to add the attribute and assign it to the appropriate class. Please consult your Active Directory documentation for more information. After adding the attribute, use the ASDI Edit snap-in to assign values to the new attribute for each user. For example, the following figure shows a value assigned to the new attribute RFID for the John Test user. 46 Leostream Connect Administrator’s Guide You must then tell the Connection Broker the name of the Active Directory attribute that contains the card IDs, as follows. 1. Go to the > Users > Authentication Servers page. 2. Edit the Active Directory authentication server that contains the custom attribute. 3. In the Edit Authentication Server form, scroll down to the User Login Search section. 4. Enter the attribute name into the Match proximity card ID against this field (Leostream Connect, only) field, as shown in the following figure. 5. Click Save on the Edit Authentication Server form. In this configuration, if the client device has an RF IDeas pcProx card reader plugged into its USB port, Leostream Connect launches with the following prompt. 47 Chapter 5: Smart Card, Biometric, and Proximity Card Support After the user taps their proximity card, they are prompted for their Active Directory password, as shown in the following figure. Leostream Connect passes the user’s proximity card ID and password to the Connection Broker. The Connection Broker identifies the user by matching that ID against the IDs registered in your custom Active Directory attribute. After the Connection Broker finds a match, it authenticates the user using their username and password, and sends the username back to Leostream Connect. Proximity Card Logins with HID Numbers Stored in Connection Broker If you select ID stored in Connection Broker from the HID proximity card logins drop-down menu, the user must enroll their HID number with the Connection Broker the first time they tap their proximity card. To enroll a proximity card: 1. Launch Leostream Connect. It displays the prompt for the proximity card, shown in the following figure. 2. Tap the proximity card on the RF IDeas pcProx card reader. Leostream Connect opens the following enrollment dialog. 3. Enter the username, password, and domain for the user associated with the tapped proximity card. 4. Click Enroll. 48 Leostream Connect Administrator’s Guide The Connection Broker stores the users HID number in the user’s Connection Broker record, found on the > Users > Users page. To see the stored HID, click the Edit link associated with the user’s record. The Edit User form opens and displays the user’s stored HID, as shown in the following figure. The Connection Broker uses the password and username provided during enrollment to log the user into their remote desktop. The Connection Broker does not store the user’s password. Therefore, for single sign-on to the remote desktop after enrollment, when the user subsequently taps their proximity card, the Connection Broker prompts them to re-enter their password. Proximity Card Logins with HID Numbers and PINs Stored in Connection Broker If you select ID and PIN stored in Connection Broker from the HID proximity card logins drop-down menu, the user must enroll their HID number with the Connection Broker and set their PIN the first time they tap their proximity card. When using a PIN, the user does not need to enter their Active Directory password on subsequent logins. To enroll a proximity card with a PIN: 1. Launch Leostream Connect. It displays the prompt for the proximity card, shown in the following figure. 2. Tap the proximity card on the RF IDeas pcProx card reader. Leostream Connect opens the following enrollment dialog. 49 Chapter 5: Smart Card, Biometric, and Proximity Card Support 3. Enter the username, password, and domain for the user associated with the tapped proximity card, then set and confirm the PIN to associate with this card. 4. Click Enroll. The Connection Broker stores the users HID number, PIN, and password in the user’s Connection Broker record, found on the > Users > Users page. To see the stored HID, click the Edit link associated with the user’s record. The Edit User form opens and displays the user’s stored HID, as shown in the following figure. The PIN and password are never displayed with the user’s record. The Connection Broker uses the password and username provided during enrollment to provide single sign-on to the user’s remote desktop. By storing the password, when the user subsequently taps their proximity card to log in, the Connection Broker prompts them only for their PIN. During a user login, if the user’s password in AD is different from the password stored in the Connection Broker, the Connection Broker prompts the user to re-enroll their HID card. 50 Leostream Connect Administrator’s Guide Resetting the Users Stored HID or PIN If the Connection Broker is storing the user’s HID and, optionally, PIN and the user needs to reset one of these values, you must clear the existing HID number out of the Connection Broker. To clear the user’s enrolled HID and PIN: 1. Go to the > Users > Users page. 2. Click the Edit link associated with the user whose HID and PIN you want to reset. 3. In the Edit User form, select the Clear the HID proximity card number option, shown in the following figure. 4. Click Save. When a user does not have a stored value, the HID proximity number field in the Edit User form displays no value. Overriding Proximity Card Logins with Username and Password Credentials If the Allow username/password override for proximity cards option is selected on the Connection Broker > System > Settings page, users can choose to provide their username and password to log in to Leostream, in lieu of tapping their proximity card. With this option selected, the Click here to enter username/password link appears on the Login dialog, as shown in the following figure. Click the link to enter a username and password. When the user logs out, the Login dialog again prompts for a proximity card. 51 Chapter 6: Using the Microsoft Windows version of Leostream Connect Chapter 6: Using the Microsoft® Windows® version of Leostream Connect Running Leostream Connect and Connecting to Resources To run Leostream Connect, double-click on the Leostream Connect icon. For instructions on running Leostream Connect from the command line, see Running Leostream Connect for Windows from the Command Line. Logging into Leostream Connect The appearance of the Login User dialog depends on the Connection Broker configuration. Authenticating with Username/Password If you can authenticate with a username/password, the Login User dialog appears as shown in the following figure. The Domain field can be either an edit field or a drop-down menu containing the list of available domains. Authenticating with Username/Password and Smart Cards If you must provide a username/password and enter a smart card, the following dialog opens. 52 Leostream Connect Administrator’s Guide Authenticating with Smart Cards If you authenticate using only a smart card, the Login User dialog appears as shown in the following figure. Insert your smart card into the smart card reader to log into Leostream Connect. If an invalid or unknown smart card is inserted into the reader, Leostream Connect issues a warning. Authenticating with Fingerprints If you can authenticate using a fingerprint reader, login to Leostream Connect as directed by the Login User dialog. After you log into Leostream Connect, a dialog on the remote desktop prompts you to swipe your fingerprint. Accessing the Login Menu from the System Tray You can use the Leostream Connect system tray menu to access the Login User dialog, as follows: 1. Right-click on the Leostream Connect icon in the system tray. 2. Select the Login option. If a user is already logged into Leostream Connect, the system tray menu does not contain a Login option. Instead, select the Switch User option to open the Switch User dialog, which allows a new user to log into Leostream Connect. In the dialog that opens: 1. Enter any necessary credentials, such as username, password, domain, etc. 2. Click Login. Connecting to Desktops and Applications By default, if the Connection Broker offers you a single desktop or application, Leostream Connect automatically connects you to that resource when you log into the client. You can change this default by unchecking the Connect to desktop after login option on the Leostream Connect Options dialog (see Setting Login Options). If you have more than one desktop or application, Leostream Connect opens the Connect dialog, listing your available connections, as shown in the following example. 53 Chapter 6: Using the Microsoft Windows version of Leostream Connect To connect to one or more of your desktops and applications: 1. Highlight the resource. Alternately, click Select All to select all items. 2. Click Connect. Leostream Connect launches the display protocol associated with each selected desktop and application. If you click Cancel on the Connect dialog, Leostream Connect continues to run and you remain logged into the Connection Broker, but you will not connect to any resources. Select Connect from the system tray menu or press Ctrl-Shift-C to reopen the Connect dialog and connect to your resources. Using Multi-User Mode If the Allow multiple logins using different credentials option is selected on the Connection Broker > System > Settings page, you can simultaneously log into Leostream Connect with the credentials of multiple users. Leostream Connect displays the desktops offered to all logged in users. This feature is useful when you have a mixed Windows and Linux environment and you log into each environment using different authentication servers To use this feature, log into Leostream Connect using one set of credentials. After you log in, the Leostream Connect System Tray menu contains a New Login option, for example: Selecting New Login opens the main Leostream Connect Login dialog, where you can enter a new set of credentials. After you log in with the second set of credentials, the Leostream Connect System Tray menu displays the desktops for each user, for example: 54 Leostream Connect Administrator’s Guide Leostream Connect uses the credentials of the user who the desktop is offered to, when connecting to a desktop. Using Shell Mode You can install Leostream Connect in shell mode by selecting the Enable Run as Shell mode task in the Installation Wizard. In this mode, LeostreamConnect.exe replaces explorer.exe in the winlogon Shell registry key. After a user logs into their physical client device, the Leostream Connect Login User dialog automatically opens. When the user logs out of their last desktop, the login dialog automatically reopens. When the user boots a client device that has Leostream Connect installed in shell mode, Leostream Connect waits for the network to be available before opening the Login dialog. If the client device is experiencing networking problems, Leostream Connect opens an appropriate warning. In shell mode, Leostream Connect must be able to communicate with the Connection Broker. If Leostream Connect cannot communicate with the Connection Broker and you are defined as an administrator on the client device, Leostream Connect prompts you for a new Connection Broker address. Otherwise, you must manually open the Options dialog and configure the Connection Broker address (see Changing the Connection Broker Address). If your Connection Broker uses a static IP address, enter this address into Leostream Connect as described in Configuring the Connection Broker Address. Otherwise, ensure that you have a DNS SRV record for your Connection Broker and check the Obtain Connection Broker address automatically option on the Broker tab of the Leostream Connect Options dialog. Using Quick-Key Options in Shell Mode When Leostream Connect is running in shell mode, you cannot access the Leostream Connect System tray menu. Instead, use the hover menu or the following key combinations to access Leostream Connect dialogs. Ctrl-Shift-C: Opens the Connect dialog, where you can launch desktops and applications. 55 Chapter 6: Using the Microsoft Windows version of Leostream Connect Ctrl-Shift-L: Locks the client workstation running Leostream Connect, if the Allow user to lock client workstation option is selected on the Connection Broker > System > Settings page. Ctrl-Shift-M: Opens the Manage dialog, where you can manage another user’s resources. Ctrl-Shift-O: Opens the Options dialog, where you can modify the Connection Broker address and USB options. Ctrl-Shift-X: Exits shell mode. Using the Shell-Mode Hover Menu The Leostream Connect System Tray menu provides options for connecting to and disconnecting from desktops, as well as attaching and detaching USB devices and managing Leostream Connect options. When running in shell mode, end users do not have access to the System Tray. Instead, they can use the Leostream Connect hover menu. To access the hover menu, move and hold the cursor at any edge of the primary display for two seconds. You can change the two second delay by modifying the following DWORD registry key. Set the registry key value in milliseconds. HKEY_LOCAL_MACHINE\SOFTWARE\Leostream\Leostream Connect\HoverMenuDelay To restrict the hover menu to appear only on certain edges, set the string registry value HoverMenuEdge in HKEY_LOCAL_MACHINE\SOFTWARE\Leostream\Leostream Connect. The HoverMenuEdge value is a comma delimited list that can contain: all, left, right, top, and bottom. You may specify any combination of the values. The default value is all. By default, after the hover menu opens, it remains visible until the user clicks away. You can set the DWORD value HoverMenuHideDelay in HKEY_LOCAL_MACHINE\SOFTWARE\Leostream\Leostream Connect to hide the hover menu automatically after an elapsed idle time. Set the registry key value in milliseconds. The content of the hover menu is identical to that of the System Tray menu. See Using the Leostream Connect System Tray Menu for information on using this menu. If you do not want to give users access to the Leostream Connect menu, set the DWORD value of the following registry key to zero. HKEY_LOCAL_MACHINE\SOFTWARE\Leostream\Leostream Connect\HoverMenuEnabled The Exit menu closes all desktop connections and logs the user out of the client device. Changing the Connection Broker Address To point Leostream Connect at a different Connection Broker, press Ctrl-Shift-O to open the 56 Leostream Connect Administrator’s Guide Options dialog. Use the settings on the General tab to change the Connection Broker address (see Configuring the Connection Broker Address). Exiting Shell Mode To exit shell mode, press Ctrl-Shift-X. Leostream Connect prompts you to confirm that you want to exit shell mode, as shown in the following figure. Click OK to exit shell mode. Leostream Connect automatically logs out the current session. You must log back in to access the explorer.exe shell. When you log back in, Leostream Connect no longer runs in shell mode. Ensure that your Connection Broker is properly running; start Leostream Connect; and confirm that the IP address used by Leostream Connect is correct before returning to shell mode. If users do not need access to the Leostream Connect menu, set the DWORD value of the following registry key to zero. HKEY_LOCAL_MACHINE\SOFTWARE\Leostream\Leostream Connect\HoverMenuEnabled Using Client-Side Idle Actions The Connection Broker allows users to automatically lock their client device and close all their connected desktops after the client device is idle for a specified length of time. To enable client-side idle-time actions, select the Provide client workstation idle time actions option on the Connection Broker > System > Settings page, shown in the following figure. 57 Chapter 6: Using the Microsoft Windows version of Leostream Connect After selecting this option, additional settings appear that allow you to configure the default behavior for the user’s client. The user can override these default values using the Leostream Connect Options dialog (see Setting Client Workstation Idle-Time Options) 1. In the Specify wait times for client workstation field, enter all the possible wait times the user can select from. Use a zero (0) to indicate the user has the option to never perform an action no matter how long the client is idle. All wait times are entered in minutes. Enclose the default value in braces, for example {0}. 2. In the Specify actions to perform after elapsed idle time, indicate the default actions Leostream Connect takes after the client passes its specified idle time. The Close all connections option automatically closes all open desktop connections without prompting the user. The Lock workstation option automatically locks the client workstation. If Leostream Connect is not installed in shell mode, the native Windows locking mechanism is used. If Leostream Connect is running in the Windows shell, Leostream Connect uses its own locking mechanism. Locking the Client Session Leostream Connect for Windows operating system can provide the user with an option to lock their client workstation, instead of their remote connection. To enable client-side locking, select the Allow user to lock client workstation option on the Connection Broker > System > Settings page. With the previous option selected, the Leostream Connect system tray menu contains a Lock Workstation option. Selecting this option, or pressing Ctrl-Shift-L, locks the client workstation. The appearance of the locked workstation depends on if Leostream Connect is running in the system shell. If Leostream Connect is running in the system shell, the Leostream Connect Unlock dialog appears. In this case, the user that is logged into Leostream Connect must enter their password into the Unlock dialog to unlock the client workstation. Typically, this is a different user than the user that is logged into the client device. Only the user that locked the client workstation can unlock Leostream Connect. If Leostream Connect is running as an application not in the system shell, the native Windows lock screen appears. In this case, the user that is logged into the client device must enter their password to unlock the client workstation. Client-Side Credential Passthrough When repurposing desktops and laptops as VDI clients, end users must provide their credentials in two places: 58 Leostream Connect Administrator’s Guide 1. When logging into their physical client device. 2. When logging into their VDI client. Leostream Connect credential passthrough shrinks the two step process into a single login, allowing end users to seamlessly launch their remote desktops directly after logging into their physical client device. Credential passthrough is most effective when used in conjunction with Leostream Connect in shell mode. With these two features working together, you can lock down your fat desktops and laptop, turning them into repurposed thin clients. To enable credential passthrough, install Leostream Connect with the Enable client-side credential passthrough task selected in the Installation Wizard (see the Leostream Installation Guide). Example: Credential Passthrough with Shell Mode If you install Leostream Connect in shell mode and with credential passthrough, end users experience the following behavior. 1. The user boots up their desktop/laptop and see the normal Windows login prompt. 2. The user enters their credentials into the Windows login prompt. 3. Because Leostream Connect is in shell mode and using credential passthrough, after the user logs in, Leostream Connect automatically starts up (without presenting a login dialog), grabs the user’s Windows logon credentials, and passes those credentials to the Connection Broker. 4. If the user’s policy offers them a single desktop, Leostream Connect automatically launches the remote session. If the user’s policy offers them multiple resources, Leostream Connect offers the list of resources. 5. When a remote session is launched, Leostream Connect automatically signs the user into the remote session. From and end user’s perspective, it’s as if their original Windows login, logged them directly into the remote session. 6. When the user logs out of the remote session, they are logged out of Leostream Connect and the physical client device, going back to the original Windows login screen. If credential passthrough is on but Leostream Connect is not in shell mode, after the user logs into their client device, they must manually launches Leostream Connect. At this point, Leostream Connect automatically starts up (without presenting a login dialog), grabs the user’s Windows logon credentials, and passes those credentials to the Connection Broker. For security reasons, after the first login, end user’s must re-enter their credentials to log into Leostream Connect. Configuring Options on Microsoft® Windows® Operating Systems 59 Chapter 6: Using the Microsoft Windows version of Leostream Connect Use the Leostream Connect Options dialog to set logging, USB, and Connection Broker options. You must start Leostream Connect to access the Options dialog. To configure Leostream Connect options: 1. Right-click on the Leostream Connect icon running in the system tray. 2. Select Options.... The Options dialog opens. General Options Setting Login Options The Leostream Connect Startup section on the General tab contains options that control Leostream Connect behavior when the user logs in. In general, leave these options selected to provide the smoothest end-user experience. Login to Connection Broker: Indicates if Leostream Connect opens the Login User dialog when they start Leostream Connect. If you do not select this option, after the user starts Leostream Connect they must select the Login option from the Leostream Connect system tray menu to log in. Login automatically when Smart Card is inserted: If checked, when the user starts Leostream Connect, the client automatically logs in the user if a smart card reader is attached and a valid smart card is inserted in the reader. This option appears only if the Smart card authentication method is selected in the Leostream Connect Configuration section of the > System > Settings page. Connect to desktop after login: Indicates if the remote desktop session starts immediately after a successful login. When enabled, if the Connection Broker assigns one desktop to the user, Leostream Connect immediately connects to that desktop. If the Connection Broker assigns multiple resources, Leostream Connect opens the Connect dialog. If this option is disabled, the user must use the system tray menu to connect to their resources. Do not disable the Connect to desktop after login option if Leostream Connect runs in shell mode. Setting Client Workstation Idle-Time Options When the Provide client workstation idle time actions option is selected on the Connection Broker > System > Settings page, the Workstation section appears on the General tab, shown in the following figure. 60 Leostream Connect Administrator’s Guide The initial values selected in the Workstation section reflect the default settings on the Connection Broker > System > Settings page. You can modify these settings to perform actions after the client workstation has been idle for a specified length of time. 1. From the Idle menu, indicate how long the client should be idle before invoking the selected actions. Idle time is defined as no mouse or keyboard movement, but does not reflect CPU usage. Select Never to prevent Leostream from monitoring client idle time. 2. Select Close all connections to automatically disconnect any open desktop and application sessions. You remained logged into the disconnected session. The Connection Broker invokes the When User Disconnects from Desktop section of the user’s Power Control and Release plans when the session is closed. 3. Select Lock workstation to lock the client workstation. The appearance of the locked workstation depends on if Leostream Connect is running in the client’s shell. If Leostream Connect is running in the client’s shell, the Leostream Connect Unlock dialog opens. Use the credentials for the user logged into Leostream Connect to unlock the client. If Leostream Connect is not running in the client’s shell, the native Windows operating system Unlock dialog opens. Use the credentials for the user logged into the client workstation to unlock the client. Connection Broker Options By default, Leostream Connect searches for a DNS SRV record associated with your Connection Broker. See the Leostream DNS Setup Guide, available on the Leostream Downloads and Documentation Web site, for instructions on creating an appropriate DNS entry for your Connection Broker. After the client starts and locates the record, it retains the record’s information for the length of the TTL associated with the record. After the TTL expires, Leostream Connect queries the DNS SRV record. 61 Chapter 6: Using the Microsoft Windows version of Leostream Connect If a DNS SRV record does not exist, or the Leostream Connect cannot communicate with the Connection Broker, the client displays a warning message. In this case, you must either configure a DNS SRV for your Connection Broker, or hard-code the Connection Broker address into each Leostream Connect installation. To enter a specific Connection Broker address: 1. Select the Broker tab, shown in the following figure. 2. Uncheck the Obtain Connection Broker address automatically option. 3. Enter the Connection Broker’s fully qualified domain name (FQDN) or IP address in the Address edit field. 3. To test the Connection Broker address, click Test. A message opens, indicating if Leostream Connect was able to communicate with the Connection Broker. 4. Click Apply to store the changes and continue working with the Options dialog, or click OK to apply the changes and close the dialog. USB Options The Options dialog contains a USB tab only for users who log in with a policy that allows the Connection Broker to manage USB devices. The USB tab, shown in the following figure, allows you to control how USB devices are assigned to your desktops. 62 Leostream Connect Administrator’s Guide Assigning USB Devices When You Connect to Your Desktop Options in the When Desktop Starts section allow you to configure what happens to existing USB devices when you connect to a desktop. You can choose from the following three options. Option 1: Assign all available devices: Select this option to associate all USB devices with one desktop. If you connect to multiple desktops, the Connection Broker attaches the USB devices to the first connected desktop. Option 2: Select devices to assign: Select this option if you want to select particular USB devices to associate with one of your desktops. Ensure that you select option 2 if you are allowed to connect all USB devices to your remote desktop and you use a USB mouse or USB keyboard. Otherwise, Leostream Connect automatically redirects the mouse and keyboard to the remote machine. With this option selected, after you select the desktop to connect, the following dialog opens: To select USB devices: 1. Select the desktop to connect USB devices to from the Select desktop drop-down menu. 2. Check the boxes before the USB devices to assign to your desktop. If a device is disabled in the list, your administrator does not allow you to pass through this type of device to your connected desktops. Mouse over any USB devices to learn more about this particular device. 3. Click Connect to launch a remote viewer to your connected desktops and assign USB devices. Click Cancel to stop connecting to desktops. Option 3: Do not assign any devices: Select this option if you do not want to assign any USB devices to any of your desktops. Assigning New USB Devices Options in the When Device is Plugged In section allow you to configure what happens when you connect a USB device to your client after you are connected to a desktop. You can choose from the following three options. 63 Chapter 6: Using the Microsoft Windows version of Leostream Connect Option 1: Assign to active desktop: Select this option to associate new USB devices with the desktop you are currently working with, i.e., the desktop whose remote viewer session is currently maximized. When you use this option, a remote viewer session must be open on your screen. Leostream Connect will not assign new USB devices to any desktop if you minimize all your remote viewer sessions. Option 2: Select desktop for assignment: Use this option to select which desktop to associate new USB device with, as follows: If you are connected to a single desktop, Leostream Connect assigns the new USB device to this desktop. If you are connected to multiple desktops, Leostream Connect opens the following dialog, where you can select the desktop for attached USB devices. Option 3: Do not assign to any desktop: Select this option if you do not want to passthrough a new USB device to any of your connected desktops. Unassigning USB Devices Leave the Unassign all devices option checked to ensure that USB devices can be reassigned to new desktops when you disconnect from its currently assigned desktop. Leostream Connect automatically unassigns all USB devices when you exit Leostream Connect. 64 Leostream Connect Administrator’s Guide Log Options To log Leostream Connect operations for debugging purposes: 1. Select the Log tab, shown in the following figure. 2. Ensure that the Enable Logging option is selected, the default. 3. Enter a destination folder for the logs in the Folder edit field. Leostream Connect stores log files in this directory in a file named LeostreamConnect.log. 4. Click the Events button to configure the type of information to store in the Leostream Connect logs. The Log Events dialog, shown in the following figure, opens. a. Select the events to log. Use the Select All button to check all options, and the Unselect All option to remove all selections b. Click OK to store any changes, or Cancel to exit the dialog without saving your new selections Ensure that the Diagnostic events are selected when creating logs to send to Leostream Support. 5. To view the log file, at any time, click View. 6. Click Apply to store the changes and continue working with the Options dialog, or click OK to apply the changes and close the dialog. 65 Chapter 6: Using the Microsoft Windows version of Leostream Connect Leostream Connect first attempts to write the log in the directory entered in the Folder edit field. If it cannot write to this directory, Leostream Connect attempts to write the log into one of the following directories, in order: 1. 2. 3. 4. The Leostream Connect installation folder A folder named temp inside the Leostream Connect installation folder The user’s temp folder The root folder Obfuscating User Information in Logs Leostream Connect never logs a user’s password. However, usernames, domains, and desktop addresses are routinely added to the logs as Leostream Connect manages the user’s session. By default, these values are written to the logs in plain text. If you prefer, you can instruct Leostream Connect to obfuscate personal information before writing to the logs. When enabled, Leostream Connect obfuscates any personal information, including: User names Domain names Desktop addresses To enable obfuscation, turn on bit 12 in the following registry key. HKEY_LOCAL_MACHINE\SOFTWARE\Leostream\Leostream Connect\TraceLevel Please, contact [email protected] for assistance with setting this registry key. Rotating Logs By default, Leostream Connect maintains a single log file and continuously appends logs to that file. You can use registry keys on the client device to rotate and backup the log file, in order to limit the file size. All keys should be set for the local machine in the following location. HKLM\SOFTWARE\Leostream\Leostream Connect The following registry keys are supported: LogBackupFrequency – A DWORD value indicating how often to backup the logs, either: o o o o o 0 – Rotate the logs daily. Use LogBackupTime to specify the rotation time 1 – Rotate logs weekly. Use LogDayOfWeek and LogBackupTime to specify the rotation time 2 – Rotate the logs monthly. Use LogDayOfMonth and LogBackupTime to specify the rotation time 3 (default) – Logs are never rotated 4 – Rotate the logs based on file size. Use TraceFileSize to specify the file size 66 Leostream Connect Administrator’s Guide LogBackupTime – A DWORD value indicating the time, in the client device’s time zone, at which to backup the log file. Specify a decimal value using a 24-hour clock. For example, to backup the logs at 11pm, enter 2300. LogDayOfWeek – A DWORD value indicating the day of the week on which to backup the logs. Specify a decimal value between 1 and 7, where 1 is Sunday, 2 is Monday, and so forth. Use the LogBackupTime to specify the rotation time on the specified day. LogDayOfMonth – A DWORD value indicating the day of the month on which to backup the logs. Specify a decimal value for the numeric day of the month, or enter 32 to backup the logs on the last day of every month. Use the LogBackupTime to specify the rotation time on the specified day. LogArchiveType – A DWORD value indicating how many backup log files are retained. Set to zero to retain all backup files, or set to one to retain a specified number of backup files. Use LogNumberOfFilesToKeep to indicate how many backup files to retain. LogNumberOfFilesToKeep – A DWORD value indicating how many backup log files to retain. TraceFileSize – When LogBackupFrequency is set to 4, TraceFileSize indicates the file size at which the log file is backed up and rotated. About Options The About tab contains information about your Leostream Connect installation, including version number, installed options, and links to relevant Leostream Web pages. Using the Leostream Connect System Tray Menu Leostream Connect appears as an icon in your system tray whenever the client is running. Right-click on the Leostream Connect icon to access the Leostream Connect system tray menu. If you are currently logged into Leostream Connect, the menu lists your available desktops and applications, followed by a list of actions, for example: If you are not logged in, the system tray menu contains a Login option, as shown in the following figure. 67 Chapter 6: Using the Microsoft Windows version of Leostream Connect Use the Login option to log into the Connection Broker so that you can connect to your desktops. Connecting to Desktops and Applications Using the System Tray Menu After you log in to Leostream Connect, you can use the system tray menu to access the desktops and applications offered to you by the Connection Broker, as follows: To connect to a particular desktop, select the name of the desktop and select Connect, as shown in the following figure. If the Connect menu is disabled, you are already assigned to the maximum number of desktop allowed by the Connection Broker. To launch another desktop, you must first release one of your existing desktops. To restart a desktop, select the Restart option, shown in the previous figure. To update your list of offered resources, select the Refresh List menu item. To simultaneously connect to a number of desktops and applications, select Connect to open the Connect dialog. To disconnect from a connected desktop, select the Disconnect or Disconnect and Release option associated with that desktop. Depending on the settings in your assigned Connection Broker policy, your system tray menu may not contain the Disconnect and Release option, as shown in the following figure. 68 Leostream Connect Administrator’s Guide You cannot use Leostream Connect to disconnect from applications. Use the application’s native Exit feature. When running Leostream Connect in shell mode, the Exit menu closes all desktop connections and logs the user out of the client device. Connecting to VMware View Connection Servers To connect to a VMware View server, the client device must have an installed VMware View client. If you are using Leostream to manage USB devices, do not install the USB component of the VMware View client. If your policy is configured to offer VMware View Servers, the Leostream system tray menu contains an entry for View, as shown in the following figure. Select the Connect option associated with View to log in to the VMware View Client. The VMware View Client displays the authentication process, as shown in the following figure. After the authentication succeeds, the View Client displays the desktop pools that you are entitled to use, as configured in the View Manager, for example. 69 Chapter 6: Using the Microsoft Windows version of Leostream Connect The VMware View Manager completely configures and controls all desktop connections started from the View Client. After logging in to the VMware View Client, the Leostream System Tray menu displays a Disconnect menu, as shown in the following figure. Selecting Disconnect logs out of the View Client and disconnects any desktop connections s that were launched from the View Client. Leostream power control and release plans are not invoked on desktops launched from VMware View. Managing USB Devices Using the System Tray Menu After you are connected to a remote desktop, you can use the system tray menu to attach and detach USB devices. Leostream Connect does not control how the devices or any associated applications run or perform on the remote desktop. To attach a USB device: 1. Right-click on the Leostream Connect icon in the system tray. 2. Select the name of a connected desktop to attach the USB device to. 3. Select Attach USB Devices, as shown in the following figure. 70 Leostream Connect Administrator’s Guide The USB Passthrough dialog, shown in the following figure, opens. If a USB device is missing from the USB Passthrough list, the device was likely grabbed by another application running on the client device. For example, Skype may grap a Webcam, making the camera invisible to Leostream Connect. Unplug and replug in the device while Leostream Connect USB Passthrough list is displayed, to allow Leostream Connect to see the device. 4. To select the USB devices to attach. 1. Check the box before the desired USB devices to assign to your desktop. 2. Mouse over any USB devices to learn more about this particular device. 3. Click Connect. If you previously attached the selected USB device to another desktop, Leostream Connect prompts you to confirm that you want to move this USB device to the new desktop. To detach a USB device from a desktop: 1. Right-click on the Leostream Connect icon in the system tray. 2. Select the name of the desktop to detach the USB device from. 3. Select Detach USB Devices. 4. In the dialog that opens, select the USB devices to detach. 5. Click OK. 71 Chapter 6: Using the Microsoft Windows version of Leostream Connect Managing Resources If you log into the Connection Broker with a role that has the Allow user to manage another user’s resources option selected, the Leostream Connect system tray menu contains a Manage Resource option. This feature allows you to log into desktops using credentials other than those you provided to the Connection Broker. Managing resources allows you to perform administrative tasks on desktops, including: Reviewing the list of desktops that the Connection Broker offers to another user. Logging into a desktop that is offered to another user, to perform administrative tasks on that desktop. Logging into one of your own desktops using different credentials from what you provided to the Connection Broker. How the Connection Broker Determines the Offered Resource List When you manage a user’s resources, the Connection Broker offers you resources based on that user’s policy. The policy the Connection Broker assigns to that user is determined by the Assigning User Role and Policy section found in each authentication server in the Connection Broker, an example of which is shown in the following figure. . As the previous figure shows, the policy selected in the User Policy drop-down menu, is assigned to the managed user based on their membership in a particular group in the authentication server (the selection in the Group drop-down menu), and the location of their client (the selection in the Client Location dropdown menu). After the Connection Broker knows the managed user’s policy, it looks only at the following sections of this policy. All other aspects of the managed user’s policy are ignored. The Filters section for constraining which desktops to pull from all desktop pools. The When User Logs into the Connection Broker section for all pools in the Desktop Assignment from Pools section, with the exception of the Allow users to reset offered desktops option. You cannot use Leostream Connect to restart a managed dekstop. The selection in the Protocol plan drop-down menu for each pool. The Application Assignment from Pools section. 72 Leostream Connect Administrator’s Guide In the Desktop Hard Assignments section, the Display to user as and Protocol plans drop-down menus. Based on these sections, the Connection Broker offers you the following resources to manage. All desktops hard-assigned to the managed user. Any Citrix XenApp applications contained in the application pool selected in the Application Assignment from Pools section of the managed user’s policy. For each pool in the Desktop Assignment from Pools section of the managed user’s policy, the desktops determined by the When User Logs into the Connection Broker section, shown in the following figure, after any constraints in the Filters section have been applied. In the previous figure, the Connection Broker offers three desktops from the pool named Xen. These desktops must be running, but are not required to have an installed, running Leostream Agent. The desktops are offered by name. When determining which three desktops to offer from the pool, the Connection Broker always offers any desktops that are already assigned to the managed user. The Connection Broker then picks the remaining desktops based on the availability of desktops in the pool. Because the Connection Broker can choose any unassigned desktop from the pool, you may not see exactly the same list of desktops as would be offered to the user. Connecting to a Managed Resource The Connection Broker connects you to the managed desktop using the protocol determined by the protocol plan in the managed user’s policy. If the managed user typically connects to their desktops using HP RGS, you must log into their desktop from a client that supports RGS. When you log into a managed resource, the Connection Broker does not assign that resource over to you. Because you are not assigned to the desktop: The Connection Broker does not honor any settings in the When User is Assigned to Desktop section of the managed user’s policy. The Connection Broker does not use the selections in the Power control or Release plan dropdown menus in the managed user’s policy. 73 Chapter 6: Using the Microsoft Windows version of Leostream Connect You do not appear in the User column for that desktop in the Connection Broker > Resources > Desktops page. You will not appear in any resource usage reports run from the Connection Broker > Status > Reports page. Managing Your Own Resources Managing your own resources allows you to log into your offered desktops using different credentials from what you provided the Connection Broker. If your Connection Broker account does not have administrative privileges for your desktop, you can use the manage resource feature to, for example, log into your desktop using administrator credentials. To manage your own resources: 1. After you log into Leostream Connect, select the Manage Resources menu from the system tray menu. The Manage dialog, shown in the following figure opens. By default, the Resources list shows your offered applications and desktops. 2. To manage one of your desktops: a. Select the appropriate desktop from the Resources list. You can connect to one desktop at a time. b. Click Connect. Leostream Connect launches a remote session to that desktop, but does not sign you in. Instead, the Login dialog appears for that desktop. c. Enter credentials to log into the desktop. These can be the credentials for any user that has rights to log into this desktop. 3. To manage another desktop, repeat step 2. You can reopen the Manage dialog at any time by pressing Ctrl-Shift-M. 74 Leostream Connect Administrator’s Guide Managing another User’s Resources Managing another user’s resources allows you to perform administrative tasks on the user’s desktop. The user’s policy determines which resources are offered to them by the Connection Broker. The policy the Connection Broker chooses to assign to the user depends on the domain the user logs into, and the location the user logs in from. To accurately obtain a list of resources offered to a particular user, you must enter this information, as follows. 1. After you log into Leostream Connect, select the Manage Resources menu from the system tray menu. The Manage dialog, shown in the following figure opens. 2. To get the list of desktops offered to a particular user, simulate that user logging into the Connection Broker: a. Enter the user’s login name in the User name edit field. b. Select the domain to log the user into from the Domain drop-down menu. The user must be in a domain defined by one of your Authentication Servers. You cannot manage resources for a user that is defined locally in your Connection Broker. c. Select the user’s location from the Location drop-down menu. This menu contains all the locations defined in the Connection Broker > Clients > Locations page. d. Click Refresh. The Resources list updates to show the applications and desktops that would be offered to that user, if they logged in from that location. See How the Connection Broker Determines the Resource List for a description of how the Connection Broker determined this list. 3. Select the desktop you want to log into from the Resources list. You can connect to one desktop at a time 4. Click Connect. Leostream Connect launches a remote session to that desktop, but does not sign you in. Instead, the Login dialog appears for that desktop. 5. Enter credential to log into the desktop. These can be the credentials for any user that has rights to log into this desktop. 75 Chapter 6: Using the Microsoft Windows version of Leostream Connect If the user is still logged into their desktop, and you are logging in with non-administrator credentials, you will not automatically log the user out. Only administrators are allowed to automatically log another user out of their desktop. Similarly, because the Connection Broker does not assign you to the desktop you are managing, you are technically a rogue user on that desktop. The Connection Broker may offer that desktop to another user. If you are not logged into the desktop as an administrator and the Connection Broker offers that desktop to a user with a policy that logs out rogue users, the Connection Broker will automatically log you out to accommodate the new user. Switching Users The Switch User option allows you to change your user credentials after you are already logged into Leostream Connect. Selecting the Switch User option opens the following dialog. Enter your new credentials and click Switch. Leostream Connect warns you that switching users closes any existing desktop and applications. Click Yes to continue, or No to remain logged in as the current user. Branding Leostream Connect for Windows You can replace the Leostream Connect logo at the top of the Login dialog to brand the client with your corporate image, as follows. 1. Create a bitmap file with your corporate brand. 2. Save your bitmap to a file named logo.bmp. 3. On each client device, replace the logo.bmp file in the Leostream Connect installation directory with your bitmap file. When you run Leostream Connect, your image appears on the Login dialog. Create a bitmap with sufficient width to span the Login dialog on client devices with a high DPI. When using 96 pixels per inch, the logo should be 294 pixels wide and 40 pixels high. If your clients use 120 pixels per inch, the logo should be 392 pixels wide and 40 pixels high. At 192 pixels per inch, the logo should be 539 pixels wide. 76 Leostream Connect Administrator’s Guide Leostream Connect left-justifies the logo, but does not scale the logo. If you have clients with a mixture of DPI settings, ensure that any graphic in the logo renders correctly on clients with the lowest DPI. Running Leostream Connect for Windows from the Command Line You can run the Leostream Connect client from the command line, using the following syntax: LeostreamConnect.exe -address ip address:port options Available options include the following: -domain or -d: The domain name to log the user into. -user or -u: The name of the user to login. -pwd or -p: The user’s password. -machine: The name of the desktop to launch, for users that are offered multiple desktops. Use * to launch all connections. -address, -cb: The Connection Broker address and, optionally, port. -login: Use with the -user, -pwd, and, optionally, -domain, command line options to switch users without opening a confirmation dialog. Leostream Connect forcefully logs out any user that is already logged into the Connection Broker. -logout: Forcefully log out the user that is currently logged into Leostream Connect. Leostream Connect continues to run. -closeall or -ca: Closes all desktops that have been connected to via Leostream Connect. -clearuser: Forces the Username field to be empty when launching Leostream Connect, even if a username is specified. -noprompt or -np: Use in conjunction with command line arguments that finish with the Login or Switch User dialog opening, to suppress that dialog when the command finishes. For example, use with -closeall to prevent the Switch User dialog from opening after all connections are closed. -exit or -e: Exits Leostream Connect. If -exit is used in the same command as -login or -logout, the -login and -logout are ignored. -help or ? - Display a message box describing the available command line options. You can use a forward slash (/) instead of a dash (-) in front of each option. You can encode these command line options into a desktop icon, to open Leostream Connect in a particular configuration. For example, use the following command to encode a username and password into the command: "C:\Program Files\LeostreamConnect\LeostreamConnect.exe" -user myUser -pwd Password Where myUser is the user’s user name and Password is their password. 77 Chapter 6: Using the Microsoft Windows version of Leostream Connect If you encode your username and password into the shortcut, Leostream Connect skips the Login dialog if no other form of authentication is required and automatically logs you into the Connection Broker. 78 Leostream Connect Administrator’s Guide Chapter 7: Using the Java™ version of Leostream Connect Running Leostream Connect and Connecting to Resources To run the Java™ version of Leostream Connect, issue the following command: java [options] -jar LeostreamConnect.jar Where java is the full path to the Java executable. For a description of available options, see Running Leostream Connect for Linux® from the Command Line. Logging into Leostream Connect The following figure shows the Login dialog for the Java version of Leostream Connect. The buttons provided on your Login dialog may differ, based on the setting of the Show additional login button option on the Connection Broker > System > General Configuration page (see Customizing the Leostream Connect User Interface). For a description of the functionality of these additional buttons, see Alternate Login Button Configurations. To log into Leostream Connect: 1. Enter your username and password in the User name and Password edit fields, respectively. The Java version of Leostream Connect does not accept smart card, biometric, or proximity card logins. 2. Enter or select a domain from the Domain field, if this field is shown. 3. Click Login. If the Connection Broker offers you a single desktop, a connection to that desktop automatically launches. Otherwise, the Connect dialog opens, allowing you to select which resources to launch. 79 Chapter 7: Using the Java™ version of Leostream Connect Connecting to Desktops and Applications By default, the Java version of Leostream Connect allows you to launch multiple resources. If you are offered multiple resources, the Connect dialog lists the available applications and desktops preceded by check boxes, as shown in the following figure. A Restart button appears if you are logged in as a user with a Connection Broker role and policy that allows you to restart one or more of your offered desktops (see Allowing Users to Restart Desktops). To connect to one or more resources, select the checkbox associated with the resources you want to connect to. Click Connect to launch these resources Click Refresh to query the Connection Broker for an updated list of offered desktops If available, click Restart to restart the desktops before connecting. If you select multiple desktops, Leostream Connect restarts all selected desktops before opening any remote viewer. Restarting multiple desktops could take a significant amount of time. If you do not have permission to restart all of the selected desktops, Leostream Connect indicates which desktops will not be restarted before establishing the connection. If you are restricted to launch a single resource, the Connect dialog lists the available resources in a single-selection list, as shown in the following figure. To connect to a resource, select the resource you want to connect to. 80 Leostream Connect Administrator’s Guide Click Connect to launch this resource If available, click Restart to restart the desktop before connecting. Using the Sidebar Menu The Leostream Connect sidebar allows you to connect to and disconnect from your offered resources without having to return to the Connect dialog, as well as attach USB devices to your remote desktop, if applicable. To enable the Leostream Connect sidebar, add the following lines to the lc.conf file. sidebar_enabled = true – Enables the sidebar. Set this value to false to disable the sidebar. If not specified, the default value is false. sidebar_show_delay = seconds – An integer value indicating the amount of time, in seconds, the user must keep their mouse at the left-most side of the screen before the sidebar opens. If not specified, this value defaults to 2. sidebar_hide_timeout = seconds – An integer value indicating the length of time, in seconds, that the sidebar remains open after the mouse leaves the sidebar. If not specified, this value defaults to 1. To open the sidebar, hold the mouse anywhere along the edge of the client’s display. If you are connected to a remote desktop that is not in full screen mode, place the mouse at the edge of the physical display, not at the edge of the remote session. The following figure shows an example of the sidebar. In this menu: The top row displays the name of the current user. Click the red X in this row to close the sidebar. The middle rows display your offered resources. Each item has a Connect or Disconnect submenu. Select these items to establish a connection to the resource, or disconnect from an existing connection. When using HP RGS to manage USB device on the remote desktops, the Leostream Connect sidebar menu contains additional menus that allow you to select which remote desktop should have access to all USB devices. See USB Passthrough with HP RGS for more information. Any resource that is already connected is preceded by a green dot. Use the Connect All option to launch a connection to all resources. 81 Chapter 7: Using the Java™ version of Leostream Connect Use the Disconnect All option to disconnect from any existing resource connections. Alternate Login Button Configurations Depending on the setting for the Show additional login button option on the Connection Broker > System > Settings page, your Login dialog may have one of the following button configurations. 1. The Login button, only: o If the Connection Broker offers you a single resource and you do not have permission to restart that desktop, clicking the Login button connects the desktop. o If the Connection Broker offers you a single resource and you do have permission to restart that desktop, clicking the Login button opens the Connect dialog. Use the Restart button on the Connect dialog to restart and connect to the desktop. Use the Connect button to connect to the desktop without restarting. o If the Connection Broker offers you multiple resources, clicking Login always opens the Connect dialog. 2. The Login and Advanced Login buttons: o If the Connection Broker offers you a single desktop, click the Login button to connect to the desktop without restarting the desktop, regardless of if you have permission to restart the desktop. o If the Connection Broker offers you a single desktop and you want to restart that desktop before connecting to it, click the Advanced Login button to open the Connect dialog. Use the Restart button on the Connect dialog to restart and connect to the desktop. Use the Connect button to connect to the desktop without restarting. o If the Connection Broker offers you multiple desktops, and you do not want to restart any of the desktops before connecting, click the Login button to open the Connect dialog. Use the Connect button on the Connect dialog to connect to the desktop without restarting. o If the Connection Broker offers you multiple desktops and you want to restart one or more of them, click the Advanced Login button to open the Connect dialog. Use the Restart button on the Connect dialog to restart and connect to the desktop. Use the Connect button to connect to the desktop without restarting. 3. The Login and Restart buttons: o If the Connection Broker offers you a single desktop, click the Login button to connect to the desktop without restarting, regardless of if you have permission to restart the desktop. 82 Leostream Connect Administrator’s Guide o If the Connection Broker offers you a single desktop and you want to restart that desktop before connecting to it, use the Restart button to automatically restart and connect to that desktop. The Restart button differs from the Advanced Login button in that clicking Restart instantly restarts the desktop while clicking Advanced Login opens the Connect dialog, where you have the option to restart your desktop. o If the Connection Broker offers you multiple desktops, and you do not want to restart any of the desktops before connecting, use the Login button to open the Connect dialog. Use the Connect button on the Connect dialog to connect to the desktop without restarting. o If the Connection Broker offers you multiple desktops and you need to restart one of them, use the Restart button to open the Connect dialog. Use the Restart button on the Connect dialog to restart and connect to the desktop. Use the Connect button to connect to the desktop without restarting. Managing Resources If you log into the Connection Broker with a role that has the Allow user to manage another user’s resources option selected, the Connect dialog contains a Manage button, shown in the following figure. This feature allows you to log into desktops using credentials other than those you provided to the Connection Broker. You must access the Connect dialog by clicking either the Advanced Login or Restart button. The Connect dialog does not contain the Manage button when launched from the Login button. Managing resources allows you to perform administrative tasks on desktops, including: Reviewing the list of desktops that the Connection Broker offers to another user. Logging into a desktop that is offered to another user, to perform administrative tasks on that desktop. 83 Chapter 7: Using the Java™ version of Leostream Connect Logging into one of your own desktops using different credentials from what you provided to the Connection Broker. See the Managing Resources section for the Windows version of Leostream Connect for information on how the Connection Broker determines which resources you can manage, and what happens when you connect to a managed resource. Managing Your Own Resources Managing your own resources allows you to log into your offered desktops using different credentials from what you provided the Connection Broker. If your Connection Broker account does not have administrative privileges for your desktop, you can use the manage resource feature to, for example, log into your desktop using administrator credentials. To manage your own resources: 1. On the Connect dialog, click the Manage button to open the Manage Resources dialog, shown in the following figure. By default, the Resources list shows your offered applications and desktops. 2. To manage one of your desktops: a. Select the appropriate desktop from the Resources list. You can connect to one desktop at a time. b. Click Connect. Leostream Connect launches a remote session to that desktop, but does not sign you in. Instead, the Login dialog appears for that desktop. c. Enter credential to log into the desktop. These can be the credentials for any user that has rights to log into this desktop. 3. To manage another desktop, repeat step 2. Managing another User’s Resources Managing another user’s resources allows you to perform administrative tasks on the user’s desktop. The user’s policy determines which resources are offered to them by the Connection Broker. The policy the 84 Leostream Connect Administrator’s Guide Connection Broker chooses to assign to the user depends on the domain the user logs into, and the location the user logs in from. Therefore, to accurately obtain a list of resources offered to a particular user, you must enter this information, as follows. 1. On the Connect dialog, click Manage to open the Manage Resources dialog, shown in the following figure opens. 2. To get the list of desktops offered to a particular user, simulate that user logging into the Connection Broker: a. Enter the user’s login name in the Username edit field. b. Select the domain to log the user into from the Domain drop-down menu. c. Select the user’s location from the Location drop-down menu. This menu contains all the locations defined in the Connection Broker > Clients > Locations page. d. Click Refresh. The Resources list updates to show the applications and desktops that would be offered to that user, if they logged in from that location. See How the Connection Broker Determines the Resource List for a description of how the Connection Broker determined this list. 3. Select the desktop you want to log into from the Resources list. You can connect to one desktop at a time 4. Click Connect. Leostream Connect launches a remote session to that desktop, but does not sign you in. Instead, the Login dialog appears for that desktop. 5. Enter credential to log into the desktop. These can be the credentials for any user that has rights to log into this desktop. If the user is still logged into their desktop, and you are logging in with non-administrator credentials, you will not automatically log the user out. Only administrators are allowed to automatically log another user out of their desktop. Similarly, because the Connection Broker does not assign you to the desktop you are managing, you are 85 Chapter 7: Using the Java™ version of Leostream Connect technically a rogue user on that desktop. The Connection Broker may offer that desktop to another user. If you are not logged into the desktop as an administrator and the Connection Broker offers that desktop to a user with a policy that logs out rogue users, the Connection Broker will automatically log you out to accommodate the new user. Simulating Shell Mode The Windows version of Leostream Connect can be used in the shell registry key to create a shellmode installation. However, the Java version of Leostream Connect requires that you simulate shell mode using a script. The script automatically launches Leostream Connect when the user logs in to the Linux desktops, and effectively disables the Cancel button by placing the call to launch Leostream Connect in a while loop. For example: if [ -f /opt/leostreamconnect/LeostreamConnect.jar ] ; then echo "Launching LSCj.... " while : do java -jar /opt/leostreamconnect/LeostreamConnect.jar done echo "exiting LSCj ...." fi Place this script in /etc/X11/xinit/initrc.d. Ensure that the command java -jar /opt/leostreamconnect/LeostreamConnect.jar functions properly before placing it in the initrc.d directory as this will affect all users that using KDE. Also, ensure that you have an alternate method for logging in to the Linux desktop, such as SSH. Configuring Options You can use the Leostream Connect Options dialog to specify the Connection Broker address and remote viewer locations. Alternately, you can configure Leostream Connect options using the lc.conf file (see Writing lc.conf Files). Click the Options button to open the Options dialog, shown in the following figure. You can access the Options dialog by pressing Ctrl+Shift+O, even if the Options button does not appear on the Login dialog. 86 Leostream Connect Administrator’s Guide Entering the Connection Broker Address By default, Leostream Connect uses the Connection Broker address stored in the lc.conf file (see Writing lc.conf Files). To change the Connection Broker used in this session of Leostream Connect, enter the Connection Broker hostname or IP address in the Address combo-box on the Broker tab, or select an existing address from the drop-down menu. To instruct Leostream Connect to discover the Connection Broker address using the appropriate DNS SRV record, select the Obtain Connection Broker address automatically option. Clicking OK attempts to save the new address in the lc.conf file. If you do not have write privileges to the lc.conf file, the new Connection Broker address is used only during the current Leostream Connect session. Closing and restarting Leostream Connect reverts to the Connection Broker address contained in the lc.conf file. If you do have write privileges to the lc.conf file, the new Connection Broker address is stored in the file and used for all subsequent Leostream Connect sessions. Specifying Remote Viewer Clients You can use any of the following remote viewer clients with the Java version of Leostream Connect. RDP: To connect to a Windows desktop. Leostream Connect looks for the rdesktop executable when installed on a Linux desktop, and looks for the Microsoft RDP executable when installed on a Windows desktop. VNC: To connect to a Linux or Windows desktop Citrix ICA: To connect to a Citrix XenApp application or desktop 87 Chapter 7: Using the Java™ version of Leostream Connect NoMachine NX: To connect to a Linux or Windows desktop HP RGS: To connect to a Linux or Windows desktop Ericom Blaze: To connect to a Windows desktop OpenText Exceed onDemand: To connect to a Linux desktop Red Hat Enterprise Virtualization SPICE: To connect to a Linux or Windows desktop Famatech Radmin: To connect to a Windows desktop View: To connection to VMware Horizon View deployments using the VMware Horizon View Client. On the Viewers tab, in the edit field associated with each remote viewer, enter the full path to the file name for the associated executable file. You can browse for the remote viewer binary file in the following two ways. Click the Browse button next to the remote viewer to locate. Place the cursor in the edit field for the remote viewer and press Ctrl-O. The command line parameters and configuration file for these remote viewers are determined by the protocol plans in the Connection Broker. See the Leostream Choosing and Using Display Protocols guide for information on specifying configuration files and command line parameters for the different display protocols. Setting Log Levels The Log tab allows you to specify the type of events to include in the Leostream Connect logs, and view the resultant logs. If you are gathering logs to send to Leostream support, ensure that Diagnostic event types are being logged. To view the current logs, click the View button. The text to the left of the View button indicates the full path to the log file. To set the logging levels: 1. Click the Events button. 2. In the Log Events dialog check the box before each type of event to log. 3. Click OK on the Log Events dialog. 88 Leostream Connect Administrator’s Guide Viewing Logs Leostream Connect writes all log information in the lc.log file. If you do not specify a directory for the log file, Leostream Connect places the log file in one of the following two locations, depending on the permissions allotted to the user that is running Leostream Connect. The Leostream Connection installation directory, if the user has permission to write to that directory and any lc.log file already in that directory. The user’s directory, if the user cannot write to the installation directory. To place the log file in a specific directory, run Leostream Connect with the LeostreamLogDir option (see Running Leostream Connect for Linux® from the Command Line). The user running Leostream Connect must have write permission for the specified directory. Otherwise, Leostream Connect places the log file into the user’s directory. Using the Graphical Log Viewer You can access the Log Viewer by clicking the View button on the Log tab of the Options dialog. Alternatively, you can open the Log Viewer at any time by pressing Ctrl+Shift+L. The following figure shows the default Log Viewer. The logs display in the text field with the most recent log messages at the bottom. To use the Log Viewer: Click Tail or Pause to turn off or on, respectively, the real-time display of new log information in the Log Viewer. If you turn off the real-time display of the logs, Leostream Connect continues to store log information in the lc.log file. If you have stopped the real-time display of log information, click Refresh to update the Log Viewer with the current contents of the lc.log file. Click Save As... to store the log information to a file. 89 Chapter 7: Using the Java™ version of Leostream Connect Specifying USB Device Redirection Options If Leostream Connect is communicating with a Connection Broker that has the USB passthrough control feature selected on the > System > Settings page, the Options dialog contains the USB tab, shown in the following figure. By default, Leostream Connect does not prompt the user to attach any USB devices to the remote desktop. You can specify different behavior based on if the user is offered a single or multiple desktops, as follows. For users with a single offered desktop: Select Do not attached USB devices (the default) to restrict Leostream Connect from redirecting a USB device connected to the client over to the remote desktop. Select Prompt to select devices to attach to indicate that Leostream Connect should prompt the user to redirect a USB device connected to the client over to the remote desktop. The user is prompted to redirect the USB device when they connect to their remote desktop and when a new USB device is attached to the client. Select Automatically attach all devices to indicate that Leostream Connect should automatically redirect all USB devices as soon as the user connects to their remote desktop. Leostream Connect redirects all USB devices as soon as the user connects to their remote desktop, and whenever a new device is attached to the client. For users with a multiple offered desktop: Select Do not attached USB devices (the default) to restrict Leostream Connect from redirecting a USB device connected to the client over to the remote desktop. Select Prompt to select devices to attach to indicate that Leostream Connect should prompt the user if they want to redirect a USB device connected to the client over to the remote desktop. The user is prompted to redirect the USB device when they connect to their remote desktop and when a new USB device is attached to the client. 90 Leostream Connect Administrator’s Guide When Prompt to select devices to attach is selected and the user connects to a remote desktop, Leostream Connect opens the following dialog. To attach a USB device to the remote desktop: 1. Select the checkbox in front of the USB devices to redirect to the remote desktop. If you do not want to redirect any USB devices, leave all checkboxes unchecked. 2. Click Connect to connect to the remote desktop, regardless of if you are redirecting USB devices, or not. Click Cancel only if you do not want to connect to the remote desktop. Writing lc.conf Files Leostream Connect stores a set of configuration parameters in a file called lc.conf. You can modify the lc.conf file to customize Leostream Connect, such as changing the colors used on the Login dialog. By default, Leostream Connect looks for the lc.conf file in the Leostream Connect installation directory. If an lc.conf file does not exist in the installation directory, Leostream Connect looks for the file in the following directories. In order: 1. A .leostream directory within the Leostream Connect installation directory 2. A .leostream directory inside the user’s home directory Alternatively, you can store the lc.conf file in a user-defined directory and use the LeostreamConfFile option to specify the absolute or relative path to the file when you run Leostream Connect. See Running Leostream Connect for Linux® from the Command Line for more information. In general, if you are running Leostream Connect in a kiosk-like mode where multiple users can access the lc.conf file, setup the lc.conf file with your default values and then mark this file as read-only for all users. The lc.conf file takes the following form option1 = value1 option2 = value2 91 Chapter 7: Using the Java™ version of Leostream Connect The following options are available. Connection Options connection_broker_address: IP address or hostname of the Connection Broker. domain: The default authentication server shown to the user in the Domain field. logout_ondisconnect: Set to true (1) to return to the legacy Leostream Connect logout behavior. In legacy versions of the client, users that connected to multiple resources were automatically logged out of Leostream Connect when they closed their last desktop connection. Setting logout_ondisconnect to false (0), the default, leaves the user logged into Leostream Connect after they close their last desktop connection. read_username_from_smartcard: Set to true (1) to read the username from a Sun Ray DTU Java smartcard, and automatically filled in to the User name field on the Leostream Connect login dialog. The default value is false; the username is not automatically populated. recent_brokers: A comma separated list of Connection Broker addresses that this Leostream Connect client has contacted. These addresses appear in the Address combo-box on the Options dialog (see Entering the Connection Broker Address). Delete this entry or individual addresses from the lc.conf file to clear out the contents of the Address combo-box. enable_input_methods: Set it to true (1) when experiencing issues with the Password field being disabled on a Linux system. enable_window_tracking: When establishing HP RGS connections from a client with multiple monitors, indicates if Leostream Connect should track and remember the movement of RGS windows across displays. When tracking window location, Leostream Connect automatically reopens a disconnect RGS session in the display that last contained the session. Set to true (1) to enable window tracking; false (0) to disable tracking. Please see the Leostream Guide to Choosing and Using Display Protocols for more information. caps_lock_warning: Set to true (1) to warn users when their Caps Lock key is on and they are entering their password. Defaults to false. External Programs exceed_path: Path to the Exceed onDemand client ica_path: Path to the ICA client nx_path: Path to NX client radmin_path: Path to the Radmin binary rdp_path: Path to the Terminal Services Client (rdesktop) binary rgs_path: Path to the HP Remote Graphics Software receiver binary ttatsc_path: Path to the ttatsc binary for Sun Global Desktop uttsc_path: Path to the uttsc binary view_path: Path to the VMware View client binary vnc_path: Path to the vncviewer binary 92 Leostream Connect Administrator’s Guide blaze_path: Path to the Ericom Blaze Client binary prompt_for_path: If set to true (1), displays a prompt to browse for the remote viewer binary file if a file is not specified in the Options dialog. Common UI Controls All colors are specified as RGB triplets, using the format (R,G,B), where R, G and B are decimal values between 0-255. You can use either ones and zeros or the strings true and false for the values of parameters that accept Boolean values. border_color: Specify the color of the border around the Login dialog. Expects a value in the form (R,G,B), where R, G and B are decimal values between 0-255. For example, to make the border all red, use border_color=(255,0,0) border_width: Width in pixels of the border along the left, bottom and right of the panels. Use the border_color option to specify a color for the border. button_face_color: Color of the face of all buttons. The default color is based on the configured Look-and-Feel. button_select_color: Color of the background on selected buttons. The default color is based on the configured Look-and-Feel. button_text_color: Color of the text on all buttons. The default color is based on the configured Look-and-Feel. control_background: Color of the background of text fields on the Login and Connect dialogs. Default is (255,255,255). decorate_window: Show or hide default window decorations such as title bar and border. By default the value is set to 1 to show the decorations. Set to 0 to hide the decorations. Note that some windows managers do not support hiding window decorations. dialog_background: Color of the background of the entire panel. Default is (212,208,200). disable_options_tab: Deprecated. See hide_options_button. exit_ondisconnect: Set to 1 to indicate that Leostream Connect should exit after the user closes, either by disconnecting or logging out, their last resource connection. Default is 0. geometry: Specify the initial location of the login dialog. Default is 0,0, which is the top-left corner of the screen. header_background: Background color for top panel containing the logo. If not specified, the header background color is set by the panel_background parameter. hide_exit_button: If set to 1, will prevent the Cancel button on the credentials form from 93 Chapter 7: Using the Java™ version of Leostream Connect appearing. hide_options_button: Set to 1 to hide the Options button on the Connect dialog. Default is 0, which displays the button. See Configuring Options on Linux® Operating Systems for information on available options. keyboard_country: Enter the two-letter uppercase country code for the keyboard attached to the client, for example US or GB. Must be used in conjunction with keyboard_language. keyboard_language: Enter a two-letter lowercase language code for the keyboard attached to the client, for example en, jp, or fr. keyboard_language must be used in conjunction with keyboard_country. Leostream Connect attempts to force the keyboard locale used for inputting data into text fields. laf: Specifies the look-and-feel for the Leostream Connect dialogs. When not specified, Leostream Connect defaults to the system look-and-feel. Possible values include, the following, when supported by the client device. o o o o o o windows – Default Windows look-and-feel windows classic – Windows classic look-and-feel motif – Motif gtk – gtk metal – Java cross platform look-and-feel system (default) – Default system look-and-feel login_url: Specify a full URL to include as a link on the bottom right side of the Login dialog. login_url_label: Specify a label for the link to display on the bottom right side of the Login dialog. Must be used in conjunction with login_url. If 9 is specified by no login_url_label is given, a potentially truncated version of the URL is displayed on the Login dialog. login_url_tooltip: Specify a tooltip to display when the user hovers the cursor over the URL displayed on the Login dialog. If left blank, or not included in the lc.conf file, no tooltip is displayed. logo_path: Specify the path to a GIF-file to replace the Leostream banner on the login dialog. The file must be sized to 294 x 40. logout_ondisconnect: Specify if users that connect to multiple resources are automatically logged out of Leostream Connect after they close their last desktop connection. If the lc.conf file does not contain this parameter, the default behavior is determined by the Log out user after last connection is closed option on the Connection Broker > System > Settings page. resource_dlg_size: The width and height, in pixels, of the resource selection dialog, entered as (width, height). selected_background: RGB value indicating the color of the background of selected options in the 94 Leostream Connect Administrator’s Guide Resource Selection dialog. selected_text_color: RGB value indicating the color of the text of selected options in the Resource Selection dialog. sidebar_edge: Indicates the edges of the screen where the user can access the Leostream Connect sidebar menu. Possible values include left, right, top, bottom, and all. sidebar_enabled: If set to 1 (true), enables the Leostream Connect sidebar for connecting and disconnecting from remote sessions. The default value of 0 (false) hides the sidebar. sidebar_show_delay: An integer value indicating the amount of time, in seconds, the user must keep their mouse at the left-most side of the screen before the sidebar opens. If not specified, this value defaults to 2. sidebar_hide_timeout: An integer value indicating the length of time, in seconds, that the sidebar remains open after the mouse leaves the sidebar. If not specified, this value defaults to 1. single_desktop_only: Set to 1 to restrict the user to connect to a single desktop. When set to one, if the user is offered multiple desktops, the desktops are displayed with radio buttons instead of check boxes. See Connecting to a Single Offered Desktop for an example dialog. window_title: Set the window title. The default window title is Leostream Connect. Other UI Controls check_port_timeout: (Deprecated) Specify the length of time, in milliseconds, before interrupting a port check. Default is 2000 (2 seconds). Leostream Connect 1.5 and later hard-code this value to 8000 (8 seconds). serial_number: An optional setting that will be automatically generated if not manually configured. sr_alive_port: Enter the port to check on the Sun Ray host before redirection. The default port is 7007. trace_level: Specify the level of information to keep in the Leostream Connect logs. Valid trace levels include: ERROR, WARN, INFO, TRACE, EXCEPT, DIAG, DUMP, and STDOUT. With the exception of STDOUT, all trace levels correspond to the associated checkbox on the Log Events dialog. The STDOUT trace level instructs Leostream Connect to print the logs to standard out, as they occur. 95 Chapter 7: Using the Java™ version of Leostream Connect Running Leostream Connect for Linux® from the Command Line To invoke Leostream Connect from the installation directory, enter the following command. java -jar LeostreamConnect.jar The following sections describe the supported command line parameters and options. Command Line Parameters The following command line parameters are supported by Leostream Connect version 1.5 and later. -user <username>: Specifies the username to automatically use when the client starts up. (Replaces the obsolete form.username command line option.) -password <password>: Specifies the password to automatically use when the client is authenticating with the Connection Broker. (Replaces the obsolete form.password command line option.) -readpassword: Causes the client to wait for up to 2 seconds for the password to be written to the standard input of Leostream Connect to facilitate more secure credential passing. -domain <domain>: Specifies the domain to automatically use when the client is authenticating with the Connection Broker using the credentials provided by -user and -password. (Replaces the obsolete form.domain command line option.) To use the command line parameters, append the options after LeostreamConnect.jar, for example: java –jar LeostreamConnect.jar -user Example -readpassword -domain leostream Command Line Options You can customize Leostream Connect by invoking the command with any of the following options: LeostreamConfFile: Full path to the Leostream Connect configuration file. This directory name overrides any other possible location for the lc.conf file. LeostreamLogDir: Full path to the directory for storing the Leostream Connect logs. Overrides other settings. LeostreamLogFileSuffix: An additional identifier for log file names. The default log file name is lc.log. If this option is used, the log filename is changed to lc-$ID.log. LeostreamLogStdOut: Write log to standard out in addition to a file. 96 Leostream Connect Administrator’s Guide geometry: Sets the position of the window (e.g. -Dgeometry=100,100). To invoke Leostream Connect for Linux with any of the options, prepend the option with -D and add it to the command just before the -jar, for example, the following command sets the directory for the lc.conf file. java –DLeostreamConfFile=/etc/leostream/lc.conf –jar LeostreamConnect.jar Running Leostream Connect for Linux® from a Shell Script You can create shell scripts that launch Leostream Connect/Java so users do not have to use the command line interface. For example: #!/bin/sh JAVA_HOME=/path/to/jre LSC_HOME=/path/to/leostream cd $LSC_HOME $JAVA_HOME/bin/java -jar LeostreamConnect.jar Where /path/to/jre and /path/to/leostream are the full path name to your Java Run-Time Environment and Leostream Connect, respectively. 97