1
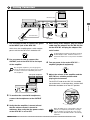
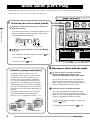
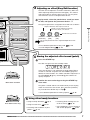
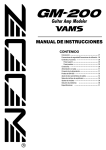
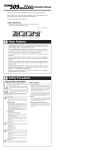
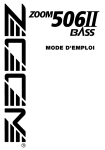
Operation Manual
CONTENTS
USAGE AND SAFETY PRECAUTIONS
Introduction
•••••••••••••••••••••••••
2
•••••••••••••••••••••••••••••••••••••••••••••••
3
Naming of Parts
••••••••••••••••••••••••••••••••••••••••••••
4
Front Panel
Rear Panel
•••••••••••••••••••••••••••••••••••••••••••••••
•••••••••••••••••••••••••••••••••••••••••••••••
4
4
Preparations
•••••••••••••••••••••••••••••••••••••••••••••••
4
Inserting the Batteries • • • • • • • • • • • • • • • • • • • • • • • • • • • • • • • • • • • • • • • 4
Getting Connected • • • • • • • • • • • • • • • • • • • • • • • • • • • • • • • • • • • • • • • • • 5
Quick Guide (Let's Play)
••••••••••••••••••••••••••••••••••••
6
Amp Simulator Settings
••••••••••••••••••••••••••••••••••••
8
Setting Up the Playback Equipment
Selecting the Amp Simulator Type
••••••••••••••••••••••••••••
•••••••••••••••••••••••••••••
Listening to Patches (Play Mode Operation)
•••••••••••••••••••
8
8
9
Panel Display in Play Mode • • • • • • • • • • • • • • • • • • • • • • • • • • • • • • • • • • • 9
Selecting a Patch • • • • • • • • • • • • • • • • • • • • • • • • • • • • • • • • • • • • • • • • • • 9
Using the Bypass (Mute) and Tuner Function • • • • • • • • • • • • • • • • • • • • • 10
Playing With Rhythm Accompaniment • • • • • • • • • • • • • • • • • • • • • • • • • • 11
Using the Sampler Function • • • • • • • • • • • • • • • • • • • • • • • • • • • • • • • • • • 12
Using the Easy Edit Function • • • • • • • • • • • • • • • • • • • • • • • • • • • • • • • • • 13
Reserving the Next Patch (DIRECT LOAD) • • • • • • • • • • • • • • • • • • • • • • • 14
Fixing the Bank (BANK HOLD) • • • • • • • • • • • • • • • • • • • • • • • • • • • • • • • • 14
Altering the Sound of a Patch (Edit Mode Operation)
••••••••••
15
Patch Configuration • • • • • • • • • • • • • • • • • • • • • • • • • • • • • • • • • • • • • • • • 15
Basic Edit Mode Steps • • • • • • • • • • • • • • • • • • • • • • • • • • • • • • • • • • • • • 15
Storing and Copying Patches • • • • • • • • • • • • • • • • • • • • • • • • • • • • • • • • 16
Effect Types and Parameters
•••••••••••••••••••••••••••••••
17
COMP•DIST (compressor/distortion) module • • • • • • • • • • • • • • • • • • • • •
ZNR/EQ (Zoom Noise Reduction/Equalizer) module • • • • • • • • • • • • • • • • •
MOD (modulation) module • • • • • • • • • • • • • • • • • • • • • • • • • • • • • • • • • • •
REV (Reverb) module • • • • • • • • • • • • • • • • • • • • • • • • • • • • • • • • • • • • • • •
TOTAL module • • • • • • • • • • • • • • • • • • • • • • • • • • • • • • • • • • • • • • • • • • •
PEDAL module • • • • • • • • • • • • • • • • • • • • • • • • • • • • • • • • • • • • • • • • • • •
17
17
18
19
20
20
Using the Jam Play Function
•••••••••••••••••••••••••••••••
Controlling an Effect With the Pedal
All Initialize/Factory Recall
•••••••••••••••••••••••••
22
•••••••••••••••••••••••••••••••••
23
Adjusting the Expression Pedal
Troubleshooting
GFX-707 Specifications
21
••••••••••••••••••••••••••••
23
USAGE AND SAFETY PRECAUTIONS
USAGE AND SAFETY PRECAUTIONS
USAGE AND SAFETY PRECAUTIONS
In this manual, symbols are used to highlight warnings
and cautions for you to read so that accidents can be
prevented. The meanings of these symbols are as
follows:
This symbol indicates explanations
about extremely dangerous matters. If
users ignore this symbol and handle the
Warning device the wrong way, serious injury or
death could result.
This symbol indicates explanations
about dangerous matters. If users
ignore this symbol and handle the
Caution device the wrong way, bodily injury and
damage to the equipment could result.
Please observe the following safety tips and precautions to ensure
hazard-free use of the GFX-707.
• Power requirements
Warning
Since power consumption of this unit is fairly high, we
recommend the use of an AC adapter whenever possible.
When powering the unit from a battery, use only an alkaline
type.
[AC adapter operation]
• Be sure to use only an AC adapter which supplies 9 V
DC, 300 mA and is equipped with a "center minus" plug
(Zoom AD-0006). The use of an adapter other than the
specified type may damage the unit and pose a safety
hazard.
• Connect the AC adapter only to an AC outlet that supplies
the rated voltage required by the adapter.
• When disconnecting the AC adapter from the AC outlet,
always grasp the adapter itself and do not pull at the
cable.
• When not using the unit for an extended period,
disconnect the AC adapter from the AC outlet.
[Battery operation]
• Use four conventional IEC R6 (size AA) batteries
(alkaline).
• The GFX-707 cannot be used for recharging.
Pay close attention to the labelling of the battery to make
sure you choose the correct type.
• When not using the unit for an extended period, remove
the batteries from the unit.
• If battery leakage has occurred, wipe the battery
compartment and the battery terminals carefully to
remove all remnants of battery fluid.
• While using the unit, the battery compartment cover
should be closed.
• Excessive dust or sand
• Excessive vibration or shock
• Handling
Caution
Since the GFX-707 is a precision electronic device, avoid
applying excessive force to the switches and buttons. Also
take care not to drop the unit, and do not subject it to shock
or excessive pressure.
• Alterations
Caution
Never open the case of the GFX-707 or attempt to modify
the product in any way since this can result in damage to the
unit.
• Connecting cables and input and output
jacks
Caution
You should always turn off the power to the GFX-707 and
all other equipment before connecting or disconnecting any
cables. Also make sure to disconnect all cables and the AC
adapter before moving the GFX-707.
Usage Precautions
• Electrical interference
For safety considerations, the GFX-707 has been designed to
provide maximum protection against the emission of
electromagnetic radiation from inside the device, and protection
from external interference. However, equipment that is very
susceptible to interference or that emits powerful electromagnetic
waves should not be placed near the GFX-707, as the possibility of
interference cannot be ruled out entirely.
With any type of digital control device, the GFX-707 included,
electromagnetic interference can cause malfunctioning and can
corrupt or destroy data. Care should be taken to minimize the risk
of damage.
• Cleaning
Use a soft, dry cloth to clean the GFX-707. If necessary, slightly
moisten the cloth. Do not use abrasive cleanser, wax, or solvents
(such as paint thinner or cleaning alcohol), since these may dull
the finish or damage the surface.
Please keep this manual in a convenient place for future
reference.
• Environment
Caution
Avoid using your GFX-707 in environments where it will be
exposed to:
• Extreme temperature
• High humidity or moisture
2
ZOOM GFX-707
Introduction
Thank you for selecting the ZOOM GFX-707 (hereafter simply called the "GFX-707"). The
GFX-707 is a sophisticated multi-effect device with the following features and functions:
Introduction
•
Large variety of built-in effects
Four separate effect modules (single/combined effects) can be used at the same time, together with
ZNR (Zoom Noise Reduction) and the built-in amp simulator. Effects include analog distortion,
various modulation effects such as chorus and flanger, and reverberation effects such as reverb and
delay. In total, you have a choice of 48 types of effects.
•
60 immediately usable patches
A combination of effect modules and parameter settings stored in memory is called a "patch". The
GFX-707 has room for 30 patches that are read-only and 30 that can be freely modified by the user.
So you have a total of 60 patches readily available. Patches are organized in banks (A - F, 0 - 5),
each with five patches. It is even possible to assign a distinctive name of up to 6 characters to each
patch.
•
Designed for use on stage
The GFX-707 will operate continuously for up to 14 hours on one set of alkaline batteries. The large
display showing patch names is easy to read at a distance, and the built-in expression pedal is great
for enhancing any performance. For extended use, the unit can also be powered by an AC adapter.
•
Rotary knobs allow speedy parameter editing
When editing a patch, the three knobs on the top panel let you change parameters with a quick and
direct feel. Even during a performance, fine-tuning an effect is no problem at all. The edited patch
can be stored for later use.
•
A first in this class: built-in rhythm section
A high quality PCM sound source creates realistic rhythm patterns that are handy for practicing or
for small jam sessions. You can choose from as many as 45 rhythm patterns.
•
6-second sampler
Another advantage is the integrated sampler with a recording duration of up to six seconds. It even
allows half-speed playback without altering the pitch. This feature comes in handy when copying
phrases.
•
Jam Play
With a simple foot switch operation, you can record and play a phrase of up to 2 seconds during a
gig. This is great for creating scratch effects such as used by DJs, doing reverse playback or
producing other special effects.
•
Integrated amp simulator
Simulates the cabinet sound of a guitar amplifier for a dynamic sound also when sending the line
output to a mixer or recorder.
Please take the time to read this manual carefully, in order to get the most out of your GFX707 and to ensure optimum performance and reliability.
ZOOM GFX-707
3
Naming of Parts
Front Panel
OUTPUT knob
AMP SIM (simulator) knob
PARM (Parameter) knob 1 - 3
Naming of Parts /Preparations
BANK/PATCH indicator
Display
Module LEDs
OUTPUT
OFF
AMP SIM
COMP•DIST/PARM1
MOD/PARM2
Pedal status LED
REV/PARM3
PATCH NAME
PATCH NAME
BANK
BANK
BOTH
BOTH
COMP-DIST
ZNR/EQ
MOD
REV
MODULE
TYPE (BANK)
(ON/OFF)
(GROUP)
TOTAL
PEDAL
EDIT
(CANCEL)
STORE
EDITED
(VALUE)
RHYTHM
PATCH
PATCH
COMP-DIST
SAMPLER
ZNR/EQ
MOD
REV
MODULE
TYPE (BANK)
(ON/OFF)
(GROUP)
TOTAL
EDITED
(VALUE)
PEDAL
EDIT
STORE
(CANCEL)
RHYTHM
SAMPLER
/
/
SAMPLER key
RHYTHM key
STORE key
EDIT (CANCEL) key
TYPE(BANK)
MODULE
/
foot switches
/
/
keys
keys
Expression pedal
Rear Panel
INPUT/AUX IN jack
OUTPUT/PHONES jack
How to use the cable hook
INPUT
DC9V
(AUX IN)
300mA
OUTPUT
OU
(PHONES)
POWER
ON
(PH
OFF
ER OFF
POW
UT )
V
DC9 A
ON
300m
IN
DC 9V (AC adapter) jack
POWER switch
Cable hook
Preparations
Inserting the Batteries
The GFX-707 can be powered either by alkaline batteries or by an AC adapter. To use the unit
on batteries, insert them as follows.
1
2
Turn the unit over and open the battery
compartment cover.
Insert four new IEC R6 (size AA) alkaline
batteries into the battery compartment.
Battery
compartment
cover
Four IEC R6 (size AA) batteries
3
Close the battery compartment cover.
If the indication "BATT" appears on the display
during battery-powered operation, the batteries
are exhausted. Replace all four batteries with
fresh ones.
PATCH NAME
GFX-707 rear
Adjacent batteries
are inserted with
opposite polarity.
OPEN
Battery
compartment
cover
Tab
4
NOTE
• If the unit is not to be powered from batteries
for an extended period, remove the batteries
from the battery compartment. Otherwise
battery fluid may leak and cause damage to
the unit.
• An AC adapter is not supplied with the unit.
ZOOM GFX-707
Getting Connected
Monaural cable
INPUT
DC9V
(AUX IN)
300mA
Guitar amplifier
OUTPUT
(PHONES)
POWER
ON
OFF
Preparations
Monaural cable
AC adapter
Guitar
1
Use a monaural cable to connect the guitar
to the INPUT jack of the GFX-707.
5
At this time, the amplifier power switch and the
power switch of the GFX-707 should be OFF.
When using an AC adapter, plug the output
cable from the adapter into the DC 9V jack
on the GFX-707 and plug the adapter into
an AC outlet.
HINT
2
Use a monaural cable to connect the
OUTPUT jack of the GFX-707 to the input
of the amplifier.
HINT
To guard against inadvertently disconnecting
the AC adapter cable, wind the cable once
around the hook on the rear panel of the GFX707.
6
Turn on power in the order GFX-707 →
amplifier (playback equipment).
7
Adjust the volume of the amplifier and the
GFX-707 to a suitable position while
playing the instrument.
By using two amplifiers, you can get great
stereo sound from stereo effects. Use a stereo
Y cable to connect the OUTPUT jack to the
two amplifiers.
Two guitar amplifiers
Stereo Y cable
9V
The OUTPUT knob of the GFX-707 should be
set to about the 3 o'clock position, and the AMP
SIM knob should be set to the OFF position.
OUTPUT
mA
(PHONES)
POWER
ON
3
Headphones
OFF
To monitor the sound with headphones,
connect the headphones to the OUTPUT
jack.
OUTPUT
4
Verify that the amplifier is turned off and
that the volume control is turned to
minimum. Also verify that the power switch
of the GFX-707 is set to OFF.
ZOOM GFX-707
OFF
AMP SIM
OFF
NOTE
When the GFX-707 is in the bypass state (all
effects are temporarily turned off; see page
10), the output level will be the same as the
input level if the OUTPUT knob is turned fully
clockwise.
5
Quick Guide (Let's Play)
Immediately after being turned on, the GFX-707 is in the so-called "play mode". The Quick Guide explains the basic
steps in play mode. This will let you use the unit right away.
1
Selecting the effect sound (patch)
Quick Guide (Let's Play)
To select a patch in play mode, press one of the
▲/▼ foot switches.
OUTPUT
The name of the currently selected patch appears on the
display. The bank and patch number can be checked
using the BANK/PATCH indicator.
PATCH NAME
BANK
OFF
COMP•DIST/PARM1
MOD/PARM2
PATCH NAME
PATCH
COMP•DIST
BOTH
AMP SIM
ZNR/EQ
MOD
REV
MODULE
TYPE (BANK)
(ON/OFF)
(GROUP)
TOTAL
BANK
PA
BOTH
EDI
PEDAL
EDIT
(CANCEL)
REV
STORE
(VALUE)
RHYTHM
EDITED
(VALUE)
/
Bank
Patch number
Patch name
To directly switch the bank, use the TYPE(BANK)
▼/▲ keys.
• For a detailed explanation of patch switching,
• To fix the bank,
• To reserve a patch,
p. 9
p. 14
p. 14
2 Altering an effect with the pedal
[ Patches, groups and banks ]
A collection of effect modules, each with
distinct parameter settings, is called a patch.
The GFX-707 has memory capacity for 60
patches which are immediately available for
use. These are divided into two groups of 30
patches each. The PRESET group comprises
read-only patches that cannot be changed by
the user. The USER group contains read-andwrite patches that can be freely overwritten by
the user.
Each patch is given a patch name of up to 6
characters, and patches are organized in
banks (A - F, 0 - 5) and patch numbers (1 - 5).
BANK A
PATCH
PATCH
PATCH
PATCH
PATCH
1
2
3
4
5
USER group
6
The aspect of the patch that is changed by the
expression pedal can be programmed for each
patch. To get a feel for this, select various patches
and try out the pedal to see what it does.
Push the expression pedal fully down
The expression pedal also incorporates a pushdown switch that allows on/off control of a preset
effect. The effect that is switched by the push-down
switch can be programmed for each patch.
BANK 5
BANK F
PATCH
A1
BANK
A 2
BANK
PATCH
BANK
PATCH
1A1 1
BANK
PATCH
PATCH
A1
BANK
A 2
BANK
PATCH
BANK
PATCH
bA1 1
BANK
PATCH
3
PATCH
1
PATCH
PATCH
1 22
PATCH
PATCH
4
PATCH
2
PATCH
PATCH
2 33
PATCH
PATCH
PATCH
3 4 5
PATCH
PATCH
3 4
PATCH
PATCH
4
PATCH
PATCH
4 55
PATCH
PATCH
PATCH 5
PATCH 5
To alter an effect in real time, move the
expression pedal while playing your
instrument with the GFX-707 in play mode.
BANK 0
PATCH
PATCH
PATCH
PATCH
PATCH
1
2
3
4
5
3
PATCH
1
PATCH
PATCH
1 22
PATCH
PATCH
4
PATCH
2
PATCH
PATCH
2 33
PATCH
PATCH
5
PATCH
3
PATCH
PATCH
3 44
PATCH
PATCH
4 5
PATCH
PATCH
4 5
PATCH
PATCH
5
PATCH
PATCH 5
• To set the effect to be altered by the expression
pedal,
p. 22
• To readjust the expression pedal,
p. 23
PRESET group
ZOOM GFX-707
S
3 Adjusting an effect (Easy Edit function)
The GFX-707 incorporates a function called "Easy Edit" that
allows adjusting effect parameters during play. This is done
with three knobs on the front panel. You can vary the patch
sound with the ease of a compact effect device.
In play mode, select the patch whose sound you want
to alter, and operate the parameter knob 1 - 3.
The types of parameters assigned to the knobs are as follows.
Depth of distortion and compressor effects
ATCH
Quick Guide (Let's Play)
Depth of chorus and flanger intensity
For some effects, echo amount
V/PARM3
Reverb and echo amount
PARM1 knob PARM2 knob PARM3 knob
[COMP•DIST]
[MOD]
[REV]
DITED
)
NOTE
SAMPLER
The actual parameter that is adjusted depends on the
patch.
• For a detailed explanation of Easy Edit,
• For full-fledged editing,
p. 15
p. 13
4 Storing the adjusted effect sound (patch)
Press the STORE key.
The GFX-707 goes into store standby mode.
If the store location is not specified, the original bank/patch
number is selected. If a patch from the PRESET group was
edited, the store location "A1" will be selected. If required, use
the TYPE(BANK) ▼/▲ keys and the ▼/▲ foot switches to
specify the patch.
Move back and forth
Confirm the store action by pressing the STORE key
once more.
The patch is stored and the unit automatically reverts to play
mode. To cancel the store action, press the EDIT (CANCEL)
key instead of the STORE key in step
.
• For a detailed explanation of storing a patch,
p. 16
5 Using other handy functions
• Using the Amp Simulator,
Push down all the way
• Using the auto tuner,
p. 8
p. 10
• Practicing with the built-in rhythm
pattern,
p. 11
ZOOM GFX-707
• Practicing while listening to a CD
or other source,
p. 12
• Using hold delay, reverse playback,
and scratch playback ,
p. 21
7
Amp Simulator Settings
The GFX-707 incorporates an amp simulator that recreates the sound of a guitar amplifier or speaker enclosure. This
section explains how to set up the amp simulator.
Setting Up the Playback Equipment
To get the best out of the amp simulator, the playback equipment must be set up correctly.
Proceed as described below. After power-up, the GFX-707 is always set up for use with a guitar
amplifier. When a guitar amplifier is used exclusively, the following steps are not necessary.
Amp Simulator Settings
1
In play mode, press the EDIT (CANCEL)
key.
2
Press the MODULE / keys repeatedly,
until the TOTAL module LED is lit.
5
Continue to use parameter knob 3 to
select one of the following settings.
Choose the setting that best matches your
setup.
• GFX-707 is connected to a guitar amplifier
AP
MODULE
COMP•DIST
ZNR/EQ
MOD
REV
• GFX-707 is connected to line level equipment
such as a mixer, or used with headphones
TOTAL
(ON/OFF)
Ln
3
Press the TYPE (BANK) ▼/▲ keys
repeatedly, until the indication "DIRLOD"
appears on the display.
PATCH NAME
TYPE (BANK)
(GROUP)
4
BANK
BOTH
When "AP" is selected, the amp simulator can
be used to simulate cabinet sound also when
using the guitar amplifier at low levels. When
"Ln" is selected, characteristics are optimized
for recording.
PATCH
EDITED
(VALUE)
BOTH
Turn parameter knob 3.
As soon as you turn parameter knob 3, the
display indication changes to "AMPMOD" (amp
simulator mode). This is the parameter for
selecting the type of amp simulator.
PATCH NAME
EDITED
(VALUE)
PARM3 knob
BANK
6
Press the EDIT (CANCEL) key once more.
The unit returns to the play mode. The AMPMOD
parameter setting applies to all patches.
PATCH
NOTE
BOTH
The AMPMOD parameter is reset to "AP"
when the GFX-707 is turned off.
EDITED
(VALUE)
PARM3 knob
Selecting the Amp Simulator Type
Use the AMP SIM knob to select one of the following amp simulator types. When the knob is
operated, the name of the currently selected type is shown on the display, and the indication
A or b appears on the BANK/PATCH indicator.
• OFF
Amp simulator is turned off.
• COMBO A, b
This is a combo type amplifier simulation. The
"b" position will result in a stronger cabinet
sound.
• BRIGHT A, b
This is a combo type amplifier simulation with
a bright sound character. The "b" position will
result in a stronger cabinet sound.
8
• STACK A, b
This is a stack type
amplifier simulation. The
"b" position will result in
a stronger cabinet sound.
STACK
BRIGHT
COMBO
OFF
FL STK
AMP SIM
• FL STK A, b
This is a triple-decker stack type amplifier
simulation. The "b" position will result in a
stronger cabinet sound.
ZOOM GFX-707
Listening to Patches
(Play Mode Operation)
The condition where you call up patches stored in the memory of the GFX-707 and use them for playing your
instrument is called "play mode". This is the condition the unit is in when you turn the power on. The various
operations possible in play mode are described in this section.
Panel Display in Play Mode
In play mode, the panel shows the following information.
Bank (A - F, 0 - 5)
Play mode display indication
Banks A - F are for the USER group, and banks
0 - 5 are for the PRESET group
Patch name
BANK
PATCH NAME
PATCH
BOTH
COMP•DIST
ZNR/EQ
MOD
REV
TOTAL
PEDAL
Listening to Patches (Play Mode Operation)
Patch number (1 - 5)
EDITED
(VALUE)
When a dot (.) is shown here,
an effect parameter has been changed
Module LED corresponds
to modules that are ON in
currently selected patch are lit
When a dot (.) is shown here, patches can be
selected from either the USER group or
the PRESET group.
For patches where moving
the pedal will change the effect,
the PEDAL status LED is lit
Selecting a Patch
1
To switch patches in play mode, press one
of the ▼/▲ foot switches.
Pressing the ▼ foot switch moves to the next
lower patch, and pressing the ▲ foot switch moves
to the next higher patch. For example, if you press
the ▲ foot switch repeatedly, the unit will switch
patches, banks, and groups as follows.
USER group
location, use the TYPE (BANK) ▼/▲ keys together
with the ▼/▲ foot switches.
NOTE
This is not possible while playing a rhythm
pattern.
It is also possible to set up the unit so that only
patches from the USER group or from the
PRESET group are switched. To do this, press
both TYPE (BANK) ▼/▲ keys together. With
each push, the group from which patches can
be selected is toggled as follows.
Both groups
USER group
only
PRESET group
only
PRESET group
HINT
2
To directly switch the bank, use the TYPE
(BANK) ▼/▲ keys. This allows you to move
to the next lower or next higher bank.
To quickly move to a patch stored at a distant
ZOOM GFX-707
TYPE (BANK)
TYPE (BANK)
(GROUP)
(GROUP)
• If you plan to use several patches in a song,
copying them to continuous numbers in the
USER group will make them easy to call up.
For information on copying patches,
p.
16
• You can also set up the unit to reserve a
patch and switch to it only after you confirm
the selection. (For details,
p. 14.)
9
Using the Bypass (Mute) and Tuner Function
The GFX-707 incorporates an auto-chromatic tuner for guitars. To use the tuner function, the
built-in effects must be bypassed (temporarily turned off) or muted (original sound and effect
sound turned off).
1
To set the GFX-707 to the bypass (mute)
mode, press and immediately release both
▼/▲ foot switches in play mode.
3
The indication "BYPASS" will appear on the
display and the BANK/PATCH indicator shows
"--".
When the display shows the desired note,
perform fine tuning until the center module
LED lights up.
COMP•DIST
ZNR/EQ
When pitch is low,
these LEDs light up
MOD
REV
TOTAL
When pitch is high,
these LEDs light up
Release immediately
When pitch is correct,
this LED lights up
Listening to Patches (Play Mode Operation)
4
BANK
BOTH
PATCH
The current reference pitch is briefly shown on
the display. The default setting after power-on is
"440HZ" (center A = 440 Hz).
EDITED
(VALUE)
While the GFX-707 is in the bypass condition,
the amp simulator is also off and the expression
pedal works as a volume pedal.
By pressing both ▼/▲ foot switches for at least 1
second and then releasing them, the GFX-707 is
set to the mute condition. The indication "MUTE"
will appear on the display and the BANK/PATCH
indicator shows "--".
To change the reference pitch of the tuner,
press the TYPE (BANK)▼/▲ keys.
PATCH NAME
Reference pitch name
5
While the reference pitch is shown, you
can change the pitch by pressing the TYPE
(BANK) ▼/▲ keys.
The available setting range is "435HZ" - "445HZ"
in 1-Hz steps. When the GFX-707 is turned off and
on again, it will be reset to "440HZ".
Press and release
after at least 1 second
PATCH NAME
BANK
TYPE (BANK)
PATCH
(GROUP)
PATCH NAME
BOTH
EDITED
(VALUE)
The indication "--" on the BANK/PATCH indicator
shows that the tuner is in the input standby
condition.
2
6
Pressing one of the ▼/▲ foot switches
returns to the play mode.
Play the open string you want to tune, and
watch the BANK/PATCH indicator.
The indicator shows the note which is closest to
the current pitch.
10
ZOOM GFX-707
Playing With Rhythm Accompaniment
The GFX-707 incorporates various realistic rhythms using a PCM sound source. There are 45
different rhythm patterns from which you can choose. This is great not only for parts practice
but also for simple play sessions.
1
To activate a rhythm pattern, press the
RHYTHM key in play mode, bypass/mute
mode, or edit mode.
Rhythm playback starts. In play mode, the name
of the currently selected rhythm pattern appears
on the display, and the BANK/PATCH indicator
shows the pattern number. During rhythm pattern
playback, the rhythm LED flashes in the tempo of
the rhythm.
BANK
BOTH
Pattern name
PATCH
EDITED
(VALUE)
PARM1 knob
PATCH NAME
Tempo
PARM2 knob
PATCH NAME
BANK
PATCH
BOTH
/
EDITED
(VALUE)
To stop rhythm pattern playback, press the
RHYTHM key once more.
RHYTHM
PARM3 knob
HINT
• The settings for rhythm pattern, tempo, and
volume level are reset to the default values
when the unit is turned off and on again.
• The tempo value can also be changed with
the MODULE
/ keys. In this case, the
value changes in 1-step units.
• The TYPE (BANK) ▼/▲ keys can be used to
change the pattern type.
[Rhythm pattern list]
/
3
To change the rhythm pattern type, tempo,
or volume, operate parameter knobs 1 - 3
in play mode.
The knobs operate as follows.
Rhythm pattern tempo
(BPM40 - BPM250 in 2-step units)
Rhythm pattern type
Rhythm pattern volume level
(LVL0 - LVL30)
PARM1 knob PARM2 knob PARM3 knob
* BPM = number of quarter note beats per minute,
a unit for tempo
When a parameter knob is operated during rhythm
pattern play, the content of the BANK/PATCH
indicator changes temporarily.
ZOOM GFX-707
Rhythm
pattern
8Beat1
8Beat2
8Beat3
8BeatShuffle
16Beat1
16Beat2
16Beat3
16BeatShuffle
3/4
6/8Rock
5/4
5/4Rock
Rock'nRoll1
Rock'nRoll2
Rock1
Rock2
HardRock1
HardRock2
Metal1
Metal2
Thrash
Punk
Pop1
Pop2
Dance1
Dance2
Dance3
Funk1
Funk2
Ballad1
Ballad2
Blues1
Blues2
Country
BossaNova
Jazz1
Jazz2
Reggae
Ska
Latin1
Latin2
Metronome (triple)
Metronome (quadruple)
Metronome (quintuple)
Metronome (no beat)
Display
BANK/PATCH
indicator
Basic
patterns
Rock
patterns
Dance
patterns
Other
genres
11
Listening to Patches (Play Mode Operation)
Rhythm volume
PATCH NAME
RHYTHM
2
PATCH NAME
Using the Sampler Function
The GFX-707 also incorporates a sampler that allows recording for up to 6 seconds. This can
be used not only to record guitar sounds but also for external sources such as a CD player.
The data are stored in the memory of the unit and can be played easily using the foot
switches. A recorded phrase can also be played at half the original speed without changing
the pitch. This is convenient for example to study how a fast guitar phrase played by a pro.
1
Connect the recording source to the
INPUT jack of the GFX-707.
4
Turn parameter knob 2 to select "NML"
(normal playback speed) or "SLW" (slow
playback speed at half tempo without
changing pitch).
CD player
PATCH NAME
Cable with standard stereo plug
PARM knob 2
Listening to Patches (Play Mode Operation)
INPUT
DC9V
(AUX IN)
300mA
ON
NOTE
2
PATCH NAME
OFF
Before making or changing any connections,
be sure to set the OUTPUT knob to the zero
position. If a cable is plugged in or unplugged
while the OUTPUT knob is turned up, shock
noise may damage the speaker.
5
Push the ▲ foot switch and start playback
of the external source (CD player or
similar) you want to record, or play the
phrase you want to record.
To activate the sampler function, press the
SAMPLER key in play mode.
The sampler goes into the recording standby
mode and the display shows the following
information.
SAMPLER
In this mode, the expression pedal operates as
controller for the recording level.
PATCH NAME
Input source
3
or
OUTPUT
(PHONES)
POWER
During recording, the display shows the
indication "RECORDING". The module LEDs on
the panel light up in sequence, to show the
elapsed time.
Play mode
Turn parameter knob 1 to select "BP"
(GFX-707 effects are not used for
recording) or "EF" (GFX-707 effects are
used for recording).
PATCH NAME
PARM knob 1
or
PATCH NAME
COMP•DIST
Elapsed
time
6
ZNR/EQ
1-2
MOD
2-3
REV
3-4
TOTAL
4-5
5-6
seconds
To terminate the recording, press the ▼
foot switch. Recording stops, and
playback immediately starts from the
beginning.
During playback, the indication "PLAY" is shown
on the display.
PATCH NAME
If no steps are taken after starting to record,
12
ZOOM GFX-707
recording will terminate automatically after 6
seconds, and playback starts.
7
Use the ▼/▲ foot switches and MODULE
keys to control playback/stop/rewind/fastforward.
MODULE
The controls operate as shown at left. When
using the controls, you can think of the sampler
function as a kind of tape recorder.
8
To turn off the sampler and return to the
play mode, press the SAMPLER key again.
SAMPLER
key: rewind
MODULE
key: fast-forward
MODULE
TYPE (BANK)
(ON/OFF)
(GROUP)
NOTE
Pushing both keys
returns to start of sample
▼ foot switch/TYPE (BANK)▼ key:
play/stop
Using the Easy Edit Function
Normally, for editing a patch of the GFX-707, you set the unit to edit mode, call up the target
parameter, and change the setting. However, it is possible to use the parameter knobs 1 - 3 in
play mode to change certain effect parameters. This is called "Easy Edit".
1
been changed. If the parameter is returned to the
original setting, the dot disappears.
To change the sound of a patch in play
mode, turn parameter knobs 1 - 3. The
parameters controlled by the knobs are as
follows.
BANK
COMP•DIST (compressor•distortion)
module parameter
BOTH
HINT
2
The actual parameter controlled by the parameter
knob 1 - 3 depends on the patch.
When a knob is turned, the current setting of the
affected parameter is shown on the BANK/PATCH
indicator, and a dot (.) appears at the "EDITED"
position. This indicates that the parameter has
ZOOM GFX-707
EDITED
(VALUE)
Shows that parameter
has been changed
MOD (modulation)
module parameter
REV (reverb)
module parameter
PARM1 knob PARM2 knob PARM3 knob
PATCH
Besides the above parameters, the MODULE
/ keys can be used to change the PATCH
LEVEL parameter.
To store an edited patch, carry out the
steps for storing(
p. 16).
If another patch is called up without storing the
edited patch, the edited contents will be lost.
NOTE
The Easy Edit function is not available while
using the rhythm pattern.
13
Listening to Patches (Play Mode Operation)
▲ foot switch/TYPE (BANK)▲ key:
start a new recording
• The sampler function cannot be used at the
same time as the rhythm function or the Jam
Play function.
• While using the sampler function, the MOD
module and REV module included in a patch
cannot be used. (These modules are set to
off, regardless of what the original setting of
the patch is.)
• The recorded contents of the sampler are
automatically erased when the sampler
function is terminated.
Reserving the Next Patch (DIRECT LOAD)
In the factory default condition, patches are switched as soon as you make the selection, resulting
in an immediate change in the sound. This is called "Direct Load". If you want to change to a distant
patch (for example from patch A1 to patch E5), all the intermediate patches will briefly change the
sound, which may not be desirable. In such a case, you can reserve the patch and cause the patch
change to be delayed until confirmed by you. This function is activated as follows;
1
In play mode, press the EDIT (CANCEL) key.
2
Use the MODULE / keys to cause the
TOTAL module LED to light up.
The unit returns to the play mode, and reserving
a patch is now possible. When a new patch is
selected in this condition, the BANK/PATCH
indicator and the patch name on the display are
flashing, but the sound does not change yet.
This shows that the unit is waiting for
confirmation from the user.
MODULE
COMP•DIST
ZNR/EQ
MOD
REV
TOTAL
(ON/OFF)
3
Listening to Patches (Play Mode Operation)
Use the TYPE (BANK) ▼/▲ keys to cause
the indication "DIRLOD" (Direct Load) to
appear on the display.
BANK
BOTH
PATCH NAME
BANK
(GROUP)
4
BOTH
PATCH
EDITED
(VALUE)
5
BOTH
BANK
BOTH
PATCH
EDITED
(VALUE)
BANK
BOTH
PATCH
BANK
EDITED
BOTH
(VALUE)
PATCH
EDITED
(VALUE)
BANK
PATCH
BOTH
EDITED
(VALUE)
PATCH
EDITED
(VALUE)
Confirm
PATCH
PARM1 knob
BOTH
EDITED
(VALUE)
Turn parameter knob 1 so that the
BANK/PATCH indicator shows "oF".
BANK
BANK
To confirm the patch change, press both ▼/▲
foot switches at the same time. The
BANK/PATCH indicator and display indication
stop flashing, and the sound of the new patch
becomes active.
This parameter determines whether the sound is
switched immediately when a patch is selected.
TYPE (BANK)
PATCH
HINT
EDITED
(VALUE)
Press the EDIT (CANCEL) key once more.
• To return to the original operation mode, set
the DIRLOD parameter to "on".
• The DIRECT LOAD setting is stored
automatically by the unit. There is no need to
perform any steps for storing.
Fixing the Bank (BANK HOLD)
In play mode, you can fix the bank so that only patches within that bank are switched.
1
In play mode, press the EDIT (CANCEL) key.
5
Keep on turning parameter knob 2 until the
BANK/PATCH indicator shows "on".
2
Use the MODULE / keys to cause the
TOTAL module LED to light up.
6
Press the EDIT (CANCEL) key once more.
3
Use the TYPE (BANK) ▼/▲ keys to cause
the indication "DIRLOD" (Direct Load) to
appear on the display.
TYPE (BANK)
PATCH NAME
(GROUP)
4
BANK
BOTH
PATCH
EDITED
(VALUE)
Turn parameter knob 2.
BANK
PATCH
PARM2 knob
BOTH
14
When Bank Hold is activated, repeatedly
pressing ▲ foot switch will switch patches only
within the current bank, as shown below.
BANK
As soon as you operate parameter knob 2, the
display indication changes to "BNKHLD" (Bank
Hold). This parameter determines whether the
bank is fixed in play mode or not. The default
setting is "oF".
PATCH NAME
The unit returns to the play mode. The BNKHLD
parameter setting is reset to "off" when the
GFX-707 is turned off and on again.
EDITED
(VALUE)
BOTH
PATCH
EDITED
(VALUE)
HINT
BANK
BOTH
PATCH
EDITED
(VALUE)
BANK
BOTH
PATCH
EDITED
(VALUE)
BANK
BOTH
PATCH
EDITED
(VALUE)
• In the Bank Hold condition, the bank can still
be switched with the TYPE (BANK) ▼/▲
keys.
• To return to the original setting, set the
BNKHLD parameter to "oF".
ZOOM GFX-707
Altering the Sound of a Patch (Edit Mode Operation)
The edit mode allows you to freely alter the parameters that make up a patch, so that you can create your own patches.
This section describes the operation steps.
Patch Configuration
Each patch of the GFX-707 consists of several effects (effect modules), as shown in the illustration below. A patch is
a combination of modules, each with their distinct parameter settings.
SAMPLER
Patch
COMP•DIST
ZNR
EQ
AMP SIM
MOD
REV
PATCH LEVEL
HINT Also within the same module, different effect types will have different parameters.
Basic Edit Mode Steps
1
In play mode, select the patch you want to
edit.
Patches for editing can be selected from either
the USER group or the PRESET group.
However, the PRESET group does not allow
storing. When you have altered a patch from the
PRESET group and want to store it, you must
select a location in the USER group.
2
3
Modules are switched in the following order,
and the respective module LED is flashing.
COMP•
DIST
COMP•DIST
Red
The GFX-707 switches to the edit mode.
Immediately after the edit mode is activated, the
TOTAL module will be selected.
BANK
BOTH
TOTAL
ZNR/EQ
MOD
REV
TOTAL
EQ
PAGE 1
EQ
PAGE 2
MOD
ZNR/EQ
Red
ZNR/EQ
Green
MOD
Red
ZNR/EQ
Orange
PATCH NAME
PATCH
REV
Red
TOTAL
PEDAL
TOTAL
Red
PEDAL
Green
PATCH
EDITED
BOTH
EDITED
(VALUE)
Effect type
Shown if selected effect
can be controlled by pedal
PATCH
PEDAL
BOTH
REV
BANK
(VALUE)
Currently
selected module: Currently ON module:
BANK
LED is lit
LED flashes
COMP•DIST
ZNR
The display shows the effect type currently
selected for that module. If the currently
selected module is OFF, the indication "-oFF-"
is shown on the display.
Press the EDIT (CANCEL) key.
PATCH NAME
Use the MODULE / keys to select the
module you want to edit.
EDITED
(VALUE)
Play mode:
When any module ON/OFF state,
Currently OFF module: effect type, or parameter value was
LED is out
changed, a dot (.) appears here.
This indicates that the patch was
edited.
4
To change the effect type, use the TYPE
(BANK) ▼/▲ keys.
For details on effect types and parameters for
each module, see page 17 - 20.
TYPE (BANK)
Edit mode:
When currently displayed
parameter was changed,
a dot (.) appears here.
ZOOM GFX-707
(GROUP)
15
Altering the Sound of a Patch (Edit Mode Operation)
Within each module, there are several effects which are called effect types. For example. the REV (reverb) module
comprises effect types such as HALL, ROOM, and PP-DLY (ping-pong delay).
The elements that determine the sound of a patch are called effect parameters. Each module has several effect
parameters, whose value can be adjusted with the parameter knobs 1 - 3.
5
Use parameter knobs 1 - 3 to change the
parameter setting.
TYPE (BANK)
For example, if the effect type ROOM of the REV
module is selected, the parameter knobs 1 - 3
will adjust the following parameters.
• Parameter knob 1
• • • • • • TIME
• Parameter knob 2
• • • • • • TONE
• Parameter knob 3
• • • • • • MIX
BANK
PATCH
BOTH
EDITED
(VALUE)
First push
In edit mode, the parameter knobs 1 - 3 serve to
adjust the parameters 1 - 3 of the currently
selected module.
When one of parameter knobs 1 - 3 is turned,
the name of the corresponding parameter
appears on the display and the current value on
the BANK/PATCH indicator.
PATCH NAME
(GROUP)
TYPE (BANK)
PATCH NAME
BANK
PATCH
(GROUP)
BOTH
EDITED
(VALUE)
Second push
TYPE (BANK)
PATCH NAME
BANK
PATCH
(GROUP)
BOTH
EDITED
(VALUE)
Third push
6
To switch the ON/OFF status of a module,
press the MODULE / keys together.
7
Repeat steps 3 - 6 to edit other modules
8
When editing is completed, press the EDIT
(CANCEL) key.
Altering the Sound of a Patch (Edit Mode Operation)
The GFX-707 returns to the play mode. A dot (.)
appears at the "EDITED" position of the
BANK/PATCH indicator, to indicate that the
patch has been edited.
To check the value of a parameter without
moving the parameter knob, press the TYPE
(BANK) ▼/▲ keys together. With each push of
the two keys, the names of parameters 1 - 3 and
the respective settings are shown.
Storing and Copying Patches
Unless you store an edited patch in the memory of the unit, the edited contents will be lost (the
patch will revert to its original condition) when you select another patch. If you have created a
patch you like, do not forget to store it. It is also possible to store an existing patch in another
location, thereby creating a copy. By copying several patches you want to use in a song to
adjacent numbers in the USER group, you can easily call them up during a performance.
1
The GFX-707 enters the store standby
condition. If the STORE key is pressed while
using the rhythm function, the rhythm output is
stopped and the unit then enters the standby
condition. When storing an edited patch, be
sure to change the patch name. This is done
with the TOTAL module (
p. 20).
2
Use the TYPE (BANK) ▼/▲ keys and ▼/▲
foot switches to select the store target
(copy target).
If you do not specify the store target, the original
bank/patch number becomes the store target.
When you change the store target bank/patch
number, the changed portion on the
BANK/PATCH indicator flashes. The indication
"STORE?" and the store target patch name are
16
flashing alternately on the display.
In play mode or edit mode, press the
STORE key.
PATCH NAME
BANK
BOTH
3
PATCH
EDITED
(VALUE)
To execute the patch store (copy) process,
press the STORE key once more.
Storing is carried out, and the unit returns to the
play mode. To abort the store process, press
the EDIT (CANCEL) key before step 3.
NOTE
• The PRESET group is read-only. If a patch
from the PRESET group was selected and
the STORE key is pressed, the store target
automatically becomes "A1". Change the
bank/patch number as required.
• When store (copy) is carried out, the previous
patch in the target is overwritten (erased). If
that patch was edited, its contents cannot be
restored. However, it is possible to restore a
selected patch or all patches from the USER
group (
p. 23) to the factory defaults.
ZOOM GFX-707
Effect Types and Parameters
In this section, all effect types and parameters of the GFX-707 are explained. Parameters that are the same for several
effects are explained in detail only the first time they appear.
The [
] mark indicates that this parameter can be assigned to the expression pedal (
p. 22).
The
marks indicate parameters that can be controlled with the parameter knobs 1 - 3 in play mode.
COMP•DIST (compressor/distortion) module
In addition to various distortion effects such as overdrive and fuzz, this module contains a clean compressor and acoustic guitar
simulator.
TYPE 1
ACOSIM (Acoustic simulator)
This effect makes an electric guitar sound like an acoustic guitar.
Parameter 1
TOP
1 – 10
Adjusts characteristic sound of acoustic guitar strings.
Parameter 2
BODY
1 – 10
Adjusts body resonance.
Parameter 3
LEVEL
1–8
Adjusts volume level after passing COMP•DIST module.
TYPE 2
CMP FS (Compressor/fast)
TYPE 3
CMP SL (Compressor/slow)
This is a slow-attack compressor.
TYPE 4
CMP+CR (Compressor + Crunch)
Combination of compressor and crunch.
* TYPE 4 - 7 parameters are identical.
Parameter 1
GAIN
1 – 30
Adjusts distortion depth.
Parameter 2
COMP
oF, 1 – 10
Adjusts depth of compressor effect.
Parameter 3
LEVEL
1–8
Adjusts volume level after passing COMP•DIST module.
TYPE 5
CMP+OD (Compressor + Overdrive)
This is a combination of compressor and overdrive.
CMP+DS (Compressor + Distortion)
This is a combination of compressor and distortion.
TYPE 7
CMP+FZ (Compressor + Fuzz)
This is a combination of compressor and fuzz.
TYPE 8
OD1 (Overdrive 1)
This effect produces a dry overdrive sound. * TYPE 8 - 16
parameters are identical.
1 – 30
Parameter 1
GAIN
Adjusts distortion intensity.
0 – 10
Parameter 2
TONE
Adjusts tonal quality.
1– 8
Parameter 3
LEVEL
Adjusts volume level after passing COMP•DIST module.
TYPE 9
OD2 (Overdrive 2)
This effect produces an overdrive sound with a pronounced cabinet character.
TYPE 10
DIST2 (Distortion 2)
This effect produces a dry distortion sound.
TYPE 11
DIST2 (Distortion 2)
This effect produces a strong distortion sound.
TYPE 12
FUZZ
Produces fuzz sound reminiscent of the sixties.
TYPE 13
WILDFZ (Wild Fuzz)
Produces high-gain, aggressive fuzz sound.
TYPE 14
LEAD
Produces sound with a distinctive midrange character.
TYPE 15
METAL
Produces high-gain sound with boosted low and high end.
TYPE 16
PWR DRV (Power Drive)
Simulates the sound of a large amplifier.
ZNR/EQ (Zoom Noise Reduction/Equalizer) module
This module contains a 4-band equalizer for making tone adjustments. The equalizer has only one effect type, but because there are
many parameters, it is divided into two pages titled EQ P1 and EQ P2. (Use the MODULE
/
keys to switch between pages.) This
module also comprises the ZNR settings.
ZNR
(Zoom Noise Reduction)
The original noise reduction developed by Zoom cuts noise
during performance pauses without impairing the sound quality.
Parameter 1
ZNR
OF, 1 – 7
Adjusts ZNR sensitivity. The recommended approach is to set the
value as high as possible without producing an unnatural cut of
the instrument sound. When set to "oF", ZNR is disabled.
NOTE
EQ P1
ZNR operates independently of the EQ module. The ZNR
setting will be active also if the EQ module is off, and the EQ
module and ZNR can also be used together.
(EQ page 1)
This page of the 4-band equalizer allows adjustment from the
extreme high range to the midrange.
ZOOM GFX-707
Parameter 1
PRESEN
-12 – 12
Controls boost/cut in ultra high range (center frequency 8 kHz).
Parameter 2
HIGH
-12 – 12
Controls boost/cut in high range (center frequency 3.125 kHz).
Parameter 3
MIDDLE
-12 – 12
Controls boost/cut in midrange (center frequency 800 Hz).
EQ P2
(EQ page 2)
This page of the 4-band equalizer allows adjustment in the low range.
Parameter 1
LOW F
1, 2
1 selects the ultra low range (center frequency 63 Hz) and 2 the
low range (center frequency 125 Hz).
Parameter 2
LOW G
-12 – 12
Controls boost/cut in the range selected with LOW F.
Parameter 3
LEVEL
1–8
Adjusts volume level after passing EQ module.
17
Effect Types and Parameters
This is a fast-attack compressor.
* TYPE 2 and 3 parameters are identical.
Parameter 1
COLOR
FL, Ft, bt
Selects sound character.
FL(Flat): Clean sound with flat characteristics
Ft(Fat Clean): Clean sound with prominent midrange
bt(Bright): Clean sound with vivid mid/high range
Parameter 2
COMP
oF, 1 – 10
Adjusts depth of compressor effect. "oF" means that effect is
disabled.
Parameter 3
LEVEL
1– 8
Adjusts volume level after passing COMP•DIST module.
TYPE 6
MOD ( modulation) module
This module comprises spatial effects such as chorus and flanger, filter effects such as auto wah, and modulation effects such as ring
modulator.
TYPE 1
CHORUS
This stereo chorus effect produces a clear and very wide sound
stage.
Parameter 1
DEPTH
0 – 10
Adjusts effect depth.
Parameter 2
RATE
1 – 30
Adjusts modulation speed.
Parameter 3
MIX
0 – 30
Adjusts effect mix ratio.
TYPE 2
V-CHO (Vintage Chorus)
This chorus effect is characterized by warm and smooth sound.
Parameter 1
DEPTH
0 – 10
Adjusts effect depth.
Parameter 2
RATE
1 – 30
Adjusts modulation speed.
Parameter 3
MIX
0 – 30
Adjusts effect mix ratio.
TYPE 3
FLANGE (Flanger)
Effect Types and Parameters
This effect produces a unique, undulating sound.
Parameter 1
DEPTH
0 – 10
Adjusts effect depth.
Parameter 2
RATE
1 – 30
Adjusts modulation speed.
Parameter 3
FB
-10 – 10
Adjusts feedback level. Increasing this value in the plus or minus
direction emphasizes the distinctiveness of sound, but with
different tonal character.
TYPE 4
PHASE
This effect results in a swooshing sound.
Parameter 1
POSI
AF, bF
Selects connection order of COMP•DIST module and MOD
module, as follows.
AF: COMP•DIST →MOD
bF: MOD →COMP•DIST
Parameter 2
RATE
1 – 30
Adjusts modulation speed.
Parameter 3
COLOR
1–4
Selects phase sound type.
TYPE 5
TREMOL (Tremolo)
This effect periodically varies the level of the sound.
Parameter 1
TOPDEPTH
0 – 10
Adjusts effect depth.
Parameter 2
RATE
1 – 30
Adjusts modulation speed.
Parameter 3
CLIP
0 – 10
Adjusts modulation waveform clip. Larger values result in more
intense modulation.
TYPE 6
A-PAN (Auto Pan)
This stereo panning effect periodically moves the sound back and
forth between the right and left channel.
Parameter 1
WIDTH
0 – 10
Adjusts effect width.
Parameter 2
RATE
1 – 30
Adjusts modulation speed.
Parameter 3
CLIP
0 – 10
Adjusts modulation waveform clip.
TYPE 7
A-WAH (Auto Wah)
This effect gives a varying wah sound that depends on the
picking intensity.
Parameter 1
POSI
AF, bF
Selects connection order of COMP•DIST module MOD module,
as follows.
AF: COMP•DIST →MOD
18
bF: MOD →COMP•DIST
Parameter 2
RESO
1 – 10
Adjusts wah effect intensity.
Parameter 3
SENS
-10 – -1, 1 – 10
Adjusts sensitivity. Negative values result in downward wah.
P-WAH (Pedal Wah)
TYPE 8
This effect lets you control wah with the expression pedal.
Parameter 1
POSI
AF, bF
Selects connection order of COMP•DIST module and MOD
module.
Parameter 2
FREQ
1 – 10
Adjusts wah effect center frequency.
Parameter 3
DIRMIX
0 – 10
Adjusts original sound mix.
NOTE
For the MODE parameter of the PEDAL module (
"Hi" and "Lo" is equivalent to "dn".
p. 20),
STEP
TYPE 9
This is a special effect with step-like filter characteristics.
Parameter 1
DEPTH
0 – 10
Adjusts depth.
Parameter 2
RATE
1 – 30
Adjusts modulation speed.
Parameter 3
RESO
0 – 10
Adjusts effect intensity.
PITCH (Pitch Shifter)
TYPE 10
This is a pitch shifter with a range of 1 octave up and 2 octaves
down.
Parameter 1
PITCH
-12, ...- 1, dt, 1,... 12, 24
Sets the pitch shift amount. The "dt" setting results in a detune
effect.
Parameter 2
TONE
0 – 10
Adjusts effect tone.
Parameter 3
BAL
0 – 30
Adjusts balance between effect sound and direct sound. Higher
values emphasize effect sound.
P-PIT (Pedal Pitch)
TYPE 11
This effect lets you vary the pitch in real time, using the
expression pedal.
Parameter 1
TYPE
1 – 16
Selects the pedal pitch type. Depending on the type, the pitch
when pushing the pedal down or when raising it differs.
Pedal
minimum value
P-PIT
TYPE
1
2
3
4
5
6
7
8
9
10
11
12
13
14
15
16
Parameter 2
-100 cent
Original sound only
DOUBLING
Detune + DRY
0 cent
+1 octave
0 cent
-2 octaves
-1 octave + DRY
+1 octave + DRY
-700 cent + DRY
500 cent + DRY
-∞ (0 Hz) + DRY
+1 octave
-∞ (0 Hz) + DRY
+1 octave + DRY
TONE
Pedal
maximum value
Original sound only
-100 cent
Detune + DRY
DOUBLING
+1 octave
0 cent
-2 octaves
0 cent
+1 octave + DRY
-1 octave + DRY
500 cent + DRY
-700 cent + DRY
+1 octave
-∞ (0 Hz) + DRY
+1 octave + DRY
-∞ (0 Hz) + DRY
0 – 10
Adjusts effect tone.
ZOOM GFX-707
Regardless of the MODE parameter setting of the PEDAL
module (
p. 20), this effect type causes the same
operation as "UP".
NOTE
TYPE 12
RING-M (Ring Modulator)
This effect produces a metallic sound.
Parameter 1
POSI
AF, bF
Selects connection order of COMP•DIST module and MOD
module.
Parameter 2
RATE
1 – 30
Sets frequency for ring modulation effect. The tone changes
considerably depending on the frequency setting.
Parameter 3
BAL
0 – 30
Adjusts balance between effect sound and direct sound.
TYPE 13
SLOW-A (Slow Attack)
This effect automatically creates a "violin playing" sound
depending on the picking intensity.
Parameter 1
POSI
AF, bF
Selects connection order of COMP•DIST module and MOD
module.
Parameter 2
TIME
1 – 30
Adjusts attack speed.
Parameter 3
CURVE
1 – 10
Adjusts attack curve.
TYPE 14
FILTER
It is recommended to use the filter effect only with single
notes.
NOTE
TYPE 15
DELAY
This is a ping-pong delay with a delay time of up to 500 ms
(milliseconds).
Parameter 1
TIME
1 – 50
Adjusts delay time in 10-ms steps.
Parameter 2
FB
0 – 10
Adjusts feedback amount. Higher values result in more delay
repetitions.
Parameter 3
RANGE
1 – 10
ECHO
This effect produces a soft echo similar to a tape echo.
Parameter 1
TIME
1 – 50
Adjusts delay time in 10-ms steps.
Parameter 2
FB
0 – 10
Adjusts feedback amount.
Parameter 3
MIX
0 – 30
TYPE 17
T-TRIP (Time Trip)
This is a new kind of delay effect which varies the delay time
according to the picking intensity.
Parameter 1
SENS
1 – 50
Adjusts effect sensitivity.
Parameter 2
FB
-10 – 10
Adjusts feedback amount.
Parameter 3
BAL
0 – 30
Adjusts balance between effect sound and direct sound.
TYPE 18
TRMCHO (Tremolo + Chorus)
This is a combined tremolo and chorus effect.
Parameter 1
TRAMRAT
1 – 30
Adjusts tremolo speed.
Parameter 2
CHORAT
1 – 30
Adjusts modulation speed of chorus effect.
Parameter 3
CHOMIX
0 – 30
Adjust chorus sound mix.
TYPE 19
RINVIB (Ring Modulator + Vibrato)
Effect Types and Parameters
This effect tracks the picking action and controls filter opening
accordingly.
Parameter 1
POSI
AF, bF
Selects connection order of COMP•DIST module and MOD
module.
Parameter 2
TIME
1 – 30
Adjusts attack speed.
Parameter 3
MIX
0 – 30
Sets the adjustable filter range.
TYPE 16
This is a combined ring modulator and vibrato effect.
Parameter 1
RINRAT
1 – 30
Adjusts ring modulation effect frequency.
Parameter 2
VIBRAT
1 – 30
Adjusts vibrato effect speed.
Parameter 3
VIBDEP
0 – 10
Adjusts vibrato effect depth.
TYPE 20
VIBE
This is a vibrato effect.
Parameter 1
DEPTH
1 – 30
Adjusts effect depth.
Parameter 2
RATE
1 – 30
Adjusts effect speed.
Parameter 3
BAL
0 – 30
Adjusts balance between effect sound and direct sound.
REV (Reverb) module
Besides reverb and delay effects, this module also contains sophisticated jam effects using latest sampling technology.
TYPE 1
HALL
This is a reverb effect which simulates the acoustics of a concert
hall.
* TYPE 1 and 2 parameters are identical.
Parameter 1
TIME
1 – 30
Adjusts reverb duration (reverb time).
Parameter 2
TONE
0 – 10
Adjusts effect tone.
Parameter 3
MIX
0 – 30
Adjusts effect mix.
TYPE 2
ROOM
This is a reverb effect which simulates the acoustics of a room.
TYPE 3
PP-DLY (Ping-Pong Delay)
This is a ping-pong delay effect with a duration of up to 1.5
seconds.
Parameter 1
TIME
1 – 99, 1.0 – 1.5
Adjusts delay time from 10 ms to 990 ms in 10-ms steps.
(1 - 99), and over 1 second in 100-ms steps (1.0 - 1.5).
ZOOM GFX-707
Parameter 2
FB
Adjusts feedback amount.
Parameter 3
MIX
Adjusts effect mix.
TYPE 4
0 – 10
0 – 30
DLYHAL (Delay + Hall)
This is a combined delay and hall effect.
* TYPE 4 and 5 parameters are identical.
Parameter 1
DLYTIM
1 – 50
Adjusts delay time in 10-ms steps.
Parameter 2
DLYMIX
0 – 15
Adjusts delay mix.
Parameter 3
REVMIX
0 – 15
Adjusts reverb mix.
TYPE 5
DLYROM (Delay + Room)
This is a combined delay and reverb effect.
19
JAM (Jam Play)
This is a special effect that lets you record a guitar phrase during
play and reproduce it in various ways.
Parameter 1
STYLE
nM, rS, SC
Selects playback method for recorded phrase.
nM (Normal): Play in normal direction.
rS (Reverse): Play in reverse direction.
SC (Scratch): Use expression pedal to play with scratch type
effect. From center position, pedal controls either forward or
reverse playback.
Parameter 2
TRG/GT
Selects playback method for ▼ foot switch.
tL (Trigger Loop): Pressing ▼ foot switch causes loop play.
Pressing ▼ foot switch during play stops play.
GS (Gate One-Shot): While ▼ foot switch is pressed, one play
run from start is performed. Releasing ▼ foot switch stops play.
GL (Gate Loop): While ▼ foot switch is pressed, loop play from
start is performed. Releasing ▼ foot switch stops play.
rS (Retrigger One-Shot): Pressing ▼ foot switch causes one play
run from start. Pressing ▼ foot switch during play causes restart
from beginning.
Parameter 3
MIX
0 – 30
Adjusts effect mix.
NOTE
For a detailed explanation of Jam Play, see page 21.
tS (Trigger One-Shot): Pressing ▼ foot switch causes one play
run from start. Pressing ▼ foot switch during play stops play.
TOTAL module
TOTAL is not an independent effect module. Rather it serves to set parameters that affect all patches or the entire GFX-707. You can
switch between the TOTAL 1 and TOTAL 2 pages with the TYPE (BANK) ▼/▲ keys.
TOTAL 1
TOTAL 2
Effect Types and Parameters
Parameter 1
Specifies input position
Parameter 2
Selects characters
Parameter knobs 1 and 2 let you input or edit a patch name. Knob
1 specifies the character input position (indicated by the flashing
part of the display), and knob 2 selects the alphanumeric
character to be input at that position.
(Space)
(Space)
'
(
)
*
+
-
/
0
1
2
3
4
5
6
7
8
9
<
=
>
?
@
A
B
C
D
E
F
G
H
I
J
K
L
M
N
O
P
Q
R
S
T
U
V
W
X
Y
Z
\
Parameter 1
DIRLOD
on, oF
Switches Direct Load function on and off. When "on", the sound
changes immediately when the patch is switched (default). When
"oF", reading in the new patch is delayed until confirmed by the
user.
This parameter applies to all patches. It is stored automatically
when the parameter setting is changed.
Parameter 2
BNKHLD
on, oF
Switches Bank Hold function on and off. When "oF", repeatedly
pressing the ▲ foot switch cycles through all patches and banks,
such as A1 → A2 → A3 → A4 → A5 → B1. When "on", the
bank is fixed and patches are switched only within the bank, such
as A1 → A2 → A3 → A4 → A5 → A1.
This parameter applies to all patches. It is reset to "oF" at poweron.
Parameter 3
AMPMOD
AP, Ln
Adapts characteristics of built-in amp simulator to usage
environment of unit. When GFX-707 is connected to guitar
amplifier, use "AP". For connection to line-level equipment such
as mixer or recorder, use "Ln".
This parameter applies to all patches. It is reset to "AP" at poweron.
Parameter 3
PATLVL
1 – 30
Sets final patch level. Level adjustment is performed with
parameter knob 3. A value of 25 corresponds to unity gain.
PEDAL module
Strictly speaking, the PEDAL module is not an effect module. It contains various settings for the expression pedal.
Parameter 1
ASSIGN
oF, VL, dS, Md, rV
Selects module to be assigned to expression pedal.
oF: Off
VL: Volume
dS: COMP•DIST module
Md: MOD module
rv: REV module
Parameter 2
MODE
UP, dn, Hi, Lo
Determines how parameter changes when pedal is moved.
UP: Parameter minimum value → maximum value
(forward direction)
dn: Parameter maximum value → minimum value
(reverse direction)
Hi: Current value → maximum value (forward direction)
Lo: Minimum value → current value (forward direction)
20
Parameter 3
MINVOL
0 – 10
Sets minimum value when using expression pedal as volume
pedal (ASSIGN parameter set to "VL").
NOTE
NOTE
HINT
When using the expression pedal as a volume pedal, the
volume changes from the MINVOL value to the maximum
value in the forward direction, regardless of the MODE
parameter setting.
Parameters 1 and 2 can be set for each patch and are stored
when the patch is stored. Parameter 3 applies to all patches
and is automatically stored when the setting is changed.
For information on adjusting parameters with the expression
pedal, see page 22.
ZOOM GFX-707
Using the Jam Play Function
Besides its regular sampler, the GFX-707 incorporates a Jam Play feature that records and plays a guitar phrase of up
to 2 seconds. This allows hold delay, and the phrase can also be played in reverse. The direction and speed of
playback can be controlled with the expression pedal, letting you achieve a "scratch" effect such as used by DJs. To
use Jam Play, select a patch for which the effect type of the REV module is set to JAM, and set the STYLE
parameter (playback method) and TRG/GT parameter (foot switch function) as desired.
1
Select the patch to use with Jam Play.
2
Activate edit mode, and select JAM as
effect type for the REV module (
p. 15).
Verify that the REV module is ON.
3
Turn parameter knob 1 and select the
STYLE parameter (playback method for
recorded phrase).
tL (Trigger Loop)
Pressing ▼ foot switch
causes loop play
Pressing ▼ foot switch during
play stops play
GS (Gate One-Shot)
nM (Normal): Play in normal direction.
rS (Reverse): Play in reverse direction.
While ▼ foot switch is
pressed, one play run
from start is performed
Releasing ▼ foot switch
stops play
GL (Gate Loop)
Play in normal direction
Recorded phrase
While ▼ foot switch
is pressed, loop play
from start is performed
Play in reverse direction
4
When the STYLE parameter is set to "nM"
(Normal) or "rS" (Reverse), use parameter
knob 1 to set the TRG/GT parameter
(trigger/gate mode).
Releasing ▼ foot
switch stops play
rS (Retrigger One-Shot)
tS (Trigger One-Shot)
Pressing ▼ foot switch
causes one play run
from start
Pressing ▼ foot switch
during play to restart
from beginning
When the STYLE parameter is set to "SC", this
parameter has no effect.
Pressing ▼ foot switch
causes one play run from start
ZOOM GFX-707
Pressing ▼ foot switch
during play stops play
5
Move to the PEDAL module and assign the
expression pedal to the REV module (
p. 22).
6
Store the patch and return to the play
mode.
21
Using the Jam Play Function
SC (Scratch): Use expression pedal to play with
scratch type effect. From center position, pedal
controls either forward or reverse playback.
The function of the ▼ foot switch and expression
pedal depends on the STYLE parameter and
TRG/GT parameter setting.
In play mode, when a patch where JAM Play
can be used is selected, the REV and PEDAL
module LEDs are flashing.
7
When "nM" or "rS" is selected as STYLE
parameter, the expression pedal can be used to
adjust the level of the playback signal.
Push down the expression pedal fully.
The GFX-707 enters the Jam Play mode and
goes into the recording standby condition. The
indication "JP" is shown on the BANK/PATCH
indicator.
8
While playing your instrument, press the ▲
foot switch when you want to start
recording.
To record and play a new phrase, repeat steps
8 - 10.
11 To terminate the Jam Play mode, push the
expression pedal once more fully down or
press the EDIT (CANCEL) key.
As opposed to the regular sampler function, the
signal recorded for Jam Play always is
processed by the currently selected effects.
9
Also after terminating the Jam Play mode, the
most recent recorded phrase is temporarily
retained by the unit and can be used again
when a patch is selected for which Jam Play is
enabled. If Jam Play is enabled for both
patches, it is also possible to switch between
patches while playing the recorded phrase.
To stop recording midway, press the ▼
foot switch. Alternatively, after 2 seconds,
recording stops automatically.
When the regular sampler is used or when the
unit is turned off, the phrase is cleared.
10 Use the ▼ foot switch or the expression
pedal to control play/stop of the recorded
phrase.
Controlling an Effect With the Pedal
Controlling an Effect With the Pedal
The expression pedal of the GFX-707 can be used to control the volume or parameters of the COMP•DIST, MOD,
and REV modules in real time.
1
In edit mode, use the MODULE / keys
to cause the PEDAL module LED to flash.
3
When wishing to control a parameter with the
expression pedal, the parameter must first be
assigned to the pedal in edit mode.
2
Parameter 2 is the MODE parameter that
determines the range and direction of the
change caused by the expression pedal.
Available settings are "UP", "dn" (Down), Hi
(High), Lo (Low).
Use the parameter knob 1 to select the
assign target for the expression pedal.
Parameter 1 of the PEDAL module is the
ASSIGN parameter.
Parameter value
Maximum value
The following targets can be selected: "VL"
(Volume), "dS" (COMP•DIST module), "Md"
(MOD module), "rv" (REV module). When a
module to which the pedal is assigned is called
up, the indication "Pd" appears on the
BANK/PATCH indicator.
The parameter that is actually controlled is
predetermined for every effect type in the
module. This parameter is indicated by a pedal
mark in the description on pages 17 through 20.
22
Use parameter knob 2 to select the way
the parameter changes when the pedal is
moved.
UP
Hi
dn
Value
programmed
in patch
Lo
Minimum value
4
Store the patch and return to the play
mode.
Verify that the module to which the pedal was
assigned is ON.
ZOOM GFX-707
NOTE
For information on the volume change when
using the expression pedal as a volume pedal,
see the explanation of the MINVOL parameter
in the PEDAL volume (
p. 20).
5
While the stored patch is selected, move the
expression pedal. The parameter assigned to
the pedal in edit mode should change.
6
To switch the ON/OFF status of a module
assigned to the pedal, push the expression
pedal fully down.
In play mode, pushing the expression pedal fully
down switches the ON/OFF status of a module.
NOTE
• There is one exception to the above
behavior. If a patch is selected for which Jam
Play (
p. 21) is active, pushing the
expression pedal fully down will activate Jam
Play mode and cause the GFX-707 to go into
the recording standby condition.
• When using the expression pedal as a
volume pedal, pushing the pedal fully down
has no effect other than raising the volume.
All Initialize/Factory Recall
The All Initialize/Factory Recall function is a special function that lets you reset the GFX-707 to the condition in
which it was originally shipped. When All Initialize is performed, all patches in the USER group and all other
settings of the unit are returned to the default condition. Factory Recall can be used to reset specific patches in the
USER group to the default settings.
1
Turn power to the GFX-707 on while
keeping the STORE key depressed.
2
Press the STORE key once more.
• To perform Factory Recall → Use the ▼/▲
foot switches and TYPE (BANK) ▼/▲ keys to
select the patch (from the USER group) that
you want to return to the factory default
condition.
Important: When All Initialize is executed, the
contents of all patches stored by the user will
be overwritten (erased). When wishing to
cancel All Initialize/Factory Recall, press the
EDIT (CANCEL) key before step 2.
The indication "ALINIT" flashes on the display.
Adjusting the Expression Pedal
The expression pedal of the GFX-707 uses a highly reliable optical sensor mechanism. The pedal is adjusted for
optimum operation at the factory, but sometimes, readjustment may be necessary. If on/off switching is not
performed when the pedal is fully pushed down, or if on/off switching occurs even if the pedal is only lightly pushed,
adjust the pedal as follows.
1
Turn power to the GFX-707 on while
keeping the SAMPLER key depressed.
The indication "MIN" flashes on the display.
2
With the expression pedal fully raised,
press the STORE key.
Push strongly,
so that pedal
touches here
When foot is lifted,
pedal returns slightly
The display indication changes to "MAX".
STORE
Press STORE key
STORE
PATCH NAME
The adjustment is completed, and the unit
returns to the play mode.
3
Push the expression pedal fully down and
then lift your foot off the pedal (the pedal
goes back a little). Press the STORE key at
this point.
ZOOM GFX-707
The point where the STORE key is pressed in
HINT step 3 determines the on/off switching point. If
you want the pedal to perform on/off switching
with a lighter touch, push the key at a
somewhat higher position of the pedal.
23
All Initialize/Factory Recall / Adjusting the Expression Pedal
• To perform All Initialize → Continue with step 2
All Initialize or Factory Recall is carried out. If All
Initialize was carried out, the unit automatically
returns to the play mode.
Troubleshooting
Symptom
Check
Remedy
• Is suitable AC adapter connected, and
power switch set to ON?
Make connections as described in "Getting
Connected" and turn power on.
• Is instrument connected correctly to INPUT
jack and playback equipment to OUTPUT jack?
Make connections as described in "Getting
Connected".
• Is shielded cable defective?
Try using another cable.
• Is amplifier turned on? Are level controls for
instrument and amplifier set to proper values?
Turn amplifier on and adjust volume to
proper level.
• Is GFX-707 set to mute condition?
Cancel the mute condition.
• Is OUTPUT knob turned down?
Set OUTPUT knob to proper position.
• Is expression pedal raised?
For some patches, the expression pedal
controls the volume. Set it to a suitable
position.
Sound of CD player or
other equipment
connected to INPUT jack
is not heard (sampling is
not carried out)
• Is output level of CD player set to
appropriate position?
Adjust level.
Rhythm pattern is not
played
• Is rhythm volume turned down?
Use PARM 3 knob to adjust the volume.
Expression pedal on/off
switching is not
performed properly
• Readjusting the pedal may correct the
problem.
Readjust pedal, as described on page 23.
No sound or very low
volume
GFX-707 Specifications
Effect Programs
48 types (43 effects + 4 amp simulator settings
+ ZNR)
Effect Modules
4 modules + amp simulator + ZNR
Sampler Function Maximum recording time: 6 seconds
Playback speed control
<MOD and REV modules are temporarily
turned off when sampler function is used>
Patch Memory
USER: 6 banks x 5 = 30 (rewritable, with
store)
PRESET: 6 banks x 5 = 30
Total 60 patches
Sampling Frequency
31.25 kHz
A/D Conversion
20-bit, 64-times oversampling
D/A Conversion
20-bit, 128-times oversampling
DSP
ZOOM original ZFx-2
Input
Guitar input: standard mono phone jack
(Nominal input level -20 dBm, input
impedance 470 kilohms)
Also serves as AUX IN for standard stereo
phone jack
Output
Combined line/headphone output
Standard stereo phone jack
(maximum output level = +3 dBm with output
load impedance of 10 kilohms or higher)
Display
6-position alphanumeric LED display
2-position 7-segment LED display
Power Supply
AC adapter (available separately)
9 V DC, center minus, 300 mA (ZOOM AD0006)
Batteries: IEC R6 (size AA) x 4
Continuous operation: approx. 14 hours (with
alkaline batteries)
External Dimensions
235 mm (W) x 189 mm (D) x 54 mm (H)
Weight
740 g (without batteries)
* 0 dBm = 0.775 Vrms
* Design and specifications subject to change without notice.
ZOOM CORPORATION
NOAH Bldg., 2-10-2, Miyanishi-cho, Fuchu-shi, Tokyo 183-0022, Japan
PHONE: 042-369-7116 FAX: 042-369-7115
Printed in Japan 707-5000