1
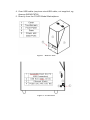
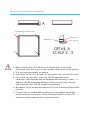
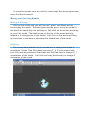
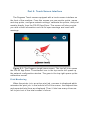
4 Own er’ s M anual Pegasus Touch 3D Printer R 0.1 – M ay 4, 2014 (work in pr ogr ess) © 2014 Full Spectrum L aser 3D , LLC http://f sl3d.c om Contents Introducti on ..................................................................................... 6 Icons U sed in This M anual ............................................................ 6 Part 1: Saf ety .................................................................................. 7 Overview ...................................................................................... 7 Laser saf ety ................................................................................. 8 C ompli ance Statement .................................................................. 9 Gener al Prec auti ons .................................................................... 11 W ork Area ................................................................................ 11 R esin ....................................................................................... 11 Isopr opyl Alc ohol ...................................................................... 12 Part 2: Gettin g Start ed .................................................................... 13 Overview ..................................................................................... 13 U npacking ................................................................................... 13 Parts and Accessor ies ............................................................... 14 Addit ion al R ecommended Tools ................................................. 14 U npacking ................................................................................... 15 Setup .......................................................................................... 15 Build Tray (Vat) R ef er ence D rawing ........................................... 18 Build platf or m ........................................................................... 19 D ouble C heck ........................................................................... 19 R etinaC reate (sof t war e) Instal lat ion ........................................... 19 Part 3: Printing ............................................................................... 20 Add a model ................................................................................ 20 View C ontrol ................................................................................ 20 Zoom In/Out with a M ouse ......................................................... 20 C hange View with a M ouse ........................................................ 20 Pan .......................................................................................... 20 M oving and Ori enting M odels ........................................................ 21 M oving and Si zing ..................................................................... 21 Orientin g .................................................................................. 21 Gener at e Supports ....................................................................... 22 M anual Support M odif icat ion ........................................................ 22 Print............................................................................................ 22 Part 4: Af ter Printing ....................................................................... 24 R emoving th e Build Pl atf or m ........................................................ 24 Finishing Steps ............................................................................ 24 Gener al St eps ........................................................................... 24 R epair I mperf ect Prints .............................................................. 25 Part 5: Touch Screen Interf ace ........................................................ 27 Print M onitoring ........................................................................... 27 Pause/Play an d Stop .................................................................... 28 N etwork Set tings ......................................................................... 28 C alibr at ion .................................................................................. 28 FSL3D App Stor e ......................................................................... 29 Part 6: R etinaC reat e ....................................................................... 30 Overview ..................................................................................... 30 Save as J ob - The progr am wi ll s ave y our scene. ........................ 31 Part 7: M aintenance ........................................................................ 32 Pegasus Touch Laser 3D Printer C are ........................................... 32 To keep th e body of Pegasus clean, use microf iber cl oth t o wi pe the outsi de. If you want shine f or the c over, use product s specif ical ly recommended f or acryl ic (ex. N ovus #1). Avoid products that cont ain ammoni a ( ex W index). ................................................................... 32 Transport ati on ............................................................................. 32 R esin Car e ............................................................................... 33 Appen di x A: Troubleshootin g ........................................................... 35 H ardware .................................................................................... 35 Sof twar e...................................................................................... 35 Appen di x B: W arranty Statement ..................................................... 36 Appen di x C : Pegasus Touch Specif icati ons ...................................... 39 Appen di x D : M ater ial Saf ety D at a (r esin) .......................................... 40 Introduction Thank you f or your purchase of a Pegasus Touch Laser 3 D Printer by FSL3D . It is our wish that this product adds valu e t o your business or hobby activ iti es f or years t o come. Please tak e ti me to r ead this manual in its ent irety to saf ely use y our device t o its f ull potenti al . For more inf ormati on an d products, please visit htt p:/ /f sl3d.com. Icons U sed in This M anual This icon marks Warnings and Cautions . Please pay special att enti on to inf ormat ion associ at ed with this icon. The Wing icon is used t o in dicate inf or mat ion th at will hel p you oper at e more ef f iciently. Part 1: Safety Over view To ensure a saf e workin g environ ment, it is necess ary to treat th e print er and accessori es with car e. Pl eas e car ef ully read all instructi ons bef or e att empting to operate y ou r 3D Printer. U se only pr inting mat eri als f rom FSL3D or appr oved part ners. U se of other mat eri als may damage y our machine or voi d y our warranty. M odif ying the print er without FSL 3D’ s appr oval wi ll invali date the warr anty and may pose a heal th hazar d. N ever at tempt to operat e y our Printer with the li d open or att empt t o overr ide th e saf ety inter lock system. W hen you receive y our Printer, pl ease c aref ully inspect i t f or any shippin g damage and c ontact us immedi at ely vi a email if there ar e any issues—please include your unit’ s seri al number and phot os of the probl em. C aution – M odif ying the machine or overr iding th e saf et y interl ock may result in hazar dous las er r adiati on exposure. Laser safety The standard ref er ence f or las er saf ety is the A merica n S tandar d f or the Saf e U se of Lasers, Z136.1-2000, devel oped by the A merican N at ion al Standar ds Institut e (AN SI). This ref erence is th e basis f or many of the f eder al regulati ons f or las er and las er system manuf acturers, and f or th e Occupati onal Saf ety an d H ealth Administr ati on (OSH A) laser saf ety guidel ines. I t cont ains det ail ed inf or mati on concerning pr oper instal lat ion and use of las er systems. W hile the AN SI standar d i tself does not have the f orce of law, i ts rec ommen dati ons, including warning signage, tr aining, and th e desi gnat ion of a las er saf ety of f icer, may be compulsory under local workplac e r egul ati ons when oper atin g l aser systems abov e C lass I. It is the operator’ s res ponsi bil ity t o ensure that the instal l ati on an d oper ati on of the Full Spectru m Las er H obby Adv anced Laser System is perf or med in accor dance with all applic able l aws. C opies of ANSI Standar d Z136.1 -2000 are avai labl e f rom: Laser Institut e of Amer ica 12424 R esearch Parkway, Suite 125 Orlan do, FL 32826 (407) 380 -1553 N ever remove any of the case panels of the P rint er. R emoval of case pan els wi ll expose you t o dan ger and voi d y our warranty. Overri ding the interl ock system can expose y ou t o C lass 3B Laser R adi ation. The Pegasus Touch 3D printer is a C l ass 1 Laser System. The Print er case has a saf ety inter lock s witch that deact ivat es the laser if the c over is opened during oper at ion, and n o speci al pr ecauti ons ar e necessary t o oper at e the unit saf ely. 200m W C W M AXIMUM 405nm C ompliance Statem ent The Pegasus Touch 3D printer is a C lass 1 Las er Product, as def ined in Internati onal St andard IEC 60825 -1. Pegasus Touch compl ies with 21 C FR 1040.10 and 1040.11, the Federal Perf or mance Standar ds f or Light -E mit ting Pr oduc ts, except f or devi at ions pursuant to L aser N otice N o. 50, dat ed June 24, 2007 . The C enter f or D evices and R adi ol ogical H ealth of the U S FDA issued Laser N otice N o. 50 t o per mit manuf acturers to c lassif y and manuf acture their products in acc ordance with the Intern ati onal Standar d. 21 CFR 1040 and IEC 60825 -1 require th at c ertif icat ion, i dentif icati on and warning l abels be plac ed on l aser products. R epr oductions of the labels f ound on th e Full Spectrum H obby Advanced Las er System f ol low, with l ocat ions specif ied: 1. C ertif icati on/Identif icat ion L abel. This sticker is l oc ated on the rear of the machine. Any updates to the inf or mati on ( dat e of manuf acture and manuf acturer address) are added as adhesiv e overl ays. Gener al Pr ecautions Please f oll ow the instructi ons bel ow. W ork Area The Printer must be inst all ed on a l ev el s urf ace t o prev en t spi llage of resin. The r esin may s pil l out durin g the lif t cycles if th e surf ace is uneven. Always use a 9” x14.5" wide cuttin g boar d ( eg A mazon ASIN # B00E4W RVTI) or other dr ip pr ot ector when r emov ing th e buil d head. Other wis e R esin may dri p over the f ront of the print er. N ever remove the buil d tr ay without f irst r emoving th e bui ld head. Other wis e R esin may dri p f rom the h ead down ont o the in ternal components of the pr inter . The Printer must be inst all ed in a l ocat ion away f rom dir ect s unlight or int ense artif ici al li ght sources. The work area shoul d be kept at or sl ightly abov e r oom temper atur e (21°C / 70°F). The print er its elf emits no f umes an d the res in contains zero vol at il e organic compounds. H owever, isopr opy l alcohol is c ommonl y used to f inish prints s o an ar ea with good vent il ati on is r ecommended. R esin FSL3D photopoly mer r esin is a mil d irrit ant: t reat it with t he same car e as you would any household chemical and f ol low stan dar d saf ety proc edur es an d FSL3D handling instructio ns. . ● Only use resin f rom FSL3D or approv ed partn ers. U sing 3rd party resin may damage your machine and v oid your warr anty. In addit ion, the R et inaC reat e sof t ware end user l icense is vali d only wh en used with mat eri als f rom FSL3D or approv ed partners ● W ear pr ot ective gl ov es when handling the r esin ; goggl es are also recommended if ther e is a risk of spl ashing. ● R esin is not edi bl e in l iqui d or s oli d f or m. ● Liquid and sol id f or ms of resin ar e not appr oved f or use with f ood or drink. ● Liquid and sol id f or ms of resin ar e not t est ed or appr oved f or use in medical applic ati ons. ● D o not mi x the resin with any subst ances. ● Please ref er to Appendix G f or inf or mati on on h andl ing, s tor age, properti es, and an out line of M ater ial Saf ety. ● M ateri al Saf ety D at a Sheets f or each color ar e avai labl e on the web: http://f sl3d.c om/support . The resin is l ight s ensitive so avoid lon g exposure t o str ong art if icial light ing or sunlight. The transparent y el low cover is desi gned t o bl ock l aser r adiat ion, but stron g exter ior li ght may ent er and cure the r esin. It i s import ant that the unit be kept out of dir ect sunlight or hi gh-intensity artif ici al l ight . D o not pour used r esin back int o the or iginal bottl e to avoid contamin ati on. It is saf e to stor e r esin in th e bui ld tr ay f or a peri od of 24hrs or less bet ween pr ints. For peri ods >24hrs, we r ecommend the bui ld tr ay should be empt ied and the r esin should be f ilt ered and pl aced in a l ight- pr oof cont ainer ; amber N al gene Lab Bot t les work wel l. W e recommen d color ed r esins be gently st irred with a spoon f or 5 minut es bef ore use if l ef t sitting f or more than 7 days du e to possi bl e pi gment s ettl ing. All R esin should be stor ed in a cool dry pl ace. Please ref er to Appendix G f or inf or mati on on h andl ing, s tor age, properti es, and an out line of M ater ial Saf ety of the resin. Isopr opyl Alcohol Isopr opyl Alcohol (IPA) is commonly used to remove uncured resin to f inish parts (see Part 4: Finishing Steps ). FSL3D does not manuf acture or sell IPA. Standar d 9 9% IPA is avai labl e f rom A mazon or y our l ocal groc ery/conveni ence st ore. Please read an d f oll ow all us age and s af ety instructions pr ovided wi th the IPA that y ou purchase. ● ● ● ● Good v entil ati on is str ongly rec ommen ded. Keep away f rom f ir e, heat, or sparks C ontainers shoul d be k ept cl osed or cov ered wh en not in use Always f oll ow instructi ons pr ovided f rom your IPA suppli er. C onsult the pr ovi der f or more inf or mat ion. Part 2: Getting Started Over view The f ollowing s ecti on is a br ief gui de t o getting up and ru nning . Setup of the Pegasus Touch usually takes less than 10 minutes, but there ar e a f ew things t o t ake c are of bef or e it arr ives: Install R etinaC reat e sof t ware Prepare y our work ar ea Purchase 99% IPA f or cleaning of parts Purchase prot ectiv e gl oves . D isposabl e nitr il e glov es wor k wel l. Purchase cleaning an d r emov al t ools Save the box an d packaging! It is nec essary f or shippin g if your unit requi res r epai r or warranty s ervice. U npacking Once your Pegasus Touch has arriv ed and you hav e removed the unit f rom th e box, y ou wi ll notice that the accessor ies and st arter r esin are shipped inside th e bui ld ar ea of the machine. You wi ll n eed to do th e f ollowing to pr epar e th e machine ( wir e cutt ers or scissors required): 1. R emove all wr appin g an d packagin g material f rom th e ext eri or 2. C ut the zi p t ies holding the r esin an d cabl es t o the Z (ver tical) spin e of the machine 3. C ut the zi p t ie restr aining the v at h ol der 4. R emove th e f oam padding f rom th e vat hol der 5. R emove th e r esin 6. R emove th e power brick and Ethern et cabl e 7. R emove th e r esin tr ay. 8. C heck that the r esin tr ay is cl ean and al l plast ic wr ap is r emov ed. 9. Inspect th e int eri or and exteri or of the pr inter f or damage Parts and Accessor ies The Pegasus Touch includes th e f oll owing par ts an d acc essories . Please mak e sure th ey were sh ipped with your machine. I f anything is missing, pl eas e emai l suppor t. Table 1 - Packing List Par t Quantity Pegasus Touch 3D printer 1 pc Build Platf or m with Thumbscr ew 1 set R esin tray (vat ) 1 pc Power c able 1 pc Ethernet cabl e 1 pc 500mL Starter R esin 1 bot tl e Addit ion al R ecommended Tools FSL3D recommen ds the purchase of a nu mber of tools f or removing prints f rom th e bui ld plate, cleaning pr ints, an d f iltering r esin. Some of these t ools are sharp and can pos e a danger if u sed i mpr operly. The resin can be sli ppery s o it is i mportant to be aware of your gri p and dir ecti ons of moti on when r emoving parts f rom the bui ld plat e. Al ways take c are wh en removing parts f rom th e build platf or m an d handle t ools in a saf e manner. FSL3D recommen ds the purchase of the f ol lowing additi onal accessori es f or print f inishing avai labl e at A mazon.com and oth er suppli ers: Part removal: N itrile or dish washer gl oves ( eg A mazon B004E3LN 96 ) 9”x14.5" W ide C utting Boar d ( eg Amazon B00E4W RVTI) Steel paint scraper as a chis el: eg Tooluxe 6 -in-1 Paint er ’ s Tool (Amazon B000VOK13Q) Flush cutters : eg Xuron 170 -II (Amazon B000IBSFAI) R ubber mall et (t o t ap the st eel paint scraper) , eg H ome D epot #31030. Part f inishing 1-2L glass container f or soaking f inis hed parts in IPA : eg Amazon B0000C FG5I 2.5 ounce spray bottl e: eg Amazon B000N JHN LW Tongs: eg A mazon B00004OC K1 Tweezers: eg A mazon B00BG8WW 2Y U npacking U nwrap machine an d inspect f or damages C ut zip ti es hol ding the VAT holder C ut zip ti es hol ding the r es in and accessori es and r emove resin/access ori es f rom printer Setup M ake sure that your printer is on a lev el surf ace, away f rom dir ect sunlight, an d in a t emper ature -c ontroll ed l ocat ion. Af ter r emovin g all accessori es f rom th e int eri or of the machine an d e nsuring it is cl ean, it is ti me to connect t o y our machine. 1. C onnect the Ethernet port of the machine t o a f ree port on your internet rout er using the suppl ied Ethernet cabl e . 2. Ethernet is th e pr ef err ed int erf ace but U SB PC connection (requi res micr oU SB cable, not suppl ied) and W iFi (requir es don gl e, not suppli ed) ar e als o support ed. You may also l oad j obs via U SB key. R ef er to instructions at the user f orums at http://f sl3d.c om/f orums f or mor e inf ormati on. 3. Plug the power adapt er into a c onvenient mains power ou tlet . 4. Plug the D C barr el c onnector into the power por t on th e machine. 5. The machine shoul d boot within 90 seconds. The Pegasus Touch can get print data f rom on e of f ive sources: 1. Over Ethernet f rom the R etinaC reat e j ob preparat ion and machine management sof t ware. 2. From a U SB f lash drive. 3. Over W iFi (requi res opti onal T enda W 311M USB W iFi dongle, not suppli ed, eg Amazon B006GC YAOS ) 4. Over U SB cable ( requir es microU SB cabl e, not suppli ed , eg Amazon B004GF8TIK ) 5. D irectly f rom the FSL3D M odel M arket pl ace. Figure 1 - Exterior View Figure 2 - Connec tions Figure 3 - Interior View Build Tray (Vat) R ef er ence D rawing V a t R e ta i ni ng L oc a t i ng H o les M a x F i ll L i ne P D MS F i ll L i ne M i n. F i ll L i ne ● N ever remove the VAT wi thout f irst r emovin g the bui ld h ead. Other wis e r esin wi ll dri p onto the internal components of the pr inter . ● Pull the tr ay hori zontally t o r emov e ● Push back on th e VAT to return t o th e printer until y ou f eel th e click ● Pour resin int o the t ank. U se only FSL3D approv ed resin ; other wise, your machine may be damaged and warr anty v oi ded. In addit ion, the R et inaC reat e sof t ware lic ense is vali d only with use with mater ials f rom FSL3D or appr oved partners. ● Be caref ul not to exceed the maxi mu m f il l lin e t o avoi d s pill age whi le printin g ● If mor e r esin is n eeded wh il e printing, you can al ways pause the print er and pour mor e r esin. Press the pause button on th e LC D screen or si mply open the li d t o pause the print. Build platf or m ● Always pl ace a 9” x14.5” cutting boar d over the VAT bef or e r emovin g the bui ld platf or m to av oi d r esin dr ips over the f ront of the machine. ● To remove the buil d pl atf or m l oosen the l arge thu mbscr ew enou gh so the buil d head sli des out. It is not necessary to f ully r emov e the hand screw. Apply a down war d pressure to sl ide the buil d plate out. ● Always make sure t o r emov e th e platf or m bef or e the resi n tray t o avoi d th e r esin dr ippin g int o the pr inter . D ouble C heck Please double check th e l ist bel ow bef ore you proc eed t o next steps ● Are al l t apes and f il ms r emov ed f rom all the print er par ts? ● Are the r esin tr ay an d the bui ld pl atf or m s ecurely instal led? ● Is resin f ill ed to maxi mu m f il l lin e? D o not ov erf ill the r esin. ● Is the print er well connect ed to the power out let? ● Is the print er connect ed to your c omput er wi th the Ethern et cabl e, U SB cable or wir el essly? R etinaC reate (sof t war e) Instal lat ion D ownl oad the l at est sof t war e f rom htt p://f sl3d.c om an d f ollow the onscreen instructi ons. Ensure you read, underst and, an d agree t o th e ter ms in th e End U ser Licensing Agr eement. R emember t hat the R etinaC reate s of t war e license is valid only wh en used wit h printers and mat eri als f rom FSL3D or approv ed partners. Part 3: Printing Add a m odel Open R et inaC reat e an d select A dd M odel under the Scene menu. Load the model y ou want to pr int. R etin aC reate supports .st l and .obj f iles. The box with gri d l ines on the bottom in the mi ddle of your screen r epres ents the bui ld platf or m the print er. R etinaC reat e will plac e the model i n the mi ddl e of the gr id when you add a model. Keep in mind that th e bui ld pl atf or m is u pside down in the pr inter. View C ontrol Zoom In/Out with a M ouse R oll up the mouse wheel t o zoom in and rol l down to zoom out C hange View with a M ouse To change the vi ew, ri ght click anywh ere on th e screen and mov e the mouse around. M ove the mouse t o the l ef t to rot at e in cl ock wis e an d the right t o r ot at e in counter-cl ockwise. D rag the mouse down t o achieve top vi ew and dr ag up to achieve the bottom view. Pan To move the scr een vi ew as a whole, pr ess down th e mouse wheel and move th e M ouse around. M oving and Or ienting M odels M oving and Si zing C lick on the model and you wi ll s ee red, gr een, and black arr ows surrounding the model. R ed and gr een arr ows ar e t o move the model in the direct ion wh er e they ar e point ing t o. L ef t click on th e arrows an d drag to move the model . The black arr ow on the top of the model point ing upwar d is to change si ze of the model. Lef t cl ick on the arrow and drag up and down t o incr eas e or decr eas e the di mensi ons of the model. Orientin g The curved bars att ached t o the arr ows ar e t o change th e model’ s ori entat ion. Green, R ed, Blue bars repr esent Y, X, Z axis respectively. Lef t click and dr ag v ert ical ly the G reen an d the R ed bars to chang e X, Y ori entat ions of the model. Lef t click and drag h ori zont al ly to chan ge Z ori entat ion of the model . Gener ate Suppor ts Supports ar e i mportant f or a successful print, especi ally f or models with ov erhangs. For now, you only hav e on e model to pr i nt. Select Support All under the Scene menu. R et inaC reat e wi ll generat e supports with a base f or your model. The dr op -down menu wil l be cover ed in depth in Part 6. M anual Suppor t M odification C licking on a support wil l select it; sel ect ed supports are hig hli ghted in red. Press the del et e key t o manual ly del et e the sel ect ed suppor t. Lef t-click on a support and h ol d the l ef t mouse button to drag th e suppor t. H old down the C TR L key and click on th e model to add supports Pr int R etinaC reate dis pl ays the c on nected print ers on th e upper lef t han d side of your screen. You will see green circl es, the word ‘ Idle’ , and th e print er’ s IP when th e print er is r eady. C lick th e gr een circ le with a tri angle to st art print ing. R etinaC reat e will transf er the model t o t he pr inter. The number of slices tr ansf erred wi ll be shown on the bottom of your screen. Please do not disconnect th e cabl e or cl ose R et inaC reat e bef ore it s ays ‘ All Transf erred’ . If you are pr inting a bi g model and need mor e r esin whil e print ing, simply click pause butt on, pour mor e r esin in the t ank, an d r estar t the printin g. Part 4: After Printing R emoving the Build Platform ● W hen the model has f inished printing, wait at l east 10 mi nutes to all ow excess r esin to dr ip out bef ore openin g the li d ● Insert a 9.5"x14.5" cutting board and l ay it on t op of the VAT. Always insert th e cutting board bef ore removing the buil d pl atf or m t o avoi d dri pping resin insi de the machine. ● R emove th e buil d head as descri bed P art 2: Build platf or m. ● R otat e the platf or m to f ac e upwar d or h ol d a cont ainer un der the platf or m t o catch any resin. ● Scrape excess r esin of f the bui ld pl atf or m into the t ray bef ore transf erring t o the f inishing stati on. ● M ake sure you keep the c over clos ed to pr ot ect th e r esin f rom extern al U V light. Finishing Steps Gener al St eps ● Transf er the platf or m to your self -prepared f inishing st ati on. ● U se the corner of the paint scraper t o r el eas e some part of the base of your model, th en remove the wh ol e model . The scraper may be sharp. Pl eas e be c aref ul not t o hurt yourself . Someti mes you may f ind it usef ul to use a rubber mal let in c onjunction with th e scraper to work th e part of f . ● To rinse exc ess resin f rom the model , f ill y our cont ainer with 99% isopr opyl alcoh ol ( IPA) and plac e your model insi de. Let it soak f or 15 minutes. You may try h olding the model with t ongs an d s wir ling the model inside the container f il led with IPA to work out any loose resin. W e recommend you c over the c ontain er with a pl at e t o prev ent exc essive evapor at ion of the IPA. ● Take the model out of the IPA using the t ongs af t er soaki ng f or 15 minut es. ● R emove th e suppor ts car ef ully. ○ U se the f lush cutters to snip away supports or chisel them away with th e paint scrapper + rubber mall et. ● Put the model on s ome paper tissue t o dry. ○ You may use 220-1500 sandpaper t o s and away any unwanted marks af ter the model is f ully dry. ○ C lean sanding dust wi th isopr opyl alc ohol . ○ You may want to clear -c oat or paint the model as des ired. ● W ash the build platf or m with isopropyl alc ohol . All ow t o dry. You want t o wash the pl atf or m r ight away af ter each print. L eaving it in the air will mak e it very har d t o cl ean l ater. ○ You don’ t need to wash th e platf or m if you use th e same resin f or your next prints. In this c ase, please put th e pl atf or m back in the print er ri ght away. Post-curing ● Printed objects ar e by desi gn cured to about 90% strengt h to exten d the us ef ul lif e of the non -stick l ayer of the VATs ● To cure f ully, you may pl ace the models in sunlight af ter cleanin g them ● Placing models in sunlight t o cure ma y cause the models to turn slightly yell ow as sunlight c ontains a wide spectru m of light that breaks down c ol or addit ives in th e r esin ● Alternat ively t o pr eserv e the best color (or tr anspar ency) of the model, cur e the model under a 285nm U V light source eg Phillips 325126 bulbs (Amazon B00172Y0H 4). Af ter it is cured under 285nm light, giv e i t a ant i -U V clear c oat such as Krylon 1305 to best pres erve c ol or (A mazon B00397STRW ). R epair I mperf ect Prints Follow instructi ons below t o r epair i mperf ect models. R epa ir c an only be done wh en the model came out nearly perf ect but with small hol es or brok en parts. ● Prepare: a t ooth pick, r esin, natur al sunli ght (or a 405nm laser point), 220 -1500 grit sand paper ● D ip the t oothpick in the r esin and f ill the h ole compl et ely w ith the resin. Try to be accurate in order t o r educe san ding later on. D o the same t o glu e parts and put them t ogeth er. ● Leave the model in the sun to cure. You may use a las er point which is f aster. ● Once f ully cured, san d th e bu mp t o s mooth th e surf ace. W ash with IPA to clean any dust. Part 5: Touch Screen Interface The Pegasus Touch comes equi pped with a t ouch screen interf ace on the f ront of the machine. From this scr een you c an monit or prints, pause and st op pr ints, conf igure net work settin gs, cal i br at e th e print er, and print models dir ectly f rom the FSL3D App Stor e. The screen wi ll also pr ovi de you with crit ical inf or mat ion such as l id open warnings an d r esin ref il l warnings. Figure 5 -1: The Pegasus tough home screen. The t op l ef t icon opens the FSL3D App Store. The ethernet icon in the t op cent er -lef t opens up the net work c onf igurati on win dow. The gear in the top ri ght opens up th e cali brati on screen. Pr int M onitor ing W hen the printer is in an act ive print job, a screen is dis played which ani mates th e print j ob. In th e bot tom lef t of this screen, t he el apsed t i me and expected tot al ti me are displ ayed. Then i t l ists how many slices are lef t t o pr int out of the total number of slic es. Figure 5 -2: An image of the Pegasus Touch Screen D uring Printi ng. Pause/Play and Stop The user can pause, r esume, and stop jobs by pr essing t he t wo buttons in the t op ri ght of the screen. W hen the stop butt on is pr essed, th e print er will cease l asing an d sl owly r ais e the bui ld pl atf or m u p t o wh er e the h ead can be saf ely dis mounted. N etwork Settings The print er can be wir el essly connect ed to your home net work using a U SB wif i dongle. The wif i settin gs can be input dir ectly f rom the pr inter via the net work s ettin gs menu. To access the net work settings, t ap the ethern et or wif i connectivity icon in the top c enter - lef t of the home screen. C alibration WAR N IN G: Mi suse of the C al ibrati on Screen can permanentl y damage your pri nter. Generall y, you should not have to use the C al ibration Screen unl ess di rected to by FSL3D custom er support. The print er's l aser can be r ecali br ated manual ly. A print abl e cali bration sheet f il e is avail able at f sl3d.c om. This sheet consists of a coll ecti on of twenty-f ive dots the s pan th e bui ld ar ea of the Pegasus Touch. To perf or m cali brati on, pr int the cal ibr at ion sheet and cut out the squ are regi on which f its into a res in vat. Pl ace the sheet in a r esin vat an d opt ionally t ape it in pl ace. Insert th e r esin vat into the print er and cl ose the printer's li d. N ext you wil l need t o steer the l aser t o ea ch of the 25 cal ibr ati on points in the pr oper or der . Turn on the las er by pr essing t he "Laser On" button in the t op ri ght. The las er shoul d glow bri ghtly on t he insert ed sheet of paper. Pressin g "Laser H old" wil l dramat ical ly reduce the bri ghtness of the las er and may hel p y ou to mor e accurat ely posi ti on the laser on th e cali brati on points. To st eer th e l aser, use the 9 dir ecti onal buttons in th e cent er -ri ght of the cali brati on screen. In or der to tr avers e the l aser acr oss the buil d area, it will be nec essa ry t o uti l ize the three laser step si zes av ail abl e in the bott om r ight of the c ali br ati on screen. Steer th e l aser to the c enter of each of the pr inted dots and pr ess the "Add Point" button. Once the 25 points have been added, pr ess the "Accept" butt on to c ompute and stor e a new cal ibrat ion t abl e. This wil l over wr it e the pr evi ous cali br ati on t able. Press the "C los e" button wh en f inished or to c ancel c al ibr ati on. Figure 5 -3: The cali br ati on screen. FSL3D App Stor e The FSL3D logo in the t op l ef t of the h ome scr een is a bu tton which opens up th e FSL3D App Store. You can only connect t o the app store with a working int ernet connecti on. From the FSL3D App Store, y ou can brows e print able models and print dir ectly f rom the web. M odels in the FSL3D App Stor e have b een test ed an d shoul d successf ully pr int on y our Pegasus Touch print er. Part 6: RetinaCreate Over view R etinaC reate is an easy to use progr am f or preparing 3D models f or printin g on y our Pegasus Touch. R etinaC reate is int ended only to f acilitate pr inting obj ects--it is not a gen er al purpose 3D editing pr ogram. It includes basic 3D manipul at ion t ools f or par t plac ement, or ient ati on, and si ze. R et inaC reate uses the st andar d .STL f ile f ormat pr oduced by many 3D progr ams such as Blender, ZBrush, AutoD esk Inve ntor, Solidworks, etc. M odels may cont ain def ects such as hol es that prev ent th em f rom being print ed. For advanced 3D editin g and r epair f eatur es, consi der using 3rd party 3D pr eproc essing sof t ware such as the f reely av ail abl e M eshM ixer ( www. meshmixer.c om) or N etFabb Privat e/Prof essional (www.netf ab.c om). B oth of thes e progr ams wil l all ow you to r epair brok en .STL f iles bef ore pr inting. Scene Add Model W ill add des ired model on th e gri d lin es wi thin the bl ack background, the workspac e. Scene > select Add M odel > select .stl or . obj f il e > open Save Scene W ill save th e whole sc ene including the suppor ts an d adv anced opti ons Scene > select Save Scene > save Load Scene W ill load the wh ol e scene includin g the supports and advanced opti ons Scene > select Load Scen e > sel ect a Scene Fil e ( .f slscene) > open C lear Scene W ill delet e the wh ol e scene but t est patt erns remain Scene > select C lear Scene Support Al l W ill auto matic ally support al l the models in the scene. Generate Base Only - The progr am creat es a f lat base wi th the model without any cylinder supports. The base wi ll be at tached t o the given model . C lear All Supports - The progr am r emov es all supports on every models that is pl ace inside th e gri d lin e 3D -space, this includes any cylinder column and f l at bas e suppor ts. H owever, if you choos e t o lef t click with your mouse on a specif ic model an d click on this f unction, it wil l only remov e th at specif ic model suppo r ts. Anal yze Onl y - The progr am wi ll hi ghli ght areas that need supports f or a successf ul print out of your model. Thes e highl ight ed areas wi ll be col or yell ow and r ed. As mat ter of f act, the red ar ea must have suppor t f or a successf ul print out. Save as J ob - The progr am wi ll s ave y our scene. Part 7: Maintenance Pegasus Touch Laser 3D Pr inter C are To k eep t he body of P eg asu s c lean, us e m ic rofiber c lot h t o w ipe t he out side. I f you w ant shi ne f or t he c ov er, use pr oduc t s spec ific ally rec om m ended f or ac r yl i c (ex. N ovus #1). A voi d produc t s t hat c ont ain am m onia (ex W index). Please D O N OT clean the c over with is opropyl alc ohol si nce it will cause per manent damage t o the acryl ic. N ever remove the buil d pl atf or m without f irst pl acing a 9. 5"x14.5" cutting boar d on top of the vat t o prev ent res in dri ps. N ever remove the VAT bef or e r emovin g the bui ld pl atf or m to pr event r esin damage to the mirror or galv anomet ers. W ipe mirr ors only with a dry micr of iber cloth . N ever attempt t o cl ean the galvo mirrors or the f irst surf ace 45 degr ee mir ror with any solvents or other li quid solut ions as these wil l l eave s ome streaking and y our pr int perf or mance wil l degrade. You may use f irst cont act polymer soluti on to clean mirrors wh en ext remely dirty ( http: // www. phot oniccl eanin g.com/ ) . Follow all manuf acturer instructi ons wh en using f irst cont act poly mer. R emoving cured pieces fr om failed pr ints In case of a f ai led print, y ou wi ll n eed t o r emov e cured r esin remnants f rom th e buil d tr ay. Li ghtly run a s of t rubber s patul a across the bott om surf ace of the tr ay t o f ind the piec es and dislodge them. Tweezers ar e never a good i dea bec ause th e shar p ti ps can damage th e sil icone release layer . Tr anspor tation To transport the print er, pl ease f ol low the instructions bel ow. ● C lean exc ess resin f rom th e bui ld platf orm wi th isopropyl alcoh ol and paper t owels. ● W rap the buil d pl atf or m in pl astic wr ap and r eatt ach to th e printer. ● C lean the resin tr ay as instructed in next part, wr ap the tr ay and put it back in the pr inter. U se a zip ti e t o s ecure the VAT holder to th e magnet s witch brack et t o prev ent it f rom moving during transport. If you do not secure the VAT holder, th e VAT may be damaged. ● Lower the buil d pl atf or m by manually tu rning the Z l ead s crew all the way down until i t pr esses against the VAT. ● Position th e protect ors or scorin g car dboar d ov er th e f ron t edges, and bind in plac e using pl astic wrap. ● R ebox th e printer an d accessori es in th e ori ginal package as they wer e when y ou rec eived th em. R esin Car e H andli ng ● Please wear pr ot ective glov es when han dlin g r esin. If you get any on your skin, wash thor oughly wi th soap and water i mmedi ately. The resin can cause mil d skin irr it ati on. ● N ever ingest r esin nor use pr int parts f o r that purpose. ● N ever pour r esin back into the ori gin al bottl e t o avoid contamin ati on. Keep unused r esin in the VAT or pour i t out into a secondary dark bottl e and st or e in a dark c abinet. ● C ured resin is saf e t o t ouch and h andl e without gl oves or other protect ion. ● R ef er to Appen di x H f or chemic al inf or mati on. R efi lli ng ● Pause the print ● Pour resin direct ly int o the tray. D o not exceed the maxi mum f ill line as it wil l spill and damage th e printer whil e printin g. Spi ll s ● C lean up i mmedi at ely bef or e it har den s. ● To clean pr inter body and mirr ors: use isopropyl alc ohol and paper towels, or cl ean microf i ber c loths. ● U se only f irst contact poly mer solut ion t o cl ean mirr ors - never cl ean the mirr ors with solv ents ● To clean up th e cov er: N ever use is opr opyl alcoh ol o r s ol utions including IPA. use war m wat er and mil d dish soap. Storage ● Always stor e the resin in opaque bott les or under th e prin ter c over. N atural l ight wil l cure the r esin. R eusing ● You can r euse th e r emaining r esin in the tr ay, but do not return it to its or iginal bott le since it may r esult in c ontamin ati on. Keep it in the tray under the cover . D isposal ● C leaned par ts an d cured res in can be thr own away as nor mal wast e. They are n on -recyclabl e. ● R esin in liqui d f or m must be cured bef or e thrown away. P ut the liqui d in a cl ear pl astic bot tl e or bag and use sunli ght or U V lamp t o cure. Appendix A: Troubleshooting H ardwar e Issue: M achine does n ot r ecognize cl osed c over Solution: Adjustment of the cov er may be nec essary. This can be accomplished with a set Issue: Prints f ail t o adh ere to bui ld pl at e Solution: The VAT levelling screws may need adjust ment to ensure f lat contact against th e buil d VAT. C ontact suppor t f or more i nf ormat ion. Software Issue: M achine does n ot boot f or mor e th an one minute Solution: U nplug power c able f rom machine (not at wall) f or 5 sec onds and plug back in. Appendix B: Warranty Statement FSL3D warrant ies th e Pegasus Touch 3D Laser print er f or a bas e per iod of 90 days. Ext ended warr anty peri ods ar e avai labl e at t he ti m e of purchase. C overed parts: The f ollowing parts are c over ed dur ing th e warr anty peri od: l aser diode, galvos, mot ors, power supply, lin ear rails, el ectr onics, touchscreen display N ot cover ed consumable parts: The f ollowing parts are c onsider ed c onsum able and ar e n ot cov er ed under any warr anty an d need t o be r epl aced per iodic ally: a) R esin: Once cur ed, resin c annot be reused. H owev er, uncured li quid resin can be reused f or th e next pr int. D o not r eturn used r esin to the ori ginal bot tl e t o avoi d c ont amin ati on. Al ways stor e unused resin in a dark c abinet or bottl e. U nopened unused r esin carr ies a 1 year warr anty and will be r epl aced f ree of charge if it cures in th e bot tl e without li ght exposure ( exc ludes shi pping/h andl ing char ges) . b) VATs/Build tr ay: W e esti mate every 2 -4L of resin the antistick surf ace of the VAT wil l be c onsumed and the VAT wi ll need t o be replac ed. T he antistick l ayer of the tray may begin t o cl oud af ter many prints. To l i mit this and ext end th e lif e or the t ray, v ary the pr in ting loc ati on. You can buy repl acement VATs f rom FSL3D . c) Build platf or m: C onstant r emoving parts f rom th e bui ld pl atf or m wil l eventually wear down th e aluminum surf ace. W e esti mat e it t o l ast 10L or more of pr inting. You may want to consider s par e buil d platf or ms if you print / change r esin f requent ly. Spares pl atf or ms will all ow to begin a new print i mmedi at ely af ter th e pr evi ous pr int. d) 45 degr ee First Surf ace M irror: This mirr or shoul d n ever wear out but if resin f alls on it then it wi ll l ike ly need to be r eplac ed unless cleaned immedi ately wi th f irst contact poly mer solut ion (www. phot oniccleaning.c om). Excluded Events: The warr anty is vali d f or nor mal use only and excludes Acts of God, user err or and use outsi de of nor mal paramet ers. Parts cover ed in spill ed r esin ar e consi dered user err or and ar e not cover ed under warr anty: Always ensure the pr inting surf ace is l evel as the r esin can spi ll whi le pr inting. N ever f ill th e r esin past the f ill l ine Always use a 9.5" x14.5" cutting boar d over t he VAT when ever removin g the bui ld platf or m to pr event spi lls when r emovi ng the buil d platf or m. Always remove the buil d pl atf or m bef or e r emov ing th e VAT to prev ent dri ps f rom f all ing int o th e int ernal parts of the machine. R eturn Policy Products purch ased dir ectly f rom FSL3D : W ithin the f irst 30 days, you may r eturn the machine subj ect t o a 20% restocking f ee + shi pping f ees if the 3D Printer is opened due to the need to r eplac e consumabl e i tems. If it is r eturned new, unopened or order cancell ed, only a 5% r estockin g f ee + shi pping f ees (if an y) is appli ed. C onsumable it ems (bui ld plat e, VAT, resin) may not be r eturned if opened. If unopened, th ey ar e subject to a 5% r est ocking + shippi ng f ees. Products purchased f rom other 3rd party distri butors o r r esel lers: review the 3rd party distri butor /res ell er return policy. Shipping Expenses W ithin the f irst 30 days, FSL3D will repl ace or repair any def ectiv e par ts f ree of charge and pay f or gr ound shi pping of parts if you paid FSL3D f or shipping on y our or der. Ov erni ght shipping is avai labl e at extra charge. If you picked up in person or used your own shipping methods, FSL considers th e par ts to be sold FOB our war ehouse and y ou must arran ge y our own shipping or pickup r epl acement parts as FSL does di d not mak e the or iginal shi pping arr angements. Outside the f irst 30 days, Full Spectrum Laser wil l r eplac e or r epair any def ectiv e within the war ranty per iod f ree of charge but al l shipping charges to and f rom FSL3D are th e r esponsibi lity of the c ustomer. T he warr anty includes parts and labor only. Shipping of def ective and replac ement c omponents to/f rom FSL3D is excluded by the warr anty. The customer may arr ange th eir own shippin g or drop parts of f to exchange par ts at our war ehouse f ree of charge. Typic al ly Full Spectrum Las er has most r eplac ement parts on hand f or i mmedi at e shipment of under warr anty par ts. Advance R eplac ement Policy W ithin the f irst 30 days, FSL3D will advance repl ace any f ailed par t f ree of char ge Af ter the f irst 30 days, all def ect ive parts must be returned t o FSL post age pai d f or evalu ati on bef or e r eplac ements ar e issued unless other wise author ized. FSL3D 's warr anty pol icy is to repair parts wh enever possible and repl acing them only if they ar e unrepair abl e. Thus, all warranty par ts must be r eturned f irst t o det er mi ne if they can be repair ed. Accuracy and Toler ance Statement FSL3D mak es no s pecif ic accuracy or t ol er ance gu arant ees but machines are desi gned wi th f ull end user cal ibrat ion/ adjustment. U sers may self cali brate their machines to f ine tune accuracy r equi rements. For details contact FSL3D tech support. Appendix C: Pegasus Touch Specifications Technology: 405nm sol id stat e di ode las er cured l iqui d r esin Average Las er Beam Spot Si ze: ~80um FW HM XY Posit ion C ontr ol: 16 bit D i git al to Analog C onvert er (D AC ) to closed l oop galvan ometer (3 micron positi oning r esoluti on) XY D raw S peed: up to 10 x f aster than other c onsumer 3D print ers, up to 3000mm/s ec l aser dr aw s peed Z M otor C ontrol : screw dr iven stepping mot or (5 micron s tep resolut ion) On boar d computer: 1GH z proc essor with 512MB SDR AM f or on boar d proc essing, 2 GB int ernal stor age, 8GB micr oSD ext ernal storage D isplay: 4.3" LC D C olor Touchscreen Interf aces: U SB, Ethernet, W iFi (requir es option al dongl e), U SB key Build V olu me: up t o 7" x7"x9" buil d ar ea D imensi ons: 11"x14"x22.5" W eight: 29lbs Power: 24V 2.5Amp external power brick (<75W total power draw) Appendix D: Material Safety Data (resin) (In pr ogr ess)