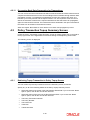
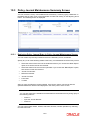
1
LEP Transaction User Guide Oracle FLEXCUBE Investor Servicing Release 12.0.3.0.0 Part No. E53392-01 April 2014 LEP Transaction User Guide April 2014 Oracle Financial Services Software Limited Oracle Park Off Western Express Highway Goregaon (East) Mumbai, Maharashtra 400 063 India Worldwide Inquiries: Phone: +91 22 6718 3000 Fax:+91 22 6718 3001 www.oracle.com/financialservices/ Copyright © 2007, 2014, Oracle and/or its affiliates. All rights reserved. Oracle and Java are registered trademarks of Oracle and/or its affiliates. Other names may be trademarks of their respective owners. U.S. GOVERNMENT END USERS: Oracle programs, including any operating system, integrated software, any programs installed on the hardware, and/or documentation, delivered to U.S. Government end users are "commercial computer software" pursuant to the applicable Federal Acquisition Regulation and agency-specific supplemental regulations. As such, use, duplication, disclosure, modification, and adaptation of the programs, including any operating system, integrated software, any programs installed on the hardware, and/or documentation, shall be subject to license terms and license restrictions applicable to the programs. No other rights are granted to the U.S. Government. This software or hardware is developed for general use in a variety of information management applications. It is not developed or intended for use in any inherently dangerous applications, including applications that may create a risk of personal injury. If you use this software or hardware in dangerous applications, then you shall be responsible to take all appropriate failsafe, backup, redundancy, and other measures to ensure its safe use. Oracle Corporation and its affiliates disclaim any liability for any damages caused by use of this software or hardware in dangerous applications. This software and related documentation are provided under a license agreement containing restrictions on use and disclosure and are protected by intellectual property laws. Except as expressly permitted in your license agreement or allowed by law, you may not use, copy, reproduce, translate, broadcast, modify, license, transmit, distribute, exhibit, perform, publish or display any part, in any form, or by any means. Reverse engineering, disassembly, or decompilation of this software, unless required by law for interoperability, is prohibited. The information contained herein is subject to change without notice and is not warranted to be error-free. If you find any errors, please report them to us in writing. This software or hardware and documentation may provide access to or information on content, products and services from third parties. Oracle Corporation and its affiliates are not responsible for and expressly disclaim all warranties of any kind with respect to third-party content, products, and services. Oracle Corporation and its affiliates will not be responsible for any loss, costs, or damages incurred due to your access to or use of third-party content, products, or services. Table of Contents 1. About This Manual ................................................................................... 1-1 1.1 1.2 1.3 1.4 1.5 1.6 1.7 1.8 2. 1-1 1-1 1-1 1-1 1-2 1-2 1-2 1-2 1-3 1-4 UH Deal Maintenance .............................................................................. 2-1 2.1 3. Introduction.............................................................................................................. Related Documents ................................................................................................. Audience.................................................................................................................. Organization ............................................................................................................ Conventions Used in this Manual ............................................................................ 1.5.1 General Conventions.................................................................................. 1.5.2 Keyboard Conventions ............................................................................... Glossary of Icons..................................................................................................... Abbreviations and Acronyms................................................................................... Getting Help............................................................................................................. Introduction.............................................................................................................. 2-1 Policy ........................................................................................................ 3-1 3.1 3.2 3.3 3.4 3.5 3.6 3.7 Introduction.............................................................................................................. 3-1 Creating and Saving Policy ..................................................................................... 3-1 3.2.1 Invoking Screen.......................................................................................... 3-1 3.2.2 Fields in Policy Maintenance Screen.......................................................... 3-2 3.2.3 Saving Information Entered ...................................................................... 3-46 3.2.4 Creating Future-dated Rules for Policies.................................................. 3-46 3.2.5 Processing Back Data Propagation for Transactions ............................... 3-46 Policy Maintenance Summary Screen................................................................... 3-47 3.3.1 Retrieving Policy in Policy Maintenance Screen ...................................... 3-47 3.3.2 Editing Policy ............................................................................................ 3-48 3.3.3 Viewing Policy .......................................................................................... 3-48 3.3.4 Deleting Policy.......................................................................................... 3-49 3.3.5 Authorizing Policy ..................................................................................... 3-49 3.3.6 Amending Policy....................................................................................... 3-49 3.3.7 Authorizing Amended Policy..................................................................... 3-50 3.3.8 Reversing Policy....................................................................................... 3-50 3.3.9 Authorizing Reversal of Policy.................................................................. 3-50 Maintaining Ratio Percentage .............................................................................. 3-50 Enriching Policy Transactions ............................................................................... 3-51 3.5.1 Fields in the Policy Transaction Exchange Rate Enrichment Screen ................................................................................... 3-51 Maintaining Interest Rate Details........................................................................... 3-53 3.6.1 Invoking Screen........................................................................................ 3-53 3.6.2 Fields in Policy Maintenance Screen........................................................ 3-53 Interest Rate Maintenance Summary Screen........................................................ 3-54 3.7.1 Retrieving Interest Rate in Interest Rate Maintenance Screen ................ 3-54 3.7.2 Editing Interest Rate ................................................................................. 3-55 3.7.3 Viewing Interest Rate ............................................................................... 3-55 3.7.4 Deleting Interest Rate .............................................................................. 3-56 3.7.5 Authorizing Interest Rate .......................................................................... 3-56 3.7.6 Amending Interest Rate ........................................................................... 3-56 3.7.7 Authorizing Amended Interest Rate ......................................................... 3-57 3.7.8 4. Policy Transactions – Top Up ................................................................ 4-1 4.1 4.2 4.3 5. Checking for Duplicate Transactions........................................................ 3-57 Introduction.............................................................................................................. 4-1 Top Up Transactions ............................................................................................... 4-1 4.2.1 Entering Top up Transaction ...................................................................... 4-1 4.2.2 Invoking screen .......................................................................................... 4-1 4.2.3 Fields in Policy Transaction TOPUP Screen .............................................. 4-2 4.2.4 Retrieving Unit Holder Deal in Unitholder Deal Screen .............................. 4-6 4.2.5 Editing Unit Holder Deal ............................................................................. 4-7 4.2.6 Viewing Unit Holder Deal............................................................................ 4-8 4.2.7 Deleting Unit Holder Deal ........................................................................... 4-8 4.2.8 Authorizing Unit Holder Deal ...................................................................... 4-8 4.2.9 Amending Unit Holder Deal ........................................................................ 4-9 4.2.10 Saving Information Entered ...................................................................... 4-19 4.2.11 Processing Back Data Propagation for Transactions ............................... 4-20 Policy Transaction Topup Summary Screen ......................................................... 4-20 4.3.1 Retrieving Topup Transaction in Policy Topup Screen ............................ 4-20 4.3.2 Editing TopUp Transaction ....................................................................... 4-21 4.3.3 Viewing TopUp Transaction ..................................................................... 4-22 4.3.4 Deleting TopUp Transaction..................................................................... 4-22 4.3.5 Authorizing TopUp Transaction ................................................................ 4-22 4.3.6 Amending TopUp Transaction.................................................................. 4-23 4.3.7 Authorizing Amended Transaction TopUp................................................ 4-23 4.3.8 Reversing TopUp Transaction.................................................................. 4-23 Policy Transactions – Switch ................................................................. 5-1 5.1 5.2 5.3 Introduction.............................................................................................................. 5-1 Switch Transactions ................................................................................................ 5-1 5.2.1 Entering Switch Transaction....................................................................... 5-1 5.2.2 Invoking Screen.......................................................................................... 5-1 5.2.3 Fields in Policy Transaction Switch Screen................................................ 5-2 5.2.4 Retrieving Unit Holder Deal in Unitholder Deal Screen .............................. 5-5 5.2.5 Editing Unit Holder Deal ............................................................................. 5-6 5.2.6 Viewing Unit Holder Deal............................................................................ 5-6 5.2.7 Deleting Unit Holder Deal ........................................................................... 5-7 5.2.8 Authorizing Unit Holder Deal ...................................................................... 5-7 5.2.9 Amending Unit Holder Deal ........................................................................ 5-7 5.2.10 Un-Allotted Fee Transaction..................................................................... 5-15 5.2.11 Saving Information Entered ...................................................................... 5-16 5.2.12 Processing Back Data Propagation for Transactions ............................... 5-16 Policy Transaction Switch Summary Screen......................................................... 5-17 5.3.1 Retrieving Transaction Switch in Policy Transaction Switch Screen........................................................................................... 5-17 5.3.2 Editing Transaction Switch ....................................................................... 5-18 5.3.3 Viewing Transaction Switch...................................................................... 5-18 5.3.4 Deleting Transaction Switch ..................................................................... 5-19 5.3.5 Authorizing Policy Switch ......................................................................... 5-19 5.3.6 Amending Transaction Switch .................................................................. 5-19 5.3.7 Authorizing Amended Transaction Switch ................................................ 5-20 5.3.8 Reversing Transaction Switch .................................................................. 5-20 6. Policy Transactions – Surrender ............................................................ 6-1 6.1 6.2 6.3 7. Policy Status Change .............................................................................. 7-1 7.1 7.2 7.3 8. Introduction.............................................................................................................. Changing Status of Policy ....................................................................................... 7.2.1 Invoking Screen.......................................................................................... 7.2.2 Fields in Policy Status Change Screen ...................................................... 7.2.3 Saving Information Entered ........................................................................ Policy Status Change Summary Screen ................................................................. 7.3.1 Retrieving Policy Status in Policy Status Change Screen .......................... 7.3.2 Editing Policy Status Change ..................................................................... 7.3.3 Viewing Policy Status Change.................................................................... 7.3.4 Deleting Policy Status Change ................................................................... 7.3.5 Authorizing Policy Status Change .............................................................. 7.3.6 Amending Policy Status Change ................................................................ 7.3.7 Authorizing Amended Policy Status Change.............................................. 7-1 7-1 7-1 7-2 7-5 7-6 7-6 7-7 7-7 7-7 7-8 7-8 7-8 Cession Maintenance .............................................................................. 8-1 8.1 8.2 8.3 9. Introduction.............................................................................................................. 6-1 Surrender Transactions ........................................................................................... 6-1 6.2.1 Entering Surrender Transaction ................................................................. 6-1 6.2.2 Invoking Screen.......................................................................................... 6-2 6.2.3 Fields in Policy Transaction Surrender Screen .......................................... 6-2 6.2.4 Saving Information Entered ...................................................................... 6-18 6.2.5 Processing Back Data Propagation for Transactions ............................... 6-19 6.2.6 Automatic Surrender of Policy ................................................................. 6-19 Policy Transaction Surrender Summary Screen ................................................... 6-20 6.3.1 Retrieving Surrender Transaction in Policy Transaction Surrender Screen ................................................................. 6-20 6.3.2 Editing Surrender Transaction.................................................................. 6-21 6.3.3 Viewing Surrender Transaction ................................................................ 6-21 6.3.4 Deleting Surrender Transaction................................................................ 6-22 6.3.5 Authorizing Surrender Transaction........................................................... 6-22 6.3.6 Amending Surrender Transaction............................................................. 6-22 6.3.7 Authorizing Amended Surrender Transaction .......................................... 6-23 6.3.8 Reversing Surrender Transaction............................................................. 6-23 Introduction.............................................................................................................. Creating and Saving Cession ID ............................................................................. 8.2.1 Invoking Screen.......................................................................................... 8.2.2 Fields in Cession Maintenance Screen ...................................................... 8.2.3 Saving Information Entered ........................................................................ Cession Maintenance Summary Screen ................................................................. 8.3.1 Retrieving Cession Maintenance in Cession Maintenance Screen ............ 8.3.2 Editing Cession Maintenance ..................................................................... 8.3.3 Viewing Cession Maintenance ................................................................... 8.3.4 Deleting Cession Maintenance................................................................... 8.3.5 Authorizing Cession Maintenance .............................................................. 8.3.6 Amending Cession Maintenance................................................................ 8.3.7 Authorizing Amended Cession Maintenance.............................................. 8-1 8-1 8-1 8-2 8-2 8-3 8-3 8-4 8-4 8-4 8-5 8-5 8-5 Policy Cession Maintenance .................................................................. 9-1 9.1 Introduction.............................................................................................................. 9-1 9.2 9.3 Attaching Cession ID to Policy ................................................................................ 9.2.1 Invoking Screen.......................................................................................... 9.2.2 Fields in Policy Cession Maintenance Screen............................................ 9.2.3 Saving Information Entered ........................................................................ Policy Cession Summary Screen ............................................................................ 9.3.1 Retrieving Policy Cession in Policy Cession Screen .................................. 9.3.2 Editing Policy Cession ................................................................................ 9.3.3 Viewing Policy Cession .............................................................................. 9.3.4 Deleting Policy Cession.............................................................................. 9.3.5 Authorizing Policy Cession ......................................................................... 9.3.6 Amending Policy Cession........................................................................... 9.3.7 Authorizing Amended Policy Cession......................................................... 9-1 9-1 9-2 9-4 9-4 9-4 9-5 9-6 9-6 9-6 9-7 9-7 10. Policy Journal Maintenance ................................................................. 10-1 10.1 Introduction............................................................................................................ 10-1 10.2 Maintaining Journal Entries for Policy ................................................................... 10-1 10.2.1 Invoking Screen........................................................................................ 10-1 10.2.2 Fields in Policy Journal Maintenance Screen........................................... 10-2 10.3 Policy Journal Maintenance Summary Screen...................................................... 10-5 10.3.1 Retrieving Policy Journal Entry in Policy Journal Maintenance Screen.................................................................... 10-5 10.3.2 Editing Policy Journal Entry...................................................................... 10-6 10.3.3 Viewing Policy Journal Entry .................................................................... 10-6 10.3.4 Deleting Policy Journal Entry.................................................................... 10-6 10.3.5 Authorizing Policy Journal Entry............................................................... 10-7 10.3.6 Amending Policy Journal Entry................................................................. 10-7 10.3.7 Authorizing Amended Policy Journal Entry .............................................. 10-7 11. Batch Activities ...................................................................................... 11-1 11.1 Introduction............................................................................................................ 11-1 11.2 Sequence of Batch Functions................................................................................ 11-1 11.3 Batch Functions..................................................................................................... 11-2 11.3.1 LEP - Plan Funding Repayment ............................................................... 11-2 11.3.2 LEP - Generate Plan Transactions........................................................... 11-2 11.3.3 LEP - Update Product Fiscal Year............................................................ 11-2 11.3.4 LEP - Update Plan Transaction Allotted Status........................................ 11-2 11.3.5 LEP - Plan Financial Bucket Adjustment .................................................. 11-3 11.3.6 LEP - Plan Annuity 5/20 Validation Process............................................. 11-3 11.3.7 LEP – 120% Rule Support........................................................................ 11-5 11.3.8 LEP – NAV Correction.............................................................................. 11-5 11.3.9 LEP - Set Latest Rule for Product ............................................................ 11-6 11.3.10 LEP - Set Latest Rule for Plan................................................................. 11-6 11.3.11 LEP - Plan Anniversary Value Computation............................................ 11-6 11.3.12 LEP - Plan Annuity Escalations ............................................................... 11-7 11.3.13 LEP - Plan Recurring Switch Escalations................................................ 11-7 11.3.14 LEP - Plan Premium Escalations............................................................. 11-7 11.3.15 LEP - Recurring Plan Annuity Processing ............................................... 11-7 11.3.16 LEP - Recurring Plan Switch Processing ................................................ 11-7 11.3.17 LEP - Recurring Plan Premium Processing............................................. 11-7 11.3.18 LEP - Plan Funding Repayment .............................................................. 11-7 11.3.19 LEP - Generate Plan Redemption Transactions for Periodic Fees............................................................................................ 11-7 11.3.20 LEP - Process Plan Surrender ................................................................ 11-7 11.3.21 LEP - BOD Plan Transaction Generations .............................................. 11-8 11.3.22 LEP – Cash Management Switch Process.............................................. 11-8 12. Allocation Details ................................................................................... 12-1 12.1 Allocation Details ................................................................................................... 12.1.1 Entering Allocation Details........................................................................ 12.1.2 Invoking Screen........................................................................................ 12.1.3 Fields in Allocation Details Screen ........................................................... 12-1 12-1 12-1 12-1 13. Annexure ................................................................................................ 13-1 13.1 Introduction............................................................................................................ 13-1 13.2 Fund Distribution Processing................................................................................. 13-1 14. Function ID Glossary ............................................................................. 14-1 1. About This Manual 1.1 Introduction Welcome to Oracle FLEXCUBE Investor Services ™, a comprehensive mutual funds automation software from Oracle Financial Services Software Ltd. ©. This Oracle FLEXCUBE Investor Services User Manual helps you use the system to achieve optimum automation of all your mutual fund investor services processes. It contains guidelines for specific tasks, descriptions of various features and processes in the system and general information. 1.2 Related Documents The User Manual is organized in to various parts, each discussing a component of the Oracle FLEXCUBE Investor Services system. 1.3 Audience This Fund Manager User Manual is intended for the Fund Administrator users and system operators in the AMC. 1.4 Organization This volume of the Fund Manager User manual is organized under the following chapter sequence: Chapter 1 About This Manual explains the structure, audience, organization, and related documents of this manual. Chapter 2 LEP Transactions – An Overview enables you learn about LEP Transactions. Chapter 3 LEP Transactions – UH Deal Maintenance explains the deal maintenance. Chapter 4 LEP Transactions – Policy takes you through the process of entering the details of a Policy. A reference has been made to the Agency Branch User Manual. The chapter, to which a reference has been made, will help you create a Unit Holder in the system. This is to be done before a Policy is created in the system, as every Policy Holder in the system should be a valid Unit Holder. Chapter 5 LEP Transactions – Policy Transaction – Top Up Refer to this chapter for information on entering Policy Transactions. Chapter 6 LEP Transactions – Policy Transaction – Switch Refer to this chapter for information on entering Policy Switch Transactions. Chapter 7 LEP Transactions – Policy Transaction – Surrender Refer to this chapter for information on entering Policy Surrender Transactions. Chapter 8 LEP Transactions – Policy Status Change Refer to this chapter for information on changing the status of a Policy. 1-1 1.5 Chapter 9 LEP Transactions – Cession Maintenance talks about maintaining cessions in the system. Chapter 10 LEP Transactions – Policy Cession Once you have maintained various cessions in the system, you may want to attach one to a Policy. Refer to this chapter for information on the same. Chapter 11 LEP Transactions – Policy Journal Maintenance Whenever you make an adjustment to the annuity amount, you need to post it as a policy journal entry. Refer to this chapter for information on the same. Chapter 12 LEP Transactions – Batch Functions lists and explains the various End Of Day (EOD) and Beginning Of Day (BOD) Batch Activities. Chapter 13 LEP Transactions – Allocation Details explains how to enter and save Allocation Details. Chapter 14 LEP Transactions – Annexure explains certain procedures that apply to both, the LEP and UT modules. Conventions Used in this Manual Before you begin using this User Manual, it is important to understand the typographical conventions used in it. 1.5.1 1.5.2 1.6 General Conventions Convention Type of Information Italic type Functional /foreign terms Validations for fields on a screen References to related Headings/Users Manuals For emphasis Numbered Bullet Step by step procedures Keyboard Conventions Convention Type of Information Keys All keys of the keyboard are represented in capital letters. For example, <CTRL>. Shortcut keys All short cut keys are contained in brackets. For example, <ALT+SHIFT>. Glossary of Icons This User Manual may refer to all or some of the following icons. Icons Function Exit 1-2 Icons Function Add Row Delete Row Option List Refer the Procedures User Manual for further details about the icons. 1.7 Abbreviations and Acronyms The following acronyms and abbreviations are adhered to in this User Manual: Abbreviation/ Acronym Meaning ADMIN User Administrator AGY The Agency Branch component of the system AMC Asset Management Company BOD Beginning of Day CDSC Contingent Deferred Sales Charge CGT Capital Gains Tax CIF Customer Information File EOD End of Day EPU Earnings per unit FC-IS Oracle FLEXCUBE Investor Services FMG The Fund Manager component of the system FPADMIN Oracle FLEXCUBE Administrator ID Identification IHPP Inflation Hedged Pension Plan IPO Initial Public Offering LEP Life and Endowment Products LOI Letter of Intent NAV Net Asset Value REG The Registrar component of the system ROA Rights of Accumulation ROI Return on Investment 1-3 1.8 Abbreviation/ Acronym Meaning SI Standing Instructions SMS Security Management System URL Uniform Resource Locator VAT Value Added Tax WAUC Weighted Average Unit Cost Getting Help Online help is available for all tasks. You can get help for any function by clicking the help icon provided or by pressing F1. 1-4 2. UH Deal Maintenance 2.1 Introduction In some cases, the AMC may wish to offer a special, unique load option to be applied on all transactions involving a specific CIF Account or unit holder. This could also be at the request of the investor. This special load option would override the existing load option mapped to the fund or load group. Such a load option is called a ‘deal’ for an investor. You can set up a deal for an investor for a particular Product. You have the option of selecting a specific fund under the Product to which the load is to be applied or applying the load to the Product, in which case, the deal will apply to all funds mapped to it. The ‘Unitholder Deal Maintenance Detail’ screen is where a deal is setup. You can invoke the ‘Unitholder Deal 2-1 Maintenance Detail’ screen by typing ‘UTDUHDEL’ in the field at the top right corner of the Application tool bar and clicking on the adjoining arrow button. Refer to the chapter “Setting Up Investor Preferences” in the User Manual for further information. 2-2 3. Policy 3.1 Introduction After the products are defined in the system, you can accept requests for creating policies in the products, for Policy Holders. A Policy Holder can buy policies in any of the active products defined in the system. A Policy, therefore, essentially is an investment into the underlying portfolios of the Product, and the creation of a Policy lays down the profile or guidelines of the desired pattern of investment by a Policy Holder into a Product. Note Policies can be created through the Agency Branch component only. The Policy Maintenance screen allows you to capture the details of a Policy. The next section gives you step-by-step instructions to do the same. 3.2 Creating and Saving Policy The following are the steps you need to follow to create a Policy. Each of these steps is explained in detail in subsequent sections. Note Any investor, who desires to invest in any of the Products by purchasing a Policy in a product, can invest only if he is a valid Unit Holder with an account in the system. Therefore, you must first set up a Unit Holder account for the Policy Holder in the system. Refer to the chapter ‘Managing Investor Accounts’ for further information. 3.2.1 Invoke the Policy Maintenance screen Enter information in the Policy Maintenance screen. Save the information entered. Invoking Screen You can invoke the ‘Policy Maintenance Detail’ screen by typing ‘LEDPLAN’ in the field at the top right corner of the Application tool bar and clicking on the adjoining arrow button. 3-1 The following screen is invoked: Select ‘New’ from the Actions menu in the Application tool bar or click new icon to enter the details of the Policy Maintenance. 3.2.2 Fields in Policy Maintenance Screen Unit Holder ID Mandatory Enter the Unit Holder ID of the Policy Holder. System allows you to create a policy for unauthorized Unit Holder IDs. However, a policy can be authorized only if the policy holder has been authorized in the system. Unit Holder Name System will default Unitholder Name for the selected Unit Holder ID. CIF Number Mandatory Enter the CIF Number of the Policy Holder. Note – You have the option of using the Find Options screen to enter the CIF Number and Unit Holder ID. This screen is invoked when you click on the option list. – Once you have entered the Unit holder ID, the CIF Number and the Unit Holder Name will get updated. 3-2 3.2.2.1 Specifying Policy Information When you click ‘Policy Information’ link, the following screen is invoked: Policy Details Section Product ID Mandatory Select the product in which the Policy Holder wants to buy the Policy. The option list includes all valid and active Products. Product Description Display The system displays the description of the selected product. Policy Number System Generated/ User Input, Mandatory Specify the Policy Number at the time of policy creation. The system validates the value input for its uniqueness. The policy number cannot, however, be changed during subsequent edit or amend operations. When a Policy Holder subsequently contributes into this Policy that has been created, the same Policy number has to be specified, and the Policy must be an active, valid Policy for the transactions to be accepted. Reference Number 16 Characters Maximum, Alphanumeric, Mandatory Specify a unique initial identification for this Policy. The Reference Number is the initial identification that you give to a Policy, before the Policy Number is generated. 3-3 You can invoke the Policy or retrieve it through the Find Form using this Reference Number for subsequent inquiries and transactions. Rule Effective Date (DD/MM/YYYY) Date Format, Mandatory Specify the date from which the Policy will be effective. The format will be the one that has been maintained for your user ID in the ‘My Dash Board User’ setting date format. Policy Status Code Mandatory By Default Policy Status will be 'ACT' on New Mode. Transaction Currency Numeric; Optional Specify the transaction currency for the policy. If you do not maintain this value, the system will default this value at the time of saving the maintenance. The transaction currency maintained at the fund level will be default if all the transaction currencies for the fund are the same. If various currencies have been maintained at the fund level, then the system will default the policy base currency as the policy transaction currency. Include Interest in Investment Optional Select, from the adjoining drop-down list, if the interest earned on the initial investment should be considered along with the initial investment for investment in the policy. If you select ‘Yes’, the interest amount will be included in the investment and a single transaction will be generated for both. You need to manually add the interest amount calculated in the settlement details to the transaction amount of the particular currency in the asset allocation details. For instance, if the interest amount is USD 1000 and the transaction amount is USD 100000, then you are required to add USD 1000 to the transaction amount for the currency USD in the asset allocation details. If you select ‘No’, the interest amount will be generated as a separate UT transaction. Initial Investment Amount Optional You have the option of entering the initial amount to be invested in the policy. If the product is a single premium product (the box ‘Multiple Premiums Allowed?’ is not checked while creating a product), and you enter an amount here, the system will generate a transaction for this amount. You will be allowed to change the initial investment amount, interest amount and the asset allocation details for a policy that has been authorized as long as it has not been allocated. When you modify the details, the system will reverse the existing initial investment transaction and create a new policy transaction for the modified amount. You can modify the policy any number of times till policy allocation. If transactions like allocation, premium, annuity, recurring switch, top-ups, and surrender have been generated for the policy, the system will not allow you to modify the initial investment amount. Consider the following cases: 3-4 Case 1 The product is a multiple premium product; you enter the initial investment amount and premium details. The Start Date for the premiums is a system date when the policy is authorized. When the policy is Authorized, a transaction will be created on the date mentioned for the initial investment amount you have entered. Case 2 The product is a multiple premium product; you enter the initial investment amount and premium details. The Start Date for the premiums is the System Date. When the policy is saved: A transaction will be created for the initial investment amount you have entered. A transaction will also be generated for the first premium amount, at EOD. Case 3 The product is a multiple premium product; you do not enter any initial investment amount, but only the premium amount. The Start Date for the premiums is the System Date. When the policy is Authorized, an initial investment transaction will be generated with the premium amount. Case 4 The product is a multiple premium product; you do not enter any initial investment amount, but only the premium amount. The Start Date for the premiums is a future date. When the policy is Authorized, an initial investment transaction will be generated on the date specified, with the premium amount. Note In a scenario as described under Case 4, you will be allowed to amend the premium amount till the date specified. You will, however, not be allowed to enter an initial investment amount after you authorize a policy. Case 5 The product is a multiple premium product; you do not enter either the initial investment amount or the premium amount. No transaction will be generated on saving the policy. An initial investment transaction will be generated only if you enter any premium details at a later stage. Note The initial investment amount and premium amounts are independent of each other. This means that changing the initial investment will not change the premium amount and vice versa. Let us say, for example, you have not entered the initial investment amount and have entered only the premium amount. You now wish to enter an initial investment amount. You may do so before the policy is authorized, and in doing so, the premium amount you have entered will not be affected. Similarly, if you change the premium amount, the initial investment amount will not be affected. 3-5 Interest Amount Display; Can Be Changed The system computes the interest amount based on the interest calculation days and interest rate provided by you in the Interest Calculation Screen (explained below). Product Defaulting section Funding Factor 5 Characters, Numeric, Optional The funding factor that is applicable to Policy transactions in this Product, which would have been set up at product-definition level, is displayed here. You can override this value at this stage. This must be expressed as a percentage and cannot exceed one hundred percent. Funding Repayment Period Optional The duration of the repayment period, at the end of which the entire funded amount will be paid back to the investor, which would have been specified for this product, is displayed here. You can change the same for the Policy. Asset Allocation Mandatory The asset allocation for the Policy can be specified either by the sponsor of the product, or by the Policy Holder. The drop-down list contains two options – ‘By Fund’ and ‘By Policy Holder’. Select the required option. Cession Status Display When Policy Holders exercise the option of ‘ceding’ their policies on either a temporary or a permanent basis, the ceded Policy will be designated a ‘Cession ID’ and ‘Cession Status’ in the system. The Cession Status for this Policy is displayed here. Typically, at the time of Policy creation, the newly created Policy does not have a Cession ID or Cession Status, and this field is blank, and locked. Subsequently, whenever this Policy record is viewed, any changes to Cession Status will be displayed in this field. Funding Frequency Display The frequency at which the funded amount will be repaid to the investor, which would have been set up at the time of Product definition, is displayed here. It cannot be changed at this stage. Description_ Funding Frequency Display The system displays the description of the specified funding frequency. Policy Creation Type Optional Select the Policy Creation Type from the drop-down list. 3-6 Description_ Policy Creation Type Display The system displays the description of the specified Policy Creation Type. Preferred Fund for Redemption You can select or amend the redemption fund during the creation or amendment of the policy. If you maintain adequate balance to recover periodic fees in ‘Preferred Fund for Redemption’, system will redeem entire periodic fees from the preferred fund. If you do not maintain adequate balance ‘Preferred Fund for Redemption’ system will follow the present logic to recover the periodic fees. Note For a CMA applicable Product, system would treat CMA Fund as preferred fund for periodic fee redemptions, provided no preferred fund is selected at Product level. Refer the section ‘Cash Management Account’ in this chapter for more details on the operation of the Cash Management Account. Description Display The system displays the description of the specified preference for fund redemption. Initial Investment Policy Txn Number Display The system displays the transaction number of the initial investment policy. Specifying Exchange Rate Details The exchange rate details that are defaulted here or that you modify here will be used to convert the policy transaction amount as well as the interest on initial investment amount into the policy base currency. Amount Applied Display Only The system displays the transaction amount in terms of the policy base currency. Source ID Alphanumeric; Optional You can select the source ID required from the adjoining option list. If you do not specify any, the system will default the source ID when you save the policy. FX Deal Date Date; Optional Enter the deal date for exchange rate. FX Value Date Date; Optional Enter the value date for the exchange rate. 3-7 Override Exchange Rate Alphanumeric; Optional Select ‘Yes’ if you wish to change the exchange rate that is displayed here. If you select ‘Y’, however, you need to specify the exchange rate to be used for the transaction in the ‘Exchange Rate Applied’ field. Select ‘No’ if you wish to retain the exchange rate that is displayed by the system. Exchange Rate Applied Numeric; Conditional Specify the exchange rate to be used to convert the transaction amount from transaction base currency to policy base currency, if you have chosen to override the exchange rate. 3.2.2.2 Specifying Policy Details When you click ‘Policy Details’ tab, the following screen is invoked: Policy Dates Section Creation Date (DD/MM/YYYY) Mandatory This signifies the date on which Policy record was entered into the system. By default, the system displays the Application Date in this field. This date cannot be altered. Policy Start Date (DD/MM/YYYY) Date Format, Mandatory Specify the date from which the Policy is available for transactions. By default, the system displays the application date in this field. 3-8 The Policy Start Date can be a past date if backdating is allowed for the product (if you have selected the option ‘BackDating Allowed?’ in the Product Maintenance screen), but it must not be earlier than the Product Start Date. Maturity Date Basis Mandatory The option you select here, will decide on what basis the maturity date will be calculated. You have the following two options: Retirement Age Minimum Tenor You can select the option ‘Retirement Age’ only if you have selected the option ‘YES’ against the field ‘Retirement Features Supported’. In such a case, the maturity date will be calculated on the basis of the age of retirement you will specify at the Product level. If you select the option ‘Minimum Tenor’, the maturity date will be calculated on the basis of the minimum tenor you will specify at the Product level. Maturity Date (DD/MM/YYYY) Date Format, Mandatory When the Start Date of the Policy is specified, the system computes the maturity date for the Policy by adding the Minimum Tenor that has been specified at the product level for all policies, to the Policy Start Date, and defaults the computed date in this field. You can change this date. The concept of a Maturity Date enables the AMC to keep track of premature closures of policies that take place, so that the applicable exit fees may be levied. A Policy that has matured continues to exist in the product for all activities, but no transactions will be accepted into the Policy after the Policy End Date. Policy End Date (DD/MM/YYYY) Date Format, Mandatory Specify the date beyond which the Policy should cease to be active. This date must not be earlier than the application date or the Policy Start Date. Type of Policy Optional Specify whether the Policy being created is a new Policy, a rollover from an existing Policy or whether the customer is transferring retirement assets. Transfer-in option is applicable for fresh investment. If Balance Transfer-in is chosen from the drop down list the policy asset allocation will be enhanced to capture the unit transferred in each fund and WAC .The system will generate unit based transaction for such an initial investment. Note The option list includes the option ‘Accelerated Annuity’. If you select this option, in case of death of a policy holder, the policy will be transferred to a new policy opened in the name of the beneficiary .The initial amount of the new policy will be the maturity amount of the old one and the entire maturity proceed will be paid out over number of occurrences and frequency (maintained in the annuity tab). 3-9 Description Display The system displays the description of the selected policy type. Dates Defaulting Section Next Anniversary Date (DD/MM/YYYY) Date Format, Mandatory if the box ‘Override Anniversary Date’ is checked Enter the Anniversary Date for the annuity payment. This field is enabled only if the ‘Override Anniversary Date?’ option has been checked. Previous Anniversary Value Numeric, Mandatory if the box ‘Override Anniversary Date’ is checked Enter the preceding anniversary amount. Note Post authorization, you will be allowed to amend the ‘Anniversary Value’ and the ‘Previous Anniversary Value’ fields provided the ‘Override Anniversary Date?’ option has been checked. Override Anniversary Details? Optional When you enter the Start Date of the Policy in the Policy Details section of this screen, the system defaults the Anniversary Date to a date that is exactly one year after the Start Date. Policy Administrator Display The plan administrator you have specified for the product will be displayed. You will not be allowed to change this. Policy Amount Numeric, Optional Specify an indicative amount for which the Policy is taken in the product. The system does not perform any validation against this amount, and it is used only for information purposes. ROA Applicable Indicate whether a Rate of accumulation is applicable for the policy . The initial administrator and broker will use the market value at policy level to derive the fee return value. The fee is calculated based on the gross amount of the individual transaction value. You can select the applicable ROA for policy and policy holder. On selecting the Right of accumulation for Policy, an accumulation rate is applied on the policy, being created. On selecting Unit holder, the Right of Accumulation is applicable for all the policies mapped to the particular Unitholder. For an ROA function to be applicable, a cumulative load would have to be setup and mapped in the Load Product. 3-10 Allow ROA at CIF Level Indicate if ROA is to be allowed at CIF level or not by choosing from the drop-down list. Withdrawal Counter Display This field displays the number of withdrawals taken by the policy holder. It will be displayed irrespective of the product to which the policy belongs. System will update the Withdrawal counter at policy level after doing a withdrawal transaction, and also validates with the No. of withdrawals allowed at Policy level. Example If you enter the Start Date of the Policy as 3rd June 2005, the Anniversary Date will be defaulted to 3rd June 2006. If you wish to change the Anniversary Date of the annuity payment, check the box ‘Override Anniversary Date’. This field is enabled only if the ‘Override Anniversary Date?’ option has been checked Product Level Defaulting Section Statement Frequency Mandatory Specify the frequency at which the Policy statement must be mailed to the Policy Holder for this Policy. Note This frequency overrides the frequency specified for the Product. Description_ statement frequency Display The system displays the description of the specified statement frequency. Policy Base Currency Mandatory Specify the base currency to be associated with the policy or select the policy base currency from the option list provided. All currencies maintained in the system get displayed in the option list. While saving the record, the system validates whether the selected currency is supported by product and saves the record on successful validation. Description_ policy base currency Display The system displays the description of the specified policy base currency. Life Cover Applicable Optional This field indicates whether or not the Policy Holder has an option to opt for a life cover while subscribing to this product. The option you have selected for the product will be displayed here. You can change the same for the Policy. 3-11 Life Cover Amount Display This is the amount to be paid by the Policy Holder as a fee for obtaining the life cover for any Policy held by him in this product. The amount you have specified for the product will be displayed Proof of Existence Certificate Display This field indicates whether or not the Policy Holder will need to produce a certificate of existence. This option specified at for the product, in the Product Maintenance screen, will be defaulted. You will not be allowed to change this. Guarantee Period Optional Specify the guarantee period. Take on Annuity Amount Enter the take-on annuity amount here. The annuity details will be calculated by the system based on the amount you enter here and not the annuity percentage, till the first anniversary. The annuity details will be taken into consideration after the first anniversary. Number of Surrenders Allowed System will default the value from Product. User can override it. Retirement Age Mandatory and Enabled only if Maturity Date Basis for Product is ‘Retirement Age’ Specify the age that will be considered as retirement age for Policy Holders under this product. After this age, the Policy Holders will become eligible for retirement benefits, if any. Note This field will be enabled only if, for the Product , in the Product Maintenance screen: – You have selected the option ‘Yes’ against the field ‘Retirement Features Supported?’ – You have selected the option ‘Retirement Age’ against the field ‘Maturity Date Basis’ Life Expectancy Optional User can enter life expectancy. Policy Term (Years) Optional You can enter the policy term. 3-12 3.2.2.3 Specifying Additional Details When you click ‘Additional Details’ link, the following screen is invoked: Maximum Annual Contribution Numeric, Optional This is the maximum amount that the Policy Holder can invest annually in a Policy in this Product. This amount includes top ups, if any. The amount displayed is the amount specified for the Product. You can change the same for the Policy. Minimum Withdrawal Numeric, Optional This field will be enabled if you have specified the Withdrawal Limit Mode as Amount. Specify the minimum amount that a Policy Holder can be withdraw from the holdings. Maximum Withdrawal Numeric, Optional This field will be enabled if you have specified the Withdrawal Limit Mode as ‘Amount’. Specify the maximum amount that a Policy Holder can be withdraw from the holdings. Limit Percentage Numeric, Optional This field will be enabled if you have specified the Withdrawal Limit Mode as ‘Percentage’. Specify the maximum withdrawal in terms of a percentage, that a Policy Holder can be withdraw from the holdings. Additional Investments Allowed Mandatory This option indicates whether or not the Policy Holder can make an additional investment in a Policy. The option you have specified for the Product will be defaulted here. 3-13 Note You will be allowed to uncheck this box if it is checked. You will, however, not be allowed to check this box if it is unchecked Minimum Additional Investment Numeric, Optional This field indicates the minimum additional investment amount that a Policy Holder should make (if the option ‘Additional Investments Allowed’ has been selected for the Policy Holder). The amount in displayed in this field is the amount entered for the Product. You may change the same for the Policy. Maximum Additional Investment Numeric, Optional This field indicates the maximum additional investment amount that a Policy Holder should make (if the option ‘Additional Investments Allowed’ has been selected for the Policy Holder). The amount in displayed in this field is the amount entered for the Product. You may change the same for the Policy. Add. Investment Step Amount Numeric, Optional This field indicates the step amount for an additional investment. The amount in displayed in this field is the amount entered for the product. You may change the same for the Policy. Minimum Annual Withdrawal Numeric, Optional If the withdrawals are allowed at the Product level then the minimum amount that customer needs to withdraw annually can be specified here while creating a Policy. This will override the amount set at the Product level. The amount set at the product level will be shown here after user selects the Product. Participating Employer Optional You may specify the underlying policyholders’ employer. The option list displays all participating employers linked to the chosen product. Auto Clear Provisional Balance This field indicates whether 100% outflow transactions include provisionally allotted units. The option specified for the product, in the Product Maintenance screen, will be defaulted. However, you can change the defaulted option. You can specify any of the following options: Option not allowed: Provisionally allotted units should not be considered while processing 100% outflow transactions. Allowed – Default checked: Provisionally allotted units should be considered while processing 100% outflow transactions by default. Allowed – Default unchecked: Provisionally allotted units will not be considered while processing 100% outflow transactions by default. However, you can check this option while performing transactions. Auto Clear Reinvestments This field indicates whether 100% outflow transactions include freeze held and reinvestment units. The option specified for the product, in the Product Maintenance screen, will be defaulted. However, you can change the defaulted option. 3-14 You can specify any of the following options: Option not allowed: Freeze held/reinvestment units should not be considered while processing 100% outflow transactions. Allowed – Default checked: Freeze held/reinvestment units should be considered while processing 100% outflow transactions by default. Allowed – Default unchecked: Freeze held/reinvestment units will not be considered while processing 100% outflow transactions by default. However, you can check this option while performing transactions. Remarks Optional You may enter any remarks on the Policy if you wish. Refer to the chapter “Maintaining System Parameters” for more details. 3.2.2.4 Specifying Intermediary Details You will need to capture details of the intermediaries attached to the initial investment. When you click ‘Intermediary Details’ link, the following screen is invoked: The default intermediary details maintained for the unit holder involved in the transaction are displayed here. However, you can change the defaulted values. Intermediary Alphanumeric, Optional From the list, select the broker preferred by the Policy Holder. Parent Broker Code The system will display the parent broker code once the intermediary code is chosen. Split Percentage Percentage Format, Mandatory if you select any broker in the Intermediary field. Specify the percentage of the commission that the selected broker is entitled to receive on any transactions put through for the investor. 3-15 This percentage must not exceed one hundred percent. Note If you specify more than one broker in this section, the split percentages for all brokers, when summed up, must not exceed or fall below one hundred percent. 3.2.2.5 Specifying Beneficiary Details In this section, you must specify the details of one or more beneficiaries, if any, for the Policy Holder. A beneficiary could be an existing Unit Holder in the system or could be an external entity. When you click ‘Beneficiary Details’ link, the following screen is invoked: It is mandatory for you to maintain beneficiary details only if the option ‘Beneficiary Details Mandatory’ has been checked for the underlying product. Existing UH Mandatory Select ‘Yes’ for existing Unit Holder. Else ‘No’. Beneficiary ID Mandatory If the beneficiary is an existing Policy Holder, you can invoke the same from the option list. Else, specify the same. 3-16 Relationship Mandatory Specify the relationship of the beneficiary with the Policy Holder. Ratio Mandatory Specify the percentage of the Policy Holder’s holdings that belongs to the beneficiary. The ratio should sum up to 100. Date of Birth (DD/MM/YYYY) Optional Enter the date of birth of the beneficiary. Type Mandatory Specify whether the beneficiary is a primary or secondary holder. Beneficiary for Select ‘Ownership’ or ‘Proceeds’ from the drop down list. Personal Details First Name, Middle Name and Last Name Display The names are defaulted for the selected identification type. Identification ID Display The identification ID is defaulted for the selected identification type. Identification Type Select the identification type from the option list. Address Details State or Country, City, Zip Code and Address Optional Enter the address of the beneficiary, including details such as the city, zip code and state or country. Phone Number Optional Enter the phone number of the beneficiary. Fax Number Optional Enter the fax number of the beneficiary. 3-17 Email ID Optional Enter the email ID of the beneficiary. Account Details Bank Optional Specify the bank code of the beneficiary’s bank. You can select the same from the option list, if the bank code is a valid code in the system. Branch Display The branch of the bank is defaulted for the selected beneficiary bank. Account Currency, Account Number, Account Type Display The values are defaulted for the selected beneficiary bank IBAN 36 Characters Only; Alphanumeric; Optional Specify the IBAN (International Bank Account Number) of the account holder. 3.2.2.6 Specifying Constituent Details When you click ‘Constituent Details’ link, the following screen is invoked: 3-18 It is mandatory for you to maintain constituent details only if the option ‘Constituent Details Mandatory’ has been checked for the underlying product. Constituent Details The constituent details are given below: Existing UH Mandatory Select ‘Yes’ for existing Unit Holder. Else ‘No’. Constituent Type Mandatory Select all the stakeholders of the Policy from the option list. Constituent ID Mandatory Specify the ID of the constituent from the option list. You can either select a valid Unit Holder in the system or enter a Constituent ID. Relationship Mandatory Select, from the option list, the relationship of the constituent to the Policy Holder. Status Select the status ‘Alive’ or ‘Dead’. Personal Details The personal details are given below: Identification Type Select the identification type from the option list. Identification ID Display The identification ID is defaulted for the selected identification type. Date of Birth Optional Enter the date of birth of the constituent holder. First Name, Middle Name and Last Name Display The names are defaulted for the selected identification type. Address Details The address details are given below: 3-19 State or Country, City, Zip Code and Address Optional Enter the address of the constituent holder, including details such as the city, zip code and state or country. E-mail ID Optional Enter the E-mail ID of the constituent holder. Phone number Optional Enter the phone number of the constituent holder. Fax Number Optional Enter the fax number of the constituent holder. Account Details The account details are given below: Bank Optional Specify the bank code of the constituent's bank. You can select the same from the option list, if the bank code is a valid code in the system. Branch Display The branch of the bank is defaulted for the selected constituent bank. Account Currency, Account Number, Account Type Display The values are defaulted for the selected constituent bank. IBAN 36 Characters Only; Alphanumeric; Optional Specify the IBAN (International Bank Account Number) of the constituent holder. 3.2.2.7 Specifying Load Override Details In this section, you can override or alter the value of any load (including derived loads, if any) mapped to the selected fund and applicable for the transaction type, which is to be computed at the time of allocation. The frequency of computation for such loads would be "allocation". 3-20 Clicking on the ‘Load Override Details’ link invokes the following screen: This section is only enabled for funds that have allocation time loads mapped to them as applicable for the transaction type. Policy Number Optional System displays the Policy Number. Transaction Number Optional System displays the Transaction Number. Transaction Date Optional System displays the Transaction Date. Fund ID Optional System displays the Fund ID. Policy Holder Optional System displays the Policy Holder. Load ID Optional System displays the Load ID. Transaction Type Optional System defaults the Transaction Type. 3-21 Ref Type Optional System defaults the Reference Type. Projected Return Value Optional The System populates the return value from the load setup. If there are criteria based loads, the criteria is evaluated during UT transaction generation and it will be used during allocation. 3.2.2.8 Asset Allocation Details The initial contribution towards the Policy can be directed into any number of mapped funds for the product, and annuity is paid out to the Policy Holder from any of these funds. The ratio of contributions received into the Policy to the annuity payouts for each of the mapped funds of the product, as specified at the time of Policy creation are displayed here. The initial contribution that you enter can be in different currencies. In this case, you need to mention the currency-wise details here. Note The asset allocation details that you specify here will be applicable to only the initial contribution towards the policy, and not the annuity and premium payments. When you click ‘Asset Allocation’ button, the following screen is invoked: Enter information in the following fields: Fund ID Mandatory All the funds mapped for the selected product are displayed in the option list. Against each of these funds, you can specify the investment ratio and the annuity ratio. 3-22 Transaction Currency Alphanumeric; Optional Specify the transaction currency for the initial contribution. If many currencies have been mentioned in the settlements, then you are required to enter the amount for individual currencies. You can specify a transaction currency only if the transaction is amount-based. Transaction Amount Numeric; Optional Specify the transaction amount for the currency selected. If different currencies have been mentioned in settlements, then you can specify only the transaction amount. The system will default the ratio. If all the currencies in settlements are the same, then you can specify either the transaction amount or the ratio. Note – If you have checked the ‘Include Interest in Investment’ box, then the total of settlement and interest amounts for each currency needs to be equal to the asset allocation transaction amount for the currency. – If the ‘Include Interest in Investment’ box has not been checked, then sum of currency wise settlement amount should be equal to the asset allocation transaction amount for the currency. Exchange Rate Source Alphanumeric; Optional The system will display the exchange source maintained at default set-up in system parameters. You can change it by selecting the required exchange rate source from the adjoining option list. This will be used by the system to convert the transaction amount in terms of fund base currency. Override Exchange Rate? Optional Select ‘Yes’ if you wish to change the exchange rate that is displayed here. If you select ‘Yes’, however, you need to specify the exchange rate to be used for the transaction in the ‘Exchange Rate Applied’ field. Select ‘No’ if you wish to retain the exchange rate that is displayed by the system. Exchange Rate Numeric; Optional The system will default the exchange rate available for the currency based on the exchange source specified. If you have elected to override the exchange rate, you need to enter the exchange rate to be used here. If exchange rate is not available, then the system will generate the transactions as incomplete ones. Such transactions can be enriched later through the ‘Policy Transaction Enrichment Screen’. FX Deal Date Date format; Optional The system will default the starting date of the policy here. You can change it if required. FX Value Date Date format; Optional The system will default the starting date of the policy here. You can change it if required. 3-23 Units/ Ratio 3 Characters Maximum, Numeric, Mandatory For each fund that is displayed, specify the ratio of investment or the number of units to be made in the fund out of the total contribution towards the Policy. The sum total of the investment ratio should add up to 100. If there are many currencies specified as part of settlements, then the system will not allow you to enter a ratio. Instead you need to enter the transaction currency and transaction amount for each currency. The system will compute and display the ratio based on the currency and amount details provided. To calculate the ratio, the transaction amounts will be If the settlements are maintained in only one currency, then you can enter either the ratio or the transaction amount. Note If the type of policy is 'Balance Transfer-in' the number of units being transferred-in are mentioned and not the ratio of investment. WAC Specify the take-on WAC here. This will be used as the opening WAC in respective funds. CGT computation for initial investment transaction will be based on the take-on WAC Note WAC is mandatory in case of Balance Transfer-In type of policy. 3.2.2.9 Payment Details Section The Settlement Details screen is invoked when you click on this button. 3-24 Sequence Number Optional You can enter the sequence number. Account Number Optional Specify the account number from which the transfer of payment is being made. Account Currency Optional Specify the account currency of the account number from which the transfer of payment is being made. Bank Name Optional Specify the bank from which the transfer of payment is being made. Account Type Optional Specify the account type from which the transfer of payment is being made. Branch Code Optional Specify the branch from which the transfer of payment is being made. IBAN 36 Characters Only; Alphanumeric; Optional Specify the IBAN (International Bank Account Number) of the account holder. Payment Date Date Format; Mandatory Specify the date on which the initial investment was done. You can deposit the amount in different currencies and on different dates. Payment Currency Alphanumeric; Mandatory Enter the currency in which the initial investment is being done. The initial amount can be deposited in multiple currencies. Payment Amount Numeric; Mandatory Enter the initial investment amount being paid in the particular currency. Exchange Rate Details When you click the ‘Enrich’ button in the ‘Policy Information’ tab, the system will default the following exchange rate details for each settlement: Source ID Exchange Rate Applied Transaction Currency Amount 3-25 Override Exchange Rate FX Deal Date FX Value Date If exchange rate details are not available for any settlement when the transaction or policy is entered, the system will not generate a UT transaction. Once all the settlement details have been enriched in the ‘Policy Transaction Exchange Rate Enrichment’ screen and the ‘FCIS Enrich Exchange Rate Detail’ screen, the system will compute the transaction amount and generate the UT transaction. If it is not enriched, then the system will pick the exchange rate during EOD and generate the UT transaction. Interest Details When you click the ‘Enrich’ button in the ‘Policy Information’ tab, if the initial investment amount has been deposited prior to the policy start date, the system will calculate and display the interest on the payment amount in the ‘Policy Information’ tab. The interest will be calculated from the date of payment till the transaction date. When you click ‘Calculate Interest’ button in the ‘Settlement Details’ screen, the system will calculate and display the interest amount in the ‘Interest Amount’ field in the same screen. Interest Rate Numeric; Optional Enter the rate of interest that is to be used to calculate interest amount for the particular currency. Alternatively, you can maintain the interest rate in the ‘Interest Rate Maintenance’ screen. If you do not maintain an interest rate, the system will take it as null. Interest Amount Display Only The system computes and displays the interest amount. Interest Amount in Transaction Currency Display Only The system computes and displays the interest amount in terms of the transaction currency. Interest Calc. Days Display Only The system calculates the number of days for which interest calculation has to be done for a policy based on the policy start date and payment date. Basis Days Mandatory, Numeric Select the interest basis days, based on which the interest will be calculated. The options available are: 360 days 365 days When you click the ‘Clear’ button, the interest-related details will be cleared. 3-26 3.2.2.10 Premium Details Section In this section, enter the details of the premium payment and the frequency at which the premium payments will be made. You can enter the details for more than one premium. When you click on the ‘Premium Details’ button, the following screen is invoked: Enter information in the following fields: 3-27 Premium Details Sequence Number Optional You can enter the sequence number. Policy SI Number Display This number is generated by the system. It represents the number of premium payments between the Start Date and End Date specified for the premium payment. Status Mandatory Select the status of the standing instruction for premium payment from the option list. Note If you select the status ‘STOP’, escalation will not be applied on the premium. Transactions will not be generated for SIs on premiums whose status is ‘STOP’. It is possible for you to change the status of such SIs to ‘ACTIVE’ during amendment of the policy. During amendment of a policy, you can change the status of an active SI, to ‘Paused’, ‘Stopped’ or ‘Cancelled’. During amendment of an SI marked ‘Not Started’, you can change all details except the status of the SI. You will be allowed to delete the SI. During amendment of an active SI: – Escalation End Date can be amended only it is greater than the System Date – Escalation Start Date and Escalation Frequency can be amended only if escalation has not been applied on the policy Start Date (DD/MM/YYYY) Date Format, Mandatory Specify the date, beginning from which, the first premium payment is to be made for this Policy. Subsequent to this payment, premium payments will be made according to the premium frequency specified for the Policy. Note The Premium Start Date must not be equal to and earlier than the Policy Start Date. End Date (DD/MM/YYYY) Date Format, Mandatory Specify the date on which the last premium payment will be made. Note The premium period of premium SIs cannot overlap. 3-28 Value Numeric, Mandatory Specify the amount paid by the Policy Holder as the premium amount for the Policy. Frequency Mandatory Specify the frequency at which the premium payments will be made, for this Policy, by the Policy Holder. Payment Mode Mandatory Select the mode of the premium payment. You have the following options: Cheque Transfer Bank Code Specify the bank code. The adjoining option list displays valid bank codes maintained in the system. You can choose the appropriate one. Bank Name Specify the bank from which the transfer of payment is being made. Branch Code Specify the branch from which the transfer of payment is being made. Account Type Optional Specify the account type from which the transfer of payment is being made. Account Number Optional Specify the account number from which the transfer of payment is being made. Account Currency Optional Specify the account currency of the account number from which the transfer of payment is being made. IBAN 36 Characters Only; Alphanumeric; Optional Specify the IBAN (International Bank Account Number) of the account holder. Enter escalation information in the following fields: Escalation Start Date (DD/MM/YYYY) Date Format, Optional Specify the date from which escalation will commence. This date must be earlier than the End Date of the Policy, and must be later than the Premium Start Date. 3-29 Escalation End Date (DD/MM/YYYY) Date Format, Optional Specify the date from which the escalation must cease to be applied on the annuity. This date must be later than the Premium Start Date. If the Premium Escalation Start Date has been specified, then the End Date is mandatory and must be specified. Escalation Mode Mandatory Annuity payments can be escalated periodically as a pre-defined percentage, amount or market value. Select the mode from the drop-down list. Escalation Frequency Mandatory Select the frequency at which the escalation is to be applied, from the values in the drop-down list. If the Start Date has been specified, the frequency is mandatory and must be specified. Escalation Value Mandatory’ Specify the escalation amount that is to be applied. Cheque Details Enter the check details in the following fields: Cheque Number Mandatory Enter the cheque number of the cheque by which the premium is being paid. Cheque Date (DD/MM/YYYY) Date Format, Mandatory Enter the cheque date of the cheque by which the premium is being paid. 3.2.2.11 Annuity Details Section As mentioned earlier, this section is available only if, for the product you have chosen, you have selected the option ‘Annuity Applicable?’ in the Premium and Annuities section of the Product Maintenance Details screen. 3-30 If, for the product you have chosen, annuity details are applicable, the following screen is invoked when you click on the Annuity Details tab: Annuity Details Sequence Number Optional You can enter the sequence number. SI Number Display When you save the details of the Policy you are entering, the Standing Instructions or SI Number will be generated by the system and displayed. Status Mandatory Select the status of the standing instruction of the annuity payment from the option list. The options are: A-Active C-Cancel N-Not Started 3-31 P-Pause S-Stop Note If you select the status ‘STOP’, escalation will not be applied on the annuity. Transactions will not be generated for SIs on annuities whose status is ‘STOP’. It is possible for you to change the status of such SIs to ‘ACTIVE’ during amendment of the policy. During amendment of a policy, you can change the status of an active SI, to ‘Paused’, ‘Stopped’ or ‘Cancelled’. However, if you have checked the box ‘Phase-In’, you will not be allowed to select the options ‘Paused’ and ‘Stopped’. During amendment of an SI marked ‘Not Started’, you can change all details except the status of the SI. You will be allowed to delete the SI. During amendment of an active SI: – Escalation End Date can be amended only it is greater than the System Date – Escalation Start Date and Escalation Frequency can be amended only if escalation has not been applied on the policy Start Date (DD/MM/YYYY) Date Format, Mandatory Specify the date, beginning from which, the annuity payment is to be made for this Policy. Subsequent to this payment, annuity payments will be made according to the annuity frequency specified for the Policy. Note The Annuity Start Date must not be equal to and earlier than the Policy Start Date. End Date (DD/MM/YYYY) Date Format, Mandatory Specify the date on which the last annuity payment is to be made for this Policy. This date must not be the same as the Annuity Start Date. Note The annuity period for annuity SIs cannot overlap. Value Numeric, Optional The amount that is to be paid as annuity to the Policy Holder over a time period in definite intervals / frequencies against the initial investment towards this Policy in this Product is displayed here. You can change this amount at this stage. Note The is not applicable if the type of policy is 'Accelerated Annuity' If the value specified here is a percentage, it must be within the Annuity Minimum Ratio and the Annuity Maximum Ratio specified at product level. 3-32 Note If you have selected the option ‘Amount’ against the field Mode, the value you enter will be the annuity amount to be paid in the frequency specified. If you have selected the option ‘Percentage’, the percentage value of the policy annuity amount will be calculated and paid in the frequency specified. The same is illustrated with the following example: Case 1 The Mode is ‘Amount’. Value is 1000 currency units. Frequency is Monthly. In this case, 1000 currency units will be paid to the policy holder every month. Case 2 The Mode is ‘Percentage’. Value is 10%. Frequency is Monthly. In this case, 10% of the policy anniversary amount will be paid to the policy holder in that year. Frequency Mandatory Specify the frequency at which annuity payments must be made for this Policy. Mode Alphanumeric, Mandatory Annuity payments can be made either as a percentage of the net investment amount or as a flat amount. Accordingly, select the appropriate mode in this field. Note This is not applicable if the type of policy is 'Accelerated Annuity' Transaction Currency Specify the code of the transaction currency. The adjoining option list displays all valid currency codes along with their description. You can choose the appropriate one. Pay Incidence Mandatory The payment incidence for an annuity payment sets up the actual payout incidence within the specified frequency for the annuity payment. Annuity Type Mandatory Select the desired annuity type that is to be applicable for this Policy, from the options provided in the drop-down list. For information purposes only, the annuitant has the option of specifying the type of annuity that should accrue. The four types provided are as follows: Type 1: In this type, the annuity is a single life annuity payable until the death of the annuitant. Type 2: In this type, the annuity is a joint life and last survivor annuity and is payable until the last death of both annuity and spouse, that is, while at least one of the annuitant or spouse is alive. 3-33 Type 3: The annuity is a joint life and last survivor annuity where the amount of the annuity reduces on the first death of annuitant or spouse. The percentage reduction is specified by the annuitant at the outset. Type 4: The annuity is a joint life and last survivor annuity where the amount of the annuity reduces on the male death. The percentage reduction is specified by the annuitant at the outset. Asset Allocation Type Mandatory Select the type of asset allocation from the drop down list provided. The options available are: User Input Policy Portfolio If the option selected is “User Input” then you need to specify the annuity asset allocation. If the option selected is “Policy Portfolio” then you will not be allowed to capture the ratio of funds for annuity or override the load details during policy maintenance. In this case the ratio of funds will be calculated based on policy portfolio. If the type of asset allocation is specified as ‘Policy Portfolio’, then you will not be allowed to pass policy journal entries for such transactions. Reduction Percentage 5 Characters Maximum, Numeric, Mandatory Specify the reduction in the annuity in the case of death of one or more of the annuitants, or the primary annuitant, as is applicable. Note This field is only applicable for Annuity Types 3 and 4. No Of Annuity Occurrences Numeric Enter the number of annuity occurrences. This is applicable only for accelerated annuity policies. Payment Details Payment Mode Mandatory Select the mode of the annuity payment. Bank Code Specify the bank code. The adjoining option list displays all valid bank codes maintained in the system. You can choose the appropriate one. Payment Branch Code Specify the branch from which the transfer of payment is being made Account Number Optional Specify the account number from which the transfer of payment is being made. 3-34 Bank Name Specify the bank from which the transfer of payment is being made. Account Type Optional Specify the account type from which the transfer of payment is being made. Account Number Specify the account number. The adjoining option list displays all valid account numbers maintained in the system. Transfer Account Currency Optional Specify the account currency of the account number from which the transfer of payment is being made. Asset Allocation Details Enter the following asset allocation details for the annuity details : Fund ID Mandatory All the funds mapped for the selected product are displayed in the option list. Against each of these funds, you can specify the investment ratio and the annuity ratio. Fund Name Specify the fund name. Units/ Ratio 3 Characters Maximum, Mandatory wherever applicable For each fund that is displayed, specify the ratio of annuity payment to be made from the fund, to the total annuity payment from the Policy. The sum total of the annuity ratio should add up to 100. Enter information in the following fields: Escalation Start Date (DD/MM/YYYY) Date Format, Optional Specify the date from which escalation will commence. This date must be earlier than the End Date of the Policy, and must be later than the Annuity Start Date. Escalation End Date (DD/MM/YYYY) Date Format, Optional Specify the date from which the escalation must cease to be applied on the annuity. This date must be later than the Annuity Start Date, If the Annuity Escalation Start Date has been specified, then the End Date is mandatory and must be specified. 3-35 Escalation Mode Mandatory Annuity payments can be escalated periodically as a pre-defined percentage, amount or market value. Select the mode from the drop-down list. Escalation Frequency Mandatory Select the frequency at which the escalation is to be applied, from the values in the drop-down list. If the Start Date has been specified, the frequency is mandatory and must be specified. Escalation Value Mandatory’ Specify the escalation amount that is to be applied. 3.2.2.12 Recurring Switch Details Section In this section, enter the details of any recurring switch transactions that the Policy Holder may want to enter into. The details maintained would be standing instructions for a switch transaction. 3-36 Recurring Switch Details Sequence Number Optional You can enter the sequence number. SI Number Display When you save the details of the Policy you are entering, the Standing Instructions or SI Number will be generated by the system and displayed. Note During amendment of a Policy you will not be allowed to change the number of occurrence that you already have specified. Status Mandatory Select the status of the recurring switch from the option list. The options available are: A-Active C-Cancel N-Not Started P-Pause S-Stop Note If you select the status ‘STOP’, escalation will not be applied on the annuity. Transactions will not be generated for SIs on annuities whose status is ‘STOP’. It is possible for you to change the status of such SIs to ‘ACTIVE’ during amendment of the policy. During amendment of a policy, you can change the status of an active SI, to ‘Paused’, ‘Stopped’ or ‘Cancelled’. During amendment of an SI marked ‘Not Started’, you can change all details except the status of the SI. You will be allowed to delete the SI. During amendment of an active SI: – Escalation End Date can be amended only it is greater than the System Date – Escalation Start Date and Escalation Frequency can be amended only if escalation has not been applied on the policy Start Date (DD/MM/YYYY) Date Format, Mandatory Enter the date on which the switch transactions should begin. End Date (DD/MM/YYYY) Date Format, Mandatory Enter the date on which the switch transactions should stop. 3-37 Value Numerical, Mandatory if the box ‘Portfolio Switch ’or ‘Phase In’ is not checked Enter the value of the switch transaction. Frequency Mandatory Select the frequency with which the switch transactions should occur. Transaction Currency Specify the code of the transaction currency. The adjoining option list displays all valid currency codes along with their description. You can choose the appropriate one. Portfolio Switch Optional Select ‘Yes’ to indicate the switch will be a portfolio switch. In such a case, the field ‘Transaction Value’ will be defaulted to 0 and locked. A portfolio switch can be a complete or partial switch. Phase In Optional If you select ‘Yes’, the system will allow you to move the fund amount of one fund to into another and you will be able to enter the Start Date, Number of Occurrences and Frequency in this screen. The system will calculate the SI value, based on these parameters. Note – If you have selected ‘Yes’, Escalation Details will not be applicable. – If you have selected ‘Yes’, the SI Status codes ‘PAUSED’ and ‘STOPPED’ are not applicable. – If you have selected ‘Yes’, the system will allow you to move the fund amount of one fund to into another or from one fund to more than one fund. However movement from multiple funds to one fund or from multiple funds to multiple funds is not permitted. – If you have selected ‘Yes’, you will not be allowed to enter more than one ‘From’ fund in the Recurring Switch Asset Allocation Details screen (which is invoked by clicking the Asset Allocation link). – During amendment of a Policy you will not be allowed to change the preference you have specified for a phase-in. For example, If you have selected ‘Yes’ in Phase-In, you will not be allowed to uncheck it and vice-versa. Type Mandatory Select the type of switch applicable. No Of Annuity Occurrences Numeric Enter the number of annuity occurrences. This is applicable only for accelerated annuity policies. 3-38 Escalation Start Date (DD/MM/YYYY) Date Format, Optional Specify the date from which escalation of the recurring switch will commence. This date must be earlier than the End Date of the recurring switch, and must be later than the Start Date of the recurring switch. Escalation End Date (DD/MM/YYYY) Date Format, Optional Specify the date from which the escalation must cease to be applied on the recurring switch. This date must be later than the Start Date. If the Escalation Start Date for the recurring switch has been specified, then the End Date is mandatory and must be specified. Escalation Mode Mandatory Switch payments can be escalated periodically as a pre-defined percentage, amount or market value. Select the mode from the drop-down list. Escalation Frequency Mandatory Select the frequency at which the escalation is to be applied, from the values in the drop-down list. If the Start Date has been specified, the frequency is mandatory and must be specified. Escalation Value Mandatory’ Specify the escalation amount that is to be applied. Asset Allocation Details : Fund ID Mandatory All the funds mapped for the selected product are displayed in the option list. Select funds FROM which you are moving the investment amount. Units/Ratio Numeric, Mandatory Specify the percentage of the amount that must be invested in each of the selected funds. The sum of all such percentages must add up to 100, and not fall below or exceed it. The percentages specified here must not be fractional. Typically, this field is only applicable for transactions for which the Transaction Mode is ‘Percentage’. Note If you have specified the investment amounts in each fund, the investment ratios are computed and displayed here, and this field is locked. The latest investment ratio applicable for the Policy is displayed here when the form is opened. These values can be amended, and you can specify the required percentages. Switch Asset Allocation Details Capture the funds INTO which the investment amount is being moved, in the ‘Switch Asset Allocation’ section: 3-39 Fund ID Mandatory All the funds mapped for the selected product are displayed in the option list. Select funds INTO which you are moving the investment amount. Units/Ratio Numeric, Mandatory Specify the percentage of the amount that must be invested in each of the selected funds. The sum of all such percentages must add up to 100, and not fall below or exceed it. The percentages specified here must not be fractional. Typically, this field is only applicable for transactions for which the Transaction Mode is ‘Percentage’. Note If you have specified the investment amounts in each fund, the investment ratios are computed and displayed here, and this field is locked. The latest investment ratio applicable for the Policy is displayed here when the form is opened. These values can be amended, and you can specify the required percentages. 3.2.2.13 Initial Load Override Details Section You can override or alter the value of any load (including derived loads, if any) mapped to the selected fund in the Initial Load Override Details screen which is invoked by clicking on the initial load override button in the Policy Maintenance Details screen. Initial Load Override Details Load ID Display Only The ID of the load that has been mapped to the fund is displayed here. The load ID is displayed as a link. To view details of the load, click the ID link. 3-40 If a derived load has been mapped, it is also displayed here and can be overridden. Change Type Optional When you override or alter a load at the time of entering a transaction, you can effect the change in any of the following ways: Discount (reducing the load return value in all the slabs) Increase (increasing the load return value in all slabs) Return Value (assigning an altered return value that will be applicable to all the loads) Group ID Display, Mandatory Displays the Group ID. Change Value Numeric, Optional Specify the altered return value for the allocation time load that you are overriding. Txn Type Display, Mandatory This displays the transaction type. Ref Type Display, Mandatory This displays the reference type. 3-41 3.2.2.14 Premium Load Override Section You can override or alter the value of load applied on premium payment mapped to the selected fund. You can do so in the Load Override Details screen which is invoked when you click on the Load Override Details button in the Policy Maintenance Details screen. Load ID Display Only The ID of the load that has been mapped to the fund is displayed here. The load ID is displayed as a link. To view details of the load, click the ID link. If a derived load has been mapped, it is also displayed here and can be overridden. Group ID Display, Mandatory Displays the group ID. Change Type Optional When you override or alter a load at the time of entering a transaction, you can effect the change in any of the following ways: Discount (reducing the load return value in all the slabs) Increase (increasing the load return value in all slabs) Return Value (assigning an altered return value that will be applicable to all the loads) Change Value Numeric, Optional Specify the altered return value for the allocation time load that you are overriding. 3-42 Txn Type Display, Mandatory This displays the transaction type. Ref Type Display, Mandatory This displays the reference type. 3.2.2.15 Annuity Load Override Section You can override or alter the value of load applied on annuity amount towards the Policy mapped to the selected fund. You can do so in the Load Override Details screen which is invoked when you click on the Load Override Details button in the Policy Maintenance Details screen. Load ID Display Only The ID of the load that has been mapped to the fund is displayed here. The load ID is displayed as a link. To view details of the load, click the ID link. If a derived load has been mapped, it is also displayed here and can be overridden. Group ID Optional Displays the group ID. Change Type Optional When you override or alter a load at the time of entering a transaction, you can effect the change in any of the following ways: 3-43 Discount (reducing the load return value in all the slabs) Increase (increasing the load return value in all slabs) Return Value (assigning an altered return value that will be applicable to all the loads) Change Value Numeric, Optional Specify the altered return value for the allocation time load that you are overriding. Txn Type Display, Mandatory This displays the transaction type. Ref Type Display, Mandatory This displays the Reference Type. 3.2.2.16 Switch Load Override Section You can override or alter the value of load applied on the load mapped to the selected fund. You can do so in the Recurring Switch Load Details screen which is invoked when you click on the Recurring Switch Load Details‘ button in the Policy Maintenance Details screen. Load ID Display Only The ID of the load that has been mapped to the fund is displayed here. The load ID is displayed as a link. To view details of the load, click the ID link. If a derived load has been mapped, it is also displayed here and can be overridden. 3-44 Group ID Display, Mandatory Displays the Group ID. Change Type Optional When you override or alter a load at the time of entering a transaction, you can effect the change in any of the following ways: Discount (reducing the load return value in all the slabs) Increase (increasing the load return value in all slabs) Return Value (assigning an altered return value that will be applicable to all the loads) Change Value Numeric, Optional Specify the altered return value for the allocation time load that you are overriding. Txn Type Display, Mandatory This displays the Transaction Type. Ref Type Display, Mandatory This displays the Reference Type. 3.2.2.17 Add Info Click on this link to enter any additional information that you wish. You should have defined an additional information head along with valid values, use the Additional Information Maintenance screen, in order to be able to enter additional information. Add Info screen is invoked when you click on the Add Info button in the Policy Maintenance Details screen. Other Info Field Enter the information in this field. 3-45 Field Value Enter the valid value which is defined in the add info maintenance. 3.2.3 Saving Information Entered When you have entered all the mandatory information, click ‘Ok’ button. The following message will be displayed: The system displays the following confirmation message “Record Successfully Saved” This indicates the record has been saved. Click ‘Ok’ button. 3.2.4 Creating Future-dated Rules for Policies You can create a future-dated rule by copying a policy and making changes to the new rule with a Rule Effective Date in the future. The rule will become active on the ‘Rule Effective Date’. On this date, the system will mark the new rule as the latest rule and disregard the old rules for the policy. The system will allow you to create only one future-dated rule for a policy and on a given date only one rule will be active. You can amend future-dated rule details including the Rule effective Date and also close an existing future-dated rule. In case, you wish to re-open a future-dated rule, the system will allow it only if there is no other future-dated rule maintained in the system for the policy. 3.2.5 Processing Back Data Propagation for Transactions You can correct erroneous transactions as well as enter those that have been missed out and compute the effect these have on the current holdings of the unit holder through the back data propagation process. To facilitate this propagation process, two schemas are used – the business (or normal) schema and the report schema. You are required to enter the correct data in the business schema for the required transactions and select these for propagation, again from the business schema. The transactions will be simulated in the report schema and the results can be viewed in the business schema. 3-46 Refer the chapter ‘Back Data Propagation’ for more details on the back data propagation process 3.3 Policy Maintenance Summary Screen You can invoke the ‘Policy Maintenance Summary’ screen by typing ‘LESPLAN’ in the field at the top right corner of the Application tool bar and clicking on the adjoining arrow button. The following screen is displayed: 3.3.1 Retrieving Policy in Policy Maintenance Screen You can retrieve a previously entered record in the Summary screen, as follows: Specify any or all of the following details in the Policy Maintenance Summary screen: 1. Select the status of the record in the Authorized field. If you choose the “Blank Space” option, then all the records are retrieved. 2. Select the status of the record in the open field. If you choose the “Blank Space” option, then all the records are retrieved. Policy Number Policy Reference Number Policy Start Date Maturity Date Policy End Date Latest Rule After you have specified the required details, click ‘Search’ button. All records with the specified details are retrieved and displayed in the lower portion of the screen. Note You can also retrieve the individual record detail from the detail screen by doing query in the following manner: – Press F7. 3-47 – Input the Product Number. – Press F8. You can perform Edit, Delete, Amend, Authorize, Reverse, Confirm operation by selecting from the Action list. You can also search the record by using combination of % and alphanumeric value. Example You can search the record for Product Number by using the combination of % and alphanumeric value as follows:- 3.3.2 Search by A%: System will fetch all the records whose Product Number starts from Alphabet ‘A’. For example, AGC17, AGVO6, AGC74 etc. Search by %7: System will fetch all the records whose Product Number ends by numeric value’ 7’. For example, AGC17, GSD267, AGC77 etc. Search by %17%:- System will fetch all the records whose Product Number contains the numeric value 17. For example, GSD217, GSD172, AGC17 etc. Editing Policy You can modify the details of a record that you have already entered into the system, provided it has not been subsequently authorized. You can perform this operation as follows: 1. Invoke the Policy Maintenance Summary screen from the Browser. 2. Select the status of the record that you want to retrieve for modification in the Authorization Status field. You can only modify records that are unauthorized. Accordingly, choose the Unauthorized option from the drop down list. 3. Specify any or all of the details of the record in the corresponding fields on the screen to retrieve the record that is to be modified. All unauthorized records with the specified details are retrieved and displayed in the lower portion of the screen. 4. Double click the record that you want to modify in the list of displayed records. The Policy Maintenance Detail screen is displayed. 5. Select Unlock Operation from Action list to modify the record. Modify the necessary information 6. Click Save to save your changes. The Policy Maintenance Detail screen is closed and the changes made are reflected in the Policy Maintenance Summary screen. 3.3.3 Viewing Policy To view a Policy you have previously entered, you must retrieve the same in the Policy Maintenance Summary screen, as follows: 1. Invoke the Summary Screen from the Browser. 2. Select the status of the Policy that you want to retrieve for viewing in the Authorization Status field. You can also view all records that are either unauthorized or authorized only, by choosing the Unauthorized/ Authorized option. 3. Specify any or all of the details of the records in the corresponding fields on the screen, and click ‘Search’ button. All records with the specified details are retrieved and displayed in the lower portion of the screen. 4. Double click the record that you want to view in the list of displayed records, in the lower portion of the screen. The Policy Maintenance screen is opened in view mode. 3-48 3.3.4 Deleting Policy You can delete only unauthorized records in the system. To delete a record that you have previously entered, you must retrieve the same in the Policy Maintenance Summary screen, as follows: 1. Invoke the Policy Maintenance Summary screen from the browser. 2. Select the status of the record that you want to retrieve for deletion. 3. Specify any or all of the details of the record in the corresponding fields on the screen, and click ‘Search’ button. All records with the specified details are retrieved and displayed in the lower portion of the screen. 4. Double click the record that you want to delete in the list of displayed records, in the lower portion of the screen. The Policy Maintenance Detail screen is opened in View mode. 5. Select Delete operation from the Action list. The system prompts you to confirm the deletion, and the record is deleted physically from the system database. 3.3.5 Authorizing Policy An unauthorized record must be authorized in the system for it to be processed. To authorize a record, you must first retrieve the same in the Policy Maintenance Summary screen. 1. Invoke the Policy Maintenance Summary screen from the Browser. 2. Select the status of the record that you want to retrieve for authorization. Typically, choose the Unauthorized option from the drop down list. 3. Specify any or all of the details of the record in the corresponding fields on the screen. Click ‘Search’ button. All records with the specified details that are pending authorization are retrieved and displayed in the lower portion of the screen. 4. Double click the record that you wish to authorize. The Policy Maintenance Detail screen is opened in View mode. 5. Select Authorize operation from Action list. When the checker authorizes a record, details of validations, if any, that were overridden by the maker of the record during the Save operation, are displayed. If any of these overrides results in an error, the checker must reject the transaction. 3.3.6 Amending Policy After a record is authorized, it can be modified using the Unlock operation from Action list. To make changes to a record after authorization, you must invoke the Unlock operation which is termed as Amend Operation. 1. Invoke the Policy Maintenance Summary screen from the Browser. 2. Select the status of the record that you wish to retrieve for amendment. You can only amend records that are authorized. 3. Specify any or all of the details of the record in the corresponding fields on the screen. All records with the specified details are retrieved and displayed in the lower portion of the screen. 4. Double click the record that you want to amend. The Policy Maintenance screen will be displayed in Amendment mode. Click the Unlock operation from the Action list to amend the record. 3-49 5. Amend the necessary information. Click the Save button to save your changes. 3.3.7 Authorizing Amended Policy An amended policy must be authorized for the amendment to be made effective in the system. Authorization of amended records can only be done from Fund Manager Module and Agency branch Module. The process of authorization is subsequently the same as that for normal transactions. 3.3.8 Reversing Policy You can reverse a policy that you have already entered into the system, provided it has not been subsequently authorized. You can perform this operation as follows: 1. Invoke the Policy Maintenance Summary screen from the browser. 2. Select the status of the record that you want to retrieve for reversal. 3. Specify any or all of the details of the record in the corresponding fields on the screen, and click ‘Search’ button. All records with the specified details are retrieved and displayed in the lower portion of the screen. 4. Double click the record that you want to reverse in the list of displayed records, in the lower portion of the screen. The Policy Maintenance Detail screen is opened in View mode. 5. Select Reverse operation from the Action list. The system prompts you to confirm the reversal of record. 6. Click the Save button to save your changes. 3.3.9 Authorizing Reversal of Policy A reversed policy must be authorized. The process of authorization is subsequently the same as that for normal transactions. 3.4 Maintaining Ratio Percentage Fund Products and Policies, invested by the client can be divided into components. The components can be singular or a combination of two or more components. According to the Prudential Investment Guidelines these Funds are classified as components or combination of the same, these can be invested according to a specified percentage. For example; a fund investment of F1 can be allocated under the following ratios of components: Onshore Cash (25%) Onshore Property (40%) Offshore Cash (35%) The cumulative investment ratio would add up to the total Fund Investment F1. You have to maintain the rules for Prudential Investment Guidelines and Forex compliance in accordance with this asset allocation. You can do so by invoking the Prudential Investment Guidelines/ Forex Compliance Screen from the browser, and click on Detailed. 3-50 Refer to the chapter ‘Prudential Investment Guidelines and Forex compliance (PIGS)’ in LEP User Manual for further details on UM. 3.5 Enriching Policy Transactions The initial investment for a policy can be deposited in multiple currencies. If the exchange rate is not available while saving the policy, the policy is incompletely generated and hence the underlying UT transactions are also generated incompletely. Till the policy is allocated, it can be enriched. The enrichment can be done using the ‘Policy Transaction Exchange Rate Enrichment’ screen. All the settlements of a policy transaction need to be enriched before the policy transaction itself can be enriched. When the settlements are being enriched, the system will compute the policy transaction amount and asset allocation ratio. Subsequently, when the policy transaction is enriched, the system will convert the policy transaction amount in terms of the policy base currency. To invoke the ‘Policy Transaction Exchange Rate Enrichment’ screen, type ‘LEDTXNEE’ in the field at the top right corner of the Application tool bar and clicking on the adjoining arrow button. 3.5.1 Fields in the Policy Transaction Exchange Rate Enrichment Screen Enter the required details here: Enrichment Option Alphanumeric; Optional Select the enrichment option from the adjoining drop-down list. The options are: Policy Settlement Policy Transaction Product ID Alphanumeric; Optional Specify the Product ID for which you wish to enrich transactions. 3-51 Policy Number Alphanumeric; Optional Specify the policy number for which enrichment is required. Policy Txn Number Specify the policy transaction number for which enrichment is required. Source ID Specify the Source ID for which enrichment is required. Source Name The system defaults the name for the Source ID selected.. From Date Specify the date from which enrichment is required. To Date Specify the date till which enrichment is required. After you specify the required details, press ‘OK’. The system will display all the matching records in the ‘Exchange Rate Enrichment Details’ grid 3.5.1.1 Exchange Rate Enrichment Details In this grid, the system will display the following values for the records matching the criteria specified above. Process Product ID Policy Number Policy Txn Number Source ID From Currency To Currency Amount Exchange Rate Applied Override Exchange Rate FX Deal Date FX Value Date If you have selected ‘Policy Settlement’ as the enrichment option, then all settlement details for the selected policy are available and the exchange rates can be enriched from settlement currency to transaction currency. If ‘Policy Transaction’ has been selected as the enrichment option, then exchange rate details to convert the policy transaction amount into policy base currency can be changed (after the settlements of the policy transactions have been enriched). Note If you have not changed the ‘FX Deal Date’ and ‘FX Value Date’, that is, the dates are current dates, then the LEP policy settlement and policy transaction will not be available for 3-52 enrichment on the next day. This is because clearance would have been done during EOD. If you change the ‘FX Deal Date’ and ‘FX Value Date’ to the next day, then policy settlement and policy transaction will be available for enrichment the next day. 3.6 Maintaining Interest Rate Details The interest rate that is to be used for interest calculation is maintained using the Interest Rate Maintenance screen. In order to arrive at the rate of interest, you have to maintain the effective date, transaction currency details and Interest Rate of the transaction. 3.6.1 Invoking Screen You can invoke the ‘FCIS Interest Rate Maintenance Detail’ screen by typing ‘UTDINRMN’ n the field at the top right corner of the Application tool bar and clicking on the adjoining arrow button. The following screen is invoked: Select ‘New’ from the Actions menu in the Application tool bar or click new icon to enter the details of the Interest Rate Maintenance. 3.6.2 Fields in Policy Maintenance Screen 3.6.2.1 Interest Rate Maintenance Section Effective Date, DD/MM/YYYY, Numeric , Mandatory Specify the date the system should consider for calculating the rate of interest. 3-53 Interest Rate (%) Mandatory Specify the Interest Rate for the currency you have selected. Translation Currency Mandatory Select the currency of transaction from the option list. Currency Name Display Displays the name of the Translation Currency selected. 3.7 Interest Rate Maintenance Summary Screen You can invoke the ‘FCIS Interest Rate Maintenance Summary’ screen by typing ‘UTSINRMN’ in the field at the top right corner of the Application tool bar and clicking on the adjoining arrow button. The following screen is displayed: 3.7.1 Retrieving Interest Rate in Interest Rate Maintenance Screen You can retrieve a previously entered record in the Summary screen, as follows: Specify any or all of the following details in the Interest Rate Maintenance Summary screen: Select the status of the record in the Authorization Status field. If you choose the “Blank Space” option, then all the records are retrieved. Select the status of the record in the Record Status field. If you choose the “Blank Space” option, then all the records are retrieved. – Effective Date – Transaction Currency – Interest Rate(%) After you have specified the required details, click ‘Search’ button. All records with the specified details are retrieved and displayed in the lower portion of the screen. 3-54 Note You can also retrieve the individual record detail from the detail screen by doing query in the following manner: – Press F7. – Input the Authorization Status. – Press F8. You can perform Edit, Delete, Amend, Authorize, Reverse, Confirm operation by selecting from the Action list. You can also search the record by using combination of % and alphanumeric value. Example You can search the record for Product ID by using the combination of % and alphanumeric value as follows:- 3.7.2 Search by A%: System will fetch all the records whose Product ID starts from Alphabet ‘A’. For example, AGC17, AGVO6, AGC74 etc. Search by %7: System will fetch all the records whose Product ID ends by numeric value’ 7’. For example, AGC17, GSD267, AGC77 etc. Search by %17%:- System will fetch all the records whose Product ID contains the numeric value 17. For example, GSD217, GSD172, AGC17 etc. Editing Interest Rate You can modify the details of a record that you have already entered into the system, provided it has not been subsequently authorized. You can perform this operation as follows: 1. Invoke the Interest Rate Maintenance Summary screen from the Browser. 2. Select the status of the record that you want to retrieve for modification in the Authorization Status field. You can only modify records that are unauthorized. Accordingly, choose the Unauthorized option from the drop down list. 3. Specify any or all of the details of the record in the corresponding fields on the screen to retrieve the record that is to be modified. All unauthorized records with the specified details are retrieved and displayed in the lower portion of the screen. 4. Double click the record that you want to modify in the list of displayed records. The Interest Rate Maintenance Detail screen is displayed. 5. Select Unlock Operation from Action list to modify the record. Modify the necessary information 6. Click Save to save your changes. The Interest Rate Maintenance Detail screen is closed and the changes made are reflected in the Interest Rate Maintenance Summary screen. 3.7.3 Viewing Interest Rate To view an Interest Rate you have previously entered, you must retrieve the same in the Interest Rate Maintenance Summary screen, as follows: 1. Invoke the Summary Screen from the Browser. 2. Select the status of the Interest Rate that you want to retrieve for viewing in the Authorization Status field. You can also view all records that are either unauthorized or authorized only, by choosing the Unauthorized/ Authorized option. 3-55 3. Specify any or all of the details of the records in the corresponding fields on the screen, and click ‘Search’ button. All records with the specified details are retrieved and displayed in the lower portion of the screen. 4. Double click the record that you want to view in the list of displayed records, in the lower portion of the screen. The Interest Rate Maintenance screen is opened in view mode. 3.7.4 Deleting Interest Rate You can delete only unauthorized records in the system. To delete a record that you have previously entered, you must retrieve the same in the Interest Rate Maintenance Summary screen, as follows: 1. Invoke the Interest Rate Maintenance Summary screen from the browser. 2. Select the status of the record that you want to retrieve for deletion. 3. Specify any or all of the details of the record in the corresponding fields on the screen, and click ‘Search’ button. All records with the specified details are retrieved and displayed in the lower portion of the screen. 4. Double click the record that you want to delete in the list of displayed records, in the lower portion of the screen. The Interest Rate Maintenance Detail screen is opened in View mode. 5. Select Delete operation from the Action list. The system prompts you to confirm the deletion, and the record is deleted physically from the system database. 3.7.5 Authorizing Interest Rate An unauthorized record must be authorized in the system for it to be processed. To authorize a record, you must first retrieve the same in the Interest Rate Maintenance Summary screen. 1. Invoke the Interest Rate Maintenance Summary screen from the Browser. 2. Select the status of the record that you want to retrieve for authorization. Typically, choose the Unauthorized option from the drop down list. 3. Specify any or all of the details of the record in the corresponding fields on the screen. Click ‘Search’ button. All records with the specified details that are pending authorization are retrieved and displayed in the lower portion of the screen. 4. Double click the record that you wish to authorize. The Interest Rate Maintenance Detail screen is opened in View mode. 5. Select Authorize operation from Action list. When the checker authorizes a record, details of validations, if any, that were overridden by the maker of the record during the Save operation, are displayed. If any of these overrides results in an error, the checker must reject the transaction. 3.7.6 Amending Interest Rate After a record is authorized, it can be modified using the Unlock operation from Action list. To make changes to a record after authorization, you must invoke the Unlock operation which is termed as Amend Operation. 1. Invoke the Interest Rate Maintenance Summary screen from the Browser. 2. Select the status of the record that you wish to retrieve for amendment. You can only amend records that are authorized. 3-56 3. Specify any or all of the details of the record in the corresponding fields on the screen. All records with the specified details are retrieved and displayed in the lower portion of the screen. 4. Double click the record that you want to amend. The Interest Rate Maintenance screen will be displayed in Amendment mode. Click the Unlock operation from the Action list to amend the record. 5. Amend the necessary information. Click the Save button to save your changes. 3.7.7 Authorizing Amended Interest Rate An amended Interest Rate must be authorized for the amendment to be made effective in the system. Authorization of amended records can only be done from Fund Manager Module and Agency branch Module. The process of authorization is subsequently the same as that for normal transactions. 3.7.8 Checking for Duplicate Transactions At the time of saving the transaction details, the system checks for the Policy Number Transaction Type combination. If there are any existing transactions for the same combination that has been captured in the past ‘n’ days, the system will display you an warning message if you try to save another transaction with the same combination within those ‘n’ days. You need to specify this ‘n’ number of days which the system has to consider for validation. The system performs the duplicate transaction validation: 3.7.8.1 For unauthorized transactions If a parameter code called “DUPWARNINGLAG” and the value for the ‘n’ number of days has been maintained. The validation fails if the ‘n’ number of days is specified as zero. Maintaining Parameter Code for Displaying Warning Messages You need to maintain the parameter code “DUPWARNINGLAG” and the number of days as the Parameter Value in the Parameter Setup screen. Refer to the chapter “Maintaining System Parameters” for further details on maintaining the parameters. 3-57 4. Policy Transactions – Top Up 4.1 Introduction A Policyholder can initiate any of the following transactions in a Policy that heone has purchased: Top Ups Partial or Full Redemption Transactions, known as Surrender Transactions Partial or Full Switch Transactions Note Policy transactions can be carried out through the Agency Branch component only. Policy Transactions can only be initiated into authorized policies for which the underlying initial investment transaction has already been generated. The Policy transaction must be authorized before it becomes effective and the underlying transactions are generated. This chapter deals with Top Up transactions. 4.2 Top Up Transactions After subscribing to a Policy in any of the Products of the AMC, the Policyholder may deem it necessary to increase his contribution in the Policy at any given point of time. In such an event, he can request for a Policy transaction to be initiated. Such investments are called ‘top ups’ in the system. 4.2.1 Entering Top up Transaction The following are the steps you need to follow to enter and save a Top Up transaction. Each of these steps is explained in detail in subsequent sections. 4.2.2 Invoke the Policy Transaction – Top Up screen. Enter information in the Policy Transaction – Top Up screen. Save the information entered. Invoking screen Invoke the ‘Policy Transaction-TOPUP Detail’ screen by typing ‘LEDPLTOP’ in the field at the top right corner of the Application tool bar and clicking on the adjoining arrow button. 4-1 The following screen is invoked: Select ‘New’ from the Actions menu in the Application tool bar or click new icon to enter the details of the Policy Transaction TOPUP. 4.2.3 Fields in Policy Transaction TOPUP Screen 4.2.3.1 Policy Transaction section Policy Transaction Number System Generated Number This is a unique identification for the Policy transaction that is effected in this Policy. It is generated by the system when all details that are mandatory for the transaction profile have been successfully entered, and the transaction record is saved. Reference Number 16 Characters Maximum, Alphanumeric, Optional Specify a unique identification for this Policy transaction that will be used in all subsequent references to this transaction, before it is authorized. Policy Number Mandatory Select the Policy on which this transaction is to be effected. You can use the Find Policy Options screen. The Policy selected must be an authorized, active Policy on which the underlying initial investment transaction has already been generated. Policy Start Date (dd/MM/yyyy) Display When you select the Policy Number, the start date of the selected Policy is displayed here. 4-2 Policy Holder ID Display When you specify the Policy Number, the ID of the Policy holder is displayed here. Name Display When the Policy Number is selected, the name of the corresponding Policyholder is displayed here. Product ID Display When the Policy is specified, the ID of the product under which the corresponding Policy has been created is displayed in this field. Product Name Display When the Policy is specified, the name of the product under which the corresponding Policy has been created is displayed in this field. Policy Maturity Date (dd/MM/yyyy) Display The maturity date of the Policy is taken from the Policy creation details and displayed here. You will not be allowed to change the same. 4-3 4.2.3.2 Policy Financial Wizard When you click ‘Policy Financial Wizard’ button in the Policy Transaction-TOPUP Detail screen, the following screen in invoked: The Policy Fin Wizard Detail screen enables a Policy Holder to know, at a glance, the value of his policy, and the details of his holdings in the funds. Policy Financial Wizard section Policy Number Policy number provided in policy transaction details will be displayed here Product ID The product ID of the LEP product gets displayed here. Policy Base Currency The base currency of the policy gets displayed here. Product Base Currency The base currency of the product gets displayed here. 4-4 Policy Holder ID Display Unitholder ID provided by you in the policy transaction details will be displayed here. Policy Holder Name Policy Holder name will be displayed. Options section The details of the holdings that can be viewed are given below: Market Ratio Contribution Amount Compounded Contribution Portfolio Amount All Select one of the options (the option ‘All ’allows you to view all details together) and click ‘View Information’ button. The position of the Policy Holder’s investment is thus available at a glance, and will aid him, when transaction amounts are specified. 4.2.3.3 Amount Contributions Section Options Display Policy Financial Info details is displayed here as per the search criteria. Net Amount Display Only This displays the total policy holdings in each individual section. Amount In Product Currency Display Only The net amount in product base currency converted from policy base currency get displayed here. 4.2.3.4 Market Ratio Section Fund Id Display Fund ID is displayed here Units Display Policy Holdings under particular fund is displayed. 4-5 NAV Display Net Asset Value is displayed. Net Amount Display Value of the Holdings in each fund is displayed Split Percentage Display This displays the percentage of holdings in a fund from the total policy holdings. 4.2.3.5 PH Deal Click ‘Ph Deal’ button in the Policy Transaction-TOPUP Detail screen, to view the details of all the deals set up for the unit holder. The following screen is displayed. 4.2.4 Retrieving Unit Holder Deal in Unitholder Deal Screen You can retrieve a previously entered record in the Summary screen, as follows: 1. Invoke the Unitholder Deal Summary screen by clicking ‘Ph Deal’ button. 2. Select the status of the record in the Authorized field. If you choose the “Blank Space” option, then all the records are retrieved. 3. Select the status of the record in the Open field. If you choose the “Blank Space” option, then all the records are retrieved. 4. Unit Holder/ CIF Number 4-6 5. Apply At CIF Level. 6. Apply Deal At. 7. Load ID. After you have specified the required details, click ‘Search’ button. All records with the specified details are retrieved and displayed in the lower portion of the screen. Note You can also retrieve the individual record detail from the detail screen by doing query in the following manner:– Press F7. – Input Product ID. – Press F8. You can perform Edit, Delete, Amend, Authorize, Reverse, Confirm operation by selecting from the Action list. You can also search the record by using combination of % and alphanumeric value. Example You can search the record for Reference Number by using the combination of % and alphanumeric value as follows: 4.2.5 Search by A%: System will fetch all the records whose Product ID starts from Alphabet ‘A’. For example, AGC17, AGVO6, AGC74 etc. Search by %7: System will fetch all the records whose Product ID ends by numeric value’ 7’. For example, AGC17, GSD267, AGC77 etc. Search by %17%:- System will fetch all the records whose Product ID contains the numeric value 17. For example, GSD217, GSD172, AGC17 etc. Editing Unit Holder Deal You can modify the details of a record that you have already entered into the system, provided it has not been subsequently authorized. You can perform this operation as follows: 1. Invoke the Unitholder Deal Summary screen by clicking ‘Ph Deal’ button. 2. Select the status of the record that you want to retrieve for modification in the Authorization Status field. You can only modify records that are unauthorized. Accordingly, choose the Unauthorized option from the drop down list. 3. Specify any or all of the details of the record in the corresponding fields on the screen to retrieve the record that is to be modified. All unauthorized records with the specified details are retrieved and displayed in the lower portion of the screen. 4. Double click the record that you want to modify in the list of displayed records. The UNITHOLDERDEAL Detail screen is displayed. 5. Select Unlock Operation from Action list to modify the record. Modify the necessary information. 6. Click Save to save your changes. The Unitholder Deal Detail screen is closed and the changes made are reflected in the Unitholder Deal Summary screen. 4-7 4.2.6 Viewing Unit Holder Deal To view a Unitholder Deal you have previously entered, you must retrieve the same in the Unitholder Deal Summary screen, as follows: 1. Invoke Unitholder Deal Summary screen by clicking ‘Ph Deal’ button. 2. Select the status of the Unitholder Deal that you want to retrieve for viewing in the Authorized field. You can also view all records that are either unauthorized or authorized only, by choosing the Unauthorized/ Authorized option. 3. Specify any or all of the details of the records in the corresponding fields on the screen, and click ‘Search’ button. All records with the specified details are retrieved and displayed in the lower portion of the screen. 4. Double click the record that you want to view in the list of displayed records, in the lower portion of the screen. The UNITHOLDERDEAL screen is opened in View mode. 4.2.7 Deleting Unit Holder Deal You can delete only unauthorized records in the system. To delete a record that you have previously entered, you must retrieve the same in the Unitholder Deal Summary screen, as follows: 1. Invoke the Unitholder Deal Summary screen by clicking ‘Ph Deal’ button. 2. Select the status of the record that you want to retrieve for deletion. 3. Specify any or all of the details of the record in the corresponding fields on the screen, and click ‘Search’ button. All records with the specified details are retrieved and displayed in the lower portion of the screen. 4. Double click the record that you want to delete in the list of displayed records, in the lower portion of the screen. The Unitholder Deal Detail screen is opened in View mode. 5. Select Delete operation from the Action list. The system prompts you to confirm the deletion, and the record is deleted physically from the system database. 4.2.8 Authorizing Unit Holder Deal An unauthorized record must be authorized in the system for it to be processed. To authorize a record, you must first retrieve the same in the Unitholder Deal Summary screen. 1. Invoke the Unitholder Deal Summary screen by clicking ‘Ph Deal’ button. 2. Select the status of the record that you want to retrieve for authorization. Typically, choose the unauthorized option from the drop down list. 3. Specify any or all of the details of the record in the corresponding fields on the screen. Click ‘Search’ button.. All records with the specified details that are pending authorization are retrieved and displayed in the lower portion of the screen. 4. Double click the record that you wish to authorize. The Unitholder Deal Detail screen is opened in View mode. 5. Select Authorize operation from Action list. When the checker authorizes a record, details of validations, if any, that were overridden by the maker of the record during the Save operation, are displayed. If any of these overrides results in an error, the checker must reject the record. 4-8 4.2.9 Amending Unit Holder Deal After a record is authorized, it can be modified using the Unlock operation from Action list. To make changes to a record after authorization, you must invoke the Unlock operation which is termed as Amend Operation. 1. Invoke the Unitholder Deal Summary screen by clicking ‘Ph Deal’ button. 2. Select the status of the record that you wish to retrieve for amendment. You can only amend records that are authorized. 3. Specify any or all of the details of the record in the corresponding fields on the screen. All records with the specified details are retrieved and displayed in the lower portion of the screen. 4. Double click the record that you want to amend. The Unitholder Deal screen will be displayed in Amendment mode. Click the Unlock operation from the Action list to amend the record. 5. Amend the necessary information. Click the Save button to save your changes. 4.2.9.1 Specifying Transaction Details Transaction Date (dd/MM/yyyy) Date Format, Mandatory Specify the date for the transaction. You can enter a backdated transaction here, if backdated transactions are allowed in the corresponding product. If backdated transactions are not allowed, then this date must not be earlier than the Application Date. The system supports future dated policy transactions. Therefore, you can enter the transaction date of a policy greater than the system date. Future Date Limit Numeric, Optional As stated earlier, the system allows you to enter future dated policy transactions. 4-9 The Future Date Limit indicates the number of days (in terms of Fund Calendar days) up to which future dating of transactions will be allowed. The system validates the transaction date against the Future Date Limit and ensures that the transaction date is within the future date limit. In other words, the transaction date cannot be beyond the number of days expressed as Future Date Limit. Example Let us assume you are trying to enter a future date policy transaction on 11/01/2007 (System Date) with the following details: Policy Transaction Date – 11/02/2007 Future Date Limit – 45 The system will allow you to save this transaction as the policy transaction date is within the future date limit range. However, you cannot enter a policy with the transaction date beyond 45 days. For future dated policy top up transactions: If multiple funds are attached and a future date limit validation fails for one or more associated funds, the system will reject the complete transaction. You will have to select a transaction date, which is within the future date limit for all the funds chosen under Asset Allocation. The validation will be made against the latest available fund rule, as of the transaction date that you enter. The system will display a warning indicating that the transaction is future dated. The system will calculate the settlement date be based on the transaction date entered. If there is any change in the fund/system level holiday, the future dated transaction date also becomes a holiday. The system will carry forward the transactions which are falling on a holiday to the next working date. Note The Transaction Date must be later than the Start Date of the Policy, earlier than the End Date of the Policy, and must not be a holiday. The transaction date cannot be earlier than the policy start date or the first Rule Effective Date of the policy. Top Up Inclusive? Mandatory If the transaction is a top up transaction, check this box to indicate that it must be an inclusive top up transaction. When a top up is inclusive, the top up amount is considered immediately for the next annuity payment. If it is an exclusive top up, the top up amount is not considered for annuity payments till after the first anniversary date. Transaction Mode Mandatory The mode, in this case ‘Amount’, in which the transaction must be put through, will be displayed. 4-10 Transaction Entry Date (dd/MM/yyyy) Date Format, Mandatory The Transaction Entry Date signifies the date on which the transaction is entered into the system. By default, the application date is displayed in this field, and it cannot be altered. Transaction Amount Numeric, Mandatory Specify the investment amount of the transaction. Transaction Currency Mandatory When different currencies have been used in payment details, then you are required to enter the transaction currency. If you do not, then the system will default the corresponding Plan (or Policy) base currency from the Policy details record as the default transaction currency. If all the transaction currencies used in payment details are the same, then the system will default the same currency. You can change it to a transaction currency of your choice. Policy Base Currency Display When the Policy is selected, the corresponding Plan (or Policy) Base Currency is displayed here from the Policy details record. This currency cannot be changed at this stage. Transaction Type Optional Select the Adjustment Transaction Type. The drop-down includes options which can be maintained in the System Parameters Maintenance screen under the Param Code PLCYTOPUPTYPE. Refer to the chapter “Maintaining System Parameters” for further information on the System Parameters Maintenance screen. Include Interest in Investment Optional Select, from the adjoining drop-down list, if the interest earned on the initial investment should be considered along with the initial investment for investment in the policy. If you select ‘Yes’, the interest amount will be included in the investment and a single transaction will be generated for both. You need to manually add the interest amount calculated in the settlement details to the transaction amount of the particular currency in the asset allocation details. For instance, if the interest amount is USD 1000 and the transaction amount is USD 100000, then you are required to add USD 1000 to the transaction amount for the currency USD in the asset allocation details. If you select ‘No’, the interest amount will be generated as a separate UT transaction. Funding Percentage 5 Characters, Numeric, Optional The funding factor that is applicable to Policy transactions in this product, which would have been set up at Product definition level, is displayed here. You can override this value at this stage. This must be expressed as a percentage and cannot exceed one hundred percent. 4-11 Phase In To Be Cancelled Optional You could choose to cancel all, none or specific Ids of the active PhaseIn setup. Balance Transfer System allows you to specify the Units in Asset allocation details. Interest Amount Display; Can Be Changed The system computes the interest amount based on the interest calculation days and interest rate provided by you in the Interest Calculation Screen (explained below). You will be able to change the amount displayed, if you wish to. Exchange Rate Details The policy transaction currency can be different from the base currency of the policy. In this section, you can maintain the details related to the exchange rate to be used for currency conversion. Source ID Mandatory Specify the source from which the exchange rate is obtained or select the source ID from the option list provided. Exchange Rate Applied The exchange rate corresponding to the combination of policy base currency and policy transaction currency gets displayed here. The exchange rate for a top-up transaction will be between the transaction currency and policy base currency. Amount Applied The amount calculated based on the exchange rate specified gets displayed here, after the calculation. Override Exchange Rate Select the option to indicate if you wish to override the exchange rate that gets defaulted. Select ‘Yes’ to indicate that you wish to override the exchange rate and ‘No’ to indicate otherwise. Click Enrich button to calculate the amount using the exchange rate specified. The interest amount associated with the policy transaction also gets converted to policy base currency based on the exchange rate specified. 4-12 4.2.9.2 Specifying Asset Allocation Capture the fund-wise pattern of distribution of the investment amount in the Asset Allocation Details section of this tab. If the initial contribution that you enter is in different currencies, you need to mention the currency-wise details here Fund ID Mandatory All the funds mapped for the selected product are displayed in the option list. Select the required funds. Units/Ratio Numeric, Mandatory Specify the portion of the units that are to be invested in each of the selected funds. Specify the percentage of the amount that must be invested in each of the selected funds. The sum of all such percentages must add up to 100, and not fall below or exceed it. The percentages specified here must not be fractional. The latest investment ratio applicable for the Policy is displayed here when the form is opened. These values can be amended, and you can specify the required percentages. If there are many currencies specified as part of settlements, then the system will not allow you to enter a ratio. Instead you need to enter the transaction currency and transaction amount for each currency. The system will compute and display the ratio based on the currency and amount details provided. To calculate the ratio, the transaction amounts will be converted to policy transaction currency based on the exchange rate defined in settlements. If the settlements are maintained in only one currency, then you can enter either the ratio or the transaction amount. Transaction Amount Numeric, Mandatory Specify the portion of the transaction amount that is to be invested in each of the selected funds. If different currencies have been mentioned in settlements, then you can specify only 4-13 the transaction amount. The system will default the ratio. If all the currencies in settlements are the same, then you can specify either the transaction amount or the ratio. Note – If you have checked the ‘Include Interest in Investment’ box, then the total of settlement and interest amounts for each currency needs to be equal to the asset allocation transaction amount for the currency. You need to manually add the interest amount calculated in the settlement details to the transaction amount for the particular currency in the asset allocation details. – If the ‘Include Interest in Investment’ box has not been checked, then sum of currency wise settlement amount should be equal to the asset allocation transaction amount for the currency. WAC Mandatory Enter the Weighted Average Cost. Transaction Currency Alphanumeric; Optional Specify the transaction currency for the initial contribution. If many currencies have been mentioned in the settlements, then you are required to enter the amount for individual currencies. You can specify a transaction currency only if the transaction is amount-based. Exchange Rate Source Alphanumeric; Optional The system will display the exchange source maintained at the default set-up in system parameters. You can change it by selecting the required exchange rate source from the adjoining option list. This will be used by the system to convert the transaction amount in terms of fund base currency. Exchange Rate Applied Numeric; Optional The system will default the exchange rate available for the currency based on the exchange source specified. If you have elected to override the exchange rate, you need to enter the exchange rate to be used here. If exchange rate is not available, then the system will generate the transactions as incomplete ones. Such transactions can be enriched later through the ‘Policy Transaction Enrichment Screen’. Override Exchange Rate? Optional Select ‘Yes’ if you wish to change the exchange rate that is displayed here. If you select ‘Yes’, however, you need to specify the exchange rate to be used for the transaction in the ‘Exchange Rate Applied’ field. Select ‘No’ if you wish to retain the exchange rate that is displayed by the system. FX Deal Date Date format; Optional The system will default the transaction date of the policy top-up transaction here. You can change it if required. 4-14 FX Value Date Date format; Optional The system will default the transaction date of the policy top-up transaction here. You can change it if required. 4.2.9.3 Specifying Payment Details Capture the details of payments made by the Policy Holder towards processing of the transaction in this tab. Payment Details Bank Code Mandatory Select the Bank code from the option list. Branch Code Mandatory Select the Branch code from the option list. Cheque Number Mandatory Enter the cheque number of the cheque /draft number of the demand draft by which the payment is being made. 4-15 Clearing Date (DD/MM/YYYY) Date Format, Mandatory Specify the Clearing Date of the payment. Cheque Date Date Format, Mandatory Enter the cheque date of the cheque /draft number of the demand draft by which the payment is being made. Payment Type Mandatory Specify whether the payment will be made by the Policyholder or a 3rd party. Payment Mode Mandatory Select the mode through which the payment is made by the Policyholder. This could be any one of the following, as applicable: Cash Cheque Money Transfer (Account Transfer) Demand Draft Payment Date Date Format; Mandatory Specify the date on which the initial investment was done. You can deposit the amount in different currencies and on different dates. Payment Currency Alphanumeric; Mandatory Enter the currency in which the initial investment is being done. The initial amount can be deposited in multiple currencies. Payment Amount Numeric; Mandatory Enter the initial investment amount being paid in the particular currency. Account Currency Display The transaction currency is displayed. You are not allowed to change this value. Account Number Mandatory Specify the number of the transfer account. Account Type Mandatory Select the account type of the transfer account. 4-16 IBAN 36 Characters Only; Alphanumeric; Optional Specify the IBAN (International Bank Account Number) of the account holder. Exchange Rate Details The system will default the following exchange rate details for each settlement: Source ID Exchange Rate Applied Transaction Currency Amount Override Exchange Rate FX Deal Date FX Value Date However if required you can override the default values and input new values. If exchange rate details are not available for any settlement when the transaction or policy is entered, the system will not generate a UT transaction. Once all the settlement details have been enriched in the ‘Policy Transaction Exchange Rate Enrichment’ screen and the ‘FCIS Enrich Exchange Rate Detail’ screen, the system will compute the transaction amount and generate the UT transaction. If it is not enriched, then the system will pick the exchange rate during EOD and generate the UT transaction. Interest Details When you click the ‘Enrich’ button in the ‘Transaction Detail’ tab, if the investment amount has been deposited prior to the transaction date, the system will calculate and display the interest on the payment amount in the ‘Policy Information’ tab. The interest will be calculated from the date of payment till the transaction date. When you click ‘Calculate Interest’ button in the ‘Settlement Details’ screen, the system will calculate and display the interest amount in the ‘Interest Amount’ field in the same screen. Interest Rate Numeric; Optional Enter the rate of interest that is to be used to calculate interest amount for the particular currency. Alternatively, you can maintain the interest rate in the ‘Interest Rate Maintenance’ screen. If you do not maintain an interest rate, the system will take it as null. Interest Amount Display Only The system computes and displays the interest amount. Interest Amount in Transaction Currency Display Only The system computes and displays the interest amount in terms of the transaction currency. Interest Calc. Days Display Only The system calculates the number of days for which interest calculation has to be done for a policy top-up based on the payment date and transaction date. 4-17 Basis Days Mandatory, Numeric Select the interest basis days, based on which the interest will be calculated. The options available are: 4.2.9.4 360 days 365 days Specifying Broker Details Broker Code System will fetch the Broker Mapped for the Policy. User can also input the broker code from the option lsit. Broker Name Display Upon selection of the broker code, the system displays the name of the selected broker code. Parent Broker Code Display The system displays the parent broker code. Split Percentage Percentage Format, Mandatory if you select any broker in the Intermediary field. Specify the percentage of the commission that the selected broker is entitled to receive on any transactions put through for the investor. This percentage must not exceed one hundred percent. 4-18 Note If you specify more than one broker in this section, the split percentages for all brokers, when summed up, must not exceed or fall below one hundred percent. 4.2.9.5 Specifying Load Override Details You can override or alter the value of load mapped to the selected fund. You can do so in the Load Override Details screen which is invoked when you click on the ‘Load Override Details’ Link. Refer the section “Load Override Details Link” in the chapter ‘Policy’ for a detailed discussion of the load override details. 4.2.10 Saving Information Entered When you have entered all the mandatory information, click ‘Ok’ button. The following message will be displayed: The system displays the following confirmation message “Record Successfully Saved” This indicates the record has been saved. Click ‘Ok’ button. 4-19 4.2.11 Processing Back Data Propagation for Transactions You can correct erroneous transactions as well as enter those that have been missed out and compute the effect these have on the current holdings of the unit holder through the back data propagation process. To facilitate this propagation process, two schemas are used – the business (or normal) schema and the report schema. You are required to enter the correct data in the business schema for the required transactions and select these for propagation, again from the business schema. The transactions will be simulated in the report schema and the results can be viewed in the business schema. Refer the chapter ’Back Data for more details on the back data propagation process: 4.3 Policy Transaction Topup Summary Screen Invoke the ‘Policy Transaction-Topup Summary’ screen by typing ‘LESPLTOP’ in the field at the top right corner of the Application tool bar and clicking on the adjoining arrow button. The following screen is displayed: 4.3.1 Retrieving Topup Transaction in Policy Topup Screen You can retrieve a previously entered record in the Summary screen, as follows: Specify any or all of the following details in the Policy TopUp Summary screen: Select the status of the record in the Authorization Status field. If you choose the “Blank Space” option, then all the records are retrieved. Select the status of the record in the Record Status field. If you choose the “Blank Space” option, then all the records are retrieved. The Policy Transaction Number The Policy Number The Product ID TXNTYPE Transaction Date 4-20 Policy Holder ID Transaction Reference Number After you have specified the required details, click ‘Search’ button. All records with the specified details are retrieved and displayed in the lower portion of the screen. Note You can also retrieve the individual record detail from the detail screen by doing query in the following manner: – Press F7. – Input Product ID. – Press F8. You can perform Edit, Delete, Amend, Authorize, Reverse, Confirm operation by selecting from the Action list. You can also search the record by using combination of % and alphanumeric value. Example You can search the record for Reference Number by using the combination of % and alphanumeric value as follows: 4.3.2 Search by A%: System will fetch all the records whose Product ID starts from Alphabet ‘A’. For example, AGC17, AGVO6, AGC74 etc. Search by %7: System will fetch all the records whose Product ID ends by numeric value’ 7’. For example, AGC17, GSD267, AGC77 etc. Search by %17%: System will fetch all the records whose Product ID contains the numeric value 17. For example, GSD217, GSD172, AGC17 etc. Search by %: System will fetch all the records maintained. Editing TopUp Transaction You can modify the details of a record that you have already entered into the system, provided it has not been subsequently authorized. You can perform this operation as follows: 1. Invoke the Policy Transaction TopUp Summary screen from the Browser. 2. Select the status of the record that you want to retrieve for modification in the Authorization Status field. You can only modify records that are unauthorized. Accordingly, choose the Unauthorized option from the drop down list. 3. Specify any or all of the details of the record in the corresponding fields on the screen to retrieve the record that is to be modified. All unauthorized records with the specified details are retrieved and displayed in the lower portion of the screen. 4. Double click the record that you want to modify in the list of displayed records. The Policy Transaction TopUp Detail screen is displayed. 5. Select Unlock Operation from Action list to modify the record. Modify the necessary information. 6. Click Save to save your changes. The Policy Transaction TopUp Detail screen is closed and the changes made are reflected in the Policy Transaction TopUp Summary screen. 4-21 4.3.3 Viewing TopUp Transaction To view a Transaction Top Up you have previously entered, you must retrieve the same in the Policy Transaction Topup Summary screen, as follows: 1. Invoke the Summary Screen from the Browser. 2. Select the status of the Policy Transaction Topup that you want to retrieve for viewing in the Authorization Status field. You can also view all records that are either unauthorized or authorized only, by choosing the Unauthorized / Authorized option. 3. Specify any or all of the details of the records in the corresponding fields on the screen, and click ‘Search’ button. All records with the specified details are retrieved and displayed in the lower portion of the screen. 4. Double click the record that you want to view in the list of displayed records, in the lower portion of the screen. The Policy Transaction Topup screen is opened in View mode. 4.3.4 Deleting TopUp Transaction You can delete only unauthorized records in the system. To delete a record that you have previously entered, you must retrieve the same in the Policy Transaction Topup Summary screen, as follows: 1. Invoke the Policy Transaction Topup Summary screen from the browser. 2. Select the status of the record that you want to retrieve for deletion. 3. Specify any or all of the details of the record in the corresponding fields on the screen, and click ‘Search’ button. All records with the specified details are retrieved and displayed in the lower portion of the screen. 4. Double click the record that you want to delete in the list of displayed records, in the lower portion of the screen. The Policy Transaction TOPUP Detail screen is opened in View mode. 5. Select Delete operation from the Action list. The system prompts you to confirm the deletion, and the record is deleted physically from the system database. 4.3.5 Authorizing TopUp Transaction An unauthorized record must be authorized in the system for it to be processed. To authorize a record, you must first retrieve the same in the Policy Transaction TopUp Summary screen. 1. Invoke the Policy Transaction Topup Summary screen from the Browser. 2. Select the status of the record that you want to retrieve for authorization. Typically, choose the Unauthorized option from the drop down list. 3. Specify any or all of the details of the record in the corresponding fields on the screen. Click ‘Search’ button.. All records with the specified details that are pending authorization are retrieved and displayed in the lower portion of the screen. 4. Double click the record that you wish to authorize. The Policy Transaction TopUp Detail screen is opened in View mode. 5. Select Authorize operation from Action list. When the checker authorizes a record, details of validations, if any, that were overridden by the maker of the record during the Save operation, are displayed. If any of these overrides results in an error, the checker must reject the record. 4-22 4.3.6 Amending TopUp Transaction After a record is authorized, it can be modified using the Unlock operation from Action list. To make changes to a record after authorization, you must invoke the Unlock operation which is termed as Amend Operation. 1. Invoke the Policy Transaction Topup Summary screen from the Browser. 2. Select the status of the record that you wish to retrieve for amendment. You can only amend records that are authorized. 3. Specify any or all of the details of the record in the corresponding fields on the screen. All records with the specified details are retrieved and displayed in the lower portion of the screen. 4. Double click the record that you want to amend. The Product Type screen will be displayed in Amendment mode. Click the Unlock operation from the Action list to amend the record. 5. Amend the necessary information. Click the Save button to save your changes. 4.3.7 Authorizing Amended Transaction TopUp An amended transaction top up must be authorized for the amendment to be made effective in the system. Authorization of amended records can only be done from Fund Manager Module and Agency branch Module. The process of authorization is subsequently the same as that for normal transactions. 4.3.8 Reversing TopUp Transaction You can reverse a policy that you have already entered into the system, provided it has not been subsequently authorized. You can perform this operation as follows: 1. Invoke the Policy Transaction Topup Summary screen from the browser. 2. Select the status of the record that you want to retrieve for reversal. 3. Specify any or all of the details of the record in the corresponding fields on the screen, and click ‘Search’ button. All records with the specified details are retrieved and displayed in the lower portion of the screen. 4. Double click the record that you want to reverse in the list of displayed records, in the lower portion of the screen. The Policy Transaction TOPUP Detail screen is opened in View mode. 5. Select Reverse operation from the Action list. The system prompts you to confirm the reversal of record. 6. Click the Save button to save your changes. Refer to the chapter “Allocation Details” of Allocation Module for information on the Allocation Details screen 4-23 5. Policy Transactions – Switch 5.1 Introduction A Policy Holder can initiate any of the following transactions in a policy that he has purchased: Top Ups Partial or Full Redemption Transactions, known as Surrender Transactions Partial or Full Switch Transactions Note Policy transactions can be carried out through the Agency Branch component only. Policy Transactions can only be initiated into authorized policies for which the underlying initial investment transaction has already been generated. The policy transaction must be authorized before it becomes effective and the underlying transactions are generated. This chapter deals with Switch transactions. 5.2 Switch Transactions A partial or total switch transaction is effected when a Policy Holder chooses to re-allocate his assets in the underlying funds of the policy. As a result, he re-distributes his investment in some or all funds of the policy. He may choose to invest in a different fund set or change his investment ratios in the same funds. The funds he wishes to invest should be mapped as allowable portfolios for the product. In the system, a switch transaction is processed as two separate transactions; the first involving a redemption from the first or ‘From’ fund, and the second involving a subscription to the second or ‘To’ fund. 5.2.1 Entering Switch Transaction The following are the steps you need to follow to enter and save a Switch Transaction. Each of these steps is explained in detail in subsequent sections. 5.2.2 Invoke the Policy Transaction – Switch screen. Enter information in the Policy Transaction – Switch screen. Save the information entered. Invoking Screen You can invoke the ‘Policy Transaction-Switch Detail’ screen by typing ‘LEDPLSWI’ in the field at the top right corner of the Application tool bar and clicking on the adjoining arrow button. 5-1 The following screen is invoked: Select ‘New’ from the Actions menu in the Application tool bar or click new icon to enter the details of the Policy Transaction Switch. 5.2.3 Fields in Policy Transaction Switch Screen 5.2.3.1 Policy Transaction section In the Policy Transaction section, you will have to enter information in the following fields: Policy Transaction Number System Generated Number This is a unique identification for the policy transaction that is effected in this policy. It is generated by the system when all details that are mandatory for the transaction profile have been successfully entered, and the transaction record is saved. Transaction Reference Number 16 Characters Maximum, Alphanumeric, Optional Specify a unique identification for this policy transaction that will be used in all subsequent references to this transaction, before it is authorized. Policy Number Mandatory Select the policy on which this transaction is to be effected from the option list. The policy selected must be an authorized, active policy on which the underlying initial investment transaction has already been generated. Policy Start Date (dd/MM/yyyy) Display When you select the Policy Number, the start date of the selected Policy is displayed here. 5-2 Product ID Display When the Policy is specified, the ID of the Product under which the corresponding Policy has been created is displayed in this field. Product Name Display When the Policy is specified, the name of the Product under which the corresponding Policy has been created is displayed in this field. Policy Holder ID Display When you specify the Policy Number, the ID of the Policy Holder is displayed here. Policy Holder Name Display When the Policy Number is selected, the name of the corresponding Policy Holder is displayed here. Policy Maturity Date (dd/MM/yyyy) Display The Maturity Date of the Policy is taken from the policy creation details and displayed here. You will not be allowed to change the same. You will also have to enter information in the fields in the following tabs in this screen: Transaction Details Asset Allocation Brokers Details 5-3 5.2.3.2 Policy Financial Wizard When you click ‘Policy Financial Wizard’ button, the following screen in invoked: The Policy Financial Wizard enables a Policy Holder to know, at a glance, the value of his Policy and the details of his holdings in the funds. The product Id, product base currency and the policy base currency also are displayed based on the Policy Holder ID specified. Options Section The details of the holdings that can be viewed are given below: Market Ratio Contribution Amount Compounded Contribution Portfolio Amount All of the above Select one of the options (the option ‘All of the above’ allows you to view all details together) and click ‘View Information’ button. The position of the Policy Holder’s investment and the holding value in product base currency are thus available at a glance, and will aid him when transaction amounts are specified. 5-4 5.2.3.3 PH Deal Click ‘Ph Deal’ button to view the details of all the deals set up for the unit holder. The following screen is displayed. 5.2.4 Retrieving Unit Holder Deal in Unitholder Deal Screen You can retrieve a previously entered record in the Summary screen, as follows: 1. Invoke the Unitholder Deal Summary screen by clicking ‘Ph Deal’ button. 2. Select the status of the record in the Authorization Status field. If you choose the “Blank Space” option, then all the records are retrieved. 3. Select the status of the record in the Record Status field. If you choose the “Blank Space” option, then all the records are retrieved. 4. Unit Holder/ CIF Number 5. Apply At CIF Level 6. Apply Deal At 7. Load ID After you have specified the required details, click ‘Search’ button. All records with the specified details are retrieved and displayed in the lower portion of the screen. Note You can also retrieve the individual record detail from the detail screen by doing query in the following manner:– Press F7. 5-5 – Input Product ID. – Press F8. You can perform Edit, Delete, Amend, Authorize, Reverse, Confirm operation by selecting from the Action list. You can also search the record by using combination of % and alphanumeric value. Example You can search the record for Reference Number by using the combination of % and alphanumeric value as follows: 5.2.5 Search by A%: System will fetch all the records whose Product ID starts from Alphabet ‘A’. For example, AGC17, AGVO6, AGC74 etc. Search by %7: System will fetch all the records whose Product ID ends by numeric value’ 7’. For example, AGC17, GSD267, AGC77 etc. Search by %17%:- System will fetch all the records whose Product ID contains the numeric value 17. For example, GSD217, GSD172, AGC17 etc. Editing Unit Holder Deal You can modify the details of a record that you have already entered into the system, provided it has not been subsequently authorized. You can perform this operation as follows: 1. Invoke the Unitholder Deal Summary screen by clicking ‘Ph Deal’ button. 2. Select the status of the record that you want to retrieve for modification in the Authorization Status field. You can only modify records that are unauthorized. Accordingly, choose the Unauthorized option from the drop down list. 3. Specify any or all of the details of the record in the corresponding fields on the screen to retrieve the record that is to be modified. All unauthorized records with the specified details are retrieved and displayed in the lower portion of the screen. 4. Double click the record that you want to modify in the list of displayed records. The Unitholder Deal Detail screen is displayed. 5. Select Unlock Operation from Action list to modify the record. Modify the necessary information. 6. Click Save to save your changes. The Unitholder Deal Detail screen is closed and the changes made are reflected in the Unitholder Deal Summary screen. 5.2.6 Viewing Unit Holder Deal To view a Unitholder Deal you have previously entered, you must retrieve the same in the Unitholder Deal Summary screen, as follows: 1. Invoke Unitholder Deal Summary screen by clicking ‘Ph Deal’ button. 2. Select the status of the Unitholder Deal that you want to retrieve for viewing in the Authorization Status field. You can also view all records that are either unauthorized or authorized only, by choosing the Unauthorized/ Authorized option. 3. Specify any or all of the details of the records in the corresponding fields on the screen, and click ‘Search’ button. All records with the specified details are retrieved and displayed in the lower portion of the screen. 4. Double click the record that you want to view in the list of displayed records, in the lower portion of the screen. The Unitholder Deal screen is opened in View mode. 5-6 5.2.7 Deleting Unit Holder Deal You can delete only unauthorized records in the system. To delete a record that you have previously entered, you must retrieve the same in the Unitholder Deal Summary screen, as follows: 1. Invoke the Unitholder Deal Summary screen by clicking ‘Ph Deal’ button. 2. Select the status of the record that you want to retrieve for deletion. 3. Specify any or all of the details of the record in the corresponding fields on the screen, and click ‘Search’ button. All records with the specified details are retrieved and displayed in the lower portion of the screen. 4. Double click the record that you want to delete in the list of displayed records, in the lower portion of the screen. The Unitholder Deal Detail screen is opened in View mode. 5. Select Delete operation from the Action list. The system prompts you to confirm the deletion, and the record is deleted physically from the system database. 5.2.8 Authorizing Unit Holder Deal An unauthorized record must be authorized in the system for it to be processed. To authorize a record, you must first retrieve the same in the Unitholder Deal Summary screen. 1. Invoke the Unitholder Deal Summary screen by clicking ‘Ph Deal’ button. 2. Select the status of the record that you want to retrieve for authorization. Typically, choose the Unauthorized option from the drop down list. 3. Specify any or all of the details of the record in the corresponding fields on the screen. Click ‘Search’ button. All records with the specified details that are pending authorization are retrieved and displayed in the lower portion of the screen. 4. Double click the record that you wish to authorize. The Unitholder Deal Detail screen is opened in View mode. 5. Select Authorize operation from Action list. When the checker authorizes a record, details of validations, if any, that were overridden by the maker of the record during the Save operation, are displayed. If any of these overrides results in an error, the checker must reject the record. 5.2.9 Amending Unit Holder Deal After a record is authorized, it can be modified using the Unlock operation from Action list. To make changes to a record after authorization, you must invoke the Unlock operation which is termed as Amend Operation. 1. Invoke the Unitholder Deal Summary screen by clicking ‘Ph Deal’ button. 2. Select the status of the record that you wish to retrieve for amendment. You can only amend records that are authorized. 3. Specify any or all of the details of the record in the corresponding fields on the screen. All records with the specified details are retrieved and displayed in the lower portion of the screen. 4. Double click the record that you want to amend. The Unitholder Deal screen will be displayed in Amendment mode. Click the Unlock operation from the Action list to amend the record. 5-7 5. Amend the necessary information. Click the Save button to save your changes. 5.2.9.1 Specifying Transaction Details Transaction Date (dd/MM/yyyy) Date Format, Mandatory Specify the date for the transaction. You can enter a backdated transaction here, if backdated transactions are allowed in the corresponding product. If backdated transactions are not allowed, then this date must not be earlier than the application date. The Transaction Date must be earlier than the End Date of the Policy, and must not be a holiday. The transaction date cannot be earlier than the first Rule Effective Date of the policy. Portfolio Switch Optional Select ‘Yes’ to indicate the switch is a complete or partial switch transaction within the funds in which the investor as invested. Portfolio switch is applicable to both transaction put through by amount or by percentage of holdings. Transaction Mode Mandatory Select the mode in which the transaction must be put through, from the drop-down list. Transactions can be put through either by amount, percentage and units of holdings. If you select the option ‘Units’ then the system defaults the following fields: Transaction Amount and Percentage of holdings field will be disabled and default amount will be zero. Transaction Entry Date (dd/MM/yyyy) Date Format, Mandatory The Transaction Entry Date signifies the date on which the transaction is entered into the system. By default, the application date is displayed in this field, and it cannot be altered. 5-8 Transaction Amount Numeric, Mandatory if the Transaction Mode is ‘Amount’ Specify the investment amount of the transaction. On saving amount based policy switch transactions, the system will compute the market value of policy across all funds. If the transaction amount is greater than the threshold limit of policy market value, the system will display the following error message “Transaction amount exceeds threshold limit of the policy market value. Please use transaction mode as percentage - % to ensure guaranteed execution of transaction”. You will then have to change the Transaction Mode to Percentage and indicate the percentage as 100%. Transaction Currency Mandatory If the switch is done in a currency other than the policy base currency, then you are required to specify the transaction currency. If you do not, then the system will default the base currency of the corresponding policy or plan from the Policy details record as the transaction currency. Percentage Holding 5 Characters Maximum, Numeric, Mandatory if Transaction Mode is ‘Percentage of Holdings’ If the specified Transaction Mode is ‘Percentage of Holdings’, then specify the percentage of the Policy Holder’s holdings that is to be reckoned as the transaction amount for this transaction. When you specify this percentage, the transaction amount is computed and displayed in the ‘Transaction Amount’ field, and locked. The percentage you specify here must not exceed one hundred. Policy Base Currency Display When the Policy is selected, the corresponding Plan (or Policy) Base Currency is displayed here from the policy details record. This currency cannot be changed at this stage. Remarks Alphanumeric, Optional Enter a brief description of the transaction, or any applicable remarks about the transaction. Exchange Rate Details The policy transaction currency can be different from the base currency of the policy. In this section, you can maintain the details related to the exchange rate to be used for currency conversion. Source ID Mandatory Specify the source from which the exchange rate is obtained or select the source ID from the option list provided. 5-9 Exchange Rate Applied The exchange rate corresponding to the combination of policy base currency and policy transaction currency gets displayed here. The exchange rate for a switch transaction will be between policy base currency and transaction currency. Amount Applied The amount calculated based on the exchange rate specified gets displayed here, after the calculation. Override Exchange Rate Select the option to indicate if you wish to override the exchange rate that gets defaulted. Select ‘Yes’ to indicate that you wish to override the exchange rate and ‘No’ to indicate otherwise. Click ‘Calculate’ button to calculate and convert the amount in terms of the policy base currency using the exchange rate specified. 5.2.9.2 Specifying Asset Allocation If the transaction amount that you enter is in different currencies, you need to mention the currency-wise details here. Asset Allocation Details section Capture the funds FROM which the investment amount is being moved, in the Asset Allocation Details section of this tab: 5-10 Fund ID Mandatory All the funds mapped for the selected Product where the Policy holder has a balance are displayed in the option list. Select funds FROM which you are moving the investment amount. Fund Name Specify the fund name from the adjoining option list. Ratio Numeric, Mandatory Specify the percentage of the amount that must be invested in each of the selected funds. The sum of all such percentages must add up to 100, and not fall below or exceed it. The percentages specified here must not be fractional. Typically, this field is only applicable for transactions for which the Transaction Mode is ‘Percentage’. Note If you have specified the investment amounts in each fund, the investment ratios are computed and displayed here, and this field is locked. The latest investment ratio applicable for the Policy is displayed here when the form is opened. These values can be amended, and you can specify the required percentages. If there are many currencies specified as part of settlements, then the system will not allow you to enter a ratio. Instead you need to enter the transaction currency and transaction amount for each currency. The system will compute and display the ratio based on the currency and amount details provided. To calculate the ratio, the transaction amounts will be converted to policy transaction currency based on the exchange rate defined in settlements. If the settlements are maintained in only one currency, then you can enter either the ratio or the transaction amount Transaction Amount Numeric, Mandatory Specify the portion of the transaction amount/units that are to be invested in each of the selected funds. The sum of these amount/units must not be greater than the total transaction amount/units specified in the transaction details tab for this transaction. If different currencies have been mentioned in settlements, then you can specify only the transaction amount. The system will default the ratio. If all the currencies in settlements are the same, then you can specify either the transaction amount or the ratio. Note If you have specified the investment ratios in each fund, the investment amounts are computed and displayed here, and this field is locked. Auto Clear Provisional Balance For a complete switch transaction, you can use this field to indicate that the outflow transaction should include units in provisional balance. 5-11 If the policy transaction already has an underlying UT transaction with this option checked, then system throws up a warning and tracks the provisionally allotted transactions for auto clearing. Auto Clear Reinvestments Use this field to indicate that for a complete switch transaction, the out flow transaction should include freeze held and reinvestment units. Note The ‘Auto Clear Provisional Balance’ and ‘Auto Clear Reinvestments’ fields will be checked or unchecked based on the specification for the same in the policy maintenance screen. However, you can change the defaulted value. These options will be enabled if the Percentage of Holdings is ‘100’. Transaction Currency Alphanumeric; Optional Specify the transaction currency for the initial contribution. If many currencies have been mentioned in the settlements, then you are required to enter the amount for individual currencies. You can specify a transaction currency only if the transaction is amount-based.. Source ID Alphanumeric; Optional The system will display the exchange source maintained at the default set-up in system parameters. You can change it by selecting the required exchange rate source from the adjoining option list. This will be used by the system to convert the transaction amount in terms of fund base currency. Override Exchange Rate? Optional Select ‘Yes’ if you wish to change the exchange rate that is displayed here. If you select ‘Yes’, however, you need to specify the exchange rate to be used for the transaction in the ‘Exchange Rate Applied’ field. Select ‘No’ if you wish to retain the exchange rate that is displayed by the system Exchange Rate Applied Numeric; Optional The system will default the exchange rate available for the currency based on the exchange source specified. If you have elected to override the exchange rate, you need to enter the exchange rate to be used here. If exchange rate is not available, then the system will generate the transactions as incomplete ones. Such transactions can be enriched later through the ‘Policy Transaction Enrichment Screen’. FX Deal Date Date format; Optional The system will default the start date of the policy here. You can change it if required. FX Value Date The system will default the start date of the policy here. You can change it if required. Units Specify the units 5-12 Ratio Specify the ratio WAC Enter the Weighted Average Cost. You can click delete icon to delete any specified fund. Switch Asset Allocation Details Section You can capture the funds INTO which the investment amount is being moved in the Switch Asset Allocation Details Section:, To Fund ID Mandatory All the funds mapped for the selected product are displayed in the option list. Select funds INTO which you are moving the investment amount. Fund Name Specify the fund name. Ratio Specify the ratio. You can click delete icon to delete any specified fund. Note If the ‘From’ and ‘To’ funds do not belong to the same AMC, the switch will be a pseudoswitch. The system will generate a redemption transaction on the same day and the subscription transaction on the settlement day. While doing a reversal for 100% Switch Transaction prior fee, system should throw an override able warning message if periodic fee has been charged for the switch. 5.2.9.3 Specifying Broker Details The broker details can be fetched in the following two ways: 1. It can be fetched directly by clicking ‘Fetch Broker Details’ button. The system will automatically default the broker details maintained at the policy level 5-13 2. It can also be selected in the screen itself by clicking add icon. Select the Broker Code from the option list. You should also specify the split percentage. You can follow this step when you want to fetch the broker details that are maintained at the policy level. Broker Details Section Broker Code Broker Code is defined when a broker is created. Select the broker code from the option list. Broker Name Once you select the broker code, the broker name gets populated. Parent Broker Code Once you select the broker code, system the parent broker code gets populated. Split Percentage Percentage Format, Mandatory if you select any broker in the Intermediary field. Specify the percentage of the commission that the selected broker is entitled to receive on any transactions put through for the investor. When the Policy Number is selected the split percentage as mentioned in the policy is defaulted here. This percentage must not exceed one hundred percent. Note If you specify more than one broker in this section, the split percentages for all brokers, when summed up, must not exceed or fall below one hundred percent. Delete? You can click delete icon to delete any specified fund. 5-14 5.2.9.4 Specifying Load Override Details You can override or alter the value of load mapped to the selected fund. You can do so in the Load Override Details screen which is invoked when you click on the Load Override Details Link. Refer the Section ‘Load Override Details Link’ in the chapter ‘Policy’ for a detailed discussion of the load override details. 5.2.10 Un-Allotted Fee Transaction During the fee redemption transaction generation process, the system will check for 100% switch transaction that is Un-Allotted. If Un-allotted, then the fee transaction is reversed: If there is an external switch (Pseudo), the fee would be taken proportionately from the switch in fund/s by means of a fee override and the fee transaction would not get generated. If there is an internal switch, the fee transaction would be generated from the switch in fund Note And during the 100% switch transaction process, the system will check for any fee transaction that is un-allotted. Annuity Transaction When you have entered all the mandatory information for a 100% switch transaction, system checks if the annuity is applicable for the policy and the month. 5-15 If annuity is applicable for the policy system will calculate the next annuity generation date using annuity frequency & annuity payment lag. If difference between annuity generation date & 100% switch transaction date is greater than or equal to 6 days (External switch)or 4 days(Internal Switch, then system will check for the funds for which 100% switch is being processed are also part of the annuity asset allocation. If funds are common between 100% switch transaction & annuity asset allocation then following warning message gets displayed: Annuity transaction is applicable for this policy, are you sure you wish to proceed with this switch? Select override, for the normal annuity transaction. If difference between annuity generation date & 100% switch transaction date is less than 6 days (External switch) or 4 days(Internal Switch), then system will check for the funds for which 100% switch is being processed are also part of the annuity asset allocation. If funds are common between 100% switch transaction and annuity asset allocation then following error message will be displayed: "Annuity is in progress, this transaction can not be processed". If annuity has already been generated before the switch and If funds are common between 100% switch transaction and annuity asset allocation then following error message will be displayed "Annuity is in progress, this transaction can not be processed". User should not be allowed to proceed with the transaction. 5.2.11 Saving Information Entered When you have entered all the mandatory information, click ‘Ok’ button. The following message will be displayed: The system displays the following confirmation message “Record Successfully Saved ” This indicates the record has been saved. Click ‘Ok’ button. 5.2.12 Processing Back Data Propagation for Transactions You can correct erroneous transactions as well as enter those that have been missed out and compute the effect these have on the current holdings of the unit holder through the back data propagation process. To facilitate this propagation process, two schemas are used – the business (or normal) schema and the report schema. You are required to enter the correct data in the business schema for the required transactions and select these for propagation, again from the business schema. The transactions will be simulated in the report schema and the results can be viewed in the business schema. 5-16 Refer the chapter ‘Back Data Propagation’ for more details on the back data propagation process: 5.3 Policy Transaction Switch Summary Screen You can invoke the ‘Policy Transaction-Switch Summary’ screen by typing ‘LESPLSWI’ in the field at the top right corner of the Application tool bar and clicking on the adjoining arrow button. The following screen is displayed: 5.3.1 Retrieving Transaction Switch in Policy Transaction Switch Screen You can retrieve a previously entered record in the Summary screen, as follows: Specify any or all of the following details in the Policy Transaction Switch Summary screen: Select the status of the record in the Authorized field. If you choose the “Blank Space” option, then all the records are retrieved. Select the status of the record in the Open field. If you choose the “Blank Space” option, then all the records are retrieved. Policy Txn Number Policy Number Product ID Transaction Type Transaction Date Policy Holder ID Transaction Reference Number After you have specified the required details, click ‘Search’ button. All records with the specified details are retrieved and displayed in the lower portion of the screen. 5-17 Note You can also retrieve the individual record detail from the detail screen by doing query in the following manner: – Press F7 – Input the Policy Transaction Number – Press F8 You can perform Edit, Delete, Amend, Authorize, Reverse, Confirm operation by selecting from the Action list. You can also search the record by using combination of % and alphanumeric value. Example You can search the record for Policy Transaction Number by using the combination of % and alphanumeric value as follows: 5.3.2 Search by A%: System will fetch all the records whose Policy Transaction Number starts from Alphabet ‘A’. For example, AGC17, AGVO6, AGC74 etc. Search by %7: System will fetch all the records whose Policy Transaction Number ends by numeric value’ 7’. For example, AGC17, GSD267, AGC77 etc. Search by %17%: System will fetch all the records whose Policy Transaction Number contains the numeric value 17. For example, GSD217, GSD172, AGC17 etc. Search by 66%: System will fetch all the switch transactions. Editing Transaction Switch You can modify the details of a record that you have already entered into the system, provided it has not been subsequently authorized. You can perform this operation as follows: 1. Invoke Policy Transaction Switch Summary screen from the Browser. 2. Select the status of the record that you want to retrieve for modification in the Authorization Status field. You can only modify records that are unauthorized. Accordingly, choose the Unauthorized option from the drop down list. 3. Specify any or all of the details of the record in the corresponding fields on the screen to retrieve the record that is to be modified. All unauthorized records with the specified details are retrieved and displayed in the lower portion of the screen. 4. Double click the record that you want to modify in the list of displayed records. The Policy Transaction Switch Detail screen is displayed. 5. Select Unlock Operation from Action list to modify the record. Modify the necessary information 6. Click Save to save your changes. The Policy Transaction Switch Detail screen is closed and the changes made are reflected in the Policy Transaction Switch Summary screen. 5.3.3 Viewing Transaction Switch To view a Policy Switch you have previously entered, you must retrieve the same in the Policy Transaction Switch Summary screen, as follows: 1. Invoke the Policy Transaction Switch Summary screen from the browser. 5-18 2. Select the status of the Policy that you want to retrieve for viewing in the Authorization Status field. You can also view all records that are either unauthorized or authorized only, by choosing the Unauthorized/ Authorized option. 3. Specify any or all of the details of the records in the corresponding fields on the screen, and click ‘Search’ button. All records with the specified details are retrieved and displayed in the lower portion of the screen. 4. Double click the record that you want to view in the list of displayed records, in the lower portion of the screen. The Policy Transaction Switch screen is opened in view mode. 5.3.4 Deleting Transaction Switch You can delete only unauthorized records in the system. To delete a record that you have previously entered, you must retrieve the same in the Policy Transaction Switch Summary screen, as follows: 1. Invoke the Policy Transaction Switch Summary screen from the browser. 2. Select the status of the record that you want to retrieve for deletion. 3. Specify any or all of the details of the record in the corresponding fields on the screen, and click ‘Search’ button. All records with the specified details are retrieved and displayed in the lower portion of the screen. 4. Double click the record that you want to delete in the list of displayed records, in the lower portion of the screen. The Policy Transaction Switch Detail screen is opened in View mode. 5. Select Delete operation from the Action list. The system prompts you to confirm the deletion, and the record is deleted physically from the system database. 5.3.5 Authorizing Policy Switch An unauthorized record must be authorized in the system for it to be processed. To authorize a record, you must first retrieve the same in the Policy Transaction Switch Summary screen. 1. Invoke the Policy Transaction Switch Summary screen from the Browser. 2. Select the status of the record that you want to retrieve for authorization. Typically, choose the Unauthorized option from the drop down list. 3. Specify any or all of the details of the record in the corresponding fields on the screen. Click ‘Search’ button.. All records with the specified details that are pending authorization are retrieved and displayed in the lower portion of the screen. 4. Double click the record that you wish to authorize. The Policy Transaction Switch Detail screen is opened in View mode. 5. Select Authorize operation from Action list. When the checker authorizes a record, details of validations, if any, that were overridden by the maker of the record during the Save operation, are displayed. If any of these overrides results in an error, the checker must reject the transaction. 5.3.6 Amending Transaction Switch After a record is authorized, it can be modified using the Unlock operation from Action list. To make changes to a record after authorization, you must invoke the Unlock operation which is termed as Amend Operation. 1. Invoke the Policy Transaction Switch Summary screen from the Browser. 5-19 2. Select the status of the record that you wish to retrieve for amendment. You can only amend records that are authorized. 3. Specify any or all of the details of the record in the corresponding fields on the screen. All records with the specified details are retrieved and displayed in the lower portion of the screen. 4. Double click the record that you want to amend. The Policy Transaction Switch screen will be displayed in Amendment mode. Click the Unlock operation from the Action list to amend the record. 5. Amend the necessary information. Click the Save button to save your changes. 5.3.7 Authorizing Amended Transaction Switch An amended policy must be authorized for the amendment to be made effective in the system. Authorization of amended records can only be done from Fund Manager Module and Agency branch Module. The process of authorization is subsequently the same as that for normal transactions. 5.3.8 Reversing Transaction Switch You can reverse a policy that you have already entered into the system, provided it has not been subsequently authorized. You can perform this operation as follows: 1. Invoke the Policy Transaction Switch Summary screen from the browser. 2. Select the status of the record that you want to retrieve for reversal. 3. Specify any or all of the details of the record in the corresponding fields on the screen, and click ‘Search’ button. All records with the specified details are retrieved and displayed in the lower portion of the screen. 4. Double click the record that you want to reverse in the list of displayed records, in the lower portion of the screen. The Policy Transaction Switch Detail screen is opened in View mode. 5. Select Reverse operation from the Action list. The system prompts you to confirm the reversal of record. 6. Click the Save button to save your changes. Refer to the chapter ‘Allocation Details’ for information on the Allocation Details screen 5-20 6. Policy Transactions – Surrender 6.1 Introduction A Policy Holder can initiate any of the following transactions in a policy that he has purchased: Top Ups Partial or Full Redemption Transactions, known as Surrender Transactions Partial or Full Switch Transactions Note Policy transactions can be carried out through the Agency Branch component only. During policy transaction, system displays a warning message if there is a security cession marked against this policy. Warning message would be displayed on top of the Policy Transaction Screen. Warning: There is a Security Cession recorded against this policy. Transaction may only be executed with the agreement of both parties. Policy Transactions can only be initiated into authorized policies for which the underlying initial investment transaction has already been generated. The policy transaction must be authorized before it becomes effective and the underlying transactions are generated and allotted. Note This chapter deals with Surrender transactions. 6.2 Surrender Transactions A partial or total surrender transaction could happen in a policy in any one of the following situations: 6.2.1 When the policy is claimed or redeemed by the Policy Holder When the policy is closed before maturity (that is, prematurely) for various reasons A partial redemption or surrender is effected Entering Surrender Transaction The following are the steps you need to follow to enter and save a Surrender transaction. Each of these steps is explained in detail in subsequent sections. Invoke the Policy Transaction – Surrender screen. Enter information in the Policy Transaction – Surrender screen. Save the information entered. 6-1 6.2.2 Invoking Screen You can invoke the ‘Policy Transaction-Surrender Detail’ screen by typing ‘LEDPLSUR’ in the field at the top right corner of the Application tool bar and clicking on the adjoining arrow button. The following screen is invoked: Select ‘New’ from the Actions menu in the Application tool bar or click new icon to enter the details of the Policy Transaction Surrender. 6.2.3 Fields in Policy Transaction Surrender Screen 6.2.3.1 Policy Transaction Section In the Policy Transaction section, you will have to enter information in the following fields: Policy Txn Number System Generated Number This is a unique identification for the policy transaction that is effected in this Policy. It is generated by the system when all details that are mandatory for the transaction profile have been successfully entered, and the transaction record is saved. 6-2 Reference Number 16 Characters Maximum, Alphanumeric, Optional Specify a unique identification for this policy transaction that will be used in all subsequent references to this transaction, before it is authorized. Policy Number Mandatory Select the policy on which this transaction is to be effected. You can use the Find Policy Options screen. The policy selected must be an authorized, active policy on which the underlying initial investment transaction has already been generated. If a policy has been surrendered by mistake, the system will allow you to re-activate it. On reactivation, the system will reverse the redemption transactions generated during policy surrender and change the status of the policy from ‘SUR’ to ‘ACT’. Annuities, premiums, dividends and broker commissions that have been missed out can be computed through the back data propagation facility. This computation will not be done by the system during reactivation of the policy. Policy Start Date (dd/MM/yyyy) Display When you select the Policy Number, the start date of the selected Policy is displayed here. Product ID Display When the Policy is specified, the ID of the product under which the corresponding policy has been created is displayed in this field. Product Name Display When the Policy is specified, the name of the product under which the corresponding policy has been created is displayed in this field. Policy Holder ID Display When you specify the Policy Number, the ID of the Policy Holder is displayed here. Policy Holder Name Display When the Policy Number is selected, the name of the corresponding Policy Holder is displayed here. Maturity Date (dd/MM/yyyy) Display The maturity date of the policy is taken from the policy creation details and displayed here. You will not be allowed to change the same. You will also have to enter information in the fields in the following tabs in this screen: Transaction Details Asset Allocation Payment Details Brokers Details 6-3 6.2.3.2 Load Override Details Policy Financial Wizard When you click ‘Policy Financial Wizard’ button, the following screen in invoked: The Policy Financial Wizard enables a Policy Holder to know, at a glance, the value of his policy, and the details of his holdings in the funds. The product Id, product base currency and the policy base currency also are displayed based on the Policy Holder ID specified. Options Section The details of the holdings that can be viewed are given below: Market Ratio Contribution Amount Compounded Contribution Portfolio Amount All of the above Select one of the options (the option ‘All of the above’ allows you to view all details together) and click ‘View Information’ button. The position of the Policy Holder’s investment and the holding value in product base currency are thus available at a glance, and will aid him, when transaction amounts are specified. 6-4 6.2.3.3 PH Deal Click ‘Ph Deal’ button to view the details of all the deals set up for the unit holder. The following screen is displayed. To retrieve the details of a record in the UnitHolder Summary screen, you need to specify the search criteria for the system to retrieve records. You can retrieve records based on: Authorization Status Record Status UnitHolder/ CIF Number Apply At CIF Level Apply Deal At Load ID You can specify any or all of the search criteria. Click ‘Search’ button to view the records. You can view the record details by double-clicking on the particular record. The details of the selected record will be displayed in the ‘UnitHolderDeal Maintenance’ screen. 6-5 6.2.3.4 Specifying Transaction Details You will need to enter the following information in this tab: Transaction Currency Mandatory If redemption is done in a currency other than the policy base currency, then you are required to specify the transaction currency. If you do not, then the system will default the base currency of the corresponding policy or plan from the Policy details record as the transaction currency. Transaction Entry Date (dd/MM/yyyy) Date Format, Mandatory The Transaction Entry Date signifies the date on which the transaction is entered into the system. By default, the application date is displayed in this field, and it cannot be altered. Currency Name Display The system displays the name of the currency. 6-6 Policy Transaction Date (dd/MM/yyyy) Date Format, Mandatory Specify the date for the transaction. You can enter a backdated transaction here, if backdated transactions are allowed in the corresponding product. If backdated transactions are not allowed, then this date must not be earlier than the application date. The transaction date must be earlier than the End Date of the Policy, and must not be a holiday. The transaction date cannot be earlier than the first Rule Effective Date of the policy. Transaction Amount Numeric, Mandatory if the Transaction Mode is ‘Amount’ Specify the portion of the transaction amount that is to be redeemed in each of the selected funds. The sum of these amounts must not be greater than the total transaction amount specified in the transaction details tab for this transaction. Typically, this field is only applicable for transactions for which the mode is ‘Amount’. Policy Base Currency Display When the Policy is selected, the corresponding Plan (or Policy) Base Currency is displayed here from the policy details record. This currency cannot be changed at this stage. Transaction Mode Mandatory Select the mode in which the transaction must be put through, from the drop-down list. Transactions can be put through either by amount or percentage of holdings. Portfolio Surrender? Optional You can select ‘Yes’ to indicate the surrender is a complete or partial surrender transaction within the funds in which the investor as invested. Percentage 5 Characters Maximum, Numeric, Mandatory if Transaction Mode is ‘Percentage of Holdings’ If the specified Transaction Mode is ‘Percentage of Holdings’, then specify the percentage of the Policy Holder’s holdings that is to be reckoned as the transaction amount for this transaction. When you specify this percentage, the transaction amount is computed and displayed in the ‘Transaction Amount’ field, and locked. In case you have specified the percentage as 100, then the transaction amount is displayed as zero. The percentage you specify here must not exceed one hundred. Adjustment Transaction Mandatory This box is enabled if the transaction is mentioned under the Transaction Sub Types for Adjustment Withdrawal. However, you can edit it. If the transaction is an adjustment withdrawal, then system would not validate the No. of withdrawals allowed at Product/Policy level. Also, the withdrawal counter at the policy level would not be updated. 6-7 PhaseIn To Be Cancelled Optional You can choose to cancel all, none or specific Ids of the active PhaseIn setup. Surrender Money Payable Mandatory Specify to whom the surrender money is payable, by selecting the same from the option list. Transaction Type Optional Select the Adjustment Transaction Type from the option list. The option list includes options which can be maintained in the System Parameters Maintenance screen under the Param Code PLCYSURRTYPE. For further information on the System Parameters Maintenance screen, refer to the chapter Maintaining System Parameters.. Description System displays the description of the selected transaction type. Remarks Alphanumeric, Optional Enter a brief description of the transaction, or any applicable remarks about the transaction. Surrender Limit Display For the Product that you have chosen for the Policy Holder, you would have selected the ‘Withdrawal Limit Basis’. The Surrender Limit will be calculated based on this specification and displayed here. Exchange Rate Details The policy transaction currency can be different from the base currency of the policy. In this section, you can maintain the details related to the exchange rate to be used for currency conversion. Amount Applied The amount calculated based on the exchange rate specified gets displayed here, after the calculation. Exchange Rate Applied The exchange rate corresponding to the combination of policy base currency and policy transaction currency gets displayed here. The exchange rate for a surrender transaction will be between policy base currency and transaction currency. Source ID Mandatory Specify the source from which the exchange rate is obtained or select the source ID from the option list provided. 6-8 Override Exchange Rate Select the option to indicate if you wish to override the exchange rate that gets defaulted. Select ‘Yes’ to indicate that you wish to override the exchange rate and ‘No’ to indicate otherwise. Click ‘Calculate’ to calculate the amount using the exchange rate specified. The interest amount associated with the policy transaction also gets converted to policy base currency based on the exchange rate specified. 6.2.3.5 Specifying Asset Allocation Capture the fund-wise pattern of distribution of the surrender amount in the Asset Allocation Details section of this tab. If the redemption is in different currencies, you need to mention the currency-wise details here. Fund ID Mandatory All the funds mapped for the selected product where the Policy holder has a balance are displayed in the option list. Select the required funds. Fund Name Display The name of the fund that you select will be displayed. 6-9 Transaction Currency Alphanumeric; Optional Specify the transaction currency for the transaction. If many currencies have been mentioned in the settlements, then you are required to enter the amount for individual currencies. You can specify a transaction currency only if the transaction is amount-based. Transaction Amount Numeric, Mandatory Specify the portion of the transaction amount that is to be redeemed in each of the selected funds. The sum of these amounts must not be greater than the total transaction amount specified in the transaction details tab for this transaction. Typically, this field is only applicable for transactions for which the mode is ‘Amount’. If different currencies have been mentioned in settlements, then you can specify only the transaction amount. The system will default the ratio. If all the currencies in settlements are the same, then you can specify either the transaction amount or the ratio. Note If you have specified the investment ratios in each fund, the investment amounts are computed and displayed here, and this field is locked. Source ID Alphanumeric; Optional The system will display the exchange source maintained at the default set-up in system parameters. You can change it by selecting the required exchange rate source from the adjoining option list. This will be used by the system to convert the transaction amount in terms of fund base currency. Override Exchange Rate? Optional Select ‘Yes’ if you wish to change the exchange rate that is displayed here. If you select ‘Yes’, however, you need to specify the exchange rate to be used for the transaction in the ‘Exchange Rate Applied’ field. Select ‘No’ if you wish to retain the exchange rate that is displayed by the system. Exchange Rate Applied Numeric; Optional The system will default the exchange rate available for the currency based on the exchange source specified. If you have elected to override the exchange rate, you need to enter the exchange rate to be used here. If exchange rate is not available, then the system will generate the transactions as incomplete ones. Such transactions can be enriched later through the ‘Policy Transaction Enrichment Screen’. FX Deal Date Date format; Optional The system will default the start date of the policy here. You can change it if required. FX Value Date Date format; Optional The system will default the start date of the policy here. You can change it if required. 6-10 Units The Units field enables you to allot units applied for each fund under asset allocation. This is based on the gross amount of the unit/product. To show the number of units applied to the fund under allocation, specify the number of units allocated. Once the Transaction Mode is selected as units, the following fields are defaulted: Portfolio Surrender option is chosen as true, and the field is disabled for entry The Transaction amount is defaulted as Zero, and the field is disabled for entry The percentage of holdings are rendered zero, and the field is disabled for further input It is necessary for you to enter the Units applied for each Fund, under the asset allocation details. Ratio Numeric, Mandatory Specify the percentage of the amount that must be redeemed in each of the selected funds. The sum of all such percentages must add up to 100, and not fall below or exceed it. The percentages specified here must not be fractional. Typically, this field is only applicable for transactions for which the Transaction Mode is ‘Percentage’. If there are many currencies specified as part of settlements, then the system will not allow you to enter a ratio. Instead you need to enter the transaction currency and transaction amount for each currency. The system will compute and display the ratio based on the currency and amount details provided. To calculate the ratio, the transaction amounts will be converted to policy transaction currency based on the exchange rate defined in settlements. If the settlements are maintained in only one currency, then you can enter either the ratio or the transaction amount Note If you have specified the investment amounts in each fund, the investment ratios are computed and displayed here, and this field is locked. Auto Clear Provisional Balance Mandatory For a complete surrender transaction, you can use this field to indicate that the outflow transaction should include units in provisional balance. If the policy transaction already has an underlying UT transaction with this option checked, then system throws up a warning and tracks the provisionally allotted transactions for auto clearing. Auto Clear Reinvestments Mandatory Use this field to indicate that for a complete surrender transaction, the out flow transaction should include freeze held and reinvestment units. Note The ‘Auto Clear Provisional Balance’ and ‘Auto Clear Reinvestments’ fields will be checked or unchecked based on the specification for the same in the policy maintenance 6-11 screen. However, you can change the defaulted value. These options will be enabled if the ‘Percentage of Holdings’ is specified as 100.. 6.2.3.6 Specifying Payment Details Capture the details of payments made to the Policy Holder towards processing of the transaction in this tab. Payment Details Payment Mode Mandatory Select the mode through which the payment is made to the Policy Holder or Product. The following are the options available: Cash Cheque Money Transfer Demand Draft 6-12 Note Though the above mentioned options are available, for a Surrender Transaction, the acceptable Mode of Payment is ‘Money Transfer’. The system will not allow you to save a Surrender Transaction with any Mode of Payment other than ‘Money Transfer. Clearing Date (DD/MM/YYYY) Date Format, Mandatory Specify the Clearing Date of the payment. Beneficiary Details Payment Type Mandatory Specify the type of payment. Following are the options available: Self Beneficiary Product Third Party Note – The payment types ‘Beneficiary’, ‘Third Party’ and ‘Product’ are applicable only if the payment mode is chosen as Money Transfer. – The payment type must be set to Product if the type of transaction is Balance transfer out. Check Number Mandatory Enter the cheque number of the cheque /draft number of the demand draft by which the payment is being made. Ratio Numeric Specify the ratio of payment to be made in the specified payment mode. If the Mode of Payment is specified as ‘Cheque’ or as ‘Demand Draft’, you will have to specify the following: Bank Mandatory Select the Drawee Bank from the option list. Branch Code Mandatory Select the Branch code from the option list. 6-13 Cheque Date (DD/MM/YYYY) Date Format, Mandatory Enter the cheque date of the cheque /draft number of the demand draft by which the payment is being made. Clearing Date (DD/MM/YYYY) Date Format, Optional Specify the Clearing Date of the payment. When you specify that the Mode of Payment is ‘Money Transfer’ and the Payment Type is ‘Self’, you will have to specify the following: The following bank account details will be displayed: Bank Branch Account Number Account Type Account Currency Account Holder Name When you specify that the Mode of Payment is ‘Money Transfer’ and the Payment Type is ‘Beneficiary’, you will have to specify the following: Product/ Beneficiary ID Mandatory Select the beneficiary from the option list. The list contains all the beneficiaries maintained for the policy holder. Mandatory Select the bank account of the beneficiary. The following bank account details will be displayed: Bank Branch Account Number Account Type Account Currency Account Holder Name When you specify that the Mode of Payment is ‘Money Transfer’ and the Payment Type is ‘Product’, you will have to specify the following: Enter the Product ID in the Product/Beneficiary ID Select ‘P’ in the Surrender Money Payable field in the Transaction Details tab Mandatory Select the bank account of the product. The list contains all the bank accounts maintained for the chosen product. The following bank account details will be displayed: Bank 6-14 Branch Account Number Account Type Account Currency Account Holder Name When you specify that the Mode of Payment is ‘Money Transfer’ and the Payment Type is ‘Third Party’, you will have to specify the following: Identification Number Enter the identification number assigned to the third party. Contact Name Enter the name of the contact person. Address Line1 and Line 2 Alphanumeric, Mandatory Specify the address of the third party for which the transfer payment must be made. Bank Mandatory Select the name of the bank in which the transfer account is present, from the drop down list. Branch Code Alphanumeric, Mandatory Specify the branch code of the bank in which the transfer account is present. Account Type Mandatory Select the account type of the transfer account. Account Number Mandatory Specify the number of the transfer account. Account Currency Display The transaction currency is displayed. You are not allowed to change this value. Clearing Date Date Format, Mandatory Specify the Clearing Date of the payment. Note During Surrender transaction, if the third party bank detail is set to ‘Payment Type’, you can select the ‘Verified’ and ‘Unverified’ bank details from the option list. However, if you choose the bank account as ‘Unverified’, a warning message will be put-up. 6-15 IBAN 36 Characters Only; Alphanumeric; Optional Specify the IBAN (International Bank Account Number) of the account holder. 6.2.3.7 Specifying Broker Details Broker Code Mandatory Select the broker code from the option list. Broker Name Once you select the broker code, the broker name gets populated. Parent Broker Code Once you select the broker code, the parent broker code gets populated. Split Percentage Percentage Format, Mandatory if you select any broker in the Intermediary field. Specify the percentage of the commission that the selected broker is entitled to receive on any transactions put through for the investor. When the Policy Number is selected the split percentage as mentioned in the policy is defaulted here. This percentage must not exceed one hundred percent. 6-16 Note If you specify more than one broker in this section, the split percentages for all brokers, when summed up, must not exceed or fall below one hundred percent. 6.2.3.8 Specifying Load Override Details You can override or alter the value of load mapped to the selected fund. You can do so in the Load Override Details screen which is invoked when you click on the Load Override Details Link. 6-17 Refer the section “Load Override Details” Link in the chapter “Policy” for a detailed discussion of the load override details. 6.2.4 Saving Information Entered When you have entered all the mandatory information, click ‘Ok’ button. The following message will be displayed: The system displays the confirmation message as “Record Successfully Saved”. This indicates the record has been saved. Click ‘Ok’ button. On saving the policy, the system provides a feature to withdraw the units. 6.2.4.1 Fee Transaction Generated Prior to Surrender Transaction During the 100% surrender transaction process, the system will check for any fee transaction that is Un-Allotted. If there is an Un-allotted fee transaction, then the transaction will be reversed. The fee must be taken through fee override and the fee transaction will not get generated. Note For 100% Unit Transfer Surrender Transaction with transaction type as ‘BALANCE TRANSFER OUT’, fee transaction generated for the policy will get reversed & will not be overridden. 6.2.4.2 Surrender Transaction Generated Prior to Fee Transaction During the fee redemption transaction generation process, the system will check for any 100% surrender transaction that is Un-Allotted. If there is an Un-allotted transaction, then the Fee would be taken through fee override and the fee transaction will not get generated. Note For 100% Unit Transfer Surrender Transaction with transaction type as ‘BALANCE TRANSFER OUT’, fee transaction will not be generated & will not be overridden. 6.2.4.3 Surrender Transaction before Annuity Generation When you have entered all the mandatory information for a 100% surrender transaction, system will if the annuity is applicable for the policy and for the month. If annuity is applicable for the policy, system will calculate the next annuity generation date using annuity frequency & annuity payment lag. If difference between annuity generation date & 100% surrender transaction date is greater than or equal to 4 days, then system will check for the funds for which 100% surrender is being processed are also part of the annuity asset allocation. If funds are common between 100% surrender transaction & annuity asset allocation then, following warning message will be displayed. Annuity transaction is applicable for this policy, are you sure you wish to proceed with this transaction? You can select override the message and proceed the transaction. 6-18 If difference between annuity generation date & 100% surrender transaction date is less than 4 days, then system will check for the funds for which 100% surrender is being processed are also part of the annuity asset allocation. If funds are common between 100% surrender transaction & annuity asset allocation then error message will be displayed as “Annuity is in progress, this transaction can not be processed. ”. You will not be allowed to proceed with this transaction. 6.2.5 Processing Back Data Propagation for Transactions You can correct erroneous transactions as well as enter those that have been missed out and compute the effect these have on the current holdings of the unit holder through the back data propagation process. To facilitate this propagation process, two schemas are used – the business (or normal) schema and the report schema. You are required to enter the correct data in the business schema for the required transactions and select these for propagation, again from the business schema. The transactions will be simulated in the report schema and the results can be viewed in the business schema. Refer the chapter ‘Back Data Propagation’ for more details on the back data propagation process 6.2.6 Automatic Surrender of Policy The system facilitates automatic surrender of policy when the policy’s market value goes below certain threshold amount. This amount parameterizes at the system level. This surrender is paid to the product account and not to the policy holder. ‘Process Automatic Surrender’ and ‘Threshold Policy Market Value’ defined in the Product maintenance screen accounts for the automatic surrender of policy. This can be explained as follows: The user is able to input the threshold value, if Process Automatic Surrender is checked. The system automatically triggers 100% policy withdrawal transaction, if Threshold Policy Market value is less than this threshold amount. The System then triggers an automatic surrender transaction with the following parameters: Portfolio Surrender flag as True Payment mode as transfer Payment type as Product Asset allocation with all funds having balances and percentage applied as 100% 6-19 Refer to the chapter “Product and Batch Activities” for further information on Automatic Surrender. 6.3 Policy Transaction Surrender Summary Screen You can invoke the ‘Policy Transaction-Surrender Summary’ screen by typing ‘LESPLSUR’ in the field at the top right corner of the Application tool bar and clicking on the adjoining arrow button. The following screen is displayed: 6.3.1 Retrieving Surrender Transaction in Policy Transaction Surrender Screen You can retrieve a previously entered record in the Summary screen, as follows: Specify any or all of the following details in the Policy Transaction Surrender Summary screen: 1. Select the status of the record in the Auth Status field. If you choose the “Blank Space” option, then all the records are retrieved. 2. Select the status of the record in the Record Status field. If you choose the “Blank Space” option, then all the records are retrieved. Policy Txn Number Policy Number Product ID Transaction Type Transaction Date Policy Holder ID Transaction Reference Number After you have specified the required details, click ‘Search’ button. All records with the specified details are retrieved and displayed in the lower portion of the screen. 6-20 Note You can also retrieve the individual record detail from the detail screen by doing query in the following manner:– Press F7. – Input the Product ID. – Press F8. You can perform Edit, Delete, Amend, Authorize, Reverse, Confirm operation by selecting from the Action list. You can also search the record by using combination of % and alphanumeric value. Example You can search the record for Product ID by using the combination of % and alphanumeric value as follows:- 6.3.2 Search by A%: System will fetch all the records whose Product ID starts from Alphabet ‘A’. For example, AGC17, AGVO6, AGC74 etc. Search by %7: System will fetch all the records whose Product ID ends by numeric value’ 7’. For example, AGC17, GSD267, AGC77 etc. Search by %17%:- System will fetch all the records whose Product ID contains the numeric value 17. For example, GSD217, GSD172, AGC17 etc. Editing Surrender Transaction You can modify the details of a record that you have already entered into the system, provided it has not been subsequently authorized. You can perform this operation as follows: 1. Invoke the Policy Transaction Surrender Summary screen from the Browser. 2. Select the status of the record that you want to retrieve for modification in the Authorization Status field. You can only modify records that are unauthorized. Accordingly, choose the Unauthorized option from the drop down list. 3. Specify any or all of the details of the record in the corresponding fields on the screen to retrieve the record that is to be modified. All unauthorized records with the specified details are retrieved and displayed in the lower portion of the screen. 4. Double click the record that you want to modify in the list of displayed records. The Policy Transaction Surrender Detail screen is displayed. 5. Select Unlock Operation from Action list to modify the record. Modify the necessary information. 6. Click Save to save your changes. The Policy Transaction Surrender Detail screen is closed and the changes made are reflected in the Policy Transaction Surrender Summary screen. 6.3.3 Viewing Surrender Transaction To view a Surrender Transaction you have previously entered, you must retrieve the same in the Policy Transaction Surrender Summary screen, as follows: 1. Invoke the Summary Screen from the Browser. 2. Select the status of the Surrender Transaction that you want to retrieve for viewing in the Authorization Status field. You can also view all records that are either unauthorized or authorized only, by choosing the Unauthorized / Authorized option. 6-21 3. Specify any or all of the details of the records in the corresponding fields on the screen, and click ‘Search’ button. All records with the specified details are retrieved and displayed in the lower portion of the screen. 4. Double click the record that you want to view in the list of displayed records, in the lower portion of the screen. The Policy Transaction Surrender screen is opened in view mode. 6.3.4 Deleting Surrender Transaction You can delete only unauthorized records in the system. To delete a record that you have previously entered, you must retrieve the same in the Policy Transaction Surrender Summary screen, as follows: 1. Invoke the Policy Transaction Surrender Summary screen from the browser. 2. Select the status of the record that you want to retrieve for deletion. 3. Specify any or all of the details of the record in the corresponding fields on the screen, and click ‘Search’ button. All records with the specified details are retrieved and displayed in the lower portion of the screen. 4. Double click the record that you want to delete in the list of displayed records, in the lower portion of the screen. The Policy Transaction Surrender Detail screen is opened in View mode. 5. Select Delete operation from the Action list. The system prompts you to confirm the deletion, and the record is deleted physically from the system database. 6.3.5 Authorizing Surrender Transaction An unauthorized record must be authorized in the system for it to be processed. To authorize a record, you must first retrieve the same in the Policy Transaction Surrender Summary screen. 1. Invoke the Policy Transaction Surrender Summary screen from the Browser. 2. Select the status of the record that you want to retrieve for authorization. Typically, choose the Unauthorized option from the drop down list. 3. Specify any or all of the details of the record in the corresponding fields on the screen. Click ‘Search’ button. All records with the specified details that are pending authorization are retrieved and displayed in the lower portion of the screen. 4. Double click the record that you wish to authorize. The Policy Transaction Surrender Detail screen is opened in View mode. 5. Select Authorize operation from Action list. When the checker authorizes a record, details of validations, if any, that were overridden by the maker of the record during the Save operation, are displayed. If any of these overrides results in an error, the checker must reject the record. 6.3.6 Amending Surrender Transaction After a record is authorized, it can be modified using the Unlock operation from Action list. To make changes to a record after authorization, you must invoke the Unlock operation which is termed as Amend Operation. 1. Invoke the Policy Transaction Surrender Summary screen from the Browser. 2. Select the status of the record that you wish to retrieve for amendment. You can only amend records that are authorized. 6-22 3. Specify any or all of the details of the record in the corresponding fields on the screen. All records with the specified details are retrieved and displayed in the lower portion of the screen. 4. Double click the record that you want to amend. The Policy Transaction Surrender screen will be displayed in Amendment mode. Click the Unlock operation from the Action list to amend the record. 5. Amend the necessary information. Click the Save button to save your changes. 6.3.7 Authorizing Amended Surrender Transaction An amended Surrender Transaction must be authorized for the amendment to be made effective in the system. Authorization of amended records can only be done from Fund Manager Module and Agency branch Module. The process of authorization is subsequently the same as that for normal transactions. 6.3.8 Reversing Surrender Transaction You can reverse a transaction that you have already entered into the system, provided it has not been subsequently authorized. You can perform this operation as follows: 1. Invoke the Policy Transaction Surrender Summary screen from the browser. 2. Select the status of the record that you want to retrieve for reversal. 3. Specify any or all of the details of the record in the corresponding fields on the screen, and click ‘Search’ button. All records with the specified details are retrieved and displayed in the lower portion of the screen. 4. Double click the record that you want to reverse in the list of displayed records, in the lower portion of the screen. The Policy Transaction Surrender Detail screen is opened in View mode. 5. Select Reverse operation from the Action list. The system prompts you to confirm the reversal of record. 6. Click the Save button to save your changes. Refer to the chapter “Allocation Details” for information on the Allocation Details screen 6-23 7. Policy Status Change 7.1 Introduction When a policy is created, the status of the same is ‘Active’. It may be required to change the status of the policy. A status change may, or may not have a processing impact and depending on the change in status, a restriction may be placed on the policy. Note The status of a policy can be changed through the Fund Manager component only. The Policy Status Change screen allows you to change the status of a Policy. The next section gives you step-by-step instructions to do the same. 7.2 Changing Status of Policy The following are the steps you need to follow to change the status of a policy. Each of these steps is explained in detail in subsequent sections. 7.2.1 Invoke the Policy Status Change screen. Enter information in the Policy Status Change screen. Save the information entered. Invoking Screen You can invoke the ‘Policy Status Change Detail’ screen by typing ‘LEDPLSTA’ in the field at the top right corner of the Application tool bar and clicking on the adjoining arrow button. 7-1 The following screen is invoked: Select ‘New’ from the Actions menu in the Application tool bar or click new icon to enter the details of the Policy Status Change. 7.2.2 Fields in Policy Status Change Screen Status Change Details Section Policy Number Mandatory Enter the number of the Policy whose status you are changing. Note You have the option of using the Policy Find Options screen to enter the Policy Number. This screen is invoked when you click ‘Fetch Values’ button. This procedure is similar to the one for a Top Up Transaction. Rule Effective Date (dd/MM/yyyy) Mandatory When you enter the Policy Number, the Rule Effective Date, which is the date from which the new status of the Policy is effective, will be displayed. You will not be allowed to change this field. 7-2 Present Status Display When you enter the Policy Number, the existing status of the Policy will be displayed. You will not be allowed to change this field. Present Status Code Display Each status carries a Status Code. The existing status code of the Policy will be displayed. You will not be allowed to change this field. New Status Mandatory Select the new status of the Policy from the option list. Note – When you change the status of a Policy to ‘Death Without Commutation’, ‘Death With Commutation’, ‘Policy Holder Retirement’ and ‘Early Policy Holder Retirement’, all standing instructions on premium, annuity, recurring switch, will be cancelled. – When you change the status of a Policy to ‘Matured’, surrenders on the Policy will not be validated against the ‘Surrender Limit’. The Policy Holder will be allowed to carry out as many surrender transactions as he wishes. New Status Code Display When you select the changed status of the Policy, the new status code will be displayed. You will not be allowed to change this field. Generate Redemption Transaction Mandatory If you want redemption transaction to be generated for the policy, select ‘Yes’. Else select ‘No’. Note This field will be enabled only for the options ‘Claim’ and ‘Surrender’ in the drop-down list against the field ‘New Status’. Surrender Money Payable Mandatory Indicate to whom the surrender money is payable. Offset Value Optional, Numerical Specify the amount that will be deducted from the surrender money payable to the Policy Holder. 7-3 Back Date Surrender Optional During a status change to ‘Surrender’ or ‘Claim’, a 100% redemption transaction will be generated. If you want redemption transaction to be back dated, select ‘Yes’. The transaction date can then be entered in the field ‘Last Transaction Date’. Note This field will be enabled only for the options ‘Claim’ and ‘Surrender’ in the drop-down list against the field ‘New Status’. Last Transaction Date (dd/MM/yyyy) Mandatory if box ‘Back Date Surrender’ is checked Initially, this field will display the date on which the last transaction was carried out. If you have checked the box ‘Back Date Surrender’, you can change this date. Note The date that you enter here, should necessarily be between the date that was originally displayed in this box, and today’s date. Average Salary (Last 2 Years) Optional Enter the average salary of the Policy Holder in the last two years. Note This field will be enabled only for the options ‘Death Without Commutation’, ‘Death With Commutation’, ‘Policy Holder Retirement’, and ‘Early Policy Holder Retirement’ in the drop-down list against the field ‘New Status’. Date of Death (dd/MM/yyyy) Optional Enter the date of death of the Policy Holder. Note This check box will be enabled only for the options ‘Death Without Commutation’, ‘Death With Commutation’, ‘Policy Holder Retirement’ and ‘Early Policy Holder Retirement’ in the drop-down list against the field ‘New Status’. Allow Surrender Mandatory only if the New Status is ‘Death Without Commutation’ Select ‘Yes’ to indicate the Policy can be surrendered. Allow Closure Mandatory only if the New Status is ‘Death Without Commutation’ Select ‘Yes’ to indicate the Policy can be closed. 7-4 Allow Transfer Mandatory only if the New Status is ‘Death Without Commutation’ Select ‘Yes’ to indicate the Policy can be transferred. Adjustment Transaction Type Mandatory only if the New Status is ‘Claim’ Select the adjustment transaction type from the option list. Description Optional You may enter any remarks on the status change of the Policy. 7.2.2.1 Policy Details section The following policy details are displayed in the Policy Details section, when you select a Policy Number: 7.2.2.2 Policy Holder Name Product Name Policy Base Currency Policy End Date (dd/MM/yyyy) Payment Details section The payment details displayed in this section will depend on whether the surrender money is payable to the client or the product. If the surrender money is payable to the client, the payment details of the client will be displayed. If payable to the product, the payment details of the product will be displayed. 7.2.3 Bank Branch Account Number Account Type Account Currency Account Name IBAN Saving Information Entered When you have entered all the mandatory information, click ‘Ok’ button. The following message will be displayed: The system displays the following confirmation message “Record Successfully Saved”. This indicates the record has been saved. Click ‘Ok’ button. 7-5 7.3 Policy Status Change Summary Screen You can invoke the ‘Policy Status Change Summary’ screen by typing ‘LESPLSTA’ in the field at the top right corner of the Application tool bar and clicking on the adjoining arrow button. The following screen is displayed: 7.3.1 Retrieving Policy Status in Policy Status Change Screen You can retrieve a previously entered record in the Summary screen, as follows: Specify any or all of the following details in the Policy Status Change Summary screen: 1. Select the status of the record in the Authorized field. If you choose the “Blank Space” option, then all the records are retrieved. 2. Select the status of the record in the Open field. If you choose the “Blank Space” option, then all the records are retrieved. Policy Number Rule Effective Date Present Status Code New Status Code After you have specified the required details, click ‘Search’ button. All records with the specified details are retrieved and displayed in the lower portion of the screen. Note You can also retrieve the individual record detail from the detail screen by doing query in the following manner:– Press F7. – Input the Policy Number. – Press F8. You can perform Edit, Delete, Amend, Authorize, Reverse, Confirm operation by selecting from the Action list. You can also search the record by using combination of % and alphanumeric value. 7-6 Example You can search the record for Policy Status by using the combination of % and alphanumeric value as follows:- 7.3.2 Search by A%: System will fetch all the records whose Policy Number starts from Alphabet ‘A’. For example, AGC17, AGVO6, AGC74 etc. Search by %7: System will fetch all the records whose Policy Number ends by numeric value’ 7’. For example, AGC17, GSD267, AGC77 etc. Search by %17%:- System will fetch all the records whose Policy Number contains the numeric value 17. For example, GSD217, GSD172, AGC17 etc. Editing Policy Status Change You can modify the details of a record that you have already entered into the system, provided it has not been subsequently authorized. You can perform this operation as follows: 1. Invoke the Policy Status Change Summary screen from the Browser. 2. Select the status of the record that you want to retrieve for modification in the Authorization Status field. You can only modify records that are unauthorized. Accordingly, choose the Unauthorized option from the drop down list. 3. Specify any or all of the details of the record in the corresponding fields on the screen to retrieve the record that is to be modified. Click ‘Search’ button. All unauthorized records with the specified details are retrieved and displayed in the lower portion of the screen. 4. Double click the record that you want to modify in the list of displayed records. The Policy Status Change Detail screen is displayed. 5. Select Unlock Operation from Action list to modify the record. Modify the necessary information. 6. Click Save to save your changes. The Policy Status Change Detail screen is closed and the changes made are reflected in the Policy Status Change Summary screen. 7.3.3 Viewing Policy Status Change To view a Policy Status Change you have previously entered, you must retrieve the same in the Policy Status Change Summary screen, as follows: 1. Invoke the Summary Screen from the Browser. 2. Select the status of the Policy Status Change that you want to retrieve for viewing in the Authorization Status field. You can also view all records that are either unauthorized or authorized only, by choosing the Unauthorized / Authorized option. 3. Specify any or all of the details of the records in the corresponding fields on the screen, and click ‘Search’ button. All records with the specified details are retrieved and displayed in the lower portion of the screen. 4. Double click the record that you want to view in the list of displayed records, in the lower portion of the screen. The Policy Status Change screen is opened in View mode. 7.3.4 Deleting Policy Status Change You can delete only unauthorized records in the system. To delete a record that you have previously entered, you must retrieve the same in the Policy Status Change Summary screen, as follows: 1. Invoke the Policy Status Change Summary screen from the browser. 7-7 2. Select the status of the record that you want to retrieve for deletion. 3. Specify any or all of the details of the record in the corresponding fields on the screen, and click ‘Search’ button. All records with the specified details are retrieved and displayed in the lower portion of the screen. 4. Double click the record that you want to delete in the list of displayed records, in the lower portion of the screen. The Policy Status Change Detail screen is opened in View mode. 5. Select Delete operation from the Action list. The system prompts you to confirm the deletion, and the record is deleted physically from the system database. 7.3.5 Authorizing Policy Status Change An unauthorized record must be authorized in the system for it to be processed. To authorize a record, you must first retrieve the same in the Policy Status Change Summary screen. 1. Invoke the Policy Status Change Summary screen from the Browser. 2. Select the status of the record that you want to retrieve for authorization. Typically, choose the Unauthorized option from the drop down list. 3. Specify any or all of the details of the record in the corresponding fields on the screen. Click ‘Search’ button. All records with the specified details that are pending authorization are retrieved and displayed in the lower portion of the screen. 4. Double click the record that you wish to authorize. The Policy Status Change Detail screen is opened in View mode. 5. Select Authorize operation from Action list. When the checker authorizes a record, details of validations, if any, that were overridden by the maker of the record during the Save operation, are displayed. If any of these overrides results in an error, the checker must reject the record. 7.3.6 Amending Policy Status Change After a record is authorized, it can be modified using the Unlock operation from Action list. To make changes to a record after authorization, you must invoke the Unlock operation which is termed as Amend Operation. 1. Invoke the Policy Status Change Summary screen from the Browser. 2. Select the status of the record that you wish to retrieve for amendment. You can only amend records that are authorized. 3. Specify any or all of the details of the record in the corresponding fields on the screen. Click ‘Search’ button. All records with the specified details are retrieved and displayed in the lower portion of the screen. 4. Double click the record that you want to amend. The Policy Status Change screen will be displayed in Amendment mode. Click the Unlock operation from the Action list to amend the record. 5. Amend the necessary information. Click the Save button to save your changes. 7.3.7 Authorizing Amended Policy Status Change An amended Policy Status Change must be authorized for the amendment to be made effective in the system. 7-8 Authorization of amended records can only be done from Fund Manager Module and Agency branch Module. The process of authorization is subsequently the same as that for normal transactions. 7-9 8. Cession Maintenance 8.1 Introduction In some cases, Policy Holders with endowment policies might desire to ‘cede’ their policies. This would typically mean that ownership of the policy might be ‘ceded’ or transferred to another individual. The ‘ceding’ could be either temporary or permanent, as the case may be. Note Cession Maintenance can be carried out through the Fund Manager component only. The Cession Maintenance screen allows you to maintain various Cession IDs. These can be attached to the necessary policies. The next section gives you step-by-step instructions to do the same. 8.2 Creating and Saving Cession ID The following are the steps you need to follow to maintain a Cession ID. Each of these steps is explained in detail in subsequent sections. 8.2.1 Invoke the Cession Maintenance screen. Enter information in the Cession Maintenance screen. Save the information entered. Invoking Screen You can invoke the ‘Cession Maintenance Detail’ screen by typing ‘LEDCMSD’ in the field at the top right corner of the Application tool bar and clicking on the adjoining arrow button. The following screen is invoked: 8-1 8.2.2 Fields in Cession Maintenance Screen 8.2.2.1 Cession Maintenance Section In the Cession Maintenance section, you will have to enter information in the following fields: Cession ID 3 Characters, Alphanumeric, Mandatory Specify a unique identification for the particular cession. Cession Type Mandatory Select the appropriate type of cession that applies to this Cession ID, from the drop-down list. The cession type could be either ‘Permanent’ or ‘Temporary’. Cession Description 30 Characters, Alphanumeric, Mandatory Give a description of the cession that is being maintained in this record. Generate Policy Transfer Transaction? Display You can select ‘Yes’ to generate policy transfer transaction. Else select ‘No’. Allow Policy Surrender? Optional You can select ‘Yes’ to allow policy surrender. Allow Policy Closure? Optional You can select ‘Yes’ to allow policy closure. You will need to carry out the following steps in order to close a policy: Amend the Maturity Date of the policy through the Policy Find Options screen. Then change the status of the policy to ‘Matured’, through the Policy Status Change screen. Note This check box will be enabled only if the Cession Type is ‘Temporary’. 8.2.3 Saving Information Entered When you have entered all the mandatory information, click ’Ok’ button. The following message will be displayed: The system displays the following confirmation message “Record Successfully Saved”. This indicates the record has been saved. Click ‘Ok’ button. 8-2 8.3 Cession Maintenance Summary Screen You can invoke the ‘Cession Maintenance Summary’ screen by typing ‘LESCMSD’ in the field at the top right corner of the Application tool bar and clicking on the adjoining arrow button. The following screen is displayed: 8.3.1 Retrieving Cession Maintenance in Cession Maintenance Screen You can retrieve a previously entered record in the Summary screen, as follows: Specify any or all of the following details in Cession Maintenance Summary screen: 1. Select the status of the record in the Authorized field. If you choose the “Blank Space” option, then all the records are retrieved. 2. Select the status of the record in the open field. If you choose the “Blank Space” option, then all the records are retrieved. Cession ID Cession Type After you have specified the required details, click ‘Search’ button. All records with the specified details are retrieved and displayed in the lower portion of the screen. Note You can also retrieve the individual record detail from the detail screen by doing query in the following manner: – Press F7. – Input the Product ID. – Press F8. You can perform Edit, Delete, Amend, Authorize, Reverse, Confirm operation by selecting from the Action list. You can also search the record by using combination of % and alphanumeric value. Example: 8-3 You can search the record for Product Type by using the combination of % and alphanumeric value as follows: 8.3.2 Search by A%: System will fetch all the records whose Product Type starts from Alphabet ‘A’. For example, AGC17, AGVO6, AGC74 etc. Search by %7: System will fetch all the records whose Product Type ends by numeric value’ 7’. For example, AGC17, GSD267, AGC77 etc. Search by %17%:- System will fetch all the records whose Product Type contains the numeric value 17. For example, GSD217, GSD172, AGC17 etc. Editing Cession Maintenance You can modify the details of a record that you have already entered into the system, provided it has not been subsequently authorized. You can perform this operation as follows: 1. Invoke the Cession Maintenance Summary screen from the Browser. 2. Select the status of the record that you want to retrieve for modification in the Authorization Status field. You can only modify records that are unauthorized. Accordingly, choose the Unauthorized option from the drop down list. 3. Specify any or all of the details of the record in the corresponding fields on the screen to retrieve the record that is to be modified. Click ‘Search’ button. All unauthorized records with the specified details are retrieved and displayed in the lower portion of the screen. 4. Double click the record that you want to modify in the list of displayed records. The Cession Maintenance Detail screen is displayed. 5. Select Unlock Operation from Action list to modify the record. Modify the necessary information. 6. Click Save to save your changes. The Cession Maintenance Detail screen is closed and the changes made are reflected in the Cession Maintenance Summary screen. 8.3.3 Viewing Cession Maintenance To view a Cession Maintenance you have previously entered, you must retrieve the same in the Cession Maintenance Summary screen, as follows: 1. Invoke the Cession Maintenance Summary Screen from the Browser. 2. Select the status of the record that you want to retrieve for viewing in the Authorization Status field. You can also view all records that are either unauthorized or authorized only, by choosing the Unauthorized/ Authorized option. 3. Specify any or all of the details of the records in the corresponding fields on the screen, and click ‘Search’ button. All records with the specified details are retrieved and displayed in the lower portion of the screen. 4. Double click the record that you want to view in the list of displayed records, in the lower portion of the screen. The Cession Maintenance screen is opened in view mode. 8.3.4 Deleting Cession Maintenance You can delete only unauthorized records in the system. To delete a record that you have previously entered, you must retrieve the same in the Cession Maintenance Summary screen, as follows: 1. Invoke the Cession Maintenance Summary screen from the browser. 2. Select the status of the record that you want to retrieve for deletion. 8-4 3. Specify any or all of the details of the record in the corresponding fields on the screen, and click ‘Search’ button. All records with the specified details are retrieved and displayed in the lower portion of the screen. 4. Double click the record that you want to delete in the list of displayed records, in the lower portion of the screen. The Cession Maintenance Detail screen is opened in View mode. 5. Select Delete operation from the Action list. The system prompts you to confirm the deletion, and the record is deleted physically from the system database. 8.3.5 Authorizing Cession Maintenance An unauthorized record must be authorized in the system for it to be processed. To authorize a record, you must first retrieve the same in the Cession Maintenance Summary screen. 1. Invoke the Cession Maintenance Summary screen from the Browser. 2. Select the status of the record that you want to retrieve for authorization. Typically, choose the Unauthorized option from the drop down list. 3. Specify any or all of the details of the record in the corresponding fields on the screen. Click ‘Search’ button.All records with the specified details that are pending authorization are retrieved and displayed in the lower portion of the screen. 4. Double click the record that you wish to authorize. The Cession Maintenance Detail screen is opened in View mode. 5. Select Authorize operation from Action list. When the checker authorizes a record, details of validations, if any, that were overridden by the maker of the record during the Save operation, are displayed. If any of these overrides results in an error, the checker must reject the transaction. 8.3.6 Amending Cession Maintenance After a record is authorized, it can be modified using the Unlock operation from Action list. To make changes to a record after authorization, you must invoke the Unlock operation which is termed as Amend Operation. 1. Invoke the Cession Maintenance Summary screen from the Browser. 2. Select the status of the record that you wish to retrieve for amendment. You can only amend records that are authorized. 3. Specify any or all of the details of the record in the corresponding fields on the screen. Click ‘Search’ button. All records with the specified details are retrieved and displayed in the lower portion of the screen. 4. Double click the record that you want to amend. The Cession Maintenance screen will be displayed in Amendment mode. Click the Unlock operation from the Action list to amend the record. 5. Amend the necessary information. Click the Save button to save your changes. 8.3.7 Authorizing Amended Cession Maintenance An amended Cession Maintenance must be authorized for the amendment to be made effective in the system. Authorization of amended records can only be done from Fund Manager Module and Agency branch Module. The process of authorization is subsequently the same as that for normal transactions. 8-5 9. Policy Cession Maintenance 9.1 Introduction Whenever a policy is marked with a Cession ID, the parameters that characterize the Cession ID will affect the subsequent events in the policy, such as generation of transfer transactions, allowing of redemption transactions and policy closure, or policy surrender. Note Cession IDs can be attached to policies through the Fund Manager component only. The Policy Cession Maintenance screen allows you to attach a Cession ID to a policy. The next section gives you step-by-step instructions to do the same. 9.2 Attaching Cession ID to Policy The following are the steps you need to follow to define a Product. Each of these steps is explained in detail in subsequent sections. 9.2.1 Invoke the Policy Cession Maintenance screen. Enter information in the Policy Cession Maintenance screen. Save the information entered. Invoking Screen You can invoke the ‘Policy Cession Maintenance Detail’ screen by typing ‘LEDPLCES’ in the field at the top right corner of the Application tool bar and clicking on the adjoining arrow button. The following screen is invoked: 9-1 9.2.2 Fields in Policy Cession Maintenance Screen 9.2.2.1 Policy Cession Maintenance section In the Policy Cession Maintenance section, you will have to enter information in the following fields: Policy Number Alphanumeric, Mandatory Select the number of the Policy that must be marked with a Cession ID. Note This number must represent an authorized, enabled and active policy (for which at least one underlying transaction has been generated, authorized and allocated). The Policy Number entered here must represent a Policy that comes under a Product that is authorized and active. You can use the button alongside this field to view a list of valid policies and select the required one. When you specify the Policy Number, all the details of the Policy are picked up from the policy record and populated in the corresponding fields in this form. Cession Date Display The date on which the transfer is affected, is the Policy Cession Date. It is deemed to be the application date itself, which is displayed here by default. It cannot be changed. Policy Holder ID Display The name and ID of the Policy Holder whose Policy is to be marked with a Cession ID, is displayed here. Product ID Mandatory Explanation needed from Dev/ Testing team. Cession Type Mandatory Select the Cession Type that is to be applied to the specified Policy, from the drop-down list. Note If the type chosen here is ‘Temporary’, then only the Cession ID must be captured with remarks. If it is ‘Permanent’, then the Transferee ID must also be captured. Cession ID Mandatory Select the Cession ID that is to be applied to the specified policy, from the option list. 9-2 Note The list will contain permanent cessions if the Cession Type specified is ‘Permanent’ and temporary cessions if the Cession Type chosen is ‘Temporary’. Transferee ID Mandatory if the Cession Type is ‘Permanent’ Select, from the option list, the ID of the Policy Holder to whom the policy must be transferred, when it is marked with the specified Cession ID. This must be a valid Unit Holder in the system, and must not have a Policy in the same Product. Cession Remarks 255 Characters Maximum, Alphanumeric, Optional You can capture any descriptive/narrative text pertaining to this Policy Cession record in this field. Note If the ‘Cession Applicable’ field at the ‘Product Level’ is checked in the ‘Cession Maintenance’ screen, the system will allow the policies under this product for Policy Cession Maintenance. 9.2.2.2 Cessionary Details Section In the Cessionary Details section, you will have to enter information in the following fields: Cessionary Name Optional Specify the name of the cessionary (policy-holder ceding the policy). Cessionary Ref Number 16 Characters Alphanumeric, Optional Specify a unique reference number that will be used to identify the transaction in the system. Contact Person 40 Character Maximum, Alphanumeric, Optional For corporate investors, enter the name of the contact person at the cessionary office. Address Lines 1-2 Each line is 255 Character Maximum, Alphanumeric. Specify the postal address that is to be used for correspondence with the cessionary. City 40 Character Maximum, Alphanumeric, Optional Specify the name of the city of residence of the cessionary. State/ Country 60 Character Maximum, Alphanumeric, Optional Specify the state/country in which the city of residence of the investor is cessionary. 9-3 Zip Code 10 Characters Maximum, Alphanumeric, Optional Specify the zip code of the specified city of residence of the cessionary. Phone Number 15 Character Maximum, Alphanumeric, Optional Enter the contact telephone numbers of the cessionary. Fax Number 15 Character Maximum, Alphanumeric, Optional Enter the fax number of the cessionary. E - Mail ID 30 Characters Maximum, Alphanumeric; Optional Specify the Email address of the cessionary. 9.2.3 Saving Information Entered When you have entered all the mandatory information, click ‘Ok’ button. The following message will be displayed: The system displays the confirmation message “Record Successfully Saved”. This indicates the record has been saved. Click ‘Ok’ button. 9.3 Policy Cession Summary Screen You can invoke the ‘Policy Cession Summary’ screen by typing ‘LESPLCES’ in the field at the top right corner of the Application tool bar and clicking on the adjoining arrow button. The following screen is displayed: 9.3.1 Retrieving Policy Cession in Policy Cession Screen You can retrieve a previously entered record in the Summary screen, as follows: 9-4 Specify any or all of the following details in Policy Cession Summary screen: Select the status of the record in the Authorized field. If you choose the “Blank Space” option, then all the records are retrieved. Select the status of the record in the Open field. If you choose the “Blank Space” option, then all the records are retrieved. Product ID Effective Date After you have specified the required details, click ‘Search’ button. All records with the specified details are retrieved and displayed in the lower portion of the screen. Note You can also retrieve the individual record detail from the detail screen by doing query in the following manner: – Press F7. – Input the Product ID. – Press F8. You can perform Edit, Delete, Amend, Authorize, Reverse, Confirm operation by selecting from the Action list. You can also search the record by using combination of % and alphanumeric value. Example: You can search the record for Product Type by using the combination of % and alphanumeric value as follows: 9.3.2 Search by A%: System will fetch all the records whose Product Type starts from Alphabet ‘A’. For example, AGC17, AGVO6, AGC74 etc. Search by %7: System will fetch all the records whose Product Type ends by numeric value’ 7’. For example, AGC17, GSD267, AGC77 etc. Search by %17%:- System will fetch all the records whose Product Type contains the numeric value 17. For example, GSD217, GSD172, AGC17 etc. Editing Policy Cession You can modify the details of a record that you have already entered into the system, provided it has not been subsequently authorized. You can perform this operation as follows: 1. Invoke the Policy Cession Summary screen from the Browser. 2. Select the status of the record that you want to retrieve for modification in the Authorization Status field. You can only modify records that are unauthorized. Accordingly, choose the Unauthorized option from the drop down list. 3. Specify any or all of the details of the record in the corresponding fields on the screen to retrieve the record that is to be modified. Click ‘Search’ button. All unauthorized records with the specified details are retrieved and displayed in the lower portion of the screen. 4. Double click the record that you want to modify in the list of displayed records. The Policy Cession Detail screen is displayed. 5. Select Unlock Operation from Action list to modify the record. Modify the necessary information. 9-5 6. Click Save to save your changes. The Policy Cession Detail screen is closed and the changes made are reflected in the Policy Cession Summary screen. 9.3.3 Viewing Policy Cession To view a Policy Cession you have previously entered, you must retrieve the same in the Policy Cession Summary screen, as follows: 1. Invoke the Policy Cession Summary Screen from the Browser. 2. Select the status of the record that you want to retrieve for viewing in the Authorization Status field. You can also view all records that are either unauthorized or authorized only, by choosing the Unauthorized/ Authorized option. 3. Specify any or all of the details of the records in the corresponding fields on the screen, and click ‘Search’ button. All records with the specified details are retrieved and displayed in the lower portion of the screen. 4. Double click the record that you want to view in the list of displayed records, in the lower portion of the screen. The Product With-Holding Tax screen is opened in view mode. 9.3.4 Deleting Policy Cession You can delete only unauthorized records in the system. To delete a record that you have previously entered, you must retrieve the same in the Policy Cession Summary screen, as follows: 1. Invoke the Policy Cession Summary screen from the browser. 2. Select the status of the record that you want to retrieve for deletion. 3. Specify any or all of the details of the record in the corresponding fields on the screen, and click ‘Search’ button. All records with the specified details are retrieved and displayed in the lower portion of the screen. 4. Double click the record that you want to delete in the list of displayed records, in the lower portion of the screen. The Policy Cession Detail screen is opened in View mode. 5. Select Delete operation from the Action list. The system prompts you to confirm the deletion, and the record is deleted physically from the system database. 9.3.5 Authorizing Policy Cession An unauthorized record must be authorized in the system for it to be processed. To authorize a record, you must first retrieve the same in the Policy Cession Summary screen. 1. Invoke the Policy Cession Summary screen from the Browser. 2. Select the status of the record that you want to retrieve for authorization. Typically, choose the Unauthorized option from the drop down list. 3. Specify any or all of the details of the record in the corresponding fields on the screen. Click ‘Search’ button.All records with the specified details that are pending authorization are retrieved and displayed in the lower portion of the screen. 4. Double click the record that you wish to authorize. The Policy Cession Detail screen is opened in View mode. 5. Select Authorize operation from Action list. When the checker authorizes a record, details of validations, if any, that were overridden by the maker of the record during the Save operation, are displayed. If any of these overrides results in an error, the checker must reject the transaction. 9-6 9.3.6 Amending Policy Cession After a record is authorized, it can be modified using the Unlock operation from Action list. To make changes to a record after authorization, you must invoke the Unlock operation which is termed as Amend Operation. 1. Invoke the Policy Cession Summary screen from the Browser. 2. Select the status of the record that you wish to retrieve for amendment. You can only amend records that are authorized. 3. Specify any or all of the details of the record in the corresponding fields on the screen. . Click ‘Search’ button. All records with the specified details are retrieved and displayed in the lower portion of the screen. 4. Double click the record that you want to amend. The Policy Cession screen will be displayed in Amendment mode. Click the Unlock operation from the Action list to amend the record. 5. Amend the necessary information. Click the Save button to save your changes. 9.3.7 Authorizing Amended Policy Cession An amended Product With-Holding Tax must be authorized for the amendment to be made effective in the system. Authorization of amended records can only be done from Fund Manager Module and Agency branch Module. The process of authorization is subsequently the same as that for normal transactions. 9-7 10. Policy Journal Maintenance 10.1 Introduction Whenever you need to make an adjustment to the annuity amount, you need to post it as a policy journal entry. Authorization of policy journal creates a policy transaction on par with normal annuity transaction. Appropriate tax is deducted from the gross annuity amount and is posted as annuity tax transaction. On authorization of the journal entry, it will generate the annuity transaction with gross annuity amount. The Policy Journal Maintenance screen allows you to make adjustments to the annuity amount of a policy. The next section gives you step-by-step instructions to do the same. 10.2 Maintaining Journal Entries for Policy The following are the steps you need to follow to make a journal entry for a policy. Each of these steps is explained in detail in subsequent sections. 10.2.1 Invoke the Policy Journal Maintenance screen. Enter information in the Policy Journal Maintenance screen. Save the information entered. Invoking Screen You can invoke the ‘Policy Journal Maintenance Detail’ screen by typing ‘LEDPLJNL’ in the field at the top right corner of the Application tool bar and clicking on the adjoining arrow button. The following screen is invoked: 10-1 Select ‘New’ from the Actions menu in the Application tool bar or click new icon to enter the details of the Policy Journal Maintenance. 10.2.2 Fields in Policy Journal Maintenance Screen 10.2.2.1 Policy Journal Section Journal Number System Generated This is a unique identification for the journal entry made for the policy. It is generated by the system when all details that are mandatory for the journal entry have been successfully entered, and the policy journal entry is saved. This journal number identifies the first journal entry made into a policy, and all subsequent journal entries into this Policy will have system generated sequential journal transaction numbers. Journal Type Mandatory Select the type of journal entry you wish to make. Currently system supports only one type of journal entry, that is, Annuity Adjustment. Policy Number Mandatory Select the Policy on which you want maintain a journal. You can use the Find Policy Options screen. You can invoke the same by clicking on the option list.. The Policy selected must be an authorized, active Policy on which the underlying initial investment and Annuity transaction has already been generated. Journal Currency Display When the Policy Number is selected, the corresponding Plan (or Policy) Base Currency is displayed as the default journal currency, from the Policy details record. This currency cannot be changed. Reference Number 16 Characters Maximum, Alphanumeric, Mandatory Specify a unique alphanumeric identifier for the journal entry. You will use this reference number to track this entry subsequently. Policy SI Number Mandatory This number is generated by the system. It represents the number of annuity/ premium payments between the Start Date and End Date specified for the annuity/ premium payment. Journal Txn Date Mandatory The Journal Transaction Date signifies the date on which the journal entry is made into the system. You can enter a backdated transaction here, but this must not be earlier than the first Rule Effective Date of the policy. By default, the application date is displayed in this field. 10-2 Policy Holder Display When the Policy Number is selected, the name of the corresponding Policyholder is displayed here. 10.2.2.2 Outstanding Payment Section From Date (DD/MM/YYYY) Mandatory Specify the date that marks the beginning of the period for which the journal entry is made. This date cannot be a future date. Note This date cannot be lesser than or equal to the date of policy creation. To Date (DD/MM/YYYY) Mandatory Specify the date that marks the end of the period for which the journal entry is made. This date cannot be a future date. Adjustment for Previous Cycle Optional Select ‘Yes’, to indicate that the journal entry being posted is an adjustment for the previous cycle. Journal Amount Numeric, Conditional Enter the outstanding amount to be paid to the customer. System will treat the value specified here as the gross annuity amount. Note The field will be disabled if the ‘Adjustment for Previous Cycle’ option is checked. Net Annuity Amount Numeric, Conditional Enter the adjusted net annuity amount here. The annuity details will be calculated by the system based on the amount you enter here on the journal transaction date and the tax ledger entries will be made for the new net annuity amount. Note This field is enabled only if you have selected the option ‘Adjustment for Previous Cycle’. WHT Amount Numeric, Conditional Specify the amount of with holding that is applicable on the annuity amount. The withholding tax details will be calculated by the system based on the amount you enter here on the journal transaction date and the tax ledger entries will be made for the new withholding tax amount. 10-3 If a Product is not mapped with ‘Withholding Tax’ then user can uncheck ‘Adjustment for Previous Cycle’ otherwise system will not allow the user to save the journal without maintaining WHT Amount. If the user maintains WHT Amount as '0' system will through an error saying "WHT Amount should be greater than 0". Note This field is enabled only if you have selected the option ‘Adjustment for Previous Cycle’. Remarks You can enter the important information any, in this field 10.2.2.3 Payment Details Section You can select the mode of payment and select the type of payment in this section. Payment Mode Alphanumeric, Mandatory Select the mode of payment as Transfer. Payment Type Mandatory Specify whether the payment will be made to the Policy Holder or to a third party. Maintained Bank Accounts Mandatory Select the bank account of the Policy Holder. The following bank account details will be displayed: Bank Branch Account Number Account Type Account Currency IBAN 36 Characters Only; Alphanumeric; Optional Specify the IBAN (International Bank Account Number) of the account holder. Saving the information entered When you have entered all the mandatory information, click ‘Ok’ button. The following message will be displayed: The system displays the confirmation message “Record Successfully Saved”. This indicates the record has been saved. Click ‘Ok’ button. 10-4 10.3 Policy Journal Maintenance Summary Screen You can invoke the ‘Policy Journal Maintenance Summary’ screen by typing ‘LESPLJNL’ in the field at the top right corner of the Application tool bar and clicking on the adjoining arrow button. The following screen is displayed: 10.3.1 Retrieving Policy Journal Entry in Policy Journal Maintenance Screen You can retrieve a previously entered record in the Summary screen, as follows: Specify any or all of the following details in the Policy Journal Maintenance Summary screen: Select the status of the record in the Authorized field. If you choose the “Blank Space” option, then all the records are retrieved. Select the status of the record in the open field. If you choose the “Blank Space” option, then all the records are retrieved. Journal Txn Number Reference Number Journal Txn Date From Date To Date After you have specified the required details, click ‘Search’ button. All records with the specified details are retrieved and displayed in the lower portion of the screen. Note You can also retrieve the individual record detail from the detail screen by doing query in the following manner:– Press F7. – Input the Journal Number. – Press F8. You can perform Edit, Delete, Amend, Authorize, Reverse, Confirm operation by selecting from the Action list. 10-5 You can also search the record by using combination of % and alphanumeric value. Example You can search the record for Journal Number by using the combination of % and alphanumeric value as follows:- 10.3.2 Search by A%: System will fetch all the records whose Journal Number starts from Alphabet ‘A’. For example, AGC17, AGVO6, AGC74 etc. Search by %7: System will fetch all the records whose Journal Number ends by numeric value’ 7’. For example, AGC17, GSD267, AGC77 etc. Search by %17%:- System will fetch all the records whose Journal Number contains the numeric value 17. For example, GSD217, GSD172, AGC17 etc. Editing Policy Journal Entry You can modify the details of a record that you have already entered into the system, provided it has not been subsequently authorized. You can perform this operation as follows: 1. Invoke the Policy Journal Maintenance Summary screen from the Browser. 2. Select the status of the record that you want to retrieve for modification in the Authorization Status field. You can only modify records that are unauthorized. Accordingly, choose the Unauthorized option from the drop down list. 3. Specify any or all of the details of the record in the corresponding fields on the screen to retrieve the record that is to be modified. Click ‘Search’ button. All unauthorized records with the specified details are retrieved and displayed in the lower portion of the screen. 4. Double click the record that you want to modify in the list of displayed records. The Policy Journal Maintenance Detail screen is displayed. 5. Select Unlock Operation from Action list to modify the record. Modify the necessary information. 6. Click Save to save your changes. The Policy Journal Maintenance Detail screen is closed and the changes made are reflected in the Policy Journal Maintenance Summary screen. 10.3.3 Viewing Policy Journal Entry To view a Policy Journal Entry you have previously entered, you must retrieve the same in the Policy Journal Maintenance Summary screen, as follows: 1. Invoke the Summary Screen from the Browser. 2. Select the status of the Policy Journal Maintenance that you want to retrieve for viewing in the Authorization Status field. You can also view all records that are either unauthorized or authorized only, by choosing the Unauthorized / Authorized option. 3. Specify any or all of the details of the records in the corresponding fields on the screen, and click ‘Search’ button. All records with the specified details are retrieved and displayed in the lower portion of the screen. 4. Double click the record that you want to view in the list of displayed records, in the lower portion of the screen. The Policy Journal Maintenance screen is opened in View mode. 10.3.4 Deleting Policy Journal Entry You can delete only unauthorized records in the system. To delete a record that you have previously entered, you must retrieve the same in the Policy Journal Maintenance Summary screen, as follows: 10-6 1. Invoke the Policy Journal Maintenance Summary screen from the browser. 2. Select the status of the record as “Unauthorized’ that you want to retrieve for deletion. 3. Specify any or all of the details of the record in the corresponding fields on the screen, and click ‘Search’ button. All records with the specified details are retrieved and displayed in the lower portion of the screen. 4. Double click the record that you want to delete in the list of displayed records, in the lower portion of the screen. The Policy Journal Maintenance Detail screen is opened in View mode. 5. Select Delete operation from the Action list. The system prompts you to confirm the deletion, and the record is deleted physically from the system database. 10.3.5 Authorizing Policy Journal Entry An unauthorized record must be authorized in the system for it to be processed. To authorize a record, you must first retrieve the same in the Policy Journal Maintenance Summary screen. 1. Invoke the Policy Journal Maintenance Summary screen from the Browser. 2. Select the status of the record that you want to retrieve for authorization. Typically, choose the Unauthorized option from the drop down list. 3. Specify any or all of the details of the record in the corresponding fields on the screen. Click ‘Search’ button. All records with the specified details that are pending authorization are retrieved and displayed in the lower portion of the screen. 4. Double click the record that you wish to authorize. The Policy Journal Maintenance Detail screen is opened in View mode. 5. Select Authorize operation from Action list. When the checker authorizes a record, details of validations, if any, that were overridden by the maker of the record during the Save operation, are displayed. If any of these overrides results in an error, the checker must reject the record. 10.3.6 Amending Policy Journal Entry After a record is authorized, it can be modified using the Unlock operation from Action list. To make changes to a record after authorization, you must invoke the Unlock operation which is termed as Amend Operation. 1. Invoke the Policy Journal Maintenance Summary screen from the Browser. 2. Select the status of the record that you wish to retrieve for amendment. You can only amend records that are authorized. 3. Specify any or all of the details of the record in the corresponding fields on the screen. Click ‘Search’ button. All records with the specified details are retrieved and displayed in the lower portion of the screen. 4. Double click the record that you want to amend. The Policy Journal Maintenance screen will be displayed in Amendment mode. Click the Unlock operation from the Action list to amend the record. 5. Amend the necessary information. Click the Save button to save your changes. 10.3.7 Authorizing Amended Policy Journal Entry An amended Policy Journal Entry must be authorized for the amendment to be made effective in the system. 10-7 Authorization of amended records can be done from Fund Manager Module and Agency branch Module. The process of authorization is subsequently the same as that for normal transactions. 10-8 11. Batch Activities 11.1 Introduction For the purpose of processing transactions in the LEP products, the system provides a number of processes that must be initiated by the user during either the End of Day Processes (EOD) or Beginning of Day Processes (BOD). These processes and their functioning are explained below. 11.2 Sequence of Batch Functions The following table gives you the sequence of the Batch Functions, the Activity and whether the Activity is an EOD or BOD function. Activity EOD/BOD LEP - Plan Funding Repayment EOD LEP - Generate Plan Transactions EOD LEP - Update Product Fiscal Year EOD LEP - Update Plan Transaction Allotted Status EOD LEP - Plan Financial Bucket Adjustment EOD LEP - Plan Annuity 5/20 Validation Process EOD LEP – 120% Rule Support EOD LEP – NAV Correction EOD LEP - Set Latest Rule for Product BOD LEP - Set Latest Rule for Plan BOD LEP - Plan Anniversary Value Computation BOD LEP - Plan Annuity Escalations BOD LEP -Plan Recurring Switch Escalations BOD LEP - Plan Premium Escalations BOD LEP -Recurring Plan Annuity Processing BOD LEP -Recurring Plan Switch Processing BOD LEP -Recurring Plan Premium Processing BOD LEP -Plan Funding Repayment BOD LEP - Generate Plan Redemption Transactions for Periodic Fees BOD LEP - Process Plan Surrender BOD LEP - BOD Plan Transaction Generations BOD 11-1 11.3 Batch Functions The various Batch Functions are explained below: 11.3.1 LEP - Plan Funding Repayment Funding is a feature where a part of the initial investment and subsequent top ups, if any, is retained by the Life Company and then paid back to the customers in equal installments. The customer receives the principal amount and not the interest earned on the same. The Funding Factor, which is the percentage of the initial contribution or top ups which is retained by Life Company, and the Funding Frequency, which is the frequency at which the installment is paid back to the customer, are specified for the product. The Repayment Period, which is the period within which the entire amount is to be paid back to the customer, is also specified. This EOD Process carries out the funding repayment for the policies marked for the same. This is also a BOD Process. 11.3.2 LEP - Generate Plan Transactions A policy transaction might involve one or more funds. This process generates one transaction per fund. The process will pick up all policy transactions that do not have underlying UT transactions generated. The system intimates the user upon completion of the activity and the successful generation of underlying transactions. This process is also scheduled as a BOD process to take care of all the system generated policy transactions that might have occurred as a result of other Batch Activities. Note If a policy transaction triggers a number of underlying subscription transactions at the fund level, the process of generation must be successful for each of these underlying transactions at the fund level. If not, the generation is aborted for all underlying transactions for that policy. 11.3.3 LEP - Update Product Fiscal Year This process updates the fiscal year dates for all products for which the fiscal year end date is the next working day, on the application date. The fiscal year is updated to the next fiscal year. 11.3.4 LEP - Update Plan Transaction Allotted Status A policy transaction is considered allotted only if all the underlying Unit Trust (UT) transactions are allotted. This batch process checks if all the underlying UT transactions are allotted and if they are, it marks the policy transactions as allotted. 11-2 11.3.5 LEP - Plan Financial Bucket Adjustment This process facilitates the adjustment of investment in the funding bucket in the event of repayment of the funded amount. The process will also adjust the funded units if there is a reversal of a surrender or top up transaction. The process works as follows: 11.3.6 On the application date, the process identifies the funding amount repayment transactions at a policy level for funded endowment products The units repaid for these transactions are identified The funding units in the funded bucket are reduced for each of the funds by subtracting the funding units with the funding repaid units. LEP - Plan Annuity 5/20 Validation Process When a policy is created and authorized, this EOD process performs the following functions: The policy amount is allotted into the underlying portfolio and the Net Invested Amount (NIA) is validated against the minimum and the maximum annuity ratio specified at the policy level. The ad hoc (top up) contribution is marked as ‘Inclusive’ even if it is ‘Exclusive’, if it violates the minimum/maximum annuity ratio specified. A procedure is then used to validate the 5/20 rule, using the annuity amount specified and the NIA as parameters and an error report is logged if the 5/20 Rule is violated on any on any of the following events: – Saving of a policy – Amendment of a policy – Top Up transaction – On the Anniversary Date – Anniversary Escalations 11.3.6.1 5/20 Rule The annuity amount that is paid to the policyholder must be within the range of the Minimum Annuity Ratio (5%) and the Maximum Annuity Ratio (20%) of the Net Investible amount (NIA). The Net Investible Amount is the investment amount minus the initial fees and charges. The annuity should not be accepted if the annuity amount either falls below the 5% threshold of the NIA, or exceeds the 20% threshold of the NIA and all inclusive top up transactions. Consider the example given below: Case A Let us consider a Policy Holder who buys a policy in an ELLA product. He initially contributes 60000 currency units, net of initial charges on 1st January 2005. On 1st January 2005 (EOD), the 5/20 Rule batch checks the annuity amount, which has been specified as 3000 currency units, against the NIA (60,000 currency units). This amounts to 5% of the NIA, per month for a period of 5 years. There is no violation of the rule here. Now let us suppose the Policy Holder tops up (transaction T1) his investment in the policy by 40000 currency units (top up being ‘Inclusive) on 1st April 2005. The total contribution has now increased to 100,000 currency units. On 1st April 2005 (EOD), the 5/20 Rule batch checks the annuity amount specified as 3000 currency units against total contribution amount (100,000 currency units), which amounts to less than 5% of the total contribution amount, thus violating the 5/20 Rule and logs an entry into the error report with the reason for failure of the 5/20 check. Subsequent to above, for 11-3 any of the other top up transactions, the system considers the same NIA, initial top up amount and the latest top up amount for the 5/20 validation in the policy year. Case B Let us consider a Policy Holder who buys a policy in an ELLA product. He initially contributes 60000 currency units, net of initial charges on 1st January 2005. On 1st January 2005 (EOD), the 5/20 Rule batch checks the annuity amount, which has been specified as 3000 currency units, against the NIA (60,000 currency units), which amounts to 5% of the NIA, per month for a period of 5 years. There is no violation of the rule here. Now let us suppose the Policy Holder tops up (transaction T1) his investment in the policy by 40000 currency units (top up being ‘Exclusive’) on 1st April 2005. The total contribution has now increased to 100,000 currency units. On 1st April 2005 (EOD), the 5/20 Rule batch checks the annuity amount, which is specified as 3000 currency units, against total contribution amount (100,000 currency units). This amounts to less than 5% of the total contribution amount and hence violates the 5/20 Rule. The system marks the ‘Exclusive’ top up transaction (T1) as ‘Inclusive’ and logs an entry into the error report with the reason for failure of the 5/20 check. For any subsequent top up transactions, the system considers the same NIA, initial top up amount and the latest top up amount for the 5/20 validation in the policy year. Note As seen in the case above, the initial top up amount T1 was made ‘Inclusive’. This amount will be considered for any subsequent validation as an ‘Inclusive’ top up and not an ‘Exclusive’ top up. The logging in of the error report and the change/adjustment in annuity details are operationally controlled. Note The system considers the following formulae while calculating the annuity amount: Case 1: When top up is ‘Inclusive’ Annuity Amount >= Minimum Annuity Percentage * (Latest Anniversary Value + All ‘Inclusive’ Net contributions made during the year The current top up amount will be included in the contribution Annuity Amount <= Maximum Annuity Percentage * (Latest Anniversary Value + All ‘Inclusive’ net contributions made during the year The current top up amount will be included in the contribution Case 2: When top up is ‘Exclusive’ Annuity Amount >= Minimum Annuity Percentage * (Latest Anniversary Value + All ‘Inclusive’ Net contributions made during the year + Current ‘Exclusive’ net top up) Annuity Amount <= Maximum Annuity Percentage * (Latest Anniversary Value + All ‘Inclusive’ net contributions made during the year + Current ‘Exclusive’ net top up) 11-4 11.3.7 LEP – 120% Rule Support This is an EOD activity which checks all the policies that come under ‘Endowment Products’ and have a Top Up, Premium Transaction or a Premium Escalation on the particular day. This process is carried out for each policy. The 120% Rule triggers on the following events: Top Up Transactions Premium/Premium Escalation Due Date If the date happens to be less than the Policy Anniversary Date, the projected premiums for the rest of the policy year will be considered for the 120% Rule validation. The system will sum up all the contributions (Initial Investment, if any + Top Ups, if any + Premiums, both, paid and projected) in the current policy year. Say, for example, the contribution amount sums up to ‘X’ Rands. This process will sum up the contributions (Initial Investment, if any + Top Ups, if any +Premiums paid) in the two policy years. Note A policy year is a year between two Policy Anniversary Dates. Let us say the contribution amount sums up to ‘Y’ Rands in the first policy year and ‘Z’ Rands in the second year. The system will compare the higher contribution amount of the two years, against the amount ‘X’ Rands. If ‘X’ exceeds the higher, say ‘Y’, by more than 120%, the Policy Maturity Date will be reset (New Maturity Date = Current Application Date + Minimum Term). The existing rule will not be changed, but there will be a remark stating the Policy was amended by the system as a result of the 120% Rule. The minimum term/tenor considered here will be the one you have saved during Policy creation which might not be same as the default Product tenor. 11.3.8 LEP – NAV Correction When an NAV correction is made, the system reverses all relevant policy transactions and generates new transactions. If the original transaction has been allocated, the new transaction will also be allocated. This will be an EOD Batch Process. 11-5 You have the option of executing this process manually, through the ‘NAV Correction Policy Transaction Reversal’ screen. You can invoke this screen by typing ‘UTDPLREV’ in the field at the top right corner of the Application tool bar and clicking on the adjoining arrow button. This helps when you want to allocate transactions that have undergone NAV correction, prior to the EOD Batch Process. Click ‘Execute’ button to execute the process online. Click ‘Submit’ button to submit a job for the same. Note NAV Correction does not support the correction of an initial investment if the transaction has been allotted or if any underlying policy transactions have been generated. NAV correction will also not support the reversal/correction of policy switch transactions if it is across AMCs, provided there is no allocation lag.. 11.3.9 LEP - Set Latest Rule for Product When a new Product is setup, or after a Product has been amended, if the System Date is equal to the Rule Effective Date of the Product, this BOD Batch Process will set the current rule as the latest rule. The new rule will be considered for all the validation processes. 11.3.10 LEP - Set Latest Rule for Plan When a new Plan/Policy is setup, or after a Plan/Policy has been amended, if the System Date is equal to the Rule Effective Date of the Plan/Policy, this BOD Batch Process will set the current rule as the latest rule. The new rule will be considered for all the validation processes. 11.3.11 LEP - Plan Anniversary Value Computation The system facilitates the revaluation of annuity payments on every Anniversary Date, through this BOD process. It works along the following lines: 1. The process checks if the Application Date is an Anniversary Date. 11-6 2. If so, the anniversary revaluation is done for all ELLA policies, and the computed values updated in the system. 3. The process then performs the 5/20 validation for the new anniversary values. 11.3.12 LEP - Plan Annuity Escalations This process works in much the same way as the 5/20 validation process, but takes into account any changes that are made to the annuity amount either by way of amendment or escalation, in the Policy Maintenance screen. The 5/20 validation is also performed for this BOD process. 11.3.13 LEP - Plan Recurring Switch Escalations If recurring switch escalation details are specified for a Policy, this BOD Batch Process will amend the policy rule and create a new rule with the new escalated recurring switch value on the specified/calculated Escalation Date, for the specified funds. 11.3.14 LEP - Plan Premium Escalations If premium escalation details are specified for a Policy, this EOD Batch Process will amend the policy rule and create a new rule with the new escalated premium value on the specified/ calculated Escalation Date, for the specified funds. 11.3.15 LEP - Recurring Plan Annuity Processing This BOD Batch Process generates periodic annuities for the Policies for which annuity is applicable. This transaction is generated using the annuity setup corresponding to the latest rule for the Policy. 11.3.16 LEP - Recurring Plan Switch Processing This BOD Batch Process generates periodic recurring switch transactions for the Policies for which recurring switch is applicable. This transaction is generated using the recurring switch setup corresponding to the latest rule for the policy. 11.3.17 LEP - Recurring Plan Premium Processing This BOD Batch Process generates periodic premium transactions for the Policies for which premium is applicable. This transaction is generated using the premium setup corresponding to the latest rule for the Policy. 11.3.18 LEP - Plan Funding Repayment See Plan Funding Repayment. This will be a BOD Process. 11.3.19 LEP - Generate Plan Redemption Transactions for Periodic Fees After the periodic fee has been calculated for a Product by the system, this BOD Batch Process generates a redemption transaction in policyholder’s account for the calculated Periodic Fees. 11.3.20 LEP - Process Plan Surrender This process reduces the funded units in the underlying portfolio for a Policy, in the event of a surrender transaction initiated by the policyholder. It functions as follows: On the Application Date, this process identifies the surrender transactions that have been effected at a policy level for funded endowment products, and checks for the existence of funded units for these policies. 11-7 The funded units are then reduced in proportion to the surrender transaction. The value of the reduced funded units is moved to the suspense bank account maintained for the product, using the same policy transaction number corresponding to the surrender transaction. The value is arrived at using the redemption price for each fund. 11.3.20.1 LEP - Batch Process to trigger Automatic Surrender The Batch Process to trigger Automatic Surrender is as follows: 1. The Batch process first checks the value of ‘Process Automatic Surrender’ at Product level. 2. The system fetches the ‘Threshold Policy Market Value’, whether ‘Process Automatic Surrender’ at Product level is correct. 3. The system identifies all the policies for which market values have gone below the threshold amount. 4. The system then triggers an automatic surrender transaction with following parameters: – Asset allocation with all funds having balances and percentage applied as 100%. – Portfolio Surrender flag as True. – Payment mode as transfer. – Payment type as Product. 11.3.21 LEP - BOD Plan Transaction Generations Same as LEP – Generate Plan Transactions, except, this is a BOD Process. 11.3.22 LEP – Cash Management Switch Process This process ensures that the Cash Management Account has sufficient balance to meet all the forthcoming annuity payments as well as the periodic fee redemptions. This can be run either as part of EOD operations or be manually triggered. It works as follows: The system checks the ‘Cash Management Account Applicability’ and ‘Redeem Periodic Fee from CMA Fund’ options maintained at the product level. If both the parameters are applicable, the system – computes the Projected Periodic Fee for all the policies under such products (Projected Periodic Fee is the sum of admin and broker periodic fee computed in the last batch run for the policy) – computes Projected Annuity Payment for all policies where the Cash Management Account fund forms a part of the annuity asset allocations – computes the Projected Outflow from CMA (Projected Outflow is the sum of Projected Annuity Payment and Projected Periodic Fee) The system then compares the Projected Outflow from CMA with the market value of the Cash Management Account. If the Projected Outflow from CMA is greater than the market value of the CMA, the system switches funds (equal to the Switch Amount) to the Cash Management Account from other policy funds. (Switch Amount is the difference between Projected Outflow from CMA and the Cash Management Account Market Value). The switch amount is generated proportionately from the available funds and directed into the CMA fund. 11-8 12. Allocation Details 12.1 Allocation Details 12.1.1 Entering Allocation Details The following are the steps you need to follow to enter and save Allocation Details. Each of these steps is explained in detail in subsequent sections. 1. Invoke the Allocation Details screen. 2. Enter information in the Allocation Details screen. 3. Save the information entered. 12.1.2 Invoking Screen You can invoke the ‘Allocation Details’ screen by typing ‘LEDPLALC’ in the field at the top right corner of the Application tool bar and clicking on the adjoining arrow button. The following screen is invoked: Select ‘New’ from the Actions menu in the Application tool bar or click new icon to enter the details of the Allocation Details. 12.1.3 Fields in Allocation Details Screen Product ID Mandatory Select the product ID from the option list. 12-1 Policy Number Mandatory Select the Policy Number from the option list. TXNTYPE Mandatory Select the transaction type from the option list. Policy Txn Number Mandatory Select the policy transaction number from the option list. Alloted? Mandatory If you want to allot allocation, select ‘Yes’. Else ‘No’. Transaction Amount Optional This is amount applied for the transaction. Gross Amount Optional Gross Amount is the amount inclusive of all fees. Date of Allocation Optional Enter the date of allocation. Net Investible Amount Optional Net Investible amount is the Gross amount of fees Switch In Gross Amount Optional Switch in Gross Amount is the amount inclusive of all fees for Switch in Fund. Fetch Allocation Details Section Click ‘Fetch Allocation Details’ button to specify the Fund Transactions, Allocation Details and Fee Details. 12-2 12.1.3.1 Specifying Fund Transactions Fund Transactions Section Transaction Number Mandatory Enter the transaction number. Fund ID Mandatory Select the Fund ID from the option list. To Fund ID Specify the To Fund ID. Amount Enter the amount. Date of Allocation Specify the date of allocation. Gross Amount in FBC Enter the gross amount. Net Amount in FBC Enter the net amount. Settlement Amt Txn Ccy Display The settlement amount is displayed. 12-3 12.1.3.2 Specifying Allocation Details Allocation Details Allotted Units Specify the allotted units. Confirmed Units Enter the confirmed units. Unit Price Specify the Price. Base Price Mandatory Specify the base price. Allocation Price Mandatory Specify the allocation price. Load Amount Enter the load amount. 12-4 Unit Cost Mandatory Enter the unit cost. Price Date Mandatory Specify the price date. 12.1.3.3 Specifying Fee Details Load Details Section Transaction Number Mandatory Enter the transaction number. Fund ID Mandatory Enter the fund ID Load ID Mandatory Select the ID of the load that must be applied for the selected product. 12-5 From Entity Mandatory Specify the entity that bears this load. To Entity Mandatory Specify the entity that will be recipients of the load. Load Amount Mandatory Enter the load amount. Load Amount in Fee Currency Mandatory Enter the load amount in fee currency. Note If load is applied at product level, the policy transaction amount gets converted in terms of product base currency, while computing the amount slabs. The transaction amount in product base currency is calculated using the latest available exchange rate for the default source. If exchange rate is not available for the currency pair, the allocation fails. 12-6 13. Annexure 13.1 Introduction This annexure explains certain procedures that apply to both, the LEP and UT modules. References to the Agency Branch and Fund Manager User Manuals have been made. For complete information on the procedures and processes that have been mentioned here, refer to the manuals mentioned. 13.2 Fund Distribution Processing The system tracks the dividends proceeds separately for Unit Trust (UT) Transactions and Policies. The dividend on a Policy is always reinvested. The dividend due for a policy investment will be reinvested with the Policy Transaction Type ‘80’. This is shown in the screen given below: The dividend due for a UT investment will be reinvested with the Reference Type RE and Reference Number ‘REINV’. This is shown in the screen given below: 13-1 14. Function ID Glossary L LEDCMSD ...........................8-1 LEDPLALC .........................12-1 LEDPLAN .............................3-1 LEDPLCES ..........................9-1 LEDPLJNL .........................10-1 LEDPLSTA ...........................7-1 LEDPLSUR ..........................6-2 LEDPLSWI ...........................5-1 LEDPLTOP ..........................4-1 LEDTXNEE ........................3-51 LESCMSD ............................8-3 LESPLAN ...........................3-47 LESPLCES ..........................9-4 LESPLJNL .........................10-5 LESPLSTA ...........................7-6 LESPLSUR ........................6-20 LESPLSWI .........................5-17 LESPLTOP ........................4-20 U UTDINRMN ........................3-53 UTDPLREV ........................11-6 UTDUHDEL .........................2-2 UTSINRMN ........................3-54 14-1