1
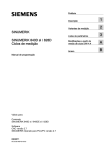
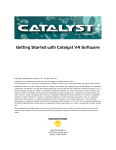
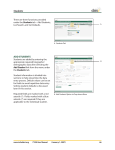
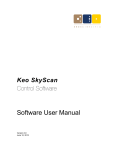
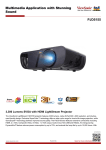
USER MANUAL
Solar SE
Version 2011
DRAFT VERSION
FOR MORE HELP VISIT:
email: [email protected]
web: www.lightstream24.com/forum/
Copyright © 2010-2011 Lightstream Sp. Z o. o
Solar SE Manual
Page 1 of 89
TABLE OF CONTENTS
1.
Introduction
1.1. Welcome
1.2. About SOLAR
2.
Installation
2.1. Hardware Requirements
2.2. Install Instructions
2.3. License
3.
SOLAR Walkthrough
3.1. Meet SOLAR
3.2. SOLAR Interface
3.3. Interface details
3.4. Basic Controls
3.5. SOLAR Menus
3.6. Creating and managing projects
4.
Solar Operators
4.1. IN/OUT
4.2. Filter
4.3. Color
4.4. Layer
4.5. Transform
4.6. Add
5.
HELP/FAQ
5.1. If you need help
5.2. FAQ
5.3. Known issues
Solar SE Manual
Page 2 of 89
1. Introduction
1.1.
Welcome
We are extremely excited to introduce our new family of next generation postproduction tools.
After almost 5 years of development and testing we are pleased to present to you:
SOLAR – a High-end compositing software
1.2. About
SOLAR
Solar is available and distributed in two versions, depending on your needs and budget.
SOLAR 2011
Powerful multiflow nodal-based compositing software. Includes over 150 powerful creation,
transforming, color correction, compositing tools and special effects. Comes with integrated
professional node-based Compositing User Interface. Contains all the great features of the base
version plus advanced timeline editing and 35 additional tools and effects to extend your
postproduction toolkit.
SOLAR 2011 SE
Base version of our compositing software. Offers access to all key high end tools for an affordable
price. Includes over 100 powerful creation, transforming, color correction, compositing tools and
special effects. Comes with the same integrated professional node-based Compositing User
Interface as main Solar version. Take the next step, enter the world of ultimate visual effects!
Solar SE Manual
Page 3 of 89
2. Installation
2.1. Hardware Requirements
Basic hardware requirements to run SOLAR software:
64 Bit Windows Operating System (Windows 7 (recommended), Windows VISTA, Windows XP)
Minimum 1024 MB of RAM
1GB of available disk space to run the software
NVIDIA graphics Card with CUDA Support – SOLAR software won’t run without an nvidia
card without CUDA support – http://www.nvidia.com/object/cuda_gpus.html
2.2. Please make sure you have the latest drivers for your graphics card .
2.3. Install Instructions
- Doubleclick on the solar installer file, usually named „Solar_Setup.exe“
- Follow the on screen install instructions: read and accept the software license agreement, choose
your install location and proceed
- after installation doubleclick on the Solar shortcut on your desktop to launch the software
2.4. License
After you launch SOLAR you will be asked to enter your license key – both trial and full versions
require a license.
You can obtain a license by visiting www.lightstream24.com
Solar SE Manual
Page 4 of 89
3. SOLAR Walkthrough
3.1. Meet SOLAR
SOLAR is an advanced mutiflow nodal based tool offering complete set of tools for real time
special effects and video enhancement.
We compiled a brief walkthrough to help you familiarize yourself with Solar basics.
For more help please visit www.lightstream24.com
3.2. SOLAR Interface
After startup SOLAR interface fills your entire screen
Solar Interface
Solar SE Manual
Page 5 of 89
The interface consists of the following key areas:
Solar interface layout
Tip: You can adjust the work areas by grabbing and dragging the dividers to the desired
position/size. Doublecliking on a work area – zooms your screen on that section, to see the whole
interface again doubleclik one more time.
VIEWER – displays your current working media, selected/desired effect or composite.
Tip: doubleclick the viewer area to expand the viewer to full screen for better viewing
NAVI BAR – View selection between realtime and broadcast display & broadcast versions, basic
video/image controls, displayed video quality and size settings.
Subproject Selector - Subproject selector is a frame based visual time lime representation of current
subprojects.
TOOLBAR– access to most SOLAR tools, objects, filters, and predefined actions/effects.
SHORTCUTS – most commonly used tools, you can re-arrange those or add the desired items by a
simple drag&drop.
TREEVIEW – shows current or global project as a tree diagram.
SUBPROJECT SELECTOR – visual representation of loaded clips as a frame timeline bars.
Solar SE Manual
Page 6 of 89
CONTROL PANEL - main screen area displaying current parameters, controls, deck editors.
LEFT WORK MENU – switch between Control Panel, Global Timeline you can also access
SOLAR settings and a potent Image Analizer tool.
INFORMATION BAR –current license information and file control menu.
TOOLTIPS – SOLAR includes „tooltips“ that describe elements on the interface – buttons,
fields, tree view elements. To use tooltips move the cursor over an object and wait a few
seconds.
3.3. Interface Details
3.3.1. The Viewer contextual menu
Accessing the right click/contextual menu gives you access to several options:
show color curve;show image; clamp to format, pixel aspect ration; high dynamic range; use
LUT; Autoproxy; Cache, Compare Tool; Preview;| Show Treeview; Save Image, Render
Flipbook
3.3.2. Navi Bar
Realtime & Broadcast – switch between realtime view of your project and a broadcast view defined by
Broadcast operator,
Video control buttons - navigate the active sequence with standard Forward/Fast Forward, Back/Rewind,
Play Stop buttons.
Keyframe control buttons: by clicking the „key“ button you can turn autokey function on or off, when
enabled it automatically defines a keyframe on each operation performed within the timeline for an active
project/operator. [for example adjusting an operator setting]. Clicking on the left/right buttons next to the
autokey button jumps between set keyframes within the project.
DOD (rectangle icon]– shows the active area in the project
Color Mode – switches between RGB and alpha channel views.
A/B sink buttons – switches between alternative views within the projects
TIP: use sinks with compare tool to quickly compare operator results on a projects
Solar SE Manual
Page 7 of 89
FIT button – resizes your project to fit the preview window.
View and Proxy settings buttons – 100% button sets the view to 1:1 ration in the viewer.
1/1;1/2;1/4;1/8 presets – simplify the project calculations by autocalculating at lower resolutions in the
viewer, the setting autoadjusts the clip view – at lower resolutions it automatically zooms in to remain at the
previously set size.
Gizmo button – shows/hides gizmos – [gloss. Gizmos are visual modifier for certain operators.]
Invert – Inverts Current selection
3.3.3. Subproject Selector
Subproject selector is a frame based visual time lime representation of current subprojects. SS is basically a
simplified Global Timeline,
Each subproject is represented as horizontal bar. Doublecliking on a subproject highlights the subproject
bar and switches the treeview to reflect the selected subproject.
Tip: Press del to delete a selected frame sequence/project
Tip: select multiple subprojects by dragging a box around the desired subprojects, while holding the
mouse button.
Elements:
Subproject No – displays the active subproject number.
Global/Local mode & frame numbers – switch between global (displays current frame in the Global
timeline and the total number of frames.) and local (displays current frame and a total number of frames
in an active subproject).
Autoswitch Track – enables disables automatic switching between active subprojects and tree views as
you move the frame selector line.
Track Number – indentifies tracks, starts at 0.
Lock elements – locks all subprojects in the Selector in place.
Frame – displays active frames 1 global, 2 in the active subprojects.
Additional options in Contextual/right click menu
Solar SE Manual
Page 8 of 89
TIP: you can zoom in on the project view by scrolling the mouse wheel
3.4. Basic Controls
Basic Controls
3.4.1. Mouse and Keyboard
Most actions can be accomplished using a 3 button, scroll wheel mouse.
Default setting: left button is used for selection or action, right button for contextual menus
[changes depending which item or area is active. Middle button scrollwheel is used for
zooming in or out of an area for example in the Viewer, timeline or Framestore. Holding the
middle button down enables you to move around the zoomed in area or control areas for some
reason not filly visible in your UI setting or resolution.
3.4.2. Treeview operators
3.4.2.1.
Treeview is a major part of managing SOLAR workflows, most work in treeview is
shown by operators. They appear as Nodes in Treeview by selecting the desired operator
from one of the top menus.
3.4.2.2.
Most operators have following properties:
In socket on the top, Out socket on the bottom.
Left side has a restrict and outgoing mask sockets
Right side has Mask and intensivity mask sockets.
Clicking on the right side button in the Node body, displays the available operator’s
settings in the main control panel.
Operators can be connected by clicking and dragging between corresponding elements,
for example by clicking from an OUT socket of imported movie clip and dragging the
mouse cursor to an IN socket or a chosen mask socket of our operator/node we create a
connection which in effect applies chosen effect to the clip.
Current view in The Viewer corresponds to the selected operator in treeview – for
example if an imported video clip is selected [you can select operators by single click on
Solar SE Manual
Page 9 of 89
the given icon] the view will show unedited image – when you click on the connected blur
operator, The Viewer will show the clip with blur effect applied.
[See Treeview Tutorial on....... for a brief walkthrough how to use treeview operators
and nodes]
3.5. SOLAR Menus
3.6. Creating and managing projects
4. Solar Operators
Operators – all the graphical node representations of SOLAR‘s effects and tools are commonly called
„operators“
4.1. IN/OUT menu operators
Solar SE Manual
Page 10 of 89
4.1.1. BOX
Creates a rectangle shaped object – can be adjusted in size, color or rotated, – You can adjust
inner and outer radius to gain a desired intensity of the object.
Box Example
Box Control Panel
4.1.2. Broadcast
The broadcast operator gathers input from all the connected operators and generates an output
of visuals and audio to a location defined in operator settings . Broadcast operator generates the
„Broadcast“ view enabled by the Navibar button.
Broadcast renders contents of the entire project, OUT operator renders contents only a
connected subproject tree
Solar SE Manual
Page 11 of 89
Broadcast Control Panel
4.1.3. Checkerboard
Creates a „checkerboard“ object, you can adjust the contrasting colors, and change the size of
the board to get the desired look.
Checkerboard Example
Checkerboard Control Panel
Solar SE Manual
Page 12 of 89
4.1.4. Dots
Overlays a field of Dots – circular objects -over your projects. You can adjust the size, distance
between individual dots, animation speed, even adjust colors of the dots. Dots give you an
infinite number of combinations to enhance other input material or to create interesting
animated content.
Dots Examples
Dots Control Panel
4.1.5. FLOW
Pardon the white space...
Please visit www.lightstream24.com/support/ for an updated manual or go to
Solar SE Manual
Page 13 of 89
www.lightstream24.com/forum/ to get help from Lightstream Staff.
4.1.6. Grid
Draws/overlays a grid on your project. Grid is fully adjustable – from line distance through
deviation in line weight to adjusting color settings and animation parameters.
Grid Example
Solar SE Manual
Page 14 of 89
Grid Control Panel
4.1.7. IN
Imports media into a SOLAR project. Handles import of image/graphic files sequence or video
files in a streaming format. Your basic import media tool.
Solar SE Manual
Page 15 of 89
IN OBJECT (first sequence frame in preview panel)
IN operator control panel
4.1.8. NOISE
Generates a TV like „noise effect“ – you can adjust the sizing, density and number of seed
points for the effect and choose the number of overlaying seed layers to get the desired look.
Noise Example
Noise Control Panel
4.1.9. Out
An output operator –gathers input from nodes or trees – sends it to broadcast view [see Viewer
pp) , can be used to create alternative outputs/versions of the project.
Solar SE Manual
Page 16 of 89
OUT operator renders contents only a connected subproject tree, BROADCAST renders
contents of the entire project.
Out Control Panel
4.1.10. PAINT
Very potent module – enables you to add graphic elements to your project sing predefined
shapes & brushes. You can draw using freehand, Bezier Curve, Lines, Ellipses, Boxes or
shapes. Includes some predefines graphical brushes.
Solar SE Manual
Page 17 of 89
Paint Operator Example
Paint Control Panel
4.1.11. RADIAL
Creates a spherical shape with an inner and outer radius. Radial is fully adjustable to fine tune
it to your needs.
Solar SE Manual
Page 18 of 89
Radial Examples
Radial control Panel
4.1.12. RAMP
Creates a color gradient. You can adjust start & end colors, adjust the color spread using X,Y
parameters to suit your project needs.
Ramp example
Ramp Control Panel
4.1.13. SHAPE
One of the most advanced operators in Solar. Enables drawing to mask and select desired
shapes and to create custom objects to interact with other SOLAR operators.
Solar SE Manual
Page 19 of 89
Shape Example
Shape control panel
4.1.14. SOLID
Generates a solid one color shape. You can sjuts color, size, bit depth of the created object.
Solid Control Panel
4.1.15. TEXT - enables user to create and manipulate text.
Solar SE Manual
Page 20 of 89
Text Options and settings
4.2. Filter menu operators
4.2.1. BLUR
Allows to modify an image using a lowthroughput filter to change the quality of the incoming
image and get a „blurring“ effect.
Parameters:
Strength x/y – adjust the basic blur strength
Filter x/y - Gaussian blur filter
Solar SE Manual
Page 21 of 89
Blur Example
Blur Control Panel
4.2.2. CIRC BLUR
Blurs an incoming image using a circle with radius measured from the effect center with given
arc length. The visual effect is similar to a painter using his brush to spread the wet paint in a
circular motion.
Parameters:
Center (defined by X,Y location values)
Length – blur arc length (brush stroke length)
Solar SE Manual
Page 22 of 89
Circ Blur Example
Circ Blur Control Panel
4.2.3. DOF
Depth Of Field (the distance between the nearest and farthest objects in a scene that appear
acceptably sharp in an image). DOF is a digital emulation of lack of sharpness apparent in
images as recorded using optical lenses . DOF can create the same effect of varying sharpness
throughout the edited image.
Parameters:
Strength X/Y – effect intensity
boostpoint – together with overwhite lightens the effect – describes the light intensity above
Solar SE Manual
Page 23 of 89
which a given pixel should be lightened
Overwhite – lightening scale
DOF Example
DOF Control Panel
4.2.4. DAMAGE
Digitally „damages“ the incoming image, a visual effect of pixelizing or „compressing“ the
image to appear to be at much lower quality or resolution
Parameters:
Quality – changes the quality of the image
Smoothing Factor – smoothing the pixel edges in the modified image for a more subtle effect
Solar SE Manual
Page 24 of 89
Damage Example
Damage Control Panel
4.2.5. DEFOCUS
Blurring effect simulating a defocusing effect as seen through an optical lens with a prism
pattern. Several predefined prism patterns are available to finetune for a desired optical effect.
Parameters:
Strength x/y - effect intensity
Solar SE Manual
Page 25 of 89
Boost Point - together with overwhite lightens the effect – describes the light intensity above
which a given pixel should be lightened
Over White – lightening scale
Defocus Example
Defocus Control Panel
4.2.6. DENOISEWAV
Operator which can help restore a damaged image by smoothing out the incoming image to
discern the „original“ pattern – a side effect - by denoising a relatively clean and sharp image
we can achieve an outerwordly painting effect.
Parameters:
Solar SE Manual
Page 26 of 89
Amount – the level of smoothing desired
Detail – amount of detail - scale of denoising desired
Denoise Wav Example
Denoise Wav Control Panel
4.2.7. Direct Blur .
Directional blur – applies a blur effect applied on a chosen direction (angle).
Parameters:
Angle – set the angle at which incoming image will blur
Length – length of the effect
Solar SE Manual
Page 27 of 89
Direct blur Example
Diret Blur Control Panel
4.2.8. EDGE DETECT
Detects sharp changes in image brightness or colors and presents them as varied line outlines.
Parameters:
Radius- range of complexity in the presented image edges
Strength – effect intensity
Solar SE Manual
Page 28 of 89
Threshold – defines detail level of presented „edges“
Edge Detect Example
Edge Detect Control Panel
4.2.9. EMBOSS
Emulates sculpting of the incoming image in a model surface (for example metallic) – so called
embossing or bas-relief).
Parameters:
Gain: effect strength (depth of the emboss)
Azimuth: angle at which light hits the embossing
Solar SE Manual
Page 29 of 89
Azimuth: height of the light source.
Emboss Example
Emboss Control Panel
4.2.10. ENGRAVE
Simulates engraving of predefined shapes over your image- lines, circles or dots.
Parameters:
You can adjust Intensity, Spacing, Phase, Scale , Position, Angle and coloring of the engraved
shapes.
Solar SE Manual
Page 30 of 89
Engrave Example
Engrave Control Panel
4.2.11. GLARE
Overlays (on screen) defined shapes on lighter image areas – intensifies lighter points or
potential light sources.
You can adjust effect threshold and brightness, adjust rays angle and length length. Fine-tune
blurring and background contrast (brightness source).
Solar SE Manual
Page 31 of 89
Glare Example
Glare Control Panel
4.2.12. GLOW
Add a radiant glow (lightens) brighter spots in an incoming image – causes the images to gain
an enhanced outerwordly color characteristic.
Parameters:
Glow X/Y – adjusts glow level
Solar SE Manual
Page 32 of 89
Threshold – effect threshold and noticeable level
Intensity – intensity of the effect
Saturation – color saturation adjustment
Restore highlights - adjusts highlights
Tint – adjust the effect color from default white
Glow Example
Glow Control Panel
4.2.13. GRAIN
Overlays the incoming image with a color deformation simulating noise visible when playing
analog video tapes
Solar SE Manual
Page 33 of 89
Parameters:
Force Random - forces new effect calculation for each frame.
Obey Alpha – turns on ignoring the pixels with alpha equal to 0.
Intensity - sets effect strength
Density – sets density of generated rain effect
Scale - sets grain particles size
Response – sets the color of generated grain
OverResponse – sets the way grain is generated depending on lightness of a given pixel
Saturation – sets the color saturation of the generated grain
Softness – defines smoothing of individual grain particles
Random – changes the constant of the grain generating algorithm
GrainCenter – adjusts the brightness of both the incoming image and the overlaid grain effect.
Grain Example
Grain Control Panel
4.2.14. GRID WARP
Overlays an incoming image with an adjustable grid – each grid intersection is an active point
which enables you to warp the image. When you click the grid warping point making it active,
additional warping points become available to fine tune the warping of a given area.
NOTE: changing grid area and size in the operator control panel – resets the grid and all the
warping points to default positions
Solar SE Manual
Page 34 of 89
Parameters:
Width/Height – adjust the width&height of the grid area
xNO/yNO – set grid area – number of grid sectors in horizontal (x) and vertical (y)
Grid Warp Example
Grid Warp Control Panel
4.2.15. MEDIAN
Median filter resulting in noise reduction (while preventing edges) in an incoming image.
Parameters:
Strength X/Y – filter strength
Channels R/G/B/A – active channel Red/Green/Blue/Alpha
Solar SE Manual
Page 35 of 89
Median Example
Median Control Panel
4.2.16. PIXELIZE
Renders the image using large pixel blocks. It is similar to the effect seen on TV when obscuring someone’s face.
Parameters:
Size (%) X/Y – changes pixel size
Solar SE Manual
Page 36 of 89
Center (%) X/Y – adjusts pixel position in reference to image center
Pixelize Example
Pixelize Control Panel
4.2.17. POSTERIZE
Converts the image consisting of distinct areas of flat colors or tones – reduces the number of
colors within the full color image – results in a sort of „cut-out“ effect.
Parameters:
Solar SE Manual
Page 37 of 89
Levels – adjusts the color levels/areas
Smooth/ Smooth Range – adjust smoothing of color/contrast areas.
Posterize Example
Posterize Control Panel
4.2.18. QUANTIZE
Simplifies the color structure of an incoming image.
Parameters:
Solar SE Manual
Page 38 of 89
Colors – set the number of colors (min 2)
Quantize Example
Quantize Control Panel
4.2.19. RADIAL BLUR
Another blur filter - creates a blur effect centered around a Radial consisting of two circles.
Solar SE Manual
Page 39 of 89
Parameters:
Center X/Y – adjust the defining radial
Inner/Outer Radius – set the defining circles size
Amplitude – change the effect strength
Shift – warp the blurred area in the relation to image edges
R/G/B/A – set color channels
Radial Blur Example
Radial Blur Control Panel
4.2.20. RAYS
Effect drawing light rays coming out of a single point called a source. Rays are created by
Solar SE Manual
Page 40 of 89
brightening or colorizing pixels in a circle radius around set center point (source).
Rays Example
Rays Control Panel
Solar SE Manual
Page 41 of 89
4.2.21. SHARPEN
Sharpens an image using mask enhancing edges and other high contrast components
Parameters:
Pixels X/Y – changes vertical and horizontal values of sharpening mask
Percent – changes sharpening intensity
Sharpen Example
Sharpen Control Panel
4.3. COLOR menu operators
Solar SE Manual
Page 42 of 89
4.3.1. BRIGHTNESS
Operator affecting the color curve of an image. It can darken or lighten an incoming image.
Parameters:
Master – adjusts the overall image brightness
Low – adjusts the darker tones in an image
Medium – adjusts the median tones in an image
High – adjusts the brightest tones in an image
RGB/Luminance - switches between two brightness conversion
modes.
Auto Black at 0 – alternative calculation mode while darkening
R/G/B/A –turns on/off pixel conversion in RGB/Alpha channels
Brightness Example
Brightness Control Panel
Solar SE Manual
Page 43 of 89
4.3.2. BYTE
Converts the byte value of an incoming image.
Parameters:
8/10/12/16 – supported byte conversion values
Byte Control Panel
4.3.3. CLAMP
Adjusts the RGB channels of the color in an incoming image to within the gamut of 0 to 1 if they fall outside that range.
Parameters:
Minimum/Maximum – Set minimum or maximum color value between 0 and 1.
Clamp Example
Clamp Control Panel
Solar SE Manual
Page 44 of 89
4.3.4. COLOR CURVES
Used to remap image color tones using graphical representations of colors, you can adjust all
channels in a picture at once (master) or to fine tune each channel individually.
Parameters:
Master (RGBA) – adjust all channels
Red (R) – adjust Red channel
Green (G) - adjust Green channel
Blue (B) - adjust Blue channel
Alpha (A) - adjust Alpha channel
Color Curves Example
Color Curves Control Panel
Solar SE Manual
Page 45 of 89
4.3.5. COLOR GRADE
Enhances colors in an incoming image – you can adjust color in the master image, or adjust
Low, Med or High channels in the image.
Parameters:
Adjust all color settings (master/hi/med/low) using standard color wheels and sliders.
Color Grade Example
Color Grade Control Panel
Solar SE Manual
Page 46 of 89
4.3.6. COLOR MATCH
Advanced color correction tool – simplifies Hi, Low and Mid tone correction using a source
and target colors.
Parameters:
Source Low/Mid/Hi – sets source color in darker /medium/brighter image tones
Destination Low/Mid/Hi – sets destination color in darker/medium/brighter image tones.
Contrast – changes overall image contrast
Gamma – changes overall gamma values in an image
Add – enables adding a set color value to each pixel
Multiply – sets a value by which all pixels are multiplied.
Min Float – sets brightness value that replaces black in an image
Max Float – sets brightness value that replaces white in an image.
Color Match Example
Color Match Control Panel
Solar SE Manual
Page 47 of 89
4.3.7. COLOR REPLACE
This operator affects all pixels in an image – replaces pixels and their surroundings with
chosen color with a set target color. Pixel surrounding is defined in HSV space.
Parameters:
Source – sets color to be replaced
Destination – sets color that will replace the source color
Hue Range – sets range modifying „hard“ source pixel surroundings (affects Hue)
Hue FallOff – sets range modifying „soft“ source pixel surroundings (affects Hue)
Hue Sharpens – sets smoothness of color change in „soft“ source pixel surroundings (affects
Hue)
Saturation Range - sets smoothness of color change in „hard“ source pixel surroundings
(affects Saturation)
Saturation FallOff - sets range modifying „soft“ source pixel surroundings (affects Saturation)
Saturation Sharpness - sets smoothness of color change in „soft“ source pixel surroundings
(affects Saturation)
ValueRange - sets smoothness of color change in „hard“ source pixel surroundings (affects
Value)
ValueFallOff - - sets range modifying „soft“ source pixel surroundings (affects Value)
ValueSharpness - sets smoothness of color change in „soft“ source pixel surroundings (affects
Value)
Color Replace Example
Color Replace Control Panel
Solar SE Manual
Page 48 of 89
4.3.8. COLOR TEMP
Adjusts color characteristics of visible light – to change cool colors (blueish white) to warm
colors (yellowish, red) or vice versa.
Parameters:
Color Temp – set color temperature of an image
Color Tint – set color intensity
Color Temp Example
Color Temp Control Panel
Solar SE Manual
Page 49 of 89
4.3.9. COLORIST
Consists of a few smaller operators to make large scale color changes easier – contains a large
number of basic color modifying options.
Parameters:
Gamma – general gamma correction of an image
Gamma Low/Med/High – gamma correction in dark /median/bright tones of an image
Contrast – general contrast correction of an image
Contrast Low/Med/High contrast correction in dark /median/bright tones of an image
Contrast Center – median value contrast correction of an image
Contrast Center Low/Med/High - median value contrast correction in dark /median/bright tones
of an image
Brightness - general brightness correction of an image
Brightness Low/Med/High - brightness correction in dark/median/bright tones of an image
Hue – modifies general hue in colors of an image
Hue Low/Med/High - modifies hue in dark /median/bright tones of an image
Saturation - modifies general saturation in colors of an image
Saturation Low/Med/High - modifies color saturation in dark /median/bright tones of an image
Colorist Example
Solar SE Manual
Page 50 of 89
Colorist Control Panel
Solar SE Manual
Page 51 of 89
4.3.10. COMPRESS
Operator enables packing or compressing a full color range of the input pixels to a more
constrained one. For example a range 0-1 can be fit into a range of 0.3-0.7
Parameters:
Low – bottom value of the compressed range
High – top value of the compressed range
Compress Example
Compress Control Panel
Solar SE Manual
Page 52 of 89
4.3.11. CONTRAST
Corrects incoming image contrast value.
Parameters:
Contrast Value – sets general image contrast
Contrast Center – sets general brightness of an image
Lo Value – sets contrast in the darker tones of an image
Lo Center - sets brightness in the darker tones of an image
Med Value – sets contrast in median tones of an image
Med Center – sets brightness in median tones of an image
Hi Value - sets contrast in brighter tones of an image
Hi Center - sets contrast in brighter tones of an image
Contrast LoSoftness – smooths dark and sharp edges created by the operator
Contrast HiSoftness – smooths bright and sharp edges created by the operator
RGB/Luminance – switches between two operator modes
R/G/B/A – turns on operator’s impact on R/G/B/A channels
Contrast Example
Contrast Control Panel
Solar SE Manual
Page 53 of 89
4.3.12. EXPAND
Operator enables expanding or „stretching“ a full color range of the input pixels to a broader
one. For example a range 0-1 can be fit into a range of -1 to 2.
Parameters:
Low – bottom value of the expanded range
High – top value of the expanded range
Expand Example
Expand Control Panel
Solar SE Manual
Page 54 of 89
4.3.13. FADE
Enables an even dimming or brightening of all pixels in an incoming image.
Parameters:
Value – sets the operator factor impacting the incoming image
R/G/B/A – turns on operator’s impact on R/G/B/Alpha channels
Fade Example
Fade Control Panel
4.3.14. GAMMA
gamma correction of an image
Parameters
Gamma – whole image adjustment
Gamma Low/Med/High – gamma correction in dark /median/bright tones of an image
Solar SE Manual
Page 55 of 89
Gamma Example
Gamma Control Panel
4.3.15. HSV
Enables color correction of an image using HSV (Hue/Saturation/Value) color space using
detailed range settings.
Parameters:
Source color –sets source color value
Destiny color – sets target color value
Hue Offset – sets changes to the Hue component
Hue Range – sets the range in which Hue is modified
Hue Falloff - sets the range in which Hue is modified smoothly
Hue Sharpness - sets the range in which Hue is modified smoothly
Saturation Offset -– sets changes to the Saturation component
Saturation Range - sets the range in which Saturation is modified
Saturation Falloff - sets the range in which Saturation is modified smoothly
Saturation Sharpness - sets the range in which Saturation is modified smoothly
Value Offset - – sets changes to the Value component
Value Range - sets the range in which Value is modified
Value Falloff - sets the range in which Value is modified smoothly
Value Sharpness - sets the range in which Value is modified smoothly
Solar SE Manual
Page 56 of 89
HSV Example
HSV Control Panel
Solar SE Manual
Page 57 of 89
4.3.16. HSV WHEELS
Enables color correction of an image using HSV (Hue/Saturation/Value) color space using
visual color wheel representations of HSV color space.
Parameters:
Master – adjusts the overall image color space
Low – adjusts the color space in dark image tones
Med - adjusts the color space in median image tones
High - adjusts the color space in bright image tones
HSV Wheels Example
HSV Control Panel
4.3.17. LUT FILE - allows you to load a color look up table file (LUT) – to apply predefined color
settings to an image.
Lut File Control Panel
Solar SE Manual
Page 58 of 89
4.3.18. LEVELS
Allows defining values for RGB color space components and adjusting linear transfer between
top and bottom values.
Parameters:
RGB – graphical operator interface affecting full RGB color space
R/G/B/A - graphical operator interface affecting R, G, B or A color space
R Low/High – sets bottom and top values in the R channel range
R Med - adjusts linear transfer between bottom and top values in the R channel
G Low/High - sets bottom and top values in the G channel range
G Med - adjusts linear transfer between bottom and top values in the G channel
B Low/High – sets bottom and top values in the B channel range
B Med - adjusts linear transfer between bottom and top values in the B channel
A Low/High – sets bottom and top values in the A channel range
A Med - adjusts linear transfer between bottom and top values in the A channel
Levels Example
Levels Control Panel
Solar SE Manual
Page 59 of 89
4.3.19. LOG2LIN
Converts linear color space into a logarithmic color space and vice versa.
Useful function when working with 10bit DPX/Cineon file formats. Parameters:
Log2Lin/Lin2Log – switches the conversion mode from Linear to Log between Log to Linear
Offset – adjusts the central correction point
Black – represents a 10 Bit resolution value representing Black
White - represents a 10 Bit resolution value representing white
nGamma – sets value of gamma correction in the numerator of the conversion formula
dGamma - sets value of gamma correction in the denominator of the conversion formula
Log2Lin Example
Log2Lin control Panel
Solar SE Manual
Page 60 of 89
4.3.20. MDIVMMULT
Multiplies or divides incoming color values by a set intensity factor (doesn‘t affect mask value)
Parameters:
Mdivide – divide mode
Mmultiply – multiply mode
Intensity - multiplication / division factor
Ignore Zero – ignore black color values
MdivMmult Control Panel
4.3.21. MIXER
Dual input operator – allows mixing of color space from two sources using RGB color space
using detailed settings
Parameters:
Left Source R/G/B/Alpha – finetune Left incoming source color space in
Red/Green/Blue/Alpha Channels using numeric values or sliders
Right Source R/G/B/Alpha - finetune Right incoming source color space in
Red/Green/Blue/Alpha Channels using numeric values or sliders
Mixer Preview
Solar SE Manual
Page 61 of 89
Mixer Control Panel
Solar SE Manual
Page 62 of 89
4.3.22. NEGATIVE
Converts incoming image into a negative by inverting colors.
Parameters:
Negative Color – set main negative color using RGB color space
Hue – activate/adjust Hue color component in HSV color space
Saturation - activate/adjust Saturation color component in HSV color space
Value - activate/adjust Value color component in HSV color space
Negative Example
Negative Control Panel
Solar SE Manual
Page 63 of 89
4.3.23. REORDER
Switches places between chosen RGB color space channels in an image. Allows adding color
channels to each other or overlapping them, depending on your particular needs.
Allows to add channels between each other base based on your preferences.
Reorder Example
Reorder Control Panel
Solar SE Manual
Page 64 of 89
4.3.24. SAFE COLORS
Limits output colors to broadcast safe color ranges for PAL or NTSC standards.
Safe colors Control Panel
4.3.25. SATURATION
Operator sets the saturation level in incoming image colors
Parameters :
Value: sets overall image color saturation
Weight R/G/B: sets value and „weight“ of the R/G/B channel in color correction
TIP: to avoid an unnatural color effect, weights of all composite channels should add up to 1.
The initial values are preset at:
Weight Red = 0.299; Weight Green = 0.587; Weight Blue = 0.114.
Saturation Example
Solar SE Manual
Page 65 of 89
Saturation Control Panel
4.3.26. SET
Operator replaces chosen color space components in all image pixels with values chosen as
parameters in the control panel.
Parameters
R/G/B/A Buttons – turns on/off R/G/B/A components in the image
R/G/B/A Value – sets channel parameter value applied to the image pixels
Set Example
Solar SE Manual
Page 66 of 89
Set Control Panel
4.3.27. SET ALPHA
Replaces alpha channel value in an incoming image with set parameter
Parameters:
Alpha Button – turns Alpha components in the image
Alpha Value – sets channel parameter value applied to the image pixels
Set Alpha control Panel
Solar SE Manual
Page 67 of 89
4.3.28. SET BG COLOR
Sets background color - can be used to change background color in the visible area outside
operator transform/impact area or overlay a new BG color over an image for a new effect.
Parameters:
Color - Set background color
R/G/B /Alpha– set R/G/B/Alpha channel values
Preserve DOD – preserve the active area of the project
Set BG Color Control Panel
4.3.29. SWITCH
Dual input operator – allows mixing of color space from two sources using RGB color space
with simplified color settings (on/off values) – simplified version of the Mixer operator.
Parameters Left Source: left input source R/G/B/A channels control (on/off) buttons
Right Source: right input source R/G/B/A channels control (on/off) buttons
Switch Control Panel
Solar SE Manual
Page 68 of 89
4.3.30. THERMOGRAPH –
Converts incoming picture to a view of a thermo graphic camera – representing colors
depending on their temperature in the infrared spectrum.
Parameters:
0°/16°/32°/48°/64°/80° - temperature simulation points – change color settings at predefined
temperature points using RGB color space.
Thermograph Example
Thermograph Control Panel
Solar SE Manual
Page 69 of 89
4.3.31. TINT
Adjust incoming image color in bright/median and dark tones of an image, and RGB color
space weight to achieve a desired tint.
Parameters:
Master – adjust overall tint of an image
Low - adjust image tint in darker tones of an image
Med - adjust image tint in median tones of an image
High - adjust image tint in brighter tones of an image
Weight R/G/B – set color weight in an image in R/G/B channels
Tint Preview
Tint Control Panel
Solar SE Manual
Page 70 of 89
4.3.32. WHITE BALANCE
Allows to fine tune and adjust white balance of an incoming image to gain correct mixture of
colors using a reference point.
Parameters:
Mode – Switch between Autolight/Automassive modes
Massive Percent - ???
White – set the white color reference point in RGB color space
Color Temp – set the color temperature in Kelvins
Color Tint – adjust color tint setting
Black Point – define black point value in an image
White Point – define white point value in an image
Master Intensity – Adjust color intensity in an incoming image
Low Intensity - – Adjust color intensity in darker tones of an incoming
image
Medium Intensity – Adjust color intensity in median tones of an
incoming image
High Intensity - Adjust color intensity in brighter tones of an incoming
image
White Balance Example
White Balance Control Panel
Solar SE Manual
Page 71 of 89
4.4. LAYER menu operators
4.4.1. ANAGLYPH
Dual input operator, helps to create a stereoscopic 3D effect using two color layers (usually
chromatically opposite like red and cyan) superimposed over each other to produce a depth
effect – the produced image using „anaglyph“ glasses gives a perception of a three
dimensional scene.
Parameters:
Right: choose the right eye color Blue/Green
Zero Unused Color – unused color value
Left/Right Weight – set weight of the left/right eye layer.
Anaglyph Example
Anaglyph Control Panel
Solar SE Manual
Page 72 of 89
4.4.2. CHROMA KEY
Operator enables keying of set color pixels (HSV color space) in an incoming image.
Generated mask is located in the alpha channel of the outgoing image.
Color - defines a RGB space color around which operator keys image pixels
Multiply – decides if the incoming image should be multiplied by the generated mask
Invert – inverts all values of the generated mask
Replace – causes the generated mask to fully replace alpha channel of the image
Add - adds the generated mask to the image alpha channel
Subtract – subtracts the generated mask from the image alpha channel
Hue Range – sets keying range for the Hue component
Hue FallOff – sets of the smooth keying range for the Hue component
Hue Sharpness – modifies range of the smooth keying of the Hue component
Saturation Range - sets keying range for the Saturation component
Saturation FallOff - sets of the smooth keying range for the Saturation component
Saturation Sharpness - modifies range of the smooth keying of the Saturation component
Value Range - sets keying range for the Value component
Value FallOff - - sets of the smooth keying range for the Value component
Value Sharpness - modifies range of the smooth keying of the Value component
Chroma Key Example
Chroma Key Control Panel
Solar SE Manual
Page 73 of 89
4.4.3. DEPTH COMPOSE
quadruple input operator
Depth Compose Control Panel
4.4.4. Edge Correct
Pardon the white space...Please visit www.lightstream24.com/support/ for an updated manual
or go to www.lightstream24.com/forum/ to get help from Lightstream Staff.
Edge Correct Example
Solar SE Manual
Page 74 of 89
Edge Correct Control Panel
4.4.5. INNER MASK
Pardon the white space...Please visit www.lightstream24.com/support/ for an updated manual
or go to www.lightstream24.com/forum/ to get help from Lightstream Staff.
4.4.6. LAYER
Dual input operator – uses two incoming images to create a layered result.
Parameters:
Layer Operation – predefined incoming layer blending operations
CropToFormat – crops the outgoing image to a set format
ClipToForeground – decides which incoming image will define the format
Layer Control Panel
Solar SE Manual
Page 75 of 89
4.4.7. LUMA KEY
Affects all pixels in an image. Operator generates a mask in Alpha channel based on the
brightness of pixels in an incoming image. Mask can be multiplied by incoming pixels.
Parameters:
Low/High – sets bottom and top value of the keying range
LowSmooth / High Smooth – adjusts smoothing of the bottom and top edges of the keying
range
Multiply – multiplies image pixels by generated Alpha channel
Invert – inverts Alpha channel values (negative)
Replace – completely replaces original alpha channel with the newly generated one
Add – adds generated Alpha channel to the original one
Subtract – subtracts generated alpha channel from the original one
Luma Key Control Pane
Solar SE Manual
Page 76 of 89
4.4.8. MASK CONTROL
Helps in modifying image mask (alpha channel) of an incoming image
Can be supplemented by using the Spill operator (with “edge spill” enabled)
Parameters:
Invert – turns on/off inverting values (negative) of the generated mask
MMult – multiplies generated mask by a set value
Edge spill Removal – turns on/off the Spill operator support
Shrink X/Y – sets the shrink element value in horizontal/vertical
Blur X/Y – sets the strength of the mask blur in horizontal/vertical
Fade – sets brightness of the generated mask
Contrast Value – sets contrast parameter value
Contrast Center – sets contrast center value
Gamma – modifies brightness of the generated mask using gamma correction
Hue – sets keyed color (Hue parameter in Spill Operator)
Red/Green/Blue – sets hue parameter value at 0/120/240
Replace Hue – sets color that should replace keyed color (ReplaceHue in Spill operator)
Replace Range - sets range or radius around a color from Hue parameter that should be
changed
Auto Replace – turns on automatic setting of the Replace Hue parameter to value dependent on
Hue.
Gain – sets image color shade when affected by Spill operator
Lumi Gain – affect image brightness when affected by Spill operator
Classic/AlternativeMode – two possible working modes of Spill Operator
Mask Control – settings panel
4.4.9. RANGE KEYER
Pardon the white space...Please visit www.lightstream24.com/support/ for an updated manual
or go to www.lightstream24.com/forum/ to get help from Lightstream Staff.
Solar SE Manual
Page 77 of 89
4.4.10. SPILL
Supplemental operator to Mask Control
Parameters:
Hue – sets keyed color
Red/Green/Blue – sets hue parameter value at 0/120/240
Replace Hue – sets color that should replace keyed color
Replace Range - sets range or radius around a color from Hue parameter that should be
changed
Auto Replace – turns on automatic setting of the Replace Hue parameter to value dependent on
Hue.
Gain – sets image color shade when affected by Spill operator
Lumi Gain – affect image brightness when affected by Spill operator
Classic/AlternativeMode – two possible working modes of Spill Operator
Spill Control Panel
4.4.11. WAND KEY
Pardon the white space...Please visit www.lightstream24.com/support/ for an updated manual
or go to www.lightstream24.com/forum/ to get help from Lightstream Staff.
Solar SE Manual
Page 78 of 89
4.5. TRANSFORM menu Operators
4.5.1. CAMERA SHAKE
Pardon the white space...Please visit www.lightstream24.com/support/ for an updated manual
or go to www.lightstream24.com/forum/ to get help from Lightstream Staff.
4.5.2. CHAOS
Pardon the white space...Please visit www.lightstream24.com/support/ for an updated manual
or go to www.lightstream24.com/forum/ to get help from Lightstream Staff.
4.5.3. CLONER
Pardon the white space...Please visit www.lightstream24.com/support/ for an updated manual
or go to www.lightstream24.com/forum/ to get help from Lightstream Staff.
4.5.4. CORNER PIN
Pardon the white space...Please visit www.lightstream24.com/support/ for an updated manual
or go to www.lightstream24.com/forum/ to get help from Lightstream Staff.
4.5.5. CROP
Pardon the white space...Please visit www.lightstream24.com/support/ for an updated manual
or go to www.lightstream24.com/forum/ to get help from Lightstream Staff.
4.5.6. DISPLACE
A dual input operator – displaces incoming pixels with given displacement map (2nd incoming
image). Alpha channel from the displacement map is a displacement vector for a corresponding
picture pixel in the incoming image.
Parameters:
Direction X/Y – displacement strength in horizontal and vertical
Strength – displacement strength factor
Enlarge – displacement effect strength
Gradient Kernel Bend 4.5.7. FIT
Pardon the white space...Please visit www.lightstream24.com/support/ for an updated manual
or go to www.lightstream24.com/forum/ to get help from Lightstream Staff.
Solar SE Manual
Page 79 of 89
4.5.8. FLIP
Pardon the white space...Please visit www.lightstream24.com/support/ for an updated manual
or go to www.lightstream24.com/forum/ to get help from Lightstream Staff.
4.5.9. MIRROR
Pardon the white space...Please visit www.lightstream24.com/support/ for an updated manual
or go to www.lightstream24.com/forum/ to get help from Lightstream Staff.
4.5.10. PAN
Pardon the white space...Please visit www.lightstream24.com/support/ for an updated manual
or go to www.lightstream24.com/forum/ to get help from Lightstream Staff.
4.5.11. RESIZE
Pardon the white space...Please visit www.lightstream24.com/support/ for an updated manual
or go to www.lightstream24.com/forum/ to get help from Lightstream Staff.
4.5.12. ROTATE
Pardon the white space...Please visit www.lightstream24.com/support/ for an updated manual
or go to www.lightstream24.com/forum/ to get help from Lightstream Staff.
4.5.13. SCALE
Pardon the white space...Please visit www.lightstream24.com/support/ for an updated manual
or go to www.lightstream24.com/forum/ to get help from Lightstream Staff.
4.5.14. SCROLL
Pardon the white space...Please visit www.lightstream24.com/support/ for an updated manual
or go to www.lightstream24.com/forum/ to get help from Lightstream Staff.
4.5.15. SPHERIZE
Pardon the white space...Please visit www.lightstream24.com/support/ for an updated manual
or go to www.lightstream24.com/forum/ to get help from Lightstream Staff.
4.5.16. STABILIZE
Pardon the white space...Please visit www.lightstream24.com/support/ for an updated manual
or go to www.lightstream24.com/forum/ to get help from Lightstream Staff.
4.5.17. TILE
Pardon the white space...Please visit www.lightstream24.com/support/ for an updated manual
or go to www.lightstream24.com/forum/ to get help from Lightstream Staff.
Solar SE Manual
Page 80 of 89
4.5.18. TRACK
Pardon the white space...Please visit www.lightstream24.com/support/ for an updated manual
or go to www.lightstream24.com/forum/ to get help from Lightstream Staff.
4.5.19. TRANSFORM
Pardon the white space...Please visit www.lightstream24.com/support/ for an updated manual
or go to www.lightstream24.com/forum/ to get help from Lightstream Staff.
4.5.20. TWIRL
Pardon the white space...Please visit www.lightstream24.com/support/ for an updated manual
or go to www.lightstream24.com/forum/ to get help from Lightstream Staff.
Solar SE Manual
Page 81 of 89
4.6. ADD menu Operators
4.6.1. DEFLICKER
Helps minimize the occurrence of “flickering“ in image sequence
Parameters:
Intensity – sets operator intensity
Deflicker Control Panel
4.6.2. DEINTERLACE
Removes interlacing form the incoming image sequence with interlacing
Parameters:
UpperField/LowerField – in affected operations – chooses the appropriate pixel field
Restore Quality Merge Fields – uses both pixel fields
Interpolate – uses chosen pixel field (interpolates)
Replicate - uses chosen pixel field in replication
Deinterlace Control Panel
Solar SE Manual
Page 82 of 89
4.6.3. INTERLACE
Pardon the white space...Please visit www.lightstream24.com/support/ for an updated manual
or go to www.lightstream24.com/forum/ to get help from Lightstream Staff.
Interlace control Panel
4.6.4. SHADOW –
Adds a shadow to the existing incoming image. Shadow shape is defined by Alpha channel of
an incoming image.
Parameters:
Translate X/Y – decides the shadow shift in horizontal (X)/vertical (Y)
Light Distance – sets the distance from the light source to the object throwing the shadow
Softness X/Y - causes blurring of the shadow in horizontal (X) or vertical (Y)
Opacity – sets intensity of the shadow
Color – define shadow color (RGB color space)
Shadow Control Panel
Solar SE Manual
Page 83 of 89
4.6.5. SWITCH
Pardon the white space...Please visit www.lightstream24.com/support/ for an updated manual
or go to www.lightstream24.com/forum/ to get help from Lightstream Staff.
Switch Control Panel
4.6.6. TIMECODE
Pardon the white space...Please visit www.lightstream24.com/support/ for an updated manual
or go to www.lightstream24.com/forum/ to get help from Lightstream Staff.
Timecode Control Panel
Solar SE Manual
Page 84 of 89
4.6.7. TIMEMASTER
Pardon the white space...Please visit www.lightstream24.com/support/ for an updated manual
or go to www.lightstream24.com/forum/ to get help from Lightstream Staff.
Timemaster Control Panel
4.6.8. TIMETRAILS
Pardon the white space...Please visit www.lightstream24.com/support/ for an updated manual
or go to www.lightstream24.com/forum/ to get help from Lightstream Staff.
/
Timetrails Control Panel
Solar SE Manual
Page 85 of 89
4.6.9. VIGNETTE
Creates a frame around the picture. Consist fo an internal and external frames which have a smooth
fading transition between them. You can add color to the area outside the frame (with adjustable
color opacity). A „Vingetting“ effect known to photographers.
Parameters:
Inner/Outer Radius –length of half the side of the inner/outer frame
Center X/Y – frame center location
Scale Inner X/Y – scale of width (X) /height (Y) of the inner frame
Scale Outer X/Y - scale of width (X) /height (Y) of the outer frame
Vignette Example
Vignette Control Panel
Solar SE Manual
Page 86 of 89
4.6.10.
5.
HELP/FAQ
5.1. If you need help
5.2. FAQ
5.3. Known issues
Solar SE Manual
Page 87 of 89
Solar SE Manual
Page 88 of 89
a. Element Hierarchy/Priority/
In SOLAR there is more than one way to manage your project elements and add effects to yor
material [outside basic tree view], we use the following hierarchy:
i. Subproject is a basic unit in SOLAR workflow – editable in Tree View , Subproject
Timelime and Global Timeline– [the resulting output is defined by the Broadcast
operator]
ii. Global Tree – takes input from subprojects operators
iii. Global Timeline – unified representation of your project
Solar SE Manual
Page 89 of 89