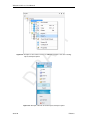
1
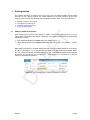
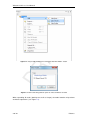
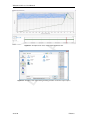
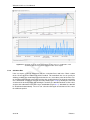
Storm impact model for gravel beaches
DR
AF
T
XBeach-G
Manual
DR
AF
T
T
DR
AF
XBeach-G GUI 1.0
Graphical user interface for setting up, running and
analysing XBeach-G calculations
User Manual
Version: 1.0.0
Revision: 41593
7 April 2014
DR
AF
T
XBeach-G GUI 1.0, User Manual
Published and printed by:
Deltares
Boussinesqweg 1
2629 HV Delft
P.O. 177
2600 MH Delft
The Netherlands
telephone:
fax:
e-mail:
www:
+31 88 335 82 73
+31 88 335 85 82
[email protected]
https://www.deltares.nl
Contact:
Pieter van Geer
telephone:
+31 88 335 8339
fax:
+31 88 335 8582
e-mail:
[email protected]
[email protected]
Copyright © 2015 Deltares
All rights reserved. No part of this document may be reproduced in any form by print, photo
print, photo copy, microfilm or any other means, without written permission from the publisher:
Deltares.
Contents
.
.
.
.
.
.
.
.
.
.
.
.
.
.
.
.
.
.
.
.
.
.
.
.
.
.
.
.
.
.
.
.
.
.
.
.
.
.
.
.
.
.
.
.
.
.
.
.
.
.
.
.
.
.
.
.
.
.
.
.
.
.
.
.
.
.
.
.
1
1
3
4
4
2 Introduction
2.1 System requirements . . . . . . . . . . . . .
2.2 XBeach-G, the XBeach-G GUI and this manual
2.3 The NUPSIG-project . . . . . . . . . . . . .
2.4 Delta Shell framework . . . . . . . . . . . . .
.
.
.
.
.
.
.
.
.
.
.
.
.
.
.
.
.
.
.
.
.
.
.
.
.
.
.
.
.
.
.
.
.
.
.
.
.
.
.
.
.
.
.
.
.
.
.
.
.
.
.
.
.
.
.
.
.
.
.
.
.
.
.
.
5
5
5
6
6
T
Contents
3 Graphical user interface in general
3.1 Working with projects . . . . . . . . . . . .
3.1.1 Project structure . . . . . . . . . .
3.1.2 Save or Load a project . . . . . . .
3.2 Toolwindows and document windows . . . .
3.2.1 Toolwindows . . . . . . . . . . . .
3.2.1.1 Project toolwindow . . . .
3.2.1.2 Chart toolwindow . . . . .
3.2.1.3 Properties toolwindow . .
3.2.1.4 Messages toolwindow . .
3.2.1.5 Time Navigator toolwindow
3.2.2 Document views . . . . . . . . . .
3.3 Customizing the interface . . . . . . . . . .
3.3.1 Dock and undock windows . . . . .
3.4 Ribbon bar . . . . . . . . . . . . . . . . .
.
.
.
.
.
.
.
.
.
.
.
.
.
.
.
.
.
.
.
.
.
.
.
.
.
.
.
.
.
.
.
.
.
.
.
.
.
.
.
.
.
.
.
.
.
.
.
.
.
.
.
.
.
.
.
.
.
.
.
.
.
.
.
.
.
.
.
.
.
.
.
.
.
.
.
.
.
.
.
.
.
.
.
.
.
.
.
.
.
.
.
.
.
.
.
.
.
.
.
.
.
.
.
.
.
.
.
.
.
.
.
.
.
.
.
.
.
.
.
.
.
.
.
.
.
.
.
.
.
.
.
.
.
.
.
.
.
.
.
.
.
.
.
.
.
.
.
.
.
.
.
.
.
.
.
.
.
.
.
.
.
.
.
.
.
.
.
.
.
.
.
.
.
.
.
.
.
.
.
.
.
.
.
.
.
.
.
.
.
.
.
.
.
.
.
.
.
.
.
.
.
.
.
.
.
.
.
.
.
.
.
.
.
.
.
.
.
.
.
.
.
.
.
.
.
.
.
.
.
.
.
.
.
.
.
.
.
.
7
7
7
9
9
10
10
11
12
13
13
13
14
14
15
4 Setting up an XBeach-G model (Input)
4.1 Profile definition . . . . . . . . . . . . .
4.1.1 Using geometrical characteristics
4.1.2 Using Coordinates . . . . . . .
4.1.3 Grid generation . . . . . . . . .
4.2 Waves input . . . . . . . . . . . . . .
4.3 Tide input . . . . . . . . . . . . . . . .
4.4 Parameters . . . . . . . . . . . . . . .
.
.
.
.
.
.
.
.
.
.
.
.
.
.
.
.
.
.
.
.
.
.
.
.
.
.
.
.
.
.
.
.
.
.
.
.
.
.
.
.
.
.
.
.
.
.
.
.
.
.
.
.
.
.
.
.
.
.
.
.
.
.
.
.
.
.
.
.
.
.
.
.
.
.
.
.
.
.
.
.
.
.
.
.
.
.
.
.
.
.
.
.
.
.
.
.
.
.
.
.
.
.
.
.
.
.
.
.
.
.
.
.
.
.
.
.
.
.
.
17
17
17
18
19
21
22
24
.
.
.
.
.
.
.
.
.
.
.
.
.
.
.
.
.
.
.
.
.
.
.
.
.
.
.
.
.
.
.
.
DR
AF
1 Getting started
1.1 Adding a model to the project
1.2 Changing the model input . .
1.3 Running an XBeach model .
1.4 Analyse model output . . . .
.
.
.
.
.
.
.
.
.
.
.
.
.
.
5 Running XBeach-G
27
5.1 Inside GUI . . . . . . . . . . . . . . . . . . . . . . . . . . . . . . . . . . 27
5.2 Outside GUI . . . . . . . . . . . . . . . . . . . . . . . . . . . . . . . . . 28
6 Analyse model output
6.1 Cross-shore . . . . . . . . . . .
6.2 Time series . . . . . . . . . . . .
6.3 Runup . . . . . . . . . . . . . .
6.4 Run report . . . . . . . . . . . .
6.5 Tools . . . . . . . . . . . . . . .
6.5.1 Time representation . . .
6.5.2 Ruler . . . . . . . . . . .
6.5.3 Show cross-shore position
6.5.4 Calculate R2% . . . . . .
References
Deltares
.
.
.
.
.
.
.
.
.
.
.
.
.
.
.
.
.
.
.
.
.
.
.
.
.
.
.
.
.
.
.
.
.
.
.
.
.
.
.
.
.
.
.
.
.
.
.
.
.
.
.
.
.
.
.
.
.
.
.
.
.
.
.
.
.
.
.
.
.
.
.
.
.
.
.
.
.
.
.
.
.
.
.
.
.
.
.
.
.
.
.
.
.
.
.
.
.
.
.
.
.
.
.
.
.
.
.
.
.
.
.
.
.
.
.
.
.
.
.
.
.
.
.
.
.
.
.
.
.
.
.
.
.
.
.
.
.
.
.
.
.
.
.
.
.
.
.
.
.
.
.
.
.
.
.
.
.
.
.
.
.
.
.
.
.
.
.
.
.
.
.
.
.
.
.
.
.
.
.
.
.
.
.
.
.
.
.
.
.
.
.
.
.
.
.
.
.
.
31
31
33
34
35
35
36
36
37
38
41
iii
DR
AF
T
XBeach-G GUI 1.0, User Manual
iv
Deltares
List of Figures
List of Figures
1.1
1.2
1.3
1.4
1.5
Home ribbon with the Add New Model button selected. . . . . . . . . . . .
Project with context menu showing the Add New Model... button . . . . . .
New model dialog with the option to select an XBeach-G model . . . . . . .
Project treeview with all Input and Output items expanded just after adding a
new model . . . . . . . . . . . . . . . . . . . . . . . . . . . . . . . . .
Project treeview context menu after right clicking an item in the Input folder of
an XBeach-G model . . . . . . . . . . . . . . . . . . . . . . . . . . . .
.
.
.
1
2
2
.
3
.
3
Example of the Home ribbon tab with the possibility to add an item, folder or
model to the project. . . . . . . . . . . . . . . . . . . . . . . . . . . . . .
3.2 Example of the context menu after right clicking in the Project toolwindow. . .
3.3 Example of the XBeach-G GUI with all available toolwindows . . . . . . . . .
3.4 Example of the project toolwindow with a project that contains one XBeach-G
model . . . . . . . . . . . . . . . . . . . . . . . . . . . . . . . . . . . . .
3.5 Example of the Chart toolwindow when the Time series output is selected . .
3.6 Example of the time navigator. Each green dot represents an output time step
3.7 Example of the visual help when docking a window. The green circle indicates
the locations in the main document window. Red circles indicate docking positions at the sides of the GUI. . . . . . . . . . . . . . . . . . . . . . . . .
3.8 Example showing some unpinned documents (blue oval), pin/unpin pushpin
and cross to hide a toolwindow (red oval) and the border of a toolwindow that
can be dragged to change its size (green oval) . . . . . . . . . . . . . . . .
3.9 Overview of the available buttons in the Home tab . . . . . . . . . . . . . . .
3.10 Overview of the available buttons in the View tab . . . . . . . . . . . . . . .
3.11 Overview of the available buttons in the Chart tab . . . . . . . . . . . . . . .
DR
AF
T
3.1
4.1
4.2
4.3
4.4
4.5
4.6
4.7
5.1
5.2
5.3
5.4
5.5
Deltares
Example of the Profile document view when specifying the profile by means of
geometrical characteristics . . . . . . . . . . . . . . . . . . . . . . . . .
Example of the Profile document view when specifying the profile by means of
coordinates . . . . . . . . . . . . . . . . . . . . . . . . . . . . . . . . .
Recommended offshore water depth at the XBeach-G model boundary as a
function of the offshore mean wave period are shown in green shading. Acceptable offshore water depths are shown in orange. Note that the offshore
water depth should include tidal variation and that the Tm−1,0 wave period
can be approximated by Tp /1.1, where Tp is the peak wave period, if spectral wave data are not available. The user is not recommended to apply water
depths that fall outside the orange area. . . . . . . . . . . . . . . . . . . .
Example of the document view for specification of the wave boundary conditions in time . . . . . . . . . . . . . . . . . . . . . . . . . . . . . . . . .
Example of the document view for specification of the tide boundary condition
Example of the tide generation dialog . . . . . . . . . . . . . . . . . . . .
Example of the document view to specify input parameters . . . . . . . . .
Example of the Home tab in the Ribbon bar when a model is selected. Run
Current and Run All options are enabled . . . . . . . . . . . . . . . . . .
Example of the GUI running 5 XBeach-G models. The first four models are run
simultaneously, the fifth model will be executed when one of the other models
is finished . . . . . . . . . . . . . . . . . . . . . . . . . . . . . . . . . .
Microsoft windows file explorer showing all files created by the XBeach-G
model set-up exporter to run the XBeach-G model outside the GUI . . . . .
Example of the context menu of an XBeach-G model in the GUI including
Import and Export options . . . . . . . . . . . . . . . . . . . . . . . . .
Example of the file menu with Import and Export option . . . . . . . . . . .
7
8
10
11
12
13
14
15
15
15
16
. 18
. 19
. 21
.
.
.
.
22
24
24
26
. 27
. 28
. 29
. 30
. 30
v
XBeach-G GUI 1.0, User Manual
6.5
6.6
6.7
6.8
6.9
6.10
6.11
. 32
. 32
. 33
. 34
. 35
. 35
.
.
.
.
35
36
36
37
. 38
. 39
. 39
DR
AF
6.12
6.13
Example of the Cross-shore output document view . . . . . . . . . . . . .
Example of the export dialog including selection of the time step to export . .
Example of the Time series output document view . . . . . . . . . . . . .
Example of the export dialog including selection of the cross-shore position to
export . . . . . . . . . . . . . . . . . . . . . . . . . . . . . . . . . . .
Example of the Runup output document view . . . . . . . . . . . . . . . .
Example of the Chart ribbon tab when the main window shows a cross-shore
output document view . . . . . . . . . . . . . . . . . . . . . . . . . . . .
Example of the Chart ribbon tab when the main window shows a runup output
document view . . . . . . . . . . . . . . . . . . . . . . . . . . . . . . .
Example of the Runup output document view with time format . . . . . . . .
Example of the Runup output document view with seconds format . . . . .
Example of the use of the ruler tool in the cross-shore output document view
Example of usage of the cross-shore position tool in a combination of the
document views for cross-shore output and time series output . . . . . . .
Example of making a selection with the R2% tool . . . . . . . . . . . . . .
Example a message after using the R2% tool . . . . . . . . . . . . . . . .
T
6.1
6.2
6.3
6.4
vi
Deltares
List of Tables
List of Tables
Message types . . . . . . . . . . . . . . . . . . . . . . . . . . . . . . . . 13
DR
AF
T
3.1
Deltares
vii
DR
AF
T
XBeach-G GUI 1.0, User Manual
viii
Deltares
1 Getting started
This chapter describes in short the necessary steps to run an XBeach model. Each section
describes a step. Where needed, the section contains all relevant references to the main
chapters of this manual that describe the functionality in more detail. The steps consist of:
Adding a model to the project
T
After starting up the GUI an empty project is shown. To start using XBeach-G the user first
has to add a new model to the project. Two actions can lead to a new XBeach-G model being
added to the project:
Click Add New Model in the Home tab of the ribbon (Figure 1.1)
Right-click the project in the Project toolwindow and select "Add → New Model..." (Figure
1.2)
DR
AF
1.1
Adding a model to the project
Changing the model input
Running an XBeach model
Analyse model output
Both actions will lead to a selection dialog asking the user what kind of model he or she wants
to add (see also Figure 1.3). In this GUI the only option is to add an XBeach-G model. When
the user selects the XBeach-G model and presses OK, a new XBeach model will be added to
the project. It is possible to save a project (File - Save or Save as..) in order to use it later on
(Open) as described in chapter 3.
Figure 1.1: Home ribbon with the Add New Model button selected.
Deltares
1 of 44
DR
AF
T
XBeach-G GUI 1.0, User Manual
Figure 1.2: Project with context menu showing the Add New Model... button
Figure 1.3: New model dialog with the option to select an XBeach-G model
When expanding all nodes (both Input as well as Output), the model contains 4 input items
and three output items (see Figure 1.4).
2 of 44
Deltares
T
Getting started
1.2
DR
AF
Figure 1.4: Project treeview with all Input and Output items expanded just after adding a
new model
Changing the model input
Changing the input of a model can be done in the document view representing one of the input
items (Profile, Waves, Tide or Parameters). The user has two options to open a document
view for an item. If the requested document view is already open, the GUI will automatically
switch to this view instead of opening a new one. Opening the document view for one of the
input or output items is further explained in chapter 4. In short the user can either:
Double-Click the Input item for which a document view should be opened, or
Right-click the Input item in the Project toolwindow and select Open (Figure 1.5)
Figure 1.5: Project treeview context menu after right clicking an item in the Input folder of
an XBeach-G model
Deltares
3 of 44
XBeach-G GUI 1.0, User Manual
1.3
Running an XBeach model
Before running a model it is important to save the project first. If a project is not saved yet,
the GUI will ask the user to specify where to save the project. When running a model, the
GUI uses the models working directory to store the model setup (input files), run information
and output. By default this information is stored in a folder with the same name as the project
(followed by _data), next to the project file.
Starting a model run can be done by either:
Pressing F9 when the model is selected in the Project toolwindow, or
Pressing "Run model" in the Home tab of the ribbon, or
Right-click the model in the Project toolwindow and select Run model
T
Analyse model output
After running a model, the output folder of a model contains four items:
Cross-shore - Presents the output variables in a cross-shore view
Time series - Presents the development of output variables in time at a specified crossshore position
Runup - Presents a time series of the wave run-up elevation
Run report - Summarizes the messages created during the model run (by both the calculation engine as well as the GUI)
DR
AF
1.4
The user can open a document view for each output item similar to the document views for the
input items. Furthermore it is also possible to export the model output to a csv ASCII file by
right clicking one of the output items and select Export... Chapter 6 explains the possibilities
to examine and export the model output in more detail.
4 of 44
Deltares
2 Introduction
2.1
System requirements
This section summarizes the minimum hardware and software specifications for proper use of
the software:
Microsoft Windows XP SP3 or higher
Intel Pentium III/800 MHz processor or similar
256 MB internal memory (RAM)
Screen resolution 1024x768
Microsoft .NET 4.0
120 MB available hard disk space
The recommended requirements are:
2.2
Microsoft Windows 7
Intel Quad Core 3GHz
4 GB internal memory
20 GB available hard disk memory
Microsoft .NET 4.0
Screen resolution of 1920x1080
DR
AF
T
XBeach-G, the XBeach-G GUI and this manual
This manual describes the use of the XBeach-G GUI that has been developed by Deltares at
the request of Plymouth University as part of the NUPSIG-project (Section 2.3). This manual does not describe the physical processes, numerical formulations, or model validation
of the open-source XBeach-G model. This is described by Roelvink et al. (2009), McCall
et al. (2012) and McCall et al. (2013). For more information about the XBeach-G model,
including model formulations and validation, the reader is referred to the scientific dissemination products on the NUPSIG-project website (http://www.research.plymouth.ac.uk/
coastal-processes/projects/nupsigsite/home.html), or the website of the XBeach
model (www.xbeach.org). The reader is advised that the results of XBeach-G simulations
presented in the XBeach-G GUI are subject to the applicability and validity of the open-source
XBeach-G model. In particular the reader is advised that the XBeach-G models simulated using the XBeach-G GUI are limited to 1D cross-shore profile models that are unable to account
for longshore processes, including longshore sediment transport gradients and the effect of
waves with large angles of incidence. The reader should be aware that the morphodynamics predicted by the XBeach-G model are under development and validation, and that any
morphodynamic prediction made by the model should be regarded as unvalidated.
Deltares
5 of 44
XBeach-G GUI 1.0, User Manual
2.3
The NUPSIG-project
Delta Shell framework
The XBeach-G Gui is built as a plugin for the Delta Shell framework that is being developed
at Deltares. Delta Shell (Donchyts and Jagers, 2010) is an open source integrated modeling environment with a focus to setup, configure, run and analyze results of the integrated
environmental models used to simulate water, soil and the subsurface processes. The software components available within Delta Shell are easy to reuse separately, or as a part of an
integrated environment. The software can run in a graphical user interface or a commandline mode. Most of the components are developed using the C# programming language.
The XBeach-G plugin adds an XBeach-G (1D) model to the framework with which calculations with the XBeach-G model can be performed. Delta Shell is expected to become an
open source project soon. More information about Delta Shell can be found on their website
(http://oss.deltares.nl/web/delta-shell/).
DR
AF
2.4
T
The development of the XBeach-G model and the XBeach-G GUI has been carried out as
part of the NUPSIG-project. The NUPSIG (New Understanding and Prediction of Storm Impacts on Gravel beaches) project is a three-year research project funded by the Engineering
and Physical Sciences Research Council (EPSRC: EP/H040056/1). The project is led by Plymouth University, in collaboration with the Channel Coastal Observatory, HR Wallingford and
partners Deltares and the Environment Agency. The aim of the project is to obtain new understanding of how gravel beaches are affected by storms, and to use this knowledge to develop
coastal management tools to help protect the coast of the United Kingdom. The XBeach-G
GUI represents one of the end-user tools developed in this project. Further information on the
NUPSIG project can be found on the project website: http://www.research.plymouth.
ac.uk/coastal-processes/projects/nupsigsite/home.html.
6 of 44
Deltares
3 Graphical user interface in general
This chapter describes the functionality of the XBeach-G graphical user interface in general.
The chapter covers the project structure (section 3.1), the various types of document views
and toolwindows available (section 3.2), how to customize the look and feel of the interface
(section 3.3) and a description of the ribbon bar (section 3.4).
Project structure
Data and models that are presented in the GUI are ordered in a project. The structure of this
project is presented in the Project toolwindow (see also section 3.2.1.1). Data, folders and
models can be added to a project in the following two ways:
T
3.1.1
Working with projects
1 Click Add New Folder, Add New Item or Add New Model in the Home tab of the Ribbon
on top of the GUI, as shown in Figure 3.1.
2 Right click in the Project toolwindow on the location an item, folder or model should be
added and click New Item..., New Folder or New Model..., as shown in Figure 3.2.
DR
AF
3.1
Figure 3.1: Example of the Home ribbon tab with the possibility to add an item, folder or
model to the project.
Deltares
7 of 44
DR
AF
T
XBeach-G GUI 1.0, User Manual
Figure 3.2: Example of the context menu after right clicking in the Project toolwindow.
Possible items to add to a project are divided in three different categories as listed below:
Item - Represents data of an arbitrary type (mostly input and output of a model)
Model - Represents a model
Folder - Represents a folder in the project
Item
An item can contain arbitrary information. In most cases an item represents input or output of
a model. There are two types of items that can be added to each project:
Text Document - Adds an empty text document to the project
Web link - Adds an url (webpage) to the current project
An item is always coupled to a document window (section 3.2.2) representing the content
of that item. Document windows enable viewing and/or changing the content of an item. A
document window can be opened by double clicking in the item in the Project toolwindow or
by right-clicking the item in the Project toolwindow and selecting Open.
8 of 44
Deltares
Graphical user interface in general
Model
A model represents a calculation engine with associated input and output. In this GUI the
calculation engine is XBeach-G. This model has an Input and Output folder describing the
input and output of the XBeach-G model. Running a model can be initiated the following
ways:
Right-click on the model in the Project toolwindow and click Run Model
Click (run) or (run All) in the Home tab of the ribbon (see also section 3.4)
Select a model and press either F9(Run selected model), or Ctrl+F9 (run all models)
Folder
3.1.2
Save or Load a project
T
A folder in a project is comparable to a folder in the Microsoft Windows Explorer. It can be
used to order or group items and models. Folders are also used to split model input and
output.
3.2
DR
AF
Saving a project enables the user to continue a project at another moment. Saving a project
in this GUI can be done by either pressing Ctrl+S or clicking Save/Save As.. in the File menu.
The GUI will prompt for a location to save the project if this has not already been specified by
the user. The project will automatically have the filename as its project name. When saving a
project, the GUI writes the model setup and model configuration including all items included
in the project, but excluding model output to a .dsproj file. Next to the file a directory with the
same name (followed by *_data) will be created. This folder contains all working directories of
the project models. Model output is not stored in the .dsproj file, but retrieved directly from the
model output (xboutput.nc) in the working directory of a model. The *.dsproj file only stores
the path of the model output file. This is important to have in mind when copying projects
to another location. The user should include the *_data folder and copy it together with the
*.dsproj file. Because of this it is also important not to have two models with the same name
in one project. That will cause one model to overwrite the output of another model.
Toolwindows and document windows
Figure 3.3 gives an overview of the interface after starting up the XBeach-G GUI. It contains
several windows that will be described in this section. The GUI is organised with so-called
toolwindows and document views. These windows can be positioned depending on the needs
of the user. In addition, the GUI provides the possibility to add Quick access shortcuts (1 in the
figure) and a ribbon (2 in the figure) to manipulate items, folders or models in the project. This
section will first give an overview of the possibilities for adjusting the interface to the needs
of the user and then explain all available toolwindows. Numbers included in the descriptions
refer to the numbers shown in Figure 3.3.
Deltares
9 of 44
DR
AF
T
XBeach-G GUI 1.0, User Manual
Figure 3.3: Example of the XBeach-G GUI with all available toolwindows
3.2.1
Toolwindows
Toolwindows represent the currently selected item in the GUI. The content of the toolwindows
can therefore change each time another item is selected in the project toolwindow. XBeach-G
offers the following toolwindows:
3.2.1.1
Project (3)
Chart (4)
Properties (5)
Messages (6)
Time Navigator (7)
Project toolwindow
The project toolwindow facilitates navigating through the contents of the current project. It
shows a tree view that includes the complete project structure (see Figure 3.4 for an example).
The structure of the items, folders and models in a project can be changed, new items can
be added and existing items can be removed in this toolwindow. By clicking the button on the
top-left of the toolwindow, the currently selected item will be shown in the tree view.
10 of 44
Deltares
T
Graphical user interface in general
DR
AF
Figure 3.4: Example of the project toolwindow with a project that contains one XBeach-G
model
There are several possibilities to alter the project structure or view the content of an item in
the tree view:
Select an item by clicking the item in the tree view
Show a menu with available options by right clicking an item (options can contain functionality to open a document view, import or export content, or show properties in the
properties tolwindow)
Double-click an item to open its associated document window
3.2.1.2
Chart toolwindow
The Chart toolwindow (Figure 3.5) presents a list of all data series can be plotted in the
selected chart. By selecting an item in the chart toolwindow, data can be added or removed
from the chart. When selected, properties of the selected data series in the chart toolwindow
can be changed in the properties toolwindow. This enables the user to customize a chart to
his or her needs. Selecting the Axes enables the user to change axes properties. Fixing the
axes limits is possible by disabling automatic determination of the axes limits (under Bottom
axis or Left axis in the properties of the selected axes) and manually adding a minimum and
maximum value.
Deltares
11 of 44
DR
AF
T
XBeach-G GUI 1.0, User Manual
Figure 3.5: Example of the Chart toolwindow when the Time series output is selected
3.2.1.3
Properties toolwindow
After selecting an element in the GUI, the properties toolwindow shows all properties of the
selected element. Some of the properties can be changed, whereas others are read only
(gray instead of black).
12 of 44
Deltares
Graphical user interface in general
3.2.1.4
Messages toolwindow
The message toolwindow keeps track of all log messages generated by the GUI and the
XBeach-G model. Messages created by the model and GUI are displayed in chronological
order. Depending on the content of the message an icon is associated to the message,
visualising the severity level of the message. Table 3.1 contains an explanation of the three
logging levels and their associated icons. If the user closes the toolwindow and reopens it
again, only new messages will be displayed. Older messages are stored in two places:
T
1 Each model run generates a run report in which all log messages that were issued during
the run are stored. A run report will be visible in the Project toolwindow as part of the
output of a model.
2 A full log is kept for every session of the GUI (between start-up and closing the GUI) in
the project database. This log file stores all messages created during the session. Click
Show Log in the Home ribbon to open the full log file.
Table 3.1: Message types
Message type
DR
AF
Icon
Information
Warning
Error
3.2.1.5
Time Navigator toolwindow
The time navigator displays a timeline with the output times of time-dependant data (see
Figure 3.6). This toolwindow can be used to navigate through time in the Cross-shore output
view of the model output data. Since the Time series output view and the Runup output view
already show all time steps, they are not connected to the time navigator. The time navigator
allows an animated view of the calculated cross-shore output.
Figure 3.6: Example of the time navigator. Each green dot represents an output time step
3.2.2
Document views
Document windows are used to visualize and edit the content of specific items. They are
directly coupled to a single item in the project. Document windows are opened in the main
window of the GUI (8).
Main window / Document views location
The main window is the location where all document views initially are opened. The main
window features a tab structure to keep track of all open document views. The user can
navigate through the document views by clicking the arrows at the top (right side) of the main
window or by using Ctrl+Tab. The possibility of moving and docking document views enables
Deltares
13 of 44
XBeach-G GUI 1.0, User Manual
the user to keep an overview when using multiple document views at once.
Dock and undock windows
The GUI can be accommodated according to the user’s needs by means of docking, pinning
and unpinning document windows and toolwindows. Moving (and docking) windows can be
done by dragging a window with the left mouse button. Docking help is provided when the
user drags a window over the GUI (see Figure 3.7). Next to docking the window at another
location in the GUI, it is also possible to leave the window undocked (floating). If a window is
in a docked position two symbols at the top right of the window (see Figure 3.8) can be used
to:
pin or unpin the window (pushpin)
remove the toolwindow from the GUI (cross). After removing a toolwindow, the user can
T
3.3.1
Customizing the interface
get the toolwindow back via the Views tab on the Ribbon
The size of the various windows can be adjusted as well. The user can adjust the size of a
window by clicking on the interface between two windows and drag the division to the desired
position.
DR
AF
3.3
Figure 3.7: Example of the visual help when docking a window. The green circle indicates
the locations in the main document window. Red circles indicate docking
positions at the sides of the GUI.
14 of 44
Deltares
Graphical user interface in general
Ribbon bar
The top part of the GUI includes a so-called Ribbon bar (number 2 in Figure 3.3). The Ribbon
bar features functionality ordered in three tabs:
DR
AF
3.4
T
Figure 3.8: Example showing some unpinned documents (blue oval), pin/unpin pushpin
and cross to hide a toolwindow (red oval) and the border of a toolwindow that
can be dragged to change its size (green oval)
Home - The home tab offers buttons with general functions that can be used when editing
a project (Figure 3.9)
View - This tab offers buttons for all available toolwindows to toggle the current visual
mode (visible / hidden) of the toolwindows in the GUI (Figure 3.10)
Chart - The Chart tab features various functions related to viewing and analysing data in
a chart (Figure 3.11)
Figure 3.9: Overview of the available buttons in the Home tab
Figure 3.10: Overview of the available buttons in the View tab
Deltares
15 of 44
XBeach-G GUI 1.0, User Manual
DR
AF
T
Figure 3.11: Overview of the available buttons in the Chart tab
16 of 44
Deltares
4 Setting up an XBeach-G model (Input)
This chapter discusses how to define input for the XBeach-G model through the use of the
four Input items in the project tree view.
4.1
Profile definition
The geometry of the cross-shore profile to be simulated in XBeach-G is defined in the "Profile"
input item and corresponding profile document view. Upon starting a project, a default crosssection of a gravel barrier will be shown in the profile document view. The user can choose to
change the shape of the cross-shore profile by either:
T
Setting characteristic geometrical descriptions of the cross shore profile (Section 4.1.1).
Importing or defining profile coordinates (Section 4.1.2).
4.1.1
DR
AF
The user can choose which method to use to set-up the cross-shore profile by selecting either
the "Characteristics" tab, or the "Coordinates" tab in the profile document view (see Figure
4.1). A description of both methods is given in the following sections. Note that whatever
method is selected by the user, the model will be run using the last cross-shore profile shown
in the profile document view.
Using geometrical characteristics
By selecting the "Characteristics" tab in the profile document view, the user can define the
cross-shore profile of the model by means of eight parameters that characterise the gravel
beach or barrier geometry. These parameters are:
Crest level - the height of the gravel beach or barrier crest above vertical datum.
Land level - the height of the land behind the beach or barrier above vertical datum.
Toe depth - the depth of the toe of the gravel beach above vertical datum.
Offshore depth - the depth to which the model should extend in offshore direction. Typically this is the depth at which offshore wave conditions are known. The user should take
care to ensure the water depth at the offshore boundary of the model is sufficiently deep
at the model boundary. This is discussed in more detail in Section 4.1.3.
Foreshore slope - the slope of the bed between the offshore boundary and the gravel
beach toe. Note that the slope if input as the tangent of the slope, not in degrees.
Beach slope - the slope of the gravel beach between the gravel beach toe and the crest
of the beach. Note that the slope if input as the tangent of the slope, not in degrees.
Back slope - the slope of the back of the gravel barrier between the barrier crest and the
land behind the barrier. Note that the slope if input as the tangent of the slope, not in
degrees and that a positive value indicates a downhill slope towards land.
If the user changes any of the eight parameters of the barrier geometry, the GUI will automatically update the shape of the cross-shore profile. By pressing the "Edit these coordinates"
button, the user exports the parametric description of the barrier to the "Coordinates" tab
described in the following section. The user may then add, remove, or adjust coordinate
locations in the "Coordinates" tab to fine-tune the cross-shore profile.
Deltares
17 of 44
T
XBeach-G GUI 1.0, User Manual
4.1.2
DR
AF
Figure 4.1: Example of the Profile document view when specifying the profile by means
of geometrical characteristics
Using Coordinates
By selecting the "Coordinates" tab in the profile document view, the user can define the crossshore and vertical coordinates of the model profile (see Figure 4.2). The coordinates of the
cross-shore profile can be input in the following ways:
Directly inserting every cross-shore and vertical coordinate individually in the profile coordinate editor in the profile document view. The user can add new coordinates to the profile
by inserting the coordinate on the bottom row of the coordinate editor. Note that all input
coordinates are automatically placed in the correct cross-shore order by the GUI.
Copying two columns representing the profile cross-shore and vertical coordinates from a
spreadsheet program such as Microsoft Excel and pasting these in the coordinate editor
in the profile document view.
By importing an external .csv file containing the cross-shore and vertical coordinates of
the cross-shore profile. The .csv file should contain two columns of data separated by a
semicolon (";"), in which the first column contains the cross-shore position and the second
column contains the vertical elevation of the coordinates. The decimal format for both
coordinates should be a period ("."). The external .csv file can be imported into the GUI
by pressing the "Import" button below the coordinate editor.
The user can copy, paste and remove rows in the coordinate editor of the profile document
view by right-clicking on the row of the coordinate, or by pressing CTRL+C (copy), CTRL+V
(paste) and DELETE (remove).
The user should ensure that the input profile is defined with the vertical coordinate increasing in upward direction and the cross-shore coordinate increasing in landward direction. The
profile displayed in the profile document view should therefore always be oriented with the
landward part of the profile on the right and the land elevation shown higher than the bathymetry of the sea. Should the input data have a different orientation, for instance cross-shore
coordinates increasing in seaward direction, the user can use the two "flip profile" buttons to
the right of the "Import" button below the coordinate editor to rotate the coordinate system
18 of 44
Deltares
Setting up an XBeach-G model (Input)
DR
AF
T
until the correct orientation for the model is achieved.
Figure 4.2: Example of the Profile document view when specifying the profile by means
of coordinates
4.1.3
Grid generation
Once the user has defined the shape of the cross-shore profile, the GUI automatically generates a computational model grid that is used by the XBeach-G model to compute the hydrodynamics and morphodynamics of the gravel beach or barrier. The computational model grid
is represented in the profile document view by a grey line with blue dots.
In general, the computational model grid will have a higher spatial resolution than the input
resolution of the profile coordinates. The resolution of the computational grid is automatically
determined by the GUI, taking into account the resolution required to correctly represent the
hydro- and morphodynamics in the model.
The user is able to influence the automatic computational model grid generation by specifying
three model grid parameters in the "Grid generation" panel above the "Characteristics" and
"Coordinates" tabs. These parameters are:
Minimum grid size - this represents the smallest grid size that will be used for the computational model grid. This size is applied near the waterline and on the gravel beach.
Increasing the minimum grid size will reduce the computational effort of the XBeach-G
model, but will reduce the ability of the XBeach-G model to accurately predict wave breaking and wave run-up.
Maximum grid size - this represents the maximum grid size that will be used for the
computational model grid. This size may be applied in deeper sections of the model,
where computed wave lengths are large.
Minimum points per wavelength - this represents the minimum number of grid points
used to describe the characteristic waves applied in the model. Since wave lengths vary
with water depth, this criterion for the computational model grid resolution varies in the
cross-shore direction. Reducing the minimum number of points per wave length will reduce the computational effort of the XBeach-G model, but will greatly reduce the ability
of the model to correctly simulate wave propagation towards the shore. It is not recom-
Deltares
19 of 44
XBeach-G GUI 1.0, User Manual
mended to reduce the number of points per wave length to less than 15–20.
The computational model grid generation by the GUI applies the strictest criterion of the maximum grid size and the minimum number of points per wave length to determine the largest
allowable computational grid size on the offshore boundary of the model. The GUI subsequently applies a smooth transition of the computational grid size to the minimum grid size in
shoreward direction, taking into account an optimal weighting based on the Courant condition
and the resolution to describe hydrodynamic processes. These weighting factors cannot be
altered by the user.
T
When designing the computational model grid in the GUI, the user should ensure that the
water depth at the offshore boundary is such that the assumptions in the XBeach-G model
are valid and the restrictions in the model boundary conditions are not exceeded. These
assumptions and restrictions are as follows:
The water depth at the offshore boundary of the model should be sufficiently deep that
DR
AF
wave breaking does not occur at the model boundary. In general it is sufficient to assume
that the water depth should be at least twice the offshore significant wave height.
The water depth at the offshore boundary of the model should be sufficiently deep that
bound infragravity waves imposed at the model boundary are not significantly out of phase
with the generated wave groups. This restriction is indicated by the lower bounds of the
green and orange shading in Figure 4.3. Note that this restriction becomes most relevant
in conditions of large infragravity wave energy generation.
The maximum water depth in the model, which is generally located at the offshore boundary of the model, should not exceed the reliability limits of the non-hydrostatic pressure
solver of the XBeach-G model. This restriction is indicated by the upper bounds of the
green and orange shading in Figure 4.3.
Should the cross-shore profile data used to set up the XBeach-G model in the GUI not extend
to a sufficient water depth to meet the restrictions of the model boundary conditions, the user
can artificially lower the offshore boundary of the model by specifying the "Maximum offshore
bottom level" in the Grid generation panel. If this level is lower than the offshore bed level in
the profile coordinates, the GUI will automatically lower the offshore bed to the imposed bed
level using a 1:10 slope. Note that if data are available to describe the true coastal profile to
the correct water depth, these data should be used and an artificial lowering of the offshore
bed level should be avoided.
20 of 44
Deltares
Setting up an XBeach-G model (Input)
Recommended offshore water depth relative to wave period
25
15
10
T
Offshore water depth (m)
20
0
DR
AF
5
0
2
4
6
8
10
Tm−1,0 wave period (s)
12
14
16
18
Figure 4.3: Recommended offshore water depth at the XBeach-G model boundary as
a function of the offshore mean wave period are shown in green shading.
Acceptable offshore water depths are shown in orange. Note that the offshore
water depth should include tidal variation and that the Tm−1,0 wave period
can be approximated by Tp /1.1, where Tp is the peak wave period, if spectral
wave data are not available. The user is not recommended to apply water
depths that fall outside the orange area.
4.2
Waves input
Wave input for the XBeach-G model is defined in the "Waves" input item and corresponding
waves document view. The user can specify time series of spectral wave conditions in the
wave boundary condition editor in the bottom of the waves document view, see Figure 4.4.
A spectral representation of the wave boundary conditions is shown in the wave spectrum
display in the top of the waves document view. The user can specify wave boundary conditions
for the XBeach-G model by specifying wave spectrum parameters for JONSWAP-type wave
spectra in the wave boundary condition editor. The parameters that can be specified are as
follows:
Time - this represents the start time of the wave boundary condition is seconds relative to
the start of the simulation. These wave boundary conditions continue until new conditions
are specified, or until the end of the model simulation.
Spectrum type - this allows the user to specify whether the spectral boundary conditions
should be unimodal or bimodal.
Gamma - this allows the user to set the JONSWAP peak enhancement factor for the
primary wave spectrum. For a standard JONSWAP spectrum this should be set to 3.3.
For a Pierson-Moskowitz spectrum this value should be set to 1.0.
Hs - this allows the user to set the significant wave height of the primary wave spectrum.
Tp - this allows the user to set the peak wave period of the primary wave spectrum.
S - this allows the user to set the directional spreading of the primary wave spectrum
according to D = cos2s ((θ−θm)/2). Common values for s are 5–10 for wind waves and
20–75 for swell waves. Setting s to a value greater than 1000 will impose wave conditions
Deltares
21 of 44
XBeach-G GUI 1.0, User Manual
with no directional spreading. Note that the directional wave spreading imposed on the
model will affect the generation of bound infragravity waves at the boundary of the model.
If the user imposes a bimodal spectrum, the wave boundary condition editor will allow the user
to specify the JONSWAP peak enhancement factor (Gamma (2)), significant wave height (Hs
(2)), peak period (Tp (2)) and directional spreading coefficient (S (2)) for the secondary wave
spectrum.
T
To impose varying spectral wave boundary conditions over time, the user may add multiple
rows containing wave spectral parameters in the wave boundary condition editor. The user
should always ensure that the start time (first column in the editor) of each wave spectrum is
distinct. Any wave spectra sharing the same start time as an earlier defined wave spectrum
will be ignored by the model.
DR
AF
The wave spectrum display in the top of the waves document view automatically displays
the spectrum currently selected in the wave boundary condition editor. Multiple spectra can
be displayed in the wave spectrum display by selecting multiple rows in the wave boundary
condition editor, see Figure 4.4.
Figure 4.4: Example of the document view for specification of the wave boundary conditions in time
4.3
Tide input
Tide and surge input for the XBeach-G model is defined in the "Tide" input item and corresponding tide document view. The user can specify time series of tide and surge in the
Offshore water level editor in the left of the tide document view, see Figure 4.5. A representation of the time series of the imposed tide and surge conditions is shown in the tide display in
the right of the tide document view.
In order to input tide and surge conditions in the XBeach-G model, the user must specify a
time series of the combined tide and surge water level at the offshore boundary of the model.
The user can do this in three ways:
By manually adding a time series of offshore water levels in the Offshore water level
editor. The user can add additional rows to the tide time series by inserting values in
the bottom row of the editor. Note that the GUI will automatically sort all rows in the
22 of 44
Deltares
Setting up an XBeach-G model (Input)
T
Amplitude - the amplitude in meters of the sinusoidal tide.
Phase shift - the phase shift of the sinusoidal tide in hours relative to the start of the
simulation.
Period - the period of the sinusoidal tide in hours. Generally this is 12.42 hours to
represent the M2 tide.
Surge - the additional constant surge water level in meters. Note that the surge level
can also be used to adjust the vertical elevation of the tide to account for a vertical
datum in the model that is not equal to Mean Sea Level.
Signal length - the length in seconds of the tide and surge signal to be imposed on
the XBeach-G model. Note that this value should be at least as long as the duration
of the model simulation Section 4.4).
Time step - the time step in seconds with which the tide and surge signal is described
and imposed on the XBeach-G model. Note that this value should be sufficiently small
to correctly describe the tidal curve. This time step is separate from the computational
time step used in the XBeach-G model, and will therefore not affect the computation
time of the XBeach-G model.
DR
AF
correct chronological order. The user can copy, paste and remove rows in Offshore water
level editor in the same way as in the wave boundary condition editor.
By generating a simple sinusoidal tide with a constant surge level above Mean Sea Level.
The user can do this by pressing the "Generate tide" button below the Offshore water level
editor, which brings up the tide generation dialogue (Figure 4.6). In the tide generation
dialogue, the user can specify the following tide and surge parameters:
By importing an external .csv file containing a time series of the combined tide and surge
level at the offshore boundary of the model. The .csv file should contain two columns of
data separated by a semicolon (";"), in which the first column contains the time in seconds
relative to the start of the simulation and the second column contains the vertical elevation
of the tide and surge above the vertical datum of the XBeach-G model. The decimal format
for both coordinates should be a period ("."). The external .csv file can be imported into
the GUI by pressing the "Import" button below the Offshore water level editor.
The user must ensure that the imposed tide and surge level are specified relative to the same
vertical datum as the definition of the cross-shore profile in the profile document view. The
user must also ensure that the time series of the imposed tide and surge conditions is at least
as long as the duration of the model simulation Section 4.4). The XBeach-G model will not be
able to run a simulation if this information is missing.
The tide document view also allows the user to specify three types of water level boundary
conditions for the landward end of the model. These boundary conditions are specified in the
"Back boundary water level" editor, located above the Offshore water level editor, and have
the following options:
Constant - in this case a constant water level and groundwater head are imposed at
the landward boundary of the XBeach-G model. The value of these levels above vertical
datum is set in the edit box in the Back boundary water level editor. This option is principally used if XBeach-G is used to model a gravel barrier backed by a lagoon that is not
connected to the sea.
Variable - in this case, the water level applied at the offshore boundary of the XBeachG model is also applied at for the water level and groundwater head at the landward
boundary of the XBeach-G model. This is principally used if XBeach-G is used to model
a gravel barrier spit that is surrounded by sea on both the front and back.
Dry - in this case, the landward boundary of the XBeach-G model is assumed to be dry.
In order to achieve this, the water level and groundwater head at the landward boundary
of the XBeach-G model is set 0.5m lower than the bed elevation of the most landward
Deltares
23 of 44
XBeach-G GUI 1.0, User Manual
DR
AF
T
grid point. Note that this effect can be achieved by setting the back boundary water level
condition to a constant value that is lower than the land level.
Figure 4.5: Example of the document view for specification of the tide boundary condition
Figure 4.6: Example of the tide generation dialog
4.4
Parameters
The most important model input parameters for the XBeach-G model are defined in the "Parameters" input item and corresponding parameters document view (Figure 4.7). Model parameters that are not shown in the parameters document view are set to their XBeach-G
default values. A brief discussion of how to run XBeach-G models outside the XBeach-G
GUI, thereby allowing the user to specify non-default model parameters, is given in Section
5.2.
The model parameters that can be set in the parameters document view are the following:
Duration - this represent the duration of the model simulation in seconds. This parameter
takes precedence over the tide and surge time series imposed in the tide document view,
and the wave time series imposed in the waves document view. As noted previously, the
user should ensure that the tide and surge time series imposed in the tide document view
is at least as long as the duration of the model simulation specified in the parameters
document view.
24 of 44
Deltares
Setting up an XBeach-G model (Input)
Output timestep - this represents the time step in seconds at which cross-shore output is
T
DR
AF
stored in the model results. Larger output time steps lead to smaller output files, but also
less detailed information for post-processing of the model results.
D50 - this represents the median grain diameter in meters of the gravel beach or barrier.
The median grain diameter affects sediment transport (if morphology if computed) and to
a lesser degree the bed roughness. It is not possible to specify multiple sediment types in
the XBeach-G GUI.
k - this represents the hydraulic conductivity in meters per second of the permeable gravel
sediment. This value is used to compute the groundwater dynamics in the gravel beach
or barrier.
Groundwater level - this represents the initial groundwater level in the gravel beach or
barrier in meters above vertical datum. Initialising the XBeach-G model with the correct
groundwater level increases the accuracy of the computed swash dynamics at the start of
the simulation.
Bottom aquifer - this represents the uniform vertical position of the impermeable layer underneath the permeable gravel, specified in meters above vertical datum. This parameter
therefore defines the thickness of the permeable gravel layer, which affects groundwater
dynamics in the gravel bed.
Calculate morphology - this allows the user to set the computation of sediment transport
and morphology on and off in the XBeach-G model. If this switch is turned on, the user
can subsequently specify the following morphodynamic parameters:
Sediment friction factor - this represents the non-dimensional sediment friction factor
used to compute the Shields parameter and subsequent sediment transport. The
value of the sediment friction factor should lie between 0.01–0.05.
Nielsen"s boundary layer phase lag - this represents the phase lag in degrees between the free stream velocity and the boundary layer velocity in Nielsen’s (2002)
approximation of the bed boundary layer in the swash. The value for the phase lag
should lie between 20–35 degrees.
Angle of repose - this represents the angle of repose of the gravel sediment in degrees. The angle of repose affects sediment transport on slopes and avalanching of
steep slopes above water.
Deltares
25 of 44
DR
AF
T
XBeach-G GUI 1.0, User Manual
Figure 4.7: Example of the document view to specify input parameters
26 of 44
Deltares
5 Running XBeach-G
Running an XBeach-G model can be initiated from the GUI, but also with an executable outside the GUI environment. This chapter discusses both options.
Inside GUI
When running a model via the GUI it is important to save the project first. Saving a project will
automatically create a working directory for each model. This working directory will contain
the result after running a model (see also section 3.1.2). By default the GUI will save a project
before running a model. If a project is not saved before, the GUI will ask the user to specify
where to save the project.
T
Starting a single model run can be done by either:
Pressing F9 when the model is selected in the Project toolwindow, or
Pressing "Run Current" in the Home tab of the ribbon (see Figure 5.1), or
Right-click the model in the Project toolwindow and select "Run model"
DR
AF
5.1
Figure 5.1: Example of the Home tab in the Ribbon bar when a model is selected. Run
Current and Run All options are enabled
It is also possible to run multiple models at once. The GUI will try to run at maximum four
models simultaneously (see Figure 5.2). When running models next to each other, the GUI
distributes each model run to a new process. In this way the GUI makes optimal use of multiple
CPU cores when those are available. Running models simultaneously can be initiated by the
user by either:
Pressing Ctrl + F9, or
Pressing "Run All" in the Home tab of the ribbon (see Figure 5.1), or
Right-click the project or folder that contains multiple models in the Project toolwindow and
select "Run All Models"
Running a model is done in two phases:
1 Initialize - First the model is initialized. During this step the input bathymetry and boundary
conditions are communicated to the XBeach-G model. The XBeach-G model also creates
a time series of the boundary conditions (tide and waves). This can take some time,
depending on the boundary conditions that were specified.
2 Execute - During this phase, the GUI asks the XBeach-G model to compute the output
for each time step until the simulation duration is exceeded.
During a model run, all messages created by either the GUI or the XBeach-G model are shown
in the Messages toolwindow (section 3.2.1.4). Messages created during the first phase will be
included in the window after completion of the phase. Messages created during the second
phase (the time loop) are posted after the computation of a time step completed. All messages
created during a model run will also be stored in the "Run Report" in the output of a model in
Deltares
27 of 44
T
XBeach-G GUI 1.0, User Manual
DR
AF
Figure 5.2: Example of the GUI running 5 XBeach-G models. The first four models are
run simultaneously, the fifth model will be executed when one of the other
models is finished
the GUI (see also section 6.4).
5.2
Outside GUI
There is also an option to build models with the GUI, run them somewhere else (for example
on a faster computer) and import the results back into the GUI afterwards. To do so, the user
must follow the following steps:
1 Create model - Similar to running a model inside the GUI, the user first needs to set-up a
model as described in chapter 4.
2 Export model setup - Next the user needs to export the model set-up. Exporting a model
set-up can be done in two ways:
Right click a model in the Project toolwindow and select "Export..." (see Figure 5.4)
Select a model in the Project toolwindow, Click "File" in the Ribbon bar and select
"Export" (see Figure 5.5)
After selecting "Export..." the user will be prompted for a directory where the model set-up
should be saved. If the user specifies a directory, the exporter will write several files to
that directory, divided into the following two categories (see also Figure 5.3):
Model input - The model input will be written in a file with the name "params.txt" This
file also specifies files where the model can find a bathymetry, tidal signal and wave
boundary conditions. These derived files will also be written to the specified directory
Stand alone executable of the XBeach-G model - The main executable file of the
XBeach-G model ("xbeach.exe") will be written to the specified directory. This executable depends on several other libraries that will be written to the specified directory
as well (*.dll). The directory will also include licence information of the XBeach-G
model. The user is free to move or copy the files of this folder to other locations on the
computer.
3 Run model outside the GUI - If the model set-up is exported, the user is able to change
some of the parameters that are not exposed in the interface, specify some additional
output or use a newer / updated version of the XBeach-G executable. Running a model
outside the GUI is done by double clicking the xbeach.exe file in the specified directory.
28 of 44
Deltares
DR
AF
T
Running XBeach-G
Figure 5.3: Microsoft windows file explorer showing all files created by the XBeach-G
model set-up exporter to run the XBeach-G model outside the GUI
4 Import model results - After an external model run has finished, it is also possible to
include the results in the GUI again. To do so, the user can either:
Right click a model in the Project toolwindow and select "Import..." (see Figure 5.4)
Select a model in the Project toolwindow, Click "File" in the Ribbon bar and select
"Import" (see Figure 5.5)
These actions will initialize a model output importer that prompts the user for the location
of the output file (xboutput.nc). After selecting the output file, the importer will copy the file
to the working directory of the model (see section 3.1.2 for more details) and connect the
model to that output file. The GUI will not make sure the input of that model corresponds to
the selected output file. When possible the GUI will also show additional output variables.
Deltares
29 of 44
DR
AF
T
XBeach-G GUI 1.0, User Manual
Figure 5.4: Example of the context menu of an XBeach-G model in the GUI including
Import and Export options
Figure 5.5: Example of the file menu with Import and Export option
30 of 44
Deltares
6 Analyse model output
Once an XBeach-G model has been run, the user can visualise and analyse the model data
using four output items in the project tree view:
Cross-shore
Time series
Runup
Run report
These four output items are discussed in this chapter.
Cross-shore
T
The cross-shore output item and associate cross-shore output document view (Figure 6.1)
presents the state of model variables across the entire cross-shore profile at a given point in
time. When first selected, the cross-shore output document view will present the bed level,
water level and groundwater level at the start of the model simulation, as well as the range of
minimum and maximum water levels over the simulation in the cross-shore profile chart at the
top of the cross-shore output document display.
DR
AF
6.1
The user can modify the output time step shown in the cross-shore profile chart by selecting
a time step in the Time Navigator Toolwindow (Figure 3.6) at the bottom of the cross-shore
output document view. Alternatively, the user can start, pause and skip through an animated
display of the cross-shore profile chart by selecting the animation buttons on the left-hand
side of the Time Navigator toolwindow.
The user can modify the variables displayed in the cross-shore profile chart by checking the
tick-boxes in the Chart Toolwindow (Figure 3.5) on the right-hand side of the cross-shore
output document display. Variables in the Chart Toolwindow are categorised in the following
types:
Instantaneous values (no suffix) - these variables contain the instantaneous value of the
selected variable at the time step indicated by the user in the Time Navigator Toolwindow
(Figure 3.6).
Mean values - these variables that are suffixed by the name "(mean)" contain the mean
value of the selected variable, averaged over the entire model simulation duration.
Range values - these variables that are suffixed by the name "(range)" contain the range
between the minimum and maximum values of the selected variable, computed over the
entire model simulation duration.
Statistics values - these variables that are suffixed by the name "(statistics)" contain the
range between the mean of the selected variable, plus and minus the standard deviation
of the selected variable, computed over the entire model simulation duration.
The user can choose to export the model output values of all model variables at a given output
time step to an external .csv file by right-clicking on the cross-shore output item in the project
treeview and selecting the "Export" function. This action will start the export dialogue (Figure
6.2), where the user can set the file name and location for the exported .csv file, as well as
selecting at which output time step the variables should be exported.
Deltares
31 of 44
T
XBeach-G GUI 1.0, User Manual
DR
AF
Figure 6.1: Example of the Cross-shore output document view
Figure 6.2: Example of the export dialog including selection of the time step to export
32 of 44
Deltares
Analyse model output
Time series
The time series output item and associate time series output document view (Figure 6.3)
presents time series of model variables at a single location along the model profile. When first
selected, the time series output document view will present the water level, mean water level
and water level statistics at the offshore boundary of the model in the time series chart at the
top of the time series output document display.
The user can modify the location for which the time series is shown in the time series chart by
selecting a cross-shore position in the cross-shore position slider below the time series chart.
Note that only positions in the centre of XBeach-G model grid cells can be displayed in the
time series chart.
T
The user can modify the variables displayed in the time series profile chart by checking the
tick-boxes in the Chart Toolwindow (Figure 3.5) on the right-hand side of the time series output
document display in a similar manner to the cross-section output document view.
The user can choose to export the model output values off all model variables at a given
output location to an external .csv file by right-clicking on the time series output item in the
project treeview and selecting the "Export" function. This action will start the export dialogue
(Figure 6.4), where the user can set the file name and location for the exported .csv file, as
well as selecting at which output time step the variables should be exported.
DR
AF
6.2
Figure 6.3: Example of the Time series output document view
Deltares
33 of 44
T
XBeach-G GUI 1.0, User Manual
6.3
Runup
DR
AF
Figure 6.4: Example of the export dialog including selection of the cross-shore position
to export
The runup output item and associate runup output document view (Figure 6.5) presents time
series of the absolute vertical position of the waterline at the beach (Z) and the wave runup elevation above the tide and surge level (R) in the runup chart at the top of the runup
output document display. If the duration of the simulation is sufficient to do so, the runup
output document display will display the 2% exceedence of the absolute vertical position of
the waterline (Z2%) and the 2% exceedence of the wave run-up elevation above the tide and
surge level (R2%).
The 2% exceedence values of the vertical position of the waterline (Z2%) and wave run-up
(R2%) are determined by the GUI through an empirical cumulative distribution function of all
waterline elevation maxima that exceed the mean waterline elevation, or are spaced more
than half a period apart from other waterline elevation maxima.
The vertical position of the waterline is determined by the last submerged XBeach-G model
grid point in landward direction. Note that when overtopping occurs, the XBeach-G GUI will
not be able to correctly compute the location of the waterline and wave run-up levels. In these
situations, the results presented in the runup output view should not be considered valid.
The user can modify the variables displayed in the runup time series chart by checking the
tick-boxes in the Chart Toolwindow (Figure 3.5) on the right-hand side of the runup output
document display in a similar manner to the cross-section output document view.
The user can choose to export the computed vertical position of the waterline and wave runup, as well as the 2% exceedence values of both variables to an external .csv file by rightclicking on the runup output item in the project treeview and selecting the "Export" function.
This action will start the export dialogue, where the user can set the file name and location for
the exported .csv file.
34 of 44
Deltares
Analyse model output
6.4
Run report
T
Figure 6.5: Example of the Runup output document view
6.5
DR
AF
The run report output item and associate run report output document view displays a list of all
messages generated by the XBeach-G model during model simulation.
Tools
The user has four tools available in the "Chart" tab of the Ribbon bar that can help analysing
the model results (see Figures 6.6 and 6.7). Whenever one of the document views that
presents model output is opened, these tools will be enabled depending on the content of
the document view. This section will discuss the following tools:
1
2
3
4
Time representation
Ruler
Show Cross-shore position
Calculate R2%
Figure 6.6: Example of the Chart ribbon tab when the main window shows a cross-shore
output document view
Figure 6.7: Example of the Chart ribbon tab when the main window shows a runup output
document view
Deltares
35 of 44
XBeach-G GUI 1.0, User Manual
6.5.1
Time representation
The "Chart" tab of the Ribbon bar contains a "Time" section in which the user can specify
the way time is represented in all relevant document views or toolwindows in the GUI. This
includes the horizontal axis of the document views for "Runup" and "Time series", but also the
"Time Navigator" toolwindow. The user can select two options:
DR
AF
T
1 Time format (hh:mm:ss) - This format represents the time relative to the start of the
simulation following the hh:mm:ss format, in which hh represents the hours, mm minutes
and ss seconds. Figure 6.8 shows an example of the "Runup" document view when this
format is selected.
2 Elapsed seconds - This format denotes the elapsed time in seconds since the start of
the simulation. Figure 6.9 shows an example of the "Runup" document view in case the
"Elapsed seconds" format is chosen.
Figure 6.8: Example of the Runup output document view with time format
Figure 6.9: Example of the Runup output document view with seconds format
6.5.2
Ruler
The "Ruler" tool is available in the "Tools" section of the "Chart" tab of the Ribbon bar. This
tool is enabled when the user selects a "Cross-shore" or "Time series" document view. With
the tool the user can measure distances between arbitrary points in the chart. To do so, the
user must select the tool in the Ribbon bar. Subsequently the user needs to click two points in
the figure. After clicking the first point, the tool will show a dotted line between that point and
36 of 44
Deltares
Analyse model output
the mouse pointer. After clicking the second point, the dotted line connects the two clicked
points and a tooltip with the desired information will be shown each time the mouse pointer
hoovers over that line (see Figure 6.10). The user can select new points by clicking the figure
again. To stop measuring, the user needs to click the button in the Ribbon bar again.
DR
AF
T
While selecting the points it is still possible to pan the chart by holding the right mouse button
and zoom in and out by pressing Ctrl on the keyboard and using the mouse wheel to scroll.
Figure 6.10: Example of the use of the ruler tool in the cross-shore output document view
6.5.3
Show cross-shore position
When analysing "Time series" output in the associated document view, it is possible to use
the slider on the bottom of the view to navigate the cross-shore position that is shown. The
user can choose to open the "Cross-shore" document view next to the already opened "Time
series" document view (or in reverse order). In that case, the user may want to specify a
cross-shore position in the "Cross-shore" document view, that will be shown in the "Time
series" view. To that end, the "Tools" section of the "Chart" tab in the Ribbon bar contains
a tool named "Show cross-shore position". This tool is enabled when the user has both
the "Cross-shore" and the "Time series" document views of a model open, and selects the
"Cross-shore" view. If the user activates this tool (by clicking the tool in the Ribbon bar),
the "Cross-shore" document view will show an additional vertical line, corresponding to the
cross-shore position that is shown in the "Time series" document view. The user can now
use both the slider in the "Time series" document view and the vertical line in the "Crossshore" document view to control the cross-shore position that is displayed in the "Time series"
document view. Figure 6.11 shows an example of the two document views with an activated
"Show cross-shore position" tool. In this case a location near the water-line is selected. The
tool can be deactivated again by clicking the tool in the Ribbon bar.
Deltares
37 of 44
DR
AF
T
XBeach-G GUI 1.0, User Manual
Figure 6.11: Example of usage of the cross-shore position tool in a combination of the
document views for cross-shore output and time series output
6.5.4
Calculate R2%
If the user opens a "Runup" document view, the "Calculate R2%" tool in the "Tools" section
of the "Chart" tab in the Ribbon bar will be enabled. This tool allows the user to specify an
arbitrary period in the model output and calculate the 2% exceedance value of the wave runup elevation above the tide and surge level over the specified period. To select the period the
user should draw a rectangle over the desired period (Figure 6.12) by clicking the start and
end time of the desired period. After clicking the end time, the tool will calculate an R2% value
and post this information in the "Messages" toolwindow (Figure 6.13). Afterwards the tool will
be deactivated automatically. The user can select the tool again to calculate an R2% value
for a different period.
38 of 44
Deltares
T
Analyse model output
DR
AF
Figure 6.12: Example of making a selection with the R2% tool
Figure 6.13: Example a message after using the R2% tool
Deltares
39 of 44
DR
AF
T
XBeach-G GUI 1.0, User Manual
40 of 44
Deltares
References
Donchyts, G. and B. Jagers, 2010. “DeltaShell - an open modelling environment.” In International Environmental Modelling and Software Society (iEMSs) 2010 International Congress
on Environmental Modelling and Software.
McCall, R., G. Masselink, T. Poate, A. Bradbury, P. Russel and M. Davidson, 2013. “Predicting
overwash on gravel barriers.” In Proceedings of the 12th International Coastal Symposium,
Journal of Coastal Research, Special Issue No. 65 (2013), 65, pages 1473-1478.
McCall, R., G. Masselink, D. Roelvink, P. Russell, M. Davidson and T. Poate, 2012. “Modelling
overwash and infiltration on gravel barriers.” In Proceedings of the International Conference
of Coastal Engineering, Santander (2012).
DR
AF
T
Roelvink, D., A. Reniers, A. V. Dongeren, J. V. T. de Vries, R. McCall and J. Lescinsky, 2009.
“Modelling storm impacts on beaches, dunes and barrier islands.” Coastal Engineering 56:
1133-1152.
Deltares
41 of 44
DR
AF
T
XBeach-G GUI 1.0, User Manual
42 of 44
Deltares
DR
AF
T
T
DR
AF
PO Box 177
2600 MH Delft
Rotterdamseweg 185
2629 HD Delft
The Netherlands
[email protected]
www.xbeach.org