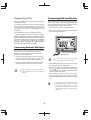
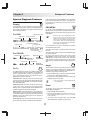
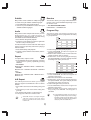
1
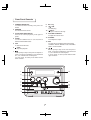
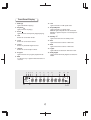
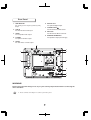
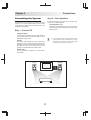
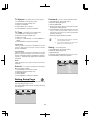
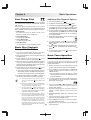
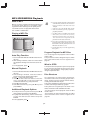
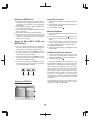
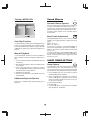
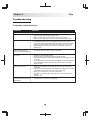
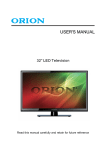
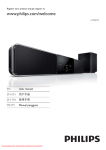
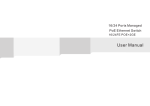
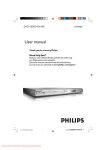
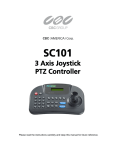
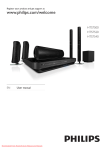
MICRO DVD SYSTEM
DVA-206LX
USER'S MANUAL
Unpack Your DVD System
Main unit (1)
Remote control (1)
1.5V AAA batteries (2)
Main speakers (2)
AM loop antenna (1)
FM wire antenna (1)
User's Manual (1)
Video cable (1)
06LX
DVA-2
US ER
Feature List
1.
2.
3.
4.
5.
6.
7.
8.
9.
10.
11.
12.
13.
Support DVD playback
Support VCD / SVCD playback
Support MP3 / JPEG / MPEG4 playback
Support CD / CD-R / CD-RW playback
Support DVD-R / DVD-RW
Support DVD+R / DVD+RW
Powerful output, 10Wrms X 2
Dolby Digital bit stream optical output
24 bits / 192KHz audio DAC
PLL FM tuner with RDS
Preset memory for AM/FM tuner, 30 stations for AM and 30 FM
Video output terminals: Composite Video / S-Video / Scart
Sound effects
1
TEM
DVD SYS
MICRO
NU
'S MA
AL
Important Notice
Dear Customer,
Thank you for purchasing our product. Before you can enjoy using it, please read this safety information and
precautions to ensure a proper use of your DVD Player.
IMPORTANT
CAUTION
RISK OF ELECTRIC SHOCK
DO NOT OPEN
The lightning flash with arrowhead symbol, within an equilateral
triangle, is intended to alert the user to the presence of uninsulated
"danger voltage" within the product's enclosure that may be of
sufficient magnitude to constitute a risk of electric shock to persons.
The exclamation point within an equilateral triangle is intended to
alert the user to presence of important operating and servicing
instructions.
You can help protect the environment!
Please remember to respect the local regulations: hand in the non-working
electrical equipments to an appropriate waste disposal center.
WARNING
To prevent fire or shock hazard, do not expose this
product to rain or moisture.
The apparatus shall not be exposed to dripping or
splashing. No object filled with liquids, such as
vases, shall be placed on the apparatus.
To completely disconnect the power input, the mains
plug of the apparatus should be disconnected from
the mains on condition that the disconnected device
is the mains plug of the apparatus.
The mains plug of the apparatus should not be
obstructed OR should be easily accessed during
intended use.
CAUTION
To avoid electrical shock, do not open the cover (or
rear). Refer servicing to qualified service personnel.
To prevent electric shock, match wide blade of plug
to wide slot, fully inserted.
To ensure a minimum distance of 5 cm around the
apparatus for sufficient ventilation.
To ensure that the ventilation is not impeded by
covering the ventilation openings with items, such
as newspapers, table-cloths, curtains, etc.
2
Do not place naked flame sources, such as lighted
candles on the apparatus.
To use the apparatus only in moderate climates
(not in tropical climates).
DANGER
This DVD Player uses a visible Laser Beam.
The DVD Player is a class 1 laser product.
To prevent direct exposure of laser beam. When
the enclosure is open, visible laser radiation is
present, which is harmful to the eyes.
Use of other controls, adjustments or performance
of procedures than those specified herein may
result in hazardous radiation exposure.
Do not open the front (or rear) and repair by yourself.
Refer servicing to qualified personnel only.
IMPORTANT SAFETY INSTRUCTIONS
Failed to meet the following precautions may result in damage to your DVD Player
Power Sources
Object and Liquid Entry
Be sure that the power supply voltage of the area
where this unit will be used meets the required
voltage. (230V AC, 50Hz)
Keep the power cord from heating devices.
Do not pinch the power cord by heavy items.
Power cord should be routed well.
Ventilation
Environment
DO NOT place the DVD Player in environments
as below:
In an environment prone to extreme
temperatures or humidity.
Near heat source like heat registers, stoves, or
other products (including amplifiers) that
produce heat.
Near water - for example, near bath tub, wash
bowl, kitchen sink, and the like.
Subject to direct sunlight or heater.
In a dusty environment.
In where strong magnetic fields are generated.
On a surface that is unstable or subject to
vibration.
Cleaning
Unplug this product from the wall outlet before
cleaning.
Do not use liquid cleaners or aerosol cleaners.
Use a damp cloth for cleaning.
3
Do not place heavy objects on the DVD Player.
Do not push objects of any kind into this product.
Never spill liquid of anything on the product.
Do not block the DVD Player's ventilation
openings.
Overloading
Do not overload the wall outlet, extension cords,
or integrated convenience receptacles.
Without using
When not using in near future, unplug the power
cord.
Caution
Danger of explosion if battery is incorrectly replaced.
Replace only with the same or equivalent type.
Table of Contents
1 - Getting Started.......................... 5
RDS Features ..........................................
Program Service Station Name(PS) ..........
Radio Text(RT) ........................................
Program Type(PTY) ...............................
Welcome ..................................................... 5
Compatible Discs .................................... 5
System Overview .......................................
Remote Control .......................................
Front Panel Controls ...............................
Front Panel Display .................................
Rear Panel ..............................................
6
6
8
9
10
Connecting External AUX Input .................. 19
Connecting USB Card Reader ..................... 19
5 - Advanced Features.................... 20
Special Playback Features .......................
Display ....................................................
Go To .......................................................
PBC/MENU ..............................................
Angle .......................................................
Zoom .......................................................
Subtitle ....................................................
Audio .......................................................
Repeat .....................................................
A-B Repeat ..............................................
Random ...................................................
Program Play ............................................
2 - Connections ............................. 11
Connecting the System ............................
Step 1 - Connect TV ...............................
Step 2 - Place Speakers .........................
Step 3 - Connect Speakers .....................
Step 4 - Connect AM Loop Antenna ........
Step 5 - Connect FM Wire Antenna ........
Step 6 - Connect External Audio ............
Step 7 - Power on the System ................
11
11
11
12
12
13
13
14
3 - Setup.......................................... 15
20
20
20
20
20
20
21
21
21
21
21
21
MP3/JPEG/MPEG4 Playback ...................... 22
What is MP3 ............................................ 22
Playing a MP3 File ................................... 22
Auto Play Function ................................... 22
Manual Playback ..................................... 22
Additional Playback Options ..................... 22
Program Playback for MP3 Files .............. 22
What Is JPEG .......................................... 22
Disc Structure .......................................... 22
Notes For JPEG Discs .............................. 23
Notes for Mixed MP3, JPEG and MPEG4
Discs ........................................................ 23
Playing a JPEG File ................................ 23
Auto Play Function .................................. 23
Manual Playback ..................................... 23
Additional Playback Options .................... 23
Playing a MPEG4 File .............................. 24
Auto Play Function .................................. 24
Manual Playback ..................................... 24
Additional Playback Options .................... 24
Setup Menu Overview ............................... 15
Setup Menu Navigation ........................... 15
Language Setup Page ................................ 15
OSD Language ......................................... 15
Audio Language ....................................... 15
Subtitle Language .................................... 15
Menu Language ....................................... 15
Video Setup Page ...................................... 15
System Setup Page .................................... 15
TY System ................................................ 16
TY Type .................................................... 16
Default ....................................................... 16
Rating Setup Page ........................................ 16
Password ................................................... 16
Rating ......................................................... 16
4 - Basic Operations........................17
First Things First ....................................... 17
Sound Effects ...........................................
Surround Sound Options ..........................
Bass/Treble Adjustment ..........................
Sleep Timer Setting ..................................
Sleep Options ..........................................
Basic Disc Playback .................................. 17
Playing a DVD, CD or VCD ....................... 17
Additional Disc Playback Options ............. 17
Basic Tuner Operation ..............................
Presetting Radio Stations ........................
Auto Scan Radio Stations ........................
Listening to the Radio ..............................
Adjusting Stereo/Mono ............................
18
18
18
19
17
17
18
18
18
24
24
24
24
24
6 - Help............................................. 25
Troubleshooting ........................................ 25
Frequently Asked Questions .................... 25
Using the Radio Data System(RDS) ........... 18
Radio Data System .................................. 18
Receiving RDS Broadcasts ..................... 18
Technical Specifications ........................... 27
Notes about Discs ..................................... 29
4
Chapter 1
Getting Started
Welcome
Welcome to this MICRO Digital Home Theater system - a complete system with a DVD/CD player, AM / FM
receiver and built-in amplifier. Now you can enjoy all your favorite home entertainment media in one
integrated package, including:
DVD movies in Dolby Digital
Audio / Video CDs
MP3 files recorded on CD-R or CD-RW
Plus all your favorite AM / FM radio stations
In case warranty service is required, please take a moment to attach your receipt to this manual and write
down your Serial Number, located on the back panel of the DVD system: ____________________________.
Compatible Discs
This DVD System can play discs with the following logos:
DVD Video (+DVD R / +DVD RW / -DVD R / -DVD RW )
Dolby Digital
Audio CD (CDDA)
Video CD (VCD / SVCD)
MP3 / JPEG files on CD-R / CD-RW
DIVX / MPEG4
Note
Region - Your system has a region code printed on the back of the unit and will only play DVD discs
labeled with the same region code.
When Facing with any abnormal operations or playback, customers can reset the
system to normal by pressing the power button on the front panel or remote control.
Copyright Statement
This product incorporates copyright protection technology that is protected by method
claims of certain U.S. patents and other intellectual property rights owned by Macro vision
Corporation and other rights owners. Use of this copyright protection technology must be
authorized by Macro vision Corporation, and is intended for home and other limited viewing
used only unless otherwise authorized by Macro vision Corporation. Reverse engineering or
disassembly is prohibited.
Manufactured under license from Dolby Laboratories. "Dolby" and the double-D symbol are
trademarks of Dolby Laboratories. Confidential Unpublished Works.
Don't throw away the battery with general house waste, dispose of it correctly as
chemical waste.
5
System Overview
Remote Control
1.
1
OPEN/CLOSE
To open or close the disc tray.
2
2. ANGLE
In DVD mode, to view among angles (if
available).
3. DIGITAL BUTTONS
In DVD/CD mode, for direct access of chapter/
track or for use in disc menus. In Tuner mode,
for direct access of preset stations.
18
19
20
21
3
4. 10+
To key in numbers over 10.
22
4
5. GO TO
In DVD/CD mode, to jump to a specific time,
title, chapter or track.
5
6
23
6. BASS / TREB
To select BASS or TREBLE.
(with volume +/- keys to adjust the tone level)
7
24
7. ARROW KEYS / / /
To navigate through on-screen menus.
8
8. ZOOM
For DVD/VCD or CD with JPEG files, to zoom
pictures at 2, 3, 4, 1/2, 1/3 or 1/4 time of original
size.
9
10
11
9. SLOW
In DVD/VCD mode, to select slow motion
forward/backward playback at 1/2, 1/3, 1/4, 1/5,
1/6, 1/7 time of normal speed.
10.
11.
12
STOP
To stop and hold playback (press PLAY to
resume).
28
29
30
31
13
PAUSE/STEP
Press once to pause playback. Duning DVD/CD
playback, press repeatedly to step forward one
frame at a time.
14
12. +
- VOLUME
To adjust the volume level.
13.
25
26
27
32
33
34
35
15
36
16
17
37
38
MUTE
To toggle mute on/off for audio output.
14. USB
To select USB mode.
15. SETUP
To display setup menu for the DVD system.
6
16. SUBTITLE
In DVD mode, to select among subtitle
languages (if available).
17. REPEAT
In DVD/VCD/CD mode, to repeat all or
individual chapters/tracks.
18.
POWER STANDBY
To switch between power-on and standby
modes.
30.
TUNING + / SCAN FORWARD
In DVD/VCD/CD mode, press repeatedly to
scan forward at 2, 4, 8 or 20 times of normal
speed. In Tuner mode. to tune up the frequency
spectrum.
31.
TUNING - / SCAN BACKWARD
In DVD/VCD/CD mod, press repeatedly to scan
backward at 2, 4, 8 or 20 times of normal
speed. In Tuner mode, to tune down the
frequency spectrum.
19. SLEEP
To set up sleep timer and enter sleep mode.
32. AM/FM
To switch between AM and FM wavebands.
20. SEL/CLEAR
To clear one item of setting just keyed in.
33. ST/MONO
In Tuner mode, to select FM stereo or mono.
21. PROGRAM
In DVD/VCD/CD mode, to preset program
playback in custom order. In tuner mode, to
store the current station into memory. Long
press to search and store radio stations
automatically.
34. FUNCTION
To select DVD, TUNER FM, TUNER AM or
AUX IN mode.
35. RANDOM
To select RANDOM mode during DVD / CD /
MP3 / JPEG playback.
22. RETURN
In DVD/VCD mode, to cancel program playlist or
to return to the previous page in disc submenus.
36. TITLE
In DVD mode, to view the disc title menu.
23. DSP
To select the sound field. Options as belows:
CLASSIC / ROCK / DANCE / POP / TECHNO
/ SOFT / LIVE / EQ OFF.
37. AUDIO
In DVD mode, to select the desired audio
language when playing multi-language DVD. In
VCD/CD mode, to select the desired audio
channel: Mono Left / Mono Right / Stereo.
24. ENTER
To confirm setting or selection in disc menus.
38. A-B
In DVD/VCD/CD mode, to repeat a segment
between two points (A and B).
25. PBC/MENU
To view the disc menu for DVD or to view the
PBC for VCD of version 2.0.
RDS
In Turner Mode, to display RDS information if
available. (For Europe only)
26. DISPLAY
To display disc information in the info menu.
27.
PLAY
During DVD/VCD/CD playback, press once to
play the disc. Press again to pause.
28.
SKIP FORWARD
In DVD/VCD/CD mode, to skip to the next
chapter or track. In Tuner mode, to skip to the
next stored station.
29.
SKIP BACKWARD
In DVD/VCD/CD mode, to skip to the previous
chapter or track. In Tuner mode, to skip to the
previous stored station.
7
Front Panel Controls
8. Disc Tray
1. POWER STANDBY/OFF
To switch between standby and power-off
modes.
9.
2. SENSOR
For Infrared remote control.
USB
For USB plug
10.
EJECT
To open or close the disc tray.
3. PLAY/PAUSE (DVD/CD/VCD)
Press once to start playback, press again to
pause.
11. VOLUME CONTROL
To adjust the volume level.
12. PHONES
For headphone output.
4. TUNER
To select TUNER mode. It can also switch
between AM and FM modes.
13. DSP
To select the sound fieldl. Options as belows:
CLASSIC / ROCK / DANCE / POP / TECHNO /
SOFT / LIVE / EQ OFF.
6.
STOP
To stop disc playback.
7.
Press quickly to skip to the previous chapter or
track. Long press repeatedly to scan backward
at 2, 4, 8 or 20 times of normal speed.
In Tuner mode, to select preset stations with
lower numbers.
14.
5. AUX
To select AUX IN mode.
Press quickly to skip to the next chapter or
track. Long press repeatedly to scan forward at
2, 4, 8 or 20 times of normal speed.
In Tuner mode, to select preset stations with
upper numbers.
10
1
2
3
11
4
5
6
7
12
13
14
8
9
8
Front Panel Display
1. DVD logo
Lights if DVD disc is playing.
10. A-B
Lights if the disc is in AB repeat mode.
2. Playback
Lights if the disc is playing.
3. Pause
Lights if the disc is temporarily stopped playing.
11. Repeat/Repeat 1
Lights if the disc is in repeat mode.
REPEAT lights if Repeat All mode is selected.
REPEAT 1 lights if Repeat 1 Track/Chapter is
selected.
4. Title
Shows the current title number.
12. Standby zZ
Lights if the main unit is in standby mode.
5. Track
Shows the current track number.
13. KHz
Lights if the tuner function is in AM mode.
6. Tuned
Shows any boardcast signal receved.
14. MHz
Lights if the tuner function is in FM mode.
7. Chapter
Shows the current chapter number.
15. Lights
Lights if Stereo is selected in FM Tuner mode.
8. Program
Lights if the disc is in program playback mode.
16. Dolby Digital
Lights if DVD with Dolby Digital soundtrack is
loaded.
9. RDS
For Europe only. It lights if RDS information is
received.
1
2 3 4
TITLE
5
6
7
8
9
10
11
TRACK
TUNED
CHP
PROG
RDS
A .B
REPEAT 1
zZ
DIGITAL
12
STEREO
JPEG
VCD MP3
16
15
14 13
9
Rear Panel
1. SUB-WOOFER
For Analog Low Frequency Effect (LFE)
output
2. AUX IN
For external stereo audio input
6. DIGITAL OUT
For Optional Digital output
7. COAXIAL FM75
For FM Antenna Coaxial Socket
8. AM LOOP
For AM Antenna Block Terminals
3. VIDEO
For Composite Video output
9. SPEAKER TERMINALS
For Speakers output (left and right)
4. S-VIDEO
For Optional S-Video output
5. SCART
For Scart Video or Audio output
2
1
3
4
9
5
6
7
8
WARNING!
Please ensure that the Voltage is set as per your Country's Specification before connecting the
unit to the Mains.
Please continue with Chapter 2 to connect your DVD system.
Note
10
Chapter 2
Connections
Connecting the System
Step 2 - Place Speakers
Follow these seven steps to connect your DVD
system. It is recommended that you turn off all
components (or unplug AC power) while you are
connecting the system.
For the best result, arrange the 2 speakers as
shown in your listening area:
Front Speakers (L, R)
Align the front speakers at ear level and at a
horizontal angle of 45 degrees to the primary
listening area.
Step 1 - Connect TV
Composite Video
Connect the video cable from the Video Out jack
on the back panel of the DVD system to your
television's Video In jack.
S-Video
For better video quality, you can connect the
system to your TV with a S-Video cable (not
included). Connect the S-Video cable from the
S-Video Out jack on the back panel of the
system to your television's S-Video In jack.
Note
It's recommended not to connect both SCART
and S-VIDEO signals simultaneously. It may
degrade the video quality because the signals
are shared between the two connectors.
SCART Video
You can connect the system to your TV with a
scart cable.
L(Left)
R(Right)
11
Step 3 - Connect Speakers
Step 4 - Connect AM Loop Antenna
1 Make sure the power is turned off to prevent
possible damage to the system.
1 Assemble the supplied AM loop antenna by
rotating the base and snapping it into place.
2 Connect the speakers' wires to the connectors
on the back panel of the DVD system. Be sure to
connect all the speakers' wires to terminals!
2 Connect the two wires from the AM loop
antenna to the AM antenna connector on the
back panel. Press down the thumb levers to
insert each wire, and then release the thumb
levers to lock the wires in place.
3 To insert a speaker wire, press down the thumb
levers, fully insert each tip of the wire into its
connector, and then release the thumb levers to
lock the wire in place.
Note
CAUTION - To prevent damage to
circuits, do not short-circuit the posivite
and negatative speaker output jacks.
Make sure the exposed tips of each
speaker wire are separated to the distance
that they cannot touch each other after
they are inserted into the connectors.
Do not connect any other speakers or
devices that are not included with this
system.
Note
Left (L)
To prevent noise pickup, keep the AM
loop antenna away from the system and
other components.
AM loop antenna
Right (R)
12
Step 5 - Connect FM Wire Antenna
Step 6 - Connect External Audio
1 Connect the supplied FM wire antenna to the
FM 75 antenna connector on the back panel.
The back panel of the DVD System provides.
2 Be sure to fully extend the FM wire antenna.
Make use of the small loop at the free end of the
antenna to maintain its position.
3 If noise or interference occurs, use an external
antenna with a 75 coaxial cable (not included).
1 AUX IN
Connect to an external stereo audio input.
2 Video Output
Connect to the inputs of your TV, VCR (or other
audio/video component) with video cables.
3 S-Video Output
Connect to the S-Video input of your TV.
4 Optical Out
Connect to an external audio decoder.
5 SCART
Connect to the TV with standard SCART input.
1
2
3
5
FM wire antenna
Note
4
After connecting the FM wire antenna,
keep it as horizontal as possible. The
antenna is directional, so you may need to
move it around to get the best reception.
13
Step 7 - Power on the System
1 Ensure that the power supply outlet matches
with the main unit AC input (230V) before
connection.
2 Now your DVD system is in standby mode. The
standby < zZ > lights on the display.
3 Press < > key on the remote control, then go
into DVD mode (if you power on the system for the
first time).
Note
To save energy, turn off the main switch
before you leave.
The system can memorize and enter into
the mode you selected last time when you
power on the system again.
14
Chapter 3
Setup
Setup Menu Overview
To select your preferred language for each
language setting:
After the system is properly connected, it is
important to customize the factory preset values for
your particular components and preferences. There
are 4 major categories in the setup menu.
1 LANGUAGE Setup Page
2 VIDEO Setup Page
3 SYSTEM Setup Page
4 RATING Setup Page
1. Press SETUP on the remote control.
2. Select the Language Setup icon.
3. Select one of OSD, AUDIO, SUBTITLE and
MENU LANG.
4. The language options (ENGLISH / GERMAN /
SPANISH / FRENCH) are displayed on the right.
Then select your desired language.
5. Press ENTER to confirm the selection.
Setup Menu Navigation
The following keys are used to display and navigate
within the setup menu:
SETUP
Press to display and exit the Setup menu.
Video Setup Page
This setup menu allows you to set the video
interface to suit your TV system.
/
VIDEO SETUP
VIDEO
Press to move left/right for selection.
ENTER
Press to confirm selection in submenus.
CVBS
RGB
/
Press to move up/down for selection.
Language Setup Page
This setup page enables you to select any of the
available languages for on-screen display (OSD),
system menus as well as subtitle and audio output
for discs. Language options include ENGLISH
(default), GERMAN, SPANISH and FRENCH.
To set up your video interface:
1. Press SETUP on the remote control.
2. Select the Video Setup icon.
3. Select VIDEO.
4. Select CVBS or RGB.
5. Press ENTER to confirm the selection.
LANGUAGE SETUP
OSD LANGUAGE
AUDIO LANG
SUBTITLE LANG
MENU LANG
Note
ENGL ISH
GERMAN
SPANISH
FRENCH
To turn on/off the SCART <RGB> output,
you may adjust the setting as below:
Select CVBS, then SCART will output
CVBS signal.
Select RGB, then SCART will output
RGB signal.
OSD Language - Language options for all
on-screen messages and system menus such as
program play lists, info menus and the setup menu.
Select CVBS if you connect your TV to the
system with a S-video cable, and SCART
will output S-VIDEO signal normally.
System Setup Page
In this setup page, you can set the TV color system,
TV type (aspect ratio) and factory default setting.
Audio Language - Only available when a
multi-language DVD is playing.
Subtitle Language - Only available if the
DVD has more than one subtitles. Select "OFF" to
remove subtitle from the screen.
Menu Language - Language options for
disc menus such as disc player menus and title
menus.
15
SYSTEM SETUP
TV SYSTEM
TV TYPE
DEFAULT
NTSC
PAL
AUTO
TV System - To select your TV color system:
1. Press SETUP on the remote control.
2. Select the Preference Setup icon.
3. Select TV SYSTEM.
4. Select NTSC, PAL or AUTO.
5. Press ENTER to confirm the selection.
TV Type - To select your TV aspect ratio:
1. Press SETUP on the remote control.
2. Select the Preference Setup icon.
3. Select TV TYPE.
4. Select 4:3 PANSCAN, 4:3 LETTERBOX or
WIDE.
5. Press ENTER to confirm the selection.
4:3 Pan Scan
Take this option if you have a standard 4:3 TV and
prefer to watch the full-screen version of DVD
movies (if available).
4:3 Letter Box
Take this option if you have a standard 4:3 TV and
prefer to watch the wide-screen version of DVD
movies (if available). Movies will display in letterbox
format; i.e., black bars will appear above and below
the picture.
Wide
Take this option if you have a wide screen (16:9)
television.
Default - To restore all settings in the Setup
Menu into factory default:
1. Press SETUP on the remote control.
2. Select the Preference Setup icon.
3. Select DEFAULT.
4. Select RESET.
5. Press ENTER to confirm the selection.
Rating Setup Page
In this setup page, you can set the parental control
lock and rating level from 1 to 8.
This setting takes effect only for the DVD containing
the rating level.
RATING SETUP
PASSWORD
RATING
16
Password - To set or cancel parental control:
1. Press SETUP on the remote control.
2. Select the Rating Setup icon.
3. Select PASSWORD.
4. Press the left arrow
key to the right and enter
the password using 0-9 keys.
5. Press ENTER to confirm the password. (The lock
icon is closed if parental control is set.
Conversely, the lock icon is open if the parental
control is cancelled.)
* The factory default password is 0000.
You should set the rating level before
you set parental control.
Or you must unlock the password
before you set the rating level.
Note
Rating - To set rating level:
1. Press SETUP on the remote control.
2. Select the Rating Setup icon.
3. Select RATING.
4. Select the desired parental lock level from 1 to 8.
5. Press ENTER to confirm the selection.
RATING SETUP
PASSWORD
RATING
1
2
3
4
5
6
7
8
KID SAFE
G
PG
PG13
PG-R
R
NC-17
ADULT
Chapter 4
First Things First
The first step in using the unit is to select one of the
four basic functions (DVD, TUNER FM, TUNER
AM, AUX IN).
Do this by pressing FUNCTION on the remote
control or by pressing one of the FUNCTION keys
DVD / TUNER / AUX on the front panel to switch to:
1 DVD function
For watching movie on DVD or VCD, or for
listening to music on CD or MP3-CD.
2 Tuner FM function
For listening to FM radio.
3 Tuner AM function
For listening to AM radio.
Basic Operations
Additional Disc Playback Options
4 AUX IN function
For Listening from external AUDIO sources.
Basic Disc Playback
Playing a DVD, CD or VCD
1 Turn on the TV and make sure the TV's video
input source is set to view the DVD system.
2 Press the DVD button on the front panel, then go
into DVD mode.
3 Press EJECT on the front panel or
on the
remote control to open the disc drawer.
4 Place the disc in the drawer with the label side
facing up and the playback side facing down. If
the disc has two playback sides, place the disc
with the desired side facing down.
5 Press EJECT on the front panel or
on the
remote control again to close the disc drawer.
The system will begin to play the disc after the
disc drawer closes. If the DVD has a disc menu,
or more than one title, the disc menu will appear.
6 To adjust volume with the VOLUME +/- button on
the remote control or the knob at the front panel.
Do not push the disc tray when it is closed.
Always use the EJECT/ button to close the
disc tray.
If the disc is scratched, dirty, or not encoded for
the correct region, you will receive an error
message and the disc will not be played.
Always use the stop button to stop playing a
disc before the system is turned off. If the disc is
not properly stopped during playback, all changes
to the menu settings may be deleted.
Note
This system can memorize and play the disc
from where the disc stopped last time when the
unit was powered off or the disc tray was open.
However, this DVD system can only resume
playing the last disc (if more than one
DVD/CD/VCDs were played). For instance,
you played 9 discs including 3 DVDs, 3CDs
and 3VCDs. When you power on the system
again, only the last DVD, CD and VCD can be
resumed for playback.
To freeze playback, press
.
To advance one frame at a time, press
again.
To resume normal playback, press the Play button.
To skip to the next or previous chapter/track,
press I (skip forward) or I (skip backward).
To scan forward or backward at variable speeds
during playback, press (scan forward) or (scan backward) repeatedly for x2, x4, x8, x20 times
of normal playback.
Press SLOW repeatedly to play images in slow
motion at variable speeds.
To stop playback, press once. To resume
playback from the same place on the disc, press the
Play button.
To completely stop playback and restart the disc,
press
twice. To restart the disc, press the Play
button.
To mute audio output, press
. Press again to
restore audio output.
Basic Tuner Operation
Presetting Radio Stations
You can preset up to 30 stations in the FM
waveband and 30 stations in the AM waveband. To
preset radio stations:
1 Before you begin, turn the volume down to avoid
sudden and excessive noise from the speakers.
2 Press TUNER on the front panel or FUNCTION
on the remote control to switch to the Tuner
AM/FM function.
The last station received is tuned in, and its
waveband and frequency are displayed on the
front panel display.
3 To switch between FM and AM wavebands,
press TUNER on the front panel or AM/FM on
the remote control again.
4 Press and hold or (-TUNING+) on the
remote control until the frequency starts to
change, then release.
5 Scanning stops when the system reaches a
station. "Tuned" appears on the front panel
display.
6 Press PROGRAM. SAVE TO -- will blink on the
display.
7 Use the 0-9 keys to enter a number from 01-30.
(The 10+ key is unavailable here. )
8 Press ENTER to confirm the channel number.
The radio station is saved.
9 Repeat steps 3 to 8 to preset up to 30 stations in
each waveband.
17
Note
If the system reaches a weak station, press
or (-TUNING+) to adjust manually.
To change a preset station, simply save
over the previously memorized station.
Press ST/MONO to set the FM Tuner audio
to Stereo or Mono.
Auto Scan Radio Stations
1 Long press PROGRAM on the remote control
until "AUTO SAVE" after "SAVE TO--" appears
on the display.
2 Auto Scan function will proceed. It searches,
and saves stations into Tuner memory
between AM and FM wavebands automatically.
Listening to the Radio
1 Press TUNER on the front panel or FUNCTION
on the remote control to switch to the Tuner (AM
/FM) function.
The last station received is tuned in and its
waveband and frequency are displayed on the
front panel display.
Using The Radio Data System
(RDS)
Radio Data System
Radio Data System (RDS) is a broadcasting service
that allows radio stations to send additional
information along with regular program signals.
This tuner offers convenient RDS features such as
station name display. RDS is available only for FM
stations.
Receiving RDS Broadcasts
Simply select a station from the FM waveband,
and press RDS on the remote control.
RDS information as PS/RT/PTY shows on the
front panel display. If the station provides RDS
services, the station name(PS) will firstly appear
on the front panel display.
Note
2 To select a preset station, press I or I
(-Present+) on the remote control to skip to the next
or previous station.
Not all FM stations provide RDS service,
nor do they provide the same type of
services.
If you are not familiar with the RDS
system, check with your local radio
stations for details on RDS services in
your area.
3 To change the tuner waveband, press AM/FM on
the remote control to toggle between AM and FM.
4 To tune in a non-preset station, press
or (-TUNING+) on the remote control:
To tune manually, press or (-TUNING+)
repeatedly until the desired station is tuned in.
To tune automatically, press and hold
or (-TUNING+) for 2 seconds, it will
automatically search for stations. If the system
reaches a station, "Tuned" will appear on the
front panel display.
5 To improve reception, relocate the supplied
antennas.
Adjusting Stereo/Mono
If a FM station is noisy, press ST/MONO on
the remote control. "STEREO" will disappear on
the front panel display.
This turns off stereo sound but may improve
reception.
To switch back to stereo, press ST/MONO again.
Not all stations are broadcast in stereo. For those
stations without stereo, pressing the ST/MONO
button has no effect.
RDS may not work properly if the station to
which you are listening is not transmitting
the RDS signal properly, or if the signal
strength is too weak.
RDS Features
RDS is a broadcasting service which allows FM
stations to send additional information along with
regular radio signals.
The additional information is derived from the
features of RDS described below.
Program Service Station Name
(PS)
The station name is displayed automatically when
a station that provides RDS service is tuned in.
Radio Text (RT)
The service can show text information such as the
title of a song on the display.
Press RDS repeatedly to show the radio text, on
condition if the station to which you are listening,
provides RDS services.
If the station is not transmitiing text information,
"NO RT" will be displayed.
To return to the regular display, press RDS again.
18
Program Type (PTY)
Connecting USB Card Reader
This is an identification to specify the program being
broadcast currently.
This system supports you to play particular files in
audio / video / picture format through a USB card
reader. These files are stored in a memory card in
MP3, WMA, MPEG4, AVI or JPEG format.
Press RDS repeatedly to show the program type.
The program type will be displayed for 6 seconds. If
no PTY data or undefined PTY data is being
transmitted, "NO PTY" or "UNDEFINE" will be
displayed.
1. Insert the memory card into the card reader.
2. Open the cover at the front panel and connect the
card reader to the USB port.
The following PTYs can be received on the unit.
"TRAFFIC, NEWS, AFFAIRS, INFO, SPORT,
EDUCATE, DRAMA, CULTURE, SCIENCE, VARIED,
POP M, ROCK M, EASY M, LIGHT M, CLASICS,
OTHER M, WEATHER, FINANCE, CHILDREN,
SOCIAL, RELIGION, PHONE IN, TRAVEL,
LEISURE, JAZZ, COUNTRY, NATION M, OLDIES,
FOLK M, DOCUMENT, TEST, ALARM".
Connecting External AUX Input
External stereo audio from different kinds of audio
units can be input to the system. The system will
amplify these audio signals and then output at the
speakers. To use this feature:
USB CARD READER
1 Connect the external audio unit to the AUX IN
socket on the back panel with an audio cable
(not provided) which has a RCA male plug.
2 Press AUX on the front panel or FUNCTION on the
remote control to switch to the AUX IN function.
Note
Note
The use of an extended USB wire with
FCC/CE approval is recommended.
3. Press FUNCTION on the front panel or remote
control to switch to the DVD function.
Before you begin, turn down the volume to
avoid sudden and excessive noise form the
speakers.
4. If the system plays the DVD/CD in the disc tray,
press <
> button on the remote control to read
the files stored in the memory card through the
connected USB card reader.
5. After reading is finished, a disc menu will be
shown on the screen. (For operation about
MP3/JPEG/MPEG4 Playback, please go to page
21.)
Note
19
Although the system can allow more than
one kinds of memory cards into the card
reader during playback, it is recommended to insert one memory card into
the card reader before connecting it to the
main unit.
Chapter 5
Advanced Features
Special Playback Features
Display
Press DISPLAY to view the current playback
information such as title, chapter and elapsed playing
time. Press repeatedly to toggle and hide the info
menu at the top screen.
For DVD:
in the track field and press ENTER. The system will
play from the desired track. (When you apply GO
TO function to an Audio CD, turn on the TV to view
the info menu.)
PBC/MENU
For DVD, press PBC/MENU to bring up the DVD
title menu where you select the desired title. Press
ENTER and the system will start playing from the
desired title.
Elapsed Playing Time
Total Title No. Current Chapter No.
Current Title No.
Total Chapter No.
1/ 1
TT
T
CH
00:02:10
Total Subtitle Languages
Current Subtitle
Audio Language
1/ 2 ENG
4/ 6
Note
2 / 4 ENG
5.1CH
1/ 4
Current Angle View
Total Angle Views
Elapsed Playing Time
Current Track No. Total Track No.
3/ 3
00:02:40
PBC On /Off
Mute On/Off
Repeat Mode
VC
4 / 15
For VCDs with 2.0 version, this button is used to
turn the PBC mode on/off.
Turn PBC "On" to play a VCD from the first track to
the end.
Turn PBC "Off" to play a VCD from the desired track
you have selected.
For CD/VCD:
C
DVD discs have "Title and Chapters". There
can be several Titles on one disc and Title can
contain several Chapters. Usually one Title
will show the disc publisher and studio logos.
Under another Title is the feature film itself.
Other Titles can contain trailers for other films
also available, or introduction.
PBC
1
To select the desired track on the VCD, press
PBC/MENU on the remote control. The message
"PBC OFF" is shown on the screen. Then, enter the
desired track number using 0-9 keys. The system
will jump to your desired track and start playing the
disc.
00:03:05
Angle
Some DVDs contain scenes filmed from multiple
angles. The Angle information will appear on the
screen when additional angles are available. To
select the angle that you wish to view:
1 Press ANGLE when you see the angle information
on the screen during DVD playback.
2 Continue to press ANGLE to select among all
available angles on the disc.
Go To
This DVD system provides you different searching
methods by using GO TO function. The system can
jump to a specific title, chapter or playing time to
play your DVD as well as to a specific track or
playing time to play a CD/VCD.
Title search - For DVD, press GO TO to bring up
the info menu. Enter the desired Title Number in the
title field and press ENTER. The system will play
from the desired title.
Note
The angle feature is not available during
VCD playback.
Chapter Search - For DVD, press GO TO to bring
up the info menu. Enter the desired Chapter
Number in the chapter field and press ENTER. The
system will play from the desired chapter.
Zoom
Playing Time - For DVD/CD/VCD, press GO TO to
bring up the info menu. Enter the desired Playing
Time within a title in the playing time field and press
ENTER. The system will play from the playback
time that you have set.
1 Press ZOOM during playback.
2 The zoom level will b e a d j u s t e d a c c o r d i n g t o
the following sequence (x2, x3, x4, x1/2, x1/3,
x1/4, normal).
3 To return to the normal image, press ZOOM
until "ZOOM OFF" appears on the screen.
To Zoom in or out the image during DVD / VCD /
JPEG / MPEG4 playback:
Track Search - For CD/VCD, press GO TO to bring
up the info menu. Enter the desired Track Number
20
Subtitle
Random
Many DVDs contain subtitles in multiple languages.
To select among all available subtitle languages:
This function allows you to play tracks/titles/files in
random order. Press RANDOM repeatedly to turn
the function on/off.
1 Press SUBTITLE during DVD playback.
2 Continue to press SUBTITLE to select among all
available subtitle languages.
* For CD/DVD/VCD/MP3/JPEG:
RANDOM ON RANDOM OFF
Audio
Program Play
Many DVDs contain multiple audio formats, such as
Dolby Digital 5.1 or 2-channel stereo, or
soundtracks in multiple languages. To select among
all available audio formats/soundtracks:
1 Press AUDIO during DVD playback.
2 Continue to press AUDIO to select the right audio
format to suit your audio system.
The Playing order of the titles on a DVD or the
tracks on a CD/VCD can be programmed according
to your preference.
For VCD, this button is used to select the audio output
channel, which is especially useful when playing a
VCD for Karaoke.
1 Press AUDIO during VCD playback.
2 Continue to press AUDIO to select Stereo, Mono L
or Mono R.
Repeat
To repeat a title, chapter or track:
1 Press REPEAT during disc playback, following
will be shown in cycle by repeatedly pressing
REPEAT.
* For CD/VCD:
REPEAT OFFREPEAT TRACK REPEAT ALL
* For DVD:
REPEAT OFF REPEAT CHAPTER REPEAT
TITLE
* For MP3:
REPEAT OFFREPEAT ONEREPEAT DIR
REPEAT ALL
A-B Repeat
The A-B Repeat function allows you to repeat
playing a segment of a DVD/VCD or CD. To set this
function:
1 Press A-B to start record at the starting time (point
A).
2 Press A-B key to end record at the ending time
(point B).
3 The segment will repeat in a continuous loop.
4 To stop, press A-B to turn off this function.
Note
When PBC mode is on, Repeat or Repeat
A-B mode cannot be activated. If this
happen, press PBC on the remote control
to turn it off.
21
PROG
T
C
T
C
T
C
T
1
5
9
13
2
6
10
14
3
7
11
15
4
8
12
16
PLAY
CLEAR
C
To make a Program during DVD playback,
1 Press PROGRAM, and then a Program list
appears on the screen.
2 Enter the title numbers under T columns and the
chapter numbers under C columns.
3 Select "PLAY" on the screen (using arrows keys)
and press ENTER. The system will play the DVD
according to the order you have set.
PROG
1
5
9
13
2
6
10
14
3
7
11
15
4
8
12
16
PLAY
CLEAR
To make a Program during CD/VCD playback,
1 Press PROGRAM, and then a Program list
appears on the screen.
2 Enter the track numbers in the track fields.
3 Select "PLAY" on the screen (using arrows keys)
and press ENTER. The system will play the disc
according to the order you have set.
To clear the Program that you have set,
1 Press PRPGRAM, and then the Program list
appears on the screen.
2 Select "CLEAR" on the screen (using arrows
keys) and press ENTER. The Program is
cancelled.
Note
To clear/modify the setting, use arrows keys to
highlight the number that you want to change.
Press SEL/CLEAR to clear the number. If you
want to modify the setting, after the number is
cleared, key in the new number into "-".
MP3/JPEG/MPEG4 Playback
What is MP3
MP3 is one of the popular formats which allows you
to compress music files up to 1/12 (MP3) of their
original size while retaining near CD quality sound.
Your DVD receiver can play MP3 files burned
onto a CD-R or CD-RW disc.
Note
If there is any gap (blank data) on the
multi-session disc, you may experience
playback problems.
Playing a MP3 File
For Mixed discs with MP3 and regular
MP3 data, this machine can only
identify and read e i t h e r k i n d o f d a t a .
T h e i d e n t i f i c a t i o n depends on the
placement of the data on the disc.
[MP3] ALL KIND .MP3
0 1 .MP3
0 2 .WMA
To ensure proper playback of discs burned
with MP3 files, make sure the files have
been recorded at a bit rate of at least
128kpbs.
0 1 .ALL KIND
0 2 .BECAUSE
For a disc with MP3 data written at the
beginning and regular CD data at the end,
the machine will only identify the disc as a
MP3 data disc and vice visa.
0 3 .BIG BIG
0 4 .BRIDGE O
0 5 .CLOSE TO
0 6 .DO-RE-MI
0 7 .DONT CRY
0 8 .FIRST OF
0 9 .HEY JUDE
Not all MP3 players can be supported by
this system.
1 0 .HOLIDAY
Program Playback for MP3 files
Auto Play Function
1 Insert a CD-R/CD-RW disc with MP3 files into the
disc tray.
2 After reading is finished, a disc menu will be shown
and playback will begin from the first track of the
disc.
3 To stop playback, press .
Manual Playback
1 Insert a CD-R/CD-RW disc with MP3 files into the
disc tray.
2 After reading is finished, a disc menu will be
shown on the screen and auto-play begins.
3 Press
to stop auto-play function.
4 If there are more than one folders on the disc
menu, press / to select the folder that
contains the desired song, and press Enter.
5 Press to the right side.
6 Select the desired song using / keys and
press ENTER.
Additional Playback Options
To skip to the next or previous track, press /
during playback, and then press ENTER.
To jump to the desired song, use the numeric keys
to enter the desired track number and press
ENTER.
To stop playback, press .
You can arrange the file playback order for MP3
tracks or files.
The procedure to make a Pragram Play for a MP3
disc is the same as the one for a regular CD on
page 20.
What is JPEG
A still-picture data compression system was proposed
by the Joint Photographic Expert Group, which
features a small decrease in image quality in spite of
its high compression ratio.
Disc Structure
On a JPEG disc, each still picture (material) is
recorded as a file. Files are usually grouped into a
folder. Folders can also include another folders,
creating hierarchical folder layers.
This system simplifies the hierarchical construction
of a disc and manages folders by "groups."
This system can recognize up to 700 items in one
folder, and items include subfolders and files.
You can arrange the file playback order for MP3
tracks or files.
The procedure to make a Pragram Play for a MP3
disc is the same as the one for a regular CD on
page 20.
22
Notes for JPEG Discs
Auto Play Function
1 Insert a CD-R/CD-RW disc with JPEG files into the
disc tray.
2 After reading is finished, playback will begin from
the first picture of the disc.
3 To stop playback, press .
JPEG discs (either CD-R or CD-RW) require a
longer readout time. (Different lengths of readout
time subject to complexity of the directory/file
configuration.)
When making a JPEG disc, select ISO 9660 Level
1 or Level 2 as the disc format.
This system cannot support "multi-session" discs
(up to 5 sessions).
This system cannot play "packet write" discs.
We recommend to record a file at 640 x 480
resolution. (If a file has been recorded at a
resolution of more than 640 x 480, it will take a
longer time for reading.)
Manual Playback
1. Insert a CD-R/CD-RW disc with JPEG files into
the disc tray.
2. After reading is finished, press
to stop autoplay function, then a disc menu appears on the
screen.
3. If there are more than one folders on the disc
menu, press / to select the folder that
contains the desired picture, and press Enter.
4. Press to the right side.
5. Select the desired picture using / keys and
press ENTER.
Notes for Mixed MP3, JPEG and
MPEG4 Discs
For a disc with mixed MP3, JPEG and MPEG4
files, the system can only show one category of
audio, picture or video files on the disc menu.
To view the audio files, press /until you can
select the "Audio" icon at the bottom of the disc
menu. Press ENTER to confirm it.
To view the picture files, press /until you can
select the "Picture" icon at the bottom of the disc
menu. Press ENTER to confirm it.
Additional Playback Options
To view the video files, press /until you can
select the "Video" icon at the bottom of the disc
menu. Press ENTER to confirm it.
Audio
Icon
Picture
Icon
To select a playback mode for JPEG files, press
PROGRAM repeatedly to view and confirm the
desired mode. 17 different modes can be obtained.
WIPE TOP/ WIPE BOTTOM/ WIPE LEFT/ WIPE
RIGHT/ DIAGONAL WIPE LEFT TOP/ DIAGONAL
WIPE RIGHT TOP/ DIAGONAL WIPE LEFT
BOTTOM/ DIAGONAL WIPE RIGHT BOTTOM/
EXTEND FROM CENTER H/ EXTEND FROM
CENTER V/ COMPRESS TO CENTER H/
COMPRESS TO CENTER V/ WINDOW H/ WINDOW
V/ WIPE FROM H TO CENTER/ MOVE IN FROM
TOP/ NONE
Video
Icon
During playback, press to rotate pictures in anticlockwise and in clockwise. To flip pictures
vertically or horizontally press /.
Playing a JPEG File
[PICTURES] 00000000 .JPG
0 1 .PICTURES
To jump to the desired picture, use the numeric
keys to enter the desired picture number. Press
ENTER to start playing from the desired picture.
To stop playback, press .
0 1 .00000000
0 2 .00000000
0 3 .00000000
0 4 .00000000
0 5 .0000005
0 6 .0000006
0 7 .0000007
0 8 .0000008
0 9 .0000009
1 0 .0000010
23
Playing a MPEG4 File
Sound Effects
DSP
Surround Sound Options
[MPEGAV]AVSEQ02.MPG
[
MPEGAV]AVSEQ02.MPG
01. AV1
01. AVSE002
02. MPEGAV
02. AVSE002B
The surround sound of this DVD system enables you
to enjoy a 3D realistic sound effect in your room.
There will be 7 different 3D effects which will be
perfect for watching movies and listening to music.
03. SEGMENT
CLASSIC / ROCK / DANCE / POP / TECHNO / SOFT /
LIVE / EQ OFF
Bass/Treble Adjustment
Auto Play Function
If a CD-R/CD-RW contains only one MPEG4 file, the
system can auto play the disc as a normal DVD disc.
For the operations and procedures to play a disc with
a MPEG4 file, please go to "Basic Disc Playback" on
page 16.
Manual Playback
If a CD-R/CD-RW contains more than one MPEG 4
files, the system can let you select the desired one to
play.
1. Insert a CD-R/CD-RW disc with MPEG4 files into
the disc tray.
2. After reading is finished, a disc menu will be shown
on the screen.
3. If there are more than one folders on the disc
menu, press /to select the folder that contains
the desired video, and press Enter.
4. Press to the right side.
5. Select the desired video using / keys and
press ENTER.
Additional Playback Options
Please go to "Additional Disc Playback Options" on
page 16.
24
The BASS/TREBLE key on the remote control
enables you to adjust the bass or treble level of the
player.
Normal level = 0
MAX = +6 MIN = -6
For bass level setting, press BASS/TREBLE to
select bass adjustment, press the VOLUME +/button on the remote control to adjust the bass level
from -6 to +6.
For treble level setting, press BASS/TREBLE twice
to select treble adjustment, press the VOLUME +/button on the remote control to adjust the treble
level from -6 to +6.
SLEEP TIMER SETTING
SLEEP
Sleep Options
Use this Sleep timer to turn the system off after a
certain length of time. After the Sleep timer is set,
you can fall asleep to music, and ensure that the
system will turn off by itself rather than play all night.
1 Press SLEEP when one of the main functions
(DVD/TUNER/AUX) is selected.
2 When "SLEEP OFF" appears on the display,
press the / keys repeatedly until you can
select your desired length of time from 10, 20, 30,
60, 90, 120 to 150 mins.
To cancel the Sleep timer,
1 Press SLEEP.
2 Press the / keys repeatedly until "SLEEP
OFF" appears on the display.
Chapter 6
Help
Troubleshooting
Frequently Asked Questions
Problem
Solution
No power
•
Make sure the AC power cord is securely connected.
No picture
•
•
•
•
Securely connect the video cable.
Repair or replace the damaged video cable.
Make sure the system is connected to the correct TV input.
Make sure the video input on the TV is set to view the DVD system.
Picture noise
•
•
Make sure the disc is not dirty or flawed.
If the picture output is from your system through a VCR to your TV,
any copy-protection signal applied to DVD programs could affect picture
quality. If you still experience problems even when you connect your
system directly to your TV, try to connect your system to your TV's
S-Video input.
DVD picture does not fit
screen on standard television
•
The aspect ratio of the disc is fixed on your DVD.
No sound
•
•
•
Securely connect all audio cables.
Repair or replace any damaged audio or speaker cable.
Press MUTE button on remote control if "MUTE ON" is displayed on the
TV screen.
The system is in the mode of Pause, Slow Motion or Forward/Reverse
Scan. Press PLAY button on the remote control to return to normal
playback mode.
•
Severe hum or noise
•
•
•
•
•
No stereo sound during VCD/
CD playback
•
Make sure all speakers and components are correctly and securely
connected.
Make sure to connect cables that are away from a transformer or motor,
and at least 10 feet away from a TV or fluorescent light.
Move your TV away from your audio components.
The plugs and jacks are dirty. Wipe them with a cloth with moderate
alcohol.
Clean the disc.
Check speaker connections and settings.
25
Cannot tune in radio
stations
•
•
•
Make sure antennas are securely connected. Adjust the antennas
and connect an external antenna if necessary.
The signal strength of stations is too weak (when in Auto Scan
mode). Use manual tuning.
No stations have been preset or the preset stations have been
cleared. Preset the stations.
Remote does not function
•
•
•
•
Remove any obstacles between the remote control and the main unit.
Move closer to the system when operating the remote control.
Point the remote control directly at the sensor on the front panel.
Replace the batteries.
Disc is not played
•
•
Make sure there is a disc in the tray.
Close the disc cover. Make sure the playback side of the disc is
facing down on the disc tray.
The disc is skewed or warped.
The region code on the DVD does not match the system.
Moisture has condensed inside the system. Remove the disc and
leave the system turned on for about half an hour.
•
•
•
Disc is not played
from the beginning
•
•
Program Play or Repeat Play is selected. To cancel Program Play
before playing a disc, press PROGRAM button to display program
play list, select CLEAR button and press ENTER. To cancel Repeat
Play, press REPEAT button until you see "REP OFF" on the display.
Resume Play is active. Press STOP button twice and then restart
playing the disc.
Disc is played automatically
•
The DVD features an auto playback function.
Playback stops automatically
•
Some discs contain an auto pause signal. While playing such a disc,
the system stops playback at the auto pause signal.
Cannot perform certain functions, such as Stop, GO TO,
Slow Motion Play, Repeat
Play,or Program Play
•
Depending on the disc, some operations may not be available. See
the documentation that came with the disc.
26
Technical Specifications
Amplifier Section
Stereo Mode
10W + 10W (6
Inputs (Analog)
AUX - Sensitivity: 1V; Impedance: 50 k
at 1 kHz, THD 10%)
Outputs (Analog)
VIDEO (SCART OUT) - Voltage: 1~2V; Impedance: >10 k
Outputs (Optical)
DIGITAL OUT - Level: -18dBm
DVD System
Laser
Semiconductor laser
Signal Format System
NTSC / PAL
Frequency response
at 2 CH STEREO mode - DVD (PCM): 20Hz to 20kHz (-3dB);
CD: 20Hz to 20kHz (-3dB)
Signal-to-noise ratio
More than 80dB (VIDEO OUT (AUDIO) Scart connectors only)
Harmonic distortion
Less than 0.1%
FM Tuner Section
System
PLL quartz-locked digital synthesizer system
Tuning range
87.50 - 108.00MHz (50kHz step)
Antenna
FM wire antenna
Antenna terminals
75
Intermediate frequency
10.7MHz
, unbalanced
AM Tuner Section
System
Tuner section: PLL quartz-locked digital synthesizer system
Tuning range
522 - 1,629kHz (with the interval set at 9kHz)
Antenna
Loop antenna
Video Section
Video Input
Nil
Video Output
1 Vp-p 75
S-Video Output
Y: 1 Vp-p 75
; C: 0.286 Vp-p 75
Front Speakers
Speaker Unit
150mm
Rated Impedance
6
Box Dimensions (approx.) 145 (W) mm x 230 (H) mm x 125 (D) mm
Mass (approx.)
1.3kg
27
General
Power Requirements
Power Consumption
Dimensions (approx.)
Mass (approx.)
Operating Temperature
Operating Humidity
230V CA, 50Hz
55W
170 x 137 x 310 mm
3,1kg
5º to 35º C
5-90%
28
Notes about Discs
On handling discs
To keep the disc clean, handle the disc by its edge. Do not
touch the surface.
Do not expose the disc to direct sunlight or heat sources such
as shot air ducts, or leave it in a car parked in direct sunlight
as the temperature may rise considerably inside the car.
After playing, store the disc in its case.
On cleaning discs
Before playing, clean the disc with a cleaning cloth. Wipe the
disc from the centre out.
Do not use solvents such as benzine, thinner, commercially
available cleaners, or anti-static spray intended for vinyl LPs.
29