1
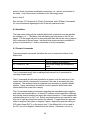
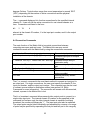
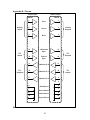
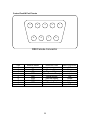
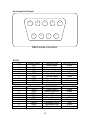
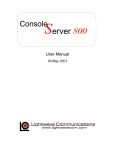
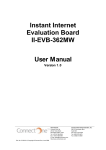
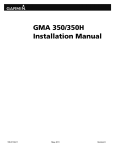
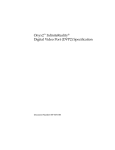
Series 1000 User Manual
13 July 2001
Lightwave Communications, Inc.
100 Washington Street Milford, CT 06460 USA
(800) 871-9838 • (203) 878-9838 • Fax: (203) 874-0157
Email: [email protected] • Internet: www.lightwavecom.com
LCI Asia/Pacific
postal address: P.O. Box 19 GlenIris VIC 3146 Australia
delivery address: 16 Network Drive Port Melbourne VIC 3207 Australia
+61 3 9646 1144 • Fax: +61 3 9645 3377
Email: [email protected] • Internet: www.lightwavecom.com.au
LCI Europe
Zaubzerstraße 11 Munich D-81677 Germany
49-89-306-3810 • Fax: 49-89-306-3812
Email: [email protected] • Internet: www.lightwave.de
Table Of Contents
Page
1.0 Matrix-Hub System Overview.......................................................................1
2.0 Matrix-Hub Components ...............................................................................2
2.1 Adding and Removing Cards ...............................................................4
2.2 Replacing Failed Power Supplies .......................................................6
3.0 Video Cards.....................................................................................................7
4.0 Keyboard/Mouse Cards.................................................................................9
5.0 Serial Cards.....................................................................................................13
6.0 Switch and Control Cards .............................................................................16
7.0 Electroluminescent Display...........................................................................18
8.0 User Interface..................................................................................................21
8.1 Logging In ...............................................................................................21
8.2 Help Menu ..............................................................................................22
8.3 Chassis Commands ..............................................................................22
8.4 Connection Commands ........................................................................23
8.4.1 Serial Connections .............................................................................24
8.5 Entity Commands ..................................................................................25
8.6 Macro Commands .................................................................................26
8.6.1 Autoexec Macro..................................................................................27
8.7 Password Commands...........................................................................27
Appendix A – Control Card Settings ....................................................................29
Appendix B – Pinouts .............................................................................................31
Appendix C – Sample Matrix-Hub Session.........................................................36
Matrix-Hub Series 1000 User Manual
13 July 2001
Copyright 1999-2000 Lightwave Communications, Inc.
100 Washington Street, Milford, Ct, 06460, USA
All rights reserved. No part of this copyrighted material may be reproduced in any form or by any means without prior
written permission from Lightwave Communications, Inc.
1.0 Matrix-Hub System Overview
The Matrix-Hub Series 1000 is a matrix switch for the entire desktop. The switch
may route video, keyboard/mouse, and serial connections using an integrated
user interface. Each type of connection may be individually managed or may be
integrated to operate with one or both of the other connection types. The primary
function of the device is to permit up to ten attached users or destinations to gain
access to up to ten computers or sources. Whe n used with the VDE/200
extension system from Lightwave, a versatile and highly flexible topology may be
created to maximize the effectiveness of both creative and high-performance
computer resources.
The Series 1000 chassis features redundant power supplies with separate AC
inputs, on-board cooling fans, and an electroluminescent display for easy access
to Matrix-Hub diagnostic and connection activity displays.
Each customer may decide how and by whom the Matrix-Hub will be controlled.
The matrix switch is controlled through a DB9 serial connector that may be
connected to a network, an attached server, an industry-standard controller (i.e.,
Dataton), or a plain ASCII terminal. The switch is capable of routing RGB video
signals to any number of destinations simultaneously, while keyboard/mouse and
serial signals are routed to single destinations only.
The Matrix-Hub Series 1000 may be configured according to customer
requirements. Each card type (video input and output, keyboard/mouse input
and output, and serial input and output) has five external ports per card. There
may be a maximum of two of each card for video input, keyboard/mouse input,
video output, and keyboard/mouse output. Serial cards can be combined in any
combination to fill the four chassis slots available for serial cards (i.e., a chassis
may have up to three serial input and one serial output cards, two input and two
output cards, or one input and three output cards).
The manual covers the card types, as well as the use of the front panel display,
the user interface, and the physical components of the chassis. Use of thirdparty equipment is not covered in this manual.
1
2.0 Matrix-Hub Components
Each Series 1000 chassis consists of a metal enclosure, an electroluminescent
display, cooling fans, redundant power supplies with separate AC inputs, a
control card, three switch cards, and the user-specified signal input and output
cards.
The chassis is rack-mountable using the flanges on the front of the unit. If the
unit is to be rack-mounted, it is recommended that the rear of the unit is
supported within the rack using support brackets (available from Lightwave), and
allowance is made for adequate ventilation through the unit. The chassis may
also be used as a stand-alone unit, and is shipped with rubber feet attached to
allow airflow through the bottom of the unit when placed on a surface.
The electroluminescent front panel display allows access to the Matrix-Hub’s
internal diagnostic and connection displays (see section 7.0, Electroluminescent
Display).
The Series 1000 has redundant power supplies with separate AC inputs. Each
power supply is a set of two individual power supplies that provides separate
+5VDC and –5VDC. In ordinary operation, the two power supply sets share the
electrical current load equally. However, when one set fails, the other set can
provide all power for the unit. If the separate AC inputs are connected to
different AC sources, then the Matrix-Hub will not fail if one AC source fails. The
power supplies report their status through the front panel display and through the
user interface.
2
Power Supplies – Series 1000 Chassis
Front pair provides +5 VDC
Rear pair provides –5 VDC
Every chassis has three switch cards. Each switch card handles one element of
video signals (red, green, or blue), and two of the switch cards also handle
keyboard and mouse signals (serial signals are switched internally by the serial
cards and are not routed through the switch cards). All switch cards have a
temperature sensor that may be read through the front panel display or through
the user interface.
There is one control card in every chassis. The control card coordinates actions
within the chassis and provides a serial port for user interface and control.
Several attributes of the Matrix-Hub are user-defined and may be set using the
control card (see Appendix A, Control Card Settings).
The user-specified input and output cards allow individual users to access
computer resources through the matrix switch. One video input may be routed to
one or more video outputs, but keyboard/mouse and serial inputs may only be
routed to one output at a time. Inputs may be switched to outputs in whatever
groups of video, keyboard/mouse, and serial are required by the user.
3
Back of Matrix-Hub Series 1000 Chassis with All Cards
2.1 Adding and Removing Cards
Matrix-Hub cards may be purchased separately at any time to expand the
capacity or change the functionality of an existing unit. The user may add or
remove cards in the field quite easily, allowing for great flexibility of existing
systems.
All Matrix-Hub cards may be hot-swapped. It is not necessary to power-down the
unit when adding or removing cards.
When removing a card, use the two black plastic ejectors located at the top and
bottom of each card to help pull the card out of its slot. Push the tabs apart
vertically, and they will lever the card back out of its slot. The card may then be
slid out. If removing a switch card, be sure to first loosen the screws located
inside the metal frame attaching the plastic ejector tabs to the card. Loosen the
screws until the threads disengage from the chassis, but do not entirely remove
the screws from the card.
4
Switch Card Screws (Inside Top Ejectors)
When adding a card, first remove the blank panel covering the card slot by
loosening the screws located at the top and bottom of the panel. Insert the card
into the empty slot being sure to slide the card into the guides on the top and
bottom of the chassis. Push the card all the way in until the black plastic tabs
engage the edge rails on the top and bottom. Push the plastic ejector tabs
together vertically so the card is levered in to the slot and is firmly seated. If
resistance is encountered, removing an adjacent card and inserting both
simultaneously will often reduce the force required.
All cards for the Series 1000 have metal key tabs protruding along their inside
edge near the backplane connectors. These tabs prevent the insertion of
keyboard/mouse, serial, or control cards into slots designated for video or switch
cards. Video and switch cards require higher voltage than the other cards, so
accidental insertion of another card type into a video or switch slot would damage
that card.
5
Key Tabs – Series 1000 Cards
left – keyboard/mouse input & output, serial input & output, control
right – matrix switch, video input & output
2.2 Replacing Failed Power Supplies
If a power supply fails in a unit, it may be replaced in the field if necessary. Be
sure the failure is not due to a damaged power cord or a faulty outlet. The power
supplies are NOT hot swappable. Contact Lightwave Communications for more
instructions if the power supply must be replaced.
6
3.0 Video Cards
Video Input, Part Number 400.100.1001
Video Output, Part Number 400.100.1002
Video input cards (part number 400.100.1001) and video output cards (part
number 400.100.1002) are located in the four slots immediately surrounding the
switch cards, two to each side. The input cards are located to the left, while
output cards are located to the right. Ports are numbered from 1 to 10, starting at
the top outermost port, and ending at the bottom innermost port.
7
Video Port Numbering Scheme
Each card has five HD15 female connectors. From the connectors, the input
card routes red, green, and blue video signals, as well as horizontal and vertical
sync and three monitor ID lines to the switch cards. The switch cards then pass
the signals selected output card connector(s). The matrix switch will also handle
connections that use composite sync, but not over as great a distance as native
HD15 connections.
The input cards should be connected to the monitor output of a CPU or other
video source. If necessary, an adapter may be used to convert to the HD15
connector to the required connector.
The output cards should be connected to a monitor or other video destination.
Adapters may also be used on the output cards. See Appendix B for video card
pinouts.
8
4.0 Keyboard/Mouse Cards
PS/2 Input Card, Part Number 400.100.2001
PS/2 Output Card, Part Number 400.100.2002
RJ 45 Extender Input Card, Part Number 400.000.2009
9
RJ 45 Extender Output Card, Part Number 400.000.2010
The keyboard/mouse input cards (PS/2: part number 400.100.2001 or RJ 45:
part number 400.000.2009) and keyboard/mouse output cards (PS/2: part
number 400.100.2002 or RJ 45: part number 400.000.2010) are located in the
four slots immediately outboard from the video cards, two to each side. The
input cards are located on the left, while the output cards are located on the right.
Ports (keyboard/mouse pairs in the case of the PS/2 cards) are numbered from 1
to 10, starting at the top outermost port (or pair of ports) and ending at the bottom
innermost port (or pair of ports).
10
PS/2 Keyboard/Mouse Port Numbering Scheme
RJ 45 Keyboard/Mouse Port Numbering Scheme
There are two types of keyboard/mouse cards: PS/2 and RJ 45 Extender. The
PS/2 cards are designed to connect directly CPUs, keyboards, and mice to the
Matrix-Hub using PS/2 cables. The RJ 45 Extender cards are designed to work
with Lightwave’s PS/2 Keyboard/Mouse Cat5 Extender or VDEs, either
separately or together.
The ports on the PS/2 cards operate in keyboard and mouse pairs, with five pairs
of female PS/2 ports per card. Each pair is always routed through the switches
together. Keyboards and mice with non-PS/2 connectors may be attached the
Matrix-Hub using commercially available adapters (e.g., USB to PS/2) so long as
the keyboard and/or mouse is PS/2 compatible (i.e., Sun keyboards and mice will
not work with a simple adapter; a third-party converter is required)
The RJ 45 Extender cards have five female RJ 45 ports each. The user may
connect the port to either a PS/2 Keyboard/Mouse Cat5 Extender or a VDE with
an RJ 45 personality module on either the input or output cards.
The two types of cards can be mixed in a single installation. A PS/2 input card
will successfully send a signal to an RJ 45 output card and vice versa. The two
types may be mixed in any combination, so long as the proper conversion
between CAT5/RJ 45 Extender and PS/2 is made when using the RJ 45
11
Extender card. Contact Lightwave for more information regarding the use of the
Matrix-Hub with VDEs and CAT5 Keyboard/Mouse Extenders.
12
5.0 Serial Cards
Input Card, Part Number 400.100.3001
Output Card, Part Number 400.100.3002
The serial input cards (part number 400.100.3001) and serial output cards
(part number 400.100.3002) are located in the four slots immediately to the left
of the control card. Unlike other card types, any combination of inputs and
outputs may be mixed in the four serial slots so long as the inputs are to the left
and the outputs are to the right. Input cards have five female DB9 connectors
each, while output cards have five male DB9 connectors each.
13
Numbering Scheme for Two Input Cards and Two Output Cards
Numbering Scheme for One Input Card and Three Output Cards
14
Numbering Scheme for Three Input Cards and One Output Card
The serial cards support both RS-232 and RS-422 connections through DB9
connectors. The serial protocol is determined by the command used at the
control card to make the connection (see section 8.4.1, Serial Connections). The
serial cards will also support the stereo emi tter used with 3D visualization. The
Matrix Hub must be configured for RS-422 to accomplish this,.
15
6.0 Switch and Control Cards
Switch Card, Part Number 400.100.1003
Control Card, Part Number 400.100.1004
Three switch cards and one control card are included in each Matrix-Hub
chassis. The switch cards are located in the three slots between the video input
cards and the video output cards. The control card is located in the rightmost
card slot in the chassis.
The switch cards (part number 400.100.1003) route one aspect (red, green, or
blue) of video signal each. In addition, the left switch card routes mouse signals
between keyboard/mouse input and output cards, while the right switch card
routes keyboard signals between mouse/keyboard input and output cards.
Monitor ID lines are switched directly between video input and output cards
without any routing from the switch cards. In ordinary operation, it should not be
necessary to remove a switch card, so they are screwed into the chassis to
prevent accidental removal.
16
The control card (part number 400.100.1004) coordinates and reports actions
within the Matrix-Hub. It provides the user interfaces, initiates connections
between cards, and stores macros and other connectivity shortcuts in memory.
There are two DB9 connectors on the control card; one is male, while the other is
female. The user may access the Matrix-Hub user interface through the female
connector (labeled “IN”); the male connector (labeled “OUT”) has not been
implemented yet.
The IN port baud rate for the control card’s serial port and other options are
changeable using DIP switches mounted on the surface of the control card. The
user may alter the settings by removing the card from the chassis and turning the
switches on or off according to the tables in Appendix A, Control Card Settings.
See section 8.0, User Interface and section 7.0, Electroluminescent Display for
more information on using the control card and its interfaces.
17
7.0 Electroluminescent Display
Electroluminescent Display in Screen Saver Mode
The electroluminescent (EL) display allows the user to access the Matrix-Hub’s
internal diagnostics and active connection list through the front panel. The two
buttons located immediately below the display control the EL display. When not
in use, the display goes into a screen saver mode and displays a moving MatrixHub logo.
18
Electroluminescent Display Showing Sample Connections List –
For video cards: input port 4 is connected to output port 1 and input port 3
is connected to output port 3; for keyboard/mouse cards: input port 4 is
connected to output port 1 and input port 3 is connected to output port 3.
Pressing the left button displays the active connection list. The list displays the
inputs and outputs as a matrix, with outputs as columns and inputs as rows. The
columns are divided into three sections: video, keyboard/mouse, and serial.
Video and keyboard/mouse have ten columns each, while serial has fifteen. An
“X” will appear between whichever inputs and output are actively connected.
The active connection list also displays the software version number, power
supply status, and switch card temperatures. Power supplies will be reported as
“OK” or “Failed”. If a power supply fails, contact Lightwave for further
information regarding replacement. Switch card temperature is reported
immediately below the power supply status. Typical temperature ranges from
room temperature to around 100?F (38?C), depending on number of connections
and physical installation. Higher temperatures may indicate a problem with the
air circulation in the room, i.e., the unit’s fans may be blocked.
19
Electroluminescent Display Showing Sample Installed Cards List –
Chassis in this example has two input cards of each type, but only one
output card of each type.
Pressing the right button displays the installed cards list. The cards are listed in
the same order they are mounted in the chassis. Video and keyboard/mouse
inputs are to the left of the switch cards, and outputs are to the right. Serial cards
are additionally specified as “SI” for input cards and “SO” for output cards when
installed. The port numbering scheme is also displayed for installed cards. If a
slot has no numbers, there is no card installed in that slot. The control card is not
displayed on the cards list. It is assumed that the control card is present if the EL
display is operational.
The installed cards list also displays the communication and options settings that
are set using the control card DIP switches. The communication settings for the
control card IN port are displayed as “Serial Settings:”, while the options
settings (those set on DIP switch SW 3) are simply displayed as “Options:”.
20
8.0 User Interface
The Matrix-Hub is controlled through the control card IN port using the user
interface. The user interface may be accessed by any device capable of sending
and receiving serial communications (i.e., an ASCII terminal, a PC running a
terminal program, a network interface, etc.).
Internal to the Matrix-Hub Series 1000, each card type is divided into separate
chassis. Video cards are chassis 1, keyboard/mouse cards are chassis 2, and
serial cards are chassis 3. Several commands specify that a chassis ID number
is entered along with the command. Although this may be a bit confusing, as
there is only one physical chassis, it allows a convenient way to categorize
connection types.
Characters that are to be entered by the user or are returned by the Matrix-Hub
are in Lucida Console font. Optional command items are enclosed in
brackets [like this]. Unless otherwise specified, all commands should be followed
by the <ENTER> key. Commands are not case sensitive, but appear in the
manual as all capital letters for clarity.
8.1 Logging In
Before using the Matrix-Hub, a device capable of serial communications must be
connected to the control card IN port. The Matrix-Hub control card IN port uses 8
data bits, 1 stop bit, and no parity (8N1). The baud rate can be set to several
values (see Appendix A, Control Card Settings), with 9600 baud being the factory
default.
After properly connecting the Matrix-Hub to a terminal or other communication
device, the user may log in. The Matrix-Hub should be turned, and it will send
the following text:
Lightwave Communications Matrix-Hub Console Copyright 1998
Version: 1.43
please wait for initialization…
Enter password:
At the prompt to enter the password, the user should enter the default password,
mh1. The system will respond with:
MatrixHub#
This indicates the Matrix-Hub is ready to take commands. The user is now
logged in at level one access, as indicated by the # following MatrixHub. Level
one allows access to all functions of the Matrix-Hub. There is also level two
21
access, which only allows predefined connections (i.e., macros and entities) to
be made. Level two access is indicated by the following prompt:
MatrixHub$
See sections 8.7 Passwords, 8.5 Entity Commands, and 8.6 Macro Commands
for more information regarding the use of the two password levels.
8.2 Help Menu
The help screen listing all the available Matrix-Hub commands may be reached
by entering H or ?. The Matrix-Hub will display the help screen in two 24 line
pages. The first page will print to the screen and then wait for the user to press a
key to advance to the next page. Individual help screens are also available for
groups of commands (i.e., macro commands or entity commands).
8.3 Chassis Commands
There are several commands that allow the user to observe the status of the
Matrix-Hub.
CH
CL
CP <chassis ID>
CS <chassis ID>
Lists chassis status commands
Lists all chassis card inventory
Lists power supply and temperature
status
Lists active connections
The CH command simply lists an abridged help screen list of commands for
reporting chassis status.
The CL command lists all cards installed in a chassis, with the exclusion of the
control card (which is assumed to be present if the user is accessing the user
interface). The cards are listed on separate lines according to internal chassis
number. Upper case letters denote that a card is present, while lower case
letters denote that a card slot is empty.
The CP command displays information regarding the redundant power supplies
and switch card temperatures. A chassis ID number must be specified, although
any internal chassis number will report the same information. Power supplies are
reported either as OK or Failed. Switch card temperatures are reported in order
from left to right as viewed from behind the chassis. Temperatures are reported
either in degrees Fahrenheit or degrees Celsius, depending upon the setting on
DIP switch three (SW 3) on the control card. If the Matrix-Hub is to be used in
the US, it is set for degrees Fahrenheit at the factory. Otherwise, it is set for
22
degrees Celsius. Typical values range from room temperature to around 100?F
(38?C), depending on the number of active connections and the physical
installation of the chassis.
The CS command displays a list of active connections for the specified internal
chassis ID. It can only list the active connection for one internal chassis at a
time. Connections are listed in the form
NS
I
TO
O
where N is the chassis ID number, I is the input port number, and O is the output
port number.
8.4 Connection Commands
The main function of the Matrix-Hub is to provide connections between
computing resources and end users. The Matrix-Hub user may control
connections made with the Matrix-Hub by using the connections commands.
C <chassis ID> <input> <output>
B 1 <input> <output>[,][-][<output>]
C <source entity> <destination entity>
D <chassis ID> <input> <output>
D [<chassis ID>] ALL
CLEAR [<chassis ID>]
RESTORE
Connects input port to output port
Connects i nput port to multiple
output ports
Connects source entity to
destination entity
Disconnect input port from output
port
Disconnect all connections
Clear current connections (no
restore possible)
Restore previously broken
connections
The C, or connect, command is the most basic method to connect an input port to
an output port. For single connections, the user must specify the chassis ID, the
input port number, and the output port number. This command may also be used
to connect source entities to destination entities (see section 8.6, Entity
Commands for more information). The connection will remain until disconnected,
cleared, or power to the Matrix-Hub is lost.
The B, or broadcast, command allows several video output ports to connect to a
single video input port. The internal chassis ID number is also specified in this
command, but because only the video internal chassis is capable of multiport
broadcast, the number will always be “1”. The input port must also be specified.
The output ports may be listed individually and separated by commas, or a range
of ports may be specified by separating the first port and last port in the range by
23
a dash. Output ports may be individually disconnected from the broadcast using
the disconnect command
The D, or disconnect, command will disconnect the specified ports from one
another. This command may also be used to disconnect all the connections in
the Matrix-Hub or all connections in an internal chassis. To disconnect a single
connection, the chassis ID number, the input number, and the output number
must be specified in that order. To disconnect all the connections on one internal
chassis, enter the chassis ID number followed by the command qualifier ALL. To
disconnect all connections in the Matrix-Hub, use D ALL. The disconnect
command may also be used to disconnect entities from one another.
Connections that are broken using the disconnect command may be made again
by using the RESTORE command.
The CLEAR command breaks all connections, either in the entire Matrix-Hub or
only in an internal chassis (if the chassis ID number is specified), and removes all
record of the connection. The RESTORE command (see below) will not work
when connections are cleared. The CLEAR command also works after using the
D command; it simply removes the record of the broken connections so that the
RESTORE command will not work. Caution must be exercised when using the
CLEAR command to prevent inadvertent disconnection of active connections.
The RESTORE command re-establishes connections that were broken using the D
command. The command is not selective, and all connections that have been
broken and not cleared will be reconnected.
If a connection exists between two ports and one of those ports is included in a
new connect or broadcast command, then the existing connection will be broken
in favor of the new connection. However, the connect command will take slightly
longer than usual to execute while the previously existing connection is broken.
8.4.1 Serial Connections
Serial connections are established in a command syntax identical to other
connection types. However, the syntax varies slightly since two types of serial
connection are possible: RS-232 and RS-422. If just the serial port number (e.g.,
5) is specified in the connect command, then the connection will be made using
the RS-232 protocol. If 100 is added to the serial port number (e.g., 105), then
the connection will be made using the RS-422 protocol. The different protocols
may not be mixed. That is, a port specified as RS-232 in the connect command
may not be connected to a port specified as RS-422. This applies to entity and
macro commands as well; an entity that has an RS-232 serial connection
specified may not connect to an entity with an RS-422 serial connection, nor may
a macro be used to connect two ports with different protocols. When switching
the stereo emitter, the Matrix Hub must be in RS-422 mode.
24
8.5 Entity Commands
Entities allow the user to define a group of input or output ports that should be
connected together. This allows resources to be switched as a group to an end
user. Inputs are grouped together in source entities, while outputs are grouped
together in destination entities. Any number of inputs or outputs may be included
in an entity, but there must be a one to one match-up between input ports in a
source entity and output ports in a destination entity. Entities are one of the two
predefined connection methods that level two password users may use.
EH
EL
EN
ED
ES
[<entity>]
<entity>
<entity>
[<entity>]
List entity commands
List all entities [or entity definitions]
Create new entity
Delete entity
Show entity status [for a single entity]
The EH command lists all the commands that are used with entities.
The EL command either lists all entities in memory, or one entity’s definitions. If
EL is used by itself, the type (source or destination) and name of the entities
defined in memory will be listed. Specifying the name of an entity after EL lists
the type of entity (source or destination) and the chassis and port number of the
inputs or outputs that are associated with that entity name.
The EN command creates new entities. The name of the new entity must be
entered at the same prompt as the command. The Matrix-Hub will prompt the
user for the type of entity (source or destination), and then will ask for the internal
chassis number and port number of the inputs or outputs that are to be
associated with that entity. The user may enter as many ports as exist on the
Matrix-Hub. The user should press <ENTER> at the prompt to enter an entity
item to exit back to the system prompt when done.
The ED command will delete a single entity. The name of the entity must follow
the command on the same line. The Matrix-Hub will prompt the user for
confirmation before deleting the entity. Once an entity is deleted, it is not
recoverable.
The ES command lists all cur rently connected entities and the port to port
connections for those entities, or the port to port connections made for a single
entity if that entity is specified in the command line. If there are no entities
currently connected then the Matrix-Hub will only echo success and return to
the command prompt. The ES command will also list entities with identical
connection lists to the entity specified at the command line (but those entities will
not have been used to make the connections).
25
Entities may be connected to one another using the C command in the form
C SOURCE_ENTITY DESTINATION_ENTITY
or may be disconnected with the D command using the same syntax. If an entity
is connected to another entity, and is then specified in a new connect command,
then that entity will be switched to the new connection. The connection will be
made at a slower than usual rate as the old connections are broken before
establishing the new connections. Individual port to port connections may also
be broken; not all connections in an entity need to be broken at one time.
Level two password users may make connections using entity names that are
previously known to them. The Matrix-Hub will not allow a level two user to use
the EL, EN, ED, or ES commands. It will only allo w the level two user to use the C
and D commands with entity names to manage connections.
8.6 Macro Commands
The use of macros allows the user to automate repetitive and lengthy
commands. Typically, macros are used to connect or disconnect a series of
input and output ports. Any number of commands may be specified in a macro,
but only as many connections may be made as there are available ports. Macros
are available for use by level two password users, but in a limited capacity. All
macros must be defined before use; they cannot be defined as the user enters
individual commands.
MH
MR
ML
MN
MD
<macro>
[<macro>]
<macro>
<macro>
List macro commands
Run a macro
List all macros [list macro definition]
Create a new macro
Delete a macro
The MH command will list all commands for use with macros.
The MR command will run a previously defined macro. The macro name must be
specified at the command line. As the macro executes, it will echo the macro
name and the defined commands to the user’s terminal screen. If the macro
attempts to execute a connect command on a port that has a previously existing
connection, it will pause while the old connection is broken in favor of the new
connection. Once the macro has finished executing, it will echo the macro name,
followed by End Macro, and then Macro Complete on the following line.
The ML command will either list all the defined macros or the individual
commands defined for a macro. When used alone, the ML command lists the
26
macros that are defined in Matrix-Hub memory. If a macro name is specified at
the command line, the commands defined for the macro will be listed.
The MN command creates a new macro. The name of the new macro must follow
the command or an error message will be returned and a new macro will not be
created. After correctly entering the command (with new macro name), the
Matrix-Hub will prompt the user for the commands that are to be executed when
the macro is run. Once all the commands for the macro have been entered, the
user must press <ENTER> at the Enter macro item: prompt to exit from
command entry and create the macro.
The MD command deletes a macro. The name of the macro to be deleted must
follow at the command line or an error message will be returned and the macro
will not be deleted. When the command is correctly entered, the Matrix-Hub will
ask the user to confirm that the macro will be deleted. Once deleted, a macro is
not recoverable and must be re-entered if it will be used again.
8.6.1 Autoexec Macro
The Matrix-Hub will automatically execute a macro named AUTOEXEC at powerup if a macro with that name has been created. This macro could contain system
default connections or connections for management of power problems. The
execution of the macro cannot be halted unless the macro itself is deleted before
power is turned off and back on. If there is no macro named AUTOEXEC, then no
macro will execute at power-up.
8.7 Password Commands
Users are defined or deleted using the password commands. There are two
levels of passwords: level one and level two. Level one passwords allow
complete access to all functions and commands available on the Matrix-Hub.
Level two passwords allow a user to only make or break connections using
entities or macros. A level two password user does not have access to any
commands other than C, D, or MR; the C and D commands may only be used with
entity names. Entity and macro names cannot be listed, so the level two user
must know the name of the entities or macros before using them.
The user prompt changes according to the password level. For level one
passwords, the prompt is MatrixHub# ; for level two passwords it is
MatrixHub$ .
The Matrix-Hub is shipped from the factory with two passwords defined: one level
one password, and one leve l two password. The level one password is mh1,
27
while the level two password is mh2. These passwords should be deleted as
soon as possible to prevent unauthorized access to the Matrix-Hub.
PH
PL
PD
PN
List password commands
List number of defined passwords
Delete a password
Create a password
The PH command lists the commands that are used only with passwords.
The PL command lists the number of passwords defined on the Matrix-Hub. It
does not list the actual password. Only the total number of defined passwords is
displayed, and no distinction is made between the two levels. The passwords
must be recorded separately from the Matrix-Hub, as there is no way to display
the passwords on the Matrix-Hub.
The PD command deletes a password from the Matrix-Hub. When using this
command, the Matrix-Hub will prompt the user for the password to delete, and
then to confirm that password by retyping it. The password will then be
permanently deleted and is not recoverable. The name of the password must be
known to delete it. The password currently in use may not be deleted.
The PN command creates a new password. The level of the password (level one
or level two) must be specified at the command line; numerals must be used (i.e.,
type 1 or 2, not one or two). After the command is entered, the user is
prompted to enter the new password, and then confirm it. The password is casesensitive, so care must be exercised when recording it. Only ten passwords of
either level may be created on each Matrix-Hub.
28
Appendix A - Control Card Settings
There are three DIP switches mounted on the surface of the control card that
allow the user to change the control card parameters. One DIP switch (SW1) is
reserved for system use and should not be changed. The other switches (SW2
and SW3) change the control card IN port baud rate and user interface options.
Control Card DIP Switch Locations
29
SW1 – System Use (do not change)
Switch Position ? ? ? ? ?
1
2
3
on
off
off
4
off
5
off
6
off
7
off
8
off
SW2 – IN Port Baud Rate
Switch Position ? ? ? ? ?
1
2
3
Baud
Rate
19,200
off
off
9600*
off
off
4800
on
on
2400
off
off
*Factory default setting
off
off
off
on
4
5
6
7
8
off
off
off
off
off
off
off
off
off
off
off
off
off
on
off
on
off
off
on
on
SW3 – User Interface Options
Switch Position
1
2
3
off
on
Display temperature in ?F Display temperature in ?C
Do not echo characters
Echo Characters
Do not send error
Send error messages
messages
4
Do not add line feed to
Add line feed to output
output
5-7
Not used
Not used
8*
Disable diagnostic
Enable diagnostic
commands
commands
*The diagnostic command setting on position 8 of SW3 is not enabled in normal
operation of the Matrix-Hub. It allows the use of a more basic (but more cryptic)
command language through the control card IN port. This command language is
used mostly for diagnostic purposes, and does not add or take away any
functionality from the Matrix-Hub.
30
Appendix B – Pinouts
Video Input
Video Output
HD15F
HD15F
1
1
Red
Analog
Inputs
2
2
Green
3
Analog
Outputs
3
Blue
13
TTL
Inputs
14
Horizontal
Sync
Vertical
Sync
11
13
14
TTL
Outputs
11
Monitor ID 0
TTL
Outptus
12
12
Monitor ID 1
4
4
Monitor ID 3
5
6
Red Return
7
6
7
Green Return
8
8
Blue Return
10
10
Sync Return
HD15 Video Pinout
31
TTL
Inputs
Control Card IN Port Pinouts
5
4
9
3
8
2
7
1
6
DB9 Female Connector
PIN
1
2
3
4
5
6
7
8
9
SIGNAL NAME
RD
TD
DTR
GND
DSR
RTS
CTS
-
DESCRIPTION
Receive Data
Transmit Data
Data Terminal Ready
Signal Ground
Data Set Ready
Request to Send
Clear to Send
-
32
INPUT/OUTPUT
NC
Output
Input
Input
N/A
Output
Input
Output
NC
Serial Input Port Pinouts
5
4
9
3
8
2
7
1
6
DB9 Female Connector
RS-232
PIN
1
2
3
4
5
6
7
8
9
RS-422
PIN
1
2
3
4
5
6
7
8
9
SIGNAL NAME
DCD
RD
TD
DTR
GND
DSR
RTS
CTS
RI
DESCRIPTION
Carrier Detect
Receive Data
Transmit Data
Data Terminal Ready
Signal Ground
Data Set Ready
Request to Send
Clear to Send
Ring indicator
INPUT/OUTPUT
Output
Output
Input
Input
N/A
Output
Input
Output
Output
SIGNAL NAME
(DCD)
RXDL
TXDL
TXDH
GND
RXDH
HSKOA
HSKIA
(RI)
DESCRIPTION
(Carrier Detect)
Receive Data Low
Transmit Data Low
Transmit Data High
Signal Ground
Receive Data High
Handshake Output
Handshake Input
(Ring Indicator)
INPUT/OUTPUT
Output
Output
Input
Input
N/A
Output
Input
Output
Output
33
Serial Output Port Pinouts
1
2
6
3
7
4
8
5
9
DB9 Male Connector
RS-232
PIN
1
2
3
4
5
6
7
8
9
RS-422
PIN
1
2
3
4
5
6
7
8
9
SIGNAL NAME
DCD
RD
TD
DTR
GND
DSR
RTS
CTS
RI
DESCRIPTION
Carrier Detect
Receive Data
Transmit Data
Data Terminal Ready
Signal Ground
Data Set Ready
Request to Send
Clear to Send
Ring Indicator
INPUT/OUTPUT
Input
Input
Output
Output
N/A
Input
Output
Input
Input
SIGNAL NAME
(DCD)
RXDL
TXDL
TXDH
GND
RXDH
HSKOA
HSKIA
(RI)
DESCRIPTION
(Carrier Detect)
Receive Data Low
Transmit Data Low
Transmit Data High
Signal Ground
Receive Data High
Handshake Output
Handshake Input
(Ring Indicator)
INPUT/OUTPUT
Input
Input
Output
Output
N/A
Input
Output
Input
Input
34
Matrix-Hub
Serial Input
RS-232
Matrix-Hub
Serial Output
RS-232
DB9M
DB9F
RS-422 to DB9 Conversion Pinouts
3
Tx
Tx
3
2
Rx
Rx
2
7
RTS
RTS
7
8
CTS
CTS
8
4
DTR
DTR
4
6
DSR
DSR
6
1
DCD
DCD
1
9
RI
RI
9
5
SG
SG
5
100 Washington Street, Milford CT 06460
800 871-9838 * Fax 203 874-0157 * www.lightwavecom.com
Title:
RS-232 mode Pinouts for Serial Input / Output
Part Number
Drawing Number
Size:
File:
35
N/A
N/A
System:
A
Matrix-Hub Serial
Sheet
Matrix_Serial_IO.vsd
01
A
02
Rev:
of
Appendix C – Sample Matrix -Hub Session
The following text is a sample session printed from a terminal program log file. It
contains examples of the use of Matrix-Hub commands in the two different
password levels.
Lightwave Communications Matrix Hub Console Copyright 1998
Version: 1.02
...please wait for initialization...
Enter password: ***
MatrixHub# help
+===================== MaxtriX-Hub System Help ============================+
|
?,(H)elp
- display this help
|
|
(C)onnect <chassis-id> <src port#> to <dst port#>
|
|
(B)roadcast <chassis-id> <src port#> to <dst port#> [,] [<dst port#>] |
|
(C)onnect <src entity> to <dst entity>
|
|
(D)isconnect <chassis-id> <src port#> from <src port#>
|
|
(D)isconnect [<chassis-id>] ALL - disconnect all (can be restored)
|
|
(LO)goff
- log off system
|
|
CLEAR [<chassis-id>] - Clear current connections (cannot be restored) |
|
- specifying chassis-id clears only that chassis |
|
RESTORE [<chassis-id>] - Restore previous connections
|
|
specifying chassis-id restores only that chassis
|
|
connections
|
|
(VER)SION - display version information
|
|- Entity Commands --------------------------------------------------------|
|
EH
- Entity Help
|
|
EL [<entity>] - List entities, list <entity> definition
|
|
EN <entity>
- create New entity
|
|
ED <entity>
- Delete entity
|
|
ES [<entity>] - Entity Status
|
|- Macro Commands ---------------------------------------------------------|
|
MH
- Macro Help
|
|
MR <macro>
- Run a macro
|
(press any key to continue)
|
ML [<macro>] - List current macros, list <macro> definition
|
|
MN <macro>
- create New macro
|
|
MD <macro>
- Delete macro
|
|- Passwords --------------------------------------------------------------|
|
PH - Password Help
|
|
PL - List number of passwords defined
|
|
PD - Delete a password
|
|
PN <access level> - New password
|
|- Chassis ----------------------------------------------------------------|
|
CH
- Chassis Help
|
|
CL
- list all chassis including card inventory
|
|
CP <chassis-id> - Display chassis power (& temperature info if avail) |
|
CS <chassis-id> - show connection info for a chassis
|
+==========================================================================+
success
MatrixHub# cl
Chassis-id List
--------------1rV, V1.63, IIRGBOO
2rK, V1.63,II M K OO
3rS, V1.63,
IIOO
success
MatrixHub# ver
Firmware version 1.02 10/19/98 16:55:39
Text ROM version 1.00
success
MatrixHub# cp 1
1PP1,Power Supply A +5V: OK
1PP1,Power Supply A -5V: OK
1PP1,Power Supply B +5V: OK
1PP0,Power Supply B -5V: OK
36
1PT 88ßF
1PT 91ßF
1PT 89ßF
success
MatrixHub# cs 1
success
MatrixHub# cs 2
success
MatrixHub# cs 3
success
MatrixHub# connect 1 1
1C1,1
success
MatrixHub# cs 1
1S
1 TO
1
success
MatrixHub# connect 2 1
2C1,1
success
MatrixHub# cs 2
2S
1 TO
1
success
MatrixHub# connect 3 1
3C1,1
success
MatrixHub# cs 3
3S
1 TO
1
success
MatrixHub# c 3 6 6
3C6,6
success
MatrixHub# cs 3
3S
1 TO
1
3S
6 TO
6
success
MatrixHub# d 3 1 1
3D1,1
success
MatrixHub# cs 3
3S
6 TO
6
success
MatrixHub# c 3 101 101
3C101,101
success
MatrixHub# cs 3
3S 101 TO 101
3S
6 TO
6
success
MatrixHub# c 3 2 102
Error>> 08; 3C2,102
Chassis error (08)
MatrixHub# cs 3
3S 101 TO 101
3S
6 TO
6
success
MatrixHub# d all
1I
2I
3I
success
MatrixHub# cs 1
success
MatrixHub# cs 2
success
MatrixHub# cs 3
success
MatrixHub# restore
Restoring connections,
1I
2I
3I
1C1,1
1
1
1
please wait...
37
2C1,1
3C6,6
3C101,101
success
MatrixHub# cs 1
1S
1 TO
1, 10
success
MatrixHub# cs 2
2S
1 TO
1
success
MatrixHub# cs 3
3S 101 TO 101
3S
6 TO
6
success
MatrixHub# clear
Are you sure (y/n):Y
1I
2I
3I
success
MatrixHub# restore
No connections to restore
MatrixHub# b 1 1 1-10
1B1,1,2,3,4,5,6,7,8,9,10
success
MatrixHub# cs 1
1S
1 TO
1, 2, 3, 4, 5, 6, 7, 8, 9, 10
success
MatrixHub# b 2 1 1-10
Chassis did not respond to command
MatrixHub# cs 2
success
MatrixHub# b 3 1 1-10
Chassis did not respond to command
MatrixHub# cs 3
Success
MatrixHub# clear
Are you sure (y/n):Y
1I
2I
3I
success
MatrixHub# eh
+===================== MaxtriX-Hub System Help ============================+
|- Entity Commands --------------------------------------------------------|
|
EH
- Entity Help
|
|
EL [<entity>] - List entities, list <entity> definition
|
|
EN <entity>
- create New entity
|
|
ED <entity>
- Delete entity
|
|
ES [<entity>] - Entity Status
|
+==========================================================================+
success
MatrixHub# el
Entity List
----------No entity names defined
MatrixHub# en onyx2 src
Enter entity item (chassis-id, port #): 1,1
Enter entity item (chassis-id, port #): 2,1
Enter entity item (chassis-id, port #): 3,1
Enter entity item (chassis-id, port #):
success
MatrixHub# el
Entity List
----------Entity type, name: SRC, ONYX2
success
MatrixHub# el onyx2
Entity List
----------Entity name: ONYX2
Entity type: SRC
38
Chassis:
1 port: 1
Chassis:
2 port: 1
Chassis:
3 port: 1
success
MatrixHub# en conf_room_1 dst
Enter entity item (chassis-id, port #):
Enter entity item (chassis-id, port #):
Enter entity item (chassis-id, port #):
Enter entity item (chassis-id, port #):
success
MatrixHub# el
Entity List
----------Entity type, name: SRC, ONYX2
Entity type, name: DST, CONF_ROOM_1
success
MatrixHub# el conf_room_1
Entity List
----------Entity name: CONF_ROOM_1
Entity type: DST
Chassis:
1 port: 1
Chassis:
2 port: 1
Chassis:
3 port: 1
success
MatrixHub# es
Entity Status
------------success
MatrixHub# connect onyx2 conf_room_1
1B1,1
2B1,1
3B1,1
success
MatrixHub# es
Entity Status
------------ONYX2
TO CONF_ROOM_1
success
MatrixHub# cs 1
1S
1 TO
1
success
MatrixHub# cs 2
2S
1 TO
1
success
MatrixHub# cs 3
3S
1 TO
1
success
MatrixHub# en octane src
Enter entity item (chassis-id, port #):
Enter entity item (chassis-id, port #):
Enter entity item (chassis-id, port #):
Enter entity item (chassis-id, port #):
success
MatrixHub# en eng_lab src
Enter entity item (chassis-id, port #):
Enter entity item (chassis-id, port #):
Enter entity item (chassis-id, port #):
Enter entity item (chassis-id, port #):
success
MatrixHub# el
Entity List
----------Entity type, name: SRC, ONYX2
Entity type, name: DST, CONF_ROOM_1
Entity type, name: SRC, OCTANE
Entity type, name: SRC, ENG_LAB
success
MatrixHub# ed eng_lab
Are you sure (y/n):Y
success
MatrixHub# en eng_lab dst
1,1,
2,1
3,1
1,1 2
2,2
3,2
1,2
2,2
3,2
39
Enter entity item (chassis-id, port
Enter entity item (chassis-id, port
Enter entity item (chassis-id, port
Enter entity item (chassis-id, port
success
MatrixHub# el
Entity List
----------Entity type, name: SRC, ONYX2
Entity type, name: DST, CONF_ROOM_1
Entity type, name: SRC, OCTANE
Entity type, name: DST, ENG_LAB
success
MatrixHub# en o2 src
Enter entity item (chassis-id, port
Enter entity item (chassis-id, port
Enter entity item (chassis-id, port
Enter entity item (chassis-id, port
success
MatrixHub# en softw_lab dst
Enter entity item (chassis-id, port
Enter entity item (chassis-id, port
Enter entity item (chassis-id, port
Enter entity item (chassis-id, port
success
MatrixHub# el
Entity List
----------Entity type, name: SRC, ONYX2
Entity type, name: DST, CONF_ROOM_1
Entity type, name: SRC, OCTANE
Entity type, name: DST, ENG_LAB
Entity type, name: SRC, O2
Entity type, name: DST, SOFTW_LAB
success
MatrixHub# c octane eng_lab
1B2,2
2B2,2
3B2,2
success
MatrixHub# c o2 softw_lab
1B3,3
2B3,3
3B3,3
success
MatrixHub# es
Entity Status
------------ONYX2
TO CONF_ROOM_1
OCTANE
TO ENG_LAB
O2
TO SOFTW_LAB
success
MatrixHub# cs 1
1S
1 TO
1
1S
2 TO
2
1S
3 TO
3
success
MatrixHub# cs 2
2S
1 TO
1
2S
2 TO
2
2S
3 TO
3
success
MatrixHub# cs 3
3S
1 TO
1
3S
2 TO
2
3S
3 TO
3
success
MatrixHub# d octane eng_lab
1D2,2
2D2,2
3D2,2
success
#): 1,2
#): 2,2
#): 3,2
#):
#): 1,3
#): 2,3
#): 3,3
#):
#): 1,3
#): 2,3
#): 3,3
#):
40
MatrixHub# es
Entity Status
------------ONYX2
TO CONF_ROOM_1
O2
TO SOFTW_LAB
success
MatrixHub# cs 1
1S
1 TO
1
1S
3 TO
3
success
MatrixHub# cs 2
2S
1 TO
1
2S
3 TO
3
success
MatrixHub# cs 3
3S
1 TO
1
3S
3 TO
3
success
MatrixHub# c onyx2 softw_lab
1B1,3
2B1,3
3B1,3
success
MatrixHub# es
Entity Status
------------ONYX2
TO SOFTW_LAB
success
MatrixHub# cs 1
1S
1 TO
3
success
MatrixHub# cs 2
2S
1 TO
3
success
MatrixHub# cs 3
3S
1 TO
3
success
MatrixHub# c o2 conf_room_1
1B3,1
2B3,1
3B3,1
success
MatrixHub# es
Entity Status
------------ONYX2
TO SOFTW_LAB
O2
TO CONF_ROOM_1
success
MatrixHub# cs 1
1S
1 TO
3
1S
3 TO
1
success
MatrixHub# cs 2
2S
1 TO
3
2S
3 TO
1
success
MatrixHub# cs 3
3S
1 TO
3
3S
3 TO
1
success
MatrixHub# c 3 110 110
3C110,110
success
MatrixHub# es
Entity Status
------------ONYX2
TO SOFTW_LAB
O2
TO CONF_ROOM_1
3, 110 TO 110
success
MatrixHub# cs 1
1S
1 TO
3
41
1S
3 TO
1
success
MatrixHub# cs 2
2S
1 TO
3
2S
3 TO
1
success
MatrixHub# cs 3
3S
1 TO
3
3S
3 TO
1
3S 110 TO 110
success
MatrixHub# clear
Are you sure (y/n):Y
1I
2I
3I
success
MatrixHub# es
Entity Status
------------success
MatrixHub# mh
+===================== MaxtriX-Hub System Help ============================+
|- Macro Commands ---------------------------------------------------------|
|
MH
- Macro Help
|
|
MR <macro>
- Run a macro
|
|
ML [<macro>] - List current macros, list <macro> definition
|
|
MN <macro>
- create New macro
|
|
MD <macro>
- Delete macro
|
+==========================================================================+
success
MatrixHub# ml
Macro List
---------No macros defined
MatrixHub# mn setup_1
Enter macro item: c onyx2 eng_lab`
Enter macro item: c octane softw_lab
Enter macro item: c o2 conf_room_1
Enter macro item:
success
MatrixHub# ml
Macro List
---------Macro: SETUP_1
success
MatrixHub# ml setup_1
Macro List
---------Macro name: SETUP_1
CONNECT ONYX2 TO ENG_LAB
CONNECT OCTANE TO SOFTW_LAB
CONNECT O2 TO CONF_ROOM_1
success
MatrixHub# es
Entity Status
------------success
MatrixHub# cs 1
success
MatrixHub# cs 2
success
MatrixHub# cs 3
success
MatrixHub# mr setup_1
(mr SETUP_1) 1B1,2
2B1,2
3B1,2
(mr SETUP_1) 1B2,3
2B2,3
3B2,3
(mr SETUP_1) 1B3,1
42
2B3,1
3B3,1
(mr SETUP_1) END MACRO
Macro completed
MatrixHub# es
Entity Status
------------ONYX2
TO ENG_LAB
OCTANE
TO SOFTW_LAB
O2
TO CONF_ROOM_1
success
MatrixHub# cs 1
1S
1 TO
2
1S
2 TO
3
1S
3 TO
1
success
MatrixHub# cs 2
2S
1 TO
2
2S
2 TO
3
2S
3 TO
1
success
MatrixHub# cs 3
3S
1 TO
2
3S
2 TO
3
3S
3 TO
1
success
MatrixHub# mn setup_2
Enter macro item: c onyx2 softw_lab
Enter macro item: c octane eng_lab
Enter macro item: c o2 eng_lab
Enter macro item:
success
MatrixHub# ml
Macro List
---------Macro: SETUP_1
Macro: SETUP_2
success
MatrixHub# mn setup_3
Enter macro item: c onyx2 conf_room_1
Enter macro item: c octane eng_lab
Enter macro item: c o2 softw_lab
Enter macro item:
success
MatrixHub# ml
Macro List
---------Macro: SETUP_1
Macro: SETUP_2
Macro: SETUP_3
success
MatrixHub# mr setup_2
(mr SETUP_2) 1B1,3
2B1,3
3B1,3
(mr SETUP_2) 1B2,2
2B2,2
3B2,2
(mr SETUP_2) 1B3,2
2B3,2
3B3,2
(mr SETUP_2) END MACRO
Macro completed
MatrixHub# es
Entity Status
------------ONYX2
TO SOFTW_LAB
O2
TO ENG_LAB
success
MatrixHub# cs 1
1S
1 TO
3
1S
3 TO
2
43
success
MatrixHub# cs 2
2S
1 TO
3
2S
3 TO
2
success
MatrixHub# cs 3
3S
1 TO
3
3S
3 TO
2
success
MatrixHub# mr setup_3
(mr SETUP_3) 1B1,1
2B1,1
3B1,1
(mr SETUP_3) 1B2,2
2B2,2
3B2,2
(mr SETUP_3) 1B3,3
2B3,3
3B3,3
(mr SETUP_3) END MACRO
Macro completed
MatrixHub# es
Entity Status
------------ONYX2
TO CONF_ROOM_1
OCTANE
TO ENG_LAB
O2
TO SOFTW_LAB
success
MatrixHub# cs 1
1S
1 TO
1
1S
2 TO
2
1S
3 TO
3
success
MatrixHub# cs 2
2S
1 TO
1
2S
2 TO
2
2S
3 TO
3
success
MatrixHub# cs 3
3S
1 TO
1
3S
2 TO
2
3S
3 TO
3
success
MatrixHub# ph
+===================== MaxtriX-Hub System Help ============================+
|- Passwords --------------------------------------------------------------|
|
PH - Password Help
|
|
PL - List number of passwords defined
|
|
PD - Delete a password
|
|
PN <access level> - New password
|
+==========================================================================+
success
MatrixHub# pl
Number of passwords defined: 2
success
MatrixHub# pn 1
Enter new password: *****
Re-enter password: *****
success
MatrixHub# pl
Number of passwords defined: 3
success
MatrixHub# pd
Enter password to delete: *****
Re-enter password: *****
success
MatrixHub# pl
Number of passwords defined: 2
success
MatrixHub# pd
Enter password to delete: ***
Re-enter password: ***
44
Cannot delete current password
MatrixHub# logoff
success
Enter password: ***
MatrixHub$ c 1 1 1
Command not allowed for current access level
MatrixHub$ b 1 1 1-10
Command not allowed for current access level
MatrixHub$ d 1 1 1
Command not allowed for current access level
MatrixHub$ clear
Command not allowed for current access level
MatrixHub$ restore
Command not allowed for current access level
MatrixHub$ ver
Firmware version 1.02 10/19/98 16:55:39
Text ROM version 1.00
success
MatrixHub$ ch
Command not allowed for current access level
MatrixHub$ cl
Command not allowed for current access level
MatrixHub$ cp 1
1PP1,Power Supply A +5V: OK
1PP1,Power Supply A -5V: OK
1PP1,Power Supply B +5V: OK
1PP0,Power Supply B -5V: OK
1PT 88ßF
1PT 91ßF
1PT 89ßF
success
MatrixHub$ cs 1
Command not allowed for current access level
MatrixHub$ eh
Command not allowed for current access level
MatrixHub$ el
Command not allowed for current access level
MatrixHub$ en etest src
Command not allowed for current access level
MatrixHub$ ed onyx2
Command not allowed for current access level
MatrixHub$ es
Command not allowed for current access level
MatrixHub$ c onyx2 conf_room_1
1B1,1
2B1,1
3B1,1
success
MatrixHub$ d onyx2 conf_room_1
1D1,1
2D1,1
3D1,1
success
MatrixHub$ mh
Command not allowed for current access level
MatrixHub$ mr setup_1
(mr SETUP_1) 1B1,2
2B1,2
3B1,2
(mr SETUP_1) 1B2,3
2B2,3
3B2,3
(mr SETUP_1) 1B3,1
2B3,1
3B3,1
(mr SETUP_1) END MACRO
Macro completed
MatrixHub$ ml
Command not allowed for current access level
MatrixHub$ mn mtest
Command not allowed for current access level
MatrixHub$ md setup_1
45
Command not allowed
MatrixHub$ ph
Command not allowed
MatrixHub$ pl
Command not allowed
MatrixHub$ pd
Command not allowed
MatrixHub$ pn 1
Command not allowed
MatrixHub$ lo
success
Enter password:
for current access level
for current access level
for current access level
for current access level
for current access level
46