1
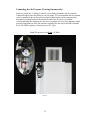
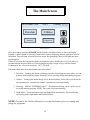
Operating Manual SUMMIT Porcelain & Press Furnace Manufactured in the USA by Ibex Dental Technologies 850 N. Dorothy Dr., Suite 502 Richardson, TX 75081 Firmware V2014 CE 1-877-370-4242 972-918-0393 fax 1 www.ibexdental.com 2 Table of Contents Cautionary Notes Welcome to Summit Furnaces Serial No. and Calibration Log …………………………….. Page 5 - 6 …………………………….. Page 7 …………………………….. Page 7 Location and Setup Lifting and Carrying Furnace Location & Ventilation Set-up and Connections Air Pressure Connection …………………………….. …………………………….. …………………………….. …………………………….. …………………………….. Operating the Touch Screen …………………………….. Page 13 Main Screen …………………………….. Page 14 Utilities Menu Time & Date User Settings Format Power Save Auto Night Mode Set Factory Defaults Features Volume Info Import Programs Export Programs Calibration Touch Screen Calibration Door Lift Calibration Vacuum Calibration Plunger Calibration Global Temperature Slider …………………………….. …………………………….. …………………………….. …………………………….. …………………………….. …………………………….. …………………………….. …………………………….. …………………………….. …………………………….. …………………………….. …………………………….. …………………………….. …………………………….. …………………………….. …………………………….. …………………………….. …………………………….. Select Program Screen ……………………………. Creating a Porcelain Program …………………………….. Entering Program Name …………………………….. Listing of Porcelain Program Parameters .…………... Entering Program Data …………………………….. Program Data Entry …………………………….. Programming Vacuum …………………………….. Page 8 Page 8 Page 8 Page 9 – 11 Page 12 Page 15 Page 16 Page 17 Page 17 Page 18 Page 18 Page 19 Page 19 Page 20 Page 20 Page 21 Page 22 Page 23 Page 24 Page 24 Page 25 Page 26 Page 27 Page 28 - 29 Page 30 Page 30 Page 31 Page 32 Page 32 - 34 Pages 33-34 Create a New Pressing Program …………………………….. Page 35 Pressing Program Parameters …………………………. Page 35 3 Modify an existing Program Copy a program Move a Program Delete a Program …………………………….. …………………………….. …………………………….. …………………………….. Page 36 Page 37 - 38 Page 38 Page 38 Run a Program Edit on the Fly Stop Program Skip Step Utilities …………………………….. ……………………………. …………………………….. …………………………….. …………………………….. Page 39 Page 40 Page 40 Page 41 Page 41 Metal Sintering …………………………….. Page 42 Technical Specifications Safety Checks Cleaning and Maintenance Spare Parts List …………………………….. …………………………….. …………………………….. …………………………….. Error Codes and Troubleshooting …………………………….. Pages 47 - 48 4 Page 43 Page 44 Page 44 - 45 Page 46 Cautionary Notes Intended Use The intended use of the IBEX Porcelain and Press furnaces is for the proper firing of dental ceramic materials and or the pressing of dental pressing ceramics into a lost wax investment mold. Use of IBEX furnaces in any manner other than their intended design usage may cause damage to the furnace and or personal injury. Observe all safety instructions. The user is solely responsible for any risk resulting from failure to observe these Instructions. Please read the User Manual carefully. Warnings DO NO USE ANY OTHER TYPE OF POWER CORD TO POWER THIS FURNACE! THE CORD PROVIDED IS RATED FOR 15 AMPS FOR 120Vac Models, 10 AMPS FOR 230Vac Models! ALL GROUNDING, (EARTHING), IS ACCOMPLISHED WITH THE FACTORY SUPPLIED POWER CORDS. REPLACE WITH PROPERLY RATED POWER CORDS ONLY. DO NOT POWER THIS FURNACE THROUGH AN EXTENSION CORD! STRICTLY OBSERVE CIRCUIT BREAKER RATINGS WHEN CONNECTING THIS FURNACE TO POWER. IMPROPER BREAKER AMP RATING OR CONNECTING MUTIPLE ELECTRONIC DEVICES, (FURNACES), CAN DRAW HIGHER AMPERAGE THAN THE BREAKER RATING AND MAY CAUSE THE BREAKER TO TRIP. CAUTION! DANGEROUS VOLTAGES! Hazardous line voltages are present under both the upper and lower covers. Disconnect the AC Mains Power Cord from the rear of the furnace before removing any covers. Removal of covers or any service related work should be performed by qualified personnel only! To avoid risk of electrical shock, this equipment must be connected to supply mains with a ground connection, (protective earth). CAUTION, HOT SURFACE! METAL SURFACES MAY GET HOT DURING NORMAL OPERATION! 5 For Porcelain Firing The Ibex Summit and Summit Press muffle is constructed with a proprietary Radiance Ring mounted from the top of the inside of the muffle. Therefore, its position is fixed relative to the firing brick. DO NOT use a firing apparatus, i.e.: a honeycomb tray or similar devise that has a height greater than ½”, 13mm or a diameter greater than 3” (7.62cm). Failure to adhere to this height and width restriction can result in damage to the Radiance Ring and Thermocouple. Firing trays should always be centered on the brick and never hang over the edge. For Pressing The Ibex Summit Press was designed to use disposable plungers. The Ibex Summit Press was designed to press using disposable plungers. Regardless of any advice or information received to the contrary, the Ibex Summit Press was designed to press all pressable materials using disposable plungers. There is no physical danger to the furnace or user with using reusable, (aluminous oxide), plungers. NOTE! Reusable plungers can only be used when they have been preheated in the burnout oven with the investment ring. Burnout oven temperatures should be raised to no less than 1600° F, (870° C). IBEX believes that the quality of pressings in the IBEX Summit Press may be lessened with the use of aluminous oxide plungers due to the steep temperature gradients they create within the ring. Drying the Muffle The muffle should be dried out prior to the furnace being placed into service. Please read the instructions on Page 11 for details in drying out the muffle. A Note on Vacuum Level Programming The Summit furnaces allow for precise vacuum control while many furnaces do not. Instead they provide for a “YES / NO” and a percentage of vacuum, typically 90% to 100%. Also, many porcelain manufactures do not provide a specific minimum vacuum level in their user instructions. A simple rule is to enter 72 – 73 cm (or 28 inches). Higher vacuum levels of 74 - 75 cm (29inches) can be programmed in. However, many vacuum pumps will have difficulty achieving these levels. See page 32, “Entering Program Data” for detailed information. 6 Welcome to the Ibex SUMMIT Porcelain & SUMMIT Press Furnace Your new Ibex SUMMIT includes many state of the art features that will provide you with unparalleled firing quality and ease of operation. 1. The revolutionary new “Long Life” open wire muffle with “Radiance Ring” patent pending provides unparalleled firing quality and consistency on all locations of the firing tray. No misfires 2. State of the art electronics and a high accuracy thermocouple make the Ibex SUMMIT a true “NO Temperature Calibration” furnace. With regular maintenance and purging of the furnace at least once a month will provide years of stable and reliable operation without calibrating. * See page 4 for an in depth explanation of the functioning of the patented Radiance Ring and the Temperature Reference System used in the IBEX Furnace. 3. A tangentially placed High CFM cooling fan blows air across the muffle opening creating a Venturi effect to draw the heat out of the muffle, reducing cool down times by up to 50%. 4. ALL TOUCH Display screen. There are no buttons to press. Just use a light ¼ second touch to operate all functions of your Ibex SUMMIT. 5. The Ibex SUMMIT features a “Power Save” option that helps to extend the muffle life and decrease electricity usage while the oven is between firings. Furnace Serial Number: _________________________ Temperature Offset: ______________ Vacuum Offset: ______________ 7 Location, Set-up and Connections Lifting and carrying the furnace Photo #1 Photo #2 Care should be taken when lifting the furnace from the box. While bending from the knees and back, place your hands around to the rear of the furnace and lift straight up, as shown in photo #1. Someone may be needed to hold the shipping box in place while lifting. Set the furnace down to remove the packing materials. Be sure to save all packing materials and the shipping box. They are required for any warranty repairs. After removing all the packing materials and plastic cover, carry the furnace, as shown in photo #2 for proper balance and control. Furnace Location and Ventilation Give careful consideration to the placement of the IBEX furnace. The furnace requires a flat level surface with a minimum of 4” inches clearance on all sides and top of the furnace to maintain proper heat ventilation and conduction cooling of the top cover. When properly situated, the upper cover will maintain a safe temperature even where the cover comes closest to the chamber opening. NOTE! Do not place the furnace near any materials that can catch fire. While the case temperatures will stay relatively cool, even after multiple firings, the muffle area operates at high temperatures even at idle, thus creating a potential fire hazard at the muffle opening when the platform is lowered. 8 Setup and Connecting the Ibex SUMMIT Remove all items from the accessories box, you should have the following: A1- One Ibex SUMMIT door brick (porcelain and pressing) A2- One door brick with ceramic press plate (pressing furnace only) B- One Ibex SUMMIT memory C- One Ibex SUMMIT heat tray, black anodized D- One AC power cord Type Approved, 15 Amp for 120Vac Models E- One vacuum pump power cord adaptor F- One airline (pressing furnace only) A2 D B F E C A1 Photo #3 Setup of the Ibex Summit is simple. Place the IBEX Summit or Summit Press on a flat, level work surface. The footprint or area required by the either furnaces is 11ʺ x 12”. The height of the Ibex Summit is 21ʺ. The Summit Press is 25ʺ tall. All sides require at least 4ʺ of clearance to allow for proper heat ventilation from the muffle chamber. 9 a b Photo #4 c d e f a) On/Off switch with integrated 15 Amp Circuit Breaker (10 Amp Breaker for 230Vac Models) b) Mains Power Receptacle c) Vacuum Pump Receptacle d) Vacuum Pump Fuse- Type 3AG, 250V 10 Amp, (250V 4 Amp for 230Vac Models) e) Computer USB peripheral port (future use) f) Hose connector for vacuum pump 10 After properly situating the Ibex SUMMIT on a level work surface, take the 7 ft. AC power cord, and plug the female plug into the (b) Mains Power Receptacle located at the lower left corner of the furnace, just below the ON / OFF switch. Insert the male plug into the appropriate AC power socket. NOTE! Do not position the furnace or power cord in a manner that makes emergency shut off or quick disconnection of the power cord difficult or impossible. Allow proper room for quick access to the mains power switch, power cord and the power outlet. Connecting the vacuum pump Some vacuum pumps are supplied with a connector matching the vacuum pump receptacle (c) located on the rear panel. If your pump has a standard 120Vac plug, use the vacuum pump power cord adaptor (E) supplied. Insert the plug from the vacuum pump into the adaptor. Then plug the adaptor, with vacuum pump power cord attached, into the female vacuum power receptacle. This receptacle is located just to the right of the main power receptacle. Connect the vacuum hose to the barbed hose connector located at the lower right corner of the back of the furnace. NOTE! It is recommended that the vacuum pump be plugged directly into an AC receptacle and run for 30 seconds before connecting to your furnace. This loosens the manufacturing grease. Powering up the Ibex SUMMIT With the vacuum pump and vacuum hose connected, insert the female end of the mains power cord into the Mains Power Receptacle, “b” as shown in photo # 4. Plug the male end into the appropriate power socket. NOTE! Make certain that the circuit breaker amp rating is appropriate for the furnace! Now that your Ibex SUMMIT Furnace has been properly situated and all the required connections have been made, it is ready to be turned on. NOTE! Remove the platform lift and chamber blocks prior to powering on the furnace, as the platform motor will try to move the platform down as part of the power up tests. Turn on the main power switch located just above the main power cord in the rear of the oven. The default Power Save, (idle), Temperature for the porcelain furnace is 450 C. The pressing furnace is 700° C. Drying out the Muffle (Very Important) Refractory materials used in dental furnaces today are at least 50% Silica based. Silica is a natural desiccant and draws moisture out of the air. Any time the muffle or brick (platform) is allowed to cool down below 212° F (100° C), the refractory material will start to absorb water vapor from the air. When powering up the furnace for the first time it is recommended to run the furnace at a high temperature (700 - 900°C)* for at least one hour with the platform open 1 inch, (2.5 cm). This will ensure that the moisture in the muffle will vaporize and escape through the opening. This is an important step prior to running programs with vacuum. Water vapor coming out of the muffle material under vacuum will cause poor vacuum performance and could generate vacuum failure errors. In addition, the water vapor, as it is drawn through the vacuum line and into the vacuum pump, will condense back into water and collect in the vacuum pump. This can greatly reduce the life of the vacuum pump and could the pump void the warranty. *See Power Save settings in the Utilities section for instructions to change Power Save Temperature and Time from their preset values to 900° C and 60 minutes. 11 Connecting the Air Pressure (Pressing Furnace only) Insert one end of the ¼ʺ tubing (F) into the swivel fitting mounted to the air regulator. Connect the other end of the tubing to your air supply. It is recommended that an isolation valve be installed in the air line system so that the pressing line can be connected and disconnected without having to shut down the entire line or system. It is further recommended that the main pressure line have a regulator on it as well to minimize output pressure fluctuations on down line pressure regulators like the one for the IBEX Summit Press. The IBEX regulator is factory preset to 65- 70psi. Note! The pressure is at 65 psi (.45 MPa) Photo #5 12 TOUCH SCREEN OPERATION The touch screen of the Ibex SUMMIT is the control center of your furnace. All control functions and information to and from the user is carried out through this screen. The Touch Screen is a highly precise device that requires only a Light Touch of about a quarter of a second with the pad of your finger. NEVER USE: hard, sharp or pointy devices such as pens or pencils, as damage may result and may void the display warranty. Excessive pressure, such as hard pressing, poking or impacts with a hard device may result in touch screen damage and may also crack the glass cover plate. This kind of damage is not covered under warranty. Difficulty with the display recognizing your touch entries or wrong entries may occur occasionally. The touch screen may require recalibrating. Carefully follow the Display Calibration instructions found in the Utilities menu under Calibration on page 24. A scratch resistant Mylar panel that covers the display should be cleaned periodically with a clean damp cloth by wiping in a straight motion across the panel with a light pressure. The fine powders that accumulate in the dental lab environment can scratch the cover over time. 13 The Main Screen IDT Dental Tech. Porcelain 450 C 0 cmHg 08/13/12 04:15:45 Utilities Door Sintering Night Mode Display Example #1 After powering up your Ibex SUMMIT for the first time, the Main Screen, as shown in Display Example 1 above, should be showing. If some other screen is displaying instead, touch the Cancel or OK button. This will bring you to the previous screen. Keep touching Cancel or OK until the above screen appears. If there is no screen showing but the display is a light blue color, shut the power off, wait about 10 seconds and turn the power back on. If no screen persists after a couple of trys, call Ibex Dental Technologies, Inc. service for assistance. 1-877-370-4242 The main screen offers four menu buttons plus door control. 1. Porcelain – Touching this button will bring you to the Select Program screen where you can perform all the required program functions, such as creating, editing and running programs. 2. Utilities – Touching this button brings you to the main utilities screen. Here you can set the user parameters to customize the furnace’s operation to your requirements. 3. Sintering – “METAL SINTERING ONLY” - This button will bring you to a quick, easy to use metal sintering program. NOTE! This is not for zirconia sintering. 4. Night Mode – Touch this button to go into Night Mode immediately. This overrides the time setting in the Night Mode and Features utilities. NOTE! Proceed to the Utilities Menu first to set up the furnace prior to creating and firing any programs. 14 Utilities Menu Utilities 450 C 0cmHg User settings Date/ Time Info Import Export Calibrate 08/13/12 04:15:45 Ok Display Example #2 The Utilities Menu is where the Ibex SUMMIT Porcelain Furnace can be customized to meet your particular needs. The Utilities Screen offers six menu picks. 1. User Settings – Input user settings and operational parameters 2. Time and Date – Select 12/24 clock, input time and date 3. Information – Review software version and usage counters 4. Import – Import programs from the memory stick to the furnace memory 5. Export – Save programs from furnace memory to the memory stick 6. Calibration – Calibrate touch screen, door lift time and vacuum level NOTE! The Time and Date information was entered at the time of manufacture for testing purposes. The date should be accurate, but you may need to enter the correct time. You can change the date and time format. Touch the Date/ Time button. 15 Date and Time Set Date/Time MM/DD/YY 12 Hour DD/MM/YY 2 3 4 5 6 7 8 9 0 24 Hour 8:35 AM 1 Ok PM Del Display Example #3 The Time and Date screen is where the time and date for the real time clock will be entered. The user can select the date format, a 12 hour or 24 hour time format and AM or PM by touching the appropriate light blue squares. The center of the square will blacken to acknowledge your selection. The blue lined box under the MM/DD/YY is for entering the date. Touch this box to enter the date. The box will clear and is ready for the date to be entered. To enter August 15, 2012, in the US format enter the date in a string of numbers, 081512. Use leading zeroes for months and days that are less than ten. If the International format has been selected, enter the number string 150812. If the date format is changed at a later time, the date display will automatically update and there is no need to reenter the date information. While entering the date or time if a miss touch is made, press the Del button to delete the previous touch entry. NOTE! To correct or change a completed entry, just retouch the appropriate box. This clears the box and the correct data can be entered. All entries on any screen can be corrected in this manner! The two light blue squares below the date are for selecting the 12/ 24 hour format. After selecting the appropriate time format, touch the blue lined time box to enter the time in the same manner used for entering the date. To enter the time 8:35pm, touch 0835. When completed, touch the appropriate box for AM or PM. If the 24 hour format has been selected enter the string 2035. The AM and PM boxes will be grayed out and inoperative. When completed, touch the OK button. All data is now saved to memory and the display has returned to the Utilities screen. The date and time will reflect your changes. The SUMMIT’s real time clock battery will maintain proper time for up to five years. All operational memory such as the user programs and utilities settings are stored in a non-volatile memory and will not be affected should the battery fail. Loss of date and time information after turning off or from a power loss indicates a low battery failure. Replacement is necessary. 16 User Settings Touch the User Settings button to proceed with entering the options settings User Settings 450 C 0cmHg Format Prefs Power Save Night Mode Set Defaults Features Volume 08/13/12 04:15:45 Ok Display Example #4 The User Settings Menu is where the user customizes the furnace operation. The menu picks are as follows: 1. Format – Here you select the temperature display in °C or °F and the vacuum in cm or inches. Any combination is permissible. When finished, touch the OK button to return to the User Settings Menu. Format Prefs 450 C 0cmHg 08/13/12 04:15:45 01/13/10 Temperature Celsius Fahrenheit Pressure Inches cmHg Display Example #5 17 OK 2. Power Save – This feature will raise the platform and maintain the programmed temperature after a specified amount of time. The factory settings are 400° C and 90 minutes for the porcelain furnace and 700° C and 5 minutes for the Pressing Furnace. Touch the “Idle Time…” box to enter how many minutes need to elapse from either power up or the completion of the last firing cycle before going into the Power Save mode and touch the “Power Save Temp” box to enter a new temperature to maintain while in the Power Save mode. It is recommended that you enter a temperature at or near your most common Low Temp setting that will be used. When completed, touch the OK button to return to the User Settings Menu. Power Save 1 2 3 4 Minutes 5 6 Power Save Temp: 7 8 9 0 Idle Time Until Power Save: 400 Celsius Ok Display Example #6 3. Auto Night Mode – Night Mode places the furnace into a sleep state at a particular time of day, every day. Touch the Vacuum or No Vacuum box enables or disables vacuum when going into Night Mode. Using vacuum during Night Mode helps eliminate water vapor from collecting in the chamber. Start Time is the time the furnace automatically enters Night Mode. Use the same time format that was selected in the Time / Date Utility. The left box is hours, hh, and the right box is minutes, mm. As in all data entries, leading zeros are not required. Touch the appropriate box for AM or PM if using the 12 hour clock. Touch the Temp box to enter the desired Night Mode temperature. The temperature range is 50° C, (122° F) to 300° C (572° F). Touch OK when all data has been entered. NOTE! The Main Screen Night Mode button is immediate and overrides the time settings! Auto Night Mode Vacuum Start Time No Vacuum 8 00 AM Temp (C): PM 300 Display Example #7 18 Ok 1 2 3 4 5 6 7 8 9 0 4. Set Factory Defaults – This button will reset all user settings to the factory defaults and erase all porcelain and pressing programs. You will be prompted to verify that this is the action you wish to take. NOTE! This action should only be taken when experiencing erratic or irregular system operation. It is strongly recommended that you contact Ibex Dental Technologies with a detailed description of the symptoms prior to taking this action. Set Factory Defaults 450 C 0 cmHg 08/13/12 04:15:45 Rest all settings to Factory Defaults? Warning! All current user programs and settings will be erased! Yes No Display Example #8 5. Features – This screen allows you to enable or disable the Night Mode, Cooling Fan and European Offset features. The enable or disable aspect is global in nature, meaning that regardless of any other parameters or settings, these features will be enabled or disabled. Enable / Disable Features Auto Night Mode Off On Quick Cooling On Off European Offset Ok On Off Display Example #9 European Offset – This feature places a fixed temperature offset of +10° C internally. This brings the High Temperature firing value more in line with the values used in European manufactured furnaces. This feature is active with Porcelain firing programs only. Pressing programs are not affected. NOTE! The Night Mode button on the Main Screen places the furnace into Night Mode immediately regardless of the Auto Night Mode setting. NOTE! The Quick Cooling Fan is always disabled at the completion of Pressing programs. 19 6. Volume – This button brings up the Volume select screen. There are three volume level choices, Low, Medium and High. The default setting is High. To change the volume level, touch either of the buttons not selected. A beep at the associated volume level will be heard allowing you to choose which volume setting works for you. Volume Low Medium High Ok Display Example #10 Info Information 450 C 0cmHg 08/13/12 02:15:45 A SW Version: 2013R(T) S/N 0999908 Total On Time: 00720:18 Door Time: 02:45:50 Reset Heater On Time: 00065:17 Reset Firing Cycles: 229 Reset Ok Display Example #11 The INFO screen displays the current software version that the SUMMIT is running. Additionally, the INFO screen provides the total number of hours that the furnace has been powered on, the number of hours and minutes that the door lift motor has been run and the total number of hours and minutes of power applied to the muffle. The last counter displays the number of firings the furnace has run. The ability to reset the last 3 counters is password protected by a 6 character code and is reserved for factory use only. 20 Import The import function is a powerful tool that allows an owner, manager, or user to quickly import programs that have been previously exported. One can choose to globally clear all existing programs stored in the furnace memory prior to importing from the memory stick or just import the programs stored on the memory stick. When you press the IMPORT button you will be asked to erase all programs stored in the furnace before importing programs or import the memory stick programs. For example: One of your Ibex furnaces has the following programs stored: 1, 2, 3, 5, 6, 10 and 12. The memory stick has the following programs stored: 1, 2, 3, 4, 6, 7, 8 and 11. If you were to select the global erase option, all the original programs will be deleted from the furnace memory first, and then the memory stick programs will be copied over. Programs 1, 2, 3, 4, 6, 7, 8 and 11 have now been copied to the furnace memory. Programs 5, 10 and 12 have been permanently erased. If you choose the regular import option, then programs 5, 10 and 12 will not be deleted. The furnace’s list of programs will now look like this: 1, 2, 3, 4, 5, 6, 7, 8, 10, 11 and 12. NOTE! The parameters for the program numbers that were on both the memory stick and the furnace have been overwritten to the values stored on the memory stick. When an additional Ibex Summit furnace is being placed into service, you can quickly import all the original programs from the first furnace to the new furnace. It also allows an owner or manager to quickly restore programs to their original settings should they be altered by technicians. It is strongly recommended that the 32MB USB memory stick supplied with the Ibex SUMMIT be used. Not all USB memory sticks are compatible with the Ibex SUMMIT as many larger capacity memory sticks, (4GB or greater), have special formatting or programs that interfere with the SUMMIT’s ability to read the memory. The memory stick supplied with your SUMMIT furnace has been designed to work correctly with your furnace and has ample memory capacity for all 80 programs and system file upgrades. If the memory stick has been inserted when the Import button was touched, then the display will show the number of programs found on the stick. You will be prompted to continue to import or cancel to return to the previous screen. If the memory stick has not been inserted, you will receive the message “No Media Present”. Just insert the memory stick and the program count will be displayed. You can proceed to import or cancel. 21 Export The export function is a simple procedure. Simply insert the memory stick into the USB port and touch the EXPORT button. You will be prompted to either proceed with exporting or cancel the procedure. If you touch the EXPORT button prior to inserting the memory stick, you will receive the following message: “No Media Present”. After inserting the memory stick you will be prompted to either proceed with exporting or cancel the procedure. Remember to keep your Ibex SUMMIT memory stick in a safe location. All memory sticks come with a nylon loop so that it can be hung over a hook or nail. It is strongly recommended that the memory stick be stored on one of the back cover retaining nuts. As the furnace is rarely moved, the memory stick should be easily accessible when required. 22 Calibration There is no requirement or ability to calibrate the temperature of your Ibex SUMMIT furnace. If you feel that your Ibex SUMMIT is not firing at the proper temperature or if you have any other operating questions please call tech support at 877-370-4242 or email us at [email protected]. Calibration 450 C 0cmHg 08/13/12 04:15:45 Press Screen Vacuum Door Temperature Ok Display Example #12 The calibration button is provided to calibrate the following furnace functions: 1. 2. 3. 4. 5. Touch Screen Calibration Door Calibration Vacuum Calibration Pressing Plunger Calibration (Pressing Furnace only) Temperature Slider 23 Touch Screen Calibration The touch screen will require occasional recalibrating. This is a very quick and simple procedure. If you are noticing difficulty in the touch screen responding when touched, do not press harder or use a hard or pointed object to get the screen to respond. Be careful to touch at the very tip of the arrow points for the most accurate calibration. IMPORTANT. Now touch screen calibration will be performed. Touch points EXACTLY at the positions shown by arrows. CALIBRATION 3 touches left Display Example #13 Display Example #14 CALIBRATION CALIBRATION 3 touches left 3 touches left Display Example #15 Display Example #16 Door Lift Calibration The Door Lift Calibration is used to determine the travel time for the lift motor to raise and lower the platform. The calibration values are used to provide more accurate preheat and cooling times. Touch the “Calibrate” button and the lift will raise and lower. The travel times will be displayed and recorded in memory. Touch the “Back” button to return to the calibration screen. Door Calibration Door Close Time: 13.0 s Door Open Time: 13.5 s Calibrate Display Example #17 24 Back Vacuum Calibration Vacuum Test Test Vacuum (mmHg) 720 Actual Vacuum 0 mmHg Vacuum Adjust ± 5% -3 Start Back Stop +/- 1 2 3 4 5 6 7 8 9 0 Display Example #18 This Vacuum Test utility’s primary function is to calibrate the vacuum transducer. The transducer’s worst case error is rated at + or – 5%, thus the ability to increase or decrease the Actual Vacuum value by +/- 5%. This calibration is performed at the factory using precision vacuum gauges and should never need adjusting. NOTE! The actual Vacuum Adjust value should be written down inside your manual should you need to change this value and restore it at a later time. The Vacuum Calibration utility is also a powerful tool for helping to diagnose vacuum issues with either the vacuum pump or the furnace. By running a very simple test it is easy to determine if you have a vacuum leak in the furnace or a bad vacuum pump. Enter a lower than normal vacuum level into the Test Vacuum box, ie. 650 mmHG. Touch the Start button. The platform will rise, if not already up, and once at the top the vacuum pump will start. Note that while the platform is rising the Actual Vacuum will show a value of 10 mmHG or more. This is normal and does not indicate a problem. As the vacuum rises, if the pump is strong enough it will exceed 650 mmHG by 3 mmHG and the pump will shut off. There will be some loss of vacuum level due to the valves closing and pressure stabilizing throughout. If it takes a minute or more before the pump restarts then the furnace is holding vacuum well enough to achieve higher vacuum levels. The problem is in the vacuum pump and needs replacing. This can be confirmed by entering a higher value in the Test Vacuum box. At some point the pump will be unable to achieve the required vacuum level. 25 Plunger Press Test (Pressing Furnaces only) Press Test Press Dn Time 16.5 s Door Open Time: 2.0 s Plunger Up: Plunger Down: Press Solenoid: High Low Low Toggle Back Display Example # 19 The Plunger Press Test is used to test and adjust the rate at which the plunger moves down and back up. The factory calibration has a plunger down time range of 12 to 18 seconds. The up time is factory calibrated for 1.7 to 2.3 seconds. To verify the plunger travel times, have the furnace idling at 700°C for at least one hour. Touch the “Toggle” button. There should be a popping sound from inside the furnace as the “Press Solenoid” has been activated. It should now read High. The “Press Dn Time” is incrementing and updates approximately once a second. After a couple of seconds the “Plunger Up” status should have changed to Low. When the plunger reaches the lower sensor the “Plunger Down” status should change to High and the “Press Dn Time” will stop incrementing. As mentioned earlier, the time range should be between 12 to 18 seconds. NOTE! If the “Toggle” button has been touched and in the middle of a downward cycle, repetitive touches of the Toggle” button will have no effect. To cancel a Press Dn Test simply touch the Back button. You will be returned to the Calibration Menu Screen. 26 Temperature Slider Global Temperature Slider Error +/- 25°C (77°F) Ok -3 Cancel +/- 1 2 3 4 5 6 7 8 9 0 Display Example # 20 The Global Temperature Slider allows for minor temperature adjustments up to + or - 25° C. It is useful in adjusting minor thermocouple variations due to aging or contamination. Any value placed here is global in effect and internally adjusts the temperature by the entered amount. The need for adjusting each program is not necessary. Enter a negative value in the box when the temperature appears low. Enter a positive value in the box when the temperature appears high. There are two methods to determine how many degrees + or – to adjust. The first method is through visual inspection. Over time, if it is determined that work is coming out more under fired or pressings are pressing short, a -2° C or -3° C, or more if needed, should be entered at a time. Touch the Ok button to return to Main Calibration Screen. The second method is by running a Temperature Verification Program, No. 78, labeled “Silver”. The result of this test provides a clear indication of whether the furnace is firing hot or cool. Refer to the Temperature Verification section for detailed instructions on running this test. 27 Select Program Screen Porcelain or Press The Select Program Screen Select Program 08/13/12 04:15:45 450 C 0cmHg 009 010 VM 13 1ST BAKE 011 VM 13 2ND BAKE 012 VM 13 GLAZE 013 VM 13 2ND GLAZE 014 MEDIUM CORRECTIVE 015 NAT ENAMEL BAKE 016 TEST 1* (On Pressing Only) Create Modify Door Delete Run Cancel Display Example #21 Touching the Porcelain button from the Main Screen brings up the Select Program Screen. This screen is the heart of a powerful and highly intuitive control center that brings total functionality to Create, Run, Modify or Delete programs at the touch of your finger tip. The left side of the Select Program Screen Located on the left half of the screen is the program list. The SUMMIT furnaces feature 80 user programmable locations. The numbers at the far left represents the program locations from 1 to 80. Eight (8) locations are displayed per page with 10 pages, thus providing 80 programs. Easy access to the additional 9 pages is accomplished by touching the up or down arrows located at the top and bottom of the program list. The program locations, or slots, start with “001 – 008”. To view program slots “009 – 016” or “071 – 080” touch the up or down arrows located at the top and bottom of the program list. With repeated touches of the up or down arrows, you can view the remaining program pages in ascending or descending order. The program pages will wrap around, meaning that if you start at the 1st program screen, programs 001 – 008 and wish to view program 075, press the up arrow to wrap around to the last program page, displaying programs “071 – 080”. Touching anywhere within a program line will select that program location. The selected location will be highlighted to confirm your selection. The Display Example above shows that location 009 has been selected. NOTE! The Summit Press runs both porcelain and pressing programs. An “*” will appear at the end of all pressing program names as shown in Display Example above. Program #16 is a pressing program. 28 The right side of the Select Program Screen The right half of the display holds all the controls for creating, editing and manipulating the user programs. Located at the far right are the door control buttons for raising and lowering the platform. Located immediately below the door arrows is the Cancel button. Touching this button will bring you back to the MAIN SCREEN. Reminder! Touching a Cancel or OK button on any screen will bring you back to the previous screen. The OK button may update or save any applicable changes whereas the Cancel button will not. Create Create new programs by touching this button. You can create a program only in an empty memory location. A memory location is considered empty if the area to the right of the program number is blank. In Example Display #18, the only empty memory location is slot #009. All other memory locations have a name to the right of the program number and are, therefore, not empty. For example, in Example Display #18, if you select program # 12 then touch the CREATE button, an error message will be displayed. You must then press the OK button to clear the alarm. You must either Delete or Move the program from slot #12 before you can create a new program there. NOTE! For pressing furnaces, You will be prompted to choice whether you are creating a porcelain or pressing program. NOTE! The operating system does not check for duplicate program names. Therefore, different memory locations can have the same program name. Modify This button is used to bring up the Edit screen where all editing functions to an existing program can be performed. NOTE! A program must be created and saved prior to its being edited. Delete Run This button is used to delete an existing program. Deleting a program will make its memory location blank again. A new program can now be created in this memory location. There is no way to recover a deleted program unless it was saved to a memory stick where it can be imported along with all the other programs on the memory stick. This button starts the selected user program. NOTE! The platform must be fully lowered prior to running a program. If the platform is not fully lowered and the “RUN” button is touched, an alarm will sound, the platform will start to lower and a warning message, “Wait until door opens then press RUN” will be displayed. You must touch the OK button to silence the alarm and clear the warning message. Once the door has reached the lower limit and stops, the RUN button can again be touched. 29 Creating a Porcelain Program Entering a Program Name Name Program Name Program SAMPLE Q W E R T Y U I O A S D F G H J K L Z X C V B N M Del 123 Space Ok P Cancel Q W E R T Y U I O A S D F G H J K L Z X C V B N M Del 123 Space Ok Display Example #22 P Cancel Display Example #23 After touching the empty memory location #009 in Example Display #21, touch the CREATE button. NOTE! If using a Summit Press, the next screen will ask Porcelain or Pressing?. Touch Porcelain. Example Display #22 will be displayed on the screen. At this screen you will enter the program name. Name Program Name Program SAMPLE 1 SAMPLE 1 1 2 3 Q W E R T Y U I O 4 5 6 A S D F G H J K L 7 8 9 Z X C V B N M Del Del Back 0 123 Space Cancel Example Display #24 Ok Cancel Display Example #25 Any combination of letters, spaces and numbers may be used up to 15 characters per name. To enter numbers, touch the 123 button and the number keypad will be displayed. See Display Example #24. Enter the number(s) and touch the Back button to bring you to the Program Name Screen. Touching the OK button will bring up Program Data Entry Screen. 30 P Porcelain Program Parameters Low Temp (° C or F)– The starting or entry temperature of the porcelain. 350°C min - 850°C max Preheat (minutes:seconds)- The time required to bring the porcelain into the muffle chamber. 00:20sec min – 99min:59sec max Heat Rate (°C or F / min)- The rate of change (delta) in temperature per minute. 2°C/minute min - 150°C/minute max. Vac Level (cmHG or inHG)- The level of vacuum required for the program. 5 cmHG (15 inHG) min – 75 cmHG (29 inHG) max. NOTE! When entering a 76 cmHG (30 inHG), the pump will run continuously. High Temp (°C or F)- The high temperature required by the porcelain. 500°C min - 1195°C Max. Vac Hold (minutes:seconds)- The time in minutes and seconds that the porcelain is required to stay at High Temp while under vacuum. 00min:00sec min – 99min:59sec max. NOTE! When using Vac Hold the value for Vac Release must be zero (0). Hold Time (minutes:seconds)- The time in minutes and seconds that the porcelain is required to stay at High Temp without vacuum. 00min:00sec min – 99min:59sec max. NOTE! The Vac Hold and Hold Time are consecutive timers. For example, if Vac Hold is programmed for 30 seconds and Hold Time is programmed for 1 minute and 30 seconds. There is a total of 2 minutes that High Temp will be maintained. Once High Temp has been reached, the Vac Hold timer of 30 seconds starts with vacuum. After 30 seconds the vacuum is released and the Hold Time timer of 1 minute and 30 seconds starts. After 1 minute and 30 seconds the program proceeds to the next program step. 2nd Hold Temp (°C or F)- The temperature that the porcelain needs to cool down to when layered over a zirconia or titanium core. 1° C or F below High Temp to 500° C. NOTE! This parameter allows for the proper recrystallization of layered materials with widely different thermal coefficients of expansion and conduction. The program lowers the High Temp to the 2nd Hold Temp in a controlled 15° C/min rate. 2nd Hold Time (minutes:seconds)- The time the 2nd Hold Temp will be maintained after the 2nd Hold Temp has been reached. 00min:00sec min – 99min:59sec max. Cool Time (minutes:seconds)- The time to completely lower the porcelain from the muffle chamber. 00min:00sec min – 99min:59sec max. Start Vac (°C or F)- The temperature that the vacuum pump will start at. This value must be equal to or greater than the Low Temp value and less than the High Temp value. Release Vac (°C or F)- The temperature that the vacuum will be released. This value must be equal To or less then the High Temp value and greater than the Low Temp value. NOTE! When using Vac Hold the value for Vac Release must be zero (0). 31 Entering Program Data Program Data Entry Screen Porcelain Low Temp (C) Preheat (mm:ss) 4 5 6 0 7 8 0 9 0 01:00 2ndHold Temp (C) 0 Vac Level (cmHg) 0 Cancel 3 00:00 60 Vac Hold (mm:ss) 2 Hold Time (mm:ss) Heat Rate (C/min) High Temp (C) 1 450 890 00:00 2nd Hold Time (mm:ss) Cool Time (mm:ss) Start Vac (C) Release Vac (C) 00:00 00:00 Ok Display Example #26 Display Example #27 is the default porcelain parameters screen for creating a new program. From here you touch the specific program parameter box and enter the value from the number panel at the right side of the screen. Each time you touch a parameter box it will highlight and clear to verify the correct box has been touched. If a box has been touched accidentally the original data will remain in memory. Just touch the correct box and the original data in the first box will reappear. Porcelain Low Temp (C) Preheat (mm:ss) 01:00 Heat Rate (C/min) 60 Vac Level (cmHg) 0 High Temp (C) Vac Hold (mm:ss) Cancel 890 00:00 1 2 3 4 5 6 0 7 8 0 9 0 Hold Time (mm:ss) 00:00 2ndHold Temp (C) 0 2nd Hold Time (mm:ss) 00:00 Cool Time (mm:ss) 00:00 Start Vac (C) Release Vac (C) Ok Display Example #27 To select a parameter to be changed, touch the appropriate box. It will clear the current data and highlight the box. In Display Example #27, the Low Temp box has been touched and has been highlighted. A new value can now be entered. There is no Enter key to be touched after data has been entered. Simply touch the next box to be programmed and continue entering data until all appropriate values have been entered. There is no specific order for entering program parameters. They can be entered in any order. If an incorrect value has been entered, simply retouch the box. The box will clear, and the correct value can be entered. 32 A special consideration has been made with regard to the vacuum parameters. A default value of zero (0) is programmed for all new programs. When the value of the vacuum is zero, all parameters regarding vacuum are lighted out in yellow and are not used, (see Display Example #27). When the vacuum box is touched, the vacuum boxes will appear and can be programmed. Porcelain Low Temp (C) Preheat (mm:ss) Heat Rate (C/min) Vac Hold (mm:ss) Cancel 2 3 4 5 6 0 7 8 0 9 0 Hold Time (mm:ss) 00:00 01:00 2ndHold Temp (C) 0 60 Vac Level (cmHg) High Temp (C) 1 450 890 2nd Hold Time (mm:ss) 00:00 Cool Time (mm:ss) 00:00 Start Vac (C) 00:00 Release Vac (C) Ok Display Example #28 The vacuum level entered can be any value between 15– 76 cm (5– 30in). A value entered outside this range of values will produce an error message. If 76 cm (30in) is entered, the program will run the vacuum pump continuously regardless of the actual vacuum level as long as a minimum level of 73cm (28.5) is obtained for minimum vacuum requirements. The Start Vac can be any value equal to or greater than the Low Temp value and must be lower than the High Temp value. The Release Vac value must be greater than the Start Vac value and less than or equal to the High Temp. NOTE! When using a Vac Hold time other than (0), the Release Vac must be set to zero (0) as the Vac Hold timer starts once High Temp has been reached. If Vac Hold time is not required than this value must be (0) and a Release Vac temperature must be entered. If both non zero parameters are entered, than an error message will be displayed. The following are examples of Vacuum error messages: Porcelain Error! Low Temp (C) Start Preheat (mm:ss) Hold Time (mm:ss)00:0 300 1 2 Vac Hold 00:0 Vac Temp not(mm:ss) within limits 3 4 Cool Time (mm:ss) 01:0 Heat Rate (C/min) Start Vac (C) Ok Vac Level (cmHg) Vent Temp (C) High Temp (C) Cancel Ok 0 0 5 6 7 8 9 0 Display Example #29 The above error occurs when the Start Vac temperature entered is not equal to or greater than the Low Temp temperature entered. 33 Porcelain Porcelain 1 2 Error! Low Temp (C) 300 Vac Hold (mm:ss)00: Vac Hold or Release 3 4 Preheat (mm:ss) Error! Low Temp (C) 300 Set Vac Preheat (mm:ss) Hold Time (mm:ss) 00: 01: Cool Time (mm:ss) 0 Ok (C) Start Vac 0 Heat Rate (C/min) Vent Temp (C) Cancel Ok 1 2 Vac Hold 00: Vac3 Clear Vac Hold or (mm:ss) Release 4 5 6 Heat Rate 7 8 (C/min) 9 Hold Time (mm:ss) 00: 01: Cool Time (mm:ss) 0 Ok (C) Start Vac 0 Vent Temp (C) 0 Cancel Display Example #30 Ok 5 6 7 8 9 0 Display Example #30 The “Set Vac Hold or Release Vac” error occurs when both the Vac Hold and Release Vac values are (0). A valid value for one or the other (but not both) must be entered. The “Clear Vac Hold or Release Vac” error occurs when values for both Vac Hold and Release Vac have been entered. A valid value for one or the other (but not both) must be entered. When all the parameters have been entered and the program is ready for saving, touch the Ok button. By touching the Ok button, all entries are saved to the permanent memory and the display returns to the Select Program Screen, (Display Example #31). Notice that program slot 009 is now filled with the new program named SAMPLE 1. The new program can now be run by touching the Run button. NOTE! By touching the Cancel button at any time during the programming, all entries will be erased and you will be returned to the Select Program Screen, (Display Example #21). Notice that program slot 009 will still be blank. Select Program 450 C 0cmHg 08/13/12 04:15:45 Create 009 SAMPLE 1 010 VM 13 1ST BAKE 011 VM 13 2ND BAKE 012 VM 13 GLAZE 013 VM 13 2ND GLAZE 014 MEDIUM CORRECTIVE 015 NAT ENAMEL BAKE 016 TEST 1* (Pressing Only) Modify Door Delete Run Cancel Display Example #31 An Additional Note on Programming Vacuum Many furnaces do not allow for the programming of a specific vacuum level but instead provide for a “YES / NO” or a percentage of vacuum entry, typically 90% to 100%. The Summit furnaces allow for a more precise vacuum control. A simple rule for entering programs that do not state a specific vacuum level in cm or inches is to enter 72 – 73 cm (28 inches). Higher vacuum levels of 74 - 75 cm (29inches) can be programmed in. However, most vacuum pumps will have difficulty achieving these levels. 34 Creating a Pressing Program NOTE! This section assumes that the reader has read and understands how to enter name and data via the touch screen. If not, please refer to the detailed instructions “Creating a Porcelain Program” found on page 30. After selecting to create a pressing program, naming the pressing program follows the same steps as naming a porcelain program. Please refer to Creating a New Program Porcelain Section, Display Examples #22 - #25 for naming a pressing program. With the program name entered, the pressing parameters screen will be displayed to enter the program data. Refer to Display Example #32. Pressing Program Low Temp (C) 700 Init. Soak (mm:ss) 25:00 Heat Rate (C/min) 100 Press Hold (mm:ss) 12:00 Start Vac (C) 700 2nd Hold Temp (C) 830 High Temp (C) 920 2nd H/R (C/min) Cancel 1 2 3 4 10 5 6 2nd Hold (mm:ss) 10:00 7 8 Cool Time (mm:ss) 00:30 9 0 Ok Display Example #32 Low Temp – is the entry temperature for the program. 700°C (1292°F) is typical Low Temp value. Heat Rate – the number of degrees per minute the temperature will increase Start Vac – this function has two modes of operation: 1. Traditional Vacuum Mode – place any temperature equal to or greater than Low Temp and less than or equal to High Temp. That is the temperature that the vacuum pump will come on. Vacuum will be maintained for the remainder of the cycle 2. Minimum Vacuum Mode – place a zero (0) or any value less than the Low Temp value and vacuum will come on prior to the Press Hold Stage. High Temp – the maximum temperature that the program will run Init. Soak – the time in minutes and seconds that the ring will soak prior to pressing. Press Hold – the time in minutes and seconds that the pressing piston is engaged to the ring 2nd Hold Temp – the temperature that the furnace will lower to after completion of the Press Hold stage. This stage does not use pressing or vacuum. NOTE! The purpose of this stage is to provide controlled cooling to eliminate or greatly minimize substrate stress. Place a zero (0) in this box to disable this feature. nd 2 H/R – the rate at which the temperature will drop from High Temp to the 2nd Hold Temp 2nd Hold – the time in minutes and seconds that the 2nd Hold Temp will be held for Cool Time – the time in minutes and seconds that it takes for the door to come down 35 Modify an Existing Program Porcelain or Pressing SAMPLE 1 Porcelain Low Temp (C) Preheat (mm:ss) 3 4 5 6 550 7 8 880 9 0 01:30 05:00 2ndHold Temp (C) 0 60 Vac Level (cmHg) 73 High Temp (C) 890 Cancel 2 Hold Time (mm:ss) Heat Rate (C/min) Vac Hold (mm:ss) 1 450 00:00 Save 2nd Hold Time (mm:ss) Cool Time (mm:ss) Start Vac (C) Release Vac (C) Copy 00:00 03:00 Move Display Example #33 Once a program has been created and saved, it is possible for you to modify or edit the program. From the Select Program Screen, select the program to be modified. After selecting the program to be modified, touch the Modify button. A screen similar to Display Example #33 will appear. It looks almost identical to the Create Program screen. From here you can make all the changes needed to the program, including its name and location. You can also make copies of the original program that you wish to save in different memory locations. Modifying or Editing a Program Editing a program is very simple. Make all the changes that you need to as if creating a new program. When you are finished, touch the Save button. All changes will be recorded to memory and the Select Program screen will appear indicating that the edit process has been completed. NOTE! Touch the Save button only after all the changes have been made. Since NO changes are saved to memory during the edit process, should you decide not to save your changes, touch the Cancel button. No changes will be recorded to memory, and the program will retain all its original values. The Select Program screen will appear indicating that the edit process has been cancelled. 36 Copying a Program There are 2 methods for copying a program: Method 1 Select program Sample 1 from the Select Program screen and touch the Modify button. A screen similar to Display Example #34 will be displayed. In the Modify Program screen, touch the Copy button. The next screen displayed will be the Name Program screen. Enter the new name of the program to be copied in the same manner as you used to enter in Sample 1 earlier in the manual. Name this program Sample 2. When completed, touch the OK button. The next screen will look very similar to the Select Program screen. Select the program location number where you would like the program to be copied to. If necessary, use the Page Up or Page Down arrows to bring up the desired program page. Touch the appropriate program location box and the copied program will be completed. The Select Program screen will appear with this copied program selected. The copied program can now be run or modified as necessary. SAMPLE 1 Porcelain Low Temp (C) Preheat (mm:ss) 3 4 5 6 550 7 8 880 9 0 01:30 05:00 2ndHold Temp (C) 0 60 Vac Level (cmHg) 73 High Temp (C) 890 Cancel 2 Hold Time (mm:ss) Heat Rate (C/min) Vac Hold (mm:ss) 1 450 00:00 Save 2nd Hold Time (mm:ss) Cool Time (mm:ss) Start Vac (C) Release Vac (C) Copy 00:00 03:00 Move Display Example #34 Method 2 Select program Sample 1 from the Select Program screen and touch the Modify button. Once in the Modify Program screen, do not touch the Copy button as in Method 1. Make all necessary changes that will be required to the copied program first. For example, program Sample 1, created earlier in the manual, has a Pre Heat of 5 minutes and a High Temp of 890 C. The copied program will require a Pre Heat of only 1 minute and a High Temp of 840C. Again, make all the changes first. Do not modify the program name to Sample 2 at this time. After making all the required changes to the program, touch the copy button. The next screen displayed will be the Name Program screen. Enter the new name of the program to be copied. In the above example, use Sample 2. When completed, touch the OK button. The next screen will look very similar to the Select Program screen. Select the program location number where you would like the modified 37 program to be copied to. If necessary, use the Page Up or Page Down arrows to bring up the desired program page. Touch the appropriate program location box, and the copied program will be completed. The Select Program screen will appear with this copied program selected. The copied program, Sample 2, has been saved at the new location with all the modifications and can now be run. NOTE! The original program, Sample 1, will be as it was originally. None of the changes that were made will be saved to Sample 1, only to the copied Sample 2 program. Select Program 450 C 0cmHg 08/13/12 04:15:45 Create 017 SAMPLE 2 018 019 020 021 022 023 024 Modify Door Delete Run Cancel Display Example #35 Move a Program To move a program from one program slot to another, touch the Modify button then press the Move button. The display will now show the Program Select screen. From here, simply touch the program slot you would like to move the program to. The Program Select screen will now update to show that the program has been moved and the process is complete. Delete a Program To delete a program, touch the appropriate program slot to highlight it. Touch the Delete button. A box will open to confirm that the program is to be deleted. Touching “Yes” will delete the program. The Program Select screen will reappear with the selected program slot vacant. If “No” is selected, the Delete process will be cancelled and the Program Select screen will return unchanged. 38 Run a Program Once a program as been created and saved it is ready to run. From the Program Select screen, touch and highlight the program to be run. Touch the Run button. The display will change to the Run Program screen and the program will commence. NOTE! If the lift platform has not been fully lowered prior to touching the “Run” button, an error message “Wait until Door opens then press RUN” will be displayed and an alarm will sound. The lift platform will then start to lower automatically. Touch the “OK” button to silence the alarm and clear the error screen. Once the lift platform is completely lowered the “Run” button can be touched to start the program. Sample 1 Heat Rate 08/13/12 04:15:45 748 C 72cmHg 60 Target Temp. Target Vac. Completion Time 6:52 890 73 Current Step Step Time 2:22 High Temp Ramp Enter Night Mode after completion Edit Stop Skip Step Utilities Display Example #36 Display Example #36 shows the Program Run Screen. It provides critical information regarding the running status of the program. Starting at the top, upper left corner, there is the name of the program being run followed by the current temperature and vacuum level. The upper right corner shows the date and time. In the middle section of the screen, the far left column shows the program’s key parameters: Heat Rate, Target Temp., Target Vac. and the current step of the program being run. The next column shows the programmed values. The Heat Rate is 60°C /min, the target temperature of the current step is 890°C and the target vacuum level is 73 cmHG. The current step is “High Temp Ramp”, meaning the program is ramping up to the programmed high temp of 890°C. The right column shows two time counters. The upper counter named “Completion Time” refers to overall time to program completion. The counter shows that there is 6 minutes and 52 seconds until the program is completed. The lower counter named “Step Time” refers to the time required to complete the current step. The counter shows that there is 2 minutes and 22 seconds of the “High Temp Ramp” to reach a high temp of 890°C. Once this timer has counted down to 0 minutes and 00 seconds, the temperature of 890°C will have been reached. The next step, “Hold Time” will commence, the “Current Step will change to “Hold Time” and the “Step Time” counter will show 1:30 and start counting down to zero. An added feature allows the furnace to go into Night Mode automatically at the completion of the program. By touching the box, the center turns black showing that Night Mode is enabled. This setting is not kept in memory and must be set each time. 39 The lower section of the Run screen has four buttons: Run, Stop, Skip Step, Utilities Edit Touching the “Edit” button brings up the powerful a full function “On the Fly” edit screen. See display Example #37. Any parameter can be changed while the program is running. All rules and limits for creating and modifying a program apply to editing a program while it is running. NOTE! All edited values are valid for that cycle only. When the program ends the original parameter values will be restored. Porcelain Low Temp (C) Preheat (mm:ss) 450 Hold Time (mm:ss) 01:30 05:00 2ndHold Temp (C) 0 60 Heat Rate (C/min) Vac Level (cmHg) 73 High Temp (C) 890 Vac Hold (mm:ss) Cancel 2nd Hold Time (mm:ss) Cool Time (mm:ss) 00:00 00:00 880 Release Vac (C) 2 3 4 5 6 7 8 9 0 03:00 550 Start Vac (C) 1 Ok Display Example #37 Stop To Stop or cancel a running program touch the Stop button. This will bring up a confirmation box shown below. To continue and stop the program touch “Yes”. If the Stop button was touched by accident or you prefer to continue with running the program, touch the “No” button. Confirmation Do you really want to stop the program? Yes No Display Example #38 40 Skip Step Skip Step is a powerful tool that allows the user to move or Skip ahead one or more steps from the current step in a program. NOTE! When starting a program, the processor runs several system checks before actually starting the program. Upon completion of these tests an audible clicking of the vacuum vent valve closing will be heard. Any attempts to Skip a step prior to this will be ignored. You can only skip forward. There is no going back once a step has been skipped. Utilities Utilities 450 C 0cmHg User settings Date/ Time Info Import Export Calibrate 08/13/12 04:15:45 Ok Display Example #39 Touching the Utilities button while running a program allows the user to access the Utilities menu as shown above in Display Example #39. All Utilities features with the exception of Calibrate and Set User Defaults are available. See the Utilities section starting on page 12. 41 (Metal) Sintering Sintering Program Heat Rate (C/ min) High Temp (C) 1070 Hold Time (mm:ss) 10:00 Cancel 1 2 3 4 5 6 7 8 9 0 200 Run Display Example #40 This special purpose screen is to facilitate the sintering of metal, (NOT Zirconia). This screen eliminates the need for using up a program memory location for this limited function. Programming is simple. 1. Enter the desired heat rate, (540° F, 300° C max), the sintering temperature, (2192° F, 1200° C Max). 2. Enter hold time in minutes and seconds. 3. Touch the Run button to start your program. Remember that we are here to help you if you should have any difficulties with programming. You may call us for tech support at 1-877-380-4242 or email us at [email protected]. 42 Technical Specifications Power Source: Models SM-1000 & SP-2000 Models SM-1000-230 & SP-2000-230 120Vac ± 10% 50 – 60 Hz 230Vac ± 10% 50 – 60 Hz Power Consumption: All Models 1200W – Furnace 1500W – With Vacuum Pump Vacuum Pump Specifications (any make): Pump Wattage Nominal Attainable Vacuum 300 Watts Max. ≥ 28.5 in Hg, 74cmHg, (≤ 50mbar) Main Circuit Protection: 120Vac Models – Dual Circuit Breaker integrated On / Off Switch 230Vac Models – Dual Circuit Breaker integrated On / Off Switch 250Vac, 15A 250Vac, 10A Vacuum Pump Fuse: 120Vac Models – 230Vac Models – Type 3AG, 250V, 10Amp Type 3AG, 250V, 4Amp Dimensions: SM-1000 & SM-1000-230 W 11”, 27.94 cm, H 21”, 53.34 cm D 12”, 30.48 cm W 11”, 27.94 cm, H 25”, 63.50 cm D 12”, 30.48 cm SP-2000 & SP-2000-230 Unit Weight: SM-1000 & SM-1000-230 SP-2000 & SP-2000-230 44 Lbs., 19.96 Kg 48 Lbs., 21.77 Kg Shipping Weight: SM-1000 & SM-1000-230 SP-2000 & SP-2000-230 48 Lbs., 21.77 Kg 52 Lbs., 23.59 Kg Acceptable operating conditions Ambient temperature: +5 °C to +40 °C Humidity range: Max. 80% relative humidity for temperatures to 31 °C, decreasing to 50% relative humidity at 40 °C. No condensation allowed. Ambient pressure: Tested to altitudes of up to 6,600Ft (2000m) above sea level. Acceptable transportation and storage conditions Temperature range: -20 °C to +65 °C Humidity range: Max. 80% relative humidity Ambient pressure: 6,600Ft (2000m) above sea level. Only use the original box and foam materials for shipping purposes. Failure may void warranty. 43 Safety Checks, Cleaning and Maintenance Safety Checks: Muffle and Radiance Ring It is recommended that once every three months the interior of the muffle be inspected to assure that the muffle wiring, Radiance Ring and Thermocouple are in good condition. With the lift in the lowered position a thorough inspection can be carried out by removing the platform, (brick), from the lift plate. Using a mirror and a flash light, shine the light onto the mirror and direct the light into the muffle chamber. Use the mirror to view the muffle wall, heating element and Radiance Ring. The muffle wiring should never show any signs of breaking out from the refractory lining. The Radiance Ring should never be touching the refractory wall or the heating element. A slight oval shape is ok. The Thermocouple tip should be fairly centered within the Radiance Ring notch and the two wires forming the tip of the thermocouple should be straight clean “V” shape. Furnace and Vacuum Power Cords: At least once every six months the furnace and pump power cords should be inspected for any cuts or fraying that could lead to electrical shorts or shocks. Any damaged cord should be replaced. Replace with properly rated cords only. Replacement cords are available from IBEX Dental. Call IBEX Tech support should you have any safety questions regarding IBEX furnaces or ovens. Cleaning and Maintenance: Cleaning The furnace should be kept clean of dust build-up. As needed, clean the off of all surfaces with a soft damp cloth. Use light pressure only to avoid scratching the finish of the furnace with the abrasive dusts normally found in dental labs. Use the same light pressure with a soft damp cloth for cleaning the touch screen Mylar cover. Should excessive scratching to the display cover occur, replacement covers are available. Contact IBEX Dental Tech support. Muffle Purge For both the pressing and porcelain furnaces, it recommended that the muffle be purged. The frequency depends on how many firings or pressings that are done. For heavy use, purging up to once a week may be necessary. It is recommended that minimally, purging be performed once a month. There is not a dedicated purge cycle programmed in the IBEX as different purge materials have different cycle parameters. IBEX recommends using the IBEX decontamination spray for this purpose. The spray does not require a special Purge program. You can purge using the spray on any pressing cycle and during most firing cycles without fear of affecting your work. 44 Cleaning the lift platform and Vacuum Seal: P Photo #6 Photo #7 Dirt buildup on both the platform and the ring can cause poor vacuum performance. The lift platform and vacuum seal should be cleaned regularly to prevent dirt and dust buildup on the vacuum seal and platform. It is recommended that a cleaner such as Simple Green be used to clean the seal and platform. Should you have persistent vacuum problems, contact IBEX Dental Tech support for assistance. 45 Spare Parts List 1017 1018 2018 2019 1023 1023-230V 2023 2023-230V 1027 1029-1 1035 1045-Aut 1050 1060 1061 1065 1068 1070 1073 1075 1078 1080 1083 1085 1086 1100 1101 1102 1103 1110 1520 1600 2058 2065 2071 2072 Display Mylar Overlay Firing Brick Pressing Brick Pressing Insert 120V Heating Element 230V Heating Element 120Volt Press Heating Element 230V Press Heating Element Cooling Tray Thermocouple Chamber Cooling Fan Lift Motor Touch Display Vacuum Vent Valve Vacuum Inlet Valve Control PCB Power PCB 12Vdc Power Supply Door Limit Switch Power Inlet Module 120Vac Power Inlet Module 230Vac 8 Ohm Speaker 3.3V Lithium Battery Fuse 3AG 10 Amp – Vacuum Pump 120Vac Fuse 3AG 4 Amp – Vacuum Pump 230Vac Power Cord – 120Vac Vacuum Pump Adaptor – 120Vac Power Cord – 230Vac European Vacuum Pump Adaptor – 230Vac European Lift Belt Upper/ Lower Chamber Seal Rubber Foot (Black – Set of 4) Press Rod Assembly Press Cooling Fan Pneumatic Cylinder Press Limit Sensor, Reed Switch 46 Error Codes The following is a listing of all the error codes by category. Programming Errors "Low Temp not within limits" "Preheat Time not within limits" "Heat Rate not within limits" "Vacuum Level not within limits" "High Temp not within limits" "Vac Hold Time not within limits" "Hold Time not within limits" "Start Vac Temp not within limits" "Set only Vac Hold or Release Vac" "Clear Vac Hold or Release Vac" "Release Vac not within limits" "Cool Time not within limits" Press Programming Errors "Initial Soak Time not within limits" "Press Hold not within limits" "2nd Hold Temp not within limits" "2nd Hold Time not within limits" "2nd Heat Rate not within limits" Set Up Errors "Idling time out of range" "Power Save temp out of range" "Invalid Month specified!" "Invalid Feb day for leap year!” "Invalid Feb day!" "Max day for month is 30!" "Invalid Day specified!" "Invalid hour for PM" "Must be in the range of -5% to +5%" Operational Errors "Wait until door opens and press Run." "Pressing not enabled!" "Run-time error!" "Could not achieve minimum vacuum level!" "Could not reach vacuum!" "Unable to hold vacuum!" 47 Pressing Operational Errors "ROD LIMIT SWITCH FAILURE, Press Disabled" "ROD NOT EXTENDED, Check Pressure" "ROD FULLY EXTENDED, Check Ring" "ROD FAILED TO RETRACT, Press Disabled" // Both limit switches are ON System Errors "Door Failure: Motor Alert!" "Door Failure!: NO LIMIT IN STOP" // Door is stopped but cannot detect limit switch "Door Failure!: NO LIMIT IN MOTION" // Door is in motion but has not detect limit switch "Door Failure!: BOTH LIMITS" // Both limit switches are ON simultaneously "Open Thermocouple!" "Oven Overtemp!" "Heater Runaway!" "Heater Failure!" "TEST: Could not achieve vacuum level!” "Corrupt data may exist!" "Could not write program!" "Could not write user settings!" "Could not write export file!" 48