1
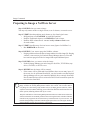
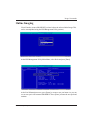
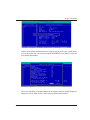
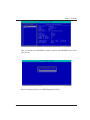
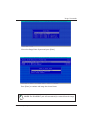
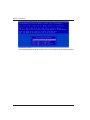
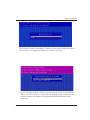
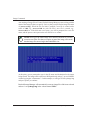
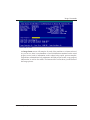
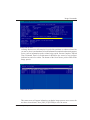
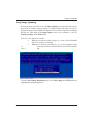
Image Commands
IMAGE COMMANDS
Image Commands
This chapter includes the following topics:
•
•
•
•
•
•
•
•
•
•
Overview of the Image Commands
Considerations when Imaging a Server
Preparing to Image a NetWare server
Writing and image using Online Imaging
Writng an image to CD/DVD
Writing an Image to a Disk File
Writing an Image to a TCP/IP Link
Writing an Image to a Tape Drive
Writing an image to an FTP Server
Using Image Spanning
Portlock Storage Manager User Manual
1
Image Commands
Overview of the Image Commands
Portlock Storage Manager images Compaq, Dell and IBM Diagnostic partitions, DOS
FAT16 partitions, Traditional volumes and NSS Volumes. NetWare Partitions are not
imaged, only the volumes within the NetWare partition. Imaging the NetWare Partition
is not necessary as they are created on the fly by Portlock Storage Manager during a
restore.
NOTE: For NetWare 6.x NSS the volumes are not imaged, the Pool is
imaged. It is not possible to image volumes within a Pool. In order to move a
volume from one Pool to another, you need to use the Volume Copy command
discussed in Chapter 5.
Portlock Storage Manager images Traditional and NSS Volumes by storing the volume
data blocks and file system structure into the image. This allows the volumes to be
resizable during the restore. Portlock Storage Manager implements a third-generation
technology for imaging NetWare servers that maximizes the performance of the image
and restore commands. For most systems, Portlock Storage Manager can easily stream
to the fastest SCSI tape drives such as the DLT-8000 or the Super-DLT.
An entire NetWare server can be saved into an image that can be stored as an image
file on another server or as an image written to a SCSI tape drive. Images can consist of
multiple files that are “spanned.” Spanning supports images that are larger than the
media to which they are written (i.e., CD/DVDs).
Restoring an image can be done from DOS or from NetWare. An entire server or just
portions of the server can be restored from the image. Portlock Storage Manager does
not support individual file recovery from images. This is a deliberate design decision due
to our goal of very high performance and compressibility of images.
Compaq Diagnostic partitions are not resizable when restored. This is also deliberate, as
Diagnostic partitions are special types of partitions.
DOS Partitions are not resizable during the restore. This is a limitation of Portlock
Storage Manager that will be corrected in a future release. DOS partitions are restored
to the same size as the original partition. Partitions can be made larger using the partition
copy command see Chapter 4 for details.
2
Portlock Storage Manager User Manual
Image Commands
Portlock Storage Manager images Traditional and NSS volumes by storing the volume
data blocks and file system structure into the image. This allows the volumes to be
resizable during the restore. Portlock Storage Manager implements a third-generation
technology for imaging NetWare servers that maximizes the performance of the image
and restore commands. For most systems, Portlock Storage Manager can easily stream
the fastest SCSI tape drives such as the DAT, DLT, SDLT, AIT or LTO.
Portlock Storage Manager can image a NetWare server while NetWare is running or
from DOS. Device drivers written for NetWare are 32-bit drivers that have been optimized
for performance. For this reason, we recommend imaging servers from NetWare instead
of from DOS.
DOS device drivers are typically 16-bit real-mode drivers that are usually not optimized
for performance, but rather for small memory size. You will often see a two-to-one
performance difference between DOS device drivers and NetWare device drivers.
Portlock Storage Manager supports both the NWPA (HAM) drivers and NWIO (DSK)
drivers for communicating with tape drives. When using the NWPA interface, Portlock
Storage Manager interfaces directly with the HAM drivers. When using the NWIO
interface, Portlock Storage Manager uses the ASPI interface. NWPA drivers are faster.
Portlock Storage Manager only supports ASPI drivers for communicating with tape
drives under DOS. ASPI drivers provide an interface to SCSI Host Adapters that is
consistent across various makes and models of SCSI Controllers.
Portlock Storage Manager User Manual
3
Image Commands
Considerations when Imaging a Server
There are several considerations that need to be made when you image a server. The
information contained in this section should be used as a guideline only. If you are unsure,
please consult a Novell Professional or the Novell Support Knowledge base at http://
support.novell.com, or you could ask a question in the Novell newsgroups supportforums.novell.com using either a news reader or a web browser.
The first thing you need to know is what sort of image you want to do. For example, do
you want to perform a Disaster Recovery, clone a server to a new hardware platform,
or upgrade the hard drive space of an image? You may wish to have a default server
image to be used when you wish to deploy a new server.
There are two types of environments where there are different considerations that you
need to take into account in the event of an image and restore of a server. Before we go
into the two types of situations, you need to understand that Portlock Storage Manager
backs up an entire volume. This means that even files that have been deleted and not yet
been purged by NetWare are also backed up as part of the imaging process. If you do
not want to bring over the deleted files, then you need to run a purge of each of the
volumes by using the Novell Toolbox.nlm program or the DOS Purge command, or you
can use the Purge Command for each volume located in the Volume Commands in
Portlock Storage Manager.
Portlock Storage Manager should not be considered a normal backup solution for your
server as it does not by design support individual file backups or restores. You need to
have another backup mechanism for this. If you choose to use Portlock Storage Manager
as a backup mechanism (not recommended), you will have to restore the entire volume
on your server to get that one file back.
Single-Server Environment
If you have a single-server environment you will be using Portlock Storage Manager,
this is a simpler environment for imaging and restoration.
4
Portlock Storage Manager User Manual
Image Commands
Disaster Recovery
If you are using Portlock Storage Manager to have an off-site disaster recovery image,
you need to understand when you restore the image all the data will be at the currently
backed up version. This means that any email or documents are only imaged at the time
of the image. Any newer files will not be part of the image that you have.
For disaster recovery, you would need to restore the image that you made with Portlock
Storage Manager and then overwrite the information with the latest version of the backup.
This will give you a server that has all of the data up to the most recent backup that you
restored. Your only consideration is that all of your user ids and passwords for these user
ids will be the ones that were used when the Portlock Storage Manager image was
created. Some backup software, such as DeTroubler from Futuregate Software, does
support restoration of NDS objects, which in a single-server tree can be okay, but please
consult your backup software manual for information regarding this.
Cloning a Server
This method is used when you are upgrading the hardware for your server. In this case,
you would use Portlock Storage Manager to make an image of the server so that you
can restore it onto your new server.
The only consideration is that once the image is restored to the new server, you may
have to modify the server so that it supports the new disk controller and NIC (Network
Interface Card) before your users will be able to login to the server.
Please consult the manuals that came with your new hardware to ensure that you have
the correct drivers loaded for the disk subsystem under NetWare.
Upgrade of Hard Drives
This is the simplest solution for upgrading your server. All you have to do is make an
image of your server, take out the existing drives, install the new, and then restore the
Portlock Storage Manager image, resizing the volumes as appropriate.
Portlock Storage Manager User Manual
5
Image Commands
Multiple Server Environments
The main consideration in a multi-server environment is that you must consider the
implications to NDS (Novell Directory Services). NDS, renamed as Novell eDirectory
with version 8, is a dynamic, heirarchical database that contains all object information
for your network, such as user ids and passwords. NDS is a dynamic database that
contains all object information for your network, such as user ids and passwords.
When you take a server off line, or a link to a remote site is down, NDS keeps a record
of changes that have been made (i.e., user has changed their password) that will be
synced out to the other servers on your network. Because of this, you need to be aware
of the effects of imaging and restoration of servers using Portlock Storage Manager in
this environment.
Disaster Recovery/Test Lab
If you are creating images to be used for disaster recovery of a server, or even to be
used in a test environment, you must be careful about how they are used.
If the server is being imaged for disaster recovery, when you restore it, the existing
server information may need to be removed from the tree and treated as a crashed
server in NDS. There are other options that can be used for this, which are discussed in
the Novell Knowledge base at http://support.novell.com. If you are not able to find the
information in the Novell Knowledge base, then please consult your local Novell
Professional before proceeding.
If you are cloning a server to be used in a test environment, you must make sure that the
restored server is not located anywhere on the production network as this may cause
severe problems in NDS for both the users and the servers. It should only be used on an
isolated network.
Cloning a Server
When you clone the server to do an upgrade to a new hardware platform, you also have
some NDS issues to consider. When you image a server, it is basically a snapshot of the
whole server at the time of imaging. Based on this, it would be best to dismount all of the
volumes on the server before you start the imaging process. This will then halt any
changes on the server from occurring to ensure that an exact copy of the server is
made.
When the imaging process is complete, you should remove the network cable from the
back of the old server to ensure that if the server is accidentally rebooted, it cannot
attach to the network and cause problems for the users and NDS.
6
Portlock Storage Manager User Manual
Image Commands
If the hardware that you are upgrading to is similar, you may not need to make any
changes. You will need to ensure that any new drivers are loaded for the server to be
able to load NetWare, such as disk device drivers and NIC (Network Interface Card).
Without these loaded, the server may boot to a NetWare server prompt without loading
any volumes or if the server boots, not all services may be available if the server cannot
communicate to the network correctly.
Once you have loaded any new device drivers, the server will boot up fine and any
changes that have been made in NDS while you were performing this process will be
sent to the server.
Upgrade of Hard Drives
This is much the same as the procedure outlined in the Cloning a Server section. You
need to make the same considerations in regards to NDS and dismounting of volumes.
If you are also changing the disk controller, you will need to add the device driver so that
NetWare can mount the volumes.
Deployment of New Servers into an Existing Environment
If you are making an image of a server so that you can use it to deploy new servers, you
can image the server and make a template.
Once this image has been created, you will need to restore it to a temporary server on an
isolated LAN and then remove NDS from it and change both the Novell Server Name
and the ServerID to be something unique. Failure to do this could cause issues for your
production LAN.
Reboot the server and use Portlock Storage Manager to image the server. This image
can then be used as a template for new server deployments.
Portlock Storage Manager User Manual
7
Image Commands
Preparing to Image a NetWare Server
Step 1: DECIDE what you want to image.
You may only want to archive a single volume, a set of volumes, or an entire server.
Step 2: VERIFY that the partitions and volumes are free from logical errors.
• DOS partitions: run SCANDISK on each DOS partition.
• NetWare Traditional volumes: run VREPAIR on each volume.
• NetWare NSS volumes/Pools: run nss /verify=volume or Pool name
for each volume.
Step 3: VERIFY that Directory Services has no errors (Ignore for NetWare 3.x)
• Run DSREPAIR on the server.
Step 4: DECIDE if you want to purge the NetWare volumes.
• Purging volumes reduces the time to image and the size of the image file. Purging
volumes is not necessary for Portlock Storage Manager however, files that
have not been purged will also be imaged and require additional space.
Step 5: DECIDE where you want to write the image.
• Portlock Storage Manager can write images to disk files, TCP/IP links, tape
drives, CD/DVD, or an FTP server.
Step 6: DECIDE how the image will be restored.
• If the restore will be performed from NetWare, there are not many issues. If
the restore is to be performed from DOS, you need to make sure that Portlock
Storage Manager can see your controllers and disk drives correctly from DOS.
Not all controllers have drivers written for DOS. Not all controllers report the
true drivesize from DOS.
NOTE: If you are imaging a large NetWare server, consider imaging in two steps. The first
image would be the booting DOS partition and the SYS volume. The second would be
everything else. Then during a full machine restore, the DOS partition and SYS volume
could be restored from DOS, enabling you to reboot into NetWare and restore the rest
of the system, reducing restore time by 2x or more.
Keep the combined size of the booting DOS partition and the SYS volume under 8 GB. This
will ensure that there are no BIOS problems when restoring from DOS. A number of RAID
controllers only support the first 8 GB of an array from DOS mode. If you are not sure, run
Portlock Storage Manager from DOS with the logfile option, then review the logfile. Portlock
Storage Manager reports device geometry in the logfile.
8
Portlock Storage Manager User Manual
Image Commands
Online Imaging
You will need to create a SNAPSHOT pool and volume in order to Online Image. This
can be accomplished using the NSS Management Utility (nssmu).
At the NSS Management Utility Main Menu, select Pools and press [Enter].
At the Pool Information screen, press [Insert] to create a new pool name. As you can
see our new pool will be named SNAPSHOT. Press [Enter] to name the new pool and
continue.
Portlock Storage Manager User Manual
9
Image Commands
Select the partition where the pool will be created and press [Enter]. Next enter the
partition size and press [Enter] to continue.
Next select Volumes from the NSS Management Utility Main Menu. Press [Enter] to
create a new volume within the new SNAPSHOT pool.
10
Portlock Storage Manager User Manual
Image Commands
At the Logical Volume Information screen, press [Insert] to create a new volume name.
As you can see the new volume will be named SNAPSHOT. Press [Enter] to name the
new volume and continue.
This screen will allow you to make changes to the volume properties. In this example no
changes have been made. Select Create and press [Enter] and continue.
Portlock Storage Manager User Manual
11
Image Commands
Next you will be asked if you want to encrypt the volumes. Select No and press [Enter].
Next select the SNAPSHOT pool created earlier. Press [Insert] to create the new
volume in the SNAPSHOT pool. Press [Enter] to continue.
12
Portlock Storage Manager User Manual
Image Commands
Here you see the new SNAPSHOT volume created in the SNAPSHOT pool. Press
[Esc] to exit
Select Yes and press [Esc] to exit NSS Management Utility.
Portlock Storage Manager User Manual
13
Image Commands
Load Storage Manager.
At the Main Menu select Image Commands. Press [Enter] to continue.
14
Portlock Storage Manager User Manual
Image Commands
Next select Image Entire System and press [Enter].
Press [Enter] to continue and image the selected items.
NOTE: The SNAPSHOT pool will automatically be omitted from the image.
Portlock Storage Manager User Manual
15
Image Commands
Next select Image Pools Online. Press [Enter] to continue.
A confirmation screen will appear. Select Continue and press [Enter].
16
Portlock Storage Manager User Manual
Image Commands
Two screens will appear while the snapshot is being taken. Do not press any key during
this time.
NOTE: Once the snapshot is taken, any data written after this point will not
be saved in the image.
Portlock Storage Manager User Manual
17
Image Commands
Select image destination and press [Enter] to save the image to the selected destination.
18
Portlock Storage Manager User Manual
Image Commands
Writing an Image to a Disk File
Portlock Storage Manager can write a server image to a disk file either on a DOS
partition or a NetWare volume (both Traditional and NSS).
NOTE: The maximum file size that the file system supports, e.g., DOS
partitions are limited to files of 2 GB, NetWare volumes to 4 GB.
First, from the Portlock Storage Manager Main Menu, select Image Commands by
highlighting it and pressing [ENTER] to continue.
Portlock Storage Manager User Manual
19
Image Commands
From the Image Menu, you have several options:
1. Image Entire System
2. Image a single disk drive
3. Create a sector image of a disk drive
4. Create a sector image of a partition
5. Create a sector image of a disk region
NOTE: Choose to Create a Sector Image when you would like a bit-for-bit
image. This command is most commonly used for data recovery purposes
and also to backup a failing drive partition or region, errors and all.
20
Portlock Storage Manager User Manual
Image Commands
This brings up a status screen revealing all items on the server that can be imaged.
These items can either be volumes or partitions. If you do not see a volume, NSS Pool
or DOS partition that you expect, make sure that you have the correct device drivers
loaded. By default Portlock Storage Manager images all server partitions and volumes.
To skip an item, scroll the highlighted bar down and then press the [F5] function key,
which will alternatively enable or disable an item. Press [Enter] to continue.
Portlock Storage Manager User Manual
21
Image Commands
A confirmation screen will appear. Choose the option Continue and image selected
items and press [Enter] to continue. At this time, only the volumes that are to be
imaged will be dismounted. This is done to prevent data from being changed during the
imaging process.
You will then be asked if you woul like to purge your volumes if there are volumes that
are present.
22
Portlock Storage Manager User Manual
Image Commands
You will then be asked to dismount the volumes or deactivate the NSS Pools that you
have selected to be imaged. Press [Enter] on continue to proceed.
If you are imaging the SYS: volume you will be asked to unload certain NLMs that
may try and write to the SYS: volume while the imaging process is underway. Once
this has completed, the volumes will be dismounted and the NSS Pools will be
deactivated.
Portlock Storage Manager User Manual
23
Image Commands
From the Select Image Destination menu, you must determine where you want the
image to be written. Five destinations are supported:
1. Disk File
2. TCP/IP Link
3. Tape Drive
4. CD/DVD Recorder
5. FTP Server
For this example, we will select Write image to a disk file and press [Enter]. This can
be a normal file on a NetWare volume or a DOS partition.
24
Portlock Storage Manager User Manual
Image Commands
An options screen appears having several selectable options pertaining to the image
being created. The first option you are given is compression, which can either be enabled
or disabled. Enabling compression will create smaller file sizes but will take longer to
image and restore. Disabling compression will allow for faster imaging and restoring
but result in larger file sizes.
The second option box is image file options. They are:
1 Auto name image files, which by selecting will name the files with an increasing
numeric extension for each image file, such as .001 .002 and so on.
2 Ask for new image file name when the image file is full. Enabling this option
will automatically split the entire image file into 2000 MB segments.
3 Split Image Files at 2000 MB (this value can be changed), which by enabling
this option will automatically split the entire image file into 2000 MB segments.
4 Wait after each image file change, by enabling the fourth option will
pause the process after each image file change.
Since all the choices are pertinent to our example, we will press [Enter] to continue.
NOTE: Portlock Storage Manager supports limiting the size of each image file to
any size in multiples of 1,000,000 bytes. If you want to create an image that is
limited to 600 MB for writing to a CD-ROM, specify a size of 600 in the Split
image files at: 600 MB field. If you want to use removable media and you want
to exchange the media when full, specify Wait after each image file change field.
If you would like to write images to a NetWare partition and have Portlock Storage
Manager auto name each file after the first one, specify Auto name image files
field.
Portlock Storage Manager User Manual
25
Image Commands
Auto naming of image files will cause Portlock Storage Manger to start writing with the
name of the image file that you specify. Let’s say that you specified an image file name
of “nwserver.img”. When the file size limit is reached, a new file is created with a
suffix of .000, e.g., nwserver.000. As each file fills a new file is created, e.g.,
nwserver.001, etc. If the disk runs out of space, you will be prompted for a new file
name, and the process can repeat on the new disk drive or volume.
NOTE: Never give the initial image file a numeric extension as you may
overwrite one of the files that you require as part of the image, also ensure
that the image files are no larger than 2000 MB in size.
At this point, you are prompted to type in the file name and destination for the image
being created. The image can be written to a DOS partition by using C:/ or to a NetWare
volume by using the “volumename”:/. In this example, we will type in Voll:sysimage.img
and press [Enter] to continue.
Portlock Storage Manager will automatically create an image file of the items selected
and save it as sysimage.img in the volume named VOL1.
26
Portlock Storage Manager User Manual
Image Commands
An Image Status screen will transpire for each of the partitions or volumes selected.
As you can see, there is an abundance of useful information contained on the actual
progress screen, such as information on the volume being copied, percent complete,
elapsed time, estimated time left, performance in Kilobytes per second, a copy progress
indicator bar, as well as few others. The bottom of the screen shows you the status of
the Image process.
Portlock Storage Manager User Manual
27
Image Commands
Once the entire process is complete, the Main Device status screen is shown – verifying
the success or failure of each individual item. Notice that the partitions and pool that we
imaged were successful. Press [ESC] to return to the original Main Menu.
28
Portlock Storage Manager User Manual
Image Commands
Writing an Image to a TCP/IP Link
Portlock Storage Manager supports sending an image over a TCP/IP link. The machine
that is running on the other end of the TCP/IP link can be Portlock Storage Manager
running in Restore Mode, which implements server-to-server cloning. The other end
of the TCP/IP link can also be Portlock Image Manager, (located in the same directory
as Portlock Storage Manager IMAGEMGR.NLM) which can receive data from TCP/
IP and write it as a disk file, or write it to a SCSI tape drive. The latter supports a multiserver environment with only one SCSI tape drive.
When using Portlock Storage Manager on two servers, one executing the Image Server
command and the other server executing the Restore Server command, you can clone
servers at very high speeds. With 100-Megabit full duplex Ethernet, speeds of 7
Megabytes per second are easily achieved. You can even use an Ethernet “Cross-over”
cable to minimize network traffic on your backbone.
Portlock Storage Manger has been written with special performance features for highspeed tape drives such as the SDLT, which can write at a sustained 11 Megabytes per
second. With the increased size of disk drives/RAID arrays, classic file-by-file backup
methods are just too slow.
From the Select Image Destination menu, choose the option Write image to a
TCP/IP link. With a TCP/IP link, a data stream can be received from another computer.
The other computer must be running either Portlock Image Manager (located in the
same directory as Portlock Storage Manager IMAGEMGR.NLM) or Portlock Storage
Manager.
Portlock Storage Manager User Manual
29
Image Commands
Portlock Storage Manager can compress the image as it is being written. For a server
to server migration you should not enable compression because it could slow the process
down. From the Compression Mode menu, select whether to Disable or Enable
software write compression and press [Enter] to continue.
When transferring an image via TCP/IP, one side needs to be a server, and the other
side needs to be a client. The system that is running as a server must be started first.
The system running as a server will listen for a connection from the other system.
Select the TCP/IP mode for this system and press [Enter] to continue.
30
Portlock Storage Manager User Manual
Image Commands
Specify the TCP Port number to be used to listen for connections from the remote
system. The remote system will connect to this system in Client Mode. The TCP Port
number must be the same on both systems.
This screen will appear while the system is waiting for a connection to be established.
As you can see in the screenshot above, the system is listening on TCP Port 19000.
Portlock Storage Manager User Manual
31
Image Commands
The image status screen provides information about the image progress. As you can
see, there is an abundance of useful information on this screen, such as Volume Name,
Block Size, Volume Size, Segment Count, Current Segment, Segment Size, Space Used,
Space Free, Completion percentage, Elapsed Time, Estimated Time Left, Blocks to
Copy, Blocks Copied, Performance in KBS and a Copy Progress indicator bar.
As you can see, the only item selected to be imaged was the FAT16 and the image
process for this volume was successful.
32
Portlock Storage Manager User Manual
Image Commands
Writing an Image to a Tape
Portlock Storage Manager supports all SCSI tape drives that support writing in Variable
Length Mode. Portlock Storage Manager does not support tape drives that only support
block mode. This is not an issue, as all modern SCSI tape drives support Variable Length
Mode. It provides better tape capacity and higher performance.
Portlock Storage Manager writes to a SCSI tape drive using a 32,768-byte block size.
This block size was chosen to maximize performance and tape capacity. Portlock Storage
Manager will write to a tape until the Early Warning of End of Media is detected.
Then, a filemark is written to the tape and the tape is rewound. Then, the cycle repeats
itself with a new tape until all data to be imaged has been written to tape. This allows an
image to be spanned across multiple tapes.
Portlock Storage Manager encodes header information while writing to tape. This header
information ensures that data written to tape can be verified when read back. If
compression is enabled, additional information is written to ensure the validity of the
uncompressed data.
From the Select Image Destination screen, select the option to Write image to a
tape drive. The image can be read from an IDE or SCSI tape drive.
Portlock Storage Manager User Manual
33
Image Commands
From the Select Compression Mode menu, select to either Disable or Enable
Software Write Compression. In our example, we will select Disable Software
Write Compression by pressing [ENTER] to continue. We selected this option because
our tape drive supports hardware compression.
NOTE: When writing images to IDE or SCSI Tape drives that provide
hardware compression, do not enable software compression.
Some inexpensive tape drives do not provide hardware compression.
34
Portlock Storage Manager User Manual
Image Commands
The Select Tape Drive menu will appear with a list of all detected tape drives. In our
example, we will select Device #1, which is a QUANTUM DLT7000 by pressing
[ENTER] to continue.
Portlock Storage Manager User Manual
35
Image Commands
From the Select Tape Mode menu, choose the mode that best suits your hardware. In
our example, we will select to Access tape using Variable Length records by pressing
[ENTER] to continue.
36
Portlock Storage Manager User Manual
Image Commands
An Image Status screen will transpire for each of the partitions or volumes selected. As
you can see, there is an abundance of useful information contained on the actual progress
screen, such as information on the volume being copied, Percent Complete, Elapsed
Time, Estimated Time Left, Performance in Kilobytes per second, a copy progress
indicator bar, and a few others. The bottom of the screen shows you the status of the
Image process.
This status screen will appear informing you that the image process was a success for
our three selected items. Press [ESC] or [ENTER] to close the screen.
Portlock Storage Manager User Manual
37
Image Commands
Write Image to a CD/DVD Recorder
For a list of supported DVD Recorders please go to http://www.portlock.com/
dvd.htm
This command allows you to directly image to a DVD recorder. As most servers do
not have DVD recorders installed (in some cases not even a DVD-ROM) a better
option may be to image the server to an FTP server (see next section for details) and
then burn those created images to a DVD or CD to do a file restore (see Chapter 8
for details on restoration of images from a disk file).
When the DVD image command is run it will allow you to make an image of your
server directly to the DVD recorder. If the media is not formatted then Portlock
Storage Manager will format the media and then proceed to write the image. If the
image size exceeds the capacity of the media then you will be asked to remove the
existing media and insert new media so that the image can be spanned to
accommodate the full image.
Select Write Image to a CD/DVD Recorder and press [Enter] to continue.
38
Portlock Storage Manager User Manual
Image Commands
You now select whether you wish the image to be compressed or not compressed. If the
imagefile is compressed then it will consume less space. If it is not compressed then it
will take up more space on the DVDs.
You are now asked which of the attached DVD recorders you wish to write to. Select
the correct DVD recorder and press [Enter] to continue.
Portlock Storage Manager User Manual
39
Image Commands
The image writing to the DVD recorder is now taking place.
This status screen will appear informing you that the image process was a success for our
selectd selected items. Press [ESC] or [ENTER] to close the screen.
40
Portlock Storage Manager User Manual
Image Commands
Writing an Image to an FTP Server
One of the newest features in Portlock Storage Manager is the ability to image and
restore using a remote FTP server. This ability gives Network Administrators the ability
to easily store and retrieve images of volumes, partitions, and even entire servers. This
ability is good for backups; as well as for storing and retrieving images that are used in
a test environment.
NOTE: Some FTP servers are case sensitive for file names. This means that
if a file is “DOS.img” then specifying “dos.img” will not work.
From the Select Image Destination menu, select Write image to an FTP server by
highlighting it and pressing [Enter].
Portlock Storage Manager User Manual
41
Image Commands
The Image Option screen appears having several selectable options pertaining to the
image being created.
The first option is Compression. You can choose to Enable or Disable compression.
Enabling compression will create smaller file sizes, but will take longer to image and
restore. Disabling compression will allow for faster imaging and restoring, but result in
larger file sizes.
If you would like to write images to a NetWare partition and have Portlock Storage
Manager auto name each file after the first one, specify Auto name image files field.
Auto naming of image files will cause Portlock Storage Manager to start writing with
the name of the image file that you specify. If you specified an image file name of
nwserver.img and the file size limit is reached, a new file is created with a suffix of
.000, e.g., nwserver.000. As each file fills, a new file is created, e.g., nwserver.001,
etc.
Portlock Storage Manager will Ask for a new filename when the image file is full. If
the disk runs out of space, then you will be prompted for a new file name, and the
process can continue on the new disk drive or volume.
Portlock Storage Manager supports limiting the size of each image file to any size in
multiples of 1,000,000 bytes. If you want to create an image that is limited to 600 MB for
writing to a CD-ROM, specify a size of 600 in the Split image files at: 600 MB field.
42
Portlock Storage Manager User Manual
Image Commands
If you want to use removable media and you want to exchange the media when full,
specify Wait after each image file change field.
For this example, Compression has been Disabled and Auto naming is Enabled.
Press [Enter] to continue.
NOTE: Never give the initial image file a numeric extension as you may
overwrite one of the files that you require as part of the image, larger then
2000MB in size..
At this point, you are prompted to enter the IP address, the name of the file that is to be
created/accessed, the user name and the password of the remote FTP server. Cursor
down to the temp.img (yourimage) file and select it by pressing [Enter]. Portlock
Storage Manager will communicate with the server and start the actual imaging process.
It will also be simultaneously sending the image to the FTP server to be stored as an
image file.
Portlock Storage Manager User Manual
43
Image Commands
The Image Status screen will appear. There is an abundance of useful information
contained on the actual progress screen, such as the copy progress indicator bar,
information on the volume being copied, percent complete, elapsed time, estimated time
left, performance in Kilobytes per second, and a few others. Once the entire process is
complete, the Main Device Status screen will appear verifying the success or failure
of each individual item. Press [ESC] to return to the Main Menu.
This status screen will appear informing you that the image is complete.
44
Portlock Storage Manager User Manual
Image Commands
Using Image Spanning
Writing an image to an FTP server with Image Spanning selected breaks files up into
pieces that are smaller. Image spanning is a selectable option that allows the user to
segment an image file into equally sized segments. The size of these segments is something
that the user must input on the Image Options screen. In our example, we will be
Writing an image to an FTP server.
There are a few factors to consider:
1.
What do you want to do with the image, e.g., create a series of 600 MB
files to be written to a CD-ROM.
2.
What type of media are you writing to, e.g., you are writing the image
to
a removable JAZ drive and will need to switch JAZ cartridges
every 1
GB.
From the Select Image Destination menu, select Write image to an FTP server by
highlighting it and pressing [Enter].
Portlock Storage Manager User Manual
45
Image Commands
The Image Option screen appears having several selectable options pertaining to the
image being created.
The first option is Compression. You can choose to Enable or Disable compression.
Enabling compression will create smaller file sizes but will take longer to image and
restore. Disabling compression will allow for faster imaging and restoring but results in
larger file sizes.
If you would like to write images to a NetWare partition and have Portlock Storage
Manager auto name each file after the first one, specify Auto name image files field.
Auto naming of image files will cause Portlock Storage Manager to start writing with
the name of the image file that you specify. If you specified an image file name of
nwserver.img and the file size limit is reached, a new file is created with a suffix of
.000, e.g., nwserver.000. As each file fills, a new file is created, e.g., nwserver.001,
etc.
Portlock Storage Manager will Ask for a new filename when the image file is full. If
the disk runs out of space, you will be prompted for a new file name, and the process can
continue on the new disk drive or volume.
Note: With many FTP servers file sizes over 2000MB may be received
by the FTP server but, it may not be able to send the file back to Portlock
Storage Manager. Test that the FTP server supports an FTP “get” of the
files before creating many images.
46
Portlock Storage Manager User Manual
Image Commands
Portlock Storage Manager supports limiting the size of each image file to any size in
multiples of 1,000,000 bytes. If you want to create an image that is limited to 600 MB for
writing to a CD-ROM, specify a size of 600 in the Split image files at: 600 MB field.
For this example, Compression has been Disabled, files are set to be Split at 200
MB, Auto naming is Enabled and Waiting after each image file change has been
selected. Press [Enter] to continue.
At this point, you are prompted to specify the TCP/IP address of the FTP server, you
can either enter the ip address or if DNS has been correctly configured on the server
you can enter the IP address, FTP server name, the image file name, and location of the
file, as well as the username and password for the remote FTP server. Press the [F10]
function key when ready to continue, or [ESC] to cancel and return to the previous
screen. If you are not sure where you wish to store the image hit the F5 key to get a
directory listing of the FTP server.
Note: Some FTP servers are case sensitive for file names. This means
that if a file is “DOS.img” specifying “dos.img” will not work.
A Connection screen will appear informing you that the system is trying to connect to
the FTP server and proceed to the image process.
Portlock Storage Manager User Manual
47
Image Commands
Here is a listing of an FTP server. Navigate to the directory that you wish to save the
image to and press [F10] to select FTP server and continue.
Here is a listing of an FTP server. Navigate to the directory that you wish to save the
image to and press [F10] to select it and continue.
You are now presented with the directory that you selected. Type in the filename for the
image that you require and press [F10] to begin the imaging process.
48
Portlock Storage Manager User Manual
Image Commands
This screen informs you that the Image File Size Limit has been reached. Highlight one
of two options: Continue with next image file (or insert new media) or Cancel
image command and press [Enter].
NOTE: An Image Status screen will appear for each of the partitions or
volumes selected. The bottom of the screen shows you the status of the
Image process.
This status screen will appear informing you that the Image Process was a success.
Portlock Storage Manager User Manual
49
Image Commands
Image a Single Disk Drive
This command allows you to make an image of a single drive in your server. This will
image all of the volumes and Pools on the drive to a designated location as mentioned
previously in this chapter. If a drive contains a segment of a Pool or a Volume then the
whole Pool or Volume is imaged, as part of this image, regardless of which other drive,
the other segments of the object being are imaged.
To image a disk drive go under the Image Commands and then choose Image a single
disk drive and press [Enter] to continue.
50
Portlock Storage Manager User Manual
Image Commands
You then must select the drive that you wish to be imaged.
A list of objects on that drive will be presented to be imaged. From here the same
commands for the image location are the same as mentioned previously in this chapter.
Portlock Storage Manager User Manual
51