1
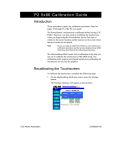
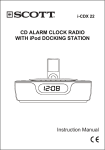
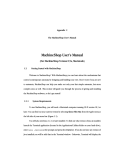
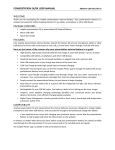
P ent ium T hi rd S e ri a l P o rt In s ta l l a ti o n Introduction This document explains how to add a third serial port to P3, P4, or P5 PowerStations that have a Pentium CPU card. It includes instructions for opening the PowerStation, reconfiguring the System Support card, establishing communication for COM2 on the CPU card, reinstalling the System Support card, installing the third COM port, closing the PowerStation, enabling COM3 during startup, reconfiguring the PowerStation’s touchscreen, and having Windows® detect the new serial port. Warning You must observe normal precautions against electrostatic discharge to prevent damage to the PowerStation. Electrostatic Discharge Precautions Modern integrated electronic devices, especially CPUs and memory chips, are extremely sensitive to electrostatic discharges (ESD) and fields. Before you disassemble the PowerStation, be sure to follow these simple precautions to protect you and the PowerStation from harm resulting from ESD. 1. To avoid electric shock, always disconnect power from the PowerStation before you remove the back cover. Do not touch any components of the CPU card or other cards while the PowerStation is on. 2. Disconnect power before making any hardware configuration changes. The sudden rush of power as you connect a jumper or install a card may damage sensitive electronic components. 3. Only handle internal components in an ESD-safe location, using appropriate grounding methods. 4. Always ground yourself to remove any static charge before you touch the CPU card. 5. Be particularly careful not to touch the chip connectors. 6. Keep any card in its anti-static packaging when it is not installed in the PowerStation and place it on a static dissipative mat when you are working on it. 7. Wear a grounding wrist strap for continuous protection. CTC Parker Automation A3-06229-100 Pentium Third Serial Port Installation Before You Start Be sure you have the following tools: • Keyboard (If you have a P3 or P4 PowerStation, you will also need a Y cable.) • Flat-head and Phillips screwdrivers • Needlenose pliers 8. Third COM Port Upgrade Kit (including the serial tang cable assembly pictured below) Open the PowerStation In order to add a third serial port to the PowerStation, you must open the unit. Warning For safety reasons, the PowerStation should be opened only by qualified service personnel. To open the PowerStation, complete the following steps: 1. Turn off the PowerStation. 2. Disconnect the unit from the power source. 3. Remove the PowerStation from its enclosure (if previously installed). Consult your PowerStation User Guide if you need help with this removal. 2 CTC Parker Automation Pentium Third Serial Port Installation 4. Remove the back cover from the unit by removing the screws that secure the cover. 5. Remove the Compact Flash (CF) card if applicable. Important Always make sure power to the PowerStation is turned off when removing the CF card. Reconfigure the System Support Card The first step in adding a third serial port to the PowerStation is to reconfigure the System Support card. The following sections explain how to do this, including instructions for disconnecting cables from the System Support card, and removing and reconfiguring the card. Disconnect the Cables Before you can remove and reconfigure the System Support card, you must first disconnect some cables that are attached to the card. Use the illustration below to find the cables and other components mentioned in the following steps. Serial cable Video cable Wide ribbon cable Backlight cable (P6) Touchscreen cable (P5) CTC Parker Automation 3 Pentium Third Serial Port Installation To disconnect the cables, complete the following steps: 1. Press out the locking ears to disconnect the video and wide ribbon cables. The video cable connects at the top left corner of the card. The wide ribbon cable connects very close to the other video cable. 2. Lift the locking ears to disconnect the serial cable from the top center of the System Support card. 3. Disconnect the backlight cable (P6) by depressing the latch on top of the connection and sliding the connector out. 4. Disconnect the touchscreen cable (P5) by depressing the latch on top of the connection and sliding the connector out. Remove the System Support Card Once you have disconnected the cables from the System Support card, you can remove the card. Use the illustration below to find the components mentioned in the following steps. Tang screw System Support card To remove the System Support card, complete the following steps: 1. Remove the tang screw from the System Support card tang. 4 CTC Parker Automation Pentium Third Serial Port Installation 2. Carefully pull out the System Support card and lay it to the side. Important Be careful to observe ESD guidelines when handling the System Support card. Reconfigure the System Support Card After you have removed the System Support card from the PowerStation, you are ready to reconfigure the card. To reconfigure the System Support card, complete the following steps: 1. On the System Support card, find the IRQ jumpers JP7 and the jumpers JP8, JP9, and JP11, as shown below. JP11 JP9 IRQs JP7 JP8 CTC Parker Automation 5 Pentium Third Serial Port Installation 2. Move the COM jumper at IRQ 3 to IRQ 11 and the TOUCH jumper at IRQ 11 to IRQ 9, as shown below. JP7 (default) IRQs COM TOUCH 3 4 5 7 9 10 11 12 15 z z z z z z z z z z z z z z z z z z z z z z z z z z z IRQs COM TOUCH JP7 (new) 3 4 5 7 9 10 11 12 15 z z z z z z z z z z z z z z z z z z z z z z z z z z z 3. Change jumper JP8 according to the RS setting you need. JP8 (RS232) 232 422 485 3 4 5 7 9 10 z z z z z z z z z z z z z z z z z z 232 JP8 (RS422) 232 422 485 3 4 5 7 9 10 z z z z z z z z z z z z z z z z z z 422/485 JP8 (RS485) 232 422 485 6 3 4 5 7 9 10 z z z z z z z z z z z z z z z z z z 422/485 CTC Parker Automation Pentium Third Serial Port Installation 4. Change jumper JP9-A from Off To On, and jumper JP9-B from On To Off. Default New (A-Off) 2F8h (A-On) 3E8h A B z z z z A B z z z z Making these changes sets the System Support card to COM3. 5. Change jumper JP11-B from Off to On. Default New (B-On) 2E8h A B z z z z A B z z z z Making this change sets the touchscreen to COM4. Establish Communication for COM2 on the CPU Card The next step in adding a third serial port to the PowerStation is to establish communication for COM2 on the CPU card. To do this, you may need to change a jumper setting (if you need to change the interface to RS422 or RS485 communication). Then you will connect the 9-pin COM2 cable to the CPU card. CTC Parker Automation 7 Pentium Third Serial Port Installation Change Jumper Settings (if required) Perform this step only if you need to change the interface to RS422 or RS485 communication. Important You do not need to remove the CPU card from the backplane to complete this step. To change jumper settings, complete the following steps: 1. Gently lay the unit face down to enable easy access to the CPU card. 2. Use the needlenose pliers to set jumper JP1. Use the following cut-away diagrams to determine the exact locations and settings for this jumper. RS232 Configuration (Default) 8 CTC Parker Automation Pentium Third Serial Port Installation RS422 Configuration RS485 Configuration CTC Parker Automation 9 Pentium Third Serial Port Installation Connect the 9-pin COM2 Cable to the CPU Connect the 9-pin ribbon cable, attached to the vented tang, to one of the COM2 connectors on the CPU depending on the communication protocol desired for COM2. Connect the COM2 cable to the connector closest to the exterior tang for RS-232 communications. For RS-422 or RS-485 communications, connect the COM2 cable to the connector farthest from the tang. Refer to the illustration below for clarification. JP1 set to RS-232 Red stripe indicates pin 1 RS-232 connector RS-422/485 connector Important Be sure that pin 1 is closest to the riser card, toward the bottom of the PowerStation, or the connection will not function properly. 10 CTC Parker Automation Pentium Third Serial Port Installation Reinstall the System Support Card After you have reconfigured the System Support card and established communication for COM2 on the CPU card, reinstall the System Support card in the PowerStation. To reinstall the System Support card, complete the following steps: 1. Slide the System Support card back into its slot in the PowerStation. 2. Reconnect the touchscreen and backlight cables to the System Support card, as shown in the illustration below. 3. Reconnect the video cable and wide ribbon cable to the System Support card, as shown in the illustration below. 4. Attach the card to the PowerStation with the tang screw. Serial cable Video cable Wide ribbon cable Backlight cable (P6) Touchscreen cable (P5) CTC Parker Automation 11 Pentium Third Serial Port Installation Install the Third COM Port (COM3) After you have reinstalled the reconfigured System Support card, you are ready to install the third COM port (COM3) on your PowerStation. To install the third COM port, complete the following steps: 1. Insert the new serial tang (from the Third COM Port Upgrade Kit) into the next available slot, as shown in the illustration below. New serial tang 9-pin ribbon cable System Support card Note You may need to remove a blank cover if an insertion slot is not available for the new serial tang. 2. Attach the 9-pin ribbon cable from the new serial tang to the System Support card, as shown in the preceding illustration. Close the PowerStation After you have established COM2 on the CPU card and installed the reconfigured System Support card and the third COM port, close the PowerStation. In order to close the PowerStation, complete the following steps: 1. If you have a CF card, insert it into the PowerStation’s flash card slot. Important Make sure that the PowerStation is turned off when you insert the CF card. 12 CTC Parker Automation Pentium Third Serial Port Installation 2. Replace the back cover on the PowerStation and fasten the screws that you removed in step 4 of Open the PowerStation on page 3. 3. Reconnect the PowerStation to the power source. Enable COM2 During System Startup Before the PowerStation can use the new COM2 port, you must enable the port. To enable COM2 during startup, complete the following steps: 1. Turn the PowerStation on. 2. While the system is starting up, press the Delete key during the memory test to enter the CMOS setup utility. 3. From the CMOS setup utility main menu, select ‘PNP/PCI Configuration’; then press Enter. 4. Press the arrow down key to highlight ‘IRQ9 assigned to’. 5. Press the Page Up key to select ‘Legacy ISA’. 6. Perform steps 4 and 5 for IRQ11. 7. Press Esc to save and return to the main menu. 8. From the CMOS setup utility main menu, select ‘Integrated Peripherals’; then press Enter. 9. Press the arrow up or arrow down key to highlight ‘Serial Port 2’. 10. Press the Page Up key to select ‘2F8/IRQ3’. 11. Press Esc to save and return to the main menu. 12. Highlight ‘Save & Exit Setup’; then press Enter. 13. Press Y at the ‘Save to CMOS and Exit’ prompt; then press Enter. CTC Parker Automation 13 Pentium Third Serial Port Installation Reconfigure the Touchscreen The final step in adding a third serial port to your PowerStation is to reconfigure then calibrate the touchscreen. You must do this because the COM port for the touchscreen has now changed from COM3 to COM4. You can calibrate the touchscreen in MS-DOS mode by running the touchscreen configuration utility from the MachineShop Shell. If you are running Windows on your PowerStation, you can reconfigure the touchscreen by running the UPDD program in Windows. If you use both MS-DOS and Windows operating systems, you must reconfigure the touchscreen in both DOS and Windows. Instructions for both procedures follow. Reconfiguring the Touchscreen under MS-DOS To reconfigure the touchscreen, complete the following steps: 1. Reboot the PowerStation, and when “Starting MS-DOS...” appears, press the F5 key on your keyboard. 2. At the DOS prompt, type edit AUTOEXEC.BAT. 3. In the AUTOEXEC.BAT file, change the Address and/or IRQ setting, and save the file. Note The following segment of the AUTOEXEC.BAT file shows the new values for IRQ and Address. PROMPT $p$g SET TEMP=C:\DOS SET TOUCH_ADDR=2E8 SET TOUCH_IRQ=9 PATH C:\;C:\DOS;C:\CTC 4. Reboot the PowerStation. Important You must restart your system for the changes to take effect. The third serial port to your PowerStation has been successfully installed. You can now use this port to communicate with external devices. 14 CTC Parker Automation Pentium Third Serial Port Installation Reconfiguring the Touchscreen under Windows If you run Microsoft Windows 95, 98, or NT on your PowerStation, you must configure the touchscreen under Windows. To reconfigure the touchscreen under Windows, complete the following steps: 1. On the Windows taskbar, click Start; then click Programs, then click UPDD, and then select Settings. The Pointer Device Properties dialog will appear. 2. Select the Hardware tab. 3. In the Port drop down box, select COM4. 4. Click the Apply button. Several messages will appear as the system captures the proper Address and IRQ assigned to COM4. If the instructions ask that you reboot the PowerStation, do so. The Hardware page should appear, as shown below, for a properly configured system using COM4. If your system does not display as shown you must select the Advanced button to change the parameters. 5. Exit the Pointer Device Properties dialog. CTC Parker Automation 15 Pentium Third Serial Port Installation 6. Restart the PowerStation. Important You must restart the PowerStation for the changes to take effect. Recalibrating the Touchscreen After reconfiguring the touchscreen, you must also recalibrate it. You can calibrate the touchscreen in MS-DOS mode from the MachineShop Shell or under Windows 95, 98, or NT. If you use both DOS and Windows operating systems, you must recalibrate the touchscreen in both DOS and Windows. Instructions for both procedures follow. Recalibrating the Touchscreen under MS-DOS The MachineShop Shell comes with a calibration utility that you can use to calibrate the touchscreen in MS-DOS mode. The calibration utility requires a keyboard and involves calibrating the touchscreen for text and for graphics. To calibrate the touchscreen, complete the following steps: 1. On the MachineShop Shell main menu, press the Settings button. The Settings submenu will appear as shown below. 16 CTC Parker Automation Pentium Third Serial Port Installation 2. On the Settings submenu, press the PWRSTA button. The PowerStation Settings menu will appear, as shown below. 3. On the PowerStation Settings submenu, press the Calibrate Touchscreen button. You will be prompted that a keyboard is needed to calibrate the touchscreen. Then you will be asked if you want to continue. 4. If necessary, install a keyboard on the PowerStation. See your PowerStation User Manual for information about connecting a keyboard to the PowerStation. 5. When you have attached a keyboard to the PowerStation, press the Yes button to continue the calibration. 6. Press any key on the keyboard when you are ready to begin the calibration program. 7. Type H for Hard calibrate. 8. When the next screen appears, follow the instructions on the screen by touching each square as it appears until you hear a beep. 9. When you have finished, press any key. 10. Press X or Esc to exit the calibration utility. Important After calibrating the touchscreen, enter Interact in Program Mode. Verify that the cursor appears on the screen where you touch. If it does not, recalibrate the touchscreen. The calibration must be accurate to avoid activating a button unintentionally during Run Mode. CTC Parker Automation 17 Pentium Third Serial Port Installation Recalibrating the Touchscreen under Windows To recalibrate the touchscreen under Windows 95, 98, or NT, complete the following steps: 1. On the Windows taskbar, click the Start button; then click Programs, then click UPDD, then Calibrate. An arrow appears in the upper left corner. Place your finger on the target in the upper left corner. As the target moves from corner to corner, place your finger on the target. Calibration is finished when you are returned to the desktop. 18 CTC Parker Automation