1
รหัสโครงการ10p12c066
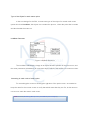
กระดานอัจฉริยะ(SmartBoard)
โปรแกรมเพื่อสงเสริมการเรียนรู (น.ศ.)
รายงานฉบับสมบูรณ
เสนอตอ
ศูนยเทคโนโลยีอิเล็กทรอนิกสและคอมพิวเตอรแหงชาติ
สํานักงานพัฒนาวิทยาศาสตรและเทคโนโลยีแหงชาติ
กระทรวงวิทยาศาสตรและเทคโนโลยี
ไดรับทุนอุดหนุนโครงการวิจัย พัฒนาและวิศวกรรม
โครงการแขงขันพัฒนาโปรแกรมคอมพิวเตอรแหงประเทศไทย
ครั้งที่ 10
ประจําปงบประมาณ 2550
โดย
นาย อรรถบูรพ สานุตร
นาย นายจุฬากร อริธชาติ
นาย สรรพสิทธิ พงศทัต
ชื่ออาจารยที่ปรึกษาโครงการ ผศ.ดร.จิตรทัศน ฝกเจริญ
สถาบันการศึกษา มหาวิทยาลัยเกษตรศาสตร
Acknowledgement
SmartBoard will not be able to succeed if we were lack of the invaluable resources,
knowledge and the workplace whose is given from our Kasetsart University. And SmartBoard
also has been taken care of by Asst. Prof., Ph.D. Jittat Fakcharoenphol as a project advisor. We
would like to thank you for your great suggestion, ideas and advice which can keep our
project’s main point of view stable and obvious for the past of the time.
However, SmartBoard cannot achieve the most completed development point without
the assistance from National Electronics and Computer Technology Center (NECTEC) which
including funds, recommendation and also the significant opportunity given to us to be one of
the challenger of the Nation Software Contest (NSC) 2007.
Finally, we’re deeply indebted to by Asst. Prof., Ph.D. Jittat Fakcharoenphol, a project
advisor, who spent his valuable time to re-organize our work, analyze the results and teaching
us everything which I couldn’t be given from the others as well.
Best Regards,
SmartBoard Team
Report Manipulator
03 January 2008
บทคัดยอ
โครงการนี้ทาํ ขึ้นเพื่อสงเสริมการศึกษาของประเทศไทยในวิชาฟสกิ ส โดยกลุมผูจ ดั ทํามีแนวคิดที่วา
ภาพเคลื่อนไหวและกราฟจะชวยใหนักเรียนมัธยมศึกษาตอนปลายสามารถเขาใจวิชาฟสิกส และ เกิด
ความสนใจในวิชาฟสิกสมากยิ่งขึน้
นอกจากนี้ โปรแกรมนี้ยัง สงเสริมการเรียนรูและความรูท างดานฟสิกสในเด็กชัน้ ประถมศึกษา เด็ก
จะไดรับความรูทางดานฟสกิ สเบื้องตนผานการวาดภาพ และ ภาพเคลือ่ นไหวของวัตถุตางๆ
การทํางานของโปรแกรมคือ โปรแกรม Smart board จะทําการจดจําภาพที่นกั เรียนไดวาดใน
โปรแกรมโดยอิสระ เมื่อนักเรียนไดกดปุมแสดงภาพเคลือ่ นไหว โปรแกรมจะทําการคํานวณ แรง และ
ทิศทาง ของวัตถุในภาพ และ แสดงออกมาเปนภาพเคลือ่ นไหว และกราฟ ของวัตถุตางๆ ตามกฎฟสิกส
ABSTRACT
Smart Board was created to enhance Physics education in Thailand. We think that
motions of objects and graphs of object motions can help high school students to understand
Physics and have good attitude toward Physics.
Moreover, this program increases Physics knowledge in an elementary school.
Elementary student will gain basic Physics from drawing and motion of objects.
Process of Smart board, this program will recognize a free hand drawing picture drawn
by student in its drawing frame, and after a student press a play button, program will simulate
motions and graphs which respect to the law of motions by calculating force and vectors of
objects in the picture.
บทนํา
Smart Board เปนซอฟแวรที่สงเสริมการเรียนฟสกิ สผานภาพเคลื่อนไหว โปรแกรมจําลอง
เหตุการณทางฟสิกสจากภาพที่ผูใชงานไดวาดในโปรแกรม โดยโปรแกรมจะสรางวัตถุตางๆ จากการวาด
โดยการเปรียบเทียบลักษณะของภาพที่ถกู วาดในโปรแกรม กับ วัตถุที่โปรแกรมสามารถสรางได เชน
วงกลม สี่เหลีย่ ม และ รูปหลายเหลี่ยมอืน่ ๆ นอกจากนีผ้ ูใชงานยังสามารถสรางวัตถุที่เกี่ยวกับระบบฟสิกส
เชน สปริง, ขอตอ, หรือ เชือก โดยการวาดรูปปกติหรือการใช เครื่องมือจากเมนู
เมื่อผูใชโปรแกรมสามารถสรางวัตถุตา งๆแลว ผูใชยงั สามารถนําวัตถุที่สรางขึน้ มานัน้ มาประกอบ
กันเปนวัตถุชนิดใหม เชน รถ, กระดานหก หรือ ลูกตุม ตามจิตนาการของผูใชงาน ตัวอยางเชน กระดานหก
เกิดจากการรวมกันของรูปสี่เหลี่ยม และ ขอตอแบบธรรมดา
นอกจากโปรแกรมจะสามารถจําลองการเคลื่อนที่ของวัตถุแลว โปรแกรมยังสามารถแสดงกราฟ
ของความเร็ว ระยะทาง และ ความเรงของวัตถุ ที่ผูใชงานจะตองการศึกษาไดอีกดวย และขณะทีโ่ ปรแกรม
จําลองการเคลื่อนทีน่ ั้น ผูใชสามารถ รบกวนระบบฟสิกสโดยการเพิ่มแรงเขาในระบบ หรือ จับวัตถุที่
เคลื่อนไหวเพือ่ หยุดวัตถุนนั้
Our team was together to develop the 3D-Game online called Magic Isla on 3rd year
semester. We are familiar with working in group and if we’re back to develop the new project
again, it will easier for us to communicate, break down the tasks, and understand the work
content in order to achieve same goal.
Nowadays, World is competing all the time and highly increased. So, each huge
company has to develop, adapt or enhance in order to maximize the profit and avoid the
bankrupt. This makes their software they’re using more complex and increasing in size. If we
have a team with better development process, appropriate communication and management, it
will be the important factor to success in building the effectively software according to the
timeline and resources. So, this is the reason why we prefer to working in team.
The motivation we choose this project is right now, Thai students especially feel
perplexed about physics, a necessary subject in high school, because they cannot imagine
motions of object in a physical problem. For example, a big ball hits the other smaller and lighter
ball. Some students are not able to imagine a motion of both balls. Therefore, a physical
simulation program can assist them to study the Physics because the student can see a
simulated motion in a computer screen and understand a physical situation better. If the
students understand the Physics, they will be inspired to study it in higher education.
Table of Contents
Pages
Chapter 1 Objective
1
Chapter 2 Graphic User Interface
2
•
•
•
•
•
•
•
•
•
•
•
•
•
Iteration 1
Main Menu and Toolbar
Main Property window
GUI Structure
New design GUI in SmartBoard application
Menu Option Component
Icon Menu Structure
Icon enlarge
Component in each Menu Option
Template
Properties Menu Option
Change in new design for property frame
Shortcut Component
Chapter 3 Functional Algorithm
•
•
•
•
•
•
Functional Algorithm Topics
Line Cutting Algorithm
Close Shape Detection Algorithm
Sort Point2D in clockwise
Transformation
Physic simulation control
2
3
5
8
8
10
11
12
13
16
19
22
23
24
24
26
28
29
30
33
•
•
•
•
•
•
•
•
•
•
•
•
•
•
•
•
•
•
•
•
•
•
•
•
•
•
Shape Description
Shape Intersection
Fix Joint
Basic Joint
Undo and Redo function
Spring selection area function
Spring selection area rotation function
Rebuild a cross function
Rebuild an arrow function
An Arrow rotation algorithm function
A Polygon rotation strategy
A drawing rotation point function
A drawing magnitude of lines of polygon function
A real location of value of line magnitude function
Pool nine balls function
Check a cross function
Check an arrow function
Check a spring function
Spring paint function
Add force to an Object
Save file system
Polygon Shape
Auto Shapes
Friction
Graph Generator
What is pulley system?
Chapter 4 Design Patterns
• State Pattern
• Factory Method Pattern
34
35
36
36
37
45
46
47
48
49
50
51
52
54
55
56
57
58
59
60
69
74
74
78
86
94
110
110
112
• Builder Pattern
• Mediator Pattern
117
119
Chapter 5 Scope
121
Chapter 6 Tool characteristic that use with program
123
Chapter 7 Target Users
124
Chapter 8 Result of testing
125
Chapter 9 Problem and Constraint
126
• Drawing Behavior
• Graphic interface design
• Memory management in Java
126
126
126
Chapter 10 Future development
127
Chapter 11 Conclusion and suggestion
128
Chapter 12 Reference
129
Chapter 1
Objective
1. It enhances and assists high school student to study physics from simulation. It shows
motions of objects such as ball, box, and spring from a free hand drawing picture.
2. It helps young children to understand physics from drawing.
3. It makes good impression and encourages them to be interested in physics by the
enjoyable program.
Chapter 2
Graphic User Interface
Iteration1
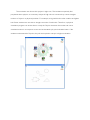
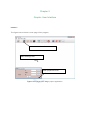
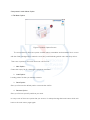
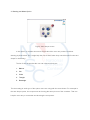
This figure below show the main page of the program,
Main Menu and Toolbars Main drawing frame Main properties frame Figure: Main page of the Magic paper application.
You will see this page can be separate into 3 parts.
-Main Menu and Toolbar
Menu bar have the following option that the user can choose.
File: New, Open, Save, Save as, Exit
The standard file for use in this application is *.xml file.
Edit: Cut, Copy, Paste
It’s common option that almost application have. It affects to the object that you select it.
View: Tool view and Properties view
This option can be visible or invisible the toolbar frame and Properties frame.
Help
It contains the user manual for the new user for easy learning it and it also have the description
about this program too.
Toolbar
In this application, toolbar contains some common shortcut keys for easy use when you
need to draw something which is called “auto tool” and the command key to start generate the
real physical movement after you done drawing the object.
There is a list of tools that can be used right now are listed below.
Auto Tools Mode
-
Pencil, choose the pencil and draw the picture with your own.
Rope, draws the rope to connect in each object or just a rope.
Joint, draws joint to connect the object together.
Spring, draw the spring.
Auto generate object tools
-
Triangle
Rectangle
Circle
Polygon
Auto generate complex object tools
- Cross, to make object which is mark with this cross to a static object.
- Arrow
- Car
- Balloon
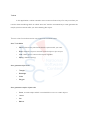
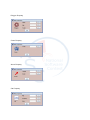
Main Properties window
This window has for setup the properties in each tool that you are selected. When you pick the
tool in the toolbar, the window will change the property page for the option.
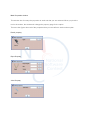
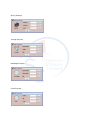
There are the figures show all of the properties that you can define in each toolbar option.
Pencil property
Rope Property
Joint Property
Spring Property
Triangle Property
Rectangle Property
Circle Property
Polygon Property
Cross Property
Arrow Property
Car Property
Balloon Property
GUI Structure
For the GUI of this application, here are the components in each structure.
Toolbar event structure
To reach the event, the action object will be embedded in each icon.
We use the EventAction class to handle the event for the tool bar and every menu command on
this menu option.
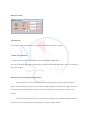
New Design GUI in Smartboard application
From iteration 1, we will see that the GUI functions aren’t proper for the end-user for
easy used and learning. Then, in this iteration we will change the overall for the gui function for
more easy understanding, also supported the pen which is can control all the function in 3
buttons.
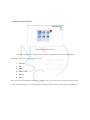
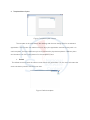
The new design GUI will use the button which using picture instead of regular button in
the menu bar. The overview for the application is show in figure below.
Shortcut Tools Current tool State Undo – Redo Components Figure: First page of new GUI in smartboard application
From this figure, you will see that the menu bar and the toolbar are removed. The
components of the right corner are the shortcut –menu and the tool status which is can tell you
which current tool that you using right now. Also, in the new application we adding the undoredo function that you can go forward and backward step too.
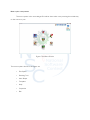
Menu option components
The menu option in the new design GUI will be show when user pressing the middle key
on the mouse or pen.
Figure: The Menu Screen
The menu options shows in the figure are
-
File Option
Drawing Tool
Auto Shape
Template
Help
Properties
Run
Type of the Object for each menu option
In the new design for the GUI, it create new type of the object for contain each menu
option which call IconMenu ,this object can contains the picture , check the point that it contain
and also handle the event too.
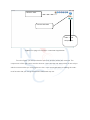
IconMenu Structure
Figure: IconMenu Structure
The IconMenu will keep the image in its object and also position of the picture too, and
the event parameter will added in to menuevent object which is the instance in Iconmenu class.
Accessing in each node of menu option
For controlling the screen to showing the right time of the option menu, we needed to
keep the state for the current screen to verify that which state that they are. So, in this case we
use enum to track the state in each menu.
enum state{Drawing,Main,File,DrawMode,AutoShape};
Icon enlarge
When user move mouse over any icon in the menu,
m the icon will be bigger to notify that
user will choose this specific option
Figuure: Icon Enllarge
Component in each Menu Option
1 .File Menu Option
Figure: File Menu Option Screen
The components in file menu option contains about externalize and internalize file. It comes
with the folder background to make the user easy understanding which menu that they still on.
There are 4 options in the menu that user can choose.
1. New Option :
Create the empty file for drawing the physical simulation.
2. Load Option :
Loading exists file that you already create it.
3. Save Option :
Save your file into the default path or overwrite the old file.
4. Save as Option
Save your file into specific path that you need.
In every node of the menu option that you access, it’s always having that back button which will
back to the main menu page again.
2 .Drawing tool Menu Option
Figure: Drawing tool screen
This menu contains the tools that user will use to draw the object for simulating the
physical. The lists of components are here:
1. Fix joint
2. Pen
3. Rope
4. Basic Joint
5. Spring
6. Arrow
After the user choosing the tool that they want to use. The current tool on the right corner of the
screen will be change too. That make the user always know which tool that they use right now.
3. Drawing tool Menu Option
Figure: Auto shape screen
In this option, it contains about auto shape which the user can produce it without
drawing by themselves. So, it might help the user to draw when they need the specific size and
shape for simulating.
The list of auto shape that the user can choose is list here:
1.
2.
3.
4.
5.
Balloon
Car
Circle
Triangle
Rectangle
The decorating in each type of the option menu are using with the same theme. For example in
the auto shape option, the components are having the same picture of the container. That can
help the user easy to remember and knowing the component.
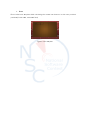
4. Template Menu Option
Figure: Template option screen
The template is the new feature that adding with the new design GUI for smartboard
application. This function can make user more enjoy the application and like to play with it. In
each template , there are different style to reprensent the physical template in different place
and situation. List of the components for the template is here:
1. Default
The default screen means the white screen without any decoration. So, the user will create the
entire simulation particle with their own idea.
Figure: Default template
1. Room
Room iss the basic template
t
whhich simulating the screeen into the room.
r
In thiss room provide 4
particless (2 side waalls, cellar annd floor)
Figurre: room tem
mplate