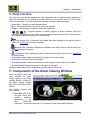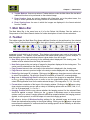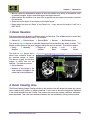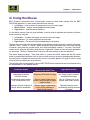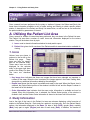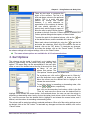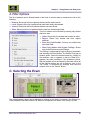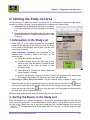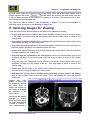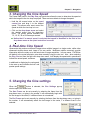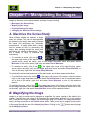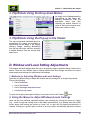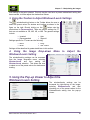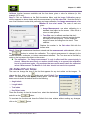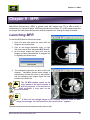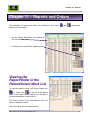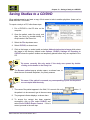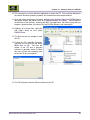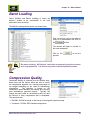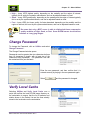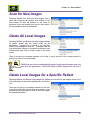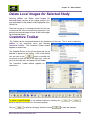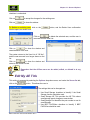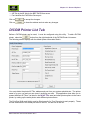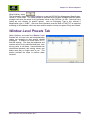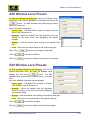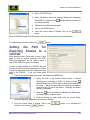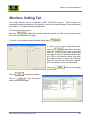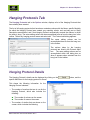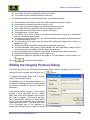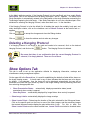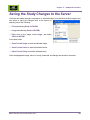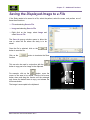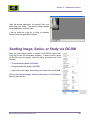
1
BRIT PACSView March 2010 Release 1.3 UM-BPV-001.3 Notices, Copyrights, and Revision Records Notices and Copyrights Notice This document is subject to change without notice and does not represent a commitment by BRIT Systems, Inc. The information set forth in this document and all rights in and inventions disclosed herein and the patents that might be granted thereon disclosing or employing the materials, methods, techniques, or apparatus described herein are the exclusive property of BRIT Systems, Inc. Copyright Copyright 2009, BRIT Systems, Inc. All rights reserved. Printed in the United States of America Trademarks BRIT (Beyond Roentgen Imaging Technology), BRIT Systems, Inc., BRIT Viewer, and the Pincher-Man logo/icon are trademarks of BRIT Systems, Inc. Microsoft and MS-Windows are registered trademarks of Microsoft Corporation. All other product names or trademarks mentioned herein are the property of their respective owners BRIT PACSView User Manual UM-BPV-001.3 ii Notices, Copyrights, and Revision Records Revision Records Revision Record for User Manual for BRIT PACSView Rev. # Date Sections/Pages Affected Change Authority Author Release Number 1 Mar 2009 All Initial T. Harris 1.0 2 Mar 2010 All M. Hinselwood 1.3 Copyright 2009 BRIT Systems, Inc. Printed in U.S.A. All rights reserved BRIT PACSView User Manual UM-BPV-001.3 Technical Publications Department BRIT Systems, Inc. 1909 Hi Line Drive Dallas, TX 75207 iii Notices, Copyrights, and Revision Records BRIT PACSView User Manual UM-BPV-001.3 iv i Table of Contents Contents CHAPTER 1 – INTRODUCTION ................................................................................................................................... 1 A. WHAT’S NEW IN RELEASE 1.3 ..................................................................................................................................... 1 B. STARTING AND EXITING FROM THE BRIT PACSVIEW APPLICATION .......................................................................... 3 C. LOGGING INTO MULTIPLE SERVERS ............................................................................................................................. 4 D. STORAGE OF USER PREFERENCES ................................................................................................................................ 5 E. COMPONENTS OF THE PATIENT SELECT WINDOW ........................................................................................................ 5 1. Main Menu Bar ....................................................................................................................................................... 6 2. Quick Search Bar .................................................................................................................................................... 6 3. Monitor Selection .................................................................................................................................................... 6 4. Patient Select/Worklist ............................................................................................................................................ 7 5. Study List Area ........................................................................................................................................................ 8 F. COMPONENTS OF THE EXAM VIEWING WINDOW .......................................................................................................... 8 1. Main Menu Bar ....................................................................................................................................................... 9 2. Toolbar .................................................................................................................................................................... 9 3. Exam Headers ....................................................................................................................................................... 10 4. Exam Viewing Area ............................................................................................................................................... 10 G. USING THE MOUSE .................................................................................................................................................... 11 CHAPTER 2 – SEARCHING FOR A PATIENT ......................................................................................................... 13 A. USING THE QUICK SEARCH BAR ................................................................................................................................ 13 B. USING SEARCHMORE… ON THE MENU...................................................................................................................... 14 1. Patient ................................................................................................................................................................... 14 2. Study ...................................................................................................................................................................... 14 3. Study Date and Time ............................................................................................................................................. 15 4. Favorite ................................................................................................................................................................. 16 5. Maximum Results .................................................................................................................................................. 16 CHAPTER 3 – USING PATIENT AND STUDY LISTS.............................................................................................. 17 A. UTILIZING THE PATIENT LIST AREA .......................................................................................................................... 17 1. Icons ...................................................................................................................................................................... 17 2. Study Information .................................................................................................................................................. 17 B. SORTING THE PATIENT LIST ....................................................................................................................................... 18 1. Simple sort ............................................................................................................................................................. 18 2. Column Options..................................................................................................................................................... 18 3. Sort Options........................................................................................................................................................... 19 4. Filter Options ........................................................................................................................................................ 20 C. SELECTING THE EXAM ............................................................................................................................................... 20 D. UTILIZING THE STUDY LIST AREA ............................................................................................................................. 21 E. SELECTING IMAGES FOR VIEWING.............................................................................................................................. 22 F. INFORMATION IN THE VIEWING AREA ........................................................................................................................ 23 G. TOGGLING BETWEEN PATIENT LIST AND LIGHTBOX ................................................................................................. 25 H. SELECTING PATIENTS FROM THE WORKSPACES ......................................................................................................... 25 BRIT PACSView User Manual UM-BPV-001.3 i Table of Contents I. GETTING ADDITIONAL STUDY INFO ............................................................................................................................ 25 CHAPTER 4 – FORMATTING THE LAYOUT .......................................................................................................... 27 A. FORMATTING USING THE POP-UP WINDOW ................................................................................................................ 27 B. FORMATTING BY DRAGGING STUDIES INTO THE VIEWER .......................................................................................... 28 CHAPTER 5 - NAVIGATION ....................................................................................................................................... 29 A. MOVING TO THE NEXT OR PREVIOUS IMAGE ............................................................................................................. 29 B. MOVING TO THE NEXT SERIES ................................................................................................................................... 29 C. MOVING TO THE NEXT STUDY ................................................................................................................................... 29 D. SIMULATING CINE ..................................................................................................................................................... 29 1. Manually Simulating Cine ..................................................................................................................................... 30 2. Automatically Simulating Cine .............................................................................................................................. 30 3. Changing the Cine Speed ...................................................................................................................................... 31 4. Real-time Cine Speed ............................................................................................................................................ 31 5. Changing the Cine settings.................................................................................................................................... 31 CHAPTER 6 – COMPARISON OF IMAGES .............................................................................................................. 33 A. COMPARING IMAGES USING SCOUT LINES, LINKING AND LOCATE WITHIN A STUDY ................................................ 33 1. Scout Lines ............................................................................................................................................................ 33 Turning off Scout Lines ............................................................................................................................................. 34 2. Synchronized Zoom ............................................................................................................................................... 35 3. Synchronized Formats ........................................................................................................................................... 35 4. Moving Series ........................................................................................................................................................ 36 5. Selecting Series to View on the Screen .................................................................................................................. 36 6. Comparing Same Series at Different Window and Level Settings - Cloning ......................................................... 37 7. Locate Function..................................................................................................................................................... 38 B. COMPARING STUDIES ................................................................................................................................................. 39 CHAPTER 7 – MANIPULATING THE IMAGES....................................................................................................... 41 A. MAXIMIZE THE SERIES/STUDY................................................................................................................................... 41 B. MAGNIFYING THE IMAGE ........................................................................................................................................... 41 1. Magnify the Image Using the Toolbar ................................................................................................................... 42 2. Magnify Using the Image Using the Drop-down Menu......................................................................................... 42 3. Magnify the Image Using the Pop-up in the Viewer .............................................................................................. 42 4. Magnifying the Image Using the Smooth Zoom Slider .......................................................................................... 43 5. Using the Magnifying Glass .................................................................................................................................. 43 6. Changing the Magnification Level of the Magnifying Glass ................................................................................. 43 7. Changing the Size of the Magnifying Glass ........................................................................................................... 44 8. True Size Magnification ........................................................................................................................................ 44 C. FLIPPING/ROTATING THE IMAGE ................................................................................................................................ 44 1. Flip/Rotate Using the Toolbar............................................................................................................................... 44 2. Flip/Rotate Using the Drop-down Menus ............................................................................................................. 45 3. Flip/Rotate Using the Pop-up in the Viewer ......................................................................................................... 45 D. WINDOW AND LEVEL SETTING ADJUSTMENTS .......................................................................................................... 45 1. Methods for Adjusting Window and Level Settings ............................................................................................... 45 2. Using the Mouse to Adjust Windows/Levels Settings ............................................................................................ 45 3. Using the Toolbar to Adjust Windows/Levels Settings .......................................................................................... 46 4. Using the Image Drop-down Menu to Adjust the Windows/Levels Setting ........................................................... 46 5. Using the Pop-up Viewer to Adjust the Windows/Levels Setting ........................................................................... 46 6. Preset Window and Level Settings ........................................................................................................................ 47 E. IMAGE STITCHING ...................................................................................................................................................... 50 BRIT PACSView User Manual UM-BPV-001.3 ii Table of Contents CHAPTER 8 – ANNOTATING THE IMAGE ............................................................................................................. 53 A. EDIT MARKUPS MENU ............................................................................................................................................... 53 B. CREATING, EDITING, DELETING AND RESTORING THE ANNOTATIONS ....................................................................... 54 1. Angle Measurements ............................................................................................................................................. 54 2. Drawing a Polygon ............................................................................................................................................... 55 3. Drawing a Polygon ROI ........................................................................................................................................ 55 4. Length Measurements............................................................................................................................................ 55 5. Draw Perpendicular .............................................................................................................................................. 56 6. Draw Cobb Angle for Scoliosis Measurement....................................................................................................... 56 7. Draw Rectangle ..................................................................................................................................................... 57 8. Draw Rectangle ROI ............................................................................................................................................. 57 9. Draw Ellipse .......................................................................................................................................................... 57 10. Draw Ellipse ROI ................................................................................................................................................ 58 11. Draw Freehand ................................................................................................................................................... 58 12. Draw Freehand ROI ............................................................................................................................................ 58 14. Draw Arrow......................................................................................................................................................... 59 15. Arrow and Text .................................................................................................................................................... 59 16. Text Box ............................................................................................................................................................... 60 17. Spine Labeling ..................................................................................................................................................... 60 18. Add Key Note ....................................................................................................................................................... 60 19. Calibration .......................................................................................................................................................... 61 20. Default Font Sizes ............................................................................................................................................... 62 21. Erasing Annotations ............................................................................................................................................ 63 C. TURNING DISPLAY OF MARKUPS ON AND OFF .......................................................................................................... 63 D. SAVING ANNOTATIONS AND KEY IMAGE NOTES TO THE SERVER .............................................................................. 65 CHAPTER 9 - MPR......................................................................................................................................................... 67 LAUNCHING MPR .......................................................................................................................................................... 67 MPR TOOLBAR .............................................................................................................................................................. 68 MENU FEATURES FROM THE MPR TOOLBAR ................................................................................................................. 69 Menu Features from the Format Button .................................................................................................................... 69 Menu Features from the Mag Button ........................................................................................................................ 71 Menu Features from the Ruler Button ....................................................................................................................... 71 Menu Features from the Window/Level Button ......................................................................................................... 73 MANUALLY CHANGING THE WINDOW/LEVEL SETTINGS................................................................................................ 74 CLOSING THE MPR FUNCTION ....................................................................................................................................... 74 CHAPTER 10 - PRINTING IMAGES – DICOM AND PAPER ................................................................................. 75 PRINTING THE IMAGE TO A PRINTER ............................................................................................................................... 75 PRINTING TO A DICOM PRINTER ................................................................................................................................... 75 CHAPTER 11 – REPORTS AND ORDERS ................................................................................................................. 76 VIEWING THE REPORT/ORDER IN THE PATIENT/SELECT WORK LIST.............................................................................. 76 VIEWING THE REPORT OR ORDER IN THE EXAM VIEWING WINDOW .............................................................................. 77 PRINTING REPORTS AND ORDERS ................................................................................................................................... 77 CHAPTER 12 – SAVING A STUDY TO CD/DVD ...................................................................................................... 78 VIEWING STUDIES FROM A CD/DVD ............................................................................................................................. 78 IMPORTING STUDIES FROM A CD/DVD .......................................................................................................................... 79 SAVING STUDIES TO A CD/DVD .................................................................................................................................... 81 CHAPTER 13 –HANGING PROTOCOLS ................................................................................................................... 83 SETTINGS DEFINED IN HANGING PROTOCOLS................................................................................................................. 83 BRIT PACSView User Manual UM-BPV-001.3 iii Table of Contents DEFINING THE HANGING PROTOCOL .............................................................................................................................. 84 SETTING UP SEQUENTIAL HANGS ................................................................................................................................... 86 USING HANGING PROTOCOLS ......................................................................................................................................... 87 Selecting a Hanging Protocol ................................................................................................................................... 87 Reopening the Study Without the Hanging Protocol ................................................................................................. 87 Using Sequential Hanging Protocols ........................................................................................................................ 87 CHAPTER 14 – OTHER UTILITIES ........................................................................................................................... 88 STORE AND FORWARD .................................................................................................................................................... 88 NETWORK QUEUE .......................................................................................................................................................... 90 Download Studies ...................................................................................................................................................... 91 Upload Studies .......................................................................................................................................................... 92 Download Errors....................................................................................................................................................... 92 Upload Errors ........................................................................................................................................................... 93 BATCH LOADING ............................................................................................................................................................ 94 COMPRESSION QUALITY ................................................................................................................................................. 94 CHANGE PASSWORD ....................................................................................................................................................... 95 VERIFY LOCAL CACHE ................................................................................................................................................... 95 SCAN FOR NEW IMAGES ................................................................................................................................................. 96 DELETE ALL LOCAL IMAGES .......................................................................................................................................... 96 DELETE LOCAL IMAGES FOR A SPECIFIC PATIENT .......................................................................................................... 96 DELETE LOCAL IMAGES FOR SELECTED STUDY ............................................................................................................. 97 CUSTOMIZE TOOLBAR .................................................................................................................................................... 97 CHAPTER 15 - STUDY MANAGEMENT TOOLS - OPTIONAL ........................................................................... 99 A. HOLD/UNHOLD ........................................................................................................................................................ 100 B. URGENT FINDINGS ................................................................................................................................................... 100 Entering Urgent Findings ....................................................................................................................................... 100 Acknowledging Urgent Findings ............................................................................................................................. 101 C. INITIAL DIAGNOSIS / DISCORDANCE ........................................................................................................................ 103 Entering an initial diagnosis ................................................................................................................................... 103 Acknowledging the Radiologist’s Response ............................................................................................................ 103 Radiologists’ Review of ER Calls ............................................................................................................................ 104 CHAPTER 16 – SETTING DEFAULTS AND OPTIONS ........................................................................................ 106 GENERAL TAB .............................................................................................................................................................. 106 SERVER LIST TAB ......................................................................................................................................................... 107 Add, Edit, and Delete Servers ................................................................................................................................. 107 Setting a Default Server .......................................................................................................................................... 109 Add, Edit, and Delete Users .................................................................................................................................... 110 Edit My AE Title ...................................................................................................................................................... 111 DICOM PRINTER LIST TAB .......................................................................................................................................... 112 WINDOW LEVEL PRESETS TAB ..................................................................................................................................... 113 Add Window Level Presets ...................................................................................................................................... 114 Edit Window Level Presets ...................................................................................................................................... 114 Delete Window Level Presets .................................................................................................................................. 115 CD/DVD TAB .............................................................................................................................................................. 115 Setting the Path for Importing Studies from a CD/DVD ......................................................................................... 115 Setting the Path for Exporting Studies to a CD/DVD.............................................................................................. 116 HOTKEYS TAB ............................................................................................................................................................. 118 Removing a Hot Key Setting .................................................................................................................................... 119 MONITORS SETTING TAB .............................................................................................................................................. 120 HANGING PROTOCOLS TAB .......................................................................................................................................... 121 Hanging Protocol Details ....................................................................................................................................... 121 BRIT PACSView User Manual UM-BPV-001.3 iv Table of Contents Editing the Hanging Protocol Dialog ..................................................................................................................... 122 Deleting a Hanging Protocol .................................................................................................................................. 123 SHOW OPTIONS TAB ..................................................................................................................................................... 123 CHAPTER 17 – ADDITIONAL FUNCTIONS ........................................................................................................... 125 AUTOMATICALLY CLOSE STUDIES ............................................................................................................................... 125 MARKING A STUDY AS READ ....................................................................................................................................... 125 GETTING A DICOM DUMP ........................................................................................................................................... 125 COPYING THE IMAGE TO A CLIPBOARD......................................................................................................................... 126 PRINTING THE IMAGE TO A PRINTER ............................................................................................................................. 127 SAVING THE STUDY CHANGES TO THE SERVER ............................................................................................................ 128 SAVING THE DISPLAYED IMAGE TO A FILE ................................................................................................................... 129 SENDING IMAGE, SERIES, OR STUDY VIA DICOM ........................................................................................................ 130 CHAPTER 18 – SYSTEM MANAGEMENT INFORMATION ............................................................................... 131 A. UNDERSTANDING AND WORKING WITH HIPAA LOGGING TOOLS............................................................................ 131 Reason for the logs .................................................................................................................................................. 131 Location of the logs ................................................................................................................................................. 131 Content of the logs................................................................................................................................................... 131 Sample log ............................................................................................................................................................... 132 B. PACSVIEW GENERAL INFORMATION...................................................................................................................... 134 Managing Access to Local Images .......................................................................................................................... 134 C. PACSVIEW.INI INFORMATION ................................................................................................................................. 135 D. FAVORITES.INI INFORMATION .................................................................................................................................. 139 BRIT PACSView User Manual UM-BPV-001.3 v Chapter 1 – Introduction Chapter 1 – Introduction BRIT PACSView is a medical image viewing workstation that provides a Windows solution for general viewing and complete diagnosis of medical images from imaging devices, image archives, or from other DICOM-compliant devices. Note that BRIT PACSView follows guidelines for Windows programming whenever possible. The BRIT PACSView application can be set up to view images in one of two ways: Local Only – for studies that were previously viewed on the computer or that were stored directly to the computer. Note: some sites automatically delete the study upon exiting the application.) Remote – for an interface to the servers where the images are stored remotely. A. What’s New in Release 1.3 PACSView 1.3 is the second major release of PACSView. The first thing returning users will notice is that we slightly changed its name from PACS View to PACSView. This is to be more consistent with the naming conventions of our other programs. The new release is full of new features. These include the following: Worklist features Extended methods of searching for patients Saved searches that are available from main patient list Color coding based on exam priority/status The ability to log onto multiple servers and obtained a combined worklist Series icons available for studies that have been DICOM pushed to viewer Viewing features Grid tool for selection of image montage True Size image viewing and printing Interactive Locate spot tool Improvements in hanging of selected series Stitching of images, for example long bone studies Calibration tools for distance measurements Real-time playing of cine studies Improvement in the look of some annotations Sequential hanging protocols Report and Order window now floats so user can position where desired within image viewing screen. Miscellaneous features Store and forward features for routing of studies API for access to other applications Integration for ER Discordance Tool BRIT PACSView User Manual UM-BPV-001.3 1 Chapter 1 – Introduction Integration to open studies from Roentgen Works worklist Improvements in auto-deletion of old images Auto-close of study when status changed to “done” option Setting of study status on the server Saving user preferences on the server for access from anywhere. We hope the new features enhance your viewing experience with PACSView. We are always delighted to hear from our users with comments on the existing features as well as ideas for new features. Our best ideas from enhancements always come for our users. You can send your comments to [email protected]. Also, we send out routine emails with tips and techniques for using the product. If you would like to receive these, send a request to [email protected]. They are also available from our web site under our customer log-on area. Contact [email protected] for a user ID and password, if you don‟t have one. BRIT PACSView User Manual UM-BPV-001.3 2 Chapter 1 – Introduction B. Starting and Exiting from the BRIT PACSView Application To start the BRIT PACSView application, click on the Internet Explorer icon on the desktop and enter the address (or URL) for BRIT PACSView, or click on the BRIT PACSView icon on the desktop. The login window opens. Enter the user ID and password. The BRIT PACSView Server address should already be displayed in the field under Server, but it can be selected by clicking on the drop-down and selecting the desired server. The first time you start the application, you may need to use the ID and Password provided by BRIT. This will be particularly true if the application was downloaded from BRIT and not provided by a local server/system administrator. This allows you to log-on to the application to set-up your server(s). You may also use this ID and password to authenticate locally if you are not connecting to a server (studies can be sent directly to the viewer and you can also view studies previously downloaded from a server if they still exist on your workstation without logging into a server). Once the User ID and Password are entered, click on the “Login” button, the application loads and the window opens as shown here (there may be patients in the patient select list when opened). You may also select the Work OffLine option if you do not wish to connect to the server; you must still select the server that knows about this user ID and password. The application runs in the service tray, as evidenced by a small BRIT PACSView icon on the Windows or Apple service tray. This is done so the application can continue receiving images even when a user is not logged in. To exit the program, click on the icon in the toolbar and a pop-up window will appear as shown. Exit must be selected and a warning will be given as shown below. Click on yes and the program will stop. BRIT PACSView User Manual UM-BPV-001.3 3 Chapter 1 – Introduction C. Logging into Multiple Servers You must have user IDs and passwords on the systems and they must be defined in your Options…< Server List. Sign onto the first server. Select Servers… and the following screen displays: The server(s) to which you are connected are listed in the Connected servers window. The other servers defined to your application are listed under the All servers Window. Select the additional server to which you wish to connect and select the Connect button. You will be presented with a logon screen for entry of your user ID and password as you are known in that system. Once logged in, that server will now be listed in the Connected servers window. To log off of a system, select the server from the Connected servers windows and select Disconnect. Your worklist is a compilation of all the servers to which you are connected. Any query will go out to all servers and return the results to your study list. BRIT PACSView User Manual UM-BPV-001.3 4 Chapter 1 – Introduction D. Storage of User Preferences Users may store some default settings onto the server to which they are logged on and they may retrieve those settings from any workstation. They may also select to use the defaults of a local machine. The downloading and uploading of preferences do not happen automatically when a user logs into or out of a server: the user must request the action. To save or store setting to a server, the server must be a Roentgen Files server that has been properly configured to work with PACSView. From the File<Preferences menu, select: Load from the server to restore previously saved settings; Store on the server to send current settings from both the viewer and the worklist to the server and Restore local to reset the preferences to those stored locally. If not logged onto such a server, then the features are grayed out. E. Components of the Patient Select Window The BRIT PACSView application displays in a window that is divided into various components, depending on the current activity. Initially, the BRIT PACSView application allows the user to get a list of all the patients, or to search for a patient by a variety of criteria. This window is divided into five main sections: 1. Menu Bar 2. Quick Search Bar 3. Monitor Select 4. Patient Select/Worklist 5. Study List Area This section provides just an overview of the BRIT PACSView User Manual UM-BPV-001.3 5 Chapter 1 – Introduction components of each window. For further details, see the appropriate section. Also, please be aware that there may be more than one way to perform a task in PACSView. The various ways will be presented; one is not better than another unless stated. Otherwise, which method is chosen to perform a task is solely a matter of personal preference. 1. Main Menu Bar There are main menus that provide additional functionality in the BRIT PACSView application. These are: File: lets the user to save, print, upload/export a CD/DVD, toggle between server and local worklists, log onto additional servers and set their preferences for where their profiles are to be stored. LightBox/Patient List: allows toggling between the Patient List and the images on the Lightbox Utilities: permits batch loading of studies, selection of compression quality for a chosen image, scan for or delete images and customize the toolbar Image: provides a variety of control mechanisms for the formatting of images Search More…: allows an advanced search using more detailed criteria Saved Searches: permits the use searches for patients that had been saved previously Servers: allows connection or disconnection of available servers Print: permits printing of a hardcopy of the Report or the Order for the selected study Workspaces: allows toggling between studies being viewed if multiple studies are open Options: allows the selection of a variety of options including: server list, Hot Keys, monitor settings, hanging protocols, etc. Help: the help menu provides the version information as well as full access to the full user manual Hide Study List/Show Study List: in the upper right hand corner of the screen. Lets the study list be hidden or shown. 2. Quick Search Bar The Quick Search Bar allows a search for the patient to be performed. The criteria to perform a quick search include: Patient Name – Patient first or last name Init+ID – Initial plus the last one to four digits of the Patient ID number. Patient ID – Patient identification number Accession number – Number assigned for the study by the modality when the exam begins See the section “Searching for a Patient or an Exam” for further details on how to use the Quick Search Bar fields. 3. Monitor Selection The BRIT PACSView system can be set up with multiple monitors and the user can select the monitor on which the images appear when the study is opened. BRIT PACSView User Manual UM-BPV-001.3 6 Chapter 1 – Introduction Studies can be dragged and dropped on to the desired monitor by clicking on the study in the Exam list, holding the left mouse button down and dragging it to either Monitor 1 or 2. Dragging the study into the space between the two monitors opens the study across both monitors. The number of monitors is picked up automatically based on the number of monitors available. Multiple monitors allow the user to have the Worklist up on one monitor and to view the studies on the other monitor. 4. Patient Select/Worklist When the entire patient list is displayed, the left window displays the Patient Select/Work List with the patient information, which includes: Key Images Link: Identifies if Key Images have been selected for the patient. See the section on Key Images for further details. Reports Link: Identifies if Reports are available for the study or series. See the section on Reports for further information. Order or Information Link: Displays the Patient Order information. See the section on Information for further details. Name: Shows the first and last name of the patient ID: Shows the identification number of the patient Date of Birth: Displays the date of birth for the patient Sex: Displays the gender of the patient Mod: Shows the medical device used to perform the study. Region: Displays body region for the most current patient study. Date: Shows the date the study was performed #Stu: Displays the number of studies for the patient Local/Remote: Identifies if the Study has been downloaded locally to the hard drive or if it is still remote on the server The list is also color coded based on exam status. The selected study is always turquoise. BRIT PACSView User Manual UM-BPV-001.3 7 Chapter 1 – Introduction 5. Study List Area The right side of the window displays the exam information with the selected study expanded to show the thumbnails for the studies and series. Below the most recent exam is a list of older studies for the patient. This area contains the following information about the exams: Study Date – The date the exam was performed Mod – The medical device on which the exam was captured Region – The body part on which the exam was performed – Progress indicator to identify progress of study download. Solid blue indicates the images have not loaded. As the download progresses the yellow indicator shows the progress and upon completion, it becomes white. Key Images Link – Identifies if Key Images have been selected for the patient. See the section on Key Images for further information. Reports Link – Identifies if Reports are available for the study or series. See the section on Reports for further information. Information Link: Displays the Patient Order information. See the section on Information for further details. Thumbnails: Small images showing the first image in the series or study Description: Contains the study description Accession Number: Shows the accession number assigned to the study by the modality Report Snippet: Displays a fragment of the report for this exam Additional older studies can be accessed by scrolling down the Study List. F. Components of the Exam Viewing Window After the patient‟s study has been selected, the study images appear in the Exam Viewing Window. Sections of the Exam Viewing window differ from the Patient Select window. This window contains four main sections: 1. Main Menu Bar: there are main menus that provide additional functionality in the BRIT PACSView application. These were discussed in “Components of the Patient Select Window”. BRIT PACSView User Manual UM-BPV-001.3 8 Chapter 1 – Introduction 2. Toolbar Buttons: there are a series of Toolbar buttons under the Main Menu Bar that allow additional functions to be performed on the selected image. 3. Exam Headers: these are various headers with information as to the patient exam, the study or series opened and the image number in the selected series. 4. Exam Viewing Area: the area in which the images are displayed in the format selected from the Toolbar. 1. Main Menu Bar The Main Menu Bar is the same here as it is for the Patient List Window. See the section on Components of the Patient Search window for further descriptions of each of these selections. 2. Toolbar The toolbar under the Main Menu Bar allows additional functions to be performed on the selected image. Some Toolbar buttons have a to their right, indicating additional functionality that can be accessed via right clicking on the arrow. This displays a drop-down menu next to the button with additional options. The toolbar is user definable; the toolbar shown above is just an example. A brief description of the depicted toolbar buttons is given below, from left to right: Next Study goes to the next study for the selected patient displayed in the viewing area. The studies must be selected from the Study List area first. Next Series goes to the next series of images for the patient displayed in the viewing area. The series must be selected from the Study List area first. Page Forward moves to the next image in the series that is displayed in the viewing area. Page Reverse returns to previous image in the study or series displayed in the viewing area. Rotate flips the image 90 clockwise. Clicking on the opens a drop-down menu to allow user to select Flip top/bottom, Flip left/right, Rotate 90clockwise or Rotate 90 counterclockwise. Mag turns on a Magnifying Glass to allow just a section of the image to be magnified. Clicking on the opens a drop-down menu to menu to turn the magnification glass on as well as to select the magnification level for the entire selected image (True image size, Fit, ½X, 1X to 4X). Format allows a selection of the layout of the viewing window. Clicking on the opens a dropdown window containing a menu with a variety of formatting options such as Stack, Grid, X x Y, All, 2 to 20 images/page, 1 x 2 or 2 x 1. Hanging Protocol lets the user choose whether the hanging protocol for the selected Exam should be applied or saved. Clicking on the opens a drop-down menu to allow several options such as to select if hanging protocols should be reopened without the hanging protocol applied, to edit a protocol, to add new steps or to save the hanging protocol. WL allows a choice of Windows/leveling settings for the selected image as Inverted or to Reset the window/leveling setting to the original setting. Clicking on the opens a drop-down menu allows the selection of various window level settings specific for the modality on which the open study was performed. BRIT PACSView User Manual UM-BPV-001.3 9 Chapter 1 – Introduction Markup opens the Annotations window to allow the creation of a variety of annotations; such as measure lengths, angles, draw cobb angles add angles and text. Select permits the selection of an area of the image that can be cropped and copied to another file and saved. Reset returns the layout of the images to the original layout. Done marks the study as “Done” in the Patient List. It may also set the study to “read” on a BRIT PACS. 3. Exam Headers The exam headers are divided into different areas of information. First, a blue banner is shown that further describes the patient‟s exam. This contains: Patient ID Patient Name Date of Birth Gender # of Studies Open The second is a green banner on selected images that further describes the study or series. This banner is olive green for the other images or series that are not selected. This banner contains: Study Modality Region of Study # of # of Number Interest Date Images Series The third is a blue banner that is above each individual image on the selected images or series. This banner is grey for the other images or series that are not selected. This banner contains: Series Number Number of the image in the total number of images in the series that is being displayed. 4. Exam Viewing Area The Exam Viewing (Image Viewing) window is the section to the left where the exams are viewed when a patient study, series, or image is selected. It is the area in which the images are displayed in the format selected from the Toolbar. This is where the exams are viewed, compared, measured, and manipulated. There are a few additional features that are available by clicking various buttons BRIT PACSView User Manual UM-BPV-001.3 10 Chapter 1 – Introduction G. Using the Mouse BRIT Systems recommends that a three-button mouse be used when working with the BRIT PACSView application. In most cases the buttons are used for: Left button – Used to select the image and move to the next image Middle button – Used to control brightness and contrast Right button – Used for special functions If a two-button mouse is the only type available, it can be used to duplicate the functions of a threebutton mouse by using the: Left button – To select the image, and move to the next image Both buttons – To control brightness and contrast Right button – For special functions depending on the feature Typically the users utilize the left and middle mouse buttons primarily during the viewing of images. The term "click", “press” or “select” means to position the mouse pointer (or cursor) over the item of interest, then press the mouse button once and immediately release it. The term “left click” means to click using the left button while the term “right click” means to click using the right button on the mouse. The term “double-click” means to click twice quickly on the mouse button. The terms "drag and drop", "click and hold", or “press and hold” means that the left mouse button is pressed and held down over an item and the mouse is moved in the appropriate direction, then the button is released to leave the item where it is currently placed. This type of action is used to move items to another part of the window. The following table summarizes the various BRIT PACSView functions that can be performed using the three button or two button mouse. Left Mouse Button Click moves to next image/page & selects functions & items Double-click opens studies from Patient/Study Lists Depress & drag for markups & drag & drop for thumbnails Middle Button or Right/Left Button at the Same Time Click on image to set optimal brightness & contrast of image Click on image & hold mouse button & drag left/right to adjust image contrast Click on image & hold mouse button & drag up/down to adjust image contrast BRIT PACSView User Manual UM-BPV-001.3 Right Mouse Button Click on the image to bring up the “Image” pop-up menu to manipulate the image Click on “Patient List” to set column order, filters & sorts Depress & drag to move incrementally through a series of images 11 Chapter 1 – Introduction BRIT PACSView User Manual UM-BPV-001.3 12 Chapter 2 – Searching for a Patient Chapter 2 – Searching for a Patient Users can log into the server(s) and view patient lists and exams that are on the server(s) or work off-line which only displays the patients that have been formerly downloaded to the local machine from a previous session or sent directly to the workstation via DICOM. After logging onto the system, the patient and the exam can be selected for viewing, measurements, manipulations, or comparisons. A. Using the Quick Search Bar Patients search for the patient by the search fields in the Quick Search Bar on the main window. There are several criteria and methods to perform a search, including: Patient Name – Used to search for the patient via their Name by entering: The full patient name A portion of the Patient name if the exact spelling of the patient name is unknown A list of patients by entering an asterisk (*) or by just hitting “Search” A wild card search for the name, i.e., “SM*” to get a list of patients whose names begin with “SM” or “SM” to get a list of patients whose names contain “SM”. Patient Id – Used to search for the patient via their Patient ID by entering: The full patient ID A portion of the Patient ID number if the full Patient ID is unknown A wild card search for the beginning of the ID number, i.e., “ZT*” to get a list of IDs beginning with “ZT” or “ZT” to get a list of patients whose Patient ID contains ZT. Int+ID – Used to search for the patient via first initial of their last name plus the last one to four digits of their Patient ID by entering: The first initial of their last name plus the last one to four digits of their patient ID A wild card search for characters at the beginning and end of the int+ID, i.e., “Z*6” or “Z*06” to get a list of IDs that contain “Z” at the beginning of the last name and “6” or “06” at the end of the ID. There may be up to a total of four characters at the end of the ID. Accession Number – Number assigned to the exam by the modality where the exam was performed. It cannot be changed and it is not the same number as the patient ID. The full accession number A portion of the accession number if the exact number is unknown To search for a patient, enter the information in one of the fields and click on the Search button and the results are displayed in the Patient Search window. BRIT PACSView User Manual UM-BPV-001.3 13 Chapter 2 – Searching for a Patient B. Using SearchMore… on the Menu A patient can be searched for by clicking on the SearchMore… option on the main menu, and the BRIT PACSView Advanced Search window opens. A search for the patient can performed using information on: be 1. Patient: information on the Patient 2. Study: information on type of study 3. Study Date and Time: information on date of study 1. Patient This section is used to search for the patient via patient information. All of the same options are available in “Search More…” as are found in “Quick Search” for finding patient studies, including “Patient Name”, Patient ID” and “Initial + ID”. In addition to these options, the following options are also available: Age: Used to search via age of the patient. Select the age range criteria from the drop-down menu and enter the age in the next field by selecting and entering: Equal (=): Select equal to and enter the specific age. Greater Than (>): Select greater than and enter the lower end of the age range. Less Than (<): Select less than and enter the upper end of the age range. Gender: Used to search via the gender of the patient by selecting one of the following: All: Select all patients regardless of gender. Male: Selects all patients who have a gender status of Male. Female: Selects all patients who have a gender status of Female. Other: Selects all patients who have a gender status of Other. 2. Study This section is used to search for the patient via the current status of the patient‟s study. The same option is available in “Search More…” as is found in “Quick Search” for finding patient studies, namely “Accession #”. In addition to this option, the following options are also available using the drop-down menus. Please note that these may be modified by the administrator. BRIT PACSView User Manual UM-BPV-001.3 14 Chapter 2 – Searching for a Patient Study Status: used to search for the patient via the current status of the patient‟s study. Some of the most common include: All Read Examined Unmatched Verified Complete Body Part: used to search for the patient via the body part selected for the study. Those body parts available include: All Abdomen Ankle Arm Breast Chest Clavicle Coccyx CSpine Elbow Extremity Foot Hand Head Heart Hip Jaw Knee Leg LSpine Neck Pelvis Shoulder Skull SSpine TSpine Modality: used to search for the patient using the modality on which the study was performed. Those modalities available include: All CT - Computer CR – Computed Tomography MG - Mammogram MR – Magnetic Radiography or X-Ray NM – Nuclear Resonance Imaging Medicine nd RF – Radio SC – 2 Capture US - Ultrasound Fluoroscopy Origin: used to search for the patient using the origin of the study. The origin is classified by modality as well as origin. The option to search by original AE title is only available to those who use the Brit Server. Some of the most common origins include: ALL CR_AE1 CT_AE1 US_AE1 CT_AE2 FOREIGN_PACS Group: used to search for the patient using the group responsible for the image. Some of the potential examples include: ALL ADMIN RADIOLOGIST FACILITY1 PHYSICIAN 3. Study Date and Time This section is used to search for the patient based on the date and time the study was performed. Studies performed any date and time: includes all studies, it is the default setting. Studies performed within the last: enter the number and select days or hours. Studies performed: select today, yesterday or tomorrow. Study date between: enter the potential range of dates for the study BRIT PACSView User Manual UM-BPV-001.3 either 15 Chapter 2 – Searching for a Patient 4. Favorite Select a Favorite – Used to select the preferred search from the criteria that were previously saved. These are shown in the drop-down menu. If one of the saved searches is no longer needed, click on the “Press to Remove Select Favorite” button. Name New Favorite – If a specific type of search is performed frequently, the search can be saved. The “Name New Favorite” field is used to save the search criteria entered so that it can be recalled later without having to re-enter the search criteria. To save the criteria selected, enter the name of the search in the “OR Name New Favorite” field and click on the “then Save Settings Above” button. The search criteria are now saved and can be reused at any time. 5. Maximum Results The number of results the system can display after any search may be changed. The default is 100 maximum results but the user may increase this (up to 1000) or decrease this number (down to 1). Once the search information is entered, click on the “Search” button and the results are displayed in the Patient Select/Work List area of the window. To clear this search to perform another search, click on the “Clear” button. To close the window, click on the “Close” button. BRIT PACSView User Manual UM-BPV-001.3 16 Chapter 3 – Using Patient and Study Lists Chapter 3 – Using Patient and Study Lists Once a search has been performed for the study or studies of interest, the Patient and Study List Areas have information available to aid in further sorting and filtering to obtain specific patient studies. A description of the Patient and Study List areas follow, as well as how to sort and select the patient studies by parameters of interest. A. Utilizing the Patient List Area Once a search for studies of interest has been performed, they are shown in the Patient List area. The Patient List area has a number of useful icons and information displayed for the various studies. They will be broken down by topic: 1. Icons: used to denote information attached to study and/or report. 2. Patient List: gives a brief overview of the Patients and their associated studies available for viewing. 1. Icons Various icons are shown in columns in the far left on the Patient List page. These icons are links for specific data for the selected study. These same icons are also displayed for the selected study in the upper right hand corner of the Study List Area. The icons are described below. Key Image Icon indicates that there are images that have been selected as important or relevant to the exam. When the icon is selected, the images appear in the Exam Viewing Area, along with any additional information added by the radiologist. Report Icon shows that the report is available and ready to be read. When the Report icon is selected, the Patient Select portion of the window is divided in half and the Report is shown in the lower half of this window. Order Information Icon indicates that the exam order information is available and can be viewed. When this Information icon is selected, the Patient Select portion of the window is divided in half, and the Patient Order information is shown in the lower half of this window. 2. Study Information Just to the right of the icons in the Patient List area are columns displaying a brief overview of studies in the Patient Study list. Each study for a patient is a unique entry. As in the Patient Search options, the information displayed is the Name, Id, date of birth (DOB), gender (Sex), modality (Mod), body part or region (Region) and date of each study (Date). In addition, the number of BRIT PACSView User Manual UM-BPV-001.3 17 Chapter 3 – Using Patient and Study Lists studies each patient has in the system is provided (# Studies), along with the state of the study (Loc/Rem). State of the study is one of four different categories. Local: specifies that the study has been downloaded to the local hard drive Remote: indicates that the study still resides on the server and is available for viewing Viewed: indicates that the user has already viewed the study. Done: indicates that the user has viewed the study, marked it “Read” and closed the study. To select the desired patient, position the cursor on the desired patient name and click one time. The exams for that patient are shown on the right in the Study List Area. Double clicking on the patient opens the selected study on the first monitor. Studies can be shown on a one line per patient or a one line per study basis. To change to one line per patient, or one line per study, see the System Administrator. B. Sorting the Patient List The patient list can be sorted by a variety of different means. In addition to simple sorting, there are some advanced sorting features with the patient list that provides the user some advanced column selection, sorting, and filtering options. These are listed below and then described in more detail. 1. Simple sort: the patient list can be sorted by clicking once on any column heading. 2. Column options: the column options selection allows the user to arrange the columns according to personal preferences. 3. Sort options: the columns can be sorted in multi-level, up to tertiary level, sorts by rightclicking on the patient study and selecting Sort options. 4. Filter options: the list of patients can be filtered based on the local or remote state to customize the list. 1. Simple sort As stated above, the patient list can be sorted by once on any column heading. For example, to sort by Patient Name, click on the Patient Name heading, or to sort by modality type, click on the Modality heading. In order to get an alphabetical list in any of the categories, the heading for Patient Name must be clicked on first and then the heading for the category of interest (for example, Id) must be selected. 2. Column Options The Column options selection allows columns to be arranged according to personal preferences. For example the columns can be in order of Patient Name, Patient ID, and Date of Birth, or whatever arrangement of columns as desired. BRIT PACSView User Manual UM-BPV-001.3 18 Chapter 3 – Using Patient and Study Lists There are two ways to customize the layout of the columns. The first is to click and drag a column to the preferred location. This is a quick and easy method for moving one column. However, if a more extensive reorganization of the columns is desired, the user should right-click on any patient study and the pop-up opens to allow the user to select Column options as shown to the left. Once the “Column options” is selected, the Column options dialog window opens, as shown below. To select the optic for the desired column, click on the to the desired column, and the available list is shown. next Select each column individually by using the to get the list and make the selections. When all of the columns are set as desired, click on the “OK” button. To terminate any changes, and close the window, click on the “Cancel” button. To return the column settings to the original settings, click on the “Reset” button. The same column options are available for all 12 column selections. 3. Sort Options The columns can be sorted in multi-level, up to tertiary level, sorts by right-clicking on the patient study and selecting Sort options. The same thing can be accomplished if the user rightclicks on one of the header bars at the top of the study list, such as Name, Id, etc and selects Sort options. The “Sort options” window opens, as shown here. For a primary sort, click on the arrow next to “Order by” and the drop-down menu appears, as shown to the left. Move the mouse over the desired field to highlight it and release the mouse button. To sort the column in ascending or descending order, click on the or button, respectively. Next, click on the secondary level column, which is the first “Then by” and move the mouse over the desired field to highlight it and release the mouse button. As mentioned above, the user can sort the column in ascending or descending order. Lastly, click on the tertiary level column, which is the second “Then by”, move the mouse over the desired field to highlight it and release the mouse button, and if desired, sort the column in ascending or descending order. The columns will be sorted according to selected preference. When all of the sorting options are set as desired, click on the “OK” button. To terminate any changes and close the window, click on the “Cancel” button. BRIT PACSView User Manual UM-BPV-001.3 19 Chapter 3 – Using Patient and Study Lists 4. Filter Options The list of patients can be filtered based on the local or remote state to customize the list for the following: Remote: Shows just the list of patients that are at the remote server Local: Shows just the list of patients that have been locally downloaded Viewed: Shows just the list of patients that the user has viewed Done: Shows just the list of patients that the user has viewed and closed. The list of studies can be filtered by showing only studies that have a/an: Order: Shows only the studies that contain an order. Report: Shows only studies that have reports attached. Show Only Held Studies: Pulls up only studies that have been held. Show Only Studies with Urgent Findings: Shows only studies that have urgent findings. The filtering is customized by right-clicking on the patient, and selecting the Filter Options. The Patient Filter pop-up window opens. Select the desired states by clicking on the checkbox, and a appears in the box. When the appears, the state is selected. If the checkbox is blank, then the studies will not be filtered by that state. When all of the filtering options are set as desired, click on the “OK” button. To terminate any changes, and close the window, click on the “Cancel” button. C. Selecting the Exam The desired patient‟s study can be selected by clicking on the study of interest in the Patient List. Once the patient has been selected, all exams for that patient are shown in the Study List area. BRIT PACSView User Manual UM-BPV-001.3 20 Chapter 3 – Using Patient and Study Lists D. Utilizing the Study List Area All of the exams for a patient are listed in the Study List. The information for a specific exam can be viewed in the Study List area. It may be sorted prior to opening in the Viewing area. 1. Information in the Study List: the Study List contains information expanded from that displayed in the Patient List. 2. Sorting the Exams in the Study List: the user is able to sort the exams by a number of parameters for ease of viewing. 1. Information in the Study List Study List: all of the studies available for the selected patient will be displayed in the Study List area. The Study List is sorted in chronological order by date, with the most recent study listed first. Study Information Displayed: only information on the selected study is shown in detail in the Study List. The details include: Study date, Modality and Region. Thumbnail images showing the first image in each series or study, with the number of images in each series shown in the lower left corner of each thumbnail image. Study description, Accession #, Server, Status and Report Snippet, if available. Icons for the following: Progress indicator to identify the progress of the study being downloaded, Key Images link, Report link and Order Information link. Expanding or Hiding Study Information: Only the selected study is shown in detail in the Study List area. In order to expand and view other studies, the user can click on the icon to the left of the exam date to expand the exam and view the images for that exam. To close the exam, the user can click on the icon to close the exam. All of the images can be opened at the same time. (more studies shown icon) Additional older studies can be accessed by scrolling down the Study List. 2. Sorting the Exams in the Study List When the exam list for a patient first appears, it is sorted in chronological order by date, with the most recent study listed first. To sort the exams in order by Date, such as oldest exam first in the list, click on the “Study Date” tab in the Exam Header bar and a triangle appears next to the title . The exams are sorted by the oldest date first in the list. To sort the exams in order BRIT PACSView User Manual UM-BPV-001.3 21 Chapter 3 – Using Patient and Study Lists by most recent exam first in the list, click on the ”Study Date” tab in the Exam Header, and a triangle appears next to the and the exams are sorted by the most recent date first in the list. When the exam list for a patient first appears, it is sorted in chronological order by date, with the most recent study listed first. The exams may also be sorted in order by Modality or Region. This can be accomplished as described above, by clicking on the Modality or Region tab. E. Selecting Images for Viewing There are several ways that the images in the exam can be selected for viewing: Double-click on the Exam Header (Study Date, Modality or Region) titles for the study shown in the Study List window using the left mouse button and the entire study is added to the viewing area. Drag and drop the Exam Header to the viewing area: hold the left mouse button down on the exam header and drag it to the viewing area. Drag and drop the Exam Header to the desired monitor: hold the left mouse button down on the exam header and drag it to the desired monitor at the top. Double-click on the Thumbnail for that study using the left mouse button, and only that series or image is added to the viewing area. Drag and drop the Thumbnail to the viewing area: hold the left mouse button down on the thumbnail and drag it to the viewing area. Only that image or series is shown in the viewing area. Drag and drop the Thumbnail to the monitor: old the left mouse button down on the thumbnail and drag it to the monitor at the top. Only that image or series is shown in the viewing area. Double-click on the study in the patient list for that study using the left mouse button and only that series or image is added to the viewing area. Hold down the ctrl key, click on multiple series, then drag and drop them to the viewing area to open multiple series in the same study. This is not available for using with multiple studies yet. Images from other studies or series can be viewed by opening the other study or series and clicking on the image or dragging the thumbnail to the viewing area. Notice that the window changes to display more information about the exam, as described in detail in Chapter 1. First, a blue banner is BRIT PACSView User Manual UM-BPV-001.3 22 Chapter 3 – Using Patient and Study Lists on top that describes the patient‟s exam. The second banner is green and it describes the study or series. The third is a blue banner that is above each individual selected series or image. When the series or image is not selected this second banner is olive green and the third banner is grey. To expand the image from a series to fill the viewing area for closer viewing, click on the for that image (in the third line in the upper right side of the image). To return the viewing area to the previous format, click on the for that image (in the third line in the upper right side of the image), and the original format is shown. To expand the image from one study, click on the for that image (in the second line in the upper right hand side of the image) and to return the viewing area to the previous format, click on the for that image (in the second line in the upper right hand side of the image. To remove the image from the viewing area, click on the for that image (the upper right side of the image), and the image is no longer displayed in the viewing area. To get the image back into the viewing area, double-click on the image thumbnail in the Study List area to the right, or click on the thumbnail and drag it to the viewing area. Images from other studies or series can be viewed by opening the other study or series and clicking on the image or dragging the thumbnail to the viewing area. F. Information in the Viewing Area 1. Key Images As stated in the introduction, there are various icons that can appear in a number of places. The first icon is the key image icon. It can appear in one of three places: Patient Select/Worklist Exam Header On the image itself Images that have been selected by the radiologist as important or relevant to the patient‟s exam are available when the Key Images icon is shown. Click on the icon and the selected Key Images are shown in the Viewing Area. The Radiologist‟s comments, if available, are shown as a “yellow sticky” tab. Note: the notes for the key images appear as a “yellow sticky” note on the image tagged as a Key Image. Once these have been applied and saved they cannot be erased. BRIT PACSView User Manual UM-BPV-001.3 23 Chapter 3 – Using Patient and Study Lists 2. Report Information The (Report) icon is available to display the Report if available for the patient. This icon is only available in one of two places: Patient Select/Worklist Exam Header . If one is available, a snippet of the report can be seen on the Report List. Click on this icon in either area and the report appears for the exam in the lower half of the Patient Study/Worklist section. 2. Order Information An icon for the Order Information ( ) can appear in two places: Patient Select/Worklist xam Header The (Information) icon is available to display the Order information for the patient. Click on this icon and the following information appears for the exam in the lower half of the Patient Study/Work List section. BRIT PACSView User Manual UM-BPV-001.3 24 Chapter 3 – Using Patient and Study Lists G. Toggling Between Patient List and LightBox To toggle back and forth between the Patient List and the LightBox, the LightBox menu must be selected while on the Patient List or Patient List must be selected while in the Viewing Area. Additionally, in the upper right hand corner of the screen, there is a “Show Study List” or “Hide Study List” tab to add or remove the Study List from the viewing window. H. Selecting Patients from the Workspaces When patients have been selected and the study has not been closed after the images are viewed, the study is saved in the Workspaces. To select a patient that has already been opened and is available in Workspaces, click on the Workspaces drop-down menu, then move the cursor over the patient to be selected, and release the mouse. The patient‟s images are displayed in the Image Viewing area. I. Getting Additional Study Info Additional information for the study can be obtained by right-clicking on the study header or date in the Study List section. Right-clicking on the header displays the modality manufacturer, the facility name, and the referring physician‟s name. Right-clicking on the thumbnail provides additional information about the series or image. This information displays the values of the DICOM attributes that are available. BRIT PACSView User Manual UM-BPV-001.3 25 Chapter 3 – Using Patient and Study Lists BRIT PACSView User Manual UM-BPV-001.3 26 Chapter 4 – Formatting the Layout Chapter 4 – Formatting the Layout The ability to format changes in the layout of the study is accomplished easily in order to view other images in the study or to compare a previous study to a current study. Initially, when images are loaded into the Viewing area, there is only one image shown at a time in the window. Formatting the layout of the study or the series so the default setting can be changed can be accomplished by: Clicking on Images in the drop-down menus, selecting Format and then clicking on the desired layout. Clicking on the desired layout from the Format toolbar button Right clicking on the image, selecting Format and selecting the desired layout from the drop down menu Dragging additional images into the viewing area from the current study or another study As additional series are selected, the viewing window changes the image size to accommodate the new series. Therefore, if a second study or series is selected, the window is divided in half so that the images from both studies are shown. If a third or fourth study is selected the window is divided appropriately so that all three or four studies are shown. A. Formatting using the Pop-up Window As stated above, the montage or format of images can be changed by selecting Images and Format from the main menu, by selecting the Format button from the Toolbar or by right clicking on the Image and selecting Format. When one of these methods is utilized, the pop-up window on the right is displayed. Note that there are shortcuts available for many of the choices. Where letters are indicated they do not have to be capitalized. This is true throughout the application. The formatting choices are: Stack: Opens up one window for each series in a study on the monitor, and places all the images in each series in a “stack” mode. This means that all the images in the series are “stacked” behind the first image of that series. Grid format: Opens up a grid so the user can drag and select with the mouse from a 1 x1 up to a 5 x 5 format on a page for the selected series. BRIT PACSView User Manual UM-BPV-001.3 27 Chapter 5 – Navigation X x Y Format: Opens up a pop-up box that allows the user to select from a 1 x 1 to a 25 x 25 format for the selected series on a page, with the X and Y bars specified. All: Displays all of the images in a series at once. 2/page – Displays two images in a one row by two column format. 4/page – Displays four images in a two row by two column format. 6/page – Displays six images in a two row by three column format. 9/page – Displays nine images in a three row by three column format. 12/page – Displays 12 images in a three row by four column format. 16/page – Displays 16 images in a four row by four column format. 20/page – Displays 20 images in a four row by five column format. 1 by 2 - Displays two images in a one row by two column format. 2 by 1 - Displays two images in a two row by one column format. B. Formatting by Dragging Studies into the Viewer Additional images or studies may be dragged into the viewing area by clicking and dragging on the image/study of interest. In the example shown below, the first study is in the Viewing Area. To add images from the second study or selected series of images to the viewing area for comparison, simply click and drag the study or series over into the Viewing Area. Double- clicking on the bar for the study or for a series of images causes just that study or images from the series to be shown in the Viewing area. Once these images have been put in the Viewing Area, they may be formatted as described in the previous section. BRIT PACSView User Manual UM-BPV-001.3 28 Chapter 5 – Navigation Chapter 5 - Navigation There are several ways to go to the next or previous image in the study, or in the series by using the mouse, the toolbar, drop-down menus, or pop-up menus. A. Moving to the Next or Previous Image Once the patient and series of images are selected, there are several ways to move to the next image in the series. The first way is to click the left mouse button on the image and the system advances forward to the next image. Each time the left mouse button is pressed, the system advances forward to the next image. The second way is to go to the Toolbar, click on move to the previous image. to move to the next image, or click on to B. Moving to the Next Series Once a study with multiple series is open, the first way to move to the next series is by clicking on the series of interest or secondly, by clicking on the button on the Toolbar. The same thing may be accomplished either by selecting Image from the Main Menu Bar and then selecting Next Series on the drop-down menu or by right clicking on the image and selecting Next Series on the drop-down menu. Be aware when moving from series to series in a multiple series study, even if all of the series are shown in the Viewing Area, when this is chosen, only the selected series will be shown in the Viewing Area. To view all of the series in a study again, simply click on Reset in the Toolbar. C. Moving to the Next Study Select multiple studies for the patient. Once multiple studies are open in the Viewing Area, to move to the next study, click on the specific study, or click on the button on the Toolbar. Alternatively, select Image from the Main Menu Bar and select Next Study from the drop-down box or right click on the image and select Next Study from the drop-down box. As with moving to the Next Series, only the selected study will be shown in the Viewing Area when Next Study is chosen. To go back to the original view, click on Reset in the Toolbar. D. Simulating Cine To play images in a cine loop, cine can be manually simulated or the system can automatically play the cine loop, in one continuous loop, or one way through, forwards or backwards via the cine tool. When studies contain information as to the original rate of image capture, the cine tool defaults to the actual rate and indicates that it is the real rate. It also sets and indicates half and quarter speed options. This section identifies the methods to perform cine loops. BRIT PACSView User Manual UM-BPV-001.3 29 Chapter 5 – Navigation 1. Manually Simulating Cine Users have the ability to manually simulate “cine” on a series of images, by clicking on the image in the viewing area, holding the right mouse button down and moving the mouse down the window to move numerically through the images from the first image to the last. Move the mouse up the window to move numerically through the images in the series from the last to the first image in the series. Additionally, the scroll wheel can be used to manually simulate cine by rolling the wheel forward and backward to control the direction. This is sometimes called “Scroll Stack. 2. Automatically Simulating Cine When the user needs to have a more automated form of simulating cine, this can be done by selecting the study, opening the series, then selecting Image on the Toolbar and Play Cine or by right clicking on the image and selecting Play Cine. The Play Cine pop-up window opens, as shown here. The Play Cine pop-up window contains buttons for controlling cine play and settings as well as an area for adjusting the Frame Rate. Additionally, the bottom portion of the window shows a statistics identifier containing information about the Cine. A cine loop can be played in more than one series at a time in a study. For example in the image above, one series is selected and playing cine (as seen by the light blue bar). Cine can be played simultaneously in multiple series once they have been selected and the play button started. There are five buttons to control playing of the Cine loop: Starts the cine loop automatically playing through the images in the series. Pauses the cine loop while it is playing through the selected images. When the play button is once again selected, the cine begins at the image it was paused. Pauses the cine loop for all of the series in the study that started playing cine. To restart cine playing, cine must be started again in each series. Stops the cine loop playing function through the selected images. When the play button is once again selected, the cine begins again. Stops the cine loop playing function for all of the series in the study that that started playing cine. To restart cine playing, cine must be started again in each series. BRIT PACSView User Manual UM-BPV-001.3 30 Chapter 5 – Navigation 3. Changing the Cine Speed The Frame Rate panel in the Play Cine pop-up window allows the user to determine the speed at which the images in the cine loop are played. There are two methods to change the speed: Hold the left mouse button on the speed control bar and drag it to the desired speed. This allows more exact control the speed at which the cine loop is to run. Click on the drop-down arrow and select the desired speed from the drop-down menu. The preset speeds available are: 7.5, 15, 25, 30 or 60 frames per second. Notice that if a manual speed is selected that speed is identified in the field of the drop-down menu as the speed control bar is moved. 4 4. Real-time Cine Speed Ultrasounds that produce multiframe images store multiple images in a single series, unlike other ultrasound studies where each image is its own series. Multiframe studies commonly provide information within the study as to the actual rate of image acquisition. In these cases, PACSView will default to the actual acquistion rate when manually using the cine tool. Also, when selecting the Play Cine tool from the right click drop down menu, it will display the speed and in parenthesis indicate the actual speed, as shown: In additional to displaying the real speed, it also sets up and indicates the half and quarter speed settings. 5. Changing the Cine settings When the button is selected, the Cine Settings pop-up window opens, as shown here: The Start Frame can be set manually by selecting the frame from the drop-down menu, or typing in the number. It will automatically begin with the first image in the series, if a different frame is not selected. The End Frame can be set manually by selecting the frame from the drop-down menu, or typing in the number. It will automatically select the last image in the series, if a different frame is not selected. BRIT PACSView User Manual UM-BPV-001.3 31 Chapter 5 – Navigation The Play Mode can also be selected, by clicking on the drop-down arrow. This allows the user to determine if the images are to be played in any of the following manners: Forward – Plays the images in the series beginning with the first image and ending with the last image in the series. It will only play the cine loop forward from beginning to ending one time, and will not continue to repeat the cycle. Reverse – Plays the images in the series beginning with the last image and ending with the first image in the series. It will only play the cine loop in reverse from ending to beginning one time, and will not continue to repeat the cycle. Forward cycle – Plays the images in the series beginning with the first image and ending with the last image in the series. It will continue play the cine loop forward from ending to beginning one time, continuing to repeat the cycle until paused or stopped. Reverse cycle – Plays the images in the series beginning with the last image and ending with the first image in the series. It will continue play the cine loop backward from ending to beginning one time, continuing to repeat the cycle until paused or stopped. Click on the button to accept the settings. Click on the pop-up window and not accept the changes. button to close the On the Play Cine pop-up window, at the bottom is a statistics identifier that shows the settings that have been selected. This shows the beginning frame of the cine loop, the ending frame of the cine loop, the status, and the play mode, as set from the button. Click on the at the upper right to close out of the Play Cine pop-up window. When this is closed, the cine loop automatically stops playing. BRIT PACSView User Manual UM-BPV-001.3 32 Chapter 6 – Comparison of Images Chapter 6 – Comparison of Images Images and series of images from the same study or different studies can be selected for comparison. For comparison of two series or images in the same study, this can be accomplished with Scout Lines and Linking. A comparison can also be performed between an older image and a current one from two different studies. A. Comparing Images Using Scout Lines, Linking and Locate within a Study Scout Lines and Linking are typically used in conjunction, so that when one image is advanced, or zoomed in one series, all the synchronized series also advance or zoom in relation to the corresponding series. The corresponding reference points are marked on the topogram or Scout. 1. Scout Lines Scout lines are used to determine the location of the images in one series compared to another (e.g., sagittal or coronal to axial views) for MR and CT. Scout lines are used alone to reflect the position on the sagittal and axial images in relation to the Scout image, to display the corresponding plane of interest in the series as compared to the Scout image. Scout lines can be used as a stand-alone feature, such that when the user left-clicks on the area of interest in the Scout image, the other series is adjusted to display the corresponding plane of interest. To use scout lines, follow these steps: 1. Select the patient and exam, and display the study on the monitor. 2. Format the series as desired. 3. Select Options, pick the General tab and ensure that the checkbox next to Show Scout Lines has a in it. 4. Choose Image and Show, and ensure that the checkbox next to Scout Lines has a in it. 5. Select Image and Link/Locate Series and then there is one of two possible choices. a. Link Auto All: lets the system link the images together based on location. Note the available shortcut. b. Manual Link: allows the user to choose which images link together. 6. Click on the desired location in the image. BRIT PACSView User Manual UM-BPV-001.3 33 Chapter 6 – Comparison of Images 7. The Scout line on the scout image displays the relationship of the selected image to the Topogram or scout, and the images are synchronized so that when one image is advanced the synchronized image is advanced as well. As seen below, the scout image is on the left and synchronized image on the right. 8. The placement of the image of interest (on the right of the screen) is shown on the scout image as evidenced by the green arrow, while the two purple arrows show the range for the series of images on the right. This can be done for one or multiple series of images in the same study. Turning off Scout Lines Scout lines can be turned off by selecting Image and Link Image, and select Link Auto All. When the is removed, the Scout Lines and synchronized images are turned off. If the user wants to turn off Scout Lines during the current session, click on Image and Show, and click on the checkbox next to Scout Lines. Notice that the is no longer shown next to Scout Lines. If the user to permanently turn of Scout Lines, click on Options, click on the General tab, and click on Show Scout Lines. Next, click on Image and Show and click on the checkbox next to Scout Lines. Notice that in both cases the is no longer shown next to Scout Lines. BRIT PACSView User Manual UM-BPV-001.3 34 Chapter 6 – Comparison of Images 2. Synchronized Zoom When Scout Lines are turned on, the option for Synchronized Zoom (and Synchronized Format) is also turned on. This means that when one image is magnified, all the images in the other series in the study are enlarged at the same magnification rate. To turn on the Synchronized Zoom feature without Scout lines and linking, select Image and Link Image and select Synchronized Zoom. Notice a appears next to the feature. To turn off the Synchronized Zoom feature go back and deselect Synchronized Zoom. Notice the that is next to the feature disappears. 3. Synchronized Formats When Scout Lines are turned on, the option for Synchronized Format (and Synchronized Zoom) is also turned on. This means that when a different format is selected for one image, all the images in the other series in the study are changed to the same format. To turn on the Synchronized Format feature select Image and Link Image, and select Synchronized Format. Notice a appears next to the feature. To turn off the Synchronized Format feature select Selecting Image and Link Image, and select Synchronized Format. Notice the that is next to the feature disappears. BRIT PACSView User Manual UM-BPV-001.3 35 Chapter 6 – Comparison of Images 4. Moving Series Series can be rearranged on the screen by depressing the left mouse button in the series‟ top window border, as indicated in the red arrow in the diagram below and dragging it anywhere in the window of the desired location, as indicated by the red X in the diagram below and releasing it. , When the series has been selected, its top window border turns medium blue. Before Picture After Picture 5. Selecting Series to View on the Screen Studies may include many different series and the system provides a selection of ways to determine which series are displayed on the screen or screens simultaneously. Viewing all series: When first opening an exam, double clicking on the study in the worklist or the study description bar in the study list on the right hand side of the screen displays all series across all monitors. Once in the viewing application, to display all of the series, display the study list and then double click on the study description. To view a subset of series: When first opening an exam, multiple select (using the standard Windows method of holding down the <Ctrl> key while selecting with the left mouse click) the image thumbnails from the study list. The thumbnail highlights in green and blue indicating that it has been selected. Then, drag and drop (depress the left mouse button) any of the selected thumbnails and drop on the worklist. Once in the viewer, additional series can be dragged and dropped from that study or any other study from the study list, onto the viewer. To remove a series, select the red X in the upper right hand corner of the series window. You can also use the Compare Series button (available from the customizable toolbar, if not available as a default) to select and view series. To use the Compare Series button, Select the Series Comp button and it changes by displaying the numbers 1 and 2 in yellow boxes above the Comp label, indicating that it is active. Next, left click anywhere in the active image area of each series you wish to compare. Each will display a black box outlined in yellow with consecutive, yellow numbers. When all desired series have been selected, right click in any BRIT PACSView User Manual UM-BPV-001.3 36 Chapter 6 – Comparison of Images image area and only the selected series will be displayed. To undo, click the Compare button again. The entire study will now be displayed in stack mode. 6. Comparing Same Series at Different Window and Level Settings - Cloning A clone is an exact duplicate of the selected series in stack mode. The clone is synchronized with the selected series, but the window/leveling can be changed separately from the original series. This function is helpful when the user wants to look at the series in different window/leveling settings. To create a clone, follow these steps: 1. Select the patient and select the series to be cloned. 2. Click on the Image drop-down menu and select the Clone series selection. For example the original series of the brain may have the window/leveling set for brain, (image on the left) while the window/ leveling setting for the clone (image on the right) is set to bone. It allows side-by-side comparisons of images in the same series. The series are also synchronized, so that the same image number is shown as the user scrolls through the series. If the original is magnified, the clone is magnified at the same level. When the user no longer needs the clone, click on the cloned image. BRIT PACSView User Manual UM-BPV-001.3 button at the top right corner of the 37 Chapter 6 – Comparison of Images 7. Locate Function Locate is used to determine the exact position of a specific point as it relates to other images in the study. To turn the Locate function on, click on the Options drop-down menu, go to the General tab, and put a in the Show Locate Points checkbox. Additionally, on the Image drop-down menu, click on Show and the Show pop-up window will open. Make sure Locate Points has a in the checkbox next to it. Once the full study is downloaded, click on the Image drop-down menu, and click on the Locate selection. Find the specific point on one of the series that needs to be located in the other series, and click the left mouse button on that point. The same point is displayed on all the other series where it is contained and it is marked with a white + plus indicator (shown surrounded by a red circle in the figure above). Additional points can be located simply by clicking the left mouse button on the desired point or interactively by depressing the left mouse button on the crosshair and dragging it around the screen. When the user no longer needs the Locate function turned on, click on the Image drop-down menu, click on Show and the Show pop-up window will open. Remove the in the checkbox next to Locate Points. This turns the function off. The Locate function is only active if there are two or more series whose slice orientations are in orthogonal planes. BRIT PACSView User Manual UM-BPV-001.3 38 Chapter 6 – Comparison of Images B. Comparing Studies To compare images in different studies, open the first study into the viewer and then click on the Show Study list option on the right hand side of the Windows menu bar. This displays a list of all the studies for that patient: The currently displayed study displays the image thumbnails. To open another study into the viewer, select the study description from the list and drag and drop it onto the image viewing screen or double click on the study description. To get more information about the study before opening it, click on the + on the left hand side of the description. This opens up the image information and displays the thumbnails, as with the original study. This also allows you to select individual images or series to select for viewing. The selected studies open in the viewer and there is a green line between the studies, as seen in the diagram below. Also notice that the patient name label on the top of the image viewing area indicates the number of studies open. BRIT PACSView User Manual UM-BPV-001.3 39 Chapter 6 – Comparison of Images To view an individual study, select the study you wish to view (click anywhere in its viewing area or window bars and then select the green Study arrow on the top left side of the toolbar. When the comparison study no longer needs to be open, to close the study, click on the to close the exam. button An alternate way to view the multiple studies is to select them from the main worklist. To compare images in different studies, open the first study into the viewer and then click on the Patient List menu item. This returns you to the worklist, with the same patient selected and all the studies for that patient listed in the study list area on the right hand side of the screen. Select the additional study from the Study List area, and double click on the header to add the entire study to the viewing area, or double click on an individual thumbnail image to add just the image to the viewing area or drag and drop the thumbnail to the worklist. Note, these tools may also be used to open the original study. The selected additional study opens into the viewer and there is a green line separating the studies. This whole process can be repeated to open additional studies into the viewer. BRIT PACSView User Manual UM-BPV-001.3 40 Chapter 7 – Manipulating the Images Chapter 7 – Manipulating the Images Images in the study can be manipulated in a variety of ways including: Maximizing the Series/Study Magnifying the Image Flipping/Rotating the Image Changing the Windows/levels settings A. Maximize the Series/Study When multiple studies are opened, a single study can viewed. This can be accomplished by maximizing the study, then scrolling though the series and performing the necessary manipulations. A single series within a study can be viewed as well, by maximizing the series, then scrolling though the series and performing the needed manipulations. There are a variety of ways to maximize the series/study: To maximize a series, click on the in the upper right corner of the specific series (purple arrow), select the series, click on the Image drop-down menu and select Series Maximize or click on the series, right click, and select Series Maximize. To maximize a study, click on the in the upper right corner of the specific study (green arrow), select the study, click on the Image drop-down menu and select Study Maximize or click on the study, right click, and select Study Maximize. To minimize the series/study and return to the stack mode, any of these steps can be taken: To minimize the series lick on the in the upper right corner of the series, select the series click on the Image drop-down menu and select Series Maximize to turn the maximize feature off or click on the series, right click, and select Series Maximize to turn off .the maximize feature. To minimize the study, click on the in the upper right corner of the series, select the study click on the Image drop-down menu and select Study Maximize to turn the maximize feature off or click on the study, right click, and select Study Maximize to turn off the maximize feature. B. Magnifying the Image Images in a study or series can be enlarged or magnified, for easier viewing of the detail of the images. Typically when the image is first opened the magnification selected is fit to the window size. There are four ways to magnify the whole image using: the Toolbar, the Image drop-down menu, the Pop-up viewer or the Smooth zoom slider. There is one way to magnify only a portion of the image through the use of the Magnifying Glass. Clicking on the up the Magnifying Glass. BRIT PACSView User Manual UM-BPV-001.3 button directly brings 41 Chapter 7 – Manipulating the Images If the image is magnified, and is larger than the viewing area, click on the image with the left mouse button, hold the button down, and drag the image around the Viewing Area until the desired portion of the image is shown, this is called “Panning” the image. 1. Magnify the Image Using the Toolbar The first method to magnify an image is to either right click on the button in the toolbar and a drop-down menu appears or to left click on the arrow to the right of the button to bring up the drop-down menu as shown on the left. The image is resized to the magnification level selected. The following selections are shown: Mag Glass: turns on the magnifying glass True Image Size: shows the image at its physical size or “true” size. So, a 3 inch long finger will be 3 inches on the screen. Fit: fits the image in the screen X1/2: one-half the original size X1: one screen pixel equal to one original image pixel X2: two times the original size X3: three times the original size X4: four times the original size 2. Magnify Using the Image Using the Drop-down Menu The same magnification levels listed above (X1/2-X4) are available by clicking Image, selecting Image Mag in the drop-down menu and then choosing a magnification level from the second drop-down menu (shown on left). The image is resized to the magnification level selected. Notice that there are shortcuts listed for all of the magnification levels. In the case of letters, they do not have to be capitalized. 3. Magnify the Image Using the Pop-up in the Viewer These same magnification levels as listed on the previous page (X1/2-X4) are available by right-clicking on the image in the Viewer, selecting Image, selecting Image Mag from the pop-up viewer, and then choosing a magnification level from the second drop-down menu (shown on previous page). The image is resized to the magnification level selected. BRIT PACSView User Manual UM-BPV-001.3 42 Chapter 7 – Manipulating the Images 4. Magnifying the Image Using the Smooth Zoom Slider Another feature that allows the user to magnify the image, in a very controlled manner, is the Smooth Zoom Slider Bar. The Smooth Zoom bar is in the upper right side of the selected image. To manually magnify the image, hold the left mouse button on the slider bar, and drag the bar to the desired magnification level. As the bar is dragged, the image is understated or diminished. Release the left mouse button at the desired magnification level. The magnification level can be less than X1/2, depending upon the initial size of the image. To return toolbar. to the original magnification level, click on the button on the 5. Using the Magnifying Glass A magnifying glass is available with the BRIT PACSView system so only the section of interest in the image can be magnified. There are three ways to start the magnifying glass: Click on the button and the magnifying glass will appear on the selected image. Click on the Image menu, select Image Mag and select Mag Glass. Right-click on the image, select Image Mag and select Mag Glass. A small checkmark is shown beside Mag Glass when the Magnifying Glass is on. To turn off the magnifying glass click on the deselect Mag Glass. button again or 6. Changing the Magnification Level of the Magnifying Glass The magnification level of the magnifying glass is shown above the glass (green arrow). As the magnification level changes this area shows the changed value. Underneath the magnifying glass is a selection bar (purple arrow) that allows the user to change the magnification level of the magnifying glass. To change the magnification level, move the slider to the left to decrease the magnification and to the right to increase the magnification level. The magnification level ranges from 1X to 8X. BRIT PACSView User Manual UM-BPV-001.3 43 Chapter 7 – Manipulating the Images 7. Changing the Size of the Magnifying Glass The size of the magnification glass can be changed by positioning the cursor on one of the handles on the corner. A white double arrow appears when the cursor is positioned correctly on the handle. The size of the magnifying glass can then be changed by holding the left mouse button down and dragging the handle to the desired size and then releasing the left mouse button. The shape and the magnification level are not changed in the image; just the area the glass magnifies changes. 8. True Size Magnification Note the option for the true size magnification from the pulldown list. Most modern monitors can automatically report their size to PACSView. If there is some doubt about the accuracy of this, view an object of known size, display it at true size and measure it with a ruler. It should display at actual size on the monitor. If it does not, then the most likely cause is that the monitor is not reporting its size to the application. The size can be changed by displaying an image of known size, C. Flipping/Rotating the Image The images can be flipped top to bottom or left to right or they can be rotated 90clockwise or 90 counterclockwise by using one of these three methods: From the Toolbar From the Image drop-down menu From the Pop-up viewer 1. Flip/Rotate Using the Toolbar Clicking directly on the Rotate button flips the image 90 clockwise. Clicking on the opens a drop-down menu to allow user to manipulate the image by selecting Flip top to bottom, Flip left to right, Rotate 90clockwise or Rotate 90 counterclockwise each time the button is selected. If the buttons are continuously selected the image will continue to flip or rotate in the selected direction. BRIT PACSView User Manual UM-BPV-001.3 44 Chapter 7 – Manipulating the Images 2. Flip/Rotate Using the Drop-down Menus An image can be flipped/rotated by right-clicking on the Image tab, selecting Rotate/Flip from the drop-down menu and then choosing the desired direction to rotate or flip from the second dropdown menu (shown on left). 3. Flip/Rotate Using the Pop-up in the Viewer The same commands described above for manipulating the image are available by right-clicking on the image in the Viewer, choosing Image, selecting Rotate/Flip from the pop-up viewer, and then choosing a desired direction from the second dropdown menu. D. Window and Level Setting Adjustments The window and level settings allow the user to change the range of densities being viewed on the screen. There are four different ways to change window and level settings and there are various preset and manual settings for window and level settings. 1. Methods for Adjusting Window and Level Settings There are four different ways to adjust the window and level settings for an image being viewed. They are the following: Use of the Mouse Use of the Toolbar Use of the Image drop-down menu Use the Pop-up viewer To return the image to the original setting in every case, click on the Toolbar button. 2. Using the Mouse to Adjust Windows/Levels Settings Users can get to a particular optimized window value manually by moving the cursor to a region (e.g., , bone or lung) and clicking once on the middle mouse button, or by holding down the middle mouse button and moving the mouse up, down, left, or right until the desired window/level is reached. Clicking on a specific point, such as on a lung or bone, automatically adjusts the window BRIT PACSView User Manual UM-BPV-001.3 45 Chapter 7 – Manipulating the Images level setting to the point selected. This tool may be used once a preset window/level setting has been reached, to further adjust the window/level values. 3. Using the Toolbar to Adjust Windows/Levels Settings The (window/leveling) button on the Toolbar allows the user to select the preset values for window and leveling as shown in the figure on the right. Directly clicking on the button sets the window/level to Recommended. There are specific settings for CT that are not available on CR, MR, US, or NM. The general settings include: Inverted Recommended Auto Sigmoid Settings specific for CT scans are the following: Bone Brain Lung Soft Tissue Settings will be described in greater detail later in this section. 4. Using the Image Drop-down Windows/Levels Setting Menu to Adjust the The window/leveling settings can be accessed from the Image drop-down menu, selecting Windows/levels and then making the Windows/levels selection. This allows the user to select one of the preset values for window and leveling. 5. Using the Pop-up Viewer to Adjust the Windows/Levels Setting The windows/levels settings can be accessed by right-clicking on the image, selecting Windows/levels and then choosing one of the preset values for the Windows/levels setting from the pop-up viewer. BRIT PACSView User Manual UM-BPV-001.3 46 Chapter 7 – Manipulating the Images 6. Preset Window and Level Settings There are four preset windows/levels settings for all modalities and an additional four preset settings for CT scans. They are described in greater detail below. Any of these presets can be further refined using the mouse as described in the previous section (D.1.a). Inverted Window/Level Setting The Inverted window/level setting inverts the grayscale. Many radiologists find value in having an inverted (black bone) image in addition to the conventional (white bone) image at the time of viewing. To obtain an Inverted window/level setting, the Invert preset must be selected. Recommended Window/Level Setting In general, when the DICOM header contains settings of appropriate windows/levels these are used when the image is shown on the screen. Thus, selecting Recommended may not change the windows/levels of the image. In those situations where the DICOM header does not have the appropriate settings, an attempt is made to find a single window/level setting for the image or series of images. Directly clicking on the button sets the window/level to Recommended as well. Auto Window/Level Setting When using the Auto window/leveling setting, the application runs an algorithm to best view the image based on a histogram of the grayscale spectrum of the image. This gives the user a starting point to achieve the best image possible. It may or may not differ significantly from the Recommended window/leveling setting. To set the image to these calculated values, select Auto and the window/level settings change to the calculated window/level settings in the selected series. Sigmoid Window/Level Setting The Sigmoid window/level settings are primarily used in Mammography viewing. Sigmoid window/level settings are modified by a nonlinear sigmoid function, in order to provide a smooth transition at the extremes of the greyscale range. This allows the radiologist to view small differences in intensities more easily. To obtain a Sigmoid window/level setting, the Sigmoid preset must be selected. Shown on the left is an image with the recommended window/level setting, while the same image is shown to the right with the Sigmoid window/leveling setting. BRIT PACSView User Manual UM-BPV-001.3 47 Chapter 7 – Manipulating the Images Bone Window/Level Setting There are four additional window/level presets that are specific for CT scans. The first of which is the Bone setting to best image bone. To get the window/level preset values for bone, the Bone preset must be selected. As seen on the right, the image on the left is set on the Recommended window/level preset, while the image on the right is being viewed with the Bone window/level preset. Notice how much easier it is to discern subtle differences in bone with the image on the right. Brain Window/Level Setting The second preset setting specifically for CT scans is that for Brain. To get the window/level preset values for brain, the Brain preset must be selected. As seen on the left, the image on the far left is set on the Recommended window/level preset, while the image on the right is being viewed with the Brain window/level preset. Notice how much easier it is to discern subtle differences in brain with the image on the right. Lung Window/Level Setting To better view lung tissue, there is a preset for CT scans that gives a good starting point to view images of the lungs. To get the window/level preset values for the Lung, the Lung preset must be selected. Shown on the right are the same image with the Recommended window/level preset (top) and the Lung window/level preset (bottom). Once this preset has been selected, further refinement of the window/level setting can be performed. BRIT PACSView User Manual UM-BPV-001.3 48 Chapter 7 – Manipulating the Images Soft Tissue Window/Level Setting Lastly, there is a preset window/level for Soft Tissue. This preset setting may be obtained by selecting Soft_tis in the selection box. As shown in the images on the left, the Recommended preset window/level is used on the first image (left), while the Lung window/level preset is can be seen on the second image (right). BRIT PACSView User Manual UM-BPV-001.3 49 Chapter 7 – Manipulating the Images E. Image Stitching For some types of studies, such as long bone studies, multiple CR images are taken along the length of the body. PACSView provides a “stitching tool” to line up the images and combine them into a single image. To Stitch images into a single image: Select the Study and Open into the viewer From the right click pulldown menu, select stitch radiographs… This displays the Stitch radiographs window on top of the image viewer. The process takes the user through a 3 step process to 1) align; 2) crop and 3) save the image. When the window first displays, it is defaulted to Step 1. The Stitch radiographs window with Step 1 selected is shown below: Step1 Align Images – Mouse drag – move selected images. Drag and drop (depress with left mouse key and drag to black screen) images from the image viewing screen onto the black screen. Now, with the images in the stitch radiographs window, align them by moving one in relation to the others. The images may be dragged by depressing with the left mouse key on the image and dragging or by selecting the image and moving it 1 pixel at a time with the Arrow keys or 10 pixels at a time with <Shift+ Arrow keys>. To better view the images, they can be magnified with the BRIT PACSView User Manual UM-BPV-001.3 50 Chapter 7 – Manipulating the Images slider bar on the top right hand side of the screen. To reposition all the images, select the <Ctrl > key and drag the entire image with the mouse. Many long bone studies will include a ruler to assist with the alignment. After magnifying, you can easily view the entire set of images by select the Fit Image button on the top of the screen. Undo reverses your last action recursively. Redo applies the action again, recursively. Many long bone studies will include a ruler to assist with the alignment. The rules are particularly useful with overlaying the images along the length of the ruler. The diagram below shows lined up long bones, using the ruler to overlay/align the images vertically. Note: the lines between the images will disappear when the images are stitched. Step 2: Crop the image The next step is to crop the image, if you don‟t want to display the entire stitched image. BRIT PACSView User Manual UM-BPV-001.3 51 Chapter 7 – Manipulating the Images Select the Step 2 Crop Image button. The image stitches together and displays in a fit mode in the window. The magnification functions still work. There is a dotted line around the image, as shown below. To crop the image, grab and drag any of the control points in the dotted line (indicated by the solid white boxes) around the desired image. Remember that you can move the whole image with the <ctrl> mouse drag function to access areas of the image that are outside the black box when the image is magnified. Next, click the Step 3 Save Image button. Stitched Image After Cropping Stitched Image Before Cropping Fill in the name of the new series to be stored and select save. The stitched is available after the study has been closed and is reopened. BRIT PACSView User Manual UM-BPV-001.3 52 Chapter 11 – MPR Chapter 8 – Annotating the Image Many different annotations can be made on the image. Measurements can be done for Angles and Lengths on the image, text can be entered, spine labeling can be done, arrows drawn, region of interest measurements taken, keynotes added and different fonts can be selected as desired. Annotations can also be turned on and off for the image. Annotations can be achieved by performing one of the following: Click on the button on the Toolbar. When this action is performed the Distance tool will be automatically selected. Click on Image in the menu bar, and select Edit Annotations Right-click on the image and select Edit Annotation A. Edit Markups Menu The various Tools available on the Edit Markups menu include: Angle: Allows the user to create an angle which includes the measured angle. Draw Polygon: Lets the user to create multiple lines, which contains the length of each line and the angles between them. Polygon ROI: Permits the user to create a Hounsfield region of interest measurement of a polygon area. Distance: Allows the user to measure the distance between two points. Perpendicular: Lets the user draw a line perpendicular to the selected line. This tool only works on lines made by the Polygon tools. Cobb Angle: Permits the user to calculate a measurement of the angle between two lines in order to evaluate the curves in scoliosis. Draw Rectangle: Allows the user to draw a rectangle on a specific area. Rectangle ROI: Lets the user to create a Hounsfield region of interest measurement of a rectangular area. Draw Ellipse: Permits the user to draw an ellipse on a specific area. Ellipse ROI: Allows the user to create a Hounsfield region of interest measurement of an elliptical area. Draw Freehand: Lets the user to create a freehand drawing around a specific area. Freehand ROI: Permits the user to create a Hounsfield region of interest measurement of a freehand drawing area. Draw Arrow: Allows the user to include arrows on the image. Arrow and Text: Permits the user to draw an arrow and immediately enter text that will appear at the tail of the arrow. Text Box: Lets the user select a point on the image and enter text. BRIT PACSView User Manual UM-BPV-001.3 53 Chapter 11 – MPR Label Spine: Allows the user to select the appropriate vertebrae label for labeling the spine. Add Key Note: Permits the user to create a Key Note for images that are of particular interest and need to be flagged for reports and referring physicians. Calibrate: Lets the user calibrate an image a number of different ways. The image may be calibrated based on information in the DICOM header or it may be based on information in the DICOM header as well as corrected for size of the monitor. Can also be used with caution for other images, such as to temporarily adjust a radiograph and compensate for primary beam magnification. Default font sizes: Allows the user to select default font sizes for all text on the image. Delete Selected: Permits the user to select and remove a specific drawing or text. Delete All: Lets the user delete all drawing or text that is created on the displayed image. Undo: Deletes the last measurement or drawing created. Redo: Replaces the last measurement or drawing created that was deleted. Exit Markup: Closes the Edit Markups menu. B. Creating, Editing, Deleting and Restoring the Annotations 1. Angle Measurements Angle measurements can be taken after selecting Image and Edit Annotations. Once the angle measurement is turned on, the cursor becomes a small protractor tool or goniometer. Angle measurements can be performed by positioning the cursor over the part to be measured, hold the left mouse button down and drag the mouse to the lower end of the measurement, release, and then hold the mouse button down again and drag the mouse to the last part of the area to be measured for the angle and release. To measure a second angle that is separate from the first one, simply move the mouse to the area to be measured and repeat the same measurement procedure. Right-click on the window to turn the annotation for angle measurement off. To delete the drawing, click on the Undo, Delete Segment, or the Delete All button on the Edit Markups window. The drawing can be returned by clicking on the Redo button on the Edit Markups window, provided no other drawings have been performed, or Delete Selected, or Delete All buttons have been used to delete the drawing. BRIT PACSView User Manual UM-BPV-001.3 54 Chapter 11 – MPR 2. Drawing a Polygon Polygon measurements show the lengths of the sides as well as the angles. To draw a polygon, select Image and Edit Annotations, and click on Draw Polygon. The cursor becomes a . Click the left mouse button at each location for the end points; when the last point is reached, click the left mouse button twice. The measurements for each length and angle are shown. 3. Drawing a Polygon ROI Polygon ROI measurements show the mean measurement, standard deviation, area, and perimeter measurements. To draw a polygon, select Image and Edit Annotations, and click on Polygon ROI. The cursor becomes a . Click the left mouse button at each location for the end points; when the last point is reached, click on the left mouse button twice. The measurements for each length and angle are shown. 4. Length Measurements Length measurements can be done by positioning the cursor over one end of the area to be measured, and drag the mouse down to the length that needs to be measured, and release the mouse. Length measurements can be taken after selecting Image, Annotations and Distance. Once the Length measurement is turned on, the cursor becomes an . Position the cursor at one area of the length to be measured, drag the mouse down to the opposite end of the measurement and release, then right-click on the window to turn the annotation for angle measurement off. BRIT PACSView User Manual UM-BPV-001.3 55 Chapter 11 – MPR 5. Draw Perpendicular Ninety degree perpendicular lines can be drawn for alignment or other types of measurements. To draw a perpendicular line, first select the button from the Toolbar and the Edit Markups window opens. Select Distance. Once the Length measurement is turned on, the cursor becomes an . Position the cursor where the beginning of the line is to be, click the left mouse button, move the mouse to the ending position of the line, and click the left mouse button again. The line is shown along with the length measurement. To draw the perpendicular line, select Perpendicular from the Edit Markups window. Position the cursor at the desired point to begin the perpendicular line; click the left mouse button for the end point, and the perpendicular line is drawn at a 90 angle from the original line. The length measurements are shown for each line. Rightclick on the window to turn the annotation for angle measurement off. 6. Draw Cobb Angle for Scoliosis Measurement The Cobb angle was originally used to measure coronal plane deformities on antero-posterior plain radiographs for scoliosis. It has subsequently been adapted to classify sagittal plane deformities, especially in the setting of traumatic thoracolumbar spine fractures. Cobb angle drawings can be easily done in the BRIT PACSView application. To draw a Cobb angle, first select the button from the Toolbar and the Edit Markups window opens. Select Draw Cobb Angle. Select a vertebra at the upper portion of the spine to measure, click the left mouse button, move the cursor vertically to the opposite side, and click the left mouse button again. A line appears. Move the cursor to the lower portion of the section of spine to measure, click the left mouse button, move the cursor vertically to the opposite side, and click the left mouse button again. A line appears and the measurement in degrees is shown between these two lines. The beginning measurements for each line should be made beginning from the same side, either left or right. BRIT PACSView User Manual UM-BPV-001.3 56 Chapter 11 – MPR 7. Draw Rectangle A rectangle is another drawing that can be completed in the BRIT PACSView application. To draw a rectangle, select Image and Edit Annotations, and click on Draw Rectangle. The cursor becomes a . Click the left mouse button at one end point, drag the mouse to size the rectangle, and click the left mouse button again. The rectangle is shown. To delete the rectangle, click on the Undo, Delete Selected, or the Delete All button on the Edit Markups window. 8. Draw Rectangle ROI Rectangular ROI measurements show the mean measurement, standard deviation, area, and perimeter measurements. To draw a rectangle, select Image and Edit Annotations and click on Draw Rectangle ROI. The cursor becomes a . Click the left mouse button for the first end point, move the cursor to the opposite end point to size the rectangle and release the left mouse button. The Region of Interest mean, standard deviation, area, and perimeter measurements are shown. To delete the entire drawing, click on the Delete Selected, Undo, or the Delete All button on the Edit Markups window. The drawing can be returned by clicking on the Redo button on the Edit Markups window, provided no other drawings have been performed. 9. Draw Ellipse An ellipse is another drawing that can be completed in the BRIT PACSView application. To draw an ellipse, select Image and Edit Annotations and click on Draw Ellipse. The cursor becomes a . Click the left mouse button at one end point, drag the mouse to size the ellipsis, and click the left mouse button again. The ellipse is shown. BRIT PACSView User Manual UM-BPV-001.3 57 Chapter 11 – MPR 10. Draw Ellipse ROI Ellipse ROI measurements show the mean measurement, standard deviation, area, and perimeter measurements. To draw an ellipse, select Image and Edit Annotations and click on Draw Ellipse. The cursor becomes a . Click the left mouse button for the first end point, move the cursor to the opposite end point to size the ellipse, and release the left mouse button. The Region of Interest mean, standard deviation, area, and perimeter measurements are shown. 11. Draw Freehand A freehand is another drawing that can be completed in the BRIT PACSView application. To create a freehand drawing, select Image and Edit Annotations, and click on Draw Freehand. The cursor becomes a . Hold the left mouse button down and move the mouse to create the drawing and continue until the drawing is completed. 12. Draw Freehand ROI Freehand ROI measurements show the mean measurement, standard deviation, area, and perimeter measurements. To create a freehand drawing, select Image and Edit Annotations, and click on Draw Freehand ROI. The cursor becomes a . Click the left mouse button for the first end point, continue moving the mouse and clicking the left mouse button until the drawing is completed, and release the left mouse button. The Region of Interest mean, standard deviation, area, and perimeter measurements are shown. BRIT PACSView User Manual UM-BPV-001.3 58 Chapter 11 – MPR 14. Draw Arrow An Arrow is another drawing that can be completed in the BRIT PACSView application. To draw an arrow, select Image and Edit Annotations and click on Draw Arrow. The cursor becomes a . Hold the left mouse button down where the point of the arrow is located, and move the mouse to create the tail of the arrow. 15. Arrow and Text Drawing an arrow and entering text to be associated with the arrow can be completed in the BRIT PACSView application. To draw an arrow with associated text, select Image and Edit Annotations, and click on Text and Arrow. The cursor becomes a . Hold the left mouse button down where the point of the arrow is located, and move the mouse to create the tail of the arrow. A text box opens to allow the user to enter the text, as shown below: Click on the button to accept the text, and it appears next to the arrow at the tail. Click on the button to terminate the action. BRIT PACSView User Manual UM-BPV-001.3 59 Chapter 11 – MPR 16. Text Box Creating a text box and entering text to be associated with the image can be completed in the BRIT PACSView application. To enter text on an image, select Image and Edit Annotations, and click on Text Box. Place the cursor at the location where the text is to be displayed; click the left mouse button A text box opens to allow the user to enter the text, as shown: Click on the to accept the text, and the text appears in the selected location. If the Text box needs to be moved to an area where it is not covering critical anatomy, it can be moved by clicking on text so that brackets are visible and then holding the left mouse button down, and dragging the text to a more desirable area. This can be done at anytime. Click on the to terminate the action without any text being saved. 17. Spine Labeling Labeling the vertebrae is easily accomplished with the labeling feature. To place labels for vertebrae, click on Image and Edit Annotations, and click on Label Spine. The Spine Labeling box opens as shown here: Labels can be selected as a group by clicking on C1-C7, T1-T12, L1-L5 or S1-S2, so that the entire section can be labeled. When one of these buttons are activated, for example on the right, C1C7; the spinal labels for C1 through C7 can be labeled. Click on the C1 vertebrae with the left mouse button, and the C1 label appears on the vertebrae. Click again for each of the C2 through C7 vertebrae, and the subsequent labels appear. This can be done with any of the four selections, by clicking on the appropriate box. Individual vertebrae labels can also be selected by clicking on the label in the Spine Labeling box, then clicking on the appropriate vertebrae on the image. Notice that when the range buttons are used (e.g., C1 to C7); be sure to start with the C1 vertebrae for correct labels. With each click of the mouse button the next sequential label is applied beginning with C2 and continuing through C7. This can be done with C1-C7, T1-T12, L1-L5 or S1-S2. 18. Add Key Note Once an image is identified as an important image to the study, it is helpful to notate the image with additional information regarding why the image was selected and to identify the relevant area of BRIT PACSView User Manual UM-BPV-001.3 60 Chapter 11 – MPR interest. This is particularly helpful later on when these images are used as comparisons for newer studies in order to note the changes between the studies or reviewed by the Referring Physicians. To add a note to the image that has been identified as a Key Image, select Image and Edit Annotations, and click on Add Key note, and the Add Key Object Note pop-up window appears. Click on the drop-down arrow in the “From” field to select the originator of the note. Current choices for originator are: Attending, ER Physician, Radiologist, Referring or Technologist. Click on the drop-down arrow in the “Reason Code” to select the reason this image is identified as a Key Image. Current choices for Reasons are: For Conference, for Patient, For Peer Review, for Referring Provider, For Research, For Surgery, For Teaching, For Therapy, Of Interest, Quality Tissue or Rejected for Quality. Type in a note to further explain the reason that the image is selected in the space provided and click on the button. A yellow “sticky” note appears in the upper left side of the image with the information selected in the pop-up window. Click on the button to terminate the activity. 19. Calibration The calibration tool lets the user calibrate an image a number of different ways. The image may be calibrated based on information in the DICOM header or it may be based on information in the DICOM header as well as corrected for size of the monitor. It can also be used with caution for other images, such as to temporarily adjust a radiograph and compensate for primary beam magnification. To perform the calibration function in BRIT PACSView, select a study with a known standard in it, click on the button and select Draw Line. Step 1: Select Draw Line and measure the known standard. Notice that the BRIT PACSView User Manual UM-BPV-001.3 61 Chapter 11 – MPR Calibrate function becomes available and the line drawn gives a value for distance (in this example, 327.2 mm). Step 2: Click on Calibrate on the Edit Annotations Menu, and the Image Calibration pop-up window appears as shown below with the measurement in the Set value field. Note that there is one of two choices to make while performing an image calibration, for Image measurement or for Monitor in „true size‟ mode. The uses of each are given. Image Measurement: use when calibrating to a standard sized object on the screen. Often this is a coin or a metal sphere. True Size: use to calibrate monitors that don‟t report their size to use or to correct monitors that do not report their size properly. To use, display an image of known size using true size zoom. Then calibrate. Replace the number in the Set value field with the known value. Step 3: Once this measurement has been entered and the measurement units selected, click on the button to activate the calibration. The original measurement is changed to the correct millimeter, centimeter, or inches measurement selected. The True size can be verified by using a ruler to measure the object on the screen. The calibration “for image measurement” is only in effect until the current study is closed. When the same study, or another similar study, is re-opened, the calibration has to be performed again. Any markups that were made would retain the calibrated values. Measurement “for Monitor in „true size‟ should not need to be repeated. 20. Default Font Sizes The user can change the size of the font that appears for any text written on the images. To change the font, click on the button and select Default Font sizes. The Default font sizes pop-up window opens. Use the dropdown arrow to select the desired size for the following: Angle labels Length labels Text labels Key Object notes There are a variety of sized to choose from; select the desired size and click on the button. To terminate the function and close the Default font sizes window without making any changes, click on the button. BRIT PACSView User Manual UM-BPV-001.3 62 Chapter 11 – MPR 21. Erasing Annotations Annotations made by the user logged in can be erased by several methods: Select Image, Annotations, and Delete Selected to erase an annotation that was not the latest one created. Select Image, Annotations, and Delete All to erase all annotations that have been created. Select Undo to remove the last annotation created. Remember deleted annotations can only be restored if the study has not been closed and saved. If the study has not been closed and saved, any annotations that were removed by using the functions of Delete Selected, Delete All or Undo can be restored by selecting the Redo function on the Edit Markups list. This does not affect annotations saved previously by the Radiologist, Technologist, or other clinician using BRIT Vision or BRIT View. In order to close the Edit Mode, click on the Exit Markup from bottom of the Edit Markups list or hit the E key on the keyboard. C. Turning Display of Markups On and Off Annotations are measurements for the angles or lengths that have been selected and measured, and are saved as a Presentation State. They are part of markups which can also be key notes or image labels that have been added to the image and saved. These can be shown depending on what the users want to view. For the user to view these Annotations, or markups, click on the Options drop-down menu, select the Show Options tab and click on the checkbox next to what the user wants to view, either Presentation State for the measurements and angles, Key Notes for key notes or Image Labels for any text included on the image. Notice that a appears in the checkbox to turn these various functions on. Turning the any of these three functions on under the Options drop-down menu and the Show Options tab turns these functions on when the application is restarted, and it remains on until BRIT PACSView User Manual UM-BPV-001.3 63 Chapter 11 – MPR changed the next time. The checkboxes for the Presentation State, Key Notes and/or Image Labels must have a beside it for these options to be shown on the study. The next step if the user wants the Annotations to be shown is to click on Image and select Show. The Show pop-up window opens, as shown here: Turning the Presentation State, Key Notes and/or Image Labels on via the Image and Show pop-up window is the preferred method for turning annotations on temporarily. When the desired choice is made, click on the button. If the action is to be terminated, click on the button. To turn these displays off, simply go back and remove the checked boxes via the Options and Show Options drop-down menu and remove the checked boxes via the Image and Show pop-up window. BRIT PACSView User Manual UM-BPV-001.3 64 Chapter 11 – MPR D. Saving Annotations and Key Image Notes to the Server To save annotations to the a Roentgen Files Server that is connected via HTTP, this must be enabled for each user and each server. From the Options….<Server List menu, select the Roentgen Files server to which you want to send annotations. Then, in the HTTP Settings box, select Allow Save KO and PS via DICOM. For servers connected via DICOM and for the Roentgen Works servers which are connected via the JSON selection, no additional action is required here. However, in all cases, the users will need to select to send changes to the server when they close a study. Some DICOM servers will require configuration before they accept the images, as well. Setup and test the storing of annotations to each server with your system administrator. Note: the DICOM servers don‟t know anything about user IDs, just AE Titles, IP addresses and port numbers. This also means that if you are returning images to a server that runs in strict mode, your workstation must have a static IP (or it must have the same IP address assigned each time the workstation is turned on. When a user closes a study, a Save changes popup box appears asking if you want to save the annotations locally and providing a checkbox to also save to the server. . BRIT PACSView User Manual UM-BPV-001.3 65 Chapter 11 – MPR Annotations made by the user logged in can be erased by several methods: Select Image, Annotations, and Delete Selected to erase an annotation that was not the latest one created. Select Image, Annotations, and Delete All to erase all annotations that have been created. Select Undo to remove the last annotation created. Remember deleted annotations can only be restored if the study has not been closed and saved. If the study has not been closed and saved, any annotations that were removed by using the functions of Delete Selected, Delete All or Undo can be restored by selecting the Redo function on the Edit Annotations list. This does not affect annotations saved previously by the Radiologist, Technologist, or other clinician using BRIT Vision or BRIT View. In order to close the Edit Mode, click on the Exit from Edit Mode button or hit the E key on the keyboard. BRIT PACSView User Manual UM-BPV-001.3 66 Chapter 11 – MPR Chapter 9 - MPR Multi-Planar Reconstruction (MPR) is typically used with images from CTs or MRs to build a reconstruction of a specified plane. MPR takes the data from multiple CT or MR images and builds the images into other planes and provides another perspective for viewing the region of interest. Launching MPR To start the MPR feature, follow these steps: 1. Open the exam and select the series with the images to be reconstructed. 2. Click on the Image drop-down menu, or right click on the series itself, and select MPR Series. 3. As the series‟ images are being built and the images are being reconstructed, a progress bar is displayed, as shown below: 4. Two orthogonal projections are built in their own windows. Navigation around these images is performed by moving the mouse in any window; and the remaining two images depict the new location of the Scout line. Note: The 3D MPR window opens on the color monitor if the active monitor is an 8-bit greyscale. If the monitor is a 24-bit greyscale, it may open on the greyscale monitor. Note: If there are not enough images in the selected series to create an MPR image, the message “No valid volumes in the current series.” appears. Standard measurements and markups can be done as well. BRIT PACSView User Manual UM-BPV-001.3 67 Chapter 11 – MPR MPR Toolbar The 3D MPR Toolbar has a variety of Tools that are available specifically for the 3D feature. These include the following: – Max – Shows the image using Maximum intensity projection. – Min – Shows the image using Minimum intensity projection. – Avg – Shows the image using Average intensity projection. – 2D – Displays a 2D MPR image. – Format – Provides a method to select the images to be left, right, top, or bottom by right-clicking on the button, and selecting from the menu. – Mag – Magnifies the image ½, 1, 2, 3, or 4 times the size of the original image, or Fits it to the current window size. – Link Zoom – Provides a method to synchronize magnification on series or images that are linked. – Ruler – Measures distance for the selected length on the image. – W/L – Provides the window/level settings for the reconstructed image to the recommended window/level setting for the image at the specific modality or allows selection of a predefined window level setting for the selected body part. – V-Flip – Rotates the volume 180 top to bottom. – Smooth – Evens the edges to make for a less pixelated rim on the image. – Hide X – Conceals or displays the cross hairs on the image. BRIT PACSView User Manual UM-BPV-001.3 68 Chapter 11 – MPR – Reset – Resets the rotations and positions of the crosshair for each window and returns the image to the original format before rotations and zooms were selected. – Lightbox – Shuts down the MPR feature, and returns to normal viewing. Menu Features from the MPR Toolbar There are several drop-down menus that appear when right-clicking on several of the Toolbar buttons. The following shows each of these menus. Menu Features from the Format Button There are four menu buttons that appear when right-clicking on the button. These buttons allow the format of the images to be changed, as follows: 2 x 2 – Changes the window to a 2x2 format of two rows and two columns, as shown here BRIT PACSView User Manual UM-BPV-001.3 69 Chapter 11 – MPR Small windows on left – The Left Window Panel places the coronal and Sagittal images in the left window, with the axial image in the larger panel to the right, as shown here:. Small windows on right – The Right Window Panel places the coronal and Sagittal images in the right window, with the axial image in the larger panel to the right, as shown here: Small windows on top – The Top Window Panel places the coronal and Sagittal images in the top of the window, with the axial image in the larger panel to the lower half, as shown here: BRIT PACSView User Manual UM-BPV-001.3 70 Chapter 11 – MPR Small windows on bottom – The Bottom Window Panel places the coronal and Sagittal images in the lower part of the window, with the axial image in the larger panel to the top, as shown here: Note: The co-ordinates, rotation, and window/leveling values for each panel are shown in the lower right side of each panel. Menu Features from the Mag Button To magnify the image on the 3D window, right-click on the button and the popup box appears with the selection of magnification levels. In order to select the desired magnification level, hover the cursor over the size and release the right mouse button. The image magnification level will either be reduced or enlarged to the selected setting, or resized to fit to the current size of the window. These include: Fit to Window – Sizes the image to completely fit in the current size of the window. Regardless of the format, the image is appropriately sized. .5x Zoom – Reduces the image size to one-half of the originally captured size of the image. 1x Zoom – Sizes the image to a one-to-one pixel ration of the originally captured size of the image. 2x Zoom – Magnifies the image to two times the original size of the image. 3x Zoom – Magnifies the image to three times the original size of the image. 4x Zoom – Magnifies the image to four times the original size of the image. Menu Features from the Ruler Button There are two menu features when right-clicking on the follows: button, as Clear Markups – The Clear Markups button erases any measurements that were done on the image. BRIT PACSView User Manual UM-BPV-001.3 71 Chapter 11 – MPR Hide Markups – The Hide Markups button acts as a toggle switch to remove or reveal any markups that have been done on the image. Note: Be aware that as the user scrolls through the various images, the measurements made on the image remain on each image in the series. BRIT PACSView User Manual UM-BPV-001.3 72 Chapter 11 – MPR Menu Features from the Window/Level Button There are several methods that can be used to change the window/leveling values from the button on the toolbar, using the preset values. Select the image to change the window/level values and hold the right-mouse button down on the button to get the menu, move the cursor over to the desired preset selection, and click the desired selection with the left mouse button, then release the right-mouse button. The window/level settings that are currently displayed include: Bone – To get the window/level preset values for the Bone, right-click on the button, and left-click to select Bone from the menu. The window/level settings change to the preset value for the Bone in the selected series, as shown here: The preset values for CTs for the bone are 1500 (Window) and 750 (Level), but these can be customized according to individual preference. Brain – To get the window/level preset values for the Head, right-click on the button, and left-click to select Head from the menu. The window/level settings change to the preset value for the Head in the selected series, as shown here: The preset values for CTs for the Head are 85 (Window) and 35 (Level), but these can be customized according to individual preference Lung – To get the window/level preset values for the Lung, right-click on the button, and left-click to select Lung from the menu. The window/level settings change to the preset value for the Lung in the selected series, as shown here: BRIT PACSView User Manual UM-BPV-001.3 73 Chapter 11 – MPR The preset values for CTs for the lung are 1048 (Window) and -500 (Level), but these can be customized according to individual preference. Soft Tissue – To get the window/level preset values for the Abdomen, right-click on the button, and left-click to select Soft Tissue from the menu. The window/level settings change to the preset value for the Soft Tissue in the selected series, as shown here: The preset values for CTs are 400 (Window) and 50 (Level), but these can be customized according to individual preference. Manually Changing the Window/Level Settings The Window and Level settings on an image can be adjusted by holding down the middle mouse button and moving the mouse on the image. Closing the MPR Function When the user has completed viewing the MPR images, to exit the MPR function, click on the button to exit and return to normal viewing. BRIT PACSView User Manual UM-BPV-001.3 74 Chapter 11 – MPR Chapter 10 - Printing Images – DICOM and Paper This printing application works best if just a single image is selected for printing. Printing the Image to a Printer Display the image in viewer or within a window in the viewer. Set it to the desired Window and Level setting. Next, select : File and selecting Print Image Image and selecting Print Image Right click on the image, select Image and select Print Image The Print window opens displaying a print preview, allowing the user to position the image within the print space with the arrow keys, select the image size, and to select the printer. The properties of the printer available from its drivers are available from the Properties button. . Click on the Print button when the criteria has been selected. Click on the Print function. button to terminate the Printing to a DICOM Printer Note that the DICOM Printer capability of PACSView is for casual use. It is not meant to replace the capabilities / flexibility of printing from the hundreds of modalities that each provide their own DICOM Print services. This capability is provided as is, although improved functionality for given modalities can be provided on a fee for service by contacting BRIT. The DICOM Print capability provided with the application prints just what is displayed within the selected window. It works best if only a single image is printed. To DICOM Print, first, the DICOM Printer must be setup in the Options…<DICOM Printer List tab. Then, select the window to print and select File<Print Image, same as with the paper printer. Then, select the DICOM printer from the printer selection drop down menu. BRIT PACSView User Manual UM-BPV-001.3 75 Chapter 12 – Reports Chapter 11 – Reports and Orders The availability of reports and orders are indicated by their icons, displaying in two places: and , respectively, On the Patient Select/Work List window in the icon section In the Study List in the Exam Header section Viewing the Report/Order in the Patient/Select Work List To view the report or order, click on the Report icon ( ) or Order icon ( )to the left of the patient name in the Patient/ Select Work list or to the right of the exam description on the study list. The bottom section of the Patient/Select Work List opens to display the report. Click on the X to close the report window. BRIT PACSView User Manual UM-BPV-001.3 76 Chapter 12 – Reports Viewing the Report or Order in the Exam Viewing Window When viewing images click on the Report icon ( ) or Order icon ( ) to the right of the study description in the study list. A floating window appears with the order or report. Click on the to close the report window. Note: To get the Study List to display, click on Show Study List on the right side of the Windows Menu bar at the top of the page. To hide the Study list, click on Image, and select Hide Study List. Printing Reports and Orders The user can print the report or order by displaying it via one of the methods described above and selecting Print < Report or Print <Order from the Windows menus. Select the printer on which the report is to be sent for printing, and click on . BRIT PACSView User Manual UM-BPV-001.3 77 Chapter 13 – Saving a Study to a CD/DVD Chapter 12 – Saving a Study to CD/DVD One of the features of BRIT PACSView is the ability to import a study a patient has brought in from another facility that has their studies on it, and to export studies to a CD that a patient for the patient to take to their doctor. When patients come in and want a copy of their exam to take to another physician, copies of their studies are done on CD rather than film. When a copy is made of a patient‟s study, a copy of the BRIT Lite application is put on the CD so that the receiving physician has a way of viewing the studies. This section describes how to import and export these studies to the CD/DVD. Note: Be aware, the destination folders must be set up under Options and the CD/DVD tab for these to be successfully imported and exported. See the section CD/DVD for instructions. Viewing Studies from a CD/DVD When the patient has brought a CD in from another facility, images, and series in the studies on this CD can be viewed in BRIT PACSView. To view the studies on a CD from another facility, follow these steps: 1. Put the CD/DVD with the patient‟s studies on it in the CD/DVD drive. 2. Click on File and select CD/DVD. 3. Click on View PDI-compliant CD or DVD. 4. The patient list closes, and a DICOM Directory, which is a list of the studies on the CD/DVD, is provided, as shown here: 5. To view the study, double click on the patient name, or double click on the header for the study in the Study List area, or drag BRIT PACSView User Manual UM-BPV-001.3 78 Chapter 13 – Saving a Study to a CD/DVD and drop the image to the viewing are. The images are shown in the Viewing Area. Various manipulations can be done on the study, such as magnification, formatting window/ leveling, and others. 6. If the study is to be saved on the BRIT System, see the section on Importing Studies from a CD/DVD. 7. To close this list, click on File, and select Hide PDI-compliant CD/DVD, the study closes, and the window returns to the Patient List. 8. The CD can then be removed. Importing Studies from a CD/DVD When the patient has brought a CD in from another facility, the studies on this CD have to be imported in order for the images and series to be stored on the BRIT PACSView server. To import a CD from another facility, follow these steps: 1. Put the CD/DVD with the patient‟s studies on it in the CD/DVD drive. 2. Click on File and select CD/DVD. 3. Click on View PDI-compliant CD or DVD. BRIT PACSView User Manual UM-BPV-001.3 79 Chapter 13 – Saving a Study to a CD/DVD 4. The patient list closes, and a DICOM Directory, which is a list of the studies on the CD/DVD, is provided, as shown here: 5. Click on the desired study to import. 6. In order to import the study, it must be displayed. To display the study double click on the patient name, or double click on the header for the study in the Study List area, or drag and drop the image to the viewing are. The images are shown in the Viewing Area. 7. Click on File. 8. Click on Import study for off-line viewing. 9. A pop-up window opens showing the progress of the import, as shown below: 10. Once all of the images in the series have been imported successfully, the pop-up window closes. 11. To close this list, click on File, and select Hide PDI-compliant CD/DVD, the study closes, and the window returns to the Patient List. 12. The CD can then be removed. BRIT PACSView User Manual UM-BPV-001.3 80 Chapter 13 – Saving a Study to a CD/DVD Saving Studies to a CD/DVD When patients come in and want a copy of their exam to take to another physician, these can be made from BRIT PACSView. To export a study to a CD, follow these steps: 1. Put a CD/DVD in the CD drive on the computer. 2. Open the patient, select the study, and open the study by double-clicking on study header in the Exam List. 3. Select the File drop-down menu. 4. Select CD/DVD, as shown here: 5. Click on the image, or series to add, and select Add selected series to image which stores the image in the directory defined under Options, CD/DVD, Settings for Exporting to CD/DVD where the patient studies are temporarily placed before they are exported to the CD. Note: Be aware, currently this only works if the study was opened by doubleclicking on the header in the Study List. 6. The Rename patient pop-up window opens, as shown here, to allow the user to rename the patient, for privacy reasons. Note: Be aware, if the patient is renamed, any corresponding reports for the patient are not copied with the study. 7. The name of the patient appears in the field, if it is correct click on the the patient is to be renamed, type in the new name, and click on the button. If button. 8. The progress indicator displays, as shown here: 9. To ensure the content has been exported successfully, click on File, select CD/DVD, and select Show CD/DVD Export Content. If this is correct, proceed to the next step. BRIT PACSView User Manual UM-BPV-001.3 81 Chapter 13 – Saving a Study to a CD/DVD 10. The next step is to use the Windows application to create the CD. This could be different for the various Windows operating systems, but is shown here as a sample method. 11. Open the folder containing the directory defined under Options, Export to CD/DVD where the patient studies are placed, such as C:\Patient Studies for Export. There should be several files in this directory, including the BRIT Lite application, the Patient study with the images, a spoollite folder, an autorun file, and DICOM directory, and a startup file. 12. Highlight all of these files, right-click and select Send to and select DVD/CD Drive. 13. The files are sent for storage to write the CD. 14. To write the CD, open My Computer, right-click on the CD/DVD and select Write files to CD. The files are written to the CD and a progress indicator is generally shown to allow the user to know the remaining time left for the CD to be completed. 15. The CD will pop out and the files are written on the CD. BRIT PACSView User Manual UM-BPV-001.3 82 Chapter 14 – Set up Hanging Protocols Chapter 13 –Hanging Protocols There are many different ways that the studies can be set up for viewing the series and images. These include the format that is used, window and leveling preferences, rotation preferences, and several other variables. These settings are called “Hanging Protocols” and can be defined based on the modality on which the study is performed as well as the body part. Different modalities and body parts can be set up with specific hanging protocols. Multiple protocols can be defined and users can select any of those as the default, or dynamically as desired. Hanging protocols are supported for exams by modality, body region, and study description for each user. These hanging protocol tools can be used to rearrange an exam‟s images and then save the settings under a specific name just for that modality or exam type. The saved view can be quickly applied by clicking on the name in the list that displays after Options and Hanging protocol is selected on the Toolbar. This section identifies the components that can be defined, the steps to set up hanging protocols. Settings Defined in Hanging Protocols Images on the Image Viewing screen can be arranged in many ways using the various screen tools. The variables that can be pre-set and saved as part of a hanging protocol include the following: The Description of the Series so that the series is placed in the specific location Determination if multiple monitors are turned on or off The number of Columns to display the individual images in the series The number of Rows to display the individual images in the series The number of the first image that is to display in the series The Magnification, or zoom, level The location for the scroll X which is the horizontal addresses of any pixel or addressable point on a computer display screen The location for the scroll Y which is the vertical addresses of any pixel or addressable point on a computer display screen The Orientation of the image, such as rotated left, rotated right, flipped top to bottom, or flipped left to right The Recommended window/level settings for the specified image type The Recommended index setting, which indicates the best appearance setting that the technologist set on the modality when the image was captured. Auto Link determines if the series is synchronized, or linked to other series in the study. Determines if Sigmoid is turned on for the image or not. Determines if Sigmoid is required for the image or not, and whether it can be turned on or off. Each of these settings are stored and saved when the Hanging Protocol is saved. BRIT PACSView User Manual UM-BPV-001.3 83 Chapter 14 – Set up Hanging Protocols Defining the Hanging Protocol The best way to set up these hanging protocols is to select the exam that depicts the modality and body parts, set it in the desired stack and format modes, set the window/leveling, and all the other available settings, then save it as a hanging protocol. Before setting up the Hanging Protocol, follow these steps: 1. Select the Format and Stack Mode – Based on the modality and body part, select the desired format to display the images appropriately. To do this, select the and select the desired format. button on the Toolbar Next based on the series types, select the stack mode for the exams by right-clicking on the button and selecting Stack. This builds a separate window for each series in the study. 2. Select the Magnification/Zoom – Based on the body part, select the desired magnification or zom levels by selecting the appropriate magnification button, such as level by moving the Smooth Zoom Slider bar to the desired setting. or any other Zoom 3. Select Window/Leveling settings – Right-click on the button and select the appropriate window/level setting for the modality and body part, or manually set the desired window/level setting. 4. Select the Rotation or Flip settings – If the images are to be rotated or flipped, click on the appropriate , , , or buttons. 5. Scout Lines – If Scout lines are to be turned on for the exam, select Image, select Show and ensure Scout Lines are checked, then select Image, select Link Series, and select Auto Link All. 6. Position the Series – If the series are to be viewed in a specific order, it is possible to set the series up based on the label on the series. To do this, left-click on the banner at the top of the image, or series, and drag it to the position where it is to be viewed, and release the left mouse button. For example an Axial view could be placed on the top right window and a Sagittal view on the next left window. Drag each series to the desired position. Note: Be aware that series labels MUST be consistent for the Hanging Protocol to hang exams as customized. Different modalities label the images with unique labels, and are inconsistent between the modality manufacturers. Because of these differences in labeling, the positioning of the series may NOT always work. Consistency of the techs is directly proportional to the successful launch of protocols for very specific exam configurations. 7. Make sure the series is set to the first image – Generally the user want the series to display beginning with the first image in the series. It is always a good idea to make sure that the BRIT PACSView User Manual UM-BPV-001.3 84 Chapter 14 – Set up Hanging Protocols image displayed is the first image by verifying that the banner shows Image 1 of xx. When the Hanging Protocol is set, the image that is displaying when it is saved is where the hanging protocol sets the series to begin. Once everything is set to the desired look, click on pull down list on the right of the Hang icon and select create new protocol. It is also available from Image< Hanging Protocol<create new protocol. The Protocol Edit Dialog pop-up window opens, as shown below: The modality field will always be filled in and is not editable. The Body part field and the Study description fields display information in the DICOM header. If you wish to use this hanging protocol for a specific body part or specific study description, then select those boxes. The protocol step gives a description of the hang that is displayed. More information about the hang is provided under the Details button. The following items can be defined or selected to identify the Hanging Protocol: Protocol Name – Enter the name that would identify that Hanging Protocol. It is always the best idea to make this descriptive as possible, such as 2-view Chest, Portable, or Bilateral Knees, or Chest, Abdomen, Pelvis. In the Match attributes section, if the Hanging Protocol is to be specifically set for a certain Body Part, click on the checkbox next to Body Part and a appears. The name of the Body Part is automatically entered in the field from information in the DICOM header of the study. If the Body part is not to be considered part of the attributes for selecting the Hanging Protocol, make sure there is no in the checkbox. BRIT PACSView User Manual UM-BPV-001.3 85 Chapter 14 – Set up Hanging Protocols In the Match attributes section, if the Hanging Protocol is to be specifically set for a certain Study Description, click on the checkbox next to Study Description and a appears. The name of the Study description is automatically entered in the field from the DICOM header of the study. If the Study Description is not to be considered part of the attributes for selecting the Hanging Protocol, make sure there is no in the checkbox. If the Hanging Protocol is to be the default for all studies that match the modality, body part, and study description criteria, click on the checkbox next to Default Protocol at the bottom and a appears. Click on to accept the changes and close the Dialog window. Click on to close the window and not make any changes. When studies are opened with the same modality, and body part, the default protocol selected is used to display the study. Setting up Sequential Hangs To add additional steps to a hanging protocol: Select hanging protocol you created. Then, set up the next desired hang, same as before. Next, from the hanging icon‟s pulldown list, select Add a new step…. It will give a description of the new step in the Protocol steps box. Select OK to save it. Repeat for each additional hang you wish to add to the sequence. Note that you may need start over again to add a new step if you manipulate the study in ways that are not supported by the sequential hangs, such as creating a clone or an MPR. Some manipulations that are not supported in the sequential hanging protocols can still be set up as hanging protocols. For example, you can clone a series and set up the window and level in each series and save that as a hanging protocol. To rearrange the sequence of steps in the hanging protocols, select the desired hanging protocol which is listed by its name from the Hang‟s pull down list and select Edit protocol… From the Protocol steps box, select the step and then select the Up or Down buttons to move it up and down in the sequence. Select Delete to delete any step. BRIT PACSView User Manual UM-BPV-001.3 86 Chapter 14 – Set up Hanging Protocols Using Hanging Protocols Selecting a Hanging Protocol The default hanging protocol determines how the study will open initially. After the initial hang, additional hangs can be selected. This can be done by selecting the name of the protocol from the pull down menu on the right of the Hanging Protocol icon. The study will display in the selected format. Reopening the Study Without the Hanging Protocol If a default Hanging Protocol is selected, when the study is opened, the Hanging Protocol is applied. If the user wants the study to reopen without the default Hanging Protocol to be used, click on Image, select Hanging Protocol, and select the Reopen with Protocol. The study is reopened without applying any Hanging Protocol. Using Sequential Hanging Protocols If the hanging protocol is a sequential hanging protocol, then after its initial selection, the next step can be applied by selecting the + key from the keypad section on the keyboard. The previous hang can be applied by selecting the – key from the keypad section of the keyboard. To return to the first step, select the * key from the keypad. These steps are also available from under the Hang icon‟s pulldown list: Apply First Step, Apply Next Step, Apply Previous Step. BRIT PACSView User Manual UM-BPV-001.3 87 Chapter 15 – Other Utilities Chapter 14 – Other Utilities There are several other actions that can be performed that are found in the Utilities drop down menu. These include: Network Queue Batch Loading Compress Quality Change Password Verify Local Cache Delete all Local Images Delete Local Images for patient xxx Delete Local Images for selected study Customize Toolbar Another useful utility that is managed from the Network Queue but set up from the Options…. < Server List is the Store and Forward function for DICOM studies. Store and Forward Studies that are DICOM stored to PACSView can automatically be forwarded to other DICOM servers. To do this first set up the server to which you want to forward studies: Under Options…<Servers List, set up a DICOM server. Note that it must be set to DICOM in the Server Type field and it requires a DICOM port. The Nickname field is for your use in selecting the server from within this application. It does not have to be the AE Title of the DICOM server. The AE Title of the DICOM Server is entered in the DICOM Settings area in the HostAE field. If the DICOM server is set to “strict mode”, then this name must be correct for PACSView to store to the device. Note that PACSView can present different AE Titles to different hosts. You may enter any AE Title in the MyAE field. This may need to be entered exactly as typed in the receiving DICOM server you are setting up if it works in strict mode. The system administrator on that system must add this information. Select the Store/forward server option. BRIT PACSView User Manual UM-BPV-001.3 88 Chapter 15 – Other Utilities Select Test Server to run a DICOM echo to the entered host. The system will return a report on this page and if it communicates properly, at the bottom of the report, you will see the message: DICOM Echo Successful! If it is not successful, it may not mean that your information is incorrect. Some sites do not allow for DICOM echos to operate across their network. If does finish successfully, then the two devices can communicate via DICOM: the IP addresses and the ports are connecting. Select OK to complete. This displays the following: By adding a user, you will be allowed to DICOM Q/R from this server to verify that studies have arrived correctly. Select Yes and you will be presented with the add user screen for the new server. Now, any study that is DICOM stored onto PACSView will be sent to this server. Verifying and monitoring that the studies are being sent are done from the Utilities <Network Queue manager. Select the Upload Series tab and this presents a list of all series that are in the queue to be sent and displays any failures. The icon on the left of the screen indicates if the series is being sent (the green arrow) , waiting to be sent or has failed its send (red circle). After a series has been successfully sent, it is removed from the queue. BRIT PACSView User Manual UM-BPV-001.3 89 Chapter 15 – Other Utilities Select any series to view additional information about the error in the Error description window in the bottom right hand corner of the box. Also note the statistics available in the bottom left hand corner of the screen. The application will continuously attempt to send to the destination YYY times. The application rereads any information in the host definition files, so if the originally entered information was not correct, then it just needs to be fixed and the queue will pick it up when it retries the sending. A series can be removed from the list by selecting its description and selecting Remove selected. A failed series can be resent by selecting Send again. Note that this is a basic utility. BRIT recommends the use of our Roentgen Router for more advanced functions such as multiple sending queues, sending on a schedule, routing rules based on criteria in the study, and alerting mechanisms. Network Queue The Network Queue allows the user to monitor the status of the studies that are being downloaded or uploaded, as well as any error messages for either the download session or the upload session. BRIT PACSView User Manual UM-BPV-001.3 90 Chapter 15 – Other Utilities Download Studies When the status of the studies that have been selected to be downloaded to the local workstation, from the server, need to be viewed, click on Utilities and Network Queue, and select the Download Studies tab. As the studies are downloaded locally, they will drop off this list when the list is refreshed. To remove a study on the list from being downloaded, click on the study, and click on the button. To remove all studies on the list from being downloaded, click on the To refresh the list, click on the button. button. To rearrange the list of studies that are selected to be downloaded, and move a study to the top of the list, click on the button, and then click on the To close out the Network Queue pop-up window, click on the button. button. To accept the Refresh, Remove all, or Remove selected functions, and close the window, click on the button. BRIT PACSView User Manual UM-BPV-001.3 91 Chapter 15 – Other Utilities Upload Studies When the status of the studies that have been selected to be uploaded from the local workstation to the server need to be viewed, click on Utilities and Network Queue, and select the Upload Studies tab. As the studies are uploaded, they will drop off this list when the list is refreshed. To remove a study on the list from being uploaded, click on the study, and click on the button. To remove all studies on the list from being uploaded, click on the button. To refresh the list, click on the button. To rearrange the list of studies that are selected to be uploaded, and move a study to the top of the list, click on the button, and then click on the To close out the Network Queue pop-up window, click on the button. button. To accept the Refresh, Remove all, or Remove selected functions, and close the window, click on the button. Download Errors If any errors occur during the downloading of a study, those are shown by selecting Utilities and Network Queue¸ and clicking on the Download errors tab. In this tab, the following information is shown about the study with the error: Number of the study in the list Patient Name Patient ID Study Description Series Description BRIT PACSView User Manual UM-BPV-001.3 92 Chapter 15 – Other Utilities Images Count Server Name Error Description The options to handle these errors are: to eliminate all of the studies with errors from the list to eliminate only the selected study from the list to return the study to the download queue and try to retrieve it from the server again To get an updated list, click on the button. To accept the Refresh, Remove all, or Remove selected functions, and close the window, click on the button. Upload Errors If any errors occur during the uploading of a study to the server, those are shown by selecting Utilities and Network Queue¸ and clicking on the Upload errors tab. In this tab, the following information is shown about the study with the error: Number of the study in the list Patient Name Patient ID Study Description Series Description Images Count Server Name Error Description The options to handle these errors are: to eliminate all of the studies with errors from the list to eliminate only the selected study from the list to return the study to the upload queue and try to send it from the server again To get an updated list, click on the button. To accept the Refresh, Remove all, or Remove selected functions, and close the window, click on the button. BRIT PACSView User Manual UM-BPV-001.3 93 Chapter 15 – Other Utilities Batch Loading Select Utilities and Batch Loading to select the patient‟s studies to be downloaded to the local workstation from the server. The Batch Loading window opens, as shown below: Click on the box next to the patient‟s study to be downloaded and click on the button. The studies will begin to transfer to the local workstation. Click on the process. Note: to end the Be aware selecting “All Patients” could take an extremely long time to down for a large patient list. It is best to only select individual patient‟s studies. Compression Quality Compress Quality is selected from the Utilities dropdown menu and the feature allows the user to control the compression algorithm on a case-by-case basis for the images depending on the need for teleradiology consultation. The selection is based on the transmission speed between the sending and receiving sites workstation‟s graphical support. Typically the images are sent based on the desired matrix size and the amount of lossy compression that is acceptable. The selections are: DICOM – DICOM as exists on the Server of the originally captured image Lossless – DICOM JPEG lossless compression. BRIT PACSView User Manual UM-BPV-001.3 94 Chapter 15 – Other Utilities High – Lossy JPEG highest quality, depending on the modality and the region of interest, typically this is set by the systems administrator, and can be adjusted based on need. Good – Lossy JPEG good quality, depending on the modality and the region of interest typically this is set by the systems administrator, and can be adjusted based on need. Fast – Lossy JPEG, but lower quality for faster download, depending on the modality and the region of interest; this is set by the systems administrator, and can be adjusted based on need. Note: Be aware that only a BRIT server is able to distinguish these compression quality variables of High, Good, or Fast. Some DICOM serves do not deliver Lossless or Lossy jpeg images. Change Password To change the Password, click on Utilities and select Change Password. . The Change Password window opens. Passwords must be greater than two characters but less than 16 characters in length, with at least two of the characters being alphabetic. The password rules can be customized on a per site basis. Enter the new password, and then confirm that it is entered correctly by keying in the new password again. Select , and the password is changed. Verify Local Cache Selecting Utilities and Verify Local Cache runs a script that verifies the local DICOM image directory on the workstation to ensure that the list of patients and studies shown in the Patient List are the ones actually stored in the local cache on the workstation. BRIT PACSView User Manual UM-BPV-001.3 95 Chapter 15 – Other Utilities Scan for New Images Selecting Utilities and Scan for New Images runs a script that compares the patients and studies on the local Patient List with the patients on the server to determine if any new studies have come in that need to be downloaded to the local workstation. Delete All Local Images Selecting Utilities and Delete All Local Images deletes all patient studies that are stored locally on the workstation. Typically this is function is run, and then Scan for New Images is then run. This helps keep the local workstation cleared of old patient studies that have already been read, and no longer needs to be stored locally. There is a pop-up or message windows for the user to verify that this is the correct process to perform, to clean off the local images. Note: PACSView can be set to automatically delete locally stored images when the user exits the application. The PACS Admin or BRIT Support can set this, if desired. Delete Local Images for a Specific Patient Selecting Utilities and Delete Local Images for Patient xxx removes all the images stored in the local workstation for the patient highlighted in the Patient List. There are no pop-up or message windows for the user to verify that this is the correct process to perform, it just performs the required steps to clean off the local images for the selected patient. BRIT PACSView User Manual UM-BPV-001.3 96 Chapter 15 – Other Utilities Delete Local Images for Selected Study Selecting Utilities and Delete Local Images for Selected Study removes all the images stored in the local workstation for the patient‟s study highlighted in the Patient List. There are no pop-up or message windows for the user to verify that this is the correct process to perform, it just performs the required steps to clean off the local images for the selected patient. Customize Toolbar The Toolbar can be customized based on the preferences of the user. This is done by selecting Utilities in the drop-down menu and selecting Customize Toolbar. The Customize Toolbar window appears as shown here: The Available Buttons on the left are those that can be selected to appear on the Toolbar. Click on the desired tool, and click on the button, or double click on the tool to move the tool to the right side. Once the tool is on the right side it will appear on the Toolbar. The Customize Toolbar window appears as shown here: To move a specific button to the desired location by selecting the button to move the tool until it is in the correct position. Click on to affect the changes, and then click on BRIT PACSView User Manual UM-BPV-001.3 or to save the changes. 97 Chapter 15 – Other Utilities Click on the button to close the window. To remove a button on the Toolbar, click on the button in the “Current buttons set” list and clicking on the button. The tool is then moved to the “Available buttons” list. Once all desired buttons are removed, click on to affect the changes, and then click on to save the changes. Click on the button to close the window. Note: Note that the buttons shown under Available buttons that have an * next to it are the ones with the drop-down menus. There are five of them. BRIT PACSView User Manual UM-BPV-001.3 98 Chapter 15 – Other Utilities Chapter 15 - Study Management Tools - Optional BRIT Systems Roentgen Works servers provide some additional tools to assist with study management that integrate with PACSView. The actions a user can take with these tools depend on their role which is established by their user ID on Roentgen Works. Note: A user can have different roles when logged onto different systems. For these tools to operate, the user must be logged into a Roentgen Works server with an ID with appropriate privileges AND the user must have these options selected in the Options…Show Option Study Management check boxes. These study management tools are: Hold/Unhold - Allows a user to put a study on hold and/or remove it from hold. Urgent Finding Management - Allows a radiologist type user to enter an urgent finding and allows physicians and others with privileges to acknowledge it. The urgent finding from a radiologist may be culled out a report rather than manually entered. Initial diagnosis (Discordance) mgmt - Allows a person with what is called “Site Coordinator” privileges to enter an non-radiologist‟s diagnosis, also called an initial diagnosis (which is not the same as a “wet read” made by a radiologist). It allows a radiologist to agree, disagree or strongly disagree with the initial reading. It allows anyone with privileges to acknowledge the radiologist‟s findings. Each of these statuses is color coded on the worklist. Held studies are highlighted in yellow. Urgent Findings are highlighted in orange. Studies with ER Discordance entries are highlighted in aqua / turquoise. After studies are unheld, the highlighting disappears. After Urgent Findings and ER Discordances have been acknowledged, the highlighting disappears. BRIT PACSView User Manual UM-BPV-001.3 99 Chapter 15 – Other Utilities A. Hold/Unhold Radiologists and technologists have permissions to place studies on hold. They may do this within this application or other applications. To put studies on hold within this application, while viewing a study, the user selects the Hold button below: . This displays the On Hold dialog box as shown Reasons may be typed into the Enter reason box or selected from the drop down menu by selecting the arrow on the right hand side of the box. Contact your system manager to enter On Hold reasons into the pulldown list. Studies that are on hold are highlighted in yellow on the worklist. Users with permission to remove studies from a hold may want to place the Unhold button on their toolbar. It is actually looks like the Hold button when selecting it from the list of icons, but displays as either Hold or Unhold based on the status of the opened study. To unhold a study, first open the study into the viewer. If the study is on hold, the icon will appear in its UnHold form on the toolbar. Select the UnHold button .. The yellow highlighting is removed from the study. B. Urgent Findings Entering Urgent Findings The user must be logged onto a Roentgen Works Server as a radiologist to manually enter an Urgent Finding (note often these are culled from the reports so they are not entered manually). Note: they may also be entered from other applications. BRIT PACSView User Manual UM-BPV-001.3 100 Chapter 15 – Other Utilities While viewing a study, the user selects the Urgent Findings button Urgent Findings dialog box. . This displays the Enter the Urgent Finding by typing in the Add an Urgent Finding field or select one from the pull down menu available by clicking on the down arrow at the right of the entry field. Contact your system manager to enter values into this pull down menu. Acknowledging Urgent Findings Studies with Urgent Findings are highlighted in a bright orange in the study list as show below: The study will continue to be highlighted in orange until it has been “acknowledged”. It will also be tracked by the radiology department until it has been acknowledged. The receipt of the urgent finding can be acknowledged within this application, or via other methods outside of this application. To acknowledge an urgent finding within PACSView, open the study and select the Findings button. This displays the Urgent Findings dialog box. BRIT PACSView User Manual UM-BPV-001.3 101 Chapter 15 – Other Utilities You must fill in an urgent note in the Add an Urgent Note field and then acknowledge the communication by selecting the Acknowledge Urgent yes radial button. Each hospital will have its own rules as to what is required in the Urgent Note. Usually, a user is required to give a “read back” indicating that they properly received the message by repeating it. Once the study has been acknowledged, the highlighting goes away. BRIT PACSView User Manual UM-BPV-001.3 102 Chapter 15 – Other Utilities C. Initial Diagnosis / Discordance The initial diagnosis is entered by a user, normally in the emergency room, who is logged on to Roentgen Works with Site Coordinator privileges. Entering an initial diagnosis To enter an initial diagnosis, select the study and open in the viewer. Select the Discordance button and the following screen appears if another diagnosis has not been entered: Select the appropriate ER Call radial button. Note that for Abnormal-Critical selections, the result of the study will go through your site‟s standard critical results reporting workflow. Select the diagnosis from the pulldown list or type it in the Note area. Contact your radiology system manager if you‟d like an ER Diagnosis added to the pulldown list. Once the ER Discordance has been entered, it will be viewable by the radiologist. In the worklist, the study will now be highlighted in bright aqua to standout from the selected study in a grayish, duller aqua color. Note that any study for which an ER discordance has been added but has not been viewed by the radiologist will have the same color. Once the radiologist has responded to the initial call, it must be acknowledged by someone within the department where the ER Call was made. Acknowledging the Radiologist’s Response After entering the ER Call, the radiologist will review and agree, disagree or strongly disagree (Note this can be done with this viewer when logged on as a radiologist user type or via other methods). BRIT PACSView User Manual UM-BPV-001.3 103 Chapter 15 – Other Utilities To acknowledge the radiologist‟s diagnosis, you must be logged into the Roentgen Works as a user with the right privileges. Any study with an ER Call will be highlighted in bright aqua, as shown above. Open the image in the viewer and then select the Discordance button . Discordance dialog box appears with the ER Call and the ER Diagnosis displayed as follows: The In the Acknowledgement area at the bottom of the window, select the yes radial button to acknowledge the receipt of the information. The study will remain on the radiology department‟s action items list until this has been acknowledged, regardless of if the radiologist agrees or not; i.e. every study for which an ER Call was entered must be acknowledged. Radiologists’ Review of ER Calls There are multiple methods for radiologists to review the ER Calls or other initial diagnosis entered into the system. This may be done from the web interface or via an API from another workstation. This discusses how it can be done from the PACSView application. First, you must be logged onto Roentgen Works as a radiologist user type. Next, search for any new, unread studies using the standard application tools. Any study with an ER Call entered will be highlighted in a bright aqua color. Open the study into the viewer and select the discordance button dialog box appears: BRIT PACSView User Manual UM-BPV-001.3 . The Discordance 104 Chapter 15 – Other Utilities Select one of the Radiologist Call radial buttons: Agree, Disagree or Strongly Disagree and add the note which is only optional if Agree has been selected. Otherwise, it must be filled in. When finished, select OK. The study will remain color coded until someone in the ER department acknowledges the receipt of the message. Administrative users within radiology also can be setup to have privileges to acknowledge the receipt of the message. BRIT PACSView User Manual UM-BPV-001.3 105 Chapter 16 – General Options Chapter 16 – Setting Defaults and Options Selecting Options… from the Windows menu opens a pop-up window with nine tabs. These are used to set the default operating characteristics of the viewer and to set of other values. This sections cover the functions and uses of each of these nine tabs, which include: General Server List DICOM Printer List Window Level Presets CD/DVD Hot Keys Monitors settings Hanging Protocols Show Options General Tab Select Options and the first tab on the Options window is the General tab. The functions shown on this tab allow the user to customize features according to their individual preference. Note: Be aware that these must be turned on or off before the study is opened for the setting to apply. These settings include: Automatically apply hanging protocol when study is opened – applies the specific hanging protocol to a study when the box is selected. If there is no in the box, the system default hanging protocols will be applied when the studies are opened. Show “Some series haven‟t been seen warning - warns users if they close a study before some series have not been viewed when box is selected. A warning message allows the user to continue to close the exam, or to discontinue closing the exam in order to view the remaining series. If the box is not checked, the system will not track the viewing of series. Warn about downloading for image more than xx MB total size – If the user is on a slow network, setting this feature allows the user to be warned if a study that has been selected for BRIT PACSView User Manual UM-BPV-001.3 106 Chapter 16 – General Options viewing from the patient‟s study screen is larger than the total size entered by the user. The user can then choose to download the study in the background, and work on other studies until the larger one is completely downloaded. If box remains unchecked the message is not displayed. Auto Close Studies – Allows the users to choose for the system to automatically close the studies as soon as the next study is opened. Otherwise, studies are kept in the Workspaces area. Close studies when Done– When selected, closes the current study when the user selects the Done icon. Delete all local images on exit– When selected, deletes all images on the local server. This may be done for security reasons or to prevent a disk from filling up. Automatically apply full PS – When selected, automatically displays all DICOM standard presentation states in the images. Apply Auto Link when study is opened – When selected, automatically links displayed, relevant series within the same study. Default Mag Glass value – Determines the default magnification level when the magnifying glass is initially activated. For example, if a value of three is selected in the field, then when the magnifying glass is activated, the size of the image in the magnifying glass is three times the original size of the image. Server List Tab Select Options and the second tab is Server List. This tab allows the user to add, edit, delete, and set the default of the servers that are defined. This tab also allows the user to add additional users to the workstation to allow them to work off-line on the workstation, and move images to the selected server. Add, Edit, and Delete Servers If the user needs to receive images from a different server, that server can be added to the list, and existing servers can be edited, deleted, or set as the default. Click on Options, and select the Server List tab. BRIT PACSView User Manual UM-BPV-001.3 107 Chapter 16 – General Options To Add a server, click on the button, and the Add New Server window opens, as shown here: Enter the following information to add the server to the list: Nickname of the Server – Make it appropriate so that the user knows which server it is, such as Medical Center Hospital, or Southern Imaging Center. Server Type – Select the type of server from the drop-down menu, the choices are http server and DICOM server. If a BRIT server is used, the selection HTTP should be used, and following is recommended: Host – Enter the IP address of the server being added. Use port – The default port is 80 to access all BRIT servers, unless the network administrator has set a different port. BRIT servers are generally configured to use port 8080, but this has to be allowed by the network administrator. If a specific port number is to be used to access this server, click on the checkbox and a appears, and enter the port number in the open field. Multiple Image Download – Identifies the number of images that can be downloaded simultaneously. Be aware that BRIT Servers with software prior to PACSView may require images be downloaded one at a time, which is much slower. Servlet Path – Identifies the path for the web client if the server type is set to HTTP. It must be the exact path name. Generally the default setting is acceptable unless the network administrator changes it. Command Verb – Select either POST or GET from the drop-down menu. This must be entered if the Server Type is HTTP. Use HTTPS – Specifies that the server is a secure server and it specifies fully encrypted communications across the network. This should be set if communications is across the Internet. Make this my default server – Identifies this server as the default server that is selected every time the user logs in. If a DICOM server is used, the following is recommended: Host – Enter the IP address of the server being added. Use port – The default port is 3000 for DICOM communications, unless the network administrator has set a different port. If a specific port number is to be used to access this server, click on the checkbox and a appears, and enter the port number in the open field. Multiple Image Download – Identifies the number of images that can be downloaded simultaneously. Be aware that various DICOM servers can have different requirements, so check with the network administrator. BRIT PACSView User Manual UM-BPV-001.3 108 Chapter 16 – General Options Access Method – The administrator of the PACS DICOM server that the system is communicating with should identify the access method. The access method could be a CGET or a C-MOVE which determines if the server responds to queries over a specific port and sends the requested patient information (equivalent to pulling a record) or if the server responds to the queries over a specific for and pushes the requested patient information to the workstation making the request. The DICOM Service Class Provider (SCP – the AE title of the PACS DICOM Server) and the DICOM Service Class User (SCU – the AE title of the user‟s workstation) must also be provided. Make this my default server – Identifies this server as the default server selected every time the user logs in. – Resets the information to what is entered as the default. Click on the button to accept the changes and add the new server. Click on the button to terminate the activity and close the window without adding a new server. To Edit an existing server, click on the server in the Server List that needs to be changed, click on the Server Connection opens, as shown here: button, and the Edit Information window Enter the information that needs to be changed, and click on the button. Click on the button to end the session without making any changes to the server selected. To Delete an existing server, click on the server in the Server List that needs to be removed, click on the button, and the server is removed from the list. Note: Be aware that when the existing server is deleted, it does not as for a confirmation that the correct server is selected. If the incorrect server is selected to be deleted from the list, it will have to be added again. Setting a Default Server To set up a default server, click on the desired server, and click on the button. A appears in the Default column next to the selected server to indicate the selection is successful. BRIT PACSView User Manual UM-BPV-001.3 109 Chapter 16 – General Options Add, Edit, and Delete Users In order to allow additional users to view patient‟s studies on this workstation, they can be added for Off-line viewing only. The additional users cannot download studies from the servers, and can only view studies that are already local to the workstation. To add a new user, click on Options, and under the Server list tab, click on the server named Off-line and then select the button. To Add a new user, click on the button, and the Edit User Information window opens, as shown here: Enter the following for the new user: Name Password Confirm password If the user is to have limited access, click on the Limited account checkbox, and a appears. Click on to add the new user. Click on to close the window. To Edit an existing user, click on the button, and the Edit User Information window opens, as shown here: Change any of the following for the existing user: Name Password Confirm password If the user is to have limited access, click on the Limited account checkbox, and a appears. If the user is not to have limited access, make sure the BRIT PACSView User Manual UM-BPV-001.3 110 Chapter 16 – General Options checkbox is unchecked. Click on to accept the changes for the existing user. Click on to close the window. To Delete an existing user, click on the window opens, as shown here: button, and the Delete User confirmation Click on to delete the selected user, and the user is removed from the User List. Click on to close the window and cancel deletion of the user. The system returns to the User List of “Off-line”, and the user removed is no longer shown on the list. Click on to close the window and return to the Server List tab. Note: Remember that the off-line users can be added, edited, or deleted is at any time. Edit My AE Title This setting is accessed by selecting the Options drop-down menu, and under the Server list tab, click on the button. This allows the user to The settings that can be changed are: Use Small Storage checkbox to identify if the Small Storage function should be used Small Storage AE Title provides the AE Title where small storage sends changes or new studies Small Storage Port identifies the port number to use for small Storage Use BRIT PACSView checkbox to identify if BRIT PACSView should be used. BRIT PACSView User Manual UM-BPV-001.3 111 Chapter 16 – General Options AE Title is the AE title for the BRIT PACSView server. Port identifies the PACSView Server port. Click on to accept the changes. Click on to close the window and not make any changes. DICOM Printer List Tab Before a DICOM printer can be used, it must be configured using this utility. To add a DICOM printer, select the button from the right hand side of the DICOM Printer List screen. The following screen displays with the default printer information filled in: You must obtain the printer AE Title, address and port from your system administrator. The printer name is for your use and you can name it anything you want. This application does allow you to present different AE Titles (as listed in the My AE Title area) and other printer options to the same printer, by setting up the same printer under different printer names. The Print Box Width and Height must be filled correctly for True Size print to work properly. These are the dimensions of the actual print area of the film, not the size of the film. BRIT PACSView User Manual UM-BPV-001.3 112 Chapter 16 – General Options When finished, select . The functionality of all of the Printer Options is as per the DICOM Print Management Specification, Version 3.3 from 2008. The values should be provided by the system manager and the system manager can enter the values for the pull down values in the PACView .ini files. Note that some values are only relevant for specific options, such as Smoothing Type is only relevant if Magnification type = CUBIC. Also note that information must be filled in EXACTLY as expected according to the standards, which are case sensitive and do not strip out spaces if they are entered. Window Level Presets Tab Under Options, and under the Window Level Presets tab, the user can add window/leveling values, set according to their specific viewing preference. It tends to be more useful for CT and MR settings. This sets the brightness and contrast values for the identified body part, such as lung, bone, or soft tissue. Users can add new window/level presents, edit existing values, and delete ones they no longer want to use. This section provides the steps to perform these functions. BRIT PACSView User Manual UM-BPV-001.3 113 Chapter 16 – General Options Add Window Level Presets To Add new Window Level Presets, click on the Options dropdown menu, and under the Window Level Presets tab, click on the button. The Add Window/Level preset pop-up window opens, as shown here: Enter the following information: Preset name – The Body Part or region of interest, such as Bone, Lung, Soft tissue, etc. Modality – Select the modality from the drop-down menu by clicking on the down arrow and highlighting the desired modality. Window – Enter the window value setting for the specific body part. Level – Enter the Level value setting for the specific body part. Click on the button for the changes to take affect. Click on to accept the addition. Click on to close the window and not make any changes. Edit Window Level Presets To Edit existing Window Level Presets, click on the Options drop-down menu, and under the Window Level Presets tab, click on the button. The Edit Window/Level preset pop-up window opens, as shown here: Any of the following information can be changed: Preset name – The Body Part or region of interest, such as Bone, Lung, Soft tissue, etc. Modality – Select the modality from the drop-down menu by clicking on the down arrow and highlighting the desired modality. Window – Enter the window value setting for the specific body part. Level – Enter the Level value setting for the specific body part. Click on to accept the changes. Click on to close the window without saving changes. BRIT PACSView User Manual UM-BPV-001.3 114 Chapter 16 – General Options Delete Window Level Presets To Delete existing Window Level Presets, click on the Options dropdown menu, and under the Window Level Presets tab, click on the button. The Confirmation pop-up Window/Level preset opens, as shown here: to delete the Click on to delete the selected preset window/level value. The system returns to the Options window and the selected window/level preset is now removed. Click on to close the window and not delete the selected setting. CD/DVD Tab When patients come in and want a copy of their exam to take to another physician, copies of their studies are done on CD rather than film. When a copy is made of a patient‟s study, a copy of the BRIT Lite application is put on the CD so that the receiving physician has a way of viewing the studies. Also, there are occasions when a patient arrives with a CD/DVD from another facility with their studies on it, and this also allows the importing of these studies into the system. This section shows how set up the default values for importing a CD/DVD from another facility, and for exporting studies to a CD/DVD to give to a patient. Setting the Path for Importing Studies from a CD/DVD When a patient brings a CD/DVD with their studies on it from another facility, these studies can be imported to the system using the BRIT PACSView application. In order to import a CD, the path must be set up first to have a destination on where the study‟s series and images are stored. To do this, follow these steps: 1. Click on the Options tab. BRIT PACSView User Manual UM-BPV-001.3 115 Chapter 16 – General Options 2. Select the CD/DVD tab. 3. Select the path in the section labeled “Setting for importing from DVD” by clicking on the and select the folder. (Browse button) to search for 4. A Browse for Folder window opens. 5. Click on the CD/DVD drive. 6. Once the correct folder is located, click on the button. When a CD/DVD is loaded into the system, the study data is stored on this selected path. To terminate the selection, click on the button. Setting the Path for Exporting Studies to a CD/DVD When patients come in and want a copy of their exam to take to another physician, the BRIT PACSView application can be used to make a copy of the CD/DVD to give to the patient. . In order to export studies to a CD/DVD, the path must be set up first to have a destination on where in order for the system to find the studies and copy them to the CD/DVD. To do this, follow these steps 1. Click on the Options drop-down menu, and select the CD/DVD tab. 2. Select the path in the second section which is labeled “Settings for exporting to DVD” by clicking on the (Browse button) to locate the path to the directory and select the folder. This is the export directory where the temporary contents of the CD are to be placed. Generally the default setting is acceptable. 3. When the button is selected the Browse for Folder popup window opens, as shown here: 4. Continue clicking on each folder until the correct folder, where the patient‟s images are to be stored, is located. 5. Once the correct folder is located, click on the selection, click on the BRIT PACSView User Manual UM-BPV-001.3 button, or to terminate the button. 116 Chapter 16 – General Options 6. If the image directory is to be cleaned when the application starts, click on the check box and a appears. This ensures that any patient files that were copied to a CD/DVD previously are erased from this directory and prevents other patient‟s studies from being copied as well. 7. Click on the checkbox next to Add BritLite viewer to CD/DVD to enable the BRIT Lite application to be stored on the CD/DVD. This allows the receiving physician to have a viewer on which to view the studies for the patient. 8. Click on the check box next to Write autorun file for BRIT Lite to enable BRIT Lite to run when the receiving physician places the CD/DVD in the drive. 9. Enter the login and the password, and confirm the password. Most customers tend to use admin and admin so that it is easy to remember, and that the referring physician does not have to call and ask for an ID and password. If the user is supposed to enter a password when they put the CD in the CD drive, click on the AskForPassword check box and a appears. 10. Click on the 11. Click on Click on Note: button for the changes to take effect. to accept the addition. to close the window and not make any changes. Multiple patients can be put on one CD/DVD by selecting all the patient‟s studies that are to be put on the CD/DVD before actually writing the CD/DVD. Instructions for creating a CD are found in the section called Creating a CD for the Patient Study. BRIT PACSView User Manual UM-BPV-001.3 117 Chapter 16 – General Options HotKeys Tab Individual preferences for Hot Key settings can be setup by each user in this area. These settings are saved on the server for that user and available wherever they log on. Using this tool, specific combinations of keys to be replace the default actions of the right, middle, or left click on the mouse, or use of toolbar or menu items. It is primarily for those users who prefer to use the keyboard. To define the specific hot keys for the individual user, click on the Options drop-down menu, and under the Hot Keys tab, click on the desired command in the commands list to the left, then press the key combination for the selected command – this shows up in the field to the right. For example, on the image shown to the right, the Change Password does not have a hot key assigned. To assign a hot key, click on the Change Password line in the list to highlight it, click on the field in the Press key combination for selected command at the upper right, and click on the button. If the combination entered is already assigned to another feature, a warning message appears, as shown here: Click on the button to clear the field and enter another combination. If the combination is not already assigned, it will be accepted and entered next to the command in the list. Click on the addition. Click on button for the changes to take effect. Click on to accept the to close the window and not make any changes. BRIT PACSView User Manual UM-BPV-001.3 118 Chapter 16 – General Options Removing a Hot Key Setting Sometimes the user no longer wants a hot key setting that was defined. To remove the hot key setting, follow these steps: 1. Click on the Options menu. 2. Click on the CD/DVD tab. 3. Click on the command that needs to be changed. 4. In the upper right section labeled “Press key combination for selected command”, erase the Keyboard key setting that is in that field. 5. Click on the button. 6. Click on the button. 7. Click on the button. To cancel without making changed, click on the BRIT PACSView User Manual UM-BPV-001.3 button. 119 Chapter 16 – General Options Monitors Setting Tab Up to eight monitors can be configured on BRIT PACSView‟s system. These monitors are configured automatically based on the number of monitors the system detects in the configuration as a default. To change the default configuration: To utilize just a single monitor: Select the radial button and then select the monitor you wish to use from the monitor list on the right hand side of the page. . To use all of your monitors, select the radio button next to . In order to set a more customized format, select the radial button and then select the monitors to be used on the right hand list. If the user has a large monitor that can “appear” to be two monitors instead of just one, click on the specific monitor, and enter the desired number of Rows and Columns. Enter one Row and two Columns to “appear” to be two monitors on the one wide screen. Click on the to take effect. Click on button for the changes to accept the addition. Click on to close the window and not make any changes. BRIT PACSView User Manual UM-BPV-001.3 120 Chapter 16 – General Options Hanging Protocols Tab The Hanging Protocols tab in the Options window, displays a list of the Hanging Protocols that have already been created. The list of all hanging protocols that have been created are shown with the Name, specific Modality for which the Hanging Protocol was created, any matching criteria, such as body part or Study Description was selected, and if that Hanging Protocol automatically controls the manner in which the study is hung. The same editing actions can be accomplished here as from the hang icon in the toolbar. Select any hanging protocol name and select edit. The Protocol edit dialog appears: The same editing actions can be accomplished here as from the hang icon in the toolbar. The actions taken by the hanging protocols are listed in the Protocol steps box. The same editing actions can be accomplished within this dialog box as when it appears when selected from the hang icon in the toolbar. Hanging Protocol Details The Hanging Protocol‟s details can be displayed by clicking on the specific definitions for the hanging protocol is shown, button, and the This shows the following information for the Hanging Protocol selected: The number of monitors that are in use for the Hanging Protocol, which also includes the following: The number of columns on the screen The number of rows on the screen The number of studies that are shown on the screen, which includes the following: BRIT PACSView User Manual UM-BPV-001.3 121 Chapter 16 – General Options The number of columns to display the series in the study The number of rows to display the series in the study The setting descriptions for each individual series, including the following: The Description of the Series so that the series is placed in the specific location Determination if multiple monitors are turned on or off The number of Columns to display the individual images in the series The number of Rows to display the individual images in the series The number of the first image that is to display in the series The Magnification, or zoom, level The location for the scroll X which is the horizontal addresses of any pixel or addressable point on a computer display screen The location for the scroll Y which is the vertical addresses of any pixel or addressable point on a computer display screen The Orientation of the image, such as rotated left, rotated right, flipped top to bottom, or flipped left to right The Recommended window/level settings for the specified image type The Recommended index setting, which indicates the best appearance setting that the technologist set on the modality when the image was captured. Auto Link determines if the series is synchronized, or linked to other series in the study. Determines if Sigmoid is turned on for the image or not. Determines if Sigmoid is required for the image or not, and whether it can be turned on or off. Click on to close the Dialog window. Editing the Hanging Protocol Dialog The name and a few of the attributed of the Hanging Protocol can be changed by clicking on the Hanging Protocol to change, and clicking on the button. To change the Protocol Name, type in the new name for the Hanging Protocol. The Modality can not be changed because it is set when the Hanging Protocol is created based on the type of modality on which the study was performed. In the Match attributes section, if the Hanging Protocol is to be specifically set for a certain Body Part, click on the checkbox next to Body Part and a appears. The name of the Body Part is automatically entered in the field based on the body part selected by the Technologist capturing the initial study. If the Body part is not to be considered part of the attributes for selecting the Hanging Protocol, make sure there is no in the checkbox. BRIT PACSView User Manual UM-BPV-001.3 122 Chapter 16 – General Options In the Match attributes section, if the Hanging Protocol is to be specifically set for a certain Study Description, click on the checkbox next to Study Description and a appears. The name of the Study description is automatically entered in the field based on the study description entered by the Technologist capturing the initial study. If the Study Description is not to be considered part of the attributes for selecting the Hanging Protocol, make sure there is no in the checkbox. If the Hanging Protocol is to be the default for all studies that match the modality, body part, and study description criteria, click on the checkbox next to Default Protocol at the bottom and a appears. Click on to accept the changes and close the Dialog window. Click on to close the window and not make any changes. Deleting a Hanging Protocol If a Hanging Protocol is no longer to be used and needs to be removed, click on the desired Hanging Protocol, and click on the Note: button. The Hanging Protocol is deleted. Be aware that there is no confirmation that the correct Hanging Protocol is selected, it is simply deleted. There are five of them. Show Options Tab This tab is used to set up the application defaults for displaying information, markups and miscellaneous study management options. On the upper left is the General box; it is used for establishing the defaults of what will be shown on the image viewing screen. A check mark in any of them indicates that the items are to be shown by default. If not selected, then the items will not be displayed automatically, but can still be accessed from under the right mouse key when in the image viewing mode by selecting Show and then selecting the appropriate box. Show Presentation States - automatically displays presentation states (saved annotations) when a study is opened. Show Key Notes - automatically displays Key Image Notes when a study is opened. Show Image Labels –automatically displays the image overlays Show Locate Points – Determines the location of the point selected for the Orthogonal views. Click on the specific point on the Scout or one of the other images, and the remaining images that contain the same location display the point with a white + sign. For this to work, the Show Locate Points must be check marked here, Locate Points must also be checked under BRIT PACSView User Manual UM-BPV-001.3 123 Chapter 16 – General Options Images, and under Images, click on Locate to turn the feature on to be used. Show Status Icons – This is reserved as a future feature, and is not currently activated. Show Scout Lines – Determines if the reference line is applied to the Scout or Topogram image when the user scrolls through the Sagittal or Axial views. For this to work, the Show Scout must be check marked here, Scout Lines must also be checked under Images, and under Images, click on Link Series, and Link Auto All to turn on the feature. Show Zoom Slider – When selected, the slider bar for on screen smooth zoom will be enabled within the selected image indow. If there is no in any of the boxes, any item can be displayed from under the right mouse click, via the Show option. Below the General box is the Markups box. This box determines the default size of the annotations. From this area, select the Line width, Selected line width (which is the active annotation), the Outline width (of the annotation) and the Arrow size. Select the Make bigger arrow for bigger line box if you want the size of the arrow head to vary with the length of the line. The Study management box is on the upper right hand quadrant of the screen. It determines the additional tools that can be used with this application. These are normally used with another BRIT application. Allow placing study Hold/Unhold - When selected, activates the ability for users logged into Roentgen Works Flow to put a study on hold and release it from a hold. Studies highlighted in yellow indicate that they are on hold. Allow Urgent Finding Management - When activated, it allows a user logged into Roentgen Works to enter and respond to Urgent Findings. Users logged in as radiologists can enter and acknowledge urgent findings. Other users can view them and acknowledge them, but can‟t enter or modify them. Initial diagnosis (Discordance) mgmt - When activated, it allows a user logged into Roentgen Works to initiate and communicate the discordance workflow. Users logged in as physicians can enter their initial diagnosis. Radiologists can respond and the original physician can review and acknowledge. BRIT PACSView User Manual UM-BPV-001.3 124 Chapter 17 – Additional Functions Chapter 17 – Additional Functions There are numerous additional functions that are available, such as automatically closing a study when the next one is selected, getting a DICOM dump file of the study, marking the study as “Read”, printing an image to the clipboard to be placed in a Word document or PowerPoint presentation for later use, printing the image to the printer, saving the study to a file, sending changes to the server, sending the image, series, or study via DICOM, or. This section covers these additional functions. Automatically Close Studies If the user wants to automatically close the study when the next study is selected, click on Options and select the General tab and click on the checkbox next to Auto Close Studies. When the user selects another study to open, the previous study is automatically closed. Marking a Study as Read When a Study has been dictated, and needs to be marked as “Read”, it can be marked through PACSView while the study is open by clicking on Image and selecting Mark Study as Read. Once the study is dictated, marking the study as “Read” helps prevent duplicate reading by other radiologists on the system. Getting a DICOM Dump Occasionally, there is a need to get a DICOM Dump to get information for the active, or selected, image or series. This is the information that has been put into the DICOM header, and it is also used to find the specific tag for the Meta File data. There are three methods to get a DICOM Dump: File and Dump info Image and select DICOM Dump info Right click on the image, select Image and select DICOM Dump info select DICOM The DICOM Dump window opens. Scroll down to find the desired information. To exit the DICOM Dump window, click on the BRIT PACSView User Manual UM-BPV-001.3 button. 125 Chapter 17 – Additional Functions Copying the Image to a Clipboard The image, series, or study, exactly as it appears on the window can be copied to the Clipboard in order to use in a MS Word document, PowerPoint presentation, or other application for later use in a lecture or seminar. In order to make the screenshot to be copied to the clipboard, follow these steps: 1. Select the patient by double-clicking on the study in the patient list 2. Select the individual image or series to be copied to the clipboard 3. Put the image or series in the desired format 4. Make sure all annotations are made 5. Select any of the following: File and selecting Copy to Clipboard Image and selecting Copy to Clipboard Right click on the image, select Image and select Copy to Clipboard The image is now available to be pasted into a Word document, a PowerPoint presentation, or other application. There are no messages or other indication that the image has been copied to the clipboard, it is simply available. Note: Only one screenshot can be copied to the clipboard at a time, it must immediately be pasted the document, PowerPoint presentation, or other application before another image is copied to the clipboard. This can also be used in conjunction with the button to copy part of an image to the clipboard. For example, click on the button, move the cursor to the area to be copied, hold the left mouse button down and drag the mouse until the rectangle only shows the desired area to copy, and release the left mouse button. The image is now copied to the clipboard. BRIT PACSView User Manual UM-BPV-001.3 126 Chapter 17 – Additional Functions Open the desired application, for example Paint, and select Copy and Paste. The selected image appears on the application, as shown here: It can be saved as a jpg, gif, tif, bmp, or whatever desired format the application supports. Printing the Image to a Printer The image, series, or study can be selected to be printed by selecting: File and selecting Print Image Image and selecting Print Image Right click on the image, select Image and select Print Image The Print window opens to allow the user to select the specific printer, the number of copies, the range, and selecting any special properties. Click on the selected. button when the criteria has been Click on the button to terminate the Print function. BRIT PACSView User Manual UM-BPV-001.3 127 Chapter 17 – Additional Functions Saving the Study Changes to the Server If the user has made markups, annotations, or selected images to be identified as Key images, they can select to send the changes back to the server by selecting one of the following: File and selecting Send via DICOM. Image and selecting Send via DICOM. Right click on the image, select Image, and select Send via DICOM. From there select: Send Current Image to send the selected image. Send Current Series to send the selected series. Send Current Study to send the selected study. Once the appropriate image, series, or study is selected, all changes are saved on the server. BRIT PACSView User Manual UM-BPV-001.3 128 Chapter 17 – Additional Functions Saving the Displayed Image to a File If the Study needs to be saved to a file, select the patient, select the exam, and perform one of these three functions: File and selecting Save to File Image and selecting Save to File Right click on the image, select Image and select Save to File The Save As pop-up window opens to allow the user to select the file where the study is to be saved. Once the file is selected, click on the button to save the file. Click on the function. button to terminate the Save This can also be used in conjunction with the button to copy part of an image to the clipboard. For example, click on the button, move the cursor to the area to be copied, hold the left mouse button down and drag the mouse until the rectangle only shows the desired area to copy, and release the left mouse button. The image is now copied to the clipboard. BRIT PACSView User Manual UM-BPV-001.3 129 Chapter 17 – Additional Functions Open the desired application, for example Paint, and select Copy and Paste. The selected image appears on the application, as shown here: It can be saved as a jpg, gif, tif, bmp, or whatever desired format the application supports. Sending Image, Series, or Study via DICOM Users can send images, series, or studies via DICOM for another user to be able to view for consultative purposes. In order to send a study via DICOM, select the patient, select the study, and select one of the following: File and selecting Send via DICOM Image and selecting Send via DICOM Right click on the image, select Image and select Send via DICOM Click on Send Current Image, Send Current Series, or Send Current Study to send the file. BRIT PACSView User Manual UM-BPV-001.3 130 Chapter 17 – Additional Functions Chapter 18 Information – System Management A. Understanding and working with HIPAA Logging Tools Reason for the logs The logging of access to patient records as required by HIPAA is normally the responsibility of the PACS server or the imaging modality. For instance, when PacsView is used with a BRIT PACS server, the server controls access to the patient‟s records (authorized user credentials and privileges) and logs all access to the patient‟s records by that user. However, there are some circumstances in which a DICOM image viewer may need to create logs that can be kept for HIPAA purposes. The most likely case is when the viewer is being used as a DICOM “push destination” and the device that is pushing images to PacsView is not logging the transaction. A second example is if PACSView is operating as a DICOM Query/Retrieve SCU accessing a 3rd party DICOM server that is not logging PACS transactions. Location of the logs PACSView produces and stores logs on local disk (or with configuration, on a network storage location) that have all of the information required for HIPAA access logs. By default, these logs are stored in C:\spool\UsersActivityLog, with filenames like BRIT PACS View-2010-mm-dd.log. A new log is created each day that PacsView is used. Between the UsersActivityLog directory and the UsersActivityLogBackup directory, a running log history can be maintained. The log files themselves are typically a few tens of kilobytes per day‟s use; not much of a burden for the large disk drives in use today. If the logs routinely need to be saved for later use, a systems administrator can use one of the many tools available to automatically transfer them from each PACSView station to a log server during off-hours. Content of the logs Every action that a user performs to log in/out, and to search for, view or otherwise manipulate patient information is logged. Since we at BRIT have no way to predict exactly how administrators might wish to use the logs, we chose a format that is easy to display in a word processor such as MS Wordpad, can be easily searched for specific information by common tools (grep, Windows Explorer, etc.), and is still relatively easy for an experienced database administrator to write an import script for the database of their choice. A portion of a sample log follows this section. Note that each entry begins with a date/time stamp followed by a username then the action that the user performed on the first line. Each entry is 1, 2 or 3 lines. BRIT PACSView User Manual UM-BPV-001.3 131 Chapter 17 – Additional Functions A single-line entry is a simple user action that doesn‟t affect a particular patient or information source. Example: 03/09/10 17:44:29 bob Logoff Two-line entries access the server or search for a list of patients. Some examples – a logon: 03/09/10 17:42:48 bob Successfully logon to RSNA 3.200 HTTP Protocol:HTTP Host:10.255.3.200 Port:80 etc. Or a search for a list of patients: 03/09/10 17:49:40 rad1 SearchPatients StringForAudit:PatientNameLike=AAP MaximumResults=100 A three-line entry involves a specific patient: 03/09/10 17:50:19 rad1 ViewStudy PatientName:AAPM TEST PATTERNS PatientId:PID000000 StudyUID:2.16…. StudyDescription:Multi Purpose 1K Sample log A user with ID of bob logs in to a particular server, searches for a list of patients, looks at what a few studies consist of, views a couple of them, and logs out. A user with ID of rad1 logs in to a different server, searches for patients, chooses a study, views it and logs off. A user with ID of notAuser attempts three times to log on to a BRIT server to which they have no access rights, but is unsuccessful. This sample truncates some of the long UIDs and paths below so this printout would be more clear. 03/09/10 17:42:48 bob Successfully logon to RSNA 3.200 HTTP Protocol:HTTP Host:10.255.3.200 Port:80 servletPath:britsrv1… 03/09/10 17:42:51 bob SearchPatients StringForAudit:PatientNameLike=* MaximumResults=100 03/09/10 17:42:52 bob QueryStudy PatientName:ABBY, ABDOMEN PatientId:RSNA200928 StudyUID:1.2… StudyDescription:ABD/PELVIS 03/09/10 17:42:57 bob ViewStudy PatientName:ABBY, ABDOMEN PatientId:RSNA200928 StudyUID:1.2… StudyDescription:ABD/PELVIS 03/09/10 17:43:25 bob ChangeApplicationAndUserSettings 03/09/10 17:43:34 bob QueryStudy PatientName:ABDOHILLIPS, ARNETTE PatientId:PID00000119 StudyUID:1.2… StudyDescription:Body Soft tissue 03/09/10 17:43:34 bob QueryStudy PatientName:ABDOHILLIPS, ARNETTE PatientId:PID00000119 StudyUID:1.2… StudyDescription:Body Soft tissue 03/09/10 17:43:36 bob ViewStudy PatientName:ABDOHILLIPS, ARNETTE PatientId:PID00000119 StudyUID:1.2… StudyDescription:Body Soft tissue 03/09/10 17:43:58 bob ChangeApplicationAndUserSettings 03/09/10 17:44:05 bob QueryStudy PatientName:CEREBRALGE, ANN PatientId:RSNA200933 StudyUID:2.16…. StudyDescription:70470-CT HEAD/BRAIN;… 03/09/10 17:44:05 bob ChangeApplicationAndUserSettings 03/09/10 17:44:15 bob QueryStudy PatientName:LEE, GRACE PatientId:RSNA200940 StudyUID:1.2… StudyDescription:MRCSPS 03/09/10 17:44:15 bob ChangeApplicationAndUserSettings BRIT PACSView User Manual UM-BPV-001.3 132 Chapter 17 – Additional Functions 03/09/10 17:44:29 bob Logoff 03/09/10 17:49:31 rad1 Successfully logon to JSON dev 4.150 Protocol:JSON Host:10.255.4.150 Port:9080 03/09/10 17:49:40 rad1 SearchPatients StringForAudit:PatientNameLike=AAP MaximumResults=100 03/09/10 17:49:42 rad1 QueryStudy PatientName:AAPM TEST PATTERNS PatientId:PID000000 StudyUID:2.16… StudyDescription:Resolution 2K 03/09/10 17:49:48 rad1 QueryStudy PatientName:AAPM TEST PATTERNS PatientId:PID000000 StudyUID:2.16… StudyDescription:Noise 1K 03/09/10 17:49:51 rad1 QueryStudy PatientName:AAPM TEST PATTERNS PatientId:PID000000 StudyUID:2.16… StudyDescription:Luminance 1K 03/09/10 17:49:55 rad1 QueryStudy PatientName:AAPM TEST PATTERNS PatientId:PID000000 StudyUID:2.16… StudyDescription:Glare 1K 03/09/10 17:50:01 rad1 QueryStudy PatientName:AAPM TEST PATTERNS PatientId:PID000000 StudyUID:2.16… StudyDescription:Resolution 1K 03/09/10 17:50:07 rad1 QueryStudy PatientName:AAPM TEST PATTERNS PatientId:PID000000 StudyUID:2.16… StudyDescription:Resolution 2K 03/09/10 17:50:11 rad1 QueryStudy PatientName:AAPM TEST PATTERNS PatientId:PID000000 StudyUID:2.16… StudyDescription:Multi Purpose 1K 03/09/10 17:50:19 rad1 ViewStudy PatientName:AAPM TEST PATTERNS PatientId:PID000000 StudyUID:2.16… StudyDescription:Multi Purpose 1K 03/09/10 17:50:56 rad1 ChangeApplicationAndUserSettings 03/09/10 17:51:07 rad1 Logoff 03/09/10 17:54:16 notauser Failed logon to RSNA 3.200 HTTP Protocol:HTTP Host:10.255.3.200 Port:80 … 03/09/10 17:54:20 notauser Failed logon to RSNA 3.200 HTTP Protocol:HTTP Host:10.255.3.200 Port:80 … 03/09/10 17:54:22 notauser Failed logon to RSNA 3.200 HTTP Protocol:HTTP Host:10.255.3.200 Port:80 … 03/09/10 17:54:43 Logoff BRIT PACSView User Manual UM-BPV-001.3 133 Chapter 17 – Additional Functions B. PACSView General Information PACSView is a standalone application, written in C++, for viewing medical images in a Windows environment. Minimum system configuration is Windows XP, Vista or Windows 7, 2 GB of memory and a graphic card and monitor capable of displaying 256 shades of gray at a resolution of at least 1024 x 768. It also requires some kind of a network connection to receive the studies. The memory requirements, as well as the system requirements, will vary with use. Users viewing large imaging studies and utilizing the MPR features will want to have 4 GB of memory on their system. PACSView can be obtained by downloading the application from the web, from another BRIT server or from a local system manager via a CD. PACSView may be customized at a site to contain the DICOM/BRIT server information at installation time. When logging onto the application, users must authenticate with a BRIT server or the local system. Local user names and IDs can be established by the system administrator. If no server information has been customized on the install executable, then the first time PACSView is used on a workstation, the servers or local user names and IDs must be entered. The user must log on to accomplish this and they do so with a user ID and password provided by BRIT. This is also the user ID and password that is used when logging onto BRIT‟s support site and requesting fixes and new releases. The default directory for the PACSView executable is "C:\Program Files\BritPacsView and the executable name is BritPacsView.exe. The default settings for users are in the C:/spool/config/PACSView.ini file. There is only a single PACSView.ini file for all users. User specific settings are found in the favorites.ini file for each user. The favorites.ini file is found in the directory C:/spoolite<user<username. Managing Access to Local Images If studies are not erased when the application closes, then they will be available to any user who logs on offline! This may be ideal for places such as ICUs, ERs and doctors‟ offices – and you may wish that they are not allowed to erase them. For a viewer in a general viewing area, such as viewers in an educational area, you may set up the system so studies are erased and the user can‟t change this. Control on erasing the studies is set in the Pacsview.ini file In the [Path] stanza, Set the DeleteOnExit = FALSE to not delete the studies when the user exits and set it to TRUE so the images are erased. Note: this is not case sensitive. To prevent users from being able to change this from the GUI interface, in the [AdministratorsSetting] Stanza of the PacsView.in file, set AllowClearCachOnExit=FALSE. If you want users to be able to change this, set this value to TRUE. You will notice that when set to FALSE, the delete all local images on exit field is not available, i.e. it is grayed out. BRIT PACSView User Manual UM-BPV-001.3 134 Chapter 17 – Additional Functions C. PACSView.ini Information PACSView.ini stores the default setting for all users. Most of these are set from within the application from the GUI. To change the defaults for a general distribution, the system manager must be logged on with the initial user ID and password assigned by BRIT and edit the settings in the C:/spool/config/PACSView.ini. Note that items that are saved for the individual user are saved in that user‟s favorites.ini file, described in Section D directly below this section. [ServerList] The user may use the Utilities GUI to enter a list of servers and/or receive the PacsView.ini file with the desired servers already configured by your site‟s PACS administrator. The application may be configured to communicate via three different protocols: 1. HTTP/HTTPS –the common protocol used by all internet browsers, preferred when the server is BRIT Roentgen Files (only). It allows for secure encryption of all packets “over the wire” and can more easily access BRIT capabilities such as extended status tracking, orders, reports, and participation in transactions that require special messages. 2. JSON – as in HTTP/HTTPS, can connect anywhere a browser could be used, is preferred method when the server is BRIT Roentgen Works. Has the same advantages as mentioned above, including participation in Critical Results Reporting, Discordance Handling, and so forth. 3. DICOM – can connect to any standard DICOM PACS server/archive, and can use either DICOM C-GET or C-MOVE to retrieve images. Needs to communicate over VPN if the entire network is not behind a secure firewall. Note that PacsView could also connect to Roentgen Files or Roentgen Works via DICOM, but would lose some of the extended functionality mentioned above.. SAMPLE 1 – A BRIT Roentgen Files server accessed through HTTP or HTTPS Server_1_Type=HTTP Server_1_Nickname=BRIT Web Test Site Server_1_Host=web.brit.com Server_1_MultipleImageDownload=20 Server_1_StoreForward=FALSE Server_1_ServletPath=britsrv1/servlet/com.brit.MiniRIS.Servlet.WebClientServlet Server_1_UseHttps=FALSE Server_1_Verb=POST Server_1_HTTPPort=80 Server_1_SaveKOandPS=FALSE - Note that the MultipleImageDownload value sets the maximum number of images that are requested in a single transaction. A value in the 20-50 range usually gives good performace. SAMPLE 2 – A BRIT Roentgen Works server accessed via JSON objects Server_9_Default=TRUE Server_9_Type=JSON Server_9_Nickname=JSON 195 Server_9_Host=10.255.255.195 Server_9_MultipleImageDownload=50 BRIT PACSView User Manual UM-BPV-001.3 135 Chapter 17 – Additional Functions Server_9_StoreForward=FALSE Server_9_JSONServicePath=JSONRPC Server_9_JSONPort=9080 Server_9_ImageServicePath=PacsObjectService Server_9_IMAGEPort=9080 - The JSON service path and port assignments indicate (truly) that the underlying protocol is the same as for Sample 1. SAMPLE 3 – A generic DICOM archive/server accessed via pure DICOM Server_6_Type=DICOM Server_6_Nickname=AIX 46 DICOM Server_6_Host=10.255.255.46 Server_6_MultipleImageDownload=20 Server_6_StoreForward=FALSE Server_6_SCU=BRIT_PV01 Server_6_SCP=SERVER01 Server_6_AccessMethod=C-GET Server_6_DICOMPort=3000 - If the AccessMethod was C-MOVE, the server would send requested images back to the CMOVEThreadAETitle of the ini file (PacsView’s “My AE Title”). [MiddleClickCTValue] When axial CT images are displayed, a middle-mouse click in a region of the image will result in an auto-selection of window/level that is appropriate to the type of tissue displayed in that region. For the defaults we selected as the lowest range, a pixel value from about -1024 to -150 will give W/L settings of 1100, -550 (about right for lung W/L). Note that the PixVal pairs are continuous and nonoverlapping from the lowest part of the CT range to the highest. [StudyStatusList] These values may be edited by the PACS administrator to reflect the statuses the institution uses. These additional statuses must be made by editing this .ini file (i.e. it cannot be set from the GUI) Enter the following two lines for each status under the stanza: Status_X_Value = <Status S> (and example would be Read) Status_X_Default = <true or false>, where X = a number starting with 1 and incrementing by 1 for each additional status to define. Only one status should be set to Default = true. This is the status that will be set when the user selects the “DONE” button. [PATH] Common changes that some administrators might make here for PacsView operating under a site (as opposed to individual) license would be to comment out the registration and license URLs. If the PACSView manual is stored, kept up-to-date and accessed on the PACS site‟s web server, modify the url for the manual as well. These selections must be made from within this file. For some PACSView installations, the PACS administrator may also wish to delete all images and patient information when PacsView exits. This selection can be made via the application‟s GUI. BRIT PACSView User Manual UM-BPV-001.3 136 Chapter 17 – Additional Functions [SEARCH] These settings define the drop-down lists for the Advance Search dialog. Note that under Modality, when the user selects „CR‟, the CR=CR,RG,DX setting causes a search for DICOM RG and DX modality types as well. These equivalents must be set from within this .ini file. Some settings are for Roentgen Files only at present, though analogous settings for Roentgen Works are under development. StudiesOriginTitle is a comma-separated list of the AETitles from which the studies originated (usually the original modality that created them). SearchForGroup is a list of the access groups as defined in Roentgen Files (user must have access to those groups, of course). The InitialQuery is normally left alone. If SkipInitialQuery=FALSE, the user gets his/her default list as defined in Roentgen Files when PACSView is started. This could cause delays if the user has to wait for a default (maybe long) query before they can go to work. [Compression] Contains the list of available compressions in the comment field and sets the default compression type used by the application. [THREAD] Contains settings to allow receiving images from DICOM push or retrieving by C-Move. MaxThreadNum=1 is OK, can still receive from multiple DICOM sources at once – provided StartCMOVEThread=TRUE and AETitle and port settings are known to the sender. [GUI] and [IMAGE] These are normally set from the PacsView dialogs. Much of the appearance of the PacsView lists and dialogs can be reconfigured by manipulating these settings. [LOG] The LogFileLevel=Error is the normal setting. If you ever have need to set the level to „Trace‟, as for instance at the request of BRIT support for identifying a knotty problem, it produces a really big log. So remember to set it back to „Error‟ when done. [ExportToCD] These settings are for creating a DICOM-compliant PDI CD including an embedded BritLite viewer, and there is seldom any need to change them. Any changes must be made in this .ini file. [INTERPOLATION] Given today‟s fast CPUs, it very seldom speeds up image viewing to use video adapter hardware interpolation, and often gives really ugly images, but the user can try it, if they are interested. [DATABASE] These settings are best left alone, with the possible exception of AllowScanForNewFiles. Though we don‟t recommend it, some users „drag/drop‟ DICOM files (with .dcm extension) into the DicomImages directory tree, and use the capability to find and view them. Be warned – scanning for BRIT PACSView User Manual UM-BPV-001.3 137 Chapter 17 – Additional Functions new files means opening and reading the DICOM header of every file (including the ones that were already known) & comparing every value with what is already in the database. This process can easily take minutes to complete. [MULTIFRAME] Sets whether to split a single open series across 2 monitors by default – leave true. [CCOW] W can do it – but if you are using CCOW now you know it takes a bit of integration. This area is not for amateurs…. [AdditionalStudyInfo] and [AdditionalSeriesInfo] By right-clicking on a particular study in the study list area (or series icon), one can display specific attributes from the DICOM header in a popup box. Note the standard DICOM attribute designation of the entries. Changes must be made by editing this .ini file. [OTHER] User will be automatically logged of after IdleLogoutSeconds of inactivity. [PRINT] DPI for paper print, often overridden by the printer itself. [MEMORY] Self-explanatory [SmallStorage] This is the older BRIT application that runs on BRITView and QC Workbench. It is handy if you have a DICOM modality that cannot use the same AE Title and port as other archives and devices use in the [THREAD] stanza. It also sometimes useful for storing and forwarding studies. [ReportSnip] Looks inside report for SnipKeyword_1 first, shows the line following it in the study list details if found. If not, looks for snip2, etc.; and if none found shows first line of report body. [IgnoreRecommendedWL] Mostly historical – we used to have to override modality recommended values frequently. [HOLD], [URGENT], and [DISCORDANCE] Here is where you set the values for the drop-down lists used with properly configured Roentgen Works and authorized users for these transactions. Must be added into this area. To set the Holds and Urgent reasons, enter a stanza for each and then add: Reason_1= <Reason 1> BRIT PACSView User Manual UM-BPV-001.3 138 Chapter 17 – Additional Functions Reasond_2 = <Reason 2>, etc. For Discordance, add its stanza and then under it add: Diagnosis_1 = <Diagnosis 1 Diagnosis_2 = <Diagnosis 2, etc. [AdministratorSettings] These settings are for limiting the things non-administrative users can set/change using PacsView GUIs. They must be changed by editing this .ini file. [DICOMPrinterList] Set within the Options dialog of PacsView. Should have a default entry similar to: PrinterDefaultOptions=-mt BILINEAR -t NO -fo PORTRAIT -fs 14INX17IN -ed BLACK -maxd 400 -bd WHITE mind 0 [Monitor_X] Lists each monitor‟s information as reported from the monitor. True size displays are based on the actual monitor dimensions obtained from this area. D. Favorites.ini information Each user has their preferences stored in C:/spool/userprofiles/<username>/favorites.ini. All items that can be changed on a user by user basis are stored here. Items include searches, Export CD settings, including the password that will go on the CDs, GUI settings and if the user is utilizing the study management tools, screen layout settings, window and level presets and customizations to toolbars and hotkeys. A sample favorites.ini file is shown below: [APPLICATION] NAME=BritPacsView VERSION=1.3.0.0 [SEARCHES] All_Today=StudyDate%3DToday%0D%0AMaximumResults%3D200%0D%0AQuery%3DAll_Today %0D%0A CR_Today=StudyModality%3DCR%0D%0AStudyDate%3DToday%0D%0AMaximumResults%3D2 00%0D%0AQuery%3DCR_Today%0D%0A CT_Today=StudyModality%3DCT%0D%0AStudyDate%3DToday%0D%0AMaximumResults%3D1 00%0D%0AQuery%3DCT_Today%0D%0A MR_Today=StudyModality%3DMR%0D%0AStudyDate%3DToday%0D%0AMaximumResults%3D1 00%0D%0AQuery%3DMR_Today%0D%0A UserDefault=Query%3DUserDefault%0D%0A search=All_Today,CR_Today,CT_Today,MR_Today,UserDefault [ExportToCD] ImageDirectoryPath=C:\CDExport AutoRun=TRUE BritLiteLogin=admin BRIT PACSView User Manual UM-BPV-001.3 139 Chapter 17 – Additional Functions BritLitePassword=admin1 AutoClean=FALSE AddBritLiteViewer=TRUE CDImportDirectory=D: AskForPassword=FALSE [GUI] UseHangingProtocols=TRUE DefaultMagGlassValue=1 LargeImagesDownloadingWarning=250 CloseStudyWhenDone=FALSE HaventSeenSeriesWarning=FALSE AutoCloseStudies=FALSE AutoHideStudyList=TRUE AllowPlacingStudyHold=TRUE AllowUrgentFindingsManagement=TRUE InitialDiagnosisMgmt=TRUE MonitorSelection=1 [COMPRESSION] Quality=dicom [IMAGELABELS] On=TRUE [PSMARKUPS] On=TRUE AutoApplyFullPS=TRUE ArrowSize=6 OutlineWidth=1 LineWidth=1 SelectedLineWidth=2 MakeArrowBiggerWithLineGrowth=TRUE [LOCATEPOINTS] On=TRUE [STATUSICONS] On=TRUE [SCOUTLINES] On=TRUE [SHORTCUT] Ask=FALSE [WindowsLevelPresets] Preset_1_Modality=CT Preset_1_Name=Bone Preset_1_Window=1500 Preset_1_Level=750 Preset_2_Modality=CT Preset_2_Name=Brain Preset_2_Window=100 Preset_2_Level=30 BRIT PACSView User Manual UM-BPV-001.3 140 Chapter 17 – Additional Functions Preset_3_Modality=CT Preset_3_Name=Lung Preset_3_Window=1100 Preset_3_Level=-550 Preset_4_Modality=CT Preset_4_Name=Soft_tis Preset_4_Window=400 Preset_4_Level=50 [AnnotationFontSize] TextFont=18 AngleFont=14 LengthFont=14 KONotesFont=18 [HotKeys] ImageFormatGrid=Ctrl+G ImageShowUserDefine= AnnotationsUndo=U ImageLevelsAutoReset= ImageShowAll=Alt+N AnnotationsRedo=R [ZOOMSLIDER] On=TRUE [KEYNOTES] On=TRUE [LINKAGE] ApplyAutoLink=FALSE [TOOLBAR] Button_1_ID=NextStudy Button_2_ID=NextSeries Button_3_ID=NextImage Button_4_ID=PrevImage Button_5_ID=Separator Button_6_ID=Flip/Rotate Button_7_ID=Separator Button_8_ID=Magnification Button_9_ID=Format Button_10_ID=FormatGrid Button_11_ID=HangingProtolol Button_12_ID=WindowLevel Button_13_ID=Separator Button_14_ID=EditAnnotations Button_15_ID=SelectMode Button_16_ID=ResetAll Button_17_ID=CompareMode Button_18_ID=MarkDone [ToolbarPosition] BRIT PACSView User Manual UM-BPV-001.3 141 Chapter 17 – Additional Functions Toolbar_1_Align=TOP Toolbar_1_Coords=5,56 Toolbar_1_Floating=FALSE BRIT PACSView User Manual UM-BPV-001.3 142