1
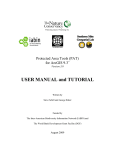
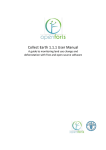
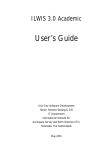
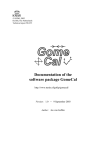
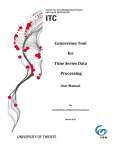
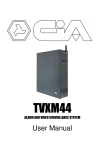
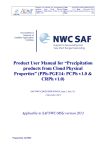
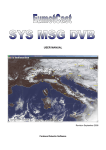
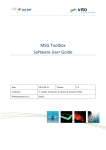
FACULTY OF GEO-INFORMATION SCIENCE AND EARTH OBSERVATION ITC GNCDataManager Version2 AutomatedStorageof GEONETCastdata Installation–UserManual By: Ben Maathuis and Bas Retsios February 2013 1 Colofon: University of Twente Faculty of Geo-Information Science and Earth Observation Department of Water Resources Department of Geo-Information Processing Date last modified: 20 February 2013 E-mail corresponding author: [email protected] Postal address: P.O. Box 217 7500 AE Enschede The Netherlands Website: http://www.itc.nl and http://52North.org/communities/earth-observation Published by: University of Twente Faculty of Geo-Information Science and Earth Observation Departments of Water Resources and Geo-information Processing © This work is licensed under the Creative Commons Attribution-NonCommercial 3.0 Netherlands License. To view a copy of this license, visit http://creativecommons.org/licenses/by-nc/3.0/nl/ or send a letter to Creative Commons, 444 Castro Street, Suite 900, Mountain View, California, 94041, USA. 2 Releasenotes Following comments have to be taken into consideration with respect to the release of this GEONETCast Data Manager Version 2: 1. This is the second release of the Data Manager and utmost care was taken to ensure appropriate operation of the routines developed but at this stage some new functionality might still result in defects and these should be reported to the corresponding author to be addressed in a new release; 2. No liability can be accepted for use of the Data Manager by the developers; 3. When using the Data Manager you agree and comply with the conditions of the software utilities used as well as the terms and conditions stipulated by other software and data providers for the use or references to the source of the data. 3 Contents 1. Introduction ................................................................................................................................ 5 2. General design considerations for development of the GEONETCast Data Manager ................ 5 3. The GEONETCast Data Manager ‐ “Rules” .................................................................................. 6 4. Installing and Configuring the GEONETCast Data Manager Version 2 ....................................... 6 5. Editing the GNC Data Manager Configuration file .................................................................... 10 6. Auto starting the GNC Data Manager ....................................................................................... 13 7. Making the GEONETCast data available within the organisation ............................................. 14 8. GEONETCast Product Navigator ................................................................................................ 15 9. Conclusions ............................................................................................................................... 16 4 1. Introduction Once having installed and configured a local GEONETCast ground receiving station the satellite and environmental data that is (re-) broadcasted via communication satellites can be received and stored on a storage device (server). As the data is received on a 24 hour – 7 days a week basis, the “GEONETCast Data Manager”, a data management system, has been developed that can be easily configured using a simple ascii text file. How to prepare or modify this ascii configuration file and to run the Data Manager is described below. This document is of special relevance to the system administrator that is operating the ground receiving station. On the 52north.org website (the navigation tab: “Earth Observation”) also a recent ascii “GEONETCast Data Manager” configuration file is available, so new users don’t need to start from scratch constructing the ascii file. Here a standalone setup-configuration of the GNC Data Manager is described. The new version described here has a few added advantages, such as an automatic start option after system re-start and a copy option, leaving the data in the source folder of the ground receiving station to be available by other applications. This allows the construction of time series even if the other software routines running on the ground reception station are deleting the data from the source folder after some time. Note that this utility needs to be configured by or in collaboration with the GEONETCast system manager-administrator to ensure that the data which is required by the organization – institute is properly retrieved from the ground receiving station and transferred to a storage device from which it can be accessed by the other users within the organization – institute. 2. GeneraldesignconsiderationsfordevelopmentoftheGEONETCast DataManager The GEONETCast Data Manager is a software application for Windows / Linux written in Java that - in short – examines computer files, and transfers them to a proper location, based on filename-patterns. It was developed at ITC (http://www.itc.nl). The utility checks every 30 seconds if new files have arrived at the ground receiving system source folder and moves or copies these files to specified target directories. The primary purpose for developing this application is to organize the large amount of data files received on a GEONETCast receiving station (a computer with a Digital Video Broadcast (DVB) card connected to a satellite dish, configured to receive the EUMETCast – GEONETCast data. The data that is received on the EUMETCast - GEONETCast receiving station must be transferred to computer storage that is independent of the receiving station's disk storage before users can access it. Users are not allowed to work directly with the data on the receiving station, because it should perform its primary task undisturbed, which is to be available all the time for storing the files captured by the (DVB) card. Main objectives of the GEONETCast Data Manager application: To organize all files in the "incoming" folder of the EUMETCast – GEONETCast receiving station, according to “rules” defined by the local system administrator. To detect and log "missing files". The application can be fed with knowledge about the files that are expected from a certain category (e.g. for MSG-HRV this would be 24 segments every 15 minutes). The "missing files" log is very helpful when users need to check data consistency prior to time-series analysis. Be extremely reliable to work continuously, 24 hours per day, 7 days per week, preferably unattended for several months, because if the application stops working unexpectedly (and nobody is available to solve the problem), after a couple of days, the files accumulated in the "incoming" folder on the EUMETCast - GEONETCast receiving station is likely to reach the maximum available disk capacity. Cause as little as possible disturbance to the EUMETCast – GEONETCast receiving station (lightweight activity), or otherwise the station will be too busy and occasionally miss the reception of files (fail to store some of the files captured by the DVB card). 5 It must be easy to restore the configuration of the GEONETCast Data Manager after a software or hardware crash or a power failure, even by non-experts, as the local system administrator may not be available at all times. The GEONETCast Data Manager must be able to process a large number of files in a single folder at one time. Therefore it must be able to handle all files that have been accumulated in the "incoming" folder in case the application has not worked for a couple of days. This can be more than a million files! The type of files that the GEONETCast Data Manager can process must not be fixed to a specific type (e.g. satellite images). Therefore the application will only depend on the fact that EUMETCast files have specific filename-patterns. With this, the process of detecting a file's category can be kept lightweight, as the file does not need to be opened. The “rules” with which files are organized are kept simple in the initial implementation (transfer files to a new location, delete after a certain time period, delete immediately or keep forever, ignore specific files, etc.), which is sufficient for the primary objective of the application. However, it is not difficult to extend their capability if such demand exists. The system administrator must be able to easily adapt the configuration file, so that new data that is broadcasted can be easily handled, as the EUMETCast-GEONETCast system is further developing and it is expected that in the future more data will be broadcasted. The system administrator should be able to fine-tune the storage of the data that is received to be tailored for a specific organization. Given the data load it is impossible to store all of the data. Each organization will have its own specific data storage requirements! The GEONETCast Data Manager can run without problems on the EUMETCast-GEONETCast receiving station, but can also run on another computer, as long as all necessary folders can be accessed through the network connection. Note that the (sub-) directories assigned to store the various data files can be created manually prior to starting the Data Manager or can be automatically generated according to the directory names specified in the ascii configuration file. 3. TheGEONETCastDataManager‐“Rules” The local EUMETCast-GEONETCast system administrator creates the file-processing rules. This is initially done by editing a text-file (the configuration file that is used by the GEONETCast Data Manager). At a later stage, the rules are fine-tuned in the user-interface of the GEONETCast Data Manager. This was done to keep the user-interface simple and understandable. For example, file patterns or expected frequency of a category of files must be changed in the configuration file, using a text-editor. However, the destination location or the duration of storage of a category of files is changed in the user-interface, because it is considered a "last-minute" change: the administrator may frequently change his mind about this. The user-interface of the GEONETCast Data Manager adapts itself to the rules that are defined. Rules are organized in “groups” and “items”. Each group becomes a tab, and each item becomes a box within a tab. 4. InstallingandConfiguringtheGEONETCastDataManagerVersion2 Download from 52North the GNC Data Manager Version 2 (GNC_DataManagerV2.7z) and unzip the file. Check if your system has Java runtime available, else download and install JAVA first (can be obtained from http://www.java.com). If JAVA is already installed on your system navigate using the explorer to the new directory ‘\GNC_DataManagerV2’ and double click with the mouse on the file “DataManagerv2.jar”. Once the GNC Data Manager is activated an input configuration file needs to be specified as indicated in figure 1. A sample configuration file that is used at ITC for the Ku-Band EUMETCast broadcasting is provided. This configuration file also incorporates all the services that are rebroadcasted via C-Band (e.g. for Latin America, Africa and South-East Asia). Select the file “[email protected]” and a menu will appear on the screen. A menu sample is shown in figure 2. 6 Figure 1: Selection of the input configuration file The menu that subsequently appears is based upon the settings that are provided in the “[email protected]” file. Examine the various tabs (“groups”) and look at the “items” within each of these groups from the Graphical User Interface. Do not start the application! Figure 2: The GEONETCast Data Manager, showing the menu as defined by the text file [email protected] The User Interface allows the system administrator to define the “Source folder”, the directory where the newly incoming data arrive on the ground receiving station; the “Destination folder” is used to store the newly arrived data on the archiving system. Note that any data which is not assigned by the rules specified in the configuration file is stored in the directory indicated under the “Unmatched files folder”. If this directory is regularly checked the new data that has arrived can be easily captured in a set of new “rules” and these new settings can be stored in an updated configuration file. A location and filename for the “Missing Data log” can be specified if for each “Item” the number of “Times per day” is specified and the “Open” button can be used to check the actual log entries and get an idea of missing data. Also “Duration of storage” can be interactively defined and how the data 7 is stored, e.g. using a date formatted folder structure, by activating the “Dated folders” option. If this option is used a \year\month\day directory structure is created storing the respective data received in the appropriate sub-directory. Note that this is a preferred folder structure in case on a daily basis a large number of files are received from a certain source, like MSG. For the HRIT data every 15 minutes 11 low resolution channels (consisting of 8 segments), 1 high resolution channel (consisting of 24 segments) and a prolog and epilog file are received. This amounts to (11*8+24+2)*96 = 10944 files per 24 hours! To be able to browse these directories, if they would contain even more files would be very cumbersome. The current log will be shown when pressing the “View Log” button. Underneath the graphical user interface a new “Data Manager Messages” window will appear providing actual information encountered during the present execution of the data manager. Using the top right button this window can be closed again. The application is started by pressing the “Start” button. If this is done then the utility first checks if all output directories are available, if this is not the case the system administrator will be prompted if these have to be created automatically. By specifying “Yes” the destination output folders are created and the application starts moving or copying the files into the respective destination folders. Press the “Start” button and wait until the data manager notifies you to create the output folders, specify “No”, note the message displayed and press “OK”. In this case the Data Manager is not started. Close the Data Manager by clicking the closing button in the top-right corner of the user interface. This configuration file can also be opened using a text editor and can be modified according to the specific need of the user but given the initial complexity of this file this will be done at a later stage. Once more activate the “DataManagerv2.jar” by double clicking the application using the mouse. Now use the default configuration file name “DataManager.txt” (see also figure 3) and press “Open”. This is the default configuration file (using the default settings) created when no other configuration file is selected! Close the Data Manager and select the newly created file “DataManager.txt”, right click the file with the mouse and open it using Notepad (++). This file that can be used to build your own data storage configuration settings (see also figure 4). Figure 3: Default GEONETCast Data Manager configuration file As indicated before, by modifying the configuration file, and in particular the “Group Name” and “Item Name” entries, you are modifying the menu that appears when starting the application. In case other settings than the default must be used, ensure that the corresponding lines in the configuration file are uncommented, by deleting the '#' in front of the line. Commented lines do not have any effect, and are overwritten by the Data Manager. See also the header lines in the ascii configuration file. If the “#” is still at the start of the line the default settings (as specified in figure 4) are assumed. These default settings are based on the file (e.g. number of segments) and file name string patterns for the (MSG) HRIT and LRIT data stream. Note that the configuration file must only be edited when the Data Manager is closed, because the Data Manager only reads the file when it starts, and overwrites it several times after that in order to store its own settings. 8 Figure 4: Default GEONETCast Data Manager configuration file in Notepad++ New in version 2 of the Data Manager are: Two new entries are added to the configuration file: "Copy files:" (yes/no) and "Autostart delay:" (integer: number of seconds). These modifications are considered relevant to ensure that the data manager can also be operated on other ground receiving systems and create a (external) time series archive independent on the software rules defined for the main ground receiving operating system. By using the copy option the data remains at the disposal of the main operating software application. An optional command-line parameter can be supplied (the file-name of a config-file for autostart is added). This option is relevant to prevent data gaps in the external archive; in case the other operating software is deleting the files in the source folder after a specified period of time and the system administrator has not activated the Data Manager relevant data might have been automatically deleted! Further details are provided below: A new entry is introduced in the configuration txt file, indicating whether files should be moved or copied. This entry is located after the "Unmatched files folder:" entry and is named "Copy files:". The value can be ‘yes’ or ‘no’. The default is "no", which means files will be moved. 1. This will also be the case for all existing (Version 1) configuration files where this entry is missing. After running the Data Manager with an existing configuration file (or letting the Data Manager create a new configuration file), the entry will appear at its correct location: # Copy files: no If you wish to have the Data Manager copy the files from the Source folder instead of move them, change this to: Copy files: yes (remember to remove the #). Besides the obvious difference, there is also a subtle difference between move and copy: - "move" will try to move files from the ground receiving system source folder, even if they already exist in their destination folder (because occasionally at the first attempt, some files in the source folder are incomplete or are still being written by Tellicast). 9 - "copy" will only copy files from the source folder, if they are not found in their destination folder (otherwise all files from the source folder would be copied at every 30 seconds cycle, which will cause problems in system performance). Files whereby copying failed, are deleted from the destination, so that they are re-tried at the next cycle. If this algorithm appears to be problematic (because too many files are incomplete), ideas are welcome. 2. The system administrator can supply one parameter on the command-line (optional!). This parameter is assumed to be the filename of a configuration file. If this file exists, it will be used, and without prompting the user, the Data Manager will automatically start transferring files after a specified number of seconds. Otherwise the user is still asked which config.txt file to use. The usage is: java -jar DataManager.jar myfile.txt If “myfile.txt” exists, the Data Manager will start its activity of transferring files after the specified number of seconds. A delay of 10 seconds (this is the default value, it is userconfigurable) is introduced in order to ensure that any Network Attached Storage or other shares do get their time to mount after a reboot, (otherwise starting file-transfers would fail, as questions such as "Source folder does not exist" or "Destination folders do not exist, create?" will be prompted). In case this still happens, the 10 seconds can be changed: a new element is introduced in the configuration file after the "Copy files:" This element is: # Autostart delay: 10 If you wish to have the Data Manager auto-start the transfer slower or faster than this, you can change this, e.g. Autostart delay: 2 for a 2 second delay (remember to remove the #). Note that auto-start is only applicable if the auto-start config-filename parameter is supplied in the command-line. Note that the two new entries of the configuration file are optional. This means that this Data Manager is automatically backwards compatible with old configuration files. The old files will be updated upon first use. After updating, the new configuration files cannot be used with older versions of the Data Manager, unless they are manually edited. 5. EditingtheGNCDataManagerConfigurationfile Having described the layout of the default configuration file “DataManager.txt” open this file with Notepad or Notepad ++. Change for the ‘Title: Data Manager’ into “Data Manager MyName”. Uncomment by removing the “#” in front of the line to let it take effect! Change for the Group Name the ‘Sample Group’ into “SATELLITE_X”, repeat this also for ‘Description’, indicate “SATELLITE_X” here as well, also uncomment the line. Change the Item Name ‘Sample Item’ into “Band_1”. Save the file as “DataManager_MyName.txt”. Open the Datamanagerv2.jar by double clicking it with the mouse and select as configuration file “DataManager_MyName.txt” and press “Open”. Note the changes and close the Data Manager. Open the ascii file “DataManager_MyName.txt” once more. Copy the whole content of the Item name (including the lines with ‘Pattern:’ up to ‘Segments to Store:’) and paste it below, leaving a single line as a space. Now change for the copied section the Item name from ‘Band_1’ into “Band_2”. Repeat this procedure to create also the Item names “Band_3”, “Band_4” and “Band_5”. Save the file and open it again with the Data Manager. Note that in this way multiple group and items can be created. Close the Data Manager and open the file “DataManager_MyName.txt” once more. Now change the ‘Columns: 2’ into “Columns: 5”. Don’t forget to uncomment by removing the “#” in front of the line! Save the changes and open the file once more with the Data Manager. Note the changes, all items are now arranged in a horizontal manner. Now specify some of the options available from the menu, 10 like “Source folder”, “Unmatched files folder”, “Destination Folder”, “Missing data log” and “Duration of Storage”, change this from “FOREVER” to another storage duration option. Do not specify the root of your C:\ or D:\ drive as your source folder, take any directory as source containing a few files. Close the Data Manager and inspect the content of the configuration file “DataManager_MyName.txt”. All folders are now added and the duration of storage has also changed. After you have inspected the ascii file open the Data Manager again, select the “DataManager_MyName.txt”, and press “Start”. Your results should resemble those of figure 5, but the directory assignment is of course different. Figure 5: Modification of the configuration file While the Data Manager is running use your explorer and check the content of source directory specified and the destination and unmatched file folder. Note that all files have moved from source to unmatched file folder: these files have not been specified with the appropriate ‘Pattern’ information and are therefore not recognized but are moved! To temporary stop the Data Manager press “Close”, eventually use the option “View Log”. To completely abort the application, left click using the mouse the top right closing button. Copy the data back from the unmatched file folder to the source folder specified! Ensure that the Data Manager application is aborted and once more open the configuration file “DataManager_MyName.txt”. Remove the “#” in front of the ‘Copy Files:’ entry and now specify “yes” (instead of the default ‘no’). Save the file and open another instance of the Data Manager, using the “DataManager_MyName.txt” configuration file and press “Start”. While the Data Manager is running use your explorer and check the content of source directory specified and the destination and unmatched file folder. Note that all files have been copied from source to unmatched file folder: these files have not been specified with the appropriate ‘Pattern’ information and are therefore not recognized but are copied. Note that the files also remain in the source directory! To temporary stop the Data Manager press “Close”, eventually use the option “View Log”. To completely abort the application, left click using the mouse the top right closing button. Next challenge is to define for the “Group’ the ‘Date position’ and ‘File id position’ (in the file name string) and for the ‘Item” the file patterns and eventually add information which is used to define missing data, like ‘Times per day’, ‘Times to store’, ‘Expected segments’ and ‘Segments to store’ To define the appropriate patterns in the GNC Data Manager Version 2 also wildcard characters * and ? are allowed in the filename pattern (thus not full regular expressions). Due to this change, the existing Version 1 users might need to go once through the configuration file to append a * or insert a ? to relevant portions of the file name string patterns, otherwise they don't match the GEONETCast files anymore, especially after the change from MSG2 to MSG3 in January 2013. New expected pattern examples are: *H-000-MSG?__-MSG?________-HRV______-* *g2_BIOPAR*Africa* or *g2_BIOPAR*America* The last example shows that the generic part of the centre of the file name string is maintained but the data for Africa and America can still be separated and moved to other folders. These wildcard options provide more flexibility to define the filename patterns. 11 Open with Notepad the file “[email protected]” and inspect the content. Part of the file is also provided in figure 6. As example the HRIT data from MSG is used and the file name format for the epilog, prolog, HRV and VIS006 channels are provided below. First have a careful look at this. H-000-MSG3__-MSG3________-_________-EPI______-201302140000-__ H-000-MSG3__-MSG3________-_________-PRO______-201302140000-__ H-000-MSG3__-MSG3________-HRV______-000001___-201302140000-C_ H-000-MSG3__-MSG3________-VIS006___-000001___-201302140000-C_ For further fine tuning of the configuration file the received filename strings have to be analysed to obtain the required parameters. Note from the filename string that the ‘File id position’ (EPI, PRO, 000001) starts at string position 36 and the ‘Date position’ starts at position 46. Note that here the default settings are used and therefore the ‘#’ is does not have to be removed! Figure 6: Start of GeonetcastDataManager configuration file listing Inspect the section under ‘Group Name: MSG HRIT’. You see that the start of the date and file id position, obtained from the file name string, have been indicated, a destination folder, having a dated directory structure has been assigned. Furthermore the log file name and location is provided and the data will be stored forever. 12 Now have a look at the first item (under this MSG HRIT Group). For the Item Name: ‘Pro’ the generic portion of the file name string is used as the ‘Pattern’: *H-000-MSG?__-MSG?________-_________-PRO______-* Note the use of the ‘?’ and ‘*’. When checking the temporal resolution one can derive that one prolog file (not consisting of multiple segments) is received every 15 minutes, therefore 96 ‘Pro” files are received on a daily basis. Although the ‘#’ is still present in front of the ‘Process’, ‘Times to store’ and ‘Segments to store’ entries, these options are by default activated. When looking at the ‘Item Name: HRV’ the full field of view of a single MSG image is consisting of 24 segments and all are stored. For the low resolution channels there are 8 segments per image (see ‘Item Name: VIS006’). Having provided this information at each instance the Data Manager is checking new arrived files in the source directory and an occurrence is found of a filename with a generic portion specified, this file is subsequently moved or copied into the designated target directory. Having provided the temporal resolution and the number of segments the Data Manager can do the accounting if files have not been received. Study the remainder of the configuration file used at ITC into more detail to see how the configuration file is constructed and how it is ‘building’ the graphical user interface. To get further information on file names, temporal interval, etc. you can use the GEONETCast Product Navigator, see also chapter 8. Note that new GEONETCast users can use the “[email protected]” configuration file to get started and adapt it to their local circumstances (using copy, paste and delete!). On the http://52north.org website (navigation tab: “Earth Observation”) also a recent ascii “GEONETCast Data Manager” configuration file is available, which can be downloaded and used/modified. 6. AutostartingtheGNCDataManager To automatically start the Data Manager an ‘auto-start’ option is included. To open the batch file rightclick with the mouse the file “GeonetcastDataManager.bat” and select “Edit” from the context sensitive menu. The file is consisting of a single line: "java.exe" -jar DataManagerv2.jar [email protected] This batch file will start JAVA, opens the Data Manager utility and is using as parameter the provided configuration file. Close the batch file and open the “[email protected]” configuration file. Delete the ‘#’ in front of the Autostart delay option and save the file. Double click the batch file with the mouse. It will start a delayed event (note the default 10 seconds) of the data manager. Note that instead of the “Start” button” it has become an “Autostart 10” button. When getting the message to create the output directories use the option “No” and “OK”. Close the Data Manager. To run the Data Manager automatically when Windows starts a shortcut needs to be placed in the Windows-Startup folder and it will run whenever Windows starts. To create such a shortcut, right click on the file “GeonetcastDataManager.bat” and from the context sensitive menu select “Create shortcut”. Right click the newly created shortcut and from the context sensitive menu select “Copy”. Click the Windows Start button, click All Programs, right-click the Startup folder, and then click Open. Activate the startup window by clicking with the right mouse button in this window and from the context sensitive menu select “Paste”. The next time you start Windows, the program will run automatically. Reboot your system to check if the data manager automatically starts, close the data manager and remove the shortcut from the Windows Startup directory! 13 7. MakingtheGEONETCastdataavailablewithintheorganisation The data received via EUMETCast-GEONETCast is commonly stored on a file server that can be accessed by all users within the organization according to the Data Manager settings described above. When using the ““[email protected]”” configuration file, two directories are relevant: RAWDATA; a year, month, day formatted directory structure, which is storing the High Rate Image Transmitted data of Meteosat Second Generation (full spatial, spectral and temporal resolution data of MSG); OTHER; including a number of sub-directories as well as (undefined) data that might reside in the root of this directory, which still needs to be defined by new “rules”. The directory “OTHER” is configured to contain all the other data, except the MSG HRIT data from the receiving computer, using the settings as specified by the GEONETCast Data Manager’s configuration file and is stored in various sub-directories in this archiving folder. Some relevant subdirectories in this folder are: FENGYUN: Data and products from China Meteorological Agency, e.g. FY-2E; JASON: data from Jason altimeter mission (sea surface height and sea level anomaly); LRIT: Low Rate Image Transmitted satellite image data from Geostationary satellites (MSG, Meteosat-7, MTSAT2, GOES-East and GOES-West); METOP: Data from the various instruments onboard of METOP; MPEF: Secondary Meteorological Products (AMV, GII, CLM, CLAI); NOAA: NOAA based satellite (AVHRR-GAC) and sounder data (e.g. HIRS, GOME, etc); RSS: Rapid Scanning Service, 5 minutes recordings of the northern 1/3 portion of MSG-field of view and secondary products from METEOSAT-8; SAF: Satellite Application Facility data (e.g. surface radiation budget, bio-geophysical parameters, sea surface temperature); MODIS: MODIS global products like fires and chlorophyll; SERVIR: Data from regional visualization and monitoring system, e.g. Mesoamerica; VGT4Africa and VGT4LatAmerica: Decadal processed data derived from SPOT Vegetation Instrument, like NDVI, NDWI, DMP, etc, for Africa and Latin America respectively; DevCoCast: Products produced by the DevCoCast partners (CSIR, PML, INPE and INTA) in Africa and Latin America; EAMNET: Various marine products for several regions in Africa, produced by UCT. AVISO: Geophysical data records, coastal and hydrological products (licensed service). TAMSAT: Decadal and monthly rainfall and rainfall anomaly products over the African continent; AMESD-SADC: Products for the Southern African Region related to Agriculture, Drought, Fires and Long Range Forecasting. For the user to get easy access to the data, as it is stored on a “distant” file server, it is convenient to map these directories as a Network Drive using the Windows Explorer Tools option. When using WINDOWS XP, open Windows Explorer, from the Menu, select Tools and Map Network Drive. Specify a Drive letter, select the shared network folder from Windows and browse to the target folder. If you have configured your system using the “[email protected]” file, specify two network mappings, one for the folder “RAWDATA” (e.g. as drive Z:\) and one for the folder “OTHER” (e.g. drive Y:\). When using WINDOWS-7 open Windows Explorer and from the left hand menu, right click with the mouse on the icon “Network” and select from the context sensitive menu the option: “Map Network Drive..”, and proceed as indicated above. These settings will vary for different locations. You have to consult the system manager to get the details of how the data is stored in the archive. Note that there are differences with respect to the type of data disseminated by Ku and C-Band services and a certain organization might not have requested all the services that are disseminated by EUMETCast-GEONETCast. 14 8. GEONETCastProductNavigator To get an idea of what is currently disseminated using the various services, browse to the Product Navigator from EUMETSAT, available at: http://navigator.eumetsat.int/. From there select: Extended Search. Under Dissemination, select EUMETCast Europe / Africa / Americas, GEONETCast Americas or CMACast and press the Search button. Also the total number of products that are operationally broadcasted is indicated. Open the Product Navigator website and enter the Extended Search criteria as given in figure 7. At the time of accessing this utility 18 products meet the given criteria, press the option “Start query” and subsequently select the dataset: “High Rate SEVERI Level 1.5 Image Data – MSG – 0 degree” and press the information icon. Note the information provided under the tabs “Description”, “Categorisation”, “Metadata” and especially under “Distribution”. Here also the file name strings are provided of the various products used in the EUMETCast-GEONETCast dissemination. Figure 7: GEONETCast Product Navigator 15 9. Conclusions Having the capability to easily start, adapt functionality (copy or move) and modify-configure the menu any new modifications resulting from adaptations of the EUMETCast-GEONETCast system can be easily incorporated without the need to wait for software updates. This is important as the broadcast system continuously changes (different satellite and environmental data). Using simple copy and paste options the text file can be configured according to the need of the user, the system manageradministrator does not need to have any programming experience to do these types of manipulations. When operating a GEONETCast reception station mostly a “move” of the files is sufficient. When using the data manager in conjunction with other operating software (which is deleting the source folder from time to time) the system administrator might consider copying the files from the source folder to a certain destination location. When this option is used the data remains in the source folder for the other application(s) running. With the auto-start option it is now possible to automatically start the data manager during starting of the system. This ensures that no data gaps might result from not operating the data manager when the system is running and other utilities might delete files from the source folder after some time. For newly – unassigned data disseminated through GEONETCast-EUMETCast the product navigator is providing additional information. 16