1
Cat No. V028−E1−1
NT-series
Support Tool
OPERATION MANUAL
i
ii
NT-series
Support Tool
Operation Manual
Produced July 1995
iii
iv
Safety Precautions:
Read these safety precautions carefully and make sure you understand them before using the programmable terminal so that you can use it safely and correctly.
Safety Conventions and Their Meanings
This operation manual uses the following conventions and symbols to indicate cautions and warnings in
order to ensure safe use of the PT. The cautions and warnings shown here contain important information
related to safety. The instructions in these cautions and warnings must be observed.
The conventions used and their meanings are presented below.
WARNING
Indicates unsafe practices which, if not avoided, could result in death or serious injury.
Example Symbols
The triangle indicates a hazard (caution or warning).
Details are provided by the contents of the triangle and the accompanying text.
The symbol to the left indicates a general hazard.
WARNING
Do not use input functions such as PT touch switches for applications where danger to human life or serious damage is possible, or for emergency switch applications.
v
OMRON Product References
All OMRON products are capitalized in this manual. The word “Unit” is also capitalized when it refers to an
OMRON product, regardless of whether or not it appears in the proper name of the product.
The abbreviation “Ch,” which appears in some displays and on some OMRON products, often means
“word” and is abbreviated “Wd” in documentation in this sense.
The abbreviation “PC” means Programmable Controller and is not used as an abbreviation for anything
else.
[Numeral settings]
Each support tool screen displays options for functions to be set. The example to the left shows such
an option, “Numeral setting”.
<Example screens>
This support tool (NT-ZA3PC-V2/ZA3DV-V2) can be used to create screen data for the following
models:
NT20M
NT612G
NT20S
NT610C
NT2000M
NT620S
NT600M
NT600S
NT30
NT30C
NT620C
The screens used for the purposes of explanation in this manual are mainly those of the NT610C.
Note that, depending on the model used, the contents of the screen displays may differ somewhat
from those shown in this manual.
Visual Aids
The following headings appear in the left column of the manual to help you locate different types of information.
Note
1, 2, 3...
Indicates information of particular interest for efficient and convenient operation
of the product.
1. Indicates lists of one sort or another, such as procedures, checklists, etc.
E OMRON, 1995
All rights reserved. No part of this publication may be reproduced, stored in a retrieval system, or transmitted, in any
form, or by any means, mechanical, electronic, photocopying, recording, or otherwise, without the prior written permission of OMRON.
No patent liability is assumed with respect to the use of the information contained herein. Moreover, because OMRON
is constantly striving to improve its high-quality products, the information contained in this manual is subject to change
without notice. Every precaution has been taken in the preparation of this manual. Nevertheless, OMRON assumes no
responsibility for errors or omissions. Neither is any liability assumed for damages resulting from the use of the information contained in this publication.
vi
TABLE OF CONTENTS
SECTION 1
Setting Up the Support Tool . . . . . . . . . . . . . . . . . . . . . . . .
1-1
1
Preparing Equipment . . . . . . . . . . . . . . . . . . . . . . . . . . . . . . . . . . . . . . . . . . . . . . . . . . . .
1-1-1 Equipment to be Prepared . . . . . . . . . . . . . . . . . . . . . . . . . . . . . . . . . . . . . . . . . . .
1-1-2 Before Starting Preparations . . . . . . . . . . . . . . . . . . . . . . . . . . . . . . . . . . . . . . . . .
IBM PC/AT Preparations . . . . . . . . . . . . . . . . . . . . . . . . . . . . . . . . . . . . . . . . . . . . . . . . .
1-2-1 Installation Method . . . . . . . . . . . . . . . . . . . . . . . . . . . . . . . . . . . . . . . . . . . . . . . .
2
2
3
4
4
SECTION 2
Basic Operations of the Support Tool . . . . . . . . . . . . . . . .
7
1-2
2-1
Starting Up and Exiting the Support Tool . . . . . . . . . . . . . . . . . . . . . . . . . . . . . . . . . . . .
2-1-1 Start-Up Procedure . . . . . . . . . . . . . . . . . . . . . . . . . . . . . . . . . . . . . . . . . . . . . . . .
2-1-2 Exit Procedure . . . . . . . . . . . . . . . . . . . . . . . . . . . . . . . . . . . . . . . . . . . . . . . . . . . .
Basic Operating Procedures . . . . . . . . . . . . . . . . . . . . . . . . . . . . . . . . . . . . . . . . . . . . . . .
2-2-1 Cursors . . . . . . . . . . . . . . . . . . . . . . . . . . . . . . . . . . . . . . . . . . . . . . . . . . . . . . . . .
2-2-2 Selecting Options . . . . . . . . . . . . . . . . . . . . . . . . . . . . . . . . . . . . . . . . . . . . . . . . .
2-2-3 Using the Function Keys . . . . . . . . . . . . . . . . . . . . . . . . . . . . . . . . . . . . . . . . . . . .
2-2-4 Using the Mouse . . . . . . . . . . . . . . . . . . . . . . . . . . . . . . . . . . . . . . . . . . . . . . . . . .
2-2-5 Using Help Messages . . . . . . . . . . . . . . . . . . . . . . . . . . . . . . . . . . . . . . . . . . . . . .
2-2-6 Selecting Numbers and Codes . . . . . . . . . . . . . . . . . . . . . . . . . . . . . . . . . . . . . . .
8
8
9
10
10
11
11
12
15
16
SECTION 3
Support Tool Operations . . . . . . . . . . . . . . . . . . . . . . . . . .
19
2-2
3-1
3-2
3-3
3-4
3-5
Using the Support Tool . . . . . . . . . . . . . . . . . . . . . . . . . . . . . . . . . . . . . . . . . . . . . . . . . .
Main Menu . . . . . . . . . . . . . . . . . . . . . . . . . . . . . . . . . . . . . . . . . . . . . . . . . . . . . . . . . . . .
“Tool Settings” Screen . . . . . . . . . . . . . . . . . . . . . . . . . . . . . . . . . . . . . . . . . . . . . . . . . . .
“File List” Screen . . . . . . . . . . . . . . . . . . . . . . . . . . . . . . . . . . . . . . . . . . . . . . . . . . . . . . .
“Scr list” Screen . . . . . . . . . . . . . . . . . . . . . . . . . . . . . . . . . . . . . . . . . . . . . . . . . . . . . . . .
3-5-1 Functions of the “Scr list” Screen . . . . . . . . . . . . . . . . . . . . . . . . . . . . . . . . . . . . .
3-5-2 Setting Direct Connection Information . . . . . . . . . . . . . . . . . . . . . . . . . . . . . . . . .
20
21
22
26
31
31
42
SECTION 4
Creating Screen Data . . . . . . . . . . . . . . . . . . . . . . . . . . . . .
49
4-1
4-2
Initial Editing Screen and Basic Operations . . . . . . . . . . . . . . . . . . . . . . . . . . . . . . . . . . .
4-1-1 Displaying the “Edit” Screen . . . . . . . . . . . . . . . . . . . . . . . . . . . . . . . . . . . . . . . .
4-1-2 Basic Operations on the “Edit” Screen . . . . . . . . . . . . . . . . . . . . . . . . . . . . . . . . .
4-1-3 Environmental Settings (Tool Settings for the “Edit” Screen) . . . . . . . . . . . . . . .
Common Setting Operations . . . . . . . . . . . . . . . . . . . . . . . . . . . . . . . . . . . . . . . . . . . . . .
4-2-1 Setting Character/Character-String Displays . . . . . . . . . . . . . . . . . . . . . . . . . . . .
4-2-2 Setting Numeral Displays . . . . . . . . . . . . . . . . . . . . . . . . . . . . . . . . . . . . . . . . . . .
4-2-3 Specifying the Display Color (NT30C, NT610C Only) . . . . . . . . . . . . . . . . . . . .
4-2-4 Setting Numeral Memory Tables . . . . . . . . . . . . . . . . . . . . . . . . . . . . . . . . . . . . .
4-2-5 Setting Character-String Memory Tables . . . . . . . . . . . . . . . . . . . . . . . . . . . . . . .
4-2-6 Bit Memory Table Setting . . . . . . . . . . . . . . . . . . . . . . . . . . . . . . . . . . . . . . . . . . .
4-2-7 Setting Words and Bits . . . . . . . . . . . . . . . . . . . . . . . . . . . . . . . . . . . . . . . . . . . . .
4-2-8 Copying to the Next Input Field (Increment Copy) . . . . . . . . . . . . . . . . . . . . . . .
51
51
54
59
61
61
63
66
68
70
72
75
77
vii
4-3
4-4
4-5
4-6
4-7
4-8
4-9
4-10
4-11
4-12
4-13
4-14
4-15
4-2-9 Searching Within a Memory Table . . . . . . . . . . . . . . . . . . . . . . . . . . . . . . . . . . . .
4-2-10 Batch Changing Bits and Words . . . . . . . . . . . . . . . . . . . . . . . . . . . . . . . . . . . . . .
Creating Fixed Displays . . . . . . . . . . . . . . . . . . . . . . . . . . . . . . . . . . . . . . . . . . . . . . . . . .
4-3-1 Inputting Characters . . . . . . . . . . . . . . . . . . . . . . . . . . . . . . . . . . . . . . . . . . . . . . .
4-3-2 Inputting Marks . . . . . . . . . . . . . . . . . . . . . . . . . . . . . . . . . . . . . . . . . . . . . . . . . . .
4-3-3 Creating Polylines . . . . . . . . . . . . . . . . . . . . . . . . . . . . . . . . . . . . . . . . . . . . . . . . .
4-3-4 Creating Squares . . . . . . . . . . . . . . . . . . . . . . . . . . . . . . . . . . . . . . . . . . . . . . . . . .
4-3-5 Creating Polygons . . . . . . . . . . . . . . . . . . . . . . . . . . . . . . . . . . . . . . . . . . . . . . . . .
4-3-6 Creating Circles/Arcs . . . . . . . . . . . . . . . . . . . . . . . . . . . . . . . . . . . . . . . . . . . . . .
4-3-7 Creating Fans . . . . . . . . . . . . . . . . . . . . . . . . . . . . . . . . . . . . . . . . . . . . . . . . . . . .
4-3-8 Tiling . . . . . . . . . . . . . . . . . . . . . . . . . . . . . . . . . . . . . . . . . . . . . . . . . . . . . . . . . . .
Setting Numeral Displays . . . . . . . . . . . . . . . . . . . . . . . . . . . . . . . . . . . . . . . . . . . . . . . . .
4-4-1 Setting Numeral Displays . . . . . . . . . . . . . . . . . . . . . . . . . . . . . . . . . . . . . . . . . . .
4-4-2 Modifying Numeral Displays . . . . . . . . . . . . . . . . . . . . . . . . . . . . . . . . . . . . . . . .
Setting Character-String Displays . . . . . . . . . . . . . . . . . . . . . . . . . . . . . . . . . . . . . . . . . .
4-5-1 Setting Character-String Displays . . . . . . . . . . . . . . . . . . . . . . . . . . . . . . . . . . . . .
4-5-2 Modifying Character-String Displays . . . . . . . . . . . . . . . . . . . . . . . . . . . . . . . . . .
Setting Lamps . . . . . . . . . . . . . . . . . . . . . . . . . . . . . . . . . . . . . . . . . . . . . . . . . . . . . . . . . .
4-6-1 Setting Lamps . . . . . . . . . . . . . . . . . . . . . . . . . . . . . . . . . . . . . . . . . . . . . . . . . . . .
4-6-2 Modifying Lamps . . . . . . . . . . . . . . . . . . . . . . . . . . . . . . . . . . . . . . . . . . . . . . . . .
Setting Touch Switches . . . . . . . . . . . . . . . . . . . . . . . . . . . . . . . . . . . . . . . . . . . . . . . . . .
4-7-1 Setting Touch Switches . . . . . . . . . . . . . . . . . . . . . . . . . . . . . . . . . . . . . . . . . . . . .
4-7-2 Modifying Touch Switches . . . . . . . . . . . . . . . . . . . . . . . . . . . . . . . . . . . . . . . . . .
Creating Graphs . . . . . . . . . . . . . . . . . . . . . . . . . . . . . . . . . . . . . . . . . . . . . . . . . . . . . . . .
4-8-1 Setting Graphs . . . . . . . . . . . . . . . . . . . . . . . . . . . . . . . . . . . . . . . . . . . . . . . . . . . .
4-8-2 Modifying Graphs . . . . . . . . . . . . . . . . . . . . . . . . . . . . . . . . . . . . . . . . . . . . . . . . .
Creating Input Settings . . . . . . . . . . . . . . . . . . . . . . . . . . . . . . . . . . . . . . . . . . . . . . . . . . .
4-9-1 Creating Numeral Setting Input Fields . . . . . . . . . . . . . . . . . . . . . . . . . . . . . . . . .
4-9-2 Creating Character-String Setting Input Fields
(NT30, NT30C, NT610G, NT610C with Ver.3 or Later Only) . . . . . . . . . . . . . .
4-9-3 Setting Window Displays
(NT30, NT30C, NT610G, NT610C with Ver.3 or Later Only) . . . . . . . . . . . . . .
4-9-4 Creating Numeric Keys . . . . . . . . . . . . . . . . . . . . . . . . . . . . . . . . . . . . . . . . . . . . .
4-9-5 Modifying Numeral/Character-String Setting Input Fields . . . . . . . . . . . . . . . . . .
4-9-6 Changing Orders . . . . . . . . . . . . . . . . . . . . . . . . . . . . . . . . . . . . . . . . . . . . . . . . . .
Extended I/O Settings . . . . . . . . . . . . . . . . . . . . . . . . . . . . . . . . . . . . . . . . . . . . . . . . . . . .
Inputting Image and Library Data . . . . . . . . . . . . . . . . . . . . . . . . . . . . . . . . . . . . . . . . . .
Editing Memory Tables . . . . . . . . . . . . . . . . . . . . . . . . . . . . . . . . . . . . . . . . . . . . . . . . . .
Creating Alarm Lists/Histories . . . . . . . . . . . . . . . . . . . . . . . . . . . . . . . . . . . . . . . . . . . . .
4-13-1 Setting Alarm Lists/Histories . . . . . . . . . . . . . . . . . . . . . . . . . . . . . . . . . . . . . . . .
4-13-2 Modifying Alarm Lists/Histories . . . . . . . . . . . . . . . . . . . . . . . . . . . . . . . . . . . . .
Standalone Settings . . . . . . . . . . . . . . . . . . . . . . . . . . . . . . . . . . . . . . . . . . . . . . . . . . . . .
Editing Screen Data . . . . . . . . . . . . . . . . . . . . . . . . . . . . . . . . . . . . . . . . . . . . . . . . . . . . .
SECTION 5
Creating Marks, Images, and Library Data . . . . . . . . . . .
5-1
viii
Marks
5-1-1
5-1-2
5-1-3
................................................................
Mark Creation Procedure . . . . . . . . . . . . . . . . . . . . . . . . . . . . . . . . . . . . . . . . . . .
Mark Creation Screen . . . . . . . . . . . . . . . . . . . . . . . . . . . . . . . . . . . . . . . . . . . . . .
Mark Creation Functions . . . . . . . . . . . . . . . . . . . . . . . . . . . . . . . . . . . . . . . . . . .
78
79
80
80
82
84
86
88
90
92
93
96
96
97
98
98
99
100
100
104
105
106
115
117
118
126
128
131
134
135
136
137
139
140
141
143
144
145
147
149
150
159
160
160
160
161
5-2
Images . . . . . . . . . . . . . . . . . . . . . . . . . . . . . . . . . . . . . . . . . . . . . . . . . . . . . . . . . . . . . . .
5-2-1 Procedure for Image Creation . . . . . . . . . . . . . . . . . . . . . . . . . . . . . . . . . . . . . . . .
5-2-2 Image Editing Operations . . . . . . . . . . . . . . . . . . . . . . . . . . . . . . . . . . . . . . . . . . .
Library Data . . . . . . . . . . . . . . . . . . . . . . . . . . . . . . . . . . . . . . . . . . . . . . . . . . . . . . . . . . .
5-3-1 Procedure for Library Data Creation . . . . . . . . . . . . . . . . . . . . . . . . . . . . . . . . . .
5-3-2 Library Editing Operations . . . . . . . . . . . . . . . . . . . . . . . . . . . . . . . . . . . . . . . . . .
164
165
166
171
171
172
SECTION 6
Printing Data . . . . . . . . . . . . . . . . . . . . . . . . . . . . . . . . . . . .
175
6-1-1 Things that can be Done Using the Data Printing Function . . . . . . . . . . . . . . . . .
6-1-2 Printing from the “File Selection” Screen . . . . . . . . . . . . . . . . . . . . . . . . . . . . . . .
6-1-3 Printing from the “Screen Selection” Screen . . . . . . . . . . . . . . . . . . . . . . . . . . . .
176
178
180
SECTION 7
Data Communication . . . . . . . . . . . . . . . . . . . . . . . . . . . . .
183
5-3
7-1
7-2
7-3
Preparation and Procedure for Data Communication with the PT . . . . . . . . . . . . . . . . . .
Transmitting Data . . . . . . . . . . . . . . . . . . . . . . . . . . . . . . . . . . . . . . . . . . . . . . . . . . . . . . .
Receiving Data . . . . . . . . . . . . . . . . . . . . . . . . . . . . . . . . . . . . . . . . . . . . . . . . . . . . . . . . .
7-3-1 Data Reception . . . . . . . . . . . . . . . . . . . . . . . . . . . . . . . . . . . . . . . . . . . . . . . . . . .
7-3-2 Reception of Display History Records . . . . . . . . . . . . . . . . . . . . . . . . . . . . . . . . .
184
188
190
190
192
APPENDICES . . . . . . . . . . . . . . . . . . . . . . . . . . . . . . . . . . .
193
A.
B.
C.
Connecting Cable Specifications . . . . . . . . . . . . . . . . . . . . . . . . . . . . . . . . . . . . . . . . . . .
Tool Interface Connector Specifications . . . . . . . . . . . . . . . . . . . . . . . . . . . . . . . . . . . . .
Assembly of Connecting Cables . . . . . . . . . . . . . . . . . . . . . . . . . . . . . . . . . . . . . . . . . . .
Error Messages . . . . . . . . . . . . . . . . . . . . . . . . . . . . . . . . . . . . . . . . . . . . . . . . . . . . . . . . .
Special Characters . . . . . . . . . . . . . . . . . . . . . . . . . . . . . . . . . . . . . . . . . . . . . . . . . . . . . .
193
193
193
195
197
ix
About this Manual:
This manual describes the basic functions and operation procedures of the NT-series Support Tool and
includes the sections described below.
Please read this manual carefully and be sure you understand the information provided before attempting
to install and operate the NT-series Support Tool.
WARNING Failure to read and understand the information provided in this manual may result in personal
injury or death, damage to the product, or product failure. Please read each section in its
entirety and be sure you understand the information provided in the section and related sections before attempting any of the procedures or operations given.
SECTION 1
Setting Up the Support Tool
This section describes how to install the support tool at a personal computer.
SECTION 2
Basic Operations of the Support Tool
This section describes the basic operations that apply to the support tool as a whole, such
as those for start-up, exit, and settings.
SECTION 3
Support Tool Operations
This section describes how to use the basic screens of the support tool, setting options,
and the functions of the function keys.
SECTION 4
Creating Screen Data
This section describes how to create the screen data to be displayed by the programmable terminal (PT).
SECTION 5
Creating a Marks, Images, and Library Data
This section describes how to create special characters and symbols (marks), image
data, and library data.
SECTION 6
Printing Data
This section describes how to print various types of support tool data, such as screen
data and the conditions of use of memory tables.
SECTION 7
Data Communication
This section describes how to transfer screen data created using the support tool to the
PT, and how to receive data from the PT.
Appendix
x
This section describes the specifications of the connecting cables, error messages, etc.
Organization of the Manual, and How to Use It:
The related manuals are listed below.
* The final digit of the manual number is the revision code.
[For operating the support tool]
S NT-series Support Tool Operation Manual (V028-E1-1)
. . . . . . . . . . . . . . . . . . . . . . . . . . . . . . . . . . . . . . . . . . . . . . . . . . . . . . . This manual
The support tool displays details of operations and procedures on the screen in
the form of “help messages”. Normally, operations can be performed by following these messages.
However, if you become unsure how to proceed during the course of an operation, or want to check the capabilities of the support tool, refer to this manual.
This manual only describes the operations pertinent to the support tool itself. It
does not give detailed explanations of the meanings or effects of the items to be
set. For this information, refer to the manuals below.
[For information on PT functions, operations, and restrictions]
S NT20M/NT2000M Programmable Terminal Operation Manual (V001-E1-2)
S NT20S Programmable Terminal Operation Manual (V020-E1-2)
S NT600M Programmable Terminal Operation Manual (V002-E1-2)
S NT600S Programmable Terminal Operation Manual (V022-E1-1)
S NT30/NT30C Programmable Terminal Operation Manual (V034-E1-1)
S NT612G Programmable Terminal Operation Manual (V024-E1-1)
S NT610C Programmable Terminal Operation Manual (V025-E1-1)
S NT620S/NT620C Programmable Terminal Operation Manual (V033-E1-1)
These manuals contain full descriptions of PT functions, operations, and restrictions. They are organized in a manner that allows screen data to be created by
following the User’s Manual for the PT.
[For communication between the PT and host]
S NT-series Direct Connection Operation Manual (V026-E1-1)
The functions that can be executed and the methods for these functions differ
widely according to the host interface unit. The user’s manuals for the host interface units have been compiled with the PT, the PC, and the communication format taken into consideration.
Anyone familiar with the functions of the PT can create screen data by referring to
the manual for the host interface unit alone.
[For information on the functions and operations of the PC]
S User’s manual for each PC
When you need information about the operations, functions, etc., of the PC, refer
to the operation manual for the PC, advanced function unit, or communication
unit being used.
xi
Usable Hardware Combinations
The combinations of hardware that can be used, and the settings to be made with
the support tool, are shown in the table below. Within each box of the table, the
upper entry indicates the model of the interface unit (latter part of the model designation only) and the lower entry in parentheses indicates the model of the system ROM (latter part of the model designation only).
This table shows the basic combinations. Depending on the PT display method
and system configuration, they may not be usable.
Communication
Method
None
Ver.4
Ver.5
NT20S
Host
−
ST121 (-V1) (*1)
ST121 (-V1) (*2)
NT
−
ST121 (-V1) (*1)
ST121 (-V1) (*2)
RS
ST128 (*2)
−
−
C200H
−
ST121 (-V1) (*1)
ST121 (-V1) (*2)
Host
LK201
(SMR01-E)
LK201
(SMR31-E)
−
RS
LK201/LK202
(SMR01-E)
−
−
C200H
LB121
(SMR02-E)
LB122
(SMR32-E)
−
SYSBUS
RT121
(SMR01-E)
−
−
Host
−
ST121 (-V1)/ST211 (-V1)
(*2)
ST121 (-V1)/ST211 (-V1)
(*2)
NT
−
ST121 (-V1)/ST211 (-V1)
(*2)
ST121 (-V1)/ST211 (-V1)
(*2)
RS
ST121/ST211 (*2)
−
−
C200H
−
LB122
LB122
Host
LK201 (*3)
(SMR01-EV1)
LK201
(SMR31)
−
RS
LK201/LK202
(SMR01-EV1)
−
−
C200H
LB121
(SMR02-EV1)
LB122
(SMR32)
−
SYSBUS
RT121
(SMR01-EV1)
−
−
NT20M/
NT2000M
NT600S
NT600M
xii
Support Tool “Direct Access” Setting
PT Model
Support Tool “Direct Access” Setting
Communication
Method
Ver.3
Ver.4
Ver.5
NT30/
NT30C
Host (*2)
−
ST131/ST141
−
NT (*2)
−
ST131/ST141
−
NT612G
Host (*4)
LK210/LK202
(SMR31-V21)
−
−
NT (*4)
LK201
(SMR34-V21)
−
−
RS
−
−
−
C200H
LB122
(SMR32-V21)
−
−
BUS/2
−
−
−
Host (*4)
LK210/LK202
(SMR31-V21)
−
−
NT (*4)
LK201
(SMR34-V21)
−
−
RS
−
−
−
C200H
LB122
(SMR32-V21)
−
−
BUS/2
−
−
−
Host (*5)
−
ST211/ST141
−
NT (*5)
−
ST211/ST141
−
PT Model
NT610C
NT620S/
NT620C
(*1) Since the host interface unit/system ROM are incorporated, the PT model is
indicated. Set “NT20M” as the NT Model with the support tool.
(*2) Since the host interface unit/system ROM are incorporated, the PT model is
indicated.
(*3) There is also a system ROM for use with the process control function
(SMR05).
(*4) When the host link or NT link method of the direct connection function is
used, the DAC function (process control function) can be loaded from the
support tool.
(*5) Since the host interface unit and system ROM are incorporated, the PT
model is indicated. When using an NT620S, set “NT610G (NT612G)” as
the NT Model with the support tool, and when using an NT620C, set
“NT610C”. The DAC function (process control function) can be loaded from
the support tool.
Communication methods are indicated in the table above using the following abbreviations:
Host: Host link
C200H: C200H
NT: NT link
RS: RS-232C/422
SYSBUS: SYSBUS
xiii
PT Model and Tool Settings
“PT Type” and “Direct Access”
The following combinations of “PT Type” and “Direct Access” settings can be
made in the Tool Settings.
PT Type
Direct
Access
20S
20M
600S
600M
30
30C
612G
610C
620S
620C
None
f
f
f
f
×
×
×
×
×
×
Ver.3
×
×
×
×
×
×
f
f
×
×
Ver.4
×
f
f
f
f
f
×
×
f
f
Ver.5
f
×
f
×
×
×
×
×
×
×
Specifiable Tool Settings
The Tool Settings items that can be set in combination with each “PT Type” and
“Direct Access” setting are indicated in the table below.
PT Type
Direct Access
20S
20M
600S
600M
None
Ver.4
Ver.5
None
Ver.4
None
Ver.4
Ver.5
None
Ver.4
32KB
×
×
×
f
f
×
×
×
f
f
64KB
f
f
×
f
f
×
×
×
f
f
96KB
×
×
f
f
f
×
×
×
f
f
128KB
×
×
×
f
f
f
f
f
f
f
256KB
×
×
×
×
×
×
×
×
f
f
512KB
×
×
×
×
×
×
×
×
×
×
1024KB
×
×
×
×
×
×
×
×
×
×
Printer
f
f
f
f
f
f
f
f
f
f
Sheet Feeder
f
f
f
f
f
f
f
f
f
f
Mouse Use
f
f
f
f
f
f
f
f
f
f
Communication Mode
f
f
f
f
f
f
f
f
f
f
Communication Port
f
f
f
f
f
f
f
f
f
f
Work Directory
f
f
f
f
f
f
f
f
f
f
Data Directory
f
f
f
f
f
f
f
f
f
f
Time [F3]
×
×
×
×
×
×
×
×
×
×
Edit [F4]
f
f
f
f
f
f
f
f
f
f
Memory
Size
xiv
PT Type
30
30C
612G
620S
610C
620C
Direct Access
Ver.4
Ver.4
Ver.3
Ver.4
Ver.3
Ver.4
32KB
×
×
×
×
×
×
64KB
×
×
×
×
×
×
96KB
×
×
×
×
×
×
128KB
×
×
×
×
×
×
256KB
×
×
×
×
×
×
512KB
f
f
×
f
×
×
1024KB
×
×
f
×
f
f
Printer
f
f
f
f
f
f
Sheet Feeder
f
f
f
f
f
f
Mouse Use
f
f
f
f
f
f
Communication Mode
f
f
f
f
f
f
Communication Port
f
f
f
f
f
f
Work Directory
f
f
f
f
f
f
Data Directory
f
f
f
f
f
f
Time [F3]
f
f
f
f
f
f
Edit [F4]
f
f
f
f
f
f
Memory
Size
xv
Functions of the Support Tool:
Things that can be done using the support tool
The support tool has the following functions.
Creation of screen data . . . . . . . . . . . . . . . . . . . . . . . . . . . . . . . . . . . . SECTION 4 Creating Screen Data
Creates screen data to be displayed by an NT610C/NT612G.
Besides creating characters and graphics, lamps, touch switches, etc., as
screen data, it is also possible to allocate words for individual elements by using
the direct connection function.
Management of screen data . . . . . . . . . . . . . . . . . . . . . . . . . . . . SECTION 3 Support Tool Operations
Operations relating to screen data, such as the setting of screen attributes, and
copying and deletion in screen units, are possible.
File management . . . . . . . . . . . . . . . . . . . . . . . . . . . . . . . . . . . . . . SECTION 3 Support Tool Operations
Screen data can be managed in file units.
Data communication with the PT . . . . . . . . . . . . . . . . . . . . . . . . . . . . SECTION 7 Data Communication
The PT can be connected to the support tool for communication of screen data
files and other types of data.
Printing data . . . . . . . . . . . . . . . . . . . . . . . . . . . . . . . . . . . . . . . . . . . . . . . . . . . . . SECTION 6 Printing Data
Screen data, memory table data, etc., can be printed out at a printer.
Environmental settings . . . . . . . . . . . . . . . . . . . . . . . . . . . . . . . . . SECTION 3 Support Tool Operations
The parameters of the working environment, such as the PT model and data
memory capacity, can be set.
Creating files from screens . . . . . . . . . . . . . . . . . . . . . . . . . . . . . SECTION 3 Support Tool Operations
Screen data can be saved in Microsoft Windows (TM) files (BMP format)
Reading files created
with other available drawing software . . . . SECTION 5 Creating Marks, Images, and Library Data
Reading BMP files
Image files (BMP format) created using packages such as Microsoft Windows
(TM) Paintbrush can be read as data.
xvi
Menu Tree
Main Menu
* This comprises the function keys F1 through F10.
File Settings
Scr list
(p.26)
Edit
(p.31)
[Setting Items]
F1
Copy
F1
Copy
F2
Delete
F2
Delete
F3
Print
F3
Print
F4
ToolS
F4
Attrib
F5
Hist.
F5
Read
F6
Tmx.
F6
Commnt
F7
Rcv.
F7
Image & Lib
F8
In.Scr
F8
Co/Ovl
F9
Title
F9
Mark
Fixed display
Character input (p.80)
Mark display (p.82)
Polyline (p.84)
Square (p.86)
Polygon (p.88)
Circle, arc (p.90)
Fan (p.92)
Tiling (p.93)
Numeral display (p.96)
Character-string display (p.98)
Lamp setting (p.100)
Touch switch setting (p.105)
Graph creation (p.117)
Bar graph
Trend graph
Broken-line graph
F10
Next
F10
Next
Input setting (p.128)
Data input
Keyboard display
F1
F10
F1
ROM
Prev
[Setting Items]
Tool Settings
(p.22)
Exit
F3
Time
F4
Edit
PT Type
Memory Size
Direct Access
Direct Macn Type
Printer
Sheet Feeder
Mouse Use
Communication Port
Communication Mode
Work Directory
Data Directory
Check
F2
Direct
F3
CoFile
F4
BchChg
F6
Tmx.
F7
Rcv.
F10
Prev
User ten keys
Extended I/O settings (p.140)
Image library data display (p.141)
Memory table edit
Numeric values
Character-strings
Alarm list setting (p.144)
Screen data editing (p.150)
Copy
Move
Delete
Centering
Environmental settings (p.59)
xvii
xviii
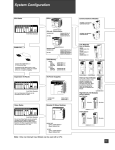
SECTION 1
Setting Up the Support Tool
When using the support tool for the first time, the support tool system has to be installed in the personal computer you are
using.
This section describes the environment in which the support tool can be used and the method for installing it in a personal
computer.
1-1
1-2
Preparing Equipment . . . . . . . . . . . . . . . . . . . . . . . . . . . . . . . . . . . . . . . . . . . . . . . . . . . . . . . . . .
1-1-1 Equipment to be Prepared . . . . . . . . . . . . . . . . . . . . . . . . . . . . . . . . . . . . . . . . . . . . . . . .
1-1-2 Before Starting Preparations . . . . . . . . . . . . . . . . . . . . . . . . . . . . . . . . . . . . . . . . . . . . . . .
IBM PC/AT Preparations . . . . . . . . . . . . . . . . . . . . . . . . . . . . . . . . . . . . . . . . . . . . . . . . . . . . . . .
1-2-1 Installation Method . . . . . . . . . . . . . . . . . . . . . . . . . . . . . . . . . . . . . . . . . . . . . . . . . . . . . .
2
2
3
4
4
1
Preparing Equipment
1-1
Section 1-1
Preparing Equipment
The following equipment and materials must be prepared in order to use the support tool.
1-1-1
Equipment to be Prepared
Software
S NT Series Support Tool (Type NT-ZA3AT-EV2)
This software comes in the form of a 3.5 inch floppy disk.
S DOS
IBM DOS, Ver.5.02 or later version is required.
Hardware
S IBM PC/AT Personal computer
At least 640 Kbytes of main memory is required.
Use an IBM personal computer or 100% compatible.
S At least one floppy disk drive (2HD format type)
There must be one 3.5 inch drive.
S Display
VGA compatible display
When creating screen data for an NT30C/NT610C/NT620C, a color display is required.
S Mouse
Serial mouse or bus mouse
A Microsoft mouse driver is required.
[Common Items]
S Printer
EPSON ESC/P printer (24 pin) or HP LASER Jet.
S Hard disk drive
A hard disk is essential. The available area required for the support tool files and
data area is 2 Mbytes.
2
Preparing Equipment
Section 1-1
S Using the EMS (expansion memory)
The EMS must be loaded to the support tool before using it.
DEVICE=EMM386.SYS /F=C000
Equipment Relating to Transfer of Screen Data
S RS-232C connecting cable
For the cable specifications, see Section 7 Data Communication, and the Appendix.
Recommended environment
For convenience, you are recommended to use the NT series support tool in the
following environment.
Support tool installation site
:
Hard disk
Work directory (tool settings)
:
RAM disk
Data directory (tool settings)
:
Hard disk
For details on “tool settings”, see 3-3 “Tool Settings” Screen (p.22).
Note
1-1-2
Back up the data stored in the hard disk in a floppy disk.
Before Starting Preparations
Be sure to make a back-up disk for the support tool system disk and keep the original somewhere safe.
When making the back-up, ensure that the original disk is write-protected, as
shown below:
Write-protection tag
3
IBM PC/AT Preparations
1-2
Section 1-2
IBM PC/AT Preparations
To enable the support tool to be run on your IBM PC/AT, install the system in its
hard disk by using the support tool installation program.
1-2-1
Installation Method
Explained here is the method for installing the system in a hard disk that already
has a history of use.
Check that the following conditions are satisfied.
S IBM DOS (Version 5.02 or later) is installed.
S [FORMAT.EXE] and [DISKCOPY.EXE] are loaded.
If these files are loaded in a subdirectory, set an environment variable PATH.
For the purposes of this explanation, the drive configuration is assumed to be as
follows:
Drive A: 3.5 inch floppy disk
Drive B: 3.5 inch floppy disk
Drive C: Hard disk
If the drives of the system you are using differ from those in this example, rename
the drive names in the example to achieve correspondence with your system (remember that there must be at least one 3.5 inch floppy disk drive).
Procedure
1. Start up the personal computer that has DOS installed in its hard disk.
2. Prepare a new floppy disk and use it to create a back up disk for the support
tool system disk in the following way.
Set the new disk in the B drive.
Enter “FORMAT B:
”. The new disk will be formatted.
On completion of formatting, set the support tool system disk in the A drive.
Enter “DISKCOPY A: B:
”. The back up disk will be created.
" If the disks in drive A and drive B are of different types, use the command
“DISKCOPY A: A:
” and create the back up disk in the same drive.
Now take the original disk out of the A drive and store it, and transfer the back
up disk to the A drive.
3. Use the command “A:
4. Enter “INSTALL C: \NT
” to set the current drive to “A”.
”.
The underlined part (\NT) is the directory in the hard disk to which the support tool
is copied; if it does not exist already it is created automatically. It is possible to
specify another directory name.
4
IBM PC/AT Preparations
Section 1-2
WARNING
If a directory that already exists is specified, the support
tool system will be copied to that directory with no request
for confirmation. Make sure that no necessary files will be
overwritten.
5. When the message indicating completion is displayed, the installation work is
finished.
D Notes on Installation
S A hard disk with an available capacity of at least 2 Mbytes is required in order to
install the NT series support tool. If a work directory for the support tool is to be
created on the hard disk, an additional capacity of up to 2 Mbytes will also be
required.
S Start installation after securing sufficient available capacity.
D Available Capacity Required to Run the NT Series Support Tool
S At least 445 Kbytes (455000 bytes) of available main memory capacity is required to run the NT series support software (NT.EXE).
D Checking Available Main Memory Capacity
S Check the available main memory capacity either by using CHKDSK.EXE or
MEM.EXE, which are included in the DOS package.
S Input “CHKDSK.EXE” or “MEM.EXE” at the command line to display the
memory capacity and other data. If the “usable memory” or “maximum
executable program size” is 445 Kbytes (455000 bytes) or greater, NT.EXE
can be used.
5
IBM PC/AT Preparations
6
Section 1-2
SECTION 2
Basic Operations of the Support Tool
This section explains the basic operations that apply to the support tool as a whole, such as those for starting up and exiting the
support tool, and operations using the keyboard and mouse.
When using the support tool, “help messages” which explain the operating procedures are displayed on the screen. After
becoming familiar with the basic operations by reading this section, you will therefore be able to use the support tool by
following the help messages.
2-1
2-2
Starting Up and Exiting the Support Tool . . . . . . . . . . . . . . . . . . . . . . . . . . . . . . . . . . . . . . . . . .
2-1-1 Start-Up Procedure . . . . . . . . . . . . . . . . . . . . . . . . . . . . . . . . . . . . . . . . . . . . . . . . . . . . . .
2-1-2 Exit Procedure . . . . . . . . . . . . . . . . . . . . . . . . . . . . . . . . . . . . . . . . . . . . . . . . . . . . . . . . .
Basic Operating Procedures . . . . . . . . . . . . . . . . . . . . . . . . . . . . . . . . . . . . . . . . . . . . . . . . . . . . .
2-2-1 Cursors . . . . . . . . . . . . . . . . . . . . . . . . . . . . . . . . . . . . . . . . . . . . . . . . . . . . . . . . . . . . . . .
2-2-2 Selecting Options . . . . . . . . . . . . . . . . . . . . . . . . . . . . . . . . . . . . . . . . . . . . . . . . . . . . . . .
2-2-3 Using the Function Keys . . . . . . . . . . . . . . . . . . . . . . . . . . . . . . . . . . . . . . . . . . . . . . . . .
2-2-4 Using the Mouse . . . . . . . . . . . . . . . . . . . . . . . . . . . . . . . . . . . . . . . . . . . . . . . . . . . . . . . .
2-2-5 Using Help Messages . . . . . . . . . . . . . . . . . . . . . . . . . . . . . . . . . . . . . . . . . . . . . . . . . . . .
2-2-6 Selecting Numbers and Codes . . . . . . . . . . . . . . . . . . . . . . . . . . . . . . . . . . . . . . . . . . . . .
8
8
9
10
10
11
11
12
15
16
7
Starting Up and Exiting the Support Tool
2-1
Section 2-1
Starting Up and Exiting the Support Tool
This section describes the procedure for starting up the support tool once it has
been installed in a personal computer.
2-1-1
Start-Up Procedure
The method for start-up differs a little according to the hard disk drive and directory
in which the support tool is installed.
Procedure
1. Switch on the power supply to the personal computer to start up DOS.
Check that the current drive is the drive for the hard disk in which the support
tool is installed.
” to change the current drive. For the underlined part
If it is not, enter “C:
(C:), specify the drive name of the drive in which the support tool is installed.
2. Use the command “CD \NT
” to change the current directory to the directory that contains the support tool. For the underlined part (\NT), specify the
name of the directory into which the support tool was copied.
3. Input “NT
”.
The support tool will start up.
S “Main Menu” screen of the support tool
When the support tool starts up the “Main Menu” screen shown below will be
displayed.
Reference: When the support tool is started up for the first time, the “Tool Settings” screen is
displayed first. See 3-3 “Tool Settings” Screen (p.22).
8
Starting Up and Exiting the Support Tool
2-1-2
Section 2-1
Exit Procedure
When the “Main Menu” screen is displayed, move the cursor to “Exit” using the [ ]
[ ] keys and press enter key ( ).
The support tool will be exited and the DOS prompt will be displayed.
After the prompt has appeared, switch the power off.
9
Basic Operating Procedures
2-2
Section 2-2
Basic Operating Procedures
The support tool is a software package that allows the creation of screen data for a
PT, and communication with a PT, using simple operations. The user can perform
these operations simply by following the help displays that appear on the screen.
Support tool operations can be performed either by using the keyboard or by using
a mouse.
This section explains basic operations such as the selection of menu options and
operation of the mouse.
2-2-1
Cursors
The following types of cursor are displayed on the screen in different circumstances.
), box cursor (
S Bar cursor (
), check box (
)
Used to select options, file names, etc.
This cursor is moved by using the [ ][ ][ ][ ] keys or the mouse.
S Mouse cursor (
)
This cursor follows the motion of the mouse. When performing operations using
the mouse, locate this cursor on the required item and click the left mouse button.
S Cup cursor (
)
This cursor is displayed while the support tool is carrying out processing. When
the processing is finished it changes into the mouse cursor.
S Enquiry cursor (
)
This cursor is displayed while the support tool is waiting for the input of a reply,
key (for YES) or
such as YES/NO. When this cursor is displayed, press the
the [Esc] key (for NO).
When using the mouse, press either the left button (for YES) or the right button
(for NO). It is also possible to click on icons with the pointed part of the enquiry
cursor (at its top left corner) (p.12).
S Key input prompt cursor (
)
This cursor is displayed when input is required. When it is displayed, carry out
input from the keyboard or by using the mouse.
10
Basic Operating Procedures
2-2-2
Section 2-2
Selecting Options
When performing operations using the support tool it will be necessary to select
menu options, choices, file names, etc.
Such selections are made by locating the bar cursor on the item to be selected by
key.
using the arrow keys ([ ][ ][ ][ ] keys) and pressing the
Move using [ ] [ ]
Move using [ ] [ ]
\
\
Items which cannot be selected are displayed in red.
2-2-3
Using the Function Keys
The currently available functions and currently selectable options are displayed at
the bottom of the screen. The items displayed correspond to the function keys on
the keyboard. To execute one of the displayed options, press the function key on
the keyboard that corresponds to it.
F1
F2
F3
F4
F5
F6
F7
F8
F9
F10
11
Basic Operating Procedures
2-2-4
Section 2-2
Using the Mouse
It is possible to perform all the support tool operations by using a mouse.
The left button of the mouse has the same function as the
and right button the same function as the [Esc] button.
key on the keyboard
Selection or specification of items using the mouse is achieved by clicking one of
its buttons. “Clicking” means pressing the button and releasing it immediately.
Clicking with the left mouse button is sometimes called “left clicking” and clicking
with the right mouse button is sometimes called “right clicking”.
S “Mouse Use” specification
Whether the mouse is used or not is specified with the “Mouse Use” option of the
“Tool Settings” menu (see p.22). If “No” is specified, the mouse cursor ceases to
be displayed (however, even if “No” is specified, the mouse cursor will be displayed and will be able to be used when editing image data).
S Selection
Select items by moving the cursor to them and clicking on them.
For example, to select a file, locate the mouse cursor at the intended file name and
click the left mouse button. When the bar cursor has moved, click on the file name
again with the left button. This will select the file.
Clicking on an input field has the same effect as pressing the
key.
S Icon operations
The key marks displayed in the help message area and elsewhere are icons that
can be actuated with the mouse. Clicking on an icon with the left mouse button will
execute the function represented by that icon.
For example, clicking on the [SPACE] mark displayed on the screen with the left
key.
mouse button will have the same effect as pressing the
Click on the
mark with
the mouse.
Icons
12
Basic Operating Procedures
Section 2-2
S Operations on the editing screen
When specifying coordinate positions etc. on the editing screen, the cross-hair
cursor (intersecting vertical and horizontal lines) is displayed. The cross-hair cursor follows the motion of the mouse. To fix a position, click the left mouse button.
Cross-hair cursor
When the cross-hair cursor touches the menu box, the menu box is automatically
cleared from the screen and coordinates are displayed at the top right of the
screen. When the operation with the cross-hair cursor is completed, the menu box
is redisplayed.
Whether or not a menu box is displayed when the cross-hair cursor is displayed is
specified in the “environmental settings” (tool settings for the “Edit” screen).
S Double click
To specify the end points for continuous lines and polygons, double-click the
mouse. “Double-clicking” means pressing the left mouse button twice in rapid succession.
13
Basic Operating Procedures
Section 2-2
S Moving the bar cursor
When screens or display elements are displayed in a list, the bar cursor can be
moved by clicking at entries above or below the current cursor position.
Clicking here causes the
bar cursor to move upward.
Bar cursor
Clicking here causes the bar
cursor to move downward.
14
Basic Operating Procedures
2-2-5
Section 2-2
Using Help Messages
The support tool is provided with “help messages” for each screen: they display
the key operations that can currently be used, or prompt parameter input or selections.
The key displays in the help message area also function as icons that can be actuated using the mouse.
Operate the support tool by following the help messages. There are two types of
help message, distinguished on the basis of the screen and function, as indicated
below.
S Help messages that display the operating procedure
Usually, as shown in the screen below, the operation keys that can be used with
the current screen, and their details, are displayed in the help message area.
Operation help message
The
key, cursor keys, [Page Down], [Page Up], etc., can be used even if they
are not displayed.
S Help messages for parameter input
In cases such as when a function has been selected with a function key, settings
and parameters can be specified in the help message area.
15
Basic Operating Procedures
2-2-6
Section 2-2
Selecting Numbers and Codes
The support tool allows simple selection of the following numbers and codes.
S Screen numbers
S Numeral table numbers
S Character-string memory table numbers
S Bit memory table numbers
S Image codes
S Library codes
S Extended I/O input terminal numbers (*)
S Extended I/O output terminal numbers (*)
(*)
Only number specification using the [Tab] key can be used for these.
When a screen that displays a list of numbers or codes is displayed, the key operations indicated below can be used:
[Shift] + [ ] key
: Moves the bar cursor from the position where it is currently
located to the previous number or code for which there is
data.
[Shift] + [ ] key
: Moves the bar cursor from the position where it is currently
located to the next number or code for which there is data.
Example:
Assume that the bar cursor is on screen number 6 and there is data only for screen
numbers 2, 4, and 10:
[Shift] + [ ] key
: The bar cursor moves to screen number 4.
[Shift] + [ ] key
: The bar cursor moves to screen number 10.
If now, while the bar cursor is at screen number 10, [Shift] + [ ] is pressed again,
the bar cursor will move full cycle to screen number 2.
16
Basic Operating Procedures
Section 2-2
[Tab] key
: The number/code input field is displayed. When a number of
key pressed, the bar cursor moves
code is input and the
to the specified number or code.
Example: Screen number input field
17
Basic Operating Procedures
18
Section 2-2
SECTION 3
Support Tool Operations
The support tool has the following 5 screens: the “Main Menu” screen, the “Tool Settings” screen, the “File Selection”
screen, the “Screen Selection” screen, and the “Edit” screen. This section describes the four screens other than the “Edit”
screen.
3-1
3-2
3-3
3-4
3-5
Using the Support Tool . . . . . . . . . . . . . . . . . . . . . . . . . . . . . . . . . . . . . . . . . . . . . . . . . . . . . . . .
Main Menu . . . . . . . . . . . . . . . . . . . . . . . . . . . . . . . . . . . . . . . . . . . . . . . . . . . . . . . . . . . . . . . . .
“Tool Settings” Screen . . . . . . . . . . . . . . . . . . . . . . . . . . . . . . . . . . . . . . . . . . . . . . . . . . . . . . . . .
“File List” Screen . . . . . . . . . . . . . . . . . . . . . . . . . . . . . . . . . . . . . . . . . . . . . . . . . . . . . . . . . . . .
“Scr list” Screen . . . . . . . . . . . . . . . . . . . . . . . . . . . . . . . . . . . . . . . . . . . . . . . . . . . . . . . . . . . . . .
3-5-1 Functions of the “Scr list” Screen . . . . . . . . . . . . . . . . . . . . . . . . . . . . . . . . . . . . . . . . . .
3-5-2 Setting Direct Connection Information . . . . . . . . . . . . . . . . . . . . . . . . . . . . . . . . . . . . . .
20
21
22
26
31
31
42
19
Using the Support Tool
3-1
Section 3-1
Using the Support Tool
The support tool is a software package for creating screen data and transferring it
to a PT.
The support tool has five basic screens and on these five screens it is possible to
create data, and to select various functions and execute them.
The relationships between the screens are shown below.
Support Tool Startup/Exit
Main Menu
“Tool Settings” screen
Used to set the environmental
settings for the support tool, such
as the PT model used.
“File List” screen
Used to select screen data files.
Permits various file-related operations.
Communication with the PT
Execute communication of
screen data etc. with the PT.
Print
“Screen List” screen
Used to select screen data.
Screen data attributes can be set
and various operations relating to
screen data are possible.
Print screen data, conditions of use
of memory tables, etc., at a printer,
or store them in files.
“Edit” screen
Used to create screen data using
characters and graphics.
Reference: When the support tool is started up for the first time, the “Tool Settings” screen is
displayed first.
20
Main Menu
3-2
Section 3-2
Main Menu
When the support tool is started up, the “Main Menu” screen is displayed first.
The items in the main menu have the following functions.
S Edit Screen: Select this item to create or edit screen data. The “File Selection”
screen will be displayed and operations relating to screen data
and files will be possible.
S Tool Settings: Used to set the environmental conditions for using the support
tool, such as the model of the PT used in conjunction with the support tool, the image data memory capacity, and the model of printer used. Provided there are no changes, these settings only have
to be set once.
S Exit :
Used to exit the support tool. To exit, select this item, wait for the
DOS prompt to be displayed and then switch the power off.
21
“Tool Settings” Screen
3-3
Section 3-3
“Tool Settings” Screen
This screen is used to set the environmental settings required to use the support
tool, such as the PT model, capacity of the screen data memory board, and the
directory in which data is saved.
When using the support tool for the first time, this screen is displayed first. Be sure
to set the tool settings in accordance with the model you are using. After this first
setting, it will not be necessary to set the tool settings again unless there is some
change.
When “Tool Settings” is selected from the main menu, the “Tool Settings” screen is
displayed. For details on the permissible combinations of settings, see “PT Model
and Tool Settings” (p.xiv) at the beginning of this section.
Settings
<“Tool Settings” screen>
\
\
S PT Type:
Note
22
Specify the model of PT being used.
The specified PT Type setting is different from the actual PT model in the following
cases:
NT20S-ST121 (without [-V1]):
[NT20M]
NT612G:
[NT610G]
NT620S:
[NT610G]
NT620C:
[NT610C]
S Memory Size:
Specify the capacity of the screen data memory
board installed in the PT.
S Direct Access:
Specify the direct connection version. If not using
the direct connection function, set “Ver.4” for the
NT20S, NT20M, NT600S, and NT600M. “NONE”
cannot be set for NT612G/610C or NT620C/S.
S Direct Macn Type:
Set “NONE” if direct connection is not used. Set
“OMRON” if direct connection is used.
“Tool Settings” Screen
Section 3-3
S Printer:
Specify the type of the printer used to print screen
data, etc., here.
S Sheet Feeder:
Specify whether or not the printer is fitted with a
sheet feeder here.
S Mouse Use:
Specify whether or not a mouse is used with the support tool, and, if a mouse is used, the operation when
the mouse is used.
If “Auto movement” is selected, the mouse cursor
moves automatically when a window or other screen
display for making setting is displayed, speeding up
input and specification operations.
If “No
AutoMvmnt” is selected, the mouse cursor does not
move automatically. However, the mouse cursor is
displayed, and can be used, during image data
editing, even if “Not used” is set.
S Communication Port:
Specify the port on the computer to be used to communicate with the PT. If possible, do not specify the
same port as the one used for the mouse.
S Communication Mode:
Set the communication speed for communication of
data with the PT.
Set “Stndrd” if the conditions for communication are
unfavorable due to interference, etc.
S Work Directory:
The support tool temporarily creates work files for
data creation and communication, etc. This setting
specifies the directory in which work files can be
created.
S Data Directory:
Specify the directory in which created screen data
files are saved here.
Reference: S The NT series support tool is compatible with all OMRON PT models, all
versions of the direct connection function (Ver.3, Ver.4, Ver.5), and the
communication methods other than direct connection. The support tool displays
and selectable functions differ according to the settings made for “PT Type”,
“Direct Access”, and “Direct Macn Type”.
S For details on the direct connection function, refer to the user’s manual for the
relevant host interface unit.
S The specified “PT Type”, “Memory Size”, “Direct Access”, and “Direct Macn
Type”, are displayed on each screen as shown below.
23
“Tool Settings” Screen
Section 3-3
Example
File Selection screen when “612G”, “512B”, and “Ver.3”, respectively, have been
set for these items.
File List
512KB
NT610G−V3−O
PT Type (PT model name)
Direct Access (Direct connection version)
Memory size
Direct Macn Type (Direct model)
V3 = “Ver.3”
V4 = “none”* or “Ver.4”
V5 = “Ver.5”
*:
O = PC made by OMRON
Noting displayed = Direct connection
not used
For “20M”, “20S”, “600M”, “600S”
Functions of the function keys
[TypSel]
[F1] . . . Direct connection setting for PT model
Used to set the “Direct Access” based on the model of PT or system ROM. Since
the settings for “PT Type”, “Memory Size”, “Direct Access” and “Direct Macn Type”
differ according to the PT and the system ROM used, selection based on the model makes it possible to set all the settings for “PT Type”, “Memory Size”, “Direct
Access” and “Direct Macn Type” at the same time.
(1) Press the [F1] (TypSel) key. The window shown below will be displayed. The
communication methods that can be used are also displayed for your reference.
When the window is displayed by pressing [F1] (TypSel), the bar cursor is located at the PT model which was set for “PT Type”.
(2) Select the model of PT/system ROM being used.
(3) Press the
key. The “Tool Settings” screen will be redisplayed with the “PT
Type”, “Memory Size”, “Direct Access” and “Direct Macn Type” settings that
can be used with the selection made in step (2) set.
24
“Tool Settings” Screen
[Time]
Section 3-3
[F3] . . . PT time setting
Used to make the time setting for the PT. The time function can be used with the
NT30, NT30C, NT612G, NT610C, NT620S, NT620C.
(1) Connect the PT and the support tool (see Section 7 Data Communication).
(2) Press the [F3] (Time) key.
(3) To change the current time, enter the time on the screen.
(4) Set the PT to the “Transmit Mode”.
(5) Press the
key: the time data will be sent and set in the PT.
" It is also possible to receive the time set in the PT and set it. Press the [F1]
(receive) key with the time setting screen displayed.
[Edit]
[F4] . . . Tool settings for the “Edit” screen (environmental settings)
Used to set the “Edit” screen settings, such as grid display and “snap ON” setting.
These settings can also be made by selecting SET ENV on the initial editing
screen. For the details of these settings see “Environmental Settings” (p.59).
Quitting tool setting
S Press
key twice: the support tool will be set in accordance with the details
displayed on the screen and the display will return to the main menu.
S Press the [Esc] key to return to the main menu without making any settings.
25
“File List” Screen
3-4
Section 3-4
“File List” Screen
When the “Edit Screen” option is selected from the main menu, the “File List”
screen is displayed.
In support tool terminology, an assemblage of screen data is called a “file”.
Actually, each “file” comprises four or five files with different extension names (the
number of files per “file” depends on the “tool settings”).
On the “File List” screen, besides creating and selecting files, it is also possible to
perform functions such as data communication with the PT.
Settings
<“File List” screen>
(a)
(b)
(c)
(e)
(d)
(f)
26
(g)
(a)
PT model name:
This is the PT model and direct connection version number set in the “Tool Settings”. The final 0
indicates direct connection. Even if direct connection is not used, the version is displayed as “V4”
when using an NT20M, NT20S, NT600M, or
NT600S.
(b)
PT memory size
(c)
Name of task currently being executed
(d)
Help message area:
Displays a guide to operation and allows parameter input.
(e)
File name:
The file names are indicated in this column. If the
bar cursor is located on a file name and the
key pressed, the “Screen Selection” screen will be
displayed. To create a new file, select
“NEW_FILE”.
(f)
Title:
This is a comment that indicates the contents of a
file. It is input when the file is saved.
“File List” Screen
Section 3-4
(g)
File information:
The NT model, direct connection version, direct
connection indication, and file size for the file at
which the bar cursor is located are displayed here.
Even if direct connection is not used, the version
is displayed as “V4” when using an NT20M,
NT20S, NT600M, or NT600S.
The support tool allows the creation of up to 200 “files” (the number may be smaller
than this due to restrictions on the number of files per DOS directory). If the required file is not displayed on the screen, screens earlier and later in the sequence
can be displayed by using the [Page Down] and [Page Up] keys, or icons.
Depending on the direct connection version of the model used, it may or may not
be possible to use certain files.
Files that cannot be used are displayed in red.
To use more than 200 files, create another directory. The data directory can be
changed by using the “Tool Settings” option.
All the files in the specified data directory are displayed.
The files that correspond to the “PT Type” and “Direct Access” set in the “Tool
Settings” are first in the order of display. The other files are displayed in the following order: 20M, 20S, 600M, 600S, 612G, 610C, 30, 30C; files corresponding
to the same model are displayed in order of direct connection version.
It is possible to read files set using other models but you are advised to check the
details of the file information displayed when the file is specified before reading it.
It is also possible to read files created using previous support tool versions.
Returning to the main menu
To return to the main menu, press the [Esc] key.
Functions of the Function Keys
[Copy]
[F1] . . . Copy file
Used to copy the contents of a file to another file (copying in support tool “file”
units).
(1) Press the [F1] (copy) key.
(2) Select the file to be copied.
(3) Input the file name and title of the copy destination and press the
key.
" If [F1] (drive) is now selected, the file can be copied to the directory of another
drive.
[Delete]
[F2] . . . Delete file
Used to delete unnecessary files (deletion in support tool “file” units).
(1) Locate the bar cursor at the file to be deleted and press the [F2] key.
(2) Check the file name and then press the
key: the file will be deleted.
27
“File List” Screen
[Print]
Section 3-4
[F3] . . . Print data
Used to print out files, information relating to screen data, character-strings, the
conditions of use of numeral tables, etc.
See Section 6 “Printing Data”.
[Tools]
[F4]] . . . Tool settings
Displays the “Tool Settings” screen.
Used to change the support tool environment during file operations.
For details of the setting operation, see 3-3 “Tool Settings” Screen (p.22).
[Hist.]
[F5] . . . Receive display history registration data
Used to read display history registration data registered in the PT and save it in a
file.
This file is a text style of DOS format file and is therefore different style from the
files in which screen data is saved.
See Section 7 “Data Communication”.
[Tmx.]
[F6] . . . Send data to the PT
Establishes a connection with the PT, sends created data to it in file units and
writes it to the image data memory. The types of data that can be sent are screen
data, character-string memory table and numeral table data, system memory
data, mark data, image data, library data, and direct information.
See Section 7 “Data Communication”.
[Rcv.]
[F7] . . . Receive data from the PT
Used to receive data registered in the PT in file units. The types of data that can be
received are screen data, character-string memory table and numeral table data,
system memory data, mark data, image data, library data, and direct information.
See Section 7 “Data Communication”.
[In.Scr]
[F8] . . . Set system memory
Used to set the screen number and PT statuses at startup that are displayed when
the PT is started up.
28
“File List” Screen
Section 3-4
The following items can be set:
Initial screen
Number of the screen data displayed when the
PT is started up.
Supported by all
NT models
(Invalid when direct connection is used)
Key input buzzer
ON/OFF status of key input sound.
Buzzer
Buzzer sound ON/OFF or ON only when an
error occurs.
Resume function
ON/OFF status of the “resume” function.
Alarm output
ON/OFF status of alarm output.
Backlight OFF
(prevention of
afterimage)
This is an afterimage prevention function which
automatically switches off the backlight (or
makes the display blank). The available
settings are to switch the backlight off after a
time lapse of 10 minutes/1 hour, or “off”. With
an LED screen, this function switches the
backlight OFF. With an EL screen, it makes the
screen blank.
Printer:
Type of printer connected to the PT: EPSON
Esc/P printer (24 pin) or HP LASER Jet.
Print way
Printing method used when printing a screen
displayed on the PT: color or grayscale (only
valid when using NT30C and NT610C).
Numeral tables
The number of numeral tables: 512 or 1000 (if
reduced to 512, the memory capacity available
for screen data is increased by 4880 bytes).
String tables
The number of character-string memory tables:
256 or 1000 (if reduced to 256, the memory
capacity available for screen data is increased
by 29760 bytes).
Alarm fast I/O
Processing method when the maximum number
of alarm instances (256) is exceeded when
using the alarm history.
“Yes”
Old records are deleted as new ones
are registered.
“No”
The registration of new history records
is prevented.
On completion of setting, press the
Supported by
NT30, NT30C,
C
NT612G, and
NT610C only.
key.
29
“File List” Screen
[Title]
Section 3-4
[F9] Change file title
Used to change the titles of files for which titles have been set.
(1) Locate the bar cursor at the file whose title is to be changed and press the [F9]
(Title) key.
(2) Enter the new title and press the
[Next]
key.
[F10] . . Display next function keys
Pressing this key changes the function key display to the next set of function keys.
The functions of these function keys are explained below.
[ROM]
[F1] . . . Data communication with P-ROM writer
Used to communicate with a P-ROM writer in order to create or modify EP-ROMs
for image memory boards.
[Prev]
[F10] . . Display previous function keys
Pressing this key changes the key display to the previous set of function keys.
30
“Scr list” Screen
3-5
Section 3-5
“Scr list” Screen
The “Scr list” screen is displayed when a file to be edited is selected from the “Select File” screen, or when NEW_FILE is selected.
3-5-1
Functions of the “Scr list” Screen
Besides specifying the screen number for which screen data is to be created, various other operations and settings relating to screen data are possible on this
screen, for example the setting of attributes for screen data and reading of data
from other files in screen units.
Settings
Select the required screen and press the
key to enable editing of the screen.
<“Scr list” Screen>
(a)
(b)
(c)
(d)
(e)
(h)
(i)
(f)
(g)
(j)
(a)
Selected file name
(b)
PT model name:
(c)
PT memory size
(d)
Name of task currently being executed
(e)
Help message area:
Displays a guide to operation and allows parameter input.
(f)
Screen status details:
Detailed information on screen data is displayed here.
(g)
Screen data size
The PT model name and direct connection version for the file is displayed here. Even when
direct connection is not used, the version is
displayed as “V4” when using an NT20M,
NT20S, NT600M, or NT600S. Data for direct
connection has an “O” appended as the final
character.
31
“Scr list” Screen
Section 3-5
(h)
Screen number:
The support tool manages screen data under
screen numbers. Screen data can be created
under the screen numbers shown in the table
below.
NT Model Setting
Usable Screens
20S
1 to 500
20M
1 to 250
600S, 600M
1 to 1000
30, 30C, 612G, 610C
1 to 2000
The previous and next pages can be displayed
by using the [Page Up] and [Page Down] keys.
The bar cursor can be moved to the previous
and next screen number for which there is data
by using [Shift] + [ ] and [Shift] + [ ].
The “No.” column is displayed by pressing
[Tab] key.
(i)
Screen status, attribute:
In the “Status” column, the presence/absence
of screen data and the set attribute are displayed in symbolic form.
More detailed information relating to these indications is displayed in the “Screen Status”
area at the bottom right of the screen.
32
“Scr list” Screen
Section 3-5
Symbol
(Blank)
“Screen Status”
Information
Meaning
(No data)
No data has been created for this number.
!
(Data exists)
There is data for this number.
A
A: Cont
Parent screen of continuous screens
A
A: Ovlp
Parent screen of overlapping screens
B
B: Cont
Buzzer attribute (continuous tone)
B
B: Long
Buzzer attribute (intermittent long tones)
B
B: Shrt
Buzzer attribute (intermittent short tones)
C
C: Hist
Display history attribute
D
D: Touch
Bit input (touch switch)
D
D: Fn key
Bit input (function key)
E
E: Alrm
Alarm attribute
F
F: Keys
“Keypad” ten keys are set by the user.
G
G: Ext
NT20M, NT30
NT20S
NT30C
: Red backlight or flashing backlight
: Flashing backlight
: Background color or
flashing backlight
NT610C, NT620C : Background color
(j)
Comment:
This is a comment assigned to the screen
data. It is set when the screen data is saved.
It can be changed using the [F6] (Commnt)
key.
33
“Scr list” Screen
Section 3-5
<Screen numbers and their applicability>
When the NT Model setting is “30”, “30C”, “610G (612G)”, or “610C”, some
screens are earmarked for special applications, as shown below. When the NT
Model setting is not one of these, only “0” (clear screen display) is valid and all other screens are user screens.
Application
Screen No.
0
Screen display OFF
1 to 1899
User screens
1900 to 1979
Window (keyboard) screen
1980 to 1996
Reserve screens for expansion functions
1997
Display history screens
1998
1997: Order or occurrence
1998: Order of frequency
1999
“Connecting Host” screen
2000
“Host Error” screen
f: Possible
User Editing
Remarks
×
Specified in order to switch the screen display off.
f
Can be used without restriction
f
Can be used as a window (keyboard) screen
called to overlay another screen.
Can also be used as a normal screen.
f
If data is registered for these screens, treating them as normal screens, the registered
data takes priority.
Only when using Ver.3 or a later version of
the direct connection function (necessary to
create scroll keys).
f
If no data is registered, the “Connecting
Host” screen set by the system is displayed.
f
If no data is registered, the “Host Error”
screen set by the system is displayed.
(Used as a user screen in the case of the
NT30, NT30C, NT620S, NT620C)
: Only the area outside the display history display area can be edited. ×: Not possible
<Using the marking function>
When, for example, deleting screen data, a number of screens can be handled
together by using the marking function. All marked (*) screen data is taken as the
object of the executed operation, regardless of the location of the bar cursor. In a
copy operation, the screen data at the location of the bar cursor is copied to all
screen numbers marked by (*). This is useful when creating very similar screens.
34
[Space] key:
Marks the selected screen data. If the data is already marked,
the mark is deleted.
[Home] key:
Deletes all marks.
[Shift] + [Home]:
Deletes the marks of all marked screen data and marks all unmarked screen data.
“Scr list” Screen
Section 3-5
To perform an operation all screens except a specified screen (or screens), use
the following procedure:
Example: Deleting all screen numbers except screens 1 to 3.
1. Clear all marks by pressing the [Home] key.
2. Mark screens 1 through 3 by pressing the [Space] key.
3. Press [Shift] + [Home].
All screen numbers except 1 through 3 will be marked.
4. Delete the screen data by pressing [F2] (Delete).
<Saving and quitting screen data files>
Pressing the [Esc] key while the “Screen Selection” screen is displayed quits
screen creation. There are two types of quitting: quitting after saving the file, and
quitting without saving the file.
key:
Press after inputting the file name and comment to save the file
and return to the “File Selection” screen.
[Space] key:
Used to return to the “File Selection” screen without saving the
file.
[Esc] key:
Used to abort quitting and continue screen selection.
Functions of the Function Keys
[Copy]
[F1] . . . Copy screen data
Used to copy screen data to another screen number.
(1) Locate the bar cursor at the screen data to be copied, and press the [F1]
(Copy) key.
(2) Input the copy destination screen number and comment and press the
key.
" It is also possible to batch copy all marked screen numbers.
[Delete]
[F2] . . . Delete screen data
Used to delete unnecessary screen data.
(1) Locate the bar cursor at the screen data to be deleted and press the [F2] (Delete) key.
(2) Press the
key.
" It is also possible to batch copy all marked screen numbers.
[Print]
[F3] . . . Print data
Used to print out screen images and the numbers of lamps and touch switches at a
printer.
See Section 6 “Printing Data”.
35
“Scr list” Screen
Section 3-5
[Attrib]
[F4] . . . Set attribute
Used to set screen attributes. Setting is accomplished by making selections in the
Help Message area. The following attributes can be set.
Attribute
Buzzer
History
“NT Model” Setting
Possible Settings
20S
20M 600S 600M
None, Cont (continuous sound),
Long (long intermittent sounds),
Shrt (short intermittent sounds)
No, Yes
f
f
f
f
30
30C 610G 610C
f
f
f
f
f
f
f
f
Bit In
Off, Touch SW (touch switch),
Extd I/O
/× f/×
/×
f/× −/× −/× f/× f/×
Alarm
×
f
×
f
×
×
Keypad
System, User
f
f
f
f
f
f
f
f
Back light
Lit, Flash
f
f
×
×
f
f
−
−
Bklt Col
White, Red
×
f
×
×
f
×
−
−
Back Col
Screen background colors
−
−
−
−
×
f
×
f
: Partly possible (some restrictions apply).
: Continuous
sound,
Intermittent
sounds
Direct connection
used/not used
: F keys cannot
be set.
: Cannot be
used with
NT620S/
NT620C
No, Yes
f: Possible
Remarks
×: Not possible,
−: No display
For details on each attribute, refer to the Operation Manual for the PT.
WARNING
The attributes of the parent screen are used in the case of
continuous screens and overlapping screens. Screen
attributes set for child screens are invalid.
Batch setting of attributes for all marked screen numbers is possible.
[Read]
[F5] . . . Read screen data
Used to read screen data and memory table data from other files.
However, the data of files displayed in red cannot be read as it is: data conversion
is necessary (see Section 8).
(1) Press the [F5] (Read) key.
(2) Select the file whose data is to be read and press the
key.
" Pressing the [F1] (Drive) key allows the specification of a file in another drive
directory. Only files for which the “Direct Access” setting is the same can be
specified.
36
“Scr list” Screen
Section 3-5
(3) The procedure after this point differs according to the type of data: see the
scheme below. Specify the data to be read, the reading source and reading
destination by following the directions on the screen in order to read the data.
information of
data to be read
Screen data
*1
Reading source
screen information
Reading destination
screen information
*2
All/part?
Read execution
confirmation
Execution of reading
*3
*2
All
Mark data
Overwrite/insert
information
Read execution
confirmation
Execution of reading
Part
Reading source
range information
(start point, end point)
Read position
information
Numeral table
Character-string table
Direct connection information
I/O comment
Bit memory table
Read execution
confirmation
Read execution
confirmation
Execution of reading
Execution of reading
*4
Image data
Library data
All
All/part?
Read execution
confirmation
Execution of reading
Part
Reading source
code information
Reading destination
code information
*5
Confirmation of
reading execution
Execution of reading
*5
(*1)
The following restrictions apply to the data that can be read.
Image data: “30”, “30C”, “610G”, and “610C” only.
Library data: “30”, “30C”, “610G”, and “610C”, Ver.3 or later only.
Direct connection information:
When direct connection used only.
I/O comment:
When direct connection used only
Bit memory table:
“30”, “30C”, “610G”, and “610C”, Ver.3 or later only.
(*2)
When the [Tab] key is pressed and a screen number input, the bar cursor
shifts to the specified screen.
(*3)
Overwrite:
If data already exists at the destination it is overwritten (the
original data is cleared).
Insert:
If data already exists at the destination the data is read into the
file without clearing the original data.
37
“Scr list” Screen
Section 3-5
(*4)
When direct connection is used and reading of a numeral memory table,
character-string memory table, or bit memory table is specified, confirmation of whether or not the direct connection information is read is displayed.
(*5)
S Image data is selected from codes FE20 through FEFF.
S Library data is selected from FA20 through FAFF, FB20 through FBFF,
FC20 through FCFF, FD20 through FDFF.
S Use [Shift] + [ ] or [Shift] + [ ] to move the bar cursor to the previous or
next code for which there is data.
S The bar cursor can be moved to a specified code by pressing the [Tab] key
and inputting the code.
It is possible to continue reading more data from the same file.
To quit data reading, press the [Esc] key; the display will return to the “Screen
Selection” screen.
[Commnt]
[F6] . . . Change comment
Used to change the comments assigned to screen data.
(1) Locate the bar cursor at the screen number whose comment is to be changed
and press the [F6] (Commnt) key.
(2) Input the new comment and press the
key.
It is possible to change the comments for a number of screen numbers in a
batch by marking the screen numbers. However, this only applies to screen
numbers for which data already exists.
[Image & Lib]
[F7] . . . Edit Image/library data
Used to create and modify image library items.
Editing of images and library data is only possible with the NT30, NT30C,
NT612G, and NT610C.
See Section 5 “Creating a Mark Image Library”.
[Co/Ovl]
[F8] . . . Continuous screen & overlapping screen setting
Used to specify continuous screens and overlapping screens.
(1) Locate the bar cursor at a screen number for which there is no data and press
the [F8] (Co/Ovl) key.
" If a number for which there is data is specified, a message asking whether or
not the data is to be cleared is displayed.
(2) Select either “Cont Scr” or “Ovlp Scr” and press the
key.
The set screen will become the parent screen.
(3) Set the child screens by following the help messages.
" Up to 8 child screens can be set in the case of both continuous screens and
overlapping screens.
" Only one numeral setting screen can be set as a child screen.
38
“Scr list” Screen
[Mark]
Section 3-5
[F9] . . . Mark creation
Used to create and modify marks.
See Section 5 “Creating a Mark, Images, and Library Data”.
[Next]
[F10] . . Display next function keys
Pressing this key changes the function key display to the next set of function keys.
Direct connection not used
Ver.1 to Ver.4 used
For an explanation of the function of each function key, see the following.
[Check]
[F1] . . . Check on continuous screens/overlapping screens
Used to check if there is any abnormality in the relationship between the parent
and child screens of continuous screens and overlapping screens.
(1) Select the file to be selected on the “File List” screen.
(2) Press the [F10] (Next page) key and then press the [F1] (Check) key.
(3) Set whether or not the results are to be output at a printer and execute the
check.
The results of the check are displayed in the following form.
No.
No.
Error
Details
: The parent screen number is displayed here.
Error : If an error is found, its details are displayed.
Error Type
Cause
Prnt
A screen set as child screen has been specified as the parent screen for another
continuous screen or overlapping screen.
Keys
Overlapping screen
There are two or more child screens for which a numeral
setting has been made (when carrying out system setting).
Continuous screen
There is a child screen for which a numeral setting has been
made.
Overlapping screen
In direct connection, the total of the numbers the following
functions exceeds the maximum number that can be set.
Num
Number of functions settable:
Numeral displays + graphs + numeral settings = Max. 1024
Attr
Overlapping screen
The “keypad attribute” is different for the parent screen and
child screens.
39
“Scr list” Screen
Section 3-5
Details: The numbers of the child screens that make up the overlapping
screen or continuous screen are displayed.
If there is an error, the relevant screen number is underlined.
If screen numbers in the range 1900 to 1979 are specified as parent screens,
“No.” will be displayed in red. These screens cannot be used as window
screens.
[Table]
[F2] . . . Edit table (when not using direct connection)
Used to write data to, and change the data in, character-string memory tables and
numeral memory tables.
(1) Press the [F2] (Table) key.
(2) Select the character-string memory table or numeral memory table and press
key.
the
(3) Edit the contents of the memory table.
S Move the bar cursor with the arrow keys, make the selection by pressing the
key, and change the data.
S Previous and next screens can be displayed by using the [Page Up] and [Page
Down] keys.
S The bar cursor can be moved to a specified number by pressing the [Tab] key
and inputting the number.
S Pressing the [F1] (Ref) key will display a list of the screens that refer to the
memory table with the specified number. When editing a character-string
memory table, marks can be input using [F3] (Mark) and images using [F4]
(Image).
(4) To quit editing, press the [Esc] key.
[Direct]
[F2] . . . Set direct connection information (when using direct connection)
Data area allocations for direct connection can be made using batch settings.
See “Setting Direct Connection Information” (p.42).
[CoFile]
[F3] . . . Creating files from screens
Screen data can be saved in Microsoft Windows (TM) files (BMP format)
Files are created under the following file names in the data directory.
20S, 600S:
NTSVVVV.BMP
20M, 600M:
NTMVVVV.BMP
612G:
NTGVVVV.BMP
30C, 610C:
NTCVVVV.BMP
VVVV indicates the screen number.
[BchChg]
[F4] . . . Batch change of screen data bits and words
Used to change bits and words allocated to lamps and touch switches in the
screen data in a batch by specifying a range.
See “Batch Changing Bits and Words” (p.79).
40
“Scr list” Screen
[Tmx.]
Section 3-5
[F6] . . . Send data to the PT in screen units
After connecting the support tool to the PT, used to send screen data, characterstring and numeral memory tables to the PT in screen units and write them to the
screen data memory.
See Section 7 “Data Communication”.
This function cannot be used with the NT30, NT30C, NT612G, or NT610C.
[Rcv.]
[F7] . . . Receive data from the PT in screen units
Used to receive screen data and character-string/numeral memory table data registered in the PT.
See Section 7 “Data Communication”.
This function cannot be used with the NT30, NT30C, NT612G, or NT610C.
[Prev]
[F10] . . Display previous function keys
Pressing this key changes the key display to the original set of function keys.
41
“Scr list” Screen
3-5-2
Section 3-5
Setting Direct Connection Information
The “Direct Spec. Setting” menu option on the “Screen List” screen allows batch
setting of the following functions:
S PT status control area allocation
S PT status notify area allocation
S Numeral table allocation and initial value setting
S Character-string table allocation and initial value setting
S Extended I/O unit input terminal allocation and function setting
S Extended I/O unit output terminal allocation
S Setting of the functions, display, and allocations of bit memory tables
WARNING
“Bit memory table” can only be selected when the NT
Model setting is NT30, NT30C, NT612G, or NT610C, and
the direct connection version used is Ver.3 or later.
Note
Procedure
Be sure to allocate the data area referenced in the PC to the PT status control area
and PT status notify area. Allocate these two areas so that they do not overlap.
1. Press the [F10] (Next) key on the “Screen List” screen.
2. Press the [F2] (Direct) key.
3. Locate the bar cursor at the function to be set and press the
key.
The function setting window will be displayed: carry out allocations to the data
area in the PC and function setting in this window. For details of the settings,
refer to the descriptions of the individual functions.
4. On completion of setting, press the [Esc] key.
42
“Scr list” Screen
Section 3-5
PT Status Control Area, PT Status Notify Area
Allocate data areas at the PC for the PT status control area, which controls the PT
from the PC, and the PT status notify area, which notifies the PC of information
from the PT.
For details of the settings, see “Setting Words and Bits” (p.75).
WARNING
It is not possible to set timers (TIM) or counters (CNT).
43
“Scr list” Screen
Section 3-5
Numeral Memory Table Settings, Character-String Memory Table Settings
Set the initial values and word allocations for numeral tables and character-string
memory tables.
<Numeral table setting>
<Character-string memory table setting>
For details of the settings, see “Setting Numeral Tables” (p.68), and “Setting Character-String Memory Tables” (p.70).
44
“Scr list” Screen
Section 3-5
Extended I/O Input Setting
Set the functions, and allocate the bits referenced at the PC, for extended I/O unit
input terminals.
The following functions can be set for the input terminals of the extended I/O unit.
S Screen switching
When the input terminal comes ON, the display changes to the set screen number. If the screen number is set as “0”, the display will return to the previously
displayed screen.
S Notify bit
Notifies the status (ON/OFF) of the input terminal to the bit at the PC.
S Numeric key
When the input terminal comes ON, it has the same effect as pressing the set
control key.
S Backlight OFF cancelling attribute
When the input terminal comes ON the backlight, which had been switched off
by the “backlight OFF function” (afterimage prevention function) set by memory
switch, comes back ON (in the case of the EL display type, the screen display is
redisplayed).
The backlight OFF cancellation function is automatically featured in conjunction
with the screen switch function and ten key function.
Extended I/O units cannot be used with Ver.1 direct connection.
WARNING
Do not use the PT extended I/O input function for
applications where there is any danger to human life or
possibility of serious damage, or for an emergency stop
switch function.
45
“Scr list” Screen
Section 3-5
S NO.:
Extended I/O unit input terminal number.
S Cl:
Presence/absence of the backlight OFF cancelling attribute.
S Function:
Function set for the input terminal. In the case of the input
notification function, the bit number is displayed.
In the area to the right of the Function column, screen numbers
(screen switching), comments (input notification), and control keys
(ten keys) are displayed.
S Key operations
key:
Sets a screen switching function at the input
terminal at which the bar cursor is located.
[F1] (Del) key:
Deletes the function set for the input terminal at
which the bar cursor is located.
[F4] (BtchChng) key:
Used to change notify bit keys in a batch. See
“Batch Changing Bits and Words” (p.79).
[Home] (Bklight Off Cncl) key:
Sets the backlight OFF cancelling attribute at
the input terminal at which the bar cursor is located.
[Tab] key:
Used to move the bar cursor and display the
terminal number input field.
Extended I/O Output Setting
The output terminals of the Extended I/O unit are controlled in accordance with the
status (ON/OFF) of PC bits (output control function). Set the bit numbers of the PC
bits that will control the output terminals.
S NO.:
Extended I/O unit output terminal number.
S Cl :
Bit number set for the output terminal.
A comment is displayed in the column to the right of the function column.
46
“Scr list” Screen
Section 3-5
S Key operations
key:
[F1] (Del) key:
Sets an output control function for the output terminal at
which the bar cursor is located.
Deletes the output control function set for the output terminal at which the bar cursor is located.
[F4] (BtchChng) key: Changes notify bit keys in a batch. See “Batch Changing
Bits and Words” (p.79).
[Tab] key:
Bit Memory Table Setting
Used to move the bar cursor and display the terminal
number input field.
This setting sets bit memory table functions and bit memory table bit allocations.
Bit memory tables can only be used when the “NT Model” setting is NT30, NT30C,
NT612G, or NT610C and direct connection Ver.3 or higher is used.
For details on the actual settings, see 4-2-6 “Bit Memory Table Setting” (p.72).
47
“Scr list” Screen
48
Section 3-5
SECTION 4
Creating Screen Data
Screen data has to be created for display by the PT. Screen data can be created by selecting the editing functions of the “Edit”
screen.
This chapter explains the creation procedure, with emphasis on key operations. The mouse can be used to execute all operations except character and numeral input.
4-1
4-2
4-3
4-4
4-5
4-6
4-7
4-8
Initial Editing Screen and Basic Operations . . . . . . . . . . . . . . . . . . . . . . . . . . . . . . . . . . . . . . . .
4-1-1 Displaying the “Edit” Screen . . . . . . . . . . . . . . . . . . . . . . . . . . . . . . . . . . . . . . . . . . . . . .
4-1-2 Basic Operations on the “Edit” Screen . . . . . . . . . . . . . . . . . . . . . . . . . . . . . . . . . . . . . . .
4-1-3 Environmental Settings (Tool Settings for the “Edit” Screen) . . . . . . . . . . . . . . . . . . . . .
Common Setting Operations . . . . . . . . . . . . . . . . . . . . . . . . . . . . . . . . . . . . . . . . . . . . . . . . . . . .
4-2-1 Setting Character/Character-String Displays . . . . . . . . . . . . . . . . . . . . . . . . . . . . . . . . . .
4-2-2 Setting Numeral Displays . . . . . . . . . . . . . . . . . . . . . . . . . . . . . . . . . . . . . . . . . . . . . . . . .
4-2-3 Specifying the Display Color (NT30C, NT610C Only) . . . . . . . . . . . . . . . . . . . . . . . . . .
4-2-4 Setting Numeral Memory Tables . . . . . . . . . . . . . . . . . . . . . . . . . . . . . . . . . . . . . . . . . . .
4-2-5 Setting Character-String Memory Tables . . . . . . . . . . . . . . . . . . . . . . . . . . . . . . . . . . . . .
4-2-6 Bit Memory Table Setting . . . . . . . . . . . . . . . . . . . . . . . . . . . . . . . . . . . . . . . . . . . . . . . .
4-2-7 Setting Words and Bits . . . . . . . . . . . . . . . . . . . . . . . . . . . . . . . . . . . . . . . . . . . . . . . . . . .
4-2-8 Copying to the Next Input Field (Increment Copy) . . . . . . . . . . . . . . . . . . . . . . . . . . . . .
4-2-9 Searching Within a Memory Table . . . . . . . . . . . . . . . . . . . . . . . . . . . . . . . . . . . . . . . . . .
4-2-10 Batch Changing Bits and Words . . . . . . . . . . . . . . . . . . . . . . . . . . . . . . . . . . . . . . . . . . . .
Creating Fixed Displays . . . . . . . . . . . . . . . . . . . . . . . . . . . . . . . . . . . . . . . . . . . . . . . . . . . . . . .
4-3-1 Inputting Characters . . . . . . . . . . . . . . . . . . . . . . . . . . . . . . . . . . . . . . . . . . . . . . . . . . . . .
4-3-2 Inputting Marks . . . . . . . . . . . . . . . . . . . . . . . . . . . . . . . . . . . . . . . . . . . . . . . . . . . . . . . .
4-3-3 Creating Polylines . . . . . . . . . . . . . . . . . . . . . . . . . . . . . . . . . . . . . . . . . . . . . . . . . . . . . .
4-3-4 Creating Squares . . . . . . . . . . . . . . . . . . . . . . . . . . . . . . . . . . . . . . . . . . . . . . . . . . . . . . . .
4-3-5 Creating Polygons . . . . . . . . . . . . . . . . . . . . . . . . . . . . . . . . . . . . . . . . . . . . . . . . . . . . . .
4-3-6 Creating Circles/Arcs . . . . . . . . . . . . . . . . . . . . . . . . . . . . . . . . . . . . . . . . . . . . . . . . . . . .
4-3-7 Creating Fans . . . . . . . . . . . . . . . . . . . . . . . . . . . . . . . . . . . . . . . . . . . . . . . . . . . . . . . . . .
4-3-8 Tiling . . . . . . . . . . . . . . . . . . . . . . . . . . . . . . . . . . . . . . . . . . . . . . . . . . . . . . . . . . . . . . . .
Setting Numeral Displays . . . . . . . . . . . . . . . . . . . . . . . . . . . . . . . . . . . . . . . . . . . . . . . . . . . . . .
4-4-1 Setting Numeral Displays . . . . . . . . . . . . . . . . . . . . . . . . . . . . . . . . . . . . . . . . . . . . . . . . .
4-4-2 Modifying Numeral Displays . . . . . . . . . . . . . . . . . . . . . . . . . . . . . . . . . . . . . . . . . . . . . .
Setting Character-String Displays . . . . . . . . . . . . . . . . . . . . . . . . . . . . . . . . . . . . . . . . . . . . . . . .
4-5-1 Setting Character-String Displays . . . . . . . . . . . . . . . . . . . . . . . . . . . . . . . . . . . . . . . . . .
4-5-2 Modifying Character-String Displays . . . . . . . . . . . . . . . . . . . . . . . . . . . . . . . . . . . . . . .
Setting Lamps . . . . . . . . . . . . . . . . . . . . . . . . . . . . . . . . . . . . . . . . . . . . . . . . . . . . . . . . . . . . . . .
4-6-1 Setting Lamps . . . . . . . . . . . . . . . . . . . . . . . . . . . . . . . . . . . . . . . . . . . . . . . . . . . . . . . . . .
4-6-2 Modifying Lamps . . . . . . . . . . . . . . . . . . . . . . . . . . . . . . . . . . . . . . . . . . . . . . . . . . . . . . .
Setting Touch Switches . . . . . . . . . . . . . . . . . . . . . . . . . . . . . . . . . . . . . . . . . . . . . . . . . . . . . . . .
4-7-1 Setting Touch Switches . . . . . . . . . . . . . . . . . . . . . . . . . . . . . . . . . . . . . . . . . . . . . . . . . .
4-7-2 Modifying Touch Switches . . . . . . . . . . . . . . . . . . . . . . . . . . . . . . . . . . . . . . . . . . . . . . . .
Creating Graphs . . . . . . . . . . . . . . . . . . . . . . . . . . . . . . . . . . . . . . . . . . . . . . . . . . . . . . . . . . . . . .
4-8-1 Setting Graphs . . . . . . . . . . . . . . . . . . . . . . . . . . . . . . . . . . . . . . . . . . . . . . . . . . . . . . . . .
4-8-2 Modifying Graphs . . . . . . . . . . . . . . . . . . . . . . . . . . . . . . . . . . . . . . . . . . . . . . . . . . . . . .
51
51
54
59
61
61
63
66
68
70
72
75
77
78
79
80
80
82
84
86
88
90
92
93
96
96
97
98
98
99
100
100
104
105
106
115
117
118
126
49
4-9
4-10
4-11
4-12
4-13
4-14
4-15
50
Creating Input Settings . . . . . . . . . . . . . . . . . . . . . . . . . . . . . . . . . . . . . . . . . . . . . . . . . . . . . . . .
4-9-1 Creating Numeral Setting Input Fields . . . . . . . . . . . . . . . . . . . . . . . . . . . . . . . . . . . . . . .
4-9-2 Creating Character-String Setting Input Fields
(NT30, NT30C, NT612G, NT610C with Ver.3 or Later Only) . . . . . . . . . . . . . . . . . . . .
4-9-3 Setting Window Displays
(NT30, NT30C, NT612G, NT610C with Ver.3 or Later Only) . . . . . . . . . . . . . . . . . . . .
4-9-4 Creating Numeric Keys . . . . . . . . . . . . . . . . . . . . . . . . . . . . . . . . . . . . . . . . . . . . . . . . . .
4-9-5 Modifying Numeral/Character-String Setting Input Fields . . . . . . . . . . . . . . . . . . . . . . .
4-9-6 Changing Orders . . . . . . . . . . . . . . . . . . . . . . . . . . . . . . . . . . . . . . . . . . . . . . . . . . . . . . .
Extended I/O Settings . . . . . . . . . . . . . . . . . . . . . . . . . . . . . . . . . . . . . . . . . . . . . . . . . . . . . . . . .
Inputting Image and Library Data . . . . . . . . . . . . . . . . . . . . . . . . . . . . . . . . . . . . . . . . . . . . . . . .
Editing Memory Tables . . . . . . . . . . . . . . . . . . . . . . . . . . . . . . . . . . . . . . . . . . . . . . . . . . . . . . . .
Creating Alarm Lists/Histories . . . . . . . . . . . . . . . . . . . . . . . . . . . . . . . . . . . . . . . . . . . . . . . . . .
4-13-1 Setting Alarm Lists/Histories . . . . . . . . . . . . . . . . . . . . . . . . . . . . . . . . . . . . . . . . . . . . . .
4-13-2 Modifying Alarm Lists/Histories . . . . . . . . . . . . . . . . . . . . . . . . . . . . . . . . . . . . . . . . . . .
Standalone Settings . . . . . . . . . . . . . . . . . . . . . . . . . . . . . . . . . . . . . . . . . . . . . . . . . . . . . . . . . . .
Editing Screen Data . . . . . . . . . . . . . . . . . . . . . . . . . . . . . . . . . . . . . . . . . . . . . . . . . . . . . . . . . . .
128
131
134
135
136
137
139
140
141
143
144
145
147
149
150
Initial Editing Screen and Basic Operations
4-1
Section 4-1
Initial Editing Screen and Basic Operations
On the “Edit” screen, characters and graphics can be drawn, and elements such
as lamps and touch switches can be created.
4-1-1
Displaying the “Edit” Screen
The “Edit” screen is displayed when a screen number is selected on the “Screen
Selection” screen.
The initial editing screen displays the editing menu, from which the functions for
creating screen data can be selected.
<Initial editing screen>
(a)
(b)
(c)
(e)
(d)
(f)
(g)
(a)
“Edit” screen:
This is a data creation screen with the same
number of dots as the PT screen. A grid and
screen range is displayed on it to make it easy
to create data. It is possible to select whether
or not to display the grid and screen range by
changing a setting in the environmental settings (tool settings for the “Edit” screen).
(b)
Menu box:
The editing menu and help messages are displayed here.
The display position of this box, and the setting
to determine whether it is displayed or not, can
be changed by pressing the [Home] key.
(c)
Editing menu:
The editing function to be executed is selected
from this menu.
(d)
Help message display:
Displays an explanation of the function.
(e)
Key operation guide:
The keys and functions that can currently be
used are displayed here. Functions can be
executed either by pressing the relevant key or
by clicking on the corresponding icon with the
mouse.
51
Initial Editing Screen and Basic Operations
Section 4-1
(f)
Screen number:
This is the screen number of the screen data
currently being edited.
(g)
Free capacity:
This is the free capacity for file storage.
Saving Screen Data and Quitting
Pressing the [Esc] key while the initial editing screen is displayed quits screen data
creation. There are two types of quitting: quitting after saving the data and quitting
without saving data.
S
key:
Saves the data and returns the display to the “Screen List”
screen (the first time a screen is saved, a comment can be input).
S [Space] key:
Returns the display to the “Screen List” screen withoutsaving
data.
S [Esc] key:
Aborts quitting and allows editing to continue.
Comments can be changed by using the [F6] (Commnt) key on the “Scr list”
screen.
Grid and Screen Range Display
In order to provide help with input and drawing, a grid is displayed on the “Edit”
screen.
If the “snap ON” function is set, the cursor position is locked to the grid intersections.
Whether a grid is displayed or not, the grid type, and the “snap ON” function setting
are specified in the SET ENV settings in the “Edit” screen editing menu (see p.59).
The intervals of the grid display can be set anywhere between 2 and 99 dots in both
the X direction (horizontal direction) and the Y direction (vertical direction). (The
grid display aligned with the touch switches differs according to the PT model).
When the grid is displayed, a solid-line frame that indicates the screen range, and
a “+” mark that indicates the center of the screen are automatically displayed.
Coordinate Display
During drawing, the coordinates of the cursor position are displayed in the lower
part of the menu box, as shown below.
Snap ON function status
X coordinate
Y coordinate
While the snap ON function is effective, the coordinate indication is preceded by
an “S”, and the coordinate values become those of the closest grid coordinate
point (see p.59).
When the menu box is not displayed, the coordinate value is displayed at the top
right of the screen.
52
Initial Editing Screen and Basic Operations
Section 4-1
Screen Data Display Sequence
Elements are displayed in the following sequence on the PT screen.
Note
Take the display sequence into consideration when creating screen data.
(1) Image data*1
(2) Touch switches, alarm list, alarm history*2
(3) Lamps
(4) Fixed data
(Polygons
squares
characters/marks) *1
circles/arcs
fans
continuous lines
tiling
(5) Character-strings
(6) Numeric values
(7) Graphs
(8) Numeric value and character-string setting input fields*2
*1:
Image data, polygons, squares, fans, tiling, and marks can only be used
with the NT30, NT30C, NT612G, and NT610C.
*2:
The alarm list/alarm history and character-string setting functions can only
be used with an NT30, NT30C, NT612G, or NT610C with “Ver.3” set for “Direct Access”.
53
Initial Editing Screen and Basic Operations
4-1-2
Section 4-1
Basic Operations on the “Edit” Screen
Basic Operations
S Moving the cursor
There are various cursors, including a cross-hair cursor (intersecting vertical and
horizontal lines) used for drawing graphics and a box used for specifying the position of character displays. These cursors can be moved either with the arrow keys
([ ][ ][ ][ ]) or with the mouse. Pressing one of the arrow keys while holding
down the [Shift] key gives larger motion increments (of 16 dots).
To fix a position, either press the
key or click the left mouse button.
S Character input
Insert/overwrite:
The [Insert] key is used to select whether the insert or
overwrite mode is effective for character input.
: Insert mode
: Overwrite mode
Shifting the character cursor:
The character cursor can be moved to the left and right
with the [ ] and [ ] keys. Pressing the [ ] or [ ] key
while holding down the [Shift] key shifts the cursor to the
head or end of a character-string.
Character deletion:
An input character can be deleted by pressing the [Back
Space] key or the [Delete] key.
All characters being input can be deleted by pressing
the [CLR] key.
Mark input:
Pressing the [F3] (Mark) key on the character input
screen displays the mark list window. Select the mark
key.
to be input with the cursor and press the
S Numeric value/character-string input
Numeric value/character-string clearance:
To clear an input numeric value or character-string during numeric value/character-string input, press the
[Home] key.
S Re-input into fields that have inputs
The following operations are possible, depending on the key that is pressed first
When the [INS], [BS], [DEL], [ ], or [ ] key is pressed first, the operation corresponding to that key is performed while the existing data remains in the input field.
This saves having to input data again when making modifications.
When a key other than one of the above is pressed first, the input field is cleared as
the character corresponding to the pressed key is input. This makes it unnecessary to clear the existing data before inputting the new data.
54
Initial Editing Screen and Basic Operations
Section 4-1
S Shortcut keys
It is possible to move characters, or delete them, by pressing specific character
keys while holding down the [Ctrl] key.
Corresponding key
Shortcut key
[Ctrl]+[S]
[ ] key
[Ctrl]+[D]
[ ] key
[Ctrl]+[E]
[ ] key
[Ctrl]+[X]
[ ] key
[Ctrl]+[R]
[Page Down] key
[Ctrl]+[C]
[Page Up] key
[Ctrl]+[H]
[Back space] key
[Ctrl]+[G]
[Delete] key
[Ctrl]+[I]
[Tab] key
[Ctrl]+[M]
key
[Ctrl]+[ [ ]
[Esc] key
[Ctrl]+[K]
Deletes everything right of the cursor
[Ctrl]+[U]
Deletes everything left of the cursor
S Skipping parameter input ([Shift] +
key)
While the window for inputting and setting parameters is displayed, pressing the
key while holding down the [Shift] key will allow you to proceed to the next step
while leaving the setting unchanged. This is convenient when registering a series
of display elements with the same settings.
55
Initial Editing Screen and Basic Operations
Section 4-1
Operations Exclusive to NT610C
The screen size for the NT610C is 640 x 480 dots.
Shifting Display Fields
When the display elements are listed on the screen, the list can be shifted by
pressing the [Home] key. The list can also be shifted by clicking the list name
(“TOUCH SW” in the example below) with the mouse (the mouse cursor also
moves).
(CLR)
56
Initial Editing Screen and Basic Operations
Section 4-1
Redisplaying a Screen
If, elements overlap or the display is confused during drawing, the screen can be
redisplayed by pressing the [Tab] key.
Operations Inside Windows
During operation, windows for parameter input and settings are sometimes displayed. Use the displayed keys, arrow keys and key to perform operations inside these windows.
If using a mouse, click the relevant item.
The settings to be made are the basic settings, which relate mainly to the display
contents, and the detailed settings, which relate to the display method. Other windows are displayed for some settings.
Reference: You can move to the next step without making a setting by pressing the
holding down the [Shift] key.
key while
<Operation example: numeral display setting>
Basic settings
Detailed settings
Theactualimagethatwouldresultfrom
the settings made is displayed.
It may not be possible to reflect some settings in images displayed in the bottom
right window frame.
Specifying Modifications with the Mouse (Direct Modification)
The modification window for a created display element can be displayed by locating the mouse cursor that element and clicking. This speeds up modification since
it can be done without having to identify the display element.
Note that this operation cannot be used for image library items even if they are
displayed on the screen.
The conventional method for specifying the objects of support tool modifications
(selecting the type of display element from the menu and then specifying the display element) can also be used.
57
Initial Editing Screen and Basic Operations
Click the touch switch on the initial editing screen.
Section 4-1
The modification window for the specified touch
switch is displayed.
Color Specification when the NT Model Setting is “30” (NT30)
The NT30 has a monochrome display, but since it stores internal data in the same
form as the NT30C, a color specification window may be displayed during operation. Since when “30” is set as the NT model, the PT can be used in the same way
as other monochrome PTs provided the default color settings are used, do not
change these default settings without good reason.
If you do change the settings by mistake and wish to return to the original settings,
follow the procedure below.
S Character color and basic color for graphics, etc.
Character color, display color, basic color, boundary color, frame color, ON color,
flashing color, color when positive, color when negative.
Specify the white at the right end.
S Background color, etc.
Background color, OFF color, frame + range, frame - range
If transparentcolor isnot required,select theblack atthe leftend.
If transparent color is required, select the transparent setting.
58
Initial Editing Screen and Basic Operations
4-1-3
Section 4-1
Environmental Settings (Tool Settings for the “Edit” Screen)
These are the “Edit” screen settings, such as those for grid display and the snap
ON function.
The environmental settings can also be changed during screen editing.
Select “ENV SET” on the initial editing screen. The “Tool Settings (for edit screen)”
key.
screen will be displayed. To quit setting, press the
S Grid Display X Width
S Grid Display Y Width:
A grid is displayed on the screen. The intervals for this grid display are specified
in the range of 2 to 99 dots in both the X direction (horizontal direction) and Y
direction (vertical direction). If “0” or “1” is specified, the grid is not displayed.
Pressing [F1] (TchSw) specifies a grid corresponding to the smallest unit for
touch switches (“SW” is displayed). Pressing [F2] (8), [F3] (16) and [F4] (32)
specifies grids with 8-dot, 16-dot, and 32-dot intervals respectively.
When a grid is displayed, a solid-line frame that indicates the screen range, and
a “+” mark that indicates the center of the screen are also displayed.
S Snap ON Fun.:
When this function is set, cursor motion is automatically locked to the grid intersections while a grid is displayed. Cancel this function if fine positioning is required. By pressing the [Space] key during graphics creation, it is possible to
temporarily switch the snap ON function on or off (when the creation of one
graphic has been completed, the original snap ON function status is restored).
S Disp Mode:
By not displaying images, library items and tiling, the redisplay of screens can be
speeded up. When the “Hspeed” mode is set, image library items are indicated
by a broken line frame, regardless of the setting for “Brkn Line Frame Disp” described below, and tiling is not displayed at all. The setting for this function has
no effect on printouts of the PT screen or screen data.
59
Initial Editing Screen and Basic Operations
Section 4-1
S Lamp/TouchSw # Disp:
After having created lamps and touch switches, the lamp bit numbers that correspond to the lamps and touch switches can be displayed in the graphics. These
numbers are not displayed on the PT screen. The setting for this function also
determines whether or not lamp bit numbers are printed when screen data is
printed out.
S Memory Table # Disp.:
It is possible to display the memory table number referenced when numeric values and characters are displayed. This number is not displayed on the PT
screen. The setting for this function also determines whether or not memory
table numbers are printed when screen data is printed out.
S Image/Library # Disp:
When images and library items are displayed, the code for the image or library
item can be indicated. The code is not displayed on the PT screen; the setting for
this function determines whether or not the code is printed when screen data is
printed out.
S Brkn Line Frame Disp:
This setting makes it possible to display a broken line frame at the display locations for numeral/character-string tables, images, and library items. Set this
function when you need to make a distinction with fixed-display characters, and
when you want to check areas. Even if there are spaces in a character-string,
the character-string display range is made clear with this function. This frame is
not displayed on the PT screen.
S Lamp/TSW Disp Mode:
Specifies the way in which lamps and touch switches are displayed.
The appearance of the display during operation at the PT can be checked in advance using the support tool.
The setting for this function also determines the status of lamps and touch
switches when screen data is printed out.
S NT20M/NT20S Enlrgd Disp
When the “NT Model” setting is NT20S or NT20M, editing can be performed with
the “Edit” screen magnified by a factor of 2 in the vertical and horizontal directions. The setting for this function has no effect on printouts of the PT screen or
screen data.
60
Common Setting Operations
4-2
Section 4-2
Common Setting Operations
Some setting operations are used frequently with all editing functions, such as numeral display setting and word setting. These are explained here by summarizing
the representative setting operations.
Refer to this section if you are unsure how to perform a setting operation during
screen creation.
4-2-1
Setting Character/Character-String Displays
<Character input>
<Character-string display>
S Ref Way
In the case of a character-string display, specify the method used to reference
the memory table used for the display here. This item can only be specified
when using direct connection.
(1) Direct
The character string in the specified character-string memory table is displayed.
(2) Indrct
The numeric value in the specified numeral table is taken as the number of a
character-string memory table, and the character-string in that characterstring memory table is displayed.
Indirect specification can be specified in the following cases. Do not specify it
unless one of these conditions applies.
S When using a C200H interface unit
S When using an NT20S or NT600S with Ver.5 direct connection
S When using an NT30 or NT30C
Up to 50 indirect specifications can be made on one screen, including both
numerical displays and character-string displays.
61
Common Setting Operations
Section 4-2
S Ref Table
In the case of a character-string display, specify the number of the memory table
to be referenced here. In direct specification, specify the character-string
memory table number, and in indirect specification, specify a memory table
number.
Pressing the [F1] key enables selection from a memory table list.
S Length
In the case of character-string display, a display area equivalent to the specified
number of characters is created. The character string is displayed displaced as
far to the left as possible in the display area.
S Size
Specify whether the half-size font or normal font is to be used for one-byte characters here.
However, note that 64x cannot be specified with an NT20S or NT20M.
Note
This font specification is not valid in the case of mark data and image data.
Half-size
Normal
S Scale
Characters can be displayed at magnifications from 1x (Equ) to 64x.
Equ
Wide
High
4x
9x
16x
64x
S Attribute
Characters can be displayed with any of the following attributes: “Norm” (normal), “Inv.” (inverted), “Flsh” (flashing), or “Spot”. For screen data of models other than the NT30C and NT610C, “Flsh” and “Spot” are displayed in yellow on the
support tool screen.
S Smoothing
This function smooths out the jaggedness that appears in magnified characters.
It can be specified for characters whose magnification is 4x or greater and marks
whose size is 16 x 16 dots or greater.
When using an NT20S, NT20M, NT600S, or NT600M without direct connection,
only decimal display is possible and this setting is therefore ineffective.
With smoothing
62
Without smoothing
Common Setting Operations
4-2-2
Section 4-2
Setting Numeral Displays
These settings set the display size and display status for numerals.
S Ref Way
Specify the method used to reference the memory table used for the display
here. This item can only be specified when using direct connection.
(1) Direct
The numeric value in the specified character-string memory table is displayed.
(2) Indrct
The numeric value in the specified numeral table is taken as the number of a
numeral table, and the numeric value in that numeral table is displayed.
Indirect specification can be specified in the following cases. Do not specify it
unless one of these conditions applies.
S When using a C200H interface unit
S When using an NT20S or NT600S with Ver.5 direct connection
S When using an NT30 or NT30C
Up to 50 indirect specifications can be made on one screen, including both
numerical displays and character-string displays.
63
Common Setting Operations
Section 4-2
S Ref Table
Specify the number of the numeral table to be referenced here.
Pressing the [F1] key enables selection from a numeral table list.
S Integer:
Specify the number of digits in the integral part of the numeric
value here.
S Decimal:
Specify the number of digits in the decimal fraction here.
S Disp Type:
Specify whether the displayed numeric value will be decimal or
hexadecimal format.
When using an NT20S, NT20M, NT600S, or NT600M and not
using direct connection, only decimal values can be displayed
and this setting is therefore ineffective.
S Zero Sup:
When “No” is specified here, if the numeric value does not have
the available number of digits, “0” will be displayed for the digits
preceding the digits comprising the numeric value.
S Disp Sign:
When “Yes” is specified here, a minus sign will be displayed for
negative numeric values (when using direct connection, these
are decimal format numbers with “F” at the head).
S Size:
Three fonts are available for numeric value display: “Half”,
“Norm” and “Wide”.
Half-size
S Scale:
Normal
Wide
Characters can be displayed at magnifications from 1x (Equ) to
64x.
However, note that 64x cannot be specified with an NT20S or
NT20M.
S Attribute:
Numeric values can be displayed with any of the following
attributes: “Norm” (normal), “Inv.” (inverted), “Flsh” (flashing),
or “Spot”. For screen data of models other than the NT30C and
NT610C, “Flsh” and “Spot” are displayed in yellow on the
support tool screen.
S Smoothing:
This function smooths out the jagged appearance of magnified
numerals. It can be specified for numerals whose scale is 4x or
greater.
With the NT20S, NT20M, NT600S, and NT600M, smoothing is
always performed on characters and marks with a magnification of 4 or greater and this setting is therefore not used.
64
Common Setting Operations
Section 4-2
Reference: The display of numeric values changes in the following way in accordance with the
specifications made for “Integer”, “Decimal”, “Zero Sup”, and “Disp Sign”.
Integer
Decimal
Zero Sup
Disp Sign
Contents of the
numeral table
Screen
display
3
0
No
No
12
012
3
0
No
No
−12
012
3
0
Yes
No
12
12
3
0
Yes
No
−12
12
3
0
Yes
Yes
12
12
3
0
Yes
Yes
−12
−12
3
1
No
No
1
000.1
3
1
No
No
−12
001.2
2
1
No
Yes
1
00.1
2
1
No
Yes
−12
−01.2
2
1
Yes
Yes
1
0.1
2
1
Yes
Yes
−12
−1.2
* In the memory table, those characters suffixed by a “-” symbol are actually suffixed by an “F” in decimal notation when using direct connection (with the
NT612G and NT610C, they are suffixed by an “F” even when direct connection
is not used).
For example, “−12” is represented as “F0000012”.
65
Common Setting Operations
4-2-3
Section 4-2
Specifying the Display Color (NT30C, NT610C Only)
When using the NT30C or NT610C, both the color used to display characters and
graphics and the color used for the background can be specified. Depending on
the screen elements created, the following colors can be specified.
Characters/Numeric Values
S Display color:
Specifies the color of characters and numeric values.
S Background color:
Specifies the color of the background to characters
and numeric values. If
(transparent color) is
specified, the background becomes transparent and
elements underneath it can be seen through it.
A
Background color
Character color
Graphics
S Basic color:
In the case of graphics drawings this is the color of
lines and in the case of tiled figures it is the color of the
tiling.
S Background color:
Specifies the color that will be the background after a
graphic has been tiled (the color that can be seen in
the gaps in a pattern). If transparent color is
specified, the elements underneath can be seen
through the background.
S Boundary color:
Specifies the color that indicates the boundaries of
tiled areas.
Graphic
Tiling
Boundary line color
Green (Basic color)
Pattern display color (Basic color)
Pattern background color
Lamps/Touch Switches
S Frame color:
frame
This specifies the color of the frame if “Frame” is set for
display.
66
S Ptot color:
This specifies the color of a lamp or touch switch when it is
OFF. If transparent color is specified, the elements
underneath can be seen through the OFF color.
S Lit color:
This specifies the color of a lamp or touch switch when it is
ON.
Common Setting Operations
Section 4-2
S Flashing color:
This specifies the color of a lamp or touch switch when it is
flashing. During flashing, the OFF color and ON color are
displayed alternately.
When “OFF”
When “ON”
When flashing
“OFF” color
Frame color
“OFF” color
Frame color “ON” color
Flashing color
Reference: The appearance of lamps and touch switches during operation at the PT can be
checked in advance on the support tool screen by using the “Lamp/TSW Disp
Mode” option in the environmental settings (tool settings for the “Edit” screen).
Graphs
−100%
S Frame color
Specifies the color for the frame of a graph.
S Frame + range
Specifies the color of the graph when the numeric
value is positive.
S Frame − range
Specifies the color of the graph when the numeric
value is negative.
Bar graph
Trend graph
0%
“+” range in frame
100%
When positive
Display color
for positive value
−100%
0%
Frame color
100%
When negative
Display color
for negative value
Polygonal line graph
Frame color
“+” range in frame
100%
100%
0%
0%
−100%
−100%
“−” range in frame
Frame color
“−” range in frame
Frame color
67
Common Setting Operations
4-2-4
Section 4-2
Setting Numeral Memory Tables
This section describes how to set the initial values, and data area referenced in the
PC, for numeral memory tables.
The number of numeral memory tables is determined by the “PT Type” setting, as
follows:
NT20S, NT20M:
128 tables
NT600S, NT600M:
256 tables
NT30, NT30C, NT612G, NT610C:
1,000 tables (The number can be changed to 512 even
when using direct connection, in accordance with the system memory).
Reference: When using an NT30, NT30C, NT612G, or NT610C, numeral memory table numbers 247 through 255 are used for the clock function and, therefore, setting operations cannot be set for them.
[When not using direct connection]
[When using direct connection]
68
S No.:
Numeral table number
S Init Val:
Initial value
Common Setting Operations
Section 4-2
S In:
Execution/non-execution of numeral table initialization in
accordance with initial values set using the support tool
when the PT is started up.
S #:
Number of words used at the PC for reference by the
numeral table.
S Word:
First word (lower word) in the data area at the PC
referenced by the numeral table.
The entry in the parentheses to the right is a comment input
when word setting was performed. It gives information such
as the contents of the word.
When direct connection is not used, only “Init Val” can be set.
Reference: If the host interface unit’s DIP switch is set for initialization of the data contents of
the allocated words in the PC, the “Initial Value” setting will be invalidated.
<Setting method>
Procedure
1. Locate the bar cursor at the number of the numeral table to be set.
" [Shift] + [ ] or [Shift] + [ ] can be used to move the bar cursor to the previous or
next numeral table for which the “Init Val” setting is not “0”.
" Press the [Tab] key to display the memory table number input field.
" Press the [F1] (Ref) key to display the screen number that references a particu-
lar numeral table.
" Press [F5] (Srch) to search for initial values or allocated words. See “Search-
ing within a Memory Table” (p.78).
Reference: S Data can be copied into the next numeral memory table by pressing [F2] (iCopy).
Incrementing processing is performed in accordance with the setting made with
[F3] (iCopySet). See “Copying to the Next Input Field (Increment Copy)” (p.77).
S Allocated bits of a numeral memory table can be changed in a batch with a designated range by pressing [F4] (Btch Chng). See “Batch Changing Bits and
Words” (p.79).
key in the “Init Val” input field, input the initial value of the numeral
2. Press the
key again.
memory table, then press the
Input numerical values can be deleted by pressing the [Home] key.
3. If using direct connection, to initialize the numeral memory table when it is
started, move the bar cursor to the “In” input field and press the [SPACE] (Init)
key.
4. If using direct connection, press the
ber of words (1 or 2), then press the
key in the “#” input field, input the numkey again.
5. Carry out word setting.
For details of the setting procedure, see “Setting Words and Bits” (p.75).
69
Common Setting Operations
4-2-5
Section 4-2
Setting Character-String Memory Tables
This section describes how to set the initial values, and data area referenced in the
PC, for character-string memory tables.
The number of character-string memory tables is determined by the “PT Type” setting, as follows:
NT20S, NT20M:
32 tables
NT600S, NT600M:
256 tables
NT30, NT30C, NT612G, NT610C:
1,000 tables (The number can be changed to 256 even
when using direct connection, in accordance with the system memory).
Reference: Only “Initial Data” can be set for character-string memory table numbers 256
through 999. It is not possible to reference PC data areas with these numbers.
[When not using direct connection]
[When using direct connection]
70
S No.:
Character-string memory table number
S Initial Data:
Initial value
Common Setting Operations
Section 4-2
S In:
Execution/non-execution of character-string table
initialization in accordance with initial values set using the
support tool when the PT is started up.
S #:
Number of words used at the PC for reference by the
character-string memory table.
S Word:
First word (lower word) in the data area at the PC
referenced by the character-string memory table.
The entry in the parentheses to the right is a comment input
when word setting was performed. It gives information such
as the contents of the word.
Reference: If the host interface unit’s DIP switch is set for initialization of the data contents of
the allocated words in the PC, the “Initial Value” setting will be invalidated.
<Setting method>
Procedure
1. Locate the bar cursor at the number of the character-string memory table to be
set.
" [Shift] + [ ] or [Shift] + [ ] can be used to move the bar cursor to the previous or
next character-string memory table for which the “Initial Data” setting is not
blank.
" Press the [Tab] key to display the memory table number input field.
" Press the [F1] (Ref) key to display the screen number that references the char-
acter-string memory table in question.
" Press [F5] (Srch) to search for initial values or allocated words. See “Search-
ing within a Memory Table” (p.78).
Reference: S Data can be copied into the next character-string memory table by pressing [F2]
(iCopy). Incrementing processing is performed in accordance with the setting
made with [F3] (iCopySet). See “Copying to the Next Input Field (Increment
Copy)” (p.77).
S Allocated bits of a character-string memory table can be changed in a batch with
a designated range by pressing [F4] (Btch Chng). See “Batch Changing Bits and
Words” (p.79).
2. Press the
key in the “Init Val” input field, input the initial value of the charackey again.
ter-string memory table, then press the
Input character-strings can be deleted by pressing the [Home] key.
3. If using direct connection, to initialize the character-string memory table when
it is started, move the bar cursor to the “In” input field and press the [SPACE]
(Init) key.
key in the “#” input field, input the num4. If using direct connection, press the
key again.
ber of words (1 to 20), then press the
5. If using direct connection, carry out word setting.
For details of the setting procedure, see “Setting Words and Bits” (p.75).
71
Common Setting Operations
4-2-6
Section 4-2
Bit Memory Table Setting
This setting sets screen switching functions, which switch the screen when a PC
bit comes ON, and the alarm list/history function, which is actuated in accordance
with bit statuses (ON/OFF). The bit memory table allocations are also set in this
setting.
Bit memory tables can only be used with Ver.3 and later versions of the NT30,
NT30C, NT610G, NT612G, and NT610C.
Reference: The allocated bits for the screen switching functions and alarm history function in
the bit memory tables are continually read by data communication while the PT is
operating. If too many settings are made, PT processing may be delayed.
72
S No.:
Bit memory table number
S Hist:
Execution/non-execution of bit status check (reading) for
alarm history
S #:
Presence/absence of screen switching function
S Table:
Character-string memory table displayed in the alarm list/
history
S Dsp Cl:
Display color for the character-string memory table.
For models other than the NT30C” and NT610C”, this color
is fixed as white.
S Image & Lib:
Image library code displayed in the alarm history
S SwScreen:
Displayed screen number if screen switching is executed
S Bit:
Bit allocated in the bit memory table. The parentheses to the
right contain a comment indicating, for example, the function
of the bit).
Common Setting Operations
Section 4-2
S Setting procedure
The bit memory table has the following two functions:
S Screen switching function
S Alarm list/history function
For details on these functions, refer to the user’s manual for the PT you are using.
<Setting screen switching functions>
Procedure
1. Locate the bar cursor at the “#” input field for the bit memory table with the required number and press the SPACE (Hist/SWScreen) key.
S To register changes in bit statuses in the alarm history, also press the SPACE
key (Hist/SWScreen) in the “Hist” input field.
S [Shift] +
and [Shift] +
can be used to move the bar cursor to the previous
and next positions in the bit memory table where there is a setting in the “Bit”
column.
S Pressing the [Tab] key displays the memory table number input field.
S Pressing the [Home] (Delete) key clears the bit memory table setting at which
the bar cursor is located (applies only if there is a setting in the “Bit” column).
S An allocated bit number search will be executed each time the [F5] (Srch) key is
pressed. See “Searching Within a Memory Table” (p.78).
Reference: S Data can be copied into the next bit memory table by pressing [F2] (iCopy). See
“Copying to the Next Input Field (Increment Copy)” (p.77).
S Allocated bits of a bit memory table can be changed in a batch with a designated
range by pressing [F4] (Btch Chng). See “Batch Changing Bits and Words”
(p.79).
2. Press the
key in the “SwScreen” input field, input the screen number of the
key again.
screen whose display is to be switched, then press the
When the screen switching function is used, the “Table”, “Dsp Cl”, and “Image
& Lib” settings are invalid.
3. Carry out bit setting.
For details of the setting procedure, see “Setting Words and Bits” (p.75).
73
Common Setting Operations
Section 4-2
<Setting the alarm list/history function>
Procedure
1. Locate the bar cursor at the number of the bit memory table to be set.
S To register changes in bit statuses in the alarm history, press the SPACE key
(Hist/SWScreen) in the “Hist” input field.
S [Shift] +
and [Shift] +
can be used to move the bar cursor to the previous
and next positions in the bit memory table where there is a setting in the “Bit”
column.
S Pressing the [Tab] key displays the memory table number input field.
S Pressing the [Home] (Delete) key clears the bit memory table setting at which
the bar cursor is located (applies only if there is a setting in the “Bit” column).
S An allocated bit number search will be executed each time the [F5] (Srch) key is
pressed.. See “Searching Within a Memory Table” (p.78).
Reference: S Data can be copied into the next bit memory table by pressing [F2] (iCopy). See
“Copying to the Next Input Field (Increment Copy)” (p.77).
S Allocated bits of a bit memory table can be changed in a batch with a designated
range by pressing [F4] (Btch Chng). See “Batch Changing Bits and Words”
(p.79).
key in the “SwScreen” input field, input the character-string
2. Press the
key again.
memory table number, then press the
Pressing [F1] (Select) allows you to select the number from a displayed list.
3. If using an NT610C, specify the display color.
For details of the setting procedure, see “Specifying the Display Color” (p.66).
4. To display an image library entry, press the
field, input the relevant code, then press the
key in the “Image & Lib” input
key again.
Pressing [F1] (Select) allows you to select the number from a displayed list.
5. To switch the display, input the screen number and press the
key.
6. Carry out bit setting.
For details of the setting procedure, see “Setting Words and Bits” (p.75).
Reference: The allocated bits for the screen switching functions and alarm history function in
the bit memory tables are continually read by data communication while the PT is
operating. If too many settings are made, PT processing may be delayed.
74
Common Setting Operations
4-2-7
Section 4-2
Setting Words and Bits
The words and bits referenced in the PC have to be set.
S Word/Bit:
In the case of numeral tables and character-string memory tables, specify the
lower word number of the referenced words. In the case of lamps, touch
switches, and bit memory tables, set the bit number to be allocated.
The entries in the parentheses on the right hand side are comments. Comments
can be input to provide information such as the purpose of use of the word or bit
(to input a comment, press the [F1] (Ref Inpt) key.
When specifying a DM are for a bit, append the bit number (00 to 15) at the end of
the DM number.
Timers (TIM) and counters (CNT) cannot be set in bits or the words of characterstrings.
Note
When using a SYSMAC BUS/2 interface unit, all the other bits in the same word as
a bit used for touch switch input notification are turned OFF.
Direct Input Method
To make entries in the allocated bit/word input field directly by key input, press the
key while the cursor is in the input field, input the bit or word number, then press
key again. If the number is input correctly it is confirmed. For details on the
the
input procedure, see “Character input” (p.54).
The following rules apply to bit and word input.
S Even if lower case letters are input, the characters will be upper case.
S If nothing is input, this will be interpreted as “no bit or word”.
S Symbols that indicate the type of bit or word, such as “AR”, “LR”, and “DM”, are
correctly identified even if only the first character is input. However, in the case
of “CH” (I/O, internal relay area), correct identification is possible only when
nothing is input at the head.
S Blanks (space) are ignored.
S The zeros that precede a bit or word number can be omitted.
S If the bit or word number exceeds the upper limit, a warning “pip” will sound and
the number will be changed to the maximum possible value.
75
Common Setting Operations
Section 4-2
Short cut keys can also be used (see p.55).
Example
Specifying link relays (LR) for allocated bits:
Input
[
After Input
]
[
[L01]
[L000001]
[LR0212]
[L000212]
[12]
[ 000012]
[Ir5601]
[L005601]
[ LR914]
[L000914]
[L999999]
[L006300]
]
Reference Input Procedure
If you are not sure of the types of bit and channel that can be specified, it is possible
to display a list of the types that can be specified and select the type from among
these. It is also possible to input a comment at this time.
<Setting method>
Procedure
1. Press the
Inpt).
key in the allocated bit/word input field, then press [F1] (Ref
The window shown below will be displayed.
2. Specify the type of bit or word by pressing the corresponding function key. If a
type that cannot be input in the input field is selected, the selection is ignored.
key. If the
3. Input the bit or word number with the numeral keys and press the
input number exceeds the upper limit, a warning “pip” will sound and the number will be changed to the maximum possible value.
If input is performed correctly, the cursor will shift to the comment input field.
4. If required, input a comment, then press the
key.
quired, just press the
key. If no comment is re-
The window closes, and the bit/word number and comment are displayed in
the original input field.
76
Common Setting Operations
4-2-8
Section 4-2
Copying to the Next Input Field (Increment Copy)
When a memory table or screen data is displayed in list form, data can be copied to
the next input field. It is also possible to perform addition processing (increment
copy) at this time.
The data that can be copied is indicated below.
Type
Details
Incrementing
Remarks
Numeral
memory table
t bl
Initial value
f
Word
f
Characterstring memory
table
Initial value
¢
Word
f
Bit memory
table
All items
If any of the items is selected for copying, all
items will be copied.
The “Table”, “Image & Lib”, “SwScreen” and “Bit”
items will all automatically be incremented by 1.
Numeral display
Numeral
memory table
number
Executed only if the next input field already has an
entry in it.
Automatically incremented by 1.
Characterstring display
Character
string memory
table number
Executed only if the next input field already has an
entry in it.
Automatically incremented by 1.
Lamp
Control bit
number
Executed only if the next input field already has an
entry in it.
Automatically incremented by 1.
Touch switch
Control bit
number
Executed only if the next input field already has an
entry in it, and the touch switch is an input notification function touch switch.
“In” and “#” can be copied simultaneously.
“In” and “#” can be copied simultaneously.
Automatically incremented by 1.
Bar graph
Numeral
memory table
number
Executed only if the next input field already has an
entry in it.
Automatically incremented by 1.
Numeral setting input field
Numeral
memory table
number
Executed only if the next input field already has an
entry in it.
Automatically incremented by 1.
O: Incrementing in accordance with the copy setting
: No copy setting ¢: No incrementing
77
Common Setting Operations
Section 4-2
<Operation>
Procedure
1. To make a copy setting, press [F3] (iCopySet), input the value to be added on
copying, and the type of numerical value (decimal/hexadecimal), then press
key.
the
2. Locate the bar cursor at the item to be copied and press [F2] (iCopy).
The data will be copied to the next input field. Addition processing is carried
out in accordance with the nature of the copied data and the copy setting.
Repeated copy operations are possible by continuing to press the [F2] (iCopy)
key.
4-2-9
Searching Within a Memory Table
This function is used to search for data in a numeral or character-string memory
table.
The data that can be searched for are tabled below.
Type
Numeral memory table
Details
Initial value
Word
Character-string memory table
Initial value
Word
Bit memory table
Bit
<Operation>
Procedure
1. Locate the bar cursor on the item to be searched for, press the [F5] (Srch) key,
input the data to be searched for and the direction of the search, then press the
key.
The search will start. When the specified data is found, the bar cursor will be
located at its position.
2. To search for the next occurrence, press the
the [Esc] key.
78
key. To quit the search, press
Common Setting Operations
4-2-10
Section 4-2
Batch Changing Bits and Words
The bits and words allocated to memory tables and screen data can be changed in
batches with specified ranges.
The types of data for which batch change operations are applicable are indicated
below.
Type
Details
Remarks
Numeral memory table
Word
Executed using the numeral memory table setting window
Character-string
memory table
Word
Executed using the character-string memory table setting
window
Bit memory table
Bit
Executed using the bit memory table setting window
Screen data
Bit
Executed for each screen after displaying the next item
with [F10] (Next) on the “Screen Selection” screen.
Example
Changing a DM area to link relays (LR)
Before the change
After the change
Head word before
the change
D001200
L003000
End word before
the change
D001408
L003208
Head word after
the change
<Operation>
Procedure
1. Display the list of the data to be subjected to the batch change, press the [F4]
(Btch Chng) key, input the head and end words before the change, head word
after the change, and presence/absence of a comment change, then press the
key.
S A window indicating the types of bits and words that can be input can be displayed by pressing the [F1] (Ref Inpt) key.
S By marking screen data, bits and words in more than one screen can be changed
together.
79
Creating Fixed Displays
4-3
Section 4-3
Creating Fixed Displays
This section describes how to create fixed characters and graphics in screen data.
The following characters and graphics can be created.
Characters (fixed display), marks (display)
Continuous lines, squares, polygons, circles/arcs, fans, tilings
When using an NT20S, NT20M, NT600S, or NT600M, only characters (fixed display), continuous lines, and circles can be used (arcs cannot be used).
4-3-1
Inputting Characters
Characters to be displayed have to be input. For details on the display of character-strings and numeric values, setting the display color (NT30C or NT610C), setting numeral tables, and setting words and bits, see 4-2 “Common Setting Operations” (p.61).
Procedure
1. Select “FIX DISP” on the initial editing screen.
The fixed display menu will be displayed.
2. Select “STR IN”.
3. Input the characters to be displayed at the keyboard and press the
key.
" Pressing the [F3] (Mark) key enables mark input.
" With the NT30, NT30C, NT612G, and NT610C, pressing the [F4] (Image) key
enables image input.
4. Set the Details and press the
key.
5. If using an NT30C or NT610C, set the character color and background color.
6. Press the
key with the cursor on “Exec”.
7. A box indicating the size of the character data is displayed.
Move this box to the required display position and press the
acters will be displayed.
8. Press the [Esc] key to quit character input.
80
key. The char-
Creating Fixed Displays
Section 4-3
Deleting Displayed Characters
This is the procedure for deleting displayed characters. Deletion is executed in
character-string units.
Procedure
1. Select “STR IN” from the fixed display menu.
2. Press the [F1] (Delete) key.
3. Locate the cross-hair cursor at a position inside the character-string to be dekey. The selected character-string will be enclosed by
leted and press the
a dotted line.
4. Check the message, then press
to delete the character-string.
Modifying Displayed Characters
This is the procedure for modifying displayed characters, their character size, attributes, or position. Modification is executed in character-string units.
Procedure
1. Select “STR IN” from the fixed display menu.
It is also possible to proceed straight to step 4. by left clicking on the character
to be modified (see p.57).
2. Press the [F2] (Modify) key.
3. Locate the cross-hair cursor at a position inside the character-string to be mokey.
dified and press the
4. Select the required item in the window and modify the character-string.
S Modify String:
Select to change characters.
S Set Display:
Select to change the character font, scale, or display
attribute.
S Color:
Select to change the character color or background color.
(NT30C and NT610C only)
S Display Position:
Select to move the character box in order to change the
display position.
5. Press the [Esc] key to quit modification.
81
Creating Fixed Displays
4-3-2
Section 4-3
Inputting Marks
Created marks are input during screen editing. Marks can be handled in the same
way as characters and magnification scales can be specified for them.
However, smoothing is only possible for 16 x 16 dot marks when using an NT30,
NT30C, NT612G, or NT610C.
Select the mark that you want to display from the mark selection screen.
Displaying Marks
Marks can be displayed in the following two ways.
(1) Specification during character input
Press the [F3] (Mark) key after inputting characters or a label to display the
mark selection screen. Only 16 x 16 dot marks can be input.
(2) Specification using the fixed editing menu
Select “Mark” from the fixed display menu and specify the display position: the
mark selection screen will be displayed.
This operation cannot be used with the NT20S, NT20M, NT600S, or
NT600M.
Select the mark to be displayed from this screen, specify the Details and character color if using an NT30C or NT610C, then specify the display position.
32 x 32 and 64 x 64 dot marks can also be displayed at the same time.
The mark will be displayed in its actual form in the character input field. It will
be displayed on the editing screen with its bottom left extremity take as the
origin.
Marks displayed on the screen can be deleted using the following method (marks
located inside character-strings can be deleted using the “STR IN” function).
Deleting Marks
Procedure
1. Select “FIX DSP” from the initial editing menu.
The fixed display menu will be displayed.
2. Select “MARK”.
3. Press the [F1] (Delete) key.
4. Locate the cursor at the mark to be deleted and press the
5. Check the message and then press the
82
key.
key.
Creating Fixed Displays
Section 4-3
Use the following procedure to modify marks displayed on the screen (marks located inside character-strings can be modified using the “STR IN” function).
Modifying Marks
Procedure
1. Select “FIX DSP” from the initial editing menu.
The fixed display menu will be displayed.
It is also possible to proceed straight to step 5. by left clicking on the mark to be
modified (see p.57).
2. Select “MARK”.
3. Press the [F2] (Modify) key.
4. Locate the cursor at the mark to be modified and press the
key.
5. Select the required item and execute the modification.
S Modifying code:
Select to modify a mark.
S Set display:
Select to change the character font, scale, or display
attribute.
S Color:
Select to change the character color or background color.
(NT30C and NT610C only)
S Display position:
Select to move the mark box in order to change the display
position.
6. Press the [Esc] key to quit modification.
83
Creating Fixed Displays
4-3-3
Section 4-3
Creating Polylines
This is the procedure for drawing continuous lines (polygonal lines). It is possible
to connect a maximum of 255 individual line segments.
Procedure
1. Select “FIX DSP” from the initial editing menu.
The fixed display menu will be displayed.
2. Select “POLYLINE” from the fixed display menu.
3. Select the type of line.
The selectable options are solid line, broken line, 1-dot chain and 2-dot chain.
" It is not possible to use more than one line type in the same continuous line.
4. If using an NT30C or NT610C, specify the line color.
5. Press the
key with the cursor on “Exec”
6. Draw the continuous line.
1) Press the
key at the start point.
2) Locate the cursor at an intermediate point and press the
key.
Set as many intermediate points as required.
3) At the end point, press the
key while holding down the [Shift] key (or
double click if using the mouse).
Intermediate
points ( )
Start point (
End point
(Shift+ )
)
" Pressing the [Esc] key before the end point has been set deletes the last drawn
line segment.
" Pressing the [Esc] key while holding down the [Shift] key aborts the drawing.
7. Press the [Esc] key to quit continuous line drawing.
Deleting Polylines
Procedure
1. Select “POLYLINE” from the fixed display menu and then press the [F1] (Delete) key.
A j mark will be displayed at the start point of the continuous line.
2. Locate the cursor at the j mark of the continuous line to be deleted and press
the
key.
3. Check the message and then press the
leted.
84
To abort deletion, press the [Esc] key.
key; the continuous line will be de-
Creating Fixed Displays
Section 4-3
Modifying Polylines
Procedure
1. Select “POLYLINE” from the fixed display menu, then press the [F2] (Modify)
key.
A j mark will be displayed at the start point of the continuous line.
It is also possible to proceed straight to step 3. by left clicking on the polyline to
be modified (see p.57).
2. Locate the cursor at the j mark of the continuous line to be modified and press
the
key.
3. Select the required item and execute the modification.
S Line Type:
Select to change the line type.
S Color:
If using an NT30C or NT610C, select to change the line
color.
S Display position:
The cursor moves to the end point of the continuous line.
Change the shape using the same operations as used for
drawing. Pressing the [Esc] key deletes the last straight line
and allows the creation of a new straight line.
After changing the shape, press the
down the [Shift] key.
key while holding
If using a mouse, double click.
4. Press the [Esc] key to quit modification.
85
Creating Fixed Displays
4-3-4
Section 4-3
Creating Squares
This is the procedure for drawing squares.
Procedure
1. Select “FIX DSP” from the initial editing menu.
The fixed display menu will be displayed.
2. Select “SQUARE” from the fixed display menu.
3. Select the display attribute with “Detail”.
The selectable options are “normal”, “inverted”, “flashing” and “spot”.
4. If using an NT30C or NT610C, specify the line color.
5. Press the
key with the cursor on “Exec”
6. Draw the square.
1) Press the
key at the start point.
2) Locate the cursor at the end point (diagonally opposite point) and press the
key.
Start point (
)
End point (
)
" Pressing the [Esc] key before the end point has been set aborts the drawing.
7. Press the [Esc] key to quit square drawing.
Deleting Squares
Procedure
1. Select “SQUARE” from the fixed display menu and then press the [F1] (Delete) key.
A j mark will be displayed at the start point of the square.
2. Locate the cursor at the j mark of the square to be deleted and press the
key.
3. Check the message and then press the
To abort deletion, press the [Esc] key.
86
key; the square will be deleted.
Creating Fixed Displays
Section 4-3
Modifying Squares
Procedure
1. Select “SQUARE” from the fixed display menu, then press the [F2] (Modify)
key.
A j mark will be displayed at the top left corner of the square.
It is also possible to proceed straight to step 3. by left clicking on the square to
be modified (see p.57).
2. Locate the cursor at the j mark of the square to be modified and press the
key.
3. Select the required item and execute the modification.
S Attribute:
Select to change the display attribute.
S Color:
If using an NT30C or NT610C, select to change the line
color.
S Display position:
Select to move the bottom right point of the square.
Pressing the [Esc] key makes it also possible to move the
top left point of the square.
Change the size and shape and then press the
key.
4. Press the [Esc] key to quit modification.
87
Creating Fixed Displays
4-3-5
Section 4-3
Creating Polygons
This is the procedure for drawing polygons. It is possible to create polygons with
up to 255 sides.
It cannot be used with the NT20S, NT20M, NT600S, or NT600M.
Procedure
1. Select “FIX DSP” from the initial editing menu.
The fixed display menu will be displayed.
2. Select “POLYGON” from the fixed display menu.
3. Select the display attribute with “Detail”.
The selectable options are “normal”, “inverted”, “flashing” and “spot”.
4. If using an NT30C or NT610C, specify the line color.
5. Press the
key with the cursor on “Exec”
6. Draw the polygon.
1) Press the
key at the start point.
key.
2) Locate the cursor at a the next vertex and press the
Set as many vertices as required.
3) At the final vertex, press the
key while holding down the [Shift] key (or
double click if using the mouse).
The final vertex will be joined to the start point automatically.
Start point (
)
Automatically joined
Vertices (
)
End point
(Shift+ )
" Pressing the [Esc] key before the end point has been set deletes the last drawn
straight line.
" Pressing the [Esc] key while holding down the [Shift] key aborts the drawing.
7. Press the [Esc] key to quit polygon drawing.
88
Creating Fixed Displays
Section 4-3
Deleting Polygons
Procedure
1. Select “POLYGON” from the fixed display menu and then press the [F1] (Delete) key.
A j mark will be displayed at the start point of the polygon.
2. Locate the cursor at the j mark of the polygon to be deleted and press the
key.
3. Check the message and then press the
key; the polygon will be deleted.
To abort deletion, press the [Esc] key.
Modifying Polygons
Procedure
1. Select “POLYGON” from the fixed display menu, then press the [F2] (Modify)
key.
A j mark will be displayed at the start point of the polygon.
It is also possible to proceed straight to step 3. by left clicking on the polygon to
be modified (see p.57).
2. Locate the cursor at the j mark of the polygon to be modified and press the
key.
3. Select the required item and execute the modification.
S Attribute:
Select to change the display attribute.
S Color:
If using an NT30C or NT610C, select to change the line color.
S Display position:
The cursor moves to the end point of the polygon.
Change the shape using the same operations as used for drawing. Pressing the [Esc] key deletes the last vertex and allows
the creation of a new vertex.
After changing the shape, press the
the [Shift] key.
key while holding down
S Attribute position:
Select to change the starting point for tiling when the “Normal”,
“Flashing” or “Spot” attribute is set. Use this feature when
graphics are overlapped, making tiling difficult.
4. Press the [Esc] key to quit modification.
89
Creating Fixed Displays
4-3-6
Section 4-3
Creating Circles/Arcs
This is the procedure for drawing circles and arcs.
Arcs cannot be created when using an NT20S, NT20M, NT600S, or NT600M.
Procedure
1. Select “FIX DSP” from the initial editing menu.
The fixed display menu will be displayed.
2. Select “CIRC/ARC” from the fixed display menu.
3. Select the display attribute with “Detail”
The selectable options are “normal”, “inverted”, “flashing”, and “spot”.
The selected attribute will be valid only for circles.
When using an NT20S, NT20M, NT600S, or NT600M, the attribute is fixed as
“normal”.
4. If using an NT30C or NT610C, specify the line color.
5. Press the
key with the cursor on “Exec”.
6. Draw the circular/arc.
1) Press the
key at the center of the circle or arc.
2) Move the cursor to set the size of the circle or arc and press the
key.
3) For a circle:
After setting the size, simply press the
key once more.
For an arc:
Locate the cursor at the end point of the arc. Specify the direction in which
key.
the arc is to be drawn with the [Insert] key, then press the
End point of the arc (
)
Start point of the arc (
Center (
)
7. Press the [Esc] key to quit circle/arc drawing.
90
)
Creating Fixed Displays
Section 4-3
Deleting Circles/Arcs
Procedure
1. Select “CIRC/ARC” from the fixed display menu and then press the [F1] (Delete) key.
A j mark will be displayed at the start point of the circle/arc.
2. Locate the cursor at the j mark of the circle/arc to be deleted and press the
key.
3. Check the message and then press the
key; the circle/arc will be deleted.
To abort deletion, press the [Esc] key.
Modifying Circles/Arcs
Procedure
1. Select “CIRC/ARC” from the fixed display menu, then press the [F2] (Modify)
key.
A j mark will be displayed at the start point of the circle/arc.
It is also possible to proceed straight to step 3. by left clicking on the circle or
arc to be modified (see p.57).
2. Locate the cursor at the j mark of the circle/arc to be modified and press the
key.
3. Select the required item and execute the modification.
S Attribute:
Select to change the display attribute. This selection is only
valid if using an NT30, NT30C, NT612G, or NT610C.
S Color:
If using an NT30C or NT610C, select to change the line
color.
S Display position:
Select to move the end point of an arc.
Pressing the [Esc] key makes it possible to change the start
point and center point also.
After changing the shape, press the
key.
4. Press the [Esc] key to quit modification.
91
Creating Fixed Displays
4-3-7
Section 4-3
Creating Fans
This is the procedure for drawing fans.
It cannot be used if using an NT20S, NT20M, NT600S, or NT600M.
Procedure
1. Select “FIX DSP” from the initial editing menu.
The fixed display menu will be displayed.
2. Select “FAN” from the fixed display menu.
3. Select the display attribute with “Detail”.
The selectable options are “normal”, “inverted”, “flashing”, and “spot”.
4. If using an NT30C or NT610C, specify the line color.
5. Press the
key with the cursor on “Exec”
6. Draw the fan.
1) Press the
key at the center of the fan.
2) Move the cursor to set the size and start point of the fan and press the
key.
3) Locate the cursor at the end point of the fan.
4) Specify the direct in which the fan is to be drawn by using the [Insert] key,
key.
then press the
End point (
Center (
)
)
Start point (
)
7. Press the [Esc] key to quit fan drawing.
Deleting Fans
Procedure
1. Select “FAN” from the fixed display menu and then press the [F1] (Delete) key.
A j mark will be displayed at the start point of the fan.
2. Locate the cursor at the j mark of the fan to be deleted and press the
3. Check the message and then press the
To abort deletion, press the [Esc] key.
92
key; the fan will be deleted.
key.
Creating Fixed Displays
Section 4-3
Modifying Fans
Procedure
1. Select “FAN” from the fixed display menu, then press the [F2] (Modify) key.
A j mark will be displayed at the center of the fan.
" It is also possible to proceed straight to step 3. by left clicking on the fan to be
modified (see p.57).
2. Locate the cursor at the j mark of the fan to be modified and press the
key.
3. Select the required item and execute the modification.
S Attribute:
Select to change the display attribute.
S Color:
If using an NT30C or NT610C, select to change the line
color.
S Display position:
Select to move the end point of the fan.
Pressing the [Esc] key makes it possible to change the start
point and center point also.
After changing the shape, press the
key.
4. Press the [Esc] key to quit modification.
4-3-8
Tiling
This is the procedure for filling an area enclosed by lines, such as a square or
circle, with a specified tiling pattern.
It cannot be used if using an NT20S, NT20M, NT600S, or NT600M.
Procedure
1. Select “FIX DSP” from the initial editing menu.
The fixed display menu will be displayed.
2. Select “TILING” from the fixed display menu.
3. Select the tiling pattern with “Detail”.
4. If using an NT30C or NT610C, specify the base color, background color, and
boundary color.
5. Press the
key with the cursor on “Exec”
6. Locate the cursor inside the area to be tiled and press the
key.
Any point inside an area that is enclosed by solid lines can be specified.
If using an NT30C or NT610C, make the specification inside the boundary color area.
7. A message asking for confirmation that the area is to be tiled will be displayed.
93
Creating Fixed Displays
Section 4-3
Press the
key to tile the area.
Press the [Esc] key to abort tiling.
8. Press the [Esc] key to quit tiling.
Take the display sequence into consideration when creating screen data (see
p.53).
The tiling patterns on the support tool screen may differ a little from the tiling patterns on the PT screen.
Note
If an area which is not closed is specified, the entire screen may be tiled. In addition, when using an NT610C, if a graphic for which the boundary color is not closed
is specified, the tiling may extend outside the specified area.
Example:
x (1)
x (2)
x : Point where tiling is specified
(1): Boundary color
(2): Boundary color
When tiling is specified at point (1), only the area inside the frame will be tiled, but
when it is specified at (2), the area outside the frame will also be tiled from the part
where the frames overlap.
Note
94
Do not specify tiling inside graphics assigned the “flashing” attribute.
Creating Fixed Displays
Section 4-3
Deleting Tiling
Procedure
1. Select “TILING” from the fixed display menu and then press the [F1] (Delete)
key.
A j mark will be displayed at the point at which the tiling was specified.
2. Locate the cursor at the j mark of the tiling to be deleted and press the
key.
3. Check the message and then press the
key; the tiling will be deleted.
To abort deletion, press the [Esc] key.
Modifying Tilings
Procedure
1. Select “TILING” from the fixed display menu, then press the [F2] (Modify) key.
A j mark will be displayed at the point where the tiling was specified.
" It is also possible to proceed straight to step 3. by left clicking on the tiling to be
modified (see p.57).
2. Locate the cursor at the j mark of the tiling to be modified and press the
key.
3. Select the required item and execute the modification.
S Detail:
Select to change the tiling pattern.
S Color:
If using an NT30C or NT610C, select to change the color.
S Display position:
Select to change the tiling location.
4. Press the [Esc] key to quit modification.
95
Setting Numeral Displays
4-4
Section 4-4
Setting Numeral Displays
This section describes how to display the contents of numeral tables on the
screen.
A maximum of 50 numeral displays can be set for display on one screen.
4-4-1
Setting Numeral Displays
This is the procedure for setting numeral displays. For details on the display of
character-strings and numeric values, setting display colors (NT30C and
NT610C), setting numeral tables, and setting words and bits, see 4-2 “Common
Setting Operations” (p.61).
Procedure
1. Select “NUM DISP” on the initial editing screen.
2. Select the field in which the numeral display is to be registered in the window
key.
and press the
" To delete an entry that has already been set, locate the cursor at that number
and press the [F1] (Delete) key.
Reference: To “increment copy” an existing numeral display entry into the next input field (incrementing the numeral memory table number), press the [F2] (iCopy) key with
the cursor located on that entry (see p.77).
3. Make the necessary settings.
4. Press the
key with the cursor on “Exec”.
5. A box that indicates the size of the numeral display will be displayed.
Move this box to the required display position and press the
key.
If required, more numeral displays can be set by repeating steps 2. through 5.
To quit numeral display, press the [Esc] key; the display will return to the menu.
Reference: If “Yes” is set for “Brkn Line Frame Disp” in the environmental settings (tool settings for the “Edit” screen), the display range for the numerals can be continually
monitored on the screen.
96
Setting Numeral Displays
4-4-2
Section 4-4
Modifying Numeral Displays
The contents and position of numeral displays created on the screen can be modified.
Procedure
1. Select “NUM DISP” on the initial editing screen.
" It is also possible to proceed straight to step 3. by left clicking on the numeral
display to be modified (see p.57).
2. In the window, select the entry corresponding to the numeral display to be mokey.
dified and press the
" It is also possible to make the selection by locating the mouse cursor on the
numeral display to be modified and clicking the left mouse button.
3. Select the required item in the window and execute the modification.
S Num Disp Setting: Select to change settings such as the referenced
memory table, the scale, and the attribute.
S Display Position:
Select to change the display position.
4. Press the [Esc] key to quit modification.
97
Setting Character-string Displays
4-5
Section 4-5
Setting Character-String Displays
This section describes how to display the contents of character-string memory
tables on the screen.
The maximum number of character-string displays that can be set on one screen
is 32 for the NT20S, 8 for the NT20M, and 50 for other models.
4-5-1
Setting Character-String Displays
This is the procedure for setting character-string displays. For details on the display of character-strings and numeric values, setting display colors (NT30C and
NT610C), setting numeral tables, and setting words and bits, see 4-2 “Common
Setting Operations” (p.61).
Procedure
1. Select “STR DISP” on the initial editing screen.
2. Select the field in which the character-string is to be registered in the window
key.
and press the
" To delete an existing character-string from the field in which it is registered, lo-
cate the cursor at that number and press the [F1] (Delete) key.
Reference: To “increment copy” an existing character-string numeral table entry into the next
input field (incrementing the character-string memory table number), press the
[F2] (iCopy) key with the cursor located on that entry (see p.77).
3. Make the necessary settings.
4. Press the
key with the cursor on “Exec”.
5. A box that indicates the size of the character-string display will be displayed.
Move this box to the required display position and press the
key.
If required, more character-string displays can be set by repeating steps 2.
through 5.
To quit character-string display, press the [Esc] key; the display will return to the
menu.
Reference: If “Yes” is set for “Brkn Line Frame Disp” in the environmental settings (tool settings for the “Edit” screen), the display range for the character-string can be continually monitored on the screen.
98
Setting Character-string Displays
4-5-2
Section 4-5
Modifying Character-String Displays
The contents and position of character-string displays created on the screen can
be modified.
Procedure
1. Select “STR DISP” on the initial editing screen.
" It is also possible to proceed straight to step 3. by left clicking on the character-
string display to be modified (see p.57).
2. In the window, select the entry corresponding to the character-string display to
key.
be modified and press the
" The character-string display to be modified can also be selected by left-clicking
it with the mouse.
3. Select the required item in the window and execute the modification.
S Str Disp Setting:
Select to change settings such as the referenced
memory table, the scale, and the attribute.
S Display Position:
Select to change the display position.
4. Press the [Esc] key to quit modification.
99
Setting Lamps
4-6
Section 4-6
Setting Lamps
This section describes how to create lamp graphics whose display can be controlled from the PC.
The maximum number of lamps that can be set for display on one screen is 64 for
the NT20S and NT20M, 128 for the NT600S and NT600M, and 256 for the NT30,
NT30C, NT612G, and NT610C.
Reference: When lamps are displayed in the same location as numeral table data or character-string memory table data, depending on the timing for lamp lighting and
memory table update timing, the lamp and numeral displays may overlap on the
screen. Refer to the operation manual for the PT you are using.
4-6-1
Setting Lamps
This is the procedure for setting lamps. For details on the display of characterstrings and numeric values, setting display colors (NT30C and NT610C), setting
numeral tables, and setting words and bits, see 4-2 “Common Setting Operations”
(p.61).
By using the “Lamp/TSW Disp Mode” in the environmental settings (tool settings
for the “Edit” screen), it is possible to check how lamps appear on the PT during
operation by viewing the support tool screen.
Setting Normal Lamps
This is the procedure for setting “Normal lamps”, which come on, go off, or flash, in
accordance with the status of PC bits.
Procedure
1. Select “LAMP” on the initial editing screen.
2. Select the field in which the lamp is to be registered in the window and press
key.
the
S To delete an existing lamp from a field in which it is registered, locate the cursor
at that number and press the [F1] (Delete) key.
Reference: To “increment copy” an existing lamp entry into the next input field (incrementing
the bit number), press the [F2] (iCopy) key with the cursor located in the “Bit” column at that entry. Note that the next input field must also have an entry in it. (See
p.77).
3. When using an NT30, NT30C, NT612G, or NT610C with Ver.3 or a later version of the direct connection function, select “Normal” as the lamp type and
key.
press the
When using an NT20S, NT20M, NT600S, or NT600M without direct connection, the “Lamp Type Set” is not displayed.
100
Setting Lamps
Section 4-6
4. Make the necessary settings.
S LampNo. /Bit: If direct connection is not used, set the lamp number here. If
direct connection is used, set the bit (lamp bit) allocated at the
PC.
S Label:
Set the characters (Label) that will be displayed together with
the lamp. If this setting is omitted, nothing will be displayed
together with the lamp.
S Pressing the [F3] (Mark) key allows marks to be input.
S With the NT30, NT30C, NT612G, and NT610C, pressing
[F4] (Image) allows images to be input.
S Details
S Frame:
Specify whether or not a frame is to be displayed around the
lamp graphic here.
S Attribute: Specify whether the lamp will come on continuously or flash
when there is an instruction for it to light from the PC here.
S Shape:
Specify the graphic used to create the lamp here.
Four types of graphic can be used: square, circle, polygon, or
fan.
When using an NT20S, NT20M, NT600S, or NT600M, only
squares and circles can be used.
S Color:
Frame color, OFF color, ON color, and flashing color for the
lamp (NT30C and NT610C only).
S Label Det:
Display settings for the Label characters.
Display attributes and smoothing cannot be specified with the
NT20S, NT20M, NT600S, or NT600M. It is not possible to
specify a scale of x64 when using an NT20S or NT20M.
S Label Col:
5. Press the
Specifies the character color and background color of the Label (NT30C, NT610C only).
key with the cursor on “Exec”.
6. Create the lamp graphic.
For details on the creation method, see 4-3 “Creating Fixed Displayes” (p.80).
101
Setting Lamps
Section 4-6
7. A box indicating the size of the label will be displayed in the center of the lamp
graphic.
Move this box to the required display position and press the
key.
If “No” is set for the “Label” setting in the “Lamp Setting” window, it will not be
possible to make this setting.
8. The specified label and lamp graphic will be displayed.
9. The screen on which registration fields for lamps can be selected will be displayed.
To create another lamp, select a field.
To quit lamp creation, press the [Esc] key.
Setting Image/Library Lamps (NT30, NT30C, NT612G, NT610C, with Ver.2 Direct Connection Only)
This is the procedure for setting image/library lamps, which display different image
data or library data according to the status of a PC bit.
When using an NT20S, NT20M, NT600S, or NT600M, when using an NT612G or
NT610C and not using direct connection, or when using Ver.1 direct connection,
this setting is not possible.
Procedure
1. Select “LAMP” on the initial editing screen.
2. Select the field for lamp registration in the window and press the
key.
" To delete an existing lamp from the field in which it is registered, locate the cur-
sor at that field and press the [F1] (Delete) key.
Reference: To “increment copy” an existing entry into the next input field (incrementing the bit
number), press the [F2] (iCopy) key with the cursor located in the “Bit” column at
that entry (see p.77).
3. Select “Image & Lib” as the lamp type and press the
102
key.
Setting Lamps
Section 4-6
4. Make the necessary settings.
S Lamp Bit:
Set the allocated bit in the PC.
S Ptot Code:
Set the code for the image data or library data that is displayed when the lamp is off (when the PC bit is OFF).
S Press the [F1] (Ref Inpt) key to enable selection of the code
from a list display.
S If “0” is specified, nothing will be displayed when the lamp is
off.
S Light Code:
Set the code for the image data or library data that is displayed when the lamp is off (when the PC bit is ON).
S Press the [F1] (Ref Inpt) key to enable selection of the code
from a list display.
S If “0” is specified, nothing will be displayed when the lamp is
on.
5. Press the
key with the cursor on “Exec”.
6. Specify the display position for the image data or library data that is displayed
when the lamp is off, and press the
key.
" If “0” (no display) is set for the code, it is not possible to specify a display posi-
tion.
7. Specify the display position for the image data or library data that is displayed
key.
when the lamp is on, and press the
" If “0” (no display) is set for the code, it is not possible to specify a display posi-
tion.
8. The screen on which registration fields for lamps can be selected will be displayed.
To create another lamp, select a field.
To quit lamp creation, press the [Esc] key.
103
Setting Lamps
4-6-2
Section 4-6
Modifying Lamps
It is possible to modify the contents, shape, and position of created lamps.
Procedure
1. Select “LAMP” on the initial editing screen.
" It is also possible to proceed straight to step 3. by left clicking on the lamp to be
modified (see p.57).
2. Select the type of modification from the options in the window (“Lamp Type
Set” column) and press the
key.
" It is also possible to select the lamp to be modified by left clicking on it (this ap-
plies to displayed lamps only: depending on the setting for “Lamp/Touch Sw
Disp Mode” in the environmental settings, image/library lamps may not be visible).
" For “Bit” (lamp bit) and “Label”, direct modification is possible by locating the
cursor where the modification is to be made and pressing the
key.
3. Select the type of modification from the options in the window and execute the
modification.
For a “Normal lamp”
For an “Image & library lamp”
S Set Display:
Select to modify the item specified in the window
during setting.
S Area Position:
Select to modify the shape of the lamp graphic.
S Attrib Posiiton:
Select to change the starting position for tiling when
the lamp is on or flashing. This item can only be
used when a polygonal lamp is selected.
S Label Posiion:
Select to modify the position at which the label is
displayed.
S Ptot Position:
Select to modify the position at which image/library
data is displayed when the lamp is off.
S Light Positioin:
Select to modify the position at which image/library
data is displayed when the lamp is on.
4. Press the [Esc] key to quit modification.
104
Setting Touch Switches
4-7
Section 4-7
Setting Touch Switches
This section describes how to create touch switch graphics that are displayed on
the PT screen and can be used as input switches.
The sensitive area (area that senses being touched) of a touch switch is not set in
accordance with the ordinary coordinates but with touch switch elements as the
minimum units.
The number of touch switches that can be created for one screen and the size of
touch switch elements is determined by the “PT Type” setting, as follows:
Max. Number per Screen (when
using/not using direct connection)
Size of Touch
Switch Elements
(vert. x hori.)
64/72
21 x 21 dots
NT600S, NT600M
128/128
50 x 40 dots
NT612G
256/256
25 x 20 dots
NT30, NT30C,
NT610C
256/256
20 x 20 dots
NT Model
NT20S, NT20M
A grid that matches the size of the touch switch elements can be set by pressing
the [F1] (Tch Sw) key while the cursor is located on “Grid Display X Width” and
“Grid Display Y Width” in the environmental settings.
WARNING
Do not use the PT touch switch function for applications
where there is any danger to human life or possibility of
serious damage, or for an emergency stop switch function.
The same operations are used for both the NT610C and NT612G, with the exception of color specification.
105
Setting Touch Switches
4-7-1
Section 4-7
Setting Touch Switches
This is the procedure for setting touch switches.
Touch switches can have the following functions, depending on the settings for
“PT Type” and “Direct Access”:
Function
NT20S, NT20M,
NT600S, NT600M
NT612G,
NT610C
NT30/C,
NT620S/C
Remarks
None
Ver.4
Ver.5
Ver.3
Ver.4
Input notification
n
n
n
f
f
n:
Screen switching
n1
n2
n2
f
f
n1: Standalone function
ON/OFF only
n2: No return key
Input
y
keys
Character
keys
x
x
x
f
f
−
Window
keys
x
x
x
n
f
n:
n1
n2
n2
f
f
n1: Input notification keys with
specific numbers
n2: Numeric keys and system
keys only
Copy setting
x
x
x
f
f
Cursor motion
x
x
x
f
f
f:
Print screen setting
x
x
x
f
f
Cannot be used with NT612G
Control keys
S Input Notification:
Can only be used during
character-string setting
Window keys can also be
set.
Notifying the PC that a touch switch has been pressed.
[NT20S, NT20M, NT600S, NT600M,
direct connection not used]
[NT612G, NT610C, direct connection not used]
[NT20S, NT20M, NT600S, NT600M, with Ver.4]
[NT20S, NT600S, with Ver.5]
[NT30, NT30C, NT612G, NT610C, with Ver.3 or later]
106
Setting Touch Switches
Section 4-7
S Noti Bit:
Specify the PC bit that is notified that the touch switch
has been pressed here (only when direct connection is
used).
S No.:
Specify the number used to notify that a touch switch
has been pressed, or to control the touch switch on/off
(flashing) status (used only when direct connection is
not used).
S Lamp Bit:
Specify the bit in the PC that controls the on/off (flashing) status of the touch switch (used only when direct
connection is used).
S Comment:
Input a memo here, for example one that indicates the
purpose of use.
S Act Type:
Specify the effect of pressing the touch switch here.
When using an NT20M or NT600M, or an NT20S or
600S with Ver.5 direct connection, or using an NT612G
or NT610C and not using direct connection, or using
Ver.1 direct connection, setting is not possible and the
setting is fixed as “Moment”.
Moment:
The PC bit comes ON when the touch
switch is pressed and goes OFF when it is
released.
Altnat:
Each time the touch switch is pressed the
status of the PC bit (ON/OFF) is changed
to the opposite status.
Set:
The PC bit is switched ON when the touch
switch is pressed.
Rset:
The PC bit is switched OFF when the
touch switch is pressed.
Reference: Specification of notify bits and input of I/O comments is possible by using either the
input notification window or the touch switch setting screen.
107
Setting Touch Switches
Section 4-7
S Screen Switching:
Switching to a specified screen when the touch switch is
pressed.
[NT20S, NT600S]
[NT20M, NT600M with Ver.4]
[NT30, NT30C, NT612G, NT610C,
Ver.3 or later]
If using an NT20M or NT600M and not using direct connection, set screen
switching by using the “standalone” function (p.150).
S SwScreen No.:
Specify the screen number of the screen to be displayed here. When using an NT30, NT30C, NT612G,
or NT610C with Ver.3 or a later version, if “0” is specified
the display will return to the screen that was displayed
before the current one.
Reference: Screen switching numbers can be specified using either the screen switching window or the touch switch setting screen.
S Character keys:
108
Used as input keys when setting character-strings. A
character-string that is the same as the label on the
touch switch is input when the touch switch is pressed.
These keys can only be used when using an NT30,
NT30C, NT612G, or NT610C with Ver.3 or a later version of the direct connection function.
Setting Touch Switches
Section 4-7
S Window keys:
[NT612G, NT610C with Ver.3]
When one of these touch switches is pressed, the specified window is opened or closed. These keys can only
be used when using an NT30, NT30C, NT612G, or
NT610C with Ver.3 or a later version of the direct connection function. (With Ver.3 they can only be used for
character-string settings.)
[NT30, NT30C, NT612G, NT610C with Ver.4]
S Window Screen No.:
Specify the screen number of the window to be called
here.
S Type:
Specify the operation when the touch switch is pressed
here. When using Ver.3, the setting is fixed as “open”.
S Open:
The specified window is opened.
S Close:
The open window is closed.
S Open/Close:
Any open window is closed and the specified window is
opened. If the specified window is already open, it is
closed.
S Control keys:
Used as numeric keys and system keys in numeral setting.
[NT20S, NT20M, NT600S, NT600M, with Ver.4 or Ver.5]
[NT30, NT30C, NT612G, NT610C]
When using an NT20S, NT20M, NT600S, or NT600M, the control keys are specified with touch switch numbers 231 to 255.
When using an NT20S, NT20M, NT600S, or NT600M with Ver.4 or Ver.5 of the
direct connection function, or an NT30, NT30C, NT612G, or NT610C, select the
numeric keys and system keys to be allocated to touch switches.
However, the last four items in the third row can only be selected when using an
NT30, NT30C, NT612G, or NT610C, and the control keys in the bottom row can
only be selected when using an NT30, NT30C, NT612G, or NT610C with Ver.3
or a later version of the direct connection function.
109
Setting Touch Switches
Section 4-7
The touch switch control keys have the following functions:
Key
Number
Function
0 to 9, A to F
231 to 246
Used to input numerical values
CLR
247
Clears input numerical values and character-strings
248
Assigns the opposite sign to input numerical values
.
249
Used to input a decimal point
HOME
250
Used to move to the input field at the top left of the screen
251
Used to move to the next input field up (Y direction)
252
Used to move to the next input field down (Y direction)
253
Used to move to the input field to the left (X direction)
254
Used to move to the input field to the right (X direction)
255
system key (confirms character input without shifting to another
input field)
256
,
MENU
system key (stops the buzzer)
257, 258
and
system keys (screen switching of continuous screens, shifting to input fields in the order in which they were registered with the
support tool)
259
System keys
+
+
(system menu display)
CA
−
Used to cancel input (Cancel)
BS
−
Deletes the numeral or character immediately preceding the input
cursor
DEL
−
Deletes the numeral or character at the input cursor location
A, "
−
Used to shift the input cursor
ENT
−
Confirms input of a character (after confirmation, the cursor shifts to
the next input field)
−
Alarm list/history display page scrolling
−
Alarm list/history line scrolling
Y, B
S Copy Setting:
When a touch switch is pressed, the contents of a
memory table, or a code, are copied to the input field
(cursor position) for a memory table or numeral/character-string setting. This function is only available when
using an NT30, NT30C, NT612G, or NT610C with Ver.3
or a later version of the direct connection function.
Copy From: Specify the type of copy source here.
110
Setting Touch Switches
Section 4-7
No/Fixed:
Specify the memory table number and numeric value (code) of the
copy source here. In the case of memory table specifications,
pressing the [F1] (Lst Slct) key enables the selection to be made
from a displayed list.
Copy To:
Specify the type of copy destination here.
Crsr Posi:
When copying between memory tables, specify the copy destination memory table number here. Pressing the [F1] (Lst Slct) key
enables the selection to be made from a displayed list.
When copying to an input field (to the cursor position), the data is
copied into the specified input field when the touch switch is
pressed. There are no particular specifications to be made.
S Cursor Motion:
When a touch switch is pressed, the cursor moves to
the input field for a specified numeral/character-string
setting. This function is only available when using an
NT30, NT30C, NT612G, or NT610C with Ver.3 or a later
version of the direct connection function (with Ver.4,
window settings are also possible).
Select the input field to which the cursor will move. Input fields of the thumbwheel type cannot be selected.
111
Setting Touch Switches
Section 4-7
S Print Screen Setting:
When a touch switch is pressed, printing of the displayed screen is started or suspended. This function is
only available when using an NT30, NT30C, NT612G,
or NT610C with Ver.2 or a later version of the direct connection function.
Reference: The type of printer used (EPSON Esc/P printer (24 pin)) and the printing method
when using an NT30C or NT610C (color, grayscale) are set using the memory
switches on the PT body (see p.28).
The following eight types of display area can be specified for touch switches. However, note that the shapes that can be used depend on the settings made for “PT
Type” and “Direct Access”, as shown below:
NT20S, NT20M,
NT600S,
NT600M
NT612G
NT30, NT30C,
NT610C
Ver.3 or later
Ver.3 or later
Normal
f
f
f
Solid 1
f
f
f
Solid 2
x
x
f
None
f
f
f
Square
x
f
f
Circle
x
f
f
Polygon
x
f
f
Fan
x
f
f
f: Can be used
x : Cannot be used
Display Area
In the case of squares, circles, polygons and fans, the sensitive area (the area that
senses being touched) and display area (the area that lights, goes off, or flashes in
accordance with the status of the PC bit) can be specified separately.
Normal
Solid
(Solid 1)
Solid 2
None
Sensitive area = display area
Square
Circle
Polygon
Fan
Solid line: display area
Broken line: Sensitive area
For details on the display of character-strings and numeric values, setting display
colors (NT30C and NT610C), setting numeral tables, and setting words and bits,
see 4-2 “Common Setting Operations” (p.61).
112
Setting Touch Switches
Section 4-7
By using the “Lamp/TSW Disp Mode” function in the environmental settings (tool
settings for the “Edit” screen), it is possible to check how touch switches appear on
the PT during operation by viewing the support tool screen.
Procedure
1. Select “TOUCH SW” on the initial editing screen.
2. Select the field in which the touch switch is to be registered in the window and
key.
press the
" To delete an existing touch switch from the field in which it is registered, locate
the cursor at that field and press the [F1] (Delete) key.
Reference: S To “increment copy” an existing touch switch into the next input field (incrementing the bit number), press the [F2] (iCopy) key with the cursor located in the “Bit”
column at that entry. Note that the next input field must also have an entry in it.
(See p.77).
S Pressing the [Space] (open) key with the cursor located on the field of a created
window key will open the window that the key specifies. A window opened in this
way can be closed by returning to the initial editing menu and pressing the [Tab]
(redisplay) key.
S The notify bit display can be changed to a lamp bit display either by pressing the
[Insert] key or by clicking on the word “Bit” with the mouse. While the lamp bit
display is used, “Bit” is displayed.
3. Make the necessary settings.
S Function:
On selecting the touch switch function and pressing
, the
window for that touch switch function will be displayed, allowing the appropriate settings to be made. However, specific
windows will not be displayed for the following:
S Input notification when not using direct connection
S Character keys (NT30, NT30C, NT612G, NT610C used
with Ver.3 or later version only)
S Control keys when using an NT20S, NT20M, NT600S, or
NT600M and not using direct connection
S Noti/Scrn No.:
If not using direct connection, set the screen number of the
screen displayed when the touch switch is pressed. If using
direct connection, set the PC bit used to notify the fact that the
switch has been pressed.
113
Setting Touch Switches
Section 4-7
S No. /Lamp Bit:
If not using direct connection, set the touch switch number. If
using direct connection, set the PC bit that controls the ON,
OFF, or flashing state of the touch switch (lamp bit).
S Label:
Set the characters (label) that will be displayed together with
the touch switch. If this setting is omitted, nothing will be displayed together with the touch switch.
S Pressing the [F3] (Mark) key allows marks to be input.
S With the NT30, NT30C, NT612G, and NT610C, pressing
[F4] (Image) allows images to be input.
S Details
S Inverse:
Specifies whether the graphic will be inverted when there is
input on the PT screen.
[Normal, solid 1, square, circle, polygon, fan]
Other than NT30C and NT610C:
Becomes inverted
NT30C, NT610C:
Assumes the ON color
[Solid 2] (NT30, NT30C, NT610C only)
Input
inversion
S Attribute: Specify ON display or flashing display.
When using an NT20S, NT20M, NT600S, or NT600M, the
setting is fixed as “ON display” and cannot be specified.
S Shape:
Specifies the type of touch switch display area.
S Color:
Specifies the frame color, OFF color, ON color (inverted color
when ON) and flashing color (NT30C, NT610C only).
S Label Det:
Set the label display settings.
Display attributes and smoothing cannot be specified with the
NT20S, NT20M, NT600S, or NT600M. It is also not possible to
specify a scale of x64 when using an NT20S or NT20M.
S Label Col:
Specifies the character color and background color of the “Label”
(NT30C, NT610C only).
4. Press the
key with the cursor on “Exec”.
5. If “square”, “circle”, “polygon”, or “fan” was specified for the shape of the display area, create the graphic.
114
For details on how to create the graphic, see 4-3 “Creating Fixed Displays”
(p.80).
Setting Touch Switches
Section 4-7
6. Create the sensitive area for the touch switch.
Specify the start point and end point by using the
cursor.
7. The specified label and touch switch graphic will be displayed.
8. The screen on which registration fields for touch switches can be selected will
be displayed.
To create another touch switch, select a field.
To quit touch switch creation, press the [Esc] key.
4-7-2
Modifying Touch Switches
The contents, shape, and position of a touch switch created on the screen can be
modified.
Procedure
1. Select “TOUCH SW” on the initial editing screen.
" It is also possible to proceed straight to step 3. by left clicking on the touch
switch to be modified (see p.57).
2. Select the touch switch to be modified in the window (“Func” field) and press
key.
the
" It is also possible to select the touch switch to be modified by left clicking on it.
" For “Bit” (notify bit) and “Label”, direct modification is possible by locating the
cursor where the modification is to be made and pressing the
key.
3. Select the type of modification from the options in the window and press the
key.
115
Setting Touch Switches
Section 4-7
S Set Display:
Select to change the function.
S Area Position:
Select to change the frame of the display area.
S Attrib Position:
Select to change the tiling start position when the
touch switch is lit or flashing.
This option is only displayed when a polygonal
touch switch is selected.
S Touch Sw Position:
Select to change the sensitive area. The location of
the modification (start point/end point) can be
changed by pressing the [Esc] key.
S Label Position:
Select to change the display position of the label.
4. Press the [Esc] key to quit modification.
116
Creating Graphs
4-8
Section 4-8
Creating Graphs
This section describes how to create graphs whose display corresponds to the numeric values in numeral memory tables. There are the following three types of
graph.
When using an NT20S, NT20M, NT600S, NT600M, or NT612G, only bar graphs
can be used.
S Bar graph:
Numeral table contents are displayed in the form of a
bar graph.
43%
S Trend graph:
Numeral table contents that change with time are displayed in the form of broken lines.
Trend graphs can only be used when using an NT30,
NT30C, NT612G or NT610C with Ver.3 or a later version of the direct connection function.
1000
: Numeral table 1 84%
: Numeral table 2 21%
0
Time
S Broken line graph:
The contents of several consecutive numeral tables are
displayed in the form of a broken line. The display intervals can be changed without restriction.
Broken line graphs can only be used when using an
NT30, NT30C, NT612G or NT610C with Ver.3 or a later
version of the direct connection function. If using Ver.3
or later, the display intervals can be changed without restriction.
1000
1000
0
0
1
2
3
Numeral table
4
5
0
0
1 2
3 4
5
Numeral table
(After changing the interval)
117
Creating Graphs
4-8-1
Section 4-8
Setting Graphs
These are the procedures for setting graphs. For details on the display of character-strings and numeric values, setting display colors (NT30C and NT610C), setting numeral tables, and setting words and bits, see 4-2 “Common Setting Operations” (p.61).
Setting Bar Graphs
A maximum of 50 bar graphs can be set for display on one screen.
When using an NT600S or NT600M, it is not possible to create bar graphs with a
width of greater than 256 dots.
Procedure
1. Select “GRAPH” from the initial editing screen.
2. If using an NT30, NT30C, NT612G or NT610C with Ver.3 or a later version of
the direct connection function, select “BAR GRAPH” from the graph menu and
press the
key.
If you are using an NT20S, NT20M, NT600S, or NT600M, the graph menu will
not be displayed.
3. Select the field in which the bar graph is to be registered in the window and
key.
press the
" To delete an existing bar graph from the field in which it is registered, locate the
cursor at that field and press the [F1] (Delete) key.
Reference: To “increment copy” an existing entry into the next input field (incrementing the numeral memory table number), press the [F2] (iCopy) key with the cursor located on
that entry. Note that there must also be an entry in the next input field. (See p.77).
4. Make the necessary settings.
S Ref Way:
Specify the method used to reference the memory table
used for the display here.
" This item can only be set when using direct connec-
tion. Only the “Direct” setting is valid. Do not select
“Indrct”.
118
Creating Graphs
Section 4-8
S Ref Table:
Specify the number of the memory table to be referenced here.
Pressing the [F1] (Lst Slct) key enables selection from a
memory table list.
S 100% Val
S 0% Val
S −100% Val:
Specify the reference methods for 100%, 0%, and
−100% values. If “Num Table” is specified, specify the
numeral table number.
If not using an NT30, NT30C, NT610G, or NT610C and
Ver.2 or a later version of the direct connection function,
only the “Fix Num” setting for the 100% value is valid.
When “Num Table” is specified, pressing the [F1] (Lst
Slct) key enables the memory table to be selected from
a displayed list.
S Display %:
Specify whether or not a percentage value is displayed
on the screen.
S Details
S Direction:
Specify the orientation of the bar (up, down, right, left) here.
S Frame:
Specify whether or not a graph frame is displayed here.
S Dsp Sign:
Specify whether or not a minus sign is to be displayed in the
case of negative values here. If “Yes” is specified, the center
of the graph area is displayed at the origin to allow the display
of negative values.
S Color:
Specify the display color of the bar graph when it shows
positive values and the display color when it shows negative values (NT30C, NT610C only).
S % Disp Det:
Set the label display settings.
Display smoothing cannot be specified with the NT20S,
NT20M, NT600S, or NT600M. It is also not possible to
specify a scale of x64 when using an NT20S or NT20M.
S % Col Set:
Specifies the character color and background color of
the “%” character (NT30C, NT610C only).
119
Creating Graphs
Section 4-8
5. Press the
key with the cursor on “Exec”.
6. Locate the cursor at the start point of the bar graph frame and press the
key. The bar graph will be created as a rectangular graphic. Graphics oriented
either vertically or horizontally can be created.
7. A box that indicates the size of the percentage display will be displayed.
Move this box to the required display position and press the
key.
If “No” is set for “Display %”, this box is not displayed.
8. The specified percentage display and bar graph will be displayed.
9. The screen on which registration fields for bar graphs can be selected will be
displayed.
To create another bar graph, select a field.
To quit bar graph creation, press the [Esc] key.
Setting Trend Graphs (NT30, NT30C, NT612G, or NT610C with Ver.3 or later only)
One trend graph frame can be created per screen, and up to 50 broken lines can
be set within this frame.
Procedure
1. Select “GRAPH” from the initial editing screen.
The graph menu will be displayed.
2. Select “TREND GRAPH” from the graph menu.
" If there is already a trend graph, the screen for selecting the field for registration
is displayed. Selecting an empty field allows you to proceed to step 7.
3. Locate the cursor at the start point for the trend graph frame and press the
key.
Trend graphs are created as rectangular graphics. They can be oriented either vertically or horizontally.
4. Locate the cursor at the end point of the trend graph frame and press the
key.
120
Creating Graphs
Section 4-8
5. Set the basic settings for the trend graph as required.
S Type:
Specify the type of trend graph.
Normal:
The graph remains in a fixed position and
successive points in the graph are drawn
in the “Mv Direction”.
Pen Reco: The latest point is always drawn at a fixed
position and the entire graph moves in the
“Mv Direction”.
S Dw Width:
Specify the direction in which the broken line moves
with time here.
S Sampling Cycl:
Specify the cycle in which the graph is rewritten in 0.1
second units (range: 1 to 65535 = 0.1 to 6553.5 seconds)
S Mv Direct:
Specify the direction in which the broken lines move
with time.
S Details
S Frame:
Specify whether or not a graph frame is displayed.
If “No” is specified here only the broken lines within the
graph are displayed.
S Dsp Sing:
S Color:
6. Press the
Specify whether or not a minus sign is to be displayed
in the case of negative values here. If “Yes” is specified, the center of the graph area is displayed at the origin to allow the display of negative values.
Specify the graph’s frame color, the color of the positive
area inside the frame, and the color of the negative
area inside the frame (NT30C, NT610C only).
key with the cursor on “Exec”.
121
Creating Graphs
Section 4-8
7. Set the required display settings for the trend graph.
These settings have to be made for each broken line.
S Ref Way:
Specify the method used to reference the memory
table used for the display here.
Only the “Direct” setting is valid. Do not specify the
“Indrct” setting.
S Ref Table:
Specify the number of the memory table to be referenced here.
Pressing the [F1] (Lst Slct) key enables selection from
a memory table list.
S 100% Val:
S 0% Val:
S −100% Val:
Specify the reference methods for 100%, 0%, and
−100% values. If “Num Table” is specified, specify the
numeral table number.
Pressing the [F1] (Lst Slct) key while “Num Table” is
specified allows the memory table to be selected from
a displayed list.
S Display %:
Specify whether or not a percentage value is displayed
on the screen.
S Line:
Specify the line type for the broken lines.
(Sold Lin, Brkn Lin, 1 Dot Chn, 2Dot Chn)
S Line Col:
Specify the display color of the broken lines (NT30C,
NT610C only).
S % Disp Det:
Specify the label display settings.
Display attributes and smoothing cannot be specified
with the NT20S, NT20M, NT600S, or NT600M. It is
also not possible to specify a scale of x64 when using
an NT20S or NT20M.
S % Col Set:
122
Specifies the character color and background color of
the “%” character (NT30C, NT610C only).
Creating Graphs
Section 4-8
8. Press the
key with the cursor on “Exec”.
9. A box that indicates the size of the percentage display will be displayed.
Move this box to the required display position and press the
key.
If “No” is set for “Display %”, this box is not displayed.
10. The specified percentage display and trend graph will be displayed.
11. The screen on which registration fields for trend graphs can be selected will be
displayed.
To create another trend graph, select a field.
Further broken lines can be added by repeating the operation from step 7.
To quit trend graph creation, press the [Esc] key.
Reference: S If a broken line extends beyond the frame, only the part contained by the frame
will be displayed, as shown below.
S Each time the [Tab] key is pressed, the graph display changes.
Setting Broken Line Graphs (NT30, NT30C, NT612G, NT610C with Ver.3 or Later)
No more than one frame for a broken line graph can be created per screen; up to
256 broken lines can be set within this frame. Each broken line can display the
data in up to 512 numeral tables. Broken line graph frames can be set for screen
(maximum of eight) in an overlapping screen but in this case that the total number
of broken lines for the overlapping screen as a whole cannot exceed 256.
Procedure
1. Select “GRAPH” from the initial editing screen.
The graph menu will be displayed.
2. Select “BRK-LIN GRAPH” from the graph menu.
" If there is already a broken line graph (or graphs), the screen for selecting the
field in which the broken line graph is to be registered is displayed. Select an
empty field to proceed to step 7.
3. Locate the cursor at the start point for the broken line graph frame and press
key.
the
Broken line graphs are created as rectangular graphics. They can be oriented
either vertically or horizontally.
4. Locate the cursor at the end point of the broken line graph frame and press the
key.
123
Creating Graphs
Section 4-8
5. Set the basic settings for the broken line graph as required.
S Mv Direct:
Specify the direction in which the broken line is to be
drawn in accordance with the ascending order of
memory table numbers here.
S Detail Info
S Frame:
Specify whether or not a graph frame is displayed.
If “No” is specified here only the broken lines within the
graph are displayed.
S Disp Sign:
S Color:
6. Press the
Specify whether or not a minus sign is to be displayed
in the case of negative values here. If “Yes” is specified, the center of the graph area is displayed at the origin to allow the display of negative values.
Specify the graph’s frame color, the color of the positive
area inside the frame, and the color of the negative
area inside the frame (NT30C, NT610C only).
key with the cursor on “Exec”.
7. Set the required display settings for the broken line graph.
These settings have to be made for each broken line.
124
Creating Graphs
Section 4-8
S Ref Table:
Specify the memory table number from which reference is to be started here.
Pressing the [F1] (Lst Slct) key allows the memory
table to be selected from a list.
S Points:
Specify the number of vertices in the broken line.
The contents of a number of numeral tables equivalent
to this number and starting with the “reference start
table” will be displayed in the form of a broken line.
S 100% Val:
S 0% Val:
S −100% Val:
Specify the reference methods for 100%, 0%, and
−100% values. If “Num Table” is specified, specify the
numeral table number.
Pressing the [F1] (Lst Slct) key while “Num Table” is
specified allows the memory table to be selected from
a displayed list.
S Line:
Specify the line type for the broken lines.
(Solid line, broken line, 1-dot chain, 2-dot chain)
S Color:
8. Press the
Specify the display color for the broken lines (NT30C
and NT610C only).
key with the cursor on “Exec”.
9. The screen on which registration fields for broken line graphs can be selected
will be displayed.
To create another broken line graph, select a field.
Further broken lines can be added by repeating the operation from step 7.
To quit broken line graph creation, press the [Esc] key.
Reference: S If a broken line extends beyond the frame, only the part contained by the frame
will be displayed, as shown below.
S Each time the [Tab] key is pressed, the graph display changes.
125
Creating Graphs
4-8-2
Section 4-8
Modifying Graphs
The contents and position of a graph created on the screen can be modified.
Reference: When using an NT30, NT30C, NT612G, or NT610C and Ver.3 or a later version of
the direct connection function, the interval between the vertices in a broken line
graph can be changed as required during modification.
Procedure
1. Select “GRAPH” on the initial editing screen.
The graph menu will be displayed.
" It is also possible to proceed straight to step 4. by left clicking on the graph to be
modified (see p.57).
2. Select the type of graph to be modified from the graph menu and press the
key.
3. Select the graph to be modified in the window and press the
key.
" To delete a graph that has already been set, locate the cursor at the field for that
graph and press the [F1] (Delete) key.
Batch deletion of trend graphs and broken line graphs in frame units is possible
by pressing the [F2] (All delete) key. Pressing the [F10] (Basic) key allows
modification of the basic settings.
4. Select the required item and execute the modification.
For details on the meanings of each of the items, refer to the sections describing the creation of each of the graph types.
Bar graph
126
Trend graph
basic settings
Trend graph
Broken line graph
basic settings
Broken line
graph
Creating Graphs
Section 4-8
S “Brkn-Line Grph Intv” setting
Used to change the interval between vertices in a broken line graph.
Use the space key to assign and delete marks. Vertices will be displayed at the
locations where marks have been assigned. Always assign a number of marks
equal to the number of vertices (if the numbers of vertices and marks do not the
same, interval setting cannot be completed).
Number of marks
Number of vertices
Edge of graph
Use the [ ]/[ ] keys to move to the location where a mark is to be assigned and
the [Page Up]/[Page Down] keys to shift the display range to the left or right.
Press the
key to quit interval setting.
5. Press the [Esc] key to quit modification.
127
Creating Input Settings
4-9
Section 4-9
Creating Input Settings
This section describes how to create the “numeral setting” and “character-string
setting” input fields required to input numeric values and character-strings from a
touch panel or extended I/O unit.
What is a “Numeral Setting”?
Once a numeral setting input field has been created, it is possible to input numeric
values from touch switches or extended I/O units.
The touch switches used to input numeric values (numeric keys) can be arranged
without restriction on the screen. See “Creating Numeric Keys” (p.136).
There are the following two types of input for numeral settings.
The thumbwheel type can only be used with the following combinations of PT model and direct connection version.
S NT20S or NT600S with Ver.5
S NT30 or NT30C with Ver.4
S NT612G or 610C with Ver.3
Reference: When not using direct connection, the touch switch or extended I/O unit is selected
in accordance with the screen bit input attribute.
When not using direct connection, the correspondence between extended I/O unit
input terminals and numeric keys is fixed. Refer to the operation manual for the PT
you are using.
128
S Numeric keys:
Used to input numeric values into input fields as if using an
electronic calculator.
S Thumbwheel:
There is a plus/minus touch switch for each digit of the numeric
value and the value is input in one digit units (input from an extended I/O unit is not possible). This function is only available
when using an NT20S or NT600S with Ver.5 of the direct connection function, or an NT30, NT30C, NT612G, or NT610C
with Ver.3 of the direct connection function.
Creating Input Settings
Section 4-9
The switches come in three sizes, as shown below.
With thumbwheel setting, if “Yes” is set for “Disp Sign”, the maximum number of digits in the numeric value is reduced to 7.
When using an NT20S, only “small” and “medium” can be used,
and when using an NT600S, only “medium” can be used.
Small
Medium
Large
What is a “Character-string Setting”?
Once a character-string setting has been created, the label that appears on a
touch switch can be input as a character-string with one press of the switch.
In addition, if several window screens (keyboard screens) − which each comprise
a group of related touch switches − are created, the windows required for specific
purposes can be displayed whenever necessary, allowing various types of input.
Windows can be created in screen numbers 1900 through 1979 and can be displayed by pressing touch switches that have been set as “window keys”.
Character-string settings and window displays can only be used when using an
NT30, NT30C, NT612G, or NT610C with Ver.3 or a later version of the direct connection function.
Reference: Character-string setting and keyboard display is only possible when using direct
connection.
Character-string setting screen
TYPE
Window opening touch switches
numerals
Window screen
letters
Window opening
touch switch pressed
TYPE
numerals
letters
129
Creating Input Settings
Section 4-9
Reference: Temporary input fields
Only one numeral or character string setting input field can be registered for a window (screen number in the range 1900 through 1979). This input field can be used
− in combination with a number of numeral and character-string input fields on
base screens − for provisional input before any data is input into the actual input
field on the base screen. This kind of numeral or character-string input field in a
window is called a “temporary input field”.
Its advantage is that entries can be input into the temporary input field while checking the current setting on the base screen.
However, if the temporary input field in the window and the input field on the base
screen are not of the same type, the temporary input field will not be displayed.
Note also that temporary input fields cannot be used for thumbwheel type input
fields. If it is not possible to use a temporary input field, the data has to be input
directly onto the base screen.
Numeral setting input
123456
− 4 1. 8
0 0 0 2 .7 1
Current setting
Temporary input field (displays data being input)
0 555 . 44
7 8 9
4 5 6
1 2 3
0 . ENT
The temporary input field will also be unusable
and not displayed if it has fewer digits than the
actual input field on the base screen (number of
integer digits + number of decimal fraction digits
+ digit for decimal point + digit for sign).
Window
The temporary input field displays the contents of the current input field at that
point in time. The display of the temporary input field is governed by the following
attributes:
S Attributes determined by the settings for the temporary input field:
Character font, scale, display attribute, smoothing, character color, background
color
S Attributes determined by the settings for the actual input field on the base
screen:
Numbers of integer and decimal fraction digits, upper limit value, lower limit value, decimal/hexadecimal, zero suppress, sign display.
130
Creating Input Settings
4-9-1
Section 4-9
Creating Numeral Setting Input Fields
This is the procedure for creating input fields for numeral settings. For details on
the display of numeric values, setting display colors (NT30C and NT610C), setting
numeral tables, and setting words and bits, see 4-2 “Common Setting Operations”
(p.61).
Procedure
1. Select “IN SET” from the initial editing screen.
The input setting menu will be displayed.
2. Select “DATA IN” from the input setting menu.
3. Select the field in which the numeral setting input field is to be registered and
press the
key.
" To delete an existing numeral setting from the field in which it is registered, lo-
cate the cursor at that field and press the [F1] (Delete) key.
Reference: When using direct connection, to “increment copy” an existing entry into the next
input field (incrementing the memory table number), press the [F2] (iCopy) key
with the cursor located on that entry. Note that there must also be an entry in the
next input field. (See p.77).
4. If the input type can be specified, specify either “Number Input” or “Thumbkey.
wheel”, specify “Mv Crsr Sw” if necessary, then press the
" If the thumbwheel type cannot be used, the input type selection window will not
be displayed.
" If “Mv Crsr Sw” is set for “Yes”, touch switches for which the “cursor motion”
function has been set will be automatically created and displayed overlying the
input field (this function is not available when using the thumbwheel input type).
131
Creating Input Settings
Section 4-9
5. Set the necessary settings for the numeral setting input field.
[Numeric keys]
[Numeric keys]
(NT20M, NT600M, without direct connection)
(NT20S, NT600S, NT612G, NT610C, without
direct connection)
[Numeric keys]
[Thumbwheel]
(Ver.1 to Ver.5)
The settings that are specific to numeral setting are listed below.
132
S Sending:
Specify the number of digits in the value notified to the host.
S Dig Input:
Specify the number of digits that can be input.
S Max, Min:
Specify the upper and lower limits for the numeric value.
S Num Disp:
Specify whether or not the input is displayed.
S Crsr Frm:
Specify whether or not a cursor frame, which indicates the
currently selected input field, is to be displayed, here.
S Slct Frm:
Specify the display method for the cursor frame here.
S Size:
Specify the size for thumbwheel type touch switches here.
S End plate:
Specify whether or not end plates are to be displayed at the
left and right of thumbwheel type switch displays.
Creating Input Settings
Section 4-9
6. Press the
key with the cursor on “Exec”.
7. A box indicating the size of the input field will be displayed.
Locate this box at the required display position and press the
key.
8. The specified input field for display setting, numeric keys, or system keys, will
be displayed.
" If the keypad attribute for the screen is “User”, numeric keys and system keys
are not displayed. If the numeral setting attribute is changed from “Syst” to
“User” after completing numeral setting, the numeric keys and system keys will
be lost.
System keys
Input field
Numeric keys
Reference: The two numeral setting attributes are used in the following cases:
“Syst”:
Used to eliminate the need to carry out screen creation by using
the PT default input keys.
“User”:
Used when creating customized input keys.
9. It is now possible to select another registration field and create another numeral setting input field.
Press the [Esc] key to quit numeral setting.
133
Creating Input Settings
4-9-2
Section 4-9
Creating Character-String Setting Input Fields
(NT30, NT30C, NT612G, NT610C with Ver.3 or Later Only)
This is the procedure for creating input fields for numeral settings. For details on
the display of character-strings, setting display colors (NT30C or NT610C), setting
numeral tables, and setting words and bits, see 4-2 “Common Setting Operations”
(p.61).
Procedure
1. Select “IN SET” from the initial editing screen.
The input setting menu will be displayed.
2. Select “DATA IN” from the input setting menu.
3. Select the field in which the character-string setting input field is to be registered and press the
key.
" To delete an existing character-string setting input field from the field in which it
is registered, locate the cursor at that field and press the [F1] (Delete) key.
Reference: To “increment copy” an existing entry into the next input field (incrementing the
memory table number), press the [F2] (iCopy) key with the cursor located on that
entry. Note that there must also be an entry in the next input field. (See p.77).
4. Specify “Str In”, specify “Mv Crsr Sw” if necessary, then press the
key.
" If “Mv Crsr Sw” is set for “Yes”, touch switches for which “cursor motion” has
been set will be automatically created and displayed overlying the input field.
5. Set the necessary settings for the character-string input field.
The settings that are specific to character-string setting are listed below.
S Details
S Crsr Frm:
Specify whether or not a cursor frame, which indicates
the currently selected input field, is to be displayed,
here.
S Slct Frm:
Specify the display method for the cursor frame here.
6. Press the
key with the cursor on “Exec”.
7. A box indicating the size of the input field will be displayed.
Locate this box at the required display position and press the
key.
8. The input field for the specified display setting will be displayed.
9. It is now possible to select another registration field and create another character-string setting input field.
134
Press the [Esc] key to quit character-string setting.
Creating Input Settings
4-9-3
Section 4-9
Setting Window Displays
(NT30, NT30C, NT612G, NT610C with Ver.3 or Later Only)
This is the procedure for setting windows to be displayed when a switch is made to
a character-string setting screen.
It is also possible to display a created window and check the display position etc.
during screen creation. It is possible to arrange elements on the screen so that
they do not overlap with the displayed window.
Procedure
1. Select “IN SET” from the initial editing screen.
The input setting menu will be displayed.
2. Select “KEYBD/WINDOW DISP” from the input setting menu.
3. Specify the screen number of the window to be displayed when the screen is
displayed and press the
key.
The specified window will be displayed.
" If “0” is specified, the window display disappears, and when the screen is dis-
played during operation, it is displayed without the window.
Reference: To check the display status when another window is displayed, repeat steps 1
through 3.
135
Creating Input Settings
4-9-4
Section 4-9
Creating Numeric Keys
Numeric keys are touch switches for inputting numeric values. If the keypad attribute for the screen is set as “User”, the keys can be positioned wherever required on
the screen.
The arrangement of the numeric keys displayed on the screen can be changed by
using the “TOUCH SW” and “EDIT” functions on the “Edit” screen.
Procedure
1. On the “Screen Selection” screen, locate the cursor at the screen number for
which the numeric keys are to be created and press the [F4] (Attrib) key.
2. Set “User” for “Keypad”.
" “F” will be displayed in the “Status” column of the screen for which attribute set-
ting has been performed.
3. Select the screen for which the attribute has been set: the “Edit” screen will be
displayed.
4. Select “IN SET” on the initial editing screen.
5. Specify “USER TKEY”.
The created keys differ according to the “PT Type” setting.
136
Creating Input Settings
Section 4-9
6. To change the arrangement of the numeric keys, use the following functions:
S TOUCH SW:
Specify the relevant touch switch and change its position or other characteristics.
S EDIT:
Move the numeric keys by using the “Move” function.
Example of a Change
4-9-5
Modifying Numeral/Character-String Setting Input Fields
This is the procedure for modifying the contents of existing numeral and characterstring settings.
Procedure
1. Select “IN SET” from the initial editing screen.
The input setting menu will be displayed.
" It is also possible to proceed straight to step 4. by left clicking on the numeral/
character-string setting to be modified (see p.57).
2. Select “DATA IN” from the input setting menu.
3. Select the numeral or character-string setting to be modified and press the
key.
" The numeral/character-string setting can also be selected by clicking the left
mouse button with the cursor located on it.
" When using direct connection, the allocated word for a memory table can be
changed directly by locating the cursor on “USER TKEY” at an existing entry
key.
and pressing the
137
Creating Input Settings
Section 4-9
4. Select the required item and execute the modification.
[Numeric key type]
[Numeric key type]
[Numeric key type]
(NT20M, NT600M, without
direct connection)
(NT20S, NT600S)
(Ver.3 to Ver.5)
[Thumbwheel type]
[Character-string setting]
S Num Disp Setting:
S ThumWhl Setting:
S Str Disp Setting:
Used to modify the item specified in the window during
setting.
S Display Position:
Used to change the display position of a numeral/character-string setting input field.
5. Press the [Esc] key to quit modification.
138
Creating Input Settings
4-9-6
Section 4-9
Changing Orders
In cases where there is more than one numeral/character-string setting on one
screen, the order of movement between input fields can be changed using the system keys.
Procedure
1. Select “IN SET” from the initial editing screen.
The input setting menu will be displayed.
2. Select “DATA IN” from the input setting menu.
3. Press the [F3] (Ord) key.
The mode in which order specifications can be made will be established.
4. Locate the cursor at the numeral/character-string setting field that is to be set
as No.1, and press the [Space] key.
“1” will be displayed in the “Or” column.
" The numeral/character-string setting can also be selected by locating the cur-
sor at the relevant field and clicking the left mouse button twice.
5. Set the order for the remaining numeral/character-string settings by using the
[Space] key.
Specify a position in the order for all numeral/character-string settings.
" Pressing the [CLR] key clears the sequence of settings made up to that point.
6. After setting a position in the order for all settings, press the
key.
The order will be changed as specified.
7. Press the [Esc] key to quit.
139
Extended I/O Settings
4-10
Section 4-10
Extended I/O Settings
This section describes how to apply the screen switching function to the input terminals of extended I/O units using the “Edit”. When the input terminal of an extended I/O unit comes ON, the display switches to the specified screen.
An extended I/O unit is used in the following cases:
NT20M, NT600M:
When not using direct connection
NT30, NT30C, NT612G, NT610C:
When using Ver.3 direct connection or a later version
However, when using an NT20M or NT600M, “extended I/O” cannot be selected
and screen switching must be set using the standalone function.
Reference: When using an NT20 or NT30C, connect the extended I/O unit with a dedicated
B7A interface unit.
Procedure
1. Select “EXTD I/O” from the initial editing menu.
2. Locate the cursor at the extended I/O unit input terminal number at which the
screen switching function is to be used.
" To delete an existing terminal number setting from the field in which it is regis-
tered, locate the cursor at that field and press the [F1] (Delete) key.
3. Specify the screen number of the screen to be switched to.
If “0” is specified the display will return to the screen that was displayed before
the current one.
4. Press the [Esc] key to quit extended I/O setting.
Reference: The settings made for an input terminal on the “Edit” screen are valid only while the
relevant screen is displayed at the PT.
When using direct connection, set “Direct” on the “Scr list” screen in order to make
the settings valid regardless of which screen is currently displayed.
140
Inputting Image and Library Data
4-11
Section 4-11
Inputting Image and Library Data
This section describes how to display image and library data created on the
“Screen Selection” screen.
Images can only be used with the NT30, NT30C, NT612G, and NT610C. The
codes that can be used are FE20 to FEFF (224 codes).
Library data can only be used when using an NT30, NT30C, NT612G, or NT610C
with Ver.2 or a later version of the direct connection function.
The codes that can be used for library data are listed below:
Ver.3 and later: FA20 to FAFF, FB20 to FBFF, FC20 to FCFF, FD20 to FDFF
(896 codes)
S Displaying Images and Library Data
Images can be displayed in one of two ways: by specifying a code during character input, or by making a selection from the fixed display menu (library data can
only be selected by making a selection from the fixed display menu).
Images and library data can also be specified for display when an “image & library lamp” goes OFF or comes ON (see p.102).
Setting “Yes” for “Brkn Line Frame Disp” in the environmental settings (tool settings for the “Edit” screen) will enable you to check the image/library data registration range on the screen at any time.
If “Hspeed” is set for “Disp Mode” in the environmental settings (tool settings for
the “Edit” screen), only the broken line frame will be displayed, without the
image/library data.
Caution: S To modify an image or library data that is already being used for display, either
re-edit the registered data by using the “Image & Lib” option on the “Screen
Selection” screen, or delete it and then redisplay it. However, note that when the
registered data is modified, the data identified by the relevant code is changed
for all screens that use that code.
S If an attempt is made to display the codes of image and library data for which no
data is registered,
marks will be displayed.
Reference: When using an NT30C or NT610C, if an image is displayed in the two-color mode,
the display color and background color can be specified.
(1) Specification during character input
Pressing the [F4] (Image) key when inputting characters or a label enables
selection of an image from the image selection screen.
It is possible to use images in combination with characters and marks.
141
Inputting Image and Library Data
Section 4-11
Image data in a character input field is displayed as a [I] mark. In image editing, the real image is displayed, taking the left bottom extremity of the image
as the origin.
Note
Image
:
Character input field
:
A B I D E
A B
Display on “Edit” screen:
D E
The following specifications are not valid for image displays:
Scales, smoothing, display attributes
(2) Specification from the fixed display menu
Images and library data can be displayed by selecting the “Image & Lib” option
from the fixed display menu in the following way.
Procedure
1. Select “Image & Lib” in the initial editing menu.
2. Locate the cursor at the code corresponding to the image or library data to be
displayed and press the
key.
The image codes are FE20 to FEFF. The library codes are FA20 to FAFF,
FB20 to FBFF, FC20 to FCFF, and FD20 to FDFF when using Ver.3 direct connection.
" Use [Shift] + [ ] or [Shift] + [ ] to move the bar cursor to the previous or next
code for which there is data.
" Press the [Tab] key to display the code input field.
" The [
]/[ ] keys can be used to switch between image data and library data.
3. When displaying an image in the two-color mode with an NT30C or NT610C,
key with curspecify the display color and background color, then press the
sor on “Exec”.
4. A box indicating the size of the image/library display will be displayed. Move
key.
this box to the required display location and press the
5. Press the [Esc] key to quit image & library display.
Deleting Images and Library Data
The images and library data displayed on the screen can be deleted by selecting
the “EDIT” option on the initial editing screen. For details on the procedure, see
“Delete” (p.152).
Reference: Images and library data are sometimes registered in a more extensive range than
that visible on the screen. If the broken line frame display function is not used,
select such images and data either by using “Simple”, or by using “In frm” and enclosing the entire area saved at registration.
142
Editing Memory Tables
4-12
Section 4-12
Editing Memory Tables
It is possible to check the initial values in numeral memory tables and characterstring memory tables, and to change these values.
For details of the procedure, see 4-2 “Common Setting Operations” (p.61).
Procedure
1. Select “TBL EDIT” from the initial editing menu.
2. Select “Numeral”, “String” or “Bit Memory”.
3. Select “Numeral” or “String”.
4. Input data to the memory table or change its contents.
5. Press the [Esc] key to quit table editing.
143
Creating Alarm Lists/Histories
4-13
Section 4-13
Creating Alarm Lists/Histories
This section describes how to create “alarm lists” − which automatically display a
character-string memory table in accordance with the status of the allocated bit in
a bit memory table − and “alarm histories”, which record and display the status of
allocated bits.
The alarm list/history function is only available when using an NT30, NT30C,
NT612G, or NT610C and Ver.3 or a later version of the direct connection function.
S Alarm list:
The contents (messages) of character-string memory tables,
or images/library data, that correspond to the allocated bit in a
bit memory table are displayed.
If a screen number is set in advance, screen switching is also
possible.
S Alarm history:
144
The day and hour on which the allocated bits in a bit table are
set to “1” (come ON) is recorded and the order of occurrence
or order of frequencies is displayed. It is also possible to display corresponding images or library data.
Creating Alarm Lists/Histories
4-13-1
Section 4-13
Setting Alarm Lists/Histories
This is the procedure for setting alarm lists and histories. For details on the display
of character-strings, setting display colors (NT30C or NT610C), setting bit
memory tables, and setting words and bits, see 4-2 “Common Setting Operations”
(p.61).
A maximum of four alarm lists and alarm histories can be created on one screen.
In the case of alarm histories, both an order of occurrence display and order of
frequency display can be created on the same screen.
Procedure
1. Select “ALARM” on the initial editing screen.
2. Select the field in which the alarm list/history is to be registered and press the
key.
" To delete an existing alarm list/history from the field in which it is registered,
locate the cursor at that field and press the [F1] (Delete) key.
3. Specify either “List” or “History” as the display type.
4. Make the necessary settings.
Alarm list
S Start Bit Tbl No.:
Alarm history
Specify the bit memory table number from which
reference is to start here.
Pressing [F1] (Ref Inpt) allows selection from a
memory table list.
S Ref Bit Tbl Qty:
Specify the number of bits to be checked (read) for
the alarm list.
This number of bit memory tables, starting from the
“start bit table number”, will be subjected to the
check. A maximum of 128 memory tables can be
subjected to the check.
S Disp Order:
Specify whether the order of display in the alarm
history is to follow the order of occurrence or the order of frequency.
145
Creating Alarm Lists/Histories
Section 4-13
S Line Qty:
Specify the number of messages/history entries to
be displayed here.
The numbers of lines that can be displayed are as
follows:
NT30, NT30C: Max. 12 lines
S Length:
NT612G:
Max. 16 lines
NT610C:
Max. 24 lines
Specify the number of displayed characters in one
message or history entry here. An area that will just
accommodate the specified number of digits will be
created.
When using an NT30 or NT30C, a maximum of 36
lines can be displayed, but this maximum may be
decreased depending on the display method and
history information display.
S Dsp Image & Lib:
Specify whether or not images and library data corresponding to messages/histories are to be displayed here.
S Hist Info:
When an order of frequency is displayed, specify
whether or not the times of occurrence are also to
be displayed here. This setting is invalid with order
of frequency displays.
S Info Type:
Specify one of the following formats for expressing
times of occurrence:
Y/M/D/ h : m:
Year/Month/Day Hour/Minute
(14 digits)
M/D h : m:
Month/Day Hour/Minute
(11 digits)
h : m:
Hour/Minute (5 digits)
S Details
S Scale:
S Smoothing:
Specify the display method for messages or history
entries here.
S Color:
Specify the frame color, OFF/background color,
and ON color for the alarm list/history, and the display color and background color for image/library
data (NT30C and NT610C only). The display color
for image/library data is only valid for images displayed in the two-color mode.
5. Press the
key with the cursor on “Exec”.
6. A box indicating the size of the alarm list/history will be displayed.
Move this box to the required display position and press the
146
key.
Creating Alarm Lists/Histories
Section 4-13
7. Locate the cursor at the start point for the image & library data display area and
key, then move the cursor to the end position and press the
press the
key once more.
" If “No” has been specified for “Dsp Image & Lib”, nothing will be displayed.
8. The specified alarm list/history, image & library display area, and scroll keys
will be displayed.
" If the “Dsp Image & Lib” set in the display settings is 1 to 3 lines, “up” and “down”
line scroll keys will be automatically displayed. If the “Dsp Image & Lib” set was
4 or more lines, “up” and “down” line scroll keys and a page scroll key will be
automatically displayed.
4-13-2
Modifying Alarm Lists/Histories
This is the procedure for changing the contents, display position, etc., of created
alarm lists and histories.
Procedure
1. Select “ALARM” on the initial editing screen.
" It is also possible to proceed straight to step 3. by left clicking on the alarm list/
history to be modified (see p.57).
2. Select the alarm list/history to be modified and press the
key.
" It is also possible to select the alarm list/history to be modified by left clicking on
it.
3. Select the required item and execute the modification.
Alarm list
Alarm history
S Set Display:
Used to modify the item specified in the window during setting.
S Disp Position:
Select to change the display position of the alarm
list/history.
S Disp Pos Image & Lib: Select to change the display position of an image or
library data.
147
Creating Alarm Lists/Histories
Section 4-13
4. Press the [Esc] key to quit modification.
5. Use the following editing functions to change the arrangement of the scroll
keys or to add page scroll keys.
S TOUCH SW:
The control keys used for the “input keys” are set.
Their positions and other characteristics can be
changed by using the touch switch modification operation. New scroll keys can be set for existing
alarm lists/histories by using control keys.
S EDIT:
The scroll keys can be moved by using the “Move”
function.
Reference: S The scroll keys will automatically light if there are undisplayed messages or histories in the scrolling directions. Do not set lamp bits for them.
S The scroll keys remain displayed even if the alarm list/history is deleted. Delete
them using the “TOUCH SW” or “EDIT” function.
148
Standalone Settings
4-14
Section 4-14
Standalone Settings
When using an NT20M or NT600M without direct connection, it is possible to assign screen switching functions to the input terminals of an extended I/O unit or
touch switches. When the set input terminal or touch switch comes ON, the display switches to the specified screen. This screen switching function when using
an NT20M or NT600M without direct connection is called the “standalone function”.
When direct connection is used, and when other PT models are used without direct connection, screen switching is set with the touch switch and extended I/O
functions.
Procedure
1. Select “STANDALON” on the initial editing screen.
2. Locate the cursor on the extended I/O unit input terminal number or touch
switch number that is to be assigned the screen switching function and press
key.
the
Whether the input terminals of an extended I/O unit or touch switches are used
depends on the PT model used.
3. Specify the screen number of the screen to be switched to.
4. Press the [Esc] key to quit standalone setting.
Reference: A standalone setting is only valid while the screen for which it is set is displayed.
149
Editing Screen Data
4-15
Section 4-15
Editing Screen Data
This section describes how to copy, move, and delete existing screen data.
Selecting the applicable screen data
Editing is executed in existing screen data units.
The method for specifying the object of the editing operation is set with “Edit way”
on the EDIT. The object of the editing operation is selected as follows.
Reference: Depending on the lamp status, which is determined by the setting for “Lamp/TSW
Disp Mode” in the environmental settings, image/library lamps may not be displayed and it may not be possible to select them using the “EDIT”.
S For “In frm” specifications
Procedure
1. Specify the start point of the area that is to encompass the object of the editing
operation.
2. Set the end point at a diagonally opposite point chosen so that the object of the
editing operation is accommodated within the frame.
Start point (
)
Object of the editing operation
Selection frame
End point (
)
The object of the editing operation will be encompassed by a dotted line.
For copy and move operations, a frame the same size as the area enclosed by this
dotted line becomes a cursor and can be moved.
S For “On frm” specifications
Procedure
1. Specify the start point and end point of an area that contains some part of the
object of the editing operation.
Start point (
)
Selection frame
End point (
Objects of the editing operation
150
)
Editing Screen Data
Section 4-15
All the graphics that are wholly or partly contained within the area are selected as
objects of the editing operation.
The objects of the editing operation will be encompassed by dotted lines.
For copy and move operations, a frame the same size as the area enclosed by this
dotted line becomes a cursor and can be moved.
S For “Simple” specifications
Procedure
key.
1. Locate the cursor over the object of the editing operation and press the
Object of the editing operation
Specification (
)
The object of the editing operation will be encompassed by a dotted line.
For copy and move operations, a frame the same size as the area enclosed by this
dotted line becomes a cursor and can be moved.
Filtering Object Data
By specifying the data that is to be the object of the editing operation in advance
using “Data sel” in the EDIT, it is possible to protect data that is not to be changed
by editing operations.
Example: Exempting a bar graph from editing
Bar graph
Selection frame
30%
30%
A B C D E F
Character display
A B C D E F
Polygon
Object of editing operation
151
Editing Screen Data
Procedure
Section 4-15
1. Select “EDIT” from the initial editing menu.
2. Select “Data sel” from the editing menu.
3. Locate the box cursor at the data you do not want to edit and press the [Space]
key to change the check mark
to
.
" Pressing the [Home] (All) key will make all screen data types subject to editing
again.
4. Press the
key with the cursor on “Exec”.
This is the procedure for copy and move operations. In a copy operation, the original object remains in existence. In a move operation, it does not.
Copy and Move
Procedure
1. Select “EDIT” from the initial editing menu.
2. Select “Copy” or “Move” from the editing menu.
3. Select the object that is to be the copy source (or move source).
4. Locate the cursor at the copy destination (move destination) and press the
key.
" To abort the operation, press the [Esc] key.
This is the procedure for deleting the object of the editing operation.
Delete
Procedure
1. Select “EDIT” from the initial editing menu.
2. Select “Delete” from the editing menu.
3. Select the object of the deletion operation.
4. Check the message and then press the
" To abort deletion, press the [Esc] key.
152
key.
Editing Screen Data
Section 4-15
This is the procedure for centering labels or character input (fixed display) to locate
them at the center of a lamp or touch switch display area (this positional adjustment is only performed in the left/right direction; the position in the vertical direction remains unchanged).
Centering
Reference: S In the case of lamps, only those characters that are completely contained within
the area of the graphic will be subject to the centering operation.
Only “ABC” is centered.
S In the case of touch switches, only those characters that are completely contained within the sensitive area will be subject to the centering operation.
Sensitive area
Display area
Only “EFG” is centered.
Procedure
1. Select “EDIT” from the initial editing menu.
2. Select “Centering” from the editing menu.
3. Select the object of the centering operation (a lamp or touch switch).
4. Check the message and then press the
key.
" To abort centering, press the [Esc] key.
153
Editing Screen Data
Alter
Section 4-15
Using this function, the object of the editing operation (fixed display only) can be
reduced, enlarged, inverted, moved, or copied.
When an Alter is performed, a frame is displayed surrounding the object of the editing operation and the symbol
is displayed at each vertex and on each side of
this frame, as shown below. By dragging one of these symbols with the mouse
(dragging is moving the mouse with the left button held down), the object of the
editing operation can be reduced, enlarged, or inverted. It can also be moved or
copied by dragging the entire frame.
b
a
a
c
c
a
b
a
a:
Used to enlarge or reduce the object of the editing operation with the diagonally opposite point as the reference point, while maintaining the same
relative proportions. By moving to the opposite side of the diagonally opposite point, the object of the editing operation can be inverted vertically or
laterally.
b:
Used to enlarge or reduce the object of the editing operation in the vertical
direction only with the opposite side as the reference. Vertical inversion is
possible by moving the cursor beyond the opposite side.
c:
Used to enlarge or reduce the object of the editing operation in the horizontal direction only with the opposite side as the reference. Horizontal
inversion is possible by moving the cursor beyond the opposite side.
Frame: Used to move the object of the editing operation. If the [CTRL] key is being pressed when the left mouse button is released at the destination, the
object of the editing operation is copied.
Only fixed displays can be the objects of “Alter” operations. The following restrictions may also apply depending on the type of the object being edited.
Shape
(vertical/horizontal ratio)
Size
Position
Continuous line, square,
polygon
f
f
f
Circle, arc, fan
¢
f
f
Character, mark, tiling
¢
¢
f
Object of Editing Operation
f: Can be changed ¢: Cannot be changed
Reference: “Alter” operations can only be performed using the mouse. Key operations are not
possible.
154
Editing Screen Data
Section 4-15
S Lateral enlargement
The circle does not change shape.
Note
If a circle, arc, or fan which has been reduced in the vertical or horizontal direction
and whose position has been changed is returned to its original size, it will not return to its original position (in contrast, shapes which are modified while retaining
their relative proportions can be returned to their original position by returning
them to their original size).
S Enlargement while retaining relative proportions
S Inversion
Dragged to the
opposite side
Procedure
1. Select “EDIT” from the initial editing menu.
2. Select “Alter” from the editing menu.
3. Select the object of the editing operation.
4. Perform modification by dragging a
symbol or the frame.
To abort the operation, press the [Esc] key.
155
Editing Screen Data
Section 4-15
This function rotates the object of the editing operation by 90_ in the clockwise
direction.
Rotation
Rotation is performed with the center of the frame that encloses the object of the
editing operation as the reference point. If a rotation operation would cause the
object of the editing operation to project beyond the edge of the screen, rotation is
not performed.
Only fixed displays can be the objects of “Rotate” operations. The following restrictions may also apply depending on the type of object being edited.
Object of Editing Operation
Rotation
Continuous line, square, polygon, circle, arc, fan, tiling
f
Character, mark
¢
f: Can be changed ¢: Cannot be changed
Procedure
1. Select “EDIT” from the initial editing menu.
2. Select “Rotate” from the editing menu.
3. Select the object of the editing operation.
4. Check the message and press the
key.
To abort the operation, press the [Esc] key.
156
Editing Screen Data
Section 4-15
Batch Changing Colors (NT30C and NT60C only)
Used to change the colors for specified data within a specified area in a batch.
Procedure
1. Select “EDIT” from the initial editing menu.
2. Select “ColChg” from the editing menu.
3. Select the objects subject to the batch color change operation.
However, note that a specification to change to transparent color will be ignored if it applies to a part of the image for which transparent color cannot be
used.
4. Specify the color change method and press the
5. Check the message and press the
key.
key.
" To abort the batch color change, press the [Esc] key.
Select whether to quit after saving the result of editing or to quit without saving the
result of editing.
Quitting Editing
Procedure
1. Press the [Esc] key while the editing menu is displayed.
2. Check the message.
S Press the
key to quit after saving the result of editing.
S Press the [Space] key to quit without saving the result of editing (the status
before editing started will be re-established).
157
Editing Screen Data
158
Section 4-15
SECTION 5
Creating Marks, Images, and Library Data
It is possible to create customized characters and symbols called “marks” and display them on the screen.
Marks can be treated in the same way as wide font characters: they can be displayed at various scales of enlargement and
attributes can be set for them.
They can also be used in the creation of image data and library data for display on the screen.
5-1
5-2
5-3
Marks . . . . . . . . . . . . . . . . . . . . . . . . . . . . . . . . . . . . . . . . . . . . . . . . . . . . . . . . . . . . . . . . . . . . . .
5-1-1 Mark Creation Procedure . . . . . . . . . . . . . . . . . . . . . . . . . . . . . . . . . . . . . . . . . . . . . . . . .
5-1-2 Mark Creation Screen . . . . . . . . . . . . . . . . . . . . . . . . . . . . . . . . . . . . . . . . . . . . . . . . . . . .
5-1-3 Mark Creation Functions . . . . . . . . . . . . . . . . . . . . . . . . . . . . . . . . . . . . . . . . . . . . . . . . .
Images . . . . . . . . . . . . . . . . . . . . . . . . . . . . . . . . . . . . . . . . . . . . . . . . . . . . . . . . . . . . . . . . . . . . .
5-2-1 Procedure for Image Creation . . . . . . . . . . . . . . . . . . . . . . . . . . . . . . . . . . . . . . . . . . . . .
5-2-2 Image Editing Operations . . . . . . . . . . . . . . . . . . . . . . . . . . . . . . . . . . . . . . . . . . . . . . . . .
Library Data . . . . . . . . . . . . . . . . . . . . . . . . . . . . . . . . . . . . . . . . . . . . . . . . . . . . . . . . . . . . . . . . .
5-3-1 Procedure for Library Data Creation . . . . . . . . . . . . . . . . . . . . . . . . . . . . . . . . . . . . . . . .
5-3-2 Library Editing Operations . . . . . . . . . . . . . . . . . . . . . . . . . . . . . . . . . . . . . . . . . . . . . . . .
160
160
160
161
164
165
166
171
171
172
159
Marks
5-1
Section 5-1
Marks
This section describes how to create customized characters and symbols and display them on the screen.
Marks can be created in three sizes: 16x16, 32x32, or 64x64 dots.
When using an NT20S, NT20M, NT600S, or NT600M, only 16x16 dot marks can
be created.
5-1-1
Mark Creation Procedure
The procedure for creating marks is as follows.
Procedure
1. Press the [F9] (Mark) key on the “Screen Selection” screen.
2. Specify the size of the mark to be created.
Three sizes are available: 16x16, 32x32, and 64x64 dots.
" An existing mark can be copied by pressing the [F1] (Copy) key, specifying the
range for the copy source by inputting a start point and end point, and then
specifying the position of the copy destination.
An existing mark can be moved by pressing the [F2] (Move) key, specifying the
range for the move source by inputting a start point and end point, and then
specifying the position of the move destination.
An existing mark can be deleted by pressing the [F3] (Delete) key and specifying the range by inputting a start point and end point.
3. Move the cursor to specify the position at which the mark is to be registered
once it has been created.
4. Create the mark graphic in the creation area.
5. Press the [F8] key to register the created mark.
6. Press the [Esc] key to quit mark creation.
5-1-2
Mark Creation Screen
Marks are created on the mark creation screen.
Up to 224 marks of the 16x16 dot size can be registered.
Since the same registration area is used for each mark size, 32x32 dot marks
occupy four times the area that 16x16 dot marks do, and 64x64 dot marks occupy
sixteen times the area that 16x16 dot marks do.
160
Marks
Section 5-1
<Example: 16x16 dot screen>
5-1-3
S Reference Area:
Area used to display other marks for reference during mark
creation.
S Creating Area:
Area used for creating marks with dot data.
Mark Creation Functions
Dot Operations
S Dot display/deletion
When the [Shift] key is pressed, a dot is displayed at the cursor position.
If the [Shift] key is pressed while the cursor is located over a displayed dot, the dot
will be deleted.
When using a mouse, click with the left button to display dots and click with the
right button to delete them.
S Continuous display or deletion of dots
To display or delete a continuous line of dots, move the cursor by pressing one of
the arrow keys while holding down the [Shift] key.
S Screen rotation
Each time the [ ] or [ ] key is pressed while holding down the [Alt] key and [Shift]
key, the mark displayed on the screen will be rotated by 90.
Alt
+
Shift
+
Alt
+
Shift
+
161
Marks
Section 5-1
S Moving the screen
Pressing one of the arrow keys while holding down the [Alt] key will move the mark
displayed on the screen.
Alt
Alt
+
+
Creating screen
Alt
Alt
+
+
Functions of the Function Keys
[Cha Ref]
[F1] . . . Character reference
Used to display an input character in the reference area.
(1) Press the [F1] (Cha Ref) key.
(2) Input the character to be used for reference (one wide font character or a maximum of two normal font characters).
(3) Press the
[Mk Ref]
key: the character will be displayed.
[F2] . . . Mark reference
Used to display an existing mark in the reference area.
(1) Press the [F2] (Mk Ref) key.
(2) Locate the cursor on the mark in the mark list window that is to be displayed.
(3) Press the
[Copy]
key: the character will be displayed.
[F3] . . . Area copy
Used to copy the dots in a specified area into the creating area.
(1) Press the [F3] (Copy) key.
(2) Specify the start point and end point of the area to be copied.
(3) Move the area to the copy destination and press the
copied.
[RCopy]
key: the dots will be
[F4] . . . Copy from the reference area
Used to copy the dots in a specified area of the reference area to the creating area.
(1) Press the [F4] (RCopy) key.
(2) Specify the start point and end point of the area within the reference area that
is to be copied. Specify diagonally opposite points to specify a rectangular
area.
(3) Move the area to the copy destination within the creating area and press the
key: the dots will be copied.
162
Marks
Section 5-1
[Set]
[F5] . . . Set dots in a specified area
Used to set (display) all the dots within a specified area.
(1) Press the [F5] (Set) key.
(2) Specify the start point and end point of the area in which the dots are to be set.
Specify diagonally opposite points to specify a rectangular area.
(3) Press the
[Clear]
key: the dots inside the specified area will be set.
[F6] . . . Reset dots in a specified area
Used to reset (clear) all the dots within a specified area.
(1) Press the [F6] (Clear) key.
(2) Specify the start point and end point of the area in which the dots are to be
cleared.
Specify diagonally opposite points to specify a rectangular area.
(3) Press the
[Inv.]
key: the dots inside the specified area will be cleared.
[F7] . . . Invert dots
Used to invert the display of all the dots within a specified area: displayed dots are
cleared and cleared dots are displayed.
(1) Press the [F7] (Inv.) key.
(2) Specify the start point and end point of the area in which the dots are to be
cleared.
Specify diagonally opposite points to specify a rectangular area.
(3) Press the
[Save]
key: the dots inside the specified area will be inverted.
[F8] . . . Register a mark
Used to register a mark that has been created.
Displaying Marks
Marks can be displayed in either of the two following ways.
(1) Specification during character input
If the [F3] (Mark) key is pressed when inputting characters or a label, a mark can
be selected from the mark selection screen (only 16x16 dot marks can be selected).
It is possible to use marks in combination with characters.
Mark data is displayed as data in the character input field. On the “Edit” screen, the
actual mark is displayed, taking the left bottom extremity of the mark as the origin.
(2) Specification from the Fixed Display Menu
On selecting “Mark” from the fixed display menu and specifying a size, a mark can
be selected from the mark selection screen.
For details on the operating procedure, see “Inputting Marks” (p.82).
163
Images
5-2
Section 5-2
Images
Image data is created in dot units and can be displayed on the screen. Marks and
symbols can be created and registered.
Images are handled in the same way as characters and marks.
Illustrations and figures can be read with an image scanner.
Images can only be used when using an NT30, NT30C, NT610G, or NT610C.
Reference: The sizes of images that are not reduced are as follows, depending on the width
and height of the image area.
NT610G : {(width + 7)$8} x height + 558 bytes
NT30, NT30C, NT610C : [{(width + 7)$8} x height + 48] x 3 + 510 bytes
(“$” indicates a division operation in which decimal fractions are discarded.)
When an image is reduced, the size will be smaller that indicated above. The reduction scale will differ according to the nature of the image data.
164
Images
5-2-1
Section 5-2
Procedure for Image Creation
Image data is created on the screen in dot units using mouse and key operations,
then the required area is specified and the image registered. Up to 224 images can
be registered.
Procedure
1. Select “Image & Lib” on the “Screen Selection” screen.
2. Locate the cursor at the code (from FE20 to FEFF) of the image to be created
key.
and press the
" Use [Shift] + [ ] or [Shift] + [ ] to move the bar cursor to the previous or next
code for which there is data.
Use the [ ]/[ ] keys to switch between image and library data.
Press the [Tab] key to display the code input field.
The data of a code for which data already exists can be deleted by pressing the
[F1] (Delete) key and then specifying that code.
The data of a code can be copied by pressing the [F2] (Copy) key and then
specifying the copy source code and the copy destination code.
Existing comments can be changed by pressing the [F6] (Commnt) key and
inputting the required characters.
3. Draw image data on the screen using the mouse and keys (see “Image Editing
Operations” on the next page).
4. Press the [Esc] key to quit image creation.
On quitting, specify “Confirm”.
5. Select whether or not to reduce the saved data.
" Displaying reduced image data takes more time than displaying image data
that is not reduced.
6. Specify the area that is to be saved as the image data.
locate the cross-hair cursor at the start point and end point of the area and
key at each.
press the
7. Input a comment.
This is a memo that indicates the nature of the image data.
165
Images
5-2-2
Section 5-2
Image Editing Operations
On selecting an image code, the image editing screen shown below is displayed.
(a)
(b)
(c)
(d)
(a) Image editing screen:
This is the screen on which images are created. No
grid is displayed.
(b) Image editing menu:
This is the menu for editing images.
(c) Code:
This is the code of the image that is currently being
edited.
(d) Remaining capacity:
The data size (number of bytes) that can still be used
for image creation.
S Color Mode
If using an NT30C or NT610C, the color mode (2 colors or 8 colors) can be
changed by selecting “COL MODE” from the image editing menu.
166
Images
Enlarged Display
Section 5-2
A part of the image display screen can be displayed enlarged by selecting
“LOUPE” from the image editing menu: this allows editing in dot units.
S Key Operations
[Home] key:
Used to shift the help message window.
Arrow keys:
Used to move the cursor (the cursor can be moved
more quickly by pressing an arrow key while holding
down the [Shift] key, but this operation can only be used
in the box tiling mode).
[Ctrl] + arrow keys:
Used to shift the enlarged display window (it can be
moved faster by pressing the [Shift] key also).
[F1] key:
Used to change the enlargement scale (2x, 4x, 8x)
[F2] key:
Used to change the drawing mode (locus, box tiling)
The enlarged display window can also be moved by locating the cursor inside it,
key, then moving the cursor and pressing the
key again.
pressing the
S Drawing method
On this screen, images are drawn with dots in the manner described below. If using an NT30C or NT610C, the color used for the help message window has to be
selected (this selection can be made using the numeric keys).
[Locus mode]
Key operation:
Dots are drawn by moving the cursor while holding down
the [Shift] key.
Mouse operation:
Dots are drawn by dragging the mouse while holding down
the left mouse button.
[Box tiling mode]
Key operation:
Press the
key at the diagonally opposed corners of the
area (rectangle) to be tiled.
Mouse operation:
Click the left mouse button at the diagonally opposed corners of the area (rectangle) to be tiled.
167
Images
Section 5-2
Procedure
1. Select “LOUPE” from the image editing menu.
2. Carry out drawing in dot units.
3. Press the [Esc] key to quit the enlarged display.
Drawing Operations Using the Image Editing Menu
Functions are selected from the image editing menu in order to carry out drawing.
The following graphic elements can be used:
Points, lines, locus, circles, ellipses, squares
In the case of circles, ellipses and squares, it is also possible to select normal or
inverted displays.
When using an NT30C or NT610C, the color can also be specified.
Ellipses can only be drawn as images.
S Points
Key operation:
Press the
key.
Mouse operation: Click the left mouse button.
S Lines
Key operation:
Press the
key at the start point and end point.
Mouse operation: Click at the start point and end point.
S Locus
Key operation:
Locus drawing is not possible with key operations.
Mouse operation: Drag the mouse while holding down the left mouse button.
S Circles/ellipses
Key operation:
Press the
key at diagonally opposed points to draw a circle
or ellipse that just makes contact with the inside of the rectangle defined by these points.
Mouse operation: Click at diagonally opposed points to draw a circle or ellipse
that just makes contact with the inside of the rectangle defined
by these points.
S Squares
Key operation:
Press the
key at the diagonally opposed points.
Mouse operation: Click at the diagonally opposed points.
168
Images
Section 5-2
Reading Existing Image Data
Existing image data can be read onto the image editing screen.
Procedure
1. Select “READ FIL” from the image editing menu.
2. Locate the bar cursor on the code of the image to be read and press the
key.
3. A box that indicates the size of the image will be displayed.
Move this box to the required display position and press the
key.
Reading Bit map Files (.BMP)
Bit map files can be read as image data.
However, only bit map files that comply with the following conditions can be read:
S The bit map must be monochrome, 16-color, or 256-color.
S The data must not be compressed.
Note
1. PCX format bit map files cannot be read.
2. When 16-color and 256-color bit map files are read, the number of colors is
reduced to eight. This means that the rendition of color will not be the same as
in the original file.
Procedure
1. Press the [F7] (Image & Lib) key on the “Screen Selection” screen.
2. Select the image code (range: FE20 to FEFF).
3. Select “READ FIL” (read file) from the image editing menu.
4. A prompt requesting the file name of the bit map file will appear: specify the
path and enter the file name (see the example below). An extension must be
specified.
Example
C:\WIN\PUPPY.BMP<ENTER>
5. After reading, the data can be edited as image data.
Storing Screen Data in Files
Existing screen data can be converted to the bit map file format and stored as a file.
Procedure
1. Locate the bar cursor on the screen to be converted to bit map data, press the
[F10] key, then press the [F3] (Co File) key.
2. Follow the screen messages to create a file for the screen data. The file name
will be registered in the format shown below.
NT612G:
NTGVVVV.BMP
NT610C:
NTCVVVV.BMP
*
The screen number is entered in the section represented as VVVV.
169
Images
Section 5-2
Copying Images on the Image Editing Screen
Images can be copied on the image editing screen.
Since it is possible to repeatedly specify copy destinations for the same copy
source, moving the mouse with the mouse button held down has the effect of using
a thick pen or eraser.
Procedure
1. Select [COPY] from the image editing menu.
2. Press the
source.
key with the cursor on the diagonally opposite point of the copy
3. Move the cursor to the copy destination and press the
key.
The image will be copied. Other copy destinations can now be specified.
" Press the [Esc] key to quit copying.
" Continuous copying is possible by moving the mouse with the button held
down.
Displaying Images
Images can be displayed in either of the following two ways.
(1) Specification during character input
If the [F4] (Image) key is pressed when inputting characters or a label, an
image can be selected from the image selection screen.
It is possible to use images in combination with characters and marks.
Image data in a character input field is displayed as a [I] mark. In image editing, the real image is displayed, taking the left bottom extremity of the image
as the origin.
Image
:
Character input field
:
A B I D E
A B
Display on “Edit” screen:
D E
WARNING
The following specifications are not valid for image
displays:
Scales, smoothing, display attributes
(2) Specification on the initial editing screen
Selecting “Image & Lib” from the initial editing screen enables selection of
images from the image/library selection screen (the image codes are FE20 to
FEFF).
For details on the procedure, see 4-11 “Inputting Image and Library Data”
(p.141).
Images can also be set for the ON and OFF codes of image/library lamps. For
details, see “Setting Image/Library Lamps” (p.102).
170
Library Data
5-3
Section 5-3
Library Data
Two or more graphics can be registered together as library data. Complex graphics need only be created once, after which they can be used repeatedly.
Library data can only be used when using an NT30, NT30C, NT610G, or NT610C.
The following codes can be used for library data:
FA20 to FAFF, FB20 to FBFF, FC20 to FCFF, FD20 to FDFF (896 items).
5-3-1
Procedure for Library Data Creation
Library data is created by registering two or more graphics created on the library
editing screen collectively under one code. Up to 896 library data can be registered.
Procedure
1. Select “Image & Lib” on the “Screen Selection” screen.
2. Locate the cursor at the code of the library data to be created and press the
key.
" Use [Shift] + [ ] or [Shift] + [ ] to move the bar cursor to the previous or next
code for which there is data.
Use the [ ]/[ ] keys to switch between image and library data.
Existing comments can be changed by pressing the [F6] (Commnt) key and
inputting the required characters.
Press the [Tab] key to display the code input field.
The data in a code for which data already exists can be deleted by pressing the
[F1] (Delete) key and then specifying that code.
The data in a code can be copied by pressing the [F2] (Copy) key and then
specifying the copy source code and the copy destination code.
3. Draw the library data on the screen using the mouse and keys (see “Library
Editing Operations” on the next page).
4. Press the [Esc] key to quit library data creation.
On quitting, specify “Confirm”.
5. Specify the area that is to be saved as the library data.
Regardless of the environmental settings (tool settings for the “Edit” screen),
only graphics that are completely contained within the specified area will be
registered.
Locate the cross-hair cursor at the start point and end point of the area and
press the
key at each.
6. Input a comment.
This is a memo that indicates the nature of the library data.
171
Library Data
5-3-2
Section 5-3
Library Editing Operations
On selecting a library code, the library editing screen shown below is displayed.
(a)
(b)
(c)
(a) Library editing screen:
This is the screen on which library data is created.
(b) Library editing menu:
This is the menu for editing library data.
(c) Code:
This is the code of the library data that is currently
being edited.
Drawing Operations in the Library Editing Menu
Functions are selected from the library editing menu in order to carry out drawing.
The following graphic elements can be used. All of them are fixed display graphics. For details on the drawing methods, see the relevant pages of 4-3 “Creating
Fixed Displays”.
Character input (fixed display) (p.80)
Marks (display) (p.82)
Continuous lines (p.84)
Squares (p.86)
Polygons (p.88)
Circles/Arcs (p.90)
Fans (p.92)
Tiling (p.93)
Also see the relevant pages of 4-14 “Editing Screen Data” for details on editing
(p.150) and environmental settings (p.59).
172
Library Data
Section 5-3
Reading From Existing Screen Data
Existing screen data can be read onto the library editing screen.
WARNING
The only data that can be read is fixed displays on the
specified screen.
Reference: Read graphics are overlapped with any graphics that are already present on the
library editing screen, leaving these existing graphics in place.
Procedure
1. Select “READ SCR” from the library editing menu.
2. Locate the bar cursor on the code of the screen from which the graphic is to be
read and press the
key.
Displaying Library Data
Use the following method to display library data.
Select “Image & Lib” from the initial editing screen to allow select of library data
from the image/library selection screen (the library codes are FA20 to FAFF, FB20
to FBFF, FC20 to FCFF, and FD20 to FDFF).
For details on the procedure, see 4-11 “Inputting Image and Library Data” (p.141).
Library data can also be set for the ON and OFF codes of image/library lamps. For
details, see “Setting Image/Library Lamps” (p.102).
173
Library Data
174
Section 5-3
SECTION 6
Printing Data
Various types of data can be printed in file units or in screen data units.
6-1
6-1-1 Things that can be Done Using the Data Printing Function . . . . . . . . . . . . . . . . . . . . . . .
6-1-2 Printing from the “File Selection” Screen . . . . . . . . . . . . . . . . . . . . . . . . . . . . . . . . . . . .
6-1-3 Printing from the “Screen Selection” Screen . . . . . . . . . . . . . . . . . . . . . . . . . . . . . . . . . .
176
178
180
175
Printing Data
6-1-1
Section 6-1
Things that can be Done Using the Data Printing Function
Various data relating to the support tool, such as screen data and the conditions of
use of memory tables, can be printed out at a printer and checked.
S Specifiable output destinations
Any of the following three output destinations can be specified:
Printer:
Screen images, various settings, etc., can be
printed out at a printer.
File (specify the file name): Various settings and other data can be output as
a DOS text file. However, screen images cannot
be output to a file.
Display:
Screen images, various settings and other data,
can be displayed on the screen.
S Types of data that can be displayed
Printing can be initiated in one of two ways: by selecting “Print” on the “File
Selection” screen or by selecting “Print” on the “Screen Selection” screen. The
data that can be printed differs according to the method used.
S When “Print” is selected on the “File Selection” screen
(1) Print out of the file list
(2) Print out of the screen list
(3) Print out of screen images
(4) Print out of cross-references (the conditions of use of memory tables)
(5) Print out of display history records received from the PT
(6) Print out of the mark list
(7) Print out of image/library data
S Cannot be specified with an NT20S, NT20M, NT600S, or NT600M
(8) Printout of direct connection information (only when using direct connection)
The mark list can only be output to the printer.
S When “Print” is selected on the “Screen Selection” screen
The following information can be specified, in single screen units.
(1) Screen images
(2) Color printing (NT30C and NT610C)
(3) Detailed information
Before attempting printing, make sure that the printer is connected and that
there is paper in the printer.
176
Printing Data
Section 6-1
Reference: S The environmental settings (tool settings for the “Edit” screen) determine whether or not lamp/touch switch numbers, memory table numbers, and image/library
numbers are printed or not.
S The type of printer and the presence or absence of a sheet feeder are set in the
“Tool Settings” (see p.22).
177
Printing Data
6-1-2
Section 6-1
Printing from the “File Selection” Screen
Use the following method to specify printing from the “File Selection” screen.
Procedure
1. Locate the bar cursor on the file to be printed.
2. Press the [F3] (Print) key.
3. Locate the bar cursor on the data to be printed.
S Print File List:
Select to print the set memory, memory used,
etc., for all files.
S Print Screen List:
Select to print the screen numbers, comments in
screens, etc.
S Print Screen:
Select to print images or other data in the screen
in a file.
Set the following settings:
S Printing/non-printing of screen images
S Method for printing color (NT30C and
NT610C) ... No / Imitation / 8 colors
(“Imitation” is printing in monochrome with 8
grayscale levels).
S Printing/non-printing of detailed information
S Print Cross-References:
Select to print numeral memory tables, character-string memory tables, and the conditions of
use of bits.
Set the following settings:
S Memory Table
Print the conditions of use of memory tables.
S Bit
Print the conditions of use of bits.
178
Printing Data
Section 6-1
S All
Print the conditions of use of all memory
tables.
S Use Data only
Print only the part of the file used for screen
data.
S Print Display History File: Select to print the display history record data received from the PT.
Input the file whose display history record data is
to be printed.
S Print Mark List:
Select to print a list of marks.
S Print Image/Library List:
Select to print a list of image data and library
data. This list can only be printed out when using an NT30, NT30C, NT612G, or NT610C.
S Print Direct Access Info.: Select to print the direct connection information.
Set the following settings:
S All
Print all direct connection information.
S Use Data only
Print only the specified direct connection information.
(4) Specify the output destination and press the
key.
Depending on the data to be printed, further settings may be necessary.
When the marks list is printed “Print Mark List” is not displayed.
(5) Check the printer and press the
key.
The data will be printed.
Press the [Esc] key to stop printing.
179
Printing Data
6-1-3
Section 6-1
Printing from the “Screen Selection” Screen
Use the following method to specify printing from the “Screen Selection” screen.
Procedure
1. Locate the bar cursor on the screen number whose data is to be printed.
If the screen data of more than one screen is to be printed, “mark” each of the
relevant screen numbers.
" For details on using the mark function, see 3-5 “Screen Selection” Screen
(p.31).
2. Press the [F3] (Print) key.
3. Specify the output destination.
4. Specify the printing format.
S Scr Image:
Specify whether or not the screen image is to be printed as it
is.
S Col Print:
If using an NT610C, specify the method that will be used to
print color (“Imitat” means printing in monochrome with 8
grayscale levels).
S Detl Info:
Specify whether or not to print detailed information relating to
the screen.
5. Check the printer and press the
key.
The data will be printed.
Press the [Esc] key to stop printing.
<Restrictions on data printing>
S If there is no data for an item, nothing will be printed.
S Up to 62 lines can be printed on one page.
S Up to 32 character data can be printed.
S If continuous screens or overlapping screens are printed with “No” set in the detailed information printing settings, only the child screen numbers will be printed.
S If continuous screens are printed with “Yes” set in the detailed information printing settings, the screen image and child screen number of the child screen specified as number one will be printed.
S If overlapping screens are printed with “Yes” set in the detailed information printing settings, the screen image and child screen numbers will be printed.
180
Printing Data
Section 6-1
NT30C and NT610C Screen Data Printing Example
Shown here is an example of screen data printing with an NT610C. Printing is carried out in the same way when using an NT30C.
In this example, the screen includes black characters on a white background, and
squares colored with all the available colors: the results of printing with “Imitat” and
“No” selected for “Col Print” are shown below.
Col Print: Imitat
BLACK
BLUE
RED
MAGENTH GREEN
CYAN
YELLOW
WHITE
Background: black
BLACK
BLUE
RED
MAGENTA GREEN
CYAN
YELLOW
WHITE
Background: white
Col Print: No
BLACK
BLUE
RED
MAGENTA GREEN
CYAN
YELLOW
WHITE
BLACK
BLUE
RED
MAGENTA GREEN
CYAN
YELLOW
WHITE
When “No” is selected, neither the tiling nor the inversion of the graphics are
shown and only the outlines are printed.
181
Printing Data
182
Section 6-1
SECTION 7
Data Communication
This chapter describes how screen data created using the support tool can be sent to the PT or written to a memory board, and
how data such as screens and display histories received from the PT can be communicated.
7-1
7-2
7-3
Preparation and Procedure for Data Communication with the PT . . . . . . . . . . . . . . . . . . . . . . . .
Transmitting Data . . . . . . . . . . . . . . . . . . . . . . . . . . . . . . . . . . . . . . . . . . . . . . . . . . . . . . . . . . . .
Receiving Data . . . . . . . . . . . . . . . . . . . . . . . . . . . . . . . . . . . . . . . . . . . . . . . . . . . . . . . . . . . . . .
7-3-1 Data Reception . . . . . . . . . . . . . . . . . . . . . . . . . . . . . . . . . . . . . . . . . . . . . . . . . . . . . . . . .
7-3-2 Reception of Display History Records . . . . . . . . . . . . . . . . . . . . . . . . . . . . . . . . . . . . . . .
184
188
190
190
192
183
Preparation and Procedure for Data Communication with the PT
7-1
Section 7-1
Preparation and Procedure for Data Communication
with the PT
Screen data created using the support tool, and mark and memory table information, etc., can be transferred to the PT data memory. It is also possible to receive
various types of data and display history records from the PT and save them.
Caution: When using an NT30, NT30C, NT612G, or NT610C, data is communicated in file
units. Communication in screen units is not possible.
Connection to the PT
Connect the PT and personal computer with an RS-232C connecting cable.
Connect this cable to the tool interface at the PT side and to the RS-232C interface
at the personal computer side. Note that this connection with the PT is established
only for data communication; it is not usually necessary to make this connection.
S Connection method
Make the connection with the RS-232C cable in the manner shown below.
Connection to an NT20M/NT20S
Connection to an NT2000M
184
Preparation and Procedure for Data Communication with the PT
Section 7-1
Connection to an NT600M/NT600S/NT612G/NT620S/NT620C
Connection to an NT30/NT30C
Connection to an NT610C
S Connecting cable
Make the connecting cable by referring to Appendix A “Connecting Cable Specifications”.
185
Preparation and Procedure for Data Communication with the PT
Section 7-1
Select the communication speed for communication with the PT by setting “Communication Mode” on the “Tool Settings” screen.
Communication Speed
Setting “Hspeed” for this setting will enable high-speed data transfer.
If the communication environment is unfavorable or communication errors occur,
set “Stndrd” for low-speed communication so that the data will be communicated
reliably.
Reference: Presented below are OMRON’s measurements of the time taken to transfer the
entire capacity of the image memory when transfer is in the “Hspeed” mode. Use
these as a guide to data communication times.
S When using a capacity of 512 Kbytes:
5 min. 5 sec.
S When using a capacity of 1 Mbyte:
9 min. 30 sec.
Communication in the “Stndrd” mode takes approximately twice as long as communication in the “Hspeed” mode.
Tool Settings When Communicating With an NT20S or NT600S
When using an NT20S or NT600S, the combination of tool settings that allows
communication with the support tool depends on which model is used.
Set the tool settings for communication with an NT20S or NT600S correctly by referring to the table below.
S When using an NT20S
Model
Tool Settings
“PT Type”
Setting
Direct Access
NT20S-ST121
NT20S-ST121-V1/
ST122-V1
NT20S-ST128
20M
Not used
x
x
x
20S
Not used
x
x
f
20M
Ver.4
f
f in NT20M compatible mode
x
20S
Ver.4
x
f
x
20S
Ver.5
x
f
x
f: possible x: not possible
S When using an NT600S
Model
Tool Settings
“PT Type”
Setting
186
Direct Access
NT600S-ST121/
ST211
NT600S-ST 121-V1/
ST211-V1 direct
connection
NT600S-ST121-V1/
ST211-V1 direct
connection
600M
Not used
x
x
x
600S
Not used
x
x
f
600M
Ver.4
f in NT600M
compatible
mode
f in NT600M
compatible mode
x
600S
Ver.4
f
f
x
600S
Ver.5
x
f
x
f: possible x: not possible
Preparation and Procedure for Data Communication with the PT
Section 7-1
Types of Data Communication with Each PT Model
There are two methods for data communication, as follows:
S Data communication in file units executed using the “File Selection” screen
S Data communication in screen units executed using the “Screen Selection”
screen.
Whether or not data communication in file units or screen units can be used is
shown in the table below for each PT model.
PT Model
File Units
Screen Units
NT20S
f
ST121:
ST121-V1:
ST122-V1:
ST128:
NT20M/NT2000M
f
f
NT600S
f
n*
NT600M
f
f
NT30
f
x
NT30C
f
x
NT612G
f
x
NT610C
f
x
NT620S
f
x
NT620C
f
x
x
n*
n*
f
f: possible n: partly possible x: not possible
*:
In the NT20S/NT600M compatible mode, simultaneous transmission of multiple screens and verification are not possible.
Procedure for Data Communication
Use the following procedure to make preparations at the PT and support tool sides
and execute data communication.
<Procedure at PT side>
<Procedure at the support tool side>
Connect to the PT
Connect to the support tool
Display the system menu
Select “Transmit Mode”
Execute the transmit or receive function
Transmission or reception
Return to “Run Mode”
Reference: For details on the operations at the PT side, refer to the operation manual for the
PT.
187
Transmitting Data
7-2
Section 7-2
Transmitting Data
This is the procedure for transmitting data such as image data or memory table
data to the PT, and writing it into the flash memory type data memory of the PT.
There are two methods for transmitting data, as follows:
S Selecting a file from the “File Selection” screen and transmitting it to the PT.
S Selecting a screen from the “Screen Selection” screen and transmitting it to the
PT.
Transmitting Data in File Units
Select a file from the “File Selection” screen and transmit it to the PT.
Procedure
1. Set the PT to the “Transmit Mode”.
" Check that the write switch of the screen data memory board is released.
2. Locate the bar cursor on the file to be sent on the “File Selection” screen.
3. Press the [F6] (Tmx.) key.
4. A message will be displayed for the purpose of confirmation.
Check the message and press the
key.
" Press the [Esc] key to abort data transmission.
5. Data transmission will start.
On completion of the transmission, the message “Data successfully transmitted.” will be displayed.
" Press the [Esc] key to stop transmission part way through.
Reference: When data transmission has been aborted part way through, initialize the image
data memory: do this by using the DIP switch on the PT.
For details, refer to the operation manual for the PT.
Also initialize the image data memory by this means if data transmission is
stopped due to trouble.
188
Transmitting Data
Section 7-2
Data Transmission in Screen Units
Whether or not data communication in screen units is possible depends on the PT
model used. For details, see “Types of Data Communication with Each PT Model”
(p.185).
Procedure
1. Set the PT to the “Transmit Mode”.
Check that writing to the screen data memory is possible.
2. Locate the bar cursor at the screen to be transmitted on the “Screen Selection”
screen.
When transmitting multiple screens, “mark” the appropriate screens. For details on using the marking function, see 3-5 “Screen Selection Screen” (p.31).
If transmitting numeral or character-string memory table data only, it does not
matter where the bar cursor is.
3. Press [F10] (Next), then [F6] (Tmx).
4. Specify either “Screen Data” or “Memory Table” as the data to be transmitted,
and press the
key.
5. Specify whether or not verification (writing check) is to be executed, then press
key.
the
6. A confirmation message will be displayed.
Check the message and press the
key.
To abort transmission, press the [Esc] key.
7. Transmission will start.
On completion of transmission, the message “Data successfully transmitted”
is displayed.
To abort transmission part way through, press the [Esc] key.
Reference: After aborting data transmission part way through, initialize the screen data
memory. To do this, perform forced initialization with the DIP switch on the PT. For
details, refer to the Operation Manual for the PT. Take the same measures if data
transmission is discontinued due to trouble.
189
Receiving Data
7-3
Section 7-3
Receiving Data
This is the procedure for receiving screen data, memory table data, display histories, etc., from the PT and storing this data as support tool files, and for receiving
data in screen units, and writing it to the screen data of the support tool.
7-3-1
Data Reception
Use the following procedure to receive all the data in the data memory and write it
to a file.
There are two methods for receiving data, as follows:
S Receiving all the data in the PT’s data memory and writing it to a file.
S Receiving data in screen units and writing it to the support tool.
Receiving Data in File Units
Procedure
1. Set the PT to the “Transmit Mode”.
2. Display the “File Selection” screen.
It does not matter where the bar cursor is.
3. Press the [F7] (Rcv.) key.
4. Input the file name of the file to which the received data is to be written.
5. Press the
key.
File reception will start.
" If a file that already exists is specified, a message asking whether or not the file
is to be overwritten will be displayed. If you do not want to overwrite it, press the
[Esc] key.
" Press the [Esc] key to stop reception part way through.
On completion of reception, the message “Data successfully transmitted” will
be displayed.
190
Receiving Data
Section 7-3
Receiving Data in Screen Units
Whether or not it is possible to execute data reception in screen units depends on
the PT model. For details, see “Types of Data Communication with Each PT Model” (p.185).
Procedure
1. Set the PT to the “Transmit Mode”
2. Display the “Screen Selection” screen.
It does not matter where the bar cursor is.
3. Press the [F10] (Next) key, then press the [F7] (Rcv.) key.
4. Specify “Screen Data” or “Memory Table” as the type of data to be received,
key.
then press the
5. Specify the screen number at the PT side and the screen number at the support tool side, pressing the
key after each specification.
6. A message will displayed for the purpose of confirmation.
Check the message and press the
key.
" Press the [Esc] key to abort reception.
7. Reception will start.
On completion of reception, the message “Data successfully transmitted” will
be displayed.
" Press the [Esc] key to stop reception part way through.
191
Receiving Data
7-3-2
Section 7-3
Reception of Display History Records
When a screen for which the “History” screen attribute is set is displayed during PT
operation, the PT records this display in the display history record.
This display history record can be read using the support tool in order to analyze
how the screen is used or its frequency of display, for example.
Received files are saved in the DOS text format in the set data directory, and the
extension “.G6L” is automatically assigned to them. The data directory is set in the
“Tool Settings”.
The received data is stored in the order of the order of occurrence record and the
order of frequency record.
Reference: Received display history data can be printed out by selecting [F3] (Print) on the
“File Selection” screen.
Procedure
1. Set the PT to the “Transmit Mode”.
2. Display the “File Selection” screen.
It does not matter where the bar cursor is.
3. Press the [F5] (Hist.) key.
4. Input the file name of the file in which the received display history record is to
be saved.
Specify a file name no longer than eight characters. Do not specify an extension: the support tool will automatically assign the extension “.G6L” to the file.
5. Press the
key to start file reception.
" If a file that already exists is specified, a message asking whether or not the file
is to be overwritten will be displayed.
key to start reception. If you do not want to overwrite data, press
Press the
the [Esc] key.
" To stop reception part way through, press the [Esc] key.
On completion of reception, the message “Data completely received” will
be displayed.
192
Connecting Cable Specifications
Appendix A
APPENDIX A
Connecting Cable Specifications
Tool Interface Connector Specifications
The following specifications apply to the connection between the PT and the support tool (personal computer).
Pin No.
Signal Name
1
FG
Frame ground
2
SD
Send data
3
RD
Receive data
4
RS
Request to send
5
CS
Clear to send
9
SG
Signal ground
Meaning
Assembly of Connecting Cables
Wiring should be carried out in one of the following ways, depending on the type of
RS-232C connector.
25-pin Connector
Connector for peripheral
devices on PT body
Personal computer
Shielded wire
Use the following recommended products when making the connecting cable.
Name
Connector
Connector hood
Cable
Model
Remarks
XM2D-2501
25-pin Made by OMRON
XM2A-0901
9-pin Made by OMRON
XM2S-2511
25-pin Made by OMRON
XM2S-0911
9-pin Made by OMRON
AWG28×5P
IFVV-SB
Multi-core shielded cable Made by
Fujikura, Ltd.
CO-MA-VV-SB
5P×28AWG
Multi-core shielded cable Made by
Hitachi, Ltd.
193
Connecting Cable Specifications
Appendix A
9-pin Connector
Personal computer
Connector for peripheral
devices on PT body
Shielded wire
Use the following recommended products when making the connecting cable.
Model
Remarks
XM2D-0901
9-pin Made by OMRON
XM2A-0901
9-pin Made by OMRON
Connector hood
XM2S-0911
9-pin Made by OMRON (Two)
Cable
AWG28×5P
IFVV-SB
Multi-core shielded cable Made by
Fujikura, Ltd.
CO-MA-VV-SB
5P×28AWG
Multi-core shielded cable Made by
Hitachi, Ltd.
Name
Connector
194
Error Messages
Appendix B
APPENDIX B
Error Messages
The error messages that may be displayed while using the support tool, and the
action to take in response to them, are shown below.
Error Message
3,000 I/O comments registered.
Corrective Action
(Confirm)
If there unnecessary comments, delete them.
One screen exceeds 16 Kbytes.
(Confirm)
The maximum data size for one screen is 16 Kbytes. If there is
unnecessary data, delete it (see 3-5 “Screen Selection Screen”
on p.31).
Image/Library area exceeds 64 KBytes.
(Confirm)
Delete unnecessary data.
The number of bits for cross-referencing
has exceeded 3000.
(Confirm)
Not usable with this version.
(Confirm)
No more can be registered.
Check usable functions and adjust the tool settings.
This file can’t be sent.
(Confirm)
Check the tool settings and file (detailed info).
If there is unnecessary screen data, delete it.
The current tool settings (“PT Model”, “Direct Access”) do not
correspond with the specified function.
Files displayed in red cannot be transmitted. Match the tool
settings with the file to be transmitted.
Work directory disk capacity insufficient.
(Confirm)
Data directory disk capacity insufficient.
(Confirm)
Seek error detected.
(Confirm)
Disk is faulty.
(Confirm)
Sector not found.
(Confirm)
Initialize (format) the disk in DOS format before using it.
Check the direct access version.
(Confirm)
Adjust the tool settings to match the direct connection version of
the selected file.
Error detected in the data
(Confirm)
Part of the data has been destroyed and it cannot be used as it
is. Delete the data and create it again. Or, if there is backup
data, use that.
Disk may be broken.
(Confirm)
Replace the disk. If there is a backup disk, use that.
Disk is protected.
[ G G : Retry
G G : Abort ]
(Confirm)
Try again after releasing the disk’s write protection.
Disk not ready.
[ G G : Retry
(Confirm)
Set the floppy disk correctly in the designated drive and try
again.
G G : Abort ]
Too many registered channels: correct to MAX value?
( G G Yes/ G G Abort)
Set the data in a directory with sufficient free area (1 MB or
greater)
greater).
The disk is damaged, or the drive may be faulty. Either replace
the disk or inspect the disk drive.
drive
The number of registered counter words has been set to two or
more by a batch change operation: this is automatically corrected to one word (see “Batch Changing Bits and Words”,
p.79).
195
Error Messages
Appendix B
Error Message
PT memory capacity insufficient.
Corrective Action
(Confirm)
Increase the size of the PT screen memory.
Expand the image memory.
The PT image memory is an EEP-ROM.
In the case of an EEP-ROM or EP-ROM or Flash ROM, delete
data in file units.
units
The PT image memory is an EP-ROM.
Check the combination of PT Type,
Memory Size, and Direct Access settings.
(Confirm)
Items displayed in red in the tool settings cannot be set.
Can’t read file.
(Confirm)
Can’t read screen data.
(Confirm)
Either the disk is faulty, or data has been destroyed. Replace
the disk or delete the files and create them again.
again If there is a
backup disk, use that.
Can’t read or write data.
(Confirm)
Can’t save file.
Input the data directory name in the tool settings correctly, then
try again.
Number of files is max.
(Confirm)
Number of data directory files exceeds max.
The maximum number of files that can be handled by the support tool is 200. Delete unnecessary files (see 3-4 “File Selection Screen” on p.26).
Data this support tool
can’t handle received.
Either the received data is destroyed, or the support tool you are
using is not compatible with the direct connection version of the
data If the same message is displayed even when the latest
data.
support tool is used, create the data again.
ROM data that support tool
can’t handle received.
196
Special Characters
Appendix C
APPENDIX C
Special Characters
English Character Codes
Pin 3 of SW1 must be ON to enable English language messages to use the following codes.
Example
Hex code is represented by 30, decimal code by 48, and character by
0.
Code 20 and 32 in the table represents a space, as indicated by
“SP”.
197
Special Characters
Appendix C
*1
*1
*1
*1
*2
*3
*1 Used as the prefix for library data codes ( 2 bytes).
*2 Used as the prefix for image data codes ( 2 bytes).
*3 Used as the prefix for mark data codes ( 2 bytes).
198
INDEX
A
Alarm . . . . . . . . . . . . . . . . . . . . . . . . . . . . . . . . . . . . 145
Alarm history . . . . . . . . . . . . . . . . . . . . . . . . . . . . . 144
Alarm list . . . . . . . . . . . . . . . . . . . . . . . . . . . . . . . . . 144
Allocated bit . . . . . . . . . . . . . . . . . . . . . . . . . . . . . . . 75
Allocated word . . . . . . . . . . . . . . . . . . . . . . . . . . . . . 75
Alter . . . . . . . . . . . . . . . . . . . . . . . . . . . . . . . . . . . . . 154
Arcs . . . . . . . . . . . . . . . . . . . . . . . . . . . . . . . . . . . . . . 90
Assembly of connecting cables . . . . . . . . . . . . . . 193
Changing orders . . . . . . . . . . . . . . . . . . . . . . . . . . 139
Character input . . . . . . . . . . . . . . . . . . . . . . . . . . 54, 61
Character keys . . . . . . . . . . . . . . . . . . . . . . . . . . . . 108
Character reference . . . . . . . . . . . . . . . . . . . . . . . 162
Character-string displays . . . . . . . . . . . . . . . . . . . . 61
Character-string memory table . . . 40, 98, 143, 177
Character-string memory table setting . . . . . . 44, 70
Character-string setting input fields . . . . . . . . . . . 134
Check box . . . . . . . . . . . . . . . . . . . . . . . . . . . . . . . . . 10
Attribute . . . . . . . . . . . . . . . . . . . . . . . . . . . . . . . . 62, 64
Check on continuous screens/overlapping
screens . . . . . . . . . . . . . . . . . . . . . . . . . . . . . . . . . . . 39
B
Child screen . . . . . . . . . . . . . . . . . . . . . . . . . . . . . . . 38
Back-up . . . . . . . . . . . . . . . . . . . . . . . . . . . . . . . . . . . . 3
Background color . . . . . . . . . . . . . . . . . . . . . . . . . . . 66
Backlight OFF cancelling attribute . . . . . . . . . . . . . 45
Bar cursor . . . . . . . . . . . . . . . . . . . . . . . . . . . . . . . . . 10
Bar graph . . . . . . . . . . . . . . . . . . . . . . . . . . . . 117, 118
Basic color . . . . . . . . . . . . . . . . . . . . . . . . . . . . . . . . 66
Circles . . . . . . . . . . . . . . . . . . . . . . . . . . . . . . . . 90, 168
Clear . . . . . . . . . . . . . . . . . . . . . . . . . . . . . . . . . . . . 163
Clicking . . . . . . . . . . . . . . . . . . . . . . . . . . . . . . . . . . . 12
Clock function . . . . . . . . . . . . . . . . . . . . . . . . . . . . . . 68
Col print . . . . . . . . . . . . . . . . . . . . . . . . . . . . . . 180, 181
Color mode . . . . . . . . . . . . . . . . . . . . . . . . . . . . . . . 166
Batch changing . . . . . . . . . . . . . . . . . . . . . . . . 79, 157
Color specification when the NT model setting
is “30” (NT30) . . . . . . . . . . . . . . . . . . . . . . . . . . . . . . 58
Bit map files . . . . . . . . . . . . . . . . . . . . . . . . . . . . . . 169
Communication mode . . . . . . . . . . . . . . . . . . . 23, 184
Bit memory table . . . . . . . . . . . . . . . . . . . . . . . . . . 144
Communication port . . . . . . . . . . . . . . . . . . . . . . . . 23
Bit memory table setting . . . . . . . . . . . . . . . . . . 47, 72
Communication speed . . . . . . . . . . . . . . . . . . . . . 186
Bits . . . . . . . . . . . . . . . . . . . . . . . . . . . . . . . . . . . 75, 178
Connecting cable . . . . . . . . . . . . . . . . . . . . . . . . . . 185
Boundary color . . . . . . . . . . . . . . . . . . . . . . . . . . . . . 66
Connecting cable specifications . . . . . . . . . . . . . 193
Box cursor . . . . . . . . . . . . . . . . . . . . . . . . . . . . . . . . . 10
Connection to the PT . . . . . . . . . . . . . . . . . . . . . . 184
Box tiling mode . . . . . . . . . . . . . . . . . . . . . . . . . . . . 167
Connector . . . . . . . . . . . . . . . . . . . . . . . . . . . . 193, 194
Brkn line frame disp. . . . . . . . . . . . . . . . . . . . . . . . . 60
Connector hood . . . . . . . . . . . . . . . . . . . . . . . 193, 194
“Brkn-line grph intv” setting . . . . . . . . . . . . . . . . . 127
Continuous screen . . . . . . . . . . . . . . . . . . . . . . . . . . 38
Broken line graph . . . . . . . . . . . . . . . . . . . . . . 117, 123
Control keys . . . . . . . . . . . . . . . . . . . . . . . . . . . . . . 109
Bus mouse . . . . . . . . . . . . . . . . . . . . . . . . . . . . . . . . . 2
Coordinate display . . . . . . . . . . . . . . . . . . . . . . . . . . 52
C
Copy . . . . . . . . . . . . . . . . . . . . . . 27, 35, 77, 152, 162
Cables . . . . . . . . . . . . . . . . . . . . . . . . . . . . . . . . . . . 193
Center of the screen . . . . . . . . . . . . . . . . . . . . . . . . 52
Centering . . . . . . . . . . . . . . . . . . . . . . . . . . . . . . . . 153
Cha ref . . . . . . . . . . . . . . . . . . . . . . . . . . . . . . . . . . . 162
Change comment . . . . . . . . . . . . . . . . . . . . . . . . . . 38
Change file title . . . . . . . . . . . . . . . . . . . . . . . . . . . . 30
Copy setting . . . . . . . . . . . . . . . . . . . . . . . . . . . . . . 110
Creating area . . . . . . . . . . . . . . . . . . . . . . . . . . . . . 161
Cross-hair cursor . . . . . . . . . . . . . . . . . . . . . . . . . . 13
Cup cursor . . . . . . . . . . . . . . . . . . . . . . . . . . . . . . . . 10
Cursor motion . . . . . . . . . . . . . . . . . . . . . . . . . . . . . . 111
Cursors . . . . . . . . . . . . . . . . . . . . . . . . . . . . . . . . . . . 10
199
D
Data communication . . . . . . . . . . . . . . . . . . . . . . . 184
Data communication with P-ROM writer . . . . . . . 30
Data communication with the PT . . . . . . . . . . . . . 182
Data directory . . . . . . . . . . . . . . . . . . . . . . . . . . . . . . 23
DATA IN . . . . . . . . . . . . . . . . . . . . . . . . . . . . . . 131, 134
Decimal . . . . . . . . . . . . . . . . . . . . . . . . . . . . . . . . . . . 64
Environmental settings
(Tool settings for the “Edit” screen) . . . . . . . . . . . . 59
Error messages . . . . . . . . . . . . . . . . . . . . . . . . . . . 195
Exit procedure . . . . . . . . . . . . . . . . . . . . . . . . . . . . . . 9
Extended I/O . . . . . . . . . . . . . . . . . . . . . . . . . . . . . 140
Extended I/O input setting . . . . . . . . . . . . . . . . . . . 45
Extended I/O output setting . . . . . . . . . . . . . . . . . . 46
Delete . . . . . . . . . . . . . . . . . . . . . . . . . . . . . 27, 35, 152
F
Direct . . . . . . . . . . . . . . . . . . . . . . . . . . . . . . . . . . 61, 63
Fans . . . . . . . . . . . . . . . . . . . . . . . . . . . . . . . . . . . . . . 92
Direct Access . . . . . . . . . . . . . . . . . . . . . . . . . . . . . . 22
File . . . . . . . . . . . . . . . . . . . . . . . . . . . . . . . . . . . . . . . 26
Direct connection information . . . . . . . . . . . . . . . . 42
“File list” screen . . . . . . . . . . . . . . . . . . . . . . . . . . . . 26
Direct input . . . . . . . . . . . . . . . . . . . . . . . . . . . . . . . . 75
Fixed displays . . . . . . . . . . . . . . . . . . . . . . . . . . . . . 80
Direct Macn Type . . . . . . . . . . . . . . . . . . . . . . . . . . . 22
Flashing color . . . . . . . . . . . . . . . . . . . . . . . . . . . . . . 67
Direct modification . . . . . . . . . . . . . . . . . . . . . . . . . . 57
Floppy disk drive . . . . . . . . . . . . . . . . . . . . . . . . . . . . 2
DISKCOPY . . . . . . . . . . . . . . . . . . . . . . . . . . . . . . . . . 4
Flsh . . . . . . . . . . . . . . . . . . . . . . . . . . . . . . . . . . . 62, 64
Disp mode . . . . . . . . . . . . . . . . . . . . . . . . . . . . . . . . . 59
FORMAT . . . . . . . . . . . . . . . . . . . . . . . . . . . . . . . . . . . 4
Disp sign . . . . . . . . . . . . . . . . . . . . . . . . . . . . . . . . . . 64
Frame color . . . . . . . . . . . . . . . . . . . . . . . . . . . . 66, 67
Disp type . . . . . . . . . . . . . . . . . . . . . . . . . . . . . . . . . . 64
Function keys . . . . . . . . . . . . . . . . . . . . . . . . . . . . . . . 11
Display . . . . . . . . . . . . . . . . . . . . . . . . . . . . . . . . . . . . . 2
Functions of the support tool . . . . . . . . . . . . . . . . . xvi
Display area . . . . . . . . . . . . . . . . . . . . . . . . . . . . . . 112
G
Display color . . . . . . . . . . . . . . . . . . . . . . . . . . . . . . . 66
Display color for negative value . . . . . . . . . . . . . . . 67
Display color for positive value . . . . . . . . . . . . . . . 67
Display library data . . . . . . . . . . . . . . . . . . . . . . . . 173
Display sequence . . . . . . . . . . . . . . . . . . . . . . . . . . 53
Displaying images . . . . . . . . . . . . . . . . . . . . . . . . . 170
Displaying marks . . . . . . . . . . . . . . . . . . . . . . . . . . 163
DOS . . . . . . . . . . . . . . . . . . . . . . . . . . . . . . . . . . . . . . . 2
Double click . . . . . . . . . . . . . . . . . . . . . . . . . . . . . . . 13
E
Editing . . . . . . . . . . . . . . . . . . . . . . . . . . . . . . . . . . . 150
Editing screen data . . . . . . . . . . . . . . . . . . . . . . . . 150
“Edit” screen . . . . . . . . . . . . . . . . . . . . . . . . . . . . . . . 51
Ellipses . . . . . . . . . . . . . . . . . . . . . . . . . . . . . . . . . . 168
EMS . . . . . . . . . . . . . . . . . . . . . . . . . . . . . . . . . . . . . . . 3
End plate . . . . . . . . . . . . . . . . . . . . . . . . . . . . . . . . . 132
Enlarged display . . . . . . . . . . . . . . . . . . . . . . . . . . 167
Enquiry cursor . . . . . . . . . . . . . . . . . . . . . . . . . . . . . 10
200
Graphs . . . . . . . . . . . . . . . . . . . . . . . . . . . . . . . . . . . 117
Grid . . . . . . . . . . . . . . . . . . . . . . . . . . . . . . . . . . . 52, 59
H
Half-size . . . . . . . . . . . . . . . . . . . . . . . . . . . . . . . . . . 64
Half-size font . . . . . . . . . . . . . . . . . . . . . . . . . . . . . . 62
Hard disk drive . . . . . . . . . . . . . . . . . . . . . . . . . . . . . . 2
Hardware . . . . . . . . . . . . . . . . . . . . . . . . . . . . . . . . . . 2
Hardware combinations . . . . . . . . . . . . . . . . . . . . . . xii
Help messages . . . . . . . . . . . . . . . . . . . . . . . . . . . . 15
Hexadecimal . . . . . . . . . . . . . . . . . . . . . . . . . . . . . . . 64
History . . . . . . . . . . . . . . . . . . . . . . . . . . . . . . . 145, 192
Hspeed . . . . . . . . . . . . . . . . . . . . . . . . . . . . . . . . . . 184
I
IBM DOS . . . . . . . . . . . . . . . . . . . . . . . . . . . . . . . . . . . 2
IBM PC/AT personal computer . . . . . . . . . . . . . . 2, 4
Icon . . . . . . . . . . . . . . . . . . . . . . . . . . . . . . . . . . . . . . 12
Image & Lib . . . . . . . . . . . . . . . . . . . . . . . 142, 165, 171
LOUPE . . . . . . . . . . . . . . . . . . . . . . . . . . . . . . . . . . 167
Image creation . . . . . . . . . . . . . . . . . . . . . . . . . . . . 165
M
Image editing screen . . . . . . . . . . . . . . . . . . . . . . . 166
Image/library # disp. . . . . . . . . . . . . . . . . . . . . . . . . 60
Image/library lamp . . . . . . . . . . . . . . . . . . . . . . . . . 102
Images . . . . . . . . . . . . . . . . . . . . . . . . . . . . . . . 141, 164
Imitat . . . . . . . . . . . . . . . . . . . . . . . . . . . . . . . . . . . . 180
In frm . . . . . . . . . . . . . . . . . . . . . . . . . . . . . . . . . . . . 150
Increment copy . . . . . . . . . . . . . . . . . . . . . . . . . . . . 77
Indrct . . . . . . . . . . . . . . . . . . . . . . . . . . . . . . . . . . 61, 63
Initial editing screen . . . . . . . . . . . . . . . . . . . . . . . . . 51
Input keys . . . . . . . . . . . . . . . . . . . . . . . . . . . . . . . . 106
Input settings . . . . . . . . . . . . . . . . . . . . . . . . . . . . . 128
Inputting image and library data . . . . . . . . . . . . . 141
Inputting marks . . . . . . . . . . . . . . . . . . . . . . . . . . . . . 82
INSTALL . . . . . . . . . . . . . . . . . . . . . . . . . . . . . . . . . . . 4
Installation method . . . . . . . . . . . . . . . . . . . . . . . . . . 4
Integer . . . . . . . . . . . . . . . . . . . . . . . . . . . . . . . . . . . . 64
Inv. . . . . . . . . . . . . . . . . . . . . . . . . . . . . . . . . 62, 64, 163
K
Key input prompt cursor . . . . . . . . . . . . . . . . . . . . . 10
Keyboard display . . . . . . . . . . . . . . . . . . . . . . . . . . 135
L
Main menu . . . . . . . . . . . . . . . . . . . . . . . . . . . . . . 8, 21
Mark creation . . . . . . . . . . . . . . . . . . . . . . . . . . . . . . 39
Mark creation screen . . . . . . . . . . . . . . . . . . . . . . . 160
Mark reference . . . . . . . . . . . . . . . . . . . . . . . . . . . . 162
Marks . . . . . . . . . . . . . . . . . . . . . . . . . . . . . . . . . 82, 160
Memory size . . . . . . . . . . . . . . . . . . . . . . . . . . . . . . . 22
Memory Table # Disp. . . . . . . . . . . . . . . . . . . . . . . . 60
Menu box . . . . . . . . . . . . . . . . . . . . . . . . . . . . . . . . . 51
Menu Tree . . . . . . . . . . . . . . . . . . . . . . . . . . . . . . . . . xvii
“−” range in frame . . . . . . . . . . . . . . . . . . . . . . . . . . 67
Mk Ref . . . . . . . . . . . . . . . . . . . . . . . . . . . . . . . . . . . 162
Monochrome with 8 grayscale levels . . . . . . . . . 177
Mouse . . . . . . . . . . . . . . . . . . . . . . . . . . . . . . . . . . 2, 23
Mouse cursor . . . . . . . . . . . . . . . . . . . . . . . . . . . . . . 10
Move . . . . . . . . . . . . . . . . . . . . . . . . . . . . . . . . . . . . 152
Moving the cursor . . . . . . . . . . . . . . . . . . . . . . . . . . 54
N
Next function keys . . . . . . . . . . . . . . . . . . . . . . . 30, 39
Norm . . . . . . . . . . . . . . . . . . . . . . . . . . . . . . . . . . 62, 64
Normal . . . . . . . . . . . . . . . . . . . . . . . . . . . . . . . . . . . . 64
Normal font . . . . . . . . . . . . . . . . . . . . . . . . . . . . . . . . 62
Lamp bit . . . . . . . . . . . . . . . . . . . . . . . . . . . . . . . . . 107
Normal lamps . . . . . . . . . . . . . . . . . . . . . . . . . . . . . 100
Lamp/TouchSw # disp. . . . . . . . . . . . . . . . . . . . . . . 60
Notify bit . . . . . . . . . . . . . . . . . . . . . . . . . . . . . . 45, 107
Lamp/TSW disp mode . . . . . . . . . . . . . . . . . . . . . . . 60
NT20M/NT20S enlrgd disp . . . . . . . . . . . . . . . . . . . 60
Lamps . . . . . . . . . . . . . . . . . . . . . . . . . . . . . . . . . . . 100
Numeral displays . . . . . . . . . . . . . . . . . . . . . . . . . . . 96
Left clicking . . . . . . . . . . . . . . . . . . . . . . . . . . . . . . . . 12
Numeral memory table settings . . . . . . . . . . . . . . . 44
Left mouse button . . . . . . . . . . . . . . . . . . . . . . . . . . 12
Numeral memory tables . . . . . 40, 96, 117, 143, 178
Length . . . . . . . . . . . . . . . . . . . . . . . . . . . . . . . . . . . . 62
Numeral setting input fields . . . . . . . . . . . . . . . . . 131
Library data . . . . . . . . . . . . . . . . . . . . . . . . . . . 141, 171
Numeric keys . . . . . . . . . . . . . . . . . . . . . . 45, 128, 136
Library data creation . . . . . . . . . . . . . . . . . . . . . . . 171
Numeric value/character-string input . . . . . . . . . . 54
Library editing screen . . . . . . . . . . . . . . . . . . . . . . 172
O
Lines . . . . . . . . . . . . . . . . . . . . . . . . . . . . . . . . . . . . 168
List . . . . . . . . . . . . . . . . . . . . . . . . . . . . . . . . . . . . . . 145
Lit color . . . . . . . . . . . . . . . . . . . . . . . . . . . . . . . . . . . 66
Locus . . . . . . . . . . . . . . . . . . . . . . . . . . . . . . . . . . . . 168
Locus mode . . . . . . . . . . . . . . . . . . . . . . . . . . . . . . 167
OMRON product references . . . . . . . . . . . . . . . . . . vi
On frm . . . . . . . . . . . . . . . . . . . . . . . . . . . . . . . . . . . 150
Organization of the manual . . . . . . . . . . . . . . . . . . . xi
Overlapping screen . . . . . . . . . . . . . . . . . . . . . . . . . 38
201
P
Parent screen . . . . . . . . . . . . . . . . . . . . . . . . . . . . . . 38
“+” range in frame . . . . . . . . . . . . . . . . . . . . . . . . . . 67
Points . . . . . . . . . . . . . . . . . . . . . . . . . . . . . . . . . . . . 168
Polygons . . . . . . . . . . . . . . . . . . . . . . . . . . . . . . . . . . 88
Polylines . . . . . . . . . . . . . . . . . . . . . . . . . . . . . . . . . . 84
Previous function keys . . . . . . . . . . . . . . . . . . . 30, 41
Print . . . . . . . . . . . . . . . . . . . . . . . . . 2, 23, 28, 35, 176
Print cross-references . . . . . . . . . . . . . . . . . . . . . . 178
Print direct access info. . . . . . . . . . . . . . . . . . . . . . 179
Print display history file . . . . . . . . . . . . . . . . . . . . . 179
Print file list . . . . . . . . . . . . . . . . . . . . . . . . . . . . . . . 178
Print image/library list . . . . . . . . . . . . . . . . . . . . . . 179
Print mark list . . . . . . . . . . . . . . . . . . . . . . . . . . . . . 179
Print screen list . . . . . . . . . . . . . . . . . . . . . . . . . . . . 178
Print screen setting . . . . . . . . . . . . . . . . . . . . 112, 178
Procedure for data communication . . . . . . . . . . . 187
PT status control area . . . . . . . . . . . . . . . . . . . . . . . 43
PT status notify area . . . . . . . . . . . . . . . . . . . . . . . . 43
PT type . . . . . . . . . . . . . . . . . . . . . . . . . . . . . . . . . . . 22
Ptot color . . . . . . . . . . . . . . . . . . . . . . . . . . . . . . . . . . 66
Q
Quitting after saving the data . . . . . . . . . . . . . . . . . 52
Quitting without saving data . . . . . . . . . . . . . . . . . . 52
R
Ref way . . . . . . . . . . . . . . . . . . . . . . . . . . . . . . . . 61, 63
Reference area . . . . . . . . . . . . . . . . . . . . . . . . . . . 161
Reference input . . . . . . . . . . . . . . . . . . . . . . . . . . . . 76
Right clicking . . . . . . . . . . . . . . . . . . . . . . . . . . . . . . 12
Right mouse button . . . . . . . . . . . . . . . . . . . . . . . . . 12
Rotation . . . . . . . . . . . . . . . . . . . . . . . . . . . . . . . . . . 156
RS-232C connecting cable . . . . . . . . . . . . . . . . 3, 184
S
Safety precautions . . . . . . . . . . . . . . . . . . . . . . . . . . . . v
Save . . . . . . . . . . . . . . . . . . . . . . . . . . . . . . . . . . . . . 163
Scale . . . . . . . . . . . . . . . . . . . . . . . . . . . . . . . . . . 62, 64
Screen applicability . . . . . . . . . . . . . . . . . . . . . . . . . 34
Screen attributes . . . . . . . . . . . . . . . . . . . . . . . . . . . 36
Screen number . . . . . . . . . . . . . . . . . . . . . . . . . . 32, 34
Screen range . . . . . . . . . . . . . . . . . . . . . . . . . . . . . . 52
Screen status, attribute . . . . . . . . . . . . . . . . . . . . . . 32
Screen switching . . . . . . . . . . . . . . . . . . . 45, 108, 140
Scr image . . . . . . . . . . . . . . . . . . . . . . . . . . . . . . . . 180
“Scr list” screen . . . . . . . . . . . . . . . . . . . . . . . . . . . . 31
Scrol keys . . . . . . . . . . . . . . . . . . . . . . . . . . . . . . . . 148
Scrolling . . . . . . . . . . . . . . . . . . . . . . . . . . . . . . . . . . 55
Searching . . . . . . . . . . . . . . . . . . . . . . . . . . . . . . . . . 78
Selecting numbers and codes . . . . . . . . . . . . . . . . 16
Selecting options . . . . . . . . . . . . . . . . . . . . . . . . . . . . 11
Send data to the PT . . . . . . . . . . . . . . . . . . . . . . . . 28
Sensitive area . . . . . . . . . . . . . . . . . . . . . . . . . . . . . 112
RCopy . . . . . . . . . . . . . . . . . . . . . . . . . . . . . . . . . . . 162
Serial mouse . . . . . . . . . . . . . . . . . . . . . . . . . . . . . . . . 2
Re-input . . . . . . . . . . . . . . . . . . . . . . . . . . . . . . . . . . . 54
Set . . . . . . . . . . . . . . . . . . . . . . . . . . . . . . . . . . . . . . 163
Re-input into fields that have inputs . . . . . . . . . . . 54
Setting character/character-string displays . . . . . 61
Read . . . . . . . . . . . . . . . . . . . . . . . . . . . . . . . . . . . . . 36
Setting numeral displays . . . . . . . . . . . . . . . . . . . . . 63
READ FIL . . . . . . . . . . . . . . . . . . . . . . . . . . . . . . . . 169
Setting numeral memory tables . . . . . . . . . . . . . . . 68
READ SCR . . . . . . . . . . . . . . . . . . . . . . . . . . . . . . . 173
Setting screen switching functions . . . . . . . . . . . . 73
Reading from existing screen data . . . . . . . . . . . 173
Setting the alarm list/history function . . . . . . . . . . 74
Receive data from the PT . . . . . . . . . . . . . . . . . . . . 28
Setting words and bits . . . . . . . . . . . . . . . . . . . . . . . 75
Receive display history registration data . . . . . . . 28
Sheet feeder . . . . . . . . . . . . . . . . . . . . . . . . . . . . . . . 23
Reception of display history records . . . . . . . . . . 192
Shifting display fields . . . . . . . . . . . . . . . . . . . . . . . . 56
Recommended environment . . . . . . . . . . . . . . . . . . 3
Shortcut keys . . . . . . . . . . . . . . . . . . . . . . . . . . . . . . 55
Redisplaying a screen . . . . . . . . . . . . . . . . . . . . . . . 57
Simple . . . . . . . . . . . . . . . . . . . . . . . . . . . . . . . . . . . 151
Ref table . . . . . . . . . . . . . . . . . . . . . . . . . . . . . . . 62, 64
Size . . . . . . . . . . . . . . . . . . . . . . . . . . . . . . . . . . . 62, 64
202
Sizes of images . . . . . . . . . . . . . . . . . . . . . . . . . . . 164
Skipping parameter input . . . . . . . . . . . . . . . . . . . . 55
Smoothing . . . . . . . . . . . . . . . . . . . . . . . . . . . . . . 62, 64
Snap ON fun. . . . . . . . . . . . . . . . . . . . . . . . . . . . . . . 59
Software . . . . . . . . . . . . . . . . . . . . . . . . . . . . . . . . . . . 2
U
USER TKEY . . . . . . . . . . . . . . . . . . . . . . . . . . . . . . 136
Using the marking function . . . . . . . . . . . . . . . . . . . 34
Using the mouse . . . . . . . . . . . . . . . . . . . . . . . . . . . 12
Specifiable tool settings . . . . . . . . . . . . . . . . . . . . . xiv
W
Spot . . . . . . . . . . . . . . . . . . . . . . . . . . . . . . . . . . . 62, 64
Warning . . . . . . . . . . . . . . . . . . . . . . . . . . . . . . . . . . . . . v
Squares . . . . . . . . . . . . . . . . . . . . . . . . . . . . . . . 86, 168
What is a “character-string setting”? . . . . . . . . . . 129
Standalone . . . . . . . . . . . . . . . . . . . . . . . . . . . . . . . 149
What is a “Numeral setting”? . . . . . . . . . . . . . . . . 128
Start-up procedure . . . . . . . . . . . . . . . . . . . . . . . . . . . 8
Wide . . . . . . . . . . . . . . . . . . . . . . . . . . . . . . . . . . . 62, 64
Stndrd . . . . . . . . . . . . . . . . . . . . . . . . . . . . . . . . . . . 186
Window keys . . . . . . . . . . . . . . . . . . . . . . . . . . . . . 109
STR DISP . . . . . . . . . . . . . . . . . . . . . . . . . . . . . . . . . 98
Window screen . . . . . . . . . . . . . . . . . . . . . . . . . . . . 129
STR IN . . . . . . . . . . . . . . . . . . . . . . . . . . . . . . . . 81, 134
Windows displays . . . . . . . . . . . . . . . . . . . . . . . . . 135
System memory . . . . . . . . . . . . . . . . . . . . . . . . . . . . 28
Wiring . . . . . . . . . . . . . . . . . . . . . . . . . . . . . . . . . . . 193
T
Words . . . . . . . . . . . . . . . . . . . . . . . . . . . . . . . . . . . . 75
TBL EDIT . . . . . . . . . . . . . . . . . . . . . . . . . . . . . . . . 143
Temporary input fields . . . . . . . . . . . . . . . . . . . . . . 130
Things that can be done using the data printing
function . . . . . . . . . . . . . . . . . . . . . . . . . . . . . . . . . . 176
Thumbwheel . . . . . . . . . . . . . . . . . . . . . . . . . . . . . . 128
Work directory . . . . . . . . . . . . . . . . . . . . . . . . . . . . . 23
Write-protected . . . . . . . . . . . . . . . . . . . . . . . . . . . . . . 3
Z
Zero Sup. . . . . . . . . . . . . . . . . . . . . . . . . . . . . . . . . . 64
Tiling . . . . . . . . . . . . . . . . . . . . . . . . . . . . . . . . . . . . . 93
Tiling pattern . . . . . . . . . . . . . . . . . . . . . . . . . . . . . . . 93
Time setting . . . . . . . . . . . . . . . . . . . . . . . . . . . . . . . 25
Time taken to transfer . . . . . . . . . . . . . . . . . . . . . . 186
Tmx. . . . . . . . . . . . . . . . . . . . . . . . . . . . . . . 28, 188, 189
Tool interface . . . . . . . . . . . . . . . . . . . . . . . . . . . . . 184
Tool interface connector specifications . . . . . . . . 193
Tool settings . . . . . . . . . . . . . . . . . . . . . . . . . . . . xiv, 28
“Tool settings” screen . . . . . . . . . . . . . . . . . . . . . . . 22
Tool settings when communicating
with an NT20S or NT600S . . . . . . . . . . . . . . . . . . 186
TOUCH SW . . . . . . . . . . . . . . . . . . . . . . . . . . . . . . 113
Touch switch elements . . . . . . . . . . . . . . . . . . . . . 105
Touch switches . . . . . . . . . . . . . . . . . . . . . . . . . . . . 105
Transmit mode . . . . . . . . . . . 188, 189, 190, 191, 192
Transparent color . . . . . . . . . . . . . . . . . . . . . . . . . . . 66
Trend graph . . . . . . . . . . . . . . . . . . . . . . . . . . 117, 120
Typ Sel . . . . . . . . . . . . . . . . . . . . . . . . . . . . . . . . . . . 24
Types of data communication . . . . . . . . . . . . . . . 187
203
Revision History
A manual revision code appears as a suffix to the catalog number on the front cover of the manual.
Cat. No. V028-E1-1
Revision code
The following table outlines the changes made to the manual during each revision. Page numbers refer to the
previous version.
Revision code
1
204
Date
July 1995
Revised content
Original production
OMRON CORPORATION
PT Business Promotion Department
FA Division H.Q.
Yokohama Business Park
134 Godo-cho, Hodogaya-ku, Yokohama-shi
Kanagawa 240 Japan
Tel: (81)45−336−6209/Fax: (81)45−336−6239
Regional Headquarters
OMRON EUROPE B.V.
Wegalaan 69, NL−2132 JD Hoofddorp
The Netherlands
Tel: (31)2503−81−300/Fax: (31)2503−81−388
OMRON ELECTRONICS, INC.
1 East Commerce Drive, Schaumburg, IL 60173
U.S.A.
Tel: (1)708−843−7900/Fax: (1)708−843−8568
OMRON MANAGEMENT CENTRE OF ASIAPACIFIC PTE LTD.
510 Thomson Road #13−03
SLF Bldg.
1129 Singapore
Tel: (65)353−2611/Fax: (65)353−5391
Authorized Distributor:
Cat No. V028-E1-1
Note: Specifications subject to change without notice.
Printed in Japan
0795-1.5M (0795)