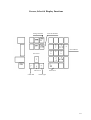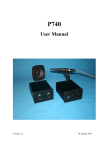
1
P630
User Manual
Version 1.1-b
1 November 2006
SAFETY PRECAUTIONS
The following general safety precautions must be observed during all phases of operation,
service, and repair of this instrument. Failure to comply with these precautions or with specific
warning elsewhere in this manual violates safety standards of design, manufacture, and intended
use of the instrument. K&K International assumes no liability for the customer's failure to
comply with these requirements.
GROUND THE INSTRUMENT
To minimise shock hazard, the instrument chassis and cabinet must be connected to an electrical
ground. The instrument is equipped with a tree-conductor ac power cable. The power cable must
either be plugged into an approved tree-contact electrical outlet or used with a three-contact to
two-contact adapter with the grounding wire (green) firmly connected to an electrical ground
(safety ground) at the power outlet. The power jack and mating plug of the power cable meet
International Electro-technical Commission (IEC) safety standards.
DO NOT OPERATE IN AN EXPLOSIVE ATMOSPHERE
Do not operate the instrument in the presence of flammable gases or fumes. Operation of any
electrical instrument in such environment constitutes a definite safety hazard.
KEEP AWAY FROM LIVE CIRCUITS
Operating personnel must not remove instrument covers. Component replacement and internal
adjustments must be made by qualified maintenance personal only. Do not replace components
with power cable connected. To avoid injuries, always disconnect power and discharge circuits
before touching them.
DO NOT SERVICE OR ADJUST ALONE
Do not attempt internal service or adjustment unless another person, capable of rendering first
aid and resuscitation, is present.
DO NOT SUBSTITUTE PARTS OR MODIFY INSTRUMENT
Because of the danger of introducing additional hazards, do not install substitute parts or
perform any unauthorised modification to the instrument. Contact a K&K International Sales
and Service Office for service and repair to ensure that safety features are maintained.
WARNING
TO HELP MINIMISE THE POSSIBLE OF ELECTRICAL
FIRE OR SHOCK HAZARDS, DO NOT EXPOSE THIS
INSTRUMENT TO RAIN OR EXCESSIVE MOISTURE
K&K International ApS
CONTENTS
Volume 1
Introduction................................................................................................................................ 9
Hardware Concept.......................................................................................................... 9
PC Cards ........................................................................................................................ 10
Software Concept ........................................................................................................... 13
Global setup: ...................................................................................................... 13
Setup mode:........................................................................................................ 14
Utility functions: ................................................................................................ 17
Process Statistical Data.................................................................................................... 17
Copy Reference Data ....................................................................................................... 17
Convert, Export and Import Data .................................................................................... 17
Match Stored Data (optional) .......................................................................................... 17
Log Manager.................................................................................................................... 18
Run mode: .......................................................................................................... 18
Installation ................................................................................................................................. 19
P600 Hardware............................................................................................................... 19
P600 Cabinet ...................................................................................................... 19
Connections........................................................................................................ 20
P630 PC Boards ................................................................................................. 23
P600 - PC Cabling.............................................................................................. 23
External key box ............................................................................................................ 23
External foot contact single (or optionally dual) ........................................................... 23
Software installation, Win2000/XP ............................................................................... 25
Install files .......................................................................................................... 25
The Alt4-hw.cfg file........................................................................................... 25
[The ALT4.KEY file]......................................................................................... 26
[The ALT4-M.KEY file].................................................................................... 27
[The ALT4-U.KEY file] .................................................................................... 27
[The ALT4.ID file]............................................................................................. 27
Software User Section ............................................................................................................... 29
Main Menu................................................................................................................................. 29
Pw. Mgr...................................................................................................................................... 30
New password ................................................................................................................ 31
Edit password................................................................................................................. 31
Delete password ............................................................................................................. 32
Disable password ........................................................................................................... 32
New Master Code........................................................................................................... 32
Spl Menu.................................................................................................................................... 32
Global Menu .............................................................................................................................. 33
Control ........................................................................................................................... 33
Start Control ....................................................................................................... 33
Cancel Record .................................................................................................... 34
Multiplex ............................................................................................................ 34
Repeat By Reject................................................................................................ 34
Chain .............................................................................................................................. 34
Path................................................................................................................................. 34
Display Graph ................................................................................................................ 35
Sound Beep .................................................................................................................... 35
User key’s ...................................................................................................................... 35
1
Store ............................................................................................................................... 35
Data .................................................................................................................... 35
Results ................................................................................................................ 36
Screen............................................................................................................................. 36
Graphics Scale................................................................................................................ 36
Print (optional) ............................................................................................................... 37
Gain Adjustment ............................................................................................................ 37
External Amplifier ......................................................................................................... 37
Output................................................................................................................. 37
Rs Out................................................................................................................. 37
Setup............................................................................................................................... 39
Type................................................................................................................................ 41
Name .................................................................................................................. 41
Description ......................................................................................................... 41
Chain .................................................................................................................. 41
Help File ............................................................................................................. 41
3-Limit................................................................................................................ 41
Status .................................................................................................................. 41
I/O .................................................................................................................................. 41
Auto Save ....................................................................................................................... 42
Data App............................................................................................................. 42
Data Rej.............................................................................................................. 42
Results ................................................................................................................ 42
Sweep ............................................................................................................................. 42
Start .................................................................................................................... 42
Stop..................................................................................................................... 42
Reverse ............................................................................................................... 42
Delay .................................................................................................................. 42
Points .................................................................................................................. 42
Time.................................................................................................................... 43
Output............................................................................................................................. 43
Output................................................................................................................. 43
Volt..................................................................................................................... 43
dB ....................................................................................................................... 43
Polarity Test ................................................................................................................... 43
On ....................................................................................................................... 43
Negative.............................................................................................................. 43
Pulse Time.......................................................................................................... 43
After.................................................................................................................... 43
Sensitivity Test............................................................................................................... 43
Move................................................................................................................... 44
Hz ....................................................................................................................... 44
Compress........................................................................................................................ 44
Range.................................................................................................................. 44
Reference Channel ............................................................................................. 44
Loudness ........................................................................................................................ 44
Form ................................................................................................................... 44
Test ..................................................................................................................... 44
Input ............................................................................................................................... 45
Status .................................................................................................................. 45
Mux .................................................................................................................... 45
2
Detector .............................................................................................................. 45
Gain .................................................................................................................... 45
Smoothing .......................................................................................................... 45
Filter ............................................................................................................................... 45
Type.................................................................................................................... 46
Har. (Harmonics)................................................................................................ 46
Freq/Bw (Frequency / Bandwidth)..................................................................... 46
Gain .................................................................................................................... 46
Display ............................................................................................................... 46
Limit ................................................................................................................... 47
Reference ....................................................................................................................... 49
Measure .............................................................................................................. 49
Include................................................................................................................ 49
Reset ................................................................................................................... 50
Edit ..................................................................................................................... 50
Compensate ........................................................................................................ 50
Master Comp ...................................................................................................... 50
Make M-Comp ................................................................................................... 50
Out Compress..................................................................................................... 51
Delete & exit .................................................................................................................. 51
Delete Reference Data........................................................................................ 51
Delete Compensation Curve............................................................................... 51
Delete Compress Output Curve.......................................................................... 51
Delete Master Curve .......................................................................................... 51
Delete Master Compensation Curve .................................................................. 52
Delete Best Fit Curve ......................................................................................... 52
Save & exit..................................................................................................................... 52
Save as Reference Curve.................................................................................... 52
Save as Compensation Curve............................................................................. 52
Save as Master Curve......................................................................................... 52
Save as Best Fit Curve ....................................................................................... 52
Reference submenu.................................................................................................................... 53
Edit mode ....................................................................................................................... 53
Left Arrow.......................................................................................................... 53
Right Arrow........................................................................................................ 53
Up Arrow............................................................................................................ 53
Down Arrow....................................................................................................... 53
Fast Cursor ......................................................................................................... 54
Page Up .............................................................................................................. 54
Page Down ......................................................................................................... 54
Change Channel ................................................................................................. 54
Show Hidden curves........................................................................................... 54
Write point left ................................................................................................... 54
Write point right ................................................................................................. 54
Write point up..................................................................................................... 54
Write point down................................................................................................ 54
Move curve up.................................................................................................... 54
Move curve down............................................................................................... 54
Point to Point straight line.................................................................................. 55
Curve Convert Menu.......................................................................................... 55
Scale Window Menu .......................................................................................... 55
3
Tolerance Curve Menu....................................................................................... 55
Power On / Off ................................................................................................... 55
Resonance test menu .......................................................................................... 55
Gain adjust menu................................................................................................ 55
Polarity Window menu....................................................................................... 55
Frequency average menu.................................................................................... 55
Sensitivity average menu ................................................................................... 55
Spectrum............................................................................................................. 55
Move part left ..................................................................................................... 56
Move part right................................................................................................... 56
Reset lower limit ................................................................................................ 56
Reset Limit ......................................................................................................... 56
Center reference limits ....................................................................................... 56
Print .................................................................................................................... 56
Print Setup .......................................................................................................... 56
Curve convert menu ....................................................................................................... 57
Upper -> Data..................................................................................................... 57
Lower -> Data .................................................................................................... 57
Data -> Upper..................................................................................................... 57
Data -> Lower .................................................................................................... 57
Data – Upper -> Data ......................................................................................... 57
Data – Lower -> Data......................................................................................... 58
Upper – Data -> Data ......................................................................................... 58
Lower – Data -> Data......................................................................................... 58
Print .................................................................................................................... 58
Print Setup .......................................................................................................... 58
Scale window menu ....................................................................................................... 59
Range Up............................................................................................................ 59
Range Down ....................................................................................................... 59
Window Up ........................................................................................................ 59
Window Down ................................................................................................... 59
Print .................................................................................................................... 60
Print Setup .......................................................................................................... 60
Tolerance curve menu .................................................................................................... 61
Add ..................................................................................................................... 61
Add2 ................................................................................................................... 62
Add3 ................................................................................................................... 62
Load.................................................................................................................... 62
Save .................................................................................................................... 62
Delete.................................................................................................................. 62
Print .................................................................................................................... 62
Print Setup .......................................................................................................... 62
Resonance test menu ...................................................................................................... 63
Low Limit........................................................................................................... 63
High Limit .......................................................................................................... 63
Reset Limits........................................................................................................ 64
F-Set ................................................................................................................... 64
Q-Set................................................................................................................... 64
Print .................................................................................................................... 65
Print Setup .......................................................................................................... 65
Gain adjust menu............................................................................................................ 67
4
New Value.......................................................................................................... 67
Reset Value ........................................................................................................ 68
Move Data .......................................................................................................... 68
Reset Move (Default) ......................................................................................... 68
Print .................................................................................................................... 68
Print Setup .......................................................................................................... 68
Polarity window menu ................................................................................................... 69
Low Mark........................................................................................................... 69
High Mark .......................................................................................................... 70
Reset Makers ...................................................................................................... 70
Print .................................................................................................................... 70
Print Setup .......................................................................................................... 70
Frequency average menu ............................................................................................... 71
Low Mark........................................................................................................... 71
High Mark .......................................................................................................... 72
Reset Makers ...................................................................................................... 72
Include................................................................................................................ 72
Group.................................................................................................................. 72
Limit ................................................................................................................... 72
Print .................................................................................................................... 73
Print Setup .......................................................................................................... 73
Spectrum ........................................................................................................................ 75
On / Off .............................................................................................................. 75
Down / Up .......................................................................................................... 75
Coarse................................................................................................................. 75
Print .................................................................................................................... 75
Exit ..................................................................................................................... 75
Run Speaker Tests ..................................................................................................................... 77
Run 1 .............................................................................................................................. 78
Run 2 .............................................................................................................................. 78
View ............................................................................................................................... 78
Exit View ....................................................................................................................... 78
Cursor............................................................................................................................. 79
First ................................................................................................................................ 79
Last................................................................................................................................. 79
Reset............................................................................................................................... 79
Delete ............................................................................................................................. 79
Stat A.............................................................................................................................. 79
Stat B.............................................................................................................................. 79
Number........................................................................................................................... 79
U-code ............................................................................................................................ 79
Cursor Submenu................................................................................................. 81
Zoom +............................................................................................................................. 81
Zoom – ............................................................................................................................. 81
Power + ............................................................................................................................ 81
Power - ............................................................................................................................. 81
Calibrate........................................................................................................................... 81
Display Hide Off.............................................................................................................. 82
Display Hide On .............................................................................................................. 82
Move Fast ........................................................................................................................ 82
Move Normal ................................................................................................................... 82
5
Key “+” ............................................................................................................................ 82
Key “←” .......................................................................................................................... 82
Key “→” .......................................................................................................................... 82
Key “↑” ............................................................................................................................ 82
Key “↓” ............................................................................................................................ 82
Print.................................................................................................................................. 82
Print Setup........................................................................................................................ 82
Statistics ......................................................................................................................... 83
Stat A -Varians & Collation ............................................................................... 83
First .................................................................................................................................. 83
Last................................................................................................................................... 84
Print.................................................................................................................................. 84
Print Setup........................................................................................................................ 84
Stat B - Results & Distribution .......................................................................... 85
Print.................................................................................................................................. 85
Print Setup........................................................................................................................ 85
Utilities....................................................................................................................................... 87
Process Statistical Data Utility....................................................................................... 89
Process Selected Type ........................................................................................ 90
Process & Extract found Type to a File ............................................................. 90
Process & Extract & Delete found Type ............................................................ 90
Copy & Delete selected type to a File................................................................ 90
Delete selected Type from Statistical File.......................................................... 90
Number selection................................................................................................ 91
Date selection. .................................................................................................... 91
Code selection (optional). .................................................................................. 91
Test results.......................................................................................................... 91
User test. (Optional) ........................................................................................... 92
Select field.......................................................................................................... 92
Manual mode...................................................................................................... 93
Include.............................................................................................................................. 94
Skip .................................................................................................................................. 94
Back ................................................................................................................................. 94
Continue ........................................................................................................................... 94
Results.............................................................................................................................. 94
Print.................................................................................................................................. 95
Print Setup........................................................................................................................ 95
Automatic mode. ................................................................................................ 95
Continue ........................................................................................................................... 97
Print.................................................................................................................................. 97
Print Setup........................................................................................................................ 97
Continue ............................................................................................................. 98
Limit................................................................................................................................. 98
Stat ................................................................................................................................... 98
Print.................................................................................................................................. 98
Print Setup........................................................................................................................ 98
Statistical mode 1 ............................................................................................... 99
Data .................................................................................................................................. 99
Cursor............................................................................................................................... 99
Save.................................................................................................................................. 99
6
Select................................................................................................................................ 99
Find .................................................................................................................................. 100
Submenus: .......................................................................................................... 100
Select................................................................................................................................ 100
Find .................................................................................................................................. 100
Statistical mode 2 ............................................................................................... 102
Fast................................................................................................................................... 102
Normal ............................................................................................................................. 102
Zoom In............................................................................................................................ 102
Zoom Out ......................................................................................................................... 102
Replace............................................................................................................................. 102
M-Start ............................................................................................................................. 102
M-End .............................................................................................................................. 103
M-Reset............................................................................................................................ 103
Print.................................................................................................................................. 103
Print Setup........................................................................................................................ 103
Convert Statistical Data...................................................................................... 105
Copy Reference Data ..................................................................................................... 109
List Reference Types.......................................................................................... 109
List Types in DBS files ...................................................................................... 110
Copy Reference to Floppy or Disk..................................................................... 111
Copy from Floppy or Disk to Reference............................................................ 111
Rename Reference Types................................................................................... 113
Delete Reference Types ..................................................................................... 113
Export Reference Data ................................................................................................... 115
Selected .............................................................................................................. 115
All....................................................................................................................... 115
Line length Standard .......................................................................................... 116
Line Length Limited........................................................................................... 116
Import Reference Data ................................................................................................... 117
Log Manager .................................................................................................................. 119
Restore................................................................................................................ 120
Clean Up............................................................................................................. 120
Match Stored Data (optional)......................................................................................... 123
Save NotFound base to file ................................................................................ 123
Restore NotFound base from File ...................................................................... 124
Append data to NotFound base .......................................................................... 124
Reset NotFound base.......................................................................................... 125
List NotFound database...................................................................................... 125
Match Data Processing....................................................................................... 126
Significant frequency ....................................................................................................... 127
Acceptance level .............................................................................................................. 127
Span limit ......................................................................................................................... 127
Save Parameters ............................................................................................................... 128
Include Notfound ............................................................................................................. 128
Continue........................................................................................................................... 128
Log Utility.................................................................................................................................. 129
Restore ........................................................................................................................... 130
Clean up ......................................................................................................................... 130
Delete Log...................................................................................................................... 131
Appendix A................................................................................................................................ 133
7
Cursor, Select & Display Functions............................................................................... 137
Write curve and pixel functions ..................................................................................... 141
Appendix B ................................................................................................................................ 147
Functions changed added from version 1.0 to 1.1 ........................................................... 147
8
Introduction
The P630 is a test system designed to work in a production environment.
With a computer and a test box/chamber with measuring microphone(s) it is a complete
workstation for objective production testing of loudspeaker units and systems. It is also the right
solution for test of other transducers like microphones, headphones and telephone handsets.
The P630 system can test all currently tested parameters and is prepared for future needs:
•
•
•
•
•
•
•
•
Frequency Response / Average
Efficiency / Sensitivity
Loudness
Polarity
Rub & Buzz / Distortion / THD
Impedance / Resonance
Qms / Qts
F (fres / q)
The system consists of P600 hardware and the P630 software. All tests are performed
simultaneously, extremely fast and reliable and can be stored locally or on a network for later
analyze. The system makes use of a swept sinus. For the analysis of noise and distortion the
system utilizes filters, which ensures very fast response time. The input to the system is
microphone response signals. For microphone measurements, P630 have a built-in compressor
function. All analysis and graphical presentation is done by software to both assure fast
processing, fast graphic presentation and flexibility. The software consists of a run mode for
relatively unskilled day-to-day production testing, and a setup mode for set-up of test parameters
etc. The technical mode is protected by password.
NOTE: The P600 box or P500 box can be used as a part of the P630 hardware.
Hardware Concept
The system hardware consists of a standard industrial 19" Rack with standard sized modules,
which easily can be plugged in/out. This allows a very flexible, serviceable and adaptable
construction, built not only for the present but also for the future, as the customer very easily can
construct or reconstruct the system to meet his actual demands.
The system hardware is prepared for up to six individual microphone input modules, for all kind
of purposes and/or placement of test microphones. The system embodies an input multiplexer.
This adds up to that it is the software, not the hardware, which connects the microphones to the
personal computer, ensuring a high flexibility.
By installing an optional internal microphone power supply module it is possible to mix all kinds
of suitable microphones (B&K measuring microphone, Phantom coupled, Electré etc.).
There are as standard two individual outputs, connected to one internal power amplifier, which
can be selected freely by the software. Impedance measurements are performed using an internal
9
series resistor, which is sized by software. As optional solution an external power amplifier can
replace the internal power amplifier. For impedance measurements when an external power
amplifier is used, external series resistor is used with connection of one or two input modules.
The system input/output is opto-coupled, and is used for external control and processing.
In the standard delivery a push button box is included, which often is to prefer instead of the PC
keyboard in a production environment. The external control possibilities support start/end of test
and sending the results to an output device.
More uniquely the system also embodied a built-in system multiplexer, which makes it possible
freely to interchange input and output modules, and to run a two-line production line with only
one workstation. By enabling the system multiplexer it is possible to test two production lines
side by side:
While one loudspeaker unit/system or microphone is mounted/disconnected on production line
1, a second unit/system on production line 2 is tested automatically and vice versa. The two
different production line set-ups do not necessarily need to be identical.
Even with fully automated production line facilities, the needed handling time will be
significantly longer than the required test time. The built-in system multiplexer thus ensures a
very high productivity with a complete test cycle down to less than 2 seconds or faster is
possible.
PC Cards
The PC cards are the type of PCI bus. In principle there are two different types:
•
•
A/D & D/A converter board
Digital I/O board
The A/D & D/A converter Board is a professional sound card with 4 A/D converters of 24-bit
resolution. Each input has one A/D converter. The card has 4 D/A converters of 24 bits. Two
D/A converters are used to generate the balanced sinus waves. The output level can be changed
during a sweep to obtain a compressor function.
The A/D converters allow to have four analyse channels with selectable filters in channel B, C &
D. Utilising the built-in system multiplexer, this gives the capability of two individual test
stations with four analyse channels and tree filter channels each.
The programming capabilities includes the following filter types:
•
•
•
10
Tracking High Pass
Fixed High Pass
Tracking Band Pass
P600 HARDW ARE LAY O UT
19" RACK
PC
INPUT
1
2 x A/D
2
2 x A/D
6
2 x D/A
O UT A
PA
O UT B
8
5
IN
I/O
O UT
11
12
Software Concept
Additionally to the very modular and flexible hardware lay out, all hardware parameters are
under direct software control, consequently highly improving the versatility and possible
applications of the entire workstation.
The accompanying software has been designed in such a way that it is:
•
•
•
•
Easy to use in a production environment
Fast and secure to setup the test parameters
Simple graphical control of rejected/approved test
Incorporates extensive automated database storage possibilities
All tests are performed in parallel and all results are shown simultaneously on the screen in
appropriate coding of color (green approved (yellow for attention) / red rejected).
Global setup:
In the opening menu of the program the current global parameter setup as well as the setup /
change of parameters are found.
The global parameters comprise of the following:
•
Control:
Start Control – Keyboard / External
Barcode - Enable / Disable
Cancel Record - Enable / Disable
Multiplexer – Enable / Disable
Repeat By Reject - Enable / Disable
•
Chain:
Chain – On / Off
Delay – Off / 1 / 2 / 3 / 4 / 5 sec.
Break – On / Off
•
Sound Beep:
By Approve – Enable / Disable
By Reject – Enable / Disable
•
Display Graph:
By Approve – Enable / Disable
By Reject – Enable / Disable
Delay – Enable / Disable
•
Store:
Data Approve – On / Off / Aut
Data Reject - On / Off / Aut
Last – Enable / Disable
Results – On / Off / Aut
Data Format – Dbf / Txt
•
Graphic Scale:
Auto – Enable / Disable
13
•
User Key’s:
User ID – Enable / Disable
Password – Enable / Disable
Lock - Enable / Disable
•
Screen:
Statistics – Enable / Disable
Include - All results / Approved
Reload – Enable / Disable
•
Gain Adjustment:
Input 11, 12, 13, 21, 22, 23 and Ch C
•
Print:
By Approve – Enable / Disable (optional)
By Reject – Enable / Disable (optional)
•
Path:
Reference, Data, Results
•
Extern Amplifier
Test signal Output A / B
Value of Rs A / B
Any changes to the current global parameters can be stored on disk / network for further
reference.
Setup mode:
Appropriate setup of test parameters requires a certain level of expertise and in-depth knowledge
of loudspeaker / microphone technology. To ensure that only skilled personnel are allowed to
make or change of test parameter setups, a secure manager protects the technician mode.
After entering of a valid password, the type descriptions and content of the memo field for all
previous setups are shown on the screen and a new setup can be implemented in various ways:
•
•
•
•
•
14
Previously stored parameter setup can be used as the basis for manual changes
The software contains a built-in standard “default” setup which can be used as basis
A number of "good" speakers / microphones can be tested and used to create envelopes
for frequency and filter setups
Limits can be established/modified using the cursor in the graphical edit functions
A fixed level can be added to/subtracted from existing envelopes
P630 SOFTWARE LAY OUT
RUN
MODE
SELECT
PREPARED
SETUP
STORE
TEST
RESULTS
DISPLAY
RESULTS
WAIT FOR MEASURE
SYSTEM 1 OR 2
Password
Manager
SETUP
MAIN
MENU
SETUP
OF GLOBAL
PARAMETERS
PRESENT
RESULTS
ON I/O
MODE
SETUP/CHANGE
PARAMETERS
STORE
SETUP
DISPLAY
CURVE
MANIPULATION
MEASURE
Spl Setup
Utility’s
15
Furthermore, any combination of the above mentioned procedures could be used. This gives a
very flexible and powerful technique of setting up parameter characteristics.
Available parameters for setup include:
• Type name
• Chain name
• Description
• Selection of help file
• 3-Limit function
• Start and Stop frequencies
• Delay time
• Test points
• Sweep time
• Sweep Reverse
• Output level and channel
• I/O code (optional)
• Polarity test ON/OFF
• Polarity pulse time and pulse polarity POS/NEG
• Polarity pulse window setup
• Polarity before / after sweep
• Inputs, gain, LIN/LOG/SPL setup
• Active channels, 1-4.
• Setup of series resistor for impedance measurements
• Sensitivity test ON/OFF and test frequency
• Move frequency test function ON/OFF for Sensitivity test
• Separate Sensitivity test 1 to 5 with separate limits and without move
• Loudness functions
• Compensation curve function
• Master and calibrations curve functions
• Storage of best fit curves
• Compressor function
• Filter types and functions
• F resonance, Q and F test setup
• Average group selection setup
• Auto save functions
• Multi Frequency Average test function
• Single point Average test 1 and 2 function with separate limits
The manipulation reference functions contains:
• Measure loudspeaker unit/system
• Include/reject results
• Smoothen results
• Reset curves
And a comprehensive number of edit functions:
• Writing points of curve
• Moving whole or part of curve
• Tolerance curves to manipulate reference curves
16
•
•
•
•
•
•
Reset lower envelope
Reset selected envelope
Curve manipulation
Input level scale function
Gain adjust function for channel “A”
Manual power on output at cursor value
With the zoom function it is possible to interchange between the channels A-D on the screen
when editing. The edit functions can be operated by the cursor and/or by the numeric keypad.
The type number of speaker setup can be up to 12 characters for storage of data, and the
corresponding memo field can be up to 25 characters long.
The number of different setup stored on hard disk is virtually unlimited (depending on hard disk
size only).
Utility functions:
To enhance the exploitation of collected reference and measurement data a variety of utilities are
included.
Process Statistical Data
Processing all stored data processed in the “run” mode for each setup type.
For each type you can select start and ending date, start and end number, [start and end code,
user test result], test result and select active channels to process. ([] Optional)
You can select either automatic, where all records from a user-defined selector are included, or
manual, where you decide for each record to include or exclude to process.
In manual mode the actual test results can be displayed if stored together with data.
After processing the results are shown graphically on the screen for valid records. Here you can
further process the data to show curves as average, +/- standard deviation. With a powerful
“Find” function the best match to the average or a “best fit” reference can be found or a match to
a stored user curve.
Copy Reference Data
The copy reference utility contains most functions to copy single record(s) from the referencedatabase to floppy or disk.
You can list reference and database files.
Copy reference to or from other media vice versa.
You can rename or delete reference types in the database.
Convert, Export and Import Data
The export, import, convert utility can be used to export data to spreadsheets for further
manipulation or presentation.
Reference files, including all parameters and reference curve data can be converted to ASCII
files with a delimiter as comma or semicolon. Likewise also measured data can be converted.
Finally this utility can also import text files generated from the export utility as reference.
Match Stored Data (optional)
The Match utility are a group a functions where a match between different measured frequency
responses can be found against selected match parameters.
The outcome is a list of speakers with serial numbers to be matched together.
17
Log Manager
The log manager list all saved changes made in the setup of types and global parameters as well.
The changes are listed in group of global and type of setups sorted on date of change.
The Log Manager has functions as restore of changes (backups) and a Clean-up of saved Log
files as list of changes and backup database.
Run mode:
Relatively unskilled operators can be used for production testing since test setups and decisions
about test parameters are made in the protected technician mode.
The operator selects from the menu which of the existing setups to be used for running
production tests. In a two-line production assembly, the system multiplexer too must be selected
from the menu. The setups for each production line can be selected freely and independently.
The operator can select to view complex detailed graphical results, or alternatively short, simple
and clear result flags in the form of descriptive text, appropriate color code.
The main results from each test: rejected/approved, error type, speaker type, channels, date etc.,
are stored in a database for analysis and statistics, and also all the actual measured data can
optionally be stored in another database.
An on screen statistics can be displayed for each single test type and analyzed for selected data.
The operator can make small on-line calibrations / adjustment in reference setup by entering a
user-password and making use of a previously stored master curve.
If one of the “store” measure data functions is “on” in global-setup - and - cancel record function
is “on”, the operator have the possibility to “Delete”/ cancel the last stored data set on disk.
18
Installation
P600 Hardware
P600 consist of components of hardware placed in two different locations.
The two locations are in the P600 rack and in the PC.
P600 Cabinet
A.
Check that the delivered P600 is supplied with the right mains voltage. You will find a
label marked 120 V or 220 V on the P600 near the main inlet.
If the label is not correct please contact the K&K International representative for
replacement of voltage.
B.
P600 cabinets have locations for 11 modules. Counting the modules from left front to
right, the positions are the following:
Module
No. 1 System Power Supply.
No. 2 Microphone Power Supply.
This module is optional. This module supplies all necessary voltages for all input
modules and for almost all kinds of microphones.
the
No. 3 I/O module.
This module contains all opto-coupling device to the outer world. Furthermore
module contains the input multiplexing system.
No. 4-10 Input modules.
The input modules can freely be placed in either location. The input modules are
selected by an address.
No. 11 Output module.
The output module contains the output selector and the impedance circuit.
C.
Switch setting and address for modules:
Module no. 3, I/O
SW 1:
4 OFF, rest ON.
Module no. 4-10, Input
The particular module must have an address referring to the actual hardware channel
number.
Valid hardware channels are 11, 12, 13, 21, 22, and 23.
19
No 11
No 12
No 13
No 21
No 22
No 23
denotes system 1 channel 1
1 2
1 3
2 1
2 2
2 3
System 1 and 2 are referring to the system multiplex number.
Channel
11
12
13
21
22
23
SW 1
1-8 ON
2-8 ON
3-8 ON
2,4-8 ON
1,4-8 ON
4-8 ON
SW 2
SW 3
2 ON
4 ON
6 ON
2 ON
4 ON
6 ON
SW-no. not listed must be set to OFF.
Module no. 11 output:
SW 1: 2 OFF, the remainder ON.
Connections
Output A + B
Type XLR
PIN 1, +OUT
PIN 2, -OUT
PIN 3, Not connected
Inputs
Type 1+2, XLR
PIN 1, Signal GND
PIN 2, +INPUT
PIN 3, -INPUT
Type 1+2 DC, XLR
PIN 1, Signal GND
PIN 2, +INPUT, DC (+48V)
PIN 3, -INPUT, DC (+48V)
Type 1+2 DC, B&K
PIN 1 Signal GND
PIN 2, +200V
20
2 ON
5 ON
7 ON
2 ON
5 ON
7 ON
For B&K type 2639
& type 2669
PIN 3,
PIN 4,
PIN 5,
PIN 6,
PIN 7,
Signal GND
+INPUT
+28V (some versions not connected)
+28V
Not connected
Depending on the set up of I/O in the ALT4-HW.CGF file pin assignments are as follows:
I/O = Normal (or not defined)
15 pole female
PIN 1
PIN 2
PIN 3
PIN 4
PIN 5
PIN 6
PIN 7
PIN 8
PIN 9
PIN 10
PIN 11
PIN 12
PIN 13
PIN 14
PIN 15
+IN 0, START SYSTEM 1
+IN 2, DELETE last statistics record
+IN 4, [SAVE data as user reject] optional
+IN 6
IN RETURN
+OUT 0, testing
+OUT 2, result system 2
+OUT 4
+IN 1, START SYSTEM 2
+IN 3, [SAVE data as user approved] optional
+IN 5
+IN 7
OUT RETURN
+OUT 1, result system 1
+OUT 3, archive system
I/O = Separate:
15 pole female
PIN 1
PIN 2
PIN 3
PIN 4
PIN 5
PIN 6
PIN 7
PIN 8
PIN 9
PIN 10
PIN 11
PIN 12
PIN 13
PIN 14
PIN 15
+IN 0, START SYSTEM 1
+IN 2, DELETE last statistics record
+IN 4, [SAVE data as user reject] optional
+IN 6
IN RETURN
+OUT 0, testing
+OUT 2, Rub & Buzz Ch. B & D
+OUT 4, Polarity test
+IN 1, START SYSTEM 2
+IN 3, [SAVE data as user approved] optional
+IN 5
+IN 7
OUT RETURN
+OUT 1, Frequency-, sensitivity, loudness and 3. limit test
+OUT 3, Impedance-, resonance- and F-test
21
I/O = Group:
15 pole female
PIN 1
PIN 2
PIN 3
PIN 4
PIN 5
PIN 6
PIN 7
PIN 8
PIN 9
PIN 10
PIN 11
PIN 12
PIN 13
PIN 14
PIN 15
+IN 0, START SYSTEM 1
+IN 2, DELETE last statistics record
+IN 4, [SAVE data as user reject] optional
+IN 6
IN RETURN
+OUT 0, testing
+OUT 2, Rub & Buzz Ch. B & D
+OUT 4, Polarity test
+IN 1, START SYSTEM 2
+IN 3, [SAVE data as user approved] optional
+IN 5
+IN 7
OUT RETURN
+OUT 1, Freq.-, sensitivity-, Loudness-, ImpedanceResonance-, F-test and 3 limit test
+OUT 3, archive system
I/O = Control (special SW module):
15 pole female
PIN 1
PIN 2
PIN 3
PIN 4
PIN 5
PIN 6
PIN 7
PIN 8
PIN 9
PIN 10
PIN 11
PIN 12
PIN 13
PIN 14
PIN 15
+IN 0, START SYSTEM 1
+IN 2, DELETE last statistics record
+IN 4, [SAVE data as user reject] optional
+IN 6
IN RETURN
+OUT 0, testing
+OUT 2, user IO switch setting: bit 0
+OUT 4, user IO switch setting: bit 2
+IN 1, START SYSTEM 2
+IN 3, [SAVE data as user approved] optional
+IN 5
+IN 7
OUT RETURN
+OUT 1, result system 1
+OUT 3, user IO switch setting: bit 1
Inputs are opto coupled. With the light diode anode connected to +IN and all cathodes
connected to IN RETURN. Input voltage ranges 5-24 V DC.
Outputs are opto coupled. A transistor with open collector connected to +OUT and all emitters
connected to OUT RETURN. Voltage ranges max. 30 V DC.
22
P630 PC Boards
The P630 have following 2 boards:
MARC4 DIGI
PIO-D24
4 channel 24 bit A/D & D/A PCI soundboard
24-bit TTL level PCI I/O board
NOTE
Before any installation, be sure that the power cord is disconnected from the PC and the P600 as
well as the PC screen.
P600 - PC Cabling
The connection between the P600 and the PC consist of 3 cables.
1. A cable with a mini jack in one end and jack in the other end. This is for connection between
the MACH 4 output 1/2 (no 1 jack from top) and the P600 "Input".
2. A cable with a 25-pole male plug in one end and 2 x jacks in the other. This connecting to
input 1/2 (no 2 jack from top) and input 3/4 (no 4 jack from top) on the MARC4 board.
3. A cable with a 25-pole female plug in one end and a 37 pole in the other end. This is for
connecting between the PIO-D24 I/O board to the P600 "PC control".
External key box
Delivered with the P600 system, you find a key box. This key box has two buttons.
Connect the 15 pole plug to P600 "I/O". Connect the jumper box between P600 "PC Control"
and the cable to the PC.
External foot contact single (or optionally dual)
Connect the 15 pole plug to P600 "I/O". Connect the jumper box between P600 "PC Control"
and the cable to the PC.
23
24
Software installation, Win2000/XP
Install files
Before the P630 installation install the drivers for MARC4 and PIO-D24 boards.
See the manuals for March4 & Pio-D24 how to install the drivers.
After proper installation of these drivers continue to install the P630 program.
To install P630 run installation. Select the program media and run “setup” and follow the
instructions on the screen.
The Alt4-hw.cfg file
This file located on installed path contains all hardware dependent information for the P630
program.
In the file you find a configuration list for your hardware.
With the system delivery this file is prepared for your actual system.
If you change hardware in your system, you must make changes in this file.
Commands keywords:
c11 = 31
Denotes channel 11 active and installed with a type 1 module (max. 10 Volt
input, overload at 31 Volt). Valid channels: C11, C12, C13, C21, C22, C23
c12 = 100
Denotes channel 12 active and installed with a type 2 module (max. 100 Volt
input). Valid channels: C11, C12, C13, C21, C22, C23
//c13 = 31
// denotes remarks
out = 0
Impedance calibrations. 0 = Ver. 1.0 & Ver. 3.0,
Remark: out is properly setup from the factory
IO = normal
The IO output control lines from P500 can be modified in a “separate”, a
“normal”, a “group” or as a “control” function (separate/normal/group/control).
This ”group” and ”control” function is special SW modules. Contact K&K
International for information.
1 = Ver. 2 (1.1)
Chain = normal
Normal/One. In chain mode the test “result” (i/o output bit 0) and “test end” (i/o
output bit 1) are activated at every single sub-test in the chain. This is the normal
condition (chain = normal or if no command is used). With the command “Chain
= one” all the test results are treated as one total test and the “test end” signal is
only activated one time.
AVE = off
If the AVE setup is changed a LOG function can be set on /off.
Ave = off, the LOG function is deactivated.
Ave = on, the LOG function is activated. Changes is stored in the file A4_ave.txt
25
Vout = 15
Information of the type of power amplifier installed. Default is 15.
Vout = 15, (or no command line) Max voltage of output is 15 V rms.
Vout = 20, Max voltage of output is 20 V rms. Amplifier PA2.
AOut = off
Output module can control the amplifier gain in steps to enable a better s/n ratio
however on the cost of output level tolerance. Default is off. Note if an external
power amplifier is used this function is disabled.
Aout = off, (or no command line) this function is disabled
Aout = Auto, this function is enabled
PA = Ext
An external power amplifier is used to replace the internal one. Default Internal.
PA = Internal, (or no command line) P630 internal power amplifier is used.
PA = External, External power amplifier is used.
RFlag = 0
Type of the reject flag in Run-mode can be controlled by this line. Default is 0.
Rflag = 0, (or no command line) Reject flag is red with text "REJECT".
Rflag = 1, Reject flag is yellow with text "CONTROL".
Sdelay = 0
Sweep delay is an optional. Sdelay is default 0. Valid value is between 1 and
3000. The value between 1 and 3000 is a delay between start signal of test and
actual sweep is done in mSec.
Lmarg = 10
(optional) Left margin for a print out of match list under the Utility Match Stored
data function can be set here. Default is 10.
Lmarg = 10, (or no command line)
Valid values: >= 0 and <= 20
Lat = 0
Latency adjustment (timing adjustment between in and out going signals from
sound board)
Valid values: 0 – 200
[The ALT4.KEY file]
No longer used. The file is only used in version 1.0 & version 1.1-a
The passwords in this file are the passwords, which allows you to make changes in the reference
setup.
This file contains a list of passwords. Normally the default password is "p600" or "P600".
To change the password, you must change the contents in the file.
Use program as “notepad" to change the file. Multiple words are allowed. The maximum length
of the word is 16 terminated by a <CR>.
Note: If only <CR> it means no password.
26
[The ALT4-M.KEY file]
No longer used. The file is only used in version 1.0 & version 1.1-a
The passwords in this file are the passwords, which allows you to delete a master curve setup.
This file contains a list of passwords. Normally the default password is "p600" or "P600".
To change the password, you must change the contents in the file.
Use program as “notepad" to change the file. Multiple words are allowed. The maximum length
of the word is 16 terminated by a <CR>.
Note: If only <CR> it means no password.
[The ALT4-U.KEY file]
No longer used. The file is only used in version 1.0 & version 1.1-a
The passwords in this file are the password, which allows the User to make master adjustment in
Run mode.
This file contains a list of passwords. Normally the default password is "p600" or "P600".
To change the password, you must change the contents in the file.
Use program as “notepad" to change the file. Multiple words are allowed. The maximum length
of the word is 16 terminated by a <CR>.
Note: If only <CR> it means no password.
[The ALT4.ID file]
No longer used. The file is only used in version 1.0 & version 1.1-a
This file contains a list of identification words. Normally the default identification word is
"p600" or "P600".
Note: If only <CR> it means no password.
An identification word is like a password, but is stored in the statistics files. It is used to “lock”
persons to results to record test stations, results, time and performance.
To change the identification word, you must change the contents in the file.
Multiple words are allowed. The maximum length of the word is 16 terminated by a <CR>.
27
28
Software User Section
This section describes how the P630 software is used to properly setup and carry out speaker
tests.
It consists of an overall setup of global parameters, mostly to be used by a fairly unskilled
operator during production. A more detailed setup of test parameters and characteristics only to
be used by a skilled technician and production runs to be performed by an operator and a set of
utility functions to be used off-line.
The manual consists of the following chapters:
•
•
•
•
•
•
•
Main menu
Pw. Mgr.
Spl menu
Global menu
Setup menu
Run menu
Utility menu
Main Menu
Main menu as showed is the entry point for the P630 program.
From top bar you get the information of program name and serial number.
The Menu bar contains the Main and Version menus.
From Version menu you get information about program name, version and serial number.
The Main menu has same functions as Toolbar below it except for the Spl submenu.
29
Pw. Mgr.
The “Pass Word Manager” control all passwords used in the Program. With this “Pass Word
Manager” password can be, generated, edited, deleted and disabled. All passwords are coded and
saved on disk. To manage this Pass Word Manager an administrator need to generate a unique
administrator password to enter the Pass Word Manager. First time the Pass Word Manager is
entered following picture is shown.
A password for the administrator must be entered. Minimum 6 characters and maximum 24
characters are allowed. Only following characters are allowed: Space, @, 0 - 9, A - Z and a - z.
Then password is entered it must be confirmed. ”Ok” saves the password.
IMPORTANT after the password is saved it is NOT possible to read the word. Remember the
word or write it down and save it on a safe location.
If the password is lost then reinstall the program.
Next time the Pass Word Manager is entered the administrator password must be used.
When the administrator password is entered correct following menu appear:
30
In the Pass Word manager Setup following password can be managed:
For parameter setup and change.
The setup password, the Master curve password, the Global Menu password and the user ID
name. Note the user ID is enabled from the Global menu.
Changed by user.
Scale Calibration / Adjustment password and the Compensation curve adjustment password.
Note the user Compensation is enabled from the Global menu.
New password
Enter the new password in the edit field (top on the list). Password length must be between 4 and
24 characters. Add the new password to the list by CR (the enter key). There are almost no limits
for numbers of passwords.
Edit password
Highlight a password on the list by clicking by left mouse button. Move the cursor to the edit
field so the word in the edit field no longer is highlighted. Edit the name and save the name on
the list by CR. Note the manager check for a name duplet. If so the name cannot be saved twice.
31
Delete password
Highlight a password on the list by clicking by left mouse button. Use the Delete or Backspace
button to delete the password from the list.
Disable password
To disable a password function, mark the disable function right for the list name. When asked
for a password in the program you just need to hit a key (no password).
New Master Code
This calls the first time administrator password menu.
Spl Menu
The SPL Sensitivity Menu are only used is the scale in log mode is selected as “SPL”.
To get the correct Spl level on P630 scale the program must know your sensitivity of the
selected microphone. To do this you enter the sensitivity of your microphone connected to a
P600 input module. You can ether enter the sensitivity in db with reference to 1V/Pa, without
the minus sign, or in mV/Pa.
32
Global Menu
The Global Menu can be grouped into various functions of similar nature:
•
•
•
•
•
•
•
•
•
•
•
•
Control
Chain
Path
Display Graph
Sound Beep
User Key’s
Store
Screen
Graphic Scale
Print
Gain Adjustment
External Amplifier
Control
Start Control
With this function (only works in run mode) you will be able to control the measurements in the
production line process either by use of the Keyboard or by External I/O unit (I/O plug on P600
rear).
If Barcode is activated P630 read a type of setups before a test is started. This enables the system
to test a mix of different tests. Barcode can only be activated if External start is selected.
33
Note. If Barcode is activated the System Multiplex is disabled.
Cancel Record
If one of the Store Data or Store Results is on, the Cancel Record function can be enabled. This
“cancel” function enables the “Delete” key in run mode. The delete key cancel the last stored
measured data by marking the actual record with “deleted”.
Multiplex
The system contains a built-in multiplier. This allows you to operate two different production
lines of speakers in run mode side by side with only one P600 and one PC (providing that you
configured your P630 and PC with the sufficient microphone inputs and filters, please refer to
the hardware setup selection).
Repeat By Reject
By enable this function a second test will be executed if the first test was rejected.
Chain
This function allows you to activate an indefinite number of other test setups in a "chain".
First the setup test is carried out and then the chain setup test is carried out (which in turn can
invoke another chain operation etc.). Care should be exercised NOT to chain the same type twice
in the process as this would result in an infinite loop! In the setup you can select the delay
between tests in the chain from 0 to 5 seconds, and you can select whether or not you want to
break the chain of tests at the first "reject" in one of the test the results.
Note: To activate a “chain” in run mode both this global chain must be “on” and a valid chain
name (name of a test) must be in the called setup of test and must be present in the database, else
the chain function will be forced “off”.
Path
To facilitate the processing of the results and the statistics you can freely select where the input
files are to be found and where the output files shall be stored.
Define the appropriate paths for this here.
The Reference refers to where the P630 reference data are located. If listed “c:” tells that the
reference data are located where the P630 main program are placed.
The Data refer to the location of all measured data.
The Results refer to the location of all test results.
Make sure that the paths referred to already exists, if not, the program will not work properly
and you will get error messages when you try running the software.
To use a network you have to map the network with a drive letter, example “j:\my_network”.
34
Display Graph
When you are in the run mode you have the option of having the result presented graphically on
the screen, whichever they are approved, rejected or rejected and approved or not at all.
Without graphics you will see if the individual tests are either rejected, color coded RED, or
approved, color coded GREEN, or if 3-limit used and approved however out site one of the 3limits color coded YELLOW.
Display Graph can be activated by Approve only, by Reject only or both at same time.
A Delay function can be enabled.
In the Run Mode this facility maintain the results from the preceding test on the screen until the
result from the next test is ready (“delays” the updating of the screen).
Sound Beep
As a supplement to the screen approved/rejected or the graphical screen you can have your
approved or rejected individual test identified by an audible "beep" from your PC-speaker.
You must select if “beep” in run mode should be used for approved or/and rejected tests or not at
all.
User key’s
The ID function allows you to enable/disable a request for your identification code during
running speaker tests. The ID is like a production password. Several ID codes are possible. The
ID code is stored in the A4STAT database.
To change or make a new ID code you have to make the changes in the file ALT4.ID.
The User Password, a Key, is only used when the user makes a calibration in run mode. The
calibration function will only appear if you have created a compensation curve in setup/changes
parameters.
The Password is stored in the A4STAT-U.KEY file. To change or make a new password you
have to make the changes in this file.
Lock function. As described above it is possible to make small changes in a compensation curve
in run-mode. If the changes are more than 3 db you get a warning. If the changes are more than 6
db the system tells that you must do the changes from edit mode. To suppress the 3 db warning
however not the 6-db warning flag enable the Lock field.
Store
Data
You will be able to store the measure data (only in run mode) of the test for approved, rejected or
for all tests (in file A4M_STAT.DAT).
Valid modes for both approved and rejected are:
OFF, The actual function disabled.
ON, The actual function activated.
EXT, Store data by an external signal from P600 i/o. (optional)
AUT, Store data as saved in actual type setup. See Auto Save functions in setup.
35
Choosing the Last test function, the latest measurement is stored in a file: A4LAST_D.DBF for
later reference. The format is described in the README.DOC file. The files A4M_STAT.DAT and
A4LAST_D.DBF are created automatically.
If you want to transfer the last measured data to your off-line, demo disk just rename the "type"
LAST0, LAST1, LAST2, LAST3 and LAST4 to xaDEMO0, xbDEMO1, xcDEMO2, xdDEMO3
and xpDEMO4. Then replace the old DEMO with the new records. Remember to re-index after
replacement.
Results
You will be able to store all test results (only in run mode).
This is for further post-processing analysis and you will be able to store in either TXT format or
in DBF format. The file: A4STAT.DBF or A4STAT.TXT is self-creating. The formats are
described in the README.DOC file.
Valid modes are:
OFF, The actual function disabled.
ON, The actual function activated.
AUT, Store test results as saved in actual type setup. See Auto Save functions in setup.
NOTE: Data to files in store data and store statistics are appended. To avoid a disk full message
remove files A4M_STAT.DAT, A4STAT.TXT and A4STAT.DBF by copying and deleting files
frequently or if not used, simply by deleting the files.
Screen
By selecting Statistics you will be able to see the statistics on-screen. The number of cumulated
approved and rejected tests are shown on the screen.
You can add test results as all or approved only.
By selecting Reload you can reload previous statistics from last time the P630 program was
running.
Graphics Scale
With Auto scaling enabled you will maximise the screen representation depending on the
number of active channels. With the function OFF, the screen will be split into four default
segments, even when you only are performing a single test, in such case only using a quarter of
the available screen.
36
Print (optional)
This is a function to print the current test result to a printer connected to the defaults printer port.
The results have the same format as stored in the A4STAT.DBF or A4STAT.TXT file.
The next test CANNOT continue before the printing data is transferred to the printer.
Valid option: OFF
REJ print only rejected test.
APP print only approved test.
ALL print all test results.
This option is NOT a part of the standard software.
Gain Adjustment
By Gain Adjustment each input amplifier can be fine adjusted within +/- 10.0 db. By entering
the correcting gain value in db the value will be added to data with sign. On this way it is
possible to change gain as input gain setting in the setup mode.
This Gain Adjust function will be disabled if the SPL function is used.
External Amplifier
Output
Two outputs can be connected to external amplifiers. Output A and B. To adjust and calibrate
the maximal output level on each power amplifier a test signal is supplied on A or B. When the
test signal is supplied the gain on the external amplifier can be changed and when the test signal
is stopped the system measure Output level in Volt rms. And displayed. The test signal is 1 KHz
with a level at –20 dB of Maximal level. Came must taken to not allow a out signal higher than
the power amplifier allow for a undistorted signal.
Rs Out
The value of the actual used sense resistor Rs is entered in the fields Rs Out A and Rs Out B.
37
38
Setup
Before you can run a speaker test you have to configure your testing parameters. As a proper setup
is very important and requires a certain level of expertise and in-depth knowledge of loudspeaker /
microphone technology this should only be performed by a skilled technician. Therefore all
parameters in this setup are protected by password.
When entering setup, the type name and the content of the descriptive field for all existing setups
are shown on the screen.
To create / change a setup you can either use an existing setup as model or start from scratch
with default parameters. To use an existing as model, enter the “Type” name of the existing
setup or double click on a Type to move the name to Type field and click Ok.
To start from scratch with default parameters, enter a new unique name with max. 12 characters
in the Type field and click Ok.
If you entered a new type name you will be prompted to respond on the question if you really
want to create a new type or you just made a typing mistake.
The next screen picture is the setup of parameters. If it is a new type it contains only standard
setup values. If it was an existing it contains the characteristics of this type. To make it into a
new type you must change the name of the type.
39
The setup of parameters screen consists of the following main items:
•
•
•
•
•
•
•
•
•
•
•
40
Type
I/O (optional)
Auto Save
Sweep
Output
Sensitivity Test
Polarity Test
Compress
Loudness
Input
Filter
Type
Name
Select the new Name of the setup to change and copy into a new type. If no new type is entered
any changes will be done on the existing type name.
Description
Enter a test description of the selected setup.
Chain
Input an existing type as chain. The chain test type is carried out after this test setup in the run
mode. Care must be taken NOT to chain a previous type used in the chain. This will result in an
infinite loop.
To use the chain function the following must be completed:
1: Chain in global parameters must be ON.
2: The chain type must be an existing valid type.
Help File
When entering a test setup in the menu the user will be presented with a request for (user
defined) “Help” text description relating to the Type. The file containing the description shall be
in HTML format (files ending with *.htm) created/edited by the user previously. The user can
then in this Help File field select the file name.
3-Limit
This function does only work for channel A. Normally the frequency response is tested against
an upper and a lower limit.
With the 3-limit function on you can test the frequency response against 2’Th and 3’Th upper
and lower test limits. Each set of limits is a separate test.
The color-coding of the frequency response is only referred to the first upper and lower limit.
If you only want the read color coding of the frequency response by a total reject of all 3 test
limits you start with 3’th limit and end with the 1’th limit as the widest set of tolerance. The
color-coding between rejects and approved are then yellow.
Status
Status is information for current setup as compensation, master and master compensation and
output curves.
I/O
As a special software module (optional), the I/O output address is then selected entering a decimal
value from 0 to 7.
Each individually defined type can have a different I/O setting.
41
Auto Save
Data App.
This function has same function as approve in “Store Data Approve” in “setup of global menu”.
To activate this function the “Store Data Approve” in “setup of global menu” must be set to
“AUT”.
Data Rej.
This function has same function as reject in “Store Data Reject” in “setup of global menu”.
To activate this function the “Store Data Reject” in “setup of global menu” must be set to
“AUT”.
Results
This function has same function as “Store Results” in “setup of global menu”.
To activate this function the “Store Results” in “setup of global menu” must be set to “AUT”.
Sweep
Start
Start frequency of the sweep (min. 20 Hz.).
Move cursor to another field to see updated field.
Stop
End frequency of the sweep (max. 30000 Hz.).
The minimum difference between start and end frequency is one octave.
Move cursor to another field to see updated field.
Reverse
If reverse is enabled the sweep become back word, reversed. The sweep begins with the end
frequency and end with the start frequency. Note this method may make the sweep slower.
Delay
Delay time in milliseconds. Minimum is 0 sec and maximum is 999 sec. The typical value is 150
to 350 mSec for a woofer and 0 to 150 mSec for a tweeter. The delay time is the time from the
signal is present on output to input signals are processed.
A normal test sequence is the following: First comes the pulse for polarity, then the delay time
and finally the sinus sweep. If the “After” in polarity test is enabled the polarity test comes after
the sweep.
Move cursor to another field to see updated field.
Points
Number measuring points, minimum 10 and maximum 250. For speaker measurements use 250
points.
42
Time
Sweep time. A sweep starting with a lower frequency requires a longer sweep time than a sweep
starting with a higher one. Sweep time must be adjusted for best and more reliable Rub & Buzz
results. Minimum 0.1 seconds for start frequency >= 100 Hz else 0.5 seconds, maximum 32
seconds.
An advantageous hint: Start with a relative slow sweep. Then reduce the sweep time until the
curve starts to change. This shows the point where the sweep time is too short for the selected
frequency range. Make the sweep time a little bit longer.
Output
Output
As standard the system have two output connectors, output A & B. Note the text field must be
highlighted to be selected and activated.
Volt
Select the actual output level in Volt.
Minimum is 0 Volt and maximum is 15 Volt as standard. Optional 20.0 Volt
Move cursor to another field to see updated field.
dB
Select the actual output level in dB.
Maximal output is 0 dB = 15 volt Rms. as standard. Optional 20.0 Volt
Move cursor to another field to see updated field.
Polarity Test
On
A mark at the on enable the polarity tests during at the start of a sweep. Initial for using this test
the time gate window has to be set up. See Polarity Time Gate Submenu (Pol-lim) in Edit Mode.
Negative
Select polarity approved by a positive or negative signal. The output pulse is always positive but
you can select the polarity test to be approved as positive or negative.
Pulse Time
Input the duration of the polarity pulse in milliseconds from 50 - <3 mSec.
After
Polarity test is as standard done before the delay and sweep. With the “After” enabled the
polarity test is done after the delay and sweep.
Sensitivity Test
43
The Sensitivity test a single point tested against the yellow upper and lower limits selected by
the Sensitivity frequency.
Similar 5 sensitivity tests without the move can be selected against a list of upper and lower
limits different from the yellow curve limits. To select those test enter the Reference, then the
edit mode and select the S-Ave menu.
Move
Selecting this feature you can move the entire frequency band. This is only for channel A and in
LOG mode and only during run mode. If the frequency response follows the tolerance band but
is outside the upper or lower limit, the move function moves the measured data into limits. If by
doing so the frequency test then is approved the actual value of the moved curve is displayed. If
the “move” frequency curve is on, the sensitivity frequency test is performed before the
movement of the curve.
Hz
Enter Sensitivity frequency in Hz. The sensitivity frequency must be within the start and end
frequency. The sensitivity test is a separate test in run mode.
Compress
Range
This is only valid when an output curve is generated in reference mode.
If the output compression is used (for testing microphones), you can select a reference channel
to compensate the Ch A. The compress range is then displayed.
Normal test procedure: With the use of a reference microphone an almost constant sound level is
generated with the output curve. The remaining variations in sound level are then subtracted
from channel A, the measuring channel, with a reference microphone channel
Reference Channel
Reference channel against Ch A can be Channel B or D if enabled as input.
Loudness
Form
You can enable / disable a loudness test in run mode only. You can select various SendLR and
RecieveLR types (to be used within the telephone industry). Tests are according to CCITT
standard and works only for proper frequency ranges and only for channel A in LOG mode.
To select a proper gain in channel A, use the gain adjust mode.
Test
Input loudness test in %. This is the allowable deviation in percent from the selected loudness
rating. This test is a separate test in run mode.
44
Input
Channel C is reserved for impedance measurements.
Channel B and D are designed to measure Rub & Buzz and THD measurements however can be
used for measurements of frequency response as well.
Status
Select active channels. Note that at least one channel must be active.
Mux
Select input module address: 11, 12, 13, 21, 22 or 23 (depending on your hardware
configuration). Address:
11 & 21 is Ch A
12 & 22 is Ch B
13 & 23 is Ch D
if external Power amplifier is selected 13 & 23 is Ch C
You can gate (multiplex) an input module to one or two other analyze channels. If the selected
address is not listed in your ALT4-HW.CFG file you will get an "ERROR" message.
You cannot change a channel if the host channel is already used. The host channel is the number
where the gain is displayed.
If a selected channel not can go off, check that the module address is used in the other channels
even if the other channels are off.
Detector
Select detector and presentations mode:
Channel C linear or logarithmic. For filter data in channel C logarithmic only.
Channel A, B and D linear, logarithmic or SPL.
SPL is logarithmic with reference to 20 micro Paschal as 0 dB.
Gain
Select gain for each channel (A, B or D). For channel C, the impedance channel, you here select
the "current sense" resistor size between output amplifier and loudspeaker. Select the Rs sense
resistor to approx. 1/10 of output load. If external power amplifier is selected an auto gain is
used for channel C by using the input 13 or 23.
The gain depends of input module type.
Normal: 3.15 mV / +50 dB to 10 / -20 dB for input module type 1
3.15 mV / +50 dB to 100 V / -40 dB for input module type 2
Rs are 0.1 / 1.0 / 10 ohm.
Note the external power amplifier is selected in the alt4-hw.cfg file.
Smoothing
Here you can select data smoothing on or off to appear on the screen as well as in the data
processing. You can select smoothness over octave selections of 1/48, 1/24, 1/12, 1/6, 1/3, 2/3
and 3/3. If external power amplifier is selected a second smoothing appear for smoothing the
second filter data curve. This second is only valid if filter C is on in log mode.
Filter
The programming capabilities of the filters includes the following filter types:
45
1: Tracking Band Pass
2: Tracking High Pass
3: Fixed High Pass
Advanced high order, filter technology ensures that both Rub & Buzz and THD can be
controlled efficiently.
Type
The filters can be selected as TRK-BP, TRK-HP, FIX-HP or OFF.
For Rub & Buzz use TRK-HP and FIX-HP filters.
Har. (Harmonics)
For the TRK-BP the tracking Band Pass filter and TRK-HP the Tracking High Pass filter the
possible setting range of harmonics are from 2 to 12.
Freq/Bw (Frequency / Bandwidth)
TRK-BP:
The Tracking Band Pass filter can change the filter bandwidth. It is possible to select 0.25, 0.5,
1.0 and 2.0 harmonic around the center frequency as filter bandwidth.
This filter can be used to suppress noise if selected for 1st. harmonic.
TRK-HP:
The Tracking High Pass filter can change following low pass frequency: ∞, 20, 10, 8, 6 and 4.
To calculate the low pass frequency, use following formula: selected high pass harmonic *
selected low pass harmonic. Example, harmonic = 5 & BW - har. = 20. The low pass end is 5*20
= 100 times higher than generator signal. If low pass frequency is ∞ the filter limit is 45 kHz.
Normal makes use of the no limit for low pass, the ∞ sign. The high end can be limited using the
"Limit" function. This filter, and the Fixed High Pass, emits more noise than the Band Pass
filter, but have a higher dynamic range. The 5th harmonics is often used to measure Rub &
Buzz, while the 2nd harmonic is commonly used to measure the THD.
FIX_HP:
The Fixed High Pass filter frequency, start - end, can be selected freely between 20 Hz. and
20000 Hz. This is especially useful for the testing of full tone speakers and woofers.
Make use the filter frequency approximate 10 to 20 times the resonance frequency for Rub &
Buzz give the best results.
Gain
The filter gain can be selected as 0 or 20 dB. This can be useful if the signal level trough the
filter is less than –70 dB.
Display
When Ch A and Ch B or Ch D are using the same input amplifier (same address) and using the
log mode, you can display the result of Ch B or Ch D as relative. This function is made to
display the difference between frequency curve and rub & buzz. The differences are displayed,
as a distortion in dB and the 100% in top of the screen as 0 dB.
If Relative% is used the scale is displayed in % this useful in THD measurements.
46
Limit
Select the filter high-end limit between 22 kHz and 45 kHz.
47
48
Reference
Activating “Reference” leads you into the setting up of reference envelopes for approved and
rejected conditions for the different test channels.
Often you use already approved reference speakers to set up a future standard. Often called a
"good" speaker. By testing a number of "good" speakers you can create the basis for the
tolerance envelope curves.
Measure
To make a measurement, activate the “Measure” command, make use of the “Measure” toolbar
or use the key "M".
Include
If you accept the test results of a tested speaker you include the test by selecting all or a single
channel the transgressions of the upper or lower limit with respect to the present envelopes will
be included to the future reference envelopes.
49
Reset
The upper limit is thus positioned to minimal value and lower limit is positioned to maximal
value. If you only want to reset a single channel, then enter edit mode, select channel and press
Ctrl End.
Edit
Testing of "good" speakers will only provide the basis for a set of envelope curves. To complete
the envelopes you have to go to the "Edit" function. See Edit Reference Mode.
Compensate
Note: You must make a least one measurement to get the menu - and - a compensation curve
must be present.
Compensate the actual measurement in channel A with "stored compensation curve".
The compensation curve can be modified by the user in run mode within +- 3 dB and if Lock
flag is in Global setup +- 6 dB.
Master Comp
Mater compensates current measurements.
This will compensate all channels that use channel A as input.
Note: You must make a least one measurement to get the menu - and - a master curve and a
master compensation curve must also be present.
Make M-Comp
Make a master compensation curve.
Note: You must make a least one measurement to get the menu - and - a master curve must also
be present.
Generate a master calibrate curve. This curve acts like a compensations curve but if channel B or
channel D use same input as channel A the actual channels will be compensated as channel A.
What is the use of a calibration curve? To calibrate your total test system you use a reference
speaker.
First make a master curve with the reference speaker. As time goes your test parameters will
change due to changes in microphone, microphone position, temperature, mechanical changes in
your test environment, change in calibrations of the P630, etc. etc.
To calibrate the system you make a new measurement with your reference speaker. If you have
differences then you must re-calibrate. Then you get the master calibrate curve. After this is
done all measurements will be corrected to your first measurement stored as master curve.
50
Out Compress
Note: You must make at least one measurement to get to this the menu.
Generate a output compress curve. To compress output the frequency response in channel A is
inverted and moved to the top of the channel A display. The compress curve is actually the
voltage output. Maximal output is output level minus 0 dB. Min output is output level minus
maximal curve deviation. This value in dB is displayed in the setup of parameters. Channel A
must be “on” and in the Log mode and a least one measurement must have been produced.
Delete & exit
Normally you only delete the reference data. If so you just have to confirm to delete. If
compensation or a compress output curves are present, you have to select:
Delete Reference Data
Delete all reference curve data.
Delete Compensation Curve
This is only active if a compensation curve is present.
Delete only compensation curve data
Delete Compress Output Curve
This is only active if an output compress curve is present.
Delete only compress output curve data
Delete Master Curve
This is only active if a master curve is present.
Delete only master curve data. To delete a master curve you have to enter your master password
as stored in the file ALT4-M.KEY.
51
Delete Master Compensation Curve
Only active if a master and a master calibration (compensation) curve is present.
Delete only master calibration curve.
Delete Best Fit Curve
This is only active if a best-bit reference curve is present.
Delete only best bit reference curve. The best-fit reference curve is used together with the find
function, a utility function.
Save & exit
Save as Reference Curve
Save all reference data and limits as a reference curve.
Save as Compensation Curve
Save upper limit in Channel A as a compensation curve. If reference data are not present a set of
reference limit and setup will be stored as a compensation curve.
Upper and lower limits must be of the same level. Else you receive a “warning” from the system.
Save as Master Curve
Save upper limit in Channel A as a master curve. If reference data are not present a set of
reference limits and setup will be stored as a master curve.
Upper and lower limit must be of the same level. If not, you will receive a “warning” from the
system.
Save as Best Fit Curve
Save best-fit reference curve. Using the Find function in Utility mode uses the best-fit reference
curve to match a measured curve.
52
Reference submenu
Edit mode
Here you can edit the tolerance band for the different channels. The cursor will start in the upper
left window: "Ch A Upper". In the upper right corner the present cursor values are shown.
Left Arrow
Move the cursor to the left.
Right Arrow
Move the cursor to the right.
Up Arrow
Move cursor up to next curve on the selected channel.
Down Arrow
Move cursor down to next curve on the selected channel.
53
Fast Cursor
You can activate and toggle the fast cursor (10 times faster) by pressing the “0” key or in
”Move” menu use the Fast / Normal function.
Page Up
“Page up” key or the “Display - Zoom In” will blow the selected channel up to full screen. If this
function already is active, the screen will be refreshed.
Page Down
“Page down“ key or the “Display - Zoom out” forces the system to display all channels. If all
channels already are displayed, the screen will be refreshed.
Change Channel
Use the key “+” to change the active channel.
Show Hidden curves
If a compensation-, master-, master compensation- or a ”best-fit” (user) curve is present you can
display this from hide level.
Write point left
Write one point (or 10 with fast cursor) to the left with the cursor.
Use “Edit - Point Left” or use the NUM Lock on keyboard and the numeric keypad on the right
part of the keyboard and use the “4 / ←” key.
Write point right
Write one point (or 10 with fast cursor) to the right with the cursor.
Use “Edit - Point Right” or the “6 / →” key.
Write point up
Write one unit (or 10 fast cursor) up with the cursor.
Use “Edit - Point Up” or the “8 / ↑” key.
Write point down
Write one unit (or 10 fast cursor) down with the cursor.
Use “Edit - Point Down” or the “2 / ↓” key.
Move curve up
Write and move the entire curve one unit (or 10 fast cursor) up. The moved value is displayed in
the top of the display.
Use “Move - Move Up” function or the key “9 / Pg Up”.
Move curve down
Write and move the entire curve one unit (or 10 fast cursor) down. The moved value is displayed
in the top of the display.
Use “Move – Move Down” function or the key “3 / Pg Down”.
54
Point to Point straight line
With this function you can write a straight line between two points. Move or write cursor to the
starting point.
Activate the function by “Set – Line Start” or pressing "5". Move or write cursor to the end
point. Note that the line change color. Activate again the function by “Set – Line End” or
pressing "5". A straight line between the two points is made.
Curve Convert Menu
To go to Curve Convert Menu activate “Functions – Curve Convert”, use toolbar “Convert” or
use shortcut key “C”.
Scale Window Menu
To activate Scale Window Menu enter “Functions – Scale Window”, use toolbar “Scale” or
shortcut key “S”.
Tolerance Curve Menu
To enter tolerance curve menu activate “Function s– Tolerance Curve”, use toolbar “T-curve” or
use the shortcut key “T”.
Power On / Off
Power “on” at cursor frequency value. The output level is the setup level as measured.
To activate power on enter “Functions – Power On” or Toolbar “Power On”.
To set power “off “ use “Functions – Power Off” function or use Toolbar “Power Off”.
Use the shortcut key “P” to toggle the power on/off.
Resonance test menu
To enter resonance test sub menu enter “Functions – Resonance Test”, use toolbar “R-test” or
shortcut key “R”.
Gain adjust menu
Use “Functions - Display gain adjust” or toolbar “Gain Adj.” to enter menu.
Polarity Window menu
Polarity Window activates the “Pulse-polarity time window” sub menu.
To activate menu enter “Functions – Polarity Window” or use shortcut key “W”.
Frequency average menu
Average frequency response quality test menu is activated by enter “Functions – Freq. Average”
or with toolbar “F-ave.”.
Sensitivity average menu
Sensitivity average test menu is activated by enter “Functions – Sen. Ave. Test” or with toolbar
“S-ave.”.
Spectrum
Spectrum activates a Power Spectrum display. The Power Spectrum shows the actual spectrum
with the first harmonic as selected frequency by sine generator.
55
Move part left
“Ctrl ←” key or use “move – Move part Left”.
By writing part of a curve up or down you can keep the curve envelope shape and move part of
the curve to the left.
Move part right
“Ctrl →” key or use “move – Move part Right”.
By writing part of a curve up or down you can keep the curve envelope shape and move part of
the curve to the right.
Reset lower limit
“Ctrl Pg Down”, “Set Limit off” or shortcut key “Ctrl Page Down”.
This forces the lower limit to zero on the selected channel. A quick way to reject to have a lower
limit in rub & buzz test.
Reset Limit
This resets upper and lower limits only on the selected channel.
Use toolbar “Reset – Channel Limit” or use shortcut key “Ctrl End”.
Center reference limits
This sets the upper and lower limit to half range value 40 dB from screen top. This is to make
tolerance curves. See the tolerance sub menu.
Use “Set – Center Limits” or shortcut key “Ctrl Home”.
Print
Print curves on selected printer.
Print Setup
Select printer and settings.
56
Curve convert menu
Functions can be activated by toolbar, by entering Functions pub up menu or the short key
shown in pup up menu.
Upper -> Data
Convert upper reference curve to data curve on selected channel.
Lower -> Data
Convert lower reference curve to data curve on selected channel.
Data -> Upper
Convert data curve to upper reference curve on selected channel.
Data -> Lower
Convert data curve to lower reference curve on selected channel.
Data – Upper -> Data
Data minus upper reference curves added a half scale stored in data curve.
57
Data – Lower -> Data
Data minus lower reference curves added a half scale stored in data curve.
Upper – Data -> Data
Upper reference plus data curves minus a half scale stored in data curve.
Lower – Data -> Data
Lower reference plus data curves minus a half scale stored in data curve.
Print
Print curves on selected printer.
Print Setup
Select printer and settings.
58
Scale window menu
The display has a range in Log mode of 80 dB. By changing the display scale you can display up
to 10 dB for full scale. 80 dB / 10 dB give max. 8 windows you can select.
For channel C you have a range of 50 dB and can select max. 5 windows.
Functions can be activated by toolbar, by entering Functions pub up menu or the short key
shown in pup up menu.
Range Up
Decrease the display by 10 dB. Display range up.
Range Down
Increase the display by 10 dB. Display range down.
Window Up
Move selected window up.
Window Down
Move selected window down.
59
Print
Print curves on selected printer.
Print Setup
Select printer and settings.
60
Tolerance curve menu
Normally you have a number of different test setups, however when you analyse the setups you
have different reference curves. But the tolerance levels are almost the same for example +/- 2
dB. The tolerance curve is the standard tolerance from a straight line around the middle measure
range.
How to use of tolerance curve:
a)
- Make a measurement
- Include data
- Go to tolerance curve
- Load a tolerance curve
- Add the tolerance curve
- Edit reference curve if necessary
How to make a tolerance curve:
b)
- Reset channel A to middle position (Ctrl Home)
- Make the tolerance curve
- Store the tolerance curve
Functions can be activated by toolbar, by entering Functions pub up menu or the short key
shown in pup up menu.
Add
Add the tolerance curve to the upper and lower limit.
61
Add2
Add the tolerance curve to the 2nd upper and 2nd lower limit.
This only for channel A and 3-limit is enabled.
Add3
Add the tolerance curve to the 3rd upper and 3rd lower limit.
This only for channel A and 3-limit is enabled.
Load
Load a tolerance curve from disk to memory.
Save
Store a tolerance curve, upper and lower limit to disk.
NOTE: To save a tolerance curve the curve must be generated in channel A.
Delete
Delete a loaded tolerance curve from disk.
Print
Print curves on selected printer.
Print Setup
Select printer and settings.
62
Resonance test menu
In the Run menu you can perform a resonance test as a separate test if Ch. C is enabled. When a
resonance test is performed all result as resonance frequency and value, test result, min.
impedance and frequency, Q at resonance (if enabled) the F result and value are stored in the
A4STAT file.
To activate this test you have to tell the system the actual start and end test frequency of
resonance.
The F is (resonance frequency / Q) hertz. In this way you can test the resonance frequency, the
maximal Q and the min Q by using the F.
Functions can be activated by toolbar, by entering Functions pub up menu or the short key
shown in pup up menu.
Low Limit
Select the start frequency for resonance test. Move the cursor to the start frequency and set
frequency with “Low". You can use the fast cursor "0".
High Limit
Select the end frequency for resonance test. Move the cursor to the end frequency and set
frequency with "High". You can use the fast cursor "0".
63
Reset Limits
Reset the resonance test frequency markers and set the test off.
F-Set
If the resonance test is selected you can enable F test by entering an upper and lower tolerance.
Note 0 = off. This F test is separate test in run mode.
F = (resonance frequency / Q)
The F is the span in hertz measured between the lower and higher frequency point the Q is
calculated at.
F - upper and F - lower limits must be added to activate the F test.
To disable the F test enter 0 to upper limit.
Q-Set
If the resonance test is selected you can enable the Q test by entering an upper and lower
tolerance. Note 0 = off. This Q test is separate test in run mode.
The Q test can be selected as Qms or Qts.
To cope with a fast automatic test system approximations can be necessary.
To calculate the exact value of Q the Re, the DC resistance is needed.
To compare a speaker with others – relative measurement a approximation is preferred to be
selected.
Following different Q calculations can be selected:
64
Q = Qms.
Approximated level as –3dB from resonance frequency.
Q <= Qms due to the Re value.
Q = Qms.
Exact value. Re must be known and entered to the separate setup.
Q ≠ Qms if the Re not is constant for every measurement.
Q = Qms.
Approximated Re. Re = Z min.
Q >= Qms. This value is normally >= to Re. (approximate +0 to +10%).
Q = Qts.
Exact value. Re must be known and entered to the separate setup.
Q ≠ Qts if the Re not is constant for every measurement.
Q = Qts.
Approximated Re. Re = Z min.
Q >= Qts. This value is normally >= to Re. (approximate +0 to +10%).
Q - upper and Q - lower limits must be added to activate the Q test.
To disable the Q test enter 0 to upper limit.
Print
Print curves on selected printer.
Print Setup
Select printer and settings.
65
66
Gain adjust menu
If you are using the loudness functions you must first select the output level. Then select the best
gain in the input amplifier. Normally you adjust the microphone sensitivity by using a Sound
Level Calibrator.
Set the Calibrator to microphone. Set the best gain in input stage. Enter the gain adjust sub
menu.
Select proper frequency by using cursor. Set new value on display.
Functions can be activated by toolbar, by entering Functions pub up menu or the short key
shown in pup up menu.
New Value
Enter the new display value. The value is included in all calculations. This function only works
in channel A.
67
Reset Value
Resets adjust value. Get the previous screen value.
Move Data
Move data moves the measured data with entered value, as an offset, before any processing and is
displayed as moved. This function has same affect as changes in the input gain.
Reset Move (Default)
Reset the data move function and value.
Print
Print curves on selected printer.
Print Setup
Select printer and settings.
68
Polarity window menu
The polarity test is by the program performed in the following manner:
The program finds the largest positive signal and stores this. Then the program finds the largest
negative signal and stores this. The result of the polarity test is approved if the largest positive
signal arrives before the largest negative signal and “APROVED” has been set to “POSITIVE”
in the setup menu and visa versa.
If the magnet is poor or if amplifiers have been built-into the speaker (as in PC speaker systems),
the polarity may look like a damped sine oscillation. Also if the environment is noisy, a faulty
polarity test result may occur. To prevent this a time window can be defined to eliminate any
signal that can interfere with the polarity test.
Functions can be activated by toolbar, by entering Functions pub up menu or the short key
shown in pup up menu.
Low Mark
Select the start marker for the window. Move the cursor to the start time and set marker with
“Low". You can use the fast cursor "0".
69
High Mark
Select the end maker for the window. Move the cursor to the end time and set maker with
"High". You can use the fast cursor "0".
Reset Makers
Reset the makers and set time lock out window off.
Print
Print curves on selected printer.
Print Setup
Select printer and settings.
70
Frequency average menu
It is possible to select measurements of frequency response and put the results into different quality
groups. This is done by calculating the average for a given frequency response and compare this
value against a reference value. To select the quality groups a user defined quality criteria can be
set up in the “Group” menu. The frequency average test is the measured data between the markers
against the sensitivity limits.
Note – this test is different from the Sensitivity average test found in the “S-ave.”.
Functions can be activated by toolbar, by entering Functions pub up menu or the short key
shown in pop up menu.
The two markers define the frequency range used to calculate the average value.
The reference level is generated using the include function. Include converts the actual
calculated average value to the reference value.
Low Mark
Select the low mark for start of average frequency range. Move the cursor to the start frequency
and set start with “Start Mark". You can use the fast cursor "0".
71
High Mark
Select the high mark for end of average frequency range. Move the cursor to the end frequency
and set end with “End Mark". You can use the fast cursor "0".
Reset Makers
Reset the makers and disable average function and test.
Include
Include average value calculated between markers as reference average value.
Group
15 individual quality groups can be defined.
Seven groups are defined as P1 to P7, as positive groups.
One group is defined as “0” the zero group around the reference.
Seven groups are defined as M1 to M7, as negative groups.
The input for each group is the upper + or – tolerance in dB and the lower + or – tolerance in dB
from the reference value.
The tolerances of each group can be defined freely (+ to +, + to –, – to – or – to +), but two
different groups must not overlap.
This facility is for example useful to group the data into purely individual quality groups.
Limit
By define an upper and lower absolute limit an average test will be enabled in run-mode.
The test result in edit-mode will display the “Ave” value as green if approved and red if rejected.
72
The average is the absolute value between the low and high markers. The markers must be
defined together with the upper and lower limits to activate this test
Print
Print curves on selected printer.
Print Setup
Select printer and settings.
73
74
Spectrum
The spectrum is a Power Spectrum generated out from measured data with first harmonic as
selected generator frequency.
In this example the generator frequency is 641 Hz.
The start frequency of the display is the same as start frequency of the sweep and the end
frequency of the display depends of the sample rate.
The display range is 120 dB with the upper display with same sensitivity as selected values as in
sweep menu and with each division 10 dB.
On / Off
This start / stop the Power Spectrum analyze furthermore the power is set On / Off.
Down / Up
Move the generator frequency “Down” and “Up”.
Coarse
Move Down / Up fine or Coarse. Coarse step is 10 times as normal.
Print
Print the graph to a printer.
Exit
Exit Power spectrum menu.
75
76
Run Speaker Tests
Entering "Run" from the main menu will show you the available selection of speaker setups.
The screen will be almost the same as if you were editing type setups, described in setup of
testing characteristics.
Select a valid type by entering an existing type name. If the system multiplexer is “on” you have
to select two setups. The system requests the type for system 1 and then the type for system 2.
Functions can be activated by toolbar, by entering Functions pub up menu or the short key
shown in pup up menu.
Note:
The green approved label is for the last test (all test together except the first). Channel b shows a
reject for the first test and approved for the rest test only if the chain function is activated.
77
Following picture show same test as before, however the first one of the chain and as graph
“View” enabled.
With both pictures have the following options:
Run 1
Make a measurement. This is only valid if control is KEYboard and system multiplexer is “off”.
This is selected in the global setup. For system multiplexer is on make a measurement channel 1.
The control is KEYboard.
Run 2
Make a measurement. This is for system multiplexer channel 2. The control is KEYboard.
View
View the test result graphical. Only necessary if “Display Graph” is disabled in global setup.
Else this function is automatically entered.
Exit View
Exit View and enter the text result mode.
78
Cursor
Cursor submenu.
First
Only if chain is enabled and activated, display first measurement.
Last
Only if chain is enabled and activated display, last measurement.
Reset
Reset screen statistics. Note: Only possible before making the first measurement and only if the
option is enabled in “Setup of Global Parameters”.
Delete
Delete last statistics record if statistics or store data is “enabled” in the global setup. The record
is not removed but renamed to USERDELETED.
Note. If a chain is used it is only the last displayed record that is marked for deletion.
Stat A
Enter on screen statistics A if “enabled” in the global setup.
Stat B
Enter on screen statistics B, result statistics, if “enabled” in the global setup.
Number
The actual measurement displayed can be indicated by a serial number of 16 digits. If activated
the serial number is stored together with the measured data. Store measured data must be ON in
global setup.
If the chain function is activated you must enter the “View” and select the first or rest to enter a
properly serial number for each test data. If the chains have more than two tests in the chain you
can only add a serial number to the first and last sat of data.
U-code
This function is optional.
This allows the user to give the actual set of data a user code 0 – 999. This a useful function to
add a user reject code to the actual test.
If you start a measurement all the tests (according to the setup and tolerances in the type setup)
will be carried out.
79
Depending on the setup in the global parameters you will see the results color-coded in text
mode (approved / rejected) or color coded in graphics mode.
If you use the "chain mode" (chain must be selected in global setup and use of a valid chain
name in your selected type) two rows of results appears. The first row and numbers are the
results for the first test in the chain. The second row and numbers are for the entire rest test in
the chain lumped together. However, if you only have two tests in the chain, the second row is
the results for the second test only.
The text will show you for each individual channel, if it has been approved (Green) or rejected
(Red), yellow for 3-limit if data outside 2nd or 3rd limit however still within reject limit.
Appropriate beeps will accompany the tests (as setup in the global parameters).
80
Cursor Submenu
Navigation is performed equivalent to the Edit mode in the setup of reference parameters described
in setup of testing characteristics. In run mode you cannot change parameters as in Edit mode.
Functions can be activated by toolbar, by entering Functions pub up menu or the short key
shown in pup up menu.
Zoom +
Enlarge display at selected channel. Key “Page Up” has same function.
Zoom –
View all channels. Key “Page Down” has same function
Power +
Set power on output. Move cursor to select frequency. Key “P” as toggle has same function.
Power Disable power on output. Key “P” as toggle has same function.
Calibrate
Update master calibrate curve. Act like a compensation curve.
81
Display Hide Off
Display compensation-, masters-, master compensation curve if present.
Display Hide On
Hide compensation-, masters-, master compensation curve if present.
Move Fast
Select fast cursor. 10 time faster.
Move Normal
Select normal cursor. Disable Fast cursor.
Key “+”
Select active channel by use of cursor.
Key “←”
Move cursor left.
Key “→”
Move cursor right.
Key “↑”
Move cursor up to next curve.
Key “↓”
Move cursor down to next curve.
Print
Print curves on selected printer.
Print Setup
Select printer and settings.
82
Statistics
Stat A -Varians & Collation
If on screen statistics is “enabled” in the global setup you can have display information as:
- Rejected test in percent and the variance for each sub test.
- If resonance test or loudness test is enabled you have information in the form:
- f(y) = a + bx ,
"a" is the average , "b" is the slope
- Last measured value
- Variance of "a"
- Correlation of result. Note: If "b" is “0” the correlation coefficient will be “0”
- Numbers of tests in analyze
Functions can be activated by toolbar, by entering Functions pub up menu or the short key
shown in pup up menu.
If you use the "chain mode" (chain must be selected in global setup and use of a valid chain
name in your selected Type) two pages of results are presented. The first page is the statistics for
the first test in the chain and the second page is for the remainder of the tests lumped together.
First
Select first type data.
83
Last
Select last type data. If more than 2 tests in chain impendence channel is only from the last else
approved and rejected data from all types lumped together except the first.
Print
Print curves on selected printer.
Print Setup
Select printer and settings.
84
Stat B - Results & Distribution
This menu shows the statistics and test results for the actual test type. If the user code is
activated the statistics for the first 40 different user codes is displayed (optional).
Print
Print curves on selected printer.
Print Setup
Select printer and settings.
85
86
Utilities
For better to manipulate with the reference and measuring data a collection of utilities can be
selected under the utility menu.
You can select as standard six (optional seven) different groups of utility functions.
•
A utility to process the stored data in the Statistical Data file, default A4M_STAT.DAT.
The file containing all measuring data, stored in run mode if "enabled" in the global
setup.
•
A utility to convert data stored a DAT file to plain ASCII as input for spreadsheets.
•
A group of utilities to transfer setup and reference data to and from your P500 systems.
•
A group of utilities to export setups and reference data.
•
A group of utilities to import setups and reference data.
•
A utility a Log Manager to restore setups and make a clean up of Log Database.
•
(Optional) A utility to match two set measurement of frequency responses together.
87
88
Process Statistical Data Utility
When entering the Statistical Data Utility, the program asks you to select a Statistical Data file.
Default A4M_STAT.DAT.
When a Data File of the type “DAT” if opened, a list of all different type names stored in the
selected file is displayed.
In this case only tree types is in the a4m_stat.dat file.
Note: The program reads only the first 64 different setup types. It is a good idea to copy and then
delete the DAT file from your production line PC to avoid a message "disk full" or to be sure
that the file does not become to big to process.
After a proper selection of a valid Type you get the choices.
89
It is possible to manipulate with the stored data. The following options are possible:
Process Selected Type
Process the data without manipulating any of your source data in the Statistical Data
file.
Process & Extract found Type to a File
Process and extract the found and accepted data to a file (A4M_XTR.DAT is default).
Process & Extract & Delete found Type
Process and extract the data to a file and delete only the transferred data in the source
file. Found but not accepted (missed) data will be left in the source file allowing later
separate processing of missed data. Missed data is caused by mismatch in parameters
as: number of channels, gain/scale, start / end frequency and number of test points.
Copy & Delete selected type to a File
Copy and Delete selected type to a file. Copies all data of the selected type to a separate
file and deletes it from the source file.
Delete selected Type from Statistical File
Delete the selected type from the selected Statistical Data file.
90
To process the data a selection of criteria’s can be selected.
To select only a fraction of all stored data it is possible to select Number, Date, User Code
(optional), Test results, User test (optional) and Select the field.
Number selection.
If the serial numbers are present in the data file, a selection of numbers to process can be
selected. A start number and an end number can be selected. The maximum number of
counts, hits is 64000.
Note: if the data do not contain this information, as older format, the default is all,
64000.
Date selection.
Start and end date can be selected within data can be processed and maximum of counts
/ hits. Date format is: MM, DD, YY, hh, mm.
Where MM is month, DD is date, YY is year, hh is hour and mm is minutes.
The maximum number of counts, hits is 64000.
Code selection (optional).
A user start and end code can be selected for the processed data. The maximum number
of counts, hits is 64000.
Note: if the data do not contain this information, as older format, the default is all,
64000.
Test results.
It is possible to process the data by selecting the test results. Selection can be approved,
rejected or all.
Note: if the data do not contain this information, as older format, the default is all.
91
User test. (Optional)
It is possible to process the data by selecting the user test results, results forced by
operator. Selection can be approved, rejected or all.
Note: if the data do not contain this information, as older format, the default is all.
Select field.
By default all data is processed this to process old format of the data files. However it is
possible only to select new data format records containing the number selection field.
It is possible to select only a single channel if more than one channel is present. If all present
channels have to be processed just select “All Channels”.
If you in the “Input channel setup” menu have chosen the data smoothing function for at least one
of the active channels, you will be presented for the following screen picture, where you can select
either to present the data as recorded with smoothing or as recorded non-smoothened. If no
smoothing is selected the display will not appear.
If all stored data have to be processed by the criteria selected at “Record select” the automatic
function must be selected. If you want to process the “good” or only the best or maybe only the
“bad” data records select instead the manual mode. In manual mode the date code and serial
number are displayed. If the data is stored in new format the actual test results for each
measurement can be displayed in manual mode.
92
Manual mode.
In the manual mode the actual record is displayed. By entering manual mode you can select to
display the upper and lower limits together with the data or make displays without any limits.
Then you are asked to accept the current data or skip the record.
In the bottom line a date code and a serial number are displayed. The date is the actual date code
for the record. If the record is stored in an old format, the two last numbers is a sequential
number if more than one record have the same date code, else the two last numbers is seconds.
In this way no two records have the identical date code, this only for the old format.
The format is: month, date, year, hour, minute and seconds.
If the selected type number is present in the reference curve setup, the displayed data is colorcoded “green” for approved and “red” for rejected. If the program cannot find the selected
reference type all curves becomes “red”.
If the selected data type you want to process is stored in your reference base with a valid upper
and lower limit the following menu appears:
93
Functions can be activated by toolbar, by entering Functions pub up menu or the short key
shown in pup up menu.
Include
Include current measurement to statistical data.
Skip
Skip current measurement and go to next record.
Back
Step one record back. It is possible to step up 20 records back due to all 20 results as well as
displays are stored temporally in a file.
Continue
This command is only active when last record is found with selected type.
Continue to process accepted data.
Results
The actual test results can be displayed. This only if the data is stored in the new format.
94
Print
Print curves on selected printer.
Print Setup
Select printer and settings.
Automatic mode.
If “auto” mode is selected and a valid set of upper and lower limits are found a suppress function
appears.
Note: if no valid limits are found this suppress function do not appear.
95
It is possible to suppress unwanted stored records. This works in the following way. The value
you add as suppress value is added to your upper and lower limits to widen your present limits.
This is a way to suppress wrong measurements from your data. If for example the speaker was
disconnected during the test you collect totally erroneous data. To add for example 10 dB or
more to your present limits, you can suppress this kind of errors but still include normal rejects
to your processing of data.
It is possible to choose to by-pass the screen presentation for each data set and jump directly to
the presentation of limits in the “STATISTICS” submenu. This is done in the “Display” or
“Reject” submenu. This speeds up the process considerable if many data sets are present.
When all data records have been processed all accepted records are displayed at the same time.
If a valid reference setup is found a proper color-coding is selected.
At the top of the display information about the total number of collected record is displayed. If
for any reasons the structure of the first selected record is different from the rest a "miss" is
counted. The cause could be a change of frequency range, gain or active channel number. None
of the "miss" records are processed.
96
Functions can be activated by toolbar, by entering Functions pub up menu or the short key
shown in pup up menu.
Continue
Continue to process displayed data.
Print
Print curves on selected printer.
Print Setup
Select printer and settings.
97
Continue
Functions can be activated by toolbar, by entering Functions pub up menu or the short key
shown in pup up menu.
Limit
Add limit to display.
Stat
Enable Statistical menu Mode 1.
If the "Reject display" function has been selected the screen picture is bypassed and goes
directly to the Statistical menu Mode 1.
The statistics function processes the already collected data called “Mode 1” and the presentation
of the following curves:
- Yellow
upper and lower reference curves if selected.
- Pink
average of collected data.
- Blue
maximum and minimum of collected data.
- Light blue + and - 3 times standard deviation of collected data.
Print
Print curves on selected printer.
Print Setup
Select printer and settings.
98
Statistical mode 1
Functions can be activated by toolbar, by entering Functions pub up menu or the short key
shown in pup up menu.
Data
Go back to previous menu.
Cursor
Cursor function activates the cursor and enter the “mode 2” from which replacement between the
different data and reference curves can be done.
Save
The function is a sub menu. The save function allows to store the processed data to selected
reference curves or as a totally new type.
Select
The select is a sub menu. It is possible to select the curves to display on screen as listed in this
sub menu.
99
Find
With this function the user can “find” the best match of a data set to the “average” of the
included data set or a “Best fit reference”. A “Best fit reference” must be saved in the “EDIT”
menu before processing the data with the statistics utility function. This is done like the saving
of a “Reference”, “Compensation” or “Master” curve in the “SAVE” submenu. A status will
accordingly be shown in the “SET UP OF PARAMETER” screen picture for the Type.
The “average” or “best fit” selection criteria are set up in the “MODE 1” submenu “SELECT”.
The user can select the average for channel A, B, C or D or any combination of these, or for the
best-fit reference.
Submenus:
Select
In this sub menu it is possible to select the curves to display in "Mode 1" and "Mode 2". This
function is made for better to make a screen dump to a printer or disk for documentation
purposes.
Find
The find function select the records that match best to the average or the best file reference curve
selected in “select curve” menu. Note a least one best-fit channel must be selected as above
channel A.
In this example record 12 out of total 68 or record out of 68 processed records was found. The
date code of the unit is 0107030919
100
Functions can be activated by toolbar, by entering Functions pub up menu or the short key
shown in pup up menu.
Fast
Fast Cursor is 10 times faster than normal.
Normal
Disable the cursor.
Zoom In
Enlarge display at selected channel. Key “Page Up” has same function.
Zoom Out
View all channels. Key “Page Down” has same function
Print
Print curves on selected printer.
Print Setup
Select printer and settings.
101
Statistical mode 2
Functions can be activated by toolbar, by entering Functions pub up menu or the short key
shown in pup up menu.
Fast
Fast Cursor is 10 times faster than normal.
Normal
Disable the cursor.
Zoom In
Enlarge display at selected channel. Key “Page Up” has same function.
Zoom Out
View all channels. Key “Page Down” has same function
Replace
Replace selected limit/curve with listed data.
M-Start
Set start marker for part replacement.
102
M-End
Set end maker for part replacement.
If start and end maker are present and you make use of the “Replacement” the replacement is
only performed between the markers.
M-Reset
Reset markers
Print
Print curves on selected printer.
Print Setup
Select printer and settings.
Note:
If the scale of the display is changed from the standard setup and you want to make use of a
different scale setup, you have to change the display scale before you store the data in the
A4M_STAT.DAT file. It is not possible to change the scale later on. The presentation is made
exactly as it was recorded.
103
104
Convert Statistical Data
This function converts data types stored a DAT file, default file name is A4M_STAT.DAT, to
plain ASCII.
When selected file is opened a list of stored “Types” appears. A selection of a single data
“Type” can be selected or all listed data types listed on the screen by the “Use All Listed”
function.
After to have selected types to convert a Data Field Select menu appears. Here it is possible to
select a part of selected type by entering start and end date.
105
If a type, which has been recorded with smoothing, is selected, you are prompted to select the
data to be converted as recorded with smoothing or as the raw non-smoothened data.
If, however, you select all types to be converted, and there among these exist types with
smoothened data, all types will be converted just as recorded (with or without the smoothening
function).
Furthermore it is possible to select “line” or “row” format. The line format is standard. All records
are converted as lines in a text file. If the row format is selected all records are stored as rows.
However, using row format the date and time codes are lost in the transfer.
In text files, used for third party programs, (as spreadsheet) a delimiter has to be used as “,” or “;”.
Finally a problem of too long strings can cause problems in some programs. To solve such
problems a selection of the maximum string length can be made.
106
Line Length Standard:
In line mode:
None of the strings are broken down into minor parts. A single string length for a reference
curve can be up to 1775 charters long.
In row mode:
The number of rows is maximal 250. Number of lines are 8 + channels* (points + 3).
Line Length Limited:
In line mode:
The maximum string length is 1/2 of length used as in the standard mode.
In row mode:
Number of row is maximal 125. Number of lines are 8 + channels*(points + 3).
After all these selections have been made the conversion takes place you have to save the
converted file.
107
108
Copy Reference Data
This group of utilities contains the most functions needed to copy single record(s) existing in the
P600 main reference database to or from a floppy or another disk. The files, which you are
copying, have the extension DBS for setup files, DBC for reference curve file, DBA for
Frequency average setup and DBN for sensitivity average setup.
List Reference Types
This function lists all types existing in the reference setup database. This is the same list you are
presented with when entering the run or change setup mode.
109
List Types in DBS files
It is possible to copy a single or a group of files to the DBS file by using “wildcat” characters.
To make a list of types containing a particular DBS file use this function.
To list types in DBS file select disk, path and file name. Here a list contains of the file
“Dbscopy.dbs” with only one type “test”.
110
Copy Reference to Floppy or Disk
To copy a reference type or types to floppy use this function. With this function a proper
reference type name must be entered. “Wildcat” characters such as “*” and “?” are allowed. An
asterisk (*) has the same function as in DOS. An asterisk means all characters, if places in the
beginning or at the end of a string. The question mark(s) means character(s) in a particular place
in a string.
Here the type “test1” is selected to copy to a DBS file. DBS file name and destination must be
defined.
Copy from Floppy or Disk to Reference
To copy a reference type, stored in a DBS format, to the main reference structure, use this
function. The actual type name or names in the particular DBS file have to be specified.
“Wildcat” characters as “*” and “?” are allowed. An asterisk (*) has the same function as in
111
DOS. An asterisk means all characters if places in the beginning or at the end of a string. The
question mark means a character in a particular place in the string.
After valid password is entered you have to select the DBS filename from you have to copy
reference data from.
Here the file “Dbscopy.dbs” is selected to copy from.
The file contains only one type with name “test1”.
112
If the type name you want to copy to main reference structure already exist the system ask you to
overwrite this type in the main reference or to exit the menu.
Rename Reference Types
This function renames a type name in the reference database.
In this example the type “test1” will be renamed to type “newname”.
Delete Reference Types
To delete a single reference type or several types use this function. Enter the name of type you
want to delete. “Wildcat” characters as “*” and “?” are allowed. An asterisk has the same
function as in DOS: All characters are marked if places in the beginning or at the end of a string.
The question mark indicates a character in a particular place in string. Final you have to confirm
the operation or quit.
113
114
Export Reference Data
This function takes the reference setup and converts both the setup parameters and the reference
curve data to a TXT file. First a list of available type name appears on the screen.
Selected
Select only one reference Type to be converted. Type must be in gray field “Type to
Export”. Click twice on name to select.
All
Select all reference types listed on the display to be converted.
When the desired action has been chosen a proper path for the output text file have to be selected.
115
In text files used for third party programs (as spreadsheet) a delimiter has to separate the data. Too long strings can
cause problems in some programs. To solve such problems a selection of the maximum string
length can be made.
Line length Standard
None of the strings are broken down into minor parts. A single string length for a
reference curve can be up to 1775 characters long.
Line Length Limited
The maximum string length is 1/2 of the length used in the standard mode.
116
Import Reference Data
This function imports a setup from a text file format as generated by “export reference data” to
TXT format. If changes in the file have to be made or lines have been added it is the user's
responsibility to check that the changes does not cause the system to hang or terminate.
However, if changes are done properly, with valid numbers and line format, it should work fine.
First the input file name has to be specified. Normally the input file name is the output file as
exported - A4EXPORT.TXT.
If the imported file contains an already present type name for reference setup, the system asks to
overwrite or not.
In case of a new type name, but not all parameters are specified, a question of filling in the
remainder of the parameters by default values or not is asked by the system.
117
118
Log Manager
The Log Manager is a tool to list changes made in the Global Setup and Setup of Types.
Every time s Global Setup is save the program find out the changes made between the new and
old setup. Only the changes are saved as plain text in a log file.
See more about this in the section “Log Utility”.
On the same way the changes between a setup of a “Type” are saved in the log file as plain text.
If changes are made in your reference curves a backup of the old setup with curves are stored in
a log database. The “Type name” of this backup is a time stamp at present time the backups are
made. This to ensure not two backups have same type name.
The left side of the Log Manager is a selection tree to enable a list of a change in “Global
Changes” or the “Setup Changes”.
119
The lists of ”Global Changes ” are sorted on the saved time stamp as year, month, date, hour,
minute and second.
The lists of ”Setup Changes” are sorted in types and then on date.
When as picture above a backup id made the restore function will be active.
As this example the Type “tx” have been changed 11 October 2004 at time 9:39 and saved as
“101104093929”.
Restore
To restore a setup simply use the restore function when enabled. If the Type is present in your
current setup you have to confirm to overwrite type if desired.
Current setup will then be saved in the log backup database to ensure it is possible to restore last
action.
Clean Up
With this Clean Up function all saved data in the Log database will be removed up to and
including the selected date code.
120
In this case all saved data including and before the date of 10 November 2004 will be removed
from the log database.
Finally to remove the saved data it must be confirmed with a yes.
121
122
Match Stored Data (optional)
The match utility is optional and do only work together with records the stored with a serial
number. This function matches all selected records together and finds the two speakers where
the frequency responses of both speakers are within predefined limits and criteria’s.
As input to the match data process the data stored in a DAT file generated in run-mode is used.
The result of the match process is a list of paired records, and normally some records not paired.
The not paired records are added to a DAT database with name A4NOFIND.DAT.
To avoid conflicts with data records with same serial number a check for dual records is made
before any match process. This removes the problem if the “nofind” database is added more than
one time.
Note: If you by mistake have added the same speaker record more the one time, maybe the first
record was made by mistake, the last record will be the valid one.
Save NotFound base to file
To save the notfound database use this menu. The database can be saved on different location and
name.
123
Restore NotFound base from File
Use this function to restore a notfound database. The present notfond database will be overwritten
with the new one.
Append data to NotFound base
Use this function to append data from file saved as notfound file.
This function leaves the stored data on the present notfound database and appends data only.
124
Reset NotFound base
This function removes all present records from notfound database.
List NotFound database
Use this function to list the records in the notfound database.
125
Match Data Processing
When entering the match data-processing menu the input data file has to be selected. Select the file
name. The default file name is A4M_STAT.DAT.
When the file is selected the type to process must be selected.
Select the start and end serial number to process or to accept all numbers.
126
Select the start and end date code to process or accept all date codes.
Parameters for the match process must be selected properly to match measurements together.
Up to tree calculations frequency span can be selected. First, start of the sweep to the lower
significant frequency. Second, between lower significant to upper significant frequency. Third,
from upper significant frequency to end frequency of the sweep.
This to make an outer set of parameters and an inside set of match parameters.
Significant frequency
The significant lower frequency can be selected from the start of the sweep to less than the upper
significant frequency point.
The significant upper frequency can be selected from the point higher than lower significant
frequency to end of the sweep.
Acceptance level
The inside acceptance is the maximum numeric difference between the two measure of all
measurement points in the inside band before the match is rejected as nofind.
Span limit
The inside span limit per octave is the maximum sum of numeric differences of all measurement
points calculated on octaves entered in this function compared to the inside acceptance level. If the
sum of inside differences based on the entered octaves is higher than the inside acceptance level the
match record is rejected as a nofind.
127
Save Parameters
Save the current match parameters and continue with the match process.
Include Notfound
Include add the records from the current Not Found database to the match process.
Continue
Continue the match process with the current match parameters.
An example of the match process is shown above. Record with serial number 703 is matched
with a record with serial number 45.
Processed records not listed above are added to the notfound database.
128
Log Utility
This function record all changes made in the setup or in the references to a file named
A4_LOG.TXT stored in a (predefined) subdirectory “LOG” located where your P630.exe
program are saved
To list the contains of this log, restore saved backup types and to clean up please use the “Log
Manager” found in the Utility Menu.
Manual list of all changes, backup and clean up can be done. If so please read following section.
The file contains time and date for the changes, the technician password and which parameters
that have changed. The changes made in reference curves are only stored as how many points
that has been changed in the actual curve. However, if changes are made to any reference curves,
backs up of all setup and limits databases with its index files are stored in the LOG subdirectory.
Note only backup of setup and reference curves are made when changes are made in the
curves.
Note: These set of files are growing each time any changes are made. To avoid the files get to
big, the disk full problem, or the base get to big and data can not be stored any longer you must
check the size of the files.
Move the files and delete the old set when the files get to big.
Following is an example of the file A4_LOG.TXT:
Date: 060697161912
Global changes made by: p500
Chain function changed
from: OFF
to: ON , delay: OFF
, break: OFF
*****************************************************************************
Date: 060697162214
Type: test
Changes made by: p500
Channel A changed
Channel A Upper limit changed
Channel A Lower limit changed
Channel B changed
Multiplex B changed
Channel
Channel
Channel
Channel
Channel
B
B
C
C
D
Upper limit
Lower limit
Upper limit
Lower limit
changed
changed
changed
changed
changed
Multiplex D changed
Channel D Upper limit changed
Channel D Lower limit changed
from:
to:
in:
in:
from:
to:
from:
to:
in:
in:
in:
in:
from:
to:
from:
to:
in:
in:
-20.0 dB
0.0 dB
250 points
250 points
-20.0 dB
0.0 dB
12
11
221 points
250 points
250 points
250 points
-20.0 dB
0.0 dB
13
11
250 points
250 points
129
Filter CH B changed
Absolute
from: TRK-BP harmonic
to: TRK-HP, harmonic
1, Bw 1.00, Display
5, Bw 35.00, Display
Absolute
Filter CH D changed
from: OFF
to: FIX-HP, freq. 2000 Hz, Display Absolute
Backup setup made in LOG path
as:060697162214
*****************************************************************************
Date: 060697165031
Global changes made by: p500
Display by approve changed
from: ON
to: OFF
Display by reject changed
from: ON
to: OFF
*****************************************************************************
Date: 060697165104
Global changes made by: p500
Chain function changed
from: ON, delay: OFF
, break: OFF
to: OFF
*****************************************************************************
Date: 060697165811
Type: test1
Changes made by: p500
Current Type Created
*****************************************************************************
As example above a backup are made in the log directory with the type name “060697162214”.
Restore
Use the Log Manager to restore data. Else:
To restore this setup and transfer it to the working database of setups do following:
Enter “Global Setup” and select as “Reference Path” your Log path.
Example: “c:\p630\log”
Now it is possible to get a list of saved backup types saved in the log database.
It is possible to enter the “Setup” and read the type you want to examine or go direct to the
“Utility” and copy the setup to a temporary place as copy reference to a floppy or export the
selected setup.
To restore enter “Utility” and save reference to floppy.
Then enter your “Global Setup” and select as “Reference Path” your working directory.
Now by the temporary setup can be restored by copying the setup to reference from a dbs file or
by an import.
Note you need to rename the type name to the correct type. In this example, rename
“060697162214” to “test”.
Clean up
Use the Log Manager to Clean up data. Else:
130
To clean up saved backup types in the log database changes your “Reference Path” to your Log
Path as described above.
Now it is possible by entering the “Setup” to delete a single setup or by entering the “Utility” –
“Copy Reference Date” – “Delete Reference Type” to delete one or servile types.
The A4_log.txt file need to be edit too. This can be done with a simple text editor.
Delete Log
It is possible to make a main clean up by simply delete the “Log” directory.
If so all log data will disappear.
Next time the P630 program is called the program simply generate an empty skeleton of the log
database.
131
132
Appendix A
Keyboard layout
"Edit Mode"
133
134
Following commands are allowed in "Edit Mode":
←, →, ↑, ↓, 0, Page Up, Page Down, +, H, 4, 6, 8, 9, 3, 5, C, S, T, P, R, G, W, CTL:←, → ,
Page Down, End, Home
C,S,T,R,G are submenus:
C,
Curve Convert menu.
S,
Scale Window menu.
T,
Tolerance Curve menu.
R,
Resonance Test menu.
G,
Display Gain menu.
W,
Polarity Window menu.
H,P is utility functions:
H,
Display compensations curve if present.
P,
Set power on output at cursor selected frequency.
←,→ ,↑ ,↓ ,0,PgU,PgD,+ are cursor, select and display functions:
←,
Move cursor left.
→,
Move cursor right.
↑,
Select next curve, up.
↓,
Select next curve, down.
0,
Enable/disable fast cursor.
Page Up,
Enlarge selected channel, Page Up.
Page Down, View all channels, Page Down.
+,
Select next channel as active channel.
4,6,8,2,9,3,5, CTL(←,→ ,Page Down ,End, Home) are write curve and pixel functions.
4,
Write pixel’s to left.
6,
Write pixel’s to right.
8,
Write pixel’s up.
2,
Write pixel’s down.
9,
Move & write whole curve pixel’s up.
3,
Move & write whole curve pixel’s down.
5,
Write a straight line between two points.
CTL ←,
Write curve left, keep envelope.
CTL →,
Write curve right, keep envelope.
CTL Page Down,
Set lower limit to zero on selected channel.
CTL End,
Reset selected channel.
CTL Home, Set limits to half scale. 40 dB down.
135
Common edit and write keyboard layout
136
Cursor, Select & Display Functions
enlarge channel
view all channels
next channel
next curve
next curve
cursor left
fast cursor
cursor right
137
Move cursor left
Move cursor right
Select next curve, step up
138
Select next curve, step down
Enable / disable fast cursor
Enlarge selected channel, Page Up
139
View all channels, Page Down
Select next channel as active channel
140
Write curve and pixel functions
half scale
write pixel up
reset channel
write pixel left
move curve up
write pixel right
zero lower
write line
enevelope left
write pixel down
move curve down
envelope right
141
Write pixel’s left
Write pixel’s right
Write pixel’s up
142
Write pixel’s down
Move & write whole curve pixel’s up
Move & write whole curve pixel’s down
143
Write a straight line between two points
Write curve left and keep envelope
Write curve right and keep envelope
144
Set lower limit to zero on selected channel
Reset selected channel
Set limits to half scale, 40 dB from top
145
146
Appendix B
Functions changed added from version 1.0 to 1.1-b
•
Sensitivity test 1 to 5, single point test, added for channel A.
Average sensitivity test 1 and 2, 1 to 5 single point, added for channel A.
•
Filter added to Channel C.
Second limits and test added for channel C when filter is enabled.
•
Frequency Average multipoint test added for channel A.
•
Pass Word Manager added to the main menu. This password manager allows an
administrator to add, edit, delete enable and disable use of password. The passwords are
now encrypted to protect unauthorized use.
•
Software functions added to support external power amplifier.
Channel C can as input be selected by input “13” and / or “23” for impedance
measurement.
147