1
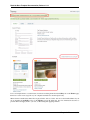
Read the Docs Template
Documentation
Release 1.9.2
Read the Docs
December 08, 2015
Contents
1
Getting Started
1.1 Installing-Orchard . . . . . . . . . . . . .
1.2 Manually installing Orchard from a zip file
1.3 Working with Orchard in WebMatrix . . .
1.4 Getting Around the Dashboard . . . . . . .
1.5 Getting Started with Orchard . . . . . . . .
1.6 Navigation and Menus . . . . . . . . . . .
1.7 Adding a Blog to Your Site . . . . . . . .
1.8 Adding and Managing Media Content . . .
1.9 Managing Widgets . . . . . . . . . . . . .
1.10 Organizing Content Using Tags . . . . . .
.
.
.
.
.
.
.
.
.
.
.
.
.
.
.
.
.
.
.
.
.
.
.
.
.
.
.
.
.
.
.
.
.
.
.
.
.
.
.
.
.
.
.
.
.
.
.
.
.
.
.
.
.
.
.
.
.
.
.
.
.
.
.
.
.
.
.
.
.
.
.
.
.
.
.
.
.
.
.
.
.
.
.
.
.
.
.
.
.
.
.
.
.
.
.
.
.
.
.
.
.
.
.
.
.
.
.
.
.
.
.
.
.
.
.
.
.
.
.
.
.
.
.
.
.
.
.
.
.
.
.
.
.
.
.
.
.
.
.
.
.
.
.
.
.
.
.
.
.
.
.
.
.
.
.
.
.
.
.
.
.
.
.
.
.
.
.
.
.
.
.
.
.
.
.
.
.
.
.
.
.
.
.
.
.
.
.
.
.
.
.
.
.
.
.
.
.
.
.
.
.
.
.
.
.
.
.
.
.
.
.
.
.
.
.
.
.
.
.
.
.
.
.
.
.
.
.
.
.
.
.
.
.
.
.
.
.
.
.
.
.
.
.
.
.
.
.
.
.
.
.
.
.
.
.
.
.
.
.
.
.
.
.
.
.
.
.
.
.
.
.
.
.
.
.
.
.
.
.
.
.
.
.
.
.
.
.
.
.
.
.
.
.
.
.
.
.
.
.
.
.
.
.
.
.
.
.
.
.
.
1
1
9
24
37
39
73
77
86
90
98
2
Tutorial Videos
101
2.1 Tutorial Videos About Orchard . . . . . . . . . . . . . . . . . . . . . . . . . . . . . . . . . . . . . 101
3
Documentation
3.1 Authoring Websites . . . . . . . . . .
3.2 Customizing Websites . . . . . . . . .
3.3 Using the Orchard Gallery . . . . . . .
3.4 Managing Websites . . . . . . . . . . .
3.5 Hosting and Deploying Websites . . .
3.6 Using shell settings storage . . . . . .
3.7 Using Microsoft Azure Media Storage .
3.8 Using Windows Azure Cache . . . . .
3.9 Extending Orchard . . . . . . . . . . .
3.10 Working with Data . . . . . . . . . . .
3.11 Creating Themes . . . . . . . . . . . .
3.12 Developer Tools and Guidelines . . . .
3.13 Additional Topics . . . . . . . . . . .
3.14 Getting Involved . . . . . . . . . . . .
.
.
.
.
.
.
.
.
.
.
.
.
.
.
.
.
.
.
.
.
.
.
.
.
.
.
.
.
.
.
.
.
.
.
.
.
.
.
.
.
.
.
.
.
.
.
.
.
.
.
.
.
.
.
.
.
.
.
.
.
.
.
.
.
.
.
.
.
.
.
.
.
.
.
.
.
.
.
.
.
.
.
.
.
.
.
.
.
.
.
.
.
.
.
.
.
.
.
.
.
.
.
.
.
.
.
.
.
.
.
.
.
.
.
.
.
.
.
.
.
.
.
.
.
.
.
.
.
.
.
.
.
.
.
.
.
.
.
.
.
.
.
.
.
.
.
.
.
.
.
.
.
.
.
.
.
.
.
.
.
.
.
.
.
.
.
.
.
.
.
.
.
.
.
.
.
.
.
.
.
.
.
.
.
.
.
.
.
.
.
.
.
.
.
.
.
.
.
.
.
.
.
.
.
.
.
.
.
.
.
.
.
.
.
.
.
.
.
.
.
.
.
.
.
.
.
.
.
.
.
.
.
.
.
.
.
.
.
.
.
.
.
.
.
.
.
.
.
.
.
.
.
.
.
.
.
.
.
.
.
.
.
.
.
.
.
.
.
.
.
.
.
.
.
.
.
.
.
.
.
.
.
.
.
.
.
.
.
.
.
.
.
.
.
.
.
.
.
.
.
.
.
.
.
.
.
.
.
.
.
.
.
.
.
.
.
.
.
.
.
.
.
.
.
.
.
.
.
.
.
.
.
.
.
.
.
.
.
.
.
.
.
.
.
.
.
.
.
.
.
.
.
.
.
.
.
.
.
.
.
.
.
.
.
.
.
.
.
.
.
.
.
.
.
.
.
.
.
.
.
.
.
.
.
.
.
.
.
.
.
.
.
.
.
.
.
.
.
.
.
.
.
.
.
.
.
.
.
.
.
.
.
.
.
.
.
.
.
.
.
.
.
.
.
.
.
.
.
.
.
.
.
.
.
.
.
.
.
.
.
.
.
.
.
.
.
.
.
.
.
.
.
.
.
.
.
.
.
.
.
.
.
105
105
145
157
180
235
251
252
254
269
427
433
481
499
506
4
User Experiences
519
4.1 Walkthroughs and UI Mockups . . . . . . . . . . . . . . . . . . . . . . . . . . . . . . . . . . . . . 519
5
Archived Specs
521
5.1 Archived Specs . . . . . . . . . . . . . . . . . . . . . . . . . . . . . . . . . . . . . . . . . . . . . . 521
i
ii
CHAPTER 1
Getting Started
1.1 Installing-Orchard
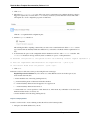
This topic targets, and was tested with, the Orchard 1.8 release.
1.1.1 Different Ways To Install Orchard
There are four ways you can install Orchard. You can:
• Install it using the Microsoft Web Platform Installer.
• Install it from Microsoft WebMatrix as shown in Working with Orchard in WebMatrix.
• Download the Orchard .zip file and install it as described in Manually Installing Orchard Using a zip File.
• Enlist in the Orchard source code and build Orchard from the command line or in Visual Studio.
This topic shows how to install Orchard using the Microsoft Web Platform Installer.
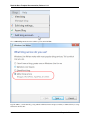
1.1.2 Requirements
The minimum requirements for running Orchard are the following:
• ASP.NET 4.5
• A web server such as IIS Express 8, 7.5 or IIS 7.x.
When installing IIS, make sure you enable the ASP.NET IIS modules. Also make sure that you run Orchard in an
integrated pipeline ASP.NET 4 application pool.
Important: If you previously installed any pre-release versions of WebMatrix, ASP.NET Web Pages,
or ASP.NET MVC 4, you should uninstall those products before Orchard will run correctly on your
computer. To develop Orchard sites, many developers will want to use a database such as SQL Server,
and a web page programming environment such as WebMatrix or Visual Studio 2013. The following
installation was tested with a clean installation of Windows 8.1. It uses the Web Platform Installer and
it includes Orchard, IIS 8.0 Express, and optional applications for Orchard development like WebMatrix
and SQL Server Compact 4.0.
1
Read the Docs Template Documentation, Release 1.9.2
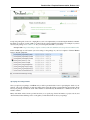
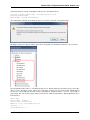
1.1.3 Installing Orchard
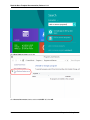
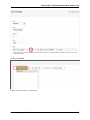
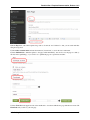
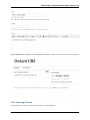
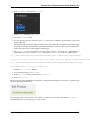
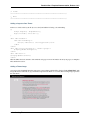
To begin, download and install the Web Platform Installer. When you’re done, run it.
Find Orchard CMS and then click Add to include Orchard as an item to install.
Click Install. Accept the license terms in order to continue.
2
Chapter 1. Getting Started
Read the Docs Template Documentation, Release 1.9.2
When the installation is complete, the dialog shows the list of installed tools in addition to Orchard. Click the Launch
link to open the site in WebMatrix.
1.1. Installing-Orchard
3
Read the Docs Template Documentation, Release 1.9.2
1.1.4 Running Orchard in WebMatrix
After WebMatrix starts, it should inmediately launch Orchard in the default browser. If not, you can launch Orchard
by clicking the Run drop-down button, and selecting which browser to use. In WebMatrix you can click the Files
workspace to see the contents of the Orchard site.
4
Chapter 1. Getting Started
Read the Docs Template Documentation, Release 1.9.2
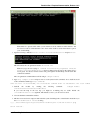
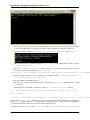
The first time Orchard is launched, you see in your browser the Orchard setup screen.
1.1. Installing-Orchard
5
Read the Docs Template Documentation, Release 1.9.2
6
Chapter 1. Getting Started
Read the Docs Template Documentation, Release 1.9.2
By default, Orchard includes a built-in database that you can use without installing a separate database server. However, if you are running SQL Server or SQL Server Express, you can configure Orchard to use either of those products
instead by specifying a connection string. Optionally, you can enter a table prefix so that multiple Orchard installations
can share the same database but keep their data separate.
The setup screen also includes a section where you can choose an Orchard recipe to set up your site. You can choose
from the following Orchard recipes:
• Default. Sets up a site with frequently used Orchard features.
• Blog. Sets up a site as a personal blog.
• Core. Sets up a site that has only the Orchard framework for development use.
1.1. Installing-Orchard
7
Read the Docs Template Documentation, Release 1.9.2
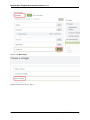
For information about recipes and how to make a custom recipe, see Making a Web Site Recipe.
After you’ve entered the required information on the setup screen, click Finish Setup. When the setup process is
complete, your new site’s home page is displayed.
8
Chapter 1. Getting Started
Read the Docs Template Documentation, Release 1.9.2
You can now begin configuring your site.
1.1.5 Change History
• Updates for Orchard 1.8
– 4-15-14: Updated info for 1.8 release. Updated some screenshots, requirements, .zip link and other minor
changes.
• Updates for Orchard 1.1
– 4-12-11: Updated screens for 1.1 installation.
– 3-14-11: Added information about recipes in the setup screen.
1.2 Manually installing Orchard from a zip file
This topic targets, and was tested with, the Orchard 1.8 release.
This topic shows the steps you need to perform to install Orchard using the .zip file.
We will use three different approaches:
• IIS.
• WebMatrix and IIS Express
• Visual Studio and the Visual Studio Development Server.
Note: If you prefer using the Web Platform Installer, or if you plan to use WebMatrix to develop your site,
you may want to see the topic Installing Orchard, which installs Orchard from the Web Platform Installer
and includes WebMatrix in the installation.
1.2.1 Downloading the .zip File
Navigate to the Releases Section of Orchard in GitHub.
You will find two .zip files.
• Orchard.Web.1.x.xx.zip : In this file the site has already been built and can be run without additional compilation.
It does not includes all the source code.
• Orchard.Source.1.x.xx.zip : This file includes the source code. If you plan to develop modules you probably
prefer this one. It is easier to use with Visual Studio and you have plenty of source files to see how everything
is done.
1.2.2 Running the Site Using IIS
This procedure was tested with a clean installation of Windows 8.1 Enterprise Edition.
First let’s setup the server. Search for “Add or Remove Programs” in your system. And execute it.
1.2. Manually installing Orchard from a zip file
9
Read the Docs Template Documentation, Release 1.9.2
Click Turn Windows features on or off.
Click Internet Information Services and then ASP.NET 4.5. Click OK.
10
Chapter 1. Getting Started
Read the Docs Template Documentation, Release 1.9.2
At this point we recommend rebooting your system. This way you will be sure that all the required services are started
from scratch.
When the system restarts, download the Orchard.Web.1.x.xx.zip file from here. Extract the .zip file to your Desktop.
The extracted folder contains several files and an Orchard folder.
Copy the Orchard Folder to C:\inetpub\wwwroot\.
In Windows Explorer go inside the Orchard Folder.Let’s start with App_Data folder.
This folder is where Orchard stores site settings. Right-click App_Data folder, click Properties and using the Security
tab set modify and read permissions for the IIS_IUSRS user.
Then repeat the same procedure for the following folders:
• Modules. This is required if you want to install modules from the gallery. (We recommend that you remove the
read/write permissions for production sites.)
• Themes. This is required if you want to install themes from the gallery. (We recommend that you remove the
read/write permissions for production sites.)
• Media. This folder is where Orchard stores media files (images, etc.).
1.2. Manually installing Orchard from a zip file
11
Read the Docs Template Documentation, Release 1.9.2
Tip: If you want to completely reset an Orchard site configuration to its default settings, you can delete
the contents of the App_Data directory. This removes all your custom settings, users, and configuration,
as well as any custom data you have added to the site. If you delete the contents of the App_Data folder,
and if you want to remove custom images that you have added to the site, you can delete the contents of
the Media folder as well. The required files will be recreated the next time Orchard is started.
Now you can create your new website. Search your system for Internet Information Services (IIS) Manager, and
execute it.
12
Chapter 1. Getting Started
Read the Docs Template Documentation, Release 1.9.2
Click in Default Web Site and stop. This will free port 80 for our site.
Right-click Sites and Add Website.
1.2. Manually installing Orchard from a zip file
13
Read the Docs Template Documentation, Release 1.9.2
Write your site name and point Physical path to your Orchard folder. Click Ok.
14
Chapter 1. Getting Started
Read the Docs Template Documentation, Release 1.9.2
Click Yes in the warning dialog about two sites using port 80.
1.2. Manually installing Orchard from a zip file
15
Read the Docs Template Documentation, Release 1.9.2
Your website is running now. Click browse to navigate to it.
You should see the Orchard setup screen in your browser.
1.2.3 Running the Site Using WebMatrix and IIS Express
Download the Orchard.Web.1.x.xx.zip file from here. Extract the Orchard .zip file to a local folder. Launch WebMatrix,
and in the Quick Start screen, click Open and then Folder.
16
Chapter 1. Getting Started
Read the Docs Template Documentation, Release 1.9.2
Navigate to the folder where you extracted the .zip file, select the folder named Orchard, and then click Select Folder
to open the site.
1.2. Manually installing Orchard from a zip file
17
Read the Docs Template Documentation, Release 1.9.2
To run the site, in the WebMatrix Files workspace, select the root Orchard folder. Click the drop-down list in the
Run button and then select a browser.
18
Chapter 1. Getting Started
Read the Docs Template Documentation, Release 1.9.2
You should see the Orchard setup screen in your browser.
1.2.4 Running the Site Using Visual Studio and the Visual Studio Development
Server
This procedure was tested with Visual Studio 2013 Update 1.
Altough you can run the precompiled version of Orchard in Visual Studio, you will find much easier to work in Visual
Studio with the full source code version. Download the full source code from here. Extract the .zip file to a local
folder.
1.2. Manually installing Orchard from a zip file
19
Read the Docs Template Documentation, Release 1.9.2
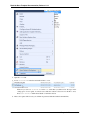
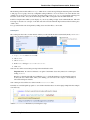
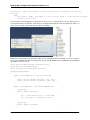
Launch Visual Studio and select File > Open > Project/Solution. Navigate to the folder where you extracted the .zip
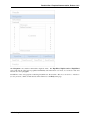
and open the folder named src. Select the Orchard.sln solution file.
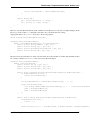
Attachments/Manually-installing-Orchard-zip-file/VSOpenSolution.PNG
To run the site, press Ctrl+F5. You should see the Orchard setup screen in your browser.
1.2.5 Setting Up a Site
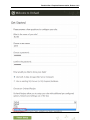
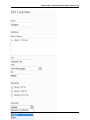
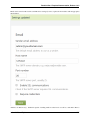
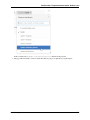
When you first launch the Orchard site, you are presented with the Orchard setup screen:
20
Chapter 1. Getting Started
Read the Docs Template Documentation, Release 1.9.2
1.2. Manually installing Orchard from a zip file
21
Read the Docs Template Documentation, Release 1.9.2
By default, Orchard includes a built-in database that you can use without installing a separate database server. If you
choose this option then you don’t need to configure the database at all. A mini version of SQL Server called SQL
Server CE will be automatically run with your site. It keeps its data inside a database file that lives inside App_Data.
However, if you are running SQL Server or SQL Server Express, you can configure Orchard to use either of those
products instead by specifying a connection string. The database and user specified in the connection string must be
created before you start the Orchard setup. Just create an empty database on your database server, create the user and
that’s it. Orchard will set up all of the tables and data automatically for you during the setup process.
Optionally, you can enter a table prefix so that multiple Orchard installations can share the same database but keep
their data separate.
The Orchard setup screen includes a section where you can choose an Orchard recipe. You can choose from the
following Orchard recipes:
• Default. Sets up a site with frequently used Orchard features.
• Blog. Sets up a site as a personal blog.
• Core. Sets up a site that has only the Orchard framework for development use.
22
Chapter 1. Getting Started
Read the Docs Template Documentation, Release 1.9.2
For information about recipes and how to make a custom recipe, see Making a Web Site Recipe.
After you’ve entered the required information on the setup screen, click Finish Setup. When the setup process is
complete, your new site’s home page is displayed.
You are now on the Orchard home page and can begin configuring your site.
1.2. Manually installing Orchard from a zip file
23
Read the Docs Template Documentation, Release 1.9.2
1.2.6 Change History
• Updates for Orchard 1.8
– 4-9-14: Added screenshots and more detail to the IIS section. Updated Webmatrix screenshots. Changed
a bit the structure of some paragraphs to make them clearer. Updated some links.
• Updates for Orchard 1.6
– 11-07-12: Updated screens for 1.6 installation.
– 4-12-11: Updated screens for 1.1 installation.
– 3-14-11: Added section on using WebMatrix and IIS Express.
– 3-14-11: Added information about recipes in the setup screen.
– 3-15-11: Fixed the IIS section to use the Orchard subfolder from the zip.
1.3 Working with Orchard in WebMatrix
WebMatrix, Microsoft’s one-stop web development tool, lets you create, edit, and publish websites with unprecedented
ease. WebMatrix includes a built-in web server (IIS Express), along with a simple editor for editing and customizing
applications like Orchard. When installing Orchard using the Web Platform Installer, you have the option to install to
WebMatrix instead of IIS.
1.3.1 Links
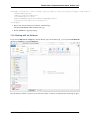
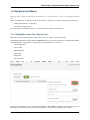
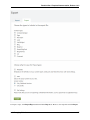
1.3.2 Installing and Launching WebMatrix
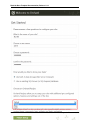
Download and launch the Microsoft Web Platform Installer Then click the Add button for Microsoft WebMatrix and
click Install.
Documentation/../Upload/screenshots/Install_selectorWebMatrix.png
Accept the license terms and launch WebMatrix when the installation finishes.
1.3.3 Using WebMatrix to create an Orchard Website
To create an Orchard Website using WebMatrix, click App Gallery on the WebMatrix startup page.
24
Chapter 1. Getting Started
Read the Docs Template Documentation, Release 1.9.2
Scroll down and select Orchard CMS. Enter a name to be used as the folder name for your site. For example, if
the site name “Orchard CMS” is entered, the folder “Documents/My Websites/Orchard CMS” will be created. Click
Next.
1.3. Working with Orchard in WebMatrix
25
Read the Docs Template Documentation, Release 1.9.2
Click I Accept to accept the EULA agreement.
26
Chapter 1. Getting Started
Read the Docs Template Documentation, Release 1.9.2
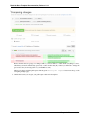
A new subfolder, “Orchard CMS”, will be added to your “My Websites” folder. Click OK. Your Orchard site will then
be opened in Web Matrix and the “Orchard Setup” page will be launched in a new browser window.
1.3. Working with Orchard in WebMatrix
27
Read the Docs Template Documentation, Release 1.9.2
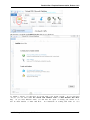
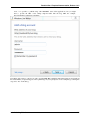
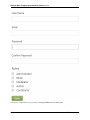
Enter basic information about your site on the Orchard Setup page. Specifically: the name of the site, the name of a
user of the site, the user’s password, the kind of database to use for site data, and the Orchard recipe.
If you are just starting out using Orchard, we recommend that you select SQL Compact Server for the database and
Default for the recipe. Enter the information and click Finish Setup.
28
Chapter 1. Getting Started
Read the Docs Template Documentation, Release 1.9.2
1.3. Working with Orchard in WebMatrix
29
Read the Docs Template Documentation, Release 1.9.2
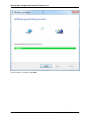
Orchard sets up your initial site and then opens a browser window with the site’s home page. You will automatically
be logged in with the user name you specified in setup (in this case, admin). At this point, clicking on Dashboard will
take you to the Orchard Dashboard where website changes can be made.
1.3.4 Running your website from Web Matrix
At any point in time, you can run your website from WebMatrix by selecting the project node and clicking Run.
30
Chapter 1. Getting Started
Read the Docs Template Documentation, Release 1.9.2
1.3.5 Working with Files
You can use WebMatrix to edit the files in your Orchard installation. WebMatrix provides a simple editor that includes
colorization for HTML, CSS, JavaScript, and code files.
Although WebMatrix does not provide a build system for compiling code files, Orchard itself provides dynamic compilation for code files when they are edited. For more information, see Orchard Dynamic Compilation.
1.3. Working with Orchard in WebMatrix
31
Read the Docs Template Documentation, Release 1.9.2
You can change the editor WebMatrix uses by following these instructions.
As an example, you may find it helpful to use the XML editor (which provides colorization) on the placement.info
file. To do this you must change the setting for .info files in the WebMatrix file filetypes.xml (which can be found in
the following locations):
32-bit machines: C:\Program Files\Microsoft WebMatrix\config\filetypes.xml
64-bit machines: C:\Program Files (x86)\Microsoft WebMatrix\config\filetypes.xml
1. Add the .info file extension to the list of XML file types:
32
Chapter 1. Getting Started
Read the Docs Template Documentation, Release 1.9.2
<FileType extension=''.info;.config;.csproj;.vbproj;.resx;.settings;.sitemap;.user;.wsdl;.b
<OpenAs>XML</OpenAs>
<TabColor>Yellow</TabColor>
<Icon>XMLFileIcon</Icon>
<EmitUtf8BomByDefault>True</EmitUtf8BomByDefault>
<Description>An XML File</Description>
</FileType>
1. Remove the .info file extension from the list of Text file types:
Text Gray DefaultFileIcon False Unknown file type
2. Restart WebMatrix to apply the change.
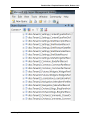
1.3.6 Working with the Database
If you selected SQL Server Compact for the the database option in Orchard setup, you can open the Orchard.sdf
database in WebMatrix by selecting Databases.
Once the database window is opened, you can view the contents of a table by selecting the table in the explorer pane.
1.3. Working with Orchard in WebMatrix
33
Read the Docs Template Documentation, Release 1.9.2
(If you were already in the Databases workspace, you might need to right-click the Orchard node and then click
Refresh in order to display the database and tables.)
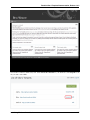
1.3.7 Publishing Your Web Site
When you’re ready to upload the local copy of your website to the Internet, click the Publish button in the WebMatrix
ribbon.
34
Chapter 1. Getting Started
Read the Docs Template Documentation, Release 1.9.2
The first time you publish, the Publish Your Site dialog box is displayed.
To publish a website, you must have an account with a web hosting provider.
If you don’t have
one yet, you can select either Get Started with Windows Azure or Find Windows Web Hosting.
If you select Windows Azure, you will have the option of creating your website as either an Azure Website or Azure Web Role.
For instructions on working with Azure see ?????
1.3. Working with Orchard in WebMatrix
35
Read the Docs Template Documentation, Release 1.9.2
After you’ve set up an account with a hosting provider, the provider will typically send you an email with your user
name, server name, and other information. To save you the extra step of entering this information manually, the
provider might send you a “Profile XML” file (named with the .publishsettings extension) that contains this information. You can use these settings by selecting Import publish profile and then selecting the file provided by your
hoster. Otherwise, you can enter the settings manually.
After you’ve published your site, you might want to make changes to it and republish it. When you subsequently
select Publish, WebMatrix will list the local files that have been changed since the last time the local site was published. At this point you can select which files you want to upload to the remote stie and select Continue or cancel.
36
Chapter 1. Getting Started
Read the Docs Template Documentation, Release 1.9.2
Once you have published your website, you can view the files in the remote site by opening the Remote View.
More information about using WebMatrix to publish websites can be found here.
Change History
• Updates for Orchard 1.6
– 11-14-12: Updated screens and workflow.
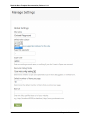
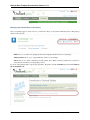
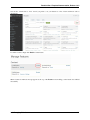
1.4 Getting Around the Dashboard
This topic targets, and was tested with, the Orchard 1.8 release.
The Orchard dashboard lets you manage your website, change its appearance, add content, and enable and disable
Orchard features. When you are logged into your website, you can access the dashboard by clicking the Dashboard
1.4. Getting Around the Dashboard
37
Read the Docs Template Documentation, Release 1.9.2
link at the bottom of your default home page.
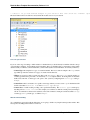
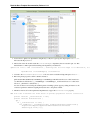
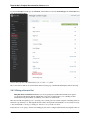
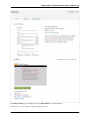
When you open the dashboard, you see a list of application features and settings on the left side of the page. This list
is divided into sections of related features. Each expandable section can be collapsed to show only the section title. If
you click a section title, the first feature in that section is selected. This list changes as you enable and disable Orchard
features. For example, the Blog section will have a set of additional collapsible items under it (as shown) after you
actually create a blog. The New section allows you to create new instances of default content types as well as any
custom content types that you define. The right side of the page displays the settings that are available for the selected
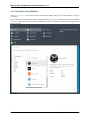
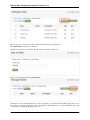
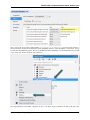
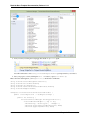
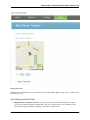
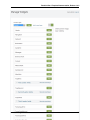
feature. The following image shows the contents of the dashboard.
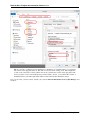
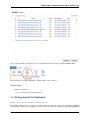
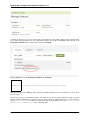
Attachments/Getting-Around-The-Dashboard/Dashboard.png
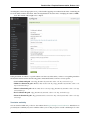
1.4.1 Feature Settings Available in the Dashboard
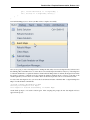
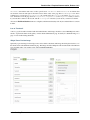
The following table shows each of the dashboard sections and briefly describes the available settings.
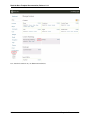
Section Title | Description ————- | ———– Dashboard | Contains the dashboard and displays the main (“Welcome
to Orchard”) page. This page contains a number of helpful links for working with Orchard. The page also shows the
Orchard version that is running, and displays advisories from http://orchardproject.net (when advisories are available)
that can notify you when a new version is available or when an important update needs to be applied. New | Lets you
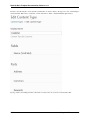
create new instances of default content types or of custom content types that you define in the Content Definition
screen. For more information, see Creating Custom Content Types. Content | Lets you manage the instances of your
content types. For example it lets you create pages, edit or remove existing pages, and publish pages. For more
information, see Adding Pages to Your Site Content Definition | Lets you manage existing content types as well as
creating your own. For more information, see Content Types Blog | Lets you add a blog to your website, create new
blog posts, and manage your blog. For more information, see Adding a Blog to Your Site. Queries | Lets you add new
queries and edit or remove existing queries.Queries are later used for display lists of content items through the site.
Comments | If your website is configured to allow users to post comments, lets you manage the posted comments.
For more information, see Moderating Comments. Taxonomies | Lets you manage taxonomy terms. Later on you
can use them to categorize content items and display or hide them in different ways according to their taxonomy.
Widgets | Lets you manage the widgets that appear on the pages of your site. For more information, see Managing
widgets. Media | Lets you add or remove folders that contain media. For more information, see Adding and Managing
Media Content. Navigation | Lets you add or remove items in the main menu and define additional navigation menus.
For more information, see Navigation and Menus. Tags | Lets you add or remove content tags for your site. For
more information, see Organizing Content with Tags. Modules | Lets you download, install, and manage modules
and features on your site. For more information, see Installing Modules and Themes from the Gallery, Enabling and
Disabling Features, and Installing and Upgrading Modules. Themes | Lets you install new themes and apply themes to
your site. For more information, see Installing Themes and Previewing and Applying a Theme. Workflows | Lets you
manage your workflows. Through workflows your site can perform simple or complex tasks based on system events or
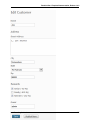
user interaction. Users | Lets you manage users and roles for your site. For more information, see Managing Users and
Roles. Reports | Lets you manage and view reports that Orchard generates for your site. Settings | Lets you configure
a variety of site settings such as the site name and culture, the default number of items per page, URLs for Gallery
feeds, whether user-added comments must be approved, media file types that can be uploaded, and user registration
settings. For more information see Modifying Site Settings.
Change History
• Updated for Orchard 1.8
38
Chapter 1. Getting Started
Read the Docs Template Documentation, Release 1.9.2
– 4-20-14: Updated screenshot. Updated available settings on 1.8.
• Updated for Orchard 1.1
– 3-15-11: Updated screen shot and table to show 1.1 version of the dashboard.
1.5 Getting Started with Orchard
This topic targets, and was tested with, the Orchard 1.8 release.
This walkthrough provides a glimpse of the features that Orchard has to offer, provided as a step-by-step guide. If this
is your first time using Orchard, this document is for you!
1.5.1 Getting Started with Orchard
Being new to Orchard, you should know the right place where you can find the resources and latest information about
Orchard.
1. Orchard Beginner
2. Orchard in GitHub - Orchard Code Repository
3. Orchard Discussion Forum - Discussion area for Orchard
4. Orchard Documentation - Documentation area for Orchard
5. Orchard Community Websites - Community sites on Orchard from all over the world
6. Orchard CMS Weekly Meeting
This topic assumes that you have already installed Orchard and set up your website. If you haven’t, follow the
instructions in Installing Orchard.
There are plenty of options to get up and running with Orchard without installing Orchard on your local machine or
local IIS Server.
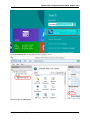
1.5.2 Try Orchard
Try Orchard! is a showcase for the Orchard content management framework: you can try how Orchard feels by
checking out an already running demo site where you can play with Orchard as you wish.
No registration, no setup, nothing required, you can just go to Try Orchard!, open one of the continuously re-installed
demo sites and play with it. This is the simplest way of taking the first steps with Orchard.
Be aware though that Try Orchard! is really just for testing: since the demo sites are wiped out hourly you don’t try to
publish your blog there!
1.5. Getting Started with Orchard
39
Read the Docs Template Documentation, Release 1.9.2
40
Chapter 1. Getting Started
Read the Docs Template Documentation, Release 1.9.2
1.5.3 DotNest : Orchard SaaS provider
DotNest is the Orchard SaaS provider: this means that you can simply register and create Orchard websites that run in
the cloud without any hassle. Your website will just work: you don’t have to deploy and later upgrade it, you can just
use it.
With DotNest you can try out Orchard very simply, very quickly and since your website is already hosted for you you
can also show it to everybody. Apart from getting used to the user interface and features of Orchard you can also get
into the basics of Orchard theme development with it and style and customize your Orchard website in a lot of ways.
Convenience does come with disadvantages: due to the architecture of DotNest you can’t install custom modules, so
you have to use what is already available (that however should be enough for a big part of websites).
1.5. Getting Started with Orchard
41
Read the Docs Template Documentation, Release 1.9.2
1) What is DotNest
2) Click New Tenant to create a new tenant on DotNest
3) Fill in the required details to create a New Tenant
42
Chapter 1. Getting Started
Read the Docs Template Documentation, Release 1.9.2
3) New Tenant successfully created
1.5. Getting Started with Orchard
43
Read the Docs Template Documentation, Release 1.9.2
1.5.4 Orchard on Azure Websites
After a free registration you can create websites from the Azure Gallery where you can select Orchard to deploy in
one click too.
Your Orchard site on Azure Websites will be completely under your control: you can install any module and theme
you want too. However this also comes with responsibilities: you have to maintain your website yourself, upgrade and
fix it as necessary.
44
Chapter 1. Getting Started
Read the Docs Template Documentation, Release 1.9.2
1.5. Getting Started with Orchard
45
Read the Docs Template Documentation, Release 1.9.2
1.5.5 Changing The Layout Of The Home Page
Out of the box, Orchard applies a theme to your website known as the “Theme Machine”. The Theme Machine
includes CSS styles and a layout. Orchard allows you to selectively include or exclude portions (zones) of the layout
on each page of your website.
46
Chapter 1. Getting Started
Read the Docs Template Documentation, Release 1.9.2
The Navigation zone contains a menu with a single tab, Home. The TripelFirst, TripleSecond and TripleThird
zones at the bottom of the page are populated with dummy text in the First Leader Aside, Second Leader Aside and
Third Leader Aside paragraphs.
In addition to zones, every page has a central region (In this case, the text from “Welcome to Orchard” to “Thank you
for using Orchard”) which, for this tutorial, will be referred to as the Body of the page.
1.5. Getting Started with Orchard
47
Read the Docs Template Documentation, Release 1.9.2
Although the Theme Machine has many possible zones defined, on a given page the only zones visible will be zones
that have had widgets added to them (you can learn more about widgets here). The Navigation, TripelFirst, TripelSecond and TripelThird zones are visible on the home page because they contain widgets.
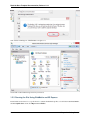
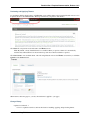
1) Select Widgets from the Dashboard.
The Widgets management page opens with the Default layer selected. Any zone that is visible in the Default layer will
appear on all pages. Therefore, the Navigation zone is visible on all web pages and has a Main Menu widget. The
Main Menu widget is annotated in green because it has been added to a zone in the current layer.
48
Chapter 1. Getting Started
Read the Docs Template Documentation, Release 1.9.2
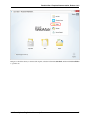
2) Select the HomePage layer to see which zones are visible for the home page.
Widgets which have been added to zones in the selected layer will be annotated in green (FirstLeaderAside, SecondLeaderAside and ThirdLeaderAside). Widgets which have been added to zones in other layers will be annotated
in gray (Main Menu).
1.5. Getting Started with Orchard
49
Read the Docs Template Documentation, Release 1.9.2
50
Chapter 1. Getting Started
Read the Docs Template Documentation, Release 1.9.2
The TripelFirst, TripelSecond, and TripelThird zones on the home page have widgets in them and are visible. Removing all of the widgets in a zone will make the zone invisible.
3) Select Remove for the Third Leader Aside widget.
The TripelThird zone will no longer be visible on the home page.
4)
Select
Add
for
the
1.5. Getting Started with Orchard
TripelThird
zone
to
add
a
widget
to
the
zone.
51
Read the Docs Template Documentation, Release 1.9.2
5)
Select
the
HTML
Widget
to
add
this
type
of
widget
to
the
TripelThird
zone.
6) Enter a title for your widget and some content.
52
Chapter 1. Getting Started
Read the Docs Template Documentation, Release 1.9.2
7) Save the new widget.
8) Select Your Site in the upper-left side of the Dashboard to view the modified home page with the new TripelThird
1.5. Getting Started with Orchard
53
Read the Docs Template Documentation, Release 1.9.2
zone.
1.5.6 Editing The Content Of The Home Page
Orchard provides a feature that makes it easy for you to edit the content in a zone or the page body. To turn on this
feature you must enable the Content Control Wrapper and Widget Control Wrapper modules
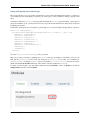
1) Select Modules on the Dashboard.
2) Enable Content Control Wrapper
3) Enable Widget Control Wrapper
54
Chapter 1. Getting Started
Read the Docs Template Documentation, Release 1.9.2
Once these modules are enabled, you can edit the contents of an individual zone by clicking the Edit link (at the top
right) in the zone.
1.5. Getting Started with Orchard
55
Read the Docs Template Documentation, Release 1.9.2
4) Select the Edit link for the TripelFirst zone of the home page.
5) Change the title, and optionally, change or remove the existing body text for the zone.
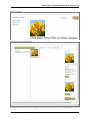
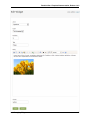
Inserting a Media Item
6) Select Insert Media Item.
56
Chapter 1. Getting Started
Read the Docs Template Documentation, Release 1.9.2
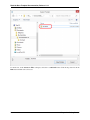
7) Click Create Folder.
8) Name the folder myImages and click Save.
1.5. Getting Started with Orchard
57
Read the Docs Template Documentation, Release 1.9.2
9) Click the folder myImages, and then click Import
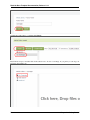
10) Click My Computer and then click in the central zone to browse for an image. If you prefer you can drop your
image into the central zone.
58
Chapter 1. Getting Started
Read the Docs Template Documentation, Release 1.9.2
11) Close the dialog.
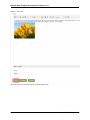
12) Click the image and click Select.
13) If needed, resize the image using the handlers so that later it fits nicely into the zone. Then click Save to save the
1.5. Getting Started with Orchard
59
Read the Docs Template Documentation, Release 1.9.2
changes to the widget.
The home page is automatically displayed with the updated zone.
60
Chapter 1. Getting Started
Read the Docs Template Documentation, Release 1.9.2
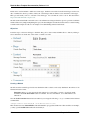
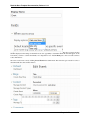
14) Select the Edit link for the Body of the page.
Orchard will display the Edit Page screen.
Note: The Edit Page screen can also be reached from the Dashboard by selecting Content on the Dashboard and then selecting Edit for the page you are interested in.
15) Enter some text for the content.
1.5. Getting Started with Orchard
61
Read the Docs Template Documentation, Release 1.9.2
16) Select Publish Now at the bottom of the page to make the updates to the page visible immediately.
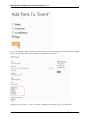
1.5.7 Adding a New Page to Your Site
1) In the Orchard Dashboard, under New, select Page.
2) Enter a title for the page. When you enter a title for the page and save it (for example, “Download”), the permalink
(URL) for the page will be filled in automatically (“download”). You can edit this link if you prefer a different URL.
3) Enter some text for the content page body.
62
Chapter 1. Getting Started
Read the Docs Template Documentation, Release 1.9.2
4) In the Tags field, add comma-separated tags such as “download” and “Orchard” so that you can search and filter
using those tags later.
5) Check Show on main menu and enter the menu text (“Downloads”) to use in the site’s main menu.
6) Select Publish Now to make the updates to the page visible immediately. You can also save the page as a draft (to
edit later before publishing), or you can choose to publish the page at a specific date and time.
7) Select Your Site in the upper-left side of the Dashboard to view the modified home page with the new menu. Clik
Downloads and you will see your new page.
1.5. Getting Started with Orchard
63
Read the Docs Template Documentation, Release 1.9.2
1.5.8 Adding New Layer for a Page
To change the layout of your new page without affecting the rest of the site you can create a new layer, that will be
applied only to the Downloads page. Then you can place some widgets on that layer and they will be visible only in
the Downloads page.
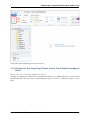
1) Go to the Dashboard and select Widgets. Then click add a new layer to add a new layer for this page which will
allow you to customize the layout for the new page at a later point in time.
2) Write a name for the layer, a description, and a layer rule: url”~/download”. This will instruct the Orchard System
to show the widgets in this layer only when the url of the browser is pointing to “download”. Select Save.
64
Chapter 1. Getting Started
Read the Docs Template Documentation, Release 1.9.2
1.5.9 Adding a New HTML Widget
3) To check that your layer rule is working you can add a widget to it. Ensure that Current Layer is Download. Click
Add in AsideFirst.
1.5. Getting Started with Orchard
65
Read the Docs Template Documentation, Release 1.9.2
4) Add a new Html Widget.
5) Write a title and a body for it. Save it.
66
Chapter 1. Getting Started
Read the Docs Template Documentation, Release 1.9.2
6) Select Your Site in the upper-left side of the Dashboard. Navigate to Downloads. You should see the custom layout.
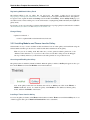
1.5.10 Selecting A Theme
To customize the look and feel of the Orchard website you change the theme.
1.5. Getting Started with Orchard
67
Read the Docs Template Documentation, Release 1.9.2
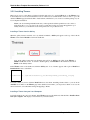
1) On the Orchard Dashboard, select Themes. The currently installed themes are listed.
2) To download new themes, select the Gallery tab.
3) Search for PJS.Bootstrap to find the PJS.Bootstrap Theme. Install the PJS.Bootstrap theme.
4) Select the Installed tab.
After a theme has been installed it appears as an option in the Available section on the Installed tab. In the following
illustration, the PJS.Bootstrap theme has been installed so it appears in the Available section. (The current theme for
the site is PJS.Bootstrap.)
5) To see how your site will look with an available them, select Preview for the theme. To apply an available theme
to your site select Set Current for the theme. For more details, see Previewing and Applying a Theme and Installing
Themes.
68
Chapter 1. Getting Started
Read the Docs Template Documentation, Release 1.9.2
1.5. Getting Started with Orchard
69
Read the Docs Template Documentation, Release 1.9.2
1.5.11 Extending Orchard With Modules And Features
A key feature of Orchard is the ability to add new features in order to extend the functionality of your site. The primary
way to do this is by installing modules. You can think of a module as a package of files (in a .zip folder) that can be
installed on your site. To view the modules that are included with Orchard, in the Orchard Dashboard, click Modules
and then click the Installed tab in the Modules screen.
70
Chapter 1. Getting Started
Read the Docs Template Documentation, Release 1.9.2
Orchard provides some built-in modules, and you can install new modules. For details, see Installing and Upgrading
Modules and Registering additional gallery feeds.
Individual modules can expose features that can be independently enabled or disabled. To view the features exposed
by the built-in modules in Orchard, click the Features tab in the Modules screen.
1.5. Getting Started with Orchard
71
Read the Docs Template Documentation, Release 1.9.2
Each feature has an Enable or Disable link (depending on its current state), as well as an optional list of dependencies
that must also be enabled for a specific feature. The documentation throughout this site describes the variety of features
in Orchard and how you can use them to customize your site’s user interface and behavior.
Change History
• Updates for Orchard 1.8
– 9-04-14: Added new sections for how to get started with Orchard and how to get up and running with Orchard : Try Orchard, DotNest, Azure Websites. Updated screen shots for themes (PJS.Bootstrap Theme),
modules and control wrappers.
– 4-22-14: Media selection is different now, updated that part. Adding a widget layer is not suggested
anymore when adding a new page, updated that part. Link to registering additional gallery feeds was not
working. Updated several screenshots. Added capitalization to section headers.
• Updates for Orchard 1.6
– 11-25-12: Added section describing how to change the layout for a page by enabling/disabling zones.
Removed section on Creating a Blog (which already has it’s own topic).
• Updates for Orchard 1.1
– 3-14-11: Updated screen shots showing updated menus, and updated dashboard and settings options.
72
Chapter 1. Getting Started
Read the Docs Template Documentation, Release 1.9.2
1.6 Navigation and Menus
This topic targets, and was tested with, the Orchard 1.8 release. It also includes a reference to navigation in Orchard
<1.5
There are different ways to build up a menu structure. Here we will show two common methods that could be used:
• Adding menu items first, content later.
• Content first, navigation later.
Of course they are not mutually exclusive, you can alternate both methods in the same site.
1.6.1 Adding Menu Items First, Content Later
This method could be prefered when you first want to style your website to see all menu items.
In the Orchard administration panel click the Navigation menu item. You will see that there is a default menu available,
called ‘Main Menu’. The right side contains all types of menu items that you can add:
• Content Menu Item
• Custom Link
• Html Menu Item
• Query Link
• Shape Link
• Taxonomy Link
Click
Add
next
to
the
Content
Menu
Item
to
add
a
new
menu
item.
On the ‘Create Menu Item’ page you can fill in the Menu text. Select Browse and link to any content item (e.g your
Home Page). Later, when you have prepared your real target content item you can update the menu link.
1.6. Navigation and Menus
73
Read the Docs Template Documentation, Release 1.9.2
1.6.2 Content First, Navigation Later
Here we first create a new Page (or edit a Page). Select New Page on the left menu. Create an About Us page. Give
it a title and a body. At the bottom check the Show on a menu checkbox to see the menu options for that page. The
Menu text is the name of your menu item. By default the Page link will be added to the Main Menu.
74
Chapter 1. Getting Started
Read the Docs Template Documentation, Release 1.9.2
When you now Save your page and navigate to the Navigation menu item on the left side you will see that the new
menu item that you created was added to the Main Menu.
1.6.3 Creating A Submenu
Creating a submenu is very easy: Navigate to the Navigation section. If you hover over an already added Menu Item
with your mouse, you’ll see that you can drag and drop the Menu Item. Simply drag the Menu Item a bit to the right
until it snaps to a sub container. Remember that changes you made here won’t be updated until you click the Save All
in the bottom-right side of the page.
1.6. Navigation and Menus
75
Read the Docs Template Documentation, Release 1.9.2
1.6.4 Older Versions Of Orchard (Before 1.5)
Managing menus in older versions of Orchard was quite different. Orchard <1.5 has a very simple main menu feature
that is a list of menu item text and links to display, accessible from the Navigation link in the Orchard admin panel.
When you add an item to the main menu using the page or blog post editor screens, a new entry is added here. You can
use this screen to rename, reorder, and remove menu items. (This will not delete the content item; it will only remove
the menu item).
76
Chapter 1. Getting Started
Read the Docs Template Documentation, Release 1.9.2
You can also add arbitrary URLs in your menu, whether external or pointing to a page in your Orchard site, by adding
a new menu item. Note that only items added in this way have an editable URL on this screen. Content item URLs
must be edited from the editor screen for that content item instead.
To reorder menu items, type a numeric index in the “Position” textbox. Position indexes can be any of the following
format:
• Integer: 1, 2, 3, etc.
• Decimal: 1.1, 1.2, 1.3, etc
• Multi-part number: 1.1.1, 1.2.1, 1.2.2, etc
When you are satisfied with your changes, click Update All to update the main menu of your site (effective immediately).
Change History
• Updates for Orchard 1.8
– 4-24-14: Added screenshots. Now you can’t create a Content Menu Item and leave empty the content item;
updated that part. Changed a bit the structure to comply with Orchard style documentation guidelines.
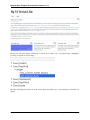
1.7 Adding a Blog to Your Site
This topic targets, and was tested with, the Orchard 1.8 release.
Orchard provides a blogging engine that makes it easy to add a blog to your web site. This topic describes how to
create a blog for your site, add a new blog post, and then setup comments and tags.
1.7. Adding a Blog to Your Site
77
Read the Docs Template Documentation, Release 1.9.2
1.7.1 Add the Blog
On the Orchard dashboard expand the Blog submenu. Then click New Blog. In the New Blog screen add a title,
description, and menu text for the blog and click Save.
78
Chapter 1. Getting Started
Read the Docs Template Documentation, Release 1.9.2
A page for managing the blog is displayed.
Note: You can have several blogs in the same Orchard site.
1.7. Adding a Blog to Your Site
79
Read the Docs Template Documentation, Release 1.9.2
1.7.2 Add a post to the Blog
Click New Post to create a new blog entry. The New Blog Post screen is displayed. Enter a title for your post and the
post contents.
Enter tags (separated by commas) to your blog post in the Tags field. Check Show comments , Allow new comments
and Allow threaded comments. Click Save to save it as a draft.
80
Chapter 1. Getting Started
Read the Docs Template Documentation, Release 1.9.2
In the dashboard, click Blog to view the list of posts in the blog. In the list of posts, the new post is saved as a draft,
which means it is not yet visible to visitors of the site. Click Publish to allow site visitors to see the post.
A screen shows that the post was published successfully.
1.7. Adding a Blog to Your Site
81
Read the Docs Template Documentation, Release 1.9.2
Click Your Site to view the site’s home page again.
A new tab, Blog, has been added to the menu. Click the Blog tab which will display the blog and the new the post. To
see more details about the new post, click the more link at the end of the post content.
82
Chapter 1. Getting Started
Read the Docs Template Documentation, Release 1.9.2
1.7.3 Add a comment to the post
Because comments were enabled for the post, a new comment can be entered. The comment may not appear immediately after it is submitted. That is because Orchard has a setting which requires the site administrator to approve
comments before they are published.
Return to the Orchard dashboard and under Settings, click Comments. There are two options which effect how
comments are handled. One to require administrator approval before a comment is published, and another option
for enabling automatic closing of comments for old posts. For more details about these features, see the Moderating
Comments topic.
Note: There are several good modules in the Orchard Gallery to enable spam protection in your blog.
1.7. Adding a Blog to Your Site
83
Read the Docs Template Documentation, Release 1.9.2
84
Chapter 1. Getting Started
Read the Docs Template Documentation, Release 1.9.2
1.7.4 Using Tags in blogs
Orchard provides the ability to browse content by the tags that are added to the content. Click one of the tags (for
example, “Orchard”) in the blog post to see a list of all content that has that tag. For more information about managing
tags, see Organizing Content with Tags.
Notice the URL for browsing tagged content as well.
If the URL is shortened to just the /Tags/ portion, the list of tags used in your site is displayed.
1.7. Adding a Blog to Your Site
85
Read the Docs Template Documentation, Release 1.9.2
1.7.5 Change History
• Updates for Orchard 1.8
– 4-25-14: New Screenshots. Comment settings are different. You can add many blogs.
• Updates for Orchard 1.6
– 11-25-12: Broke into multiple sections.
1.8 Adding and Managing Media Content
When you upload images using the rich-text editor in Orchard (or using an XML-RPC client, such as Windows Live
Writer), the images are saved in a Media folder under the root of your Orchard installation. The Media folder must
be writable (by the user process that’s running the website) in order for image uploads to succeed. If you installed
Orchard using the Web Platform Installer, the Media folder write permissions are configured automatically.
To add and delete media folders, click Media in the dashboard.
86
Chapter 1. Getting Started
Read the Docs Template Documentation, Release 1.9.2
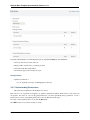
Browse to a media image file and view the details. The properties of a media file are:
• Screenshot. A thumbnail preview of the image content.
• Size and Added on. Properties of the media file.
• Embed. The URL of the media file, which you can copy to the HTML view of the rich-text editor in order to
embed the media image into content.
• Name. The name of the media file.
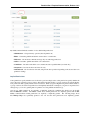
To manage the subfolders for your media folder, click Media again on the dashboard. Then click a folder to display
the Manage Folder screen.
1.8. Adding and Managing Media Content
87
Read the Docs Template Documentation, Release 1.9.2
This screen gives you the options to add or delete media files and to create subfolders.
Click Add a folder to create a new subfolder.
Name the new subfolder (for example, name the subfolder “Pictures”) and save it.
Browse to the new subfolder and click Add media.
Orchard lets you upload single media files as well as uploading a .zip file that contains multiple image files. If you
have a large set of images to upload, it can be more efficient to first add them all to a .zip file and then just upload the
.zip file instead of uploading the images one by one.
88
Chapter 1. Getting Started
Read the Docs Template Documentation, Release 1.9.2
To see how this works, create a .zip file on your computer that contains several image files, and then click Upload.
The Extract zip checkbox is selected by default, which will cause the uploaded images in the .zip to be extracted and
added to the folder.
The uploaded and extracted images are displayed in their parent folder.
To see or edit the details of an individual uploaded image, click it.
1.8. Adding and Managing Media Content
89
Read the Docs Template Documentation, Release 1.9.2
1.8.1 Change History
• Updates for Orchard 1.1
– 3-16-11: Updated all screen shots and menu choices text.
1.9 Managing Widgets
In Orchard, a widget is a fragment of UI (such as HTML) and code (such as a content part) that can be easily mapped
to any location or zone in the active theme, such as a sidebar or footer zone. Examples of widgets include navigation
menus, image galleries, ads, videos, and tag clouds.
This article explains the basics of widgets and shows you how to manage them.
90
Chapter 1. Getting Started
Read the Docs Template Documentation, Release 1.9.2
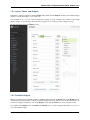
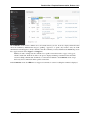
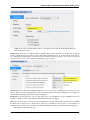
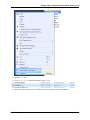
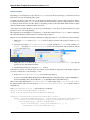
1.9.1 Layers, Zones, and Widgets
In Orchard, you manage widgets by clicking Widgets in the dashboard. The Widgets screen lists the available widgets
and lets you assign the widget to a layer and a zone.
You can think of a layer as a set of rules for displaying a widget (or group of widgets). For example, a layer might
display a widget on a specific page only if the user is logged in. A zone helps to position a widget on a page.
The following image shows the Widgets screen.
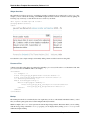
1.9.2 Available Widgets
Whenever a widget becomes available (usually by enabling another feature in the Features tab on the Modules screen
of the dashboard), Orchard adds it to the list of available widgets that can be added to zones in the current theme. To
see the list of widgets available in a zone, in the Widgets screen, click the Add button on one of the listed zones.
For example, in the Widgets screen click Add for the Header zone. A screen is displayed that allows you to choose
one of the available widgets.
1.9. Managing Widgets
91
Read the Docs Template Documentation, Release 1.9.2
The following table describes the widgets that are available by default in Orchard:
Widget | Description ——————— | —————————————————————— Blog Archives | Displays a list of archived entries for the specified blog. Container Widget | Displays a “contained” content item, such
as a list. Html Widget | Displays HTML content, which is entered using the widget’s editor. Recent Blog Posts |
Displays a list of recent posts for the specified blog.
1.9.3 List of Layers
Orchard comes with a number of layers already defined. You can define additional layers as needed, as discussed later
in Adding a Layer. In the Widgets screen, you can edit the existing layers by selecting a layer in the Current Layer
drop-down list, or you can add new layers by clicking Add a new layer.
The following table lists the default layers, shows the rule that defines the layer, and describes the effect of the layer.
Layer | Rule | Description ————– | —————– | ————————————— Default | true | Always displayed on every page. Authenticated | authenticated | Displayed if the user is authenticated. Anonymous | not authenticated | Displayed if the user is anonymous. Disabled | false | Not displayed. This layer is provided as way to save the
configuration of widgets that are not currently displayed. TheHomepage | url(“~/”) | Displayed on the home page.
1.9.4 List of Zones
In Orchard, a web page is divided into zones (regions). The available zones are defined by the website’s theme. In
the Widgets screen, you can see the list of all zones available for the currently selected layer. The list also shows the
widgets assigned to each zone for the selected layer.
For information about the zones that are available in the default theme (TheThemeMachine), see Customizing the
Default Theme.
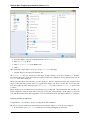
1.9.5 Adding a Layer
To add a layer, in the dashboard, click Widgets. On the Widgets screen, click Add a new layer. The Add Layer
screen is displayed:
92
Chapter 1. Getting Started
Read the Docs Template Documentation, Release 1.9.2
To define the new layer, enter the name of the layer, a description, and the rule that defines the layer. When you’re
finished, click Save.
The Layer Rule value is an expression that resolves to either true or false. If it resolves to true, the widget is
displayed; otherwise the widget is not displayed.
The following table summarizes the syntax for building layer rules.
Rule Syntax | Description —————————- | —————————— url(“ < url
path > ”) | True if the current URL matches the specified path. If you add an asterisk (*) to the end of the path,
all pages found in subfolders under that path will evaluate to true (for example, url("~/home*")). authenticated |
True if the user is logged in. ContentType(“ < Type > ”) | True if the content type being view matches the content
type specified e.g. ContentType(“Page”) not | Logical NOT. and | Logical AND. or | Logical OR.
Your expression can use parentheses.
For example, the following expression defines a rule that displays a widget on the About page if the user is not
authenticated, or on any page if the user is authenticated.
1.9. Managing Widgets
93
Read the Docs Template Documentation, Release 1.9.2
(not authenticated and url(``~/about'')) or authenticated
To allow multiple URL values, you can use the following syntax:
url(``~/foo'') or url(``~/bar'')
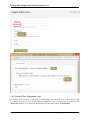
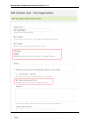
1.9.6 Assigning a Widget to a Zone
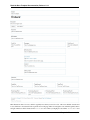
To assign a widget to a zone, click the Add button on a zone that you want to add the widget to, and then select the
widget to add.
For example, click Add on the Header zone, and then in the Choose A Widget screen click the Html Widget.
The Add A Widget screen is displayed.
94
Chapter 1. Getting Started
Read the Docs Template Documentation, Release 1.9.2
1.9. Managing Widgets
95
Read the Docs Template Documentation, Release 1.9.2
The fields you need to fill in depend on the widget you’re configuring. However, all widgets have Zone, Layer,
Title, and Position fields. The Position field determines the relative position of all widgets within the zone (in effect,
z-order). Keep in mind that the widgets within the zone can come from multiple layers. For example, two different
layers might have widgets assigned to the same zone.
The value of the Position field can be an integer or a sequence of integers separated by dots. For example, the following
values are all valid: 5, 10.1, 7.5.3.1. Widgets with lower position values will be rendered before those with higher
values.
After setting the values of all fields, click Save.
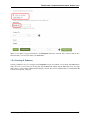
1.9.7 Editing or Deleting a Widget
To edit or delete a widget, in the Widgets screen, use the Current Layer drop-down list to select the layer that the
widget is assigned to. In the list of zones displayed for the layer, click the widget you want to edit. The Edit Widget
screen is displayed:
96
Chapter 1. Getting Started
Read the Docs Template Documentation, Release 1.9.2
1.9. Managing Widgets
97
Read the Docs Template Documentation, Release 1.9.2
Edit the field you want to change, then click Save. To remove the widget from the zone, click Delete.
Change History
• Updates for Orchard 1.1
– 3-16-11: Updated screen shots for 1.1 version.
• Updates for Orchard 1.7
– 4-4-14: Added Content Type rule
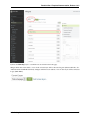
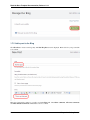
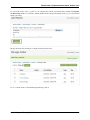
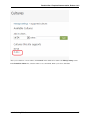
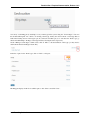
1.10 Organizing Content Using Tags
Content items in Orchard can be categorized with tags, and the list of items tagged with a given keyword are accessible
via a front-end ~/tags/tag-name URL. The browser navigates to the URL for a particular tag when that tag is selected
by the user.
To edit the global list of tags in your site, go to the Manage Tags screen in the Orchard dashboard by selecting Tags
from the navigation section.
98
Chapter 1. Getting Started
Read the Docs Template Documentation, Release 1.9.2
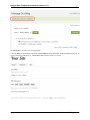
Here you can edit the tag keywords and remove tags. When you remove a tag, it is removed from all content items
that share that tag. When you edit a tag, it updates all content items with that tag to the new keyword. You can also
collapse tags by renaming a tag to the same name as another tag. This is useful for cleaning up your tags so that they
are consistent throughout your site.
Clicking on a tag keyword in this screen will display the list of content items that share that tag.
1.10.1 Change History
• Updates for Orchard 1.8
– 10-31-14: Updated screen shots for managing tags
1.10. Organizing Content Using Tags
99
Read the Docs Template Documentation, Release 1.9.2
100
Chapter 1. Getting Started
CHAPTER 2
Tutorial Videos
2.1 Tutorial Videos About Orchard
2.1.1 Introduction Training Videos
2.1.2 Commercial
Pluralsight has an introductory training course available here: http://pluralsight.com/training/courses/tableofcontents?courseName=orcha
fundamentals
The first part of the Pluralsight video course is free, and subsequent episodes require a subscription.
Orchard CMS Theme Development For Beginners
Orchard CMS Theme Development for Beginners by Abhishek Luv
Orchard CMS Tutorial : Workflows in Orchard CMS
Orchard CMS Tutorial : Workflows in Orchard CMS by Abhishek Luv
2.1.3 Free
Dojo Course
Course for beginners interested in developing on Orchard, starting with how to use Orchard from the UI.
Orchard CMS for Absolute Beginners
Orchard CMS for Absolute Beginners by Abhishek Luv
Orchard CMS Tutorial : Recipes in Orchard CMS
Orchard CMS Tutorial : Recipes in Orchard CMS by Abhishek Luv
101
Read the Docs Template Documentation, Release 1.9.2
Introduction to Orchard 1.5 by Sébastien Ros
A 4-part series by Brent Arias:
Introduction to Orchard 1.4 by Bertrand Le Roy:
2.1.4 Hands-on Labs
Kris van der Mast made his hands-on
http://www.krisvandermast.com/downloads.html
lab
material
available
to
anyone
for
free:
2.1.5 Conferences
2.1.6 CodeStock 11
Grow Your Website using Orchard by Jason Gaylord
2.1.7 TechEd 11
Orchard 1.1: Build,Customize,Extend,Ship by S é bastien Ros
2.1.8 TechDays 11
TechDays 11 Basel - Develop and maintain CMS solutions using WebMatrix and Orchard by Ken Casada
2.1.9 Mix11
Deconstructing Orchard: Build, Customize, Extend, Ship by Brad Millington
102
Chapter 2. Tutorial Videos
Read the Docs Template Documentation, Release 1.9.2
2.1.10 Themes
2.1.11 Getting Started With Custom Theme Development
2.1.12 Deployment
2.1.13 Deploying an Orchard site using WebMatrix
2.1.14 Migrating from SqlCe to SQL Express
2.1.15 Taxonomies
2.1.16 Getting Started With Taxonomies
2.1.17 Projector
2.1.18 Live demo of Projector by Sébastien Ros
2.1.19 Development
2.1.20 Setting up a source code environment
2.1.21 Localization
2.1.22 Building a Multilanguage Website Structure
2.1. Tutorial Videos About Orchard
103
Read the Docs Template Documentation, Release 1.9.2
104
Chapter 2. Tutorial Videos
CHAPTER 3
Documentation
3.1 Authoring Websites
3.1.1 Blogging with LiveWriter
While Orchard provides a simple way to write blog posts using the built-in features of the admin panel, many people
prefer to author posts using a client application, such as Windows Live Writer. These clients use an XML-RPC
interface to publish posts remotely, and offer additional capabilities like saving offline drafts (for example, to write
your blog posts on an airplane and sync-up your site later).
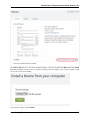
To enable Remote Blog Publishing, click Features in the Orchard admin panel.
To use Windows Live Writer with Orchard, you need to enable the Remote Blog Publishing feature. To enable
Remote Blog Publishing click the Enable link on the feature box. Note that if you haven’t already created a blog on
your site, you’ll want to do so.
105
Read the Docs Template Documentation, Release 1.9.2
Now, launch Live Writer from your Start menu in Windows.
106
Chapter 3. Documentation
Read the Docs Template Documentation, Release 1.9.2
Choose Add blog account... from the Blogs menu.
3.1. Authoring Websites
107
Read the Docs Template Documentation, Release 1.9.2
Choose Other blog service from the available options and click Next.
Type the URL to your Orchard blog, along with the admin user name and password that you defined when you set-up
Orchard for the first time.
108
Chapter 3. Documentation
Read the Docs Template Documentation, Release 1.9.2
Note: it is possible to publish using other XML-RPC aware client applications, but you might
have to provide the URL of the xmlrpc endpoint rather than the blog URL. For example,
http://myimaginaryorchardsite.com/xmlrpc.
Live Writer will connect to your blog in order to read the XML-RPC capabilities that Orchard supports and download
the current Theme (for previewing posts before publishing). If you are prompted to create a temporary post during this
step, select “Yes” in the dialog.
3.1. Authoring Websites
109
Read the Docs Template Documentation, Release 1.9.2
After Live Writer is configured, click Finish.
110
Chapter 3. Documentation
Read the Docs Template Documentation, Release 1.9.2
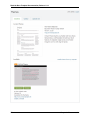
Write a title and some content for your blog post in the Live Writer editor area.
You can also insert pictures to your post using the Insert Picture button on the toolbar.
3.1. Authoring Websites
111
Read the Docs Template Documentation, Release 1.9.2
To edit the URL for your post, select View / Properties in the Live Writer menu.
112
Chapter 3. Documentation
Read the Docs Template Documentation, Release 1.9.2
The Slug input appears at the bottom of the editor, where you can type the portion of the URL that refers to this post.
To preview your post in the context of the currently applied Theme in Orchard, select the Preview tab in Live Writer.
When you are satisfied with the way your post looks, click the Publish button.
3.1. Authoring Websites
113
Read the Docs Template Documentation, Release 1.9.2
Live Writer publishes your post, and will automatically load the URL for the post in your browser for viewing.
114
Chapter 3. Documentation
Read the Docs Template Documentation, Release 1.9.2
3.1.2 Creating Global-Ready Applications
Orchard’s localization management is hosted on an external service (Crowdin), the project is available for the public
and contributions are welcome!
Orchard supports two kinds of localization:
• Localization of text strings in the Orchard application and in installed modules.
• Localization of database-driven content items.
This topic describes both of these features.
Localizing the Orchard Application and Orchard Modules
All strings in the Orchard application are output through a single T() method that can look up a translated string
based on the default site culture. By default, Orchard includes strings for English (en-US), but you can add support
for additional cultures. Translations for the dashboard UI and all static strings in the front end can also be added to
the application through translation files in .po format. To localize a site for a culture, you download and install the
appropriate set of .po files, and then you update your site settings as shown in this section.
Note In .NET Framework applications, localization is usually done using .resx files and satellite assemblies. Orchard takes a more lightweight approach that uses .po files. In Orchard, the number of translation
files is the number of modules multiplied by the number of supported cultures. That number could rapidly
grow, and the satellite-assembly design wasn’t built for that kind of usage. On the other hand, .po files
can be loaded and unloaded on demand. Like .resx files, .po files are a standard format for which many
tools exist.
Installing translation files
As an example, download a set of .po translation files for French (fr-FR). Browse to the page for the files at the
following URL:
https://crowdin.net/download/project/orchard-cms/fr.zip.
Click the link to download the .po files and save the .zip file to your computer.
3.1. Authoring Websites
115
Read the Docs Template Documentation, Release 1.9.2
Method 1: Extracting the zip
Extract the downloaded .zip file into the root folder of your website. Make sure you extract the contents to the actual
Orchard root folder, and not to a subfolder named for the .zip file. When Windows opens a Confirm Folder Replace
window and asks whether you want to merge the extracted contents into the Orchard folders of the same names in your
website, select Do this for all current items and then click Yes to merge in the translation files.
This method of extracting the po files by expanding the zip file into your site’s directory is very simple but if your site
does not have all the translated modules that are in the file, you may end up with some additional directories that you
don’t need. In order to avoid that, you can use the following alternative method.
Method 2: Using Translation Manager
The Translation Manager Feature in Vandelay Industries module, available from the gallery, adds commands to install
translation files more parsimoniously.
Once you have the module installed and the po file that you want to install downloaded, enter the following command,
replacing the path to the po file as necessary:
install translation c:\temp\fr.zip
This should have only extracted those resources for the modules that are actually installed that it has translations for. If
a module is not found, running the command won’t create unnecessary directories and your Orchard site will remain
clean.
If you later install additional modules for which a translation exists, it is possible to re-run the command.
Switching the site to another culture
To change the default culture for the application, go to the Settings => General screen in the Orchard dashboard.
Under Default Site Culture, click Add or remove supported cultures for the site.
In the Cultures screen, select a culture from the Add a culture list (for example, fr-FR) and then click Add. The
culture code is added under Cultures this site supports. To remove a culture, click the x button next to it.
116
Chapter 3. Documentation
Read the Docs Template Documentation, Release 1.9.2
After you’ve added one or more cultures, click General on the dashboard to return to the Manage Settings screen.
In the Default Site Culture list, select the culture to set as the default. When you’re done, click Save.
3.1. Authoring Websites
117
Read the Docs Template Documentation, Release 1.9.2
118
Chapter 3. Documentation
Read the Docs Template Documentation, Release 1.9.2
Assuming that you have the appropriate set of .po files installed, applying a new culture has the effect of translating the
text in the dashboard menu and UI text. The following illustration shows the effect of changing the culture to fr-FR.
Note: The translation files might not be complete.
Setting the default site culture to a specific culture won’t have any effect unless you have a corresponding translation
file installed. Orchard searches the following paths to find translation files, from most to least specific:
• Core localization file path ~/Core/App_Data/Localization/ < culture-code > /orchard.core.po
• Modules localization file path ~/Modules/ < module-name > /App_Data/Localization/ < culture-code
> /orchard.module.po
• Theme localization file path ~/Themes/ < theme-name > /App_Data/Localization/ < culture-code >
/orchard.theme.po
• Root localization file path ~/App_Data/Localization/ < culture-code > /orchard.root.po
• Tenant localization file path ~/App_Data/Sites/ < tenant name > /Localization/ < culture-code >
/orchard.po
Translation availability
You can download additional .po files for other cultures from http://orchardproject.net/localization. Translations are
provided by the community. If you don’t find the culture you’re looking for, please consider contributing it. It’s a few
3.1. Authoring Websites
119
Read the Docs Template Documentation, Release 1.9.2
hours of work and it will benefit the whole community.
Contributing new translations
Working with a plain text editor
The localization tool available at https://crowdin.net/project/orchard-cms can prepare stub files for a specific language.
Orchard’s translations are stored in the form of PO-files in packages, that you can add to your own Orchard instance.
These packages are regenerated at the beginning of every hour (the process takes 2-3 minutes). Please visit the project
home page on Crowdin to see the progress of the translations for each language.
You can download all the translations for each language for both projects: Orchard CMS, Orchard CMS Gallery.
The downloaded .zip file contains the set of .po files that you can edit using a text editor. When you’re done, please
subscribe to our localization mailing list by sending email to [email protected], and then
send the zipped package of .po files to the list.
Please make sure when working with .po files that the files are saved in UTF-8 with Byte Order Mark. This is usually
a setting in your text editor (in Notepad it is under the Encoding drop-down in the “Save As” dialog).
Translation File Format The following illustration shows the format of a translation file. Each text string is represented by elements listed in the following table.
A reference (see below) | #: reference-string ———————– | ——————— An ID, which is often the original (untranslated) string. After the ID is set, this string should not be changed even if the English
string changes, so that existing translations continue to work even if they’re not immediately updated. | #| msgid
"id-string" The current English string for reference. This helps the translator. | msgid "English-string"
The translated string. | msgstr "translated-string"
120
Chapter 3. Documentation
Read the Docs Template Documentation, Release 1.9.2
How to contribute
• Register on Crowdin.
• Go to the project page of Orchard CMS and Orchard CMS Gallery and apply to join the project.
• Your application will be accepted shortly and you’ll be added to the project as “Proofreader” for the selected
languages. This means that you’ll be able to edit and approve translations (which is necessary for the translated
strings to be included in the downloadable packages).
• If you are new to the Orchard translations, please consult with other translators of the same language and make
sure you follow the same conventions.
Resource String Reference The reference for a resource string in a .po file (the reference-string value
described in the previous section) is optional. If no reference is specified, the resource string will be used as a fallback
whenever a resource with the same ID is queried with a reference that can’t be found. This is a useful way to create
generic resource strings that are used in multiple places in the application and are not context-sensitive. You can
always override a generic fallback like this as needed.
The reference strings can be stored in different locations, depending on how the string is used in the application:
3.1. Authoring Websites
121
Read the Docs Template Documentation, Release 1.9.2
• Strings from views: Use the virtual path of the view from the root of the application (for example,
~/Themes/TheThemeMachine/Views/User.cshtml).
• Strings from .cs files: Use the fully qualified type name of the class where the string is being used (for example,
Orchard.Packaging.AdminMenu).
• Strings from module manifests or theme manifests: Use the virtual path of the manifest from the root of
the application (for example, ~Themes/TheThemeMachine/Theme.txt). Note that module and theme manifest
localization uses a path for fields as the key. For example, the Author field uses the key “Author” and the
Description field of the Gallery feature would be under the key “Gallery Description”.
Contributing files for third party modules
Our localization infrastructure is built to host translations for third party modules. If you are the author of a module or
want to contribute translations for a module, you can generate po files for it using the Translation Manager module.
From an Orchard command line, type the following command (for the example of the Bing.Maps module):
extract default translation /Extensions:Bing.Maps /Output:\temp
This will create a new Orchard.en-us.po.zip file with the strings for the module. The command looks at the source code
for the module and creates entries for T-wrapped strings, manifest strings and everything that should be localizable.
Please send this file to [email protected] so that we can add it to the online localization
database.
Localizing Database-Driven Content Items
In addition to application and module localization, Orchard provides the ability to translate content items that are
stored in the database. To localize content items, you must enable the Localization feature. In the dashboard, click
Modules, and then on the Features tab you will see Localization. Click the Enable link.
By default, both the Page and Blog Post content types are localizable, because they both contain the Localization
part. You can add the Localization part to other content types that need translation. Click Content on the dashboard,
and then view the items in the Manage Content screen. Notice the + New Translation link for each content item.
122
Chapter 3. Documentation
Read the Docs Template Documentation, Release 1.9.2
Note This link appears only if you have more than one culture enabled on the site (see previous section),
and if you have enabled the Localization feature.
Clicking the + New Translation link allows you to define a translated version of the content item to be associated
with the “parent” content item (in the site’s default culture). Each translated content item is treated as a unique content
item in the system. On the Translate Content editor screen, you can define the culture code for the content item. The
permalink will change accordingly in order to ensure that URLs are unqiue for each translation. You can then translate
the content item from the default site culture to the selected culture.
3.1. Authoring Websites
123
Read the Docs Template Documentation, Release 1.9.2
Add some translation text in the body of the page, and then click Save. After the content item is saved, the current
culture code is indicated, along with links to any related content items in different cultures.
When you browse content items on the site, if there are translations available for a content item, links to those content
items will be displayed. This makes it easy for your site visitors to switch between translations of the item. This is
what the site looks like when you view the English (en-US) item:
Click the culture code link to see translated version of the page. When you do, the original cultural code (en-US)
appears as a link to the original page.
124
Chapter 3. Documentation
Read the Docs Template Documentation, Release 1.9.2
To enable localization for custom content types, add the Localization part to the content type. For example, to add
localization to a custom content type named MyEvent, click Content on the dashboard, and then click the Content
Types tab. Click Edit on the MyEvent type (this example assumes the custom type already exists). Click Add in the
Parts section of the type. The Add screen is displayed, and you can select Localization or other parts to add.
For more information about creating and working with custom content types, refer to the Creating Custom Content
Types topic.
Note The localization feature is a work in progress, and not all parts of the Orchard application are
yet localizable. For example, Orchard does not yet provide an automatic way to filter and display
only content items in a given culture (one instance of this is the browser’s default culture). We
will address this in a future release. In the meantime you can provide your own implementation of
ICultureSelector in a module. If you want to give us feedback on localization support in Or3.1. Authoring Websites
125
Read the Docs Template Documentation, Release 1.9.2
chard (for example, to help us understand the scenarios that are important for your site), please contact at
[email protected] and drop us a line!
Translating an Html Widget
Note these steps apply to a clean installation using the default theme ‘The Theme Machine’
In the admin panel, navigate to Modules and verify that you have the Localization module installed and enabled. The
next step is to navigate to Content in the admin panel. Select the Content Types tab page on top and click Edit to
adjust the Html Widget. Our goal is to translate a Html Widget. Click Add Parts in the Parts section. Here we select
the Localization part and click Save to add this part. At the bottom of the page click Save again to save your Content
Item adjustments.
Now we need to navigate to the Settings menu item in the admin panel. Under the section Default Site Culture you
can add the cultures that you want to support. In our case we have nl-BE and en-US. Click Save to apply your culture
settings.
Navigate to the Widgets menu item. On the Default layer find for example the FooterQuadThrid section and click
Add to add a Widget. Now you need to Choose A Widget, select the Html Widget, because this is the one that we
adjust. Now fill in the needed information (Title and Content) and click Save. Your Html Widget is now added to the
FooterQuadThird section. Now we are ready to translate the item. Select you newly added widget to edit it. On top of
the Edit Widget page you will find the following text: + New translation. Click this to add the translation for another
culture.
Change History
• Updates for Orchard 1.8
– 11-03-14: Updated Localization steps and procedure (aka Crowdin)
– 3-17-11: Updated for references to dashboard.
– 3-17-11: Updated screens and procedures in section on localizing database-driven content items.
– 3-18-11: Updated screens and procedures in section on localizing the Orchard application and modules.
– 4-12-11: Structure of the document modified. Added online tool tutorial.
3.1.3 Search and Indexing
Orchard provides the ability to index and search content items in the application. The indexing functionality is provided
by enabling the Indexing feature, along with a specific implementation of indexing (Lucene-based is included by
default). In addition to the Indexing, the Search feature provides the ability to query the index (by keyword or using
Lucene query syntax) to return a list of content items matching the query on the front end.
You must enable all the following Modules Search, Indexing, and Lucene.
126
Chapter 3. Documentation
Read the Docs Template Documentation, Release 1.9.2
Because search depends on indexing, enabling search will automatically enable indexing as well. Note that you must
also enable Lucene before search and indexing will work.
When the indexing feature is enabled, a new Search and Indexes item becomes available under the Settings section
of the dashboard. The indexer runs as a background task, once per minute by default, and you can optionally update or
rebuild the index from this screen. The Indexes screen also displays the number of documents (content items) indexed
and the Search screen displays the indexed fields.
Documentation/../Upload/screenshots_675/indexnsearch.png
Documentation/../Upload/screenshots_675/indexcreated.png
3.1. Authoring Websites
127
Read the Docs Template Documentation, Release 1.9.2
Documentation/../Upload/screenshots_675/indexupdated.png
After enabling the Search feature goto the Content Definition section and click on any Content Type which you want
to index and then check the check box for the available index. For e.g. Page Content Type
Documentation/../Upload/screenshots_675/indexcontenttype.png
When the search feature is enabled, the Settings screen in the dashboard displays the fields that will be queried from
the index (listed on the Search screen).
Documentation/../Upload/screenshots_675/searchfield.png
The front end of the site does not have the searching UI yet at this point. To add it, you need to add a widget. Click
Widgets in the admin menu. With the default layer selected, click Add to zone next to SearchForm in the list of
available widgets.
Keep “Header” selected as the zone and “Default” as the layer so that your search widget appears on top of all pages
(the default layer applies to all pages in the site).
Give it a title such as “Search” and click the Save button.
For more information about widgets, see Managing widgets.
If you navigate now to any page in the front end of the site, you will see the search form.
Documentation/../Upload/screenshots_675/searchformwidget.png
When you type a keyword or query into this input box, a list of matching content items is displayed.
Documentation/../Upload/screenshots_675/searchwidgetfrontend.png
128
Chapter 3. Documentation
Read the Docs Template Documentation, Release 1.9.2
Change History
• Updates for Orchard 1.8
– 9-05-14: Updated all screen shots for Search , Indexing and Lucene
3.1.4 Saving, Scheduling, and Publishing Drafts
This topic has been updated for the Orchard 1.0 release.
Orchard lets you save a page as a draft or publish it to your web site. When you publish a page, you can either publish
immediately or specify a time when the page should be published. The options for saving or publishing a page are
available at the bottom of the Create Page page.
Documentation/../Upload/screenshots_675/draftpublish.png
Save a Draft Option
When you want to save a page but do not want the page to be visible to visitors, you can save the page as a draft. You
can continue working on the file until it is ready to be published. In the Manage Content page, you can see the files
that are currently saved as drafts.
Documentation/../Upload/screenshots_675/draftunpublish.png
A draft is listed as Not Published and you can use the links to publish, edit, or remove the page. Clicking the Publish
link immediately changes the draft to a published page, and visitors will be able to see it immediately.
Publish Now Option
To publish a page immediately, click Publish Now. For a draft page, click the Publish link in Manage Content. In
the Manage Content page, you see the files that are published.
Documentation/../Upload/screenshots_675/draftpublished.png
You can click links to view, unpublish, edit, or remove the page. Clicking Unpublish immediately turns the published
page into a draft.
3.1. Authoring Websites
129
Read the Docs Template Documentation, Release 1.9.2
Publish Later Option
You can schedule the publication of a page for a future time by setting a date and time, and clicking the Publish Later
option.
Documentation/../Upload/screenshots_675/publishlater.png
The page will remain as a draft until the publication date and time. No further action is needed to publish the page.
In the Manage Content page, you can see the date and time the draft is scheduled to be published.
Documentation/../Upload/screenshots_675/pagepublishlater.png
Change History
• Updates for Orchard 1.8
– 9-05-14: Updated all screen shots for Scheduling and Publishing Draft
3.1.5 Creating Custom Content Types
Although Orchard includes the Page and Blog Post content types by default, it is very easy to create a custom content
type (or even extend the definition of an existing content type) using the admin panel. By default, the Content Types
feature is enabled. This feature must be enabled to create a custom content types. If needed, you can manually enable
the feature in the Manage Features page.
To create a content type, Click Content Definition and select the Content Types link in the admin panel.
130
Chapter 3. Documentation
Read the Docs Template Documentation, Release 1.9.2
On this screen, you can see the available content types in the system. Notice that it is possible to create and list content
items of some of these types (such as “Page”), whereas others only allow you to edit the definition of the type here
(such as Comments and Widgets, since these have a dedicated/custom admin experience for creating and listing these
items instead).
Documentation/../Upload/screenshots_675/ContentTypes_manage2.png
If you click “List Items”, to list the items of the “Page” type, you can see the available content items of this type
(“Page”) in the site, similar to the “Manage Content” screen in the admin menu).
You can also edit the definition of the Page type by clicking “Edit” for this type.
3.1. Authoring Websites
131
Read the Docs Template Documentation, Release 1.9.2
A content type in Orchard is made up of fields and parts. An good overview of these concepts is described in Basic
Orchard Concepts. A field is something specific to the type; for example, a Product type might have SKU and Price
fields. A part, however, is a reusable component that can be attached to one or more types. For example, the Autoroute
part gives a type the ability to be addressed on the front-end via a route/url. In some ways, you can think of a type as
having fields, and being made up of one or more parts. This is actually reflected in the underlying code in Orchard as
well. To treat a blog post as a AutoroutePart and access it’s AutoroutePart.Slug property, you would write something
like this: post.As < AutoroutePart > .Slug. Fortunately you don’t have to write code to have fun with types and
parts. We are going to look at this in more detail by way of example in the next section.
132
Chapter 3. Documentation
Read the Docs Template Documentation, Release 1.9.2
Defining a New Content Type
Let’s define a custom content type. Suppose you wanted to define an “Event” type, for listing events with location and
date fields. To do this in the Manage Content Types screen, click on Create new type.
Type the name “Event” for the content type. The Content Type Id field is automatically populated with “Event”
which you can keep.
Click Add to add a field.
3.1. Authoring Websites
133
Read the Docs Template Documentation, Release 1.9.2
Currently Orchard only includes a single field type (TextField), but more can be created as extensions to Orchard
(for example, CheckBoxField, EmailField, TextAreaField, DateTimeField, etc), and a number of additional fields are
available under Gallery > Modules as optional downloads. Type “Location” for the name of the field, and click Save.
134
Chapter 3. Documentation
Read the Docs Template Documentation, Release 1.9.2
3.1. Authoring Websites
135
Read the Docs Template Documentation, Release 1.9.2
The field is now listed in the Event type screen.
Go ahead and repeat the previous two steps to add a second field named “Date”.
To add a part to your type, click “Add” in the “Parts” section of the Event type.
Here you can see the available parts in Orchard (as of the current release). For our Event type, we want to be able
to comment on the event (“Comments” part), tag the event (“Tags part”), access the event from the front-end via
a URL/route (“Autoroute” part), add the event to the main menu (“Menu” part), and be able to publish the event
immediately, on a schedule, or as a draft (“PublishLater” part).
Also add the “Common” part so that your items can appear in lists of content items.
136
Chapter 3. Documentation
Read the Docs Template Documentation, Release 1.9.2
Types, fields and parts can have settings as well. The specific settings that are available on the fields or parts is
determined by the features that are activated in Orchard. If we have enabled the “Indexing” feature, there is a setting
to “Index this content type for search” and on each field, a setting to “Include in the index”. Select these options for
the “Location” field of the custom “Event” type. This will enable visitors of your site to search by location on the
front-end (when the “Search” feature is enabled). Hit Save.
3.1. Authoring Websites
137
Read the Docs Template Documentation, Release 1.9.2
138
Chapter 3. Documentation
Read the Docs Template Documentation, Release 1.9.2
Now that we have defined our custom content type, let’s create a new item of this type. Notice the “Create New Event”
link in “Manage Content Types”.
Similarly, there is a new admin menu link entitled Event under New. Click either one of these links to create a new
“Event” content item.
3.1. Authoring Websites
139
Read the Docs Template Documentation, Release 1.9.2
We can see that the editor for our “Event” type has all the fields and parts we defined. It has a Title because of the
TitlePart and Permalink because of the AutoroutePart, a Location because of the fields we added, a Tags input
from the Tags part, a Show on main menu checkbox from the Menu part, and the ability to enable comments from
the Comments part. The fact that we can Publish Now, Publish Later or Save As Draft is given by the Publish
Later part. Once you have filled in these fields, go ahead and publish the event.
140
Chapter 3. Documentation
Read the Docs Template Documentation, Release 1.9.2
Looking at the “Manage Content” screen in the Orchard admin panel, we can see our event item listed among the
3.1. Authoring Websites
141
Read the Docs Template Documentation, Release 1.9.2
pages in the site!
On the site’s front-end notice the event has been added to the main menu (as expected), and that our fields and parts
are being displayed correctly here as well.
It is possible to customize the way the event appears and template its rendering. See Template File Syntax Guide for
more information on how to do that.
142
Chapter 3. Documentation
Read the Docs Template Documentation, Release 1.9.2
Let’s try out the Search capability against our new content type. Make sure you have first enabled the Indexing,
Search, and Lucene features in the Features admin screen. Now visit the Search Index page to view the available
fields that are indexed. You should see the event-location field in the index as expected (if not, just rebuild the index
and you’ll see it).
3.1. Authoring Websites
143
Read the Docs Template Documentation, Release 1.9.2
We can tell the Search feature to query this field by going to the Settings admin screen and adding this field to the
Search settings.
On the front-end type a keyword that matches the location of your event.
Search indexing has indexed our Location field and our event appears in search results as expected!
144
Chapter 3. Documentation
Read the Docs Template Documentation, Release 1.9.2
This concludes the tutorial on custom content types. If you are interested in delving further, check out the related
tutorials on this site for how to build a custom type, field or part using code.
Change History
• Updates for Orchard 1.8
– 9-6-14: Updated all screen shots for creating custom content type.
3.2 Customizing Websites
3.2.1 Previewing and Applying a Theme
Orchard provides a powerful but simple theming system for customizing the look and feel of your site. Orchard
includes one theme in the default installation to help you get started.
Managing Themes
To manage themes, click Themes in the dashboard.
3.2. Customizing Websites
145
Read the Docs Template Documentation, Release 1.9.2
The main Themes screen defaults to the Installed tab, which displays the current theme, shows any other available
themes, and lets you upload a new theme. There are also tabs for the Gallery (which shows additional online themes
you can install), Updates (which shows available updates for installed themes), and a link to Install a theme from
your computer (use this to install a theme package from your local computer to your site). For more information on
options for adding new themes, see Installing Themes.
To download and install additional themes, click the Gallery tab. Click Install on a theme to install it in your site. To
see how themes work, install the Contoso and the Classic themes.
146
Chapter 3. Documentation
Read the Docs Template Documentation, Release 1.9.2
After you have installed a theme, click the Installed tab on the Themes screen. Any newly installed themes appear in
the Available section.
3.2. Customizing Websites
147
Read the Docs Template Documentation, Release 1.9.2
As you can see from the links and buttons on the available themes, you have the following options for each theme:
• Preview. Lets you preview a theme before you apply it. This lets you see how a theme will look on your site,
but site visitors do not see the new theme until you apply it.
• Set Current. Changes the current theme of the site to the selected theme.
• Uninstall. Removes a theme from the Available themes section.
• Enable. Used for two cases: dependent themes and multiple themes. For dependent themes, you can create a set
of themes that depend on each other (by specifying a BaseTheme value in the Theme.txt file), so that activating
that theme automatically enables the others. For multiple themes, you can enable several themes at once (even
though only one theme is set as the current theme), which lets you dynamically change the current theme based
on an incoming request. These are advanced topics that aren’t covered here.
Note You do not have to click the Enable link to carry out the other operations on themes, such as
previewing a theme or setting the current theme.
148
Chapter 3. Documentation
Read the Docs Template Documentation, Release 1.9.2
Previewing and Applying Themes
To experiment with the theme features, click Preview on an available theme. The following illustration shows a site
in preview mode for the Contoso theme. The drop-down list lets you preview other themes.
Click Cancel to exit preview mode and return to the Themes screen.
Note: By default, a newly installed theme is not enabled. When you preview a theme it is automatically
enabled. Only enabled themes are shown in the drop-down list of themes available for preview.
Click Set Current on an available theme. The following illustration shows the Themes screen after you click Set
Current on the Contoso theme.
When return to the home page for your site, the new theme is applied to your pages.
Change History
• Updates for Orchard 1.1
– 3-21-11: Updated screen shots and reworked text for installing, applying, and previewing themes.
3.2. Customizing Websites
149
Read the Docs Template Documentation, Release 1.9.2
3.2.2 Installing Themes
There are two ways to add a theme to Orchard. The first and easiest is to use the Gallery tab on the Themes page
in the dashboard to browse and install themes from an online feed of available themes. The second is to go to the
dashboard Themes page and click the link to install a theme, which allows you to browse for a theme package on your
local computer and install it.
Note If your site is running under IIS, make sure you have granted read/write permissions to the ~/Themes
folder under the root of your site for the service account that is being used as the IIS application pool
identity. However, you should remove the write permissions on a production server.
Installing a Theme from the Gallery
When the gallery feature is enabled, as it is by default in Orchard, a Gallery tab appears at the top of the both the
Themes screen and the Modules screen in the dashboard.
Note: If the gallery feature has been disabled, there will be no Gallery tab visible in the Themes or
Modules dashboard screens. To enable a disabled gallery, click Modules in the dashboard, and click
Enable on the Gallery feature.
In the Themes screen of the dashboard, click the Gallery tab. A set of themes appears with a pair of Install and
Download links next to each theme.
Documentation/../Upload/screenshots_675/Gallerythemes_installing_675.png
To install a theme in your site, click the Install link next to the theme. Installing a theme adds it to your site in the
Available list of themes on the Themes page in the dashboard. From there, you can preview a theme or set it as the
current site theme, as described Previewing and Applying a Theme.
Installing a Theme from your Local Computer
To install a theme from your local computer, in the Themes screen of the dashboard, click the link to Install a theme
from your computer. This displays a screen that lets you install a theme.
150
Chapter 3. Documentation
Read the Docs Template Documentation, Release 1.9.2
Browse to a local package file that contains a theme (the file will have a .nupkg extension), select it, and then click
Install. The theme package is installed in your site, and you will see the theme listed in the Available section of the
Themes screen.
Note A theme contains a number of files and folders packaged in a ZIP file that has a .nupkg file extension.
The packaging feature is provided by the NuGet package management system. Packaging themes and
other add-ons is beyond the scope of this topic, but you can learn more at http://nuget.codeplex.com/.
The following illustration shows the Terra theme, which was previously downloaded to the local computer from the
Gallery, after clicking the Install a theme from your computer link and installing it to an Orchard site. The installed
theme appears in the Available section.
3.2. Customizing Websites
151
Read the Docs Template Documentation, Release 1.9.2
To use an example theme to test this feature, download an existing theme from the Gallery tab on the Themes page,
then browse to the saved .nupkg file on your computer and install it as described previously.
When a theme is installed, the theme files are placed in the ~/Themes folder. You can see the installed themes in your
site by checking the Available section on the Themes page in the dashboard. For more information about how to
preview themes and apply them to your site, see Previewing and Applying a Theme.
152
Chapter 3. Documentation
Read the Docs Template Documentation, Release 1.9.2
Change History
• Updates for Orchard 1.1
– 3-21-11: Updated screen shots and text for installing themes.
3.2.3 Customizing Themes
The default Orchard theme is called The Theme Machine. It is designed as a versatile starting point for customizing
and developing themes.
This article introduces The Theme Machine and demonstrates how to create your own theme by customizing The
Theme Machine style sheet (Site.css).
Introducing the Theme Machine
The Theme Machine provides a flexible and powerful foundation for themes. The following image shows the file
structure.
The files at the heart of the Theme Machine are the layout page (Layout.cshtml) and style sheet (Site.css).
Overview of the Layout Page
The layout page defines multiple zones. Each zone has a conditional statements, so that it renders if and only if it has
content. If you don’t provide the content, the rendered page will not contain the zone. The following images show the
zones.
3.2. Customizing Websites
153
Read the Docs Template Documentation, Release 1.9.2
This live demo site shows the anatomy of a theme.
• Zones and their children have an aqua background,
154
Chapter 3. Documentation
Read the Docs Template Documentation, Release 1.9.2
• widgets & content-items have a red border, and
• a gradual lightening from black indicates the topography.
• You can click through the menu to view zones collapse when they lack content.
You will typically provide content for zones by using the Admin Panel.
Overview of the CSS Styles
The style sheet (Site.css) for the Theme Machine provides an extensive set of styles for fine-grained control of the
look and feel of your website. The style sheet groups styles to make it easier for you to locate a style that you want to
customize. The following table shows the groupings and describes the type of styles available to you.
Grouping | Description ——— | ——————————————————————————————————
—— General | Contains the default styles for the body, headings, lists, and text elements. Forms | Contains styles
related to HTML forms, such as form, legend, fieldset, label, and input. Structure | Contains page layout styles for
each of the zones defined in the Theme Machine. Main | Contains styles defined for blog posts, comments, tagged
search, and search results. Secondary | Contains additional layout styles for secondary content in aside zones, tripel
zones, and footer quad zones. Widgets | Contains styles for selected widgets such as the search widget, edit-mode
widgets, and content mode. Pager | Contains styles related to a pager shape. Misc | Contains styles for miscellaneous
formatting, such as small, large, quiet, and highlight.
Creating a Child Theme
You can create your own theme by customizing the Theme Machine. However, you should not edit the Theme Machine
files directly. Instead, you should create a child theme and copy any files that you intend to change into the child theme.
You don’t need to copy any files that you do not intend to change – a child theme inherits from its parent theme, and
overrides just the files from the parent theme that you have customized. When your child theme is active as the current
theme, Orchard first looks to that theme to resolve files, and if not found, it will look to the parent (BaseTheme) to
find the files instead (and so on... even your parent theme can have it’s own parent).
The process of creating a child theme is this:
1. Generate the child theme’s code structure using the command-line CodeGen utility.
2. Copy the files you want to change from the Theme Machine to your child theme.
3. Edit the files in the new child theme.
4. Apply the new theme to your website.
Generating the Theme Structure
To generate the code structure for your new theme, we are going to use the Code Generation feature, which can
be obtained from the Gallery > Modules page in the admin panel. Once you have installed and activated the code
generation feature, you will be able to generate a new theme from the Orchard command-line. Refer to the Using the
command-line interface topic if you need to know more about using commands in Orchard.
Open the Orchard command-line utility and enter the following command:
codegen theme MyTheme /BasedOn:TheThemeMachine
If you are using Visual Studio for editing (or if you plan for your Theme to eventually contain code files too), you may
also want specify the CreateProject and IncludeInSolution options as follows:
codegen theme MyTheme /BasedOn:TheThemeMachine /CreateProject:true /IncludeInSolution:true
3.2. Customizing Websites
155
Read the Docs Template Documentation, Release 1.9.2
This line tells Orchard to create the code structure for a new theme, sets the name of the theme to MyTheme, and directs
Orchard to base the theme on TheThemeMachine. The CodeGen command generates the following folder structure:
The only files created are the Theme.txt and Views\Web.config files. The Theme.txt file (the theme manifest) is where
the Admin Panel looks for information such as the name of the theme. This is also where your BaseTheme is specified.
Web.config is a configuration file that ASP.NET MVC requires for rendering any views placed in the Views folder.
You seldom have to make changes in the Web.config file.
Copying Files from the Theme Machine
To keep this example simple, the only file you will customize will be the Site.css file. Copy the Site.css file from
TheThemeMachine\Styles folder to the MyTheme\Styles folder.
Currently, you must also copy the TheThemeMachine\Views\Layout.cshtml file to the MyTheme\Views folder. (It’s
anticipated that this step will not be required in later releases.)
Customizing Theme Files
After copying the files you want to customize into your new theme folder, you can make changes to those files. You
can also create new files as needed. In this example, the only change you will make is the background color for the
body of the page.
In the Site.css file that you copied, find the body style in the General section. Then change the background color from
#fff to #fff8dc as shown in the following example:
body {
font-size: 81.3%;
color: #434343;
background: #fff8dc;
font-family: Tahoma, ``Helvetica Neue'', Arial, Helvetica, sans-serif;
}
This will change the background color to cornsilk, which is a light yellow.
You can also provide a thumbnail image of your new theme in the theme’s root folder. The image file must be named
Theme.png. The image will be displayed in the Admin Panel to help users select a theme.
The following image was copied from TheThemeMachine and changed to show the light-yellow background color.
Documentation/../Upload/screenshots/NewTheme_thumbnail.PNG
156
Chapter 3. Documentation
Read the Docs Template Documentation, Release 1.9.2
Applying Your New Theme
In the Admin Panel, under Themes, select Installed. The Installed tab will display the new theme under the Available
Themes:
Documentation/../Upload/screenshots/themes_available.png
Click Set Current. The Installed tab is redisplayed showing MyTheme as the current theme.
You can now go to your website to see the new theme in action.
Change History
• Updates for Orchard 1.8
– 9-8-14: Updated screen shots for Customizing Default Theme.
3.3 Using the Orchard Gallery
3.3.1 Gallery Overview
Orchard is a modular web-based CMS that’s designed to be extended by installing additional module packages and
by enabling features contained in those modules. A module package consists of a ZIP file in the .nupkg format. In
Orchard, a theme is also a module. To facilitate sharing for modules and themes, Orchard lets you search for modules
and themes online and install them directly to your site.
Browsing the Gallery Web Site
To find available modules and themes and download them to your computer, you can browse the Orchard Gallery
website. For more information, see Browsing the Gallery Website.
Installing Modules and Themes from the Gallery
You can also access the Gallery from within your Orchard site in order to download or install modules and themes. To
do so, click Themes or Modules on the dashboard and then click the Gallery tab.
Note: The Gallery feature is enabled by default. For more information about working with the Gallery
feature, including how to enable or disable it, see Installing Modules and Themes from the Gallery.
Contributing a Module or Theme to the Gallery
If you are a developer who writes modules or themes for Orchard, you are probably interested in sharing your module
with others in the gallery. For information about how to do this, see Contributing a Module or Theme to the Gallery.
3.3. Using the Orchard Gallery
157
Read the Docs Template Documentation, Release 1.9.2
Registering Additional Gallery Feeds
The Orchard Gallery is just one gallery that you can browse. By default, a single feed is exposed from
http://packages.orchardproject.net/FeedService.svc. Orchard allows you to register additional feeds for other galleries.
To register a feed, expand the dashboard Settings section and then click Gallery. On the Gallery Feeds page you
can add new feeds or delete existing ones. For more information, see [Registering Additional Gallery Feeds](Module
gallery feeds).
If you want to set up your own gallery, a reference implementation for exposing a gallery feed and website is available
on OrchardGallery.CodePlex.com and GalleryServer.CodePlex.com.
Change History
• Updates for Orchard 1.1
– 3-22-11: Updated dashboard and UI references in the text.
3.3.2 Installing Modules and Themes from the Gallery
Orchard makes it easy to browse available modules and themes from an online gallery and install them using the
Orchard dashboard. This topic shows how to install both modules and themes from the gallery.
Note: If your site is running under IIS, make sure you have granted read/write permissions to the
~/Themes folder under the root of your site for the service account that is being used as the IIS application pool identity. However, you should remove the write permissions on a production server.
Accessing and Enabling the Gallery
The gallery feature is enabled by default in Orchard. When the gallery is enabled, a Gallery tab appears at the top of
the both the Themes screen and the Modules screen in the dashboard.
Note: If the gallery feature has been disabled, there will be no Gallery tab visible in the Themes or
Modules dashboard screens. To enable the gallery, click Modules in the dashboard, find the gallery
feature, and then click Enable on the feature.
Installing a Theme from the Gallery
To access the gallery for themes, click Themes in the dashboard. On the Themes screen click the Gallery tab. A set
of themes appears with a pair of Install and Download links next to each theme.
158
Chapter 3. Documentation
Read the Docs Template Documentation, Release 1.9.2
If you install a theme, it becomes available to apply to your site. If you download a theme, you save the theme package
file to your local computer. You can then use the Themes screen in the Orchard dashboard to install the downloaded
theme package. For more information, see Installing Themes.
Previewing and Applying an Installed Theme
After installing a new theme, you can preview, enable, and apply that theme to your site by clicking Themes in the
dashboard. For more information, see Previewing and Applying a Theme.
Installing a Module from the Gallery
To access the gallery for modules, click Modules on the dashboard and then click the Gallery tab. A set of modules
appears with a pair of Install and Download links next to each module.
3.3. Using the Orchard Gallery
159
Read the Docs Template Documentation, Release 1.9.2
As with themes, if you install a module it becomes available to use on your site. If you download a module, you save
the module package file to your local computer. You can then go to the Modules screen on the dashboard, click the
Installed tab, and then click Upload to install the module in an Orchard site. For more information about how to
activate a module after installing it, see Installing and Upgrading Modules and Enabling and Disabling Features.
On the dashboard Modules screen, click the Installed tab. This tab displays all the modules that are installed in an
Orchard site.
160
Chapter 3. Documentation
Read the Docs Template Documentation, Release 1.9.2
Notice that on every page in the Installed tab, there is a link that lets you upload a module package to the site.
Displaying Additional Gallery Feeds
The Gallery tabs on the Modules page and the Themes page of the dashboard together display the aggregated list of
themes and modules exposed by all feeds registered on your site. On the Gallery tabs for both themes and modules,
you can use the Feed drop-down list to filter the display so that it shows all available items, or only the items from a
selected feed. (This is only useful if you have multiple feeds registered.)
3.3. Using the Orchard Gallery
161
Read the Docs Template Documentation, Release 1.9.2
By default, the Orchard Gallery feed is registered for an Orchard site. To register additional gallery feeds see [Registering Additional Gallery Feeds](Module gallery feeds).
Change History
• Updates for Orchard 1.1
– 3-22-11: Updated screen shots and menu or UI options.
3.3.3 Browsing the Gallery Web Site
The Orchard Gallery web site allows you to browse and search for available modules and themes to extend and
customize the behavior of any Orchard site. It also provides a convenient way for developers and designers to upload
and share modules and themes with others.
You can also browse modules and themes from the gallery using the Orchard admin panel. Refer to
Installing modules and themes from the gallery for more information.
To view the gallery website, navigate to http://gallery.orchardproject.net/ in your browser.
162
Chapter 3. Documentation
Read the Docs Template Documentation, Release 1.9.2
On the Modules tab of the website, you can browse and search for available modules.
3.3. Using the Orchard Gallery
163
Read the Docs Template Documentation, Release 1.9.2
Modules are categorized, so you can quickly find what you are looking for by clicking any category link or selecting
from the category dropdown next to the search input box.
164
Chapter 3. Documentation
Read the Docs Template Documentation, Release 1.9.2
The Themes tab displays a list of themes, similar to the modules section. Unlike modules, themes are not categorized.
However, both modules and themes support tags that can be specified by the author/submitter, and you can click any
tag link on the site to find other items that share that tag.
3.3. Using the Orchard Gallery
165
Read the Docs Template Documentation, Release 1.9.2
You can search for available themes or modules by typing keywords in the search input box. For modules, you can
also search within a specific category or across all categories.
166
Chapter 3. Documentation
Read the Docs Template Documentation, Release 1.9.2
Each module or theme in the gallery has a details page that displays more information about the package, such as
screenshots, the package version, number of downloads, license information, or a project site where you can learn
more. There is a Report Abuse link on every details page that you can use to contact the gallery administrator to report
inappropriate content or malware. Please use this for abuse reports only. If you want to report a bug or issue to the
package author, please use the Project Site link instead.
3.3. Using the Orchard Gallery
167
Read the Docs Template Documentation, Release 1.9.2
Note that a few key gallery features are remaining to implement, and those will be available on the website
as soon as they are ready. See “About the Orchard Gallery Project” below for more information
Multiple Versions of the Same Package
Currently, each version of a package (module or theme) is listed as a unique entry in the web site, which can make it
somewhat difficult to know whether you are downloading the most recent version.
We have plans to address this in a future update to the gallery website (see “About the Orchard Gallery Project” below).
For now, we recommend that you search for the name of the package (without the version number) in order to list all
versions of a given package before selecting one to download.
168
Chapter 3. Documentation
Read the Docs Template Documentation, Release 1.9.2
About the Orchard Gallery Project
The gallery website (and related feed) implementation are being developed as an open source project under the
same New BSD license and contribution terms as Orchard itself, and the source code is available to you on OrchardGallery.CodePlex.com and GalleryServer.CodePlex.com). The open source gallery project is meant to provide a
reference implementation for exposing a gallery feed and website, and can be used to set up your own gallery site. For
example, the NuGet.org website uses this gallery implementation too.
The gallery project is a work-in-progress, and there are a number of improvements we will be making to the gallery
over time. In the near future, we are planning to implement these features:
• Reviews and ratings
• Collapse all versions of a package under a single details page
• Display aggregate rating and download stats across all versions of a package
• Better management and submission interface for package submitters
If you want to log a bug (or submit a patch) for the gallery website, or if you have a great feature suggestion we should
consider, please post it to OrchardGallery.CodePlex.com.
3.3.4 Contributing a Module or Theme to the Gallery
Have you created an Orchard module or theme that you want to share with other Orchard users? The Orchard Gallery
makes this easy, and you can always update and manage your contributions to the gallery as you have new versions to
share, or when you want to make changes to existing contributions.
To get started, click on the Contribute tab of the gallery site.
Creating a User Account
To submit a module or theme to the gallery, you must first create a user account on the gallery. Click the Sign In link
in the header area of the site to get to the Log On page. In the sidebar for the site, click the link to Register Now.
3.3. Using the Orchard Gallery
169
Read the Docs Template Documentation, Release 1.9.2
On the account registration page, specify your account details.
Upon submitting this form, you will receive a notification that email has been sent to you.
170
Chapter 3. Documentation
Read the Docs Template Documentation, Release 1.9.2
Click the verification link in the email in order to activate your account.
This will return you to the web site, where you can now sign in.
3.3. Using the Orchard Gallery
171
Read the Docs Template Documentation, Release 1.9.2
Submitting a Package to the Gallery
A package is just a zipped up file (in .nupkg format) containing your module or theme, and it is easy to create a
package using the orchard command-line utility. For instructions on how to create a package, refer to these topics:
• Packaging and sharing a module
• Packaging and sharing a theme
Once you have packaged your module or theme, visit the Contribute page on the gallery site and click the Add a New
Module or Theme link.
Uploading a package is done in three simple steps:
1. Upload a package file (or specify a remote URL to the package file)
2. Enter the details about your package (description, tags, license, etc)
3. Specify an optional logo and/or screenshots.
Specifying a Package File
In the first step, you will be asked to specify a package file, either by uploading from your local computer or by a
specifying a URL.
172
Chapter 3. Documentation
Read the Docs Template Documentation, Release 1.9.2
To upload a package file, browse for a .nupkg file on your local computer that you created using the Orchard commandline utility. You can also specify a URL to a package file if you have published it elsewhere. For example, if you have
released your package on a CodePlex.com site, you could specify the URL to your release.
• Example URL: http://orchardmaps.codeplex.com/Project/Download/FileDownload.aspx?DownloadId=187223
In this walkthrough, we will assume you are browsing for the package on your local computer. Click the Browse
button to find the .nupkg file.
Specifying the Package Details
Once you upload your package, click Next and you will be presented with a form for specifying the details of your
package. One of the advantages of using the .nupkg format is that the gallery can automatically extract many details
about your package from the file itself. These details are determined by the Module.txt or Theme.txt file in your
module or theme.
Many of the fields on this form are optional, but allow you to specify tags, license information, a project web site, and
other information that will help visitors of the gallery to find and learn more about your package.
3.3. Using the Orchard Gallery
173
Read the Docs Template Documentation, Release 1.9.2
174
Chapter 3. Documentation
Read the Docs Template Documentation, Release 1.9.2
There are a couple key fields worth calling out:
• Package ID is the unique name for your package. It is obtained from the package when you upload it, and if
you are the first person to submit a package with this ID, you will given exclusive ownership for that ID. While
you can upload additional versions of packages sharing this ID, no other submitter will be able to use this ID for
their package uploads unless you grant explicit owner rights to that user. It is also possible to register a package
ID in advance of uploading your module, to be sure you can claim the name that you want.
• Package Version is a version number for the package, and must be unique among all other packages in the
gallery that same the same package ID. Every time you submit a package to the gallery, you will need to
increment the version number for your package. This allows users of your package to know when a new version
is available.
• Package Type is what determines whether your package will appear on the Modules or Themes tab of the
gallery site. Be sure to pick the right type for your package!
Specifying a Logo and Screenshots
In the final step of the submission process, you can specify a custom logo image and zero or more screenshot images,
which users will be able to see on the details page for your package. Both of these are optional, so feel free to skip
this step, if you prefer not to customize the default images.
When you finish the submission, you will be notified that your package will appear on the gallery shortly. Normally,
your package will appear on the site in 60 seconds or less.
3.3. Using the Orchard Gallery
175
Read the Docs Template Documentation, Release 1.9.2
Managing your Contributions to the Gallery
Once your package appears on the web site, you will notice that you can perform additional tasks for this package
when you are logged in:
• Edit allows you to return to the package details form and update information about your package.
• Manage Owners allows you to assign additional owners for your package.
• Delete allows you to delete a submission from the gallery. Note: When you delete a submission, you will lose
the download count history for that package version.
To see all of the packages that you previously uploaded to the gallery, visit the Contribute tab and click the Manage
My Contributions link.
176
Chapter 3. Documentation
Read the Docs Template Documentation, Release 1.9.2
Assigning Additional Owners to a Package
By default, you will be the only owner for packages that you contribute, and only you can edit, delete, or manage
owners for the package. However, by assigning additional owners, you can grant permissions to other users of the
gallery to perform these operations on your package too.
Be careful that you trust users you grant ownership rights, as they will be able to perform all of the
same operations on the package that you can perform, including deleting your package from the gallery.
Also, anyone with ownership rights to your package can upload additional versions of this package to the
gallery.
Registering a Package ID in Advance
You may want to register a package ID ahead of time, because you want to claim the name of an idea, before you’ve
implemented your module or theme. You can do this from the Contribute tab of the site.
3.3. Using the Orchard Gallery
177
Read the Docs Template Documentation, Release 1.9.2
It is a known issue that you cannot see the packages that you have previously claimed. This will be fixed
in a future update to the gallery site.
Managing Your Account
The My Account link allows you to manage your gallery account.
You can view your account key and reset your password from here. You account key is used when using the NuGet.org
command-line utility to upload a package to the gallery feed.
3.3.5 Registering Additional Gallery Feeds
To facilitate sharing of modules and themes, Orchard lets you register gallery feeds. When gallery feeds are registered
in an Orchard site, you can browse, install, or download the available modules and themes from the feeds by using
the Orchard dashboard. This topic shows you how to register new gallery feeds and remove existing feeds from an
Orchard site.
To see the gallery feed registration screen, expand the dashboard Settings section and then click Gallery.
178
Chapter 3. Documentation
Read the Docs Template Documentation, Release 1.9.2
The Gallery Feeds screen displays currently registered feeds.
As the illustration shows, by default an Orchard site provides a single registered gallery feed from
http://packages.orchardproject.net/FeedService.svc. You can add feeds or delete existing feeds.
To register an additional feed, click the Add Feed button.
In the Add a Feed screen, enter a URL and then click Add Feed.
Note For information about publishing a module or theme to the default Orchard gallery feed, visit
the gallery website. To learn how to create and expose a custom gallery of themes or modules,
see the reference implementation of a gallery website at OrchardGallery.CodePlex.com and GalleryServer.CodePlex.com.
To view the contents of a feed in your browser, click the feed link in the Gallery Feeds screen. (If you are using
Internet Explorer and it renders the gallery instead of displaying the feed contents, go to Internet Options and turn
off the feed-reading feature.)
3.3. Using the Orchard Gallery
179
Read the Docs Template Documentation, Release 1.9.2
Change History
• Updates for Orchard 1.8
– 9-04-14: Updated the gallery feed and the screen shots.
• Updates for Orchard 1.1
– 3-23-11: Updated screens and UI options for registering feeds.
3.4 Managing Websites
3.4.1 Enabling and Disabling Features
You can add additional functionality to your site by enabling and disabling features exposed by the modules that are
installed to Orchard. To view the available features, click Features under the Modules heading in the Orchard admin
panel.
The Features screen displays the available features that can be enabled or disabled. Depending on which features
are enabled or disabled, your site will have different admin panel options, front-end user interface elements, and
other behaviors. The default view of available features displays in “Box” view (to maximize the number of features
displayed at a glance).
180
Chapter 3. Documentation
Read the Docs Template Documentation, Release 1.9.2
You can also switch views to “List” view if you prefer to see your features as a list of items with more verbose
descriptions.
To enable a feature, simply click Enable for that feature.
When a feature is enabled a message appears at the top of the Features screen telling you the feature was enabled
successfully.
3.4. Managing Websites
181
Read the Docs Template Documentation, Release 1.9.2
A feature can depend on one or more other features (listed under the feature name). When a feature with dependencies is enabled, the dependencies are also automatically enabled. For example, the Gallery feature depends on the
Packaging Commands feature, which in turn depends on Packaging.
Enabling Gallery will enable Packaging Commands and Packaging.
Documentation/../Upload/screenshots_675/gallery_enabled_675.png
Enabling a feature (such as Gallery), will sometimes add additional menu items in the admin panel, as shown in the
previous image.
Orchard also provides a command-line interface, from which you can also list, enable, and disable features. You can
find the Orchard command-line tool in the bin directory of the application, and run it from the root of the website by
typing bin\orchard.exe at the Windows command-prompt. To list available features, type feature list or
feature list /Summary:true at the command-prompt.
182
Chapter 3. Documentation
Read the Docs Template Documentation, Release 1.9.2
Enable a feature from the command-line by typing feature enable <feature-name>, for example: feature enable Gallery.
For more information about the Orchard command-line interface, see Using the command-line interface.
Change History
• Updates for Orchard 1.8
– 9-07-14: Updated all the screen shots for Enabling/Disabling feaures
3.4.2 Using the Command-Line Interface
Orchard provides a command-line interface for performing many of the functions that are available from the admin
panel (and some that aren’t). The command-line tool is named “orchard.exe” and is located in the bin directory
underneath to root of your site. To run the command-line tool, first open a command prompt on the root of the site
(i.e. Orchard.Web). This can be done for example by SHIFT+right-clicking on the folder in Windows Explorer and
choosing “Open command window here”. From there, type “bin\orchard.exe”. Note that you need to run this tool
from the root of your site.
Using Commands
To view a list of available commands, type “help commands” at the prompt.
3.4. Managing Websites
183
Read the Docs Template Documentation, Release 1.9.2
If you run Orchard.exe before you have set up your site, the only command you can run is the setup command. This
performs exactly the same function as running Orchard in the browser and completing the setup form (to enter a
site name, admin user name, password, and database options). Additionally, the setup command takes an optional
argument, which is a list of features to enable at setup-time.
After running the setup command, you can type “help commands” again to reveal more commands.
orchard> help commands
List of available commands:
--------------------------blog create /Slug:<slug> /Title:<title> /Owner:<username> [/MenuText:<menu text>]
Creates a new Blog
blog import /Slug:<slug> /FeedUrl:<feed url> /Owner:<username>
Import all items from <feed url> into the blog at the specified <slug>
cultures get site culture
Get culture for the site
cultures list
List site cultures
cultures set site culture <culture-name>
Set culture for the site
feature disable <feature-name-1> ... <feature-name-n>
Disable one or more features
feature enable <feature-name-1> ... <feature-name-n>
Enable one or more features
feature list [/Summary:true|false]
Display list of available features
help <command>
Display help text for <command>
help commands
184
Chapter 3. Documentation
Read the Docs Template Documentation, Release 1.9.2
Display help text for all available commands
package create <extensionName> <path>
Create a package for the extension <extensionName>
(an extension being a module or a theme).
The package will be output at the <path> specified.
The default filename is Orchard.[Module|Theme].<extensionName>.<extensionVersion>.nupkg
For example, ``package create SampleModule c:\temp'' will create the package
``c:\temp\Orchard.Module.SampleModule.1.0.0.nupkg''.
package install <packageId> <location> /Version:<version>
Install a module or a theme from a package file.
package uninstall <packageId>
Uninstall a module or a theme.
The <packageId> should take the format Orchard.[Module|Theme].<extensionName>.
For example, ``package uninstall Orchard.Module.SampleModule'' will uninstall the Modul
``package uninstall Orchard.Theme.SampleTheme'' will uninstall the Theme under the ``~/
user create /UserName:<username> /Password:<password> /Email:<email>
Creates a new User
The available commands depends on the features that are currently enabled for your site. To list the features that you
can enable or disable, type “feature list” or “feature list /Summary:true”. You can enable additional features (and thus,
additional commands), by typing “feature enable < feature-name > at the command-prompt.
orchard> feature list /Summary:true
Common, Enabled
Containers, Enabled
Contents, Enabled
Dashboard, Enabled
DatabaseUpdate, Disabled
Feeds, Enabled
Gallery, Enabled
HomePage, Enabled
Lucene, Disabled
Navigation, Enabled
Orchard.ArchiveLater, Disabled
Orchard.Blogs, Enabled
Orchard.Blogs.RemotePublishing, Disabled
Orchard.CodeGeneration, Enabled
Orchard.Comments, Enabled
Orchard.ContentTypes, Enabled
Orchard.Email, Disabled
Orchard.Experimental, Disabled
Orchard.Experimental.TestingLists, Disabled
Orchard.Experimental.WebCommandLine, Disabled
Orchard.Indexing, Disabled
Orchard.jQuery, Enabled
Orchard.Lists, Enabled
Orchard.Localization, Disabled
Orchard.Media, Enabled
Orchard.Messaging, Disabled
Orchard.Migrations, Disabled
Orchard.Modules, Enabled
3.4. Managing Websites
185
Read the Docs Template Documentation, Release 1.9.2
Orchard.MultiTenancy, Disabled
Orchard.Packaging, Enabled
Orchard.Pages, Enabled
Orchard.PublishLater, Enabled
Orchard.Roles, Enabled
Orchard.Scripting, Enabled
Orchard.Scripting.Dlr, Disabled
Orchard.Scripting.Lightweight, Enabled
Orchard.Search, Disabled
Orchard.Setup, Disabled
Orchard.Tags, Enabled
Orchard.Themes, Enabled
Orchard.Users, Enabled
Orchard.Widgets, Enabled
PackagingServices, Enabled
Profiling, Disabled
Reports, Enabled
Routable, Enabled
SafeMode, Disabled
Scheduling, Enabled
Settings, Enabled
Shapes, Enabled
TheAdmin, Disabled
TheThemeMachine, Enabled
TinyMce, Enabled
XmlRpc, Disabled
#Batched or scripted Commands
There are two specific “Non-interactive” modes; single command and response file. Each allow for useful batching of
commands in a non-interactive context. Commands still need to have been enabled, and orchard.exe still needs to be
launched from the correct location for each command type.
##Single Command Single command is exactly as you would expect. A single command can be run and the orchard.exe tool will exit directly after completion.
From the Orchard.Web/bin path
orchard package create ``Orchard.Blogs'' ``c:\\temp\\''
##Response File
A response file simply contains a series of lines, each one representing a command to be executed. This is an excellent
way to run multiple commands without the large footprint of the orchard context initialisation.
Example response file text (myfile.txt):
package create ``Orchard.Blogs'' ``c:\\temp\\''
package create ``Orchard.Users'' ``c:\\temp\\''
To execute this response file run the orchard.exe in the single command mode as above, but note the “@” prefix on the
parameter, indicating a response file
orchard @myfile.txt
Adding Commands
Modules developers can add their own commands to the system by implementing a new class deriving from Orchard.Commands.DefaultOrchardCommandHandler. A command is simply a method on that class that has the Com186
Chapter 3. Documentation
Read the Docs Template Documentation, Release 1.9.2
mandName attribute. The following code creates a new “hello world” command that takes a name as a parameter and
can take an optional “YouRock” switch.
[CommandName(``hello world'')]
[CommandHelp(@''hello world <name> [/YouRock:true|false]
Says hello and whether you rock or not.'')]
[OrchardSwitches(``YouRock'')]
public void HelloWorld(string name) {
Context.Output.WriteLine(T(``Hello {0}.'', name ?? ``world''));
Context.Output.WriteLine(YouRock ? ``You rock.'' : ``You do not rock.'');
}
The switch itself is declared as a property of the class:
[OrchardSwitch]
public bool YouRock { get; set; }
Commands run in the full Orchard environment and can query the database, inject dependencies, and in general do
almost anything that can be done from code running in the web site.
Throwing Exceptions From Commands
Throwing from a command handler is not recommended. Instead, whenever possible, write to the context output and
return. If you do want to throw a generic exception, you should throw an OrchardException.
3.4.3 Installing and Upgrading Modules
Orchard is a modular web-based CMS, designed to be extended easily by installing additional modules and enabling
module features. A module is a package that can be installed and uninstalled. A package consists of a ZIP file in the
.nupkg file format.) A feature is a behavior that’s exposed by an installed module that you can individually enable or
disable.
This topic shows you how to install or download modules from the online gallery, how to install a module from your
local computer, and how to work with the features of an installed module. It also shows you how to update installed
modules.
Note If your site is running under IIS, make sure you have granted read/write permissions to the ~/Themes
folder under the root of your site for the service account that is being used as the IIS application pool
identity. However, you should remove the write permissions on a production server.
Viewing Installed Modules
To view the modules that have been installed for your site, click Modules on the dashboard, and then in the Modules
screen, click the Installed tab.
Documentation/../Upload/screenshots_675/modules_installedTab_upload_675.png
The Installed tab displays a list of the modules that are included with Orchard, along with properties of each module
such as version, author, a description, and a list of features. It also provides a link that you can use to upload and install
a module package.
3.4. Managing Websites
187
Read the Docs Template Documentation, Release 1.9.2
You can add modules to Orchard in two ways. The first and easiest is to install a module from the online gallery. The
second is to upload a module package from your local computer and install it in your site. If you simply want to use
an existing module in your Orchard site, you can install the module directly from the gallery to your site. If you want
to modify a module package, or if you want to upload it to multiple Orchard sites, you will probably want to download
the module from the gallery to your local computer.
Installing a Module from the Gallery
When you install a module, its package file is downloaded from the gallery, and the source files are extracted from the
package and added to your site. After you install a module, its features are available for use.
To install a module from the gallery, click Modules on the dashboard, then click the Gallery tab. The Gallery tab
displays a list of available online modules from the gallery feed (or feeds) registered for your site.
188
Chapter 3. Documentation
Read the Docs Template Documentation, Release 1.9.2
The gallery displays the aggregated list of modules exposed by all registered feeds. You can also use the Feed dropdown list in the Gallery tab to display all feeds or to filter and display only the modules from a particular feed.
To install a module, click the Install link for the module. This topic uses the Bing.Maps module as an example.
3.4. Managing Websites
189
Read the Docs Template Documentation, Release 1.9.2
After the module has been installed, Orchard prompts you to enable features in the module. Select the features you
want to enable and then click OK.
When you return to the Installed tab, you can see the module that you just installed.
Downloading a Module from the Gallery
At times you may want to simply download a module package to your computer rather than installing it in a site. To
download a module, return to the Gallery tab and click Download for a specific module. (For example, download the
Contact Form module.) The download process lets you save the .nupkg file that contains the module contents to your
local machine. You can then optionally modify the module, or install it in an Orchard site.
190
Chapter 3. Documentation
Read the Docs Template Documentation, Release 1.9.2
Installing a Module from your Local Computer
To install a module from your local computer to an Orchard site, go to the Modules > Installed tab and then click the
link to Install a module from your computer.
Browse to the local module (a .nupkg file), select it, and then click Install. This installs the module package to your
site the same way that clicking Install does for an online module in the gallery.
3.4. Managing Websites
191
Read the Docs Template Documentation, Release 1.9.2
Working with Module Features
When you install a module in an Orchard site, the module contains one or more features. You can enable or disable
each feature individually, either when you first install the module, or later. The Bing.Maps module used as an example
in the previous section contains a single feature, also called Bing.Maps. (Remember that a module can have one or
many features, and that the features do not have to have the same name as their parent module.) In this section, you’ll
see how to enable or disable an individual feature (the Bing.Maps feature), and how to add that feature to a content
type, such as a page.
Begin by observing how to enable or disable the Bing.Maps feature. To do this, go to the Modules > Features tab,
find the Bing.Maps feature. Note that it is enabled, and that you can disable it by clicking a Disable link on the
feature. If the feature is disabled, then an Enable link appears for enabling the feature. Leave the feature enabled for
this tutorial.
Now you can add a new content part (a Bing Map part, which is included in the disabled Bing.Maps feature) to the
page content type. On the dashboard, click Content, and then click the Content Types tab. Find the Page content
type, and then click Edit next to the type. In the Edit Content Type screen, click Add Parts in the Parts section. The
Add Parts to Page screen is displayed.
Select the Bing Map content part from the list of available parts, and then save the updated page content type.
Now you can see the effect of adding the Bing Maps content part to the page type. On the dashboard in the New
menu, click Page to create a new page. Because you installed the Bing Maps module, enabled the feature, and added
the Bing Map content part to the page, when you create a new page instance, a number of map-related fields appear.
192
Chapter 3. Documentation
Read the Docs Template Documentation, Release 1.9.2
Updating an Installed Module
Occasionally modules will be updated with fixes or new features. You can update an installed module by clicking
Modules on the dashboard and then clicking the Updates tab. If there are no updates available for your installed
modules, the Updates tab is empty. If there are updates available, you can install or download the updates the same
way that you installed the module originally.
3.4. Managing Websites
193
Read the Docs Template Documentation, Release 1.9.2
Change History
• Updated for Orchard 1.1
– 3-23-11: Reordered sections of the topic, added new section on enabling and disabling features, plus
another section on updating a module. Updated screens and text in existing sections.
3.4.4 Modifying Site Settings
You can configure the general, global, and feature-specific settings for your site in the Settings panel (the menu items
contained in the Settings section) of the Orchard dashboard. This topic describes these site-level settings.
In the Settings panel in the dashboard, the settings are arranged into categories, including General, Gallery, Comments, Media, Users, and Cache.
General Settings
To access general settings, click Settings in the Settings panel. This opens the following screen:
Note The general settings screen also displays options that are specific to the features that are enabled for
your site.
194
Chapter 3. Documentation
Read the Docs Template Documentation, Release 1.9.2
In the general settings category, you can modify the following global and site-wide settings:
• Site Name. The name of your site, which is usually displayed by the applied theme.
• Default Site Culture. The default culture for the site. You can also add culture codes here. For more information, see Creating Global-Ready Applications.
• Page title separator. The character that is used to separate sections of a page title. For example, the default
separator character for the en-US locale is a hyphen (-).
• Super user. A user who has administrative capability on the site, regardless of configured roles. This is usually
the user who ran the Orchard installation and setup. The default user is the admin account.
• Resource Debug Mode. The mode that determines whether scripts and style sheets are loaded in a “debuggable”
form or in their minimal form.
• Default number of items per page. Determines the default number of items that are shown per page.
• Base URL. The base URL for your site.
3.4. Managing Websites
195
Read the Docs Template Documentation, Release 1.9.2
• Maximum number of items per page. Determines the maximum number of items that are shown per page.
Leave 0 for unlimited.
• Default Time Zone. Determines the default time zone used when displaying and editing dates and times.
• Default Site Calendar. Determines the default calendar used when displaying and editing dates and times.
The ‘Culture calendar’ option means the default calendar for the culture of the current request will be used (not
necessarily the configured default site culture).
Gallery Settings
To access settings for the gallery, click Gallery in the Settings panel. This opens the following screen:
In the gallery feed settings, you can add or delete a feed using the following settings:
• Add Feed. Lets you specify the URL to a gallery feed.
• Delete. Lets you remove an existing gallery feed.
For more information about how to add feeds to the gallery, see Registering Additional Gallery Feeds.
Comments Settings
To access settings for comments, click Comments in the Settings panel. This opens the following screen:
In the comments settings, you can enable or disable the following features:
196
Chapter 3. Documentation
Read the Docs Template Documentation, Release 1.9.2
• Comments must be approved before they appear. Requires user comments to be approved by an administrator
or moderator before they become visible on the site.
• Automatically close comments after. Number of days after comments are automatically closed. Leave to 0 to
have them always available.
For more information about how to work with comments, see Moderating Comments.
User Settings
To access user settings, click Users in the Settings panel. This opens the following screen:
In the user settings, you can enable or disable the following settings in order to customize user registration:
• Users can create new accounts on the site. Configures the site to let users create a new account.
• Display a link to enable users to reset their password. Provides users with a way to reset their password.
• Users must verify their email address. Requires users to confirm their email address during registration.
• Users must be approved before they can log in. Requires administrative approval of new accounts before
users can log in.
Cache
To access caches settings like Default Cache Duration, Max Age, Vary Query String Parameters, Vary Request Headers
and Ignored Urls.
3.4. Managing Websites
197
Read the Docs Template Documentation, Release 1.9.2
Change History
• Updates for Orchard 1.8
– 9-8-14: Updated screen shots for dashboard settings. Added cache section.
• Updates for Orchard 1.1
– 3-29-11: Added sections for new screens in the dashboard. Updated existing screen shots.
3.4.5 Moderating Comments
The Comments feature of Orchard provides the ability to monitor and manage the comments for content items on your
site. This topic describes two sets of tools that Orchard provides for working with site comments: tools for managing
existing comments, and site-level settings for comments.
Managing Comments
To access the comment management screen, click Comments on the Orchard dashboard.
198
Chapter 3. Documentation
Read the Docs Template Documentation, Release 1.9.2
The Comments screen lists the comments across all content items in your site. It can also display a filtered list that
shows all comments by administrative category (“pending”, “approved”, or “spam”). If you want to carry out a bulk
administrative task that applies to many comments, select the comments you want, and then use the Actions drop-down
list to apply an action such as Approve or Unapprove.
Note If you want to manage just the comments for a specific content item, such as a page or a blog post,
edit the content item. In edit mode, there is an option to display and manage comments for that item. The
screen for editing comments that are linked to a content item is identical to the Comments screen, except
that it only shows comments from the specific content item.
In the Comments screen, click Edit next to an approved comment. A screen for editing the comment is displayed.
3.4. Managing Websites
199
Read the Docs Template Documentation, Release 1.9.2
Click Pending to change the comment status, and then save the comment. Browse to your site and view the content
item for which you changed the comment category to “pending”. The pending comment is no longer visible.
You can assign comments to the following categories:
• Pending. The comment is pending administrator approval. The comment will not be visible to users unless an
administrator marks it as “Approved”.
• Approved. The comment is approved and will appear on the site. This is the default category for new comments
unless you enable the site-level setting to require approval of all comments. (See the next section.)
• Mark as spam. The comment is spam and will not displayed. For more information, see the next section.
Setting Site-Level Comment Options
Orchard provides two site-level features for comments: administrative approval of comments and spam protection.
You can access both features by clicking Settings > Comments on the dashboard to open the screen for setting
comment options.
200
Chapter 3. Documentation
Read the Docs Template Documentation, Release 1.9.2
Requiring Approval for Comments
You might want to require moderator approval of comments before they become visible on the site. As the previous
illustration for editing comments shows, by default, comments are approved and visible. However, if you enable the
site-level setting to require approval of comments, new comments will default to the “pending” category and will not
be displayed until they are approved.
To require approval of comments, click Settings > Comments in the dashboard. A screen appears for managing
site-level comment settings.
Select Comments must be approved before they appear and then save the settings. After you have enabled this
setting, you will need to review all new user comments in the Comments screen, and for the comments that you want
to allow on the site, change their status from “pending” to “approved”.
Enabling Spam Protection
The spam-protection feature helps to automatically categorize certain comments as spam so that you can prevent them
from being displayed in your site.
To implement spam protection, Orchard uses Akismet spam protection, which reviews comments as they are posted.
When Akismet detects a comment that fits the criteria for spam, it automatically assigns it to the Mark as spam
category.
To enable the Akismet spam protection feature on a site, do the following:
• Obtain an Akismet key from Akismet.com.
• Enter your Akismet key in the field.
• Save the updated setting.
3.4. Managing Websites
201
Read the Docs Template Documentation, Release 1.9.2
After you enable spam protection in your site, you can use the Comments screen described earlier to select the
comments that are marked as spam, review them, and delete the comments that really are spam.
Change History
• Updates for Orchard 1.8
– 3-28-11: Updated existing screens for site level comment and anti-spam settings.
• Updates for Orchard 1.1
202
Chapter 3. Documentation
Read the Docs Template Documentation, Release 1.9.2
– 3-28-11: Updated existing screens, added new step showing how to require pre-approval of comments.
3.4.6 Managing Users and Roles
Orchard provides the ability to manage users and roles for your site, with users assigned to one or more roles, and
different permissions associated to each role.
To manage the users in your site, click the Users link in admin panel.
By default, there is ony one user, which is the admin user that is configured in the Orchard setup screen on first install.
To add an additional user, click Add a new user. You can also edit, remove, and disable user accounts from this
screen.
When adding a new user, specify a user name, email and password, along with one or more roles for the user. The roles
determine what permissions a user has on your site, in other words, what operations they are allowed to perform. The
effective permissions for a user are the union of permissions for all applied roles. Permissions only grant operations
to a user; they never deny them.
3.4. Managing Websites
203
Read the Docs Template Documentation, Release 1.9.2
You can also configure the roles in your site by clicking the Roles link in the admin panel.
204
Chapter 3. Documentation
Read the Docs Template Documentation, Release 1.9.2
By default, Orchard includes a number of roles with default permissions:
• Administrator - Can perform any operation (has all permissions)
• Editor - Can author, publish and edit his own and others’ content items.
• Moderator - Can moderate comments and tags only. No authoring permissions.
• Author - Can author, publish and edit his own content items
• Contributor - Can author and edit his own content items, but not publish them (save draft only)
• Anonymous - Can view the front-end of the site only.
• Authenticated - Can view the site front-end, and perform other operations depending on the site and other role
permission settings.
To edit the permission for a given role, click Edit next to the role name.
3.4. Managing Websites
205
Read the Docs Template Documentation, Release 1.9.2
To permit a limited number of self-management options expand the Settings tab and click Users:
• Users can create new accounts on the site
• Display a link to enable users to reset their password
• Users must verify their email address
• Users must be approved before they can log in
Change History
• Updates for Orchard 1.8
– 9-8-14: Updated screen shots for Managing users and roles.
3.4.7 Understanding Permissions
This topic has been updated for the Orchard 1.8.1 release.
Each role has a set of permissions assigned to it, and these permissions indicate which actions a user in that role
can perform. For each role, you can only grant permissions; you cannot specifically deny a permission. A user’s
permission set consists of all granted permissions for all roles that the user belongs to.
To assign or review permissions for a role, click the Roles link.
Click Edit for the role you want to modify or review.
206
Chapter 3. Documentation
Read the Docs Template Documentation, Release 1.9.2
By default, Orchard includes a number of roles with default permissions:
• Administrator - Can perform any operation (has all permissions)
• Editor - Can author, publish and edit his own and others’ content items.
• Moderator - Can moderate comments and tags only. No authoring permissions.
• Author - Can author, publish and edit his own content items
• Contributor - Can author and edit his own content items, but not publish them (save draft only)
• Anonymous - Can view the front-end of the site only.
• Authenticated - Can view the site front-end, and perform other operations depending on the site and other role
permission settings.
Implied Permissions
Some permissions specify whether a user is allowed to perform a single action; other permissions specify whether the
user is allowed to perform a group of actions. The permissions that pertain to a group of actions are typically higherlevel permissions that logically include lower-level actions. When you grant a higher-level permission that relates to
a group of actions, the lower-level permissions are implicitly included. For example, if you grant a role permission to
manage blogs, you are also granting that role permission to edit, publish, and delete blogs.
You can see which permissions are explicitly or implicitly granted by examining the check boxes in the Allow and Effective columns. The Allow column shows which permissions are explicitly granted and the Effective column indicates which permissions are explicitly or implicitly granted. The following image shows
that Manage blogs was specifically granted to the role and the other permissions were implicitly granted.
3.4. Managing Websites
207
Read the Docs Template Documentation, Release 1.9.2
If you unselect the Manage blogs permission, all of the other permissions are also revoked.
The following image shows a role with Edit any blog posts granted. Edit own blog posts is implicitly granted.
The following image shows a role with only Edit own blog posts granted. No permissions are implicitly granted with
208
Chapter 3. Documentation
Read the Docs Template Documentation, Release 1.9.2
this selection.
Orchard.ContentPermissions
This applies to the Orchard.ContentPermissions Module, available since Orchard 1.5.1
When enabling the ContentPermissions module, you can define item-level permissions for the front end. This allows
you to protect your Projections or own Content Types.
3.4.8 Making a Website Recipe
Orchard simplifies the process of setting up a new website by letting you use website recipes. A recipe is an XML
file that contains the startup configuration for an Orchard website. When you start Orchard for the first time, you can
select a recipe that best matches the type of site you want to set up. For example, if you want your website to be a
blog, you can select the Blog recipe, and much of the configuration work will be done for you.
You can create your own recipes and customize the process of setting a website and configuring Orchard features.
Recipes can also instruct Orchard to download and install modules and themes from the Orchard Gallery during
website setup.
This article describes how to use recipes, how to create custom recipes, export or import recipes, and how to create a
specialized distribution of Orchard using recipes.
Using a Recipe to Create a Website
When you first set up an Orchard website, the setup page that is displayed contains a list of recipes. You can choose a
recipe to base your new website on.
3.4. Managing Websites
209
Read the Docs Template Documentation, Release 1.9.2
210
Chapter 3. Documentation
Read the Docs Template Documentation, Release 1.9.2
The initial list contains the following recipes:
• Default. The default recipe for an Orchard site that includes pages, blogs, custom content types, comments,
tags, widgets, and basic navigation.
• Blog. A recipe that provides an installation profile with features for a personal blog.
• Core. A recipe that provides the Orchard framework with limited end-user functionality that can be used during
development.
After you choose a recipe and click Finish Setup, Orchard creates the website using the selected recipe and opens the
home page.
How Recipes Work
An Orchard recipe is an XML file that contains website configuration information. The following example shows the
contents of the default recipe file.
<?xml version=''1.0''?>
<Orchard>
<Recipe>
<Name>Default</Name>
<Description>The default recipe for an Orchard site that includes pages, blogs, custom
<Author>The Orchard Team</Author>
<WebSite>http://orchardproject.net</WebSite>
<Tags></Tags>
<Version>1.0</Version>
<IsSetupRecipe>true</IsSetupRecipe>
</Recipe>
<Feature enable=''Orchard.Blogs,Orchard.Comments,Orchard.Tags,Orchard.Alias,Orchard.Autor
TinyMce,Orchard.MediaLibrary,Orchard.ContentPicker,Orchard.PublishLater,
Orchard.jQuery,Orchard.Widgets,Orchard.ContentTypes,
Orchard.Scripting,Orchard.Scripting.Lightweight,PackagingServices,Orchar
Orchard.Projections,Orchard.Fields,Orchard.OutputCache,Orchard.Taxonomie
Orchard.Layouts,Orchard.Layouts.Tokens,
TheThemeMachine'' />
<Metadata>
<Types>
<Page ContentTypeSettings.Draftable=''True'' TypeIndexing.Indexes=''Search''>
<TagsPart />
<LocalizationPart />
<TitlePart/>
<AutoroutePart />
<MenuPart />
</Page>
<BlogPost ContentTypeSettings.Draftable=''True'' TypeIndexing.Indexes=''Search''>
<CommentsPart />
<TagsPart />
<LocalizationPart />
<TitlePart/>
<AutoroutePart />
</BlogPost>
</Types>
<Parts>
3.4. Managing Websites
211
Read the Docs Template Documentation, Release 1.9.2
<BodyPart BodyPartSettings.FlavorDefault=''html'' />
</Parts>
</Metadata>
<Settings />
<Migration features=''*'' />
<Command>
layer create Default /LayerRule:''true'' /Description:''The widgets in this layer are d
layer create Authenticated /LayerRule:''authenticated'' /Description:''The widgets in t
layer create Anonymous /LayerRule:''not authenticated'' /Description:''The widgets in t
layer create Disabled /LayerRule:''false'' /Description:''The widgets in this layer are
layer create TheHomepage /LayerRule:''url `~/''' /Description:''The widgets in this lay
site setting set baseurl
menu create /MenuName:''Main Menu''
page create /Slug:''welcome-to-orchard'' /Title:''Welcome to Orchard!'' /Path:''welcome
menuitem create /MenuPosition:''0'' /MenuText:''Home'' /Url:''~/'' /MenuName:''Main Men
widget create MenuWidget /Title:''Main Menu'' /RenderTitle:false /Zone:''Navigation'' /
theme activate ``The Theme Machine''
</Command>
</Orchard>
The following sections of a recipe file are the elements that are most important to understand:
• Recipe. This section contains metadata about the recipe, such as its name and description.
• Feature. This section lists module features that Orchard will enable.
• Metadata. This section provides configuration for the types, parts, and fields that Orchard contains.
• Settings. This section provides a way to configure website settings.
• Command. This section lists commands that Orchard will run against your website in order to complete the
setup. For more information about Orchard commands, see Using the Command-line Interface.
Creating a Custom Recipe
You can create your own recipe, which can then be added to the setup page or to your own module. Recipes added to
the setup page can be selected by the user only during site setup; recipes added to a module can be executed by the
user after site setup.
To get started with creating a custom recipe, you can select an existing recipe that you can tailor to your purposes. The
following example shows how to start with the default recipe (default.recipe.xml) and add the Bing.Maps module and
a theme, both of which will be downloaded and enabled during setup. The recipe also creates a blog and a page that
displays the map widget. Finally, the recipe adds layers and menu tabs for the blog and map page.
<?xml version=''1.0''?>
<Orchard>
<Recipe>
<Name>Custom Recipe</Name>
<Description>A recipe that includes a landing page with blog on a second tab.</Descript
<Author>The Orchard Team</Author>
<WebSite>http://orchardproject.net</WebSite>
<Tags></Tags>
<Version>1.0</Version>
<IsSetupRecipe>true</IsSetupRecipe>
212
Chapter 3. Documentation
Read the Docs Template Documentation, Release 1.9.2
</Recipe>
<Module packageId=''Orchard.Module.Bing.Maps'' />
<Theme packageId=''Orchard.Theme.Dark'' current=''true'' />
<Feature enable=''Orchard.Blogs,Orchard.Comments,Orchard.Tags,
Orchard.Lists,TinyMce,Orchard.Media,Orchard.MediaPicker,Orchard.PublishL
Orchard.jQuery,Orchard.Widgets,Orchard.Widgets.PageLayerHinting,Orchard.
Orchard.Scripting,Orchard.Scripting.Lightweight,
PackagingServices,Orchard.Packaging,Gallery,Gallery.Updates,
TheThemeMachine,Bing.Maps'' />
<Metadata>
<Types>
<Page ContentTypeSettings.Draftable=''True'' TypeIndexing.Included=''true''>
<TagsPart />
<LocalizationPart />
</Page>
<BlogPost ContentTypeSettings.Draftable=''True'' TypeIndexing.Included=''true''>
<CommentsPart />
<TagsPart />
<LocalizationPart />
</BlogPost>
</Types>
<Parts>
<BodyPart BodyPartSettings.FlavorDefault=''html'' />
</Parts>
</Metadata>
<Settings />
<Migration features=''*'' />
<Command>
layer create Default /LayerRule:''true''
layer create Authenticated /LayerRule:''authenticated''
layer create Anonymous /LayerRule:''not authenticated''
layer create Disabled /LayerRule:''false''
layer create TheHomepage /LayerRule:''url `~/'''
layer create Blog /LayerRule:''url `~/Blog'''
layer create Maps /LayerRule:''url `~/Maps'''
page create /Slug:''welcome-to-orchard'' /Title:''Welcome to Orchard!'' /Path:''welcome
blog create /Slug:''blog'' /Title:''Blog'' /Homepage:false /Description:''This is your
page create /Slug:''maps'' /Title:''Bing Maps'' /Path:''bing-maps'' /Homepage:false /Pu
widget create HtmlWidget /Title:''First Leader Aside'' /Zone:''TripelFirst'' /Position:
widget create HtmlWidget /Title:''Second Leader Aside'' /Zone:''TripelSecond'' /Positio
widget create HtmlWidget /Title:''Third Leader Aside'' /Zone:''TripelThird'' /Position:
menuitem create /MenuPosition:''1'' /MenuText:''Home'' /Url:'''' /OnMainMenu:true
menuitem create /MenuPosition:''2'' /MenuText:''Blog'' /Url:''~/Blog'' /OnMainMenu:true
menuitem create /MenuPosition:''3'' /MenuText:''Maps'' /Url:''~/Maps'' /OnMainMenu:true
</Command>
</Orchard>
3.4. Managing Websites
213
Read the Docs Template Documentation, Release 1.9.2
Note the following about the changes made to the default recipe:
• Module element. This element identifies a module that will be downloaded from the Orchard Gallery on the
website. This does not enable the features in the module; it only downloads it. To enable a module feature, add
it to the Feature element as shown in the example.
• Theme element. This element identifies a theme that will be downloaded from the Orchard Gallery. If the
current attribute is set to true, the theme becomes the current theme and is applied to the website. Otherwise,
it will just be downloaded. It is also possible to enable a theme by using the enable="true" attribute.
Otherwise the theme is initially disabled. If you use current="true", the theme is automatically enabled.
Important: The Module and Theme elements must appear in the recipe immediately after the Recipe
element.
• layer create command. This was added in order to create the Blog and Maps layer.
• blog create command. This was added in order to create the blog.
• page create command. This was added in order to create the Maps page.
• menuitem create command. This was added in order to create the Blog and Maps menu tabs.
In addition to the attributes shown here for the Module and Theme elements, both elements support a version attribute.
If the version is specified, that version will be downloaded from the Orchard Gallery. Both elements also have a
repository attribute. By default, the repository attribute points to the Orchard Gallery. However, you can set it to any
feed URL.
To add your custom recipe to the setup page use the IsSetupRecipe attribute in the Recipe element as shown
above, and put the recipe XML file into the Recipes folder (or its subfolder) of a module. Note that recipe files should
have a name ending in .recipe.xml, e.g. Custom.recipe.xml. When you set up a new Orchard website, the recipe list
will contain your setup recipe.
214
Chapter 3. Documentation
Read the Docs Template Documentation, Release 1.9.2
3.4. Managing Websites
215
Read the Docs Template Documentation, Release 1.9.2
Note that recipes used for importing mustn’t contain an IsSetupRecipe element or it should be set to false.
Importing and Exporting a Recipe
Orchard enables you to import and export recipes from and to the web server. It uses the Import Export module,
which is disabled by default. Therefore you must enable the module to use this feature.
To enable the Import Export module, open the dashboard and click Modules. On the Modules page, select the
Features tab. Under Content, locate the Import Export feature and click Enable. A message at the top of the page
will notify you when the feature is enabled. You will also see Import/Export listed in the dashboard feature list.
To export a recipe, open the dashboard and click Import/Export. Click the Export tab and then choose the types,
metadata, data, and settings to include in the export file. When you are finished, click Export.
216
Chapter 3. Documentation
Read the Docs Template Documentation, Release 1.9.2
To import a recipe, click Import/Export and then click the Import tab. Browse to the recipe file and click Import.
3.4. Managing Websites
217
Read the Docs Template Documentation, Release 1.9.2
Creating a Specialized Distribution of Orchard
Recipes simplify the process of creating a specialized distribution of Orchard. Using recipes (and optionally custom
modules), you can configure a version of the Orchard platform that is optimized for nearly any type of website you
can envision.
To create a specialized distribution of Orchard
1. Enlist in the Orchard source code. For information about how to enlist in Orchard, see Setting Up a Source
Enlistment.
2. Sync to the latest build.
3. Create a custom recipe and add it to the Orchard.Web/Modules/Orchard.Setup/Recipes folder. If you want your
recipe to be the only option, you can remove the other recipe files.
4. Add any custom modules to the Orchard.Web/Modules folder.
5. Compile the project.
6. Distribute all files under the Orchard.Web folder.
3.4.9 Creating an Image Gallery
Draft topic
This document targets Orchard developers. Using only the admin dashboard, you will create a gallery that renders
thumbnails of images that you select from the Media folder. Afterward, you can customize the gallery with CSS and
an alternate HTML template.
Create the Image Gallery Content Type
• From the admin dashboard, click Content Definition.
• The Manage Content Types page will open.
• Click Create new type.
218
Chapter 3. Documentation
Read the Docs Template Documentation, Release 1.9.2
• Give the new type a Display Name (e.g. My Image Gallery).
• Click Create.
Attachments/Creating-an-image-gallery/new-content-type.jpg
• When you click create, Orchard will open the Add Parts page.
• Check Widget, then click Save.
• The Edit Content Type page will now show.
• Change the Stereotype to Widget and click Save.
• Then click Add Field.
• The Add New Field page will open.
• Choose Media Library Picker Field.
• Name the field (e.g. My Media Library Picker Field.)
• Click Save.
Attachments/Creating-an-image-gallery/add-new-field.jpg
• After you click save, click on the down carat beside the new field.
• Check “Allow multiple content items.”
• Click Save at the bottom of the page.
• You will now have the following Content Type. It has both a Widget Part and a Media Library Picker Field.
3.4. Managing Websites
219
Read the Docs Template Documentation, Release 1.9.2
220
Chapter 3. Documentation
Read the Docs Template Documentation, Release 1.9.2
Add the Widget a Zone
• From the admin dashboard, click on Widgets.
• Click Add beside any zone (e.g. BeforeContent.)
• The Choose a Widget page will open.
• Choose the Widget that you just created (i.e. My Image Gallery.)
• The Add Widget page will open.
• Give the Widget a Title (e.g. My Gallery Widget.)
• Click the Add button below the “My Media Library Picker Field” label.
• The Media Library Picker modal will show.
In this screen shot, we have already imported some images and created some folders. You can create folders using
the Create Folder button. You can import images by opening a folder and clicking the Import button. This tutorial
assumes you know how to do that.
• Select the images that you want to display.
– Tip: Use ctrl + click to select multiple images at once.
• Then click the Select button in the lower left of the modal (it’s a bit hidden.)
• The Add Widget page will again display. Click Save.
• Visit the front end of your site to see the scaffolding of an image gallery.
Customize the Look of the Gallery
• Turn on Shape Tracing
3.4. Managing Websites
221
Read the Docs Template Documentation, Release 1.9.2
• Create an Alternate for the Fields_MediaPickerLibrary
• Edit the HTML and add CSS.
• Here are example alternate templates, courtesy of Bertrand Le Roy’s Codeplex Reply
Fields.MediaLibraryPicker.cshtml
@using Orchard.ContentManagement
@using Orchard.MediaLibrary.Fields
@using Orchard.Utility.Extensions;
@{
var field = (MediaLibraryPickerField) Model.ContentField;
string name = field.DisplayName;
var contents = field.MediaParts;
}
<section class=''media-library-picker-field media-library-picker-field @name.HtmlClassify()
@foreach(var content in contents)
{
<div>
@Display(BuildDisplay(content, ``Summary''))
</div>
}
</section>
Media.Summary.cshtml
@using Orchard.MediaLibrary.Models
@using Orchard.Utility.Extensions;
@{
MediaPart mediaPart = Model.ContentItem.MediaPart;
}
<a href=''@mediaPart.MediaUrl''>
<img
src=''@Display.ResizeMediaUrl(Width: 200, Height: 200, Mode: ``crop'',
alt=''@mediaPart.Caption'' class=''thumbnail''/>
</a>
3.4.10 Workflows
This topic targets, and was tested with, the Orchard 1.8 release.
The Orchard.Workflows Module in Orchard provides us tools to create custom workflows for events or activities
like Content Created, Content Published, Content Removed, Send Email, Timer and many more.
Dependencies : Orchard.Tokens, Orchard.Forms, Orchard.jQuery
Upload/workflows/workflowsmodule.png
In this particular demo , we’ll be creating a Contact us Email Notification Workflow.
The Orchard.EmailMessaging Module needs to be enabled in order to send email notifications using the Orchard.Workflows Module.
222
Chapter 3. Documentation
Alignment: `
Read the Docs Template Documentation, Release 1.9.2
Email.Messaging
Learn how to Configuring Email
Upload/workflows/emailmodule.png
Custom Form
Learn how to Creating Custom Content Types
Learn how to Create Custom Forms
Upload/workflows/contactform.png
Workflows Demo
1. Creating Workflow
Upload/workflows/createnewworkflow.png
2. Contact Us Email Notification Workflow
Upload/workflows/contactnotification.png
3. Editing Contact Us Email Notification Workflow
Upload/workflows/workflowcreated.png
4. Workflow Starting State
The workflow needs at least one activity to be set as a starting state.
3.4. Managing Websites
223
Read the Docs Template Documentation, Release 1.9.2
Upload/workflows/workflowstartingstate.png
5. Editing Workflow Activity (Form Submitted)
Upload/workflows/editingworkflowactivity.png
6. Adding a Timer Activity
The Timer Activity adds a delay so that the processing thread doesn’t get blocked
Upload/workflows/addingtimer.png
7. Editing Timer Activity
Upload/workflows/editingtimer.png
8. Adding Send Email Activity
Upload/workflows/addingsendemail.png
9. Editing Send Email Activity
Using Tokens to access the form posted values by the end-user
New Contact Request by {Content.Fields.ContactUs.Name}
<p>New Contact Request by {Content.Fields.ContactUs.Name}</p>
<p>Email : {Content.Fields.ContactUs.EmailAddress}</p>
<p>Message : {Content.Fields.ContactUs.Message}</p>
224
Chapter 3. Documentation
Read the Docs Template Documentation, Release 1.9.2
Upload/workflows/editingsendemail.png
10. Submitting Form
Upload/workflows/submittingform.png
11. Workflow Running
Upload/workflows/workflowrunning.png
12. Blocking Activity
The timer (Blocking Activity) has a delay period of 2 mins
Upload/workflows/blockingactivity.png
13. Contact Us Email Notification Sent
Upload/workflows/emailsent.png
Upload/workflows/emailsent1.png
for more on Workflows browse to the Orchard Tutorials Area
3.4.11 Projection
This topic targets, and was tested with, the Orchard 1.8 release.
3.4. Managing Websites
225
Read the Docs Template Documentation, Release 1.9.2
The Orchard.Projections Module Provides methods to control how lists of content items are filtered and displayed.
Dependencies : Orchard.Tokens, Orchard.Forms, Feeds, Title
In this particular demo, we’ll create an External Post functionality using Query , Projection Page and Projection
Widget.
Creating External Post Content Type
Learn how to Create Custom Content Types
1.External Post Content Type
Upload/Projections/CreateContentType.png
2.Adding 3 Fields Title, Author, Url and 1 Part BodyPart
Upload/Projections/addingfieldsnparts.png
3.Click on Edit Placement to place fields and parts accordingly
Upload/Projections/editingplacement.png
4.Creating External Post
Upload/Projections/creatingexternalpost.png
Upload/Projections/externalpostcreated.png
Creating a Query
1.Creating a Query “ExternalPostQuery”
226
Chapter 3. Documentation
Read the Docs Template Documentation, Release 1.9.2
Upload/Projections/addingquery.png
Upload/Projections/querycreated.png
Editing a Query : Filter, Sort, Layouts
Upload/Projections/editingquery.png
2.Click Add a new Filter
Upload/Projections/addfilter.png
Select External Post as the Content Type
Upload/Projections/externalpostfilter.png
3.Click Add a new Sort Criteria and Select Publication Date
Upload/Projections/sortpublication.png
4.Click Add a new Layout and Select Html List
3.4. Managing Websites
227
Read the Docs Template Documentation, Release 1.9.2
Upload/Projections/selectlayout.png
5.Save the Layout with Display Type as Detail
Upload/Projections/savelayout.png
5.Previewing the query result
Upload/Projections/clickpreview.png
Upload/Projections/queryresult.png
Adding Properties to the Html List Layout
Change Display Mode to Properties
Upload/Projections/changedisplaymode.png
1.Title Property
Upload/Projections/titleproperty.png
Open Rewrite Results -> Select Rewrite output
Rewriting the output for the Title Property and using Tokens to the Title and Url fields.
<h1><a href=''{Content.Fields.ExternalPost.Url}'' target=''_blank''>{Content.Fields.Externa
228
Chapter 3. Documentation
Read the Docs Template Documentation, Release 1.9.2
Upload/Projections/titlerewrite.png
2.Author Property
Upload/Projections/addingproperties.png
Rewriting the output for the Author Property and using Tokens
<p>Posted By <b>{Content.Fields.ExternalPost.Author}</b> on {Content.Date}</p>
Upload/Projections/authorrewrite.png
Creating a Projection Page for ExernalPostQuery(Unordered Html List)
Upload/Projections/projectionpage.png
Select the Show Pager check box to add a pager to the list.
Upload/Projections/creatingprojectionpage.png
Rendering Results using Projection Widget
Upload/Projections/projectionwidget.png
Select ExernalPostQuery(Unordered Html List) For Query
3.4. Managing Websites
229
Read the Docs Template Documentation, Release 1.9.2
Upload/Projections/creatingprojectionwidget.png
Rendered Result
Upload/Projections/renderedresult.png
3.4.12 Create Dynamic Forms
The Dynamic Forms module is used to capture information from site visitors on the front end. Dynamic Forms can
work in combination with a Content Type or standalone. Dynamic Forms can be used to create Contact Us and
Subscribe widgets/pages to name a couple. The information is then stored in Orchard and can be exported later.
Enable the Dynamic Forms Module
The Dynamic Forms module is different from the custom forms module because it can work in combination with a
Content Type to capture input on the front-end or you can choose to just store the form submission. If you choose to
just store the submission you will find it in the Form Submissions section of the admin. The information submitted is
stored and can be exported using the Import-Export module. Let’s start by enabling the Dynamic Forms module that
is shipped with Orchard by going to the Modules section in the admin.
Documentation/../upload/dynamic-forms/enable-dynamic-forms.png
Once the module has enabled the feature, a new content type called Form will appear in the create new content section
of the admin.
As stated before, the Dynamic Forms module works with a content type either create a submission or create forms on
the front-end of the site. In the New content section of the admin, you can click on Form to create a new form, an edit
form screen will popup allowing you to create your form. In this screen is where you can choose to either store the
submission or create content from the submitted values. However, let’s say we are looking to add a new widget that
will live in the right rail (AsideSecond zone) that is a call for visitors to join a mailing list. The only input that will be
captured will be the users email address.
Store Form Submission as a Content Type
In order for Dynamic Forms to capture and save an email address from a visitor as Content we need to create a new
content type in Orchard. In the admin, browse to the Content Definitions tab and click on Create new type button in
the upper right. Let’s call the new type ‘Subscribe Form’.
230
Chapter 3. Documentation
Read the Docs Template Documentation, Release 1.9.2
Documentation/../upload/dynamic-forms/dynamic-forms-new-content-type-subscribe-form.png
The next screen asks if we’d like to save any Parts to the new Subscribe Form content type. Since all we are looking
to capture is an email address, click on the save button without selecting any of these options. Now that we have our
new content type we’ll want to add an input field for the email.
Documentation/../upload/dynamic-forms/subscribe-form-email-field.png
After adding and saving the input field with the name ‘Email’ we can now customize the type of validation the new
input field should have by selecting an input type of ‘Email’. Feel free to fill in the other information for the field as
well.
Documentation/../upload/dynamic-forms/subscribe-form.png
At this point we have all the pieces we need to create out new widget in the right rail (AsideSecond zone). We’ve
enabled the Dynamic Forms module and we’ve created a new content type (Subscribe Form) that will be used to
capture the email address of visitors looking to enroll in the mailing list. All that’s left is to create the Widget.
Create a Form Widget
Select Widgets in the left menu of the admin and find the appropriate Add button for the AsideSecond zone and add a
Form Widget.
Documentation/../upload/dynamic-forms/subscribe-form.png
The only thing left to do is to adjust the settings on our new Form Widget. In this example, the layer is set to ‘Default’
and the position is set to ‘1’. This will render the widget on the top of the right rail (AsideSecond zone) for all pages.
In the Layout section of the form you need to add your form fields and bind it to your content type. In the layout
section, see highlighted below, edit the form by dragging an Email Field field from the Layout items on the right side
of the screen.
3.4. Managing Websites
231
Read the Docs Template Documentation, Release 1.9.2
Documentation/../upload/dynamic-forms-edit-layout.png
Once it is dropped an Edit Email Field will pop up. Enter the value as shown in the screenshot below.
Documentation/../upload/dynamic-forms-edit-email-field.png
Then click on the Validation tab and make sure to check the Required checkbox. Now you can save the form, but we
are not finished yet. After you save, now we can bind the form to your content type we created earlier. Hover back
over the form and click on the angle brackets. You should see the Edit Form pop up. Make sure to check the Create
Content and then select your Subscribe Form from the dropdown. Now save the form.
Documentation/../upload/dynamic-forms-bind-form.png
Almost there, now hover on the Email Field and click the angle brackets. Click on the Bindings tab and then check
the field you want to bind it to, which in our case is the Email.Text field of the Subscribe Form content type. If you do
not see the bindings tab, then please save your form and go back to edit it.
Documentation/../upload/dynamic-forms-bind-email.png
These are some example settings:
Documentation/../upload/dynamic-forms/news-letter-widget.png
After saving the widget browse to a page on the site and check out the new feature!
Documentation/../upload/dynamic-forms/page-view.png
232
Chapter 3. Documentation
Read the Docs Template Documentation, Release 1.9.2
NOTE: If the input field for the owner is visible remove it by un-checking the ‘Show editor for owner’ option under
Documentation/../upload/dynamic-forms/remove-owner.png
the Common part of the Subscribe Form content type.
Store Form Submission without a Content Type
This is easy to do, all you need to do is check the Store Submission option in the form layout.
Documentation/../upload/dynamic-forms/no-content-type.png
View Submitted Dynamic Forms Data
At this point, we have enabled the Dynamic Forms module, created a new content type for the Dynamic Forms to use
and added a Dynamic Forms widget to draw the Subscribe Form content type in the right rail (AsideSecond zone) of
all the pages. The submissions are being saved in Orchard because the option in the Dynamic Forms widget ‘Create
Content’ was checked. So where are they being saved? Select the ‘Content’ link on the left in the admin section of
Orchard.
Documentation/../upload/dynamic-forms/subscribe-form-entries.png
You can view all submitted data without a content type by going to Form Submissions section in the admin.
Documentation/../upload/dynamic-forms/form-submissions.png
Export Dynamic Forms Data
Since Dynamic Forms can be either saved as a content type or as a form submissions you have different steps when
exporting and importing.
Exporting Forms saved as Content Type
The only thing left to do is to export our list of submissions so that the email addresses can be used by services like
Publicaster, Campaign Monitor, MailChimp and the like. The easiest way to export anything and everything from the
3.4. Managing Websites
233
Read the Docs Template Documentation, Release 1.9.2
Orchard CMS is to use the Import/Export module. The Import/Export module is shipped with Orchard by default in
version 1.6 and on but is not enabled by default. Let’s enable the Import/Export module.
Documentation/../upload/dynamic-forms/import-export-enabled.png
The Import/Export functions are now available in the admin via the left navigation. Selecting the ‘Export’ tab at the
top of the Import/Export section of the admin shows all of the available content types in Orchard. To export the list of
emails that have been submitted check the box next to the Subscribe Form content type. Towards the bottom of the
page there are a few options for export. The first option, Metadata, will include the definition of the content type. One
use for this option would be an easy way to copy a content type and it’s records from one Orchard CMS site to another.
A prime example of this would be to move a new content type and data from a development site to a production site.
When importing an XML file that contains both the metadata and data, Orchard will create the content type copy in
the included data.
In the current situation we are only interested in exporting the data so there is no need to check the Metadata option.
Also, be sure to bullet ‘Draft Only’ since none of the items submitted from the front end would have a published state.
Documentation/../upload/dynamic-forms/export.png
The exported file is and XML file that can be opened in MS Excel and manipulated to be made ready for the email
campaign platform of your choice. And that’s it... The site is now able to collect visitor’s email addresses and save
them for export later for a newsletter. The Dynamic Forms is also a great way to implement a Contact Us page or any
other number of types of information a site should collect from it’s users.
Exporting Forms saved as a Form Submission
To export form submissions you need to enable the Dynamic Forms Import Export module.
Documentation/../upload/dynamic-forms/enable-import-export.png
Once enabled, now when you perform an export, you need to enable the custom step called “Forms” to export your
Form Submissions
Documentation/../upload/dynamic-forms/exporting-form-submissions.png
234
Chapter 3. Documentation
Read the Docs Template Documentation, Release 1.9.2
3.5 Hosting and Deploying Websites
3.5.1 Upgrading a Site to a New Version of Orchard
A new version of a CMS is an important event in the life of a site, and transitioning to it should ideally be simple.
Unfortunately, Orchard does not currently have an automated upgrade mechanism. This topic will show how to
upgrade to a new version as painlessly as possible today while focusing on making your data safe.
A Word of Warning
No matter which method you choose to use to upgrade your site, you are going to have to overwrite a lot of files
in the process. This should emphasize the requirement to backup first, but it should also call your attention to any
modifications you made to common files. For example, if you made any modifications to core modules and/or the
framework (something you shouldn’t do: custom modules and themes should be used instead), you will lose them, or
you will need to re-apply your changes after the upgrade. Any modification you made to web.config or other common
files will also need to be re-applied after the process.
If you made modifications to permissions on the files and folders inside your site, they may also get reset in the upgrade
and need to be re-applied.
Upgrading a Running Instance of Orchard to a New Version
The instructions in this section only apply for a standalone Orchard web site. If you are working with the full source
code of Orchard, please refer to #enlistment.
It is highly recommended that you work on a local copy of your site throughout the update process.
• Make a backup of everything in your site, including the database. This is extremely important so that you can
roll back to a running site no matter what happens during migration.
• Visit the Settings pages on your current Orchard instance and make a note of the current settings. This information might not be needed during the migration process, but if it is, it will otherwise be difficult to get the
information.
• Visit the Modules/Features and the Themes pages on your current Orchard instance and make a note of all the
modules and themes you have installed.
• Download a copy of the site from the server to your local computer. If you are routinely working with a staging
environment from which you publish to production, you already have that local copy, but the data and media
might be out of date. Make sure you download the App_Data and Media folders from the server.
• If you’re using a SQL Server Compact database, you’ve copied the site data by downloading the App_Data
folder. If your site is using SQL Server, you can copy that data to a local server in order to work with
up-to-date data. However, this isn’t required for migration. If you want to work with a local database,
you’ll also need to edit the settings.txt file for each of the tenants. The settings.txt files can be found under
App_Data\Sites\Default or App_Data\Sites\\[NameOfTheTenant\].
• In a new, empty directory, install a fresh copy of the latest version of Orchard, but don’t go through setup.
• Copy your existing site’s Media folder into the new directory.
• Copy the remaining module and themes directories that you have on your existing site and that are not already
in the new one into the new directory’s Modules and Themes directories.
• Copy the App_Data folder from the existing site into the new directory.
3.5. Hosting and Deploying Websites
235
Read the Docs Template Documentation, Release 1.9.2
• Point a local web server to the new directory. You can use IIS; in that case, use IIS Manager to create a new web
site that points at the directory and then navigate to it. Alternatively, you can use WebMatrix and IIS Express;
to do that, right-click the directory in Windows Explorer and choose Open as a Web Site with Microsoft
WebMatrix and then run the site. Finally, you can open the site in Visual Studio as a web site and run it. The
new site will have all the data from the old site and have all the new features.
• Go into the dashboard. Modules should have already upgraded themselves automatically. In rare cases, you may
be prompted to upgrade features. Click Modules and upgrade each of the modules one by one until they are all
up to date. If this doesn’t work, it means that something is wrong with your install and/or one of the modules
you’re using, and you should investigate further in App_Data\logs.
• Go to the Orchard Gallery and get the latest version of all the modules you have on your site.
• Some versions of Orchard come with version-specific upgrade features. Go to Modules and locate the “Upgrade”
feature. Enable it, then click on the new upgrade menu entry that was added to the admin menu. Visit all the
relevant tabs and execute the required upgrade actions they present. Once you’re done, the feature can be
disabled, which will remove the menu entry.
Publishing the Upgraded Site
You can deploy the locally upgraded site to your production server using your preferred deployment solution. That
might be Visual Studio Web deployment, WebMatrix, or even FTP. You again have a choice of wiping out the target
directory before you deploy. Make your choice depending on your deployment method, how clean you want the
resulting directory to be, and on how long it’s acceptable to keep the site down.
As you deploy, make sure that the target settings.txt files aren’t overwritten, so that the production site continues to
point to the production database.
While you deploy, you might want to shut the site down by dropping an app_offline.htm file into the root.
Remove that file once you’re done.
Once deployed, manual upgrade actions (for example, those from the “Upgrade” feature) need to be performed again
on the deployed production site.
Upgrading An Orchard Site In-Place
It is possible to upgrade a site in-place, if you can’t or don’t want to work with a local copy and then publish it. The
procedure is less clean but it works.
• Backup everything (site and database).
• Download the new version to your local machine.
• Add app_offline.htm to the root of the site during the upgrade. This effectively tells the web server to
return this page for all requests. You should put a message such as “The site is currently being updated. Thank
you for your patience. Please try again later.” in the file.
• Delete what’s in bin. This ensures that old versions of binaries that won’t get replaced will not continue to be
picked up by the application.
• Delete the App_Data\Dependencies folder. Orchard will rebuild this folder on startup. This ensures that
old versions of module assemblies will not be picked up by the application.
• Extract the new version’s zip file and copy what’s in its Orchard folder over the server’s Orchard web directory
(answer yes to all prompts to overwrite).
• Remove the app_offline.html file.
• The site should be running now. Log-in and go into admin.
236
Chapter 3. Documentation
Read the Docs Template Documentation, Release 1.9.2
• Go into the dashboard. Modules should have already upgraded themselves automatically. In rare cases, you may
be prompted to upgrade features. Click Modules and upgrade each of the modules one by one until they are all
up to date. If this doesn’t work, it means that something is wrong with your install and/or one of the modules
you’re using, and you should investigate further in App_Data\logs.
• Go to the Orchard Gallery and get the latest version of all the modules you have on your site.
• Some versions of Orchard come with version-specific upgrade features. Go to Modules and locate the “Upgrade”
feature. Enable it, then click on the new upgrade menu entry that was added to the admin menu. Visit all the
relevant tabs and execute the required upgrade actions they present. Once you’re done, the feature can be
disabled, which will remove the menu entry.
You are done.
Upgrading an Azure Instance of Orchard
• You should already have the full source code, with your modifications if you had any (additional modules or
themes). Upgrade that by copying the source of the new version over it (overwrite whenever asked), or by doing
a Mercurial update to the desired version. If you do not already have the full source code, then that means you
don’t have any changes to the default distribution. In that case just get the source code for the new version. In
any case, at this point you should have a local directory on your development machine that has the code for the
new version, plus any themes and modules you may have added, and no data (be it media or database, as on
Azure you are using blob storage for the former, and Sql Azure for the latter). All that remains to be done is to
build the new package and deploy it.
• Run clickToBuildAzurePackage.cmd. This file should be at the root of your source code folder. If it’s
not there (it was missing from older release files), get it and other root files from the relevant version in
http://orchard.codeplex.com/SourceControl/list/changesets
• Unzip artifacts/Azure/AzurePackage.zip
• Open ServiceConfiguration.cscfg and replace the value of the DataConnectionString with your
DefaultEndpointsProtocol=https;AccountName=your-account-name;AccountKey=your-account-key
• Open
counts
the
&
Azure
CDN
Management
Portal,
and
choose
your
3.5. Hosting and Deploying Websites
go
to
Hosted
Services,
Storage
Acdeployment
target.
Click
Upgrade.
237
Read the Docs Template Documentation, Release 1.9.2
238
Chapter 3. Documentation
Read the Docs Template Documentation, Release 1.9.2
• Browse to the package and config file, click OK.
• Log-in and go to admin.
• Go into the dashboard. Modules should have already upgraded themselves automatically. In rare cases, you may
be prompted to upgrade features. Click Modules and upgrade each of the modules one by one until they are all
up to date. If this doesn’t work, it means that something is wrong with your install and/or one of the modules
you’re using, and you should investigate further in logs.
• Some versions of Orchard come with version-specific upgrade features. Go to Modules and locate the “Upgrade”
feature. Enable it, then click on the new upgrade menu entry that was added to the admin menu. Visit all the
relevant tabs and execute the required upgrade actions they present. Once you’re done, the feature can be
disabled, which will remove the menu entry.
You’re done.
If You Have a Source Code Enlistment
If you are working with a source code enlistment, the update process is going to be extremely simple because you are
already going through it every time you sync your source code directory with the repository. When the time comes to
upgrade, just get the latest changes and sync to the latest in the default branch.
3.5. Hosting and Deploying Websites
239
Read the Docs Template Documentation, Release 1.9.2
Import/Export
The Import/Export module can be used to do clean data migrations from one version to another.
Applying a framework patch
Occasionally, we may release small updates in the form of a patch to one or several dlls. These patch files are regular
zip files that contain updated dll files.
To install such a patch, first extract the zip, then make a copy of the version of those files that are already in the bin
folder of your site. Then, replace the existing copy with the one from the patch file.
3.5.2 Optimizing Server Performance of Orchard Applications
This topic discusses various techniques for tuning a server environment to run Orchard efficiently. The optimal configuration depends on the type of site you’re running and on usage patterns, so site administrators should pick from
this list what applies best to their particular scenario. As always, improving performance should involve measuring
and analyzing performance data so that changes you propose are demonstrably beneficial.
Trust Level
Orchard is configured out of the box to run in Full trust. Medium trust is no longer supported.
<trust level=''Full'' originUrl='''' />
Debug/Release
On your production server, there is no reason to run in debug mode. Make sure that the application you deployed was
compiled in release mode and that the web.config file in Orchard.Web specifies release mode:
<compilation debug=''false'' targetFramework=''4.0''
batch=''true'' numRecompilesBeforeAppRestart=''250''>
Shared Versus Dedicated Versus Cloud Hosting
Shared Hosting
Shared hosting environments usually consist of web farms with load-balancing. The way this is implemented varies
greatly between hosting companies and it is usually difficult for customers to get information on the specific configuration being used. How well these configurations perform depends on the load on hosted applications and on the
architecture of the application itself.
Shared hosting is a nice solution for Orchard users on a budget, but there can be tradeoffs. There is a natural contention
between the customer who wants his or her site to be immediately available and to run as fast as possible, and the
hosting company that wants to support as many sites as possible on a single computer. In order improve site density,
hosting companies can be very aggressive about app domain recycling, causing sites to shut down often if they are not
accessed frequently or if they consume too much memory.
There are mitigations for these situations, such as using a pinging service or a module that accesses the site on a fixed
interval to prevent the app domain from shutting down due to a timeout. A mitigation like this might seem like a good
idea, but ultimately it ruins the site density objective and penalizes everyone.
240
Chapter 3. Documentation
Read the Docs Template Documentation, Release 1.9.2
Another mitigation is to improve the perceived startup time of the application so that a shutdown ceases to be a
significant problem. The Orchard.Warmup module (new in Orchard 1.1) is a good way to make the most commonly
accessed pages of your site immediately accessible even while the app domain is restarting.
Hosting companies can optimize for Orchard by setting up machine affinity so that a given instance always runs on
the same server. This can in turn enable the local file system to be used rather than a network appliance. This can
make a real difference, because Orchard can make a heavy use of the file system, such as when performing dynamic
compilation or when using SQL Server Compact databases.
Dedicated Hosting
A dedicated hosting environment is typically more expensive than a shared hosting account, but it might be worth
the investment if your business depends on your application responding immediately to any request. A dedicated
computer or a dedicated virtual machine offers the advantage of being configurable in exactly the way you want. You
get guaranteed processing and bandwidth instead of sharing it with a varying load on other applications running on the
same computer, and you get the opportunity to fine-tune all the parameters for the application.
Cloud Hosting
Cloud hosting such as Microsoft Azure offers most of the advantages of dedicated hosting plus the ability to scale to
increased loads with the flip of a switch. If you are building a business that is expected to grow considerably, this
might be the most secure way of ensuring the scalability that you need.
SQL Server Compact Versus SQL Server
An Orchard instance can either run on SQL Server Compact or on full versions of SQL Server or SQL Server Express.
SQL Server Compact is an embedded version of SQL Server that has the advantage of being deployable by simply
copying its DLLs and database files.
While SQL Server Compact is extremely lightweight and easy to use and deploy, full versions of SQL Server offer the
guaranteed performance that you might need on your site. It might therefore be worth the cost of investing in a hosting
solution that gives you access to a full edition of SQL Server.
File System
The file system itself can be a drag on application performance. Possible bottlenecks can include a fragmented file
system or a congested network connection to a NAS. Checking the speed of the file system and then optimizing it can
be a way to get better performance.
Memory
The more memory is available on a server, the better it will perform. If you can afford it, increasing memory might be
among the most efficient ways of improving performance (assuming it’s properly configured). Increasing processing
power is more expensive and often has a lower return on investment.
App Pool Recycling
If you have access to IIS settings and if your site has few hits over extended periods of time, consider increasing
the default value for app pool recycling. This can be done by going into IIS Manager, going to Application Pools,
selecting the app pool for your application, and clicking Recycling:
3.5. Hosting and Deploying Websites
241
Read the Docs Template Documentation, Release 1.9.2
Removing the timeout is generally a good idea if it is replaced by a limit on memory usage; recycling at an arbitrary
interval has little benefit, whereas recycling if the application uses all available memory is a good practice.
Multi-Tenancy
Orchard has an optional module called Multi Tenancy that enables more than one site to exist on the same Orchard
instance. The data for the sites is separated, and for all practical purposes they are distinct sites. There are a few
limitations on what each tenant can do, such as installing new modules and themes.
The advantage of a multi-tenant installation over multiple instances of Orchard is that there is only one app domain,
which hosting companies favor because it improves site density considerably. It also has advantages for each of the
multi-tenant sites, because a hit on any of the tenants keeps the app domain alive. Therefore, even sites that receive
very few hits will remain responsive if they share the app domain with enough other sites.
This results in the seemingly paradoxical notion that more sites on a single app domain might perform better in some
cases than a single site per app domain. In shared hosting scenarios in particular, this configuration is optimal if it is
an option.
Installed Modules
For both security and performance reasons, it’s a good idea to keep the number of modules installed on your production
server as low as compatible with your application. There’s a cost to anything you add to the system, in particular in
terms of dynamic compilation and loading additional assemblies.
If you are not using a module, it should be removed. Some modules, such as the gallery, will be useful on your
development server but probably not on your production server and should be removed.
242
Chapter 3. Documentation
Read the Docs Template Documentation, Release 1.9.2
Going even further, some modules are a convenience that you might want to do without. For example, many modules
do nothing more than render a pre-formatted bit of HTML to include some external script or embedded object. If so,
it’s a good to determine whether you couldn’t achieve the same thing with an HTML widget or the body of content
items by going into the HTML source and directly injecting HTML there.
Depth of the Views Folders
The contents of Views folders are dynamically compiled and there is some overhead associated with each subfolder.
This, combined with the multiplication of modules in a typical Orchard instance, means that it can have an impact on
startup performance to flatten Views directories. Orchard gives a choice to module and theme authors to use subfolders
or equivalent dotted names for templates (see Accessing and Rendering Shapes). It is generally preferable to use the
dotted notation.
IPv6, Development Servers, and Modern Browsers
If you are in an IPv6 environment and using a local development server such as the Visual Studio Development Server
or IIS Express in WebMatrix, some browsers may have trouble handling more than one request at once. This results
in slower performance because resources are fetched one after the other. If you are testing locally and see images
appearing one by one, you are probably hitting this bug.
An easy workaround is to use 127.0.0.1 instead of localhost as the domain for the development server. Another
is to disable IPv6 in the browser, although this change can have side effects. A third workaround is to make sure there’s
an explicit entry for localhost in your HOSTS file.
Future Perspectives
The Orchard team is planning more work for performance in the future. This might include versions of the core
assemblies and main dependencies that can be put into the GAC as well as NGen optimizations.
3.5.3 What’s New for Windows Azure in Orchard 1.7.1
The Windows Azure integration and deployment in Orchard have undergone a complete overhaul for version 1.7.1.
This topic describes what’s changed and the benefits of some of the new capabilities.
Visual Studio tooling
Prior to version 1.7.1, packaging and deploying to Windows Azure had to be done from the command line, outside of
Visual Studio. The external custom MSBuild file AzurePackage.proj that was used to do this is no longer needed
(but retained for people whose established build processes depend on it). The cloud service deployment configuration
has been redesigned to work fully and seamlessly within Visual Studio Tools for Windows Azure. This has a number
of benefits:
• We now have one-click publishing to Windows Azure from directly within Visual Studio, like the Azure gods
intended.
• Newer releases of the Visual Studio Tools for Windows Azure automate things like creating and connecting to a
Windows Azure subscription, creating and provisioning the necessary certificates, and downloading subscription
IDs and access keys. This functionality can now be utilized seamlessly. With the old deployment solution this
had to be done manually.
• Newer SDK features such as role content folders can now be utilized.
3.5. Hosting and Deploying Websites
243
Read the Docs Template Documentation, Release 1.9.2
• Adding more roles to your deployment besides Orchard.Azure.Web is now as easy as right-clicking and
selecting “Add New Role” in Solution Explorer. Before, they also had to be carefully worked into the
AzurePackage.proj file which was far from trivial.
• Publish can now be done for either Debug or Release build configurations. Previous hard coded assumptions
no longer apply. This can be very useful for things like collecting IntelliTrace logs from your cloud service
deployment, or to simply get line numbers in exception stack traces.
• Continuous deployment from TFS to Windows Azure should now “just work” although this has not yet been
tested.
Additionally, when building and publishing using Release build configuration, configuration file transformations
are now used instead of custom MSBuild logic. Configuration transform files are visible and editable directly in
Solution Explorer (visualized as child items of the Web.config, Host.config and Log4net.config files)
and therefore much more discoverable and maintainable.
See the topic Deploying Orchard to Windows Azure topic for more information.
Windows Azure SDK 2.1
All Azure-specific solution and project files have been migrated to Windows Azure SDK 2.1. You will need to install
Windows Azure SDK for .NET (VS 2012) - 2.1 using Web Platform Installer to open the Orchard.Azure.sln
solution and to package and publish Orchard to Windows Azure.
All code that reads settings from Azure role configuration has been updated to use the new platform-agnostic CloudConfigurationManager class, so settings are now read from either Windows Azure Cloud Service role configuration,
Windows Azure Web Site configuration settings, or the Web.config <appSettings> element.
All code that uses Windows Azure Blob Storage has been migrated to use version 2.0 of the Windows Azure Storage
Client.
The Azure-specific solution Orchard.Azure.sln has been brought up to date with main solution Orchard.sln
in terms of project structure etc.
All referenced assemblies from Windows Azure SDK has been placed in the lib folder, and are now referenced from
there. This avoids having to install Windows Azure SDK just to compile and run Orchard from the main solution
Orchard.sln.
New module Orchard.Azure
A new module Orchard.Azure has been added. All Azure-specific functionality has been consolidated into this
module. Some functionality is enabled automatically by configuration when publishing to a Windows Azure Cloud
Service, while other functionality is packaged as features which can be enabled regardless of hosting. The module
contains the following features:
• Windows Azure Media Storage: Provides an Orchard media storage provider that targets Windows Azure
Blob Storage.
• Windows Azure Output Cache: Provides an Orchard output cache provider that targets Windows Azure Cache.
• Windows Azure Database Cache: Provides an NHibernate second-level cache provider that targets Windows
Azure Cache.
These features are completely portable and can be used from any hosting environment, i.e. Windows Azure Cloud
Services, Windows Azure Web Sites or some other hosting option.
As you might guess from above, as part of this work two new native providers for Windows Azure Cache have been
written and are shipped built-in with Orchard. No more need to add the memcached shim to your deployment, and
no more need to install custom modules with third-party memcached providers in order to use Windows Azure Cache
244
Chapter 3. Documentation
Read the Docs Template Documentation, Release 1.9.2
(which also means better performance as the memcached compatibility layer is not used). The new native providers
have been designed and tested to work with both Windows Azure Role-based Cache and the newly released Windows
Azure Cache Service.
See the following topics for more information:
• Using Windows Azure Blob Storage
• Using Windows Azure Cache
Cloud services and web sites
As far as possible we now have feature parity between Windows Azure Cloud Services and Windows Azure
Web Sites. Things like media storage and output caching have been reimplemented and packaged as features in the
Orchard.Azure module that can be enabled from either environment. Also, automated publishing from within
Visual Studio has been overhauled and is supported for both target environments.
Fully loaded by default
Orchard is now pre-configured for Windows Azure Cache when deploying to a Windows Azure Cloud Service. If
you scale out your deployment to more than one role instance, you can take advantage of this to keep your instances
in sync.
By default the cloud service project is configured for co-located role-based caching with 30% of the role instance memory allowed for cache usage. Three named caches OutputCache, DatabaseCache and SessionStateCache
are configured by default. Windows Azure Output Cache and Windows Azure Database Cache have to be enabled as
features in the dashboard post-deployment, while the ASP.NET Session State Provider for Windows Azure Cache is
configured and enabled by default in Web.config.
Windows Azure Diagnostics is now fully configured by default when deploying Orchard to a Windows Azure Cloud
Service. The Windows Azure Diagnostics appender is configured by default in the cloud service web role. You can use
Server Explorer to download and examine diagnostics data from within your deployment. Additionally, the Windows
Azure Diagnostics appender has been improved and now logs messages with their correct severity level (prior to 1.7.1
all Log4net entries were logged to Windows Azure Diagnostics as verbose messages).
As before, when deploying to a Windows Azure Cloud Service, Orchard is pre-configured to use Windows Azure
Blob Storage as the underlying file system implementation for shell settings (the Settings.txt file). Unlike
before, using Windows Azure Blob Storage for media storage is not preconfigured, but easily activated by enabling
the new Windows Azure Media Storage feature. Storage account credentials for these providers need to be specified
in the cloud service project before deployment (Visual Studio will display warning messages if you don’t). As before,
containers are created automatically in the storage service if they don’t already exist.
3.5.4 Deploying Orchard to Windows Azure
Orchard can be deployed to both Windows Azure Cloud Services and Windows Azure Web Sites. Orchard also
ships with a number of integration features that takes advantage of Windows Azure services such as blob storage
and caching, and that can be configured before deployment if needed. This topic walks you through the process of
deploying Orchard to Windows Azure.
NOTE: The Windows Azure deployment process in Orchard has undergone a complete overhaul for version 1.7.1. For more information about what’s changed see the What’s new for Windows Azure in Orchard
1.7.1 topic.
3.5. Hosting and Deploying Websites
245
Read the Docs Template Documentation, Release 1.9.2
Prerequisites
Before you can deploy Orchard to Windows Azure you need the following:
• Visual Studio 2012
• Windows Azure SDK 2.1 for Visual Studio 2012
• The Orchard source code
• An active Windows Azure subscription
Deploying Orchard to a Windows Azure Cloud Service
If you only plan to run a single role instance, deploying is extremely simple. Starting with version 1.7.1 of Orchard,
deployment can be performed using the Windows Azure tooling in Visual Studio.
By default, Orchard uses a local file-based SQL Server CE database. This database won’t suffice when running in a
Windows Azure Cloud Service, because the Windows Azure fabric controller may decide to reimage your role instance
at any time, without warning. When that happens, anything that has been written to the local hard drive in your role
instance VM since it was created is lost, which means any changes made to the site since it was first deployed will be
lost.
Obviously that’s not acceptable, so we need to instead store the data in a shared database that will not be affected
by role instance reimaging. To do this you need to create a Windows Azure SQL database that will be used to store
Orchard data. You will configure Orchard to use this database later during setup.
With that out of the way, let’s start by opening the Orchard.Azure.sln solution in Visual Studio.
NOTE: If you have AppFabric installed on your local machine (or have AppFabric-related assemblies in the GAC for some other reason) you need to make sure all the following assembly references in the Orchard.Azure.Web project have Copy Local set to True before publishing: Microsoft.ApplicationServer.\*, Microsoft.Data.\*, Microsoft.Web.\*,
Microsoft.WindowsAzure.\* and Microsoft.WindowsFabric.\*.
The only thing you have to configure before starting the deployment process is the storage account to use for shell
settings. To do this, in Solution Explorer, navigate to Orchard.Azure.CloudService project, double click the
Orchard.Azure.Web role and navigate to the Settings tab. Configure the connection string of the storage account
you want to use:
246
Chapter 3. Documentation
Read the Docs Template Documentation, Release 1.9.2
Now to deploy the cloud service, right click the Orchard.Azure.CloudService project in Solution Explorer
and select Publish, and follow the instructions in the publishing wizard to select subscription, cloud service, storage
account and other publishing options. How to use the Windows Azure publishing tools in Visual Studio is beyond the
scope of this topic, but they are pretty self-explanatory:
Once deployment has successfully completed, browse to the newly deployed Orchard site and go through setup.
3.5. Hosting and Deploying Websites
247
Read the Docs Template Documentation, Release 1.9.2
Specify the connection string to the Windows Azure SQL Database you created earlier:
Congratulations! Orchard is now fully configured for a single role instance on Windows Azure.
Using multiple role instances
Let’s take it up a notch. You may want to scale out your cloud service to run on more than one role instance, either
because you want to support a higher workload, or because the site is mission critical and you need some fault tolerance
(using only a single instance of any one role in a Windows Azure Cloud Service voids the Windows Azure SLA).
Using multiple instances (also known as a web farm or a server farm) with Orchard requires some extra consideration.
In the most basic default configuration of Orchard, multiple instances can cause problems:
1. Orchard media files are stored in the local file system. This won’t work as the file systems or the different
instances will soon start to diverge as users add/remove media.
2. Orchard output caching and database caching (NHibernate second-level cache) use local memory for storage.
This won’t work as content might be updated on one instance and any cached copies invalidated there, while
other instances continue unaware of this change.
3. Session state is stored in local memory. This won’t work because the cloud service load balancer has no session
affinity so users will lose their state when moving between instances.
Luckily, Orchard has features to overcome each of these complications, but you must configure and enable them.
Preparing for multiple instances
First off, configure the number of instances you want to use in the cloud service project. In Solution Explorer, navigate
to Orchard.Azure.CloudService project, double click the Orchard.Azure.Web role and navigate to the
Configuration tab. Change the Instance count value from 1 to some higher number:
248
Chapter 3. Documentation
Read the Docs Template Documentation, Release 1.9.2
NOTE: You can also leave the instance count at 1 and change it after deployment through the Windows
Azure management portal.
Problem #1 in the list above we will deal with by enable the Windows Azure Media Storage feature later. To prepare
for this, configure the storage accounts to use for shell settings and media storage. To do this, navigate to the Settings
tab. Change the following settings to the storage account connection strings you want to use. You can use the same
storage account for both, or any combination of different storage accounts:
Problem #2 will be addressed by enabling the Windows Azure Output Cache and Windows Azure Database Cache
features. These don’t need any preparation, as the cloud service project is already preconfigured for co-located rolebased caching with the appropriate named caches configured.
Problem #3 is already taken care of for us. The cloud service is preconfigured to use the ASP.NET session state
provider for Windows Azure Cache. This takes effect immediately after we deploy.
This section above describes only the most basic configuration steps and options. More detailed steps for enabling
the Windows Azure Media Storage, Windows Azure Output Cache and Windows Azure Database Cache features for a
Windows Azure Cloud Service, as well as more advanced configuration options, are described the following topics:
• Using Windows Azure Blob Storage
3.5. Hosting and Deploying Websites
249
Read the Docs Template Documentation, Release 1.9.2
• Using Windows Azure Cache
Deploying
After these few steps of preparation, you are now ready to deploy the cloud service. Right click the
Orchard.Azure.CloudService project in Solution Explorer and select Publish, and follow the instructions
in the publishing wizard to select subscription, cloud service, storage account and other publishing options. How
to use the Windows Azure publishing tools in Visual Studio is beyond the scope of this topic, but they are pretty
self-explanatory.
Once deployment has successfully completed, browse to the deployed Orchard site and go through setup. Specify the
connection string to the Windows Azure SQL Database you created earlier:
Once setup has finished, navigate to the admin dashboard of the site and enable the following three features:
• Windows Azure Media Storage
• Windows Azure Output Cache
• Windows Azure Database Cache
Congratulations! Orchard is now fully configured for multiple role instances on Windows Azure. You can now scale
out to as many role instances as you need and things will be handled.
NOTE: If you set the instance count to more than 1 before deploying, you must now restart all role
instances once to make sure they pick up the new configuration.
Deploying Orchard to a Windows Azure Web Site
Deploying to a Windows Azure Web Site is also done using the Windows Azure tooling in Visual Studio. However,
instead of using the Orchard.Azure.sln as described for Windows Azure Cloud Services above, for a Windows
Azure Web Site we use the normal Orchard.sln solution and publish the normal Orchard.Web project.
As with a cloud service, if you only plan to run a single instance, deploying is extremely simple.
The steps for using Windows Azure SQL Database as the database are the same as for a cloud service (create a
Windows Azure SQL database beforehand and specify its connection string during setup).
250
Chapter 3. Documentation
Read the Docs Template Documentation, Release 1.9.2
Start by opening the Orchard.sln solution in Visual Studio.
Right click the solution node in Solution Explorer and select Rebuild. This step is necessary to get all modules
and themes compiled, thereby having their resulting DLL files included in the published package; compilation of
modules and themes does not happen automatically since they are not referenced by the Orchard.Web project being
published.
To deploy the web site, right click the Orchard.Web project in Solution Explorer and select Publish, and follow the
instructions in the publishing wizard. Click the Import button to import a web deploy publishing configuration from
your Windows Azure subscriptions. How to use the Windows Azure publishing tools in Visual Studio is beyond the
scope of this topic, but they are pretty self-explanatory.
Once deployment has successfully completed, browse to the newly deployed Orchard site and go through setup.
Specify the connection string to the Windows Azure SQL Database you created earlier.
Congratulations! Orchard is now fully configured for a single instance Windows Azure Web Site.
Using multiple instances
As with cloud services, you need to do a little more configuration if you plan to scale out your web site to more than
one instance.
The steps for enabling the Windows Azure Media Storage, Windows Azure Output Cache and Windows Azure Database
Cache features for a Windows Azure Web Site are described the following topics:
• Using Windows Azure Blob Storage
• Using Windows Azure Cache
Orchard ships with providers for Microsoft Azure Blob Storage, allowing Orchard to use Microsoft Azure Blob Storage as the underlying file system implementation for shell settings (Settings.txt) and/or media storage. This
topic describes how to configure and enable this functionality.
3.6 Using shell settings storage
Storing shell settings in Microsoft Azure Blob Storage is useful when running Orchard in server farm where there is
no shared file system storage. Microsoft Azure Cloud Services is an example of this. For this reason, when deploying
Orchard to a Microsoft Azure Cloud Service using the Orchard.Azure.sln solution, the resulting package is
already preconfigured to store shell settings in Microsoft Azure Blob Storage.
The only thing you need to change before deploying is the connection string of the storage account you want to use:
1. Open Orchard.Azure.sln.
3.6. Using shell settings storage
251
Read the Docs Template Documentation, Release 1.9.2
2. Navigate to Orchard.Azure.CloudService, double click the role Orchard.Azure.Web to bring up
its property page, and navigate to the Settings tab.
3. Set the Orchard.Azure.Settings.StorageConnectionString setting to be the connection string
of the storage account you want to use.
4. Deploy the cloud service.
NOTE: It is not necessary to use this feature when running Orchard in a Microsoft Azure Web Site,
because in this environment the file system is shared among instances.
It is also possible to use this feature is any other hosting environment where you have a server farm with multiple
nodes but no shared file system. To do this you need to do the following:
• Add the Orchard.Azure.Settings.StorageConnectionString setting in the <appSettings>
element of your Web.config file and set it to the connection string of the storage account you want to use.
• Configure Autofac to load the AzureBlobShellSettingsManager implementation in your
Config\Host.config file.
Here’s an example Config\Host.config configuration:
<autofac defaultAssembly=''Orchard.Framework''>
<components>
<!-- Configure Orchard to store shell settings in Microsoft Azure Blob Storage. -->
<component instance-scope=''single-instance'' type=''Orchard.FileSystems.Media.Conf
<component instance-scope=''single-instance'' type=''Orchard.Azure.Services.Environ
</components>
</autofac>
3.7 Using Microsoft Azure Media Storage
The Microsoft Azure Media Storage feature in the Orchard.Azure module configures Orchard to use Microsoft
Azure Blob Storage is the underlying file system implementation for storing media:
Orchard.Azure:
Name: Microsoft Azure Media Storage
Description: Activates an Orchard media storage provider that targets Microsoft Azure B
Category: Hosting
There are two main reasons to use this feature:
• Running Orchard in a server farm configuration. Without using some form of shared storage, media content will
become out of sync between the nodes in your farm as users add or remove media files.
• Offloading media requests from the Orchard web server. When Microsoft Azure Media Storage is enabled all
end user requests for media content are made directly to the public blob storage endpoint.
3.7.1 Enabling for Microsoft Azure Cloud Services
Before the feature can be enabled you must configure the connection string to the storage account you want to use.
When running Orchard in a Microsoft Azure Cloud Service this can be done either before deploying (in the cloud
service project) or after deploying (in the Microsoft Azure management portal).
To configure the connection string before deploying:
1. Open Orchard.Azure.sln.
252
Chapter 3. Documentation
Read the Docs Template Documentation, Release 1.9.2
2. Navigate to Orchard.Azure.CloudService, double click the role Orchard.Azure.Web to bring up
its property page, and navigate to the Settings tab.
3. Set the Orchard.Azure.Media.StorageConnectionString setting to be the connection string of
the storage account in which you want to store media content.
4. Deploy the cloud service.
To configure the connection string after deploying:
1. Deploy the cloud service.
2. In the management portal, navigate to your cloud service and select the Configure tab.
3. Under Orchard.Azure.Web locate the setting Orchard.Azure.Media.StorageConnectionString.
4. Set it to be the connection string of the storage account in which you want to store media content.
5. Click Save.
You can now enable the feature Microsoft Azure Media Storage in the admin dashboard.
NOTE: For multi-tenancy scenarios the Orchard.Azure.Media.StorageConnectionString
setting can optionally be prefixed with a tenant name.
3.7.2 Enabling for Microsoft Azure Web Sites
Before the feature can be enabled you must configure the connection string to the storage account you want to use.
When running Orchard in a Microsoft Azure Web Site this can be done either before deploying (in Web.config) or
after deploying (in the Microsoft Azure management portal).
To configure the connection string before deploying:
1. Open Orchard.sln.
2. Navigate to Orchard.Web and open the Web.config file.
3. In the <appSettings> element add a setting named Orchard.Azure.Media.StorageConnectionString
and set its value to be the connection string of the storage account in which you want to store media content
(see example below).
4. Deploy the web site.
Here’s an example configuration:
<appSettings>
...
<add key=''Orchard.Azure.Media.StorageConnectionString'' value=''[storageConnectionStri
</appSettings>
The storage connections string will look something like the following:
DefaultEndpointsProtocol=http;AccountName=myAccount;AccountKey=myKey;
*You can get the account name and key from the Microsoft Azure management portal
that you used to create your storage or ask you dev ops admin to provide them for you.
To configure the connection string after deploying:
1. Deploy the web site.
2. In the management portal, navigate to your web site and select the Configure tab.
3. Under App settings add a setting named Orchard.Azure.Media.StorageConnectionString and
set its value to be the connection string of the storage account in which you want to store media content.
3.7. Using Microsoft Azure Media Storage
253
Read the Docs Template Documentation, Release 1.9.2
4. Click Save.
You can now enable the feature Microsoft Azure Media Storage in the admin dashboard.
NOTE: For multi-tenancy scenarios the Orchard.Azure.Media.StorageConnectionString
setting can optionally be prefixed with a tenant name.
3.7.3 Enabling for any other hosting
To enable the feature when running Orchard in any other hosting environment, use the Web.config method described above. Once the connection string has been added to the <appSettings> element, can enable the feature
Microsoft Azure Media Storage in the admin dashboard.
3.7.4 Using a custom domain name for blob storage
Microsoft Azure Blob Storage allows the use of your own custom domain instead of the default endpoint hostname
[mystorageaccount].blob.core.windows.net.
However, registering and configuring a custom domain in your storage account is not enough to make Orchard use it.
Unless you also reconfigure your storage connection string to take advantage of your custom domain, Orchard will
continue to generate public URLs for the media files stored in Microsoft Azure Blob Storage based on the default
[mystorageaccount].blob.core.windows.net hostname.
To ensure the public URLs for your media files contain your custom domain name, modify your storage account
connection string accordingly. See the topic Configuring Connection Strings in the Microsoft Azure Storage documentation for details.
Here’s an example connection string using a custom domain name:
BlobEndpoint=http://blobs.mycustomdomain.com;AccountName=mystorageaccount;AccountKey=KauG3A
3.7.5 Multi-tenancy configuration
For multi-tenancy scenarios each setting can optionally be prefixed with a tenant name followed by colon, such
as SomeTenant:Orchard.Azure.Media.StorageConnectionString. Whenever the media storage
provider reads configuration settings it will always first look for a setting specific for the current tenant, and if no
such setting exists, fallback to the default non-prefixed setting.
Here’s an example Azure Web Site configuration with two tenants, both using Microsoft Azure Blob Storage is the
underlying file system implementation for storing media, but each using its own separate storage account:
<appSettings>
<!-- Setting for Tenant1 -->
<add key=''Tenant1:Orchard.Azure.Media.StorageConnectionString'' value=''[storageConnec
<!-- Setting for Tenant2 -->
<add key=''Tenant2:Orchard.Azure.Media.StorageConnectionString'' value=''[storageConnec
</appSettings>
3.8 Using Windows Azure Cache
3.8.1 Running Orchard on Mono
Orchard doesn’t currently run on Mono, and hence can’t run on Linux.
254
Chapter 3. Documentation
Read the Docs Template Documentation, Release 1.9.2
All command line examples in this article assume you are using a Linux machine.
You can test the CMS using our virtual machine and/or Live CD SuSE Studio appliance.
Prerequisites
You will need the following software in order to run Orchard on your Linux distribution of choice:
• PostgreSQL RDBMS version 8.2 or newer (8.4 recommended) installed, with rights to create databases
• Mono 2.10.1 or newer
• Apache 2 (optional, you can use Mono’s XSP development server for testing)
• A set of Linux utilities installed on your machine: wget, patch, unzip and sudo (for root access - you must have
administrative/root rights on the machine)
If you want to compile Orchard from source on Linux (compiling with VisualStudio is, of course, also supported), you
will also need:
• MonoDevelop 2.6 Beta 1 or newer
• Mono versions of certain assemblies used by Orchard
Common Setup Steps
Add a Host Name Alias for the Demo
Since you are using a non-existing DNS name for this demo, you need to let the system know how to find the server.
To do so, execute the following sequence of commands:
sudo -i
echo ``127.0.0.1 orchard-demo'' >> /etc/hosts
If you want to visit the Orchard demo from another machine, you will need to modify the machine’s /etc/hosts file in
the similar way, replacing 127.0.0.1 with your server’s IP address.
Database Setup
First, make sure you have PostgreSQL installed and running:
ps ax|grep postgres
Output of the command should be similar to:
1275
1277
1278
1279
1280
?
?
?
?
?
Ss
Ss
Ss
Ss
Ss
0:00
0:00
0:00
0:00
0:00
postgres:
postgres:
postgres:
postgres:
postgres:
logger process
writer process
wal writer process
autovacuum launcher process
stats collector process
When PostgreSQL is running and ready, type the commands below to create the database and the user:
sudo -i
su - postgres
createuser -l -D -R -S -P orchard
Type the password when prompted and then create the database (it will be named orchard):
createdb -E UTF8 -O orchard orchard
3.8. Using Windows Azure Cache
255
Read the Docs Template Documentation, Release 1.9.2
At this point you must make sure the new orchard user has access rights to the database. In order to do it, you need to
find the pg_hba.conf file and open it in the editor (you must be doing that with administrator/root rights). The file is
located in /var/lib/pgsql/data/ on SuSE and in /etc/postgresql/X.Y/main/ on distributions derived from Debian (X.Y is
the major.minor version number of your PostgreSQL server). After the file is found and opened, make sure it contains
a line similar to this:
host
all
all
127.0.0.1/32
md5
It is extremely important that the last item in the line above is not indent - it should be md5, password or trust (for other
authentication methods please refer to the PostgreSQL documentation). After the line is in the file, restart PostgreSQL
and you’re ready to use the new database from Orchard.
Configuring with Apache 2 and mod_mono
Make sure you have Apache 2 (the Worker MPM is recommended) and mod-mono 2.10.1 (or newer) installed. Configuration paths given below are specific to OpenSuSE 11.4, you will need to adjust them for your distribution. Contents
of the created files does not change (save for the filesystem paths, of course).
Create Apache Virtual Host Configuration File
sudo -i
cd /etc/apache2/vhosts.d
At this point you will need a working text editor. You can try typing any of the following commands to launch one:
gedit, mcedit, joe, vi. editor below is used as a placeholder:
editor /etc/apache2/vhosts.d/orchard-demo.conf
One of them should result in the editor starting. If you don’t know how to use the started editor, refer to its online help.
After the editor is started, paste the following code in it:
<VirtualHost *:80>
ServerAdmin webmaster@orchard-demo
ServerName orchard-demo
# Change the path below to suit your configuration
DocumentRoot /srv/www/vhosts/orchard-demo
# The paths used here should be common for all Linux distributions
ErrorLog /var/log/apache2/orchard-demo_error.log
CustomLog /var/log/apache2/orchard-demo_access.log combined
HostnameLookups Off
UseCanonicalName Off
ServerSignature On
# Make ABSOLUTELY sure that the path in double quotes ends with a slash!
Alias / ``/srv/www/vhosts/orchard-demo/''
AddMonoApplications OrchardDemo ``/:/srv/www/vhosts/orchard-demo''
# Orchard is a .NET 4.0 application. If your Mono was installed in a different prefix,
MonoServerPath OrchardDemo /usr/bin/mod-mono-server4
# Helps when you get stack traces
MonoDebug OrchardDemo True
256
Chapter 3. Documentation
Read the Docs Template Documentation, Release 1.9.2
# Orchard assumes a case-insensitive filesystem
MonoIOMAP OrchardDemo all
<Directory ``/srv/www/vhosts/orchard-demo''>
SetHandler mono
MonoSetServerAlias OrchardDemo
</Directory>
</VirtualHost>
Save the file, close the editor and type one the following commands to restart Apache (use only one of those):
service apache2 restart
/etc/init.d/apache2 restart
To make sure Mono backend has been started correctly, type:
ps ax|grep OrchardDemo
As the result you should see output similar to:
2252 ?
Ssl
0:00 /usr/bin/mono --debug /usr/lib/mono/4.0/mod-mono-server4.exe --fi
Now you are ready to start your favorite web browser and point it to http://orchard-demo/!
Configuring for XSP
No extra steps are necessary. You need to run xsp4 in the Orchard.Web directory using the following command line:
MONO_IOMAP=all xsp4
Using Binary Version of Orchard
Currently Orchard needs to be patched in order to run on Mono with PostgreSQL database, so for your convenience
a precompiled version is available. All you need to do is to download the archive, create a directory on your server in
which you want to put the application and unzip the archive in that directory (locations used here are samples which
would work without changing on a machine running OpenSuSE 11.4):
sudo -i
mkdir -p /srv/www/vhosts/orchard-demo
cd /tmp
wget http://dl.dropbox.com/u/22037511/orchard/orchard-1.0.20-mono_bin.zip
cd /srv/www/vhosts/orchard-demo
unzip /tmp/orchard-1.0.20-mono_bin.zip
Compiling Orchard from Source
We will use the current (as of March 11 2011) version of Orchard sources - 1.0.20. After downloading and unzipping
them in a directory of your choice, you need to perform the steps outlined below in before compiling the application.
3.8. Using Windows Azure Cache
257
Read the Docs Template Documentation, Release 1.9.2
Patching the Source
Ideally, in the future Orchard will not need to be patched in order to work under Mono, but for the moment you need
to download two little patches and apply them to the source. Unzip the archive in the directory where you unpacked
the Orchard sources and issue the following commands:
patch -p1 < 01.\ orchard-1.0-mono-support.patch
patch -p1 < 02.\ orchard-1.0-postgresql-support.patch
And Orchard is patched!
Overlaying Mono Versions of Some Assemblies
Orchard comes with a host of assemblies it depends upon both during compilation and the execution. Two of those
assemblies (Microsoft.Web.Infrastructure.dll and NHibernate.dll) have to be replaced because the versions shipped
with Orchard will work only in the Microsoft .NET environment. The assemblies can be found in this archive which
has to be unzipped in the directory where you unpacked your Orchard sources.
Compiling
You must use MonoDevelop 2.6 or newer to compile on Orchard on Linux (you can also use VisualStudio after
performing the steps above) since its earlier versions had a bug which would require you to edit assembly references
in all of the Orchard projects. Compilation using Mono’s xbuild is also currently not possible because of missing
features (but we’re working on it and soon you should be able to compile Orchard from command line).
You must make absolutely sure that the full Mono 2.10.1 (or newer) stack is installed - all of the development files,
assemblies, compilers have to be present on your system.
After opening the solution in MonoDevelop just type F8 (or use the Build -> Build All menu option) and after a while
you should have Orchard compiled and ready to run.
Deploying
Unfortunately at the time of this writing MonoDevelop will not deploy Orchard properly, so you need to do it manually.
To do so, copy contents of the src/Orchard.Web/ directory to your website root. If you want to remove the source and
binary files which aren’t necessary for the CMS to run, please consult the binary release of Orchard and use it as a
template of what has to remain and what can be removed safely.
Resources
SuSE Studio Appliance with Orchard and Mono
We have prepared a virtual machine and a Live CD based on OpenSuSE 11.4 with Orchard 1.0.20 and Mono 2.10.1
preinstalled so that you can test the CMS without having to go through any of the steps above.
The Virtual Machine can be loaded both in Virtual Box (recommended, tested with version 4.0.4) and VMware.
After starting the VM/Live CD, type http://orchard-demo/ in the browser (FireFox will auto-start) and watch it work!
The first time you browse the above URL you will be greeted with Orchard setup screen and prompted for database
connection string. You need to use the following:
Server=localhost;Database=orchard;User ID=orchard;Password=orchard
258
Chapter 3. Documentation
Read the Docs Template Documentation, Release 1.9.2
Known Issues
• Orchard requires Mono IOMAP to be active since there are a few files and directories that use inconsistent name
case.
• After a few requests you might get npgsql (PostgreSQL ADO.NET provider) connection errors. Only restarting
the application will cure it.
3.8.2 Setting Up a Multi-Tenant Orchard Site
When running Orchard, you most often will run a single site in a single application domain (app domain), which in
ASP.NET terms is an isolation boundary between applications. However, Orchard provides an additional isolation
boundary between sites, referred to as multi-tenancy, that allows you to run multiple Orchard sites within a single
ASP.NET app domain. This is useful because app domains are generally expensive to initialize, tear down, and
recycle from memory usage standpoint. Running multiple isolated Orchard sites in a single app domain can allow
more sites to fit on a single server, which is favored by hosting providers to keep costs down. The assumption is that
cost savings for hosting providers result in lower cost for hosting customers. Multi-tenancy is particularly nice in a
Windows Azure environment, because one deployment to Azure can easily support multiple websites.
Note: If you want to set up a multi-tenant test site on your local machine, first read Testing Multi-Tenancy
on a Local Machine later in this article.
Enabling Multi-Tenancy
By default, the multi-tenancy feature is not enabled when you install Orchard. To enable multi-tenancy, open the
Orchard dashboard, click Modules, find the Multi Tenancy feature under Hosting, and then click Enable.
Once multi-tenancy is enabled, you see a Tenants dashboard menu section. A tenant refers to a separate site configuration inside of the default tenant, which is initial site created after you install Orchard. You can think of the default
tenant as the landlord of an apartment building who can provision new apartments and decide the terms for each tenant,
and the individual tenants as inhabitants of each apartment.
Adding Tenants
Initially, you will only have a single tenant, which is the Default tenant.
3.8. Using Windows Azure Cache
259
Read the Docs Template Documentation, Release 1.9.2
To provision another tenant site, click Add a Tenant.
260
Chapter 3. Documentation
Read the Docs Template Documentation, Release 1.9.2
The Add New Tenant screen asks for the name of the tenant (the name may not contain spaces), and the host domain
that will map to the tenant. As the landlord for your tenants, you decide whether the tenant should be allowed to
configure the database (on the Orchard setup screen), or whether you want to configure the database on behalf of the
tenant.
After you’ve decided how to provision your new tenant site, click Save. Under List of Site’s Tenants you see the new
tenant.
To provision the new tenant site, click Set Up. The Orchard setup screen is displayed, as if you were setting up a
3.8. Using Windows Azure Cache
261
Read the Docs Template Documentation, Release 1.9.2
brand new Orchard installation. However, the database options are not displayed, because they were decided when the
tenant was added.
Note: If you decide to use an existing database for your tenant, you will be asked for the connection string
and for a table prefix. The table prefix will be added to each of the tenant’s tables within the database:
262
Chapter 3. Documentation
Read the Docs Template Documentation, Release 1.9.2
3.8. Using Windows Azure Cache
263
Read the Docs Template Documentation, Release 1.9.2
Working with Tenant Sites
Isolated tenants can each have a unique configuration of content items, enabled features, and applied themes. Tenants
all share the same file system view of the application, however, so the list of available modules and themes will be
the same for each tenant. In the following screenshots, the Alpha tenant and the Beta tenant have different themes
applied.
264
Chapter 3. Documentation
Read the Docs Template Documentation, Release 1.9.2
You can take a tenant site offline at any time. Under List of Site’s Tenants for your default site, click Suspend for the
site you want to take offline.
3.8. Using Windows Azure Cache
265
Read the Docs Template Documentation, Release 1.9.2
To bring the tenant site back online, click Resume.
Removing Tenants
Currently, there is no UI to remove a tenant, but it can be done by going to the App_Data/Sites directory of the
site, locating the subdirectory for the tenant to remove, and then deleting it. You might want to move the folder to a
backup location in case you need to restore it later.
Note: On Azure, there is currently no way to remove a tenant except by removing the actual database and
the configuration from BLOB storage.
Testing Multi-Tenancy on a Local Machine
If you are running locally and do not have a domain to
\Windows\System32\drivers\etc\hosts file to create a sample host.
map,
you
can
edit
your
The following advice is for Windows 7 or Windows Vista and was taken from Orchard Issue Tracker on GitHub).
These instructions assume that you’re using WebMatrix and IIS Express to work with Orchard.
1. Open the \Windows\System32\drivers\etc\ folder.
2. Right-click the hosts file and give yourself modify permissions to that file.
3. Open the hosts file in a text editor.
4. Add the following line, replacing mydemo with the domain name you want to use:
127.0.0.1 mydemo
5. Open the \Users\\[YourUserName\]\Documents\IISExpress\config\ folder.
6. Open the Applicationhost.config file in a text editor.
7. Locate the section for your existing Orchard site, such as the following:
<site name="mydemo" id="nnnnnnnnn"/>
8. Under the <bindings> section, leave the default localhost binding, but copy it onto the next line and edit it to
read:
<binding protocol="http" bindingInformation="*:28923:mydemo" />
9. Substitute the port number above for the one you copied from the default localhost binding.
If you do not want to run WebMatrix with admin privileges (which is not a good practice for security reasons), you
need to follow the steps outlined in the article Handling URL Binding Failures in IIS Express as follows:
1. Open a command window that has administrative privileges. (In All Programs > Accessories > Command Prompt, right-click the program shortcut and then click Run as administrator.)
2. Run
the
following
command:> netsh http add urlacl url=http://mydemo:28923/
user=everyoneThis can later be removed with the following command:> netsh http delete
urlacl url=http://mydemo:28923/
Alternatively, you could run WebMatrix using admin privileges as follows:
• Open WebMatrix with admin privileges. (Right-click the shortcut in Windows, then click Run as administrator.)
Finally:
1. Open your site and attempt to start it.
266
Chapter 3. Documentation
Read the Docs Template Documentation, Release 1.9.2
2. Locate the IIS Express icon in the taskbar and right-click it. You see your site name, where you can select to
open it via its additional URL.
Remember to remove the item from the hosts file or comment out the line using the # character if you want to view
the live site from the same domain name after you’ve deployed it to an ISP. You need to be very careful that you are
looking at the remote site rather than the local one. Consider adding something to one or other of the themes to make
the difference immediately apparent.
Note: Alternatively, instead of editing the hosts file, you can use the URL _*.127-0-0-1.org.uk_, where
* is the name of your tenant or another name of your choosing. This will loop back to localhost and is
sufficient for testing multi-tenancy locally.
3.8.3 Setting Up a Machine Key
We recommend that deployed versions of Orchard are configured with a fixed machine key rather than the default
setting, which is to automatically generate the key at runtime. This default setting can cause the key to change
unexpectedly, which can cause validation errors.
Setting Up the Machine Key Using IIS Manager
If you have access to the IIS management console for the server where Orchard is installed, it is the easiest way to
set-up a machine key.
Start the management console and then select the web site. Open the machine key configuration:
The machine key control panel has the following settings:
3.8. Using Windows Azure Cache
267
Read the Docs Template Documentation, Release 1.9.2
Uncheck “Automatically generate at runtime” for both the validation key and the decryption key.
Click “Generate Keys” under “Actions” on the right side of the panel.
Click “Apply”.
268
Chapter 3. Documentation
Read the Docs Template Documentation, Release 1.9.2
Setting Up the Machine Key Directly in the Web.config File
If you do not have access to the IIS management console, it is still possible to set-up a machine key for an Orchard
application.
To do so, open the web.config file that is at the root of the Orchard web site. The machine key settings can be found
or created under configuration/system.web:
<configuration>
<system.web>
<machineKey decryptionKey=''Decryption key goes here,IsolateApps''
validationKey=''Validation key goes here,IsolateApps'' />
</system.web>
</configuration>
To create the keys that go into the placeholders above, you can use one of the available online generators, such as:
• http://www.eggheadcafe.com/articles/GenerateMachineKey/GenerateMachineKey.aspx
• http://www.betterbuilt.com/machinekey/
• http://www.codeproject.com/KB/aspnet/Machine_Key_Generator.aspx
• http://www.developerfusion.com/tools/generatemachinekey/
3.9 Extending Orchard
3.9.1 First Steps into Orchard
The goal of this article is to ease you into Orchard. There are so many concepts to understand that I think it is necessary
to give a high level view of the whole thing before digging in. So, this article starts with a common ground that any
web user should understand and progressively deepens while introducing relevant technical terms.
When you finish reading this, you should have a good enough understanding to start playing with Orchard (as a
designer/developer) without getting confused by its high level architecture and its terminology. When introduced,
each new term is put in bold so that you make sure to understand it before moving forward.
This article also contains a lot of links to other pages with more specific explanation; so you can use it as a starting
point. To answer some general questions about what Orchard is and where it comes from, read the Frequently Asked
Questions. For a more technical presentation, read How Orchard works.
Looking at Orchard as...
The best way to introduce the basics of Orchard is to look at the roles that a user can have when access it: normal user
(aka reader/visitor/guest), administrator, designer and developer.
User
As a user, an Orchard website is just like any website: It starts with a front page, from which you can access other
pages by following links. Depending on what the website is about, the content will vary (can be static pages, blog,
wiki, e-commerce, etc.)
3.9. Extending Orchard
269
Read the Docs Template Documentation, Release 1.9.2
Administrator
The administrator has access to a few more aspects of the website:
1. When installing Orchard, they will see the installation page. This step results in the creation of a database where
all the content and settings of the website are stored.
2. Of course, as users, they can see the front-end as well
3. They can open the dashboard (aka control panel/back-end) for two reasons:
(a) Configure the website: Edit settings around the behavior and look of the website (or install/disable/upgrade
them)
270
Chapter 3. Documentation
Read the Docs Template Documentation, Release 1.9.2
(a) Edit the content of the website
3.9. Extending Orchard
271
Read the Docs Template Documentation, Release 1.9.2
4. Command line: It is possible to script most admin stuff from the command line, making it easy to automate
certain operations.
Designer
The designer can modify the look of the website. He can edit the settings of an existing theme (if provided) or create
one. A theme is everything that plays in the visual representation of the website. It is sometimes called skin or
template. It transforms the content (user-generated data) into HTML that can be displayed in a browser. Eg: When
272
Chapter 3. Documentation
Read the Docs Template Documentation, Release 1.9.2
you write a blog post, the theme defines where and how to show the menu, title, body, comments, etc.
Depending on how much customization is required, the designer may edit some or all elements of the theme. These
elements are of the following types:
• Documents defining the layout and its zones: This is the overall representation of a page on the website (without
any actual content). Eg: It says if the website should have one, two or three columns. So, a zone is a container
that is part of the layout and ready to receive any content. Note that a flexible theme (like the one provided by
Orchard) can adapt to hide empty zones. So, although Figure 6 shows a lot of zones, most of them will not be
visible on actual pages because they aren’t being used.
• Views: Visual representation of a specific content. A view is typically a file with the extension .CSHTML or
.ASPX. It provides the HTML code to use when displaying a specific type of content. So, a page with many
contents (menu, blog post, comments, etc) will be created by using the composition of all the relevant individual
3.9. Extending Orchard
273
Read the Docs Template Documentation, Release 1.9.2
views.
• Stylesheets, Javascript and Media files: They are used to modify the look defined in the views. They are files
like “Site.css”, jQuery or the images for background, borders and icons
• Widget: A web page typically presents one main content (like a blog post), but it often also has small pieces of
information on the sides. Eg: a tag cloud, a list of recent posts, a twitter feed, etc
• Layers and the binding between content to specific zones: A layer is like the description of a group of pages.
Once defined, you can tell where to put each content (or widget). Eg: A layer grouping all the blog posts can be
defined, then we can make a Tag cloud widget appear on the side.
274
Chapter 3. Documentation
Read the Docs Template Documentation, Release 1.9.2
More advanced themes may also include some programming code to further customize the look.
Developer
The developer has a complete insight of the architecture of Orchard and can extend it.
Orchard is organized in modules. Each module provides a building block (aka add on/plugin) to the website with a
high level distinct goal. For example, you can have:
• Extension module: Adds some (low-level) features that will benefit the website. Eg: Ability to search your
content or to use an external editor to write blog posts (like Live Writer)
• Content module: Adds everything (code and visual) required to view/edit some type of content (like blog posts)
• Widget module: Adds a small visual content that can be displayed on the side of existing content modules (like
a Tag cloud next to a blog)
• Element module: Adds a small contained element for use in the Orchard.Layouts module, a core module that
lets you design page layouts in the browser.
• Theme module: Changes the look of existing content modules (This is what the designer would typically create)
• All the above: A module can have many extensions, content types, widgets and themes all in one package
Orchard is designed to be highly extensible; this means that almost anything that you interact with can be extended,
replaced or disabled. Out of the box, Orchard comes with a number of modules to provide a good user/administrator
experience; but a designer/developer can change them or create more. It is also possible to share your modules with
the Orchard community and to install modules developed by others.
Orchard comes with only one theme (called “The Theme Machine”). However, it has enough zones to allow various
arrangements. This is important because a site can only have one theme active at a time. This means the theme must
be flexible enough to allow pages to have different layouts. If you are not satisfied, you can copy it and add more
zones.
The Orchard Gallery contains a lot more themes and modules ready to install. Make sure to browse it to find out what
extra features are available.
Content
In order to fill your website, Orchard allows you to edit and display content. It comes with the ability to create pages
and blog posts out of the box. But it also allows you to define your own content. This is important because you may
want to have events or profiles or anything else that isn’t supported out of the box. This section explains the various
elements that plays into providing that capability.
3.9. Extending Orchard
275
Read the Docs Template Documentation, Release 1.9.2
• Content: Data that is typically displayed on the front-end website. I use this term as a generic way of calling
anything that is user-generated.
• Content Type & Item: A content type is like a dynamic class; it defines a structure of data for a specific
type of content. That structure can be changed, even by the administrator. A content item is an instance of
content type. So, BlogPost can be a content type, and when you write one, that one is a content item.
• Content Part: Because many content types share many aspects; these aspects can be created independently and
reused in each content type. That’s what a content part is. Eg: A blog post can have comments; a photo can also
have comments; so, instead of implementing the “comments” feature twice, we can create it as a content part
and reuse it for both content types.
• Content Field: In the same spirit of reusability, we can have smaller types that must behave in a certain way.
Eg: Most content types will need Date, phone number, email address, etc. They aren’t simple properties since
we can attach some behavior (like validation rules) but they aren’t content parts either (too “small”).
• Record: In order to be able to save a content type/part (in a SQL database), it needs to be “linked” to a record. It
is a class with all the properties that should be saved. Eg: A Map part must save its coordinates (Latitude &
Longitude), so it will be linked to a record with these two properties; and Orchard will do the rest to load/save
it. You will not have to deal with records unless you develop your own module. But it is useful to understand
this concept in case you encounter it.
• Record: In order to be able to save a content type/part (in a database), it needs to be “linked” to a record. It is
a class with all the properties that should be saved. Eg: A Map part must save its coordinates (Latitude &
Longitude), so it will be linked to a record with these two properties; and Orchard will do the rest to load/save
it. You will not have to deal with records unless you develop your own module. But it is useful to understand
this concept in case you encounter it.
Note that a content type can only have one of each kind of content parts. But it can have many fields of the same kind.
The reason is in the semantic meaning of these concepts. For example, a blog post can only have one commenting
aspect and it can have many dates (creation date, last update date, etc.).
Since Orchard is an open source project, feel free to contribute any feature/module you would like.
Conclusion
We are going to stop here. At this point, you should have a good understanding of what is Orchard. The next step is
to get into a bit more details about modules, themes and the low-level architecture of Orchard. This would be useful
when you start learning how to extend Orchard.
3.9.2 How Orchard Works
Building a Web CMS (Content Management System) is unlike building a regular web application: it is more like
building an application container. When designing such a system, it is necessary to build extensibility as a first-class
feature. This can be a challenge as the very open type of architecture that’s necessary to allow for great extensibility
may compromise the usability of the application: everything in the system needs to be composable with unknown
future modules, including at the user interface level. Orchestrating all those little parts that don’t know about each
other into a coherent whole is what Orchard is all about.
This document explains the architectural choices we made in Orchard and how they are solving that particular problem
of getting both flexibility and a good user experience.
276
Chapter 3. Documentation
Read the Docs Template Documentation, Release 1.9.2
Architecture
Orchard Foundations
The Orchard CMS is built on existing frameworks and libraries. Here are a few of the most fundamental ones:
• ASP.NET MVC: ASP.NET MVC is a modern Web development framework that encourages separation of concerns.
• NHibernate: NHibernate is an object-relational mapping tool. It handles the persistence of the Orchard content
items to the database and considerably simplifies the data model by removing altogether the concern of persistence from module development. You can see examples of that by looking at the source code of any core content
type, for example Pages.
• Autofac: Autofac is an IoC container. Orchard makes heavy use of dependency injection. Creating an injectable
Orchard dependency is as simple as writing a class that implements IDependency or a more specialized interface
that itself derives from IDependency (a marker interface), and consuming the dependency is as simple as taking
a constructor parameter of the right type. The scope and lifetime of the injected dependency will be managed by
the Orchard framework. You can see examples of that by looking at the source code for IAuthorizationService,
RolesBasedAuthorizationService and XmlRpcHandler.
• Castle Dynamic Proxy: we use Castle for dynamic proxy generation.
The Orchard application and framework are built on top of these foundational frameworks as additional layers of
abstraction. They are in many ways implementation details and no knowledge of NHibernate, Castle, or Autofac
should be required to work with Orchard.
Orchard Framework
The Orchard framework is the deepest layer of Orchard. It contains the engine of the application or at least the parts
that couldn’t be isolated into modules. Those are typically things that even the most fundamental modules will have
to rely on. You can think of it as the base class library for Orchard.
Booting Up Orchard
When an Orchard web application spins up, an Orchard Host gets created. A host is a singleton at the app domain
level.
Next, the host will get the Shell for the current tenant using the ShellContextFactory. Tenants are instances of the
application that are isolated as far as users can tell but that are running within the same appdomain, improving the site
density. The shell is a singleton at the tenant level and could actually be said to represent the tenant. It’s the object
that will effectively provide the tenant-level isolation while keeping the module programming model agnostic about
multi-tenancy.
The shell, once created, will get the list of available extensions from the ExtensionManager. Extensions are modules
and themes. The default implementation is scanning the modules and themes directories for extensions.
At the same time, the shell will get the list of settings for the tenant from the ShellSettingsManager. The default
implementation gets the settings from the appropriate subfolder of App_Data but alternative implementations can
get those from different places. For example, we have an Azure implementation that is using blob storage instead
because App_Data is not reliably writable in that environment.
The shell then gets the CompositionStrategy object and uses it to prepare the IoC container from the list of available
extensions for the current host and from the settings for the current tenant. The result of this is not an IoC container
for the shell, it is a ShellBlueprint, which is a list of dependency, controller and record blueprints.
3.9. Extending Orchard
277
Read the Docs Template Documentation, Release 1.9.2
The list of ShellSettings (that are per tenant) and the ShellBluePrint are then thrown into ShellContainerFactory.CreateContainer to get an ILifetimeScope, which is basically enabling the IoC container to be scoped at the
tenant level so that modules can get injected dependencies that are scoped for the current tenant without having to do
anything specific.
Dependency Injection
The standard way of creating injectable dependencies in Orchard is to create an interface that derives from IDependency or one of its derived interfaces and then to implement that interface. On the consuming side, you can take a
parameter of the interface type in your constructor. The application framework will discover all dependencies and will
take care of instantiating and injecting instances as needed.
There are three different possible scopes for dependencies, and choosing one is done by deriving from the right
interface:
• Request: a dependency instance is created for each new HTTP request and is destroyed once the request has
been processed. Use this by deriving your interface from IDependency. The object should be reasonably cheap
to create.
• Object: a new instance is created every single time an object takes a dependency on the interface. Instances are
never shared. Use this by deriving from ITransientDependency. The objects must be extremely cheap to create.
• Shell: only one instance is created per shell/tenant. Use this by deriving from ISingletonDependency. Only use
this for objects that must maintain a common state for the lifetime of the shell.
Replacing Existing Dependencies
It is possible to replace existing dependencies by decorating your class with the OrchardSuppressDependency attribute,
that takes the fully-qualified type name to replace as an argument.
Ordering Dependencies
Some dependencies are not unique but rather are parts of a list. For example, handlers are all active at the same time.
In some cases you will want to modify the order in which such dependencies get consumed. This can be done by
modifying the manifest for the module, using the Priority property of the feature. Here is an example of this:
Features:
Orchard.Widgets.PageLayerHinting:
Name: Page Layer Hinting
Description: ...
Dependencies: Orchard.Widgets
Category: Widget
Priority: -1
ASP.NET MVC
Orchard is built on ASP.NET MVC but in order to add things like theming and tenant isolation, it needs to introduce
an additional layer of indirection that will present on the ASP.NET MVC side the concepts that it expects and that will
on the Orchard side split things on the level of Orchard concepts.
For example, when a specific view is requested, our LayoutAwareViewEngine kicks in. Strictly speaking, it’s not a
new view engine as it is not concerned with actual rendering, but it contains the logic to find the right view depending
on the current theme and then it delegates the rendering work to actual view engines.
278
Chapter 3. Documentation
Read the Docs Template Documentation, Release 1.9.2
Similarly, we have route providers, model binders and controller factories whose work is to act as a single entry point
for ASP.NET MVC and to dispatch the calls to the properly scoped objects underneath.
In the case of routes, we can have n providers of routes (typically coming from modules) and one route publisher that
will be what talks to ASP.NET MVC. The same thing goes for model binders and controller factories.
Content Type System
Contents in Orchard are managed under an actual type system that is in some ways richer and more dynamic than
the underlying .NET type system, in order to provide the flexibility that is necessary in a Web CMS: types must be
composed on the fly at runtime and reflect the concerns of content management.
Types, Parts, and Fields
Orchard can handle arbitrary content types, including some that are dynamically created by the site administrator in a
code-free manner. Those content types are aggregations of content parts that each deal with a particular concern. The
reason for that is that many concerns span more than one content type.
For example, a blog post, a product and a video clip might all have a routable address, comments and tags. For that
reason, the routable address, comments and tags are each treated in Orchard as a separate content part. This way, the
comment management module can be developed only once and apply to arbitrary content types, including those that
the author of the commenting module did not know about.
Parts themselves can have properties and content fields. Content fields are also reusable in the same way that parts are:
a specific field type will be typically used by several part and content types. The difference between parts and fields
resides in the scale at which they operate and in their semantics.
Fields are a finer grain than parts. For example, a field type might describe a phone number or a coordinate, whereas
a part would typically describe a whole concern such as commenting or tagging.
But the important difference here is semantics: you want to write a part if it implements an “is a” relationship, and you
would write a field if it implements a “has a” relationship.
For example, a shirt is a product and it has a SKU and a price. You wouldn’t say that a shirt has a product or that a
shirt is a price or a SKU.
From that you know that the Shirt content type will be made of a Product part, and that the Product part will be made
from a Money field named “price” and a String field named SKU.
Another difference is that you have only one part of a given type per content type, which makes sense in light of the
“is a” relationship, whereas a part can have any number of fields of a given type. Another way of saying that is that
fields on a part are a dictionary of strings to values of the field’s type, whereas the content type is a list of part types
(without names).
This gives another way of choosing between part and field: if you think people would want more than one instance of
your object per content type, it needs to be a field.
Anatomy of a Content Type
A content type, as we’ve seen, is built from content parts. Content parts, code-wise, are typically associated with:
• a Record, which is a POCO representation of the part’s data
• a model class that is the actual part and that derives from ContentPart<T> where T is the record type
• a repository. The repository does not need to be implemented by the module author as Orchard will be able to
just use a generic one.
3.9. Extending Orchard
279
Read the Docs Template Documentation, Release 1.9.2
• handlers. Handlers implement IContentHandler and are a set of event handlers such as OnCreated or OnSaved.
Basically, they hook onto the content item’s lifecycle to perform a number of tasks. They can also participate in the actual composition of the content items from their constructors. There is a Filters collection on
the base ContentHandler that enable the handler to add common behavior to the content type.For example,
Orchard provides a StorageFilter that makes it very easy to declare how persistence of a content part should
be handled: just do Filters.Add(StorageFilter.For(myPartRepository)); and Orchard will
take care of persisting to the database the data from myPartRepository.Another example of a filter is the ActivatingFilter that is in charge of doing the actual welding of parts onto a type: calling Filters.Add(new
ActivatingFilter<BodyAspect>(BlogPostDriver.ContentType.Name)); adds the body
content part to blog posts.
• drivers. Drivers are friendlier, more specialized handlers (and as a consequence less flexible) and are associated
with a specific content part type (they derive from ContentPartDriver<T> where T is a content part type).
Handlers on the other hand do not have to be specific to a content part type. Drivers can be seen as controllers
for a specific part. They typically build shapes to be rendered by the theme engine.
Content Manager
All contents are accessed in Orchard through the ContentManager object, which is how it becomes possible to use
contents of a type you don’t know in advance.
ContentManager has methods to query the content store, to version contents and to manage their publication status.
Transactions
Orchard is automatically creating a transaction for each HTTP request. That means that all operations that happen
during a request are part of an “ambient” transaction. If code during that request aborts that transaction, all data
operations will be rolled back. If the transaction is never explicitly cancelled on the other hand, all operations get
committed at the end of the request without an explicit commit.
Request Lifecycle
In this section, we’ll take the example of a request for a specific blog post.
When a request comes in for a specific blog post, the application first looks at the available routes that have been
contributed by the various modules and finds the blog module’s matching route. The route can then resolve the request
to the blog post controller’s item action, which will look up the post from the content manager. The action then gets
a Page Object Model (POM) from the content manager (by calling BuildDisplay) based on the main object for that
request, the post that was retrieved from the content manager.
A blog post has its own controller, but that is not the case for all content types. For example, dynamic content types will
be served by the more generic ItemController from the Core Routable part. The Display action of the ItemController
does almost the same thing that the blog post controller was doing: it gets the content item from the content manager
by slug and then builds the POM from the results.
The layout view engine will then resolve the right view depending on the current theme and using the model’s type
together with Orchard conventions on view naming.
Within the view, more dynamic shape creation can happen, such as zone definitions.
The actual rendering is done by the theme engine that is going to find the right template or shape method to render
each of the shapes it encounters in the POM, in order of appearance and recursively.
280
Chapter 3. Documentation
Read the Docs Template Documentation, Release 1.9.2
Widgets
Widgets are content types that have the Widget content part and the widget stereotype. Like any other content types,
they are composed of parts and fields. That means that they can be edited using the same edition and rendering logic
as other content types. They also share the same building blocks, which means that any existing content part can
potentially be reused as part of a widget almost for free.
Widgets are added to pages through widget layers. Layers are sets of widgets. They have a name, a rule that determines
what pages of the site they should appear on, and a list of widgets and associated zone placement and ordering, and
settings.
The rules attached to each of the layers are expressed with IronRuby expressions. Those expressions can use any of
the IRuleProvider implementations in the application. Orchard ships with two out of the box implementations: url and
authenticated.
Site Settings
A site in Orchard is a content item, which makes it possible for modules to weld additional parts. This is how modules
can contribute site settings.
Site settings are per tenant.
Event Bus
Orchard and its modules expose extensibility points by creating interfaces for dependencies, implementations of which
can then get injected.
Plugging into an extensibility point is done either by implementing its interface, or by implementing an interface that
has the same name and the same methods. In other words, Orchard does not require strictly strongly typed interface
correspondence, which enables plug-ins to extend an extensibility point without taking a dependency on the assembly
where it’s defined.
This is just one implementation of the Orchard event bus. When an extensibility point calls into injected implementations, a message gets published on the event bus. One of the objects listening to the event bus dispatches the messages
to the methods in classes that derive from an interface appropriately named.
Commands
Many actions on an Orchard site can be performed from the command line as well as from the admin UI. These
commands are exposed by the methods of classes implementing ICommandHandler that are decorated with a CommandName attribute.
The Orchard command line tool discovers available commands at runtime by simulating the web site environment and
inspecting the assemblies using reflection. The environment in which the commands run is as close as possible to the
actual running site.
Search and Indexing
Search and indexing are implemented using Lucene by default, although that default implementation could be replaced
with another indexing engine.
3.9. Extending Orchard
281
Read the Docs Template Documentation, Release 1.9.2
Caching
The cache in Orchard relies on the ASP.NET cache, but we expose a helper API that can be used through a dependency
of type ICache, by calling the Get method. Get takes a key and a function that can be used to generate the cache entry’s
value if the cache doesn’t already contains the requested entry.
The main advantage of using the Orchard API for caching is that it works per tenant transparently.
File Systems
The file system in Orchard is abstracted so that storage can be directed to the physical file system or to an alternate
storage such as Azure blob storage, depending on the environment. The Media module is an example of a module that
uses that abstracted file system.
Users and Roles
Users in Orchard are content items (albeit not routable ones) which makes it easy for a profile module for example to
extend them with additional fields. Roles are a content part that gets welded onto users.
Permissions
Every module can expose a set of permissions as well as how those permissions should be granted by default to
Orchard’s default roles.
Tasks
Modules can schedule tasks by calling CreateTask on a dependency of type IScheduledTaskManager. The task can
then be executed by implementing IScheduledTaskHandler. The Process method can examine the task type name and
decide whether to handle it.
Tasks are being run on a separate thread that comes from the ASP.NET thread pool.
Notifications
Modules can surface messages to the admin UI by getting a dependency on INotifier and calling one of its methods.
Multiple notifications can be created as part of any request.
Localization
Localization of the application and its modules is done by wrapping string resources in a call to the T method:
@T("This string can be localized"). See Using the localization helpers for more details and guidelines. Orchard’s resource manager can load localized resource strings from PO files located in specific places in the
application.
Content item localization is done through a different mechanism: localized versions of a content item are physically
separate content items that are linked together by a special part.
The current culture to use is determined by the culture manager. The default implementation returns the culture that
has been configured in site settings, but an alternate implementation could get it from the user profile or from the
browser’s settings.
282
Chapter 3. Documentation
Read the Docs Template Documentation, Release 1.9.2
Logging
Logging is done through a dependency of type ILogger. Different implementations can send the log entries to various
storage types. Orchard comes with an implementation that uses Castle.Core.Logging for logging.
Orchard Core
The Orchard.Core assembly contains a set of modules that are necessary for Orchard to run. Other modules can safely
take dependencies on these modules that will always be available.
Examples of core modules are feeds, navigation or routable.
Modules
The default distribution of Orchard comes with a number of built-in modules such as blogging or pages, but third party
modules are being built as well.
A module is just an ASP.NET MVC area with a manifest.txt file that is extending Orchard.
A module typically contains event handlers, content types and their default rendering templates as well as some admin
UI.
Modules can be dynamically compiled from source code every time a change is made to their csproj file or to one of
the files that the csproj file references. This enables a “notepad” style of development that does no require explicit
compilation by the developer or even the use of an IDE such as Visual Studio.
Modules must be placed in the Modules folder (Orchard.Web/Modules/MyModule) and the folder name must
match the name of the compiled DLL produced by the project. So, if you have a custom module project called
My.Custom.Module.csproj and it compiles to My.Custom.Module.dll, then the module root folder must be named
My.Custom.Module. [~/Modules/My.Custom.Module/]
Themes
It is a basic design principle in Orchard that all the HTML that it produces can be replaced from themes, including
markup produced by modules. Conventions define what files must go where in the theme’s file hierarchy.
The whole rendering mechanism in Orchard is based on shapes. The theme engine’s job is to find the current theme
and given that theme determine what the best way to render each shape is. Each shape can have a default rendering
that may be defined by a module as a template in the views folder or as a shape method in code. That default rendering
may be overridden by the current theme. The theme does that by having its own version of a template for that shape
or its own shape method for that shape.
Themes can have a parent, which enables child themes to be specializations or adaptations of a parent theme. Orchard
comes with a base theme called the Theme Machine that has been designed to make it easy to use as a parent theme.
Themes can contain code in much the same way modules do: they can have their own csproj file and benefit from
dynamic compilation. This enables themes to define shape methods, but also to expose admin UI for any settings they
may have.
The selection of the current theme is done by classes implementing IThemeSelector, which return a theme name and a
priority for any request. This allows many selectors to contribute to the choice of the theme. Orchard comes with four
implementations of IThemeSelector:
• SiteThemeSelector selects the theme that is currently configured for the tenant or site with a low priority.
• AdminThemeSelector takes over and returns the admin theme with a high priority whenever the current URL is
an admin URL.
3.9. Extending Orchard
283
Read the Docs Template Documentation, Release 1.9.2
• PreviewThemeSelector overrides the site’s current theme with the theme being previewed if the current user is
the one that initiated the theme preview.
• SafeModeThemeSelector is the only selector available when the application is in “safe mode”, which happens
typically during setup. It has a very low priority.
An example of a theme selector might be one that promotes a mobile theme when the user agent is recognized to
belong to a mobile device.
3.9.3 Command-Line Code Generation
Code generation is an Orchard module that automates the task of creating additional files and extensions. This feature is
useful for developers that want to create controllers, data migration classes, modules, and themes. The code generation
feature is installed by default but has to be enabled by the end user/developer.
Documentation/../Upload/screenshots_675/codegen.PNG
To enable code generation, click Features under Modules, find the Code Generation feature, and click Enable.
Documentation/../Upload/screenshots_675/codegenenable.png
To enable the feature from the Orchard command-line, open the orchard command-line, and enter the following command. For more information about the Orchard command-line, see Using the command-line interface.
orchard> feature enable Orchard.CodeGeneration
Enabling features Orchard.CodeGeneration
Orchard.CodeGeneration was enabled
Once the code generation feature is enabled, new commmands are available for creating a module, theme, data migration, or controller. Currently, the code generation commands add files to the appropriate location.
codegen controller <module-name> <controller-name>
Create a new Orchard controller in a module
codegen datamigration <feature-name>
Create a new Data Migration class
codegen module <module-name> [/IncludeInSolution:true|false]
Create a new Orchard module
codegen theme <theme-name> [/CreateProject:true|false][/IncludeInSolution:true|false][/Base
Create a new Orchard theme
codegen moduletests <module-name>
Create a new test for a module
284
Chapter 3. Documentation
Read the Docs Template Documentation, Release 1.9.2
For a walkthrough of using the code generation feature to create a new module and data migration, read the Getting
Started with Modules course.
Change History
• Updates for Orchard 1.8
– 9-04-14: Updated the screen shots for Code Generation Module.
3.9.4 Getting-Started-with-Modules
Part 1 - Getting Started with Modules
Introduction
This four part course will get you started with a gentle introduction to extending Orchard at the code level. You will
build a very simple module which contains a widget that shows an imaginary featured product.
It will teach you some of the basic components of module development and also encourage you to use best-practices
when developing for Orchard.
In this first part we are going to set up our dev environment, scaffold a module and then build a simple Widget inside
it.
Prerequisites
This course assumes the following:
• You have some experience using Orchard and understand its core concepts. Refreshers and links to related
guides will be provided.
• You can read and write C# code.
• You have some experience with ASP.NET MVC. This doesn’t need to be deep but you should be aware of Razor
templates, views, strongly-typed models and similar basics.
The course was written and tested against Orchard v1.9.2. It should work in new 1.x branch releases as they come out.
Getting help
If you get stuck or need some support at any point in the course there are several places you can turn:
1. Post a question in the official support forums on CodePlex.
2. Post a question on Stack Overflow tagged with OrchardCMS.
3. Open an issue on the Orchard Doc GitHub repo.
Setting up
First things first, you need to follow the setting up for a lesson guide.
This will take you through the initial steps to set up your dev environment and pull a fresh copy of the source code
down. When you’ve completed it please use your back button to come back to this course.
3.9. Extending Orchard
285
Read the Docs Template Documentation, Release 1.9.2
Getting the most out of this course
Writing an Orchard module that actually does something is going to contain a minimum of 9 different files. You will
need to do a lot of development before you can run your module code and see it working in Orchard.
At first you might be overwhelmed by this, but here is a little tip; don’t be. Just forge ahead with the tutorial and don’t
worry if terms like drivers, content parts, or placements seem unfamiliar at the moment. As you continue with your
module development you will come across these files many times over. Before long you will start recognizing these
core files and you will see how it all fits together.
Course structure
Throughout the course we will alternate between discussing topics and implementing them. The discussion may
contain example code or other example scenarios.
So that there is no confusion for you as to what you should be doing, when it comes to implementing these lessons
into the module it will be explained step-by-step via numbered lists.
Later on in the course, as the topics become more advanced, we may go through several sections of discussion before
wrapping up the lessons into changes to the codebase.
You will also occasionally come across Bonus Exercise sections. These are completely optional. You can skip them,
complete them at the time, or come back after completing the course to complete them. They are suggested when there
is an extra feature you could implement using the skills you have just learned.
Getting started
Now that you’ve completed all of the setup tasks you will have a fresh copy of Orchard configured and ready to go.
The rest of this part of the course will walk you through the process required to scaffold an empty module and then
build a simple Widget inside of it.
Command line scaffolding with Orchard.exe
You should now be looking at Visual Studio. Down the side, in your Solution Explorer window you will see many
files and folders.
The first step to take is to collapse all of the projects down. Its a long list and we need to be able to see an overview of
the solution so we can start working with it. You don’t need to collapse these individually by hand however:
1. If your Solution Explorer window is not visible click View, Solution Explorer.
2. Click the Collapse All icon in the toolbar along the top of the solution explorer. It looks like this:

If you expand your Modules folder you will see a long list of the modules which come packaged with Orchard:
286
Chapter 3. Documentation
Read the Docs Template Documentation, Release 1.9.2
There is a utility that is packaged with each copy of Orchard which will let us add our own module into this list. It is
called orchard.exe. This is a command line utility which will scaffold up a new empty module and add it to the
main solution. There are also other commands you can use with this utility.
To scaffold a new module:
1. Press the Save All button (or press Ctrl-Shift-S). Its a good practice to always save before using the
command line utility. Many of its commands will make changes to your solution and if you have unsaved
changes you will get merge conflicts.
2. In the Solution Explorer, scroll down to the Orchard.Web project. It should be the very last project in the
solution.
3. Right click on the Orchard.Web project and choose Open Folder in File Explorer:
3.9. Extending Orchard
287
Read the Docs Template Documentation, Release 1.9.2
4. Open the bin folder
5. Locate orchard.exe in the list and double click it to open.
Note: If you don’t see orchard.exe in the bin folder then you didn’t follow the steps in the
setting up for a lesson guide. You need to have built the solution at least once for this file to exist.
Press Ctrl-Shift-B within Visual Studio to build the solution.
6. After a short pause while it loads you will then be presented with the Orchard command line:
288
Chapter 3. Documentation
Read the Docs Template Documentation, Release 1.9.2
Note: There is a separate article where you can learn more about orchard.exe and its features. You
don’t need to read it to understand this course but it will be useful to review in the future as part of
your overall training.
7. Type the following command: feature enable Orchard.CodeGeneration and press enter.
This will activate the code generation features of orchard.exe.
Note: If you get an error saying No command found matching arguments "feature
enable Orchard.CodeGeneration" then you didn’t follow the steps in the setting up for a
lesson guide. You need to run the solution and go through the Orchard Setup screens before this
command is available.
The code generation command that we will be using is codegen module.
8. Type help codegen module and press enter to see the syntax for this command. To see details about all
of the commands available type help commands.
Like the rest of Orchard CMS, the orchard.exe command shell is extendable. The total number
1. Scaffold
the
module
by
entering
the
Orchard.LearnOrchard.FeaturedProduct.
following
command:
codegen module
If you read the help in the last step you might be wondering why we didn’t include the
/IncludeInSolution:true argument. This defaults to true so you don’t need to add it.
2. Close the Orchard command-line window.
3. This has now created a new, empty module in the file system. Switching back to Visual Studio should show you
the File Modification Detected dialog:

Click `Reload`.
3.9. Extending Orchard
289
Read the Docs Template Documentation, Release 1.9.2
> **Note:** If you had unsaved changes in your Solution file then click the `Dismiss` optio
The basic framework for a module now exists inside the modules section of your solution:
Core concepts refresher
If you are at the stage of wanting to build modules for Orchard then you should already be familiar with the concept
of Content Types, Widgets, Content Items and Content Parts. These are all things that you can manage via the admin
dashboard and you will have worked with them if you have built any kind of site in Orchard. To refresh your memory:
• Content Type: The template for a type of content in Orchard. The most common example is the Page content
type which provides the structure for a page of content in an Orchard site.
• Widgets: You can also make a content type that works as a Widget. The Widget is a special variation of
content type which can be placed into one of the many Zones a template defines. It’s manageable via the admin
dashboard at run-time. Content types can opt-in to this system by configuring their Stereotype setting to
Widget.
• Content Item: This is an instance of a specific content type. When you create a new Page in Orchard and fill
it with content that is a Content Item with a Content Type of Page.
• Content Part: A small module providing some specific functionality. The Content Type is made up by
attaching various Content Parts to it. For example you could have a comments content part. It just manages
a block of comments for whatever it is attached to. The same comments content part could be attached to a Page
content type, a Blog content type, or within a Widget.
What we will be building
As you might have guessed from the module name, we are going to build a very simple featured product module. This
first step into extending Orchard will be a small one.
290
Chapter 3. Documentation
Read the Docs Template Documentation, Release 1.9.2
The featured product module will be a Widget which shows a static message listing the featured product with a link
to that page. It’s not going to have any configurable settings behind it so we won’t need to look at the database side
of things yet. It’s not going to be powered by an actual product system. A Widget is a great starting pointing point
because it doesn’t need to worry about menu settings, titles, URLs or integration into the admin dashboard.
It will be a simple banner which you can display on your site by adding a widget via the admin dashboard. This will
be enough to show the core concepts of a module. We will come back and make improvements in the next three parts
of this course.
Let’s get started with some development by adding classes and other files to our module.
Content part
The content part class is the core data structure. When you scaffolded the module it automatically made you a Models
folder. Now we need to add the FeaturedProductPart class to this folder:
1. Right click on the Models folder.
2. Choose Add
3. Choose Class...
4. In the Name: field type FeaturedProductPart
5. Click Add
Your new class will be created and opened up in the Visual Studio editor.
Important note: In order for Orchard to recognize Content Part classes they must be in a namespace
ending .Models.
Because you already added this class within the Models folder the namespace is automatically wrapped
around your class. In the future, when you’re making your own classes don’t forget to ensure that you
follow this namespace structure.
Your content part class will need to derive from the ContentPart class.
Normally we would add public properties to store all the related data but as we are keeping it simple this first example
won’t have any.
Add the ContentPart inheritance by following these steps:
3.9. Extending Orchard
291
Read the Docs Template Documentation, Release 1.9.2
1. Type : ContentPart after your FeaturedProductPart class definition to inherit from the
ContentPart class.
2. Wait a second and the red squiggles will appear underneath the class. Add the namespace by pressing Ctrl-.
on your keyboard to bring up the Quick Actions menu.
3. Select the using Orchard.ContentManagement; option and press enter.
That’s all you need to do for your first ContentPart class. Your FeaturedProductPart.cs file should now
look like this:
using Orchard.ContentManagement;
namespace Orchard.LearnOrchard.FeaturedProduct.Models {
public class FeaturedProductPart : ContentPart {
}
}
Data migrations
When your module is enabled in the admin dashboard Orchard will execute a data migration process. The purpose of
the data migration is to register a list of the features contained in the module and any data it uses.
We aren’t going to use this yet, but the migration is also used for upgrades. As you work on your modules you will
want to add and remove bits. The data migration class can make changes and you can transform your existing data to
meet your new requirements.
The data migration class can be created by hand, following a similar process as the last section but we can also scaffold
it with the orchard.exe command line. Let’s dive back in to the command line and add a data migration class to
the module.
1. Press the Save All button (or press Ctrl-Shift-S). Its a good practice to always save before using the
command line utility. Many of its commands will make changes to your solution and if you have unsaved
changes you will get merge conflicts.
2. In the Solution Explorer, scroll down to the Orchard.Web project. It should be the very last project in the
solution.
3. Right click on the Orchard.Web project and choose Open Folder in File Explorer:
292
Chapter 3. Documentation
Read the Docs Template Documentation, Release 1.9.2
4. Open the bin folder.
5. Locate orchard.exe in the list and double click it to open.
6. After a short pause while it loads you will then be presented with the Orchard command line:
3.9. Extending Orchard
293
Read the Docs Template Documentation, Release 1.9.2
7. We enabled the code generation feature when scaffolding the module but if you have been playing with Orchard
or are just using this guide as a reference it can’t hurt to run the command a second time to make sure.
Type the following command: feature enable Orchard.CodeGeneration and press enter.
This will activate the code generation features of orchard.exe. The command that we will be using is
codegen datamigration.
8. Type help codegen datamigration and press enter to see the syntax for this command. To see details
about all of the commands available type help commands.
Like the rest of Orchard CMS, the orchard.exe command shell is extendable. The total number
1. Scaffold the data migration class by entering the following command: codegen datamigration
Orchard.LearnOrchard.FeaturedProduct.
2. Close the Orchard command-line window.
3. This has now created a new data migration the file system called Migrations.cs. It will be in the root folder
of your module.
Switching back to Visual Studio should show you the File Modification Detected dialog:

Click `Reload`.
> **Note:** If you had unsaved changes in your Solution file then click the `Dismiss` optio
Now you have a Migrations.cs file in the root folder of your module’s project. By default it has an empty method
called Create() which returns an int. For the moment, returning a value of 1 is fine. It’s the version number of
your data migration and we will look into it in more detail later in this course.
As discussed earlier the Widget is just a ContentType with a Stereotype of Widget. A ContentType is
294
Chapter 3. Documentation
Read the Docs Template Documentation, Release 1.9.2
basically just a collection of ContentParts. Every ContentType should contain the CommonPart which gives
you the basics like the owner and date created fields. We will also add the WidgetPart so it knows how to widget.
Finally we also include the content part we are building, FeaturedProductPart.
Let’s update the Create() method to implement these plans:
1. Open Migrations.cs from within your module project if you don’t already have it open.
2. Replace the Create() method with the following:
public int Create() { ContentDefinitionManager.AlterTypeDefinition( “FeaturedProductWidget”, cfg
=> cfg .WithSetting(“Stereotype”, “Widget”) .WithPart(typeof(FeaturedProductPart).Name) .WithPart(typeof(CommonPart).Name) .WithPart(typeof(WidgetPart).Name)); return 1; }
Orchard doesn’t have a CreateTypeDefinition method so even within the create we still used
AlterTypeDefinition. If it doesn’t find an existing definition then it will create a new content type.
3. Press Ctrl-. on the red squiggles under FeaturedProductPart and CommonPart then let Visual
Studio add the required using statements.
4. Try the same under the WidgetPart - you will see Visual Studio doesn’t understand where to point the using
statement at and it only offers you options to generate stubs. We don’t want this.

1. Right click on your References and choose Add Reference...
2. Click the Projects tab on the left. Scroll down until you can see Orchard.Widgets in the list. Hover
your mouse over it and a checkbox will appear. Click the checkbox for Orchard.Widgets. Click OK.
3.9. Extending Orchard
295
Read the Docs Template Documentation, Release 1.9.2
3. Now you can try resolving the red squiggly lines under WidgetPart again:
You will now have the correct using Orchard.Widgets.Models option presented to you. Select it.
4. Save your progress so far by clicking the Save all button (or press Ctrl-Shift-S).
That’s all for the data migration, your Migrations.cs should now look like this:
using
using
using
using
using
Orchard.ContentManagement.MetaData;
Orchard.Core.Common.Models;
Orchard.Data.Migration;
Orchard.LearnOrchard.FeaturedProduct.Models;
Orchard.Widgets.Models;
namespace Orchard.LearnOrchard.FeaturedProduct {
public class Migrations : DataMigrationImpl {
public int Create() {
ContentDefinitionManager.AlterTypeDefinition(
``FeaturedProductWidget'', cfg => cfg
.WithSetting(``Stereotype'', ``Widget'')
.WithPart(typeof(FeaturedProductPart).Name)
.WithPart(typeof(CommonPart).Name)
296
Chapter 3. Documentation
Read the Docs Template Documentation, Release 1.9.2
.WithPart(typeof(WidgetPart).Name));
return 1;
}
}
}
Update dependencies as you go along
In the Create() method of the data migration we introduced a dependency on WidgetPart.
This means that our module won’t run without the Orchard.Widgets module being installed and enabled within
the system.
In order to let Orchard know that we have this dependency we need to record it in a manifest file called Module.txt.
This is a text file written in YAML format which stores meta information about the module like the name, author,
description and dependencies on other modules. If you haven’t heard of YAML before don’t worry, it is a simple
format to understand.
We will look at the Module.txt manifest file again in more detail in part 4 of this course, for now we just need to
go in and record the dependency we have created with Orchard.Widgets.
It is important to record this information as soon as we make a dependency on a module. If we don’t record the
information then your module can cause exceptions for your users at run-time. You really need to get into the habit
of doing it straight away because not only are they are easy to forget but if you have the module that you depend on
already enabled you won’t see any errors but your users will.
Lets update the manifest now to include the Orchard.Widgets dependency:
1. In the solution explorer, open up Module.txt which will be located in the root folder of the module.
2. The last three lines describe the main feature of the module (we have only one feature in this module):
Features:
Orchard.LearnOrchard.FeaturedProduct:
Description: Description for feature Orchard.LearnOrchard.FeaturedProduct.
Add an extra row underneath Description: and add a Dependencies: entry like this:
Features:
Orchard.LearnOrchard.FeaturedProduct:
Description: Description for feature Orchard.LearnOrchard.FeaturedProduct.
Dependencies: Orchard.Widgets
The indentation is important as creates hierarchy within a YAML document. Indent the line with 8 spaces.
How is all this magic working?
So far the ContentPart class has been magically detected as long as it uses the .Model namespace, now the data
migration is automatically detected just for deriving from DataMigrationImpl. How is all of this happening?
Under the hood Orchard uses Autofac, an Inversion of Control container. If you’re interested you can learn about how
it’s integrated in the how Orchard works guide.
Don’t worry though, you don’t really need to know anything deeper about it other than it’s in the background and it
automatically scans & registers your components for you.
Later on we will use Autofac’s dependency injection which let us automatically get instances of things we need
supplied directly into our classes.
3.9. Extending Orchard
297
Read the Docs Template Documentation, Release 1.9.2
Content part driver
Everything you see in Orchard is composed from Shapes. If you don’t know about shapes you can learn more about
them in the accessing and rendering shapes guide.
A content part driver is a class that composes the shapes that should be used to view and edit content parts. Drivers
live in their own folder called Drivers. A basic driver class will contain three methods; a display driver for viewing
a content part in the front end, an editor driver for presenting an editor form in the admin dashboard and an update
method to handle changes submitted from the editor form.
As the shapes are created in the driver you can also pass data through to a view. Views are discussed in the next section
but first we need to wire in the plumbing.
The widget that we are building has no configuration, so all this driver will need is the Display method configuring.
The other methods will be added in when we revisit the widget it part two.
There aren’t any command line scaffolding commands for setting up new drivers so you will need to create it manually:
1. Make a new Drivers folder (Right click on the module project in the solution explorer, click Add, New
Folder)
2. Add a new class called FeaturedProductDriver by right clicking the Drivers folder, clicking Add,
Class... and typing FeaturedProductDriver for the name (Visual Studio will automatically add the
.cs on to the end for you)
3. Extend the class so it derives from ContentPartDriver<FeaturedProductPart> (note that the
generic type class ends in Part not Driver).
4. Add the missing namespaces using the Ctrl-. shortcut.
In the future we will do a lot with the driver class and the way that it builds its display but for this simple example all
we need is a simple class to wire the shape to a view.
1. Inside your FeaturedProductDriver class add this single method:
protected override DriverResult Display(FeaturedProductPart part, string displayType, dynamic shapeHelper) {
return ContentShape(“Parts_FeaturedProduct”, () => shapeHelper.Parts_FeaturedProduct()); }
This says that when displaying the FeaturedProductPart return a shape called Parts_FeaturedProduct.
By default Orchard will look for this shape in Views\Parts\FeaturedProduct.cshtml which is what we
will build next.
Your FeaturedProductDriver.cs file should now look like this:
using Orchard.ContentManagement.Drivers;
using Orchard.LearnOrchard.FeaturedProduct.Models;
namespace Orchard.LearnOrchard.FeaturedProduct.Drivers {
public class FeaturedProductDriver : ContentPartDriver<FeaturedProductPart> {
protected override DriverResult Display(FeaturedProductPart part,
string displayType, dynamic shapeHelper) {
return ContentShape(``Parts_FeaturedProduct'', () =>
shapeHelper.Parts_FeaturedProduct());
}
298
Chapter 3. Documentation
Read the Docs Template Documentation, Release 1.9.2
}
}
View
Orchard uses Razor template views to display it’s shapes. You can supply strongly-typed data models and use many
of the normal ASP.NET MVC Razor view features within Orchard.
For this first widget our needs are simple and we will only be putting plain HTML markup inside the .cshtml file:
1. Add a new folder inside the Views folder called Parts (Right click on the View folder in the solution
explorer, click Add, New Folder and type Parts).
2. Add a new .cshtml Razor view within the Parts folder called FeaturedProduct.cshtml
3. Within the FeaturedProduct.cshtml view file add the following HTML markup:
Placement
Almost all of the key elements are in place now except for this last one. The configuration inside a driver class tells
Orchard how to render that content part. Content parts always exist within a larger composite content item. Placement
is used to tell Orchard where to render these components.
The placement.info file goes in the root folder of the module. It is an XML file with a simple structure. You can
learn more about the placement.info in understanding placement.info guide.
Add the placement.info file to your module:
1. Right click on the module project in the solution explorer.
2. Choose Add, New Item to get to the add item screen:
3.9. Extending Orchard
299
Read the Docs Template Documentation, Release 1.9.2
3. From the templates categories in the left hand side, choose General
4. Find Text File in the list
5. Enter placement.info in the Name: field.
6. Click OK
This module has a single shape so we need to set up a <Place> for that shape.
1. Add this snippet to the empty placement.info file:
The Content:1 is the zone and priority of that shape. A shape will have several zones defined for it. Typically
these include the header, content, meta and footer but they can have any combination of zones defined. In this case the
Content is the main content area.
The priority means that it will be near the top of the content zone. In more complicated modules there could be several
shapes. Setting different priorities will let you organize their display order when you want them to be in the same
zone. For example, if another shape had a place of Content:0.5 it would go before it, Content:15 and it would
go after it.
Theme developers can customize these layout preferences by providing their own placement.info and overriding your
initial configuration. This lets theme authors customize your module without having to make changes to the actual
code. This means when the module is upgraded to a new version the theme developers changes will not be overwritten.
Trying the module out in Orchard
Congratulations, you’ve made it to the pay off, using the module in Orchard!
The last few steps will enable the module in Orchard and assign the widget to a zone in the active template:
1. In Visual Studio, press Ctrl-F5 to start the dev server without debugging mode enabled.
300
Chapter 3. Documentation
Read the Docs Template Documentation, Release 1.9.2
2. Log in to the admin dashboard. The login link will be in the footer of the site.
3. Click Modules in the navigation menu.
4. The first item in the list should be our module, Orchard.LearnOrchard.FeaturedProduct:
Click Enable to activate the plugin:
5. You can now add the Widget to a layer in the site. Click Widgets from the navigation menu.
6. In the AsideFirst section of the Widgets page click the Add button:
7. The Featured Product Widget will be in the list, click the item to select it:
8. You can leave most of the Widget settings on their defaults. Just set the Title to Featured Product:
9. Click Save at the bottom of the page.
If you go back to the main site now you will see the module in the site:
3.9. Extending Orchard
301
Read the Docs Template Documentation, Release 1.9.2
We haven’t created a page for the Sprocket 9000 so clicking the button will give a 404 at the moment.
Download the code for this lesson
You can download a copy of the module so far at this link:
• Download Orchard.LearnOrchard.FeaturedProduct-Part1-v1.0.zip
To use it in Orchard simply extract the archive into the modules directory at .\src\Orchard.Web\Modules\.
For Orchard to recognize it the folder name should match the name of the module. Make sure that
the folder name is Orchard.LearnOrchard.FeaturedProduct and then the modules files are
located directly under that.
Conclusion
This first guide in the module introduction course has shown the main components of a module.
In the next part we will extend the module to add some interactivity to the module. This means adding database
backing, an editor view, configuration settings and we will dip our toes in with some of the Orchard API features.
In the final part of the course we will review the module and clean it up to ensure we follow development best practices
that have been missed so far.
This was a long guide. Take a break now and when you’re refreshed come back and read part two of the course.
Part 2 - Make the Widget Dynamic
Introduction
This is part two of a four part course. It will get you started with a gentle introduction to extending Orchard at the
code level. You will build a very simple module which contains a widget that shows an imaginary featured product.
It will teach you some of the basic components of module development and also encourage you to use best-practices
when developing for Orchard.
If you haven’t read the previous part of this course then you can go back to the overview to learn about the Getting
Started with Modules course.
302
Chapter 3. Documentation
Read the Docs Template Documentation, Release 1.9.2
Expanding the widget to make it more dynamic
In the first version of the widget we took the bare minimum of steps that we could in order to get something up and
running.
This meant we missed out a few classes that would be in a normal data-driven module and some of the classes we did
add were pretty much empty.
Now that you understand the basic workflow of building a module we’re going to go back and take a second look at it,
adding in some new classes and expanding out the Widget.
By the time we have finished with this part we will have made the widget more dynamic. To achieve this goal we are
going to:
• Add a Boolean property to signify if the item is on sale.
• Dip into the Orchard API to hide the widget if the page we are viewing is the featured product.
Getting setup for the lesson
You should have already completed part one of this course before you move on to this part. This means you should
have a copy of Orchard with the completed module work.
If you have the original Solution and module files available then:
1. Open Visual Studio
2. Open the Solution you created in the first part of the course
If for some reason you don’t have these files you can play catch-up by following these steps:
1. Follow the setting up for a lesson guide.
2. Download the completed module source code from part 1.
3. Extract the archive into the modules directory at .\src\Orchard.Web\Modules\.
4. Run Orchard by pressing Ctrl-F5, go to the admin dashboard, select Modules from the navigation menu and
enable the module.
Now we can begin the lesson by starting to build in database functionality to the Featured Product module.
Add a ContentPartRecord class
In the first part of this course we created a simple ContentPart class called FeaturedProductPart. Because
we weren’t storing anything at the time this class was just an empty placeholder.
We are going to go back and give it a property to store some data in the next section but first we need to create a
ContentPartRecord class.
The ContentPartRecord class is used by Orchard to store content part data in a database.
Let’s add the class to the module and then start wiring in the Boolean IsOnSale property:
1. Locate your FeaturedProduct module in the Solution Explorer, Right click on the Models folder
and choose Add, Class...
2. In the Add New Item dialog enter FeaturedProductPartRecord in to the Name: field and press
Add.
3. Derive the class from ContentPartRecord:
3.9. Extending Orchard
303
Read the Docs Template Documentation, Release 1.9.2
public class FeaturedProductPartRecord : ContentPartRecord
4. Add the namespace by pressing Ctrl-.:
5. Add a public property to the class. Place your cursor in the main body of the class. Type prop then press the
Tab key twice:
This will insert a code snippet for an automatically implemented public property.
6. In the first placeholder (you can just start typing and it will replace the int automatically) set it to virtual
bool then press Tab, type IsOnSale and press Enter to complete the property.
The important thing to remember for your ContentPartRecord classes is that each of the properties you want
to store in the database should be marked with the virtual keyword. This is so that NHibernate, the database
system used by Orchard, can inject its underlying plumbing.
You should now end up with a file called .\Models\FeaturedProductPartRecord.cs with the contents:
using Orchard.ContentManagement.Records;
namespace Orchard.LearnOrchard.FeaturedProduct.Models {
public class FeaturedProductPartRecord : ContentPartRecord {
public virtual bool IsOnSale { get; set; }
}
}
Update the ContentPart
You now have a class that will provide the interface between your database and your content part
(FeaturedProductPartRecord).
The first change to the content part will be to let it know about this record class. Then we will add a public property
which mirrors the data class and specifies how it will store its data:
1. Open the ContentPart file located in .\Models\FeaturedProductPart.cs
2. Add a generic type parameter to the FeaturedProductPart class by changing this:
304
Chapter 3. Documentation
Read the Docs Template Documentation, Release 1.9.2
public class FeaturedProductPart : ContentPart
To this:
public class FeaturedProductPart : ContentPart<FeaturedProductPartRecord>
3. Add the public property to the class:
[DisplayName(``Is the featured product on sale?'')]
public bool IsOnSale {
get { return Retrieve(r => r.IsOnSale); }
set { Store(r => r.IsOnSale, value); }
}
4. Add the namespace for the DisplayName attribute
The DisplayName attribute is a feature provided by ASP.NET MVC. Later on when we build the editor view for
the admin dashboard it will use this phrase instead of simply displaying “IsOnSale”
You should now end up with a FeaturedProductPart.cs file that looks like this:
using System.ComponentModel;
using Orchard.ContentManagement;
namespace Orchard.LearnOrchard.FeaturedProduct.Models {
public class FeaturedProductPart : ContentPart<FeaturedProductPartRecord> {
[DisplayName(``Is the featured product on sale?'')]
public bool IsOnSale {
get { return Retrieve(r => r.IsOnSale); }
set { Store(r => r.IsOnSale, value); }
}
}
}
The Retrieve() and Store() methods come when you inherit from ContentPart<T>.
Under the hood your data is stored in two places. There is the underlying database and something called the infoset.
Understanding data storage in Orchard
Orchard provides an incredibly modular architecture. The way it achieves this is that it breaks everything up into
their own little components called content parts. We are busy building one of these content parts right now. Orchard
composes these together at run-time to form content types, such as the widget we are working on.
In order to store all of these little pieces of data in the database they are split up into many tables. There can be a lot of
SQL JOIN‘s involved with pulling a content item out of the database. This means things aren’t always as fast as they
could be.
To minimize these effects a secondary data cache is kept. All of the different content parts are encoded into XML and
stored in a single column inside a database table. For example, our widget looks something like this:
<Data>
<IdentityPart Identifier=''0e8f0d480f0d4d4bb72ad3d0c756a0d4'' />
<CommonPart CreatedUtc=''2015-09-24T19:37:19.5819846Z''
ModifiedUtc=''2015-09-24T19:37:19.6720488Z''
PublishedUtc=''2015-09-24T19:37:19.6810555Z'' />
<WidgetPart RenderTitle=''true'' Title=''Featured Product'' Position=''1''
Zone=''AsideFirst'' Name='''' CssClasses='''' />
</Data>
3.9. Extending Orchard
305
Read the Docs Template Documentation, Release 1.9.2
So instead of pulling data from three different tables (IdentityPart, CommonPart and WidgetPart) Orchard just selects
the single XML block and checks in there. The Retrieve() and Store() methods automatically keep this data
and the individual database tables in sync for you.
Why not just use the XML infoset all the time? If you need to sort the data or filter it then its actually quicker to do
this all within the SQL database server rather than extracting everything and sorting / filtering it after.
In certain scenario’s you might not need one or the other of these data stores. There are more advanced
approaches that you can take in these situations but that’s an advanced topic for a later guide.
This changeover was implemented in Orchard v1.8 and was known as “The Shift”. Bertrand Le Roy has written more
about this on his blog.
Upgrading using a data migration
In the first part of this course we created a Migrations.cs class file. Inside it we wrote the Create() method
which returned 1. When Orchard had finished running the method it stored that 1 in the database.
Now that we want to make some changes to our modules data storage (we want to add in a table for the data to be
stored in) we can add a new method UpdateFrom1(). Orchard will automatically find this method the next time
the site is loaded and run this updated data migration.
At the end of the update method we will return 2. This means in the future if we want to make further changes we
could add an UpdateFrom2() method. We can keep returning a number one higher than the previous to update as
many times as we need.
1. Open the Migrations.cs file in the root folder of the module.
2. Beneath the Create() method, add in the following method:
public int UpdateFrom1() { SchemaBuilder.CreateTable(typeof(FeaturedProductPartRecord).Name, table => table .ContentPartRecord() .Column(“IsOnSale”)); return 2; }
To start off with we are using the SchemaBuilder class to create a new table. The first parameter is the table name.
This should match the ContentPartRecord we built.
Instead of pulling it out using typeof().Name you could pass in a string such as
CreateTable("FeaturedProductsPartRecord", ...); but that leaves you open to introducing small typos into the code - like I did just then.
Did you notice the extra s I accidentally typed into the table name?
If you make a mistake like this then you won’t get an exception. Orchard will still run but your data will
be saved to the wrong table creating hard to find bugs.
The ContentPartRecord() call is just a simple shorthand to add in the id column. If you look in the definition
(just place your cursor in the method in Visual Studio and press F12) you will see it simply adds an extra Column<>
into the chain:
Column<int>(``Id'', column => column.PrimaryKey().NotNull());
We then add our column with a data type bool and a name IsOnSale which matches our property on the record
class. NHibernate will automatically match the name of the property on the record class with the column in the
database.
Bonus Exercise: Look around in the Migrations.cs files located in the other built-in modules for
many examples of the things you can do with this class.
To do this just select the Search Solution Explorer textbox at the top of the Solution
Explorer or press Ctrl-;. When it’s selected just type Migrations.cs in and it will filter out
all of the migrations.cs files in the solution.
306
Chapter 3. Documentation
Read the Docs Template Documentation, Release 1.9.2
You should now end up with a Migrations.cs file that looks like this:
using
using
using
using
using
Orchard.ContentManagement.MetaData;
Orchard.Core.Common.Models;
Orchard.Data.Migration;
Orchard.LearnOrchard.FeaturedProduct.Models;
Orchard.Widgets.Models;
namespace Orchard.LearnOrchard.FeaturedProduct {
public class Migrations : DataMigrationImpl {
public int Create() {
ContentDefinitionManager.AlterTypeDefinition(
``FeaturedProductWidget'', cfg => cfg
.WithSetting(``Stereotype'', ``Widget'')
.WithPart(typeof(FeaturedProductPart).Name)
.WithPart(typeof(CommonPart).Name)
.WithPart(typeof(WidgetPart).Name));
return 1;
}
public int UpdateFrom1() {
SchemaBuilder.CreateTable(typeof(FeaturedProductPartRecord).Name,
table => table
.ContentPartRecord()
.Column<bool>(``IsOnSale''));
return 2;
}
}
}
Add a handler
The plumbing for connecting the module code to the database is almost complete. The last thing to do is to register a
StorageFilter for the ContentPartRecord.
The StorageFilter class takes care of persisting the data from repository object to the database. In this case it’s
the FeaturedProductPartRecord class that needs registering.
You do this registration inside the Handler class, although that’s not it’s only use. You can think of the handler like
a filter in ASP.NET MVC. It’s a piece of code that is meant to run when specific events happen in the application, but
that are not specific to a given content type.
For example, you could build an analytics module that listens to the Loaded event in order to log usage statistics.
If you’re curious, you can see what event handlers you can override in your own handlers by examining
the source code for ContentHandlerBase and reading the understanding content handlers guide.
The handler you need in this module is not going to be very complex, but it will implement some plumbing that is
necessary to set up the persistence of the part:
1. In the Solution Explorer, right click on the Orchard.LearnOrchard.FeaturedProduct project
and choose Add, New Folder and create a new folder called Handlers.
2. Now right click on the Handlers folder and choose Add, Class....
3. In the Add New Item dialog enter FeaturedProductHandler in to the Name: field and press Add.
3.9. Extending Orchard
307
Read the Docs Template Documentation, Release 1.9.2
4. Derive the class from ContentHandler:
public class FeaturedProductHandler : ContentHandler
5. Add the namespace by pressing Ctrl-.:
6. You now need to add in the standard boilerplate handler constructor code which wires up the StorageFilter
to the repository:
public FeaturedProductHandler( IRepository repository) { Filters.Add(StorageFilter.For(repository)); }
7. Add the namespace for the FeaturedProductPartRecord and then the IRepository<>.
You should now end up with a FeaturedProductHandler.cs file that looks like this:
using Orchard.ContentManagement.Handlers;
using Orchard.Data;
using Orchard.LearnOrchard.FeaturedProduct.Models;
namespace Orchard.LearnOrchard.FeaturedProduct.Handlers {
public class FeaturedProductHandler : ContentHandler {
public FeaturedProductHandler(
IRepository<FeaturedProductPartRecord> repository) {
Filters.Add(StorageFilter.For(repository));
}
}
}
Update the driver to support an editor view
This time through with the driver it’s going to get it’s other two core boilerplate methods.
The first is a method called Editor() which is used to build the shape which will display the edit interface in the
admin dashboard. This is designed to be used with a HTTP GET request.
The second is another Editor() overload which takes the submitted information from the first and attempts to pass
that information back into the database. This is designed to be used with a HTTP POST request.
1. Open the FeaturedProductDriver.cs class which is in the .\Drivers\ folder of the module project.
2. Below the Display() method, paste in this block of code:
protected override DriverResult Editor(FeaturedProductPart part, dynamic shapeHelper) { return
ContentShape(“Parts_FeaturedProduct_Edit”,
() => shapeHelper.EditorTemplate( TemplateName:
“Parts/FeaturedProduct”, Model: part, Prefix: Prefix)); }
protected override DriverResult Editor(FeaturedProductPart part, IUpdateModel updater, dynamic shapeHelper)
{ updater.TryUpdateModel(part, Prefix, null, null); return Editor(part, shapeHelper); }
3. Add the namespace for IUpdateModel using the Ctrl-. keyboard shortcut.
As explained above, the first Editor() method is for displaying an edit form in the admin dashboard. You can see
that it returns a content shape called Parts_FeaturedProduct_Edit. We will use this information later on
when updating the placement.info.
308
Chapter 3. Documentation
Read the Docs Template Documentation, Release 1.9.2
The way it does it is by using the provided shapeHelper factory to create a new shape for the current content
part (our FeaturedProductPart with the bool IsOnSale property). This is the same shape factory we used in our
Display() method the first time around.
For editor views you use the .EditorTemplate() method and pass in the configuration values.
By default, Orchard places all of its editor views in the EditorTemplates folder.
Combining this with the TemplateName parameter we know that we will be creating a view called
.\Views\EditorTemplates\Parts\FeaturedProduct.cshtml in the next section.
The Model parameter passes in the data, in our case a data structure that includes the IsOnSale value. This will be
accessible inside the Razor view and we will use it to determine what to display.
The Prefix is a text value that is prepended to the names of the shapes internally. This makes sure that the names
are unique. The Prefix value that we supply is a method that comes with deriving from ContentPartDriver
that just uses a typeof() to get the name of the class:
protected virtual string Prefix { get { return typeof(TContent).Name; } }
In more complicated projects this method can combine multiple shapes together and return them as a
single CombinedShape.
The second overload of the Editor() method is used when the administrator submits a page that has the
EditorTemplate form inside it. You can see the bare minimum code here which just attempts to pass the form
data to the correct internal model. As long as it doesn’t have any errors the model will then be persisted to the database
automatically by Orchard.
It then calls the original POST version of the Editor() method with the form data already included in the model.
This means that after the form has been submitted and the page loads up again it will have the form fields pre-populated
with the data that has been entered.
In more complicated projects you will see further processing being completed after the
TryUpdateModel() call.
Don’t forget, browsing the Orchard source code is an invaluable tool to learn more about its inner workings. A good reference module for both this and the last tip is the WidgetPartDriver located
in .\Orchard.Web\Modules\Orchard.Widgets\Drivers\WidgetPartDriver.cs. It
shows both the combining of shapes and extra validation in the editor update method.
You should now end up with a FeaturedProductHandler.cs file that looks like this:
using Orchard.ContentManagement;
using Orchard.ContentManagement.Drivers;
using Orchard.LearnOrchard.FeaturedProduct.Models;
namespace Orchard.LearnOrchard.FeaturedProduct.Drivers {
public class FeaturedProductDriver : ContentPartDriver<FeaturedProductPart> {
protected override DriverResult Display(FeaturedProductPart part, string displayType, d
return ContentShape(``Parts_FeaturedProduct'', () => shapeHelper.Parts_FeaturedProduc
}
protected override DriverResult Editor(FeaturedProductPart part, dynamic shapeHelper) {
return ContentShape(``Parts_FeaturedProduct_Edit'',
() => shapeHelper.EditorTemplate(
TemplateName: ``Parts/FeaturedProduct'',
Model: part,
Prefix: Prefix));
}
protected override DriverResult Editor(FeaturedProductPart part, IUpdateModel updater,
3.9. Extending Orchard
309
Read the Docs Template Documentation, Release 1.9.2
updater.TryUpdateModel(part, Prefix, null, null);
return Editor(part, shapeHelper);
}
}
}
Add the EditorTemplate view
The editor template view uses the same underlying technology as the front-end view, a Razor view template. Orchard
keeps all of its editor templates inside the EditorTemplates folder of the Views folder.
When you’re building the administration form you will normally use many of the ASP.NET MVC helper methods
such as @Html.CheckBoxFor(model => model.IsOnSale).
For this reason you will find that editor template views are strongly-typed views and start off with the @model
command. This will mean that you get the IntelliSense while using model to build the forms.
The editor form for this module will have a single section to represent the Boolean value that we have added to the
model. When building the view you should wrap each form item inside a <fieldset> tag.
Add the EditorTemplate view by following these steps:
1. Add a new folder inside the Views folder called EditorTemplates (Right click on the View folder
in the solution explorer, click Add, New Folder and type EditorTemplates).
2. Add another folder inside that called Parts.
3. Add a new .cshtml Razor view within the Parts folder called FeaturedProduct.cshtml
4. Within the FeaturedProduct.cshtml view file add the following HTML markup:
@model Orchard.LearnOrchard.FeaturedProduct.Models.FeaturedProductPart
<fieldset>
<div class=''editor-label''>
@Html.LabelFor(model => model.IsOnSale)
</div>
<div class=''editor-field''>
@Html.CheckBoxFor(model => model.IsOnSale)
@Html.ValidationMessageFor(model => model.IsOnSale)
</div>
</fieldset>
When you edit the widget in the admin dashboard you will see a simple edit form:
310
Chapter 3. Documentation
Read the Docs Template Documentation, Release 1.9.2
You can see that it is automatically pulling through the [DisplayName] attribute value that we used earlier.
Update the front-end view
Now that we have gone through all the steps to surface the IsOnSale property we can finally use it to make a decision
in the front-end view.
If you have experience with normal ASP.NET MVC Razor views you will know that you can blend your C# code in
with the HTML including features such as using conditional statements to control the visibility of certain sections.
We will now update the module to show a red “ON SALE!” box in the widget when IsOnSale is set to true:
1. Open up the view file located at .\Views\Parts\FeaturedProduct.cshtml
2. Copy this CSS snippet into the <style> block at the top of the view:
.sale-red { background-color: #d44950; color: #fff; float: right; padding: .25em 1em; display: inline; }
3. Add this snippet in to the main body, above the first <p> tag:
@if (Model.ContentPart.IsOnSale) { ON SALE! }
You will notice that this view doesn’t feature an @model directive at the top. This is because the model is a dynamic
class which contains the content part information and various other properties supplied by Orchard. This means that
you can’t define it in the view beforehand as the class isn’t a named type and IntelliSense doesn’t know what properties
are going to be available at run-time.
Because of this you are on your own when typing up the views. It can be helpful to add breakpoints to inspect the
structure of the model at run-time if you don’t know what value you’re looking for.
The @if (Model.ContentPart.IsOnSale) { } line simply checks if the value is true and if so it dynamically shows the HTML contained within the curly braces, displaying a red “ON SALE!” banner within the widget.
You should now have a FeaturedProduct.cshtml file that looks like this:
<style>
.btn-green {
padding: 1em;
text-align: center;
color: #fff;
background-color: #34A853;
3.9. Extending Orchard
311
Read the Docs Template Documentation, Release 1.9.2
font-size: 2em;
display: block;
}
.sale-red {
background-color: #d44950;
color: #fff;
float: right;
padding: .25em 1em;
display: inline;
}
</style>
@if (Model.ContentPart.IsOnSale) {
<p class=''sale-red''>ON SALE!</p>
}
<p>Todays featured product is the Sprocket 9000.</p>
<p><a href=''/sprocket-9000'' class=''btn-green''>Click here to view it</a></p>
Update the placement.info
Before we run the module to see our updated widget in action we need to make a change to the placement.info
file. The module should run without errors at this stage but until we set up a <place> for the editor template you
won’t be able to configure the IsOnSale variable.
1. Open the placement.info file located in the root folder of the module.
2. Within the <placements> tag add the following <place> tag:
The order of the <place> tags doesn’t matter.
The name of the place that we are targeting Parts_FeaturedProduct_Edit was defined in the driver class
when we configured it in the EditorTemplate() shape factory method. The shape will be injected into the local
zone named “content” with a weight of 7.5. In this case the weight of 7.5 will move it down to the bottom of the form.
When developing your modules it is common to forget this last stage. While you might not always be able
to remember to update the placement.info before you run, you should take a moment to remember
the solution.
Whenever the shape isn’t displayed where it was expected, think placement.info first.
You should now have a placement.info file that looks like this:
<Placement>
<Place Parts_FeaturedProduct=''Content:1''/>
<Place Parts_FeaturedProduct_Edit=''Content:7.5''/>
</Placement>
Trying the module out in Orchard
Great! You have completed another stage of the development. Now its time to load the website up in the browser and
play with the new feature you just built.
1. Within Visual Studio, press Ctrl-F5 on your keyboard to start the website without debugging enabled (its
quicker and you can attach the debugger later if you need it).
2. Navigate to the admin dashboard.
3. Click Widgets in the side menu.
312
Chapter 3. Documentation
Read the Docs Template Documentation, Release 1.9.2
4. If you follow the guide correctly in part 1, you should see your Featured Product Widget in the list
under AsideFirst. Click on the word Featured Product (this may vary depending the title you entered
when you set the widget up):

1. The Edit Widget page will be displayed. Scroll down to the bottom to find the setting we added:

Tick the checkbox.
1. Click Save.
2. Navigate back to the homepage of the website by clicking on the site title in the top corner of the admin
dashboard:

You should now see your product is marked as being on sale:
Bonus Exercise: Go back into the admin dashboard, uncheck the setting, save and come back again to
see how the it no longer shows as being on sale.
Download the code for this lesson
You can download a copy of the module so far at this link:
• Download Orchard.LearnOrchard.FeaturedProduct-Part2-v1.0.zip
To use it in Orchard simply extract the archive into the modules directory at .\src\Orchard.Web\Modules\.
If you already have the module installed from a previous part then delete that folder first.
For Orchard to recognize it the folder name should match the name of the module. Make sure that
the folder name is Orchard.LearnOrchard.FeaturedProduct and then the modules files are
located directly under that.
Conclusion
This part of the course has expanded your knowledge to touch on some of the data storage and content management
features in Orchard.
3.9. Extending Orchard
313
Read the Docs Template Documentation, Release 1.9.2
You have added in the common module development classes that we didn’t cover in the first part. You’ve experienced
using the data migrations to incrementally update your data. You’ve also seen the basics of creating an admin interface
and using it to update the configuration settings of a widget.
You can now see the core process of adding a variable to your module and then implementing it, working successively
up the layers to surface it in the admin dashboard and the front-end view.
In the next part of the getting started with modules course we will look at working with content items at the code level.
Part 3 - Using the Orchard API
Introduction
This is part three of a four part course. It will get you started with a gentle introduction to extending Orchard at the
code level. You will build a very simple module which contains a widget that shows an imaginary featured product.
It will teach you some of the basic components of module development and also encourage you to use best-practices
when developing for Orchard.
If you haven’t read the previous parts of this course then you can go back to the overview to learn about the Getting
Started with Modules course.
Now that we have built the widget and expanded it to use database storage for it’s configuration we will turn to the
Orchard API to make some decisions via code.
Amending the widget through code
The second feature we have planned to add to the widget is some code that will detect when a user is viewing the
featured product page and then make some changes to the display.
At the moment the widget is displayed site-wide with a big green “Click here to view it” link. When the user is on the
product page it doesn’t make sense to show a link back to itself.
In the previous part we added a configurable item to the widget. The widget read that setting in and updated itself.
The same code is run no matter where you embed the widget.
This time, we will expand the widget so that it is aware of it’s surroundings. When the page loads and the widget is
asked to display, it will inspect the page as a whole, figure out what type of page it is on and then, if applicable, drill
down to see what specific product page it’s on.
This information will then be passed through to the view so that we can change the display on the fly.
Setting up a ContentType to work with
The admin dashboard is quite powerful. If you have been using Orchard for long you’ll likely have set up your own
content types within the Content Definition section of the admin dashboard.
This section allows you to combine pre-existing content parts together to form a custom content type that can be
displayed in your site.
314
Chapter 3. Documentation
Read the Docs Template Documentation, Release 1.9.2
It also has a section called Fields. When there isn’t a content part that quite fits your needs you can turn to the
Fields to add extra pieces of data to the content type on the fly.
We are going to quickly build a Product content type which has some of the common core content parts; a title, a
URL, a menu entry and some body text. We will also add in single text field called Product Id to detect which
particular product is being viewed:
1. Navigate to the admin dashboard of your site.
2. Click Content Definition in the menu down the side.
3. Click Create new type.
4. Enter Product for the Display Name. This should automatically fill out the Content Type Id field
for you. Make sure the Content Type Id is also set to Product:

1. Click Create.
2. In the Add Parts to "Product" section tick the following parts:
• Autoroute
• Body
• Menu
• Title
3. Click Save. You will be taken to the Edit Content Type page and you should see several messages from
the Orchard notifier system:

1. Scroll down to the Fields section and then click the Add Field button:

1. On the Add New Field To "Product" page fill the form out like this:
• Display Name: Product Id
• Technical Name: ProductId
• Field Type: Input Field
3.9. Extending Orchard
315
Read the Docs Template Documentation, Release 1.9.2
1. Click Save.
2. The main Edit Content Type page will reopen. Just for completeness lets configure the field so that it is
flagged as required. If you scroll to the Fields section you will see your new field is now listed. The small >
will expand out to show configuration properties for that field:
Click the > to expand the field configuration pane.
3. Tick the Required check box:
This will flag the field as requiring content when you create a new content item based off the Product content
type. Orchard will automatically handle the validation for you and show a notification if the requirement is not
met.
4. To demonstrate the power of the configurable fields in Orchard we will also add a Pattern constraint. The
ProductId should be in all caps, with only letters or numbers, no spaces or other punctuation.
To describe this pattern to the system we will use something called a regular expression (o
To meet the requirement described above the regex will be: `^[A-Z0-9]+$`
In the Pattern field enter the pattern `^[A-Z0-9]+$`.
1. Click Save.
In the next section we will create a demo product using this new content type.
Regular Expression breakdown: If you’re curious as to what different sections are in the regex we just
used, it breaks down into this:
• ^ means match the start of the string (nothing before it)
• [] means match the pattern of characters inside these brackets
• A-Z means match any character between uppercase A to uppercase Z
• 0-9 means match any character between 0 to 9
• + means match one or more repetitions of this character set. This means any combination of the letters and
numbers but there needs to be at least one.
• $ means match the end of the string (nothing after it)
Prepare a sample product
For this to work we need to create a dummy product that will act as the featured product:
1. Navigate to the admin dashboard of your site.
316
Chapter 3. Documentation
Read the Docs Template Documentation, Release 1.9.2
2. In the New section of the menu click Product:
3. Set the Title of the page to Sprocket 9000.
4. Leave the Permalink blank.
5. You can optionally add some content in to the Body section just for something to preview. Here is some Lorem
Ipsum sample data:
Curabitur non nulla sit amet nisl tempus convallis quis ac lectus. Nulla quis lorem ut libero malesuada feugiat.
Sed porttitor lectus nibh. Vestibulum ante ipsum primis in faucibus orci luctus et ultrices posuere cubilia Curae;
Donec velit neque, auctor sit amet aliquam vel, ullamcorper.
6. The Product Id is the custom field we created for the content type. Notice the red * which indicates a
required field. If you try to create the Product with a blank Product Id you will see a validation error:

If you try to enter an incorrect value that doesn't match the pattern we specified you will

Enter `SPROCKET9000` into the `Product Id`.
1. Tick the Show on a menu checkbox.
2. Leave the menu selection on Main Menu.
3. In the Menu text enter the product name, Sprocket 9000.
4. Click Publish Now.
The page will reload after Orchard has created the new content item in the background. You will see a green message
saying “Your Page has been created”:
If you navigate back to the front-end of the website you should see a new menu item called Sprocket 9000.
Clicking it will take you to the demo page you just created:
3.9. Extending Orchard
317
Read the Docs Template Documentation, Release 1.9.2
If the menu option doesn’t appear on the page you probably clicked Save instead of Publish. When we created the
content type is defaults to being marked as draftable. This means that you can save a copy in the system before it’s
made available publically. Until you click the Publish Now button it won’t show on the website.
That’s all the preparation we need to do before we can dive back into the code.
Bonus Exercise: Go back to the admin dashboard and add in another product. It’s not required but will
mean that you can demonstrate the code is correctly identifying the product id later on.
All of this could also have been done through code. We developed this content type via the admin dashboard to show
that it’s possible to work with content types via code whether created through classes in a module or in the admin
dashboard.
Bonus Exercise: Using the techniques learned in the first parts of this course, go back and create a clone
of the Product content type but create it through code. Name the new content type ProductViaCode
so that it doesn’t clash with the Product we have just created.
Hint: The creating types from code documentation should point you in the right direction if you get stuck.
Writing code against the Orchard API
At the moment the widget is displayed site-wide with a big green “Click here to view it” link. When the user is on the
featured product page it doesn’t make sense to show a link back to itself.
We’re going to use Orchard’s API so that when the widget is asked to display itself (in the driver) it will examine the
current page that’s being displayed (the content item), check if it’s on a product page (content type of Product) and
then check the product id of the product page to see if it’s the current featured product (the ProductId field contains
the product).
For the sake of visual comparison we will swap the green “Click here to view it” button out with a purple box that says
“Read more about it on this page”.
Expanding out the display shape lambda
So, based on this blueprint of our plans, how do we take the first step? The decision about what the module
should display when it’s asked to comes from the code within the driver class. The Display() method in the
FeaturedProductDriver.cs class currently looks like this:
protected override DriverResult Display(FeaturedProductPart part,
string displayType, dynamic shapeHelper) {
return ContentShape(``Parts_FeaturedProduct'',
318
Chapter 3. Documentation
Read the Docs Template Documentation, Release 1.9.2
() => shapeHelper.Parts_FeaturedProduct());
}
The shapeHelper takes a lambda as it’s parameter (() => shapeHelper.Parts_FeaturedProduct())
and because the code being run at the moment is just a single line statement it is using a short form version of it. To
give ourselves some room to code we can expand out the lambda so that it wraps the code in curly braces and returns
a shape at the end.
In the case of our current Display() method the code would go from this:
return ContentShape(``Parts_FeaturedProduct'',
() => shapeHelper.Parts_FeaturedProduct());
To this:
return ContentShape(``Parts_FeaturedProduct'', () => { // curly brace here
// extra space to write additional lines of code here
return shapeHelper.Parts_FeaturedProduct(); // return keyword and semicolon
}); // curly brace here
An alternative solution to expanding out this Display() method would have been to do our preparation at the start
of the method, something like this:
protected override DriverResult DisplayCat(FeaturedProductPart part,
string displayType, dynamic shapeHelper) {
// extra code here
return ContentShape(``Parts_FeaturedProduct'',
() => shapeHelper.Parts_FeaturedProduct());
}
What’s the difference and why is this a bad idea? The Display() method gets called to prepare the shapes each
time a visitor requests a page. With the modularity of the Orchard code you might still end up having something else
on the page influencing it’s display so that the shape doesn’t make it to the final output.
When the setup code is passed within the lambda it doesn’t get run until it’s actually needed. This means that if you
need to do some “expensive” setup code you don’t want to run it unless you’re sure it’s going to be used. In this
context expensive means heavy resource usage (it could require complicated database calls or data crunching) or time
consuming (you might rely on calling a 3rd party web service to get some information).
You don’t want to waste your resources and slow down the page being displayed by running unnecessary setup code
so that’s why you should use the first solution above. It keeps all the setup code inside the curly braces of the lambda
and only runs it when the shape is actually being displayed.
Let’s implement what we have discussed so far:
1. Open up the FeaturedProductDriver.cs file located in the .\Drivers\ folder.
2. Replace the Display() method with the following:
protected override DriverResult Display(FeaturedProductPart part, string displayType, dynamic shapeHelper) {
return ContentShape(“Parts_FeaturedProduct”, () => { // extra space to write additional lines of code here return
shapeHelper.Parts_FeaturedProduct(); }); }
Getting the current ContentItem being displayed
Getting the current ContentItem from within the widget driver means using some of the built-in Orchard classes.
To look up the ContentItem we need to get the Id of the content out of the ASP.NET MVC route data, then convert
this into a content item by requesting it via the content manager.
3.9. Extending Orchard
319
Read the Docs Template Documentation, Release 1.9.2
We could add a public property to the driver which looked like this:
private IContent _currentContent = null;
private IContent CurrentContent {
get {
if (_currentContent == null) {
var itemRoute = _aliasService.Get(_workContextAccessor.GetContext()
.HttpContext.Request.AppRelativeCurrentExecutionFilePath
.Substring(1).Trim(`/'));
_currentContent = _contentManager.Get(Convert.ToInt32(itemRoute[''Id'']));
}
return _currentContent;
}
}
But where do all of these supporting classes like _aliasService and _contentManager come from?
Dependency injection in Orchard
The modular design of Orchard means that each feature of Orchard tries to be as independent as it can. This means
that when the Widget is building it’s shape it doesn’t automatically know about the wider context of the page being
requested. It is a specialized unit of code which completes it’s task as efficiently and simply as possible.
When it’s required, the module can request access to parts of the larger Orchard system through the use of Orchard’s
service classes.
Orchard provides service classes that allow you to leverage Orchard features at the code level. When you need to do
things like pulling content out of the content manager, displaying notifications, logging or working with the URL, you
can turn to these services classes.
These classes are grouped together by a common inheritance; they implement IDependency. When you need one
of them you simply need to add it to your constructor and an instance will be injected into your class at run-time.
This is called dependency injection. You can get many frameworks that will enable this but in Orchard the service is
provided by Autofac.
Each of these support classes specialize in providing a single feature. This means you only open communication
channels to the main system for the parts which you actually need, keeping the system decoupled.
Constructor injection
When you want to get access to one of Orchard’s service classes you need to add a reference to the class to the default
constructor. However, instead of requesting the class directly you will always work with the interface that the service
you want implements.
The advantage of dependency injection is that you don’t depend on concrete implementations (the actual class). Working with an interface means that you or a module can swap out the implementation of a specific class if it needs to.
By always working with an interface instead of the actual service it means you don’t need to know which particular
implementation you are working with, preventing you from being tied to it.
So if you wanted a copy of the content manager then you would request IContentManager contentManager
in your constructor.
The standard process for incorporating a new service into the class is as follows (you don’t need to do this now):
320
Chapter 3. Documentation
Read the Docs Template Documentation, Release 1.9.2
1. Create a new private, read only variable to hold the injected class. It should start with an underscore like
_contentManager.
2. Update the default constructor to include the service as a parameter.
3. Assign the injected class to the private variable for later use.
We will use this three step theory in the next section.
Implementing CurrentContent
Based on the service requirements in our demo implementation above of the CurrentContent property we know
that we will need IContentManager, IWorkContextAccessor, IAliasService to turn the route data into
an instance of the current ContentItem.
Taking what we have learned about dependency injection and knowing our service requirements we can now implement the next stage of the FeaturedProductDriver class:
1. Open up the FeaturedProductDriver.cs file located in the .\Drivers\ folder.
2. Add the following properties to the top of the FeaturedProductDriver class:
private readonly IContentManager _contentManager; private readonly IWorkContextAccessor _workContextAccessor; private readonly IAliasService _aliasService;
`IAliasService` will need it's namespace but when you try to add it via `Ctrl-.` you will s
We need to add a reference and update the dependencies of our module.
1. Right click on the References entry in the module’s project within the Solution Explorer window and choose Add Reference....
2. Click the Projects tab on the left. Orchard.Alias should already be visible. Hover your mouse over it
and a checkbox will appear. Click the checkbox for Orchard.Alias. Click OK.
3.9. Extending Orchard
321
Read the Docs Template Documentation, Release 1.9.2
3. Now we have to update our dependencies straight away so they don’t get forgotten. Open up the Module.txt
file located in the project root.
4. The last line of the file should contain the Orchard.Widgets dependency that we created in part one. This
field will take a comma separated list detailing each dependency a modules has.
Update the line to add `Orchard.Alias`, ensuring that the line keeps it's indentation, so t
Dependencies: Orchard.Widgets, Orchard.Alias
1. Go back to the FeaturedProductDriver.cs file. You can now add the missing namespace via Ctrl-..
2. Below the private properties, add in a default constructor:
public FeaturedProductDriver(IContentManager contentManager, IWorkContextAccessor workContextAccessor, IAliasService aliasService) { _contentManager = contentManager; _workContextAccessor = workContextAccessor; _aliasService = aliasService; }
You can see that we are following the standard pattern of defining a private property, adding an instance to the
constructor parameters and then assigning the injected class to the private variable.
3. The Driver now has all of the requirements implemented to support the CurrentContent property.
Add this code in between the first batch of private properties and the constructor:
private IContent _currentContent = null;
private IContent CurrentContent {
get {
if (_currentContent == null) {
var itemRoute = _aliasService.Get(_workContextAccessor.GetContext()
.HttpContext.Request.AppRelativeCurrentExecutionFilePath
.Substring(1).Trim(`/'));
322
Chapter 3. Documentation
Read the Docs Template Documentation, Release 1.9.2
_currentContent = _contentManager.Get(Convert.ToInt32(itemRoute[''Id'']));
}
return _currentContent;
}
}
1. If you have cleaned up your using statements then you might need to add a namespace using Ctrl-. for the
Convert.ToInt32().
The complete FeaturedProductDriver.cs should now look like this:
using
using
using
using
using
System;
Orchard.Alias;
Orchard.ContentManagement;
Orchard.ContentManagement.Drivers;
Orchard.LearnOrchard.FeaturedProduct.Models;
namespace Orchard.LearnOrchard.FeaturedProduct.Drivers {
public class FeaturedProductDriver : ContentPartDriver<FeaturedProductPart>{
private readonly IContentManager _contentManager;
private readonly IWorkContextAccessor _workContextAccessor;
private readonly IAliasService _aliasService;
private IContent _currentContent = null;
private IContent CurrentContent {
get {
if (_currentContent == null) {
var itemRoute = _aliasService.Get(_workContextAccessor.GetContext()
.HttpContext.Request.AppRelativeCurrentExecutionFilePath
.Substring(1).Trim(`/'));
_currentContent = _contentManager.Get(
Convert.ToInt32(itemRoute[''Id'']));
}
return _currentContent;
}
}
public FeaturedProductDriver(IContentManager contentManager,
IWorkContextAccessor workContextAccessor,
IAliasService aliasService) {
_contentManager = contentManager;
_workContextAccessor = workContextAccessor;
_aliasService = aliasService;
}
protected override DriverResult Display(FeaturedProductPart part,
string displayType, dynamic shapeHelper) {
return ContentShape(``Parts_FeaturedProduct'', () => {
// extra space to write additional lines of code here
return shapeHelper.Parts_FeaturedProduct();
});
}
protected override DriverResult Editor(FeaturedProductPart part,
3.9. Extending Orchard
323
Read the Docs Template Documentation, Release 1.9.2
dynamic shapeHelper) {
return ContentShape(``Parts_FeaturedProduct_Edit'',
() => shapeHelper.EditorTemplate(
TemplateName: ``Parts/FeaturedProduct'',
Model: part,
Prefix: Prefix));
}
protected override DriverResult Editor(FeaturedProductPart part,
IUpdateModel updater, dynamic shapeHelper) {
updater.TryUpdateModel(part, Prefix, null, null);
return Editor(part, shapeHelper);
}
}
}
Passing data to the view
We have already passed data to the view in previous parts but we didn’t stop to examine it in detail:
return ContentShape(``Parts_FeaturedProduct_Edit'',
() => shapeHelper.EditorTemplate(
TemplateName: ``Parts/FeaturedProduct'',
Model: part,
Prefix: Prefix));
These parameters are dynamic which means you can add any parameter you want. This means that we could update
the Display() method to pass through a value by changing the code to:
shapeHelper.Parts_FeaturedProduct(FavoriteColor: ``Green'');
The view would then be able to use this by using @Model.FavoriteColor.
We want to implement some logic into the Display() method which will result in answering the question
IsOnFeaturedProductPage so that this can be passed through to the view.
We will do this by declaring bool isOnFeaturedProductPage = false; at the top of the method. It will
be given a default value of false to start with. Then throughout the next few sections we will perform tests to see if
it is in fact true.
Modify the first Display() method by following these steps:
1. Open up the FeaturedProductDriver.cs file located in the .\Drivers\ folder.
2. Locate the Display() method and replace it with the following:
protected override DriverResult Display(FeaturedProductPart part, string displayType, dynamic shapeHelper)
{ return ContentShape(“Parts_FeaturedProduct”, () => { bool isOnFeaturedProductPage = false; // detecting
current product code will go here return shapeHelper.Parts_FeaturedProduct( IsOnFeaturedProductPage: isOnFeaturedProductPage); }); }
This has laid the groundwork for us. The next piece of code will detect the content type, read the product id and update
isOnFeaturedProductPage if required.
Detecting the content type
The CurrentContent property that we implemented doesn’t exactly return the current content item, it returns an
IContent. This contains a property called ContentItem which then gives us access to everything related to the
324
Chapter 3. Documentation
Read the Docs Template Documentation, Release 1.9.2
current content item.
You can explore the ContentItem class by navigating around the IntelliSense, or by navigating to the class itself
with F12. There are lots of interesting properties to use.
The content type is stored as a string inside a ContentTypeDefinition property called TypeDefinition.
You can get to it using this notation:
var itemTypeName = CurrentContent.ContentItem.TypeDefinition.Name;
The itemTypeName variable will then contain a string version of the content type. The Product content type was
created via the admin dashboard. This means that there isn’t a concrete class for us to use in a typeof(T).Name
call so we will have to work with the string "Product" when we’re checking the type of the current content item.
Putting the code together is just a case of a standard .NET string comparison:
1. Open up the FeaturedProductDriver.cs file located in the .\Drivers\ folder.
2. Locate the Display() method and replace it with the following:
protected override DriverResult Display(FeaturedProductPart part, string displayType, dynamic shapeHelper)
{ return ContentShape(“Parts_FeaturedProduct”, () => { bool isOnFeaturedProductPage = false; // new code
if(CurrentContent != null) { var itemTypeName = CurrentContent.ContentItem.TypeDefinition.Name; if (itemTypeName.Equals(“Product”, StringComparison.InvariantCultureIgnoreCase)) { // final product id check will
go here }} // end of new code return shapeHelper.Parts_FeaturedProduct( IsOnFeaturedProductPage: isOnFeaturedProductPage); }); }
You don’t need to include the comments in your module, they are just for guidance.
Using fields
Fields are a great way to quickly surface data. We added one to our Product content type in the admin dashboard
in just a minute or two. We didn’t need write a ContentPart or work with Visual Studio at all. When creating
websites in Orchard you will find plenty of occasions where using a field is appropriate.
If you look in forums and chat rooms you will find that they’ve been known to confuse first time users.
It’s not that they are complicated to use, far from it. It’s just that the correct way to access them isn’t discoverable
through IntelliSense so developers hit a brick wall.
We are going to cover the two important things you need to learn about fields so that you find them just as easy to
work with in code as you have done in the admin dashboard.
The first important thing to understand is: Fields are always in a ContentPart.
To be fair, it looked like you had just created the field loose in the content type:
But in truth, Orchard created an invisible ContentPart for you and attached those fields to that. The name of that
content part is the name of the content type. So for our Product content type, the content part would be Product.
For a HtmlWidget it would be HtmlWidget, if you added a field to the Page you would access it with Page.
So the way to access our ProductId field which is on the ContentType of Product we would write:
3.9. Extending Orchard
325
Read the Docs Template Documentation, Release 1.9.2
var productId = CurrentContent.ContentItem.Product.ProductId.Value;
Where did the .Value come from? Well, your field is not just a simple string. You defined it as a "Text Field"
when you filled out the form. This maps to the Orchard.Fields.Fields.InputField class and you can
access it’s data through the .Value property.
As you build up your skills as an Orchard module developer one of the important ones will be digging
through the code to discover this sort of thing for yourself. As I was writing this I didn’t know what the
class was called. To find it out I put a breakpoint on the line of code, started a debug session and inspected
the field to see what class it was and how to get at it’s data.
This is a useful skill to have in your repertoire when working with Orchard but in this case you also have a
useful resource that has been put together by Sebastien Ros. He has created an Orchard Cheatsheet which
covers common properties that you might want to access on each of the built-in Orchard content fields.
The second important thing to understand with accessing fields is that if you tried that line above you wouldn’t get
very far, and this is the reason why new developers have had so much trouble with it. The fields are injected into the
class at run-time using .NET dynamic features.
This means you don’t get IntelliSense for dynamic properties. It also means that unless the class is marked
as dynamic the code won’t compile. So before you can use code to access your field you need to cast your
ContentItem to dynamic:
var dynamicContentItem = (dynamic)CurrentContent.ContentItem;
var itemProductId = dynamicContentItem.Product.ProductId.Value;
Once you have the product id in a string it’s just a case of comparing it against the known value and setting
isOnFeaturedProductPage = true if it’s a match:
1. Open up the FeaturedProductDriver.cs file located in the .\Drivers\ folder.
2. Locate the Display() method and replace it with the following:
protected override DriverResult Display(FeaturedProductPart part, string displayType, dynamic shapeHelper)
{ return ContentShape(“Parts_FeaturedProduct”, () => { bool isOnFeaturedProductPage = false; var itemTypeName = CurrentContent.ContentItem.TypeDefinition.Name; if (itemTypeName.Equals(“Product”,
StringComparison.InvariantCultureIgnoreCase)) { // new code var dynamicContentItem = (dynamic)CurrentContent.ContentItem; var itemProductId = dynamicContentItem.Product.ProductId.Value;
if(itemProductId.Equals(“SPROCKET9000”, StringComparison.InvariantCulture)) { isOnFeaturedProductPage = true; } // end of new code } return shapeHelper.Parts_FeaturedProduct( IsOnFeaturedProductPage:
isOnFeaturedProductPage); }); }
That’s all the code that’s needed to detect the page content type and check the product id field.
You might have noticed that this time around we just used StringComparison.InvariantCulture. This is
because we have already enforced uppercase so we can be sure that the case doesn’t conflict with the test value.
Now that we have completed the code to identify the current page and passed that through to the shape it will be
accessible in the view as @model.IsOnFeaturedProductPage.
In the last section of this lesson we will update the view to make use of this information.
Updating the view
Once you have done the work in the driver it’s simple for you to make decisions based on the value passed to the
model. In part two we looked at using conditionals and reading values from the Model.
Now we are going to re-use these skills:
1. Open up the view file located at .\Views\Parts\FeaturedProduct.cshtml
326
Chapter 3. Documentation
Read the Docs Template Documentation, Release 1.9.2
2. Copy this CSS snippet into the <style> block at the top of the view:
.box-purple { padding: 1em; text-align: center; color: #fff; background-color: #7b4f9d; font-size: 2em; display:
block; }
3. Find this line of markup (it should be the last line in the view):
And replace it with:
@if (!Model.IsOnFeaturedProductPage) {
Click here to view it.
} else { Read more about it on this page. }
4. Save and close the file.
For reference, your complete FeaturedProductDriver.cs class should now look like this:
using
using
using
using
using
System;
Orchard.Alias;
Orchard.ContentManagement;
Orchard.ContentManagement.Drivers;
Orchard.LearnOrchard.FeaturedProduct.Models;
namespace Orchard.LearnOrchard.FeaturedProduct.Drivers {
public class FeaturedProductDriver : ContentPartDriver<FeaturedProductPart> {
private readonly IContentManager _contentManager;
private readonly IWorkContextAccessor _workContextAccessor;
private readonly IAliasService _aliasService;
private IContent _currentContent = null;
private IContent CurrentContent {
get {
if (_currentContent == null) {
var itemRoute =
_aliasService.Get_workContextAccessor.GetContext()
.HttpContext.Request.AppRelativeCurrentExecutionFilePath
.Substring(1).Trim(`/'));
_currentContent = _contentManager.Get(
Convert.ToInt32(itemRoute[''Id'']));
}
return _currentContent;
}
}
public FeaturedProductDriver(IContentManager contentManager,
IWorkContextAccessor workContextAccessor, IAliasService aliasService) {
_contentManager = contentManager;
_workContextAccessor = workContextAccessor;
_aliasService = aliasService;
}
protected override DriverResult Display(FeaturedProductPart part,
string displayType, dynamic shapeHelper) {
return ContentShape(``Parts_FeaturedProduct'', () => {
bool isOnFeaturedProductPage = false;
3.9. Extending Orchard
327
Read the Docs Template Documentation, Release 1.9.2
if (CurrentContent != null) {
var itemTypeName =
CurrentContent.ContentItem.TypeDefinition.Name;
if (itemTypeName.Equals(``Product'',
StringComparison.InvariantCultureIgnoreCase)) {
var dynamicContentItem =
(dynamic)CurrentContent.ContentItem;
var itemProductId =
dynamicContentItem.Product.ProductId.Value;
if (itemProductId.Equals(``SPROCKET9000'',
StringComparison.InvariantCulture)) {
isOnFeaturedProductPage = true;
}
}
}
return shapeHelper.Parts_FeaturedProduct(
IsOnFeaturedProductPage: isOnFeaturedProductPage);
});
}
protected override DriverResult Editor(FeaturedProductPart part,
dynamic shapeHelper) {
return ContentShape(``Parts_FeaturedProduct_Edit'',
() => shapeHelper.EditorTemplate(
TemplateName: ``Parts/FeaturedProduct'',
Model: part,
Prefix: Prefix));
}
protected override DriverResult Editor(FeaturedProductPart part,
IUpdateModel updater, dynamic shapeHelper) {
updater.TryUpdateModel(part, Prefix, null, null);
return Editor(part, shapeHelper);
}
}
}
Trying the module out in Orchard
This is the part where it all pays off. If you run Orchard in the browser you will see the updates we have been working
on in action:
1. Within Visual Studio, press Ctrl-F5 on your keyboard to start the website without debugging enabled (it’s
quicker and you can attach the debugger later if you need it).
2. You will start off on the homepage. The widget should look the same as it did at the end of part two:

1. Click on the Sprocket 9000 menu item to go to your product page. You should see a purple notification box
instead of a link:
328
Chapter 3. Documentation
Read the Docs Template Documentation, Release 1.9.2

1. If you followed the Bonus Exercise section and created additional demo product pages you can also navigate to
those and you will see the same view as the homepage:

This is because it matches the content type but not the product id.
Download the code for this lesson
You can download a copy of the module so far at this link:
• Download Orchard.LearnOrchard.FeaturedProduct-Part3-v1.0.zip
To use it in Orchard simply extract the archive into the modules directory at .\src\Orchard.Web\Modules\.
If you already have the module installed from a previous part then delete that folder first.
For Orchard to recognize it the folder name should match the name of the module. Make sure that
the folder name is Orchard.LearnOrchard.FeaturedProduct and then the modules files are
located directly under that.
Conclusion
In this part we have learned valuable skills that will allow us to create content types in the admin dashboard and
add fields to them. We have learned about dependency injection, how to request access to Orchard’s various service
classes, how to examine the current content item and make decisions based on it. Finally we looked at how we can
create and surface custom information from the code of the module up to the view.
In the next and final part of this getting started with modules course we will refine the existing module and apply some
development best-practices that haven’t been covered yet.
Part 4 - Applying Best Practices
Introduction
This is part four of a four part course. It will get you started with a gentle introduction to extending Orchard at the
code level. You will build a very simple module which contains a widget that shows an imaginary featured product.
It will teach you some of the basic components of module development and also encourage you to use best-practices
when developing for Orchard.
If you haven’t read the previous parts of this course then you can go back to the overview to learn about the Getting
Started with Modules course.
This final part will look at applying some best practices to improve the quality of the module’s codebase.
What’s left to do
So far in the course we have covered a pretty impressive list of topics. You might be tempted to think that the items in
this last part are extras but just because we saved them until last doesn’t mean they aren’t important.
In fact, the only reason these weren’t covered earlier was because they aren’t essential to being able to load up the
module in Orchard and there was already plenty to discuss. Your module is not really complete though until you’ve
incorporated these techniques into your development process.
3.9. Extending Orchard
329
Read the Docs Template Documentation, Release 1.9.2
The topics in this article will help you add polish to your module and if you’re going to release them to the public it
will mean the difference between a beginners module and a professional module.
Customize the manifest file
Starting with an easy one, the module.txt is a text file you will find in the root of your module folder. We have
already looked at this file briefly in this course each time we have added dependencies. When Orchard is scanning the
folders looking for modules to load it will parse this file to get information about it.
The module.txt is a manifest file. Technically, the document is in YAML format. If you open it now you will see
the following:
Name: Orchard.LearnOrchard.FeaturedProduct
AntiForgery: enabled
Author: The Orchard Team
Website: http://orchardproject.net
Version: 1.0
OrchardVersion: 1.0
Description: Description for the module
Features:
Orchard.LearnOrchard.FeaturedProduct:
Description: Description for feature Orchard.LearnOrchard.FeaturedProduct.
The Name field at the top is a friendly text name that’s displayed to the user. For example the Name field for the
module in the screenshot below reads Dynamic Forms Validation Activities:
AntiForgery enables the XSS injection protection so you should have this set to enabled unless you have a
specific reason to manage this yourself.
The file format is quite straightforward. The fields mean what you would expect them to mean.
Version is the version of the module.
OrchardVersion is the version of Orchard that this module was written against.
Features is the only complicated one. We didn’t look at it in this course, but you can include several features within
a single module. This means you can enable or disable individual parts of the module. The description field and
features section work together and can be displayed in several different formats.
For a detailed explanation of the Features section and the other fields read the manifest files guide.
Time to make some changes:
1. Open module.txt.
2. Edit the module.txt to your liking while staying within the spec. Go ahead and put your name and details
into it. It feels good to see your name in lights!
3. Save the file.
You will probably need to restart the development server before Orchard picks up the changes you’ve made to your
module.txt.
330
Chapter 3. Documentation
Read the Docs Template Documentation, Release 1.9.2
Categorize your module
While we are working with the manifest file, there is one field which is very useful but not included by default in the
module.txt. The field is called Category:.
If you omit this field then the module defaults to the Uncategorized grouping:
When developing your own modules you should first check the Modules section of the admin dashboard to see if
your module would sit well in one of the existing common categories.
It’s better to group your module with other modules where possible so that users can find related modules easily.
In this case we will make our own category, “Learn Orchard”, which is the category used for all demo modules on this
site:
1. Open module.txt.
2. Add the following line to the file:
Category: Learn Orchard
It doesn’t matter where you put it in this case because we are only defining a single feature. In the future if your
module supports multiple features then you should add in the relevant category to each feature.
3. Save the file.
You will probably need to restart the development server before Orchard picks up the changes you’ve made to your
module.txt.
Localize all of your text
Orchard has great support for writing global aware, localized websites. Administrators can add cultures to their site
for a wide variety of different languages.
This means that as a module developer you can’t know ahead of time what language your module will be used in.
Orchard makes it possible for you to support this scenario by wrapping all of your text in a T() method.
Every string that you display in Orchard should be passed through the T() method.
When you are working with Razor views the T() is automatically available. So, for example, this snippet from the
FeaturedProduct.cshtml view would change from:
<p class=''sale-red''>ON SALE!</p>
Over to:
<p class=''sale-red''>@T(``ON SALE!'')</p>
If you need to inject variables into the string then you should use String.Format() style formatting. Don’t try to
concatenate them. For example, if you had a snippet that looked like this:
<p>Today's featured product is the @Model.ProductName.</p>
3.9. Extending Orchard
331
Read the Docs Template Documentation, Release 1.9.2
The correct way to format this would be:
<p>@T(``Today's featured product is the {0}.'', @Model.ProductName)</p>
Don’t use concatenation because the position of the variable might change in different translations.
This is BAD:
<p>@T("You have ") + @Model.SmsCredits + @T(" credits left.")</p>
This is GOOD:
<p>@T("You have {0} credits left.", @Model.SmsCredits)</p>
Let’s update the front end view so that it follows the correct localized development best practices:
1. Open .\Views\Parts\FeaturedProduct.cshtml
2. Wrap each of the four blocks of text in their own @T() calls:
@if (Model.ContentPart.IsOnSale) { @T(“ON SALE!”) }
In the model class we used the [DisplayName] attribute on the IsOnSale property. The [DisplayName] is
an ASP.NET MVC attribute which allows you to automatically inject a descriptive label into your UI.
Unfortunately Orchard’s localization system doesn’t intercept this information so when creating localized labels we
need to pass the display name in each time.
There is a pull request currently being discussed for this issue which will hopefully bring in a
[LocalizedDisplayName()] attribute that will solve this issue.
To localize the label with our [DisplayName] text we need to pass an extra parameter in to the
@Html.LabelFor() so. This would look something like this:
@Html.LabelFor(model => model.IsOnSale, T(``Is the featured product on sale?''))
However, this kind of duplication of the text is not a best practice. Instead there is a way to pull the [DisplayName]
attribute text in and pass it through the T() and into the LabelFor():
1. Open .\Views\EditorTemplates\Parts\FeaturedProduct.cshtml
2. Find the call to LabelFor:
@Html.LabelFor(model => model.IsOnSale)
And replace it with:
@Html.LabelFor(model
=>
model.IsOnSale).ToHtmlString()))
model.IsOnSale,
T(Html.DisplayNameFor(model
=>
Localization is an important topic in Orchard. Read the using the localization helpers and the creating global ready
applications guides for more detailed information about supporting this feature.
Your styles shouldn’t be inline
Hopefully this one should have raised some alarm bells as you were doing this - having a <style> tag in the view is
not a good HTML practice. You should always put your CSS into an external .css file. This allows the browser to
download the file once for each the sites and keep it cached for subsequent requests.
However, just putting the styles into an external file is not the whole story with Orchard. It provides two techniques to
help you include scripts and styles within your view.
The quick fix for this is to move the CSS into a .css file and then use Script.Require("filename.css")
to include it:
332
Chapter 3. Documentation
Read the Docs Template Documentation, Release 1.9.2
1. In the Solution Explorer, right click on the Styles folder within the module.
2. Choose Add, New Item... from the context menu.
3. Select Visual C# then Web from the categories down the left hand side.
4. Find Style Sheet in the list and give it a Name: of FeaturedProduct.css.
5. Click Add.
6. Open .\Views\Parts\FeaturedProduct.cshtml.
7. Copy the css content from within the <style> tag (don’t include the <style> tag itself) and drop it into the
FeaturedProduct.css style sheet.
8. Go back to FeaturedProduct.cshtml and replace the now empty <style></style> with this code:
@{ Style.Include(“FeaturedProduct.css”); }
If you don’t specify a folder then Orchard will automatically check the .\Styles folder first.
This is a quick solution but not a best practice solution so let’s improve it a bit further. The problem with
Style.Include() is that it blindly includes the file whenever requested. Orchard supports something called a
ResourceManifest class which can help you manage your external resources in a more intelligent way.
Using the resource manifest class you can assign extra information to your CSS files. This could be alternative URLs
to use for debug / live, content delivery networks, setting the version of the script or setting dependencies on other
other resources that have been added.
I have used the word resources so far when describing this feature. This is because you can use it for managing both
scripts and style sheets.
Each resource is assigned a plain text name. This can then be used in the view and it can also be used if another
resource needs to depend on it.
This class is normally found in the ResourceManifest.cs file in the root of your module folder but as long as
your class implements the IResourceManifestProvider interface then Orchard will pick it up.
The example code below is a shortened version of the Orchard.Layouts ResourceManifest.cs file:
using Orchard.UI.Resources;
namespace Orchard.Layouts {
public class ResourceManifest : IResourceManifestProvider {
public void BuildManifests(ResourceManifestBuilder builder) {
var manifest = builder.Add();
manifest.DefineScript(``Layouts.Lib'')
.SetUrl(``Lib.min.js'', ``Lib.js'')
.SetDependencies(``jQuery'');
manifest.DefineScript(``Layouts.Models'')
.SetUrl(``Models.min.js'', ``Models.js'')
.SetDependencies(``jQuery'', ``Layouts.Lib'');
}
}
}
You can see that a few of the features of the resource manifest are being used here. The first script, called
Layouts.Lib uses SetUrl() to set up minified (live) and unminified (debug) filenames for the resource.
It also sets a dependency on a resource called jQuery. This is a common feature that you will see throughout
many Orchard modules. The jQuery resource comes from the Orchard.jQuery module. If you looked in the
Orchard.Layouts module.txt then you would find that it specifies a dependency on the Orchard.jQuery
module.
3.9. Extending Orchard
333
Read the Docs Template Documentation, Release 1.9.2
This kind of external dependency shows off some more of the resource manager features:
1. You can share the resource strings between different modules so that dependencies for common scripts can be
centrally managed.
2. If you look in the views of the Orchard.Layouts module you won’t find any includes for the jQuery script.
When the Layouts.Lib resource sets a dependency on the jQuery resource Orchard automatically knows
to generate a jQuery script tag before the Layouts.Lib script tag.
So you will find some code like Script.Require("Layouts.Lib").AtFoot(); in the view but
Script.Require("jQuery").AtFoot(); isn’t needed.
3. You will also just find jQuery included just once, no matter how many modules have requested the script.
This is because Orchard recognizes the resource. It pools the requests together and knows how to order the
scripts correctly.
The second DefineScript in the example above is included just to show that you can include multiple dependencies
in your SetDependencies() call.
Now that its clear what service the resource manifest provides, let’s upgrade the module to use this feature of Orchard:
1. In the Solution Explorer, right click on the module’s project name.
2. Select Add, New Item... and add a class called ResourceManifest.cs.
3. Add the IResourceManifestProvider interface to the ResourceManfiest class:
public class ResourceManifest : IResourceManifestProvider { }
4. Use the Ctrl-. technique to add the using Orchard.UI.Resources; namespace.
5. You will now notice that the IResourceManifestProvider still has its red squiggles underneath it:
Use the Ctrl-. technique a second time to implement the interface. Choose the first option, Implement
interface.
6. Remove the throw new NotImplementedException(); line of code.
7. In it’s space add in the following code:
var manifest = builder.Add(); manifest.DefineStyle(“FeaturedProduct”).SetUrl(“FeaturedProduct.css”);
Orchard knows to automatically check the .\Styles\ folder for this style sheet.
The name we assign in the DefineStyle() call is how we can reference this in the view.
8. Open up the front-end view located in .\Views\Parts\FeaturedProduct.cshtml
9. Replace the Style.Include() call, which is used to directly reference style sheets, with a
Style.Require() call. This is used to refer to resources defined in resource manifest files:
334
Chapter 3. Documentation
Read the Docs Template Documentation, Release 1.9.2
@{ Style.Require(“FeaturedProduct”); }
Don't forget that the resource doesn't need the `.css` extension on the end.
If you run the module in Orchard now then it will look the same as it did before. While this is a simplistic application
of a best practice, I think that from the explanation of it you will see how valuable it will be in more complex modules.
Orchard also has an assets pipeline feature. This feature can help build your resources into the final files to be included
by Orchard in the resource manifest. For example, you might want to combine the scripts into a single file or minify
your style sheets. If you look in your project you will see a file called Assets.json which drives this feature.
Don’t tie your CSS classes to the visuals
The CSS classes used throughout the module so far have been intentionally terrible. The reason for this was to highlight
the fact that you shouldn’t tie the class names to the visuals of the class.
When your module is out there in the wild it will be used by many different themes which will all provide their own
color schemes and styles.
If somebody took our module and wanted to make the On Sale! label yellow, the class name of sale-red would
not make sense.
Instead you should describe the functionality that the class is styling.
Let’s take a look at the class names we have used so far and improve them based on this best practice:
Current class name | Improved class name ——————— | —————- .btn-green | .btn-featuredproduct .sale-red
| .label-onsale .box-purple | .box-moreinfoavailable
You might have your own ideas for some improved class names. As long as they don’t tie your functionality to a
specific visual style you can use whatever you think is best.
This is actually a best practice for all of your style sheets. Over time your website projects will be refined and even
redesigned. You shouldn’t tie your classes to the visual designs in any area of your project.
Apply these changes to the module:
1. Open the .\Styles\FeaturedProduct.css file.
2. Change .btn-green to .btn-featuredproduct
3. Change .sale-red to .label-onsale
4. Change .box-purple to .box-moreinfoavailable
5. Open the front-end view at .\Views\Parts\FeaturedProduct.cshtml
6. Update the view to reflect the new class names:
@{ Style.Require(“FeaturedProduct”); } @if (Model.ContentPart.IsOnSale) { @T(“ON SALE!”) }
Use services instead of making a mess in your driver
In part three of this course we spent our time making a complete mess of the driver class.
We took a nice clean driver class that wires data to the view via shapes and added on many modifications. We added
dependencies, then we built private variables into it, finally we wrote lines of business logic into the shape factory
lambda, diluting its focus.
The modifications we made are also tied directly to that driver class. It’s entirely plausible that you might want to
extend the module and need to reuse that information.
3.9. Extending Orchard
335
Read the Docs Template Documentation, Release 1.9.2
The Orchard.Layouts module (which is used to manage the contents of pages within Orchard) has the concept
of building Elements. They are like widgets that you can place on to the layout Canvas. If you wrote a custom
element for this module then it would need to duplicate the code we wrote in widget driver class. This code should
live in a central location.
We have already used a built-in version of the solution to this problem; the Orchard services, such as
IContentManager. These services are used throughout Orchard so that they can share their functionality. Each of
the services implements IDependency to share this access.
In exactly the same way that we used dependency injection to request access to various Orchard services, we can write
our own IDependency and let the driver ask for this.
By writing our own service we will wrap up all the driver modifications into its own class and then supply a single
method which can answer the question for the driver: “Is the current page the featured item page?”
The first step to creating your own service is to write an interface for the class. The second step is to write a concrete
class which implements that interface. Then we move the code from the driver to the concrete class. Then we request
the service in the driver and use its functionality.
The way dependency injection works is that you request an interface to be injected and based on the configuration
values of the system your request is resolved to the best matching concrete class.
In our case there will be only one concrete class so it will be a simple decision but this highlights again the extensibility
of the Orchard architecture. There is nothing stopping a developer coming along and writing their own version of a
particular service and configuring the dependency injection framework to use theirs instead. When you only work
with the interface it doesn’t matter to you which underlying class is provided.
Let’s upgrade the module to use our own service:
1. In the Solution Explorer, right click on the module’s project name.
2. Select Add, New Folder and name it Services
3. Right click the Services folder, select Add, New Item....
4. Select the Interface item template, name it IFeaturedProductService and click Add
5. The interface should be public so add that keyword to the start of the interface declaration. It should also
implement the IDependency interface:
public interface IFeaturedProductService : IDependency {
6. The purpose of the service is to answer a single question, so add a method declaration to the interface called
IsOnFeaturedProductPage which returns bool. You don’t need to specify the public modifier when
working with an interface:
public interface IFeaturedProductService : IDependency { bool IsOnFeaturedProductPage(); }
7. Add a class to the services folder called FeaturedProductService. This will be the concrete implementation that we place the actual code into.
8. Add the IFeaturedProductService interface to the class:
public class FeaturedProductService : IFeaturedProductService {
9. Implement its interface using the Ctrl-. technique.
10. Now its time to start moving the code over. Open up the FeaturedProductDriver.cs file that’s in the
.\Drivers\ folder. Review the code and start thinking about what could be moved out into the service class.
11. The CurrentContent property is only used for calculating the IsOnFeaturedProductPage value.
The three private variables which hold references to Orchard services are only used by the CurrentContent
property. This means everything from the start of the class through to the end of the constructor can be moved
over.
336
Chapter 3. Documentation
Read the Docs Template Documentation, Release 1.9.2
12. Cut the following code from the driver and paste it into the service class:
private readonly IContentManager _contentManager;
private readonly IWorkContextAccessor _workContextAccessor;
private readonly IAliasService _aliasService;
private IContent _currentContent = null;
private IContent CurrentContent {
get {
if (_currentContent == null) {
var itemRoute = _aliasService.Get(_workContextAccessor.GetContext()
.HttpContext.Request.AppRelativeCurrentExecutionFilePath
.Substring(1).Trim(`/'));
_currentContent = _contentManager
.Get(Convert.ToInt32(itemRoute[''Id'']));
}
return _currentContent;
}
}
public FeaturedProductDriver(IContentManager contentManager,
IWorkContextAccessor workContextAccessor,
IAliasService aliasService) {
_contentManager = contentManager;
_workContextAccessor = workContextAccessor;
_aliasService = aliasService;
}
1. The private variables need several namespaces adding to be valid code. Use the Ctrl-. technique to add in
the required using statements.
2. The constructor now has the wrong name,
FeaturedProductService.
update it from FeaturedProductDriver to
Go back to the driver class and look at the Display() method. We want to pull the business logic code out into the
service.
This means the code from the bool isOnFeaturedProductPage to the start of the return statement can be
moved:
1. Cut the following code and paste it into the IsOnFeaturedProductPage() method of the service class:
bool
isOnFeaturedProductPage
=
false;var
itemTypeName
=
CurrentContent.ContentItem.TypeDefinition.Name;if
(itemTypeName.Equals(“Product”,
StringComparison.InvariantCultureIgnoreCase)) { var dynamicContentItem = (dynamic)CurrentContent.ContentItem; var
itemProductId = dynamicContentItem.Product.ProductId.Value;if(itemProductId.Equals(“SPROCKET9000”,
StringComparison.InvariantCulture)) { isOnFeaturedProductPage = true; } }
2. Delete the throw new NotImplementedException(); line if its still in there.
3. The IsOnFeaturedProductPage() method should return a bool so add a return value to pass
isOnFeaturedProductPage back:
public bool IsOnFeaturedProductPage() { //..snip.. return isOnFeaturedProductPage; }
The service class is now complete. Your completed service class FeaturedProductService.cs should now
look like this:
using System;
using Orchard.Alias;
using Orchard.ContentManagement;
3.9. Extending Orchard
337
Read the Docs Template Documentation, Release 1.9.2
namespace Orchard.LearnOrchard.FeaturedProduct.Services {
public class FeaturedProductService : IFeaturedProductService {
private readonly IContentManager _contentManager;
private readonly IWorkContextAccessor _workContextAccessor;
private readonly IAliasService _aliasService;
private IContent _currentContent = null;
private IContent CurrentContent {
get {
if (_currentContent == null) {
var itemRoute = _aliasService.Get(_workContextAccessor.GetContext()
.HttpContext.Request.AppRelativeCurrentExecutionFilePath
.Substring(1).Trim(`/'));
_currentContent = _contentManager.Get(Convert.ToInt32(itemRoute[''Id'']));
}
return _currentContent;
}
}
public FeaturedProductService(IContentManager contentManager,
IWorkContextAccessor workContextAccessor,
IAliasService aliasService) {
_contentManager = contentManager;
_workContextAccessor = workContextAccessor;
_aliasService = aliasService;
}
public bool IsOnFeaturedProductPage() {
bool isOnFeaturedProductPage = false;
var itemTypeName = CurrentContent.ContentItem.TypeDefinition.Name;
if (itemTypeName.Equals(``Product'',
StringComparison.InvariantCultureIgnoreCase)) {
var dynamicContentItem = (dynamic)CurrentContent.ContentItem;
var itemProductId = dynamicContentItem.Product.ProductId.Value;
if(itemProductId.Equals(``SPROCKET9000'',
StringComparison.InvariantCulture)) {
isOnFeaturedProductPage = true;
}
}
return isOnFeaturedProductPage;
}
}
}
Now you have separated out the functionality into a service class. This means you can keep your driver clean and also
re-use it in the future.
The driver class can now be modified so that the service is injected as a dependency.
1. Switch to the driver class again.
There should be a red squiggly underneath the usage of
isOnFeaturedProductPage because it no longer exists. In order to pull this information from the ser-
338
Chapter 3. Documentation
Read the Docs Template Documentation, Release 1.9.2
vice we need to inject it via the constructor.
Add a new private variable to hold the service reference. Don't forget we always work with
private readonly IFeaturedProductService _featuredProductService;
1. The IFeaturedProductService will need its namespace adding. Do it via the Ctrl-. shortcut.
2. Create a default constructor which will request an instance of IFeaturedProductService:
public FeaturedProductDriver(IFeaturedProductService featuredProductService) { }
Make sure you add the public keyword at the start or Autofac will thrown an exception.
3. Assign the injected constructor parameter to the private variable:
public FeaturedProductDriver(IFeaturedProductService featuredProductService) { _featuredProductService =
featuredProductService; }
4. Update the Display() method so that it uses the new service:
protected override DriverResult Display(FeaturedProductPart part, string displayType, dynamic shapeHelper)
{ return ContentShape(“Parts_FeaturedProduct”, () => { return shapeHelper.Parts_FeaturedProduct( IsOnFeaturedProductPage: _featuredProductService .IsOnFeaturedProductPage()); }); }
Your FeaturedProductDriver.cs class should now look like this:
using
using
using
using
Orchard.ContentManagement;
Orchard.ContentManagement.Drivers;
Orchard.LearnOrchard.FeaturedProduct.Models;
Orchard.LearnOrchard.FeaturedProduct.Services;
namespace Orchard.LearnOrchard.FeaturedProduct.Drivers {
public class FeaturedProductDriver : ContentPartDriver<FeaturedProductPart> {
private readonly IFeaturedProductService _featuredProductService;
public FeaturedProductDriver(IFeaturedProductService featuredProductService) {
_featuredProductService = featuredProductService;
}
protected override DriverResult Display(FeaturedProductPart part,
string displayType, dynamic shapeHelper) {
return ContentShape(``Parts_FeaturedProduct'', () => {
return shapeHelper.Parts_FeaturedProduct(IsOnFeaturedProductPage:
_featuredProductService.IsOnFeaturedProductPage());
});
}
protected override DriverResult Editor(FeaturedProductPart part,
dynamic shapeHelper) {
return ContentShape(``Parts_FeaturedProduct_Edit'',
() => shapeHelper.EditorTemplate(
TemplateName: ``Parts/FeaturedProduct'',
Model: part,
Prefix: Prefix));
}
protected override DriverResult Editor(FeaturedProductPart part,
IUpdateModel updater, dynamic shapeHelper) {
3.9. Extending Orchard
339
Read the Docs Template Documentation, Release 1.9.2
updater.TryUpdateModel(part, Prefix, null, null);
return Editor(part, shapeHelper);
}
}
}
Now the driver class is clean again and only has dependencies that it directly needs.
Describe your content parts
We created the content part (the widget) back in the first part of this course. However, we missed a best practice when
running that initial data migration because the content part was created without a description.
You should always add a description to your parts so that it’s clear what they do. Both your users and likely even
yourself when you come back in a few months time will need a prompt which explains what it’s for.
The description can be added within a data migration by calling WithDescription("Your description
here").
The description is displayed in the admin dashboard in the content definition section:
And when you are working with the content part:
340
Chapter 3. Documentation
Read the Docs Template Documentation, Release 1.9.2
Let’s add an update to the data migration class so that this is populated:
1. Open the Migrations.cs located in the root folder of the module.
2. Each time you want to add a new migration you add one to the number in your UpdateFromN() methods.
Unless you have been experimenting with the code you should be on UpdateFrom2() now. Add this method
to the class and set its return value to 3:
public int UpdateFrom2() { return 3; }
3. We want to edit the description by using .WithDescription() on the part.
Add this code into the method:
ContentDefinitionManager.AlterPartDefinition( typeof(FeaturedProductPart).Name, part => part .WithDescription(“Renders information about the featured product.”));
4. The .WithDescription method is an extension method in it’s own namespace. If you have cleaned up your
using statements in one of the previous parts you will need to use Ctrl-. to add the using in.
Your Migrations.cs file should now look like this:
using
using
using
using
using
using
Orchard.ContentManagement.MetaData;
Orchard.Core.Common.Models;
Orchard.Core.Contents.Extensions;
Orchard.Data.Migration;
Orchard.LearnOrchard.FeaturedProduct.Models;
Orchard.Widgets.Models;
namespace Orchard.LearnOrchard.FeaturedProduct {
public class Migrations : DataMigrationImpl {
public int Create() {
ContentDefinitionManager.AlterTypeDefinition(
``FeaturedProductWidget'', cfg => cfg
.WithSetting(``Stereotype'', ``Widget'')
.WithPart(typeof(FeaturedProductPart).Name)
.WithPart(typeof(CommonPart).Name)
.WithPart(typeof(WidgetPart).Name));
return 1;
}
public int UpdateFrom1() {
SchemaBuilder.CreateTable(typeof(FeaturedProductPartRecord).Name,
table => table
.ContentPartRecord()
.Column<bool>(``IsOnSale''));
return 2;
}
public int UpdateFrom2() {
ContentDefinitionManager.AlterPartDefinition(
typeof(FeaturedProductPart).Name, part => part
.WithDescription(
``Renders information about the current featured product.''));
return 3;
3.9. Extending Orchard
341
Read the Docs Template Documentation, Release 1.9.2
}
}
}
If you load the Orchard site up in the web browser then the data migration will automatically run. You can see the
updated description in the Content Definitions page:
1. Within Visual Studio, press Ctrl-F5 to load up the dev server.
2. Navigate to the admin dashboard and click the Content Definition menu option.
3. Click the Content Parts tab along the top of the page.
4. Scroll down to the Featured Product entry. It will now have a description:
Roll your data migrations up into Create()
Now our Migrations class contains a Create() and two UpdateFromN() methods. As time goes on it will
get more added.
We may have some updates which revert earlier mistakes or remove features that aren’t needed. There is no point in
making a new user that’s installing the module for the first time to go through all of these steps if they are no longer
needed for the final product.
Instead we should keep the Create() as a pristine record of the way we want our data to be configured for the current
codebase. At the end of the Create() we can then return a higher number which will leapfrog the Create()
method over all the unnecessary UpdateFromN() calls.
At the moment the Migrations.cs is on UpdateFrom2() which has a return value of 3. This is the value that
we want new installs to start at.
The first update calls CreateTable() on a SchemaBuilder instance. That can be copied in to the end of the
Create() method.
The second update uses AlterPartDefinition() which is another method on the
ContentDefinitionManager class so technically this could be chained on to the end of the
ContentDefinitionManager instance already in use in the Create() method.
In practice however, it is common to separate out the work on each content type / part to its own statement block.
This means the process will be as follows:
1. Open the Migrations.cs located in the root folder of the module.
342
Chapter 3. Documentation
Read the Docs Template Documentation, Release 1.9.2
2. Copy the CreateTable() call from UpdateFrom1() to the Create() method so that your Create()
method now looks like this:
public int Create() { // Featured Product Widget ContentDefinitionManager.AlterTypeDefinition( “FeaturedProductWidget”, cfg => cfg .WithSetting(“Stereotype”, “Widget”) .WithPart(typeof(FeaturedProductPart).Name)
.WithPart(typeof(CommonPart).Name) .WithPart(typeof(WidgetPart).Name));
// Featured Product Part Record
SchemaBuilder.CreateTable(typeof(FeaturedProductPartRecord).Name,
table => table
.ContentPartRecord()
.Column<bool>(``IsOnSale''));
return 1;
}
Leave the original UpdateFrom1() method intact.
3. Copy the AlterPartDefinition() call from UpdateFrom2() to the Create() method so that your
Create() method now looks like this:
public int Create() { // Featured Product Widget ContentDefinitionManager.AlterTypeDefinition( “FeaturedProductWidget”, cfg => cfg .WithSetting(“Stereotype”, “Widget”) .WithPart(typeof(FeaturedProductPart).Name)
.WithPart(typeof(CommonPart).Name) .WithPart(typeof(WidgetPart).Name));
// Featured Product Part
ContentDefinitionManager.AlterPartDefinition(
typeof(FeaturedProductPart).Name, part => part
.WithDescription(``Renders information about the featured product.''));
// Featured Product Part Record
SchemaBuilder.CreateTable(typeof(FeaturedProductPartRecord).Name,
table => table
.ContentPartRecord()
.Column<bool>(``IsOnSale''));
return 1;
}
Leave the original UpdateFrom2() method intact.
4. Update the Create() methods return value from return 1; to return 3;
Your Migrations.cs file should now look like this:
using
using
using
using
using
using
Orchard.ContentManagement.MetaData;
Orchard.Core.Common.Models;
Orchard.Core.Contents.Extensions;
Orchard.Data.Migration;
Orchard.LearnOrchard.FeaturedProduct.Models;
Orchard.Widgets.Models;
namespace Orchard.LearnOrchard.FeaturedProduct {
public class Migrations : DataMigrationImpl {
public int Create() {
// Featured Product Widget
ContentDefinitionManager.AlterTypeDefinition(
``FeaturedProductWidget'', cfg => cfg
.WithSetting(``Stereotype'', ``Widget'')
3.9. Extending Orchard
343
Read the Docs Template Documentation, Release 1.9.2
.WithPart(typeof(FeaturedProductPart).Name)
.WithPart(typeof(CommonPart).Name)
.WithPart(typeof(WidgetPart).Name));
// Featured Product Part
ContentDefinitionManager.AlterPartDefinition(
typeof(FeaturedProductPart).Name, part => part
.WithDescription(
``Renders information about the featured product.''));
// Featured Product Part Record
SchemaBuilder.CreateTable(typeof(FeaturedProductPartRecord).Name,
table => table
.ContentPartRecord()
.Column<bool>(``IsOnSale''));
return 1;
}
public int UpdateFrom1() {
SchemaBuilder.CreateTable(typeof(FeaturedProductPartRecord).Name,
table => table
.ContentPartRecord()
.Column<bool>(``IsOnSale''));
return 2;
}
public int UpdateFrom2() {
ContentDefinitionManager.AlterPartDefinition(
typeof(FeaturedProductPart).Name, part => part
.WithDescription(
``Renders information about the featured product.''));
return 3;
}
}
}
In the future when you add new updates to your Migration you should follow these steps:
1. Create a new UpdateFromN() method.
2. Set the appropriate return value.
3. Apply the amendments you want to make within the update method.
4. Alter the Create() method so that it creates your data in the correct way your codebase is expecting for a
fresh install.
5. Update the return value of Create() so that it matches the return value of the UpdateFromN() you just
created.
Download the code for this lesson
You can download a copy of the module so far at this link:
• Download Orchard.LearnOrchard.FeaturedProduct-Part4-v1.0.zip
344
Chapter 3. Documentation
Read the Docs Template Documentation, Release 1.9.2
To use it in Orchard simply extract the archive into the modules directory at .\src\Orchard.Web\Modules\.
If you already have the module installed from a previous part then delete that folder first.
For Orchard to recognize it the folder name should match the name of the module. Make sure that
the folder name is Orchard.LearnOrchard.FeaturedProduct and then the modules files are
located directly under that.
Conclusion
In this course we have looked at many of the core components that make up a module. These topics included:
• Command-line scaffolding
• Module.txt manifest
• ContentPart
• ContentPartRecord
• Widget
• Data migration
• Dependency injection
• Handler
• Driver
• Editor view
• Front-end view
• Placement.info
• Content types via the admin dashboard
• Fields
• Localization
• Module dependencies
• Resource manifest
• Services
• Orchard API
This should have given you a solid grounding for extending Orchard via code. With this knowledge you can now build
your own simple modules and you will also understand the documentation found elsewhere on this site and around the
web.
Bonus Exercise: Using the skills you have now learned, research implement the following:
1. Add a Content Picker Field to the FeaturedProductWidget part so that you can select a Product to be
featured.
1. Implement the code so that the widget will work with the selected Product rather than using the hard-coded
information we supplied throughout this course.
You can find the information to complete this exercise by using resources such as this documentation
website, reading the Orchard source code and searching the World Wide Web.
3.9. Extending Orchard
345
Read the Docs Template Documentation, Release 1.9.2
3.9.5 Building a Hello World Module
This article describes how to build a very small module for Orchard that will just display a “hello world” page. The
technique that it shows you is a great start if you are looking to take control of the page lifecycle with your own MVC
controller.
Another simple example of a module can be found here: Quick Start - Get module blueprint
This guide has been marked for review. If you are just getting started with Orchard module development
you should read the Getting Started with Modules course first. It will introduce you to building modules
with Orchard using Visual Studio Community, a free edition of Visual Studio.
Introduction
Orchard is built on top of ASP.NET MVC, which means that if you already know that framework you should feel right
at home. If not, do not worry as we’ll explain everything we’re doing.
MVC is a pattern where concerns are neatly separated: there is a model (M) for the data, a controller (C) that orchestrates the UI and determines how it operates on the model, and a view (V) whose only responsibility is to display what
the controller hands it.
In the case of our Hello World module, we won’t have any data so the model will be of no concern to us. We will just
have a controller and a view. All the rest will be some necessary plumbing to declare what we’re doing to Orchard.
We will come back to these concepts and recapitulate once we’ve built our module.
Modules in Orchard are sets of extensions that can be packaged in order to be re-used on other Orchard sites. Modules
are implemented as MVC Areas. Areas in MVC are sub-sites that contain a set of features that act in relative isolation
from the other parts of the site. An Orchard module is simply an area with a manifest file. It may use Orchard APIs
(but it doesn’t necessarily have to).
Generating the Module Structure
Before you can generate the file structure for your module, you need to download, install, and enable the Code
Generation feature for Orchard. For more information, see Command-line Code Generation.
Once you have code generation enabled, open the Orchard command-line, and create the HelloWorld module with
the following command:
codegen module HelloWorld
Modifying the Manifest
You should now have a new HelloWorld folder under the Modules folder of your Orchard web site. In this folder,
you’ll find a module.txt file. Open it and customize it as follows:
name: HelloWorld
antiforgery: enabled
author: The Orchard Team
website: http://orchardproject.net
version: 0.5.0
orchardversion: 1.8.1
description: The Hello World module is greeting the world and not doing much more.
features:
HelloWorld:
Description: A very simple module.
Category: Sample
346
Chapter 3. Documentation
Read the Docs Template Documentation, Release 1.9.2
This text file is describing your module to the system. The information contained in this file will be used for example
in the features administration screen.
Note: While both spaces and tabs are supported to indent the manifest file, we recommend that you use
spaces instead of tabs. As with your main coding, using spaces gives a more consistent editing experience
when working in teams.
Adding the Route
Your module will have to handle the /HelloWorld relative URL under your Orchard web site. In order to declare what
to do when that URL gets hit, create the following Routes.cs file in the HelloWorld folder:
using
using
using
using
System.Collections.Generic;
System.Web.Mvc;
System.Web.Routing;
Orchard.Mvc.Routes;
namespace HelloWorld {
public class Routes : IRouteProvider {
public void GetRoutes(ICollection<RouteDescriptor> routes) {
foreach (var routeDescriptor in GetRoutes())
routes.Add(routeDescriptor);
}
public IEnumerable<RouteDescriptor> GetRoutes() {
return new[] {
new RouteDescriptor {
Priority = 5,
Route = new Route(
``HelloWorld'', // this is the name of the page url
new RouteValueDictionary {
{``area'', ``HelloWorld''}, // this is the name of your module
{``controller'', ``Home''},
{``action'', ``Index''}
},
new RouteValueDictionary(),
new RouteValueDictionary {
{``area'', ``HelloWorld''} // this is the name of your module
},
new MvcRouteHandler())
}
};
}
}
}
A route is a description of the mapping between URLs and controller actions. This code maps the HelloWorld URL
to the area HelloWorld with the Home controller and the Index action.
Creating the Controller
The new module also has a Controllers folder ready to be filled. Create the following HomeController.cs file in that
folder:
3.9. Extending Orchard
347
Read the Docs Template Documentation, Release 1.9.2
using System.Web.Mvc;
using Orchard.Themes;
namespace HelloWorld.Controllers {
[Themed]
public class HomeController : Controller {
public ActionResult Index() {
return View(``HelloWorld'');
}
}
}
This is the controller that will handle the requests for the HelloWorld URL. The default action, index, is requesting
that the HelloWorld view gets rendered.
Notice the Themed attribute on the controller class that will request that the view gets skinned with the currently active
theme.
Creating the View
In the Views folder, create a folder named Home. In the Views\Home folder, create the following HelloWorld.cshtml
file:
<h2>@T(``Hello World!'')</h2>
This file is specifying the core contents of our view. All the chrome around it will get added by the current theme’s
default layout.
Notice that we used the T helper function that makes this view ready to be localized. This is not mandatory but it’s a
nice touch.
Adding the new files to the project
We’re almost done. The only task remaining is to declare to the system the set of files in the module for dynamic
compilation.
Open the HelloWorld.csproj file in a text editor and add the following lines after one of the < /ItemGroup > tags:
<ItemGroup>
<Compile Include=''Routes.cs''/>
<Compile Include=''Controllers\HomeController.cs''/>
</ItemGroup>
Also add the following to the ItemGroup section that already has other Content tags:
<Content Include=''Views\Home\HelloWorld.cshtml'' />
Activate the Module
Finally, you need to activate your new module. In the command line, type:
feature enable HelloWorld
You could also have done this from the “Features” screen in the site’s admin UI.
348
Chapter 3. Documentation
Read the Docs Template Documentation, Release 1.9.2
Use the Module
You may now add /HelloWorld to the URL of your Orchard site in your favorite web browser and obtain a nice Hello
World message:
Documentation/../Attachments/Building-a-hello-world-module/HelloWorld.png
Conclusion
In this tutorial, we have built a very simple module that handles a route (/HelloWorld) through the home controller’s
index action and serves a simple view that gets skinned by the current theme. We have done so with only free tools
and in a way that differs very little from what you would do in a regular ASP.NET MVC area. We did get a few things
for free by making this an Orchard module, such as activation/deactivation of the module, or theming of the view with
no effort on our part.
Hopefully this will get you started with Orchard and prepare you to build more elaborate modules.
The code for this topic can be downloaded from here: HelloWorld.zip
3.9.6 Creating a Module with a Simple Text Editor
In this tutorial, you will learn how to develop a simple commerce module using only a text editor.
If you do not have the Web Platform Installer on your computer, download it before beginning this tutorial.
This guide has been marked for review. If you are just getting started with Orchard module development
you should read the Getting Started with Modules course first. It will introduce you to building modules
with Orchard using Visual Studio Community, a free edition of Visual Studio.
Setting Up the Orchard Site
First, you will set up a new Orchard website. If you already have a site set up, you can skip this section and jump
directly to the code generation section. To start the setup, open IIS Manager, right-click Sites, and click Add Web
Site.
3.9. Extending Orchard
349
Read the Docs Template Documentation, Release 1.9.2
In the Add Web Site dialog box, fill in the fields to point the new website to a folder, such as \inetpub\wwwroot\Orchard. Name the new site Orchard and give it an unused port, such as 90. Use the default application
pool (.NET 4.0 integrated pipeline). Click OK.
From the Windows Start menu, launch Web Platform Installer, select Orchard CMS, click Add, and then click
350
Chapter 3. Documentation
Read the Docs Template Documentation, Release 1.9.2
Install.
After you accept the license terms, Orchard is installed.
Open a command window and change the current directory to point to the root of the site.
bin\orchard.exe.
Then run
Type help commands to get the list of available commands. For now, only the help and setup commands are
available. However, as Orchard is developed and modules are activated, new commands will become available. (The
Orchard command-line executable actually discovers the commands from the modules inside of the application.)
To set up the site, enter the following command:
setup /SiteName:Orchard /AdminUsername:admin /AdminPassword:123456
/DatabaseProvider:SqlCe
This is equivalent to setting up the site from the web interface.
3.9. Extending Orchard
351
Read the Docs Template Documentation, Release 1.9.2
Leave the command window open. (In fact, don’t close it until you have finished this tutorial.)
Generating Code for the Module
Now you are ready to start developing the commerce module. Orchard provides a code generation feature that sets
up the structure of an empty module to help you get started. By default, code generation is disabled. So you must
first install and enable the feature. The easiest way to do this is to go to Modules in the admin UI and then click the
“Gallery” tab. Do a search for “code generation” and then install the module.
To enable code generation, if you didn’t do so right after install, you may enter the following command in the command
window:
feature enable Orchard.CodeGeneration
You will use a code-generation command to create a commerce module. Enter the following command:
codegen module SimpleCommerce
Open
a
Windows
Explorer
window
and
browse
to
the
newly
created
pub\wwwroot\Orchard\Modules\SimpleCommerce folder. Open the module.txt file using a text editor.
\inet-
Change the description to “A simple commerce module”. Change the description of the feature to be “A simple product
part”. Save the file and close it. The following example shows the complete module.txt file after the changes.
Name: SimpleCommerce
AntiForgery: enabled
Author: The Orchard Team
Website: http://orchardproject.net
Version: 0.5.0
OrchardVersion: 0.5.0
Description: A simple commerce module
Features:
SimpleCommerce:
Name: Simple Commerce
Description: A simple product part.
Category: Commerce
Creating the Model for the Part
Next, you will create a data model that is a representation of what will be stored in the database.
In Modules/SimpleCommerce/Models, create a Product.cs file and add the following content:
using System.ComponentModel.DataAnnotations;
using Orchard.ContentManagement;
using Orchard.ContentManagement.Records;
namespace SimpleCommerce.Models {
public class ProductPartRecord : ContentPartRecord {
public virtual string Sku { get; set; }
public virtual float Price { get; set; }
}
public class ProductPart : ContentPart<ProductPartRecord> {
[Required]
public string Sku {
get { return Retrieve(r => r.Sku); }
352
Chapter 3. Documentation
Read the Docs Template Documentation, Release 1.9.2
set { Store(r => r.Sku, value); }
}
[Required]
public float Price {
get { return Retrieve(r => r.Price); }
set { Store(r => r.Price, value); }
}
}
}
This code has two properties, Sku and Price, that are virtual in order to enable the creation of a dynamic proxy that
will handle persistence transparently.
The code also defines a content part that derives from ContentPart<ProductPartRecord> and that exposes
the SKU and price from the record as public properties and infoset. You can find more info about infoset here. The
properties have attributes that will surface in the UI as validation tests.
In order for the application to pick up the new file, you need to add it to the module’s project file. Open the SimpleCommerce.csproj file and look for “assemblyinfo.cs”. After that line, add the following:
<Compile Include=''Models\Product.cs'' />
Save the file, but leave it open, because you will make additional changes to it throughout the tutorial.
Navigate to the site in your browser to make sure the application’s dynamic compilation feature picks up the new part
and record. You will know that everything is working if you go to the Features administration screen and see the new
SimpleCommerce feature.
In the command window, enable the new feature using the following command:
feature enable SimpleCommerce
Creating the Initial Data Migration File
Data migration is a pattern that enables an application or component to handle new versions gracefully, without any
data loss. The main idea is that the system keeps track of the current version installed and each data migration describes
the changes to go from one version to the next. If the system detects that there is a new version installed and the current
data is from a previous version, the administrator of the site is prompted to upgrade. The system then runs all necessary
migration methods until the data version and the code version are in sync.
Start by creating the initial migration for the new module, which will just create the data tables that are needed. In the
command window, enter the following command:
codegen datamigration SimpleCommerce
This creates the following Migrations.cs file:
using
using
using
using
using
using
using
using
System;
System.Collections.Generic;
System.Data;
Orchard.ContentManagement.Drivers;
Orchard.ContentManagement.MetaData;
Orchard.ContentManagement.MetaData.Builders;
Orchard.Core.Contents.Extensions;
Orchard.Data.Migration;
namespace SimpleCommerce.DataMigrations {
public class Migrations : DataMigrationImpl {
3.9. Extending Orchard
353
Read the Docs Template Documentation, Release 1.9.2
public int Create() {
// Creating table ProductPartRecord
SchemaBuilder.CreateTable(``ProductPartRecord'', table => table
.ContentPartRecord()
.Column(``Sku'', DbType.String)
.Column(``Price'', DbType.Single)
);
return 1;
}
}
}
The method name Create is the convention for the initial data migration.
It calls the
SchemaBuilder.CreateTable method that creates a ProductPartRecord table that has Sku and Price
columns in addition to the columns from the basic ContentPartRecord table.
Notice that the method returns 1, which is the version number for the migration.
Add another migration step to this in order to illustrate how you can later alter the existing schema and type metadata
as the module evolves. In this case, you will take this opportunity to add a feature that will enable the part to be
attached to any content type. Add the following method to the data migration class:
public int UpdateFrom1() {
ContentDefinitionManager.AlterPartDefinition(``ProductPart'',
builder => builder.Attachable());
return 2;
}
This new migration is named UpdateFrom1, which is the convention for upgrading from version 1. Your next
migration should be called UpdateFrom2 and return 3, and so on.
Make sure the following line is present in the .csproj file. (It should already have been added by the code generation
command.)
<Compile Include=''Migrations.cs'' />
Navigate to the Features screen in the dashboard. You see a warning that indicates that one of the features needs to be
updated, and the Simple Commerce module is displayed in red. Click Update to ensure that the migrations are run
and that the module is up to date.
Adding a Handler
A handler in Orchard is analogous to a filter in ASP.NET MVC. It’s a piece of code that is meant to run when specific
events happen in the application, but that are not specific to a given content type. For example, you could build an
analytics module that listens to the Loaded event in order to log usage statistics. To see what event handlers you can
override in your own handlers, examine the source code for ContentHandlerBase.
The handler you need in the module is not going to be very complex, but it will implement some plumbing that is
necessary to set up the persistence of the part. We hope that this kind of plumbing will disappear in a future version of
Orchard, possibly in favor of a more declarative approach such as using attributes.
Create a Handlers folder and add a ProductHandler.cs file to it that contains the following code:
using Orchard.ContentManagement.Handlers;
using SimpleCommerce.Models;
354
Chapter 3. Documentation
Read the Docs Template Documentation, Release 1.9.2
using Orchard.Data;
namespace SimpleCommerce.Handlers {
public class ProductHandler : ContentHandler {
public ProductHandler(IRepository<ProductPartRecord> repository) {
Filters.Add(StorageFilter.For(repository));
}
}
}
Add the file to the .csproj file so that dynamic compilation can pick it up, using the following line:
<Compile Include=''Handlers\ProductHandler.cs'' />
Adding a Driver
A driver in Orchard is analogous to a controller in ASP.NET MVC, but is well adapted to the composition aspect that
is necessary in web content management systems. It is specialized for a specific content part and can specify custom
behavior for well-known actions such as displaying an item in the front end or editing it in the administration UI.
A driver typically has overrides for the display and editor actions. For the product part, create a new Drivers folder
and in that folder create a ProductDriver.cs file that contains the following code:
using SimpleCommerce.Models;
using Orchard.ContentManagement.Drivers;
using Orchard.ContentManagement;
namespace SimpleCommerce.Drivers {
public class ProductDriver : ContentPartDriver<ProductPart> {
protected override DriverResult Display(
ProductPart part, string displayType, dynamic shapeHelper)
{
return ContentShape(``Parts_Product'',
() => shapeHelper.Parts_Product(
Sku: part.Sku,
Price: part.Price));
}
//GET
protected override DriverResult Editor(ProductPart part, dynamic shapeHelper)
{
return ContentShape(``Parts_Product_Edit'',
() => shapeHelper.EditorTemplate(
TemplateName: ``Parts/Product'',
Model: part,
Prefix: Prefix));
}
//POST
protected override DriverResult Editor(
ProductPart part, IUpdateModel updater, dynamic shapeHelper)
{
updater.TryUpdateModel(part, Prefix, null, null);
return Editor(part, shapeHelper);
}
3.9. Extending Orchard
355
Read the Docs Template Documentation, Release 1.9.2
}
}
The code in the Display method creates a shape to use when rendering the item in the front end. That shape has
Sku and Price properties copied from the part.
Update the .csproj file to include the following line:
<Compile Include=''Drivers\ProductDriver.cs'' />
The Editor method also creates a shape named EditorTemplate. The shape has a TemplateName property
that instructs Orchard where to look for the rendering template. The code also specifies that the model for that template
will be the part, not the shape (which would be the default).
The placement of those parts within the larger front end or dashboard must be specified using a placement.info file that
is located at the root of the module. That file, like a view, can be overridden from a theme. Create the placement.info
file with the following contents:
<Placement>
<Place Parts_Product_Edit=''Content:3''/>
<Place Parts_Product=''Content:3''/>
</Placement>
Add the placement.info file to the .csproj file using the following line:
<Content Include=''placement.info'' />
Building the Templates
The last thing to do in order for the new content part to work is to write the two templates (front end and admin) that
are configured in the driver.
Create the front-end template first. Create a Parts folder under Views and add a Product.cshtml file that contains the
following code:
<br/>
@T(``Price''): <b>[email protected]</b><br />
@Model.Sku<br/>
This is very plain rendering of the shape. Notice the use of the T method call to wrap the “Price” string literal. This
enables localization of that text.
The administration view is a little heavier on HTML helper calls. Create an EditorTemplates folder under Views and a
Parts folder under that. Add a Product.cshtml to the Parts folder that contains the following code:
@model SimpleCommerce.Models.ProductPart
<fieldset>
<label class=''sub'' for=''Sku''>@T(``Sku'')</label><br />
@Html.TextBoxFor(m => m.Sku, new { @class = ``text'' })<br />
<label class=''sub'' for=''Price''>@T(``Price'')</label><br />
@Html.TextBoxFor(m => m.Price, new { @class = ``text'' })
</fieldset>
Add those two templates to the .csproj file using the following lines:
<Content Include=''Views\Parts\Product.cshtml'' />
<Content Include=''Views\EditorTemplates\Parts\Product.cshtml'' />
356
Chapter 3. Documentation
Read the Docs Template Documentation, Release 1.9.2
Putting it All Together into a Content Type
The content part that you’ve put together could already be composed from the administration UI into a content type
(see Creating Custom Content Types), but per the goal of this topic, you will continue by writing code using a text
editor.
You will now build a new Product content type that will include the Product part and a number of parts that you
can get from Orchard. So far, you have been focused on your specific domain. This will now change and you will start
integrating into Orchard.
To build the content type from a new migration, open the Migrations.cs file and add the following method to the class:
public int UpdateFrom2() {
ContentDefinitionManager.AlterTypeDefinition(``Product'', cfg => cfg
.WithPart(``CommonPart'')
.WithPart(``RoutePart'')
.WithPart(``BodyPart'')
.WithPart(``ProductPart'')
.WithPart(``CommentsPart'')
.WithPart(``TagsPart'')
.WithPart(``LocalizationPart'')
.Creatable()
.Indexed());
return 3;
}
Also add using Orchard.Indexing; to the top of the file.
What you are doing is creating (or updating) the Product content type and adding to it the ability to have its own
URL and title (RoutePart), to have a rich text description (BodyPart), to be a product, to be commented on
(CommentsPart), to be tagged (TagsPart) and to be localizable (LocalizationPart). It can also be created,
which will add a Create Product menu entry, and it will also enter the search index (Indexed).
To enable your new module, open the Orchard dashboard and click Modules. Select the Features tab, find the
SimpleCommerce module, and click Enable.
3.9. Extending Orchard
357
Read the Docs Template Documentation, Release 1.9.2
To add a new Product content type, click Content on the dashboard, select the Content Types tab, find Product, and
click Create New Product.
You now have a product editor that features your Sku and Price fields.
The code for this module can be downloaded from the following page: Orchard.Module.SimpleCommerce.0.5.0.zip
3.9.7 Writing a Content Part
This guide has been marked for review. If you are just getting started with Orchard module development
you should read the Getting Started with Modules course first. It will introduce you to building modules
with Orchard using Visual Studio Community, a free edition of Visual Studio.
This tutorial walks through the process of creating a new content part from scratch, using the scaffolding feature in
Orchard as a productivity tool. Although this tutorial assumes development in Visual Studio, it is not strictly necessary
to have Visual Studio to develop a content part - feel free to use your editor of choice.
In this tutorial, we are going to build a custom Map part, that can be configured with latitude and longitude values in
358
Chapter 3. Documentation
Read the Docs Template Documentation, Release 1.9.2
order to display a map image for a content item.
Important: Before you can generate the file structure for your module, you need to download, install,
and enable the Code Generation feature for Orchard. For more information, see Command-line Code
Generation.
We are going to add a new “Maps” module to contain our Map part implementation, as a new project in the Orchard
solution. Assuming you have enlisted in the Orchard source tree, launch Visual Studio 2010 and open the Orchard.sln
file under the “src” folder of your enlistment.
3.9. Extending Orchard
359
Read the Docs Template Documentation, Release 1.9.2
Type “codegen module Maps /IncludeInSolution:true” at the Orchard command-prompt. The “IncludeInSolution”
360
Chapter 3. Documentation
Read the Docs Template Documentation, Release 1.9.2
switch tells Orchard to wire up a new Maps module project to the Orchard.sln file.
orchard> codegen module Maps /IncludeInSolution:true
Creating module Maps
Module Maps created successfully
After running this command, Visual Studio prompts to re-load the solution file. Accept this prompt.
The Maps module project appears added to the solution, along with some default files and folder to get you started.
Open the Module.txt file at the root of the Maps module project. This file defines the information about your module,
such as a name, description, version, author, and a categorized of features exposed by the module. The Module.txt
file can also contain additional information such as dependencies, which we will not cover here. Our module is
pretty simple, and only contains a single “Maps” feature with no additional dependencies. Edit the Module.txt file as
indicated below.
Name: Maps
AntiForgery: enabled
Author: The Orchard Team
Website: http://orchardproject.net
Version: 1.0.0
OrchardVersion: 1.0.0
3.9. Extending Orchard
361
Read the Docs Template Documentation, Release 1.9.2
Description: Adds a map image to content items, based on longitude and latitude.
Features:
Maps:
Description: Adds a map image to content items, based on longitude and latitude.
Category: Geolocation
Now let’s begin to write the Map part. To begin with, we need a class to contain the data for the part. Data classes are
conventionally added to the “Models” folder of the project. Right-click the Models folder in Visual Studio and choose
“Add > Class” from the context menu and name the new file Map.cs:
In Orchard, content part data is represented by a Record class, which represents the fields that are stored to a database
table, and a ContentPart class that uses the Record for storage. Add the MapRecord (ContentPartRecord) and MapPart
(ContentPart) classes as follows:
using System.ComponentModel.DataAnnotations;
using Orchard.ContentManagement;
using Orchard.ContentManagement.Records;
namespace Maps.Models
{
public class MapRecord : ContentPartRecord
{
public virtual double Latitude { get; set; }
public virtual double Longitude { get; set; }
}
public class MapPart : ContentPart<MapRecord>
{
[Required]
public double Latitude
{
get { return Retrieve(r => r.Latitude); }
set { Store(r => r.Latitude, value); }
}
[Required]
public double Longitude
{
362
Chapter 3. Documentation
Read the Docs Template Documentation, Release 1.9.2
get { return Retrieve(r => r.Longitude); }
set { Store(r => r.Longitude, value); }
}
}
}
Now build the Maps project to ensure your Record class compiles successfully.
Next, we are going to create a data migration for our Maps module. Why do we need a migration class? The reason is
that defining a Record and Part class to store the data doesn’t actually impact the database in any way. A data migration
is what tells Orchard how to update the database schema when the Maps feature is enabled (the migration runs when
the feature is activated). A migration can also upgrade the database schema from prior versions of a module to the
schema required by a newer version of a module - this is an advanced topic that won’t be covered in this tutorial.
To create a new data migration class, you can use the Code Generation feature of Orchard. Run “codegen datamigration
Maps” from the Orchard command-line.
orchard> codegen datamigration Maps
Creating Data Migration for Maps
Data migration created successfully in Module Maps
Visual Studio prompts to re-load the solution again. After accepting this prompt, the new data migration classes
appears in the project.
3.9. Extending Orchard
363
Read the Docs Template Documentation, Release 1.9.2
The migration class added by the codegen command contains a single Create() method that defines a database table
structure based on the Record classes in project. Because we only have a single MapRecord class with latitude and
longitude properties, the migration class is fairly simple. Note that the Create method is called at the time the feature
is activated, and the database will be updated accordingly.
using
using
using
using
using
using
using
using
using
System;
System.Collections.Generic;
System.Data;
Maps.Models;
Orchard.ContentManagement.Drivers;
Orchard.ContentManagement.MetaData;
Orchard.ContentManagement.MetaData.Builders;
Orchard.Core.Contents.Extensions;
Orchard.Data.Migration;
namespace Maps.DataMigrations {
public class Migrations : DataMigrationImpl {
public int Create() {
// Creating table MapRecord
SchemaBuilder.CreateTable(``MapRecord'', table => table
.ContentPartRecord()
.Column(``Latitude'', DbType.Double)
.Column(``Longitude'', DbType.Double)
);
ContentDefinitionManager.AlterPartDefinition(
typeof(MapPart).Name, cfg => cfg.Attachable());
return 1;
}
}
}
364
Chapter 3. Documentation
Read the Docs Template Documentation, Release 1.9.2
Add the AlterPartDefinition lines to the migration in order to make the part attachable to any content type. Also add
using Maps.Models; to the top of the file.
Now let’s add the handler for the Map part. A handler in Orchard is a class that defines the behavior of the part,
handling events or manipulating data model prior to rendering the part. The Map part is very simple, and in this case,
our handler class will only specify that an IRepository of MapRecord should be used as the storage for this part. Add
the following Handlers\MapHandler.cs:
using Maps.Models;
using Orchard.ContentManagement.Handlers;
using Orchard.Data;
namespace Maps.Handlers {
public class MapHandler : ContentHandler {
public MapHandler(IRepository<MapRecord> repository) {
Filters.Add(StorageFilter.For(repository));
}
}
}
We will also add a driver for our Map part. A driver in Orchard is a class that can define associations of shapes to
display for each context in which the Map part can render. For example, when displaying a Map on the front-end,
a “Display” method defines the name of the template to use for different displayTypes (for example, “details” or
summary”). Similarly, an “Editor” method of the driver defines the template to use for displaying the editor of the
Map part (for entering values of the latitude and longitude fields). We are going to keep this part simple and just
use “Map” as the name of the shape to use for both Display and Editor contexts (and all displayTypes). Add the
Drivers\MapDriver class as follows.
using Maps.Models;
using Orchard.ContentManagement;
using Orchard.ContentManagement.Drivers;
namespace Maps.Drivers {
public class MapDriver : ContentPartDriver<MapPart> {
protected override DriverResult Display(
MapPart part, string displayType, dynamic shapeHelper) {
return ContentShape(``Parts_Map'', () => shapeHelper.Parts_Map(
Longitude: part.Longitude,
Latitude: part.Latitude));
}
//GET
protected override DriverResult Editor(
MapPart part, dynamic shapeHelper) {
return ContentShape(``Parts_Map_Edit'',
() => shapeHelper.EditorTemplate(
TemplateName: ``Parts/Map'',
Model: part,
Prefix: Prefix));
}
//POST
protected override DriverResult Editor(
MapPart part, IUpdateModel updater, dynamic shapeHelper) {
3.9. Extending Orchard
365
Read the Docs Template Documentation, Release 1.9.2
updater.TryUpdateModel(part, Prefix, null, null);
return Editor(part, shapeHelper);
}
}
}
We can now add the display and editor views in Visual Studio. First add “Parts” and “EditorTemplates/Parts” folders
to the “Views” folder in the Maps project, and then add Map.cshtml files into the Views/EditorTemplates/Parts and the
Views/Parts folders as follows.
Views/EditorTemplates/Parts/Map.cshtml :
@model Maps.Models.MapPart
<fieldset>
<legend>Map Fields</legend>
<div class=''editor-label''>
@Html.LabelFor(model => model.Latitude)
</div>
<div class=''editor-field''>
@Html.TextBoxFor(model => model.Latitude)
@Html.ValidationMessageFor(model => model.Latitude)
</div>
<div class=''editor-label''>
@Html.LabelFor(model => model.Longitude)
</div>
<div class=''editor-field''>
@Html.TextBoxFor(model => model.Longitude)
@Html.ValidationMessageFor(model => model.Longitude)
</div>
</fieldset>
Views/Parts/Map.cshtml :
<img alt=''Location'' border=''1'' src=''http://maps.google.com/maps/api/staticmap?
&zoom=14
&size=256x256
&maptype=roadmap
&markers=color:blue|@Model.Latitude,@Model.Longitude
&sensor=false'' />
Both of these templates will be rendered as parts of a larger, composite page. Because the system needs to know the
order and location where they will render within the composed page, we need to add a placement.info file into the root
of the module’s directory:
<Placement>
<Place Parts_Map=''Content:10''/>
<Place Parts_Map_Edit=''Content:7.5''/>
</Placement>
This is saying that the Parts_Map shape (which is rendered by Views/Parts/Maps.cshtml unless overridden in the
current theme) should render in the “Content” zone if available, in tenth position. It also positions the editor
shape/template in the “Primary” zone in second position.
To activate the Map part, go to the “Features” section of the Orchard admin panel and enable it.
366
Chapter 3. Documentation
Read the Docs Template Documentation, Release 1.9.2
You can try out the Map part by attaching it to any content type in the system, using the “Content Types” section of
the Orchard admin panel. Let’s add it to an existing content type, namely, the custom “Event” content type that we
built in the Creating custom content types topic. If you haven’t read that topic yet or don’t have the “Event” type, go
ahead and add the Map to the Page content type instead (following the same steps below).
On the “Manage Content Types” admin screen, click on “Edit” to edit the definition of this type (you may need to
enable the Orchard.ContentTypes feature first).
In the list of parts for the “Event” type, click on “Add” to add a part.
The Map part displays in the list of available parts to add. Select it, and click “Save”.
3.9. Extending Orchard
367
Read the Docs Template Documentation, Release 1.9.2
Now go the “Manage Content” and edit an event content item. Notice that the Map part adds Latitude and Longitude
fields to this item. Type some valid coordinates and re-publish the content item.
On the front-end of your site, you can see the effect of the Map part rendering on the event content item.
368
Chapter 3. Documentation
Read the Docs Template Documentation, Release 1.9.2
Getting the Code
The Map part described in this topic is available from here: Orchard.Module.Maps.1.0.0.zip, ready to install and use,
with full source code.
3.9.8 Writing a Content Field
This guide has been marked for review. If you are just getting started with Orchard module development
you should read the Getting Started with Modules course first. It will introduce you to building modules
with Orchard using Visual Studio Community, a free edition of Visual Studio.
3.9. Extending Orchard
369
Read the Docs Template Documentation, Release 1.9.2
Fields can be used in Orchard to build new content types. Orchard comes with a few built-in field types such as text,
date or enumeration, but it is possible to build your own field types that can then be used to build new content types.
This topic will teach you how to add such a new field type. You can find the source code for this tutorial here:
http://orcharddatetimefield.codeplex.com/.
We will assume Visual Studio and a full source code enlistment are being used in this topic. It is possible to build this
module without it by simply manipulating the csproj file and adding the relevant files in there. Please consult Creating
a module with a simple text editor for an example of module building without Visual Studio.
Objectives
Learn the steps to add a new field type to Orchard. The goal is to have a Date and Time editor so that any existing or
new Content Type can let the user select a Date or a Time very easily.
Creating a Module
We will create the new field type inside a new Orchard module so that it can be easily distributed. We will use Code
Generation feature for that.
Important: Before you can generate the file structure for your module, you need to download, install,
and enable the Code Generation feature for Orchard. For more information, see Command-line Code
Generation.
Once the Code Generation feature has been enabled, you can type the following codegen command on the Orchard
command-line.
codegen module CustomFields /IncludeInSolution:true
This should create a new CustomFields folder under Modules, pre-populated with a few folders and files. For example,
you may open the module.txt manifest file and modify it:
370
Chapter 3. Documentation
Read the Docs Template Documentation, Release 1.9.2
Name: CustomFields
AntiForgery: enabled
Author: Me
Website: http://orcharddatetimefield.codeplex.com
Version: 0.6.1
OrchardVersion: 0.8.0
Description: A bunch of custom fields for use in your custom content types.
Features:
CustomFields:
Description: Custom fields for Orchard.
Category: Fields
DateTimeField:
Description: A date and time field with a friendly UI.
Category: Fields
Dependencies: CustomFields, Orchard.jQuery, Common, Settings
We are defining two features here because this module will eventually contain more fields and we want to distinguish
between the default feature of the module (which has the same name as the module itself and has to exist in any
module) and the date field feature. This also demonstrates categories and dependencies.
Modeling the Field
Let’s now create a Fields folder inside of our CustomFields folder and create the following DateTimeField.cs file in
there:
using
using
using
using
using
System;
System.Globalization;
Orchard.ContentManagement;
Orchard.ContentManagement.FieldStorage;
Orchard.Environment.Extensions;
namespace CustomFields.DateTimeField.Fields {
[OrchardFeature(``DateTimeField'')]
public class DateTimeField : ContentField {
public DateTime? DateTime {
get {
var value = Storage.Get<string>();
DateTime parsedDateTime;
if (System.DateTime.TryParse(value, CultureInfo.InvariantCulture,
DateTimeStyles.AdjustToUniversal, out parsedDateTime)) {
return parsedDateTime;
}
return null;
}
set {
Storage.Set(value == null ?
String.Empty :
value.Value.ToString(CultureInfo.InvariantCulture));
}
3.9. Extending Orchard
371
Read the Docs Template Documentation, Release 1.9.2
}
}
}
The field is defined as a class that derives from ContentField, which gives us a few services for free, such as the
storage of the value of the field. The fields will be stored as strings. The conversion of dates to and from strings could
be handled automatically, but we are doing it explicitly here to give a good idea of how you would do things for more
complex field types.
Creating a View Model
It is good practice (although not mandatory) to create one or several view models that will be used as the model in
the admin template that we will use to render instances of our field. Let’s create the following DateTimeFieldViewModel.cs file in a new ViewModels folder:
namespace CustomFields.DateTimeField.ViewModels {
public class DateTimeFieldViewModel {
public string Name { get; set; }
public string Date { get; set; }
public string Time { get; set; }
public bool ShowDate { get; set; }
public bool ShowTime { get; set; }
}
}
This not only exposes the date and time as separate properties, it also has some parameters that can be passed into the
view to customize the rendering.
Creating Settings for the Field
This flexibility in rendering that we just introduced in the view model can be exposed as settings for the field. This
way, administrators can configure fields on the content types they create in order to adapt them to their exact needs.
Create a Settings folder and add the following DateTimeFieldSettings.cs file to it:
namespace CustomFields.DateTimeField.Settings {
public enum DateTimeFieldDisplays {
DateAndTime,
DateOnly,
TimeOnly
}
public class DateTimeFieldSettings {
public DateTimeFieldDisplays Display { get; set; }
}
}
We have defined here an enumeration describing the possible values of our display setting, which is the only setting
for the field. The settings class itself is just an ordinary class with one property typed with that enumeration.
372
Chapter 3. Documentation
Read the Docs Template Documentation, Release 1.9.2
Writing the Driver
Exactly like a part, a field has a driver that will be responsible for handling display and editing actions on the field
when it’s been added to a content type.
Create a Drivers folder and add the following DateTimeFieldDriver.cs:
using
using
using
using
using
using
using
using
using
System;
JetBrains.Annotations;
Orchard;
Orchard.ContentManagement;
Orchard.ContentManagement.Drivers;
CustomFields.DateTimeField.Settings;
CustomFields.DateTimeField.ViewModels;
Orchard.ContentManagement.Handlers;
Orchard.Localization;
namespace CustomFields.DateTimeField.Drivers {
[UsedImplicitly]
public class DateTimeFieldDriver : ContentFieldDriver<Fields.DateTimeField> {
public IOrchardServices Services { get; set; }
// EditorTemplates/Fields/Custom.DateTime.cshtml
private const string TemplateName = ``Fields/Custom.DateTime'';
public DateTimeFieldDriver(IOrchardServices services) {
Services = services;
T = NullLocalizer.Instance;
}
public Localizer T { get; set; }
private static string GetPrefix(ContentField field, ContentPart part) {
// handles spaces in field names
return (part.PartDefinition.Name + ''.'' + field.Name)
.Replace('' '', ``_'');
}
protected override DriverResult Display(
ContentPart part, Fields.DateTimeField field,
string displayType, dynamic shapeHelper) {
var settings = field.PartFieldDefinition.Settings
.GetModel<DateTimeFieldSettings>();
var value = field.DateTime;
return ContentShape(``Fields_Custom_DateTime'', // key in Shape Table
field.Name, // used to differentiate shapes in placement.info overrides
// this is the actual Shape which will be resolved
// (Fields/Custom.DateTime.cshtml)
s =>
s.Name(field.Name)
.Date(value.HasValue ?
value.Value.ToLocalTime().ToShortDateString() :
String.Empty)
3.9. Extending Orchard
373
Read the Docs Template Documentation, Release 1.9.2
.Time(value.HasValue ?
value.Value.ToLocalTime().ToShortTimeString() :
String.Empty)
.ShowDate(
settings.Display == DateTimeFieldDisplays.DateAndTime ||
settings.Display == DateTimeFieldDisplays.DateOnly)
.ShowTime(
settings.Display == DateTimeFieldDisplays.DateAndTime ||
settings.Display == DateTimeFieldDisplays.TimeOnly)
);
}
protected override DriverResult Editor(ContentPart part,
Fields.DateTimeField field,
dynamic shapeHelper) {
var settings = field.PartFieldDefinition.Settings
.GetModel<DateTimeFieldSettings>();
var value = field.DateTime;
if (value.HasValue) {
value = value.Value.ToLocalTime();
}
var viewModel = new DateTimeFieldViewModel {
Name = field.Name,
Date = value.HasValue ?
value.Value.ToLocalTime().ToShortDateString() : ``'',
Time = value.HasValue ?
value.Value.ToLocalTime().ToShortTimeString() : ``'',
ShowDate =
settings.Display == DateTimeFieldDisplays.DateAndTime ||
settings.Display == DateTimeFieldDisplays.DateOnly,
ShowTime =
settings.Display == DateTimeFieldDisplays.DateAndTime ||
settings.Display == DateTimeFieldDisplays.TimeOnly
};
return ContentShape(``Fields_Custom_DateTime_Edit'',
() => shapeHelper.EditorTemplate(
TemplateName: TemplateName,
Model: viewModel,
Prefix: GetPrefix(field, part)));
}
protected override DriverResult Editor(ContentPart part,
Fields.DateTimeField field,
IUpdateModel updater,
dynamic shapeHelper) {
var viewModel = new DateTimeFieldViewModel();
if (updater.TryUpdateModel(viewModel,
374
Chapter 3. Documentation
Read the Docs Template Documentation, Release 1.9.2
GetPrefix(field, part), null, null)) {
DateTime value;
var settings = field.PartFieldDefinition.Settings
.GetModel<DateTimeFieldSettings>();
if (settings.Display == DateTimeFieldDisplays.DateOnly) {
viewModel.Time = DateTime.Now.ToShortTimeString();
}
if (settings.Display == DateTimeFieldDisplays.TimeOnly) {
viewModel.Date = DateTime.Now.ToShortDateString();
}
if (DateTime.TryParse(
viewModel.Date + '' '' + viewModel.Time, out value)) {
field.DateTime = value.ToUniversalTime();
}
else {
updater.AddModelError(GetPrefix(field, part),
T(``{0} is an invalid date and time'',
field.Name));
field.DateTime = null;
}
}
return Editor(part, field, shapeHelper);
}
protected override void Importing(ContentPart part, Fields.DateTimeField field,
ImportContentContext context) {
var importedText = context.Attribute(GetPrefix(field, part), ``DateTime'');
if (importedText != null) {
field.Storage.Set(null, importedText);
}
}
protected override void Exporting(ContentPart part, Fields.DateTimeField field,
ExportContentContext context) {
context.Element(GetPrefix(field, part))
.SetAttributeValue(``DateTime'', field.Storage.Get<string>(null));
}
}
}
Let’s enumerate a few things we’re doing in this code in order to explain how it works.
The driver derives from ContentFieldDriver<DateTimeField> in order to be recognized by Orchard and to
give strongly-typed access to the field value from the driver’s code.
We start by injecting the localizer dependency (the T property) so that we can create localizable strings throughout the
code.
The static GetPrefix method is a conventionally defined method that is used to create unique column names in the
database for instances of the field type.
3.9. Extending Orchard
375
Read the Docs Template Documentation, Release 1.9.2
We then have two actions, Display and Editor, which start by fetching the settings and value for the field
and build shapes out of them.
Note: The UsedImplicitly attribute is only here to suppress a warning from Resharper. It could be
removed without much harm.
The shapeHelper object provides some helper methods to create shapes, two of which can be seen in action here.
The second Editor method is the one that is called when the admin form is submitted. Its job is to map the submitted
data back into the field and then to call the first Editor method to render the editor on the screen again.
Writing the Templates
We need to write the views that will determine how our field is represented in admin and front-end UI.
Create a Fields and an EditorTemplates directory under Views. Then create another Fields directory under EditorTemplates. In Views/Fields, create the following Custom.DateTime.cshtml:
<p class=''text-field''><span class=''name''>@Model.Name:</span>
@if(Model.ShowDate) { <text>@Model.Date</text> }
@if(Model.ShowTime) { <text>@Model.Time</text> }
</p>
This code renders the name of the field, a colon and then the date and time according to the field’s configuration.
Now create a file of the same name under Views/EditorTemplates/Fields with the following contents:
@model CustomFields.DateTimeField.ViewModels.DateTimeFieldViewModel
@{
Style.Include(``datetime.css'');
Style.Require(``jQueryUI_DatePicker'');
Style.Require(``jQueryUtils_TimePicker'');
Style.Require(``jQueryUI_Orchard'');
Script.Require(``jQuery'');
Script.Require(``jQueryUtils'');
Script.Require(``jQueryUI_Core'');
Script.Require(``jQueryUI_Widget'');
Script.Require(``jQueryUI_DatePicker'');
Script.Require(``jQueryUtils_TimePicker'');
}
<fieldset>
<label for=''@Html.FieldIdFor(m => Model.Date)''>@Model.Name</label>
@if ( Model.ShowDate ) {
<label class=''forpicker''
for=''@Html.FieldIdFor(m => Model.Date)''>@T(``Date'')</label>
<span class=''date''>@Html.EditorFor(m => m.Date)</span>
}
@if ( Model.ShowTime ) {
<label class=''forpicker''
for=''@Html.FieldIdFor(m => Model.Time)''>@T(``Time'')</label>
<span class=''time''>@Html.EditorFor(m => m.Time)</span>
}
376
Chapter 3. Documentation
Read the Docs Template Documentation, Release 1.9.2
@if(Model.ShowDate) { <text>@Html.ValidationMessageFor(m=>m.Date)</text> }
@if(Model.ShowTime) { <text>@Html.ValidationMessageFor(m=>m.Time)</text> }
</fieldset>
@using(Script.Foot()) {
<script type=''text/javascript''>
$(function () {
$(``#@Html.FieldIdFor(m => Model.Date)'').datepicker();
$(``#@Html.FieldIdFor(m => Model.Time)'').timepickr();
});
</script>
}
This template is registering a few styles and scripts (note that if other parts register the same files, they will still be
rendered only once). Then, it defines the editor as a date picker and a time picker according to the field’s configuration.
The fields are regular text boxes that are unobtrusively enriched by date and time pickers using jQuery UI plug-ins.
To specify the order and location where these templates will be rendered within the composed page, we need to add a
placement.info file into the root of the module’s directory:
<Placement>
<Place Fields_Custom_DateTime_Edit=''Content:2.5''/>
<Place Fields_Custom_DateTime=''Content:2.5''/>
</Placement>
Managing the Field Settings
We are not quite done yet. We still need to take care of managing and persisting the settings for the field.
Add the following DateTimeFieldEditorEvents.cs file to the Settings folder:
using
using
using
using
using
using
System.Collections.Generic;
Orchard.ContentManagement;
Orchard.ContentManagement.MetaData;
Orchard.ContentManagement.MetaData.Builders;
Orchard.ContentManagement.MetaData.Models;
Orchard.ContentManagement.ViewModels;
namespace CustomFields.DateTimeField.Settings {
public class DateTimeFieldEditorEvents : ContentDefinitionEditorEventsBase {
public override IEnumerable<TemplateViewModel>
PartFieldEditor(ContentPartFieldDefinition definition) {
if (definition.FieldDefinition.Name == ``DateTimeField'') {
var model = definition.Settings.GetModel<DateTimeFieldSettings>();
yield return DefinitionTemplate(model);
}
}
public override IEnumerable<TemplateViewModel> PartFieldEditorUpdate(
ContentPartFieldDefinitionBuilder builder, IUpdateModel updateModel) {
var model = new DateTimeFieldSettings();
if (builder.FieldType != ``DateTimeField'') {
yield break;
}
3.9. Extending Orchard
377
Read the Docs Template Documentation, Release 1.9.2
if (updateModel.TryUpdateModel(
model, ``DateTimeFieldSettings'', null, null)) {
builder.WithSetting(``DateTimeFieldSettings.Display'',
model.Display.ToString());
}
yield return DefinitionTemplate(model);
}
}
}
This is the equivalent of a driver, but for field settings. The first method gets the settings and determines the template
to render, and the second updates the model with the values from the submitted form and then calls the first.
The editor template for the field is defined by the following DateTimeFieldSettings.cshtml that you should create in
a new DefinitionTemplates folder under Views:
@model CustomFields.DateTimeField.Settings.DateTimeFieldSettings
@using CustomFields.DateTimeField.Settings;
<fieldset>
<label for=''@Html.FieldIdFor(m => m.Display)''
class=''forcheckbox''>@T(``Display options'')</label>
<select id=''@Html.FieldIdFor(m => m.Display)''
name=''@Html.FieldNameFor(m => m.Display)''>
@Html.SelectOption(DateTimeFieldDisplays.DateAndTime,
Model.Display == DateTimeFieldDisplays.DateAndTime,
T(``Date and time'').ToString())
@Html.SelectOption(DateTimeFieldDisplays.DateOnly,
Model.Display == DateTimeFieldDisplays.DateOnly,
T(``Date only'').ToString())
@Html.SelectOption(DateTimeFieldDisplays.TimeOnly,
Model.Display == DateTimeFieldDisplays.TimeOnly,
T(``Time only'').ToString())
</select>
@Html.ValidationMessageFor(m => m.Display)
</fieldset>
This template creates a label for the setting and then a drop-down that enables the site administrator to pick one of the
options for the setting.
Updating the Project File
If you are using Visual Studio, you should skip this section as your project file has already been updated, provided you
saved all (CTRL+SHIFT+S). Otherwise, in order for the Orchard dynamic compilation engine to be able to pick up
our new module’s cs files, we need to add them to the CustomFields.csproj file.
Find the <Content Include="Properties\AssemblyInfo.cs"/> line in CustomFields.csproj. If you
look at it then you will see that this is inside an <ItemGroup> element. After that end </ItemGroup> for that
section add in this code:
<ItemGroup>
<Compile Include=''Drivers\DateTimeFieldDriver.cs'' />
<Compile Include=''Fields\DateTimeField.cs'' />
378
Chapter 3. Documentation
Read the Docs Template Documentation, Release 1.9.2
<Compile Include=''Settings\DateTimeFieldEditorEvents.cs'' />
<Compile Include=''Settings\DateTimeFieldSettings.cs'' />
<Compile Include=''ViewModels\DateTimeFieldViewModel.cs'' />
</ItemGroup>
Adding the Style Sheet
Create a Styles directory and create the following datetime.css:
html.dyn label.forpicker {
display:none;
}
html.dyn input.hinted {
color:#ccc;
font-style:italic;
}
.date input{
width:10em;
}
.time input {
width:6em;
}
Using the Field
In order to be able to use the new field, you must first make sure that the Orchard.ContentTypes feature is enabled.
Also enable our new DateTimeField feature under Fields. Once it is, you can click on Manage content types in the
admin menu. Click Create new type and give it the name “Event”. Click Add next to fields and type in “When” as
the name of the field. Select our new DateTime field type as the type of the field.
Now in the type editor, you should see our new When field, and you should be able to deploy its settings section by
clicking the “ > ” on its left:
3.9. Extending Orchard
379
Read the Docs Template Documentation, Release 1.9.2
We chose to keep both date
and time displayed. The settings for the field are also the opportunity to determine where the field will appear on the
front end if you want to override the defaults. Let’s skip that for now. Add the Route part so that our events can have
a title, then hit Save.
We can now add a new event by clicking Create Event in the admin menu. The editor that gets created for us has a
when field with nice date and time pickers:
380
Chapter 3. Documentation
Read the Docs Template Documentation, Release 1.9.2
Create an event and save it. You can now view it on the site:
Getting the Code
Download the code here: CustomFields.zip. The code is also hosted on http://orcharddatetimefield.codeplex.com/.
3.9.9 Packaging and Sharing a Module
After developing a module extension to Orchard, you probably want to share it with others. Orchard provides a module
packaging feature that can be used to create a package file containing your module. To enable this feature, visit the
“Features” section of the Orchard admin panel and enable the “Orchard.Packaging” feature.
Alternatively, you can enable the Orchard.Packaging feature from the Orchard command-line. To do this, run
bin\orchard.exe from the root of your Orchard installation, or the root of the Orchard.Web project if you are running against a source enlistment.
orchard> feature enable Orchard.Packaging
When the Orchard.Packaging feature is enabled, the Orchard command-line tool supports additional commands that
can be used to create a package (.nupkg file) from any module in your Orchard installation, and to install a new module
from a packaged .nupkg file.
package create <extensionName> <path>
Create a package for the extension <extensionName>
(an extension being a module or a theme).
The package will be output at the <path> specified.
The default filename is Orchard.[Module|Theme].<extensionName>.<extensionVersion>.nupkg
3.9. Extending Orchard
381
Read the Docs Template Documentation, Release 1.9.2
For example, ``package create SampleModule c:\temp'' will create the package
``c:\temp\Orchard.Module.SampleModule.1.0.0.nupkg''.
package install <packageId> <location> /Version:<version>
Install a module or a theme from a package file.
package uninstall <packageId>
Uninstall a module or a theme.
The <packageId> should take the format Orchard.[Module|Theme].<extensionName>.
For example, ``package uninstall Orchard.Module.SampleModule'' will uninstall the Modul
``package uninstall Orchard.Theme.SampleTheme'' will uninstall the Theme under the ``~/
user create /UserName:<username> /Password:<password> /Email:<email>
Creates a new User
By running the “package create” command, you can create a zip file of a module.
orchard> package create Lucene C:\Temp
Package ``C:\Temp\Orchard.Module.Lucene.1.0.0.nupkg'' successfully created
Orchard uses the NuGet packaging format to create module packages (basically .zip files with extra metadata information about your package). NuGet is based on the OPC packaging format, which you can learn more about at
http://en.wikipedia.org/wiki/Open_Packaging_Conventions.
Once you’ve created a module package, you can share it easily with others. Orchard provides the ability to browse
and install a module from the “Modules” section of the Orchard admin panel. Refer to the Installing and upgrading
modules topic for more details.
Additionally, Orchard provides a Gallery feature that can register one or more gallery feeds of module extensions
(OData format). Users can easily install modules from any registered feed. A default gallery feed is exposed from this
website, at http://packages.orchardproject.net/FeedService.svc. For more information, refer to the [Module gallery
feeds](Module gallery feeds) topic.
You can visit the Gallery admin panel menu to browse and install available modules and themes online. The
http://gallery.orchardproject.net/ website provides a browsable front-end for finding and downloading available modules and themes too.
You can easily upload your custom module package to our Galllery website to share it with other Orchard users.
Register an account and contribute your module here.
3.9.10 Writing a Widget
This guide has been marked for review. If you are just getting started with Orchard module development
you should read the Getting Started with Modules course first. It will introduce you to building modules
with Orchard using Visual Studio Community, a free edition of Visual Studio.
In Orchard, a widget is a piece of reusable UI that can be arbitrarily positioned on the pages of a web site. Examples
of widgets could include a tag cloud, a search form, or a Twitter feed. A widget is a content type, which enables you
to reuse existing code and UI.
This article describes how to write a widget by first creating a content part and then turning that part into a widget.
Creating a Content Part
For this example, you will use the Map part that is described in Writing a content part. If you did not create the Map
part, do so now.
382
Chapter 3. Documentation
Read the Docs Template Documentation, Release 1.9.2
Turning a Part into a Widget
To turn a content part into a widget, you must update the database with your widget’s type definition. You do this by
adding an UpdateFrom{version} method to the part’s Migrations.cs file.
The following example shows the Map part’s Migrations.cs file with the UpdateFrom1 method added.
using
using
using
using
using
System.Data;
Maps.Models;
Orchard.ContentManagement.MetaData;
Orchard.Core.Contents.Extensions;
Orchard.Data.Migration;
namespace Maps
{
public class Migrations : DataMigrationImpl
{
public int Create()
{
// Creating table MapRecord
SchemaBuilder.CreateTable(``MapRecord'', table => table
.ContentPartRecord()
.Column(``Latitude'', DbType.Single)
.Column(``Longitude'', DbType.Single)
);
ContentDefinitionManager.AlterPartDefinition(typeof(MapPart).Name, cfg => cfg
.Attachable());
return 1;
}
public int UpdateFrom1()
{
// Create a new widget content type with our map
ContentDefinitionManager.AlterTypeDefinition(``MapWidget'', cfg => cfg
.WithPart(``MapPart'')
.WithPart(``WidgetPart'')
.WithPart(``CommonPart'')
.WithSetting(``Stereotype'', ``Widget''));
return 2;
}
}
}
In this example, the UpdateFrom1 method creates MapWidget by combining MapPart, WidgetPart, and
CommonPart, and then setting the widget stereotype. The WidgetPart and CommonPart objects are built into
Orchard. The method returns 2, which is the new version number.
The part has now been transformed into a widget.
3.9. Extending Orchard
383
Read the Docs Template Documentation, Release 1.9.2
Displaying the Widget
After you create the new widget, open the Orchard Dashboard and click Widgets. You can then select the layer and
zone where you want to display the widget. The following image shows the Manage Widgets page.
384
Chapter 3. Documentation
Read the Docs Template Documentation, Release 1.9.2
3.9. Extending Orchard
385
Read the Docs Template Documentation, Release 1.9.2
For information about how to display your widget, see Managing Widgets.
Sharing Your Widget
To share the widget with others or to upload it to the widget gallery, you first need to package you widget to a module
.zip file. This is done the same way any module is packaged in Orchard. For information, see Packaging and sharing
a module.
3.9.11 Creating 1-N and N-N Relations
It is very common for contents to consist in part of lists or choices in lists. For example, an address can have a state
or region property where the value is one in a predefined list of choices. That is a 1-n relationship. A n-n relationship
could be for example a list of commercial rewards that a customer can benefit from. Orchard does of course provide
support for those scenarios. This topic is going to walk you through the creation of such contents.
Building a 1-N Relationship
The model that we’re going to build here consists of an Address part that can be attached for example to a Customer
content type. The address part has a street address, a zip code, a city name and a state. The state is what we are going
to model as a 1-n relationship to a table of states.
Note: this is clearly over-normalized, as a state in an address would usually be sufficiently well represented
by a simple two-letter state code. The UI can then take care of representing the choice of that code as a
constrained choice in a list of states. We are not claiming what we are building here is the correct way to
represent a state in an address, but that the process exposed here is representative of what you’d follow to
build a real-world 1-n association in Orchard.
Modeling the Address Part
Here is the code for the Address part:
using Orchard.ContentManagement;
namespace RelationSample.Models {
public class AddressPart : ContentPart<AddressPartRecord> {
public string Address {
get { return Retrieve(r => r.Address); }
set { Store(r => r.Address, value); }
}
public string City {
get { return Retrieve(r => r.City); }
set { Store(r => r.City, value); }
}
public StateRecord State {
get {
var rawStateRecord = Retrieve<string>(``StateRecord'');
return StateRecord.DeserializeStateRecord(rawStateRecord);
}
set {
var serializedStateRecord = StateRecord.SerializeStateRecord(value);
386
Chapter 3. Documentation
Read the Docs Template Documentation, Release 1.9.2
Store(``StateRecord'', serializedStateRecord);
}
}
public string Zip {
get { return Retrieve(r => r.Zip); }
set { Store(r => r.Zip, value); }
}
}
}
This uses stores the data in the infoset and in a database record. However you can only store simple datatypes in the
infoset so you can see that State field runs some extra code to encode the class into a string.
All properties in the AddressPart are proxies to the record properties:
using Orchard.ContentManagement.Records;
namespace RelationSample.Models {
public class AddressPartRecord : ContentPartRecord {
public virtual string Address { get; set; }
public virtual string City { get; set; }
public virtual StateRecord StateRecord { get; set; }
public virtual string Zip { get; set; }
}
}
The state record class itself has a two-letter code and a name. It also has methods to serialize and deserialize its data
into a string so that the AddressPart above can store its data in the infoset.
namespace RelationSample.Models {
public class StateRecord {
public virtual int Id { get; set; }
public virtual string Code { get; set; }
public virtual string Name { get; set; }
public static StateRecord DeserializeStateRecord(string rawStateRecord) {
if (rawStateRecord == null) {
return new StateRecord();
}
var stateRecordArray = rawStateRecord.Split(new[] { `,' });
return new StateRecord() {
Id = String.IsNullOrEmpty(stateRecordArray[0]) ? 0 : Int32.Parse(stateRecor
Code = stateRecordArray[1],
Name = stateRecordArray[2]
};
}
public static string SerializeStateRecord(StateRecord stateRecord) {
if(stateRecord == null) {
return ``'';
}
return String.Join('','', stateRecord.Id, stateRecord.Code, stateRecord.Name);
3.9. Extending Orchard
387
Read the Docs Template Documentation, Release 1.9.2
}
}
}
Here is a representation of what we just showed in code:
Creating the Database Tables and Part
The database structure for the model we just built can be created from a migration:
public int Create() {
SchemaBuilder.CreateTable(``AddressPartRecord'',
table => table
.ContentPartRecord()
.Column<string>(``Address'')
.Column<string>(``City'')
.Column<int>(``StateRecord_Id'')
.Column<string>(``Zip'')
);
SchemaBuilder.CreateTable(``StateRecord'',
table => table
.Column<int>(``Id'', column => column.PrimaryKey().Identity())
.Column<string>(``Code'', column => column.WithLength(2))
.Column<string>(``Name'')
);
388
Chapter 3. Documentation
Read the Docs Template Documentation, Release 1.9.2
ContentDefinitionManager.AlterPartDefinition(``AddressPart'',
builder => builder.Attachable());
return 1;
}
This migration creates an AddressPartRecord table that is a content part record (this gets us the default fields that
a content part needs). It adds columns for address, city and zip that are going to be auto-mapped to our record’s
properties.
The interesting column here is StateRecord_Id. As you can see, its type is the same as the type of the Id column of the
StateRecord class, because the system will be able to recognize this as a foreign key and to map that integer value to a
StateRecord property by just following the relation. It is important here that the name of the column that will represent
the relation is the name of the column on the “1” end of the relation, followed by an underscore and the name of the
column of the “n” end of the relation.
There is nothing remarkable on the StateRecord table: it’s just mapping Id to be the primary key and constraining the
Code column to be 2 characters long.
The last statement before the return in the migration is declaring the AddressPart and making it attachable. That will
enable us to attach it to any content type.
Populating the State Table
Note: this section is included for completeness of the sample code but is far from essential to understanding how to implement relationships in Orchard. Please consider it as sample data generation. If you’re
following along and want to import this data you can find code in the migrations.cs file. This is
included in the downloadable source code example link at the end of this guide.
Because the list of states is going to be relatively stable, I did not make them content items (although that would
be entirely possible with just a little more work). Instead, I’m populating the table with a list of states right in the
migration code. The migration class has a reference to the state repository:
private readonly IRepository<StateRecord> _stateRepository;
[...]
public RelationSampleDataMigration(IRepository<StateRecord> stateRepository) {
_stateRepository = stateRepository;
}
It also has the list of states to add to the database:
private readonly IEnumerable<StateRecord> _states =
new List<StateRecord> {
new StateRecord {Code = ``AL'', Name = ``Alabama''},
new StateRecord {Code = ``AK'', Name = ``Alaska''},
[...]
new StateRecord {Code = ``WS'', Name = ``Western Australia''},
};
The population of the table is done by the following code:
public int UpdateFrom1() {
if (_stateRepository == null)
throw new InvalidOperationException(``Couldn't find state repository.'');
foreach (var state in _states) {
_stateRepository.Create(state);
}
3.9. Extending Orchard
389
Read the Docs Template Documentation, Release 1.9.2
return 2;
}
The Address Part Handler
The handler for the address part is rather uninteresting and just wires up the repository:
using Orchard.Data;
using Orchard.ContentManagement.Handlers;
using RelationSample.Models;
namespace RelationSample.Handlers {
public class AddressPartHandler : ContentHandler {
public AddressPartHandler(IRepository<AddressPartRecord> repository) {
Filters.Add(StorageFilter.For(repository));
}
}
}
The Address Part Driver
The driver is more interesting as it prepares the shapes for rendering and handles posted back admin forms.
using
using
using
using
using
using
JetBrains.Annotations;
Orchard.ContentManagement;
Orchard.ContentManagement.Drivers;
RelationSample.Models;
RelationSample.Services;
RelationSample.ViewModels;
namespace RelationSample.Drivers {
[UsedImplicitly]
public class AddressPartDriver : ContentPartDriver<AddressPart> {
private readonly IAddressService _addressService;
private const string TemplateName = ``Parts/Address'';
public AddressPartDriver(IAddressService addressService) {
_addressService = addressService;
}
protected override string Prefix {
get { return ``Address''; }
}
protected override DriverResult Display(
AddressPart part,
string displayType,
dynamic shapeHelper) {
return ContentShape(``Parts_Address'',
() => shapeHelper.Parts_Address(
ContentPart: part,
Address: part.Address,
390
Chapter 3. Documentation
Read the Docs Template Documentation, Release 1.9.2
City: part.City,
Zip: part.Zip,
StateCode: part.State.Code,
StateName: part.State.Name));
}
protected override DriverResult Editor(
AddressPart part,
dynamic shapeHelper) {
return ContentShape(``Parts_Address_Edit'',
() => shapeHelper.EditorTemplate(
TemplateName: TemplateName,
Model: BuildEditorViewModel(part),
Prefix: Prefix));
}
protected override DriverResult Editor(
AddressPart part,
IUpdateModel updater,
dynamic shapeHelper) {
var model = new EditAddressViewModel();
if (updater.TryUpdateModel(model, Prefix, null, null))
{
if (part.ContentItem.Id != 0)
{
_addressService.UpdateAddressForContentItem(
part.ContentItem, model);
}
}
return Editor(part, shapeHelper);
}
private EditAddressViewModel BuildEditorViewModel(AddressPart part) {
var avm = new EditAddressViewModel {
Address = part.Address,
City = part.City,
Zip = part.Zip,
States = _addressService.GetStates()
};
if (part.State != null) {
avm.StateCode = part.State.Code;
avm.StateName = part.State.Name;
}
return avm;
}
}
}
When displaying on the front-end, we prepare a Parts_Address shape that has a reference to the original part (although
that is not necessary), all the part properties flattened out and the state is available as both a code and a name.
3.9. Extending Orchard
391
Read the Docs Template Documentation, Release 1.9.2
When in the admin UI, we build shapes with a statically-typed view model because these are still easier to use when
using form fields and MVC model binding. That view model, like the shape used on the front-end, has a flattened view
of the data that we need to display, but it also has a full list of all the available states, that the view will use to render
the state drop-down list:
using System.Collections.Generic;
using RelationSample.Models;
namespace RelationSample.ViewModels {
public class EditAddressViewModel {
public string Address { get; set; }
public string City { get; set; }
public string StateCode { get; set; }
public string StateName { get; set; }
public string Zip { get; set; }
public IEnumerable<StateRecord> States { get; set; }
}
}
The last thing to notice in the driver is that the Editor override that handles postbacks is just using
updater.TryUpdateModel(), which is enough to incorporate the submitted form values onto the view model.
This is followed by a call into the address service class which will update the actual content part data with the updated
model.
The Address Service Class
The address service class takes a dependency on the state repository in order to be able to query for the full list of
states. Its other method, UpdateAddressForContentItem, copies an EditAddressViewModel onto the address
content part of a content item. It does so by looking up a state record from the state repository using the state code
from the model.
using
using
using
using
using
using
using
System.Collections.Generic;
System.Linq;
Orchard;
Orchard.ContentManagement;
Orchard.Data;
RelationSample.Models;
RelationSample.ViewModels;
namespace RelationSample.Services {
public interface IAddressService : IDependency {
void UpdateAddressForContentItem(
ContentItem item, EditAddressViewModel model);
IEnumerable<StateRecord> GetStates();
}
public class AddressService : IAddressService {
private readonly IRepository<StateRecord> _stateRepository;
public AddressService(IRepository<StateRecord> stateRepository) {
_stateRepository = stateRepository;
}
public void UpdateAddressForContentItem(
ContentItem item,
392
Chapter 3. Documentation
Read the Docs Template Documentation, Release 1.9.2
EditAddressViewModel model) {
var addressPart = item.As<AddressPart>();
addressPart.Address = model.Address;
addressPart.City = model.City;
addressPart.Zip = model.Zip;
addressPart.State = _stateRepository.Get(
s => s.Code == model.StateCode);
}
public IEnumerable<StateRecord> GetStates() {
return _stateRepository.Table.ToList();
}
}
}
Building the Views
The Front-End View
The front-end view for the part is straightforward as it’s just displaying the properties of the shape:
<p class=''adr''>
<div class=''street-address''>@Model.Address</div>
<span class=''locality''>@Model.City</span>,
<span class=''region''>@Model.StateCode</span>
<span class=''postal-code''>@Model.Zip</span>
</p>
We are using the vcard microformat in this template so the address can get picked-up by consumers that understand
this format.
The Editor View
The editor view is also relatively straightforward, with just the editor for the state being of a little more interest:
@model RelationSample.ViewModels.EditAddressViewModel
<fieldset>
<legend>Address</legend>
<div class=''editor-label''>
@Html.LabelFor(model => model.Address, T(``Street Address''))
</div>
<div class=''editor-field''>
@Html.TextAreaFor(model => model.Address)
@Html.ValidationMessageFor(model => model.Address)
</div>
<div class=''editor-label''>
@Html.LabelFor(model => model.City, T(``City''))
</div>
<div class=''editor-field''>
@Html.TextBoxFor(model => model.City)
3.9. Extending Orchard
393
Read the Docs Template Documentation, Release 1.9.2
@Html.ValidationMessageFor(model => model.City)
</div>
<div class=''editor-label''>
@Html.LabelFor(model => model.StateCode, T(``State''))
</div>
<div class=''editor-field''>
@Html.DropDownListFor(model => model.StateCode,
Model.States.Select(s => new SelectListItem {
Selected = s.Code == Model.StateCode,
Text = s.Code + '' '' + s.Name,
Value = s.Code
}),
``Choose a state...'')
@Html.ValidationMessageFor(model => model.StateCode)
</div>
<div class=''editor-label''>
@Html.LabelFor(model => model.Zip, T(``Zip''))
</div>
<div class=''editor-field''>
@Html.TextBoxFor(model => model.Zip)
@Html.ValidationMessageFor(model => model.Zip)
</div>
</fieldset>
The DropDownListFor method takes an expression for the property to represent, and a list of SelectListItems that we
build on the fly from the complete list of states and what we know of the current state for that address (notice the
expression for Selected).
The Placement File
Finally, we need a placement file to determine the default position of our part within a larger content type:
<Placement>
<Place Parts_Address_Edit=''Content:10''/>
<Place Parts_Address=''Content:10''/>
</Placement>
Using the Address Part
We can now go into the “Features” admin page and enable the RelationSample feature under the Sample category.
Once this is done we can go to “Content Types” and create a new “Customer” content type. Add the Common and
Address parts, as well as a text field named “Name”.
394
Chapter 3. Documentation
Read the Docs Template Documentation, Release 1.9.2
We now have a new “Customer” menu entry under “New”, enabling us to create a new customer:
3.9. Extending Orchard
395
Read the Docs Template Documentation, Release 1.9.2
The customer can be displayed on the front-end as well.
396
Chapter 3. Documentation
Read the Docs Template Documentation, Release 1.9.2
Building an N-N Relationship
Building a n-n relationship in Orchard relies on the same principles as what we did for the 1-n relationship. The
main difference is that instead of having one foreign key on the part record, we have an intermediary object for the
relationship that has two foreign keys to the records. This is of course close to the way this is done in relational
databases.
In this section, we are going to build a part that can record an arbitrary number of associations with reward programs
for our customers.
Modeling the Rewards Part
The rewards part and its association with reward programs are modeled as follows:
3.9. Extending Orchard
397
Read the Docs Template Documentation, Release 1.9.2
The Rewards Part Record
The part record has just one property, the collection of rewards:
using System.Collections.Generic;
using Orchard.ContentManagement.Records;
namespace RelationSample.Models {
public class RewardsPartRecord : ContentPartRecord {
public RewardsPartRecord() {
Rewards = new List<ContentRewardProgramsRecord>();
}
public virtual IList<ContentRewardProgramsRecord> Rewards { get; set; }
}
}
398
Chapter 3. Documentation
Read the Docs Template Documentation, Release 1.9.2
The Rewards Part
The rewards part itself proxies the Rewards property to the record:
using System.Collections.Generic;
using System.Linq;
using Orchard.ContentManagement;
namespace RelationSample.Models {
public class RewardsPart : ContentPart<RewardsPartRecord> {
public IEnumerable<RewardProgramRecord> Rewards {
get {
return Record.Rewards.Select(r => r.RewardProgramRecord);
}
}
}
}
The Reward Program Record
Reward programs have a name and a discount rate:
namespace RelationSample.Models {
public class RewardProgramRecord {
public virtual int Id { get; set; }
public virtual string Name { get; set; }
public virtual double Discount { get; set; }
}
}
The Association Record
Finally, the association record has a reference to a reward part record and a reference to a reward program:
namespace RelationSample.Models {
public class ContentRewardProgramsRecord {
public virtual int Id { get; set; }
public virtual RewardsPartRecord RewardsPartRecord { get; set; }
public virtual RewardProgramRecord RewardProgramRecord { get; set; }
}
}
Creating the Database Tables and Record
Here is the migration:
public int UpdateFrom2() {
SchemaBuilder.CreateTable(``RewardsPartRecord'',
table => table
.ContentPartRecord()
);
SchemaBuilder.CreateTable(``RewardProgramRecord'',
3.9. Extending Orchard
399
Read the Docs Template Documentation, Release 1.9.2
table => table
.Column<int>(``Id'', column => column.PrimaryKey().Identity())
.Column<string>(``Name'')
.Column<double>(``Discount'')
);
SchemaBuilder.CreateTable(``ContentRewardProgramsRecord'',
table => table
.Column<int>(``Id'', column => column.PrimaryKey().Identity())
.Column<int>(``RewardsPartRecord_Id'')
.Column<int>(``RewardProgramRecord_Id'')
);
ContentDefinitionManager.AlterPartDefinition(
``RewardsPart'',
builder => builder.Attachable());
return 3;
}
This code creates the three tables we need to persist the three records that we just modeled. It also declares the
RewardsPart and makes it attachable.
As with addresses and states, you can see the convention for relations in action here: the columns for the association
record table are of type integer (the type of the id of each of the associated tables) and bears the name of the linked
table, an underscore and the name of the key column of the associated table.
Populating the Reward Program Table
Like we did with states, we pre-populate the reward program table from the migration class. In a real world scenario,
the rewards could be content items and you could have a specific management screen for them. There would be nothing
specific about that coming from the fact that these items happen to be at one end of a n-n relation.
private readonly IRepository<RewardProgramRecord> _rewardProgramRepository;
[...]
private readonly IEnumerable<RewardProgramRecord> _rewardPrograms =
new List<RewardProgramRecord> {
new RewardProgramRecord {Name = ``Senior'', Discount = 0.05},
new RewardProgramRecord {Name = ``Family'', Discount = 0.10},
new RewardProgramRecord {Name = ``Member'', Discount = 0.15},
};
[...]
public int UpdateFrom3() {
if (_rewardProgramRepository == null)
throw new InvalidOperationException(
``Couldn't find reward program repository.'');
foreach (var rewardProgram in _rewardPrograms) {
_rewardProgramRepository.Create(rewardProgram);
}
return 4;
}
400
Chapter 3. Documentation
Read the Docs Template Documentation, Release 1.9.2
The Reward Handler
There is nothing remarkable with the driver for this part, which is just wiring the repository:
using Orchard.Data;
using Orchard.ContentManagement.Handlers;
using RelationSample.Models;
namespace RelationSample.Handlers {
public class RewardsPartHandler : ContentHandler {
public RewardsPartHandler(IRepository<RewardsPartRecord> repository) {
Filters.Add(StorageFilter.For(repository));
}
}
}
The Reward Driver
The driver is also surprisingly unsurprising given the requirement to persist the n-n relationship:
using
using
using
using
using
using
using
System.Linq;
JetBrains.Annotations;
Orchard.ContentManagement;
Orchard.ContentManagement.Drivers;
RelationSample.Models;
RelationSample.Services;
RelationSample.ViewModels;
namespace RelationSample.Drivers {
[UsedImplicitly]
public class RewardsPartDriver : ContentPartDriver<RewardsPart> {
private readonly IRewardService _rewardService;
private const string TemplateName = ``Parts/Rewards'';
public RewardsPartDriver(IRewardService rewardService) {
_rewardService = rewardService;
}
protected override string Prefix {
get { return ``Rewards''; }
}
protected override DriverResult Display(
RewardsPart part,
string displayType,
dynamic shapeHelper) {
return ContentShape(``Parts_Rewards'',
() => shapeHelper.Parts_Rewards(
ContentPart: part,
Rewards: part.Rewards));
}
3.9. Extending Orchard
401
Read the Docs Template Documentation, Release 1.9.2
protected override DriverResult Editor(
RewardsPart part,
dynamic shapeHelper) {
return ContentShape(``Parts_Rewards_Edit'',
() => shapeHelper.EditorTemplate(
TemplateName: TemplateName,
Model: BuildEditorViewModel(part),
Prefix: Prefix));
}
protected override DriverResult Editor(
RewardsPart part,
IUpdateModel updater,
dynamic shapeHelper) {
var model = new EditRewardsViewModel();
updater.TryUpdateModel(model, Prefix, null, null);
if (part.ContentItem.Id != 0) {
_rewardService.UpdateRewardsForContentItem(
part.ContentItem, model.Rewards);
}
return Editor(part, shapeHelper);
}
private EditRewardsViewModel BuildEditorViewModel(RewardsPart part) {
var itemRewards = part.Rewards.ToLookup(r => r.Id);
return new EditRewardsViewModel {
Rewards = _rewardService.GetRewards().Select(
r => new RewardProgramEntry {
RewardProgram = r,
IsChecked = itemRewards.Contains(r.Id)
}).ToList()
};
}
}
}
Like with the address part, we are fetching all the reward programs and putting them on the editor view model for
the template to display as checkboxes. In BuildEditorViewModel, you can see that we build the current rewards as a
lookup and then use that to determine the checked state of each reward program.
Here is the editor view model:
using System.Collections.Generic;
using RelationSample.Models;
namespace RelationSample.ViewModels {
public class EditRewardsViewModel {
public IList<RewardProgramEntry> Rewards { get; set; }
}
public class RewardProgramEntry {
402
Chapter 3. Documentation
Read the Docs Template Documentation, Release 1.9.2
public RewardProgramRecord RewardProgram { get; set; }
public bool IsChecked { get; set; }
}
}
Note: we are making the assumption here that there are only a few reward programs. If you are modeling
a relationship with a large number of records on both sides of the relationship, the basic principles and
models exposed here still stand but you’ll have to adapt and optimize the code. In particular, using
checkboxes to select the associated records is the best UI solution for small numbers of records but it
won’t scale well to more than a few dozens of records. Instead, you’d probably need to use a search UI of
sorts and an Add/Remove pattern.
The Rewards Service
The rewards service is responsible for driving the relatively complex task of updating the database for the new values
for the relation:
using
using
using
using
using
using
using
System.Collections.Generic;
System.Linq;
Orchard;
Orchard.ContentManagement;
Orchard.Data;
RelationSample.Models;
RelationSample.ViewModels;
namespace RelationSample.Services {
public interface IRewardService : IDependency {
void UpdateRewardsForContentItem(
ContentItem item,
IEnumerable<RewardProgramEntry> rewards);
IEnumerable<RewardProgramRecord> GetRewards();
}
public class RewardService : IRewardService {
private readonly IRepository<RewardProgramRecord>
_rewardProgramRepository;
private readonly IRepository<ContentRewardProgramsRecord>
_contentRewardRepository;
public RewardService(
IRepository<RewardProgramRecord> rewardProgramRepository,
IRepository<ContentRewardProgramsRecord> contentRewardRepository) {
_rewardProgramRepository = rewardProgramRepository;
_contentRewardRepository = contentRewardRepository;
}
public void UpdateRewardsForContentItem(
ContentItem item,
IEnumerable<RewardProgramEntry> rewards) {
var record = item.As<RewardsPart>().Record;
var oldRewards = _contentRewardRepository.Fetch(
r => r.RewardsPartRecord == record);
3.9. Extending Orchard
403
Read the Docs Template Documentation, Release 1.9.2
var lookupNew = rewards
.Where(e => e.IsChecked)
.Select(e => e.RewardProgram)
.ToDictionary(r => r, r => false);
// Delete the rewards that are no longer there
// and mark the ones that should stay
foreach(var contentRewardProgramsRecord in oldRewards) {
if (lookupNew.ContainsKey(
contentRewardProgramsRecord.RewardProgramRecord)) {
lookupNew[contentRewardProgramsRecord.RewardProgramRecord]
= true;
}
else {
_contentRewardRepository.Delete(contentRewardProgramsRecord);
}
}
// Add the new rewards
foreach(var reward in lookupNew.Where(kvp => !kvp.Value)
.Select(kvp => kvp.Key)) {
_contentRewardRepository.Create(new ContentRewardProgramsRecord {
RewardsPartRecord = record,
RewardProgramRecord = reward
});
}
}
public IEnumerable<RewardProgramRecord> GetRewards() {
return _rewardProgramRepository.Table.ToList();
}
}
}
Note: again, this is designed for small numbers of reward programs. If you have larger models and
have adopted an Add/Remove pattern talked about in the previous note, the code for the service actually
becomes simpler as it executes lower-level operations that affect one program at a time rather than try to
synchronize the whole collection at once.
Building the Views
The Front-End View
The front-end view is just displaying the list of rewards as an unordered list:
<h4>@T(``Rewards''):</h4>
<ul>
@foreach (var reward in Model.Rewards) {
<li>@string.Format(``{0} ({1:P1})'', reward.Name,
}
</ul>
404
-reward.Discount)</li>
Chapter 3. Documentation
Read the Docs Template Documentation, Release 1.9.2
The Editor View
The editor view is a little more remarkable:
@model RelationSample.ViewModels.EditRewardsViewModel
<fieldset><legend>@T(``Rewards'')</legend>
<ul>
@{
var rewardIndex = 0;
}
@foreach (var reward in Model.Rewards) {
<li><input type=''hidden'' value=''@reward.RewardProgram.Id''
name=''@Html.FieldNameFor(m => m.Rewards[rewardIndex].RewardProgram.Id)''/>
<label for=''@Html.FieldNameFor(m => m.Rewards[rewardIndex].IsChecked)''>
<input type=''checkbox'' value=''true''
name=''@Html.FieldNameFor(m => m.Rewards[rewardIndex].IsChecked)''
id=''@Html.FieldNameFor(m => m.Rewards[rewardIndex].IsChecked)''
@if (reward.IsChecked) {<text>checked=''checked''</text>}/>
@string.Format(``{0} ({1:P1})'',
reward.RewardProgram.Name,
-reward.RewardProgram.Discount))
</label>
@{rewardIndex++;}
</li>
}
</ul>
</fieldset>
Notice how the check-boxes use Html.FieldNameFor. This will ensure that they will have a name that the model binder
will be able to understand and correctly bind when it is posted back.
Also noticeable is the hidden input, which is a standard workaround for the peculiar way in which HTML check-boxes
don’t post anything when not checked. The model binder knows how to use the information for both the hidden input
and the check-box to determine the Boolean values to set.
Of course, any variation from that naming scheme would make the binding fail.
The Placement File
For the parts to appear at all in the UI, we need to update our placement.info file:
<Placement>
<Place Parts_Address_Edit=''Content:10''/>
<Place Parts_Address=''Content:10''/>
<Place Parts_Rewards_Edit=''Content:11''/>
<Place Parts_Rewards=''Content:11''/>
</Placement>
Using the Rewards Part
If you haven’t used the application’s admin UI since you wrote the migration, it should now warn you that a feature
needs to be upgraded. That is our sample feature, as the system noticed the latest executed migration does not match
the highest available. Go to the features screen, locate the RelationSample and click “Update”.
3.9. Extending Orchard
405
Read the Docs Template Documentation, Release 1.9.2
In order to use the new part on our customer content items, we need to add it to the type. Go to the “Content Types”
screen and click “Edit” next to “Customer”. Click “Add” next to “Parts”, check the Rewards part and save.
If you go back to an existing customer’s edit screen or create a new one, you’ll see a screen such as this:
406
Chapter 3. Documentation
Read the Docs Template Documentation, Release 1.9.2
3.9. Extending Orchard
407
Read the Docs Template Documentation, Release 1.9.2
On the front-end, the customer now looks like this:
Building a Relation Between Content Items
Our third example will establish a relation between content items, which is a step up from our previous examples which
were establishing relations between records. Doing the same thing with items is not fundamentally very different, but
there are a couple of caveats that justify a specific example.
The example that we will build is a Sponsor part that records that a specific customer was sponsored by another.
Modeling the Sponsor Part
The Sponsor part will consist of a single Sponsor property. This time, we will use a lazy field so that its content only
gets fetched when it is needed.
using Orchard.ContentManagement;
using Orchard.Core.Common.Utilities;
namespace RelationSample.Models {
public class SponsorPart : ContentPart<SponsorPartRecord> {
private readonly LazyField<IContent> _sponsor = new LazyField<IContent>();
public LazyField<IContent> SponsorField { get { return _sponsor; } }
public IContent Sponsor {
get { return _sponsor.Value; }
set { _sponsor.Value = value; }
}
}
408
Chapter 3. Documentation
Read the Docs Template Documentation, Release 1.9.2
}
We will see how the lazy field gets set and populated when we look at the code for the handler.
The corresponding record is extremely simple:
using Orchard.ContentManagement;
using Orchard.ContentManagement.Records;
namespace RelationSample.Models {
public class SponsorPartRecord : ContentPartRecord {
public virtual ContentItemRecord Sponsor { get; set; }
}
}
Building the Database Table and Part
The migration for this part is as follows:
public int UpdateFrom4() {
SchemaBuilder.CreateTable(``SponsorPartRecord'',
table => table
.ContentPartRecord()
.Column<int>(``Sponsor_Id'')
);
ContentDefinitionManager.AlterPartDefinition(
``SponsorPart'', builder => builder.Attachable());
return 5;
}
We are in known territory here: the table uses the convention that we have already applied twice in the previous
examples, where the name of the column establishing the relation is the concatenation of the column names in both
records.
We also make the new SponsorPart attachable, as usual.
The Sponsor Handler
The handler is going to be a little more elaborate than usual, because of the use of lazy fields:
using
using
using
using
Orchard.ContentManagement;
Orchard.Data;
Orchard.ContentManagement.Handlers;
RelationSample.Models;
namespace RelationSample.Handlers {
public class SponsorPartHandler : ContentHandler {
private readonly IContentManager _contentManager;
public SponsorPartHandler(
IRepository<SponsorPartRecord> repository,
IContentManager contentManager) {
3.9. Extending Orchard
409
Read the Docs Template Documentation, Release 1.9.2
Filters.Add(StorageFilter.For(repository));
_contentManager = contentManager;
OnInitializing<SponsorPart>(PropertySetHandlers);
OnLoaded<SponsorPart>(LazyLoadHandlers);
}
void LazyLoadHandlers(LoadContentContext context, SponsorPart part) {
// add handlers that will load content just-in-time
part.SponsorField.Loader(() =>
part.Record.Sponsor == null ?
null : _contentManager.Get(part.Record.Sponsor.Id));
}
static void PropertySetHandlers(
InitializingContentContext context, SponsorPart part) {
// add handlers that will update records when part properties are set
part.SponsorField.Setter(sponsor => {
part.Record.Sponsor = sponsor == null
? null
: sponsor.ContentItem.Record;
return sponsor;
});
// Force call to setter if we had already set a value
if (part.SponsorField.Value != null)
part.SponsorField.Value = part.SponsorField.Value;
}
}
}
The storage filter is as usual setting up the repository of sponsor part records, but we also have OnInitializing and
OnLoaded event handlers that will respectively set-up the setter for the lazy field and the loader of the value that will
be executed the first time the field is accessed.
At loading time, we look at the record, and if there is a sponsor we get the full content item from the content manager
using the record’s id.
The lazy field setter just sets the underlying record’s Sponsor property.
The Driver
The driver is relying on the following view model:
using System.Collections.Generic;
using Orchard.ContentManagement;
using RelationSample.Models;
namespace RelationSample.ViewModels {
public class EditSponsorViewModel {
public int CustomerId { get; set; }
public int SponsorId { get; set; }
public IEnumerable<CustomerViewModel> Customers { get; set; }
}
410
Chapter 3. Documentation
Read the Docs Template Documentation, Release 1.9.2
public class CustomerViewModel {
public int Id { get; set;}
public string Name { get; set;}
}
}
Here is the code for the driver itself, which should by now seem very familiar:
using
using
using
using
using
using
using
System.Linq;
JetBrains.Annotations;
Orchard.ContentManagement;
Orchard.ContentManagement.Drivers;
RelationSample.Models;
RelationSample.Services;
RelationSample.ViewModels;
namespace RelationSample.Drivers {
[UsedImplicitly]
public class SponsorPartDriver : ContentPartDriver<SponsorPart> {
private readonly ICustomerService _customerService;
private const string TemplateName = ``Parts/Sponsor'';
public SponsorPartDriver(ICustomerService customerService) {
_customerService = customerService;
}
protected override string Prefix {
get { return ``Sponsor''; }
}
protected override DriverResult Display(
SponsorPart part, string displayType, dynamic shapeHelper) {
return ContentShape(``Parts_Sponsor'',
() => shapeHelper.Parts_Sponsor(
ContentPart: part,
Sponsor: part.Sponsor,
SponsorName: _customerService.GetCustomerName(part.Sponsor)
));
}
protected override DriverResult Editor(
SponsorPart part, dynamic shapeHelper) {
return ContentShape(``Parts_Sponsor_Edit'',
() => shapeHelper.EditorTemplate(
TemplateName: TemplateName,
Model: BuildEditorViewModel(part),
Prefix: Prefix));
}
protected override DriverResult Editor(
SponsorPart part, IUpdateModel updater, dynamic shapeHelper) {
3.9. Extending Orchard
411
Read the Docs Template Documentation, Release 1.9.2
var model = new EditSponsorViewModel();
updater.TryUpdateModel(model, Prefix, null, null);
if (part.ContentItem.Id != 0) {
_customerService.UpdateSponsorForContentItem(
part.ContentItem, model);
}
return Editor(part, shapeHelper);
}
private EditSponsorViewModel BuildEditorViewModel(SponsorPart part) {
var itemSponsor = new EditSponsorViewModel {
CustomerId = part.ContentItem.Id,
Customers = _customerService.GetCustomers()
};
if (part.Sponsor != null) {
itemSponsor.SponsorId = part.Sponsor.Id;
}
return itemSponsor;
}
}
}
The Service Class
The driver is also using the following helper service:
using
using
using
using
using
using
using
using
System;
System.Collections.Generic;
System.Linq;
Orchard;
Orchard.ContentManagement;
Orchard.Data;
RelationSample.Models;
RelationSample.ViewModels;
namespace RelationSample.Services {
public interface ICustomerService : IDependency {
void UpdateSponsorForContentItem(
ContentItem item, EditSponsorViewModel model);
string GetCustomerName(IContent customer);
IEnumerable<CustomerViewModel> GetCustomers();
}
public class CustomerService : ICustomerService {
private readonly IContentManager _contentManager;
public CustomerService(IContentManager contentManager) {
_contentManager = contentManager;
}
public void UpdateSponsorForContentItem(
ContentItem item, EditSponsorViewModel model) {
412
Chapter 3. Documentation
Read the Docs Template Documentation, Release 1.9.2
var sponsorPart = item.As<SponsorPart>();
sponsorPart.Sponsor = _contentManager.Get(model.SponsorId);
}
public string GetCustomerName(IContent customer) {
return customer.ContentItem.Parts
.SelectMany(p => p.Fields)
.Where(f => f.Name == ``Name'')
.First()
.Storage.Get<string>(null);
}
public IEnumerable<CustomerViewModel> GetCustomers() {
return _contentManager
.Query(``Customer'')
.List()
.Select(ci => new CustomerViewModel {
Id = ci.Id,
Name = GetCustomerName(ci)
});
}
}
}
The only notable thing here is the way we are assuming the content type has a “Name” field that we’ll use to build the
list of customers that will be used to build the UI to select the sponsor. The GetCustomerName is implementing this
assumption. Of course, you could also have a Customer part that has a Name property, or you could use Routable and
its Title.
Building the Views
The editor and front-end views should by now look fairly familiar:
@model RelationSample.ViewModels.EditSponsorViewModel
<fieldset>
<legend>Sponsor</legend>
<div class=''editor-field''>
@Html.DropDownListFor(model => model.SponsorId,
Model.Customers
.Where(c => c.Id != Model.CustomerId)
.Select(c => new SelectListItem {
Selected = c.Id == Model.SponsorId,
Text = c.Name,
Value = c.Id.ToString()
}),
``Choose a customer...'')
@Html.ValidationMessageFor(model => model.SponsorId)
</div>
</fieldset>
Note: Again, we are assuming a small number of customers. In a real scenario where there are too many
customers to be handled in a drop-down-list, it would be possible to adapt the code in this sample by
changing among other things the kind of UI that is used to select the sponsor customer.
3.9. Extending Orchard
413
Read the Docs Template Documentation, Release 1.9.2
The front-end view is as follows:
@if (Model.Sponsor != null) {
<text>Customer sponsored by @Model.SponsorName.</text>
}
Of course, the placement file also needs to be updated:
<Placement>
<Place Parts_Address_Edit=''Content:10''/>
<Place Parts_Address=''Content:10''/>
<Place Parts_Rewards_Edit=''Content:11''/>
<Place Parts_Rewards=''Content:11''/>
<Place Parts_Sponsor_Edit=''Content:12''/>
<Place Parts_Sponsor=''Content:12''/>
</Placement>
Using the Sponsor Part
We can now go back to the Customer type definition and add our new part. Now when we create a new customer, we
can choose his sponsor:
414
Chapter 3. Documentation
Read the Docs Template Documentation, Release 1.9.2
3.9. Extending Orchard
415
Read the Docs Template Documentation, Release 1.9.2
On the front-end, the sponsor now also appears:
Accessing NHibernate Configuration directly
For most relationships these conventions should create and auto-map your data model appropriately. However, for
more complex data models you may find that it’s necessary to access the NHibernate configuration directly in order to
appropriately map classes. You can do this by implementing the ISessionConfigurationEvents interface like so:
using
using
using
using
using
FluentNHibernate.Automapping;
FluentNHibernate.Cfg;
NHibernate.Cfg;
Orchard.Data;
Orchard.Utility;
namespace DataMapping.Example
{
public class Mappings : ISessionConfigurationEvents
{
public void Created(FluentConfiguration cfg, AutoPersistenceModel defaultModel)
{
//Many-to-many mapping example
defaultModel.Override<ClassA>(x => x.HasManyToMany(y => y.ClassB).Cascade.All()
.Table(``DataMapping_Example_ClassAClassBCrossReferenceTable''));
//One-to-One example
defaultModel.Override<ClassA>(x => x.HasOne(y => y.ClassB));
}
public void Prepared(FluentConfiguration cfg) {}
public void Building(Configuration cfg) {}
416
Chapter 3. Documentation
Read the Docs Template Documentation, Release 1.9.2
public void Finished(Configuration cfg) {}
public void ComputingHash(Hash hash) {}
}
}
Conclusion
This topic should show the way for the creation of complex content parts involving arbitrary data relations. There
is actually not much to it, as the system already knows how to persist and bind such complex objects. Rather, it’s a
matter of building the model according to the conventions in place.
You may download the code for this topic from this link: Orchard.Module.RelationSample.0.5.0.zip
3.9.12 Manifest Files for Modules and Themes
In the Orchard CMS, modules and themes are important tools for extending and customizing an application. Every
module and theme is required to have a manifest, which is a text file named module.txt or theme.txt that resides in the
root folder of the associated module or theme. A manifest stores metadata that Orchard uses to describe modules and
themes to the system, such as name, version, description, author, and tags.
This topic is a reference for manifest files. If you create a custom module or theme, or if you write code that accesses
modules or themes, you must understand the metadata fields in a manifest. The data in a manifest is structured into
name-value pairs in the form Field Name: Value.
The following sections describe the available fields in a manifest for themes and for modules. Because a theme is a
type of module, many of the same metadata fields occur in both theme manifests and module manifests.
Module manifest fields
The manifest for a module should be called module.txt and should be located in the root of the project.
A module’s manifest is made up of an overall description of the package itself and then an optional repeating section
describing each of the individual features.
The module can be comprised of a default single feature or a group of individually defined features. This allows
module developers to specify separate areas of the module and allow users to enable them on a per-feature basis.
Main module.txt fields
Some of the fields may be overridden if a module defines multiple features. These are detailed in the Features:
sub-section fields table below.
Field Name | Description —————— | ————————————————— Name | OptionalProvides a
human-readable name for a module.If a name is provided, it will be used as the module’s display name in the Orchard Gallery and in the Orchard UI.If a name is not provided in the manifest, the ID is used instead.Note: The ID
of a module is generated internally from the name of the module’s folder and is used for programmatic references to
the module. For example, if the module is located in /Modules/Bing.Maps/ its ID would be Bing.Maps. To
make things more friendly to the end user module developers should provide a name in the manifest such as Bing
Mapping Component or even Bing Maps (notice that the ”.” is removed). Path | OptionalProvides a name that
is used to build more readable URLs for routing purposes compared to URLs that are based on module names or ID
values.If a path is not provided, Orchard builds URLs based on the module’s name (if one is provided) or on the ID.
However, module names often have spaces, and ID values often have ”.” characters, neither of which result in very
3.9. Extending Orchard
417
Read the Docs Template Documentation, Release 1.9.2
readable URLs.For example, for the Orchard.ArchiveLater module, its name is Archive Later, and its ID
is Archive.Later. In the manifest, a path is provided with the value of ArchiveLater, which enables Orchard
to build a more readable URL than the module name or the ID would.Note: If specified, the Path must be a valid
URL segment. If you’re unsure what this means the best bet is to stick with letters and numbers with no spaces. AntiForgery | RequiredPossible values are enabled or disabled.A value that indicates whether request validation
is enabled for a module. Author | OptionalThe developer of the module.This can be an organization, individual, or
a list of individuals. Website | OptionalThe URL for the website of the module developer. Version | RequiredThe
version number of the module in SemVer format.The version information is displayed in the Orchard Gallery and in
the Orchard UI.It is also used to determine whether an update is available. OrchardVersion | RequiredThe minimum version of Orchard CMS that the module has been tested against. Description | OptionalA brief summary of
what the module does.The description is used in the Orchard Gallery and in the Orchard UI.Will be overridden by
the FeatureDescription field when present. Dependencies | Required if the feature has dependencies. If all
features are defined in the Features: subsection this field is not required.A comma-separated list of the application
Id values of all features that the specified feature depends on.Note: dependencies are case sensitive. Category |
OptionalDefaults to uncategorized.This field groups the module together in the Modules page of the Orchard admin
dashboard. Related modules which have the same category are displayed together. The category field can be assigned
one category. To aid in discoverability, module developers should review the Modules page of the Orchard admin
dashboard and choose a related category from existing categories. If a relevant category doesn’t exist modules can
freely define a new category within this field. Tags | OptionalA comma-separated lists of tags for the module.The
tags field allow users to find related modules in the Orchard Gallery. FeatureDescription | OptionalA description
of the default feature in a module.If the module has only a single feature, use either the FeatureDescription
or Description field to describe it. The FeatureDescription will override the Description field.If the
module has multiple features and one of the features is the default, use the FeatureDescription field to describe
the default feature. The FeatureDescription will override the Description field.If the module has multiple features and doesn’t define a default feature then leave this field out and follow the instructions in its description
down in the Features: table below. Features | OptionalA special repeating section of the manifest which allows
a module to define multiple features within a module.Supports several sub-fields as described by the table in the next
section.The features section should be placed at the end of the manifest.
Module.txt Features: sub-section fields
If a module provides multiple individual features within a single module then the repeating Features: sub-section
should be used. It allows module developers to specify separate manifest fields for each individual feature. These
individual features can then be enabled and disabled separately by end users.
The Features: field doesn’t have any assigned value. It is a placemarker field that indicates the beginning of a
repeating list of features.
Examples of the formatting to be used for this part of the manifest can be found in the next section.
Field Name | Description ———————- | ————————————————— FeatureId | RequiredBecause
the feature is already contained within the module ID module developers need to supply a unique ID for Orchard to use
internally as a reference.The FeatureId should take the form of the name of the feature with no punctuation and full
stops where spaces would be.This is a special field. The line must begin with either a single tab character
or four spaces. Immediately following this the Featured Id itself (the value not the field name) must be
entered, followed by a colon :. This serve as an indented header for the specification of the feature.Important: All
fields below must begin with either two tab characters or eight spaces. This indentation process resets
back to the left margin and the process repeats with the next feature. Examples of this are shown in the next section.
Name | OptionalProvides a human-readable name for the feature.If a name is provided, it will be used as the features
display name in the Modules section of the Orchard admin dashboard.If a name is not provided in the manifest, the
FeatureId is used instead. Description | OptionalA description of the feature. If this is the default feature of the
module use the FeatureDescription instead. FeatureDescription | OptionalEither the main manifest section
should define this field or a single feature in the features sub-section should assign this field.It should contain a description of the individual feature. Category | OptionalDefaults to uncategorized.This field groups the feature together
in the Modules page of the Orchard admin dashboard. Related features which have the same category are displayed
418
Chapter 3. Documentation
Read the Docs Template Documentation, Release 1.9.2
together.Each individual feature can be assigned one category, however the different features included in the module
may have each have their own category to move that feature into the most relevant area of the admin dashboard.To aid
in discoverability, module developers should prefer to review the Modules page of the Orchard admin dashboard and
choose a related category from existing categories. If a relevant category doesn’t exist modules can freely define a new
category within this field of the manifest. Dependencies | Required if the feature has dependenciesA comma-separated
list of the application Id values of all features that the specified feature depends on.Each individual feature should only
define its own dependencies. If all features are defined in the Features: subsection this main Dependencies
field is not required.Note: dependencies are case sensitive. Priority | OptionalThe default is 0 and higher priorities
will take precedence.Used by Orchard to determine how to resolve dependencies implementing a specific interface.
Module manifest examples
Listed below are the three different ways you can use the module manifest.
Single feature module
Name: Modules
AntiForgery: enabled
Author: The Orchard Team
Website: http://orchardproject.net
Version: 1.9.1
OrchardVersion: 1.9
Description: The Modules module enables the administrator of the site to manage the install
FeatureDescription: Standard module and feature management.
Dependencies: Orchard.ExampleModule, Orchard.AnotherModule
Category: Core
Multiple features with a default module in the main manifest The Orchard.Alias module itself (defined as Name:
Alias) is its own default feature. There are two extra optional features defined in the Features which can be
separately enabled. In this case they both have dependencies on their parent feature Orchard.Alias but module
developers can define independent features as well.
Name: Alias
AntiForgery: enabled
Author: The Orchard Team
Website: http://orchardproject.net
Version: 1.9.1
OrchardVersion: 1.9
Description: Maps friendly urls to specific module actions.
FeatureDescription: Maps friendly urls to specific module actions.
Category: Content
Features:
Orchard.Alias.UI:
Name: Alias UI
Description: Admin user interface for Orchard.Alias.
Dependencies: Orchard.Alias, Orchard.ExampleModule
Category: Content
Orchard.Alias.Updater:
Name: Alias Updater
Description: Synchronizes aliases when created from different servers.
Dependencies: Orchard.Alias
Category: Content
3.9. Extending Orchard
419
Read the Docs Template Documentation, Release 1.9.2
Multiple features all defined in the features sub-section of the manifest
Name: AntiSpam
AntiForgery: enabled
Author: The Orchard Team
Website: http://orchardproject.net
Version: 1.9.1
OrchardVersion: 1.9
Description: Provides anti-spam services to protect your content from malicious submissions
Features:
Orchard.AntiSpam:
Name: Anti-Spam
Description: Provides anti-spam services to protect your content from malicious sub
Category: Security
Dependencies: Orchard.Tokens, Orchard.jQuery
Akismet.Filter:
Name: Akismet Anti-Spam Filter
Description: Provides an anti-spam filter based on Akismet.
Category: Security
Dependencies: Orchard.AntiSpam
TypePad.Filter:
Name: TypePad Anti-Spam Filter
Description: Provides an anti-spam filter based on TypePad.
Category: Security
Dependencies: Orchard.AntiSpam
Notice the structure that is used for each feature described in the Features field. The FeatureId of the feature
is listed followed by a colon :. Then on a new line for each field, you can specify the other relevant fields including
Name, Description, Category and Dependencies.
For more information about how to create a module, including how to generate a manifest file and how to modify the
manifest, see these guides:
• Getting Started with Modules course
• Writing a Content Part
• Writing a Content Field
• Building a Hello World Module.
Theme manifest fields
A theme manifest can have the following fields:
Field Name | Description ———– | —————————————————- Name | Provides a human-readable
name for a theme that is an alternative to using the theme’s ID. The ID of a theme is the name of the theme’s folder
in the virtual base path (the default virtual base path is ~/Themes), and is used for programmatic references. For
example, for a theme whose ID is Orchard.Theme.Contoso, you might provide a name in the manifest such as
Contoso Theme. If you do not provide a name in the manifest, the ID is used instead. If you do provide a name, it
will be used as the theme’s display name in the Orchard Gallery and in the Orchard UI. Description | A brief summary
of a theme’s appearance and layout details. The description is used in the Orchard Gallery and in the Orchard UI.
Version | The version number of a theme. The version information is displayed in the Orchard Gallery and the Orchard
UI, and is also used to determine whether an update is needed. Author | The developer of a theme. This can be an
organization, individual, or a list of individuals. Website | The URL for the website of the theme developer. Tags | A
comma-separated lists of tags for the theme. The tags can be used to filter or group themes in a list. For example, a
custom online gallery of themes can provide the ability to filter and display themes by tag. Zones | A comma-separated
420
Chapter 3. Documentation
Read the Docs Template Documentation, Release 1.9.2
list of the Orchard zones that are used by a theme. These zones are displayed in the Orchard dashboard and can be
used to customize the layout of a site by adding, removing, or arranging widgets. BaseTheme | The ID of another
theme that this theme inherits from. This is an optional field. It is useful in cases where you want to customize an
existing theme by copying it and then making some changes in style and appearance. When you use this approach, add
the BaseTheme field to the manifest for the customized theme, and specify the Id of the base theme. For example,
if you customized the Contoso theme, you could add the line BaseTheme: Orchard.Theme.Contoso to the
manifest of your theme.
The following example shows the manifest for The Theme Machine theme, which is the default Orchard theme.
Name: The Theme Machine
Author: jowall, mibach, loudej, heskew
Description: Orchard Theme Machine is a flexible multi-zone theme that provides a solid fou
Version: 1.9.1
Tags: Awesome
Website: http://orchardproject.net
Zones: Header, Navigation, Featured, BeforeMain, AsideFirst, Messages, BeforeContent, Conte
For more information about how to write a theme, including how to generate and modify a manifest, see Writing
a New Theme. For information about how to customize an existing theme and then generate a manifest for it, see
Customizing Themes.
3.9.13 Caching
Here are the different levels of caching that Orchard can provide:
Application Settings Cache Using ICacheManager
This is used to store application settings and can be invalidated based on an extensible set of parameters. By default
you find expiration tokens based on time, file system and signals. This is a very powerful caching API but has one
drawback: it is not meant to provide farm invalidation, because it has not been designed for this purpose and should
not be used for data which is volatile. Using for settings is totally fine, like for Content Types, module settings, etc.
because those values must not change on a production farm. You never create a content type on production on a farm,
or you have to restart all nodes one after the other.
Another reason to use this module (and why it has been done) is that it is not dependent on memory pressure, so entries
won’t be removed if your system memory consumption grows, as opposed to the ASP.NET cache. All the other cache
providers are and must use memory pressure limits.
2nd Level NHibernate Caching
This is used to prevent recurring sql queries to the database.
Because the accessors are simple and well defined (checking a string in the dictionary), it’s safe to use it on a farm as
long as the data is store in a central repository, like using Memcached.
A simple Memcached provider for it is tricky as you need to configure the provider (location, port), and usually the
settings are best placed in the database, but it’s the chicken and egg issue and you can’t bootstrap it from a module.
The only solution is then to have the configuration for it inside the web.config, or maybe the settings.txt when it will
be extensible.
3.9. Extending Orchard
421
Read the Docs Template Documentation, Release 1.9.2
Output Caching Using Contrib.Cache
The goal of this module is to provide output caching like ASP.NET does, and to provide cache headers management
(max-age, Cache-Control, ETag). It was recently extended to be able to define the storage mechanism dynamically for
the cache data as distributed setups where more widely used. This is why there are two distributed storage provider,
one based on the Database and the other one based on Memcached.
Here is the set of related modules:
• http://orchardcache.codeplex.com/
• https://bitbucket.org/sebastienros/contrib.cache.database
• https://bitbucket.org/sebastienros/contrib.cache.memcached
Not a single Orchard website should go into production without this module. Not only does it improve responsiveness
but also throughput, and finally it frees your CPU from unneeded cycles. Using the Max Age setting you also enable
IIS Kernel caching plus public proxy cache which makes your application even faster. You can get thousands of
requests per seconds with a very small server.
Business Data Caching Using Orchard.Caching
Because of the limitations of the ICacheManager in terms of distributed caching, another set of modules was necessary
to cache business data which has to be shared across servers. This module can set and get entries by a key only, and
invalidate by name or time. This is the only requirement for storage providers in this module, which allows its usage
on farms.
This is implemented in:
• https://bitbucket.org/sebastienros/orchard.caching
• https://bitbucket.org/sebastienros/orchard.caching.memcached
Why Memcached ?
Implementing Memcached providers by default is done for a specific reason, which is that Azure Caching Services
are binary compatible with it. So this implementation works by default on both custom Memcached servers and also
Azure services.
3.9.14 Custom Site Settings
Sometimes you may need to persist some global settings (eg. license code, service login, default width etc.) to be
reused across your module. Orchard makes it really simple and I’ll show you how to do it.
Basically, there are two scopes you can define your settings in:
1. Site scope - for global site settings.
2. Content type scope - for settings common to all items of a given type (eg. a Page, a Blog, a BlogPost and so
on).
##Defining site scope settings (Orchard 1.8 Onwards)
Orchard 1.8 drastically simplifies creation of site settings, removing the previous need for “Part Records” and migration files. To create new site settings for your module you now only need three classes; A ContentPart, a
Handler and potentially a view file if you want the settings to be edited via the “Site Settings” area of Admin. For a
real world example look for the RegistrationSettingsPart, RegistrationSetttingsPartHandler
and Users.RegistrationSettings.cshtml files in the Orchard.Users module.
422
Chapter 3. Documentation
Read the Docs Template Documentation, Release 1.9.2
###The Content Part
public class ShareBarSettingsPart : ContentPart {
public string AddThisAccount {
get { return this.Retrieve(x=> x.AddThisAccount); }
set { this.Store(x=> x.AddThisAccount, value); }
}
}
###The Handler
[UsedImplicitly]
public class ShareBarSettingsPartHandler : ContentHandler {
public ShareBarSettingsPartHandler() {
T = NullLocalizer.Instance;
Filters.Add(new ActivatingFilter<ShareBarSettingsPart>(``Site''));
Filters.Add(new TemplateFilterForPart<ShareBarSettingsPart>(``ShareBarSettings'', `
}
public Localizer T { get; set; }
protected override void GetItemMetadata(GetContentItemMetadataContext context)
{
if (context.ContentItem.ContentType != ``Site'')
return;
base.GetItemMetadata(context);
context.Metadata.EditorGroupInfo.Add(new GroupInfo(T(``Modules'')));
}
}
###The View
@model Szmyd.Orchard.Modules.Sharing.Models.ShareBarSettingsPart
<fieldset>
<legend>@T(``Content sharing settigs'')</legend>
<div>
@Html.LabelFor(m => m.AddThisAccount, @T(``AddThis service account''))
@Html.EditorFor(m => m.AddThisAccount)
@Html.ValidationMessageFor(m => m.AddThisAccount, ``*'')
</div>
</fieldset>
Using site scope settings
Accessing your site setting is a simple one liner:
var shareSettings = _services.WorkContext.CurrentSite.As<ShareBarSettingsPart>();
Where _services is the IOrchardServices object (eg. injected in the constructor).
Defining site scope settings (Pre-Orchard 1.8)
Defining custom site scope settings for before Orchard 1.8 can be in Adding Custom Settings pre Orchard 1.8
3.9. Extending Orchard
423
Read the Docs Template Documentation, Release 1.9.2
Defining settings for Content Types
We’re now going to create settings and defaults wired with specific content type (like Page, User, Blog etc.).
This looks much different comparing to the previous one, but also requires less coding. There are just two classes
and one shape involved and that’s all. As before, we’ll use the simplified examples taken from the Orchard Sharing
project.
The goal:
“I want all of my Blog Posts to have ShareBar with the same look.”
Imagine that you’re writing posts via LiveWriter (like me). Do you want to log in and edit every post after publishing
just to change the share bar? I don’t. I want to have it defined upfront.
The first thing you have to do is to create a class holding your settings:
public class ShareBarTypePartSettings {
public ShareBarMode Mode { get; set; }
public IEnumerable<dynamic> AvailableModes { get; set; }
}
This class has one property - Mode, which holds the default mode for all ShareBarParts attached to some content items
of a given type. ShareBarMode is just an enum type defining the display modes. For the sake of brevity, I won’t
paste the code here. This could be any type you want. The second property is just used for the display purposes (holds
items for display in drop-down list), as this class is also used as a ViewModel. It is not being persisted.
The second class can be thought of as a kind of a driver for the settings. It’s not the Orchard ContentDriver we wrote
previously, but also it’s responsible for rendering the edit form and saving the posted data:
public class ShareBarSettingsHooks : ContentDefinitionEditorEventsBase {
public override IEnumerable<TemplateViewModel> TypePartEditor(
ContentTypePartDefinition definition) {
if (definition.PartDefinition.Name != ``ShareBarPart'') yield break;
var model = definition.Settings.GetModel<ShareBarTypePartSettings>();
model.AvailableModes = Enum.GetValues(typeof(ShareBarMode))
.Cast<int>()
.Select(i =>
new {
Text = Enum.GetName(typeof(ShareBarMode), i),
Value = i
});
yield return DefinitionTemplate(model);
}
public override IEnumerable<TemplateViewModel> TypePartEditorUpdate(
ContentTypePartDefinitionBuilder builder,
IUpdateModel updateModel) {
if (builder.Name != ``ShareBarPart'') yield break;
var model = new ShareBarTypePartSettings();
updateModel.TryUpdateModel(model, ``ShareBarTypePartSettings'', null, null);
builder.WithSetting(``ShareBarTypePartSettings.Mode'',
((int)model.Mode).ToString());
424
Chapter 3. Documentation
Read the Docs Template Documentation, Release 1.9.2
yield return DefinitionTemplate(model);
}
}
This class overrides the ContentDefinitionEditorEventsBase which defines two overridable methods:
TypePartEditor and TypePartEditorUpdate. The first one gets called when the edit form is being rendered
(GET) and the second one when the edit form data gets posted (POST). Unlike the generic content part drivers, this
class is not bound to the specific content type (as the content types are just a list of names for a collection of parts), so
each of the methods we just defined will be called for every content type and for every part. This is why the yield
break statement is used - to filter only the ones containing the part we need, ShareBarPart.
By convention, as shown in the TypePartEditorUpdate method, settings should be named as
<prefix>.<propertyName> when passing to builder.WithSetting(...), where prefix
is the string passed to the updateModel.TryUpdateModel.
Prefix can be anything, but has to be
unique.
Remember though, when you use string other than your settings class name, you cannot use
Settings.GetModel<Your_Settings_Type>() (as shown in the TypePartEditor method above). In
this case you have to use Settings.GetModel<Your_Settings_Type>(prefix) instead.
1. It should be considered best practice to use your settings class name as a prefix (as in the code above).
2. Settings are persisted within the content type definition in the db in the string form. You have to be sure that the
properties you define are convertible to and from the string representation.
Notice
the
usage
of
Enum.GetValues(typeof(someEnum)),
Enum.GetNames(typeof(someEnum)) and Enum.GetName(typeof(someEnum), i).
This methods get very useful when you want to iterate over the names/values of an enum.
If you’re done with the code above, there’s only one thing left: creating a .cshtml view (shape) to render our form.
Shapes defining edit forms for content type settings has to be placed under /Views/DefinitionTemplates/
with the name <settingsClassName>.cshtml. So in our case it’ll look like on the picture above. Inside, it’s
just like any other Razor view file:
@model Szmyd.Orchard.Modules.Sharing.Settings.ShareBarTypePartSettings
<fieldset>
<div>
@Html.LabelFor(m => m.Mode, T(``Share bar display style''))
@Html.DropDownListFor(m => m.Mode,
new System.Web.Mvc.SelectList(
Model.AvailableModes, ``Value'', ``Text'', (int)Model.Mode))
</div>
</fieldset>
This renders the dropdown list so user can choose one of the predefined Modes. Model.AvailableModes contains
the available ones: we populated the property with appropriate data in TypePartEditor method above.
Hooray, we’re done!
Now you possibly wonder, where will this edit form be shown? Orchard will render settings form when you’ll try to
edit the content type containing your part. The steps are like this: Content Types -> Edit the type you
want -> Add your part -> Voila! There is a nice arrow image next to your part. If you click it - the form
shows.
Using settings for content type
As for site-scoped settings, this section is also a one-liner. The part below is some content part (in this case a ShareBarPart from the Orchard Sharing project).
var typeSettings = part.Settings.GetModel<ShareBarTypePartSettings>();
3.9. Extending Orchard
425
Read the Docs Template Documentation, Release 1.9.2
You can retrieve and use the settings wherever you have access to your part (particularly in the driver Display/Editor
methods, but also shapes, handlers and so on). I used it in the ShareBarPart driver Display method to change the look
of a share bar part.
3.9.15 Web Api in Orchard
Web Api is available in Orchard. You can implement a web api to fit your needs in a custom module.
Creating Api Controllers
The process of creating an Api Controller in Orchard is very similar to how you would do so in a standard .NET Web
Api application. Create your controller class and have it inherit from ApiController:
namespace MyCustomModule.Controllers.Api{
public class MyApiController : ApiController{
public IHttpActionResult Get(){
var itemsList = new List<string>{
``Item 1'',
``Item 2'',
``Item 3''
};
return Ok(itemsList);
}
}
}
The above code sample will return the 3 item list shown in code when you hit the endpoint
“/api/MyCustomModule/MyApi”.
Declaring custom Api Routes
To generate more friendly Api routes, you follow a similar process to declaring custom MVC routes in Orchard.
Implement the IHttpRouteProvider interface like so:
namespace MyCustomModule {
public class ApiRoutes : IHttpRouteProvider {
public IEnumerable<RouteDescriptor> GetRoutes() {
return new RouteDescriptor[] {
new HttpRouteDescriptor {
Name = ``Default Api'',
Priority = 0,
RouteTemplate = ``api/myapi/{id}'',
Defaults = new {
area = ``MyCustomModule'',
controller = ``MyApi'',
id = RouteParameter.Optional
}
}
};
}
public void GetRoutes(ICollection<RouteDescriptor> routes) {
426
Chapter 3. Documentation
Read the Docs Template Documentation, Release 1.9.2
foreach (RouteDescriptor routeDescriptor in GetRoutes()) {
routes.Add(routeDescriptor);
}
}
}
}
Now, the Api endpoint can be reached by hitting “/api/myapi”.
Configuring Web Api in Orchard
Since Orchard doesn’t have the concept of an AppStart file, in order to add custom configuration to Web Api in
Orchard, you must do so in an Autofac module. For example, the following will set the default Web Api return type
to Json, and will ensure that Json objects/properties returned by the Api follow the camelCased naming convention.
namespace MyCustomModule {
public class WebApiConfig : Module {
protected override void Load(ContainerBuilder builder) {
GlobalConfiguration.Configuration.Formatters.JsonFormatter.SupportedMediaTypes.
var jsonFormatter = GlobalConfiguration.Configuration.Formatters.OfType<JsonMed
if (jsonFormatter != null) {
jsonFormatter.SerializerSettings.ContractResolver = new CamelCasePropertyNa
}
}
}
}
Conclusion
This document should provide the basics of getting started with Web Api in Orchard. Enjoy!
3.10 Working with Data
3.10.1 Understanding Data Access
This topic has been updated for the Orchard 1.9 release.
Data access in an Orchard project is different than data access in a traditional web application, because the data model
is built through code rather than through a database management system. You define your data properties in code and
the Orchard framework builds the database components to persist the data. If you need to change the data structure,
you write code that specifies the changes, and those changes are then propagated by that code to the database system.
This code-centric model includes layers of abstraction that permit you to reuse components in different content types
and to add or change behaviors without breaking other layers.
The key concepts of data access are the following:
• Records
• Data migrations
• Content handlers
• Content drivers
3.10. Working with Data
427
Read the Docs Template Documentation, Release 1.9.2
Records
A record is a class that represents the database schema for a content part. To create a record, you define a class that
derives from ContentPartRecord and add the properties that you need in order to store data for the content part.
Each property must be virtual. For example, a Map part might include the following record:
namespace Map.Models {
public class MapRecord : ContentPartRecord {
public virtual double Latitude { get; set; }
public virtual double Longitude { get; set; }
}
}
Typically, the record class resides in a folder named Models. The parent class, ContentPartRecord, also includes
a property named id and a reference to the content item object. Therefore, an instance of the MapRecord class
includes not just Latitude and Longitude but also the id property and the content item object that is used to
maintain the relationships between the part and other content.
When you define a content part, you use the record as shown below:
namespace Maps.Models
{
public class MapPart : ContentPart<MapRecord>
{
[Required]
public double Latitude
{
get { return Retrieve(r => r.Latitude); }
set { Store(r => r.Latitude, value); }
}
[Required]
public double Longitude
{
get { return Retrieve(r => r.Longitude); }
set { Store(r => r.Longitude, value); }
}
}
}
Notice that only data that’s relevant to the part is defined in the MapPart class. You do not define any properties that
are needed to maintain the data relationships between MapPart and other content.
For a complete example of the MapPart, see Writing a Content Part. You can also read the Getting Started with
Modules course to familiarize yourself with the overall concepts of module development.
Data Migrations
Creating the record class does not create the database table; it only creates a model of the schema. To create the
database table, you must write a data migration class.
A data migration class enables you to create and update the schema for a database table. The code in a migration
class is executed when an administrator chooses to enable or update the part. The update methods provide a history of
changes to the database schema. When an update is available, the site administrator can choose to run the update.
You can create a data migration class by running the following command from the Orchard command line:
codegen datamigration <feature_name>
428
Chapter 3. Documentation
Read the Docs Template Documentation, Release 1.9.2
This command creates a Migrations.cs file in the root of the feature. A Create method is automatically created in
the migration class.
In the Create method, you use the SchemaBuilder class to create the database table, as shown below for the
MapPart feature.
In the Uninstall method you can implement destructive operations that will be executed when the module is
uninstalled. Keep in mind that when a module is re-added and enabled after it was uninstalled it will be installed
again, thus the Create method of migrations will also run.
namespace Map.DataMigrations {
public class Migrations : DataMigrationImpl {
public int Create() {
// Creating table MapRecord
SchemaBuilder.CreateTable(``MapRecord'', table => table
.ContentPartRecord()
.Column(``Latitude'', DbType.Double)
.Column(``Longitude'', DbType.Double)
);
ContentDefinitionManager.AlterPartDefinition(
typeof(MapPart).Name, cfg => cfg.Attachable());
return 1;
}
public void Uninstall() {
// Dropping tables can potentially cause data loss for users so be sure to warn
SchemaBuilder.DropTable(``MapRecord'');
ContentDefinitionManager.DeletePartDefinition(typeof(MapPart).Name);
}
}
}
By including .ContentPartRecord() with your properties in the definition of the database schema, you ensure that other essential fields are included in the table. In this case, an id field is included with Latitude and
Longitude.
The return value is important, because it specifies the version number for the feature. You will use this version number
to update the schema.
You can update the database table by adding a method with the naming convention UpdateFromN, where N is the
number of the version to update. The following code shows the migration class with a method that updates version by
adding a new column.
namespace Map.DataMigrations {
public class Migrations : DataMigrationImpl {
public int Create() {
// Creating table MapRecord
SchemaBuilder.CreateTable(``MapRecord'', table => table
.ContentPartRecord()
.Column(``Latitude'', DbType.Double)
.Column(``Longitude'', DbType.Double)
);
3.10. Working with Data
429
Read the Docs Template Documentation, Release 1.9.2
ContentDefinitionManager.AlterPartDefinition(
typeof(MapPart).Name, cfg => cfg.Attachable());
return 1;
}
public int UpdateFrom1() {
SchemaBuilder.AlterTable(``MapRecord'', table => table
.AddColumn(``Description'', DbType.String)
);
return 2;
}
}
}
The update method returns 2, because after the column is added, the version number is 2. If you have to add another
update method, that method would be called UpdateFrom2().
After you add the update method and run the project the module will be silently & automatically upgraded.
Content Handlers
A content handler is similar to a filter in ASP.NET MVC. In the handler, you define actions for specific events. In a
simple content handler, you just define the repository of record objects for the content part, as shown in the following
example:
namespace Map.Handlers {
public class MapHandler : ContentHandler {
public MapHandler(IRepository<MapRecord> repository) {
Filters.Add(StorageFilter.For(repository));
}
}
}
In more advanced content handlers, you define actions that are performed when an event occurs, such as when the
feature is published or activated. For more information about content handlers, see Understanding Content Handlers.
Content Drivers
A content driver is similar to a controller in ASP.NET MVC. It contains code that is specific to a content part type
and is usually involved in creating data shapes for different conditions, such as display or edit modes. Typically, you
override the Display and Editor methods to return the ContentShapeResult object for your scenario.
For an example of using a content driver, see Accessing and Rendering Shapes.
This topic has been updated for the Orchard 1.9.1 release.
A content handler defines what happens with a content part in response to specific events, such as when the part is
activated. The content handler enables you to perform actions at particular moments in the lifecycle of the content
item. It also enables you to set up data repositories and manipulate the data model prior to rendering the content item.
Typically, you define a handler for a content part by creating a class that inherits from ContentHandler. The
ContentHandler class is a base class that provides the methods and properties you will commonly need when
defining your own content handler. Alternately, you can also create your own content handler by creating a class that
implements IContentHandler.
430
Chapter 3. Documentation
Read the Docs Template Documentation, Release 1.9.2
3.10.2 Defining Data Repository and Adding Filters
When working with a content part that persists data, add a constructor for the handler that accepts an IRepository
parameter for objects of the type you defined for records in the part. The following code shows a basic implementation
of a content handler. MapRecord is a class defined in a separate file.
using Map.Models;
using Orchard.ContentManagement.Handlers;
using Orchard.Data;
namespace Map.Handlers {
public class MapHandler : ContentHandler {
public MapHandler(IRepository<MapRecord> repository) {
Filters.Add(StorageFilter.For(repository));
}
}
}
You can add other types of filters to the content handler. For example, you can add an ActivatingFilter to the
Filters collection to define how the part is added to a type.
3.10.3 Built-in filter types
• StorageFilter class - Takes care of persisting the data from repository object to the database. Its usage
is shown in the example above.
• ActivatingFilter class - Attaches a part to a content type from code. As opposed to attaching parts via
migrations, parts attached using this filter will neither be displayed in the Dashboard, nor users will be able to
remove them from types. It’s a legitimate way of attaching parts that should always exist on a given content
type.
3.10.4 Lifecycle Events
In addition to defining the repository, you can add code for handling events. You use the following methods to add the
code that is executed for the event:
• OnActivated
• OnCreated
• OnCreating
• OnDestroyed
• OnDestroying
• OnGetContentItemMetadata
• OnGetDisplayShape
• OnGetEditorShape
• OnIndexed
• OnIndexing
• OnInitialized
• OnInitializing
3.10. Working with Data
431
Read the Docs Template Documentation, Release 1.9.2
• OnLoaded
• OnLoading
• OnPublished
• OnPublishing
• OnRemoved
• OnRemoving
• OnUpdated
• OnUpdateEditorShape
• OnUpdating
• OnUnpublished
• OnUnpublishing
• OnVersioned
• OnVersioning
For example, the TagPartHandler class contains code to take action for the Removed and Indexing events, as
shown in the following example:
public class TagsPartHandler : ContentHandler {
public TagsPartHandler(IRepository<TagsPartRecord> repository, ITagService tagService)
Filters.Add(StorageFilter.For(repository));
OnRemoved<TagsPart>((context, tags) =>
tagService.RemoveTagsForContentItem(context.ContentItem));
OnIndexing<TagsPart>((context, tagsPart) =>
context.DocumentIndex.Add(``tags'', String.Join('', '', tagsPart.CurrentTags.Se
}
}
3.10.5 Data Manipulation
You can override the following methods to perform actions related to the state of the data:
• GetItemMetadata
• BuildDisplayShape
• BuildEditorShape
• UpdateEditorShape
For example, the BlogPostPartHandler class overrides the GetItemMetadata method to add route values
using code like the following:
protected override void GetItemMetadata(GetContentItemMetadataContext context) {
var blogPost = context.ContentItem.As<BlogPostPart>();
if (blogPost == null)
return;
context.Metadata.CreateRouteValues = new RouteValueDictionary {
432
Chapter 3. Documentation
Read the Docs Template Documentation, Release 1.9.2
{``Area'', ``Orchard.Blogs''},
{``Controller'', ``BlogPostAdmin''},
{``Action'', ``Create''},
{``blogId'', blogPost.BlogPart.Id}
};
context.Metadata.EditorRouteValues = new RouteValueDictionary {
{``Area'', ``Orchard.Blogs''},
{``Controller'', ``BlogPostAdmin''},
{``Action'', ``Edit''},
{``postId'', context.ContentItem.Id},
{``blogId'', blogPost.BlogPart.Id}
};
context.Metadata.RemoveRouteValues = new RouteValueDictionary {
{``Area'', ``Orchard.Blogs''},
{``Controller'', ``BlogPostAdmin''},
{``Action'', ``Delete''},
{``postId'', context.ContentItem.Id},
{``blogSlug'', blogPost.BlogPart.As<RoutePart>().Slug}
};
}
3.11 Creating Themes
3.11.1 Writing a New Theme
This topic was updated for the Orchard 1.0 release.
An Orchard theme defines an application’s appearance and is used to customize the look and feel of an Orchard
website. A theme can override the style sheets, images, layouts, or content templates provided by any Orchard module.
In addition, a theme can contain code that overrides targeted code in a module.
This article shows how to create a theme from scratch. It is intended to be an introduction to theme development and
has been kept simple by design.
Instead of starting from scratch, you can create a theme by customizing an existing theme (a parent theme). Orchard
provides a theme named “TheThemeMachine” that is designed as an easy-to-use parent for custom themes. For more
information about using a parent theme, see Customizing the Default Theme.
Generating a New Theme
Before you can use the command-line command codegen to generate the code structure for you new theme, you must
download and enable the Code Generation feature. This feature is not installed to Orchard by default. For more
information, see Command-line code generation.
To generate the code structure for a new theme, open the Orchard command-line utility and enter the following command:
codegen theme MyFirstTheme
The codegen command creates the code structure for a new theme and sets the name of the theme to MyFirstTheme.
The command generates the following folder structure:
3.11. Creating Themes
433
Read the Docs Template Documentation, Release 1.9.2
The only files created are the Theme.txt and Views\Web.config files. The Theme.txt file is the theme manifest and is
where the Admin Panel (dashboard) looks for information such as the name of the theme. Web.config is a configuration
file that ASP.NET MVC requires for rendering any views that are in the Views folder. You seldom have to make changes
in the Web.config file.
Creating Styles for Your Theme
In the Styles folder, create a file named Site.css. (You can name the file anything you want as long as it has a .css
extension.)
The following example shows a stylesheet. (It has been kept simple for this example.) For information about the
structure of this stylesheet and other CSS recommendations, see UI Guidelines for Theme Authors.
/*
Theme: My First Theme
Author:
Copyright:
*/
/* Colors Palette
Background: #d3d3d3
Text: #000
Main Accent: #999
Links: #c03
*/
/* Reset
***************************************************************/
html, body, div, span, applet, object, iframe,
h1, h2, h3, h4, h5, h6, p, blockquote, pre,
a, abbr, acronym, address, big, cite, code,
del, dfn, em, font, img, ins, kbd, q, s, samp,
small, strike, strong, sub, sup, tt, var,
dl, dt, dd, ol, ul, li,
fieldset, form, label, legend,
table, caption, tbody, tfoot, thead, tr, th, td {
margin: 0;
padding: 0;
border: 0;
outline: 0;
font-weight: inherit;
font-style: inherit;
font-size: 100%;
font-family: inherit;
434
Chapter 3. Documentation
Read the Docs Template Documentation, Release 1.9.2
vertical-align: baseline;
}
header, footer, aside, nav, article { display: block; }
/* Clearing Float
***************************************************************/
group:after {
content: ''.'';
display: block;
height: 0;
clear: both;
visibility: hidden;
}
.group {display: inline-block;}
/* for IE/Mac */
/* General
***************************************************************/
body {
font: normal 100% Segoe UI,Trebuchet,Arial,Sans-Serif;
height: 100%;
text-align:left;
color:#000;
background: #d3d3d3;
}
/* Headings */
h1,h2,h3,h4,h5,h6,legend {font-weight:normal; font-style: normal;}
h1
h2
h3
h4
h5
{font-size:
{font-size:
{font-size:
{font-size:
{font-size:
160%;}
145%;}
130%;}
120%;}
105%;}
p
{ margin: 0 0 1em; line-height: 1.538em; }
p img.left { float: left; margin: 0.923em 0.923em 0.923em 0; padding: 0; }
p img.right { float: right; margin: 0.923em 0 0.923em 0.923em; }
a:focus,
a:hover
a
{ text-decoration: underline; }
{ color: #c03; text-decoration: none; }
#header {
background:#000;
color: #000;
width:100%;
height:50px;
margin-bottom:40px;
}
#branding h1{
3.11. Creating Themes
435
Read the Docs Template Documentation, Release 1.9.2
font-size: 140%;
color:#fff;
padding:8px 0 0 40px;
}
/* Structure
***************************************************************/
#layout-navigation
{
width: 960px;
margin: 0 auto;
display: block;
border-bottom: 1px solid #dbdbdb;
}
nav ul
{
padding: 0px;
margin: 0px;
}
nav ul li
{
border:1px solid #dbdbdb;
background:#f6f6f6;
display:block;
float:left;
margin:0 2px -1px 0;
}
nav ul li.current
{
border-bottom: 1px solid #fff;
background:#fff;
}
nav ul a
{
padding:0 18px;
display:block;
float:left;
color: #333;
font-size: 1.077em;
text-decoration:none;
line-height:24px;
}
/* Main
***************************************************************/
#main {
margin:0 auto 40px;
width:600px;
}
/* Secondary
***************************************************************/
436
Chapter 3. Documentation
Read the Docs Template Documentation, Release 1.9.2
/* Forms
***************************************************************/
/* Misc
***************************************************************/
Adding a Layout to Your Theme
In the Views folder, add a layout file (Layout.cshtml) and add the following code and markup:
@{
Script.Require(``ShapesBase'');
Style.Include(``site.css'');
}
<div id=''header''>
<div id=''branding''>
<h1>@T(``Welcome to the Playground'')</h1>
</div>
</div>
<div id=''layout-navigation'' class=''group''>
@Display(Model.Navigation)
</div>
<div id=''main''>
@Display(Model.Content)
</div>
This file defines the basic structure of the rendered web page. For more information about layout pages, see Template
Files and their Locations.
Adding a Theme Image
You can provide a thumbnail image that represents your new theme, which will be displayed in the Admin Panel. The
image file must be named Theme.png and it must be placed in the theme’s root folder. The following image represents
this new theme.
3.11. Creating Themes
437
Read the Docs Template Documentation, Release 1.9.2
Applying a New Theme
To apply a theme, in the Dashboard, click Themes. Under Available, select the new theme and then click Set
Current.
438
Chapter 3. Documentation
Read the Docs Template Documentation, Release 1.9.2
The Manage Themes page is redisplayed showing MyFirstTheme as the current theme.
You can now go to your website to see the new theme in action.
3.11. Creating Themes
439
Read the Docs Template Documentation, Release 1.9.2
3.11.2 The Anatomy of a Theme
Themes enable Orchard users to customize the rendering of the site and tailor it to their needs and design goals.
Themes can perform targeted overrides of style sheets, images, layouts, or of any content template provided by any
Orchard module.
Where Themes Live
A theme is set of appropriately named files inside of a folder. That folder must be under the Themes folder under your
Orchard website’s root folder.
TheThemeMachine
The theme named TheThemeMachine is the theme that comes built into Orchard. You can examine this theme in
order to learn about Orchard themes. Like any theme, it can be found under the Themes folder.
The TheThemeMachine theme has been designed to be a clean-looking, modern theme and to be a good starting
point for customization and for the development of new themes. This article uses this theme as an illustration.
Anatomy of a Theme
This section describes required and optional elements of a theme.
Manifest
To be valid, a theme must have a manifest that describes it to the system. The manifest is a text file named Theme.txt
that is found in the root folder of the theme it describes. Here is the manifest for the TheThemeMachine theme:
Name: The Theme Machine
Author: jowall, mibach, loudej, heskew
Description: Orchard Theme Machine is a flexible multi-zone theme that provides a solid fou
440
Chapter 3. Documentation
Read the Docs Template Documentation, Release 1.9.2
Version: 1.8.1
Tags: Awesome
Website: http://orchardproject.net
Zones: Header, Navigation, Featured, BeforeMain, AsideFirst, Messages, BeforeContent, Conte
The beginning of the file gives the theme a friendly name, description, author, description, and tags. The Zones field
provides a list of all the zone names that are going to be available for widgets throughout the theme’s layouts and
templates. Zones are containers that can be added to any template or layout. Various UI elements can be injected into
zones, but the most common ones are widgets. Not all zones need to be exposed in the manifest, only those that are
intended to host widgets.
3.11. Creating Themes
441
Read the Docs Template Documentation, Release 1.9.2
This illustration shows 19 zones, which is typically more than you need for a site. The zones include a header and
footer, which are zones situated on the top and bottom of the page. There is a navigation zone, which is typically where
navigation menus would be inserted. The Featured zone is where you might put a site banner. BeforeMain and
442
Chapter 3. Documentation
Read the Docs Template Documentation, Release 1.9.2
AfterMain surround the main zones on the top and bottom. AsideFirst and AsideSecond are sidebars that
are rendered on the left and right of the main content. In the center of the page there is a Messages zone where
notifications go, followed by BeforeContent, the content itself, the Content zone and the AfterContent
zone. On the bottom of the page, there are TripelFirst, TripelSecond, and TripelThird that you can use
if you want three columns on the bottom, and the FooterQuad* zones that you can use if you want four columns.
All zones in TheThemeMachine theme are collapsible, which means that they will only be rendered if there is content
in them.
Icon or Thumbnail
A Theme.png file should be included with all Orchard themes. This image should be at least 400x400 pixels and is
meant to represent the theme in the gallery or in the theme administration page. It usually is a thumbnail image of a
page of a site rendered using that theme.
Widget Zones Preview Image
Optionally, a preview image for the widget zones can be added to the theme. The image should be placed at the root of
the theme and be called ThemeZonePreview.png. This image should be 400 pixels wide and should show the different
zones and their names. An example can be found in TheThemeMachine.
3.11. Creating Themes
443
Read the Docs Template Documentation, Release 1.9.2
Static Resources
A theme typically contains a number of static resources, such as CSS style sheets, JavaScript files, or images. Those
files must be in the following folders:
• CSS style sheets should be in the \Styles folder of the theme.
• JavaScript files should be in the \Scripts folder of the theme. Any scripts you put in this folder should be custom
scripts that are only related to your theme, not scripts that are intended to be reused. Such reusable scripts should
be included in a separate module. See the jQuery module for an example.
• Images should be in \Content\Images folders. If your theme contains few images, it’s fine to keep them all at the
same level. However, if you have many images, it is recommended that you organize them in subfolders.
Note To enable files to be served, each of the folders that contains static files such as style sheets, images,
or JavaScript code should contain a web.config file that contains the following content:
<?xml version=''1.0'' encoding=''UTF-8''?>
<configuration>
<system.webServer>
<staticContent>
<clientCache cacheControlMode=''UseMaxAge'' cacheControlMaxAge=''7.00:00:00'' />
</staticContent>
<handlers accessPolicy=''Script,Read''>
<!-iis7 - for any request to a file exists on disk, return it via native http module.
accessPolicy `Script' is to allow for a managed 404 page.
-->
<add name=''StaticFile'' path=''*'' verb=''*'' modules=''StaticFileModule'' preCondit
</handlers>
</system.webServer>
</configuration>
Document
The Document.cshtml file is usually not found in themes because there is seldom any reason to overwrite it. Most
themes can just fall back to the version of the file that can be found in the SafeMode theme, under \Views. The
Document.cshtml file is responsible for the HTML that goes around the body element. This means it defines the
doctype element (Orchard assumes the HTML5 document type), the html element, the head element (where it
defines the head zone where the meta tags), some script elements, and the links for style sheets to be inserted.
(This is different from the Header zone, which is the top zone in the body.) The Document.cshtml file also contains
the title element inside the head element. Finally, the file defines the body element where the Body and Tail
zones are rendered.
Layouts
Layouts are the outermost shape that is rendered within the body element. For example, this is typically where you
define the main widget zones. You can read about the details of the markup inside of a layout in the Markup section
later in this document.
A theme can contain any number of layout files, even though currently only one is supported and included in the
TheThemeMachine theme, namely Layout.cshtml. For example, a theme can add specialized layouts, such as LayoutBlog.cshtml or Layout-HomePage.cshtml, that would be used instead of the default for a blog or for the homepage,
provided there is an extension providing those layout shape alternates. Notice that layouts are named Layout-{layout
name}.cshtml. Each layout can have a different set of zones, organized differently in markup.
444
Chapter 3. Documentation
Read the Docs Template Documentation, Release 1.9.2
For an example of how your own modules and themes can provide alternative layouts based on custom criteria, see
Switching the Layout in Orchard CMS.
Shape Templates
In Orchard, before a web page is rendered into HTML, it is built as a tree of shapes. Shapes are flexible objects that
represent the objects that will contribute to the rendering of the page. Examples include zones, menus, menu items,
and widgets.
Each shape can be rendered by a template, which can be overridden by a theme. Templates have the same name as the
shape they are made to render. For example, if Menu.cshtml exists, it is used to render a Menu shape.
The TheThemeMachine theme has two shape templates, BadgeOfHonor and Branding, which are built from
Layout.cshtml and injected into the Header and Footer zones using the following code:
// Site name and link to the home page
WorkContext.Layout.Header.Add(New.Branding(), ``5'');
// Powered by Orchard
WorkContext.Layout.Footer.Add(New.BadgeOfHonor(), ``5'');
Note Templates are one of two ways to render shapes. In addition to templates, you can define the
rendering using code, by defining a method that has a Shape attribute. Look for the CoreShapes.cs file
for examples. This is usually done in modules, but themes can do it as well.
Item Templates
Themes can override how content items are rendered by including a template in their \Views\Items folder. The
name of the template should be Content-{content type name}.cshtml or Content-{content type name}.{display
type}.cshtml. For example, a template that overrides how blog posts are rendered should be \Views\Items\ContentBlogPost.cshtml, and a template that overrides the summary rendering of a blog post should be \Views\Items\ContentBlogPost.Summary.cshtml.
Part Templates
Themes can override the rendering of content parts. The convention is similar to the convention for content item
templates. The template for a part must be in \Views\Parts and must be named for the shape for the part. For example,
the rendering for comments can be overridden by creating the file \Views\Parts\Comments.cshtml.
Field Templates
Field rendering can be overridden as well, although not yet at the field instance level. In other words, you can override
what a text field looks like but not what a specific text field looks like. To override a field template, create a {field type
name}.cshtml or {field type name}.{display type}.cshtml file in \Views\Fields. For example, the rendering of text fields
can be overridden by a \Views\Fields\Common.Text.cshtml template.
Alternates
Alternates are a set of related shapes with corresponding templates or layout files that enable you to control how
different types of content are rendered within a theme. For example, you can use alternates to apply one layout file
for the home page but another layout file for subpages, or you can use alternates to render elements one way when the
elements are in a page but a different way when they are in a blog post.
For more information, see Alternates.
3.11. Creating Themes
445
Read the Docs Template Documentation, Release 1.9.2
Widget Overrides
The rendering for widgets can also be overridden by creating a template in \Views named widget-{widget type}. For
example, you can override the rendering of the HTML widget and add a red frame around the content by putting the
following widget-htmlwidget.cshtml file into the \Views folder of your theme:
<div style=''border:1px red solid''>
@Display(Model.Content)
</div>
Note that this is just a simple example, and normally adding a frame would be better done using CSS.
Placement Files
A theme can modify where shapes are rendered by including a placement.info file at the root of the theme folder. The
placement.info file is an XML file. Here is an example:
<Placement>
<!-- widgets -->
<Place Parts_Blogs_BlogArchives=''Content:before''/>
<Place Parts_Blogs_RecentBlogPosts=''Content:after''/>
<!-- default positioning -->
<Match ContentType=''Blog''>
<Match DisplayType=''Summary''>
<Place Parts_Blogs_Blog_Description=''Content:before''
Parts_Blogs_Blog_BlogPostCount=''Meta:3''/>
</Match>
</Match>
</Placement>
Markup
The markup in each file is constrained by the view engine that you choose. The default in Orchard is Razor (.cshtml
files), for which a quick guide can be found in Template File Syntax Guide.
Within a template, the Model object represents the current shape being rendered. That means that if you are working
with the message shape, which has a Message property, you can display that by writing @Model.Message from
within the template markup.
446
Chapter 3. Documentation
Read the Docs Template Documentation, Release 1.9.2
An important addition that Orchard provides is the Display method, which renders a shape. For example, if you look
at the layout.cshtml file, you can see how the zones are rendered, using calls such as @Display(Model.Content).
Finally, you can also see in various templates calls such as @Html.RegisterScript("mystyle.css") or
@Html.RegisterScript("myscript.js"). These registration calls are necessary because the collections of
scripts and stylesheets are a shared resource. The same link or script element should not be rendered twice even
if multiple modules or multiple instances of the same widget require the same file.
Themes with Code
Most themes will consist only of a stylesheet, a few templates (usually layouts), and a few images. They will contain
no code except for the simple code in the template files. For more advanced themes, you might want to provide
settings, create custom shapes, or override shapes in code.
To address these scenarios, it is possible to build a theme much like a module and include a .csproj file that describes
how to compile the code it contains. For information about module development, see Walkthrough: Writing An
Orchard Module and Creating a Module with a Simple Text Editor.
3.11.3 Understanding the placement.info File
In a CMS such as Orchard, content is built as a composition of arbitrary parts. For example, a blog post is an
assemblage of a route (Autoroute Part), title (Title part), contents (Body part), tags (Tags part), comments
(Comment part), and a few additional technical parts (Common and PublishLater).
To get a template to render an object like this, you could access each of these parts explicitly and render them; that’s
a scenario that would work in Orchard. But that would not handle well the unpredictable changes in the definition of
the content types that are the essence of a CMS. For example, what if the administrator of the site downloaded a star
rating module and added the rating part to posts? If the layout for the whole item were explicitly defined, you would
have to explicitly modify the template.
In Orchard, this isn’t necessary, and adding a new part and displaying it can be done without touching the templates.
This is possible because Orchard separates layout into two stages:
• Rendering (performed by generating HTML from templates or shape methods) and
• Placement (done through the placement.info file).
This way, parts can not only specify their default rendering, which can be overridden by themes, they can also specify
where they prefer to be rendered relative to other parts (which can also be overridden by themes).
Best Practice: Avoid creating templates for high level Content Types.
Instead, create templates for Content Parts and Content Fields then change their order with placement.
Specifying placement using the placement.info file is the subject of this article.
Summary
• Placement works only on parts (and some fields) of content items.
• Place element attributes are shape names (not alternate names).
• Find shape names via shape tracing or in driver code.
• Match element attributes include ContentType, DisplayType, and Path.
• Path can include a * to represent all child paths.
• Override module placements in the theme
3.11. Creating Themes
447
Read the Docs Template Documentation, Release 1.9.2
Syntax Overview
<placement>
[ <match scope> ]
<place Shape_Name=''order[;alternate][;wrapper][;shape]'' />
[ </match> ]
</placement>
The placement.info File
If you look at the files in your Orchard website, you’ll see that most modules and themes have a placement.info
file at their root. This is an XML file that specifies the placement of each part of a content item.
The following example shows an example of a placement file. (It’s based on the placement.info file that comes
with Orchard.Tags.)
<Placement>
<Place Parts_Tags_Edit=''Content:7''/>
<Match DisplayType=''Detail''>
<Place Parts_Tags_ShowTags=''Header:after.7''/>
</Match>
<Match DisplayType=''Summary''>
<Place Parts_Tags_ShowTags=''Header:after.7''/>
</Match>
<Match DisplayType=''SummaryAdmin''>
<Place Parts_Tags_ShowTags=''-``/>
</Match>
</Placement>
Placement Scope
A placement file acts at the Content Item level. This means that you can use it to reorder the display of the parts
of anything that is a content item (blog posts, pages, comments, custom items, widgets, elements, etc.), but not
necessarily arbitrary shapes. If a shape that is not representing a content part needs placement, it is up to you to
provide a placement mechanism for that shape.
Comments
Comments can be included in the placement.info using normal <!-- comment --> syntax.
The “Placement” Element
The Placement element must be present at the root of the placement.info document. It is a simple container.
“Place” Element
The Place element is the main entity in a placement.info file. It can have any number of attributes, although
it’s recommended for readability to have only one shape place defined per Place element. For additional shapes, you
can add more Place tags, one per line.
Single shape per line example:
448
Chapter 3. Documentation
Read the Docs Template Documentation, Release 1.9.2
<Place Parts_TagCloud=''Content:5''/>
<Place Parts_TagCloud_Edit=''Content:7''/>
Multiple shapes per line example:
<Place Parts_TagCloud=''Content:5'' Parts_TagCloud_Edit=''Content:7''/>
Shape Name Attribute
Each attribute of a Place element is the name of a shape (such as Parts_Tags_ShowTags), as defined from the
relevant part driver, and has the placement as the value. To determine the shapes that are part of the display of a given
content item, you can read the code for the part drivers. Or a simpler method might be to enable the Shape Tracing
module and use the shape debugging tools to examine the model.
The name of the attribute can be any shape name (but not an alternate name; use Match to specialize placement
instead).
There are also special extensions for certain fields so that placement can be targeted at specific field instances.
For example, the following placement will display text fields named “Occupation” at the start of the local content
zone:
<Place Fields_Common_Text-Occupation=''Content:before''/>
Note for field developers: you may give your own fields this capability by using a special override of
ContentShape in your driver that provides the differentiator (the part after the dash in the attribute name).
See the Text Field driver for example, or read Creating a Custom Field Type.
You can learn more about shapes and alternates in these topics: Accessing and Rendering Shapes and Alternates.
The value itself is split into a zone name, a colon, and then a position.
Local Zone Placement
By default the zone name will specify a local zone.
If you look inside that shape template you will see that there are several locally defined zones. Razor templates would
use @Display(Model.Content) to display the content zone for example.
Usually you will find a zones like Header, Meta, Content, or Footer available for placement.
Example local zone placement:
<Place Parts_TagCloud=''Content:5''/>
Top-Level Zone Placement
The zone name can also specify a top-level zone. Top level zones are defined in the Layout.cshtml view.
In the case of a top-level zone, the zone name must begin with a slash, e.g. /AsideFirst
Example top-level zone placement:
<Place Parts_TagCloud=''/AsideFirst:5''/>
3.11. Creating Themes
449
Read the Docs Template Documentation, Release 1.9.2
Placement Order
The position is defined using a dotted notation. It can be a single number (1, 5, 10, 42) or it can be a succession of
numbers separated by a dot (1.2, 1.52.3, etc.). The order will be determined starting from the first number, and if
multiple positions have the same first number, using the subsequent numbers. This way, 1 comes before 2.4.5, and
2.4.5 comes before 2.10.
You can also use before and after qualifiers to position shapes before or after a certain position. For example,
Header:after positions the shape at the next available position following everything that’s defined using numeric
positions.
Placement order examples:
<!-- A weight of 5 in local content zone -->
<Place Parts_TagCloud=''Content:5''/>
<!-- Before the top-level header zone -->
<Place Parts_TagCloud=''/Header:Before''/>
<!-- After the top-level asidefirst zone with a weight of .5 -->
<Place Parts_TagCloud=''/AsideFirst:After.5''/>
Suppression
There is a special value, “-”, that suppresses the shape rendering instead of sending it to a zone.
Suppression examples:
<!-- Suppress Parts_TagCloud everywhere -->
<Place Parts_TagCloud=''-``/>
<!-- Suppress Parts_TagCloud in views using SummaryAdmin -->
<Match DisplayType=''SummaryAdmin''>
<Place Parts_TagCloud=''-``/>
</Match>
Alternate
Added in v1.1
Use alternate to specify shape alternates from Place elements.
For example, if you want to enable a theme author to specify a different template for rendering the tags for blog posts,
you can do the following:
<Match ContentType=''BlogPost''>
<Place
Parts_Tags_ShowTags=''Header:1;Alternate=Parts_Tags_ShowTags_BlogPost''/>
</Match>
A theme author can then provide a Parts/Tags.ShowTags.BlogPost.cshtml file that customizes the display of tags for
blog posts.
450
Chapter 3. Documentation
Read the Docs Template Documentation, Release 1.9.2
Wrapper
Added in v1.1
Use ‘wrapper’ from Place elements to wrap an extra shape around the original shape.
Similarly, you can provide a wrapper as part of the placement (Header:after;Wrapper=Wrapper_GreenDiv).
Using a wrapper enables wrapping content with a cshtml markup. Here is a 3 step example showing how to add a div
around the Html Widget to enable css styling of the widget.
In placement.info :
<Match ContentType=''Widget''>
<Place Parts_Common_Body=''Content:5;Wrapper=Wrapper_HtmlContent'' />
</Match>
If you just put the wrapper without specifying ‘Content:5’ the body part will not show up. By adding Content:5 it
specifies which zone to render the part in.
After modifying your placement.info the Shape Tracing module Shape tab will show your wrapper location at the
bottom. It will be: ~/Themes/{yourTheme}/Views/Wrapper.HtmlContent.cshtml.
Create this file and put the following text in it:
<div class=''htmlWrapperContent''>
@Model.Html
</div>
This will enable you to target the wrapper from site.css like this:
.htmlWrapperContent {
background-color: #94CCE7;
}
Shape
Added in v1.1
Use ‘shape’ from Place elements to rename the shape.
For example:
<Place Parts_Common_Body=''Content:5;Header:after;
Shape=IPreferToCallThoseStickersForSomeReason'' />
“Match” Element
Match elements let you scope a particular set of Place tags. Match elements can have the following scope attributes:
• DisplayType
• ContentType
• Path
Match elements can be nested.
3.11. Creating Themes
451
Read the Docs Template Documentation, Release 1.9.2
DisplayType
Scopes the contained Place tags to a specific display type.
You can define your own custom display types when developing content parts or fields, but Orchard uses standard
ones:
• Detail - Used when rendering a single item, e.g. a blog post
• Summary - Used when rendering a list of items
• SummaryAdmin - Used when rending a list of items in the admin panel
Some modules have registered their own such as:
• Layout - Added in v1.9 - Used by the Orchard.Layouts module when an element is rendering a shape like a
ContentField or ContentItem
• Design - Added in v1.9 - Used by the Orchard.Layouts module when showing an element in the admin panel
ContentType
Scopes the contained Place tags to a specific content type or stereotype.
• Content Type - Such as BlogPost or Page
• Stereotype - Added in v1.1 - Such as Widget
Path
The Path attribute was added in v1.1.
Scopes the contained Place tags to a specific path or to a path and its children.
• Specific Path - For example, Path="/About" enables changes that only affect the About page (assuming you
have one)
• Path and it’s Children - For example, Path="/MyBlog/*" affects everything that is under the path MyBlog,
such as Myblog or MyBlog/FirstPost.
Overriding Placement
A module should define default placements for the parts and fields it provides by having a placement.info file at
the root of the module’s directory.
Without a placement your parts and fields will not appear on the page. By supplying a default you take the burden away
from theme developers to configure your module and you make it easy for them to copy sections over to customise
them. Consider the various DisplayTypes your parts and fields may be viewed and provide sensible defaults.
That default placement can be overridden by any theme by placing a placement.info file in the root of the theme
directory.
The current theme’s placement will win over that of any module.
452
Chapter 3. Documentation
Read the Docs Template Documentation, Release 1.9.2
3.11.4 Accessing and Rendering Shapes
A shape is a dynamic data model. The purpose of a shape is to replace the static view model of ASP.NET MVC by
using a model that can be updated at run time — that is, by using a dynamic shape. You can think of shapes as the
blobs of data that get handed to templates for rendering.
This article introduces the concept of shapes and explains how to work with them. It’s intended for module and theme
developers who have at least a basic understanding of Orchard modules. For information about creating modules, see
the Getting Started with Modules course. For information about dynamic objects, see Creating and Using Dynamic
Objects.
Introducing Shapes
Shapes are dynamic data models that use shape templates to make the data visible to the user in the way you want.
Shape templates are fragments of markup for rendering shapes. Examples of shapes include menus, menu items,
content items, documents, and messages.
A shape is a data model object that derives from the Orchard.DisplayManagement.Shapes.Shape class.
The Shape class is never instantiated. Instead, shapes are created at run time by a shape factory. The default shape
factory is Orchard.DisplayManagement.Implementation.DefaultShapeFactory. The shapes created by the shape factory are dynamic objects.
NoteDynamic objects are new to the .NET Framework 4. As a dynamic object, a shape exposes its
members at run time instead of at compile time. By contrast, an ASP.NET MVC model object is a static
object that’s defined at compile time.
Information about the shape is contained in the ShapeMetadata property of the shape itself. This information
includes the shape’s type, display type, position, prefix, wrappers, alternates, child content, and a WasExecuted
Boolean value.
You can access the shape’s metadata as shown in the following example:
var shapeType = shapeName.Metadata.Type;
After the shape object is created, the shape is rendered with the help of a shape template. A shape template is a piece of
HTML markup (partial view) that is responsible for displaying the shape. Alternatively, you can use a shape attribute
(Orchard.DisplayManagement.ShapeAttribute) that enables you to write code that creates and displays
the shape without using a template.
Creating Shapes
For module developers, the most common need for shapes is to transport data from a driver to a template for rendering. A driver derives from the Orchard.ContentManagement.Drivers.ContentPartDriver class
and typically overrides that class’s Display and Editor methods. The Display and Editor methods return a
ContentShapeResult object, which is analogous to the ActionResult object returned by action methods in
ASP.NET MVC. The ContentShape method helps you create the shape and return it in a ContentShapeResult
object.
Although the ContentShape method is overloaded, the most typical use is to pass it two parameters — the shape
type and a dynamic function expression that defines the shape. The shape type names the shape and binds the shape
to the template that will be used to render it. The naming conventions for shape types are discussed later in Naming
Shapes and Templates.
The function expression can be described best by using an example. The following example shows a driver’s Display
method that returns a shape result, which will be used to display a Map part.
3.11. Creating Themes
453
Read the Docs Template Documentation, Release 1.9.2
protected override DriverResult Display(
MapPart part, string displayType, dynamic shapeHelper)
{
return ContentShape(``Parts_Map'',
() => shapeHelper.Parts_Map(
Longitude: part.Longitude,
Latitude: part.Latitude));
}
The expression uses a dynamic object (shapeHelper) to define a Parts_Map shape and its attributes. The expression adds a Longitude property to the shape and sets it equal to the part’s Longitude property. The expression
also adds a Latitude property to the shape and sets it equal to the part’s Latitude property. The ContentShape
method creates the results object that is returned by the Display method.
The following example shows the entire driver class that sends a shape result to a template either to be displayed or
edited in a Map part. The Display method is used to display the map. The Editor method marked “GET” is used
to display the shape result in editing view for user input. The Editor method marked “POST” is used to redisplay
the editor view using the values provided by the user. These methods use different overloads of the Editor method.
using Maps.Models;
using Orchard.ContentManagement;
using Orchard.ContentManagement.Drivers;
namespace Maps.Drivers
{
public class MapPartDriver : ContentPartDriver<MapPart>
{
protected override DriverResult Display(
MapPart part, string displayType, dynamic shapeHelper)
{
return ContentShape(``Parts_Map'',
() => shapeHelper.Parts_Map(
Longitude: part.Longitude,
Latitude: part.Latitude));
}
//GET
protected override DriverResult Editor(
MapPart part, dynamic shapeHelper)
{
return ContentShape(``Parts_Map_Edit'',
() => shapeHelper.EditorTemplate(
TemplateName: ``Parts/Map'',
Model: part));
}
//POST
protected override DriverResult Editor(
MapPart part, IUpdateModel updater, dynamic shapeHelper)
{
updater.TryUpdateModel(part, Prefix, null, null);
return Editor(part, shapeHelper);
}
}
}
454
Chapter 3. Documentation
Read the Docs Template Documentation, Release 1.9.2
The Editor method marked “GET” uses the ContentShape method to create a shape for an editor template. In
this case, the type name is Parts_Map_Edit and the shapeHelper object creates an EditorTemplate shape.
This is a special shape that has a TemplateName property and a Model property. The TemplateName property
takes a partial path to the template. In this case, "Parts/Map" causes Orchard to look for a template in your module
at the following path:
Views/EditorTemplates/Parts/Map.cshtml
The Model property takes the name of the part’s model file, but without the file-name extension.
Naming Shapes and Templates
As noted, the name given to a shape type binds the shape to the template that will be used to render the shape. For
example, suppose you create a part named Map that displays a map for the specified longitude and latitude. The name
of the shape type might be Parts_Map. By convention, all part shapes begin with Parts_ followed by the name
of the part (in this case Map). Given this name (Parts_Map), Orchard looks for a template in your module at the
following path:
views/parts/Map.cshtml
The following table summarizes the conventions that are used to name shape types and templates.
Applied To | Shape Naming Convention | Shape Type Example | Template Example ———————- | ———
——————————————————– | —————————————————- | —————————
————— Content shapes | Content__[ContentType] | Content__BlogPost | Content-BlogPost Content shapes |
Content__[Id] | Content__42 | Content-42 Content shapes | Content__[DisplayType] | Content__Summary | Content.Summary Content shapes | Content_[DisplayType]__[ContentType] | Content_Summary__BlogPost | ContentBlogPost.Summary Content shapes | Content_[DisplayType]__[Id] | Content_Summary__42 | Content-42.Summary
Content.Edit shapes | Content_Edit__[DisplayType] | Content_Edit__Page | Content-Page.Edit Content Part templates | [ShapeType]__[Id] | Parts_Common_Metadata__42 | Parts/Common.Metadata-42 Content Part templates |
[ShapeType]__[ContentType] | Parts_Common_Metadata__BlogPost | Parts/Common.Metadata-BlogPost Field templates | [ShapeType]__[FieldName] | Fields_Common_Text__Teaser | Fields/Common.Text-Teaser Field templates |
[ShapeType]__[PartName] | Fields_Common_Text__TeaserPart | Fileds/Common.Text-TeaserPart Field templates |
[ShapeType]__[ContentType]__[PartName] | Fields_Common_Text__Blog__TeaserPart | Fields/Common.Text-BlogTeaserPart Field templates | [ShapeType]__[PartName]__[FieldName] | Fields_Common_Text__TeaserPart__Teaser
| Fields/Common.Text-TeaserPart-Teaser Field templates | [ShapeType]__[ContentType]__[FieldName]
|
Fields_Common_Text__Blog__Teaser
|
Fields/Common.Text-Blog-Teaser
Field
templates
|
[ShapeType]__[ContentType]__[PartName]__[FieldName] | Fields_Common_Text__Blog__TeaserPart__Teaser
| Fields/Common.Text-Blog-TeaserPart-Teaser LocalMenu | LocalMenu__[MenuName] | LocalMenu__main |
LocalMenu-main LocalMenuItem | LocalMenuItem__[MenuName] | LocalMenuItem__main | LocalMenuItemmain Menu | Menu__[MenuName] | Menu__main | Menu-main MenuItem | MenuItem__[MenuName] | MenuItem__main | MenuItem-main Resource | Resource__[FileName] | Resource__flower.gif | Resource-flower.gif Style
| Style__[FileName] | Style__site.css | Style-site.css Widget | Widget__[ContentType] | Widget__HtmlWidget
| Widget-HtmlWidget Widget | Widget__[ZoneName] | Widget__AsideSecond | Widget-AsideSecond Zone |
Zone__[ZoneName] | Zone__AsideSecond | Zone-AsideSecond
You should put your templates in the project according to the following rules:
• Content item shape templates are in the views/items folder.
• Parts_ shape templates are in the views/parts folder.
• Fields_ shape templates are in the views/fields folder.
• The EditorTemplate shape templates are in the views/EditorTemplates/ template name folder.For
example, an EditorTemplate with a template name of Parts/Routable.RoutePart has its template at
views/EditorTemplates/Parts/Routable.RoutePart.cshtml.
• All other shape templates are in the views folder.
3.11. Creating Themes
455
Read the Docs Template Documentation, Release 1.9.2
NoteThe template extension can be any extension supported by an active view engine, such as .cshtml,
.vbhtml, or .ascx.
From Template File Name to Shape Name
More generally, the rules to map from a template file name to the corresponding shape name are the following:
• Dot (.) and backslash () change to underscore (_). Note that this does not mean that an example.cshtml file in
a myviews subdirectory of Views is equivalent to a myviews_example.chtml file in Views. The shape templates
must still be in the expected directory (see above).
• Hyphen (-) changes to a double underscore (__).
For example, Views/Hello.World.cshtml will be used to render a shape named Hello_World, and Views/Hello.World85.cshtml will be used to render a shape named Hello_World__85.
Alternate Shape Rendering
As noted, an HTML widget in the AsideSecond zone (for example) could be rendered by a widget.cshtml template,
by a widget-htmlwidget.cshtml template, or by a widget-asidesecond.cshtml if they exist in the current theme. When
various possibilities exist to render the same content, these are referred to as alternates of the shape, and they enable
rich template overriding scenarios.
Alternates form a group that corresponds to the same shape if they differ only by a double-underscore suffix. For
example, Hello_World, Hello_World__85, and Hello_World__DarkBlue are an alternate group for a
Hello_World shape. Hello_World_Summary, conversely, does not belong to that group and would correspond
to a Hello_World_Shape shape, not to a Hello_World shape. (Notice the difference between “__” and “_”.)
Which Alternate Will Be Rendered?
Even if it has alternates, a shape is always created with the base name, such as Hello_World. Alternates give additional template name options to the theme developer beyond the default (such as hello.world.cshtml). The system will
choose the most specialized template available among the alternates, so hello.world-orange.cshtml will be preferred
to hello.world.cshtml if it exists.
Built-In Content Item Alternates
The table above shows possible template names for content items. It should now be clear that the shape name is built
from Content and the display type (for example Content_Summary).
The system also automatically adds the content type and the content ID as alternates (for example
Content_Summary__Page and Content_Summary__42).
For more information about how to use alternates, see Alternates.
Rendering Shapes Using Templates
A shape template is a fragment of markup that is used to render the shape. The default view engine in Orchard is the
Razor view engine. Therefore, shape templates use Razor syntax by default. For an introduction to Razor syntax, see
Template File Syntax Guide.
The following example shows a template for displaying a Map part as an image.
456
Chapter 3. Documentation
Read the Docs Template Documentation, Release 1.9.2
<img alt=''Location'' border=''1'' src=''http://maps.google.com/maps/api/staticmap?
&zoom=14
&size=256x256
&maptype=satellite&markers=color:blue|@Model.Latitude,@Model.Longitude
&sensor=false'' />
This example shows an img element in which the src attribute contains a URL and a set of parameters passed as
query-string values. In this query string, @Model represents the shape that was passed into the template. Therefore, @Model.Latitude is the Latitude property of the shape, and @Model.Longitude is the Longitude
property of the shape.
The following example shows the template for the editor. This template enables the user to enter values for the latitude
and longitude.
@model Maps.Models.MapPart
<fieldset>
<legend>Map Fields</legend>
<div class=''editor-label''>
@Html.LabelFor(model => model.Longitude)
</div>
<div class=''editor-field''>
@Html.TextBoxFor(model => model.Latitude)
@Html.ValidationMessageFor(model => model.Latitude)
</div>
<div class=''editor-label''>
@Html.LabelFor(model => model.Longitude)
</div>
<div class=''editor-field''>
@Html.TextBoxFor(model => model.Longitude)
@Html.ValidationMessageFor(model => model.Longitude)
</div>
</fieldset>
The @Html.LabelFor expressions create labels using the name of the shape properties.
The
@Html.TextBoxFor expressions create text boxes where users enter values for the shape properties. The
@Html.ValidationMessageFor expressions create messages that are displayed if users enter an invalid value.
Wrappers
Wrappers let you customize the rendering of a shape by adding markup around the shape. For example, Document.cshtml is a wrapper for the Layout shape, because it specifies the markup code that surrounds the Layout
shape. For more information about the relationship between Document and Layout, see Template File Syntax
Guide.
Typically, you add a wrapper file to the Views folder of your theme. For example, to add a wrapper for Widget, you
add a Widget.Wrapper.cshtml file to the Views folder of your theme. If you enable the Shape Tracing feature, you’ll
see the available wrapper names for a shape. You can also specify a wrapper in the placement.info file. For more
information about how to specify a wrapper, see Understanding the placement.info File.
3.11. Creating Themes
457
Read the Docs Template Documentation, Release 1.9.2
Creating a Shape Method
Another way to create and render a shape is to create a method that both defines and renders the shape. The method
must be marked with the Shape attribute (the Orchard.DisplayManagement.ShapeAttribute class). The
method returns an IHtmlString object instead of using a template; the returned object contains the markup that
renders the shape.
The following example shows the DateTimeRelative shape. This shape takes a DateTime value in the past and
returns a string that relates the value to the current time.
public class DateTimeShapes : IDependency {
private readonly IClock _clock;
public DateTimeShapes(IClock clock) {
_clock = clock;
T = NullLocalizer.Instance;
}
public Localizer T { get; set; }
[Shape]
public IHtmlString DateTimeRelative(HtmlHelper Html, DateTime dateTimeUtc) {
var time = _clock.UtcNow - dateTimeUtc;
if (time.TotalDays > 7)
return Html.DateTime(dateTimeUtc, T(```on' MMM d yyyy `at' h:mm tt''));
if (time.TotalHours > 24)
return T.Plural(``1 day ago'', ``{0} days ago'', time.Days);
if (time.TotalMinutes > 60)
return T.Plural(``1 hour ago'', ``{0} hours ago'', time.Hours);
if (time.TotalSeconds > 60)
return T.Plural(``1 minute ago'', ``{0} minutes ago'', time.Minutes);
if (time.TotalSeconds > 10)
return T.Plural(``1 second ago'', ``{0} seconds ago'', time.Seconds);
return T(``a moment ago'');
}
}
3.11.5 Alternates
Alternates are optional variations of a shape that you can implement in a theme in order to customize the rendering of
the shape for specific cases. By using alternates, you can override which template is used to render content, based on
the type (or other characteristic) of that content. For example, you can use alternates to apply one layout file for the
home page but another layout file for subpages. Or you can use alternates to render tags one way when the tags are in
a page but a different way when the tags are in a blog post. Alternates are particularly useful when you have different
types of content and you want to customize the appearance of these different types of content.
The Orchard framework uses a naming convention to determine whether an alternate template is used for rendering
content. The naming convention enables you to add template files that are used automatically, without requiring you
to modify any code.
458
Chapter 3. Documentation
Read the Docs Template Documentation, Release 1.9.2
Naming Convention for Alternates
Alternate shapes are named using the name of the base shape followed by a double underscore (__) and an ending
that is specific to the alternate shape. For example, a Parts_Tags_ShowTags shape can have alternates with
names such as Parts_Tags_ShowTags__BlogPost and Parts_Tags_ShowTags__Page. The part of the
alternate name after the double underscore reflects when the shape is used, such as the current content type. (For more
information about how shapes are named, see Accessing and Rendering Shapes.)
Mapping a Template File to an Alternate
To create a template file that maps to the corresponding shape name, you must name the template according to the
following naming convention:
• Convert an underscore (_) in the shape name to either a dot (.) or backslash () in the template name. A backslash
indicates that the template resides in a subfolder.
• Convert a double underscore (__) in the shape name to a hyphen (-).
• For any Display type value in the shape name, place the type name after a dot (.) at the end of the template
name, such as Content-BlogPost.Summary.
All templates for alternates must reside in the Views folder. The Views folder can be located either in the theme or in
the module. The following table shows which subfolders of Views to use for different types of templates.
Shape type | Template Folder ————– | —————- Content item | Views\Items Parts | Views\Parts Fields |
Views\Fields EditorTemplate | Views\EditorTemplates\[template type folder] (For example, an EditorTemplate for
a part is located at Views\EditorTemplates\Parts.) All other | Views
For example, to create an alternate template for the Tags part, you can add a template to the MyTheme\Views\Parts
folder. However, because the underscore can be converted to either a dot (.) or backslash (), you can also
create a template in the Views folder and add Parts. to the beginning of the name. A template at either
Views\Parts\Tags.ShowTags-BlogPost.cshtml or Views\Parts.Tags.ShowTags-BlogPost.cshtml will map to a shape
named Parts_Tags_ShowTags__BlogPost.
If the Orchard framework cannot locate an alternate template that has the expected name, the default template will be
used for those shapes. For example, if you do not create an alternate for showing tags, the default template for tags
(located at Views\Parts\Tags.ShowTags.cshtml) is used.
The Orchard framework automatically creates many alternates that you can use in your application. However, you can
create templates for these alternate shapes. The patterns for creating alternates are shown below, with examples of
matching templates in parenthesis.
For Content shapes:
• Content__[DisplayType]. (Example template: Content.Summary)
• Content__[ContentType]. (Example template: Content-BlogPost)
• Content__[Id]. (Example template: Content-42)
• Content[DisplayType]__[ContentType]_. (Example template: Content-BlogPost.Summary)
• Content[DisplayType]__[Id]_. (Example template: Content-42.Summary)
For Zone shapes:
• Zone__[ZoneName]. (Example template: Zone-SideBar)
For Navigation shapes (the new menu system since version 1.5):
• MenuItemLink__[MenuName]. (Example template: MenuItemLink-main-menu)
3.11. Creating Themes
459
Read the Docs Template Documentation, Release 1.9.2
• MenuItemLink__[ContentType].
(Examples template:
MenuItemLink-HtmlMenuItem, MenuItemLink-Blog)
MenuItemLink-ContentMenuItem,
For menu and menu item shapes:
• Menu__[MenuName]. (Example template: Menu-main)
• MenuItem__[MenuName]. (Example template: MenuItem-main)
For local menu and local menu item shapes:
• LocalMenu__[MenuName]. (Example template: LocalMenu-main)
• LocalMenuItem__[MenuName]. (Example template: LocalMenuItem-main)
For styles and resources:
• Style__[FileName]
• Resource__[FileName]
For widget shapes:
• Widget__[ZoneName]. (Example template: Widget-SideBar)
• Widget__[ContentType]. (Example template: Widget-BlogArchive)
For fields:
• [ShapeType__FieldName]. (Example template: Fields\Common.Text-Teaser)
• [ShapeType__PartName]. (Example template: Fields\Common.Text-TeaserPart)
• [ShapeType]__[ContentType]__[PartName]. (Example template: Fields\Common.Text-Blog-TeaserPart)
• [ShapeType]__[PartName]__[FieldName]. (Example template: Fields\Common.Text-TeaserPart-Teaser)
• [ShapeType]__[ContentType]__[FieldName]. (Example template: Fields\Common.Text-Blog-Teaser)
• [ShapeType]__[ContentType]__[PartName]__[FieldName].
Fields\Common.Text-Blog-TeaserPart-Teaser)
(Example
template:
For content parts:
• [ShapeType]__[Id]. (Example template: Parts\Common.Metadata-42)
• [ShapeType]__[ContentType]. (Example template: Parts\Common.Metadata-BlogPost)
You can use the Shape Tracing module to generate alternate templates through the Shape Tracing user interface. For
more information, see Customizing Orchard using Designer Helper Tools.
URL and Widget Alternates
The URL Alternates module enables you to create templates for specific URLs, and the Widget Alternates enables
additional alternates for widgets of certain types and in specific zones. You must enable the URL Alternates and
Widget Alternates modules in order to use their features. When enabled, alternate shapes are created based on the
URL or the zone. These URL alternates are combined with the alternate patterns defined above.
For example, the URL /my-blog/post-1 has alternates available for a MenuItem object with the following template
names:
MenuItem-mainMenuItem-main-url-my-blogMenuItem-main-url-my-blog-post-1
For the homepage, the following alternate is available:
MenuItem-main-url-homepage
460
Chapter 3. Documentation
Read the Docs Template Documentation, Release 1.9.2
Using this module, you can add URL-specific alternates to the Layout shape, such as the following:
Layout-url-homepage. This adds a specific layout for your About page of your site.
Creating a new layout file in your Themes/ThemeName/Views named Layout-url-About.cshtml would be
picked up and used when viewing the /About page in your site.
Note: if the changes are only small, perhaps using alternate url naming to the zone would be more
appropriate.
You can enable URL Alternates by downloading the Designer Tools module from the Orchard Team in the Orchard
Modules Gallery: Orchard Designer Tools
Similarly, widget alternates add new templates names that you can use to change the rendering of content parts when
they are rendered as part of a specific widget type or inside of a specific zone. Shape Tracing (another feature of the
Orchard Designer Tools module) is a great way to discover what alternates are available for any shape template on the
page.
Here are some examples of widget alternate template names:
Parts.Common.Body-HtmlWidget-TripelSecondParts.Common.Body-TripelSecond
Explicitly Designating an Alternate Template
In addition to using the automatically generated alternates, you can manually specify an alternate. In a placement.info
file, you can specify which alternates are available for a content type. For example, to specify a different template
(identified as Parts_Tags_ShowTags_BlogPost) for rendering the tags for blog posts, you can revise the
placement.info file for the Orchard.Tags module to include an element that matches BlogPost types. The following example shows the revised file.
<Placement>
<Place Parts_Tags_Edit=''Content:7''/>
<Match ContentType=''BlogPost''>
<Place Parts_Tags_ShowTags=''Header:after.7;Alternate=ShowTags_BlogPost''/>
</Match>
<Match DisplayType=''Detail''>
<Place Parts_Tags_ShowTags=''Header:after.7''/>
</Match>
<Match DisplayType=''Summary''>
<Place Parts_Tags_ShowTags=''Header:after.7''/>
</Match>
</Placement>
The ordering of the Match elements is significant. Only the first matched element is used to render the item. In the
example, placing the element for BlogPost below Detail and Summary means that ShowTags_BlogPost
will not be used, even for BlogPost items, because the earlier elements match the item. For more information about
the placement.info file, see Understanding placement.info.
Alternates for MVC views
Some modules in Orchard use regular MVC views to render the results of an action that was invoked on a custom
controller. To customize the look of the pages produced by custom MVC controllers in Orchard, you need to add a
version of the view file in your theme’s Views folder.
For example, if you want to customize the search results page of the Orchard Search module (Orchard.Search) you
need to add a file in the following folder of your theme:
/Themes/{Your theme}/Views/Orchard.Search/Search/Index.cshtml
3.11. Creating Themes
461
Read the Docs Template Documentation, Release 1.9.2
This file will override the default view used by the Orchard.Search module. The ViewEngine used by Orchard will
look for the following pattern when resolving MVC views.
• ~/Themes/{Active theme}/Views/{Area}/{Controller}/{View}.cshtml
• ~/Themes/{Active theme}/Views/{Controller}/{View}.cshtml
• ~/Themes/{Active theme}/{Partial}.cshtml
• ~/Themes/{Active theme}/DisplayTemplates/{TemplateName}.cshtml
• ~/Themes/{Active theme}/EditorTemplates/{TemplateName}.cshtml
Please be aware, any other convention that is normally supported in MVC is not supported within a theme. Unless
specified in the list above.
Adding Alternates Through Code
In addition to methods described above for adding alternates, you can add alternates through code. To designate an
alternate through code, you create a class that implements the IShapeTableProvider interface. Then, you add
a handler for OnDisplaying for each type of shape that needs an alternate. You specify the shape name as the
parameter for the Describe method on the ShapeTableBuilder class. Within the handler, you add any logic
that you need to specify when the alternate is used. The following example first shows how to specify an alternate for
shape named Content, but only when the user is on the home page. It also shows how to specify an alternate for a
shape named Parts_Tags_ShowTags when the DisplayType is Summary.
using Orchard;
using Orchard.ContentManagement;
using Orchard.DisplayManagement.Descriptors;
namespace MyTheme.ShapeProviders
{
public class ExampleShapeProvider : IShapeTableProvider
{
private readonly IWorkContextAccessor _workContextAccessor;
public ExampleShapeProvider(IWorkContextAccessor workContextAccessor)
{
_workContextAccessor = workContextAccessor;
}
public void Discover(ShapeTableBuilder builder)
{
builder.Describe(``Content'')
.OnDisplaying(displaying =>
{
if (displaying.ShapeMetadata.DisplayType == ``Detail'')
{
ContentItem contentItem = displaying.Shape.ContentItem;
if (_workContextAccessor.GetContext().CurrentSite.HomePage
.EndsWith(`;' + contentItem.Id.ToString())) {
displaying.ShapeMetadata.Alternates
.Add(``Content__HomePage'');
}
}
});
462
Chapter 3. Documentation
Read the Docs Template Documentation, Release 1.9.2
builder.Describe(``Parts_Tags_ShowTags'')
.OnDisplaying(displaying =>
{
if (displaying.ShapeMetadata.DisplayType == ``Summary'')
{
displaying.ShapeMetadata.Alternates
.Add(``Tags_ShowTags_Summary'');
}
});
}
}
}
3.11.6 Template File Syntax Guide
Orchard uses templates and shapes to build views. Templates are conceptually similar to partial views in ASP.NET
MVC, and they provide the basic structure for rendering shape data in a page. A template can contain web page content
such as HTML markup, CSS styles, and JavaScript code to help render shape data. In addition, a template can contain
server-code blocks so that you can access and render shape data in a web page. Shapes are dynamic data models that
represent content structures such as menus, menu items, content items, documents, and messages. Shapes provide the
data for dynamic views (as opposed to the static ASP.NET views in MVC) that templates render at run time. For more
information about working with shapes, see Accessing and Rendering Shapes.
The view engine is responsible for parsing the template and rendering the shape data into a web page. The default
view engine for Orchard is the Razor view engine, which is installed with ASP.NET MVC 3. In order for the Razor
view engine to correctly parse a template, you must write the template using the Razor syntax, which defines a small
set of rules for writing web page templates that contain a mixture of static web page content (such as HTML markup)
and programming code.
This topic gives an overview of the Razor syntax used in templates and layout pages. It then shows you how to create
your own shape template.
Razor Syntax Primer
Using the simple rules of the Razor syntax, you can embed server-based code (in C# or Visual Basic) into web page
markup. Like server code in other ASP.NET web applications, the server code that you embed in a web page using the
Razor syntax runs on the server before the page is sent to the browser. The server code in ASP.NET web pages can
dynamically generate client content such as HTML markup, CSS, or JavaScript, and then send it to the browser along
with any static HTML that the page contains.
The most commonly used language for writing server code with the Razor syntax is C#, and the examples in this article
are all written in C#. For an introduction to web page programming using the Razor syntax with C#, see Coding with
the Razor Syntax. For a Visual Basic version of the introduction, see ASP.NET Web Pages Visual Basic.
Web pages that contain Razor content have a special file extension (.cshtml for C#, .vbhtml for Visual Basic). The
Microsoft feature name for these pages is ASP.NET Web Pages with Razor Syntax. These pages contain the full
functionality of the ASP.NET MVC page framework, with the added capability of the Razor syntax for writing page
templates. The server recognizes these file extensions, runs the code that’s marked with Razor syntax, and sends the
resulting page to the browser.
3.11. Creating Themes
463
Read the Docs Template Documentation, Release 1.9.2
Experimenting with Razor Syntax
If you want to experiment with Razor syntax, you might want to start with WebMatrix. WebMatrix is a free programming environment for creating ASP.NET Web Pages with Razor syntax. It includes IIS Express (a development web
server), ASP.NET, and SQL Server Compact (an embedded database also used by Orchard).
WebMatrix gives you productivity features that support Razor syntax, such as syntax highlighting for code and IntelliSense for HTML markup and CSS. You can also work with Razor syntax in Visual Studio 2010, which provides the
added features of full IntelliSense for your server code, and also lets you use the Visual Studio debugger. For more
information, see Program ASP.NET Web Pages in Visual Studio. However, you can use any text editor to experiment
with Razor syntax.
To download and install WebMatrix, go to the WebMatrix downloads page and click the link for the Microsoft Web
Platform Installer to start your download.
Code Blocks and Inline Expressions
You add code to a web page using the @ character. Braces ({ }) are used to mark a code block. For example, the
following expression assigns the string “Hello World” to a variable named myMessage.
@{ var myMessage = ``Hello World''; }
Code blocks can be inserted in the web page interspersed with HTML markup. The following code defines a greeting
message that includes the current day of the week and embeds the message in the page markup.
@{
var greeting = ``Welcome to our site!'';
var weekDay = DateTime.Now.DayOfWeek;
var greetingMessage = greeting + '' Today is: '' + weekDay;
}
<p>The greeting is: @greetingMessage</p>
When the code block consists of a single expression, such as a for loop, you can place the @ character in front of a
language keyword. In this case, the for loop serves as the entire code block, so you do not need an outer @ character
and braces to enclose the block. You can use the same approach with other block coding structures in C#: if-then
statements, foreach and while loops, case statements, and so on. In the following expression, the @ character is
placed in front of the keyword for. The loop prints a set of numbered lines from 10 to 20.
@for(var i = 10; i < 21; i++)
{
<p>Line #: @i</p>
}
464
Chapter 3. Documentation
Read the Docs Template Documentation, Release 1.9.2
The following example shows how to embed server-side comments in your web pages. These comments are stripped
from the markup before the web page is sent to the browser, so users cannot see them. In contrast, client markup
comments (<!-- -->) are not stripped from the markup, so users can see them.
@* This is a one-line comment. *@
@*
This is a multi-line comment.
It can continue for any number of lines.
*@
Comments within a Razor syntax code block can also use the standard C# commenting syntax (//).
Accessing Orchard Objects in Code
Orchard 1.1 provides simplified access to objects in code, because you can directly access content part objects without
having to use casting or extension methods.
The following examples show how to access a Title property on a widget part. The first code example shows the older way of access the property from Orchard version 1.0.20, found in the ~\Modules\Orchard.Widgets\Views\Widget.Wrapper.cshtml file. Note that the code casts the returned object to the
IContent interface and uses an As extension method to access the property.
var title = ((IContent)Model.ContentItem).As<WidgetPart>().Title;
Here is the updated and simplified way that you can access the property in Orchard 1.1:
var title = Model.ContentItem.WidgetPart.Title;
3.11. Creating Themes
465
Read the Docs Template Documentation, Release 1.9.2
Here is a second example of Orchard object access that has been simplified in version 1.1. The following code
is in Orchard version 1.0.02 to access the fields for a content item. This example is from a content shape, so the
ContentItem object is accessed directly on the Model object. The first line of code casts to ContentItem, and
then the second line uses an As() extension method to access the collection of fields on the content part. The return
value of the code is the picture width.
var contentItem = (ContentItem)Model.ContentItem;
var picture = (ImageField)contentItem.As<ProfilePart>().Fields.First(f => f.Name == ``Pictu
@picture.Width
Here is an approach you can use in Orchard 1.1, with the amount of code required to get the picture width reduced
from three lines to just one:
@Model.ContentItem.ProfilePart.Picture.Width
Creating Shape Templates
Shape templates are fragments of HTML markup for rendering shapes. To demonstrate how shape templates are used,
suppose you want display a map on your web page. The shapes that will contain the map settings for display and edit
are defined in the following driver code.
using Maps.Models;
using Orchard.ContentManagement;
using Orchard.ContentManagement.Drivers;
namespace Maps.Drivers
{
public class MapPartDriver : ContentPartDriver<MapPart>
{
protected override DriverResult Display(
MapPart part, string displayType, dynamic shapeHelper)
{
return ContentShape(``Parts_Map'',
() => shapeHelper.Parts_Map(
Longitude: part.Longitude,
Latitude: part.Latitude));
}
//GET
protected override DriverResult Editor(
MapPart part, dynamic shapeHelper)
{
return ContentShape(``Parts_Map_Edit'',
() => shapeHelper.EditorTemplate(
TemplateName: ``Parts/Map'',
Model: part));
}
//POST
protected override DriverResult Editor(
MapPart part, IUpdateModel updater, dynamic shapeHelper)
{
updater.TryUpdateModel(part, Prefix, null, null);
return Editor(part, shapeHelper);
}
466
Chapter 3. Documentation
Read the Docs Template Documentation, Release 1.9.2
}
}
The Display method is used to display the map. The Editor method marked //GET is used to display the shape
result in editing view for user input. The Editor method marked //POST is used to redisplay the editor view using
the values provided by the user. These methods use different overloads of the Editor method.
For more information about how to define shapes, see Accessing and Rendering Shapes.
The following example shows a simple template that is used to display the map.
<img alt=''Location'' border=''1'' src=''http://maps.google.com/maps/api/staticmap?
&zoom=14
&size=256x256
&maptype=satellite&markers=color:blue|@Model.Latitude,@Model.Longitude
&sensor=false'' />
This example shows an img element in which the src attribute contains a URL and a set of parameters passed as
query-string values. In this query string, @Model represents the shape that was passed into the template. Therefore, @Model.Latitude is the Latitude property of the shape, and @Model.Longitude is the Longitude
property of the shape.
The following example shows the template for the editor. This template enables the user to enter values for latitude
and longitude.
@model Maps.Models.MapPart
<fieldset>
<legend>Map Fields</legend>
<div class=''editor-label''>
@Html.LabelFor(model => model.Longitude)
</div>
<div class=''editor-field''>
@Html.TextBoxFor(model => model.Latitude)
@Html.ValidationMessageFor(model => model.Latitude)
</div>
<div class=''editor-label''>
@Html.LabelFor(model => model.Longitude)
</div>
<div class=''editor-field''>
@Html.TextBoxFor(model => model.Longitude)
@Html.ValidationMessageFor(model => model.Longitude)
</div>
</fieldset>
The @Html.LabelFor expressions create labels using the name of the shape properties.
The
@Html.TextBoxFor expressions create text boxes where users enter values for the shape properties. The
@Html.ValidationMessageFor expressions create messages that are displayed if users enter an invalid value.
Layout and Document Templates
The layout and document templates are special template types that define the structure of a web page. These templates
are most often used in themes for laying out a web page. Each web page has a Layout shape (dynamic object)
3.11. Creating Themes
467
Read the Docs Template Documentation, Release 1.9.2
associated with it. The Layout shape defines the zones that are available to hold web page contents. The layout and
document templates determine how the zones defined in the Layout shape will be laid out on the web page.
The layout template (Layout.cshtml) lays out the zones for the body of the web page. The document template (Document.cshtml) wraps around the layout template and lays out the remainder of the web page.
By default, the Layout shape defines three zones for use in the document template (Head, Body, and Tail) and
one shape for the layout template (Content). In the document template, the Head zone is used to define the header
of the web page, the Body zone is where the layout template is inserted, and the Tail zone is used for the footer of
the web page.
The following example shows a typical document template.
@using Orchard.Mvc.Html;
@using Orchard.UI.Resources;
@{
RegisterLink(new LinkEntry {Type = ``image/x-icon'', Rel = ``shortcut icon'',
Href = Url.Content(``~/modules/orchard.themes/Content/orchard.ico'')});
Script.Include(``html5.js'').AtLocation(ResourceLocation.Head);
var title = (Request.Path != Request.ApplicationPath && !string.IsNullOrWhiteSpace((str
? Model.Title + WorkContext.CurrentSite.PageTitleSeparator
: ``'') +
WorkContext.CurrentSite.SiteName;
}
<!DOCTYPE html>
<html lang=''en'' class=''static @Html.ClassForPage()''>
<head>
<meta charset=''utf-8'' />
<title>@title</title>
@Display(Model.Head)
< script>(function(d){d.className=''dyn''+d.className.substring(6,d.className.length);}
</head>
<body>
@* Layout (template) is in the Body zone at the default position *@
@Display(Model.Body)
@Display(Model.Tail)
</body>
</html>
This document template contains a code block that links to an icon and formats the page title. It also contains the basic
HTML structure for the web page, and it determines placement of the Head, Body, and Tail zones.
The following example shows a typical layout template. Notice that the layout template references zones in addition
to the Content zone. These new zones are added to the Layout shape if content is added to the zone.
@* Html.RegisterStyle(``site.css''); *@
@{
Model.Header.Add(Display.Header(), ``5'');
Model.Header.Add(Display.User(), ``10'');
Model.Header.Add(Model.Navigation, ``15'');
}
<div id=''page''>
<header>
@Display(Model.Header)
</header>
<div id=''main''>
468
Chapter 3. Documentation
Read the Docs Template Documentation, Release 1.9.2
<div id=''messages''>
@Display(Model.Messages)
</div>
<div id=''content-wrapper''>
<div id=''content''>
@Display(Model.Content)
</div>
</div>
<div id=''sidebar-wrapper''>
<div id=''sidebar''>
@Display(Model.Sidebar)
</div>
</div>
</div>
<div id=''footer-wrapper''>
<footer>
@Display(Model.Footer)
</footer>
</div>
</div>
This layout template contains a code block that adds subzones to the Header zone. It also refers to the following new
zones: Messages, Sidebar, and Footer.
In order for these zones to appear in the Orchard UI so you can add content to them, you must reference the zones in
the theme’s Theme.txt file, as shown in the following example.
Name: SimpleTheme
Author:
Description: Simple example theme.
Version: 1.0
Tags: Simple
Website: http://www.orchardproject.net
Zones: Header, User, Navigation, Messages, Content, Sidebar, Footer
Change History
• Updates for Orchard 1.1
– 4-4-11: Updated introduction to the Razor syntax. Added new section on accessing Orchard objects in
code.
3.11.7 Packaging and Sharing Themes
This topic is being updated for the Orchard 1.1 release.
Orchard provides a packaging feature that lets you share themes you have created. The feature creates a package (.zip
file, in .nupkg format) that contains your theme. It also lets you upload your new theme to the Orchard Gallery.
This article shows you how to package a theme and upload it the Orchard Gallery, and how users can download and
install your theme.
Viewing the Packaging Modules
To view the packaging modules, open the Orchard dashboard and click Modules. Scroll to Packaging.
3.11. Creating Themes
469
Read the Docs Template Documentation, Release 1.9.2
The Packaging modules are enabled by default. If any of the modules have been disabled, you must enable them in
order to package and upload your theme.
Packaging Your Theme
To package your theme, open the Orchard command line and type the following command, replacing MyFirstTheme
with the name of your theme, and C:\Temp with the output path for the generated package file.
package create MyFirstTheme C:\Temp
The package feature creates a .nupkg file. (For more information, see NuGet.org.) The name of the .nupkg file is the
name of your theme plus its version number, as in the following example:
Orchard.Theme.<nameOfYourTheme>.<version>.nupkg
Uploading Your Theme to Gallery
After creating your package, you can share your theme by giving someone the package file. You can also contribute
your theme to the Orchard Gallery. For information about how to contribute your theme, see Contributing a Module
or Theme to the Gallery.
Installing a Packaged Theme
To install a packaged theme in Orchard, open the Orchard dashboard. Click Themes, and then click Install a theme
from my compter.
470
Chapter 3. Documentation
Read the Docs Template Documentation, Release 1.9.2
Click Choose File. Browse to, and select, the theme package (.nupkg) file, and then click Open. Then click Install.
If Orchard is running on a remote server, you will be browsing your local computer; you do not need to put the .nupkg
file onto the server before installing.
Your new theme appears under Available.
3.11. Creating Themes
471
Read the Docs Template Documentation, Release 1.9.2
472
Chapter 3. Documentation
Read the Docs Template Documentation, Release 1.9.2
3.11.8 UI Guidelines for Theme Authors
This topic was updated for the Orchard 1.0 release.
This article presents recommendations for coding and formatting HTML markup and CSS that will help you keep your
themes organized.
General Guidelines
This section contains guidelines for a number of design topics, such as browser testing, file names, HTML elements,
JavaScript and images.
Browser Testing
You should test all templates using the latest versions of the following browsers. For older versions of browsers, such
as Internet Explorer 6, you should ensure that your site and templates remain functional, but don’t attempt to resolve
rendering issue that do not affect the user’s ability to consume the content.
• Microsoft Internet Explorer
• Google Chrome
• Mozilla Firefox
• Apple Safari
• Opera
File Names
The following lists file naming rules followed by the Orchard development team.
• Include files use an underscore (_) as a prefix
• .cshtml, .vbhtml, HTML, and CSS files should be named using camel casing.
HTML doctype Directive
Use the HTML5 doctype declaration, because it lets you use HTML5 markup but is also compatible with existing
markup that complies to HTML 4.01 and XHTML.
<!DOCTYPE html>
HTML Elements
Orchard assumes the use of HTML5. Although you are not required to use HTML5, it is a strong recommendation.
One reason is that templates from different modules and parent themes might be used on a single page, where there is
only one doctype declaration.
The following tables lists some commonly used HTML5 elements that provide for better structure in web pages than
earlier versions of HTML did. For more information about HTML5, see the W3C article HTML5 difference from
HTML4.
• <section>
• <article>
3.11. Creating Themes
473
Read the Docs Template Documentation, Release 1.9.2
• <aside>
• <hgroup>
• <header>
• <footer>
• <nav>
• <figure>
• <figcaption>
Example:
<figure>
<video src=''tgif.vid''></video>
<figcaption>Example</figcaption>
</figure>
If you are using any of these new elements, in order to avoid breaking script libraries in older versions of Internet
Explorer, we recommend that you use the workaround described in Styling New HTML5 Elements.
JavaScript and jQuery
Your web pages should work even if JavaScript is disabled in the browser. Scripts should be used only to enhance
the experience of the page, which is referred to as progressive enhancement. For more information, see Progressive
Enhancement with JavaScript.
Orchard has jQuery built in. The Orchard team has standardized on jQuery as its JavaScript framework.
Images
Use the appropriate image format for the scenario, as described in the following list:
• Photos and gradients should use the jpeg format.
• Graphical elements should use the png format.
• Use alpha transparency via the 24-bit png format.
• Use sprites where possible to improve load time and to reduce the number of requests made to the server.
For more information about sprites, see CSS Sprites: Image Slicing’s Kiss of Death.
Accessibility
Your HTML and CSS templates should pass the accessibility tests provided by Wave the web accessibility evaluation
tool. Your templates should satisfy the requirements of WCAG 2.0 level AA.
Markup Validation
We recommend that you always strive for standards compliance. Ensure that your templates pass validation by using
the W3C Markup Validation Service.
474
Chapter 3. Documentation
Read the Docs Template Documentation, Release 1.9.2
CSS Organization
To allow users to easily find and read styles for modification, we recommend that you standardize on a structure and
coding format. The organizational structure that is introduced in this section is used by the Orchard team.
To help you abide by the CSS standards, keep the following guidelines in mind:
• Do not use workarounds like conditional if statements in stylesheets.
• CSS markup should be valid CSS 2.1 or higher. You can also use optional progressively enhanced CSS 3
markup.
CSS Format Rules
The following list contains guidelines for formatting CSS markup.
• Use four spaces instead of tabs for indentation. (This is the default setting in Visual Studio.)
• Use a hyphen (-) between words in selectors.
• Remove unused CSS selections (except for reset styles).
• Use lowercase for color definitions.
• Use shorthand notation where possible, such as for color codes; use collapsed properties when practical.
• Use IDs instead of classes where possible. Using IDs for template elements makes it easy to identify the
important selectors in CSS and HTML.
• Use one line per property definition.
• Use “tab-nested” selectors. For more information, see CSS DIY Organization.
CSS File Structure
The recommended CSS structure was partly adapted from suggestions provided by Dan Cederholm of SimpleBits.
This structure resides in the Style.css file. The file comprises the following sections:
1. Info - A commented section for the theme that the style is associated with, the author, website, and any copyright
information.
2. Color Palette - A commented section that defines the overall color scheme for the theme. It provides a single
place to define colors and makes it easy for users to find, replace, and modify color definitions.
3. Reset - Definitions that are used to normalize settings across browsers.
4. Clearing Floats - Definitions that are used to clear parent items that contain children that float.
5. Typography - (Optional) Contains CSS code or a reference to a typography reset framework (such as YUI
Fonts) that normalizes font sizes across browsers.
6. General - Definitions for global HTML elements such as <body>, headings, links, and any other elements
where you want to apply a different style and override the reset. This can include styles for elements like <ul>,
<p>, etc.
7. Structure - Layout definitions for major structural components of your templates, such as containers, headers,
footers, etc. This section can be subdivided with comments into sections such as navigation, header, etc.
8. Main - Main styles related to your theme. This can contain definitions for blog posts, tags, etc.
9. Secondary - Secondary styles related to your theme for things like stylized text, errors, etc.
10. Forms - All styling related to form items.
3.11. Creating Themes
475
Read the Docs Template Documentation, Release 1.9.2
11. Misc - Miscellaneous definitions that are needed to render the look of your template.
The following example shows this structure applied to a CSS file.
/*
Theme: My Sample Theme
Author:
Copyright:
*/
/* Colors Palette
Background: #fff
Text: #434343
Main Accent: #999
Links: #443444
*/
/* Reset
***************************************************************/
YOUR CSS RESET CODE GOES HERE
/* Clearing Float
***************************************************************/
group:after {
content: ''.'';
display: block;
height: 0;
clear: both;
visibility: hidden;
}
.group {display: inline-block;}
/* for IE/Mac */
/* Typography (Optional)
***************************************************************/
@import url(http://yui.yahooapis.com/2.8.1/build/fonts/fonts-min.css);
/* General
***************************************************************/
body {}
a {}
a:link {}
a:hover{}
a:visited{}
h1,h2,h3,h4,h5,h6 {}
/* Structure
***************************************************************/
#container {}
#header {}
#logo {}
476
Chapter 3. Documentation
Read the Docs Template Documentation, Release 1.9.2
#footer {}
/* Main
***************************************************************/
/* Secondary
***************************************************************/
/* Forms
***************************************************************/
/* Misc
***************************************************************/
CSS Reset
You should always use a reset to normalize styling between browsers and then apply default markup manually. For
more information about resets, see Reset Reloaded. You can optionally use a reset library.
To reset a global style
1. Apply the reset.
2. Apply a default style to any global element (defined in the general section).
Example:p { padding: 0 10px; line-height: 150%;}
Typography
Use relative font sizes and set a default base size to ensure consistent font sizes across browsers, and to allow browser
users to increase font size to enhance readability. However, remember that relative sizes are cumulative. For example,
if you set the size of div tags to 2em, then you then embed a <div> element inside another <div> element and
another inside that, you’ll end up with an effective setting of 8em for the innermost <div> element.
The following list shows the methods by which you can enhance readability.
• (Method 1) Use ems and set the base font size on the <body> element. The default size for medium text in all
modern browsers is 16px. First, reduce this size for the entire document by setting font size in the <body>
element to 62.5%. You can then think in pixels but still set sizes in terms of ems: 1em is 10px, 0.8em is 8px,
1.6em is 16px, etc. For more information, see How to size text using ems.
• (Method 2) Use a framework reset such as YUI 2 Fonts CSS.
Clearing Floats
There are two methods you can use to clear floats without adding markup.
• (Method 1) Us the position if everything method with semantic modification as suggested by SimpleBits. This
method involves applying a clear property to any parent element that contains items that you want to float.The
SimpleBits modification changes the class name to group, which adds semantic value because you often float
related items as a group.
• (Method 2) Apply the overflow:auto property to the parent container.Certain combinations of margin and
padding can force internal scrollbars. If you can’t tweak things to remove the scrollbars, you can try us-
3.11. Creating Themes
477
Read the Docs Template Documentation, Release 1.9.2
ing overflow:hidden, which has virtually the same effect without the scrollbars. The only drawback of
hidden seems to be that some images are cropped if they’re placed lower in the page.
Forms
Mark up form elements using the “ordered-list” method. This method describes form elements as a sequential list of
inputs that the user needs to fill in. It provides both semantic meaning and order to the form, which aids accessibility.
When forms are rendered without style sheets, they are clearly labeled in sequential order and have a count associated
with them. The ordered list provides additional information for some screen readers that announce the number of list
items when they first encounter the list.
<fieldset>
<legend>Delivery Details</legend>
<ol>
<li>
<label for=''name''>Name<em>*</em></label>
<input id=''name'' />
</li>
<li>
<label for=''address1''>Address<em>*</em></label>
<input id=''address1'' />
</li>
<li>
<label for=''town-city''>Town/City</label>
<input id=''town-city'' />
</li>
<li>
<fieldset>
<legend>Is this address also your invoice address?<em>*</em></legend>
<label><input type=''radio'' name=''invoice-address'' /> Yes</label>
<label><input type=''radio'' name=''invoice-address'' /> No</label>
</fieldset>
</li>
</ol>
</fieldset>
Progressive Enhancements
Base your designs on modern browsers that implement up-to-date patterns, but without handicapping the experience
of older browsers. If you feel it is important to the design, use known CSS techniques such as sliding door to achieve
the desired effect.
1. Border radius
2. Multiple background images
3. Gradient
4. Transparency (RGBA and opacity)
5. Shadows
6. Text-Shadows
478
Chapter 3. Documentation
Read the Docs Template Documentation, Release 1.9.2
3.11.9 Customizing Orchard Using Designer Helper Tools
Orchard provides a designer tool named Shape Tracing that enables you to customize the appearance of your site.
The Shape Tracing module provides tools that you can use to select sections of your website and discover information
about the rendering code.
Getting Started with Shape Tracing
To use Shape Tracing, first enable the Shape Tracing feature in the dashboard. The Shape Tracing feature comes
with the Designer Tools module, that you may have to install. After you enable the feature, you will notice a narrow
frame across the bottom of the web page when you navigate to your site, similar to the following illustration:
When the Shape Tracing frame is collapsed, your site functions as it would normally. However, when you click the
icon, the frame expands and displays Shape Tracing features.
Shape Information
When the Shape Tracing frame is expanded, you can hold the mouse pointer over a section of a page and that section
is highlighted. Click the highlighted section to display information about the shape and how it is rendered.
3.11. Creating Themes
479
Read the Docs Template Documentation, Release 1.9.2
The left side of the frame displays which shape is selected. It also enables you to select which shape to highlight by
providing a navigable tree for the shapes.
The right side displays information about the selected shape and enables you to select which type of information to
display.
480
Chapter 3. Documentation
Read the Docs Template Documentation, Release 1.9.2
The Shape Tracing pane displays the following information:
• Shape. Information about the shape and the template to render the shape. Includes the option of creating
alternates as described later in this article.
• Model. Information about the model for this shape.
• Placement. The placement.info file.
• Template. The code in the template file
• HTML. The HTML for rendering this shape.
Creating Alternate Templates
The Shape Tracing interface displays links that let you automatically create alternate templates for a shape. The
interface displays the available alternate templates and includes a link titled Create to generate that template.
The Create option only creates the template in the specified directory. You must customize the template to render the
shape as needed. If you are using Visual Studio, you must include the template in your project by selecting Add >
Existing Item in Solution Explorer.
For more information about how to create alternates, see Alternates.
3.12 Developer Tools and Guidelines
3.12.1 Developer FAQ
What are the dependencies?
Orchard uses a number of external libraries. They can all be found under \lib directory in your enlistment. They are
also enumerated in Orchard dependencies and libraries.
What framework versions does Orchard support?
Orchard supports the following versions of .net:
3.12. Developer Tools and Guidelines
481
Read the Docs Template Documentation, Release 1.9.2
Orchard Version | Framework Required —————– | —————— Up to version 1.7 | Orchard supports .NET 4.0.
Version 1.8 | Orchard runs on .NET 4.5 and IIS 7 (or newer) Version 1.9 | Orchard runs on .NET 4.5.1 and IIS 7 (or
newer)
Which branch should I be using when working on the codebase?
Branches are discussed on the contributing patches page.
What types of extensions can I write?
Orchard Modules and Themes are supported. There is extensive documentation covering these topics in the main
documentation index.
Where are Modules physically located?
The projects in the “Modules” folder are physically located under the “src\Orchard.Web\Modules” folder. This allows
modules to contain ASP.NET views and static content without having to copy files between projects to be able to run
the project.
The Core modules are physically located under the “\src\Orchard.Web\Core” folder.
What is a Module.txt file?
This is the module manifest. It is a YAML-format file. You can learn more about module.txt in the manifest files
guide.
What is the AdminMenu.cs file?
This file has an implementation of the Orchard interface called INavigationProvider. It lets modules hook
themselves into the admin menu in the backend. This is typically where you declare what links should your module
inject into the Admin menu and what controller actions these links invoke.
What is the Permissions.cs file?
This file has an implementation of the Orchard interface called IPermissionProvider. It lets modules declare a
set of permissions as well as attach those permissions to default Orchard roles. Once you add a new permission type to
your module here, you will be able to use the Orchard authorization APIs to check that permission against the current
user. You will also be able to manage which custom roles the permission belongs to in the Roles administration page.
How do I do authorization inside my module against current user/roles?
Orchard comes with a default services implementation of the IOrchardServices interface. Simply include
IOrchardService in your constructor and you will get the default implementation injected. Like:
public AdminController(IMyService myService, IOrchardServices orchardServices) {
_myService = myService;
_orchardServices = orchardServices;
}
482
Chapter 3. Documentation
Read the Docs Template Documentation, Release 1.9.2
At this point, services gives you Authorizer for authorization, Notifier for writing out notifications, ContentManager
for access to the Orchard content manager and TransactionManager for handling database transactions.
To check if the current user has a certain permission, you would simply do:
Services.Authorizer.Authorize(Permissions.SomeModulePermission,
T(``Some operation failed''));
What are Core Modules?
Core Modules are Orchard Modules you can find under \src\Orchard.Web\Core. They also constitute the Orchard.Core
project in the solution. These are modules that are always enabled and come with the default Orchard installation.
See “Why are Core modules modules?” and “Why are Core Modules Core Modules?” below for more detailed
information.
Why are Core modules modules?
The difference is similar to OS concepts of monolithic vs micro-kernel: it was pretty obvious during high level design of Orchard that an extensibility point such as modules was needed. Everything else would constitute the core
framework.
Take the Common module for example, which introduces the BodyPart, a core concept common to many types of
content types, such as blog posts or pages. Now we could’ve implemented this as part of the Orchard framework dll,
and have modules depend on it. But then it wouldn’t get the benefit of being a module, such as being able to hook up
handlers, drivers, views, routes etc.
This also relates to MVC and areas, where everything that belongs to an area is under the same directory. It was pretty
clear that the right choice was to get some core concepts out of the framework dll into a separate dll, and have them
be modules.
This is very similar to non-monolithic operating systems where parts of the core functionality is implemented as
modules outside the kernel, talking to it via the same exact interfaces as the more higher level modules.
Why are Core Modules Core Modules?
Now that we want core concepts to be implemented as modules, why not put them into the modules directory along
with the rest of the more obvious Orchard modules, such as the comments module. Well, this time it’s about dependencies. In Orchard, modules that are in the modules directory can be disabled, uninstalled or otherwise updated in a
breaking way.
We prefer modules that are self-contained and don’t require other non-core modules as dependencies, as much as
possible. That’s part of the entire dynamism behind the content type architecture. Pages and Blog posts, which belong
to Pages and Blog modules, don’t reference Comments or Tags modules, but it’s possible to attach comments or tags
to pages and blogposts.
This decoupled behavior is ensured by the underlying content type architecture and not by direct reference from one
or the other modules. Core modules are part of the Orchard framework and it’s ok for modules to depend on them.
They will be distributed by us and for all practical purposes are integral parts of the Orchard framework. Modules can
depend on them and directly access their public surface.
How do I write and run tests?
Orchard comes with a solution folder called Tests. This hosts 2 types of tests:
3.12. Developer Tools and Guidelines
483
Read the Docs Template Documentation, Release 1.9.2
• Unit Tests: These are NUnit test fixtures. To write a fixture for a module, simply create a new directory under
Orchard.Tests.Modules and populate it with your tests.
• Integration Tests: These are also NUnit tests, generated using SpecFlow (http://www.specflow.org) .feature
files. Your integration tests would go under Orchard.Specs and there are a multitude of examples there you can
look at if you are new to the BDD approach.
Running the unit tests is a matter of right clicking the solution or appropriate project and choose Run Unit Tests.
Note: this applies to writing tests for the modules that come with the standard source code distribution of
Orchard.
To write code for your own modules you should work in your own separate project. You can use the
orchard scaffolding command codegen moduletests <module-name> to set up test projects for
your own modules.
How do I contribute my changes to Orchard?
Contributing changes to Orchard are discussed on the contributing patches page.
How to build a WCF service that exposes Orchard functionality?
To host a WCF Service in Orchard, with all of its goodies coming from IoC you have to:
Create a SVC file for your service with the new Orchard Host Factory:
<%@ ServiceHost Language=''C#'' Debug=''true''
Service=''Orchard.Service.Services.IService, Orchard.Service''
Factory=''Orchard.Wcf.OrchardServiceHostFactory, Orchard.Framework'' %>
Register the service normally as an IDependency.
using System.ServiceModel;
namespace Orchard.Service.Services {
[ServiceContract]
public interface IService : IDependency {
[OperationContract]
string GetUserEmail(string username);
}
}
Provide implementation (i.e.: Service : IService).
What’s in App_Data?
The App_Data folder is used to store various kinds of data. Contents of App_Data are never served. The contents
are organized this way:
• File:cache.dat is a cache XML document describing what features are enabled for each tenant in the site. This
being only a cache, modifying it may have unpredictable results.
• File:hrestart.txt stands for Host Restart. It is a file that is touched by the system to indicate a need to restart the
application.
• Folder:Dependencies is used by dynamic compilation to store compiled dlls and has an XML file, dependencies.xml that tracks how each module was compiled (dynamically or not).
484
Chapter 3. Documentation
Read the Docs Template Documentation, Release 1.9.2
• Folder:Exports contains export XML files generated by the import/export feature.
• Folder:Localization contains localization .po files.
• Folder:Logs contains log files.
• Folder:RecipeQueue is used during setup to queue the recipes to execute.
• Folder:Sites contains one folder per tenant. The default tenant is in the Default folder, which is all there is if no
tenant was created. Each folder contains the following:
– mappings.bin is a binary serialized cache of nHibernate mappings.
– Orchard.sdf is the SQL CE database file for the tenant.
– reports.dat is a legacy log file.
– Settings.txt describes the low-level settings for the tenant (database provider, connection string, etc.)
– ***.settings.xml** - You will see one of these per search index you have configured in the admin panel.
They hold configuration settings for the current state of that index.
– Folder: Indexes - Used by the Lucene module to store search index cache files.
• Folder:Warmup contains cached versions of pages generated by the warmup module, and a warmup.txt file that
contains the timestamp for the last warmup file generation.
Understanding bug status and triage
When you submit a bug, the team (or anybody subscribing to notifications) receives an e-mail. We do regular triage
meetings with a small committee, sometimes as often as daily and usually at least once a week.
When we do triage, we make a query that returns all bugs in “Proposed” state, ordered by number of votes. This means
that we are always looking at the most voted bugs first. If you care about a bug, you should vote for it, and it won’t
fall on deaf ears.
A bug that is still in “Proposed” state has not been triaged yet. When we look at a bug, several things can happen.
We may close it if it doesn’t reproduce, if it’s by design or if it was fixed since submitted. We may ask for more
information (and leave it in “Proposed” state). Or finally, we may move it to the “Active” bucket.
A bug that is in “Active” state has been triaged and should have been assigned a release. The release usually is one
of the planned releases. Planned releases are usually the ones we are currently working on, plus a “Future Versions”
release that we use for bugs and features that we want to handle but don’t think we can do in the current cycle. The
“Assigned to” field is only set when the bug is scheduled to be fixed in the current iteration or cycle. If it’s in “Future
Versions” it is usually unassigned.
Impact is usually set during triage but a “Low” value does not necessarily mean much: this is the default value so it
might just mean that it hasn’t been touched. It’s OK to investigate with the team on the impact of a bug you care about.
Developer Troubleshooting
• Record Names: Your implementations of the ContentPartRecords shouldn’t have properties that are known
keywords to NHibernate. Examples include Identity, Version.
3.12. Developer Tools and Guidelines
485
Read the Docs Template Documentation, Release 1.9.2
3.12.2 Setting Up a Source Enlistment
Enlisting in the Source Code Using Git and Git Extensions
The Orchard project source code is hosted on GitHub and can be accessed using a Git client. This page explains how
to set-up your development environment. This setup allows you to work on the project as a developer, fix issues, build
your own site from it or build modules.
When using a distributed source control system such as Git, it’s important to understand that the latest check-in on the
GitHub repository is not necessarily the one you want to download or sync to as it may be a different branch than the
master branch.
When synchronizing your enlistment, you will probably want to sync to the master branch. This is the latest stable
release. Branches are covered in more detail here.
For more information about Git, please read Git Basics, Basic Branching and Merging or Git Extensions user manual.
Step 1: Install Git Extensions
Git Extensions is one of many Git clients available. You can access the repository using any Git client. This tutorial
explains how to clone the repo with Git Extensions.
Download the latest release directly from GitHub. You have two main options, the Setup.msi and the
SetupComplete.msi. You should get the SetupComplete.msi version which comes with some useful extra
utilities bundled with it.
Open the msi when it has downloaded. Follow the steps to complete the installation:
1. Installation Scope Install for all users unless you don’t have administrator privileges.
2. Required Software Select MsysGit and KDiff3. You must have a a version of MsysGit installed for Git
Extensions to function properly. KDiff is great for comparing the differences between two files or folders. You
can optionally install Windows Credential Store for Git.
3. Destination Folder Accept the default or select your preferred destination.
4. Custom Setup The defaults are fine.
5. Select SSH Client Choose PuTTY.
When installation has completed you will find that you have extra Git Ext options when you right click in Windows
Explorer:
Documentation/../Attachments/Setting-up-a-source-enlistment/git-ext-context-menu.png
Step 2: Enlist in the Source Code Using Git Extensions
In Windows Explorer, navigate to the local directory where you want your copy of the source code to live, right-click
and choose GitEx Clone.
486
Chapter 3. Documentation
Read the Docs Template Documentation, Release 1.9.2
In the clone window you have four fields to fill out.
• In the Repository to clone field type https://github.com/OrchardCMS/Orchard/.
• The Destination field will already be filled out with your current directory.
• When you paste the repository url it will also fill out the Subdirectory to create field. If you want to
change this to a project name you can.
• Selecting the Branch dropdown will show you all of the current branches. This is loaded from GitHub so it
may take a few seconds to load the list. For the latest stable branch select master.
The rest of the settings can be left as-is. Click Clone.
3.12. Developer Tools and Guidelines
487
Read the Docs Template Documentation, Release 1.9.2
You will not be prompted for your GitHub login and password unless you try to commit changes.
Step 3: Building and Running the Orchard Source
You can build and run Orchard either from the Visual Studio, or using a command-line batch file.
Using Visual Studio Open Orchard.sln from the Git enlistment directory, in ./src. For information on the structure of the Orchard solution, see the source code organization page of this website.
488
Chapter 3. Documentation
Read the Docs Template Documentation, Release 1.9.2
Hit F5 to build and run the application.
3.12. Developer Tools and Guidelines
489
Read the Docs Template Documentation, Release 1.9.2
Without Visual Studio Build the application from the command-line following the instructions found here: Building and deploying Orchard from a source code drop. You may use IIS or IIS Express to run the application.
Everyday Git Extensions Use
The part of Git Extensions you’re going to use the most is the Repository Explorer (right-click on the Git enlistment
directory from the Windows Explorer to find it, it’s called GitEx Browse).
For example, to get the latest changes from GitHub, just click Pull.
The repository explorer gives you a view of all the branching and merging that has been going on on the server. You
can examine each change, read its description and view diffs. You can also right-click a change and update your local
repository to it by clicking Checkout revision.
490
Chapter 3. Documentation
Read the Docs Template Documentation, Release 1.9.2
You can also filter by branch, which is useful for example if you’re only interested in the more stable master branch.
Development work is done in both the 1.9.x and dev branches.
Viewing the Source Code Without Enlisting
If you don’t want to use Git you can still download the source code for the project. You can download a .zip file of the
source code but this means you don’t get the advantages of being able to easily clone and update.
Branches
Learn more about the branches on the contributing patches page.
3.12.3 Source Code Organization
This section describes the project structure of an Orchard solution in Visual Studio. The projects and folders are listed
in the order they appear in Visual Studio.
We recommend that you open the Orchard project in Visual Studio and browse through the files as you read this topic.
3.12. Developer Tools and Guidelines
491
Read the Docs Template Documentation, Release 1.9.2
Modules
Modules is a Visual Studio solution folder that contains Orchard module projects. It maps to the /Modules subfolder
of the Orchard.Web web site folder. Each subfolder of the Modules folder is an Orchard module. All Orchard modules
are ASP.NET MVC areas.
Specs
The Specs folder contains the following projects:
• Orchard.Profile. This provides for creating a profiling image for Orchard.
• Orchard.Specs. This contains integration tests written using a SpecFlow style. Feature-specific information is
contained in the _*.feature_ files.
Tests
The Tests folder contains the following projects:
• Orchard.Core.Tests is the test project for the Orchard.Core project.
• Orchard.Framework.Tests is the test project for the Orchard.Framework project.
• Orchard.Tests.Modules is the test project for Orchard modules. It contains subfolders for different modules.
• Orchard.Web.Tests is the test project for the Orchard.Web project.
Tools
The Tools folder contains the source code for tools that are used to build the Orchard solution. It also contains the
Orchard project, which builds the Orchard.exe command-line tool that you can use to run commands defined in an
Orchard website in order to automate administrative tasks.
Orchard.Core
The Core project contains a set of core modules and content types for Orchard, such as feeds, theming, navigation or
the common, routable and body content parts.
Orchard.Framework Project
Orchard.Framework is a class library project containing the Orchard CMS framework.
Orchard.Web Project
Orchard.Web is an MVC web application project. This is the application that you actually run. It is the startup
project of the application. It contains the Orchard CMS core platform binaries and is therefore the Orchard CMS host
application.
492
Chapter 3. Documentation
Read the Docs Template Documentation, Release 1.9.2
Other Notes
• The Orchard.Web project is set as the startup project of the solution (for example, when you use Visual Studio
debugging). Orchard.Web dynamically loads all Orchard modules and discovers module extensibility points
(MVC routes, admin pages, and so on.)
• The projects in the Modules folder are physically located under the Ochard.Web\Modules folder. This allows
modules to contain ASP.NET views (.aspx, .ascx, and other files) and static content without having to copy files
between projects to be able to run the project.
• The Orchard.Web project has project references to the modules. This enables automatic copying of the output
assemblies into the bin folder of the Orchard.Web project. Orchard.Web has no dependency on types in the
Modules assemblies, because the Orchard.Web project is not supposed to have a compile-time knowledge of
which modules are loaded at run time. (This is not entirely true at the current stage of Orchard development.)
• The projects in the Modules folder have a project reference to the Orchard project. This allows modules to have
access to the base Orchard services.
About Core Modules
This section discuss some of the design decisions that went into creating core modules. The first issue is this: why
are core modules modules? Because during the design phase for Orchard, it was determined that an extensibility point
such as modules was needed. Everything else would constitute the core framework.
For example, the Common module introduces the Body part, a core concept that is common to many types of content
types, such as blog posts or pages. This could have been implemented as part of the Orchard framework DLL and
could have had modules depend on it. However, then it would not get the benefit of being a module, such as being
able to hook up handlers, drivers, views, routes, and so on. This also relates to MVC and areas, where everything that
belongs to an area is under the same directory.
It was determined that the correct approach was to get certain core concepts out of the framework DLL into a separate
DLL and have them be modules. This is similar to non-monolithic operating systems where parts of the core functionality are implemented as modules outside the kernel, talking to the kernel using the same interfaces as the more
high-level modules.
A second design issue for core modules was this: why are core modules core modules? After it was determined that
core concepts would be implemented as modules, it might have made sense to put them into the modules directory
along with the rest of the Orchard modules, such as the comments module.
The problem with that approach was dependencies. In Orchard, modules that are in the modules directory can be
disabled, uninstalled, or otherwise updated in a breaking way. Orchard modules should avoid dependencies on other
modules as much as possible – that’s part of the dynamism behind the content-type architecture. Pages and blog posts,
which belong to the Pages and Blog modules, don’t reference the Comments or Tags modules, but it’s possible to
attach comments or tags to pages and blog posts. This decoupled behavior is ensured by the underlying content-type
architecture and not by direct reference from another module.
However, core modules are part of the Orchard framework and it’s considered acceptable for modules to depend on
them. Core modules will be distributed by the Orchard development team, and for all practical purposes are integral
parts of the Orchard framework. Modules can depend on them and directly access their public surface.
3.12.4 Dependencies and Libraries
This section enumerates the dependencies used in the Orchard project, with a brief description of what Orchard makes
use of. A copy of a dependencies is located in the “lib” directory of the source repository, along with their respective
licenses. You can also view the attributions for our library dependencies in the CREDITS.txt file at the root of the
Orchard source tree.
3.12. Developer Tools and Guidelines
493
Read the Docs Template Documentation, Release 1.9.2
Akismet
This is the default spam protection service in Orchard.
ANTLR v3
This is a language recognition tool, which provides a framework for constructing recognizers, interpreters, compilers,
and translators from grammatical descriptions containing actions in a variety of target languages.
ASP.NET MVC 4
ASP.NET MVC is used as the web programming model.
Autofac 2 & Autofac contrib
Dependency Injection is used heavily internally, mainly for publishing and consuming services between the Orchard.Web host and the Orchard packages.
Castle Windsor 2.0
Orchard uses Castle Winder 2.0 for type proxy generation and logging support.
Clay
The Clay library offers a flexible implementation of dynamic objects that is used in UI composition.
CodeMirror
Client-side code colorization.
DLR
The DLR can be optionally used to script certain aspects of Orchard (currently, widget layer rules).
Eric Meyer’s Reset CSS
This is used to even the CSS rendering playing field across browsers.
Fam Fam Fam Silk Icons
The Orchard user interface uses Silk Icons, which is an icon set containing over 700 16-by-16 pixel icons in PNG
format.
Fluent NHibernate
Orchard uses Fluent NHibernate, which lets you write object-relational mappings in strongly typed C# code.
494
Chapter 3. Documentation
Read the Docs Template Documentation, Release 1.9.2
FluentPath
This library is a fluent wrapper around System.IO that we use in some tests.
Html Agility Pack
Flexible HTML parsing and querying.
Html5shim
Provides Html 5 helpers.
jQuery & jQueryUI, jQuery ui.timepickr, jQuery utils, jQuery ScrollTo
We use jQuery to progressively improve the user experience in Orchard.
Log4Net
Log4Net is a tool used in Orchard to help write log statements to a variety of output targets.
Lucene.Net
Full-text search and indexation engine.
Microsoft SQL Server Compact 4.0, SQL Server, SQL Server Express
Orchard uses SQL Compact by default for database access but can also use SQL Server and SQL Server Express.
Moq
The moq library is used when object moqs are needed for writing unit tests.
NHibernate & dependencies, FluentNHibernate, NHLambdaExtensions, LinqNHibernate
Orchard uses NHibernate, Fluent NHibernate and Linq To NHibernate for data access.
NuGet
NuGet is used as the package manager (modules and themes come in the form of NuGet packages).
NUnit
NUnit is used for writing unit tests.
3.12. Developer Tools and Guidelines
495
Read the Docs Template Documentation, Release 1.9.2
SharpZipLib
SharpZipLib is used for zipping/unzipping files. For example, the Orchard media manager module uses this library to
unzip uploaded media files.
SpecFlow
This BDD-style library is used in Orchard for integration tests.
TESI Collections
Orchard uses the Tesi.collections library, which supports a SET collection that contains no duplicates.
TinyMCE
TinyMCE is currently used for editing CMS pages content.
WCat
WCat is a lightweight HTTP load generating tool used for performance testing.
YUI
We use parts of YUI for easier CSS.
3.12.5 Code Conventions
Definitions
• Camel case is a casing convention where the first letter is lower-case, words are not separated by any character
but have their first letter capitalized. Example: thisIsCamelCased.
• Pascal case is a casing convention where the first letter of each word is capitalized, and no separating character
is included between words. Example: ThisIsPascalCased.
C# Coding Conventions
We are using the C# coding conventions described in this document: C# Coding Guidelines with the following exceptions:
• Opening braces are on the same line as the statement that begins the block, with a space before the brace (this
is consistent with what we do in JavaScript), a.k.a. K&R convention. If you have the Rebracer Visual Studio
extension installed it will automatically configure the editor to use the conventional brace styling.
• Private fields are prefixed with an underscore and camel-cased.
• Using directives appear before the namespace, not inside it.
496
Chapter 3. Documentation
Read the Docs Template Documentation, Release 1.9.2
JavaScript Coding Conventions
• Namespaces are Pascal-cased.
• Class names are Pascal-cased.
• Plugin names are Camel-cased.
• Properties, fields, local variables are Camel-cased.
• Parameters are Camel-cased.
• Function names are Camel-cased unless they really are class constructors or namespaces (in other words,
global/local functions and methods are Camel-cased).
• Private/internal/protected members are underscore-prefixed and Camel-cased.
• Constants are just static fields (apply same rules as for fields).
• JavaScript coding conventions follow C# conventions except for Pascal vs. Camel.
• ” and ‘ are interchangeable (strictly equivalent). XHTML attributes should be in double quotes and if code needs
to be in there, it has to use single quotes. ex: (note: this kind of DOM-0 event creating is itself discouraged and
is only shown here as an example). In pure JS code, use double quotes for string delimiters. When the string is
one character and the intent is a character, use single quote for consistency with managed code.
• There is no need for String.Empty, just use “”.
• Localizable strings need to be isolated into resource dictionaries until we figure out our client localization story.
ex. alert(Foo.badArgument); ... Foo = {badArgument: “Teh argument was bad.”};
• Don’t worry about string concatenation unless you have specific evidence that regular concatenation is significantly harming performance in your specific scenario.
• Use the K&R style for opening braces (put the opening brace on the opening line).
This
is because in JavaScript, the semicolon is optional, which can cause difficult to spot bugs (see
http://msmvps.com/blogs/luisabreu/archive/2009/08/26/the-semicolon-bug.aspx for an example).
3.12.6 Continuous Integration
There are currently two builds configured: “Continuous Builder” that runs on every check-in and “Full Build” that
runs nightly. They are currently identical but eventually the nightly will also run functional tests.
Code Coverage
Code coverage data is being generated with each run of both builders. The code coverage data can be viewed by
clicking the “Code Coverage” tab of the project or by going into the artifacts tab and downloading the source and
coverage zips that can then be used from the NcoverExplorer to explore code coverage to the level of the line of code.
3.12.7 Merging Pull Requests
Challenges of integrating a Pull Request
When a Pull Request has been reviewed and is ready to be merged it’s usually marked with a GG comment meaning
Good to Go. At this point any dev with commit rights should be able to merge it in the main repository. However we
might need to rewrite the changes to keep the repository clean:
3.12. Developer Tools and Guidelines
497
Read the Docs Template Documentation, Release 1.9.2
• By updating the commit message if it needs to be shortened or improved. For instance if the patch is related to
a work item, the commit message should look like this:
\#12345: Short message
A longer message than can span multiple lines and describe the reasoning behind the change.
Work Item: 12345
• By rebasing the changes on the top of the branch to keep a more readable changelog.
• By squashing the changes into a single commit.
Doing so can be tedious depending on your level of knowledge on git. To help with this a specific git alias can be used.
GIT Alias to Merge changes from codeplex
• In your user’s profile folder (e.g., c:\users\sebros) open the file .gitconfig.
• Anywhere in the file (at the end for instance) add a new alias like this:
[alias]
accept-pr = ''!f(){ git checkout -b PR $1 && git pull $2 $3 && git rebase $1 && author=`git
• If the [alias] section already exists, keep it
This accept-pr command is now accessible from the git console and will apply all the necessary steps.
• $1: The branch to apply the PR to, e.g., 1.8.x, 1.x
• $2: The url of the remote PR, e.g., https://git01.codeplex.com/forks/jchenga/orchard
• $3: The branch to pull from the remote PR, e.g., issues/20311
• $4: The commit message for the squashed commit, e.g., $’#1234:
Item: 1234’
Short \n Long \n Work
The parameters $2 and $3 can be found in the modal dialog which appears when clicking on the Accept link of the
pull request page on codeplex. For instance it will show up a line like this:
git pull https://git01.codeplex.com/forks/jchenga/orchard issues/20797, where
• $2 is https://git01.codeplex.com/forks/jchenga/orchard
• $3 is issues/20797
Usage
git accept-pr 1.8.x https://git01.codeplex.com/forks/jchenga/orchard issues/20797 $'#20797:
If this command results with an error, it’s probably because the PR is too old and there are some merge conflicts. In
this case reopen the PR by requesting the user to rebase his changes on the targeted branch or to merge the conflicts,
clean you local changes, then try again. If at this point you don’t know what you doing or you have a doubt, please
contact another committer for help.
Finally, push the commits, and mark the PR as accepted.
498
Chapter 3. Documentation
Read the Docs Template Documentation, Release 1.9.2
3.13 Additional Topics
3.13.1 Orchard Dynamic Compilation
Introduction
As a composable CMS, Orchard has the ability to load an arbitrary set of modules (also known as “extensions”) at
run-time. One of the goals of the 0.5 release was to make the process of installing and updating modules as easy as
possible.
Orchard, as any ASP.NET MVC application, supports loading module compiled as assemblies using Visual Studio.
Orchard also offers a customized module loading strategy which, for example, allows loading assemblies for modules
without having to deploy them in the “~/bin” folder.
In addition to that, Orchard supports (this is still somewhat experimental) the ability to dynamically compile modules
deployed as source code only. This is more flexible than deploying binaries, and enables some interesting scenarios
such as “in place” code customization without having to use Visual Studio. This is somewhat similar to the ASP.NET
“App_Code” directory, except Orchard supports multiple “logical folder” (typically one per module) independently.
The goal of this section is to describe at a technical level how Orchard load modules in the 0.5 release. This feature is
often referred to as “Orchard Dynamic Compilation”, even though technically dynamic compilation is only involved
in very specific cases.
High Level Overview
When an Orchard application starts, the Orchard Framework (the ExtensionLoaderCoordinator class to be precise)
needs to figure out what are the modules installed in the Web Site and activate them (typically by loading their assembly).
At a high level, this process can be divided in 3 distinct phases:
• Discovery: figure out what are the modules present in the web site
• Activation: figure out what strategy to use to “activate” (or load) each module
• References Resolution: figure out what are the assembly references needed to be activated for each module.
This phase is technically part of the “Activation” phase, but it is easier to think about the problem of reference
resolution as a separate concern.
Once modules are properly activated, they are further examined to detect and enable individual features, but this is a
topic for another section.
Discovery
The list of available modules in an Orchard installation is built by searching various folders of the file system for
“module.txt” files. The folders looked at by default are listed in the following sections.
“~/Modules” folder
The “~/Modules” folder is intended to contain the vast majority of Orchard modules. The convention is that each
module is stored in a sub-folder named “ < ModuleName > ” containing a single “module.txt” file. Packaging,
distribution and sharing of modules is only supported for modules in the “~/Modules” folder.
3.13. Additional Topics
499
Read the Docs Template Documentation, Release 1.9.2
“~/Core” Folder
The “~/Core” folder contains, by convention, modules defined in the “Orchard.Core” assembly. These modules are
part of the “Core” Orchard system and are not intended to be modified as freely as modules in the “~/Modules” folder.
“~/Themes” Folder
The “~/Themes” folder is intended to contain Orchard Themes. Wrt to dynamic compilation, Themes are treated
almost exactly the same as Modules, except that Themes don’t have to have code (assembly in bin or .csproj file). For
the rest of this page, when we refer to “Module”, it should be understand that the concept applies to “Theme” the same
way.
Example
Here is an example of a Orchard installation which contains 6 modules: “Common”, “Localization”, “Foo”, “Bar”.
RootFolder
Core
Common
module.txt <= ``Common'' module from ``Core''
Localization
module.txt <= ``Localization'' module from ``Core''
Modules
Foo
module.txt <= ``Foo'' module
Bar
module.txt <= ``Bar'' module
Themes
T2
theme.txt <= ``T1'' theme
T2
theme.txt <= ``T2'' theme
Activation
Once Orchard has collected all the “Module.txt” files from the discovery phase, Orchard uses distinct strategies (or
“Module Loaders”) to load these modules in memory. Internally, the act of “loading a module” is an activity that takes
a “module.txt” file as input and returns a list of “System.Type” as output. Note that this is slightly more generic than
simply returning a “System.Assembly”, as it allows Orchard to support multiple modules per assembly. For example,
the “Orchard.Core.dll” assembly currently contains about 10 modules.
The Orchard framework currently implements the following loaders:
“Referenced Module” Loader
This loader looks in in “~/bin” directory for a assembly name corresponding to the module name specified in “module.txt”. If the assembly exists, it is loaded and all its types are returned. This loader is useful when someone wants
to deploy an Orchard web site where all modules are pre-compiled and stored in “~/bin”, in a typical “asp.net web
application” way.
500
Chapter 3. Documentation
Read the Docs Template Documentation, Release 1.9.2
“Core Module” Loader
If “module.txt” indicates a module from the “~/Core” folder, the CoreExtensionLoader return the types from the
“Orchard.Core. < moduleMame > ” namespace of the “Orchard.Core” assembly. “Orchard.Core” is a special
assembly containing modules that are “core” to the system, i.e. offering basic functionality on top of the Orchard
Framework.
“Precompiled Module” Loader
If “module.txt” indicates a module from the “~/Modules” folder, the PrecompiledExtensionLoader looks for an assembly named “ < ModuleName > ” in the “~/Modules/ < ModuleName > /bin” folder. If the file exists,
it’s is copied to the ~/App_Data/Dependencies folder, which is a special folder used to ASP.NET to look for
additional assemblies outside of the traditional “~/bin” folder.
“Dynamic Module” Loader
If “module.txt” indicates a module from the “~/Modules” folder, the “Dynamic Module” loader looks for a file named
“.csproj” in the “~/Modules/ < ModuleName > ” folder. If the file exists, the loader will use the Orchard build
manager for .csproj files to compile the file into an assembly and return all the types from that assembly.
Note: This loader is the only one in the system performing what is often referred to as “dynamic compilation”, and is
indeed optional if modules have been pre-compiled.
Loader Disambiguation
Since there is potentially more than one loader able to load a given module, Orchard has to have a way to resolve
the ambiguity, i.e. pick the “right” loader. Each loader has the ability to return a “date of last modification” for each
module they can load. For a given module, if there are multiple candidate loaders, Orchard will pick the loader which
returns the most “recent” date of last modification.
For example, a given module can be distributed with both full source code (including .csproj file) and compiled into
an assembly in its “bin” directory. The first time the module is loaded, Orchard will pick the loader for the assembly
in “bin” since it’s very likely the assembly was compiled after the last source code change was made. However, if any
change was made to the source code afterward, the “Dynamic Module” loader will return the date of the most recently
modified file (either the source file or csproj), and Orchard will pick that loader for the given module.
Note that the “Core Module” loader is never ambiguous, because there is only one way to load these modules. The
ambiguity can only arise for modules in the “~/Modules” directory.
Example
RootFolder
Bin
Orchard.Web.dll
Orchard.Core.dll
Foo.dll
Core
Common
<= ``Core Module'' loader
module.txt
Localization <= ``Core Module'' loader
module.txt
Modules
Foo
<= ``Reference Module'' loader (because a ``~/bin/Foo.dll'' file exists)
3.13. Additional Topics
501
Read the Docs Template Documentation, Release 1.9.2
module.txt
Bar
<= ``Precompiled Module'' loader (because a ``~/Modules/Bar/bin/Bar.dll''
bin
Bar.dll
module.txt
Baz
<= ``Dynamic Module'' loader (because a ``~/Modules/Baz/Baz.csproj'' file
Controller
BazControler.cs
Baz.csproj
module.txt
Disabling the “Dynamic Module” loader
The dynamic module loader should be useless when deploying a website in production, as a production enviroment it
should not be able to install and load module dynamically. But another important reason why it should be disabled is
that it creates a lot of FileSystemWatcher instances to detect changes on the modules.
To disable the module,
rename the file \Config\Sample.HostComponents.config
\Config\HostComponents.config, then check the content is:
to
<?xml version=''1.0'' encoding=''utf-8'' ?>
<HostComponents>
<Components>
<Component Type=''Orchard.Environment.Extensions.ExtensionMonitoringCoordinator''>
<Properties>
<Property Name=''Disabled'' Value=''true''/>
</Properties>
</Component>
</Components>
</HostComponents>
Deploy this file and restart the App Pool.
NB: You will have to ensure that the binaries for every modules are available in the /bin folder of each module,
such that the Precompiled Module loader can use them directly. When using Visual Studio this should be the case.
Otherwise use the command line tool to build the website, which will have the same effect.
References Resolution
(TODO: Explain how Orchard figures out references by looking at the “References” section of the csproj file as well
as looking at additional assembly binaries dropped in each module “bin” directory)
Change of Configuration Detection
As explained above, modules are loaded at application startup. However, once the application is started up, changes
can happen: a new module might be installed, the source code of a module might be manually updated, a module might
be removed from the site, etc. To detect these changes, Orchard asks each module loader in the system to “monitor”
potential changes, and notify when a change happens.
When a change is detected, the current module configuration is discarded and modules are re-examined, loaded and
activated as if the application was starting up again. In some cases, these changes require an ASP.NET AppDomain
restart (e.g. a new version of a module assembly needs to be loaded). Orchard detects these situations and forces an
ASP.NET AppDomain restart.
502
Chapter 3. Documentation
Read the Docs Template Documentation, Release 1.9.2
Rendering Web Forms Views
(TODO: Explain that Orchard uses a custom virtual path provider to insert custom “Assembly Src=xx” and “Assembly
Name=xxx” directive when reading .ascx and .aspx files)
Rendering Razor Views
(TODO: Explain that Orchard uses a Razor custom API to add Module dependencies to Views)
The ~/App_Data/Dependencies/Dependencies.xml File
This file contains the list of modules, their loader and their resolved references of the “last known good” configuration
of module, i.e. the last time Orchard successfully loaded all modules of the application. Examining the content of
this file can be useful for debugging purposes, i.e. if a the latest version of a module doesn’t seem to be loaded, for
example.
3.13.2 Configuring Email
Configuring Orchard to send email is done by enabling the Email Messaging module and adding the proper email
settings. The Email Messaging module adds Email sending functionalities. This document will talk about setting up
Orchard to be able to send emails using the localhost.
Required Module
In order for Orchard to be able to send emails; The Email Messaging Module needs to be enabled.
Click Enable
Configuring Email SMTP Settings
Once the Email Messaging module has been enabled the email settings can be configured. To configure the email
settings in Orchard, select ‘Email’ under the Settings section of the admin.
3.13. Additional Topics
503
Read the Docs Template Documentation, Release 1.9.2
504
Chapter 3. Documentation
Read the Docs Template Documentation, Release 1.9.2
Emails can be sent from the local host with the below settings (be sure to replace the from address with an appropriate
email address).
And that’s it! Well, mostly... Orchard is capable of sending emails now but how do we tell it to send email? There’s
3.13. Additional Topics
505
Read the Docs Template Documentation, Release 1.9.2
different reasons when it would be desirable for emails to be sent, one such reason would be when a new message is
received from a site’s Contact Us page. Read how to create a custom form and then use a rule or the new Work Flow
to have Orchard send an email.
Change History
• Updates for Orchard 1.8
– 9-8-14: Updated screen shots for email messaging module
3.14 Getting Involved
3.14.1 Contributing Documentation
At the beginning of your topic, add a statement that clearly identifies the version of Orchard the topic was written for,
such as the following.
This topic targets, and was tested with, the Orchard 0.8 release.
Make sure you test all code and markup with the targeted version of Orchard.
3.14.2 Documentation Style Guidelines
The Orchard documentation is built in Markdown. We use a few simple conventions to ensure a homogeneous style
throughout the full set of documents.
File Name And Title
The document should not specify its own title as part of the document itself, but its file name should be the document
title, with spaces replaced by dashes (-). The title will be added by the site dynamically, from the file name.
Structure
Topics should begin with a brief summary explaining what audience it targets and their key takeaways. This summary
will be displayed in search results, so it should make sense by itself. It should consist of one paragraph of text, without
a leading title.
If the topic is not complete enough to fulfill its goals, the top of the document should specify > Draft topic on
the first line.
After the summary, the actual contents of the document should all be under section headers, and the top section headers
should be in header 1 style: # This Is A Top Header. Headers should use capital letters to begin each word
(see [capitalization][capitalization]). [capitalization]: #Capitalization
Subsections should be one level deeper than their parent section.
Do use explicitly named anchors when building links to a specific section of the document. Anchors are automatically
created for all headers from their title by removing spaces. Anchors can be linked to using the following syntax:
[How To Build Awesome Documentation][link1]
[link1]: #HowToBuildAwesomeDocumentation
If the anchor is in another document, use the file name and the anchor name like this:
506
Chapter 3. Documentation
Read the Docs Template Documentation, Release 1.9.2
[Follow this link to learn how to build awesome documentation][link1]
[link1]: name-of-the-linked-document#HowToBuildAwesomeDocumentation
Please note that anchor names are case-sensitive.
The text within a section should be structured in short paragraphs. Don’t forget to include an empty line in wiki
markup between paragraphs.
Markup and Styles
Topics should use standard Markdown and should avoid inline HTML, including styles.
Bolding And Italics
Do not use header styles for emphasis.
Use *surrounding asterisks* for emphasis, which will be rendered as italics.
Use **double asterisks** for strong emphasis, which will be rendered as bold.
Use > angle bracket paragraphs to highlight a whole paragraph.
Code
Inline code should be surrounded by ‘ticks‘, and multi-line code samples should be in paragraphs indented with 4
spaces.
This is a code block
Try to break code lines so that the code blocks do not have horizontal scroll bars.
Escaping Markdown
If you need to use sequences of characters in your text that would normally be parsed as wiki markup, such as ‘, * or
_ but that you want to appear as they are without being parsed, add a backlash (\) in front or surround those sequences
with code delimiters (‘). You can look at the source of this document (click the edit link in the sidebar) for many
examples of this.
The list of characters that can be escaped can be found here.
Images
Images should not be wider than 675 pixels if they are going to be embedded into a topic. Wider images are acceptable
as targets of a link from a page. The link to such a wide image should itself be a 675 pixel-wide thumbnail of the
image. When including a large image, do it as a 675 pixels wide image linking to the high-resolution version. Images
narrower than 675 pixels should be included with their natural width and should not be enlarged.
Images should be checked into github, in a subdirectory of the Attachments directory that has the same name as the
topic’s markdown file. If the image exists in small and large versions, the small one should be named the same as the
full resolution, but prefixed with “s_”.
The typical markup to include an image is as follows:

If the image is a link to a higher resolution, the link and image syntaxes must be combined:
3.14. Getting Involved
507
Read the Docs Template Documentation, Release 1.9.2
[][img1]
[img1]: ../Attachments/Topic/NameOfImage.png
Acceptable image formats are PNG, JPG and GIF. Images should be reasonably compressed. Avoid JPG for screenshots, and reserve it for photos.
Links
References to other topics on this wiki can be made using:
[Text for the link](Topic-Name)
Or:
[Text for the link][ref1]
[ref1]: Topic-Name
Links to external content can be added using:
[Text for the link](http://somesite/somepage)
Or:
[Text for the link][ref1]
[ref1]: http://somesite/somepage
If you are using the reference syntax, the references may be grouped at the end of the document, separating the link
itself from the reference definition.
Do use links to specific sections of a document where relevant (see the [structure section][structure]). [structure]:
#Structure
Capitalization
In topic titles and in section headings, use title-style capitalization (as opposed to sentence style). When referring to
UI elements, follow the capitalization style used in the UI elements themselves.
Tables
Tables should be built to fit into the standard width of pages on this site. The markup to create a table is a common
extension for Markdown:
Header A
-------Cell A.1
Cell A.2
Cell A.3
|
|
|
|
|
Header B
-------Cell B.1
Cell B.2
Cell B.3
|
|
|
|
|
Header C
-------Cell C.1
Cell C.2
Cell C.3
This markup will create the following table:
Header A | Header B | Header C ——– | ——– | ——– Cell A.1 | Cell B.1 | Cell C.1 Cell A.2 | Cell B.2 | Cell C.2 Cell
A.3 | Cell B.3 | Cell C.3
For details of table syntax see Markdown Extra Tables Reference.
Contributing Documentation
The Orchard documentation is managed as Markdown files in a Git repository hosted on Github.
508
Chapter 3. Documentation
Read the Docs Template Documentation, Release 1.9.2
Making Edits On Existing Topics
In the right sidebar of each topic, you will find a link to the document on Github.
Contributing Larger Changes And Topics
We recommend the use of GitHub for Windows to clone the documentation locally. This will give you a local copy of
the documentation site, that you can run from WebMatrix or Visual Studio.
3.14.3 Contributing Patches
Orchard CMS uses GitHub for its source code management and issue tracking. You can find the main Orchard CMS
repository at:
• https://github.com/OrchardCMS/Orchard
We welcome community contributions but please read these guidelines before you start work.
First step - open an issue or discuss an existing one
If you’re new to contributing then you should discuss your plans before you start work. This is especially true if it
involves building new features or changing the architecture.
Don’t know where to start? There are lots of existing bugs which have been reported in the issue tracker.
All of Orchard’s planning is done in the GitHub repo’s issue tracker.
If your idea / bug isn’t in the issue tracker (don’t forget to check the closed issues as well - it might have been fixed in
a development branch) then open a new issue to start a discussion with the community.
Branches
The repository is split into two main development branches, 1.9.x and dev. There is also a master branch which
represents the latest released stable version of the software. While other features are being worked on you might find
3.14. Getting Involved
509
Read the Docs Template Documentation, Release 1.9.2
some additional branches temporarily created but they are just to test out ideas and they will get merged back into one
of the main branches later on.
All the active feature work is being done by the core team in the 1.9.x branch. Whenever a new release is ready,
changes get merged from 1.9.x to master. Master is a stable branch and is normally always in a “green” state.
The 1.9.x branch is the short-cycle dev branch. This is where features and bug fixes are being worked on for the
next point release (for example, the difference between v1.9.1 and v1.9.2).
The dev branch is the long-cycle dev branch. This is where bigger features are being worked on that won’t make it
into the next version of Orchard CMS.
There is also a separate repository called Brochard which is the implementation of Orchard CMS in Asp.Net vNext
(also known as DNX).
Milestones and labels
New issues are opened all the time. After an issue is submitted the core team members will review it. When it’s
acccepted as a valid task to complete it will be given a milestone and perhaps some labels. The milestone indicates
which branch any pull requests for the issue should be sent to.
You might also see some additional tags like a severity level or further categorization. These labels can help you
prioritise which issues you should give your attention first based on their urgency or your speciality as a developer.
In the screenshot above you can see that the bug has been tagged with the labels bug, high and Layouts. This
means it has been confirmed as a bug, it is a high priority fix and it is part of the Orchard.Layouts module. Below that
you can see the milestone icon with the word dev next to it. This means that if you do work on it you should work
from the dev branch.
How to fork and work with the repository
The easiest way to get started with GitHub is to use Github Desktop. This software has a built-in tutorial which will
teach you the basics when you first install it.
You can also create a fork via the GitHub website. GitHub have provided a guide explaining how to fork a repo.
GitHub is powered by Git. If you’re an advanced user with experience of using Git on the command line then you
can interact with GitHub hosted repositories as you normally would. If you’re interested in learning then GitHub have
their own interactive code school and the entire Pro Git book is available has also been made available by it’s authors
and is endorsed by the official Git website.
Working on an issue
By now you should have agreed with the community which issue you’re working on, you should know which branch
you’re targeting and you should have created your own fork.
When working on an issue you should create a branch in your local clone per-issue. This branch isolates your changes
from the master branch. You can merge this new branch back in to the main codebase later on with a pull request.
Please work on only one issue per branch / pull request.
Please follow the code conventions document when writing new code for Orchard.
510
Chapter 3. Documentation
Read the Docs Template Documentation, Release 1.9.2
Once you’ve made your changes you need to publish your local commits back to the remote fork in your GitHub
account. The basic Git concept behind this process is to commit your local changes and then push the branch to
your remote copy on GitHub.
This can be done in many ways:
• Using GitHub Desktop
• From within Microsoft WebMatrix 3
• From within Microsoft Visual Studio
• Using Git Extensions
• Using Git on the command line
If you’re just starting out with Git then you should use GitHub Desktop to make this process simple for yourself.
Once this is done, your changes are on GitHub, but not yet in the project’s official repository. To get it there, you’ll
need to ask us to pull the changes in. In order to do that, send us a pull request.
Submitting a pull request
When you have finished your work on the issue you can create a pull request. A pull request opens a dialog with the
community to review your work and provide feedback.
Creating a pull request is best done from within the GitHub.com website. You can create pull requests using other
techniques but using the GitHub.com has a clear interface so that you can make sure you are creating a pull request
with the correct branch and you can have one final check of the files before you initiate it.
Navigate
to
your
forked
copy
of
the
OrchardDocs
https://github.com/{YourUserName}/OrchardDoc
repo.
Its
url
will
be
You should see a create pull request bar along the top of your repos page:
This is a shortcut that GitHub have implemented to help you quickly create a pull request from your most recent push.
If this isn’t the branch you want to create the pull request you want by following these steps:
1. Visit your fork of OrchardDocs in your GitHub account (don’t forget,
https://github.com/{YourUserName}/OrchardDoc)
it can be found at
2. Click Pull Requests from down the right hand side of the site
3.14. Getting Involved
511
Read the Docs Template Documentation, Release 1.9.2
3. Click the New pull request button in the top right:
4. You will be taken to the Comparing changes screen. In the main box it will probably say there isn’t anything to
compare:
The base fork is the place you are sending the changes to (the official Orchard repository). The head
fork is your fork with the new files.
5. Next to the head fork select the drop down box that starts with the label compare:
6. Select the branch you want to merge:
512
Chapter 3. Documentation
Read the Docs Template Documentation, Release 1.9.2
In this screenshot the upgrade-contributing-patches branch is being selected.
7. The page will refresh and you will see all the files that are going to be updated by your pull request:
3.14. Getting Involved
513
Read the Docs Template Documentation, Release 1.9.2
Review the files that are going to be changed. This is your last chance to double check everything is correct.
Check that you haven’t included any passwords or other sensitive data (If you have you will need to change the
passwords as they are already public on your GitHub account).
When you’re happy with the pull request click the green Create pull request button near the top of the
Comparing changes page.
8. On this final screen you can give your pull request a title and a description:
514
Chapter 3. Documentation
Read the Docs Template Documentation, Release 1.9.2
You should make your description as detailed as possible. You can use markdown to add headings and other
formatting. You can also copy/paste screenshots into the description and it will automatically upload and insert
them for you.
IMPORTANT GitHub supports automatically closing issues via pull requests. If you are working on issue
#1234 then be sure to add the phrase fixes #1234 somewhere in your description. When the pull request
is accepted it will automatically close the corresponding issue. You can actually use several different keywords
depending on whichever you prefer to achieve this same effect.
9. The final step is to click the Create pull request below your description.
Your pull request has now been created and will be reviewed by the community and the core team.
Don’t forget! Your pull request is a living thing. If you make more commits to your branch and push
them to your GitHub account they will be automatically included in the pull request.
This is useful if somebody gives you feedback suggesting changes but it also means that you shouldn’t
delete the branch until after the pull request has been accepted or declined.
You will get a notification when there is any activity on your pull request. When you are on GitHub.com you will see
your notification icon light up with a little blue dot:
Unless you have turned email notifications off, you will also receive an email from GitHub.
You can check on your pull request at any time by navigating to it through one of several ways in GitHub:
• Click the Pull requests menu option in the top of the GitHub.com website:
• Navigate to the OrchardDocs repo and click Pull requests down the side menu:
3.14. Getting Involved
515
Read the Docs Template Documentation, Release 1.9.2
Pull request review process
The Orchard development team meets every week to review pull request and triage issues. During this meeting the
team will decide if the pull request fulfills the prerequisites or comment if any improvements should be applied.
If an agreement is reached to accept the pull request then it will be marked as so and someone with commit rights on
the main repository will accept the pull request and merge your work into the Orchard CMS repository. This process
might involve altering the history to remove any feedback loop changes which don’t add anything to the work done.
If more work is requested you make the changes on your local branch, commit them, push the branch to your
GitHub account they will be automatically included in the pull request for further review.
What to do once your pull request has been reviewed
Once your contribution has been accepted and integrated into the official Orchard CMS repository you can now delete
the branch. GitHub will let you know when this is safe to do. You will see a Delete branch button at the bottom
of the pull request page:
If your feature was accepted please consider contributing some documentation to the OrchardDoc repo. Just as this
article has helped you out today, by documenting your new feature you can help other Orchard users to get the most
out of Orchard CMS. You can read more about the documentation process here.
The fork that you made can be re-used for as many contributions as you like. Just remember to keep making a new
branch each time you start work on a new issue. There is one thing to consider though: While you’ve been working on
this there has probably been other commits and pull requests on whichever branch you’re working on. You can bring
your branch back in line with the main repo by syncing your fork.
What to do if your pull request is not accepted
Sometimes pull requests don’t get accepted. Maybe the feature isn’t classed as complete enough, maybe you have a
different vision for the feature compared to the core team. Whatever the reason, if you find yourself in this position
then don’t worry.
Consider implementing your new idea as an Orchard Module instead. There are plenty of tutorials on this website and
around the web which will teach you how to do this. With the way Orchard has been built you can extend and replace
almost every part of it.
516
Chapter 3. Documentation
Read the Docs Template Documentation, Release 1.9.2
When you have extracted your code into a module you can submit it to the Orchard Gallery for other users to download
and use in their sites.
3.14. Getting Involved
517
Read the Docs Template Documentation, Release 1.9.2
518
Chapter 3. Documentation
CHAPTER 4
User Experiences
4.1 Walkthroughs and UI Mockups
4.1.1 Orchard Branding
• Branding svg
• Branding vectors
• Branding PSD
• Adobe Illustrator logo sources
4.1.2 Wireframes
Click on the walkthrough title to download a zip file containing the numbered images.
• Blog
• Comments
• Media Management
• Pages
• Roles and Permissions
• Themes
4.1.3 Themes
Photoshop and HTML front-end theme mockups.
• Classic Theme - html
• Green Theme - html
• Dark Theme - not implemented
• Brown Theme - not implemented
519
Read the Docs Template Documentation, Release 1.9.2
4.1.4 Admin UI
Below are some of the more recent admin designs.
• Light Admin Theme
• Dark Admin Theme
• List of posts
• Manage users rev 1
• Manage users rev 2
4.1.5 Admin UI - Original
Below are some of the original admin designs. These show how the design progressed from something that was
strongly branded Orchard to a more generic design.
• Manage blogs
• Manage pages
• List of posts
• Zip of admin designs
4.1.6 Design Concepts & Ideas
These designs and mocks are not related to work we are currently developing.
Wireframes:
• Context buttons deep zoom concept board (Silverlight required)
• Toolbar concept for edit page UI
• Module install rev 1
• Module install rev 2
• Page Builder concept
• Live edit concept
PhotoShop mocks:
• Sidebar/toolboxes concept for edit page UI
• Drawer concept for edit page UI
• Drawer/tab concept rev 1
• Drawer/tab concept rev 2
JavaScript & html Mocks
• Context publish buttons
• Context TinyMCE
• View switcher
• Admin buttons
We use the Balsamiq Mockups tool to create these walkthroughs.
520
Chapter 4. User Experiences
CHAPTER 5
Archived Specs
5.1 Archived Specs
• Blogs
• Comments
• Content types
• Definitions
• HTML doctype
• Linkbacks: Pingbacks, Refbacks and Trackbacks
• Media management
• Navigation
• Page editing
• Page management and publishing
• Page publishing workflow
• RSS and Atom feeds
• Slugs
• Page templates and syntax
• Tags
• Themes
• Theme includes
• Users, roles and permissions
• Widgets
• XML-RPC and Live Writer
• Creating Lists of Content Items
521