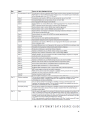
1
GP 2014 Year-End Close Table of Contents Payroll…………………………………………………………………..2 W-2 Wage & Tax Statement Data Source Guide……………………9 Receivables Management…………………………………………….13 Payables Management………………………………………………..21 General Ledger………………………………………………………..33 Fixed Assets…………………………………………………………...46 Inventory………………………………………………………………52 Analytical Accounting…………………………………….………….59 1 Article ID: 850663 - Last Review: November 24, 2014 - Revision: 25.0 SUMMARY This document outlines the recommended year-end closing procedures for Microsoft Dynamics GP Payroll. The "More Information" section contains the following: A detailed checklist of the steps that you must follow to complete the year-end closing procedures. An alternative checklist to use instead of the standard checklist if you must process 2015 pay runs before you complete the year-end closing procedures for 2014. Note Before you follow the instructions in this article, make sure that you have a complete backup copy of the database that you can restore if a problem occurs. Note This is the LAST year that a Year-End Update will be available for Microsoft Dynamics GP 2010. There will not be a 2014 Year-End Update available for Microsoft Dynamics GP 10.0 and prior versions. INTRODUCTION Read this whole article before you perform any one of the steps. If you have any questions, contact Technical Support for Microsoft Dynamics and related products. MORE INFORMATION Payroll year-end checklist To perform the year-end closing procedures, follow these steps: 1. 2. 3. 4. Verify that you have installed the latest 2014 payroll tax update Complete all pay runs for the current year Complete all month-end, period-end, or quarter-end procedures for the current year Make a backup of the original file 2 5. Install the Year-End Update 6. Create the Year-End file 7. Make a backup of the new file 8. Verify W-2 and 1099-R statement information 9. Print the W-2 statements and the W-3 Transmittal form 10. Print the 1099-R forms and the 1096 Transmittal form 11. (Optional:) Create the W-2 Electronic file 12. (Optional:) Archive inactive employee Human Resources information 13. Set up fiscal periods for 2015 14. (Optional:) Close fiscal periods for the payroll series for 2014 15. Install the payroll tax update for 2015 Alternative payroll year-end checklist If you must process 2015 pay runs before you complete the 2014 year-end closing procedures, follow the steps in this alternative checklist: 1. Verify that you have installed the latest 2014 payroll tax update 2. Complete all pay runs for the current year 3. (Optional:) Complete all month-end, period-end, or quarter-end procedures for the current year 4. Make a backup of the original file 5. Install the Year-End Update 6. Create the year-end file 7. Make a backup of the new file 8. Verify W-2 and 1099-R statement information 9. (Optional:) Archive inactive employee Human Resources information 10. Set up Fiscal Periods for 2014 11. (Optional:) Close the fiscal periods for the Payroll series for 2014 12. Install the payroll tax update for 2015 13. Process the 2015 pay runs. The user date must occur in 2015. 14. Print the W-2 statements and the W-3 Transmittal form 15. Print the 1099-R forms and the 1096 Transmittal form 16. (Optional:) Create the W-2 Electronic file Payroll module year-end details Verify that you have installed the latest 2014 tax update Download the latest tax table update and installation instructions for 2014 using one of the links below depending on if you are a partner or a customer: Partner: https://mbs.microsoft.com/partnersource/northamerica/deployment/downloads/tax-regulatoryupdates 3 Customer: https ://mbs.microsoft.com/customersource/northamerica/GP/downloads/tax-regulatory-updates Note: The latest tax tables will ensure that the FICA wage limit is correct. To check your tax table update date, click on Microsoft Dynamics GP, point to Tools, point to Setup, point to System, and click on Payroll Tax. The Last Tax Update should be 12/17/2013 (Round 1 for 2014) or later. Complete all pay runs for the current year (Optional:) Complete all monthly and quarterly payroll month-end, period-end, or quarter-end procedures for the current year For more information about period-end procedures for payroll, view Chapter 21, "Payroll Company Routines," in the Microsoft Dynamics GP user's manual. You can find this user manual in Microsoft Dynamics GP 2010 by clicking on the Help icon, click on Printable Manuals, click on Human Resources/Payroll and then click on Payroll (USA) with Direct Deposit. For Microsoft Dynamics GP 2013, use this link to obtain the printable manual for 'U.S. Payroll': http://technet.microsoft.com/en-us/library/jj673202(v=gp.30).aspx Make a backup of the original file Create a backup, and then put this backup into safe, permanent storage. By creating a backup, you make sure that you have a permanent record of the company's financial position at the end of the year. You can restore the backup to quickly recover data if a power fluctuation or other problem occurs during the year-end closing procedure. To create a backup in Microsoft Dynamics GP, follow these steps: 1. In Microsoft Dynamics GP, point to Maintenance on the Microsoft Dynamics GP menu, and then click Backup. Note The Back Up Company window opens. 2. In the Company Name list, click your company name. 3. Change the path of the backup file if it is required, and then click OK. Note We recommend that you name this backup 2014 Pre Year-End Update to differentiate it from your other backups. Install the 2014 year-end update To install the payroll year-end update, you must follow the steps in the Microsoft Dynamics GP U.S. 2014 Year-end document. The install must be performed on each computer that has Microsoft Dynamics GP installed. When the update is released, install the update and download the 2014 Year End document from one of the following locations: U.S. Payroll Year End Update for Microsoft Dynamics GP 2013 4 Partner: https://mbs.microsoft.com/partnersource/northamerica/deployment/downloads/tax-regulatoryupdates/usgpye2013 Customer: https://mbs.microsoft.com/customersource/northamerica/GP/downloads/tax-regulatoryupdates/usgpye2013 U.S. Payroll Year End Update for Microsoft Dynamics GP 2010 Partner: https://mbs.microsoft.com/partnersource/northamerica/deployment/downloads/tax-regulatoryupdates/usgpye2010 Customer: https://mbs.microsoft.com/customersource/northamerica/GP/downloads/tax-regulatoryupdates/usgpye2010 Create the year-end file To create the year-end file, follow these steps: 1. In Microsoft Dynamics GP, point to Tools on the Microsoft Dynamic GP menu, point to Routines, point to Payroll, and then click Year-End Closing. 2. In the Year field, type 2014, and then click Process. Note When you process the 2014 Year End Wage file, make sure you have a '2014' tax update in place, so the correct FICA limit used. You can install the payroll tax update for 2015 any time after the year-end wage file for 2014 has been created, and before you process a new payrun for 2015. Make a backup of the new file Create a backup, and then put this backup into safe, permanent storage. By creating a backup, you make sure that you have a permanent record of the company's financial position at the end of the year. You can restore the backup to quickly recover data if a power fluctuation or other problem occurs during the year-end closing procedure. To create a backup in Microsoft Dynamics GP, follow these steps: 1. In Microsoft Dynamics GP, point to Maintenance on the Microsoft Dynamics GP menu, and then click Backup. 2. In the Company Name list, click your company name. 3. Change the path of the backup file if it is required, and then click OK. Note We recommend that you name this backup 2014 Post Year-End File to differentiate it from your other backups. 5 Verify W-2 and 1099-R statement information To view the W-2 information in Microsoft Dynamics GP, point to Tools on the Microsoft Dynamics GP menu, point to Routines, point to Payroll, and then click Edit W-2s. To view the 1099-R information in Microsoft Dynamics GP, point to Tools on the Microsoft Dynamics GP menu, point to Routines, point to Payroll, and then click Edit 1099-Rs. Note If you change the W-2 or the 1099-R information, we recommend that you make another backup. Print the W-2 statements and the W-3 Transmittal form To print the W-2 statements, follow these steps: 1. In Microsoft Dynamics GP, point to Tools on the Microsoft Dynamics GP menu, point to Routines, point to Payroll, and then click Print W-2s. 2. In the Print W-2 Forms window, specify the following settings: Print W-2s for: Normal Year-End Print: W-2 Forms 3. Click Print. Note You can print employee W-2 statements as many times as you have to. To print the W-3 Transmittal Form, follow these steps: 1. In Microsoft Dynamics GP, point to Tools on the Microsoft Dynamics GP menu, point to Routines, point to Payroll, and then click Print W-3s. 2. In the Print W-2 Forms window, specify the following settings: Print W-2s for: Normal Year-End Print: W-3 Transmittal Form 3. Click Print. Note You can print the W-3 Transmittal Form as many times as you have to. Print the 1099-R forms and the 1096 Transmittal form To print the 1099 forms, follow these steps: 1. In Microsoft Dynamics GP, point to Tools on the Microsoft Dynamics GP menu, point to Routines, point to Payroll and then click Print 1099-Rs. 2. In the Print 1099-R Forms window, click 1099-R Forms, and then click Print. Note You can print employee 1099-R forms as many times as you have to. To print the 1096 Transmittal form, follow these steps: 6 1. In Microsoft Dynamics GP, point to Tools on the Microsoft Dynamics GP menu, point to Routines, point to Payroll, and then click Print 1099-Rs. 2. In the Print 1099-R Forms window, click 1096 Transmittal Form, and then click Print. Note You can print the 1096 Transmittal form as many times as you have to. (Optional:) Create a W-2 Electronic File To create a W-2 Electronic File, follow these steps: 1. In Microsoft Dynamics GP, point to Tools on the Microsoft Dynamics GP menu, point to Routines, point to Payroll, and then click W-2 Electronic File. 2. In the W-2 Electronic File window, click to select the check box that is next to each company that you want to include in your W-2 Electronic File. 3. In the User ID Number field, enter the user ID number (formerly called a PIN). 4. Click Submitter. The Electronic Filer Submitter Information window opens. Enter the submission information. 5. Change the file destination information in the File Name field if it is required. 6. Click Create File or Save to store the information to create the file later. (Optional): Archive inactive employee Human Resources information To archive inactive employee Human Resources information in Microsoft Dynamics GP, point to Tools on the Microsoft Dynamics GP menu, point to Utilities, point to Human Resources, and then click Archive Employee. Set up fiscal periods for 2015 To set up fiscal periods for 2015, follow these steps: 1. In Microsoft Dynamics GP, point to Setup on the Microsoft Dynamics GP menu, point to Company, and then click Fiscal Periods. 2. In the Year field, type 2015, and then click Calculate. Note You may want to close all periods except period 1 to prevent users from posting to future periods. 3. Click OK. (Optional:) Close fiscal periods for the payroll series for 2014 You can use the Fiscal Periods Setup window to close all fiscal periods that are still open for the year. By closing fiscal periods, you prevent users from accidentally posting transactions to the wrong period or to the wrong year. Before you close a fiscal period, verify that you have posted all transactions for the period and for the year for all modules. To later post a transaction to a fiscal period that you have closed, you must first reopen the period in the Fiscal Periods Setup window. 7 To close a fiscal period, follow these steps: 1. In Microsoft Dynamics GP, point to Tools on the Microsoft Dynamics GP menu, point to Setup, point to Company, and then click Fiscal Periods. 2. Click to select the Payroll check box for each Period that you close. Install the payroll tax update for 2015 Note Do not install the payroll tax update for 2015 until the year-end file has been created for 2014. To install the payroll tax update for 2015, follow these steps: 1. In Microsoft Dynamics GP, point to Maintenance on the Microsoft Dynamics GP menu, point to U.S. Payroll Updates, and then click Check for Tax Updates. 2. 3. 4. In the Tax Update Method window, click Automatic, and then click Next. In the Authorization Number field, type your authorization number, and then click Log in. Click Finish. APPLIES TO Microsoft Dynamics GP 2015 Microsoft Dynamics GP 2013 Microsoft Dynamics GP 2010 Microsoft Dynamics GP 10.0, when used with: Payroll - U.S. Payroll Keywords: kbinfo kbtshoot kbmbspayrolltaxupdate kbmbsmigrate KB850663 8 9 10 11 12 Article ID: 857444 - Last Review: October 27, 2014 - Revision: 18.0 SUMMARY This article contains checklists for the year-end closing process in Receivables Management in Microsoft Dynamics GP. This article also contains detailed information for each step in the year-end closing process. And, this article describes how to add the year-to-date finance charge information to customer statements for December and for January. INTRODUCTION This article describes the recommended year-end closing procedures for Receivables Management in Microsoft Dynamics GP. Read this article before you perform one or more of the procedures. MORE INFORMATION To obtain technical support If you have questions about how to perform the procedures, contact Technical Support for Microsoft Dynamics. To create a support request, follow these steps: 1. Visit the following Microsoft Web site: https://mbs.microsoft.com/support/newstart.aspx 2. In the list of categories, click Microsoft Dynamics GP. 3. In the list of subcategories, click Receivables Management, and then click Next. Or, contact Technical Support for Microsoft Dynamics by telephone at (888) 477-7877. 13 Year-end closing checklist You can use this checklist for the end of the fiscal year and for the end of the calendar year. Note Although Receivables Management is date sensitive, the following items are updated based on the closing of Receivables Management: The SmartList objects The Receivables Management summary reports The Amounts Since Last Close view in the Customer Summary window Therefore, we recommend that you follow these steps so that the SmartList objects, the Receivables Management summary reports, and the Amounts Since Last Close view contain the correct information: 1. 2. 3. 4. 5. 6. Post all the sales and receivables transactions for the year. Make a pre-year-end closing backup. Close the year. Close the fiscal periods. (This step is optional.) Close the tax year. Make a post-year-end closing backup. Step 1: Post all the sales and receivables transactions for the year Post all the sales and receivables transactions for the year before you close the year. If you want to enter any sales and receivables transactions for a future period before you close the year, create a batch that contains the transactions. Next, save the batch. Then, post the batch after you close the year. You must close the year because some areas of Microsoft Dynamics GP are not date sensitive. If you do not close the year after you enter all the 2014 transactions and before you enter all the 2015 transactions, these areas will contain incorrect information. However, if you have to change the information, you can change the information in the Amounts Since Last Close view in the Customer Summary window and in the Customer Finance Charge Summary window. The following areas are the areas of Microsoft Dynamics GP that are not date sensitive. The Amounts Since Last Close view in the Customer Summary window To open the Amounts Since Last Close view in the Customer Summary window, follow these steps: 1. On the Cards menu, point to Sales, and then click Summary. 2. In the Customer Summary window, type a customer ID in the Customer ID box. 3. In the Summary View list, click Amounts Since Last Close. 14 The Customer Finance Charge Summary window To open the Customer Finance Charge Summary window, follow these steps: 1. On the Cards menu, point to Sales, and then click Summary. 2. In the Customer Summary window, type a customer ID in the Customer ID field. 3. Click Finance Charges. The SmartList objects To view the SmartList columns that are affected, follow these steps: 1. In Microsoft Dynamics GP, click Columns on the Microsoft Dynamics GP menu, click SmartList, expand Sales, expand Customers, and then click Add. 2. Select the following items in the Available Columns list. Note The items that are flagged with an asterisk are affected by the calendar year-end close. All the other items are affected by the fiscal year-end close. Average Days to Pay - Year Finance Charges CYTD* Finance Charges LYR Calendar* High Balance LYR High Balance YTD Number of ADTP Documents - LYR Number of ADTP Documents - Year Number of NSF Checks YTD Total # FC LYR* Total # FC YTD* Total # Invoices LYR Total # Invoices YTD Total Amount of NSF Check YTD Total Bad Debt LYR Total Bad Debt YTD Total Cash Received LYR Total Cash Received YTD Total Discounts Available YTD Total Discounts Taken LYR Total Discounts Taken YTD Total Finance Charges LYR* Total Finance Charges YTD* Total Returns LYR Total Returns YTD Total Sales LYR Total Sales YTD 15 Total Waived FC LYR* Total Waived FC YTD* Total Writeoffs LYR Total Writeoffs YTD Unpaid Finance Charges Write Offs LYR Write Offs YTD YTD* 3. Click OK. 4. Click OK. Step 2: Make a pre-year-end closing backup Create a backup before you close the year. Put the backup in safe, permanent storage. This backup makes sure that you have a permanent record of the company's financial position at the end of the year. You can restore information from this backup if you have to. For example, this backup would let you quickly recover if a power fluctuation or another problem occurred during the year-end close procedure. To create a backup in Microsoft Dynamics GP, follow these steps: 1. In Microsoft Dynamics GP, point to Maintenance on the Microsoft Dynamics GP menu, and then click Backup. 2. In the Back Up Company window, select the company name in the Company Name list. 3. Change the path of the backup file if it is required, and then click OK. Note We recommend that you name this backup PreYearEndClosingBackup2014. Step 3: Close the year 1. In Microsoft Dynamics GP, point to Tools on the Microsoft Dynamics GP menu, point to Routines, point to Sales, and then click Year-End Close. 2. If you are closing both the fiscal year and the calendar year at the same time, click All. If you are closing only the calendar year, click Calendar. If you are closing only the fiscal year, click Fiscal. 3. Click to select the Print Report check box, and then click Close Year. Note We recommend that you keep a paper copy of the year-end report together with the permanent year-end audit records. Calendar year details The calendar year-end process in Microsoft Dynamics GP clears the following fields in the Customer Summary window: Finance Charges CYTD 16 Total # FC YTD Total Finance Charges YTD Total Waived FC YTD Unpaid Finance Charges YTD The calendar year-end process updates the amounts in the following fields: *Finance Charges LYR Calendar *Total # FC LYR Fiscal year details The fiscal year-end process in Microsoft Dynamics GP clears the following fields in the Customer Summary window: Average Days to Pay - Year High Balance YTD Number of ADTP Documents - Year Number of NSF Checks YTD Total # Invoices YTD Total Amount of NSF Check YTD Total Bad Debt YTD Total Cash Received YTD Total Discounts Available YTD Total Discounts Taken YTD Total Returns YTD Total Sales YTD Total Writeoffs YTD Write Offs YTD The fiscal year-end process updates the amounts in the following fields: High Balance LYR Number of ADTP Documents - LYR Total # Invoices LYR Total Bad Debt LYR Total Cash Received LYR Total Discounts Taken LYR Total Returns LYR Total Sales LYR Total Writeoffs LYR Write Offs LYR Step 4: Close the fiscal periods (This step is optional) To prevent users from accidentally posting transactions to the wrong period or to the wrong year, use the Fiscal Periods Setup window to close all fiscal periods that are still open for the year. 17 Before you close fiscal periods, verify that you have posted all the transactions for the period and for the year for all modules. If you must later post transactions to a fiscal period that you already closed, you can return to the Fiscal Periods Setup window to reopen the period so that you can post the transactions. To close a fiscal period, follow these steps: 1. In Microsoft Dynamics GP, point to Tools on the Microsoft Dynamics GP menu, point to Setup, point to Company, and then click Fiscal Periods. 2. Click to select the Sales check box for the period that you want to close. Step 5: Close the tax year Note Follow these steps only after you complete the year-end closing procedures for all the sales and purchasing modules. To close the tax year, follow these steps: 1. In Microsoft Dynamics GP, point to Tools on the Microsoft Dynamics GP menu, point to Routines, point to Company, and then click Tax Year-End Close. 2. Click to select the Close Year check box, and then click to select the Print Report check box. 3. Click Process. Note We recommend that you keep a paper copy of the year-end report together with the permanent year-end audit records. Step 6: Make a post-year-end closing backup Create a backup after you close the year. Put the backup in safe, permanent storage. This backup makes sure that you have a permanent record of the company's financial position at the end of the year. You can restore information from this backup if you have to. For example, this backup would let you quickly recover if a power fluctuation or another problem occurred during the year-end close procedure. To create a backup in Microsoft Dynamics GP, follow these steps: 1. In Microsoft Dynamics GP, point to Maintenance on the Microsoft Dynamics GP menu, and then click Backup. 2. In the Back Up Company window, click the company name in the Company Name list. 3. Change the path of the backup file if it is required, and then click OK. Note We recommend that you name this backup PostYearEndClosingBackup2014. Year-to-date finance charges on customer statements for December and for January 18 Year-to-date finance charges are not automatically printed on customer statements for December and for January. December statements To add the year-to-date finance charges to the December statements, follow these steps: 1. In Microsoft Dynamics GP, point to Tools on the Microsoft Dynamics GP menu, point to Customize, and then click Report Writer. 2. In the Product list, click Microsoft Dynamics GP, and then click OK. 3. Click Reports. 4. Use the appropriate method: If you have not previously modified the statement form, click the statement form that you print in the Original Reports list, click Insert, and then click the statement form in the Modified Reports list. If you previously modified the statement form, click the statement form in the Modified Reports list. 5. Click Open. 6. In the Report Definition window, click Tables. 7. In the Report Table Relationships window, click RM Customer MSTR, and then click New. 8. In the Related Tables window, click Customer Master Summary, and then click OK. 9. Click Close. 10. Click Layout. 11. In the resource list in the Toolbox box, click Customer Master Summary. 12. In the field list, drag Finance Charges CYTD to the layout of the report. You can position this field in any section of the report. 13. On the File menu, click Microsoft Dynamics GP. When you are prompted to save the changes, click Save. 14. If you have not previously modified this report, you must grant security to the report. To do this, use the steps below: a. On the Microsoft Dynamics GP menu, point to Tools, point to Setup, point to Systems, and then click Alternate/Modified Forms and Reports. b. In the ID box, enter the user ID. c. In the Product list, click Microsoft Dynamics GP. d. In the Type list, click Reports. e. Expand Sales, and then expand the node of the modified form. f. Click Microsoft Dynamics GP (Modified). January statements To add the year-to-date finance charges to the January statements, follow these steps: Follow steps 1 through 11 in the "December statements" section. 19 In the field list, drag Finance Charges LYR Calendar to the layout of the report. You can position this field in any section of the report. Follow steps 13 and 14 in the "December statements" section. APPLIES TO Microsoft Dynamics GP 2013 Microsoft Dynamics GP 2010 Microsoft Dynamics GP 10.0, when used with: 1. Receivables Management Keywords: kbhowto kbexpertiseinter kbexpertisebeginner kbexpertiseadvanced kbinfo kbtshoot kbmbsmigrate KB857444 20 Article ID: 875169 - Last Review: November 7, 2014 - Revision: 20.0 SUMMARY This article describes the recommended year-end closing procedures for the Payables Management module in Microsoft Dynamics GP. The "More Information" section contains the following information: A checklist of the steps that you must follow to complete the calendar year-end closing procedures. A checklist of the steps that you must follow to complete the fiscal year-end closing procedures. Detailed information about each step in the checklists. A list of frequently asked questions. INTRODUCTION Read this whole article before you perform the steps. If you have questions, contact Microsoft Dynamics Technical Support. MORE INFORMATION Payables Management master year-end closing checklist Note Use this checklist if you are closing your fiscal year and your calendar year at the same time. 1. Post all transactions for the year. 2. Print the Aged Trial Balance with Options report. 3. Print the Vendor Period Analysis Report. 21 4. Install the Payroll year-end update (optional) 5. Make a backup that is named "Pre-1099 Edits." 6. Verify the 1099 information and edit it if it is required. 7. Print the 1099 statements. 8. Make a backup that is named "Pre Year-End." 9. Close the year. 10. Close the fiscal periods. 11. Close the tax year. 12. Make a backup that is named "Post Year-End." Payables Management calendar year-end closing checklist Note Although the Payables Management module is date-sensitive, the SmartList objects, the Payables Management summary reports, and the Amounts Since Last Close view of the Vendor Yearly Summary window are updated based on the closing of the Payables Management module. Therefore, we recommend that you follow these steps so that the SmartList objects, the Payables Management summary reports, and the Amounts Since Last Close view of the Vendor Yearly Summary window are correct. 1. Post all transactions for the calendar year. 2. Print the Aged Trial Balance with Options report. 3. Make a backup that is named "Pre-1099 Edits." 4. Verify the 1099 information and edit it if it is required. 5. Print the 1099 statements. 6. Make a backup that is named "Pre Year-End." 7. Close the calendar year. 8. Close the fiscal periods. 9. Close the tax year. 10. Make a backup that is named "Post Year-End." Payables Management fiscal year-end closing checklist 1. 2. 3. 4. 5. 6. Post all transactions for the fiscal year. Print the Vendor Period Analysis Report. Make a backup that is named "Pre Year-End." Close the fiscal year. Close the fiscal periods. Make a backup that is named "Post Year-End." Detailed information for each step in the year-end checklist Step 1: Post all transactions for the year Post all transactions for the year before you close the year. If you want to enter future period transactions before you close the year, create a new batch for the future period transactions. Save the future period transactions in the new batch, but do not post the new batch until after the year has been closed. 22 The following areas of Microsoft Dynamics GP are not date-sensitive: The Amounts Since Last Close view of the Vendor Yearly Summary window SmartList objects Vendor Summary reports These areas of Microsoft Dynamics GP will be incorrect if you do not close the payables year after you enter all 2014 transactions and before you enter all 2015 transactions. However, the Amounts Since Last Close view of the Vendor Yearly Summary window is editable. Therefore, you can update the information in the Amounts Since Last Close view of the Vendor Yearly Summary window if it is required. To access the Amounts Since Last Close view of the Vendor Yearly Summary window, follow these steps: 1. On the Cards menu, point to Purchasing, and then click Summary. 2. In the Vendor Credit Summary window, type a vendor ID in the Vendor ID field, and then click Yearly. 3. In the Summary View list, click Amounts Since Last Close. To view the SmartList columns that are affected, follow these steps: 1. Open SmartList. To do this in Microsoft Dynamics GP, click SmartList on the Microsoft Dynamics GP menu. 2. Expand the Purchasing node, and then click Vendors. 3. Click Columns. 4. Click Add. 5. Click the following fields in the Available Columns list. Note The items flagged with an asterisk are affected by the calendar year-end close. All other items are affected by the fiscal year-end close. *1099 Amount YTD *1099 Amount LYR Amount Billed YTD Amount Billed LYR Amount Paid YTD Amount Paid LYR Average Days To Pay - Year Discount Available LYR Discount Available YTD Discount Lost LYR Discount Lost YTD Discount Taken LYR Discount Taken YTD Finance Charge LYR Finance Chare YTD 23 Number of Finance Charges LYR Number of Finance Charges YTD Number of Invoice LYR Number of Invoice YTD Number of Paid Invoice YTD Returns LYR Returns YTD Trade Discounts Taken LYR Trade Discounts Taken YTD Withholding LYR Withholding YTD Write Offs LYR Write Offs YTD 6. Click OK. 7. Click OK. To view the Vendor Summary reports, follow these steps: 1. On the Reports menu, point to Purchasing, and then click Analysis. 2. In the Reports list, click Calendar Year. 3. In the Options list, click an option, and then click Print. Step 2: Print the Aged Trial Balance with Options report We recommend that you print a paper copy of the Aged Trial Balance with Options report to keep with your year-end permanent financial records. To do this, follow these steps: 1. On the Reports menu, point to Purchasing, and then click Trial Balance. 2. In the Reports list, click Aged Trial Balance with Options. Step 3: Print the Vendor Period Analysis report We recommend that you print a paper copy of the Vendor Period Analysis report to keep with your year-end permanent financial records. To do this, follow these steps: 1. On the Reports menu, point to Purchasing, and then click Analysis. 2. In the Reports list, click Period. Step 4: Install the Payroll year-end update (optional) If there are compliance changes for Payables Management, such as 1099 form changes, install the Payroll year-end update. If there are no changes or compliance issues for the tax year for Payables Management, you may skip this step. Review the changes that are included in the Payroll year-end update. To do this, visit the appropriate Microsoft Web site: 24 Customers https://mbs.microsoft.com/customersource/downloads/taxupdates Partners https://mbs.microsoft.com/partnersource/support/selfsupport/taxupdates/ Step 5: Make a backup that is named "Pre-1099 Edits" Create a backup, and then put the backup in safe, permanent storage. A backup gives you a permanent record of the company's financial position at the end of the year, and this backup can be restored later if it is required. A backup lets you recover data quickly if a power fluctuation or other problem occurs during the year-end closing procedure. To create a backup in Microsoft Dynamics GP, follow these steps: 1. In Microsoft Dynamics GP, point to Maintenance on the Microsoft Dynamics GP menu, and then click Backup. 2. In the Company Name list, click your company name. 3. Change the path of the backup file if it is required, and then click OK. Note We recommend that you name this backup "Pre-1099 Edits" to differentiate it from your other backups. Step 6: Verify the 1099 information and edit it if it is required To print the 1099 edit list, follow these steps: 1. In Microsoft Dynamics GP, point to Tools on the Microsoft Dynamics GP menu, point to Routines, point to Purchasing, and then click Print 1099. 2. Enter the Company Information and Address ID. 3. Click on the printer icon in the upper right corner to print the 1099 Edit List. Review for accuracy. 4. If you need to edit any 1099 information, use one of the following methods (Method 3 is recommended for Microsoft Dynamics GP 2013 and higher versons): Method 1 - Edit the 1099 directly (Applies to all GP versions) (Note: The Reconcile utility for 1099 amounts would undo any edits you make.) 1. On the Cards menu, point to Purchasing, and then click 1099 Details. 2. In the Vendor ID list, click a vendor ID. 3. In the Tax Type list, select one of the following: Dividend Interest Miscellaneous 25 4. In the Display area, click Month or Year, and then type 2014 in the Year field. 5. In the Amount column, type the correct 1099 amount. 6. Click Save. Method 2: Edit the 1099 directly (Applies to all GP versions) (Note: The Reconcile utility for 1099 Amounts would undo any edits you make.) 1. 2. 3. 4. 5. On the Cards menu, point to Purchasing, and then click Summary. In the Vendor ID list, click a vendor ID, and then click Period. In the Year field, type 2014. In the Month/Period field, select the appropriate month or period. Click the "1099 Details" blue expansion button that appears next to the 1099 Amount field. This 1099 Details window will open. 6. In the Amount column, type the correct 1099 amount for the respective box. 7. Press Save. Exist out of the remaining windows. Method 3: (RECOMMENDED) Edit 1099 Transaction details (Applies to Microsoft Dynamics GP 2013 and higher versions) 1. Click on Transactions, point to Purchasing, and click on Edit 1099 Transaction Information. 2. Select the appropriate Vendor ID. (Only vendors set to be 1099able will be displayed in the window.) 3. You may restrict by Voucher Number, by Document Number or by Date, if desired. 4. Select if you want 1099 Debit Transactions, All Debit Transactions or All Credit Transactions. 5. The vendor's transaction detail will populate in the bottom of the window. For each transaction, you can edit the Tax Type, Box Number and Amount on open and historical transactions. Note: You may not enter a higher 1099 amount than the total amount of the document. 6. Click Process to have the changes made and the 1099 will be updated. Method 4: VENDOR NOT MARKED CORRECTLY: (Applies to Microsoft Dynamics GP 2013 and higher versions) If you marked a vendor as 1099able and should not have, or you forgot to mark a vendor as 1099able at all, you can use the Update 1099 Information utility to change the 1099 status on the vendor and also to update the 1099 information. You can change a 1099 vendor to be non-1099 or visa versa. 26 1. Click on Tools under Microsoft Dynamics GP, point to Utilities, point to Purchasing, and click Update 1099 Information. 2. Mark the bullet for Vendor and 1099 Transactions. 3. In the FROM and TO sections enter the following: • To change a vendor to be 1099able: select Not a 1099 Vendor in the FROM section, and select the appropriate 1099 type of Dividend, Interest or Miscellaneous, and the appropriate 1099 Box number in the TO section. (Miscellaneous and Box 7 Nonemployee Compensation is the most common.) • To change a vendor to not be 1099able: Select the current Tax Type and 1099 Box Number that is selected on the Vendor Maintenance Options window for the vendor in the FROM section, and select Not a 1099 Vendor in the TO section. *If Not a 1099 Vendor is not an option in the drop-down lists, then either you are not on a GP version higher than Microsoft Dynamics GP 2013, or you did not select Vendor and 1099 Transactions as instructed in step 2. 4. Use the Range restriction to restrict to the Vendor ID that you wish to change and click INSERT. 5. Click Process. The vendor status will be updated on the Vendor Maintenance Options window, and the 1099 information will be updated appropriately. You can use the 1099 details window (see Method 1) to verify. Step 7: Print the 1099 statements Note You can do this at any time. To print the 1099 statements, follow these steps: 1. In Microsoft Dynamics GP, point to Tools on the Microsoft Dynamics GP menu, point to Routines, point to Purchasing, and then click Print 1099. 2. In the 1099 Year field, type 2014. 3. Each of your 1099 report types must be printed separately. In the Print 1099 window, click the options that you want in the 1099 Type field and in the 1099 Box Number field, and then click Print. 27 The following table provides additional information about the fields on the 1099 form and where this information can be located in Microsoft Dynamics GP. Field window where data is located Payers name, street address, city, state, and ZIP Code/Postal Code Print 1099 window Payers Federal Identification number Print 1099 window Recipients name, address, and Zip Code/Postal Code Primary Address of the Vendor Maintenance window Recipients identification number Tax ID field of the Vendor Maintenance Options window Amounts for boxes 1-9 on the Dividend Form or 116 on the Miscellaneous Form 1099 Amount field in the Vendor Yearly Summary window Currently, Microsoft Dynamics GP does not handle magnetic media filing of state 1099s. The following Microsoft Dynamics Partner does offer compatible State W-2 and 1099 magnetic media products. For more information, contact: Greenshades Accounting Software, Inc. 7800 Belfort Parkway Suite 220 Jacksonville, FL 32207 General: 1-800-209-9793 (Toll-Free) Sales: 1-800-209-9793x2 (Toll-Free) [email protected] http://www.greenshades.com Step 8: Make a backup that is named "Pre Year-End" Create a backup, and then put the backup in safe, permanent storage. A backup gives you a permanent record of the company's financial position at the end of the year, and this backup can be restored later if it is required. A backup lets you recover data quickly if a power fluctuation or other problem occurs during the year-end closing procedure. To create a backup in Microsoft Dynamics GP, follow these steps: 1. In Microsoft Dynamics GP, point to Maintenance on the Microsoft Dynamics GP menu, and then click Backup. 28 2. In the Company Name list, click your company name. 3. Change the path of the backup file if it is required, and then click OK. Note We recommend that you name this backup "Pre Year-End" to differentiate it from your other backups. Step 9: Close the year To close the year, follow these steps: 1. In Microsoft Dynamics GP, point to Tools on the Microsoft Dynamics GP menu, point to Routines, point to Purchasing, and then click Year-End Close. 2. If you are closing both your fiscal and calendar year at the same time, click All. If you are just closing your calendar year, click Calendar. If you are just closing your fiscal year, click Fiscal. 3. Click to select the Print Report check box, and then click Close Year. Note We recommend that you keep a paper copy of the year-end report together with your permanent year-end audit records. To view the Vendor Yearly Summary window, follow these steps: 1. On the Cards menu, point to Purchasing, and then click Summary. 2. In the Vendor ID field, type a vendor ID to view, and then click Yearly. The calendar year details The calendar year-end process in Microsoft Dynamics GP will clear the 1099 Amount Year to Date field and then transfer the amount to the 1099 Amount Last Year field for the Amounts Since Last Close view of the Vendor Yearly Summary window. The fiscal year details The fiscal year-end process in Microsoft Dynamics GP will clear the following fields: Amount Billed YTD Amount Paid YTD Average Days To Pay - Year Discount Available YTD Discount Lost YTD Discount Taken YTD Finance Charge YTD Number of Finance Charges YTD Number of Invoice YTD Number of Paid Invoice YTD Returns YTD Trade Discounts Taken YTD Withholding YTD 29 Write Offs YTD The amounts in these fields will also be updated in the Amounts Since Last Close view of the Vendor Yearly Summary window: Amount Billed LYR Amount Paid LYR Discount Available LYR Discount Lost LYR Discount Taken LYR Finance Charge LYR Number of Finance Charges LYR Number of Invoice LYR Returns LYR Trade Discounts Taken LYR Withholding LYR Write Offs LYR Step 10: Close the fiscal periods You can use the Fiscal Periods Setup window to close any fiscal periods that are still open for the year. This prevents users from accidentally posting transactions to the wrong period or year. Verify that you have posted all transactions for the period and the year for all modules before closing fiscal periods. If you must later post transactions to a fiscal period that you have already closed, you can return to the Fiscal Periods Setup window to reopen the period before you can post a transaction. To close a fiscal period, follow these steps: 1. Microsoft Dynamics GP, point to Tools on the Microsoft Dynamics GP menu, point to Setup, point to Company, and then click Fiscal Periods. 2. Click to select the Purchasing check box for the Period that you must close. Step 11: Close the tax year Note This procedure should only be completed after you have completed the year-end closing procedures for all sales and purchasing modules. To close the tax year, follow these steps: 1. In Microsoft Dynamics GP, point to Tools on the Microsoft Dynamics GP menu, point to Routines, point to Company, and then click Tax Year-End Close. 2. Click to select the Close Year check box and the Print Report check box. 3. Click Process. When you are prompted to continue with the year-end close. Click Yes. Note We recommend that you keep a paper copy of the year-end report together with your permanent year-end audit records. 30 Step 12: Make a backup that is named "Post Year-End" Create a backup, and then put the backup in safe, permanent storage. A backup gives you a permanent record of the company's financial position at the end of the year, and this backup can be restored later if it is required. A backup lets you recover data quickly if a power fluctuation or other problem occurs during the year-end closing procedure. To create a backup in Microsoft Dynamics GP, follow these steps: 1. In Microsoft Dynamics GP, point to Maintenance on the Microsoft Dynamics GP menu, and then click Backup. 2. In the Company Name list, click your company name. 3. Change the path of the backup file if it is required, and then click OK. Note We recommend that you name this backup "Post Year-End" to differentiate it from your other backups. Frequently asked questions Q1: Are inactive vendor records cleared during year-end closing? If not, how can inactive vendor records be removed? A1: No, inactive vendor records are not automatically removed. To remove an inactive vendor record, the following conditions must be true: No current year 1099 amounts exist for the vendor The vendor has no documents in work or history. To delete all inactive vendor records that fit these criteria, follow these steps: 1. In Microsoft Dynamics GP, point to Tools on the Microsoft Dynamics GP menu, point to Utilities, point to Purchasing, and then click Mass Vendor Delete. 2. In the Range list, click by Vendor Status. 3. In the From list, click Inactive. 4. In the To list, click Inactive. 5. Click Process. Q2: What should I do if I must issue a check on January 1, 2015 but I am not ready to close 2014 yet? A2: Print the checks, but do not post them until after you process your year-end closing. If you must post the checks immediately, change the Amount Paid fields in the Amounts Since Last Close view of the Vendor Yearly Summary window. APPLIES TO Microsoft Dynamics GP 2015 Microsoft Dynamics GP 2013 Microsoft Dynamics GP 2010 Microsoft Dynamics GP 10.0, when used with: 31 Payables Management Keywords: kbexpertiseinter kbexpertisebeginner kbinfo kbmbsmigrate KB875169 32 Article ID: 888003 - Last Review: November 12, 2014 - Revision: 26.0 SUMMARY This article outlines the recommended year-end closing procedures for Microsoft Dynamics GP. This article contains a checklist of the steps in the procedure, detailed information for each step, and a series of frequently asked questions. INTRODUCTION Read this article before you follow any steps, and be sure to have a current backup of both the company and Dynamics databases. For information about technical support for the General Ledger year-end closing procedures, visit the following Microsoft Web site: http://www.microsoft.com/dynamics/support/default.mspx Note: During the year-end closing routine, all the records that will be moved are put in a temporary table before they are moved to the GL30000 table. You must have free disk space that is equal to the size of the GL20000 table to perform the routine. MORE INFORMATION Year-end closing checklist 1. Complete the posting procedures and the closing procedures for other modules. Note This step is only required if General Ledger is integrated with other modules. 2. Post the final adjusting entries in General Ledger. 3. Print an account list to verify the posting type of each account. 4. Close the last period of the fiscal year. Note This step is optional. 5. Optional: Perform file maintenance on the Financial series group of modules. 6. Verify the settings in the General Ledger Setup window. 7. Make a backup. 8. Print a final Detailed Trial Balance report. 9. Print the year-end financial statements. 33 10. Set up a new fiscal year. 11. Close the fiscal year. 12. Close all the fiscal periods for all the series. Note This step is optional. 13. Adjust the budget figures for the new year, and then print the financial statements. 14. Make a backup. 1. Complete the posting procedures and the closing procedures for other modules. Only follow this step if General Ledger is integrated with other modules. If General Ledger is not integrated with other modules, skip this step. a. Post final transactions in all the modules except in General Ledger. b. Complete the month-end procedure and the quarter-end procedure for all the modules except for General Ledger. c. Complete the year-end closing procedures for each module in the following order: 1. Inventory For more information, click the following article number to view the article in the Microsoft Knowledge Base: 872713 -Year-End Closing procedures in Inventory Control in Microsoft Dynamics GP 2. Receivables Management For more information, click the following article number to view the article in the Microsoft Knowledge Base: 857444 - Year-end closing procedures for Receivables Management in Microsoft Dynamics GP 3. Payables Management For more information, click the following article number to view the article in the Microsoft Knowledge Base: 875169 - Year-end closing procedures for the Payables Management module in Microsoft Dynamics GP 4. Fixed Asset Management For more information, click the following article number to view the article in the Microsoft Knowledge Base: 865653 - The year-end closing procedures for the Fixed Asset Management module in Microsoft Dynamics GP 5. Analytical Accounting For Microsoft Dynamics GP 10.0 Service Pack 2 and greater, functionality was added to consolidate balances for dimensions in Analytical Accounting. Please review KB 960356 to make sure you have properly marked the dimensions that you want to be consolidated during the year-end process. Please note that there is no separate yearend process that needs to be run in the Analytical Accounting module. When the year-end close process is run for General Ledger, it will automatically consolidate the balances and move the transactions in Analytical Accounting for dimensions that were properly marked. 34 We encourage you to ensure your AA data matches GL data by executing the scripts in KB 2910626 before closing the GL year. For more information, click the following article number to view the article in the Microsoft Knowledge Base: 960356 - The year-end close procedures for Analytical Accounting in Microsoft Dynamics GP 10.0 Service Pack 2 and in later versions Note Year-end procedures for Payroll are independent of the procedures in other modules. These procedures are always performed at the end of the calendar year. For more information, click the following article number to view the article in the Microsoft Knowledge Base: 850663 - Year-end closing procedures for Microsoft Dynamics GP Payroll 3. Post the final adjusting entries in General Ledger. The adjusting entries include all the entries that correct errors that were made when transactions were recorded. The adjusting entries also include journal entries that are used to assign revenues or expenses to the period in which the revenues were earned or in which the expenses were incurred. If you must make any adjusting entries to allocate revenue, expenses, or depreciation to the year that you are closing, use the Transaction Entry window or the Quick Journal Entry window to make adjusting entries in General Ledger. If you have to track initial adjusting entries or postaudit entries separate from other fiscal periods, auditing periods can be set up in General Ledger. This feature enables separate tracking of the adjusting entries that are made after the year is closed. For more information about how to create auditing periods, click the following article number to view the article in the Microsoft Knowledge Base: 871679 - How to set up an adjusting period in General Ledger in Microsoft Dynamics GP Note If you are using closing periods and you reconcile, the transactions all move to the first period with the start date. 4. Print an account list to verify the posting type of each account. The posting type determines whether an account is closed to the retained earnings account or whether an account brings a balance forward to the next fiscal year. If the account balance will be brought forward at the end of the year, the posting type must be set to Balance Sheet. If the account balance will be closed to a retained earnings account at the end of the year, the posting type must be set to Profit and Loss. Use the Account Maintenance window if you must change the posting type for an account. Follow these steps to print an account list: . On the Reports menu, point to Financial, and then click Account. 35 a. In the Reports list, select All Accounts, and then click New. b. In the Option box, type all accounts. c. Click to select the Inactive Accounts check box. Note The year-end close process is designed to delete inactive General Ledger accounts that have no current year activity. For more information, see Q17 in the Frequently Asked Questions section. d. Click Destination to specify a report destination, and then click OK. e. Click Print. 5. Close the last period of the fiscal year. This step is optional. You can use the Fiscal Periods Setup window to close all fiscal periods that are still open for the year. This prevents transactions from being posted to the wrong period or to the wrong year. Notes Make sure that you post all the transactions for the period and for the year for all modules before you close the fiscal periods. Later, if you have to post transactions to a fiscal period that you already closed, you must return to the Fiscal Periods Setup window to reopen the period. If you use Microsoft FRx, keep one period in the most recent historical year open to prevent the following error message: FRX Print Engine Failed to Load the Company Calendar. For more information, click the following article number to view the article in the Microsoft Knowledge Base: 874932 - "Failed to Load Company Calendar" checklist for FRx 6. Optional: Perform file maintenance on the Financial series group of modules. Run the check links procedure on the Financial series group of modules. 7. Verify the settings in the General Ledger Setup window. If you want to keep historical records, you must click to select the Accounts check box and the Transactions check box in the Maintain History area of the General Ledger Setup window. The account history lets you print financial statements and calculated budgets from historical information. The transaction history lets you print detailed historical trial balances. The transaction history also lets you view the transaction details. If these check boxes are selected, both the account history and the transaction history are updated during the year-end closing routine. 36 8. Make a backup. Make a backup of all company data, and then put the backup in safe permanent storage. The backup gives you a permanent record of the company's financial position at the end of the year. The backup can then be restored later if it is required. 9. Print a final Detailed Trial Balance report. Use the Trial Balance Report window to print a year-end Detailed Trial Balance report. Note We recommend that you post all transactions for the period and for the year for all modules before you print the Detailed Trial Balance report. If you post additional transactions later, we recommend that you print a new Detailed Trial Balance report. 10. Print the year-end financial statements. Print any year-end financial statements that are required. The most common financial statements include the following statements: Balance Sheet Profit and Loss Statement Statement of Cash Flows Statement of Retained Earnings 11. Set up a new fiscal year. Before you can perform the year-end closing routine, you must set up a new fiscal year by using the Fiscal Periods Setup window. 12. Close the fiscal year. To close the fiscal year, follow these steps: . In Microsoft Dynamics GP, point to Tools on the Microsoft Dynamics GP menu, point to Routines, point to Financial, and then click Year-End Closing. a. Specify an account in the Retained Earnings Account box. The account that you specify in the Retained Earnings Account box is the account to which the year's profit and loss accounts are closed. The default account is the account that you specified in the General Ledger Setup window. All current-year earnings or current-year losses are transferred to the account that you specify in the Retained Earnings Account box. If you want to distribute the retained earnings for the year to more than one account, you can specify an allocation account to distribute the retained earnings amount to the appropriate accounts. For example, you could set up an allocation account to divide the earnings between several departments in the business. 37 Or, you could transfer the year's profit or loss to accounts that contain a specific account segment. This process is known as closing to a divisional retained earnings account. For more information, click the following article number to view the article in the Microsoft Knowledge Base: 850615 - How to use divisional retained earnings accounts in General Ledger in Microsoft Dynamics GP See the "Frequently asked questions" section for more information about how to close to divisional retained earnings accounts. b. Specify the number that you want to use as the first journal entry number for the next fiscal year in the Starting Journal Entry box. c. You can accept the default number. The default number is one more than the highest journal entry number that is posted for the current year. Or, you can specify a new number. The journal entry number that you specify is used as the journal entry number for the Year-End Closing report. d. To start the routine, click Close Year. Important Click Close Year one time. If you click more than one time, you will close more than one year during the process. Also, if the progress window appears to stop at 50 percent, do not restart the routine. As long as the hard disk is processing, let the process continue. If you are maintaining the account history, the year-end closing routine transfers all current-year information for each account in the chart of accounts to the account history. If you are maintaining the transaction history, the year-end closing routine also transfers all current-year information for each account in the chart of accounts to the transaction history. The process then prepares the accounting system for a new fiscal year. In addition to transferring current-year figures to the transaction history and to the account history, the year-end closing routine does the following: The year-end closing routine reconciles and summarizes the general ledger balances that accumulated throughout the year. The year-end closing routine removes accounts that are marked as inactive if the accounts match the criteria for deleting a posting account. Inactive accounts that have been set up as budget accounts can also be deleted if they have no activity for the year. These accounts can be deleted even if budget amounts from past years are associated with these accounts. The year-end closing routine moves all profit and loss account balances to the retained earnings account. The year-end closing routine summarizes balance sheet accounts and brings the balances forward as the beginning balances of the account in the new fiscal year. The year-end closing routine prints the Year-End Closing report. 38 When the year-end closing routine is complete, the Year-End Closing report is printed. This report lists the accounts that were closed and the transactions that were created to close those accounts. The Year-End Closing report is part of the audit trail. Save this report for the company's permanent records. The Year-End Closing report cannot be reprinted. Note If you use Microsoft SQL Server, and if database maintenance is not automated, we recommend that you perform database maintenance after you close the year. For more information about recommended database maintenance procedures, click the following article number to view the article in the Microsoft Knowledge Base: 866439 - Recommended maintenance with SQL Server for Microsoft Dynamics GP databases 13. Close all the fiscal periods for all the series. This step is optional. After you complete the closing procedures for all the modules, use the Fiscal Periods Setup window to mark all the periods for all the series as closed. We recommend that you do this to prevent transactions from being posted from any module to any period that you closed. After a period is marked as closed, transactions cannot be posted to the period unless you reopen the period. Later, if you must post a transaction to a closed period, return to the Fiscal Periods Setup window to reopen the period. 14. Adjust the budget figures for the new year, and then print the financial statements. Adjust the budget figures by using one of the following windows: Excel-Based Budgeting Budget Maintenance Single-Account Budget Maintenance Print the "Profit and Loss" statement to verify that profit and loss accounts were closed to the retained earnings account. Print the balance sheet to verify that the balance sheet accounts indicate that the balances were brought forward. If you are using Advanced Financial Analysis to print the financial statements, you must update the report layout to reflect the current fiscal year. To do this, follow these steps: c. On the Reports menu, point to Financial, and then click Advanced Financial. d. In the Reports list, select the financial statement, click Open, and then click Layout. e. Double-click each column button to verify the Column Definition for the column. For example, double-click the C1 button or the C2 button. 39 f. If the column type is set to Period Range, to Year-to-Date, or to Variable Year-to-Date, select the current fiscal year in the Year list, and then click OK. g. Repeat steps 13a through 13d for each column of each report. 15. Make a backup. Make a backup of all the company data, and then put the backup in safe permanent storage. The backup gives you a permanent record of the company's financial position at the start of the new year. This backup can be restored later if it is required. Frequently Asked Questions Q1: Do I have to close the fiscal year before the first day of the next fiscal year? A1: The year-end closing routine for General Ledger does not have to be completed before you start the next fiscal year. However, we recommend that you close the year as soon as possible. For more information about how to print a balance sheet if you have two open years, click the following article number to view the article in the Microsoft Knowledge Base: 866371- How to print a Balance Sheet for the year if the prior year is not a closed year using Microsoft FRx Q2: Can I make adjusting entries after I close the year? A2: You can post an entry to the most recent historical year if the Posting to History check box is selected in the General Ledger Setup window. If you post an entry to a closed year, a second entry is automatically made that updates the beginning balances for the current fiscal year. The following tables show an adjusting entry and the way the entry appears in the General posting journal. In this example, an adjusting entry was posted to a P&L account to the 2014 year, after the year-end close process was performed. Adjusting entry 12/20/2014 Administration Expenses $500 Cash $500 General Posting journal 12/20/2014 Administration Expenses $500 Cash 12/31/2014 Retained Earnings Cash $500 $500 $500 40 Q3: After I performed the year-end closing routine, beginning balances were brought forward for some of my sales and expense accounts. Some of my asset accounts also closed to the retained earnings account. Why did this problem occur, and what can I do to correct it? A3: The posting type that is specified in the Account Maintenance window for the account determines whether a balance is brought forward for the account or whether the account is closed to the retained earnings account. Accounts that use the Balance Sheet posting type carry a balance forward. Accounts that use a Profit and Loss posting type close to the retained earnings account. To resolve this problem, use the appropriate method: METHOD 1: Restore from a backup, correct the posting type, and then run the Year End Closing routine again. METHOD 2: For more information about how to correct accounts that had an incorrect posting type without restoring to a backup, click the following article number to view the article in the Microsoft Knowledge Base: 864913 - How to correct accounts that were set up to use the wrong posting type after you close the year in General Ledger in Microsoft Dynamics GP METHOD 3: For Microsoft Dynamics GP 2013 R2 (12.00.1745) and later versions, you can go to the Year End Closing Routine window and click on the button for Reverse Historical Year, verify the Year to Open displayed and click Process. The year will be reopened as if it was never closed in the first place, so you can change the posting type on the account and then run the Year End Closing routine again. Q4: I tried to run the year-end closing routine by using a divisional retained earnings account, but I received the following error message: Retained Earnings account not found. What can I do to resolve the problem that causes this error message? A4: Before the routine can continue, the year-end closing routine must validate that all the required divisional retained earnings accounts exist. For example, the Fabrikam, Inc. demonstration company uses an account format of nnn-nnnn-nn. The first segment represents the department. A retained earnings account must exist for each department that has a profit and loss account. For example, if sales account 400-4100-00 exists, but no 400-nnnn-nn retained earnings account exists, you receive this error message. For more information about how to close to divisional retained earnings accounts, click the following article numbers to view the articles in the Microsoft Knowledge Base: 850615 - How to use divisional retained earnings accounts in General Ledger in Microsoft Dynamics GP 850741- Error message when you try to perform the year-end closing process in General Ledger in Microsoft Dynamics GP: "Retained Earnings account not found" An Automated Solution script may be available to perform this task, as well as other basic checks on your accounting data to help you prepare to close your fiscal year. For more information, visit the following Microsoft Dynamics Web site: https://mbs.microsoft.com/customersource/support/selfsupport/AutomatedSolutions.htm 41 Q5: What happens to unit accounts during the year-end closing routine? A5: Unit accounts are treated as balance sheet accounts. Unit accounts have a balance that is brought forward when the year is closed. For more information about how to clear the beginning balances for unit accounts, click the following article number to view the article in the Microsoft Knowledge Base: 857582 How to clear beginning balances for unit accounts in General Ledger in Microsoft Dynamics GP Q6: I am preparing to close the year in General Ledger. Must everyone exit Microsoft Dynamics GP before I perform the year-end routine? A6: We recommend that client computer users stop working in Microsoft Dynamics GP while the year-end closing routine is processing. If users continue to work in the program, their work may be lost if you have problems with the year-end closing routine and need to restore to the last backup. Q7: I want to allocate the net profit to the retained earnings account or to the capital accounts each month. Also, net profit is supposed to be allocated to three retained earnings accounts or capital accounts. Can I do this? A7: No, you cannot do this. However, you can specify a non-financial account in the Account Maintenance window. Use a number that is not in your current account numbering scheme. This account acts as a suspense account for the net income or for the net loss. Every month, you can post an adjusting entry to the three capital accounts that you want to adjust. For the offset account, use the suspense account. When the year-end closing routine is finished, use the suspense account as the retained earnings account. This offsets all the manual adjustments that you made to the suspense account during the year. Make sure that the suspense account does not appear on reports. If you are using Advanced Financial Analysis for financial statements, when you format the balance sheet, put the NP line as the last line on the Advanced Financial Analysis statement. Then, put a page break before the NP line. The balance sheet must have an NP line. However, this line makes the net income or the net loss appear two times. Therefore, format the NP line so that it is off the financial statement. You can also use a report type of Other. Q8: Why is the status of some of my financial reports set to Invalid? A8: If a report is configured to use the accelerator file, any changes that are made to accounts in any one of the following windows causes the status of the financial report printing options to change to Invalid: Account Maintenance Unit Account Maintenance Mass Modify Chart of Accounts Year-End Closing Before you print financial statements, you must update the accelerator file. To do this, follow these steps: a. On the Reports menu, point to Financial, and then click Update Financial Accelerator. 42 b. Click Update, and then click Continue. c. Close the Update Financial Accelerator Information window. Q9: How are non-financial accounts closed during the year-end closing routine? A9: If the non-financial account is configured to use the Balance Sheet posting type, the account balance is brought forward during the year-end closing routine. If the non-financial account is configured to use the Profit and Loss posting type, the account balance is closed to the retained earnings account during the year-end closing routine. Q10: When I try to post a batch in the General Ledger module, I receive the following message: Batches cannot be posted while the Year-End Close is in progress. The year-end closing routine is not being run in General Ledger. What should I do? A10: To resolve this issue, have all users close all transaction entry windows. Then, delete the SY00800 file if you are running a Microsoft SQL Server database. To do this, run the following statement on the DYNAMICS database. delete SY00800 where BACHNUMB = 'GL_Close' For more information, click the following article number to view the article in the Microsoft Knowledge Base: 856550 - Error message when you try to post a transaction in General Ledger in Microsoft Dynamics GP after the year is closed: "Year End Close is still in process and batches cannot be posted" Q11: I receive the following message when I try to close the year in General Ledger: Sorry, another user is closing the year. No one else is trying to close the year. What should I do? A11: To resolve this issue, delete the SY00800 file if you are using a Microsoft SQL Server database. To do this, run the following statement in SQL Query Analyzer on the DYNAMICS database. delete SY00800 where BACHNUMB = 'GL_Close' Q12: I am performing the year-end closing routine in General Ledger and it appears to be stopped at 50 percent. My workstation seems to have stopped responding. What should I do? A12: If the year-to-date transaction open file (GL20000) is large, it may take a long time for the year-end closing routine to finish. If the hard disk is still processing, the year-end closing routine has not stopped responding. We recommend that you let the routine run. If the hard disk is not processing, we recommend that you restore from a backup. Then, follow the steps in this article again, starting at step 5. Q13: If an adjusting entry has been posted to a year that is closed, can I print a corrected Trial Balance report for that year? A13: Yes, you can print a corrected Trial Balance report for the year that is closed. To do this, follow these steps: 43 1. 2. 3. 4. On the Reports menu, point to Financial, click Trial Balance, and then click New. In the Option field, type With Adjustments. In the Include area, click to select the Posting Accounts check box. In the Year area, click to select the History check box, and then select the historical year in the Year list. 5. Click Destination to specify a report destination, and then click OK. 6. Click Print. Q14: How does Microsoft Dynamics GP determine the financial statement that is printed for the account that I am adding? A14: The category determines the type of financial statement that is printed when you use quick financial statements for the account that you are adding. The category is either the Balance Sheet category or the "Profit and Loss" category. You must format the reports to print the accounts that you want in Advanced Financial Analysis and in Microsoft FRx. The posting type is used during the year-end closing routine to determine the accounts that close to the retained earnings account and to determine the account that carries a balance forward. The posting type does not affect the financial statements. Q15: When I tried to perform the year-end closing routine, I received an error message that stated that a single-use batch or a quick journal transaction had not been posted. What does this error message mean? A15: When you try to perform the year-end closing routine, you may receive the following error message: A single use batch or quick journal transaction has not been posted yet. Do you want to continue closing? You receive this error message if an unposted single-use batch or an unposted quick journal transaction exists in General Ledger. This error message does not prevent you from continuing with the year-end closing routine. If you do not want to post the single-use batch or the quick journal transaction, continue with the year-end closing routine. Q16: When I try to perform the year-end closing routine in General Ledger, why do I receive the following error message: [Microsoft][ODBC SQL Server Driver][SQL Server]Violation of PRIMARY KEY constraint 'PK##0671112'. Cannot insert duplicate key in object '##0671112' A16: The year-end closing transactions contain a currency that is not assigned to an account. For more information about how to resolve this issue, click the following article number to view the article in the Microsoft Knowledge Base: 950019 - Error message when you try to perform the year-end closing routine in General Ledger in Microsoft Dynamics GP: "Violation of PRIMARY KEY constraint 'PK##0671112'" Q17: Why did the year-end closing process delete some GL accounts that may be tied to budgets? A17: In Microsoft Dynamics GP 2010 and Microsoft Dynamics GP 10.0, the year-end closing process will automatically delete GL accounts that are marked as inactive and have no activity in the current year. 44 In Microsoft Dynamics GP 2013 and Microsoft Dynamics GP 2015, there is new functionality in the Year-End Closing window to Maintain Inactive Accounts. This allows you to have inactive accounts without a balance automatically deleted, or to maintain all inactive accounts, or just those used in Budgets. For more information about inactive GL accounts and the year-end close process, click the following article number to view the article in the Microsoft Knowledge Base: 2452542 -Inactive GL accounts deleting during the Year-End Close process for General Ledger in Microsoft Dynamics GP Q18: If I had a failed year end close, can I use the Reverse Historical Year checkbox in the Year-End Closing window in Microsoft Dynamics GP 2013 R2 (and later versions), to try to fix it or 'un-do' it? A18: No, if you had an error message or a failed year-end close, you should make a screenprint of the error message and restore to a backup immediately. Open a support incident with Microsoft Dynamics Support for further assistance. (The Reverse Historical Year checkbox in Microsoft Dynamics GP 2013 R2 and later versions, should only be used to reopen a GL year that was successfully closed and should not be used to troubleshoot a failed year-end close.) APPLIES TO Microsoft Dynamics GP 2015 Microsoft Dynamics GP 2013 Microsoft Dynamics GP 2010 Microsoft Dynamics GP 10.0, when used with: General Ledger Keywords: kbexpertiseadvanced kbexpertiseinter kbexpertisebeginner kbmbsmigrate kbhowto kbmsifixme kbfixme KB888003 45 Article ID: 865653 - Last Review: October 27, 2014 - Revision: 18.0 SUMMARY This document outlines the recommended year-end closing procedures for Fixed Asset Management in Microsoft Dynamics. This article includes a checklist of the steps that you must follow to complete these procedures. The "More information" section contains detailed information about each step. A series of frequently asked questions (FAQ) follows the description of the procedures. INTRODUCTION Read this document before you perform any of the following procedures. If you have any questions, contact Technical Support for Microsoft Dynamics. MORE INFORMATION Year-end checklist Step 1: Perform all the year-end closing procedures for Payables Management in Microsoft Dynamics GP Close Payables Management first. This action guarantees that all the outstanding fixed asset transactions are capitalized. For more information about closing Payables Management, click the following article number to view the article in the Microsoft Knowledge Base: 875169 - Yearend closing procedures for the Payables Management module in Microsoft Dynamics GP Step 2: Enter all the fixed asset transactions for the current fiscal year Post all the additions, the changes, the transfers, and the retirements for the current fiscal year. Note Transfers and undo retirement transactions should never be performed in a historical year. 46 Step 3: Depreciate all assets through the last day of the current fiscal year 1. In Microsoft Dynamics GP, point to Tools on the Microsoft Dynamics GP menu, point to Routines, point to Fixed Assets, and then click Depreciate. 2. In the Depreciation Target Date box, type the last date of the current fiscal year. 3. To insert all the fixed asset books, click All. 4. Click Depreciate. NOTE: It is very important to depreciate all assets through the last day of the current FA Fiscal Year. If all assets are not depreciated through the last day of the current FA Fiscal Year prior to processing the year-end-close, depreciation amounts will be incorrect. Please see Q3 and A3 in the FAQ section below for more information. Step 4: Perform the GL Posting (GL Interface) process (This step is optional.) 1. In Microsoft Dynamics GP, point to Tools on the Microsoft Dynamics GP menu, point to Routines, point to Fixed Assets, and then click GL Posting. 2. In the Beginning Period box, type 2014-012. 3. 4. 5. 6. 7. Note The 2013-012 placeholder represents period 12 of the fiscal year 2013. If you are not running on a calendar fiscal year, or if you have more than 12 periods, the period that you type is different. In the Ending Period box, type 2014-012. In the Transaction Date box, type the last date of the current fiscal year, or type the date when you need the posting to affect the general ledger. Click Continue. When you receive a message that the batch number is being created, click Continue. In the Report Destination window, click to select the Printer check box, and then click OK. Note You may want to keep this report as part of the year-end financial records. Step 5: Run any year-end reports that you want to keep as part of the year-end financial records The year-to-date depreciation amounts for previous fiscal years are not kept in Fixed Asset Management. Therefore, you must print any reports that contain this information before you close the year. There are several reports available for fixed assets. We recommend that you print the following reports: Annual Activity To print the Annual Activity report, point to Fixed Assets on the Reports menu, and then click Activity. 47 Additions To print the Additions report, point to Fixed Assets on the Reports menu, and then click Transaction. Retirements To print the Retirements report, point to Fixed Assets on the Reports menu, click Transaction, and then click Retirements in the Reports list. Transfers To print the Transfers report, point to Fixed Assets on the Reports menu, click Transaction, and then click Transfers in the Reports list. Depreciation Ledger To print the Depreciation Ledger report, point to Fixed Assets on the Reports menu, click Depreciation, and then click Depreciation Ledger in the Reports list. Property Ledger To print the Property Ledger report, point to Fixed Assets on the Reports menu, click Inventory, and then click Property Ledger in the Reports list. "Fixed Assets to General Ledger Reconciliation" To print the "Fixed Assets to General Ledger Reconciliation" report, point to Fixed Assets on the Reports menu, click Activity, and then click Fixed Assets to General Ledger Reconciliation in the Reports list. If you have more than one fixed asset book, we recommend that you also print the following reports: "Book to Book Reconciliation" To print the "Book to Book Reconciliation" report, point to Fixed Assets on the Reports menu, and then click Comparison. "Book to Book YTD Depreciation Comparison" To print the "Book to Book YTD Comparison" report, point to Fixed Assets on the Reports menu, click Comparison, and then click Book to Book YTD Depreciation Comparison in the Reports list. Step 6: Guarantee that the Fixed Assets calendar is built correctly (This step is optional.) 1. In Microsoft Dynamics GP, point to Tools on the Microsoft Dynamics GP menu, point to Utilities, point to Fixed Assets, and then click Build Calendar. 2. Click Inquire, and then click Verify. When you are prompted to verify the periods, click OK. 3. In the Report Destination window, click Screen, and then click OK. Step 7: Verify that the quarters are set up correctly for all the fiscal years 1. In Microsoft Dynamics GP, point to Tools on the Microsoft Dynamics GP menu, point to Setup, point to Fixed Assets, and then click Quarter. 48 2. Make sure that the following boxes are not empty: Start Date Mid Date End Date Note These boxes must exist for each quarter. If any box is empty, type the appropriate date in that box. Step 8: Create a backup This backup should be stored off-site together with the rest of the year-end documentation. This backup gives you a permanent record of the company's financial position at the end of the year. Additionally, this backup can be restored later if it is required. Making a backup guarantees that you can quickly recover if a power fluctuation or other problem occurs during the year-end closing procedures. To create a backup in Microsoft Dynamics GP, follow these steps: 1. In Microsoft Dynamics GP, point to Maintenance on the Microsoft Dynamics GP menu, and then click Backup. 2. In the Company Name list, click the company name. 3. Change the path of the backup if you must, and then click OK. Step 9: Perform the fixed assets year-end closing routine 1. In Microsoft Dynamics GP, point to Tools on the Microsoft Dynamics GP menu, point to Routines, point to Fixed Assets, and then click Year End. 2. Verify that the fiscal year that is displayed for each book is the current fiscal year. (The current fiscal year is the year that you are closing.) Note If the fiscal year that is displayed for a book is not the current fiscal year, see question 1 in the "Frequently asked questions (FAQ)" section. 3. Click a book that you want to close, and then click Insert. Repeat this step until all the books that you want to close have been inserted. Note Microsoft Dynamics performs the following procedures during the year-end closing routine: In the Asset General Information window, the Quantity field is copied to the Begin Quantity field of the Expand Quantity window. In the Expand Last Maintenance window, the YTD Maintenance amount is cleared. In the Asset Book window, the YTD Depreciation Amount is cleared. The following procedures are performed: The Cost Basis field is copied to the Begin Year Cost field. The LTD Depreciation field is copied to the Begin Reserve field. The Salvage Value field is copied to the Begin Salvage field. In the Book Setup window, the Current Fiscal Year field is increased by one. Note A report is not generated during the fixed assets year-end closing routine. 49 Frequently asked questions (FAQ) Q1: The fiscal year that is displayed for my book in the Asset Year End window is not 2014. I closed 2011 last year, and I have not yet closed 2014. What should I do? A1: See the answer for question 4. Q2: I have closed General Ledger in Microsoft Dynamics GP, and I now realize that I have not yet closed Fixed Asset Management. Can I perform the fixed assets year-end closing routine at this point? A2: We recommend that you close General Ledger last, after all the subsidiary modules have been closed. However, Fixed Asset Management can be closed after General Ledger is closed. The GL Posting (GL Interface) process can be performed, and then the transaction or transactions can be posted to the closed year or to the historical year in the general ledger. For more information about the GL Posting (GL Interface) process, see step 4 in the "Year-end checklist" section. To post transactions to the historical year in the general ledger, make sure that the following options are selected in the General Ledger Setup window: Allow Posting to History Maintain History Accounts Maintain History Transactions To access the General Ledger Setup window in Microsoft Dynamics GP, point to Tools on the Microsoft Dynamics GP menu, point to Setup, point to Financial, and then click General Ledger. Notes The posted transaction will update the historical year, and it will roll forward as a beginning balance to the open year. If any expense accounts or any revenue accounts were included in the transaction, they will automatically close out to the Retained Earnings account or accounts. Q3: I ran the year-end routine in Fixed Asset Management, and then I ran depreciation in the new year. I see that the depreciation is highly overstated and that some assets have a negative number in the "Net Book Value" field. Why is the system calculating so much depreciation? A3: This problem occurs if the following conditions are true: The year was closed. The assets were not depreciated through the last day of the fiscal year. Consider the following example: The fiscal year is a calendar year (January 1 through December 31). The assets were depreciated through December 28 when the year was closed. 50 In this example, depreciation will be incorrect the next time that depreciation is run. The system does not recalculate the yearly rate when the year-end closing routine is performed. Therefore, fixed assets take a full year of depreciation in the last few days that remain in the previous year (December 29 through December 31). The rate of depreciation is the yearly rate currently on each asset. Additionally, if there are assets that are near the end of their original life, the Net Book Value field may become negative. There are two workarounds for this problem: Recommended workaround Restore the data from a backup, run depreciation through the last day of the year, and then perform the year-end closing procedures. Alternative workaround Reset life on all the assets. Note If amounts on the assets have ever been entered for the YTD Depreciation field or for the LTD Depreciation field, resetting life on the assets will change these amounts, and the result may be different. If you change the YTD Depreciation field or the LTD Depreciation field by resetting life on the asset, you will cause inconsistencies between Fixed Asset Management and General Ledger. These inconsistencies must be explained. Q4: Instead of completing the year-end routine for Fixed Asset Management, I manually changed the "Current Fiscal Year" field in the Book Setup window to the next year. Do I have to go back and run the year-end closing routine, or can I continue to process activity in Fixed Asset Management for the new year? A4: If no activity, such as additions, changes, transfers, retirements, or depreciation, has been run for the new year, the Current Fiscal Year field in the Book Setup window can be changed back to the previous year, and then the year-end closing routine can be processed. If any activity, such as additions, changes, transfers, retirements, or depreciation, has been run for the new year, restore the data from a backup, and then continue with the year-end closing routine. In either situation, the year-end closing routine must be run. If the year-end closing routine is not completed, the amount in the YTD Depreciation field will be overstated on any report that includes assets that were retired or that were fully depreciated in the previous year. If the yearend closing routine is not performed, the amounts in the YTD Depreciation field will not be cleared. The amounts in the YTD Depreciation field will not be zeroed out. Therefore, these amounts will be incorrectly included in the reports for the new year. APPLIES TO Microsoft Dynamics GP 2013 Microsoft Dynamics GP 2010 Microsoft Dynamics GP 10.0, when used with: Fixed Asset Management Keywords: kbhowto kbexpertiseinter kbexpertiseadvanced kbinfo kbtshoot kbmbsmigrate KB865653 51 Article ID: 872713 - Last Review: October 27, 2014 - Revision: 15.0 INTRODUCTION This article discusses how to close the year and how to prepare your inventory records for the new fiscal year in Inventory Control in Microsoft Dynamics GP. MORE INFORMATION Inventory year-end closing procedures Follow these steps to close the year and to prepare your inventory records for the new fiscal year. Closing a year transfers all summarized current-year quantity (cost and sales amounts) to transaction history for the items for which you have been keeping a summarized Sales History. The Quantity Sold field for each item is set to zero. These steps also update the amount in each item's Beginning Quantity field to the Quantity on Hand field at each site. Additional resources Refer to the Inventory Year-End Closing Tips. Refer to the Inventory Year-End Questions and Answers. Summary steps 1. 2. 3. 4. 5. 6. 7. 8. Post all transactions for the year. Reconcile inventory quantities. Complete a physical inventory count, and then post any adjustments. Print additional reports. Make a backup. Close the year. Close the fiscal periods for the Inventory series (optional). Make a final backup. 52 DETAILED STEPS 1. Post all transactions for the year. Make sure that all Invoicing transactions, Sales Order Processing transactions, and Inventory transactions for the current year have been entered and then posted before you close the year. This is true so that historical information is accurate for the year you are closing, and year-to-date amounts are accurately stated for the new year. If you want to enter future-period transactions before closing the year, create a new batch that has new transactions. However, do not post the batch until after the year has been closed. 2. Reconcile inventory quantities. Reconcile quantities for all items by using the Reconcile Inventory Quantities window to make sure that your Inventory Control data has not become damaged during the year. To open the Reconcile Inventory Quantities window, follow this step: In Microsoft Dynamics GP, point to Tools on the Microsoft Dynamics GP menu, point to Utilities, point to Inventory, and then click Reconcile. If any differences are found during the reconcile process, the quantities will be adjusted. If adjustments are made, they will be reflected on the Reconcile Report. Additionally, any serial numbers and lot numbers that were added for the adjusted items are included. If you want to change these serial numbers and lot numbers, you can use the Item Transaction Entry window. Enter decrease adjustment transactions to remove the existing serial numbers and the existing lot numbers. Then, enter increase adjustment transactions to enter the correct serial numbers and the correct lot numbers. To open the Item Transaction Entry window, point to Inventory on the Transactions menu, and then click Transaction Entry. 3. Complete a physical inventory count, and then post any adjustments. a. Use the Stock Calendar Maintenance window to set up and then maintain information about when stock counts can be performed and about which days will be counted when the system calculates suggested dates for the next stock count for a specific item-site combination. To open the Stock Calendar Maintenance window, follow this step: In Microsoft Dynamics GP, point to Tools on the Microsoft Dynamics GP menu, point to Setup, point to Inventory, and then click Stock Calendar. b. The Stock Count Cycle Assignment window can be used if you want to assign one stock count frequency to many items. 53 To open the Stock Count Cycle Assignment window, point to Inventory on the Cards menu, and then click Count Cycle Assignment. c. Create a Stock Count Schedule. A Stock Count Schedule is a list of the specific items at a specific site that will be counted during a specific count. When you start a stock count schedule, the quantity on hand for each line in the stock count schedule is captured. Later, the actual count number quantities will be compared to the captured values to create default variance transactions. Stock Count Forms can be printed during this process. To open the Stock Count Schedule window, point to Inventory on the Transactions menu, and then click Stock Count Schedule. d. Use the Stock Count Entry window to enter information about the results of your stock counts. When you process a stock count, variance transactions are created. If the Autopost Stock Count Variances check box is selected, the transactions will also be posted. To open the Stock Count Entry window, point to Inventory on the Transactions menu, and then click Stock Count Entry. Instead of following step 3, you can manually create your adjusting entries. To do this, print a Physical Inventory Checklist by using the Inventory Activity Reports window, and then perform a physical count of your Inventory Items to verify that quantity on hand amounts are accurate for all Items. To open the Inventory Activity Reports window, point to Inventory on the Reports menu, and then click Activity. If there are any differences, enter the necessary adjustments in the Item Transaction Entry window, and then post the transactions. To open the Item Transaction Entry window, point to Inventory on the Transactions menu, and then click Transaction Entry. 4. Print additional reports. Print any additional reports that you will need for planning or for your permanent records. The suggested reports are as follows: Stock Status Report Purchase Receipts Report Turnover Report Transaction History Report Serial Number List Lot Number List To access the Reports palette, point to Inventory on the Reports menu. Use selections from the Inventory Reports palette to print these reports. If you plan to remove sold purchase receipts during the year-end closing process, we recommend that you print the Purchase Receipts Report to review the receipts that will be removed. 54 5. Make a backup. Make a backup of all company data. This is true so that you will be able to recover quickly should a power fluctuation or other problem occur during the year-end closing procedure. 6. Close the year. Closing a year performs the following tasks: a. Transfers all summarized current-year quantity (cost and sales amounts) to transaction history for the Items for which you have been keeping summarized sales history. b. Updates the amount in the item's Beginning Quantity field to the Quantity on Hand field at each site. Certain reports, such as the Turnover Report, use the amount in the Beginning Quantity field for report calculations. c. Zeros the Quantity Sold field in Item Quantities Maintenance window for each site. d. Removes purchase receipts and cost change history for items that have been completely sold. e. Removes any discontinued items from the Item records that have been completely sold. f. Removes any lot attributes from the records of lot numbered items if they have been completely sold. g. Updates the standard cost of each item to the current cost if you use either the FIFO periodic method or the LIFO periodic valuation method. h. Uses the Inventory Year-End Closing window to close the year. The following options are available: i. Remove discontinued items If you click to select the Discontinued Items check box, all discontinued Items that have a zero balance will be removed during the year-end closing process. Items can be designated as discontinued by using the Item Maintenance window. Discontinued Items that have a quantity on hand of zero (except for kit components) and have no unposted transactions will be completely removed from the Inventory module. If you use the Service Call Management module, determine whether any discontinued items exist on any unposted service documents. If discontinued items exist on any unposted service documents, the documents must be posted before you continue. The Sales Order Processing report, the Invoicing report, or the Purchase Order Processing report and inquiries will still be able to display information about these discontinued items. However, you will be unable to perform a lookup on the Item Number because it has been removed from the Item Master table. If you want to print a report or inquire on the discontinued Item, you must include the item within the Item Number range. 55 Note If you select this option, you will remove the discontinued items. Additionally, you will remove all inventory history for the items. You will be unable to drill back on the inventory history for these items. j. Remove sold receipts If you click to select the Sold Receipts check box, all sold receipts whose quantity received amounts and quantity sold amounts are equal will be removed. This is an optional step, and it may not be a procedure that is performed every year-end. These values may help when items are returned through Invoicing. Therefore, you may not want to remove the purchase receipts from the file. In Microsoft Dynamics GP, remove: Sold Receipts and Cost Change History Prior To. Click to select the Sold Receipts and Cost Change History Prior To check box to remove all sold purchase receipts and historical cost changes for items that use Average Perpetual, Last In, First Out (LIFO) Perpetual, or the First In, First Out (FIFO) Periodic valuation method, and then you enter a date. The sold receipts, quantity sold details, and historical cost changes with dates that come before the date that you entered will be removed. k. Remove sold lot attributes If you click to select the Sold Lot Attributes check box, values for completely sold lot numbers will be removed. For example, you can remove the value red for the lot attribute Color if you have sold all lot numbered items that have been assigned the value red. l. Update an item's standard cost If you click to select the Item's Standard Cost check box, the Standard Cost for any items that have been assigned the FIFO periodic valuation method or the LIFO periodic valuation method will be adjusted automatically to reflect each item's current cost or the amount you most recently paid for the item. If you are registered for the Manufacturing module, you will be unable to select the Item's Standard Cost check box. For more information, click the following article number to view the article in the Microsoft Knowledge Base: 930998 Error message when you perform the "Inventory Year-end Closing" routine in Microsoft Dynamics GP: "Update standard costs in the Standard Cost Rollup window" When you have selected all the options that you want, click Process to start the year-end closing process. When the year is being closed, you will be unable to post, reconcile quantities, change valuation methods, or change decimal places for items. 7. Close the fiscal periods for the Inventory series (optional). You can use the Fiscal Periods Setup window to close fiscal periods that are still open for the year. To open the Fiscal Periods Setup window, follow this step: 56 a. In Microsoft Dynamics GP, point to Tools on the Microsoft Dynamics GP menu, point to Setup, point to Company, and then click Fiscal Periods. This keeps transactions from accidentally being posted to the wrong period or year. Make sure that you have posted all transactions for the period and year for all modules before closing fiscal periods. If you later have to post transactions to a fiscal period you have already closed, you must return to the Fiscal Periods Setup window to reopen the period before you can post the transaction. 8. Make a final backup. Make a final backup of the company data files and keep it in safe, permanent storage. This gives you a permanent record of the company's financial position at the time that you closed the year. INVENTORY Y EAR-END CLOSING TIPS The year-end close must be done before any transactions for the new year have been posted. You have the option to select the Discontinued Items check box, the Sold Receipts check box, or the Sold Lot Attributes check box. If you select these check boxes, all items, sold receipts, and sold lot attributes that have a zero balance will be removed during the year-end closing process. If you select the Update Item's Standard Cost check box, the standard cost for any items that have been assigned the FIFO periodic valuation method or the LIFO periodic valuation method will be adjusted automatically to reflect each item's current cost. The current cost is the amount that you most recently paid for the Item. There is no Year End Closing report for Inventory. INVENTORY Y EAR- END FAQ Q1: How is the average cost of an item updated throughout the year and during the yearend closing process when you use the Average Perpetual valuation method? A1: If you are using the Average Perpetual valuation method, all receipts for each item will be averaged to determine the average cost. The year-end closing process does not change the average cost. However, it will remove the purchase receipts that have been completely sold. The next time that a receipt is entered, the average cost will be revalued with the receipts that remain in the Inventory Purchase Receipts file. Note In Microsoft Dynamics GP 9.0, enhancements were made to the calculation of the average cost. For more information about the calculation of average costs, click the following article number to view the article in the Microsoft Knowledge Base: 923960 - Enhancements made to the calculation of average cost in Microsoft Dynamics GP 9.0 57 Q2: Can the Inventory Year-End Closing window be used throughout the year to update the standard cost of items if you use the Periodic valuation method? A2: We do not recommend this because the Beginning Quantity field is updated during the yearend closing process. This would make that field incorrect on reports such as the Turnover report. In addition, all summary sales history information would be incorrectly moved to the following year. Q3: What is the effect of doing a late inventory year-end close in Great Plains? A3: Year-end closing for this module is optional. In summary, the fields that are updated during year-end closing are mainly used in reports for quantity summaries. If these fields are not important, you may decide not to run year-end closing. The inventory year-end close moves the summary history information from the current year to last year (as seen under Cards/Inventory/History), and zeroes out the current year information. We recommended that you close the inventory module before you post sales and purchase transactions in the new year because, if you do this, the item's history numbers will not be accurate (as seen under Cards/Inventory/History.) Also, the Inventory Turnover Report may not be accurate, because the item's beginning quantities for the year will not be accurate. To illustrate, say you sold 100 items in 2014. Then, you sold 10 additional items in 2015. You posted these 2015 inventory transactions. Before doing 2014 year-end close for inventory, you will have a quantity sold of 110 in 2015. After the 2014 year end close, you will have a value of 0 instead of 10 for your 2015 (Current Year) Sales Quantity and 110 for your 2014 (Last Year) Sales Quantity. The summary windows in inventory with the specific views of calendar or fiscal year are datesensitive. The inventory year end close process is not date-sensitive. APPLIES TO Microsoft Dynamics GP 2013 Microsoft Dynamics GP 2010 Microsoft Dynamics GP 10.0, when used with: Inventory Control Keywords: kbhowto kbinfo kbexpertiseinter kbexpertisebeginner kbmbsmigrate KB872713 58 Article ID: 960356 - Last Review: October 27, 2014 - Revision: 21.0 INTRODUCTION There is not a 'separate' year-end close procedure for Analytical Accounting. Balance Brought Forward (BBF) entries are created for AA dimensions automatically as part of the GL year-end close process, if you have the AA dimensions setup to have a BBF entry created. The steps in this article will assist to check your data prior to doing the GL year-end close process to check for AA data that may cause errors during the GL year-end close process. This article will also show you how to set up the AA dimensions to have a Balance Brought Forward entry created in the new year per dimension, if desired. Steps are also given on how to move historical data to history, which will resolve the error message below that may be experienced during the GL year-end close process: (See step 3 to resolve this message.) You must run the consolidate transactions and transfer detail to history utility for closed years to recreate the Analytical Accounting Balances Brought Forward. MORE INFORMATION When the year-end close process is run for General Ledger in Microsoft Dynamics GP, it automatically moves the Analytical Accounting transactions from the AAG30000 historical tables to the AAG40000 series tables. (There is no separate closing procedure that must be run in Analytical Accounting.) You may select which dimensions that you want to be consolidated during the year-end process. In Analytical Accounting, Balance Brought Forward entries are created in the AAG30000 tables for those dimensions that were marked to be included in the year-end process, and then the detail is moved to the AAG40000 series tables. Note If you are using FRx reporting, you should be on FRx 6.7 SP12 (version 6.7.12008) or higher. If your FRx version is lower than 6.7.12008, then you must first apply hotfix 962862 in order for Microsoft FRx to be able to read Analytical Accounting historical data in the AAG40000 series tables. 59 RESOLUTION STEP 1: DETERMINE IF FINANCIAL REPORTS USE AA TABLES: Before you close GL or do any steps in this article, run your Financial reports that you normally run to balance to the GL Trial Balance. Based on what you found, follow the appropriate method: -METHOD 1 - IF CORRECT: If your Financial reports are correct and match GL, then you may proceed with steps 2-8 in this article, which still must be completed so you do not get any AA errors during the GL year end close process. Note: If you use a reporting system that only reads directly from GL tables (such as the Legacy provider in Management Reporter when reading from a GL company or other reporting tool)] for your Financial Reports, then you may continue on to Step 2 since AA data does not affect your Financial reporting. -METHOD 2 - IF NOT CORRECT: However, if your Financial reports are not correct, it is mostly likely due to the AA tables being used and the AA data does not match GL data. To verify the AA data, you must first run through the SQL scripts provided in KB 2910626 in addition to the rest of the steps in this article. Note: Data Mart in Management Reporter reads from AA (and GL) tables, or the Legacy provider used with Management Reporter may read from an AA company. Steps for Method 2: a.) First, run all the scripts in KB 2910626 to verify AA data with GL data. Financial Reports from Management Reporter do not match the General Ledger Trial Balance Reports in Microsoft Dynamics GP http://support.microsoft.com/kb/2910626 b.) When you have completed the steps in KB 2910626, then return back to this KB and continue on with the rest of the steps listed below. (Note that step 2 and step 4 are also in KB 2910626, but we recommend to double-check this again, as they should not return any results if you already fixed this data.) STEP 2: VERIFY AA DATA FOR OVERLAPPING YEARS Run these scripts to make sure you do not have overlapping years in the AAG30000 Open table with the AAG40000 historical table. Each distinct year should only exist in one table or the other, but not both. select distinct(YEAR1) from AAG30000 select distinct(YEAR1) from AAG40000 -If you find overlapping years in both tables, then it is recommended to open a support incident for assistance. The support case is chargeable since this issue is usually created due to importing records. Please note that if data-fixing is needed, this may need to be referred to consulting, which would be a billable expense to you. 60 STEP 3: VERIFY THE YEARS BETWEEN OPEN/HISTORICAL TABLES MATCH BETWEEN AA/GL: Next, make sure the years are in the AA tables are in the same open or closed years as your GL tables. The AAG30000 and GL20000 open tables should have the same years. And the AAG40000 and GL30000 historical tables should contain the same closed years. select distinct(YEAR1) from AAG30000 select distinct(OPENYEAR) from GL20000 select distinct(YEAR1)from AAG40000 order by YEAR1 select distinct(HSTYEAR) from GL30000 order by HSTYEAR -If you find years in the AAG30000 open table PRIOR to the year you are closing, you must also do STEPS TO MOVE DATA TO HISTORY below as well to move the historical year data to history. The AAG30000 table should only have data for the years that are currently open years in GL.If you attempt to close the year in GL, you will be prompted with this message: You must run the consolidate transactions and transfer detail to history utility for closed years to recreate the Analytical Accounting Balances Brought Forward. So use the scripts above to determine if you need to run the STEPS TO MOVE DATA TO HISTORY, so you can prevent the message above from happening durng the GL year-end close process. STEPS TO MOVE DATA TO HISTORY: The first time you close GL on a version higher than GP 10.0 SP2 or higher (with AA activated), you will be prompted to move AA data to history before the system will allow you to close the GL year. The system will verify that the AA data is in the corresponding open/historical series of AA tables, as the GL data sits in the open/historical tables in GL. If this is not the case, you will receive a message to run the Move to History Utility for AA before you can proceed with the GL Year End close. Remember, if you have not closed your GL year (with AA activated) after installing a service pack later than SP2 for version 10.0, or upgrading to GP 2010, you may receive a message stating "You must consolidate transactions and transfer detail to history utility to close the year". Code was added to the closing process that will compare the years in the AA open tables against the historical years in the Company Fiscal Period Setup. If there is AA data in the AAG3000X series of tables for a historical year, you will receive the error. Follow these steps to consolidate those years: 1.) On the Microsoft Dynamics GP menu, point to Tools, point to Utilities, point to Financial, point to Analytical Accounting, and then click Move Data to History. 2.) The oldest year will default in that the system found in the open AAG3000x tables. You will only be able to move one year at a time. 61 3.) Select the appropriate option: Transfer transaction detail to history – This option will move the AA detail records from open to history tables and no BBF entries will be created. You must ensure there are no BBF entries in the AA tables otherwise you will not be able to select this option. This option just moves the records from the AAG30000 tables to the AAG40000 tables. Consolidate transactions and transfer detail to history – This option will move the AA detail records from open to history tables, and create BBF entries. However, you must have the options mentioned previously selected in order for BBF entries to be created. This option will consolidate the balances of all the transaction dimension codes in the closed year (that are marked to be consolidated) and transfer the AA information to the history tables. Note: The consolidated balances are brought forward to the new year. BBF entries are created from the closed years. Print transfer preview report only – This will allow you to view the transactions that will be moved without actually moving the data. The preview report displays the consolidations that will be made. Note: This option does not change data. 4.) Click OK. 5.) Repeat this process for each 'historical' year. (Where the year is in the AAG30000 open table but in the GL30000 history table. The year needs to be moved to the AA history table to match.) Note: If you rerun the distinct year scripts in 'STEP 3' above again, you should get the distinct years to match between open AA and GL tables, and historical AA and GL tables. STEP 4: CHECK AA TABLES FOR OVERLAPPING HEADER ID'S Run this script against the company database see if the same header ID's also exist between the tables: select * from AAG30000 where aaGLHdrId in (select aagLHDrId from AAG40000) - If you find duplicate header ID's both tables, then it is recommended to open a support incident for assistance. The support case is chargeable. Please note that if data-fixing is needed, this may need to be referred to consulting, which would be a billable expense to you. This would happen if you restored an older Dynamics database over the top of the current Dynamics database, and so the next available numbers stored in the AAG00102 table in the Dynamics database are set back. GP continues to increment from these values, even though they may already have been used and would result in the same aaGLHdrID value getting used for different YEAR1 values. STEP 5: UPDATE AACOPYSTATUS VALUES Next check for an incorrect aacopystatus value in the AAG40001 table. Run this script: select count(*) from AAG40001 where aaCopyStatus<>8 62 If the script above returns results you will want to update the aaCopyStatus to '8' before running the GL Year Close: (The value of '8' is a value that the year-end close process will accept.) update AAG40001 set aaCopyStatus=8 STEP 6: REVIEW SETUP FOR DIMENSIONS TO BE INCLUDED IN YEAR-END Verify that you marked the AA dimensions that you want to be included in the year-end close so that AA codes are linked to the Balance Brought Forward journal entries. If you have not closed General Ledger yet, follow these steps to make sure the dimension is marked correctly to be included in the close process: 1. Mark the setup option to include Analytical Accounting in the year-end close as follows: a. On the Microsoft Dynamics GP menu, point to Tools, point to Setup, point to Company, point to Analytical Accounting, and then click Options. b. Click to select the Include in Year End Close check box, and then click OK. Note This option is just to enable the functionality to create Balance Brought Forward entries on the dimensions. The Analytical Accounting data will still move to the AAG40000 series tables when General Ledger is closed regardless of whether this option is marked. 2. Individually mark the dimensions to be included in year-end as follows: . On the Cards menu, point to Financial, point to Analytical Accounting, and then click Transaction Dimension. a. In the Trx Dimension list, click the dimension that you want to include in the year-end close process. b. In the Year End Close area, click to select the Include in Year End Close check box, and then click Save. c. Repeat steps b and c for each dimension that you want to include in the yearend close process. STEP 7 - RUN GL YEAR-END CLOSE PROCESS to move AA balances and create BBF's Always make a current backup before starting the GL year-end close process. It is recommended to test running the GL year-end close in a test company first to ensure you do not get any errors. The GL Year-end close process is what actually creates the balance brought forward journal entries (BBF's) and moves the records for the year that you are closing in both General Ledger and Analytical Accounting tables. BBF entries are created in both GL and AA tables. Refer to the process outlined in KB 888003 for year-end closing procedures for General Ledger. For more information, click the following article number to view the article in the Microsoft Knowledge Base: 888003 - Year-End Closing procedures for General Ledger in Microsoft Dynamics GP 63 STEP 8 - VERIFY BALANCE SHEET REPORTS It is recommended to compare the Balance Sheet report in Management Reporter to the General Ledger Trial Balance report from Microsoft Dynamics GP, to verify that the account balances brought forward to the new year are correct. If these balances do not match, restore to your backup and contact Microsoft Dynamics GP Support to open a support incident for additional assistance. APPLIES TO Microsoft Dynamics GP 2013 Microsoft Dynamics GP 2010 Microsoft Dynamics GP 10.0, when used with: Analytical Accounting Keywords: kbsurveynew kbexpertiseinter kbhowto kbinfo kbmbsmigrate kbexpertisebeginner KB960356 64