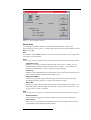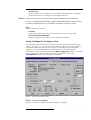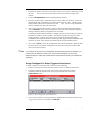
1
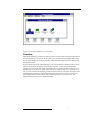
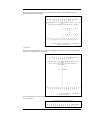
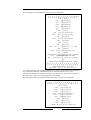
Phoenix Technologies, Ltd. PhoenixCard Manager™ User's Manual Version 4.0.2 Click here to content page and choose the ones you want. Proprietary Information Information specific to the design contained in this document is proprietary to Phoenix Technologies, Ltd. It is against the law to copy software on any medium except as specifically allowed in the license or nondisclosure agreement. Copyright 1994-1996 Phoenix Technologies, LTD. All rights reserved. This document may not be copied, reproduced, transmitted, electronically or mechanically, stored in a retrieval system, or translated into any computer language in any form or by any means without the prior written permission of Phoenix Technologies, Ltd., 135 Technology Drive, CA, 92618 Disclaimers Phoenix Technologies Ltd., makes no representations or warranties with respect to the design and documentation described in this manual. Phoenix Technologies Ltd., especially disclaims any implied warranties of merchant ability or fitness for any particular purpose. Further, this design and documentation is subject to change without notice. ((Additional Phoenix Technologies, Ltd. documentation can be found in electronic form at www.phoenix.com\pcmcia\pcmcia\html.)) Trademarks Phoenix, PhoenixCard Manager, Phoenix CardAgent, and Phoenix EPD are trademarks of Phoenix Technologies, Ltd. Novell is a trademark of Novell, Inc. Microsoft, MS, MS-DOS, Microsoft Flash File System I and II, and Windows are registered trademarks of Microsoft Corporation. Intel, Intel Series I And II Flash Cards are registered trademarks of Intel Corporation. IBM is a registered trademark of the International Business Machines Corporation. Document Number: PCM4.0.2.02.10.97 Next Contents Introduction 5 Quick Reference ...................................................................................................................5 Installation ...........................................................................................................................6 Overview..............................................................................................................................8 Features..............................................................................................................................11 Configuring PC Cards 13 CardAgent Utility...............................................................................................................13 Menu Items...........................................................................................................14 Using CardAgent To Configure Cards ..................................................................15 Before You Use CardAgent ............................................................................15 Shortcut to Configuring a Card with CardAgent ............................................16 Editing a PC Card Configuration ...................................................................16 Using CardAgent For Event Triggered Associations .............................................17 Using Diagnostics.................................................................................................19 Using The Event Log ............................................................................................20 Customizing The Event Log .................................................................................21 PhoenixCard Manager Setup ..............................................................................................21 Menu Items...........................................................................................................22 Using PCM DOS Utilities 27 PCMFDISK........................................................................................................................27 Delete Partition.....................................................................................................28 Create Partition.....................................................................................................29 Geometry ..............................................................................................................30 Save......................................................................................................................31 Exit 32 Help......................................................................................................................32 PCM.EXE ..........................................................................................................................32 Before You Use PCM.EXE ...................................................................................32 When to Use PCM.EXE........................................................................................32 3 Using PCM.EXE .................................................................................................. 33 Menu Items .......................................................................................................... 33 Index 47 4 Introduction Quick Reference To install PhoenixCard Manager, insert Installation Disk number 1 into your 3.5” drive, and from Windows Program Manager, select File, Run (Alt-F, R) and type a:install (if A: is the letter of your 3.5-inch floppy drive. Otherwise, substitute the appropriate drive letter.) in the Command Line field. Simply follow the subsequent instructions to complete the installation. For your convenience, the tables below will direct you to the section in this manual for instruction on how to complete the corresponding task: For Basic information about... Go to page.. Installation 6 How PhoenixCard Manager works 8 Enabling Automatic or Manual Conflict Resolution 13 or 22 The CardAgent utility 13 The Event Log 20 The PCM Setup utility 21 Adding support for functions that you originally did not enable when you first installed PhoenixCard Manager 22 Specifying default communications ports or Flash File System path 23 Next Back to Content 5 For Advanced details about.. Go to page... Configuring a PC Card 13 Editing a card configuration 15 Associating an action or application with a PC Card 17 Generating a report of the Event Log or a CIS dump 19 Customizing the Event Log 21 Specifying a value for IRQ, CIS address, Token Ring Speed, or Card Settling Time 24 Specifying ATA or Flash card values for Base Address, Window Size, Spin Down Time, Number of Partitions, or Number of Erase Queues 25 Setting the partition table for an ATA card 27 Installation Installing PhoenixCard Manager is very easy. Before you start the installation program, make sure your system has the following: • DOS 5.0 (or later version) • Windows 3.1 or Windows for Work Groups 3.11 • At least one PC Card socket • Socket Controller • Hard disk with at least 2.2 MB of free space. • 386 or better processor The installation procedure is self explanatory and simple. If you encounter an error message, can click on the Help button at any time during installation for easy, specific details and instructions. To successfully install and use PhoenixCard Manager, do the following: 1. Start Windows (if you have not already done so). 2. Remove all PC Cards that you may have inserted into any of the sockets in your system. 3. Close all Windows applications, but leave Windows running. 4. Insert the PhoenixCard Manager diskette 1 into your 3.5-inch floppy drive. 5. From Windows Program Manager select File, Run... (Alt-F, R) and enter A:\INSTALL.EXE (if A: is the letter of your 3.5-inch floppy drive. Otherwise, substitute the appropriate drive letter.) 6. Follow the instructions in the windows that the Installation program initially presents to you. 6 Previous Next Back to Content F Note If your system is set up for multiple boot configurations, after you complete the initial steps, the installation program scans your CONFIG.SYS file, displays all possible boot configurations), and highlights the configuration under which your system is currently booted. 7. If the configuration that the Installation program highlights is NOT the configuration in which you want to install PhoenixCard Manager, then you must exit from the installation program and reboot your system under the configuration in which you plan to use PhoenixCard Manager. The system will bring up a Boot Configuration Options screen. The configuration you are currently booted under will selected as the destination. You must be booted under the correct configuration to install PhoenixCard Manager. 8. To successfully install PhoenixCard Manager, either you must manually, or the installation program must automatically, modify your AUTOEXEC.BAT, CONFIG.SYS, PROGRAM.INI, WINDOWS.INI and SYSTEM.INI files. Before modifying these files, the installation program queries whether or not it should directly modify the original files. Allow the installation program to make all the necessary changes directly to your system files. If you choose the Save Changes to Backup File option, the installation program makes the changes to a copy of the file, saves the file by adding a .MOD (modified) extension and leaves the original files intact. After the installation program makes the changes to the backup files, you must incorporate these changes manually into your system files and then reboot your system. F Note The installation program automatically creates sequential backup files with an XXX extension, where XXX is an integer between 000 and 999 epending on how many times the files have been modified with PhoenixCard Manager. These backups of your system files are distinct from the MOD files described above. 9. F Note The installation program displays a window that allows you to select a Typical or Custom installation. If you choose Typical, PhoenixCard Manager will install support for the most commonly used PC Card functions. If you choose Custom, PhoenixCard Manager allows you to specify the additional functions (e.g., ATA and SRAM Flash card support) for which support will be installed. If you want ATA or Flash support to be installed, you must select Custom and check the ATA and/or Flash box. Before you choose the installation type, double check the destination path, shown at the bottom of the window. The Destination Directory is the directory into which you would like to install PhoenixCard Manager. The installation program defaults to C:\PCM4. If this directory is acceptable to you, click on Next with your mouse after you have selected the installation type. If the default directory, C:\PCM4, is not acceptable, click on the Browse... button. After you click on Browse, the installation program displays a window where you can specify the drive and complete path in which to install PhoenixCard Manager. 10. Before the installation program copies files and creates the group window and icons, you have the option of specifying a group folder name, or accepting the default name of PhoenixCard Manager. 11. After you specify the folder name, installation is complete when the installation program copies its files to your hard disk and creates the group window and icons. Previous Next Back to Content 7 Figure 1. PhoenixCard Manager group window. Overview PhoenixCard Manager provides you with the tools you need to take advantage of the latest in PC Card technology. In order to use PC Cards, your system must be equipped with at least one PC Card socket and a Socket Controller, which interfaces between the host system and the actual PC Card. On the software side of PC Card technology, your system must have Socket Services, which intializes and enables the features of the socket controller. In the case of PhoenixCard Manager, the Socket Services driver is PCMSS.EXE. Of equal importance in the PC Card specification is Card Services, which is the sole client of Socket Services. Card Sevices, in turn, provides a means for managing system resources (memory, interrupts, I/O ranges) and communicating with drivers that configure the actual PC Card in a socket. These drivers that configure the PC Cards register with, and become clients of, Card Services. The Phoenix Card Services driver is PCMCS95.EXE. 8 Previous Next Back to Content Storage Devices Flash SRAM I/O Devices ATA FAX Modem SCSI PC Card Functions LAN Drivers Card Services PCM PM Socket Services Hardware CPU Logic Level Figure 2. Basic PC Card Architecture The table below shows the PC Card function, the required driver for configuring the card, and whether PhoenixCard Manager will automatically configure that card. PC Card function Driver Used For Configuring Automatically Configured By PCM? ATA drive Phoenix PCMATA.SYS Yes, if ATA software is installed Flash Memory SRAM Phoenix PCMFFCS.EXE and Phoenix PCMMTD.EXE Yes, if Flash software is installed FAX/MODEM Phoenix PCMSCD.EXE Yes LAN * ** SCSI * ** SOUND * ** VIDEO * ** * Drivers are usually provided by card vendor. Some card vendors do not provide this software to configure the card you may have to use Super Client Driver PCMSCD.EXE. ** These are usually not but can be added for SCD (e.g., Linksys). F Note An exception in the case of LAN cards is the LINKSYS card, which should be configured by Phoenix Super Client Driver PCMSCD.EXE. In the case of ATA, FLASH, SRAM, and FAX/MODEM cards (if the drivers are installed), PhoenixCard Manager automatically configures them and all you have to do is insert them into a socket on your system in order to use them. However, FAX/MODEM and ATA cards may require application software. Previous Next Back to Content 9 The heart of PhoenixCard Manager is the Event Processor Daemon (EPD), a technological breakthrough that automatically loads when you start windows and runs in the background along with your other Windows applications. The EPD monitors all events related to the PC Card sockets in your system, such as card insertions/extractions, card configuration success/failures, card event-action associations, and programs launched. EPD records these events in the Event Log, which you can easily access, review and print (if needed). Keep in mind that EPD does not have a User Interface, and does not interact with you, the user. Instead, you will interact with the Windows-based CardAgent utility to review information, diagnose errors, configure cards, and associate applications with cards and events. For PC Cards configured by PhoenixCard Manager Card Services, client (ATA, Flash, SRAM, and FAX/Modem), PhoenixCard Manager can automatically detect and resolve resource conflicts during card configuration. If you choose the automatic option, CardAgent does all the work for you. PhoenixCard Manager also provides you the option of resolving resource conflicts manually. If you select the manual option, PhoenixCard Manager launches the CardAgent interface when you insert a card that it is unable to use due to resource conflicts. You should need to use CardAgent to configure cards only in the rarest of cases. Additionally, PhoenixCard Manager includes a number of utilities, such as: • F Note DEINSTAL.EXE A DOS-based deinstallation utility that removes any previously installed PCMCIA software. PhoenixCard Manager cannot be installed while other PCMCIA software is still loaded in the current configuration on the system. For details about deinstallation, see Appendix A on page 36. • PCM.EXE This utility enables users who do not have Windows running on their system to review allocated resources and to configure cards. This is strictly a DOS-based utility which you cannot execute in a DOS window from MS-Windows. If Windows is running on your system, you should use CardAgent. • PCM Setup Enables you to add options and features that you originally did not select when you first installed PhoenixCard Manager. In previous versions of PhoenixCard Manager, this setup utility was strictly DOS-based. Now, with PCM 4.0, the Setup utility must be used in Windows. The Install Program automatically installs an icon for PCM Setup in the PhoenixCard Manager group window. • PCMFDISK.EXE A DOS only utility used for managing, creating, or deleting partitions on ATA cards. • PCMRMAN.EXE A DOS-based utility that allows you to review and allocate resources, such as IRQ, I/O ranges, Memory ranges, and DMA channels. PCMRMAN also displays the voltage setting. The PCM Install Program automatically installs an icon for PCMRMAN.EXE in the PhoenixCard Manager group window. 10 Previous Next Back to Content Features PhoenixCard Manager offers the following: • PC Card 16 Compliance • Additional host silicon support • Enhanced Windows-based Setup and Installation • Direct Memory Access support • Mixed Voltage (5.0v and 3.3v Vcc) support • Multi-function card support • Input/Output range increased to 16 bits • Enhanced Power Management, including Intel/Microsoft Management (APM) 1.1. • Support for DOS 6.x Multiple Boot Option. • Support for Microsoft • Information and configuration utilities for managing PC Cards in both DOS and Microsoft Windows. • Supports wide range of PC Cards, including Zoom Video, Flash Memory, SRAM, Network/LAN, Fax/Modem, ATA hard disks, SCSI, and other I/O Cards. • Very Small Memory Footprint. Bundled with Novell DPMS.EXE utility, PhoenixCard Manager loads its drivers into Extended Memory (XMS) to maximize the availability of conventional memory (or DOS memory). • Sophisticated real-time Conflict Resolution capabilities that automatically resolve resource conflicts. • Diagnostic capabilities through the Phoenix Event Log. • Notification of PC Card insertions, extractions and configurations under the CardAgent interface. • Event Triggered Associations allow PC Card users to associate specific actions (launch or terminate an application, etc.) with a specified PC Card event (card insertion or removal). Advanced Power Flash File System II (FFSII). Additional User Documentation Additional user documentation is available from www.phoenix.com\pcmcia\pcmcia\html. Previous Next Back to Content 11 12 • Previous Next Back to Content Configuring PC Cards By design, it is best to allow PC Cards to be configured by the drivers that the card manufacturer provides. Therefore, the first task to perform when you want to use a new PC Card is to install the software and the driver that comes with the PC Card. However, PhoenixCard Manager recognizes and dynamically configures FAX/Modem, ATA, SRAM, and FLASH cards (if support is installed). Other PC Card types should be configured by their own drivers. However, when a PC Card fails to configure for any reason, PhoenixCard Manager provides you with the tools to configure a card. While PhoenixCard Manager will display information about all card types, it allows non-Phoenix drivers to take responsiblity and configure their respective PC Cards. F Note If you prefer to use DOS, or if Windows is not operating on your system, you can use Phoenix DOS-based PCM.EXE to review, modify, or create PC Card configurations. See the section, PCM.EXE, in the next chapter, Using PCM DOS Utilities. CardAgent Utility The CardAgent Utility, the main user interface for PhoenixCard Manager, allows you to perform the following tasks: • F Note Create or modify a configuration for a specific PC Card You should not have to use the CardAgent utility to configure cards. However, if all else fails, then you can use CardAgent to configure a PC Card. • Associate an application or action with a specific card or card event • Diagnose the cause of errors you might encounter while attempting to use a PC Card • Review the Event Log generated by the Event Processor Daemon (EPD). • Specify either Automatic or Manual Conflict Resolution Previous Next Back to Content 13 Figure 3. The CardAgent interface. Menu Items The CardAgent interface includes the menu items described below. Note that the descriptions below are very basic. For more details about the menus and commands, click on Help or press F1. File File includes only the Exit command. You can activate File, and then exit, by using either your mouse or your keyboard. View Click on View with your mouse to activate the drop-down menu that includes these options: Client Driver List Displays a list of Drivers that have registered with Card Services. Further, you can obtain detailed information about each of the drivers in the list. Such information is useful for troubleshooting, or when contacting Technical Support. Event Log Displays a time-stamped history of events that have been saved to the PCM.LOG by the Event Processor Daemon (EPD) and CardAgent (AGT). Diagnostics Menu Enables you to generate separate text file reports of the Event Log and of the Card Information Structure (CIS) for a specific card inserted in a socket. Status Bar Removes or displays the Status Bar at the bottom of the CardAgent main window. The Status Bar displays short messages such as Ready, Card Extraction or Insertion, Card Configured Successfully, and others. Edit Click on Edit with your mouse to activate the drop-down menu that includes these options: All Associations Shows all Event-Triggered associations that have been saved to the PCM.INI file. Associations Shows only those associations corresponding to a PC Card inserted in the socket that you highlight from the CardAgent main window. 14 • Previous Next Back to Content PC Card List This list includes PC Cards that have been recorded in the PCM.INI file. CardAgent will use Phoenix drivers to configure a card included in this list. !Caution If a PC Card comes with its own driver and software, DO NOT add this card to the list. Further, since CardAgent automatically configures FAX/MODEM, SRAM, FLASH, and ATA (is support is installed) cards, it is not necessary to add these card types to the list. Help The Help menu has two options Contents Shows a list of topics, tasks and menu items about which you can receive help. About PhoenixCard Manager Displays a copyright notice and the version number of CardAgent. Using CardAgent To Configure Cards The installation program installs the CardAgent icon in the PhoenixCard Manager group window. (See Figure 1.) You can execute CardAgent by clicking on the icon. However, if the Manual Conflict Resolution option (see Figure 2) is enabled, and you subsequently attempt to use an unconfigured PC Card for the first time, PhoenixCard Manager automatically executes CardAgent and opens the Edit Configuration window. If you have used a card previously and you need to add or edit a configuration, click on the Configurations button in the CardAgent main window. Figure 4. Edit Configuration window Before You Use CardAgent Before you attempt to configure a card with CardAgent, remember: Previous Next Back to Content 15 • CardAgent will automatically configure FAX/Modem, ATA, SRAM, and FLASH cards (if support is installed). • For PC Cards other than those mentioned above, you should use the PC Card manufacturer driver. Follow the instructions provided by the manufacturer to install the respective driver. To make certain that a PC Card is configured by its driver, you must first load the driver and then insert the PC Card into one of the sockets in your system. CardAgent will show this card as configured. However, if you do not run CardAgent, you should hear two beeps when you insert the card indicating that the card has been successfully configured. F Note When a PC Card has been configured by its own driver, and you want to view its configuration values, you can use the Phoenix DOS utility PCM.EXE or the Windows utility. CardAgent. Shortcut to Configuring a Card with CardAgent If you cannot use a PC Card because CardAgent could not configure it due to unresolved resource conflicts, you may be able to solve the problem as follows: 1. From the CardAgent main window, click on the button that corresponds to the socket in which the PC Card in question is inserted. 2. Click on Configurations to open the Edit Configurations window. 3. CardAgent indicates that the PC Card is not configured, and displays the values of the first configuration as predefined by the PC Card manufacturer in the Card Information structure (CIS). CardAgent also shows the total number of configurations defined in the CIS. 4. Click on the Next>> button to display the values of the next predefined configuration in the CIS. Under certain conditions, some of the fields may not show a value; In which case, you must supply values for those empty fields. Failure to do so will result in an error. 5. Click on Validate. If the PC Card is configured successfully, CardAgent will display a message to indicate a successful configuration and you should be able to use the PC Card. If CardAgent does not configure the PC Card, repeat steps 4 and 5 until you have attempted to configure the PC Card using all of the predefined configurations. If CardAgent still cannot configure the card, you will need to create a new configuration by modifying some or all of the configuration values (see following section) and then saving the new configuration. Editing a PC Card Configuration The Edit Configuration window allows you to view values for the Configuration Registers and Voltage, and to assign values for the following: • I/O Window • IRQ • Memory Window • DMA To edit a PC Card Configuration, do the following: 16 • Previous Next Back to Content F Note 1. Insert the PC Card in question into one of the sockets in your system. Make sure you see the card icon on one of the socket buttons at the top of the Edit Configuration window 2. Click on Configurations from the CardAgent main window. 3. Enter the required values. Some cards require specific values for resources. Check the documentation that accompanies your card to determine those values. CardAgent may display default values that it reads from the card CIS. You can accept the defaults and try to validate the card with those values. 4. After you have entered the necessary values (or have accepted the displayed defaults), click on Validate. If the current configuration values are valid, CardAgent displays a message indicating that the configuration was successful. If CardAgent reports that the attempt to configure the card is unsuccessful, the cause for the failure is usually a resource conflict. You will have to take extra steps to resolve resource conflicts. Among those extra steps is running the Phoenix DOS utiltity PCMRMAN.EXE (Refer to Phoenix Technologies Web page at WWW.PHOENIX.COM and click on the PC Card link for more details about using PCM DOS Utilities. 5. Next, click on Save to write the configuration data to the PCM.INI file. When the data has been written to PCM.INI, CardAgent closes the Edit Configuration window and returns to the main window. If you change the resources for a FAX/Modem card (particularly IRQ and I/O address), you must also go into Windows Control Panel, open the Ports dialog box, and check the advanced settings to make sure the IRQ and I/O values match those that you specified with CardAgent. Using CardAgent For Event Triggered Associations To setup or modify an association with a PC Card do the following: 1. Insert into a socket the card for which you want to create or modify an association. 2. From the CardAgent main window, click on the socket and function number combination that corresponds to the card you just inserted, then click on the Associations button. Figure 5. Event Triggered Assosciations List 3. If you want to modify an existing association, highlight that association from the Event Triggered Associations list and click on Edit Info. Previous Next Back to Content 17 4. If you want to create a new association, click on New. Figure 6. Associations window 5. To choose the associated Event, click on the down arrow to the right of the Event field and highlight the any of the following events in the subsequent pull down menu: Card Insertion Card Insertion Failure Card Extraction Power Management Resume Power Management Suspend Time Triggered F Note If you specify Time Triggered as the event, the only available action is Launching a Program. 6. For the associated Action, click on the down arrow to the right of the Action field and highlight the appropriate action in the subsequent pull down menu. These are the actions that you can choose: Launch A Program Terminate A Program Display A Message Box Send A Windows Message F Note 7. After you select the action and provide the required information for the subsequent fields that correspond to the selected action, make sure the Association Enabled box is checked, and then click on Save. Or, if you decide not to complete this association, click on Cancel. 8. When you click on Save or Cancel, CardAgent returns to the Event Triggered Associations list window. To complete the association, click on OK, after which CardAgent writes the new association to the PCM.INI file and returns to the CardAgent main window. You can delete an association by selecting one from the Event Triggered Associations list, clicking on Edit Info, and then clicking on Delete. (See Figures 5 and 6). 18 • Previous Next Back to Content Using Diagnostics CardAgent provides you with a number of tools to diagnose the cause of any errors you may encounter. Some of these tools are for reference, should you need to contact Technical Support personnel. Figure 7. Diagnostics dialog box When you click on Diagnostics from the main window, CardAgent displays a dialog box in which you can select the following options for generating reports to review or print: Report of Log - When you select this option, CardAgent generates a summary of the Event Log, and saves that report as REPORT.TXT in the directory into which you installed PhoenixCard Manager (usually this directory is C:\PCM4\PROGRAM). CIS Dump of Socket (0 or 1) - You can enable a CIS dump of the first two sockets (designated as 0 and 1, respectively) on your system. When you select this option, CardAgent generates a text file of the CIS of the PC Card that is inserted in the corresponding socket, and saves that file as CSDUMP.TXT in the directory into which you installed PhoenixCard Manager. F Note CardAgent can only generate one CIS dump. Therefore, if you want to generate CIS files for both Socket 0 and Socket 1, you must first generate the file for Socket 0 and then rename the file. Otherwise, when you want to generate the file for Socket 1, CardAgent will overwrite the file generated for Socket 1, as it uses the same file name CSDUMP.TXT. Of equal importance: If you want to generate a CIS dump for a socket number greater than 1 (i.e., you have more that two sockets in your system), then you must go to the DOS prompt and run CISDUMP directly. Previous Next Back to Content 19 Using The Event Log Clicking on the Event Log button in the CardAgent main window opens the Event Log Viewer window. The Event Log contains information about all events related to the PC Card sockets in your system, including card insertions/extractions, card configuration success/failures, card event-action associations, and programs launched. Figure 8. Event Log Viewer The Event Log displays the last page of events, all of which are time-stamped and listed in chronological order, with the latest message highlighted. You can scroll up to view earlier messages. A three-letter acronym indicates the origin of each message as follows: AGT - CardAgent EPD - Event Processor Daemon STP - PCM Setup INS - Install Program CardAgent saves the Event Log as a text file, PCM.LOG, in the directory into which you installed PhoenixCard Manager (usually this directory is C:\PCM4\PROGRAM). You should refer to the Event Log (or to the printed copy PCM.LOG) for troubleshooting purposes, particularly when you contact Technical Support. Because the Event Log viewer has a display limit of 64Kb worth of characters, you should delete PCM.LOG when it size exceeds that limit. When PCM.LOG exceeds 64Kb in size, you will not be able to scroll to up to view earlier messages beyond 64Kb. You should also note the FROM and TO fields at the top of the Event Log viewer, which indicate the time span of the messages currently displayed. Although PCM.LOG may contain may more messages, the Event Log view displays only those messages within the indicated time span. As you scroll upwards, the FROM field will go back in time. As the Event Log receives real-time messages from card insertions, extractions, and other events, the TO field will go forward in time. The Clear List button is useful if you want to see messages displayed as they occur, that is in real time. You can turn off (or turn back on) the Real Time Message feature by clicking on the Real Time Message checkbox. The checkbox will be empty (¨) when real time is disabled. Turning off Real Time Messages is useful when you are reviewing older messages because, if Real Time Messages is enabled, CardAgent will automatically scroll down to the latest message when an event occurs. When you have finished reviewing the Event Log, click on OK to return to the CardAgent main window. 20 • Previous Next Back to Content Customizing The Event Log You can customize the type of information CardAgent displays in the Event Log. To do so, complete the following steps: 1. Click on the Event Log button in the Card Agent main window. 2. Click on the Settings button in the Event Log Viewer window. Figure 9. Event Log Message Filter Dialogue Box 3. F Note After CardAgent displays the Event Log Message Filter dialogue box, click on the appropriate options to exclude the corresponding messages from the Event Log. If you click on All Off, then none of the filters are enabled and all events, actions, and messages will be displayed in the Event Log. Only those switches that you enable will filter the corresponding event/action/message and prevent them from being displayed in the Event Log. F Note 4. Click on OK. 5. After the Event Log Message Filter dialogue box closes, click on the Filter check box in the Event Log Viewer window. The corresponding event/action/messages that you specified will be instantaneously excluded from the Event Log. The filter only takes out the relevant messages from the Event Log viewer, but does not exclude them from the PCM.LOG file. The filter settings remain in effect only for duration of time that you use the Event Log viewer. When you exit the viewer and re-enter at a later time, Event Log reverts to the default setting of having all filter turned off. PhoenixCard Manager Setup PCM Setup is a utility that enables you to: • Select PC Card options that you did not originally select when you first installed PhoenixCard Manager. • Configure your system to optimize its performance • Customize the PhoenixCard Manager software to maximize its functionality Previous Next Back to Content 21 To start PCM Setup, click on the PCM Setup For Windows icon in the PhoenixCard Manager group window from Windows Program Manager. Menu Items The PCM Setup interface includes the menu items described below. Note that the descriptions are very basic. For more details about the menus and selections, press the F1 key. Options The Options menu allows you to make selections that you did not originally specify when you first installed PhoenixCard Manager. When you execute PCM Setup, the utility defaults to the Options dialogue box. (You can also activate the Options window with your mouse by clicking on Options or with your keyboard by pressing <Alt> <O>.) Figure 10. PCM Setup Options Window. After you activate Options, you can enable various options for your system by clicking on the appropriate checkbox. When the option is enabled, an X appears in the box (ý). When you disable the option, the box is empty (o). Options gives you specific choices for using PhoenixCard Manager, as follows: PCMCIA Options Flash File Enable this option if you plan to use Flash cards. ATA Devices Enable this option if you plan to use ATA cards. F Note If you use ATA Cards and you did not install ATA support, you must run SETUP after INSTALLATION. Card Selection The Card Selection section allows you to instruct CardAgent to configure a PC Card that you select from this list. Note that when you select a card, CardAgent will use the Phoenix Super Client Driver (PCMSCD.EXE) to configure the card. However, since it is best to allow the manufacturer-supplied driver to configure its own PC Card, in virtually all cases you should not have to use the card selection list. To select a card, use your mouse to click on the name of the card displayed in the Card List window. Resource Conflict Resolution 22 • Previous Next Back to Content On occasion, a card cannot be configured because one or more of its assigned resources (COM port, IRQ, Memory range, etc.) are also allocated to another device. You can resolve resource conflicts in one of the two following options: Automatic When you enable this option, CardAgent automatically reallocates the resources that are in conflict. With automatic conflict resolution, CardAgent does all the work and does not require any input from you, the user. If CardAgent cannot automatically resolve the conflict, the Event Log will indicate that the resolution attempt was unsuccessful. Manual When you enable this option, and if the card is unconfigured, CardAgent automatically opens its Edit Configuration window and prompts you to reallocate resources in order to successfully configure the card. After you have made your selections, you can save your choices and exit from the Options window by clicking on OK. Or, if you decide not to save your choices, you can exit by clicking on Cancel. Defaults The Defaults menu allows you to assign the default Communications port for your FAX/Modem card, and permits you to specify the complete path to the directory that contains your Flash File System (FFS) drivers. To specify a Communications port for your FAX/Modem card, do the following: 1. Activate the Defaults menu by pressing <Alt> <d> on your keyboard, or by clicking on Defaults with your mouse. 2. Press <m> on your keyboard or click on Modem Port. Figure 11. Modem Communications Port Dialogue Box 3. After the Modem Communications Port dialogue box appears, click on the down arrow (ò) with your mouse to open the drop down menu. 4. Select the appropriate Comm Port (1, 2, 3 or 4). Make sure there are no conflicts with other devices on your system that use a Comm Port. 5. Click on DONE when you have specified the default Comm Port, or click on Cancel to exit without saving the Comm Port specification. 6. After you click on DONE, exit from PCM Setup. Be sure to specify Yes to the prompts that PCM Setup presents before exiting. To specify the default path to the Flash File System drivers for your Flash card, do this: 1. Activate the Defaults menu by pressing <Alt> <d> on your keyboard, or by clicking on Defaults with your mouse. 2. Press <f> on your keyboard, or click on Flash Path. Previous Next Back to Content 23 Figure 12. Flash File System Path Dialogue Box 3. After the Flash File System Path dialogue box appears, type in the complete path to the directory that contains the Flash File System drivers for your Flash card. 4. When you have entered the Flash File System path, click on Done, or click on Cancel to exit without saving the FFS path designation. Advanced The Advanced menu contains options that are intended for experienced and advanced computer users. The default settings should suffice for most systems and users. However, there may be occasions when you must change these settings to resolve confilicts. To activate the Advanced Options dialog box, use your mouse to click on Advanced, or press <Alt> <a> on your keyboard. Figure 13. Advanced Options Dialogue Box The Advanced Options dialog box allows you to specify values for the following resources: IRQ IRQ is an acronym for Interrupt ReQuest. When an application requires services (data processing, transferring, etc.) from the CPU (Central Processing Unit, or the rain” of your system), the application generates an interrupt request and passes that request for services to the CPU via one of 16 (numbered 0 to 15) IRQ lines. In the case of Phoenix Card Manager, it is Card Services that processes interrupts generated by card events, such as card insertion/extraction. The default is no IRQs, as Card Services will poll eriodically checking for card status changes. Many of the IRQ lines are reserved for other devices and peripherals such as communication ports, printer ports, video, and other hardware. You have the option of specifying the IRQ, with a value ranging from 0 to 15. Be sure that you do not assign two devices to the same IRQ, or an error will result. CIS Address The Card Information Structure, more commonly known by its acronym CIS, is an area within a PC Card containing data that is required for your system to properly identify and use the card. This option allows you to indicate the specific location in memory for PCM Card Services to access a PC Card CIS. In order to read a PC Card CIS, PCM Card Services must have a 4K window that resides within C800 and EF00. Token Ring Speed If you are using a network-type PC Card with a Token Ring format, you have the option of specifying a transfer speed of either 4-Mbps (megabits per second) or 16-Mbps. Card Settling Time The default value should suffice for most PC Cards. However, if the manufacturer of the card you are using suggests a different value, enter that value here. 24 • Previous Next Back to Content ATA/FFS Options You can optimize your use of ATA and FLASH cards when you specify these values: • Memory Base • Window Size • Spin Down Time • Partitions • Erase Queues When you have finished entering the appropriate values, click on Done, or click on Cancel to exit without saving the values. Help The Help menu offers the following commands: Index Displays the Contents page of PhoenixCard Manager Setup Help. Using Help Provides general instructions on using Help. About Displays the version number of PCM Setup. File File includes only the Exit command. You can activate File, and then exit, by using either your mouse or your keyboard. • Using your mouse, you can exit from PCM Setup by clicking on File, and then clicking on Exit. At that time, PCM Setup will prompt you to confirm that you want to exit, and then will query whether to save the changes you have made. • Using your keyboard, you can exit from PCM Setup by pressing <Alt> <f>, and then pressing <Enter> or <x>. At that time, PCM Setup will prompt you to confirm that you want to exit, and then will query whether to save the changes you have made. Previous Next Back to Content 25 26 • Previous Next Back to Content Using PCM DOS Utilities The installation program loads several additional programs to the PhoenixCard Manager directory (default of which is C:\PCM4\PROGRAM). The table below lists these files and their uses. Each program is explained in detail later in this chapter. File PCM.EXE PCMFDISK.EXE Function DOS-based utility for reviewing, modifying , or creating PC Card configurations. Edits partition table for ATA PC Cards. PCMFDISK PCMFDISK, like the DOS FDISK utility, sets the partition table for ATA rotating disks and solid-state mass-storage PC Cards. N Warning PCMFDISK will destroy all data on the device if new partitions are created. DO NOT use PCMFDISK on SRAM PC Cards formatted for use with PCMATA (the Phoenix ATA-IDE device driver) because PCMATA treats SRAM cards more like floppy disk drives than hard disk drives. PCM Setup enables you to specify the maximum number of partitions to allow on ATA cards. By default, all ATA cards will have the minimum of one partition. Use the PCMFDISK utility to optimize the settings you may have specified in PCM Setup. After inserting the ATA PC Card, run PCMFDISK to set (or reset) the following: • • • Number of partitions Number of drive heads The number of sectors per track. PCMFDISK calculates the resulting drive size. Use PCMFDISK also to adjust partition settings for enhancing the performance of the disk. Consult the documentation Previous Next Back to Content 27 accompanying the ATA PC Card for the optimum configuration. To run PCMFDISK, type the following at the DOS prompt: PCMFDISK <Enter> The initial display comes into view as follows: Save Modify Help Ú Ä Ä Ä Ä Ä Ä Ä Ä Ä Ä Ä Ä Partition and Geometry Ä Ä Ä Ä Ä Ä Ä Ä Ä Ä Ä Ä Ä ¿ ³ ³ ³ Socket Number: 0 ³ ³ ³ ³ Partition System Size Usage Head Cyl Sec Sectors ³ ³ Ä Ä Ä Ä Ä Ä Ä Ä Ä Ä Ä Ä Ä Ä Ä Ä Ä Ä Ä Ä Ä Ä Ä Ä Ä Ä Ä Ä Ä Ä Ä Ä Ä Ä ³ ³ 1 FAT16 10mb 100% 1 0 1 20448 ³ ³ 2 ³ ³ 3 ³ ³ 4 ³ ³ ³ ³ Geometry ³ ³ ³ ³ Heads: 2 Cylinders: 320 Sectors/Track: 32 ³ ³ ³ ³ Total Disk Size: 10 Mbytes (20480 Sectors) ³ ³ ³ ³ ³ À Ä Ä Ä Ä Ä Ä Ä Ä Ä Ä Ä Ä Ä Ä Ä Ä Ä Ä Ä Ä Ä Ä Ä Ä Ä Ä Ä Ä Ä Ä Ä Ä Ä Ä Ä Ù <F1>=Help <Alt>-<Menu Key>=Activate Menu, The Partition and Geometry screen presents information on the current partition(s) existing on an ATA card. This screen provides information on each partition, including: the socket number where the card is located; the system type; the partition size; the amount of the partition currently being used; and the number of heads, cylinders, and sectors used by the partition. Below the partition information, the PCMFDISK utility provides the geometry for the total ATA disk. To access the pull-down menu options (Save, Modify, Help), press <Alt> and the highlighted letter simultaneously. To modify the Partition or Geometry of the installed ATA card, do one of the following: 1. Create a new partition. First, delete existing partitions with Delete Partition, then create new partitions with Create Partitions. 2. Add a new partition to existing partitions. Use Create Partitions to define a new space. This new partition is limited to the size of the disk minus the existing partition size. If the Usage field on the main screen displays 100%, the disk does not have enough free space to add a new partition. 3. Change the default geometry for the ATA disk to optimize access speed and overall performance. Use the Geometry option. Delete Partition 1. Press Alt-M to open this pulldown menu: 28 • Previous Next Back to Content Ú Ä Ä Ä Ä Ä Ä Ä Ä Ä Ä ¿ ³ Create Partition ³ ³ Delete Partition ³ ³ Geometry ³ À Ä Ä Ä Ä Ä Ä Ä Ä Ä Ä Ù 2. Press D or use the down arrow key to select Delete Partition and press <Enter>. PCMFDISK displays the following message: Ú Ä Ä Ä Ä Delete Partition Ä Ä Ä Ä ¿ ³ ³ ³ Partition 1 will be deleted. ³ ³ ³ ³ Press ENTER to confirm ³ ³ or press ESC to abort ³ À Ä Ä Ä Ä Ä Ä Ä Ä Ä Ä Ä Ä Ä Ä Ä Ä Ù If more than one partition exists on the card, PCMFDISK deletes the last partition first. For example, if two partitions exist on the disk, Partition 2 is deleted before Partition 1. 3. F Note Press <Enter> to confirm deletion of the partition, or press <ESC> to abort deletion and return to the main screen. Changes made to the partition table with the Modify option are not committed to the disk until the Write Partition option under Save is selected. Create Partition Use this option to create a partition entry in the first empty partition slot. A maximum of four partition entries are allowed per ATA card. The number of partitions which PCMATA can access depends on how PCMATA is set up. PCMFDISK displays the number of partitions set by PCM Setup when Environment from under the Help menu is selected. Selecting the Quick mode from PCM Setup limits the number of partitions which PCMATA can access to only one. Consequently, no matter how many partitions are created with PCMFDISK, only the first partition may be accessed. However, if access to more than the one partition is required, return to PCM Setup and run the Advanced mode version. The Advanced mode in PCM Setup allows stipulating the number of partitions on any ATA card in a particular socket. This stipulation in the advanced mode of PCM Setup sets the maximum number of partitions that can be accessed. 1. Press Alt-M to open the following pulldown menu: Ú Ä Ä Ä Ä Ä Ä Ä Ä Ä Ä ¿ ³ Create Partition ³ ³ Delete Partition ³ ³ Geometry ³ À Ä Ä Ä Ä Ä Ä Ä Ä Ä Ä Ù 2. Press <C> or <Enter>. PCMFDISK displays the following window: Ú Ä Ä Ä Ä Ä Ä Ä Ä Create Partition Ä Ä Ä Ä Ä Ä Ä Ä Ä ¿ ³ ³ ³ Total Disk Size: 10 Mbytes (20480 Sectors) ³ ³ Maximum space available for Partition 1 : ³ ³ 10 Mbytes (20480 Sectors 100%) ³ ³ ³ ³ Enter partition size in Mbytes(1 to 10):10 ³ ³ ³ À Ä Ä Ä Ä Ä Ä Ä Ä Ä Ä Ä Ä Ä Ä Ä Ä Ä Ä Ä Ä Ä Ä Ä Ä Ä Ù F Note 3. Press <Enter> to accept the partition size shown in the highlighted field (this value reflects the total size of the Mbytes remaining on the disk), or type in a new size and press <Enter>. The Partition table reappears with the new partition table values. 4. To create another partition, repeat steps 1 through 3. Changes made to the partition table with the Modify option are not committed to the disk until you select the Write Partition option under Save. Previous Next Back to Content 29 Geometry Usually, the disk geometry does not require any changes. The default geometry has the fastest access speed. However, some ATA cards allow changes to their geometry. N Warning After you change the geometry, the partition table may become invalid and you may need to reset it. Also, some ATA cards will fail to write and become unstable, in which case you must remove and reinsert the card to reset the state. 30 • Previous Next Back to Content To change the Geometry, follow these steps. 1. Press Alt-M to open this pulldown menu: Ú Ä Ä Ä Ä Ä Ä Ä Ä Ä Ä ¿ ³ Create Partition ³ ³ Delete Partition ³ ³ Geometry ³ À Ä Ä Ä Ä Ä Ä Ä Ä Ä Ä Ù 2. Press G or use the down arrow key to highlight Geometry, and press <Enter>. PCMFDISK displays this window: Ú Ä Ä Ä Ä Ä Ä Modify Geometry Ä Ä Ä Ä Ä Ä ¿ ³ ³ ³ For advanced users only ³ ³ Press F1 for detail ³ ³ ³ ³ Heads: 2 ³ ³ Sectors/Track: 32 ³ À Ä Ä Ä Ä Ä Ä Ä Ä Ä Ä Ä Ä Ä Ä Ä Ä Ä Ä Ä Ù 3. Type in a new value for either Heads, Sector/Tracks, or both, as required. Use the arrow key to highlight the desired field. Press <Enter> after typing in the new value(s). PCMFDISK displays this subwindow: É r Wite Geometry» º No º º Yes º Í Í Í Í Í Í Í ¼ 4. Select Yes to change the disk geometry. Select No to ignore the changes and return to the main menu. If Yes is selected, the heads and sector per track values will reflect the new values. Save No modifications to the ATA disk partition tables become actual until Write Partition is selected. This saves all the changes and deletes/creates a new partition table for the disk. To use this option: 1. Press Alt-S to open this pulldown menu: Ú Ä Ä Ä Ä Ä Ä Ä Ä Ä ¿ ³ Write Partition ³ ³ Exit ³ À Ä Ä Ä Ä Ä Ä Ä Ä Ä Ù 2. Press <Enter>. PCMFDISK displays this warning: Save Modify Help Ú Ä Ä Ä Ä Ä Ä Ä Ä Ä Ä Ä Ä Partition and Geometry Ä Ä Ä Ä Ä Ä Ä Ä ¿ ³ ³ Socket Number: 0 ³ ³ Partition System Size Usage Head Cyl Sec ³ Ä Ä Ä Ä Ú Ä Ä Ä Ä Ä Ä Ä Ä Ä Ä Ä Ä Ä Ä Ä Ä Ä Ä Ä Ä Ä ¿ Ä Ä Ä Ä ³ ³ 1 ³ Warning: Writing the partition table may cause ³ 2 ³ the loss of all data currently on the card. ³ 3 ³ Please format drive(s) after exit. ³ 4 ³ ³ ³ Do you wish to write partition table? ³ ³ Ä Ä Ä Ä Ä Ä Ä Ä Ä Ä Ä Ä Ä Ä Ä Ä Ä Ä Ä Ä ³ ³ ³ ³ No ³ ³ Yes ³ À Ä Ä Ä Ä Ä Ä Ä Ä Ä Ä Ä Ä Ä Ä Ä Ä Ä Ä Ä Ä Ù ³ ³ ³ Total Disk Size: 10 Mbytes (20480 Sectors) ³ À Ä Ä Ä Ä Ä Ä Ä Ä Ä Ä Ä Ä Ä Ä Ä Ä Ä Ä Ä Ä Ä Ä Ä Ä Ä Ä Ä Ä Ä Ä Ù Write Partition table to ATA card 3. Ä Ä Ä Ä Ä ³ ³ ³ Sectors ³ Ä Ä Ä Ä Ä ³ 448 ³ ³ ³ ³ ³ ³ ³ ³ ³ Ä Ä Ä Ä Ä ³ ³ ³ ³ Ä Ä Ä Ä Ä ³ ³ ³ Ä Ä Ä Ä Ä <Enter>=Select Option, <F1>=Help Select Yes to confirm the write. The partition information is written/changed. Previous Next Back to Content 31 4. Exit to DOS and format the drive with the DOS FORMAT command. At the DOS prompt type: FORMAT d: /U Where d is the drive letter. The partition number and drive letter mapping is under sequential and ascending order. Exit To exit from PCMFDISK and return to the DOS prompt: 1. Press Alt-S. 2. Use the down arrow key to highlight Exit and press <Enter>, or press <X>. Help PCMFDISK provides three areas of help under the Help menu, including: • • Contents - A short overview of PCMFDISK and what it can change. • Environment - Information about this disk number of partitions set by PCM Setup. About PCMFDISK - The utility version numbers. specific environment. This includes the PCM.EXE PCM.EXE, a DOS-based utility that allows you to review, modify, or create PC Card configurations, is intended for advanced users who do not have Windows on their system or who prefer to use DOS. Using PCM.EXE requires knowledge of system resource allocation. You cannot execute this utility in a DOS box from Windows. You must close all applications and exit from Windows before you execute PCM.EXE. If you are using Windows, you should use the CardAgent utility because it offers more features and options than PCM.EXE. The only exception to using CardAgent is when you want to review the configuration values of a PC Card configured by the driver that the card manufacturer supplies. CardAgent cannot access the configuration of a PC Card that has been configured by a third-party driver. Before You Use PCM.EXE Before you attempt to use PCM.EXE to configure a card, remember: • PhoenixCard Manager will automatically configure FAX/Modem, ATA, SRAM, and FLASH cards. • For PC Cards other than those mentioned above, you should use the PC Card manufacturer driver. Follow the instructions provided by the manufacturer to install the respective driver. To make certain that a PC Card is configured by its driver, you must first load the driver and then insert the PC Card into one of the sockets in your system. When to Use PCM.EXE You can use PCM.EXE in any of the following situations: • You want view a configuration of a PC Card that has been configured by a non-Phoenix driver. 32 • Previous Next Back to Content • Windows is not operating on your system, or you prefer to work in DOS. • Windows is not operating on your system and a PC Card fails to configure. Using PCM.EXE To execute PCM.EXE, exit from Windows and move to the directory in which you installed PhoenixCard Manager (the default of which is C:\PCM4\PROGRAM). At the prompt type PCM and press <Enter>. PCM initially displays the version and copyright notice. After you press any key, the General Information Per Socket window is displayed as shown below: View Information Configure Option Help Ú Ä Ä Ä Ä Ä Ä Ä ÄGeneral Information Per Socket Ä Ä Ä Ä Ä Ä Ä Ä Ä ¿ ³ ^ ³ Socket Number: 0 Û ³ Function Number: Single Function PC Card ± ³ Status: Card configured successfully ± ³ Client Driver: PCMSCD ± ³ Client Handle: 20aah ± ³ Manufacturer: ECC ± ³ Model: DFM-A ± ³ Type: Serial Port COM3 ± ³ Memory Window 1: None ± ³ Memory Window 2: None ± ³ I/O Window 1: 3E8h - 3EFh ± ³ I/O Window 2: None ± ³ IRQ: 4 ± ³ DMA: None ± ³ Power: Vcc: 5.0V, Vpp1: 5.0V, Vpp2: 5.0V ± ³ _ À Ä Ä Ä Ä Ä Ä Ä Ä Ä Ä Ä Ä Ä Ä Ä Ä Ä Ä Ä Ä Ä Ä Ä Ä Ä Ä Ä Ä Ä Ä Ä Ä Ù <F1>=Help, <Alt>-<Menu Key>=Activate Menu, <PgUp/PgDn>=Prev/Next Funcs/Soc The information displayed therein is for viewing purposes only. Menu Items The following is a brief discussion of the commands and fields that correspond to the PCM.EXE menus. View View contains two options: Advanced and Exit. To exit from PCM.EXE , press <Alt><v> and then press <x>. The Advanced menu item displays a window in which you can review the following information: • Socket Number • Function Number • Register Base Address • Option, Status, Pin Replacement, Extended Status and Copy Registers • I/O Base Address Registers • I/O Limit Registers • Voltage Previous Next Back to Content 33 Information This menu contains two options: Card List and Client Info. Card List contains a list of PC Cards which are to be configured by any of the Phoenix drivers such as, PCMMTD.EXE, PCMATA.SYS, or PCMSCD.EXE. Client Info shows information about the driver that is responsible for configuring the PC Card in question, such as: Type (i.e, I/O or memory), Name, Vendor, Card Services compliance, Release Date, and Client Handle. Configure Configure contains these two options: Add Card to List and Edit Config Parameters Add Card to List is used to write information to the PCM.INI file. You should use this command only if you want PhoenixCard Manager to configure a card. If the card in question comes with its own driver and software, DO NOT add that card to the list. Edit Config Parameters allows you to modify or reassign the values for the following: • Memory Window Address • I/O Window Address • IRQ • COM Port • DMA Channel Option This item enables your system to display a message whenever you insert or extract a PC Card from a socket. To activate this option: 1. From the PCM main menu, press <Alt><o> to open the following pulldown message: Ú Ä Ä Ä Ä Ä Ä Ä Ä Ä Ä Ä Ä Ä ¿ ³ Message On Card Events ³ À Ä Ä Ä Ä Ä Ä Ä Ä Ä Ä Ä Ä Ä Ù 2. Press <Enter>. PCM displays this message: Card Events Enabled Once enabled, PhoenixCard Manager displays a message each time a card is inserted or withdrawn from a PCMCIA socket, or when a card is successfully configured. The messages look like: É Í Í Í C ard Event OccurredÍ Í Í Í » º º º PC Card inserted in Socket 0 º º º Í Í Í Í Í Í Í Í Í Í Í Í Í Í Í Í ¼ É Í Í Í C ard Event OccurredÍ Í Í Í » º º º PC Card removed from Socket 0 º º º Í Í Í Í Í Í Í Í Í Í Í Í Í Í Í Í ¼ When Options is activated, a check mark (√) appears before the pulldown message. To disable this option, simply repeat steps 1 and 2. PCM displays a message to indicate that the Card Events feature has been disabled and the check mark disappears from the pulldown message. Help Help contains three options: About PCM shows the version number and copyright notice Contents shows a brief message describing PCM.EXE 34 • Previous Next Back to Content Environment shows the Card Services version number, the number sockets detected and the available memory in bytes. Previous Next Back to Content 35 Appendix A. Deinstallation Deinstallation is required when other PCMCIA support software has been installed. If other PCMCIA software is already installed, PCM issues this message during installation: PhoenixCARD Manager Installation Ú Ä Ä Ä Ä Ä Ä Ä Ä Ä Ä Ä Ä Ä ÄError! Ä Ä Ä Ä Ä Ä Ä Ä Ä Ä Ä Ä Ä Ä Ä ¿ ³ ³ ³ It has been determined that your system has another version ³ ³ of PCMCIA utilities installed. You cannot continue ³ ³ installation until the other version of PCMCIA utilities ³ ³ have been removed. Would you like PCM+ to deinstall ³ ³ these utilities at this time ? ³ ³ ³ ³ Ú Ä Ä Ä Ä ¿ ³ ³ ³ Yes ³ ³ ³ ³ No ³ ³ ³ À Ä Ä Ä Ä Ù ³ ³ ³ À Ä Ä Ä Ä Ä Ä Ä Ä Ä Ä Ä Ä Ä Ä Ä Ä Ä Ä Ä Ä Ä Ä Ä Ä Ä Ä Ä Ä Ä Ä Ä Ä Ä Ù <Enter>=Continue, <ESC>=Back, <F1>=Help, <F3>=Exit F Note PhoenixCard Manager cannot be installed while other PCMCIA software is still loaded in the system. The PhoenixCard Manager De-Install utility will automatically remove previously installed PCMCIA software (specifically, Card Services and Socket Services). To deinstall software, highlight Yes and press <Enter>. The Deinstall utility displays: PhoenixCARD Manager De-Installation Ú Ä Ä Ä Ä Ä Ä Ä Ä Ä Ä Ä Ä Ä Ä Ä Ä Ä Ä Ä Ä Ä Ä Ä Ä Ä Ä Ä Ä Ä Ä Ä Ä ¿ ³ ³ ³ PhoenixCARD Manager Version 3.20 ³ ³ ³ ³ ³ ³ ³ ³ PCMCIA De-Installation Utility ³ ³ Revision 2.00 ³ ³ ³ ³ Copyright(c) 1993, 1994, Phoenix Technologies Ltd. ³ ³ All Rights Reserved. ³ ³ ³ ³ ³ ³ Press any key to continue ³ ³ ³ À Ä Ä Ä Ä Ä Ä Ä Ä Ä Ä Ä Ä Ä Ä Ä Ä Ä Ä Ä Ä Ä Ä Ä Ä Ä Ä Ä Ä Ä Ä Ä Ä Ù 36 • Previous Next Ä Ä Ä Ä Back to Content <Enter>=Continue, <ESC>=Abort, <F1>=Help, <F3>=Exit Previous Next Back to Content 37 After you press <Enter>, Deinstall displays the following: PhoenixCARD Manager De-Installation Ú Ä Ä Ä Ä Ä Ä Ä Ä Ä Ä Ä Ä Ä Ä WARNING! Ä Ä Ä Ä Ä Ä Ä Ä Ä Ä Ä Ä Ä Ä Ä ¿ ³ ^ ³ THERE ARE CONDITIONS UNDER WHICH THIS PROGRAM MAY FAIL TO Û ³ UPDATE YOUR SYSTEM FILES PROPERLY. PLEASE READ YOUR MANUAL ± ³ CAREFULLY BEFORE PROCEEDING. ± ³ ± ³ CREATING BOOTABLE DISKETTE. It may be advisable to create ± ³ a bootable diskette. Make sure that you have a bootable ± ³ diskette available, so that, in the unlikely event that ± ³ problems occur, due to conflict with unsupported utilities, ± ³ you can re-boot your system. ± ³ ± ³ GENERAL. This program allows you to disable PCMCIA ± ³ utilities, already on your system, so that the latest ± ³ version of PCM+ can be installed. Utilities are disabled by ± ³ removing, from your system files, all directives which were ± ³ added there by the PCM+ INSTALL.EXE utility. These are ± ³ typically in CONFIG.SYS, AUTOEXEC.BAT, SYSTEM.INI, WIN.INI ± ³ or PROGMAN.INI files. Program may not succeed if these ± ³ files have been edited by user, or by other utilities, or if _ À Ä Ä Ä Ä Ä Ä Ä Ä Ä Ä Ä Ä Ä Ä Ä Ä Ä Ä Ä Ä Ä Ä Ä Ä Ä Ä Ä Ä Ä Ä Ä Ä Ù <PgUp><PgDn>...=Scroll, <Enter>=Continue, <ESC>=Back, <F1>=Help, <F3>=Exit Read the above message carefully. When you have finished reviewing the message, press <Enter> to continue. Deinstall then gives you the option of either commenting out or removing the lines associated with the previously installed software and drivers. PhoenixCARD Manager De-Installation Ú Ä Ä Ä Ä Ä Ä Ä Ä Ä Remove or Comment Out Ä Ä Ä Ä Ä Ä Ä Ä Ä Ä ¿ ³ ³ ³ To disable PCMCIA utilities, changes must be made ³ ³ to your CONFIG.SYS file, and possibly other files. ³ ³ The lines which need to be made inactive, can either ³ ³ be removed from the file or they can be commented out. ³ ³ ³ ³ Would you like to remove such lines from the file, ³ ³ or would you like to place a comment in front of ³ ³ such lines? ³ ³ ³ ³ Ú Ä Ä Ä Ä Ä Ä Ä Ä Ä Ä ¿ ³ ³ ³ Comment-out lines ³ ³ ³ ³ Remove lines ³ ³ ³ À Ä Ä Ä Ä Ä Ä Ä Ä Ä Ä Ù ³ ³ ³ À Ä Ä Ä Ä Ä Ä Ä Ä Ä Ä Ä Ä Ä Ä Ä Ä Ä Ä Ä Ä Ä Ä Ä Ä Ä Ä Ä Ä Ä Ù <R>=Remove, <C>=Comment, <Enter>=Select, <ESC>=Back, <F1>=Help, <F3>=Exit 38 • Previous Next Back to Content If your system is running DOS 6.0 with the multiple boot option, Deinstall displays the following: PhoenixCARD Manager De-Installation Ú Ä Ä Ä Ä Ä Ä Ä De-Install from All Configurations Ä Ä Ä Ä Ä Ä Ä ¿ ³ ³ ³ It has been determined that your system is capable ³ ³ of multiple boot configurations. You have a choice ³ ³ of disabling drivers in current or all boot configurations. ³ ³ (If you are using Windows, and previous version of PCM ³ ³ included Windows drivers, then you need to disable ³ ³ drivers in ALL configurations.) ³ ³ ³ ³ Would you like to disable drivers in all configurations? ³ ³ ³ ³ Ú Ä Ä Ä Ä Ä Ä Ä Ä Ä Ä Ä Ä Ä Ä Ä Ä Ä Ä Ä ¿ ³ ³ ³ Disable in All Configurations ³ ³ ³ ³ Disable in Current Configuration ³ ³ ³ À Ä Ä Ä Ä Ä Ä Ä Ä Ä Ä Ä Ä Ä Ä Ä Ä Ä Ä Ä Ù ³ ³ ³ À Ä Ä Ä Ä Ä Ä Ä Ä Ä Ä Ä Ä Ä Ä Ä Ä Ä Ä Ä Ä Ä Ä Ä Ä Ä Ä Ä Ä Ä Ä Ä Ä Ù <A>=All <C>=Current, <Enter>=Select, <ESC>=Back, <F1>=Help, <F3>=Exit Previous Next Back to Content 39 As the previous message indicates, you should disable drivers in all configurations. Next, Deinstall displays the following: PhoenixCARD Manager De-Installation Ú Ä Ä Ä Ä Ä Ä Ä Ä Ä Ä ÄWindows Directory Ä Ä Ä Ä Ä Ä Ä Ä Ä Ä Ä Ä ¿ ³ ³ ³ Some PCMCIA utilities modify Windows' system files. Do you ³ ³ have Microsoft Windows installed on your system? ³ ³ ³ ³ Ú Ä Ä Ä Ä Ä Ä ¿ ³ ³ ³ Yes ³ ³ ³ ³ No ³ ³ ³ À Ä Ä Ä Ä Ä Ä Ù ³ ³ ³ À Ä Ä Ä Ä Ä Ä Ä Ä Ä Ä Ä Ä Ä Ä Ä Ä Ä Ä Ä Ä Ä Ä Ä Ä Ä Ä Ä Ä Ä Ä Ä Ä Ù <Y>=Yes, <N>=No, <Enter>=Select, <ESC>=Back, <F1>=Help, <F3>=Exit s you press If you are running Windows on your system, highlight Yes and press <Enter>. Deinstall then requests the complete path to Windows: PhoenixCARD Manager De-Installation Ú Ä Ä Ä Ä Ä Ä Ä Ä Ä Ä Ä Ä Windows DirectoryÄ Ä Ä Ä Ä Ä Ä Ä Ä Ä Ä Ä Ä ¿ ³ ³ ³ Some PCMCIA utilities modify Windows' system files. Please ³ ³ enter the directory where Microsoft Windows is installed: ³ ³ ³ ³ ³ ³ C:\WINDOWS ³ ³ ³ ³ ³ ³ ³ ³ ³ ³ ³ ³ ³ ³ ³ ³ ³ À Ä Ä Ä Ä Ä Ä Ä Ä Ä Ä Ä Ä Ä Ä Ä Ä Ä Ä Ä Ä Ä Ä Ä Ä Ä Ä Ä Ä Ä Ä Ä Ä Ù <Enter>=Continue, <ESC>=Back, <F1>=Help, <F3>=Exit Next, Deinstall gives you the option of viewing the changes which the program will make to the system files: PhoenixCARD Manager De-Installation Ú Ä Ä Ä Ä Ä Ä Ä Ä Ä Ä Ä Ä ÄVIEW CHANGES Ä Ä Ä Ä Ä Ä Ä Ä Ä Ä Ä Ä Ä ¿ 40 • Previous Next Back to Content ³ ³ ³ In order to de-install PCMCIA utilities several of your system ³ ³ files have been modified. ³ ³ ³ ³ Would you like to view the modifications made to these files? ³ ³ (This will allow you to accept or reject the changes). ³ ³ ³ ³ Ú Ä Ä Ä Ä Ä Ä ¿ ³ ³ ³ Yes ³ ³ ³ ³ No ³ ³ ³ À Ä Ä Ä Ä Ä Ä Ù ³ ³ ³ À Ä Ä Ä Ä Ä Ä Ä Ä Ä Ä Ä Ä Ä Ä Ä Ä Ä Ä Ä Ä Ä Ä Ä Ä Ä Ä Ä Ä Ä Ä Ä Ä Ä Ù <Y>=View, <N>=Continue, <Enter>=Select, <ESC>=Back, <F1>=Help, <F3>=Exit If you select Yes to view the changes, Deinstall walks you through all the system files, line-by-line. Previous Next Back to Content 41 First, it displays your CONFIG.SYS file, similar to the following: PhoenixCARD Manager De-Installation Ú Ä Ä Ä Ä Ä Ä Ä Ä Ä Ä Ä Ä Ä Ä CONFIG.SYS Ä Ä Ä Ä Ä Ä Ä Ä Ä Ä Ä Ä Ä Ä ¿ ³ KEEP [menu] ^ ³ KEEP menuitem=swedish Û ³ KEEP menuitem=spanish ± ³ KEEP menuitem=german ± ³ KEEP menuitem=italian ± ³ KEEP menuitem=french ± ³ KEEP [common] ± ³ KEEP device=c:\dos\power.exe ± ³ KEEP device=c:\windows\himem.sys ± ³ KEEP dos=high,umb ± ³ KEEP device=c:\dos\setver.exe ± ³ KEEP BUFFERS=45 ± ³ KEEP FILES=40 ± ³ KEEP STACKS=9,256 ± ³ KEEP shell = c:\command.com c:\ /p /e:800 ± ³ KEEP [swedish] ± ³ KEEP device=c:\dos\emm386.exe noems ± ³ KEEP [spanish] ± ³ COMMENT device=c:\dos\emm386.exe noems X=C800-C8FF X=CC00-CFFF ± ³ ADD DEVICE=C:\DOS\EMM386.EXE NOEMS ± ³ KEEP REM de PCM+ V3.0 X=C800-C8FF X=CC00-CFFF ± ³ KEEP ± ³ COMMENT DEVICE=C:\SPANISH\CNFIGNAM.EXE /SPANISH Û À Ä Ä Ä Ä Ä Ä Ä Ä Ä Ä Ä Ä Ä Ä Ä Ä Ä Ä Ä Ä Ä Ä Ä Ä Ä Ä Ä Ä Ä Ä Ä Ä Ä Ä Ù <ENTER>=Accept changes, <ESC>=Back, <PgUp><PgDn>...=Scroll, <F1>=Help, <F3>=Exit In the above example, which includes Multiple Boot options, KEEP indicates an unchanged line, COMMENT indicates a REMarked-out line, and ADD indicates a line which PhoenixCard Manager will install into the file. Use your mouse to click on the scroll bar on the right of the window to scroll through each line of the file. Next, Deinstall displays your SYSTEM.INI, which may be similar to the following: PhoenixCARD Manager De-Installation Ú Ä Ä Ä Ä Ä Ä Ä Ä Ä Ä Ä Ä Ä Ä Ä SYSTEM.INI Ä Ä Ä Ä Ä Ä Ä Ä Ä Ä Ä Ä Ä Ä Ä Ä Ä ¿ ³ KEEP [boot] ^ ³ KEEP shell=progman.exe ± ³ KEEP mouse.drv=mouse.drv ± ³ KEEP comm.drv=comm.drv ± ³ KEEP keyboard.drv=keyboard.drv ± ³ KEEP system.drv=system.drv ± ³ KEEP 386grabber=vga.3gr ± ³ KEEP device=*vfd ± ³ KEEP device=*parity ± ³ KEEP device=*biosxlat ± ³ COMMENT ; by PCM+ by PCM+ device=*vcd ± 42 • Previous Next Back to Content ³ COMMENT COM4BASE=2E8 ± ³ KEEP PCMCIAComm4=TRUE ± ³ KEEP pcmciatimer=TRUE ± ³ COMMENT EMMExclude=C800-DFFF ± ³ KEEP device=*vmcpd ± ³ KEEP device=*combuff ± ³ KEEP device=*cdpscsi ± ³ KEEP local=CON ± ³ KEEP FileSysChange=off ± ³ KEEP PagingFile=C:\WINDOWS\WIN386.SWP ± ³ KEEP MaxPagingFileSize=12288 ± ³ KEEP pcmcianotify=true ± ³ KEEP pcmciacom4=true ± ³ COMMENT device=C:\FRENCH\PCMVCD.386 ± ³ ADD device=*vcd ± ³ COMMENT EmmExclude=C800-C8FF CC00-CFFF Û À Ä Ä Ä Ä Ä Ä Ä Ä Ä Ä Ä Ä Ä Ä Ä Ä Ä Ä Ä Ä Ä Ä Ä Ä Ä Ä Ä Ä Ä Ä Ä Ä Ä Ä Ä Ä Ä Ù <ENTER>=Accept changes, <ESC>=Back, <PgUp><PgDn>...=Scroll, <F1>=Help, <F3>=Exit Scroll through the file line-by-line, and when your are finished reviewing the changes, press <Enter>. Next, Deinstall walks you through your WIN.INI file, which may be similar to the following: PhoenixCARD Manager De-Installation Ú Ä Ä Ä Ä Ä Ä Ä Ä Ä Ä Ä Ä Ä Ä Ä Ä Ä WIN.INI Ä Ä Ä Ä Ä Ä Ä Ä Ä Ä Ä Ä Ä Ä Ä Ä Ä Ä Ä ¿ ³ KEEP [windows] ^ ³ KEEP spooler=yes Û ³ KEEP load= ± ³ COMMENT run=C:\FRENCH\PCMWARN.EXE ± ³ ADD RUN= ± ³ KEEP Beep=yes ± ³ KEEP NullPort=None ± ³ KEEP device= ± ³ KEEP BorderWidth=3 ± ³ KEEP CursorBlinkRate=530 ± ³ KEEP DoubleClickSpeed=452 ± ³ KEEP Programs=com exe bat pif ± ³ KEEP Documents= ± ³ KEEP DeviceNotSelectedTimeout=15 ± ³ KEEP TransmissionRetryTimeout=45 ± ³ KEEP KeyboardDelay=2 ± ³ KEEP KeyboardSpeed=31 ± ³ KEEP ScreenSaveActive=0 ± ³ KEEP ScreenSaveTimeOut=120 _ À Û Q ± ± ± ± ± ± ± ± ± ± ± ± ± ± ± ± ± ± ± ± ± ± ± ± ± ± ± ± ± ± ± ± ± ± ± ± ± ± ± PÙ <ENTER>=Accept changes, <ESC>=Back, <PgUp><PgDn>...=Scroll, <F1>=Help, <F3>=Exit Previous Next Back to Content 43 After you have scrolled through the file and accepted the changes by pressing <Enter>, Deinstall then takes you through the changes in your PROGRAM.INI file which may look like: PhoenixCARD Manager De-Installation Ú Ä Ä Ä Ä Ä Ä Ä Ä Ä Ä Ä Ä Ä PROGMAN.INI Ä Ä Ä Ä Ä Ä Ä Ä Ä Ä Ä Ä Ä Ä ¿ ³ KEEP [Settings] ³ ³ KEEP Window=68 48 580 384 3 ³ ³ KEEP display.drv=vga.drv ³ ³ COMMENT Order= 5 3 4 2 1 ³ ³ ADD ORDER= 3 4 2 1 ³ ³ KEEP SaveSettings=1 ³ ³ KEEP AutoArrange=1 ³ ³ KEEP ³ ³ KEEP [Groups] ³ ³ KEEP Group1=C:\WINDOWS\MAIN.GRP ³ ³ KEEP Group2=C:\WINDOWS\ACCESSOR.GRP ³ ³ KEEP Group3=C:\WINDOWS\GAMES.GRP ³ ³ KEEP Group4=C:\WINDOWS\STARTUP.GRP ³ ³ COMMENT Group5=C:\ITALIAN\SAVE\PCMPLUS.GRP ³ À Ä Ä Ä Ä Ä Ä Ä Ä Ä Ä Ä Ä Ä Ä Ä Ä Ä Ä Ä Ä Ä Ä Ä Ä Ä Ä Ä Ä Ä Ä Ä Ä Ù <ENTER>=Accept changes, <ESC>=Back, <PgUp><PgDn>...=Scroll, <F1>=Help, <F3>=Exit After you have finished scrolling through the changes and you want to accept the changes press <Enter>. Deinstall then displays the following window to summarize the system files that it has modified: PhoenixCARD Manager De-Installation Ú Ä Ä Ä Ä Ä Ä Ä Ä Ä Ä Ä Ä Ä CHANGES MADE Ä Ä Ä Ä Ä Ä Ä Ä Ä Ä Ä Ä Ä Ä ¿ ³ ³ ³ CONFIG.SYS : Was MODIFIED ³ ³ CONFIG.103 : Contains the ORIGINAL data (backup) ³ ³ ³ ³ AUTOEXEC.BAT : Was not used ³ ³ ³ ³ ³ ³ SYSTEM.INI : Was MODIFIED ³ ³ SYSTEM.103 : Contains the ORIGINAL data (backup) ³ ³ ³ ³ WIN.INI : Was MODIFIED ³ ³ WIN.103 : Contains the ORIGINAL data (backup) ³ ³ ³ ³ PROGMAN.INI : Was MODIFIED ³ ³ PROGMAN.103 : Contains the ORIGINAL data (backup) ³ À Ä Ä Ä Ä Ä Ä Ä Ä Ä Ä Ä Ä Ä Ä Ä Ä Ä Ä Ä Ä Ä Ä Ä Ä Ä Ä Ä Ä Ä Ä Ä Ä Ù <Enter>=Continue, <ESC>=Continue, <F1>=Help, <F3>=Exit 44 • Previous Next Back to Content Deinstall saves your old files by adding a .10n extension, where n is the number of previously backed up files plus one. The first time that Deinstall saves an old file, it adds the extension .101, and the next time it saves the file with an extension of.102, and so on. Consequently, you will have access to all of your previous system files, regardless of how many time you use Deinstall. F Note In the example used in this section of the manual, the AUTOEXEC.BAT file was not modified. However, if changes are needed in your AUTOEXEC.BAT, Deinstall will treat it as it would the other system files it modifies. Previous Next Back to Content 45 After you press <Enter> or <Esc> while in the CHANGES MADE screen, Deinstall displays this final screen: PhoenixCARD Manager De-Installation Ú Ä Ä Ä Ä Ä Ä Ä Ä Ä Ä Ä ÄRE-BOOT SYSTEM Ä Ä Ä Ä Ä Ä Ä Ä Ä Ä Ä Ä Ä Ä ¿ ³ ³ ³ All of the system files have been properly updated. However, ³ ³ changes will not take effect, and PCMCIA drivers will not be ³ ³ disabled until your system is re-booted. ³ ³ Be sure to remove any diskettes before rebooting. ³ ³ ³ ³ ³ ³ ³ ³ ³ ³ ³ ³ ³ ³ ³ ³ PLEASE RE-BOOT YOUR SYSTEM AFTER RETURNING TO DOS ³ ³ ³ À Ä Ä Ä Ä Ä Ä Ä Ä Ä Ä Ä Ä Ä Ä Ä Ä Ä Ä Ä Ä Ä Ä Ä Ä Ä Ä Ä Ä Ä Ä Ä Ä Ä Ù <Enter>=Exit, <ESC>=Exit, <F1>=Help, <F3>=Exit Modifications will not take effect until you exit to DOS (by pressing <Enter> or <Esc>) and reboot your system. After you reboot your system, run the install program to complete the installation of PhoenixCard Manager. 46 • Previous Next Back to Content Index — access more than one partition on a ATA card, 29 adding PC card options, 21 association delete, 18 setup or modify, 17 ATA cards access to more than one partition, 29 erase queues, 25 Geometry, 29 Memory Base, 24 partitions, 25 partitions and PCMSETUP, 29 specifying number of partitions, 29 spin down time, 25 Window Size, 24 ATA partition table editing, 27 — card configuration viewing when configured by third-party driver, 16, 31 Card Information Structure CIS dump, 19 Card Settling Time, 24 CardAgent, 13 Previous Next Back to Content 47 configuring cards with, 15 Diagnostics, 19 Event Log, 20 menu items, 14 CIS Address, 24 CIS dump, 19 more than 2 sockets, 19 configuring cards when Windows is not installed, 10 with CardAgent, 13 Conflict Resolution manual, 15 specifying automatic or manual, 13, 22 Creating a partition, 29 Customizing The Event Log, 21 — Deinstalling old PCMCIA software, 34 delete an assocation, 18 Deleting a partition, 28 Diagnostics, 19 CIS dump, 19 DOS Utilities, 27 PCM.EXE, 31 — Enabling DOS card event message, 33 EPD. See Event Processor Daemon Erase Queues, 25 Event Log, 20 customizing, 21 Real Time Messages, 20 Event Processor Daemon, 10 — Flash cards Memory Base, 24 spin down time, 25 Window Size, 24 — installation, 6 IRQ specifying, 24 — Partition table, 27 Partitions, 25 specifying on ATA card, 29 PCM Setup, 21, 29 menu items, 22 PCM.EXE, 13, 27 PCM.LOG, 20 PCMATA.SYS, 29 PCMFDISK, 27 creating a partition, 29 deleting a partition, 28 48 • Previous Next Back to Content exit, 31 geometry, 29 PhoenixCard Manager features, 11 product overview, 8 PhoenixCard Manager Setup, 21 — Real Time Messages, 20 turning off, 20 required drivers, 9 — Setting ATA Card partition table, 27 Setup utility, 21 — Token Ring Speed, 24 — Using CardAgent To Configure Cards, 15 Using The Event Log, 20 — Writing the partition, 30 Previous Back to Content 49