1
Bank Reconciliation
User’s Guide
Version 7.6
2210.BR76
© 2010 Open Systems Holdings Corp. All rights reserved.
Document Number 2210.BR76
No part of this manual may be reproduced by any means without the written permission of Open Systems, Inc.
OPEN SYSTEMS and OSAS are registered trademarks of Open Systems Holdings Corp. All other product
names are trademarks or registered trademarks of their respective companies.
Printed in U.S.A. This manual is recyclable.
October 2010, Release 7.6
This document has been prepared to conform to the current release version of OPEN SYSTEMS Accounting
Software. Because of our extensive development efforts and our desire to further improve and enhance the
software, inconsistencies may exist between the software and the documentation in some instances. Call your
customer support representative if you encounter an inconsistency.
Open Systems, Inc.
4301 Dean Lakes Boulevard
Shakopee, Minnesota 55379
General Telephone
(952) 403-5700
General Fax
(952) 496-2495
Support Telephone
(800) 582-5000
Support Fax
(952) 403-5870
Internet Address
www.osas.com
CONTENTS
Chapter 1 Introduction
1-1
The Bank Reconciliation System . . . . . . . . . . . . . . . . . 1-3
Starting OSAS . . . . . . . . . . . . . . . . . . . . . . . . . . . . . . . 1-9
Navigating OSAS . . . . . . . . . . . . . . . . . . . . . . . . . . . . 1-13
Reports . . . . . . . . . . . . . . . . . . . . . . . . . . . . . . . . . . . . 1-27
Chapter 2 Installation and Conversion
2-1
Conversion . . . . . . . . . . . . . . . . . . . . . . . . . . . . . . . . . . 2-3
Chapter 3 Setup
3-1
Setup Checklist and Functions . . . . . . . . . . . . . . . . . . . 3-5
Chapter 4 Transactions
4-1
Transactions . . . . . . . . . . . . . . . . . . . . . . . . . . . . . . . . . 4-3
Void Checks and Stop Payments . . . . . . . . . . . . . . . . 4-13
BR Journal . . . . . . . . . . . . . . . . . . . . . . . . . . . . . . . . . 4-19
Bank Account Register. . . . . . . . . . . . . . . . . . . . . . . . 4-21
Post Transactions . . . . . . . . . . . . . . . . . . . . . . . . . . . . 4-25
Chapter 5 Reconciliation
5-1
Cleared Transactions . . . . . . . . . . . . . . . . . . . . . . . . . . 5-3
Reconciliation Report. . . . . . . . . . . . . . . . . . . . . . . . . 5-15
Change Cleared Transaction Status . . . . . . . . . . . . . . 5-21
Purge Reconciled Transactions . . . . . . . . . . . . . . . . . 5-23
Chapter 6 File Maintenance
6-1
Codes . . . . . . . . . . . . . . . . . . . . . . . . . . . . . . . . . . . . . . 6-3
Recurring Adjustments. . . . . . . . . . . . . . . . . . . . . . . . . 6-5
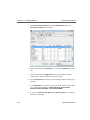
Reconciliation Import. . . . . . . . . . . . . . . . . . . . . . . . . 6-11
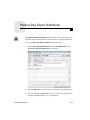
Positive Pay Export Definitions . . . . . . . . . . . . . . . . . 6-15
Positive Pay Fields . . . . . . . . . . . . . . . . . . . . . . . . . . . 6-23
Bank Reconciliation
iii
CONTENTS
Tables. . . . . . . . . . . . . . . . . . . . . . . . . . . . . . . . . . . . . 6-25
Chapter 7 Master File Lists
7-1
Codes List . . . . . . . . . . . . . . . . . . . . . . . . . . . . . . . . . . 7-3
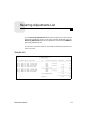
Recurring Adjustments List. . . . . . . . . . . . . . . . . . . . . 7-5
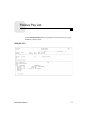
Positive Pay List . . . . . . . . . . . . . . . . . . . . . . . . . . . . . 7-7
Positive Pay Fields List . . . . . . . . . . . . . . . . . . . . . . . . 7-9
Tables List . . . . . . . . . . . . . . . . . . . . . . . . . . . . . . . . . 7-11
GL Account Audit Report . . . . . . . . . . . . . . . . . . . . . 7-13
iv
Bank Reconciliation
CHAPTER 1
Welcome to OSAS
1-1
The Bank Reconciliation
System
1-3
Starting OSAS
1-9
Navigating OSAS
1-13
Reports
1-27
1
Introduction
Welcome to OSAS
Welcome to the Bank Reconciliation application for OPEN
SYSTEMS Accounting Software® (OSAS®). Bank
Reconciliation helps you enter and track bank and credit card
transactions (deposits, disbursements, transfers, and
adjustments) and reconcile your bank and credit card account
balances with the statement balance you receive from your
bank. You can also void checks or stop payment on checks
entered into the system through Bank Reconciliation or
through other OSAS applications.
Bank Reconciliation plugs into Resource Manager, the
foundation of OSAS. Consult the Resource Manager User’s
Guide for more information on basic OSAS functionality and
details on how Resource Manager works within the OSAS
system.
About This Guide
This guide describes the functions that make up the Bank
Reconciliation application and gives details on how Bank
Reconciliation fits into your existing business workflow. This
guide is divided into these sections:
•
Bank Reconciliation
Chapter 1 introduces OSAS and the Bank Reconciliation
application, and describes the basics of the Bank
Reconciliation system and how to navigate around OSAS.
1-1
CHAPTER 1 • Introduction
•
Chapter 2, Installation and Conversion, details how to install Bank
Reconciliation using Resource Manager and how to create or convert the
data files it requires.
•
Chapter 3, Getting Started, gives information and checklists on the steps you
need to perform to set up Bank Reconciliation.
•
Chapters 4 through 12 contain function descriptions organized by menu.
These chapters mirror the order that appears on the Bank Reconciliation
menu.
•
The Appendixes contain supplementary material not directly related to Bank
Reconciliation functionality.
•
The Index is a topical reference to the information in the rest of the chapters,
and concludes this guide.
Conventions
This guide uses the following conventions to present information.
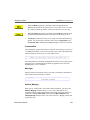
When the Inquiry or Maintenance commands (or both) are available for a field,
the Inquiry and Maint flags appear in the margin. See page 1-20 and page 1-24
for more information on these commands.
When you see the phrase “use the Proceed (OK) command” in this guide, press
Page Down in either text or graphical mode to continue. In graphical mode, you
can also click OK to proceed.
If a function or feature is only available if the Banking application is installed,
this banking flag appears in the margin.
1-2
Bank Reconciliation
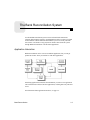
The Bank Reconciliation System
Use the Bank Reconciliation system to enter and track bank transactions
(deposits, disbursements, transfers, and adjustments) and to reconcile your bank
account balance with the bank statement balance you receive from your bank.
You can also void checks or stop payment on checks entered into the system
through Bank Reconciliation or an interfaced application.
Application Interaction
Bank Reconciliation can be used as a standalone application, but you can get
optimal use from it when you interface it with other applications.
Interfacing applications means that the information you enter in one application
can be transferred to and used in other applications, reducing data entry time and
errors.
For information about application interfaces, see page 3-5.
Bank Reconciliation
1-3
CHAPTER 1 • Introduction
The Bank Reconciliation System
Menu Structure
The Bank Reconciliation menu structure is similar to the structure of other OSAS
applications: functions appear roughly in order of use.
File Maintenance
Use the functions on the File Maintenance menu to set up and maintain
information about your transaction codes, and recurring adjustments to your
accounts. For example, use the Recurring Adjustments function to establish and
maintain transactions that happen on a periodic basis.
Transactions
After you establish the valid codes and IDs through the File Maintenance
functions, you can use the Transactions functions to enter transactions (deposits,
disbursements, transfers, and adjustments), to void checks or stop payment on a
check, and then to post your transactions.
Reconciliation
When you receive a bank statement, you must specify which transactions have
cleared in order to reconcile your bank account balance (that is, the balance
stored in the system) with the bank statement balance. Use the Cleared
Transactions function to designate transactions as cleared. You can periodically
purge the system of cleared transactions to keep the clearing process simple.
Master File Lists
Information that you enter in the File Maintenance functions is kept in master
files. Use the Master File Lists functions to produce the contents of the files:
details about transaction codes, recurring adjustments, and tables.
File Information
The information you enter in Bank Reconciliation functions is stored in these
files:
1-4
Bank Reconciliation
The Bank Reconciliation System
Introduction • CHAPTER 1
The BRCDxxx (Codes) file stores default descriptions for transaction references
and recurring adjustment entries, entered through the Codes function.
The BRJRxxx (Journal) file stores transactions entered through the Transactions
function. It is a temporary file: transactions stay here until you post them, at
which time the file is erased (it is automatically re-created whenever you enter
more transactions).
The BRRAxxx (Recurring Adjustments) file stores adjustment transaction
information entered through the Recurring Adjustments function: bank account
ID, adjustment ID, amount of the adjustment, transaction description and
reference, and distribution information for the adjustment. This information can
be copied to the BRJRxxx file through the Transactions function.
The BRTRxxx (Transactions) file stores transactions posted from Bank
Reconciliation and, optionally, interfaced applications (Accounts Payable,
Purchase Order, Accounts Receivable, Sales Order, and Payroll).
Bank Reconciliation
1-5
CHAPTER 1 • Introduction
The Bank Reconciliation System
File Interaction
Bank Reconciliation file interaction is based on the Bank Reconciliation work
cycle, which consists of daily work and reconciliation.
Daily Work
Daily work begins with entering transactions, which are stored in the BRJRxxx
file (the system creates it automatically). When entering transactions, you must
enter a bank or credit card account ID (from the RMBAxxx file). Transaction
descriptions and references come from the BRCDxxx file. If you enter a recurring
adjustment, the transaction information comes from the BRRAxxx file.
After you enter transactions, produce the BR Journal to check for errors.
When you post transactions, several files are effected:
•
The transactions are moved from the BRJRxxx file to the BRTRxxx file.
•
If Bank Reconciliation interfaces with General Ledger, the offsetting entries
are created in the GLJRxxx (General Ledger Journal) file. In addition, when
you post the GLJRxxx file to the GLMAxxx (General Ledger Master) file,
the general ledger account balances are updated in the RMBAxxx file.
•
If Bank Reconciliation does not interface with General Ledger, the general
ledger account balances in the RMBAxxx file are updated.
•
The BRJRxxx file is erased.
Reconciliation
Reconciliation also begins with entering transactions—usually recurring
adjustments (such as finance charges and service charges) listed on your bank or
credit card statement. After these transactions are entered, verified, and posted to
the BRTRxxx file, you can begin clearing transactions.
When you use the Cleared Transactions function, you must enter the statement
balance and statement date. This information updates the bank account record in
the RMBAxxx file.
1-6
Bank Reconciliation
The Bank Reconciliation System
Introduction • CHAPTER 1
You can clear only transactions posted to the BRTRxxx file. Cleared transactions
remain in the file until you remove them through the Purge Cleared
Transactions function. You should purge cleared transactions after you reconcile
the bank or credit card account.
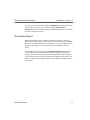
Productivity Reports
Bank Reconciliation includes a number of productivity reports in Microsoft
Excel® format. These reports connect directly to your OSAS data via the ODBC/
JDBC driver (included with OSAS 7.6) and allow you to use spreadsheet tools to
manipulate the data as you want and produce charts and graphs to visualize
trends.
The spreadsheet reports are listed on the Productivity Reports menu. Doubleclick a report name to automatically launch Excel or any other spreadsheet
program capable of opening an Excel-formatted spreadsheet to open the report.
Use the selection boxes to filter the information that appears in the report, or use
the tools within your spreadsheet software to create charts and graphs from the
report’s data.
Bank Reconciliation
1-7
Starting OSAS
OSAS runs on an operating system supported by 150 MB of permanent storage
and 4 MB of RAM. You may need additional space or memory, depending on the
size of your data files and the operating system you use. Consult your reseller for
more information.
In Windows
To start OSAS on a computer running Windows, double-click the OSAS shortcut
on the desktop or access the program from the Start menu.
In Other
Operating
Systems
To start OSAS on an operating system other than Windows, enter osas at the
operating system prompt. If your operating system has graphical capabilities, you
can also use the OSAS shortcut to start OSAS.
Using
Parameters
You can use the -u, -c, and -t parameters in OSAS shortcut properties or after the
osas command so that the system automatically uses the appropriate user ID,
and company ID to save time logging in.
In Windows, open the OSAS shortcut’s properties and enter these parameters
after the path in the Target field (as in the example below; be sure to use the
correct directories for your system).
C:\basis\bin\bbj.exe osasstrt.txt -q -tT00 -cD:\osas70\progrm\config.bbx - uSam -cH
Note: In Windows, the -u and -c parameters must follow the separation dash.
In other operating systems, enter the parameters after the osas command, as in
this example:
osas -t T2 -c B
Note: You can enter these parameters in any order, but you must leave a space
between the parameter mark (-t or-c) and the parameter itself.
Bank Reconciliation
1-9
CHAPTER 1 • Introduction
Starting OSAS
Refer to the Resource Manager User’s Guide for more information on these
parameters.
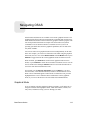
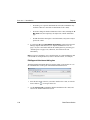
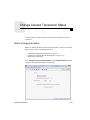
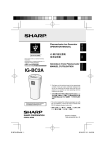
Logging In
After you start OSAS, the login screen appears.
To log in to OSAS, enter your User ID, the Company ID you want to work with,
and your Password. If you want to save your password so that you do not need
to enter it again, select the Save Password? check box (or enter Y in text mode)
to save your information. This check box appears only if the Remember
Password? option is selected for your user ID in the Users function in Resource
Manager.
Check the Change Password? box to change your password upon logging in.
You will be prompted to enter and confirm your new password.
Finally, press Enter or click OK to log in.
This screen appears only after you have set up the system, including setting up
users. See the Resource Manager User’s Guide for information on setting up
users and roles.
1-10
Bank Reconciliation
Starting OSAS
Introduction • CHAPTER 1
Roles
Roles limit use of the system and protect sensitive information. Each role allows
access to specific applications, menus, and functions. If you cannot select a menu
or function, your assigned role is not authorized for it. Use the Roles function in
Resource Manager to set up roles.
Workstation Date
To change the workstation date, select Workstation date from the File menu,
click the Change Date button on the toolbar, or press F6.
When the Workstation Date box appears, use the button or your keyboard to enter
the date and press Enter.
Bank Reconciliation
1-11
Navigating OSAS
OSAS menus and functions are available in two modes: graphical and text. The
graphical mode allows both keyboard and mouse commands and uses data entry
fields and buttons similar to those found in any graphical software program. The
text mode presents information in a simpler text format and uses keyboard
commands to access functions and move around the screen. If you use an
operating system that does not have graphical capabilities, the text mode is the
only mode available.
You can use either text or graphical function screens independently of the main
menu. For example, you can use text function screens while using the graphical
main menu, and vice versa. Select GUI Functions from the Modes menu or press
Shift+F6 to toggle between the text and graphical modes for function screens.
When available, press Shift+F5 to switch between graphical and text menu
modes, or press Shift+F6 to switch between modes on function screens. You can
also use the Resource Manager Defaults function to select the default mode to
use for the main menu and function screens.
In text mode, use the Page Up, Page Down, arrow, and Enter keys to move
between menus, select and enter functions, and move around function screens.
When a list of commands appears at the bottom of a function screen, press the
highlighted letter to use a command. These methods also work in graphical
mode, or you can use the mouse to click on fields and command buttons.
Graphical Mode
If you’re familiar with other graphical software programs, you’ll find it easy to
navigate around the OSAS graphical mode, which uses buttons, toolbars, text
entry boxes, and menus to help you move through your tasks.
Bank Reconciliation
1-13
CHAPTER 1 • Introduction
Navigating OSAS
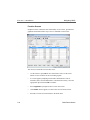
Main Menu
If you use BBj in graphical mode, the main menu is available in two flavors:
graphical and MDI. To switch between the two styles, press Shift+F5. If you use
Visual PRO/5, the graphical main menu is the only graphical menu available.
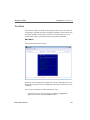
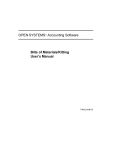
Graphical
Main Menu
The graphical main menu is shown below.
You can move around the graphical menu in these ways:
1-14
•
Click an application to view that application’s menu. Click a menu item to
view its functions. Double-click a function name to enter that function.
•
To exit from the graphical menu, click a different application or menu name
or press Tab to return to the main menu.
•
To exit from OSAS, click the Close box in the upper-right corner of the
screen, press F7, or select Exit from the File menu.
Bank Reconciliation
Navigating OSAS
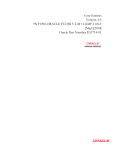
MDI Main
Menu
Introduction • CHAPTER 1
The MDI menu centralizes all OSAS functionality in one location: applications
appear as tabs at the top of the screen, their menus and functions appear in a
navigation pane on the left side of the screen, and function screens appear in the
large pane on the right. Using this menu, you can open more than one function
screen at a time and move or minimize screens as needed. However, you cannot
open two functions that lock the same data file at the same time.
You can move around the MDI menu these ways:
•
To view an application’s menus, click that application’s tab.
•
To view the functions a menu contains, click the menu name. The menu
expands to list the functions it contains. Click the function name to enter the
function. The function screen appears in the right pane.
•
To exit from a menu, click a different menu name or application tab. To exit
from OSAS, click the Close box in the upper-right corner of the screen,
press F7, or select Exit from the File menu.
Bank Reconciliation
1-15
CHAPTER 1 • Introduction
Navigating OSAS
Function Screens
Graphical screens contain the same functionality as text screens, presented in a
graphical format that includes easy access to commands via the mouse.
You can move around the screen in these ways:
1-16
•
Use the mouse or press Tab to move from field to field. Use the scroll
buttons to move from line to line in scrolling regions.
•
If a screen appears prompting for the kind of information to enter or
maintain (such as on File Maintenance or Transactions screens), select the
appropriate option and click OK to continue.
•
Press Page Down if prompted to move to the next section.
•
Click Header when it appears to return to the screen’s header section.
•
Press F7 to exit the screen and return to the main menu.
Bank Reconciliation
Navigating OSAS
Introduction • CHAPTER 1
Menus
Both the graphical main menu and graphical function screens contain drop-down
menus that give you access to additional commands without using the function
keys. While you can use the function keys to access commands in graphical
mode, you may find it easier to access command through these menus.
To access a menu’s commands, click a menu title. The commands for that menu
appear, followed by any associated hot key combinations in brackets < >. To use
a command, click the command name or press the hot key combination.
Refer to the Resource Manager User’s Guide for more information on the menus
available in OSAS and their commands.
Shortcut
Menu
OSAS gives you quick access to commands relating to the screen you’re using
via a shortcut menu. The commands that are available depend on the function and
the field you are currently using. To use these commands, click the right mouse
button and select the command from the menu that appears.
On the main menu, the shortcut menu gives you access to commands that help
you manage your Favorites menu, switch between sample and live data, perform
certain setup tasks, and view function information. On function screens, this
menu helps you access help documentation, move around the function screen,
work with EIS dashboards, and so on.
Other
Commands
Menu
The Other Commands (or F4) menu is available on both graphical and text
menu and function screens and gives you access to additional utilities and
commands not directly related to the function you’re currently using. Among
other things, these commands open calculators or allow you to view or enter
additional information. In text mode, press F4 twice on the menu or once on
function screens to access this menu.
Consult Appendix A in the Resource Manager User’s Guide for more
information on the commands available on the Other Commands menu.
Information
Menu
The Information (or Shift+F2) menu is available in some graphical or text
function screens in certain applications and gives you access to additional
information about a customer, vendor, item, job, bill of material, or employee.
The commands available on the Information menu are determined by the
applications you have installed, and can include:
Bank Reconciliation
1-17
CHAPTER 1 • Introduction
•
General Information
•
Comments
•
History
•
Documents
•
Address Lookup
Navigating OSAS
Not all of the commands above appear on every Information menu; instead,
commands are available only as they are relevant to the task you are performing.
For example, if you are entering a transaction in Accounts Receivable, you can
access comments or documents about items or customers but not about
employees or vendors.
Consult Appendix A in the Resource Manager User’s Guide for more
information on how to use the functions on the Information menu.
Favorites
Menu
The Favorites menu gives you quick access to the OSAS functions you use most
by allowing you to add selections for entire menus or particular functions to a
custom menu. After you’ve set up the menu, select Change to Favorites from
the graphical Favorites menu or press F2 to access the functions.
The Favorites menu saves you time by eliminating the need to switch between
applications. You can add functions from several different applications to the
Favorites menu and access them all there rather than switching between
applications on the main menu to access the functions you need.
To add a function to the Favorites menu, select the function you want to add and
press F10. Press F2 to switch to the Favorites menu to confirm that your
selection was added.
To remove a function from the menu, select the function on the Favorites menu
that you want to remove and press F10 again.
1-18
Bank Reconciliation
Navigating OSAS
Introduction • CHAPTER 1
Toolbars
As with menus, graphical screens also contain toolbars that give you fast access
to the most frequently used OSAS commands. The toolbar for the main menu
differs slightly from that of function screens.
Main Menu
Toolbar
The toolbar for the main menu is shown below. Click a button to access that
command.
Command
Help
Workstation
Date
Function
Screen
Toolbar
Application
Versions
Calendar
Calculator
Toggle
Favorites
Call a BBj/Pro5
Program
The toolbar for function screens is shown below. Click a button to access that
command.
File
Maintenance
Start
Over
Delete
Paste
Copy
Calendar
Calculator
Online
Documentation
Field
Help
Address
Mapping
Date Fields
If you use BBj in graphical mode, click the Calendar button when it appears next
to date fields to open a calendar so that you can select the date you want to enter
into that field.
Bank Reconciliation
1-19
CHAPTER 1 • Introduction
Navigating OSAS
Browse
If you use BBj in graphical mode, you can use the Browse button when it
appears next to fields to navigate to directories and files and automatically enter
file paths into that field. Click the Browse button to open the Select Directory/
File screen, then navigate to the directory or file and click Open to automatically
enter the file path in the field.
Inquiry
The Inquiry command helps you look up and select valid entries for fields that
are connected to master file records. For example, when you use the Inquiry
command in a Batch ID field, OSAS lists all batches you have set up so that you
can select the one you want to enter in that field. When the Inquiry button
appears next to a field, you can either click the button or press F2 to open the
Inquiry screen and search for valid entries.
Maintenance
The Maintenance command allows you to enter or edit master file records on the
fly from within functions. For example, you can use the Maintenance command
to add a new customer or item from within the Transactions function. The
Maintenance command is available when the Maintenance button appears on the
toolbar. Click the button or press F6 to open the File Maintenance function
associated with that field and enter or edit a new master file record.
Address Mapping
When you are working with a screen that contains an address, you can use the
Address Mapping command to view a map of that address. This command
combines address information with the URL and search variables in the Resource
Manager Web Setup function and the Map Lookup ID in the Company Setup
function to direct your web browser to a mapping website and generate the map.
Note: Before you can view maps, you must set up mapping website information
in the Resource Manager Web Setup function, select the Map Lookup ID to use
in the Resource Manager Company Information function, and enter the path to
your workstation’s web browser in the Resource Manager Defaults function.
1-20
Bank Reconciliation
Navigating OSAS
Introduction • CHAPTER 1
Text Mode
The OSAS text mode is available on all operating systems. If you use OSAS on
an operating system that does not have graphical capabilities, the text mode is the
only mode available. In text mode, all screens are presented in an easy-to-use
textual interface that you navigate through using keyboard commands.
Main Menu
The text main menu is shown below.
When you select an application, the application’s menu is superimposed over the
main menu. Selecting an entry on an application menu opens a function screen or
a submenu.
You can move around the text main menu in these ways:
•
Bank Reconciliation
Use the arrow keys to move the cursor up and down to highlight the
application you want. Then press Enter to select it.
1-21
CHAPTER 1 • Introduction
Navigating OSAS
•
Press the first letter of the application you want to move the cursor to the
first application beginning with that letter. Continue to press the letter key or
the down arrow until the application you want is highlighted, then press
Enter to select it.
•
Use the mouse to click an application to view that application’s menu.
•
To move to the first application on the menu, press Home. To move to the
last application on the menu, press End.
•
On an application menu, press Page Up to move to the menu immediately
behind it. If you are several levels away from the main menu, you can return
to the main menu by pressing Page Up repeatedly or by pressing Tab once.
•
To exit from OSAS, press F7.
Function Screens
Like the text menu, OSAS text function screens can be used on all operating
systems and in combination with graphical menus.
1-22
Bank Reconciliation
Navigating OSAS
Introduction • CHAPTER 1
You can move around the screen these ways:
•
Press Enter or the down arrow to move from field to field.
•
To use a command that is listed in the command bar, press the highlighted
letter.
•
Use hot key commands to access information screens or to toggle commands
on and off. Refer to Appendix B in the Resource Manager User’s Guide for
more information on these commands and their corresponding hot keys.
•
If a screen contains more than one section, press Page Down when
prompted to move to the next section.
•
If a menu appears prompting you for the kind of information to enter or
maintain (such as in the example and on Transaction and File Maintenance
screens), select the appropriate option and press Enter.
•
To exit the screen and return to the menu, press F7.
Menus
Like the graphical mode, the text mode also includes menus that give you access
to commands that open additional utilities, show additional information about the
task at hand, or set up a custom menu that contains frequently-used commands.
Refer to Appendix A in the Resource Manager User’s Guide for full details about
the menus available in OSAS.
Other
Commands
The Other Commands (or F4) menu gives you access to additional utilities and
commands not directly related to the function you’re currently using. In text
mode, press F4 twice on the menu or once on function screens to access this
menu. See page 1-17 for more information on this menu.
Information
Menu
The Information (or Shift+F2) menu gives you access to additional information
about a customer, vendor, item, job, bill of material, or employee. In text mode,
this menu is available when the Info flag appears at the bottom of a function
screen.
Bank Reconciliation
1-23
CHAPTER 1 • Introduction
Navigating OSAS
The commands on the menu are available only as they are relevant to the task
you are performing. For example, if you are entering a transaction in Accounts
Receivable, you can access comments or documents about items or customers
but not about employees or vendors. See page 1-17 for more information.
Favorites
Menu
The Favorites menu allows you add the OSAS menus or functions you use most
frequently to a custom menu. After you’ve set up the menu, select Change to
Favorites from the graphical Favorites menu or press F2 to access the functions.
To add a function to the Favorites menu, select the function you want to add
from the main menu and press F10. To remove a function from the menu, select
the function on the Favorites menu that you want to remove and press F10 again.
See page 1-18 for more information on this menu.
Commands and Flags
Both the text menu and text function screens let you use commands to drill down
to more information, change companies, switch to sample data, and perform
tasks related to the function you are using. These commands are analogous to the
commands contained on drop-down menus in graphical mode.
You access commands by pressing the hot key combination for the command you
want to use. If you’re working with a keyboard that lacks function keys (labeled
with an F followed by a number) or if you’re working with an emulator in UNIX
(which can cause function keys to become unavailable), press the appropriate
alternate key combination to access the command.
Refer to Appendix B in the Resource Manager User’s Guide for a list of all
OSAS commands and their associated hot keys.
Not all commands are available for every function or field; when a command is
available, a flag appears at the bottom of the function screen. Common flags
include Quick, Info, Maint, Inquiry, and Verify.
1-24
•
The Quick flag reminds you that you are using the Quick Entry mode to skip
fields that are not required. Press Ctrl+F to toggle quick entry on and off.
•
When the Info flag appears, press Shift+F2 to access the Information menu
to access additional information about a customer, vendor, item, job, bill of
material, or employee. See page 1-17 for more information on this menu.
Bank Reconciliation
Navigating OSAS
Introduction • CHAPTER 1
•
When the Maint flag appears, press F6 to launch the appropriate File
Maintenance function to edit a master file record or enter a new one “on the
fly.” When you finish, press F7 to return to the function you were using.
•
When the Inquiry flag appears, press F2 to use the Inquiry command to look
up additional information and select valid entries for the field you are in.
•
The Verify flag reminds you that you are using verification. When this flag
appears, you must provide verification when you press Page Down or use
the Proceed (OK) command. Press Ctrl+V to toggle verification on and off.
Command Bar
The command bar appears at the bottom of function screen and gives you access
to commands that allow you to move around the screen, add or edit information,
change settings for selected lines, or select output devices.
The commands that are available depend upon the function you are using, and are
analogous to the command buttons available on graphical screens. Press the
highlighted key to use a command.
Messages
Messages appear at the bottom of the screen when a command is unavailable or
when OSAS needs information to continue.
Address Mapping
When you are working with a screen that contains an address, you can use the
Address Mapping command menu to view a map of that address. This
command combines address information with the URL and search variables in
the Resource Manager Web Setup function and the Map Lookup ID in the
Company Setup function to direct your web browser to a mapping website and
generate the map.
Bank Reconciliation
1-25
CHAPTER 1 • Introduction
Navigating OSAS
The Address Mapping command is available when the Map flag appears at the
bottom of the screen. To view a map of the first address on the screen, press
Shift+F4. To view a map of the second address (if present), press Shift+F5. The
second command is not available when there is only one address.
Note: Before you can view maps, you must set up mapping website information
in the Resource Manager Web Setup function, select the Map Lookup ID to use
in the Resource Manager Company Information function, and enter the path to
your workstation’s web browser in the Resource Manager Defaults function.
1-26
Bank Reconciliation
Reports
OSAS applications contain a variety of reports that help you make the best
decisions for your business. With reports, you can view transaction summaries,
print audit trails of activity managed through OSAS functions, make lists of your
basic master file information for reference, and analyze all aspects of your
company’s cash flow.
This section summarizes the basics of using reports. For detailed information on
a specific report, see that report’s description in the appropriate application guide.
Selecting a Range of Information
To produce a report, you must specify what information you want to include in
the report.
•
To produce a report that includes all information available, leave the FromThru fields on the report screen blank. For example, if you want to include
information about all the vendors you work with in a report, leave the
Vendor ID From and Thru fields blank.
•
To limit the amount of information in the report, enter a range in the FromThru fields. For example, if you want a report to include information only
about vendor ACE001, enter ACE001 in both the Vendor ID From and Thru
fields. If you want the report to include information only about vendors that
start with CO, enter CO at From and COZZZZ at Thru.
•
Bank Reconciliation
You can also select the Tag check mark next to a selection to select a noncontiguous range of information. In fields where you’ve tagged individual
choices, the selection will appear as an asterisk in the From/Thru fields after
the selection.
1-27
CHAPTER 1 • Introduction
Reports
Each field where you enter information on a report screen usually restricts the
overall output of the report. For example, if you leave the Vendor ID From and
Thru fields blank, the report contains information about all the vendors. But if
you enter invoice 100 in the Invoice Number From and Thru fields, and invoice
100 is assigned only to vendor ACE001, the report includes information only
about vendor ACE001.
Sorting
Information for reports is sorted first by a space (_), then by special characters,
then by digits, then by uppercase letters, and finally by lowercase letters. No
matter what you enter in the From and Thru fields, however, your entries are
sorted in alphabetical order (unless the function provides an option to sort the
information differently).
Sorting by alphabetical codes or IDs is easy. For example, the ID ACL comes
before the ID BB because A comes before B.
Use caution when you enter codes or IDs consisting of characters other than
letters; the order might not be what you expect. For example, if 20 items are
labeled 1 through 20, and all are included in a report, you might enter 1 at From
and 20 at Thru, expecting them to be listed 1, 2, 3. . . 19, 20. However, since
OSAS sorts in alphabetical order, rather than numerical order, the numbers are
listed in this order: 1, 10–19, 2, 20. In this example, numbers 3 - 9 are not
included in the sort since they fall after 20 in an alphabetical sort. To prevent this
situation, pad extra spaces in codes and IDs with zeros so that numbers in
alphabetical order are also in numerical order. In the example above, the items
could be labeled 000001 through 000020.
Outputting Reports
You can output reports in a variety of ways, but keep in mind that the mode you
use controls which output options are available to you. If you use graphical
function screens, you have the following output options: Printer, Print Preview,
PDF, File, or E-mail (for selected reports). If you use text function screens, you
have these options: Printer, File, Screen, or E-mail (for selected reports).
1-28
Bank Reconciliation
Reports
Introduction • CHAPTER 1
If you use graphical screens, the Output Information dialog box appears after you
select the range of information to include in the report.
If you use text screens, these options appear at the bottom of the screen after you
select what to include in the report and how to organize it.
Print the Report
Follow these steps to print a report:
1.
Select Printer (in graphical screens) or enter P (in text screens).
2.
If multiple printers are available for the terminal, either select the printer
from the list or enter the appropriate code for the printer and press Enter.
Use the Devices function in Resource Manager to add printers to the
terminal.
3.
When available, select either Standard (or enter S) to print the report in
standard width or Compressed (or enter C) to print it in compressed width.
4.
Click OK or press Enter to begin printing the report.
5.
If you want to stop printing after it has begun, press Ctrl+Break.
6.
Click OK or press Enter to continue.
Bank Reconciliation
1-29
CHAPTER 1 • Introduction
Reports
Preview the Report
The Print Preview option is only available for graphical workstations. However,
before Print Preview will work in Windows, you must add a sysprint device line
in the config.bbx file for that workstation. Use the Devices function on the
Resource Manager User Setup menu to add this line.
Follow these steps to view a report using Print Preview:
1.
Select Print Preview (in graphical screens).
2.
If multiple printers are available for the terminal, either select the printer
from the list or enter the appropriate code for the printer and press Enter.
Use the Devices function on the Resource Manager Installation and
Configuration menu to add printers to the terminal.
3.
Click OK or press Enter to continue.
4.
When available, either select Standard or enter S if you want to view the
report in standard width or select Compressed or enter C if you want to
view it in compressed width.
5.
Press Enter. The Print Preview screen displays the report as it will look
when printed out in hard copy.
6.
To print from this screen, select Print from the File menu. To exit from this
screen, select Exit from the File menu.
Save the Report as a PDF
PDF output is available for OSAS systems using BBj. The data path set up for the
workstation in the Preferences function appears. If necessary, enter a new data
path or click the Browse button to navigate to the correct directory, then enter the
file name followed by the .PDF extension. The file name plus extension that you
enter must be less than 35 characters. Press Enter to save the report as a PDF file
in that directory.
1-30
Bank Reconciliation
Reports
Introduction • CHAPTER 1
To save the report as a text file, select File or enter F. The data path set up for the
workstation in the Preferences function appears. If necessary, enter a new data
path or click the Browse button to navigate to the correct directory, then enter the
file name followed by the .txt extension. The file name plus extension that you
enter must be less than 35 characters. Press Enter to save the report in that
directory.
Note: To preserve spacing and formatting, view text file reports with a fixed-
width or monospaced font (Courier, Letter Gothic, or Lucida Console, for
example).
View the Report on Screen (Text Screens Only)
If you use text screens, you can view selected reports directly in the OSAS
screen. Keep in mind that this option displays the report one page at a time,
storing previously viewed pages in the workstation’s memory. Use the
Preferences function on the Resource Manager User Setup menu to limit the
number of screen pages you can view to conserve memory resources.
Follow these steps to view the report on screen:
1.
Enter S to select (S)creen.
2.
When available, enter S if you want to view the report in standard width or C
if you want to view it in compressed width.
3.
When the report appears, press Enter to view the next page or Page Up to
view previous pages.
Bank Reconciliation
1-31
CHAPTER 1 • Introduction
Reports
E-mail the Report
Before you can e-mail reports, you must enter details about your e-mail system
using the E-Mail Setup function on the Resource Manager Installation and
Configuration menu. You can e-mail only selected reports. In general, any report
or form that makes up part of your audit trail cannot be e-mailed.
Follow these steps to e-mail a report:
1-32
1.
Select E-mail or enter M. The E-Mail Information screen appears.
2.
The E-Mail From field displays the originating e-mail address. Change it if
you want the return e-mail address to be different from the one set up in the
E-Mail Setup function in Resource Manager.
Bank Reconciliation
Reports
Introduction • CHAPTER 1
3.
In the To, carbon copy (CC), and blind carbon copy (BCC) fields, select
Other and enter the e-mail address, or select Vendor, Customer, or
Employee and choose from the e-mail addresses on file for those respective
categories (depending upon installed applications), or select None to leave
the field blank (you must choose at least one To, CC, or BCC address).
4.
The name of the report appears in the Subject field. Change the subject line,
if necessary.
5.
Select Yes in the Attachment field to send the report as a text file
attachment to the e-mail message, select No to send the report in the body of
the e-mail, or select PDF to attach the report as a PDF file.
6.
The E-Mail Message dialog box appears.
Enter the message you would like included in the body of the e-mail, and use
the Proceed (OK) command. You are returned to the E-Mail Information
Screen.
7.
Bank Reconciliation
Use one of the following commands in the Attachment File scroll region:
•
Press Enter to edit the highlighted attachment (if any). Browse to or
enter the name of the file you would like to attach in the Edit
Attachment dialog box (see “Edit/Append Attachment dialog box” on
page 1-34).
•
Press A to add an attachment to the e-mail. Browse to or enter the name
of the file you would like to attach in the Append Attachment dialog
box (see “Edit/Append Attachment dialog box” on page 1-34).
1-33
CHAPTER 1 • Introduction
Reports
•
Press G to go to a specific attachment line item (this command is only
available if there are more than six attachments to the e-mail).
•
Press H to change the header information of the e-mail, including the EMail From field, the recipient(s), the subject line, and the attachment
type.
•
8.
Press D when done entering the e-mail information, and you are ready to
process the e-mail.
If you choose No in the Send E-Mails Immediately? option in the Resource
Manager Options and Interfaces (see “Options and Interfaces List” on
page 3-47), the e-mail will be held in the E-Mail Queue for processing (see
“E-Mail Queue” on page 3-49). Otherwise, the e-mail will be sent
immediately.
Note: To preserve formatting, view e-mailed reports (or e-mail attachments) with
a fixed-width or monospaced font (Courier or Lucida Console, for example).
Edit/Append Attachment dialog box
The Edit/Append Attachment dialog box appears when you press Enter or A in
the Attachment File scroll region of the E-Mail Information screen.
1-34
1.
Enter the File Name of the file you want to attach to the e-mail, or click the
browse button (
) to navigate to the file.
2.
Use the Proceed (OK) command to add the attachment to the e-mail, and
return to the E-Mail Information Screen.
Bank Reconciliation
Reports
Introduction • CHAPTER 1
Commands
Use the following commands when a report appears on the screen:
Key
Operation
PgUp
Moves to the previous page of the report.
PgDn
Moves to the next page of the report.
Home
Moves directly to the top of a group of pages.
End
Moves directly to the bottom of a group of pages.
F7
Exits to the menu from any point in the report.
Left
Moves left one character.
Right
Moves right one character.
Tab
Toggles between the left and right halves of a report.
Up/Down
Moves a line up and down the screen to line up information when
you toggle between halves of a report.
Using Report Pick Screen Criteria
You can save the pick criteria from any report screen to make it easier to run
reports without redefining the criteria each time.
The RM option to Use Report Defaults? must be set to Yes to use this
functionality.
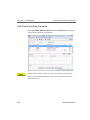
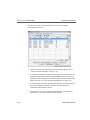
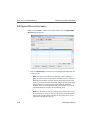
After you choose to print a report, the Save Report Criteria screen appears.
Bank Reconciliation
1-35
CHAPTER 1 • Introduction
Reports
•
Check the Save as Personal Report Picks? box save the pick criteria for
use at a later time on your workstation.
•
Check the Save as Global Report Picks? box to save the pick criteria for
use by anyone in your organization who has access to this report.
•
Enter a Description for these report defaults for identification.
•
If you check the Set as Personal Default? box (or enter Y in text mode),
these pick criteria will be automatically applied on the report screen the next
time you run the report from the menu.
•
If you check the Set as Global Default? box (on enter Y in text mode), these
pick criteria will be automatically applied on the report screen whenever
anyone in your organization runs the report from the menu.
Whether or not you set saved criteria as a default, you can load any report criteria
you have saved by clicking Shift-F3 and choosing the description you want.
Consult the Resource Manager User’s Guide for more information about reports.
1-36
Bank Reconciliation
CHAPTER 2
Installation
2-1
Conversion
2-3
2
Installation and Conversion
Installation
Before You Install Bank Reconciliation
Make sure your system meets these minimum requirements
before you install Bank Reconciliation.
The Bank Reconciliation system needs a minimum of 3
megabytes (3 MB) of disk space to work correctly with
programs, sample data, data dictionaries, system files, and
graphics files. Having more disk space available is necessary
for the data files you create and maintain.
The OSAS system requires at least one megabyte (1 MB) of
main memory to run. More memory may be necessary in
certain environments and operating systems.
Installing Bank Reconciliation
Use the Install Applications function in Resource Manager
(see the Resource Manager User’s Guide) to install Bank
Reconciliation.
Setting up Bank Reconciliation
Once you install Bank Reconciliation on your system, you
must prepare your data files for everyday use.
Bank Reconciliation
2-1
CHAPTER 2 • Installation and Conversion
You can prepare files for use with Bank Reconciliation in one of two ways: you
can create and set up your files manually on a new system, or you can convert
your old files when you upgrade from an earlier version. To create files on a new
system, use the Data File Creation function on the Company Setup menu in
Resource Manager (see the Resource Manager User’s Guide). For instructions on
converting your files, see the Conversion section later in this chapter.
If you plan to use General Ledger with Bank Reconciliation, you must install and
set up GL before you set up Bank Reconciliation. If you plan to use Accounts
Payable, Purchase Order, Accounts Receivable, Sales Order, or Payroll with
Bank Reconciliation, set up those applications after you set up Bank
Reconciliation.
2-2
Bank Reconciliation
Conversion
If you use an earlier version of OSAS Bank Reconciliation, you can convert your
files from the older version to the current version.
When you are ready to convert files, use the Data File Conversion function on
the Company Setup menu in Resource Manager (see the Resource Manager
User’s Guide) to upgrade Bank Reconciliation data files. You can upgrade from
version 4.xx, 5.xx, 6.xx, or 7.0x.
Follow these guideline to convert your files to version 7.6:
You must install the new version of Bank Reconciliation before you convert
files. You can replace and update the programs properly only by using the
Install Applications function in Resource Manager.
Before you convert an application’s files, make note of the version number
of the application from which you are converting. The Data File Conversion
function has no way of determining the information from within the
function.
Because tables are also converted when you convert data files, any changes
made (including those in Options and Interfaces) since the initial set up
may be lost. Check table settings and verify your options and interfaces
selections after converting all companies. If you need to reconvert a
company, either reset your options after conversion or back up the xxTB files
before converting.
Before you convert an application’s files, back up your data files.
Bank Reconciliation
2-3
CHAPTER 2 • Installation and Conversion
Conversion
Consider Your Setup
Before you try to convert from your version of Bank Reconciliation, consider the
exact setup of your system. Since OSAS code can be customized, modifications
to your system might be lost if you install a new version of a program or update a
file. If you are not sure if your system is ready for conversion, consult your
value-added reseller.
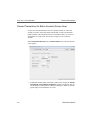
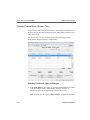
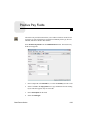
Converting to Version 7.6
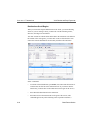
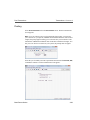
Select Data File Conversion from the Company Setup menu in Resource
Manager. The function screen appears.
2-4
1.
The system displays all valid OSAS data paths. Select the destination
directory where your new data files will reside.
2.
Enter the path (drive and directory) that has the files you want to convert.
You cannot enter the same path as the path you selected as the destination.
Bank Reconciliation
Conversion
Installation and Conversion • CHAPTER 2
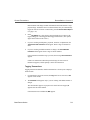
3.
If you want source files to be erased after conversion, select the check box
(or enter Y in text mode); if not, clear the box (or enter N in text mode).
4.
If you want the conversion process to pause if a problem occurs, select the
check box (or enter Y in text mode); if not, clear the box (or enter N in text
mode). The system considers file corruption or evidence of data not
converting correctly a problem.
5.
Enter BR in the Appl column; Bank Reconciliation appears.
6.
Enter your earlier version number of Bank Reconciliation, and press Enter.
(You can determine the version by looking at the copyrights screen when
you start OSAS, or in most versions, by using the Application Information
tool button on the menu screen in graphical mode or by pressing Shift+F2 in
text mode.
7.
If data files already exist for Bank Reconciliation in the intended destination
path, the BR data files exist. Do you want this task to erase them? prompt
appears. If you want to erase the existing files and convert the files from the
version in the source path, select Yes (or enter Y in text mode); if not, select
No (or enter N in text mode). If you elect not to erase existing files, you must
change your directory choices so that no conflict exists.
8.
To convert, use the Proceed (OK) command.
9.
The Do you want a printout of error log after each application? prompt
appears. If you want the error log to be produced after files are converted for
each application, select Yes (or enter Y in text mode); if you want the log to
be produced after files for all applications are converted, select No (or enter
N in text mode). If you are converting only Bank Reconciliation files, your
answer to this prompt makes no difference.
10. Answer the questions that appear relating to the conversion of the employee
history and last-year files.
11. If a problem occurs and you indicated that you want the system to pause
when a problem occurs, a prompt alerts you. To stop the conversion process,
select Yes (or enter Y in text mode). To let the conversion run its course and
investigate later, select No (or enter N in text mode).
Bank Reconciliation
2-5
CHAPTER 2 • Installation and Conversion
Conversion
12. When the process is finished, the files are converted. Select the output
device for the error log.
After conversion is finished and the error log is produced, the main menu—
with Bank Reconciliation added—appears.
2-6
Bank Reconciliation
Bank Reconciliation User’s
Manual
CHAPTER 3
Setup Considerations
3-1
Setup Checklist and Functions
3-5
3
Setup
Setup Considerations
After you have installed the software for the first time or after
you have upgraded the software, you must set up the system.
Follow the setup procedures carefully; the choices you make
determine how the system will operate.
Codes and IDs
When you set up the system, you assign codes and IDs to tell
the system how to identify each item on file. The system uses
these identifiers to organize the information in reports and
inquiry windows.
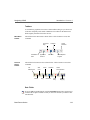
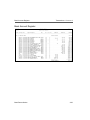
The system arranges code characters in a particular order. In
the following list codes and IDs are sorted from lowest to
highest, and dashes represent blank spaces.
—————0
—————1
—————Z
—————a
————01
——a———
000000
000001
1
Bank Reconciliation
3-1
CHAPTER 3 • Setup
The organization of these codes illustrates the following principles:
•
The system reads codes from left to right until it finds something other than a
blank space.
•
Items that make up a code are always listed alphabetically. The items are
listed in this order for each position:
•
•
•
•
•
blank spaces
characters (-, *, /, and so forth)
numbers (0–9)
uppercase letters (A–Z)
lowercase letters (a–z)
Alphabetical rules are not intuitive when numbers are involved. Numbers are
sorted as if they were letters: When the first characters of several IDs are
compared, the ID with the smallest first character is placed first in the list. If
the first character of the IDs is the same, the second characters are compared
and the ID with the smallest second character is placed first in the list. This
comparison is made for each character in the range of IDs until the IDs are
clearly in alphabetical order.
If you use numbers for IDs, pad them with zeros so that they are all the same
length and numeric rules can hold true. For example, in alphabetical sorting
ID 112 comes before ID 60, since anything that starts with 1 comes before
anything that starts with 6 alphabetically. If ID 60 were ID 000060 and ID
112 were ID 000112, ID 000060 would be listed first, since 060 is less than
112 alphabetically and numerically.
When you assign IDs and codes, establish a format that makes sense for your
business and use it consistently. The following suggestions may help:
3-2
•
To prevent organization problems, use zeros to make all IDs the same length.
If IDs are divided into more than one part, the parts should be the same
length in every ID. Do not use spaces to divide IDs into more than one part.
For example, use ACE-01 and ACE-11 instead of ACE-1 and ACE-11 or
ACE 01.
•
If you use letters in IDs, use either all uppercase or all lowercase letters so
that the IDs can be sorted correctly.
Bank Reconciliation
Setup • CHAPTER 3
•
Use descriptive IDs. For example, FNB001 and SNB002 are more
descriptive IDs than 000001 and 000002. (If you already use a numbered
system, you might want to stick with it.)
•
If you want to sort items by a particular attribute—name or group—put the
attribute in the ID. For example, to organize bank accounts by name, put the
first characters of the name of the bank in the bank account ID.
•
To ensure that you can insert new items into a sequence, use a combination
of letters and numbers that leaves room in the sequence for later additions.
For example, setting up two consecutive IDs of FNB001 and FNB005 leaves
room for three bank accounts in between.
Bank Reconciliation
3-3
Setup Checklist and Functions
Follow the steps below to set up the Bank Reconciliation system. Each step is
explained in this section.
1.
2.
3.
4.
5.
Set up the options and interfaces.
Build the RMBAxxx (Bank Accounts) file.
Enter initial balances.
Set up roles.
Set up a backup schedule.
NOTE: Bank Reconciliation has no tables to set up. The OPTxxx (Options) table
stores options and interfaces settings. Maintain the information stored in this
table through Resource Manager functions, not through the table itself.
Options and Interfaces
An application can be interfaced to work in conjunction with other applications.
Bank Reconciliation can be interfaced with General Ledger, Accounts Payable/
Purchase Order, Accounts Receivable/Sales Order, and Payroll.
General Ledger
When Bank Reconciliation interfaces with General Ledger, you can use the
Inquiry (F2) command to look up and select general ledger account numbers
when you enter bank accounts. In addition, posting bank reconciliation
transactions makes offsetting entries that update the GLJRxxx (General Ledger
Journal) file. Finally, the general ledger accounts assigned to the bank account
records use the balances in the GLMAxxx (General Ledger Master) file.
Bank Reconciliation
3-5
CHAPTER 3 • Setup
Setup Checklist and Functions
Accounts Payable/Purchase Order
When Bank Reconciliation interfaces with Accounts Payable/Purchase Order,
you can specify the ID of the bank account the checks are paid from when you
post payments. Summary entries of the checks are created in the BRTRxxx
(Transactions) file for that bank account.
Accounts Receivable/Sales Order
When Bank Reconciliation interfaces with Accounts Receivable/Sales Order,
posting accounts receivable transactions updates the BRTRxxx file with deposits
for cash sales and cash receipts in the bank accounts specified.
Payroll
When Bank Reconciliation interfaces with Payroll, you can specify the ID of the
bank account the checks are paid from when you post checks. Summary entries
of the checks are created in the BRTRxxx file for that bank account.
3-6
Bank Reconciliation
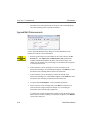
Setup Checklist and Functions
Setup • CHAPTER 3
Options and Interfaces
Select Options and Interfaces from the Resource Manager Company Setup
menu. The Options and Interfaces screen appears.
The name of the company you are working with appears. Specify whether the
Options table is shared or owned. (See the Resource Manager User’s Guide for
information about Options tables.) Then enter BR as the application ID. The
Bank Reconciliation Options screen appears.
For Bank Reconciliation, there is only one option: whether or not you want to
interface Bank Reconciliation with General Ledger. This interface option
depends on whether or not General Ledger is installed. Do not try to interface
Bank Reconciliation with General Ledger if General Ledger is not installed.
Set up the interface between Bank Reconciliation and Accounts Payable/
Purchase Order, Accounts Receivable/Sales Order, and Payroll in those
applications, not in Bank Reconciliation. See the Setup section in each
application’s user’s manual for more information.
Bank Reconciliation
3-7
CHAPTER 3 • Setup
Setup Checklist and Functions
Press Enter to interface Bank Reconciliation with General Ledger. When you
finish, press W to save your entries. Then exit to the Options and Interfaces
screen. Select another application whose options and interfaces you want to
change, or exit to the Resource Manager Company Setup menu.
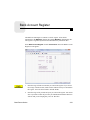
Bank Accounts
The Resource Manager file RMBAxxx (Bank Accounts) file stores information
about your company’s checking and savings and credit card accounts that you
will reconcile. If you are installing Bank Reconciliation for the first time, collect
the up-to-date information about your bank and credit card accounts and enter the
information into the RMBAxxx file before you begin operations. Use the Bank
Accounts function in Resource Manager to set up and update bank and credit
card account information.
Each account record must have a unique ID. In each record you record such
things as the bank account or credit card number and description, the contact at
the bank, the account’s general ledger account number, and the last statement
date and balance. If Resource Manager does not interface with General Ledger,
you can also enter the balance of the general ledger bank account.
Initial Balances
After you have set up your bank accounts, set up the initial balances of your bank
accounts. Follow these steps:
1.
In the Resource Manager Bank Accounts function, enter the last statement
balance and date of each bank account. If Resource Manager does not
interface with General Ledger, enter the balance of the general ledger
account assigned to each bank account record.
2.
Turn off the interface between Bank Reconciliation and General Ledger (see
Options and Interfaces above).
3.
In Bank Reconciliation, enter, verify, and post the outstanding transactions
since your last bank statement (see Chapter 4).
After you post the outstanding transactions, turn on the interface between Bank
Reconciliation and General Ledger.
3-8
Bank Reconciliation
Setup Checklist and Functions
Setup • CHAPTER 3
If Bank Reconciliation interfaces with General Ledger, Accounts
Receivable/Sales Order, Accounts Payable/Purchase Order, and Payroll, see
the Setup sections in those user’s manuals before you begin processing in
the Bank Reconciliation system. If those systems are not properly set up,
errors can result in your data.
Roles
To safeguard your system, you’ll need to prevent access by unauthorized people.
Use the Resource Manager Roles function to set up roles on your system. You
can set up roles for the Accounts Payable system itself, for menus in the system,
and for individual functions. To control users’ access to menus and functions,
you can set up an roles for each user or group of users that performs the same
functions.
Different Roles for Each Company
Roles are company-specific. When you set up a role, the role is assigned the
company you are in.
Because the roles are company-specific, you must set up roles for each company
a user needs to access.
What Should Be Protected
Because of the sensitive nature of some of the information in the Bank
Reconciliation data files and reports, you should limit access to the functions that
provide confidential information or are sensitive to change. For maximum
security, protect the Bank Reconciliation application itself, each of the Bank
Reconciliation menus, and the individual functions.
For more information about roles, see the Resource Manager User’s Guide.
Backup Schedule
Plan a backup schedule before you begin day-to-day operations.
Bank Reconciliation
3-9
CHAPTER 3 • Setup
Setup Checklist and Functions
You can lose files because of disk drive problems, power surges and outages, and
other unforeseen circumstances. Protect yourself against such an expensive crisis
by planning and sticking to a backup schedule.
Backing up Data Files
Back up your Bank Reconciliation data files whenever they change—every day
or every week—and before you run the Post Transactions and Purge Cleared
Transactions functions.
Backing up Programs
Once a month or so, back up your programs. Even though these files do not
change, backup media can be damaged or deteriorate, so it pays to have a fresh
copy in storage in case you need it.
Media
Keep more than one set of backups in case one set is bad or damaged. Rotate the
sets of backup media, keeping one set off-site.
Use Resource Manager
Use the Backup function on the Resource Manager Data File Maintenance
menu to back up files.
You must back up all the files in the data path for a particular list of
companies at once to ensure that you have up-to-date copies of the system
files. Do not try to use operating system commands to back up only a few
files that have been changed; if you do, your system may not work after you
restore them. The Backup function backs up all the data files for a specified
company in a data path at one time.
3-10
Bank Reconciliation
Bank Reconciliation User’s Manual
CHAPTER 4
Transactions
4-3
Void Checks and Stop
Payments
4-13
BR Journal
4-19
Bank Account Register
4-21
Post Transactions
4-25
4
Transactions
Introduction
The functions explained in this chapter constitute the daily
work portion of Bank Reconciliation. With the Bank
Reconciliation system, you might or might not perform
transaction work daily. You might choose to enter transactions
daily or weekly and perform your reconciliation monthly, after
you receive your bank or credit card statements.
Bank Reconciliation
4-1
Transactions
Use the Transactions function to enter deposits, disbursements (checks and
withdrawals), adjustments (for example, finance charges and service charges to
your bank accounts), and transfers that have not been created through other
applications. Transactions entered through this function remain in the BRJRxxx
(Journal) file until you post them to the BRTRxxx (Transactions). Once you post
a transaction, you can tag it as cleared using the Cleared Transactions function
(see on page 5-3).
You can enter only adjustment type transactions for credit card accounts. You can
enter any of the transaction types for normal bank accounts.
You must enter transactions in two stages. First enter the transaction. Then enter
the offsetting entries, which include the general ledger account numbers.
If Bank Reconciliation interfaces with Accounts Receivable/Sales Order, enter
deposits through those applications. See the Accounts Receivable User’s Guide
and the Sales Order User’s Guide for information.
If Bank Reconciliation interfaces with Accounts Payable/Purchase Order and
Payroll, enter disbursements through those applications. See the information on
posting payments in the Accounts Payable User’s Guide and the section on
posting checks in the Payroll User’s Guide for information.
Bank Reconciliation
4-3
CHAPTER 4 • Transactions
Transactions
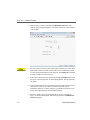
Select Transactions from the Transactions menu. The Transactions screen
appears.
Note: If you are entering a new set of transactions after posting, you store last
year’s GL files on your system, and Bank Reconciliation interfaces with General
Ledger, this prompt appears asking you to select the GL year for which to enter
transactions. If Bank Reconciliation does not interface with General Ledger, or if
last year’s GL files are not stored on your system, the prompt does not appear.
Select the year you want to work with and use the Proceed (OK) command to
continue. The Transaction screen appears.
4-4
Bank Reconciliation
Transactions
Transactions • CHAPTER 4
1.
Enter the bank account for which you want to enter or edit transactions.
2.
If you specified a bank account, enter the number corresponding to the kind
of transaction you want to enter or edit. The transaction types appear at the
bottom of the screen. After you enter the transaction type, you are taken to
the transactions scroll region. If no transactions are on file, you go directly
into append mode.
Transactions Scroll Region
Select a command:
•
Press Enter to edit the selected transaction. The Edit Transactions dialog box
appears.
•
Press A to add a transaction for the bank account. The Append Transactions
dialog box appears.
•
Press H to return to the Bank Account ID field.
•
To delete the selected transaction, use the Delete (F3) command. (You
cannot delete transactions posted from an interfaced application.) When you
delete offsetting entries for deposits, disbursements, voided checks, or
adjustments, the associated entries are also deleted. Print the BR Journal (see
on page 4-19) before and after you delete a transaction so that you maintain
an accurate audit trail.
Bank Reconciliation
4-5
CHAPTER 4 • Transactions
Transactions
Append/Edit Transactions
The fields that appear in the upper scroll region of the Transactions screen as well
as the Append/Edit Transactions dialog box vary slightly, depending on the type
of transaction you selected. Fields that are transaction-specific are designated as
such; if a field does not have a transaction-specific designation, it is available
regardless of transaction type.
1.
The Deposit box appears only when you are working with deposits. Enter
the slip number of the deposit.
The Check box appears only when you are working with disbursements and
adjustments.
For a check disbursement, enter the check number. For a cash withdrawal,
enter W. The description W/D appears.
For a one-time adjustment, press Enter to skip this field.
For a recurring adjustment, enter an asterisk (*) and then the adjustment ID
(for more information, see page 6-5). For example, if you have set up a
recurring adjustment with an ID of SVCCHG, enter *SVCCHG. The
recurring adjustment information appears in the upper scroll region, and the
following prompt appears at the bottom of the screen: Copy this recurring
adjustment. If you want to copy the recurring adjustment, select the check
box (or enter Y in text mode); if not, clear the box (or enter N in text mode).
The To Bank box appears only when you are working with transfers.
4-6
Bank Reconciliation
Transactions
Transactions • CHAPTER 4
Enter the ID of the bank account you are transferring money to (it cannot be
the ID of the bank you entered in the Bank Account ID box above). The
description of the bank account appears at the bottom of the screen for
verification.
2.
If you are adding a transaction, the date you are entering the transaction
appears in the Tran Date box. If you are editing a transaction, the date you
entered the transaction appears. Accept the current date, or change it.
3.
If you are adding a transaction, the general ledger period for which you are
entering the transaction appears in the Per box. If you are editing a
transaction, the period for which you entered the transaction appears. Accept
the current period, or change it.
4.
Enter the amount of the transaction in the Amount box.
5.
If you are adding a transaction, the default description (from the BRCDxxx
file) appears in the Description box. Accept the default description, or enter
a different description.
6.
Enter a reference for the adjustment in the Ref box. References are posted to
General Ledger and provide another way of searching for information in the
General Ledger application.
If you are entering a recurring adjustment, the reference you entered for the
recurring adjustment (see page 6-5) appears.
7.
The Void? check box appears only when you are working with
disbursements.
If you do not want to void the check (that is, if you are entering a new check
or editing a check), clear the check box (or N in text mode). If you want to
void a check, select the box (or enter Y in text mode). You can void checks
generated from Accounts Payable or Payroll (if Bank Reconciliation
interfaces with those applications), void zero-balance checks to account for
checks lost to alignment, and so on.
When finished, one of the following steps may occur:
Bank Reconciliation
4-7
CHAPTER 4 • Transactions
4-8
Transactions
•
If you are adding a deposit, a disbursement, or an adjustment, you are taken
to the distributions portion of the screen after you enter the reference.
•
If you are editing a deposit, a disbursement, or an adjustment, select Yes (or
enter Y in text mode) at the Edit Distributions? prompt that appears after
you enter the reference to move to the Distributions portion of the screen, or
select No (or enter N in text mode) to return to the transactions scroll region
if you are finished editing the transaction and do not need to edit the
distributions.
•
If you are adding or editing a transfer, you are returned to the scroll region.
•
When you are finished entering transactions, exit to the Transactions menu.
Bank Reconciliation
Transactions
Transactions • CHAPTER 4
Distributions Scroll Region
Deposits, disbursements, and adjustments must have both the debit and the credit
side of the transaction accounted for. You can enter more than one offsetting
entry to counterbalance the transaction. (For example, if you enter a deposit of
100 dollars, 40 of it may be charged against one account and 60 against another.)
You cannot exit from the distributions portion of the screen until you have
accounted for the amount of the transaction in terms of both debits and credits
(that is, the balance reaches zero).
Select a command:
•
Press Enter to edit the current distribution. (You cannot edit the first line of a
transaction; the first line is the transaction itself. If you want to edit the
transaction, you must edit it in the transaction scroll region.)
•
Press A to add a distribution for the transaction.
Bank Reconciliation
4-9
CHAPTER 4 • Transactions
•
Transactions
Press D to return to the transactions scroll region. (This command appears
only when offsetting entries equal the transaction.)
Append/Edit Disbursements
Use the Append/Edit Distributions dialog box to add a distribution to the
transaction or edit the selected distribution.
1.
Enter the general ledger account number for the credit or debit in the GL
Account box. (The Inquiry (F2) and Maintenance (F6) commands are
available if Bank Reconciliation interfaces with General Ledger.) You
cannot enter the number of a general ledger account that has been assigned
to a bank account record.
2.
If the transaction you are offsetting was a credit, the amount of the
transaction remaining to be counterbalanced appears in the Debit box. Enter
the amount of the offsetting debits related to the transaction.
3.
If the transaction you are offsetting was a debit, the amount of the
transaction remaining to be counterbalanced appears in the Credit box. Enter
the amount of the offsetting credits related to the transaction.
4.
Accept the default Description, or enter a different description.
5.
Enter a reference for the offsetting entry in the Ref box. References are
posted to General Ledger and provide another way of searching for
information in the General Ledger application.
If you have not entered enough credits or debits to offset the amount of the
transaction, the amount remaining to compensate for appears in the Balance
section of the dialog box.
4-10
Bank Reconciliation
Transactions
Transactions • CHAPTER 4
After you enter the reference, edit or append an offsetting entry, or press D to
return to the transactions scroll region.
Incorrect Entries
If you save an incorrect entry, you can do one of these things:
•
If you have not posted the transaction to the BRTRxxx file, enter a negative
transaction for the incorrect amount.
•
If the incorrect entry is a check (disbursement) and you have not posted it to
the BRTRxxx file, void the check (see on page 4-13).
•
If you have posted the transaction to the BRTRxxx file, enter a negative
transaction for the entire amount, enter the correct transaction, post the
entries (see on page 4-25), and tag the incorrect and the negative deposits as
cleared (see on page 5-3). The next time you purge cleared transactions, the
incorrect and the negative deposits are deleted from the BRTRxxx file.
Bank Reconciliation
4-11
Void Checks and Stop Payments
Use the Void Checks and Stop Payments function to void a check before it is
sent or to stop the payment of a check before it is cashed.
You can void any check after it is posted to the BRTRxxx (Transactions) file. The
check might have been entered through Bank Reconciliation or through Payroll
or Accounts Payable/Purchase Order (if these applications interface with Bank
Reconciliation). You can also void Bank Reconciliation checks in those
interfaced applications.
You can stop the payment of any check, even if you posted it from an interfaced
application (Accounts Payable/Purchase Order or Payroll). In addition, you must
do one of these things:
•
If you posted the check from an interfaced application, enter a transaction to
reverse the check. Then enter the correct check (if necessary) and post the
transactions. See the appropriate user’s manual for more information.
•
If you entered the check through the Transactions function, reverse the
check. Then enter the correct check (if appropriate), and post the
transactions.
When you post a voided check, these things happen to the original disbursement:
•
•
•
The status is changed to void.
The amount is set to zero.
The check is tagged as cleared.
When you post a stop payment, the status of the original disbursement is
unchanged, but it is flagged as a stop payment, which you must manually tag as
cleared.
Bank Reconciliation
4-13
CHAPTER 4 • Transactions
Void Checks and Stop Payments
Void Checks and Stop Payments
Select Void Checks and Stop Payments from the Transactions menu. The Void
Checks and Stop Payments screen appears.
Enter the bank account for which you want to void checks or stop payments.
After you enter the bank account ID, you are taken to the transactions scroll
region of the screen.
4-14
Bank Reconciliation
Void Checks and Stop Payments
Transactions • CHAPTER 4
Transactions Scroll Region
The posted disbursements for the bank account you selected appear:
•
In the first column, for a check disbursement, the check number appears. For
cash withdrawal, W/D appears.
•
In the Type column, if Void appears, the transaction has been voided. If Stop
appears, payment of the check has been stopped.
•
The date you entered the transaction, the amount of the transaction, and the
transaction description and reference appear.
•
The abbreviation of the application where the transaction was created
appears in the Src column. For example, if the check was posted to Bank
Reconciliation from Payroll, PA appears.
Select a command:
•
Press C to leave the transactions scroll region and return to the Bank
Account ID field.
•
Press V to toggle the void status for the check currently selected. If you are
voiding a check that you entered in Bank Reconciliation, you are taken to the
distributions portion of the screen.
If you are voiding a check that was posted from Accounts Payable or
Payroll, several prompts appear. See the Accounts Payable User’s Guide or
the Payroll User’s Guide for more information.
If you are restoring a voided check, this prompt appears: Press F3 to delete
this voided transaction. Use the Delete (F3) command to restore the check
to active status.
•
Bank Reconciliation
Press S to toggle the stop payment status for the check currently selected. If
you are restoring a check on which you have stopped payment, this prompt
appears: Press F3 to delete this stopped transaction. Use the Delete (F3)
command to restore the check to active status.
4-15
CHAPTER 4 • Transactions
Void Checks and Stop Payments
Distributions Scroll Region
When you entered the original disbursement of the check, you made offsetting
entries. If you are voiding a check, you must also void the offsetting entries;
otherwise, the ledger will not balance.
You must account for both the debits and credits in the transaction. The debit for
the amount of the void appears; you must enter credits to offset the debit. You
cannot exit from the distributions section until you balance the transaction.
Select a command:
4-16
•
To edit the selected distribution, press Enter. (You cannot edit the first line of
a transaction; the first line is the transaction itself. If you want to edit the
transaction, you must edit it in the transactions scroll region of the screen.)
•
Press A to add a distribution for the transaction.
•
Press D to return to the transactions scroll region of the screen. (This
command appears only when offsetting entries equal the transaction.)
Bank Reconciliation
Void Checks and Stop Payments
Transactions • CHAPTER 4
Append/Edit Distributions
Use the Append/Edit Distributions dialog box to add a distribution to the
transaction or edit the selected distribution.
1.
Enter the general ledger account number for the credit or debit. (The Inquiry
command is available if Bank Reconciliation interfaces with General
Ledger.) You cannot enter the number of a general ledger account that has
been assigned to a bank account record.
2.
In the Debits box, enter the amount of the offsetting debits related to the
transaction.
3.
In the Credits box, enter the amount of the offsetting credits related to the
transaction.
4.
Accept the default Description (from the BRCDxxx file), or enter a different
description.
5.
Enter a reference for the offsetting entry in the Ref box. References are
posted to General Ledger and provide another way of searching for
information in the General Ledger application.
If you have not entered enough credits or debits to offset the amount of the
transaction, the amount remaining to compensate for appears in the Balance
section of the dialog box.
6.
Bank Reconciliation
After you enter the reference, edit or append an offsetting entry, or press D to
return to the transactions scroll region of the screen.
4-17
CHAPTER 4 • Transactions
Void Checks and Stop Payments
Incorrect Entries
If you save an incorrect entry, you can do one of these things:
4-18
•
If you have not posted the disbursement to the BRTRxxx file, enter a
reversing entry with the reference void, or delete the entry and reenter it
correctly.
•
If you have posted the disbursement to the BRTRxxx file, reenter the
transaction (see on page 4-3).
Bank Reconciliation
BR Journal
After you have entered the day’s transactions, print the BR Journal to check for
errors and omissions and to use as an audit trail of Bank Reconciliation
transactions. Only unposted transactions appear in the journal.
Print the BR Journal before and after you delete a transaction, void a check, or
stop payment on a check so that you maintain an accurate audit trail.
Select BR Journal from the Transactions menu. The BR Journal screen appears.
1.
Enter the range of bank account IDs, check numbers, and deposit numbers
you want in the journal, or leave the boxes blank to include all.
2.
Select the type of transactions you want to print in the journal.
3.
Select the order in which you want to organize the journal.
Bank Reconciliation
4-19
CHAPTER 4 • Transactions
4.
BR Journal
Select the output device. Select the output device to begin printing the
report. See “Reports” on page 1-27 for more information. After the journal is
produced, the Transactions menu appears.
BR Journal
4-20
Bank Reconciliation
Bank Account Register
The Bank Account Register is similar to a check register. It lists all the
transactions in the BRJRxxx (Journal) file and the BRTRxxx (Transactions) file.
The register is organized by bank account ID and then by transaction date.
Select Bank Account Register from the Transactions menu. The Bank Account
Register screen appears.
1.
Enter the range of bank account IDs you want in the register. If you elect to
list a range of bank accounts, bank accounts without activity are included in
the register. Leave the boxes blank to include all IDs.
2.
Enter the range of GL periods and years you want in the register. You cannot
enter a year that is earlier the prior GL year if Bank Reconciliation interfaces
with GL and you are keeping last year’s GL data files.
Bank Reconciliation
4-21
CHAPTER 4 • Transactions
3.
Bank Account Register
Select which transactions you want to include:
•
•
•
Uncleared transactions
Cleared transactions
Reconciled transactions
Note: If you chose to print reconciled transactions and Bank Reconciliation
interfaces with General Ledger, no balances print on the report.
4-22
4.
If Bank Reconciliation interfaces with General Ledger, this function uses the
most recent general ledger account balance from the GLMAxxx (GL Master)
file. If you want unposted GL Journal entries to be included in the balance,
select the check box (or enter Y in text mode); if not, clear the box (or enter
N in text mode). Including unposted entries in the balance provides you with
up-to-date bank balances without first posting General Ledger transactions.
5.
Select the output device. Select the output device to begin printing the
report. See “Reports” on page 1-27 for more information. After the register
is produced, the Transactions menu appears.
Bank Reconciliation
Bank Account Register
Transactions • CHAPTER 4
Bank Account Register
Bank Reconciliation
4-23
Post Transactions
Use the Post Transactions function to move the entries in the BRJRxxx
(Journal) file to the BRTRxxx (Transactions) file, and if Bank Reconciliation
interfaces with General Ledger, to create offsetting entries in the GLJRxxx
(Journal) file for Bank Reconciliation transactions.
When you post transactions, these things happen in the Bank Reconciliation
system:
•
The transactions in the BRJRxxx file are moved to the BRTRxxx file.
•
If Bank Reconciliation does not interface with General Ledger, the general
ledger account balances are updated in the RMBAxxx (Bank Accounts) file.
•
The BRJRxxx file is erased to make room for the next set of transactions.
•
If Bank Reconciliation interfaces with General Ledger, entries are created in
the GLJRxxx file for the offsetting entries that you entered for deposit,
disbursement, void check, and adjustment transactions.
Deposits
When you post deposits, entries are made to these accounts:
Bank Account
DB
Offsetting
Account
CR
Additional
Offsetting
Accounts
DB
CR
The bank account comes from the bank account record. Offsetting accounts are
specified when deposits are entered. If the deposit was offset to only one account,
that account is credited. If the deposit was offset to several accounts, there might
be a combination of debit and credit entries to offsetting accounts.
Bank Reconciliation
4-25
CHAPTER 4 • Transactions
Post Transactions
If a deposit is reversed, the bank account is credited and the offsetting account is
debited. If the deposit is offset to more than one account, there might be a
combination of debit and credit entries to the offsetting accounts.
Disbursements
When you post disbursements, entries are made to these accounts:
Bank Account
CR
Offsetting
Account
DB
Additional
Offsetting
Accounts
DB
CR
The bank account comes from the bank account record. Offsetting accounts are
specified when disbursements are entered. If the disbursement was offset to only
one account, that account is debited. If the disbursement was offset to several
accounts, there might be a combination of debit and credit entries to offsetting
accounts.
If a disbursement is reversed, the bank account is debited and the offsetting
account is credited. If the disbursement is offset to more than one account, there
might be a combination of debit and credit entries to the offsetting accounts.
Voided Checks
When you post voided checks, entries are made to these accounts:
Bank Account
DB
Offsetting
Account
CR
Additional
Offsetting
Accounts
DB
CR
The bank account comes from the bank account record. Offsetting accounts are
specified when voided checks are entered. If the voided check was offset to only
one account, that account is credited. If the voided check was offset to several
accounts, there might be a combination of debit and credit entries to offsetting
accounts.
4-26
Bank Reconciliation
Post Transactions
Transactions • CHAPTER 4
If a voided check is reversed, the bank account is credited and the offsetting
account is debited. If the voided check is offset to more than one account, there
might be a combination of debit and credit entries to the offsetting accounts.
Adjustments
Positive Adjustments
When you post positive (or debit) adjustments, entries are made to these
accounts:
Bank Account
Offsetting
Account
CR
DB
Additional
Offsetting
Accounts
DB
CR
The bank account comes from the bank account record. Offsetting accounts are
specified when adjustments are entered. If the positive adjustment was offset to
only one account, that account is credited. If the adjustment was offset to several
accounts, there might be a combination of debit and credit entries to offsetting
accounts.
Negative Adjustments
When you post negative adjustments, entries are made to these accounts:
Bank Account
CR
Offsetting
Account
DB
Additional
Offsetting
Accounts
DB
CR
The bank account comes from the bank account record. Offsetting accounts are
specified when adjustments are entered. If the negative adjustment was offset to
only one account, that account is debited. If the adjustment was offset to several
accounts, there might be a combination of debit and credit entries to offsetting
accounts.
Bank Reconciliation
4-27
CHAPTER 4 • Transactions
Post Transactions
Before Posting
Before you post transactions, complete these tasks:
•
•
•
4-28
Enter and verify all Bank Reconciliation transactions.
Print the BR Journal.
Back up your data files.
Bank Reconciliation
Post Transactions
Transactions • CHAPTER 4
Posting
Select Post Transactions from the Transactions menu. The Post Transactions
screen appears.
Note: If you are entering a new set of transactions after posting, you store last
year’s GL files on your system, and Bank Reconciliation interfaces with General
Ledger, this prompt appears asking you to select the GL year for which to enter
transactions. If Bank Reconciliation does not interface with General Ledger, or if
last year’s GL files are not stored on your system, the prompt does not appear.
Select the year for which you want to post transactions and use the Proceed (OK)
command to continue. The Post Transaction screen appears.
Bank Reconciliation
4-29
CHAPTER 4 • Transactions
Post Transactions
If you have completed transaction entry, printed the BR Journal, and backed up
your data files, select the check box (or enter Y in text mode); if not, clear the box
(or enter N), return to the Transactions menu, and do so before posting. After
posting completes and the log is produced, the Transactions menu appears.
Posting Log
4-30
Bank Reconciliation
CHAPTER 5
Cleared Transactions
5-3
Reconciliation Report
5-15
5
Reconciliation
Change Cleared Transaction
Status
5-21
Purge Reconciled Transactions
5-23
Bank Reconciliation
5-1
Cleared Transactions
When you receive a statement for one of your bank or credit card accounts, use
the Cleared Transactions function to indicate which transactions have cleared
the bank or been recorded against your card. Cleared transactions update bank
account records, are included in the Reconciliation Report (see page 5-15), and
are purged when you run the Purge Cleared Transactions function (see page
5-23).
If Bank Reconciliation interfaces with General Ledger, you may want to post the
GLJRxxx (Journal) file to the GLMAxxx (Master) file before you clear
transactions so that the general ledger account assigned to each bank account
record reflects the most recent balance.
To clear transactions for a bank account, see “Cleared Transactions for Bank
Accounts (Screen One)” on page 5-4. To clear transactions for a credit card
account, see “Cleared Transactions for Credit Cards (Screen One)” on page 5-6.
Bank Reconciliation
5-3
CHAPTER 5 • Reconciliation
Cleared Transactions
Cleared Transactions for Bank Accounts (Screen One)
Use the first Cleared Transactions screen to identify the bank or credit card
account you want to work with and the current bank or credit card statement
balance and date. The information below covers bank accounts. See “Cleared
Transactions for Credit Cards (Screen One)” on page 5-6 for credit card
accounts.
Select Cleared Transactions from the Reconciliation menu. The first function
screen appears.
1.
5-4
If Bank Reconciliation does not interface with General Ledger, the Include
Unposted GL Journal Entries in Balance? field does not appear. You can
use the Bank Accounts function in Resource Manager to make sure that the
general ledger account balances are correct.
Bank Reconciliation
Cleared Transactions
Reconciliation • CHAPTER 5
If Bank Reconciliation interfaces with General Ledger, the Cleared
Transactions function uses the most recent general ledger account balances
assigned in the bank or credit card account records. If you want unposted GL
Journal entries to be included in the balance, select the check box (or enter Y
in text mode); if not, clear the box (or enter N in text mode). Including
unposted entries in the balance provides you with up-to-date bank balances
without having to post General Ledger transactions first.
2.
Enter the ID of the bank account with which you want to work.
3.
If Bank Reconciliation interfaces with General Ledger, the GL account
balance (with or without unposted entries included) associated with the bank
account record appears.
4.
Accept the last statement balance, or enter the balance from the bank
statement.
5.
Select what statement type you want: Date or Period.
6.
Accept the last statement date, or enter the date from the bank statement.
When you save your entries on the first screen, the Last Statement Balance
and Last Statement Date fields in the RMBAxxx file are updated, and the
system computes the total of the outstanding transactions. The second
Cleared Transactions screen appears.
7.
Bank Reconciliation
Proceed to “Cleared Transactions (Screen Two)” on page 5-8.
5-5
CHAPTER 5 • Reconciliation
Cleared Transactions
Cleared Transactions for Credit Cards (Screen One)
Select Cleared Transactions from the Reconciliation menu. The first function
screen appears.
1.
If Bank Reconciliation does not interface with General Ledger, the Include
Unposted GL Journal Entries in Balance? field does not appear. You can
use the Bank Accounts function in Resource Manager to make sure that the
general ledger account balances are correct.
If Bank Reconciliation interfaces with General Ledger, the Cleared
Transactions function uses the most recent general ledger account balances
assigned in the bank or credit card account records. If you want unposted GL
Journal entries to be included in the balance, select the check box (or enter Y
in text mode); if not, clear the box (or enter N in text mode). Including
unposted entries in the balance provides you with up-to-date bank balances
without having to post General Ledger transactions first.
2.
5-6
Enter the ID of the credit card account with which you want to work.
Bank Reconciliation
Cleared Transactions
3.
Reconciliation • CHAPTER 5
If Bank Reconciliation does not interface with General Ledger, the balance
from the bank account record appears.
If Bank Reconciliation interfaces with General Ledger, the GL account
balance (with or without unposted entries included) associated with the bank
account record appears.
4.
Accept the last statement balance, or enter the balance from the bank
statement.
5.
Select what statement type you want: Date or Period.
6.
Accept the last statement date, or enter the date from the bank statement.
7.
Enter the Payment Amount for the next credit card payment.
8.
Enter the Invoice Date for the next credit card payment.
9.
Enter the Invoice Number for the next credit card payment.
10. Check the Create Invoice? box to automatically create an accounts payable
or purchase order transaction for the next credit card payment amount (if
Bank Reconciliation is interfaced with Accounts Payable or Purchase
Order). If you choose to create an invoice, you will be prompted to choose
an AR/PO batch in which to create it.
11. When you save your entries on the first screen, the Last Statement Balance
and Last Statement Date fields in the RMBAxxx file are updated, and the
system computes the total of the outstanding transactions. The second
Cleared Transactions screen appears. Proceed to “Cleared Transactions
(Screen Two)” on page 5-8.
Bank Reconciliation
5-7
CHAPTER 5 • Reconciliation
Cleared Transactions
Cleared Transactions (Screen Two)
Use the second Cleared Transactions screen to select the type of transaction you
want to work with, the range of transaction types, and whether you want to tag or
untag cleared items.
You can clear only one type of transaction at a time: deposits (payments),
disbursements (charges), transfers, or adjustments.
Selecting Transaction Types and Ranges
1.
In the Clear Type box, select the type of transaction with which you want to
work: deposits (payments), disbursements (charges), transfers, or
adjustments. (The options appear at the bottom of the screen.)
Note: Transactions with a status of Reconciled do not appear on the report.
5-8
Bank Reconciliation
Cleared Transactions
Reconciliation • CHAPTER 5
Disbursements and charges include withdrawals and checks that have stoppayment flags. Voided checks are not shown because they are automatically
tagged as cleared. To look at voided checks, print the Reconciliation Report
(see page 5-15).
2.
3.
In the Tag Status box, select the tag status with which you want to work:
tagged, untagged, or both tagged and untagged transactions. (The options
appear at the bottom of the screen.)
If you are working with deposits, payments, transfers, or adjustments, the
Transaction Date From/Thru fields appear. Enter a range of transaction
dates.
4.
If you are working with disbursements or charges, the Check Number
From/Thru fields appear. Enter a range of check numbers.
If no transactions match the range you enter, the message No transactions
appears.
If there are transactions within the specified range, the first screen of
transactions appears, and the prompt is at the first transaction.
Tagging Transactions
Tagging transactions identifies which transactions have cleared your company’s
bank accounts.
1.
If a transaction is tagged as cleared, the Tag check box is selected (or Yes
appears in text mode).
2.
The Chk Num field appears only if you are working with disbursements or
charges.
The check number appears. If payment of a check has been stopped, S
appears after the check number.
If the transaction is a withdrawal, W/D appears.
Bank Reconciliation
5-9
CHAPTER 5 • Reconciliation
Cleared Transactions
The following information appears:
•
The transaction date
•
The check number or deposit slip number
Note: The Chk/Dep field appears only if you are working with deposits,
payments, transfers, or adjustments.
•
3.
The transaction description, reference, and amount of the transaction
appear
Select a command:
•
Press Enter to tag or untag a transaction, move to the transaction you
want to tag or untag, and press Enter.
•
Press T to tag all transactions that appear on the screen.
•
Press U to untag all transactions that appear on the screen.
•
Press R to reverse the tag status of the current transaction and all the
transactions that appear on the screen below it.
If only one or two of the transactions have not cleared the bank, you can
press T to tag the entire screen. Then move to the transactions that have not
cleared, and press Enter to untag them.
5-10
•
Press S to work with a particular transaction. In the screen that appears,
enter the number of the transaction you want to process and press Enter.
The transaction appears.
•
To see a breakdown of the outstanding balances by transaction type and
the amount to reconcile, press B at any time. The Outstanding Balances
screen appears.
•
Press H to return to the Clear Type field on the second screen.
Bank Reconciliation
Cleared Transactions
Reconciliation • CHAPTER 5
Totals Information
These totals appear at the bottom of the second Cleared Transactions screen:
•
The balance of the general ledger account from the bank account record
•
The outstanding balance, which is updated as you tag and untag transactions
•
The adjusted balance (the bank account balance minus the outstanding
balance), which is updated as you tag and untag transactions
•
The statement balance you entered on the first screen
When your bank or credit card account and the statement balances are reconciled,
the account balance equals the statement balance and the reconciliation amount is
zero.
When you are finished tagging and untagging the type of transactions you are
working with, use the Header command to save your changes and go to the Clear
Type field. Select the next type of transactions to work with, or exit to save your
changes and return to the Reconciliation menu.
After you have tagged all the items that have cleared the current bank statement,
print the Reconciliation Report (see page 5-15) to check for errors or omissions,
to ensure that the statement balance and your bank or credit card account balance
are reconciled, and as a record of the reconciliation.
Import Reconciliation Data
Use the Import Reconciliation Data function to import data from ASCII files into
Bank Reconciliation based on the reconciliation import layout established in the
Reconciliation Import function (see “Reconciliation Import” on page 6-11).
Bank Reconciliation
5-11
CHAPTER 5 • Reconciliation
Cleared Transactions
Press I on the second Cleared Transactions screen to open the Import
Reconciliation Data screen.
5-12
1.
Press I to import new data through the Import New Data dialog box (see
“Import New Data Dialog Box” on page 5-13).
2.
To manually synchronize an imported transaction with a transaction on file,
highlight the imported transaction and press Enter. The Sync Transaction
dialog box opens, allowing you to match the imported transaction data with a
transaction on file (see “Sync Transaction Dialog Box” on page 5-14).
3.
To automatically synchronize the imported transactions with transactions on
file, press A. OSAS will attempt to match the imported transaction
information with transactions on file.
4.
To toggle between views of synchronized transactions, unsynchronized
transactions, or all imported transaction data, press S.
Bank Reconciliation
Cleared Transactions
Reconciliation • CHAPTER 5
5.
To undo all synchronizations between imported transactions and transactions
on file, press U.
6.
To create a transaction to coincide with imported transaction information,
highlight the imported transaction and press C. The bank reconciliation
Transactions function opens (see “Transactions” on page 4-3).
7.
When you are done importing and synchronizing import reconciliation data,
press D to remove imported transactions from the transaction list.
Import New Data Dialog Box
The Import New Data dialog box opens when you press I while in the Import
Reconciliation Data function. It allows you to choose a layout ID and a
reconciliation file for import.
1.
Enter the Layout ID, or press F2 to choose one from a list.
2.
The description of the Layout ID is displayed, as well as the File Type.
3.
The default File Name is displayed. If necessary, change the path or use the
browse function to locate the file on your computer or network. Press Enter.
Bank Reconciliation
5-13
CHAPTER 5 • Reconciliation
4.
Cleared Transactions
The file information is displayed. Press G to go to a specific line of the file.
Press W to write the changes to the Import Reconciliation screen. See
“Import Reconciliation Data” on page 5-11 for more information about
processing and editing the entries after import.
Sync Transaction Dialog Box
Use the Sync Transaction dialog box to manually synchronize an imported
transaction with a transaction on file. The Sync Transaction dialog box appears
when you highlight an entry on the Import Reconciliation Data screen and press
Enter.
5-14
1.
The screen displays the transaction data for the imported transaction. Enter
the Transaction number you would like to match the imported data with, or
press F2 to choose a transaction from the OSAS system.
2.
The system will not allow you to choose a previously cleared transaction. If
the transaction you choose has not previously been cleared, press Enter.
3.
The transaction number will be matched with the imported data on the
Import Reconciliation Data screen. See “Import Reconciliation Data” on
page 5-11 for more information about processing transactions after matching
them.
Bank Reconciliation
Reconciliation Report
After you have tagged the transactions that have cleared a bank or credit card
account for the most recent statement, produce the Reconciliation Report to
check for errors and omissions, to make sure that the statement balance and the
bank or credit card account balance are reconciled, and to use as an audit trail of
the cleared entries.
The Reconciliation Report lists the items that are tagged as cleared. It contains
these sections:
Note: Transactions with a status of Reconciled are not shown on the report.
•
The cleared transactions section shows a summary of each transaction that
has cleared and is organized by transaction type. The original void amount of
the check is also included. This section is optional.
•
The outstanding transactions section shows a summary of each outstanding
transaction, and is organized by transaction type. This section is optional.
•
The reconciliation section consists of bank-to-book reconciliation and bookto-bank reconciliation. This section is always produced.
•
The void transactions section shows a summary of each voided transaction
and is organized by transaction type. This section is always produced.
Bank Reconciliation
5-15
CHAPTER 5 • Reconciliation
Reconciliation Report
Select Reconciliation Report from the Reconciliation menu. This screen
appears.
5-16
1.
Enter the bank account ID for which you want to produce the report.
2.
Select whether you want to print the report for a range of transaction dates
(Date) or for a transaction period and year (Period).
3.
If you selected Period, the Include Transactions Thru box appears. Enter
the transaction period and year. All transactions up to and including the
selected period/year print. The GL Balance, if included, is also calculated up
to and including the selected period/year.
Bank Reconciliation
Reconciliation Report
Reconciliation • CHAPTER 5
Note: When a voided transaction is encountered, the void period/year is
checked to make sure that the void happened in the same or earlier GL
period/year as entered. If not, the disbursement information is included as if
the void never happened, since when you print for a prior period, that check
would still have been issued and not yet voided.
If you selected Date, the Transaction Date boxes appear. Enter the range of
transaction dates you want the report to cover. The dates you enter pertain
only to the transactions in the BRTRxxx (Transactions) file. Transactions
stored in the GLJRxxx (Journal) file are not included in the report.
4.
If Bank Reconciliation interfaces with General Ledger, this function uses the
most recent general ledger account balance from the GLMAxxx (GL Master)
file. If you want to include unposted GL Journal entries in the balance, select
the check box (or enter Y in text mode); if not, clear the box (or enter N in
text mode). Including unposted entries in the balance provides you with upto-date bank balances without having to post General Ledger transactions
first.
5.
Select the amount of detail you want: Summary (print only the
reconciliation section) or Detail (print the cleared transactions, outstanding
transactions, and reconciliation sections).
Note: Transactions with a status of Reconciled are not shown on the report.
6.
If you elected to produce a detailed report, select the sections you want to
produce: Cleared, Outstanding, or Both.
7.
Select the output device to begin printing the report. See “Reports” on
page 1-27 for more information. After you produce the list, the
Reconciliation menu appears.
Bank Reconciliation
5-17
CHAPTER 5 • Reconciliation
Reconciliation Report
Reconciliation Report (Cleared Transactions)
Reconciliation Report (Outstanding Transactions)
5-18
Bank Reconciliation
Reconciliation Report
Reconciliation • CHAPTER 5
Reconciliation Report (Reconciliation)
Bank Reconciliation
5-19
Change Cleared Transaction Status
Use this function to change the status of all cleared transactions to a status of
reconciled.
Before Changing the Status
Before you change the status of all cleared transactions to a status of reconciled,
make sure that you have completed these tasks:
•
•
•
Cleared all the applicable transactions (see page 5-3)
Printed and verified the Reconciliation Report (see page 5-15)
Backed up your data files.
Select Change Cleared Transaction Status from the Reconciliation menu.The
Change Cleared Transaction Status screen appears.
Bank Reconciliation
5-21
CHAPTER 5 • Reconciliation
5-22
Change Cleared Transaction Status
1.
If you have completed reconciliation and backed up your data files, select
the check box (or enter Y in text mode); if not, clear the box (or enter N in
text mode), and return to the Reconciliation menu to complete these tasks.
2.
Select the bank account ID for which you want to change the status.
3.
To change the status, use the Proceed (OK) command. After the transaction
status changes, the Reconciliation menu appears.
Bank Reconciliation
Purge Reconciled Transactions
After you have reconciled a bank or credit card account with a statement, use the
Purge Reconciled Transactions function to delete the reconciled transactions
from the BRTRxxx (Transactions) file.
You can purge the transactions for one bank account or for a range of bank
accounts.
This function purges only reconciled transactions.
Before Purging Reconciled Transactions
Before you purge reconciled transactions, make sure that you have completed
these tasks:
•
•
•
Bank Reconciliation
Cleared all the applicable transactions (see page 5-3).
Printed and verified the Reconciliation Report (see page 5-15).
Backed up your data files.
5-23
CHAPTER 5 • Reconciliation
Purge Reconciled Transactions
Select Purge Reconciled Transactions from the Reconciliation menu. The
Purge Reconciled Transactions screen appears.
1.
If you have completed reconciliation and backed up your data files, select
the check box (or enter Y in text mode); if not, clear the box (or enter N in
text mode), return to the Reconciliation menu, and do so now.
2.
Enter the range of bank account IDs for which you want to purge reconciled
transactions, or leave the boxes blank to include all bank account IDs.
3.
Select how you want to purge the information: by transaction date (Date) or
transaction period and year (Period).
4.
If you selected Period, enter the transaction period and year in the Purge
Transactions On or Before text box. All transactions up to and including
the period/year you enter are purged.
If you selected Date, enter the transaction date up to which you want to
purge transactions. All transactions up to and including the date you enter
are purged.
5-24
Bank Reconciliation
Purge Reconciled Transactions
5.
Reconciliation • CHAPTER 5
To begin purging transactions, use the Proceed (OK) command.
After you purge the reconciled transactions, the Reconciliation menu
appears.
Bank Reconciliation
5-25
CHAPTER 6
Codes
6-3
Recurring Adjustments
6-5
Reconciliation Import
6
File Maintenance
6-11
Positive Pay Export Definitions
6-15
Positive Pay Fields
6-23
Tables
6-25
Bank Reconciliation
6-1
Codes
Use the Codes function to set up and maintain default descriptions and
references for transactions (deposits/payments, disbursements/charges, and
transfers) and recurring adjustments. The descriptions you assign to transactions
and recurring adjustments are stored in the BRCDxxx (Codes) file and appear
when you enter or edit transactions through the Transactions function and in the
Bank Account Register, among other places.
Select Codes from the File Maintenance menu. The Codes screen appears.
1.
Enter the default description you want to appear for bank deposits and credit
card payments.
2.
Enter the default description you want to appear for bank disbursements and
credit card charges.
Bank Reconciliation
6-3
CHAPTER 6 • File Maintenance
Codes
3.
Enter the default description you want to appear for adjustments.
4.
Enter the default description you want to appear for the From Trans portion
of the transfer transaction — the transaction that records the reduction to the
bank account you entered in the Bank Account ID field on the Transactions
screen.
If you enter fewer than 20 characters in this field, the To Trans bank account
ID is appended to the description.
5.
Enter the default description you want to appear for the To Trans portion of
the transfer transaction — the transaction that records the addition to the
bank account specified in the To Bank field in the scroll region of the
Transactions screen.
If you enter fewer than 20 characters in this field, the From Trans bank
account ID is appended to the description.
After you save your entries, enter descriptions again, or exit to the File
Maintenance menu.
6-4
Bank Reconciliation
Recurring Adjustments
Recurring adjustments are routine service charges applied to bank or credit card
accounts by a bank. For example, banks commonly charge an overdraft fee for
bounced checks or levy an annual fee for some credit cards.
Use the Recurring Adjustments function to set up and maintain recurring
adjustments you regularly make to your accounts. Recurring adjustments are
stored in the BRRAxxx (Recurring Adjustments) file.
You must also set up the offsetting entries for the adjustments.
Select Recurring Adjustments from the File Maintenance menu. The Recurring
Adjustments screen appears.
Bank Reconciliation
6-5
CHAPTER 6 • File Maintenance
Recurring Adjustments
1.
Enter the bank account for which you want to set up or maintain recurring
adjustments.
2.
After you enter the bank account ID, select a command in the adjustments
portion of the screen.
•
Press Enter to edit the adjustment the prompt is at.
•
Press A to add an adjustment for the bank account.
•
Press H to return to the Bank Account ID field.
Append/Edit Recurring Adjustments
When you press Enter to edit the adjustment or A to add an adjustment, the
Append/Edit Recurring Adjustments screen appears.
1.
Enter an adjustment ID in the Adjustment ID box. The ID is unique only to
the bank account—that is, you can set up adjustment SVCCHG for bank
account FNB001 and adjustment SVCCHG for bank account SNB001. That
way, you have to remember only one ID for similar types of adjustments.
2.
In the Trans Date box, if you are adding an adjustment, the workstation date
appears. If you are editing an adjustment, the date you entered the
adjustment appears.
Accept the default date, or change it.
6-6
Bank Reconciliation
Recurring Adjustments
3.
File Maintenance • CHAPTER 6
If you are adding an adjustment, the general ledger period corresponding to
the Tran Date you entered appears in the Period box. If you are editing an
adjustment, the period you entered the adjustment appears.
Accept the default period, or change it.
4.
Enter the amount of the recurring adjustment.
5.
If you are adding an adjustment, accept the current description (from the
BRCDxxx file), or enter a different description.
6.
Enter a reference for the adjustment in the Ref box. References are posted to
General Ledger and provide another way of searching for information in the
General Ledger application.
7.
When you save an adjustment, the Edit Distributions? prompt appears.
If you are editing an adjustment, select Yes (or enter Y in text mode) at the
prompt to move to the distributions portion of the screen, or select No (or
enter N in text mode) to return to the adjustments scroll region if you are
finished editing the adjustment and do not need to edit the distributions.
When you finish entering adjustments, exit to the File Maintenance menu.
Bank Reconciliation
6-7
CHAPTER 6 • File Maintenance
Recurring Adjustments
Distributions
Each adjustment must have both the debit and the credit side of the transaction
accounted for. You can offset the adjustment with as many credits/debits as
necessary. You cannot exit from the distributions portion of the screen until you
have accounted for the amount of the adjustment in terms of both debits and
credits.
6-8
1.
Press Enter to edit the distribution the prompt is at. (You cannot edit the first
line of a distribution; the first line is the adjustment itself. If you want to edit
the adjustment, you must edit it in the adjustments portion of the screen.)
2.
Press A to add a distribution for the adjustment.
3.
Press D to return to the adjustments portion of the screen. (This command
appears only when credits equal debits—that is, the balance is zero.)
Bank Reconciliation
Recurring Adjustments
File Maintenance • CHAPTER 6
Append/Edit Distributions
When you press Enter to edit the distribution or A to add a distribution, the
Append/Edit Distributions dialog box appears.
1.
In the GL Account box, enter or select the General Ledger account number
for the credit or debit. (The Inquiry (F2) and Maintenance (F6) commands
are available if Bank Reconciliation interfaces with General Ledger.)
2.
In the Debit box, enter the amount of the debits related to the adjustment.
3.
In the Credit box, enter the amount of the credits related to the adjustment.
4.
In the Description box, accept the default description (from the BRCDxxx
file), or enter a different description.
5.
In the Ref box, enter a reference for the offsetting entry. References are
posted to General Ledger and provide another way of searching for
information in the General Ledger application.
6.
After you enter the reference, edit or append another offsetting entry, or
press D to return to the adjustments portion of the screen.
Bank Reconciliation
6-9
Reconciliation Import
Use the Reconciliation Import function to create an import layout format for
importing reconciliation data from a file created by another system into Bank
Reconciliation. This format tells the OSAS system where information is located
in the file, whether default values should be used when null or empty fields are
encountered, and how to place the imported data into Bank Reconciliation tables.
This function is only available if you have the Banking application installed.
The files from which you are importing data must be ASCII files in one of the
following comma-delimited or flat file formats:
•
Comma Delimited: Use this format when the fields in the file from
which you are importing data are separated by commas. This is the
format used when saving an Excel spreadsheet as a .csv format file.
•
Comma-Quote Delimited: Use this format when fields are separated by
commas and each field is also enclosed by quotation marks to allow for
commas within the field’s contents.
•
Fixed Length Field: Use this format when records are separated by a
return character and the fields within the record are all the same width.
•
Fixed Length Record: Use this format when all records in the file are
the same width and the fields within records are the same width.
To set up Reconciliation Import files, follow these steps:
Bank Reconciliation
6-11
CHAPTER 6 • File Maintenance
6-12
Reconciliation Import
1.
Select Reconciliation Import from the File Maintenance menu. The
Reconciliation Import screen appears.
2.
Enter a unique ID in the Layout ID box, or select the Layout ID you want to
edit.
3.
Select a layout ID in the Copy From box to copy information from an
existing layout. This box appears only for new layouts.
4.
Enter a Description for the layout you are creating or edit the existing one, if
necessary.
5.
In the Field Type box, select the record format of the ASCII file from which
you are importing information: Comma Delimited, Quote-Comma
Delimited, Field Fixed Width, or Record Fixed Width.
6.
If you selected Fixed Length Record, the Record Length box is available.
Enter the record length.
Bank Reconciliation
Reconciliation Import
File Maintenance • CHAPTER 6
7.
In the File Name box, enter the location and name of the file you want to
import, or click the browse
button to locate the file.
8.
The field names appear in the lower half of the screen. Your import file may
not use the same field names or these fields may not exist at all in the ASCII
file. Scroll through the field names and set up your import parameters. Press
Enter to open the Edit Field Information dialog box.
Edit Field Information Dialog Box
Use the Edit Field Information dialog box to change the record information for a
field name and to enter translation values.
Bank Reconciliation
•
If you select Comma Delimited or Comma-Quote Delimited as the file
type, enter the field number in the Field box. The system takes data
from the field you specify here and places it in the specified field in the
OSAS tables.
•
If you select Fixed Length Field or Fixed Length Record as the file
type, enter the starting position in the Start box and the length of the
respective field in the Length box. The system scans the file, takes data
from the file based on the information you specify here, and places it in
the specified field in the OSAS tables.
6-13
CHAPTER 6 • File Maintenance
9.
6-14
Reconciliation Import
•
To place a value into a field that exists in the ASCII file but may be null
or blank in some of the records, enter that value into the Default box.
•
To assign the value <null> or <blank> to a field, select it in the Default
box. Otherwise enter the appropriate value.
•
To force a value into a field that exists within OSAS when the ASCII
file does not contain that field, enter that value into the Default box and
select the Force Default check box.
•
To translate data contained in fields in the import file into values
recognized by OSAS (for example, to map account numbers contained
in the import file field to OSAS Bank Ids or to translate codes), press A.
To edit the translation values, highlight the line you wish to change and
press Enter.
•
When the Enter/Append Transactions translation dialog box appears,
enter the value the field in the import file contains in the Translate
From field and the OSAS value to which to translate the value in the
Translate To field.
Close the screen to save your changes and return to the main menu.
Bank Reconciliation
Positive Pay Export Definitions
The Positive Pay Export Definition function enables you to build a positive pay
ASCII file that can be transmitted to your bank for check payment authorization.
To set up a Positive Pay Export Definition, follow these steps:
1.
Select Positive Pay Export Definition from the File Maintenance menu.
The Positive Pay Export Definition screen appears.
2.
Enter the Export ID you want to create or edit for this export definition file.
3.
Select an export ID to Copy From if you have want to use a similar setup to
an already established positive pay export definition.
Bank Reconciliation
6-15
CHAPTER 6 • File Maintenance
Positive Pay Export Definitions
4.
Enter or edit the Description for the export ID.
5.
Select the File Type you want to export the file to. The files you are
exporting data to must be ASCII files in one of the following commadelimited or flat file formats:
•
Delimited: Use this format when you want the fields in the file you are
exporting data to are separated by a delimiting character. Use the
Delimiter field to define the character by which the fields will be
separated.
•
Field Fixed Width: Use this format when you want records to be
separated by a return character and the fields within the record are all
the same width.
•
Record Fixed Width: Use this format when you want all the records in
the file are the same width and the fields within records are the same
width.
6-16
•
XML: Short for Extensible Markup Language, designed especially for
Web documents. It allows designers to create their own customized tags,
enabling the definition, transmission, validation, and interpretation of
data between applications and between organizations. Note:
•
Block: Use this format if you want to have your file set up similar to the
standard ACH file. Each record consists of blocks of data that are 94
characters long. Each block of data will consist of a specified number of
records in a block.
6.
If you selected Delimited as your file type, enter the character by which the
fields will be separated in the Delimiter field. For a ‘tab’ delimited file, enter
a capital T in the field.
7.
Check the Quotes? box if you intend to enclose each field with quotation
marks to allow for commas (or other delimiting character) within the field’s
contents.
Bank Reconciliation
Positive Pay Export Definitions
File Maintenance • CHAPTER 6
8.
If you selected Block as your file type, enter the Block Factor. This is how
many records you want in each block of data in the file. If you have fewer
records than the amount that will fill the blocking factor, record lines will be
added with the fill character you enter when setting up your block fields.
Typically this fill character is a 9.
9.
Enter the path and File Name you want to use when you export the positive
pay file.
10. Enter the Criteria by which the export definition will be generated. The
minimum required information is the transmission date and the transmission
time. The current date and time is automatically entered with the following
commands: BAPA.TRANSMIT_DATE=PROCESSDATE AND
BAPA.TRANSMIT_TIME$=PROCESSTIME$
11. Enter the Sort By field by which the export file will be sorted.
12. When you have finished entering the Export ID information, click OK to
enter or edit records. Use the following commands in the records section of
the screen.
Bank Reconciliation
•
Enter - press Enter to edit a highlighted record.
•
A - press A to append a record.
•
D - press D to delete the highlighted record.
•
G - press G to go to a specific record.
6-17
CHAPTER 6 • File Maintenance
Positive Pay Export Definitions
Edit/Append Record Information
When you press Enter to edit the record or A to add a record, the Append/Edit
Record dialog box appears.
1.
Select the Record Type you want to use for each field in the output file. The
record types are:
•
Block: You must set up one block record when you are setting up a
block file. This record is used to fill the remainder of the records in the
Blocking Factor number of records. When setting up the block record
fields you will leave the field values blank and just fill in the Fill Length
and Fill Character. Typically the fill length will be 94 and the fill
character will be 9. This will add records of 94 characters of 9s for the
remaining number of records to fill the blocking factor.
•
Detail: Use the detail record type selection for the detail section of your
file. This usually is where you will have the majority of the information.
You typically will have all the columns you are going to have in your
output file in the detail record type.
6-18
Bank Reconciliation
Positive Pay Export Definitions
•
File Maintenance • CHAPTER 6
Header: Use the header record type when you want to group your
records into specific groups and have sorting by columns in these
groups.
•
Footer: Use the footer record type when you want to group your footer
total records by a specific field from your detail section. Enter or edit
the Description for the record type field.
2.
Enter the Description of the field.
3.
Enter or edit the Header/Tag. This is used for the XML file output type to
enter a header tag into the output file of your record. A typical header/tag
would look like this: <BankID>. You must include opening and closing <
and > characters in these fields. This will start the header section of the file.
4.
Enter or edit the Footer/Tag. This is used for the XML file output type to
enter a footer tag into the output file of your record. A typical footer/tag
would look like this: <CheckTotal>. You must include opening and closing
< and > characters in these fields. This will start the footer section of the file.
5.
Press A to append a field to the record, or highlight a field and press Enter to
edit it. In either case, the Append/Edit Field Information dialog box opens.
6.
Click Done to return to the Positive Pay Export Definitions screen.
Bank Reconciliation
6-19
CHAPTER 6 • File Maintenance
Positive Pay Export Definitions
Append/Edit Field Information
Once records are set up you will then need to set up your fields. Typically you
will have header, detail, and footer records with multiple fields within the
records. Each field you set up will be a column in your output file. Enter the
fields in the order you want your output file to be set up.
To enter the detail of each field, put your cursor into the record and field you
want to add or edit and follow these steps:
6-20
1.
Select the Field ID you want in to the field you have selected.
2.
Enter the Description of the field.
3.
Enter the Multiplier value you want the field value to be multiplied by to
assure the correct formatting. A block type file will by default assume that
you have multiplied all values by 100. There are no decimal places in a
block file, and it is assumed when you are using this type of file that you
have two decimal places in all numbers.
4.
Enter the Format Mask in which you want the field value to be displayed.
Bank Reconciliation
Positive Pay Export Definitions
File Maintenance • CHAPTER 6
5.
Choose how you want to Justify the records in this field (Left or Right).
6.
Enter the number of characters you want as a Fill Length for a Block type
file. This will be the number of characters this field will use when filling the
block type record. For the Block record you will need to fill in 94 into this
field.
7.
Enter the Fill Character to use to fill in any blank characters in a block type
file. This typically will be 9. If you have a record that does not use all the
characters in the field the rest of the field will be filled in with 9s. The Block
record that will fill in the remaining blocking factor records will be records
filled in with 9s.
8.
Enter or edit the Header/Tag. This is used for the XML file output type to
have a header tag entered into the output file for the header of your record. A
typical header/tag would look like this <BankID>. You must include opening
and closing < and > characters in these fields. This will start the header
section of the file.
9.
Enter or edit the Footer/Tag. This is used for the XML file output type to
have a footer tag entered into the output file for the footer of your record. A
typical footer/tag would look like this <CheckTotal>. You must include
opening and closing < and > characters in these fields. This will start the
footer section of the file.
10. To translate field values from your data to a different value in the final
output, enter the original value in the Translate From field and the output
value to which to translate the original value in the Translate To field.
11. Click F to edit to the Field ID information at the top of the screen, or D to
return to the Append Record Information screen. Press G to go to a specific
translation value.
Bank Reconciliation
6-21
Positive Pay Fields
The Positive Pay Fields function allows you to add new fields as needed for use
in positive pay files. Fields that are required for minimum positive pay files are
included, and can be edited in this function.
Select Positive Pay Fields from the File Maintenance menu. The Positive Pay
Fields screen appears.
1.
Enter a unique ID in the Field ID box, or select the Field ID you want to edit.
2.
Select a field ID in the Copy From box to copy information from an existing
layout. This box appears only for new fields.
3.
Enter a Description for the field.
4.
Select the Field Type:
Bank Reconciliation
6-23
CHAPTER 6 • File Maintenance
•
•
•
•
5.
Positive Pay Fields
File
Cross Reference
Value
Global Variable
Depending on the Field Type you choose, you will be able to edit the
following information:
•
Field ID - Fields from the OSEV file can be selected via the F2 function.
Only valid fields are allowed.
•
Description - Defaults from the OSEV file, can be changed by the user.
•
Multiplier - If the field is numeric from the OSEVx file, this field will be
available. The numeric value will be multiplied by the value entered.
This will allow users to remove decimal points by entering a value in
this field.
•
Format - A numeric masking format will be allowed in this field if the
field value is a numeric field.
•
Justify - Options are Left or Right.
•
Fill Length - This will allow a field to be filled to a specific length if
needed. If the field is numeric, this will be calculated based from the
format field.
•
Fill Character - The character used to fill a particular field. This will
only be available on non-numeric fields.
•
From/To Values - This region is a scroll region that the user can enter
translations values to.
6.
6-24
When you finish entering adjustments, exit to the File Maintenance menu.
Bank Reconciliation
Tables
Use the Tables function to set up and maintain the Bank Reconciliation tables.
Tables can store information about the system, data, options, and default settings
for other applications.
The OPTxxx table is the only table related to Bank Reconciliation at this time.
The OPTxxx (Options) tables store options and interfaces settings. Maintain
the information stored in this table through Resource Manager Options and
Interfaces function, not through the table itself.
Select Tables from the File Maintenance menu. A blank tables screen appears.
Bank Reconciliation
6-25
CHAPTER 6 • File Maintenance
Tables
1.
To add or change a table, enter the table ID. To set up a company-specific
table, enter the table ID plus the one- to three-character company ID. To set
up a terminal-specific table, enter the table ID plus the four-character
terminal ID. To delete the table, use the Delete (F3) command.
2.
If you entered a new table ID, the Copy From field appears. To copy a
company- or terminal-specific table, enter the table ID plus the company ID
and terminal ID.
A set of tables comes with the sample company, Builders’ Supply. You can
copy the sample tables for a company and then change the appropriate fields.
To copy a sample table, enter the table ID.
3.
Accept the default table description, or enter a different description.
The number of columns, their length, and the type of data you can enter—
alphanumeric (A), numeric with two decimals (N), numeric with three
decimals (3), or numeric with four decimals (4)—appear.
6-26
Bank Reconciliation
CHAPTER 7
Printing a Master File List
7-1
Codes List
7-3
7
Master File Lists
Recurring Adjustments List 7-5
Positive Pay List
Positive Pay Fields List
Tables List
7-7
7-9
7-11
GL Account Audit Report 7-13
Printing a Master File List
All master file lists are produced in the same way. Use the
instructions below to print a master file list, modifying the
procedure as necessary for the list you are printing. For
example, if the screen for the list you want to print does not
contain check box options, ignore that step and continue to the
next.
Follow these steps to print a master list:
Bank Reconciliation
7-1
CHAPTER 7 • Master File Lists
7-2
1.
Select the list you want to print from the Master File Lists menu. The
selection screen for that list appears. The Tables List screen is shown below
as an example.
2.
Select the range of values to print on the report in the list boxes. Leave these
fields blank to select all values, or enter values into a combination of fields
to select specific information to print on the list. The Inquiry (F2) command
is usually available for these list boxes.
3.
If the screen contains selection options (for example, Print By options to sort
the report), select the option to use when printing the list. You can select only
one option.
4.
If the screen has check boxes (as in the lower portion of the example screen),
select the check box (or enter Y in text mode) to print that type of
information in the list. Clear the check box (or enter N in text mode) if you
do not want to print that type of information in the list.
5.
Select the output device to begin printing the report. See “Reports” on
page 1-27 for more information. After the list is produced, the Master File
Lists menu appears.
Bank Reconciliation
Codes List
Use the Codes List function to produce a list of the information in the codes
records you have on file. Use the Codes function to enter code information. The
code information is stored in the BRCDxxx (Codes) file.
Use this list as a reference when you enter bank reconciliation transactions or to
check your work.
Sample List
Bank Reconciliation
7-3
Recurring Adjustments List
Use the Recurring Adjustments List function to produce a list of the recurring
adjustment information you have on file. Enter recurring adjustments using the
Recurring Adjustments function. The adjustments are stored in the BRRAxxx
(Recurring Adjustments) file.
Use this list as a reference when you enter bank reconciliation transactions or to
check your work.
Sample List
Bank Reconciliation
7-5
Positive Pay List
Use the Positive Pay List function to produce a list of the positive pay export
definitions you have on file.
Sample List
Bank Reconciliation
7-7
Positive Pay Fields List
Use the Positive Pay Fields List function to produce a list of the positive pay
fields within your positive pay export definition files.
Sample List
Bank Reconciliation
7-9
Tables List
The Tables List shows the number of columns, column length and type, and data
for any or all Bank Reconciliation tables.
Use this list to keep records and verify contents of the Bank Reconciliation tables
you are using.
Sample List
Bank Reconciliation
7-11
GL Account Audit Report
The GL Account Audit Report List shows Bank Reconciliation tables and data
files with invalid or missing GL account numbers.
Sample List
Bank Reconciliation
7-13
Bank Reconciliation User’s
Manual
APPENDIX A
A
System Messages
Messages on the screen or in a report indicate an error or tell
you how to enter data or what is happening in the function you
are using. Self-explanatory messages are not listed.
Bank Reconciliation
A-1
APPENDIX A • System Messages
An error occurred while converting files. Conversion aborted.
An error occurred wile creating files. File creation aborted.
If an error occurs during data file creation or conversion, a message that
describes the problem appears. Then this message appears on the Resource
Manager Data File Conversion and Data File Creation screens to inform you that
the process has been aborted. Correct the problem described in the first message
and try again.
Basic Error = {error} Host Error = {error} Line = {line} Program = {program}
Basic Error = {error} Line = {line} Program = {program}
A serious error has occurred. Write down the information that appears and get
help from a support technician.
{check number} is not on file.
1.
The number of the check you are trying to void or stop the payment of is not
on file.
2.
You cannot void or stop payment of a check that is tagged as cleared.
Could not find any valid source files for this application.
The source directory you specified does not have files for the application you are
converting. Make sure that you entered the correct source directory and
application ID.
Current journal entries do not balance.
The total of the debit entries does not equal the total of the credit entries for the
transaction. You cannot exit from the function until these two balances are equal.
File unavailable {file}.
This message appears for one of three reasons:
•
A-2
The function you are trying to access needs one or more files that are locked
by another user on your system. When a file is locked, other users cannot
access it during posts and other functions that need to keep the files intact.
Bank Reconciliation
System Messages • APPENDIX A
•
•
The function you are trying to access needs one or more files that are not on
your system. Use the Options and Interfaces function on the Resource
Manager Company Setup menu to verify that the correct interfaces have
been selected. If that does not correct the problem, get help from a support
technician.
You are working with the wrong company. Return to the menu; then use the
Change Company (F5) command to enter the ID you want.
In any case press Enter to get back to the menu, correct the problem, and select
the function again.
GL account {account number} belongs to account AAAAAA.
When entering the distributions portion of a Bank Reconciliation transaction, you
cannot enter the number of a general ledger account that has been assigned to a
bank account record.
GL account {account number} is a memo account.
You cannot assign memo accounts to bank account records or Bank
Reconciliation transactions.
Invalid date in {directory/file name}.
You must convert the old data files before you switch to European-format dates.
Use the Company Information function on the Resource Manager Company
Setup menu to switch back to the American-format dates, and reconvert the data.
Unable to execute program {program}.
The system cannot run the program you selected from the menu. Make sure that
the displayed program is in the application’s program directory, and select the
function again.
Unable to load menu record {menu} from file {file}.
The application’s menu record is not in the menu file, or the menu file is missing.
Make sure that the application is properly installed and try again.
Bank Reconciliation
A-3
Bank Reconciliation User’s
Manual
APPENDIX B
B
Common Questions
Use the answers to these commonly asked questions about the
Bank Reconciliation system as a quick reference to common
problems.
How can I exit from the Transactions function if
my entries are out of balance?
You cannot exit from the distributions portion of the
Transactions screen unless the entries are balanced (or offset).
If you realize that you made a mistake in the transaction or if
you want to delete the transaction, you must complete the
distributions portion of the screen. Then return to the upper
scroll region of the Transactions screen and either edit the
transaction or use the Delete (F3) command to delete it.
How can I void an unposted check?
If the check was posted from an interfaced application (Payroll
or Accounts Payable/Purchase Order), see the appropriate
user’s manual for instructions on how to enter a reversing
transaction.
If the check was entered through the Transactions function,
you can use one of the following methods to void an unposted
check:
Bank Reconciliation
B-1
APPENDIX B • Common Questions
B-2
•
Delete the transaction in the Transactions function by selecting the
transaction you want to delete, then use the Delete (F3) command. Do not
use this method if you want an audit trail of the transaction.
•
Post the check to the BRTRxxx (Transactions) file. Then use the Void
Checks and Stop Payments function (on page 4-13) to void it.
•
When you post the voided check, the status of the original disbursement will
be set to Void and the amount will be set to zero.
•
Enter a reversing disbursement transaction. In the Ref field, enter VOID or
some other reference which indicates that the transaction will void the
original disbursement.
•
When you post transactions, both the original disbursement and the
reversing entry will be moved to the BRTRxxx file.
Bank Reconciliation
Bank Reconciliation User’s
Manual
APPENDIX C
C
Glossary
account
A storage unit of financial data in accounting, usually
grouping related information under one account number or
account ID.
accounting period
A period of time in accounting, used to provide distinct
units of time you can work with. For example, you might
want a report to include transactions done within a
particular accounting period.
adjustment
Charges made to your bank account, often by the bank:
service charges, finance charges, fees paid for bounced
checks, and so on. See also transaction.
application
A software package made up of several related programs
(functions) and files. Usually an application is named after
a common accounting practice—for example, Accounts
Receivable, Inventory, or Payroll.
Bank Reconciliation is one application; applications that
interface with Bank Reconciliation are General Ledger,
Accounts Payable/Purchase Order, Accounts Receivable/
Sales Order, and Payroll.
back up
Bank Reconciliation
To make a copy of data for archival purposes. For
example, you would want to back up a history file before
you purged history so that you could retrieve the data if
you had to.
C-1
APPENDIX C • Glossary
company
In OSAS, a business record associated with its own files, tables, and menu of
applications.
conversion
The process of updating existing files, programs, or applications to the
current version. See also installation.
data file
See file.
deposit
Money added to a bank account. See also transaction.
disbursements
Money extracted from a bank account. In Bank Reconciliation,
disbursements take the form of checks and withdrawals. See also
transaction.
distributions
Offsetting debits and credits that account for the total amount of the
transaction.
field
A region on the screen that accepts input from the user; also, one element of
a record in a file. On the screen, most fields are labeled.
file
A collection of records stored under a particular name. Function screens
often represent files, but you do not directly see a file. See also table.
function
A menu item that leads to a full screen. Most functions have a corresponding
program. See also program.
general ledger
A record of accounts in terms of a chart of accounts and accounting periods.
The General Ledger application tracks the effects on accounts from
transactions entered in General Ledger and interfaced applications, and it is
updated by other applications interfaced with it.
installation
The process of adding an application to an existing system. See also
conversion.
interface
To join to another application for the purpose of having information entered
in one application update information in another application’s files.
journal
A chronological record of transactions.
journal
entries
Transactions recorded in a journal.
C-2
Bank Reconciliation
Glossary • APPENDIX C
menu
A list of applications, functions, options, or other menus.
offsetting
entries
See distributions.
post
To transfer information from one place to another, usually at the end of the
day or at a distinct break in business.
program
A self-contained list of executable code, written and implemented to do a
task. Most programs are represented by a function on a menu. See also
function.
purge
To remove from the system. See also restore.
reconcile
To check a financial account against another for accuracy. In the Bank
Reconciliation application, this process involves using the Cleared
Transactions function to indicate which transactions have cleared your
company’s bank.
reconciliation
See reconcile.
record
A unit of information that has other pieces of information assigned to it.
Each record is assigned an ID so that the file can sort information in terms of
record IDs.
recurring
adjustments
Adjustments made regularly to your account. For example, some banks
extract a monthly service charge on some types of accounts. See also
adjustment and transaction.
reference
An additional description attached to a transaction. References are posted to
General Ledger and provide another way of searching for information in the
General Ledger application.
restore
To bring information back to its original place and condition. See also
purge.
table
A grid that holds records and is visible. See also file.
transfer
To shift a sum of money from one bank account to another. See also
transaction.
Bank Reconciliation
C-3
APPENDIX C • Glossary
transaction
An exchange or transfer of funds involving two or more bank accounts:
adjustments, deposits, disbursements, and transfers. See also adjustment,
deposit, disbursements, and transfer.
transaction
reference
See reference.
C-4
Bank Reconciliation
Bank Reconciliation User’s Manual
INDEX
A
Accounts Payable
interfaced with Bank Reconciliation, 3-6, 3-9, 4-7
Accounts Receivable
interfaced with Bank Reconciliation, 3-6, 3-9
Address Lookup, 1-20, 1-25
address mapping, 1-20, 1-25
addresses, 1-20, 1-25
adjustments
clearing, 5-8
distributions, 6-8
editing, 6-6
posting, 4-27
recurring adjustments, 6-5
alphabetical sorting, 3-2
ASCII files
layouts for importing, 6-11
B
back up schedule
for data files, 3-10
backup schedule
for programs, 3-10
setting up, 3-9
Bank Account Register
function, 4-21, 6-3
sample, 4-23
Bank Accounts
file
setting up, 3-8
unique IDs, 3-8
Bank Reconciliation
before converting, 2-3
before you install, 2-1
Bank Reconciliation User’s Manual
IX
converting to version 7.0, 2-4
description, 1-1, 1-3
files, 1-4
installation, 2-1
installing new version before converting, 2-3
interfaced with Accounts Payable,
4-7
interfaced with General Ledger,
4-25
interfaced with Payroll, 4-7
interfaces, 1-3, 3-5
Accounts Payable, 3-6
Accounts Receivable, 3-6, 3-9
General Ledger, 3-5, 3-7, 3-9
Payroll, 3-6, 3-9
Purchase Order, 3-6, 3-9
Sales Order, 3-6, 3-9
with General Ledger, 1-6
menu structure, 1-4
Options screen, 3-7
posting transactions, 4-25
setting up, 3-1
setup considerations, 2-4
system requirements, 2-1
tables, 7-11
bank-to-book reconciliation, 5-15
book-to-bank reconciliation, 5-15
BR Journal
function, 4-19
sample, 4-20
BRCDxxx file
description, 1-5
setting up, 6-3
BRJRxxx file, 1-5, 1-6
Browse, 1-20
BRRAxxx file, 1-5
IX-1
INDEX
BRTRxxx file, 1-5, 3-6
C
change
status of stopped payment, 4-15
status of voided check, 4-15
Change Cleared Transactions Status
before you purge, 5-21
Cleared Transactions
after clearing, 5-11
function, 5-3
totals information, 5-11
Codes
file
description, 1-5
setting up, 6-3
format, 3-2
function, 6-3
setting up, 3-1
sorting, 3-1
codes
sorting, 1-28
Codes List
function, 7-3
sample, 7-3
commands
flags, 1-24
hot keys, 1-24
Proceed (OK), 1-2
company
assigning roles, 3-9
conversion
before converting, 2-3
setup considerations, 2-4
converting to OSAS version 7.0, 2-4
D
data dictionaries, 2-1
Data File Conversion
function, 2-3, 2-4
Data File Creation
function, 2-2
data files
IX-2
backing up, 3-10
date fields, 1-19
debits
posting, 4-27
default descriptions for transactions, 6-3
deposits
clearing, 5-8
posting, 4-25
disbursements
clearing, 5-8
posting, 4-26
distributions
for transactions, 4-9
for voided checks, 4-16
E
e-mail
e-mailing reports, 1-32
F
F2 Inquiry
button, 1-20
flag, 1-25
F6 Maintenance
flag, 1-25
icon, 1-20
file information, 1-4
File Maintenance menu structure, 1-4
files
backing up, 3-10, 5-21, 5-23
BRCDxxx, 1-5
BRCDxxx file, 6-3
BRJRxxx, 1-5
BRRAxxx, 1-5
BRRAxxx file, 6-5
BRTRxxx, 1-5
flags, in text mode, 1-24
flat files
layouts for importing, 6-11
from/thru ranges, 1-27
Bank Reconciliation User’s Manual
INDEX
G
J
General Ledger
interfaced with Bank Reconciliation, 3-5, 3-9,
4-22, 4-25, 5-3, 5-5, 5-6, 5-17
references, 4-7, 4-10, 4-15, 4-17, 6-7, 6-9
GL Account Audit Report, 7-13
GLJRxxx file, 1-6, 3-5, 4-25, 5-3, 5-17
GLMAxxx file, 1-6, 3-5, 5-3
graphical mode
drop-down menus, 1-17
function screens, 1-16
graphical main menu, 1-14
Inquiry button, 1-20
Maintenance icon, 1-20
MDI menu, 1-15
shortcut menu, 1-17
toolbars, 1-19
Journal file, 1-5
H
hot keys, 1-24
I
IDs
establishing a format, 3-2
setting up, 3-1
sorting, 3-1
importing transactions
layouts, 6-11
Incorrect Entries
transactions, 4-11
incorrect entries
stopped payments, 4-18
transactions, 4-11
voided checks, 4-18
initial balances, 3-8
Inquiry (F2)
button, 1-20
flag, 1-25
Install Applications
function, 2-1, 2-3
installing Bank Reconciliation, 2-1, 3-8
L
launching
OSAS in other operating systems, 1-9
OSAS in Windows, 1-9
Lists
printing, 7-1
M
main menu
graphical, 1-14
MDI, 1-15
navigating graphical, 1-14
navigating MDI, 1-15
navigating text, 1-21
text, 1-21
toolbars, 1-19
Maintenance (F6)
flag, 1-25
icon, 1-20
mapping, 1-20, 1-25
Master File Lists menu structure, 1-4
Master Lists
printing, 7-1
menu structure in Bank Reconciliation, 1-4
menus
drop-down menus, 1-17
graphical main menu, 1-14
MDI, 1-15
shortcut, 1-17
text main menu, 1-21
messages
in text mode, 1-25
modes
graphical, 1-13
text, 1-21
N
navigating
Bank Reconciliation User’s Manual
IX-3
INDEX
graphical function screens, 1-16
graphical main menu, 1-14
MDI menu, 1-15
text function screens, 1-23
text main menu, 1-21
to directories and files, 1-20
negative adjustments
posting, 4-27
numbers
alphabetical sorting, 3-2
O
offsetting entries
in the GLJRxxx file, 4-25
voiding checks, 4-16
Options
table, 6-25
Options and Interfaces
function, 3-5, 3-7
screen, 3-7
OPTxxx table, 6-25
OSAS
MDI menu, 1-15
modes, 1-13
graphical, 1-13
text, 1-21
setup considerations, 2-4
starting in other operating systems, 1-9
starting in Windows, 1-9
output device
e-mail, 1-32
file, 1-31
preview, 1-30
printer, 1-29
screen, 1-31
Outstanding Balances window, 5-10
outstanding transactions
in Reconciliation Report, 5-15
P
Payroll
interfaced with Bank Reconciliation, 3-6, 3-9,
4-7
IX-4
positive adjustments
posting, 4-27
Post Transactions
Deposits T accounts, 4-25
Disbursements T accounts, 4-26
function, 4-25
Negative Adjustments T accounts, 4-27
Positive adjustments T accounts, 4-27
posting log, 4-30
Voided checks T accounts, 4-26
posting
before you post, 4-28
debits, 4-27
deposits, 4-25
disbursements, 4-26
negative adjustments, 4-27
positive adjustments, 4-27
stop payments, 4-13
transactions, 4-25
voided checks, 4-26
voids, 4-13
Proceed (OK) command, 1-2
programs
backing up, 3-10
Purchase Order
interfaced with Bank Reconciliation, 3-6, 3-9
Purge Cleared Transactions
before you purge, 5-23
function, 1-7, 5-3
Purge Reconciled Transactions
function, 5-23
R
ranges
in reports, 1-27
Reconciliation
menu structure, 1-4
reconciliation, 5-15
Reconciliation explained, 1-6
Reconciliation Report
Cleared Transactions report, 5-18
function, 5-3, 5-9, 5-15
Outstanding Transactions report, 5-18
produce after clearing transactions, 5-11
Bank Reconciliation User’s Manual
INDEX
produce before changing cleared transaction status, 5-21
produce before purging reconciled transactions,
5-23
Reconciliation report, 5-19
Recurring Adjustments
distributions, 6-8
file, 1-5
function, 6-5, 7-5
recurring adjustments
adding distributions, 6-8
distributions, 6-8
entering transactions, 4-6
Recurring Adjustments List
list, 7-5
Recurring Entries List
function, 7-5
references, 4-7, 4-10, 4-15, 4-17, 5-10, 6-7, 6-9
reports
e-mailing, 1-32
formatting, 1-34
including information, 1-27
previewing, 1-30
printing, 1-29
ranges, 1-27
saving to a file, 1-31
selecting information, 1-27
sorting information, 1-28
viewing on screen, 1-31
Resource Manager
Data File Conversion function, 2-3, 2-4
Data File Creation function, 2-2
Install Applications function, 2-1, 2-3
Options and Interfaces function, 3-7
restoring a check that has been stopped, 4-15
restoring a voided check, 4-15
reversing tag status of a transaction, 5-10
right-click menu See shortcut menu, 1-17
RMBAxxx file
setting up, 3-8
Roles
setting up, 3-9
roles
company-specific information, 3-9
what to protect, 3-9
Bank Reconciliation User’s Manual
S
Sales Order
interfaced with Bank Reconciliation, 3-6, 3-9
screens
graphical function, 1-16
graphical main menu, 1-14
navigating graphical, 1-16
navigating text function, 1-23
OSAS MDI menu, 1-15
text function, 1-22
text main menu, 1-21
Select, 2-4
setting up Bank Reconciliation
roles, 3-9
setup
checklist, 3-5
shortcut menu, 1-17
sorting
alphabetical, 3-2
codes and IDs, 3-1
principles of, 3-1, 3-2
Specific Item window, 5-10
starting
OSAS
in other operating systems, 1-9
in Windows, 1-9
stop payments
manually tagging as cleared, 4-13
stopped payments
incorrect entries, 4-18
stopping the payment of a check, 4-13
T
Tables
function, 6-25
use of, 6-25
tables, 7-11
Tables List
function, 7-11
tagging transactions, 5-9, 5-10
text mode
command line, 1-25
commands, 1-24
IX-5
INDEX
flags, 1-24
function screens, 1-22
main menu, 1-21
messages, 1-25
toolbars, 1-19
function screens, 1-19
main menu, 1-19
totals information, 5-11
Transaction Import function, 6-11
Transactions
exiting from function when out of balance, B-1
file, 1-5
function, 4-3, 4-13
import layouts, 6-11
menu structure, 1-4
screen, 4-4
transactions
after clearing, 5-11
appending, 4-6
before you change cleared transaction status,
5-21
before you clear, 5-3
before you purge reconciled transactions, 5-23
clearing, 5-3
default descriptions for, 6-3
distributions, 4-9
editing, 4-6
incorrect entries, 4-11
list of cleared items, 5-15
out of balance, B-1
purging reconciled transactions, 5-23
reversing tag status, 5-10
tag status, 5-9
tagging, 5-9
totals information, 5-11
Transactions function, 6-3
transfers
clearing, 5-8
V
Void Checks and Stop Payments
function, 4-13, B-2
screen, 4-14
voided checks
incorrect entries, 4-18
posting, 4-26
voiding checks, 4-13
from Accounts Payable, 4-7
from Payroll, 4-7
voiding unposted checks, B-1
W
workstation date, 1-11
U
unposted checks
voiding, B-1
untagging transactions, 5-10
IX-6
Bank Reconciliation User’s Manual