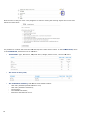
1
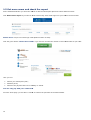
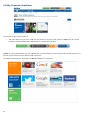
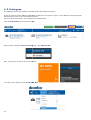
Index
1. First access ........................................................................................................................................................ 4
1.1 Start Delivering Online Training................................................................................................... 5
1.2 Visit the Marketplace ......................................................................................................................... 6
1.3 Set Up a New Course ....................................................................................................................... 9
1.4 How to create a test ........................................................................................................................ 13
1.5 Get more users and check the report ....................................................................................... 19
1.6 My Courses: functions ..................................................................................................................... 20
1.7 My Courses Area: enter and view the course ........................................................................ 23
1.8 Change view ....................................................................................................................................... 26
2. Admin Area .................................................................................................................................................... 27
2.1 Dashboard ........................................................................................................................................... 27
2.2 User management ............................................................................................................................ 28
2.3 Course Management ....................................................................................................................... 30
2.4 Reports .................................................................................................................................................. 34
2.5 Statistics ............................................................................................................................................... 35
3. Main ................................................................................................................................................................ 36
3.1 User Management ............................................................................................................................ 37
3.2 Groups Management ....................................................................................................................... 40
3.3 Admin Management – Admin Profile ......................................................................................... 41
3.4 Power User .......................................................................................................................................... 42
3.5 Competencies ..................................................................................................................................... 44
3.6 Functional Roles ................................................................................................................................ 46
3.7 Newsletter ........................................................................................................................................... 47
4. My LMS ............................................................................................................................................................ 48
4.1 Courses ................................................................................................................................................. 49
4.2 Reports ................................................................................................................................................. 51
4.3 Certificates .......................................................................................................................................... 54
4.4 Curricula ............................................................................................................................................... 56
4. 5 Catalogues ......................................................................................................................................... 58
4.6 Enrollment rules................................................................................................................................ 60
4.7 E-Commerce Transaction .............................................................................................................. 61
4.8 Edit Settings ........................................................................................................................................ 62
4.9 Template Manager ........................................................................................................................... 63
4.10 Web Pages ........................................................................................................................................ 65
4.11 My Courses Layout ....................................................................................................................... 66
4.12 Labels .................................................................................................................................................. 67
4.13 Settings .............................................................................................................................................. 68
4.14 Language Management ................................................................................................................ 72
4.15 Event Manager ................................................................................................................................ 73
4.16 Additional Fields ............................................................................................................................. 74
4.17 Manage Menu .................................................................................................................................. 75
4.18 Locations ........................................................................................................................................... 77
4.19 Questions Category....................................................................................................................... 78
3
1. First access
To get into your Docebo platform you
have to log-in. The first access to the
account will be done with Super
administrator level created during the
installation.
If you have lost your password or username,
username click
Add your e-mail
mail address if you don’t remember your username or your UserID
Use
if you can’tt remember your password.
An e-mail
mail with some instruction will be sent to your e-mail
e
address.
4
1.1 Start Delivering Online
e Training
After the log- in procedure, you will see this page.
Start to customize your new LMS: upload
load your
logo, choose layout colors and the login image.
After that, click Continue.
Fill in the blanks with all the information
about you and your company, then click
The trial is a platform available for 14 days. In
that period you can use all Docebo LMS functions
without limitations. Besides you can create or
import an limitless number of users. This manual
gives you indications about every platform
function. At the end of these 14 days you will be
able to go ahead with the
he purchase of your
platform, choosing a subscription plan. Otherwise,
the platform will be not accessible anymore.
Contact our sales team in order to arrange an
extension of the trial.
5
1.2 Visit the Marketplace
The Marketplace is one of the main new features of Docebo.
You can access it directly from your Docebo platform or from the site http//marketplace.docebo.com, logging in
with User and Password of your LMS platform.
There it’s possible to purchase courses. There are also free courses that can be installed on the platform.
Only Docebo users can buy courses.
This is what the Marketplace looks like:
On top there is:
•
Home button;
•
Go back to the LMS button;
•
Change language button;
•
Logout button.
Courses are divided into categories and are easy to find
thanks to the search bar, a function that allows you to
set a search language too.
This way the system will give only results in the selected
language.
Besides the categories there are:
•
•
the top 5 rated courses:
A window with all of the latest courses
Selecting a course it’s possible to visualize a preview and all main course information: description, category,
duration, language.
You can also rate the course and add a comment using your Facebook, Yahoo, Aol or Hotmail account.
7
The courses in the Marketplace can be:
Free: under the course there is the option to “install for free”. After the installation, the course can be
visualized selecting Play the course button.
Purchased: under the course there is the option to “buy
now”.
8
1.3 Set Up a New Course
You can create a new course from the hom
mepage, selecting the Set Up a New Course ta
ab.
The first step to take is to choose a title and
a
a thumbnail for your course. Then, click Cre
eate Your Course
button.
After that, this page will be shown
Now, you can start uploading Your training
g resources, selecting first Training Resources
s and than Upload Your
training material.
9
Choose what kind of file you
need to upload among:
•
•
•
•
A Scorm;
A File that students can
download;
A video;
A test: to create test
assessment using the
Docebo built-in tool.
Insert a title,
Select
to find the fil
ile on your Pc, wait until the upload is complete
When the operation is done, click Close.
Once you have Uploaded the training materials,
ma
you can choose a learning path among::
10
•
•
•
Free learning path;
Sequential learning path;
Conditional learning path;
Now you can add new students, select the instructors and subscribe them to courses in the User Management
area, located next to Training Resources area.
To add instructors, write their name in the box and press enter.
To add a new user, insert his email address in the box and select Add.
11
To subscribe or unsubscribe users from th
his course, add or remove the flag.
The checkbox will be green if the student is enrolled or white if he is not.
You can also use the quick research bar on
o the right, writing the name of users you wantt to enroll.
While you are managing user and contentts, your course is still unpublished, so no one can see it.
To publish your course, press Publish.
’s always possible to change the course status sele
electing Unpublish.
Now, your course has been published. It’s
<
The course created is visible in My Courses page.
nage your courses tab
If you want to modify the course click Man
12
1.4 How to create a test
It’s possible to add a test to an existing course or to a new course.
Only users subscribed to a course as Teachers or Administrators can create a test.
The first step is to access a course, select Upload your training material and choose the option Create a test.
Give your test a Title and a Description and click Save Changes.
At this point, You can add questions and answers by clicking
cli
on the icon in the middle.
This page will be shown.
13
Selecting Add question, you can choose among different kind of questions. It’s possible to mix various
types of questions in the same test.
To create a question, You have to complete this form which allows you also to add a picture into the question text.
Now You can insert the answers. Two options are already available, but You can add others selecting Add
Answer.
In this page it’s possible to select the correct option, to add a comment
comment that the user will see after the test
and to decide a score for every single answer.
When the test is done, You can customize its options.
14
Test options:
1. Questions visualization: questions can be displayed one for page or collected
collected in groups over several pages.
2. Questions order:
•
questions can follow the original order or be random;
•
You can decide to create sub-groups
sub groups of questions, among which the system choose randomly.
3. In case of multiple choice, it’s possible to arrange answers
answe in sequence or randomly.
4. You can set attempts options:
•
If the user has to answer to all questions or not;
•
If he can browse among the questions during the test;
•
If he can leave the test and continue another time (all the answers will be saved);
•
If there
re is a maximum number of attempts to answer the test;
•
Iff the test will be suspended after a number of failed attempts. In that case it’s possible to establish
also if the student has to follow the course again.
again
5. It’s also possible to decide if, after the test, user can see:
•
The final score;
•
The score grouped by question category;
•
The answers given;
•
Correct answers.
15
Administration points: it’s possible to
1. Establish the minimum score required to pass the test;
2. If the score will be expressed as points
point or percentage;
3. Select a different score for each question.
Feedback management: in this page, You are able to decide also to:
1. Give a textual feedback based on a score range;
2. Assign a competency;
3. Subscribe the user to a course
rse according to his score.
16
Test properties can be customized. Switch to the Advanced Version,
Version, select the course that contains your
test and go to Teacher Training resources management
Properties
In this way You are able to decide:
•
If the test is hidden or not;
•
A start and end date of publishing;
•
The number of views: until not completed or passed, infinite times, only one time;
•
If You want to set the test as an end object marker.
In the same page, You can customize prerequisites
prerequisites too. This means you can establish, a hierarchy of the
object completion. Student will has to complete the contents as per the organization you set.
After setting the prerequisites, the test will be marked by this icon
17
Now the test is ready
y for users. They only have to select it among the learning objects of a course and
follow the instructions.
It’s possible to visualize who took the test and keep the results under control. In the Teacher Area,
Area there
is the Grade Book,, that allows You to visualize:
18
•
Test Details: Type, Max Score, Required Score, Weight, Show to user, Use for final score.
•
The score of every user;
•
The evaluation summary,, that shows some statistics about:
How many students passed the test
t
or not;
How many students checked in;
The average;
The standard deviation;
Maximum and Minimum score.
1.5 Get more users and check the report
As the LMS administrator you have the chance to edit the subscription plan and control all the accesses.
acce
Click Active users report if you want to control how many users made login into your LMS in the last month.
Active users: Unique Users that sign in the platform within 30 days
Click the green button "Active
Active more users"
users if you need to increase the number of users subscribed to your LMS.
Here you can:
•
•
•
Choose your subscription plan;
Visualize prices;
Choose if the payment have to be monthly or annual.
You can only pay with your credit card.
From the same page you are able to choose to confirm
con
the purchase of the APP installed.
19
1.6 My Courses: functions
The function of My courses area are:
•
The green button to get more users, the grey button to access to the courses marketplace, the orange
button to activate APPS and the blue button to contact the help desk.
APPS: As super-administrator
administrator you can activate and set-up
set up the APPS on your Docebo LMS. An APP allows you to
activate some useful tools like catalog and e-commerce.
e
The APPS are divided into: My APPS, Free APPS and APPS (on payment)
pay
20
Help Desk: it’s possible to contact the help desk selecting the Help Desk button (the blue one).
Fill in the form and choose to direct your request to Technical area or Pre-Sales
Pre Sales team. You can also attach a file
to show your problem.
•
The user panel,, that allows to change profile photo and password.
•
The localization tool,, to change the LMS language and manage the translation of all the voices of the
LMS.
•
Settings: this menu includes the Template manager,
manager the Localization Tool and the function
func
to switch
from one version of the LMS to another (simplified(simplified advanced).
If you switch to the Advanced version, the same button
•
Sign-out button
allows you to access to the Administration.
to logout.
Further down there is the menu: you can activate
activate or deactivate all the functions in the Admin aria,
aria except for the
Catalog that have to be activated using the APP function.
In the same page you can see all the courses you are subscribed to. This page is visible also by the students.
21
The star icon on the left (close to my courses) is a filter that allows you to visualize the category that includes all
your courses and the sub-category
category of all the courses you have completed yet.
Using the simplified version, you can find 3 tabs useful to create,
reate, activate and manage courses.
•
•
•
Set-up
up a new course: redirects you to the course creation panel, explained in the 2.2 paragraph;
Access to existing courses: redirects you to the Marketplace;
Manage your courses, allows you to:
Create a new course;
Choose an existing one from the Marketplace;
Visualize the list of all your courses, the subscriptions made and the learning materials. Here you can
also edit a course
22
or delete it
.
1.7 My Courses Area:: enter and view the course
My courses Area includes all the courses you’re subscribed to.
Pass the mouse through a course icon to visualize all the information about your activities and your subscription
level.
To access to a course, you have just to select it.
This is the course page.
In the center of the page, there is a list of all the Learning Objects of the course. Select one of them to begin. The
Learning Objects could be in different formats:
•
•
•
Scorm;
A file to download;
A Test.
Next to every learning object there is:
•
A flag, that will be green
yet.
•
This icon
takes you to the statistics. Here you are able to find all the additional information about the
accesses and the score.
if the learning object is completed or yellow
In that page there is also all of the info
ormation about your activities:
•
•
•
23
How many times you have visited this course;
The time spent on it;
The progress made, indicated by the progress bar.
if it has not been completed
By selecting the icon
, you will be redirected to a page with all of the details about your progress:
•
A tab with all the information about: subscription date, last access date, session time, objects completed;
•
Statistics about course access;
•
A timeline that reports all the important events about the course;
Progress made with all the learning objects of the course. You can view:
-
The status: Not started
Incomplete
Completed
24
-
Time spent on the learning object;
-
Completion date;
-
Score
Above all the statistics, under the menu, there is the
student area.
This section permits you to view:
•
Course documents, with all the Learning Objects of the course;
•
25
Report card, with the score for the activities of the course.
1.8 Change view
In the menu on top of the page, you can see which version
version of LMS you are using: simplified or advanced. You
are always able to switch from one to another.
The difference between these two versions is that the Simplified View gives you the chance to administer the
platform without access to the Admin
in Area.
Clearly, there are less function compared to admin area, but you can manage routine processes like courses
creation and editing, users subscription and enrollment, change of language.
The switch between simplified and advanced version it’s completely
complet
free.
26
2.
Admin Area
If you need a deeper managing of platform
rm functions, you have to go to the Admin Area, switch to the Advanced Area
and select the icon next to the language icon.
2.1 Dashboard
You’ll be redirected to the Dashboard, with
w
all the functions of admin area.
On the top there are still the buttons that we have explained earlier, while further down there is:
•
A menu that divides the function in Main, My LMS, Language and settings. Here you have all the information
informati
about your subscription plan;
•
3 tabs with shortcuts to user mana
agement, course management and report functio
tions;
•
Some statistics about recent activities, course performance, less visited, less completed and best performer
courses.
27
2.2 User management
Here, there are some quick links to main activities for use management: User profile, change password, new user,
organization chart, import users.
To complete these actions, you only have to select one of the quick links and complete the form.
User Profile
You can visualize a user profile finding him thanks to the searching bar. Insert the name of use you want to find and
press confirm.
The system gives you his personal file with all the information about the student and his progresses.
Change Password
28
New User
Organization chart
This quick link will take you to the organization chart, where it’s possible to create a user cataloguing tree.
29
2.3 Course Management
The second tab helps manage courses, in a quicker way.
It’s divided into: New course, available courses, subscribe
New Course
To create a new course, select New course and fill in the form with all the information of the course you want to
create. Beside code, course name and description, you can choose:
Type of course:
E-learning: a course studied online;
Classroom: a course that can be studied in the classroom or in a blended formula with which the management
of physical classrooms can be associated.
Course Status:
•
•
•
•
Confirmed/ Available: the course is accessible to the users;
Under construction: the course is only accessible to the users responsible for preparing its content (normally
teachers, tutors, mentors and/or administrators);
Concluded: the course is finished and only those users who have concluded it have access;
Cancelled: the course is no longer accessible, and registration from the course catalogue is no longer possible.
Options of use:
Direct access to the first learning object of the course;
Direct access to the statistics link for the first learning object of the course.
30
Numerous Details can be established, including:
The menu (self training, collaboration);
Course language;
Level of difficulty;
Credits;
Labels.
It is also possible to manage the enrollment policy, defining whether:
subscription is exclusively reserved to the
administrator;
subscription is subject to the approval of an
administrator;
subscription is free, in self-registration;
And the course subscription:
Subscriptions are closed;
Subscriptions are open;
Subscriptions are available during a defined
period;
If there is the possibility to unsubscribe (only
administration can, on approval or free);
If there is a date limit to unsubscribe;
If there is a code for the automatic subscription to
a course;
If the course has a price.
You can also set the display mode options:
to show this course to everyone, only to logged in users, or only to subscribed users;
to show progress, time and advanced info on course interface
to show users online in this course (only number of connected, only connected with instant
messenger, or no one);
to select levels of user shown on information course page;
to deny access to this course if the user status is: subscribed, in progress, completed, or suspended.
31
In the time options, you can:
Limit subscriptions to a predefined
period of time;
Set begin and end date, and days
of course validity;
You can use the special options:
to assign a minimum and
maximum number of
subscriptions;
to allow overbooking;
to assign a disk space limit for the
material uploaded.
It is possible to determine the variables connected with the sale of the courses and to give a logo the course.
Course material can be directly uploaded by the administration, if so desired.
32
Now it’s time to save changes made to your course.
Available courses
Here you can find all the available courses, add new course categories and manage multiple subscriptions.
Subscribe
To easily subscribe someone to a course, fill the form with course name, user name and level of subscription.
33
2.4 Reports
This third tab is a quicker way to review reports about:
courses – users;
users – 30 days delay;
users – courses;
users – learning objects
You can also find and download data.
34
2.5 Statistics
The Dashboard also presents some statistics, all static, updated every day on a period of 7 days.
Recent Activities
Here there are statistics about: number of sessions; course completion; enrollments.
All referred to a week period.
Under the statistic could be a warning
icon
to indicate that there are:
courses with no enrollments;
courses with no materials;
courses with no completion.
Performance Indicators
There are other available statistics
regarding:
course status (under construction, active,
closed);
student status (to start, in progress,
completed);
most popular courses.
In the Dashboard there is also data about:
•
•
•
35
less opened courses in the last week;
least completed courses;
most completed courses.
3. Main
The menu of the
e Administration Area is divided into Main and My LMS.
Main menu has functions regarding:
•
•
•
•
•
•
•
•
36
Dashboard
Users management;
Groups management;
Admin management;
Power user management;
Competencies;
Functional roles;
Newsletter.
3.1 User Management
By selecting MainUsers
- Management you will be redirected to the Organization Chart.
By dividing the users into folders and subfolders, it is possible to create a user map with a configuration similar to
the company’s organization chart or a tree reflecting the needs of the HR or Training office for managing
subscription to the courses.
Folder names can always be changed, subfolders created, by inserting a new branch within one that has
Been selected, and individual folders dragged and dropped inside others.
New Sub-node
To create a subfolder in an existing node, select the node you wish to create a sub-node in and select the link
“Add node”.
Associate a user to a node
To associate a user to an organization chart node, select the icon “Associate users” closest to the node you wish
to associate a user to.
The system displays all the users registered on the LMS, allowing us to flag one or more interested users. Confirm by
clicking the button “Save changes”.
User subscription to the platform
Once the organization chart has been created, the users must be subscribed. Subscription can be done in four ways:
Direct creation by an administrator/super administrator;
“Moderated” creation by a sub-administrator (this must be confirmed by a higher level administrator);
Free self-subscription to the platform;
Moderated self-subscription to the platform (this must be confirmed by an administrator).
Direct subscription by an administrator can be done in various ways:
Manual registration
Massive import
Manual registration of individual users
To create a new user select the folder you want to place it in, and click the link New user.
A registration window will be displayed. This screen contains all the information needed for a new user subscription.
After selecting the button Confirm, a notice with username and password will be sent to the user’s email address.
A single user or group of users can be assigned to a specific branch of the organization chart, either by selecting the
destination folder and starting the subscription procedure or by entering the data regarding positioning on the tree
at a later point during the subscription process.
37
Once the users have been imported, changes can be made to each profile.
It is possible to:
View the users’ personal information files;
Delete associations with the organization chart branch;
Suspend and later reactivate users;
Change data on the personal information files;
Delete users from the platform.
Importing Users
Choose the file to import. The system can automatically determine the separators to be used for separating fields
(commas or semicolons), or else this can be set manually.
The first line of the table can be assigned as a heading for the imported file. If this is done, the first line of the
file, which normally contains data headings, will then be ignored.
Assign the organization chart node with which the users should be associated.
Once the file is imported, assign each column to the required values. In the example shown in the figure, the imported
file contains the first line as a header, making it is easier to recognize the values to assign to each column.
At the end of the process the system provides feedback on the number of users successfully imported or signals
import errors.
Through the icons close to the organization chart nodes we can:
Associate a registered user to a node;
Associate one or more additional fields to an organization chart node;
Modify the name of the node;
Delete an organization chart node.
NOTE: By deleting an organization chart node, the users associated will NOT be deleted.
User search/sort
In the User management page there are search filters allowing subscribers to be sorted or searches to be made
through specific modes.
The system automatically displays the search by individual users and shows the list of all users subscribed to the
platform. To select the user to subscribe, use the search engine on the right and enter the user ID, name or
surname of the user.
An advanced search can be activated through Advanced search.
38
This option enables a search to be made based on the fields of the personal information file used in the
platform, including supplementary fields.
Select the search parameter from the drop down menu, click on the Add button, add the required data and then
click on the Apply dyn filter button.
The system will show the name or names corresponding to the chosen search criteria.
The users can be listed by Name, Surname, e-mail, most recent access to the platform or subscription date, by
clicking the buttons at the top of the users list.
If multiple users are selected, a series of “batch” operations can be performed. Clicking on the More functions button
provides the options of: suspending, restoring or cancelling selected users, exporting a .CSV file for the selected users
containing all the data fields, or disassociating the group of users from the present branch.
39
3.2 Groups Management
As well as through branches of the organization chart, users can also be categorized on the basis of groups they
belong to. The creation of groups is useful whenever a group of users with different characteristics than
those determining the branches of the organization chart is to be subscribed to a course.
To create a new group, select Main Groups Management.
Click New and then proceed to complete the
form.
Through the active menu beside each group, it is possible
to:
•
•
•
associate users with a group;
change the name and description of the group;
delete the group.
By selecting the icon “associate users”, as well as per the organization chart nodes, the system will display the
2 procedures to associate one or more users to the interested group:
•
Assign users- select manually the interested users through all the users, groups, orgchart nodes and roles,
and confirm;
•
Import users – by uploading a .CSV file with a single column containing the usernames of registered users we
wish to assign to that given group.
Note: a user can be assigned to more groups.
40
3.3 Admin Management – Admin
Adm Profile
To create an administrator, the level of th
he designated user must be raised by changing his/her
h
profile:
Two fundamental tasks must be performe
ed in order to define the administrator's roles an
nd powers:
•
•
creating the administrator profile, with
w
assignment of the respective permissions to each profile;
associating the users branches and
d course categories to be managed with the profile.
To create an administrator
dministrator profile, you have to select the
Edit Settings button and choose the Admin Profile
option.
ile allows you to:
The active menu beside each created profil
Manage the permissions for that profile;
p
Assign the administration and publi
blic area modules that the profile can manage;
Manage the languages that the prrofile can change;
Manage the subscriptions, to assig
ign a number of users this profile can manage th
he subscription for.
Special settings
This setting aims to define the limits of permission
pe
in terms like user creation limit or cou
urse subscription limit.
Edit settings
This function aims to define the modules that
t
a profile can manage in the Administration area and LMS area. There
are different permissions related to each module
m
like faculty to create, modify or delete a user or a course.
In the Framework tab are displayed all the
t
functions related to user management and LMS
L
settings. Under LMS we
find all the modules concerning course management
ma
and training reports
Assign a language
Through the red flag icon it is possible to assign one or more languages to the interested
d profile.
When the administrator profile is completed
ted, you can manage it by going to Main
41
Adm Management.
Admin
3.4 Power User
The power user is an administrator with limited
li
powers who does not have access to the administration area but can
access his administrative functions throug
gh a panel in the public area.
In order to create a Power User, the levell of the designated user must be raised by changi
ging his/her profile.
As with administrators, for power users it is also necessary to:
•
•
ning the respective permissions to each profile;
create a Power User profile, assign
associate the user’s branches and course categories to be managed with the profile
ile.
To create a power user profile, select Editt Settings
Power User Profile.
Create a profile by clicking Add
The active menu beside each created profile allows you:
•
•
•
To Manage the permissions for th
hat profile;
To Assign the administration and public area modules that the profile can manage
ge;
To Manage the subscriptions, to assign
ass
a number of users this profile can manage
e the subscription for;
Special settings
This setting aims to define the limits of permission
pe
in terms like user creation limit or cou
urse subscription limit.
Edit settings
This function aims to define the modules that
t
a profile can manage in the Administration area and LMS area. There
are different permissions related to each module
m
like faculty to create, modify or delete a user o a course.
Different from the Administrator profile, there
t
is no distinction between Framework and LMS,
L
meaning that the power
user has less permissions.
42
To associate the users and courses to be administered with the profile select Main Power User management.
This page will display all the users created with a Power User level.
We can easily assign one of the created profiles by selecting the relative dropdown menu.
The active menu beside each administrator allows you to:
Assign a number of users this Power User will manage;
Assign a number of course this Power User will manage the subscriptions for;
Assign one or more communications to monitor.
Note: To successfully assign an Administrator or Power User profile, the interested users must be subscribed on the
LMS with the relative level.
43
3.5 Competencies
Docebo can create and manage a system that matches the competencies that a user/group/corporate department
must obtain to a series of activities that the teacher/administrator determines as being necessary for acquiring them.
To access the Competencies area, select Main
Competences.
Creating and categorizing competencies is a preliminary operation for developing the system.
Categorization is done by creating a tree divided into various folders, each of which corresponds to a category.
To create a new branch, click the Add button.
To create a competency, select the branch of the tree to which the competency belongs and click Map a
new competency.
This page will be shown. Here you have to select a category, a language, give a name and a description to the
competency.
Assign a Category
Assign a Typology to the competency:
Skill: technical competencies
Attitude: behavior
Knowledge: knowledge
and an Evaluation method:
44
Score: competencies with an assignable score
Flag: acquired (YES) / not acquired (NO)
Through the active menu beside each competency, it is possible to:
view who has attained the competencies and assign them to users, manually specifying the score achieved;
change the details regarding the competency;
delete the competency.
Note: To associate a competency to a course follow the path E-Learning – E-Learning – Course and select the icon
Competency.
45
3.6 Functional Roles
The competencies system can monitor the difference between competencies actually acquired by persons in a specific
company position and the level of competencies considered as the ideal to attain (defined and set by the
administrator).
In order to make this assessment, Functional roles must be created to which the respective competencies can be
associated.
With more complex organizations, various roles can be grouped together for more streamlined management.
To access Functional roles select Main
Functional Roles.
Create a role through the specific Groups management option.
Through the active menu beside each role, it is possible to:
•
•
•
•
•
•
Associate the users occupying that role;
Associate the competencies assigned to the role;
View the courses through which the competencies associated with the role can be acquired;
Perform a gap analysis to see the difference between the level of competence achieved by the user and the
required level;
Change the name of the role;
Delete the role.
Gap analysis: by clicking the appropriate icon, the system displays an exportable table showing the analysis and
monitoring.
By clicking the last icon (gap analysis), the system shows a detailed analysis for each user:
Note: To assign one or more users to a role it is necessary to create a group with those users assigned.
46
3.7 Newsletter
The Docebo platform allows you to send newsletters directly from the administration to all the LMS users or to just a
specific group of them.
To activate this function, select Main
47
Newsletter:
4. My LMS
This menu is divided into:
•
•
•
•
•
•
•
•
48
Courses;
Reports;
Certificates;
Curricula;
Catalogues;
Content Library;
Enrollment Rules;
E-Commerce Transactions.
4.1 Courses
Another way to create a new course is to s
select My LMS
49
Courses
To add a new course select
The active menu on the right
•
Approve users waiting for subscription
•
See if the course is a classroom edition
•
Assign a certificate
•
Assign competencies
•
Assign a menu to the course
•
Make a copy of the course
•
Edit the course
•
Delete the course
it’s useful for some routine activities:
Courses can be divided into categories. To add a new category, click
and choose a name.
How to sell courses
You can decide to sell your courses using the e-commerce
e
tool.
First thing to do is to buy and setup the E-Commerce
E
APP.
Go back to the Administration and select My LMS
Courses.
Create a new course to sell or choose one of those created. Click the Sell courses button and decide a price.
Now, users can decide to buy the course.
50
4.2 Reports
This section goes deeper into what is mentioned in the dashboard.
To obtain a Report monitoring the progress of training activity in the platform, select My LMS
Reports.
The system allows you, as Super administrator, to create a new report anytime or view the details of another report
previously created.
To create a new report, click New.
Assign it a name and type:
Users;
Courses;
Aggregate.
Choose the users for whom you wish to create a report; all the users on the platform can be selected by clicking the
specific check box.
Select Columns data:
Relates users to courses;
Make delay analysis;
Relates users to Learning Objects;
Relates users to communications.
51
Then, choose columns filter’s setting:
Select courses: all or manual selection;
Select condition: all conditions must be satisfied or at least one condition must be satisfied (filters can be
changed);
Set a start and end date for the classroom.
Decide what you want to view in the report table:
Users custom fields: last name, first name, email, join date, suspended, suspend date.
Course information: category, code, path, status, credits;
Classroom fields;
User’s information about courses: subscribed date, first access date, completed, last access date, level,
status, start score, final score, course score, number of sessions, total time, estimated time.
Set visualization order and if you want to also see suspended users results
When the report has been created, it’s possible to export it in HTML, CSV or XLS.
All reports are listed in the page shown by selecting My LMS
52
Report.
Here, the active menu beside each report can be used for:
Making the reports public for other administrators;
Viewing and updating data;
Exporting reports in .csv format;
Exporting reports in .xls format;
Making report schedules so that they are produced and sent to specific people at regular intervals;
Change the data structure of a report;
Delete reports.
To schedule automatic report delivery: Select “Add”
Give the schedule a name and specify how often the report should be created and sent to the person concerned.
Select the user to whom you wish to send the reports and conclude the operation by clicking on the Save Changes
button.
53
4.3 Certificates
The platform allows you to create certificates to award users for completing activities.
Certificates are forms whose content can be customized on the basis of the course with which
they are to be associated.
To access the Certificates function, select My LMS Certificates.
To create a new certificate model, click Add and assign it a code, a name and a description. Then create the content:
Enter the text for the certificate in the certificate template box; by adding the items listed in square brackets []
at the foot of the page, the system will automatically create a certificate displaying that specific data for each
user.
Here is a list of customizable data:
54
An example of the text could be:
I certify that the user [firstname] [lastname] has participated in the course [course_name] and gained
[course credits] training credits.
Note: It is advisable to only use background images and not to import HTML images by entering tags such as
<p>, <div>, <centre>, as errors could occur due to limitations in the PDF conversion.
Through the active menu beside each certificate, it is possible to:
view and download an example of the model;
change the model;
change the code, title and description;
verify the courses to which the certificate has been assigned, checking how many users have created it
for each course.
By selecting the name of a course to which the certificate has been assigned, the administrator can verify the
status of
the course certificates in real-time for each subscribed user and create certificates for all of them
or just for a group of users.
The administrator can download and, if necessary, delete certificates already created by users.
55
4.4 Curricula
The Docebo platform allows you to create
e mandatory educational programs (curricula) to
o assign to individual
users, organization chart branches or grou
ups.
The program consists of a list of course
es that the user must follow in the given orde
der through a system that
regulates the level of necessity and access.
ss.
To create a curriculum, select My LMS
Curr
Curricula.
Create a new curriculum by selecting “Add
dd” and then assign it a code, a name and a descr
scription.
After setting all the fields select Save chan
nges.
56
Through the active menu beside the curriculum, it is possible to:
Monitor the number of users awaiting subscription;
Subscribe users to the program;
Assign courses to the curriculum, establishing their priorities and whether they are mandatory;
Delete completed subscriptions;
Modify data: code, name, description and subscription policy;
Delete the curriculum.
End path certificate
At the end of a curriculum, every user could download a certificate with all the relative courses and credits listed.
Select the certificate icon relative to the interested curriculum;
Assign one of the prepared certificate through the dropdown menu, selecting one of the displayed status, usually
“Assign” for users that have completed the course. Click “Save Changes” to confirm.
Selecting the number of released certificates, will make it possible to:
•
Check the users that already downloaded the certificate;
•
Download a copy of certificate of each user;
•
Generate or re-generate certificates already downloaded.
57
4. 5 Catalogues
The catalogue allows the creation of vario
ious course lists divided into types.
It can be useful to create different catalog
gues according to user types or topics, in line wit
ith the company policies
that determine users’ course subscription choices.
This tool can be used only if you activate it in the APP section.
Click the APP button on the top of the page
One you have found the Courses catalog App, click Activate APP
Now, you have to do the set-up
up to use the tool
To create a new catalog, select E-Learning
Learning
58
Catalogs in the admin area
Create a new catalogue by selecting New
w catalog, and assign it a code, a name and a description.
Each new menu has on his right a menu. Some icons are replaced by alerts icons to indicate the need to add courses
and assign users to the catalog.
Through the active menu beside each cata
alogue, it is possible to:
•
•
•
•
•
add and change the courses to include
i
in the catalogue;
assign users to the catalogue:: users can view the catalogue courses and
d subscribe independently
when permitted to do so by the policy assigned to the course;
subscribe users to the catalogue
e: users are directly subscribed to all the cours
rses in the catalogue;
change the catalogue name and description;
delete the catalogue.
Users can access to Catalogs they are subscribed
subscr
to selecting the option Catalogs in My courses area.
59
4.6 Enrollment rules
With this function you can create a system
m for automatically regulating user subscriptions
s to courses. By
associating a number of courses to one orr more organization chart nodes, all the users associated
ass
to those nodes
will be automatically subscribed to the link
nked courses.
This function is very useful with a defined
d training offer for different groups of users.
To access this area, select My LMS Enrollment
Enro
rules.
Click “Add” to create a new rule, then assign
ass
it a name and specify the languages for whiich the rule is valid.
Define the type of rule you want to creatte and click
“Confirm”.
Through the active menu beside each rule, it is possible to:
•
Activate the rule;
•
Configure the rule in relation to groups and courses;
•
Change the details;
•
Delete the rule.
Once created, the rule will be ready to be
b edited through the icon “Manage”
To configure the rule, first select the app
ppropriate icon in the menu and then click “add group”
g
and “add course”.
60
4.7 E-Commerce Transacttion
The Transactions function permits you to
o monitor payments and assign the “paid” status
s to users who have
purchased an available course through deferred
de
payment so that they can take the cours
rse.
To access the Transactions area, select My LMS
E- Commerce transaction.
The list of users that have confirmed making
ma
the transaction will be displayed.
Through the active menu, it is possible to:
to
•
•
verify whether a user has “paid” sttatus;
assign “paid” status to a user.
You have the chance to export data of this area as XLS file.
61
4.8 Edit Settings
The administrator Area has a section usefu
ful to manage settings. To access, select the icon
The function of this panel are:
•
•
•
•
•
•
•
•
•
•
•
•
•
•
62
Template manager;
Web Pages;
User area in LMS;
Label;
Settings;
Language Management;
Event Manager;
Additional Fields;
Administrator Profile;
Public Administrator Profile;
Manage Menu;
Locations;
Question Category;
Switch to simplified version
4.9 Template Manager
In this section you can customize your platform with:
A logo;
A Sign In page - Picture;
A Sign In page – Layout;
Layout options will disappear once you
have decided to show the Course
Catalog within the Sign in page.
63
A General Layout – Colors;
Customize CSS (only for
experts)
64
4.10 Web Pages
To create a new web page, select Edit Settings
Web pages.
To insert a new page, click “Add”.
Give the page a title, insert text and decide whether to publish the page directly (by checking Publish) or at a
later stage.
Through the active menu
65
beside each page, it is possible to:
•
publish/hide the page
•
change the page order (using the arrows)
•
change the text
•
delete the page
4.11 My Courses Layout
It is possible to manage the menu in My courses area, deciding what functions users can see. To do that, you
have to go to Settings User area in LMS.
In this page you can customize policy view of:
•
Certificates;
•
Competences;
•
Community;
•
Activate courses;
•
Catalog;
•
Messages.
Next to every entry there are two icons:
•
•
66
a flag: selecting it, this will be green, indicating that this content will be seen by users;
a people icon: selecting it, you’ll be able to decide who can see that content, among users, groups,
organization chart e company roles.
4.12 Labels
Labels allow you to group together the courses in the “My courses” page.
To access the label function, select Settiings Labels.
To add a new label, click “Add” and ente
ter the Ttile for the label and a description.
Choose a color anc a language.
ectly displayed in the LMS
If the module “Label” will be activated, courses associated to those labels will be corre
page.
67
4.13 Settings
Is a function to customize your platform
rm settings. It is possible to manage:
Main options:
- page title,
- website URL,
- default language,
- template,
- sender email address for alert
messages,
- default color scheme,
- session lifetime,
- visual HTML text editor
Users
Users:
limit user to change just his pass
assword
- if the user is prompted to fill in the
e
mandatory fields during the login
- if you want to keep a record of all the
deleted users
ber of
- You can decide a maximum numbe
consecutively failed login attempts
- If you want to save info about faile
iled
login attempts
- Set the customer helpdesk e-mail
address
-
68
Password:
You are able to establish if the passw
word must be composed of letters and numbers,
rs,
Password length (a minimum numbe
ber of characters),
If users are forced to change their password
p
at the first login,
If the password will be valid only forr a determined period of time,
Decide that the password has to be different from a determined number of last used
d passwords.
-
Register:
Choose the registration type: free sel
elf, moderated self, supervised by administrator,
r,
Set an email sender address for regi
egistrations and lost passwords,
Establish a limit, in hours, for the ex
xpiration of the subscription request,
Decide if the first and last name are required for the registration,
If privacy policy must be accepted,
If you want to use advanced registra
ration form,
You can prefer a registration code among:
am
a tree code entered manually by the use
er, a tree code chosen by
the user from a list in a dropdown menu,
m
a combination of tree code and course cod
ode that must be entered
manually by the user, or no code.
E-Learning:
-
69
It’s possible to decide the cours
rses sorting order in my courses (by name, statu
tus, code, none),
If the course catalog must be viewed
v
in the main page,
If the user can also see other courses
c
and curriculum,
If you want to show forum list in
i a table,
If you want to enable tags featu
ure inside the forums,
It is possible to set a limit for th
he maximum total size of content uploaded into
o the courses,
If you want the “no answer” option
optio in test and/or in poll questions,
If the users are traceable,
If, in the results area of the con
ntent library searches, objects not directly availa
able to the user are also
shown,
If, in the results of the content library searches, objects that aren’t fully catego
tegorized are also shown.
Videoconference: you can enable this
s
service and choose your provider amon
ng
DimDim and Teleskill.
LDAP: it’s possible to activate LDAP
authentication, add the number of serv
ver,
the port, and a username.
70
Advanced: You can manage advanced
d
options about debug, newsletter, uploa
ad,
and security.
Docebo and SSO
Google: enable Google
Analytics
71
4.14 Language Management
Manage languages selecting Settings
Language Management
You can Add, Import or Translate a Language.
To add a language click the Add button and fill the form
Through the active menu beside each lan
nguage it is possible to:
•
•
•
•
view all the translations included in
n platform and change the text by clicking on th
he required translation;
export the entire translation to impo
port it into another program;
modify the language data (name and
a
description);
delete the language.
The search engine can be used to search
arch for the word in the translation. Simply ente
ter the word that you
wish to change in the text.
The search can also consult the “Module
les” search engine, by specifying the module in which the text to be
changed is located.
72
4.15 Event Manager
The system provides a list of events with which an e-mail or SMS notification can be asso
ociated and the final
column indicates the user types to which the
t
communication will be sent.
To choose the events with which notificatiions may be associated, click on the buttons in the
t
“Mandatory”
column. The notification text can be custo
tomized through the Languages section of the pla
atform.
73
4.16 Additional Fields
The users in the platform are catalogued according to different fields that are characterized as follows:
mandatory/non-mandatory fields
User-editable or non-user-editable fields
The standard users’ personal information file includes the following fields: User ID, Name, Surname and E-mail.
Often the company needs to increase the set of fields for an individual user, adding entries regarding, for
example, the user's matriculation number, department or tax code.
Select the type of field that you wish to add from the drop-down menu (for example, the Fiscal code field, a
blank Text field or an MSN account) and enter the name you wish to assign to the new field, if this is different
from that shown in the menu.
The new additional field must now be assigned to the user, the organization chart branch or the entire organization
chart.
Admin and Power user profile
These functions are described in the admin and power user part.
74
4.17 Manage Menu
The menu located in the LMS area is customizable. You can:
Add a custom menu. Selecting
this page will be
shown
To create a new menu, you have to add a title and a description and decide if this will be a copy of another
existing menu.
•
Manage the existing menus (self training, collaboration, full menu), choosing one of the icons on the
right
Make a copy
Edit
75
allows you to create a copy of an existing menu, changing title and description
redirects to that page
It’s useful to:
Edit
-
manage menus order
-
assign modules to menu items
-
edit a menu item
-
delete a menu item
to change title and description of a menu
Delete a menu
76
4.18 Locations
Through this function you can directly manage the reservation of physical classes from the e-learning platform.
Click “Add” to create a new Location, or site in which classrooms are located.
Through the active menu beside each location, it is possible to add one or more classrooms to the same
location, providing details for each classroom, such as: name, description, layout, subject, capacity and
equipment.
There is an active menu beside each classroom that allows you to:
•
•
•
View the classroom reservations;
Change the classroom details;
Delete the items.
Classroom reservations are made automatically when dates and times are assigned during the creation
of a classroom course. Available locations and classrooms can be chosen at that moment and the reservations
calendar is automatically updated.
77
4.19 Questions Category
The tests managed in the platform courses allow management of the questions to be shown to users, dividing them
into sets, each of which corresponds to a category.
Tests can be arranged so that users are given a specific number of randomly chosen questions in varying
proportions from different categories.
Create a new category by clicking
and entering a name and description.
From the active menu it is possible to:
•
change the description of the category;
•
delete the category.
After creating all the interested categories, we can use them with the LMS Test module through the Learning Object
Management function in each course.
When creating every question in a test, it will be necessary to associate each question with one of the created
categories. If we associate each question correctly and set the right procedure of test generation, the system will
automatically display a defined number of questions out of each category pool.
78
FOLLOW US
www.docebo.com
READ OUR
BLOG
http://www.docebo.com/elearning/blog/
79