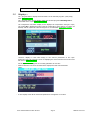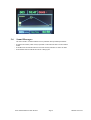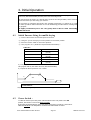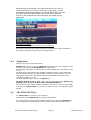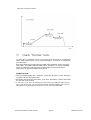
1
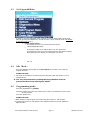
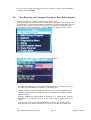
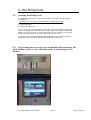
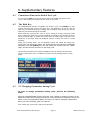
1.1
Focus 4010
INSTRUCTION MANUAL
Micromat porcelain firing furnace
Warning
You have available one of the most precise dental furnaces equipped with a
heating muffle made by the original manufacturer of this technology with an
experience of more than 25 years in the dental laboratory industry.
IN ORDER TO PRESERVE THIS PRECISION AT ALL TIMES, PLEASE BE SURE
TO ATTENTIVELY READ THE FOLLOWING INSTRUCTIONS PRIOR TO USING
THE FURNACE!
Please keep your furnace in an ambient temperature for any storage .
Prior to carrying out maintenance work on the furnace or in case of mechanical failure,
firstly be sure to completely shutdown the device. To do so, switch the main switch
(POWER) on the back of the furnace to OFF and pull the power-supply plug.
Only qualified technicians and experts recommended by the furnace supplier should open
the furnace.
Do not attempt to open the furnaces without authorization since this will void the
guarantee. For any necessary repair and maintenance work, consult your Shenpaz
device servicing center.
In case of a necessary replacement of fuses, proceed as follows:
1) Pull the power-supply plug.
2) Replace the fuse.
3) Be sure the correct safety fuse parameter is indicated on the spare fuse.
Basically your furnace has a full recovery system on any power failure
In case of a long external power failure and when it is needed to manually open the
furnace proceed as follows:
1) Pull the power-supply plug.
2) Lower the support. To do so, insert the supplied crank into the hexagonal screw on.
ATTENTION!
When operating the furnace a Refractory support must always be on the lift
tray!
Focus 4010 Dental Porcelain Furnace
Page 2
Manual version 4.1
ATTENTION!
Take out the furnace with the assistance of two persons. To do so, each person
will take a side by holding the bottom of the furnace with one hand and the top
side with the other hand.
ATTENTION!
Do not pull out the furnace by its support in order to avoid damages.
Warning
ATTENTION!
ATTENTION!
Mount on non-flammable surface material only !
Take out the furnace with the assistance of two persons. To do so, each person
will take a side by holding the bottom of the furnace with one hand and the top
side with the other hand.
Do not pull out the furnace by its support in order to avoid damages.
CAUTION:
PLEASE READ THE INSTRUCTIONS CAREFULLY
BEFORE OPERATING THE FURNACE.
When operating the furnace a Refractory support must always be on the lift tray!
• During use, the area around the furnace table is hot; approach and contact with
the table should be only when the furnace is cold
• Dental work must only be placed on the furnace table.
Avoid placing or resting objects on any area of the furnace except the rest
table.
•
In the event of an external power failure while the furnace is in operation:
1) Disconnect the power supply cord from the electrical power outlet.
2) Lower the table by inserting the crank supplied, into the hexagonal
screw located at the back of the furnace.
Focus 4010 Dental Porcelain Furnace
Page 3
Manual version 4.1
Caution!
Risk of electric
shock
Caution!
Risk or Danger
Caution!
Hot
surface!
Refer to documentation.
INDEX - CHAPTER
1.
Furnace Installation
2.
General Description
3.
Initial Operation
4.
The Firing Cycle
5.
Supplementary Features
6.
Calibration
7.
Diagnostics mode and Furnace data
8.
Build – in Programs
A.
Technical support
Focus 4010 Dental Porcelain Furnace
Page 4
Manual version 4.1
2. Furnace Installation
2.1
Unpacking
1) Check the contents of the shipping carton, compare with the enclosed list.
2) Take out the accessories and check the contents:
1. Electrical Mains cord
2. Firing table
3. Tweezers
4. Fuses
5. Emergency wrench
6. Vacuum hose
7. User manual
Remove carefully the polyethylene foam.
3) Lift out the furnace carefully, and positioning it on its feet. DO NOT lift the
furnace by the lift shaft.
4) Store the carton and the polyethylene foam for future use.
POINTS TO NOTE:
•
When positioning the furnace on the working bench, please keep safe
distances from the surrounding walls (approx. 20cm).
•
Do not place the furnace near the open window or any source of
direct airflow (like ventilator). This, in order to eliminate the
possibility of wrong temperature reading when the firing table is in its
lower position.
•
Placing the furnace according to the above mentioned instruction will
guarantee the proper temperature stabilizing, heating and cooling.
Focus 4010 Dental Porcelain Furnace
Page 5
Manual version 4.1
2.2
Installation
2.3
Vacuum Pump Connection
1) Using the rubber vacuum tube and the band supplied:
1. Connect the nozzle of the vacuum pump to the rubber vacuum tube.
2. Connect the nozzle of the furnace to the other end of the rubber tube.
3. Check the band is well secured.
2) Plug the electrical power cord of the vacuum pump, into the electrical power
outlet of the vacuum pump, located on the rear panel of the furnace.
3) Check the position of the pump so that the vacuum tube will have an undisturbed
air flow.
2.4
Furnace Connection to Power Outlet
•
Check and ensure that the main power switch at the rear of the
furnace is turned off.
•
Connect the electrical power cord into the furnace power inlet. Plug
the electrical power cord into the wall power outlet.
•
Switch the MAIN POWER switch ON (located on the rear panel). You
will hear a single beep. The furnace is now in Stand-by mode. The
word “ON” in the program field.
•
Press the ON/OFF key on the front panel. The furnace is now in
Idle mode.
•
Press the [STOP/LIFT]
automatically.
•
Place the ceramic table on the platform!!!
•
The furnace is now ready for the Initial Operation Procedure.
key
Focus 4010 Dental Porcelain Furnace
-
the
platform
Page 6
will
descend
Manual version 4.1
3. General Description
3.1
Connections and Controls
FRONT PANEL:
The furnace controls are located on the front panel and are
divided into 6 sections:
1.
2.
3.
4.
5.
6.
Data keys
Control keys
Programming keys
LCD color
Temperature and Data Display
Vacuum Display
REAR PANEL
The main switch and the furnace connections are located on the rear
panel.
1.
2.
3.
4.
Power switch
Emergency wrench inlet
Muffle fuse
RS 232 /USB Inlet for Software
uploading
5. Power cord outlet
6. Power muffle fuse
3.2
7. Calibration inlet
8. Vacuum pump inlet
9. Vacuum pump fuse
Data Keys
Data keys are for the inserting, deleting, and changing of data.
The Data keys are:-
3.3
NUMBERS
−
From numbers 0-9.
ENTER
−
Confirms the selection of a program or a parameter.
CLEAR
−
Cancels the previous key selection.
Control Keys :
The 4 control keys are:-
3.4
ON/OFF
Turns the furnace on/off.
− Switching to Idle mode.
STOP/LIFT
Raising and lowering the platform.
Interrupting a firing cycle.
START
Starting a firing cycle.
HOLD
Temporarily “freezes” the firing cycle.
Programming keys:
PROG (PROGRAM)
Sets the furnace into the mode for program selection.
ARROWS keys
Closing and opening the table and toggle between the
Focus 4010 Dental Porcelain Furnace
Page 7
Manual version 4.1
different parameters in the editing mode
3.5
Displays :
The “ program Status” display shows the Status of the selected program. (start /Stop/
hold) left upper corner
The “program Time” screen displays either the selected program remaining time or
00:00 while not in cycle middle upper section
The “temperature and data” display screen displays the temperature during the Cycle,
The symbol ° C is displayed together with the temperature when degrees in Celsius are
defined, and the symbol °F when the degrees are in Fahrenheit. Right upper section
“Vacuum” display is used when keying in the vacuum parameters of the cycle.
During the cycle, the “vacuum” screen is displaying the actual vacuum level on the lower
left corner. Lower left section
On the right lower side appear the running parameter in reel time
−
While a selection is incorrect the field will be displayed in Red with Parameters
Limits.
−
−
In The Display mode all the status and parameters will appears in reel time.
Focus 4010 Dental Porcelain Furnace
Page 8
Manual version 4.1
−
3.6
Sound Messages :
The tone sound is a useful indicator for key selection and operation procedures.
−
A single tone sounds, when a key is pressed or when the furnace is in the "HOLD"
mode.
−
A double tone sounds when there is an incorrect key selection or choice of data.
−
A five double-tone sounds at the end of a firing cycle.
Focus 4010 Dental Porcelain Furnace
Page 9
Manual version 4.1
4. Initial Operation
Before running any firing cycles the furnace must undergo an initial drying procedure to
remove any absorbed humidity that may have entered during transit.
The furnace firing procedure is a special drying cycle for the firing chamber, and it must be
carried out before you start using your furnace.
The procedure is mentioned here before the operating instructions, to remind you to read
the entire operations manual and then to run the initial firing procedure before working with
any program.
We highly recommend you to use a dry pump that is able to reach 720 mmHg
within 35-40 sec
4.1
Initial Furnace firing for muffle drying
1) Connect the furnace as instructed previous sections.
2) Using the [STOP/LIFT ] key move the platform to the lowest position.
3) Place the ceramic table on the furnace platform.
4) Use program No.1 (the BUILD-IN parameters listed below) :Table 4-1
500 °C
3 minutes
(03:00)
1 minutes
(01:00)
40 °C /minute
950 °C
5 minutes
(05:00)
START TEMP
UP TIME
DRY TIME
HEAT RATE
HIGH TEMP
TEMP DELAY
5) Run program No.1
This program will dry the muffle from any absorbed humidity.
6) Repeat the above procedure 2 to 3 times.
5
5
40°
C/m
REMEMBER:
Only after completing this procedure is the furnace ready for use.
4.2
Power Switch :
To start the furnace press the power switch located on the rear panel to the ON
position, the furnace is now in the Stand -by Mode.
By pressing the ON/OFF button on the front panel, the furnace is turned on. This mode is
called the Idle Mode. The temperature would rise and will maintain on 200ºC.
Focus 4010 Dental Porcelain Furnace
Page 10
Manual version 4.1
4.3
Set-Up possibilities:
In order to enter the Diagnostic mode you have to turn the furnace on from the front
panel by pressing the ON/OFF key. Now the furnace is in the stand-by mode (the display
is showing “Focus ”Logo ).
•
Press menu button:
•
•
By pressing the arrows you can browse through the
options/Diagnostics/setup
By pressing number 2 you will be able to set your preference:
By pressing the arrows you can navigate between the different options
By pressing the enter button you will change your choice
PIC 1/1
4.4
Idle Mode :
Press the [ON/OFF] key located on the front panel, the furnace is now ready for
Program selection.
POINTS TO NOTE
⇒ Idle mode is provided for use during long time intervals, when the furnace is not in
operational use.
⇒ It is very important that you keep the firing chamber closed to
prevent moisture from entering the muffle.
4.5
Programming mode:
Press the "PROGRAM" key [PROG].
Using the number keys enter any number from 0-249 or scroll with the arrows to the
chosen program.
Press the "ENTER" key.
POINTS TO NOTE
⇒ When editing is required press menu button and press option 1- edit program.
- by pressing the arrow you will change to the different parameters and to update the
different value
Focus 4010 Dental Porcelain Furnace
Page 11
Manual version 4.1
⇒ If you want to change your program, press the “CLEAR” key and re-enter a different
program number (0-249).
4.6
View/Entering and Changing Parameter Data-Edit program
To view parameters of a program press the button Menu+ Enter
To edit parameter of a program Press the buttons Menu+ arrow down until reaching 1-edit
current program + enter/ all the parameters will appears one after the other with the limit of
the parameter. Continue to press on the up arrow to change the other parameters, the
change will be save by pressing ENT to save or MENU to go back to the main screen.
PIC: From this screens you can neither view or edit parameters
By Pressing the Arrow key, you reach the desired parameter screen and you can read
the value on the data display or modified it to the edition one.
Using the data keys, enter the parameter data you require (for the programs 2-249).
Using this method continue to toggle through your parameters, checking or entering
data as required.
Press the “ENTER” key when finished to introduce or to change all the required
parameters. To run the cycle go back to the main screen by pressing the menu
button
In case one or couple of the parameter fields are not in use, they should remain
blank and there is no need to introduce the “0” level or any value in the blank field.
Focus 4010 Dental Porcelain Furnace
Page 12
Manual version 4.1
EXAMPLE 1
Entering a START TEMP of 400°°C and HEAT RATE 55°°C/min .
1. Press the Arrow key until the [START TEMP] field will appear
2. Press the keys [4], [0], [0].
3. Press the Arrow UP key until the HEAT RATE display will be illuminated (do not
enter values in the UP TIME and DRY TIME fields if not needed).
4. Press the keys [5], [5] for the ramp.
5. Press ENTER key.
EXAMPLE 2
Entering a UP TIME and DRY TIME of 3.5 minutes each.
1.
2.
3.
4.
5.
Press
Press
Press
Press
Press
the
the
the
the
the
arrow key until the [UP TIME] field will appear
keys [3], [3], [0].
up key.
keys [3}, [3], [0].
key [ENTER] or Arrow key again.
EXAMPLE 3
Entering a “VACUUM ON” TEMP of 420°°C, “VACUUM OFF” TEMP 820°°C and
“VACUUM LEVEL” of 720mmHg.
1. Press the up key until the Field "V on" will be displayed on the “VACUUM” field.
2. Press the keys [4], [2], [0]. For vacuum start
3. Press the up key until the field " vacuum off" will be displayed on the “V.off”
display. For the end of the vacuum
4. Press the keys [8], [2], [0].
5. The vacuum Level can be set here or by preset the Level in the option screen, if
the Level is chosen this possibility will not appear, if the fields in the option is
empty, you will be able to set the vacuum level
if the field is enable than
6. Press the keys [7], [2], [0].
7. Press the key [ENTER] or arrow key again.
Focus 4010 Dental Porcelain Furnace
Page 13
Manual version 4.1
4.7
Description of the parameters, and their limitations.
As a useful guide, we have listed for you in Table below, the parameters, their functions
and their limits. The comments will draw your attention to other relevant details.
Parameter
START. TEMP
Function
The starting temperature of the program. When it is reached the
cycle will begin.
Limits
Comments
100°C to 450°C
One of the parameters, which have to be included in order for a
program to run.
Parameter
UP TIME
Function
Limits
Comments
The time required to raise the platform from lowest position until
the muffle is closed.
0 to 30:00 Min
During UP TIME the platform rises in four progressive stages.
Parameter
DRY TIME
Function
Limits
Comments
The final stage of the UP TIME during which the muffle is closed
and the temperature does not rise for the defined duration.
0 to 30 minutes.
Vacuum pump will start pumping out the air before the DRY TIME
countdown begins.
If DRY TIME without vacuum required , VACUUM START temperature
value should be 5°C higher than START TEMP.
Parameter
HEAT RATE
Function
The rate in °C or °F at which the temperature rises from START
TEMP to HIGH TEMP and from HIGH TEMP to FINAL TEMP.
Limits
Comments
10 °C to 100 °C
One of the parameters which have to be included in order for a
program to run..
Parameter
HIGH TEMP
Function
The temperature to be reached at the end of the HEAT RATE or
intermediate temperature when the value of the FINAL TEMP is
higher
Limits
100°C to 1100°C in normal
Comments
100°C to 1180°C in HT
Must not be less than “VACUUM OFF” temperature. (When a vacuum
is included in the program).
One of the parameters which have to be included in order for a
program to run.
Parameter
TEMP DELAY
Function
The duration of time that the furnace will remain at the HIGH
TEMP before the firing chamber is opened or before the
temperature will continue it’s rise to FINAL TEMP (if defined) .
0 to 30 minutes (specified in minutes and seconds).
0 to 4:30 H in the HT Programs
Limits
Comments
Parameter
Intermediate delay when FINAL TEMP is higher than HIGH TEMP.
FINAL TEMP
Focus 4010 Dental Porcelain Furnace
Page 14
Manual version 4.1
Function
An additional heating or cooling mode. May be lower or
higher than HIGH TEMP. If higher - heating will be
reactivated. If lower - chamber will be opened slightly to
enable quick cooling to the FINAL TEMP value. Then the
platform will close the muffle and the temperature will
stabilize on FINAL DELAY temperature.
Comments
Limits
Optional parameter. In case not in use should remained blank
100°C to 1100°C in normal
100°C to 1180°C in HT
Parameter
FINAL DELAY
Function
Comments
The time duration the furnace will remain at FINAL TEMP before
opening the chamber.
0 to 30 minutes.
0 to 4:30 H in the HT Programs
To use only when FINAL TEMP parameter is programmed.
Parameter
COOL TIME
Function
Limits
The time required to lower the platform. The platform descends
in three progressive stages. Starting from when the firing
chamber is closed to the lowest position.
0 to 30 minutes.
Parameter
VAC. START [S]
Function
Limits
The temperature at which the vacuum starts
Any value within the selected temperature range of the program
(°C) or (°F).
If equal to START TEMP than vacuum will start before DRY
TIME begins.
Limits
Comments
Parameter
VAC. END [E]
Function
Limits
The temperature at which the vacuum to be released
Any value within the selected temperature range of the program
(°C) or (°F).
Must be lower or equal to the HIGH TEMP or FINAL TEMP (in
case FINAL TEMP defined higher than HIGH TEMP).
Comments
Function
VACUUM LEVEL [L]
Function
Limits
The level at which the vacuum is held during the cycle.
From 100 mmHg to 750 mmHg
In case constant vacuum pump activation required – the
VACUUM LEVEL set should be – 760mmHg.
Must always be set when using a vacuum firing.
Comments
Parameter
VAC. DELAY [DEL]
Function
Limits
Duration of the time for maintaining vacuum at HIGH TEMP or
FINAL TEMP (if FINAL DELAY defined).
0 to 30 minutes.
0 to 4:30 H in the HT Programs
POINTS TO NOTE
⇒ When programming data into a parameter, check that the data is correct and that it
correlates with the other parameters.
⇒ Remember that parameters have limits, if you enter data above or below these limits
the data will not be entered.
⇒ In the event of an error, the warning tone will sound by pressing START and the
firing cycle will not start. The erroneous parameter will blink indicating the source of
the problem. This parameter isn’t logical or it is out of the permitted limits.
Focus 4010 Dental Porcelain Furnace
Page 15
Manual version 4.1
5. The Firing Cycle
5.1
Starting the Firing Cycle
1) Check that the platform is in the lowest position. This can be done by pressing
the arrow key.
. The firing cycle will not start until the platform is completely lowered.
2) Select a program.
3) Press the [START] key.
4) The firing cycle will automatically start when the firing chamber temperature
reaches the temperature selected for the START TEMP. The relevant function will
appear on the screen after 30 second (this value can be modified in the option).
Showing the actual status of the cycle , with all the relevant value.
5) When the firing cycle has finished and the platform is in the lowest position the
five double tone sound will be heard and the graph will be turned off.
5.2 By pressing the arrow up you can modified the position of the
table within a cycle or close the table at any working stage of the
furnace .
Focus 4010 Dental Porcelain Furnace
Page 16
Manual version 4.1
5.3
Canceling a Cycle
Should you wish to cancel the program in the middle of a firing cycle, press the
[STOP/LIFT] key. The platform is lowered and the furnace remains in the selected
program mode.
Focus 4010 Dental Porcelain Furnace
Page 17
Manual version 4.1
6. Supplementary Features
6.1
Countdown Time to the End of the Cycle
You can see the Time left to the end of the cycle in the middle high section of the
screen, while sending the program but also in the screen mode
6.2
The Hold Key
The HOLD/RELEASE function is available only during a cycle. The [HOLD] key when
pressed will temporarily “freeze” the firing cycle. The temperature is held (in case the
HOLD key was pressed during the Heating) and the platform stops moving (in case the
HOLD key was pressed during the UP TIME).
When HOLD key is pressed ,the color of "Cycle" change to orange. During the HOLD
stage a single-tone single beep is heard repeatedly to remind the user that the furnace is
still in the HOLD stage. To release the furnace from the HOLD stage, press HOLD. The
indications of the HOLD stage will disappear and the furnace will return to normal
operation.
During this “freezing stage”, you can manually control and extend the drying time,
cooling time, and glazing time, When you decide that the time has been sufficiently
extended, Press the [HOLD] key, this will release the furnace from the “HOLD”
stage, and the furnace will return to the firing cycle.
This function provides the user with the flexibility to have an elective and full control
over the work being in cycle. It enables the control of drying, heating and the cooling
stages.
6.3
5.3 Changing Parameters during Cycle
In order to change parameters during cycle, perform the following
steps:
Using the HOLD/RELEASE function, during a cycle, enables to change the value of the
parameters that haven’t been performed yet. These changes are temporary and do not
effect on the pre-programmed data in the cycle. In order to change the parameters
during cycle the following steps are required:
Press “HOLD” key –Press Menu+ Edit current program.
Focus 4010 Dental Porcelain Furnace
Page 18
Manual version 4.1
Scroll through the parameters, by using the arrows keys, until you
reach the parameter (s) that are required to be changed ( only the
changeable parameter will appear in an editing Blank field). Enter the
new value and press ENTER. While you are not able to perform
change on the parameter the word "NO EDIT" will appear on the
active field.
Press HOLD, to release
from the HOLD stage and the furnace will resume the cycle.
The furnace will execute the cycle according the new parameters. After termination of
the cycle the parameters will return to their original values.
6.4
Night-mode
There are two ways to enter Night-mode:EITHER During a cycle, press the [ON/OFF] (Front panel) key. On completion of the
firing cycle the furnace will automatically enter Night mode.
The automatic night-mode is indicated by the name Night-Mode in the bottom of the
screen.
The night mode waits until the firing chamber temperature drops to 100°C. During this
time the chamber remains open and the table is resting at it lowest position. After the
temperature reaches 100°C the platform will close and maintains the furnace at the
constant temperature of 100°C.
To cancel automatic night - mode press ON/OFF key .
OR If the furnace is not in cycle : Enter the pre-programmed cycle [PROG], [0],
[ENTER], arrow up can close door before reaching 100 degrees .
The lift will close the muffle, and the temperature will drop to 100°C.To cancel nightmode press the [STOP/LIFT] key to lower the table and enter the required program
number.
6.5
The STOP/LIFT Key
The [STOP/LIFT] key serves for cycle canceling.
A short press of the [STOP/LIFT] key, will lower the platform
If you wish to cancel a program in the middle of a firing cycle, press the [STOP/LIFT]
key. The platform is lowered and the furnace remains in the selected program mode
Focus 4010 Dental Porcelain Furnace
Page 19
Manual version 4.1
6.6
Manual Pre-Heating/Drying
User can manually raise the platforms to any height in order to heat up an object or in
case additional pre-heating is required. In order to perform it, you should choose the
program number (PROG# - ENT), with START TEMP you will need to receive the optimal
preheating.
•
Press the UP arrow continuously and the platform
will start to rise. Move the platform by pressing the
UP arrow until the required distance between the
object and the opening of the muffle is achieved.
•
In order to lower the platform - use the DOWN arrow continuously.
Focus 4010 Dental Porcelain Furnace
Page 20
Manual version 4.1
Using the “Final temp” feature.
To enable the 13 parameters first go to the option screen and chose the 13 parameter
option- Menu- Options-Enter+ go to program parameters 11 while the 11 is high light
press ENT again.
Now when editing the program When the FINAL TEMP parameter will be lower than
HIGH TEMP , then FINAL TEMP and FINAL DELAY parameters can act like TEMPERN
effect i.e. temperature will drop down to FINAL TEMP and will remain at that
temperature for the defined FINAL DELAY period.
POINTS TO NOTE
⇒ When programming data into a parameter, check that the data is correct and that it
correlates with the other parameters.
⇒ Remember that parameters have limits, if you enter data above or below these limits
the data will not be entered.
⇒ In the event of an error, the warning tone will sound by pressing START and the
firing cycle will not start. The erroneous parameter will blink indicating the source of
the problem. This parameter isn’t logical or it is out of the permitted limits.
Focus 4010 Dental Porcelain Furnace
Page 21
Manual version 4.1
7. Calibration
CALIBRATION ADJUSTMENT
The furnace you received is precisely pre-calibrated at the factory. But in order to enable
even more flexibility, the CALIBRATION ADJUSTMENT feature has been introduces. It
enables you to adjust the muffles temperature to the level needed without performing
additional calibration (in case the discrepancy is small).
NOTE:
The new furnace, when it comes from the manufacturer, is properly
calibrated and checked.
In order to perform the calibration adjustment please perform the following:
•
Press Menu
•
Then press Options
•
Press arrow down until you reach the + of the " Temp calibration"
parameter high light
•
Press “ENTER” key to modified "+" to "-".
•
Press arrow down to enter to the data field .In the DATA field enter
the numeric value
•
Press "menu": or "ent " to validate your change
•
The change will affect the firing parameters in all programs.
The change will be stored in the memory and all the firing temperature will be higher or
lower accordingly.
In order to return to the basic, factory made calibration perform the
following:
Enter to the calibration adjustment mode again and cancel the stored value
Calibration will be restore
Focus 4010 Dental Porcelain Furnace
Page 22
Manual version 4.1
8. Options mode
The Options mode:
Provides the user with very valuable and convenient means of testing the equipment. It
is designed in order to assist the end-user to verify, and hence to define exactly, the
probable cause of a malfunction. Thus, when a malfunction is suspected, the user can
verify whether the various subsystems of the furnace function properly.
It is recommended that, whenever a problem occurs, an appropriate diagnosis will be
performed prior to a request for assistance.
Access to the Diagnostics Mode is achieved by pressing "menu" button and then arrow
down until reaching "diagnostic Menu" when the furnace is in the Standby
After you will enter the diagnostic mode the word “diagnostic menu” would be
displayed on the top of the screen
By pressing each one of the menu you will activate the sub menu, all the explanation
appear in the screen to activate the request menu.
•
Note we highly recommended you to exchange your
muffle after 3500 Working hours above 500 degreesyour furnace have a counter that show you all the
information" hours meter"
Focus 4010 Dental Porcelain Furnace
Page 23
Manual version 4.1
.
9. Build – in Programs
Start temp
Up time
Dry time
Heat rate
High temp
Temp delay
Final temp
Final delay
Cool time
Vacuum start
Vacuum end
Vacuum delay
Vacuum level
Focus 4010 Dental Porcelain Furnace
Page 24
Manual version 4.1
A. Technical Specifications
Thank you for choosing the Focus 4010 ceramic furnace for your laboratory needs.
For any questions or additional support, please contact us and we will look forward to
assisting you.
Electrotherm Marketing – ShenPaz Technologies
5 HaTasia Street, Ramat Gabriel Industrial Park
Migdal HaEmek
Phone: +972 (04) 6666902 or +972 (03) 562
0428
Fax: +972 (04) 6042040
Email: [email protected]
www.shenpaz.com
Focus 4010 Dental Porcelain Furnace
Page 25
Manual version 4.1