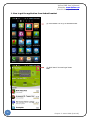
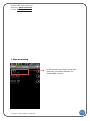
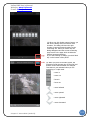
1
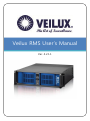
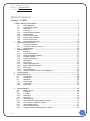
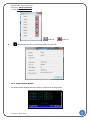
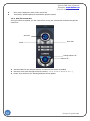
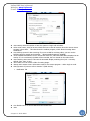
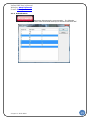
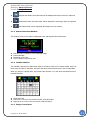
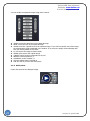
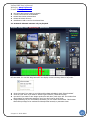
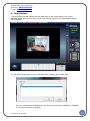
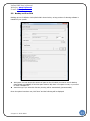
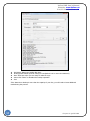
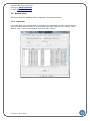
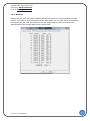
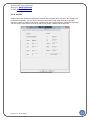
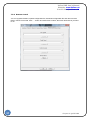
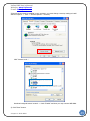
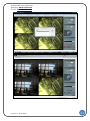
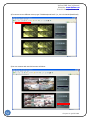
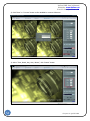
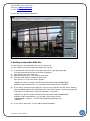
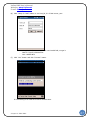
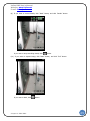
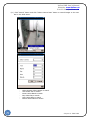
Veilux RMS User’s Manual Ver. 4.2.1.1 Veilux RMS User’s Manua Website: www.Veilux.net E - mail: [email protected] l Table of Contents Chapter 1. PC RMS ................................................................................................ ..... 3 1. RMS Program (Single Mode) ................................................................................. 3 2. 3. 4. 5. 6. Index 1.1. 1.2. 1.3. 1.4. 1.4.1. 1.4.2. 1.4.3. 1.4.4. 1.4.5. 1.4.6. Start Application ....................................................................................................... 3 Connect Main System ............................................................................................... 4 Setup Site ................................................................................................................. 4 Functions .................................................................................................................. 7 Camera Indication Boxes .......................................................................................... 7 Action Buttons ...........................................................................................................8 Screen Mode Buttons ................................................................................................ 8 System Status Window ............................................................................................. 9 Pan/Tilt Control Box ................................................................................................ 10 Context Menu Functions ......................................................................................... 12 2.1. 2.1.1. 2.1.2. Connection to Server .............................................................................................. 16 Using the Group Connection ................................................................................... 18 Action Buttons. ....................................................................................................... 19 3.1. 3.1.1. 3.1.2. 3.1.3. 3.1.4. 3.1.5. 3.1.6. 3.1.7. 3.1.8. 3.1.9. 3.1.10. 3.1.11. Functions ................................................................................................................ 20 Screen Mode Buttons .............................................................................................. 20 Status Information Window .................................................................................... 21 Calendar Window .................................................................................................... 21 Image Control Menu ............................................................................................... 21 Utility Menu ............................................................................................................. 22 Play Menu ............................................................................................................... 23 Record Table(Hour Bar) .......................................................................................... 23 Record Table(Minutes Bar) ....................................... ..............................................24 Exit Button .............................................................................................................. 24 Bookmark Button .................................................................................................... 24 Search Selected cameras only on playback ............................................................ 25 Multi Remote Monitoring ..................................................................................15 Remote Playback .............................................................................................20 Local Playback ................................................................................................27 Extend Monitoring ........................................................................................... 28 5.1. Extend Mode ............................................................. ............................................. 28 5.2. User Mode ................................................................. ............................................. 29 5.3. Map Mode .............................................................................................................. 30 5.3.1. Manage Map ............................................................. ............................................. 30 5.3.2. Event Option ............................................................. .............................................31 5.3.3. Open Map ................................................................. ............................................. 31 Remote Backup ...............................................................................................28 6.1. 6.2. 6.2.1. 6.2.2. 6.2.3. 6.3. 6.3.1. 6.3.2. 6.3.3. 6.4. 6.4.1. Backup Screen ........................................................................................................ 28 Functions ................................................................................................................ 29 Tool Bar .................................................................................................................. 29 Status Bar ............................................................................................................... 29 Menu Bar ................................................................................................................ 30 Manual Backup........................................................................................................ 30 Select desired recording data for backup ............................................................... 30 Select device or folder for backup .......................................................................... 31 Start Manual backup ............................................................................................... 31 Manual Backup.exe file ........................................................................................... 32 Selected desired recording data for backup ........................................................... 32 1 Veilux RMS User’s Manual Website: www.Veilux.net E-mail: [email protected] 7. 8. 6.4.2. 6.5. 6.6. Make a backup.exe file ........................................................................................... 32 Backup on CD or DVD ............................................................................................. 33 Backup Viewer ........................................................................................................ 35 8.1. 8.2. 8.3. 8.3.1. 8.3.2. 8.3.3. 8.3.4. 8.3.5. 8.3.6. 8.3.7. 8.4. Setup Site ............................................................................................................... 38 Sound Communication ............................................................................................ 38 Remote Setup ......................................................................................................... 39 Log Viewer .............................................................................................................. 39 Record..................................................................................................................... 40 Network .................................................................................................................. 41 Camera Name ......................................................................................................... 42 Version .................................................................................................................... 43 Remote Control ....................................................................................................... 44 Hard Disk ................................................................................................................ 45 Restrictions ............................................................................................................. 45 Connection for using DNS ................................................................................37 Connection for standalone DVR ........................................................................38 Chapter 2. Web RMS ................................................................ 46 1. 2. 3. 4. How to connect to DVR Server ............................................................................47 How to connect to Server for Playback .................................................................53 Building Custom Web RMS Site ............................................................................55 Web RMS ActiveX‟s Support API. .........................................................................56 Chapter 3. Quick RMS .............................................................. 58 1. Quick RMS .........................................................................................................59 Chapter 4. PDA RMS ................................................................ 61 1. Installation of PDA Remote Program ....................................................................62 2. How to use PDA Remote Program........................................................................64 Chapter 5. Smart RMS ( I Phone) ............................................ 73 1. 2. 3. 4. 5. How to get the “Smart RMS” from App store. .......................................................74 Add new site (DVR server) ..................................................................................75 Delete site (DVR server) .....................................................................................77 Live view, Playback, PTZ control ..........................................................................77 DNS Setting .......................................................................................................82 1. 2. 3. 4. 5. How to get the “a Viewer” from App store. ...........................................................85 How to start ......................................................................................................86 Add new site (standalone server).........................................................................88 Live view ...........................................................................................................90 How to set & edit DVR List ..................................................................................91 Chapter 6. aViewer ( I Phone for standalone) ......................... 84 Chapter 1. PC RMS 2 Chapter 1 Chapter 1. PC RMS PC RMS 1. RMS Program (Single Mode) 1.1. Start Application To use the remote service from a remote site, install the “RMS” program. Once installed, start the program from the Windows Desktop, or run the DVRHost.exe program in C:\Program Files\DVR\RMS folder. Veilux RMS User’s Manual Website: www.Veilux.net E-mail: [email protected] 1.2. Connect Main System The first screen of DVR Remote program is nearly the same as the DVR Main screen. The Remote Screen also has the “Connect” and “Disconnect” buttons as follows: Click the “Connect” button to display the connection dialog box with the list of established servers. From here, you can connect to the site of your choice. After selecting the Site, click “OK” to start the remote session. If this is the first time to using the Remote program, you will need to setup the Site first. 1.3. Setup Site Click the “Setup” button from the Connect window, and the Site Information Window will be displayed as follows 4 Chapter 2. Quick RMS Veilux RMS User’s Manual Website: www.Veilux.net E-mail: [email protected] Click the “Add” button, for the Site Information window: Site Name: Enter a descriptive site name – you can define any name you can recognize easily. IP Address: Enter the IP address of the site. Server Type: Select server type among DVRMain and standalone. Port: Enter TCP/IP Port number, the default port number is “9871” and typically does not need to be changed. Standalone default port is 7620. Use Auto Logon: You don‟t need to logon every time you try to connect to DVR, Account: Enter an account of DVR you register. Password: Enter a password of DVR you register Network: If you use dial up modem, check “Modem, ISDN” and enter the phone number, Windows user ID and password for the DVR server. Default ID/pass of Standalone is “admin”/”0000” Add Group You can use the “Multi-Channel” connection to make a grouping of multiple servers and cameras that you want to connect to by the remote surveillance program. When you click “Add Group”, you will see following window and can make your own group from a list of available servers and cameras. Chapter 2. Web RMS 5 Veilux RMS User’s Manual Website: www.Veilux.net E-mail: [email protected] 6 Delete Click on any Site that you want to delete from the list, and then simply click the “Remove” button. Modify From the Site Information Window, Click any site from the list that you want to modify, and click the “Modify” button. You can then modify any information attributes in the window, except the Site Name. To change the Site Name, you must delete the site and re-add it with the correct name. Chapter 2. Quick RMS Veilux RMS User’s Manual Website: www.Veilux.net E-mail: [email protected] 1.4. Functions 1.4.1. Camera Indication Boxes You can turn on or off individual cameras by right clicking on the camera button at the bottom of the screen. Chapter 2. Web RMS 7 Veilux RMS User’s Manual Website: www.Veilux.net E-mail: [email protected] 1.4.2. Screen Mode Buttons Single-Screen-Mode 4-Channel Multi-Screen 6-Channel Multi-Screen 9-Channel Multi-Screen 10-Channel Multi-Screen 13-Channel Multi-Screen 16-Channel Multi-Screen 25-Channel Multi-Screen 32-Channel Multi-Screen 49-Channel Multi-Screen 64-Channel Multi-Screen Full-Screen Mode Next-Screen Mode Auto-Rotation Mode 8 Chapter 2. Quick RMS Veilux RMS User’s Manual Website: www.Veilux.net E-mail: [email protected] : Relay Off : Relay On Click this button to show camera information from the DVR 1.4.3. System Status Window The System Status Window shows the status or events from the DVR system. Chapter 2. Web RMS 9 Veilux RMS User’s Manual Website: www.Veilux.net E-mail: [email protected] Sever name: Displays the name of the remote site. Transmission speed: Displays the transmission speed of system. 1.4.4. Pan/Tilt Control Box If a P/T/Z camera is installed, you can control focus, zoom, pan, tilt and other functions through this control box. Auto Pan Preset Auto Scan Change Camera ID Camera ID 10 Auto Pan: Based on the autopan features of whichever PTZ camera is installed. Auto Scan: Auto scans through the first 9 presets (1→2→3→5→6→7→8→9→1→2→…) Preset: If you click here, the following dialogue box will appear. Chapter 2. Quick RMS Veilux RMS User’s Manual Website: www.Veilux.net E-mail: [email protected] Preset - No.: Number of the Preset position (1~64). - Location: Description of the location for the preset position. - Go: Click the “Go” button, and the camera will move to that preset position. - Save: To save the current position of the PTZ in that preset location. How to save : First, move the PTZ camera to the desired position and then please select the number of the preset position and enter the location. Click “Save” to set the preset. Finally, you should click “Ok” to close Preset Control window for saving the preset. - Delete: Deletes the selected preset position. Tour (This function only operates on PTZ devices that accommodate the feature) - No.: Number of the Touring (1~64). - Program: Specify the order of the presets used in the Tour. - Run: Click the “Run” button, to initiate the preprogrammed tour. The camera will stay on each location for 5 seconds before moving to the next position. - Save: Saves the Tour number after you have setup the Tour. - Delete: Deletes the selected Tour. How to setup a Tour: Click cell you want to setup and type in the preset position numbers in the order you want. (e.g. 23, 52, 3, 15, 12, 3, 4, 18, 21 , 235231512341821…) And click “Save” button. Initiating the Tour: Simply click the “Run” button and the PTZ camera will start “touring”. Click again to stop. Control & Setup - Diff. Operation Mode: Check this box and the U, D, L, R keys will be changed from “click and move” to “cursor move”. (In case of CyberScan1, you must click the box to insert Chapter 2. Web RMS 11 Veilux RMS User’s Manual Website: www.Veilux.net E-mail: [email protected] „START(PTZ)‟ value and „END(PTZ)‟ value in the setting of „AUTO SCAN SETUP‟. You also need to click the box when you input title for the position of the Auto scan (Touring). Please refer to the PTZ manual for the details. - MENU: Calls the settings menu of PTZ camera. - ENT: Enters values chosen while you are in menu mode. - CLR / ESC: Cancels options currently chosen in menu mode. - U: Move up camera. (or, move up cursor.) - D: Move down camera. (or move down cursor.) - L: Move left camera. (or , move left cursor.) - R: Move right camera. (or, move right cursor.) - H: Goes to home position. - AP: Start/Stop auto pan. - Focus +/-: Focus near/far. - Zoom +/-: Zoom in/out. - Iris +/-: Iris open/close. - Hor Scrollbar: Pan speed. - Vert Scrollbar: Tilt Speed. 1.4.5. Context Menu Functions Right click the mouse button on any screen to bring up the options menu as seen below. Network Click on the Network option to bring up networking site information (refer to section 3, “Setup Site”) Options Click the Options menu to display the following window: Remote Tab Set the viewer mode when starting or closing. 12 Chapter 2. Quick RMS Veilux RMS User’s Manual Website: www.Veilux.net E-mail: [email protected] Auto startup: Select this option to have the system to begin with windows. When close viewer, close all service: Check this box to close all services when the remote viewer program is shut down. notifications. Use buffering space for data receiving: If you use a LAN for receiving video, you can use the buffering space to speed up the transfer. (Recommended setting is 4096KB) Show PosData Embedded: If a user selects this check box, Video and POS data is displayed as an overlay. If it is not selected, the data will be recorded, but not viewed on the video screen. Auto switching time interval: This sets the automatic display switching time (unit = seconds, default: 5sec, max: 30 sec) Save Folder: You can select a folder for saving image. Startup with remote viewer: Select start mode for the remote program – either single or multi. DNS (Dynamic IP) service: refer to Section 7 (DNS Service) This shuts down the resident program, which allows incoming alarm Notification Tab Use: Enable the PC to receive data from the remote DVR Alert Chapter 2. Web RMS 13 Veilux RMS User’s Manual Website: www.Veilux.net E-mail: [email protected] Beep: Creates an audio alert if an alarm event occurs for the defined number of seconds. The audio occurs through both the internal and external speaker, but only the external speaker works in Microsoft® Windows® 7. Popup: Pops up video from an alarmed event on server. Emergency Save: When remote notification is activated, the remote PC will backup the transferred video automatically. The action icon will turn green . If you click the action icon while it is green color, the remote backup will stop. Events: You can select the events which are applied to remote notification. Connection: If you save the Account ID and password, you can access systems without a separate login during remote notifications (recommended). Screen Mode Refer to section 9. Sound Select the Sound option to see following sub–menu. This allows you to send, receive, or activate two way audio communications between the server and remote sites. Duplex: Enables two way audio Out: Send audio data to the server (requires a local microphone). In: Receive audio from the server (requires connected speakers). Off: No use audio. Note: When you use the Multi Remote Monitoring viewer, you can use the two way audio mode only on the active server. 14 Open Pan/Tilt You can work rightly pan tilt that you want to control by right clicking on a specific camera. And you can control PTZ on a screen using mouse. Remote Backup Click here to display the Backup program. Refer to section. One Search Chapter 2. Quick RMS Veilux RMS User’s Manual Website: www.Veilux.net E-mail: [email protected] Frame Rate Bypass compressed image: Receive compressed data by bypass from DVR server to reduce CPU It‟s possible to set the Frame Rate with DVR Server. usage and to increase frame rate. Use Max Frame: If you check Use Max Frame box, DVR send max frames as it as possible. If you uncheck Use Max Frame box, you can enter the Frames as you want to receive per second. 2. Multi Remote Monitoring After run Remote program, if you select Multi Channel from the bottom of the screen, you can monitor multiple cameras installed at the different server locations. (up to 64) Chapter 2. Web RMS 15 Veilux RMS User’s Manual Website: www.Veilux.net E-mail: [email protected] Single: One remote PC able to connect with one DVR server. Multi Channel: One remote PC able to connect to multiple cameras and DVR servers. 2.1. Connection to Server Each camera window can display a camera from any server. First, choose the window to which to view the camera in, “connect” while in Multi channel mode, and select the server you want to connect to. Then choose the camera number you want. You will need to do this for each window. You can define groups of camera in the Group Add section under Setup. Insert ID and password for the server to be connected. 16 Chapter 2. Quick RMS Veilux RMS User’s Manual Website: www.Veilux.net E-mail: [email protected] Default ID/pass of Standalone is “root”/”pass” After logging on, the system shows the following window, displaying the available cameras from the chosen server. Simply select the desired camera to monitor. Once the connection is established, you will the video on the No.2 screen of client. Chapter 2. Web RMS 17 Veilux RMS User’s Manual Website: www.Veilux.net E-mail: [email protected] You can connect other channels by repeating the process the same as above. 2.1.1. Using the Group Connection When you select “Multi-Channel” and click “Connect”, you will see the following window. Select the desired group from group table and click “OK”. 18 Chapter 2. Quick RMS Veilux RMS User’s Manual Website: www.Veilux.net E-mail: [email protected] 2.1.2. Action Buttons. - Disconnect: Disconnects the current session. The following window will display, and then select the desired camera(s) to disconnect and click “OK”. Chapter 2. Web RMS 19 Veilux RMS User’s Manual Website: www.Veilux.net E-mail: [email protected] 3. Remote Playback A new Remote PLAYBACK window will be displayed as follows; 3.1. Functions 3.1.1. Screen Mode Buttons 20 Single-Screen-Mode: Display the recorded video from one camera, Multi-Screen-Mode: Display 4 the recorded video from 4 different cameras Multi-Screen-Mode: Display 9 the recorded video from 9 different cameras Multi-Screen-Mode: Display 16 the recorded video from 16 different cameras Chapter 2. Quick RMS Veilux RMS User’s Manual Website: www.Veilux.net E-mail: [email protected] Regular-Size-Mode: Recorded video will be displayed the same size as the captured image. Double-Size-Mode: Recorded video will be displayed 2 times larger than the captured image. Panorama-Mode: Views sequential still images from one camera. 3.1.2. Status Information Window This window will show the status of displayed video and captured time information. Date and Time information of the captured image. Camera Number. Recording mode used. Type of Image compression used. 3.1.3. Calendar Window The calendar represents the dates when video is recorded. If the color of a date is RED, there has been video recorded on that date, otherwise the dates will be black if there is not recorded data. When you click on a specific date, the Record Table (Section 4.1.7) will show what data has been recorded that day. Month and Year Left Arrow: to move to the previous month, click this button. Right Arrow: to move to the next month, click this button. 3.1.4. Image Control Menu Chapter 2. Web RMS 21 Veilux RMS User’s Manual Website: www.Veilux.net E-mail: [email protected] You can modify the captured images using these controls. SHARP: control the sharpness of the captured image BLUR: control the blur of the captured image ZOOM: zoom into a specific area of the captured image. If you select a specific area of the image, the selected area will be maximized in the window. If no select, the image will be enlarged each 10% per clicking based on the center. B / W: convert the image to black & white ORIGN: goes back to the original image CANCEL: cancel previous commands one by one BRIGHT: control brightness -/+ CONTRAST: control contrast -/+ POS: See POS traction if hooked up LPR: See LPR If you have the LPR system 3.1.5. Utility Menu Control the speed of the displayed image. 22 Chapter 2. Quick RMS Veilux RMS User’s Manual Website: www.Veilux.net E-mail: [email protected] 3.1.6. Play Menu The controls select forward, backward, play and stop. The first image Backward one image frame: Stop Forward one image frame The last Image Backward Play Forward Play Speed Bar Min Speed 1/2x Speed 1x Speed 2x Speed 4x Speed Max (skips frames) 3.1.7. Record Table(Hour Bar) When you select a Date from the Calendar, system will show the recording information below the video screen. Chapter 2. Web RMS 23 Veilux RMS User’s Manual Website: www.Veilux.net E-mail: [email protected] Camera: C1, C2, etc. represents the camera number chosen. Time Cell: show time zone for 24 hours (00 to 24) The color of the cell represents the type of recording that the system made. color mean that audio was recording during that time. Darker versions of each 3.1.8. Exit Button : Select this to exit from the playback screen. 3.1.9. Bookmark Button You can make a bookmark of selected images for reference or review later. This does not save the data and the video drops off in the normal course of recording if not saved. 24 Review previous bookmarked images Review next bookmarked images Make a bookmark for an image on the playback screen List the current active bookmarks. The following screen will appear Chapter 2. Quick RMS Veilux RMS User’s Manual Website: www.Veilux.net E-mail: [email protected] OK: Select and view an active bookmark Cancel: Cancel the list of bookmarks. Delete Item: Delete selected item Delete All: Delete all items. Modification: Add a note for the selected item 3.1.10. Search Selected cameras only on playback If you want to search certain cameras only, you can add or remove the cameras by right clicking in the time table. You can also drag cameras in the display screen to arrange them in any order. Show Pos Data: If you want to see Video and Pos data embedded, check ”Show PosData” Show as Local Time: If you want to search to get local time, check this function. Sync AVI: If you want to save image synchronize with time, check Sync AVI. This method has dump images to synchronize with time. So if you don‟t want it, don‟t check. Image Rendering: If you use Grandeye IPcamera, you can control this function. This function allows fisheye image to be rendered as VCams(Virtual camera) or panorama views Chapter 2. Web RMS 25 Veilux RMS User’s Manual Website: www.Veilux.net E-mail: [email protected] You can control the size of this dialog. Mount Type: Auto, Ceiling, Wall Video Type VCam: VCams can be retrospectively panned, tilted and zoomed in the same way as an ordinary motorized dome camera but do not suffer from the same limitations. Panorama: Panoramas are rendered as two 180 degree views. Fisheye: Fisheye views allow the camera images to be seen without geometric processing, but with the option to zoom and pan. CameraNo: Number of camera that you are searching. Backup: Save rendered image or backup specific video to AVI files as 26 Chapter 2. Quick RMS Veilux RMS User’s Manual Website: www.Veilux.net E-mail: [email protected] 4. Local Playback To search locally recorded images previously captured from the remote system, click on the L. PLAYBACK button from the main screen in the “DVR Remote” program. The local playback window will be displayed. Site: Select the Site button to select the desired site containing the recorded video. Once you have selected the desired site, you will need to select either “ORIGIN” or “REMOTE” for the type of recording (see below). Chapter 2. Web RMS 27 Veilux RMS User’s Manual Website: www.Veilux.net E-mail: [email protected] ORIGIN: If you recorded transmitted images to your local machine from the DVR system through remote search, it will be recorded here. REMOTE: If you recorded transmitted images to your local machine from the live view or main Remote Viewer screen, it will be recorded hear. If user wants to see Video and Pos data embedded, user click right button of the mouse, check “Show Pos data” menu button Show Pos Data: If you want to see Video and Pos data embedded, check ”Show PosData” Show as Local Time: If you want to search to get local time, check this function. Sync AVI: If you want to save image synchronize with time, click Sync AVI. This method has dump images to synchronize with time. So if you don‟t want it, don‟t check. Image Rendering: If you use Grandeye IPcamera, you can control this function. This function allows fisheye image to be rendered as VCams(Virtual camera) or panorama views. 5. Remote Backup 5.1. Backup Screen 28 Chapter 2. Quick RMS Veilux RMS User’s Manual Website: www.Veilux.net E-mail: [email protected] Show the existing recording data, listed by date. Show the device or folder the backup will go into. Show the status of the backup. 5.2. Functions 5.2.1. Tool Bar Exit: Exit button Start: Start button for manual backup. Backup to exe. File: See section 5.4 Quick Backup Stop: Stop or pause the backup. Option: Sets Manual Back-up or Scheduled Backup Viewer: Opens the Back-up Viewer Make .exe files:Make to exe file using Backup Folder and dll 5.2.2. Status Bar Chapter 2. Web RMS 29 Veilux RMS User’s Manual Website: www.Veilux.net E-mail: [email protected] Time: Shows the current second of video being backed up. Processing: Shows the level of completion for the current backup. 5.2.3. Menu Bar As an option, you can backup files in AVI format. Check this “Backup as AVI” button for this option 5.3. Manual Backup To backup a specific time of recorded data, select this option and follow the sequence below. 5.3.1. Select desired recording data for backup 30 Chapter 2. Quick RMS Veilux RMS User’s Manual Website: www.Veilux.net E-mail: [email protected] Using the recorded data tree, you can select data by camera, then day, hour, and minute. 5.3.2. Select device or folder for backup 5.3.3. Start Manual backup After setting the recorded data and device (or folder) for backup, the start button will become active. Click “Start” button and click “Yes” Chapter 2. Web RMS 31 Veilux RMS User’s Manual Website: www.Veilux.net E-mail: [email protected] Once the backup is done successfully, the status window will show the message “Backup exited normally with code 0”, and the processing bar will show “Not working”. A new folder called “BACKUP” is created. 5.4. Manual Backup.exe file By backing up recorded data using the Backup.exe function, the data and the video player are put into one file, and can be played back on any other Windows based PC. ** Note: The backup.exe file needs to be less than 2GB. 5.4.1. Selected desired recording data for backup Please refer to section 5.3.1. 5.4.2. Make a backup.exe file The process is the same as described above, except that you will choose the .exe option (see below). 32 Chapter 2. Quick RMS Veilux RMS User’s Manual Website: www.Veilux.net E-mail: [email protected] 5.5. Backup on CD or DVD Backing up to a CD-R/RW or DVD-R/DVD-RW is shown below, as long as Nero CD burning software is installed in your system. Disk space: You can choose the amount of space on the CD which you want to use for backup data (default max 680MB). If the Disc space shows 0 MB, there is no space to write, or you need to insert a writable CD. Auto Burning: If you select this function, burning will be automatically (recommended). Once the options have been set, click “Save” and the following will be displayed Chapter 2. Web RMS 33 Veilux RMS User’s Manual Website: www.Veilux.net E-mail: [email protected] Disk Name: Name your backup disc here. Writing Speed: Select speed of writing to burn(default is ok in most circumstances). Burn: Click here when you are ready to make the copy. Abort: Click “Abort” to abandon the backup operation. Exit: If the data size to backup is more than the capacity of your disc, you will need to insert additional media during the process. 34 Chapter 2. Quick RMS Veilux RMS User’s Manual Website: www.Veilux.net E-mail: [email protected] 5.6. Backup Viewer Follow this procedure to view data backed up to your hard drive or CD. Typically you would use this process if the backed up data is not in the .exe form. Click on the Viewer icon to bring up the playback screen. Please refer to “Play Back“ for detailed operation of the “Backup Viewer”. Click on the Browse button to choose a different directory if needed. Chapter 2. Web RMS 35 Veilux RMS User’s Manual Website: www.Veilux.net E-mail: [email protected] : User can search data of backup by multi viewer. Show Pos Data: If you want to see Video and Pos data embedded, click right then check ”Show Pos Data” Show as Local Time: If you want to search and view local time, click the right of the mouse, check this function. 36 Chapter 2. Quick RMS Veilux RMS User’s Manual Website: www.Veilux.net E-mail: [email protected] 6. Connection for using DNS - DNS server: Insert the DNS server IP (the same DVR Server) - Port: Insert Port No (Default = 9870) - IP Address: Insert the name of your domain registered on the DNS server in DVR Main Chapter 2. Web RMS 37 Veilux RMS User’s Manual Website: www.Veilux.net E-mail: [email protected] 7. Connection for standalone DVR PC-RMS supports standalone DVR connection. Most functions are the same as those for PC DVR connection. Here are the new features for standalone DVR. 7.1. Setup Site If you want to connect to standalone DVR, you can select the server type as „Standalone‟ on the „setup site‟ window. (See page 5 for the detail) 7.2. Sound Communication The standalone DVR that the RMS supports has 16 channel sounds, so you can receive 16 different sounds on each channel you select if the standalone DVR has 16 different sound inputs. RMS with standalone DVR supports only „Out‟ function for sound communication, which means you can receive sound data from the standalone DVR. 38 Chapter 2. Quick RMS Veilux RMS User’s Manual Website: www.Veilux.net E-mail: [email protected] 7.3. Remote Setup The remote setup for standalone DVR is composed of seven tabs as follows. 7.3.1. Log Viewer Log viewer tab is to see log data which is recorded in the remote DVR. To see the log list what you want, select date and time ranges on top and select event types, which are „All‟, „System‟, „HDD‟, „Record‟, „User‟, „Process‟ and „Network‟, then click „Search‟ button. Chapter 2. Web RMS 39 Veilux RMS User’s Manual Website: www.Veilux.net E-mail: [email protected] 7.3.2. Record Record tab is to get or set image resolutions, qualities and fps for the recoding images for each channel. You can select the different image qualities and fps for the record types such as „event‟ or „normal‟. If you want to set all the channels as the same values, you can select values on the bottom line with the title, „All‟. Click „Save‟ button to save the changed values to the remote DVR. Click „Reload‟ button to get the data again from the remote DVR. 40 Chapter 2. Quick RMS Veilux RMS User’s Manual Website: www.Veilux.net E-mail: [email protected] 7.3.3. Network Network tab is to get or set image resolutions, qualities and fps for live monitoring images for each channel. If you want to set all the channels as the same values, you can select values on the bottom line with the title, „All‟. Click „Save‟ button to save the changed values to the remote DVR. Click „Reload‟ button to get the data again from the remote DVR. Chapter 2. Web RMS 41 Veilux RMS User’s Manual Website: www.Veilux.net E-mail: [email protected] 7.3.4. Camera Name Camera name tab is to get or set camera names for each channel. Click „Save‟ button to save the changed values to the remote DVR. Click „Reload‟ button to get the data again from the remote DVR. 42 Chapter 2. Quick RMS Veilux RMS User’s Manual Website: www.Veilux.net E-mail: [email protected] 7.3.5. Version Version tab shows hardware and firmware versions and properties which are set on the remote DVR. In hardware properties, you can see model name, total frames, total video channels, total audio channels, number of sensors and number of alarms than the remote DVR has. In firmware properties, you can see the each version such as UI, DB, record, player, network and the firmware. Chapter 2. Web RMS 43 Veilux RMS User’s Manual Website: www.Veilux.net E-mail: [email protected] 7.3.6. Remote Control You can upgrade firmware, upload configuration file, download configuration file and reboot remote DVR in remote control tab. Click „…‟ button to browser files to select, then each buttons that you want to run. 44 Chapter 2. Quick RMS Veilux RMS User’s Manual Website: www.Veilux.net E-mail: [email protected] 7.3.7. Hard Disk Hard disk tab shows the hard disk status which is installed on remote DVR. 7.4. Restrictions (1) Pantilt This version just support up, down, right, left and zoom in/out, focus in/out functions for the pantilt. (2) Remote Playback This version does not support audio search during the remote playback. (3) Remote Backup This version does not support remote backup. (4) Remote Setup This version does not fully support all the functions for the remote DVR in Remote Setup. Chapter 2. Web RMS 45 Chapter 2 Chapter 2. Web RMS Web RMS Veilux RMS User’s Manual Website: www.Veilux.net E-mail: [email protected] 1. How to connect to DVR Server 1) Run Internet Explorer and the server‟s IP address http:// Ip Address : port# Chapter 2. Web RMS 47 Veilux RMS User’s Manual Website: www.Veilux.net E-mail: [email protected] You may see this message when you install ActiveX. Go to Start/Settings/Control Panel/Windows Firewall and set to “Off”. 48 Chapter 2. Quick RMS Veilux RMS User’s Manual Website: www.Veilux.net E-mail: [email protected] If Win XP Service Pack2 is installed in your computer, you must change a security setting to install ActiveX. Explorer -> Tools -> Internet Options -> Security Click “Custom Level...” Download unsigned ActiveX controls -> check “Enable” and then you may connect WEB RMS. 2) Click “Enter” button. Chapter 2. Web RMS 49 Veilux RMS User’s Manual Website: www.Veilux.net E-mail: [email protected] Default is 210.121.206.205, which is the Veilux Demo DVR Server system. If you click “enter” button, show Logon window and then type Account, Password. 50 If you want to connect DVR server of other IP address, click “Connect” button. After you set IP address, click “OK” button. Chapter 2. Quick RMS Veilux RMS User’s Manual Website: www.Veilux.net E-mail: [email protected] Chapter 2. Web RMS 51 Veilux RMS User’s Manual Website: www.Veilux.net E-mail: [email protected] 4)To connect to two different servers, type “IP Address/muti.html” (i.e., 210.121.206.205/multi.html) 5)You can connect with two DVR servers as follows: 52 Chapter 2. Quick RMS Veilux RMS User’s Manual Website: www.Veilux.net E-mail: [email protected] ** If you want to use Web-RMS through the WAN(Internet), you have to forward the port number 80 to connect on DVR server side before anything else. 2. How to connect to Server for Playback 1) Click “Playback” button Chapter 2. Web RMS 53 Veilux RMS User’s Manual Website: www.Veilux.net E-mail: [email protected] 2) Click “Enter” or “Connect” button as like WebRMS to connect DVRserver. 3) Select “Time, Month, Day, Hour, Minute”, click “Search” button 54 Chapter 2. Quick RMS Veilux RMS User’s Manual Website: www.Veilux.net E-mail: [email protected] 4) Click “play icons” button to playback. 3. Building Custom Web RMS Site You can build your own Web RMS server on your web server. You can modify the GUI using HTML and change the Logo File. (1) To download the schrms.cab file from digi-it web server, type http://www.digiit.co.kr/src/webrms/schrms.cab on the Internet Explorer. (2) Save schrms.cab on your hard disk. (3) Upload schrms.cab file in your company web server. (4) Write the HTML pages to include the schrms.cab Now version is 1.0.0.6, but it will be upgrade. <OBJECT id="schrms" classid="clsid:FC271E74-3F60-4F81-B73E-CED49845A56F" codebase='schrms.cab#version=1,0,0,6' width=100% height=100%></OBJECT> (5) If you want to change the logo image file, copy your logo image file into web server. Add the following PARAM between the HTML Object Tag. Value should be the url of the logo image file. If Web Server is UNIX system, classify a small letter or a big letter. <OBJECT id="schrms" classid="clsid:FC271E74-3F60-4F81-B73E-CED49845A56F" codebase='schrms.cab#version=1,0,0,6' width=100% height=100%> <PARAM NAME="LogoFile" VALUE="http://webrms/images/logo.jpg"> </OBJECT> (6) If you want to auto logon, you can add the following PARAM. Chapter 2. Web RMS 55 Veilux RMS User’s Manual Website: www.Veilux.net E-mail: [email protected] <OBJECT id="schrms" classid="clsid:FC271E74-3F60-4F81-B73E-CED49845A56F" codebase='schrms.cab#version=1,0,0,6' width=100% height=100%> <PARAM NAME="AutoLogon" VALUE="1"> <PARAM NAME="UserName" VALUE="XXXX"> <PARAM NAME="Password" VALUE="XXXX"> </OBJECT> 4. Web RMS ActiveX’s Support API. You can use the following API to edit your own HTML pages. (1) long Connect(BSTR lpszSiteName, BSTR lpszAddress, long nPort, long cno); Connect the DVR Server. (2) long Disconnect(long cno); Disconnect the DVR Server. (3) void ViewMode(long nSplit, long cno); Split the display view. 1, 4, 9, 16 mode is supported. (4) boolean Open Pan tilt(long nCno); Open Pan tilt (5) boolean Close Pan tilt(long nCno); Close Pan tilt (6) boolean Command Pan tilt(long nCno, PTZ_COMMAND nCmd); CommandPantilt. You have to call Open Pan tilt() before Command Pan tilt. PTZ_COMMAND as follows. 0, 1, 2, 3 : up, right up, right, right down -4, 5, 6, 7 : down, left down, left, left up -8, 9 : focus in, out -10, 11 : zoom in ,out -12, 13 : key press 1,2(Stop Operation) -14, 15 : auto pan, on/off -16, 17 : power on, off -18, 19 : ramp on, off -20, 21 : device on, off -22, 23 : device on, off (7) Sensor function Copy Dvrmain.exe and httpsvr.exe into the C:\Program files\DVR\MAIN directory. Copy ClrAlarm.html and SetAlarm.html into the C:\Program files\DVR\MAIN \webrms directory Set DVR Sensor and set the camera save mode as sensor mode. Using Internet Explorer request the page http://127.0.0.1/SetAlarm_01.html http://127.0.0.1/ClrAlarm_01.html => 01 means sensor number => 01 means sensor number If sensor type is N/C call ClrAlarm_01.html to set the alarm and SetAlarm_01.html to Clear the alarm. If sensor type is N/O call SetAlarm_01.html to set the alarm and ClrAlarm_01.html to Clear the alarm. 56 Set the Internet Explorer option to remove the temporary file cache. Chapter 2. Quick RMS Veilux RMS User’s Manual Website: www.Veilux.net E-mail: [email protected] Internet explorer -> Tools -> Internet Options -> Browsing history -> Settings ->Temporary Internet Files Every Time I visit the webpage (check) Chapter 2. Web RMS 57 Chapter 3 Chapter 3. Quick RMS Chapter Quick RMS Veilux RMS User’s Manual Website: www.Veilux.net E-mail: [email protected] 1. Quick RMS The Quick RMS is a quick way to connect with a small window that can be kept on your screen while you do other things. The Quick RMS program is located in Start/Programs/DVR/RMS. Connect button Once a site has been defined in the main RMS, clicking this button will give you access to the site(s). Log on as in the main program. Disconnect button Single-Screen-Mode Multi-Screen-Mode Camera: Select the camera number to want to view. Chapter 3. Quick RMS 59 Veilux RMS User’s Manual Website: www.Veilux.net E-mail: [email protected] server. 60 After you connect to server, If you click Relay button, you can control relays of DVR Chapter 2. Quick RMS Chapter 4 Chapter 4. PDA RMS PDA RMS Veilux RMS User’s Manual Website: www.Veilux.net E-mail: [email protected] 1. Installation of PDA Remote Program (1) Open “Install CD folder”. (2) Open “PDA setup folder”. (3) Click “setup.exe” file. (4) Click “Next” button (5) Check “I accept the items in the license agreement and click “Finish” button. 62 Chapter 4. PDA RMS Veilux RMS User’s Manual Website: www.Veilux.net E-mail: [email protected] (6) Click “Yes” button. (7) Installing PDA Remote Program from PC to PDA. (8) Click “OK” button. Chapter 4. PDA RMS 63 Veilux RMS User’s Manual Website: www.Veilux.net E-mail: [email protected] 2. How to use PDA Remote Program (1) Open “Program Files” folder (2) Open “PDVR” folder 64 Chapter 4. PDA RMS Veilux RMS User’s Manual Website: www.Veilux.net E-mail: [email protected] (3) Open “PDA Remote” folder. (4) Click “RemotePDA.exe” file. Chapter 4. PDA RMS 65 Veilux RMS User’s Manual Website: www.Veilux.net E-mail: [email protected] (5) First, click “Setup“ button and click “IP Setup” button to set Site Name, DVR IP, Port and Account, Password. - 66 Site Name: Type site name DVR IP: Type IP number of the DVR Server.(It can remember many server‟s IP) It supports DNS, so user can save name of the DVR computer (e.g. DVR, DVR_1) Port: Type the same Port number of the DVR Server Account: Type account to logon to the DVR Server Password: Type password to logon to the DVR Server Chapter 4. PDA RMS Veilux RMS User’s Manual Website: www.Veilux.net E-mail: [email protected] (6) Click “setup for DNS” button to set Oem_ID, IP of DNS server, port. - Oem_ID : User have a oem_id when user installs DVR, so type it. DNS IP : Type IP of DNS server. Port : default 9870 (7) Click “Con” button and click “Connect” button. It is connecting to the DVR Server and it will take times. Chapter 4. PDA RMS 67 Veilux RMS User’s Manual Website: www.Veilux.net E-mail: [email protected] (8) If you want to see image of the other camera, click “Main” button, and click “Select Camer a” button. 68 Chapter 4. PDA RMS Veilux RMS User’s Manual Website: www.Veilux.net E-mail: [email protected] (9) If you want to control Pantilt, click “Main” button, and click “Pantilt” button. It you want to stop controlling Pantilt, click button. (10) If you want to expand image, click “Main” button, and click “Full” button. It you want to back, click Chapter 4. PDA RMS button. 69 Veilux RMS User’s Manual Website: www.Veilux.net E-mail: [email protected] (11) Click “Search” button and click “Select Camera Data” button to search images to be recor ded in the DVR Server. - 70 Select Camera: Select camera to search. Year: Select Year to search Month: Select Month to search Day: Select Day to search Hour: Select Hour to search Minute: Select Minute to search Chapter 4. PDA RMS Veilux RMS User’s Manual Website: www.Veilux.net E-mail: [email protected] If there is no data to search, this message box will be displayed. “Can‟t find day data recorded”, or “Can‟t find hour data recorded”, or “Can‟t find day minute recorded” (12) Play function - ||<: First image of this time. - |<: Previous image of this time. - <: Back play - ㅁ: Stop - >: Playback - >|: Next image of this time - >||: Last Image of this time (13) If you want to see live image, click “Search” button and click “Return to Main” button. Chapter 4. PDA RMS 71 Veilux RMS User’s Manual Website: www.Veilux.net E-mail: [email protected] (14) Click “Con” button and click “Disconnect” button to disconnect with the DVR Server. 72 Chapter 4. PDA RMS Chapter 5 Chapter 5. Smart RMS ( I Phone) Smart RMS (I Phone) Veilux RMS User’s Manual Website: www.Veilux.net E-mail: [email protected] 1. How to get the “Smart RMS” from App store. 1) Run App store 2) Search “SmartRMS”. 3) Download “SmartRMS”.. 74 Chapter 5. Smart RMS (I Phone) Veilux RMS User’s Manual Website: www.Veilux.net E-mail: [email protected] . 4) Run SmartRMS 2. Add new site (DVR server) : Add new site (DVR server) . : DNS setting. (1) Please click button to add (register) new site (DVR server). Chapter 5. Smart RMS (I Phone) 75 Veilux RMS User’s Manual Website: www.Veilux.net E-mail: [email protected] (2) Please write (input) Server Name, IP Address, Port, User ID, PASSWORD etc as above. If you want to use DNS serve, please input the IP address of the DNS server in the IP Address. And change the “DNS USE” to “ON” (3) Then the Smart RMS will try to connect the DNS server. . (4) Please click button when you complete to add the new site. (5) If you want to cancel to add the site, please click the button. (6) When you finish to add new site, you can see the site (DVR server as follows) Site name (DVR server name). IP address of the site. You are able to see the information and can edit, modify. 76 Chapter 5. Smart RMS (I Phone) Veilux RMS User’s Manual Website: www.Veilux.net E-mail: [email protected] 3. Delete site (DVR server) If you want to delete the registered site, please click the site and move to right direction as above red arrow, then you can see the “Delete” button. 4. Live view, Playback, PTZ control (1) Please select the site which you want to connect. Move to live view. Able to playback. Back to previous menu screen. Chapter 5. Smart RMS (I Phone) 77 Veilux RMS User’s Manual Website: www.Veilux.net E-mail: [email protected] (2) Live View : Back to main menu. : If you click the button, you can see other camera numbers as below and you can change the camera number for live view. : On of the PTZ control button. : Off of the PTZ control button 78 Chapter 5. Smart RMS (I Phone) Veilux RMS User’s Manual Website: www.Veilux.net E-mail: [email protected] (3) PTZ control : Move to left. : Move to right. : Move to up : Move to bottom : Zoom –in : Zoom out : Relay out ( no activated) : Relay out button (activated) Chapter 5. Smart RMS (I Phone) 79 Veilux RMS User’s Manual Website: www.Veilux.net E-mail: [email protected] (4) Playback : selected date : Selected time and camera number : Able to change the date and time for the playback data : Move to main menu : Playback the data by setting of the time and camera 80 Chapter 5. Smart RMS (I Phone) Veilux RMS User’s Manual Website: www.Veilux.net E-mail: [email protected] : Able to set the hour, minute and camera number 07 hour, 5 minute, 7 camera number Chapter 5. Smart RMS (I Phone) 81 Veilux RMS User’s Manual Website: www.Veilux.net E-mail: [email protected] : Back to the playback setting screen : Move to first frame per hour : Move to before 1 frame : Stop : Playback : Move to next 1 frame : Move to last frame per hour 5. DNS Setting 82 Chapter 5. Smart RMS (I Phone) Veilux RMS User’s Manual Website: www.Veilux.net E-mail: [email protected] : IP address for DDNS server ( or DNS server) : Port number DDNS : when you use DIGI-IT DNS server service DNS : when you use general DNS server service : Save the DNS server setting : Back to main menu Chapter 5. Smart RMS (I Phone) 83 Chapter 6 Chapter 6. aViewer ( I Phone for standalone) aViewer (I Phone for standalone) Veilux RMS User’s Manual Website: www.Veilux.net E-mail: [email protected] 1. How to get the “a Viewer” from App store. Mobile Viewing Method through our mobile viewer(aViewer) Now, we support our mobile viewer, named aViewer, for iPhone. [How to install]: You can download and install aViewer through application store of iPhone. Click application store -> Search “aviewer” -> Click aViewer free icon -> Click Install Then aViewer icon will be created in your iPhone Chapter 6. aViewer (I Phone for standalone) 85 Veilux RMS User’s Manual Website: www.Veilux.net E-mail: [email protected] 2. How to start 86 Chapter 6. aViewer (I Phone for standalone) Veilux RMS User’s Manual Website: www.Veilux.net E-mail: [email protected] Enter Login password: default password is “admin” Chapter 6. aViewer (I Phone for standalone) 87 Veilux RMS User’s Manual Website: www.Veilux.net E-mail: [email protected] 3. Add new site (standalone server) This is aViewer‟s initial Standalone server list screen. To add a standalone server on the list, you should tap „add/modify‟ button. 88 Chapter 6. aViewer (I Phone for standalone) Veilux RMS User’s Manual Website: www.Veilux.net E-mail: [email protected] Then „Edit DVR List‟ menu will be showed. You need to register standalone DVR what you wish to access remotely. -DVR name: Input any name what you wish. –Address: Input standalone DVR IP address or host name. -Port: Input standalone DVR port number which same as DVR you set in Setup->Network->Client>Client Port. -User ID & Password: Input User ID and Password same as DVR you registered. Then if you click button, DVR List window will be showed with DVR name as you input. Save and return to DVR List menu Not save and return to DVR List menu Then click „DVR Name‟ you created in DVR List, our mobile viewer will be showed as below. Chapter 6. aViewer (I Phone for standalone) 89 Veilux RMS User’s Manual Website: www.Veilux.net E-mail: [email protected] To connect a site, choose standalone server on the list. 4. Live view zoom in in 1ch screen mode. zoom out in 1ch screen mode. Changes channel to the previous ch. Changes channel to the very next ch. 1ch screen mode. 4ch screen mode 9ch screen mode. 16ch screen mode. close live screen. 90 Chapter 6. aViewer (I Phone for standalone) Veilux RMS User’s Manual Website: www.Veilux.net E-mail: [email protected] Version information. Standalone server list setup menu. delete standalone server. add/modify standalone server. 5. How to set & edit DVR List Chapter 6. aViewer (I Phone for standalone) 91 Veilux RMS User’s Manual Website: www.Veilux.net E-mail: [email protected] 92 Chapter 6. aViewer (I Phone for standalone) Veilux RMS User’s Manual Website: www.Veilux.net E-mail: [email protected] Chapter 6. aViewer (I Phone for standalone) 93 Veilux RMS User’s Manual Website: www.Veilux.net E-mail: [email protected] 94 Chapter 6. aViewer (I Phone for standalone) Chapter 7 Chapter 7. Smart RMS (Android) Smart RMS (Android) Veilux RMS User’s Manual Website: www.Veilux.net E-mail: [email protected] 1. How to get the application from Android market (1) Click „Market‟ icon to go to Android market. (2) Click „Search‟ icon and type „Smart RMS‟. 96 Chapter 7. Smart RMS (Android) Veilux RMS User’s Manual Website: www.Veilux.net E-mail: [email protected] (3) On the result page, click „Smart RMS‟ icon to go to the download page (4) Click „Free‟ button to download Smart RMS application and then it will start downloading and installing automatically. It may take several seconds to finish it. . Chapter 7. Smart RMS (Android) 97 Veilux RMS User’s Manual Website: www.Veilux.net E-mail: [email protected] 2. Update application Once you installed „Smart RMS‟, you will see a update notification on your phone when the application is newly released. Simply follow the update step with clicking „Update‟ button‟ as you see below. If you have already installed ver. 1.xx and try to update ver. 2.xx, you must uninstall the previous version first. Just click „Uninstall‟ button. When the uninstall is done, you can install new version on your phone .See „1. How to get the application from Android market‟ . 98 Chapter 7. Smart RMS (Android) Veilux RMS User’s Manual Website: www.Veilux.net E-mail: [email protected] 3. Starting application (1) When the installation process finishes, you will find „Smart RMS‟ icon on the applications page. Click it to start „Smart RMS‟ (2) When you start the application, you will see a screen shown left. If you installed Smart RMS first time, the list would be empty. Click „+‟ button to add a new site. Chapter 7. Smart RMS (Android) 99 Veilux RMS User’s Manual Website: www.Veilux.net E-mail: [email protected] 4. Add DVR sites (1) When you click „+‟ button on the main page as you see „2. Staring program‟ , you can see a screen shown left. Site Name : string to indicate the site you register. Use DDNS : if you need to use DDNS to connect DVR, check this button. See „6. Using DDNS‟. Address : IP address to connect to DVR server or registered name on DDNS if you checked „Use DDNS‟ button. Port : port number to connect to DVR server or ignore when you checked „Use DDNS‟ button User ID : user id to log in to DVR server Password : password to log in to DVR server. Initial View : initial view mode when you start monitoring. Options you can select are 1 and 4. Camera : camera number you want to monitor when you start program. The range that you can select is 1 to 64. It may vary depending on a DVR that you connect. When you input all the items correctly, click „Save‟ button to add new site to the site list. If you want to quit without saving, just click „Cancel‟ button. (2) When you click „Menu key‟ which is on the bottom of the phone, the menu is shown on the bottom of screen as you see on the left picture. There are three items, Add Site : add site which is the same as the „+‟ button on the main page. DDNS : this menu for managing DDNS information which is the same as the „DDNS‟ button on the main page. About : show the program information including version, developer‟s website and e-mail. 100 Chapter 7. Smart RMS (Android) Veilux RMS User’s Manual Website: www.Veilux.net E-mail: [email protected] 5. Edit DVR sites (1) After you add sites, you can see the list that you added on the main page. If you want to edit or delete a site on the list, click this „Edit‟ button. Chapter 7. Smart RMS (Android) 101 Veilux RMS User’s Manual Website: www.Veilux.net E-mail: [email protected] (2) The page for editing site is the same as the add site page. You can change some items you want and then click „Save‟ button or click „Delete‟ button if you don‟t need this site information any more. 6. Using DDNS When you need to use DDNS, you should register DDNS information. Click „DDNS‟ button on the main page, you can see this page shown left. Address : IP address of DDNS server Port : port number to connect DDNS server. When you input all the items correctly, click „Save‟ button. If you want to finish this page without saving, just click „Cancel‟ button. 102 Chapter 7. Smart RMS (Android) Veilux RMS User’s Manual Website: www.Veilux.net E-mail: [email protected] 7. Start monitoring (1) When the site list is ready, you can start monitoring. Just click the site name you already added on the list. Chapter 7. Smart RMS (Android) 103 Veilux RMS User’s Manual Website: www.Veilux.net E-mail: [email protected] (2) The picture on the left is the initial monitoring screen. You will see the top and bottom toolbars with single clicking on screen. In the same way, you can hide the toolbars again. The initial view will be set according to the site information you made. There are two modes exist on the monitoring page. One is „Camera mode‟ and the other is „PTZ mode‟. Default mode you see first is „Camera mode‟ like this picture. : disconnect and go back to the main page : change „Camera mode‟ into „PTZ mode‟ when it is pressed : 1 split : 4 split : move to previous page : move to next page : open „Relay status‟ dialog : open „Select camera‟ dialog (3) When you click „Relay status‟ button, you will see the dialog which has relay buttons. When it displays, the program requests the current relay status to the connecting site, and then the new status will be applied on that. Also you can change the relay status by clicking each button. If you want close this dialog, just click „Back key‟ on the bottom of the phone. 104 Chapter 7. Smart RMS (Android) Veilux RMS User’s Manual Website: www.Veilux.net E-mail: [email protected] (4) When you click „Select camera‟ button, you will see the dialog which has buttons with numbers. The dialog will show the right number of camera buttons by asking to the connecting site. When you select one, the dialog disappears and the current monitoring page moves to the page which includes the selected camera monitoring. If you want nothing to change, just click „Back key‟ on the bottom of the phone. (5) When you press „PTZ mode‟ button, the monitoring mode changes into „PTZ mode‟ and buttons on the bottom toolbar are changed. This button is just activated when you are monitoring on 1 split mode. : zoom in : zoom out : focus in : focus out : move leftward : move upward : move rightward : move downward Chapter 7. Smart RMS (Android) 105 Veilux RMS User’s Manual Website: www.Veilux.net E-mail: [email protected] (6) When you rotate the phone horizontally, you can see the monitoring page on full screen. 106 Chapter 7. Smart RMS (Android)


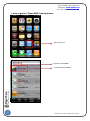

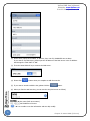
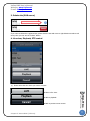

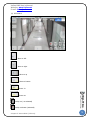


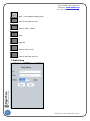


![[Proxyview]User`s Manual (5.1.4.0)](http://vs1.manualzilla.com/store/data/005658349_1-e7f841297d622d23913e7f3fcabf599d-150x150.png)