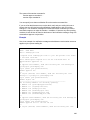
1
Lyris ListManager 7.6 Manual Lyris Technologies, Inc. Contents Contents___________________________________________________________________ 20 How to Use the Online Manual_________________________________________________ 20 How to Use this Manual ______________________________________________________ 20 If You Cannot See the Table of Contents ________________________________________ 21 User's Guide Contents _______________________________________________________ 21 Quick Start _________________________________________________________________ 22 Running ListManager for the First Time _________________________________________ 22 Logging In and Logging Out __________________________________________________ 24 Homepage _________________________________________________________________ 25 Mailing Now! _______________________________________________________________ 29 Adding Test Members________________________________________________________ 31 Creating Content ____________________________________________________________ 33 Creating and Using Templates_________________________________________________ 35 Personalizing Content _______________________________________________________ 37 Success Tracking ___________________________________________________________ 38 Delivery Tracking ___________________________________________________________ 40 Opens/Forwards Tracking ____________________________________________________ 40 Clickthrough Tracking _______________________________________________________ 41 Referral Tracking____________________________________________________________ 42 Action Tracking _____________________________________________________________ 44 Creating Segments __________________________________________________________ 46 Creating Mailings ___________________________________________________________ 47 Approving Mailings __________________________________________________________ 50 Viewing Reports ____________________________________________________________ 51 Creating List Administrators __________________________________________________ 52 Content____________________________________________________________________ 53 Content: New Content________________________________________________________ 53 Content: New Content: Essentials______________________________________________ 54 Content: New Content: Text Message ___________________________________________ 55 Content: New Content: HTML Message _________________________________________ 56 Content: New Content: Advanced ______________________________________________ 57 Content: Attach File _________________________________________________________ 58 Content: New Content: Internationalization ______________________________________ 58 Content: Insert Field _________________________________________________________ 60 2 Content: Insert Field: Mail Merge Fields _________________________________________ 62 Content: Insert Field: Database Fields __________________________________________ 64 Content: Insert Field: Unsubscribe _____________________________________________ 66 Content: Insert Field: Autoresponders __________________________________________ 68 Content: Insert Field: Referrals ________________________________________________ 68 Content: Insert Field: Template ________________________________________________ 69 Content: Insert URL _________________________________________________________ 69 Content: Insert URL: Clickable Text ____________________________________________ 73 Content: Insert URL: Clickable Image ___________________________________________ 74 Content: Insert URL: URL____________________________________________________ 74\ Content: Insert URL: Unsubscribe _____________________________________________ 75 Content: Insert URL: Profile ___________________________________________________ 76 Content: Insert URL: Web Page ________________________________________________ 76 Content: Insert URL: Rich Media _______________________________________________ 77 Content: Insert Condition _____________________________________________________ 78 Content: Insert Condition: Simple ______________________________________________ 80 Content: Insert Condition: True/False ___________________________________________ 81 Content: Insert Condition: A or B ______________________________________________ 82 Content: Insert Condition: A and B _____________________________________________ 84 Content: Insert Condition: Percentage __________________________________________ 86 Content: Tools ______________________________________________________________ 87 Content: Tools: Convert ______________________________________________________ 87 Content: Tools: Validate ______________________________________________________ 88 Content: Tools: Reformat _____________________________________________________ 89 Content: New Content From Template __________________________________________ 90 Content: Templates__________________________________________________________ 90 View/Edit All Content ________________________________________________________ 92 Content: Test Content________________________________________________________ 92 Segments __________________________________________________________________ 93 Segments Main Page ________________________________________________________ 95 View/Edit Segments _________________________________________________________ 96 Segments: New Segment _____________________________________________________ 96 Segments: New/Edit Segment: Essentials _______________________________________ 98 Segments: New Segment: Insert Clause: Text ____________________________________ 99 Segments: New Segment: Insert Clause: Numeric _______________________________ 100 Segments: New Segment: Insert Clause: Date___________________________________ 100 Segments: New Segment: Insert Clause: Action _________________________________ 101 3 Segments: New Segment: Insert Clause: Clickthrough ___________________________ 102 Segments: New Segment: Insert Clause: Clickstream ____________________________ 103 Segments: New Segment: Insert Clause: Purchase ______________________________ 103 Segments: New Segment: Insert Clause: Interest ________________________________ 104 Segments: New/Edit Segment: Advanced ______________________________________ 105 Segments: New/Edit Segment: Boundaries _____________________________________ 106 Segments: New Triggered Segment ___________________________________________ 107 Segments: New Triggered Segment: Insert Trigger: Date__________________________ 111 Segments: New Triggered Segment: Insert Trigger: Action ________________________ 112 Segments: New Triggered Segment: Insert Trigger: Clickthrough __________________ 112 Segments: New Triggered Segment: Insert Trigger: Clickstream ___________________ 113 Segments: New Triggered Segment: Insert Trigger: Purchase _____________________ 113 Segments: New Triggered Segment: Insert Trigger: Interest _______________________ 114 Joining to Another Table ____________________________________________________ 115 Mailings __________________________________________________________________ 117 Mailings: New Mailing _______________________________________________________ 117 Mailings: New Mailing: Message ______________________________________________ 120 Mailings: New Mailing: Recipients_____________________________________________ 122 Mailings: New Mailing: Tracking ______________________________________________ 123 Mailings: New Mailing: Schedule______________________________________________ 124 Mailings: New Mailing: Internationalization _____________________________________ 125 Mailings: Need Approval ____________________________________________________ 126 Mailings: Need Approval: Edit Mailing: Message Body____________________________ 128 Mailings: Need Approval: Edit Mailing: Message Header __________________________ 129 Mailings: Need Approval: Edit Mailing: Recipients _______________________________ 130 Mailings: Need Approval: Edit Mailing: Schedule ________________________________ 130 Mailings: Mailing Status: All Outgoing Mailings by Date __________________________ 131 Mailings: Mailing Status: Currently Active Mailings ______________________________ 132 Mailings: Mailing Status: Completed Mailings ___________________________________ 133 Mailings: Mailing Status: Mail Queues _________________________________________ 134 Mailings: Mailing Status: Mail Queues: Incoming ________________________________ 134 Mailings: Mailing Status: Mail Queues: Incoming: View Message ___________________ 135 Mailings: Mailing Status: Mail Queues: Outgoing ________________________________ 137 Mailings: Mailing Status: Mail Queues: Outgoing: View Message ___________________ 137 Mailings: Advanced Mailings: New Triggered Mailing_____________________________ 139 Mailings: Advanced Mailings: New Triggered Mailing Wizard ______________________ 140 Mailings: Advanced Mailings: View Triggered Mailings ___________________________ 141 4 Mailings: Advanced Mailings: Editing Triggered Mailings _________________________ 142 Mailings: Advanced Mailings: New Sequential Mailing ____________________________ 143 Mailings: Advanced Mailings: New Sequential Mailing Wizard______________________ 144 Mailings: Advanced Mailings: View Sequential Mailings __________________________ 145 Mailings: Advanced Mailings: Trigger Tab ______________________________________ 147 Mailings: Scheduled ________________________________________________________ 148 Mailings: View Outgoing Mailing: Message Body ________________________________ 149 Mailings: View Outgoing Mailing: Message Header_______________________________ 149 Mailings: View Outgoing Mailing: Recipients ____________________________________ 149 Mailings: View Outgoing Mailing: Log__________________________________________ 150 Mailings: View Outgoing Mailing: Mail Queue ___________________________________ 150 Mailings: Test Mailing _______________________________________________________ 151 Reports___________________________________________________________________ 153 Reports: Mailings __________________________________________________________ 160 Delivery Statistics __________________________________________________________ 161 Mailing Statistics Table______________________________________________________ 163 Tracking Statistics _________________________________________________________ 163 Refer-a-Friend Statistics_____________________________________________________ 166 View Mailing_______________________________________________________________ 168 View Mailing: Message Body _________________________________________________ 168 View Mailing: Message Header _______________________________________________ 169 View Mailing: Recipients ____________________________________________________ 169 View Mailing: Log __________________________________________________________ 170 View Mailing: Mail Queue ____________________________________________________ 171 Members__________________________________________________________________ 171 Subscriber Activity _________________________________________________________ 173 Attribute Reports___________________________________________________________ 174 All Lists Member Count _____________________________________________________ 176 Domain Reports____________________________________________________________ 176 Demographic Reports_______________________________________________________ 176 Over-Time Reports _________________________________________________________ 176 Reports: Server Performance ________________________________________________ 176 Reports: Blacklists _________________________________________________________ 177 Reports: Web Site __________________________________________________________ 177 Reports: Purchases ________________________________________________________ 178 Reports: Interest ___________________________________________________________ 179 Reports: Charts ____________________________________________________________ 180 5 Charts: Essentials __________________________________________________________ 180 Charts: Advanced __________________________________________________________ 181 Charts: Add Metric _________________________________________________________ 181 Charts: Chart ______________________________________________________________ 183 Charts: Table ______________________________________________________________ 183 Reports: Maps ____________________________________________________________ 183 Utilities ___________________________________________________________________ 184 Utilities: List Settings _______________________________________________________ 185 List Settings Basic Information _______________________________________________ 187 Utilities: List Settings: Basic Information: Basics ________________________________ 187 Utilities: List Settings: Basic Information: Reports _______________________________ 187 Utilities: List Settings: Basic Information: Enable Features ________________________ 191 Utilities: List Settings: Basic Information: Limits ________________________________ 193 Utilities: List Settings: New Subscriber Policy___________________________________ 194 Utilities: List Settings: New Subscriber Policy: Confirmation ______________________ 194 Utilities: List Settings: New Subscriber Policy: Security __________________________ 195 Utilities: List Settings: Email Submitted Content_________________________________ 197 Utilities: List Settings: Email Submitted Content: Message Wrapping _______________ 197 Utilities: List Settings: Email Submitted Content: Security ________________________ 198 Utilities: List Settings: Email Submitted Content: Approval ________________________ 199 Utilities: List Settings: Email Submitted Content: Email Header ____________________ 200 Utilities: List Settings: Email Submitted Content: Header Rewrites__________________ 202 Utililties: List Settings: Web Created Content ___________________________________ 204 Utilities: List Settings: Automatic Maintenance __________________________________ 205 Utilities: List Settings: Automatic Maintenance: Error Mail Handling ________________ 206 Utilities: List Settings: Automatic Maintenance: Purging Inactive Members __________ 209 Utilities: List Settings: Automatic Maintenance: Purging Archives __________________ 210 Utilities: List Settings: Discussion Forum Interface ______________________________ 210 Utilities: List Settings: Discussion Forum Interface: Message Reading ______________ 211 Utilities: List Settings: Discussion Forum Interface: New Subscriber Requirements ___ 213 Utilities: List Settings: Discussion Forum Interface: Information About Your List: General _________________________________________________________________________ 214 Utilities: List Settings: Discussion Forum Interface: Information About Your List: About this List___________________________________________________________________ 214 Utilities: List Settings: Discussion Forum Interface: Information About Your List: Contact Info ______________________________________________________________________ 214 Utilities: List Settings: Discussion Forum Interface: Information About Your List: Language _________________________________________________________________ 215 6 Utilities: List Settings: Discussion Forum Interface: Conference ___________________ 215 Utilities: List Settings: Discussion Group Features_______________________________ 216 Utilities: List Settings: Discussion Group Features: Message Look _________________ 216 Utilities: List Settings: Discussion Group Features: Security ______________________ 217 Utilities: List Settings: Discussion Group Features: Message Rejection Rules: Blanks _ 218 Utilities: List Settings: Discussion Group Features: Message Rejection Rules: Same Message Rules ____________________________________________________________ 218 Utilities: List Settings: Discussion Group Features: Message Rejection Rules: Etiquette220 Utilities: List Settings: For Programmers _______________________________________ 221 Utilities: List Settings: For Programmers: Email Scripting _________________________ 221 Utilities: List Settings: For Programmers: Extensions to Run ______________________ 222 Utilities: Members __________________________________________________________ 224 Utilities: Members Main Page_________________________________________________ 224 Utilities: Members: Bans ____________________________________________________ 225 Utilities: Members: Bans: New Ban ____________________________________________ 226 Utilities: Members: Create Members __________________________________________ 228\ Utilities: Members: Create Many New Members__________________________________ 228 Utilities: Members: New Member ______________________________________________ 228 Utilities: Members: New Member: Basics _______________________________________ 229 Utilities: Members: New Member: List Admin ___________________________________ 229 Utilities: Members: New Member: Settings______________________________________ 230 Utilities: Members: New Member: Advanced Settings_____________________________ 232 Utilities: Members: New Member: Information ___________________________________ 233 Utilities: Members: Delete Members ___________________________________________ 234 Utilities: Members: Delete Many Members ______________________________________ 234 Utilities: Members: Delete All in This View ______________________________________ 234 Utilities: Members: Find Members _____________________________________________ 235 Utilities: Members: Find Members: Email Address _______________________________ 235 Utilities: Members: Find Members: Name _______________________________________ 235 Utilities: Members: Find Members: Domain _____________________________________ 236 Utilities: Members: Find Members: Segments ___________________________________ 236 Utilities: Members: Find Members: Status ______________________________________ 236 Utilities: Members: Find Members: Kind________________________________________ 237 Utilities: Members: Find Members: Member ID __________________________________ 238 Utilities: Members: Find Members: History _____________________________________ 239 Utilities: Members: Import Members ___________________________________________ 241 Utilities: Web Forms ________________________________________________________ 244 7 Utilities: Web Forms: New Subscribe Form Overview_____________________________ 245 Utilities: Web Forms: New Subscribe Form: Subscribe ___________________________ 246 Utilities: Web Forms: New Subscribe Form: Choose Lists _________________________ 248 Utilities: Web Forms: New Subscribe Form: Choose Demographic Fields ____________ 248 Utilities: Web Forms: New Unsubscribe Form ___________________________________ 248 Utilities: Web Forms: New Unsubscribe Form: Choose Specific Lists to Unsubscribe__ 249 Utilities: Web Forms: Member Profile Forms ____________________________________ 250 Utilities: Web Forms: Member Profile Forms: New Member Profile Form: Profile ______ 250 Utilities: Web Forms: Member Profile Forms: New Member Profile Form: Advanced ___ 252 Utilities: Web Forms: Member Profile Form: New Member Profile Form: Preview ______ 252 Utilities: Web Forms: Member Profile Forms: Choose Lists________________________ 252 Utilities: Web Forms: Member Profile Forms: Choose Demographic Fields ___________ 253 Utilities: Web Forms: Member Profile Forms: Edit Member Profile Form _____________ 253 Utilities: Web Forms: Referral Forms __________________________________________ 254 Utilities: Web Forms: Referral Forms: New Referral Form _________________________ 255 Utilities: Web Forms: Referral Forms: Referral Form From Template ________________ 258 Utilities: Web Forms: Referral Forms: Edit Referral Form _________________________ 258 Utilities: Web Forms: Web Form Templates: New Referral Form Template ___________ 259 Utilities: Web Forms: Web Form Templates: Edit Referral Form Template ____________ 260 Utilities: Automated Messages: Document Content ______________________________ 260 Utilities: Automated Messages: Document Associations __________________________ 262 Utilities: Automated Messages: Document Associations: New Document Association _ 264 Sample "Hello" Document ___________________________________________________ 265 Sample "Confirm" Document_________________________________________________ 270 Utilities: Autoresponders ____________________________________________________ 270 Utilities: Automated Messages: Autoresponders ________________________________ 271 Utilities: Autoresponders: New Autoresponder: Essentials ________________________ 272 Utilities: Autoresponders: New Autoresponder: Advanced ________________________ 272 Utilities: Autoresponders: New Autoresponder: For Programmers __________________ 272 Utilities: Automated Messages: Match Phrases__________________________________ 274 Utilities: Automated Messages: New Match Phrase: Essentials_____________________ 275 Utilities: Automated Messages: New Match Phrase: Advanced _____________________ 276 Utilities: Automated Messages: Match Phrases: New Match Phrase: For Programmers_ 278 Utilities: Administration _____________________________________________________ 279 Utilities: Administration: Administrators _______________________________________ 280 Utilities: Administration: Administrators: List Administrators ______________________ 280 Utilities: Administration: Administrators: Site Administrators ______________________ 281 8 Utilities: Administration: Administrators: Site Administrators: New Site Administrator: Essentials_________________________________________________________________ 282 Utilities: Administration: Administrators: Site Administrators: Choose Sites _________ 282 Utilities: Administration: Administrators: Site Administrators: New Site Administrator: Contact Info _______________________________________________________________ 282 Utilities: Administration: Administrators: Site Administrators: New Site Administrator: Personal Info ______________________________________________________________ 282 Utilities: Administration: Administrators: Server Administrators ___________________ 283 Utilities: Administration: Administrators: Server Administrators: New Server Administrator: Essentials____________________________________________________ 283 Utilities: Administration: Administrators: Server Administrators: New Server Administrator: Contact Info __________________________________________________ 284 Utilities: Administration: Administrators: Server Administrators: New Server Administrator: Personal Info _________________________________________________ 284 Utilities: Administration: Lists ________________________________________________ 284 Utilities: Administration: Lists: New List _______________________________________ 285 Utilities: Administration: Server ______________________________________________ 288 Server Settings ____________________________________________________________ 288 Server Settings: Basic Settings _______________________________________________ 289 Server Settings: Network Settings: Receive Email _______________________________ 289 Server Settings: Network Settings: Deliver Email ________________________________ 292 Server Settings: Network Settings: Ports _______________________________________ 295 Server Settings: DNS Bypass ________________________________________________ 295 Utilities: Administration: Server: Server Settings: New DNS Bypass ________________ 297 Utilities: Administration: Server: Server Settings: Domain Connection Limits ________ 297 Server Settings: Security: User Limits _________________________________________ 298 Server Settings: Security: Bans_______________________________________________ 299 Server Settings: Security: Web _______________________________________________ 300 Server Settings: Security: GUI Hosts __________________________________________ 302 Utilities: Administration: Server: Server Settings: Security: Spam Blocking __________ 302 Server Settings: Automatic Maintenance: Error Mail______________________________ 304 Server Settings: Automatic Maintenance: Logging _______________________________ 305 Server Settings: Automatic Maintenance: Purging Old Data _______________________ 305 Server Settings: Advanced: Message Wrapping _________________________________ 306 Server Settings: Automatic Maintenance: Mail Loops_____________________________ 306 Server Settings: Advanced: Digest Wrapping ___________________________________ 307 Server Settings: Advanced: For Programmers __________________________________ 308 Server Settings: Advanced: Billing ____________________________________________ 309 Server Settings: Advanced: Enable Features____________________________________ 309 9 Server Settings: Advanced: Global Ban Settings ________________________________ 310 Server: License Capabilities _________________________________________________ 311 Server: Operational Statistics ________________________________________________ 313 Server: Log _______________________________________________________________ 318 Log: View Log Item _________________________________________________________ 318 Database _________________________________________________________________ 319 Database: View Member Table________________________________________________ 319 Database: View Any Table ___________________________________________________ 320 Database: View Segment ____________________________________________________ 320 Database: Run Your Own SQL Query __________________________________________ 321 Database: View Query Results________________________________________________ 321 Database: View Row ________________________________________________________ 322 Database: Add Member Column _____________________________________________ 322\ Database: Add Member Column: Wizard _______________________________________ 323 Database: Delete Member Column ____________________________________________ 323 Database: Add Action Tag Column ____________________________________________ 323 Database: Delete Action Tag Column __________________________________________ 324 Database: Demographic Definitions ___________________________________________ 325 Database: Demographic Definitions: New Definition______________________________ 325 Database Administration: Insert Row __________________________________________ 325 Utilities: Administration: Server: Debug Log ____________________________________ 325 Utilities: Administration: Server: Internationalization and Localization: International Charsets __________________________________________________________________ 326 Utilities: Administration: Server: Internationalization and Localization:Translations: Keys _________________________________________________________________________ 328 Utilities: Administration: Server: Internationalization and Localization: Translations: Create and Edit Languages __________________________________________________ 328 Utilities: Administration: Server: Internationalization and Localization: Translations: Translation Values _________________________________________________________ 328 Utilities: Administration: Sites ________________________________________________ 329 Utilities: Administration: Sites: New Site: Essentials _____________________________ 330 Utilities: Administration: Sites: New Site: Message Wrapping ______________________ 331 Utilities: Administration: Sites: New Site: Information ____________________________ 332 Utilities: Administration: Topics ______________________________________________ 334 Utilities: Administration: Topics: New Topic: Basics _____________________________ 334 Utilities: Administration: Topics: New Topic: Information _________________________ 335 Billing ____________________________________________________________________ 336 Billing Initial Setup _________________________________________________________ 336 10 Adding, Validating and Syncing Servers _______________________________________ 338 Creating Hosting Plans______________________________________________________ 340 Creating Additional Charges _________________________________________________ 341 Creating New Customers ____________________________________________________ 342 Creating Billing Groups _____________________________________________________ 343 Assigning Hosting Plans, Charges and Lists ____________________________________ 343 Validating Customers _______________________________________________________ 345 Running Bills ______________________________________________________________ 345 Testing and Sending Bills ___________________________________________________ 346 Terminating Customers _____________________________________________________ 348 Terminating Lists __________________________________________________________ 349 Billing Checklist ___________________________________________________________ 350 Billing Reports_____________________________________________________________ 350 Billing Utilities _____________________________________________________________ 351 Viewing a Customer's History ________________________________________________ 352 Utilities: Login Status _______________________________________________________ 352 Utilities: Change Language __________________________________________________ 353 Utilities: Other _____________________________________________________________ 354 Utilities: Other: Action Tags__________________________________________________ 354 Utilities: Other: Action Tags: Clickstream Tag ___________________________________ 355 Utilities: Other: Action Tags: Purchase Tag _____________________________________ 355 Utilities: Other: Action Tags: Interest Tag ______________________________________ 356 Utilities: Other: Action Tags: Member Update Tag _______________________________ 357 Utilities: Other: Clickthrough URLs ____________________________________________ 358 Utilities: Other: Offline Events ________________________________________________ 358 Utilities: Other: Programming API _____________________________________________ 360 Utilities: Other: About _______________________________________________________ 362 The Discussion Forum Interface ______________________________________________ 364 The Discussion Forum Interface for Members ___________________________________ 365 Accessing and Logging into the Discussion Forum Interface ______________________ 365 Navigating the Discussion Forum Interface _____________________________________ 366 Viewing and Subscribing to Forums ___________________________________________ 367 Reading Messages _________________________________________________________ 368 Sending Messages _________________________________________________________ 370 Searching for Messages _____________________________________________________ 371 Editing Your Settings _______________________________________________________ 372 Learning More About a Forum ________________________________________________ 373 11 Conferencing with Other Members ____________________________________________ 374 Administrator Discussion Forum Functions ____________________________________ 375 Discussion Forum Interface FAQ______________________________________________ 376 Email Commands __________________________________________________________ 378 Discussion Email Commands Index ___________________________________________ 379 Subscribing To A Discussion ________________________________________________ 379 Unsubscribing From A Discussion ____________________________________________ 379 Contributing Messages______________________________________________________ 379 Discussion List Subscriber Types_____________________________________________ 379 Commands For Announcement List Members___________________________________ 381 Subscribing To An Announcement List ________________________________________ 381 Unsubscribing From An Announcement List ________________________________ 381 Announcement List Subscriber Types _________________________________________ 381 Where To Send ListManager Commands Index __________________________________ 382 The List Posting Address ____________________________________________________ 383 The Command-Listname Address _____________________________________________ 383 The Command Address _____________________________________________________ 384 The ListManager Address ___________________________________________________ 384 The Listname-Request Address ______________________________________________ 385 The List Owner Address _____________________________________________________ 386 Multiple Commands In A Message ____________________________________________ 386 How Invalid Commands Are Handled __________________________________________ 386 How ListManager Sends Mail Back To You _____________________________________ 387 The Line Continuation Character______________________________________________ 387 Specific Commands Index ___________________________________________________ 388 Subscribing Index __________________________________________________________ 388 The Simplest Method For Subscribing _________________________________________ 389 Alternatives For The Word Subscribe __________________________________________ 389 Subscribing With The Lyris@ Command _______________________________________ 389 Setting Your Password ______________________________________________________ 390 Backwards Compatibility Of Subscribing Methods _______________________________ 390 Setting Other Membership Options ____________________________________________ 391 Subscribing With The Listname-Request Address _______________________________ 391 Unsubscribe Index _________________________________________________________ 391 The Listname-Unsubscribe Command Address _________________________________ 392 Purge ____________________________________________________________________ 393 Change Membership Settings Index ___________________________________________ 393 12 Email Address _____________________________________________________________ 393 Subscriber Type ___________________________________________________________ 393 Acknowledgement__________________________________________________________ 394 Receive Copies Of Your Own Postings_________________________________________ 394 Password _________________________________________________________________ 394 Comment _________________________________________________________________ 395 User ID ___________________________________________________________________ 395 Quiet Modifier _____________________________________________________________ 395 Resuming A Held Membership _______________________________________________ 395 Other Member Settings______________________________________________________ 395 Examples _________________________________________________________________ 396 Determine Membership Settings ______________________________________________ 396 Mailing List Information _____________________________________________________ 396 Searching Email Command __________________________________________________ 397 Help Document ____________________________________________________________ 397 Retrieving the Help Document ________________________________________________ 398 Get Document _____________________________________________________________ 398 End Command _____________________________________________________________ 399 Administrator Email Commands ______________________________________________ 400 Login ____________________________________________________________________ 400 Add Index _________________________________________________________________ 400 Adding Many Members ______________________________________________________ 401 Adding To Many Lists _______________________________________________________ 402 Nearly Full ________________________________________________________________ 403 More Examples ____________________________________________________________ 403 Become __________________________________________________________________ 404 Delete ____________________________________________________________________ 404 Admin End ________________________________________________________________ 405 Member___________________________________________________________________ 405 Moderate _________________________________________________________________ 407 Report____________________________________________________________________ 409 Using Report To Synchronize Your Databases __________________________________ 409 Review ___________________________________________________________________ 411 Send _____________________________________________________________________ 411 Which ____________________________________________________________________ 412 Personalization Intro________________________________________________________ 412 Message Personalization ____________________________________________________ 413 13 Using Mail Merge Tags ______________________________________________________ 414 Mail Merge Short Tags ______________________________________________________ 418 How To Format Dates _______________________________________________________ 422 Fetching Data from a Web Server _____________________________________________ 425 Troubleshooting Merge Tag Problems _________________________________________ 427 Clickthrough Tracking, Opens and HTML Detection ______________________________ 428 Conditional Content Commands ______________________________________________ 429 iffield_____________________________________________________________________ 431 ifcondition ________________________________________________________________ 433 ifboolean _________________________________________________________________ 436 ifrange ___________________________________________________________________ 439 ifdate_____________________________________________________________________ 440 showpercents _____________________________________________________________ 442 Invite _____________________________________________________________________ 442 Template Form Fields _______________________________________________________ 443 Advanced Scripting Index ___________________________________________________ 444 Scripting Introduction_______________________________________________________ 444 Conditional Statements _____________________________________________________ 448 Script Execution Points _____________________________________________________ 450 Error Handling and Debugging Scripts _________________________________________ 452 ListManager Tcl Procedures _________________________________________________ 453 ListManager Tcl vs. Standard Tcl _____________________________________________ 458 Obsolete Mail Merge ________________________________________________________ 462 Recipient Fields____________________________________________________________ 462 Member Fields _____________________________________________________________ 466 List Fields_________________________________________________________________ 468 Site Fields ________________________________________________________________ 469 Email Address Fields _______________________________________________________ 470 Incoming Mail Fields ________________________________________________________ 471 Date Fields ________________________________________________________________ 472 Http Fetch Field ____________________________________________________________ 473 Installation and Admin Guide Contents ________________________________________ 474 Supported Platforms and SQL Servers _________________________________________ 475 Supported Platforms________________________________________________________ 475 Requirements and Recommendations for Running ListManager____________________ 475 Software License Agreement _________________________________________________ 477 General Features ___________________________________________________________ 479 14 Announcement Lists________________________________________________________ 481 Discussions _______________________________________________________________ 482 What's New in this Version___________________________________________________ 484 Version 5.0 ________________________________________________________________ 484 Version 6.0 ________________________________________________________________ 485 Version 6.0h _______________________________________________________________ 486 Version 6.1 ________________________________________________________________ 487 Version 7.0 ________________________________________________________________ 488 Version 7.0a _______________________________________________________________ 491 Version 7.5 ________________________________________________________________ 492 Version 7.6 ________________________________________________________________ 495 Installing And Upgrading Index _______________________________________________ 496 General Installation Instructions ______________________________________________ 497 Upgrading ListManager _____________________________________________________ 498 Installing ListManager on Windows Index ______________________________________ 501 Installing ListManager on Windows ___________________________________________ 502 MSDE and ListManager _____________________________________________________ 502 MSSQL and ListManager ____________________________________________________ 502 Oracle and ListManager (Windows) ___________________________________________ 504 Installing Lyris ListManager As A Windows Service ______________________________ 506 Installing Lyris ListManager On Unix __________________________________________ 506 Installing ListManager on Unix _______________________________________________ 507 Basic Unix Installing Instructions _____________________________________________ 507 Oracle and ListManager (Unix) _______________________________________________ 508 PostgreSQL and ListManager (Linux) __________________________________________ 509 Installing PostgreSQL using RPM _____________________________________________ 514 Upgrading to PostgreSQL 7.3 ________________________________________________ 515 Solaris Sparc and ListManager _______________________________________________ 517 After Installing ListManager On Unix __________________________________________ 517 How To Install ListManager By Hand __________________________________________ 518 How To Upgrade ListManager By Hand ________________________________________ 521 Unix File Descriptors Needed ________________________________________________ 522 Making Your Unix Mail Server And ListManager Coexist __________________________ 523 How Can ListManager Use My Data? __________________________________________ 524 Using a Foreign Members Table ______________________________________________ 524 addmembercolumns ________________________________________________________ 525 Connecting to Your Database with lmcfg.txt ____________________________________ 526 15 Using a Foreign Member Table with Oracle or Postgres___________________________ 529 Mail Server Coexistence _____________________________________________________ 532 Having Post.Office Coexist With ListManager ___________________________________ 533 Having Netscape Mail Server Coexist With ListManager __________________________ 534 Having SLMail Coexist With Lyris ListManager __________________________________ 535 Having IMS/IIS Mail Coexist With ListManager___________________________________ 536 Having LSTMP Coexist With ListManager ______________________________________ 538 Having MailSite Coexist With ListManager ______________________________________ 539 Having Imail Coexist With ListManager ________________________________________ 541 Having Notes/Domino Coexist With ListManager ________________________________ 542 Having NTMail Coexist With ListManager_______________________________________ 544 Having Microsoft Exchange Coexist With ListManager ___________________________ 545 Having Alta Vista Mail Coexist With ListManager ________________________________ 546 Having Sendmail Coexist With ListManager_____________________________________ 548 Use Two Tcp/Ip Addresses___________________________________________________ 548 Sendmail Forwards To ListManager ___________________________________________ 550 ListManager Forwards To Sendmail ___________________________________________ 553 Disable Sendmail___________________________________________________________ 554 Having Qmail Coexist With ListManager________________________________________ 555 Having Exim Coexist With ListManager ________________________________________ 556 Antivirus Gateway Software and ListManager ___________________________________ 558 Your Firewall and ListManager _______________________________________________ 559 Living With A Firewall _______________________________________________________ 560 Ports ListManager Needs Open _______________________________________________ 562 The ListManager Web Server _________________________________________________ 563 Installing the Web Server on a Separate Machine ________________________________ 565 How To Install The Web Interface By Hand______________________________________ 565 Configuring the ListManager Web Server - tclhttpd.rc ____________________________ 566 Adding SSL to the ListManager Web Server ____________________________________ 568 Creating a Web Server for Action Tracking Only _________________________________ 572 Your ListManager Serial Code ________________________________________________ 572 Your ListManager Serial Number______________________________________________ 573 Upgrading and Your Activation Code __________________________________________ 573 Getting an Activation Code When Behind a Firewall ______________________________ 574 Moving Your ListManager License ____________________________________________ 575 Disabled License ___________________________________________________________ 575 Upgrading To ListManager From Another List Manager Index______________________ 576 16 Upgrading to ListManager from another List Manager ____________________________ 576 Importing Email Addresses __________________________________________________ 576 Using Native SQL Imports ___________________________________________________ 576 Moving Your ListManager Installation Overview _________________________________ 577 Moving Your ListManager Installation Index ____________________________________ 578 Moving ListManager with MSDE ______________________________________________ 578 Moving ListManager with an External Database _________________________________ 579 Uninstalling on Windows ____________________________________________________ 579 Uninstalling on Unix ________________________________________________________ 580 Troubleshooting Index ______________________________________________________ 580 Troubleshooting ___________________________________________________________ 581 Problems Starting The Lyris ListManager Server ________________________________ 581 What Is The TcpIp Check For _________________________________________________ 582 Do I Need A Mail Server To Run Lyris ListManager _______________________________ 582 Problems With Multiple TcpIp Addresses_______________________________________ 582 ListManager Does Not Respond To Email I Send To It ____________________________ 583 Hard Disk Defraggers _______________________________________________________ 584 Can ListManager Work On An Intranet _________________________________________ 584 Bus Error on Unix __________________________________________________________ 584 Problems with McAfee Netshield______________________________________________ 584 Uninstalling ListManager ____________________________________________________ 584 ListManager Administration__________________________________________________ 586 What Different Administrative Roles Are There? _________________________________ 586 ListManager Command Line Index ____________________________________________ 586 Command Line Options _____________________________________________________ 587 Starting List Manager _______________________________________________________ 587 Database Operations _______________________________________________________ 588 Setting Server Options ______________________________________________________ 592 Windows Services__________________________________________________________ 598 Database Maintenance and Administration Overview _____________________________ 599 Database Maintenance ______________________________________________________ 600 MSDE Limits ______________________________________________________________ 600 Backing Up MSDE __________________________________________________________ 600 Installing Service Pack 3 for MSDE ____________________________________________ 601 Tuning PostgreSQL_________________________________________________________ 601 Security Issues Relating to Members __________________________________________ 604 Security Recommendations For Announcement Lists ____________________________ 604 17 Visibility Of The Existence Of The Mailing List __________________________________ 604 Access To The List Archives _________________________________________________ 605 Access To The List Of Members ______________________________________________ 605 Access To Subscribe To The Mailing List_______________________________________ 605 Access To Unsubscribe And Change Settings __________________________________ 606 How ListManager Determines The Identity Of The Person _________________________ 608 Steps To Restrict False Impersonations ________________________________________ 608 How Lyris ListManager Decides Who To Unsubscribe ____________________________ 609 Security Considerations Of The From Field _____________________________________ 610 Confirmed Subscriptions ____________________________________________________ 610 Forgotten Password ________________________________________________________ 611 Web Interface Access _______________________________________________________ 611 Security Features for Posting Messages _______________________________________ 612 Overview Of Posting Security ________________________________________________ 612 How Can I Make A Private List ________________________________________________ 613 How Can I Make A Moderated List _____________________________________________ 613 One Way Mailing Lists ______________________________________________________ 614 Disallow Email Posting ______________________________________________________ 614 Password Based Posting ____________________________________________________ 614 Limit The Message Size _____________________________________________________ 615 List Admin Posting _________________________________________________________ 615 Anonymous Postings _______________________________________________________ 615 Allow Non Member Posting __________________________________________________ 616 Admin Moderation__________________________________________________________ 616 Number Moderating ________________________________________________________ 616 Banning Members __________________________________________________________ 617 Command Detection ________________________________________________________ 617 Maximum Messages Per Day _________________________________________________ 618 Maximum Posts Per Member _________________________________________________ 618 Reject Email Attachments ___________________________________________________ 618 Duplicate Messages ________________________________________________________ 618 Rebranding ListManager ____________________________________________________ 620 Rebranding ListManager ____________________________________________________ 620 How Can I Extend Lyris ListManager With My Own Programs ______________________ 621 How can I extend ListManager with my own programs?___________________________ 622 How Do I Validate Email Addresses In My Perl Programs__________________________ 623 Sample Program - Import List Of Email Addresses _________________________ 624 18 Sample Program - Import Mailing List Archives__________________________________ 624 Customizing the ListManager Web Interface ____________________________________ 624 Admin FAQ Index __________________________________________________________ 624 How To Bring Up The Web Interface ___________________________________________ 625 How To Start The Lyris ListManager Server _____________________________________ 625 Making ListManager Run Faster ______________________________________________ 625 Usenet Newsgroups ________________________________________________________ 626 How Can I Get The MultiView Version Of ListManager ____________________________ 626 How Can Members Expire After A Certain Time Period ___________________________ 627 How Do I Make A Mailing List That Sends To Several Mailing Lists _________________ 627 How Do I Subscribe People Automatically ______________________________________ 627 How Do I Shut Down ListManager _____________________________________________ 628 What Email Commands Does ListManager Support ______________________________ 628 What Happens To Bad Mail Addresses _________________________________________ 628 What Is A Doc Bot __________________________________________________________ 629 How Do Doc Bots Work _____________________________________________________ 629 What Machine Should I Buy __________________________________________________ 630 What About My Existing Web Server___________________________________________ 630 Why Does ListManager Not Use Sendmail ______________________________________ 631 How Does Searching Work___________________________________________________ 631 How Can I Be Certain My Email Messages Were Delivered ________________________ 632 Do I Need A Mail Server To Use ListManager ____________________________________ 632 Why Do My CSV Downloads Look Strange in Excel ______________________________ 632 Index _____________________________________________________________________ 634 19 How to Use the Online Manual Reading and searching this manual on-line is the easiest and quickest way to find what you're looking for. Searching the Manual 1. Click on Search in the upper right hand corner. 2. Specify the word(s) you would like to search for in the manual. If you specify multiple terms, the search will return all topics with any of those terms. To narrow your search, use the following operators between them: and A matching topic must include both terms. or A matching topic may include either term. near A matching topic must have the words in close proximity to one another. not A matching topic must not contain this word. Navigating the Manual The manual is displayed in three panes: the main pane displays the current manual page, and the left pane displays the table of contents. The navigation buttons on the top bar have the following functions: Doc Home The main pane returns to the manual table of contents. Lyris Home You are taken to the Lyris Technologies home page. Navigation The left pane disappears, and the URL for the specific page you are on appears. Sync The current topic is highlighted in the table of contents and its folder is expanded. Contents The table of contents is reset so only the top level is visible. 20 Index The table of contents is removed and the Contents page is displayed. Search Opens a search window in the left pane. Note if you cannot see the Table of Contents Due to a settlement agreement between Sun Microsystems and Microsoft in July, 2003, you may not be able to see the table of contents in the left panel of the ListManager manual. If this is the case, you can download the necessary Java applet by going to: http://www.java.com/en/index.jsp If you would like more information on this settlement, please see: http://www.microsoft.com/mscorp/java/ Note if you cannot see the Table of Contents Due to a settlement agreement between Sun Microsystems and Microsoft in July, 2003, you may not be able to see the table of contents in the left panel of the ListManager manual. If this is the case, you can download the necessary Java applet by going to: http://www.java.com/en/index.jsp If you would like more information on this settlement, please see: http://www.microsoft.com/mscorp/java/ 21 Quick Start This guide will help you get started using ListManager. It guides you through creating content, segments and mailings, and tells you about your reporting options. If you have questions about any page in the interface, just click on the question mark. It will take you directly to the relevant page in this manual. Running ListManager for the First Time These instructions are for administrators starting ListManager for the first time. It tells you how to start ListManager, log on, set up a test list, add members, and create a mailing. We also STRONGLY recommend you read the readme.txt file included in your ListManager installation for more information. Or, see What's New. See Installing and Upgrading for information on how to install ListManager. Starting and Logging into ListManager - Windows 1. Click on Start, then Programs. 2. Select Lyris ListManager. 3. Select Run ListManager Now. 4. From the Start menu, select Run ListManager Web Server Now. 5. From the Start menu, select ListManager Web Interface. Or, open a web browser and go to the ListManager URL directly. For example, if the hostname is "lists.example.com", point your web browser to http://lists.example.com. 6. A screen will prompt you for your admin name and password. Enter the name and password you selected when installing ListManager. Starting and Logging into ListManager - Unix 1. Log on as root. 2. Change to the ListManager directory. E.g: /usr/local/lm/bin 3. Run ./S96lm start to start ListManager. 4. Run ./S96httpd-lm start to start the ListManager Web Server. 5. Open a web browser, and go to the ListManager URL. For example, if the hostname is "lists.example.com", point your web browser to http://lists.example.com. 6. A screen will prompt you for your admin name and password. Enter the name and password you selected when installing ListManager. Your First List 22 If you are logging in for the very first time, you must create your first list. You will be automatically taken to the Your First List Page when you log into ListManager the first time. You will not be able to proceed if you do not create and save this initial list. 1. Select the Purpose of List. Email Marketing and Announcements are one-way lists from the administrator to the list members; Moderated and Unmoderated Discussion lists are two-way conversations among list members. 2. Enter "Test" as the List Name and List Description. (Note: You will not be able to change the list name later! If you believe you'll want to use this test list in production later, please use a different name). 3. Select the frequency you will be sending to this list under Message Frequency. This setting determines the error mail handling settings for your list, so that users who bounce mail will be put on hold and removed from the list appropriately. If you are not sure, select "Twice a Month." 4. Edit the Admin Name, Email Address and Password if you wish. 5. Save your list. You will be taken to the homepage for your new list. Entering Your Serial Number (Optional) If you entered your serial number while installing ListManager, you may skip this step. Without a serial number, ListManager may be disabled or limited to having 200 members. 1. Go to Utilities: Administration: Server: Server Settings: Basic Settings. To get there, click on the Utilities tab, and click on Administration. Next, click on Server, then Server Settings. Click on Basic Settings. 2. Enter your serial number. Click on Save. 3. Go to Utilities: Administration: Server: License Capabilities. To get there, click on the Utilities tab, and click on Administration. Next, click on Server, then Server Settings. Click on License Capabilities. 4. Click on Refresh This Page. Verify your license capabilities. Adding Members Now that you have a list, you'll want to add some members. Adding Members One by One 1. Click on the Members shortcut on the home page. Or, click on the Utilities tab, and click on Members. 2. Click on Create New Member button from Utilities: Members. 3. Enter the email address and name of the member. 4. Click on Save. Adding a List of Members 23 1. Click on the Members shortcut on the home page. Or, click on the Utilities tab, and click on Members. 2. Select Create Many New Members from the drop down box, and click on Go. 2. Enter a list of email addresses in the box, one per line. Do not include names. 3. Click on Save. Importing Members from a File 1. Click on the Members shortcut on the home page. Or, click on the Utilities tab, and click on Members. 2. Select Import Members from File from the drop down box, and click on Go. 2. Select the type of file you'd like to import. See Utilities: Members: Import Members for more information about the different types, and the formats they need to be in. 3. Enter the path of the file you'd like to import. Or, click on Browse... to look for the file you'd like to import. 4. Click on Import. Create a Mailing The easiest way to create a mailing is to use the New Mailing shortcut from the homepage. Later, you may wish to create content and segments before creating a mailing. 1. Click on the Home tab. Under Shortcuts, click on New Mailing. 2. Edit the Mailing Name, From and To fields if you wish. 3. Enter a Subject and a Text Body. 3. Click on Save. You will be taken to the Mailings: Need Approval page. 4. Select Send Now next to your message to send your mailing immediately. Congratulations! You're up and running! Click on the question mark in the corner of any page of the ListManager web interface if you need help. Logging In and Logging Out In order to access the ListManager administrator interface, you'll need to open a web browser and point it to your ListManager URL. If you're wondering if you have the right URL, it will look something like this: http://domain.example.com/ 24 This URL will take you to a screen that asks you log in with your email address and password. Once you have done so, you will be taken to the home page of your list. When you log into ListManager, you'll be asked for email address or name and password. Please use your email address to log in, as it will be faster. List Administrators must use their email address. You'll be taken to the Homepage for the last list you've worked on. You are always logged into a single list. If you have more than one list, and you'd like to change to that list, click on the list name in the upper right hand corner of the screen. You will be taken to a menu that will allow you to select another list. We recommend that each administrator have an individual login, because ListManager remembers the settings for each administrator. Logging Out If you'd like to log out, click on your name next to Login. You'll find it in the upper right corner of your screen no matter where you are in the ListManager web interface. The next screen will give you the option of logging out, changing your login, or changing your list. Click on Log Out to log out of ListManager. For security reasons, we recommend that you close all browser windows after logging out of ListManager. Changing Your Login If you'd like to log in as a different user, you may either Log Out and Log In again, or Change Login. Both options are available if you click on your name next to Logged In, located in the upper right hand corner of every ListManager web interface screen. Changing Your List Whenever you are logged into ListManager, you are logged into a particular list. If no lists are on the server, you must create one before you can proceed. If you'd like to change the list you're working on, click on the list name next to List, located in the upper right hand corner of every ListManager screen. You'll be given the lists which are available to you. Or, you may click on your name next to Login, located in the upper right hand corner of your screen. The next screen will give you the option to change the list you're working on. Homepage The ListManager Home Page will be the first page you see when you log in. It provides links to commonly performed tasks. It also shows you the recent mailing activity for the list you are logged into. The home page is your list "dashboard." The lower half shows current mailings that need approval, are scheduled to be sent, are currently sending or have been recently sent. The upper half of the page reminds you of the ListManager workflow: 1. 2. 3. 4. Create your message's content. Create the segment, or part of your list you'd like to mail your content to. Combine content and segments into a mailing. View reports to see the results of your mailing. 25 The tabs along the top mirror the ListManager workflow. They are visible no matter where you are in the ListManager web interface. If the Home page is your "dashboard," then Utilities shows you "what's under the hood." Here you'll administer your list. If you ever get lost, just click on the Home tab to be taken back to the Home page. If you want to dive right in and send a mailing, you can skip creating Content and Segments, and go straight to Mailings. Later, you can learn more about how you can personalize messages in Content, and target groups of your lists in Segments. If you're performing other tasks in ListManager and you'd like to return to this page, click on the Home tab. The Navigation Bar The Navigation Bar is at the top of every ListManager screen. List Language Login The upper right hand corner shows you your current list, the current language you are using, and who you are logged in as. Click on the list name to change your list, the current language to switch to another language, and your name to log in as another user. Help Clicking on the Help icon takes you to the ListManager Manual. Tabs You can navigate between the major areas of ListManager by clicking on one of the navigation bar tabs. You can always return to the home page by clicking on the Home tab. Content A mailing consists of two parts: the content of the message, and the segment you'd like to send to. Clicking on the Content tab allows you to view, create, copy or delete content. Segments Segments are typically subsets of a larger list. By creating a segment, you can send messages to a targeted portion of your list. Clicking on the Segments tab allows you to view, create, copy, test or delete segments. Mailings A mailing combines content and segments to send an email to recipients. Alternatively, you can create one-off mailings without first creating content or segments. Clicking on the Mailings tab allows you to view, create, copy, test, schedule, approve, or delete mailings. Reports Once you've sent out a mailing, you'll want to see its progress and how successful it's been. By clicking on the Reports tab, you can also view clickthrough statistics, 26 and information about your membership. Utilities Manage your settings and your members by clicking on the Utilities tab. From the Utilities tab, you can change your list settings, add or edit members, and see the mail that's coming in and out of your server. You can also set up autoresponders, manage the server, and create documents to be sent automatically when people confirm or subscribe. The Homepage Box The Homepage Box shows you the steps you need to take to create a mailing, and has links to frequently used pages. 1: Content New Takes you directly to the Content: New Content page. View Takes you to the main View All Content page, where you can view, copy or delete content. 2: Segments New Takes you directly to the Segments: New Segment page. View Takes you to the main Segments page, where you can view, copy or delete a segment. 3: Mailings New Takes you directly to the Mailings: New Mailing page, where you can create a new mailing. View Takes you to the main Mailings page, where you can select which mailings to view. Need Approval Takes you to the Mailings: Need Approval page, where you can send mailings immediately, or schedule them to be sent at a future date. 4: Reports Deliveries Takes you to the Reports: Mailing Reports: Delivery Statistics page, where you can see the success of your mailings. Tracking Takes you to the Reports: Mailing Reports: Tracking Menu: Tracking Statistics page, where you can see how many people clicked on your trackable links, 27 opened your message or explored your Web site further as a result of your message. Members Takes you to the Reports: Members page, where you can see how many members you have, what their status is, and more. Shortcuts If you don't want to follow these four steps to build a mailing, use the Shortcuts links to navigate quickly. New Mailing Takes you to the Mailing: New Mailing page, where you can send a one-off mailing to your list, or combine Content with Segments which you've created previously. New List Takes you to the Utilities: Administration: Lists: New List page, where you can create a list. Members Takes you to the Utilities: Members page, where you can view, edit, add and delete members. You can also search for members, or view the members in a particular segment you've created. Site Map A site map of the ListManager web interface. Read Messages Takes you to the Messages tab of the discussion forum interface, where you can see the messages for this list. Help Takes you to the ListManager Help manual. Mailings Control Panel The Mailings Control Panel section of the page gives you information about your mailings. If you don't have any mailings for a particular section, the section will not appear here. Mailings Needing Approval The first three mailings needing approval before being sent will be shown here. Click on the name of the mailing to view or edit it. To approve the mailing, click Send Now, or to delete it, click Delete. Clicking on the Approval Needed button takes you to the Mailings: Need Approval page, where you can send, test, schedule, copy or delete mailings needing your approval. Scheduled Mailings The first three scheduled mailings will be shown here, with the date and time they are scheduled to be sent. Click on the name of the mailing to view it. To send the mailing immediately, click on Send Now, or to delete it, click Delete. Clicking on the Scheduled Mailings button takes you to the Mailings: Scheduled page, where you may send, test, reschedule, copy or delete your scheduled mailings. 28 Current Mailings The first three mailings which are currently sending or set to be sent in retries will be shown here. Click on the name to view the mailing. Clicking on the Currently Active button takes you to the Mailings: Mailing Status: Currently Active Mailings page, where you can view all the currently active mailings or create new ones. Recently Completed Mailings The first three most recently completed mailings will be shown here. Click on the name to view the mailing. Clicking on the Recently Completed button will take you to the Mailings: Mailing Status: Completed Mailings page, where you can view all completed mailings. Mailing Now! It's fast and easy to send a message through the ListManager admin web interface: 1. Select New Mailing under Shortcuts on the Homepage. Or, click on the Mailings tab, and select New Mailing. 2. Create your message on the Message tabs. Leave the Mailing Name, From: and To: fields alone for now. Just enter your Subject and the Text Message and/or HTML Message you'd like to send. Make sure you include unsubscribe information for your list! You may create just a text or HTML body, and that is what will be sent to your recipients. Or, you can create both, and send a message that has both text and HTML. This format is called multipart-alternative, and ListManager will create the correct headers and boundaries automatically. Recipients who can see HTML will only see your HTML message; those who can't, will see the text. 3. Click on Save and Test to have a test message mailed to you so you can see what your message will look like. Or, click on Save. You'll be taken to the Mailings: Need Approval, where you can send, test, schedule, copy, or delete the mailing you just created. Special note on testing a mailing When you test a mailing, ListManager creates the message for a random recipient of your list. However, instead of sending this mailing to the member, it sends it to you. In this way, you can see exactly what the mailing will look like for your recipients. Testing a mailing is especially important if you are using conditional content, scripting, or any special formatting. Do not be alarmed if you receive a message addressed to someone else! ListManager creates the mailing for the recipient(s), but redirects it to you. The mailing has not been sent to your list, or to the person whose email address is on your test mailing. Adding Your Members Adding Members Organically 29 Your list will only be successful if people can "opt-in" easily, so you need to help new members join. We recommend you do this by adding a subscription form to your Web site. Creating a Subscription Form for Your Web Site 1. Click on Utilities: Other: Subscribe Forms. 2. Select whether you'd like the form to Ask For just the email address, or the email address and name. 3. Select "Send One Confirmation Message" for Confirmation, so your list is double opt-in. 4. Enter the Destination URL you'd like new members to be taken to after they fill out your form. 5. Select the Lists you'd like members to be able to subscribe to on this form. 6. Select additional Demographics fields if you'd like to gather information about for your new members. 7. Click on Refresh. 8. Review your subscribe form. If it contains all the information you'd like, select Get HTML. 9. Copy and paste the HTML form generated into a page on your Web site. The HTML may be modified, if desired (for instance, you want to change the field lengths, or the descriptions for the demographic information). 10. Test your form before going live! Importing Your Members from a File If you already have a list of members, you can import them into ListManager using Utilities: Members Import Members from File. You may import members from a text file, or with additional demographic information using a CSV (comma separated values) file. Importing Your Members from a Text File 1. Click on Utilities: Members. 2. Select Import Members from File from the drop down box and click Go. 3. For the File Type, select Email Addresses and Optional Names. 4. For Action, select Import as Unconfirmed Members, and Send Confirmation Request to import members with a confirmation notification. 5. Select the text file to upload. Each email address and name must be on a separate line, and must be in one of the following formats: 30 [email protected] [email protected] Bob Shelby [email protected] (Bob Shelby) Bob Shelby <[email protected]> Importing Your Members with Additional Demographic Information 1. Click on Utilities: Members. 2. Select Import Members from File from the drop down box. 3. For the File Type, select CSV File with First Row Column Names. 4. For Action, select Import as Unconfirmed Members, and Send Confirmation Request to import members with a confirmation notification. 5. Select the CSV file to upload. A CSV file has the information you would like imported in a CSV (comma separated values) format. The first row of the file tells ListManager which field the data in each column should be imported into. For example: EmailAddr_,FullName_,Company,Phone [email protected],Bob Shelby,Shelby Corp.,510-549-4350 In this example, EmailAddr_ and FullName_ correspond to the default database fields in for email addresses and full names. Additional fields called "Company" and "Phone" have been added to this Members_ table, so this information can also be imported into each member's record. The default fields are: Additional_ Placeholder for any information you want to store associated with this member. Comment_ Holds whatever comments you wish to put in. Useful as a user-defined 'additional info' field. EmailAddr_ The email address of this person (required). FullName_ Full name of this person. MailFormat_ What mail format does the user prefer, (T)ext, (M)ultipart, or (H)TML. UserID_ Holds the user-definable 'user id' information, such as a key back to another table. Adding Test Members It's helpful to add a few addresses to your list while you try out your list. We recommend having an email account at one of the many free web-based email 31 providers so you can test message delivery outside your own domain and get a better idea of how messages are going to look to the people to whom you are sending. DO NOT add all of your members now! You don't want your members to see your messages until your list is 100% tested and ready. Creating Test Members 1. Click on the Utilities tab. 2. Click on Members. 3. You will see at least one member: the administrator of the list (who may be you). 4. Click on Create New Member. 5. Enter the name and email address of a test member. 6. Save. Repeat until you've added as many as you think you need. Two or three is fine; ten is probably too many (but it's up to you). You can also add multiple members with Create Many Members or Import Members from File, available in the drop down box on the Utilities: Members page. 32 Creating Content A mailing has two parts: the content, or message you want to send, and a segment, or group of recipients who should receive the message. When you create a new mailing, you can either type the content you'd like to send directly into the mailing, or insert content you've already created. Creating content instead of entering your message into every mailing has many advantages. You can: -Create a unit of content once, then use it in multiple mailings as a template. -Personalize your message by inserting mail merge fields and conditional text. -Add clickthrough tracking URLs, and track how often they've been clicked. If you are sending out a message only once, and don't want or need to use these features, you may find it easier to skip this step and Create a New Mailing. The Main Content Page The main Content page shows you all of the content you've created for a particular list. You can save, edit or reuse content on this page. Think of it as your personal content "library." Creating New Content 1. Click on the Content tab. 2. Click on New Content. You'll be taken to the Content: New Content: Essentials page. 3. Enter a Name and Description to identify the content. Note that the Name cannot have any spaces. 4. Enter the email address of who the message should appear to be From:. By default, your email address will appear there. To customize the message, select Insert Field to insert a mail merge field or an autoresponder address. Here are some examples of valid entries for the From: field: [email protected] Bob Smith <[email protected]> [email protected] (Bob Smith) "Bob Smith" <[email protected]> 5. Enter the email address of who the message should be To:. By default, the To: field is set to %%nameemail%%, which will merge in the name and email address of each recipient. To customize the message further, select Insert Field to insert a mail merge field. The To: field does not actually select the message's recipients. When building your mailing, you'll specify the segment or lists to which you'd like to send the message. Example: 33 "Jazz List" <[email protected]> 6. Enter the Subject: of the message. Recipients will see this line as the subject of the message they receive. To customize the subject line for each recipient, select Insert Field to insert a mail merge field. 7. Select the Text Message or HTML Message tab, and type or paste the contents of your message in the field. You may create just a text or HTML body, and that is what will be sent to your recipients. Or, you can create both, and send a message that has both text and HTML. This format is called multipart-alternative, and ListManager will create the correct headers and boundaries automatically. Recipients who can see HTML will only see your HTML message; those who can't, will see the text. You can customize your message for every recipient by selecting Insert Field or Insert Condition. Track which URLs recipients click by using Insert URL. 8. Select the Advanced tab if you'd like to add headers, make this content into a template, or determine whether this particular piece of content will become an internal message (list document). For more information on this, see Contents: New Contents: Advanced. 9. Select the Internationalization tab if you would like to create content using a character set for a different language. For more information on this, see Contents: New Content: Internationalization. 10. Click on Save and Test to preview what your message will look like. Or, click on Save. You'll be taken to the Content main page, where you can edit, test, copy, or delete the content you just created. Editing Content Editing content is much like creating new content. To edit preexisting content, follow these steps: 1. Click on the Content tab and click on View All Content. 2. Click on the name of the content you'd like to edit. 3. Edit the content as desired. 4. Click on Save, or Save and Test. Adding Directions on How to Unsubscribe Important note for users of earlier versions of ListManager: The list, site or server message wrapping will not be automatically included to your message if you create it through the ListManager administrator GUI. Please remember to add these instructions to your content or mailing, or send the message to the list via email. To Insert Email Unsubscribe Instructions 34 1. Create new content, or edit existing content (see instructions above). 2. Click on the Text Message or HTML Message tab. 3. Click on Insert Field. 4. Click on the Unsubscribe tab. For details on this tab, see Content: Insert Field: Unsubscribe. 5. Under Text Unsubscribe Directions, select Short: Unsubscribe from This List. 6. Click Insert. The unsubscribe directions will be inserted at the bottom of your content. 7. Repeat for the Text Message or HTML Message, if applicable. To Insert an Unsubscribe URL: 1. Create new content, or edit existing content (see instructions above). 2. Click on the Text Message or HTML Message tab. 3. Click on Insert URL. 4. Click on the Unsubscribe tab. For details on this tab, see Content: Insert URL: Unsubscribe. 5. Specify whether you want members to receive Email Notification that they have unsubscribed from your list. If selected, they will receive the Goodbye message specified in Utilities: Automated Messages: Document Associations. 6. Enter an optional Destination URL where unsubscribing members will be taken to after unsubscribing from your list. 7. Click Insert. The unsubscribe URL will be inserted at the bottom of your content. 8. Repeat for the Text Message or HTML Message, if applicable. Creating and Using Templates Templates are easy ways to preformat content. ListManager provides sample templates for you to use. Or, create your own templates when creating content by going to Content: New Content: Advanced and select "Yes" next to "Is This a Template". The Invitation template is specifically for the Send-A-Friend feature, and should not be used for other kinds of content. Creating a Template 1. Click on the Content tab. 2. Click on New Content. You'll be taken to the Content: New Content: Essentials 35 page. 3. Create your content as you normally would. See Creating Content for more details. 4. Click on the Advanced tab. 5. Select Yes for Is This a Template? 6. Click on Save. 7. To create a template from one of ListManager's pre-existing templates, select New Content from Template from the Contents page. This allows you to select a built-in template, and edit it according to your needs. Creating a Fill-in-the-Blank Template A fill-in-the-blank template helps users insert text into the right place to make their own content. To make fill-in-the-blank templates, you must insert a template field into your content. Template fields may be put anywhere in your message—the subject line, say, or the From: address. When a user selects to use the template, all they will need to do is to fill in the form with the requested information to generate new content. 7. Click on the Content tab. 8. Click on New Content. You'll be taken to the Content: New Content: Essentials page. 9. Create your content as you normally would. See Creating Content for more details. 10. Click on the Text or HTML tab. 11. Click on Insert Field. 12. Click on the Template tab. 13. Select whether to Ask User For a Line, Paragraph or URL to an Image. 14. Enter a Description for the fill-in-the-blank template. 15. Enter a Default Value for the form. 16. Click on Insert. Your content will automatically be turned into a template. 17. Click on Save. Editing a Template Editing a template is much like creating new templates. To edit preexisting templates, follow these steps: 1. Click on the Content tab. 2. Select Templates. Select "Your Templates" or "Built-in Templates" from the dropdown menu. 3. Click on Go. 4. Click on the name of the template you'd like to edit. 5. Edit the template as desired. 6. Click on Save, or Save and Test. You don't need to know much about HTML to be able to edit ListManager's default 36 templates. See the following URL for basic information about HTML: http://www.lyris.com/products/listmanager/tools/html_basics.html This page gives helpful information about color codes: http://www.lyris.com/products/listmanager/user_area/color_codes.html http://www.lyris.com/products/listmanager/tools/html_colorcodes.html Creating Content from a Template Once you've created a template, or a fill-in-the-blank template, creating content is easy: 1. Click on New Content from Template on the Content tab. 2. Select the content template you would like to use from the Choose a Template dropdown menu. 3. Click on Preview to see what that template looks like. Or, move your cursor over one of the thumbnails to see a preview of it. 4. Click on OK to use that template for your new content. 5. If a fill-in-the-blank form, enter the requested fields. Convert the text format as desired. 6. Click OK. Personalizing Content The Content Insert Field Wizard allows you to quickly and easily personalize messages for every recipient. It also allows you to insert frequently used email addresses, such as the unsubscribe email address and email addresses for autoresponders. In addition, you can merge in fuller instructions about unsubscribing from your list. If you have a Pro or Enterprise license, you may add additional database fields and personalize your messages even further—for example, a customer's sales rep. Note that you need to import your members with this additional information—see Adding Your Members for more information. The following example shows you how to use Insert Field to personalize a message—in this case, merging in the recipient's first name: 1. Select the Text tab in Content: New Content. 2. Select Insert Field. 3. Select Recipient's First Name by clicking on the drop down box next to Recipient Fields. 4. Click on Insert. You will be returned to the message you were composing. The merge field will be included as part of your message: %%firstname%% 37 When the message is sent, Ed Kaminsky will see Ed If a member doesn't have a name, the email address will be merged in. For example, [email protected] didn't sign up with a name. Instead of her name, she'll see: [email protected] Inserting Conditional Content (Pro or Enterprise License Only) Conditional content allows you to insert blocks of text or graphics into your message depending on whether certain conditions are met by a particular recipient. Using conditional content, you can easily create unique, one-to-one emails tailored to the exact needs and interests of your recipients, without having to write (or send) more than one message. All the commands work using a simple if-then-else logic: if a particular condition is true, then insert a particular block of text; else (that is, if the condition is not true), insert a different text block. Note that by text, we mean both plain text or HTML—you may include either. Inserting a Simple Condition This example shows how to send a special message to all AOL members. Other members will not see this message. 1. While creating content, click on Insert Condition. You'll be taken to the Insert Condition: Simple page by default. 2. Select Domain_ for If This Field. 3. Enter aol.com for Is Equal to This Value. 4. Create your special message for AOL members in the field next to Then Insert This Text. 5. Click on Insert. The conditional content will be inserted into your message: %%iffield domain_ aol.com "We value our AOL subscribers!"%% For more information about inserting conditions, see Content: Insert Condition. Success Tracking Once you've sent out a mailing, you'll want to know how successful it's been. ListManager offers five kinds of success tracking: 1. Delivery Tracking - Who got my mailing? 2. Opens Tracking - Who opened my mailing? 3. Forwards Tracking - Who forwarded my mailing to another email address? (New 38 in ListManager 7.5) 4. Clickthrough Tracking - Who clicked on a link from my mailing? 5. Referral Tracking - Who invited friends to join my list? How many friends actually joined? 6. Action Tracking - Who went to my Web site? What were they interested in, and what did they purchase? Where is Tracking Enabled? Different kinds of success tracking are enabled at different points in the process of sending a mailing: Delivery Tracking - who received a particular mailing - is done automatically every time you send out a mailing. Nothing needs to be enabled—just send out a mailing. ListManager will record who received the mailing, and who bounced, or failed to receive it. You may view the results in Reports: Mailings: Delivery Statistics. Opens Tracking - who opened a particular mailing - can be enabled when you create a mailing. Forwards Tracking - Forwards are automatically detected when opens tracking is enabled. To view them, go to Reports: Mailings: Tracking Statistics. Clickthrough Tracking - who clicked on a link in a mailing - can be enabled when you create your content. Referral Tracking - who recommended friends join my list - can be enabled when you send a message with a referral link. This link takes referrers to a web page, where they can enter the email addresses of friends who they think will be interested in your list. Those friends then receive an email message inviting them to join the list. Action Tracking - who went to my Web site and made purchases - is enabled by adding action tags to your Web site. These tags can then track which pages a mailing recipient visits, how much interest they show in a particular area, and what they purchase. How Can Tracking Increase My Mailing Success? By tracking and recording tracking information in ListManager, you can then better target your customers in future mailings. Based on your tracking data, you may create segments of any group of members who show interest in your mailing, targeting just those who open your message, say, or those who purchased over a particular dollar amount. Delivery tracking helps you gauge whether or not the email addresses you have are valid or not. Trying to send a mailing to a million recipients is not very impressive if only a few thousand actually received it. Since people tend to abandon email addresses or sign up bogus ones, delivery tracking helps you check the quality of your list of recipients. Once your message has been received, you'll want to know who actually opened it. If you have a very low open rate, you can fine-tune your message to have a more appealing subject line. In addition, when opens tracking is enabled, you will automatically be able to see who forwarded your messages. 39 Clickthroughs tell you whether recipients were interested enough in the contents your mailing to click on a link and go to your Web site. Monitoring your clickthrough rates can help you see what formatting is most effective for your mailings - do you get a better response if you put a special offer at the top of your message, or at the bottom? Referral tracking helps you to organically grow your list, and is also a sign of how interesting your recipients find your content. If your mailings' recipients find your content interesting, chances are they'll want to tell their friends about it - and that their friends will find it interesting, too. Once you've gotten your recipients interested in your newsletter, you'll want to know how they become buying customers. Action tracking allows you to see how potential customers progress through your Web site, so you can later target those who show a certain level of interest or who have purchased particular products. Delivery Tracking ListManager automatically tracks who received your message. Once you've sent out a mailing to your list, go to Reports: Mailings: Delivery Statistics to see how many and what percentage of your recipients received your message. Opens/Forwards Tracking You may see how many of your members opened your HTML or multipart message if you enable opens tracking when you create your mailing. You may also detect who has HTML capability at the same time. ListManager is able to detect opens and HTML capability by inserting a 1x1 invisible gif in the HTML portion of your message. When a recipient opens the message, ListManager can register that they did so and that they have HTML capability. If a user can only read text, or if their email client or ISP prevents gif files from being retrieved automatically, you will not be able to detect opens for that user. Note that if you create a text body only and select this tracking, your mailing will be sent in multipart alternative, meaning a text and HTML body will be sent. Otherwise, opens and HTML capability could not be tracked. If you dislike the appearance of the automatically generated HTML, create an HTML section for your mailing. 1. Create a new mailing, but before saving your message, click on the Tracking Tab. 2. Select Yes for Track Opens to track how many people open your message. If opens are tracked, forwards will be automatically tracked as well. 3. Select Yes for Detect HTML Capability to track whether recipients can receive HTML. 4. Click on OK, and continue composing your message. When you're done, click on Save or Save and Test. *Note: When Opens tracking is enabled, you can automatically track forwards for any emails which were opened and then forwarded to another email address. This can be 40 viewed in ListManager's reports section. For more information, see Reports: Mailing Reports: Tracking Statistics. Clickthrough Tracking You can see how successful your mailing has been by seeing how many recipients clicked on URLs in the message. To keep track of those clicks, you must first make a clickthrough tracking URL, and insert it in your content. You'll then be able to view the clicks in Reports: Mailing Reports: Tracking Statistics. It's simple to make clicks on text or images in your message trackable. Clickable Text 1. Select the HTML tab in Content: New Content. 2. Click on Insert URL. 3. Enter the Clickable Text you'd like recipients to see. 4. Enter the Destination URL you'd like recipients to be directed to when they click on your clickable text. 5. Optionally enter a URL Name and URL Report Group to help you identify this URL later on in Reports: Mailing Reports: View Clickthrough Tracking. 6. Click on Insert. The trackable text will be inserted at the bottom of your message. Clickable Image 1. Select the HTML tab in Content: New Content. 2. Click on Insert URL. 3. Select the Clickable Image tab. 4. Enter the URL to Clickable Image. This URL must be the full path to an image on your web server. Example: http://example.com/anvil.gif 5. Enter the Destination URL you'd like recipients to be directed to when they click on your clickable image. 6. Optionally enter a URL Name and URL Report Group to help you identify this URL later on in Reports: Mailing Reports: View Clickthrough Tracking. 7. Click on Insert. The trackable image will be inserted at the bottom of your message. Undisguised URL Note: you cannot disguise tracking URLs in text messages. 1. Select the HTML or Text tab in Content: New Content. 2. Click on Insert URL. 41 3. Select the URL tab (HTML only; by default, you'll be taken to this page for a text message). 4. Enter the Destination URL you'd like recipients to be directed . 5. Optionally enter a URL Name and URL Report Group to help you identify this URL later on in Reports: Mailing Reports: View Clickthrough Tracking. 6. Click on Insert. The tracking URL will be inserted at the bottom of your message. Referral Tracking Referrals allow your list members to invite their friends to join your list. You may track how many friends were referred by list members, how many opened or clicked on a tracking link in the invitation, and how many ultimately joined the list. Here's how it works: 1. You send out a mailing to your list with a referral link asking members to invite their friends to join the list. 2. List members click on the link, and enter the email addresses of those they'd like to invite, and an optional message for them. 3. The invited members receive an email message telling them how to join the list. If they follow the instructions in the invitation, they become a list member. To use the referral feature, you must first create an invitation—a message that will be sent to those referred telling them how to join the list. This can be accomplished easily using the Invitation Template in Content, which can be customized to fit your needs. Next, you must create a referral form—the web page members are taken to when they want to invite a friend to join the list. Finally, you must insert a referral link into your mailing (or into the mailing content). 1. Create an Invitation The invitation is sent to those who are invited to join your list by your members. Referrers can optionally add their own message (if your referral form allows it). Note that you can include clickthrough links in the invitation message. 1. Go to the Content tab. 2. Select New Content from Template. 3. Select Invitation Template from the dropdown menu, and click OK. 4. Enter the Content Name. 5. Click on the Text tab. 6. Edit the text body. 7. Click on Save. You have now created your invitation which will be sent by referrers to others to join the list. 42 8. For details on this process, please see Content: New Content From Template. 2. Create a Referral Form The referral form is a web page where your list members will enter in the email addresses of people they would like to invite to join your list. Only members can refer others to join a list. 1. Go to the Utilities tab. 2. Click Web Forms. 3. Click Referral Forms. 4. Click create new or create new from template to use a pre-existing referral form template. Note that these templates must be created first, in order to be used here. To learn how to create referral form templates, see Utilities: Web Forms: Web Form Templates: New Referral Form Template. 5. Enter a title and description for the referral form, and enter the HTML for the form. 6. Select the list, site, or server you want the Referral Form to apply to from the Applies To dropdown menu. 7. Click Preview to view what the form will look like or Save. 8. For more information on creating referral forms, please see Utilities: Web Forms: Referral Forms. 3. Create a Referral Link In order for your members to be able to invite friends to join your list, you must insert a referral link into your mailing. 1. Create content as you normally would for a mailing (see Content: New Content if you need help). 2. Go to the Text or HTML tab for your content. 3. Click Insert Field. 4. Click the Referrals tab. 5. Select the Invitation Content—the message you created in step 1 above that should be sent to those invited by your members. 6. Select whether or not you want the invitation to track opens and HTML capability. 7. Select the Referral Form—the form you created in step 2 above that members should go to when they want to invite members. 8. Enter the Destination URL—the URL your members should be taken to after inviting members. If blank, they will be taken to a default web page thanking them for inviting members. 43 9. Click Insert. This will create a link at the bottom of the message. You can then move this link to wherever you want it in your content. 10. Continue to create your content as usual, and save it. 11. Create a mailing, and insert the content you created with the referral link (see Mailings: New Mailing if you need help creating a mailing). Action Tracking Action tracking allows you to track what actions your mailing recipients have taken after they've received your mailing and gone to your Web site. There are four kinds of action tracking: Clickstream tracking allows you to detect what other pages your list members visited after clicking on a link. Interest Tracking gauges a recipient's level of interest, based on the pages they have visited. Purchase Tracking gives information back to ListManager about a recipient's purchase. Member updates changes a database field for a member when they visit particular pages. For example, if a customer visits a particular page with a contest on it, you may update a database field to indicate the customer is interested in contests. Offline events allow you to record and track interest, purchase, or any other event, such as a phone call or clickthrough, which occur outside of ListManager. These events are then incorporated into the database so they can be viewed in reports. To use action tracking, you must first create an action tag in Utilities: Other: Action Tags. The resulting tag must be pasted in the source code for any web page you'd like to track. You must include some kind of tracking in your message—clickthroughs, opens, or HTML detection—in order to track interest. Clickstream Tracking 1. Go to Utilities: Other: Action Tags: Clickstream Tags. 2. Enter a name to help you identify this tag in reports. 3. Click on OK. ListManager will provide you with a page tracking tag. 4. Copy the page tracking link, and paste it in the source code for any web page you'd like to track message recipients' visits to. Interest Tracking 1. Go to Utilities: Other: Action Tags: Interest Tags. 2. Click on Choose Event. 44 3. Select an interest tag that most closely matches the interest you'd like to track. 4. Edit the Interest Stage, if desired. 5. Edit the Interest Points, if desired. 6. Click on OK. ListManager will provide you with an Interest Tracking tag. 7. Copy the Interest Tracking tag, and paste it in the source code for any web page you'd like to track message recipients' interest. Purchase Tracking 8. Go to Utilities: Other: Action Tags: Purchase Tags. 9. Enter a description to Name This Tag. 10. Click on Choose Fields to change the fields being tracked by this tag. 11. Enter the Unit Price. You may want to enter a variable here (e.g., $price) that a script on your web server can update with the correct quantity. 12. Enter the Quantity. You may want to enter a variable here (e.g., $quantity) that a script on your web server can update with the correct quantity. 13. Enter the Product/SKU#. You may want to enter a variable here (e.g., $sku) that a script on your web server can update with the correct quantity. 14. Enter the Interest Stage. 15. Enter the Interest Points. 16. Click on OK. ListManager will provide you with a Purchase Tracking tag. 17. Copy the Purchase Tracking tag, and paste it in the source code for any web page you'd like to track message recipients' purchases. Member Updates 18. Go to Utilities: Other: Action Tags: Member Update Tag. 19. Select the Field Name you'd like to update. Or, click on Create New Field to create a new field for member updates. 20. Enter the Value that should be updated to this field when a member visits this page. 21. Click on OK. ListManager will provide you with a member update tag. 22. Copy the member update tag, and paste it in the source code for any web page you'd like to update member records when members visit that page. Offline Events 1. Go to Utilities: Other: Offline Events. 2. Select if it's an Offline Event, Offline Interest Event, or Offline Purchase Event. 3. Enter the event name, member email address, and select a mailing to associate it to. 4. For interest and purchase tracking, enter interest stage and points, quantity, and any 45 optional fields. 5. Click on OK. ListManager will update the events. Creating Segments Segments are subsets of your list. They allow you to target specific members of your list based on information you have about them. For example, they could allow you to send a special message to only those list members who - live in Canada - have made a major purchase in the last year - have an email address at a particular domain (e.g., aol.com or hotmail.com) Note that you can only segment your list based on the information you have about your members. This information must be included when they join or when you import them. See Adding Members for more information. You don't have to create segments for your list. If you don't create and select a segment, your message will simply be sent to your entire list. The Main Segments Page The main Segments page shows you all of the segments you've created for a particular list. You can save, edit or test segments on this page. Like the main Contents page, it is a kind of "library" of your segments. Some segments have been created for you automatically—"administrators", "aol" and "not-aol". Creating a Segment This example shows how to make a segment of all recipients who work in education— they have .edu as their top-level domain. 1. Select the Segments tab. 2. Click Create New Segment. For triggered segments, which are segments that will be mailed to based on a particular action, click Create new triggered segment. Triggered segments are new in ListManager 7.5. 3. Enter EDU for the segment's Name. Note that there can be no spaces in a segment's Name. 4. Enter Education Addresses for the segment's Description. 5. Click Insert Clause (New in ListManager 7.5) to set the rules for the segment, for instance, to create a segment for a particular domain, date or action. For this example, select Domain_ on the "If member text" field on the Text tab. For details on each type of insertable clause, see text, numeric, date, action, clickthrough, clickstream, purchase, and interest. 7. Once created, the following will appear in the Query box: Domain_ LIKE '%.edu' 46 8. Click on Save and Test. You will be taken to the Segments: Test Segment page, where you can see the query generated and a sample of the addresses pulled. Note that if you don't have any .edu addresses, no names will be displayed here. Creating Mailings Now that you've created content and segments, the next step is to put it all together in a mailing. A mailing is a message you send to your entire list, or to segments you've created previously. You can create your mailing on the fly, or import content you've created previously. Before sending out your mailing, you can test it to see what it will look like, and schedule when you'd like it to be sent. You may also purge recipients who have received other messages, or send to a sampling of your list or segment. You can also use tracking to see if recipients open your mailing, and if they can see mailings in HTML. Later, you can see the success of your mailing in Reports. The Main Mailings Page The main Mailings page allows you to create a new mailing, review mailings that require your approval, and see what mailings are scheduled for the future. You may also view currently active and completed mailings. Important note for users of earlier versions of ListManager: The list, site or server message wrapping will not be automatically included to your message if you create it through the ListManager administrator GUI. Please remember to add these instructions to your content or mailing, or send the message to the list via email. Creating a New Mailing To Be Sent To Your Entire List To create a simple mailing to your entire list, follow these instructions: 1. Select New Mailing under Shortcuts on the Homepage. Or, click on the Mailings tab, and select New Mailing. 2. Click on Import Content in the lower right corner to insert it into your message if you have already created content which you'd like to send. You may then skip steps 3-6 below. If not, create your message on the Message tab. 3. Edit the Mailing Name field. This name is not seen by message recipients, so label the mailing in a way that will help you to identify it later. 4. Edit the From: field. By default, your email address will appear there. Here are some examples of valid entries for the From: field: [email protected] Bob Smith <[email protected]> [email protected] (Bob Smith) "Bob Smith" <[email protected]> 47 5. Edit the To: field. By default, the To: field is set to %%nameemail%%, which will merge the name and email address of the recipient. The To: field does not actually select the message's recipients. 6. Enter the Subject: of the message. Recipients will see this line as the subject of the message they receive. 7. Enter the Text Message and/or HTML Message you'd like to send. You may create just a text or HTML body, and that is what will be sent to your recipients. Or, you can create both, and send a mailing that has both text and HTML. This format is called multipart-alternative, and ListManager will create the correct headers and boundaries automatically. Recipients who can see HTML will only see your HTML message; those who can't, will see the text. 8. Click on Save and Test to see what your mailing will look like. Or, click on Save. You'll be taken to Mailings: Need Approval, where you can send, test, copy, or delete the content you just created. Sending to Different Lists or to Segments 1. Follow the steps above to create a new mailing, but before saving your message, click on the Recipients Tab. 2. Select Choose Segments. 3. Select the lists and segments that should receive this mailing. Only the segments and lists available to you will be displayed here. 4. Click on OK, and continue composing your message. When you're done, click on Save or Save and Test. Purging Recipients of Previous Mailings 1. Follow the steps to create a new mailing, but before saving your message, click on the Recipients Tab. 2. Select Choose Mailings for Purge From. 3. Select the mailings whose recipients should NOT receive this mailing. 4. Click on OK, and continue composing your message. When you're done, click on Save or Save and Test. Note that your list must be set to allow recipient purging. Tracking Opens or HTML Capability 1. Follow the steps to create a new mailing, but before saving your message, click on the Tracking tab. 2. Select Yes for Track Opens to track how many people open your message. 3. Select Yes for Detect HTML Capability to track whether recipients can receive 48 HTML. 4. Click on OK, and continue composing your message. When you're done, click on Save or Save and Test. Scheduling a Message 1. Follow the steps to create a new mailing, but before saving your message, click on the Schedule Tab. 2. Type in the date and time you'd like the message to be sent in Send When. Use one of the following formats: YYYY-MM-DD HH-MM-SS MM/DD/YY YYYY-MM-DD 3. By default, the date and time shown in your message showing when it was sent will be rewritten to be the time you schedule it to be sent. If you'd like it to be the date when it was created, change Rewrite Date When Sent to No. 4. Click on OK, and continue composing your message. When you're done, click on Save or Save and Test. You may also schedule your message in Mailings: Need Approval. Creating a Recurring Message It may be convenient to have the same mailing be resent every day, week or month if you are using conditional content to change the contents of the message sent, or if the message is sent to a segment such as all new members who joined on a certain date. A list FAQ can also be resent regularly, reminding list members of the list's rules. 1. Follow the steps to create a new mailing, but before saving your message, click on the Schedule Tab. 2. Type in the date and time in Send When. Use one of the following formats: YYYY-MM-DD HH-MM-SS MM/DD/YY YYYY-MM-DD 3. Enter the number of days ListManager should wait before resending this message in Resend After This Many Days. If you enter 1, it will be sent every day; if you enter 7, every week. 4. Click on OK, and continue composing your message. When you're done, click on Save or Save and Test. You may also schedule your message in Mailings: Need Approval. Sending to Your List Via Email To send to your list via email, send an email message to [email protected] (e.g., [email protected]). You will need to approve the message in Mailings: Need Approval before it is sent to your list. Sending to a Segment Via Email 49 Generally, users use the ListManager web interface to send to a segment. However, you may send an email message to a segment as well. The address is: [email protected] Test Message Checklist Examine your test message and make sure it contains everything you wanted, especially if you specified any header or footer text. If your list is a discussion list, ask your other testers to respond to the test message and observe the results. Or, respond to it yourself using another account. Check and make sure that you've added unsubscribe information to your message. Be sure that it includes the %%email.unsub%% mail merge code. This code creates a unique unsubscribe email address for each member, containing a code which identifies the member to Lyris ListManager. You can test it by sending a message to the unsubscribe address indicated. If you're an administrator it won't work (you really don't want to unsubscribe, you're the boss). Use one of your other test addresses to unsubscribe just to see how it works. Approving Mailings There are two methods to approve (or moderate) a message: via the web interface or via email. You can also test or schedule messages through the Mailings: Approval: Need Approval page in the web interface. If you are moderating a discussion list (where members submit mailings to the list), the Approval Wizard helps you work quickly as you approve and delete mailings in the order in which they were submitted. You also have the option of deleting mailings with feedback so contributors know why their mailing was rejected. The Approval Summary gives you an overview of all of your other lists to approve. You are also taken to the Approval Summary once you have completed approving messages for the list you're logged into. Approving Via the Web Interface 1. Select the Mailings tab. 2. Select Approval, then Need Approval. 3. Click on the number next to a particular message to review it. 4. Select Send Now to send it immediately. Or, you may test the mailing, or schedule it to be sent at a future time. 5. Select Delete Now to delete the mailing. To send a message to the sender explaining why a mailing was deleted, select Delete with Feedback. Approving Via Email If you moderate yourself (recommended for security reasons) you will receive a modification notification from Lyris ListManager for any messages sent to the list via email. The message you receive will contain the following (with a different number code, this is 50 just an example): login yourpassword moderate approve 16189 To approve this message reply, delete everything up to where it says "login" and replace yourpassword with your password. To reject the message put your password above the "moderate reject..." line, instead of the approval command. Note: Do not replace login with your name or anything, just replace yourpassword with your password above either the approve or reject command. Your response will look something like this: login yourpassword moderate approve 14962 or login yourpassword moderate reject 14962 Note that these numbers are just an example; the numbers in the messages you receive will always be different. You will receive a message from Lyris ListManager confirming the message was either accepted or rejected. Viewing Reports Once you've sent out a mailing, you'll want to know how successful it's been. ListManager offers extensive reporting and charting on your mailings and membership. Click on the Reports tab to see the reports available to you. Reports are grouped as follows: Mailings - Who received my mailings? Mailing statistics per mailing, and over time, including opens and clickthroughs. Members - Who is a part of my list? Member statistics show you subscription trends, and characteristics of your membership. Server Performance - How fast is ListManager sending mail? Available to server administrators only. Web Site - How are list members using my Web site after receiving a mailing? Requires a Pro license, and that you have clickstream tags on your Web site. Custom Charts - ListManager provides you with a wide variety of reports and charts, but if you don't find what you need, you may create your own. Purchases - What have list members purchased as a result of receiving a mailing? Requires an Enterprise license, and that you have purchase tags on your Web site. Interest - What pages have list members shown interest in? Requires an Enterprise license, and that you have interest tags on your Web site. 51 Sales cycle map - Shows key charts and reports arranged according to their place in the sales cycle; this splits the reports into Awareness, Interest, and Action reports. Map - Displays all available reports in an outline form. Creating List Administrators When you create a list, a list administrator is automatically created (most likely yourself). You can alter the list admin's settings, as well as create new and additional List Administrators. Changing the List Administrator's Password 1. Click on the Utilities tab. 2. Click on Administration. 3. Click on Administrators. 4. Click on List Administrators. 5. Click on the name of the administrator you'd like to edit. 6. Select the Settings tab. 7. Type in a new password. 8. Select Save. Changing the List Administrator's Email Address 1. Click on the Utilities tab. 2. Click on Administration. 3. Click on Administrators. 4. Click on List Administrators. 5. Click on the name of the administrator you'd like to edit. 6. Type in the new email address. 7. Select Save. Creating New List Administrators 1. Click on the Utilities tab. 2. Click on Administration. 52 3. Click on Administrators. 4. Click on List Administrators. 5. Click on Create New Administrator. 6. Enter the Email Address, Name and Password of the new admin. 7. Select Save. Content A mailing has two parts: the content, or message you want to send, and a segment, or group of recipients who should receive the message. When you create a new mailing, you can either type the content you'd like to send directly into the mailing, or insert content you've already created. Creating content instead of entering your message into every mailing has many advantages. You can: -Create a unit of content once, then use it in multiple mailings. -Personalize your mailing by inserting mail merge fields and conditional text. -Add clickthrough tracking URLs, and track how often they've been clicked. -Attach documents to your mailings -Create templates to make designing newsletters easy. Or, use one of the built-in templates when you Create Content from Template. - Create list, site, and server documents, which define messages that are sent to users based on certain list-related actions. See Utilities: Automated Messages: Document Associations for more information. If you are sending out a message only once, and don't want or need to use these features, you may find it easier to skip this step and Create a New Mailing. Content: New Content To send a message to your list, you may first create the content of the message. Once you've created content, you may combine it with a list or segment to create a new mailing. The Content: Edit Content screen is exactly like the Content: New Content screen. Creating New Content 1. Click on Create New Content. You'll be taken to the Content: New Content: Essentials page. 2. Enter a Name and Description to identify the content. 3. Enter the email address of who the message should appear to be From:. By default, your email address will appear there. To customize the message, select Insert Field to insert a mail merge field or an autoresponder address. 4. Enter the email address of who the message should be To:. By default, the To: 53 field is set to %%nameemail%%, which will merge in the name and email address of each recipient. To customize the message further, select Insert Field to insert a mail merge field. The To: field does not actually select the message's recipients. When building your mailing, you'll specify the segment or lists to whom you'd like to send the message. 5. Enter the Subject: of the message. Recipients will see this line as the subject of the message they receive. To customize the subject line for each recipient, select Insert Field to insert a mail merge field. 6. Select the Text Message or HTML Message tab, and type or paste the contents of your message in the field. You may create just a text or HTML body, and that is what will be sent to your recipients. Or, you can create both, and send a message that has both text and HTML. This format is called multipart-alternative, and ListManager will create the correct headers and boundaries automatically. Recipients who can see HTML will only see your HTML message; those who can't, will see the text. You can customize your message for every recipient by selecting Insert Field or Insert Condition. Track which URLs recipients click by using Insert URL. 6. Select the Advanced tab if you'd like to add headers, make this content into a template, or note what language the message is in. 8. Click on Save and Test to see what your message will look like. Or, click on Save. You'll be taken to the Content main page, where you can edit, test, copy, or delete the content you just created. Editing Content Editing content is much like creating new content. Note that you cannot edit the built-in content templates. To edit preexisting content, follow these steps: 1. Go to the Content main page. 2. Click on the name of the content you'd like to edit. 3. Edit the content as desired. 4. Click on Save, or Save and Test. Important note for users of earlier versions of ListManager: The list, site or server message wrapping will not be automatically included to your message if you create it through the ListManager administrator GUI. Please remember to add these instructions to your content or mailing, or send the message to the list via email. See Content: Insert Field: Unsubscribe to see how to do so quickly and easily. Content: New/Edit Content: Essentials The fields on the Essentials page are required for all content you create. Generally, 54 any message you send will also have a text and/or html message as well. For a stepby-step guide to making content, see Content: New Content. Name Select a name to identify your content. This name is not seen by message recipients, so label the content in a way that will help you to identify it later in the Content main page. The name cannot contain any spaces. Description Describe your content. This description is not seen by message recipients, so describe the content in a way that will help you to identify it later in the Content main page. From: The name and email address that should appear in the message's From: line. By default, your email address will appear in this field. Examples of valid values for this field: [email protected] Bob Smith <[email protected]> [email protected] (Bob Smith) "Bob Smith" <[email protected]> To customize the message, select Insert Field to insert a mail merge field or an autoresponder address. To: The name and email address that should appear in the message's To: line. By default, the mail merge tag %%nameemail%% appears in this field, which will merge in each recipient's name and email address. If you'd like to have a name and email address, put the name in quotation marks, and the email address in angle brackets. Example: "Jazz List" <[email protected]> To customize the message, select Insert Field to insert a mail merge field. The To: field does not actually select the message's recipients. When building your mailing, you'll specify the segment or lists you'd like to send the message to. Subject: The text which will appear in the message's Subject: line. To customize the subject line for individual recipients, select Insert Field to insert a mail merge field. Save Saves your content, and takes you back to the Content main page Save and Test Saves your content, and takes you to the Content: Test Content page, where you can see what your content will look like. Content: New/Edit Content: Text Message 55 For a step-by-step guide to making content, see Content: New Content. Text Message The plain-text contents of this message. Text copied and pasted from word processing programs such as Word may include extra characters, so it should be pasted into a plain-text editor first before being copied into the Text Message box. If your content also includes an HTML message, your message will be sent out with both text and HTML. This kind of message is called multipart-alternative format, and it ensures that recipients who can read HTML see only HTML, but those who can't see the plain text message. To create a clickthrough tracking URL, click on Insert URL. You'll be taken to the Content: Insert URL page, where you can create a tracking URL, which you can later track in Reports: Mailing Reports: Tracking Statistics. URLs included in your message may not be highlighted and clickable when received by recipients, depending on the capabilities of their email client. To personalize the message, click on Insert Field to add a mail merge tag. Or, click on Insert Condition to create conditional content. Important note for users of earlier versions of ListManager: The list, site or server message wrapping will not be automatically included to your message if you create it through the ListManager administrator GUI. Please remember to add these instructions to your content or mailing, or send the message to the list via email. See Content: Insert Field: Unsubscribe to see how to do so quickly and easily. Import File Click on Import File to import file into your text message body. Only text files may be imported. Note: Import File should not be used to attach documents to the message; use New Attachment. Save Saves your content, and takes you back to the Content main page Save and Test Saves your content, and takes you to the Content: Test Content page. Content: New/Edit Content: HTML Message For a step-by-step guide to making content, see Content: New Content. HTML Message The HTML contents of your message. If you are including images in your HTML, make sure that the path for your images is the absolute path (the complete URL), not the relative path. For example, your HTML editor might make the path for a image to be something like /img/product.jpg. These should be changed to the absolute path: http://shelby.com/img/product.jpg. Note that not all email clients will show the background of your message, so it may be 56 best to use a white background for your HTML message. If your content also includes a text message, your message will be sent out with both text and HTML. This kind of message is called multipart-alternative format, and it ensures that recipients who can read HTML see only HTML, but those who can't will see the plain text message. Keep in mind that not everyone can read HTML, so it's a good idea to always include a Text Message as well. To create a clickthrough tracking URL, click on Insert URL. You'll be taken to the Content: Insert URL page, where you can create a tracking URL which you can later track in Reports: Mailing Reports: Tracking Statistics. To personalize the message, click on Insert Field to add a mail merge tag. Or, click on Insert Condition to create conditional content. Important note for users of earlier versions of ListManager: The list, site or server message wrapping will not be automatically included to your message if you create it through the ListManager administrator GUI. Please remember to add these instructions to your content or mailing, or send the message to the list via email. See Content: Insert Field: Unsubscribe to see how to do so quickly and easily. Import File Click on Import File to import file into your HTML message body. Only html files may be imported. Make sure your imported HTML uses the complete path, not relative paths to images. Example: Wrong: /gif/lyris.gif Right: http://www.lyris.com/gif/lyris.gif Note: Import File should not be used to attach documents to the message; use New Attachment. Save Saves your content, and takes you back to the Content main page Save and Test Saves your content, and takes you to the Content: Test Content page. Content: New/Edit Content: Advanced For a step-by-step guide to making content, see Content: New Content. The Advanced Headers page allows you to add additional headers, specify the language for informational purposes, and view the date this content was created. Attachments The file names of your attachments are listed here. To attach a file, click on Attach File. 57 You will be taken to Content: New Attachment, where you may add an attachment. To remove a document already attached to the content, click on Remove next to its name. Additional Headers The message header is the part of the message that describes whom the message is from, whom it is addressed to, how the message should be displayed, and so forth. ListManager creates the correct header for your message automatically. The optional text you specify as Additional Headers will be appended to the end of the message header of mailings created with this content. A message header text has the form of Key: Value. If you want to add text to the header that is not a standard email header, you should prefix your key name with X- so that it does not interfere with normal operation of electronic mail. For example: X-Legal: Contents Copyright 1997 Example Corp Ltd. Note: All document association messages will appear as coming "FROM: Lyris ListManager". This can be overwritten here by adding other headers. Note: If headers or footers are defined at multiple levels, i.e. server, site, or list, each header/footer will be added; one will not overwrite the other. Is This a Template If selected, this content will appear as a template when creating new content from a template. See Content: New Content for details on how to use templates. Applies To Set whether this content applies to the server, a particular site, or a particular list. Date Created The date this content was originally created. For informational purposes only. Save Saves your content, and takes you back to the View All Content page. Save and Test Saves your content, and takes you to the Content: Test Content page. Content: Attach File Attachments may be added by creating new or editing content, and clicking on the Advanced tab. On this page, you may specify the file you would like attached to this content. Clicking on Browse allows you to search for a file on your computer. To remove a document already attached to the content, click on Remove next to its name in the Content: New Content: Advanced tab. Content: New/Edit Content: Internationalization 58 Creating content in an alternate character set requires that you have that character set installed on your system and that you have a means of editing or entering your message in that character set. Your web browser may be capable of converting Unicode to whatever character set you have selected for the content but you must be sure that there weren't any characters entered that don't exist in the specified character set. Otherwise they will show up incorrectly. When this content is imported to a mailing, you will see the same additional charset/encoding related settings in the mailings page; it is imported as any other content would be imported. You can also create a mailing with international characters directly, without importing content. See Mailings: New Mailing: Internationalization for more information. Character Set Before you enter any content into the web interface you must select the character set that you want to use for this content. If the character set you want to use does not exist in the drop-down listbox, your server administrator can add it in the Utilities:Other:International Character Sets page. The character set for new content will default to the character set used by the web interface for the current language. Text and HTML Sections Encoding The encoding options can be left alone, in general. Some mail servers will convert 8-bit encoded messages to quoted-printable or base64 when required so it will usually be safe to leave them as 8-bit messages. If you are pasting in text that you know is already encoded to quoted-printable or base64, you can set the encoding to the right value and flag that field as already-encoded. After selecting the character set for your content, you can now enter in your text. When you select any other tab in the content editor, the web browser will be set to use the character set that you defined. This is required to avoid character set conversions that are done by the web browser. These generally result in the loss of characters that aren't in the browser's character set. Note that if the character set of the content you are writing doesn't contain characters that your web interface requires, the web interface may display some wrong characters while you are in the content editor. For example, if your web interface is in French and you are composing a message in Japanese, some special accented characters in the web interface may show up incorrectly. When you leave the content editor, the web interface will return to normal. This is due to the fact that the web browser cannot display text in two different character sets at the same time. The exception is Unicode, which is currently not supported for content editing. You can use international characters in the From, To, and Subject fields but it isn't recommended. E-mail clients might not display these fields correctly because the character set of those fields may not be available in the message overview. Also, they must be specially encoded and not all mail clients are able to decode encoded header lines. The Name and Description should contain only standard ASCII characters since these fields are displayed in parts of the web interface that may not be displayed in the same character set. 59 If you are pasting in text or HTML that includes extended characters you should determine whether or not the text you are pasting is actually in that character set. If you are pasting from a plain text or plain html document, the character set may not be visible in the editor you are copying from. If you paste them into the content editor, they may not show up correctly after you save your message. That is because the character set that you pasted in was incompatible with the one defined for the content. You can work around this problem by entering the text before setting the character set in the Internationalization tab. Once your text is entered, you can change the character set and the content body fields will then be displayed with the correct characters. Content: New Content: Insert Field The insert field area allows you to quickly and easily personalize messages for every recipient by inserting information from your database directly into your content. It also allows you to insert frequently used email addresses, such as the unsubscribe email address and email addresses for autoresponders. In addition, you can add information about unsubscribing from your list quickly and easily. Personalizing Content: Including the Recipient's Name with Mail Merge Field A common way people personalize messages is to include a field which merges in the recipient's name. 1. Select the Text tab in Content: New Content. 2. Select Insert Field. 3. Select Recipient's First Name by clicking on the drop down box next to Recipient Fields. 4. Click on Insert. You will be returned to the message you were composing. The merge field will be included as part of your message: %%firstname%% Ed Kaminsky will see Ed If a member doesn't have a name, their email address will be merged in. For example, [email protected] didn't sign up with a name. Instead of her name, she'll see: [email protected] The Mail Merge Fields tab allows you to merge in commonly used email addresses, basic information about the recipient, and dates concerning their membership. See Content: Insert Field: Mail merge fields for more information about the kinds of fields available on this tab. Personalizing Content: Including Additional Recipient Information with 60 Database Fields Depending on how your administrator has configured ListManager, you may have more data about your recipients available, which may be merged in using the Insert Field screen. Let's say you have an additional field in your database which records each recipient's type of pet, and you'd like to include that information in the message. 1. Select the Text tab in Content: New Content. 2. Select Insert Field. 3. Select the Database Fields tab. 4. Select the field you'd like to merge into your message. In this example, you'd select the field name "pet" in the Text Fields drop down box. 5. Click on Insert. You will be returned to the message you were composing, and the merge field will be inserted at the end of your message. You may then continue composing your message. For example: Your favorite %%pet%% will love our specials! In this example, the merge field %%pet%% will merge in each member's type of pet. See Content: Insert Field: Database Fields for more information. Adding Email Addresses: Inserting the Recipient's Email Address Instead of having your message addressed to the list's email address, it's a nice touch to have the message addressed to each individual recipient. Using a merge field allows you to make every message sent be individually addressed. By default, the merge code %%nameemail%% merges in the name and email address of each recipient. If you would like only the email address merged in, follow these steps. 1. Select the Essentials tab in Content: New Content. 2. Select Insert Field next to the To: box. 3. Select Recipient's Email Address from Content: Insert Field: Mail Merge Fields: Recipient Fields. 4. Click on Insert. You will be returned to the Content: New Content: Essentials screen, and the merge tag will be inserted into the To: field: %%emailaddr%% In this example, the message would then be addressed to each recipient. Adding Email Addresses: Inserting an Autoresponder Address An autoresponder is a ListManager address which automatically replies with a message. It's sometimes useful to have an autoresponder in the From: line of your message, so that replies to the message receive an automatic message with information about how to unsubscribe, say, or how to contact your sales department. For this example, you'll need have already created an autoresponder. 61 1. Select the Essentials tab in Content: New Content. 2. Select Insert Field next to the From: box. 3. Select the Content: Insert Field: Autoresponders tab. 4. Select the autoresponder address you'd like replies to the message to go to. 5. Click on Insert. You will be returned to the Content: New Content: Essentials screen, and the autoresponder address will be inserted into the From: field. See Content: Insert Field: Autoresponders for more information. More Information About Personalizing Messages in ListManager Inserting a field or a condition is the easiest way to personalize your message. If you'd like to learn more about message personalization and scripting, see Message Personalization and Scripting. Content: Insert Field: Mail Merge Fields The Mail Merge Fields tab allows you to merge in email addresses and recipient information. For a step-by-step guide to inserting fields, see Insert Field. Email addresses This drop down box allows you to insert an email address into your message. Unsubscribe from this list The unique unsubscribe email address for each recipient. The merge tag %%email.unsub%% will be inserted into your content. For example, if you are on a mailing list called "jazztalk", the unsubscribe address that it displays for you might be: [email protected] Only member 4323 will see this address. When email comes into ListManager with this address, it will unsubscribe that member. The final "P" on the address is a "check character", ensuring that malicious people cannot unsubscribe others. For example, if someone changes the number to something else, say "4000", by mailing to "[email protected]", ListManager will see that this number has been tampered with, because "P" is not the correct "check character" for the number "4000". In this case, ListManager will interpret the message as if it were sent to "[email protected]" and unsubscribe the sender of the message. Unsubscribe from all lists The email address to which a recipient should send mail in order to unsubscribe from all lists on your server. The merge tag %%email.purge%% will be inserted into your content, which will be translated into [email protected]. Recipient's email address The email address of the recipient. The merge tag %%emailaddr%% will be inserted into your content, which will cause the email address of the recipient to be merged into your message when sent. 62 Recipient's name And email The full name and email address of the recipient. The merge tag %%nameemail%% will be inserted into your content, which will cause the name and email address of the recipient to be merged into your message when sent. If no name exists for the recipient, only the email address will be merged in. This field is recommended for your content's To: field. Owner-Listname email address The owner-listname@ email address. The merge tag %%email.owner%% will be inserted into your content. If you'd like for your list members to be able to contact you without giving out your email address, this address will automatically forward all correspondence to it to anyone who is set to get list administrator mail. Email address to post to list The email address to which discussion list members should send their messages. The merge tag %%email.list%% will be inserted into your content. Recipient Fields This drop down box allows you to insert basic information about recipients to insert into your message. If you have custom information in your database, merge it in from Content: Insert Field: Database Fields. Recipient's email address The email address of the recipient. The merge tag %%emailaddr%% will be inserted into your content, which will cause the email address of the recipient to be merged into your message when sent. Recipient's first name The first name of the recipient. The merge tag %%firstname%% will be inserted into your content, which will cause the email address of the recipient to be merged into your message when sent. If the recipient doesn't have a name recorded, the email address will be merged in. Recipient's full name The full name of the recipient. The merge tag %%fullname%% will be inserted into your content, which will cause the email address of the recipient to be merged into your message when sent. If the recipient doesn't have a name recorded, the email address will be merged in. Recipient's Name and Email The full name and email address of the recipient. The merge tag %%nameemail%% will be inserted into your content, which will cause the name and email address of the recipient to be merged into your message when sent, in the format name <email>. If no name exists for the recipient, only the email address will be merged in. This field is recommended for your content's To: field. Recipient's password The recipient's password. The merge tag %%password%% will be inserted into your content, which will cause the password of the recipient to be merged into your message when sent. If the recipient has no password, nothing will be sent. This field is recommended if you have a recurring FAQ being sent to a discussion list with basic information about the list and the recipient's subscription. It's also useful in a hello document welcoming new members to the list. Lists recipient is member of 63 All the lists the recipient is a member of on this ListManager server. The merge tag %%whatlists%% will be inserted into your content, and it will merge in all the lists the recipient is a member of into the message when sent. This field is useful in a hello document welcoming members to new lists. Note that this tag should not be used in the Subject: line of a message or document, as it will force some of the email headers into the body of the message. Recipient's unconfirmed lists All the lists the recipient has subscribed to, but not yet confirmed their membership for on this ListManager server. The merge tag %%whatlistsunconfirmed%% will be inserted into your content, which will cause all the lists the recipient hasn't confirmed to be listed in the message. This field is useful in a confirmation document sent when prospective members sign up for a double opt-in list. Note that this tag should not be used in the Subject: line of a message or document, as it will force some of the email headers into the body of the message. Member ID The recipient's unique ListManager ID. The merge tag %%memberid%% will be inserted into your content, which will cause the recipient's unique member ID to be merged into the message when sent. Content: Insert Field: Database fields The Database Fields tab allows you to merge in information about your list members directly from your members database table. The default ListManager member fields will always be displayed here. If you have added additional fields to your members table, or are using a foreign members table, those field names will also be visible here. The fields are divided into three types: text fields, number fields, and date fields. Text Fields This drop down box allows you to insert a text or text and numeric field into your message. Described here are the default ListManager text fields available; consult with your database administrator about additional fields available to you. Additional_ Additional information about the recipient which you've added. The tag %%additional_%% will be inserted into your content. Comment_ Comments about the recipient which you've added. The tag %%comment_%% will be inserted into your content. Domain_ The domain portion of the email address (e.g., lyris.com). The tag %%domain_%% will be inserted into your content. EmailAddr_ A recipient's full Internet email address. The tag %%emailaddr_%% will be inserted into your content. 64 Fullname_ The full name of this recipient . The tag %%fullname_%% will be inserted into your content. If no name is available, the email address will be inserted. List_ The name of the list this recipient is a member of. The tag %%list.name%% will be inserted into your content. MailFormat_ The type of mail the member has opted to received, whether 'M' (multipartalternative, the default), 'T' (text) or 'H' (HTML). The tag %%mailformat_%% will be inserted into your content. MemberType_ The membership status of this member, whether 'normal', 'confirm', 'private', 'expired', 'held', or 'unsub'. The tag %%membertype_%% will be inserted into your content. Password_ The recipient's password. If the recipient has no password, the field will be blank. The tag %%password_%% will be inserted into your content. Subtype_ The type of messages this recipient is set to receive, whether digest, index, nomail, or mail. The tag %%subtype_%% will be inserted into your content. Userid_ The user ID information defined by you, such as a key back to another database. The tag %%userid_%% will be inserted into your content. Number Fields This drop down box allows you to insert a numeric field into your message. Described here are the default ListManager numeric fields available; consult with your database administrator about additional number fields available to you. MemberID_ The recipient's unique ListManager member ID. The tag %%memberid_%% will be inserted into your content. NumBounces_ The number of times a recipient's mail has bounced. The tag %%numbounces_%% will be inserted into your content. Date Fields This drop down box allows you to insert a date field into your message. Described here are the default ListManager date fields available; consult with your database administrator about additional fields available to you. If the field is blank, the date 01/01/70 00:00:00 will be merged in. ConfirmDat_ The date the recipient confirmed list membership. The tag %%confirmdat_%% will be inserted. DateBounce_ 65 The most recent date the recipient last bounced. The tag %%datebounce_%% will be inserted. DateHeld_ The date the recipient was changed to "held" status because of bouncing too much email. The tag %%dateheld_%% will be inserted. DateJoined_ The date the recipient joined the list. The tag %%datejoined_%% will be inserted. DateUnsub_ The date the recipient unsubscribed from the list. The tag %%dateunsub_%% will be inserted. ExpireDate_ The date the recipient's list membership will expire. The tag %%expiredate_%% will be inserted. Content: Insert Field: Unsubscribe An important part of any message you send is an easy way for people to unsubscribe from your list. Having easy to understand unsubscribe directions helps you to maintain a good relationship with your audience, and distinguishes your legitimate email from spam. The list unsubscribe header and footer are not included in your message, so you'll need to add unsubscribe instructions to every message. Unsubscribe Email Addresses These tags merge in the email address recipients may use to unsubscribe from your list, or from all lists on your server. Unsubscribe from this list The unique unsubscribe email address for each recipient. The merge tag %%email.unsub%% will be inserted into your content. For example, if you are on a mailing list called "jazztalk", the unsubscribe address that it displays for you might be: [email protected] Only member 4323 will see this address. When email comes into ListManager with this address, it will unsubscribe that member. The final "P" on the address is a "check character", ensuring that malicious people cannot unsubscribe others. For example, if someone changes the number to something else, say "4000", by mailing to "[email protected]", ListManager will see that this number has been tampered with, because "P" is not the correct "check character" for the number "4000". In this case, ListManager will interpret the message as if it were sent to "[email protected]" and unsubscribe the sender of the message. Unsubscribe from all lists The email address to which a recipient should send mail in order to unsubscribe from all lists on your server. The merge tag %%email.purge%% will be inserted into your content, which will be translated into [email protected] Text Unsubscribe Directions 66 Typically, these instructions are provided at the end of a message, but they can be inserted anywhere in your content. The Text Unsubscribe Directions will only appear when you are inserting into a text body. Short: unsubscribe from this list The following will be inserted into your message, and provides recipients with their unique unsubscribe email address: To unsubscribe from this list, send a blank email to %%email.unsub%% Long: unsubscribe from this list The following will be inserted into your message, and provides recipients with their unique unsubscribe email address, along with additional subscription information: You are subscribed to %%list%% as %%emailaddr%%. To unsubscribe, send a blank email to %%email.unsub%% Short: unsubscribe from all lists The following will be inserted into your message, and provides recipients with the purge email address: To unsubscribe from all lists, send a blank email to %%email.purge%% Long: unsubscribe from all lists The following will be inserted into your message, and provides recipients with the purge address, along with additional information about the lists they are subscribed to on the entire server. Caution: this list might be long! To unsubscribe from all lists, send a blank email to %%email.purge%% Your email address %%emailaddr%% is subscribed to: %%whatlists%%. HTML Unsubscribe Directions Typically, these instructions are provided at the end of a message, but they can be inserted anywhere in your content. The HTML Unsubscribe Directions will only appear when you are inserting into an HTML body. Short: unsubscribe from this list The following will be inserted into your message, and provides recipients with their unique unsubscribe email address: <HR> To unsubscribe from this list, send a blank email to <A HREF=mailto:"%%email.unsub%%"><B>%%email.unsub%%</B></A><BR> Long: unsubscribe from this list The following will be inserted into your message, and provides recipients with their unique unsubscribe email address, along with additional subscription information: <HR> You are subscribed to <I>%%list%%</I> as 67 <I>%%emailaddr%%</I>.<BR> To unsubscribe, send a blank email to <A HREF="mailto:%%email.unsub%%"><B>%%email.unsub%%</B></A><BR> Short: unsubscribe from all lists The following will be inserted into your message, and provides recipients with the purge email address: <HR> To unsubscribe from all lists, send a blank email to <A HREF="mailto:%%email.purge%%"><B>%%email.purge%%</B></A><BR> Long: unsubscribe from all lists The following will be inserted into your message, and provides recipients with the purge address, along with additional information about their subscription. <HR> You are subscribed with the email address <I>%%emailaddr%%</I>.<BR> To unsubscribe from all lists, send a blank email to <A HREF="mailto:%%email.purge%%"><B>%%email.purge%%</B></A><P> Content: Insert Field: Autoresponders An autoresponder is an email address that always responds by sending a document to whomever sends an email to it. For instance, set up a "[email protected]" autoresponder that sends out price list to anyone who emails to it. An autoresponder with information on how to unsubscribe or get in touch with someone at your organization is useful to have in the From: field of your content. Create an autoresponder by going to Utilities: Autoresponders: New Autoresponder, and select it here to have the address inserted into your message. Content: Insert Field: Referrals This page is used to insert a URL that allows list members to refer others to this list (Referral Tracking). Note: You should first create a web form in Utilities: Web Forms: Referral Forms and an invitation in Content before inserting a referral into a message. Invitation content Choose the message that will be sent by ListManager when prospective members are invited to join from the dropdown menu. This message is a unit of content that you have created. We recommend you use the invitation template in Content to create your own custom invitation for members. For details on how to create this, see Content: New Content from Template. Track opens If you'd like to track how many invitees open the invitation message they receive, select yes for Track Opens. Note that opens can only be tracked by recipients who open their emails in HTML. 68 Detect HTML capability If you'd like to track how many invitees are able to see HTML, select yes for Detect HTML Capability. Click on View Current Totals to see how many members have been detected as having HTML capability. This helps you to see approximately how many of the invitees out of the current members will have HTML capability, and therefore you will have the ability to track their opens. HTML referral form Choose the web form that members will use to list the names and email addresses of friends to whom they'd like to recommend your list from the dropdown menu. Before using this feature, this form must be created in Utilities: Web Forms: Referral Forms: New Referral Form. Destination URL The URL those who refer members are taken to after filling out the referral form. If no URL is specified, users are taken to a default page thanking them for referring members. Content: Insert Field: Template You can make any template into a form by adding template form fields into your template content. When users create a message using the template content, they will be taken to a form that prompts them to fill in blocks of text. These blocks will then be inserted into the content where you inserted the template form fields. In order to make a content template that presents users with a form, you must insert template form fields into your content where you'd like users to be prompted to fill in information. These template form fields may be in either the text or HTML portions of the content. They may also be in the header to prompt users for a From: or Subject: line, while suggesting a default entry. There are three kinds of template fields: a line, a paragraph, or an image. A line prompts the user for a single line of text, whereas a paragraph prompts them for a larger block of text. Ask User For Select what the template user should be asked for: a line, a paragraph, or the URL to an image. This selection affects what kind of field appears. Description Describe what the field should be called—From address, for example, or First Body Paragraph. Default Value (Optional) Enter a default value for a field. For example, Enter Body Text Here. Content: Insert URL There are four kinds of URLs you may insert: 1. Tracking URLs 69 2. Unsubscribe and Profile URLs 3. URL to web page to insert into message (web fetch) 4. Rich Media (audio or video) You can see how successful your mailing has been by seeing how many recipients clicked on URLs in the message. To keep track of those clicks, you must first make a clickthrough tracking URL, and insert it in your content. You'll then be able to view the clicks in Reports: Tracking Statistics. You may also insert an unsubscribe URL that allows members to unsubscribe quickly and easily from your list. Insert URL also allows you to insert a web page into your content. The web page may be fetched when creating the content, for each mailing or for each individual recipient. For every clickthrough tracking URL, you may specify a URL Report Description (its Name in Reports) and URL Report Group. You may then later sort by these names when you view Reports: Mailing Reports: View Clickthrough Tracking. Note: The URL Report Description given to a URL the first time it is used will be its Name in reports in the future, even if you give it a different name. Tracking URLs It's simple to make clicks on text or images in your message trackable. Clickable Text 1. Select Content: New Content: HTML. 2. Click on Insert URL. 3. Enter the text you'd like recipients to see in Clickable Text. 4. Enter the Destination URL you'd like recipients to be directed to when they click on your clickable text. 5. Optionally enter a URL Name and URL Report Group to help you identify this URL later on in Reports: Mailing Reports: View Clickthrough Tracking. 6. Click on Insert. The trackable text will be inserted at the bottom of your message. Clickable Image 1. Select Content: New Content: HTML. 2. Click on Insert URL. 3. Select the Clickable Image tab. 4. Enter the URL to Clickable Image. This URL must be the full path to an image on your web server. Example: http://example.com/anvil.gif 5. Enter the Destination URL you'd like recipients to be directed to when they click on your clickable image. 6. Optionally enter a URL Name and URL Report Group to help you identify this URL later on in Reports: Mailing Reports: View Clickthrough Tracking. 7. Click on Insert. The trackable image will be inserted at the bottom of your message. 70 Undisguised URL Note: you cannot disguise tracking URLs in text messages. 1. Select the HTML or Text tab in Content: New Content. 2. Click on Insert URL. 3. Select the URL tab (HTML only; by default, you'll be taken to this page for a text message). 4. Enter the Destination URL you'd like recipients to be directed 5. Optionally enter a URL Name and URL Report Group to help you identify this URL later on in Reports: Mailing Reports: View Clickthrough Tracking. 6. Click on Insert. The tracking URL will be inserted at the bottom of your message. All URLs To make all URLs clickable in a message: 1. Select the HTML or Text tab in Content: New Content. 2. Click on Tools. 3. Click on the Reformat tab. 4. Select Track All URLs. 5. Click on OK. If you will be tracking a large number of URLs, or using other ListManager tracking features, you may need to ask your server administrator to set up additional ListManager Web servers to take the load. Unsubscribe URL Members can leave your list easily if you insert an Unsubscribe URL in your mailing. Giving members an easy way to unsubscribe cuts down on your administrative time 1. Select Content: New Content: HTML or Text. 2. Click on Insert URL. 3. Select the Unsubscribe tab. 4. Specify whether you'd like a plain URL, linked text or a linked graphic (HTML only) for Insert What. 5. Specify Email Notification, or whether or not verification that the member has unsubscribed should be sent via email. 6. Specify From All Lists, or whether or not the member is unsubscribing from the current lists, or from all lists on your server. 7. Specify Confirm, or whether or not the member must confirm unsubscribing on a web page. 8. Optionally specify the Destination URL of a web page members are taken to after unsubscribing. 71 9. Click on Insert. Profile Members can edit their member profiles if you insert a profile form URL in your mailing. The member profile forms must first be created in Utilities: Web Forms: Member Profile Forms, in order to appear in the dropdown menu on this page. 1. Select Content: New Content: HTML or Text. 2. Click on Insert URL. 3. Select the Profile tab. 4. Select the desired HTML profile from the dropdown menu. In order to appear here, these must first be created in Utilities: Web Forms: Member Profile Forms. 5. Enter the clickable text that the recipient will see in order to edit their member profile, for instance "Click here to edit your member profile". 6. Click on Insert. Web Page You may insert the contents of a web page into your content. This is sometimes known as webfetch. 7. Select Content: New Content: HTML or Text. 8. Click on Insert URL. 9. Select the Web Page tab. 10. Enter the URL to Fetch, which is the URL of the web page you'd like to fetch into your content. 11. For Fetch Page, specify whether you'd like to fetch the contents of the page right now (as you create your content), once per mailing (the content is the same for each member), or for each member (CAUTION: can be VERY slow, depending on your web server). 12. Click on Insert. Rich Media You may have rich media—music or video—play from your message. Keep in mind that some ISPs will strip out rich media. Also, some recipients' computers may not be set up to display embedded media set to auto play properly. 1. Select Content: New Content: HTML. 2. Click on Insert URL. 3. Select the Rich Media tab. 4. Enter the URL to Media that you'd like to insert into your message. 5. Enter the Clickable Text that users should click on to activate the media (if applicable). 6. Enter the Media Type: Video or Audio. 72 7. Enter the Action Type: Link, to have a link to the media, Embed (Autoplay) to have the media embedded in the message and play automatically when the message is opened, or Embed (Click to Start), to embed the media in the message but require the recipient start it playing. 8. Select whether or not you want to Track when people view or listen to this media. 9. Click on Insert. Content: New Content: Insert URL: Clickable Text See Content: Insert URL for more information about clickthrough tracking URLs. This tab is only available when inserting a URL into an HTML message. Clickable Text The visible text you'd like recipients to be able to click on. For example, instead of displaying the clickthrough tracking URL, you'd like the destination URL to be displayed. You'd enter that URL here. Example: http://acme.lyris.com/products/anvils.html Destination URL The URL you'd like recipients to be taken to when they click on the clickable text. For example, if you're advertising a product, and would like to track who actually goes to the page displaying that product, make the destination URL your Web site's URL for that product. Example: http://acme.lyris.com/products/anvils.html (optional) URL Report Description Describe your trackable URL. This description is not seen by message recipients, so describe the URL in a way that will help you to identify it later in Reports. Example: anvil-ad Note that once you give a particular URL a description, that description will be used as its URL Name in Reports from then on. Although you may give the same URL a different description when you insert it in the future, it will always be displayed in Reports with the original description. You cannot give the same URL different descriptions. (optional) URL Report Group A name for a group of URLs. If you provide the same report group name for a number of different URLs, you can see the results of all of those URLs as part of a report group Example: 73 anvils-top Content: Insert URL: Clickable Image See Content: Insert URL for more information about clickthrough tracking URLs. This tab is only available when inserting a URL into an HTML message. Destination URL The URL you'd like recipients to be taken to when they click on the trackable image. For example, if you're advertising a product, and would like to track who actually goes to the page displaying that product, make the destination URL your Web site's URL for that product. Example: http://acme.lyris.com/products/anvils.html URL to Image The URL of the image you'd like to be displayed in your message. This URL must be the full path to the image (e.g., /img/anvil.gif won't work). Example: http://acme.lyris.com/img/anvil.gif (optional) URL Report Description Describe your trackable URL. This description is not seen by message recipients, so describe the URL in a way that will help you to identify it later in Reports. Example: anvil-ad Note that once you give a particular URL a description, that description will be used as its URL Name in Reports from then on. Although you may give the same URL a different description when you insert it in the future, it will always be displayed in Reports with the original description. You cannot give the same URL different descriptions. (optional) URL Report Group A name for a group of URLs. If you provide the same report group name for a number of different URLs, you can see the results of all of those URLs as part of a report group Example: anvils-top Content: Insert URL: URL See Content: Insert URL: for more information about clickthrough tracking URLs. Destination URL The URL you'd like recipients to be taken to when they click on the tracking URL. For 74 example, if you're advertising a product, and would like to track who actually goes to the page displaying that product, make the destination URL your Web site's URL for that product. Example: http://acme.lyris.com/products/anvils.html (optional) URL Report Description Describe your trackable URL. This description is not seen by message recipients, so describe the URL in a way that will help you to identify it later in Reports. Example: anvil-ad Note that once you give a particular URL a description, that description will be used as its URL Name in Reports from then on. Although you may give the same URL a different description when you insert it in the future, it will always be displayed in Reports with the original description. You cannot give the same URL different descriptions. (optional) URL Report Group A name for a group of URLs. If you provide the same report group name for a number of different URLs, you can see the results of all of those URLs as part of a report group Example: anvils-top Content: Insert URL: Unsubscribe Members can leave your list easily if you insert an Unsubscribe URL in your mailing. Giving members an easy way to unsubscribe cuts down on your administrative time unsubscribing people who'd like to leave your list. Insert What (HTML Body Only) Specify what kind of unsubscribe link you'd like to insert into your HTML body. This option is unavailable for the Text Body. Linked Text The link will be encoded so that members will click on the word "unsubscribe" to leave the list. Linked Graphic The link will be encoded so that members will click on an unsubscribe graphic to leave the list. URL An unencoded unsubscribe URL will be inserted into your content. This is the only kind of unsubscribe URL that can be inserted into the text body. 75 Email Notification If set to Yes, those who unsubscribe will receive an email notifying them whether or not they have unsubscribed successfully. If set to No, they will not receive this notification. You may customize the goodbye message by creating a goodbye document in Content, and then selecting it in Utilities: Document Associations. From All Lists If set to Yes (the default), clicking on the unsubscribe URL will unsubscribe the member from all lists on the server. Confirm If set to Yes, those who unsubscribe will be taken to a web page which will ask them if they are sure that they want to unsubscribe. Otherwise, they will be unsubscribed immediately without confirmation. By default, members are not asked to confirm leaving the list. Destination URL The URL members will be taken to after clicking on the unsubscribe URL. If no URL is specified, they will be taken to a generic page telling them they have unsubscribed. Content: Insert URL: Profile A member profile form can be inserted into your content via the Insert URL: Profile tab. In order for profile forms to appear in this dropdown menu, they must first be created in Utilities: Web Forms: Member Profile Forms. You will be able to see all the forms created for your access level; list administrators can see List profile forms only, Site administrators can see List and Site forms, and Server administrators can see List, Site, and Server forms. HTML profile form Select the desired form from the dropdown menu. To learn how to create these profile forms, see Utilities: Web Forms: Member Profile Forms. Clickable text The visible text you'd like recipients to be able to click on in order to access the member profile form. For example, the clickable text could be "Click here to edit your member profile form". Content: Insert URL: Web Page Insert URL allows you to insert a web page into your content (also called web fetch). The web page may be fetched when creating the content, for each mailing or for each individual recipient. URL to Fetch 76 The URL to be fetched into your content. Make sure that the path for your images in the web page you are fetching is the absolute path (the complete URL), not the relative path. For example, your HTML editor might make the path for a image to be something like /img/product.jpg. These should be changed to the absolute path: http://shelby.com/img/product.jpg. You can make the URL to Fetch unique for each member by inserting a mail merge tag. However, you must use square brackets around the merge tag (not the normal double percents). Wrong: http://example.com/cgi-bin/getdata.pl?id=%%merge members_.emailaddr_%% Right: http://example.com/cgi-bin/getdata.pl?id=[merge members_.emailaddr_] Fetch Page Specify when you'd like the web page to be fetched. Right Now Fetch the specified URL, and insert it into your content now. Even if the contents of the fetched page change, your content will stay the same. Once Per Mailing Fetch the page once at the time a mailing with this content is sent. If the page is the same for each member, this method is much faster, as ListManager needs to wait for the web page only once. Repeatedly for Each Recipient Fetch the page for each recipient on the list. If you are specifying a unique URL for each member (see URL to Fetch above), ListManager will need to fetch the page for each message it sends out. This method is much slower than fetching the page once per mailing, because ListManager's speeds are limited by your web server's speeds. If you notice that your mailing speeds are faster if you select Once Per Mailing, your speeds are being limited by your web server. Content: Insert URL: Rich Media This tab allows you to insert links to video or audio clips into the HTML portion of your message. You may set the media so it plays automatically when a recipient opens a message, or requires the recipient to click on a link. Note that having a clip play when a message opens can be unreliable, depending on the settings of a recipient's computer. For the most reliable results, include the media as a linked URL rather than embedding it. Note that some ISPs (such as AOL) will strip out video or audio. URL to Media 77 The URL to the media you'd like played in your message. Clickable Text (If Linked) The text users should click on to play the media, if applicable. Media Type The type of media being included: video or audio. Action Type How this media should be activated: Link Recipients must click on a link to access the media. Embed (Autoplay) The message plays automatically when the recipient opens the message. Having media play automatically can be unreliable, depending on the settings of a recipient's computer. Embed (Click to Start) Recipients must click to start playing the media. Track Track how many people play the media. Results will be visible in Reports: Mailings: Tracking Statistics. Note that ListManager will record a hit every time the message is opened or the media is played. Content: Insert Condition Conditional content allows you to insert blocks of text or graphics into your message depending on whether certain conditions are met by a particular recipient. Using conditional content, you can easily create unique, one-to-one emails tailored to the exact needs and interests of your recipients, without having to write (or send) more than one message. All the commands work using a simple if-then-else logic: if a particular condition is true, then insert a particular block of text; else (that is, if the condition is not true), insert a different text block. Note that by text, we mean both plain text or HTML—you may include either. Note for those upgrading from ListManager 5.0 If you are using the ListManager Mailings menu to create mailings for your list, ListManager will automatically set Enable Scripting to Admins Only if previously disabled, and change the Scripting Level to Full. For more information about these settings, see Utilities: List Settings: For Programmers: Email Scripting. Fields Available for Conditions The fields available for making comparisons are drawn from your ListManager members table. Described here are the default ListManager member fields available; consult with your database administrator about additional fields available to you. Additional_ 78 Additional information about the recipient which you've added. Comment_ Comments about the recipient which you've added. ConfirmDat_ The date the recipient confirmed list membership. DateBounce_ The most recent date the recipient last bounced. DateHeld_ The date the recipient was changed to "held" status because of bouncing too much email. DateJoined_ The date the recipient joined the list. DateUnsub_ The date the recipient unsubscribed from the list. Domain_ The domain portion of the email address (e.g., lyris.com). ExpireDate_ The date the recipient's list membership will expire. EmailAddr_ A recipient's full Internet email address. FullName_ The full name of this recipient. List_ The name of the list this recipient is a member of. MailFormat_ The type of mail the member has opted to received, whether 'M' (multipartalternative, the default), 'T' (text) or 'H' (HTML). The tag %%mailformat_%% will be inserted into your content. MemberID_ The recipient's unique ListManager member ID. MemberType_ The membership type of this member, whether 'normal', 'confirm', 'private', 'expired', 'held', or 'unsub'. NumBounces_ The number of times a recipient's mail has bounced. Password_ The recipient's password. If the recipient has no password, the field will be blank. ReadsHtml_ Whether or not ListManager has detected if this recipient can read HTML. The 79 default is "F" or "False." If you have set ListManager to detect HTML reading capability, and the recipient reads a message with HTML, the value is "T" for "True." SubType_ The type of content this recipient is set to receive, whether digest, index, nomail, or mail. UserID_ The user ID information defined by you, such as a key back to another database. More Information About Personalizing Messages in ListManager Inserting a condition in your content is an easy way to personalize your message. If you'd like to learn more about message personalization and scripting, see Message Personalization and Scripting. Content: Insert Condition: Simple A simple condition inserts the text of your choosing if a recipient's field matches the value you specify. If This Field Select the field you'd like ListManager to examine in order to insert conditional text. See Content: Insert Condition for more information about the fields available to you. Is Equal to This Value The text, date or number that determines whether or not someone should receive the conditional text. Dates should be entered in one of the following formats: YYYY-MM-DD HH-MM-SS MM/DD/YY YYYY-MM-DD Then Insert This Text The text that should be inserted into the message if the recipient meets your condition. If the recipient does not, then no text will be included. Inserting a Simple Condition This example shows how to send a special message to all AOL members. 1. While creating content, click on Insert Condition. You'll be taken to the Insert Condition: Simple page by default. 2. Select Domain_ for If This Field. 3. Enter aol.com for Is Equal to This Value. 4. Create your special message for AOL members in the field next to Then Insert This Text. 80 5. Click on Insert. The conditional content will be inserted into your message: %%iffield domain_ aol.com "We value our AOL subscribers!"%% Content: Insert Condition: True/False Like a Simple Condition, a True/False Condition allows you to specify the text sent to recipients if the condition is true, but it also allows you to specify the text sent if the condition is false. It also allows you to define the relationship between what is in the field and what you specify: is it less than or greater than the value you define? Does it contain certain letters and numbers? The ability to specify the relationship makes a True/False Condition more powerful and complex than a Simple Condition. For more information about conditions in general, see Content: New Content: Inserting a Condition. If This Field Select the field you'd like ListManager to examine in order to insert conditional text. See Content: New Content: Inserting a Condition for more information about the fields available to you. Is Select the relationship between the value you specify, and what is in the recipient's membership record. The options available are: = equal to < less than > greater than <= less than or equal to >= greater than or equal to <> is not equal to contains (contains the letters or numbers somewhere in the field does not contain (does not contain the letters or numbers somewhere in the field ends with (contains the letters or numbers at the end of the field begins with (contains the letters or numbers at the beginning of the field. This Value The text, date or number that determines whether or not someone should receive the conditional text. Dates should be entered in one of the following formats: YYYY-MM-DD HH-MM-SS MM/DD/YY YYYY-MM-DD Then Insert This Text The text that should be inserted into the message if the recipient meets your condition. If the recipient does not, then no text will be included unless you specify one. (optional) If Not, Then Insert This Text The text that should be inserted into the message if the recipient does NOT meet your condition. 81 Inserting a True/False Condition This example shows how to send a special message to all members who work for the government. 1. While creating content, click on Insert Condition. You'll be taken to the Insert Condition: Simple page by default. 2. Click on the True/False tab. 3. Select Domain_ for If This Field. 4. Select Ends With for Is. 5. Enter .gov for This Value. 4. Create your special message for government workers in the field next to Then Insert This Text. 5. Optionally, you can create a message for everyone else who isn't a government worker. 6. Click on Insert. The conditional content will be inserted into your message: %%ifboolean domain_ endswith .gov "Government workers are especially important to us!" "No matter who you work for, you're important to us!"%% Content: Insert Condition: A or B Like a True/False Condition, an A or B Condition allows you to specify the text that is sent to recipients if the condition is true or if it is false, and allows you to specify the relationship (equal to, greater than, etc.) between what is in the field and the value you specify. It also allows you to add additional conditions, so if a recipient meets the requirements of any of your conditions, the text you specify is sent. For example, let's say you've been using the Comment_ field to contain information about recipients' interests in sports. You can use an A or B condition to include your conditional text to anyone whose interest is skating or hockey. If a recipient has expressed an interest in either sport, the text you specify will be sent. If you'd like to send a message to those who have shown an interest in both skating and hockey, you'll want to use an A and B Condition. For more information about conditions in general, see Inserting a Condition. If This Field Select the field you'd like ListManager to examine in order to insert conditional text. See Inserting a Condition for more information about the fields available to you. Is 82 Select the relationship between the field and value you specify. The options available are: = equal to < less than > greater than <= less than or equal to >= greater than or equal to <> is not equal to contains (contains the letters or numbers somewhere in the field) does not contain (does not contain the letters or numbers somewhere in the field) ends with (contains the letters or numbers at the end of the field) begins with (contains the letters or numbers at the beginning of the field) This Value The text, date or number that determines whether or not someone should receive the conditional text. Dates should be entered in one of the following formats: YYYY-MM-DD HH-MM-SS MM/DD/YY YYYY-MM-DD OR Is Selects another relationship between the field and value you specify. The options available are the same as for "is" (above). More If you'd like more values, select More. Each time you select More, another OR Is and This Value pair of fields will be added. Fewer If you've added too many values using More, and would like to remove them, select Fewer. Each time you select Fewer, the last OR Is and This Value pair of fields will be removed. Then Insert This Text The text that should be inserted into the message if the recipient meets your condition(s). If the recipient does not, then no text will be included unless you specify one. (optional) If Not, Then Insert This Text The text that should be inserted into the message if the recipient does NOT meet your condition(s). Inserting an A or B Condition This example shows how to send a special message to all members have shown an interest in skating or hockey, which has been recorded in the ListManager Comment_ field. 1. While creating content, click on Insert Condition. You'll be taken to the Insert Condition: Simple page by default. 83 2. Click on the A or B tab. 3. Select Comment_ next to If This Field. 4. Select Contains next to Is. 5. Enter skating next to This Value. 6. Select Contains next to OR Is. 7. Enter hockey next to This Value. 8. Create your special message for skating and hockey fans in the field next to Then Insert This Text. 9. Optionally, you can create a message for everyone else who isn't a skating or hockey fan. None is included in this example 5. Click on Insert. The conditional content will be inserted into your message: %%ifboolean comment_ contains skating OR comment_ contains hockey "The Iceland rink will be closed for Zamboni repairs."%% Content: Insert Condition: A and B Like a True/False Condition, an A or B Condition allows you to specify the text that is sent to recipients if the condition is true or if it is false, and allows you to specify the relationship (equal to, greater than, etc.) between what is in the field and the value you specify. It also allows you to add additional conditions, so if a recipient meets the requirements of all your conditions, the text you specify is sent. For example, let's say you've been using the Comment_ field to contain information about recipients' interests in movies, and the Additional_ field to contain information about what country they live in. You can use an A and B condition to include your conditional text to anyone whose interest is comedies, and who lives in India. For more information about conditions in general, see Inserting a Condition. If This Field Select the field you'd like ListManager to examine in order to insert conditional text. See Inserting a Condition for more information about the fields available to you. Is Select the relationship between the field and value you specify. The options available are: = equal to < less than > greater than <= less than or equal to >= greater than or equal to <> is not equal to 84 contains (contains the letters or numbers somewhere in the field) does not contain (does not contain the letters or numbers somewhere in the field) ends with (contains the letters or numbers at the end of the field) begins with (contains the letters or numbers at the beginning of the field) This Value The text, date or number that determines whether or not someone should receive the conditional text. Dates should be entered in one of the following formats: YYYY-MM-DD HH-MM-SS MM/DD/YY YYYY-MM-DD AND this field Selects another field you'd like ListManager to examine before inserting conditional text. More If you'd like more values, select more. Each time you select More, another set of And This Field, Is and This Value fields will be added. Fewer If you've added too many values using More, and would like to remove them, select Fewer. Each time you select Fewer, the last set of And This Field, Is and This Value fields will be removed. Then Insert This Text The text that should be inserted into the message if the recipient meets your condition(s)If the recipient does not, then no text will be included unless you specify one. (optional) Otherwise, Then Insert This Text The text that should be inserted into the message if the recipient does NOT meet your condition(s) Inserting an A and B Condition This example shows how to send a special message to all members have shown an interest in comedies, which has been recorded in the ListManager Comment_ field, and who live in India, which has been recorded in the ListManager Additional_ field. 1. While creating content, click on Insert Condition. You'll be taken to the Insert Condition: Simple page by default. 2. Click on the A and B tab. 3. Select Comment_ for If This Field. 4. Select Contains for Is. 5. Enter comedies next to This Value. 6. Select Additional_ for AND This Field. 85 7. Select = equal to for Is. 8. Enter India for This Value. 8. Create your special message for Indian comedy fans in the field next to Then Insert This Text. 9. Optionally, you can create a message for everyone else who isn't an Indian comedy fan. 5. Click on Insert. The conditional content will be inserted into your message: %%ifboolean comment_ contains comedies AND additional_ = india "The movie \"Serious Fun\" will be released in Bombay April 26th!" "The movie \"Serious Fun\" will be released near you soon!"%% Content: Insert Condition: Percentage ListManager has the ability to send particular messages to a percentage of your list. This feature is useful if you would like several advertisements rotated in your list, or if you would like a particular advertisement sent to only part of your list. The percentage chosen to receive each message is random—those delivered to first will have the same chances of receiving a particular message as those delivered last. The text block rotated may be plain text, HTML or blank. For each text block, you select the percentage of recipients who should receive it. Note that the sum of all the percentages cannot exceed one hundred. In other words, if you have one text block displayed 60% of the time, and another 60% of the time, you will receive an error message—you will not have 20% receiving both messages. If you'd like to do so, insert two percentage conditions, each with 60% text block, 40% blank text. Display This Text The text you would like to be included in your message. The text may be plain text or HTML. If you would like a certain percentage to receive nothing at all, leave blank. This Often The percentage of recipients who should receive this particular text. More If you'd like more text blocks, select More. Each time you select More, another set of Display This Text and This Often will be displayed. Fewer If you've added too many text blocks using More, and would like to remove them, select Fewer. Each time you select Fewer, the last set of Display This Text and This Often will be removed. Unique Name Each percentage must have a unique name. ListManager provides one for you, and we recommend you use this name. If you prefer, you may specify your own unique name here. 86 Apply To Specify whether the percentages specified above in the form apply to a percentage of recipients who receive an individual mailing, or to a particular percentage of mailings that use this content. Percentage of Recipients will rotate the text within each mailing that uses this content. Percentage of Mailings will rotate the text between mailings. For example, let's say you've selected two different text blocks to be sent 50% of the time. If you select Percentage of Recipients, half of your repents will receive a particular text block each time you mail. If you select Percentage of Mailings, half of your mailings will use one text block or another, and all recipients of the mailing will see the same text. Percentage of Recipients is most useful if you plan on using a particular piece of content only once, or would like the content rotated within each mailing. Percentage of Mailings is most useful if you are creating a template, and would like everyone to receive the same content, which is rotated between mailings. Content: Tools Tools gives you a variety of ways of manipulating your content: -Convert your text to HTML, your HTML to text, or either text/HTML to AOL HTML. -Validate that your URLs are working properly, you content does not have scripts in it or that it is correctly in AOL HTML. -Reformat the content so that long lines are wrapped, all URLs become tracking URLs, or that all scripts are removed. Content: Tools: Convert Text to HTML Converts a text message into HTML. Note that if you already have an HTML body, converting the text to HTML will overwrite the preexisting HTML body. HTML to Text Converts an HTML message into text. Note that if you already have a text body, converting the HTML to text will overwrite the preexisting text body. HTML to text conversion depends on what kind of HTML element is being converted. Some examples of HTML converted to text: ***H1 Text*** **H2 Text** *bold* _italics_ - bullet point Text and HTML to AOL 87 Converts either text or HTML into AOL HTML . If a large number of your members are using AOL, you may want to convert your text and HTML to AOL HTML. Later versions of AOL (6.0 and higher) can read standard HTML, but strips out the following elements: ActiveX Audio External Style Sheets Frames and IFrames Java Meta Refresh Scripts: JavaScript, VBScript, Perl, etc. Tooltips Video For more information about AOL's HTML mail requirements, see http://webmaster.info.aol.com/htmlemail.html Converting Text and HTML to AOL will strip the HTML section of the message of any non-AOL-compliant html tags. If there is a text section but no HTML section, ListManager will first run the Text to HTML converter, and vice versa if there is HTML but no text. Content: Tools: Validate Test all URLs Checks and sees that all URLs in your content can be reached. When you test URLs, you will get a report for each telling you its status: HTTP/1.1 200 OK This web page was found, and can be retrieved successfully. HTTP/1.1 302 Found This page redirects to another page. ListManager does not track to the redirect location, so it cannot confirm that the redirect was successful. HTTP/1.1 404 Not Found The URL does not exist, according to the destination web server. Failed! DNS failed looking up the hostname for this URL. AOL HTML Compatibility Checks that your content's HTML is compatible with AOL Version 5.0 and higher. If a large number of your members are using AOL, you may want to check that your HTML is AOL compatible. Later versions of AOL (6.0 and higher) can read standard HTML, but strips out the following elements: ActiveX Audio External Style Sheets Frames and IFrames Java Meta Refresh 88 Scripts: JavaScript, VBScript, Perl, etc. Tooltips Video For more information about AOL's HTML mail requirements, see http://webmaster.info.aol.com/htmlemail.html No JavaScript Checks whether JavaScript is in your content. AOL, Hotmail and other ISPs will automatically strip out JavaScript from messages, so your content may not appear the way you would like it to look if you leave JavaScript in. No Java Checks whether Java is in your content. AOL, Hotmail and other ISPs will automatically strip out Java from messages, so your content may not appear the way you would like it to look if you leave Java in. No Scripts Checks whether any scripting (e.g., Java, JavaScript, ActiveX) is in your content. AOL, Hotmail and other ISPs will automatically strip out scripting from messages, so your content may not appear the way you would like it to look if you leave scripting in Content: Tools: Reformat Wrap Long Text Lines Inserts line breaks at 68 characters in your Text Body so that the width of the text message is standardized. Otherwise, recipients' email clients may insert line breaks where you didn't intend them to be, making your message unattractive. Reformatting a text message to wrap long lines ensures that the message formatting you see on your screen is what recipients of the message will see. Track URLs Makes all URLs in your content tracking URLs. See Content: Insert URL for more information about tracking URLs. Make HTML Section AOL-Compliant Converts your content's HTML so it is compatible with AOL Version 5.0 and higher. If a large number of your members are using AOL, you may want to check that your HTML is AOL compatible. Later versions of AOL (6.0 and higher) can read standard HTML, but strips out the following elements: ActiveX Audio External Style Sheets Frames and IFrames Java Meta Refresh Scripts: JavaScript, VBScript, Perl, etc. Tooltips Video For more information about AOL's HTML mail requirements, see 89 http://webmaster.info.aol.com/htmlemail.html Note that converting the HTML to be AOL compliant changes the HTML for all recipients of this content. If you want only AOL members to receive content formatted for AOL, you will need to create a segment, and then mail to that segment. Content: New Content From Template Templates are easy ways to preformat content. ListManager provides built-in templates for you to use. Or, create your own templates when creating content by going to Content: New Content: Advanced and select "Yes" next to Is This a Template. To view, edit, test, copy, or delete templates, go to Content: Templates. The Invitation template is specifically for the Send-A-Friend feature, and should not be used for other kinds of content. 1. Click on New Content From Template on the Content tab. 2. Select the content template you would like to use. 3. Click on Preview to see what that template looks like. 4. Click on OK to use that template for your new content. You don't need to know much about HTML to be able to edit ListManager's templates. See the following URL for basic information about HTML: http://www.lyris.com/products/listmanager/user_area/html_basics.html This page gives helpful information about color codes: http://www.lyris.com/products/listmanager/user_area/color_codes.html http://www.lyris.com/products/listmanager/tools/html_colorcodes.html Content: Templates Finding Templates Ten content templates for the list are displayed in Templates. To view more than ten templates at a time, click on Show More. Repeatedly clicking on Show More will show greater numbers of templates at a time. Click on Next to see the next ten templates, Previous to see the last ten. You may change the sorting order of the templates by clicking the up or down triangles next to Name and Description. By clicking the top triangle, the sort order will be ascending (a-z); clicking the bottom arrow makes the sort order descending (z-a). Content Types Select Your Templates or Built-In Templates from the dropdown menu on the Templates page. The built-in templates display ListManager's built-in sample templates, which can be edited from here by clicking on the content name link. Your 90 templates displays any templates custom created, which can also be edited by clicking on the content name link. Viewing or Editing Existing Templates To view a template, click on the content name. You will be taken to the Content: Edit Content screen, where you can view the content, edit it, or save and test it. Testing Existing Templates Click on Test next to the content you'd like to test. ListManager will show you the header, text message and HTML message. Copying Templates Click on Copy next to the content you'd like to copy. ListManager will show you the old name and description, and will ask you the new name and description you'd like. It will also ask you which list to which you'd like to copy the content. Deleting Templates Click on Delete next to the content you'd like to remove. ListManager will ask you if you're sure before deleting the content. Creating New Templates Click on Create New Template to be taken to Content: New Content. Download as a File Click on the disk icon to download your template in CSV format. 91 View/Edit All Content Finding Content Ten content units for the list are displayed in View All Content. To view more than ten content units at a time, click on Show More. Repeatedly clicking on Show More will show greater numbers of content units at a time. Click on Next to see the next ten content units, Previous to see the last ten. You may change the sorting order of the content by clicking the up or down triangles next to Name and Description. By clicking the top triangle, the sort order will be ascending (a-z); clicking the bottom arrow makes the sort order descending (z-a). Viewing or Editing Existing Content To view a unit of content, click on the content name. You will be taken to the Content: Edit Content screen, where you can view the content, edit it, or save and test it. Testing Existing Content Click on Test next to the content you'd like to test. ListManager will show you the header, text message and HTML message. Copying Content Click on Copy next to the content you'd like to copy. ListManager will show you the old name and description, and will ask you the new name and description you'd like. It will also ask you which list to which you'd like to copy the content. Deleting Content Click on Delete next to the content you'd like to remove. ListManager will ask you if you're sure before deleting the content. Creating Content Click on Create New Content to be taken to Content: New Content. Creating Content from a Template Click on Create from Template to be taken to the Content: New Content from Template page. On this page you may select from several premade templates, or from your own content that you have created as a template. Clicking on Preview will allow you to see what the content template looks like. Clicking on OK will use that template for your new content. Download as a File Click on the disk icon to download your content in CSV format. Content: Test Content The Content: Test Content shows you what your content will look like. Clicking on Test next to content, or selecting Save and Test when creating content will bring you to the Content: Test Content page. Note that mail merge tags (text with %% around them) will not be merged. To see what a message sent to an actual member will look like, create and test a mailing. Header The SMTP header of the content. 92 Text Message The text portion of your content, if any. The actual message as received by list members might look different, depending on their email client settings. HTML Message The HTML portion of your content, if any. The actual message as received by list members might look different, depending on their email client settings. In the HTML message, clickthrough links will be rewritten so that you can test their destination. For example, a link that you created that looks like this: %%track "http://www.lyris.com"%% Will be rewritten to look like this: /cttest?url=http://www.lyris.com Normally, you won't see that they have been rewritten because they will be disguised in the HTML as images or clickthrough text. 93 Segments What is a Segment? Segments are portions, or fragments of lists, whose members are based on some characteristic or criteria that each member must meet in order for that member to be included in the segment. Let's say you'd like to send a special message to only those list members who - joined your list a week ago - live in Canada - are celebrating their birthday today - have made a major purchase in the last year - have an email address at a particular domain (e.g., aol.com or hotmail.com) ListManager allows you to send to a segment, or subset, of your list who meet the criteria you define. Instead of sending to your entire list, you can use segments to filter exactly who should get a message based on whatever criteria you choose. These criteria are created by inserting one or more clauses into your segment. To see more information on inserting various types of clauses, see text, numeric, date, action, clickthrough, clickstream, purchase, and interest. The segment is a statement about each member that must be true in order for that member to be included in that segment. Create a segment by inserting one or more clauses For example, let's say you'd like to send a message only to those people on your list who work at "Company X", but you don't want to create a separate list for those people. By using the Segments: New Segment: Essentials page, you can create a segment which pulls all the members of the list with "companyx.com" in their email address. Simply select Create Segment, and give your segment a name and a description. Then, specify you want to send to those email addresses with lyris.com in the domain by adding the following field: Domain_ = (equals) companyx.com To send to a segment, you may use the Mailings: New page to select the lists or subsets you'd like to send to, or you may send an email message to the segment address: [email protected] For technical users, a segment is a subset, and is a user-defined SQL 'where' clause. It will be combined with the standard member retrieval 'where' clause in order to send to just a subset of the mailing list. You don't need to understand SQL in order to use segments in ListManager. Although you can create and use segments to find members using standard ListManager, sending to segments is a feature of ListManager Pro or Enterprise, and is unavailable for standard ListManager. Contact your account representative at [email protected] if you'd like to upgrade to ListManager Pro or Enterprise. 94 Emailing to a Segment Generally, users use the ListManager web interface to send to a segment. However, you may send an email message to a segment as well. The address is: [email protected] Triggered Segments Triggered segments contain trigger clauses, which specify a given date or event, that when it occurs, will cause a mailing to be automatically sent. The trigger clause(s) specify exactly when the mailing will be sent to the segment. For more information on triggered segments, see Segments: New Triggered Segment. 95 View/Edit Segments Finding a Segment Ten segments are shown at a time. To view more than ten segments at a time, click Show More. Repeatedly clicking Show More will show greater numbers of segments at a time. You may change the sorting order of the segments by clicking the up or down triangles next to Name and Description. By clicking the top triangle, the sort order will be ascending (a-z); clicking the bottom arrow makes the sort order descending (z-a). Click on next to see the next ten segments, previous to see the last ten. You may select to view All, Standard, or Triggered segments by choosing the desired one from the dropdown menu. It will default to "All". Viewing or Editing an Existing Segment To view a segment, click on the segment's name. You will be taken to the Segments: Edit Segment page, where you can view the segment, edit it, or "save and test" it. Testing an Existing Segment Click on Test next to the segment you'd like to test. ListManager will show you the query used in the segment, and a sample of the results so you can see if the segment is selecting the members you want it to select. It is strongly recommended that segments are tested when saved, to make sure that no errors occur. Copying a Segment Click on Copy next to the segment you'd like to copy. ListManager will ask you the new name of the segment, its new description, and the lists it should be used for. Deleting a Segment Click on Delete next to the segment you'd like to delete. ListManager will ask you if you're sure before deleting the segment. Creating a Segment Click on create new segment to be taken to Segments: New Segment. Download as a File Click on the disk icon to download your segments in CSV format. This will download the information on this page, including the segment name, description, the associated list, and the clauses which identify the segment. In addition, from the Segments Main Page, you can create a new segment or create a new triggered segment. New/Edit Segment The Segments: New Segment page allows you to make a segment of your list, based on the criteria you define. The Segments: Edit Segment page is exactly like the New Segments page. Segments are portions, or fragments of lists, whose members are based on some characteristic or criteria that each member must meet in order for that member to be included in the segment. The clauses describing each member must be true in order for that member to be included in a segment. A segment is created by picking one or more 96 clauses, each of which is a statement that is true or false for a member, and connecting them together with AND's, OR's, and parentheses, to make one composite statement that is true if the member belongs in the segment. For more information on segment clauses, see Segments: New/Edit Segment/Essentials. There are three tabs for creating a segment: Segments: New Segment: Essentials The basics required to create a new segment. This page allows you to easily make a segment based on information in your members table. You can also type in an SQL query directly if you have the proper permissions. To see more information on inserting various types of clauses, see text, numeric, date, action, clickthrough, clickstream, purchase, and interest. Segments: New Segment: Advanced This page allows you to join to other tables, change the sort order, and select which columns are displayed when testing. This page is only available if your administrator has given you the proper permissions. Segments: New Segment: Boundaries Normally, a segment is limited to normal members of the list you're logged into. You can change the boundaries of the segment to include all lists on your server, or to all members regardless of their membership status. Sending to a segment with these boundaries turned off could anger recipients if not done properly, so be sure you understand what they do before changing these settings. Creating a Segment This example shows how to make a segment of all recipients who work in education— they have .edu as their top level domain. 1. Select the Segments tab. 2. Select Create New Segment. 3. Enter EDU for the segment's Name. 4. Enter Education Addresses for the segment's Description. 5. Select Domain_ for Select Text Field. 6. Select Ends With next to Domain_. 7. Enter .edu next to Ends With. 8. Click on Add next to .edu. The following will appear in the Query box: Domain_ LIKE '%.edu' 9. Click on Save and Test. You will be taken to the Segments: Test Segment page, where you can see the query generated and a sample of the addresses pulled. 97 Segments: New/Edit Segment: Essentials The Segments: New/Edit Segment: Essentials page has the essential elements required for any segment. Segment Name Select a name to identify your segment. This name is not seen by message recipients, so label the content in a way that will help you to identify it later in the Segment main page. Description Select a description to identify your segment. This description is not seen by message recipients, so label the content in a way that will help you to identify it later in the Segment main page. Summary Displays a summary of the descriptions of the clauses inserted into the query to create the segment. If it is a simple segment with clauses that do not need to be summarized, the summary may be blank. Query When a clause is created, and you click on "insert", this will then display the clause in the query field. This is where the clauses are put together by inserting the AND, OR, NOT, or parentheses in between clauses. Insert Clause You may build the criteria for the segment using the Insert Clause button. Segments are created by picking one or more clauses, each of which is a statement that is true or false for a member. These clauses are then connected together with AND, OR, NOT, or parentheses statements. Once together these clauses or statements create a comprehensive statement. Segments are statements about each member that must be true in order that that member to be included in the segment. The Segment Builder allows you to create SQL subsets of your list based on fields that are available in your ListManager members table. Fields in other tables (including tables you join to in Segments: New Segment: Advanced) will not appear here. Depending on your permissions, you may be able to type in your SQL query directly in the SQL Query box. For details on each type of insertable clause, see text, numeric, date, action, clickthrough, clickstream, purchase, and interest. The first three segment clauses (text, numeric, and date) all bring in member data from the member table. These include many built-in fields, such as name, domain, and join date. Demographic fields can be added to this table as well, such as age or gender. The remaining segment clauses (action, clickthrough, clickstream, purchase, and interest) are all events or actions which are on the clicktracking and clickstreamdata tables. AND/OR: If you'd like to combine several different criteria in your segment, you'll need to combine them with AND, OR, AND NOT or OR NOT. For example, let's say you have two additional columns in your members table: one column specifies the kind of pet a member has (the pets column), and the other column specifies the country a member lives in (the country column). If you'd like to create a 98 segment which would send to all the cat owners in England, you'd use AND. pet = cat AND country = England This segment is the intersection of these two sets: only cat owners in England would be in this segment. If you'd like to send to all cat owners anywhere in the world and to everyone on your list who lives England, you'd use OR. pet=cat OR country = England This segment is the union of these two sets; all cat owners, and all English people would be part of this subset. As you build your criteria, they will be displayed below in the Sequel Query box. NOT 'NOT' must be combined with an AND or OR, and selects those who do not have a certain criteria. For example, to send to all pet owners except to those who own cats, you'd use AND NOT: AND NOT pet = cat ( ) Open and Close Parentheses Some segments might require that you put some of your criteria in parentheses so that they're read the way you intend. For example, the following segment is unclear: country = England AND pet = dog OR pet = cat Do you want to send to everyone who lives in England and has a dog, and anyone anywhere who has a cat? Or do you want to send to everyone in England who has a dog or cat? Use parentheses to specify which you'd like: country = England AND (pet = dog OR pet =cat) This query will only pull those who live in England, and who have a cat or a dog. Query As you add fields, your query will be formed in the SQL Query field. Depending on whether your administrator allows it or not, you may be able to type in your query directly into the Selection Criteria field, and use the Advanced and Boundaries tabs to use SQL joins to other fields, pull members from all lists, and other kinds of SQL queries. Segments: New Segment: Insert Clause: Text One or more clauses define the terms for creation of the segment. Each clause is true or false for a member, and can be connected to other clauses by using the AND, OR, NOT, or parentheses. 99 If member text field Select the text field from the dropdown menu. Is Select the desired command from the dropdown menu. This value Enter the value to determine the clause. Example: Selecting a text clause of "If member text field domain_ is equal to yahoo.com", will create a segment for all members with a domain name of @yahoo.com. This can be paired with one or more clauses by using AND, OR, NOT, or the parentheses. Note: Some of the comparison options don't work for all kinds of text fields on different database platforms, so it is very important to test the segment to see if the database raises errors. Generally, the problem, if any, will be that "equals", "less than", and "greater than" are not allowed for some types of fields. Segments: New Segment: Insert Clause: Numeric One or more clauses define the terms for creation of the segment. Each clause is true or false for a member, and can be connected to other clauses by using the AND, OR, NOT, or parentheses. If member numeric field Select the text field from the dropdown menu. is Select the desired command from the dropdown menu. this number Enter the numeric value to determine the clause. Example: Creating a clause that says "If member numeric field NumBounces_ is greater than 5", will create a segment for all members who have had more than 5 bounces. This can be paired with one or more clauses by using AND, OR, NOT, or the parentheses. Segments: New Segment: Insert Clause: Date One or more clauses define the terms for creation of the segment. Each clause is true or false for a member, and can be connected to other clauses by using the AND, OR, NOT, or parentheses. If this Select "exact date and time" or "anniversary" from the dropdown menu. in this field 100 Select the desired date field from the dropdown menu. is Select the desired command from the dropdown menu. this date Enter the date in YYYY-MM-DD or YYYY-MM-DD HH:MM:SS format. Note that if you do not enter a time it will default to YYYY-MM-DD 00:00:00, so implicitly, a time of midnight at the start of the entered date is included (if you selected "exact date and time" instead of "anniversary"). If you enter "NOW" in this field, instead of an actual fixed date, the database will use the current system time whenever the segment is run. Example: Creating a clause that says "If this exact date and time in this field DateJoined_ is = equal to 2002-12-31", will create a segment for all members whose join date is on or after December 31st, 2002. Note that members whose join date happened at some time on Dec. 31st will be included, because the implicit time you entered is midnight at the start of Dec 31st. This would be a way to create a segment of more recent members, for example. This can be paired with one or more clauses by using AND, OR, NOT, or the parentheses. Example 2: Creating a clause that says "If this anniversary in this field ConfirmDat_ is equal to 2002-12-31", will create a segment for all members who's anniversary of their confirmation date is on December 31st, 2002. This would be a way to create a segment of members who joined one year ago to send a 1-year anniversary mailing, for example. This can be paired with one or more clauses by using AND, OR, NOT, or the parentheses. Segments: New Segment: Insert Clause: Action One or more clauses define the terms for creation of the segment. Each clause is true or false for a member, and can be connected to other clauses by using the AND, OR, NOT, or parentheses. If list member Select an action performed by the member from the dropdown menu. this mailing Select the desired mailing to which this action applies. before this date (optional) Enter the date in YYYY-MM-DD or YYYY-MM-DD HH:MM:SS format. Note that if you do not enter a time it will default to YYYY-MM-DD 00:00:00, so implicitly, a time of midnight at the start of the entered date is included. This field can be used alone or in conjunction with the "in the previous X days (optional) field". This is an optional field, because an action clause can be created by just selecting an action and an associated mailing. in the previous X days (optional) Enter the number of days prior allowed for the action selected above. Note that this field can be used alone or in conjunction with the "before date (optional)" field. This is an optional field, because an action clause can be created by just selecting an action 101 and an associated mailing. Example: Creating a clause that says "If list member opened this mailing 2003-08-25Newsletter before this date 2003-08-31 in the previous X days 10", will create a segment for all members who opened the August 25th newsletter mailing before August 31st, 2003 and for the 10 days prior, so the segment would be for all members who opened this mailing between August 21st and August 31st. This can be paired with one or more clauses by using AND, OR, NOT, or the parentheses. Segments: New Segment: Insert Clause: Clickthrough One or more clauses define the terms for creation of the segment. Each clause is true or false for a member, and can be connected to other clauses by using the AND, OR, NOT, or parentheses. If list member Select a clickthrough action from the dropdown menu, either "clicked on" or "did not click on". this URL Select the URL from the dropdown menu. Note that in order for the URL to appear in this dropdown menu, it must already be included in a mailing which was sent and had at least one clickthrough. This is how the URL enters the ListManager database. The mailing must be sent with the "opens" detection on. For more information on this, see Mailings: New Mailing: Tracking. in this mailing Select the desired mailing to which this clickthrough action applies. before this date (optional) Enter the date in YYYY-MM-DD or YYYY-MM-DD HH:MM:SS format. Note that if you do not enter a time it will default to YYYY-MM-DD 00:00:00, so implicitly, a time of midnight at the start of the entered date is included. This field can be used alone or in conjunction with the "in the previous X days (optional) field". This is an optional field, because a clickthrough clause can be created by just selecting an action, a URL, and an associated mailing. in the previous X days (optional) Enter the number of days prior allowed for the clickthrough action selected above. Note that this field can be used alone or in conjunction with the "before date (optional)" field. This is an optional field, because a clickthrough clause can be created by just selecting an action, a URL, and an associated mailing. Example: Creating a clause that says "If list member clicked on this URL http://www.yoururl.com before this date 2003-08-31 in the previous X days 10", will create a segment for all members who clicked on the http://www.yoururl.com URL before August 31st, 2003 and for the 10 days prior, so the segment would be for all members who clicked on this URL between August 21st and August 31st. This can be paired with one or more clauses by using AND, OR, NOT, or the parentheses. 102 Segments: New Segment: Insert Clause: Clickstream One or more clauses define the terms for creation of the segment. Each clause is true or false for a member, and can be connected to other clauses by using the AND, OR, NOT, or parentheses. If list member Select a clickstream action from the dropdown menu, either "viewed" or "did not view". this page Select the page from the dropdown menu. Note that a clickstream tag must be placed on this page, and this page must have been visited at least once, in order for it to appear here. This is how the page is entered into the ListManager database. For more information on clickstream tags, see Utilities: Other: Action Tags: Clickstream Tags. from this mailing Select the desired mailing to which this clickstream action applies. before this date (optional) Enter the date in YYYY-MM-DD or YYYY-MM-DD HH:MM:SS format. Note that if you do not enter a time it will default to YYYY-MM-DD 00:00:00, so implicitly, a time of midnight at the start of the entered date is included. This field can be used alone or in conjunction with the "in the previous X days (optional) field". This is an optional field, because a clickstream clause can be created by just selecting an action, a page, and an associated mailing. in the previous X days (optional) Enter the number of days prior allowed for the clickstream action selected above. Note that this field can be used alone or in conjunction with the "before date (optional)" field. This is an optional field, because a clickstream clause can be created by just selecting an action, a page, and an associated mailing. Example: Creating a clause that says "If list member viewed this page any page from this mailing 08-20-2003Newsletter before this date 2003-08-25 in the previous X days 10", will create a segment for all members who viewed any page from the August 20th, 2003 newsletter mailing, before August 31st, 2003 and for the 10 days prior, so the segment would be for all members who viewed any page from this mailing between August 21st and August 31st. This can be paired with one or more clauses by using AND, OR, NOT, or the parentheses. Segments: New Segment: Insert Clause: Purchase One or more clauses define the terms for creation of the segment. Each clause is true or false for a member, and can be connected to other clauses by using the AND, OR, NOT, or parentheses. 103 Member bought Select the command from the dropdown menu. this amount, price/quantity Enter the amount. This will apply to either a price or a quantity, as determined here. For instance, 1000 price = $1000 (or other monetary unit), and 1000 quantity = 1000 units. of this product code (optional) Enter a product code referencing the item purchased by the member, if any. This can be any descriptive value. before this date (optional) Enter the date in YYYY-MM-DD or YYYY-MM-DD HH:MM:SS format. Note that if you do not enter a time it will default to YYYY-MM-DD 00:00:00, so implicitly, a time of midnight at the start of the entered date is included. This field can be used alone or in conjunction with the "in the previous X days (optional) field". This is an optional field, because a purchase clause can be created by just selecting an action, an amount/quantity, a page, and an associated mailing. in the previous X days (optional) Enter the number of days prior allowed for the purchase action selected above. Note that this field can be used alone or in conjunction with the "before date (optional)" field. This is an optional field, because a purchase clause can be created by just selecting an action, an amount/quantity, a page, and an associated mailing. on this page Select the page from the dropdown menu, referencing the page from which the member purchased the item(s). Note that a purchase tag must be placed on this page, and something must then be purchased from this page, in order for it to appear here. This is how the page is entered into the ListManager database. For more information on purchase tags, see Utilities: Other: Action Tags: Purchase Tags. from this mailing Select the desired mailing to which this purchase applies. Example: Creating a clause that says "Member bought greater than this amount 1 (quantity) of this product code Widget before this date 2003-08-25 in the previous X days 10 on this page any page from this mailing 08-20-03Newsletter", will create a segment for all members who purchased more than 1 widget from the August 20th, 2003 Newsletter mailing before August 31st, 2003 and for the 10 days prior, so who purchased this between August 21st, 2003 and August 31st, 2003. This can be paired with one or more clauses by using AND, OR, NOT, or the parentheses. Segments: New Segment: Insert Clause: Interest One or more clauses define the terms for creation of the segment. Each clause is true or false for a member, and can be connected to other clauses by using the AND, OR, NOT, or parentheses. Member showed 104 Select the command from the dropdown menu. this much Enter a numeric value for the type of interest selected (interest points, stage, or events). Interest points and interest stages are arbitrary values which are determined by the list administrator, but interest events are the total number of interest (including purchase) events, which will usually be page visits. Therefore a member who visited a total of 5 pages with Interest Tags or Purchase Tags, will have 5 interest events. of this type of interest Select the type of interest for the clause: interest points, interest state, or interest events. These settings and the numeric values associated with them are predetermined by the list administrator. before this date (optional) Enter the date in YYYY-MM-DD or YYYY-MM-DD HH:MM:SS format. Note that if you do not enter a time it will default to YYYY-MM-DD 00:00:00, so no time will be entered, just the date. This field can be used alone or in conjunction with the "in the previous X days (optional) field". This is an optional field, because an interest clause can be created by just selecting an action, an amount and type of interest, a page, and an associated mailing. in the previous X days (optional) Enter the number of days prior allowed for the interest level selected above. Note that this field can be used alone or in conjunction with the "before date (optional)" field. This is an optional field, because an interest clause can be created by just selecting an action, an amount and type of interest, a page, and an associated mailing. on this page Select the page from the dropdown menu, referencing the page from which the member demonstrated some interest. Note that an interest tag must be placed on this page, and something interest event must occur on this page, in order for it to appear here. This is how the page is entered into the ListManager database. For more information on interest tags, see Utilities: Other: Action Tags: Interest Tags. from this mailing Select the desired mailing to which this interest clause applies. Example: Creating a clause that says "Member showed equal to this much 50 (interest points) before this date 2003-08-25 in the previous X days 10 on this page any page from this mailing 08-20-03Newsletter", will create a segment for all members who showed exactly 50 interest points from the August 20th, 2003 Newsletter mailing, between August 21st, 2003 and August 31st, 2003. This can be paired with one or more clauses by using AND, OR, NOT, or the parentheses. Segments: New/Edit Segment: Advanced The Segment Advanced Settings page allows you to set special parameters for your segment. Join Other Tables By default, ListManager only has access to its own database tables. To access data in 105 other tables in your database, list the table names here, separated by commas. The standard members table is already included, and need not be specified. The fields in the tables specified here will be available for mail merging. Example: demographics.customers, demographics.phonenumbers Note that joining other tables here will not make their fields appear in the query builder in Segments: New Segment: Essentials; only fields in your members table will appear there. Columns to Display This setting is only relevant for testing purposes, to see what data is returned when you test your segment. If blank, only MemberID_ and EmailAddr_ will be displayed when you test your subset. These fields will always be retrieved and need not be specified. To specify additional fields, separate them with commas: domain_, fullname_, additional_ Sorting Using an SQL "ORDER BY" clause, specify the order in which to return results. Example: members_.EmailAddr_ ASC After SELECT This setting is useful for those using ListManager with an Oracle database to tell it to use a specific index, thus improving performance. The Oracle optimizer will not always choose to use an index, even if one has been built, so this feature allows the name of the index to be added as a hint after the SQL for the subset. Append to Statement Enter any statement you'd like to append to the end of your query. Segments: New/Edit Segment: Boundaries When posting to a list or a segment, ListManager automatically adds some additional restrictions to the member selection query. These restrictions only allow sending of mail to "normal" members (i.e. not held or unsubscribed, or on another list). However, there are times when you might want to send to all members of a list regardless of whether they are set to receive message as sent. Or, perhaps you want to send the message to all members including those who are held. These types of postings are possible by modifying Pull Only Normal Members?, Pull Only Members Receiving Regular Email? and Pull Only This List's Members?. In general, you should never need to modify these settings, and problems can occur if you modify these settings without understanding the consequences. For example, you could end up sending to members who have unsubscribed from your list, or you could send to every member on the server inadvertently. Pull Only Normal Members? 106 By default, the segment will pull only "normal" members, not those who have unsubscribed from the list, who are held due to bouncing too much mail, or who have not yet confirmed that they'd like to receive mail from you. By selecting "No," you will send to all members who meet your subset criteria, regardless of the status of their subscription. Warning: By selecting "No," you may be sending to people who do not want to receive your mail. These people may be unhappy about receiving your mail if they haven't opted in, or have already opted out of receiving your mailings. Additionally, if you choose to send to members who are on hold, you will most likely have slower sending speeds and lower success rates. Pull Only Members Receiving Regular Email? By default, the subset will only send to members who have selected to receive normal postings, not digests, mimedigests, or who have set themselves to not receive mail at all. By selecting "No, pull ALL members, regardless of email type," you will be sending an email message to members regardless of the type of message they have signed themselves up for. Warning: By selecting "No," you may be sending to people who do not want to receive ordinary email messages from you. These people may be unhappy about receiving email from you at all, or in a format they haven't selected. Pull Only This List's Members? By default, the subset will select only members from the list you're currently working in. If you'd like to send to recipients regardless of the list they're subscribed to, select "No, pull members from all lists on the server." Warning: By selecting "No," you may be sending to other lists than the one you're working in. Be sure that the message you're sending is appropriate for all the lists you may be sending to. Segments: New Triggered Segment Triggered segments are a feature of ListManager Enterprise, and are unavailable for Standard or Pro ListManager. Contact your account representative at [email protected] if you'd like to upgrade to ListManager Enterprise. Triggered segments are segments that contain one or more trigger clauses. These clauses identify a specific event or date that happens when the mailing is to be sent. Anything else about the member that does not specify exactly when the mailing is to be sent is not a trigger clause, but a regular clause. Triggered segments work in conjunction with triggered mailings and sequential mailings. The trigger clause identifies the event that causes the mailing to be sent, but when you actually create the triggered mailing, you can specify exactly how long after the event the mailing should actually be sent. Typically, only one trigger clause is required, but you may want to send the mailing if any one of a list of events occur (see Using Multiple Trigger Clauses below). Note that the trigger clause identifies the event that causes the mailing to be sent, but when you actually create the triggered mailing you can specify exactly how long after the event the mailing should actually be sent. In the case where you know the date in advance (such as a member's birthday), you can send the mailing to them a certain 107 amount of time before the date. Creating a Triggered Segment From the main segments page, click "create new triggered segment". This opens the Segment: New Triggered Segment page. Enter a segment name and description, as with any segment. Click the "insert trigger" button. This opens the Segment: Insert Trigger page, which is divided into tabs. These are arranged to easily access the desired trigger type. Click on the links below for detailed information on the various trigger types: Date Action 108 Clickthrough Clickstream 109 Purchase Interest Note that triggers can be used in conjunction with clauses, and they will work together. The best way to see this is with an example: You want to send a discount offer to members when they visited a particular web page from a particular mailing, but only if they are female and have purchased more than $100 worth of items in the past 90 days. This will result in 3 clauses, only one of which is a trigger clause: < members who are female - regular clause > AND < members who purchased more than $100 worth of items in the past 90 days - regular clause > AND <send the mailing when the member visits the particular web page from the particular mailing - trigger clause > 110 Important note: If this example is entered incorrectly, such as: < members who are female - regular clause > OR < members who purchased more than $100 worth of items in the past 90 days - regular clause > OR < send the mailing when the member visits the particular web page from the particular mailing - trigger clause> it will result in sending the mailing to ALL female members or to ALL members who purchased more than $100 in the last 90 days every time the triggered mailing is sent. This is why triggered segments and mailings must be created and tested with care. Using Multiple Trigger Clauses Typically only one trigger clause is required for a triggered mailing, but sometimes you may want to send the mailing if any one of a list of events occur. For example, you might want to send a particular promotion to someone who visits any one of 3 different pages: <trigger clause when member visited page1> OR <trigger clause when member visited page2> OR <trigger clause when member visited page3> You might want to only send to members who visited all 3 on the same day. You could do this by running the triggered mailing once at the end of each day, and using this segment: <trigger clause when member visited page1> AND <trigger clause when member visited page2> AND <trigger clause when member visited page3> In another example, you might want to send a particular promotion to adults once they reach 1000 total interest points on your web site, but only send to youths once they reach 2000 total interest points on your web site: ( <regular clause - member is aged 25 or over> AND <trigger clause when the member reaches 1000 interest points total for the first time> ) OR ( <regular clause - member is aged less than 25> AND <trigger clause when the member reaches 2000 interest points total for the first time> ) Segments: New Triggered Segment: Insert Trigger: Date 111 Date Type Specify whether the trigger will be an "exact date and time" or an "anniversary". Selecting "anniversary" will create a trigger that is repetitive on the annual anniversary of the date selected in the Date field. A good example for selecting "anniversary" would be if the field contains the date on which the member was born, and you would like to send them a message on their birthday (the anniversary of their date of birth). Date Field Select the corresponding date field from the dropdown menu. These correspond with the date tables, for instance DateBounce_ or DateJoined_. For more information on how triggered segments work, see Segments: New Triggered Segment. Segments: New Triggered Segment: Insert Trigger: Action Action Select the action to create the trigger. These can be "opened", "clicked on any url in", "visited any page", or "purchased after". This refers to the type of action to occur in the mailing that will cause the mailing to be sent. Mailing Select the desired mailing or "any mailing" from the dropdown menu. Trigger will send to this member The trigger can either send the mailing to the member (that performed the set action in the selected mailing) every time, or only the first time. This allows you to send the mailing only once, when the trigger is met, or every single time it is met. For instance, if you want to send the triggered mailing only once, after the first time they've opened the desired mailing, then this would be set to "the first time". If "every time" is selected, and the member happens to open the mailing more than once, the triggered mailing will be sent each time. For more information on how triggered segments work, see Segments: New Triggered Segment. Segments: New Triggered Segment: Insert Trigger: Clickthrough It is often easiest to create triggered segments by following the fields in order so that they "read" like a sentence. Member Currently, the only option available here is "clicked on", since this refers to clickthroughs for particular URLs. This URL Select the desired URL from the dropdown menu. Note that in order for a URL to 112 appear here, it must have been included and sent in a mailing, and then clicked on at least once. In this Mailing Select the desired mailing or "any mailing" from the dropdown menu. Trigger will send to this member The trigger can either send the mailing to the member (that clicked on the set URL in the selected mailing) every time, or only the first time. This allows you to send the mailing only once, when the trigger is met, or every single time it is met. For instance, if you want to send the triggered mailing only once, after the first time they've clicked on the selected URL, then this would be set to "the first time". If "every time" is selected, and the member happens to click on the URL more than once, the triggered mailing will be sent each time. For more information on how triggered segments work, see Segments: New Triggered Segment. Segments: New Triggered Segment: Insert Trigger: Clickstream It is often easiest to create triggered segments by following the fields in order so that they "read" like a sentence. Member Currently, the only option available here is "viewed", since this refers to clickstreams for particular URLs. This page Select the desired page from the dropdown menu. A page will appear in this dropdown menu only if it has been viewed at least once. From this mailing Select the desired mailing or "any mailing" from the dropdown menu. Trigger will send to this member The trigger can either send the mailing to the member (that viewed the selected page in the selected mailing) every time, or only the first time. This allows you to send the mailing only once, when the trigger is met, or every single time it is met. For instance, if you want to send the triggered mailing only once, after the first time they've viewed the selected page, then this would be set to "the first time". If "every time" is selected, and the member happens to view the set page more than once, the triggered mailing will be sent each time. For more information on how triggered segments work, see Segments: New Triggered Segment. Segments: New Triggered Segment: Insert Trigger: Purchase It is often easiest to create triggered segments by following the fields in order so that 113 they "read" like a sentence. Member bought Select the desired command for the purchase trigger. These can be: = equal to < less than > greater than <= less than or equal to >= greater than or equal to <> not equal to Note: For the "< less than" and "<= less than or equal to" options, only members who have made at least one purchase of this type will be selected. Members who have made no purchase at all can only be detected by specifying "= equal to" and a value of 0 (zero). So for example, if you would like all members who made less than $1000 in purchases last month, including those who made no purchases at all, you will need to insert two trigger clauses: those who made "<= less than or equal to" $1000 in purchases in the last month, AND those who made "= equal to" $0 in purchases in the last month. This amount Enter the amount. This will apply to either a price or a quantity. Price/Quantity Select whether the amount specified above refers to a price ($) or quantity. For example, 500/price = $500 (or other monetary unit), and 500/quantity = 500 units. Since when Select the time frame for the purchase. This can mean that the member bought X dollars or units "since the last run time", "since forever", or "since forever, reached for the first time". This third option means that the amount entered in the "This amount" field is a total since the beginning of time, and the trigger will fire only the first time that total is reached. Of this product code (optional) Enter a product description, code, sku, etc. This will restrict the calculation to totaling the purchases of that particular code type only. On this page Select the page from the dropdown menu for the purchase. For the page to appear here, it must already be in the database as having generated a purchase event. Generally, purchases will come from only one page, but if there is more than one where purchases have been made from, all of those will be options here. From this mailing Select the desired mailing or "any mailing" from the dropdown menu. For more information on how triggered segments work, see Segments: New Triggered Segment. Segments: New Triggered Segment: Insert Trigger: Interest 114 It is often easiest to create triggered segments by following the fields in order so that they "read" like a sentence. Member showed Select the desired command for the interest trigger. These can be: = equal to < less than > greater than <= less than or equal to >= greater than or equal to <> not equal to Note: For the "< less than" and "<= less than or equal to" options, only members who have generated at least one interest point of this type will be selected. Members who have generated no interest points at all can only be detected by specifying "= equal to" and a value of 0 (zero). So for example, if you would like all members who generated less than 1000 interest points in the last month, including those with no interest points, you will need to insert two trigger clauses: those who generated "<= less than or equal to" 1000 interest points in the last month, AND those who generated "= equal to" 0 (zero) interest points in the last month. This much Enter the interest value (interest points, stage, or events) in whole numbers. Of this type of interest Select the type of interest that the command and type entered above refer to. This can be "interest points", "interest stage", or "interest events". Which occurred Select the time frame for the interest point/stage/event. This can mean that the member showed X amount of interest points/stage/events, "since the last run time", "since forever", or "since forever, reached for the first time". This third option means that the amount entered in the "This much" field is a total since the beginning of time, and the trigger will fire only the first time that total is reached. On this page Select the page from the dropdown menu for the purchase. For the page to appear here, it must already be in the database as having generated an interest event. There may be several pages that generate different types of interest events. From this mailing Select the desired mailing or "any mailing" from the dropdown menu. For more information on how triggered segments work, see Segments: New Triggered Segment. Joining to Another Table ListManager allows you to join its Members_ table to another table in your database or to any database ListManager can access. Once you have joined to another table, you may further segment your list based on criteria contained in that other table. If you send to a segment which joins to other tables, you may merge in information about 115 members contained in those tables. Ideally, you would have a key for each member in your ListManager Members_ table which corresponds to a primary key in your table. Joining on non-unique fields (such as email address) will likely cause duplicate results to be returned. In the following example, members have been imported into the ListManager Members_ table with the primary key for the demographics table in the Members_.UserID_ field. 1. Create a new segment by clicking on the Segments tab and clicking on Create New Segment. 2. Click on the Advanced Tab. 3. Enter the table name that ListManager should join its Members_ table to in Join Other Tables. Example: demographics 4. (Optional) Enter Columns to Display from your table that you would like displayed in your test results to verify your segment worked. Example: city 5. Click on the Essentials Tab. 6. Enter a Segment Name and Description. 7. Enter the SQL "where" clause in Query that joins the table to the ListManager Members_ table and any additional query. Example: demographics = UserID_ AND city='Boston' 8. Click Save and Test. 116 Mailings A mailing is a message you send to your entire list, or to segments you've created previously. You can create your message on the fly, or import content you've created previously. From the Mailings main menu page, you can: 1. Create new mailings 2. Approve mailings 3. Check the Mailing status fur outgoing mailings, currently active mailings, or completed mailings 4. View your incoming and outgoing mail queues 5. Create advanced mailings, both triggered and sequential 6. View the progress of your outgoing mailings 7. Send test mailings Before sending out your message, you can test your mailing to see what the message will look like, and schedule when you'd like the message to be sent. You may also purge recipients who have received other messages, or send to a sampling of your list or segment. Use tracking to see if recipients open your message, and if they can see messages in HTML. Later, you can see the success of your message in Reports. Once you've created mailings, or received them via email, you may approve or delete them. If you are moderating a discussion list (where members submit mailings to the list), the Approval Wizard helps you work quickly as you approve and delete mailings in the order in which they were submitted. You also have the option of deleting mailings with feedback so contributors know why their mailing was rejected. The Approval Summary shows you if any of your lists have mailings waiting to be approved. All of your mailings, whether completed or being sent, may also be viewed in Mailings. Notes for those upgrading from ListManager 5.0 If you are using the ListManager Mailings menu to create mailings for your list, ListManager will automatically set Enable Scripting to Admins Only if previously disabled, and change the Scripting Level to Full. For more information about these settings, see Utilities: List Settings: For Programmers: Email Scripting. Mailings: New Mailing To send a message to your list, you need to create a mailing. A mailing can be a message you compose in the New Mailing page, or content you've created previously. 117 You may then choose to send your mailing to your entire list, or select segments to send to. You may also purge recipients of previous messages if you have been saving that data. Creating a New Mailing To Be Sent To Your Entire List To create a simple mailing to your entire list, follow these instructions: 1. Select New Mailing under Shortcuts on the Homepage. Or, click on the Mailings tab, and select New Mailing. 2. Click on Import Content in the lower right corner to insert it into your message if you have already created content which you'd like to send. You may then skip steps 3-6 below. If not, create your message on the Message tab. 3. Edit the Mailing Name field. This name is not seen by message recipients, so label the mailing in a way that will help you to identify it later. 70 characters are allowed in the Mailing Name field. 4. Edit the From: field. By default, your email address will appear there. 5. Edit the To: field. By default, the To: field is set to %%nameemail%%, which will merge the name and email address of the recipient. The To: field does not actually select the message's recipients. When building your mailing, you'll specify the segment or lists to whom you'd like to send the message. 6. Enter the Subject: of the message. Recipients will see this line as the subject of the message they receive. 7. Enter the Text Message and/or HTML Message you'd like to send. You may create just a text or HTML body, and that is what will be sent to your recipients. Or, you can create both, and send a message that has both text and HTML. This format is called multipart-alternative, and ListManager will create the correct headers and boundaries automatically. Recipients who can see HTML will only see your HTML message; those who can't, will see the text. 8. Click on Save and Test to see what your message will look like. Or, click on Save. You'll be taken to the Mailings: Need Approval, where you can send, test, schedule, copy, or delete the content you just created. Sending to Different Lists or to Segments 1. Follow the steps above to create a new mailing, but before saving your message, click on the Recipients Tab. 2. Select Choose Segments. 3. Select the lists and segments that should receive this mailing. Only the segments and lists available to you will be displayed here. 4. Click on OK, and continue composing your message. When you're done, click on Save or Save and Test. 118 Sending to a Sample of Your List 1. Follow the steps above to create a new mailing, but before saving your message, click on the Recipients Tab. 2. Enter the number of recipients who should receive a sample mailing in Sample Size. ListManager will select a random sampling of your list of the size you've specified. 3. Click on OK, and continue posting your message. When you're done, click on Save or Save and Test. 4. You may later purge these sample recipients when sending a new message. Purging Recipients of Previous Mailings 1. Follow the steps to create a new mailing, but before saving your message, click on the Recipients Tab. 2. Select Choose Mailings for Purge From. 3. Select the mailings whose recipients should NOT receive this mailing. 4. Click on OK, and continue composing your message. When you're done, click on Save or Save and Test. Note that your list must be set to allow recipient purging. See Mailings: New Mailing: Recipients for more information about those settings. Tracking Opens or HTML Capability 1. Follow the steps to create a new mailing, but before saving your message, click on the Tracking Tab. 2. Select Yes for Track Opens to track how many people open your message. 3. Select Yes for Detect HTML Capability to track whether recipients can receive HTML. 4. Click on OK, and continue composing your message. When you're done, click on Save or Save and Test. Scheduling a Message 1. Follow the steps to create a new mailing, but before saving your message, click on the Schedule Tab. 2. Type in the date and time you'd like the message to be sent in Send When. Use one of the following formats: YYYY-MM-DD HH-MM-SS MM/DD/YY YYYY-MM-DD 119 3. By default, the date and time shown in your message showing when it was sent will be rewritten to be the time you schedule it to be sent. If you'd like it to be the date when it was created, change Rewrite Date When Sent to No. 4. Click on OK, and continue composing your message. When you're done, click on Save or Save and Test. You may also schedule your message in Mailings: Need Approval. Creating a Recurring Message It may be convenient to have the same mailing be resent every day, week or month if you are using conditional content to change the contents of the message sent, or if the message is sent to a segment such as all new members who joined on a certain date. A list FAQ can also be resent regularly, reminding list members of the list's rules. 1. Follow the steps to create a new mailing, but before saving your message, click on the Schedule Tab. 2. Type in the date and time in Send When. Use one of the following formats: YYYY-MM-DD HH-MM-SS MM/DD/YY YYYY-MM-DD 3. Enter the number of days ListManager should wait before resending this message in Resend After This Many Days. If you enter 1, it will be sent every day; if you enter 7, every week. 4. Click on OK, and continue composing your message. When you're done, click on Save or Save and Test. You may also schedule your message in Mailings: Need Approval. Important note for users of earlier versions of ListManager: The list, site or server message wrapping will not be automatically included to your message if you create it through the ListManager administrator GUI. Please remember to add these instructions to your content or mailing, or send the message to the list via email. See Content: Insert Field: Unsubscribe to see how to do so quickly and easily. Mailings: New Mailing: Message The fields on the Essentials page are required for all mailings you create. For a stepby-step guide to making mailings, see Mailings: New Mailing. Mailing Name Select a name to identify your mailing. This name is not seen by message recipients, so label the mailing in a way that will help you to identify it later in the Mailings main page. 70 characters are allowed in the Mailing Name field. From: Required. The name and email address that should appear in the message's From: line. By default, your email address will appear in this field. To insert mail merge tags or conditional text, create content and import it into your mailing. 120 Examples of valid values for this field: [email protected] Bob Smith <[email protected]> [email protected] (Bob Smith) "Bob Smith" <[email protected]> To: Required. The name and email address that should appear in the message's To: line. By default, the mail merge tag %%nameemail%% appears in this field, which will merge in each recipient's name and email address. To insert mail merge tags or conditional text, create content and import it into your mailing. The To: field does not actually select the message's recipients. To specify the recipients, click on the Mailings: New Mailing: Recipients tab. Examples of valid values for this field: %%nameemail%% "Jazztalk Announcements" <[email protected]> Subject: Required. The text which will appear in the message's Subject: line. To insert mail merge tags or conditional text, create content and import it into your mailing. Text Message The plain-text contents of this message. Text copied and pasted from word processing programs such as Word may include extra characters, so it should be pasted into a plain-text editor first before being copied into the Text Message. If your content also includes an HTML message, your message will be sent out with both text and HTML. This kind of message is called multipart-alternative format, and it ensures that recipients who can read HTML see only HTML, but those who can't see the plain text message. To insert mail merge tags or conditional text, create content and import it into your mailing. HTML Message The HTML contents of your message. If you are including images in your HTML, make sure that the path for your images is the absolute path (the complete URL), not the relative path. For example, your HTML editor might make the path for a image to be something like /img/product.jpg. These should be changed to the absolute path: http://shelby.com/img/product.jpg If your content also includes a text message, your message will be sent out with both text and HTML. This kind of message is called multipart-alternative format, and it ensures that recipients who can read HTML see only HTML, but those who can't will see the plain text message. 121 Keep in mind that not everyone can read HTML, so it's a good idea to always include a text message as well. To insert mail merge tags or conditional text, create content and import it into your mailing. Save Saves your mailing, and takes you to the Mailings: Needs Approval page Save and Test Saves your mailing, and takes you to the Mailings: Test Mailing page. Import Content Imports content into the mailing that has already been created in Contents. Important note for users of earlier versions of ListManager: The list, site or server message wrapping will not be automatically included to your message if you create it through the ListManager administrator GUI. Please remember to add these instructions to your content or mailing, or send the message to the list via email. See Content: Insert Field: Unsubscribe to see how to do so quickly and easily. Mailings: New Mailing: Recipients By default, your mailing will be sent to your entire list. The Mailings: New Mailing: Recipients page allows you to specify segments, lists, the number of recipients to be sent to, and recipients to be purged. For a step-by-step guide to making mailings, see Mailings: New Mailing. These features are a part of ListManager Pro or Enterprise, and are unavailable for standard ListManager. Contact your account representative at [email protected] if you'd like to upgrade to ListManager Pro or Enterprise. Segments By default, your mailing will be sent to the list you're currently logged into. To change the list or segment, click on Choose Segments. You will be taken to a screen that will display the segments and lists available to you. Select from the left box the segments or lists you'd like to send to, and click the >> button. To remove segments or lists, select them from the right box and click the << button. If you select multiple lists or segments to send to, a separate mailing will be created for each. You will be able to approve or schedule all of them to be sent at the same time. If your list is not configured to allow you to merge, you will see the Enable Merge Feature button. Clicking on this button takes you directly to Utilities: List Settings: Basic Information: Enable Features. Change Save Messages to Enable Merge Mailings to Yes, and save. Also check Utilities: List Settings: Automatic Maintenance: Purging Archives to make sure archives are being saved for a sufficient period of time. You will then be able to purge recipients in future mailings. Note that if you are creating a triggered mailing, the segment name will not be editable from here, and you must specify the segment on the Trigger tab. Use the back button to return to the Mailings: New Mailing: Recipients page after changing your list settings. 122 Purge From ListManager allows you to remove or purge recipients who have received previous messages. For example, let's say you want to test the effectiveness of your message by sending it to half of your list. Later, you'd like to send a message to the list members who haven't received the first message. You can purge the recipients of the previous message, so your members only receive one message from you. By default, you send to all recipients in the list or subset. To purge recipients of other messages, click on Choose Mailings. You will be taken to a screen that will display the mailings available to you. Select from the left box the mailings whose recipients should NOT receive this message, and click the >> button. To remove mailings, select them from the right box and click the << button. If your list is not configured to allow you to purge recipients, you will see the Enable Purge Feature button. Clicking on this button takes you directly to Utilities: List Settings: Basic Information: Enable Features. Change Save Recipient Info to Enable Purge Mailings to Yes, and Save Messages to Enable Merge Mailings to Yes, and save. Also check Utilities: List Settings: Automatic Maintenance: Purging Archives to make sure archives are being saved for a sufficient period of time. You will then be able to purge recipients in future mailings. Use the back button on your browser to return to the Mailings: New Mailing: Recipients page after changing your list settings. Sample Size This setting sets the maximum number of recipients to be sent this mailing. The default, blank, sends to all recipients. If a number less than the total number of possible recipients is entered here, those recipients will be selected randomly from the list of potential recipients. If multiple lists or subsets are selected, the maximum number of recipients will be selected from each list or subset. For example, if you set this number to be 10, and you select three lists to send to, there will be thirty recipients of the message, ten from each list. This feature is helpful if you'd like to send out a test message to gauge its effectiveness to a limited number of your list members. You can then purge the recipients of that message when you send it out to the entire list. Alternatively, you may find that responses to your mailing overwhelms your company's resources to respond to say, a discount offer. Sending to a part of your list allows you to respond to just part of your membership at a time. Mailings: New Mailing: Tracking This page allows you to track message opens and whether or not a user has the ability to read HTML mail. For a step-by-step guide to making mailings, see Mailings: New Mailing. ListManager is able to detect opens and HTML capability by inserting a 1x1 invisible gif in the HTML portion of your message. When a recipient opens the message, ListManager can register that they did so and that they have HTML capability. If a user can only read text, or if their email client or ISP prevents gif files from being retrieved automatically, you will not be able to detect opens for that user. Track Opens 123 Allows you to track what percentage of your messages were opened by recipients who can see HTML. Opens cannot be tracked for recipients who cannot see HTML. If a user opens a message using two different clients (e.g., their email client and a web browser), two opens will be recorded, skewing your results. If you send a text-only message, an HTML message will created and added to your message. Your message will be sent as a multipart-alternative message, since opens cannot be tracked for text-only messages. Detect HTML Capability Allows you to track whether or not a recipient is able to read HTML. If the recipient can see HTML, the recipient's member record will be updated with that information. If you send a text-only message, an HTML message will created and added to your message. Your message will be sent as a multipart-alternative message, since HTML capability cannot be detected for text-only messages. To see what proportion of your list has been detected to be able to read HTML, click on View Current Totals. You will be taken to the Reports: Members: Attribute Reports: HTML Capable page, where you can see the number of members who have been HTML detected. Use the back button on your browser to return to the Mailings: New Mailing: Tracking page. Mailings: New Mailing: Schedule This page allows you to schedule when your mailing should be sent, and to rewrite the date and time sent to be the time when actually sent. You may also schedule your mailing to be resent. For a step-by-step guide to making mailings, see Mailings: New Mailing. Send When By default, your mailing will be sent when you approve it. If you'd like to schedule it to be sent at a particular date and time, enter it here in one of the following formats: YYYY-MM-DD HH-MM-SS MM/DD/YY YYYY-MM-DD You must specify a date; otherwise, the date will be set to be 1900/01/01, and the message will be sent immediately. Rewrite Date When Sent By default, the date on your mailing will be the date and time it is actually sent. If you'd like it to be the date the mailing was created, select No here. Resend After This Many Days By default, your mailing will be sent only once. If you'd like it to be resent periodically, enter the number of days before it should be resent. This feature is useful if you are sending a message to a segment which is constantly changing (e.g., all members who joined exactly one month ago today). It's also useful if you're sending the same message but with conditional content that always changes (e.g., a list of overdue books). 124 Discussion lists which send out an FAQ about the list periodically to remind members about the list's rules can also use this feature. Mailings: New Mailing: Internationalization Creating a mailing in an alternate character set requires that you have that character set installed on your system and that you have a means of editing or entering your message in that character set. Your web browser may be capable of converting Unicode to whatever character set you have selected for the mailing but you must be sure that there weren't any characters entered that don't exist in the specified character set. Otherwise they will show up incorrectly. Note: once a mailing is saved, it is converted to its encoded form and cannot be viewed in the correct character set. The Inmail and Outmail queues do not display messages using the correct character set. This is because the messages are displayed in their raw form and may be encoded. Character Set Before you enter a mailing into the web interface you must select the character set that you want to use for this mailing. If the character set you want to use does not exist in the drop-down listbox, your server administrator can add it in the Utilities:Other:International Character Sets page. Text and HTML Sections Encoding The encoding options can be left alone, in general. Some mail servers will convert 8-bit encoded messages to quoted-printable or base64 when required so it will usually be safe to leave them as 8-bit messages. If you are pasting in text that you know is already encoded to quoted-printable or base64, you can set the encoding to the right value and flag that field as already-encoded. After selecting the character set for your mailing, you can now enter in your text. When you select any other tab in the editor, the web browser will be set to use the character set that you defined. This is required to avoid character set conversions that are done by the web browser. These generally result in the loss of characters that aren't in the browser's character set. Note that if the character set of the mailing you are creating doesn't contain characters that your web interface requires, the web interface may display some wrong characters while you are in the mailing editor. For example, if your web interface is in French and you are composing a message in Japanese, some special accented characters in the web interface may show up incorrectly. When you leave the mailing editor, the web interface will return to normal. This is due to the fact that the web browser cannot display text in two different character sets at the same time. The exception is Unicode, which is currently not supported for content editing. You can use international characters in the From, To, and Subject fields but it isn't recommended. E-mail clients might not display these fields correctly because the character set of those fields may not be available in the message overview. Also, they must be specially encoded and not all mail clients are able to decode encoded header lines. The Name and Description should contain only standard ASCII characters since these fields are displayed in parts of the web interface that may not be displayed in the same character set. 125 If you are pasting in text or HTML that includes extended characters you should determine whether or not the text you are pasting is actually in that character set. If you are pasting from a plain text or plain html document, the character set may not be visible in the editor you are copying from. If you paste them into the mailing editor, they may not show up correctly after you save your message. That is because the character set that you pasted in was incompatible with the one defined for the mailing. You can work around this problem by entering the text before setting the character set in the Internationalization tab. Once your text is entered, you can change the character set and the content body fields will then be displayed with the correct characters. Mailings: Approval The Mailings: Approval menu is divided into three subsections designed to view and approve mailings: 1. 2. 3. Need Approval Approval Wizard Approval Summary Need Approval The Mailings: Approval: Need Approval page shows you all mailings which are pending your approval to be sent. Finding a Mailing Ten mailings for the list are displayed in Mailings: Need Approval. To view more than ten mailings at a time, click on Show More. Repeatedly clicking on Show More will show greater numbers of mailings at a time. You may change the sorting order of the mailings by clicking the up or down triangles next to ID, Title, or Subject. By clicking the top triangle, the sort order will be ascending (a-z); clicking the bottom arrow makes the sort order descending (z-a). Click on next to see the next ten mailings, previous to see the last ten. Viewing or Editing a Mailing To view a mailing, click on the mailing title. You will be taken to the Mailings: Need Approval: Edit Mailing screen, where you can view the mailing, edit it, or save and test it. Sending a Mailing To send a mailing, click on Send Now next to the mailing. Your message will be approved, and sent out immediately. If you have multiple mailings with the same name and title, you will also have the option to send all of these mailings to be sent at the same time. Multiple mailings like this are created when you send a single message to multiple subsets or lists. Testing a Mailing Click on Save and Test, or Test next to a mailing. You will be taken to the Mailings: Test Mailing page. Scheduling a Mailing To schedule a mailing to be sent at a future time, click on Schedule next to the mailing. 126 The Title, Subject, and Schedule Send Date will be displayed. To schedule the date and time the message should be sent out, enter the date and time in Schedule Send Date. If you have multiple mailings with the same name and title, you will also have the option to schedule all of these mailings to be sent at the same time. Multiple mailings such as these are created when you send a single message to multiple subsets or lists. Copying a Mailing Click on Copy next to the mailing you'd like to copy. ListManager will show you the old title, and will ask you the new title you'd like. You might want to copy a mailing if you'd like to send it again at a future date. Deleting a Mailing Click on Delete next to the mailing you'd like to delete. ListManager will ask you if you're sure before deleting the mailing. To send the sender a message why the mailing was rejected, select the mailing and click Delete with Feedback. You will be taken to the Delete with Feedback page, which allows you to tailor your response to each rejected mailing sender. If you have multiple mailings with the same name and title, you will also have the option to delete all of these mailings at the same time. Multiple mailings like this are created when you send a single message to multiple subsets or lists. Creating a Mailing Click on Create New Mailing to be taken to Mailings: New Mailing Download as a File Click on the disk icon to download your messages in CSV format. Approval Wizard Approve or reject mailings quickly by using the Mailings: Approval: Approval Wizard (available from the Mailings: Approval menu page). If you are approving (moderating) a discussion list (where members submit mailings to the list), the Approval Wizard helps you work quickly as you approve and delete mailings in the order in which they were submitted. You also have the option of deleting mailings with feedback so contributes know why their mailing was rejected. If you are sending messages with international character sets, they cannot be approved using the Approval Wizard; they can only be approved from the Homepage. See Mailings: Need Approval: Edit Mailing: Message Body for details on this. If you have several lists, the Approval Wizard also gives you an overview of your other lists to approve once you have completed approving messages for the list you're logged into. Approval Summary The Approval Summary shows you all the lists you have messages pending approval. You may click Overview to change lists and see the messages pending approval for that particular list. Or, click Approval Wizard next to the list to be taken directly to the Approval wizard for that list. The Approval Summary page may be book marked for easy reference. 127 Mailings: Need Approval: Edit Mailing: Message Body The Mailings: Need Approval: Edit Mailing pages are identical to the Mailings: Scheduled: Edit Mailing pages. From Whom the mailing is From. This information is included here to assist you in approving or rejecting mailings. The From: line may be changed in Mailings: Need Approval: Edit Mailing: Message Header. Subject The mailing's subject line. This information is included here to assist you in approving or rejecting mailings. The Subject: line may be changed in Mailings: Need Approval: Edit Mailing: Message Header. Date The date the mailing was sent. This information is included here to assist you in approving or rejecting mailings. The Date: line may be changed in Mailings: Need Approval: Edit Mailing: Message Header. Body The body of the mailing you're sending. If you've created both a text and HTML body for your message, you'll see some encoding that allows email clients to select which version they can open and read. It will start like this: This is a multi-part message in MIME format. --==-=-=-=-=-=-=-=-=-=-=-=-=-=-=-=-=-=-=-=-=-=-=-== Content-Type: text/plain; charset="iso-8859-1" Content-Transfer-Encoding: 7bit Be careful if you edit the body! If you change the encoding, it may prevent the message from being viewed properly. Test your mailing before sending it out if you make any changes. Note on Messages with International Character sets: If you are sending a message over the web which contains foreign or international character sets, please note that these CANNOT be edited while running the approval wizard, because the character sets may be incompatible. This can distort the message if it is a MIME encoded message. Any attempt to open, view, or use the Approval Wizard in the web interface will distort the message. If you need to approve a message with international character sets, it can be done without any distortion by doing so from the "Home" tab and going to the Homepage, and clicking "Send now" from the "Mailings Needing Approval" table there. This does not open the message, and therefore does not distort it or change it. Send Now Approve this mailing, and send it immediately. Delete Now 128 Delete this mailing. Once deleted, a mailing cannot be sent to the list without recreating it. Delete with Feedback Delete the mailing, but send the message's author a message explaining why it has been rejected. Save Save this mailing, but do not send it out. Save and Test Save this mailing, and test it. Cancel Cancel any changes made to this mailing, and return to the main menu. Mailings: Need Approval: Edit Mailing: Message Header The Mailings: Need Approval: Edit Mailing pages are identical to the Mailings: Scheduled: Edit Mailing pages. Mailing Name The title you've given this mailing. This title is not seen by message recipients. Header The message header will be displayed here. Parts of the header will appear as mail merge tags. The information appropriate for each recipient will be merged in when the mailing is sent. If you change the header, you may prevent the mailing from being sent properly. It is recommended you test your mailing before sending it. Send Now Approve this mailing, and send it immediately. Delete Now Delete this mailing. Once deleted, a mailing cannot be sent to the list without recreating it. Delete with Feedback Delete the mailing, but send the message's author a message explaining why it has been rejected. Save Save this mailing, but do not send it out. Save and Test Save this mailing, and test it. Cancel Cancel any changes made to this mailing, and return to the main menu. 129 Mailings: Need Approval: Edit Mailing: Recipients The Mailings: Need Approval: Edit Mailing pages are identical to the Mailings: Scheduled: Edit Mailing pages. Number of Recipients to Send To If blank, all the recipients in the selected lists and subsets will be sent to. To send to a limited number of recipients (for a sample, for example), enter a number here. If you've already selected the number of recipients to be sent to when creating your mailing, that number will be shown here. Segments to Use Displays the segments or lists to be sent to. For informational purposes only; to send to a different list or subset, create a new mailing. Purge From Displays the mailings whose recipients should not receive this message. For informational purposes only; to purge different recipients or none at all, create a new mailing. Send Now Approve this mailing, and send it immediately. Delete Now Delete this mailing. Once deleted, a mailing cannot be sent to the list without recreating it. Delete with Feedback Delete the mailing, but send the message's author a message explaining why it has been rejected. Save Save this mailing, but do not send it out. Save and Test Save this mailing, and test it. Cancel Cancel any changes made to this mailing, and return to the main menu. Mailings: Need Approval: Edit Mailing: Schedule This page allows you to schedule when your mailing should be sent, and to rewrite the date and time sent to be the time when actually sent. You may also schedule your mailing to be resent. The Mailings: Need Approval: Edit Mailing pages are identical to the Mailings: Scheduled: Edit Mailing pages. Send When 130 By default, your mailing will be sent when you approve it. If you'd like to schedule it to be sent at a particular date and time, enter it here in one of the following formats: YYYY-MM-DD HH-MM-SS MM/DD/YY YYYY-MM-DD You must specify a date; otherwise, the date will be set to be 1900/01/01, and the message will be sent immediately. Rewrite Date When Sent By default, the date on your mailing will be the date and time it is actually sent. If you'd like it to be the date the mailing was created, select No here. Resend After This Many Days By default, your mailing will be sent only once. If you'd like it to be resent periodically, enter the number of days here. This feature is useful if you are sending a message to a segment which is constantly changing (e.g., all members who joined exactly one month ago today). It's also useful if you're sending the same message but with conditional content that always changes (e.g., a list of overdue books). Discussion lists can also periodically send out an FAQ about the list to remind members about the list's rules. Send Now Approve this mailing, and send it immediately. Delete Now Delete this mailing. Once deleted, a mailing cannot be sent to the list without recreating it. Delete with Feedback Delete the mailing, but send the message's author a message explaining why it has been rejected. Save Save this mailing, but do not send it out. Save and Test Save this mailing, and test it. Cancel Cancel any changes made to this mailing, and return to the main menu. Mailings: Mailing Status: All Outgoing Mailings by Date The Mailings: All Outgoing Mailings by Date page shows you all mailings being sent or which have already been sent, sorted by date and time Finding a Mailing 131 Ten mailings for the list are displayed in Mailings: All Outgoing Mailings by Date. To view more than ten mailings at a time, click on Show More. Repeatedly clicking on Show More will show greater numbers of mailings at a time. You may change the sorting order of the mailings by clicking the up or down triangles next to ID, Date Created, Mailing Name, Recips, Sent, or Status. By clicking the top triangle, the sort order will be ascending (a-z); clicking the bottom arrow makes the sort order descending (z-a). Click on next to see the next ten mailings, previous to see the last ten. The sort options are: ID The ID ListManager has assigned this mailing. Date Created The date on which the mailing was originally created. Mailing Name The title you gave this mailing. Recips The total number of recipients to be sent this mailing when the mailing was originally queued. Sent The percentage of these recipients who have definitely been sent this mailing, or who have definitely failed. Status Whether a message is new, currently sending, performing a retry, or is done. Viewing or Editing a Mailing To view a mailing, click on the mailing name. You will be taken to the Mailings: Outgoing Mailings: Edit Mailing screen, where you can view the mailing, edit it, or save it. Deleting a Mailing Click on Delete next to the mailing you'd like to delete. ListManager will ask you if you're sure before deleting the mailing. Creating a Mailing Click on Create New Mailing to be taken to Mailings: New Mailing Download as a File Click on the disk icon to download your mailings in CSV format. Mailings: Mailing Status: Currently Active Mailings The Mailings: Currently Active Mailings page shows you all mailings currently being sent or which are scheduled to be retried at a future date. Finding a Mailing 132 Ten mailings for the list are displayed in Mailings: Currently Active Mailings. To view more than ten mailings at a time, click on Show More. Repeatedly clicking on Show More will show greater numbers of mailings at a time. You may change the sorting order of the mailings by clicking the up or down triangles next to ID, Date Created, Name, Recips, Sent, or Status. By clicking the top triangle, the sort order will be ascending (a-z); clicking the bottom arrow makes the sort order descending (z-a). Click on next to see the next ten mailings, previous to see the last ten. The sort options are: ID The ID ListManager has assigned this mailing. Date Created The date on which the mailing was originally created. Name The name you gave this mailing. Recips The number of recipients to be sent this mailing. Sent The percentage of these recipients who have been sent this mailing. Status Whether a message is currently sending, performing a retry, or is done. Viewing or Editing a Mailing To view a mailing, click on the mailing name. You will be taken to the Mailings: Outgoing Mailings: Edit Mailing screen, where you can view the mailing, edit it, or save it. Deleting a Mailing Click on delete next to the mailing you'd like to delete. ListManager will ask you if you're sure before deleting the mailing. Creating a Mailing Click on Create New Mailing to be taken to Mailings: New Mailing Download as a File Click on the disk icon to download your messages in CSV format. Mailings: Mailing Status: Completed Mailings The Mailings: Completed Mailings page shows you all mailings which have been completed, and are no longer being sent or scheduled to be sent in a retry. Finding a Mailing Ten mailings for the list are displayed in Mailings: Completed Mailings. To view more than ten mailings at a time, click on Show More. Repeatedly clicking on Show More will show greater numbers of mailings at a time. 133 You may change the sorting order of the mailings by clicking the up or down triangles next to ID, Title, Recips, Sent, or Status. By clicking the top triangle, the sort order will be ascending (a-z); clicking the bottom arrow makes the sort order descending (z-a). Click on next to see the next ten mailings, previous to see the last ten. The sort options are: ID The ID ListManager has assigned this mailing. Name The name you gave this mailing. Recips The number of recipients to be sent this mailing. Sent The percentage of these recipients who have been sent this mailing. Status Whether a message is currently sending, performing a retry, or is done. Viewing or Editing a Mailing To view a mailing, click on the mailing title. You will be taken to the Mailings: Outgoing Mailings: Edit Mailing screen, where you can view the mailing, edit it, or save it. Deleting a Mailing Click on Delete next to the mailing you'd like to delete. ListManager will ask you if you're sure before deleting the mailing. Creating a Mailing Click on Create New Mailing to be taken to Mailings: New Mailing Download as a File Click on the disk icon to download your mailings in CSV format. Mailings: Mailing Status: Mail Queues The mail queues allow you to view all mail coming in and out of your ListManager server. If you're wondering what mail you're receiving, or what kinds of messages ListManager is sending other than your mailings, view the mail queues. Viewing these queues can be helpful for troubleshooting purposes. The length of time mail is held in the Incoming and Outgoing mail queues is dependent on how long you've set the server to save old data. See Utilities: Administration: Server: Server Settings: Automatic Maintenance: Purging Old Data for more information. Mailings: Mailing Status: Mail Queues: Incoming 134 The Incoming Mail Queue contains all the mail coming into your server. Finding an Incoming Message Ten messages are shown at a time. To view more than ten messages at a time, click on Show More. Repeatedly clicking on Show More will show greater numbers of messages at a time. You may change the sorting order of the messages by clicking the up or down triangles next to Date, From, To, or List. By clicking the top triangle, the sort order will be ascending (a-z); clicking the bottom arrow makes the sort order descending (z-a). Click on next to see the next ten messages, previous to see the last ten. Date The date and time the message was received. From Who the message was addressed From:. To Who the message was addressed To:. List The list or list and segment the message is addressed to, if applicable. Subject The Subject: line of the message. Click on the drop down box to select a different list's incoming messages, or to view all incoming messages for the server. Viewing an Incoming Message To view an incoming message, click on the date or on View next to the mailing you'd like to view. You will be taken to the Utilities: Mail Queues: Incoming: View Message page, where you can view the message. Deleting a Message Click on Delete next to the message you'd like to delete. ListManager will ask you if you're sure before deleting the message. Download as a File Click on the disk icon to download your mailing queue in CSV format. Mailings: Mailing Status: Mail Queues: Incoming: View Message From The email address the message is From:. To The email address or mail merge tag the message is To:. Subject The Subject: of the message. 135 List Name The name of the list or list and segment the message was sent to. Body The body of the message. Status The status of the message: New The message has just started, and is being processed. Pending The message is currently being processed. Done The message has been processed. Type The type of message this is, such as a subscription request or an admin send. Date Created The date this message was created. Message ID The incoming ID number ListManager assigned this message when it was received. Computer Name The name of the computer which received this message. Was Message Sent by Email Whether or not the message was sent by email, or sent using the ListManager web interface. All Headers All the headers for this message. Max Recipients The maximum number of recipients for this message. Priority The priority of this message, one being the highest. Purge Message Which mailings' recipients will be purged from receiving this mailing. Subset ID If sent to a subset, the ID number of the subset. Title The title of the mailing. Transact The time and steps ListManager took to process this message. 136 Mailings: Mailing Status: Mail Queues: Outgoing The Outgoing Mail Queue contains all the mail coming into your server. Finding an Outgoing Mailing or Message Ten mailings (emails sent to the entire list) from the current list are shown at a time. To view more than ten mailings at a time, click on Show More. Repeatedly clicking on Show More will show greater numbers of mailings at a time. You may change the sorting order of the mailings by clicking the up or down triangles next to Date, From, To, or List. By clicking the top triangle, the sort order will be ascending (a-z); clicking the bottom arrow makes the sort order descending (z-a). Click on next to see the next ten messages, previous to see the last ten. Date The date and time the outgoing message or mailing was created. List The list the mailing or message is associated with, if applicable. Status The current status of the message, whether New, Pending, Retry or Done. See Utilities: Mail Queues: Outgoing: View Message for more details. Retries How many retries have been attempted on this message. If still in the initial send, Retries will be set to 0. By default, all mailings for the current list are shown on this screen. Click on the drop down box to select a particular list's outgoing mailings, or to view all outgoing messages (emails sent to individuals in response to particular requests) for the server. Viewing an Outgoing Mailing or Message To view an outgoing mailing or message, click on the date or on View next to the mailing you'd like to view. You will be taken to the Utilities: Mail Queues: Outgoing: View Message page, where you can view the mailing or message. Deleting or Stopping a Mailing or Message Click on Delete next to the mailing or message you'd like to delete. ListManager will ask you if you're sure before deleting the mailing message. Download as a File Click on the disk icon to download your mailing queue in CSV format. Mailings: Mailing Status: Mail Queues: Outgoing: View Message From The email address the message is From. To The email address or mail merge tag the message is to. 137 List Name The name of the list. Body The body of the message. Status The status of the message: New The message has just started, and is being processed. Pending The message is currently being sent. Retry The message has been sent once, and it is waiting to be sent again in a retry. The number of retries is determined by your server settings. Done The message has completed sending. Type The type of message this is, such as a subscription request or an admin send. Date Created The date this message was created. Message ID The outgoing ID number ListManager assigned this message when it was sent. Date Finished The date and time the message was completed sending. All Headers All the headers for this message. Successful IDs The number of recipients who successfully received this message. Pending IDs The number of recipients who are still waiting to receive this message. Transient Recipient IDs The number of recipients with soft bounces, and who may be deliverable later. Unreachable IDs The number of recipients with hard bounces, and who are undeliverable. Inmail ID The incoming ID number ListManager assigned this message when it was received. Priority The priority level of this message, with one as the highest. 138 Retry Date The date and time of the next retry. Send Date The date and time the message was sent. Number of Retries The number of times this message was retried. Subset ID The ID numbers of the subsets this message was sent to. Transaction Log The time and steps ListManager took to process this message. Mailings: Advanced Mailings: New Triggered Mailing Triggered mailings are a feature of ListManager Enterprise, and are unavailable for standard or Pro ListManager. Contact your account representative at [email protected] if you'd like to upgrade to ListManager Enterprise. Triggered mailings work on the premise that the time when the mailing is sent to a member depends on some action performed by that member, such as visiting a web page or making a purchase. It can also depend on some date associated with that member, such as their birthday or the date they joined the list. Triggered mailings run on a regular frequency. This is usually once per day, but could be as often as once per hour, or as infrequently as every several weeks. The exact time of day when it runs is specified by you. Each time the triggered mailing runs, it works the same way as any other mailing to a segment. It first calculates which members meet the criteria specified in the segment, and then sends them the mailing. What is special about triggered mailings is that they have a special type of segment called a triggered segment, or trigger for short. A key part of a triggered segment is the trigger clause. This determines who should receive the mailing right now. Creating a Triggered Mailing Creating a triggered mailing is much like creating a standard mailing, except that the "Schedule" tab is replaced by the "Trigger" tab. For details on the other tabs, please see: Mailings: New Mailing: Message Mailings: New Mailing: Recipients (the only difference here is that rather than choosing a segment, you will select a segment based on the desired trigger on the Trigger tab. Mailings: New Mailing: Tracking Mailings: New Mailing: Internationalization 139 Trigger Tab The Trigger tab is where you select a trigger from the ones created in Segments: New Triggered Segment, and define the times for the mailing to be sent. For details on how to use the Trigger tab, see Mailings: Advanced Mailings: Trigger Tab. Mailings: Advanced Mailings: New Triggered Mailing Wizard Triggered mailings are a feature of ListManager Enterprise, and are unavailable for standard or Pro ListManager. Contact your account representative at [email protected] if you'd like to upgrade to ListManager Enterprise. The Triggered Mailing wizard allows you to quickly create a triggered mailing in one step. It also references the trigger created in Segments: New Triggered Segment, and combines all the tabs involved in creating a new triggered mailing into one page. The wizard takes the fundamentals of the Message, Recipients, Tracking, and Trigger tabs and puts them in one page for easy accessibility. Note that the wizard cannot be used to create mailings involving Internationalization- to do this, a new triggered mailing must be created. Name Select a name to identify your triggered mailing. This name is not seen by message recipients, so label the mailing in a way that will help you to identify it later in the Mailings main page. 70 characters are allowed in the Name field. Trigger Select the desired trigger (triggered segment) from the dropdown menu. In order for triggers to appear here they must first be created in Segments, by clicking on create new triggered segment. Tracking Allows you to track what percentage of your messages were opened by recipients who can see HTML. Opens cannot be tracked for recipients who cannot see HTML. If a user opens a message using two different clients (e.g., their email client and a web browser), two opens will be recorded, skewing your results. If you send a text-only message, an HTML message will created and added to your message. Your message will be sent as a multipart-alternative message, since opens cannot be tracked for text-only messages. Detect HTML Capability Allows you to track whether or not a recipient is able to read HTML. If the recipient can see HTML, the recipient's member record will be updated with that information. If you send a text-only message, an HTML message will created and added to your message. Your message will be sent as a multipart-alternative message, since HTML capability cannot be detected for text-only messages. Time after the Trigger Event Select the number of hours/days/weeks/months/years before or after the trigger event 140 the mailing should be sent. ListManager will see that the trigger event has occurred, and that the member(s) qualify to receive the mailing, but will not send the mailing immediately; rather it will delay it by the time specified here. For instance, if a member purchased an item on August 29th, 2003, you can then send the mailing 2 days after the purchase (the trigger event) rather than immediately upon the purchase. Then the setting would be "2 days afterwards". The "before" option is for future triggers that you may anticipate, such as a member birthday or join date anniversary. This would send the triggered mailing the set time prior to the upcoming event (i.e. birthday). Content Select the desired Content to be included in the triggered mailing from the dropdown menu. In order for the Content to appear here, it must first be created in Content: New Content. Once you click "OK", you will be asked to confirm the triggered mailing. Mailings: Advanced Mailings: View Triggered Mailings Triggered mailings are a feature of ListManager Enterprise, and are unavailable for standard or Pro ListManager. Contact your account representative at [email protected] if you'd like to upgrade to ListManager Enterprise. The View Triggered Mailings page displays a list of all triggered mailings, from which they can be edited, tested, rescheduled, or deleted. In addition, a new triggered mailing can be created from this page by clicking on "create new mailing". For more information on how to create triggered mailings, see Mailings: Advanced Mailings: New Triggered Mailing or Mailings: Advanced Mailings: New Triggered Mailing Wizard. Finding a Triggered Mailing Ten triggered mailings are shown at a time. To view more than ten at a time, click Show More. Repeatedly clicking Show More will show greater numbers of triggered mailings at a time. You may change the sorting order of the triggered mailings by clicking the up or down triangles next to the ID, Mailing Name, Subject, or Run Date. By clicking the top triangle, the sort order will be ascending (a-z); clicking the bottom arrow makes the sort order descending (z-a). Viewing or Editing an Existing Triggered Mailing To view a triggered mailing, click the ID for that mailing. You will be taken to the Mailings: Advanced Mailings: Editing Triggered Mailings page, where you can view the mailing details, edit it, or save and test it. Testing an Existing Triggered Mailing Click Test next to the triggered mailing you'd like to test. ListManager will show you the name and subject of the mailing. Enter a valid email address to test that the mailing arrives and verify the content. Enter a sample size (usually 1), and set whether or not to perform spam analysis. Rescheduling a Triggered Mailing Triggered mailings can be rescheduled to be sent out on a different date or at a 141 different time. When you click on "reschedule", this opens the "Reschedule Triggered Mailing" page. Here, the Mailing name and Subject are hard coded and cannot be edited, and the current send date and time are displayed. To unschedule this triggered mailing completely, click "unschedule". This will prevent the mailing from going out at all in the future. Enter the new rescheduled date and time and previous send date and time (if necessary) upon which to base the send date calculations. Changing these values allows you to skip sending mailings for a period of time, or resend the mailing for a period of time. Deleting a Triggered Mailing Click Delete next to the triggered mailing you'd like to delete. ListManager will ask you if you're sure before deleting the mailing. Creating a Mailing Click "create new mailing" to be taken to the Mailings: Advanced Mailings: New Triggered Mailing page. Download as a File Click the disk icon to download your triggered mailings in CSV format. This will download the information seen on this page, including the mailing name, subject, run date, etc. Mailings: Advanced Mailings: Editing Triggered Mailings The Edit Triggered Mailing page is reached from the Mailings: Advanced Mailings: View Triggered Mailings page, by clicking the ID number next to the triggered mailing you want to view or edit. The editing option is here to allow you to make changes in the frequency, run time, etc., without deleting the mailing and having to create a new one. There are four tabs on this page to easily edit the triggered mailing: Message Body For details, see Mailings: Need Approval: Edit Mailing: Message Body Message Header For details, see Mailings: Need Approval: Edit Mailing: Message Header Recipients For details, see Mailings: Need Approval: Edit Mailing: Recipients Trigger The selected trigger will be displayed here. To edit this trigger, click the "edit" button to go to the Segments: New/Edit Segment: Essentials page. It is not recommended that the segment be edited after the triggered mailing is created. If this is necessary, please make sure that the times set for the mailing correspond with any changes in the triggered segment. Next run time Enter the first (next) run time for the mailing. This is the first date/time that the triggered mailing will run, regardless of previous run times and run frequencies. This must be entered in YYYY-MM-DD HH:MM:SS format. If no time is entered, it will default to YYYY-MM-DD 00:00:00. The default is tonight at 23:59 (just before midnight). 142 Previous run time (optional) This is the original time or date from which the mailing will begin to detect members that will receive this mailing the first time. This must be entered in YYYY-MM-DD HH:MM:SS format. If no time is entered, it will default to YYYY-MM-DD 00:00:00. In general, this field will be left blank, in which case the Run Frequency will be used to determine how long before the Next run time the trigger will start detecting trigger events. You may wish to enter a specific time, though, in case you wish to immediately send to members who have already met the requirements of the trigger in the last month, for example. Run Frequency Select how many days/weeks/months apart this mailing will run. Each time the mailing runs, ListManager will look for members who have met the criteria to receive a mailing, since the last time the mailing ran. The default run frequency is "1 day". Time from trigger event Select the number of hours/days/weeks/months/years before or after the trigger event the mailing should run. ListManager will see that the trigger event has occurred, and that the member(s) qualify to receive the mailing, but will not send the mailing immediately; rather it will delay it by the time specified here. For instance, if a member purchased an item on August 29th, 2003, you can then send the mailing 2 days after the purchase (the trigger event) rather than immediately upon the purchase. Then the setting would be "2 days afterwards". The "before" option is for future triggers that you may anticipate, such as a member birthday or join date anniversary. This would send the triggered mailing the set time prior to the upcoming event (i.e. birthday). Mailings: Advanced Mailings: New Sequential Mailing Sequential mailings are a feature of ListManager Enterprise, and are unavailable for standard or Pro ListManager. Contact your account representative at [email protected] if you'd like to upgrade to ListManager Enterprise. Sequential mailings are a series of triggered mailings sent out in sequence, at predetermined time intervals, to each member who qualifies. This group of mailings is considered one "sequence" of mailings, and they all collectively have the same mailing name. Note that to set up this series at varying time intervals with individual Contents associated with each mailing, the Sequential Mailing Wizard may be used as a convenient way to quickly create the entire sequence of mailings. Triggered (and therefore sequential) mailings work on the premise that the time when the mailing is sent to a member depends on some action performed by that member, such as visiting a web page or making a purchase. It can also depend on some date associated with that member, such as their birthday or the date they joined the list. Triggered mailings run on a regular frequency. This is usually once per day, but could be as often as once per hour, or as infrequently as every several weeks. The exact time of day when it runs is specified by you. When the triggered mailing is sent, it runs the same way as any other mailing for a specific segment. The mailing depends on which members meet the criteria of the triggered segment, and sends the mailing to them. A key part of the segment is the trigger clause, because this determines who will receive the triggered mailing now (since the last time the triggered mailing was sent). 143 Example: Members who purchase a particular high-end product could receive a "thank you" message the next day, a promotional discount for add-on features after three days, a questionnaire about satisfaction with the product after two weeks, and a series of newsletter articles about the product and related products over the next few months. Creating a Sequential Mailing Creating a sequential mailing is much like creating a standard mailing (but with a trigger), except that the "Schedule" tab is replaced by the "Trigger" tab. For details on the other tabs, please see: Mailings: New Mailing: Message Mailings: New Mailing: Recipients (the only difference here is that rather than choosing a segment, you will select a segment based on the desired trigger on the Trigger tab. Mailings: New Mailing: Tracking Mailings: New Mailing: Internationalization Trigger Tab The Trigger tab is where you select a trigger from the ones created in Segments: New Triggered Segment, and define the times for the mailing to be sent. For details on how to use the Trigger tab, see Mailings: Advanced Mailings: Trigger Tab. Mailings: Advanced Mailings: New Sequential Mailing Wizard Sequential mailings are a feature of ListManager Enterprise, and are unavailable for standard or Pro ListManager. Contact your account representative at [email protected] if you'd like to upgrade to ListManager Enterprise. Sequential mailings are a series of triggered mailings sent out in sequence, at predetermined time intervals, to each member who meets the criteria of a single triggered segment. The intervals are set here, and the individual Contents associated with each mailing in the sequence are selected here. The Sequential Mailing wizard allows you to quickly create a sequentially triggered mailing in one step. It also references the trigger created in Segments: New Triggered Segment. The sequential mailing wizard must be used to set up the individual times and contents for each mailing to be sent out. Using the Sequential Mailing Wizard The sequential mailing wizard is set up to be intuitive and easy to use. The correct segments and triggered mailings must be set up prior to using the sequential mailing wizard. Name Select a name to identify your sequentially triggered mailing. This name is not seen by message recipients, so label the mailing in a way that will help you to identify it later in the Mailings main page. 70 characters are allowed in the Name field. 144 Trigger Select the desired trigger from the dropdown menu. In order for triggers to appear here they must first be created in Segments, by clicking on create new triggered segment. Track opens Allows you to track what percentage of your messages were opened by recipients who can see HTML. Opens cannot be tracked for recipients who cannot see HTML. If a user opens a message using two different clients (e.g., their email client and a web browser), two opens will be recorded, skewing your results. If you send a text-only message, an HTML message will created and added to your message. Your message will be sent as a multipart-alternative message, since opens cannot be tracked for text-only messages. Detect HTML capability Allows you to track whether or not a recipient is able to read HTML. If the recipient can see HTML, the recipient's member record will be updated with that information. If you send a text-only message, an HTML message will created and added to your message. Your message will be sent as a multipart-alternative message, since HTML capability cannot be detected for text-only messages. Time after the Trigger Event The times are set up for each individual mailing in the series. Each time starts counting from the trigger event, not from the previous mailing in the series. So, if the first time is 1 day after the trigger event, and the second time is 3 days after the trigger event, the second mailing will occur 3 days after the trigger event, rather than 4 days. Select the number of hours/days/weeks/months/years before or after the trigger event the mailing should run. ListManager will see that the triggered event has occurred, and that the member(s) qualify to receive the mailing, but will not send the mailing immediately; rather it will delay it by the time specified here. For instance, if a member purchased an item on August 29th, 2003, you can then send the mailing 2 days after the purchase (the trigger event) rather than immediately upon the purchase. Then the setting would be "2 days afterwards". The "before" option is for future triggers that you may anticipate, such as a member birthday or join date anniversary. This would send the triggered mailing the set time prior to the upcoming event (i.e. birthday). Content Select the Content to be associated with the sequentially triggered mailing. In order for the Contents to appear here they must have been previously created in Contents. Mailings: Advanced Mailings: View Sequential Mailings Sequential mailings are a feature of ListManager Enterprise, and are unavailable for standard or Pro ListManager. Contact your account representative at [email protected] if you'd like to upgrade to ListManager Enterprise. The View Sequential Mailings page displays a list of all sequential mailings. To view the mailings in sequence that comprise each sequential mailing, click on the Sequential Mailing Name link. This opens the Sequential Details page, which displays all of the individual mailings that make up the sequential mailings. These individual mailings can 145 be further edited by clicking the ID number next mailing. This allows you to edit the mailing itself. This can best be described as follows: Sequential page (displays sequential mailings) > Sequential Details page (displays individual mailings in sequence for the selected sequential mailing). In addition, a new sequential mailing can be created from this page by clicking "create new sequential mailing". For more information on how to create sequential mailings, see Mailings: Advanced Mailings: New Sequential Mailing and Mailings: Advanced Mailings: New Sequential Mailing Wizard. Finding a Sequential Mailing Ten sequential mailings are shown at a time. Note that the view here displays each sequential mailing, NOT the individual mailings that comprise a sequential mailing. To see the individual mailings that belong to a sequential mailing, click on the sequential mailing name to be taken to the Sequential Details page, from where new mailings can be added to the sequence. To view more than ten at a time, click Show More. Repeatedly clicking Show More will show greater numbers of triggered mailings at a time. You may change the sorting order of the sequential mailings by clicking the up or down triangles next to the Sequential Mailing Name or Count. By clicking the top triangle, the sort order will be ascending (a-z); clicking the bottom arrow makes the sort order descending (z-a). Viewing or Editing an Existing Sequential Mailing To view a sequential mailing, click the ID for that mailing. You will be taken to the Sequential Details page, where you can test, reschedule, or delete the mailing in the sequence, or further edit it by clicking the ID. Testing an Existing Sequential Mailing Sequential mailings must be tested from the Sequential Details page. Click Test next to the mailing in the sequence like to test. ListManager will show you the name and subject of the mailing. Enter a valid email address to test that the mailing arrives and to verify the content. Enter a sample size (usually 1), and set whether or not to perform spam analysis. It is strongly recommended that segments are tested when saved, to make sure that no errors occur. Rescheduling a Sequential Mailing Sequential mailings can be rescheduled to be sent out on a different date or at a different time. When you click "reschedule", this opens the "Reschedule Sequential Mailing" page. Here, the Mailing name and Subject are hard coded and cannot be edited, and the current send date and time are displayed. To unschedule this triggered mailing completely, click "unschedule". This will prevent the mailing from going out at all in the future. Enter the new rescheduled date and time, previous send date and time (if necessary) upon which to base the send date calculations, or the new send frequency. Changing these values allows you to skip sending mailings for a period of time, or resend the mailing for a period of time. Deleting a Sequential Mailing Sequential mailings must be deleted from the Sequential Details page. Click Delete next to the mailing you'd like to delete. ListManager will ask you if you're sure before deleting the mailing. 146 Adding Mailings to the Sequence Individual mailings must be added to the sequence of a sequential mailing from the Sequential Details page. Click "add to sequence" to be taken to Mailings: Advanced Mailings: New Sequential Mailing page. Note that you will be unable to edit the mailing name, and the mailing trigger, as these will be preset to the values for your existing sequence. Download as a File Sequential mailings must be downloaded from the Sequential Details page. Click the disk icon to download your sequential mailings in CSV format. This will download the information seen on this page, including the sequential mailing name and the number of individual mailings in the sequence. Mailings: Advanced Mailings: Trigger Tab Triggered and Sequential mailings are a feature of ListManager Enterprise, and are unavailable for standard or Pro ListManager. Contact your account representative at [email protected] if you'd like to upgrade to ListManager Enterprise. The fields on the Trigger page allow you to create a mailing to be sent when a particular trigger event occurs. Triggered mailings are associated with a particular segment or with a particular automated message. A trigger is necessary to create a triggered or sequential mailing, and work in conjunction with triggered segments. Note that the Trigger Tab replaces the Schedule Tab in standard mailings. Trigger Select a trigger from the dropdown menu. In order for triggers to appear here, they must first be created in Segments: New Triggered Segment. Next run time Enter the first (next) run time for the mailing. This is the first date/time that the triggered mailing will run, regardless of previous run times and run frequencies. This must be entered in YYYY-MM-DD HH:MM:SS format. If no time is entered, it will default to YYYY-MM-DD 00:00:00. The default is tonight at 23:59 (just before midnight). Previous run time (optional) This is the original time or date from which the mailing will begin to detect members that will receive this mailing the first time. This must be entered in YYYY-MM-DD HH:MM:SS format. If no time is entered, it will default to YYYY-MM-DD 00:00:00. In general, this field will be left blank, in which case the Run Frequency will be used to determine how long before the Next run time the trigger will start detecting trigger events. You may wish to enter a specific time, though, in case you wish to immediately send to members who have already met the requirements of the trigger in the last month, for example. Run Frequency Select how many days/weeks/months apart this mailing will run. Each time the mailing runs, ListManager will look for members who have met the criteria to receive a mailing, since the last time the mailing ran. The default run frequency is "1 day". Time from trigger event 147 Select the number of hours/days/weeks/months/years before or after the trigger event the mailing should run. ListManager will see that the trigger event has occurred, and that the member(s) qualify to receive the mailing, but will not send the mailing immediately; rather it will delay it by the time specified here. For instance, if a member purchased an item on August 29th, 2003, you can then send the mailing 2 days after the purchase (the trigger event) rather than immediately upon the purchase. Then the setting would be "2 days afterwards". The "before" option is for future triggers that you may anticipate, such as a member birthday or join date anniversary. This would send the triggered mailing the set time prior to the upcoming event (i.e. birthday). Mailings: Scheduled The Mailings: Scheduled page shows you all mailings which are scheduled to be sent at a future time. Finding a Mailing Ten mailings for the list are displayed in Mailings: Scheduled. To view more than ten mailings at a time, click on Show More. Repeatedly clicking on Show More will show greater numbers of mailings at a time. You may change the sorting order of the mailings by clicking the up or down triangles next to ID, Name, Subject, or Send Date. By clicking the top triangle, the sort order will be ascending (a-z); clicking the bottom arrow makes the sort order descending (z-a). Click on next to see the next ten mailings, previous to see the last ten. Viewing or Editing a Mailing To view a mailing, click on the mailing name. You will be taken to the Mailings: Scheduled Mailings Edit Mailing screen, where you can view the mailing, edit it, or save and test it. Sending a Mailing To send a mailing, click on Send Now next to the mailing. Your message will sent out immediately. If you have multiple mailings with the same name and title, you will also have the option to send all of these mailings to be sent at the same time. Multiple mailings such as these are created when you send a single message to multiple subsets or lists. Testing a Mailing Click on Test next to the mailing you'd like to test. You will be taken to the Mailings: Test Mailing page. Rescheduling a Mailing To change the scheduled time a mailing should be sent, click on Reschedule next to the mailing. The Title, Subject, Current Send Date, and Reschedule Send Date will be displayed. To reschedule the date and time the message should be sent out, enter the date and time in Reschedule Send Date. You may also click on Unschedule to prevent a message from being sent at the scheduled time. The message will then appear in Mailings: Need Approval. If you have multiple mailings with the same name and title, you will also have the option to schedule all of these mailings to be sent at the same time. Multiple mailings like this are created when you send a single message to multiple subsets or lists. 148 Copying a Mailing Click on copy next to the mailing you'd like to copy. ListManager will show you the old title, and will ask you the new title you'd like. You might want to copy a mailing if you'd like to send it again at a future date. Deleting a Mailing Click on delete next to the mailing you'd like to delete. ListManager will ask you if you're sure before deleting the mailing. If you have multiple mailings with the same name and title, you will also have the option to delete all of these mailings at the same time. Multiple mailings like this are created when you send a single message to multiple subsets or lists. Creating a Mailing Click on Create New Mailing to be taken to Mailings: New Mailing Download as a File Click on the disk icon to download your mailings in CSV format. Note that triggered and sequential mailings can be "unscheduled" as well. For more information, see Mailings: Advanced Mailings: New Triggered Mailing and Mailings: Advanced Mailings: New Sequential Mailing. Mailings: View Outgoing Mailing: Message Body Mailing Name The name you've given this mailing. This name is not seen by message recipients. To change the name of the mailing, type in the desired name and click Save. Body The body of the message you're sending. If you've created both a text and HTML body for your message, you'll see some encoding that allows email clients to select which version they can open and read. It will start like this: This is a multi-part message in MIME format. --==-=-=-=-=-=-=-=-=-=-=-=-=-=-=-=-=-=-=-=-=-=-=-== Content-Type: text/plain; charset="iso-8859-1" Content-Transfer-Encoding: 7bit Mailings: View Outgoing Mailing: Message Header Header The message header will be displayed here. Parts of the header will appear as mail merge tags (e.g., %%emailaddr%%. However, the information appropriate for each recipient was merged in when the mailing was sent. Mailings: View Outgoing Mailing: Recipients Total Recipients 149 The total number of recipients to be sent to. Successfully Sent The number of recipients successfully sent to. Failed with Soft Undeliverable The number of recipients who did not receive the message due to a soft bounce. A soft bounce is an undeliverable message which may or may not be due to a permanent problem. Examples of soft bounces: -The receiving mail server disconnects while sending the message -The receiving mail server returns an error message below 500 in the SMTP transaction (mailbox full, for example) . Failed with Hard Undeliverable The number of recipients who did not receive the message due to a hard bounce. A hard bounce is an undeliverable message which is probably due to a permanent problem with the address. Examples of hard bounces: -Email addresses with malformed domains ([email protected], for example), -The receiving mail server returns an error message 500 or above in the SMTP transaction (user does not exist, for example). Download to File Click on the file icon to download the recipients successfully sent to. The file will be in CSV format, which can be read by Excel and other programs. Mailings: View Outgoing Mailing: Log Log The record of all the tasks ListManager has performed in sending out this message. You'll see the dates and times when the message was sent, along with the number of recipients sent to. Mailings: View Outgoing Mailing: Mail Queue Priority The priority of your message. ListManager automatically assigns the priority for your mailing, but you may change the priority of your mailing in mid-send. 1 is the highest priority, and 9 the lowest. ListManager will use 2/3s of your SQL connections to process outbound mail. Typically, users have 25 connections to the SQL database, so there can be up to 18 outgoing mail items at a time. Creating one mailing with priority 1 will not cause ListManager to process it to the exclusion of all other outgoing messages; it will take the highest priority messages to process first up to the limit of SQL connections. Retry Time If your message is scheduled to be retried, this is the next time ListManager will attempt to send it again to those who were undeliverable before due to transient problems (e.g., the mailserver could not be reached). Retry Now will retry the mailing immediately. ID 150 The ID number ListManager has assigned this mailing. Status The status of this mailing: New The mailing has just started, and is being processed. Stop Mailing will prevent the mailing from being sent at all and will set it to Done. Pending The mailing is currently being sent. Retry The mailing is waiting to be resent as a retry, meaning ListManager will attempt to deliver the mailing again to those who were undeliverable before due to transient problems (e.g., the mailserver could not be reached). Stop Mailing will stop any retries and set the mailing to Done. Done The mailing has completed sending. Retry Mailing will cause ListManager to attempt delivery to all addresses that were undeliverable before due to transient problems (e.g., the mailserver could not be reached). It will not send the same message again to those who already received it, or to those whose mailservers reported a permanent failure (e.g., the email address does not exist). List Name The name of the list this message was sent to. Date Created The date this mailing was created. Send Attempts Completed The number of times this message was resent, and those sends were completed. If the message is new or pending, this value will be zero. Mailings: Test Mailing When you test a mailing, ListManager creates the message for a random recipient of your list. However, instead of sending this mailing to the member, it sends it to you. In this way, you can see exactly what the mailing will look like for your recipients. Testing a mailing is especially important if you are using conditional content, scripting, or any special formatting. Do not be alarmed if you receive a message addressed to someone else! ListManager creates the mailing for the recipient(s), but redirects it to you. The mailing has not been sent to your list, or to the person whose email address is on your test mailing. Name The name of the mailing you're testing. Subject The subject of the mailing you're testing. Send Test To 151 The email address(es) where the test messages should be sent. By default, your email address is here, but you can send these test messages to any email address. Specify multiple email addresses to which to send test messages with a comma: [email protected], [email protected] Test Sample Size The number of sample messages you'd like to receive. If you select 10, for example, you will receive ten separate messages, all addressed to recipients of your list, but redirected to you so you can see what the message would look like for them. The sample is randomly selected from your list(s) or subset(s). Perform Spam Analysis ListManager can analyze your message using Spam Assassin, a popular anti-spam program used by many people. Your message will be subjected to a number of tests and assigned a score; the lower the score, the less likely your message will be filtered as spam. If your message fails a particular spam-detection test, Spam Assassin assigns it a certain number of points. After all of the tests are complete, your points are summed and presented as a total score. Lower scores are better—they indicate that your message has fewer traits common to junk mail. Ideally, you want to get your message close to 0 points. Some of Spam Assassin's tests work the other way around: if you pass them, they assign your message a certain number of *negative* points. This helps reduce your overall score. The first test recipient will receive an email message for each test message sent, with the final score and an explanation of how the score was reached. More information about the tests Spam Assassin uses may be found here: http://www.spamassassin.org/tests.html Please remember that email standards and anti-spam rules are based on complex algorithms, and some of Spam Assassin's results may require the explanation of a Systems Administrator. Our technical staff has years of experience with email filtering, and we offer that expertise to our software and hosting customers who have support contracts. If you need help resolving a difficult false-positive, please contact us at (800) 768-2929 or (510) 549-4350 to discuss your campaign. 152 Reports ListManager offers extensive reporting on your mailings and membership. There are six categories of pre-built reports: Mailings, Members, Server Performance, Web Site, Purchases and Interest. If ListManager doesn't have the built-in chart you're looking for, create your own in Custom Charts. The charts available to you depend on your license level. Purchases and Interest charts are available to Enterprise license levels only. Contact your account representative at [email protected] if you'd like to upgrade to ListManager Pro or Enterprise. Depending on the kind of report you select, the following selections may be available to you: Line Chart When you click on the Line Chart Icon, this is how you will see your data displayed: 153 3D Line Chart When you click on the 3D Line Chart Icon, this is how you will see your data displayed: 154 Bar Chart When you click on the Bar Chart Icon, this is how you will see your data displayed: 155 Pie Chart When you click on the Pie Chart Icon, this is how you will see your data displayed: 156 Table When you click on the Table Icon, this is how you will see your data displayed: 157 Click on the Change Chart Properties to change the parameters of your chart - the dates charted, for example. 158 Information about the chart, including a legend if applicable. 159 Reports and Oracle 8i There are a few reports in ListManager that do not work properly with Oracle 8i (beta). Note that Oracle 8i is only supported with ListManager 7.6 or later. These were written using a version of the SQL standard which is not supported by Oracle 8i. They are: 1. 2. 3. 4. Members -> Attribute Reports -> member mail format preference, members that are HTML capable Members -> Domain Reports -> members held % by domain, domains bouncing % over time, domains not confirmed % over time Mailings -> Referral statistics Interest -> Length of sales cycle -> elapsed time between first open and purchase, elapsed time between first click and purchase, elapsed time between first interest event and purchase, and elapsed time between two different interest events Reports: Mailings Reports: Mailings allow you to monitor your mailings' status. They help you to see: -How many mailings have I sent out? -How successful have individual mailings been in reaching my members? -Who has opened or clicked on my mailings? -Who has referred friends to join my list? If you click on any member's name or email address, you will be taken to their Member history page. For more information on this, see Utilities: Members: Find Members: History. The reports are grouped as follows: Delivery Statistics Charts about delivery success and failure. Information about the number of recipients, number and percentages of successful deliveries and bounces. Mailing Statistics Table 160 An informational page with relevant information about individual mailings. Tracking Statistics Charts on clickthroughs, clickstreams, and opens. Referral Statistics A table displaying the success of referral campaigns. Reports: Mailing Reports: Delivery Statistics Delivery Statistics tell you the progress of your mailings, and how successful they have been. For a complete listing of all reports, see the Map on the Reports page in the ListManager web interface. Delivery Table A chart of recent deliveries for this list, and how successful they have been. Click on the mailing name to view the mailing. Click on a number to view and download recipient information. Click on the date created to view a chart of mailing counts over time. The delivery table is an overview of the success and failure rates of your recent mailings. Finding a Mailing Ten mailings for the list are displayed at a time. To view more than ten mailings at a time, click on Show More. Repeatedly clicking on Show More will show greater numbers of mailings at a time. You may change the sorting order of the mailings by clicking the up or down triangles next to ID, Name, Size, Sent, OK, Soft, Hard, Created, or Status. By clicking the top triangle, the sort order will be ascending (a-z); clicking the bottom arrow makes the sort order descending (z-a). Click on next to see the next ten mailings, previous to see the last ten. The sort options are: ID The ID number ListManager has assigned this mailing. Mailing Name The name you have given this mailing. Size The total number of recipients ListManager is trying to send to. Sent # The number of the total recipients that ListManager has finished delivering to, either successfully or unsuccessfully. Sent % The percentage of the total recipients that ListManager has finished delivering to, either successfully or unsuccessfully. 161 OK # The number of recipients who have received the message. Note that a portion of these may be later returned as a bounce. Those bounces are not recorded here. OK % The percentage of recipients who have received the message. Soft # The number of prospective recipients who did not receive the message due to a soft bounce. A soft bounce is an undeliverable message which may or may not be due to a permanent problem. Examples of soft bounces: -The receiving mail server disconnects while sending the message -The receiving mail server returns an error message below 500 in the SMTP transaction (mailbox full, for example) . Soft % The percentage of prospective recipients who did not receive the message due to a soft bounce. Hard # The number of prospective recipients who did not receive the message due to a hard bounce. A hard bounce is an undeliverable message which is probably due to a permanent problem with the address. Examples of hard bounces: -Email addresses with malformed domains ([email protected], for example), -The receiving mail server returns an error message 500 or above in the SMTP transaction (user does not exist, for example). Hard % The percentage of prospective recipients who did not receive the message due to a hard bounce. Created The date the mailing was created. Status Whether a message is new, currently sending, performing a retry, or is done. Viewing a Mailing To view a mailing, click on the mailing name. You will be taken to the Reports: Mailings: View Mailing screen, where you can view the mailing, the recipients, the log and where it is in the queue. Seeing the Recipients To see information about the total recipients, who has been successfully sent to, and information about opens, clickthroughs and clickstream, click on the number next to a mailing in the Size column. You will be taken to the Reports: Mailing Reports: View Mailing: Recipients screen. Download as a File Click on the disk icon to download your delivery statistics in CSV format. This file can be opened and read using Excel and other programs. Mailings Count Charts of how many mailings this list has sent over time, per list, by status and by 162 number of retries. Also, a chart showing the number of mailings for all of your lists. Number of Recipients Charts of how many members received your mailings, over time for your list, and per mailing. Send Success Statistics Charts of how successful your mailings have been reaching members, over time and per mailing. Send Failure Statistics Charts of how your mailings have failed to reach members, over time and per mailing. These statistics aggregate both hard and soft bounces. Bounce Statistics Charts of how your mailings have failed to reach members, or bounced, broken down into soft and hard bounces. A soft bounce is an undeliverable message which may or may not be due to a permanent problem. Examples of soft bounces: -The receiving mail server disconnects while sending the message -The receiving mail server returns an error message below 500 in the SMTP transaction (mailbox full, for example). A hard bounce is an undeliverable message which is probably due to a permanent problem with the address. Examples of hard bounces: -Email addresses with malformed domains ([email protected], for example), -The receiving mail server returns an error message 500 or above in the SMTP transaction (user does not exist, for example). Reports: Mailings: Mailing Statistics The mailing statistics page provides an overview of the success and failure rates of individual mailings. Select a mailing from the drop down Mailing box, and click on Refresh to see statistics for that mailing. Click on the number to see a chart with information about that statistic for the list. Reports: Tracking Statistics Tracking statistics tell you how many people have opened your message, clicked on a tracked URL, or who have gone from one of your mailings through to other pages on your Web site. In order to have statistics about opens, you must set Track Opens to Yes in Mailings: New Mailing: Tracking. To have statistics about clickthroughs, you must insert clickable URLs while making content. If you want to track clickstreams, you'll need to create a clickstream tag, and put it on every page you'd like to track on your Web site. 163 Tracking Summary This page provides an overview of clickthroughs, opens and clickstreams. Finding a Mailing Ten mailings for the list are displayed in Reports: Mailings: Tracking Statistics: Tracking Summary. Click on next to see the next ten mailings, previous to see the last ten. To view more than ten mailings at a time, click on Show More. Repeatedly clicking on Show More will show greater numbers of mailings at a time. You may change the sorting order of the mailings by clicking the up or down triangles next to ID, Sent, Open, CT, CS, Created, or Status. By clicking the top triangle, the sort order will be ascending (a-z); clicking the bottom arrow makes the sort order descending (z-a). The sort options are: ID The ID number ListManager has assigned this mailing. Mailing Name The name you have given this mailing. Sent # The number of recipients ListManager actually delivered messages to. Open # The number of recipients who opened the message using an email client which can read HTML. If a recipient opened the message in two different clients, or with a client and a web browser, two opens will be registered. Open % The percentage of recipients who opened the message using an email client which can read HTML. CT # The number of trackable URLs that have been clicked. This number may be greater than the number of opens or recipients if recipients click on a trackable URL multiple times, or if there are multiple trackable URLs in your message that recipients are clicking on. CT % The percentage of clicks versus recipients. CS # The number of web pages that have been visited by recipients of this message. This number may be greater than the number of opens or recipients if you put your clickstream tags on multiple pages, or if recipients visit your page multiple times. Offline events can be seen here as well, by clicking on the CS#. For more information on offline events, see Utilities: Other: Offline Events. If a recipient receives your message and goes to your Web site directly without clicking on a trackable URL, the clickstream may not be recorded (depending on the recipient's email client settings). CS % 164 The percentage of click streams versus recipients. Created The date the mailing was created. Status Whether a message is new, currently sending, performing a retry, or is done. Viewing a Mailing To view a mailing, click on the mailing name. You will be taken to the Reports: Mailings: View Mailing screen, where you can view the mailing, the recipients, the log and where it is in the queue. Seeing the Recipients To see information about the total recipients, who has been successfully sent to, and information about opens, clickthroughs and clickstream, click on the number next to a mailing in the Sent column. You will be taken to the Reports: Mailing Reports: View Mailing: Recipients screen. Seeing Who Opened a Message To see all the recipients who opened your message using an HTML-capable email client, click on the number in one of the Open columns next to a mailing. You will be taken to a page which will display the time the message was opened, and the email address and name of the recipient who opened it. You may download the list of those who opened the message by clicking on the disk icon. This file will be in CSV format, which may be opened and read using Excel and other programs. From this page, you may view a chart that shows opens over time. In addition, you may also create a segment of those who opened a message so you can target later mailings to those people. Seeing Who Clicked on a Tracking URL To see all the recipients who clicked on a tracking URL, click on the number in one of the CT columns next to a mailing. You will be taken to a page which will display the time the link was clicked, the email address and name of the recipient who clicked, and their TCP/IP address. For each click, you will also see the URL, URL Name and Group. You may download the list of those who clicked on a link by clicking on the disk icon. This file will be in CSV format, which may be opened and read using Excel and other programs. From this page, you may view a chart that shows clickthroughs over time. In addition, you may also create a segment of those who clicked on links so you can target later mailings to those people. Seeing Who Went to Other Pages on Your Web Site (Clickstream) To see all the recipients who went to other pages on your Web site, click on the number in one of the CS columns next to a mailing. You will be taken to a page which will display the time the web page was visited, the page visited, and the email address and name of the recipient who visited. You may download the list of those who clicked on a link by clicking on the disk icon. This file will be in CSV format, which may be opened and read using Excel and other programs. You may also create a segment of those who visited other pages on your Web site so you can target later mailings to those people. If you want to track clickstreams, you'll need to create a clickstream tag, and put it on 165 every page you'd like to track on your Web site. Download as a File Click on the disk icon to download your tracking statistics in CSV format. This file can be opened and read using Excel and other programs. Opens Charts of open rates, for individual mailings, lists, or all your lists. Includes charts on unique, total, aggregate and estimated opens. Clickthroughs Charts of clickthrough rates, for individual mailings, lists, or all your lists. Includes charts on unique, total, aggregate and estimated clickthroughs. Forwards Charts of forwarding rates, for individual mailings, lists, or all your lists. Includes charts on most forwarded mailings, who forwarded them, and forwards over time. Note that forwarding information is also displayed on the Member history page for each member. Note that on the "List Forwarding Detail" page, the Forwards number you see on the left is the number of unique TCP/IP addresses each person has forwarded at least one message to. If two different messages were forwarded to the same TCP/IP address, this page when then only show 1. Therefore these are "unique forwards". To see forwarding details, click on this number. What you now see are all the forwards, regardless of the TCP/IP addresses involved. So if there were 8 unique forwards, and you see a list of 9, that means that one of the TCP/IP addresses received a mailing twice. Mailing Summary Chart over time total sent, opens and clickthroughs for a mailing you select. Reports: Mailing Reports: Referral Statistics Referral statistics tell you how many people have referred friends to your list, how many friends they referred, and how many of those who were referred joined. They also show how many of those referred clicked on a tracked URL, or who have gone from one of your mailings through to other pages on your Web site. In order to have statistics about referrals, you need to included a referral link in your mailing. If you want to track clickstreams from referrals, you'll need to create a clickstream tag, and put it on every page you'd like to track on your Web site. Finding a Mailing Ten mailings for the list are displayed in Reports: Mailings: Referral Statistics. To view more than ten mailings at a time, click on Show More. Repeatedly clicking on Show More will show greater numbers of mailings at a time. Click on Next to see the next ten mailings, Previous to see the last ten. You may change the sorting order of the mailings by clicking the up or down triangles next to ID. By clicking the top triangle, the sort order will be ascending (1-10); clicking the bottom arrow makes the sort order descending (10-1). 166 The sort options are: ID The ID number ListManager has assigned this mailing. Mailing The name you have given this mailing. Other columns shown are: Referrers The number of members who referred friends to join your list. Click on the number to view the list of referrers. From this page, you may see how many referrals each individual made, and how many of those referred joined the list. You may also create a segment of those who referred others. Friends The number of friends referred to your list. For example, one referrer may have referred five friends. Click on the number to list the friends referred to the list. From this page, you may see the time of referral, and the email address of both the referrer and the friend referred to the list. You may also see whether or not the friend joined, and the time they joined. Joiners The number of friends referred to your list who actually joined. Click on the number to list those who joined as a result of being referred. From this page, you may see the email address and names of those who joined, and those who referred them. You may also see the time of referral and the time of join. In addition, you may create a segment of those who joined the list. CT # The number of trackable URLs that have been clicked in invitations. Click on the number to see a list of those who have clicked on a clickthrough URL. You will be taken to a page that shows the time they clicked the link, and the TCP/IP address and email address of the clicker. You will also be able to see the URL, URL Name and URL Group. In addition, you may create a segment of those who clicked on a link. CS # The number of web pages that have been visited by recipients of the invitation. This number may be greater than the number of opens or recipients if you put your clickstream tags on multiple pages, or if recipients visit your page multiple times. If a recipient receives your message and goes to your Web site directly without clicking on a trackable URL, the clickstream may not be recorded (depending on the recipient's email client settings). Opens The number of messages that have been opened by recipients of the invitation. Opens can only be recorded for those with HTML capability. Viewing a Mailing To view the original mailing that resulted in these referrals, click on the mailing name. You will be taken to the Reports: Mailings: View Mailing screen, where you can view the 167 mailing, the recipients, the log and where it is in the queue. Seeing Who Clicked on a Tracking URL To see all the recipients of invitations who clicked on a tracking URL, click on the number in one of the CT columns next to a mailing. You will be taken to a page which will display the time the link was clicked, the email address and name of the recipient who clicked, and their TCP/IP address. You will also see the URL, URL Name and Group. You may download the list of those who clicked on a link by clicking on the disk icon. This file will be in CSV format, which may be opened and read using Excel and other programs. You may also create a segment of those who clicked on links in a message so you can target later mailings to those people. Seeing Who Went to Other Pages on Your Web Site (Click Stream) To see all the recipients of invitations who went to other pages on your Web site, click on the number in one of the CS columns next to a mailing. You will be taken to a page which will display the time the web page was visited, the page visited, and the email address and name of the recipient who visited. You may download the list of those who clicked on a link by clicking on the disk icon. This file will be in CSV format, which may be opened and read using Excel and other programs. You may also create a segment of those who visited other pages on your Web site so you can target later mailings to those people. If you want to track clickstreams, you'll need to create a clickstream tag, and put it on every page you'd like to track on your Web site. Download as a File Click on the disk icon to download your referral statistics in CSV format. This file can be opened and read using Excel and other programs. Reports: Mailing Reports: View Mailing By clicking on the Name in the Reports: Mailings: Delivery Statistics page, you will be taken to the Reports: Mailings: View Mailing page. From this page, you may view the Message Body, Message Header, the Recipients with clickthrough, clickstream and open information, the Log of the mailing, and the Mail Queue. Reports: Mailings: View Mailing: Message Body Mailing Name The name you've given this mailing. This name is not seen by message recipients. Body The body of the message you're sending. If you've created both a text and HTML body for your message, you'll see some encoding that allows email clients to select which version they can open and read. It will start like this: This is a multi-part message in MIME format. 168 --==-=-=-=-=-=-=-=-=-=-=-=-=-=-=-=-=-=-=-=-=-=-=-== Content-Type: text/plain; charset="iso-8859-1" Content-Transfer-Encoding: 7bit Reports: Mailings: View Mailing: Message Header Header The message header will be displayed here. Parts of the header will appear as mail merge tags; the information appropriate for each recipient was merged in when the mailing was sent. Reports: Mailings: View Mailing: Recipients Total Recipients The total number of recipients to be sent to. Successfully Sent The number of recipients successfully sent to. You may download the list of those who were successfully sent to by clicking on the disk icon. This file will be in CSV format, which may be opened and read using Excel and other programs. Failed with Soft Undeliverable The number of recipients who did not receive the message due to a soft bounce. A soft bounce is an undeliverable message which may or may not be due to a permanent problem. Examples of soft bounces: -The receiving mail server disconnects while sending the message -The receiving mail server returns an error message below 500 in the SMTP transaction (mailbox full, for example). You may download the list of those who failed due to a soft bounce by clicking on the disk icon. This file will be in CSV format, which may be opened and read using Excel and other programs. Failed with Hard Undeliverable The number of recipients who did not receive the message due to a hard bounce. A hard bounce is an undeliverable message which is probably due to a permanent problem with the address. Examples of hard bounces: -Email addresses with malformed domains ([email protected], for example), -The receiving mail server returns an error message 500 or above in the SMTP transaction (user does not exist, for example). You may download the list of those who failed due to a hard bounce by clicking on the disk icon. This file will be in CSV format, which may be opened and read using Excel and other programs. Tracked Opens The number and percentage of recipients who opened the message using an email client which can read HTML. If a recipient opened the message in two different clients, or with a client and a web browser, two opens will be registered. 169 In order to have statistics about opens, you must set Track Opens to Yes when creating a new mailing. See Mailings: New Mailing: Tracking. To see all the recipients who opened your message using an HTML-capable email client, click on the number next to Tracked Opens. You will be taken to a page which will display the time the message was opened, and the email address and name of the recipient who opened it. You may download the list of those who opened the message by clicking on the disk icon. This file will be in CSV format, which may be opened and read using Excel and other programs. Tracked Clickthroughs The number and percentage of trackable URLs that have been clicked. This number may be greater than the number of opens or recipients if recipients click on a trackable URL multiple times, or if there are multiple trackable URLs in your message that recipients are clicking on. To have statistics about clickthroughs, you must insert clickable URLs when you create content. To see all the recipients who clicked on a tracking URL, click on the number in next to Tracked Clickthroughs. You will be taken to a page which will display the email address and name of each clicker, and the time they clicked. You may download the list of those who clicked on a link by clicking on the disk icon. This file will be in CSV format, which may be opened and read using Excel and other programs. Tracked Click Streams The number of web pages that have been visited by recipients of this message. This number may be greater than the number of opens or recipients if you put your clickstream tags on multiple pages, or if recipients visit your page multiple times. If a recipient receives your message in text format and goes to your Web site directly without clicking on a trackable URL, the clickstream may not be recorded (depending on the recipient's email client settings). To see all the recipients who went to other pages on your Web site, click on the number next to Tracked Click Streams. You will be taken to a page which will display the time the web page was visited, the page visited, and the email address and name of the recipient who visited. You may download the list of those who clicked on a link by clicking on the disk icon. This file will be in CSV format, which may be opened and read using Excel and other programs. Create Clickstream Tag If you want to track clickstreams, you'll need to create a clickstream tag, and put it on every page you'd like to track on your Web site. Clicking on the Create Clickstream Tag button takes you to Utilities: Other: Action Tags: Clickstream Tag, where you can create a click stream tag and name it for easy reference. Reports: Mailings: View Mailing: Log Log The record of all the tasks ListManager has performed in sending out this message. You'll see the dates and times when the message was sent, along with the number of recipients sent to. 170 Reports: Mailing Reports: View Mailing: Mail Queue Priority The priority of this message. ID The ID number ListManager has assigned this mailing. Status The status of this mailing: New The message has just started, and is being processed. Pending The message is currently being sent. Retry The message is waiting to be resent as a retry. Done The message has completed sending. List Name The name of the list this message was sent to. Date Created The date this mailing was created. Send Attempts Completed The number of times this message was resent, and those sends were completed. If the message is new or pending, this value will be zero. Reports: Members The Reports: Members page gives you both general and detailed information about your list's membership. You can learn about subscriber activity for the list—how many people have joined recently? Or for a certain time period? You can also see what the total membership for your list is, and what their status is— are they receiving mail, or are they unsubscribed or on hold? The Reports: Members page also display what kinds of members are on your list—are they receiving normal mail, or are they set to receive a digest or no mail? The member kind is important if your list is a discussion list. You may also get a count of members by domain, and for major domains. Knowing that a large portion of your mailing is going to a particular domain may help you tailor your message for those recipients, or explain why mailings are slow to close out if a particular domain is having trouble that day. Mail Formats show you a member's formatting preferences - text, HTML, or AOL - and whether a member has HTML reading capability. In order to have statistics about 171 opens, you must set Track Opens to Yes in Mailings: New Mailing: Tracking. Member counts are displayed in two ways: as tables, or as charts. Most tables may be downloaded as CSV files, which may then be opened using applications such as Excel. Viewing charts is a feature of ListManager Pro or Enterprise, and is unavailable for standard ListManager. Contact your account representative at [email protected] if you'd like to upgrade to ListManager Pro or Enterprise. The reports are grouped as follows: Subscriber Activity Shows a table of subscription information about your list. Attribute Reports Charts about member attributes that affect how or whether they are receiving your mailings. All Lists Member Count A chart of the distribution of members across all of your lists. Domain Reports Charts about how your membership is distributed across different domains. Demographic Reports Charts about demographic values that you have inserted into your members table. Over-Time Reports Subscription information about your list over time. Statistical Integrity of Member Counts It is important to keep in mind that the integrity of the statistics reported by ListManager is highly dependent on two things: 1) your list and server settings, and 2) administrator activity. The aggressiveness of your purge settings can have an impact on the data reported. Consider a weekly mailing list where members are put on hold after two bounces, and are never notified of their hold status. Also consider a "Purge Held" setting of five days. You look at your Member Counts once a week. With this configuration in mind, it is conceivable that after a mailing, some percentage of members will be put on hold. Five days later, they will be purged. This all happens between the times you look at reports. In other words, many members have moved from normal status to held status, and have then been deleted. Thus, these purged members are not "new held" members nor are they "new unsubscribed" members when the next report is run—they have effectively disappeared. This will create an effect that the numbers from week to week "don't add up", which can be misleading. This situation may be remedied by having less aggressive purge settings. Specifically, the purge held setting should be increased to something greater than the report frequency (for weekly reports then, you would want to increase the "purge held" setting to something greater than seven days, thereby preventing members from being put on hold and subsequently deleted prior to the next time you view reports.) 172 Another situation that leads to the numbers appearing to not add up is administrator activity. Specifically, if an administrator deletes members either using the web interface or via email commands, those members have moved from normal status to a status that is not monitored by the reporting (deleted). In both cases, the illusion is that "normal" members have disappeared. Please keep that in mind when you are analyzing your figures. Reports: Members: Subscriber Activity The Reports: Members: Subscriber Activity page shows a table of subscription information about your list for the past week by default. To change the length of time for the report or the totals, select Choose Dates. Subscriber activity may also be displayed as charts. Select which chart you'd like to view in the drop down box, and click Go to see a chart for the past week. Note that the statistics on this page are affected by how long you keep data. See Reports: Members for more information. Subscription Activity Charts You may view charts about subscription activity for the past week by selecting the chart you'd like to see in the drop down box and clicking Go. Note: if the number hasn't varied greatly, the chart may include fractions. Total Subscribers The total number of subscribers. New Subscribers The number of new subscribers. Unsubscribes The number of those who unsubscribed. Bad Addresses The number of those who were put on hold because their email address was undeliverable. All Statistics (Table) Date The date or range of dates for the subscription information in this row. New Members The number of new subscriptions for the period specified in Date. Click on a number to view the new members for a particular time period. From that page, you may create a segment of those members, or download the list of new members as a CSV file by clicking on the file icon. The number of members in this segment may be fewer than is displayed, because the segment will pull only normal members who are set to receive normal — not members who are on hold, unsubscribed, or set to receive a digest. You may 173 include these members as well by changing the settings in Segments: New/Edit Segment: Boundaries. Unsubscribes The number of members who unsubscribed during the period specified by Date. Click on a number to view the unsubscribed members for a particular time period. From that page, you may download the list of unsubscribed members as a CSV file by clicking on the file icon. Bad Addresses The number of members who bounced too many messages and were put on hold during the period specified by Date. See Utilities: List Settings: Automatic Maintenance: Error Mail Handling for more information about bad addresses. Click on a number to view the held members for a particular time period. From that page, you may download the list of held members as a CSV file by clicking on the file icon. Attribute Reports How or whether members receive email from your list depends on their member status or kind. If you are detecting HTML capability, you may also know what kind of email format they are capable of reading. The reports in this section show charts and tables about these member attributes. Status A member's status determines whether a member receives mail sent to the list, or if they are unsubscribed or otherwise prevented from receiving normal mail. The statuses available are: Normal Normal members, who will receive normal mailings to the entire list if their membership kind is set to receive mail. Confirm Members who have not yet confirmed their membership. These members will not receive mail until they have done so. Expired Members whose memberships have expired. These members will not receive mail until their expiration date is advanced to a future date, or erased from their membership record. Held Members who are on hold due to bad email addresses. These members were put on hold because they were undeliverable for the number of times and length of time you specified in your list settings. These members will not receive mail unless they or you change their subscription back to normal. Private Members who have not yet been approved by an administrator to join a private list. These members will not receive mail until an administrator has approved them. 174 Referred Members who have been referred to join the list by a friend, but who have not yet joined. Unsub Members who have unsubscribed from your list. These members will not be delivered to unless they resubscribe to your list. Kind The kind of mail the member has selected to receive from the list. Generally, membership kind is relevant to discussion lists only. The kinds of memberships available are: Mail Members who receive messages as they are contributed. Digest Members who receive one daily message, with all the contributions for that day. Mimedigest Members who receive one daily message, with all the contributions for that day, in MIME format. The formatting of the messages will be preserved. Index Members who receive one daily message with only the subject lines for that day. Nomail Members who receive no mail from this mailing list. Email Format The mail format have members been detected to be able to read: Text, AOL or HTML. In order to have information about text versus HTML, you must set Detect HTML Capability to Yes in Mailings: New Mailing: Tracking. Otherwise, all members will be text or AOL. Note that ListManager will not automatically send members email in the format they have been detected to receive. To do so, you must create segments based on email format, and then send mailings with that type of content to each segment. The formats available are: Text Message Count The number of non-AOL recipients who have not been detected opening a message with HTML. AOL Count The number of recipients who are AOL customers. AOL users who use AOL 5.0 or earlier cannot receive standard HTML messages. HTML Detected Count The number of recipients who have been detected to be able to read HTML, and are not AOL members. 175 All Lists Member Count This chart displays how members are distributed between your lists. If you have many lists, those with fewer members may not be displayed. Domain Reports These charts display information about members according to their domain. A domain is everything after the @ sign (e.g., AOL.com). They show how your membership breaks down according to domain, as well as those domains which have more members bouncing, held, unsubscribing or not confirming. Knowing that a large portion of your mailing is going to a particular domain may help you tailor your message for those recipients, or explain why mailings are slow to close out if a particular domain is having trouble that day. Checking bounces or held members by domain can help you see if a particular ISP is blocking your mail. To confirm, you should have detailed delivery reports mailed to you. Enable these reports by going to Utilities: List Settings: Basic Information: Reports. Demographic Reports These charts display members according to additional demographic information you may have about them. Additional demographic fields may be added to the ListManager members table, either directly in the database or by using the tools in Utilities: Administration: Server: Database. Once you have added additional fields, you will need to define them in Utilities: Administration: Server: Database: Demographic Definitions for them to be available when you view these reports. Over-Time Reports These charts give information about your membership statistics over time—for example, subscribes, unsubscribes, confirmed, or on hold. These charts can give you general trends about your list's membership. For example, you may find that your rate of unsubscribes peaks after a particular kind of mailing, and so may decide that it's not worth doing that kind of mailing if it means you will be sacrificing so many members. You may also find studying confirmation rates over time useful, so you may tailor your confirmation document to encourage more people to confirm joining your list. Email addresses go bad and are put on hold as a matter of course in running an email list. However, if you find that a large number of email addresses go on hold all at once in these charts, you may investigate ISP or network problems. Server Performance 176 These charts display how quickly your ListManager server is delivering mail, and how successfully mail is reaching subscribers. Delivery speed statistics are saved by ListManager every minute, and are saved indefinitely. The charts show how fast ListManager would be sending mail if the number of messages sent in a particular minute was sustained for an hour. For example, if ListManager actually sent 10,000 messages in a particular minute, the chart would show that you had achieved a delivery speed of 600,000 messages per hour. Note that this information is only available to those logged in as server administrators. List and site administrators will not be able to see mail speed information. Only server administrators will have the option to check for IP addresses that are blacklisted. For more information on this, see Reports: Blacklists. Blacklists The Blacklist option is only visible for server administrators. The purpose of this feature is to make sure that your TCP/IP address or hosting name has not been blacklisted by any blacklisting or banning services before you send out your mailings. These services are trying to reduce "spam" email, and will not allow any mail to be delivered from TCP/IP addresses that have been blacklisted in the past. This feature takes you directly to their Web sites, where you can verify that your TCP/IP address or hosting name has not been blacklisted. You can see which TCP/IP address you are currently sending mail from by looking in Server Settings. For more information on this, see Utilities: Administration: Server: Server Settings: Network Settings: Deliver Email. There are six blacklist options now, which include two for newsgroups. The available options today are: - 'DNS Stuff' 150+ TCP/IP Blacklists OpenRBL Universal TCP/IP Blacklist Sam Spade SpamCop Usenet Groups TCP/IP Check (for newsgroups) Usenet Groups Hostname Check (for newsgroups) This menu is dynamic, so if additional blacklisting or banning services become available, these will be added to ListManager as necessary. Once you are on the banning service's Web site, your TCP/IP address will automatically be entered for you, and you check to see if it has been banned by anyone. If you need further assistance or information regarding Blacklists, please click on the "Lyris offers a consulting service" link on the Blacklist menu page, where you can contact Lyris Technologies directly for further information about this. Web Site These charts display how your mailing recipients are visiting your Web site. If you want to track visits, you'll need to create a clickstream tag, and put it on every page you'd like 177 to track on your Web site. The following groups of Web site charts are available: Compare Tracked Pages Compare the total or unique tracked pages for particular mailings or for the list as a whole. Total Web Site Charts showing total page hits for your Web site over time, or per mailing. Track a Page Charts showing tracking information for specific pages where you have put a clickstream tag, by mailing or over time. Track a Mailing Charts showing how a particular mailing has driven Web site traffic, in aggregate or over time. Purchases These charts display information about mailing recipients who purchase . If you want to track visits, you'll need to create a purchase tag, and put it on every page you'd like to track on your Web site. Purchase Tracking is a feature of ListManager Enterprise, and is unavailable for standard or Pro ListManager. Contact your account representative at [email protected] if you'd like to upgrade to ListManager Enterprise. The following types of purchase reports are available: Number of Purchases The number of purchases made by your subscribers. These statistics may be viewed per mailing, over time, cumulatively, by join date and by demographic field. Purchase Percentage Rate The percentage of purchases made by your subscribers. You may view buyers as a percentage of your total membership, those who open, click a link in a mailing and visit your Web site. Units Sold at Each Purchase Price Charts analyzing at what purchase price you've made the most sales. These statistics may be viewed per mailing, per list, per demographic, and in a particular price range. Total Revenue for Each Purchase Price Charts displaying the amount of revenue gained at each purchase price. These statistics are displayed per mailing, per list, over time and by members' join dates. Total Revenue Charts displaying the total amount of revenue gained by mailing, over time and by demographic. Total Revenue by Product/SKU 178 Charts displaying total revenue or units sold by product or SKU. Interest These charts display information about mailing recipients who show interest in your Web site by visiting particular pages. If you want to track interest, you'll need to create an interest tag, and put it on every page you'd like to track on your Web site. Interest Tracking is a feature of ListManager Enterprise, and is unavailable for standard ListManager. Contact your account representative at [email protected] if you'd like to upgrade to ListManager Enterprise. Interest reports are grouped as follows: Number of Members at Each Interest Stage The number of members at each interest stage. Displays statistics about how members are converted into warm or hot leads, and the number of members at each interest stage based on mailing or by list. Total Interest Points Total interest points generated per mailing, list, or over time. Total Interest Events The number of interest events triggered, by mailing, per list and over time. Shopping Cart Abandonment Rate The number and percentage of members who used shopping cart, but never purchased. Hot Leads Members who have shown a particularly high amount of interest, but who have not yet purchased. Hot leads are divided by those who have high interest points, those who have achieved a high interest stage, or who have gone through a number of purchase events without actually purchasing. Time to Sale The average length of time a particular list or mailing takes to get members to purchase. Also, statistics about how membership duration, or how long a member has been on your list, affects sales. Time to Interest The average length of time a member is on your list before showing interest by visiting your Web site. Length of Sales Cycle The average length of time a member is on your list, opens a mailing, clicks on a link, or shows interest before purchasing. Note that in ListManager 7.6, if you are using Oracle 8i, the following four charts will not work: Elapsed time between first open and purchase Elapsed time between first click and purchase Elapsed time between first Interest Event and purchase 179 Elapsed time between two different Interest Events Custom Charts ListManager includes a wide variety of charts. If there is a particular chart that you'd like to see that is not included as a default, you may create it in Reports: Custom Charts. Customer Charts allow you to: -Select the type of chart you want - pie chart, bar chart, line chart, high/low, etc. -Select the metrics you'd like to combine - opens as compared to purchases over time, for example. -Specify the start and stop date for each metric and for the chart as a whole. -Specify how you'd like to group data—by time interval or by percentage of the data. -Determine chart labels and background color. All of your custom charts are displayed in the Reports: Charts page. Click on Create New Chart to create a new custom chart. Reports: Charts: Essentials Your Description Your description of this chart. Displayed Title The title displayed on your chart. Chart Type The type of chart you'd like to create. Note that not all chart types make sense for all kinds of data. For example, bounce data over time would not display properly for a pie chart. The options are: 3D Pie Chart 3D Bar Chart 3D Line Chart 3D High/Low/Close 3D Area Chart Plain Line Chart Plain Area Chart Plain Bar Chart Plain High/Low/Close Metrics to Chart What statistics should be included in this chart. Click on Add to add metrics to this chart. 180 Reports: Charts: Advanced Y Axis Label The label for the Y axis. Background Color The chart's background color. By default, the color will be white. Enter the HTML code (e.g., FFFFFF) to change the background color. Associated With What list or site this chart is associated with, or whether this chart should be available to all on the server. By default, the chart is associated with the list in which it has been created. You may opt to have the chart associated with a different list, an entire site or an entire server. Date Created The date the chart was created. Date Last Modified The date the chart was last modified. Reports: Charts: Add Metric The Add Metric page allows you to select what metric you would like to include in your chart. You must first select the metric group in the drop down box before selecting a particular metric. The metric groups are: Clickstream - Recipients who visited particular pages on your Web site. Clickthrough - Mailing recipients who clicked on links in your mailings. Forwards - Mailing recipients who forwarded your mailings. Interest - Interest levels of recipients who visited particular pages on your Web site. Mailings - Delivery success, failure and related statistics. Members - Membership data; what kinds of members are on your list(s). Misc - SQL query charts; only server admins can add metric here, anyone can run it. Opens - Recipients who opened a particular mailing. Purchases - Recipients who purchased after receiving a mailing. Server Performance - Information about how ListManager is running. Once you have selected a metric, you will be taken to a second page which will ask additional information about charting the particular kind of metric you have selected. Draw Select whether to show the Data line, or the Trend line for this metric. End Date The ending date for this chart, in YYYY/MM/DD format. Leave blank for today's date. List The list to track this metric for. 181 Number of Days The number of days to chart. The default is Forever, or all the data available. Mailing The events that resulted from the mailing selected here. If you would like to compare events from multiple mailings, you must add each as an additional metric to your chart. Maximum Interest Stage The maximum Interest Stage to display. For example, you may want to only display results with an Interest Stage under 90. Maximum Value for Demographic Field (Purchases metric only) Display members with this maximum value for the demographic field you select. For example, you may want to only display results for those whose "Children" field is less than 5. Member Demographic (Member metric only) Chart members with information for the demographic field you select here. Only demographic fields in the ListManager Members_ table will be available for charting. Minimum Count The minimum amount of data to be displayed in your chart. For example, you may want to only display clickthroughs if they are over a certain number. Minimum Interest Stage The minimum Interest Stage to display. For example, you may want to only display results with an Interest Stage over 50. Minimum Value for Demographic Field (Purchases metric only) Chart members with the minimum value for the demographic field you select. For example, you may want to only display results for those whose "Children" field is greater than 1. Minimum # of Bounces (Member metric only) The minimum number of bounces to display for this chart. Performance Metric Type (Server Performance metric only) The type of server performance data to display for this chart. SQL Query (Misc metric only), and only available to server admins. Enter a valid SQL query; an example for the LABEL/COUNT metric would be: SELECT Domain_, count(*) as Count_ FROM members_ WHERE List_='listmanager-discuss' GROUP BY Domain_ ORDER BY Count_ DESC which displays the number of members per domain. Note: It is recommended that before you paste your SQL statement into this box, that the statement be tested in the Run your own SQL Query page, to see if there is an error in the statement. If a faulty statement was entered, this will show you the error, which 182 may be helpful in revising the statement. If a faulty statement is entered in the chart SQL query, you will see the chart displayed as "Sorry, there is no data to chart". Web Page Name The name of the web page for this action tag. Reports: Charts: Chart The Chart tab shows you what your chart looks like with the parameters you have established for the chart. Editing the parameters on the other tabs can change the chart. Reports: Charts: Table This tab displays your results in tabular format based on the parameters you have established for the chart. Editing the parameters on the other tabs can change this table. Reports: Maps Clicking on Sales-cycle map displays an arrangement of key charts and reports based on the normal flow of the sales cycle. These are arranged into Awareness Reports, Interest Reports, and Action Reports: Awareness Reports Easy access to Delivery and Member reports. Interest Reports Easy access to Tracking, Interest analysis, and Time-to-interest reports. Action Reports Easy access to Purchase analysis reports, Shopping cart analysis reports, Time-to-Sale reports, and Web Site analysis reports. Clicking on map displays a complete index of all the available charts and reports in an outline form. 183 Utilities Utilities allow you to configure and manage your list, site or server, depending on your permissions. You may also create members, automated messages, web forms, and more. List Settings Your lists are created with appropriate settings for the kind of list you selected. If you'd like to fine tune your list, adjust the settings in Utilities: List Settings. Members Manage your members in Utilities: Members. Here, you can view members in your list or in a segment you've created, search for members, edit a member, add members, delete members, or view the member's history. Web Forms Web Forms is where subscribe forms, unsubscribe forms, member profile forms, and referral forms are created and edited. These allow users to join lists, update their profiles, and refer their friends. Automated Messages Automated messages include document content and document associations, which are email messages which are sent out in response to subscriber actions, such as joining a list, confirming their membership, writing to an autoresponder address. These documents typically have information about your list, your organization, etc. In order to have these documents sent out automatically, you must create them first in Utilities: Automated Messages: Document Associations. Automated messages also includes autoresponders, which are email addresses which reply with a specified document. If you are sending announcements or one-way mailings, It's useful to put an autoresponder in the From: field of your message with instructions on how to unsubscribe. Match phrases allow you to automate actions when a specific text string is seen in an incoming email. They edit or reject messages with certain text in them according to your rules. Administration Manage your server, site, lists, or topics from Utilities: Administration. You may also create other administrators here, and manage your database. Login Status Log out of ListManager or login as a different user, switch to a different list, and edit your server administrator account (must have server administrator access). Other Utilities: Other allows you to create action tags, including clickstream, interest or purchase tags, and insert them in the HTML of your Web site so you can track visitors. Create a signup page for your list using the Signup Form, and edit clickthrough URL descriptions. Learn more about ListManager and Lyris Technologies by clicking Utilities: Other: About. 184 Utilities: List Settings Mailing lists are a set of email addresses who receive electronic mail as a group. Depending on what the goal of the group is, the features needed for the mailing list to work effectively will differ. For instance, a different set of features is needed if the group wishes to discuss an issue to come to a consensus, as opposed to a group who all receive announcements of new classical music recordings. List settings govern how your list works. When you create your list, the type of list you selected determined the settings for your list. These settings are appropriate for most lists like yours, but you may want to fine-tune these settings. Basic Information The basics for your list: -Specify the topic and description for your list. -Specify what kinds of email delivery and subscription reports you'd like to have emailed to you. -Specify whether or not you'd like to save archives and recipient information, or whether the list should allow postings through other ListManager lists. -Set whether or not you'd like set open tracking and HTML detection as defaults. -Disable the list, or set a maximum number of members. New Subscriber Policy Control how people join your list: -Specify whether new subscribers must confirm their memberships by responding to a confirmation message, or confirm when they unsubscribe. -Determine how secure your list is—can anyone join? Do they require a password, or is it private? Or can members only be added by an administrator? Can people subscribe by email, or only through the ListManager web interface? -Specify who can or cannot join your list. Email Submitted Content Control what mailings look like when sent via email to the list. These settings are not in effect when sending through the ListManager administration web interface in most cases. -Specify what text wrapping should come at the beginning and end of every message sent via email to the list. -Determine what security should be in place for email posting. Specify whether messages can be sent via email, and who can send to the list. -Specify whether approval is required for email submitted messages. -Specify what additions and revisions to the header should be made, such as the default From:, To: and Reply To: headers. 185 Web Created Content Control the default settings for content and mailings created through the ListManager administrator's web interface. Automatic Maintenance Keeps your server running smoothly by removing bad email addresses: -Specify when members should be held (no longer delivered to) due to delivery problems. -Specify how frequently to purge inactive members from the database. -Specify how long to keep message archives. Users' Web Interface Determine how you'd like your list to work if list members access it through the ListManager web interface: -Specify message reading settings: who can see the list's messages, and what methods they may use. -Specify new membership requirements if subscribing through the ListManager web interface. -Provide information about your list in the ListManager web interface. -Limit access to ListManager's conferencing feature. Discussion Group Features Determine settings primarily used in discussion groups (those where recipients can also send messages to the list): -Specify how the message looks: whether or not to prepend the list's name to the Subject: line, or whether postings can be anonymous -Specify message wrapping for digests. -Specify posting security: who can write to the list, and who can see the list of members. -Specify automatic reasons to reject messages. For Programmers Allows programmers additional control over what messages should look like. -Specify who is allowed to include scripting in messages, including mail merge and conditional text. -Specify programming extensions to be run before and after messages. Map of All Settings A site index of all the list settings. 186 Utilities: List Settings: Basic Information Utilities: List Settings: Basic Information contains the most fundamental settings for your list. In this section, you may: -Specify the topic and description for your list. -Specify what kinds of email delivery and subscription reports you'd like to have emailed to you. -Specify whether or not you'd like to save archives and recipient information, or whether the list should allow postings through other ListManager lists. -Set whether or not you'd like set open tracking and HTML detection as defaults. -Disable the list, or set a maximum number of members. Utilities: List Settings: Basic Information: Basics List Name The name of the mailing list. This name is the official Mailing List Name - it is what both administrators and users will see in correspondence to the list. It also defines the email address for list mail. For example, if the name is jazz-discuss and the Site's host name is minerva.shelby.com, the mailing list's email address will be [email protected] The mailing list name cannot be changed. List Description (required) A very short description of the mailing list, which may be visible to users. Do not use any commas or "<" or ">" characters in your description. When email goes out from the list, this description can be in the email message. For example, if the Description is Jazz Discussion, the Reply-To: field for the mailing list email address will be: Reply-To: Jazz Discussion <[email protected]> Topic/Site (required) The topic and site this list belongs to. The list's site determines what its Internet hostname is, among other settings. The list's topic is a category for grouping the list together with other lists. Only sites and topics available to you will be displayed here. Utilities: List Settings: Basic Information: Reports Subscription Reports You may have ListManager send list administrators a regular email report on how your list membership has changed. These reports include the following information for the 187 period specified: confirmed and unconfirmed new members, unsubscribed members, and held members. By default, no subscription reports are emailed to you. You may have a report sent daily, weekly or monthly. You may choose more than one report if you like, which allows you to receive reports at any interval you wish. You also have the option of receiving short, normal or detailed reports. The short report does not list a day if there is no pertinent information for that day. The detailed report includes members’ email addresses. For example, here is a sample "normal" report: Grand total members by type for 'list2' - Normal members: 3 - Unsubscribed members: 2 For dates from 1999.08.13 to 1999.08.19 members by type for 'list2' - New normal members: 1 - New unsubscribed members: 1 -----------------------------------------------Members by type for list2 for dates from 1999.08.13 to 1999.08.19 --1 members who subscribed: 1999.08.13 1999.08.14 1999.08.15 1999.08.16 1999.08.17 1999.08.18 * 1 1999.08.19 --1 members who unsubscribed: 1999.08.13 1999.08.14 1999.08.15 1999.08.16 1999.08.17 1999.08.18 1999.08.19 * 1 Notice that there are several dates that do not have any data. When you opt for the "short" report, this section looks more like: Grand total members by type for 'list2' - Normal members: 3 - Unsubscribed members: 2 For dates from 1999.08.13 to 1999.08.19 members by type for 'list2' - New normal members: 1 - New unsubscribed members: 1 -----------------------------------------------Members by type for list2 for dates from 1999.08.13 to 1999.08.19 --- 188 1 members who subscribed: 1999.08.18: 1 --1 members who unsubscribed: 1999.08.19: 1 When you opt for the "detail" report, the report has an additional section at the end of the general data section. This additional section includes the email addresses associated with the data points present in the general data section. An example of the detail report: Grand total members by type for 'list2' - Normal members: 3 - Unsubscribed members: 2 For dates from 1999.08.13 to 1999.08.19 members by type for 'list2' - New normal members: 1 - New unsubscribed members: 1 -----------------------------------------------Members by type for list2 for dates from 1999.08.13 to 1999.08.19 --1 members who subscribed: 1999.08.13 1999.08.14 1999.08.15 1999.08.16 1999.08.17 1999.08.18 * 1 1999.08.19 Email address detail: 1999.08.18 1 [email protected] (Tile Vince) --1 members who unsubscribed: 1999.08.13 1999.08.14 1999.08.15 1999.08.16 1999.08.17 1999.08.18 1999.08.19 * 1 Email address detail: 1999.08.19 1 [email protected] (Vince Redmood) [joined 1999.08.19, member for 0 days] Subscription reports are an easy way to keep track of those who have subscribed and unsubscribed recently. These are very useful in maintaining external databases or tracking the growth of your list. Delivery Reports ListManager can send the list administrators of a mailing list regular progress reports on how each mailing is progressing. The Delivery Report indicates when the message was attempted, how many members received it and when the next retry is scheduled for the 189 remaining members. You may also opt to receive a detailed SMTP report addendum to the delivery report, which includes the reason ListManager couldn't send mail to each undeliverable member. This SMTP report is about 10 lines of text for each undeliverable member, so for large lists can be extremely long. You have the option of setting Delivery Reports to go out at these intervals: - After the first delivery attempt of each message. - After the last delivery attempt of each message. - After the first and last attempt of each message. - After each delivery attempt of each message. You also have the option of having these delivery reports sent only if delivery failures exist. If there were delivery failures, you will receive the type of delivery report you requested. If there were no failures, you will not receive a delivery report. The delivery reports go to all the members of a list who are set to "receive admin mail". Here is an example of a delivery report: This is a notification of the progress made in sending a message. You are receiving this notification because 'test' is set to send delivery progress notifications to list admins. -------------------------------------------------------------------Current delivery status after 1 delivery attempts is: Wed, 20 Feb 2002 17:39:55 - The ID number of this incoming mail message is: 8960 Wed, 20 Feb 2002 17:39:55 - This list posting is addressed to mailing list: 'test' Wed, 20 Feb 2002 17:39:55 - Preparing to deliver outgoing email message. Wed, 20 Feb 2002 17:39:55 - Created outgoing email job Wed, 20 Feb 2002 17:40:31 - Successfully sent to 8 out of 11 remaining recipients (72%) in 36 seconds. Delivery statistics: * 8 successfully sent (72%) * 1 members with transient problems (9%) * 2 currently unreachable (18%) Wed, 20 Feb 2002 17:40:31 190 - Next retry scheduled for: Wednesday, Feb 20 at 06:10 PM (in 30 minutes) Recipients with "transient" problems may yet be delivered to in a retry unless all delivery attempts have been completed. If a recipient's mailserver replies with a 500 or higher response, it is considered currently unreachable and will not be retried in this send. Note that by default mailings sent to larger numbers of recipients (over 4,000,000) will be split into smaller groups, and each group will have separate delivery reports. To change the size of these groups, see Setting Server Options. Utilities: List Settings: Basic Information: Enable Features Archive Messages to Enable Merge Mailings This option determines whether messages sent to this mailing list will be saved in the archives. Saving a message in the archives allows it to be read at a later date. Not saving archives conserves disk space. Note: If you disable archive saving, users will no longer be able to receive digest versions of the mailing list, and ListManager will be unable to check for duplicate messages. You will also not be able to purge message recipients later, or create segments based on those who click on clickthrough or clickstream tracking URLs. If you want your users to be able to receive digests or for duplicate postings to be purged, but do not want to keep archives, set the Save Archives setting to "YES" and set the Archive Days setting to "1" in Utilities: List Settings: Automatic Maintenance: Purging Archives. Save Recipient Info to Enable Purge Mailings This option determines whether information about which recipients received a particular message is saved with archived messages. If you are keeping archives and you have this setting enabled, the member ID of each recipient will be saved with the archived message. Those recipients may later be purged from other mailings. If messages are not archived, recipient info will not be kept. Saving recipient info is necessary if you plan on purging recipients in Mailings: New Mailing: Recipients. Enable This List as a Child List This setting determines if this mailing list will accept message submitted directly from another mailing list. This option is used to create parent/child mailing lists, where sending mail to a parent list automatically sends to a child mailing list. A typical scenario for setting up parent/child list is if you have multiple announcement lists and they are related in this way. For example, these lists could be in a parent/child relationship: 191 sports-announcements soccer-announcements tennis-announcements If lists are set up in a parent-child relationship, messages you send to "sportsannouncements" can be sent to members of "soccer-announcements" and "tennisannouncements" automatically. Or, you may just want to send to "tennisannouncements" and not to any other list. Here are the instructions for setting up a parent/child list. Please follow these directions carefully, as the relationship is a little difficult to grasp: 1. First, create your parent and child lists as you would create any ordinary lists (you will later establish the parent-child relation between them). You should not use message wrapping in any list that will act as a parent, as these header/footers will be reproduced when the messages are posted to the children. 2. For each child list, go to Utilities: List Settings: Basic Information: Enable Features, and set Enable This List as a Child List to Yes. 3. For each child list, go to Utilities: List Settings: Discussion Group Features: Message Rejection Rules: Same Message Rules and set Allow Duplicate Posting to No, Duplicate Postings Should Be Rejected. 4. For each child list, go to Utilities: List Settings: Discussion Group Features: Message Rejection Rules: Same Message Rules and set Allow Cross-Posting to No, Cross-Posted Messages Should Be Rejected. 5. For each child list, go to Utilities: List Settings: Discussion Group Features: Message Rejection Rules: Same Message Rules and set Cross-Posting and Duplicates to Make Sure that Multiple Copies of Cross-Postings are Removed. 6. For each child list, go to Utilities: List Settings: Basic Information: Enable Features and set Archive Messages to Enable Merge Mailings to Yes. 7. For each child list, go to Utilities: List Settings: Automatic Maintenance: Purging Archives and make sure Archive Days is at least 1. If you do not save archives, the lists cannot purge out crossposted duplicate messages. 8. Decide who should be able to post to your mailing lists and make them a member of all the lists (parents and children) that their message should be distributable to. A person has to be a member of the parent and all its children in order for the message to be distributed. You should also set the security permissions for this person so that their post goes through the security tests you decide. For instance, you may want to allow any post from the person to automatically be approved, in which case making this member a list admin on the lists is best. 9. In each list that is to serve as a parent list, subscribe the child list's posting address as a member of the parent list. For example, you would create two members in "sportsannouncements", with the email addresses "[email protected]" and "[email protected]". Child lists can also act as parents to other lists, so you can nest the parent/child relationship as deeply as you like. If you have configured the lists to reject cross-posted duplicates, you will prevent 192 members of multiple child lists from getting many copies when a message is sent via the parent list. However, this feature will only work if: 1) you do not include message wrapping in the parent, and 2) the messages are at least 240 characters long. Default with Open Tracking This option determines whether the list will provide open tracking by default or not. This is enabled by default for marketing list types, for other list types it can be set here to "yes" or "no". Note that this feature is for reporting of email opens; if this is set to "no", it will appear as though there were no opens, which is most likely not a realistic number. Default with HTML Detection This option determines whether the list will detect HTML by default or not, that is, whether or not recipients can read and/or send HTML. This is enabled by default for marketing list types, for other list types it can be set here to "yes" or "no". This is a reporting feature, and if set to "no", it will appear as though no recipients can detect HTML, which may not be a realistic number. Utilities: List Settings: Basic Information: Limits Disable This List This option allows a site or server administrator to prevent mailings from a list. By default, it is set to No, meaning the list functions normally. The disabled list will accept subscribe and unsubscribe requests, but no new mailings will be distributed to the mailing list. The ability to disable a list is only available and visible to site or server administrators. Max # of Members This option allows a site or server administrator to set an absolute limit on the number of members who can subscribe to a mailing list. When the maximum number is reached, the list itself will still allow mailings to be sent, but no new members will be allowed to join. This feature is useful for lists where the site administrator wants to set a limit on the list administrator of the size of the list. This feature is only available and visible to site and server admins. Please note that this limit only applies for subscriptions received through ListManager. If members are directly added to the SQL Server database, this member limit logic is ignored. Max Referrals Per Day The maximum number of referrals a member can make per day. Some members may abuse the referral feature by inviting people in order to harass them. Specifying a maximum number of referrals a member can make per day limits the damage from such people. 193 Utilities: List Settings: New Subscriber Policy Utilities: List Settings: New Subscriber Policy settings control how people join your list. You may: -Specify whether new subscribers must confirm their memberships by responding to a confirmation message, or confirm when they unsubscribe. -Determine how secure your list is--can anyone join? Do they require a password, or is it private? Or can members only be added by an administrator? Can people subscribe by email, or only through the ListManager web interface? -Specify who can or cannot join your list. Utilities: List Settings: New Subscriber Policy: Confirmation Confirm Subscribes Defines whether new members receive a confirmation request when joining the mailing list. The confirmation request will be an email message telling the person that they have requested to join this mailing list, and that the person will have to respond to the confirmation message in order to become a full member. The new member's status will be set to confirm until the confirmation response is received, and the person will not receive mail from the mailing list until the confirmation is received. The reply-to email address given in the subscription confirmation request message will be a unique address for that member. You may want to include this address in the body of a customized confirm document you send out. Thus, the reply-to address is constructed by using the following text: lyris-confirm-%%memberidchar%%@yourdomain.com This failsafe confirm address allows a member to reply to a single confirmation request and confirm their membership for all their lists. The contents of the reply is irrelevant, so long as it is addressed to the confirm address. If a member visits your Web site and signs up for four of your lists, you can have ListManager send the new member a single confirmation message for all four lists by using the "oneconfirm" option of the "add" command. When the member replies to this one confirmation request message, the reply will go to the failsafe confirmation address. When ListManager receives mail at this address, ListManager will confirm all outstanding confirmation requests for that member. Prospective members cannot confirm to some lists but not others. Confirmation serves several purposes. It is quite common for people to mistype their email address when subscribing to a mailing list using the web interface. Without confirmation, ListManager would waste effort trying to send mail to this incorrect address. Another need for confirmation is to counter a common form of electronic harassment. The harasser will sign someone they wish to harm to many mailing lists (perhaps several hundred), and that person will then be flooded with unwanted electronic mail. If 194 that person's email server is not perfectly configured, the email server may crash, or prohibit other people sharing the email server from receiving their email. At the very least, it will use bandwidth and other resources. The Confirmation feature blocks this form of electronic harassment. If the harasser subscribes someone to 100 ListManager mailing lists (all with Confirm set to Yes), the person will receive 100 confirmation messages but no further messages. If the person does not respond to the subscription confirmation messages (as they should not), the memberships will not be activated. We highly recommend that all Open mailing lists use the Confirm feature as this form of electronic harassment is quite common and is very bothersome to the victim. Confirm Unsubscribes This setting determines whether email requests to unsubscribe are immediately acted upon by ListManager, or whether it will send a request to the member asking them to confirm that they want to unsubscribe from the list. The three options for Confirming Unsubscribes are to confirm only questionable unsubscribes, to confirm all unsubscribes, and to never confirm unsubscribes (the default setting). For announcement lists we strongly recommend that you use the default setting, and that you do not use the setting that requires confirmation of all unsubscribes. Announcement list members will tend to find this extra step frustrating, and may accuse you of being a spammer. If an unsubscribe confirmation email message is sent, the message will tell the person to reply to the given message, if they want to be unsubscribed, or to ignore the message if they do not want to unsubscribe. Once a person responds to the confirming email to confirm leaving the list, they will receive the ListManager default goodbye message. Members who confirm their unsubscribes will not receive any Goodbye document you specify for the list. One reason to confirm unsubscribes is that people are sometimes nasty and will try to unsubscribe people that they do not like. They can do this by forging an unsubscribe request and sending it on behalf of that person. Another reason to confirm unsubscribes is when you are using the "failsafe unsubscribe" %%email.unsub%% address in your message. This mechanism places the recipient's email address and unsubscribe email address at the bottom of their message. If someone forwards this message to another, that person could unsubscribe the subscriber by following the unsubscribe instructions in the message. Because most lists are not subject to this problem, the default is to never confirm unsubscribes. If you are concerned about people unsubscribing others, use the setting that confirms only questionable unsubscribes. With this setting, only when a unsubscribe request comes from an address different from that subscribed to the list will the member receive a confirmation request. Utilities: List Settings: New Subscriber Policy: Security Security Defines how secure the list is to new subscriptions. The possible choices are: 195 Open Anyone can join (no approval needed). Private The administrator must approve new members. Password New members need to know the password to join. Closed Only an administrator can add new members. An Open mailing list allows anyone who finds this mailing list can join, either by email or by using the web interface. After joining (and possibly confirming the membership), this person will have full member status. A Private mailing list prevents anyone from finding the mailing list from joining immediately. When they attempt to join, (either by email or using the web interface) a List Administrator will have to approve their request to join before the person becomes a member. List Administrators who have their settings defined to receive Admin Mail will receive an email notice when a person requests to join a Private mailing list. When the list admin receives a request to join a private list and the request was done by email, the notification email message that ListManager sends out also includes the original requestor's email message, which can be helpful determining if the person should be allowed onto the list. If the admin changes the potential member's status from Needs Approval to Normal through the web interface (not via email), the new member will not receive a Hello message. A Password protected mailing list allows anyone who finds this mailing list can join (either by email or using the ListManager web interface) and will be automatically approved only if they know the password. If they do not know the password, they will be automatically rejected. The password is defined in a field further down this page. For subscription requests that arrive via email, the password is entered at the end of the subscription request, as in: subscribe jazz-discuss open-sesame A Closed mailing list is one in which non-members are not able to apply for membership. If a request for membership arrives by email, it will be automatically denied. On the ListManager web interface, the Subscribe button will not be a choice. New members to a Closed mailing list must be added by the List Administrator. You can change the Security status of a mailing list at any time. For instance, you can start out as an Open mailing list (so that anyone can join) and then become a Private mailing list (so that new members must be approved by a List Administrator). Password If the list Security (above) is set to Password, this field defines the password required for new members to join the mailing list. Allow Joining by Email This setting determines whether subscription requests by email will be accepted. By default, members can join a mailing list using the ListManager web interface or by sending a "subscribe" email command to ListManager. 196 If you want to require people to join using the ListManager web interface, you can change this setting so those requests to join by email are rejected. Note that disallowing joining by email may disable some web based subscription methods that depend on email to submit a request to join. Utilities: List Settings: Email Submitted Content Utilities: List Settings: Email Submitted Content controls what messages look like when sent via email to the list. These settings are not in effect when sending through the ListManager administrator's web interface in most cases. To configure the defaults for mailings created through the administrator's web interface, see Utilities: List Settings: Web Created Content. -Specify what text wrapping should come at the beginning and end of every message sent via email to the list. -Determine what security should be in place for email posting. Specify whether messages can be sent via email, and who can send to the list. -Specify whether approval is required for email submitted messages. -Specify what additions and revisions to the header should be made, such as the default From:, To: and Reply To: headers. Utilities: List Settings: Email Submitted Content: Message Wrapping This text will be prepended or appended to the email message body when the message is sent to the list via email only. These settings are not in effect when sending through the ListManager administration web interface. Prepend to Beginning of Every Message If specified, adds this text to the top of every mailing list message received via email. Note: If the message being sent is HTML formatted email, any < or > characters will be "protected" and converted in < and &rt;. If you do not want this behavior and want your < and > characters to be left intact then you should start your header or footer definition with <HTML>. Append to End of Every Message If specified, appends this text to the end of every mailing list message received via email. When you create a mailing list, ListManager defaults to putting a footer at the bottom of every message which tells the recipient what email address they are subscribed with, and how to unsubscribe. The text of the default footer is: --You are currently subscribed to %%list.name%% as: %%emailaddr%%. To unsubscribe send a blank email to %%email.unsub%% This footer uses the mail merge fields to allow failsafe unsubscribing. 197 You can change this footer to be anything you like, or remove it completely. In addition, the footer will get properly inserted inside your HTML or MIME-encoded message, because ListManager is aware of which type of message you are trying to send. In some cases, messages with attachments will cause this footer to be included as an attachment, instead of being part of the message. Note: If the message being sent is HTML formatted email, that any < or > characters will be "protected" and converted in < and &rt;. If you do not want this behavior, and want your < and > characters to be left intact, then you should start your header or footer definition with <HTML>. Utilities: List Settings: Email Submitted Content: Security Reject Email Submissions This setting determines whether all submissions sent via email should be automatically rejected. By default, your list is set to allow submissions by email. If you change Reject Email Submissions to "Yes", then any email that is sent to the list will automatically be rejected. Only postings made through the ListManager web interface or via a script will be allowed. Email can fairly easily be "spoofed"; that is, someone can make the email appear to be from someone it isn't from. Thus, email is not a very secure mechanism for authenticating users. Someone malicious can configure their email program to be someone else and send messages as if they were that person. In most mailing list situations, users behave ethically, and do not impersonate others, so the risk of abuse is minimal. However, you may have a need to have as much security as possible so that there is very little risk of improper email getting posted to your list. In such a case, you might want to disallow all postings over email. Only postings through the web interface or postings made with a script will be allowed. Note: These postings will be subject to normal security settings, such as moderation, action phrases, etc. Only Admins Can Send When set to Yes, only List Administrators are allowed to contribute messages to the mailing list. Any member who attempts to contribute a message will have their contribution automatically rejected. The Admin Send feature is useful for announcement or email marketing type mailing lists, where a select group is allowed to post to the list, but where all other members should not be allowed to post to the list. By default, this setting is set to Yes (only admins can send) for Email Marketing and Announcement lists created through Utilities: Administration: Lists: New List. Require Password in Body This option determines whether lists postings contributed by email require the sender to put their personal password in the message body. Passwords will only be required for members who have passwords. If certain members do not have passwords, this option will not have any affect on their ability to post messages to the list. If you want all members to have passwords, and for their passwords to be required in all list postings, you should also set "Require Password" to be true. "Require Password 198 in Body" (as distinct from "Password Required") requires that all members have passwords. See Utilities: List Settings: Users' Web Interface: New Subscriber Requirements for more information. Utilities: List Settings: Email Submitted Content: Approval Is List Moderated Defines whether message contributions sent via email will be automatically approved, or if they need to be approved by a list administrator. All messages sent through the ListManager administrator web interface require approval. Messages sent by those who are not allowed to post to the list will be automatically rejected. The options are: Not Moderated Messages never need approval. Moderated Messages always need approval. Number Moderated New members need to have a number of messages approved before they may post without approval. A Not Moderated list allows all message contributions from those allowed to post to be automatically approved and be automatically distributed to the mailing list. This setting provides little security unless you use require a password in the body; see Utilities: List Settings: Email Submitted Content: Security for more information about this setting. A Moderated list will hold all message contributions until they are approved or rejected by a List Administrator, or until the time set by Release Moderated Messages elapses. We recommend all messages be moderated if List or Server Scripting/Merge is set to Full Scripting/Merge in Utilities: List Settings: For Programmers. A Number Moderated list holds the first few message contributions of members for approval, like a Moderated list. Thereafter, they will be able to contribute messages without needing approval. The number of approvals new members need is set by the next field, Approve # for Number Moderated. If the Moderated setting is changed to Number Moderated after the list is created and people have joined, only the members who join after the change will be Number Moderated. The pre-existing members will be considered as having passed their initial approval requirements. If the Moderated setting is changed from Number Moderated to another setting, the new setting will apply and members who still had a number of messages to be approved will instead be held to the new Moderated setting. List Administrators who have their settings defined to receive Admin Mail will receive an email notice when a message has been contributed and needs approval. The List Administrator will then use either Mailings: Need Approval or email commands to approve or reject the message contributions. Or, if the mailing list is set to automatically Release Moderated Messages, the List Administrator does not need to do anything for moderated messages to be approved: the messages will be automatically approved after the release period has passed. 199 By default, this setting is set to Moderated for all lists except for unmoderated discussion lists. Approve # for Number Moderated If Is List Moderated is Number Moderated, this setting defines the number of message contributions that new members need to have approved before they can contribute without being held for approval. If the Moderated setting is not set for Number Moderated, this field has no effect. Release Moderated Messages Defines the amount of time that should elapse before messages held for approval are automatically approved if the list's Is List Moderated setting is set to Moderated or Number Moderated. For example, if the release period is set to 1 day, messages held and waiting for approval will be automatically approved at midnight, the day of their contribution. The release feature allows List Administrators to do nothing in the normal course of running their mailing lists. The List Administrator will receive a copy of the message to be approved via email and if the message is acceptable, the List Administrator does nothing and the message is approved that night. On the other hand, if the message is not acceptable, the List Administrator has until midnight to reject the message. If the List Administrator does not wish to use a release period, they can set it to Approval is Always Needed, which is the default for all lists. Automatically Release Messages At If a moderated message is set to automatically release after a certain number of days, this setting determines the default time at which it will be released. For example, if you set the time to 10 a.m., and Release Moderated Messages to "the same day", then ListManager will set all moderated messages submitted to this list to automatically approve at the next time Pam occurs. If you submit a message at 11 a.m. it will be set to automatically approve the next day at 10 a.m.. If you submit the message at 9 a.m. it will automatically approve an hour later, at 10 a.m.. Utilities: List Settings: Email Submitted Content: Email Header Change Date to Send Date When a message is sent to a moderated mailing list, the Date: header of that message is set by the email program of the person sending the message. However, if the message is approved at a later date, it is often best to have the Date: header of the message reflect the date when the message was sent by ListManager, rather than the authored date. This setting sets the default for moderated messages to automatically rewrite moderated date headers. You can still choose to rewrite (or not) the date headers of individual moderated messages by using Mailings: Need Approval: Edit Mailing: Schedule. Add List Help Headers This option determines whether helpful information is inserted into the headers of the messages ListManager sends. 200 These header lines tell people how to subscribe, unsubscribe, get help and contact the owner of the mailing list. These header lines are now an official Internet standard. ListManager complies with the standard document, titled The Use of URLs as Meta-Syntax for Core Mail List Commands and their Transport through Message Header Fields and available at http://www.isi.edu/in-notes/rfc2369.txt A number of email programs recognize the headers and assist users in subscribing, unsubscribing, or obtaining help. As of November 1, 1997, Claris Emailer, Qualcomm Eudora and Pegasus Mail directly support or plan to directly support these headers. Even when a mail program does not directly support the headers, they are still useful. Most email programs allow the user to optionally view all headers, and thus they can see this additional, helpful information. If you decide to include the List-Help headers, these six header will be added to your outgoing mail: List-Unsubscribe: <mailto:[email protected]?subject=[[email protected]]> List-Subscribe: <mailto:[email protected]> List-Owner: <mailto:[email protected]> List-Help: <mailto:[email protected]> X-List-Host: kuno.yourcompany.com List-Software: ListManager version x.x, <http://www.lyris.net> Note: Most email programs do not show the mail headers, so for most lists, it makes sense to include the headers, as they do no harm. If you choose to not include the List-Help headers, only the List-Unsubscribe header will be included. This header is included by default, because it is the most useful header. If you want to remove the List-Unsubscribe header, specify it as a header to be removed. See Utilities: List Settings: Sending to Your List: Header Rewrites. Unlike other settings in Email Submitted Content, any changes you make to Add List Help Headers will also appear in mailings created through the ListManager web interface. Note: If headers or footers are defined at multiple levels, i.e. server, site, or list, each header/footer will be added; one will not overwrite the other. Rewrite Message ID Header This option informs ListManager to leave the Message-ID header alone and instead use X-Lyris-Message-Id for that purpose. The Message-ID syntax is rewritten by ListManager to put the recipient email address in it, for easier human reading of bounces. Some users object to ListManager rewriting the Message-ID to be unique for each member, so this option allows you to disable this feature. Unlike other settings in Email Submitted Content, any changes you make to Rewrite Message ID Header will also appear in mailings created through the ListManager web interface. 201 Append to SMTP Header The message header is the part of the message that describes who the message is from, who it is addressed to, how the message should be displayed, and so forth. ListManager creates the correct header for your message automatically. The optional text you specify will be appended to the end of the message header. A message header text has the form of Key: Value. If you want to add text to the header that is not a standard email header, you should prefix your key name with X- so that it does not interfere with normal operation of electronic mail. For example: X-Legal: Contents Copyright 1997 Example Corp Ltd. Unlike other settings in Email Submitted Content, any changes you make to Append to SMTP Header will also appear in mailings created through the ListManager web interface. Note: If headers or footers are defined at multiple levels, i.e. server, site, or list, each header/footer will be added; one will not overwrite the other. Utilities: List Settings: Email Submitted Content: Header Rewrites From: If defined, replaces the From: in mailings distributed to the list when the mailing has been submitted via email. If blank, the From: is the email address and name of the author of the message. In some cases, you may want to obscure the email address of the author of the message and replace it with something else. In some cases, you may want to obscure the email address of the administrator who created the mailing and replace that address with another. For instance, if several people in the sales department of your organization can contribute announcements, you may want the From: to say sales@your-company… rather than the email address of the actual author. Doing so protects the original author's identity and prevents list members from contacting the author directly. You may also use the email address of the list, if you like. Note: This field must be a valid email address. If you do not specify a valid email address for this field, you will likely have problems when you try to mail. Some sites will refuse your mail, while others will show strange information in the From: field on the messages they receive. Examples of valid values for this field include: [email protected] Bob Smith <[email protected]> [email protected] (Bob Smith) "Bob Smith" <[email protected]> "listname" <[email protected] The default when creating content or mailings is the email address of the administrator currently logged in. To change this default, modify Default To in Utilities: List Settings: 202 Web Created Content. Reply To: If defined, replaces the Reply To: which the ListManager normally places in outgoing mailing list mail and replaces it with the contents of this field. If blank, the email address of the list is used. Enter "author" to use the email address of the message's author, or "nochange" to use the value of the header as received. The default setting depends on the type of list you created when using Utilities: Administration: Lists: New List to create a new list. For discussion lists, Reply To: is blank. The email address of the list is used, so that recipients of mail from a mailing list can reply back to the mailing list. For Email Marketing and Announcement lists, the Reply To: is set to "nochange" which uses the value as received. When using the administrator web interface to create a message, there will be no Reply To: with this setting. If you would like to have a different Reply To: than the From:, specify it here. If you are using email to send messages to an Email Marketing or Announcement list, it may be useful to change this address to an in-house email address, an autoresponder, or to the unsubscribe mail merge tag %%email.unsub%% so recipients can unsubscribe easily if they try to respond to the message. Examples of valid values for this field include: [email protected] Bob Smith <[email protected]> [email protected] (Bob Smith) "Bob Smith" <[email protected]> author nochange If you enter an invalid email address in the Reply-To: field, some mail systems may either refuse your email address or rewrite the header in unexpected ways. To: If specified, this address will be the To: message header on mail that is distributed to the mailing list. If blank, the email address of the list will be entered. Enter "nochange" to use the value of the To: header as received. The default setting depends on the type of list you created when using Utilities: Administration: Lists: New List to create a new list. For Email Marketing and Announcement lists, the To: is a mail merge tag which merges in the name and email address of the recipient. For discussion lists, To: is blank, and ListManager sets the To: header to be: "List Description <list-email-address>" as in "Jazz Discussion List <[email protected]>". If you enter a value for this field which is not an email address, the mail received from ListManager may be rejected or the To: may be rewritten to something odd, depending on what the receiving email system is programmed to do with invalid email addresses. Examples of valid values for this field include: 203 [email protected] Jazz Discussion List <[email protected]> [email protected] (Jazz Discussion List) "Jazz Discussion List" <[email protected]> %%nameemail%% %%emailaddr%% If you want to have the To: header be the email address of each recipient, you can use the mail merge feature to accomplish this. In the To: field, enter %%emailaddr%% for the email address only, or %%nameemail%% for both name and email address. If you wanted to have a combination description/email address, you could make the To: field be: "Jazz Discussion List <%%emailaddr%%>" Remove Headers This option allows you to explicitly remove any mail headers from mail being distributed to the mailing list. You can also remove headers that are inserted by ListManager. For example, if you do not want the "Precedence: bulk" header to be included in mail distributed to your list (which is added by default) you can enter "precedence" in the "Remove Headers" field. If headers or footers are defined at multiple levels, i.e. server, site, or list, each header/footer will be added; one will not overwrite the other. Therefore, to remove headers or footers, you must remove them at each level in order to remove them completely. If you want to remove multiple headers, you can as many as you like, by separating each header to remove with a carriage return. For example: Precedence Organization Comments X-Lyris-MessageID It will search in a case-insensitive manner for the headers you specify. If any of the headers you specify to remove are found, they are automatically removed. Utilities: List Settings: Web Created Content Utilities: List Settings: Web Created Content specifies default headers for content and mailings created through the ListManager administrator's web interface. These settings do not affect mailings sent to the list via email; see Utilities: List Settings: Email Submitted Content to configure these defaults. Default From By default, the Default From: email address for web created content and mailings is set to "login", which uses the name and email address of the current administrator logged into the list, formatted as follows: "Admin Name" <[email protected]> If blank, the From: address is left blank, and must be filled in every time content or a 204 new mailing is created. In some cases, you may want to obscure the email address of the administrator who created the mailing and replace that address with another. For instance, if several people in the sales department of your organization can contribute announcements, you may want the From: to say sales@your-company… rather than the email address of the actual author. Doing so protects the original author's identity and prevents list members from contacting the author directly. You may also use the email address of the list in this field, if you like. Note: This field must be a valid email address. If you do not specify a valid email address for this field, you will likely have problems when you try to mail. Some sites will refuse your mail, while others will show strange information in the From: field on the messages they receive. Examples of valid values for this field include: [email protected] Bob Smith <[email protected]> [email protected] (Bob Smith) "Bob Smith" <[email protected]> "listname" <[email protected] Note that by default there is no Reply To: header for web created content. If you would like to have a Reply To: header, specify it in Utilities: List Settings: Email Submitted Content: Header Rewrites. Default To If specified, this address will be the default To: message header for web created content or mailings. If blank, an email address or appropriate mail merge tag must be entered each time when creating content or a mailing. Examples of valid values for this field include: [email protected] Jazz Discussion List <[email protected]> [email protected] (Jazz Discussion List) "Jazz Discussion List" <[email protected]> %%nameemail%% %%emailaddr%% Default Subject If specified, this text will be the default Subject: message header for web created content or mailings. If blank, a subject must be entered each time when creating content or a mailing. Utilities: List Settings: Automatic Maintenance These settings keep your server running smoothly by automatically removing bad email addresses. They also determine how long to keep inactive members and archives. 205 -Specify when members should be held (no longer delivered to) due to delivery problems. -Specify how frequently to purge inactive members from the database. -Specify how long to keep message archives. Utilities: List Settings: Automatic Maintenance: Error Mail Handling Lyris ListManager by default handles all error mail, including bounces. However, the error mail settings must be correct for your list in order for it to function properly. By default, Lyris ListManager will try to send a message 3 times—one initial send, and two retries. If a mail server reports that an address is permanently non-deliverable, ListManager will only attempt to deliver to it once for that mailing. This kind of bounce is a hard bounce. A message that is undeliverable for other reasons (e.g., mailbox is full or mail server does not respond) is a soft bounce. If an address is undeliverable for the initial send and all the retries, it is considered to have bounced once. Even if a mail server initially accepts the message and later determines that the user does not exist, Lyris ListManager will be able to record that address as having bounced. In this situation, the receiving mail server will reply to Lyris ListManager with error mail. This error mail will go to the bounce email address and will contain the user’s unique member ID number, so Lyris ListManager will be able to track it back to the particular address unable to accept mail. This kind of bounce will not appear in delivery reports, as the mailserver initially reported that it accepted the message. Many large ISPs (e.g., AOL) accept all mail and bounce back undeliverables later. Hold Users This option determines whether members who bounce a great deal of mail have their membership automatically "held" by ListManager so it does not continue to send mail to them. By default, this setting is set to Yes. It is recommended that you retain this setting so Lyris ListManager holds users who bounce email. When people's email addresses go bad (for instance, they change to another Internet Service Provider), each email message sent to their old address bounces back to ListManager. By default, ListManager will analyze the bounces and determine who is causing them. If a member's email address appears to be invalid for several days in a row (based on your Bounce Reset and Bounce limit settings), ListManager automatically disables their membership so that ListManager no longer sends them mail. In most situations, automatic holding of users is a desired feature. In some situations, such as with internal mailing lists, where email address problems can be temporary (or must be repaired by a email system administrator) you can disable this feature. ListManager will then never put a membership on "hold". When a user is placed on hold, ListManager can send the user an email message indicating that this has occurred as well as a copy of the most recent error message 206 ListManager received from this user. This notification message, if the user receives it, can be very helpful to the user in determining why their email was being rejected by their mail system, and allows them to "unhold" their membership. Bounce Reset Determines the number of days an address needs to be bounce-free in order to have its bounces reset to zero. This value, in conjunction with the Bounce Limit (see below), controls how many bounces within a given time a member must have received before the user is put on hold. Lyris ListManager doesn’t simply limit users to an absolute number of bounces before putting them on hold. Often, there are transient problems sending to a particular email address that are soon resolved. If Lyris ListManager never reset the bounce count for an address, that address would be put on hold, even if the bounces occurred months, or even years, apart. What this number should be set to depends on how frequently you post. The Bounce Reset number should be greater than the interval of days between postings. If it is set to a number that is less than the interval between mailings, members cannot accumulate bounces and will never be put on hold. By default, this setting is set to Auto configured, meaning ListManager will monitor your mailing frequency and adjust the Bounce Reset accordingly. This option tells ListManager to analyze the mailing patterns of the server on a nightly basis, and configure this value automatically for the optimum choice. If you do choose to change this setting to something other than auto configured, we recommend the following settings: Frequency Daily Biweekly Weekly Bimonthly Monthly Bounce Reset 5 7 10 25 35 Bounce Limit Determines how many messages a member can bounce before being put on hold. The lower the number, the more quickly bad email addresses will be set to hold—and the greater chance that someone with transient server problems will be inadvertently held. ListManager counts one bounce per day, per member. As the person's bounce count is incremented, the Bounce Limit setting determines the threshold at which the person is put on hold. For example, if the Bounce Limit is 3, a member will need to bounce three times before being put on hold. The Bounce Reset setting determines how many days a member must be bounce-free before having their bounce count set to zero. The default Bounce Limit setting for your list was determined by the frequency and type of list you selected when you created this list in Utilities: Administration: Lists: New List. You may want to change this number if you'd like to be more conservative or aggressive about getting rid of bad email addresses. If you want your members to be placed on hold immediately if they bounce any messages at all, you can set this number to 1. Setting Bounce Limit to 1 is strongly 207 recommended if you are using old data with many bad email addresses. We recommend the following settings: Frequency Daily Biweekly Weekly Bimonthly Monthly Bounce Limit 5 3 3 2 2 Redirect All Bounces to Email Address If blank, ListManager handles all bounced mail for you. If you don't want ListManager to handle your bounce mail, specify an email address to where all error mail should go. This option is provided for advanced users, and it should be left blank unless you are prepared to handle the bounce mail at another address. Any email address you specify here will replace the Mail From: header in your outgoing mail message. Normally, the mail transaction Mail From: address is the error handler of the server, and error mail is defined by Internet standards as going to this address. If you change this setting ListManager will no longer receive error mail and will no longer be able to automatically process bounces, error messages, bad deliveries, etc. It is STRONGLY recommended that you do not modify this setting. Notifying Users of Their Held Status When a member bounces too much email, their status can be changed to "held". That means their email address has been declared as "invalid" or "inoperational" and they no longer receive list postings. ListManager has the capability to send a notification message to people on hold, to tell them about their status and give them the option of un-holding themselves. A member can unhold themselves by sending email to "unhold@…" at your ListManager hostname (e.g., [email protected]). If you choose to "never notify" the member will receive no notification, ever. Thus, they will not have a real opportunity to "unhold" their membership. Although it is possible to inform users that their membership is on hold because of bounces, it is not recommended; since the address is bouncing mail, a hold notification would likely bounce as well. Notifying users of their held status can greatly slow down the performance of your ListManager server. Notify How Often This setting determines the frequency at which ListManager notifies held members. You can choose to never notify held members, notify them every night, every few days or whatever interval you choose. This setting should be a number lower than that used for Notify for How Many Days, or members will never receive a held notification. By default, your list is set to not notify held members. Notify for How Many Days This setting determines for how many days a member who has been placed on hold 208 should receive a notification message. This setting does not directly correlate with how many notifications the member will get; it only means that the member will receive notifications for a specific duration. By default, your list is set to never notify held members. Thus, you can determine how many notifications someone will get if you divide the Notify for How Many Days value by the Notify How Often value, and drop the remainder. For example, if your "Held Notify Days" is set to 11 and your "Held Notify Interval" is set to two, you would divide 11 by two, and drop the remainder. These settings result in five notifications. Utilities: List Settings: Automatic Maintenance: Purging Inactive Members These settings determine how frequently inactive members are purged from your database. By default, they are never purged. If you would like to conserve space in your database, you may change these settings. Purge Held This setting determines how long someone who has had their membership placed on "hold" should remain until they are permanently erased from the system. Purge Unconfirmed This setting determines how long someone who has asked to subscribe to the mailing list, but never "confirmed" their membership should remain in the system until they are permanently erased from the system. This setting only applies if the mailing list is set to require confirmation from new members. See Utilities: List Settings: New Subscriber Policy: Confirmation. Purge Unapproved This setting determines how long someone who has applied for membership but not been approved by an administrator should remain until they are permanently erased from the system. This setting only applies if the mailing list has its security set to "private", so that new memberships require administrator approval. See Utilities: List Settings: New Subscriber Policy: Security. Purge Expired This setting determines how long someone who has had their membership expire should remain until they are permanently erased from the system. This setting only applies if an expiration date is set on memberships, so that memberships expire after a certain number of days. Otherwise, memberships never expire. Purge Unsubscribed This setting determines how long an unsubscribed member should remain in the database before they are permanently deleted. Keeping unsubscribed members allows you to get accurate reports of your membership. Remove Old Referred Members 209 This setting determines how long referred members are saved before being purged. Referred members are those that have been invited to join your list using the referral tracking feature, but who have not joined the list. Removing referred members does not prevent them from joining the list later; however, it is likely that referred members will be less likely to act on an invitation days or weeks after receiving it. This information should be kept as long as necessary for reporting purposes. Utilities: List Settings: Automatic Maintenance: Purging Archives Keep Archived Messages for How Many Days This setting determines how long archived messages will be saved. Saving a message in the archives allows it to be read at a later date. By default, your list is set to 0 (zero), or to keep archives indefinitely. If you set the list to not keep archives, no archives will ever be saved. This is the opposite of setting the list to 0 (zero). Not saving archives conserves disk space. Note: If you disable archive saving completely, you will also not be able to purge recipients from future mailings. Users will no longer be able to receive digest versions of the mailing list, and duplicate messages will not be removed. If you want your users to be able to receive digests, but do not want to keep archives, set the Archive Messages to Enable Merge Mailings setting to "Yes," and set Keep Archived Messages for How Many Days to "1". See Utilities: List Settings: Basic Information: Enable Features to save archives. Keep How Many Messages Archived This setting determines how many messages from the list will be saved in the archives. For example, a setting of 10 means that the previous 10 messages will be saved in the archives. Any old messages beyond the most recent 10 messages would be automatically removed. By default, your list is set to 0 (zero), or to keep archives indefinitely. If you set the list to not keep archives, no archives will ever be saved. This is the opposite of setting the list to 0 (zero). Keep Mailing and Clickthrough Data for How Many Days This setting determines how long outgoing mail to your list is saved. Delivery and clickthrough data is only available for saved mailings. Increase this setting if you will need to refer to this data in the future. Note that performance may decline if you keep mailing and clickthrough data for a very long time for many of your lists. Utilities: List Settings: Discussion Forum Interface These settings determine how members interact with the ListManager discussion forum interface, and what kind of information they can get about your list. 210 -Specify message reading settings: who can see the list's messages, and what methods they may use. -Specify new membership requirements if subscribing through the ListManager discussion forum interface. -Provide information about your list in the ListManager discussion forum interface. -Specify who may participate in conferences. Utilities: List Settings: Discussion Forum Interface: Message Reading Hide List Defines whether or not this list is hidden in the ListManager discussion forum interface. A hidden mailing list does not appear in the discussion forum interface menus and does not appear in the "lists" email command. The discussion forum interface pages for a hidden mailing list are still available, if you use the direct URLs to go to them. By default, Hide List is set to "No", meaning that your list is visible in the ListManager discussion forum interface. Allow Visitors to Read Archives Defines whether to allow visitors to visit your mailing list and read your archives. Allowing visitors means that the discussion forum interface will allow non-members to read and search the past mailings on your list. They will also be able to get information about your mailing list. A visitor cannot contribute to a mailing list, and cannot receive mailing list contributions via email. By default, this feature is set to "No." Allowing visitors is often a good way for prospective member to get a taste of what a mailing list is about. They will be able to read past postings to see if the mailing list interests them. If it does, they can apply for membership. Allowing visitors is also useful for specialized mailing lists, where the information is not confidential, but you do not want just anyone joining. For example, a mailing list discussing Internal Telecommunications standards would want outsiders to be able to read the discussion but, you may want the mailing list to be Private, so that only members of the standards committee can belong to the group. See Utilities: List Settings: New Subscriber Policy: Security for more information on making a private list. Enable Archive Searching This option determines whether archived messages are full text indexed and thus textsearchable. By default, this feature is set to Yes. If you do fully allow text indexing of the archives, members are able to perform very fast word searches of the archives of your mailing list. However, the full text index does consume a great deal of space and may not be applicable to all mailing lists Make Available as a Newsgroup? This setting determines whether this mailing list will be available as a newsgroup. By default this setting is set to No. 211 ListManager is capable of feeding your mailing list as a secure, private newsgroup. If your users have Netscape or Internet Explorer 4 (or newer) they can access the newsgroup with the URL news://server-name/listname. Alternatively, they can get a list of mailing lists and choose the lists they want to use by going to news://server-name. The "server-name" is the Internet machine name of the machine running ListManager, typically the same machine name users receive email from. If your users do not have Netscape or Internet Explorer 4 (or newer) they can access your group by defining your ListManager as their default Newsgroup server. For example, Forte "Agent" and Internet Explorer 3 use this method. Note: ListManager implements all the same security for newsgroups as apply to mailing lists. Thus, if your list is set to "allow visitors", then non-members will be able to read your newsgroup without joining. If your list is set to not allow visitors, only members will be allowed to read. If a user is using Netscape and they try to access a group which does not allow visitors, Netscape will automatically prompt the user for their name (which is their email address) and their password (if they have one). ListManager will then determine if they are a valid user and if they are allowed to read the group. If they are not, they will not get any further access to the group. If they are, ListManager will determine for which groups this name/password combination is valid and allow them access to these groups. If they try to access a group they are not authenticated for, Netscape will again prompt them for a name and password. Most news browsers do not ask for a name or password as needed, but rather ask for this information as part of the static configuration of the news browser. Agent and Internet Explorer work this way. If they are using one of these browsers, they will need to enter their email address as their newsgroup name and their list password into their news browser, which will allow them access. One problem with these browsers is that if the user has different passwords on different lists, ListManager will only let the user into the lists for which their name/password combination is valid. Netscape is the only browser we know of which will ask for name/passwords as needed. We recommend that most users use Netscape for accessing ListManager newsgroups, as this is currently the only Newsgroup browser that supports the latest security, multi-server and full text searching features in the NNTP protocol. ListManager also allows posting via a news browser. Postings via news browsers are treated exactly as if they came in via email. They are subject to all the same moderation, membership and security requirements that normal email is subject to. If a posting via a news browser is rejected, the poster will receive notification of this via an email message. ListManager also supports Newsgroup full text searching. At current time, only Netscape supports this feature. To use it, right-click on the newsgroup name, and choose "search". You will be able to build a complex boolean search with multiple terms and NOT terms as well. ListManager will execute your search extremely quickly, thanks to its full text index. Note: ListManager includes a demonstration version of the newsgroups support. Long messages will be truncated and each message viewed through the Newsgroups interface will have a disclaimer footer appended to it. If you decide that you want to have the full ListManager newsgroups support, you can upgrade to include this feature. 212 Contact your sales representative at [email protected] for more information. Utilities: List Settings: Discussion Forum Interface: New Subscriber Requirements Restrict Member Options This setting determines whether your members are allowed to set various membership options, such as whether or not they'd like to receive the messages in digest form. By default, lists created as email marketing or announcement lists are set to be restricted, and discussion lists are not. On an email marketing or announcement list, these member options often do not apply. For instance, if you are sending out one announcement per week, it does not make sense for members to be able to set their membership to receive a daily digest. In such a case, you may want to disable the member's ability to set their own options. The options will no longer appear in the ListManager discussion forum interface for joining and "your settings", and email commands to set them will be rejected. Ask Subscribers for Name When a member joins using the ListManager discussion forum interface, ListManager can ask the person for their name. This option allows you to require a name, to make the name optional, or to not ask for their name at all. By default, this setting is set to "Ask for name when joining, but make it optional". Note: If joining by email is allowed, this setting has no impact, because there is no way to require a name if people can join by email. If you want to always have member names, you should also set your mailing list to not allow joining by email, so that people must use the ListManager web interface to join. See Utilities: List Settings: New Subscriber Policy: Security. Note that if the name field is blank on a web subscription, but reply to a confirmation message, ListManager will automatically use the name in the From: field (if available), or from an email posting to the list. This will not overwrite any preexisting names. Require Password When a member joins using the ListManager discussion forum interface, ListManager can ask the person to pick a personal password. A personal password is useful for mailing lists where security is important. If no password is defined for a user, then other people can enter the discussion forum interface as that person by typing in their email address. Requiring each user to have a personal password adds considerable security to your mailing list. This option allows you to require a password, to make the password optional or to not ask for a password at all. By default, this option is set to "Do not ask for password at all". If you allow joining by email and you set Require Password to "yes", ListManager will generate a random numeric password for members who subscribe by email and send it. 213 Utilities: List Settings: Discussion Forum Interface: Information About Your List: General Topic Defines the topic for this mailing list. Allow Info Defines whether non-members should be able to view general information about this mailing list, such as who the administrator is, what the description is, etc. Global Defines whether the existence of this list should known to the outside world. Setting Global to Yes means that when and if Lyris creates a global directory of mailing lists, your list will be included in that directory. Utilities: List Settings: Discussion Forum Interface: Information About Your List: About this List Long List Description Reference to a document that describes this mailing list. This description will be displayed in the discussion forum interface's About tab. You may select from any document you create. See Utilities: Automated Messages: Document Content for more information about automated message documents. Comments On This List Reference to a document with comments about this mailing list. These comments will be displayed in the discussion forum interface's About tab. Keywords To Describe This List Words that describe this mailing list. If several words are specified, separate each one with a comma. These words will be displayed in the discussion forum interface's About tab. URL to GIF/JPEG List Logo The URL to a web-ready graphic to be displayed in the discussion forum interface for this mailing list. Since this interface uses white as a background color for all the web pages, it is a good idea to make your graphic look good on a white background. This URL can be a local path (off of your web server's document root), such as /graphics/jazzdisc.gif or a full URL, as in http://www.company.com/graphics/jazzdisc.gif. If you specify a full URL, the graphic does not need to reside on the same web server as the ListManager discussion forum interface. This is convenient, because it means that you can update the logo graphic without having access to the hard drive on the machine running ListManager. This logo will be displayed in the discussion forum interface's About tab. Utilities: List Settings: Discussion Forum Interface: Information About Your List: Contact Info List Contact 214 Reference to a person who is the administrative contact for this mailing list. Choosing a person as a list contact of a mailing list does not give the person any security privileges; it is for informational purposes only. This information will be displayed in the discussion forum interface's About tab. List Sponsor Reference to a document describing the organization sponsoring this mailing list. See Utilities: List Documents for more information about documents. This information will be displayed in the discussion forum interface's About tab. List URL A URL to a Web site for this mailing list. For example, if a Web site called Jazz discussion home page exists, you might enter the URL: http://www.jazz-discuss.com/. This information will be displayed in the discussion forum interface's About tab. Utilities: List Settings: Discussion Forum Interface: Information About Your List: Language The Language settings are informational only, and do not affect how your mailings are sent. Language #1 The primary language used in messages on this mailing list. Language #2 The secondary language used in messages on this mailing list (Can be the same choice as the primary language). Utilities: List Settings: Discussion Forum Interface: Conference These settings determine how members may access the conference feature of the discussion forum interface. The conference feature allows users to chat with one another using the ListManager discussion forum interface in real time, and optionally send the discussion to the list. Accessibility Determines whether or not the conference feature is available. By default, everyone may read messages posted to a list's conference, including visitors (non-members) if your list is set to allow them. If Allow Visitors to Read Archives is set to No (in Utilities: List Settings: Discussion Forum Interface: Message Reading), only list members will be able to access the list's conference. To limit access to list members, change this setting to Members Only. If visitors have been enabled, they will still be able to access your list's archives in the discussion forum interface. To disable all access to this list's conference, select Disable Conference. Posting Determines who is allowed to post to the conference, if it has been made available by 215 the Accessibility setting. By default, everyone may post messages to a list's conference, including visitors (nonmembers) if your list is set to allow them. If Allow Visitors to Read Archives is set to No (in Utilities: List Settings: Discussion Forum Interface: Message Reading), only list members will be able to post to the list's conference., To limit posting to list members, change this setting to Members Only. To limit posting to list administrators, select Admins Only. Save Posts For Determines how long posts to the conference are saved. Note that all conference posts will be lost if ListManager must be restarted. By default, posts are saved for one day. You may change how long posts are saved (from one hour to 14 days) here. Guest Message The message visitors see when they attempt to enter a conference without having logged in first. This message is provided here for your information only, and cannot be modified. It reads: Note: If you are a member, please log in before using the conference. If you are not a member, please create a temporary guest user by entering a name and password. Utilities: List Settings: Discussion Group Features These features are generally used only for discussion groups—lists where list members respond back and forth to each other's messages. -Specify how the message looks: whether or not to prepend the list's name to the Subject: line, or whether postings can be anonymous -Specify message wrapping for digests. -Specify posting security: who can write to the list, and who can see the list of members. -Specify automatic reasons to reject messages. Utilities: List Settings: Discussion Group Features: Message Look List Subject Defines whether the name of this mailing list should be prepended to the Subject: line of mailing list mail. This feature helps list members identify email as coming from your mailing list, and may help their email program filter and organize email better. For example, if the original subject is: Subject: new album from Betsy Smith 216 The new subject is: Subject: [jazz-discuss] new album from Betsy Smith By default, the subject line is untouched. Make Postings Anonymous Some kinds of mailing lists benefit from allowing people to be anonymous when they post. For example, an employee suggestion discussion might need to be anonymous, as might a psychological support group. ListManager supports anonymous mailing lists by removing all identifying marks from the headers of the messages distributed to the mailing list. The From: defaults to "Anonymous" and can be set to something else if desired. If a list is moderated, the moderator will see the real author of the message before approving it, and it will "anonymize" when distributed. Of course, this feature cannot read the message so, if the message contents contain something that identifies the person, ListManager cannot do anything about that. Thus, people should remember to not include their personal mail footers when posting to an anonymous mailing list. Prepend to Beginning of Every Digest If specified, appends this text to the beginning of every nightly digest and index message from this list. Append to End of Every Digest If specified, appends this text to the end of every nightly digest and index message from this list. By default, when you create a mailing list, this footer is added: --You are currently subscribed to %%list.name%% as:%%emailaddr%% To unsubscribe send a blank email to %%email.unsub%% This footer uses the mail merge fields to allow failsafe unsubscribing. Of course, you can change this footer to be anything you like, or remove it completely. Utilities: List Settings: Discussion Group Features: Security Reject Posts From Non-members This setting indicates that people who are not members of this mailing list will be allowed to post. The default setting is "Yes," which means that if someone tries to contribute a message to this mailing list and their name or email address is not listed as a member of the list, their message will automatically be rejected. A setting of "No" means that the person's contribution will not be rejected. However, if 217 the list is moderated in some way (either full or number moderation) their message will require moderator approval. For example, if your list is set to number moderate, so that new members need their first message approved, any message coming from a nonmember will be treated as if a new member posted it and will require moderator approval. Allowing non-members to post and not having moderation means that anyone can send email to your list address, and it will be distributed to your members. Security of Member List By default, the listing of members of a mailing list is considered confidential and is only available to the list administrator. This option also allows you to make the listing of members available to members of the mailing list or to anyone. The "review" email command is used to obtain a member listing by email. Utilities: List Settings: Discussion Group Features: Message Rejection Rules: Blanks Allow Blank Subject Allow messages to be posted which have a blank subject. By default, ListManager will not allow messages which have a blank subject to be posted to a mailing list. Related to this, some email programs place a carriage return in the Subject, which is highly non-standard and caused ListManager to sometimes think the subject was blank. ListManager removes the carriage return in the Subject line to make the message conform better with standards. Allow Blank Body Allow messages to be posted which have a blank body. By default, ListManager will not allow messages with a blank body to be posted to the mailing list. However, allowing blank bodies can be useful if you use your list to post flash messages, where the only text is in the subject. Utilities: List Settings: Discussion Group Features: Message Rejection Rules: Same Message Rules Allow Duplicate Postings A duplicate posting occurs when one person attempts to post a seemingly identical message to the same mailing list more than once in one day. Please note: Archives must be kept for at least one day for duplicates to be detected. ListManager looks at the first 200 characters to determine if a posting appears to be a duplicate. The reason for this is that some "automatic answer" programs (such as the "vacation" program) will automatically reply to anything they receive by adding a "I'm on vacation" sentence to the top of the message and quote the rest of the message. ListManager will catch the duplicate posting, since the top of the message will be identical. Normally, duplicate postings are the result of the author not being careful and sending 218 the same message twice, or of some Internet mail error where the same message is delivered twice. By default, ListManager rejects duplicate postings to discussion lists, but not to email marketing or announcement lists. Normally, for discussion lists you will want to leave this default setting as it is since there usually is no good reason why your list members would want to receive the same message twice. Also, this feature is quite effective as a mail-loop prevention technique, when people attach a misbehaving "automatic email answering" program to their email address. Most "vacation" programs are well behaved and do not answer list-mail. However, people sometimes decide to write their own "vacation" program or other automatic email generating program and this can cause problems on a list. This feature takes care of this problem. Allow Cross-Posting? This setting determines if messages that are cross-posted are rejected by ListManager or if they are allowed onto the list. A cross-posted message is a single message sent to more than one mailing list on a server. For example, in the To: field of an email message, the author can list several mailing lists and thus deliver the same message to several lists. Note: Cross-posting only works for messages posted within the last 24 hours. By default, email marketing and announcement will allow crossposting, but discussion lists will not. If Allow Cross-posting? is set to No, ListManager will catch a cross-posted message, see that it has already been posted to another list and reject any further attempts to post the identical message. If the message is modified slightly in some way (i.e., an extra space, a carriage return, an extra sentence, etc.) it will not be considered a cross-posting. Note that Archives must be kept for at least one day for cross-posted messages to be removed. In general, cross-posting to mailing lists is considered bad Internet etiquette and, occasionally, it is a method used by spammers to disseminate inappropriate email. However, there are many circumstances where it is appropriate. For instance, if there are two mailing lists or segments that deal with related topics, and messages appropriate to both groups are written, the author may want the message to be distributed to both mailing lists. Cross-Postings and Duplicates If cross-posting is allowed, this setting determines what members of multiple lists or subsets will receive. Note that Archives must be kept for at least one day for crossposted duplicates to be removed. By default, members will not receive duplicate cross-posted messages. For example, if a message is posted to two lists or segments and one person (one email address) is a member of both those lists or segments, the person will receive one copy of the posting, because the setting is "Make Sure that Multiple Copies of CrossPostings are Removed." However, there may be situations where you would like people to receive copies as posted to the lists or segments. If that is the case, change this setting to "Cross-Posted 219 Copies Should be Sent to Recipients as Listed." An example will help clarify how this feature works. Say you have several announcement lists where you post articles about various topics. You have lists named "computers", "cooking", "gardening" and "sports". People join the various lists that they are interested in. Some people join just one list, while others might join several lists. Now, say that you have an announcement about a "video game for playing soccer" and you feel that it is appropriate for both the "computers" list and the "sports" list. If you post your message to both "sports" and "computers" (i.e., you are "cross-posting" your announcement) people who are members of these two groups will receive your announcement. If you are set to "Cross-Posted Copies Should be Sent to Recipients as Listed", then someone who is a member of both "sports" and "computers" will receive two copies of your message, one from each mailing list. If you are set to "Make Sure That Multiple Copies of Cross-postings Are Removed", then someone who is a member of both "sports" and "computers" will only receive one copy of your message. They will receive the message from the first group you sent the message to. Thus, if you posted your message To: "soccer, computers" then the "soccer" messages are distributed first and that is where the person will get their message from. This feature is particularly useful with announcement lists where you want to split your lists into various topics, but you have messages that apply to several topics. With other list managers, people would receive multiple copies. With ListManager, the duplicate messages are removed and people receive only one copy. This feature works the same way when sending to multiple segments. For example, let's say you'd like to make an announcement to all administrators on your server. When selecting recipients for a mailing, you may select the administrators segment for each list. If your lists are set to "Make Sure That Multiple Copies of Cross-postings Are Removed", your administrators will receive only one announcement, regardless of how many lists they are members of. Utilities: List Settings: Discussion Group Features: Message Rejection Rules: Etiquette Max Quoting Allowed This option limits the number of continuously quoted lines in a message. The default, 0, allows unlimited quoting. Quoted lines are identified as beginning with the > character. Messages over these limits are rejected, with an explanatory message. Note: This applies to continuous quoted lines, not to the total amount of quoted lines in the message. Messages that use a different quoting character (such as :) will not be rejected if they exceed the Max Quoting Allowed. Daily Message Limit Defines the total number of messages that can be distributed to the mailing list in one day. This feature is generally used as a last resort to prevent mail loops from going out of 220 control. A mail loop occurs when mail sent to the mailing list members encounters a badly configured email server, and the email server sends a message back to the mailing list. ListManager has many features to prevent mail loops from happening, so the Daily Message Limit will, in practice, never become an issue. However, if, for some reason, a message loop were to occur, the Daily Message Limit would shut off the mail loop after a certain limit. Note: ListManager automatically blocks duplicate posts for discussion lists, and unless this feature is explicitly disabled, it is very effective at stopping mail loops before they occur. Message Size Limit Defines the maximum size of messages that may be contributed to the mailing lists. Any contributed message over this size will be automatically rejected. Sometimes mailing list members will try to send a large attachment to a mailing list (such as a sound file), and most mailing list members do not want to receive this size of a file from the mailing list. This feature will block excessively large messages from being sent. List administrators are not restricted by this message size limit—their messages can be of any size. Max Posts Per Member This setting places a limit on the number of posts that a single member is allowed to send to this mailing list in a one-day period. If the member goes over this limit, they will be rejected and notified that they need to wait until the next day. By default, this setting is "0", meaning unlimited posts. This feature is useful if someone is dominating the list, or is clogging it up with "me, too" responses. Utilities: List Settings: For Programmers These settings allow programmers additional control over what messages should look like. -Specify who is allowed to include scripting in messages, including mail merge and conditional text. -Specify programming extensions to be run before and after messages. Utilities: List Settings: For Programmers: Email Scripting Enable Scripting This setting determines how merging and scripts are handled in the body of the message. The settings are: Administrators Only When this is set, only administrators are allowed to use scripts or mail merge tags 221 delimited by %% symbols. For anybody else, they will pass through and not be interpreted. Any Member When this is set, any member of a list can post scripts or mail merge tags delimited by %% symbols. If the list is set to allow non-members to post, then they will have the same capabilities as a member in this regard. Disable Nobody can post scripts or mail merge tags delimited by %% symbols. Scripts or tags in list headers or footers will still be evaluated. Note that there is also a server wide Scripting Feature Level which regulates what kinds of scripting and mail merge are available. For example, if Scripting Level is set to No Scripting/Merge, administrators would not be able to do full scripting, even if this setting was Administrators Only. Scripting Level This setting determines what level of scripting will be available for the selected list. The options are: No Advanced Scripting Disables all advanced scripting. Merging based on the standard ListManager tables is allowed; user-defined fields are not. This is the default setting for discussion lists. Safe Scripting/Merge Allows only 'safe' advanced scripting. File system, SQL and other potentially harmful access is not allowed. Full Scripting/Merge Allows the complete Tcl Interpreter, including file system, SQL, and other access. Important: if you allow full scripting/merge, we recommend that the list be configured to moderate all incoming messages. Otherwise, certain Tcl procedures such as "redirect" could be misused. See ListManager Tcl Procedures for more information about the "redirect" command. This is the default for announcement and email marketing lists. Safe and Full Scripting/Merge are only available if you are running ListManager Pro or Enterprise. The level of scripting you select should be determined by the type of list you're using, and who is likely to post to it. For example, discussion lists are unlikely to need the advanced scripting features, so scripting should be disabled with this setting (the default for these lists). Even the 'safe' level would likely be unnecessary for this type of list. Note that the server Scripting Feature Level overrides the list level if the setting here is more restrictive than the setting for the list. Utilities: List Settings: For Programmers: Extensions to Run Before Posting This setting allows you extend the ListManager posting processing with your own program. When a message comes in for distribution on this mailing list, your program 222 will first be run and your program can do any processing it wishes on the message. If your program wants to stop processing of the message or stop the message from being posted, it can delete it. After Posting This setting allows you extend the list posting processing with your own program. When a message comes in for distribution on this mailing list, your program will run at the very end after the message has been distributed. Before Subscribing This setting allows you to extend the subscribe process by running your own program before the subscription is accepted by the server. Whenever a subscribe request comes into this list, this program will be run. For example, your program may have a database of acceptable users and you may want to look up each subscribe request to make sure they are in the database. After Subscribing This setting allows you to extend the subscribe process by running your own program after a subscribe request has been processed by the server. For example, your script may want to update your external database, so it can keep your ListManager db and your external db in sync. Before Unsubscribing This setting allows you to extend the unsubscribe process by running your own program before an unsubscribe request has been processed by the server. After Unsubscribing This setting allows you to extend the unsubscribe process by running your own program after an unsubscribe request has been processed by the server. For example, your script may then update your external database so that your ListManager db and your external db are in sync. 223 Utilities: Members You can add, edit or delete members from the Utilities: Members menu. The Members page allows you to edit or delete existing members and create new members. Search for particular members or groups of members in Utilities: Members: Find Members. In addition, you can view a member's history. You can also import members and create member bans. Since List Administrators are normal mailing list members, but with additional properties rights, the Members page can also used for editing, deleting and creating List Administrators. For information about your list's membership, see Reports: Members. Note that the total number of members you may have on your server is determined by your license. Contact your account representative at [email protected] if you'd like to increase the number of members you may have. Utilities: Members Main Page Finding Members Ten list members are displayed at one time. To view more than ten members at a time, click on Show More. Repeatedly clicking on Show More will show greater numbers of members at a time. You may change the sorting order of the members by clicking the up or down triangles next to Email and Name. By clicking the top triangle, the sort order will be ascending (a-z); clicking the bottom arrow makes the sort order descending (z-a). Click on next to see the next ten members, previous to see the last ten. Email The email address of the member. Name The full name of the member, if available. Joined The date the member joined. Status Whether the member is normal, unsubscribed, held, confirm or private status. See Utilities: Members: Find Members: Status for more information. Kind Whether the member prefers to receive normal mail, digest, MIME digest, index, or nomail. See Utilities: Members: Find Members: Kind for more information. The drop down box allows you to easily display groups of members based on member status, kind, or whether or not they are list administrators. You also have the option to Create Many Members, Ban Members, or Import Members from File. To search for members, select Find Members in the drop down box, and click Go. You will be taken to the Utilities: Members: Find Members page, where you can find 224 members based on email address, domain, segment, status, kind, or member ID. Viewing or Editing An Existing Member To view a member, click on the member's email address You will be taken to the Utilities: Members: View Members: Edit Member screen, where you can view or edit the member. Copying a Member Click on Copy next to the member you'd like to copy. ListManager will show you the old name and email address, and will ask you the new name and email address you'd like. The member created will have all of the settings of the old member, including the password. Copying a member is useful if you'd like to make another list administrator— just copy an existing one. Deleting a Member Click on Delete next to the member you'd like to delete. ListManager will ask you if you're sure before deleting the member. To delete many members select Delete Many Members or Delete All in This View in the drop down box, and click Go. Member History Click on History to see the history associated with the particular member, for instance their name, member ID, date joined, bounce count, and a viewtable showing recent information. The table will only be visible if there is data for that member. For more information on this, see Utilities: Members: Find Members: History. Creating a New Member To create a single member, click on Create New Member to be taken to Utilities: Members: New Member. To create many members, select Create Many New Members or Import Members from File in the drop down box, and click Go. Download as a File Click on the disk icon to download your list of members in CSV format. Utilities: Members: Bans This setting tells ListManager to deny subscription requests and postings from the members set here (those that are to be banned). If a banned person tries to join your mailing list, they will be rejected. Note that this feature does NOT prevent administrators from adding banned members in Utilities: Members, nor does it prevent them from receiving mail if they are already members. Members can be banned by domain or email address (not on their name alone). For information on how to create a new banned member, see Utilities: Members: Bans: New Ban. This feature works by matching the text patterns that you specify matched against the entire From: line that includes both the person's email address and their name. There are three types of bans: 1. Always accept 2. Conditionally accept 3. Reject A record found in "Always accept" is accepted with no further processing. Records found in "Conditionally accept" will be accepted if no explicit reject 225 information is found. Records found in "Reject" are rejected automatically, if matched. Example: If I create rules to always accept the domain name "example.com", and conditionally accept "yourdomain.com", but reject "[email protected]", anything at "example.com" will always be allowed, "[email protected]" will be conditionally accepted- that is, it will be accepted unless explicitly rejected (but since it is not banned it will be accepted), and "[email protected]" would be conditionally accepted, but since it is on the Reject list, it will be rejected. In tabular form: Rule Always accept Conditionally accept Example example.com Reject yourname@yourd omain.com yourdomain.com Outcome All @example.com members accepted [email protected] accepted since not banned Rejected since this rule supercedes others Note that if there are accept rules, either conditional or always accept, then failure to match one of those rules means the member is rejected. The member must match both rules in order to be accepted. If an accepted person tries to submit a posting or subscribe to your list, they will always be allowed. Everyone else will be rejected. There is no wildcarding of information in the user name or domain fields. Any email address that is checked is searched for the entire domain provided, and every subdomain. So if "yourdomain.com" is banned, then [email protected] will also be caught and banned. This is only true of the domain field (right of the @ symbol), and does not apply to the username field (left of the @ symbol). Member Ban Main Page The main page displays 10 member bans. To view more items on the list, click "Show more" at the bottom of the page. These can be sorted by using the up and down arrows next to the column header name. The list can be sorted by Username, Domain, Applies to (which list, site, or server it applies to), or Type (Always Accept, Conditionally accept, or Reject). The default sort is by Domain, showing the first 10 alphabetically, by Domain. To edit a member ban, click on the member's name. This opens the Utilities: Members: Bans: New Ban page, where you can make any changes. A particular ban can also be copied or deleted. Click "copy" or "delete" next to the ban member name. ListManager will ask you if you are sure, and then will create the copy or delete the ban. Generally, a member ban will be copied in order to include it on another list or site. Utilities: Members: Bans: New Ban For complete information on how member bans work, and the member bans main page, see Utilities: Members: Bans. User Name (lower-case) Enter the user name of the member that you want to ban. This is everything to the left of the "@" symbol in their email address. For instance, if the member to ban has an 226 email address of [email protected], enter "Jane_trouble" in this field. Note that you can enter names in any case, but they are saved in lower case. When entering a user name, it should not have the complete name of the user, i.e. "Jane Trouble" <[email protected]>. Only the user name portion (jane_trouble), should be entered, as members cannot be banned on their name, only the user name. Domain (lower-case) Enter the domain of the member that you want to ban. This is everything to the right of the "@" symbol in their email address. In the above example, you would enter "example.company.com". The domain name can also be entered in any case, but will be saved in lower case. Type There are three types of bans: 1. Always accept 2. Conditionally accept 3. Reject A record found in "Always accept" is accepted with no further processing. Records found in "Conditionally accept" will be accepted if no explicit reject information is found. Records found in "Reject" are rejected automatically, if matched. Example: If I create rules to always accept the domain name "example.com", and conditionally accept "yourdomain.com", but reject "[email protected]", anything at "example.com" will always be allowed, "[email protected]" will be conditionally accepted- that is, it will be accepted unless explicitly rejected (but since it is not banned it will be accepted), and "[email protected]" would be conditionally accepted, but since it is on the Reject list, it will be rejected. In tabular form: Rule Always accept Example example.com Conditionally accept yourdomain.com Reject yourname@yourdoma in.com Outcome All @example.com members accepted [email protected] accepted since not banned Rejected since this rule supercedes others Note that if there are accept rules, either conditional or always accept, then failure to match one of those rules means the member is rejected. The member must match both rules in order to be accepted. If an accepted person tries to submit a posting or subscribe to your list, they will always be allowed. Everyone else will be rejected. There is no wildcarding of information in the user name or domain fields. Any email address that is checked is searched for the entire domain provided, and every subdomain. So if "yourdomain.com" is banned, then [email protected] will also be caught and banned. This is only true of the domain field (right of the @ symbol), and does not apply to the username field (left of the @ symbol). Applies to Set the list, site, or server, that that member ban applies to. The options you see here 227 will depend on your privileges, whether you are a list, site, or server administrator. For example, if you are a site administrator, you will be able to create list or site bans, but not server bans. The Applies to field defaults to the current list. For information on how to specify one server to handle all banned members, see Utilities: Server: Server Settings: Advanced: Global Ban Settings. Utilities: Members: Create Members ListManager gives you three ways to add members: 1. Create a single new member 2. Create many new members 3. Import members from a file If you select Create New Member from the Utilities: Members page, you will be taken to Utilities: Members: New Member, where you can add a single name and email addresses. Selecting Create Many New Members from the drop down box takes you to the Utilities: Members: Create Many New Members page, where you can paste in a list of email addresses. The Utilities: Members: Import Members page allows you to import your members from a file. Utilities: Members: Create Many New Members Create Many New Members is similar to Utilities: Members: Add Members, except you may copy and paste a list of email addresses in at once. There may be only one email address per line. Example: [email protected] [email protected] [email protected] Email addresses which are already members will be skipped. Note that you cannot add addresses with names when you create them on this page. To do so, you'll need to use the Utilities: Members: Import Members page. Utilities: Members: New/Edit Member The New and Edit Member screens are identical, and so will be discussed together. The only thing required for your member is the name and email address, which may be found under Basics. If you'd like this member to also be a list admin, fill out the required information under List Admin, and also the Password under Settings. 228 Note that the total number of members you may have on your server is determined by your license. Contact your account representative at [email protected] if you'd like to increase the number of members you may have. Utilities: Members: New Member: Basics Email Address Required. The Internet email address of the member. For example: [email protected] If adding many members, use a separate line for each email address. For example: [email protected] [email protected] Name The member's full name. For example: John Smith Note: You cannot specify a name when adding many members at a time. Use Utilities: Members: Import Members to import members with names or other information particular to each member. Utilities: Members: New Member: List Admin These settings apply only to those members you would like to be list administrators. Is List Admin? Determines whether this member is a list administrator. If set to Yes, this member will be able to access the List Administrator functions of the web interface. Receive List Admin Mail Determines whether this member receives email for list administrators of list mailing list. Mail sent to owner-listname (example: [email protected]) is distributed to each of the members who have their Admin Mail set to Yes. Also, if the mailing list is set to be private, the Receive List Admin Mail setting determines whether this member receives email notifications of requests to join the private mailing list. Receive Moderation Notifications? Determines whether this member receives email notifications of moderated messages to the mailing list, which need to be approved or rejected. If the mailing list is not moderating messages, this setting has no effect. Bypass List Moderation? If this mailing list is set to moderate messages in some way, the bypass setting gives this member the right to contribute messages to the mailing list without being moderated. In effect, it grants this member a "general approval" to contribute without approval. Receive Error Mail? Determines whether this member receives notifications of bounced email and error mail caused by members of the mailing list. ListManager processes these electronic mail 229 errors automatically and in most cases a list administrator does not need to (or want to) know about these bounced messages, which can be a lot of mail. However, in some situations, a list administrator may want to personally keep track of error mail, to see what members are causing problems. ListManager automatically removes duplicate error messages for each day, so that no more than one error per day per bouncing user will be sent out as error mail. For example, if a user bounces 10 messages in one day, only the first bounced message will be sent, the other (duplicate) bounce messages will not be forwarded. This way, you will not be flooded with repeat error mail. Utilities: Members: New Member: Settings Membership Status Defines whether this person is a normal member, meaning that they can participate in the mailing list and receive mail, or if their status is otherwise. The different statuses are: Normal A normal member who receives mailings from the list. Confirm The person has requested to join this mailing list, has received an email message asking them to confirm their membership, but has not accepted the confirmation message. This person's membership is waiting for be confirmed. Once the confirmation message is received, the person's type will change to normal. Private The person has requested to join this mailing list, but because this mailing list is set to private, their request to join is waiting for an administrator to approve it by changing their membership to normal. A private mailing list is one where requests to join the mailing list must be approved by a list administrator. When a mailing list is set to private, mailing list administrators who have Admin Mail set to Yes receive a short email notification message for each request to join the private mailing list. Expired The member had their membership set to expire on a certain date, and that date has past, so this person's membership has expired and is no longer active. If a membership has expired, a list admin may unexpire them by going into Utilities: Members: Edit Member: Settings for that particular member, changing the member expiration date in the section and changing their membership status to "normal member." Held The member's email address was invalid, or bounced mailing list messages for several days. Therefore, their membership was held and their mail is no longer sent to their address until their status is returned to normal. Unsubscribed The member was a member of the list at one time, but has since unsubscribed. The member will not receive email, but is retained in the database for statistical reasons or in case the member decides to resubscribe. 230 Referred The member was invited to join using a referral, but has not yet joined the list. Needs-Confirm The member will receive a message asking them to confirm their membership, and then their status will be set to Confirm. Needs-Hello The member will receive a message welcoming them to the list, and their status will be Normal. Needs-Goodbye The member will receive a message informing them they have left the list, and their status will be Unsubscribed. Membership Kind This choice defines how the member wants to receive messages from the mailing list. The choices are: Mail As soon as someone contributes a message to the mailing list, the user will receive a copy of that message. Digest Each night, around 12:00 am, the user will receive a single email message containing all the messages contributed to the mailing list that day. At the top of the message will be a numbered list of the subjects in that digest, followed by the complete messages themselves. Note that the 12:00 a.m. mailing time is not configurable. MIME Digest The same as a digest, but in MIME format so that the individual messages' formatting is preserved. Index Each night, around 1 in the morning, the user will receive a single email message containing all the subject lines of all the messages contributed to the mailing list that day. If any of the messages interest the user, the bottom of the index gives the email command that will retrieve the bodies of the messages. Nomail No email is sent to the user. The user is free to go the web interface whenever they want, and read the full text of the messages there. This setting is also useful for people who want the ability to contribute to a mailing list, but do not care to see the contributions to the mailing list. Password Defines the login password for this member. This is the password the member will have to enter at the Enter Mailing List page in order to identify themselves as this member. While this field is optional, it is required that a password be used if this person is a list administrator. If this member joined by using email (with the subscribe command), their password is blank unless the list requires a member have a password. In that case, a random password will be assigned to the member if the member does not select one. 231 If you enter the word "random" as the user's password, ListManager will automatically define a random 5 digit numerical password for this user. If you are creating or editing multiple members at once, each member will be given a different random password. If the member record is edited at a later date, and the word "random" is entered again here, it will reassign a different random password, after the member record is saved. Membership Expiration Date If set, this member's Status will change to Expired after the date specified. For example, to expire this member on January 1, 2003, you would enter "1/1/03". # of Approvals Required If the mailing list is set to use Number Moderating, this setting determines how many more messages this member needs to have approved before this member can contribute messages without needing approval. It can also be used with an unmoderated list, if problems with a particular member require that person's messages to be moderated. This setting overrides the list's settings. Utilities: Members: New Member: Advanced Settings Hold User? This setting determines whether this member will be held if they bounce too much mail. The default is "Yes, Put This Member on Hold if They Bounce Too Much Mail." Change to "No, Never Put This Member on Hold, Even if They Bounce Too Much Mail" to prevent the member from ever going on hold. Note: Automatic holding of members can also be disabled at the list and server levels. User ID The "user id" information is not used by ListManager for any purpose: it is merely a placeholder for any information you care to place in there. For example, you might use it to store the Member ID from some other database. Comment The "comment" information is not used by ListManager for any purpose: it is merely a placeholder for any information you care to place in there. For example, you might use it to store the city a member lives in. Additional Like "comment," the "additional" information is not used by ListManager for any purpose, so it may be used to contain any information you'd like. Mail Format Whether or not a member has expressed an interest in receiving HTML mail. There are three options: Multipart The default setting. The user prefers to receive mail in multipart-alternative. Text The user prefers to receive text only email. HTML 232 The user prefers to receive HTML only email. You may want to have your members specify which mail format they prefer when they subscribe to your list. You may then send out specially formatted messages to segments based on this information. HTML Capability Detected Whether or not the capability to read HTML has been detected for this member. To detect HTML capability, a mailing must be sent with tracking. See Mailings: New Mailing: Tracking for more information. Receive Acknowledgement When Contributing? When a member contributes a message to the mailing list, they have the option of being notified that the message was in fact delivered and sent out. If a member is sending out an important announcement, they might want to be notified that it really went out. By default, this setting is "No", meaning that the member will not receive an acknowledgement when posting. Receive Copy of Own Postings? This setting determines if this member will get a copy of their own postings to the mailing list. If set to "Yes" (the default), the member will receive copies of messages they contribute to a mailing list when they are distributed to list. If "No," the member will not receive copies of his own postings. Utilities: Members: Edit a Member: Information List Name The name of the list this member is on. Member ID The unique ListManager member ID for this member. Bounce Count The number of bounces recorded for this member. Recent Bounce Date The date of the member's last bounce. Date Joined The date the member joined the list. Date Held The date the member was put on hold, if applicable. Date Unsubscribed The date the member unsubscribed from the list, if applicable Date Confirmed The date the confirmation email is replied to; this is the date the member status changed. 233 Utilities: Members: Delete Members ListManager gives you three ways to delete members through the web interface: -Delete individual members by finding a member in Utilities: Members, and selecting delete next to the address you'd like to delete. -Delete multiple addresses by selecting Delete Many Members, and entering the email addresses you'd like to delete. -Use Utilities: Members: Find Members to search for the members you'd like to delete, and then use Delete All in This View to delete them. Utilities: Members: Delete Many Members Enter a list of email addresses you'd like to delete, separated by carriage returns. Example: [email protected] [email protected] Note that many members can be deleted at once, if they have the same user name or the same domain name (or both). This can be done by using the * (asterisk) symbol as a wildcard to replace the user name or domain name. For instance, to delete all AOL members from your list: *@aol.com Or to delete all users named "joe": joe@* To delete anything related to AOL, that is, all users with the AOL domain: *aol* Once this is entered, ListManager will ask that you confirm that you do in fact want to delete the members, and will list all the members that will be deleted. Clicking "delete" will then delete these members from the ListManager database. Note: For case-sensitive databases, such as Oracle or Postgres, the wildcard search is also case-sensitive. It is not case-sensitive for Windows 2003 Server (MSSQL). Utilities: Members: Delete All in This View This feature allows you to delete all the members in the current view. You will be asked to confirm that you want to delete all the members in the current view, including those that could not be displayed due to the number of members. An SQL statement will also display showing you which members will be deleted. This feature allows you to use the Utilities: Members: Find Members feature to find a group of members with a certain feature, and then delete them in bulk. For example, you could create a segment that selects members whose top level domain is .gov. Then, you could use Utilities: Members: Find Members to find all members who meet 234 that criterion. Finally, you could use Delete All in This View to delete that group of members. In order to prevent a list administrator from inadvertently deleting his/her own login rights, ListManager includes a checkbox titled "Don't delete list administrators". This box will be checked by default. If it is checked, then all list administrators will NOT be deleted when the other members are. If the box is unchecked, then all list administrators, including your own login name, will be deleted. Utilities: Members: Find Members The Find Members screen allows you to search for members in many different ways: by email address, domain, segment, status, kind, or member ID. You may then view the member records of those you find, copy or delete them, or download the table to a file. Utilities: Members: Find Members: Email Address Email Address Enter the email address or partial email address of the member you'd like to find. ListManager will show you the results of your search in the Utilities: Members page. If no members matched your search, the Utilities: Members page will show no members. Look For Select whether you'd like to find an Exact Match to the email address you specified, or any address that Contains the partial address you provided in Email Address. For example, if you wanted to find all members who have .ml in their email address, you would specify .ml in Email Address, and specify Contains. Search In Specify whether you'd like to limit your search to This List, or All Your Lists. If you select All Your Lists, you will see the results for all lists for which you have admin rights and have access to. Utilities: Members: Find Members: Name Name Enter the name or partial name of the member you'd like to find. ListManager will show you the results of your search in the Utilities: Members page. If no members matched your search, the Utilities: Members page will show no members. Look For Select whether you'd like to find an Exact Match to the name you specified, or any name that Contains the partial name you provided in Email Address. For example, if you wanted to find all members who are named Jane, you would specify Jane in Name, and specify Contains. Search In Specify whether you'd like to limit your search to This List, or All Your Lists. If you select All Your Lists, you will see the results for all lists for which you have admin rights and have access to. 235 Utilities: Members: Find Members: Domain Enter the complete domain of the members you'd like to find. ListManager will show you the results of your search in the Utilities: Members page. If no members matched your search, the Utilities: Members page will show no members. Utilities: Members: Find Members: Segments A drop down box allows you to select the members in a particular segment. ListManager will show you the results of your search in the Utilities: Members page. If no members matched your search, the Utilities: Members page will show no members. Finding members by segment allows you to perform searches based on any segment you can create. Even if your license does not allow you to send to segments, you can still create segments and search for members who meet the criteria you specify. See Segments for more information. Utilities: Members: Find Members: Status A drop down box allows you to select the members who have a particular membership status. ListManager will show you the results of your search in the Utilities: Members page. If no members matched your search, the Utilities: Members page will show no members. The membership statuses are: Normal A normal member. Confirm The person has requested to join this mailing list, has received an email message asking them to confirm their membership, but has not accepted the confirmation message. This person's membership is waiting for be confirmed. Once the confirmation message is received, the person's type will change to normal. Private The person has requested to join this mailing list, but because this mailing list is set to private, their request to join is waiting for an administrator to approve it by changing their membership to normal. A private mailing list is one where requests to join the mailing list must be approved by a list administrator. When a mailing list is set to private, mailing list administrators who have Admin Mail set to Yes receive a short email notification message for each request to join the private mailing list. Expired The member had their membership set to expire on a certain date. That date has past, so this person's membership has expired and is no longer active. If a membership has expired, a list admin may unexpire them by going into Utilities: Members: Edit Member: Settings for that particular member, changing the member expiration date in the section and changing their membership status to "normal member." Held The member's email address was invalid, or bounced mailing list messages for 236 several days. Therefore, their membership was held and their mail is no longer sent to their address until their status is returned to normal. Unsubscribed The member was a member of the list at one time, but has since unsubscribed. Referred The member was invited to join using a referral, but has not yet joined the list. Needs-Confirm The member will receive a message asking them to confirm their membership, and then their status will be set to Confirm. Needs-Hello The member will receive a message welcoming them to the list, and their status will be Normal. Needs-Goodbye The member will receive a message informing them they have left the list, and their status will be Unsubscribed. Utilities: Members: Find Members: Kind A drop down box allows you to select the members who have a particular membership kind. ListManager will show you the results of your search in the Utilities: Members page. If no members matched your search, the Utilities: Members page will show no members. The membership kinds are: Mail As soon as someone contributes a message to the mailing list, the user will receive a copy of that message. Digest Each night, around 12:00 am, the user will receive a single email message containing all the messages contributed to the mailing list that day. At the top of the message will be a numbered list of the subjects in that digest, followed by the complete messages themselves. Note that the 12:00 a.m. mailing time is not configurable. MIME Digest The same as a digest, but in MIME format so that the individual messages' formatting is preserved. MIME digest is preferable if members are sending multipart messages, or messages with attachments. Index Each night, around 1 in the morning, the user will receive a single email message containing all the subject lines of all the messages contributed to the mailing list that day. If any of the messages interest the user, the bottom of the index gives the email command that will retrieve the bodies of the messages. Nomail No email is sent to the user. The user is free to go the web interface whenever they want, and read the full text of the messages there. This setting is also useful 237 for people who want the ability to contribute to a mailing list, but do not care to see the contributions to the mailing list. Utilities: Members: Find Members: Member ID Enter the ListManager Member ID of the member you'd like to find. ListManager will show you the results of your search in the Utilities: Members page. If no members matched your search, the Utilities: Members page will show no members. 238 Utilities: Members: Find Members: History The Member History page allows you to see information on individual members, including tracking their exact activities, such as messages opens, URLs clicked, clickstream events, etc. This page is accessible by clicking the History link for an individual member on the Utilities: Members menu, and also by clicking on a member's name or email address from any members or mailings report table. Similar information on members is available on the Utilities: Members: Edit/New Member: Advanced Settings page. Current Information Table Name The name and email address of the member. Status The status of the member. For more information on member statuses, see Utilities: Members: find Members: Status. Kind The kind of membership held by the member. For more information on the kinds of memberships, see Utilities: Members: Find Members: Kind. HTML Capable Information about the member's HTML detecting capabilities. T is for a member that can only open text messages, H is for a member that can open HTML messages, and M is for members that can open multipart messages (both text and HTML). Preferred Mail Format The member's preferred mail format. This will either be T (text), H (HTML), or M (Multipart = both text and HTML). Member ID The internal ListManager Member ID number. Bounce Count Displays the number of times a message bounced when sent to this member. Recent Bounce Date Displays the time and date of the most recent message bounced. Note that if the Bounce Count is 0 (zero), there will be no Recent Bounce Date line visible. Date Joined The time and date the member joined the list. Date Confirmed The time and date the member confirmed the subscription to the list. 239 Other Tables All viewtables sort results from most recent to oldest, and show a maximum of 100 results for that type of item. Note that if a member does not have any data for one of the following tables, it will not be displayed. For instance, if a member has not made any purchases, you will not see a Purchases table displayed. These tables can be exported to another file outside of ListManager by clicking on the icon on the upper right hand corner of each table. Purchases Information about the member's recent purchases. Interest Events Information about the member's recent interest events. Interest events will not show up as Clickstream events (below), although an interest event is actually a clickstream event, except that it has an interest point or stage information associated with it. ListManager will separate the two and display them as either an interest event or a clickstream event. Clickthroughs All the recent URL's the member clicked through, and associated details. Opens All the recent messages the member opened, and associated details. Clickstreams All the recent clickstream events for the member, and associated details. If a clickstream event has an interest point or any stage information associated with it, it will appear in the Interest Events table (above). Forward Tracking All the recent mailings forwarded by the member, and to how many people. Note that to appear in the Forwards table, the message must be an HTML message with open tracking, and the recipient of the forward must have opened the message from a different TCP/IP address than the original recipient opened it from. 240 Utilities: Members: Import Members The easiest way to import addresses into ListManager is to use the Utilities: Members: Import Members page. This page allows you to import members from a text file or a CSV (comma separated values) file. It also allows you to import members with additional demographic information. Email addresses which are already members will be skipped, so importing members cannot be used as a way of updating current members with additional information. File Type Select "Email Addresses with Optional Names" if you are importing a text file, and "CSV File with First Row Column Names" if you are importing a CSV file. Email Addresses with Optional Names To import email addresses or email addresses or names, the file must be a plain-text file. Each email address and name must be on a separate line, and must be in one of the following formats: [email protected] [email protected] Bob Shelby [email protected] (Bob Shelby) Bob Shelby <[email protected]> CSV File with First Row Column Names A CSV file has the information you would like imported in a CSV (comma separated values) format. The first row of the file tells ListManager which field the data in each column should be imported into. For example: EmailAddr_,FullName_,Company,Phone [email protected],Bob Shelby,Example Corp.,510-549-4350 In this example, EmailAddr_ and FullName_ correspond to the default database fields in the Members_ table for email addresses and full names. Additional fields called "Company" and "Phone" have been added to this Members_ table, so this information can also be imported into each member's record. (These fields are not provided by default; you will need to add them to your Members_ table if you would like to store this information). The "EmailAddr_" column name is required. You may add other data if you like. Some default Members_ table fields which you may want to include in your import are: Additional_ Placeholder for any information you want to store associated with this member. Comment_ Holds whatever comments you wish to put in. Useful as a user-defined 'additional info' field. EmailAddr_ The email address of this person (required). FullName_ Full name of this person. 241 MailFormat_ What mail format does the user prefer, (T)ext, (M)ultipart, or (H)TML. UserID_ Holds the user-definable 'user id' information, such as a key back to another table. You may also have your database administrator add additional columns to your Members_ table so it can store additional information about each member. Ask your database administrator about what these field names are so you can properly label the columns of your data before importing it. Action You may import members in one of three ways: Import Quietly as Regular Members Import the members into the list, but do not send a hello or confirmation message. These members will receive normal list mailings. Import as Regular Members and Send List Hello Doc Import the members into the list, and send them the hello message as specified for your list in Utilities: Document Associations. If no document is specified here, new members will receive a generic message from ListManager. These members will receive normal list mailings. Import as Unconfirmed Members, and Send Confirmation Request Import the members into the list as unconfirmed, and send them the confirmation message as specified for your list in Utilities: Document Associations. If no document is specified here, new members will receive a generic message from ListManager. These members will not receive normal list mailings until they confirm their memberships. Select File Enter the path of the file that contains the members you'd like to import. Or, select Browse to find the file. Terminate Import When importing .csv files, you can set at which level of (number of) invalid email addresses to end the import process. For instance, you may want to terminate the import after 10 invalid email addresses, and check your list to see why so many addresses are failing. The import will abort after the designated number of invalid email addresses set here. You can also set it to "Do not terminate import due to malformed addresses" if you'd like to ignore any bad addresses and process the import as is. Importing After You Have Already Done Another Import On occasion, you may want to perform a new member import, for instance to add any new members which may have joined, or to add new demographic data, etc. When you import a new member file, some of the member statuses may have changed. An example would be someone who was once a "normal" member may have become and "unsubscribed" member. When performing another import or adding members via email, ListManager will not resubscribe any members who have unsubscribed themselves from the list. Any members who were banned will not be reimported either. Also, all list administrators will maintain their list admin rights after the reimport. 242 243 Utilities: Web Forms Web forms include a variety of forms commonly used in ListManager. Various types of forms can be created, including Subscribe Forms, Unsubscribe Forms, Member Profile Forms, and Referral Forms. In addition, templates for these forms can be created and saved for later use. For Subscribe and Unsubscribe forms, only the HTML required for the form is created here. This is then inserted (copy-pasted) into your desired web page. The HTML is dynamically created here, but cannot be saved or edited. Member Profile and Referral Forms can be edited, copied, deleted, and reused. They can be inserted into your mailing content with the Insert URL function. 244 Utilities: Web Forms: New Subscribe Form Overview ListManager makes it easy for you to sign up new members. Use the New Subscribe Form pages to create subscribe and unsubscribe forms. Copy the HTML into a page on your Web site, and visitors will be able to sign up for your lists. Note: if you have changed the name of the server admin to be something other than Admin, this form will not work properly. Creating a New Subscribe Form 1. Go to Utilities: Web Forms: New Subscribe Form: Subscribe. 2. Select whether you'd like ask subscribers for a name when joining, and make it required or optional, or don't ask for a name at all. 4. Select whether or not you'd like to ask for a password when joining, and make it required or optional, or don't ask for a password at all. 5. Select whether or not you'd like to confirm new members, send a hello message for all lists, a hello message for one list, or subscribe members quietly. See Utilities: Web Forms: New Subscribe Form: Subscribe for more information on the different options. 6. Enter the URL where you'd like new members to be taken once they've filled out your form and subscribed. Note that this field is optional. 7. Set whether you'd like to add the sub info to the URL where your members will be taken to once they've subscribed. 8. Select Choose Lists to select the lists you'd like people to be able to subscribe to. 9. Select Choose Demographics to select what demographic information you'd like prospective members to give you when signing up. 10. If you have more than one list with different name and password requirements, you may see a warning telling you that the name/password requirements for the list are incompatible with the configuration of the subscribe form. 11. View your subscribe form at the bottom of the page. If you have more than one list, you can preview the form as it will apply to each list by marking the checkbox next to the list. When the form looks right, click on Get HTML. 12. Copy the HTML, and paste it into the source for the web page on which you'd like to have a subscription form. 13. Go to your Web site, and make sure you can use the form you just created to subscribe to your list(s). When a user subscribes, a "You are Subscribed" message will appear, and then they will be directed to the designated URL (if one was entered). Creating a New Unsubscribe Form 1. Go to Utilities: Web Forms: New Unsubscribe Form. 245 2. Enter the URL where you'd like unsubscribing members to be taken once they've filled out your form and unsubscribed. 3. Click on Choose Lists to select specific lists you'd like people to be able to unsubscribe from. By default, your form will unsubscribe a member from all lists. 4. View your unsubscribe form at the bottom of the page. When the form looks right, click on Get HTML. 5. Copy the HTML, and paste it into the source for the web page on which you'd like to have an unsubscribe form. 6. Go to your Web site, and make sure you can use the form you just created to unsubscribe to your list(s). Utilities: Web Forms: New Subscribe Form: Subscribe This page helps you to create a subscription form. Once you are done creating your form, view the HTML and copy it into the web page you'd like to have a subscribe form. For a step-by-step guide to making your subscription form, see Utilities: Web Forms: New Subscribe Form. Note: if you have changed the name of the server admin to be something other than Admin, this form will not work properly. Subscribe forms only show the lists that a specific list administrator has rights to. Ask subscribers for name/Require password Select whether you'd like your form to ask for the subscriber's name and a password, and whether these will be required or optional. The defaults you see for the subscribe form are set in Utilities: List Settings: Discussion Forum Interface: New Subscriber Requirements. Confirmation Select whether or not you'd like your subscribers to confirm their membership, or what kind of welcome message they should receive. The options are: Send One Confirmation Message One confirmation message will be sent, even if the subscriber subscribes to many lists. The confirmation sent will be from the first list the member subscribed to. By replying to the confirmation message, subscribers will become normal members of all lists to which they have subscribed. It is strongly recommended you confirm all new memberships to prevent malicious people from signing up others to your lists. Do Not Confirm and Send Only One Hello The subscriber will not be confirmed. A single hello message welcoming subscribers will be sent from the first list subscribed to. Do Not Confirm and Send a Hello Message for Each List The subscriber will not be confirmed. A hello message welcoming subscribers will be sent from every list subscribed to. 246 Do Not Confirm and Do Not Send a Hello Message The subscriber will not be confirmed, and no hello message welcoming the subscriber will be sent. Destination URL (optional) The URL subscribers will be taken to after filling out your form. If no URL is specified, they will be taken to a generic page thanking them for subscribing. Show confirming web page If set to Yes, users will see a quick confirmation page after subscribing, informing them that they have successfully subscribed. They will then be taken immediately to the destination URL page if one is set above, otherwise they are taken to a generic "thank you for subscribing" page. If set to No, the confirmation page will not appear, and the user will be taken directly to the destination URL page (or generic page). The default for this is set to Yes, and it is recommended that this confirming page be visible (leave set to Yes). Note that if no destination URL is defined, and Show confirming web page is set to No, then when the user saves the subscribe form, it will not redirect anywhere; the subscribe form page will just be refreshed. It is advisable either set the confirmation page to Yes, enter a destination URL, or both. Append subscribe information to destination URL Set if you'd like to append subscribe information along with the URL when the form is passed along. This information includes the name and email address of the subscriber as well as any demographic data that may be captured. Lists Select the lists that subscribers can join. By default, only the list you are logged into will be displayed. To select more lists, click on Choose Lists. You will be taken to Utilities: Web Forms: New Subscribe Form: Choose Lists. You will only be able to see lists that you are able to access with your administrative rights. Demographics By default, no demographic data will be added. To add fields for users to fill in with demographic information, click Choose Demographics. You will be taken to Utilities: Web Forms: New Subscribe Form: Choose Demographic Fields. Note that if you request a date field, the user must enter it in one of the following formats: yyyymmdd yyyymmddhhmm yyyymmdd hh:mm yyyy/mm/dd hh:mm:ss Preview of your form The subscribe form you've created will be displayed here. When it looks right, click on Get HTML. You will be taken to a page which displays the HTML for your form. Copy it and paste it into the HTML for the page you'd like to have your subscription form. 247 Utilities: Web Forms: New Subscribe Form: Choose Lists This page displays the lists that are available to you. The list you are logged into is displayed as the chosen list. To select other lists, click on them under Available Lists and click the >> button to move them to the Chosen Lists. Only the lists that the specific list administrator has rights to will be shown here. To deselect a list, click on the list name and click the << button to move them to Available Lists. You may use the Ctrl key to select multiple lists at a time. Utilities: Web Forms: New Subscribe Form: Choose Demographic Fields This page displays the demographic fields that are available to you in your Members table. To select demographic fields to include in your form, click on them under Available Demographics, and click the >> button to move them to the Chosen Demographics. To deselect a demographic field, click on the list name and click the << button to move them to Available Lists. You may use the Ctrl key to select multiple fields at a time. Utilities: Web Forms: New Unsubscribe Form This page helps you to create an unsubscribe form. Once you are done creating your form, view the HTML and copy it into the web page you'd like to have a subscribe form. For an overview of unsubscribe forms, see Utilities: Web Forms: New Subscribe Form Overview. Note: if you have changed the name of the server admin to be something other than Admin, this form will not work properly. Unsubscribe forms only show the lists that a specific list administrator has rights to. Email Notification If set to Yes, those who unsubscribe will receive an email notifying them whether or not they have unsubscribed successfully. If set to No, they will not receive this notification. You may customize the goodbye message by creating a goodbye document in Content and then selecting it in Utilities: Automated Messages: Document Associations. Confirm If set to Yes, those who unsubscribe will be taken to a web page which will ask them if they are sure that they want to unsubscribe. Otherwise, they will be unsubscribed immediately without confirmation. Lists Select the lists that subscribers can leave. By default, a member will be unsubscribed from the current list. To select another or multiple lists, click on Choose Lists. You will be taken to Utilities: Web Forms: New Unsubscribe Form: Choose Specific Lists to 248 Unsubscribe. You will only be able to see lists that you are able to access with your administrative rights. (Optional) Destination URL The URL members will be taken to after filling out your unsubscribe form or clicking on the unsubscribe URL. If no URL is specified, they will be taken to a generic page telling them they have unsubscribed. Show confirming web page If set to Yes, users will see a quick confirmation page after unsubscribing, informing them that they have successfully unsubscribed. They will then be taken immediately to the destination URL page if one is set above, otherwise they are taken to a generic "thank you for unsubscribing" page. If set to No, the confirmation page will not appear, and the user will be taken directly to the destination URL page (or generic page). The default for this is set to Yes, and it is recommended that this confirming page be visible (leave set to Yes). Note that if no destination URL is defined, and Show confirming web page is set to No, then when the user saves the unsubscribe form, it will not redirect anywhere; the unsubscribe form page will just be refreshed. It is advisable either set the confirmation page to Yes, enter a destination URL, or both. Your Unsubscribe URL This page can also generate an unsubscribe URL that you can put in your ListManager mailings. Each member receives a unique unsubscribe URL (using their member ID and a checksum character), so members can unsubscribe successfully even if they forward their email to a different account. The checksum character is a security precaution that prevents others from inadvertently or maliciously unsubscribing others by changing the member ID. Based on the other settings you've selected on this page, you can opt to have members taken to a confirm dialog that will ask them if they are sure they want to unsubscribe, and/or have them sent an email notification that they have been unsubscribed. Preview of your Form The unsubscribe form you've created will be displayed here. When it looks right, click on Get HTML. You will be taken to a page which displays the HTML for your form. Copy it and paste it into the HTML for the web page you'd like to have your unsubscribe form. Utilities: Web Forms: New Unsubscribe Form: Choose Specific Lists to Unsubscribe This page displays the lists that are available to you. Only the lists which are available to the specific list administrator will be displayed here. To select specific lists, click on them under Available Lists and click the >> button to move them to the Chosen Lists. To deselect a list, click on the list and click the << button to move them to Available Lists. You may use the Ctrl key to select multiple lists at a time. 249 Utilities: Web Forms: Member Profile Forms Member profiles can be created, edited, and updated on your web site. When the member profile form is saved, the HTML created here can then be embedded onto your web site, for members to enter their email address and edit their profile directly. It is also possible to insert references to "edit your member profile" into your mailing content by going to Content: New Content: Insert URL: Profile. Member profiles include an email address field, a name field, and any demographic fields that you choose to enter. In addition, they display the lists to which this profile form applies. Finding Member Profile Forms From the dropdown menu, select List, Site, or Server member profile forms. Note that the options available here will depend on the access level of the logged in user. Server administrators can see server, site, and list member profile forms. Site administrators can see site and list member profile forms. List administrators can see member profile forms for the lists administered by them. Ten member profiles for the list are displayed. To view more than ten profiles at a time, click Show More. Repeatedly clicking on Show More will show greater numbers of profile forms at a time. Click Next to see the next ten profiles, Previous to see the last ten. You may change the sorting order of the profile forms by clicking the up or down triangles next to Name and Description. By clicking the top arrow, the sort order will be ascending (a-z); clicking the bottom arrow makes the sort order descending (z-a). Viewing or Editing Existing Member Profile Forms To view a member profile, click on the profile form title. You will be taken to the Edit Member Profile Form screen, where you can preview, edit, and save the member profile. Copying Member Profile Forms Click Copy next to the profile form you'd like to copy. ListManager will show you the old title and description, and will ask for the new title and description. Click Copy to save the copied profile form. It will then appear on the main member profile list. Deleting Member Profile Forms Click Delete next to the profile form you'd like to remove. ListManager will ask you if you're sure before deleting the form. Utilities: Web Forms: Member Profile Forms: New Member Profile Form: Profile Title Enter a descriptive title for your member profile. This will not be seen on the web site 250 when the form is inserted. A title is required in order to save the member profile form. Description Enter a relevant description for your member profile. The description in this field will not be seen on the web site when the form is inserted. A description is required in order to save the member profile form. Form Fields Name Select the name option for the member profile form. A name can either not be asked for at all, or optionally asked for. There is no option to force a user to enter a name. Password Select if you would like to ask for or not ask for a password to access the member profile form. If a user is a member of one or more lists requiring a password, the system will not allow this user to access the member profile form unless a valid password is entered. Note that once the member profile form is accessed (using the correct password, if any), then the user is allowed to change the password. In this case, ALL the passwords on the lists that are checked on the profile will be updated to the new password, thus making all checked lists have a consistent password. If the current setting requires a password, it cannot be set to a blank (nonexistent) password. The default option here is "Do not ask for a password". Display list description If set to Yes, the list description as well as the list name will be displayed on the profile form. If set to No, only the list name will be displayed. To view and edit list descriptions, see Utilities: List Settings: Basic Information. The default for this is set to No. For example, if the list name is "Example List", and the description is "Example Customers Only": No (do not display list description), will display: Example List on the member profile form. Yes (display list description) will display: Example List : Example Customers Only Lists Select the lists that subscribers can update a member profile for. By default, only the list you are logged into will be displayed. To select more lists, click on Choose Lists. You will be taken to Utilities: Web Forms: Member Profile Forms: Choose Lists. You will only be able to see lists that you are able to access with your administrative rights. Demographics By default, no demographic data will be added. To add fields for users to fill in with demographic information, click Choose Demographics. You will be taken Utilities: Web Forms: Member Profile Forms: Choose Demographic Fields. 251 Utilities: Web Forms: Member Profile Forms: New Member Profile Form: Advanced Applies To Select the list, site, or server setting that this member profile form applies to; the level set here determines the access level required to edit the member profile. Because server administrators can set who has the ability to change these forms, the options available here depend on your access level. Server administrators can edit the server, sites, and lists. Site administrators can edit sites and lists, and list administrators only edit the lists accessible to them. (Optional) Destination URL After clicking "Save changes" on the profile form, the user will be taken to the URL specified here. If no URL is specified, they will be taken to a generic page thanking them for entering a member profile. Show confirming web page If set to Yes, users will see a quick confirmation page after creating or editing the member profile, informing them that they were successful. They will then be taken immediately to the destination URL page if one is set above, otherwise they are taken to a generic "thank you" page. If set to No, the confirmation page will not appear, and the user will be taken directly to the destination URL page (or generic page). The default for this is set to Yes, and it is recommended that this confirming page be visible (leave set to Yes). Note that if no destination URL is defined, and Show confirming web page is set to No, then when the user saves the member profile, it will not redirect anywhere; the member profile page will just be refreshed. It is advisable either set the confirmation page to Yes, enter a destination URL, or both. Utilities: Web Forms: Member Profile Forms: New Member Profile Form: Preview Preview of your form The member profile form you've created will be displayed here. When it looks right, click Save. Once the member profile is saved, you will be taken to a page which displays the HTML for your form. Copy and paste this HTML onto the web page where you would like to have your member profile form. Utilities: Web Forms: Member Profile Forms: Choose Lists 252 This page displays the lists that are available to you. The list you are logged into is displayed as the chosen list. To select other lists, click on them under Available Lists and click on the >> button to move them to the Chosen Lists. Only the lists that the specific list administrator has rights to will be shown here. To deselect a list, click on it and click on the << button to move them to Available Lists. You may use the Ctrl key to select multiple lists at a time. Utilities: Web Forms: Member Profile Forms: Choose Demographic Fields This page displays the demographic fields that are available to you in your Members table. To select demographic fields to include in your form, click on them under Available Demographics, and click on the >> button to move them to the Chosen Demographics. To deselect a demographic field, click on it and click on the << button to move them to Available Lists. You may use the Ctrl key to select multiple fields at a time. Utilities: Web Forms: Member Profile Forms: Edit Member Profile Form Title Edit the profile form title. The title entered here will not be displayed on the web site containing the profile form. Description Edit the profile form description. The description entered here will not be displayed on the web site containing the profile form. Applies To Select the list, site, or server that this member profile form applies to. Because server administrators can set who has the ability to change these forms, the options available here depend on your access level. Server administrators can edit member profile forms for the server, sites, and lists. Site administrators can edit member profile forms for sites and lists, and list administrators can only edit the member profile forms for lists accessible to them. HTML Displays the HTML originally created for the member profile form. Any changes to the HTML can be made here directly, and once the form is saved, it can then be repasted into your web site. Preview button Displays what the Member Profile form will look like on your web site. 253 Utilities: Web Forms: Referral Forms Referrals allow your list members to invite their friends to join your list. You may track how many friends were referred by list members, how many opened or clicked on a tracking link in the invitation, and how many ultimately joined the list. For details on how the referral feature works, see Referral Tracking. Referral forms are part of a three-step process, which works as follows: 1. You send out a mailing to your list with a referral link asking members to invite their friends to join the list. 2. List members click on the link, and enter the email addresses of those they'd like to invite, and an optional message for them. 3. The invited members receive an email message telling them how to join the list. If they follow the instructions in the invitation, they become a list member. To use the referral feature, you must first create an invitation—a message that will be sent to those referred telling them how to join the list. This can be accomplished easily using the Invitation Template in Content, which can be customized to fit your needs. Next, you must create a referral form, the web page members are taken to when they want to invite a friend to join the list. Finally, you must insert a referral link into your mailing (or into the mailing content). Referral Form Main Page Finding Referral Forms From the dropdown menu, select List, Site, or Server referral forms. Note that the options available here will depend on the access level of the logged in user. Server administrators can see server, site, and list referral forms. Site administrators can see site and list referral forms. List administrators can see referral forms for the lists administered by them. Ten referral forms for the list are displayed. To view more than ten at a time, click Show More. Repeatedly clicking on Show More will show greater numbers of referral forms at a time. Click Next to see the next ten, Previous to see the last ten. You may change the sorting order of the referral forms by clicking the up or down triangles next to Name and Description. By clicking the top arrow, the sort order will be ascending (a-z); clicking the bottom arrow makes the sort order descending (z-a). Viewing or Editing Existing Referral Forms To view a referral form, click on the title. You will be taken to the Edit Referral Form screen, where you can preview, edit, and save the form. Copying Referral Forms Click Copy next to the referral form you'd like to copy. ListManager will show you the old title and description, and will ask for the new title and description. Click Copy to save the copied profile form. It will then appear on the main member profile list. 254 Deleting Referral Forms Click Delete next to the referral form you'd like to remove. ListManager will ask you if you're sure before deleting the form. Using Referral Forms There is a three-step process to do this: 1. Create an Invitation The invitation is sent to those who are invited to join your list by your members. Referrers can optionally add their own message (if your referral form allows it). Note that you can include clickthrough links in the invitation message. For details on how to create the invitation, see Content: New Content from Template. 2. Create a Referral Form The referral form is a web page where your list members will enter in the email addresses of people they would like to invite to join your list. Only members can refer others to join a list. To learn how to create a referral form, see Utilities: Web Forms: Referral Forms: New Referral Form and to learn how to create one from a template, see Utilities: Web Forms: Referral Forms: Referral Form From Template. 3. Create a Referral Link In order for your members to be able to invite friends to join your list, you must insert a referral link into your mailing. This is done in Content, by clicking the "Insert Field" button on either the Text Message or HTML Message tabs. To learn how to do this, see Content: Insert Field: Referrals. Utilities: Web Forms: Referral Forms: New Referral Form Title Enter a descriptive title for your referral form. A title is required in order to save the referral form. Description Enter a relevant description for your referral form. A description is required in order to save the referral form. Applies To Select the list, site, or server that this referral form applies to. Because server administrators can set who has the ability to change these forms, the options available here depend on your access level. Server administrators can edit the server, sites, and lists. Site administrators can edit sites and lists, and list administrators only edit the lists accessible to them. HTML Enter the HTML for the referral form. If you are using a template to create the referral form, the HTML will automatically be inserted here when the template is selected. For more information on creating referral form templates, see Utilities: Web Forms: Web Form Templates: New Referral Form Template. 255 A standard example of HTML for a referral form is: <html> <head> <title>Refer a Friend</title> </head> <body bgcolor="#FFFFFF" link="#0066FF" vlink="#0066FF" alink="#0066FF"> <center> <FORM ACTION="/doinvite" METHOD="post"> <!-- leave the following hidden fields as-is --> <INPUT TYPE="hidden" NAME="DetectCode" VALUE="$DetectCode"> <INPUT TYPE="hidden" NAME="DestUrlId" VALUE="$DestUrlId"> <INPUT TYPE="hidden" NAME="MemberID" VALUE="$MemberID"> <INPUT TYPE="hidden" NAME="DocID" VALUE="$DocID"> <INPUT TYPE="hidden" NAME="ReferralFormID" VALUE="$ReferralFormID"> <INPUT TYPE="hidden" NAME="MessageID" VALUE="$MessageID"> <INPUT TYPE="hidden" NAME="HashCode" VALUE="$HashCode"> <INPUT TYPE="hidden" NAME="ListName" VALUE="$ListName"> <!-- --------------------------------------- --> <table border="0" bgcolor="#003366" cellpadding="5" cellspacing="5" width="550"> <tr> <td> <a target="home_page" href="http://www.lyris.com/products/listmanager/" title="Go to the Lyris ListManager home page"><img alt="Go to the ListManager home page" src="/img/english/button_listmanager_homepage.gif" align="left" border="0"></a> </td> </tr><tr> <td bgcolor="#FFFFFF" align="center"> <table> <tr> <td></td> <td colspan="2"> <br> <font face="verdana, arial" size="-2"> <b>You can invite your friends to join this list by filling out the form below.<br> We'll send them some information about the list and a sample issue!</b> </font> <br> <br> </td> <tr> <td></td> <td> <font face="verdana, arial" size="-2">Your email:</font><br> <input type="text" name="SenderEmailAddr" size="30" MAXLENGTH="100" VALUE="[mf_html::quoteFormValue 256 $SenderEmailAddr]"> </td><td> <font face="verdana, arial" size="-2">Your name:</font><br> <input type="text" name="SenderFullName" size="30" MAXLENGTH="100" VALUE="[mf_html::quoteFormValue $SenderFullName]"> </td> </tr><tr> <td> </td> </tr><tr> <td></td> <td><font face="verdana, arial" size="-2">Email:</font></td> <td><font face="verdana, arial" size="-2">Name:</font></td> </tr><tr> <td align="right"> <font face="verdana, arial" size="-2">Friend #1</font> </td> <!-- You can add additional friends' address entries. All entries use the same name in the input tag. --> <td><input type="text" name="FriendsEmailAddr" size="30" MAXLENGTH="100"></td> <td><input type="text" name="FriendsFullName" size="30" MAXLENGTH="100"></td> </tr><tr> <td align="right"> <font face="verdana, arial" size="-2">Friend #2</font> </td> <td><input type="text" name="FriendsEmailAddr" size="30" MAXLENGTH="100"></td> <td><input type="text" name="FriendsFullName" size="30" MAXLENGTH="100"></td> </tr><tr> <td align="right"> <font face="verdana, arial" size="-2">Friend #3</font> </td> <td><input type="text" name="FriendsEmailAddr" size="30" MAXLENGTH="100"></td> <td><input type="text" name="FriendsFullName" size="30" MAXLENGTH="100"></td> </tr><tr> <td> </td> </tr><tr> <td></td> <td colspan="2"> <font face="verdana, arial" size="-2">Message subject:</font><br> <input type="text" name="SenderSubject" size="66" MAXLENGTH="200" VALUE="[mf_html::quoteFormValue $SenderSubject]"> </td> </tr><tr> <td> </td> </tr><tr> <td></td> <td colspan="2"> <font face="verdana, arial" size="-2">Your message:</font><br> <textarea name="SenderMessage" cols="50" rows="4">[mf_html::quoteFormValue $SenderMessage]</textarea> </tr><tr> <td></td> <td colspan="2"> <font face="verdana, arial" size="-2"> 257 <input type="checkbox" name="SendCopyToReferrer" VALUE="T"[if { $SendCopyToReferrer=="T"} { return " CHECKED" } else { return "" }]>Send me a copy of this message </font> </td> </tr><tr> <td> </td> </tr><tr> <td colspan="4" align="right"> <input type="image" border="0" name="Invite my friends" src="/img/english/button_invite_my_friends.gif"></td> </tr> </table> </td> </tr> </table> </form> </center> </body> </html> Utilities: Web Forms: Referral Forms: Referral Form From Template Referral form templates can be created and saved, and then used to create a referral form. To see how to create referral form templates, see Utilities: Web Forms: Web Form Templates: New Referral Form Template. Once the template is created, it will appear on the Choose a Template dropdown menu. ListManager includes a default referral form template, which can be edited or used as is. Select the template from the dropdown menu and click OK. This inserts the HTML from the template into the referral form you are creating. Utilities: Web Forms: Referral Forms: Edit Referral Form Title Edit the referral form title. The title entered here will not be displayed on the web site containing the profile form. Description Edit the profile form description. The description entered here will not be displayed on the web site containing the profile form. Applies To Select the list, site, or server that this member profile form applies to. Because server administrators can set who has the ability to change these forms, the options available 258 here depend on your access level. Server administrators can edit the referral forms for server, sites, and lists. Site administrators can edit referral forms for sites and lists, and list administrators only edit referral forms for the lists accessible to them. HTML Displays the HTML originally created for the referral form. Any changes to the HTML can be made here directly, and once the form is saved, it can then be repasted into your web site. Preview Displays what the Referral form will look like on your web site. Utilities: Web Forms: Web Form Templates: New Referral Form Template Referral form templates allow you to create and save templates for a referral form, which you may want to use repeatedly. Once these are created here, they appear as options in the dropdown menu when creating a referral form from a template. Note that referral form templates, which are web forms, should not be confused with content templates. Referral Form Template Main Page Finding Referral Form Templates From the dropdown menu, select List, Site, or Server referral form templates. Note that the options available here will depend on the access level of the logged in user. Server administrators can see server, site, and list referral form templates. Site administrators can see site and list referral form templates. List administrators can see referral form templates for the lists administered by them. Ten referral form templates for the list are displayed. To view more than ten at a time, click Show More. Repeatedly clicking on Show More will show greater numbers of referral form templates at a time. Click Next to see the next ten, Previous to see the last ten. You may change the sorting order of the referral form templates by clicking the up or down triangles next to Name and Description. By clicking the top arrow, the sort order will be ascending (a-z); clicking the bottom arrow makes the sort order descending (za). Viewing or Editing Referral Form Templates To view a referral form template, click on the title. You will be taken to the Edit Referral Form Template screen, where you can preview, edit, and save the template. Copying Referral Form Templates Click Copy next to the referral form template you'd like to copy. ListManager will show you the old title and description, and will ask for the new title and description. Click Copy to save the copied template. It will then appear on the main referral form template list. 259 Deleting Referral Form Templates Click Delete next to the template you'd like to remove. ListManager will ask you if you're sure before deleting the form. Utilities: Web Forms: Web Form Templates: Edit Referral Form Template Referral form templates allow you to create and save templates for a referral form, which you may want to use repeatedly. Once these are created here, they appear as options in the dropdown menu when creating a referral form from a template. Note that referral form templates, which are web forms, should not be confused with content templates. Title Edit the referral form template title. Description Edit the referral form template description. Applies To Select the list, site, or server that this template applies to. Because server administrators can set who has the ability to change these templates, the options available here depend on your access level. Server administrators can edit the templates for server, sites, and lists. Site administrators can edit the templates for sites and lists, and list administrators only edit templates for the lists accessible to them. HTML Displays the HTML originally created for the referral form. Any changes to the HTML can be made here directly. Preview Displays what the Referral form will look like on your web site. 260 Utilities: Automated Messages: Document Content List Documents, Site Documents, or Server Documents define messages that are sent to users based on certain list-related actions. For example, a "hello" document is sent to someone when they first join a list. These documents are then associated with a particular message type, language, and list. Server Documents are only visible to server administrators, Site Documents are only visible to server and site administrators and List Documents are visible to any administrator. Note that although a list administrator cannot view or edit documents created as site or server documents, these documents are available for selection to list administrators in the Utilities: Automated Messages: Document Associations section. Similarly, a site administrator cannot view server documents but can select them when defining document associations. This is done so that server administrators can create common documents for use by all sites and lists without having to worry about these documents being modified by site or list administrators. The same applies to site administrators who can create documents for all lists under their site. There are templates available for these documents. These templates are the same as the default documents that are sent if no document associations are made. They do not include fill-out fields like the other content templates. These templates are grouped with the other templates and do not show up under List, Site, or Server documents which are user-defined. Finding Documents Ten documents for the list you are currently logged into are displayed at one time. To view more than ten documents at a time, click on Show More. Repeatedly clicking on Show More will show greater numbers of documents at a time. You may change the sorting order of the content by clicking the up or down triangles next to Message Type, Document Title, and Default. By clicking the top triangle, the sort order will be ascending (a-z); clicking the bottom arrow makes the sort order descending (z-a). Click on Next to see the next ten content units, Previous to see the last ten. Click on the drop down box to see the documents for other lists, and the site or server if you have administration privileges to do so. Content Name The name of document this is (confirm, goodbye, held, hello, private; see below for details on these). To edit a document content, click on the message type link. Description The description of the document content. What you see here is what is entered in the Description field when creating a new content. Viewing or Editing An Existing Document Content Click on the content name to see a detailed description. The document content can be edited from here as well. See Content: All Content: Edit Content for more information. 261 Deleting a Document Content Click on Delete next to the document you'd like to delete. ListManager will ask you if you're sure before deleting the document content. Creating a New Document Content Creating a new document content is the same as creating any other type of content for a mailing. Click on Create New to be taken to Content: New Content. 262 Utilities: Automated Messages: Document Associations Document Associations are used to associate a document created in Document Content with a message type, language, and list. List messages are messages sent to users in response to certain list-related actions, such as joining a list which results in a "hello" message, or leaving a list which results in a "goodbye" message. Documents are the email messages sent to members when they join or leave a list, confirm subscription to a list, are put on hold, or join a private list. These types of list messages are currently customizable. You may select the document to send on this page. To create a new document association, see Utilities: Document Associations: New Document Association. Several customizable document templates are provided for you to assist you in creating hello, goodbye, confirm, held, and private documents. The "private" message type is new in ListManager 7.5 and allows the customization of the message that is sent to a user after they attempt to join a private list. In addition to associating a document with a particular message type for a list, the same association can be made for the current site or the entire server, depending on your admin privileges. Associations made at site and server levels are inherited by the lists and sites under them unless overridden by an association at a lower level. For example, a site administrator can customize the hello document for all lists under that site at once. A list administrator can override that association at the list level. Documents are also used for list informational purposes, and for making autoresponders and match phrases. Finding Document Associations Ten message types for the list you are currently logged into are displayed at one time. To view more than ten at a time, click on Show More. Repeatedly clicking on Show More will show greater numbers of message types at a time. You may change the sorting order of the associations by clicking the up or down triangles next to Message Type, Document Title, and Default. By clicking the top triangle, the sort order will be ascending (a-z); clicking the bottom arrow makes the sort order descending (z-a). Click on Next to see the next ten content units, Previous to see the last ten. Click on the drop down box to see the documents for other lists, and the site or server if you have administration privileges to do so. Message Type The type of document association this is (confirm, goodbye, held, hello, private; see below for details on these). To edit a document association, click on the message type link. Document Title The actual name of the document, as set in the Contents "Content Name" field. Default Displays whether or not this is the default document association for each type. The yes/no default setting is on the Edit Document Associations page. Note that you can have multiple document associations set up for different languages, but if 263 it is set as default = Yes, then this will be the default for all languages. Viewing or Editing An Existing Document Association To view a message, click on the message type link. Here you can: Change the message type (i.e. list goodbye document or list confirm document) Find the actual document in the Document dropdown menu. The documents you see here must be created in Document Contents. Set the document association as a default. If set to "yes", this document association will apply to all languages at the specified list, site, or server level. So for instance, if the server has documents defined for English, French, or Spanish, but the site has a default document specified, all lists under that site will use the default document regardless of their language setting. Deleting a Document Association Click on Delete next to the document you'd like to delete. ListManager will ask you if you're sure before deleting the document. Creating a New Document Association Click on Create New to be taken to Utilities: Document Associations: New Document Association. Document Association Types Confirm The document which will be sent via email to new subscribers when they join the mailing list, and the list is set to confirm new subscribers. If blank, a default Confirm message will be sent. Goodbye The document which will be sent via email to members of this mailing list when they leave the mailing list. If blank, a default Goodbye message will be sent. Held The document which will be sent via email to subscribers whose subscriptions are being held due to delivery problems. If blank, a default Held message will be sent. Hello The document which will be sent via email to new members of this mailing list when they join. If blank, a default Hello message will be sent. Private The document which will be sent via email to new members who join but cannot receive any messages until an administrator subscribes them to the list. Utilities: Automated Messages: Document Associations: New Document Association Applies To The list, site or server this document can be used for. The document can apply to a 264 single list, all lists on the site, or all lists on the server. Language Set the language in which the content will be associated with the message. Message Type Select the type of message from the dropdown menu. Choose from Confirm, Goodbye, Held, Hello, and Private message types. Document Select the actual document to include in the message. The documents you see here must be created first in Document Content, by selecting List, Site, or Server documents Is Default? Set whether or not this document association is going to be a default for that type. Sample "Hello" Document The following document is an example of an extensive "hello" document that you might want mailed to new members of your discussion mailing list. The document for an announcement or email marketing list would be much shorter. ListManager provides a "hello" template that you may use when creating your own welcome message. Note: Please note that all list document messages will appear as coming "FROM: Lyris ListManager". To override this and change this to another FROM: designation, you can change the headers in the Content Advanced tab. This is a real document, used by the "Rhapsody" mailing list. It is reprinted here by permission of the author, Vince Sabio. **************************************************************** **** * PLEASE SAVE THIS WELCOME MESSAGE! * **************************************************************** **** Welcome to the Rhapsody Discussion List ... The purpose of this list is to provide an open forum for the posting and discussion of news and information relating to the Rhapsody operating system. That means that ANYTHING Rhapsody related is fair game. However, if you have something that is not somehow related to Rhapsody -for example, Apple's stock increased by two points -- it would be better to post it to one of the more general Macintoshrelated forums; subscription information for two of them is provided below. Commercial announcements are allowed and encouraged, but please follow the guidelines listed in the Posting section of the Rhapsody Discussion List FAQ (see item 6 below), or on the web at <http://user.icx.net/~bgiles/rhapsody/posting.html>. 265 This list is hosted on a Lyris ListManager mailing ListManager, provided to us by ListManager Corp. As such, we are guests on this server, and a level of decorum commensurate with our status as guests will be enforced on this list. Please keep discussion civil and constructive, and take heated discussions and nonconstructive comments off the list. Failure to do so will result in the subscribers' posting privileges being revoked by the listmoms for a "cooling off period." The listmoms for the Rhapsody Discussion List are: Bruce Giles <[email protected]> Randy Meadows <[email protected]> Vince Sabio <[email protected]> (list owner) To send a message to all three listmoms at once, use the address <[email protected]>. Please feel free to contact any of us with questions regarding the Rhapsody Discussion List or if you experience any problems with the server. Just so that you have all the commands neatly contained in one place, here is just about everything you will need to know. Note that the list is running on a Lyris ListManager; this is a very new (and VERY NICE!) server, so be aware that the commands might be different from those that you are used to using on other list managers. (For more information on Lyris ListManager, see <http://www.lyris.com/>.) 1. First of all, almost everything that you might need to do on the server is most easily and effectively performed via its web interface at <http://clio.lyris.net/rhapsody/>. 2. In case you do not have Web access, here are some key commands; in all cases, the default server address is <[email protected]>. Other addresses are shown where appropriate. Note: Commands may be placed in either the subject line or in the body of the message: SUBSCRIBING: subscribe rhapsody your_name join rhapsody your_name alternate address: [email protected] UNSUBSCRIBING: unsubscribe rhapsody leave rhapsody alternate address: [email protected] SETTING MEMBERSHIP TO DIGEST MODE: 266 set rhapsody digest SETTING MEMBERSHIP TO INDEX MODE: set rhapsody index SETTING MEMBERSHIP TO DISCUSSION MODE: set rhapsody mail TEMPORARILY SUSPENDING MAIL FROM THE LIST: set rhapsody nomail RESUMING MAIL FROM THE LIST: (command depends on your preferred mode) set rhapsody mail set rhapsody digest set rhapsody index ACKNOWLEDGMENT: set rhapsody ack (sends you a confirmation message when your posts are distributed) set rhapsody noack (no confirmation message when posts are distributed) RECEIVING COPIES OF YOUR OWN POSTS: set rhapsody repro (receive copies of your own posts) set rhapsody norepro (do not receive copies of your own posts) SETTING YOUR PASSWORD: set rhapsody pw=mypassword (where "mypassword" is the password you wish to set) DETERMINING YOUR MEMBERSHIP SETTINGS: query rhapsody RETRIEVING THE CURRENT VERSION OF THIS DOCUMENT: get rhapsody hello MORE INFORMATION ON LYRIS LISTMANAGER'S COMMANDS: help RETRIEVING THE CURRENT LIST FAQ: Send a blank email message to: [email protected] RETRIEVING THE CURRENT LIST OF RHAPSODY RESOURCES: Send a blank email message to: [email protected] RETRIEVING THE CURRENT LIST OF RHAPSODY QUESTIONS AND ANSWERS: Send a blank email message to: [email protected] 267 POSTING TO THE LIST: You must be a subscriber to post messages. Sending mail to this address will distribute it to all the members of the mailing list: [email protected] 3. CHANGING YOUR SETTINGS/ADDRESS VIA THE WEB INTERFACE: To do this, go to <http://clio.lyris.net/rhapsody/> and click the link in the "Change Your Settings" section. You'll need to enter your email address and password (if you chose one) to continue. (If you've forgotten your password, you can type in your email address in the field at the bottom of the page and click "Get password" to request Lyris ListManager to email your password to you.) At the following page, you can read messages, post a message, adjust your settings, or unsubscribe. From the settings page you can change your status (MAIL, DIGEST, INDEX, or NOMAIL), choose whether or not to see your own messages, or choose whether or not you want to receive a separate acknowledgement via email when one of your messages is posted to the list. You can also change your email address if you need to. When you change your settings, make sure you click the "Save" button at the bottom of the page. 4. ARCHIVES: The RDL archives are available on the Web, at the following URL: <http://clio.lyris.net/cgibin/lyris.pl?visit=rhapsody> 5. RDL WEB SITE: The Rhapsody Discussion List has a Web site at <http://user.icx.net/~bgiles/rhapsody/>. The Web site includes all the information in this document, PLUS a list of common questions and answers, and a list of Rhapsody resources, both on and off the Internet. Please visit the site and let us know what you want to see there. 6. OBTAINING THE FAQ AND OTHER DOCUMENTS: You can receive the current version of the Rhapsody Discussion List FAQ by email at any time by sending an email message to <[email protected]>. The subject line and body text of your message are ignored. Simply sending a blank message to this address is sufficient. You can receive a current list of Rhapsody resources by sending a blank email message to <[email protected]>. You can receive a current list of Rhapsody questions and answers by sending a blank email message to <[email protected]>. 268 7. BOUNCED MAIL: One of the key features of Lyris ListManager is its ability to handle mail bounces transparently to the list owner; as such, bounced mail will be handled primarily by the Lyris ListManager. 8. POSTS/REPLIES FROM DIGEST USERS: You *must* change the Subject: line when replying to a digest; all posts with "RHAPSODY DIGEST" in the Subject: line will be rejected by the server (you will receive a "rejection letter" when this happens). PROBLEMS: If you have ANY problems related to the Rhapsody Discussion List, *please* do not post them to the list. Listmoms (list managers) are at your disposal for this very purpose; please avail yourself of the resource: Bruce Giles <[email protected]> Randy Meadows <[email protected]> Vince Sabio <[email protected]> (list owner) To send a message to all three listmoms at once, use the address <[email protected]>. If you have any questions about the list or the Lyris ListManager, feel free to contact any or all of us. (NOTE: I currently manage five mailing lists; please be sure to state in your message which list you are referring/subscribed to. Thanks!) Once again, welcome to the Rhapsody Discussion List. - Vince Sabio Rhapsody List Owner [email protected] OTHER LISTS: As I mentioned earlier, here are two very good Macintosh-related mailing lists: Mac-L: Macintosh News and Information Format: Open subscription/open discussion Server: [email protected] In body: subscribe Mac-L your_name MacMarines: A Macintosh advocacy/activist group Format: Open subscription/moderated/very little discussion Server: [email protected] In body: join macmarines your_email_address 269 DISCLAIMER: The Rhapsody Discussion List is not associated with Apple Computer Corporation or its affiliates. The list is an independent open forum for news, information, and discussion relating to the Rhapsody operating system. The server and resources for the Rhapsody Discussion List are provided by Acme Corp, Ltd., which also has no association with Apple Computer Corp. Sample "Confirm" Document Here is a sample "confirm" document that uses mail merge codes to put the correct information in. You might want to create a server-level confirm document with this text in it, so that all lists can use this same confirm document and ListManager will automatically substitute the correct information in. Note: Please note that all list document messages will appear as coming "FROM: Lyris ListManager". To override this and change this to another FROM: designation, you can change the headers in the Content Advanced tab. ListManager provides a "confirm" template that you may use when creating your own confirmation message. Subject: Your confirmation is needed Welcome! Your confirmation is needed for the following lists: %%whatlistsunconfirmed%% By replying to this message, you will confirm yourself for all of these lists at once! Or, send a message to lyris-confirm%%memberidchar%%@yourserver.com Or, unsubscribe immediately by sending an email message to %%email.unsub%% 270 Utilities: Automated Messages: Autoresponders An autoresponder is a ListManager email address that always responds by sending a document to whomever sends an email to it. For instance, set up a "[email protected]" autoresponder that sends out price list to anyone who emails to that email address. An autoresponder with information on how to unsubscribe or get in touch with someone at your organization is useful to have in the From: field of your content. Finding an Autoresponder Ten autoresponders are shown at a time. To view more than ten autoresponders at a time, click on Show More. Repeatedly clicking on Show More will show greater numbers of autoresponders at a time. You may change the sorting order of the autoresponders by clicking the up or down triangles next to Email or Title. By clicking the top triangle, the sort order will be ascending (a-z); clicking the bottom arrow makes the sort order descending (z-a). Click on next to see the next ten autoresponders, previous to see the last ten. Email The email address prefix for this autoresponder. Title The title of this autoresponder. Click on the drop down box to select a different list's autoresponders, or to view all autoresponders for the server. Viewing or Editing an Autoresponder To view an autoresponder, click on the autoresponder's email prefix. You will be taken to the Utilities: Autoresponders: Edit Autoresponder page, where you can view or edit the autoresponder. Copying an Autoresponder Click on Copy next to the autoresponder you'd like to copy. Deleting an Autoresponder Click on Delete next to the autoresponder you'd like to delete. ListManager will ask you if you're sure before deleting the autoresponder. Creating An Autoresponder Click on Create New Autoresponder to be taken to the Utilities: Autoresponders: New Autoresponder page. Download as a File Click on the disk icon to download your list of autoresponders in CSV format. 271 Utilities: Automated Messages: Autoresponders: New Autoresponder: Essentials The Edit Autoresponder pages are identical to the New Autoresponder pages. Document Title The name of the document you'd like to have sent automatically when someone writes to the autoresponder address. If you don't see the name of the document you want, or if you'd like to create a new one, click on Create Document to be taken to Utilities: List Document: New List Document. Email Address Prefix The email address that the autoresponder will respond to. If you enter "sales", any mail sent to "sales@…" on this ListManager server will trigger the autoresponder. You cannot have duplicate autoresponder email addresses on the ListManager server, nor can you have an autoresponder address which is the same as a list address. Do not enter an @ sign or a hostname; that will be filled in automatically by ListManager. When ListManager replies to an auto-responder request, the From: and Reply-To: of the document sent back is the address of the auto-responder itself. Create Document If you don't see the name of the document you want, or if you'd like to create a new one, click on Create Document to be taken to Utilities: List Document: New List Document. Utilities: Automated Messages: Autoresponders: New Autoresponder: Advanced Notify Email Address If filled in, this email address will receive a notification when this action phrase is triggered. The notification will include the full document text of the email message sent to trigger the autoresponder. You may have multiple addresses notified by separating them with commas. Example: [email protected], [email protected] Applies To Select the desired list, site, or server from the dropdown menu. Server-wide autoresponders can only be created or edited by server administrators. Autoresponders for sites can only be created or edited by site administrators, and list administrators can only create and edit autoresponders for the lists accessible to them. Utilities: Automated Messages: Autoresponders: New Autoresponder: For Programmers Run a Program Before 272 This setting allows you extend the auto-responder command processing with your own program. When the auto-responder is triggered, your program will first be run and then your program can do any processing it wishes on the message. If your program wants to stop processing of the message, it can delete it. Run a Program After This setting allows you extend the auto-responder command processing with your own program. When the auto-responder is triggered, your program will first be run and then your program can do any processing it wishes on the message. 273 Utilities: Automated Messages: Match Phrases Match phrases are a feature in ListManager that allow you to trigger various actions based on some text appearing in a message. You can look for a trigger phrase in the body of a message, in the headers, in the Subject:, the From:, etc. Match phrases permit several kinds of security restrictions to be placed on postings. For example, you can use a match phrase to refuse if a message if particular text either does or does not appear in a specific place in the message. A few examples will help to clarify this: Suppose that everyone in your company uses the Eudora Email program, which, incidentally inserts a "X-Mailer: Eudora" header in every message it sends. You can put a match phrase that automatically rejects any message not created with Eudora. Then, to hide the fact that "X-Mailer: Eudora" might be the trigger phrase, have the ListManager match phrase change the message to say "X-Mailer: Windows Eudora", so that it no longer matches. This use of the match phrase feature allows you to reject all messages that do not have some secret phrase in them. If you want, you can create multiple match phrases to add several layers of checks. This sort of checking is very useful with announcement lists. Match phrases also have the capability of sending a document back, so you can inform the attempted sender that their message was refused. You also have the option being notified when a match phrase is triggered. This lets you monitor attempts to "hack" your system. Another example: Suppose that you maintain a mailing list to discuss Apple computers and you are not interested in discussing Unix. You can set a match phrase to refuse any message that mentions "Unix". People often use this feature to bar inappropriate language on their discussion lists. Match phrases are not restricted to postings. For example, they can also be put on an auto-responder. You could put your price list on an auto-responder, but require a password to get it. If the password is not in the email message, the match phrase triggers and sends a refusal message. If the password is present, the match phrase does not trigger and the price list is sent. Some people use match phrases to disable ListManager server commands or to be notified of things that are suspicious. For example, some mailing list owners have had their lists "hacked" when they were using other list managers and like to be told if someone is trying to snoop through their list. Thus, they disallow the "review" command (which already does not provide the member list) and set themselves to be notified of any attempts to use this command. Yet another use of match phrases is to only allow postings from certain domains -- for example, only people whose email addresses have the text "@yourcompany.com" in their From: address are allowed through. Finding a Match Phrase Ten match phrases are shown at a time. To view more than ten match phrases at a time, click on Show More. Repeatedly clicking on Show More will show greater numbers of match phrases at a time. 274 You may change the sorting order of the match phrases by clicking the up or down triangles next to Email or Title. By clicking the top triangle, the sort order will be ascending (a-z); clicking the bottom arrow makes the sort order descending (z-a). Click on next to see the next ten autoresponders, previous to see the last ten. Phrase The phrase(s) that trigger this match phrase. Title The title of this match phrase. Click on the drop down box to select a different list's match phrases, or to view all match phrases for the server. Viewing or Editing a Match Phrase To view a match phrase, click on the match phrase's phrase. You will be taken to the Utilities: Automated Messages: Match Phrases: New Match Phrase: Essentials page, where you can view or edit the match phrase. Copying a Match Phrase Click on Copy next to the match phrase you'd like to copy. Deleting a Match Phrase Click on Delete next to the match phrase you'd like to delete. ListManager will ask you if you're sure before deleting the match phrase. Creating a Match Phrase Click on Create New Match Phrase to be taken to the Utilities: Automated Messages: Match Phrases: New Match Phrase: Essentials page. Download as a File Click on the disk icon to download your list of match phrases in CSV format. Utilities: Automated Messages: Match Phrases: New Match Phrase: Essentials Search Phrases (required) Determines the word or phrase that will trigger this action. For example, if the phrase were "make money fast", a message which used this phrase would trigger this action. Instead of their message going to the mailing list, the sender would receive a document via email. This is an effective way to block unwanted topics on your mailing list. You can have several phrases, any of which will cause this action, by entering several phrases in the field, one phrase on each line. For power users, match phrases support regular expression for matching text. To specify that a given match phrase text is a regular expression you surround the text with / characters, as in: /regexp/ (Note: Regular expressions are a sophisticated mathematical description for text matching patterns). Response Documents (required) Determines what response, if any, when this match phrase is triggered. 275 If you select a document, the document will be sent to the person who sent the message. The message itself will be discarded. You cannot select a document and have the message continue to be processed by ListManager. If you choose "Nothing (reject mail)" then no document will be mailed back and the email message that caused the "action phrase hit" will be discarded. You can use this "Nothing (reject mail)" match phrase response to stop mail loops or to blacklist people that you don't want accessing your server. If you choose "Continue (passthrough mail)", the message will be processed. Utilities: Automated Messages: Match Phrases: New Match Phrase: Advanced Rule Determines the portion of the incoming email message that will be checked for the match phrase. The entire message, or some subset of it (the first line, the From: line, etc.). Notify Email Address If filled in, these email addresses will receive a notification when this match phrase is triggered. The notification will include the full document text that caused the match phrase to trigger. If you want to specify several email addresses to be notified separate each email address with a comma: [email protected], [email protected] Replace With Replace any matched text with this text. (Note: This feature does not work with regular expressions as match phrases.) This option is extremely useful for announcement lists, as it can be used to provide transparent posting security, so that only you are allowed to send to your mailing list, with 100% security. No one else is able to and you do not have to do anything special once it is set up. For example, you can create a match phrase which refuses any postings that do not have your signature line in them and changes your signature in a subtle way, perhaps changing a comma to a semicolon, so that the match phrase which allows posts is no longer present.. Or, if you are using a particular version of a mail program, which adds its own header to every message (example: "X-Mailer: MS Mail 3.412") you can set your list up to refuse any message that doesn't have a particular characteristic. Another use is to require a certain password to be included in every posting, and all postings without that password are rejected. If you do not use the "Replace With" feature, then the key phrase, which allowed the message to go through, is visible in your postings. Thus, it is possible that someone 276 would take your example message, change a few things, and attempt to forge the message as if it came from you. Because the key phrase is visible in the posted message, someone can exploit this. This is unlikely, but it is possible. There are some malfunctioning mail server programs which take locally undeliverable mail and return it in such a way that it looks exactly like the original post. ListManager almost always catches this problem (because they have headers in them that ListManager added to catch this) but, the same technique is possible by someone who is dishonest. The "Replace With" feature allows you to change (or erase) the key phrase which allowed your message to be posted. Say, for example, that you set your match phrase to refuse all postings that do not contain "X-Mailer: MS Mail 3.412" in their header. Messages that are accepted should change this key phrase to have a slight difference, say: "X-Mailer: MS Mail 3.413". There is no way for others to know that the "2" changed to a "3", and hence no way for them to bypass your security. Other headers can be used as well. For example, have the match phrase be a particular "Received" header, which indicates from where the message came from. Set your match phrase to look for a Received: header that only your internal network would generate. Set your match phrase to refuse messages, which do not have this, Received: line, and then slightly alter the Received: line so that others do not know what the key is to get in. This feature can also be used to implement password based posting, which means any contribution that does not have the posting password is refused. For example, set your match phrase to refuse any posting which does not contain the word "open sesame", then set the match phrase to Replace With a space (" ") thus, erasing the password. Context Determines in which cases ListManager will check for this Match Phrase. The choices are: Mailing List Applies to the mailing list that is selected. All Mailing Lists on This Site Applies to all lists on the site. Available only if you are creating a match phrase as a site admin. All Mailing Lists on This Server Applies to all lists on this server. Available only if you are creating a match phrase as a server admin. Mail Sent to the Lyris@ Command Address Applies only to mail sent to the lyris@ address for this server. Normally, Match Phrases are applied to the mail sent to a mailing list. With the "lyris@" setting, mail sent to the ListManager Address is checked for match phrases. This lets you add additional commands to the ones that ListManager normally understands. For instance, if you want to offer an application form for joining a mailing list, you could create a match phrase for "get application" which responds by sending back the application form. Applies To Select the desired list, site, or server from the dropdown menu. Server-wide match phrases can only be created or edited by server administrators. Match phrases for sites 277 can only be created or edited by site administrators, and list administrators can only create and edit match phrases for the lists accessible to them. Utilities: Automated Messages: Match Phrases: New Match Phrase: For Programmers Run Program Before This setting allows you to extend the match phrase command processing with your own program. When the match phrase is triggered, your program will first be run and then your program can do any processing it wishes on the message. If your program wants to stop processing of the message, it can delete it. Run Program After This setting allows you to extend the match phrase command processing with your own program. When the match phrase is triggered, your program will first be run and then your program can do any processing it wishes on the message. 278 Utilities: Administration This menu allows you to administer your lists, topics, sites and server. You may also create new administrators. Admins Create or edit List, Site and Server administrators for ListManager. Lists Create or delete lists. Available to site or server administrators only. Server Edit server wide settings that affect sending and delivery for all lists. Sites Create and edit sites. Only server administrators can create sites. Topics Create and edit topics. 279 Utilities: Administration: Administrators ListManager allows full delegation of rights and responsibilities to others, so that administrators only have control over what is appropriate for them to control. The three kinds of administrators are: Server Administrators The server administrator controls how the server runs. The server administrator can create sites, and has control over things that affect all the sites and lists on their server. A server administrator can access all Site and List administration menus, and may make other administrators at any level. Site Administrators A site administrator typically doesn't deal with the day-to-day workings of a mailing list. Instead, the site administrator can create and remove mailing lists, create documents, create auto-responders and other functions that affect the site as a whole. A site administrator is also entitled to act as the list administrator of any mailing list in their site, and may make other site administrators or list administrators. Site administrators typically are not aware of other sites on the servers, nor are they aware of mailing lists belonging to these other sites. List Administrators Typically, someone (or several people) on each mailing list act as the administrator of the mailing list. They can add and remove members of the group, approve moderated messages, and other things which concern regular mailing list maintenance. A list administrator can only make other list administrators. This page allows you to manage administrators at all levels according to your administrative privileges. Utilities: Administration: Administrators: List Administrators Finding Administrators Ten list administrators are displayed at one time. To view more than ten administrators at a time, click on Show More. Repeatedly clicking on Show More will show greater numbers of administrators at a time. You may change the sorting order of the administrators by clicking the up or down triangles next to Email and Name. By clicking the top triangle, the sort order will be ascending (a-z); clicking the bottom arrow makes the sort order descending (z-a). Click on next to see the next ten administrators, previous to see the last ten. Viewing or Editing An Existing Administrator To view an administrator, click on the admin's email address. You will be taken to the Utilities: Members: View Members: Edit Member screen, where you can view or edit the administrator. Copying an Administrator Click on copy next to the administrator you'd like to copy. ListManager will show you 280 the old name and email address, and will ask you the new name and email address you'd like. The member created will have all of the settings of the old member, including the password. Deleting an Administrator Click on delete next to the administrator you'd like to delete. ListManager will ask you if you're sure before deleting the administrator. Creating a New Administrator Click on Create New Member to be taken to Utilities: Members: View Members: New List Admin, which is identical to Utilities: Members: New Member except the settings are appropriate for a list admin. Download as a File Click on the disk icon to download your list of admins in CSV format. Utilities: Administration: Administrator Accounts: Site Administrators Finding Site Administrators Ten site administrators are displayed at one time. To view more than ten administrators at a time, click on Show More. Repeatedly clicking on Show More will show greater numbers of administrators at a time. You may change the sorting order of the administrators by clicking the up or down triangles next to Email and Name. By clicking the top triangle, the sort order will be ascending (a-z); clicking the bottom arrow makes the sort order descending (z-a). Click on next to see the next ten administrators, previous to see the last ten. Viewing or Editing An Existing Administrator To view an administrator, click on the admin's name. Copying an Administrator Click on Copy next to the administrator you'd like to copy. ListManager will show you the old name and email address, and will ask you the new name and email address you'd like. The administrator created will have all of the settings of the old administrator, including the password. Deleting an Administrator Click on Delete next to the administrator you'd like to delete. ListManager will ask you if you're sure before deleting the administrator. Creating a New Administrator Click on Create New Administrator. You will be taken to Utilities: Administration: Administrator Accounts: Site Administrator: New Site Administrator. Download as a File Click on the disk icon to download your list of admins in CSV format. 281 Utilities: Administration: Administrators: Site Administrator: New Site Administrator: Essentials Name Required. The name of this administrator. Email Address Required. The email address of this administrator. Password Required. The password of this administrator. Sites The sites accessible to this administrator. Click on Choose Sites to select or deselect sites for this administrator. You will be taken to Utilities: Administration: Administrator Accounts: Site Administrator: Choose Sites. Utilities: Administration: Administrators: Site Administrator: Choose Sites This page displays the sites that are available to you. By default, the current site will be selected for this administrator. To select specific sites, click on them under Available Sites and click on the >> button to move them to the Chosen Sites. To deselect a site, click on it and click on the << button to move them to Available Sites. You may use the Ctrl key to select multiple sites at a time. Utilities: Administration: Administrators: Site Administrator: New Site Administrator: Contact Info This page is for informational purposes only. Telephone Number The telephone number of the administrator. Fax Number The fax number of the administrator. Postal Address The postal address of the administrator. Utilities: Administration: Administrators: Site Administrator: New Site Administrator: Personal Info This page is for informational purposes only. Language The administrator's primary language. 282 Comment Any additional comments about the administrator. Utilities: Administration: Administrators: Server Administrators Finding Server Administrators Ten server administrators are displayed at one time. To view more than ten administrators at a time, click on Show More. Repeatedly clicking on Show More will show greater numbers of administrators at a time. You may change the sorting order of the administrators by clicking the up or down triangles next to Email and Name. By clicking the top triangle, the sort order will be ascending (a-z); clicking the bottom arrow makes the sort order descending (z-a). Click on next to see the next ten administrators, previous to see the last ten. Viewing or Editing An Existing Administrator To view an administrator, click on the admin's name. Copying an Administrator Click on Copy next to the administrator you'd like to copy. ListManager will show you the old name and email address, and will ask you the new name and email address you'd like. The administrator created will have all of the settings of the old administrator, including the password. Deleting an Administrator Click on Delete next to the administrator you'd like to delete. ListManager will ask you if you're sure before deleting the administrator. Creating a New Administrator Click on Create New Administrator. You will be taken to Utilities: Administration: Administration Accounts: Server Administrators: New Server Administrator. Download as a File Click on the disk icon to download your list of admins in CSV format. Utilities: Administration: Administrators: Server Administrators: New Server Administrator: Essentials Name Required. The name of this administrator. It is not recommended that you change the name of the "Admin" server administrator to another name, because it will cause problems with any subscribe forms you create. Email Address Required. The email address of this administrator. Password Required. The password of this administrator. 283 Utilities: Administration: Administrators: Server Administrators: New Server Administrator: Contact Info This page is for informational purposes only. Telephone Number The telephone number of the administrator. Fax Number The fax number of the administrator. Postal Address The postal address of the administrator. Utilities: Administration: Administrators: Server Administrators: New Server Administrator: Personal Info This page is for informational purposes only. Language The administrator's primary language. Comment Any additional comments about the administrator. 284 Utilities: Administration: Lists This page allows you to select a list to edit, or to create a new one. To edit your list's settings, go to Utilities: List Settings. You can view the different lists designated to each site by selecting the correct site from the "Site" dropdown listbox, and clicking "Go". Then only the lists for that site will be displayed below. Finding a List Ten lists are shown at a time. To view more than ten administrators at a time, click on Show More. Repeatedly clicking on Show More will show greater numbers of administrators at a time. You may change the sorting order of the lists by clicking the up or down triangles next to Name or Description. By clicking the top triangle, the sort order will be ascending (az); clicking the bottom arrow makes the sort order descending (z-a). Click on next to see the next ten lists, previous to see the last ten. Viewing or Editing a List To view a list, click on the name next to the list you'd like to view. You will be taken to the Utilities: List Settings page, where you can view or edit the list. Copying a List Click on Copy next to the list you'd like to copy. ListManager will show you the old name and description for the list, and ask you for a new name and description. It will also ask if it should copy all the old list's administrators to the new one, and if it should copy all the members from the old list to the new one. Deleting a List Click on Delete next to the list you'd like to delete. ListManager will ask you if you're sure before deleting the list. Note that you cannot delete the list you are currently logged into. Log in to a different list to delete the list you're currently logged into. Creating a List Click on Create New List to be taken to the Utilities: Administration: Lists: New List page. Download as a File Click on the disk icon to download your list of lists in CSV format. Utilities: Administration: Lists: New List This page allows you to create a list quickly and easily with the settings appropriate for your type of list. You can always edit the settings later in the Utilities: List Settings menu. Purpose of List Required. Select the type of list you want to create. This selection will have a significant impact on your default list settings. The list types are: Email Marketing (Email sent from one person to many, with marketing features) 285 All list settings will be appropriate for a list intended for email marketing. The list will be configured so only administrators may send email to the list. If members reply to the message, their responses will go to the message’s author. Recipient information will be saved so recipients of previous mailings may be purged from subsequent ones. Full personalization of messages (conditional content, mail merge) is possible because full scripting is enabled for administrators. The list will accept messages from other lists as a child list. Mailing and clickthrough data will be kept forever. Messages sent to the list must be approved before they will be sent. The list settings may be changed later in the Utilities: List Settings menu. The list settings may be changed later in the Utilities: List Settings menu. Announcement List (Email sent from one person to many) All list settings will be appropriate for a one-way announcement list. The list will be configured so only administrators may send email to the list. If members reply to the message, their responses will go to the message’s author. Unlike an email marketing list, an announcement list does not save recipient information for purging. Messages can be personalized because safe scripting is enabled for administrators. The list will not accept messages from other lists as a child list. Mailing and clickthrough data will be kept for 35 days. Messages sent to the list must be approved before they will be sent. The list settings may be changed later in the Utilities: List Settings menu. Discussion (moderated) (Email sent to and from many people, moderated) All list settings will be appropriate for a moderated discussion list. The list will be configured so that all list members may send email to the list. If members reply to the message, their responses will go to the list. Messages sent to the list must be moderated by an administrator, unless they are sent by an administrator using the ListManager web interface. Mailing and clickthrough data will be kept for 5 days. The list settings may be changed later in the Utilities: List Settings menu. Discussion (unmoderated) (Email sent to and from many people, unmoderated) All list settings will be appropriate for an unmoderated discussion list. The list will be configured so that all list members may send email to the list. If members reply to the message, their responses will go to the list. No messages sent to the list will be moderated, unless sent by an administrator using the ListManager web interface. Mailing and clickthrough data will be kept for 5 days. The list settings may be changed later in the Utilities: List Settings menu. Note that lists without moderation may be subject to spamming and flame wars, and are only recommended for small, self-controlled lists. List Name Required. Single word name for this mailing list (for example, "jazztalk"). Since this name will determine the list's email address (e.g.,"[email protected]"), we recommend you limit it to fewer than 15 characters. Select the list name carefully—once 286 configured, it cannot be changed! Use only lower-case alphanumeric characters (a-z, 09), hyphens (-),or underscores ( _ ). Do not use spaces. List Description Required. A very short description of the mailing list. This description will be visible to users. Also, when email goes out from the group, this description will be in the email message. Do not use any commas or "<" or ">" characters in your description. For example, if the Description is Jazz Discussion, the Reply-To: field for mailing list email will be: Reply-To: Jazz Discussion <[email protected]> Message Frequency Required. Indicate how frequently you will send messages through the list. This selection will determine the error mail settings for your list, so that users who bounce mail will be put on hold and removed from the list appropriately. If you are not sure, select "Twice a Month." Admin Name Required. The name of the administrator for this list. (Can be changed later in Utilities: Members: Edit Member.) List Admin Email Required. The email address of the administrator for this list. (Can be changed later in Utilities: Members: Edit Member.) List Admin Password Required. The password of the administrator for this list. (Can be changed later in Utilities: Members: Edit Member.) 287 Utilities: Administration: Server The Server Administrator has control over all the sites and all the mailing lists on that machine. Therefore, the settings in this section affect all sites and all lists on one server. To affect things that are specific to a single site or a single mailing list, you would use the commands in Utilities: Administration: Sites or Utilities: Administration: Lists sections. As a server administrator, you automatically have security clearance in those sections. Server Settings Modify essential server settings. License Capabilities See information about what your license allows you to do. Operational Statistics View statistics about ListManager's functioning Server Log View or delete information about your server's activities. Database Administer the ListManager database. Debug Log Diagnose and see any problems associated with the log files created by ListManager. Internationalization and Localization Configure the character sets you use to write messages and other languages, and change the ListManager interface into other languages. Utilities: Administration: Server: Server Settings This section stores several settings that apply to the entire server, such as your ListManager Serial number. Basic Settings Your serial code, and admin email address. Network Settings TCP/IP settings and ports for sending and receiving email. Security User feature limits, bans of particular addresses, and GUI host configuration. Automatic Maintenance Error mail handling, statistic logging intervals, purging data and mail loop protection. Advanced Message and digest wrapping for the entire server, and tools for programmers. 288 Utilities: Administration: Server: Server Settings: Basic Settings Serial Number When you test or purchase ListManager, you receive a serial number. Your serial number will be registered at Lyris Technologies when this page is saved, and your ListManager server capabilities will be updated with a new activation code. If you have a firewall, you may need to manually receive and enter an activation code. If you do not have a serial number (or if your serial code has expired), and if your configuration requires one, your ListManager server will be disabled. Subscribes and unsubscribes will proceed normally, but you will not be able to post mailings to your list(s). For more information about your ListManager license and serial code, see Your ListManager Serial Number. Admin Email Address This field should contain the email address of the administrator of this server. ListManager uses this email address to send critical information messages to. For example, if a mail loop is detected, ListManager will automatically end the loop, and notify the email address given here of the loop that occurred. Utilities: Administration: Server: Server Settings: Network Settings: Receive Email Multiple TCP/IP Addresses By default, ListManager will listen for connections on all TCP/IP addresses on the machine it is running on. If you would like to limit ListManager to only some of your TCP/IP addresses, you can enter them here. If you enter several TCP/IP addresses, separate each address with a carriage return. You will need to restart the server after saving your changes in order for them to take effect. ListManager will use the first TCP/IP address you list here for all outgoing connections. Thus, if you have some TCP/IP addresses that have access only to an internal network and others that have access to the external network, make sure that the first TCP/IP address you list has access to the portion of your network that you want ListManager to mail to (keep in mind that the "first" IP address you specify is not necessarily the "first" IP address on the machine). You also should make sure that you do not list 127.0.0.1 as your first TCP/IP address, because then ListManager will not be able to send mail to any machine but the local host. On Windows machines, ListManager can listen to more than 16 IP addresses, and you can specify a special address (1.0.0.0), which will force ListManager to listen to ALL TCP/IP addresses on the machine. When ListManager starts up, it will check on ports 2020 and 25 of each of the TCP/IP 289 addresses it listens to, to determine if another program is currently using that port and TCP/IP address combination. Two programs cannot both listen to the same TCP/IP address and port. If there is a conflict, ListManager will inform you of the problem. One reason to use the Multiple TCP/IP addresses feature is if you want to have ListManager coexist with a mail server also running on your machine. If your mail server can be made to only listen to a specific TCP/IP address , then you can have ListManager listen to the other address(es), and the two programs can coexist on your machine. check Note: By default, the web interface uses the loopback address (127.0.0.1) to talk to the server on the same machine. If you specify IP addresses to use, you want to list 127.0.0.1 as one of the IP addresses, so that the web interface can continue to function. If you do not want ListManager to use 127.0.0.1, you can still use the web interface, but you will need to change the "server_ip_address" setting to point to the new address. Forward Mail Optionally forward non-Lyris mail to another SMTP server. This setting allows ListManager to coexist with another SMTP server on the same machine. For instance, if the machine you want to run ListManager on has a mail server running on it (Sendmail or Post.Office) and you want this machine to continue running a mail server, this setting will allow ListManager to coexist with your mail server. Before ListManager can be installed, you will need to configure your mail server to listen to a different port than port 25 for receiving mail. Once this is done, you can install ListManager and instruct it with this "Forward Mail" feature to pass non-Lyris mail onto your regular mail server. Mail sending and receiving from both ListManager and your regular mail server is unaffected. In this way, both ListManager and your mail server can coexist peacefully on the same machine. For this "Forward Mail" setting, specify the TCP/IP address and port number. For example: "127.0.0.1 2025" forwards non-Lyris mail to an SMTP server running on the same machine on port 2025. This is a common setting when ListManager is coexisting with a mail server on the same machine. Another example: "207.105.7.62 25" forwards non-Lyris mail to an SMTP server running on a different machine. Thus, mail that isn't for ListManager is forwarded to another mail server for regular processing. See Mail Server Coexistence for more information. Forwarding Orders Forwarding orders allow ListManager to receive email for a given email address, and forward that email to another email address. For example, you might want to define an "administrator" (or "admin") email address on your server and have it forwarded to your personal email address. You can define as many forwarding orders as you like, each one separated by a carriage return. Each forwarding order has two parts: the first part is the email address you want ListManager to match on (the address on the ListManager) and the second part (separated by a space) is the email address to forward email to. 290 Here is an example of two forwarding orders that forward mail from "admin" and "administrator" on a server named "server5.lyris.net": [email protected] [email protected] [email protected] [email protected] You can specify multiple people to forward to, by separating each destination email address with a comma. One use of this feature might be to make a "cross-posting" address for multiple lists. Mail sent to this address could automatically be forwarded to several mailing lists. Another use of this feature is if there are several administrators who should receive the same email. Here is an example: [email protected] [email protected],[email protected] When forwarding to multiple recipients, be sure to separate each recipient address with a single comma, with no spaces between each email address; otherwise your forwarding order will not work. Incoming From: Mail Rewrites Optionally rewrite incoming From: mail addresses using these rules. This feature is useful when your users have slightly varying email addresses. For instance, people's email addresses might sometimes say "[email protected]" and other times say "[email protected]". This feature lets you rewrite an email address so that it becomes something else. On each line, specify the string to search for, a space, and then the replacement string. The process is a simple search and replace. If the first string is found, then it is replaced with the second string. You can specify as many rewrites as you like, each on a separate line. For example: "@mail.acme.com @acme.com" would cause the email address [email protected] to be rewritten to [email protected]. The incoming mail rewrites only apply mail coming into (being delivered to) ListManager. Outgoing mail addresses are not affected. Incoming To: Mail Rewrites Optionally rewrite incoming To: mail addresses using these rules. This feature is useful for creating aliases. For instance, you may want people to be able to send mail to "listservices@…" and have it delivered to ListManager as "lyris@…" On each line, specify the string to search for, a space, and then the replacement string. The process is a simple search and replace. If the first string is found, then it is replaced with the second string. You can specify as many rewrites as you like, each on a separate line. For example: "listservices@ lyris@" would cause the email address [email protected] to be rewritten to [email protected]. 291 The incoming mail To: rewrites only apply mail coming into (being delivered to) ListManager. Outgoing mail addresses are not affected. Remove ListManager Email Addresses This option allows you to have ListManager not listen for mail on the addresses you specify. By default, ListManager accepts mail on all sorts of email addresses, such as "subscribe-listname@…" "help@…" "info@…" and many others. If you want ListManager not to respond to messages at these addresses, you can list the addresses that it should not respond to. You can specify as many user names as you like, putting each on a separate line. Note: You do not include the domain name, but just give the user name. Examples: subscribe-jazztalk help info Utilities: Administration: Server: Server Settings: Network Settings: Deliver Email Max Megabits The average maximum megabits per second (Mbps) ListManager should use. In some circumstances, ListManager may use all of your bandwidth, limiting other web applications. If you have bandwidth limitations and would like to prevent ListManager from using all of your bandwidth, enter the amount of bandwidth (in Mbps) it should be allowed to used on average. Note that this feature regulates the average bandwidth used by the server. If you are sending out very large messages, ListManager will send each one as quickly as possible, but then will be idle for a period so that its average bandwidth is what is set here. If you must eliminate large bandwidth spikes as well as regulate your average bandwidth usage, you should consider a hardware solution (a managed switch with rate-limiting). Messages Per Hour The number of messages your license permits you to send per hour. Contact your account representative at 800-768-2929 or at [email protected] for more information about increasing your mailing speeds. Max Simultaneous Sends Controls the number of simultaneous mail sends that can be sent at once. In general, the maximum allowed by your license will be sufficient. However, if you are finding that your bandwidth is being overtaxed by ListManager, you may want to set Max Simultaneous Sends lower. If you are running a site that has a very large number of one-off messages, such as autoresponders, or many subscriptions, you may want to increase the number. Contact your account representative at 800-768-2929 or at [email protected] for more 292 information about increasing your max simultaneous sends. Retry Timing Sets how many times this server will retry sending failed messages, and the interval in minutes between these retries. Unless explicitly set, the default retry times are "30,720", meaning the first retry will occur 30 minutes after the first attempt, the second retry after 12 hours, and that a total of 2 retries will be attempted. Retry intervals should be separated by commas: 30,60,90 Each interval measures the time, in minutes, between the previous try and the next try. The smallest acceptable retry interval is six minutes and the largest acceptable retry interval is 1440 minutes (24 hours). Retry intervals which are not within the acceptable range will be ignored. For example, if you have one retry of three minutes, no retries will be attempted. For example, if you want to establish a retry schedule of 30 minutes, two hours, eight hours, and 24 hours, you would enter the following values: 30,120,480,1440 Please note that the retry interval is measured in relation to the time of the last retry, not the time the message was originally sent. For most lists, three to five retries are more than enough. It is a good idea to schedule one retry a full 24 hours after the message originally went out, to guard against temporary network outages. If you are running ListManager for the first time with lists that have many bad email addresses, you may want to have only one retry to make delivery quicker. Once members with bad email addresses have been put on hold and purged (based on your settings in Utilities: List Settings: Automatic Maintenance: Error Mail), your mailing speeds will increase and you may reset the retry timing to less aggressive settings. Default Delivery Domain Whenever ListManager receives a subscription request from a simple name, such as "Bob", rather than rejecting it outright or adding an obviously bad email address to the database, ListManager can append a domain name to it. One example of when this is useful is when you are using ListManager on your internal network, where everybody is on the same domain. If you submitted an add command to the ListManager server, you would only need to include the email account name, as shown below: login xxxxx add jazztalk << bob shirley farnsworth >> end Thus, with a default domain of "company.com", ListManager would append "company.com" to each of bob, shirley, and farnsworth before subscribing them to jazztalk. Relay Hosts 293 Relay all outbound mail through this mail host rather than doing regular direct delivery. Lyris strongly recommends that you not use a relay host, because ListManager has been optimized to send mail directly to the Internet. Using a relay host may delay mail delivery, and result in inaccurate delivery reports. Some bounced mail may also be returned to the relay host instead of ListManager, preventing ListManager from handling error mail correctly. However, some environments need outbound mail to be relayed through a specific host. For instance, your organization might employ a TCP/IP firewall that prevents ListManager from directly delivering mail. In such a case, each application behind the firewall must use a Relay Host to communicate with the outside. A mail server must be listening on the port of the TCP/IP address that you specify. For this setting, you specify an IP address/port combination (not a host name). You can specify as many relay hosts as you like. Each entry must be separated by a carriage return. If you specify multiple relay hosts ListManager will automatically distribute the mail relay load between them. If you need to send a great deal of mail through a relay host setup, we recommend that you specify several relay hosts. Example: 207.105.6.2 25 If the relay host is defined but unresponsive when ListManager is started or after changing this setting, you will see a warning on the console and ListManager will be unable to deliver mail. TCP/IP Address for Outgoing SMTP This setting determines which IP address will be used for outgoing SMTP connections. If "Any IP Address" is selected, it will use any available IP address for outgoing SMTP connections. Choosing this option sets it to 0.0.0.0, and the operating system then chooses which address to bind to. If specified, the first TCP/IP address specified in the Multiple TCP/IP Addresses setting (in Utilities: Administration: Server Settings: Network Settings: Receive Email) will be used for outgoing SMTP connections. The text in the HELO command will be based on this setting. If "Any IP Address" is specified then the first TCP/IP address as described above will be used to determine the HELO text. To set the HELO text manually, see Setting Server Options. This setting is useful when you want to have ListManager send mail out on a different IP address than the ones it listens to. This is required in some configurations where multiple network cards are used. HELO Text Specify the string ListManager uses in the HELO portion of the SMTP transaction. Normally, ListManager performs a reverse lookup on the first TCP/IP address of the machine it is running on to determine the HELO string. To use a different HELO string, specify it here. Example: lists.example.com 294 Changing the HELO text is extremely useful if you are behind a firewall and machines on the Internet cannot resolve the hostname your machine uses. Utilities: Administration: Server: Server Settings: Network Settings: Ports Incoming SMTP Port This setting defines the TCP/IP port, which ListManager listens on for incoming mail. By default, this setting uses port 25 that is the Internet standard for receiving SMTP mail. In some situations, you may want to move the ListManager SMTP service to another port. Perhaps you already have a service on port 25, and you do not want the services to conflict over the port assignment. In such a case, you will need to configure your mail system so that the mail that ListManager should get is forwarded on to ListManager at its port. For instance, you might create an alias (a DNS CNAME) for ListManager mail, and inform your mail system that mail addressed to this alias should be passed on to ListManager on this port assignment. Note: If you change this port number, and don't work out an alternate way for ListManager to get its mail, ListManager will no longer be able to receive mail, and any mail sent to it from the outside will not reach it. Newsgroup Port This option allows you relocate the newsgroup server built into ListManager to another TCP/IP port. Most newsgroup browsers expect a news server to be on port 119, so you should only change this port if you understand the implications: all newsgroup browsers using your server will have to explicitly ask for the port you re-assign your server to. TCL Port This option allows you relocate the Tcl Port number. By default, it uses port 2021 as its port. This is how the web interface communicates with the server. You would only change this port number if you had a TCP/IP port conflict with another service. If you change the TCL Port number, you will also need to change the server port setting in your Web Interface's tclhttpd.rc file. System IP Addresses This setting is only for server administrators. This displays all the available system IP address(es) for outgoing SMTP connections. The IP addresses seen here, as well as "Any IP Address" will be available on the dropdown menus on the Deliver Email tab. Utilities: Administration: Server: Server Settings: DNS Bypass ListManager 6.0h and higher features an integrated DNS engine, so you no longer need to set up, configure, or maintain a separate DNS server. Instead of using a separate process or DNS server to resolve hostnames, ListManager will use its own DNS resolver. By default, you will see the root name servers used by ListManager for DNS resolution 295 on this page. If you remove these servers, ListManager will not work properly. DNS Bypass allows you to specify that ListManager use a particular TCP/IP address for a domain. If you are running ListManager behind a firewall or in a DMZ, you may need it to use a particular TCP/IP address to route internal mail for your domain. Otherwise, ListManager will use the external DNS information for sending mail to your domain, which can cause problems with some firewalls. Instead of delivering to the internal IP address, ListManager will use the external DNS information for your domain, requiring the mail to go out through the firewall and then back in again. Some firewalls will refuse this kind of traffic, so you will need to use DNS Bypass to have ListManager route mail correctly inside your firewall. If you must create a DNS Bypass and you have multiple hostnames for a single domain, you will either need to create a DNS Bypass for each hostname and IP address, or designate that ListManager use a particular name server for a domain. For example, let's say you have the domain shelby.com, which has two mail servers: mx1.shelby.com, and mx2.shelby.com. You also have an internal DNS server for shelby.com, ns.shelby.com. You can either create 2 mx DNS bypasses, one instructing ListManager to use mx1.shelby.com and one telling it to use mx2.shelby.com for the shelby.com domain. Or, you could create an NS DNS bypass that instructs ListManager to use ns.shelby.com for all DNS lookups for shelby.com. Note that in this example ns.shelby.com MUST have entries for shelby.com. The hostname for each IP address must be unique; for example, you should not have both mx1.shelby.com and mx2.shelby.com point to the same IP address. Finding a DNS Bypass Ten DNS bypasses are shown at a time. You may change the sorting order of the bypasses by clicking the up or down triangles. By clicking the top triangle, the sort order will be ascending (a-z); clicking the bottom arrow makes the sort order descending (z-a). Click on next to see the next ten DNS Bypass entries, previous to see the last ten. Domain The domain for this DNS bypass entry, e.g. shelby.com. Hostname The hostname for this DNS bypass entry, e.g. mx1.shelby.com. Type The type of DNS entry: NS or MX. Address The TCP/IP address for this domain. Viewing or Editing a DNS Bypass To view a DNS bypass, click on the DNS bypass entry's domain. You will be taken to the Utilities: Administration: Server: Server Settings: DNS Bypass Edit page, where you can view or edit the DNS bypass. Deleting a DNS Bypass Click on Delete next to the DNS bypass you'd like to delete. ListManager will ask you if you're sure before deleting the DNS bypass. You must restart ListManager for this change to take effect. 296 Creating A DNS Bypass Click on Create New DNS Bypass to be taken to the Utilities: Administration: Server: Server Settings: New DNS Bypass page. Or, select Copy next to a DNS bypass entry you'd like to copy. Download as a File Click on the disk icon to download your list of DNS bypasses in CSV format. Utilities: Administration: Server: Server Settings: New DNS Bypass Domain The domain name for this DNS bypass. Example: shelby.com Hostname The hostname for this DNS bypass. If there are multiple hostnames for this domain, create a separate DNS bypass entry for each one. Specify only one hostname per DNS bypass. Example: mx1.shelby.com Type The type of entry. The choices are: NS - a name server MX - a mail server Address The TCP/IP address ListManager should use for this domain. This IP address should be unique for the hostname above. Specify only one IP address per DNS bypass. Example: 192.168.0.1 Utilities: Administration: Server: Server Settings: Domain Connection Limits By default ListManager will only open 10 connections to any given TCP/IP address. Opening more connections than this is generally not recommended because the receiving mail server may get overloaded and can think that it is under attack, such as is done with a denial-of-service attack. However, some mail servers have instituted anti-spam measures that trigger warnings at even less connection limits, such as 2. So it may be useful, on a case-by-case basis, to be able to change how many connections ListManager opens to a given host. This feature allows the number of connections to a specific domain to be configured. By default there are no domains listed, so the default of 10 connections per IP address 297 is used. If an entry is added, such as to bellsouth.net of 2, then any connections that go to a bellsouth.net computer will only open as many as two connections. Computer names 'above' the specified domain will also respect these limits, so in this example, a host of albert.bellsouth.net will also be limited to two connections. The minimum setting allowed is 1 connection per domain. ListManager uses a technology called "connection reuse" that allows it to reuse a network connection, rather than disconnecting and re-connecting. This technology allows a large amount of mail to be delivered efficiently without requiring a large number of connections. Thus, ListManager may be more efficient in sending mail with ten connections than would be other programs with 100 connections. Therefore, it is again recommended that you do not increase the number of allowed connections per IP address to be more than 10, unless you are certain that the mail server can handle this load and will not ban you for overloading their system. Creating a new Domain Limit To create a new domain limit, click the "Create New Limit" link: Domain Enter the domain name for which you would like to set a limit. For example: aol.com Connection Limit Enter the connection limit desired. Note that when entering domain limits, only integers can be entered. A minimum limit of "1" and a maximum of "32767" (a number this high should never be entered) must be entered. If you try to enter a number outside of this range, ListManager will not accept it and will warn you of the problem. To edit a domain limit, click on the link to the domain, make your changes, and save. Note that you can also copy, delete, or export these limits from ListManager, using the blue disc symbol in the upper right hand corner of the page. This setting works in conjunction with DNS Bypass settings, in case any high volume providers force high volume email via a separate server. Utilities: Administration: Server: Server Settings: Security: User Limits Allow Segment Use By default, all administrators on the server may create segments. This option allows you to limit list administrators to simple segments, or to limit all segment creation to server administrators. Scripting Feature Level This setting determines what level of scripting or merge will be available for the entire server. There are three levels of permissions: No Advanced Scripting/Merge Disables all advanced scripting. Merging based on the standard ListManager tables is allowed; user-defined fields are not. Safe Scripting/Merge 298 Allows only 'safe' advanced scripting. File system, SQL and other potentially harmful access is not allowed. Full Scripting/Merge Allows the complete Tcl Interpreter, including file system, SQL, and other access. Important: if you allow full scripting/merge, we recommend that all lists are set up to moderate all incoming messages. Certain Tcl procedures such as "redirect" could be misused. See ListManager Tcl Procedures for more information about the "redirect" command. By default, Safe Scripting is allowed if you are using ListManager Pro or Enterprise, and No Advanced Scripting if you are using standard ListManager. Safe and Full Scripting/Merge are only available if you are running ListManager Pro or Enterprise. The level of scripting you select should be determined by the types of lists you're using, and who is likely to post to it. For example, discussion lists are unlikely to need the advanced scripting features, so scripting should be disabled with this setting if all the lists on your server are discussion lists. Even the 'safe' level would likely be unnecessary for this type of list. Note that this setting overrides the list level Scripting Level if the setting here is more restrictive than the setting for the list. If you'd like Full Scripting/Merge to be available for admins but not list members, you can set this setting and the list Scripting Level to Full Scripting/Merge, but limit it to admins in the Allow Scripting in Body setting. Max Message Size Defines the maximum message size that ListManager will accept. The size is defined in bytes. This number applies to the ListManager mail receiving engine, and means that messages over this size are refused before they are even saved. This feature is useful if you want to impose a server-wide maximum message size. Utilities: Administration: Server: Server Settings: Security: Bans Mail Receive Rules Defines the rules by which ListManager determines whether or not mail should be processed. By default, ListManager looks at the username of email it receives to determine whether it should process the message. The host name portion of the mail address is not consulted. It does this to support any number of virtual hosts without needing to be configured. By default, ListManager will automatically assume the hostname identity of any email it receives which is addressed to a valid ListManager user name. This Mail Receive Rules option allows you to change this default behavior, so that ListManager first looks at the rules you have defined, and if the local recipient address does not match a rule, the message is not processed. The Mail Receive Rules are simple text search rules. For example, to accept any mail addressed to the "yourcompany.com" domain, the rule would be: 299 yourcompany.com This would allow any of these different addresses to be received: [email protected] [email protected] [email protected] But any address which did not have "yourcompany.com" in it would be rejected. If your rule was "@yourcompany.com", only the first example above "[email protected]" would be accepted. The most common use for this feature is if you are using ListManager in front of another mail server, and you want to make sure that ListManager only accepts mail addressed to itself, and forwards on any mail addressed otherwise. If you have told it to "Forward non-ListManager Mail" to another location, any mail which does not match a "Mail Receive Rule" will automatically be forwarded on to the other server. See Utilizes: Administration: Server: Server Settings: Network Settings: Receive Email. If you do not have "Forward non-ListManager Mail" defined, then mail which does not match a Mail Receive Rule will simply be rejected. You can define multiple Mail Receive Rules, each on a separate line. Ban All Mail From This option allows you to reject any incoming mail from specific addresses. For example, if a user is a troublemaker, you can have ListManager automatically reject any postings from this person. Note: This mail from: value applies to the SMTP transaction MAIL FROM: <> value. In email messages, this is usually, but not necessarily the same as the From: in the mail you receive. ListManager displays the MAIL FROM: <> value in any message it receives in the Return-Path: header line. Most other mail servers follow this convention as well. You can use this feature if a user has threatened to mail bomb you and you want to protect your server from them. Mail bombing is the tactic of sending hundreds of messages to someone, in the hopes of overwhelming them, or their server, and wasting their time. If you ban someone's email with this technique, ListManager will not even accept their messages over SMTP, and the amount of processing it does for each message is extremely small, thus defusing the power of their mail bomb. You can specify as many email addresses as you like, by putting each address on a separate line. For example: [email protected] [email protected] Utilities: Administration: Server: Server Settings: Security: Web 300 These settings limit by TCP/IP address who may access the ListManager web interface. Changes made to this page only take effect after restarting the ListManager web server. Note that more lenient settings at higher levels do not make lower levels more lenient as well. For example if the TCP/IP for Server Admins is blank (permitting access from any TCP/IP address), but the TCP/IP for List Admins limits access to certain addresses, a list admin must log in from one of the permitted TCP/IP addresses. If the server admin inadvertently locks out access to the web interface using these settings, the command reset_tcpip_server_admin may be run on the command line to reset server admin access. See Setting Server Options for more information about this command. TCP/IP for Message Reading Specifies the TCP/IP addresses that may access the discussion forum interface. If blank, all TCP/IP addresses can access the discussion forum interface; if 0, no one can. Enter one TCP address or range of addresses per line. Example: 192.168.0.1 192.168.0.1-192.168.0.10 TCP/IP for List Admins Specifies the TCP/IP addresses that may access the list admin interface. If blank, all TCP/IP addresses can access the list admin interface; if 0, no one can. Enter one TCP address or range of addresses per line. Example: 192.168.0.1 192.168.0.1-192.168.0.10 TCP/IP for Site Admins Specifies the TCP/IP addresses that may access the site admin interface. If blank, all TCP/IP addresses can access the site admin interface; if 0, no one can. Enter one TCP address or range of addresses per line. Example: 192.168.0.1 192.168.0.1-192.168.0.10 If a site TCP/IP address is not approved, the admin can still log in to the highest allowed admin rights permitted to that address. For example, if a site admin's TCP/IP address is allowed for a list admin but not a site admin, that admin would still have list admin rights. TCP/IP for Server Admins Specifies the TCP/IP addresses that may access the server admin interface. If blank, all TCP/IP addresses can access the server admin interface; if 0, no one can. Enter one TCP address or range of addresses per line. Example: 192.168.0.1 192.168.0.1-192.168.0.10 301 If a server TCP/IP address is not approved, the admin can still log in to the highest allowed admin rights permitted to that address. For example, if a server admin's TCP/IP address is allowed for a list admin but not a site admin, that admin would still have site admin rights. Utilities: Administration: Server: Server Settings: Security: GUI Hosts TCLPORT Hosts (required) This setting defines the TCP/IP address of the computers which are allowed to access the Tclport on your server. Since the web interface uses the Tclport to access your server, you will need to have the TCP/IP addresses of the machines that you want to allow running the web interface. Note: If you remove the TCP/IP address of the computer you are using to run the web interface, you will be locked and no longer able to access the web interface. Also, if you copy the web interface programs to another web server, the ListManager will not allow that web server to access it until that machine is added to the list of Tclport Hosts. You will receive an error from the ListManager Web Interface on that computer. See Installing the Web Server on Another Machine. If you do this, you will need to shutdown your ListManager and run the command: lm tclport tcp/ip-address. This will add the specified tcp/ip-address to the list of Tclport hosts. For example: lm tclport 207.105.6.2 When first installing ListManager, the TCP/IP address of the machine running the ListManager is added to the list of Tclport hosts. If you are running the ListManager Web Interface on another computer, you can remove this setting. Utilities: Administration: Server: Server Settings: Security: Spam Blocking These settings allow you to determine the length (in lines) of the body of emails submitted by first time subscribers when sending a join request. The purpose for setting a limit on the length of a join/subscribe email is to prevent "spammers" to send large amounts of spam or junk mail to your join address. By limiting the length of emails allowed, you can weed out much of the spam which could otherwise be received by and eventually overload your server. This setting is optional; it is not necessary to set a limit on any email received, but it can be set here if desired, depending on the amount of unwanted email received at your join address. Small amounts of spam are to be expected, and do not warrant setting this feature. It is intended to avoid high volumes of unwanted email. Check join mail for spam 302 This yes/no setting enables the spam blocking feature. If set to "No", mail of all lengths will be allowed at the subscribe address. If set to "Yes", join requests may be rejected based on the number of body lines set. The default is set to "No", allowing all mail to get through. It is recommended that you leave it this way initially, and only make adjustments as necessary depending on the amount of spam and unwanted email you begin to receive, and the size of these messages. When a message is rejected, an error message will be sent to the sender informing them that the email is too long, with instructions on what to do. It will look something like this: Final-Recipient: [email protected] Action: failed Status: 5.0.0 Diagnostic-Code: smtp;554 mail sent to subscribe address is too long - looks like spam! Send a blank email to subscribe (no long signatures!). DES 250-PIPELINING 250-8BITMIME 250-SIZE 10000000 250-DSN 250-ETRN 250-STARTTLS 250-DELIVERBY 250 HELP DNS (PTR record) assigned. addresses which 220 have no reverse-DNS (PTR record) assigned. which 220 have no reverse-DNS (PTR record) assigned. ions from IP addresses which 220 have no reverse-DNS (PTR record) assigned. Max subscribe mail body lines (text messages) Sets the maximum number of plain-text lines permitted in the body of a join request email. The default number of text lines is 6. If set to "Yes" above, emails to the subscribe address with more than 6 text lines will be rejected. Note that this is a very conservative number; remember that email signatures sometimes add lines. Max subscribe mail body lines (HTML messages) Sets the maximum number of HTML lines permitted in the body of a join request email. The default number of HTML lines is 16. If set to "Yes" above, emails to the subscribe address with more than 16 HTML lines will be rejected. Note that this is a very conservative number; remember that email signatures sometimes add lines. Also note that if any HTML is detected in the message, each line is scanned for "<a 303 href" to see if there are any image tags. No subscribe request should include image tags, so if one is found, the message is immediately marked as being spam. Allow name match This is a server-wide setting, enabled "Yes", or disabled "No" here. This allows or rejects join/subscribe email that matches a member name, but not the email address. If this is set to "Yes", then even if the email address is not that of a member, but the name is that of a member, then ListManager will see this as a subscribe email from a valid member and will accept the message. If this is set to "No", and the email address is not a member, it will not be accepted, even if the name is that of a member; it will be treated as spam. This default for this feature is set to off "No". Utilities: Administration: Server: Server Settings: Automatic Maintenance: Error Mail Fast Bounce Handling This option sets whether bounces are handed in memory, which may be faster, or if they are saved in the incoming mail database, and processed there. When a message mailing is sent out to its recipients, some of the recipients will bounce back a message saying they could not receive the message. ListManager automatically tracks these messages, and determines when an email address has become invalid. ListManager can keep track of these bounces in memory, as they occur. The downside to this approach is that the bounces will not appear in Utilities: Mail Queues: Incoming. On the other hand, this is a faster and more efficient way to process these messages. However, if you want to be able to view the bounces that ListManager received by looking at the "incoming mail" web page of the web interface, you should disable this feature. Auto-Hold Users This option allows you to disable auto-hold for every list on your server. You might want to do this if your server is having network connectivity problems. To disable auto-hold on a specific list, see Utilities: List Settings: Automatic Maintenance: Error Mail. Disable From: Checking This allows you to disable the built-in phrases ListManager normally uses when receiving mail. ListManager uses some regular expressions to block common types of spam, and disabling the From: checking will bypass using those regular expressions on the From: field. For example, a message from postmaster@somedomain would normally be blocked, because postmaster@ is an automated address that usually sends delivery errors. However, a real person might use their postmaster@ account to belong a ListManager list and you might want to allow this. Disable Subject: Checking This allows you to disable the built-in phrases ListManager normally uses when receiving mail. ListManager uses some regular expressions to block common types of spam and disabling the Subject: checking will bypass using those regular expressions on the Subject: field. 304 A good example of a common Subject: expression that ListManager normally blocks is "out of the office". Messages with that subject are typically auto-responder members, which inform people that they will not be able to answer their email in a timely manner. Blocking messages of that type prevents useless messages from going out to the list. Disable First Line Checking This allows you to disable the built-in phrases ListManager normally uses when receiving mail. ListManager uses some regular expressions to block common types of spam, and disabling the checking of the first line will bypass using those regular expressions on the first line of the message. For example, a sentence starting with "please remove" would normally be blocked, because it looks like an unsubscribe request sent to the list. Utilities: Administration: Server: Server Settings: Automatic Maintenance: Logging Enable Logging By default, every message posting to a list causes an entry to be written to the ListManager log. Nightly digest and index mailings are also recorded. This information is useful for tracking the overall usage of a ListManager server, and also for billing purposes. If you have no need for this logging information, you can disable this feature, and you will save a little bit of disk space which is used for the ListManager log database table. Utilities: Administration: Server: Server Settings: Automatic Maintenance: Purging Old Data Clean Outgoing Mail Queue This setting determines how long "done" mail messages will remain in Utilities: Mail Queues: Outgoing. Specifically, the outgoing mail queue will display xx days worth of outgoing mail messages which are "done". Older mail will be deleted from the database. Choosing "0" will result in all messages being shown and saved by ListManager. This is not recommended, however, as the database table will just continue to grow and grow, and the SQL server processing requests for your ListManager installation will get slower and slower. Clean Incoming Mail Queue This setting determines how long "done" incoming mail messages will remain in Utilities: Mail Queues: Incoming. Specifically, the incoming mail queue will display xx days worth of incoming mail messages which are "done". Older mail will be deleted from the database. Choosing "0" will result in all messages being shown and saved by ListManager. This is not recommended, however, as the database table will just continue to grow and grow, and the SQL server processing requests for your ListManager installation will get slower and slower. 305 Utilities: Administration: Server: Server Settings: Advanced: Message Wrapping Important note for users of earlier versions of ListManager: The list, site or server message wrapping will not be automatically included to your message if you create it through the ListManager administrator GUI. Please remember to add these instructions to your content or mailing, or send the message to the list via email. See Content: Insert Field: Unsubscribe to see how to do so quickly and easily. Prepend at Beginning of Every Body on This Server This setting allows you to define a header that will be applied to all messages on the server. This header will appear at the top of the message, before the site header and list header. Every message that passes through a list on your ListManager server will have this header tacked on. In addition, the header will get properly inserted inside your HTML or MIME-encoded message, because ListManager is aware of which type of message you are trying to send. Append to End of Every Message on This Server This setting allows you to define a footer that will be applied to all messages on the server. This footer will appear at the very bottom of the message, after the list footer and the site footer. Every message that passes through a list on your ListManager server will have this footer tacked on. In addition, the footer will get properly inserted inside your HTML or MIME-encoded message, because ListManager is aware of which type of message you are trying to send. Utilities: Administration: Server: Server Settings: Automatic Maintenance: Mail Loops Loop Detection ListManager automatically tracks how many messages per day are sent from a foreign address to a ListManager address. If the number of messages in one day exceeds the Loop Detection threshold, ListManager cuts off the mailings, issuing a single refusal message, and then discarding the rest of the messages in that 24 hour period. This feature is useful for automatically breaking mail loops that aren't able to be stopped through ListManager's other mechanism, and also for stopping a mail bomb attack. Say, for example, that someone sets their email program to send thousands of messages to your auto-responder, in order to mail bomb you, and tie up your server. This feature will detect this, notify the administrator and automatically stop the process. Note: Some sites use a web CGI script to sign people up to their list. In such a case, the script might be sending from the same address every time, and to the same address every time, thus being perceived as a mail loop if the quantity of mailings goes over the loop detection threshold. In such a case, you should put an exception for that specific from/to combination to exempt your script from this logic. If you forget to do this, the server admin will receive notification of the potential loop, and you'll thus be reminded of the need for an exception. Loop Exceptions 306 The Loop Detection feature in ListManager keeps track of how many messages From: one person have gone to each To: address, and sets a limit on the daily number. However, you might want to specify exceptions to this feature, which you can do using this "Loop Exception" field. For example, if you have a script which generates many commands from the same email address each day, you can put an exception in for your script, and still retain tight control over breaking mail loops. To use this feature, specify either the to sender or the recipient address, or specify a sender/recipient email address combination by putting the "sender-recipient" together on a line, separated by a dash. You can specify as many exceptions as you like each on a separate line. For example, to put an exception for all mail from [email protected] you would enter this: [email protected] To put an exception in for a local auto-responder named "[email protected]" you would put in: [email protected] And if you wanted to put an exception in for only the messages from [email protected] to a local auto-responder named "[email protected]" you would put in: [email protected]@mycompany.com Note: If a loop is detected, ListManager will send the server administrator an email notification of the loop. The email notification will contain the From and To information for that message, as well as the instructions for putting an exception for that loop, if so desired. Also Note: If you are using the "submany.pl" script for adding subscribers to your list, you will need to use loop exceptions if you are getting more than 50 subscribers a day. Otherwise, the fifty-first subscribe request (and all subsequent subscribe requests for that day) will be rejected. Utilities: Administration: Server: Server Settings: Advanced: Digest Wrapping Prepend at Beginning of Every Digest on This Server This setting allows you to define a header that will be applied to all digests on the server. This header will appear at the top of the digest, before the site digest header and list digest header. Every digest that passes through a list on your ListManager server will have this header tacked on. In addition, the header will get properly inserted inside your HTML or MIME-encoded digest, because ListManager is aware of which type of message you are trying to send. Append to End of Every Digest on This Server This setting allows you to define a footer that will be applied to all digests on the server. This footer will appear at the very bottom of the digest, after the list footer and the site footer. Every digest that passes through a list on your ListManager server will have this 307 footer tacked on. In addition, the footer will get properly inserted inside your HTML or MIME-encoded digest, because ListManager is aware of which type of message you are trying to send. Utilities: Administration: Server: Server Settings: Advanced: For Programmers Enable Debug Mail This option allows you to specify email addresses, which should receive debug reports on undeliverable messages. This is a very useful thing when you are trying to debug specific problems, such as a certain user that is not able to receive mail. This turns on the debugger trace output. You should be warned: this can generate HUGE amounts of mail! By default, this option is blank. To send debug mail to multiple email addresses, separate each entry with a space. Run program before lyris@ This setting allows you extend ListManager command processing with your own program. When mail is sent to lyris@… your program will first be run and then your program can do any processing it wishes on the message. If your program wants to stop processing of the message, it can delete it. See How can I extend ListManager with my own programs?. Run program after lyris@ This setting allows you extend ListManager command processing with your own program. When mail is sent to lyris@… the message will be processed and then your program can do any additional processing it wishes on the message. Disable Extensions This option allows you turn off the programming "Extensions" feature of ListManager. The fields for "run program before" and "run program after" will continue to appear in the web interface, but they will have no effect. Some administrators prefer to not allow extensions on their server, in order to enhance security. Extension Directory This option allows you to define the directory where all the ListManager extensions are located. This adds a level of security to extensions, as it prevents ListManager from running any program on your computer—only programs in this directory are allowed. TCLPORT Password (required) The password that you want the ListManager Command Protocol to use. The server uses port 2021 to communicate with the web interface and with other programs. Access to the Command Protocol is password protected, so that outsiders cannot affect your server. The default password is "TCLPORTPasswd". You may want to change this password to give you a greater level of security. However, if you do change this password, immediately after changing it the web interface will no longer work. This is because the web interface configuration file tclhttpd.rc will still have the old password, and will no longer be able to access the Command Protocol of your ListManager. So, immediately after making a change to the Tclport Password and saving the change, you will need to edit the tclhttpd.rc file that is found in your ListManager/tclweb/lib directory. You will want to change the line Config 308 tclport_password have set. {TCLPORTPasswd} to reflect the new password that you Note: If you do not change your Tclport Password, you are still well protected by the Tclport Hosts setting available at Utilities: Administration: Server: Server Settings: Security: GUI Hosts. Utilities: Administration: Server: Server Settings: Advanced: Billing For more information, see Billing. Billing Admin Email The address used as the default From: for bills. Billing Admin Name The name used in the default From: for bills. Server Settings: Advanced: Enable Features Enable Newsgroups ListManager is able to act as a secure, private Newsgroup server, so that the mailing lists being run on your ListManager are also available via a news browser program, such as Netscape News, Agent, "rn", or Internet Explorer. If you do not want this capability, you can disable it server-wide with this option, or it can be disabled on a list by list basis. For more information about newsgroup support in ListManager, see Usenet Newsgroups. Show All Lists By default, this setting is set to "No, When Message Reading, Only Show the Lists for the Current Site." When members go to view all lists in the discussion forum interface, they see only the lists for the site they are logged into. If the visitor does not specify a list, the site that comes first alphabetically will be displayed. For example, if you have two sites on a server, cars and boats, the main discussion forum URL may bring you to the lists on the boats site, as it comes first alphabetically. The All Forums tab will only show those lists belonging to those sites. To have all lists displayed, change this setting to "Yes, When Message Reading, Show All Lists for All Sites." Enable Content Internationalization If you are going to be using any international characters when creating content, a server administrator must enable this feature here in order for the Internationalization feature to appear and function properly. If content internationalization is not enabled, the Internationalization tabs will not appear in the Contents and Mailings sections. See Content: New Content: Internationalization and Mailings: New Mailing: Internationalization for more information. 309 If this feature is not enabled, the default is the ISO-8859-1 character set and 8bit encoding. Default Language Select the default language for the server from the dropdown menu (if nothing is set, English is the default). This sets the language that the ListManager interface will be in. To have other languages available for the web interface, you must run the command line function dbimporttranslations to import the translations. By default, they are not installed when installing or upgrading ListManager because they take a long time to import and can affect the performance of the web interface. Server Settings: Advanced: Global Ban Settings The Global Ban Settings determine what ListManager server should be used to download member bans from. This allows a hosting company to ban members across all servers by setting the ban on a single server and then pointing other servers to it. The information from the global ban server is added to the ban information from the local server, including the information in the local machine's server-wide ban settings. Therefore, all list, site, and server bans are kept from the local machine, but additional bans will be loaded from the server-wide settings of the ban server. An empty Server Address indicates that no server is available. Members can be banned by domain or email address. For more information on member bans, see Utilities: Members: Bans. Note: In order for global ban settings to function properly, all the servers which may receive mail from banned members must be entered in the GUI hosts page. Please see Utilities: Administration: Server: Server Settings: Security: GUI Hosts for more information. Server Address Enter the IP address of the server which will be used to download member bans. Use aaa.bbb.ccc.ddd format. If no IP address is set here, then member bans will only apply to the server they are individually set for, rather than pointing to one global server for all member bans. TclPort Port ListManager will default to the standard port used by the server, which is "2021". This port is used to communicate with the web interface and with other programs. Generally, this setting should not be changed. TclPort Password Access to the Command Protocol is password protected, so that outsiders cannot affect your server. ListManager will default to the standard password, which is "TCLPORTPasswd". Generally, this setting should not be changed. However, if you do change this password, immediately after changing it the web interface will no longer work. This is because the web interface configuration file tclhttpd.rc will still have the old password, and will no longer be able to access the Command Protocol of your ListManager. So, immediately after making a change to the Tclport Password and saving the change, you will need to edit the tclhttpd.rc file that is found in your ListManager/tclweb/lib directory. You will want to change the line Config 310 tclport_password {TCLPORTPasswd} to reflect the new password that you have set. Note: If you do not change your Tclport Password, you are still well protected by the Tclport Hosts setting available at Utilities: Administration: Server: Server Settings: Security: GUI Hosts. Utilities: Administration: Server: License Capabilities This page tells you the capabilities of your ListManager server, as determined by your ListManager license. If you have recently purchased a license upgrade, you can refresh your license by clicking on "click here" in this page. If you'd like to upgrade your license, please contact your account representative at 800768-2929 or [email protected]. Server Level Limits Serial Code Your ListManager serial code. Activation Code The activation code of ListManager. When your serial number is activated, this code is generated. It determines the capabilities of your ListManager server. Expiration Date If a time-limited license, the date the license expires. Is Rebrandable Indicates whether all references to ListManager may be removed from this server. Max Instances The number of instances of ListManager that can be run on this server. Max Click Servers The number of remote web servers allowed to track clicking activity. Is Date Restricted Whether or not this license is date restricted. Allow Foreign Member Table Whether or not a foreign member table may be used on this server. Allow Billing Whether the billing feature may be used on this server. Allow Charting Whether charts are visible on this server. Allow Detect HTML Whether the feature to detect recipient's ability to see HTML messages may be used on this server. 311 Allow Detect Opens Whether this server is allowed to detect opening of messages. Allow Clickthrough Whether this server is allowed to track trackable URLs. Allow Clickstream Whether this server is allowed to track clickstreams. Allow Referrals Whether the Referral tracking feature is available on this server. Mail Engine Limits Maximum SMTP Connections The maximum number of messages that can be sent simultaneously (simultaneous sends). Maximum Messages Per Hour The maximum number of messages that ListManager may send an hour as determined by your activation code. Your actual speeds may vary depending on your bandwidth, DNS server, list quality and other factors. List and Site Limits Maximum Number of Members The maximum number of members allowed for the entire server. If you exceed this number, your ListManager server will be disabled. Current Total Members The current number of total members on this server. Maximum Number of Sites The maximum number of sites allowed. Subsets Available Whether this server is allowed to send messages to segments, as opposed to the entire list. Conditional Content Available Whether this server is permitted to use conditional content and advanced scripting. Mailing Merge/Purge Available Indicates whether or not lists may be merged or earlier postings may be purged on this server. MultiView NNTP Available Indicates whether or not the MultiView feature is enabled on this server. Databases Supported The databases your license allows you to use. 312 Current Database Used Which type of database you are currently using. Utilities: Administration: Server: Operational Statistics The Server Statistics page gives you information about your ListManager server's performance, and a picture of what it is doing at any one time. Terms Used in Server Statistics Protocol A method of communication that has certain rules. Almost like a human language, it is the way data is formatted and presented that only makes sense to a computer program if it is expecting that protocol. This is just like human language in that we may immediately understand another person if he/she is speaking a language we know, but we have no idea if the language is different, even if both languages are trying to communicate the same ideas. SMTP SMTP stands for Simple Mail Transfer Protocol. This protocol regulates how mail servers talk to each other to send mail. Thread A thread is a method by which independent tasks are executed at the ‘same’ time by quickly alternating between them. Using threads allows a system with just one ‘brain’ (the CPU) to act as if is doing many things at once, but in fact, it is doing a little bit of each task and then switching to the next task. However, this is done so quickly that it appears the system is working on many things at the same time. As an example of the human body, you could say that there is a thread running your heart, one for breathing, and others for digestion and other bodily functions. Each of these things is happening at the same time, and could be considered similar to threads. Socket A connection to another computer. It is similar to placing a phone call. When you dial you are attempting to connect, and once the connection succeeds, a ‘socket’ is established. If the receiving end refuses the connection or is too busy (gives you the busy signal), then the socket is not established. TCP TCP stands for Transmission Control Protocol, which is the way most data is actually packaged and formatted through the Internet. NNTP NNTP stands for Network News Transport Protocol. It is used if you are using the MultiView option to allow users to read postings using a newsreader. TCLPORT TCLPORT is the means by which the current ListManager web interface is generated. Statistics Information 313 Lyris List Manager Version The program name and some version identification information. Server Date and Time Displays the current time and date on server. Total Incoming mail threads The number of system threads working on incoming mail processing. Total SMTP connections in progress The number of connections to SMTP servers that the program is attempting. This is the total that the system would like to have in progress, but doesn’t count those that are currently waiting for DNS information or waiting for a connection, for example. Total Physical Memory The total amount of physical RAM available on the machine. Physical Available The amount of physical RAM memory available. Serial number is date restricted Indicates whether or not the serial number is restricted by date. MultiView option enabled Indicates whether or not MultiView (NNTP) is enabled. Total Incoming NNTP Connections The total number of incoming connections receiving data using the NNTP protocol. Total Incoming SMTP Connections The total number of incoming connections received using the SMTP protocol. Total Incoming TCLPORT Connections The total number of connections to process web interface or clicking requests. Seconds Elapsed Since Lyris ListManager Started The number of seconds since ListManager was started. Mail Messages Successfully Sent The total number of email messages successfully sent by ListManager since the server was started. Mail Messages Attempted but Could Not Be Sent The total number of email messages ListManager attempted to send but was unable to do so since the server was started. Mail Bytes Sent The total number of bytes sent by ListManager since the server was started. Number of Outbound SMTP Connections Listed by Domain All the domains and IP addresses for which ListManager is currently processing outgoing messages. Each domain and IP address is listed, with a number indicating how many messages are being processed to that domain/IP. 314 Total Connections The total number of connections represented by the data above. This is different than Number of outbound SMTP allocations listed by Domain because this figure represents the total connections ListManager has already connected to, or is currently trying to connect to, rather than just the list of all those that we would like to connect to. And because of connection caching, ListManager can remain connected to more sockets than the figure given in the Number of outbound SMTP allocations in some cases. Total Messages Mail-Merged and Ready to Send The number of messages which have been processed for all mail merge tags and Tcl scripts, and are waiting to be sent. Currently Active Jobs The currently active outgoing jobs. Listed here is the ID from the outmail record, the ‘type’ of mail this is, whether or not it is in the first send try or a retry, and finally the list that this message is associated with. Status of currently processing incoming messages The currently active incoming jobs. Listed here is the ID from the inmail record, the ‘type’ of mail this is, and the date and time received. SQL Stats: Current Connections in Use The connections to the database server that are currently being used, and the total available. Total Connections Obtained The total number of times that a connection was used to send and/or receive data from the database server. Total Milliseconds Spent Waiting for These Connections The total time to get one of the available database connections. If this number is high, it means that the database is slow to give resources, which may mean that it is under powered for the demand being put on it. Average Time to Execute SQL and Receive a Response, in Milliseconds The average time to send a request to the database server and receive a response. A large number here means the database server is not fast enough to give good results, or the network communication is too slow. A sustained average less than 10 milliseconds is good, where higher numbers indicate problems. Recent DNS Engine Stats: Successful Lookups The number of recently successful DNS lookups. Failed Lookups The number of recently failed DNS lookups. UDP Packets Sent The amount of bandwidth currently being used by the DNS resolver currently, indicating how busy it is. Domains to Resolve The number of domains that are waiting to be resolved by the ListManager DNS 315 engine. Mail Sending Stats: Emails Ready to Queue Individual email messages from a mailing that are merged and ready to send, but have not started the sending process yet. Emails in Progress The total number of emails that the mail engine is currently processing. This is similar to Total SMTP connections in progress, but is a count at a different part of the program, so the numbers are slightly different. The stats that follow break down this count of messages into their exact steps, but done roughly, so the numbers may not always add up correctly. The point of this is to see approximately what the distribution of steps is currently. Waiting for Available MX Host to Mail Server Those that are waiting for the mail server to have an available connection for ListManager to use. Waiting for a Connection to Mail Server ListManager has started a connection to a mail server, and these number are waiting for a response. Waiting for Response to Connection A connection has been established, and this number are waiting for the server to send its first introduction data. Waiting for Response to HELO Command The number of sockets waiting for a response to the SMTP ‘HELO’ command. Waiting for Response to MAIL FROM Command The number of sockets waiting for a response to the SMTP ‘MAIL FROM’ command. Waiting for response to RCPT TO command The number of sockets waiting for a response to the SMTP ‘RCPT TO’ command. Waiting for Response to DATA Command The number of sockets waiting for a response to the SMTP ‘DATA’ command. Waiting for response to RSET command The number of sockets waiting for a response to the SMTP ‘RSET’ command. Sending message data The number of sockets actually sending the data portion of the message. Waiting for Response to Message Data The number of sockets waiting for a response to the sent data. Committing Message The number of sockets in the final stage of internal cleanup after attempting to send a message. Average Connect Wait The average time it is taking to establish a connection to a mail server. 316 Average Response to Connect Wait Average time it takes a mail server to send the initial text after a connection is established. Average HELO Wait Average time to receive a response to the SMTP command “HELO’ Average MAIL FROM Wait Average time to receive a response to the SMTP command “MAIL FROM’ Average RCPT TO Wait Average time to receive a response to the SMTP command “RCPT TO’ Average RESET Wait Average time to receive a response to the SMTP command “RSET’ Average DATA wait Average time to receive a response to the SMTP command “DATA’ Average Time to Send Message Data The average time it takes to send the actual message body of an email message. Average Time for Emails Sent The average time it takes, from the moment ListManager connects to a mail server to the time it finishes sending, to deliver mail, for all the different mail messages processed thus far. Socket Cache Hits The number of times that a connection was needed to a mail server and one was already open and available within ListManager. Socket Cache Misses The number of times that a connection was needed to a mail server and none were already connected and available from within ListManager. Sockets in the Socket Cache The number of sockets that are connected to a mail server but are currently available for use. This is the number that Socket cache hits would be attempting to pull from. Time to Process all Sockets for Activity Once The amount of time it takes to process all sockets (total from Emails in progress) for any activity. That is, how long to check each socket to see if new data is available from a mail server, or if the server can now accept new data from us. Message Body Bytes Desired to Send, this Iteration The amount of data, in bytes, we wanted to send from this pass through all the sockets. Message Body Bytes Actually Sent, this Iteration The amount of data we were actually able to send. If this number is regularly less than Message body bytes desired to send, this iteration, or is significantly less than it, then the operating system is not able to keep up with the speed at which ListManager is throwing data at it. Failed Because of Read Timeout 317 ListManager waited for a response from a server so long that it eventually gave up on it. Failed Because of Connect Timeout ListManager tried to connect, but gave up after waiting too long. Similar to letting a phone ring for many times, and then finally hanging up. Utilities: Administration: Server: Log The Server Log shows all mailings sent by the server. To keep a log, you must have Utilities: Administration: Server: Server Settings: Automatic Maintenance: Logging enabled. Finding a Log Item Ten log items are shown at a time. To view more than ten log items at a time, click on Show More. Repeatedly clicking on Show More will show greater numbers of log items at a time. You may change the sorting order of the log items by clicking the up or down triangles next to Date, Name or Byte size. By clicking the top triangle, the sort order will be ascending (a-z); clicking the bottom arrow makes the sort order descending (z-a). Click on next to see the next ten log items, previous to see the last ten. Viewing a Log Item To view a log item, click on the name or view next to the log item you'd like to view. You will be taken to the Utilities: Administration: Server: Log: View Log Item page, where you can view the log item. Deleting a Log Item Click on Delete next to the log item you'd like to delete. ListManager will ask you if you're sure before deleting the log item. Download as a File Click on the disk icon to download your list of log items in CSV format. Utilities: Administration: Server: Log: View Log Item Description A description of the transaction. Source The type of mailing it is. Subject The message's subject. Body The body includes the incoming mail id, outgoing mail id, archive message id, subject, author, and message byte size. Date Created 318 The date the log item was created. List Name The list this message was for. User Name The sender of the message. Recipient Count The number of recipients for this message. Byte Size The size of the message, in bytes. Site The site for the message Log ID The Log ID ListManager assigned this log item. Utilities: Administration: Server: Database Administration As a server administrator, you may administer your ListManager database within the ListManager interface. You may: - View and edit tables - Run SQL queries - Add and delete demographics columns to the ListManager Members_ table - Insert rows into any table ListManager stores all information about your members in one table, generally the Members_ WARNING: Using these tools can permanently alter your ListManager database. Inserting, editing or deleting data may cause ListManager to malfunction in unpredictable ways, and should be done at your own risk. Consult a database administrator if you are uncertain about a function or query. Information about the ListManager tables is available in the Programmer's Guide: http://www.lyris.com/support/listmanager/software/ Utilities: Administration: Server: Database Administration: View Member Table The View Member Table page allows you to view the ListManager Members_ table, which contains the fields it uses to send mail to each member and to keep track of their membership status. 319 You will be taken to the View Query Results page, where you may sort the members, edit rows or delete them. For more information about the Members_ table, please see the Programmer's Guide: http://www.lyris.com/support/listmanager/software/ Utilities: Administration: Server: Database Administration: View Any Table The View Any Table page allows you to select a ListManager table to view. The dropdown box displays which tables you may view. After selecting a table, you will be taken to the View Query Results page, where you may sort the data, edit rows or delete them. For more information about the tables available to you, please see the Programmer's Guide: http://www.lyris.com/support/listmanager/software/ Utilities: Administration: Server: Database Administration: View Segment The View Segment page allows you to view members in a particular segment. Finding a Segment Ten segments are shown at a time. To view more than ten segments at a time, click on Show More. Repeatedly clicking on Show More will show greater numbers of rows at a time. Click on Next to see the next ten rows, Previous to see the last ten. You may change the sorting order by clicking the up or down triangles next to Segment Name, Description, and Created For. By clicking the top triangle, the sort order will be ascending (a-z); clicking the bottom arrow makes the sort order descending (z-a). Segment Name The segment's name. Description The segment's description. Created For The list for which this segment was created. Viewing or Editing an Existing Row To view a row, click on the segment's name or on View next to the row. You will be 320 taken to the View Query Results page, where you can view the members, edit them, or delete them entirely. Use caution when editing or deleting data directly in this manner. Changes made directly to the database may cause ListManager to malfunction in unpredictable ways, and should be used at your own risk. Consult a database administrator if you are uncertain about changes you'd like to make. Information about the ListManager tables is available in the Programmer's Guide: http://www.lyris.com/support/listmanager/software/ Download as a File Click on the disk icon to download the list of segments in CSV format. Utilities: Administration: Server: Database Administration: Run Your Own SQL Query You may run your own SQL query by typing it here. If successful, you will be taken to the View Query Results page; if unsuccessful, you will see the SQL error generated by your SQL server. WARNING: Running your own SQL query can permanently alter your ListManager database. Inserting, editing or deleting data may cause ListManager to malfunction in unpredictable ways, and should be done at your own risk. Consult a database administrator if you are uncertain about a function or query. Information about the ListManager tables is available in the Programmer's Guide: http://www.lyris.com/support/listmanager/software/ Utilities: Administration: Server: Database Administration: View Query Results You will be taken to this page if you view a table, view a segment, or run your own SQL query. Finding Data Ten rows are shown at a time. To view more than ten rows at a time, click on Show More. Repeatedly clicking on Show More will show greater numbers of rows at a time. Click on Next to see the next ten rows, Previous to see the last ten. You may change the sorting order by clicking the up or down triangles next to each field. By clicking the top triangle, the sort order will be ascending (a-z); clicking the bottom arrow makes the sort order descending (z-a). Viewing or Editing an Existing Row Click on View next to the row to view it. You will be taken to the View Row page, where you can view the data, edit it, or delete it entirely (you may not edit or delete results from your own SQL queries). Use caution when editing or deleting data directly in this manner. Changes made directly to the database may cause ListManager to malfunction in unpredictable ways, 321 and should be used at your own risk. Consult a database administrator if you are uncertain about changes you'd like to make. Information about the ListManager tables is available in the Programmer's Guide: http://www.lyris.com/support/listmanager/software/ Download as a File Click on the disk icon to download the data in CSV format. Utilities: Administration: Server: Database Administration: View Row This page will display the Field Names and Field Values for the row you have selected from View Query Results. Edit the Field Value by clicking on Edit next to the Field Name. Delete the entire row by clicking on Delete Row at the bottom of the page. Use caution when editing or deleting data directly in this manner. Changes made directly to the database may cause ListManager to malfunction in unpredictable ways, and should be used at your own risk. Consult a database administrator if you are uncertain about changes you'd like to make. Information about the ListManager tables is available in the Programmer's Guide: http://www.lyris.com/support/listmanager/software/ Utilities: Administration: Server: Database Administration: Add Member Column The Members_ table is used by ListManager to store all information about your list members. It contains the fields it requires to send mail to each member and to keep track of their membership status. It also has three fields, Additional_, UserID_, and Comment_ that it does not use and that you may populate with the data you choose. If you add additional fields to the ListManager Members_ table, you may import or add members with additional data. Having these fields in the Members_ table (as opposed to another table) allows you to use the wizards in Content to easily personalize your mailings. You may segment your list more easily as well. Adding a Member Column 1. Go to Utilities: Administration: Server: Database Administration: Add Member Column. 2. Enter the Field Name. Valid field names should not have spaces. 3. Enter the Field Type. Field Type options are: Number (Integer) Numeric data only (no characters). 322 Date A date field. One, Two or Three Character String A field that must contain one, two or three characters; the length is not variable. Variable Length String A field that may contain characters or numbers, and may vary in length up to the max specified. 4. Click Add. 5. Restart ListManager and the ListManager web server for your changes to be visible in the ListManager web interface. The change has already taken place in the database, but ListManager must be restarted to recognize it. Database: Add Member Column: Wizard The Add Member Column Wizard allows you to quickly and easily add common demographics columns to your members table. Just check the demographic columns you'd like added, and click on Add at the bottom of the page. The columns will be added and available to you after you have restarted ListManager and the ListManager Web Server. Note that you may change the Data Type. For the predefined fields, it's best to use the default settings (e.g., you would not want to use anything other than "date" for a birthday field). However, you may want to change the data type for the more generic fields, or make the address fields longer. If you'd like to name your own column, use the Add Member Column utility. Utilities: Administration: Server: Database Administration: Delete Member Column You may delete member columns that you have previously added. CAUTION: all data in deleted columns will be deleted as well. Deleting a Column 1. Go to Utilities: Administration: Server: Database Administration: Delete Member Column. 2. Select the column you'd like to delete. 3. Click on Delete. 4. Restart ListManager and the ListManager web server for the change to be visible in ListManager. The change has already taken place in the database, but ListManager must be restarted to recognize it. Utilities: Administration: Database: Add Action Tag 323 Column The clickstreamdata_ table is used by ListManager to store all information about action events, such as purchases. It contains the fields it requires to track member movement on your Web site. It also has six fields, UnitPrice_, Quantity_, Points_, Stage_, ProductSku_ and OrderID_ that it does not require and that you may populate with the data you choose when you create Interest tags or Purchase tags. If you add additional fields to the ListManager clickstreamdata_ table, you may track more information about members when you create tags. Adding an Action Tag Column 1. Go to Utilities: Administration: Server: Database Administration: Add Action Tag Column. 2. Enter the Field Name. Valid field names should not have spaces. 3. Enter the Field Type. Field Type options are: Number (Integer) Numeric data only (no characters). Date A date field. One, Two or Three Character String A field that must contain one, two or three characters; the length is not variable. Variable Length String A field that may contain characters or numbers, and may vary in length up to the max specified. 4. Click Add. 5. Restart ListManager and the ListManager web server for your changes to be visible in the ListManager web interface. The change has already taken place in the database, but ListManager must be restarted to recognize it. Utilities: Administration: Server: Database: Delete Action Tag Column You may delete action tag columns that you have previously added. CAUTION: all data in deleted columns will be deleted as well. Deleting a Column 1. Go to Utilities: Administration: Server: Database Administration: Delete Action Tag Column. 2. Select the column you'd like to delete. 3. Click on Delete. 324 4. Restart ListManager and the ListManager web server for the change to be visible in ListManager. The change has already taken place in the database, but ListManager must be restarted to recognize it. Database: Demographic Definitions When you create additional Member Columns and Action Tag Columns, you may also want to define those columns so that they are available as charts in Reports. For example, let's say you add a column to your Members table called Country. By defining this column, you may see reports which break down your data by Country in the Demographic Charts section of each type of report. Once you've defined Country, for instance, you may go to Reports: Members: Demographic Charts and view member data as broken down by country. Not all demographic information is useful to chart. For example, charting zip codes may be interesting, but charting social security numbers would probably not be (as the data is unique for each member). Database: Demographic Definitions: New Definition See Database: Demographic Definitions for more information about defining demographic columns. Description Enter a description for this demographic column. Database Column and Field Select the database column you'd like to define. Only fields in your members and Clickstreamdata_ tables will be available here. If you have just created a new members or action tag column, you will need to restart ListManager and the ListManager web server to have those pages appear here. Data Type Select the type of data for this field. The options are text, date, or numerical value. Utilities: Administration: Server: Database Administration: Insert Row You may insert a row directly in any ListManager table. Simply select the table you would like to insert a row into, and then enter the data into the fields. This feature should only be used by database administrators and those who are very familiar with the ListManager database structure and the formats the data must be in. Inserting a row incorrectly may cause ListManager to malfunction in unpredictable ways, and should be used at your own risk. Information about the ListManager tables is available in the Programmer's Guide: http://www.lyris.com/support/listmanager/software/ Utilities: Administration: Server: Debug Log 325 The Debug log is intended for programmers to diagnose and see any problems associated with the log files created by ListManager. This feature is only available to server administrators. The debug log view in the GUI reads the same text log files which are created automatically by ListManager, which is in the same directory as your ListManager executable. Multiple log files are created over time, usually log1.txt, log2.txt, log3.txt, etc. This web interface is a new feature in ListManager 7.5. View Log Main Page Displays the complete log, including the time and date of the item, the error level, the subsystem, and the actual error message. To view a smaller, filtered list, click on Filter current view: Filter Current View This allows you to filter the view to customize it for what you are looking for. Filters can be set based on subsystems, and error levels. Once you have set the view, click "view" to see the filtered log file. Configure Controls what ListManager is actually saving to the log.txt file. The settings here determine what will be written to the log.txt file, and displayed on the View Log page. Everything that is checked on the Configure page will be logged. Select Yes/No for Log to File to create the log.txt file, and Yes/No for Log to Console to have the error log be visible in the console window when starting ListManager. Utilities: Administration: Internationalization and Localization: International Charsets The Internationalization feature allows you to create content and send mailings in languages that require characters that are not part of the standard ASCII character set. Before you enter any content into the web interface you must select the character set that you want to use for this content. If the character set you want to use does not exist in the drop-down listbox, your server administrator can create it here (see below). Note that to use international character sets, this feature must be enabled by a server administrator. For more information on this, see Utilities: Administration: Servers: Server Settings: Advanced: Enable Features. If this feature is disabled, ListManager defaults to the ISO-8859-1 character set and 8bit encoding. How Do Character Sets Work? A character set is a collection of symbols that represent the printable characters of a language. There are many standard character sets in use today. The correct character set choice for a message will depend on its language and on which character set is likely to be supported by the mail clients that your message recipients will use. Some languages are supported by multiple character sets and some character sets might be used for multiple languages. Additionally, your operating system, web browser and/or text editor will help determine which character set would be used to compose a message. Also, you should be sure that your recipients are likely to have that character 326 set installed on their systems and that their e-mail client is capable of using alternate character sets. Note that some web-based e-mail clients may not support international character sets. Extended characters are characters beyond the standard 7-bit ASCII characters. These are the characters that usually differ between character sets. The 7-bit ASCII characters are part of most character sets used for e-mail messages and web pages. Encoding is used to convert an 8-bit message into a 7-bit message. Most English language messages only use 7-bit characters. 8-bit characters are used for special symbols and additional characters for other languages. Since it is possible that someone may be using an older mail server that cannot handle 8-bit messages properly, messages that include 8-bit characters are often encoded to 7-bits using either quoted-printable or base64 encoding methods. This is not a requirement though. The quoted-printable encoding is used when the majority of the characters in a message can be represented by 7-bits. In this case, only the 8-bit and certain 7-bit characters are encoded making the encoded message body mostly readable. If the message contains a significant number of 8-bit characters, base64 encoding might be more space efficient. Note that mail-merge tags will not work properly with message bodies that are encoded to quoted-printable or base64. This is because the merge tags will also be encoded which will cause them to be corrupted. Some merge tags may appear to work properly with quoted-printable encoded messages because the tags didn't have any characters that required encoding. However, the data that is returned will be interpreted as quoted printable which could cause the results to be corrupted. Because of this, the default encoding for messages is 8-bit which means that the characters are not changed. Mail servers that cannot handle 8-bit messages should be extremely rare. It is highly unlikely that anyone who is accustomed to receiving messages in alternate character sets would be using a mail server that didn't support 8-bit messages. Creating a New Charset If the character set you are looking for is not available in ListManager, you can create a new one by clicking the "Create new charset" button. Name Enter a Name for the new character set. The charset you are adding should be valid and that users will be able to view it. The Name is the charset name and must be the same as what the standard for that charset specifies. Description The Description field is purely informational and is only there to aid in referencing this particular character set when looking for the correct character set in the list. The ID number will be automatically created for you, in sequential order. This will then be available to you when you create new content or a new mailing. See Content: New Content: Internationalization and Mailings: New Mailing: Internationalization for more information. The Name and Description should contain only standard ASCII characters since these fields are displayed in parts of the web interface that may not be displayed in the same character set. 327 Utilities: Administration: Server: Internationalization and Localization: Translations: Keys The Translations section contains settings and features related to the translation of the web interface. The Keys section has a listing of all strings displayed in the web interface. A "string" is a sequence of characters that make up a word or sentence in the context of a programming language. It also keeps track of what images are being used by the web interface. This page is generally only useful if you want to remove an obsolete string from the database. Creating New Keys Click on the "Create new key" button to create new keys. When a new translated string is added to the web interface, a Key for that string must be added to the database. In general, this key will be the string itself. The exceptions are strings longer than 255 characters, which are referenced by a tag instead of the original string. Strings will generally be of the type "text". Images also exist as translation keys of different types but these are used only for tracking the translated images and are not individually translated. Only "text" type keys have translations. For assistance with languages and translations, please contact Lyris Technologies at [email protected] Utilities: Administration: Server: Internationalization and Localization: Translations: Create and Edit Languages The Translations section contains settings and features related to the translation of the web interface. The Create and Edit Languages section lets you define the languages that translations will be provided for. If you plan on translating a ListManager web interface translation to a new language, please contact Lyris Technologies at [email protected] for more detailed instructions. To edit an existing language, click on the language name link to view the Edit Language page. Utilities: Administration: Server: Internationalization and Localization: Translations: Translation Values The Translations section contains settings and features related to the translation of the web interface. The Translation Values section is where translated strings are added to the database for each language. A "string" is a sequence of characters that make up a word or sentence in the context of a programming language. Once a string is translated, it then has a translation value, which can be edited by clicking on the original value name on the Translations Value page. For assistance with languages and translations, please contact Lyris Technologies at [email protected] 328 Utilities: Administration: Sites Sites help you organize your ListManager server, and facilitate in administration. A site is characterized by its Internet host name. You can have multiple sites on your server, and each one can have its own host name. All lists under that site use that host name after the @ sign when sending mail. If you have multiple divisions in your organization, or if you are hosting other people's lists, each group of lists can use a separate domain with its own "brand". For example, if you were a publisher with many different imprints, each one could have its own domain—lists.shelby.com, lists.redmood.com, etc. The messages being sent from these different sites would appear to be completely independent of one another. Another useful function for sites is for administration purposes. You can make someone a site administrator, who would have the ability to administer all lists in that particular site. That administrator could also make new lists in that site. Making site administrators is often easier than making individuals list administrators of many separate lists. If you do not have access to the Sites area, it may be that you do not have permissions to do so. Contact your server admin to be made a site administrator The number of sites you are permitted to have is determined by your license. Contact your account representative at [email protected] if you'd like to have more sites. Finding a Site Ten sites are shown at a time. To view more than ten sites at a time, click on Show More. Repeatedly clicking on Show More will show greater numbers of sites at a time. You may change the sorting order of the sites by clicking the up or down triangles next to Name or Description. By clicking the top triangle, the sort order will be ascending (az); clicking the bottom arrow makes the sort order descending (z-a). Click on next to see the next ten sites, previous to see the last ten. Viewing or Editing a Site To view a site, click on the name next to the site you'd like to view. You will be taken to the Utilities: Administration: Sites: New Sites page, where you can view or edit the site. Copying a Site Click on Copy next to the site you'd like to copy. ListManager will show you the old name and description for the site, and ask you for a new name and description. Once you have saved the site, you may edit it by clicking on the name. Deleting a Site Click on Delete next to the site you'd like to delete. ListManager will ask you if you're sure before deleting the site. Note that you cannot delete a site if you are logged into a list on that site. Log in to a different list to delete the site you're currently logged into. Creating a Site Click on Create New Site to be taken to the Utilities: Administration: Sites: New Site page. Download as a File Click on the disk icon to download your list of sites in CSV format. 329 Utilities: Administration: Sites: New Site: Essentials The Edit Site pages are identical to the New Site pages. Name A single word (without spaces) which identifies the site. For convenience, a shorter name is better. You can use the underscore or dash characters to represent spaces, such as "yourcompany_group". Description A short set of words describing your site. For example "Your Company Software Ltd.". This is the text users will see in places where your site description is given. Internet Host Name The machine name that you want ListManager to use for this site. For example, if ListManager is running on a machine called "minerva", you would enter that machine name here, minerva.acme.com. The Internet Host Name is the machine name ListManager uses as the Reply-To: and From: when it is sending out mail. It is vital that you enter a valid Internet host name. If you enter an invalid Internet host name, mail will go out with that name and people replying to it will never be able to send mail back to ListManager. For example, if you entered "ophelia.acme.com" as the host name, but this was another machine, then outgoing mail would say [email protected], and this would not be correct. There are other alternatives. If the machine running ListManager responds to several machine names, you will want to enter the appropriate machine name for this Site. For example, if two companies are sharing this server, Acme Corporation, and Widget Corporation, this host name will tell ListManager which name to use in what situation. If someone writes to a mailing list run by Widget Corporation, ListManager will respond with the Widget Corporation host name (minerva.widget.com, let's say). If someone else writes to a mailing lists run by the Acme Corporation, ListManager will respond with the Acme Corporation host name (minvera.acme.com, let's say). Also, though ListManager might be running on a machine called "minerva.acme.com", you might want outgoing mail to look like it is coming from "acme.com". If so, you would enter "acme.com" as the host name. Note: People will be sending mail to addresses at acme.com, and it is your responsibility to set up mail forwarding on your email system so that mail sent to acme.com (for ListManager or its mailing lists) gets forwarded to ListManager running on minerva.acme.com. Discuss with your server administrator what Internet host name(s) are available to you, and how you can set up additional host names. URL to Web Interface This setting determines the path clickthroughs and other tracking use when they are merged in your mailings. By default, the host name of the machine ListManager is installed on will be displayed. Example: http://lists.example.com This setting does not determine the URL that administrators or discussion forum interface users use to access your server. That is determined by any DNS entries your 330 ISP or sys admin has created for your ListManager server. See Logging In and Accessing and Logging into the Discussion Forum Interface for more information about the ListManager URL. If you have a high volume of clickthroughs or other tracking, your network administrator may have set up other web servers to handle the load. If that is the case, enter the URL of the other web servers that should be used for clicktracking. Incoming IP Address This is visible to both site and server administrators. The Incoming IP address displays the IP address of the mail server that is connecting to ListManager. This determines which domain should be displayed in the response. The IP addresses displayed for these options are determined by a server configuration setting in: Utilities: Administration: Server: Server Settings: Network Settings: Ports: System IP Address. Outgoing IP Address When connected to another mail server, this displays the IP address from which it is connected to. The IP address depends on the current site. The IP addresses displayed for these options are determined by a server configuration setting in: Utilities: Administration: Server: Server Settings: Network Settings: Ports: System IP Address. Any addresses that are taken out of another site are excluded from the list of options. For both incoming and outgoing connections, If "Any IP Address" is displayed, it will use any available IP address for SMTP connections. Choosing this option sets it to 1.0.0.0, and the operating system then chooses which address to bind to. If specified, the first TCP/IP address specified in the Multiple TCP/IP Addresses setting (in Utilities: Administration: Server Settings: Network Settings: Receive Email) will be used for outgoing SMTP connections. For more information on how to set this, please see Utilities: Administration: Server: Server Settings: Network Settings: Ports: System IP Address. This setting is useful when you want to have ListManager send mail out on a different IP address than the ones it listens to. This is required in some configurations where multiple network cards are used. Limit to License Level This is only visible to server administrators. When configuring sites, server administrators can decrease the features of a site to either the Enterprise, Pro, or Standard level. The license capability set for the "current list" that you are logged into will apply at the site. This allows site-based license decreases, where a particular site can have a lower license level (i.e. Pro or Standard) than that set at the server level. Utilities: Administration: Sites: New Site: Message Wrapping Important note for users of earlier versions of ListManager: The list, site or server message wrapping will not be automatically included to your message if you create it 331 through the ListManager administrator GUI. Please remember to add these instructions to your content or mailing, or send the message to the list via email. See Content: Insert Field: Unsubscribe to see how to do so quickly and easily. Prepend to Beginning of Every Message on This Site This setting allows you to define a header that will be applied to messages on all lists on the site. This header will appear after the server header (if one is defined) and before the list header. In addition, the header will get properly inserted inside your HTML or MIME-encoded message, because ListManager is aware of which type of message you are trying to send. Append to End of Every Message on This Site This setting allows you to define a footer that will be applied to messages on all lists on the site. This footer will appear before the server footer (if one is defined) and after the list footer. In addition, the footer will get properly inserted inside your HTML or MIME-encoded message, because ListManager is aware of which type of message you are trying to send. Prepend to Beginning of Every Digest on This Site This setting allows you to define a header that will be applied to digests on all lists on the site. This header will appear after the server header (if one is defined) and before the list header. Append to End of Every Digest on This Site This setting allows you to define a footer that will be applied to digests on all lists on the site. This header will appear after the server header (if one is defined) and before the list footer. Utilities: Administration: Sites: New Site: Information Site Logo The URL to a web-ready graphic to be displayed in the web interface. Currently, the Site Logo is not used. Site URL A URL which leads to the web page of this site. Currently, the Site URL is not used. Language The main language used at this site. This setting is for informational purposes only. Address Select a document for this field. This setting is for informational purposes only. Site Contact The list of administrators for this site (and server) is given here. Select one to be chosen as the administrator of this site. This setting is for informational purposes only, to inform users with questions about the site whom to contact. Tech Support Contact The list of administrators for this site (and server) is given here. Select one to be 332 chosen as the tech support contact for this site. This setting is for informational purposes only, to inform users with questions about the site whom to contact for technical support. Location The physical location of the site. For informational purposes only. 333 Utilities: Administration: Topics Topics are categories used to group mailing lists together. Every mailing list must belong to a topic, and a topic can contain many mailing lists. You may select the topic for a mailing list in Utilities: List Settings: Basic Information: Basics. Topics are for informational purposes only, and do not organize lists in the discussion forum interface or determine any of their characteristics. Finding a Topic Ten topics are shown at a time. To view more than ten topics at a time, click on Show More. Repeatedly clicking on Show More will show greater numbers of topics at a time. You may change the sorting order of the topics by clicking the up or down triangles next to Name or Description. By clicking the top triangle, the sort order will be ascending (az); clicking the bottom arrow makes the sort order descending (z-a). Click on next to see the next ten topics, previous to see the last ten. Viewing or Editing a Topic To view a topic, click on the name next to the topic you'd like to view. You will be taken to the Utilities: Administration: Topics: New Topic page, where you can view or edit the topic. Copying a Topic Click on Copy next to the topic you'd like to copy. ListManager will show you the old name and description for the topic, and ask you for a new name and description. Once you have saved the topic, you may edit it by clicking on the name. Deleting a Topic Click on Delete next to the topic you'd like to delete. ListManager will ask you if you're sure before deleting the topic. Note that you cannot delete a topic if you are logged into a list on that topic. Log in to a different list to delete the topic you're currently logged into. Creating a Topic Click on Create New Topic to be taken to Utilities: Administration: Topics: New Topic page. Download as a File Click on the disk icon to download your list of topics in CSV format. Utilities: Administration: Topics: New Topic: Basics Topic Name Required. Single word which identifies the general topic for a list (for example, "sports"). Use only lower-case alphanumeric characters (a-z, 0-9), hyphens (-), or underscores (_). Do not use spaces. This name is only seen by administrators. Description (required) A few words used to describe this topic (for example, “Sports Lists”). Hide This Topic This option will hide the lists for a given topic from non-administrative users of the classic web interface (that used for ListManager 5.0 or earlier versions). This setting has no effect on how topics and lists are displayed in ListManager 6.0 or higher. 334 Utilities: Administration: Topics: New Topic: Information These settings are for informational purposes only. They are not used or displayed by ListManager in the discussion forum interface. Keywords Words which describe this topic. If several words are specified, separate each one with a comma. Language #1 The main language used at this site. This setting is for informational purposes only. Language #2 The secondary language used at this site. This setting is for informational purposes only. Topic Contact The list of administrators for the site (and server) is given here. Select one to be chosen as the administrator of this topic. This setting is for informational purposes only, to inform users with questions about the topic whom to contact. Long Description Reference to a document that describes this topic. Comment Reference to a document with comments about this topic. Sponsor Reference to a document describing the organization sponsoring this topic. 335 Billing The ListManager Billing System allows you to assign lists to customers and bill them for their ListManager usage via email. Even if you do not bill your users, the billing system allows you to monitor usage of your servers, search for lists or administrators, and delete members across all servers. The instructions for billing assume that you have at least two ListManager servers: the billing server, used to monitor and bill customers, and the hosting server, the server that actually hosts customer lists. You may have multiple hosting servers, as long as they and the billing server have been set up to communicate with one another. It is also possible to have just one server, so that you are running billing on the same server that hosts customer lists. In order to use ListManager's Billing System, you must first perform the following steps. 1. Set up your server(s) for billing, so that your billing server can communicate with your hosting servers. 2. Add, validate and sync your servers, so the information in your billing server is in sync with that in your hosting servers. 3. Create hosting plans, which determine how much customers are going to be charged for their usage of your servers. 4. Create any additional charges, such as list setup fees. 5. Create customers, with information on how they should be billed. 6. Create billing groups for each customer, that allow you to assign a hosting plan and lists to a customer. 7. Assign hosting plans, charges and lists to your customers. 8. Validate customers, to make sure there are no problems with their records. Once you've taken these preliminary steps, you may run and send bills: 1. Run the bills, which creates a bill for selected customers (but does not send them). 2. Test and send the bills to customers. Billing Initial Setup These steps MUST be performed before running billing. 1. Creating the Billing Tables The tables used by ListManager for billing are not created by default when you install ListManager. You must run a command line function to create them. 1. Shut down ListManager. 2. Open a command prompt. 3. Cd to the ListManager directory. 336 4. Run the following command: lm dbbillingcreate ListManager will create all of the tables necessary for billing. WARNING: Do not run this command if you have billing tables already, or you will delete your existing data. 5. Restart ListManager. 2. Creating a Billing Admin and Customer Type Options This administrator name and email address will be the default From: for invoices. The Customer Type is informational and will be used when you create a new customer. 1. On the billing server, go to Utilities: Administration: Server: Server Settings: Advanced: Billing. 2. Enter the email address you'd like to appear as the From: for invoices in Billing Admin Email. 3. Enter the name you'd like to appear in the From: for invoices in Billing Admin Name. 4. Enter a type (e.g., Hosting) in Customer Type Options. 5. Save. 3. Creating a Billing List You'll need to create a list on the billing server that will send out the bills. 1. Click on New List on the Home tab (under Shortcuts). 2. Select Email Marketing for Purpose of List. 3. Enter billing as the List Name and List Description. 4. Enter the Message Frequency—generally, you will be sending bills once a month. 5. Enter the Admin Name, Admin Email Address and Admin Password. 6. (Optional) Change the Topic/Site of the billing list. 7. Save. 4. Requesting Delivery Reports It's a good idea to request delivery reports, so you can correct your customers' email addresses if necessary. 1. Go to Utilities: List Settings: Basic Information: Reports. 337 2. Select Report After the First and Last Delivery Attempts. 3. Save. The list admin for the billing list will now receive delivery reports about undeliverable invoices. 5. Creating Invoice Content You'll need to create an email and web invoice in Content to be sent out and to be viewable over the web. 1. Go to Content. 2. Click on Create from Template. 3. Select Sample: Billing Email Invoice. 4. Click OK. 5. Enter email-invoice as the Content Name. 6. Save. 7. Repeat the process, but select Sample: Billing Web Invoice, with web-invoice as the Content Name. We recommend you edit these invoices later so that your company logo and information appear on them. Adding, Validating and Syncing Servers Connecting Your Hosting Servers to Your Billing Server If you only have one server, and you are running billing on that server, you may skip this first step and proceed below to Creating Hosting Servers in Your Billing Server. Otherwise, you must configure your other servers so your billing server can communicate with them. Note that the billing server must be able to talk to your other servers on port 2021. For Servers Running 6.x and Higher: 1. Log into ListManager on one of your hosting servers. 2. Go to Utilities: Administration: Server: Server Settings: Security: GUI Hosts. 3. Enter the TCP/IP address of your billing server in TCLPORT Hosts . 4. Click on Save. 5. Repeat for each server you'd like to be able to monitor or bill. Creating Hosting Servers in Your Billing Server When you add a new server to your list hosting network, it will need to be created in the 338 billing server. 1. Go to Utilities: Administration: Billing: Servers. 2. Click on Create New Server. 3. Enter a Name for the server (e.g., Lists). 4. Enter the server's Host Name for the server (e.g., lists.example.com or the TCP/IP address). 5. Enter any Comments you'd like to record for this server. 6. Click on Save. 7. Repeat for each server you'd like to be able to monitor or bill. Make Your Hosting Servers Save Billing Information The ListManager Billing System keeps track of your hosting servers' activity by reading the logs. Therefore, it is important that the hosting servers are keeping logs. 8. Log into ListManager on one of your hosting servers. 9. Go to Utilities: Administration: Server: Server Settings: Automatic Maintenance: Logging. 10. Set Enable Logging to Yes, Log All Messages that ListManager Sends to Mailing Lists. 11. Click on Save. Validating and Syncing Servers Servers must be validated and synched before almost any changes can be made in the billing system. Validation compares all information on the billing server with the hosting servers. If any differences appear, the information in the billing system needs to be updated. Once you have validated a server, the Validated field will be updated, as well as Version information. Sync resolves any inconsistencies between the billing server and the hosting servers. Any time a change is made on a hosting, server, sync will need to be performed so that the billing system can be updated with the new server information. Validating all Servers 12. Go to Utilities: Administration: Billing: Servers. 13. Click on Validate All Servers to validate all of your hosting servers. 14. If validation is successful, click on OK. If not, see Validation Errors (below). Validating Selected Servers 1. Go to Utilities: Administration: Billing: Servers. 2. Select the servers you'd like to validate by clicking on the box next them.. 339 3. Click on Validate Selected Servers. 4. If validation is successful, click on OK. If not, see Validation Errors (below). Validation Errors Errors Were Found, Click Here to Fix Your billing server does not have information it needs to perform billing. Most likely, there are lists that are not assigned to a customer, or a customer has more lists or members than is permitted by their package. To correct these errors, click on Click Here to Fix. You will be taken to a page that will display the errors. To correct them, click Fix Selected Objects. Doing so will make an entry for these lists, sites or servers in your billing database tables. You may then assign an owner or perform other tasks once these objects are fixed. Creating Hosting Plans and Charges Each customer or list must have a hosting plan, which determines the amount they are charged for the use of your ListManager server. To Create Hosting Plans: 1. Go to Utilities: Administration: Billing: Hosting Plans. 2. Click Create New Hosting Plan. 3. Enter a Name and Description for this hosting plan. Users will see the Name and Description on their invoice. 4. Specify whether there should be limits on the plan: Max Members - Limits the number of members allowed for the entire plan. The default 0 allows unlimited members. Max Members Per List - Limits the number of members per list on this plan. The default 0 allows unlimited members per list. Max Lists - Limits the number of lists allowed on this plan. The default 0 allows unlimited lists. Max Lists Per Site - Limits the number of lists per site on this plan. The default 0 allows unlimited lists per site. Max Sites - Limits the number of sites on this plan. The default 0 allows unlimited sites. 4. Select whether or not to Bill by List. If Yes, the Monthly Price, Included Messages and Included Bandwidth apply to each list individually. 5. Select the Billing Method: Standard - The customer is charged by the number of messages sent. Bandwidth - The customer is charged by the total amount of mail sent 340 (bandwidth). 6. Click Refresh. Depending on the Billing Method, you will see the following options: Monthly Price - A set fee for this plan. Overage CPM - The cost per thousand messages (CPM) that exceeds the Included Messages. Included Messages - The number of message units included in a plan. The size of a message unit is determined by your setting for Max Message Size. Max Message Size - The size of a message unit, in kilobytes. Messages larger than this size are counted as more than one message. For example, if your Max Message Size was 10 (10 kilobytes), and a customer sent a single message that was 12,288 bytes in size, they would be charged for 1.2 messages. If this message was sent to one hundred recipients, they would be charged for 120 message units. Monthly Price Per Server - The set fee per month for a server. Billing by Bandwidth can only be done per server. Cost Per GB - The cost per gigabyte (GB) sent per month. If the customer exceeds the Included GB, they would be charged this rate per GB. Included GB - The number of gigabytes (GB) included in this plan before additional charges apply. 7. Click Save. Viewing a Hosting Plan To view a hosting plan, click on Detail. You will be taken to a screen that will give you an outline of the plan. Editing a Hosting Plan To edit a hosting plan, click on its name. You will be taken to a screen that will allow you to edit the plan. Creating Additional Charges ListManager allows you to bill for additional charges as well. For instance, you may want to charge customers for an initial setup fee. You also use additional charges to account for prepaid accounts. 1. Go to Utilities: Administration: Billing: Additional Charges. 2. Click Create New Additional Charge. 3. Enter a Name and Description for this additional charge. 4. Enter the charge's Default Amount. 5. Select whether or not the charge Is Recurring?, meaning should this charge be added every month. For example, an initial setup fee would be a single time charge. 341 6. Select whether or not the charge Is Proratable?, meaning should this charge be prorated. For example, a setup fee would not be proratable, whereas a service begun at a certain time might be. 7. Click Save. Prepaid Accounts Additional Charges are used to account for prepaid accounts. For example, if someone prepaid $100, you would create a non-recurring, non-proratable additional charge of $100. Entering and Editing Customers Make sure that servers have been validated and synched prior to entering new customer information, in order for new servers and lists to appear in the billing system. 1. Go to Utilities: Administration: Billing: Customers: Configure. 2. Click on Create New Customer. 3. Enter contact information about the customer on the Basic Information Tab: Company - The company associated with this customer. Contact Name - The name of the contact associated with this customer. Email Address - The email address of the contact. This address will receive invoices. Additional Addresses - Additional email addresses that should receive invoices for this customer. Phone Number - The phone number associated with this customer. 4. Enter the contract Type. Types are created in Utilities: Administration: Server: Server Settings: Advanced: Billing. See Billing Initial Setup for more information. 5. Specify whether or not this account Is Active. 6. Specify a Payment Method for this customer: Free - This customer does not pay for your services. Invoice - This customer receives an invoice, and pays by money order or check. Credit Card - This customer pays by credit card. Credit card information may be entered in the Payment Information tab. 7. Select an Invoice Template that should be used for this customer when sending out bills. If you have no options here, you must create an invoice template. See Billing Initial Setup for more information. 8. Select a Web Template that should be used for this customer when sending out bills. If you have no options here, you must create a web template. See Billing Initial Setup for more information. 9. Click on the Payment Information tab if the customer is paying by credit card, and enter the Credit Card Type, Credit Card Number, and Credit Card Expiration. 10. Click on the Information tab, and enter any additional Customer Information that 342 you would like to record for this customer. 11. Click on the Additional Settings tab. 12. Enter the Start and End Date, if applicable. 13. Enter the Salespeople responsible for this account, if applicable. 14. Enter a note that you would like to be included in your invoices to customers. 15. Click Save. Once you've created a customer, you must next create at least one billing group for the customer. Creating Billing Groups Once you've created a customer, you must create a billing group for them. If a customer has one contract, they will have only one group. If you have different contracts for the same customer, the lists will be grouped under the different contract plans. 1. Go to Utilities: Administration: Billing: Customers: Configure. 2. Click on Groups in a customer's row. 3. Give the Group a Name. 4. Click Save. Assigning Hosting Plans, Charges and Lists Once you've created your hosting plan, additional charges, a customer and a billing group, you are ready to assign hosting plans, additional charges and lists to a customer. Assigning Hosting Plans 1. Go to Utilities: Administration: Billing: Customers: Configure. 2. Click on Groups next to a customer. 3. Select Hosting Plans next to the group. Create a new group if you don't see a group here. 4. Click on Add Hosting Plan. 5. Enter a Start Date and/or an End Date, if applicable, in YYYY-MM-DD format. 6. Enter a Description (if desired). 7. Click on Select next to the Hosting Plan you'd like to assign. 8. Click Done. Assigning Additional Charges 343 1. Go to Utilities: Administration: Billing: Customers: Configure. 2. Click on Groups next to a customer. 3. Select Additional Charges next to the group. Create a new group if you don't see a group here. 4. Click on Add Additional Charge. 5. Enter a Start Date and/or an End Date, if applicable, in YYYY-MM-DD format. 6. Enter a Description (if desired). 7. Click on Select next to the Additional Charge you'd like to assign. 8. Click Done. Assigning Lists, Sites and Servers 1. Go to Utilities: Administration: Billing: Customers: Configure. 2. Click on Groups next to a customer. 3. Select Lists next to the group. 4. Click on Add List/Site/Server. 5. To assign a list to the customer, click Select Lists next to the server. Click on the box next to the list name(s) and click on Add Selected Lists. 6. To assign a site to the customer, click Select Sites next to the server. Click on the box next to the site name and click on Add Selected Sites. 7. To assign the entire server to the customer, click on the box next to the server name and click on Add Selected Servers. 8. Select the server, site, or list to update, if applicable. 9. Enter a Start Date and/or an End Date, if applicable, in YYYY-MM-DD format. 10. Specify whether or not the server, site or list Is Free, if applicable. 11. Click Update Selected Objects. 12. Click Done twice to return to the Utilities: Administration: Billing: Customers: Configure menu. 13. Click Detail next to the customer to verify the information for the customer. Assign List Wizard Alternatively, you can use the Assign List Wizard to assign lists to customers quickly and easily. 1. Go to Utilities: Administration: Billing: Utilities: Assign Lists to Customers. 2. Select the server in the drop down box, and click Select. 3. Select the Customer in the drop down box. 4. Select lists in the field below. Use a mouse click with the control key to select multiple lists, and a mouse click with the shift key to select a range of lists. 5. Click Assign Lists to Customer. 344 Validating Customers All customers should be validated periodically to check for errors in their accounts. A good time to do this is just before each billing cycle. To do so: 1. Go to Utilities: Administration: Billing: Customers: Configure. 2. Click Validate all Customers. 3. A report will be generated showing any customer accounts that have errors (e.g., customer has no lists assigned; or no expiration date for credit card). 4. Click Edit to change the customer information. Running Bills Before you send out bills, you must run them, meaning you need to have ListManager generate the bills. By default, Utilities: Administration: Billing: Customers: Bill shows all of your customers. Unless you want to bill everyone (including inactive customers), you'll want to use the Search box to find the customers you want to run bills for. Generate Invoices for Currently Active Customers Generally, you'll want to generate invoices only for customers who are currently active. 1. Go to Utilities: Administration: Billing: Customers: Bill. 2. Select Active Before in the Search drop down box. 3. Enter the last date of the billing period in the entry box in YYYY-MM-DD format. 4. Click Go. 5. Click Bill All in View to just bill those customers you selected. You will be taken to Utilities: Administration: Billing: Customers: Bill: Run Billing. 6. Confirm that the Start and End Dates at the top of the page are correct, and edit if necessary. 7. Click Run All Customers to run billing for all customers. Or, select the customers for whom you'd like to run bills, and click Run Selected Customers. 8. Click OK. 9. View an invoice for a particular customer by clicking on it under the Last Bill Period column or the Amount/Status column. 10. Click Done. Generate Invoices for Selected Customers 1. Go to Utilities: Administration: Billing: Customers: Bill. 2. Select the customers for whom you'd like to run bills by checking them. 3. Click Bill Selected Customers. Searching for Customers to Bill 345 The following options are available from the Search drop down box: All Customers All customers entered in billing. Active Customers All customers designated as active (in Utilities: Administration: Billing: Customers: Configure: Basic Information). Inactive Customers All customers designated as inactive (in Utilities: Administration: Billing: Customers: Configure: Basic Information). Start Date After All customers whose start date is after the date specified in Utilities: Administration: Billing: Customers: Configure: Additional Settings. Specify the date in the entry box in YYYY-MM-DD format. Active Before All customers who became active before a certain date. For example, if your billing period is from the first of the month but you run billing on the fifth, you want to only bill customers who were active for the billing period. If you have added new customers before that time, you would want to select for only those customers who were active before the first so you don't bill those who were added later. Specify the date in the entry box in YYYY-MM-DD format. Bill Amount Is Greater Than All customers whose bill is greater than the amount specified in the entry box. Bill Overage Amount is Greater Than All customers whose overage (messages sent in excess of what is included in their hosting plan) is greater than the amount specified in the entry box. Last Modified After All customers who were modified after a particular date (in Utilities: Administration: Billing: Customers: Configure). Specify the date in the entry box in YYYY-MM-DD format. Customer Is on Server All customers on a particular server. Specify the server in the entry box. Testing and Sending Bills Testing bills generates a copy of each invoice for your files. Sending the bills transmits a copy of the invoice to the customer via email. Viewing Bills 1. Go to Utilities: Administration: Billing: Customers: Send. 2. Click on the value in the Amount/Status column for the bill you'd like to view. 3. Alternatively, click View on the row you'd like to view. 346 Testing Bills A test creates the bill for the customer, but mails it to the Test Email Address specified here. Do not be alarmed if you receive a bill addressed to someone else! ListManager creates the bill for the recipients, but redirects it to you. You will receive exactly what your recipients will receive in your email box, so you can see if your bill looks the way you want it to. The bill has not been sent to your list, or to the customer whose email address is on your test message, until you select Send Bills. 1. Go to Utilities: Administration: Billing: Customers: Send. 2. By default, the addresses will be filled in with the values you entered in Utilities: Administration: Server: Server Settings: Advanced: Billing. If you would like to change them, enter them here: From Name The name of the person from whom the bill should appear to be coming. From Email Address The email address of the person from whom the bill should appear to be coming. Test Email Address The email address which should receive test messages. Message Bounce Email Address The email address which should receive bounced mail. If a bill bounces, the customer has not received it. Being informed of bounced mail lets you know you need to contact the customer and update their information. Tcl Error Notify Email Address - The email address which should receive notification if something goes wrong with the bill. 3. Enter the Message Comments (Text) and Message Comments (HTML), if applicable. 4. Select the bills you'd like to test by checking the box next to them. 5. Click Test Selected Bills. Or, click Test All Bills if you'd like to see what every bill will look like. WARNING: You will receive a copy of each and every bill if you test all bills! Depending on how many customers you have, that may be a great deal of mail. Sending Bills 1. Go to Utilities: Administration: Billing: Customers: Send. 2. By default, the addresses will be filled in with the values you entered in Utilities: Administration: Server: Server Settings: Advanced: Billing. If you would like to change them, enter them here: From Name The name of the person from whom the bill should appear to be coming. From Email Address The email address of the person from whom the bill should appear to be coming. Test Email Address 347 The email address which should receive test messages. Message Bounce Email Address The email address which should receive bounced mail. If a bill bounces, the customer has not received it. Being informed of bounced mail lets you know you need to contact the customer and update their information. Tcl Error Notify Email Address - The email address which should receive notification if something goes wrong with the bill. 3. Enter the Message Comments (Text) and Message Comments (HTML), if applicable. 4. Select the bills you'd like to send by checking the box next to them. 5. Click Send Selected Bills. Or, click Send All Bills if you'd like to send every bill. Deleting Bills Bills that are sent or filed disappear from this view. If you'd like to delete all bills, click Delete All. Filing Bills Bills that are filed will show in a customer's history, but are not actually sent. Terminating Customers and Lists In most cases, when a customer has cancelled their account, a final bill should be run and sent. Once the final bill has been sent, the account and lists should be terminated in billing. Sending a Final Bill to Customers 1. Go to Utilities: Administration: Billing: Customers: Configure 2. Open the Edit Customer page by clicking on the name of the customer. 3. Click the Additional Settings tab. 4. Enter the End Date of the customer. Setting the End Date will prorate the last invoice for the appropriate amount of days service was provided. 5. After generating the final invoice for the customer, be sure to terminate the customer so that no more bills can be generated for them. Terminating Customers Once you've sent a final bill to canceling customers, you must terminate them in billing so no more bills may be run for them. A customer may be terminated in two ways: making them inactive, or by deleting them. Making a customer inactive is preferable, as it prevents bills from being generated for them but preserves the customer information, including billing history, that you may need at a future time. If the customer returns, you need only reactivate them. Deleting a customer removes them and all history about them from billing. 348 Making a Customer Inactive 1. Go to Utilities: Administration: Billing: Customers: Configure. 2. Click on the name of the customer to open the Edit Customer page. 3. Select No for Is Active on the Basic Information tab. 4. Click on Save. You will be returned to the Configure page. 5. Click on Groups next to the terminated customer. 6. Click on Lists. 7. Check all lists, sites and servers on the left and click on Remove Selected Objects. 8. Confirm that you want to Remove Selected Objects. 9. Click on Done. 10. Terminate the customer's lists if they have not been deleted from the server. Terminating Lists When a customer leaves, or cancels a list, it must be terminated in billing as well. Lists must also be terminated in billing if a list is moved from one server to another, or renamed. There are two ways of terminating a list: deleting it from the server directly, or keeping it but assigning it to a fake customer named "Terminated" or "Need to Delete" in billing. It is preferable to assign terminated lists to a fake customer, because all the list information is preserved, and the list can be reinstated easily if the customer changes their mind. If the customer needs their membership, the data is still available. Once a list is deleted from the server, membership data is gone. Deleting a List 1. Log into the server where the list to be deleted is. 2. Go to Utilities: Administration: Lists. 3. Click Delete next to the list to be deleted. 4. Log into the billing server. 5. Go to Utilities: Administration: Billing: Servers. 6. Select the server from which you deleted the list 7. Click on Validate Selected Servers. 8. Click Fix Selected Objects when prompted. Terminating a List Without Deleting It If an inactive customer has lists assigned to them, you will receive an error message when customer validation is performed. To prevent that from happening, create a fake customer called "Terminated" for those lists and move them to it. 349 9. Create a “Terminated” customer account which is inactive, with a "Terminated" group. See Creating New Customers for step-by-step instructions. 10. Go to Utilities: Administration: Billing: Customers: Configure. 11. Click on Groups next to the terminated customer. 12. Click on Lists. 13. Check all lists, sites and servers on the left and click on Remove Selected Objects. 14. Confirm that you want to Remove Selected Objects. 15. Click on Done. The lists are now not assigned to any owner. They need to be assigned in order to prevent errors during validation reports. 16. Go to Utilities: Administration: Billing: Utilities: Assign Lists to Customers. 17. Select the server that has the terminated lists on it 18. Select the unassigned lists. 19. Select the "Terminated" customer. 20. Click on Assign List to Customer. 21. Click Done. Billing Checklist The following is a checklist of steps you should take every time you run bills. 1. Validate and sync your servers with the billing server. 2. Check that all lists have been assigned to customers or to fake accounts. 3. If you have customers who have prepaid, set the Carry-Over Remaining Credits. 4. Run the bills, creating a bill for each customer. 5. Test and send the bills. 6. Terminate any customer who should not receive future bills. 7. Terminate lists. Billing Reports The Utilities: Administration: Billing: Billing Reports page is a useful tool for finding lists, sites and servers. The first drop down box gives you the following options: Show All Show everything that meets your criteria. Show Contains Show lists, sites or servers which contain the text you specify in the entry box. 350 Show Exact Show lists, sites or servers which match the text you specify in the entry box exactly. The second drop down box gives you the following options: All All lists, regardless of whether or not they are owned by a customer. Owned All lists owned by a customer. Unowned All lists not owned by a customer. The third drop down box gives you the following options: Lists Search all list names. Sites Search all site names. Servers Search all server names. The entry box allows you to specify text your search should match or contain. Billing Utilities Billing utilities help you to perform tasks needed to maintain your billing system or to find particular members. Assign Lists to Customers This wizard helps you to quickly assign lists to customers you have already created. Find Administrator This utility helps you to find an administrator on any of your servers. Enter an email address or name in the entry box, and click OK to search for an administrator who matches. You may specify multiple administrators by separating them with the | character. Find Member This utility helps you to find a member on all lists on your servers, and delete them if desired. Enter an email address or name in the entry box, and click OK to search for a member who matches. Check Delete Them if you'd like to delete the address. Carry-Over Remaining Credits This utility is used if you have prepaid customers. You would create a non-recurring, non-proratable charge, and give it a negative number that correlates to how much someone prepaid. You would next assign that charge to the customer, with the correct 351 amount they prepaid. For example, if they prepaid a hundred dollars, you would enter 100.00 for the charge. Before each billing cycle, you would enter the date of the previous billing start date, in YYYY-MM-DD format. For example, if you are billing for January, you would enter 2002-12-01. Next, select a charge for all customers' prorated charges to be grouped under. Change Admins Change the email address or password for the billing server administrator. Forwarding Orders Forwarding orders allow ListManager to receive email for a given email address, and forward that email to another email address. You can specify multiple people to forward to, by separating each destination email address with a comma. Export Invoice Data Allows you to download a CSV (comma separated values) file for your invoices. Select the invoice start date (YYYY-MM-DD format), the customer type, and the fields to export. You will be prompted to save the csv file in any location. Viewing a Customer's History To obtain a billing history for a customer: 1. Go to Utilities: Administration: Billing: Customers Configure and Search for the customer. 2. Click on Bill for that customer. The Run Billing view will now be opened. 3. Click on Done. 4. Search for the customer again. 5. Click History for that customer. You can now access all invoices that have been generated for that client. 352 Utilities: Login Status Log Out After clicking on Log Out, you'll need to log in again to access ListManager. For security reasons, we recommend that you close all browser windows after logging out of ListManager. Change Login If you'd like to log in as a different user, you may either Log Out and Log In again, or Change Login. If you click on Change Login, you will have the opportunity to log back in again immediately. Change List If you'd like to change the list you're working on, click on Change List. The next screen will give you the option to change the list you're working on. Your Account If you'd like to see your settings, click on Your Account. You will be taken to the list, site or server view administrator page. Change Language The Change Language page lets you change the current language of the web interface for your administrator account. For more information on this, see Utilities: Change Language. Utilities: Change Language The Change Language page lets you change the current language of the web interface for your administrator account. This setting is currently cached in the ListManager server, which means that if the server is restarted, you may have to set your language again. To change the language, click on the "select" link or on the language name itself. The ListManager interface will then be visible in the selected language. Note that the associated character set for each language is also displayed. 353 Utilities: Other This section of Utilities allows you to create action tags, which allow you to track recipient movement through your site. You may create clickstream tags, which you can then put in web pages on your web site. If you enable clickstream tracking, you can see how many pages your mailings' recipients have visited. Purchase tags and interest tags record information in your ListManager database about recipients' purchase behavior or interest in a product. Member update tags update information about a member when they visit a particular page. A signup form for your web site is essential to help new members to join your list. The signup form page helps you to do that quickly and easily. You can also create offline events and learn more about ListManager and the company and people who make it. Utilities: Other: Action Tags This section of Utilities allows you to create action tags, which allow you to track recipient movement through your Web site. You may create clickstream tags, which you can then put in the source code of web pages on your Web site. If you enable clickstream tracking, you can see how many pages your mailings' recipients have visited. Purchase tags and interest tags record information in your ListManager database about recipients' purchase behavior or interest in a product. Member update tags update information about a member when they visit a particular page. How Do They Work? Action tracking relies in part on cookies — tiny pieces of information stored on a list member's Web browser. When list members open a message or click through on a link, ListManager gives their browser a cookie. This cookie allows ListManager to recognize list members when they subsequently make a purchase, as well to track the most recent mailing opened or clicked upon. An actual action tag is a line of HTML code that call an "invisible gif" — a tiny, 1-pixel by 1-pixel graphical image. Typically, this image is white, making it effectively invisible to the list member. When this invisible gif appears on a page viewed by a list member or is otherwise activated, your web server sends ListManager information about the action completed by that list member. Note that the data passed from your Web server to ListManager via the Internet is merely a series of numbers. These numbers contain no personally identifiable information and are thus unintelligible to outsiders or "snoopers." Only ListManager can interpret this data, which means that only list administrators with appropriate access rights can view these purchases. Your ListManager server must always be on and connected to the Internet to track actions correctly. Note also that if an individual list member's browser is configured to reject cookies, ListManager will not be able to link an action with that list member. 354 Alternatively, action tags can be created without cookies mostly for text based messages. It puts the memberid and messageid in the destination url. It gets tracked in the LM database and also in the receiving web server. Utilities: Other: Action Tags: Clickstream Tag The page tracking page allows you to create a clickstream tracking tag. When recipients of your message visit a page in your Web site, the event will be recorded by ListManager. Enter a name to help you identify this tag. Click OK, and ListManager will provide you with a page tracking tag. Copy the page tracking page, and paste it in the source code for any web page you'd like to track message recipients' visits to. You must include some kind of tracking in your message—clickthroughs, opens, or HTML detection—in order to track clickstreams. See Utilities: Other: Action Tags for more information about how action tags work. Utilities: Other: Action Tags: Purchase Tag A purchase tag gives information back to ListManager about a recipient's purchase. The resulting tag must be pasted in the source code for any web page you'd like to track message recipients' purchases. You must include some kind of tracking in your message—clickthroughs, opens, or HTML detection—in order to subsequently track purchases. Although you can use a purchase tag with static (unchanging) values for price, quantity, etc., you will likely want to make your purchase tags dynamic by using variables that your script or shopping cart application can then change based on a customer's order. For example, let's say you want to record a customer's purchase on their order confirmation page. This static purchase tag will always show that the purchaser bought one unit of product/SKU 1234 for $100.00: <IMG SRC="http://example.com/pt?name=purchase&fields=UnitPrice_, Quantity_,ProductSku_&UnitPrice_=100.00&Quantity_=1&ProductSku_ =1234" ALT="" HEIGHT=1 WIDTH=1> To make the purchase tag dynamic, use variables instead of static values: <IMG SRC="http://example.com/pt?name=purchase&fields=UnitPrice_, Quantity_,ProductSku_&UnitPrice_=$price&Quantity_=$quantity &ProductSku_=$sku" ALT="" HEIGHT=1 WIDTH=1> Your purchasing script or shopping cart application can then dynamically update these variables with information about the customer's purchase, which then is sent to ListManager. Please see your shopping cart application's documentation or consult with your purchase script's programmer for more information about how to use variable values in these tags. Note that you should use multiple tags for multiple products. 355 See Utilities: Other: Action Tags for more information about how action tags work. Name This Tag A single word to describe this tag. Fields to Track By default, the tag will track Unit Price, Quantity, Product/SKU#, Interest Stage and Interest Points. If you would like to add or remove fields to track, click on Choose Fields. Unit Price The price of the unit purchased. You may want to enter a variable here (e.g., $price) that a script on your web server can update with the correct unit price. Quantity The quantity purchased. You may want to enter a variable here (e.g., $quantity) that a script on your web server can update with the correct quantity. Product/SKU# The product or SKU number. You may want to enter a variable here (e.g., $sku) that a script on your web server can update with the correct quantity. Interest Stage The stage of a customer's interest (e.g., browsing). Interest Points The amount of points to assign to this customer. The higher amount of interest points, the more interest the customer is showing. Interest points can accumulate, depending on whether you have multiple purchase or interest tags. Utilities: Other: Action Tags: Interest Tag An interest tag lets you gauge a recipient's level of interest, based on the pages they have visited. The resulting tag must be pasted in the source code for any web page you'd like to track message recipients' interest. You must include some kind of tracking in your message—clickthroughs, opens, or HTML detection—in order to track interest. Interest Tracking is a feature of ListManager Enterprise, and is unavailable for standard or Pro ListManager. Contact your account representative at [email protected] if you'd like to upgrade to ListManager Enterprise. Interest Tracking has three components: - Events - Stages - Points Interest Events are actions that your list members take, such as clicking through to your Web site, viewing web pages, downloading material, submitting web forms, or making purchases. 356 Interest Stages are numerical values assigned to particular Interest Events to communicate the relative position of each Event within the sales cycle. Assuming an Interest Stage scale of 1 to 100, an Event such as a visit to a product page might be assigned a 30, whereas a purchase might be assigned a 90. Interest Stages thereby enable you to gauge how far your members have progressed towards demonstrating more interest in your business. The Interest Stage registered for each member will be the highest one they have visited—for example, if they purchased, and then browsed further on your Web site, their Interest Stage would still be for the higher purchase interest. You can customize the scale for Interest Stages to suit your needs. Interest Points are numerical values assigned to particular Interest Events to communicate the relative importance of each Event within your sales cycle. Assuming a Points scale of 1 to 100, an Event such as visiting a product page may be assigned 3 Interest Points, whereas a request to be contacted by might be assigned 90 Interest Points. A returned product may be assigned a negative value. As your members complete various Events, they accumulate additional Points—enabling you to identify hot leads who deserve special treatment. You can customize the scale for Interest Points to suit your needs. See Utilities: Other: Action Tags for more information about how action tags work. Name of Interest Event A single word to describe this tag. Interest Stage The stage of a customer's interest. Interest Points The amount of points to assign to this customer. The higher amount of interest points, the more interest the customer is showing. Interest points can accumulate, depending on whether you have multiple purchase or interest tags. Utilities: Other: Action Tags: Member Update Tag A member update tag updates a database field for a member. For example, if a customer visits a particular page with a contest on it, you may update a database field to indicate the customer is interested in contests. The resulting tag must be pasted in the source code for any web page you'd like to be able to update your database with member information. You must include some kind of tracking in your message—clickthroughs, opens, or HTML detection—in order to update a member in this fashion. See Utilities: Other: Action Tags for more information about how action tags work. Field Name The name of the field to update, from the ListManager Members_ table. Value The value that should updated to the field when a customer visits the page. 357 Create New Field If you do not have a field to update, you may create a new field. See Utilities: Administration: Server: Database: Add/Remove Member Columns: Add Member Column for more information. Utilities: Other: Clickthrough URLs When you create a clickthrough URL, you may optionally assign it a name to assist you with reports. Once you have assigned a URL a name, it will continue to have that name until you rename it here. The main Clickthrough URLs page displays the ID number, URL and name for each clickthrough URL you have created. Click on the URL to change the name associated with it. You will be taken to a page which displays the ID number of the URL, the URL, and an entry box with the current name. To change it, enter a new Name, and click Save. Utilities: Other: Offline Events Offline events are a feature of ListManager Enterprise, and are unavailable for standard or Pro ListManager. Contact your account representative at [email protected] if you'd like to upgrade to ListManager Enterprise. Offline events are intended for tracking purposes, to either track an interest event, a purchase event, or any other event, such as a phone call or clickthroughs. These are events that occur outside of ListManager. This feature allows you to then incorporate these events into your database so that they can be viewed in reports and added to any statistical data that you may be tracking. Offline events are added to the other events in ListManager, so they can be tracked together. They create a row in the clicktracking table, and can be viewed by going to the Utilities: Administration: Server: Database: View and edit data: View query results page. Note that each offline event can be associated with only one mailing. An identical offline event can be used for more than one mailing, but must be created individually for each mailing. In order to use offline events, the following steps must be followed; note that steps 1-4 need to be performed elsewhere in the ListManager interface, to set up the mailing to be tracked correctly: 1. Create a purchase/interest/clickstream tag using Utilities: Other: Action Tags. 2. Create the desired content. Use the Insert URL functionality in the HTML message. See Content: Insert URL: URL for more information. Otherwise, the content for the mailing can be created directly in the mailing without importing content, by using the %%track%% tag to surround the href. You must have some knowledge of HTML to use this- otherwise using the Content section will insert the correct HTML for you. 358 3. Create the mailing and import the content created in step 2. If you choose to skip the content step and create the mailing first, make sure the %%track%% tag with the format: <a href="%%track http://example.com%%">Clickable text</a> is included in the HTML message portion of the mailing, otherwise there will be nothing available to track. For more information on this, see Mailings: New Mailing: Tracking. 4. Once the mailing has been sent, and recipients have clicked on the tracked link created in content, you can begin tracking. This can be seen by going to the corresponding report, whether it be a clickstream, interest, or purchase event. See Reports for more detail on this. 5. Create the offline event using offline events, offline interest events, or offline purchase events. Note that the email address used must be the same as that of the list member. The following fields must be filled in for offline events: Event Name Enter a descriptive name for your event, such as "phone call/date" or "purchased 10 units". The event name must not be a URL ID, which is reserved for clickthroughs. This will be displayed as "StreamWebPageName" when you view query results for clicktracking. Member Email Address Enter a valid email address. This address must match that of the list member for that list; otherwise ListManager will advise you that no member with that address exists. Mailing Select a mailing from the dropdown menu. It is helpful to name mailings with a date and a description in order to easily find it here. The offline event will be associated with the mailing. Interest Stage This is only available for offline interest and purchase events. For interest events, an interest stage must be entered, for purchase events it is optional. Interest Points This is only available for offline interest and purchase events. For interest events, an interest point must be entered, for purchase events it is optional. Quantity Purchase events must have a quantity of 1 or greater filled in. Interest events will always show a quantity of zero. Interest stage and points are optional for purchase events. Optional Fields Custom values (optional fields) are only available for purchase tracking. Any optional fields seen here must be created prior. For information on this, see Utilities: Other: Action Tags: Purchase Tag. These custom fields, which are added to the clickstream_ table will appear on both the purchase tag (as normal), but also as a value in the offline event. 6. Verify that the data was successfully entered in by going to Utilities: Administration: Server: Database: View and Edit Data: View Query Results. Look at the following tables: clickstreamdata_ and clicktracking_. The event name will appear as the "StreamWebPageName", which cannot have a URL ID (this is reserved for 359 clickthroughs). The page displays the IP address as a negative number; this can be ignored, it is just the way that this page displays it. Note that the TCP/IP address recorded for the offline event will be the TCP/IP address of the person entering the event. For interest and purchase offline events only: When looking at the query results, interest and purchase offline events create two tables: clickstreamdata_ and clicktracking_. Interest events always show a quantity of zero and cannot have a product Sku, customerid, or unitprice field. But they must have an interest stage and interest points assigned. They must also have a clickid which references a newly created clicktracking row. Purchase events can have all fields filled in, and must have a Quantity greater than or equal to 1. These events can also be viewed from Reports. For instance, Reports: Mailings: Tracking Statistics displays the CS# (clickstream # of events). Clicking on the CS# displays a detail of that particular clickstream tracking for that mailing. The offline events will appear here on the list of clickstream tracking events. For even more detail, click on the email address here to view a member history, which will now include the offline events created. Utilities: Other: Programming API The Programming API in ListManager works by fetching URLs in the ListManager web interface from within your program. For example, if you use your web browser to go to http://localhost/utilities/other/api/test and click "submit" you will see the phrase "Test succeeded!". Instead of using a web browser, you will want to use small programming scripts to fetch URLs that do actions you desire. Examples in various programming languages Below is source code for fetching the test URL in the ListManager web interface. These examples show how easy it is to have ListManager perform an action for you. Linux Command Line curl -u admin:lyris http://localhost/utilities/other/api/test_do or GET http://admin:lyris@localhost/utilities/other/api/test_do Microsoft ASP <% Response.Buffer = True Dim objXMLHTTP, xml Set xml = Server.CreateObject("Microsoft.XMLHTTP") xml.Open "GET", "http://admin:lyris@localhost/utilities/other/api/test_do", False xml.Send "" Response.Write xml.responseText Set xml = Nothing %> 360 PHP <?php function urlget ($url) { $f_page = @fopen ($url, "r"); if ($f_page) { $page_contents = fread ($f_page, 10240); fclose ($f_page); return ($page_contents); }; return ""; }; print urlget("http://admin:lyris@localhost/utilities/other/api/test_do "); ?> Python import urllib f = urllib.urlopen("http://admin:lyris@localhost/utilities/other/api /test_do") print f.read() How to find API functions In order to make it easy for you to find and understand every Programming API function in ListManager, we have organized all the functions into menus, and each function has a very simple HTML form demonstrating what kind of information the function needs, and how that function works. Passing Parameters API functions can all be passed parameters in the URL, with the standard GET format (ie, setting=value on the URL) or alternatively, for larger amounts of data, all functions accept their parameters through the HTTP-POST standard (ie, as form POST variables). Return Values Most Programming API functions return just one value. In those cases the value is returned as raw text, as the HTML results of the URL. If an error occurs and the API function cannot work, a text message is returned in this format: <ERROR>sorry, an error occurred</ERROR> Some API functions need to return a list of value, such as the function for "On what lists is a given email address?". In those cases a list of items is returned in this format: <ITEM>first list item</ITEM> <ITEM>second list item</ITEM> <ITEM>third list item</ITEM> If an API function needs to return a key/value array, such as the function for "Get all attributes of a member", then the results are returned in this format: <KEY>first key</KEY><VALUE>first value</VALUE> <KEY>second key</KEY><VALUE>second value</VALUE> <KEY>third key</KEY><VALUE>third value</VALUE> 361 Security The same security which the web interface enforces applies to the programming API as well. Thus, as a list administrator, you are allowed to access to all the member functions that you normally have access to in the GUI. If you try to work on a member from a list you don't have access to, an error will occur. Some API sections, such as the Server Config, SQL and List sections, require Server Administrator security rights. All API functions are protected by an HTTP login. Whatever program you use to fetch URLs will need to pass a valid name and password when fetching the API URL (all the examples above do so). For example, in Perl this is accomplished with the command: $req->authorization_basic('admin', 'lyris'); while in many other languages this is simply accomplished by adding username:password to the URL, like so: http://username:password@hostname/utilities/other/api/test_do If you are an administrator of a shared server, note that your list administrators do have access to a smaller set of the programming API, which includes most of the members API, so that they can program direct subscription management scripts. Performance The speed of most API functions is plenty fast enough for most applications. However, if you have bulk operations you need to accomplish, such as importing a member list, you should work directly with the SQL database that ListManager is using. Utilities: Other: About The about section tells you about the benefits of ListManager, Lyris Technologies, the people who designed and built ListManager, and support links: Product Lyris ListManager is the premier email management application for business. You can use ListManager for opt-in marketing campaigns, email newsletters, and online discussion groups, among other projects. ListManager's key benefits include: A powerful interface for easy management of mailings and members A member-friendly experience to increase list size and effectiveness Failsafe subscription processes to reduce list administration workload Speed and scalability to ensure your mail is delivered reliably ListManager is used by thousands of businesses around the world, ranging from successful start-ups to Fortune 500 corporations. Our customer list includes many notable names, and our press releases discuss our customers' accomplishments. The Lyris web site includes more product information and product reviews, as well as many support resources for ListManager. If you have any questions about ListManager, please contact us. 362 Company Lyris Technologies develops software and services for email management, and specifically for email messaging and email filtering. We started operations in 1994, and are located in Berkeley, California. Our goal has always been to design applications that increase the value of email. We do this by: Enabling permission-based ("opt-in") contact Facilitating the integration of email with business Eliminating unwanted messages ("spam") Reducing the time required for email administration To learn more about Lyris, please take a look at our company news and product directory. You can also contact us directly anytime. People Lyris ListManager is the result of a dedicated team working together for many years, and we'd like to thank those who made a specific contribution to this version: Database, mail and back-end programming: Philip Thorne, John S. Jacob, Forest Wilkinson. GUI libraries and back-end programming: Dave Grossman, David Gravereaux. GUI programming: Mark Powell, Dave Grossman, Byron Whitlock. MSSQL, Oracle and PostgreSQL support: Philip Thorne, Forest Wilkinson. Product Design: John Buckman, Ryan Gilfillan, Daniel Silver. Technical Design: John Buckman. Documentation: Carolina Nascimento, Wendy Roth. Quality Assurance: Ryan Gilfillan, Bethany Garcia, Byron Whitlock, Jeffrey Rothman, Mindy Wallen, Carolina Nascimento. Installer/Build: Tyler Ross. Translations: Carolina Nascimento (Spanish), Leyla Fatourechi (French), Stefan Fuchs (Deutsch) Support and Documentation We offer support for ListManager online, by email, and by telephone: Search the FAQ and archives Submit an email support request Contact Lyris for direct help Our online self-help resources are available 24 hours a day, seven days a week. They include this User's Manual, Frequently Asked Questions (FAQ), and archives of publicly-available support questions. If you need help getting started or have "how to" questions, we recommend using these online resources first. Our optional, paid support resources allow you to submit new questions by email or telephone. You can learn more about support contracts on our web site, or by contacting us with specific questions. We also offer extensive documentation for programmers and server administrators: See the Programmer's Guide section of this manual or Tclhttpd Manual (.pdf) 363 364 The Discussion Forum Interface for Members The discussion forum interface allows those who are not ListManager administrators to interact with mailing lists, or forums, through the web interface instead of by email. By going to http://yourserver/read/, you may: -Learn about forums available on the server; -Log in, and view which forums you are subscribed to; -Subscribe and unsubscribe from forums; -Read archived messages; -Search the message archives; -Hold conferences (chat sessions) with other members; -Manage your membership settings; -Find out more about a forum. In addition, list administrators may: -Edit archived messages; -Delete archived messages. Accessing and Logging into the Discussion Forum Interface Accessing the Main Discussion Forum Interface You may access the discussion forum interface by going to the server's main discussion forum URL. For example: http://listmanager.example.com/read/ Please remember to include the final slash after read. This URL will take you to the All Forums tab for the server's first site. To see forums available in other sites, access a particular forum in that site and click on All Forums. Accessing the Discussion Forum Interface for a Particular Forum You may access a particular forum by specifying it at the end of the URL with ?forum=listname. For example: http://listmanager.example.com/read/?forum=listname Accessing the Discussion Forum Interface for a Different Site Depending on the server settings in Utilities: Administration: Server: Server Settings: Security: User Limits, the main discussion forum interface URL either brings you to the first site alphabetically on the server, or to all lists available on the server. If the server is configured to bring you to the first site instead of showing all lists the list you log into determines the site. If you do not specify a list, the site that comes first alphabetically will be displayed. For example, if you have two sites on a server, cars and boats, the main discussion forum URL may bring you to the lists on the boats site, as it comes first alphabetically. The All Forums tab will only show those lists belonging to those sites. To access all lists for a different forum, use the URL for a list in that site. 365 For example, if you wished to access all lists in the cars site, you would go directly to a discussion forum interface URL that belongs to the cars site, and then select All Forums. Logging Into the Discussion Forum Interface Many forums will require that you log in in order to view messages. Others will require that you log in in order to post a message to the forum. If this is the case, you will be prompted to provide your email address and password. Note that if you are a member of several forums on the server with different email addresses or passwords, the lists you have access to will depend on the email address/password combination you provide. If you do not have a password for some lists, but you have one for others, you will need to provide your password to access any of your lists, even those for which you do not have a password. If you try to log into a forum that you are not a member of, you will not be able to get in, and you'll be asked to log in again.. Server and site administrators must be members of a list in order to log in. If you forget your password, and enter an incorrect password, you will be warned that an incorrect password has been entered for that email address. You can then click "email password" and you will immediately be sent an email informing you of which lists you are subscribed to, and the password for each list. You can then log in with the correct password. Viewing Lists by Topic In pre-6.0 versions of ListManager, lists were organized by topics in the user interface. After the 7.0 discussion forum interface, lists are organized by site only, not by topics. Navigating the Discussion Forum Interface The Navigation Bar is at the top of every ListManager screen. It tells you whether or not you are logged in, and which forum you're logged into (if any). The tabs are available on every screen, and help you navigate the discussion forum interface. Current Forum The upper right hand corner of the screen shows you the forum you are logged into, if any. You Are The upper right hand corner of the screen shows you who you are logged in as, if at all. If you would like to log in, click on Not Logged In and provide your email address and password (if you have one). Or, click on My Account or My Forums. Help Clicking on the Help icon takes you to the ListManager Manual. Tabs You can navigate between the major areas of the ListManager discussion forum interface by clicking on one of the navigation bar tabs. Messages 366 Clicking on the Messages tab allows you to see an overview of the messages for the current forum. From there, you may read messages, reply to messages, or create a new message. Depending on a forum's settings, you may need to log in before you may view its messages. Search The Search tab allows you to search the message archives for the current forum. Whether or not a forum is searchable depends on the settings for that forum. My Account The My Account page allows you to change your members settings. On the Essentials tab, you may change your email address, name or type. On the Advanced tab, you may also change your password, specify whether or not you want to receive copies of your own postings, and whether or not the changes you make should take affect for all lists on the server. If you are not logged in, clicking on My Account will prompt you to do so. My Forums The My Forums page shows you which forums you have subscribed to. You may unsubscribe from lists on this page. If you have not logged in, clicking on My Forums will prompt you to do so. All Forums The All Forums page shows you all forums on the server. If there are multiple sites on a server, All Forums will only show you the lists for the sites in which you are a member. If you are not logged in, it will show you all the forums for the site you logged into, or for the default site if you did not specify a particular forum when you accessed the discussion forum interface. Viewing and Subscribing to Forums Viewing Forums To view all available forums for a site, click on All Forums. You will see a list of all the public forums available on the site you logged into. (For more information about logging into a site, see Accessing and Logging into the Discussion Forum Interface). Ten forums are displayed at one time. To view more than ten forums at a time, click on Show More. Repeatedly clicking on Show More will show greater numbers of forums at a time. Click on Next to see the next ten mailings, Previous to see the last ten. You may change the sorting order of the forums by clicking the up or down triangles next to Name, Description, and Members Only?. By clicking the top triangle, the sort order will be ascending (a-z); clicking the bottom arrow makes the sort order descending (z-a). Click on next to see the next ten members, previous to see the last ten, or show more to see up to a hundred forums. Name The name of the forum. Click on the forum name to read the messages for a forum. If you are already logged in, or if the list allows non-members to view 367 messages, you will be taken to the Messages page where you can read the forum's messages. If you are not logged in, and the list allows only members to read its messages, you will be asked to log in. If you are not a member of such a list, you will need to subscribe to the forum before you will be able to access it. Description A description of the forum. Members Only? Whether or not reading the forum's messages is restricted to members, or if anyone may read them. Subscribing to a Forum To subscribe to a forum, click on Subscribe next to the forum name. If you are logged in, you will be subscribed with your current settings. Depending on the forum's settings, you may be prompted for the following: New Subscriber Password The password required to join this forum. Some forums require that you specify a password in order to join. If this forum is password-protected, you must specify it here. Your Email Address The email address which should receive email from this forum. Your Name The name you'd like to be associated with your membership to this forum. This setting may be optional or required, depending on the forum. If you are already logged in, this field will be populated with the full name for the list you are currently logged into, or the name that is used most frequently for your email address on the server. Set a Password The password you'd like to use in order to access this forum. This setting may be optional or required, depending on the forum. If you are already logged in, this field will be populated with your password for the list you are currently logged into. Be aware that you may not be added immediately. You may need to reply to a confirmation message in order to activate your membership. Or, your membership may be pending the approval of an administrator. Check your email for the status of your subscription. Unsubscribing to a Forum To unsubscribe to a forum, click on the Unsubscribe link next to the forum name. ListManager will ask if you are sure that you would like to unsubscribe yourself (or that particular email address) from the forum. To unsubscribe from all forums, click the Unsubscribe all button. Note that if you are the list administrator for a particular list, you cannot unsubscribe from that particular list. Reading Messages Entering a Forum 368 If you have already selected a forum, you may click on the Messages tab to read the messages for that forum. There are several ways to select a forum: 1. Go to the forum directly in the URL. For example, if your server's name is www.example.com, and the forum you'd like to enter is jazztalk, the URL would be: http://www.example.com/read/?forum=jazztalk 2. Click on the All Forums tab, and select the forum. You will be taken to the Messages tab. 3. Click on the My Forums tab, and select the forum. You will be taken to the Messages tab. Depending on the list settings, you may need to log in before you are allowed to read the list's messages. The Messages Page Ten message threads (groups of messages and their replies) are displayed at one time. To view more than ten threads at a time, click on Show More. Repeatedly clicking on Show More will show greater numbers of threads at a time. Click on Next to see the next ten mailings, previous to see the last ten. You may change the sorting order of the threads by clicking the up or down triangles next to Date, Subject, Replies and Author. By clicking the top triangle, the sort order will be ascending (a-z); clicking the bottom arrow makes the sort order descending (za). Date The date this thread started. The date displayed is from the first message sent to the thread. Subject The thread's subject. Clicking on the subject will display all the messages for a message thread. Replies The number of replies to a message. If 0, there were no replies to the message. Clicking on this number will show an overview of the messages sent to this thread. You may then click on the subject of any particular message to read it. Author The initial message's author. Click on the author's name to find out more information about the person who started this thread. You will be taken to the About this Author Page, which displays the author's name (if available), the first part of their email address (the domain is not displayed for privacy's sake), the messages posted by this member, and the date the author became a member. From this page, you may view the messages that author has posted. That page will give you the option to view messages from all authors. Administrator Functions 369 Administrators have additional functions when reading messages: Edit Administrators may edit a message subject, header or body. Delete Administrators can delete a message altogether. If an administrator deletes the first message in a thread, the entire thread will be deleted. Sending Messages Creating a New Message A new message will be a new message thread in the discussion forum interface. All replies to your message will be grouped under your initial message as a message thread. 1. Select a forum from My Forums or All forums. 2. Click on the Messages tab. Depending on the forum's settings, you may be prompted to log in. 3. Click on Create New Message. Depending on the forum's settings, you may be prompted to log in. 4. Enter your email address (if prompted), the Subject and Message Body of the message you'd like to be sent to the forum. 5. Click Attach File if you'd like to send an attachment with your message. Note that you can attach any type of file, i.e. text, csv, exe, pdf, scripts, etc., but ListManager will warn you if the file is over 1 MB because many email programs do not allow attachments larger than this. Although you will be warned, the message will still be sent even if it exceeds 1 MB. 6. Click OK to send the message, or Cancel to abort it. Depending on the forum's settings, your message may be sent immediately or may need to be approved. Approved messages will appear on the forum's Messages tab. Replying to a Message A reply to a message will be threaded beneath the message replied to. 1. Select a message from Messages. 2. Click on Reply beneath the message you would like to reply to. Depending on the forum's settings, you may be prompted to log in. 3. Enter your email address (if prompted), the Subject and Message Body of the message you'd like to be sent to the forum. 4. Click Attach File if you'd like to send an attachment with your message. Note that you can attach any type of file, i.e. text, csv, exe, pdf, scripts, etc., but ListManager will warn you if the file is over 1 MB because many email programs do not allow attachments larger than this. Although you will be warned, the message will still be sent even if it exceeds 1 MB. 5. Click OK to send the message, or Cancel to abort it. Depending on the forum's settings, your message may be sent immediately or may need to be approved. Approved messages will appear on the forum's Messages tab. 370 Searching for Messages Some forums may allow you to search their message archives. The basic search allows you to look for particular words used in a message. The advanced search allows you to specify the location of the words (in the message header, subject or body) or to exclude words. Basic Search 1. Select a forum, either in My Forums or All Forums. 2. Select the Search tab. 3. If the forum allows searching of its archives, you will be taken to the Search page. 4. Enter the word(s) you'd like to search for. You may separate words with a space or comma. 5. Select Search. If your search is successful, the next page will show you the results. Advanced Search 1. Select a forum, either in My Forums or All Forums. 2. Select the Search tab. 3. If the forum allows searching of its archives, you will be taken to the Search page. 4. Select Advanced Search. 5. Enter the word(s) you'd like to search for. You may separate words with a space or comma. 6. Enter the location of the words you're searching for: Entire Message: anywhere in the message. Body: In the message body (below the subject line). Header: In the message header (includes information about the sender, the subject, etc.). 7. Select whether you want messages with any or all of the words you've selected. 8. (Optional) Enter the word(s) you'd like to exclude. Messages that contain these words will not be included in your search results. 9. Enter the location of these words to be excluded: Entire Message: anywhere in the message. Body: In the message body (below the subject line). Header: In the message header (includes information about the sender, the subject, etc.). 10. Select Search. If your search is successful, the next page will show you the results. Advanced Search Example Let's say you'd like to search for all messages about trains and trucks, but you'd like to exclude your own postings. 1. Select a forum, either in My Forums or All Forums. 2. Select the Search tab. 3. Select Advanced Search. 371 4. Enter the words you'd like to search for: trains trucks 5. Enter Entire Message for the location of the words you're searching for: 6. Select All to search for messages with both words (trains and trucks) in them. 7. Enter your email address as a word you'd like to exclude. 8. Select Header as the location for the word to exclude. Since your email address would appear in the header, Your search will then exclude any messages sent by you, 9. Select Search. If your search is successful, the next page will show you the results. Editing Your Settings If you are a member of a forum, you may edit your settings via email commands, or through the discussion forum interface. 1. Click on the My Account Tab. ListManager will prompt you to log in if you haven't already. 2. The My Account page shows your settings on two separate tabs: Essentials, and Advanced. You may edit your settings here. 3. Click on Save Changes to save the changes made to your account. Click on Cancel to abort any changes you've made. Click on Log Out to log out of the discussion forum interface. You will be prompted to log in again as a different user. Essentials Your Email Address The email address you've logged in with. To change it, edit it here and click on Save Changes. Your Name The name (if any) associated with your membership record. To change it, edit it here and click on Save Changes. Membership Type How you receive messages from the mailing list. The choices are: Mail You receive copies of messages posted to the forum immediately. Digest Each night, around 12:00 am, you will receive a single email message containing all the messages contributed to the forum that day. At the top of the message will be a numbered list of the subjects in that digest, followed by the complete messages themselves. Note that the 12:00 a.m. mailing time is not configurable. MIME Digest The same as a digest, but in MIME format so that the individual messages' formatting is preserved. Some email clients such as Outlook will show the digest as a series of attachments. Index 372 Each night, around 1 in the morning, you will receive a single email message containing all the subject lines of all the messages contributed to the forum that day. If any of the messages interest you, the bottom of the index gives the email command that will retrieve the bodies of the messages. Or, you can access the discussion forum interface directly. Nomail No email is sent to you. You are free to go the web interface whenever you want, and read the full text of the messages there. This setting is also useful for people who want the ability to contribute to a mailing list, but do not care to see the contributions to the forum. Advanced Password Your password. If specified, you must use this password to log into the discussion forum interface. For your security, your password is shown as asterisks here. Depending on your settings, having a password may or may not be optional. Note that if you change your password, you will need to log into the discussion forum interface again with your new password. See Your Postings This setting determines whether you will get a copy of your own postings to the forum. If set to "Yes" (the default), you will receive a copy of messages you contribute to a forum when the messages are distributed to forum. If "No," you will not receive copies of your own postings. Apply Changes By default, changes you make to your account apply to all of your subscriptions on the server. If you change your email address, for example, it will be changed for all forums. By selecting "No", the changes you are making will apply only to the list you are currently logged into (shown in the upper right corner of the screen). Learning More About a Forum To learn more about a list, click on the About tab. You may need to be logged in as a member to view this information. The information available here depends on what the administrator has chosen to make available. Forum Logo The forum's logo. Name The forum's name. Description The forum's description. Home Page The URL to the forum's home page. Forum Admins The names and first part of the email addresses of this forum's administrators. Only 373 part of the email address is displayed for privacy's sake. Clicking on the email address displays more information about the admin. Total Members The total number of normal members of this forum. Total Messages The total number of messages sent through this forum. Messages Today The total number of messages sent today through this forum. Messages in 7 Days The total number of messages sent through this forum in the past 7 days. Messages in 30 Days The total number of messages sent through this forum in the past 30 days. Sponsoring Organization Information about the organization sponsoring this forum. Long Description A longer description of this forum. Comment Additional comments or information about this forum. Date Created The date this forum was created. Allows Visitors Whether or not only members can view information about this list and read messages, or only members can. Conferencing with Other Members The Conference tab allows you to chat with others if conferencing is enabled by the list administrator. Depending on the list settings, you may need to be a member before being able to conference with others. If the list does not require you to be a member, you may join the conference as a temporary guest user by entering a name and password. By default, your screen will refresh to show the latest contributions to the conference every twenty seconds. To refresh your screen immediately, click on Refresh. Or, to have your screen refresh more or less frequently, change Refresh Rate in your options. Send a Message to the Conference 1. Log in, if required. 2. Click on the Conference tab. The current users will be listed at the right. 3. Enter the message you would like to add to the discussion. 4. Select whether you'd like to send the message to the entire group, or privately to 374 an individual. 5. Click Send. Changing Your Options To change your options for the conference, click on the Options button. You may modify the following options: Text Color Specify what color your messages should be in. By default, your messages will be navy. There are 10 color choices available. Refresh Rate Specify how frequently (in seconds) your screen should refresh to show new messages by other participants. The default is 20 seconds. The screen will refresh immediately after you contribute a message. Messages to Display Specify how many messages should be displayed at a time on the main screen. The default is ten. To view more messages, click History on the main Conference page. Allow Multi-line Specify whether you would like to be able to type in several lines of text at a time before sending to the conference, or whether to send just one line. The default is No, meaning you may only send one line of text at a time. If you enable multi-line, you must use the Send button to submit your comments to the conference. Otherwise, you may hit Return on your keyboard to submit your comments. Viewing the Conference's History By default, ten messages from the conference are displayed at a time. To have more shown, select Options, and modify the number of Messages to Display. To view the history of a conference, click on the History button on the main Conference page. You will be taken to a page that displays the history of the conference. To set up the length of time the conference history is saved, and accessibility and posting rights for conferences, see Utilities: List Settings: Users' Web Interface: Conference. Clicking OK will take you back to the main Conference page. Clicking Save will save the current conference to an email message that may then be sent to the list. Administrator Discussion Forum Functions Administrators may use the discussion forum interface as members do, but they have additional capabilities when reading messages. Edit Administrators may edit a message subject, header or body. Delete Administrators can delete a message altogether. If an administrator deletes the first message in a thread, the entire thread will be deleted. 375 Note that you must be logged in as an administrator to be able to edit or delete messages. To administer the list or to approve messages, you must log into the administrator's web interface. Discussion Forum Interface FAQ Why can't I enter a forum? Some forums allow members only to read archived messages. You will need to subscribe or log in before you can access these forums. Why can't I join a forum? You may need to confirm your membership before you can join it. Check your email to see the status of your membership. Depending on its settings, a forum may be closed, or require the administrator's permission before you may join. You may go to the About tab and click on the administrator's email address if you have any questions about the forum. Why can't I send a message? Most forums require that you be a member before you may post a message. Be sure that you are a member, and that you have logged in. The forum may also require that an administrator approve your message before it is sent to the list. In these cases, it may take some time before the administrator reads and approves your message. Why can't I read or search for messages in a forum? Some forums only allow members to read messages. If you aren't a member, subscribe to the forum to read messages. If you are already a member, you may need to log in to read messages. Not all forums keep message archives, or keep archives for a limited period of time. Other forums may keep archives, but may not make them searchable. You may go to the About tab and click on the administrator's email address if you have any questions about the forum. Why don't I see all forums on the server? I know there are others! Some administrators may choose to hide their forums, so they are not visible when you click All Forums. You may still go to these forums directly, but you cannot browse for them. Forums are also grouped into different sites. If you are logged into one site, you may not see forums for another site. You need to log into a forum for that site to see that group of forums. Why can't I log in? 376 Make sure that you are adding the final slash to the URL if you are getting an authentication window. If you are a member of several forums on the server with different email addresses or passwords, the lists you have access to will depend on the email address/password combination you provide when you try to log in. If you do not have a password for some lists, but you have one for others, you will need to provide your password to access any of your lists, even those for which you do not have a password. If you are not a member of any list, you should click on All Forums in order to subscribe. Server and site administrators must be members of a list in order to log in. Why do I keep getting asked to log in? If you do not log in successfully, the interface assumes that you made a mistake when trying to log in and asks you to log in again. Click on the Messages or All Forums tabs if you'd like to stop trying to log in. What do I do if I forget my password? If you forget your password, and enter an incorrect password, you will be warned that an incorrect password has been entered for that email address. You can then click "email password" and you will immediately be sent an email informing you of which lists you are subscribed to, and the password for each list. You can then log in with the correct password. Why am I asked if I want to accept a cookie? Cookies allow ListManager to keep track of your log in information as you move through your forums. They also allow you to share URLs with others so they can go directly to a posting, for example. Your browser must accept cookies in order to log in and use the discussion forum interface. Either manually accept the cookies ListManager is giving to you, or change your web browser's settings to allow cookies. 377 Email Commands Email commands for members Commands for discussion list members Commands for announcement list members Sending mail to ListManager General information The different addresses ListManager accepts commands from Multiple commands in a message How invalid commands are handled How ListManager sends mail back to you The line continuation character Specific commands Subscribing Unsubscribing Changing membership settings Determining membership settings Retrieving mailing list information Searching Retrieving the Help document Retrieving other documents using GET The End Command Administrator commands Index of Administrator commands 378 Email Commands For Discussion List Members Important: If you are using a mail client, you should send email commands to ListManager in plain text. The default is Rich Text or HTML text for mail clients like Microsoft Outlook and Netscape Navigator. If you do not send email commands in plain text you may get error messages, and your commands may not be effective. Subscribing to a Discussion List To subscribe to a list, send an email with no message to join-listname@yourserver For example: [email protected] Unsubscribing from a Discussion List The best way to unsubscribe from a list is to send a blank email to the unsubscribe address specified at the bottom of each email you receive. This address is in the form of leave-listname-yourspecialnumber@yourserver The "special number" is a unique identification number that ensures you will be unsubscribed. Alternatively, you can leave out this unique ID number and send a blank email to leave-listname@yourserver For example: [email protected] Contributing Messages Members can post to the list by sending their message to: listname@yourserver For example: [email protected] Discussion List Subscriber Types This determines how you will interact with the list. The subscriber types are defined as 379 follows: Mail: Receive messages to your email address as they are contributed to the list. This is the default setting, and the typically the preferred subscriber type. Alternatively, you may wish to be of subscriber type: Digest: Receive all of the daily messages in one email. MIME Digest: Receive all of the daily messages in one email in MIME format. With MIME, each message is received as an attachment to the email. Index: Receive a daily index of the subject lines of the messages of the day. You can then request specific messages or view them with the web interface. Nomail: Don’t receive list contributions to your email address. You can view messages with the web interface. Changing your subscriber type To change your subscriber type, send an email to lyris@yourserver With the message set listname option For example: [email protected] With the message set jazztalk digest Retrieving your subscriber type If you don’t know what your subscriber type is, you can find out by sending an email to lyris@yourserver With the message query listname For example: [email protected] With the message query jazztalk 380 If you send this query message, you will be sent back an email with all of your subscriber settings, including subscriber type. Email Commands For Announcement List Members Important: If you are using a mail client, you should send email commands to ListManager in plain text. The default is Rich Text or HTML text for mail clients like Microsoft Outlook and Netscape Navigator. If you do not send email commands in plain text you may get error messages, and your commands may not be effective. Subscribing to an Announcement List To subscribe to a list, send an email with no message to join-listname@yourserver For example: [email protected] Unsubscribing from an Announcement List The best way to unsubscribe from a list is to send a blank email to the unsubscribe address specified at the bottom of each email you receive. This address is in the form of leave-listname-yourspecialnumber@yourserver The "special number" is a unique identification number that ensures you will be unsubscribed. Alternatively, you can leave out this unique ID number and send a blank email to leave-listname@yourserver For example: [email protected] Announcement List Member Types This determines how you will interact with the list. The member types are defined as follows: Mail: Receive messages to your email address as they are contributed to the list. This is the default setting and typically the preferred member type. Alternatively, you may wish to be of member type: Digest: Receive all of the daily messages in one email. 381 MIME Digest: Receive all of the daily messages in one email in MIME format. With MIME, each message is received as an attachment to the email. The last two options are usually less desirable for members of announcement lists, since you don’t actually receive the messages; instead, you need to retrieve them yourself. Index: Receive a daily index of the subject lines of the messages of the day. You can then request specific contributions or view them with the web interface. Nomail: Don’t receive list contributions to your email address. You can view messages with the web interface. Changing your member type To change your member type, send an email to lyris@yourserver With the message body set listname option For example: [email protected] With the message set soccer digest Retrieving your member type If you don’t know what your member type is, you can find out by sending an email to lyris@yourserver With the message body query listname For example: [email protected] With the message query soccer If you send this query message, you will be sent back an email with all of your member settings, including member type. Where To Send ListManager Commands ListManager will respond to a number of different email addresses on your machine. 382 The different email addresses serve different functions. These different email addresses are: The List Posting Address The Command-Listname Address The Command Address The ListManager Address The Listname-Request Address The List Owner Address The List Posting Address Email Address: Listname@ Purpose: The address for sending mail to all the members of a mailing list. For example, if your list is called "jazztalk" and your server is named "clio.lyris.net", then you can submit postings to your list by sending email to [email protected]. If you'd like to send to a subset, the address is the listname, followed by a period, the subset name, and the name of the server. For example, if your list is called "jazztalk", your subset name is "clubs", and your server is named "clio.lyris.net", you can submit postings to your list by sending email to [email protected]. The Command-Listname Address Email Address: Command-Listname@ and Listname-Command@ Purpose: This is an alternate address for sending ListManager commands, and for most commands, is the simplest way to execute them. For commands that relate to a mailing list, sending any mail to the Command-Listname@ address executes that command. The text of the message sent is not relevant in the command. For example, to subscribe to a mailing list called "jazztalk", people can send mail to "jazztalk-subscribe" ("subscribe-jazztalk" also works) Listname-Command@… and Command-Listname@ are equivalent. Both will work, and both mean the same thing. The commands subscribe (and aliases), unsubscribe (and aliases), purge, mail, digest, mimedigest, index, nomail, ack, noack, unhold, query, confirm, review, stats, hello, goodbye are available in this way. See the unsubscribe and purge section for special information about those commands. For more information, see Unsubscribe 383 The Command Address: Command@ Email Address: command@ Examples: purge@, unhold@, help@, info@ Purpose: An alternate address for sending ListManager commands that do not apply to a particular list. The commands purge, unhold, help, info, which are available in this way. For example, sending mail to [email protected] will unsubscribe you from any mailing lists you are on at the ListManager server running at clio.lyris.net. Unsubscribe and Purge The unsubscribe and purge command addresses are slightly more sophisticated than the other commands. The unsubscribe and purge addresses are customized for every recipient. By default, ListManager uses the mail merge tag %%email.unsub%% in the default footer defined for a new mailing list. This mail merge tag gets rewritten for each recipient, so that they see an unsubscribe address customized for them. For example, if a member belongs to a list called "jazztalk" and happens to be member #1234, their unsubscribe address might look like this: [email protected] The -1234Y portion of the unsubscribe address uniquely identifies the recipient, so that when they send email to it, ListManager will know exactly who is unsubscribing, no matter what email address they sent the unsubscribe request from. This feature is known as "failsafe unsubscribing" because it always works no matter what email address the original message was sent from. This is a great advantage that ListManager has over other list managers, as most list managers have great problems unsubscribing people when they have changed their email address or a message is forwarded to a new email address: they cannot determine what their original subscriber address was. The "Y" at the end of "1234" is a "check character" that ListManager inserts, to ensure that the "1234" number was typed correctly. This prevents people from accidentally mistyping their unsubscribe address, and thus unsubscribing the wrong person. For example, if someone mistyped their address as "[email protected]" (by adding an extra 4), ListManager will detect that the number is not typed correctly, and ignore the "12344" number, instead unsubscribing the person who wrote the message, as determined by the From: line. The ListManager Address Email Address: Lyris@ Purpose: To send a command, such as subscribe or unsubscribe to ListManager, you can issue the commands in an email message to the lyris@ address on your server. ListManager will understand commands entered on the subject line and in the body of 384 the message. Multiple commands can be issued each on a separate line. ListManager will also accept mail for most of the common list manager addresses. Example address: [email protected] Example command "subscribe jazz-discussion" To determine the ListManager address for your Site, take the host name you created for that Site, and prepend "lyris@" to it. For example, if your Site's host name is minerva.acme.com, your Server address is [email protected]. With ListManager, you have the option of several different kinds of command syntaxes. Wherever possible, it was made to be compatible with the command syntaxes of other list processor programs, so that users can use the command they are familiar with, and are not required to learn something new. ListManager will accept mail at the following addresses and understand the mail as list manager commands: lyris@hostname list@hostname lists@hostname listserver@hostname listname-request@hostname The last format, listname-request@hostname deserves special attention. In addition, you can define additional lyris@ addresses to rewrite an address to be lyris@. For instance, you can specify that "mailing-lists@" be rewritten as "lyris@", and this would allow people to send ListManager commands to "[email protected]". Prioritizing Your Message You can optionally specify a priority for your Lyris@ mail by using the Lyris-#@ address, where # is a digit from 1 to 9. The lower the number you use, the higher the priority assigned to the message. For example, if you wanted to send a message with moderately high priority, you would send it to: lyris-2@hostname This is useful when you know the email you are sending either needs to be handled immediately (higher priority), or it can run in the background (lower priority). The Listname-Request Address Email Address: Listname-request@ Purpose: An alternative to lyris@, this email address will accept all ListManager commands. By adding the listname in the address, it does not need to be specified in the command (but it will work fine if it is). Example address: [email protected]. 385 Example command: "subscribe" When commands are sent to this address, all the same commands work, but the listname is no longer needed in the command. For instance, one command to subscribe to a mailing list is: subscribe listname That command syntax will work for any of the ListManager addresses. However, if the command is sent to listname-request, such as [email protected], this command is enough, since the list name is clear from the mailing address: subscribe Note: All ListManager address syntaxes work fine when sent to the listname-request address. The List Owner Address Email Address: Owner-Listname@ and Listname-Owner@ Mail sent to this address will be distributed to the owners of a mailing list who have specified that they want to receive owner mail. Multiple Commands In A Message You can place as many commands in an email message as you like. Each full command should be placed on a separate line. For example, to subscribe to two mailing lists and leave another in one email message: subscribe jazz-discuss subscribe rock-discuss unsubscribe opera-discuss How Invalid Commands Are Handled When ListManager sees an invalid command, it takes note, and moves to the next line. If more than ten lines in an email message are invalid, the message processing stops. For example, consider an administrator who sends a series of commands to ListManager, but the administrator misspells one of the commands. In such a case, the correctly spelled commands will be executed, and an email message will be sent to the person indicating which commands were successfully processed and which lines in the email message did not appear to be ListManager commands. Signature Detection Since so many people on the Internet use signatures, ListManager has a built-in 386 signature detection mechanism. The purpose of this mechanism is to stop processing the message, which prevents signature lines from generating errors in the response email ListManager sends out. Detecting a signature is analogous to issuing the "end" command. This mechanism looks for either of these character strings: "--", "**", or "==". Once one of these strings is encountered, ListManager stops processing the message immediately. Please note that this mechanism is not fully activated in a MIME-encoded message, because in that case the "--" may be a content type separator, and in that case the message still needs to be processed. The exception is if the MIME type is "text/plain", in which case the parser still check for "---", since it isn't oddly encoded. How ListManager Sends Mail Back To You When you create a site (in the Server Admin Menu), you define the host name that site should identify itself as. Then, when it receives mail for that site, it will use that name as the From: and Reply-To: names in the responding email. ListManager supports multiple sites, which allows it to appear to the user as if several machines are each running it, and that each site (for instance, different companies) have their own ListManager. For this reason, when mail comes in to ListManager, it needs to decide on behalf of what site the mail is for, and use the appropriate Reply-To: and From: address for that site. So, it is very important that you fill in the correct machine name for each site, so that ListManager identifies itself correctly. It is also in this way that you could have several virtual domains, each defined in their own ListManager Site, i.e., news.mycompany.com and lists.othercompany.com, etc. The Line Continuation Character If your ListManager command will not fit on one line, you can use the line continuation character to tell it that the next line in your message should be treated as part of this line. The line continuation character is the ampersand character. For example, a simple subscribe request, such as: subscribe jazztalk Robert Smith can be written with the line continuation character as: subscribe jazztalk & Robert Smith or even as: subscribe & jazztalk & Robert & Smith Note: The slash character ("\") can be used as a line continuation character, instead of 387 using the ampersand. For example: subscribe \ jazztalk \ Robert \ Smith Another example of a good use of the line continuation character is multiple commands to the lyris@ address, i.e., to delete multiple members: login xxxxxx delete listname quiet & Member1 & Member2 & Member3 & end If adding '&' to the end of each line doesn't suit you, you can use "<<" and ">>" to delimit a list of items that should be considered as a single line. In other words, if you wanted to paste a list of email addresses, one address per line, into your command message, you can accomplish this easily using "<<" and ">>". For example: login xxxxxx add jazztalk << Member1 Member2 Member3 ... MemberX >> By using the "<<" and ">>" delimiters, you don't have to place a "&" or "\" at the end of each line. Specific Commands Index This section describes and explains the email commands you can send to the ListManager server. Subscribing ListManager supports several different ways of subscribing to a mailing list: 1) You can join a mailing list by sending email to [email protected]. 2) You can send a message to the [email protected] address with the subscribe listname command in the message. 3) You can send a message to the [email protected] address with the subscribe command in the message. ListManager is very forgiving with respect to the format of the email address of the subscriber. If there is a "Default Domain" for the server, any subscribe request, which includes only a handle (i.e., account name without a domain) will have the default domain appended to it. In addition, email addresses with an IP address as the domain 388 are also acceptable. Thus, a subscribe request from "[email protected]" or "bob@[10.0.0.8]" is an acceptable subscriber email address. The Simplest Method for Subscribing It is often simplest to tell your users to use the Command-Listname address to join a mailing list. For instance, people can join a mailing list called "jazztalk" by sending email to [email protected] All the different aliases (sub, suscribe, subscribe, on, signon) can be used, and the Listname-Command@ order can be reversed. For instance, all of the following are equivalent: [email protected] [email protected] [email protected] [email protected] ListManager will automatically determine, by receiving the email, that the person wants to subscribe to a list called "jazztalk", and it will automatically determine their email address and name. Note: If your list is password protected, then users cannot use this form of subscribing, and must instead send mail to [email protected] or send mail to [email protected] Alternatives for the Word Subscribe To subscribe (join) a mailing list, any of the following commands will work: sub join on signon subscribe subscibe (a common misspelling) suscribe (a common misspelling) All these words are alternatives to the word "subscribe" and can be used interchangeably. Subscribing with the Lyris@ Command You can subscribe to a mailing list by sending a subscribe command to the [email protected] address. The lyris@ address is referred to as the "ListManager" address in this documentation. When sent to the ListManager address, any of the following subscribe syntaxes are acceptable: subscribe listname 389 subscribe subscribe subscribe subscribe listname listname listname listname password "your name" "your name" password password "your name" The password syntaxes are only applicable if the mailing list is password protected, and in such a case the password must be specified at subscription time in order to be accepted. In the cases where the person's name is specified next to the Password, ListManager is able to extract the password from the text, and correctly understands that what remains is the person's name. In the above prototypes, the your name labels are place holders where the person subscribing can insert their name. The person's name does not need to be two words—all the words in double quotes will be understood as the person's name. For instance, the following subscribe command is valid: subscribe jazz-discuss "Mr. James Barton Smith" If the subscriber does not specify their name on the subscribe command line, ListManager will attempt to determine the person's name from their email address. For example, if their email message says: From: James Smith <[email protected]> ListManager will extract the name James Smith and apply it as part of this member's subscription settings. The quiet modifier If you add the word "quiet" to the subscribe command, ListManager will not send a confirming message back, unless the subscription fails for some reason. For instance, for a list called "jazztalk", you could join it with this command: subscribe jazztalk quiet Setting Your Password You can set your personal password when subscribing by writing to the lyris@ address and adding the "pw=yourpass" command to your subscribe request. For example, to subscribe to a mailing list called "jazztalk" with a password of "blue", you would send the following command: subscribe jazztalk pw=blue Note: You can always specify your password at a later date with the "set" command or by using the web interface. This syntax is useful because you can set the password in the same command as the subscribing. Backwards Compatibility of Subscribing Methods Several public domain list server software programs use this format of subscribing, and ListManager supports this convention for backward compatibility. It will also accept email at all the common alternate list server addresses (such as 390 [email protected]) and act correctly on this email, as if it were sent to the [email protected] address. Lyris List Manger also supports the majordomostandard [email protected] address. Setting Other Membership Options You can personalize your profile and subscribe all in one command when writing to the ListManager lyris@ address. You can use any set option after your subscribe request and that option will be set for you. For example: subscribe jazztalk pw=blue mimedigest norepro The above subscribe request first subscribes you to the "jazztalk" list, sets your password to "blue", sets your member type to "mimedigest", and sets you to not receive copies of your own posts ("norepro"). For additional set options, see Change Membership Settings. Subscribing with the Listname-Request Address The public domain list server "majordomo" uses a "[email protected]" address, and ListManager supports this convention for compatibility. When sent to the listname-request address, any of the following subscribe syntaxes are acceptable: subscribe subscribe password subscribe "your name" subscribe "your name" password subscribe password "your name" All these ways of joining a mailing list is equivalent. It is up to you which method you decide to tell your users to use. There is no “Best Way”, just a way that you are most comfortable with. Unsubscribing To unsubscribe (leave) a mailing list, the following commands are equivalent: unsub uns unsubscribe unsuscribe (a common misspelling) signoff leave remove off ListManager will look at your email address, determine if your are a member of the mailing list, and remove you from the mailing list. If you are using the mail merge tag %%email.unsub%%, a unique unsubscribe email address will be generated for each recipient. See Mail Merge Short Tags for more 391 information. If you are subscribed to a mailing list with a different email address than the one you are currently mailing from, you can specify the email address to unsubscribe on the unsubscribe command line. Whenever this method is used, ListManager will send you a notification with your original request attached. This is done for security purposes, so that you are notified whenever someone who does not appear to be you attempts to unsubscribe you. When sent to the ListManager address, the command syntax is: unsubscribe listname [optional: email address OR member id] When sent to the listname-request address, the command syntax is: unsubscribe [optional: email address OR member id] For example, if you are subscribe to a mailing list called "jazztalk" at "lyris.net", you could send the following command to [email protected]: unsubscribe jazztalk If you were subscribed to "jazztalk" with a different email address than where you are currently mailing from, you could specify that email address in the unsubscribe command to [email protected]: unsubscribe jazztalk [email protected] Alternatively, you could have sent the message to [email protected], and thus omitted the list name: unsubscribe [email protected] ListManager has the ability to confirm suspicious unsubscribes. If you specify an email address to unsubscribe, and that address is not yours, ListManager will generate an unsubscribe confirmation message, and send it to the address that is being unsubscribed. You will then need to reply to that confirmation message (from any email address) in order to be unsubscribed. This is a security precaution, to ensure that people do not maliciously unsubscribe other people. Mailing lists may be set up to confirm all unsubscribes; however, it is recommended that unsubscribe confirmation be used only for contentious discussion lists. Note that you can use the quiet modifier with the unsubscribe command. This allows a member to unsubscribe and then not receive a goodbye document following the cancellation of the subscription. The Listname-Unsubscribe Command Address It is often simpler to tell your users to use the Command-Listname address to leave a mailing list. For instance, people can leave a mailing list called "jazztalk" by sending email to [email protected] All the different aliases (uns, unsubscribe, unsub, unsubscribe, signoff, leave, remove, off) can be used, and the Listname-Command@ order can be reversed, as in: [email protected] 392 All these ways of leaving a mailing list is equivalent. It is up to you which method you decide to tell your users to use. There is no “Best Way”, just a way that you are most comfortable with. Purge To unsubscribe from all the ListManager mailing lists on a server, send the purge command to lyris@: purge The purge command is also available as a Command address, by sending mail to purge@hostname… Changing Membership Settings To change your membership settings on a mailing list, you use the set command in a message sent to the lyris@ address. The command syntax when sending to lyris@ is: set listname [option] [option] … When sent to the listname-request address, the command syntax is: set [option] [option] … You can place as many options on the set line as you wish. You may set any field in the members table. Email Address To change your email address, use the email= option. The syntax for this command is: set listname email=[new-email-address] For example, if you are currently subscribed to jazztalk with the address [email protected] and want to be subscribed as [email protected] you would send the command: set jazztalk [email protected] Note: The text after the email= cannot have any spaces in it. Subscriber Type To change the type of messages you receive, use the set command with one of these keywords: Mail - Receive mail as it is contributed. 393 Digest - Receive daily digest with all the messages of the day. MIMEDigest – Receive daily digest with all the messages of the day in MIME format. Index - Receive daily index of the subject lines of the messages of the day. Nomail - Receive no mail. Example: set jazztalk digest Acknowledgement To set whether or not you receive a message confirming the message was sent, use set with one of these keywords: ack - When contributing to the mailing list, receive a confirmation message each message was distributed. noack - When contributing to the mailing list, do not receive a confirmation message that the message was distributed. Example: set jazztalk ack Receive Copies of Your Own Postings To determine whether or not you receive a copy of your own postings, use the set command with one of these keywords: repro - Receive a copy of messages you contribute to a mailing list when the messages are distributed to list (this is the default) norepro - Do not receive copies of your own postings. Example: set jazztalk norepro Password You can set your password with the "pw=password" command. For instance, to set your password on "jazztalk" to be "hamburger" if you do not currently have a password, you would write: set jazztalk pw=hamburger If you already have a password, you need to first specify the current password with the oldpw= keyword. If you do not specify your current password, ListManager will not let you change it. For example, if your current password on "jazztalk" is "flower" and you want to change it to "hamburger", you would write: 394 set jazztalk oldpw=flower pw=hamburger Comment Setting You can change your "comment" to be anything you like. The "comment" information is not used by ListManager for any purposes: it is merely a placeholder for any information you care to place in there. For example, you might use it to store the city you live in. To set the comment, use the comment= keyword, as in: set jazztalk comment=Washington Note: The text after the comment= may have spaces if surrounded by quotation marks: set jazztalk comment="Washington, DC" User ID You can change your "user id" to be anything you like. The "user id" information is not used by ListManager for any purposes: it is merely a placeholder for any information you care to place in there. For example, you might use it to store your social security number, or perhaps the Member ID from some other database. To set the user id, use the userid= keyword, as in: set jazztalk userid=045-76-1230 Note: The text after the userid= cannot have any spaces in it. The Quiet Modifier If you add the word "quiet" to the set command, ListManager will not send a confirming message back, unless the set command fails for some reason. For instance, for a list called "jazz-discuss", you could set your membership to digest with this command: set jazz-discuss digest quiet Note that the "quiet" modifier is a valid argument to the unsubscribe command. The modifier must be after the list name or the email address. The modifier will prevent the Goodbye document from being sent to the unsubscriber. Resuming a Held Membership (unhold) If your email address has been bouncing email for several days, ListManager may put your membership on "hold" and stop sending you electronic mail. In such a case, send the "unhold" command to the ListManager lyris@ address, and ListManager will return any "held" subscriptions back to "normal." The format of the unhold command is: unhold Other Member Settings 395 To change any field in your members table, use the setfield(fieldname=value) option. The syntax for this command is: set listname setfield(fieldname=value) For example, you may have added a field to your members table to record members' phone numbers, called phone. If you're currently subscribed to jazztalk and you'd like to change your phone number, you'd send the command: set jazztalk setfield(phone=800-768-2929) To set a value with spaces, use quotation marks. For example, if your database had a field for a user's complete address, called address, it could be set like so: set listname setfield(address="2070 Allston Way Berkeley, CA 94704") This command is useful if you're using an email message to the server to add people to the list with additional information by using the become command. Note that the field is case sensitive. For example, userid_ would fail, as the correct field name is UserID_. Examples Change Settings Examples: set jazztalk digest set jazztalk nomail noack set jazztalk [email protected] set jazztalk pw=orange end Determining Membership Settings The following commands are equivalent and will return an email message with your membership settings on the mailing list: query listname confirm listname When sent to the listname-request address, the command syntax is just the single command, as in: query confirm To determine which mailing lists running on that server you are a member of, use the which command which Additionally, the which command will inform you of those lists you have unsubscribed from, if that data is available. Retrieving Mailing List Information 396 The following commands are equivalent and will return general information about a given mailing list: review listname stats listname When sent to the listname-request address, the command syntax is: review stats To obtain a listing of the mailing lists running on a single site, using the lists command: lists By default, the review command will only return basic information about a mailing list. However, the list administrator can decide to have the review command return a list of members as well. Also, the list administrator may decide to not allow non-members to view the basic information that the review command provides. If the list administrator does this, the review command will reply with a message indicating that this information is not available. If the review command is given by an administrator, after the login command, then a full list of the email addresses of the members of the mailing list is also returned. If the list administrator has allowed it, the review command may also return a list of member names and email addresses. Searching If you are a member of a mailing list, you can search past messages of the mailing list, and the messages that match your search specification, will be sent back to you via email. When sent to the ListManager Address, the command syntax is: search listname [search words] … ListManager will search for messages which contain any of the given search words. If multiple messages match your search, the search results will be organized so that the messages that matched more of your search terms appear at the top, and messages with equivalent search scores are organized with the newest messages first. When sent to the listname-request address, the command syntax is: search [search words] … You can also use the web interface to read and search past messages. 397 Retrieving the Help Document The following commands are equivalent and will return an email with a URL directing users to ListManager's online documentation: help info Additional help is also available at the Lyris Web Site, at http://www.lyris.com/. This message is not configurable. Retrieving other documents using "GET" Members of a mailing list can obtain the documents from a mailing with the Get command. They syntax for the get command get listname document-name-or-range Currently, two kinds of documents are available: "hello" and "goodbye". These are the documents that are mailed when someone joins the mailing list, and when someone leaves the mailing list. For example: get jazztalk hello get rock-discussion hello The hello and goodbye documents can also be obtained by sending email to the Command-Listname address "hello-listname@…" and "goodbye-listname@…" If you know the document ID or range of IDs of archived messages that you want to retrieve, you can also use the "get" command to retrieve specific message bodies. For instance, if you subscribe to a mailing list with "index" mode, you receive a nightly summary of the messages from that day, with a get command pre-written to retrieve the message bodies. The format of the get command for retrieving an archived message (or a set of messages) is: get listname message-id [message-id] … or you can specify a range with: get listname (first-message-id)-(last-message-id) For example: get jazztalk 100 105 106 109 get jazztalk 100-109 Similarly, you can retrieve all of the messages for a certain date by following the listname with a date or range of dates. The format of the date is yyyymmdd. Usage: 398 get listname date[-ending_date] Thus, if you are requesting messages for only a single date, you can follow this example: get jazztalk 20000509 On the other hand, if you want to retrieve all the messages for February 2000, you would issue the following command: get jazztalk 20000201-20000229 Get Documents Example This is a sample nightly index document from the NeoForum mailing list. Notice that the "get" command is pre-written for the user in the message. CDLIST Index for Saturday, March 08, 1997. ----------------------------------------------------Subject: Re: results From: Jason Smith <[email protected]> ID: 133 Subject: Re: Aborting a cd From: Bob Jones <[email protected]> ID: 136 Subject: CD-Roms From: [email protected] (Matt Smith) ID: 139 Subject: Re[2]: Client/Server? From: [email protected] ID: 141 ----------------------------------------------------To receive the full text of these messages, send the following command to [email protected] get cdlist 133-141 Or, you can retrieve specific messages with a command such as: get cdlist 133 136 ----------------------------------------------------- The End command The "end" command tells ListManager that there are no more email commands to process in this message. ListManager will stop processing your message when it sees the "end" command. The "end" command is optional. If you do not include it, ListManager will automatically scan to the bottom of your message for commands. Here is an example: subscribe jazztalk set jazztalk digest end If you add the word "quiet" to the end command, ListManager will not send a confirming message back, unless there was a problem executing the command. 399 Administrator Email Commands ListManager has a number of commands specific to administrators. Whenever you submit an email command message to ListManager, you will receive a notification informing you of how the server interpreted your command(s), and the action(s) taken. The exception is if you use the "end quiet" command at the end of your message. In that case, you will receive no notification. You must be a List, Site or Server Administrator to use these commands. You must use the Login command before being able to use any of the admin commands. Note that if you are using a script to subscribe members using admin email commands, you may need to put in a loop exception for the admin email address. Login All administrator email commands require you to first login, giving your password so that ListManager can verify your right to use the administrator commands. ListManager will look at your email address to determine if you are a Server, Site or List Administrator, and then check the password you gave. If the password you specified with the login command is correct, you will be able to proceed. If it is not, processing of your message will stop. Note: In order for Server and Site administrators to be able to use administrator commands, their email address must be in their People entry so that ListManager can validate them. If you are a Site or Server administrator (and not a list administrator), your email address must be in your People information entry. In addition, administrator email commands are only available if your administrator account has a password. ListManager allows administrators to have a blank password and use the Web interface to administer ListManager however, because email is inherently a less secure communication mechanism than the web, it requires administrators to have a password in order to use the administrator commands. You can set your password using the web interface, or, for list administrators, by using the "set listname pw=password" command." The syntax of the login command is: login password ListManager will use the email address you are sending from to identify you. When ListManager detects a login command, it replaces the password with an XXX in the archived copy it keeps, and in the acknowledgement message that is sent back to you. The reason for this is so that other people looking at your email message, either in your mailbox, or in the incoming mail web page, will not be able to determine your password. Add The add command lets a list administrator add a member to their list. The syntax of the add command in its simplest form is: 400 add listname [sendconfirm] emailaddress [name] [quiet] The sendconfirm, user name and quiet modifiers are optional. Here is an example: add jazztalk [email protected] Bob Smith If you do not specify the sendconfirm modifier, the confirmation message for that list will not be sent. In other words, if you have the list set to require confirmation, the default behavior of the add command is to bypass the confirmation and set the user’s status to "normal". If, however, you use the sendconfirm modifier, the user will receive a message asking for their confirmation as if they had subscribed themselves. If you do not specify a user name, the user will be created with no name in their member record. If you specify the quiet modifier, no "hello" message will be sent out to the member. However, if the add command does not succeed, such as if the email address is already a member, you (the person submitting the add command) will be notified. By default, when you add a member with the add command, both the admin and the user receives notification of the action. If a "hello" document exists for the list, that hello document is sent to the user instead of a machine-generated notification. With the quiet modifier, no notification is sent to the user. If you, as the administrator, do not want to receive a notification, you need to use "end quiet" at the end of your command message. See End Command. If the list you are adding the user to is set to require passwords, one will be created automatically for that member. With respect to that, it is useful if, in the hello document, you notify the user of their password using a mail merge tag. Note that if you are using a script to subscribe members using admin email commands, you may need to put in a loop exception for the admin email address. Adding Members after Members have already been imported On occasion, you may want to perform a new member import, for instance to add any new members which may have joined, or to add new demographic data, etc. When you import a new member file, some of the member statuses may have changed. An example would be someone who was once a "normal" member may have become and "unsubscribed" member. When performing another import or adding members via email, ListManager will not resubscribe any members who have unsubscribed themselves from the list. Any members who were banned will not be reimported either. Also, all list administrators will maintain their list admin rights after the reimport. Adding Many Members New members may be added to your database in many ways. For single member or small number of member adds, the method described below for adding via email commands works well. However, if you want to add many members at once, you will find it faster to use Utilities: Members: Import Members. The add command can be easily used to add many members at once. This is done by using any of the line-continuation schemes discussed in the "The Line Continuation Character" section. The syntax below uses the ‘<<’ and ‘>>’ operators to delimit a list of names to be added. The syntax to add many members is: 401 add listname [quiet] << emailaddress1 emailaddress2 >> The quiet modifier is optional, and works exactly as it does when adding a single member. In the case where you add many members, a single quiet modifier serves to suppress sending a "hello" message to each member. Alternatively, you can use the "\" or "&" to separate each name, rather than delimiting the entire group. The example below uses "&" to continue the line: add jazztalk quiet & [email protected] & [email protected] If you want to add members with user names, the user name must be before the email address. For example: add jazztalk quiet << User Name1 [email protected] User Name2 [email protected] >> Note that any text that is not a legal email address is assumed to be a name. For example, if you attempted to add user1@example@com, the address would not be added or shown as part of the list of email addresses successfully added, nor would there be an error message. It would be considered part of the name for the next address to be added if there is one, or ignored. Adding Members After You Have Already Done a Member Import On occasion, you may want to perform a new member import, for instance to add any new members which may have joined, or to add new demographic data, etc. When you import a new member file, some of the member statuses may have changed. An example would be someone who was once a "normal" member may have become and "unsubscribed" member. When performing another import or adding members via email, ListManager will not resubscribe any members who have unsubscribed themselves from the list. Any members who were banned will not be reimported either. Also, all list administrators will maintain their list admin rights after the reimport. Adding To Many Lists The email add command may also be used to add members to many lists at once. This is an extension of the regular syntax: add listname1 [listname2 [listname3 [...]] [onehello][oneconfirm | sendconfirm]] emailaddress The onehello, oneconfirm, and sendconfirm modifiers are optional. You can use either sendconfirm or oneconfirm, but not both. If you specify the onehello modifier, the new member will receive a single hello 402 document, from the first list listed. This allows you to add a member at once to many lists without bombarding them with a slew of hello documents. Here is an example: add jazztalk ticketlist concertgroup onehello [email protected] The above example adds [email protected] to the jazztalk, ticketlist, and concertgroup lists, and only sends the hello document from ‘jazztalk’. If you specify the oneconfirm modifier, the new member will receive a single confirmation request that will act as a confirmation on each list that requires confirmation. Here is an example: add greenlist redlist bluelist oneconfirm [email protected] The above example adds [email protected] to the greenlist, redlist, and bluelist lists, and sets his type to "confirm". Since greenlist, redlist, and bluelist are set to require confirmations, a single confirmation will be sent to him, which he can reply to in order to confirm for all three lists. Alternatively, if you use the sendconfirm modifier, the new member will receive a confirmation message for each list you add them to, as long as the list requires confirmation. Thus, in the example above, [email protected] will receive a separate confirmation message from greenlist, redlist, and bluelist, assuming they are all lists which require confirmation. Nearly Full If you have limited the membership size of a list, ListManager will send you a message if you are approaching the member limit. While ListManager is processing your add request, it also checks to see how close you are to your member limit. If your add request brings your list to within 5% of the limit, ListManager will inform you in the email notification you receive. Below is an example of what ListManager sends you when your member list is approaching its limit: Note: This list is close to its maximum subscriber limit, with only 5 new subscriber positions available. More Examples You can mix and match the various syntaxes of add to suit your needs. For instance, you can add many email addresses to many lists, all in a single add command: add jazztalk ticketlist oneconfirm onehello << [email protected] [email protected] [email protected] >> By default, ListManager does not send a confirmation when you add members in this way. You can override this behavior with the sendconfirm modifier, as the following example shows. add jazztalk ticketlist sendconfirm [email protected] The above example adds [email protected] to both jazztalk and ticketlist, and sends a 403 separate confirmation message for each list. The add command is only available to administrators. You must issue a "login" command before using the add command. For more information about login, see "Login". Become The become commands allows administrators to become someone else, assuming their email address and name, and issue ListManager commands on their behalf. For instance, an administrator can become another person, and issue the "subscribe" command for them. There are two possible syntaxes for the become command: become email-address become email-address Full Name The first format only specifies an email address. The name is then left blank. The second format species both the email address and name of the person you are becoming. All words after the email-address are understood as being the name. The become command is only available to administrators. You must issue a "login" command before using the become command. For more information about login, see "Login". Delete The delete command lets a list administrator unsubscribe a member from their list. The syntax of the delete command is: delete listname emailaddress [quiet] The quiet modifier is optional. The word "del" may be used instead of the word "delete". For example: delete jazztalk [email protected] If you specify the quiet modifier, no confirming email messages will be sent out. However, if the delete command does not succeed, such as if the email address is not a member, you (the person submitting the delete command) will be notified. By default, when you delete a member with the delete command, both you and the user receives notification that they have been removed. If a "goodbye" document exists for the list, that document is sent to the user instead of a machine-generated notification. With the quiet modifier, no notification is sent to the user or to the administrator. As an alternative to providing an email address, you can use the member id of the member you wish to delete. For example, if you know member with id 1234 needs to be removed from the list, but you don't know that member's email address, you can use the member id without a problem. An example: delete jazztalk 1234 You can specify any number of members to delete on the command line. For example, 404 to delete the users "[email protected]" and "[email protected]", you would write: delete jazztalk [email protected] [email protected] The delete command is only available to administrators. You must issue a "login" command before using the delete command. For more information about login, see "Login". Note that the delete command does not actually delete the member from the database; the member is still part of the list, but is unsubscribed. They will not receive normal postings from the list. Delete from all Lists You can use a "*" in place of the list name in the "delete" command, and a person will be unsubscribed from all lists they belong too. For example, to remove "[email protected]" from all lists on your server, you would use the command: delete * [email protected] You may use this syntax to delete multiple members from all lists on your server: delete * [email protected] [email protected] Delete all members in a List To unsubscribe all members (except admins) from a list, substitute "all" for the email address: delete jazztalk all End Command The end command tells the ListManager command parser to stop parsing the message. The syntax of the end command is: end [quiet] The quiet modifier is optional. When the command interpreter encounters the end command, it stops processing the message immediately. Thus, if you use end, you must be certain to have all of your commands above it. If you use the quiet modifier, you will not receive notification from ListManager regarding that command message. Member The member command allows you to act upon a pending member of a moderated mailing list. The only options for the member command are to either approve or reject a membership application to a private mailing list. 405 The syntax of the member command is: member approve member-id … member reject member-id … You can specify more than one Member ID on the member command line. If you are a list administrator set to receive admin mail, and your mailing list is set to private, then you will receive email notifications of applications to join your private mailing list. The notification message will include the member command you need to send back to approve or reject the member. In addition, if there are any other pending members, these will also be listed, at the bottom of the notification message, along with commands to approve or reject them. Example Here is an example of a notification message an administrator receives when someone applies to join a private mailing list: List: test-l Name: Some Name Email: [email protected] A request from '[email protected]' to join the private list 'testl' has been received. Their subscription request will not be activated until an administrator approves it. --To approve this member, send the following two line message to [email protected] login (enter your password here) member approve 122 --To reject (delete) this member, send the following two line message to [email protected] login (enter your password here) member reject 122 ---------------------------------------------------The following members are currently pending: * Member 116 ([email protected]) * Member 117 ([email protected]) * Member 118 ([email protected]) * Member 120 ([email protected]) * Member 121 ([email protected]) * Member 122 ([email protected]) --To approve these members, send the following two line message to [email protected] login (enter your password here) member approve 116 117 118 120 121 122 --To reject (delete) these members, send the following two line 406 message to [email protected] login (enter your password here) member reject 116 117 118 120 121 122 If you approve a member, they will receive this email message (and the Hello document, if your list defined one): Your request to join 'test-l' has been approved. You are now a member of 'test-l'. If you reject a member, they will receive this email message: Your request to join 'test-l' has been rejected. If you wish to discuss this with a mailing list administrator, you can send email to [email protected] Moderate The moderate command allows you to act upon a moderated message contributed to a mailing list. The options for the moderate command are to either approve or reject a contributed message to a moderated mailing list. The basic syntax of the moderate command is: moderate [approve | reject] moderate-id … You can specify more than one Moderate ID on the moderate command line. If you are a list administrator set to receive moderated message notifications, then you will receive email notifications of each moderated message. The notification message will include the moderate command you need to send back to approve or reject the messages. In addition, if there are any other pending messages, these will also be listed, at the bottom of the notification message, along with commands to approve or reject them. Alternatively, you can schedule a message to be released at a specific time, or resubmit a message such that it sends again after a specified period of time. To schedule a message for release at a specific time, the syntax is: moderate time [hh:mm | yyyy/mm/dd] moderate-id _ Thus, if you want to schedule a message to release today, you can specify the exact time you want the message to go out, in 24-hour format (24:00). If you want to schedule the message for release for some date in the future, you must specify the date in yyyy/mm/dd format, such as 2000/05/02 (May 2, 2000). To resubmit a message for auto-approval on a periodic basis, the syntax is: moderate resubmit numdays moderate-id _ 407 In the above example, you would substitute "numdays" with the period of time you want to message to wait before sending itself out again. Thus, if you have a FAQ for your list, and the moderation notification for the FAQ indicates the moderate id is 2112, and you want the FAQ to be released every 30 days, you would use the following command: moderate resubmit 30 2112 Example By default, ListManager sends out MIME-digest moderated message notification. The digest consists of two parts: the first part is the notification with the message appended, and the second part is the message all by itself. By separating it into two parts, ListManager allows you to better perform the two functions necessary for moderation: 1) viewing the message to make sure everything looks okay, and 2) responding to ListManager to either approve or reject the message. If the message contains mail merge tags, ListManager will merge them in prior to sending the moderated message notification to you. Thus, you can view the message exactly as it will go out to the list. The following message is an example of a moderated message notification. The beginning of the message explains the purpose of the message, and at what time (if any) the message will be automatically approved. Commands for approving or rejecting this message via email are given. The message in question is then displayed. At the bottom of the email message, the currently pending moderated messages are summarized, and commands for approving or rejecting them in bulk is also given. The following message destined for Bach has been received. This message requires your approval before it will be sent to the list. If you take no action, this message will be automatically approved at midnight tonight. --To approve this message, send the following two line message to [email protected] login (enter your password here) moderate approve 103 --To reject (delete) this message, send the following two line message to [email protected] login (enter your password here) moderate reject 103 --From: [email protected] Subject: Great new CD that new recording of the Brandenburg Concerto is really good! Michael Smith ----------------------------------------------------The following moderated messages are currently pending: * Message 100 * Subject: Best recording available? * Message 102 * Subject: My new piano * Message 103 * Subject: Great new CD 408 --To approve these messages, send the following two line message to [email protected] login (enter your password here) moderate approve 100 102 103 --To reject (delete) these messages, send the following two line message to [email protected] login (enter your password here) moderate reject 100 102 103 You can configure ListManager to send out MIME-digest moderated message notifications or standard moderated message notifications by using the command line option "moderatenotification" with either old (standard) or new (MIMEdigest). Report The report command returns a "normal" Subscribe/Unsubscribe/Confirmation report. The syntax of the report command is: report listname [nochart | detail | CSV] [yyyymmdd-yyyymmdd] The yyyymmdd-yyyymmdd modifier allows you to specify a starting and ending date. For example, to retrieve a report from January 1, 2000, to March 15, 2000, you would use the range 20000101-20000315, as shown in this example: report jazztalk 20000101-20000315 By default the report is generated with a one-month history. Thus, if you do not specify a date range, the starting date will be one month prior to today, and the ending date will be today. The nochart, detail, and CSV modifiers allow you to specify the format of the report you will receive. These modifiers are mutually exclusive. When you use the nochart modifier, the report excludes dates that do not contain any data. For instance, if no one subscribed on 3/14/00, the report will not include that date in the 'subscribe' section. When you use the detail modifier, the report has an additional section at the end of the general data section. This additional section includes the email addresses associated with the data points present in the general data section. Using 'Report' to Synchronize with your Database The CSV modifier tells ListManager that you would like the report sent to you as a series of comma separated files. When you use this, the ListManager will send you an email that includes as attachments up to seven data files. These are data files, and are not designed to be human-readable. However, they are readable by most spreadsheet and database programs. Specifically, the format of these files is known as comma 409 separated values (*.CSV). You can use these files to synchronize your external database with your ListManager database. Since most database programs can read CSV files, these can be loaded directly into your database, where you can quickly run an update to put your database in synch with the ListManager database. Six of the possible attachment files conform to the possible report types from the current report option. They are: Normal (subscribed) Members: The new subscribers for the report period will be provided in the file "sub.csv". Unsubscribed Member: Those members that unsubscribed during the report period will be listed in file "unsub.csv". Held Member: Members who were put on hold during the report period will be listed in the "held.csv" file. Unconfirmed Members: Those members that subscribed during the report period but have not yet confirmed will be listed in file "notcon.csv". Expired Members: Those memberships that expired during the report period will be listed in the "expired.csv" file. Unapproved (private) Members: The members who have subscribed to private lists and are still awaiting List Admin approval will be listed in "private.csv." These data files are only attached to the email if they have any entries. For example, if no members were put on hold during the report period, there will not be a held data file attached to the email. The column layout for these first six attachments is identical for all files. It is: Member ID, Email Address, Full Name, List, Date Joined, Expire Date, Number Bounces, Date Bounce, Confirm Date, Date Held, Date Unsubscribed, User ID, Comment, Additional If any of the fields is missing data (this is common), then nothing is displayed. The seventh file attachment is the totals. This has the same information as the report command but in a vertical arrangement. There are two columns of data, the total description and the value for that section: Total normal members Total unsubscribed members Total held members Total expired members Total unapproved (private) members Total unconfirmed members 410 New normal members New unsubscribed members New held members New expired members New unapproved (private) members New unconfirmed members This file is attached if there is any data at all. Review The review command normally returns basic information about a mailing list to the person who requested it. However, if the review command is requested by an administrator, after a login command, then the review command also returns a full list of the email addresses of the members of that mailing list. Usage: review listname [all | names | full | held | unsub | private | expired | confirm] For example: login saxophone review jazztalk There are many options for the review command. If no arguments are given then members of type 'normal' are returned. Below is a short description of the function of each: (none) - return only those members who are of normal status ( default ) all - return members of all types. names - return the email addresses and names only (for normal members only). full - return email addresses, names, and other information (for normal members only). held - return only those members who are on hold. unsub - return only those members who have unsubscribed. private - return only those members who are of private status. expired - return only those members whose subscriptions have expired. confirm - return only those members who are of confirm status. Here are two examples of the review command with an option: login saxophone review jazztalk full login saxophone review jazztalk names For more information, see "Mailing List Information". Send The send command allows you to email a ListManager document to any number of email addresses. For instance, if you receive a request to join a private list, you might want to send the applicant a document describing the guidelines for being allowed into the mailing list. Or, if you have an announcement you would like to make to a number 411 of people, you can use the send command to send a "one time message" to them, without the work of creating a mailing list. The syntax of send command is: send document-name email-address [email-address] … The document-name must be a currently existing ListManager document. You can also use the line-continuation character, "\" to specify as many email addresses as you like, without being restricted by the length of a line. For example: send I_am_going_on_vacation \ [email protected] \ [email protected] \ [email protected] \ [email protected] The From: and Reply-To: of the message sent is by default the email address and name that you are issuing the send command from. If you would like the From: and Reply-To: to be something else, you can use the become command to assume another identity, and then use the send command with that identity. For more information about the become command, see "Become". The send command is only available to administrators. You must issue a "login" command before using the send command. For more information about login, see "Login". Which (for admins) The which command allows an administrator to determine which mailing lists a particular person belongs to. The syntax of the which command is: which <email address> … You can specify as many email addresses on the which command line as you like. For example, the follow commands are valid: which [email protected] which [email protected] [email protected] The which command is only available to administrators. You must issue a "login" command before using the send command. For more information about login, see "Login". Note: If you do not first login as an administrator, the which command will tell you which lists you are on. See "Determine Membership Settings". 412 Message Personalization Introduction With ListManager, you can easily create unique, one-to-one emails tailored to the exact needs and interests of your recipients, without having to create more than one message. The easiest way to personalize your message is to use the Insert Field, Insert Condition, and Insert URL wizards when creating content. This section discusses how to manually insert these tags if you don't want to use the wizards, or if you'd like to do more advanced personalization and scripting. There are four major categories of message personalization: Mail Merge, Clickthrough Tracking, Conditional Content, and Advanced Scripting. Mail Merge Tags let you insert directly into your email messages information from your database, or from procedures ListManager performs. The classic example of this is to write "Dear Bob" in Bob's email, "Dear Mary" in Mary's, and so on. Clickthrough Tracking, Opens and HTML Detection let you include tags that allow you to track the success of your mailing. They allow you to track clickthroughs, detect whether someone has opened your message, or whether or not a recipient has HTML capability. Conditional Content Commands allow you to insert blocks of text into your message depending on whether certain conditions are true for a particular recipient. As a simple example, suppose you know that Bob has a dog, but Mary does not. You can tell ListManager to add a special paragraph promoting dog biscuits into all messages going to customers who have dogs. Bob would get this special paragraph in his email, while Mary would not. Invite (Referral Feature) allows your members to invite their friends to join the list. List members click on a link, which takes them to a referral form. They fill in the names and email addresses of their friends, who receive an invitation to join the list. Template Form Fields let you make your templates into forms for users to fill out. Those without any HTML knowledge can quickly and easily create text, HTML and multipart messages. Advanced Scripting allows you to insert complex, highly dynamic content in your message. In ListManager, message personalization take advantage of a highly flexible programming language called Tcl. You don't have to be a great programmer to create and use custom scripts! This manual will show you a variety of easy templates for you to follow to create Tcl scripts. People with programming experience will also find that Tcl is a very powerful tool for extending the functionality of their messages. How Do I Use ListManager's Personalization? All mail merge tags, conditional content commands, and advanced scripts must begin and end with double percent signs (%%). Upon sending, ListManager will automatically replace the script with its appropriate result in the outgoing message. 413 For example: %%merge Members_.FullName%% will be replaced by ListManager with the full name of the message recipient, or a blank if no name is in the database table. If you want double percent signs (%%) to appear in the actual outgoing message for some reason, you can place a "\" before the "%%". The "\" will prevent the delimited script that immediately follows from being executed and replaced. Note that your %%-delimited scripts will only work if you enable scripting in your list settings. If scripting is not enabled, then the script text will appear without being replaced. Using Mail Merge Tags What are Mail Merge Tags? Mail merge tags allow you to insert information from your database directly into your email messages. You can use mail merge tags to personalize your messages for each user. Basic example include (with personalized text in bold): Dear Joe: Wouldn't your dog Rex like to...? We see that you have an account balance of $34.05. ListManager now features a variety of easy mail merge tags which replace the "$subst" tags used in earlier versions of ListManager (4.x or before). The old $subst format is currently supported but will likely be removed in future versions. All $subst functionality is now possible with the new mail merge format. (For more information on the old tags, see Lyris ListManager Mail Merge). The easiest way to personalize your message is to use the Insert Field wizard when creating content. This section discusses how to manually insert these tags if you don't want to use the wizards, or if you'd like to do more advanced personalization and scripting. What are some of the merge tags I can use right now? ListManager includes a large number of short and long tags with the product that you can use immediately. To learn more, see the section Mail Merge Short Tags. How can I have ListManager generate these tags for me automatically? If you create content, you can use the Insert Field feature to automatically merge in mail merge tags for you. 414 How do I manually create a Mail Merge Tag? ListManager supports two different types of mail merge tags: short tags, and long tags. Short tags are created automatically by ListManager for all fields in your members data table. The short tag syntax is simple: %%fieldname%% where fieldname refers to a field in your member table. Short tags are case sensitive, and only work for fields in your members table. If there's no information available, it will be left blank. For example, to merge in a member's full name using the short tag, you would put the following in your message: Dear %%FullName_%% When Thomas Middleton receives the message, he'll see: Dear Thomas Middleton, Because merging from the members table is so common, ListManager lets you merge in information from this table using this simpler short tag format. Short tags are limited to your members table; to merge in other information, use long tags. See Mail Merge Short Tags for a list of tags. Long tags let you insert fields from any database table to which ListManager has access. The long tag syntax is: %%merge tablename.fieldname%% where fieldname refers to a field (or column) in the database table tablename. Note that, like short tags, regular tags are case sensitive. To merge in a recipient's full name using a long tag, you would include the following in your message: Dear %%merge members_.FullName_%% In this case, we chose a field from the members_ table to merge into our message. Any field from the members_ table can be inserted in this manner. You can also merge data from other tables as well if you send your message to a subset which includes a join to another table (ListManager Pro or Enterprise only). For example, suppose you created a subset which joined to a table called demographics which had a field called phonenumber. You could insert this data into your message by using the following mail merge tag: Our records show we can contact you at %%merge demographics.phonenumber%% Generally, data from the lists_, topics_, sites_, inmail_ and outmail_ tables are already associated with the message, so you can merge in information from these tables 415 without creating a subset with a join to these tables. If you sent your message to a subset, you can also merge data from the subsets_ table. Example: Your message header is %%merge inmail_.HdrAll_%% or %%merge lists_.MessageFtr_%% How do I use the Mail Merge Tags? To use mail merge tags, simply insert the tag where you want the text to be placed. ListManager will automatically replace the tag with the appropriate data. Let's say you have a field in your member table called FirstName. Because the field is in your member table, ListManager automatically created a short tag for it, in the format %%FirstName%%. To use it, here is what you would write: Dear %%FullName_%%, Let me tell you about this great opportunity... When you send the message, ListManager will remove the tag and replace it with the value stored in the FullName_ field. Bob Jones, for example, would receive an email beginning this way: Dear Bob Jones, Let me tell you about this great opportunity... And Mary Wong would see: Dear Mary Wong, Let me tell you about this great opportunity... Long tags work exactly the same. Let's say you're writing to a group of pet owners. Bob has a dog named Fluffy, and you store information about Bob's dog in your pets database table. The pets table includes two fields, PetType and PetName. Since these fields are not part of the Member_ table, you must send to a subset which joins your pets table, and then specify them using the long tags. Simply type: Dear %%FullName_%%, Wouldn't your %%merge pets.PetType%% %%merge pets.PetName%% love a new, warm blanket during these winter months? As with the short tags, ListManager will replace the tag with the information stored in your tables. Bob, for example, would see: Dear Bob Jones, Wouldn't your dog Rex love a new, warm blanket during these winter months? 416 And Mary, who owns a cat, would see: Dear Mary Wong, Wouldn't your cat Snookums love a new, warm blanket during these winter months? Where can I use the tags? You can use tags in all parts of your message including the body, subject, header, footer, to: fields, and from: fields. The merge tags can also be used in documents (hello, goodbye, etc.). What if a field is blank? If a field is blank, the merge tag will simply be removed and be replaced by ... nothing! If this is a problem, you should consider using a Conditional Content Command, which can easily provide a default value in case a field is empty. (Note that some of the Mail Merge Short Tags also do this in a few simple cases.) What if I want recipients to see the word "%%anything%%" in my message? To keep ListManager from replacing a piece of text that looks like a merge tag, just place a blackslash ("\") in front of the script delimiters(the double %% sign), like so: Dear %%firstname%%, Using merge tags is in the To: field is easy! Just type \%%EmailAddr_\%% right into the To: field... ListManager will remove the backslash automatically. If you sent this message to Bob, he would see: Dear Bob, Using merge tags is in the To: field is easy! Just type %%EmailAddr_%% right into the To: field... Note that you'll need to use the backslash any time you use a double percent sign. Advanced Scripting and Mail Merge Tags The Mail Merge tags described here aren't the only way of inserting custom content into your message. Conditional Content Commands allow you to insert content into your message depending on whether certain conditions are true for a particular recipient. You can also take advantage of more powerful features using Advanced Scripting. Advanced Scripting expands upon the basic Mail Merge functionality, allowing you to leverage the power of the language Tcl to create highly customized messages. In addition to the merge command outlined above, there are other procedures for 417 inserting special content into your message. Merge and other procedures are fully documented in the ListManager Tcl Procedures section. If you are using mail merge tags in your own custom Tcl script, It is important to note that the shortcut method of mail merge is a special case and is not valid Tcl. This means that you can't use just the field name anywhere else in a Tcl script other than as the argument to a procedure. Mail Merge Short Tags The mail merge shortcut tags either pull data from your members database table, or perform procedures to provide the needed information. If you have additional columns in your members database table, you can merge their value in using this simple %%fieldname%% syntax. Note that if you have List Scripting/Merge Capabilities set to No Advanced Scripting, or if you're not running ListManager Pro or Enterprise, only the default ListManager short tags are available. The easiest way to personalize your message is to use the Insert Field wizard when creating content. This section discusses how to manually insert these tags if you don't want to use the wizards, or if you'd like to do more advanced personalization and scripting. Commonly Used Short Tags %%emailaddr%% The recipient's email address. Note that this tag works correctly even if the email address field in the database has a different name. This tag is equivalent to %%merge Members_.EmailAddr_%% %%email.owner%% The email address for sending messages to the owner(s) of this mailing list. This is the owner-listname@… address and all mail sent to this address is distributed to the members of the list who have the setting "receive admin mail: yes" set. %%email.unsub%% The email address for unsubscribing from the current mailing list. This tag creates for each member a unique unsubscribe email address, containing the MemberID_ and a "check character." Example: [email protected] Only member 4323 will see this address. When email comes into ListManager with this address, it will unsubscribe that member. The final "P" on the address is a "check character". This means that if someone malicious changes the number to something else, say "4000", by mailing to "[email protected]", that ListManager will see that this number has been tampered with, because "P" is not the correct "check character" for the number "4000". In this case, ListManager will interpret the message is if it were sent to "[email protected]" and unsubscribe the sender of the message. %%email.purge%% The email address for unsubscribing from all mailing lists at this server. %%ExpireDate_%% The date (if any) that this recipient's subscription expires. This tag is equivalent to %%merge members_.ExpireDate_%% 418 %%firstname%% The recipient's first name (the first part of their full name). If the member does not have a full name, their email address is used instead. If a member only has a single component to their name, that part is used. %%fullname%% The recipient's full name. If the member does not have a full name, their email address is used instead. For example, you might start your mailing out with this: Dear %%fullname%%, we are glad that you have… And ListManager would substitute it to say: Dear Bob Smith, we are glad that you have… %%FullName_%% is similar, except if there is no name, a blank is inserted. This tag is equivalent to %%merge members_.FullName_%% %%nameemail%% The full name and email address of the recipient. For example, you might want each posting to your list to be addressed to the individual recipient: To: %%nameemail%% If a full name is not available, ListManager will only put the email address. For example: Bob Smith <[email protected]> Or if no name is available: [email protected] %%Password_%% The recipient's password. This tag is useful if you have ListManager assign a random password to a user. By including this tag in a Hello document, the user knows what that password is. This tag is equivalent to %%merge members_.Password_%%. %%whatlists%% This substitutes in a listing of all the lists on the server the recipient is a member of. This tag is very useful when you want to let users know exactly which lists they have signed up for. It is important to note that this tag only shows those lists where the member's status is "normal". In other words, if a list the member has subscribed to is set to require confirmation, and the member has not confirmed, the list will not show up in this listing. An excellent opportunity to use this tag is when a member signs up for many lists at once and they are sent a single hello document. That way, rather than receiving a welcome message for each list, they receive a single welcome with a listing of the lists they've joined. Note that this tag should not be used in the Subject: line of a message or document, as it will force some of the email headers into the body of the message. 419 %%whatlistsunconfirmed%% This substitutes a listing of all the lists the recipient has subscribed to, but has not yet confirmed. This tag is particularly useful when adding a member to many lists and you want to send them a single confirmation that shows the lists they have not yet confirmed. A good opportunity to use this tag is when you have subscribed someone to many lists at once using the 'Add' command in a command email message. In that command message, you also specified that the member should receive a single confirmation message by using the oneconfirm modifier. See Adding to Many Lists for more information. Note that this tag should not be used in the Subject: line of a message or document, as it will force some of the email headers into the body of the message. Other Short Tags These tags are also available, though less commonly used. You may also create tags from any of the members_ fields. A list of the default ListManager member table fields may be found in the members_ section of the Programmer's guide. %%author.nameemail%% The full name and email address of the message sender, e.g.: Bob Smith <[email protected]>. Or, if no name is available, only the email address is merged in: [email protected]. %%ConfirmDat_%% The date (if any) when this recipient confirmed their membership. Only applies to lists where "confirm membership: yes" is set. This tag is equivalent to %%merge Members_.ConfirmDat_%% %%DateJoined_ %% The date when this recipient joined the list. This tag is equivalent to %%merge Members_.DateJoined_%% %%email.list%% The email address to use when writing to this list. %%inmail.bodyquoted%% The full body of the incoming mail message (does not include the header), with each line quoted with a "> " character. %%list.name%% The short name of the list. %%memberid%% The recipient's member ID. Note that this tag works correctly even if the member ID field in the database has a different name. This tag is equivalent to %%merge Members_.MemberID_%% %%memberidchar%% The recipient's member ID along with a special checksum character. This is used in many places for creating "failsafe" confirm, unsubscribe, and purge addresses and is also used by some special web-based scripts. %%outmail.messageid%% 420 The message ID of this message in the outmail queue. %%poundemail%% The recipient's email address with a "#" sign substituted for the "@" symbol. This tag is used in message headers for identification purposes and is not really useful for anything else. %%recip.hdrto%% Returns the current recipient's email address and full name in the standard header format of: "Full Name" <[email protected]> or, if the full name field is empty, just the email address will be returned. This merge tag is generally used on the To: field of a message. %%recip.smtpmessageid%% Returns a unique ID for this mailing and recipient for use in the Message-ID header field. Since this is added automatically by ListManager, you will generally not ever need this tag. %%passwordnotifystring%% Returns the string: "Note: the password "(password)" has been assigned to you", if the list is set to require a password, and the password field is not empty. This is generally only useful for Hello documents for lists that may generate random passwords for subscribers. %%listmanager.hdrfrom%% Returns the string: "Lyris ListManager" <[email protected]> The product name and command address depend on the server's rebrandable settings and the domain of the site that the current mailing is being sent to. %%listmanager.hdrfromadmin%% This tag is obsolete, instead use %%listmanager.hdrfromnoreply%%, described here: %%listmanager.hdrfromnoreply%% Returns the string: "Lyris ListManager" <[email protected]> The product name and command address depend on the server's rebrandable settings and the domain of the site that the current mailing is being sent to. %%listmanager.mailfrom%% This tag is obsolete, instead use %%brand.commandaddress%% instead, described here: %%brand.commandaddress%% Returns the command address for the server. For example: "[email protected]". %%brand.name%% Returns the current brand name. For non-rebrandable servers, this will always be "Lyris ListManager". %%brand.emailname%% Returns the name part of the ListManager command address. For non- 421 rebrandable servers, this will always be "lyris". %%brand.emailnamelc%% Returns the lower case name part of the ListManager command address. For non-rebrandable servers, this will always be "lyris". %%brand.commandaddress%% Returns the full command address including the domain. %%site.domainname%% Returns the domain name associated with the site that the outmail record is associated with. If there is now site, this will default to the alphabetically sorted first domain in the sites table. %%outmail.messageid%% Returns the message ID of the current outmail record. %%author.nameemail%% Returns the name and email address of the sender of the current mailing in the form: Full Name <[email protected]> Note that this information is not available for mailings sent via the web interface. %%email.join%% Returns the email address for joining the current list. %%email.confirm%% Returns the email address for confirming a subscription to the current list. %%email.bounce%% Returns the bounce address for the current recipient. In some cases, these tags provide substitute data if the originally requested data is blank, much like a conditional content command. For example, if there is no name, %%firstname%% will merge in the email address. For more information, see Using Mail Merge Tags. Note that ListManager 5.x will also continue to support the old $subst tags, and that these tags will work even if List Scripting/Merge Capabilities is turned off. If you are using your own members table instead of the default ListManager Members_ table, you'll need to use the field names in your members table. See Using Mail Merge Tags for more information. Scripting Information If you are using mail merge tags in your own scripts, use the full %%merge Members_.fieldname%% syntax for members table field names. The short tags above which are not member table fieldnames may be used in scripts. How do I convert dates into a useful format? Sometimes, you will want to change the format of a date into a more human-readable 422 format, instead of using the default format. You can do this using the "timeformat" mail merge tag. The syntax is: %%timeformat tablename.datefield "formatstring"%% datefield refers to any date field in the table tablename. Formatstring refers to a sequence of codes which tell ListManager how to display the date. A list of these codes is below. If the "formatstring" argument is not specified, the format string "%a %b %d %H:%M:%S %Z %Y" is used (e.g.: "Fri Mar 01 15:40:00 PDT 2002"). Format Codes Field descriptors consist of a % followed by a field descriptor character. All other characters are copied into the result. Valid field descriptors are: %% Insert a %. %a Abbreviated weekday name (Mon, Tue, etc.). %A Full weekday name (Monday, Tuesday, etc.). %b Abbreviated month name (Jan, Feb, etc.). %B Full month name. %c Locale specific date and time. %d Day of month (01 - 31). %H Hour in 24-hour format (00 - 23). %I Hour in 12-hour format (00 - 12). %j Day of year (001 - 366). %m Month number (01 - 12). %M Minute (00 - 59). %p AM/PM indicator. 423 %S Seconds (00 - 59). %U Week of year (00 - 52), Sunday is the first day of the week. %w Weekday number (Sunday = 0). %W Week of year (00 - 52), Monday is the first day of the week. %x Locale specific date format. %X Locale specific time format. %y Year without century (00 - 99). %Y Year with century (e.g. 1990) %Z Time zone name. The -gmt option to the clock command If the -gmt argument is present the next argument must be a boolean which if true specifies that the time will be recalculated as Greenwich Mean Time. If false then the local time zone will be used as defined by the operating environment. If the -gmt option is not specified, then the local time zone time will be used. Examples Suppose the value of the date field DateJoined_ is Friday, March 1, 2002 at 3:40 P.M., and your server is in California. %%timeformat Members_.Datejoined_%% would print: Fri Mar 01 15:40:00 PDT 2002 %%timeformat Members_.DateJoined_ "%A, %B %d, %Y %I:%M %p"%% would print: Friday, March 01, 2002 03:40 P.M. %%timeformat Members_.DateJoined_ "%a %d %b %Y %H:%M"%% would print: Fri 01 Mar 2002 15:40 %%timeformat Members_.DateJoined_ "%m/%d/%y %H:%M:%S"%% 424 would print: 03/01/02 15:40:00 %%timeformat Members_.DateJoined_ "%m/%d"%% would print: 03/01 %%return [clock format [clock seconds] -format "%A %b %d, %Y"]%% would print the date when the particular message is sent, based on the system time. Example: Friday August 2, 2002 Fetching Data from a Web Server %%httpget%% ListManager can retrieve data from a remote machine using the httpget mail merge tag. This data must be accessible via http. The syntax of the httpget tag is: %%httpget "URL"%% The URL argument can be virtually anything you can pull up with a web browser. The URL may point to a simple text file, some HTML code, or a CGI script. To use httpget, you must be using ListManager Pro or Enterprise, and Scripting Level must be set to Full. Httpget will fetch the data for each recipient. Example 1 You keep dozens of ads on your web server. You want them to be inserted into your newsletter, with every recipient getting a randomly selected one. The script's URL is http://yourserver/cgi-bin/ad.pl. %%httpget "yourserver/cgi-bin/ad.pl"%% Note that you don't need http:// as part of the URL. Example 2 You have a script which creates a different page for each user. The following example shows how to use this to fetch custom data for your member: %%httpget "localhost/cgi-bin/getdata.pl?id=[merge members_.emailaddr_]"%% In the above example, ListManager first performs a substitution to merge in the member’s email address, then retrieves the data at the resulting URL. Note that you must use square brackets and the full mail merge tag, not the short tag. Let’s assume that [email protected] is the member that ListManager is currently sending to. After substitution, the URL looks like: 425 http://localhost/cgi-bin/[email protected] The nature of the script being called ("getdata.pl" in this case) is to generate some data unique to the member with that email address. This script can do whatever you design it to do, whether that means generating an ad or retrieving billing information. For programmers, this means you have the ability to call a function in the middle of your message and insert whatever it returns right into the message at the point from which it was called. While the httpget merge tag does not require any specific output from the URL, it is highly recommended that you include a standard 'HTTP/1.0 200 OK' status line, then a 'Content-Type: text/plain', or 'Content-Type: text/html' line followed by an empty line and the content of the text to be inserted. For example, a (Perl) script might have: print print print print "HTTP/1.0 200 OK\r\n"; "Content-Type: text/plain\r\n"; "\r\n"; "Hello! Please buy our products!"; %%before ; httpget%% Httpget will repeatedly retrieve the data for each individual recipient. If, however, you only need to retrieve the data only once per mailing attempt, you can use the before; httpget tag instead. That is, before the mailing or retry begins, ListManager will pull the URL once, and fill in that same value for all recipients. Since the speed of httpget depends on the speed it can fetch data from your server, using before ; httpget can make your mailing speeds faster. The syntax of the before httpget tag is: %%before ; httpget "URL"%% Note that the httpget will still be run again for each retry. Example You keep dozens of ads on your web server. You want them to be inserted into your newsletter, with every recipient getting the same one. The script's URL is http://www.lyris.com/getmailad.pl. %%before ; httpget "www.lyris.com/getmailad.pl"%% For more information, see Script Execution Points. %%after ; httpget%% If you want to run a function after a message is sent, you can use the after httpget tag. ListManager will call the URL only once, at the conclusion of the message send attempt. The syntax of the after ; httpget tag is: 426 %%after ; httpget "URL"%% Example After a message is sent, you want it to be logged in your database. %%after ; httpget http://www.lyris.com/logsentmessage?id=[merge outmail_.messageid_] %% For more information, see Script Execution Points. Troubleshooting Merge Tag Problems My mail merge tags are blank. Mail merge tags are case sensitive on some platforms, so check to make sure you entered in the table and field name correctly. Also, if there is no data for that particular recipient, the result may be a blank. I'm writing my mail merge tags correctly. Why don't they work? Unless you have a Pro or Enterprise license, you cannot use mail merge tags which reference any custom fields. If you have a Pro or Enterprise license, check your list and server settings to make sure that Scripting Level is enabled. The server setting takes precedence over the list setting, so if scripting is not enabled at the server level, it will not be enabled for any list. I have a standard license, and non-custom fields aren't being merged. If you are using a standard license, and you are having trouble with standard merge tags (such as %%emailaddr%%) in your message, you should also check your list and server settings. In Utilities: List Settings, set Scripting Level to Safe Scripting/Merge, and Enable Scripting to Administrators Only, even though these features say they are Pro or Enterprise features only. Changing these settings will enable you to use standard mail merge tags. My URLs are breaking when I use mail merge. There are times when you need to send a string that is longer than the line-wrapping width of your email client. This is not a problem if you construct a message using the Send Message pages and disable word-wrap. Spaces in the string are not a problem, since the wrapped line will be removed and the string will then be sent as it was composed. However, there are circumstances where a string might not have any spaces in it. In this case, it cannot be correctly "unwrapped". This will most often occur with URL's. To use a string that is longer than the wrapping width of your email client, you can construct it from shorter pieces. For example: %%set mystring "http://www.somelongdomainname.com/cgibin/somescript.pl" ; append mystring "?someparameter=somevalue" ; append mystring "&someotherparameter=someothervalue" ; append mystring "&yetanotherparameter=yetanothervalue" ; 427 return $mystring ; %% Clickthrough Tracking, Opens, and HTML Detection ListManager offers several ways for you to track the success of your mailing using clickthrough tracking URLs, open rate tracking and detect-HTML tags. Clickthrough Tracking URLs The easiest way to include a clickthrough tracking URL is to create content, and use the Insert URL feature. See Content: Insert URL for more information. If you would like to insert your URL manually, use the following format: %%track "http://your.destination.com" -name "optionalname" group "optionalgroup"%% The -name and -group are optional, but may be helpful when viewing your tracking results in Reports: Mailing Reports: Tracking Statistics. When sent, the tracking tag will be converted by ListManager into something that looks like this: http://your.listmanager.server/t/51/3/1/2 When the recipient clicks on this tag, they will be redirected to the URL you specified when creating the clickthrough tracking URL. Information about clickthroughs can then be found in Reports: Mailing Reports: Tracking Statistics. Note that the member ID and message ID of a clickthrough can be identified without giving a user a cookie by inserting certain parameters into the URL. Curly brackets {} must be used around the tracked URL in order to accomplish this. This causes the member ID and message ID to be stored as part of the URL. If a web site receives a message ID and a member ID, it can keep track of them and pass them to ListManager in action tags, without the use of cookies. Use the following format: %%track {http://your.destination.com?x=[memberid]&y=[messageid]}%% The clickthrough logic will automatically replace the [memberid] and the [messageid] with the real message ID or member ID in the destination URL, so the web server page can have these variables. Using HTML to Disguise a Tracking URL A tracking URL contains the URL for your ListManager server. If you are sending text messages, this URL cannot be disguised. However, if you are sending an HTML message, you may disguise this URL using HTML. For example: <A HREF="%%track "http://www.lyris.com" -name "homepage" -group "top of page"%%">click here</A> The tracking URL will be triggered when someone clicks on the words "click here". 428 An image may be made clickable as well: <A HREF="%%track "http://www.lyris.com" -name "homepage" -group "bottom of page"%%"><IMG SRC="http://www.lyris.com/logo.gif" BORDER=0></A> This tracking URL will be triggered when someone clicks on the image. Tracking Rich Media The syntax for tracking rich media is much like that for tracking URLs. For video: %%track "http://example.com/video.avi" -name "video"%% For audio: %%track "http://example.com/audio.wav" -name "audio"%% Detect Opens Detecting opens of email messages can only be done in HTML or multipart-alternative messages with an HTML section. The easiest way to detect opens is to select Detect Opens in Mailings: New Mailings: Tracking. Or, you may insert the following tag into your HTML message: %%detect_open%% Detect HTML Detecting HTML capability of recipients can only be done in HTML or multipartalternative messages with an HTML section. The easiest way to detect HTML is to select Detect HTML Capability in Mailings: New Mailings: Tracking. Or, you may insert the following tag into your HTML message: %%detect_html%% Detect Both Opens and HTML Detecting opens and HTML capability of recipients can only be done in HTML or multipart-alternative messages with an HTML section. The easiest way to detect opens and HTML capability is to select Detect Opens and Detect HTML Capability in Mailings: New Mailings: Tracking. Or, you may insert the following tag into your HTML message: %%detect_both%% Note that when using multiple detect tags within the same e-mail message, some tags may not work the way you expect them to. The detect_both tag essentially has the same functionality as the detect_open and detect_html tags put together. Therefore, to avoid mistakes where detect_both and one or both of detect_open and/or detect_html are used in the same message, ListManager keeps track of what is being tracked for a particular message and if a redundant tag is inserted, it is either ignored or, in the case of detect_both, modified such that you only get a single open and html tracking image in each message. The same applies to messages where detect_html or detect_open is used multiple times. The first one is kept, and the rest ignored. Conditional Content Commands 429 The Conditional Content Commands allow you to insert blocks of text or graphics into your message depending on whether certain conditions are true for a particular recipient. Using conditional content commands, you can easily create unique, one-toone emails tailored to the exact needs and interests of your recipients, without having to write (or send) more than one message. All the commands work using a simple if-then-else logic: if a particular condition is true, then insert a particular block of text; else (that is, if the condition is not true), insert a different text block. Note that by text, we mean both plain text or HTML -- you may include either. These commands only work if you are using ListManager Pro or Enterprise, and if you have not disabled Scripting Level. The easiest way to insert conditional content is to create content and insert a condition. Basic information on the commands Like the mail merge tags, all conditional content commands must begin and end with a double percent (%%) sign. Returns and spaces contained within the %% delimiters are not read, unless they are contained in the text blocks (that is, between the <<European quotes>>). With the exception of the members table, fields are always referenced in the form tablename.fieldname, as in Members_.FullName_ or address.zip. If you are referencing a field in the members table, you may use just the field name. You may use short tags if they are members fields. Text values (listed as value in the examples to follow) are not case-sensitive. ListManager uses a special delimiter for text which we call <<European quotes>>. The open quote is formed by typing two less-than signs (<<); the close quote is formed by two greater-than signs (>>). <<European quotes>> preserve spacing, paragraph breaks, and "double quotes". Moreover, text within <<European quotes>> may contain mail merge tags, other conditional content commands, and scripts, permitting complex personalization. Commands may be nested (that is, you can have one command inside another) by enclosing the command in [square brackets]. If you do NOT want merge tags and conditional content commands to be interpreted, place them inside {curly brackets}. Supported Commands ListManager supports the following commands: iffield - for single-condition if criteria (no AND or OR) ifcondition - for simple multiple-condition if criteria (all AND or OR) ifboolean - for complex multiple-condition if criteria (mixing AND and OR) ifrange - for numerical if criteria ifdate - for date-related if criteria 430 showpercents - to rotate blocks of text While these commands cover the majority of conditional content needs, you may find you need more complex functions. If so, we recommend you visit our section on Advanced Scripting. iffield Use the "iffield" command in situations where you simply want to know whether a field is equal to a certain value or not. The "iffield" syntax is: %% iffield tablename.fieldname value1 <<content1>> value2 <<content2>> ... valuex <<contentx>> <<defaultcontent>> %% Here is what it's doing: for each individual recipient, the command looks in the table tablename for the field fieldname. If the field is equal to value1, then the command prints content1 and ends the script. If the field is equal to value2, then the script prints content2, and so on. (You can have as many value/content pairs as you like -- but make sure each value has a content result.) If the field is not equal to any of the values, the script prints defaultcontent. This command is perfect for simple true/false conditional content: %% iffield tablename.fieldname value <<contentif-true>> <<content-if-false>> %% Since paragraphs don't matter outside the curly brackets, you can put everything on one line! Example 1 Say you sell pet supplies, and are having a special on dog bowls. You want to tell only dog owners about the special -- owners of any other pet should not see anything. You already have a text field called pet in the Members_ table. The field describes what type of pet the recipient has. %% iffield Members_.pet dog <<We're having a special on dog bowls!>> <<>> %% 431 Bob, who owns a dog, would see: We're having a special on dog bowls! Mary, who owns a cat, would not see anything, since the default text is blank (that is, there is nothing between the final set of European quotes). To save space, you can write the entire command on one line. If the defaultcontent is blank, you can even omit it. The following command would work just the same as the one above: %% iffield Members_.pet dog <<We're having a special on dog bowls!>> %% Example 2 Say you've opened two new stores in San Francisco and Denver. You want to tell all Californians about the San Francisco store, and all residents of Colorado about the Denver store. Since residents of other states won't be interested, you don't want to tell about these specific stores. You already have a field called state in the Members_ table. This field contains twoletter designations for US states. %% iffield Members_.state CA <<Come see our new store in San Francisco!>> CO <<Come see our new store in Boulder!>> <<We're opening new stores all the time!>> %% Bob, who lives in California, would see: Come see our new store in San Francisco! Joe, a resident of Colorado, would see: Come see our new store in Denver! Mary, a Connecticut resident, would see the default text: We're opening new stores all the time! Example 3 (Multiple Command Nesting) Now you are having a special on dog and cat bowls, and want to tell only appropriate customers about it. %% iffield Members_.pet dog <<We're having a special on dog bowls!>> <<[iffield Members_.pet cat <<We're having a special on cat bowls!>> <<Sorry, no specials today!>>]>> %% As you see you can nest commands by placing them in [square brackets]. 432 Bob, who owns a dog, would see: We're having a special on dog bowls! Mary, who owns a cat, would see: We're having a special on cat bowls! Joe, who owns a lizard, would see: Sorry, no specials today! ifcondition [any/all] ifcondition all Use the "ifcondition all" command when you want certain content to be inserted when all of a particular set of conditions are true (i.e., condition1 and condition2 and condition3...). The "ifcondition all" syntax is: %% ifcondition all tablename.fieldname1 tablename.fieldname2 ... tablename.fieldnamex <<content-if-true>> <<content-if-false>> %% value1 value2 valuex Here, for each individual recipient, the command evaluates whether every field is equal to the listed value. The first condition, for example, looks in table tablename1 for the field fieldname1. If the value in that field is equal to value1, then the command concludes that condition is true. There is no limit on the number of conditions you can have. If all the listed conditions are true, the command prints content-if-true. If even one of the conditions is not true, the command prints content-if-false. Example 1 (ifcondition all) You want to tell people in Springfield, Illinois, about your new store there. Since there are many Springfields across the US, you need to specify which one using the state field. You store information on city and state of residence in the Members_ table. %% ifcondition all Members_.city springfield Members_.state IL <<Come see our new Springfield store!>> <<We're opening new stores all the time!>> %% 433 Residents of Springfield, Illinois, will see: Come see our new Springfield store! Residents of Springfield, Oregon, or Chicago, Illinois, or any other place, will see: We're opening new stores all the time! Example 2 (ifcondition all) You want to tell only women with white cats living in Springfield, Illinois, about your new store there. You also store information on gender, pet ownership, and pet color in the Members_ table. Simply add more conditions: %% ifcondition all Members_.city springfield Members_.state IL Members_.gender F Members_.pettype cat Members_.petcolor white <<Come see our new Springfield store!>> <<We're opening new stores all the time!>> %% Female, white-cat-owning residents of Springfield, Illinois, will see: Come see our new Springfield store! The rest of us will see: We're opening new stores all the time! ifcondition any Use the "ifcondition any" command when you want certain content to be inserted when any of a particular set of conditions are true (i.e., condition1 or condition2 or condition3...). The "ifcondition any" syntax is: %% ifcondition any tablename.fieldname1 tablename.fieldname2 ... tablename.fieldnamex <<content-if-true>> <<content-if-false>> %% value1 value2 valuex Here, for each individual recipient, the command evaluates whether every field is equal 434 to the listed value. The first condition, for example, looks in table tablename1 for the field fieldname1. If the value in that field is equal to value1, then the command concludes that condition is true. There is no limit on the number of conditions you can have. If any the listed conditions are true, the command prints <<content-if-true>>. If all of the conditions are false, the command prints <<content-if-false>>. Example 3 (ifconditional any) You want to tell people living in the states of California, Washington, and Oregon that they will now be covered by a new salesperson. %% ifcondition any Members_.state CA Members_.state WA Members_.state OR <<Your new account rep is Sheila!>> <<>> %% Recipients who live either in California, Washington or Oregon will see: Your new account rep is Sheila! If a recipient doesn't live in any of these states, they'll see nothing at all. You could of course specify that something else be printed if none of the conditions are met. Example 4 (combining conditional content commands) Say you send a regular direct marketing HTML email to all your customers. If they own a dog, their email will contain a special promo for dog food. If they own a cat, they receive a promo for cat food, and similarly for hamsters. If they own any combination of the above, the email will contain promos relevant to each of their animals. If they do not have any of the animals above, only the basic message is sent. All pet ownership data is kept in a series of true/false fields that allow customers to select multiple pet interests. %% ifcondition any Members_.hasdog T Members_.hascat T Members_.hashamster T << <p> We're having a special promotion <ul> [%%iffield Members_.hasdog <<>>%%] [%%iffield Members_.hascat <<>>%%] [%%iffield Members_.hashamster <<>>%%] </ul> on:<p> T << <li>Dog food! >> T << <li>Cat food! >> T << <li>Hamster food! >> 435 <p> >> <<>> %% The first part determines whether they have an appropriate pet at all; the second part provides a bulleted, HTML list of appropriate promotions. You could also use such conditions to turn large, formatted blocks of text or table rows on and off. ifboolean Use the "ifboolean" command when you want to create a condition with multiple fields linked by ANDs and ORs. The "ifboolean" syntax is: %% ifboolean tablename.fieldname1 operand value1 AND/OR tablename.fieldname2 operand value2 AND/OR ... tablename.fieldnamex operand valuex <<content-if-true>> <<content-if-false>> %% If you mix ANDs and ORs, you will need to use parentheses to group expressions. How it works: for each individual recipient, the command evaluates whether the entire condition statement is true. If the condition is true, the command prints content-if-true. If the condition is false, the command prints content-if-false. Supported Operands = equals < less than > greater than <= less than or equal to >= greater than or equal to <> is not equal to contains contains doesnotcontain does not contain endswith ends with beginswith begins with 436 See below for examples of how these are used. Example 1 You want to include a paragraph that goes to all Florida residents whose interests are dogs or cats. %% ifboolean address.state = FL AND (Members_.interestdog = T OR Members_.interestcat <> T) <<We have a special for your pet!>> <<>> %% Example 2 You want to include a paragraph that goes to all Florida and Georgia residents whose interests are dogs or cats. %% ifboolean (address.state = FL OR address.state = GA) AND (Members_.interestdog = T OR Members_.interestcat = T) <<We have a special for your pet!>> <<>> %% Example 3 You want to include a paragraph that goes to all Florida and Georgia residents whose interests are dogs or cats, but not if they have a lizard interest. %% ifboolean ((address.state = FL OR address.state = GA) AND (Members_.interestdog = T OR Members_.interestcat = T)) AND Members_.interestlizard <> T <<We have a special for your pet!>> <<>> %% Example 4 You want to send a special a message to all California residents who joined your list after March 1, 2001. %% 437 ifboolean address.state = CA AND Members_.DateJoined_ > 2001/03/01 <<Special message!>> <<>> %% Example 5 You want to send a special a message to all northern California residents (designated by a range of zip codes) who have an interest in basket weaving. NOTE: if parentheses are used with quotes, a space must separate the parentheses and the quote. %% ifboolean ((address.zip > 91000 AND address.zip < 95000) AND Members_.interest = "basket weaving" ) <<Special message!>> <<>> %% Example 6 You want to send a special a message to all AOL customers living in New York. %% ifboolean Members_.EmailAddr_ endswith aol.com AND address.state = NY <<Special message!>> <<>> %% Example 7 You want to send special content if member name information is blank they joined in the year 2000. %% ifboolean Members_.FullName_ = "" AND (Members_.DateJoined_ >= 2000/01/01 AND Members_.DateJoined_ <= 2000/12/31) <<Special message!>> <<>> %% Example 8 You want to send a message to everyone outside California. %% ifboolean 438 address.state <> CA <<Special message!>> <<>> %% Note that you could also do this with the "ifcondition" command, with the message as your default text: %% ifcondition address.state CA <<>> <<Special message!>> %% ifrange Use the "ifrange" command in situations where you simply want to know whether a numerical field is within a certain range of numerical values. The "ifrange" syntax is: %% ifrange tablename.numfield numvalue1a numvalue1b <<content1>> numvalue2a numvalue2b <<content2>> . . . <<defaultcontent>> %% Here is what it's doing: for each individual recipient, the command looks in the table tablename for the field numfield. If the field's numerical value is between numvalue1a and numvalue1b, then the command prints content1 and ends the script. (Note that it will also print the content, if the field value is equal to one of the range. If the field's numerical value is between numvalue2a and numvalue2b, then the command prints content2, and so on. You can have as many value-value-content groupings as you like - but make sure each value has a content result.) If the field is not equal to any of the values, the script prints defaultcontent. Example 1 Having opened a new store in Oakland and Miami, Testco wants to add a special notice in their regular newsletter to all local customers. Testco stores zip code information in the zip field in the address database table. Notice that, because zip codes can be discontinuous, you may wish to repeat content with different blocks of zip codes. %% ifrange address.zip 33122 33196 <<Come 94601 94613 <<Come 94619 94621 <<Come <<We're opening new %% see our Miami store!>> see our Oakland store!>> see our Oakland store!>> stores all the time!>> 439 Joe, who lives in zip code 94605, would see: Come see our Oakland store! Dennis, who lives in zip code 33128, would see: Come see our Miami store! Tenzing, who has no zip code information, would see: We're opening new stores all the time! Example 2 In a direct mail campaign, you want add a notice telling students and seniors about special discounts available to them. You already have information on their age stored in the Members_ table. %% ifrange Members_.age 13 23 <<Special for students: 20% off!>> 60 120 <<Special for seniors: 30% off!>> <<>> %% Note that, while ifrange does not support greater or less than, it is easy to create a range which would include everyone above a certain number by simply fixing one value to be extremely high or low. For example, no one is likely to be older than 120, so you can indicate "60 or older" by simply making the range limits 60 and 120. Joe, who is 20, would see: Special for students: 20% off! Tenzing, who is 70, would see: Special for seniors: 30% off! Dennis, who is 40, would see nothing, since defaultcriteria is blank. ifdate Use the "ifdate" command in situations where you simply want to know whether a date field is within a certain range of date values. The "ifdate" syntax is: %% ifdate tablename.datefield yyyy/mm/dd yyyy/mm/dd <<content1>> yyyy/mm/dd yyyy/mm/dd <<content2>> 440 . . . <<defaultcontent>> %% Here is what it's doing: for each individual recipient, the command looks in the table tablename for the field datefield. If the field's date value is between the first condition's two date values (in the format yyyy/mm/dd), the command prints content1 and ends the script. If the field's date value is between the second condition's two date values, the command prints content2, and so on. (You can have as many date-date-content groupings as you like -- but make sure each value has a content result.) If the field is not equal to any of the values, the script prints defaultcontent. Example 1 You want to insert an introductory line in your monthly text newsletter thanking customers who joined your list recently or long ago. Newsletter for July 1, 2002 %% ifdate Members_.DateJoined_ 2002/06/01 2002/07/01 <<WELCOME NEW CUSTOMERS! >> 1995/01/01 1999/12/31 <<THANKS VETERAN CUSTOMERS! >> <<>> %%Dear... Note that we inserted a inserted a line break after the special message, so that the thank you would appear on a line of its own. Joe, who joined in the last month, would see: Newsletter for July 1, 2002 WELCOME NEW CUSTOMERS! Dear... Dennis, who joined in 1998, would see: Newsletter for July 1, 2002 THANKS VETERAN CUSTOMERS! Dear... Tenzing, who joined in 2000, would see: Newsletter for July 1, 2002 Dear... 441 showpercents ListManager has the ability to send particular messages to a percentage of your list. This feature is useful if you would like several advertisements rotated in your list, or if you would like a particular advertisement sent to only part of your list. The percentage chosen to receive each message is random—those delivered to first will have the same chances of receiving a particular message as those delivered last. The text block rotated may be plain text, HTML or blank. For each text block, you select the percentage of recipients who should receive it. Note that the sum of all the percentages cannot exceed one hundred. In other words, if you have one text block displayed 60% of the time, and another 60% of the time, you will receive an error message—you will not have 20% receiving both messages. If you'd like to do so, insert two percentage conditions, each with 60% text block, 40% blank text. The "showpercents" syntax for a percentage of recipients is: %%showpercents {60 text block 1 40 text block2} uniquename%% 60 and 40 are the percentage of recipients who should receive each message. Text block 1 and text block 2 is the text that should be rotated. Uniquename must be a name unique on this server to label this showpercents tag. The "showpercents" syntax for a percentage of mailings is: %%before ;showpercents {60 text block 1 40 text block2} uniquename%% The syntax is the same for a percentage of recipients, but the "before" command is added so that it is applied to the entire mailing. For more information about the before command, see Script Execution Points. Invite (Referral Feature) Referral forms help your list members to invite their friends to join your list. You may track how many friends were referred by list members, how many opened or clicked on a tracking link in the invitation, and how many ultimately joined the list. Here's how it works: 1. You send out a mailing to your list with a referral link asking members to invite their friends to join the list. 2. List members click on the link, and enter the email addresses of those they'd like to invite, and an optional message for them. 3. The invited members receive an email message telling them how to join the list. If they follow the instructions in the invitation, they become a list member. To use the referral feature, you must first create an invitation—a message that will be sent to those referred telling them how to join the list. This can be accomplished easily using the Invitation Template in Content, which can be customized to fit your needs. 442 Next, you must create a referral form—the web page members are taken to when they want to invite a friend to join the list. Finally, you must insert a referral link into your mailing (or into the mailing content). See Referral Tracking for step-by-step instructions on how the referral feature works. To insert an invite link manually, you must use the invite command. The syntax for an invite link is: %%invite 1 2 -detect_open -detect_html -dest_url http://www.example.com%% invite The command to insert a referral link. 1 The DocID_ in the Docs_ table of the invitation document that should be sent to those who are invited. 2 The DocID_ in the Docs_ table of the referral form referrers should be taken to when they click on this link. -detect_open If included in the command, the invitation will detect opens of those who are invited. -detect_html If included in the command, the invitation will detect whether or not those who are invited can see HTML. -dest_url If included in the command, the destination URL referrers will be taken to after referring friends to the list. If none is specified, they will be taken to a generic page thanking them for referring friends. Template Form Fields You can make any template into a form by adding template form fields into your template content. When users create a message using the template content, they will be taken to a form that prompts them to fill in blocks of text. These blocks will then be inserted into the content where you inserted the template form fields. In order to make a content template that presents users with a form, you must insert template form fields into your content where you'd like users to be prompted to fill in information. These template form fields may be in either the text or HTML portions of the content. They may also be in the header to prompt users for a From: or Subject: line, while suggesting a default entry. There are two kinds of template fields: a line, and a paragraph. A line prompts the user for a single line of text, whereas a paragraph prompts them for a larger block of text. The syntax for including a line in a form is: 443 ##line "field label" "default text"## line The command to automatically include a template form field for a single line. "field label" The label the field will have in the template form. "default text" (Optional) The default text that will be in the template form field. The syntax for including a paragraph in a form is: ##paragraph "field label" "default text"## paragraph The command to automatically include a template form field for a paragraph. "field label" The label the field will have in the template form. "default text" (Optional) The default text that will be in the template form field. Advanced Scripting Introduction and Index Custom Scripts allow you to insert complex, dynamic content into your messages. In ListManager, you can do this with a highly flexible programming language called Tcl (pronounced "tickle"). Tcl was designed specifically to make scripting easy to learn and use. As a result, you don't have to be an advanced programmer to create custom scripts -- and the examples in the sections below will show you ways of dealing with common problems. People with programming experience, however, will find that Tcl also has powerful tools for interacting with customer data, and can permit you to do most anything you want. Advanced Scripting is not available for ListManager Standard licenses. It must be enabled in Utilities: List Settings: For Programmers: Email Scripting and Utilities: Administration: Server: Server Settings: Security. Tcl Scripting and Advanced Mail Merge Introduction ListManager utilizes a built-in scripting language which can be used to customize message content. In this context, scripts are short computer programs that can be used to perform some function. In this case, the result of the execution of a script is a string of text that is inserted into an email message. These scripts can range in complexity from simple statements to complex programs. This section and the sections that follow will guide you from the simplest forms of mail-merge that simply insert the contents of a database field to the more powerful scripts that can perform SQL queries and format the results in HTML. 444 Tcl Scripting in ListManager is supported using an embedded interpreter for a language called "Tcl" (pronounced "tickle"). Tcl is a powerful, text-oriented scripting language that has been around for many years and has a strong following and support base. It is important to note that, due to the context of where it is used in ListManager, the Tcl language used in ListManager differs slightly from standard Tcl. The differences are detailed in the section ListManager Tcl vs. Standard Tcl. This section of the manual will get you started with Tcl and show you how to use many of the scripting commands added in ListManager. The information you'll find here may be all you need to create complex and highly individualized messages. If you wish to learn more about Tcl and leverage some of the more advanced text formatting and processing features, there are many good books available. More information about this powerful scripting language can be found at: http://www.scriptics.com/scripting/ . Delimiters Tcl scripts are embedded inside email messages by enclosing them between the Tcl delimiters. The delimiters used to start and end a Tcl tag are both "%%". All text between and including the delimiters will be replaced with the result of the script evaluation. If you wish to use these characters inside your email message and you don't want them interpreted as a script delimiter, you must put a backslash ( \ ) before the first % symbol. For example, if you want the text: "Scripts are delimited by %% characters." to show up properly in your message, insert a backslash before the first '%' symbol: Scripts are delimited by \%% characters. This backslash will be removed when the message is processed. Commands Fundamental to the Tcl programming language is the concept of a command. A command is used to pass data to an internal function and then return the results of that function as a text string. To modify how the command functions, you add arguments to the command. The results returned by the command replace the script including its delimiters. It is possible to add your own commands to Tcl. These types of commands are generally referred to as procedures. Sometimes the terminology blurs the difference between these two concepts since calling a procedure is essentially identical to calling a command. The simplest form of a Tcl script is a single command call: %%command argument1 argument2 ...%% where "command" is what you want to do and "argument1" and the following arguments give the command more information about how to do what is required of it. Note that some commands take no arguments. The 'merge' Command The merge command is the most commonly used Tcl command and also one of the most useful and flexible. merge performs the common mail merge function, meaning it can merge in personal information into a message. In general, this personal information 445 will be data stored in a database table. This data can be stored in the ListManager members table or it can be from other tables that ListManager has access to. The merge command takes a single argument which is database column name. The common form of this command is: %%merge tablename.fieldname%% where tablename is any table that ListManager has a key into and fieldname is a field in that table. The standard tables that ListManager has access to are: Members_ stores information about each member in a list Lists_ stores information about a ListManager mailing list Topics_ stores information about the topic that this list is a member of Sites_ stores information about the site that this topic is part of Inmail_ stores the incoming mail message Outmail_ stores the message that is currently being sent. Subset_ stores information about the list subset that the current message was sent to For example, to merge in a member's email address, you can use the merge tag: %%merge Members_.EmailAddr_%% If you send to a subset, you can also access any tables that were part of the join ( that is, specified in the FROM and WHERE parts of the SQL statement ) in the subset. For example, if you joined to the table demographics in a subset, you can merge any field from that table. For example: %%merge demographics.ZipCode%% If no table name is specified, the Members_ table is assumed. However, you must make sure that the field name is unique among any tables you have joined to. For example: %%merge EmailAddr_%% will work in general but if, as in the previous example, demographics had a column named EmailAddr_ then this would generate an error. Additionally, the argument to merge can be any SQL that is valid in the SELECT part of an SQL statement. In this case, the argument must be encapsulated in curly braces ( { } ). For example: %%merge {'"'+Members_.FullName_+'" <'+Members_.EmailAddr_+'>'}%% will be replaced with: "John Smith" <[email protected]> The argument to merge can also be a Tcl variable or a command. Variables 446 Tcl is a text-based language. That means that almost every aspect of Tcl is based on string manipulation. Strings are returned by commands and are stored in variables. A variable is name for an internal storage area for a string. You can put something into a variable, manipulate the variable, and then return the results. You can also put numbers into variables and perform numerical operations on them as described in a later section. The most basic way to put something into a variable is with the set command. For example: %%set message "Hello world!"%% will put the string "Hello world!" into the variable message. In Tcl, strings are generally delimited using double-quotes ( " ). If you wish to use a double-quote inside of your string, prefix it with a backslash ( \ ). This is called escaping a character and is common in programming languages. You must also escape certain other characters in order to use them in a string. These include the dollar sign "$" and the open and closed square brackets "[" and "]". Here is an example using escaped quotes: %%set message "I said \"Hello world!\"."%% will return I said "Hello world!". You can retrieve the contents of a variable by putting a dollar sign ( $ ) in front of it. For example: %%return $message%% In this case, the contents of the variable message are returned from this script by using the return command. The return command will be the last thing executed in a script and the argument to this command is the text that is to be returned. It is important to note that if you don't specify a return command, the last string to be manipulated will be returned. For example: %%set message "Hello world!"%% will not only set the variable message but it will also return the text that was assigned to it. The importance of this will become evident in the next section. It is recommended that you always use the return command at the end of your scripts to return the desired result. In the merge examples described previously, this is not required, but it will become necessary for more complicated scripts. Scripts Scripts can, and generally do, have multiple lines and statements. In ListManager's Tcl implementation, each statement must be terminated by a semi-colon ( ; ). This differs from standard Tcl, where the end of a line or a semi-colon ends a statement. The last command in a script does not need the semi-colon at the end, although it doesn't hurt to include one. The following is a short Tcl script that demonstrates the features described so far and introduces one new programming concept. %% set email [merge members_.EmailAddr_] ; return $email ; 447 %% In this example, we set the variable email to be the contents of the members_.EmailAddr_ field and then returned the contents of that variable. We have also introduced the use of square brackets ( [ ] ). These brackets tell the Tcl interpreter to execute the command contained inside and return the results. Variables can be used inside of other strings very easily. Simply include them in the content of the string and prefix them with a dollar sign as shown above. For example: %% set world "world!" ; return "Hello $world." ; %% In this example, the variables, hello and world are inserted into the string which is returned from this script. Similarly, you can also execute commands like merge inside of a string. For example: %% set result "Your email address is [merge members_.EmailAddr_]." ; return $result ; %% These simple features of the Tcl language in combination with the merge commands may be all you need to do highly personalized email messages. The next section introduces some important concepts in the message send and Tcl evaluation process. Conditional Statements It is often desirable to modify the contents of a message based on the recipient's stored information. For example, suppose you were required to charge sales tax for purchases made in the state of California? You could use the if command in the following merge tag to insert this information only for recipients who live in California. %% if { [merge demographics.State] == "CA" } { return "\nCalifornia residents must add 8% sales tax.\n" ; } else { return "" ; } %% In this script, the contents of the demographics.State field is equal to the text string "CA" then the script will return a blank line followed by a line that says "California residents must add 8% sales tax.". Otherwise, it will return nothing. In Tcl, if you want to end a line, you must insert the characters "\n" into your string. In this case, the "\n" at the beginning simply inserts a blank line; the "\n" at the end will make sure that any text that follows this tag will begin on the next line. Suppose you want to insert a different line into your message depending on the time zone that your customer is in? For the continental US, this would require four alternatives. This is also possible using the if command. For example: 448 %% set timezone [merge demographics.TimeZone] ; if { $timezone <= -8 } { return "10am to 6pm PDT" ; } elseif { $timezone == -7 } { return "9am to 5pm MDT" ; } elseif { $timezone == -6 } { return "8am to 4pm CDT" ; } else { return "7am to 3pm EDT" ; } %% This example assumes that your TimeZone field is an integer that defines the number hours past Greenwich Mean Time your customer is in. These examples demonstrate the basic if command functionality. Note that the else and elseif parts of the if command are optional. For example, the first example could have also been simplified to: %% if { [merge demographics.State] == "CA" } { return "\nCalifornia residents must add 8% sales tax.\n" ; } %% It is good to get into the habit of explicitly returning an empty string, however. As noted in the introduction, not doing so can result in a script returning something that you did not expect. Another useful conditional command is the switch command. The switch command simplifies the certain types of if elseif else type commands. For example, suppose you wanted to return a state name in place of a state code. This example will be limited to just a few conditions but it is equally valid with more. Using the if command, you could do this: %% set state [merge demographics.State] ; if { $state == "CA" } { return "California" ; } elseif { $state == "OR" } { return "Oregon" ; } elseif { $state == "WA" } { return "Washington" ; } elseif { $state == "NV" } { return "Nevada" ; } else { return "Unknown" ; } %% This is obviously very hard to read and quickly gets out of hand. You can accomplish the same thing using the switch command. The above example then becomes: 449 %% switch [merge demographics.State] { "CA" { return "California" } "OR" { return "Oregon" } "WA" { return "Washington" } "NV" { return "Nevada" } default { return "Unknown" } } %% Expressions It is often useful to be able to do mathematical calculations using data specific to each recipient. This can be accomplished using the expr command. For example: %% set balance [merge accounts.Receivable] ; set penalty [expr 0.10 * $balance] ; return "If your account balance is not paid in 10 days, please include a late fee of \$$penalty." ; %% Notice that since we wanted to use the dollar sign "$", we had to escape it using a back-slash in order to keep it from being interpreted as the beginning of a string. Script Execution Points Tcl mail merge scripts can be processed at different times during the message send process. There are currently three different states at which Tcl tags can be executed: 1. Before the message send starts; 2. During the message send; 3. After the message send is completed or goes into retry mode. The states at which scripts are executed are determined by the presence of special tags at the beginning of each script. These tags can be thought of as procedures, but are actually removed before any scripts are executed. For consistency, they obey the syntax of a procedure. Message-Level Scripts When a message is sent, data that applies to the entire message and that doesn't change for each recipient is loaded once. There may also be scripts that need to be processed or certain table fields that need to be retrieved only once for the entire message. These are referred to as "message-level scripts" or "message-level data" since they apply to the entire message. Message-level scripts are indicated by the inclusion of the keywords init or before that 450 immediately follow the Tcl tag delimiters. For example: %% init ; ... some message-level Tcl code ... %% or %% before ; ... some message-level Tcl code ... %% Both of these tag types will be processed once for the entire message before the recipients are mail-merged. At this stage in the send, no recipient-level data is accessible and any attempts to execute recipient-level procedures or merge recipientlevel columns will result in an error. They will be processed again at the beginning of processing any retries of the message. The only difference between init tags and before tags is that init tags always return an empty string and before tags function as normal merge scripts. In Tcl, whatever the last string to be manipulated was is the return string of the script. For example: %% before ; set variable "some value"%% will return "some value" as if we had done: %% before ; set variable "some value" ; return $variable%% For this reason, the init tag was created. Any message-level initialization that does not require a string to be returned should be done in init tags. This will help guard against the inadvertent merging of data. before tags should be used for mail-merging text that only needs to be set once for the entire message. Recipient-Level Scripts Scripts that may return different results for each user are referred to as "recipient-level scripts" and a recipient's data is referred to as "recipient-level" data. This data is generally data from the members table but could be any data that is available via a join from the members table to any other accessible table. This join is done by sending to a subset where the join criteria has been defined as part of the subset. A "recipient-level" script requires no special tags. For example: %% set variable [merge EmailAddr_] ; return $variable %% Send-Completion Scripts When the current message send is completed or goes into retry mode, scripts defined as "after" scripts are executed. These scripts never have any impact on the content of the message because the message has already been sent by the time that these are executed. Recipient-level scripts do not require any special keywords. In general, recipient-level scripts should only be used for scripts or merging fields that could change from recipient to recipient. Recipient-level scripts can execute message-level Tcl procedures or use message-level data. The reverse is not true. Scripts to be run when the message is completed should be run in scripts using the tag 451 "after". For example: %% after ; sql tag execute "insert into results ..." %% Error Handling and Debugging Tcl scripting in email messages is much different from programming in standard programming environments; normally when you make a mistake programming, that mistake isn't emailed to all of your customers! For this reason, there are some special debugging features built into ListManager. Even with these debugging features, it is recommended that you test your Tcl scripts with a test list. errormode One of the most useful debugging features is the errormode procedure. The most common form of this procedure is: %%init ; errormode notify [email protected]%% As described in the previous section, the init part of this script indicates that this script should only be evaluated once at the beginning of the message send and should always return an empty string. The errormode procedure tells the Tcl processor to abort the message send when an error occurs and to send an error notification to the specified email address. To see where this might be useful, consider the following message text: %%init ; errormode notify [email protected]%% Dear %%merge members_.FullName_%%, ... In this case, the argument to merge has an error in the table name. In a normal message send, this would generate an error but the message would still continue to be send and other scripts processed. The result of a script with an error is normally an empty string. However, since the errormode procedure was used to set a notification address, the Tcl processor will stop processing this message and send a notification to the specified email address. This notification includes an error string that indicates what the error was and includes a copy of the script in which the error occurred. Other error modes are documented in the section ListManager Tcl Procedures. redirect Another useful debugging feature is the redirect procedure. The argument to redirect is an email address which will always override the email address of the actual recipients. This means that you can send to your list as normal and have all of the messages go to the address you specified and not the list. For example: %% init ; errormode notify [email protected] ; redirect [email protected] ; %% 452 This is useful for determining whether scripts execute properly for each member and whether the fields you expect to have data actually do. The problem with this feature is that if you are sending to a big list, you will get a lot of mail. You can use redirect as-is for small test lists, but for large production lists, it is best used in conjunction with the skip procedure. skip The skip procedure tells ListManager not to send to the current recipient. Along with some simple mathematics and some other Tcl procedures, you can have ListManager only send to every 1000th recipient. For example: %% init ; errormode notify [email protected] ; redirect [email protected] ; %% %%if { [recipindex] % 1000 != 0 } { skip }%% This form of testing is only recommended for advanced users. Most users should only test their scripts on test lists. ListManager Tcl Commands General Tcl Commands The following Tcl commands can be used in either message or recipient-level Tcl scripts. sql The sql Tcl command allows an administrator to execute an SQL statement and obtain the results. For security reasons, the administrator must login first using the login command. The sql command can be used to execute an SQL statement that returns a single result set or no results. That result set can have multiple columns and rows. SQL statements that return multiple result sets are not currently supported. The syntax for the SQL command is: %%sql (tag) (function) (function arguments)%% The first argument to the sql command is a tag that is used to identify the query when executing a statement and retrieving results. It allows multiple queries to be distinguished within a message. It is important to note that queries that are done within a message-level Tcl script are in a different scope than those in a recipient-level script. Therefore, the tags that are used to identify them are also in different scopes. A tag used in a message-level script will be distinct from the same tag used in a recipient-level script. A tag can be any string. A message-level script is executed only once for the message and a recipient-level script is executed for each recipient. The results of SQL queries executed in each of these scopes are stored separately and cannot be accessed from a different scope. In other words, recipient-level scripts cannot access the results of queries performed in a 453 message-level script. The reverse is also true. Since the results of message-level queries might be required at the recipient level, they can be stored in variables and accessed for recipients without any command call overhead. The process_merge_tags TclMerge command is useful anytime you want to merge content from another source and have the merge tags evaluated. This is very useful for HTML mailings. This will most likely be used in mailings, but can apply to other documents, such as hello and goodbye documents as well. The process_merge_tags TclMerge command will evaluate any %%-delimited merge tags in the argument passed to it and return the results. This is useful in cases where you want to perform a mail merge on text that is retrieved from the database or via http. Note that these tags are evaluated as straight Tcl and therefore any ListManager Tcl language extensions will not work in these tags. For example, the "init" and "before" modifiers will not be evaluated properly and line unwrapping is not done. Additionally, any special merge tags that are not handled as normal Tcl procedures such as %%MemberID_%% will result in errors. You must use the %%merge MemberID_%% convention for all merged data fields. Example: %%process_merge_args [httpget http://myserver/newsletter.html]%% The second argument to the "sql" command is the name of the function that will be executed. These functions and their arguments are: sql (tag) execute (sql statement) This function will execute the specified SQL statement. sql (tag) numrows This function will return the number of rows that were retrieved. sql (tag) numcolumns This function will return the number of columns that were retrieved sql (tag) columnname (column index) This function will return the name of the column at the specified index. The index must be between 1 and N where N is the number of columns retrieved. sql (tag) data (column index) (row index) This function will return the data that corresponds to the specified column and row indices. The row index must be between 1 and M where M is the number of rows retrieved. If the row index argument is omitted, it will default to 1. If both the column index and row index are omitted, they will both default to 1. Here is an example of how to return all of the names and e-mail addresses of everybody on the current list in the form: Name = Full Name, Email = email@address %%! init errormode debug login [email protected] yourpassword %% 454 %%! sql listmembers execute "SELECT EmailAddr_, FullName_ FROM members_ WHERE List_='[list.name]'" set numrows [sql listmembers numrows] set results "" for { set row 1 } { $row <= $numrows } { incr row } { set Name [sql listmembers data 1 $row] set EmailAddr [sql listmembers data 2 $row] append results "Name = $Name, Email = $EmailAddr\n" } return $results %% sendmessagelm This command is a simple method of sending a message using ListManager's standard message send system. This function takes four arguments: sendmessagelm (from) (to) (subject) (body) Due to the length of the subject and body, it may be more convenient to define these as variables to pass to this command. For example: %% after ; set From "[email protected]" ; set To "[email protected]" ; set Subject "message send has completed!" ; set Body << The message send for: [merge inmail_.HdrSubject_] is complete.>> ; sendmessagelm $From $To $Subject $Body %% Message Level Commands The following commands are valid only in message-level or send-completion scripts. login In order to use certain Tcl commands, the administrator must first log in. This is to keep someone from sending in a message containing malicious SQL or other hazardous code pretending to be an administrator by using the administrator's email address, a practice known as "spoofing". The "login" command is called with the administrator's email address and password. The syntax for this command is: %% init ; login (email address) (password) %% Since this command requires a database query to determine if this address and password are those of an administrator, it should only be used in message-level scripts -- Tcl scripts that begin with "%%init ;" or "%%before ;". Otherwise, the query will be done for each recipient, and it will slow down the send. 455 redirect For testing purposes, it is advantageous to be able to preview what each recipient will see when their message is mail-merged. The "redirect" command will allow the administrator to redirect all messages to a specified email address. The syntax for this command is: %% init ; redirect (email address) %% errormode Since Tcl can be a tricky language to program, debugging message sends will almost certainly be required or desirable. In order to make sure that the Tcl in the message executes properly, the sender should turn on error handling so that if there is an error, the message send stops and the sender is notified. The following error modes are supported: notify, abort, replace, debug, and normal. The most helpful use of this command is the "notify" mode: %% init ; errormode notify [email protected] %% When this mode is set, any Tcl errors will cause the message send to stop and an email that details the error description and the tag in which it occurred will be sent to the specified email address. The "abort" error mode simply causes the message send to stop but no notification is sent. The error text can be found in the transaction log for the message. The syntax for this mode is: %% init ; errormode abort %% The "replace" error mode will cause the tag in which the error occurred to be replaced with the specified text. The syntax for this mode is: %% init ; errormode replace "replacement text" %% The "debug" error mode will replace the tag with the error string. This string indicates what the error was and the text of the script. The "normal" error mode replaces the tag with an empty string. This is equivalent to calling "errormode replace" with an empty string. This is the default behavior. mailtest This command, which takes no arguments and returns an empty string, tells ListManager to put this message into "mailtest" mode. This means that the send will proceed as normal and go through the standard SMTP transaction but will reset before the message data is sent to the server. Any messages sent in this mode will not reach the recipients. This should only be used for testing mail-merge and send speeds. Since messages sent this mode are otherwise indistinguishable from a standard send, bounce handling for bad or intermittent email addresses will still apply. Recipient Level Commands recipindex 456 This command takes no arguments and returns a number that indicates the relative index of the current recipient during the current send. It is based on the range 1 to N where N is the total number of recipients to which the message is being sent. The ordering is based on the retrieval order from the database but isn't guaranteed to be in this order. numrecips This command takes no arguments and returns the number of total recipients that are being sent to. This number represents N in the range of results returned by the "recipindex" command. skip There are times when the sender of a message may want to not send to certain recipients that would be part of a normal send. For example, if the sender was testing a message with the "redirect" command but they were sending to a list with 100,000 messages, they would receive 100,000 copies of the message. Or, the sender might want to do mail-merge for the entire send and verify that there were no errors before doing the actual send. Using the skip command, which takes no arguments and returns an empty string, the sender could send to every 1000th recipient and skip the rest using the following Tcl mail-merge tag: %% if { [recipindex] % 1000 != 0 } { skip } %% This means that if the index of this recipient as retrieved by the recipindex command is not evenly divisible by 1000 then it will be skipped. The sender could skip every recipient by simply adding the tag "%%skip%%" to the end of the message. When the "skip" command is executed, further processing of the current message is stopped so if you are testing the message to make sure that all the scripts are executed properly, call this command at the end of the message. Otherwise, call it at the beginning. abort This command terminates the sending of the current message. If the error mode was currently set "notify", then the notification will be sent. Otherwise, the error mode will be set to abort and an error will be generated causing the message send to stop. abort can be called with a text string argument which will be passed on as the error text. For example: %%abort "Terminating this message send."%% memberstable, emailaddrcolumn, and memberidcolumn The name of the members table and the column names of the email address and member ID are all configurable by the server administrator. These commands return these names. When writing custom Tcl commands for library code, use these commands in place of Members_, EmailAddr_, and MemberID_ memberidchar Each member in the ListManager database has a unique ID and for each ID, there is a 457 special code character which is a single letter. The ID and code character are used in many places for the validation of confirmations and unsubscribes. The code character makes it harder to accidentally unsubscribe someone else by typing in the wrong ID. The memberidchar command returns the member ID and the code character as a string that can be used in your scripts. For example: To unsubscribe, click here: http://www.yourdomain.dom/cgi-bin/unsub.pl?id=%%memberidchar%% emailunsub The member unsubscribe address is fundamental to the operation of a mailing list and our failsafe unsubscribe feature makes it convenient and simple for a member to unsubscribe. The emailunsub command will return an unsubscribe address specific to the current member. This command is equivalent to the legacy subst tag version: $subst('email.unsub') which is also supported via the Tcl command "subst email.unsub". Legacy Subst Commands ListManager has always had some mail-merge capability using special subst tags of the form $subst('argument'). All of these commands are supported in the new mail-merge functionality. Prior to 6.0h, the form of the tag was subst (argument), which conflicted with the Tcl subst command. For 6.0h and higher, the form of the new tags is: lmsubst (argument) where (argument) is the same argument that was passed to the original $subst version. IMPORTANT NOTE: When upgrading to ListManager 6.0h and higher, those who have created scripts using the ListManager subst command must update them to use lmsubst. Differences between ListManager Tcl and Standard Tcl The Tcl language used by ListManager is slightly different from normal Tcl implementations. The differences are subtle but important. There are also some important additions to the syntax that allow the user to get around some of the problems involved with using a scripting language in an email message. Line Wrapping The most important difference between ListManager Tcl and standard Tcl is in the way that line breaks are handled. Since most email clients automatically word-wrap outgoing mail, it is likely that Tcl scripts would be broken by these line breaks. In Tcl, the end of the line ends the current statement. Additionally a single semi-colon ( ; ) also ends the current statement. So, to avoid inadvertent line breaks, all line breaks in Tcl scripts are removed and replaced with a single space. This requires the user to end all statements with a semi-colon. For example, the Tcl script: for { set i 1 } { $i <= 3 } { incr i } { set j [expr 2 * i] 458 set k [expr j * i] append result "$i, $j, $k\n" } which is valid standard Tcl, will not be processed correctly by ListManager Tcl. This is because the line breaks after the 'set' procedure statements will be removed. Therefore, the user must always terminate statements with a semi-colon. For example: for { set i 1 } { $i <= 3 } { incr i } { set j [expr 2 * i] ; set k [expr j * i] ; append result "$i, $j, $k\n" ; } Note that the semi-colon must always be preceded by a space and followed by a space or a line break. The importance of this feature is evident in scripts where a single command line exceeds the line-wrapping width of the email client's editor. Most editors only do linewrapping when the message is actually sent so that it is not possible to know exactly where the line will be wrapped. The process of removing line breaks is called 'line unwrapping' as opposed to 'line wrapping'. Line unwrapping is done before the Tcl script is evaluated and it does not make any distinctions between quoted text and Tcl code. For example, the following Tcl script: %%set result "The domain name for your email address [merge EmailAddr_] is [getdomain [merge EmailAddr_]]"%% has a line break in the middle of a string. In standard Tcl, this requires the use of a backslash ( \ ) at the break point as in: set result "The domain name for your email address [merge EmailAddr_]\ is [getdomain [merge EmailAddr_]]" ; In ListManager Tcl, the line break is turned into a single space. In standard Tcl, the use of the backslash at the point of the line break has additional functionality. All whitespace (i.e. non-printing characters such as line-breaks, tabs, and spaces) after the backslash is removed and replaced by a single space. This makes it possible to do the following: set result "The domain name for you email address [merge EmailAddr_]\ is [getdomain [merge EmailAddr_]]" ; In this case, the spaces at the beginning of the second line will be removed and the entire break will be replaced by a single space. If you do not end the line with a backslash, then all the spaces at the beginning of the next line will be included in the result. The backslash is also used in Tcl to continue Tcl code on the next line as in: 459 for { set i 1 } { $i <= 3 } \ { incr i } { ... } This is not required in ListManager Tcl because lines are always wrapped. Extra whitespace is ignored. It is only noticeable when it is in a string because this is generally what is visible to the user. For consistency, it is recommended that you use the backslash when inserting new lines in Tcl scripts. There is another problem that cannot be solved automatically through line unwrapping. There are some strings that exceed the word-wrapping width of a mail-client that don't have any spaces. In this case, it cannot be safely broken at a space and is generally just broken at the wrap width. The most common case of this is long URL's. To get around this problem in Tcl, you can construct the string in pieces where each piece is less than the word wrapping width. For example: %% set mystring "" ; append mystring "http://www.somelongdomainname.com/cgi-bin/somescript.pl" "?someparameter=somevalue" "&someotherparameter=someothervalue" "&yetanotherparameter=yetanothervalue" ; return $mystring ; %% Make sure you set mystring to an empty string before you do append otherwise you will keep appending to the same string for each recipient. It is possible to disable the line unwrapping step by including an exclamation mark ( ! ) immediately after the first %% mail merge tag delimiter. Care must be taken to avoid any undesired line-wrapping when the message is sent. For example %%! for { set i 1 } { $i <= 3 } { incr i } { set j [expr 2 * i] set k [expr j * i] append result "$i, $j, $k\n" } return $result %% Text Quoting Another important addition to ListManager Tcl is the inclusion of block-quoting delimiters '<<' and '>>'. Any line breaks that occur within these quotes are converted to "\r\n" sequences. These are special characters that are converted by Tcl into a line break within the string. Additionally, any normal quotes ( " ) are converted to 'escaped' quotes (i.e. \" sequences that represent a quote to Tcl) which allows them to be included in a Tcl string variable. The '<<' and '>>' characters are converted to normal quotes. 460 This allows the following: %%set advertisement <<blah blah blah blah blah blah blah blah blah blah "quoted blah" blah blah more blah blah blah>>%% to be converted to a legal Tcl statement: set advertisement "blah blah blah blah blah blah blah\r\nblah blah blah \"quoted blah\"\r\nblah blah more blah blah blah" which is interpreted and returned by Tcl as: blah blah blah blah blah blah blah blah blah blah "quoted blah" blah blah more blah blah blah Procedures and variables are still processed as normal within these quotes as in: %%set advertisement <<blah blah blah $variable blah blah blah blah [someprocedure] blah "quoted blah" blah blah more blah blah blah>>%% Since all normal quotes are 'escaped' within block quotes, it is not possible to use them as Tcl, non-string, quotes as in: %%set advertisement <<blah blah blah $variable blah blah blah blah [someprocedure "some argument"] blah "quoted blah" blah blah more blah blah blah>>%% The [someprocedure "some argument"] text will be converted to [someprocedure \"some argument\"] which is probably not what was wanted. If you need to quote any text for a procedure within block quotes, use the '{' and '}' style quotes. If you wanted to process Tcl code in the quoted argument then use a variable and set the argument text before you quote your block of text. For example: %%set argument "argument with a [tcl procedure] and $string variable" ; set advertisement <<blah blah blah $variable blah blah blah blah [someprocedure $argument] blah "quoted blah" blah blah more blah blah blah>>%% or %%set somestring [someprocedure "argument with a [tcl procedure] and $string variable"] ; set advertisement 461 <<blah blah blah $variable blah blah blah blah $somestring blah "quoted blah" blah blah more blah blah blah>>%% Lyris ListManager Mail Merge Codes (now obsolete) Important Note The following mail merge tags, while fully supported in ListManager 5.0, are now obsolete. We recommend you use the new tags described above in Message Personalization and Scripting. How can I use the Mail merge feature? ListManager allows you to place fields in an email message, which indicate that member-specific information should be placed there. For instance, you can have each user's name included in the message body, as "Dear so and so…". To use this feature, simply include the ListManager field tag where you want the text replaced. Where can I use the Mail merge tags? You can use the Mail merge tags virtually anywhere. Naturally, you can use them in the body of a list posting. They may also be placed in either the header or footer for the list. In addition, you can use many Mail merge tags in documents. Recipient Fields (Obsolete) Important Note The following mail merge tags, while fully supported in ListManager 5.0, are now obsolete. We recommend you use the new tags described above in Message Personalization and Scripting. The following mail merge fields are substituted on the fly, for each recipient as each message is delivered. $subst('Recip.nameemail') The full name and email address of the recipient. For example, you might want each posting to your list to have a header which identifies the original author, as in: From: $subst('Recip.nameemail') If a full name is not available, ListManager will only put the email address. 462 For example: Bob Smith <[email protected]> Or if no name is available: [email protected] $subst('Recip.EmailAddr') This substitutes in the recipients' email address. For example, you might make your list header be: To: $subst('Recip.EmailAddr') You may be interested to know…. And ListManager would substitute it to say: To: [email protected] You may be interested to know…. $subst('Recip.FullName') This substitutes in the recipients' full name. If the member does not have a full name, their email address is used instead. For example, you might start your mailing out with this: Dear $subst('Recip.FullName'), we are glad that you have… And ListManager would substitute it to say: Dear Bob Smith, we are glad that you have… $subst('Recip.password') The password of this recipient. This is an effective way to inform the user of their password, particularly if your list is set to use 'random' passwords. $subst('Recip.FirstName') This substitutes in the recipients' first name (the first component of their full name). If the member does not have a full name, their email address is used instead. If a member only has a single component to their name, that component is used. For example, you might start your mailing out with this: Dear $subst('Recip.FirstName'), we are glad that you have… And ListManager would substitute it to say: Dear Bob, we are glad that you have… 463 $subst('Recip.MemberID') This substitutes in the recipients' unique Member ID. This is useful for exactly identifying the user. $subst('Recip.list') The name of the mailing list this recipient is receiving this message from. $subst('Recip.receiveack') Whether or not this recipient receives acknowledgements of their postings. $subst('Recip.subtype') The type of subscription this recipient has. $subst('Recip.expiredate') The date (if any) that this recipient's subscription expires. $subst(‘recip.whatlists’) This substitutes in a listing of all the lists the recipient is a member of. This is very useful when you want to let users know exactly which lists they have signed up for. It is important to note that this tag only shows those lists where the member's status is "normal". In other words, if a list the member has subscribed to is set to require confirmation, and the member has not confirmed, the list will not show up in this listing. For example, you may want to use this merge tag in the confirmation document: Welcome! You have signed up for the following lists: $subst(‘recip.whatlists’) By replying to this message, you confirm... An excellent opportunity for the above example is when a member signs up for many lists at once and they are sent a single confirmation document. That way, rather than receiving a confirmation for each list, they receive a single confirmation with a listing of the lists. $subst('recip.whatlistsunconfirmed') This substitutes a listing of all the lists the recipient has subscribed to, but has not yet sent confirmation for. This is particularly useful when adding a member to many lists and you want to send them a single confirmation that shows the lists they have not yet confirmed on. For example, you may want to use this merge tag in the confirmation document: Welcome! Your confirmation is needed for the following lists: $subst('recip.whatlistsunconfirmed') 464 By replying to this message, you will confirm yourself for all of these lists... A good opportunity to use this tag is when you have subscribed someone to many lists at once using the 'Add' command in a command message. In that command message, you also specified that the member should receive a single confirmation message by using the oneconfirm modifier. $subst('PurgeID') This substitutes in the Recipient's email address, in square brackets. If this text is forwarded to the unsubscribe-listname@… or purge@… address, ListManager will automatically locate it and unsubscribe this address. This allows you to provide a failsafe unsubscribe mechanism. For example, a typical list footer might be: This is a posting from: $subst('List.Name') To unsubscribe, send a message to $subst('Email.UnSub') $subst('PurgeID') $subst('Outmail.MessageID') This substitutes in the message's unique ID. This is useful for exactly identifying the message. For example, if you sent the following message to a mailing list: Hello! Your email address is $subst('Recip.EmailAddr'), your member ID is $subst('Recip.MemberID') and the ID of this message is $subst('Outmail.MessageID'). To the person who received the message, it might look like this: Hello! Your email address is [email protected], your member ID is 905 and the ID of this message is 3154. $subst('Recip.datejoined') The date that this recipient joined this mailing list. $subst('Recip.numbounces') The number of bounces this recipient has produced in recent days. $subst('Recip.datebounce') The date of the most recent bounce received from this recipient. $subst('Recip.islistadm') Whether or not this recipient is a list administrator. $subst('Recip.confirmdat') The date (if any) that this recipient confirmed their membership. Only applies to lists 465 where "confirm membership: yes" is set. $subst('Recip.notifyerr') Whether or not this recipient receives error mail notifications (i.e., bounce reports). $subst('Recip.dateheld') If this recipient is held, what date they were held on. $subst('Recip.norepro') Whether or not this recipient receives copies of their own postings. $subst('Recip.cleanauto') Whether or not this recipient will be automatically held if they bounce too much mail. $subst('Recip.comment') The comments that this recipient has. $subst('Recip.additional') The additional information this recipient has. This field is not used by ListManager, and is meant for user-defined data of any type. $subst('Recip.userid') The userid information this recipient has. This field is not used by ListManager, and is meant for user-defined data of any type. Member Fields (Obsolete) Important Note The following mail merge tags, while fully supported in ListManager 5.0, are now obsolete. We recommend you use the new tags described above in Message Personalization and Scripting. The following "member" attributes are extracted from the person posting a message to a list. To substitute attributes from the person receiving a message (the recipient) see the Recip.XXX mail merge fields. $subst('member.nameemail') The full name and email address of this member. For example, you might want each posting to your list to have a header which identifies the original author, as in: From: $subst('member.nameemail') If a full name is not available, ListManager will only put the email address. 466 For example: Bob Smith <[email protected]> Or if no name is available: [email protected] $subst('member.emailaddr') The email address of this member. $subst('member.fullname') The full name of this member. For example, you might want each posting to your list to have a header which identifies the original author, as in: This message was written by $subst('member.fullname') $subst('member.password') The password of this member. In general, you would not want to include this in a list posting, since everyone who received the message would see the password. However, this field is useful in documents, such as the "hello" document, to inform the user of their password. $subst('member.memberid') The ID of this member, example: "3456" $subst('member.list') The name of the mailing list this member belongs to. $subst('member.receiveack') Whether or not this member receives acknowledgements of their postings. $subst('member.subtype') The type of subscription this member has. $subst('member.expiredate') The date (if any) that this member's subscription expires. $subst('member.datejoined') The date that this member joined this mailing list. $subst('member.numbounces') The number of bounces this member has produced in recent days. $subst('member.datebounce') 467 The date of the most recent bounce received from this member. $subst('member.islistadm') Whether or not this member is a list administrator. $subst('member.confirmdat') The date (if any) that this member confirmed their membership. Only applies to lists where "confirm membership: yes" is set. $subst('member.notifyerr') Whether or not this member receives error mail notifications (i.e., bounce reports). $subst('member.dateheld') If this member is held, what date they were held on. $subst('member.webenv') If this member subscribed using the web interface, the environment variables (such as browser type, TCP/IP address, referrer, etc.) that were active at that time. $subst('member.norepro') Whether or not this member receives copies of their own postings. $subst('member.cleanauto') Whether or not this member will be automatically held if they bounce too much mail. $subst('member.comment') The comments that this member has. $subst('member.additional') The additional information this member has. This field is not used by ListManager and is meant for user-defined data of any type. $subst('member.userid') The userid information this member has. This field is not used by ListManager and is meant for user-defined data of any type. List fields Important Note The following mail merge tags, while fully supported in ListManager 5.0, are now obsolete. We recommend you use the new tags described above in Message Personalization and Scripting. The following fields apply to list postings, which are substitutes in the values from the 468 currently active mailing list (i.e., the one getting the message posted to it). $subst('list.name') The short name of the list. $subst('list.topic') The name of the topic this list belongs to. $subst('list.descshort') The short description of this mailing list. $subst('list.primlang') The primary language used on this mailing list. $subst('list.seclang') The secondary language used on this mailing list. $subst('list.admin') The name of the administrator assigned to this mailing list. $subst('list.urllist') The URL to the home page of this mailing list (if any is defined). $subst('list.urllogo') The URL to the GIF/JPEG graphic logo for this mailing list. $subst('list.keywords') The topical keywords assigned to this mailing list. Site fields Important Note The following mail merge tags, while fully supported in ListManager 5.0, are now obsolete. We recommend you use the new tags described above in Message Personalization and Scripting. The following fields apply to list postings, which are substitutes in the values from the currently active site (i.e., the site which hosts this mailing list). $subst('site.name') The short name of this site. $subst('site.domainname') 469 The host name this site uses, example: "lyris.yourcompany.com" $subst('site.country') The country this site is located in. $subst('site.city') The city this site is located in. $subst('site.urlowner') A URL to the home page of this site's owner. $subst('site.ownergif') A URL to a GIF/JPEG graphic logo for this site owner. $subst('site.urllyris') A URL to the home page for this site (if any) $subst('site.mailaddr') The postal mailing address of this site. $subst('site.desc') A short description of this site. $subst('site.deflang') The default language used at this site. $subst('site.mainadmin') The name of the main administrator defined for this site. $subst('site.techsupp') The name of the technical support contact defined for this site. Email Address fields Important Note The following mail merge tags, while fully supported in ListManager 5.0, are now obsolete. We recommend you use the new tags described above in Message Personalization and Scripting. The following fields apply to list postings, which are substitutes in the values from the currently active posting. They all substitute in email addresses of one type or another. $subst('email.list') 470 The email address for posting to this mailing list. Messages emailed to this address will be contributed to the mailing list. $subst('email.owner') The email address for sending messages to the owner(s) of this mailing list. This is the owner-listname@… address and all mail sent to this address is distributed to the members of the list who have the setting "receive admin mail: yes" set. $subst('email.unsub') The email address for unsubscribing from this mailing list. This is the "unsubscribelistname-XXXXZ@…" address. The simplest way to unsubscribe from a mailing list is to send a message to this address. $subst('email.purge') The email address for unsubscribing from all mailing lists at this server. This is the "purge@…" address. The simplest way to unsubscribe from all mailing lists is to forward a list posting to this address. Incoming Mail fields Important Note The following mail merge tags, while fully supported in ListManager 5.0, are now obsolete. We recommend you use the new tags described above in Message Personalization and Scripting. The following fields apply to list postings, which are substitutes in the values from the currently active posting. They all pull their values from information in the incoming mail message (i.e., the message being posted). $subst('inmail.messageid') The ListManager message-ID of the message being posted. $subst('inmail.hdrfromspc') The value of the "From " field in this message. This is the value passed via the MAIL FROM:<> command during the SMTP transaction. $subst('inmail.hdrfrom') The value of the "From:" header in this message. $subst('inmail.hdrto') The value of the "To:" header in this message. $subst('inmail.hdrdate') The value of the "Date:" header in this message. 471 $subst('inmail.hdrsubject') The value of the "Subject:" header in this message. $subst('inmail.hdrall') The complete header in this message. $subst('inmail.to') The actual recipient of this message. This is the value passed via the RCPT TO:<> command during the SMTP transaction. $subst('inmail.byemail') Whether or not this incoming message was received by email (or by NNTP). If the message was received through the web interface, this value will be "no", otherwise it will be "yes". $subst('inmail.body') The full body of the incoming mail message (does not include the header) $subst('inmail.bodyquoted') The full body of the incoming mail message (does not include the header), with each line quoted with a "> " character. Date Field Important Note The following mail merge tags, while fully supported in ListManager 5.0, are now obsolete. We recommend you use the new tags described above in Message Personalization and Scripting. You can use the current date and time as a mail merge field. To do this, use the "date:" mail merge code, followed by the formatting characters you want to use, to display the date and/or time in exactly the manner you want. For example, the code: $subst('date:%c') Will print the date and time in the default format. Another example: $subst('date:%A, %B %d, %Y') Will display the Weekday, Month, day of month and year, in this format: Monday, June 14, 1997 Any characters which are not date formatting codes are displayed as-is. For example, 472 in the above example, the commas are displayed as indicated in the formatting string. Here is a complete list of date formatting codes: %a day of week, using locale’s abbreviated weekday names %A day of week, using locale’s full weekday names %b month, using locale’s abbreviated month names %B month, using locale’s full month names %c date and time as %x %x %C century, 1992 becomes 19 (-47 to 327) %d two-digit day of month (01 to 31) %D date as %m/%d/%y %e two-digit day of month, single digits are preceded by a blank (1 to 31) %f if year < 1000, then "%s %P", else "%s" %H two-digit hour (00 to 23) %I two-digit hour (01 to 12) %j three-digit day number of year (001 to 366) %k two-digit hour, single digits are preceded by a blank (0 to 23) %l two-digit hour, single digits are preceded by a blank (1 to 12) %m month number (01 to 12) %M minute (00 to 59) %n newline, same as \n %p locale’s equivalent of A.M. or P.M., whichever is appropriate %P A.D. or B.C. %r time as %I:%M:%S %p %s positive year, -4 becomes 4 (1 to 32766) %S seconds (00 to 59) %t tab, same as \t %T time as %H:%M:%S %U week number of year, Sunday is the first day of the week (00 to 53) %w day of week; Sunday is day 0 (0 to 6) %W week number of year, Monday is the first day of the week (00 to 53) %x date, using locales’ date format %X time, using locale’s time format %y year within century (00 to 99) %Y year, including century (-4713 to 32766) %Z time zone abbreviationDateFields Http Fetch Field Important Note The following mail merge tags, while fully supported in ListManager 5.0, are now obsolete. We recommend you use the new tags described above in Message Personalization and Scripting. In particular, the http fetch command has been replaced by the web fetch command. Note: the syntax of this merge type is no longer supported. You must use the new Tcl syntax. You can specify that ListManager retrieve data from a remote machine using the httpget merge tag. This data must be accessible via http. The syntax of the httpget Mail Merge tag is: <!-- merge type=["httpget" | "httpgetonce"] URL=[URL] --> 473 Notice the merge syntax is nested in an HTTP comment tag. The URL argument can be virtually anything you can pull up with a web browser. The URL may point to a simple text file, some HTML code, or a CGI script. For example, consider you want to retrieve an ad you are running on your web server and the URL is http://yourserver/cgi-bin/ad.pl; you would accomplish this by using the following merge tag: <!-- merge type="httpget" URL="http://yourserver/cgi-bin/getdata.pl" --> The above example will repeatedly retrieve the data for each recipient. If, however, you only need to retrieve the data once, you can use the httpgetonce tag instead. The following example illustrates this usage: <!-- merge type="httpgetonce" URL="http://localhost/cgi-bin/getdata.pl" --> The following example shows how to use this to fetch custom data for your member: <!-- merge type="httpget" URL="‘’http://localhost/cgi-bin/getdata.pl?id=$subst(‘Recip.EmailAddr’)" --> In the above example, ListManager first performs a substitution to merge in the member’s email address, then retrieves the data at the resulting URL. Let’s assume that [email protected] is the member that ListManager is currently sending to. After substitution, the URL looks like: http://localhost/cgi-bin/[email protected] The nature of the script being called ("getdata.pl" in this case) is to generate some data unique to the member with that email address. This script can do whatever you design it to do, whether that means generating an ad or retrieving billing information. For programmers, this means you have the ability to call a function in the middle of your message and insert whatever it returns right into the message at the point from which it was called. While the httpget merge tag does not require any specific output from the URL, it is highly recommended that you include a standard 'HTTP/1.0 200 OK' status line, then a 'Content-Type: text/plain', or 'Content-Type: text/html' line followed by an empty line and the content of the text to be inserted. For example, a (Perl) script might have: print "HTTP/1.0 200 OK\r\n"; print "Content-Type: text/plain\r\n"; print "\r\n"; print &GetCurrentTime()."\r\n"; 474 Supported Platforms and SQL Servers Windows Windows 2000/XP/2003 Server SQL Servers: MSDE (Included with ListManager) Microsoft SQL Server 7 or 2000 Oracle 8i beta (ListManager 7.6 or later only) Oracle 9i Linux Redhat Linux 7.3 and 9 SQL Servers: Oracle 8i beta (ListManager 7.6 or later only) Oracle 9i PostgreSQL 7.3.2 Important PostgreSQL note: earlier versions of ListManager supported PostgreSQL 7.1.3 only. To upgrade to ListManager 7.5 using PostgreSQL, you will need to upgrade your version of PostgreSQL to 7.3.2 in order to have ListManager run properly. Solaris Solaris for Sparc 2.8 SQL Server: Oracle 8i beta (ListManager 7.6 or later only) Oracle 9i Note: There are a few ListManager reports that do not function properly with Oracle 8i (beta). For details on which reports are affected, see the Reports section. Requirements and Recommendations for Running ListManager Minimum Requirements * Computer that is always on * Web browser 475 * Full-time, dedicated Internet connection (1.544 Mbps minimum) * Static IP address, and forward and reverse DNS. * Microsoft SQL only: 5 user license for Microsoft SQL Server Memory and Bandwidth Recommendations The requirements below are general guidelines, but your needs may vary depending on other factors. For example, if you are sharing your bandwidth with other applications, you may need more bandwidth than is recommended below for your license. If your system is low on resources or if you're seeing performance problems, adding additional RAM, CPU speed and hard drive speed may alleviate these problems. The recommendations below are based on the Intel architecture. Customers using non-Intel architecture should choose components that match these recommendations for their architecture. Bandwidth License Platinum or less Bandwidth 1.5 Mbps (T1) 10,000 msgs/hr 10 Mbps (7 T1s) Platinum Plus 100,000 msgs/hr 20 Mbps (1/2 T3) Diamond 200,000 msgs/hr Extreme 307 Mbps (T3) 300,000+ msgs/hr Minimum System Recommendations System Requirements ListManager/SQL Database on Same Machine 1.5 GB ListManager/SQL Database Server on separate machines ListManager Server SQL Database Server 512 MB 1.5 GB 1.5 GB 1.5 GB 10 GB Single 700 Mhz Processor Single 1 Ghz Processor Single or Multiple 1 Ghz Processor RAM Hard Drive Space Available Processor Average System Recommendations System Requirements ListManager/SQL Database on Same Machine 2 GB ListManager/SQL Database Server on separate machines ListManager Server SQL Database Server 512 MB 2 GB RAM 476 1.5 GB 1.5 GB 1.5 GB Single 2.0 Ghz Processor Single 2.0 Ghz Processor Single 2.0 or multiple 1.4 Ghz Processors Hard Drive Space Available Processor High End System Recommendations System Requirements ListManager/SQL Database on Same MachineNot Recommended ListManager/SQL Database Server on separate machines ListManager Server Not Recommended 2 GB Not Recommended 1.5 GB SQL Database Server 4+ GB RAM Hard Drive Space Available Not Recommended Single 2.5 Ghz Processor Other 40 GB or greater, depending on membership size and archives kept RAID hard drive controller Single 2.5 or multiple 1.4 Ghz processors 100 Mb or 1 Gb Ethernet card Tape Backup Software License Agreement Lyris Technologies Inc. (“Lyris”) grants you a non-exclusive license to use this copy of the Lyris Program in conjunction with the accompanying Serial Code (which, together, will be referred to in this Agreement as the “Program”) subject to the following terms and the proprietary notices, labels or marks on the Program and the accompanying documentation. You may: A. Use the Program only on any one computer at any one time. You may not: 1. Use more than one installation or copy of the Program on any one computer at any one time. 477 2. Modify, translate, reverse engineer, decompile, disassemble or create derivative works based upon this Program. 3. Rent, transfer or grant any rights in this Program or accompanying documentation in any form to anyone else without the prior written consent of Lyris. 4. Remove any proprietary notices, labels or marks on the Program and accompanying documentation. 5. Use this Program, or permit this Program to be used, on more than one computer at any one time. 6. Use the Program to (a) send unsolicited commercial or non-commercial email (“spam”) or (b) forge any packet header or any part of the header information in any email or otherwise attempt to hide or obscure the source of email that you send through use of this Program. 7. Use the Program to (a) interfere with service to any user of any network or computer by any means including, among other, any virus, “denial of service” attack or overloading, “flooding”, “spamming”, “mailbombing” or ”crashing” a network or Web site or (b) probe, scan or test the vulnerability of a system or network or breach security or authentication measures without proper authorization. This license is not for sale and it may not be assigned or sublicensed to anyone else. Title and copyrights to the Program and the accompanying documentation and any copies remain with Lyris. If you do not comply with any of the above restrictions, this license will terminate with or without notice, you will be liable to Lyris for damages or losses caused by your noncompliance and Lyris will be entitled to any other remedies available under applicable law including, without limit, a court order which will require you to comply. Lyris’ failure to enforce these restrictions in every instance in which it may do so will not amount to a waiver of Lyris’s rights under this License Agreement. LIMITED WARRANTY AND DISCLAIMER If, within 30 days from your first use of this Product, you are not satisfied with it for any reason, you should stop using it and notify Lyris. If you return to Lyris any materials which Lyris has sent to you in connection with the Product, Lyris will, at your option, either refund your purchase price or replace the product and related materials. LYRIS’S LIABILITY IS LIMITED TO THE REPLACEMENT OF THE PRODUCT AND RELATED MATERIALS OR THE REFUND OF THE PURCHASE PRICE. THIS IS THE ENTIRE LIABILITY OF LYRIS AND IS YOUR EXCLUSIVE REMEDY. LYRIS SHALL NOT BE LIABLE FOR ANY OTHER DAMAGES OR LOSSES INCLUDING DIRECT, INDIRECT, SPECIAL, INCIDENTAL OR CONSEQUENTIAL DAMAGES OR LOSS OF PROFITS TO YOU OR ANY THIRD PARTY INCLUDING, WITHOUT LIMIT, LOSS OF DATA. THE FOREGOING LIMITED WARRANTY IS IN LIEU OF ALL OTHER WARRANTIES, EXPRESS OR IMPLIED, INCLUDING BUT NOT LIMITED TO, THE IMPLIED WARRANTIES OF MERCHANTABILITY AND FITNESS FOR A PARTICULAR PURPOSE. The terms of the Lyris Privacy Policy are set out in full at http://www.lyris.com/about/company/privacy.html (the ”Privacy Site”) These terms are incorporated by this reference into this Software License. Lyris reserves the right in its sole discretion to amend this Software License Agreement, including the Privacy Policy, at any time by posting the amended terms on this site or 478 the Privacy site, as the case may be. The amended terms shall be effective from and after the date they are posted. You are encouraged to review the terms of the Software License Agreement and the Privacy site from time to time. This Software License Agreement may not otherwise be amended except by a written amendment signed by both you and Lyris. This agreement is the entire agreement. If any provision of this agreement is held invalid, the remainder of this agreement shall continue in full force and effect. If you agree to the above terms, please indicate your agreement by pressing the button marked “Yes” and proceed. If you do not agree to the above terms, please indicate this by pressing the button marked “No”. In that case you must discontinue any further use of this Product and return to Lyris any material (including any copies) which Lyris has sent to you in connection with this Product. IF YOU DO NOT AGREE TO THE ABOVE TERMS AND CONTINUE TO USE THIS PRODUCT AND/OR DO NOT RETURN THE RELATED MATERIALS WHICH LYRIS HAS SENT TO YOU, LYRIS WILL HAVE NO OBLIGATION TO YOU WITH RESPECT TO THIS PRODUCT OR THE RELATED MATERIALS, THE USE OF THIS PRODUCT AND RELATED MATERIALS WILL BE AT YOUR SOLE RISK AND YOU WILL BE LIABLE TO LYRIS FOR THE PRICE OF THE PRODUCT AND RELATED MATERIALS. 479 General Features The ListManager Web Interface * Everything you can do with ListManager, you can do with your web browser using its extensive World-Wide-Web interface. * You can read, contribute, search, join and leave using the web. * Members can choose to receive messages by email, or read them on the web. Security * All administrative functions are password protected. * Different security roles (list admin, site admin, and server admin) allow you to delegate rights and responsibilities. * Members can password-protect their accounts, or not, if they wish. Speed * A fast built-in mail engine can deliver mail extremely quickly. * Modern, C++ based multi-threaded design was built with performance as the top priority. Automatic email error detection * Built in mailer provides unprecedented error detection. * Every outgoing message is uniquely tagged, allowing very accurate, automated processing of bad email addresses. * All email errors are processed automatically by ListManager. * Members and administrators are completely protected from "error mail". Ease * Web interface makes learning and using ListManager easy. * Automated, wizard-based installation. * Fully documented and supported. Programmability * Java and Tcl API and Toolkits provided free * Programmer's Toolkit provided free. * Online Programmer's Manual provided free. * Source code to Web interface provided and can be customized to suit your needs. * Secure TCP/IP communications protocol facilitates programming from any language, any platform. * C/C++ API and documentation provided free. Database access * SQL Server makes importing and exporting of data easy. For example, easily import lists of email addresses. * Complete documentation of database tables and fields. See http://www.lyris.com/guide/ for more information. * Data in SQL Server can be queried at any time and may be modified directly, if done carefully. Personalize Messages * Mail merge member information into your message. * Conditional text and extended mail merge make your messages fully customizable (ListManager Pro or Enterprise only). * Tcl scripting allows advanced customization of messages (ListManager Pro or Enterprise only). 480 Targeted Mailings *Target your message to subsets of your larger list (ListManager Pro or Enterprise only). *Purge recipients of earlier messages. Test your message on a part of your list, then send to the entire list--minus your test recipients. Tracking *Track clickthroughs, opens, clickstreams, and HTML capability. Referrals *Assist your members to invite their friends to join your list. Multiple sites * Supports "virtual hosts" so that many organizations can share one ListManager Server, but each appears to outsiders as separate, dedicated servers. * Security roles and partitioning allow each site to operate independently. Archives and searching * Every message to a mailing list may be saved to the mailing list archives. * Fast text searching of archives (full text indices are automatically built). Compatibility * Web interface works with all web browsers. We test with Netscape and Internet Explorer. * Supports all major email command syntaxes (e.g.: subscribing and unsubscribing) so that your users do not have to learn new commands. * Accepts list server email at all the major email addresses. International * Supports mailing lists using International characters. * Multi-language document support. A document can exist in multiple languages, and ListManager picks the right one. * Automatically identifies the preferred language of users by their Internet domain (.de, .fr, etc) Scalable * Multithreaded architecture scales well on more powerful computers. * Speed can be increased by separating SQL Server and client ListManager processes onto different computers. * ListManager Web Interface can be run on a separate Web Server. Announcement Lists Fast mailing: Optimized multi-threaded mail sending supports hundreds of simultaneous mail send sessions with very low RAM usage. Automatic error processing: Email addresses will be automatically processed and bad addresses are flagged in the database. You can audit the corrected email address list as well. Highly configurable: You can define exactly who the "From:", "Reply-To:" and SMTP "From " are for every message. 481 Personalized Messages: Mail merge information about recipients directly into your message to personalize the message. Use conditional content to create entirely different messages depending on criteria you choose. Segmenting: Create subsets to send to a part of your list, based on criteria you choose. Tracking: Track member response to your mailings by tracking clickthroughs, opens, and clickstreams. Referrals: Help your members invite others to join your list. Auditing: Every mail transaction is fully logged. You can obtain positive confirmation of mail delivery (or failure) as well as the time delivered, number of retries, or error message obtained for a given email address. Database links: Easily import databases of email addresses and export ListManager information to your database. Subscriptions: Membership can automatically "expire" after a specified period of time. Insider Posting: Can assign a number of people to have permission to post to a group. Discussion Lists Web interface: Makes it easy for people to subscribe, leave and change their settings. Can also search, read and contribute from the web. Fast text searching: All archives may be indexed for fast searching. Confirmation: New subscriptions can send a "are you sure you want to join" message to confirm their email address and to ensure someone else did not subscribe that person as a prank. Compatible: Accepts most list server commands. Protected membership: Mailing lists can be set up so that new members must be a) approved by an administrator b) must know the new member password c) can join without approval d) cannot join, the administrator must add them. Visitors: Mailing lists can allow visitors to read and search the archives on the web, but they cannot contribute to the group. Multi-lingual: Supports mailing lists in a number of languages Easy upgrade from other programs: Imports your current member list and mailing list archives for an easy transition. Spam protection: Number-moderating feature virtually eliminates spam. By requiring new members to have their first message approved, you can keep spammers from joining your list just to spam it. Moderating: Supports several moderating models. All members can be moderated, 482 selected members can be moderated, and selected members can be unmoderated (while everyone else still is). Number moderating: An option for new members to have their first few messages approved, thereafter they can contribute unmoderated. Web based moderating: You can approve or reject messages using the web interface. Date moderating: Can have moderated messages be automatically approved after a given time period. 483 What's New in this Version Version 5.0 Major New Features 1. 2. 3. 4. 5. 6. 7. Greater speed & scalability 1. Supports much larger member lists, mailing histories, and site sizes (no more file size limit) 2. Much faster imports of member data Increased reliability & reduced risk 1. Greatly reduced downtime: no need to shut server down to repack ("dbfastpack," or "dbupgrade") database 2. Higher system stability due to SQL database, minimizing corruption risk Fast Subset Creation 1. Create list subsets fast using our easy query builders. 2. "Quick Subsets" with our point-and-click menu 3. "Advanced Subsets" to build your own SQL queries 4. Query and segment your lists using customer demographic data, or any other fields stored in your member table. 5. Define and save highly refined customer subsets using actual SQL queries, including ANDs, ORs, and NOTs. 6. Improve targeting by joining your member table to data stored in external databases. Extensive Message Personalization 1. Personalize your message by merging in data from any field ListManager can access. 2. Use conditional text to change the message sent to each member based on the criteria you select. 3. Use advanced scripting to customize your messages. Use an External Database 1. Use your own customer database, instead of using ListManager's internal member table. 2. Set ListManager to automatically update your external member table with subscription, confirmation, and bounce information. Special Messaging Features 1. Easily create HTML and Multipart MIME messages. 2. Choose the order in which customers receive mailings. 3. Exclude all recipients of a previous message from a new mailing. Shortcut Wizards 484 1. New shortcut wizards help you create new messages, lists, and sites quickly and easily. 2. List wizard helps you quickly set up new announcement or discussion groups, automatically providing the most appropriate list settings. Significant New Features 1. The ability to specify the TCP/IP address ListManager uses to send out mail. Useful when installing on a machine with multiple network cards. 2. Spanish- and Portuguese-language web interfaces now available. 3. Enhanced documents (e.g., Hello, Confirm, etc.) that use double-byte characters, accents and HTML. Minor New Features 1. Retry timing now may be modified through the Server Config page of the web interface. 2. LCP timeout now configurable. 3. Create Many Members and Copy Member to Many buttons now may be removed from the ListManager web interface by modifying lyris.plc. 4. More statistics displayed in the Server Statistics page, giving a fuller picture of what the server is doing at any time. Version 6.0 1. 2. 3. 4. 5. New Look and Feel 1. Interface completely redesigned for greater user-friendliness and to support new marketing-oriented features 2. Learn and manage ListManager more quickly than ever 3. Quickly create lists and alter settings Improved Mailing Workflow 1. Create, save, and edit reusable content 2. Easily draft, preview, test, and approve messages before sending 3. Send automatically repeating messages New Reporting 1. Monitor mailing success: deliveries, attempts, soft and hard bounces 2. View and download lists of bounced members Content Personalization (Pro version only) 1. Use mail merge to insert data from any field into your message 2. Send dynamic, conditional content based on any criteria 3. Perform advanced message customization with content scripting Segmenting and Targeting (Pro version only) 485 6. 7. 1. Segment your list members using any fields stored in your database 2. View, test, and download any audience segment 3. Merge and purge mailings to multiple lists /img/ss-lm-segments-lg.gif/img/sslm-segments-lg.gif Enhanced Results Reporting (Pro version only) 1. Detect HTML-reading capability 2. Detect when recipients open HTML messages 3. Identify and track recipients who come to your Web site with clickstream tracking Improved Full-Text Archive Searching 1. Faster and more efficient archive searches, using less disk space 2. Better threading of messages 3. Version 6.0h Important 6.0h Upgrade Notes for Linux/PostgreSQL Do not attempt to upgrade ListManager from a version of PostgreSQL other than 7.1.3. Because of a behavior change in Postgres, attempting to upgrade ListManager when using versions of PostgreSQL other than 7.1.3 will fail. See Technical Requirements for more information about supported operating systems and databases. http://www.lyris.com/products/listmanager/software/tech_requirements.html Important Note for Programmers The Tcl "subst" command now works correctly. The ListManager legacy "subst" is now "lmsubst". Those who have written programs using the ListManager "subst" command must update them to use "lmsubst" for them to function correctly in the middle of a Tcl merge. $Subst works as before. See ListManager Tcl Procedures for more information. Important DNS Information You may need to change your firewall configuration to allow ListManager to resolve DNS queries. See Ports ListManager Needs Open for more information. 1. Major New Features 1. Integrated DNS Engine - ListManager 6.0h features an integrated DNS engine, so you no longer need to set up, configure, or maintain a separate DNS server. Instead of using a separate process or DNS server to resolve hostnames, ListManager will use its own DNS resolver. 2. DNS Bypass - Allows you to specify that ListManager use a particular TCP/IP address for a domain, allowing you to specify how internal mail is routed. 3. Multiple Member Deletion - There are two new ways to delete members in 486 the ListManager GUI. You may either specify a list of email addresses to delete, or delete all members in the current view. 2. 4. Send Hello and Confirm Messages When Importing - When importing members via a text or CSV file, you can optionally specify that you want the members to receive Hello or Confirm documents. 5. Test Mailings Can be Sent to Multiple Recipients - You can now specify multiple email addresses to receive a test mailing. Minor New Features and Improvements 1. The total number of members on the server can be displayed in Utilities: Administration: Server: License Capabilities. 2. Members imported from a file now have the date they joined specified as the time they were imported. 3. The length of time incoming mail is being kept is noted in Utilities: Mail Queues. 4. Unsubscribe forms can ask members to confirm before unsubscribing them from lists. 5. Some issues with clicks not being reported in some circumstances have been resolved. 6. Upon initial installation and creation of new list, the user is directed to specify the host name if ListManager cannot determine what the host name of the server should be. 7. Version 6.1 Important Upgrade Notes for Linux/PostgreSQL Do not attempt to upgrade ListManager from a version of PostgreSQL other than 7.1.3. Because of a behavior change in Postgres, attempting to upgrade ListManager when using versions of PostgreSQL other than 7.1.3 will fail. See Technical Requirements for more information about supported operating systems and databases. http://www.lyris.com/products/listmanager/software/tech_requirements.html Important DNS Information You may need to change your firewall configuration to allow ListManager to resolve DNS queries. See Ports ListManager Needs Open for more information. 1. Major New Features 1. Referral Tracking (Pro Only) - Help your list members invite their friends to your list, and track the results of those invitations -- whether they resulted in opens, clickthroughs or new joins. 2. Graphical Charts - ListManager now provides charts to help you monitor your server mailing speed. List subscription activity and membership charts also available for pro licenses. 487 2. 3. New Discussion Forum Interface - New discussion forum interface makes it easier for list members to participate in group discussions, view and search archived messages (including text, HTML versions, and attachments), and manage their list memberships. 4. Attach Files in GUI - Add attachments to your content in the web interface, making it easier to distribute documents, spreadsheets, or other important files. 5. HTML Content Templates - Content templates make creating HTML newsletters easier. 6. Tcl Libraries Upgraded - Both the ListManager web interface and the program itself have been upgraded to use newer Tcl libraries, solving a number of problems originally attributed to ListManager itself. Minor New Features and Improvements 1. Site map of web interface helps you find settings quickly and easily. 2. You may now set the maximum amount of bandwidth ListManager can use, so you have sufficient bandwidth for other applications. 3. Large CSV member imports are now supported by the interface. 4. List admins will not be overwritten when importing new members. 5. Mailing speeds statistics now saved to an SQL table, so mailing speeds are saved even if you restart ListManager. 6. ListManager addresses such as join- and confirm- can no longer be added to lists. 7. The ListManager Web Server may now be run as a service on a separate machine from the ListManager binary. 8. Non-pro users may now search for members by segment. 9. Version 7.0 Important Upgrade Notes for Linux/PostgreSQL Do not attempt to upgrade ListManager from a version of PostgreSQL other than 7.1.3. Because of a behavior change in Postgres, attempting to upgrade ListManager when using versions of PostgreSQL other than 7.1.3 will fail. See Technical Requirements for more information about supported operating systems and databases. http://www.lyris.com/products/listmanager/software/tech_requirements.html Important DNS Information You may need to change your firewall configuration to allow ListManager to resolve DNS queries. See Ports ListManager Needs Open for more information. New Enterprise Feature Set ListManager 7.0 introduces the Enterprise feature set. The Enterprise feature set includes all of the Standard and Pro features, but also features new purchase, interest, 488 and web traffic analysis tools. To obtain an evaluation serial code, contact your account representative. 1. Major New Features 1. 1. Enterprise Features - The Enterprise feature set includes Enterprise, Pro and Standard features. 1. Purchase Tracking and Reporting - Monitor your members' online purchases to determine how much revenue a particular mailing generated, or to see which mailing or offer generated the most revenue. ListManager's purchase tags let you track individual item price, quantity sold, specific product SKUs, or any other relevant information. 2. Customer Interest and Sales Cycle Analysis - Use ListManager's interest tags to track how much interest list members show in your mailings, Web site, and product/service offerings. Learn exactly where your members are in the sales cycle and identify "hot leads" ready for personal sales calls. 3. Web Site Traffic Analysis - Discover when and how often list members visit your Web site, identify which pages are most popular, and see how member demographics affect your site traffic. 4. Over 200 New Reports - Get a clear, visual picture of your results with ListManager's pre-built reports on mailings, members, Interest and Purchase Tracking, Web site traffic, and server performance. Use this intelligence to optimize mailings, forecast future sales, and take advantage of new business opportunities. 5. Mailing Summary View - See all of your mailing's vital statistics sends, opens, clicks, purchases, and other information - in a single, one-page view, with convenient hyperlinks to detailed charts and reports. 6. Automated Member Update - Trigger permanent changes to a member's record when they visit certain pages on your Web site. Pro Features -The Pro feature set includes Pro and Standard features. 7. Over 90 New Reports - Learn even more about your list members and mailing success with ListManager's pre-built charts and graphs. New reports cover delivery statistics, opens and clickthroughs, membership statistics, confirmation rates, and server performance. 8. Custom Chart Builder - Create, edit, and save customized line or bar graphs using any metrics available to you. Display averages, trend lines, high/low ranges, standard deviations, or other statistical analyses. 9. Spam Content Analysis - Test your content in advance to avoid words, expressions, and formatting likely to trigger spam blockers. ListManager's built-in checker indicates exactly which elements of your message are most likely to cause filtering, letting you fix or remove those elements and maximize your delivery rate. You can access this feature within the interface itself, as part of your usual testing procedure. 10. Database Table Manager - As a server administrator, you can now edit the members table and add or remove demographic fields within the ListManager interface itself. This feature allows you to expand and 489 modify the member database to capture any demographic information you desire without any knowledge of SQL. You can also view any internal table, add records directly to the members table, and use segments to filter a view of the members table. 11. Ad or Text Rotation - Easy wizard inserts rotated text or HTML content in your message text. Specify the exact percentage of time each content unit appears. 12. Unique Open and Clickthrough Tracking - In addition to tracking aggregate opens and clickthroughs, ListManager now also measures opens and clickthroughs by unique recipient. 13. Track all URLs Wizard - Enable clickthrough tracking on all hyperlinks in your message with a single click. 14. Rich Media Support - Add audio and video to your email content, and track its usage from each mailing. 15. SSL Support - Be assured of secure access to the ListManager web interface using the industry standard "https" protocol. 1. Standard Features - Available at all license levels. 16. Template Builder Create your own fill-in-the-blank content templates that let editors without any HTML knowledge quickly and easily create text, HTML, and multipart-MIME content. Several prebuilt fill-in templates will be included in the release version of ListManager 7.0. 17. Web Unsubscribe - Increase list member trust and confidence by inserting one-click unsubscribe links or buttons into your messages. You can also give members the option of local vs. global unsubscription, request a web-based confirmation before they are officially removed, and customize the removal-completed email or web pages that they will see. 18. Content Conversion and Validation - Convert your email content to and from text, HTML, and AOL format. You can also use ListManager's content validators to detect broken links, or to strip out HTML code that may cause problems for AOL, Yahoo, or Hotmail users. 19. Over 20 New Reports - Learn more about your mailing delivery success and server performance. 20. Improved Approval Workflow - Administrators of mailing lists with many postings needing approval can now easily mass approve or reject messages, reject messages with specific feedback to the contributor, and rapidly moderate messages sequentially in order of submission. 21. Import Webpage Content - Easily build HTML messages by pulling web pages or other HTML content directly into your message, straight from the Internet. "Webfetch" can also be used to create highly effective, personalized messages containing unique customer information or targeted banner ads. 22. In-Progress Mailing Reprioritization - Change the priority or status of a message in mid-send. Completed mailings may be set to retry again, and mailings in retry may be set to done. 23. Enhanced Member Searching - Find a member anywhere in your database, on any list, using all or part of a name or email address. ListManager also includes a number of new, built-in filters for viewing different types of members. 490 24. Web Interface TCP/IP Security - Increase the security of ListManager by restricting web interface access for any administrator level to a limited range of IP addresses. 25. Minor New Features and Improvements 1. Action phrases now may search for multiple text strings. 2. ListManager will not send mail if relay server(s) are specified but unresponsive at startup. 3. The ability to save list mailings is now a separate setting for each list. The Keep Mailing and Clickthrough Data for How Many Days setting allows mailing information to be kept for reporting purposes. This setting is in addition to the universal server setting that determines how long outgoing mail should be kept, 4. Version 7.0a Important Upgrade Notes for Linux/PostgreSQL Do not attempt to upgrade ListManager from a version of PostgreSQL other than 7.1.3. Because of a behavior change in Postgres, attempting to upgrade ListManager when using versions of PostgreSQL other than 7.1.3 will fail. See Technical Requirements for more information about supported operating systems and databases. http://www.lyris.com/products/listmanager/software/tech_requirements.html Important DNS Information You may need to change your firewall configuration to allow ListManager to resolve DNS queries. See Ports ListManager Needs Open for more information. General Improvements 1. A Postgres query that was not running efficiently has been optimized so that it no longer causes problems with ListManager. 2. Mailings with "" as the name in the From: field are no longer accepted unless the email address is permitted to post. 3. ListManager-generated subscribe forms now prevent banned email addresses from joining lists. 4. MIME digests are now sent properly. Discussion Forum Interface Improvements 1. Discussion Forum Interface now honors the daily message limit for a list, as set in Utilities: List Settings: Discussion Group Features: Message Rejection Rules: Etiquette. 2. Discussion Forum Interface now shows all replies to a message, instead of being limited to ten messages. 3. Discussion Forum Interface now requires that a user provide a name for 491 subscribing if required, as set in Utilities: List Settings: Users' Web Interface: New Subscriber Requirements. If the user is logged in, the Name field will be automatically filled in with the name associated with that user. Upgrade Improvements 1. For upgrades, the new Keep Mailing and Clickthrough Data for How Many Days setting now defaults to the setting in Utilities: Administration: Server: Server Settings: Automatic Maintenance: Purging Old Data: Clean Outgoing Mail Queue, instead of 5 days. DNS Engine Improvements 1. ListManager can now recover if it does a DNS lookup of an entry that is maliciously malformed. 2. ListManager no longer improperly warns about the inability to find reverse DNS. Reports Improvements 1. Broken URLs on the Sales Cycle Map fixed. 2. Purchase charts display correctly whether the Product/SKU number is numeric or alphabetical. 3. Sales Cycle Over Time exception error fixed. 4. Version 7.5 New features for ListManager 7.5 Internationalization The Internationalization feature allows you to create content and send mailings in languages that require characters that are not part of the standard ASCII character set. To select the character set you want to use or create a new one, see Utilities: Administration: Server: Internationalization and Localization: International Charsets. Also see Content: New Content: Internationalization and Mailings: New Mailing: Internationalization for more information on how to create content and mailings using international character sets. List documents (such as hello, confirmation, and goodbye messages), can also be created in various languages and international character sets. For more information on this, see Utilities: Automated Messages: Document Associations. Triggered Mailings Triggered mailings allow you to send a mailing based on a particular date/time or an event generated by a member, such as a clickthrough or purchase. The mailing is created and then sent at a given time after the trigger event occurs. These mailings work in conjunction with triggered segments. For more information on triggered mailings, see Segments: New Triggered Segment and Mailings: Advanced Mailings: New Triggered Mailing. 492 Sequential Mailings Sequential mailings are a series of triggered mailings, arranged in sequence, to distribute mailings to members at given points after a trigger event. These mailings may contain different Content, and allow you to send varying follow-up messages in response to member events. For more information, see Mailings: Advanced Mailings: New Sequential Mailing. Translation to Spanish, French, and German ListManager is now available in three additional languages. The GUI will all be in the translated language. To change to another language, click on the "Language" link in the upper right hand corner of any page in ListManager, and select the desired language. In addition, new languages can be created. For more information on these, see Utilities: Administration: Server: Internationalization and Localization: Translations: Create and Edit Languages. New Debug Log visible on the web interface The Debug log is intended for programmers to diagnose and see any issues associated with the log files created by ListManager. This feature is only available to server administrators. The debug log view in the GUI reads the same text log file which is created automatically by ListManager, but this view can be configured and filtered to show only the error types or subsystems desired. For more information, see Utilities: Administration: Server: Debug Log. Multiserver banning mechanism The Member Ban settings have been moved from List Settings and Server Settings to all be in one place for ease of use. Member bans can now be created in Utilities: Members: Bans. In addition, Global ban settings now allow you to determine what ListManager server should be used to download member bans from, so members can be banned across all servers by setting the ban on a single server and then pointing other servers to it. For more information on this, see Utilities: Administration: Server: Server Settings: Advanced: Global Ban Settings. More customizability in Automated Messages The List Documents feature has changed in this version. Now they are to be found in Utilities: Automated Messages: Document Content and Document Associations. Previously, list hello, goodbye, confirm, and held documents had limited customizability. Only a subject and body could be defined. In order to support foreign language translations, international character sets, and HTML messages, the List Documents feature has been modified in important ways. Please see the Utilities: Automated Messages: Document Content and Utilities: Automated Messages: Document Associations sections in the help manual for more information about this change. Site based license decrease You can now set a limit to the license level for a particular site and the lists associated with that site. This option is only visible to server administrators. For more information on this, see Utilities: Administration: Sites: New Site: Essentials. New settings for TCP/IP addresses for sending/receiving email This is a server admin only setting, useful for users with private networks. This allows you to set and view the specific incoming and outgoing IP addresses for servers and sites. For more detail, see Utilities: Administration: Server: Server Settings: Network Settings: Deliver Email and Ports. Multiplatform Operating System and Database Support ListManager now supports the following operating systems: Linux Redhat 9, in addition 493 to Linux Redhat 7.3, and Windows 2003 Server, as well as Windows 2000/XP and Sun Solaris SPARC 8. ListManager now supports the following databases: PostgreSQL 7.3.2 Windows, as well as Oracle 9, in addition to Microsoft SQL Server 7 and 2000, and MSDE. For details on supported platforms and SQL servers, see Supported Platforms. Member History There is a new member history link, allowing you to view information about individual members, including activity, opens, clicks, interest events, purchases, and forwards, etc. For more information, see Utilities: Members: Find Members: History. Blacklist lookup The Blacklist option is only visible for server administrators. The purpose of this feature is to make sure that your TCP/IP address has not been blacklisted by any blacklisting or banning services before you send out your mailings. For more information on this, see Reports: Blacklists. List Settings to Track Opens and HTML You can now set up your lists to track opens and detect HTML by default. For more information on this, see Utilities: List Settings: Basic Information: Enable Features. New Forward Tracking Reports Automatically track who is forwarding your messages, and to how many people. For more information, see Reports: Mailings: Tracking Statistics. New Customizable Charts You can now chart any data that can be queried by an SQL statement, and save these charts to become part of your stock reporting tools. For more information on this, see Reports: Custom Charts. New Programming Toolkit ListManager's previous LCP-based toolkit has been upgraded with an HTTP based programming toolkit. For detailed information on this, please see the ListManager Programmer's guide for ListManager 7.5, available on www.lyris.com or Utilities: Other: Programming API. Discussion Forum Interface New Features Conferencing Feature in Discussion Forum Interface ListManager's Discussion Forum Interface now has a conferencing feature to allow real time conferencing between members. You must be logged into the discussion forum interface to use this. You can then chat with other users in the same conference. See Conferencing With Other Members for further information on this new feature. In Discussion Forum Interface, new Password Link If you forget your password when logging into the discussion forum interface, you can now opt to have it emailed to you immediately. For more information on this, see Accessing and Logging into the Discussion Forum Interface. You can now attach files to messages in the Discussion Forum Interface It is now possible to send messages with attachments of any type in the discussion forum interface. Please see discussion forum interface's Sending Messages section for 494 more information on this. 495 Version 7.6 New features for ListManager 7.6 Member Profiles Member profiles can be created, edited, and updated on your web site. When the member profile form is saved, the HTML created here can then be embedded onto your web site, for members to enter their email address and edit their profile directly. For details on this, please see Utilities: Web Forms: Member Profile Forms. These forms can apply to various lists, sites, or servers. Member Info Page There is a new member info page which displays the member name, status, kind, HTML capability, preferred mail format, member ID, bounce count, recent bounce date, and date joined. It also displays information about recent opens, clickthroughs, clickstreams, interest events, and purchases. For more information on this, see Utilities: Members: Find Members: History. Custom Charts have new charting options Custom charts have the same options as other charts, to see the chart table, chart information, and information about your chart. Oracle 8i (beta) now supported Oracle 8i (beta) is now supported. Click here for details on supported platforms. New server-wide security setting to allow or reject matching member names This is a server-wide setting which allows or rejects join/subscribe email that matches a member name, but not the email address. For details on this, see Utilities: Administration: Server: Server Settings: Security: Spam Blocking. 496 General Installation Instructions Before you install ListManager, you'll need some information about the computer you're installing on and your network. The installer will prompt you for this information, so please have it handy when you install. These are general instructions for all platforms and SQL databases; consult the section on your particular database and operating system for more information. Before Installation - If you have a mail server on the same machine you plan to install ListManager, you'll need to decide how you want to configure your mail server to coexist with ListManager. ListManager uses its own mail server, and doesn't need another. If there is no mail server on the machine on which you are installing ListManager, you don't need to worry about mail server coexistence. - If you are behind a firewall, and you plan on having ListManager running behind it, you'll need to configure your firewall so ListManager can send and receive mail properly. - If there is already a web server running on the machine where you'll be installing ListManager, the ListManager web interface will be installed on a different port. - If you are using your own SQL database server, you'll need to determine which database or instance to use for your ListManager tables, or create one specifically for ListManager. This step is not necessary if you are using an included database (MSDE). - If you are using your own SQL database server, and it will be on a different machine from the one that will be running ListManager, you'll need to install the client tools on the machine that will be running ListManager. During Installation Please have the following information ready: - Information about your SQL database (if using your own database, not one included with ListManager): - The name of your SQL machine. - The SQL database server login or user name. - The SQL database password. - The database name. - Whether or not you have a mail server running on the ListManager machine. See Mail Server Coexistence for more information. -What port you'd like the web interface on, if you already have a web server running (Unix only). -Your ListManager activation code. If you don't have an activation code, contact your Lyris account representative at 800-768-2929 or [email protected]. 497 Upgrading ListManager The ListManager installer makes upgrading easy! Simply select upgrade when prompted. However, there are some steps you should take before upgrading to prepare yourself. WARNING: Please back up your database before upgrading. If you encounter a problem while upgrading, you may not be able to recover your data without a backup. Important PostgreSQL note: earlier versions of ListManager supported PostgreSQL 7.1.3 only. To upgrade to ListManager 7.1.3 using PostgreSQL, you will need to upgrade your version of PostgreSQL to 7.3.2 in order to have ListManager run properly. See PostgreSQL and ListManager for more information. IMPORTANT NOTE FOR USERS OF 5.0 AND EARLIER: Headers and footers are no longer automatically appended to mailings sent via the admin web interface. You must add the unsubscribe information for your mailings manually. See Content: Insert Field: Unsubscribe for more information on how to do so quickly and easily. Getting Ready - We recommend that you evaluate ListManager 7.0 on a test machine. If you prefer to use your production ListManager server, only do so if you plan to upgrade it to version 7.0. DO NOT use the 7.0 release on your production server if you might want to go back to an older (pre-v5.0) version of ListManager. Once you upgrade to 7.0, you will not be able to downgrade back to the older version. - Be sure that ListManager is not running when you upgrade it. - ListManager 7.0 uses its own ListManager web server. If you are running another web server on the machine that is running ListManager, and you only use it for ListManager, you should stop it before installing. ListManager's web server may coexist with your web server, and will be installed on a higher port if port 80 is taken. - ListManager 6.0h and higher now uses its own DNS resolver. If you have a firewall, you must configure it so that ListManager can resolve DNS on port 53. If you have a firewall and you are upgrading from an earlier version, we HIGHLY recommend testing ListManager on a development server before you upgrade your production server to ensure ListManager can perform its DNS resolutions properly. See Your Firewall and ListManager for more information. - The old words table will no longer be available after upgrading, which may affect some custom programs. For more information about the new database table structure, see the Programmer's Guide. Preparing Your Data 4.2 and earlier versions: ListManager 5.0 and higher no longer uses FoxPro as its database format; see 498 Supported Platforms for a list of databases you may use with ListManager. ListManager 7.0 can migrate your old Foxpro-format database to your SQL database automatically. We recommend you perform a "dbupgrade" before upgrading to 7.0. To perform dbupgrade, stop ListManager, and open a command prompt. Cd to the directory which contains lyris.exe. Type: lyris dbupgrade Dbupgrade may take several hours, depending on the size of your data. Be sure to back up your "db" directory (found in your Lyris directory) before upgrading. Special Note: If you are upgrading from 4.x and using the embedded database MSDE, check the total size of your db directory. MSDE is limited to 2 GB for all its tables, so if you have too much data, the upgrade will not succeed. Your account representative can tell you more about external databases you can use with ListManager. 5.0 and later versions: It is recommended that you back up your database before upgrading. For information on backing up MSDE, see Backing Up MSDE. Get a Serial Number You can use the MSDE and PostgreSQL versions of ListManager 7.0 "Standard" without a Serial Number in a limited capacity (200 members max, MSDE and PostgreSQL installed locally). If you want to test a larger or external database, evaluate the "Pro" feature set, or connect ListManager to Microsoft SQL Server or Oracle, please contact your account representative to obtain an evaluation Serial Number. Serial codes from versions 4.2 and lower are no longer valid with ListManager 5.0 and higher, so contact an account representative to purchase an upgrade and to receive a new serial code. Your account representative can also tell you if your 5.0 and higher serial code allows you to upgrade to the current version. Upgrading ListManager Upgrading without Moving ListManager When running the ListManager installer, select "upgrade" instead of "new install", and provide the installer with the path where ListManager is currently installed. The installer will automatically copy the data if necessary and upgrade the database Moving and Upgrad