1
TM
Merlin 128
Instruction Manual
Written by
Glen Bredon
Produced by:
Roger Wagner Publishing, Inc.
1050 Pioneer Way. Suite P
El Cajon, CA 92020
Customer Service & Technical Support:
619/442-0522
ISBN 0-927796-23-6
5C587
Customer Licensing Agreement
The Roger Wagner Publishing, Inc. software product that you have just
received from Roger Wagner Publishing, Inc., or one of its authorized dealers,
is provided to you subject to the Terms and Conditions of the Software
Customer Licensing Agreement. Should you decide that you cannot accept
these Terms and Conditions, then you must return your product with all
documentation and this License marked "REFUSED" within the 30 day
examination period following the receipt of the product.
1. License. Roger Wagner Publishing, Inc. hereby grants you upon your receipt
of this product, a nonexclusive license to use the enclosed Roger Wagner
Publishing, Inc. product subject to the terms and restrictions set forth in this
License Agreement.
2. Copyright. This software product, and its documentation, is copyrighted by
Roger Wagner Publishing, Inc. You may not copy or otherwise reproduce the
product or any part of it except as expressly permitted in this License.
3. Restrictions on Use and Transfer. The original and any backup copies of this
product are intended for your personal use in connection with a single
computer. You may not distribute copies of, or any part of; this product
without the express written permission of Roger Wagner Publishing, Inc.
Limitations of Warranties and Liability
Roger Wagner Publishing, Inc. and the program author shall have no liability
or responsibility to purchaser or any other person or entity with respect to
liability, loss or damage caused or alleged to be caused directly or indirectly by
this software, including, but not limited to any interruption of service, loss of
business or anticipatory profits or consequential damages resulting from the
use or operation of this software. Some states do not allow the exclusion or
limitation of implied warranties or liability for incidental or consequential
damages, so the above limitation or exclusion may not apply to you.
Copyrights
The Merlin 128 documentation and software are copyrighted © 1986 by Roger
Wagner Publishing, Inc. This documentation and/or software, or any part
thereof, may not be reproduced in any form or by any means, electronic or
mechanical, including photocopying, recording, storage in an information
retrieval system, or otherwise, without the prior written permission of the
publisher.
We have tried our best to give you a quality product at a fair price, and made
the software copyable for your personal convenience. Please recommend our
product to your friends, but respect our wishes to not make copies for others.
Thanks!
Merlin 128 is a trademark of Roger Wagner Publishing, Inc.
About the Manual
This manual was formatted using MacAuthor from Icon Technology, Ltd, 9
Jarrom Street, Leicester LE2 7DH, England, and Apple's LaserWriter printer.
OUR GUARANTEE
This product carries the unconditional guarantee of satisfaction or your money
back. Any product may be returned to place of purchase for complete refund or
replacement within thirty (30) days of purchase if accompanied by the sales
receipt or other proof of purchase.
ABOUT THE AUTHOR
Glen Bredon is a professor at Rutgers University in New Jersey where he has taught
mathematics for over fifteen years He purchased his first computer in 1979 and began
exploring its internal operations because "I wanted to know more than my students." The
result of this study was the best selling Merlin Macro Assembler and other programming
aids. A native Californian and concerned environmentalist, Glen spends his summers away
from mathematics and computing, preferring the solitude of the Sierra Nevada mountains
where he has helped establish wilderness reserves.
MERLIN 128
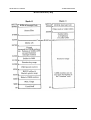
Table of Contents
INTRODUCTION
System Requirements
-----------------------------------------------------------Suggested Reading -----------------------------------------------------------------
1
1
BEGINNER'S GUIDE TO USING MERLIN 128
Steps From the Very Beginning
------------------------------------------------Editing a Source Listing -----------------------------------------------------------Assembly ---------------------------------------------------------------------------Saving and Running Programs
------------------------------------------------Making Back-up Copies of Merlin 128
--------------------------------------
2
5
8
10
11
MAIN MENU
Main Menu
-----------------------------------------------------------------------
13
THE EDITOR
About the Editor Documentation ------------------------------------------------Immediate Mode
----------------------------------------------------------------Add/Insert Commands
-----------------------------------------------------------Editing an Existing Line -----------------------------------------------------------Full Screen Editor Commands
------------------------------------------------Control Key Commands -----------------------------------------------------------Commodore Key Commands ------------------------------------------------------Editor Command Summary ------------------------------------------------------Altkeys and Keydefs
-----------------------------------------------------------If you make a mistake
-----------------------------------------------------------Find and Change Commands ------------------------------------------------------More Immediate Mode Edit Commands
-------------------------------------Other Immediate Mode Commands
-------------------------------------------Assembling a File
-----------------------------------------------------------------
17
18
20
20
21
22
25
32
33
33
35
35
39
45
THE ASSEMBLER
The Assembler ----------------------------------------------------------------------About the Assembler Documentation -------------------------------------------Preliminary Definitions -----------------------------------------------------------Assembler Syntax Conventions
------------------------------------------------Source Code Format -----------------------------------------------------------Number Format ----------------------------------------------------------------Expressions Allowed by the Assembler -------------------------------------Immediate Data Syntax
------------------------------------------------------6502 Addressing Modes
------------------------------------------------------Special Forced Non-Zero Page Addressing --------------------------------Assembler Pseudo Opcode Descriptions
--------------------------------------
46
47
48
49
49
50
51
53
54
54
55
Formatting Pseudo Ops -----------------------------------------------------------String Data Pseudo Ops -----------------------------------------------------------Data and Storage Allocation Pseudo Ops
--------------------------------Miscellaneous Pseudo Ops
------------------------------------------------------Conditional Pseudo Ops -----------------------------------------------------------Macro Pseudo Ops ----------------------------------------------------------------Variables
----------------------------------------------------------------------Local Labels -----------------------------------------------------------------------
68
72
75
79
84
87
87
88
MACROS
Macros
---------------------------------------------------------------------------Special Variables
----------------------------------------------------------------Macro Libraries and the USE Pseudo Op
--------------------------------------
90
93
97
THE LINKER
The Linker ---------------------------------------------------------------------------Pseudo Opcode for Re-locatable Code Files
---------------------------------
98
100
TECHNICAL INFORMATION
Technical Information
-----------------------------------------------------------General Information -----------------------------------------------------------Symbol Table
----------------------------------------------------------------Configuration
----------------------------------------------------------------Contents of PARMS file
------------------------------------------------------Merlin 128 Memory Map -------------------------------------------------------
105
105
105
106
107
109
ERROR MESSAGES
Error Messages -----------------------------------------------------------------------
110
SOURCEROR
Introduction
----------------------------------------------------------------------Using Sourceror
----------------------------------------------------------------Final Processing
----------------------------------------------------------------Dealing with Finished Source
------------------------------------------------Changing Sourceror’s Label Table
-------------------------------------------Using Sourceror.XL -----------------------------------------------------------------
114
114
117
118
119
120
UTILITIES
FORMATTER ----------------------------------------------------------------------XREF ---------------------------------------------------------------------------------XREFA
---------------------------------------------------------------------------PRINTFILER ----------------------------------------------------------------------Changing Printfiler's Options ------------------------------------------------ALTKEYS
----------------------------------------------------------------------KEYDEFS
----------------------------------------------------------------------Sample Programs & Files
------------------------------------------------------DEMO ---------------------------------------------------------------------------COPY
----------------------------------------------------------------------------
121
121
124
124
125
126
127
128
128
128
ZAP
---------------------------------------------------------------------------HI-RES ---------------------------------------------------------------------------SWISH ---------------------------------------------------------------------------RAMTEST ----------------------------------------------------------------------PI
---------------------------------------------------------------------------------PRDEC ---------------------------------------------------------------------------PRINTHEX ----------------------------------------------------------------------INPUT ---------------------------------------------------------------------------GETERR
----------------------------------------------------------------------READKEY ----------------------------------------------------------------------MULT/DIV ----------------------------------------------------------------------ASCHEX
----------------------------------------------------------------------BASIC HEADER
-----------------------------------------------------------KERNEL EQUATES -----------------------------------------------------------GLOSSARY
Glossary
INDEX
Index
128
128
128
129
129
129
129
129
129
130
130
130
130
130
----------------------------------------------------------------------------
131
----------------------------------------------------------------------------------
135
Merlin 128 User's Manual
Preface
MERLIN 128
Merlin 128 is an extremely powerful, comprehensive Macro Assembler system for the
Commodore 128 computer. It consists of four main modules and numerous auxiliary and
utility programs which comprise one of the most complete assembler systems available for
any personal computer. Merlin's four main modules are:
- FILE MANAGEMENT system, for disk I/O, file management, disk operations, etc.,
- EDITOR system, for writing and editing programs with word-processor-like power,
- ASSEMBLER system, with such advanced features as Macros, Macro libraries,
conditional assembly, linked files, etc.,
- LINKER system, for generating relocatable code modules, library routines, run-time
packages, etc.
But Merlin 128 is more than just the sum of these four parts. Here are some of the other
features offered by Merlin 128:
- Merlin 128 recognizes over 50 Pseudo Opcodes for extreme programming flexibility,
- Merlin 128 has over 40 editing commands for ultimate editing power equaled only by word
processors,
- Merlin 128 comes with a powerful symbolic disassembler to generate Merlin source code
from raw binary programs,
- Merlin 128 comes with many sample programs, libraries and other aids to get you going
with assembly language fast,
- Merlin 128 is UNLOCKED and COPYABLE for your benefit.
Merlin 128 User’s Manual
Introduction
INTRODUCTION
Congratulations on your purchase of Merlin 128, one of the most powerful, yet easy to use
assemblers for the Commodore 128 computer. Merlin 128 offers virtually every feature and
function that a programmer needs, thus making it unlikely that you'll outgrow it. At the same
time, Merlin 128's easy built-in editor and fast assemblies make it a pleasure to use whether
you're writing a few lines of code or 30,000!
To run Merlin 128, you'll need the following:
* COMMODORE 128
* 1571 Disk drive or equivalent
If you are currently using a printer, Merlin 128 will function just fine with it, producing
formatted listings with page breaks and titles.
If you're familiar with assembly language programming already, you will find Merlin 128
easy to adapt to. It follows the standards of 6502 programming, and its assembler-directed
commands, or pseudo-ops are a super-set of just about every other assembler. That is,
assembler directives like HEX, ASC, DS etc., that you've used in other assemblers are still
there in Merlin 128, and better still, you'll find a new complement of functions to make
programming easier. These include assembling directly to or from disk files, multiple data
formats for numbers and strings, a complete set of assembler utilities such as crossreferencing and a source code generator (Sourceror), macro capabilities and more.
If you're new to assembly language programming, Merlin 128 is the easiest assembler there
is. However, the Merlin 128 manual does not make any attempt to teach the techniques of
assembly language programming itself. Those techniques are covered in various tutorial
books available from a number of publishers. Because everyone has different goals and
objectives, you should seek out those books which best match your current needs and
experience.
Two of the better books that we recommend include:
ASSEMBLY LANGUAGE FOR KIDS - William B. Sanders. Microlit, 17857 Aguacate
Way, San Diego, CA 92127
COMMODORE 64/128 ASSEMBLY LANGUAGE PROGRAMMING - Mark
Andrews. Howard W. Sams & Co., Inc., 4300 West 62nd Street, Indianapolis, IN
46268
Both of these books offer Merlin program listings.
Page 1
Merlin 128 User's Manual
Beginner's Guide
BEGINNER'S GUIDE TO USING MERLIN 128
The purpose of this section is not to provide instruction in assembly language programming.
Rather, it will show you the loading, editing, and running of a short assembly language
program to give you an idea of how Merlin 128 works.
Many of the Merlin 128 commands and functions are very similar in operation. This section
does not attempt to present demonstrations of each and every command option. The
objective is to present examples of the more common operations, sufficient to get you
started writing your own programs using Merlin 128. You should not expect to immediately
use all of the various commands that Me4in 128 supports in your first program. The best
approach is to use the Merlin 128 manual in an encyclopedia4ike fashion, reading just those
sections that provide some utility to a current programming task. We suggest that you lightly
skim through the manual once, to become aware of generally what the software has to offer,
and then return later to specific sections as needed.
Now, let's try your first program with Merlin 128. Just follow these steps:
1.
Boot the Merlin 128 disk. A title screen appears, after which the screen changes to
the MAIN MENU. The main menu is used for loading and saving files, disk
operations, and of course, entering the MERLIN Editor and Assembler itself.
2.
When the '%' prompt appears at the bottom of the main menu, type ‘E'. This instantly
places the system in EDITOR control mode. The screen clears and the prompt
changes to a colon (":").
3.
The two most often used commands in the immediate mode of the Editor are 'A' (for
Add lines) and 'I' for inserting lines between existing lines of your source code.
Since we are entering an entirely new program, type 'A' at the ':' prompt and press
RETURN (A = ADD). A '1' appears at the top right corner of the screen. This
indicates the current line number. The cursor is on the left side of the screen, and will
appear as an inverse 'I' (the meaning of the cursor appearance will be discussed a
little later in this manual).
4.
On line 1, enter an asterisk (*). An asterisk as the first character in any line is similar
to a REM statement in BASIC it tells the assembler that this is a remark line and
anything after the asterisk is to be ignored. To confirm this, type the title 'Merlin 128
Demo' after the asterisk and press the RETURN key.
5.
After Return, the cursor once again drops down one line, a '2' appears at the top right
to indicate the new line number. Press the space bar once and type 'ORG', space
again, type '$8000', and press RETURN.
Page 2
Merlin 128 User’s Manual
Beginner's Guide
The above step instructs the assembler to create the following program so that it can run
at memory location $8000. Merlin 128 almost always assembles your program in the
same place in memory, but the ORG (for Origin) is used to tell Merlin 128 where you
want the program to eventually be run. This is so that JMPs, JSRs and other location
dependent code within your program is properly written with the final location in mind.
You'll notice that when you press the space bar, Merlin 128 automatically moves the
cursor to the next field on the line. You'll recall that in assembly language programming,
the position of text on each line determines what kind of information it is. Labels for
routines and entry points are in the first position. On line 2 you skipped this field by
pressing the space bar first, before entering any text. The second position is for the
command itself. The command can either be a 6510/8502 command such as LDA, RTS,
etc., or it can be a directive to Merlin 128 itself, to be used during the assembly to write
a file to disk, create a label, call up a macro, or any of Merlin 128's many assembler
commands.
6. Asterisk can also be used to just create a blank line. On line 3, enter another asterisk,
with no text following it, and press RETURN again.
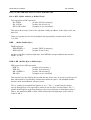
7. On line 4, do not space once after the line number. Type 'BSOUT', space, 'EQU', space,
'$FFD2', space, ';' (semicolon), 'Output subroutine', RETURN.
This defines the label BSOUT to be equal to hex FFD2. This use of a label is known as a
constant. Wherever BSOUT appears in an expression, it will be replaced with $FFD2.
Why don't we just use '$FFD2'? For one thing, 'BSOUT' is easier to remember than
'$FFD2'. Also, if a later assembly required changing the location of BSOUT, all that
needs changing is the 'EQU' statement, rather than all the other '$FFD2's throughout the
listing.
Semicolons are like asterisks, used to mark the beginning of a remark (comment).
Semicolons, however, are used to mark the start of a comment at the end of a line that
contains other text.
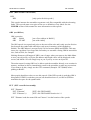
8. Line 5: Type 'BUFLEN', space 'EQU', space '20', space, ';', 'Length of string to print',
RETURN.
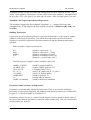
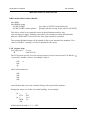
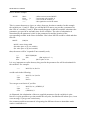
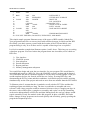
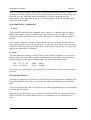
The program should now look like this:
*
Merlin 128 Demo
ORG $8010
*
BSOUT
BUFLEN
EQU
EQU
$FFD2
20
;Output subroutine
;Length of string to print
Page 3
Merlin 128 User's Manual
Beginner's Guide
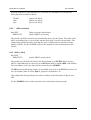
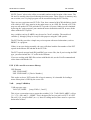
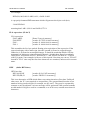
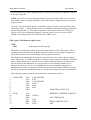
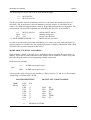
9. Enter the following 5 lines:
GETIN
KEY
*
START
LOOP
EQU
EQU
$EFE4
$FF9F
;Get input subroutine
;Keyboard scan routine
LDX
LDA
JSR
#0
SIRINO,X
BSOUT
;Set X to 0
;Get a character from STRINO
;Send it to the screen
Following the Opcode is the operand, in this case 'BSOUT'. The operand is the target information
of the Opcode. Where to JSR to, what value to load, etc.
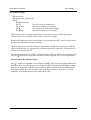
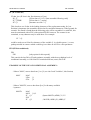
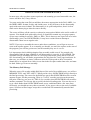
10. Enter the following lines to complete the program:
INX
;Increment X
CPX
#BUFLEN ;Compare X to value in BUFLEN
BNE
LOOP
;if not equal, go back to LOOP
SCAN JSR
KEY
;Scan the keyboard
JSR
GETIN
;Any input?
BEQ
SCAN
;If not, go back to SCAN
CMP
#$0D
;Was Return pressed?
BEQ
DONE
;If so, go to DONE
JIP
SCAN
;If not, go back to SCAN
DONE RTS
;All done
STRING TXT 'Press Return to Exit'
11. The program has been completely entered, but the system is still in ADD mode. To exit ADD,
just press the Commodore key (bottom left of keyboard) and the horizontal arrow key (top left of
keyboard) at the same time. (A Commodore command key character is typed in a manner similar
to control characters, and are indicated in this manual by CC and CTRLC, respectively.) The ':'
prompt reappears at the bottom of the screen, indicating that the system has returned to the
immediate mode.
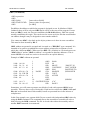
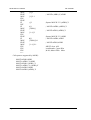
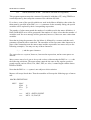
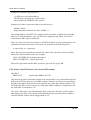
12. Prom the :' prompt, type L to list the program. The screen should now look like this:
*
Merlin 128 Demo
ORG
$8000
*
BSOUT
BUFLEN
GET IN
KEY
*
START
LOOP
SCAN
Page 4
EQU
EQU
EQU
EQU
$FED2
20
$EFE4
$FF9F
; Output subroutine
;Length of string to print
;Get input subroutine
;Keyboard scan routine
LDX
LDA
BSOUT
INX
CPX
BNE
JSR
JSR
#0
STRING, X
;Set X to 0
;Get a character from STRING
;Send it to the screen
;Increment X
;Compare X to value in BUFLEN
;If not equal, go back to LOOP
;Scan the keyboard
;Any input?
#BUFLEN
LOOP
KEY
GET IN
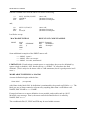
Merlin 128 User's Manual
DONE
STRING
Beginner's Guide
BEQ
SCAN
;If not, go back to SCAN
CMP
#$OD
;Was Return pressed?
BEQ
DONE
;If so, go to DONE
JMP
SCAN
;If not, go back to SCAN
RTS
;A11 done
TXT 'Press Return to Exit'
Note that throughout the entry of this program, each bit of text has been moved to a specific
field. Here is a summary of the fields as used so far:
LABEL
OPCODE
OPERAND
COMMENT
Field One is reserved for labels. BSOUT, START and DONE are examples of labels.
Field Two is reserved for opcodes, such as the Merlin 128 pseudo-opcodes (also called
directives) ORG and EQU, and the 6510/8502 opcodes JSR and RTS.
Field Three is for operands, such as $8000, $FFD2 and, in this case, BSOUT.
Field Four contains comments (preceded by";")
It should be apparent from this exercise that it is not necessary to input extra spaces in the
source file for formatting purposes, even if these spaces seem to exist in a listing you may be
using.
In summary:
1) Do not space for a label. Space once after a label or, if there is no label, once for the
opcode.
2) Space once after the opcode for the operand. Space once after the operand for the
comment. If there is no operand, type a space and a semicolon for a comment.
EDITING A SOURCE LISTING
Assuming no errors have been made in the text entered so far, you could now assemble the
program entered with Merlin 128. Before doing that, however, let's look at the editing
abilities of Merlin 128.
Editing is the process of making alterations to text that you've already entered, and this
ability is one of MERLIN 128's strong points. In a sense, an assembler is just a word
processor for the text that makes up a program. In that light, then, you can judge an
assembler in part by how good its editing features are.
Merlin has a powerful, built-in full screen editor. Powerful in the range of operations
possible but, after a little practice, remarkably easy to use.
Page 5
Merlin 128 User's Manual
Beginner's Guide
There are two phases to editing text with Merlin 128. The first is telling the Editor which
lines you wish to add, delete or edit. Sometimes a specific line number is not needed, as
when you typed 'A' to start adding lines to your listing.
Other times, you will wish to edit a line that has already been entered, and a line number
may be required. In addition, once you are editing a specific line, new commands become
available to you to make specific changes to a line of text.
Note that in the remainder of this manual, special characters will be abbreviated as follows:
C= = Commodore key, ← = Horizontal arrow, Esc = Escape key, Alt = Alternate key, and
CTRL-C = Control-C.
Inserting and deleting lines in the source code are both simple operations. The following
example will INSERT three new lines between the existing lines 5 and 6.
1.
After the ':' prompt, type 'I' for (INSERT), the number '21', and press RETURN. All
inserted lines will precede (numerically) the line number specified in the command.
2.
Type an asterisk, and press RETURN. Note that the INSERT mode has not been
exited.
3. Type another asterisk, and press RETURN again.
4. Press space once, and type 'TYA'.
The three new lines (21, 22, and 23) have been inserted, and the subsequent original
source lines (now lines 24 and 25) have been renumbered. The last few lines of the
program should now look like this:
JMP
SCAN
;If not, go bark to SCAN
TYA
RTS
TXT
;A11 done
'Press Return to Exit'
*
*
DONE
STRING
5. Press C= ← to exit the full screen editor. The system reverts to Immediate Mode (':'
prompt).
Using DELETE is equally easy.
1. In Immediate Mode of the editor, type 'D21', and press RETURN. Nothing new appears
on the screen.
2. Type L to list the source code. The source listing is one line shorter. You've just deleted
the 'TYA' line, and the subsequent lines have been renumbered.
Page 6
Merlin 128 User's Manual
Beginner's Guide
It is possible to delete a range of lines in one step.
1.
In control mode, input 'D21,22' and press RETURN.
2.
Type L to list the source.
Lines 21 and 22 from the example, which contained the inserted asterisks, have been
deleted, and the subsequent lines renumbered. The listing appears the same as when you first
entered the listing.
This automatic renumbering feature makes it IMPERATIVE that when you are deleting
several different groups of lines at once, you must remember to begin with the group with
highest numbers and work back to the lowest.
For example, if you had a long listing, and wanted to Delete lines 5-7, 15-23 and 66-72, you
would type in:
D66, 72
D15,23
D5, 7
NOT:
D5, 7
D15,23
D66, 72
This is because after the first Delete of lines 5 through 7, what used to be lines 15 through
23 are now at 12 through 20! Keep this in mind and you'll avoid problems.
While Adding, Inserting, or Editing an existing line, you have many options within the line,
all of which are accessed by using Control characters. To demonstrate, using the listing
you've entered:
1.
At the ':' prompt, enter 'E' (the EDIT command) and a line number (use '21' for this
demonstration), and press RETURN. The cursor moves to the beginning of the specified
line and is over the 'D' in 'DONE'.
2.
DONE
RTS
2.
Type CTRL-D. The character under the cursor disappears. Type CTRL-D three more
times until 'DONE' has been deleted, and the cursor is positioned to the left of the
opcode (RTS).
3.
Press C= ←, then L to list the program. In line 21 of the source code, only the opcode
remains.
4.
At the ':' prompt, enter 'E21' and press RETURN.
Page 7
Merlin 128 User's Manual
Beginner's Guide
5.
Don't move the cursor with the space bar or arrow keys. Type the word ‘DONE’, then
press C= ←.
6.
Press L to list the program. Line 21 has been restored.
The other sub-commands (CTRL-characters) used under the EDIT command function
similarly. Read the definitions in the Editor Section and practice a few operations.
ASSEMBLY
The next step in using Merlin 128 is to assemble the source code into object code.
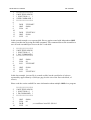
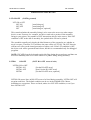
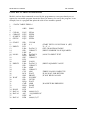
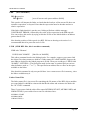
At the ':' prompt, type the command ASM and press RETURN. On your screen is the
following:
ASSEMBLING
8000:
8002:
8005:
8008:
8009:
800B:
800D:
8010:
8013:
8015:
8017:
8019:
801C:
801D:
8020:
8028:
8030:
A2
BD
20
E8
El
D0
20
20
F0
C9
F0
4C
60
70
53
4E
54
00
1D 80
D2 FF
14
F5
9F FF
E4 FF
F8
0D
03
0D 80
52 45
53 20
20 54
1
2
3
4
5
6
7
8
9
10
11
12
13
14
15
16
17
18
19
20
21
22
72
4F
* Merlin 128 Demo
ORG
*
BSOUT
EQU
BUFLEN
EQU
GETIN
EQU
KEY
EQU
*
START
LDX
LOOP
LDA
JSR
INX
CPX
BNE
SCAN
JSR
JSR
BEQ
CMP
BEQ
JMP
DONE
RTS
STRING
TXT
45 54 55 52
20 65 58 49
--End Merlin 128 assembly, 49 bytes, Errors: 0
Page 8
$8000
$FFD2
20
$FFE4
$EF9F
;Output subroutine
;Length of string to print
;Get input subroutine
;Keyboard scan routine
#0
;Set X to 0
STRING,X ;Get a character from STRING
BSOUT
;Send it to the screen
;Increment X
BUFLEN
;Compare X to value in BUFLEN
LOOP
;If not equal, go back to LOOP
KEY
;Scan the keyboard
GETIN
;Any input?
SCAN
;If not, go back to SCAN
#$0D
;Was Return pressed?
DONE
;If so, go to DONE
SCAN
;If not, go back to SCAN
;All done
'Press Return to Exit'
Merlin 128 User's Manual
Beginner's Guide
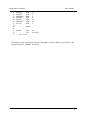
Symbol Table - alphabetical order:
BSOUT
=$FFD2
BUFLEN
KEY
=$FF9F
LOOP
STRING
=$801D
=$14
=$8002
DONE =$801C
SCAN =$800D
GETIN =$FFE4
?START=$8000
=$8000
=$801D
LOOP
KEY
SCAN --$800D
BSOUT =$FFD2
Symbol table - numerical order:
BUFLEN
DONE
GETIN
=$14
?
=$801C
=$FFE4
START
STRING
=$8002
=$FF9F
If instead of completing the above listing, the screen displays an error message, note the line
number referenced in the message, and press RETURN until the "--END ASSEMBLY..."
message appears. Then refer back to the first section where the program was first entered
and compare the listing with Step 12. Look especially for elements in incorrect fields. Using
the editing functions you've learned, change any lines in your listing which do not look like
those in the listing in step 12, then, from the ':' prompt, type ASM and press RETURN to reassemble.
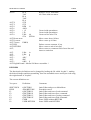
If all went well, to the right of the column of line numbers down the middle of the screen is
the now familiar, formatted Source Code.
To the left of the line numbers, beginning on line 9, is a series of numeric and alphabetic
characters. This is the Object Code, which is the opcodes and operands assembled to their
machine language hexadecimal equivalents.
For example, starting on line 9, the first group of characters (8000) is the program's starting
address in memory (see the definition of ORG in the Assembler Section). After the '8000:' is
the number 'A2'. This is the one-byte hexadecimal code for the opcode LDX.
NOTE: the label 'START' is not assembled into object code; neither are comments, remarks,
or pseudo-ops such as ORG. Such elements are only for the convenience and utility of the
programmer and the use of the assembler program.
On line 11, after the '8005:' is the number '20'. This is the one-byte hexadecimal code for the
opcode JSR. The next two bytes (each pair of hexadecimal digits is one byte) bear a curious
resemblance to the last group of characters on line 4; have a look. In line 4 of the source
code we told the assembler that the label 'BSOUT' EQUated with address $FFD2. In line 11,
when the assembler encountered 'BSOUT' as the operand, it substituted the specified
address. The sequence of the high and low-order bytes was reversed, turning $FFD2 into D2
EF, a 6510/8502 microprocessor convention.
Page 9
Merlin 128 User's Manual
Beginner's Guide
The rest of the information presented should explain itself. The total errors encountered in
the source code was zero, and 49 bytes of object code (count of bytes following the
addresses) was generated.
SAVING AND RUNNING PROGRAMS
The final step in using Merlin 128 is running the program. It is always a good idea to save
the source code and object code before testing any program. Then, if the program bombs or
hangs up, you'll be able to go back to your listing without having lost your work to that
point. To do this, you will have to return to the Main Menu, and use the SAVE SOURCE
command. You would then follow that with an OBJECT CODE SAVE. Note that OBJECT
CODE SAVE can only be done if there has been a successful assembly.
Here are the actual steps to follow:
1.
With the ':' prompt, type 'Q and press RETURN. The system will quit the EDITOR
mode and revert to Main Menu. If the Merlin 128 system disk is still in the drive,
remove it and insert an initialized work disk.
After the '%' prompt, type 'S' (the Main Menu SAVE SOURCE FILE command).
The system is now waiting for a filename. Type 'demo1', and press RETURN.
After the program has been saved, the prompt returns.
2.
Type 'C' (CATALOG) and look at the disk catalog. The source code has been saved
as a file titled "demo1 .s". The suffix “.s” is a file-labeling convention which
indicates the subject file is source code. This suffix is automatically appended to
the name by the SAVE SOURCE command.
3.
Press RETURN to return to Main Menu and type '0', for OBJECT CODE SAVE.
The object file should be saved under the same name as was earlier specified for
the source file, so press RETURN to accept 'demo 1' as the object name. There is
no danger of overwriting the source file because the suffix ".0" is appended to
object code file names. Type 'C' (CATALOG) to verify that the object code has
been saved as a file titled "demo 1.0". Press RETURN to return to the Main Menu.
When looking at the Main Menu, you'll also notice that the address and length of
your source code text is displayed. If you have done a successful assembly, the
address and length of the assembled object code is also displayed. If the object
code information is NOT DISPLAYED, Merlin 128 will not let you save an object
file to disk. The object code save is disabled whenever an error has occurred during
an assembly, you have made a change to the source code and not yet re-assembled
it, or the source code is either too big to fit or not allowed in the space you have
specified for the assembly. See the sections on ORG, OBJ and Memory Allocation
if this latter problem occurs.
Page 10
Merlin 128 User's Manual
Beginner's Guide
Next type 'G' (GO) to run a program. At the prompt, type 'demo1'. The demonstration
program puts the message 'Press Return to Exit' on the screen. It works!
Now you can return to the Main Menu by pressing RETURN. (All assembly language
programs that end in an RTS, and that are run using Merlin 128's 'G' command in the
Main Menu will return to the Main Menu when done.)
MAKING BACK-UP COPIES OF MERLIN 128
The Merlin 128 diskette is unprotected and copies may be made using any copy utility. The
Merlin 128 diskette has a copy program on it. The COPY program must be run from
BASIC. From the Main Menu, type 'B' to quit to BASIC, then type RUN "COPY".
It is highly recommended that you use only the BACK-UP copy of Merlin 128 in your daily
work, and keep the original in a safe place.
PERSONALIZING MERLIN 128
Certain aspects of Merlin 128, such as the background, border and character colors, the
printer line width, default tab positions for the fields in the source listing, etc. can be
customized by changing the file PARMS.S on the Merlin 128 disk, and reassembling the
PARMS.O file. If you would like to change any of these defaults of Merlin 128, see the
section on Configuration in the Technical Information section of this manual for details on
making the changes. For now, though, we recommend you leave well enough alone until
you're more familiar with Merlin 128.
THE REST OF THIS MANUAL...
The preceding section was a simple look at how to enter, assemble and then save a Merlin
128 program.
The remainder of this manual is an encyclopedic reference of the various commands that are
available within Merlin 128 to make writing an assembly language program easier.
Remember that the commands and directives available within Merlin 128 are merely the
building blocks from which you can create your own programs. It is up to you to decide
when and where they are to be used.
The manual describes the following aspects of Merlin 128:
1) The Main Menu: This level of Merlin 128 is used for loading and saving files, disk
operations, and entering the Editor/Assembler.
Page 11
Merlin 128 User's Manual
Beginner's Guide
2) The Editor: This section describes the functions available for creating and editing a
source listing for an assembly language program.
3) The Assembler: This section covers assembler directives within Merlin 128. Remember
that these are not editing or direct user commands, but rather, text commands included
within a source listing to tell the assembler to do something special while your program is
being assembled. This might include using a Macro definition, writing a file to disk, or other
functions.
4) Supplemental Sections: There are a number of additional sections in this manual that
describe the use of Macros, the Relocating Linker, Error Messages, Sourceror and other
Utilities, and many other aspects of Merlin 128's operation. These can be consulted as
necessary.
Page 12
Merlin 128 User's Manual
Main Menu
THE MAIN MENU
The Main Menu is used for file maintenance operations such as loading or saving code or
cataloging the disk. The following sections summarize each command available in this
mode.
C (CATALOG)
When you press "C", the CATALOG of the current diskette will be shown. The Main Menu
prompt (%) appears. This permits you to give another Main Menu command such as ‘L’ to
LOAD SOURCE while the catalog is still on the screen. If you do not want to give a
command, just press RETURN. Press the space bar to pause the catalog process, and any
other key to resume. Press the Run/Stop key (or Control-C) to abort the catalog.
L (LOAD SOURCE)
This is used to load a source file from disk. You will be prompted for the name of the file.
You should not append ".s" since Merlin 128 does this automatically. If you have pressed
‘L’ by mistake, just press Run/Stop/Restore and the command will be cancelled without
effecting any file that may be in memory.
After a LOAD SOURCE (or APPEND SOURCE) command, you are automatically placed
in the editor mode, just as if you had pressed 'E'. The source will automatically be loaded to
the correct address. Subsequent LOAD SOURCE or SAVE SOURCE commands will
display the last used filename. If a source file had already been loaded, the cursor will be
flashing under the first character of the filename. If you press RETURN, the current
filename will be used for the command. If you wish to load a different filename, type the
filename and press RETURN.
S (SAVE SOURCE)
Use this to save a source file to disk. As in the load command, you do not include the suffix
".s" and you can press Run/Stop/Restore to cancel the command. NOTE: the address and
length of the source file are shown on the MENU, and are for information only. You should
not use these for saving; the assembler remembers them better than you can and sends them
automatically. As in the LOAD SOURCE command above, the last loaded or saved
filename will be displayed and you may press RETURN to save the same filename, or enter
another filename.
NOTE: when a SAVE or WRITE is done from the Main Menu, or when the SAV opcode is
used in the source code, an error will result if the file already exists on the
Page 13
Merlin 128 User's Manual
Main Menu
diskette. This can be avoided by preceding the filename with '@:' or '@0:'. The new file is
saved before the old file is scratched, thus there must be enough room on the diskette for the
new file.
This syntax may also be used for a LOAD but it has no effect other than to make the '@:'a
part of the default filename.
A (APPEND FILE)
This loads in a specified source file and places it at the end of the file currently in memory.
It operates in the same way as the LOAD SOURCE command, and does not affect the
default file name. It does not save the appended file; you are free to do that if you wish.
N (NEW SOURCE)
This command, after confirming your intention, deletes the current source file from memory.
This is handy when used prior to a READ command, since READ always appends the file to
the existing source code, if any.
R (READ TEXT FILE)
This command reads text files into Merlin 128. They are always appended to the current
buffer. To clear the buffer and start fresh, use the NEW SOURCE command. If no file is in
memory, the name given will become the default filename. Appended reads will not do this.
When the read is complete, you are placed in the editor. If the file contains lines longer than
255 characters, these will be divided into two or more lines by the READ command. The
file will be read only until it reaches HIMEM, and will produce a memory error if it goes
beyond. Only the data read to that point will remain.
The READ TEXT FILE and WRITE TEXT FILE commands are used to LOAD or
CREATE "PUT" files, or to access files from other assemblers or text editors.
W (WRITE TEXT FILE)
This writes a Merlin 128 file into a text file instead of a binary file. The WRITE command
does not delete or scratch first. See the CAUTION in the SAVE command regarding the '@:'
syntax.
Page 14
Merlin 128 User's Manual
Main Menu
D (DRIVE CHANGE)
When you press ‘D’, the ‘New Drive #’ prompt will appear. Enter the desired number. The
currently selected drive number is shown on the Main Menu. When Merlin 128 is first
booted, the selected drive will be the on used by the boot.
E (ENTER EDITOR/ASSEMBLER)
This command places you in the Editor/Assembler mode. It automatically sets the default
tabs for the editor to those appropriate for source files. If you wish to use the editor to edit
an ordinary text file, you can type TABS from the colon prompt (:) in the Editor to zero all
tabs.
0 (SAVE OBJECT CODE)
This command is valid only after the successful assembly of a source file. In this case you
will see the address and length of the object code on the menu. As with the source address,
this is given for information only.
NOTE: the object address shown is that of the program's ORG (or $8000 by default) and not
that of the actual current location of the assembled code (which is ordinarily $AOOO in
bank 1).
When using this command, you are asked for a name for the object file. A '.o' suffix will be
automatically appended to this filename. Thus, you can safely use the same name as that of
the source file.
When this object code is saved to the disk, its address will be the correct one, the one shown
on the Main Menu. When later you LOAD it, the file will load at that address, which can be
anything ($lC00,$8000, etc).
G (RUN PROGRAM)
This command will LOAD and EXECUTE the specified object file. It will not run a BASIC
program. The specified object file must have a '.o' suffix. It is not necessary to include the
suffix when entering the filename. Therefore, pressing 'G' and entering 'filename' and
pressing RETURN will LOAD and EXECUTE the object file called 'filename.o'.
The 'G' command will run a program anywhere in RAM 0. It enters with the RAMHALF
configuration unless the program extends to $C000 or beyond. The program will be in
conflict with Merlin 128 if the load address is between $1C00 and $6FFF. In this case,
Merlin 128 will move itself into RAM 1 at $A000 and place a small interface routine at
$800 before loading your program. When your program does
Page 15
Merlin 128 User's Manual
Main Menu
an RTS, Merlin 128 will move itself back. You can also return to Merlin 128 with a JMP
$800. While Merlin 128 is moved to $A000, pressing Reset will cause a reboot.
X (DISK COMMAND)
This sends the command to the "Error Channel. Examples of intended use are:
X
then V will do a disk verify.
X
then S:FILE.O will scratch “FILE.O”.
X
then R:NEWFILE.S = OLDFILE.S will rename OLDFILE.S.
NOTE: the .S or .O, if any, must be entered here, and that quotes should not be used. Also,
to prevent unintentional initialization, the N (New) command is not supported.
M (MONITOR)
This command uses the CBM monitor program. You can use all of the standard CBM
Monitor features. Press ‘X’ to return to the Merlin 128 Main Menu. This command should
not be confused with the MON command in the Merlin 128 Editor.
B (BASIC)
After confirming your intention to quit, this command exits Merlin 128 and goes to
BASIC. Merlin 128 moves itself to $A000 in RAM 1. The default Function Key
definitions are reinstated except for the F4 key, which becomes a Return to Merlin
128' (SYS 2048) command.
Pressing F4 to re-enter Merlin 128 is provided for safety. In fact, the source file, if any, may
still be intact. It is possible, however, that a BASIC program could overwrite the re-entry
routine at $800. Therefore, the F4 method of returning to should be used with caution. The
recommended re-entry method is to press the Reset button to reboot.
Note: When inside Merlin 128 pressing the Reset button initializes the I/O devices and
returns to the Main Menu. It does not go to BASIC or reboot.
Page 16
Merlin 128 User’s Manual
The Editor
THE EDITOR
Basically there are two modes in the Editor: the Immediate Mode and the full screen Editing
Mode, which includes Adding or Inserting new lines of text.
When you first go to the Editor from the Main Menu, you will be in the Immediate Mode,
which is indicated by the colon (":") prompt. No actual editing is done at this level. Rather,
you can either type a command which will start up the full screen editor, or you may use a
number of specific Immediate Mode commands, which are of a general utility nature, such
as to print a listing, assemble a file, convert number types, etc.
When you type an editing command such as A (to Add), etc. from the Immediate Mode, the
color prompt will disappear and the screen display will change to the full screen editor, but
more on that in a moment.
ABOUT THE EDITOR DOCUMENTATION
For each of the commands available in the Merlin 128 Editor, the documentation consists of
three basic parts:
1) the name and syntax of the command,
2) examples of the use of each available syntax,
3) a description of the function of each command.
When the syntax for each command is given:
PARENTHESES () indicate a required value,
ANGLE BRACKETS <> indicate an optional value or character.
SQUARE BRACKETS [] are used to enclose comments about the command.
Page 17
Merlin 128 User's Manual
The Editor
THE IMMEDIATE MODE
GENERAL GUIDELINES FOR THE IMMEDIATE MODE
For most of the Immediate Mode commands, only the first letter of the command is
required, the rest being optional. This manual will show the required command characters in
UPPER case and the optional ones in lower case.
Line Numbers in Immediate Mode
With some commands, you must specify a line number, a range of line numbers, or a range
list. A line number is just a number. A range is a pair of line numbers separated by a comma.
A range list consists of several ranges separated by a slash (“/”).
Line Number examples:
10
LINE #
10,30
RANGE
10,30/50,60 RANGE LIST
[a single line number]
[the range of lines 10 to 30]
[ ranges 10 to 30 AND 50 to 60]
If a line number in a range exceeds the number of the last line in the source, the editor
automatically adjusts the specified line to the last line number. For example, if you wanted
to Delete all the lines past 100 in a source listing, D100,9999 would probably do it!
Delimited Strings (or d-strings)
Several commands allow specification of a string. The string must be "delimited" by a nonnumeric character other than the slash or comma. Such a delimited string is called a d-string.
The usual delimiter is single or double quote marks (' or").
Delimited string examples:
'this is a delimited string'
"this is a delimited string" @this is another d-string@
Note that the slash"/" cannot be used as a delimiter since it is the character that delimits
range lists in the editor.
Page 18
Merlin 128 User's Manual
The Editor
Wild Card Characters in Delimited Strings
For all of the commands that use delimited strings (d-strings), the “^” character acts as a
wild card character. Therefore, the d-string “Jon^s” is equivalent to the d-string "Jones" as
well as "Jonas".
Upper and Lower Case Control
The shift and caps lock keys work as you would expect. while editing or entering a line of
text, there are also special upper/lower case commands available, as will be described later.
Page 19
Merlin 128 User's Manual
The Editor
ADD/INSERT COMMANDS
Following are the commands recognized by Merlin 128 in the Immediate Mode of the
Editor. The Immediate Mode is indicated by the colon prompt (:).
Add/Insert a Line
When you first start a listing, the Add command is used to start entering lines. It can also be
used later to add lines to the end of the listing. Insert is used to insert new lines in between
existing lines in the source listing.
Add
A
[only option for this command]
The Add command places you in the Full Screen Editor at the end of the existing source
listing (if any). Adding lines is much like entering additional BASIC lines with auto line
numbering. To exit from ADD mode (actually to exit the Full Screen Editor), press C= and
←.
You may enter an empty line by pressing RETURN. This is useful for visually blocking
off different parts of a listing.
Insert
Insert (line number)
I 20
[inserts lines "above" line 20]
This allows you to enter text just above the specified line. Otherwise, it functions the same
as the Add command.
EDITING AN EXISTING LINE IN A SOURCE LISTING...
Once a line already exists in your Source listing, you may want to edit a particular line or
range of lines. This is done using the cursor control and editing commands of the Full
Screen Editor, as is described shortly.
Page 20
Merlin 128 User's Manual
The Editor
FULL SCREEN EDITOR COMMANDS
After typing E and a line number or string in the Immediate Mode of the Editor, you are
placed in the Full Screen Editor. The line specified is placed at the center of the screen with
the cursor on its first character.
At the upper right hand corner of the screen, the number of the line containing the cursor is
printed. Somewhat to the left of this you may see a vertical bar. This bar is the End-of-Line
Marker and it indicates the position at which an assembly listing will overflow the printer
line. You can put characters beyond this mark, but they should be for information only, and
will not be printed within a printer listing. The position of the mark is calculated using the
line length parameter in the PARMS (see the Technical Information section) file. If this is
very large, the mark will not be shown.
The line is tabbed as it is in the listing, and the cursor will jump across the tabs as you move
it with the arrow keys.
The Edit mode commands are divided into two types: Control key commands which are line
oriented, and Commodore key commands which are global. (i.e., entire listing-oriented).
The control key commands edit text and move the cursor on just the line the cursor is
presently on. Use the Commodore key commands to make changes to groups of lines, or to
move about in the listing. All editing commands work whether the Full Screen Editor was
started up using the Add, Insert or Edit commands. When you are through editing, press C=
and ← at the same time. The line is accepted as it appears on the screen, no matter where the
cursor is when you exit the Edit mode.
To get the most out of the Merlin 128 Full Screen Editor, you should keep in mind that a full
screen editor is like a word processor. That is, any character you type is immediately entered
into whatever line the cursor is on.
With the Merlin 128 Full Screen Editor, if you can see it on the screen, you can edit it, and
moving to a line is a simple matter of using the arrow keys or other special commands to
move to the part of the listing you want to edit. Just remember, when you are using the Full
Screen Editor, think of yourself as using a word processor where you can freely scroll to
whatever part of the page you want to edit, and the final "document" is just your source
listing.
Page 21
Merlin 128 User's Manual
The Editor
Control Key Commands (Line oriented)
Control-A (delete all)
Deletes all characters from the cursor to the end of the line.
Control-B (beginning of line)
Moves the cursor to the beginning of the line.
Control-D (delete)
Deletes the character under the cursor. (See also the DElete key)
Control-E (memory status)
This command displays a status box showing the number free and used bytes, and the
length of the clipboard, if any.
Control-F (find)
Finds the next occurrence of the character typed after the CTRL-F. The cursor changes to
an inverse 'F' to indicate the Find Mode. To move the cursor to the next occurrence on the
line, press the character key again.
Control-I (toggle cursor)
Toggles the cursor mode between the insert cursor (inverse 'I') and overstrike cursor
(inverse block). The insert mode of the cursor should not be confused with entering the
Full Screen Editor using the Add and Insert commands. The cursor can be in the insert
mode regardless of whether lines are being added or inserted. The insert mode of the
cursor refers only to whether individual characters are being inserted (inverse 'I' cursor) or
typed over (inverse block).
The character insert mode defaults to ON upon entry. When you change it with the TAB,
INST, or Control-I, it remains that way until changed again. Thus, moving from one line
to another has no effect on this status.
The status is indicated by the type of cursor displayed. It is an inverse 'I' when insert mode
is active, and an inverse block when the overstrike mode is active. (The cursor is an
inverse 'F' when you are in find mode.)
Control-K (character case change)
This command changes the case of the character under the cursor.
Page 22
Merlin 128 User's Manual
The Editor
Control-L (lower case convert)
Ordinarily, unless the cursor is in a comment or an ASCII string, lower case characters
will be converted to UPPER CASE characters. This is also defeated when the tabs are
zeroed. To override this conversion, or to reinstate it, just use the Control-L command.
This conversion is also in effect when you use the C=F, C= W, or C=L find commands to
specify the text to find.
Control-N (end of line)
Moves the cursor to the end of the line.
Control-O (other characters)
This key is used as a special 'prefix' key That is, if you wanted to type a Control-N, for
example, as part of a line, the Editor would treat the Control-N as a command key, rather
than entering it on the line you were editing. Likewise, you might want to type the
ESCAPE key as part of a PRTR initialization string. To enter any character on a line, just
press Control-O first, then immediately follow with your desired control character. The
control character will appear either in inverse, or for ESCAPE and certain other keys, as a
Commodore graphics character. For multiple control characters, Control-O will have to be
typed once each time before each character is entered.
Control-R (restore)
This command restores the original line. For example, if you have used CTRL-A to delete
all characters to the end of the line, you can press CTRL-R to undo the effects of the
CTRL-A command.
Control-W (find word)
This command jumps the cursor to the next occurrence of a word in the line
(alphanumeric).
Control-X (cancel global exchange)
This command can be used to cancel any global exchange while it is in progress.
Cursor keys
The cursor (4-directional) keys move the cursor in the specified direction.
DEL (delete key)
Deletes the character to the left of the cursor. (See also Control-D).
Page 23
Merlin 128 User's Manual
The Editor
ESC (Escape key)
This command moves the cursor to the beginning of the next line. This is similar to Return
except that ESCape does not insert a blank line.
HOME (Home key)
Pressing the Home key on any line causes that line number to be remembered when the C=
HOME command is used.
INST (toggle cursor)
Toggles the cursor mode between the insert cursor (inverse 'I') and overstrike cursor
(inverse block).
Moving from one line to another has no effect on the status of the cursor; it only changes
when toggled with CTRL-I, INST or TAB.
RETURN
Pressing Return anywhere in the line causes the cursor to move to the beginning of the
next line and insert a blank line.
TAB
Toggles the cursor mode between the insert cursor (inverse 'I') and overstrike cursor
(inverse block).
Moving from one line to another has no effect on the status of the cursor; it only changes
when toggled with CTRL-I, INST or TAB.
Page 24
Merlin 128 User's Manual
The Editor
Commodore Key Commands (Entire listing oriented)
In addition to the line-oriented commands (control key commands), the Full Screen Editor
uses Commodore key commands to move within the listing, and to edit entire lines of text.
These commands are as follows:
C= A (select all text)
This command selects all text to be cut from the current line to the end of the listing. C= C
will then copy the selected text, (C=X will cut the text), while pressing any other key will
cancel the selection.
This technique can be used to move the entire listing to the clipboard.
C= B (beginning of source)
This command moves to the beginning of the source listing and places the cursor on the
eleventh line.
C= C (copy)
C= C starts the select mode to “cut” or “copy” text. The first time C= C is pressed, the
current line is selected and is shown in inverse. Use the down cursor or ESCape keys to
extend the selection if desired, or press any other key to cancel the selection. Additional
selected lines are shown in inverse. Use the up arrow key to adjust the range selected if
you go too far, however, the select mode will be canceled if you move the cursor above
the first selected line or past the top of the screen.
The second time C= C is pressed, or if C= A has already been pressed, a copy is made of
the selected text from the listing and is placed on the clipboard. If you want to cut the text
from the listing, type C= X. The selected lines will disappear from the screen and are
placed on the clipboard.
If you are unfamiliar with the idea of a "clipboard", this is just an analogy to how you
might put piece of paper clipped from a magazine, letter, etc. on a clipboard, to hold it
temporarily while you were getting ready to put it in its final location. In the Commodore
128, the clipboard just refers to a memory buffer that holds the text you have selected
while you decide where you want the final text placed.
Page 25
Merlin 128 User's Manual
The Editor
C= D (delete current line)
This command deletes the current line (C= DEL will delete the line above the cursor) and
places it in a special 'undo' buffer which is independent of the clipboard.
The C= R command exchanges the current line with the contents of the 'undo' buffer.
Therefore, to move a single line to another location, you could place the cursor on the line
to be moved, and then type C= D to delete the line. Then move the cursor to another line,
press RETURN, C= I, or C= TAB to create an empty line, and press C= R to replace that
line with the deleted line.
C= E (global exchange) (also called 'Find & Replace')
Sometimes called 'Find & Replace', this command will let you search for a group of
words, and replace them with another. The C= E command opens a dialog box that asks
for the text to change, and the new text to replace it. If you press RETURN alone (a blank
entry) for either of these, the command is aborted.
If you enter the text in both fields and press RETURN, the file is then searched for the
change text. Unlike the FIND command, it looks only for full words. That is, the text
found must be bounded by non-alphanumeric characters or it will be ignored.
If text is found with this method, the screen is reprinted with the replacement made and
the cursor is placed on the first character of the replacement. Now you must press a key to
continue. Pressing RETURN (or most any other control character) will defeat the change
and the routine will look for the next occurrence of the text to change. Pressing the space
bar or any other character (except 'A') will accept the change and the routine will
continue.
You can back out of the global exchange while the cursor is on an entry by pressing either
ESCape or Control-X. You can also type the 'A' key, which will cause all occurrences to
be changed. Caution: this can be aborted only by RUN/STOP or RESET.
You can tell when the routine is finished by the fact that during the exchange sequence,
the line number at the top right is missing. It will return when there are no more matches
for the change text, or when you press ESCape or Control-X.
Page 26
Merlin 128 User's Manual
The Editor
C= F (find text)
The C= F command opens a window which asks for the find text. It then finds the first
occurrence of the text in the entire text file. The text can be anywhere on a line. After the
first find, you can find the next occurrence by typing another C= F. The find mode is
indicated by the inverse 'F' at the top right of the screen. You can edit the line and then
type C= F to go to the next occurrence.
If there are more occurrences to be found, one or more '+' signs will be shown next to the
line number at the top right of the screen. This starts from the line below the current line,
and only indicates the number of lines remaining with occurrences, and not the total
number of occurrences.
If the C= F command is used after text has been selected, only the selected text will be
searched for the text to be found. When the search has been completed, the text is no
longer selected. Thus, you can use the C= A and C= C commands to search just a portion
of your listing.
The C= B command and the Control-E status command both cancel the Find mode, as
does failure to find the text below the current line.
The C= W command is identical to C= F except that it finds only whole words bounded by
non-alphanumeric characters. If you type either C= W or C= F to find the next occurrence,
this mode will change accordingly.
In all cases the line containing the text is moved to the center of the screen, unless it is
within the first 10 lines of the start of the source.
C= H (half screen)
This command toggles the split or half screen mode. In this mode, the bottom ten lines are
frozen in a window. A bar is shown above these lines to separate the frozen text from the
scroll window. Pressing C= H again will cancel the half screen mode and refresh the
screen.
C= I (insert line)
Pressing C= I or C= TAB will insert a blank line at the cursor.
C= L (locate label or line)
This command will locate the first occurrence of a label or any text in the label column.
Only the characters typed are compared with the labels, so in some cases you may want to
end your input with a space.
Page 27
Merlin 128 User's Manual
The Editor
If a number is entered after this command, the cursor will move to the beginning of line
number specified. This is particularly handy when editing a source file from a printed
listing.
The C= L command asks for a label or any text to locate. It finds the first occurrence of
that text in the file, but only in the label column. Only the characters typed are compared
with the labels, so in some cases you may wish to end your input with a space.
The intended use for this command is to move rapidly to a particular place in the source.
You can use create your own 'markers' to enhance the capability of this command.
Therefore, if a line starts '*7', you can specify '*7' as the text to find for this command and
it will work.
If you type a number for the label in an C= L command, you will be sent to that line
number. This is convenient when editing a source file using a printed listing.
In all cases the line containing the text is moved to the center of the screen, unless it is
within the first 10 lines of the start of the source.
C= N (end of source)
This command moves the cursor to the end of the source listing.
C= P (paste)
Pastes the contents of the clipboard at the line containing the cursor. Only full lines are
moved. Using this command does not change the contents of the clipboard, so this
command can be used to replicate a range of lines.
If the C= P paste command is issued when a range of text has been selected, the range will
be replaced by the text in the clipboard. Text deleted in this manner is not recoverable.
C= Q (quit)
This command quits the Full Screen Editor and goes to the Main Menu. (Does not work in
Editor Immediate Mode – use ‘Q’).
C= R (replace) (See also C= D)
This command exchanges the current line with the contents of the 'undo' buffer.
Therefore, pressing C= R a second time will cancel the effect of the first press.
Page 28
Merlin 128 User's Manual
The Editor
Using C= R when the cursor is on blank line will place the contents of the undo' buffer on
the line and place the empty line in the 'undo' buffer.
The C= R command can be used to move a single line. Place the cursor at the beginning
of the line to be moved and press C= R. Move the cursor to the desired location, press
RETURN to insert a blank line, and press C= R again.
C= R can be used by itself to easily interchange two lines. Just place the cursor on the first
line, press ~R, move the cursor to the second line, press C= R again, move the cursor back
to where the first line was and press C= R for the third, and final, time.
C= W (find word)
The C= W command is identical to C= F except that it finds only whole words bounded by
non- alphanumeric characters. If you type either C= W or C= F to find the next
occurrence, this mode will change accordingly.
If the C= W command is used after text has been selected, only the selected text will be
searched for the word to be found. When the search has been completed, the text is no
longer selected.
C= X (cut highlighted text)
Similar to C= C, but selected text is removed from the screen after being copied to the
clipboard. This is in contrast to C= C which leaves the original text on the screen after
copying to the clipboard. One use of this command is to use £B, then C= A to select
everything from the beginning of the file to the end. C= X will then cut it; anything else
will cancel the select mode. This provides a simple means of moving the entire file to the
clipboard.
C= Z (reprint screen)
This command reprints the screen so that the current line becomes the eleventh line on the
screen.
C= Up cursor (move up one page)
Moves the cursor up one page. The C= Up cursor and C= Down cursor commands move
up or down one page at a time. This is approximately equivalent to two C= Left or C=
Right cursor commands.
Page 29
Merlin 128 User's Manual
The Editor
C= Down cursor (move down one page)
Moves the cursor down one page.
C= Left cursor (move half-screen up)
Moves the cursor up 10 lines; that line then becomes the eleventh line on the
screen. This command has the effect of moving the current line to the bottom of the
screen and then moving the cursor to what was the 1st line on the screen.
C= Right cursor (move half-screen down)
Moves the cursor down 10 lines; that line then becomes the eleventh line on the
screen. This command has the effect of moving the current line to the top of the screen
and then moving the cursor to what was the bottom line on the screen.
C= * (asterisk)
Produces a line of 32 asterisks.
C= ↑ (Vertical arrow)
Produces an asterisk, 30 spaces, and then another asterisk. This and the & *
command can be used to produce a large box for titles and other information.
C= - (hyphen)
Produces a line of 1 asterisk and 31 hyphens.
C= (equal sign)
Produces a line of 1 asterisk and 31 equal signs.
C= ←(Horizontal arrow)
Quits the Full Screen Editor to the Editor Immediate Mode. The colon prompt (:) appears
at the bottom of the screen to indicate that the Editor is now in the Immediate Mode.
Page 30
Merlin 128 User's Manual
The Editor
C= DEL (delete)
This command deletes the line above the cursor and places it in a special 'undo'
buffer which is independent of the clipboard.
The C= R command replaces the current line with the contents of the 'undo' buffer.
Therefore, you could use C= DEL to delete a line, move the cursor to another line, press
RETURN, C= I, or C= TAB to insert a line, and press C= R to replace that line with the
deleted line.
C= HOME
Go to the line used for the last CTRL-HOME.
C= TAB (insert line)
Pressing C= TAB or C= I will insert a blank line at the cursor.
The Editor's Handling of Strings and
Comments with Spaces
When entering strings or comments in the Add/Insert or Edit modes, you will sometimes
find the editor apparently inserting additional spaces. This is only a display function,
however, and the editor will remove the added spaces when the line is terminated.
In the case of ASCII strings, the restoration is only done when the delimiter is a quote (")or
a single quote ('). You can, however, accomplish the same thing by editing the line,
replacing the first delimiter with a quote, pressing the down arrow once, then press the up
arrow once. The spaces will be removed and then you can then edit the line and change the
delimiter back to the desired one.
Another approach, especially where an exact number of spaces or other exact formatting of
the text is necessary, is to turn off the tab formatting by typing 'TABS' in the Immediate
mode. This will stop all automatic tabbing by the Editor. Tabs are automatically restored by
going to the Main Menu, and then returning to the Editor.
Page 31
Merlin 128 User's Manual
The Editor
EDITOR COMMAND SUMMARY
CONTROL KEY COMMANDS (line oriented)
The Control Key commands consist of cursor moves and line oriented commands.
Control-A ----------Control-B ----------Control-D ----------Control-E ----------Control-F ----------Control-I
----------Control-L ----------Control-K ----------Control-N ----------Control-O ----------Control-R ----------Control-W ----------Control-X ----------Cursor keys ----------DEL
---------------ESC
---------------HOME ---------------INST ---------------RETURN ----------TAB
----------------
Deletes characters to end of line
Moves cursor to beginning of line
Deletes character under the cursor
Displays memory status window
Finds next occurrence of next character typed
Toggles insert and overstrike cursor
Toggles lower case conversion
Changes case of character under cursor
Moves cursor to end of line
Prefix key for typing control characters
Retrieves original line
Finds next occurrence of word in line
Cancels global exchange while in progress
Moves the cursor
Deletes character to left of cursor
Moves cursor to beginning of next line
Remembers line for recall by C= HOME
Toggles insert and overstrike cursor
Moves cursor down and inserts blank line
Toggles insert and overstrike cursor
COMMODORE KEY COMMANDS (entire listing oriented)
The Commodore Key commands are global commands, which means they are generally
oriented to the whole listing as opposed to just the current line (or a single character).
C=A
C=B
C=C
C=D
C=E
C=F
C=H
C=I
C=L
C=N
C=P
Page 32
---------------------------------------------------------------------------------------------------------------------------------------------------------------------------------
Selects text for cut from line to end of file
Moves to beginning. Cursor on eleventh line
Start text selection/Copy selected text to clipboard
Deletes line and places it in 'undo' buffer
Global exchange (Search & Replace)
Finds next occurrence of text entered
Toggles half-screen mode
Inserts blank line at cursor
Finds first occurrence of label or line
Moves cursor to end of listing
Pastes contents of clipboard on current line
Merlin 128 User's Manual
C=
C=
C=
C=
C=
C=
C=
C=
C=
C=
C=
C=
C=
C=
C=
C=
C=
Q --------------------------------R
W --------------------------------X
----------------Z
Up --------------------------Down
----------Left
Right
--------------------DEL
HOME ----------TAB
----------↑
----------------*
------------------------------------------------=
←
-----------------
The Editor
Quits editor and returns to Main Menu
Exchanges current line with 'undo buffer
Finds next occurrence of whole word
Cut selected text to clipboard
Current line becomes eleventh line on screen
Moves cursor up one page
Moves cursor down on page
Moves cursor up 10 lines
Moves cursor down 10 lines
Deletes line above cursor; puts in ‘undo’ buffer
Goes to line of last CTRL-HOME
Inserts a blank line at cursor
Produces 1 *, 30 spaces, and 1 *
Produces a line of 32 asterisks
Produces a line of 1 * and 31 hyphens
Produces a line of 1 * and 31 equal signs
Returns editor to Immediate Mode
GENERAL REMARKS
When you move the cursor between lines, its horizontal position will jump around. This is
because it is based on the actual position in the line and not on the screen position. If the
tabs are zeroed you will not notice this, except for the fact that the cursor is never beyond
the last character in the line.
The maximum line length is 80 characters. Lines longer than that will be truncated IF they
are edited.
You must return to the Immediate Mode (C= ←) in order to use the ASM command to
assemble, MON to use the Merlin 128 Monitor, or to Quit and go to the Main Menu, etc. An
assembly will delete the contents of the clipboard.
ALTKEYS AND KEYDEFS
ALTKEYS and KEYDEFS are source files that contain the ALT key macros and the
Function Key definitions used by Merlin 128. You can add your own macros or definitions
or edit the existing ones. Both of these programs discussed in detail, including command
charts, in the section called Utilities.
OOPS
Virtually any editor action can he undone. You should remember that the proper undo
command is of the same 'type' as the command you want to undo. Thus, any Control
Page 33
Merlin 128 User's Manual
The Editor
key command is undone by Control-R. This includes the C= *, C= -, and C= = commands
which are considered line oriented commands for this purpose.
The line deletion commands C= D and C= DEL are undone by creating an empty line with
C= TAB followed by C= R. If you forget to create the empty line, type another C= R and
repeat the above procedure.
The C= R command undoes itself.
A CUT (C= X) is undone by a PASTE (C= P) without moving the cursor off its line.
If you are entering a line of text in response to a prompt, such as a filename, PRTR
initialization, or dialog box, you can press Control-C or Control-X to cancel the line.
Page 34
Merlin 128 User's Manual
The Editor
MORE IMMEDIATE MODE COMMANDS
Merlin 128 also has Immediate Mode Find and Change commands to allow you to list all
lines that have a certain opcode, label, etc. in them (Find); or to change all or some
occurrences of a certain label or opcode to something different (Change).
F (Find)
Find (d-string)
Find (line number) <d-string>
Find (range) <d-string>
Find (range list) <d-string>
F "A String"
F 10 "STRING"
F 10,20 "HI"
F 10,20/50,99 "HI"
[finds lines with "A String"]
[finds "STRING" if in line 10]
[finds lines in range of 10 through 20 that contain "HI"]
[finds lines that contain "HI" in range of 10 through 20
and 50 through 99]
This command lists those lines containing the specified string. It is aborted with CTRL-C
or '/' key.
FW (Find Word)
FW (d-string)
FW (line number) <d-string>
FW (range) <d-string>
FW (range list) <d-string>
FW "LABEL"
FW 20 "LABEL"
FW 20,30 "PTR"
FW 20,30/50,99 "PTR"
[find all lines with "LABEL"]
[trytofind"LABEL"in20]
[find all lines between 20 and 30 that contain "PTR"]
[find all lines between 20 and 30 and between 50 and 99
that contain the word "PTR"]
This is an alternative to the FIND command. It will find the specified word only if it is
surrounded, in source, by non-alphanumeric characters.
Therefore, FW "CAT" will find:
CAT
CAT-1
(CAT,X)
but will not find CATALOG or SCAT.
Page 35
Merlin 128 User's Manual
The Editor
C (Change)
Change (d-string d-string)
Change (line number) <d-string d-string>
Change (range) <d-string d-string>
Change (range list) <d-string d-string>
C "hello"goodby
[finds "hello" and if told to do so will change it to
"goodbye"]
C 50 "hello"bye
[changes in line 50 only]
C 50,100 "Hello"BYE [changes lines 50 through 100]
C 50,60/65,66 "AND"OR [changes in lines 50 through 60 and lines 65 and 66]
This changes occurrences of the first string to the second string. The strings must have the
same delimiters. For example, to change occurrences of "speling" to "spelling" throughout
the range 20,100, you would type C 20,100 "speling"spelling. If no range is specified the
entire source file is used.
Before the change operation begins, you are asked whether you want to change "all" or
"some". If you select "some" by hitting the "S" key, the editor stops whenever the first
string is found and displays the line as it would appear with the change.
If you then press the "Y" key, the change will be made. If you press RETURN, the change
will not be made. Typing any control character such as ESCAPE, RETURN or any others
will result in the change not being made. Any other key, such as "Y" (or even "N") will
accept the change. CTRL-C or"/" key will abort the change process.
CW (Change word)
Change (d-string d-string)
Change (line numbers) <d-string d-string>
Change (range) <d-string d-string>
Change (range list) <d-string d-string>
CW "FTR"PRT
[change all "FTR"s to "PRT"s]
CW 20 "PTR"PRT
[as above but only in line 20]
CW 20,30 "PTR"PRT [do the same as the above but for lines 20 through 30]
CW 1,9/20,30 "PTR"PRT [same as above but include lines 1 through 9 in the range]
This works similar to the CHANGE command with the added features as described under
EW.
Page 36
Merlin 128 User's Manual
The Editor
D (Delete)
Delete (line number)
Delete (range)
Delete (range list)
D 10
D 10,32
D 20,30/10,12
[deletes line number 10]
[deletes lines 10 through 32]
[deletes ranges of lines 10 through 12 and 20 through30]
This deletes the specified lines. Since, unlike BASIC, the line numbers are fictitious, they
change with any insertion or deletion. Therefore, when deleting several blocks of lines
at the same time, you MUST specify the higher range first for the correct lines to be
deleted!
COPY
COPY (line number) TO (line number)
COPY (range) TO (line number)
COPY 10 TO 20
[copies line 10 to just before line 20]
COPY 10,20 TO 30
[copies lines 10 through 20 to just before line 30]
This copies the line number or range to just ‘above’ the specified number. It does not
delete anything.
MOVE
MOVE (line number) TO (line number)
MOVE (range) TO (line number)
MOVE 10 TO 20
[Move line 10 to just before 20]
MOVE 10,20 TO 30
[Move lines 10 through 20 to just before line 30]
This is the same as COPY but after copying, automatically deletes the original range. You
always end up with the same lines as before, but in a different order.
Page 37
Merlin 128 User's Manual
The Editor
L (List)
List
List (line number)
List (range)
List (range list)
L
L20
L 20,30
L 20,30/40,42
[list entire file]
[list line 20 only]
[list 20 through 30]
[list 20 through 30 and then list lines 40 through 42]
Lists the source file with line numbers. Control characters in source are shown in inverse,
unless the listing is being sent to a printer or other nonstandard output device.
The listing can be aborted by RUN/STOP, CTRL-C or with “/” key. You may stop the
listing by pressing the space bar and then advance a line at a time by pressing the space
bar again. By holding down the space bar, the auto-repeat feature of the Commodore 128
will result in a slow listing. Any other key will resume the normal speed. This space bar
technique also works during assembly and the symbol table printout. Any other key will
restart it. This space bar pause also works during assembly and the symbol table print out.
.
[period]
[only option for this command]
Lists starting from the beginning of the last specified range. For example, if you type "Li
0,100", lines 10 to 100 will be listed. If you then use".", listing will start again at 10 and
continue until stopped (the end of the range is not remembered).
/
/ <line number>
/
/50
[ start to list at last line listed ]
[ start listing at line 50 ]
This command continues the listing from the last line number listed, or, when a line
number is specified, from that line. This listing continues to the end of the file or until it is
stopped as in LIST.
Page 38
Merlin 128 User's Manual
The Editor
OTHER IMMEDIATE MODE COMMANDS
TYPE (Type)
TYPE: FILENAME
TYPE1: FILENAME
[display contents of a text file with line numbers ]
[display contents of a text file without line numbers ]
This command will display the contents of any text file without loading it into memory.
This is handy for viewing another source file without destroying the one in memory. It
works with both SEQ and PRG source files, but with a PRG file, the '.S' suffix must be
included. Do not use this command on files which are not text files.
This command lists the full file. The listing can be paused by pressing the space bar, or
aborted by pressing RUN/STOP or the '/' key.
P (Print)
Print
Print (line number)
Print (range)
Print (range list)
P
P50
P50,100
Pl,l0/20,30
[print entire file]
[print line 50 only]
[print lines 50 through 100]
[print 1 through 10, then print lines 20 through 30]
This is the same as LIST except that line numbers are not added.
PRTR (Printer)
PRTR (command)
PRTR 2
[activate printer 4n slot 1 with no printer string]
PRTR 2 "<CTRL-I>80N"
[as above, but add Control-I80N to initialize the printer]
PRTR 2 ""Page Title"
[printer in slot 1, no init string, “Page Title” is the page
header]
PRTR
[send formatted listing to screen]
This command is for sending a listing to a printer with page headers and provision for
page boundary skips. (See the section on Configuration for details on setting up default
parameters, also "TTL" in the Assembler Section).
Page 39
Merlin 128 User's Manual
The Editor
The entire syntax of this command is:
PRTR slot# " (string) "<page header>"
If the page header is omitted, the header will consist of page numbers only.
The initialization string may not be omitted if a page header is to be used. If no special
string is required by the printer, use a null string of two quotes only, as in the example
showing "Page Title" (in which case a carriage return will be used).
No output is sent to the printer until a LIST, PRINT, or ASM command is issued.
TEXT
TEXT
[only option for this command]
This converts all spaces in a source file to inverse spaces. The purpose of this is for use on
word processing type "text" files so that it is not necessary to remember to zero the tabs
before printing such a file. This conversion has no effect on anything except the Editor's
tabulation.
FIX
FIX
[only option for this command]
This undoes the effect of TEXT. It also does a number of technical housekeeping chores.
It is recommended that FIX be used on all source files from external sources that are being
converted to Merlin 128 source files, after which the file should be saved.
NOTE: The TEXT and FIX routines are somewhat slow. Several minutes may be needed
for their execution on large files. FIX will truncate any lines longer than 255 characters.
VAL
VAL "expression"
VAL "PTR
VAL "LABEL"
VAL "$1000/2"
VAL "%1000"
[return value of label "PTR" I
[gives the address (or value) of LABEL for the last assembly
done or "unknown label" if not found.]
[returns $0800]
[returns $0008]
This will return the value of the expression as the assembler would compute it. All forms
of label and literal expressions valid for the assembler are valid for this command. Note
that labels will have the value given them in the most recent assembly.
Page 40
Merlin 128 User's Manual
The Editor
Hex-Dec Conversion
128 = $0080
$80 = 128
If you type a decimal number (positive or negative) in the immediate mode, the hex
equivalent is returned. If you type a hex number, prefixed by "$", the decimal equivalent is
returned. All commands accept hex numbers.
GET
GET (obj adrs)
GET
GET $8000
[put object in RAM0 at the address specified in the source's
ORG]
[put object at location $8000 in RAM0]
This command is used to move the object code, after an assembly, from its location in
RAM1 to its ORG location in RAM0. It is only accepted if the move will not overwrite
the assembler and any source file that may be in memory. If an address is specified, the
object code will be moved to that location in RAM0. If the program's ORG address
conflicts with Merlin 128 or a source file in memory, a "RANGE ERROR" message is
displayed.
This command is supplied for convenience. The recommended method for testing a
program is to save the source cede, save the object code, and then run the program from
BASIC or with the 'G' command from the MAIN MENU.
NEW
NEW
[only option for this command]
Deletes the present source file in memory.
PORT
PORT (2 or 4,5,6,7)
PORT 4
[can be used to send output to printer]
Selects a printer in specified port for output, but does not format output as does PRTR.
NOTE: PORT is automatically turned off after an ASM command, but not after a LIST or
PRINT command. The PORT command can be used to send an assembly listing to the
printer unformatted and without page breaks. If formatting and page breaks are desired,
use the PRTR command. Unless you have a specific reason for using the PORT command,
PRTR is recommended instead.
Page 41
Merlin 128 User's Manual
USER
USER
USER 1
USER 0: FILENAME
The Editor
[example for use with XREF]
[example for use with PRINTFILER]
This does a JSR to the routine at $B00. The routine at $B00 must begin with a CLD
instruction.
TABS
TABS <number><, number><,...> <"tab character">
TABS
[clear all tabs]
TABS 10,20
[set tabs to 10 & 20]
TABS 10,20""
[as above, space is tab character]
This sets the tabs for the editor, and has no effect on the assembler listing. Up to nine tabs
are possible. The default tab character is a space, but any may be specified. The assembler
regards the space as the only acceptable tab character for the separation of labels, opcodes,
and operands. If you don't specify the tab character, then the last one used remains.
Entering TABS and a RETURN will set all tabs to zero.
LEN (Length)
LEN
[only option for this command]
This gives the length in bytes of the source file, and the number of bytes free.
W (Where)
Where (line number)
W 50
W0
[where is line 50 in memory]
[where is end of source file]
This prints in hex the location in memory of the start of the specified line. "Where 0" (or
"W0") will give the location of the end of source.
Page 42
Merlin 128 User's Manual
The Editor
MON (Monitor)
MON
[Only option with this command]
The Merlin 128 Monitor is offered as an alternative to the CBM Monitor As with the
CBM Monitor, the bank is specified by the first digit of a five digit address. You can use
the 'G' command to run a program in memory, but the specified registers are not picked up
so this is not as useful for debugging as the CBM Monitor. A BRK will send you to the
CBM Monitor. You may re-enter Merlin 128 by pressing 'Q'. This goes to the Main Menu.
Merlin 128 MONITOR COMMANDS:
Prompt = $
EXAMPLE
COMMENTS
$1000: 02 1F 2C
Note that proper entry format is byte-space-byte etc.
$1000l
Disassemble 20 lines beginning at $1000. ASCII indicated at right.
$1000ll
Disassemble 40 lines beginning at $1000. ASCII indicated at right.
Multiple l's
Continues disassembly at current address.
$l000h
Does a hex dump of 16 bytes at $1000. ASCII indicated at right.
h
Alone continues the dump from current address.
Multiple h's
Dumps multiple 16 byte blocks.
$1000, 1100h
Does a hex dump of the designated range. Note comma is used here.
$1000C= 2000,201Fm
$1000, 2000z
$1000C= 2000,201Fv
$1000g
Moves range $2000 - $201F to $1000. This supports both upward
and downward moves.
Zeros this range.
Compares the range $2000 - $201F with that starting at $1000
and displays contents of both when differences are found.
Jumps to a program at $1000. Return by RTS. A BRK will also send
you to the CBM Monitor.
Page 43
Merlin 128 User's Manual
The Editor
$r
Returns to Editor.
$q
Returns to the Main Menu. This is a "safe" return even if the zero
page locations have been changed.
TRON (Truncate On)
TRON
[only option for this command]
When used as an Immediate command, sets a flag which, during LIST or PRINT, will
suppress printing of comments that follow a semicolon. It makes reading of some source
files easier.
TROF (Truncate Off)
TROF
[only option for this command]
When used as an Immediate command, returns to the default condition of the truncation
flag (which also happens automatically upon entry to the editor from the Main Menu or
from the Assembler). All source lines when listed or printed will appear normal.
FUN (Function)
FUN (Number): Definition [temporarily redefine a function key]
This command can be used to temporarily redefine any function key from within the
Editor. For example, 'FUN4:TYPE' would cause the F4 key to produce 'TYPE' when
pressed. It is not possible to include a carriage return in the definition. However, you
could include an extra character and then use the Monitor to change the extra character to
the carriage return.
Q (Quit)
Q
Exits to Main Menu.
Page 44
[only option for this command]
Merlin 128 User’s Manual
The Editor
ASSEMBLING A FILE
Once you have entered and edited your source listing, you will want to assemble it. ASM
does that!
ASM (Assemble)
ASM
[only option for this cmd]
This passes control to the assembler, which attempts to assemble the source file.
If you wish to have a formatted printed listing of an assembly, just use the PRTR
command immediately before typing in the ASM command.
Assembly may be terminated at any point by pressing RUN/STOP or Control-C.
ESC (Escape)
ESC
[only option for this command]
During the second pass of assembly, pressing the ESC key will toggle the list flag, so that
the listing will either stop or resume. This is defeated if a LST opcode occurs in the
source, but another ESC will reinstate it.
Page 45
Merlin 128 User’s Manual
The Assembler
THE ASSEMBLER
In Merlin 128, the Editor is used to create and edit the source listing from which the final
program (object code) will be assembled. The Assembler is that part of Merlin 128 which
actually interprets your source code to create the final program.
The Assembler portion of Merlin 128 is distinct only in concept. In practice, both the Editor
and Assembler are resident in the machine at all times, and thus both are available without
having to be aware of which is in operation at any given time. This is in contrast to many
other assemblers, in which the Editor and Assemblers are completely separate programs,
necessitating the switching between them by loading and running independent programs,
and often a requirement to save the source file to disk before an assembly can even be done.
This section of the documentation explains the syntax of those commands, or directives, that
can be used in the source listing itself, and which direct Merlin 128 to perform some
function while assembling the object code. These are in contrast to the Editor commands
which are used to merely edit the source file.
An assembler directive is used to communicate an idea to the assembler which is more
complex than that addressed by just the usual opcodes of the microprocessor itself.
For example, in the simplest assembler possible, only commands like LDA, JSR, etc. would
be recognized by the assembler. However, the first time that you want to create a data table,
an instruction would be required by the assembler which will define one or more bytes that
are pure number values, as opposed to specific opcodes. This is allowed in virtually all
assemblers by creating the assembler directive, or pseudo opcode, ‘HEX’.
Thus the assembler can create a byte of data like this:
1
LABEL
HEX F7
;STORES BYTE '$F7'
Now, suppose that the data you wanted to store was an ASCII character string. With only
the HEX directive, you'd have to look up all the ASCII character equivalents, and encode
them in your program with individual HEX statements.
Wouldn't it be nice, though, if the assembler itself had a larger repertoire of 'new' commands
(i.e. directives) that included ones for defining character strings? You bet! And Merlin 128
has a lot of them.
The simplest is ‘TXT’, and a typical line would look like this:
1
LABEL
TXT 'THIS IS A TEST' ;STORE ENTIRE CHARACTER STRING
When assembled, Merlin 128 would automatically do the 'look up' of the ASCII character
equivalents, and store the bytes in memory at wherever that statement
Page 46
Merlin 128 User's Manual
The Assembler
occurred in your program. Along with the Editor, the variety and power of assembler
directives is the other biggest factor in determining the power of a given assembler. Merlin
128 is outstanding in this area with a wide complement of directives for every occasion.
This section of the documentation will explain the syntax to use in your source files for each
directive, and document the features that are available to you in the assembler.
About The Assembler Documentation
The assembler documentation is broken into three main sections:
1) Preliminary Definitions,
2) Assembler Syntax Conventions,
3) Assembler Pseudo Opcode Descriptions.
The last two sections are each broken down further into the following:
Assembler Syntax Conventions:
1) Number Format
2) Source Code Format
3) Expressions Allowed by the Assembler
4) Immediate Data Syntax
5) 6502 Addressing modes
Assembler Pseudo Opcode Descriptions:
1) Assembler Directives
2) Formatting Pseudo Ops
3) String Data Pseudo Ops
4) Data and Storage Allocation Pseudo Ops
5) Miscellaneous Pseudo Ops
6) Conditional Pseudo Ops
7) Pseudo Ops for Macros
8) Variables
The Assembler Syntax Conventions illustrate the syntax of a line of assembly code, the
proper method to specify numbers and data, how to construct assembler expressions and the
proper syntax to use to specify the different addressing modes allowed by the 6502
microprocessor. This section should be understood prior to using the assembler, otherwise it
is will be difficult to determine the acceptable methods to construct a proper expression as
the operand for a pseudo op.
The Assembler Pseudo Opcode Descriptions illustrate the functions of the many Merlin 128
pseudo ops, the correct syntax to use and examples of each pseudo ops use.
Page 47
Merlin 128 User's Manual
The Assembler
PRELIMINARY DEFINITIONS
The type of operand for almost all of Merlin 128's pseudo ops and the 6502 microprocessor
can be grouped into one of four categories:
1)
2)
3)
4)
Expressions
Delimited Strings (d-strings)
Data
Filenames
Expressions
Expressions are defined in the Assembler Syntax Conventions section of the manual.
Delimited Strings
Delimited Strings are defined in the Editor section of the manual, but that definition is
repeated here for continuity.
Several of the Pseudo Opcodes, and some of the 6502 opcodes allow their operand to be a
string. Any such string must be delimited by a non-numeric character other than the slash (/)
or comma (,). Such a string is called a delimited string or "d-string". The usual delimiter is a
single or double quote mark (" or ').
Examples:
"this is a d-string"
'this is another d-string"
@another one@
Zthis is one delimited by an upper case zZ
"A"
'A'
Note that delimited strings used as the object of any 6502 opcode must be enclosed in single
or double quotes. If not, the assembler will interpret the d-string to be a label, expression or
data instead.
Take special note that some of the pseudo ops as well as the 6502 opcodes use the delimiter
to determine the hi-bit condition of the resultant string. In such cases the delimiter should be
restricted to the single or double quote.
Data
Data is defined as raw hexadecimal data composed of the digits 0…9 and the letters
A...F.
Page 48
Merlin 128 User's Manual
The Assembler
Filenames
Filenames are defined as the name of a file without any delimiters, e.g. no quotes
surrounding the name. Source file names are suffixed with “.S”, Object files are suffixed
with a “.O”. Text files, USE files and PUT files do not have a prefix or suffix. The
applicable suffix should not be used when loading or saving files.
When a filename is used in a source listing, itr must be surrounded by quotes. For example:
DSK “MYFILE”
SAY “MYFILE”
PUT “FILEONE”
ASSEMBLER SYNTAX CONVENTIONS
SOURCE CODE FORMAT
Syntax of a Source Code Line
A line of source code typically looks like:
LABEL
OPCODE
OPERAND
;COMMENT
and a few real examples:
1
2
3
START
LDA
#50
;THIS IS A COMMENT
*
THIS IS A COMMENT ONLY LINE
;TABBED BY EDITOR
A line containing only a comment can begin with “*” as in line 2 above. Comment lines
starting with “;”, however, are accepted and tabbed to the comment field as in 3 above. The
assembler will accept an empty line in the source code and will treat it just as a SKP 1
instruction (see the section on pseudo opcodes), except that the line number will be printed.
The number of spaces separating the fields is not important, except for the editor's listing,
which expects just one space.
Source Code Label Conventions
The maximum allowable LABEL length is 13 characters, but more than 8 will produce
messy assembly listings. A label must begin with a character at least as large, in ASCII
value, as the colon, and may not contain any characters less, in ASCII value, than the
number zero. Note that periods (.) are not allowed in labels since the period is used to
specify the logical OR in expressions. Labels are CASE SENSITIYE. Thus, these are three
different labels: START, Start, start.
Page 49
Merlin 128 User's Manual
The Assembler
A line may contain a label by itself. This is equivalent to equating the label to the current
value of the address counter.
Source Opcode and Pseudo Opcode Conventions
The assembler examines only the first 3 characters of the OPCODE (with certain exceptions
such as macro calls). For example, you can use PAGE instead of PAG (because of the
exception, the fourth letter should not be a D, however). The assembler listing will not be
aligned with an opcode longer than five characters unless there is no operand.
Operand and Comment Length Conventions
The maximum allowable combined OPERAND + COMMENT length is 64 characters.
You will get an OPERAND TOO LONG error if you use more than this. A comment line
by itself is also limited to 64 characters.
NUMBER FORMAT
The assembler accepts decimal, hexadecimal, and binary numerical data. Hex numbers must
be preceded by “$” and binary numbers by “%”, thus the following four numbers are all
equivalent:
Dec
Hex
Binary
Binary
100
$64
%1100100 %01100100
as indicated by the last binary number, leading zeros are ignored.
Immediate Data vs. Addresses
In order to instruct the assembler to interpret a number as immediate data as opposed to an
address, the number should be prefixed with a “#”. The “#” here stands for "number" or
"data". For example:
LDA #100
LDA #$64
LDA #%1100100
These three instructions will all LOAD the Accumulator with the number 100, decimal.
A number not preceded by "#" is interpreted as an address. Therefore:
LDA 1000
LDA $3E8
LOA %1111101000
are equivalent ways of loading the accumulator with the byte that resides in memory
location $3E8.
Page 50
Merlin 128 User's Manual
The Assembler
Use of Decimal, Hexadecimal or Binary Numbers
We recommend that you use the number format that is appropriate for clarity. For example,
the data table:
DA
$1
DA
$A
DA
$64
DA
$3E8
DA
$2710
is a good deal more mysterious than its decimal equivalent:
DA
1
DA
10
DA
100
DA
1000
DA
10000
Similarly,
ORA
#$80
is less informative than
ORA
#%10000000
which sets the hi-bit of the number in the accumulator.
EXPRESSIONS ALLOWED BY THE ASSEMBLER
To make the syntax accepted and/or required by the assembler clear, we must define what is
meant by an “expression”.
Primitive Expressions
Expressions are built up from "primitive expressions" by use of arithmetic and logical
operations. The primitive expressions are:
1.
2.
3.
4.
A label.
A number (either decimal, $hex, or %binary).
Any ASCII character preceded or enclosed by quotes or single quotes.
The * character (stands for the current address).
Page 51
Merlin 128 User's Manual
The Assembler
All number formats accept 16-bit data and leading zeros are never required. In case 3, the
"value" of the primitive expression is just the ASCII value of the character. The high-bit will
be on (value > $7F:) if a quote (") is used, and off (value < $80) if a single quote (') is used.
Arithmetic and Logical Operations in Expressions
The assembler supports the four arithmetic operations: +, -, / (integer division), and *
(multiplication). It also supports the three logical operations: ! (Exclusive OR), (OR), and
& (AND).
Building Expressions
Expressions are built using the primitive expressions defined above, either with or without
arithmetic and/or logical operations. This means that expressions can take the form of
primitives or primitives operated on by other primitives using the arithmetic and logical
operators.
Some examples of legal expressions are:
#01
#$20
LABEL
#”A”
*
(primitive expression = 1)
(primitive expression = 32 dec)
(primitive consisting of a label)
(primitive consisting of letter "A')
(primitive = current value of PC)
The following are examples of more complex expressions
LABEL1-LABEL2
2*LABEL+$231
1234+%10111
“K”-“A”+1
"0"!LABEL
LABEL&$7F
*-2
LABEL.%10000000
(LABEL1 minus LABEL2)
(2 times LABEL plus hex 231)
(1234 plus binary 10111)
(ASCII "K" minus ASCII "A" plus 1)
(ASCII "0" EOR LABEL)
(LABEL AND hex 71)
(current address minus 2)
(LABEL OR binary 10000000)
Parentheses and Precedence In Expressions
Parentheses are not normally allowed in expressions. They are not used to modify the
precedence of expression evaluation. All arithmetic and logical operations are evaluated left
to right (2+3*5 would assemble as 25 and not 17).
Parentheses are used to retrieve a value from the memory location specified by the value of
the expression within the parentheses, much like indirect addressing. This use is restricted to
certain pseudo ops, however.
Page 52
Merlin 128 User's Manual
The Assembler
For example:
D0 ($300)
will instruct the assembler to generate code if the value of memory location $300, at the time
of assembly, is non-zero.
Example of Use of Assembler Expressions
The ability of the assembler to evaluate expressions such as LAB2-LAB1-1 is very useful
for the following type of code:
COMPARE
LOOP
DATA
EODATA
LDX
CMP
BEQ
DEX
BPL
JMP
HEX
EQU
#EODATA-DATA- 1
DATA, X
;found
FOUND
LOOP
REJECT
CACFC5D9
*
;not found
With this type of code, you can add or delete some of the DATA and the value which is
loaded into the X index for the comparison loop will be automatically adjusted.
IMMEDIATE DATA SYNTAX
For those opcodes such as LDA, CMP, etc., which accept immediate data (numbers as
opposed to addresses) the immediate mode is signed by preceding the expression with “#”.
An example is LDX #3. In addition:
#<expression
#>expression
#expression
#/expression
produces the low byte of the expression
produces the high byte of the expression
also gives the low byte (the 6502 does not accept
2-byte DATA)
is optional syntax for the high byte of the expression
Page 53
Merlin 128 User's Manual
The Assembler
6502 ADDRESSING MODES
The Merlin 128 Assembler accepts all the 6502 opcodes with standard mnemonics. It also
accepts BLT (Branch if Less Than) and BGE (Branch if Greater or Equal) as pseudonyms
for BCC and BCS, respectively.
There are 12 addressing modes available. The appropriate syntax for these are:
Addressing Mode
Implied
Accumulator
Immediate (data)
Syntax
OPCODE
OPCODE
OPCODE #expr
Zero page (address)
Indexed X
Indexed Y
Absolute (address)
Indexed X
Indexed Y
Indirect
Preindexed X
Postindexed Y
OPCODE expr
OPCODE expr,X
OPCODB expr,Y
OPCODE expr
OPCODE expr,X
OPCODE expr,y
JMP (expr)
OPCODE (expr,X)
OPCODB (expr),Y
Example
CLC
ROR
ADC #$F8
CMP #”M”
LDX #>LABELl-LABEL2-l
ROL 6
LDA $E0,X
STX LABEL,Y
BIT $300
STA $4000,X
SBC LABEL-1,Y
JMP ($3F2)
LDA (6,X)
STA ($FE),Y
Special Forced Non-Zero Page Addressing
There is no difference in syntax for zero page and absolute modes. The assembler
automatically uses zero page mode when appropriate. Merlin 128 provides the ability to
force non-zero page addressing. The way to do this is to add anything (except “D”) to the
end of the opcode. Example:
LDA $10 assembles as zero page (2 bytes) while,
LDA: $10 assembles as non-zero page (3 bytes).
Also, in the indexed indirect modes, only a zero page expression is allowed, and the
assembler will give an error message if the “expr” does not evaluate to a zero page address.
NOTE: The "accumulator mode" does not require an operand (the letter "A"). For example,
to do an LSR of the accumulator, you can use:
1
LABEL
LSR
; LOGICAL SHIFT RIGHT
Some assemblers perversely require you to put an "A" in the operand for this mode.
The assembler will decide the legality of the addressing mode for any given opcode.
Page 54
Merlin 128 User’s Manual
The Assembler
ASSEMBLER PSEUDO OPCODE DESCRIPTIONS
EQU or = (EQUate)
Label EQU expression
Label = expression (alternate syntax)
START
EQU $1000
[equate START to $1000]
CHAR
EQU "A"
[equate CHAR to ASCII value of A]
PTR
=
*
[PTR equals present address in the assembled source
listing.]
LABEL
=
55
[LABEL equals the decimal value of 55]
LABEL
EQU
LDA
$25
LABEL
This will Load the Accumulator with the value that's stored in location $25.
LABEL
EQU
LDA
$25
#LABEL
This will Load the Accumulator with the value of $25.
IMPORTANT:
Forgetting to include the # symbol to load an immediate value is
probably the number-one cause of program bugs. If you're having a problem,
double check immediate value syntax first!
EQU is used to define the value of a LABEL, usually an exterior address or an
often-used constant for which a meaningful name is desired. It is recommended that these
all be located at the beginning of the program.
NOTE: The assembler will not permit an "equate" to a zero page number after the label
equated has been used, since bad code could result from such a situation (also see
"Variables").
For Example:
1
2 LABEL
3
4 LEN
LDA
DFB
DFB
EQU
#LEN
$00
$01
* - LABEL
When assembled, this will give an "ILLEGAL FORWARD REFERENCE IN LINE 4"
error message. The solution is as follows:
1
2 LABEL
3
4 END
LDA
DEB
DFB
#END - LABEL
$00
$01
Page 55
Merlin 128 User's Manual
The Assembler
Note that Labels are CASE SENSITIVE. Therefore, the assembler will consider the
following labels as different labels:
START
Start
start
EXT
[upper case label]
[mixed case label]
[lower case label]
(EXTernal label)
label EXT
PRINT EXT
[label is external labels name]
[define PRINT as external]
This pseudo op defines a label as an external label for use by the Linker. The value of the
label, at assembly time, is set to $8000, but the final value is resolved by the linker. The
symbol table will list the label as having the value of $8000 plus its external reference
number (0-$FE). See the LINKER section of the manual for more information on this
opcode.
ENT (ENTry label)
label ENT
PRINT ENT
[define PRINT as entry label]
This pseudo op will define the label in the label column as an ENTRY label. An entry
label is a label that may be referred to as an EXTernal label by another REL code module.
The true address of an entry label will be resolved by the LINKER.
The REL code module being written, or assembled, may refer to the ENT label just as if it
were an ordinary label. It can be EQU'd, jumped to, branched to, etc.
The symbol table listing will print the relative address of the label and will flag it as an
“E”.
See the LINKER section of the manual for more information on this opcode.
Page 56
Merlin 128 User’s Manual
The Assembler
ORG (set ORiGin)
ORG expression
ORG
ORG $1000
ORG START+END
ORG
[start code at $1000]
[start at value of expression ]
[re-ORG]
Establishes the address at which the program is designed to run. It defaults to $8000.
Ordinarily there will be only one ORG and it will be at the start of the program. If more
than one ORG is used, the first one establishes the DLOAD address, while the second
actually establishes the origin. This can be used to create an object file that would load to
one address though it may be designed to run at another address.
You cannot use ORG *-1 to back up the object pointers as is done in some assemblers.
This must be done instead by DS -1.
ORG without an operand is accepted and is treated as a "REORG" type command. It is
intended to be used to reestablish the correct address pointer after a segment of code
which has a different ORG. (When used in a REL file, all labels in a section between an
"ORG address" and an "ORG no address" are regarded as absolute addresses. This is
meant ONLY to be used in a section to be moved to an explicit address.)
Example of ORG without an operand:
1000: A0 00
1002: 20 21 10
1005: 4C 12 10
0300:
0303:
0306:
0309:
8D 08 C0
20 ED FD
8D 09 C0
60
1012: A9 C1
1014: 20 00 03
1
ORG
2
LDY
3
JSR
4
JMP
5
ORG
6 PAGE3
STA
7
JSR
8
STA
9
RTS
10
ORG
11 CONTINUE LDA
12
JSR
$1000
#0
MOVE
CONTINUE
$300
MAINZP
COUT
AUXZP
;"MOVE" IS
;NOT LISTED.
;ROUTINE TO
;BE MOVED
;REORG
#”A”
PAGE3
Sometimes, you will want to generate two blocks of code with separate ORGs in one
assembly. There are three ways of doing this. Each involves a directive (DSK, SAV and
DS) that are described later in this manual, but all are presented here in the interest of
completeness.
In this first example, two separate disk files are created with independent ORG values by
using the DSK command. This command directs the assembler to assemble all code to
disk following the DSK command. The file is closed when either the assembly ends or
another DSK command is encountered.
Page 57
Merlin 128 User's Manual
1
2
3
4
5
6
7
8
9
10
11
12
13
The Assembler
*******************
* MULTIPLE ORG'S *
* SOLUTION # 1 *
* DSK COMMAND *
*******************
DSK
ORG
LDA
"FIIEONE"
$8000
#0
DSK
ORG
LDY
"FILETWO"
$8100
#1
In this second example, two separate disk files are again created with independent ORG
values, but this time by using the SAV command. This command directs the assembler to
save all code assembled previous to the SAV code disk.
1
2
3
4
5
6
7
8
9
10
11
12
13
*******************
* MULTIPLE ORG'S *
* SOLUTION # 2 *
* SAV COMMAND *
*******************
ORG
LDA
SAV
$8000
#0
"FILEONE"
ORG
LDY
SAV
$8100
#1
"FILETWO"
In this last example, just one file is created on disk, but the two blocks of code are
separated by approximately a $100 byte gap (less the size of the first code block, of
course).
Please read the section on SAV for more information about multiple ORGs in a program.
2
3
4
5
6
7
8
9
10
Page 58
*******************
* MULTIPLE ORG'S *
* SOLUTION # 3 *
* DS COMMAND *
*******************
ORG
LDA
DS ↑
LDY
$8000
#0
; or could have been DS $8100-*
#1
Merlin 128 User's Manual
The Assembler
REL (RELocatable code module)
REL
REL
[only option for this opcode]
This opcode instructs the assembler to generate code files compatible with the relocating
linker. This opcode must occur prior to the use or definition of any labels. See the
LINKER section of this manual for more information on this opcode.
OBJ (set OBJect)
OBJ expression
OBJ
$4000
OBJ
START
[use of hex address in RAM1]
[use with a label]
The OBJ opcode is accepted only prior to the start of the code and it only sets the division
line between the symbol table and object code areas in memory (which defaults to
$A000). The OBJ address is accepted only if it lies between $4000 and $FEE0. This may
cause you a problem if you forget this fact and try to assemble a listing OBJ'ed somewhere
else, such as $300, for example.
Nothing disastrous will happen if OBJ is out of range; when you return to the Main Menu
to save your object file, no object file address and length values will be displayed on the
screen, and Merlin 128 will simply beep at you if you try to save an object file.
The main reason for using OBJ is to be able to quit the assembler directly, test a routine in
memory, and then be able to immediately return to the assembler to make any corrections.
If you want to do this, simply use the GET command (Example: GET $8000) before
quitting to BASIC.
Most people should never have to use this opcode. If the REL opcode is used then OBJ is
disregarded. If DSK is used then you can, but should not have to, set OBJ to $FEE0 to
maximize the space for the symbol table.
PUT (PUT a text file in assembly)
PUT "filename"
PUT "Filename"
PUT "Filenarne",9
[PUT's file FILENAME]
[PUT's file FILENAME from device 9 1
PUT "filename' reads the named file and "inserts" it at the location of the opcode.
Page 59
Merlin 128 User's Manual
The Assembler
Occasionally your source file will become too large to assemble in memory. This could be
due to a very long program, extensive comments, dummy segments, etc. In any case, this
is where the PUT opcode can make life easy. All you have to do is divide your program
into sections, then save each section as a separate text file. The PUT opcode will load
these text files and “insert” them in the “Master” source file at the location of the PUT
opcode. This "Master" source file usually only contains equates, macros (if used), and all
of your PUT opcodes.
A "Master" source file might look something like this:
*******************
* Master Source*
*******************
*
* LABEL DEFINITIONS
*
LABEL1
EQU
$00
LABEL2
EQU
$02
BSOUT
EQU
$FFD2
*
*
MACRO DEFINITIONS
*
SWAP
MAC
LDA
]l
STA
]2
<<<
*
* SAMPLE SOURCE CODE
*
LDA
#LABEL1
STA
LABEL2
LDA
#/LABEL1
STA
LABEL2+1
LDA
LABEL1
JSR
BSOUT
RTS
*
* BEGIN PUTFILES
*
PUT
"FILE1"
PUT
"FILE2"
PUT
"FILES"
;FIRST SOURCE FILE SEGMENT
;SECOND SOURCE FILE SEGMENT
;THIRD SOURCE FILE SEGMENT
Note that you cannot define MACROs from within a PUT file. Also, you cannot call the
next PUT file from within a PUT file. All MACRO definitions and PUT opcodes must
be in the "Master" source file. There are other uses for PUT files such as PUTting
portions of code as subroutines, PUTting a file of global page equates, etc. The
possibilities are almost endless.
Here's an example of a master program that uses 3 PUT files to create a final object file,
"FINAL.O", that is called from a BASIC program:
Page 60
Merlin 128 User's Manual
1
2
3
4
5
6
7
8
9
10
11
The Assembler
* MASTER CALLING PROGRAM
BSOUT
EQU
$FFD2
ORG
$8000
PUT
PUT
PUT
"FILE1"
"FILE2"
"FILES"
; Named "FILE1" on disk
; Named "FILE2" on disk
; Named "FILES" on disk
And here are the text files that the master program calls in using the PUT commands:
1
2
3
4
5
6
7
8
9
1
2
3
4
5
6
7
8
9
1*
2
3
4
5
6
7
8
9
10
*
FILE1
LOOP1
LDX
LDA
#0
STRING1,X
BSOUT
STRING1
JSR
INX
BNE
TXT
FILE2
LOOP2
LDX
LDA
#0
STRING2,X
BSOUT
STRING2
JSR
INX
BNE
TXT
LDX
LDA
BEQ
JSR
INX
BNE
RTS
TXT
#0
STRINGS,X
DONE
BSOUT
*
LOOP1
'THIS IS FILE 1',00
FILE2
LOOP2
'NOW its FILE 2',00
FILES3
FILE3
LOOP3
DONE
STRINGS
LOOP3
'FINALLY FILE 3',00
Each PUT file (FILE1, FILE2, FILE3) prints a message about which file it is.
Page 61
Merlin 128 User's Manual
The Assembler
NOTE: "Insert" refers to the effect on assembly and not to the location of the source. The
file itself is actually placed just following the main source. These files are in memory only
one at a time, so a very large program can be assembled using the PUT facility.
There are two restrictions on a PUT file. First, there cannot be MACRO definitions inside
a file which is PUT; they must be in the main source or in a USE file. Second, a PUT file
may not call another PUT file with the PUT opcode. Of course, linking can be simulated
by having the "main program" just contain the macro definitions and call, in turn, all the
others with the PUT opcode.
Any variables (such as ]LABEL) may be used as "local" variables. The usual local
variables ]1 through ]8 may be set up for this purpose using the VAR opcode.
The PUT facility provides a simple way to incorporate often used subroutines, such as
PRDEC, in a program.
If there is an error during assembly, the error will show both the line number of the PUT
opcode in the Master file and that in the PUT file.
The PUT opcode accepts both SEQ and PRG type source files, but if you're using the PRG
type, you must include the ".S" suffix in the filename.
If you are working with PRG files written with Merlin 64, use the LOAD command and
resave them with Merlin 128.
USE (USE a text file as a macro library)
USE filename
USE "FILENAME"
USE "FILENAME",9 [Device Number]
This works as does a PUT but the file is kept in memory. It is intended for loading a
macro library that is USEd by the source file.
VAR
(setup VARiables)
VAR expr;expr;expr...
VAR 1;$3;LABEL [setup VAR's 1,2 and 3]
This is just a convenient way to equate the variables ]1-]8. "VAR 3;$42;LABEL" will set
]1 = 3, ]2 = $42, and ]3 = LABEL. This is designed for use just prior to a PUT. If a PUT
file uses ]1-]8, except in PMC (or>>>) lines for calling macros, there must be a previous
declaration of these.
Page 62
Merlin 128 User's Manual
SAV
The Assembler
(SAVe object code)
SAV "filename"
SAV "FILE"
SAV "FILE",9
"SAVE filename" will save the current object code under the specified name. It will not
add the suffix ".O" to the file name as would happen in the Main Menu. Otherwise, it acts
exactly as does the Main Menu object saving command, but it can be done several times
during assembly.
This pseudo-opcode provides a means of saving portions of a program having more than
one ORG. It also enables the assembly of extremely large files. After a save, the object
address is reset to the last specification of OBJ or to $8000 by default.
Files saved with the SAVe command will be saved to BLOAD to the correct address.
SAV allows you to save sections of assembled OBJECT code during an assembly. It saves
all assembled code in the current assembly at the point at which the SAV opcode occurs.
This applies only to the first SAV in a source. With each additional SAV, Merlin 128 only
saves the object code generated since the last SAV. This feature allows you to use one
source file to assemble code and then SAVe sections in separate files. Together with the
PUT and DSK, SAV makes it possible to assemble extremely large files.
******************
*
SAV Sample *
******************
*
* LABEL DEFINITIONS
*
LABEL1
EQU
$00
LABEL2
EQU
$02
BSOUT
EQU
$FFD2
*
* MACRO DEFINITIONS
*
SWAP
MAC
LDA
]1
STA
]2
<<<
*
* SOURCE PART ONE
*
ORG
$800
LDA
#LABEL1
STA
LABEL2
LDA
#/LABEL1
STA
LABEL2+1
;PART ONE STARTS HERE
Page 63
Merlin 128 User's Manual
END
*
*
*
LDA
JER
RTS
Etc.
NOP
SAV
The Assembler
LABEL1
BSOUT
"FILE1"
;NOT REQUIRED - EXAMPLE ONLY
;SAVE CODE FROM $800 TO HERE
SOURCE PART TWO
END1
ORG
LDA
STA
LDA
STA
LDA
JSR
RTS
Etc.
NOP
SAV
END
$6000
#LABEL1
LABEL2
#/LABEL1
LABEL2+1
LABEL1
BSOUT
;PART TWO STARTS HERE
;NOT REQUIRED - EXAMPLE ONLY
"FILE2"
;NOT REQUIRED - EXAMPLE ONLY
Therefore, SAV is used to save sections of code to separate individual binary files during
an assembly. With SAV, you can assemble code that may not be continuous in memory
but which must be assembled all at once because the sections refer to each other, and may
share labels, data, and/or subroutines.
DSK
(assemble directly to DiSK)
DSK filename
DSK "PROG"
DSK "PROG",9
"DSK filename" will cause Merlin 128 to open a file specified in the opcode and place all
assembled code in that file. It is used at the start of a source file before any code is
generated. Merlin 128 then writes all the following code directly to disk. If DSK is
already in effect, the old file will be closed and the new one begun. This is useful
primarily for extremely large files.
NOTE: Files intended for use with the linking loader must be saved with the DSK pseudo
op; see the REL opcode.
DSK has two basic purposes:
1) It allows you to assemble programs that result in object code larger than Merlin
128 can normally keep in memory.
Page 64
Merlin 128 User's Manual
The Assembler
2) It allows you to automatically put your object code on disk without having to
remember to use the Main Menu's "O" command. Like "SAV", DSK does not
automatically add the ".O" suffix to the saved file name.
The first purpose is the most often used reason for utilizing the DSK opcode.
You should be aware that using DSK will slow assembly significantly. This is
because Merlin 128 will write a sector to disk every time 256 bytes of object code
have been generated. If you don't need a copy of the object code on disk, you
should not use (or use a conditional to defeat) the DEK opcode.
Here is an example listing of a program that creates two separate object files using
the DSK command:
1
2
3
4
5
6
7
8
9
10
11
12
13
14
15
16
17
18
19
20
21
22
23
24
25
26
* DSK SAMPLE *
DSK
"F ILEONE"
ORG $4000
BSOUT
EQU
$FFD2
LOOP1
DONE1
STRING1
LOOP2
DONE2
STRING2
LDX
LDA
BEQ
JSR
INX
BNE
RTS
TXT
#0
STRING1,X
DONE1
BSOUT
ORG
DSK
$8000
“FILETWO”
LDX
LDA
BEQ
JSR
INX
BNE
RTS
TXT
#0
STRING2,X
DONE2
BSOUT
;ASSENBLE 'FILEONE' TO DISK
;'FILEONE' AT $4000 (SYS 4*4096)
LOOP1
‘This is one’,00
;’FILETWO’ AT $8000
;ASSEMBLE ‘FILETWO’ TO DISK
LOOP2
‘Now it’s two’,00
Page 65
Merlin 128 User's Manual
The Assembler
END (END of source file)
END
END
[only option for this opcode]
This rarely used or needed pseudo opcode instructs the assembler to ignore the rest of the
source. Labels occurring after END will not be recognized.
DUM (DUMmy section)
DUM expression
DUM $1000
DUM LABEL
DUM END-START
[start DUMmmy code at $1000]
[start code at value of LABEL]
[start at val of END-START]
This starts a section of code that will be examined for value of labels but will produce no
object code. The expression must give the desired ORG of this section. It is possible to reORG such a section using another DUMMY opcode or using ORG. Note that although
no object code is produced from a dummy section, the text output of the assembler will
appear as if code is being produced.
DEND (Dummy END)
DEND
DEND
[only option for this opcode]
This ends a dummy section and re-establishes the ORG address to the value it had upon
entry to the dummy section.
DUM and DEND are used most often to create a set of labels that will exist outside of
your actual program, but that your program needs to reference. Thus, the labels and their
values need to be available, but you don't want any code actually assembled for that
particular part of the listing.
Sample usage of DUM and DEND:
1
2
3
4
5 FACEXP
6 FACHO
7 FACMOH
8 FACMO
9 FACLO
10 FACSGN
Page 66
ORG
$2000
DUN
$63
DFB
DFB
DFB
DFB
DFB
DFB
0
0
0
0
0
0,0
Merlin 128 User’s Manual
11
12
13
14
15
16
17
18
19
20
21
23
24
ARGEXP
ARGHO
ARGMOH
ARGMO
ARGLO
ARGSGN
FACOV
The Assembler
DFB
DFB
DFB
DFB
DFB
DFB
DFB
0
0
0
0
0
0,0
0
DEND
START
*
LDA
STA
And so on
#0
FACEXP
Note that no code is generated for lines 3 through 19, but the labels are available to the
program itself, for example, on line 23.
Page 67
Merlin 128 User's Manual
The Assembler
FORMATTING PSEUDO OPS
LST ON/OFF
(LiSTing control)
LST ON or OFF
LST ON
LST OFF
LST
[turn listing on]
[turn listing off]
[turn listing on, optional]
This controls whether the assembly listing is to be sent to the screen (or other output
device) or not You may, for example, use this to send only a portion of the assembly
listing to your printer. Any number of LST instructions may be in the source. If the LST
condition is OFF at the end of assembly, the symbol table will not be printed.
The assembler actually only checks the third character of the operand to see whether or
not it is a space. Therefore, LST will have the same effect as LST ON. The LST directive
will have no effect on the actual generation of object code. If the LST condition is OFF,
the object code will be generated much faster, but this is recommended only for debugged
programs.
NOTE: ESCAPE from the keyboard toggles this flag during the second pass, and thus can
be used to manually turn on or off the screen or a printer listing during assembly.
LSTDO
ON/OFF
LSTDO ON or OFF
LSTDO ON
LSTDO OFF
LSTDO
(LiST DO OFF areas of code)
[list the DO OFF areas]
[don’t list the DO OFF areas]
[list the DO OFF areas, optional]
LSTDO ON causes lines in DO OFF areas to be listed during assembly. LSTDO OFF will
not print such lines. The default condition can be set in the PARMS.S file. Macro
definitions are exceptions. These are listed, unless in a LST OFF condition, even if you
have LSTDO OFF.
Page 68
Merlin 128 User's Manual
The Assembler
EXP ON/OFF/ONLY (macro EXPand control)
EXP ON or OFF or ONLY
EXP ON
[macro expand on ]
EXP OFF
[print only macro call]
EXP ONLY
[print only generated code]
EXP ON will print an entire macro during the assembly. The OFF condition will print
only the PMC pseudo-op. EXP defaults to ON. This has no effect on the object coded
generated. EXP ONLY will cause expansion of the macro to the listing omitting the call
line and end of macro line. (if the macro call line is labeled, however, it is printed.) This
mode will print out just as if the macro lines were written out in the source.
PAU (PAUse)
PAU
PAU
[only option for this opcode]
On the second pass this causes assembly to pause until a key is pressed. This can also be
done from the keyboard by pressing the space bar. This is handy for debugging.
PAG (new PAGe)
PAG
PAG
[only option for this opcode]
This sends a formfeed ($8C) to the printer. It has no effect on the screen listing.
AST
(send a line of ASTerisks)
AST expression
AST 30
AST NUM
[ send 30 asterisks to listing ]
[send NUM asterisks]
This sends a number of asterisks (*) to the listing equal to the value of the operand.
The number format is the usual one (base 10), so that AST10 will send (decimal)
10 asterisks, for example. The number is treated modulo 256 with 0 being 256
asterisks.
Page 69
Merlin 128 User's Manual
The Assembler
SKP (SKiP lines)
SKP expression
SKP 5
SKP LINES
[ skip 5 lines in listing]
[skip “LINES” lines in listing]
This sends "expression" number of carriage returns to the listing. The number format is
the same as in AST.
TR ON/OFF (TRuncate control)
TR ON or OFF
TR ON
TR OFF
[limit object code printing]
[don't limit object code print]
TR ON or TR (alone) limits object code printout to three bytes per source line, even if the
line generates more than three. TR OFF resets it to print all object bytes.
CYC (calculate and print CYCle times for code)
CYC
CYC OFF
CYC AVE
CYC
CYC OFF
CYC AVE
[print opcode cycles & total]
[stop cycle time printing]
[print cycles & average]
This opcode will cause a program cycle count to be printed during assembly. A second
CYC opcode will cause the accumulated total to go to zero. CYC OFF causes it to stop
printing cycles. CYC AVE will average in the cycles that are undeterminable due to
branches, indexed and indirect addressing.
The cycle times will be printed (or displayed) to the right of the comment field and will
appear similar to any one of the following:
5
,0326
or
5'
,0326
or
5' ',0326
The first number displayed (the 5 in the example above) is the cycle count for the current
instruction. The second number displayed is the accumulated total of cycles in decimal.
The position of the cycle count can be changed by altering the file PARMS.S. See the
Technical Information Section for details.
A single quote after the cycle count indicates a possible added cycle, depending on certain
conditions the assembler cannot foresee. If this appears on a branch
Page 70
Merlin 128 User's Manual
The Assembler
instruction then it indicates that one cycle should be added if the branch occurs. For nonbranch instructions, the single quote indicates that one cycle should be added if a page
boundary is crossed.
A double quote after the cycle count indicates that the assembler has determined that
a branch would be taken and that the branch would cross a page boundary. In this
case the extra cycle is displayed and added to the total.
TTL
TFL
TFL
‘page header’
"Title Page"
[Change page header to "Title Page"]
This lets you change the page header at any point in an assembly, provided the PRTR
command is in effect.
Page 71
Merlin 128 User's Manual
The Assembler
STRING DATA PSEUDO OPS
General notes on String Data and String Delimiters
Different delimiters have different effects. Any delimiter less than (in ASCII value) the
single quote (') will produce a string with the high-bits on, otherwise the high-bits will be
off. For example, the delimiters !"#$%& will produce a string in "negative" ASCII, and the
delimiters '( )+? will produce one in "positive" ASCII. Usually the quote (") and single quote
(') are the delimiters of choice, but other delimiters provide the means of inserting a string
containing the quote or single quote as part of the string. Example delimiter effects:
"HELLO"
HELLO!
#HELLO#
&HELLO&
ENTER "HELLO"!
'HELLO'
(HELLO(
'ENTER "HELLO"'
[negative ASCII, hi bit set]
[negative ASCII, hi bit set]
[negative ASCII, hi bit set]
[negative ASCII, hi bit set]
[string with embedded quotes]
[positive ASCII, hi bit clear]
[positive ASCII, hi bit clear]
[string with embedded quotes]
All of the opcodes in this section, except REV, also accept hex data after the string. Any of
the following syntaxes are acceptable:
TXT "string"878D00
DCI "string",878D00
ASC "string",87,8D,00
ASI "STRING",878D00
REV "string"
Command
Input
Comments
Assembles as (hex)
TXT
DCI
ASC
ASI
REV
'Abc"
'Abc"
'Abc"
'Abc"
'Abc"
Commodore ASCII
Commodore ASCII
Standard ASCII
Standard ASCII
Commodore ASCII
61
61
41
41
43
Page 72
42 43
42 C3
62 63
62 E3
42 61
Merlin 128 User's Manual
TXT
The Assembler
(define Commodore ASCII TeXT)
TXT d-string
TKF "STRING"
TXT 'STRING'
TXT "Bye,Bye",8D
[ negative Commodore ASCII string ]
[ positive Commodore ASCII string ]
[ negative with added hex bytes ]
This puts a delimited Commodore ASCII string into the object code. The only restriction
on the delimiter is that it does not occur in the string itself.
DCI
(define Commodore ASCII text - Dextral Character Inverted)
DCI d-string
DCI "STRING"
DCI 'STRING'
DCI 'Hello',878D
[ negative Commodore ASCII, except for the "G" ]
[ positive Commodore ASCII, except for the "G" ]
[ positive Commodore with two added hex bytes ]
This is the same as TXT except that the Commodore ASCII string is put into memory with
the last character having the opposite high bit to the others.
ASC
(define Standard ASCII text)
ASC d-string
ASC "STRING"
ASC 'STRING'
ASC "Bye,Bye",8D
[ negative ASCII string ]
[ positive ASCII string ]
[ negative with added hex bytes ]
This puts a delimited Standard ASCII string into the object code. The only restriction on
the delimiter is that it does not occur in the string itself.
ASI
(define Standard ASCII Inverted text)
ASI d-string
ASI "STRING"
ASI 'STRING'
[ negative ASCII, except for the "G" ]
[ positive ASCII, except for the "G" ]
This is the same as ASC except that the Standard ASCII string is put into memory with the
last character having the opposite high bit to the others. ASI is to ASC as DCI is to TXT.
Page 73
Merlin 128 User's Manual
REV
The Assembler
(define REVerse Commodore ASCII text)
REV &string
REV "Insert"
REV 'Insert'
[ negative ASCII, reversed in memory ]
[ same as above but positive ]
This puts the d-string in memory backwards. Example:
REV "COMMODORE"
gives ERODOMMOC (delimiter choice as in TXT). HEX data may not be added after the
string terminator.
STR
(define a Commodore ASCII STRing with a leading length byte)
STR d-string
STR "HI"
STR 'HI',8D
[ negative Commodore ASCII result = 02 C8 C9 ]
[ positive Commodore ASCII result 02 48 49 8D ]
This puts a delimited string into memory with a leading length byte. Otherwise it works
the same as the TXT opcode. Note that following HEX bytes, if any, are not counted in
the length.
Page 74
Merlin 128 User's Manual
The Assembler
DATA AND STORAGE ALLOCATION PSEUDO OPS
DA or DW (Define Address or Define Word)
DA expression or DW expression
DA $FDF0
[results: FO FD in memory]
DA 10,$300
[results: OA OO Oo 03]
DW LAB1,LAB2
[example of use with labels]
This stores the two-byte value of the operand, usually an address, in the object code, lowbyte first.
These two pseudo ops also accept multiple data separated by commas (such as DA
1,10,100).
DDB
(Define Double-Byte)
DDB expression
DDB $FDED+1
DDB 10,$300
[results: FD EE in memory]
[results: 00 0A 03 00 ]
As above with DA, but places high-byte first. DDB also accepts multiple data (such as
DDB 1,10,100).
DFB or DB (DeFine Byte or Define Byte)
DFB expression or DB expression
DFB 10
[results: 0A in memory ]
DFB $10
[results: 10 in memory]
DB >$FDED+2
[results: FD in memory]
DB LAB
[example of use with label]
This puts the byte specified by the operand into the object code. It accepts several bytes of
data, which must be separated by commas and contain no spaces. The standard number
format is used and arithmetic is done as usual.
The "#" symbol is acceptable but ignored, as is"<". The “>” symbol may be used to
specify the high-byte of an expression, otherwise the low-byte is always taken. The “>”
symbol should appear as the first character only of an expression or immediately after #.
That is, the instruction DFB >LAB1-LAB2 will produce the high-byte of the value of
LAB 1-LAB 2.
Page 75
Merlin 128 User's Manual
The Assembler
For example:
DFB $34,100,LAB1-LAB2,%10l 1,>LAB1-LAB2
is a properly formatted DFB statement which will generate the object code (hex):
34 64 DE 0B 09
assuming that LAB 1=$81A2 and LAB2=$77C4.
FLO expression (FLOAT)
FLO expression
FLO LABEL
FLO $FFFF
FLO 1
FLO-1
[floats 5 bytes in memory]
[results: 90 7F FF 00 00 in memory]
[results: 81 00 00 00 00 in memory ]
[results: 81 80 00 00 00 in memory]
This assembles the five byte packed floating point equivalent of the expression. If the
expression begins with a minus sign, then the operand is floated as a signed integer.
Otherwise, it is floated as an unsigned integer. It should be noted that Merlin 128 first
computes a 16 bit integer using unsigned arithmetic, which is then floated accordingly.
Thus, $FFFF will float as 65535,-1 will float as -1, and -$FFFF will float as 1. The file
called "pi.main.s" has examples of the use of this opcode. Note that you can use "FLOAT"
instead of "FLO" since only the first three characters are examined, unless used in a macro
name.
HEX
(define HEX data)
HEX hex-data
HEX 0102030F
HEX FD,ED,C0
[results: 0l 02 03 0F in memory]
[results: FD ED C0 in memory]
This is an alternative to DFB which allows convenient insertion of hex data. Unlike all
other cases, the "$" is not required or accepted here. The operand should consist of hex
numbers having two hex digits (for example, use 0F, not F). They may be separated by
commas or may be adjacent. An error message will be generated if the operand contains
an odd number of digits or ends in a command, or as in all cases, contains more than 64
characters.
Page 76
Merlin 128 User's Manual
The Assembler
DS (Define Storage)
DS expression
DS expression1, expression2
DS ↑
DS ↑,expression2
DS 10
[zero out 10 bytes of memory]
DS 10,$80
[put $80 in 10 bytes of memory]
DS ↑
[zero memory to next memory page]
DS ↑,$80
[put $80 in memory to next page]
This reserves space for string storage data. It zeros out this space if the expression is
positive. DS 10, for example, will set aside 10 bytes for storage.
Because DS adjusts the object code pointer, an instruction like DS -1 can be used to back
up the object and address pointers one byte.
The first alternate form of DS, with two expressions, will fill expression1 bytes with the
value of (the low byte of) expression2, provided expression2 is positive. If expression2 is
missing, 0 is used for the fill.
The second alternate form, "DS ↑", will fill memory (with 0's) until the next memory page.
The "DS ↑,expression2" form does the same but fills using the low byte of expression2.
Notes for REL files and the Linker
The "↑" options are intended for use mainly with REL files and work slightly differently
with these files. Any "DS ↑" opcode occurring in a REL file will cause the linker to load
the next file at the first available page boundary, and to fill with 0's or the indicated byte.
Note that, for REL files, the location of this code has no effect on its action. To avoid
confusion, you should put this code at the end of a file.
Page 77
Merlin 128 User's Manual
The Assembler
USING DATA TABLES IN PROGRAMS
Merlin's various data commands are used by the programmer to store pure data bytes (as
opposed to executable program instruction bytes) in memory for use by the program. As an
example, here is a program that prints the sum of two numbers squared.
1
2
3
4
5
6
7
8
9
10
11
12
13
14
15
16
17
18
19
20
21
22
23
24
25
26
27
28
29
30
31
32
33
34
35
36
37
38
* DATA TABLE DEMO *
ORG
$8000
CLEAR
CHROUT
SCNKEY
GETIN
EQU
EQU
EQU
EQU
$E544
$FFD2
$FE9F
$FFE4
START
JSR
LDY
INY
LDA
JSR
LDX
LDA
BEQ
JSR
INX
BNE
LDA
JSR
LDA
JSR
CPY
BCS
JMP
JSR
JSR
BEQ
CMP
BEQ
JMP
RTS
DFB
ASC
HEX
DFB
CLEAR
#-1
PRINT1
LOOP1
PRINT2
WAIT
DONE
DATA1
DATA2
DATA3
Page 78
DATA1,Y
CHROUT
#0
DATA2,X
PRINT2
CHROUT
LOOP1
DATA3,Y
CHROUT
#$8D
CHROUT
#$03
WAIT
PRINT1
SCNKEY
GETIN
WAIT
#$0D
DONE
WAIT
#48,49,50,51
“ SQUARED IS”
00
#48,49,52,57
;START WITH 1 LESS THAN '0' ($FF)
;Y = Y + 1
;GET CHAR FROM TABLE
;PRINT NUMBER TO SE SQUARED
;LOOP TO PRINT TEXT
;PRINT SQUARED VALUE
;THREE LOOPS COMPLETE?
;IF SO WAIT FOR RETURN
;IF NOT BEGIN AGAIN
;WAS RETURN PRESSED?
Merlin 128 User's Manual
The Assembler
MISCELLANEOUS PSEUDO OPS
KBD (define label from KeyBoarD)
label KBD
label KBD d-string
OUTPUT KBD
OUTPUT KBD "send to printer"
[get value of OUTPUT from keyboard]
[prompt with the d-string for the value of OUTPUT]
This allows a label to be equated from the keyboard during assembly. Any
expression may be input, including expressions referencing previously defined labels,
however a BAD INPUT error will occur if the input cannot be evaluated.
The optional delimited string will be printed on the screen instead of the standard "Give
value for LABEL:" message. A colon is appended to the string.
LUP (begin a loop)
LUP expression
(Loop)
--↑
(end of LUP)
The LUP pseudo-opcode is used to repeat portions of source between the LUP and the --↑
"expression" number of times. An example of this is:
LUP
ASL
--↑
4
which will assemble as:
ASL
ASL
ASL
ASL
and will show that way in the assembly listing, with repeated line numbers.
Perhaps the major use of this is for table building. As an example:
]A =
LUP
]A =
DPB
--↑
0
$FF
]A+1
]A
will assemble the table 1, 2, 3, ...,$FF.
Page 79
Merlin 128 User's Manual
The Assembler
The maximum LUP value is $8000 and the LUP opcode will simply be ignored if you try
to use more than this.
NOTE: the above use of incrementing variables in order to build a table will not work if
used within a macro. Program structures such as this must be included as part of the main
program source.
In a LUP, if the @ character appears in the label column, it will be increased by the loop
count (thus A,B,C...). Since the loop count is a countdown, these labels will go backwards
(the last label has the A). This makes it possible to label items inside a LUP. This will
work in a LUP with a maximum length of 26 counts, otherwise you will get a BAD
LABEL error and possibly some DUPLICATE LABEL errors.
CHK (place CHecKsum in object code)
CHK
CHK
[only option for this opcode]
This places a checksum byte into object code at the location of the CHK opcode. This is
usually placed at the end of the program and can be used by your program at runtime to
verify the existence of an accurate image of the program in memory.
The checksum is calculated with exclusive-or'ing each successive byte with the running
result. That is byte 1 is EOR'ed with byte 2 and the result put in the accumulator. Then that
value is EOR'ed with byte 3 and the process continued until the last byte in memory has
been involved in the calculation. It is not a foolproof error checking scheme, but is
adequate for most uses. If you were publishing your source listing in a magazine, or
loading object code in any situation in which you want to assure that a functional copy of
the object code has been loaded, then the use of the checksum pseudo-op is recommended.
The following program segment will confirm the checksum at run time:
1 STARTCHK
2
3
4
5
6
7
8
9 LOOP
10
11
12
13
14
Page 80
LDA
STA
LDA
STA
LDY
LDA
PHA
PLA
ROR
PHA
INC
BNE
INC
#<STARTCHK
PTR
#>STARTCHK
PTR+1
#$00
#$00
; PUSH ZERO ON STACK
; RETRIEVE CURRENT OSKEUM
(PTR),Y
; PUT TENIP BACK
PTR
CHK
PTR+1
; WRAP AROUND YET?
; YEP
Merlin 128 User's Manual
The Assembler
15 CHK
16
17
18
19
20
21
22 CHKCS
23
24
25
26 REALSTART
27
…
LDA
CMP
BCC
LDA
CMP
BCC
BEQ
PLA
CMP
BNE
998 PROGEND
999 CHNSUM
RTS
CHK
PTR+1
#>PROGEND
LOOP
PTR
#<PROGEND
LOOP
LOOP
; SEE IF WE'RE DONE YET...
; NOT YET...
; NOPE
; RETRIEVE CALCULATED VALUE
; COMPARE TO MERLIN'S VALUE
; ERROR HANDLER....
; FALL THROUGH IF O.K.
; REAL PROGRAM STARTS HERE
CHKSUM
ERROR
???
???
; END OF FUNCTIONAL PROGRAM
; Merlin 128 CHECKSUM DIRECTIVE
ERR (force ERRor)
ERR expression
ERR ↑expression
ERR
$80-($300)
ERR *-1/$4100
ERR ↑$5000
[error if $80 not in $300 ]
[error if PC > $4100]
[error if REL code address exceeds $5000]
"ERR expression" will force an error if the expression has a non-zero value and the
message "BREAK IN LINE???" will be printed.
This may be used to ensure your program does not exceed, for example, $95FF by adding
the final line:
ERR
*-l/$9600
NOTE: The above example would only alert you that the program is too long, and will not
prevent writing above $9600 during assembly, but there can be no harm in this, since the
assembler will cease generating object code in such an instance. The error occurs only on
the second pass of the assembly and does not abort the assembly.
Another available syntax is: ERR ($300)-$4C
which will produce an error on the first pass and abort assembly if location $300 does not
contain the value $4C.
Page 81
Merlin 128 User's Manual
The Assembler
Notes for REL Files and the ERR Pseudo Op
The "ERR ↑expression" syntax gives an error on the second pass if the address pointer
reaches expression or beyond. This is equivalent to "ERR *-1/expr", but it when used with
REL files, it instructs the linker to check that the last byte of the current module does not
extend to expression or beyond (expression must be absolute). If the linker finds that the
current module does extend beyond expression, linking will abort with a message
Constraint error:" followed by the value of expression in the ERR opcode. You can see
how this works by trying to link the PI file to an address over $1C20. Note that the
position of this opcode in a REL file has no bearing on its action, so that it is best to put it
at the end.
USR
(USeR definable op-code)
USR optional expressions
USR expression
[examples depend on definition]
To prevent accidents, USR opcode routines are required to start with the CLD instruction
at location $E00. (Note that this is different from USER). For purposes of loading, they
may actually begin at $DFF with an RTS.
This is a user definable pseudo-opcode. It does a JSR $E00. This location will contain an
RTS after a boot, a BRUN MERLIN or BRUN BOOT ASM. To set up your routine you
should BRUN it from the EXEC command after CATALOG. This should just set up a
JMP at $B00 to the main routine and then RTS.
The following flags and entry points may be used by your routine:
USRADS
PUTBYTE
EVAL
PASSNUM
ERRCNT
VALUE
OPNDLEN
= $EOO
= $4C06
= $4C09
= $4
= $lF
= $55
= $2B
NOTFOUND
MORKSP
= $30
= $980
;must have a CLD instruction
;see below
;see below
;contains assembly pass number
;error count
;value returned by EVAL
;contains combined length of
;operand and comment
;see discussion of EVAL
;contains the operand and
;comment in positive ASCII
Your routine will be called by the USR opcode with A=0, Y=0 and carry set. To direct the
assembler to put a byte in the object code, you should JSR PUTBYTE with the byte in A.
PUTBYTE will preserve Y but will scramble A and X. It returns with the zero flag clear
(so that BNE always branches). On the first pass PUTBYTE only adjusts the object and
address pointers, so that the contents of the registers are not important. You must call
PUTBYTE the same number of times on each pass or
Page 82
Merlin 128 User's Manual
The Assembler
the pointers will not be kept correctly and the assembly of other parts of the program will
be incorrect!
If your routine needs to evaluate the operand, or part of it, you can do this by a JSR
EVAL. The X register must point to the first character of the portion of the operand you
wish to evaluate (set X=0 to evaluate the expression at the start of the operand). On return
from EVAL, X will point to the character following the evaluated expression. The Y
register will be 0, 1, or 2 depending on whether this character is a right parenthesis, a
space, or a comma or end of operand.
Any character not allowed in an expression will cause assembly to abort with a BAD
OPERAND or other error. If some label in the expression is not recognized then location
NOTFOUND will be non-zero. On the second pass, however, you will get an
UNKNOWN LABEL error and the rest of your routine will be ignored. On return from
EVAL, the computed value of the expression will be in location VALUE and VALUE+1,
low byte first. On the first pass this value will be insignificant if NOTFOUND is non-zero.
You may use zero page locations $62-$6F, but should not alter other locations. Upon
return from your routine (RTS), the USR line will be printed (on the second pass).
When you use the USR opcode in a source file, it is wise to include some sort of check (in
source) that the required routine is in memory. If, for example, your routine contains an
RTS at location $El0 then:
ERR ($E10)-$60
will test that byte and abort assembly if the RTS is not there. Similarly if you know that
the required routine should assemble exactly two bytes of data, then you can (roughly)
check for it with the following code:
LABEL
USR
ERR
OPERAND
*-LABEL-2
This will force an error on the second pass if USR does not produce exactly two object
bytes.
It is possible to use USR for several different routines in the same source. For example,
your routine could check the first operand expression for an index to the desired routine
and act accordingly. Thus “USR 1, whatever” would branch to the first routine, “USR
2,stuff" to the second, etc.
Page 83
Merlin 128 User's Manual
The Assembler
CONDITIONAL PSEUDO OPS
DO (DO if true)
DO expression
DO 0
DO 1
DO LABEL
DO LAB1/LAB2
DO LAB1-LAB2
[turn assembly off]
[turn it on]
[if LAB EL<>0 then on]
[if LAB l<LAB2 then off]
[if LAB l-LAB2 then off]
This together with ELSE and FIN are the conditional assembly pseudo ops. If the operand
evaluates to zero, then the assembler will stop generating object code (until it sees another
conditional). Except for macro names, it will not recognize any labels in such an area of
code. If the operand evaluates to a non-zero number, then assembly will proceed as usual.
This is very useful for macros.
It is also useful for sources designed to generate slightly different code for different
situations. For example, if you are designing a program to go on a ROM chip, you would
want one version for the ROM and another with small differences as a RAM version for
debugging purposes. Conditionals can be used to create these different object codes
without requiring two sources.
Every DO should be terminated somewhere later by a FIN and each FIN should be
preceded by a DO. An ELSE should occur only inside such a DO/FIN structure. DO/FIN
structures may be nested up to eight deep (possibly with some ELSE's between). If the DO
condition is off (value 0), then assembly will not resume until its corresponding FIN is
encountered, or an ELSE at this level occurs. Nested DO/FIN structures are valuable for
putting conditionals in macros.
ELSE (ELSE do this)
ELSE
ELSE
[only option for this opcode]
This inverts the assembly condition (ON becomes OFF and OFF becomes ON) for the last
DO.
Page 84
Merlin 128 User’s Manual
The Assembler
IF (IF so then do)
IF char,]var (IF char is the first character of ]var)
IF (,]1
[if first char of ]1 is"(" then assemble following code]
IF ",]TEMP
[if first char is ", assem]
IF"=]1
[alternate use with "="]
This checks to see if char is the leading character of the replacement string for ]var.
Position is important: the assembler checks the first and third characters of the operand for
a match. If a match is found then the following code will be assembled. As with DO, this
must be terminated with a FIN, with optional ELSEs between. The comma is not
examined, so any character may be used there. For example:
IF "=]1
could be used to test if the first character of the variable ]1 is a double quote (“) or not,
perhaps needed in a macro which could be given either an ASCII or a hex parameter.
FIN(FINish conditional)
FIN
FIN
[only option for this opcode]
This cancels the last DO or IF and continues assembly with the next highest level of
conditional assembly, or ON if the FIN concluded the last (outer) DO or IF.
EXAMPLE OF THE USE OF CONDITIONAL ASSEMBLY:
* Macro "MOV', moves data from ]1 to ]2: (see also 'local Variables", this Section)
MOV
MAC
LDA
STA
]1
]2
* Macro "MOVD", moves data from ]l to ]2 with many available
* syntaxes
MOVD
MAC
MOV ]1;12
IF (,]1
INY
IF (,]2
;Syntax MOVD (ADR1),Y;????
; MOVD (ADR1),Y;(ADR2),Y
Page 85
Merlin 128 User's Manual
MOV
ELSE
MOV
FIN
ELSE
IF
INY
IF
MOV
ELSE
MOV
FIN
ELSE
IF
MOV
ELSE
MOV
FIN
FIN
FIN
<<<
The Assembler
]1;]2
; MOVD (ADR1),Y;ADR2
]1;]2+1
(,]2
;Syntax MOVD ????;(ADR2),Y
#,]1
]1/$l00;]
; MOVD #ADR1;(ADR2),Y
; MOVD ADR1;(ADR2),Y
]1+1;]2
#,]1
]1/$l00;]2+1
; MOVD ADR1;ADR2
]1+1;]2+1
Call syntaxes supported by MOW):
MOVD ADR1;ADR2
MOVD (ADR1),Y;ADR2
MOVD ADR1; (ADR2) ,Y
MOVD (ADR1),Y; (ADR2),Y
MOVD #ADR1;ADR2
MOVD #ADR1;(ADR2},Y
Page 86
;Syntax MOVD ????;ADR2
; MOVD #ADR1;ADR2
;MUST close ALL
;conditionals, Count DOs
;& Ifs, deduct FINs. Must
Merlin 128 User's Manual
MAC
The Assembler
MACRO PSEUDO OPS
(begin MACro definition)
Label MAC
This signals the start of a MACRO definition. It must be labeled with the macro name.
The name you use is then reserved and cannot be referenced by things other than the PMC
pseudo-op (things like DA NAME will not be accepted if NAME is the label on MAC).
EOM
(<<<)
EOM
<<< (alternate syntax)
This signals the end of the definition of a macro. It may be labeled and used for branches
to the end of a macro, or one of its copies.
PMC
(>>>) (macro-name)
PMC macro-name
>>> macro-name (alternate syntax #1)
macro-name
(alternate syntax #2)
This instructs the assembler to assemble a copy of the named macro at the present
location. See the section on MACROS. It may be labeled.
VARIABLES
Labels beginning with"]" are regarded as Variables. They can be redefined as often as you
wish. The designed purpose of variables is for use in macros, but they are not confined to
that use.
Forward reference to a variable is impossible (with correct results) but the assembler will
assign some value to it. That is, a variable should be defined before it is used.
It is possible to use variables for backwards branching, using the same label at numerous
places in the source. This simplifies label naming for large programs and uses much less
space than the equivalent once-used labels.
Page 87
Merlin 128 User's Manual
The Assembler
For example:
1
2
3
4
5
6
7
8
9
10
11
]JLQOP
NOGOOD
]JLOOP
LDY
LDA
BEQ
JSR
INY
BNE
LDX
INX
STA
LDA
BNE
#0
TABLE,Y
NOGOOD
DOIT
]JLOOP
#-1
DATA,X
TBL2,X
]JLOOP
;BRANCH TO LINE 2
;BRANCH TO LINE 8
LOCAL LABELS
A local label is any label beginning with a colon. A local label is "attached" to the last
global label and can be referred to by any line from that global label to the next global
label. You can then use the same local label in other segments governed by other global
labels. You can choose to use a meaningless type of local label such as :1, :2, etc., or you
can use meaningful names such as :LOOP, :EXIT, and so on.
Example of local labels:
1
2
3
4
5
6
7
8
9
10
11
12
13
14
START
:LOOP
L00P2
:LOOP
LDY
LDX
LDA
STA
INY
CPY
BNE
LDY
LDA
STA
INY
CPY
BNE
RTS
#0
#0
(JUNK),Y
(JUNKDEST),Y
#100
:LOOP
#0
(STUFF),Y
(STUFFDEST),Y
#100
:LOOP
;:loop is local to start
;branch back to LOOP in 3
;:loop is now local to loop2
;branch back to LOOP in 9
Some restrictions on use of local labels:
Local labels cannot be used inside macros. You cannot label a MAC, ENT or BXT with a
local label and you cannot EQUate a local label. The first label in a program cannot be a
local label.
Page 88
Merlin 128 User's Manual
The Assembler
Local Labels, Global Labels and Variables
There are three distinct types of labels used by the assembler. Each of these are identified
and treated differently by Merlin.
Global Labels
labels not starting with “]” or “:”
Local labels
labels beginning with”:”
Variables
labels beginning with"]"
Note that local labels do not save space in the symbol table, while variables do. Local
labels can be used for forward and backward branching, while variables cannot. Good
programming practice dictates the use of local labels as branch points, variables for
passing data, etc.
Page 89
Merlin 128 User's Manual
Macros
MACROS
Why Macros?
Macros represent a shorthand method of programming that allows multiple lines of code to
be generated from a single statement, or macro call. They can be used as a simple means to
eliminate repetitive entry of frequently used program segments, or they can be used to
generate complex portions of code that the programmer may not even understand.
Examples of the first type are presented throughout this manual and in the “MACRO
LIBRARY.S”. Examples of the second, more complex type, can be found in the "FP
MACROS" file.
Macros literally allow you to write your own language and then turn that language into
machine code with just a few lines of source code. Some people even take great pride in
how many bytes of source code they can generate with a single Macro call.
How Does a Macro Work?
A macro is simply a user-named sequence of assembly language statements. To create the
macro, you simply indicate the beginning of a definition with the macro name in the LABEL
field, followed by the definition of the macro itself.
The macro definition ends with a terminator command in the opcode field of either "EOM"
(for "End Of Macro"), or the character"<<<".
For example, suppose in your program that locations $06 and $07 need to be incremented by
one, as in this listing:
1 INC
INC
$06
; INC LO BYTE
2
BNE
DONE
3
INC
$07
; INC HIGH BYTE
4 DONE ???
; PROGRAM CONTINUES HERE...
Further, suppose that this is to be done a number of different times throughout the program.
You could make the operation a subroutine, and JSR to it, or you could write the three lines
of code out at each spot its needed.
However, a macro could be defined to do the same thing like this:
1 INK
MAC
; define a macro named INK
2
INC
$06
3
BNE
DONE
4
INC
$07
5 DONE
; NO OPCODE NEEDED
6
<<<
; this signals the end of the macro
Page 90
Merlin 128 User’s Manual
Macros
Now whenever you want to increment bytes $06,07 in your program, you could just use the
macro call:
100
>>>
INK
; use the macro "INK"
PMC
INK
; alternate for ">>>"
or:
100
Now, suppose you notice that there are a number of different byte-pair locations that get
incremented throughout your program. Do you have to write a macro for each one?
Wouldn't it be nice if there was a way to include a variable within a macro definition? You
could then define the macro in a general way, and when you use it, via a macro call, "fill in
the blanks" left when you defined it Here's a new example:
1
2
3
4
5
6
INK
MAC
INC
BNE
INC
]1
DONE
]1+1
DONE
<<<
; define a macro named INK
; increment 1st location
; increment location + 1
; NO OPCODE NEEDED
; this signals the end of the macro
This can now be called in a program with the statement:
100
>>>
INK,$06
In the assembled object code, this would be assembled as:
100
100
100
100
INC
BNE
INC
$06
DONE
$07
DONE
; NO OPODDE NEEDED
Notice that during the assembly, all the object code generated within the macro is listed with
the same line number. Don't worry though, the bytes are being placed properly in memory,
as will be evidenced by the addresses printed to the left in the actual assembly.
Later, if you need to increment locations $0A,0B, this would do the trick:
150
>>> INK,$0A
In the assembled object code, this would be assembled as:
150
150
150
150
INC
BNE
INC
DONE
$0A
DONE
$0B
; NO OPCODE NEEDED
Now, let's suppose that you want to use several variables within a macro definition. No
problem! Merlin lets you use 8 variables within a macro, ]1 through ]8.
Page 91
Merlin 128 User’s Manual
Macros
Here's another example:
MOVE
MAC
LDA
STA]2
<<<
]1
; define a macro named MOVE
; load accum with variable ]1
; store accum in location ]2
; this signals the end of the macro
This is a macro that moves a byte (or value) from one location to another. In this example
the variables are 11 and 12. When you call the MOVE macro you provide a parameter list
that "fills in" variables ]1 and ]2. What actually happens is that the assembler substitutes the
parameters you provide at assembly time for the variables. The order of substitution is
determined by the parameter's place in the parameter list and the location of the
corresponding variable in the macro definition. Here's how MOVE would be called and then
filled in:
MOVE
$00;$01
MOVE: macro being called
$00: takes place of ]1 (1st variable)
$01: takes place of ]2 (2nd variable)
then, the macro will be "expanded" into assembly code,
>>>
LDA
STA
MOVE,$0D;$01
$00
{$00 in place of ~1}
$01
{$01 in place of 121
It is very important to realize that anything used in the parameter list will be substituted for
the variables. For example:
>>>
MOVE,#"A";DATA
would result in the following:
>>>
LDA
STA
MOVE, #"A";DATA
#"A"
DATA
You can get even fancier if you like:
>>>
LDA
STA
MOVE,#"A"; (STRING),Y
#”A”
(STRING),Y
As illustrated, the substitution of the user supplied parameters for the variables is quite
literal. It is quite possible to get into trouble this way also, but Merlin will inform you, via an
error message, if you get too carried away.
One common problem encountered is forgetting the difference between immediate mode
numbers and addresses.
Page 92
Merlin 128 User's Manual
Macros
The following two macro calls will do quite different things:
>>>
>>>
MOVE,l0;20
MOVE,#10;#20
The first stores the contents of memory location 10 (decimal) into memory location 20
(decimal). The second macro call will attempt to store the number 10 (decimal) in the
number 20! What has happened here is that an illegal addressing mode was attempted. The
second macro call would be expanded into something like this (if it were possible):
>>>
MOVE,#10;#20
LDA
#10
STA
#20
*** BAD ADDRESS MODE ***
;call the MOVE macro
;nothing wrong here
;woops! can't do this!
;Merlin will let you know!
In order to use the macros provided with Merlin, or to write your own, study the macro in
question and try to visualize how the required parameters would be substituted. With a little
time and effort you'll be using them like a Pro!
MORE ABOUT SPECIAL VARIABLES
Bight variables, named ]1 through ]8, are predefined and are designed for convenience in
macros. These can be used in any macro call. Macros can be called one of three ways, and
this will affect the syntax of accompanying variable expressions.
In the first two methods,
>>>
NAME,exprl;expr2;expr3...
PMC
NAME,exprl;expr2;expr3…
and
will assign the value of expr1 to the variable ]1, that of expr2 to ]2, and so on. An example
of this usage is: SWAP,$6;$7;TEMP
MACRO DEFINITION
TEMP
SWAP
RESULTANT CODE EXAMPLE
EQU
MAC
LDA
STA
LDA
STA
LDA
STA
<<<
$10
>>>
SWAP,$6;$7;TEMP
]1
]3
]2
]l
]3
]2
LDA
STA
LDA
STA
LDA
STA
$06
TEMP
$07
$06
TEMP
$07
Page 93
Merlin 128 User's Manual
Macros
SWAP,$1000;$6;TEMP
>>>
(2nd macro call with new argument)
This program segment swaps the contents of location $6 with that of $7, using TEMP as a
scratch depository, then swaps the contents of $6 with that of $1000.
If, as above, some of the special variables are used in the Macro definition, then values for
them must be specified in the PMC (or >>>) statement. In the assembly listing, the special
variables will be replaced by their corresponding expressions.
The number of values must match the number of variables used in the macro definition. A
BAD VARIABLE error will be generated if the number of values is less than the number of
variables used. No error message will be generated, however, if there are more values than
variables.
Note that in giving the parameter list, the Macro is followed by a comma, and then each
parameter separated with a semicolon. The assembler will accept some other characters in
place of the comma between the macro name and the expressions in a macro call (see the
following examples). You may use any of these characters:
./,-
( and the space character
The semicolons are required, however, between the expressions, and no extra spaces are
allowed.
Macro names may also be put in the opcode column, without using the PMC or >>>, with
the following restriction: The macro name cannot be the same as any regular opcode or
pseudo opcode, such as LDA, STA, ORG, EXP, etc. Also, it cannot begin with the letters
DEND or POPD.
Note that the PMC or >>> syntax is not subject to this restriction.
Macros will accept literal data. Thus the assembler will accept the following type of macro
call:
MACRO DEFINITION
MUV
Page 94
MAC
LDA
STA
<<<
]1
]2
>>>
>>>
MUV . (PNTR),Y;DEST
MUV . #3;FLAG,X
Merlin 128 User’s Manual
Macros
with the resultant code from the above two macro calls being:
>>>
LDA
STA
MUV. (PNTR),Y;DEST
(PNTR),Y
DEST
;macro call
;substitute first parm.
;substitute second parm.
>>>
LDA
STA
MUV.#3;FLAG,X
#3
FLAG,X
;macro call
;substitute first parm.
;substitute second parm.
and,
It will also accept:
MACRO DEFINITION
PRINT
MAC
JSR
AEC
BRK
<<<
SENDMSC
]1
RESULTANT CODE EXAMPLE
PRINT. "Example"
JER
SENDMSG
AEC
"Example"
BRK
Some additional examples of the PRINT macro call:
>>> PRINT. "quote"!
>>> PRINT. 'This is an exarpie'
>>> PRINT. "So's this, understand?"
LIMITATION: If such strings contain spaces or semicolons, they must be delimited by
quotes (single or double). Also, literals such as >>>WHAT."A" must have the final
delimiter. (This is only true in macro calls or VAR statements, but it is good practice in all
cases.)
MORE ABOUT DEFINING A MACRO
A macro definition begins with the line:
Name MAC
(no operand)
with Name in the label field. Its definition is terminated by the pseudo-op EOM or <<<. The
label you use as Name cannot be referenced by anything other than a valid Macro call:
NAME, PMC NAME or >>> NAME.
Forward reference to a macro definition is not possible, and would result in a NOT
MACRO error message. That is, the macro must be defined before it is called by
NAME, PMC or >>>.
The conditionals DO, IF, ELSE and FIN may be used within a macro.
Page 95
Merlin 128 User's Manual
Macros
Labels inside macros are updated each time the macro NAME, PMC or >>> NAME is
encountered.
Error messages generated by errors in macros often abort assembly, because of possibly
harmful effects. Important: Such messages will usually indicate the line number of the
macro call rather than the line inside the macro where the error occurred. Thus, if you get an
error on a line in which a macro has been used, you should check the macro definition itself
for the offending statement.
Nested Macros
Macros may be nested to a depth of 15. Here is an example of a nested macro in which the
definition itself is nested. (This can only be done when both definitions end at the same
place.)
TROB
TR
MAC
>>>
MAC
LDA
STA]2
TR.]1+1;]2+1
]1
In this example >>> TR.LOC;DEST will assemble as:
LDA
STA
LOC
DEST
and >>> TRDB.LOC;DEST will assemble as:
LDA
STA
LDA
STA
LOC+1
DEST+1
LOC
DEST
A more common form of nesting is illustrated by these two macro definitions:
TABMAP
POKE
HTAB
EQU
$354
MAC
LDA
#]2
STA]1
<<<
MAC
>>> POKE.TABMAP+] 1;]2
The HTAB macro could then be used like this:
HTAB
Page 96
2;20
;set tab #2 to column 20 decimal
Merlin 128 User’s Manual
Macros
and would generate the following code:
LDA #20
STA
TABMAP+2
;]2 in POKE macro
;11 in POKE macro, 1st parm.
; in H~AB macro
Macro Libraries and the USE Pseudo Op
There are a number of macro libraries on the Merlin disk. These libraries are examples of
how one could set up a library of often used macros. The requirements for a file to be
considered a macro library are:
1)
2)
3)
Only Macro definitions and label definitions exist in the file,
The file is a text file,
The file must be accessible at assembly time (it must be on an available disk drive).
The macro libraries included with Merlin include:
Macro Library functions
MACRO LIBRARY.S
FP MACROS
PT.MACROS
Often-used macros for general use
Floating point math routines
Macros used for the “PI” linker demonstration
programs
Any of these macro libraries may be included in an assembly by simply including a USE
pseudo op with the appropriate library name. There is no limit to the number of libraries that
may be in memory at any one time, except for available memory space. See the
documentation on the USE pseudo op for a discussion on its use in a program.
Page 97
Merlin 128 User's Manual
The Linker
THE LINKER
Why a Linker?
The linking facilities built into Merlin offer a number of advantages over assemblers without
this capability:
1) Extremely large programs may be assembled in one operation, over 41000 bytes long,
2) Large programs may be assembled much more quickly with a corresponding decrease in
development time,
3) Libraries of subroutines (for disk access, graphics, screen/modem/printer drivers, etc.)
may be developed and linked to any Merlin 128 program,
4) Programs may be quickly re-assembled to run at any address.
With a linker, you can write portions of code that perform specific tasks, such as general
disk I/O handler, and perform whatever testing and debugging is required. When the code is
correct, it is assembled as a REL file and placed on a disk. Whenever you need to write a
program that uses disk I/O you won't have to re-write or re-assemble the disk I/O portion of
your new program. Just link your general disk I/O handler to your new program and away
you go. This technique can be used for a variety of often used subroutines.
Wouldn't a PUT file or Macro USES library serve the same purpose? A PUT file comes the
closest to duplicating the utility of REL files and the linker, but there are a few rather large
drawbacks for certain programs. First, using a PUT file to add a general purpose subroutine
would result in much slower assembly. Second, any label definitions contained in the PUT
file would be global within the entire program. With a REL file, only labels defined as
ENTry in the REL file (and EXTernal in the current file) would be shared by both programs.
There is no chance for duplicate label errors when using the linker. Consider the following
simple example:
A REL file has been assembled that drives a plotter. There are six entry points into the
driver: PENUP, PENDOWN, NORTH, SOUTH, EAST, WEST. To further illustrate the
value of a linker, assume the driver was written by a friend who has moved 2000 miles from
you. Your job is to write a simple program to draw a box. The code would look something
like this:
1
REL
;RELOCATABLE CODE
2 PENUP
EXT
;EXTERNAL LABEL
3 PENDOWN EXT
;ANOTHER ONE
4 NORTH
EXT
5 SOUTH
EXT
6 EAST
EXT
Page 98
Merlin 128 User's Manual
The Linker
7 NEST
EXT
8
9 BOX
LDY
#00
; INITIALIZE Y
10
JSR
PENDOWN
; GET READY TO DRAW
11 :LOOP
JSR
NORTH
; MOVE UP
12
INY
; INC COUNTER
13
CPY#100
; 100 MOVES YET?
14
BNE
:LOOP
; NOTICE LOCAL LABEL
15
LDY
#00
; INIT Y AGAIN
16 :LOOP2
JSR
EAST
; NOW MOVE TO RIGHT
17
INY
18
CPY#100
19
BNE
:LOOP2
; FINISH MOVING RIGHT
20 * YOU GET THE IDEA, DO SOUTH, THEN WEST, AND DONE!
This simple sample program illustrates some of the power of RELocatable, linked files.
Your program doesn't have to concern itself with conflicts between it's labels and the REL
files labels, you don't concern yourself with the location of the EXTernal labels, your
program listing is only 30 to 40 lines and it is capable of drawing a box on a plotter!
Let's look at another example that illustrates points 1 and 2 above. This time you are writing
a data base program. You have broken the program down into 6 modules, all of which are
REL files:
1)
2)
3)
4)
5)
6)
User interface
ISAM file system
Sort subsystem
Search subsystem
Report generator
Memory management subsystem
You would first design and write the user interface for your program. This would then be
assembled and stored as a REL file. Next, the ISAM file system is written and de-bugged.
You would then link the two modules together to see how they worked together. Next, you
would complete the Sort, the Search, and all the rest. In fact, by using REL files, and
documenting the ENTry points and their conditions, six different people could be working
simultaneously on the same project and need no more from one another than the ENT labels!
To illustrate point 2, assume that the six modules are all coded as PUT files and that the
resulting program was 40k bytes long. The time it would take to assemble and cross
reference such a large program would be measured in hours or days. Changing one byte in
the source code would require a complete re-assembly and a quite a wait! By assembling
each section independently as REL files and then linking them, the one byte change would
require assembly of only one module in the 40k program. In short, with REL files and a
linker, changes to large programs can be made quickly and efficiently, greatly speeding the
program development process.
Page 99
Merlin 128 User's Manual
The Linker
About the Linker Documentation
There are three pseudo opcodes that deal directly with relocatable modules and the linking
process. These are:
REL - Informs the assembler to generate relocatable files
EXT - Defines a label as external to the current file
ENT - Defines a label in the current file as accessible to other REL files.
There are two other pseudo opcodes that behave differently when used in a REL file,
relative to a normal file. These are:
DS - Define Storage opcode,
ERR- Force an ERRor opcode.
Each of these five pseudo opcodes will be defined or redefined in this section as they pertain
to REL files. Also, an Editor command unique to REL files will be defined: LINK.
In order to use the Linker, the files to be linked must be specified. The linker uses a file
containing the names of the files to be linked for this purpose.
The Linker documentation will make no additional attempts to educate the user as to when
(or when not) to use REL files.
PSEUDO OPCODES FOR USE WITH RELOCATABLE
CODE FILES
REL ( generate a RELocatable code file )
REL
[only options for this opcode]
This opcode instructs the assembler to generate a relocatable code file for subsequent use
with the relocating linker.
This must occur prior to definition of any labels. You will get a BAD "REL" error if not.
REL files are incompatible with the SAV pseudo op and with the EXEC mode's object
code save command. To get an object file to the disk you must use the DSK opcode for
direct assembly to disk.
There are additional illegal opcodes and procedures that are normally allowed with
standard files, but not with REL files. For example, an ORG at the start of the code is not
allowed. In addition, multiplication, division or logical operations can be applied to
absolute expressions but not to relative ones.
Page 100
Merlin 128 User's Manual
The Linker
Examples of absolute expressions are:
- An EQUate to an explicit address,
-The difference between two relative labels,
-Labels defined in DUMMY code sections.
Examples of relative expressions that are not allowed are:
-Ordinary labels,
-Expressions that utilize the PC, like: LABEL = *.
The starting address of an REL file, supplied by the assembler, is $8000. Note that this
address is a fictional address, since it will later be changed by the linker. It is for this
reason that no ORG opcode is allowed.
There are some restrictions involving use of EXTernal labels in operand expressions. No
operand can contain more than one external. For operands of the following form:
#>expression or >expression
where the expression contains an external, the value of the expression must be within 7
bytes of the external labels value. For example:
LDA #>EXTERNAL+8 [illegal expression]
DFB >EXTERNAL-1 [legal expression]
Object files generated with the REL opcode are given the file type USR.
EXT (define a label EXTernal to the current REL module)
label EXT
PRINT EXT
[define label PRINT as EXT]
This defines the label in the label column as an external label. Any external label must be
defined as an ENTry label in its own REL module, otherwise it will not be reconciled by
the linker (the label would not have been found in any of the other linked modules). The
EXTernal and ENTry label concepts are what allows REL modules to communicate and
use each other as subroutines, etc.
The value of the label is set to $8000 and will be resolved by the linker. In the symbol
table listing, the value of an external will be $8000 plus the external reference number
($0-$FE) and the symbol will be flagged with an “X”.
Page 101
Merlin 128 User's Manual
The Linker
ENT (define a label as an ENTry label in a REL code module)
label ENT
PRINT ENT
[define label PRINT as ENTry]
This defines the label in the label column as an ENTry label. This means that the label can
be referred to as an external label. This facility allows other REL modules to use the label
as if it were part of the current REL module. If a label is meant to be made available to
other REL modules it must be defined with the ENT opcode, otherwise, other modules
wouldn't know it existed and the linker would not be able to reconcile it.
The following example of a segment of a REL module will illustrate the use of this
opcode:
21
22
23
24
25 SWAP
26
27
28
29
30 * etc.
STA
INC
BNE
JMP
ENT
LDA
STA
LDA
STA
POINTER
POINTER
SWAP
CONTINUE
POINTER
PTR
POINTER +l
PTR +l
;some meaningless code
;for our example
;CAN BE USED AS NORMAL
;MUST BE DEFINED IN THE
;CODE PORTION OF THE
;MODULE AND NOT USED
;AS AN EQUated label
Note that the label SWAP is associated with the code in line 26 and that the label may be
used just like any other label in a program. It can be branched to, jumped to, used as a
subroutine, etc.
ENT labels will be flagged in the symbol table listing with an "E."
DS (Define Storage)
DS ↑
DS ↑expression
DS ↑
DS ↑,1
[start next module, fill memory with zeros to next page break]
[start next module, fill memory with the value 1 to next page]
When this opcode is found in an REL file it causes the linker to load the next file in the
"linker name file" at the first available page boundary and to fill memory either with zeros
or with the value specified by the expression. This opcode should be placed at the end of
your source file.
Page 102
Merlin 128 User's Manual
ERR
The Linker
(force an ERRor)
ERR ↑expression
ERR ↑$4200
[error if current code passes address $4200]
This opcode will instruct the linker to check that the last byte of the current file does not
extend to expression" or beyond. Note that the expression must be absolute and not a
relative expression.
If the linker finds that this is not the case, linking will abort with the message:
CONSTRAINT ERROR:, followed by the value of the expression in the ERR opcode.
You can see how this works by trying to link the PI file on the Merlin disk to an address
greater than $1C20.
Note that the position of this opcode in a REL file has no bearing on its action. It is
recommended that it be put at the end of a file.
LINK (LINK REL files, this is an editor command)
LINK adrs "filename'
LINK $1000 "NAMES"
[link files in NAMES]
This editor command invokes the linking loader. For example, suppose you want to link
the object files whose names are held in a "linker name file' called NAMES. Suppose the
start address desired for the linked program is $1000. Then you would type: LINK $1000
“NAMES” <RETURN>. (The final quote mark in the name is optional and you can use
other delimiters such as “’” or”;”.). The specified start address has no effect on the space
available to the linker.
Note that this command is only accepted if there is no current source file in memory, since
the linker would destroy it.
Linker Name Files
The linker name file is just a text file containing the file names of the REL object modules
you want linked. It should be written with the Merlin editor and written to the disk with
the “W” EXEC command.
Thus, if you want to link the object files named MYPROG.START, MYPROG.MID, and
LIB.ROUTINE,9 you would create a text file with these lines:
MYPROC.START
MYPROG.MID
LIB.ROUTINE, 9
Page 103
Merlin 128 User’s Manual
The Linker
Then you would write this to disk with the "W" command under the filename (for
example) MYPROG.NAMES. (Use any filename you wish here, it is not required to call it
NAMES.). Then you would link these files with a start address of $4000 by typing NEW
and then issuing the Editor command: LINK $4000 "MYPROG.NAMES'.
The names file may contain empty lines and comment lines starting with "*".
The linker will not save the object file it creates. Instead, it sets up the object file
pointers for the Main Menu Object command (“O”) and returns you directly to Main Menu
upon the completion of the linking process.
The Linking Process
Various error messages may be sent during the linking process (see the ERRORS section
of this manual for more information). If a error occurs involving the file loading, then that
error message will be seen and linking will abort. If the error FILE TYPE MISMATCH
occurs after the message "Externals:" has been printed then it is being sent by the linker
and means that the file structure of one of the files is incorrect and the linking cannot be
done.
The message MEMORY IN USE may occur for two reasons. Either the object program is
too large to accept (the total object size of the linked file cannot exceed about $A100) or
the linking dictionary has exceeded its allotted space ($B000 long). Each of these
possibilities is exceedingly remote.
After all files have been loaded, the externals will be resolved. Each external label
referenced will be printed to the screen and will be indicated to have been resolved or not
resolved. An indication is also given if an external reference corresponds to duplicate
entry symbols. With both of these errors the address of the field (one or two bytes)
effected is printed. This is the address the field will have when the final code is
DLOADed.
If you use the TRON command prior to the LINK command, only the errors will be
printed in the external list (NOT RESOLVED and DUPLICATE errors).
This listing may be stopped at any point using the space bar. The space bar may also be
used to single step through the list. If you press the space bar while the files are loading
then the linker will pause right after resolving the first external reference.
The list can be sent to a printer by using the PRTR command prior to the LINK command.
At the end, the total number of errors (external references not resolved and references to
duplicate entry symbols) will be printed. After pressing a key you will be sent to the
MAIN Menu and can save the linked object file with the object save command, using any
filename you please. You can also return to the editor and use the GET command to move
the linked code to RAM0.
Page 104
Merlin 128 User's Manual
Technical Information
TECHNICAL INFORMATION
The source is placed at START OF SOURCE when loaded, regardless of its original
address.
The important pointers are:
START OF SOURCE
HIMEM
END OF SOURCE
in
in
in
$C,$D
$E,$F
$10,$11
(set to $7000 unless changed)
($FF00, don't change)
GENERAL INFORMATION
When you exit to BASIC or to the monitor, these pointers are saved. They are restored upon
re-entry to Merlin 128.
Re-entry after exit to BASIC is made by the "SYS 2048" command or by the F4 function
key.
If during assembly the object code exceeds usable RAM then the code will not be written to
memory, but assembly will appear to proceed as normal and its output sent to the screen or
printer. The only clue that this has happened, if not intentional, is that the OBJECT CODE
SAVE command at EXEC level is disabled in this event. There is ordinarily a 23K space for
object code, which can be changed with the OBJ opcode.
SYMBOL TABLE
The symbol table is printed after assembly unless LST OFF has been invoked. It is displayed
first sorted alphabetically and then sorted numerically. The symbol table can be aborted at
any time by pressing RUN/STOP. Stopping it in this manner will have no ill effect on the
object code which was generated.
The symbol table is flagged as follows:
MD =
M =
V =
? =
X =
E =
Macro Definition
label defined within a Macro
Variable (symbols starting with"]")
A symbol that was defined but never referenced
External symbol
Entry symbol
(local labels are not shown in the symbol table listing.)
Page 105
Merlin 128 User's Manual
Technical Information
The symbol printout uses the first tab to determine the space to allocate to each symbol.
Thus, if you change the default tabs to enable more label space, the symbol table printout
will change also. Note that you may have to change the parameter for number of symbols
per line in the table.
CONFIGURATION
The configuration registers $D101-$D504 are set up as shown below. These should not be
changed, or reset to values shown. Return to MAIN MENU via $2000 or $2500 will reset
them.
$D501: %00000000 (ROM)
$D502: %01111111 (RAM1)
$D503: %00111111 (RAM0)
$D504: %00001110 (RAMHALF)
RAM HALF leaves RAM below $C000, ROM and I/O above. The RAM HALF
configuration is the one usually in effect at any given time.
Merlin 128 configuration data is stored in a file the PARMS.O file which is loaded at boot.
To change any of these values, load the source file, PARM.S, make the desired changes,
then reassemble it.
Use the 'S' command to save the source code as PARMS. Use the 'O' command to save the
object code as PARMS. Merlin 128 will add the appropriate suffix (.S or .O).
Page 106
Merlin 128 User's Manual
Technical Information
CONTENTS OF PARMS
1 *------------------------------2 * PARMS for Merlin-128
3 *------------------------------4
5
SRC
=
$7000
;Source address (=> $7000)
6
HIM
=
$FF00
;Don't change
7
8
ORG$2506
;Do not change the org
9
10 SPEED
DFB
0
;Printer output speed (RS232)
11 ERRFLG
DFB
$80
;0 to defeat keywait on error
12
13 PNTSAV
DA
SRC
;Don't change these
14
DA
HIM
;“
15
DA
SRC
;“
16
17
DFB
#"^"
;Editors wild card (cmd mode)
18
19
DFB
4
;Number of symbols/line in
20
; symbol table printout
21
22 CYCHORIZ DFB
80-8
;Column for CYC printing
23
24 LSTDOFLG DFB
0
;$FF to not list DO OFF areas
25
26 DEFBKGND DFB
0
;Foreground/background color
27 CHRCOLOR DFB
149
;Char color
28
29 *
For DEFBKGND use the following table:
30 *
31 * 0 black
8
red
32 * 1 medium grey
9
light red
33 * 2 blue
10 orange
34 * 3 light grey
11 purple
35 * 4 green
12 brown
36 * 5 light green
13 yellow
37 * 6 dark grey
14 light grey
38 * 7 cyan
15 white
39 *
40 *
For CHRCOLOR use the character codes for colors, i.e.:
41 *
42 * 5
=
white
151 =
dark cyan
=
43 * 28
red
152 =
grey
44 * 30
=
green
153 =
light green
45 * 31
=
blue
154 =
light blue
46 * 129
=
dark purple
155 =
light grey
47 * 144
=
black
156 =
purple
48 * 149
=
dark yellow
158 =
light cyan
49 * 150
=
light red
159 =
cyan
50
51 RS232
DFB
%00000110
;Control reg. for RS232
52
DFB
%00010000
;Command reg.
53
DFB
0
;Baud low (if used)
Page 107
Merlin 128 User's Manual
54
55
56
57
58
59
60
61
62
63
64
65
66
67
68
69
70
71
72
73
74
75
76
77
78
79
80
81
82
83
84
85
86
87
88
89
90
91
92
93
94
95
Technical Information
DFB
0
;Baud hi
RPTDFLT
DFB
$80
;Repeat key default
NUMLINES
DFB
60
;Printer lines/page
PAGSKIP
DFB
0
;# of lines skipped at perf
; will formfeed if 0.
;If printer does not recognize
; formfeed then usually you
; should put a 7 here.
NUNCHRS
DFB
80
;Printer width
PRNTRCR
DFB
$80
;Put a 0 here if your printer
; will not do an automatic CR
; after the # of chars in
; NUMCHRS (eg. if the printer
; width is more than NUNCHRS).
;This is so that output can
; keep an accurate line count.
;For almost all printers you
; should use $80 here - unless
; you use a NUMCHRS less than
; the actual printer width.
LFD
DFB
0
;Line feed default 0=no,$D=yes
CNUMSK
DFB
0
;UC/LC conversion for printer
; Put a 32=$20 here to convert
; lc/uc for printer output.
ECHO
DFB
$61
;$61=echo printer output
; 0 = no echo (to screen)
*
Editor and assembler tabs (use 5 more than column) :
DFLTABS
Page 108
DFB
DFB
DFB
14
20
31
;Opcode column (+5)
;Operand column (+5)
;Comment column (+5)
ERR
*-$2523
;That's it folks
Merlin 128 User's Manual
Technical Information
Merlin 128 Memory Map
Page 109
Merlin 128 User’s Manual
Error Messages
ERROR MESSAGES
BAD ADDRESS MODE
The addressing mode is not a valid 6510 instruction; for example, JSR (LABEL) or LDX
(LABEL),Y.
BAD BRANCH
A branch (BEQ, BCC, etc.) to an address that is out of range, i.e. further away than +127
bytes.
NOTE: Most errors will throw off the assembler's address calculations. Bad branch
errors should be ignored until previous errors have been dealt with.
BAD EXTERNAL
EXT or ENT in a macro or an equate of a label to an expression containing an external,
or a branch to an external (use JMP).
BAD INPUT
This results from either no input (RETURN alone) or an input exceeding 37 characters
in answer to the KBD opcodes request for the value of a label.
BAD LABEL
This is caused by an unlabeled EQU, MAC, ENT or EXT, a label that is too long
(greater than 13 characters) or one containing illegal characters (a label must begin with
a character at least as large in ASCII value as the colon and may not contain any
characters less than the digit zero).
BAD OBJ
An OBJ after code start or OBJ not within $4000 to $FEEO.
BAD OPCODE
Occurs when the opcode is not valid (perhaps misspelled) or the opcode is in the label
column.
BAD ORG
Results from an ORG at the start of a REL file.
Page 110
Merlin 128 User's Manual
Error Messages
BAD "PUT"
This is caused by a PUT inside a macro or by a PUT inside another PUT file.
BAD REL
A REL opcode occurs after some labels have been defined.
BAD “SAV”
This is caused by a SAV inside a macro or a SAV after a multiple OBJ after the last
SAV.
BAD VARIABLE
Occurs when you don’t pass the number of variables to a macro that it expects. It can
also occur for a syntax error in a string passed to a macro variable, such as a literal
without the final quote.
BREAK
This message is caused by the ERR opcode when the expression in the operand is found
to be non-zero.
DICTIONARY FULL
Overflow of the relocation dictionary in a REL file.
DUPLICATE SYMBOL
On the first pass, the assembler finds two identical labels.
ILLEGAL CHAR IN OPERAND
A non-math character occurs in the operand where the assembler is expecting a math
operator. This usually occurs in macro calls with improper syntax resulting from the
textual substitution.
ILLEGAL FORWARD REFERENCE
A label equated to a zero page address after it has been used. This also occurs when an
unknown (on the first pass) label is used for some things that must be able to calculate
the value on the first pass (e.g. ORG< OBJ DUM). It also occurs if a label is used before
it is defined in a DUM section on zero page.
Page 111
Merlin 128 User's Manual
Error Messages
ILLEGAL RELATIVE ADRS
In REL mode a multiplication, division or logical operation occurs in a relative
expression. This also occurs for an operand of the type #>expr or a DFB >expr when the
expr contains an external and the offset of the value of the expr from that of the external
exceeds 7.
MEMORY FULL
This is usually caused by one of two conditions: Source code too large or symbol table
too large. See "Special Note" at the end of this section.
NESTING ERROR
Macros nested more than 15 deep or conditionals nested more than 8 deep will generate
this error.
NOT MACRO
Forward reference to a MACRO, or reference by PMC or >>> to a label that is not a
MACRO.
OUT OF MEMORY
An attempt has been made to paste more text from the clipboard than will fit in the
current source listing, or to paste from an empty clipboard (such as after an assembly).
RANGE ERROR
Results when using GET to move a program with an ORG that conflicts with Merlin 128
or a source file in memory.
TWO EXTERNALS
Two or more externals in an operand expression.
UNKNOWN LABEL
Your program refers to a label that has not been defined. This also occurs if you try to
reference a MACRO definition by anything other than PMC or >>>. It can also occur if
the referenced label is in an area with conditional assembly OFF. The latter will not
happen with a MACRO definition.
256 EXTERNALS
The file has more than 255 externals.
Page 112
Merlin 128 User’s Manual
Error Messages
MEMORY FULL Errors
There are three common causes for the MEMORY FULL error message. They are as
follows:
MEMORY FULL IN LINE: xx. Generated during assembly.
CAUSE #1: Too many symbols have been placed into the symbol table, causing it to
exceed available space.
REMEDY: Make the symbol table larger by setting OBJ to $FEE0 and use DSK to
assemble directly to disk.
CAUSE #2: If the combined size of the source file and a PUT file is too large.
REMEDY: Split either file into two smaller files.
ERR:MEMORY FULL. Generated immediately after you type in one line too many.
CAUSE: The source code is too large and has exceeded available RAM.
REMEDY: Break the source file up into smaller sections and bring them in when
necessary by using the "PUT" pseudo-op.
ERROR MESSAGE: None, but no object code will be generated (there will be no
OBJECT information displayed on the MAIN menu).
CAUSE: Object code generated from an assembly would have exceeded the available
16K space.
REMEDY: Set OBJ to an address less than its $8000 default or use DSK.
GENERAL NOTE: When an error occurs that aborts assembly, the line containing the
error is printed to the screen. This may not have the same form as it has in the source, since
it shows any textual substitutions that may have occurred because of macro expansion. If it
is in a macro call, the line number will be that of the call line and not of the line in the macro
(which is unknown to the assembler).
Page 113
Merlin 128 User's Manual
Sourceror
SOURCEROR
INTRODUCTION
SOURCEROR is a sophisticated and easy to use co-resident disassembler designed to create
Merlin 128 source files out of binary programs, usually in a matter of minutes.
Using SOURCEROR
To use SOURCEROR, follow these steps:
1.
Use the Main Menu 'G' command to run SOURCEROR
2.
Press 'E' to enter the Editor.
3.
From the Immediate mode prompt (:), type:
USER (RETURN)
There must be no source in memory when the USER command is issued. If there is, the
USER command will be ignored, and you will not be able to continue the disassembly.
4.
If there is no source in memory, the following prompt will appear:
Do you want an object file loaded? (Y/N):
5.
If you type 'N', the following prompt appears:
If the present location of the program to be disassembled is its original location, hit
RETURN. If not, give PRESENT location:
After pressing RETURN or entering the PRESENT location, the following prompt
appears:
In disassembling, use the ORIGINAL location. Please specify it:
Enter the ORIGINAL location and press RETURN. Skip to item 10.
6. If you pressed 'Y' to the 'Do you want an object file loaded?' prompt, the following
appears:
Name of file:
7
Type the complete filename and press RETURN.
Page 114
Merlin 128 User's Manual
8.
Sourceror
The following prompts appear:
searching for filename loading
Original location is $####,$####
Use this for disassembly.
HIT A KEY
9. Note the addresses shown for 'Original location'. These are the beginning and ending
addresses for the file to be disassembled.
10. The SOURCEROR menu appears displaying the commands available for disassembly.
You may start disassembling now, or use any of the other commands. Your first
command must include a hex address. Thereafter this is optional, as explained shortly.
NOTE: When disassembling, you must use the ORIGINAL address of the program,
not the address where the program currently resides. It will appear that you are
disassembling the program at its original location, but actually, SOURCEROR is
disassembling the code at its present location and translating the addresses.
11. When SOURCEROR’s final processing is done, the Merlin 128 Main Menu appears.
SOURCEROR always disassembles an area in RAM 0. Thus, it is not possible to
disassemble the ROMs without saving a portion of the ROM code to a disk file and
having SOURCEROR load that into RAM.
COMMANDS USED IN DISASSEMBLY
All commands accept a 4-digit hex address before the command letter. If this number is
omitted, then the disassembly continues from its present address. A number must be
specified only upon initial entry.
If you specify a number greater than the present address, a new ORG will be created.
More commonly, you will specify an address less than the present default value. In this case,
the disassembler checks to see if this address equals the address of one of the previous lines.
If so, it simply backs up to that point. If not, then it backs up to the next used address and
creates a new ORG. Subsequent source lines are "erased". It is generally best to avoid new
ORGs when possible. If you get a new ORG and don't want it, try backing up a bit more
until you no longer get a new ORG upon disassembly.
This "backup" feature allows you to repeat a disassembly if you have, for example, used a
HEX or other command, and then change your mind.
Page 115
Merlin 128 User's Manual
Sourceror
SOURCEROR COMMAND DESCRIPTIONS
L (List)
This is the main disassembly command. It disassembles 20 lines of code. It may be repeated
(e.g. 2OOOLLL will disassemble 60 lines of code starting at $2000).
If an illegal opcode is encountered, the bell will sound and opcode will be printed as three
question marks in flashing format. This is only to call your attention to the situation. In the
source code itself, unrecognized opcodes are converted to HEX data, but not displayed on
the screen.
H (Hex)
This creates the HEX data opcode. It defaults to one byte of data. If you insert a one byte
(one or two digit) hex number after the H, that number of data bytes will be generated.
T (Text)
This attempts to disassemble the data at the current address as an ASCII string. Depending
on the form of the data, this will automatically be disassembled under the pseudo-opcode
TXT or DCI. The appropriate delimiter (" or') is automatically chosen. The disassembly will
end when the data encountered is inappropriate, when 62 characters have been treated, or
when the high bit of the data changes. In the last condition, the TXT opcode is automatically
changed to DCI.
Sometimes the change to DCI is inappropriate. This change can be defeated by using TT
instead of T in the command.
Occasionally, the disassembled string may not stop at the appropriate place because the
following code looks like ASCII data to SOURCEROR. In this event, you may limit the
number of characters put into the string by inserting a one or two digit hex number after the
T command.
This, or TT, may also have to be used to establish the correct boundary between a regular
ASCII string and a flashing one. It is usually obvious where this should be done.
W (Word)
This disassembles the next two bytes at the current location as a DA opcode. Optionally, if
the command WW is used, these bytes are disassembled as a DDB opcode.
Page 116
Merlin 128 User’s Manual
Sourceror
If W- is used as the command, the two bytes are disassembled in the form DA LABEL-1.
The latter is often the appropriate form when the program uses the address by pushing it on
the stack. You may detect this while disassembling, or after the program has been
disassembled. In the latter case, it may be to your advantage to do the disassembly again
with some notes in hand.
HOUSEKEEPING COMMANDS
/ (Cancel)
This essentially cancels the last command. More exactly, it re-establishes the last default
address (the address used for a command not necessarily attached to an address). This is a
useful convenience which allows you to ignore the typing of an address when a backup is
desired.
As an example, suppose you type T to disassemble some text. You may not know what to
expect following the text, so you can just type L to look at it. Then if the text turns out to be
followed by some Hex data (such as $8D for a carriage return), simply type / to cancel the L
and type the appropriate H command.
Q (Quit)
This ends disassembly and goes to the final processing which is automatic. If you type an
address before the Q, the address pointer is backed to (but not including) that point before
the processing. If, at the end of the disassembly, the disassembled lines include:
23412344-
4C 03 E0
A9 BE 94
JMP
LDA
$E003
$94BE,Y
and the last line is just garbage, type 2344Q. This will cancel the last line, but retain all the
previous.
FINAL PROCESSING
After the Q command, the program does some last minute processing of the assembled code.
If you press RESET at this time, you will return to Merlin 128 and lose the disassembled
code.
The processing may take from a second or two for a short program and up to several minutes
for a long one. Be patient.
When the processing is done, you are returned to Merlin 128 with the newly created source
in the text buffer. You can use Merlin 128's Save command to save it to disk when you
want.
Page 117
Merlin 128 User's Manual
Sourceror
DEALING WITH THE FINISHED SOURCE
In most cases, after you have some experience and assuming you used reasonable care, the
source will have few, if any, defects.
You may notice that some DA's would have been more appropriate in the DA LABEL-1 or
the DDB LABEL formats. In this, and similar cases, it may be best to do the disassembly
again with some notes in hand. The disassembly is so quick and painless, that it is often
much easier than trying to alter the source directly.
The source will have all the exterior or otherwise unrecognized labels at the end in a table of
equates. You should look at this table closely. It should not contain any zero page equates
except ones resulting from DA's, JMP's or JSR's. This is almost a sure sign of an error in the
disassembly (yours, not SOURCEROR's). It may have resulted from an attempt to
disassemble a data area as regular code.
NOTE: If you try to assemble the source under these conditions, you will get an error as
soon as the equates appear. If, as eventually you should, you move the equates to the start of
the program, you will not get an error, but the assembly may not be correct.
It is important to deal with this situation first as trouble could occur if, for example, the
disassembler finds the data AD008D. It will disassemble it correctly, as LDA $008D. The
assembler always assembles this code as a zero page instruction, giving the two bytes A5
8D. Occasionally you will find a program that uses this form for a zero page instruction. In
that case, you will have to insert a character after the LDA opcode to have it assemble
identically to its original form. Often it was data in the first place rather than code, and must
be dealt with to get a correct assembly.
The Memory Full Message
When the source file reaches within $600 bytes of the end of its available space you will see
MEMORY FULL and "HIT A KEY". When you hit a key, SOURCEROR will go directly to
the final processing. The reason for the $600 byte gap is that SOURCEROR needs a certain
amount of space for this processing. There is a "secret" override provision at the memory
full point. If the key you press is CTRL-O (for override), then SOURCEROR will return for
another command. You can use this to specify the desired ending point. You can also use it
to go a little further than SOURCEROR wants you to, and disassemble a few more lines.
Obviously, you should not carry this to extremes. If you get too close to the end of available
space, Sourceror will no longer accept this override and will automatically start the final
processing.
Page 118
Merlin 128 User's Manual
Sourceror
Changing Sourceror's Label Tables
One of the nicest features of the SOURCEROR program is the automatic assignment of
labels to all recognizable addresses in the binary file being disassembled. Addresses are
recognized by being found in a table which SOURCEROR references during the
disassembly process. This table is on the disk under the name LABELS.O. For example, all
JSR $FFD2 instructions within a binary file will be listed by SOURCEROR as JSR BSOUT.
This table of address labels may be edited by using the program LABELER.
To use Labeler, press 'G' from the MAIN MENU, type 'LABELER', and press RETURN.
LABELER COMMANDS
L:
LIST
This allows you to list the current label table. After ‘L’, press any key to start the listing.
Pressing any key will go to the next page; CTRL-C will abort the listing.
A:
ADD LABEL
Use this option to add a new label to the list. Simply tell the program the hex address and
the name you wish associated with that address. Press RETURN only, to abort this
option at any point.
D:
DELETE LABEL(S)
Use this option to delete any address labels you do not want in the list. After entering the
'D' command, simply enter the NUMBER of the label you want to delete. If you want to
delete a range, enter the beginning and ending label numbers, separated by a comma.
F:
FREE SPACE
This tells you how much free space remains in the table for new table entries.
Q: QUIT
When finished with any modifications you wish to make to the label table, press 'Q' to
exit the LABELER program. If you wish to save the new file, press 'S'. Otherwise, press
ESCAPE to exit without saving the table, for instance, if you had been reviewing the
table.
Page 119
Merlin 128 User's Manual
Sourceror
SOURCEROR.XL
SOURCEROR can disassemble an object file up to about 6K in length. For files longer than
that, you can use SOURCEROR.XL. This is a disk based version of the disassembler
capable of disassembling object files up to nearly 32K in length. After using the Main Menu
'G' command to run SOURCEROR.XL.O, you follow the same procedures as with the
standard SOURCEROR.
After the object file has been loaded and you have been told its address range, you will be
prompted to insert a blank formatted diskette. The diskette does not have to be blank, but it
must have a large amount of free space on it, and it must not have filenames that are the
same as those used by SOURCEROR. XL. The loaded object file must be at least a page
shorter than 32K since it must fit in memory between $8000 and $FF00.
Disassembly proceeds in the same way as with the standard SOURCEROR. However, after
about 6K has been disassembled, a portion of the disassembled source will be saved to disk
in the file called TEMP.A. After more disassembly, another portion is saved as TEMP.B and
so on. Since the saved portion leaves a sizable remainder still in memory, the interactive
feature of SOURCEROR.XL is maintained. Thus, you can still 'back up' a reasonable
distance after an automatic file save.
When you press 'Q' to quit, the final TEMP file, or possibly two, will be saved. The
SOURCEROR.XL program will then go into its final processing stage. Do not
interrupt this processing. When it is done, you will be return to the Merlin 128 Main
Menu.
While in final processing, each of the TEMP files is read into memory twice. During the
second pass, each file is deleted and the final result of the processing is saved in files named
SOURCE.A.S, SOURCE.B.S, and so on. The equates are saved in a separate file called
EQUATEFILE.S. These are all PRG file types and can be loaded by Merlin 128 as long as
the full filename is used. You may prefer, however, to load them and then use the ‘W’
command to write them as TXT files.
As with the standard SOURCEROR, you may have to make some changes regarding any
zero page equates in order to get the file to assemble correctly.
Of course, to assemble the resulting file, you will have to write a short master program that
calls all of the other files by using the PUT opcode. For example, it might look like this:
PUT "EQUATESFILE.S"
PUT "SOURCE.A.S"
PUT "SOURCE.B.S"
PUT "SOURCE.C.S"
Page 120
Merlin 128 User's Manual
Utilities
UTILITIES
FORMATTER
This program is provided to enhance the use of Merlin 128 as a general text editor. It will
automatically format a file into paragraphs using a specified line length. Paragraphs are
separated by empty lines in the original file.
To use FORMATTER, you should use the MAIN MENU 'G' command. FORMATTER will
then load itself into high memory.
This will simply set up the editor's USER vector. To format a file which is in memory, issue
the USER command from the editor.
The formatter program will request a range to format. If you just specify one number, the
file will be formatted from that line to the end. Then you will be asked for a line length,
which must be less than 250. Finally, you may specify whether you want the file justified on
both sides (rather than just on the left).
The first thing done by the program is to check whether or not each line of the file starts
with a space. If not, a space is inserted at the start of each line. This is to be used to give a
left margin using the editor's TAB command before using the PRINT command to print out
the file.
Formatter uses inverse spaces for the fill required by two sided justification. This is done so
that they can be located and removed if you want to reformat the file later. It is important
that you do not use the FIX or TEXT commands on a file after it has been formatted (unless
another copy has been saved). For files coming from external sources, it is desirable to first
use the FIX command on them to make sure they have the form expected by FORMATTER.
For the same reason, it is advisable to reformat a file using only left justification prior to any
edit of the file.
Don't forget to use the TABS command before printing out a formatted file.
XREF, XREFA
These utilities provide a convenient means of generating a cross-reference listing of all
labels used within a Merlin assembly language (i.e., source) program.
Such a listing can help you quickly find, identify and trace values throughout a program.
This becomes especially important when attempting to understand, debug or fine tune
portions of code within a large program.
The Merlin assembler by itself provides a printout of its symbol table only at the end of a
successful assembly (provided that you have not defeated this feature with the
Page 121
Merlin 128 User's Manual
Utilities
LST OFF pseudo op code). While the symbol table allows you to see what the actual value
or address of a label is, it does not allow you to follow the use of the label through the
program.
This is where the XREF programs come in.
XREF gives you a complete alphabetical and numerical printout of label usage within an
assembly language program. XREFA gives a cross reference table by ADDRESS. This is
more useful for large sources containing lots of PUT files. It also does not use as much
space for its cross-reference data and therefore can handle larger source files than XREF.
Sample Merlin Symbol Table Printout:
Symbol table - alphabetical order:
ADD
=$F786
BC
=$F7B0
BK
=$F706
ADD
= $F786
BC
=$F7BD
Symbol table - numerical order:
BK
=$F706
Sample Merlin XREF Printout:
Cross referenced symbol table - alphabetical order:
ADD
BC
BK
=$F786 101
=$F7B0 90
=$F706 104
185*
207*
121*
Cross referenced symbol table - numerical order:
BK
ADD
BC
=$F706 104
=$F786 101
=$F7B0 90
121*
185*
207*
As you can see from the above example, the "definition" or actual value of the label is
indicated by the "=" sign, and the line number of each line in the source file that the label
appears in is listed to the right of the definition. In addition, the line number where the label
is either defined or used as a major entry point is suffixed ("flagged") with a “*”.
An added feature is a special notation for additional source files that are brought in during
assembly with the PUT pseudo opcode: "134.82", for example, indicates line number 134 of
the main source file (which will be the line containing the PUT opcode) and line number 82
of the PUT file, where the label is actually used.
Page 122
Merlin 128 User's Manual
Utilities
XREF Instructions
1.
From the Main Menu, make sure you've S)aved the file that you're working on.
2.
Type 'G' and at the 'RUN:' prompt, type 'XREF' and press RETURN.
2a. Again from the MAIN MENU, type 'L' to load your file. Enter the Editor by pressing
'E', and from the colon prompt, enter your appropriate PRTR command.
3.
Enter the Editor, then type the appropriate USER command
USER 0- Print assembly listing and alphabetical cross reference only. (USER has the
same effect as USER 0).
USER 1 - Print assembly listing and both alphabetical and numerically sorted cross
reference listings.
USER 2 - Do not print assembly listing but print alphabetical cross reference only.
USER 3 - Do not print assembly listing but print both alphabetical and numerical cross
reference listings.
For example, to print a cross-reference listing only to your printer, you could type in:
PRTR 4
USER 3
ASM
USER commands 0-3 (above) cause labels within conditional assembly areas with the DO
condition OFF to be ignored and not printed in the cross reference table.
There are additional USER commands (4-7) that function the same as USER 0-3, except
that they cause labels within conditional assembly areas to be printed no matter what the
state of the DO setting is. The only exception to this is that labels defined in such areas
and not elsewhere will be ignored.
NOTE: You may change the USER command as many times as you wish (e.g., from
USER 1 to USER 2). The change is not permanent until you enter the ASM command
(below).
4.
Enter the ASM command to begin the assembly and printing process.
Since the XREF programs require assembler output, code in areas with LST OFF will not be
processed and labels in those areas will not appear in the table. In particular, it is essential to
the proper working of XREF that the LST condition be ON at the end of assembly (since the
program also intercepts the regular symbol table output). For the same reason, the CTRL-D
Page 123
Merlin 128 User's Manual
Utilities
flush command must not be used during assembly. The program attempts to determine when
the assembler is sending it an error message on the first pass and it aborts assembly in this
case, but this is not 100% reliable.
Another thing to look out for when using macros with XREF. Labels defined within macro
definitions have no global meaning and are therefore not cross-referenced.
DEF
MAC
CMP
#]1
BNE
DONE
ASL
DONE <<<
--------------------------------------->>>
DEF.GLOBAL
<---Macro definition
<---Beg. of program
<---Macro call
In the above example, variable GLOBAL will be cross referenced, but local label DONE
will not.
XREFA
This is an ADDRESS cross reference program and is handy when you have lots of PUT
files. Since this program needs only four bytes per cross reference instead of six, it can
handle considerably larger sources. Also the "where defined" reference is not given here
because it would equal the value of the label except for EQUated labels where it would just
indicate the address counter when the equate is done. This also saves considerable space in
the table for a larger source.
PRINTFILER
PRINTFILER is a utility included on the Merlin diskette that saves an assembled listing to
disk as a sequential disk file. It optionally allows you to also select "file packing" for smaller
space requirements and allows you to turn video output off for faster operation.
Text files generated by PRINTFILER include the object code portion of a disassembled
listing, something not normally available when saving a source file. This allows a complete
display of an assembly language program and provides the convenience of not having to
assemble the program to see what the object code looks like. Applications include:
- Incorporating the assembled text file in a document being prepared by a word processor.
- Sending the file over a telephone line using a modem.
- Mailing the file to someone who wants to work with the complete disassembly without
having to assemble the program (such as magazine editors, etc.)
Page 124
Merlin 128 User's Manual
Utilities
How To Use PRINTFILER
1. From the Main Menu, press 'G', then type 'PRINTFILER and press RETURN. This
need only be done the first time, and is not necessary for additional source files you may
want to assemble with PRINTFILER.
2. From the Main Menu, type ‘L’ to load followed by the source filename.
3. Insert a disk with a lot of free space on it to receive the file generated by PRINTFILER.
4. Press 'E' to enter the Editor, and from the colon prompt, type:
USER N :FILENAME
where FILENAME is the name to be used for the text file generated by PRINTFILER.
'N' must be in the range of 0 TO 3. 'N' defaults to 0 if it is omitted. The meaning of the
'N' is as follows:
N = 0 Do not echo output to screen, do not compress file.
N = 1 Echo output to screen, do not compress file.
N = 2 Do not echo to screen, compress file.
N = 3 Echo output to screen, compress file.
PRINTFILER works by redirecting output from what would normally go to the screen to the
disk file called FILENAME. Since there must be output, the LST OFF pseudo-op must not
be in the source file to be used with PRINTFILER (unless you do not want to capture some
portion of the file). Do not press ESCAPE during assembly.
Writing to a disk file is much slower than printing to the screen, so be patient. It is faster
than sending the output to the printer.
Because of memory conflicts, it is not possible to use PRINTFILER at the same time as
other USER utilities such as XREF.
PRINTFILER sends all assembly output to the disk file, including the symbol table at the
end, unless you have a LST OFF at the end of the source.
If you choose one of the compression options, packed spaces are shown as inverse
characters. All spaces in the file will be replaced by a byte representing the number of
contiguous spaces plus $80. Thus, an inverse 'A' ($81) represents one space, an inverse 'B'
($82) represents two spaces, and soon. If you are unable to write a program that will read
such a packed file, you should avoid using the compression option.
Page 125
Merlin 128 User's Manual
Utilities
ALTKEYS
The ALT key can be used with another key to produce a keyboard macro. A macro
definition lets you type one key to perform a series of actions or place a string of text on the
screen. This should not be confused with Assembler macros that Merlin 128 also supports.
An assembler macro is a definition of a set of assembler instructions, usually with variables,
that you define within a given source listing. When the program is assembled, Merlin 128
replaces the macro call with the series of lines that have been assigned to that macro.
A keyboard macro is a substitute for a small amount of typing that you might do while
you're using the editor.
For example you've probably typed 'LDA' many times in assembly language programs. With
Merlin 128, you can press the ALT key and the 'a' key at the same time, and the characters
'LDA' would appear in the opcode field and the cursor would be at the beginning of the
operand field.
Merlin 128 comes with over thirty Alternate key commands as shown below. These
commands are user definable. You can load the source file called 'altkeys.s' and add to or
edit any of the existing commands.
You type:
ALT a
ALT b
ALT c
ALT d
ALT e
ALT i
ALT j
ALT l
ALT m
ALT o
ALT p
ALT t
ALT x
ALT y
ALT A
Page 126
You get:
LDA
DFB
CMP
DEC
EOR
INC
JSR
LUP
--↑
MAC
<<<
ORA
PHA
TXA
PHA
TYA
PHA
TXT ‘ ‘
LDX
LDY
STA
Comments
Cursor at LUP operand field
Cursor at MAC label field
Save A,X,Y on stack
All 5 lines with one macro
Cursor inside quotes
Merlin 128 User's Manual
ALT P
PLA
TAY
PLA
TAX
PLA
ALT X
STX
ALT Y
STY
ALT S
DFB
%
ALT 6
AND
ALT 8
( ),Y
ALT 9
(,X)
ALT 0
LDA
#0
STA
$FFOO
ALT Down arrow
ALT Up arrow
ALT V arrow
ERR ↑
ALT DEL
ALT RETURN
ALT ;
Utilities
Retrieve A,X,Y from stack
All 5 lines with one macro
Cursor inside parentheses
Cursor inside parentheses
Cursor on line after STA
Move cursor down 10 lines
Move cursor up 10 lines
Deletes current comment, if any
Move cursor to end of next line
Moves cursor to comment field of next line and
inserts a semicolon
ALT .
LDA
#>
ALT ,
LDA
#
ALT =
=
$
ALT +
ADC
ALT SBC
ALT *
ORG $
ALT English Pound * Merlin-128 Macro-assembler *
KEYDEPS
The function key definitions can be changed by loading the file called ‘keydef.s’, making
the desired changes and then assembling. Save the assembled source and object code using
the original name of ‘keydefs’.
The current definitions are:
You press:
Definition:
Comments
SHIFT-RUN
HELP
F1
F2
F3
F4
F5
F6
Q RETURN
ASM RETURN
Q RETURN L
Q RETURN S
Q RETURN C
Q RETURN X
USER
USER RETURN
Quits Editor and goes to Main Menu
Assembles source
Quits Editor and issues Load command
Quits Editor and issues Save command
Quits Editor and issues Catalog command
Quits Editor and issues Disk command
Issues USER without RETURN
Issues USER with RETURN
Page 127
Merlin 128 User's Manual
F7
F8
Utilities
PRTR4::
PRTR0::
SAMPLE PROGRAMS AND FILES
The Merlin 128 diskette comes with many sample programs and source files that have been
fully commented. These samples can be loaded, read, or run, and have been supplied to
illustrate various commands and techniques available with Merlin 128.
DEMO
This is the program used in the Introduction section of the manual. It demonstrates a string
loop and keyboard scan for input.
COPY
This is a 1571 disk copy program which uses one or two drives. It illustrates direct disk
access methods. The program has a BASIC header and MUST be run from BASIC.
ZAP
This is a 1571 disk zap program that also demonstrates disk access techniques.
HIRES
This program contains a set of line drawing and hires plotting routines that can be accessed
from assembly. These routines are approximately four times faster than the Commodore 128
built-in routines. The source files illustrate graphics techniques.
SWISH
This is a sample hires demo which uses the HIRES program to do some dazzling color
graphics. The source illustrates graphics techniques. The object file, SWISH.O, is loaded
and accessed from the BASIC program called SWISH.
Page 128
Merlin 128 User's Manual
Utilities
RAM TEST
This is a RAM testing program which uses the hires screen and 80 Column text. It can be
run from Merlin 128 or from BASIC. You have to press reset to exit this program.
PI
This is a series of files that all have the prefix 'PI'. The purpose of these source files is to
illustrate the proper use of the linking capabilities of Merlin 128. The object files have the
'.o' suffix and are 'USR' file types. These object files can be linked by typing 'LINK
$1C03.PI.NAMES' from the immediate mode prompt (:) in the editor. The linked file is also
on the disk under the name 'PI.O'. It can be run from the Main Menu (press 'G', type 'PI',
then RETURN). It can also be run from BASIC by typing 'BOOT 'PI.O" (RETURN)'.
PRDEC
A subroutine to print A,X in decimal. It uses locations NL, NH, NFL (scratch) and JUST.
Just should contain 0 for left justification, and $20 for right justification.
PRINTHEX
A routine to print A,X in hex. The entry at PRBYTE can also be used to print the byte in A
only, or the entry at PRNIB can be used to print a nibble. VAR must be used to set ]1 to 0 if
the UC/graphics character set is in use, or ]1 must be set to $20 if the LC/UC character set is
in use.
INPUT
This routine gets input from the current input device (usually the keyboard) and stores it at
]2. The input is terminated by a carriage return and can be a maximum of ]1 characters in
length (256 characters if ]1 = 0). If the standard input buffer $200 is used for ]2, then ]1
cannot be greater than $58.
GETERR
This routine gets the error message from the current disk drive and prints it to the screen.
The device number is assumed to be in FA.
Page 129
Merlin 128 User's Manual
Utilities
READKEY
A routine to get a key from the keyboard or input device. The routine turns on the cursor,
then turns it off when the character has been received. The character is returned in the Aregister.
MULTIDIV
This file contains 16 bit multiply and divide routines. Three 16 bit (two byte) locations
ACC, AUX, and EXT must be set up, preferably on zero page.
ASCHEX
This routine converts the ASCII string located at ASCSTR to a two byte hex number located
at NUM and NUM+1. Use the VAR statement to set ]1 to 'f or 'F' according to which ASCII
set is desired . This routine ignores extra leading digits, thus 'ABCDE' will be converted to
$BCDE and so on.
BASIC HEADER
Put this routine at the start of a program to be able to 'RUN' it.
KERNEL EQUATES
This file contains over 70 common kernel equates.
Page 130
Merlin 128 User's Manual
Glossary
GLOSSARY
ABORT
terminate an operation prematurely.
ACCESS
locate or retrieve data.
ADDRESS
a specific location in memory.
ALGORITHM
a method of solving a specific problem.
ALLOCATE
set aside or reserve space.
ASCII
industry standard system of 128 computer codes assigned to
specified alpha-numeric and special characters.
BASE
in number systems, the exponent at which the system repeats
itself; the number of symbols required by that number system.
BINARY
the base two number system, composed solely of the numbers
zero and one.
BIT
one unit of binary data, either a zero or a one.
BRANCH
continue execution at a new location.
BUFFER
large temporary data storage area.
BYTE
Hex representation of eight binary bits.
CARRY
flag in the 6502 status register.
CHIP
tiny piece of silicon or germanium containing many integrated
circuits.
CODE
slang for data or machine language instructions.
CTRL
abbreviation for control or control character.
CURSOR
character, usually a flashing inverse space, which marks the
position of the next character to be typed.
DATA
facts or information used by, or in a computer program.
DECREMENT
decrease value in constant steps.
Page 131
Merlin 128 User's Manual
Glossary
DEFAULT
nominal value or condition assigned to a parameter if not
specified by the user.
DELIMIT
separate, as with a: in a BASIC program line.
DISPLACEMENT
constant or variable used to calculate the distance between two
memory locations.
EQUATE
establish a variable.
EXPRESSION
actual, implied or symbolic data.
FETCH
retrieve or get.
FIELD
portion of a data input reserved for a specific type of data.
FLAG
register or memory location used for preserving or establishing a
status of a given operation of condition.
HEX
the Hexadecimal (BASE 16) number system, composed of the
numbers 0-9 and the letters A-F.
HIGH ORDER
the first, or most significant byte of a two-byte Hex address or
value.
HOOK
vector address to an I/O routine or port.
INCREMENT
increase value in constant steps.
INITIALIZE
set all program parameters to zero, normal, or default condition.
I/O
input/output.
INTERFACE
method of interconnecting peripheral equipment.
INVERT
change to the opposite state.
LABEL
name applied to a variable or address, usually descriptive of its
purpose.
LOOKUP
slang; see table.
LOW-ORDER
the second, or least significant byte of a two-byte Hex address or
value.
LSB
least significant (bit or byte) one with the least value.
Page 132
Merlin 128 User's Manual
Glossary
MACRO
in assemblers, the capability to "call" a code segment by a
symbolic name and place it in the object file.
MICROPROCESSOR
heart of a microcomputer.
MOD
algorithm returning the remainder of a division operation.
MODE
particular sub-type of operation.
MODULE
portion of a program devoted to a specific function.
MNEMONIC
symbolic abbreviation using characters helpful in recalling a
function.
MSB
most significant (bit or byte), one with the greatest value.
NULL
without value.
OBJECT CODE
ready to run code produced by an assembler program.
OFFSET
value of a displacement.
OPCODE
instruction to be executed by the 6502.
OPERAND
data to be operated on by a 6502 instruction.
PAGE
a 256-byte area of memory named for the first byte of its Hex
address.
PARAMETER
constant or value required by a program or operation to function.
PERIPHERAL
external device.
POINTER
memory location containing an address to data elsewhere in
memory.
PORT
physical interconnection point to peripheral equipment.
PROMPT
a character asking the user to input data.
PSEUDO
artificial, a substitute for.
RAM
Random Access Memory.
REGISTER
single 6502 or memory location.
Page 133
Merlin 128 Userts Manual
Glossary
RELATVE
branch made using an offset or displacement.
ROM
Read Only Memory.
SIGN BIT
bit eight of a byte; negative if value greater than $80.
SOURCE CODE
Data entered into an assembler which will produce a machine
language program when assembled.
STACK
temporary storage area in RAM used by the 6502 and assembly
language programs.
STRING
a group of ASCII characters usually enclosed by delimiters such
as ' or ".
SWEET 16
program which simulates a 16 bit microprocessor.
SYMBOL
symbolic or mnemonic label.
SYNTAX
prescribed method of data entry.
TABLE
list of values, words, data referenced by a program.
TOGGLE
switch from one state to the other.
VARIABLE
alpha-numeric expression which may assume or be assigned a
number of values.
VECTOR
address to be referenced or branched to.
Page 134
Merlin 128 User's Manual
Index
INDEX
"!", Exclusive OR 52
“&”, Logical AND 52
"/ ( , - .”, in Macros 94
“.”,
as a logical OR 5
“/”,
to abort a CHANGE 36
Editor - Immediate Mode (List from
last line) 38
Editor - to abort LIST 38
to abort a FIND 35
Line Range Delimiter 18
in Macros 94
Sourceror (Cancel) 117
* for Comments 2, 3, 49, 50
. (period),
Listings 38
in Macros 94
256 EXTERNALS 112
6502 Addressing Modes 54
A
A: Append File 13
About the Assembler Documentation
47
About the Editor Documentation 17
About the Linker Documentation 100
Absolute addresses, and Linker 100
Accumulator mode addressing 54, 55
Add/Insert Mode Editing Commands
24, 20
ADD~ON operation, in operands 52
Altkeys 33, 126-127
All text, to select 25, 32
AND operation, in operands 52
Angle brackets in Editor Documentation
17
Arithmetic and Logical Expressions 52
ASC 73
ASI 73
Assembler,
to Pause 69, 79
Pseudo Opcode Descriptions 87
Syntax Conventions 49, 54
Assembling large files, and PUT, SAV,
DSK 59-62, 63-64, 64-65, 100, 113
Assembly 8-9, 33, 45
ASM,
Command 8-9, 33, 45
and the PR# Command 39
and PRTR 3940, 45, 106-107
AST 69
Asterisks (*),
Comments 2, 49, 50
Line of in a comment 30, 33
Automatic renumbering 6-7, 18
B
Back-up copies of Merlin 11,128
Backing up Program Counter 57
Backwards DELETE, in EDIT mode 23,
31, 33 (see also Control-D)
BAD,
ADDRESS MODE 110
BRANCH 110
EXTERNAL 110
INPUT 110
LABEL 110
OBJ 110
OPCODE 110
ORG 110
PUT 111
REL 111
SAV 111
VARIABLE 112
Beginning, move to,
of line of text 22, 32
of source file 25, 32
Binary numbers 50-51
BGE opcode 54
Block cursor 22
BLT opcode 54
Branching,
to Variables 54, 87-88, 89
with Local Labels 88-89
BREAK 111
Bugs, common cause of 55
Building Expressions 51-53
Page 135
Merlin 128 User's Manual
C
C: Catalog 12
pause 16
Case sensitive labels 56
CBM Monitor 43
Change 36
Change DRIVE 14
Changing Printfiler's Options 126
Changing Sourceror's Label Table
118-119
Character case change 19, 23, 32
Character insert mode 22, 32, 34
Characters per line 106-107
Checksum, in object code 80-81
CHK 80-81
Clipboard 22, 23, 26, 28-29, 31-34
Commands Used in Disassembly
(Sourceror) 116
Command summary 32-33
Comments 3, 33, 49, 50, 69
Comment length 21, 33, 50
Commodore Keys 21, 25-31, 32-34
C=A 25, 32
C=B 25, 27, 32
C=C 25, 32, 34
C=D 26, 32
C=E 26, 32
C=F 23, 27, 29, 32
C=H 27, 32
C=I 27, 31, 32
C=L 23, 27-28, 32
C=N 28, 32
C=P 28, 32, 34
C=Q 28, 33
C=R 28-29, 33, 34
C=W23, 29, 33.
C=X 25, 29, 33
C=Z 29, 33
C=Up 29,33
C=Down 30, 33
C=left 30, 33
C=Right 30, 33
C=DEL 31, 33
C=HOME 24, 31, 32, 33
Page 136
Index
C=TAB 27, 31, 33
↑ 30, 33
C=↑
C=* 30, 33, 34
C=- 30,33,34
C== 30, 33,34
← 4, 6, 7, 21, 33
C=←
Conditional Assembly 84-86
Conditional Pseudo Ops 84-86
Configuration 11, 106-107
Control characters 19
Control-A 22, 23, 32
Control-B ~o to line begin) 22, 32
Control-C, 4, 6
during CATALOG Command 12
to abort assembly 45
to abort List 38
to abort a Change 36
to abort a Find 35
or Control-X (to cancel lines) 34
Control-D (delete) 7, 22, 32, 33
Control-E 22, 27, 32
Control-F (find) 22, 32
Control-I (insert) 19, 22, 27, 40
Control-K 23, 32
Control-L 23, 32
Control-N (go to line end) 23, 32
Control-O (insert special) 23, 32
Control-R (restore line) 23, 32, 33-34
Control-W 23, 32
Control-X (to Cancel global exchange)
23, 32
Copy,
Full Screen Editor 3, 25, 34
Immediate Mode, Editor 37
Copy Utility 128
Copying text,
in Full Screen Editor 3, 25, 34
in Immediate Mode of Editor 37
Copying Merlin 11, 128
Cursor keys 23, 29-30, 33
Cursors,
appearance/types 2, 22, 24, 32
changing 22, 24, 32
Merlin 128 User’s Manual
moving 22-33
Cut 25, 29, 33, 34
CW (Change Word) 36
CYC 70-71
Cycle times, 70-71
column to print 106-107
D
Disk Commands 16
D: Drive Change 18
DA 75
Data, definition of 48
immediate 50, 53-54
string 18, 48, 72-74
storage 75-78, 79-80
tables in programs 78
Data and Storage Allocation Pseudo Ops
75-78
DB 75
DCI 73
DDB 75
Dealing with Finished Source 118
Defining,
an Altkey 33, 34, 126-127
a Function key 44, 127-128
a local label 88-89
a local variable 79-80, 87-88
a Macro 95
Delete,
character in Editor Immediate Mode
7, 22, 32
characters in Pull Screen Editor 22, 32
lines in Editor Immediate Mode 6, 7,
31, 32, 34, 37
lines in Full Screen Editor 6, 7, 26, 33,
34, 37
entire Source File (New) 14, 41
DELETE key 24, 31, 32, 33
Delimited Strings, 18, 48
as an operand 48
DEND 66-67
DFB 75
Index
DICTIONARY FULL 111
Disassembling,
raw object code (Merlin Monitor) 43
raw object code (Sourceror) 114-120
Disk files,
names 10, 13-16,49, 59-62, 63, 97,
104
renaming 16
viewing contents of 39
Division operation, in operands 42
DLOAD addresses and ORG 15
DO 84
Drive change 14
Drive 14
DS 57, 77
and Linker 100,102
DSK 59, 64-65
and the Linker 100, 102
DUM 66
DUPLICATE SYMBOL 104, 111
Duplicating Merlin disk 11,125
E
E: Enter Editor/Assembler 2, 15
Edit 20-21
Edit Mode 2021
Edit Mode Commands 21-34
Editor 2-7, 15, 17, 2145
ELSE 84
END 66
End of line,
marker 21
move to 23, 32
End of source, move to 28, 32
ENT 56
EOM or <<< 87
EQU (=) 55-56
ERR 81-82
and Linker 82, 103
ERR: MEMORY FULL 113
Error Messages (general) 9, 110-113
Evaluation of expressions 40, 52, 53
Exchange, global 23, 26, 32
Page 137
Merlin 128 User's Manual
EXCLUSIVE OR operation, in operands
52
EXP ON/OFF/ONLY 69
EXT 55, 101
External source files 40
Example of Conditional Assembly
84-86
Example of Use of Assembler
Expressions 51-53
Expressions Allowed by the Assembler
48, 51-53
F
Filenames 10, 13,16, 49, 59-62, 63,
97,104
FIN 85
Final Processing of Sourceror files 117
FIND,
a character in Edit mode 22, 32
a string 27, 32, 35
a word 23, 29, 32-33
Find and Replace (global exchange) 23,
26, 32
FIX 40
FLO 76
Forced Assembly Errors 81, 103
Formfeed, printer 69
FW (Find Word) 35
Formatter 121
Formatting Pseudo Ops 68-71
Full Screen Editor,
commands 21-34
entering 2, 5-6, 7, 15,17, 21
quitting 4, 6, 7, 21, 28, 32
FUN 44
Function keys, definitions 16, 44
redefining 44,127-128
G
GET 41, 59, 104
GET Command, and LINKed files 104
General Information 105
Page 138
Index
Global Exchange 23, 26, 32
Glossary 131
H
H (Hex) 116
HEX 76
Hex-Dec Conversion 41, 50, 52
Hex data, with strings 48, 50, 52, 72
HOME 24, 31, 32, 33
Housekeeping Commands 117
How Does a Macro Work? 90-93
How to Use Printfiler 125
I
IF 85
ILLEGAL,
char in operand 111
forward reference 111
relative adrs 111
Initialization string, for printer 39-40
Insert,
with TAB key 19, 22, 24, 37, 31, 32,
33
character mode 2, 19, 22, 24, 37, 31,
32, 33
lines 6, 20, 27, 31, 32, 33
control characters 23, 32
Integer division, in operands 52
Inverse spaces 40
Immediate Data Syntax 50, 53
Immediate Data vs. Addresses 50
Immediate Mode of Editor 17-20, 3545
INST 19, 22, 24, 32
K
KBD 79
Keyboard input during assembly 79
Keydefs 33, 127-128
Merlin 128 User's Manual
L
L (list - Sourceror) 116
L: Load Source 13
LABELS,
proper form of 5, 49-50
length 49
tables, changing SOURCEROR
119
case sensitivity 49, 56
go to 23, 27-28, 29, 32
LENgth 42
Line length 21, 33, 50, 106-108
Line numbers 6-7, 21
and DELETE 26, 31, 32, 33
in Immediate Mode 6-7, 18
Lines of text,
to delete 6, 7, 26, 31, 32, 33, 34
to insert 6, 20, 21, 31, 32, 33
to replace 23, 26, 28-29, 32, 33, 34
auto numbering 6-7, 18
Lines per page 108
Link 103-104
Linker
and DS opcode 77, 100,102
and DSK opcode 81,100
and ENT opcode 102
and ERR opcode 103
and EXT opcode 101
and ORG opcode 100
and REL opcode 98-101
and SAV opcode 63-64, 100
File Names 104
LIST 4, 6
and the PORT command 38, 41
and PRTR 38, 3940
from last listed line 38
from last specified line 38
to printer, formatted 39, 40, 44
to screen, formatted 39, 40, 44
to slow down 38
without line numbers 39
to abort 38
to pause 38, 69
Index
Listing,
CYCLE times 70-71, 106,107
DO OFF code 84
MACROS 68
limiting bytes printed in 70
Local Labels 88-89
Local Labels, Global Labels & Variables
89
Local Variables,
defining 79-80, 87-88
and PUT files 62
Locate a label or line 23, 27-28, 32
Logical operations, in operands 52
Lower case/upper case,
to change 19,23,32
in labels 49, 56
LST ON/OFF 68
LSTDO or LSTDO OFF 68
LSTDO, configuring 106-107
LUP 79
M
MAC 87
Macros 90-97
defining 95
and PUT files 60-62
libraries, and USE opcode 62, 97
libraries, provided with Merlin 97
listings 68
nested 96
Pseudo Ops for, 87
Main menu 10,13-16, 33, 44
Making Back-up Copies of Merlin 11,
125
Maximum,
length of comments 21, 33, 50
length of labels 49
Memory,
IN USE 104
full 112,113
full in Line: 113
full error, in Sourceror 118
status 22, 27, 32, 42
used by Merlin 105
Page 139
Merlin 128 User's Manual
Merlin,
Memory Map 109
Monitor 33, 4344
internal entry points 82-83
Miscellaneous Pseudo Ops 79-83
Mistakes, fixing 34, 55 (see also
Control-R and £R)
Monitor,
CBM 16,43
Merlin 43-44
MONitor 43-44
MOVE 37 (see Cut, Copy & Paste)
Moving,
the cursor 22-33
text 25, 28-29, 32-33, 34, 37
Multiplication operation, in operands
52
N
Nesting error 112
Nested Macros 90
New 14,41
NOT MACRO 112
Number Format (Binary, Decimal, Hex)
52
O
“.O” Suffix to Files 10, 15, 16, 63, 65
O: OBJECT SAVE Command 10,13, 15,
49
command, and Linker 100,104
OBJ 59, 113
Op code and Pseudo Opcode Conventions
50
Operand and Comment Length
Conventions 50
OR operation, in operands 52
ORG 57-58, 66
and the Linker 100
OUT OF MEMORY 112
Index
P
PAG 69
Page Header, in listing 39, 69, 71
Parentheses,
in Editor Doc 17
and Precedence in Expressions 52-53
Paste 28, 32, 34
PAU 69
PMC or >>> 83
PORT 41
PRDEC program, and PUT FILES 62,
129
Precedence, in operand expressions 52
Preliminary Definitions 48
Primitive expressions 51-53
Print 39, 44
and the PORT command 40
command, and PRTR 39-40
Printer,
slot#, in PRTR command 39-40
string, in PRTR command 39-40, 71
PRINTFILER 124-125
PRinTeR 39-40 (see also TTL, pg 28;
PAG, pg 69)
Pseudo Opcodes for Relocatable Code
Files 56, 59, 82, 100-104
PUT 59-62
files as text files 14
files vs. Linked files 98-99
Q
Q(Quit), 117
To BASIC 16
to Editor, Immediate Mode 4, 6, 7, 21,
33, 44
to Main Menu 10, 44
QUIT and MON command 44
R
R: Read Text File 14
RANGE ERROR 41,112
Page 140
Merlin 128 User's Manual
REL Files,
and the ERR Pseudo Op 82, 103
and the Linker 77
REL, 56, 59, 82
and OBJ opcode 59
Relative expressions, and Linker 100
Renaming disk files 16
REORG opcode 57
Replace 23, 28-29, 32, 33, 34
Reprint screen 29, 33
Restoring lines in Edit mode 22
Return (RETURN key) 6, 23, 32
REV 74
Reversed string data 74
RTS return to Merlin 10,15, 49
Running a program 15, 41,104
RUN/STOP: See Control-C
S
S: Save source file 10, 13, 49
SAV 63-64, 100
“.S”
suffix in file names 16,17, 61-62
Screen, reprint 29, 33
SKP 70
Source code format 5, 49-50
Sourceror 114-120
Spaces in a text line 3, 31, 40
Special variables 93-95
Status, memory 22, 27, 32, 42
STR 74
String Delimiters 72
Symbol table, to slow down LISTing 38
Syntax, Source code 46
SYS 2048 16, 105
System requirements 1
T
T (Text - Sourceror) 116
TAB KEY 19, 24,31, 32, 33
TABS,
to zero TABS 15,31,42
Index
and word processing text files 40
Technical Information 105-107
TEXT 40
Text, select all 25, 32
TRuncOFf 44, 70
TRuncON 44, 70, 104
TTL 71 (see PRTR also)
TWO EXTERNALS 112
TXT 73
TYPE 39
U
Undo (fixing mistakes) 34
UNKNOWN LABEL 112
Upper and Lower Case Control 19
Uppercase/ lower case
to change 19, 23, 32
labels 49, 56
USE, 62
and Macro Libraries 94
USER 42
USR 82-83
Using Sourceror 114-120
Utilities 121-130
V
VAL 40
Value of labels 40
VAR 62
VAR opcode, an4 PUT files 62
Variables 62, 79, 85-89, 93-95
W
W: Write Text File, 14
and the Linker 104
W (Word) 116
W 0 command 42
Word find 23, 29, 32-33
Where 42
Why Macros? 90
Why a Linker? 98
Page 141
Merlin 128 User's Manual
Wild Cards,
in Delimited Strings 19
character, changing the 106-107
Word processing text files 40
X
X: eXecute disk command 156
XREF, 121-124
Instructions 123-124
XREFA 121, 124
Z
Zero Page Addresses used by Merlin for
USR commands 82-83
Zero page addressing, forced 54
Page 142
Index
Merlin 128 Quick Reference Card
Full Screen Editor Commands
CONTROL KEY COMMANDS (line oriented)
The Control Key commands consist of cursor moves and line oriented commands.
Control-A ----------------Control-B ----------------Control-D ----------------Control-E ----------------Control-F ----------------Control-I
----------------Control-L ----------------Control-K ----------------Control-N ----------------Control-O ----------------Control-R ----------------Control-W ----------------Control-X ----------------Cursor keys ----------------DEL
---------------------ESC
---------------------HOME ---------------------INST ---------------------RETURN ----------------TAB
----------------------
Deletes characters to end of line
Moves cursor to beginning of line
Deletes character under the cursor
Displays memory status window
Finds next occurrence of next character typed
Toggles insert and overstrike cursor
Toggles lower case conversion
Changes case of character under cursor
Moves cursor to end of line
Prefix key for typing control characters
Retrieves original line
Finds next occurrence of word in line
Cancels global exchange while in progress
Moves the cursor
Deletes character to left of cursor
Moves cursor to beginning of next line
Remembers line for recall by C= HOME
Toggles insert and overstrike cursor
Moves cursor down and inserts blank line
Toggles insert and overstrike cursor
Q
Quit Immediate Mode to Main Menu
----------------------------
Copyright © 1986 Roger Wagner Publishing, Inc.
COMMODORE KEY COMMANDS (entire listing oriented)
The Commodore Key commands are global commands, which means they are generally
oriented to the whole listing, as opposed to just the current line (or a single character).
---------------------C= A
---------------------C= B
---------------------C= C
---------------------C= D
---------------------C= E
---------------------C= F
---------------------C= H
---------------------C= I
---------------------C= L
---------------------C= N
---------------------C= P
---------------------C= Q
---------------------C= R
---------------------C= W
---------------------C= X
---------------------C= Z
C= Up -------------------------------------C= Down
----------------C= Left
----------------C= Right
----------------C= DEL
C= HOME --------------------------------C= TAB
---------------------C= ↑
---------------------C= *
---------------------C= ---------------------C= =
---------------------C= ←
Selects text for cut from line to end of file
Moves to beginning. Cursor on eleventh line
Start text selection/Copy selected text to clipboard
Deletes line and places it in 'undo' buffer
Global exchange (Search & Replace)
Finds next occurrence of text entered
Toggles half-screen mode
Inserts blank line at cursor
Finds first occurrence of label or line
Moves cursor to end of listing
Pastes contents of clipboard on current line
Quits editor and returns to Main Menu
Exchanges current line with 'undo' buffer
Finds next occurrence of whole word
Cut selected text to clipboard
Current line becomes eleventh line on screen
Moves cursor up one page
Moves cursor down on page
Moves cursor up 10 lines
Moves cursor down 10 lines
Deletes line above cursor; puts in 'undo' buffer
Goes to line of last CTRL-HOME
Inserts a blank line at cursor
Produces 1*, 30 spaces, and 1 *
Produces a line of 32 asterisks
Produces a line of 1 * and 31 hyphens
Produces a line of 1 * and 31 equal signs
Returns editor to Immediate Mode