1
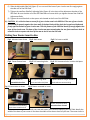
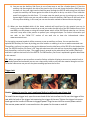
6) Place the SRG Sled in the clamp guide so it is resting on your project material (Fig 10). Adjust the clamp
guide height evenly on both sides of the clamp guide so the SRG Sled just starts to lift away from your
project material on the clamp guide side. This ensures the SRG Sled is fully engaged in the clamp guide.
Lower the SRG Sled just enough so it is resting flat on your project material. Measure the opening of
the clamp guide between the lower clamp and upper clamp guide on both sides to confirm the
measurement is the same (Fig 6). To lock the clamp guide in place and to prevent any movement of the
clamp guide while routing, it is advisable to cut a spacer block and lock it in place with the clamp screw
(Fig 6) on the indicated end of the clamp guide as shown in (Fig 6). Once the spacer block is clamped in
place, re-check the measurement on both sides of the clamp guide to ensure it is still the same. You
can use the spacer block over and over again for future set-ups.
7) With the guide system set up, you are now ready to measure where you want to router.
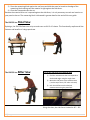
8) Measure and mark all four sides of your project material as shown in (Fig 8)
9) Line the router bit up with the layout marks (Fig 9)
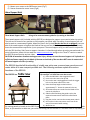
10) Place Router Guide Stops for the “X” Axis and Panel Stops for the “Y” Axis as shown in (Fig 10). The
SRG-50 comes with 2 Router Guide Stops and 2 Panel Stops.
11) Turn on the router and make your cut.
12) NOTE: It is best to make multiple passes to reach your desired depth of cut. This is to prevent
overloading the router, damaging your router bit, burning the wood, or causing “chip-out” in your
project material.
13) For routing on the “X” Axis, unlock the two SRG Sled guide locks and slide the SRG Sled back and forth
within the guide.
14) For routing on the “Y” Axis, lock the two SRG Sled guide locks and move the project material within the
two guides.
Making raised panel doors is also an easy task on the SRG-50. You can glue a second panel to a door panel,
raise the clamp guide of the SRG50 to the new height and router the raised panel.
You can also end mill or decorate panels or boards up to 49” wide. End milling allows for a professional look to
inset panels to hide the edges. For example, end milling is the professional way to inset a ¼” back panel into
the sides, top and bottom of any cabinet. Measure, clamp and router......it’s that easy.
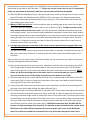
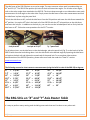
Shown below is a set up for routing dados in both side panels of a cabinet. We have clamped the two panels
on the end so they stay perfectly positioned. You can also router dados in just one sheet and rip cut the panel
to make the two side panels after the routing is completed. For this application, router guide stops are
positioned on the clamp guide rail of the SRG-50 to stop the router at the desired locations.
This set-up guarantees a perfect fit and a professional look. This feature allows, for example, the installation of
multiple shelves or any other project that requires material to be inset into another panel using dados. To give
17 | P a g e