1
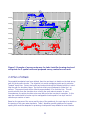
Manual of Instructions Bathymetric Surveys Ministry of Natural Resources Manual of Instructions Bathymetric Surveys June, 2004 Frank Levec Inventory Monitoring and Assessment Section Science and Information Branch Audie Skinner Aquatic Research and Development Section Applied Research and Development Branch Cette publication spécialisée n’est disponsible qu’en anglais 2 TABLE OF CONTENTS 1 INTRODUCTION...........................................................................................4 2 PRE-SURVEY.................................................................................................5 2.1 SOFTWARE AND DATA ........................................................................................... 5 BASS Software ................................................................................................. 5 NRVIS Data ..................................................................................................... 5 2.2 EQUIPMENT .......................................................................................................... 6 2.2.1 GPS Unit .......................................................................................................... 6 2.2.2 Depth Sounder ................................................................................................. 7 2.2.3 Computer ........................................................................................................ 8 2.2.4 Power Supply ................................................................................................... 8 2.2.5 Software.......................................................................................................... 9 2.3 PLANNING YOUR SURVEY ................................................................................... 10 2.1.1 2.1.2 3 SURVEY .......................................................................................................16 3.1 3.2 3.3 3.4 3.5 3.6 SAMPLING METHODS .......................................................................................... 16 PREPARATION OF FIELD FORMS AND EQUIPMENT ............................................... 12 SAFETY AND COMMUNICATION ........................................................................... 12 SETTING UP AND TESTING THE EQUIPMENT ........................................................ 13 RUNNING THE TRANSECTS .................................................................................. 18 TROUBLESHOOTING ............................................................................................ 20 3.6.1 No GPS Signal ................................................................................................ 20 3.6.2 No Depth Signal ............................................................................................. 20 4 POST-SURVEY ............................................................................................22 4.1 4.2 4.3 DISASSEMBLING THE EQUIPMENT ....................................................................... 22 TRANSFERRING DATA TO A GIS WORKSTATION ................................................... 22 DATA ARCHIVE ................................................................................................... 23 5 ACKNOWLEDGEMENTS.............................................................................24 6 REFERENCES ..............................................................................................25 APPENDIX A - EQUIPMENT CHECKLIST FOR BATHYMETRIC SURVEYING ..................................... 26 APPENDIX B - HARDWARE OPTIONS FOR BATHYMETRIC SURVEY............................................. 27 3 1 INTRODUCTION The purpose of a bathymetric survey is to describe the physical characteristics of the bottom of a waterbody. Bathymetric data can be used to construct a map showing depth contours and underwater structure and is used to calculate volume and mean and maximum depth of a waterbody. This information is important for evaluating habitat suitability of a waterbody for various aquatic species, assessing the sensitivity of that habitat to development (e.g. coldwater habitat for lake trout), locating critical habitat features (e.g. spawning shoals) and selecting sampling sites for other aquatic surveys. The information may also be used in the application of thermal habitat models. Contour maps were prepared for many of Ontario’s important lakes between 1968 and 1985 as part of the Aquatic Habitat Inventory Program. To construct these maps a series of transects were run across the lake using an echo sounder to measure water depth. Depth was transcribed from the echo sounding tapes onto a corresponding transect map. When all the depths had been transcribed, then points of equal depth were joined on the map to create contours. Preparation of a contour map often required several days of processing time and involved a certain amount of artistic interpretation. The quality of the maps depended on a variety of factors including the number of transects that were run, the accuracy of the transect map, the number of depths transcribed and the interpretive skills of the drawer. At best, only a moderately accurate bathymetric map could be produced and it was inevitable that many underwater features would be missed (Monroe and Betteridge 2000). In more recent years, new technology became available that was used in the collection of bathymetric data. Applying GPS (Global Positioning System) technology greatly improved the efficiency and speed of data collection. The quality of data also improved from using GPS, and the integration with GIS to produce maps also became much more efficient. Since 1995, three different bathymetry collection systems integrating data from GPS and depth sounders have been developed by Science and Technology staff within MNR. To better facilitate support for the collection, processing and management of bathymetric data, the Ministry has developed a new system that builds on the strengths of the earlier systems. This new system, which has retained the name of one of the earlier systems called BASS (Bathymetric Automated Survey System), is recommended as the general standard for Ministry sponsored work. This manual describes the hardware and field procedures associated with collecting bathymetric data with the BASS system. Information on the processing of the data in a GIS (Geographic Information Systems) is outside the scope of this manual and will be provided in the future. 4 2 PRE-SURVEY 2.1 Software and Data 2.1.1 BASS Software The BASS software must be installed on your portable field computer prior to beginning the field work. Check to ensure that the software is running properly. Remember to use the setup program to install the software and be sure that you have administrative rights to the computer if you are running Windows NT, Windows 2000 or Windows XP Professional. Also be sure to use the Add/Remove programs option from the Windows Control Panel to properly remove the software from the computer or when updating to a new version. It is also recommended to familiarize yourself with the software first, before conducting a survey in the field. The BASS software is available for download to all MNR employees. Please contact Frank Levec at the Inventory, Monitoring and Assessment Section in Peterborough at 705-755-1634 to obtain a copy. 2.1.2 NRVIS Data In order to conduct a bathymetric survey effectively, it is necessary to obtain and load some map layers or background data. This will help to give you context as you create a plan of attack for the lake. Note that the layers gathered here would most likely be the same layers gathered to create a hard copy map for creating an initial plan of attack for the lake. The first of these files is an outline of the lake including all islands within the lake. This file should be obtained from the District office in order to get the most up to date version. The District GIS officer should be contacted with a request to obtain the lake as a polygon in shapefile format. Other supporting layers would include, surrounding drainage features such as rivers, surrounding contours/DTM (Digital Topographic Model) of the area. A current roads layer may also help with planning access to a lake, especially with larger lakes where multiple access points may be required. As a partial aid for collecting data in a grid format on larger lakes, BASS provides the ability to overlay a grid at an interval of the user’s choice. 5 2.2 Equipment The GPS and depth sounder equipment that you select will have a direct influence on the quality and quantity of data that can be collected. For example, the lower end GPS units will provide two to ten meter accuracy whereas more expensive units can obtain accuracy under one meter. Most off the shelf sounders will not record in depths less than two feet (0.61 m). Improved accuracy normally comes at a significantly increased cost and effort for the data collection. Tradeoffs between economical efficiency and accuracy should be carefully considered. GPS units and depth sounders can be purchased as individual or combined units. Using a separate GPS and depth sounder provides advantage of being able to use the GPS unit for other field work in the off season. However most staff have found the combination units much easier to wire, configure and use in the field. The following provides general information on the minimum specifications and recommendations for hardware associated with the collection of bathymetric data and the use of the BASS software. These guidelines are for standard features to look for in a particular device, and will quickly help you to eliminate many lesser makes and models. Note that manufacturers are continually improving their equipment every year. Because of this, most hardware devices have a duty life of about 3 years. A summary of hardware options and recommended devices is provided in Appendix B. 2.2.1 GPS Unit BASS is designed to accept the NMEA (National Marine Electronics Association) standard input from GPS and depth sounder units. Almost all of the GPS and sounding units available on the market are now NMEA compatible. The application is not vendor specific as far as the GPS unit is concerned, but the device you purchase or plan to use must support output of the NMEA 0183 standard, particularly one or more of the following strings: $GPGGA – Global Positioning System Fix Data (required) $GPRMC – Recommended Minimum Navigation Information $GPGLL – Geographic Position – Latitude/Longitude The GPS Unit should also provide for minimum 2-5 m accuracy and have the ability to receive real-time corrections (RTCM-104 format). With the creation of the Canada-Wide Differential GPS system (CDGPS) (http://www.cdgps.com), we can now access free real-time corrections with the addition of these units. In order to take advantage of the correction, the GPS unit must be capable of receiving RTCM or RTCA corrections.. When deciding upon a GPS unit, strongly consider one which allows for 3-D data collection and allows filtering for signal to noise ratio and satellite geometry in the field. Methods used to obtain Real Time Corrections include: 1) Satellite subscription service 6 2) 3) 4) 5) Wide Area Augmentation System (WAAS) Coast Guard Beacons Individual Base Stations. CDGPS Although 3-D data collection with the GPS unit is not absolutely necessary, it will provide improved accuracy over 2-D data. 3-D positions allow for improved accuracy in the vertical component, which in this case is being measured by the depth sounder. Three-dimensional data collection requires signals from four satellites in order to determine position whereas 2-D data requires only three satellites. This may restrict the ability to collect data in certain situations (i.e. close to steep shorelines or very dense canopy or lack of visible satellites). If data collection is not possible in these situations, settings such as the PDOP can always be modified to allow for 2-D data If satellite coverage is in doubt for a particular time of day, it may be necessary to conduct GPS mission planning. This involves determining the GPS satellite constellation coverage through the use of software or interactive websites. This software is freely available from Trimble along with updated ephemeris data. 2.2.2 Depth Sounder Similar to the GPS unit, your depth sounder must support output of data in the NEMA 0183 standard format, particularly one or more of the following strings: $SDDPT – Depth (required if no $IIDBT) $SDDBT – Depth Below Transducer (required if no $IIDPT) $SDMTW – Water Temperature (optional – at surface). Speed and temperature inputs are optional. However, speed can be a useful guide to maintain speed within an effective operating range. Surface temperature can be useful for analyzing differences in water temperature to locate springs and upwellings, plume boundaries around industrial sites, and to show the effects of wave action on temperature, etc. If your specific application requires shallow water collection, make sure the sounder can record to the required minimum depth. Unfortunately, most lower-cost commercial units will not record depths shallower than 0.7 meters. Transducers are available in through-hull or transom-mount models. The through-hull transducers are more stable and require only one initial setup. Through-hull transducers are not portable, however, thus limiting data collection to a specific boat. Transom-mount transducers are very portable but require setup each time the transducer is used. Time must be taken to mount and test the transom-mount transducers at the proposed collection speeds to ensure proper operation. Transom-mount transducers perform best on the starboard side of the motor and where the bottom of the boat is relatively flat. Incorrect placement of the transducer will result in either poor data or no data at all. A factory made adjustable transducer mount is recommended if you plan on using a transom-mount transducer. Some transducers are more 7 aerodynamically designed than others so if possible choose a transducer that will minimize turbulence. Finally, make sure the frequency of the transducer matches the frequency of the depth sounder unit. All transducers should be checked for accuracy on initial set up. This is done easily by comparing sounder depths with a graduated, weighted hand line. Variations can be corrected after the field surveys are completed. 2.2.3 Computer The computer must contain at least one serial port but preferably two. In the two port case, one port is dedicated to the depth sounder and the other to the GPS unit. The assignment of these devices to a specific port is not necessary. In the one port case, the output of one device can be fed through the other device. Normally, the latter device is the controlling device which can create potential problems with truncating data strings. If two serial ports are necessary an additional I/O card must be supplied that will interface with a PCMCIA slot. The BASS program is Window-based running on either Windows 95/98 or Windows NT version 4.0. Although the program’s memory footprint is small ( about 6 megabytes of RAM), Windows overhead requires a minimum recommended configuration of a Pentium class (133MHz) machine, 24 Mb of RAM and at least 600 Mb of disk space. Output data files from the BASS program require about 100-500 Mb depending on the amount of data collected, and how often the data is archived to a workstation. 2.2.4 Power Supply Each of the above devices requires a power source that has to provide power for potentially 10 to 12 hours per day. Typical battery discharge rates for notebooks are two to three hours per rechargeable battery. The other devices have somewhat reduced discharge rates. As alternative to rechargeable batteries, it is recommended that a 12 volt marine battery be used to ensure a constant power source for all devices over a period of a few days. Remember, if you plan to use a 12 volt power supply to run your computer then you will require a power inverter and transformer to convert from 12v DC to 115v AC. It is strongly recommended that your power line to your computer is fused. The cables necessary will be vendor specific depending on the hardware chosen. Each device will require cables for data output as well as power supply. There are also cables required for external interfaces to antennae (GPS) as well as the transducer (sounder). Where necessary, these cables must be constructed and tested in the office prior to field work. Figure 2 illustrates the wiring schematic for the data connections for a serial port interface. 8 Figure 1 Data connections for serial port interface For all installations, provisions should be made to allow for easy storage due to rain or other adverse weather conditions. You may wish to construct a “platform” to mount and protect your equipment while deployed during field surveys 2.2.5 Software The BASS software installation and use is described in a separate document “BassManual2.2” (Levec 2001) available with the software. 9 2.3 Planning Your Survey A survey plan should be completed prior to conducting field work. This process will ensure the most efficient use of your time in the field, help avoid missing data, and minimize the collection of overlapping or redundant data. For smaller lakes with very few or no islands this usually takes no time at all. For larger lakes the plan may include multiple access points if they are available, how to divide the lake up into manageable portions, as well as how to deal with sampling in and around islands. The best way to make a field plan is to create a large plot of the lake and look at any problem areas. See if access is a problem and how many islands must be taken into consideration. Begin to break the lake up into smaller sections or basins until you have manageable sections that can be dealt with on a daily basis. The plan should also include input from other staff that may know the lake and can identify areas of concern such as shoals or other features that may warrant more detailed study. If the waterbody has a surface area greater than 500 ha it is recommended that it be partitioned into smaller sections. Partitioned units should not be greater than 500 ha in size. When possible, natural boundaries such as bays (basins) should be used to delineate spatial units. Otherwise, the waterbody can be sectioned along lines that conform to the planned survey path (Figure 3.). The objective is to define an area that can normally be surveyed in one day (300 – 500 ha). 10 START 5085300 BLU1 Space runs ~ 50 m. apart, plus center of bay 5084800 FINISH 5084500 START 5084300 GRN1 5083800 5083300 FINISH 5083400 START RED1 5082800 BLU2 5082300 5082200 FINISH BLU3 5081800 710000 710500 711000 711500 712000 712500 713000 713500 714000 714500 715000 715500 716000 716500 Figure 3. Lake Lavieille bathymetry routes Figure 2 Example of survey route map for Lake Lavieille showing start and end points for 3 spatial units and proposed survey routes for each unit. 2.4 Plan of Attack Once spatial boundaries have been defined, then the next step is to decide on the best survey path for the shoreline circuits. The objective is to avoid overlapping points and to minimize “wasted” travel time. Survey start points and end points should be selected with this in mind. Map the path for shoreline cruises. On the first circuit you will attempt to follow the 1 m contour. The second circuit will be offset by approximately 25 m from the first. This will provide a buffer from the shoreline when running the open-water transects. In some circumstances, the entire shoreline cruise may take more than one day to complete. In this case the cruise should be broken up into manageable chunks equal to one days’ worth of collection per section or basin. Based on the purpose of the survey and the size of the waterbody, the next step is to decide on the spacing of the open-water transects. Table 1 identifies general guidelines for transect spacing that would be adequate for producing a bathymetric map suitable for most fisheries 11 management applications. If more accurate bathymetric information is required then spacing between the transect lines can be reduced. Keep in mind that this will increase the amount of time required to complete the survey. For ease of navigation, it is strongly recommended that open-water transect lines have a north/south or east/west orientation. Figure 3 provides an example of a survey plan for a portion of Lake Lavieille. In this case most of the lake’s shoreline had previously been surveyed as part of a Nearshore Community Index Netting (NSCIN) project so generally only the open-lake transect lines are shown. 2.5 GPS Mission Planning When planning a day out in the field with any GPS equipment it is always a good idea to do some mission planning. Essentially this involves running a software program to see what the GPS coverage will be like for that day. Usually there will be one or two periods of time (about an hour) that will not be ideal for GPS collection. Once you know these times you can plan your collection time around them. Software is freely available from Trimble (http://www.trimble.com/planningsoftware.shtml). Be sure to download the latest ephemeris file which will give the latest updates for satellite orbits. 2.6 Preparation of Field Forms and Equipment Before going into the field the survey crew should have copies of all the necessary maps. A hard copy of your survey route map should be printed for use in the field. You may want to consider laminating this map to protect it from the weather. A digital copy of the same map may be loaded on your field computer. You will also need a copy of a suitable map showing location and access to your lake (road, trail, air, etc.). A field equipment checklist is included in Appendix A. 2.7 Safety and Communication Bathymetric surveys may be carried out in early spring or late fall. As such, hypothermia is a real threat and safety is of the utmost concern. Sampling should not be attempted if there are severe weather conditions. All safety equipment should be accessible and personal floatation devices must be worn while on the water. Floater suits are strongly recommended for early spring and late fall surveys. All members of the survey crew should be aware of their rights and obligations under the Occupational Health and Safety Act. A designated person should know where the field crew is on any given day and how to contact them. 12 2.8 Setting Up and Testing the Equipment If you are using an externally mounted transducer, the first step will be to attach the transducer bracket to the transom. You may find this easier to do prior to launching the boat. When mounting the bracket choose a location on the starboard side of the motor between the ribs and away from any other obstructions to normal water movement. Adjust the bracket so that the bottom of the transducer is situated parallel (or in the same plane) to the water surface and extends slightly below (~1 cm) the hull. It is crictical that the transducer be mounted at the proper angle to ensure accurate readings. Remove the transducer and bracket before launching the boat. Launch the boat. Place the transducer in the water, rub the bottom surface of the transducer to remove air bubbles and then clamp the bracket in location on the transom. Make sure that the transducer is mounted in the correct position. Choose a convenient location to secure the depth sounder. Depth sounders are reasonably weatherproof and can withstand rain or spray. Clamp the GPS stand or antenna to the transom, gunnel or seat in a convenient location at the back of the boat, near the transducer. Again, most GPS units are weatherproof. Select a location for the portable computer that will allow you to easily view the display screen and access the keyboard during navigation. Since this screen will be your primary navigation aid it must be clearly visible from the driver’s seat. Remember, your computer is not weatherproof and must be protected from rain or spray (keep this in mind when you are choosing a location). Place the 12 volt marine batteries in a convenient location near the middle of the boat to help distribute weight. General setup of the hardware depends on the size and style of your boat and the type of equipment you are using. Figure 4 provides an example of a typical hardware setup for bathymetric data collection. 13 Laptop computer Battery #2 GPS/Depth Sounder Battery #1 Transducer GPS antenna Figure 3 A typical GPS hardware setup for bathymetric data collection Make sure that all units are switched off before connecting the cables and power. Connect cables as follows: transducer cable to depth sounder GPS antennae cable to GPS unit Real-Time Correction antennae cable if required serial output cable from GPS unit to COM port on computer * serial output cable from sounder to COM port on computer * GPS battery cable to battery* Sounder battery cable to battery* Computer to battery (through power inverter) *NOTE – Only one connection is required if using a combination GPS/Sounder When all connections have been made, check to make sure that cables will not impede movement in the boat and that they are not lying in water in the bottom of the boat. This may cause the system to short out and overtime can lead to corrosion of cables. Once the cables are properly situated, switch on the depth sounder, GPS unit and computer. Ensure the depth sounder is providing a valid depth reading and that the measurements are in the following units: m (depth); and km/hr (speed). 14 Next, check to ensure that GPS unit is configured as follows: COMMUNICATION OUTPUT/COM1 PROTOCOL NMEA 0183 DATA CAPTURE LOGGING RATE 1 – 2 seconds DATUM NAD83 COORDINATE SYSTEM - UTM UNITS Meters Please note that when using the NMEA protocol, certain standards are enforced automatically. The NMEA standard includes a baud rate of 4800, 8 stop bits and no parity. The baud rate is set to 4800 by default, the option of 9600 is included for future revisions of the NMEA protocol. You should also ensure that data is being output to the computer. This can easily be done by displaying the NMEA output window provided in the BASS collection software. 15 3 SURVEY 3.1 Sampling Methods Generally, a bathymetric survey can be carried out at any time during the ice-free period. However, aquatic vegetation can significantly interfere with accurate depth readings. In order to minimize this error, it is strongly recommended that waterbodies with prolific aquatic vegetation are sampled either in early spring prior to establishment of macrophytes or late fall following macrophyte die off. Interference related to aquatic vegetation will generally not be a problem in lakes situated on the Canadian Shield. Weather is another factor that may influence the timing of a survey. Safety and potential water damage (from spray) to sensitive electronic equipment are important factors that must be considered in the daily planning of a survey. Rough water can also affect the operation of the depth sounder. It may cause turbulence which could cause loss of signal or result in erroneous readings due to pitching or rolling of the boat which affects the angle of the signal. It is recommended that you not attempt to conduct a bathymetry survey if wave height (trough to crest) exceeds 0.5 meters. On large waterbodies it may be necessary to divide the survey area into many sections. These should be small enough to allow for complete sampling coverage of a section in a given day. Typically, a survey crew should be able to cover a 300 – 500 ha area in one day. However, areas with complex shorelines, numerous islands, and widely deviating bathymetry may require more time. Water levels in lakes, and particularly in rivers, may fluctuate naturally depending on the season. Although not entirely necessary, it is recommended that once a bathymetry survey is started sampling should continue to ensure completion within the same general timeframe/season. This will help minimize corrections that may be required to compensate for changing water levels. In some cases, such as on large water bodies, it will not be possible to complete the survey within the same season. Also, river systems with hydro-electric development(s) can fluctuate significantly even within periods as short as an hour. The water level at the time of sampling should be compared to a local benchmark in order to ensure consistent sampling when gathering data over extended periods of time or in areas where short-term fluctuations may occur. This benchmark should be noted for further reference. Staff gauges should be read on lakes with control structures to allow meaningful comparisons at later dates. The bathymetry survey uses a systematic approach to sampling which involves a combination of shoreline perimeter cruises and cross-lake transects (Figure 2). Within a given section, all the mainland and island shorelines are cruised at least twice in their entirety. The first shoreline cruise should follow a path which maintains a constant depth of around one meter. On the second shoreline pass, a distance of approximately 25 meters from the first circuit should be 16 maintained. This data is used to define a safe navigation buffer from which open water, crosslake transects will start and end. Evenly spaced parallel transects are then run across the open water. For navigation purposes it is recommended that these transects follow either an east/west or north/south path. When planning the orientation of your transects, it may be useful to consider the direction of prevailing winds to minimize spray and drift effect (i.e. avoid crosswinds). The spacing between transects depends primarily on the surface area of the water body. Table 1 provides recommended guidelines for transect spacing which represent a compromise between accuracy and financial/time constraints. Table 1 Guidelines for open-water transect spacing for bathymetry surveys Lake Surface Area (ha) < 200 200 to 1000 > 1000 Transect Spacing (m) 50 75 100 These are general guidelines and represent a minimum program. The GPS system allows for versatile data collection strategies and you are not limited to driving only pre-planned routes. For example, if you see any sudden changes on the navigation screen that might indicate a shoal or drop-off, then you can “zigzag” over the area of interest to collect more data. Similarly, if you wish to increase sampling coverage in some critical areas, such as the littoral zone, you may wish to consider more closely spaced transects or a grid pattern in these areas. 17 Figure 4 – Example of bathymetry data collection pattern showing shoreline cruises and offshore transects for Canisbay Lake, Algonquin Park Boat speed during data collection must be considered for two reasons. First, transom-mounted transducers may cut out at faster speeds due to greater turbulence around the transducer. By reducing boat speed, loss of depth signals will be minimized. Second, NMEA data is generally pulsed at intervals of around one to two seconds which results in a time lag between the times which position and depth sentences are written to a data file. This error is in addition to any error present in the calculation of the position. Slower speeds obviously reduce this error but also reduce the area that can be covered in the course of a day. Although consideration must be given to tradeoffs between operational efficiency and accuracy, an average speed of no greater than 15 km/hr is recommended. Exceptions would be when traveling close to shore. Speed should be reduced for safety reasons as well as adhering to a ‘no wake’ principal. Speed should also be reduced when making turns at the end of a transect. This will help to reduce cavitation and improper sounder operation. 3.2 Running the Transects At the start of your survey it is recommended that you consider establishing a benchmark so that water level can be monitored over the course of the survey and at future dates. This is especially important if the survey will span weeks or months or if you expect water levels will 18 fluctuate (e.g. rivers with hydro development). When establishing a benchmark, use an existing, permanent feature such as the bottom of a bridge, top of a dam or a prominent mark on a rock face. Record a thorough description of the benchmark, including geographic location, and the distance between the water surface and bench mark. If possible, for river surveys, try to tie in to existing survey monuments. Use the survey route map that you prepared in the office to determine the start location for your survey. Although you are not limited to driving pre-planned routes you should attempt to adhere as closely as possible to your plan. Generally, your survey will begin with the shoreline cruise. Two complete circuits of the mainland and island shorelines will be completed to define a safe navigable buffer. On large, wide lakes it may be more efficient to postpone the island shoreline cruise until you have begun the open-water transects. When navigating the shoreline it is essential that you always be on the lookout for rocky shoals or deadheads. Usually the driver will be monitoring depth on the computer screen while a spotter in the front of the boat is watching the waters ahead. Polarized sunglasses are recommended to help reduce glare and make spotting underwater hazards easier. For safety reasons, it is strongly recommended that you travel at slow speeds (e.g. ~ 5 km/hr) when cruising the shoreline. During the survey you should frequently check to ensure data is being collected and received by the computer. Output can be checked by periodically checking the size of the collection file. Note that the software actually outputs three files for backup; a NMEA log file, a text file, and a shapefile. The open-water transects are started once the shoreline cruise is completed for the lake or a particular section of the lake. Begin the cross-lake transects using the survey route map. Running accurate transects will depend on you using the computer screen for navigation. You will also use the sounder or computer to constantly monitor depth. If you observe sudden changes in depth, you may want to loop back and run a zigzag pattern or series of closely spaced transects over the area of interest. You can also mark this location using the attribute tools and revisit the site at another time. The objective is to more accurately define the spatial extent and depth of potential shoals or holes. When deviating from your planned route it is OK to cross existing transects (preferably at right angle) but you should avoid direct overlaps for extended periods. Although it is recommended that you generally not exceed 15 km/hr when running your openwater transects there may be times when you will want to deviate from this guideline. If you are traversing a broad expanse of open water and depth is constant or changing very slowly you can increase boat speed without significantly affecting the accuracy of the data. If you choose to increase speed you will need to closely monitor depth for change and also to make sure that the sounder continues to operate normally. A speed of 25 km/hr is the recommended maximum that should not be exceeded. As depth begins to change more rapidly, then speed should be reduced accordingly. At the end of each day you must back up your data from the hard drive to floppy disk. It is strongly recommended that you do two backups to floppy disk. Make sure that all disks are clearly labeled with lake name, sector name and date and stored in a safe place. A more common storage media now being used is a compact flash card with a PCMCIA adapter. This 19 setup will allow you to use one of the slots on the laptop. The advantage to this media is that it can hold larger amounts of data and is easily transferable back to your office PC. 3.3 Troubleshooting Equipment malfunction can be due to cabling problems such as loose connections, wrong or faulty cables. Check the cables before leaving the office to ensure the system is operational when you arrive in the field. Check cable connections and inline fuses if problems are encountered in the field. As mentioned previously, the devices must output NMEA data. The standard for NMEA data transfer is 4800 baud, no parity, eight data bits and 1 stop bit. Ensure your devices are set to this standard otherwise the BASS software will not be able to communicate with the devices. 3.3.1 No GPS Signal A ‘No GPS Signal’ error usually occurs because the GPS unit is not currently determining a position or the output interval of the NMEA data from the device has exceeded five seconds. The output frequency of the GPS unit should not exceed two seconds. If required, reset this value on the GPS unit to ensure continuous data collection. In either case, check to see that the GPS unit is actually collecting a position. You can also open the NMEA window in BASS to see that a data stream is coming through to the computer. If there is no activity in the NMEA window, sometimes the COM port needs to be reset. Restart the computer without any device connected to the COM port. Plug in the GPS/Sounder into the COM port and turn it on. In windows, open up the program called HyperTerminal found under Programs -> Accessories -> Communications. Run this program and set up a connection with the COM port. Enable the port by clicking on the small telephone icon. You should see activity in the window. If there is no activity in HyperTerminal, check the settings on the GPS for proper NMEA output or a faulty cable. If there is activity in HyperTerminal, close the program, start BASS, and open communications with the GPS. If the satellite geometry is not currently suitable, or the filters for signal to noise ratio and satellite geometry are set incorrectly, the GPS may not determine a position. Obstruction of the unit’s antenna by any objects including topography (cliffs), shoreline vegetation or even human bodies may interfere with the reception of signals from the satellites. Very seldom during the course of a day should there be satellite reception problems under open sky conditions. If this occurs, waiting fifteen minutes may improve any problems relating to the satellite constellation. This can also be avoided by doing some mission planning the day before. 3.3.2 No Depth Signal 20 A ‘No Depth Signal’ error usually occurs because the water may be too shallow or there may be an excessive amount of turbulence around the transducer. The excessive turbulence (cavitation) may be caused by fast speeds or improper mounting of the transducer. If a turbulence problem is suspected try repositioning or adjusting the mounting bracket. Also note that because cavitation increases on turns, it is recommended that boat speed is reduced before entering and during a turn. Note that most tranducers also have a limited shallow water range, usually around one meter. Accuracy at less than a meter will be limited. Also in severe weedy conditions the transducer may register 0, failing to receive a signal off the bottom. These values can eventually be filtered out when pre-processing the data in a GIS. 3.3.3 Erratic Laptop Behavior With the increased use of Panasonic Toughbook computers, many users have found these laptops, particularly the mouse/pointer acts very erratically. This problem may be due to the mapping of the COM port to a mouse at sometime, which conflicts with the touchpad mouse. Sometimes a quick reboot will solve the problem. Otherwise you may have to go into the device settings and remove the mouse driver. This should reset the mouse the next time the computer is restarted. Also the COM port mapping may be affected when a Microsft’s ActiveSync program is used for downloading data from the laptop. ActiveSync will search all ports (COM, Infrared, etc...) and mark them as “in-use”. Again the COM port may have to be reset in order to function properly. 21 4 Post-Survey 4.1 Disassembling the Equipment When the transect work is completed and the data has been backed up then the equipment can be disconnected and stowed in travel cases. Before disconnecting cables make sure that all units are switched off. It is strongly recommended that you use a rugged travel case that is padded and weatherproof for transporting electronic equipment. When a survey is completed all equipment should be cleaned, dried and checked to make sure it is in working condition. Recharge batteries. If necessary repair or replace damaged or malfunctioning components. This is also a good time to download the data from the laptop to some sort of other media. Choices could include a disk or CD, but the easiest choice now available is a USB jump drive. These devices can store upwards of 10 gigabytes of data and are very reliable. Be sure to make a copy of each days work a dn transfer it to a workstation in the office for surther GIS work or archiving in NRVIS. 4.2 Transferring data to a GIS workstation The corporate standard for Geographic Information Systems within the MNR is ESRI’s ARCGis. Although many of the GIS processes can be duplicated on GIS software from other vendors, no attempt has been made to adapt any of the operations for software other than ARCGis. Once the data has been collected, there is more in-depth GIS analysis that can take place. One of the most useful forms for continuous data such as bathymetry is the creation of a grid or raster surface. Most GIS packages provide routines for the interpolation of irregularly spaced point data. This surface layer can then be used to derive lake volumes, determine “home ranges” based on depth, use them as a predictor of preferred habitat, and be used in combination with other data to create other models. Since the vendor of record for GIS at the MNR is ESRI, there is an easy transition to using products such as ArcMap, along with its extensions. Spatial Analyst is used for handling raster data and 3D Analyst is used for three dimensional display and analysis. Since existing digital data within the MNR is stored as Arc/Info coverage or Arcview shapefiles, the integration of bathymetric data with other data will be seamless. In addition, the resulting bathymetric information can easily be input into the Natural Resource and Values Information System (NRVIS). 22 4.3 Data Archive and NRVIS In the longer term it is anticipated that NRVIS will be the repository for the bathymetry layer. This will ensure broad access to this information and that it is maintained and up to date. Planning for bathymetry requirements in NRVIS began in the spring of 2002. The data management model was completed in 2004 and the document has been posted on ODMS for review. The data model for bathymetric data allows for data to be stored in one of two layers. Bathymetry – Point will contain all raw observations collected using the BASS or similar systems. Note that this is not a readily usable layer, but must be modeled in a GIS to create an elevation model or contour line layer. The class definition in NRVIS is points, indicating the measurement of water depth at various places in a body of water. The layer Bathymetry – Line will contain derived contour bathymetry maps from various sources. These could include old lake survey maps which have been scanned and georeferenced, derived contour maps from GPS point data, as well as other contour maps from outside the MNR. The class definition in NRVIS is a continuous line formed of vertices indicating the same measurement of water depth at various places in a body of water. It is used for a description of the terrain relief below the surface of the water. These two models were decided upon due to the different nature of the datasets. Obviously point features are different than line features, and must be stored accordingly. Point data derived from GPS work is considered much more accurate than those derived from old transect methods. Confusion may arise if contour maps, derived from BASS point data, are then uploaded to the bathymetry line layer. Again the bathymetry line layer was originally intended to store old historical data. Whether this layer becomes a working layer in NRVIS will be determined by the users. 23 5 ACKNOWLEDGEMENTS The methods described in this report are based largely on three existing bathymetry collection systems. They are BASS (Bathymetric Automated Survey System) developed by Andy Todd and Scott Christilaw at the North Bay Science and Technology Unit, the SLAPS system (Shoreline and Profundal Surveyor) developed by Rob Kushneriuk at the Centre for Northern Forest Ecosystem Research and the Real-time GPS Lake Bathymetry System developed by Brian Monroe and Greg Betteridge at the Algonquin Fisheries Assessment Unit. The contributions of these individuals to the field methodologies contained in this manual and to the development of the new BASS application were critical. 24 6 REFERENCES Monroe, B. and G. Betteridge, 2000. The Algonquin Fisheries Assessment Unit Real-time GPS Lake Bathymetry System. Algonquin Fisheries Assessment Unit, Algonquin Park. Christilaw, S. 1996. Bathymetric Automated Survey System Data Collection User Manual. South Central Science and Technology Unit, North Bay. Levec, F. 1996. B.A.S.S. Bathymetric Automated Survey System GIS Technical Guide. South Central Science and Technology Unit, North Bay. Levec, F. 2001. B.A.S.S. 2.0 User Manual. Inventory, Monitoring and Assessment, Peterborough. 25 Appendix A - Equipment checklist for Bathymetric Surveying Log book / working paper map Motor repair kit spark plugs and spark plug wrench large screwdriver pliers cotter/shear pins wire manual pull cord spare gas line Duct tape Whistle Fuel for the day Paddles or oars Bailing bucket or bilge pump Waterproof flashlight Buoyant heaving line Anchor line (for the boat) - 30.5 m (100 ft) long Required number of approved personal flotation devices Rain suits, rubber boots (or waders) GPS Unit (and antenna) Depth Sounder (plus transducer and portable mount) Portable computer (with BASS software, OBM outline, survey planning map) Blank diskettes or other removable storage media (Compact Flash) Appropriate cables Power 2 GPS extendable battery cables 1 extendable GPS serial cable 1 sounder NMEA input cable DC-AC power inverter 6 spare 5 amp fuses Two 12 volt marine batteries permanent transparency markers HB pencils (ten or more) Waterproof tarp large enough to protect electronic equipment Copy of Bathymetry Survey Field Manual Copy of BASS User Manual Data Jump drive or other download media 26 Appendix B - Hardware Options for Bathymetric Survey Minimum requirements Required NMEA output Ability to accept RTCM / RTCA differential corrections WAAS capable receiver Configurable GPS options like PDOP, elevation mask, and SNR Long battery life Waterproof 8-channel receiver, 12-channel preferred Optional Post-processing correction capability (Trimble) External high-gain antennae Additional waypoint / map storage memory NMEA - National Marine Electronics Association RTCM - Radio Technical Commission for Maritime Services RTCA - Radio Technical Commission for Aeronautics WAAS - Wide Area Augmentation System PDOP – Precise Dilution of Precision SNR – Signal to Noise Ratio Recommended Devices (see manufacturers website for new models) GPS Garmin GPSMap76 Trimble Pathfinder ProXT/XH Magellan Mobile Mapper Sounder Garmin 400c Lowrance X510C Combination GPS/ Sounder Garmin GPSMap 420s/450s (new 2007) Garmin GPSMap 238 (discontinued) Lowrance LMS-480M / LMS-520C 27