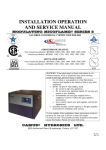
1
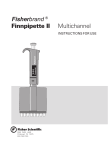
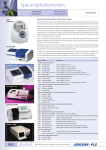
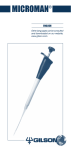
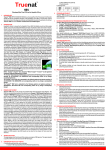
SEALPE TTE PRO
Operator Instructions
SEALPE TTE
PRO
Operator Instructions
1 – 16
Specifications
17
14
14
13
14
13
13
11
11
11
12
12
12
10
10
9
9
7
8
10
7
8
9
7
8
6
3
5
3
5
4
2
480-095,
480-039,
480-096
6
2
480-097,
480-098
1
5
480-099
1
1
Spare Parts
1 Tip ejector collar
8 Display
2 Tip cone holder
9 Handle
3 Tip cone complete
10 Tip ejector
4 Tip cone cylinder
11 ID window
5 Piston
12 ID tag
6 Piston seal
13 Handle collar
7 Calibration nut cover
14 Cap (set of 5 colours)
480-095
480-039
480-096
480-097
480-098
480-099
1
726051
726052
726052
726052
726053
726054
2
726041
726041
726041
726041
726042
N/A
3
731084
726083
726042
726039
726040
N/A
4
N/A
N/A
N/A
N/A
N/A
726038
5
731076
726084
726034
726035
726036
726037
6
N/A
N/A
N/A
N/A
N/A
N/A
7
726006
726006
726006
726006
726006
726006
8
726022
726082
726026
726027
726028
726029
9
726086
726087
726088
726089
726090
726091
10
726005
726005
726005
726005
726005
726005
11
726004
726004
726004
726004
726004
726004
12
726003
726003
726003
726003
726003
726003
13
726002
726002
726002
726002
726002
726002
14
726001
726001
726001
726001
726001
726001
13
12
10
11
9
8
6
7
4
5
8-channel:
480-190, 480-191, 480-192
12-channel:
480-193, 480-194, 480-195
1
3
2
Spare Parts
1 Tip cone housing
8 Handle
2 Tip ejector bar
9 Tip ejector
3 Tip cone complete
10 ID window
4 Piston
11 ID tag
5 Piston assembly
12 Handle collar
6 Calibration nut cover
13 Cap (set of 5 colours)
7 Display
480-190
480-191
480-192
480-193
480-194
480-195
1
726131
726132
726133
726134
726135
726136
2
726137
726138
726138
726139
726140
726140
3
726149
726150
726151
726149
726150
726151
4
726146
726147
726148
726146
726147
726148
5
726152
726153
726154
726152
726153
726154
6
726006
726006
726006
726006
726006
726006
7
726022
726141
726142
726022
726141
726142
8
726143
726144
726145
726143
726144
726145
9
726005
726005
726005
726005
726005
726005
10
726004
726004
726004
726004
726004
726004
11
726003
726003
726003
726003
726003
726003
12
726002
726002
726002
726002
726002
726002
13
726001
726001
726001
726001
726001
726001
Specifications
Sealpette Pro single-, 8- and 12-channel pipettors
Cat. No.
Channels
Volume
Range
Test
Volume
480-095
1
0.5 - 10 µl
10 µl
5 µl
1 µl
0.5 µl
1.00
1.50
2.50
5.00
480-039
1
2 - 20 µl
20 µl
10 µl
2 µl
0.90 %
1.20 %
3.00 %
0.40 %
1.00 %
2.00 %
480-096
1
10 - 100 µl
100 µl
50 µl
10 µl
0.80 %
1.00 %
2.00 %
0.15 %
0.40 %
1.00 %
480-097
1
20 - 200 µl
200 µl
100 µl
20 µl
0.60 %
0.80 %
2.00 %
0.15 %
0.30 %
0.80 %
480-098
1
100 - 1000 µl
500 µl
1000 µl
0.70 %
100µl
0.60 %
0.25 %
1.50 %
0.20 %
0.70 %
Inacc. (%)
%
%
%
%
Impr. (%)
0.60
1.00
1.50
4.00
%
%
%
%
480-099
1
500 - 5000 µl
5000 µl
2500 µl
500 µl
0.50 %
0.60 %
1.50 %
0.15 %
0.30 %
0.60 %
480-190
8
0.5 - 10 µl
10 µl
5 µl
1 µl
1.50 %
2.50 %
4.00 %
1.00 %
2.50 %
4.00 %
480-191
8
5 - 100 µl
100 µl
50 µl
10 µl
0.70 %
1.00 %
3.00 %
0.25 %
0.70 %
1.50 %
480-192
8
30 - 300 µl
300 µl
150 µl
30 µl
0.60 %
1.00 %
2.00 %
0.25 %
0.50 %
1.00 %
480-193
12
0.5 - 10 µl
10 µl
5 µl
1 µl
1.50 %
2.50 %
4.00 %
1.00 %
2.50 %
4.00 %
480-194
12
5 - 100 µl
100 µl
50 µl
10 µl
0.70 %
1.00 %
3.00 %
0.25 %
0.70 %
1.50 %
480-195
12
30 - 300 µl
300 µl
150 µl
30 µl
0.60 %
1.00 %
2.00 %
0.25 %
0.50 %
1.00 %
17
CONTENTS
1.
Product description
2
2.
Jencons tips
4
3.
Unpacking
4
4.
Personal identification
4
5.
Pipettor holder and carousel
5
5.1.
Installing the pipettor holder
5
5.2.
Carousel stand
5
6.
Calibration tool (also tube and ID window opener)
5
7.
Operating the pipettor
6
7.1.
Setting the volume
6
7.2.
Sealing and ejecting the tips
6
7.3.
Protective tip cone filters and filter ejection
8.
9.
Pipetting techniques
7
8
8.1.
Forward pipetting
8
8.2.
Reverse pipetting
8
8.3.
Repetitive reverse technique
9
Recommendations for good pipetting
9
10. Maintenance
10
10.1. Daily cleaning of the outer surface of the pipettor
10
10.2. Cleaning and decontaminating the lower part of the pipettor 10
10.3. Sterilization of the pipettor
11. Testing the performance and recalibration
11
12
11.1. Testing the performance
12
11.2. Recalibration
14
12. Troubleshooting
15
13. Warranty information
16
14. Performance specifications
17
1
1. Product description
Your new Jencons Sealpette Pro is an autoclavable air displacement
pipettor. The attractive and ergonomical design of the Sealpette Pro
pipettor together with its very low pipetting forces reduce the risk of
repetitive strain injuries (RSI)1. The pipettor is designed for both rightand left-handed use.
The special tip cone design of the pipettor offers the possibility to use
replaceable tip cone filters to help prevent the contamination and
damage of the pipettor. The operating button of the Sealpette Pro
allows safe and easy filter ejection. The pipettor uses disposable tips.
Jencons Sealpette Pro single- and multichannel pipettors
Colour
Cat. No.
Tip Cone filters
50 pcs/bag
Standard Plus
Channels
Volume
Range
Increment
Tip
480-095
480-039
480-096
480-097
480-098
480-099
1-ch
1-ch
1-ch
1-ch
1-ch
1-ch
0.5 - 10 µl
2 - 20 µl
10 - 100 µl
20 - 200 µl
100 - 1000 µl
500 - 5000 µl
0.01 µl
0.02 µl
0.1 µl
0.2 µl
1 µl
10 µl
10
30
300, 350
300, 350
1000
5000
N/A
480-121
480-115
480-117
480-054
480-051
480-190
480-191
480-192
8-ch
8-ch
8-ch
0.5 - 10 µl
5 - 100 µl
30 - 300 µl
0.01 µl
0.1 µl
0.2 µl
10
300, 350
350
N/A
N/A
480-115 480-116
480-117 480-118
480-193
480-194
480-195
12-ch
12-ch
12-ch
0.5 - 10 µl
5 - 100 µl
30 - 300 µl
0.01 µl
0.1µl
0.2 µl
10
300, 350
350
N/A
N/A
480-115 480-116
480-117 480-118
N/A
N/A
480-116
480-118
480-119
480-120
1.
Note: It is knowledge that prolonged pipetting can cause RSI. The
manufacturer is not responsible for RSI or any related diseases caused
by prolonged pipetting.
2
Pipettor Description
Tip
ejector .......
....
..
Operating
button ...................
ID window
and tag
........
Cap .......................
Finger
support
......Handle
Display .............
Volume
lock ..................
.. Calibration
nut
Tip ejector
collar ......................
Tip cone....................
Tip Cone
........ filter
Tip cone .........
......Tip cone
housing
Tip
......ejector bar
.......Tip Cone
filter
3
2.
Sealtips
The full range of Sealtips are recommended for use with Jencons
Sealpette Pro pipettors. Jencons standard tips are made of virgin
polypropylene. Jencons also offers a full range of filter tips. Jencons
Superfine tips are available as bulk packages and autoclavable (121°C,
20 min, 1 atm) trays. Pre-sterilized tips in trays are also available.
3.
Unpacking
The Jencons Sealpette Pro pipettor package contains the following
items:
1.
2.
3.
4.
5.
6.
7.
8.
9.
10.
Pipettor
Tip
Caps for colour coding
Calibration tool (also tube and ID window opener)
Pipettor holder
Identification tags
Tip cone filters (pipettors >10 ml)
Grease
Instruction manual
Performance certification in accordance with ISO 8655-6
Please check that all items are included and that no damage has
occurred during shipment.
4.
Personal identification
Each Jencons Sealpette Pro pipettor can be identified with a tag
located under the ID window which is placed on the finger support.
1.
2.
3.
Remove the ID window by using the calibration tool (Chapter 6.).
Remove the tag and mark the identifying information on it.
Position the tag on place and clip the window back into place.
4
5.
Pipettor holder and carousel stand
For convenience and safety always keep the pipettor vertically on its
own holder or carousel stand when not in use.
Cat.No.
481-123
Product
Jencons Sealpette Pro Carousel Stand
5.1. Installing the pipettor holder
1.
2.
3.
4.
Clean the shelf surface with ethanol.
Remove the protective paper from
the adhesive tape.
Install the holder by pressing it
against the edge of the shelf (Fig. 2).
Place the pipettor onto the holder.
Fig. 2.
5.2. Carousel stand
A convenient and ergonomical
Carousel Stand (Fig. 3) for six
Jencons Sealpette Pro pipettors
is also available.
Fig. 3.
6.
Calibration tool (also tube and ID window opener)
The
1.
2.
3.
calibration tool is designed for the following purposes (Fig. 4):
Tool for recalibration (A).
Opening tool for the ID window and lid of the calibration nut (B).
Opening tool for the tubes (C).
B
Fig. 4.
C
A
5
7.
Operating the pipettor
7.1. Setting the volume
The volume of the pipettor is clearly shown through the display. The
volume setting is carried out with the following steps (Fig. 5):
1.
2.
3.
Press the volume lock and hold it down.
Set the volume by rotating the operating button (clockwise to
decrease the volume and counterclockwise to increase).
Release the volume lock.
Fig. 5
Volume Lock
+
–
Note: Do not rotate the operating button without pressing down the
volume lock. Do not rotate the operating button outside the volume
range of the pipettor (Chapter. 1.)
7.2. Sealing and ejecting tips
To ensure the maximum accuracy and precision Jencons tips are
recommended to be used with Sealpette Pro pipettors. Before fitting a
tip ensure that the pipettor tip cone is clean. Press the tip on the tip
cone of the pipettor. The pipettor is provided with a spring loaded tip
cone for optimal sealing.
Eject the tip by pressing the tip ejector with your thumb (Fig. 6). Make
sure that the tip is disposed into a suitable waste container.
Fig. 6.
Tip ejector
Note: If the tip is pressed too hard the tip cone yields and, as a result,
the counter and operating button moves.
6
7.3. Protective tip cone filters and filter ejection
The tip cone design of the Jencons Sealpette Pro pipettors (> 10 ml)
allows the use of Jencons tip cone filters in the tip cones. These
removable filters prevent liquids and aerosols from entering the pipettor
and, thus, protects the pipettor from contamination and damage.
The tip cone filters are available as Standard or Plus versions. It is
recommended to use the Standard filter for general applications and
the Plus filter for more demanding applications such as cell culture,
bacterial and virological work and molecular biology. Filters need to be
changed regularly. The interval for filter changing is application
dependant but the recommendation is to change the filter daily (after 50
– 250 pipetting cycles) and always in case of over-aspiration. (See
Chapter 1 for ordering information.)
The tip cone filters can be removed with the unique filter ejector without
touching the filters by hand. Remove the operating button cap and
eject the filter by pressing the operating button down (Fig. 7). Make sure
that the filter is disposed into a suitable waste container. Clean the tip
cone if needed and put the new filter in place.
Fig. 7.
7
8.
Pipetting techniques
Two basic pipetting techniques, forward and reverse pipetting, are
associated with Sealpette Pro pipettors. Forward pipetting is the most
common used pipetting technique. The technique employs the blowout function ensuring complete delivery of the liquid. Reverse
pipetting is recommended for highly viscous, biological or foaming
liquids, or very small volumes of liquid. A selected volume plus an
excess is aspirated into the tip. The delivery is done without blow-out,
and, thus, the excess volume remains in the tip. The reverse technique
also facilitates the repeated delivery of the same volume.
8.1. Forward pipetting (Fig. 8)
1.
2.
3.
4.
Fit the tip onto the pipettor tip cone.
Press the operating button to the first stop.
Place the tip just under the surface of the liquid (2-3 mm) and
smoothly release the operating button up to the starting position.
Wait one second. Carefully withdraw the tip from the liquid,
touching against the edge of the container to remove excess from
the outside of the tip.
Dispense the liquid by pressing the operating button to the first
stop. After a short delay press the operating button to the second
stop. This action will empty the tip.
Fig. 8.
0
1
2
8.2. Reverse pipetting (Fig. 9)
1.
2.
3.
4.
5.
6.
Fit the tip onto the pipettor tip cone.
Press the operating button all the way to the second stop.
Place the tip just under the surface of the liquid (2–3 mm) and
smoothly release the operating button up to the starting position.
Withdraw the tip from the liquid touching against the edge of the
container to remove excess.
Press the operating button smoothly to the first stop to deliver the
present volume. Hold the operating button at the first stop. The
liquid that remains in the tip should not be included in the delivery.
Discard the remaining liquid by pressing the operating button to
the second stop.
Fig. 9.
0
1
2
8
8.3. Repetitive reverse technique
1.
2.
3.
Follow the reverse technique steps 1 to 5.
Continue pipetting by repeating steps 3 to 5 as long as needed.
Finally discard the remaining liquid by pressing the operating
button to the second stop.
9.
Recommendations for good pipetting
•
•
Make sure that the tip is firmly attached to the tip cone.
Hold the pipettor vertically when aspirating the liquid and place the
tip only a few millimetres into the liquid.
Always control the operating button slowly and smoothly.
Pre-rinse the tip before aspirating the liquid by filling and emptying
the tip for three to five times. This is important especially when
pipetting liquids with a viscosity and density greater than water or
liquids with high vapour pressure (e.g. ethanol).
Check that the pipettor, tip and liquid are at the same temperature.
When pipetting liquids with temperatures different to the ambient
temperature change the tip after each pipetting. Do not pre-rinse
the tip.
To avoid contamination, do not rest the pipettor on its side
especially with the tip attached.
Change the tip cone filter regularly (recommendation after 50 – 250
pipetting cycles).
Never strike the tip cone against the tip tray when mounting the tip
as this can damage the pipettor.
Avoid rough handling and do not drop the pipettor.
Avoid exposing the unit to extreme temperature changes, humidity
and dust (operating temperature from 15ºC to 40ºC).
•
•
•
•
•
•
•
•
•
9
10. Maintenance
Jencons Sealpette Pro pipettors have been designed for easy in-house
service. If the pipettor is used daily it is recommended to
clean/decontaminate and check the performance of the pipettor every
three months. Jencons also provides complete repair and recalibration
service for your pipettor including a service report and performance
certificate.
Note: Please make sure that the pipettor has been decontaminated
before you send it to us or your local representative. Please advise if
any hazardous material has been used with your pipettor.
Note: The use of the tip cone filters may prolong the interval of the
service. Change the filters regularly.
Note: It is recommended to always use gloves when cleaning the
pipettor.
10.1. Daily cleaning of the outer surface of the pipettor
Your Jencons Sealpette Pro pipettor should be checked every day for
cleanliness. To clean and decontaminate the outer surface of your
pipettor use ethanol (70%), isopropanol (60%) or a mild detergent as a
cleaning agent and a soft lint-free cloth.
Gently clean the surface of the pipettor with moistened cloth and wipe
dry. Pay special attention to the tip cone. Change the tip cone filter if
needed (Chapter 7.3.)
10.2. Cleaning and decontaminating the lower part of the pipettor
If your pipettor is in daily use it is recommended to clean/decontaminate
and grease the pipettor every three months. It is recommended to send
the multichannel pipettors to your local Jencons service representative
for cleaning and greasing. To clean and decontaminate the lower parts
of the single channel pipettor, follow these steps:
Disassembling and cleaning (see the pictures under the cover page):
1. Eject the tip cone filter (if fitted, Chapter 7.3.)
2. Unscrew the tip ejector collar (1) counterclockwise and remove it.
3. Pipettors 480-095, 480-039, 480-096, 480-097, 480-098:
Unscrew the tip cone holder (2) counterclockwise and carefully
remove it with the tip cone (3).
Pipettor 480-099:
Unscrew the tip cone cylinder (4) counterclockwise and remove it.
4. Clean the tip ejector collar, the tip cone holder, the tip cone
(cylinder) and the piston (5) with ethanol (70%), isopropanol
(60%) or mild detergent and soft lint-free cloth.
5. Clean the interior of the tip ejector collar and the tip cone
(cylinder) with a cotton swab. Be careful with the pipettors
480-095, 480-039 and 480-096 so that the seal inside the tip
cone will not damage.
6. Rinse the parts with distilled water if needed and let the parts dry.
10
7.
Pipettors 480-095, 480-039 and 480-096:
Put a thin layer of grease on the piston (5).
Pipettors 480-097 and 480-098:
Put a thin layer of grease around the seal (6).
Pipettor 480-099:
Put a thin layer of grease on the seal (6) and the interior of the tip
cone cylinder (4).
Note: Avoid excess grease. Use only the grease provided with the
pipettor.
Note: Before reassembling check that no lint or particles are on the
surface of the piston.
Decontamination:
For complete decontamination of the lower parts place the tip ejector
collar (1), tip cone holder (2), tip cone (3) and tip cone cylinder (4) (only
the model 480-099) into a beaker containing ethanol (70%) isopropanol
(60%) or a mild detergent and leave for at least 30 minutes. Wipe the
piston with Jencons Proline‚ Biocontrol and the lint-free cloth. Rinse the
parts with distilled or sterile water. Let the parts dry. Grease the piston
and seal according to the instructions given earlier in this chapter.
Reassembling:
1. Pipettors 480-095, 480-039, 480-096, 480-097, 480-098:
Carefully place the tip cone (3) on the piston and attach it by
screwing the tip cone holder (2) clockwise.
Pipettor 480-099:
Carefully place the tip cone cylinder (4) on the piston and screw
clockwise.
Make sure that the tip cone (cylinder) is properly tightened.
Avoid over tightening.
2. Attach the tip ejector collar (1) by screwing it clockwise.
3. Place the new tip cone filter on its place.
4. Press the operating button several times to ensure that the grease
has spread evenly.
5. Check the performance of the pipettor.
Note: It is always necessary to check the performance of the pipettor
after in-house service or maintenance.
10.3. Sterilization of the pipettor
The entire Sealpette Pro pipettor can be sterilized by steam autoclaving at
121OC, (252OF), 1 atm for 20 minutes. Remove the tip cone filter (if fitted,
Chapter 7.3). The single channel pipettors can be autoclaved without
special preparations. Unscrew the
Fig. 10
lower part of the multichannel pipettors by holding the connecting
collar and turning the lower part
Connecting 360° anticlockwise (Fig. 10). Put the
collar
pipettor into the sterilization bag and
place it into the autoclave. After
autoclaving the pipettor must be
360°
11
cooled down and left to dry overnight before use. Screw the lower part of
the multichannel pipettors by holding the connecting collar and turning the
lower part 360° clockwise. Make sure that the lower part is properly
tightened. It is recommended to check the performance of the pipettor
after every autoclaving. It is also recommended to grease the piston/seal
of the pipettor after every 10 autoclaving.
11. Testing the performance and recalibration
It is recommended to check the performance of your Jencons
Sealpette Pro pipettors regularly (e.g. every 3 months) and always after
in-house maintenance. However, the user should establish a regular
testing routine for their pipettors with regard to accuracy requirements
of the application, frequency of use, number of operators using the
pipettor, nature of the liquid dispensed and the acceptable maximum
permissible errors established by the user. (ISO 8655-1.)
11.1. Testing the performance
Performance testing should take place in a draught-free room at 15 –
30OC, constant to +/- 0.5OC and humidity above 50%. The pipettor, tips
and the test water should have stood in the test room a sufficient time
(at least 2 hours) to reach equilibrium with the room conditions. Use
distilled or deionised water (grade 3, ISO 3696). Use an analytical
balance with a readability of 0.01 mgs. (ISO 8655-6.)
Weighing
1. Adjust the desired test volume Vs.
2.
Carefully fit the tip onto the tip cone.
3.
Fill the tip with test water and expel to waste five times to reach a
humidity equilibrium in the dead air volume.
4. Replace the tip. Pre-wet the tip by filling it once with test water and
expel to waste.
5. Aspirate the test water, immersing the tip only 2-3 mm below the
surface of the water. Keep the pipettor vertical.
6. Withdraw the pipettor vertically and touch the tip against the inside
wall of the test water container.
7. Pipette the water into the weighing vessel, touching the tip against
the inside wall of the vessel just above the liquid surface at an
angle of 30° to 45°. Withdraw the pipettor by drawing the tip 8-10
mm along the inner wall of the weighing vessel.
8. Read the weight in mgs (mi).
9. Repeat the test cycle until 10 measurements have been recorded.
10. Convert the recorded masses (mi) to volumes (Vi)
Vi = mi Z
Z = correction factor (Table 1)
11. Calculate the mean volume (V) delivered:
V = (∑Vi)/10
12. For conformity evaluation calculate the systematic error es of the
measurement:
in µl:
es = V – Vs
Vs = selected test volume
or in %:
es = 100 (V – Vs)/Vs
12
13. For conformity evaluation calculate the random error of the
measurement:
as standard deviation s = ∑(Vi – V)2
n = number of
measurement (10)
n–1
or as coefficient of variation CV = 100s/V
14. Compare the systematic error (inaccuracy) and random error
(imprecision) with the values in the performance specifications
(page 81) or the specifications of your own laboratory.
If the results fall within the specifications, the pipettor is ready for
use. Otherwise check both systematic and random errors and,
when necessary, proceed to the recalibration procedure
(Chapter 11.2).
Note: Systematic error (inaccuracy) is the difference between the
dispensed volume and the selected test volume. Random error
(imprecision) is the scatter of the dispensed volumes around the mean
of the dispensed volume. (ISO 8655-1.)
Note: Jencons specifications are achieved in strictly controlled
conditions (ISO 8655-6). The user should establish own specifications
based on the field of use and the accuracy requirements placed on the
pipettor (ISO8655-1).
Table 1
Temp. (°C)
20.0
20.5
21.0
21.5
22.0
22.5
23.0
23.5
95
1.0028
1.0029
1.0030
1.0031
1.0032
1.0033
1.0034
1.0036
Z-values (µl/mg):
Air Pressure (kPa)
100
1.0028
1.0029
1.0031
1.0032
1.0033
1.0034
1.0035
1.0036
Note: This method is based on ISO 8655.
13
101.3
1.0029
1.0030
1.0031
1.0032
1.0033
1.0034
1.0035
1.0036
105
1.0029
1.0030
1.0031
1.0032
1.0033
1.0034
1.0036
1.0037
11.2. Recalibration
The calibration of your Sealpette Pro pipettor has been factory checked
and certified at 22OC using grade 3 distilled water according to ISO
3696. The calibration is based on ISO 8655-6: Gravimetric test method
for volumetric instruments. The pipettor’s specifications are guaranteed
only with genuine Jencons tips. If you find the pipettor to be inaccurate
after performance testing, please follow the instructions below:
1.
2.
3.
4.
Remove the lid of the calibration nut, located at the backside of the
handle, with the aid of the calibration tool (Fig. 11).
Place the hexagonal head of the calibration tool into the hole of the
calibration nut.
Turn the adjustment lock anticlockwise to decrease and
clockwise to increase the volume.
Repeat testing the performance procedure (Chapter 11.1.).
Continue until the results are correct.
Note: Jencons offers accredited calibration service. Please contact
your Jencons representative for further information.
Fig. 11.
–
+
14
12. Trouble shooting
Symptom
Possible cause
Solution
Droplets left inside
the tip
Unsuitable tip
Use original tips
Leakage or pipetted
volume too small
Non-uniform wetting
of the plastic
Attach new tip
Tip incorrectly
attached
Attach firmly
Unsuitable tip
Use original tips
Foreign particles
between tip and
tip cone
Clean the tip cone,
attach new tip
Tip cone holder
incorrectly tightened
Tighten the tip
cone holder
Pipettor damaged
Return to your
Jencons service
representative
for servicing
Incorrect operation
Follow instructions
Unsuitable tip
Use original tips
Calibration altered
Recalibrate
Liquid has penetrated
tip cone and dried
Clean and grease
the piston/seal
and the tip cone
Tip cone filter has
been contaminated
Change filter
Insufficient amount of
grease on a piston
and seal
Grease accordingly
Tip ejector collar has
been contaminated
Remove and clean
the ejector collar
and tip cone
Pipettor out of
established
specifications
Operating button
jammed or moves
erratically
Tip ejector jammed
or moves erratically
15
13. Warranty information
The Jencons Sealpette Pro pipettors are covered by warranty for 3
years against defects in materials and workmanship. Should your
Sealpette Pro pipettor fail to function at any time, please contact your
local Jencons representative.
ANY WARRANTY WILL, HOWEVER, BE DEEMED AS VOID IF FAULT
IS FOUND TO HAVE BEEN CAUSED BY MALTREATMENT, MISUSE,
UNAUTHORIZED MAINTENANCE OF SERVICE OR NEGLIGENCE
OF REGULAR MAINTENANCE AND SERVICE, ACCIDENTAL
DAMAGE, INCORRECT STORAGE OR USE OF THE PRODUCTS
FOR OPERATIONS OUTSIDE THEIR SPECIFIED LIMITATIONS,
OUTSIDE THEIR SPECIFICATIONS, CONTRARY TO THE
INSTRUCTIONS GIVEN IN THIS MANUAL OR WITH OTHER THAN
THE MANUFACTURER’S ORIGINAL TIPS.
Each Jencons Sealpette Pro pipettor is tested before shipping by the
manufacturer. The Jencons Quality Assurance Procedure guarantees
that the Jencons Sealpette Pro pipettor you have purchased is ready
for use.
Each Jencons Sealpette Pro pipettor is CE marked.
14. Performance specifications
The manufacturer’s specifications are guaranteed only when the
manufacturer’s original tips are used. The manufacturer’s specifications
below should be used as guidelines when establishing your own
performance specifications in accordance with ISO 8655.
16
Operator Instructions
1 – 16
Specifications
17
Jencons Scientific Ltd
Cherrycourt Way Ind. Est.
Stanbridge Rd, Leighton Buzzard
Jencons Scientific Inc (USA)
800 Bursca Drive, Suite 801
Bridgeville, PA 15017
LU7 4UA, ENGLAND
Phone:
Fax:
Int. Phone:
01525 372010
01525 379547
Phone:
Toll Free:
800 846-9959
+44 1525 372010
Fax:
412 257-8809
Email:
[email protected]
Website:
www.jenconsusa.com
Int. Fax:
+44 1525 851461
Email:
[email protected]
Int. Email:
[email protected]
Website:
www.jencons.co.uk
Online sales: www.ecomcat.co.uk
412 257-8861
ref: 502405