1
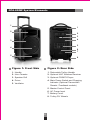
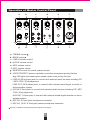
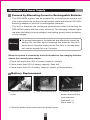
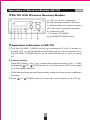
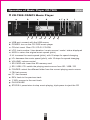
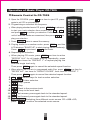
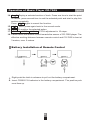
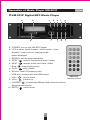
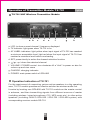
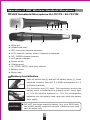
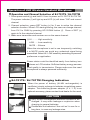
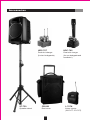
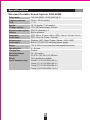
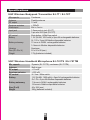
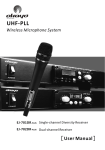
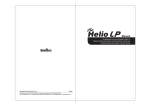
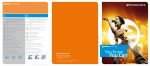
UHF Wireless
Portable Sound System
GPA-800W
USER MANUAL
Content
Preface..........................................................................................................
1
GPA-800W System Elements.............................................................................
2
Operation of Master Control Panel.................................................................
3
Operation of Power Control ..........................................................................
4
Operation of Receiver Module DR-701..........................................................
5
Operation of Music Player CD-750S / UM-501P......................................
6 ~ 10
Operation of Transmitter Module TX-701.....................................................
11
Operation of Digital Effect Module RM-800 / FB-800............................. 12 ~ 13
Operation of UHF Wireless Bodypack Transmitter ..............................
14 ~ 15
Operation of UHF Wireless Handheld Microphone...............................
16 ~ 17
Accessories....................................................................................................
18
Trouble Shooting..........................................................................................
19
GPA-800W Maintenance Guideline........................................................
20 ~ 21
Specifications.........................................................................................
22 ~ 23
Preface
GPA-800W, the wireless portable PA system, features a sturdy, lightweight and
compact solution for sound specialist. The system is constructed by an effective
100 W (RMS) power output, and capable to play both of CD and MP3 file style;
additionally, GPA-800W supports maximum two sets of wireless microphone
receivers which include individual frequency adjustors and volume control for
the great conveniency of your application.
The system is powered by the built-in batteries (4.5Ah x 2pcs) and intelligent
power adopter which can connect with the worldwide AC power directly; it can
last 4~6 hours when the batteries are fully charged. GPA-800W is mobile by
the strong trolley, and power-efficient to support quality performance for both
of music and speech application in a wide range.
System Features
100 W (RMS) powerful output
Class-D audio power amplifier
10" woofer and 1" tweeter deliver clear and quality sound
100 ~ 240 V AC / 32 V DC switching power supply
Built-in charger and sealed lead-acid batteries installed
Runs 4~6 hours on a charge
Installed receivers and CD player with LCD readout and back-lit
UHF receiver offers max. 96 selectable channels
Voice priority available
Two mic inputs available
Dual line input and line output
Aux input and aux output available
Optional and versatile modules help building up perfect system to meet
most PA application
Handle with trolley
Reach crowds of 1,000+
1
GPA-800W System Elements
1
1
2
2
3
4
3
5
4
6
7
5
8
Figure 1: Front Side
Figure 2: Rear Side
1.
2.
3.
4.
5.
1.
2.
3.
4.
Handle
Horn Tweeter
Speaker Grill
Driver
Ventilator
5.
6.
7.
8.
2
Returnable Trolley Handle
Optional UHF Wireless Receiver
Optional CD/MP3 Player
Main Power Switch and Charging
Indicator (Optional Transmitter /
Reverb / Feedback module)
Master Control Panel
AC Power Input
Battery Cover
Trolley PU Wheels
Operation of Master Control Panel
a.
b.
c.
d.
e.
f.
g.
h.
i.
j.
k.
l.
a
b
c
d
e
f
g
h
i
j
k
l
TREBLE control
BASS control
LINE IN volume control
AUX IN volume control
MIC2 volume control
MIC1 volume control
MASTER control for overall system volume
VOICE PRIORITY button to activate or end the microphone priority function
e.g. LED lights red meaning the system under voice priority function
LINE-IN (RCA phone jack) to connect with external music sources including CD
/ MP3 / DVD / iPod players etc.
LINE OUT (RCA phone jack) to connect with external mixed-signal recorder or
active speaker system
AUX IN (3.5mm jack) to connect with external music sources including CD / MP3
DVD / iPod players etc.
AUX OUT (3.5mm jack) to connect with external mixed-signal recorder or active
speaker system
MIC IN 2 (6.3mm jack) microphone connector
MIC IN 1 (XLR / 6.3mm jack) combo microphone connector
Set in the middle to keep preforming the original sound signal
3
Operation of Power Supply
Powered by Alternating Current or Rechargeable Batteries
The GPA-800W system can be powered by connecting the system with
your mains electricity via the provided power cable and internal 100-240V
switching adapter or the built-in rechargeable batteries.
The built-in batteries are recharged automatically when connecting the
GPA-800W system with the mains electricity. The charging indicator lights
red when the battery is being charged, and lighting greenly when the battery
is fully charged.
Warning
To prevent damages to the batteries and effectively extend the
battery life, the user should recharge the batteries last for 8
hours when using the system at the first time or already does
not use the system for over 3 months.
When the system is powered by the built-in batteries, the charging indicator
shows the current power status:
Power last more than 30% of battery capacity: red light
Power lower than 30% of battery capacity: flash red
Power lower than 5% of battery capacity: system off automatically
Battery Replacement
Unscrew the battery
cover
Take the batteries out
Place the battery back and screw the battery cover
4
Connect the battery
power lead with the
new batteries:
Red lead: (+)
Black lead: (-)
Operation of Receiver Module DR-701
Option
DR-701 UHF Wireless Receiver Module
a.
b.
c.
d.
e.
f.
g.
a
b
c
d
e
f
LCD (ch. & freq. displayed)
A/B antenna reception indicator
Selected channel reception indicator
Audio signal reception indicator
Frequency SET
Channel UP/DOWN
VOLUME/POWER control
g
Operation Indication of DR-701
1. Turn the VOLUME / POWER control (g) clockwise till a "click" to power on,
and the LCD (a) will be lighted up and displayed the current channel; turn
the VOLUME / POWER control (g) counterclockwise till a "click" to power
off.
2. Channel setting:
Press SET button (e) for 1 sec., choose the preferred channel (CH1 ~ CH96)
by pressing
UP /
DOWN button (f), and then press SET button again
to fix the chosen channel.
* When two receivers are used concurrently, make sure they are set on different
channels.
3. Press
UP /
DOWN button (f) to see the current frequency on LCD (a).
5
Operation of Music Player CD-750S
Option
CD-750S CD/MP3 Music Player
a
b
j
a.
b.
c.
d.
e.
f.
g.
h.
i.
j.
k.
l.
m.
n.
o.
p.
q.
c
k
l
d
m
n
e f g h
o
p
i
q
USB port: connect with the USB source
POWER: turn on the CD-750S music player
CD slot: insert 12cm CD / CD-R / CD-RW
LCD: track number / time duration / music source / mode / status displayed
NOR: to return the original music speed (pitch)
HI: increase the music speed (pitch), with 10 steps for speed changing
LO: decrease the music speed (pitch), with 10 steps for speed changing
VOLUME: volume control
SD CARD slot: insert the SD memory card
SD / USB / CD: switch the playing music source from SD / USB / CD
FOLDER: select the different folder from the current playing music source
FB: fast reverse
F.F: fast forward
REV: back to the previous track
F.WD: reverse to the next track
PLAY/PAUSE
STOP/EJ: press twice to stop music playing; triple press to eject the CD
6
Operation of Music Player CD-750S
Option
Remote Control fo CD-750S
1. Open the CD-ROM: press
one time to eject CD, press
again to pull CD in automatically.
2. Programming an individual title sequence:
When playing standard music CD, press PROG in advance
to start your track selection from numeric keys 0 ~ 9 ,
and press
to confirm you selection. Continue this action
until all selected tracks are memorized, then press
to
play your selection.
Press PROG twice to cancel the memory.
3. Playing tracks in a random order: press RAN , and the
LCD displays "SHUFFLE" to start playing tracks randomly.
Press
to previous/
next track.
4. Repeating the selection:
When playing CD music, press RAN one time to active
"REPEAT ALL" for all tracks playing repeatedly; press
RAN two times for "REPEAT 1" to repeat playing the
selected single track only.
Then press RAN again to cancel the selected repeat function.
5.
6.
7.
8.
9.
10.
11.
12.
13.
When playing MP3 music in compressed audio files, press RAN one time for
"REPEAT ALL", two times for "REPEAT FOLDER", three times for "REPEAT 1".
Then press RAN again to cancel the selected repeat function.
0 ~ 9 Numeric keys for track number selection.
FOLDER Folder selection
Play / pause
Stop
Back to the previous track
Jump to the next track
Fast reverse; press again back to the standard speed.
Fast forward; press again back to the standard speed.
CD/USB/SD Switching from different music source CD->USB->SD;
press
to confirm the selected music source.
7
Operation of Music Player CD-750S
Option
14. A B Replay a selected section of track. Press one time to start the point
of section, press second time to end the selected point and start to play this
section repeatedly.
Press A B again to cancel the function.
15.
Mute; press again back to the normal mode.
16.
To confirm the selected action.
17. LOW
NOR
HIGH PITCH adjustment in 10 steps.
18. Please direct the remote control towards the sensor of CD-750S player. The
effective working distance between remote control and CD-750S is best at
3 meters, max. 5 meters.
Battery Installation of Remote Control
1. Right push the latch in advance to pull out the battery compartment.
2. Insert CR2025 3V batteries in the battery compartment. The positive pole
must face up.
8
Operation of Music Player UM-501P
Option
UM-501P Digital MP3 Music Player
a
b
c
h
d
i
e
f
g
j
k
l
a. POWER: turn on the UM-501P player
b. LCD to show: folder number / track number / time
duration / music source / playing mode /
status displayed
c. REPEAT: set the track repeatedly
d. PREV /
: back to the previous track / folder
e. NEXT /
: reverse to the next track / folder
f. Stop /
: stop playing music
g. PLAY /
: play / pause
h. SD slot: insert SD memory card
i. USB port: connect with the USB source
UM-501P
j. VOL- / VOL- : volume down
remote control
k. VOL+ / VOL+ : volume up
l. FLODER /
: to select the different folder from the current
playing music source
m. MUTE /
: sound mute
FLODER
9
Operation of Music Player UM-501P
Option
Operation Indication of UM-501P
1. To connect your USB music source with UM-501P, it starts playing mp3 file automatically.
The LCD shows the current folder / track number / playing duration.
2. When both of USB and SD card are connected with UM-501P, USB source is the
priority for UM-501P to play. When disconnecting both of USB and SD card, UM501P stops playing music and records the last playing folder / track number; to insert
the same USB or SD card again, UM-501P starts playing from the previous recorded
track.
3. To disconnect the USB or SD card after pressing STOP (f), UM-501P does not record
the last playing folder / track number; to insert the same USB or SD card again, UM501P starts playing the USB or SD cards from the beginning.
4. To take out the SD card, please push the card gently in advance, and then the card
should eject automatically; to pull out SD card appropriately would cause the damage
on SD card and also the music player.
5. Press button FOLDER (l) in advance to active the folder selection function. To select
different folder by pressing NEXT (d), PREV. (e),and then press PLAY (g) to complete
the folder selection.
10
Operation of Transmitter Module TX-701
Option
TX-701 UHF Wireless Transmitter Module
a
b
c
d
e
f
g
h
a. LCD: to show current channel / frequency displayed
b. TX Indicator: light green when TX-701 is on
c. AF LABEL indicators: light yellow when input signal of TX-701 has reached
a minimum acceptable level; light red when the input signal of TX-701 has
reached a maximum level before overloading
d. SET: press shortly to active the channel selection function
e. / : up / down the selected channel
f. VOLUME / POWER control: turn clockwise till a "click" to power on also for
volume up and vise versa
g. CHARGE: charging indocator
h. POWER: main power switch of GPA-800
Operation Indication of TX-701
For the requirement of connecting various active speakers in a big operating
area, TX-701 module provides an effective solution as wireless audio link.
It works by locating one GPA-800 with TX-701 module as the master control
in advance, and then transmitting signals from different sources of master
(including wireless / wired microphone, CD / MP3 music etc.) to other active
speakers (including OKAYO GPA-500 / GPA-750 / GPA-800 system) with
corresponding receiver module DR-701.
11
Operation of Digital Effect Module RM-800
Option
RM-800 Digital Reverb Module
a
b
c
d
e
f
g
h
i
j
a. DELAY: echo delay control
b. REPEAT: echo repeat control
c. ECHO: echo volume control
d. Pre-LPF: reverb pre-low pass filter control
e. LPF: reverb low pass filter control
f. TIME: reverb time control
g. REVERB: reverb volume control
h. ON/OFF: effect switch to active other effect controlling knob
i. CHARGE: charging indicator
j. POWER: main power switch of GPA-800W
Operation Indication of RM-800
1. Rotate volume of ECHO (c) and REVERB (g) to the lowest level in advance;
turn on the main POWER switch (j), and active other effect controllers by
switching ON/OFF (h).
2. Adjust DELAY (a), REPEAT (b) and ECHO volume (c) of echo effect according
to user's preference.
3. Adjust Pre-LPF (d), LPB (e), TIME (f) and REVERB (g) of reverberation effect
according to user's preference.
4. DELAY (a), REPEAT (b), Pre-LPF (d), LPF (e) and TIME (f) set in the middle
to keep preforming the original sound signal.
12
Operation of Digital Effect Module FB-800
Option
FB-800 Digital Feedback Module
a
b
c
d
e
f
g
h
i
a. FEEDBACK CANCELLATION ON/OFF: switch of feedback cancellation
b. DELAY: echo delay control
c. REPEAT: echo repeat control
d. ECHO: echo volume control
e. TIME: reverb time control
f. REVERB: reverb volume control
g. ON/OFF: effect switch to active other effect controlling knob
h. CHARGE: charging indicator
i. POWER: main power switch of GPA-800W
Operation Indication of FB-800
1. Press FEEDBACK CANCELLATION (a) button to active the cancelation function
when the feedback volume is too high to control in the application.
2. Rotate volume of ECHO (d) and REVERB (f) to the lowest level in advance; turn
on the main POWER switch (j), and active other effect controllers by switching
ON/OFF (g).
3. Adjust DELAY (b), REPEAT (c) and ECHO volume (d) of echo effect according to
user's preference.
4. Adjust TIME (e) and REVERB volume (f) of reverberation effect according to user's
preference.
5. DELAY (b), REPEAT (c) and TIME (f) set in the middle to keep preforming the original
sound signal.
13
Operation of UHF Wireless Bodypack Transmitter
UHF Bodypack Transmitter EJ-7T / EJ-7XT
a. Antenna
b. MUTE control: press one time to mute the mic-in
signal; press again back the normal
c. Power switch ON/OFF
d. 3.5mm push-in jack (EJ-7T)
3-pin mini XLR jack (EJ-7XT)
e. Power indicator: light red when the unit is on
f. SENSITIVITY switch: HI/MID/LOW three levels
g. 3.5mm AUX IN
h. SET: active the channel selection function
i. LCD: channel / battery status / frequency displayed
j. UP/DOWN: channel adjustment buttons
k. Charging pins
a
b
c
d
e
f
g
h
i
j
k
Battery Installation
Insert 2 pcs of 1.5V AA alkaline batteries or 1.2V AA
rechargeable batteries into the battery case, and then
close the battery door tightly.
Operation and Channel Selection of EJ-7T / EJ-7XT
1. Turn the power switch (c) on. The power indicator lights redly and
LCD window displays
when the action is succeeded.
2. Channel setting and changing:
LCD window will display the selected channel, e.g.
. Press
SET button (h) for 2~3 sec to change current channel. When the
channel number is glittering
, change it to the preferred channel
(ch1~ ch96) by pressing UP / DOWN button (j) and follow a press
of SET (h) to fix this change.
Make sure transmitter and receiver are on the same channel.
When two receivers are used concurrently and required on different
channels, simply follow above steps to set up.
3. Lapel microphone (LM-90A) and headset microphone (HM-50A) are
recommended for EJ-7T. Lapel microphone (LM-90C) and headset
microphone (HM-50C) are recommended for EJ-7XT.
14
Operation of UHF Wireless Bodypack Transmitter
Variable sensitivity available (f) for personal preference
or applied occasions.
HI …..... High sensitivity
MID ….. Middle sensitivity
LOW … Low sensitivity
Aux in …For external audio input (g), e.g. MP3.
MUTE … Press MUTE button while the transmitter is not
in use temperately to enter into silence mode. Press it
again to escape the mode.
Power status could be identified easily from the battery
icon
shown on LCD window. Sufficient battery energy
secures good quality in transmission. Please make sure
the used transmitter is always powered sufficiently. The
optional dual-slot charging stand HDC-707 /
HDC-702 is designed to be an economic
charging solution.
CAUTION!
Only Ni-MH rechargeable batteries
are allowed to be charged. It may
arise leakage or explosion when
charging unrechargeable batteries.
Please take out batteries if the unit
isn’t in use for a long time, in case
any leakage may arise.
HDC-707
HDC-702
Safety Notes
1. Avoid rainfall or humid circumstance in case of any breakdown or electric
shock.
2. Avoid to be squeezed, stroke and dropped.
3. Only official power supply recommended using, in case of any breakdown
or danger.
15
Operation of UHF Wireless Handheld Micrphone
UHF Handheld Microphone EJ-701TS / EJ-701TM
a
b
i
a.
b.
c.
d.
e.
f.
g.
h.
i.
j.
k.
c
d
e f
g
h
k
j
Wind grill
Rubberized body
SET: active the channel selection
LCD: channel / battery status / frequency displayed
UP / DOWN channel selector
LED power indicator
Power switch
Charging port
HI / LOW / MUTE: sensitivity selector
Battery cover
Button cap
Battery Installation
Take off button cap (k) and pull off battery cover (j). Insert
batteries correctly. (two AA 1.2 V NiMH rechargeable or 1.5
V Alkaline batteries)
Put the button cap (11) back. This movement ensure the
battery cover is locked and to prevent fall off. Insert 2pcs
of 1.5V AA alkaline batteries or 1.2V AA rechargeable
batteries into the battery case, and then close the battery
door tightly.
CAUTION !
DO NOT use larger capacity battery. (e.g. over 2300 mAh
the Ni-MH battery might be stocked in battery room and
can't be taken out!)
16
Operation of UHF Wireless Handheld Micrphone
FG
Operation and Channel Selection of EJ-701TS / EJ-701TM
1. Press power switch (g) and hold 2~3 sec to power on EJ-701TS/ EJ-701TM.
The power indicator (f) will light up and LCD (h) will show "ON" and current
channel.
2. Channel selection: press SET button (c) for 3 sec to active the channel
selection function. When LCD starts glittering, the user can change channel
from CH1 to CH96 by pressing UP/ DOWN button (f). Press of SET (c)
again to fix the selected channel.
3. Make sure transmitter and receiver are on the same channel.
(i) HI …...... High sensitivity
LOW ….. Low sensitivity
MUTE … Silence
When the microphone is not in use temporarily, switching
it to MUTE mode can avoid any undesired signal being
transmitted. Select HI / LOW sensitivity according to personal
preference or application.
Power status could be identified easily from battery icon
shown on LCD window. Sufficient battery energy secures
good quality in transmission. Please make sure the used
microphone is always powered sufficiently.
EJ-701TS / EJ-701TM Charging Indication
When the power of battery (Ni-MH rechargeable) is
insufficient, simply recharge to batteries via switching power
adapter. This switching power adapter (5 V / 1 A) is an
optional accessory, please contact local dealer for the need.
CAUTION !
Only Ni-MH rechargeable batteries allowed to be
charged. It may arise leakage or explosion when
charging to general batteries.
Please take out batteries if the unit isn’t in use for a
long time, in case any leakage arise.
17
Accessories
HDC-707
HDC-702
Dual-slot charger
(for two bodypacks)
Dual-slot charger
(for one bodypack and
handheld )
ST-750
CB-800
L-707N
Speaker stand
Dust cover
Nylon holster
(for EJ-7T / EJ-7XT)
18
Trouble Shooting
Fail to power on
Check all batteries are placed correctly and power sufficient.
LCD shows "
" when power on
Please contact with your local supplier for programme resetting.
LCD window shows garbled information
Take out and reinstall the batteries.
No sound output, please double check:
The transmitter and receiver are on same channel.
The volume knobs on transmitter and receiver are on.
MUTE button is not activated.
The transmitter and receiver are on the same frequency band.
Avoid any interference source in the surrounding.
Signal disturbance
While two transmitters are used concurrently, please make sure they are
on DIFFERENT channel to reduce the probability of crosstalk. Also note
that no other wireless device is used nearby during your operation.
19
GPA-800W Maintenance Guideline
Avoid heat, humidity
Do NOT put the unit in the sunshine for a long time, or any other hot, humid
environments and places with flame. Stay away from any occasions which
the above might occur. Choose cooler places to store the unit.
Charge BEFORE you start using for the fist time
After unpacking the unit for the first time, please charge the unit for about
8 hours. This is absolutely necessary as the built-in rechargeable batteries
might have been discharged naturally due to long shipment and storage
time, even though it has been fully charged in the factory prior to shipment.
To secure a longer life for batteries, please DO execute this IMPORTANT
process.
Charge fully
Ensure batteries are fully charged BEFORE you store it for a long period.
To maintain a longer battery life and better performance, make sure you
charge the batteries regularly every month.
Notice : when you need to use the unit again after a long period of stock,
make suer you charge it fully for at least 8 hours BEFORE any operation.
Notice : please also charge this unit every time after operation to gain a
longer battery life.
This unit has DOD (depth of discharge) protection design. After the Power
Switch LED flashes red which means there isn't enough electricity (when
operating via the batteries' power), this unit will turn off automatically to
secure battery from deep-discharging damage. At this moment please
immediately recharge your unit, do not continue operation.
20
GPA-800W Maintenance Guideline
This unit has protection circuit against overcharge. After the batteries finish
charging, the unit will stop charging automatically. You can still operate during
charging.
However, it is NOT recommended to keep the power cord plugged in
continuously.
Replacing batteries
Make sure the substitute battery is with same specifications. Using incorrect
batteries may lead to explosion or malfunction
Remove the batteries in the transmitters if for a long while
you are not going to use it.
Transmitter's battery terminals
Before operation, ensure battery contacts are clean and free of corrosion. If
corrosion occurs, please replace it or contact your place of purchase if service
is required.
21
Specifications
Wireless Portable Sound System GPA-800W
Output power
Frequency response
T.H.D.
Speaker
CD player (option)
Receiver module (option)
Antenna
Audio input
Audio output
Volume control
Power supply
Battery
Operating time
Charging time
Operating distance
Dimensions
Weight
Carrier frequency range
100 Watt (RMS), 140W (MAX) @ 4 Ω
20 Hz ~ 20 kHz (audio)
<1%
10” LF woofer, 1" HF tweeter
CD + MP3 music player function
DR-701 (diversity) x 2
Built-in antenna
XLR - Mic in, 6.5 mm - Mic in, RCA - Line in, 3.5 mm - Aux in
RCA - Line out, 3.5mm - Aux out
Wireless / MIC / Bass / Treble / Master / AUX / LINE
Built-in 100~240 VAC switching power supply
12V, 4.5 Ah x 2 pcs Lead-Acid rechargeable batteries
4 ~ 6 hours
5 hours
50 ~ 60 meters
(D) 310 x (W) 360 x (H) 580 mm
20 kg (batteries included)
Group (1) 640~664 MHz (96 ch.)
Group (2) 740~752 MHz (96 ch.)
Group (3) 794~806 MHz (96 ch.)
Group (4) 863~865 MHz (16 ch.)
22
Specifications
UHF Wireless Bodypack Transmitter EJ-7T / EJ-7XT
Mic capsule
Antenna
RF output
Spurious emission
Audio input
Input jack
AF control
Battery
Battery autonomy
Housing
Size (D x W x H)
Weight
Condenser
Flexible antenna
10 mW
< 250nW
Mic in, Aux in
3.5mm push-in jack (EJ-7T)
3-pin mini XLR jack (EJ-7XT)
Mute button; Hi/Mid/Low switch
1.2V (Ni-MH, 1600 mAh) x 2pcs AA rechargeable batteries
Or 1.5V x 2 pcs AA Alkaline disposable batteries
11 hours in Ni-MH. rechargeable batteries
14 hours in Alkaline disposable batteries
Aluminum
26 x 64 x 88 (mm)
170g (batteries included)
UHF Wireless Handheld Microphone EJ-701TS / EJ-701TM
Mic capsule
Antenna
RF output
Spurious emission
AF control
Battery
Battery autonomy
Size (D x H)
Weight
Dynamic (EJ-701TS); condenser (EJ-701TM)
Built-in type
< 10 mW
< 250 nW
Hi / Low / Mute switch
1.2V (Ni-MH, 1600 mAh) x 2pcs AA rechargeable batteries
Or 1.5V x 2 pcs AA Alkaline disposable batteries
11 hours in Ni-MH. rechargeable batteries
14 hours in Alkaline disposable batteries
46 x 264 (mm)
280g (batteries included)
23
MEMO
24
MEMO
25
Sound & Communication
4F, No.11, Lane125, Sec.1, Kuo Kwang Rd., Ta-Li City, Taichung Hsien, Taiwan
Tel:886-4-2407-1617
Fax:886-4-2407-1609
E-mail:[email protected]
www.okayo.com
Rev.01