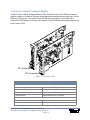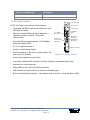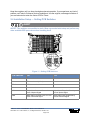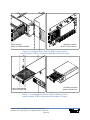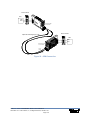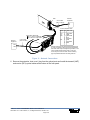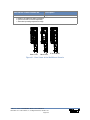
1
Vector System
User Manual
Vector System
User Manual, Part Number 127092
Copyright 2010, Telect, Inc., All Rights Reserved
Telect and Connecting the Future are registered trademarks of Telect, Inc.
1730 N Madson St., Liberty Lake, Washington
Telect assumes no liability from the application or use of these products. Neither does Telect convey any
license under its patent rights nor the patent rights of others. This document and the products described
herein are subject to change without notice.
About Telect
Telect offers complete solutions for physical layer connectivity, power, equipment housing and other
network infrastructure equipment. From outside plant and central office to inside the home, Telect draws
on more than 25 years of experience to deliver leading edge product and service solutions. Telect is
committed to providing superior customer service and is capable of meeting the dynamic demands of
customer and industry requirements. This commitment to customer and industry excellence has positioned
Telect as a leading connectivity and power solution provider for the global communications industry.
Technical Support
E-mail: [email protected]
Phone: 888-821-4856 or 509-921-6161
Telect, Inc. • USA +1.509.926.6000 • Mexico +52.33.3836.37.52
www.telect.com • © 2010 Telect, Inc., All Rights Reserved, 127092-1 A0.1
Page ii
Vector System
User Manual
Table of Contents
Chapter 1: Vector Products ...................................................................................................... 1
1.1 Overview .......................................................................................................................... 1
1.2 Vector Basic Optical Transport Module (OTM) ................................................................ 4
1.2.1 Basic OTM Features ............................................................................................... 5
1.2.2 Basic OTM Block Diagram ...................................................................................... 6
1.2.3 Specifications (Basic OTM & Basic OPM) .............................................................. 7
1.3 Vector Basic Optical Protected Module (OPM) .............................................................. 10
1.3.1 Basic OPM Features ............................................................................................. 11
1.3.2 Basic OPM Block Diagram .................................................................................... 12
1.3.3 Basic OPM Specifications ..................................................................................... 12
1.4 E-Vector Optical Transport Module ................................................................................ 13
1.4.1 E-Vector Features ................................................................................................. 14
1.4.2 E-Vector Block Diagram ........................................................................................ 15
1.4.3 E-Vector Specifications .......................................................................................... 16
1.5 Technical Support (USA) ............................................................................................... 17
Chapter 2: Vector Basic OTM ................................................................................................. 19
2.1 Overview ........................................................................................................................ 19
2.2 Installation Tools & Equipment ...................................................................................... 19
2.3 Inspection ....................................................................................................................... 19
2.4 Installation Setup — Setting PCB Switches ................................................................... 20
2.5 Installation ...................................................................................................................... 21
2.6 Operation ....................................................................................................................... 25
2.6.1 Control & Status LEDs .......................................................................................... 25
2.6.2 LOOPBACK Mode Switch ..................................................................................... 26
2.6.3 Alarm Relays ......................................................................................................... 26
2.6.4 Monitoring ............................................................................................................. 26
Chapter 3: Vector Basic OPM ................................................................................................. 27
3.1 Overview ........................................................................................................................ 27
3.2 Installation Tools & Equipment ...................................................................................... 28
3.3 Inspection ....................................................................................................................... 28
3.4 Installation Setup — Setting PCB Switches ................................................................... 28
3.5 Installation ...................................................................................................................... 30
3.5.1 Installing OPM in a BCSII Chassis ........................................................................ 30
Telect, Inc. • USA +1.509.926.6000 • Mexico +52.33.3836.37.52
www.telect.com • © 2010 Telect, Inc., All Rights Reserved, 127092-1 A0.1
Page iii
3.5.2 Installing a Standalone Wall-Mount OPM ............................................................. 35
3.5.3 Installing OPMs in a MIX 56 or MIX 28 SideCar Chassis ..................................... 36
3.5.4 Installing OPMs in a Standalone Desk-Mount Chassis ......................................... 36
3.6 Operation ....................................................................................................................... 37
3.6.1 Control & Status LEDs .......................................................................................... 37
3.6.2 Mode Switches ...................................................................................................... 38
3.6.3 Alarm Relays ......................................................................................................... 39
3.6.4 Monitoring ............................................................................................................. 39
Chapter 4: E-Vector OTM ........................................................................................................ 41
4.1 Overview ........................................................................................................................ 41
4.2 Installation Tools & Equipment ...................................................................................... 41
4.3 Inspection ....................................................................................................................... 41
4.4 Installation Setup — Setting PCB Switches ................................................................... 42
4.5 Installation ...................................................................................................................... 43
4.6 Operation ........................................................................................................................ 47
4.6.1 Status LEDs .......................................................................................................... 47
4.6.2 Alarms ................................................................................................................... 47
4.6.3 Mode Switches ...................................................................................................... 47
Chapter 5: BCSII Vector Fiber Tray ........................................................................................ 49
5.1 Overview ........................................................................................................................ 49
Chapter 6: Vector Wall Mount ................................................................................................. 55
6.1 Overview ........................................................................................................................ 55
6.2 Grounding ...................................................................................................................... 58
6.3 Power Input .................................................................................................................... 59
6.3.1 Plant DC Input ....................................................................................................... 59
6.3.2 Utility Power Input (Alternate Power) .................................................................... 60
6.4 Alarm Connections ......................................................................................................... 60
6.5 Connect Rear-Side BNC Input & Output to NE .............................................................. 61
6.6 Connect & Route Front-Side Fiber ................................................................................. 61
Chapter 7: Service ................................................................................................................... 63
7.1 Owner Maintenance ....................................................................................................... 63
7.2 In Case Of Difficulty ....................................................................................................... 63
7.3 Technical Support (USA) ............................................................................................... 63
7.4 In-Warranty Service ....................................................................................................... 63
7.5 Out-Of-Warranty Service ............................................................................................... 63
7.6 Repacking For Shipment ............................................................................................... 64
Chapter 8: Vector Accessories ............................................................................................... 65
Telect, Inc. • USA +1.509.926.6000 • Mexico +52.33.3836.37.52
www.telect.com • © 2010 Telect, Inc., All Rights Reserved, 127092-1 A0.1
Page iv
List of Figures
Figure 1 - Vector Modules ............................................................................................................ 1
Figure 2 - Telect Wall-Mount Chassis with 1 Basic OTM & a Front Spacer (left)
Telect MIX 28 with a Pair of Basic OPMs in a SideCar Chassis (right) .................................. 3
Figure 3 - Vector Basic Optical Transport Module (OTM) ............................................................ 4
Figure 4 - OTM With Separate XMT and RCV SC Connectors ................................................... 5
Figure 5 - Vector Basic Optical Protected Module (OPM) ......................................................... 10
Figure 6 - OTM With Separate XMT and RCV SC Connectors ................................................. 11
Figure 7 - E-Vector OTM ............................................................................................................ 13
Figure 8 - E-Vector Features ..................................................................................................... 14
Figure 9 - Schematic................................................................................................................... 15
Figure 10 - Vector Basic OTM ................................................................................................... 19
Figure 11 - Setting PCB Switches ............................................................................................. 20
Figure 12 - Installing Basic OTM in a BCSII Chassis (left) &
Installing Basic OTM in a Standalone Wall-Mount Chassis (right)........................................ 22
Figure 13 - Installing Basic OTM in a MIX 28 SideCar (left) &
Installing Basic OTM in a Standalone Desk-Mount Chassis ............................................... 22
Figure 14 - Installing I/O cables ................................................................................................. 23
Figure 15 - Installing I/O cables ................................................................................................. 24
Figure 16 - OTM With Separate XMT and RCV SC Connectors) .............................................. 25
Figure 17 - Vector Basic OPM ................................................................................................... 27
Figure 18 - Setting PCB Switches ............................................................................................. 29
Figure 19 - Removing Standard BNC Backplane Modules from BCSII Chassis ....................... 31
Figure 20 - Installing OPM BNC Port Panels on BCSII Chassis ................................................ 32
Figure 21 - OPM Connection ..................................................................................................... 33
Figure 22 - OPM Connection ..................................................................................................... 34
Figure 23 - Standalone Wall-Mount OPM Chassis .................................................................... 35
Figure 24 - MIX 28 SideCar OPMs ............................................................................................ 36
Figure 25 - Standalone Desk-Mounted OPMs ........................................................................... 36
Figure 26 - OPM With Separate XMT & RCV SC Connectors ................................................... 37
Figure 27 - E-Vector OTMs ........................................................................................................ 41
Figure 28 - Setting PCB Switches .............................................................................................. 42
Figure 29 - BCSII Chassis (Model 010-0000-3201BCS) on the left &
Wall-Mount Chassis (Model 710-1001-2302-E) on the right ................................................. 43
Figure 30 - Desk-Mount Chassis (Model 747-0000-1001) ......................................................... 44
Figure 31 - Network Connections .............................................................................................. 45
Figure 32 - Ethernet Cabling Schemes ...................................................................................... 46
Telect, Inc. • USA +1.509.926.6000 • Mexico +52.33.3836.37.52
www.telect.com • © 2010 Telect, Inc., All Rights Reserved, 127092-1 A0.1
Page v
Figure 33 - E-Vector OTM .......................................................................................................... 47
Figure 34 - Routing of fiber optic network element cables ......................................................... 50
Figure 35 - 23 in. Vector Fiber Tray on a BCSII Chassis
Containing Vertically Mounted Vector Modules .................................................................... 51
Figure 36 - 23 in. Vector Fiber Tray on a BCSII Chassis
Containing Horizontally Mounted Vector Modules ................................................................ 51
Figure 37 - Assembling a bracket .............................................................................................. 52
Figure 38 - Removing screws holding standard brackets to sides of BCSII chassis ................. 53
Figure 39 - OPMs (2) in a Standalone Wall-Mount Chassis ...................................................... 55
Figure 40 - OTM and a Blank Panel in a Standalone Wall-Mount Chassis ............................... 56
Figure 41 - Rear Views of the Wall-Mount Chassis ................................................................... 57
Figure 42 - Grounding ................................................................................................................ 58
Figure 43 - Vector Wall-Mount Power Connections (Rear View of Chassis) ............................. 58
Figure 44 - Connecting Wires .................................................................................................... 59
Figure 45 - Power Supply .......................................................................................................... 60
Figure 46 - Connecting Rear-Side BNC Input & Output to NE .................................................. 61
Figure 47 - Fiber Cable Being Fed to an Overhead CMS .......................................................... 62
Telect, Inc. • USA +1.509.926.6000 • Mexico +52.33.3836.37.52
www.telect.com • © 2010 Telect, Inc., All Rights Reserved, 127092-1 A0.1
Page vi
Chapter 1: Vector Products
1.1 Overview
Basic OTM
E-Vector OTM
Basic OPM
Figure 1 - Vector Modules
Vector is a category of Telect active products for bi-directional electrical/optical, point-to-point
signal conversion. Telect manufactures Vector Optical Transport Modules (OTM) for Ethernet
systems, as well as for basic (T1 / E3 / STS-1) systems, with either single-mode or multi-mode
Telect, Inc. • USA +1.509.926.6000 • Mexico +52.33.3836.37.52
www.telect.com • © 2010 Telect, Inc., All Rights Reserved, 127092-1 A0.1
Page 1-1
SC or ST optical connections. Telect also offers an Optical Protection Module (OPM), allowing
automatic or manual switchover from the active OPM to a standby OPM in basic systems.
Features common to all Vector modules:
•
TFA Optic Connections and LEDs
•
Status & Loopback LEDs
•
Automatic Line Build Out
•
Major & Power Remote Alarming
•
Low Power — Low Heat Dissipation
•
Wide operating range: 20 to 60Vdc
•
Approved: FCC Part 15, Class A; UL/CSA 1950; NEBS Level 3
Vector Modules fit Telect’s Broadband Connectivity System II (BCSII) chassis panels for
standard 19 in. and 23 in. racks, such as the one featured on the front cover. (The Front cover
features a 19-in. BCSII Horizontal Chassis with six Basic OTMs and two E-Vector OTMs.) Vector
Modules fit alongside Telect’s DSX and DNI modules in all multifunction BCSII chassis with
power (-48V or 24V) hookup. (See Chapter 5 for details on applicable BCSII chassis.) Telect
offers both vertical (2RU) and horizontal (1RU) BCSII chassis panels along with special Vector
Fiber/Copper Trays for convenient cable management.
For Telect’s MIX 56 (Telect’s DS1/DS3, multiplexer/demultiplexer panels), Telect offers a
SideCar chassis option that mounts to a MIX panel in a 23-in. rack. SideCar holds up to two
Vector modules and extends the versatility of the MIX 56 by adding two-way optical-to-electrical
conversion of DS3 I/O.
Vector is intended for both large- and small-site applications. But for LANs, campuses, cell-tower
base installations, co-locates, and other remote sites, Telect also offers this same powerful
electrical/optical connectivity in a standalone configuration for surface mounting, such as on a
wall, or on the side of a cabinet, or on a desktop. These standalone units handle a pair of OTMs
or OPMs, powered from either standard office Vdc or from a power supply that converts Vdc
from a 120Vac utility receptacle. (See Chapter 8, “Accessories”.) Standalone Wall-Mount and
Desk-Mount chassis include built-in cable management.
Telect, Inc. • USA +1.509.926.6000 • Mexico +52.33.3836.37.52
www.telect.com • © 2010 Telect, Inc., All Rights Reserved, 127092-1 A0.1
Page 1-2
Figure 2 - Telect Wall-Mount Chassis with 1 Basic OTM & a Front Spacer (left)
Telect MIX 28 with a Pair of Basic OPMs in a SideCar Chassis (right)
Telect, Inc. • USA +1.509.926.6000 • Mexico +52.33.3836.37.52
www.telect.com • © 2010 Telect, Inc., All Rights Reserved, 127092-1 A0.1
Page 1-3
1.2 Vector Basic Optical Transport Module (OTM)
Telect’s basic Vector Optical Transport Module (OTM) converts a local electrical NE signal to a
single- or multi-mode T3, E3, or STS-1 optical signal and transmits that to a receiving OTM up to
50 km away. The remote OTM receives the optical signal and reconverts to electrical, sending
that to a remote NE. Conversely, the remote OTM converts and transmits optical signals to the
local OTM.
SC Connectors
(Shown Without Plugs)
ST Connectors
(Shown Without Plugs)
Separate XMT and RCV Connectors
SC Connectors
(Shown With Plugs)
Single Fiber I/O
Figure 3 - Vector Basic Optical Transport Module (OTM)
Basic OTM Model No.
Description
Module Only
710-3201-1001-U
Multi-Mode with ST Connectors
710-3201-1002-U
Multi-Mode with SC Connectors
710-3201-2001-U
Single Mode with ST Connectors
710-3201-2002-U
Single Mode with SC Connectors
710-3201-2102-U
Single Mode with SC Connectors, Hardened1
Matched Pair of Bi-Directional Single-Fiber Modules2
710-3201-4002-U
Single Mode with SC Connectors
Module (1) & Front Spacer in a Standalone Wall-Mount Chassis
710-1001-1001-U
Multi-Mode with ST Connectors
710-1001-1002-U
Multi-Mode with SC Connectors
710-1001-2001-U
Single Mode with ST Connectors
710-1001-2002-U
Single Mode with SC Connectors
710-1001-2102-U
Single Mode with SC Connectors, Hardened1
1. Extended operating temperature range.
2. Each transmits and receives at different, complementary 1530 nm and 1310 nm wavelengths.
Telect, Inc. • USA +1.509.926.6000 • Mexico +52.33.3836.37.52
www.telect.com • © 2010 Telect, Inc., All Rights Reserved, 127092-1 A0.1
Page 1-4
1.2.1 Basic OTM Features
NOTE: See Page 1-2 for common Vector features.
•
Compatible with BCSII chassis
•
Selectable T3, E3, and STS-1 signal rates
•
ST or SC optical connectors
•
Single- or multimode optical signals.
•
Can be up to 900 ft (734 or RG-59 coaxial cable)
from remote NE
•
Point-to-point applications up to 50 km
•
Front mini-WECO monitor jack
•
LED indicators for power failure and loss of optical/electrical signals
•
Built-in electrical/optical loopback — selectable at front of module — along with status LEDs
Telect, Inc. • USA +1.509.926.6000 • Mexico +52.33.3836.37.52
www.telect.com • © 2010 Telect, Inc., All Rights Reserved, 127092-1 A0.1
Page 1-5
Figure 4 - OTM With Separate XMT
and RCV SC Connectors
1.2.2 Basic OTM Block Diagram
REAR
BATTA
RTNA
BATTB
RTNB
FRONT
POWER
SUPPLY
+3.3V
ALRM
RED
FIBER
GRN
E3
T3
STS-1
PWR FAIL
MAJ
GRN
PWR
DIP SWITCH
ALARM
CIRCUIT
MICRO
CNTRLR
COM
Not Used
ALM1
ALM2
CGND
ALM3
GRN
COAX
TAOS
IM_OK
YOUR_OK
MY_STAT
YOUR_STAT
CIRCUIT GND
DECODER
CLOCK
RECOVRY
LOOPBACK
SWITCH
CLOCK
GNRTR
OPTICAL
TRNSCVR
XMIT
RCV
E3/T3/STS1
TRNSCVR
SC
RCV
SC
XMT
*
ENCODER
RCV MON
* OTM with separate XMT and RCV connectors is shown. Single-Fiber OTM transmits/receives
using a single SC connector at each end.
Telect, Inc. • USA +1.509.926.6000 • Mexico +52.33.3836.37.52
www.telect.com • © 2010 Telect, Inc., All Rights Reserved, 127092-1 A0.1
Page 1-6
1.2.3 Specifications (Basic OTM & Basic OPM)
The tables that follow contains specification for both basic OTM and OPM. (OPMs are covered in
the next subsection.)
Electrical Interface
Specifications
Receive Equalization:
0 to 900 ft RG-59 (or equivalent)
Input Impedance:
75Ω
Output Impedance:
75Ω
Monitor Level:
21 dB +1.5 dB below signal level
Format Selection:
Manually selected prior to power up
Error Rate (max.):
1x10⁻¹⁰, with 23 dB fiber attenuation, single-mode glass fiber, 0 to 50°C
Return Loss:
<-26 dB 300kHz to 30MHz, single OTM or OPM
<-16 dB 300kHz to 30MHz, redundant OPM
Signal Formats
Specifications
T3
Input Data Rate:
44.736 Mbps +100 ppm
Input Data Format:
Bipolar with B3ZS coding
Jitter Tolerance:
Meets GR-499-CORE requirements
Output Data Rate:
Same as input signal, transmit clock is recovered from input signal
Output Data Format:
Bipolar with B3ZS coding
Output Pulse Shape:
Complies with GR-499-CORE and ANSI T1.102_1993
STS-1
Input Data Rate:
51.84 Mbps +100 ppm
Input Data Format:
Bipolar with B3ZS coding
Jitter Tolerance:
Meets GR-499-CORE requirements
Output Data Rate:
Same as input signal, transmit clock is recovered from input signal
Output Data Format:
Bipolar with B3ZS coding
Output Pulse Shape:
Complies with GR-CORE-253
E3
Input Data Rate:
34.368 Mbps +100 ppm
Input Data Format:
AMI with HDB3 coding
Jitter Tolerance:
Meets ITU-T G.832_1993 requirements
Output Data Rate:
Same as input signal, transmit clock is recovered from input signal
Output Data Format:
AMI with HDB3 coding
Output Level:
1.00 Vpk, +10%
Output Pulse Shape
Complies with ITU-T G.703
Telect, Inc. • USA +1.509.926.6000 • Mexico +52.33.3836.37.52
www.telect.com • © 2010 Telect, Inc., All Rights Reserved, 127092-1 A0.1
Page 1-7
Environmental
Specifications
Modules Designed for Moderate Site Conditions
Operating Temp Range:
0 to 50°C ambient
Storage Temp Range:
–55°C to 85°C
Operating Humidity:
25% to 80%, noncondensing
Storage Humidity:
< 90%
Heat Dissipation:
706W/m2 per meter @ ambient of 19°C (66°F)
Hardened Modules Designed for Extreme Conditions
Operating Temp Range:
–40°C to 65°C ambient
Storage Tempe Range:
–55°C to 85°C ambient
Operating Humidity:
5% to 95%, noncondensing
Storage Humidity:
< 95%
Altitude:
0–10,000 ft (3,048m), operating
Optical Interface
Specifications
Multimode Option
Range:
1.5 km (11 dB link budget)
Optical Source:
LED, 1300 nm
Transmit Pwr (Nom):
–16 dBm, into 1m 62.5/125 µm multimode glass fiber,
all-ones electrical signal, 25°C
Transmit Pwr (Min.):
–20 dBm, into 1m 62.5/125 µm multimode glass fiber,
all-ones elec signal, 0 to 50°C ambient
Optical Receiver:
PIN diode and integral amplifier
Receiver Range:
–11 dBm to –31 dBm
Link Loss Budget:
11 dB
Connector:
SC, both transmit and receive, ST optional
Single Mode Option
Range:
50 km (19 dB link budget)
Optical Source:
Laser, 1310 nm nominal wavelength
Spectral Width:
+50 nm max
Transmit Pwr (Nom.):
–11 dBm, into 1m 9 µm single-mode glass fiber,
all-ones electrical signal, 25°C
Transmit Pwr (Min.):
–15 dBm, into 1m 9 µm single-mode glass fiber,
all-ones electrical signal, 0 to 50°C ambient
Extinction Ratio:
8.2 dB min.
Laser Safety:
Unconditionally eyesafe laser, IEC 825/CDRH Class 1 compliant
Optical Receiver:
PIN diode and integral amplifier
Telect, Inc. • USA +1.509.926.6000 • Mexico +52.33.3836.37.52
www.telect.com • © 2010 Telect, Inc., All Rights Reserved, 127092-1 A0.1
Page 1-8
Optical Interface
Specifications
Receiver Range:
–8 dBm to –34 dBm
Link Loss Budget:
19 dB
Connector:
SC, XMT & RCV (ST optional on OTMs and OPMs with separate XMT &
RCV connectors)
Power
Specifications
Powering Architecture:
Single DC-DC converter
Redundant Power:
Chassis accommodate A and B battery inputs; input are diode OR’ed on
the module
Operating Voltage,
Chassis:
20 to 60Vdc
Current (Max.):
180mA @ 20Vdc
Remote Alarm
Indicators
Specifications
PWR Alarm
Loss of 3.3V on-board power, normally open contact, common output at
rear of chassis, “PWR ALARM”
MAJ Alarm
Condition determined at power-up, normally open contact, common output at rear of chassis, “MAJ ALARM”
OPM Redundancy
Specifications
Active Module:
Right-hand module, viewed from the front of the chassis, is the
factory default
Automatic Switch:
Switch of data traffic from active to standby modules initiated by
detection of loss of optical or electrical signal
Manual Switch:
Pressing MAN (“Manual”) on active module forces switchover to standby
data link if standby modules are installed and functioning
Switch Timing:
<5 ms, applies to hardware or fiber data link failure
Telect, Inc. • USA +1.509.926.6000 • Mexico +52.33.3836.37.52
www.telect.com • © 2010 Telect, Inc., All Rights Reserved, 127092-1 A0.1
Page 1-9
1.3 Vector Basic Optical Protected Module (OPM)
Vector OPMs are designed for use in pairs at each end of the optical link. The additional OPM at
each end is an automatic standby to protect against signal loss on the data link or failure of the
active OPMs. Automatic switchability between active and standby OPMs also allows “hot
swapping” without service interruptions.
SC Connectors
ST Connectors
(Shown with Optical Plugs) (Shown without Optical Plugs)
SC Connectors
(Shown without Optical Plugs)
Single Fiber I/O
Separate XMT and RCV Connectors
Figure 5 - Vector Basic Optical Protected Module (OPM)
Basic OPM Model No.
Description
Modules (2) with a Backplane Kit for a BCSII Chassis or MIX SideCar
710-3201-1221-U
Multi-Mode with ST Connectors
710-3201-1222-U
Multi-Mode with SC Connectors
710-3201-2221-U
Single Mode with ST Connectors
710-3201-2222-U
Single Mode with SC Connectors
710-3201-2122-U
Single Mode with SC Connectors, Hardened1
Two Matched Pairs of Bi-Directional Single-Fiber Modules with Backplane Kits2
710-3201-4222-U
Single Mode with SC Connectors
Modules (2) in Standalone Wall-Mount Chassis
710-1001-1221-U
Multi-Mode with ST Connectors
710-1001-1222-U
Multi-Mode with SC Connectors
710-1001-2221-U
Single Mode with ST Connectors
710-1001-2222-U
Single Mode with SC Connectors
710-1001-2122-U
Single Mode with SC Connectors, Hardened1
1. Extended operating temperature range.
2. Each pair transmits and receives at different, complementary 1530 &
1310 nm wavelengths.
Telect, Inc. • USA +1.509.926.6000 • Mexico +52.33.3836.37.52
www.telect.com • © 2010 Telect, Inc., All Rights Reserved, 127092-1 A0.1
Page 1-10
1.3.1 Basic OPM Features
NOTE: See Page 1-2 for common Vector features.
•
Loss of signal protection
•
Manual and automatic switchover between active and standby modules
•
Compatible with BCSII, wall-mount, desk-mount, &
Designation Strip
MIX SideCar chassis
•
Jack for Monitoring
Signal from NE
Alarm/Alarm Cutoff
Status LEDs
Selectable T3, E3, and
STS-1 signal rates
Alarm Cutoff Switch
Active/Standby
Status LEDs
•
ST or SC optical connectors
•
Single- or multimode
•
Can be located up to 900 ft from remote NE (using
734 or RG-59 coaxial cable)
•
Point-to-point applications up to 50 km
•
Front mini-WECO monitor jack for coax input
(received elec signal)
Manual Switch to
Change Status
COAX
Coax/Fiber Loopback
Status LEDs
FIBER
LOOPBACK
Switch
RCV
Optical Connectors
•
LED indicators for loss of optical/electrical signal
along with manual alarm cutoff (ACO) switch and
status LED
•
Built-in electrical/optical loopback — selectable at front of module — along with status LEDs
Telect, Inc. • USA +1.509.926.6000 • Mexico +52.33.3836.37.52
www.telect.com • © 2010 Telect, Inc., All Rights Reserved, 127092-1 A0.1
Page 1-11
Figure 6 - OTM With Separate XMT
and RCV SC Connectors
1.3.2 Basic OPM Block Diagram
REAR
FRONT
BATTA
RTNA
BATTA
RTNA
ACO AMBER
POWER
SUPPLY
DIP SWITCH
+3.3V
E3
T3
ACTIVE
GRN/RED
STS-1
PWR FAIL
MAJ
RED
ALRM
TAOS
ALARM
CIRCUIT
MICRO
CNTRLR
COM
CGND
STANDBY GRN/RED
ALM1
GRN
FIBER
ALM2
ALM3
GRN
COAX
RVRT
IM_OK
YOUR_OK
not used
MY_STAT
YOUR_STAT
CIRCUIT GND
MANUAL
SWITCH
ALRM CUTOFF
SWITCH
DECODER
CLOCK
RECOVRY
LOOPBACK
SWITCH
CLOCK
GNRTR
OPTICAL
TRNSCVR
XMIT
RCV
E3/T3/STS1
TRNSCVR
SC
RCV
SC
XMT
*
ENCODER
RCV MON
* OPM with separate XMT & RCV connectors is shown. Single-Fiber OPM transmits/receives
using a single SC connector at each end.
1.3.3 Basic OPM Specifications
See the tables in Section “1.2.3 Specifications (Basic OTM & Basic OPM)” on page 7.
Telect, Inc. • USA +1.509.926.6000 • Mexico +52.33.3836.37.52
www.telect.com • © 2010 Telect, Inc., All Rights Reserved, 127092-1 A0.1
Page 1-12
1.4 E-Vector Optical Transport Module
Telect’s E-Vector Optical Transport Module (OTM) converts a local 10/100 Ethernet electrical
signal to a single- or multmode, Ethernet optical signal and transmits that to a receiving E-Vector
OTM up to 30 km away. The remote E-Vector OTM reconverts optical 10/100 Ethernet to
electrical 10/100 Ethernet. Conversely, the remote E-Vector OTM transmits optical signals to the
local E-Vector OTM.
ST Connectors
SC Connectors
Figure 7 - E-Vector OTM
E-Vector OTM Model No.
Description
Module Only
710-3201-1301-E
Multi-Mode with ST Connectors
710-3201-1302-E
Multi-Mode with SC Connectors
710-3201-2301-E
Single Mode with ST Connectors
710-3201-2302-E
Single Mode with SC Connectors
Module (1), Front Spacer, & Rear Spacers (2) in a Standalone Wall-Mount Chassis
710-1001-1301-E
Multi-Mode with ST Connectors
710-1001-1302-E
Multi-Mode with SC Connectors
Telect, Inc. • USA +1.509.926.6000 • Mexico +52.33.3836.37.52
www.telect.com • © 2010 Telect, Inc., All Rights Reserved, 127092-1 A0.1
Page 1-13
E-Vector OTM Model No.
Description
710-1001-2301-E
Single Mode with ST Connectors
710-1001-2302-E
Single Mode with SC Connectors
1.4.1 E-Vector Features
Designation Strip
NOTE: See Page 1-2 for common Vector features.
•
•
RJ45 Connector
Compatible with BCSII, wall-mount, desk-mount, and
MIX SideCar chassis
Manual or automatic Ethernet signal negotiation —
selectable on front of module — along with
indicator LEDs
•
Automatic Ethernet speed selection (10 /100 Mbps),
along with indicator LEDs
•
ST or SC optical connectors
•
Single- or multimode op signals.
•
Can be located up to 100 m from remote network element (using Cat 5 cable)
Loopback LEDs
FIBER RJ45
10 / 100 Mbps
Status LEDs
100
10
MAN
RJ45 & Fiber
Linkup & Activity
Status LEDs
LOOPBACK
Switch
AUTO
RJ45
LINK
ACTV
FIBER
MAN/AUTO
Mode LEDs
MANual/AUTO
Mode Switch
Optical Connectors
Figure 8 - E-Vector Features
•
Point-to-point applications up to 30 km
•
Low-profile, shielded RJ45 connectors for either shielded or unshielded twisted pairs
•
Automatic full- or half-duplexing
•
Status LEDs for fiber and RJ45 linking and activity
•
LED indicators for power and loss of optical and electrical signal
•
Built-In electrical/optical loopback — selectable at front of module — along with status LEDs
Telect, Inc. • USA +1.509.926.6000 • Mexico +52.33.3836.37.52
www.telect.com • © 2010 Telect, Inc., All Rights Reserved, 127092-1 A0.1
Page 1-14
1.4.2 E-Vector Block Diagram
REAR
FRONT
BATTA
RTNA
BATTB
RTNB
FIBER
POWER
SUPPLY
PWR FAIL
MAJ
ALARM
CIRCUIT
COM
GRN
LOOPBACK
+3.3V
PCB SWITCHES
FIBER ALM
UTP ALM
RJ-45
GRN
10
GRN
100
GRN
AUTO
GRN
MAN
GRN
ACTIVE
GRN
MODE
FULL/HALF
TRANS/NON
FIBER
LINK GRN/RED
FRONT PANEL
SWITCHES
AUTO / MANUAL
CGND
LOOPBACK
TRANSFORMER
ETHERNET
MEDIA
CONVERTER
CLOCK
GNRTR
Figure 9 - Schematic
Telect, Inc. • USA +1.509.926.6000 • Mexico +52.33.3836.37.52
www.telect.com • © 2010 Telect, Inc., All Rights Reserved, 127092-1 A0.1
Page 1-15
ACTIVE
GRN
RJ-45
LINK GRN/RED
RJ45
OPTICAL SC
TRNSCVR SC
RCV
XMT
1.4.3 E-Vector Specifications
Electrical Interface
Specifications
Protocol
ANSI/IEEE 802.3
Data Rate
10 / 100 Mbps
Signaling
10BASE-T, 100BASE-TX
Connection Rate
•
Auto negotiate to greatest common denominator of end network interfaces, or
•
Manual mode
Segment Length (Max.)
100 m, Cat 5 (shielded or unshielded)
Interface Connector
RJ45, Shielded
RJ45 Pins
1 — Transmit +
2 — Transmit 3 — Receive +
4 — HF Termination
5 — HF Termination
6 — Receive 7 — HF Termination
8 — HF Termination
Environmental
Specifications
Operating Temperature
Range
0 to 50°C ambient
Storage Temperature
Range
-55°C to 85°C
Operating Humidity
25% to 80%, noncondensing
Storage Humidity
<90%
Heat Dissipation
15W/ft2 per foot @ ambient 26°C
Optical Interface
Specifications
Optical Source
Laser, 1310 nm (nominal wavelength)
Spectral Width
± 50 nm (max.)
Transmit Power
(Nominal)
-11 dBm, into 1m 9µm single- mode glass fiber, 25°C
Transmit Power
(Minimum)
-15 dBm, into 1m 9µm single- mode glass fiber, 0 to 50°C ambient
Optical Distance
Up to 30 km
Extinction Ratio
8.2 dB (min.)
Laser Safety
Unconditionally eyesafe laser, IEC 825/CDRH Class 1 compliant
Telect, Inc. • USA +1.509.926.6000 • Mexico +52.33.3836.37.52
www.telect.com • © 2010 Telect, Inc., All Rights Reserved, 127092-1 A0.1
Page 1-16
Optical Interface
Specifications
Optical Receiver
PIN diode and integral amplifier
Receiver Dynamic Range
-8 dBm to -34 dBm
Link Loss Budget
19 dB
Connector
SC or ST
Physical
Specifications
Dimensions
Width, .650 in. (16.51 mm)
Height, 3.895 in. (98.93 mm)
Depth, 6.838 in. (173.69 mm)
Weight
.25 lb (~115 g)
Power
Specifications
Powering Architecture
Single DC-DC converter
Redundant Power
Chassis accommodates A and B battery inputs; inputs are diode “OR’ed”
on the module
Operating Voltage,
Chassis
20 to 60 Vdc
Current (Max.)
110 mA @ 18 Vdc per module
Remote Alarm
Indicators
Specifications
PWR Alarm
Loss of 3.3V on-board power, normally open contact, common output at
rear of chassis, “PWR ALARM”
MAJ Alarm
Condition determined at power-up, normally open contact, common output at rear of chassis, “MAJ ALARM”
1.5 Technical Support (USA)
By e-mail: [email protected]
By phone: 888-821-4856 or 509-921-6161
Telect, Inc. • USA +1.509.926.6000 • Mexico +52.33.3836.37.52
www.telect.com • © 2010 Telect, Inc., All Rights Reserved, 127092-1 A0.1
Page 1-17
This page intentionally left blank.
Telect, Inc. • USA +1.509.926.6000 • Mexico +52.33.3836.37.52
www.telect.com • © 2010 Telect, Inc., All Rights Reserved, 127092-1 A0.1
Page 1-18
Chapter 2: Vector Basic OTM
2.1 Overview
SC Connectors
(Shown Without Plugs)
ST Connectors
(Shown Without Plugs)
Separate XMT and RCV Connectors
SC Connectors
(Shown With Plugs)
NOTE: Shown without
protective “dust-cover”
plugs. All Vector
products include plugs.
Single Fiber I/O
Figure 10 - Vector Basic OTM
!
CAUTION
CAUTION! Only qualified technicians may install and maintain this product.
!
ALERT
ALERT! These instructions presume you have verified that the Telect equipment being installed is compatible with the rest of the system, including power, ground, circuit protection, signal characteristics, equipment from other vendors, and local codes or ordinances.
2.2 Installation Tools & Equipment
You need only standard tools. Use listed components (UL-recognized, CSA, ETL, TUV agency)
and tools.
2.3 Inspection
Compare the contents of the Vector OTM shipping container with the packing list. Call Telect if
you are missing anything.
Telect is not liable for shipping damage.
If the shipping container is damaged, keep it for the carrier’s inspection. Notify the carrier and call
Telect’s Customer Service Department: 1-800-551-4567 or 1-509-926-6000.
Telect, Inc. • USA +1.509.926.6000 • Mexico +52.33.3836.37.52
www.telect.com • © 2010 Telect, Inc., All Rights Reserved, 127092-1 A0.1
Page 2-19
Keep the container until you have checked equipment operation. If you experience any kind of
problem, call Telect’s Customer Service Department. Use the original, undamaged container if
you are instructed to return the Vector OTM to Telect.
2.4 Installation Setup — Setting PCB Switches
!
ALERT
ALERT! The modules are sensitive to static. Wear a grounded wrist strap and perform any
other available ESD procedures when handling them.
OFF
ON
Figure 11 - Setting PCB Switches
PCB Switches
ON
OFF
E3*
E3 rate selected
Not selected
T3*
T3 rate selected (default)
Not selected
STS-1*
STS-1 rate selected
Not selected
N/A
—— not used ——
ALM1
Major Alarm Contacts Close on Local
Loss of Optical Signal
Major Alarm Relay Unaffected by
Loss of Optical Signal
ALM2
Major Alarm Contacts Close on Local
Loss of Electrical Signal
Major Alarm Relay Unaffected by
Loss of Electrical Signal
Telect, Inc. • USA +1.509.926.6000 • Mexico +52.33.3836.37.52
www.telect.com • © 2010 Telect, Inc., All Rights Reserved, 127092-1 A0.1
Page 2-20
PCB Switches
ON
OFF
ALM3
Major Alarm Contacts Close on FarEnd Loss of Signal**.Optical LOS
Causes OPM to Transmit Optical All
One Alarm Signal to Far-End OPM.
Major Alarm Relay Unaffected by FarEnd Loss of Signal**. Optical All-Ones
Alarm Signal is Not Transmitted on an
Optical LOS.
TAOS
Transmit an Electrical All-Ones Alarm
Signal on Local Loss of Optical Signal
No Electrical All-One Signal on an
Optical Loss of Signal
*Only one of these can be selected. If none selected, Vector defaults to T3.
**Far-end loss of signal is detected by locally receiving an all-ones optical signal.
2.5 Installation
!
ALERT
ALERT! The modules are sensitive to static. Wear a grounded wrist strap and perform any
other available ESD procedures when handling them.
OTMs may be installed in any or all slots in a 19-in. or 23-in. BCSII chassis, or in an OTM
Standalone Wall-Mount or Desk-Mount chassis, or in a Telect SideCar chassis on the left side of
a Telect MIX 56 or MIX 28. When installing less than a full complement of OTMs, prefer the
extreme right or left end of the chassis for best heat dissipation.
The temperature at the faceplate of an OTM can rise to 49°C (120°F) at an ambient temperature
of 19°C (66°F). If you fully load a BCSII chassis with OTMs, consider the effect that heat may
have on other shelves above the full-loaded OTM BCSII. If necessary, either leave 2RU of space
(Either leave it vacant or install shelves that dissipate no heat.) above that BCSII chassis for heat
dissipation or install a 1RU Telect heat baffle above that BCSII chassis.
(See Chapter 8, “Accessories.”)
Procedure steps:
1. Identify both modules to be used — they are installed in pairs.
2. Set switch options on the OTM PCB. (See the preceding page.)
3. If applicable, if you are adding a second OTM to a wall-mount chassis, remove the blank cover at the front of the wall-mount chassis.
4. Slide module into chassis card guides; press into rear connectors.
The illustrations that follow show typical installations.
5. Secure with top screw on module faceplate.
Telect, Inc. • USA +1.509.926.6000 • Mexico +52.33.3836.37.52
www.telect.com • © 2010 Telect, Inc., All Rights Reserved, 127092-1 A0.1
Page 2-21
BCSII Chassis
Model 010-0000-3201BCS
Wall-Mount Chassis
Model 710-1001-2002-U
Figure 12 - Installing Basic OTM in a BCSII Chassis (left) &
Installing Basic OTM in a Standalone Wall-Mount Chassis (right)
Desk-Mount Chassis
Model 710-0000-1001
MIX 28 With SideCar
Model 747-2801-000_
Figure 13 - Installing Basic OTM in a MIX 28 SideCar (left) &
Installing Basic OTM in a Standalone Desk-Mount Chassis
Telect, Inc. • USA +1.509.926.6000 • Mexico +52.33.3836.37.52
www.telect.com • © 2010 Telect, Inc., All Rights Reserved, 127092-1 A0.1
Page 2-22
6. Identify BNC I/O ports for the card position on the backplane and install I/O cables from the
network element. (IX and OX cross-connect backplane BNC connectors for this card position
will not be used. You may want to insert terminating plugs into these unused BNCs.)
Rear of Chassis
NE-1
RCV
XMT
OUT (TX)
IN (RX)
Optical fiber cable length:
Up to 1.5 km for multimode
Up to 50 km for single mode
Rear of Chassis
OX
NE-2
RCV
XMT
OUT (TX)
IN (RX)
Figure 14 - Installing I/O cables
Telect, Inc. • USA +1.509.926.6000 • Mexico +52.33.3836.37.52
www.telect.com • © 2010 Telect, Inc., All Rights Reserved, 127092-1 A0.1
Page 2-23
Rear of Chassis
NE-1
XMT
RCV
OUT (TX) @ 1530 nm
IN (RX) @ 1310 nm
Rear of Chassis
Optical fiber cable length up to 50 km
NE-2
XMT
RCV
OUT (TX) @ 1310 nm
IN (RX) @ 1530 nm
Figure 15 - Installing I/O cables
7. After having installed OTMs at both the local and remote ends of the optical linkup, remove
the protective “dust-cover” plugs at the fronts of the OTMs and connect optical data link connectors (XMT and RCV) to the OTMs.
8. If applicable, route optical cables as specified in either Chapter 5 (BCSII with Vector Fiber
Tray) or Chapter 6 (Standalone Wall-Mount chassis).
For MIX SideCar and desk-mount applications, please refer to one of the following for power,
alarm, and DS3 cabling:
•
MIX 56 SideCar User Manual (Telect Publication 124297)
•
Vector Standalone Desk-Mount Chassis Installation Guide
(Telect Publication 128077)
9. Record the installation as required by company procedures.
10. Test using standard procedures in your operating company.
This procedure is complete.
Telect, Inc. • USA +1.509.926.6000 • Mexico +52.33.3836.37.52
www.telect.com • © 2010 Telect, Inc., All Rights Reserved, 127092-1 A0.1
Page 2-24
2.6 Operation
2.6.1 Control & Status LEDs
Designation Strip
2.6.1.1 Power (PWR) LED
Jack for Monitoring
DS3 Output from NE
•
GREEN — BATT A and/or BATT B power is on.
•
Off — BATT A and BATT B power are off.
Power Status LED
2.6.1.2 Alarm (ALRM) LED
•
Coax/Fiber Loopback
Status LEDs
RED (Solid) — Major alarm condition, either optical
or electrical LOS, or both. (Also, the major alarm
relay will close the normally open major alarm contacts to set the MAJ alarm signal, depending on
ALM1 and/or ALM2.)
The settings of ALM1 and ALM2 have no effect on
the ALM LED.
•
RED (Blinking) — Indicates that an alarm has been
set at the far end.
Alarm Status LED
LOOPBACK
Switch
Optical Connectors
Figure 16 - OTM With Separate XMT
and RCV SC Connectors)
An electrical loss on one end will cause the ALM LED on that end to turn on solid and to send
an all-ones signal to the other end. The ALM LED on that other end will blink indicating that
the problem was detected at the far end.
The status of the ALM3 setting has no effect on whether the ALM LED blinks on a far-end
loss of signal.
•
Off — No major alarms. The ALM LED goes off if the condition causing a major alarm
is remedied.
If both local and far-end alarms occur, the ALM LED will light solid red. A local alarm will take
priority over a remote alarm.
2.6.1.3 COAX LED
•
GREEN — Electrical loopback mode. Electrical RCV input is internally looped back to electrical XMT output.
•
Off — Not in coax loopback mode
2.6.1.4 FIBER LED
•
GREEN — Fiber loopback mode. Optical RCV input is internally looped back to optical
XMT output.
•
Off — Not in fiber loopback mode
Telect, Inc. • USA +1.509.926.6000 • Mexico +52.33.3836.37.52
www.telect.com • © 2010 Telect, Inc., All Rights Reserved, 127092-1 A0.1
Page 2-25
2.6.2 LOOPBACK Mode Switch
•
Pressing the recessed LOOPBACK switch causes the OTM to switch from normal mode to
fiber loopback. In the fiber loopback mode, the RCV optical input is internally routed to the
XMT output of the same OTM.
•
Pressing LOOPBACK a second time switches from fiber to coax loopback. In the coax loopback mode, the RCV electrical input is internally routed to the XMT input of the same OTM.
•
Pressing LOOPBACK a third time returns the OTM to normal mode.
2.6.3 Alarm Relays
Alarm relays on the OTM cause normally open (NO) contacts to close on the local OTM. The
contacts are connected to terminals on the rear of the chassis.
•
A POWER FAIL alarm will occur for a power loss of 3.3 Vdc on both BATT A and BATT B. On
power failure, the PWR LED will extinguish and the alarm relay de-energizes to close normally open (NO) contacts. The contacts are connected to ALM PWR and ALM COM (common) located on the rear of the chassis.
•
A MAJOR alarm is used to indicate a loss of either electrical or optical signal.
− Local loss of electrical signal will turn on the local ALRM LED. If the ALM1 switch is ON
(closed), the loss of a local electrical signal will energize the major alarm relay controlling
the ALM MAJ contact on the rear of the chassis.
− If the local OTM detects a loss of optical signal, the local OTM turns on the ALRM LED. If
the ALM2 switch is ON (closed), the loss of the optical signal will energized the major
alarm relay controlling the ALM MAJ contacts on the rear of the chassis.
2.6.4 Monitoring
The monitor jack on the module faceplate accepts a mini-WECO jack plug. You can use this jack
for nonintrusive monitoring of the OUT channel from the remote network element connected to
the OUT connector (O) on the chassis backplane.
Telect, Inc. • USA +1.509.926.6000 • Mexico +52.33.3836.37.52
www.telect.com • © 2010 Telect, Inc., All Rights Reserved, 127092-1 A0.1
Page 2-26
Chapter 3: Vector Basic OPM
3.1 Overview
SC Connectors
ST Connectors
(Shown with Optical Plugs) (Shown without Optical Plugs)
SC Connectors
(Shown without Optical Plugs)
Single Fiber I/O
Separate XMT and RCV Connectors
Figure 17 - Vector Basic OPM
OPMs plug into a special backplane that allows the twin OPMs to share the same network
element I/O (RCV/XMT) signals at the rear of the chassis.
The chassis must have been previously modified either at the factory or on-site to accommodate
this OPM pair:
•
BSCII chassis, Desk-Mount, and MIX SideCar chassis are modified on-site to accommodate
the special backplane.
•
Standalone Wall-Mount chassis are modified at the factory to specifically accommodate
twin OPMs.
Once modified, either at the factory or on-site, those slots are practical only for OPMs. Although one basic OTM can be inserted in either OPM slot to function as a local or remote, unprotected terminus, the adjacent OPM slot at that terminus would have to remain empty.
Just as with OTMs on opposite ends of an optical data link, twin OPMs on the both ends of
redundant optical data links should have the same circuit board switch settings. (The speed
settings [E3, T3, STS-1] must be the same on all OTMs and OPMs at the ends of linkups.)
!
CAUTION
CAUTION! Only qualified technicians may install and maintain this product.
Telect, Inc. • USA +1.509.926.6000 • Mexico +52.33.3836.37.52
www.telect.com • © 2010 Telect, Inc., All Rights Reserved, 127092-1 A0.1
Page 3-27
!
ALERT
ALERT! These instructions presume you have verified that the Telect equipment being installed is compatible with the rest of the system, including power, ground, circuit protection, signal characteristics, equipment from other vendors, and local codes or ordinances.
3.2 Installation Tools & Equipment
You need only standard tools. Use listed components (UL-recognized, CSA, ETL, TUV agency)
and tools.
3.3 Inspection
Compare the contents of the Vector OPM shipping container with the packing list. Call Telect if
you are missing anything.
Telect is not liable for shipping damage.
If the shipping container is damaged, keep it for the carrier’s inspection. Notify the carrier and call
Telect’s Customer Service Department: 1-800-551-4567 or 1-509-926-6000.
Keep the container until you have checked equipment operation. If you experience any kind of
problem, call Telect’s Customer Service Department. Use the original, undamaged container if
you are instructed to return the Vector OPM to Telect.
3.4 Installation Setup — Setting PCB Switches
!
ALERT
ALERT! The modules are sensitive to static. Wear a grounded wrist strap and perform any
other available ESD procedures when handling them.
Telect, Inc. • USA +1.509.926.6000 • Mexico +52.33.3836.37.52
www.telect.com • © 2010 Telect, Inc., All Rights Reserved, 127092-1 A0.1
Page 3-28
OFF
ON
Figure 18 - Setting PCB Switches
PCB Switches
ON
OFF
E3*
E3 rate selected
Not selected
T3*
T3 rate selected (default)
Not selected
STS-1*
STS-1 rate selected
Not selected
SW4
—— not used ——
ALM1
Major Alarm Contacts Close on Local
Loss of Optical Signal
Major Alarm Relay Unaffected by Loss
of Optical Signal
ALM2
Major Alarm Contacts Close on Local
Loss of Electrical Signal
Major Alarm Relay Unaffected by Loss
of Electrical Signal
ALM3
Major Alarm Contacts Close on FarEnd Loss of Signal**. Optical LOS
Causes OPM to Transmit Optical All
One Alarm Signal to Far-End.OPM
Major Alarm Relay Unaffected by FarEnd Loss of Signal**. Optical All Ones
Alarm Signal is Not Transmitted on an
Optical LOS.
TAOS
Transmit an Electrical All-Ones Alarm
Signal on Local Loss of Optical Signal
No Electrical All-Ones Signal is Sent
on an Optical Loss of Signal
*Only one of these can be selected. If none selected, Vector defaults to T3.
**Far-end loss of signal is detected by locally receiving an all-ones optical signal.
Telect, Inc. • USA +1.509.926.6000 • Mexico +52.33.3836.37.52
www.telect.com • © 2010 Telect, Inc., All Rights Reserved, 127092-1 A0.1
Page 3-29
3.5 Installation
!
ALERT
ALERT! The modules are sensitive to static. Wear a grounded wrist strap and perform any
other available ESD procedures when handling them.
OPMs may be installed in any pair of slots in a 19- or 23-in. BCSII chassis, or in an OPM
Standalone Wall-Mount or Desk-Mount chassis, or in a Telect MIX 56 SideCar chassis. When
installing less than a full complement of OPMs in a BCSII chassis, the extreme right or left end of
the chassis is best for heat dissipation.
The temperature at the face plate of an OPM can rise to 49°C (120°F) at an ambient of 19°C
(66°F). If you fully load a BCSII chassis with OPMs, consider the effect that heat may have on
other shelves above the full-loaded OPM BCSII. If necessary, either leave 2RU (Either leave
vacant or install shelves that dissipate no heat.) of space above that BCSII chassis for heat
dissipation or install a 1RU Telect heat baffle above that BCSII chassis.
(See Chapter 8, “Accessories.”)
The subsections that follow briefly describe the installation process for a BCSII Chassis, WallMount Chassis, Desk-Mount Chassis, and a SideCar Chassis. Complete installation and cabling
procedures are provided along with the Vector products.
3.5.1 Installing OPM in a BCSII Chassis
OPM installation in a BSCII chassis involves removing a pair of adjacent BNC backplane
modules at the rear of the chassis and replacing those with a single BNC port panel with a
backplane that accommodates an adjacent pair of OPMs.
1. See the preceding tables and set the circuit board switches on both Vector OPMs.
Remember: The switch setting should be the same on both OPMs and should match those at
the opposite end of the optical link. The speed settings must be identical.
2. See the following illustrations and remove two side-by-side BNC backplane modules on rear
of the BCSII.
Remember: The BNC backplane modules must be at an odd-numbered slot and the next
higher, even-numbered slot.
Telect, Inc. • USA +1.509.926.6000 • Mexico +52.33.3836.37.52
www.telect.com • © 2010 Telect, Inc., All Rights Reserved, 127092-1 A0.1
Page 3-30
BCSII Chassis
Standard BNC Backplane Modules
Figure 19 - Removing Standard BNC Backplane Modules from BCSII Chassis
3. See the following illustration and install the OPM I/O port panel.
Tabs at the bottom of the panel slip into receiver slots in the bottom of the chassis, and two
screws secure the panel assembly at the top.
Telect, Inc. • USA +1.509.926.6000 • Mexico +52.33.3836.37.52
www.telect.com • © 2010 Telect, Inc., All Rights Reserved, 127092-1 A0.1
Page 3-31
BCSII Chassis
OPMs (2)
OPM BNC Port Panel
Figure 20 - Installing OPM BNC Port Panels on BCSII Chassis
4. Slide an OPM into the chassis card guides of the right-hand slot and press into interior connectors of OPM port panel.
NOTES:
•
If power is already supplied to the chassis, the first OPM into the chassis becomes the
default active OPM.
•
If power is off, the OPM on the right is chosen as the default active OPM when power is
turned on.
5. Secure with top screw on OPM faceplate.
6. Connect I/O BNC cables from the network element to the XMT/RCV ports on the OPM port
panel. (See illustrations on the following pages.)
7. Install an OPM in the left-hand slot. Secure the top screw and connect network element.
8. After having installed OPMs in OPM port panels at both the local and remote ends of the linkup, remove the protective “dust cover” plugs at the fronts of the OPMs and connect optical
data link cables.
NOTES:
•
For OPMs with Separate XMT and RCV, connect XMT on the right-hand local OPM to
RCV on the right-hand remote OPM. Likewise, connect left-hand local to left-hand
remote.
•
For Single Fiber XMT/RCV, connect the two OPMs with a single cable. Make sure that
the two Single-Fiber OPMs are a complementary pair: one must have “15/13” (for 1510
Telect, Inc. • USA +1.509.926.6000 • Mexico +52.33.3836.37.52
www.telect.com • © 2010 Telect, Inc., All Rights Reserved, 127092-1 A0.1
Page 3-32
and 1310 nm respectively) and the other must have “13/15” printed next to the
SC connector.
9. Route cables as specified in Chapter 5 (BCSII with Vector Fiber Trays) or Chapter 6 (Standalone Wall-Mount chassis).
10. If and when power is supplied to the chassis — assuming that the OPMs were installed as
prescribed — the right-hand set of OPMs will automatically become the active optical link and
the left-hand set will be the standby:
•
The ACTIVE LED on the front panel of the right-hand OPMs will be lit green.
•
The STANDBY LEDs on the front panel of the left-hand OPMs will be lit green.
11. If you intend that the left set of OPMs define the active link, press the recessed MAN switch
on one of the active OPMs.
The corresponding OPM on the other end of the data link will automatically switch
active states.
Rear of Chassis
NE-1
XMT
RCV
XMT
Optical fiber cable length:
Up to 1.5 km for multimode
Up to 50 km for single mode
RCV
Rear of Chassis
NE-2
XMT
RCV
Active
(default)
Standby
(default)
XMT
RCV
Figure 21 - OPM Connection
Telect, Inc. • USA +1.509.926.6000 • Mexico +52.33.3836.37.52
www.telect.com • © 2010 Telect, Inc., All Rights Reserved, 127092-1 A0.1
Page 3-33
Rear of Chassis
NE-1
XMT
RCV
Both Single-Fiber OPMs
are "13/15" Modules
Rear of Chassis
Optical fiber cable length up to 50 km
NE-2
XMT
RCV
Both Single-Fiber OPMs
are "15/13" Modules
Standby
(default)
Active
(default)
Figure 22 - OPM Connection
Telect, Inc. • USA +1.509.926.6000 • Mexico +52.33.3836.37.52
www.telect.com • © 2010 Telect, Inc., All Rights Reserved, 127092-1 A0.1
Page 3-34
3.5.2 Installing a Standalone Wall-Mount OPM
The Standalone Wall-Mount OPM chassis consists of a wall plate holding a dual- slot chassis
with two installed OPMs. Use three #8 screws (not supplied) to secure unit to wall-mounted rails
or plywood, as shown in the following illustration. See Chapter 6 for cabling.
Figure 23 - Standalone Wall-Mount OPM Chassis
Telect, Inc. • USA +1.509.926.6000 • Mexico +52.33.3836.37.52
www.telect.com • © 2010 Telect, Inc., All Rights Reserved, 127092-1 A0.1
Page 3-35
3.5.3 Installing OPMs in a MIX 56 or MIX 28 SideCar Chassis
Refer to the MIX 56 SideCar User Manual (Telect Publication 124297) along with the installation
guide accompanying the OPMs for details and variations on installing SideCar chassis, OPM
backplane, OPMs, and power, alarm, and DS3 cabling.
Figure 24 - MIX 28 SideCar OPMs
3.5.4 Installing OPMs in a Standalone Desk-Mount Chassis
Refer to the Vector Standalone Desk-Mount Chassis Installation Guide (Telect Publication
128077) along with the installation guide accompanying the OPMs for details and variation on
installing OPM backplanes, OPMs, and power, alarm, and DS3 cabling.
Figure 25 - Standalone Desk-Mounted OPMs
Telect, Inc. • USA +1.509.926.6000 • Mexico +52.33.3836.37.52
www.telect.com • © 2010 Telect, Inc., All Rights Reserved, 127092-1 A0.1
Page 3-36
3.6 Operation
3.6.1 Control & Status LEDs
Designation Strip
3.6.1.1 ACTIVE LED
•
•
GREEN — OPM is active.
Off — OPM is not the designated active OPM.
3.6.1.2 Standby (STBY) LED
Manual Switch to
Change Status
COAX
GREEN — OPM is standby.
•
Off — OPM is not the designated standby OPM
FIBER
LOOPBACK
Switch
RCV
3.6.1.3 COAX LED
•
Alarm Cutoff Switch
Active/Standby
Status LEDs
Coax/Fiber Loopback
Status LEDs
•
•
Jack for Monitoring
Signal from NE
Alarm/Alarm Cutoff
Status LEDs
GREEN — Electrical loopback mode. Electrical
RCV input is internally looped back to electrical
XMT output.
Off — Not in coax loopback mode
Optical Connectors
Figure 26 - OPM With Separate XMT
& RCV SC Connectors
3.6.1.4 FIBER LED
•
GREEN — Fiber loopback mode. Optical RCV input is internally looped back to optical
XMT output.
•
Off — Not in fiber loopback mode
3.6.1.5 Alarm (ALM) LED
•
RED (Solid) — Major alarm condition, either optical or electrical LOS, or both. The major
alarm relay will close the normally open major alarm contacts to set the MAJ alarm signal,
depending on ALM1 and ALM2.
The settings of ALM1 and ALM2 have no effect on the ALM LED.
•
RED (Blinking) — Indicates that an alarm has been set at the far-end alarm.
An electrical loss on one end will cause the ALM LED on that end to turn on solid and to send
an all-ones signal to the other end. The ALM LED on that other end will blink indicating that
the problem was detected at the far end.
The status of the ALM3 setting has no effect on whether the ALM LED blinks on a far-end
loss of signal.
•
Off — No major alarms. The ALM LED goes off if the condition causing a major alarm
is remedied.
If both local and far-end alarms occur, the ALM LED will light solid red. A local alarm will take
priority over a remote alarm.
Telect, Inc. • USA +1.509.926.6000 • Mexico +52.33.3836.37.52
www.telect.com • © 2010 Telect, Inc., All Rights Reserved, 127092-1 A0.1
Page 3-37
3.6.1.6 Alarm Cut-Off (ACO) LED
•
GREEN — Major alarm has occurred but the MAJ alarm contact closure has been turned off
because the ACO switch has been depressed.
The ACO switch affects the MAJ alarm broadcast by a relay switch closure. The ACO switch
has no effect on the ALM LED.
•
Off — ACO switch has not been used to reset a MAJ alarm signal.
3.6.2 Mode Switches
3.6.2.1 Loopback Mode
•
Pressing the recessed LOOPBACK switch causes the OPM to switch from normal mode to
fiber loopback. In the fiber loopback mode, the RCV optical input are internally routed to the
XMT output of the same OPM.
•
Pressing the LOOPBACK switch a second time switches from fiber to coax loopback. In the
coax loopback mode, the RCV input is internally routed to the XMT output of the same OPM.
•
Pressing the LOOPBACK switch a third time returns the OPM to normal mode.
3.6.2.2 Manual Mode
Pressing the recessed MAN switch on the active OPM changes the OPM from active to standby
status. (The MAN switch is enabled only on the active OPM. Pressing the MAN switch on the
standby OPM has no effect.)
Manually switching modes causes the OPM on the other end of the optical link to switch
active modules.
Regardless of the manually set active-versus-standby status of the data links, the data links will
change status automatically if an OPM on the active link detects a loss of optical signal (LOS).
The switchover only occurs if the standby optical data link and OPMs are operational and do not
detect an optical LOS.
If the TAOS switch is ON (closed) at the time of a LOS, the OPM will transmit an electrical allones signal.
3.6.2.3 Alarm Cut-Off Mode
A loss of either electrical or optical signal on one end causes the ALM LED to light on that end
and may cause the ALM LED to blink on the other end. In addition, depending on the status of
the ALM1, ALM2, and ALM3 switches, the local alarm will energize the major alarm relay on the
OPM causing a normally open contact to close, in turn, causing electrical continuity across the
ALM MAJ and ALM COM terminals on the back of the chassis. When the contacts close, the
alarm signal at ALM MAJ is shunted to signal ground.
The recessed alarm cut-off (ACO) switch resets (de-energizes) the major alarm relay.
The ACO switch does not affect the ALM LED or the ALM PWR relay.
Telect, Inc. • USA +1.509.926.6000 • Mexico +52.33.3836.37.52
www.telect.com • © 2010 Telect, Inc., All Rights Reserved, 127092-1 A0.1
Page 3-38
3.6.3 Alarm Relays
Alarm relays on the OPM cause normally open (NO) contacts to close on the local OPM. The
contacts are connected to terminals on the rear of the chassis.
•
A POWER FAIL alarm will occur for a power loss of 3.3 Vdc. A relay de-energizes and closes
normally open (NO) contacts. ALM PWR and ALM COM (common) are located on the rear of
the chassis.
•
A MAJOR alarm is used to indicate a loss of either electrical or optical signal.
− Local loss of electrical signal will turn on the local ALM LED. If the ALM1 switch is ON
(closed), the loss of a local electrical signal will energize the major alarm relay controlling
the ALM MAJ contact on the rear of the chassis.
− If the local OPM detects a loss of optical signal, the local OPM turns on the ALM LED. If
the ALM2 switch is ON (closed), the loss of the optical signal will energized the major
alarm relay controlling the ALM MAJ contacts on the rear of the chassis.
3.6.4 Monitoring
The monitor jack on the module faceplate accepts a mini-WECO jack plug. You can use this jack
for nonintrusive monitoring of the OUT channel from the remote network element connected to
the OUT connector (O) on the chassis backplane.
Telect, Inc. • USA +1.509.926.6000 • Mexico +52.33.3836.37.52
www.telect.com • © 2010 Telect, Inc., All Rights Reserved, 127092-1 A0.1
Page 3-39
This page intentionally left blank.
Telect, Inc. • USA +1.509.926.6000 • Mexico +52.33.3836.37.52
www.telect.com • © 2010 Telect, Inc., All Rights Reserved, 127092-1 A0.1
Page 3-40
Chapter 4: E-Vector OTM
4.1 Overview
NOTE: Shown without protective “dust
cover” plugs. All Vector products
include plugs.
ST Connectors
SC Connectors
Figure 27 - E-Vector OTMs
!
ALERT
ALERT! These instructions presume you have verified that the Telect equipment being installed is compatible with the rest of the system, including power, ground, circuit protection, signal characteristics, equipment from other vendors, and local codes or ordinances.
!
CAUTION
CAUTION! Only qualified technicians may install and maintain this product.
4.2 Installation Tools & Equipment
You need only standard tools. Use listed components (UL-recognized, CSA, ETL, TUV agency)
and tools.
4.3 Inspection
Compare the contents of the E-Vector OTM shipping container with the packing list. Call Telect if
you are missing anything.
Telect is not liable for shipping damage.
Telect, Inc. • USA +1.509.926.6000 • Mexico +52.33.3836.37.52
www.telect.com • © 2010 Telect, Inc., All Rights Reserved, 127092-1 A0.1
Page 4-41
If the shipping container is damaged, keep it for the carrier’s inspection. Notify the carrier and call
Telect’s Customer Service Department: 1-800-551-4567 or 1-509-926-6000.
Keep the container until you have checked equipment operation. If you experience any kind of
problem, call Telect’s Customer Service Department. Use the original, undamaged container if
you are instructed to return the E-Vector OTM to Telect.
4.4 Installation Setup — Setting PCB Switches
Figure 28 - Setting PCB Switches
PCB Switches
On
OFF
TRANS/NON1,
Transparent Auto Mode
Non-Transparent Auto Mode
FULL/HALF1,2
Full Duplex
Half Duplex
UTP ALM3
Major Alarm Occurs if Electrical Ethernet Link is Lost
No Major Alarm if Electrical Ethernet
Link is Lost
FIBER ALM
Major Alarm Occurs if Optical Signal
is Lost
No Major Alarm if Optical Signal is Lost
1. Switches TRANS/NON and FULL/HALF are only functional in “Auto” operational model.
Auto mode is set with the MAN/AUTO switch on the front of the module.
2. Switch FULL/HALF is only functional if switch TRANS/NON is off, that is, set to the NonTransparent Auto Mode, meaning that the Auto mode’s auto negotiation
is non-transparent.
3. “UTP” (unshielded twisted pair) refers to the electrical connection, which in this case is an
RJ45 connection. (RJ45s are not unshielded twisted pairs.)
Telect, Inc. • USA +1.509.926.6000 • Mexico +52.33.3836.37.52
www.telect.com • © 2010 Telect, Inc., All Rights Reserved, 127092-1 A0.1
Page 4-42
4.5 Installation
!
ALERT
ALERT! The modules are sensitive to static. Wear a grounded wrist strap and perform any
other available ESD procedures when handling them.
NOTE: E-Vector OTMs may be installed in any or all slots in a 19-in. or 23-in. BCSII, MIX
SideCar, Wall-Mount, or Desk-Mount chassis.
1. Before installing the E-Vector module in an enclosure or chassis, check and, if necessary,
change the settings of the switches located near the top, right side of the printed circuit board,
shown in the preceding illustration.
2. If applicable, remove blank cover on front of SideCar, Wall-Mount, or Desk-Mount chassis.
3. Install the module, as shown in the following illustrations.
Figure 29 - BCSII Chassis (Model 010-0000-3201BCS) on the left &
Wall-Mount Chassis (Model 710-1001-2302-E) on the right
Telect, Inc. • USA +1.509.926.6000 • Mexico +52.33.3836.37.52
www.telect.com • © 2010 Telect, Inc., All Rights Reserved, 127092-1 A0.1
Page 4-43
Figure 30 - Desk-Mount Chassis (Model 747-0000-1001)
4. If power is supplied to the panel or chassis, set the LOOPBACK and MAN/AUTO switches
on the front of the module.
Both switches are multi-toggle pushbutton switches: each time someone pushes the switch,
the E-Vector OTM will change operating parameters indicated by green LEDs directly above
the switch.
•
Pressing the LOOPBACK switch toggles among the following three modes of operation:
(Loopbacks are done internally without requiring external cables.)
− Normal Operation, both FIBER and RJ45 LEDs off.
− Fiber Loopback, FIBER LED on.
− RJ45 Loopback, RJ45 LED on.
•
Pressing the MAN/AUTO switch toggles between three operational RJ45 modes: (See 47 for
a description of these modes.)
− Auto, the AUTO LED is on.
− Manual @ 100 Mbps, the MANUAL and 100 LEDs are on.
− Manual @ 10 Mbps, the MANUAL and 10 LEDs are on.
Without having installed RJ45 and fiber connections, the RJ45 and FIBER LINK Status
LEDs will be red. All other LEDs will be off.
5. Install the RJ45 connection at the top of the front panel. (See the following
network illustration.)
Telect, Inc. • USA +1.509.926.6000 • Mexico +52.33.3836.37.52
www.telect.com • © 2010 Telect, Inc., All Rights Reserved, 127092-1 A0.1
Page 4-44
RJ45
Ethernet
Equipment
CAT 5 Cable
(100 m or 320 ft)
RCV
XMT
OUT (TX)
IN (RX)
Name Pin
TX+
TXRX+
Optical fiber cable length:
Up to 1.5 km for multimode
Up to 30 km for single mode
Ethernet
Equipment
E-Vector RJ45 Pin Outs*
CAT 5 Cable
(100 m or 320 ft)
RXRJ45
RCV
XMT
1
2
3
4
5
6
7
8
Wire Color
WHT/ORN
ORN
WHT/GRN
BLU
WHT/BLU
GRN
WHT/BRN
BRN
* Ethernet equipment may require either straight-through
or cross-over cabling to the E-Vector OTM. Specifically,
both RJ45 cables may be straight-through cables, or one
may be straight-through and the other a cross-over,
or both may be cross-over cables. See the following
page for possible Ethernet RJ45 cabling schemes.
OUT (TX)
IN (RX)
Figure 31 - Network Connections
6. Remove the protective “dust cover” plug from the optical ports and install the transmit (XMT)
and receive (RCV) optical cables at the bottom of the front panel.
Telect, Inc. • USA +1.509.926.6000 • Mexico +52.33.3836.37.52
www.telect.com • © 2010 Telect, Inc., All Rights Reserved, 127092-1 A0.1
Page 4-45
Hub / Switch
RJ45
1 Rx+
2 Rx3 Tx+
6 Tx-
E Vector
Straight Thru
Cable
E Vector
RJ45
1 Tx+
2 Tx3 Rx+
6 Rx-
RJ45
1 Tx+
2 Tx3 Rx+
6 Rx-
Fiber
Tx
Rx
Computer
RJ45
1 Tx+
2 Tx3 Rx+
6 Rx-
E Vector
RJ45
1 Tx+
2 Tx3 Rx+
6 Rx-
RJ45
1 Tx+
2 Tx3 Rx+
6 Rx-
Fiber
Tx
Rx
Hub / Switch
RJ45
1 Rx+
2 Rx3 Tx+
6 Tx-
Computer
Cross Over
Cable
RJ45
1 Tx+
2 Tx3 Rx+
6 Rx-
Fiber
Tx
Rx
E Vector
Straight Thru
Cable
RJ45
1 Rx+
2 Rx3 Tx+
6 Tx-
Fiber
Tx
Rx
E Vector
Cross Over
Cable
Hub / Switch
Straight Thru
Cable
E Vector
RJ45
1 Tx+
2 Tx3 Rx+
6 Rx-
RJ45
1 Tx+
2 Tx3 Rx+
6 Rx-
Fiber
Tx
Rx
Fiber
Tx
Rx
Figure 32 - Ethernet Cabling Schemes
Telect, Inc. • USA +1.509.926.6000 • Mexico +52.33.3836.37.52
www.telect.com • © 2010 Telect, Inc., All Rights Reserved, 127092-1 A0.1
Page 4-46
Computer
Cross Over
Cable
RJ45
1 Tx+
2 Tx3 Rx+
6 Rx-
4.6 Operation
4.6.1 Status LEDs
During operation, expect that
Designation Strip
•
RJ45 LINK LED will light green as long as the RJ45
communication link is enabled.
•
RJ45 ACTV LED will light (or flicker) green whenever
the RJ45 interface is active, that is, whenever data
packets are present on the RJ45 interface. Either the
“10” or “100” LED will be lit to indicate a data rate of
either 10 Mbps or 100 Mbps.
•
FIBER LINK LED will light green as long as the fiber
communication link is enabled.
•
FIBER ACTV LED will light (or flicker) green whenever
the fiber interface is active, that is, whenever data packets are present on the fiber transmit/receive lines.
RJ45 Connector
Loopback LEDs
FIBER RJ45
10 / 100 Mbps
Status LEDs
MAN
RJ45 & Fiber
Linkup & Activity
Status LEDs
LOOPBACK
Switch
100
10
AUTO
RJ45
LINK
ACTV
FIBER
MAN/AUTO
Mode LEDs
MANual/AUTO
Mode Switch
Optical Connectors
Figure 33 - E-Vector OTM
4.6.2 Alarms
•
A POWER FAIL alarm will occur for a power loss of 3.3 Vdc. A relay de-energizes and closes
normally open (NO) contacts. PWR FAIL NO and C (common) are located on the chassis.
•
A MAJOR alarm is used to indicate a loss of either electrical (RJ45) or fiber link status.
− Loss of electrical signal will cause a MAJOR alarm only if the UTP ALM switch on the circuit board is set ON.
− Loss of fiber link status will cause a MAJOR alarm only if the FIBER ALM switch on the
board is set ON.
When a major alarm occurs, a relay energizes and closes normally open (NO) contacts. MAJOR
NO and C (common) are located on the chassis.
4.6.3 Mode Switches
4.6.3.1 Loopback Mode
Pressing the LOOPBACK switch toggles among the following three modes of operation:
(Loopbacks are performed internally, without requiring external cables.)
•
Normal Operation, both FIBER and RJ45 LEDs are off.
•
Fiber Loopback, FIBER LED is on.
•
RJ45 loopback, RJ45 LED is on.
Telect, Inc. • USA +1.509.926.6000 • Mexico +52.33.3836.37.52
www.telect.com • © 2010 Telect, Inc., All Rights Reserved, 127092-1 A0.1
Page 4-47
4.6.3.2 Manual/Auto Modes
Pressing the MAN/AUTO switch toggles among three operational modes:
•
Auto, the AUTO LED is on
•
Manual @ 100 Mbps, the MANUAL and 100 LEDs are on.
•
Manual @ 10 Mbps, the MANUAL and 10 LEDs are on.
In Auto Mode, the function is determined by the settings of PCB dip switches TRANS/NON and
FULL/HALF (shown on 42), as follows:
PCB Switches
Auto Mode
Description
Transparent
E-Vector doesn't generate auto negotiations, but simply passes along the
negotiations between the fiber and RJ45 sides of the link. Use Transparent
mode when both sides of the fiber-RJ45 link are capable of auto negotations.
Non-Transparent
Full Duplex
E-Vector generates auto negotiations on the RJ45 link using the advertised 10
and 100Mbps speeds in full and half duplex auto negotiations. Use
Non-Transparent Full Duplex mode when only the RJ45 side is capable of
auto negotations in either full or half duplex operation.
Non-Transparent
Half Duplex
E-Vector generates auto negotiations on the RJ45 link using the advertised 10
and 100Mbps speeds in half duplex auto negotiations. Use Non-Transparent
Half Duplex mode when only the RJ45 side is capable of auto negotations, but
in half duplex only.
In Manual Mode, auto negotiations is disabled; E-Vector will not pass along auto negotiations.
Consequently, the speed is always the selected 10 or 100 Mbps and the duplex mode is either
the established full or half-duplex.
Telect, Inc. • USA +1.509.926.6000 • Mexico +52.33.3836.37.52
www.telect.com • © 2010 Telect, Inc., All Rights Reserved, 127092-1 A0.1
Page 4-48
Chapter 5: BCSII Vector Fiber Tray
5.1 Overview
Telect’s BCSII Vector Fiber Trays are used with standard Telect BCSII chassis containing Vector
optical modules, such as Telect’s Optical Transport Modules (OTMs) and Optical Protected
Modules (OPMs) — both being bi-directional optical/electrical converter.
The fiber tray consists of a front-mounted chassis tray containing fiber optic links or spools. The
tray is attached to an integral panel bracket used in place of the standard WECO or EIA, 19-in. or
23-in. BCSII rack brackets:
•
The articulated links are used on 19-in. or 23-in., 2RU BCSII chassis with vertically
mounted modules.
•
The spools are used on 19-in. or 23-in., 1RU BCSII chassis with horizontally mounted modules. (The illustration on the cover of this publication shows a Vector Fiber Tray [Model 0100019-0471] attached to a BCSII 8-Place Horizontal Chassis [Model 010-0000-0471BCS].)
The table that follows cross-references Telect Vector Fiber Trays with Vector-applicable Telect
BCSII chassis.
BCSII Chassis
Model
Description
Applicable Vector
Fiber Tray
010-0000-0471BCS or -0472BCS
8-Module, 19 in., Horizontal
010-0019-0471BCS
010-0000-1471BCS or -1472BCS
10-Module, 23 in., Horizontal
010-0023-1471BCS
010-0000-2401BCS or -2405BCS
24-Module, 19 in., Vertical
010-0019-2401BCS
010-0000-1401BCS
24-Module, 23 in., Vertical
010-0023-3201BCS
010-0000-3201BCS or -3216BCS
32-Module, 23 in. Vertical
010-0023-3201BCS
The illustrations that follow show how fiber-optic network element cables are routed through and
around the trays’ links and spools.
!
ALERT
ALERT! Only qualified technicians may install this product.
Telect, Inc. • USA +1.509.926.6000 • Mexico +52.33.3836.37.52
www.telect.com • © 2010 Telect, Inc., All Rights Reserved, 127092-1 A0.1
Page 5-49
Tray space for copper cabling
Inner Channel
CHANNEL CABLING
(For Vertically Mounted Optical Modules)
On 23-in. BCSII Chassis, Vector Modules 1
thru 8 & 25 thru 32 use the outer channels. For
all other Vector cabling use the inner channels.
Outer Channel
Gate Clips are Hinged & Removable for Ease of
Cabling. Use at Least Two Gate Clips per Channel,
or One Clip on every 5th or 6th Channel Link.
On 19-in. BCSII Chassis, Vector Modules 1
thru 2 & 21 thru 24 use the outer channels. For
all other Vector cabling use the inner channels.
Figure 34 - Routing of fiber-optic network element cables
Telect, Inc. • USA +1.509.926.6000 • Mexico +52.33.3836.37.52
www.telect.com • © 2010 Telect, Inc., All Rights Reserved, 127092-1 A0.1
Page 5-50
Figure 35 - 23 in. Vector Fiber Tray on a BCSII Chassis
Containing Vertically Mounted Vector Modules
Figure 36 - 23 in. Vector Fiber Tray on a BCSII Chassis
Containing Horizontally Mounted Vector Modules
Telect, Inc. • USA +1.509.926.6000 • Mexico +52.33.3836.37.52
www.telect.com • © 2010 Telect, Inc., All Rights Reserved, 127092-1 A0.1
Page 5-51
To install a BCSII Vector Fiber Tray, proceed as follows:
1. Assemble the bracket to the tray using four, 6-32 Phillips screws (screws with cross-recessed
heads) provided, as shown below.
Figure 37 - Assembling a bracket
2. Remove the screws holding the standard brackets to the sides of the BCSII chassis, as
shown in the following illustrations.
Telect, Inc. • USA +1.509.926.6000 • Mexico +52.33.3836.37.52
www.telect.com • © 2010 Telect, Inc., All Rights Reserved, 127092-1 A0.1
Page 5-52
Figure 38 - Removing screws holding standard brackets to sides of BCSII chassis
3. Use these screws to secure the Vector Fiber Tray to the BCSII chassis.
4. Secure the chassis to the rack using the 12-24 screws supplied with the chassis.
NOTE: All Vector Fiber Trays will extend about 4¾ in. beyond the rack flange.
5. Use the illustrations on pages 5-50 through 5-52 as guides for cabling the tray.
Telect, Inc. • USA +1.509.926.6000 • Mexico +52.33.3836.37.52
www.telect.com • © 2010 Telect, Inc., All Rights Reserved, 127092-1 A0.1
Page 5-53
This page intentionally left blank.
Telect, Inc. • USA +1.509.926.6000 • Mexico +52.33.3836.37.52
www.telect.com • © 2010 Telect, Inc., All Rights Reserved, 127092-1 A0.1
Page 5-54
Chapter 6: Vector Wall Mount
6.1 Overview
The Vector Standalone Wall-Mount chassis consists of a wall plate holding a dual-slot chassis.
Use three #8 screws (not supplied) to secure unit to wall-mounted rails or plywood, as shown in
the following illustration.
Figure 39 - OPMs (2) in a Standalone
Wall-Mount Chassis
Standalone Wall-Mount chassis hold up to two basic (or E-Vector) OTMs or OPMs. The
preceding illustration shows a wall-mount chassis with two OPMs; the following illustration shows
the chassis with a single OTM.
Telect, Inc. • USA +1.509.926.6000 • Mexico +52.33.3836.37.52
www.telect.com • © 2010 Telect, Inc., All Rights Reserved, 127092-1 A0.1
Page 6-55
Figure 40 - OTM and a Blank Panel in a Standalone Wall-Mount Chassis
Wall-mount chassis come with one or two OTMs. Wall-mount chassis with modules are listed in
the following table. The illustration that follows shows the rear view of each type of chassis.
Wall-Mount Chassis Model No.a
Description
Basic OTM (Chassis with One Module & One Front Spacer)b
710-1001-1001-U
Multi-Mode with ST Connectors
710-1001-1002-U
Multi-Mode with SC Connectors
710-1001-2001-U
Single Mode with ST Connectors
710-1001-2002-U
Single Mode with SC Connectors
710-1001-2102-U
Single Mode with SC Connectors, Hardenedc
Basic OPM (Chassis with Two Modules)
710-1001-1221-U
Multi-Mode with ST Connectors
710-1001-1222-U
Multi-Mode with SC Connectors
710-1001-2221-U
Single Mode with ST Connectors
710-1001-2222-U
Single Mode with SC Connectors
710-1001-2122-U
Single Mode with SC Connectors, Hardenedb
E-Vector OTM (Chassis, One Module, One Front Spacer, & Two Rear Spacers)a
710-1001-1301-E
Multi-Mode with ST Connectors
710-1001-1302-E
Multi-Mode with SC Connectors
710-1001-2301-E
Single Mode with ST Connectors
Telect, Inc. • USA +1.509.926.6000 • Mexico +52.33.3836.37.52
www.telect.com • © 2010 Telect, Inc., All Rights Reserved, 127092-1 A0.1
Page 6-56
Wall-Mount Chassis Model No.a
Description
710-1001-2302-E
Single Mode with SC Connectors
a. Model 710-0000-3201 without modules.
b. Second module is ordered separately.
c. Extended operating temperature range.
24/48V
0.5AMP
24/48V
0.5AMP
ALARM
ALARM
24/48V
0.5AMP
ALARM
www.telect.com
OX
IX
O
I
OX
IX
O
R
C
V
X
M
T
I
www.telect.com
Basic OTM
www.telect.com
Basic OPM
www.telect.com
E-Vector OTM
Figure 41 - Rear Views of the Wall-Mount Chassis
Telect, Inc. • USA +1.509.926.6000 • Mexico +52.33.3836.37.52
www.telect.com • © 2010 Telect, Inc., All Rights Reserved, 127092-1 A0.1
Page 6-57
6.2 Grounding
A #8-32 ground stud with a KEPS nut is located at the rear of the wall-mount chassis.
Interconnect the ground stud to the rack or facility dc ground (Do not connect ground wire to ac
receptacle ground. Use the dc plant ground.) using a single-hole ground lug with an 18 AWG
(min. size) copper wire, as shown in the following illustrations.
Figure 42 - Grounding
Telect, Inc. • USA +1.509.926.6000 • Mexico +52.33.3836.37.52
www.telect.com • © 2010 Telect, Inc., All Rights Reserved, 127092-1 A0.1
Page 6-58
6.3 Power Input
The wall-mount chassis is powered by either plant dc or utility power connected at the top-rear of
the chassis. Both plant dc and utility power can be connected to provide redundancy.
Spring Terminals for DC Power Plant
Input & Alarms
Power
Receptacle
for Alternate
Power Input
OX
OX
Figure 43 - Vector Wall-Mount Power Connections (Rear View of Chassis)
6.3.1 Plant DC Input
Use the spring connectors along the top-rear of the chassis for plant dc, ±24 or -48Vdc. Spring
connectors are also provided for power alarm and major alarm connections. Each position
accommodates a 24AWG to 16AWG stranded or solid copper wire. (Stranded wire should
be tinned.)
•
For a -48Vdc BATT input, connect -48Vdc fused at .5A to -A terminal and RTN to +A.
•
Likewise, for a -24Vdc BATT input, connect -24Vdc fused at .5A to -A terminal and
+24Vdc to +A.
To connect wires to spring terminal connectors, first strip about 3/8 in. (~10 mm) of insulation and
then use a 1/8-in. (3 mm) flat-tipped screwdriver to open the spring before inserting the wire.
Remove the screwdriver to cinch the wire.
Telect, Inc. • USA +1.509.926.6000 • Mexico +52.33.3836.37.52
www.telect.com • © 2010 Telect, Inc., All Rights Reserved, 127092-1 A0.1
Page 6-59
Always route power and alarm cables separately from signal cables. Use cable tie or lacing
where required, in accordance with standard operation company practices. Lances are provided
at the rear for tying down cables.
Figure 44 - Connecting Wires
6.3.2 Utility Power Input (Alternate Power)
Use the 2-mm coaxial power connector when feeding from an ac
receptacle. The optional Telect power supply (Model 010-0000-9900)
accepts inputs of 90-to-264Vac, 50-60Hz from a utility receptacle and
converts that to an output of +48Vdc @ 310 mA for the wall-mount
chassis. The Telect power supply assembly includes a 7.5 ft ac
computer-style power cord for a standard domestic ac receptacle.
If you use an alternate power supply, make sure the center of the
coaxial power connector (2 mm center dia) is positive with respect to
the sleeve and capable of 20 to 60Vdc (nominally 48Vdc @ 310 mA).
Figure 45 - Power Supply
6.4 Alarm Connections
The power alarm and major alarm connections are made in the same way as the dc plant
power connections.
The circuit between PWR and COM and between MAJ and COM are normally open, meaning
that if a power failure or major failure occurs the respective circuit is closed by the relay on
the module.
Telect, Inc. • USA +1.509.926.6000 • Mexico +52.33.3836.37.52
www.telect.com • © 2010 Telect, Inc., All Rights Reserved, 127092-1 A0.1
Page 6-60
6.5 Connect Rear-Side BNC Input & Output to NE
Except for E-Vector OTMs, use BNC cables to connect “I” and “O” at the rear if the wall-mount
chassis modules to the input and output of the network element, respectively. (The “XI” and “XO”
connectors are not used.)
Unused
Lances for Tying Down
BNC Cables
O
Figure 46 - Connecting Rear-Side BNC Input & Output to NE
BNC connectors are not used in E-Vector applications. NE I/O is handled via the RJ45 connector
at the front of E-Vector OTMs.
6.6 Connect & Route Front-Side Fiber
The illustrations that follow shows fiber cable routing for a wall-mount chassis containing two
basic OTMs:
1. If you plan to route fiber through the links, swing open the covers shown in the inset in the following illustration.
2. Remove safety plugs from fiber cable and module connectors.
3. Route cable around spool. Choose to either
•
Gather the cable, place it in the linkage, and then close link covers, or
•
Direct the fiber cable to a cable management system (CMS) either above or below the
chassis. (The illustration shows fiber cable being fed to an overhead CMS.)
Telect, Inc. • USA +1.509.926.6000 • Mexico +52.33.3836.37.52
www.telect.com • © 2010 Telect, Inc., All Rights Reserved, 127092-1 A0.1
Page 6-61
Link Cover In Open Position
Figure 47 - Fiber Cable Being Fed to an Overhead CMS
Telect, Inc. • USA +1.509.926.6000 • Mexico +52.33.3836.37.52
www.telect.com • © 2010 Telect, Inc., All Rights Reserved, 127092-1 A0.1
Page 6-62
Chapter 7: Service
!
CAUTION
CAUTION! Only qualified technicians may install and maintain this product.
7.1 Owner Maintenance
Telect’s Vector products do not need preventive maintenance.
7.2 In Case Of Difficulty
If problems occur after initial installation, check cable connections described in Sections 2
through 6, or in the installation instructions which were shipped with the module.
7.3 Technical Support (USA)
By e-mail: [email protected]
By phone: 888-821-4856 or 509-921-6161
7.4 In-Warranty Service
Contact your Telect equipment distributor, or call a Telect Customer Service Representative:
1-800-551-4567
1-509-926-6000
Telect will repair or replace defective products within the limits of the warranty. See “Repacking
for Shipment” in this section.
Call a Customer Service Representative for a Return Material Authorization (RMA) before
returning any equipment.
7.5 Out-Of-Warranty Service
The procedure for out-of-warranty service is the same as for in-warranty service, except that
Telect charges a processing fee, and you must submit a Purchase Order along with a Return
Material Authorization (RMA) before returning equipment. Call a Customer Service
Representative for help getting these forms.
The processing fee guarantees a repair estimate and is credited against actual material and
labor costs.
Telect, Inc. • USA +1.509.926.6000 • Mexico +52.33.3836.37.52
www.telect.com • © 2010 Telect, Inc., All Rights Reserved, 127092-1 A0.1
Page 7-63
7.6 Repacking For Shipment
1. Tag the equipment showing owner’s name, address, and telephone number, together with a
detailed description of the problem.
2. Use the original shipping container if possible. If you do not have it, package the equipment in
a way to prevent shipping damage. Include the RMA inside the container and legibly print the
RMA number on the outside of the package, near the shipping address.
3. Insure the package.
NOTE: Telect is not liable for shipping damage.
Telect, Inc. • USA +1.509.926.6000 • Mexico +52.33.3836.37.52
www.telect.com • © 2010 Telect, Inc., All Rights Reserved, 127092-1 A0.1
Page 7-64
Chapter 8: Vector Accessories
Description
Wall-Mount or Desk-Mount
Power Supply for a 90to-264Vac, 5060HzUtility Receptacle
Catalog No.
Illustration
010-0000-9900
Vector BCSII Trays
19-in. Tray for Horizontal
BCSII Chassis
010-0019-0471BCS
19-in. Tray for Vertical
BCSII Chassis
010-0019-2401BCS
23-in. Tray for Horizontal
BCSII Chassis
010-0023-1471BCS
Telect, Inc. • USA +1.509.926.6000 • Mexico +52.33.3836.37.52
www.telect.com • © 2010 Telect, Inc., All Rights Reserved, 127092-1 A0.1
Page 8-65
Description
23-in. Tray for Vertical
BCSII Chassis
Catalog No.
Illustration
010-0023-3201BCS
Fiber Jumpers
• Single mode or
62.5/125 Multimode
• 2 mm Simplex
• SC or ST Connector on
one end; SC or ST
Connector on the other
See telect.com to
access cable
configurator
• MegaWave or GigaWave
• Any length up to
999.0 ft or m
BNC Jumpers
Single RG59 without
messenger wire
043-0111-xxx where
xxx is length in ft
Single 735A without
messenger wire
043-0911-xxx where
xxx is length in ft
Single 735A with
messenger wire
043-1011-xxx where
xxx is length in ft
Telect, Inc. • USA +1.509.926.6000 • Mexico +52.33.3836.37.52
www.telect.com • © 2010 Telect, Inc., All Rights Reserved, 127092-1 A0.1
Page 8-66
Description
Dual 735A with
messenger wire
Catalog No.
Illustration
043-1311-xxx where
xxx is length in ft
Mini-WECO Monitor Patch Cords
RG59
043-0122-xxx where
xxx is length in ft
735A
043-0922-xxx where
xxx is length in ft
BCSII Heat Baffles
19-in. Heat Baffle
747-9999-0019
23-in. Heat Baffle
747-9999-0023
Telect, Inc. • USA +1.509.926.6000 • Mexico +52.33.3836.37.52
www.telect.com • © 2010 Telect, Inc., All Rights Reserved, 127092-1 A0.1
Page 8-67
This page intentionally left blank.
Telect, Inc. • USA +1.509.926.6000 • Mexico +52.33.3836.37.52
www.telect.com • © 2010 Telect, Inc., All Rights Reserved, 127092-1 A0.1
Page 8-68