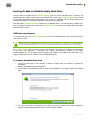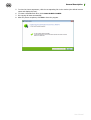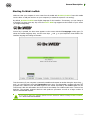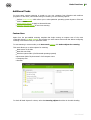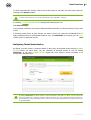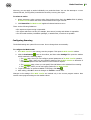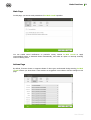
1
© Doctor Web, 2014. All rights reserved.
This document is the property of Doctor Web. No part of this document may be
reproduced, published or transmitted in any form or by any means for any purpose
other than the purchaser's personal use without proper attribution.
TRADEMARKS
Dr.Web, the Dr.WEB logo, SpIDer Mail, SpIDer Guard, CureIt!, CureNet!, AV-desk are
trademarks and registered trademarks of Doctor Web in Russia and/or other countries.
Other trademarks, registered trademarks and company names used in this document
are property of their respective owners.
DISCLAIMER
In no event shall Doctor Web and its resellers or distributors be liable for errors or
omissions, or any loss of profit or any other damage caused or alleged to be caused
directly or indirectly by this document, the use of or inability to use information
contained in this document.
Dr.Web® LiveDisk
Version 9.0.0
User Manual
18.07.2014
Doctor Web Head Office
2-12A, 3rd str. Yamskogo polya
Moscow, Russia
125124
Web site: www.drweb.com
Phone: +7 (495) 789-45-87
Refer to the official web site for regional and international office information.
Doctor Web
Doctor Web develops and distributes Dr.Web® information security solutions
which provide efficient protection from malicious software and spam.
Doctor Web customers can be found among home users from all over the world and
in government enterprises, small companies and nationwide corporations.
Dr.Web antivirus solutions are well known since 1992 for continuing excellence in
malware detection and compliance with international information security standards.
State certificates and awards received by the Dr.Web solutions,
as well as the globally widespread use of our products are the best evidence of
exceptional trust to the company products.
We thank all our customers for their support and
devotion to the Dr.Web products!
4
Table of Contents
General Description
5
System Requirements
5
Creating Dr.Web LiveDisk Bootable Flash Drive
6
Starting Dr.Web LiveDisk
8
Desktop
10
System Menu
12
Shutting Down Dr.Web LiveDisk
13
Basic Functions
14
Dr.Web CureIt! Scanner
16
Startup and Shutdown
17
General Settings
18
Express Scan
19
Additional Tasks
20
Sending Statistics
26
Quarantine Manager
27
Dr.Web Updater
28
Registry Editor
29
Auxiliary Programs
33
Graphical File Manager
33
Console File Manager
36
Terminal Emulator
38
Browser
39
System Date and Time
40
Network Configuration Program
42
Technical Support
44
User Manual
General Description 5
General Description
Dr.Web® LiveDisk is an anti-virus solution which allows to restore an operating system when high
virus activity has rendered it inoperable. To prevent such situations, do not disregard the need to
protect the operating system with anti-virus software which employs the most advanced technologies.
Technologies and features implemented in products of Doctor Web provide for reliable anti-virus
protection of both large corporate networks and computers for home use. Doctor Web anti-virus
solutions have low system requirements and delivers fast performance and reliable protection against all
types of malware. On the Doctor Web official website, you can find up-to-date information on products
for resident protection of computers and mobile devices against viruses, malicious programs, and spam.
Dr.Web LiveDisk is a bootable media (optical disk or USB flash drive) with a Linux-based portable
operating system and pre-installed software which performs anti-virus scans of the computer,
neutralizes detected threats and allows the user to work with the registry and file system as well as
browse webpages.
Dr.Web LiveDisk is delivered as a ready-to-use disk, or as an .iso image (in this case, you need to
burn the image to a blank disk), or as an executable — the utility which is started in Windows
environment to create a bootable media (USB flash drive).
System Requirements
Dr.Web LiveDisk can be installed and run on a computer which meets the following minimum
requirements:
Parameter
Requirement
CPU
x86-compatible
Random access
memory
Minimum 512 MB of RAM (1024 MB or more is recommended)
Other
A video card, a monitor, a keyboard, and a mouse (preferably)
Moreover, depending on the type of the media that contains Dr.Web LiveDisk, either an optical disk
drive or a USB port is required. The memory size of the USB flash drive must be at least 1 GB.
User Manual
General Description 6
Creating Dr.Web LiveDisk Bootable Flash Drive
You can create an original copy of Dr.Web LiveDisk to boot it from a USB flash drive. To do this, use
drwebliveusb.exe, which is a special tool for Windows OS. In this case, Dr.Web LiveDisk can be used
as a portable operating system, customized for the needs of a particular user, to access data on any
computer regardless of the installed operating systems and other software.
Note that when Dr.Web LiveDisk is loaded from a USB flash drive, it is still operating in RAM mode;
thus, no changes made to the system while Dr.Web LiveDisk is running are saved, as well as when
CD/DVD media is used.
USB flash requirements
To create a boot copy of Dr.Web LiveDisk, you can use any USB flash drive with enough free space
(not less than 1 GB).
Despite the fact that drwebliveusb.exe does not change or delete drive's content, it is recommended to
save the files of the flash drive you are going to use to another data carrier before starting the program.
All Dr.Web LiveDisk files are written to the /boot directory. The utility may change the configuration
of the flash drive partitions, if necessary; the original configuration is saved to the /boot/
partition.backup file. The drwebliveusb.exe program also creates a new MBR on the flash drive. The
original master boot record is saved to the /boot/mbr.backup file.
To create a bootable flash drive
1. Connect a flash drive to the computer. It takes no longer than ten seconds to register the
connection.
2. Run the executable file drwebliveusb.exe.
3. The program will automatically find all flash drives available in the system. Select the required
drive.
4. You can also format the selected drive (before the process starts, the program displays a
warning message that all data stored on the drive will be deleted).
User Manual
General Description 7
5. To view the License agreement, click the corresponding link in the window (the default browser
opens and displays the text).
6. To create a bootable flash drive, click Create Dr.Web LiveDisk.
7. File copying will start automatically.
8. After the process completes, click Exit to close the program.
User Manual
General Description 8
Starting Dr.Web LiveDisk
Make sure that your computer is set to start from the media with Dr.Web LiveDisk. Insert this media
into the drive or USB port and turn on your computer (or restart the system if it is running).
By default, Dr.Web LiveDisk uses English language for the interface. If necessary, you can change it
to Russian. For that, press any key once the Doctor Web logo appears at the bottom of your screen
(on a light background).
Once a key is pressed, the boot menu appears on the screen with the F2 Language section open. To
select the Russian language item, use the arrow keys
and
on your keyboard. Press ENTER. The
interface language will change to Russian:
Test the memory if your computer is extremely unstable and restarts at random Using the arrow keys
and on your keyboard, select the Test memory menu item. The Memtest86+ program will start. The
program has a feature to list bad RAM regions in the format expected by the BadRAM patch for the
Linux kernel. With this information the Linux kernel can reliably use a RAM module even if it has a few
bad bits. The program supports dual-core and quad-core processors as well as a large number of
various motherboard chipsets.
If you want to start your operating system from the hard drive without running Dr.Web LiveDisk,
select Boot from first hard disk.
User Manual
General Description 9
To start Dr.Web LiveDisk by using the arrow keys
LiveDisk item menu and press ENTER.
and
on the keyboard, select the Dr.Web
The operating system will start to load. After that, Dr.Web CureIt! starts and displays the License
and updates window. To go to the page where you can select a scanning mode, click Continue. If
you want to start an anti-virus scan later, click Exit and you will see the desktop on the screen.
User Manual
General Description 10
Desktop
Dr.Web LiveDisk includes a graphic shell with a window-based interface. Once Dr.Web LiveDisk is
started, it automatically runs the scanner Dr.Web CureIt!.
If you decide not to scan your system with Dr.Web CureIt! after Dr.Web LiveDisk startup and click
Exit or after you finish working with the scanner, the standard desktop appears on the screen.
On the desktop, you can see icons of main programs included in Dr.Web LiveDisk. The taskbar
(horizontal bar at the bottom of the screen) displays buttons of programs that are currently open as
well as the following items:
— button which opens the system menu
— network connection icon (if a connection is established)
— clock showing system date and time
User Manual
General Description 11
Dr.Web LiveDisk is supplied with the following main components:
Registry editor Dr.Web RegEdit
Anti-virus scanner Dr.Web CureIt!
Dr.Web Updater
Other auxiliary programs:
Console file manage Midnight Commander (with a text user interface)
Mozilla Firefox (browser for viewing web pages)
MATE Terminal (terminal emulator — program for working in the console)
Caja file manager (file manager with graphical interface
You can start these programs by double-clicking the appropriate icon on the desktop.
They also can be started from the system menu.
Moreover, Dr.Web LiveDisk provides you with an option to configure network connection settings and
system date and time.
User Manual
General Description 12
System Menu
You can open the system menu by clicking the
The system menu is shown in the picture below.
button on the taskbar at the bottom of the desktop.
Items of the Dr.Web LiveDisk system menu allow you to run the following programs:
Menu item
Description
Internet
Firefox Web Browser opens the browser where you can view webpages.
Office
Dictionary opens a window where you can check spelling of a word and look up its
definition in the online dictionary.
Other
This item provides access to the following options:
Notepad — opens a clone of Windows Notepad.
Common Wine — allows to adjust general Wine settings and parameters for
particular programs.
Browse C: Drive — allows to view contents of the virtual C: drive.
Uninstall Wine Software — starts the program for uninstalling Windows
applications for Wine.
System Tools
This item provides access to the following programs:
Caja — opens the file manager where you can view file system objects.
UXTerm, Xterm — opens the terminal emulator for X Windows system (for
working in the console).
Disk Usage Analyzer — informs on the size of folders and available disk space.
Log file Viewer — allows to view and monitor system logs.
MATE Terminal — allows access to the terminal emulation for MATE desktop (for
working from the console).
Accessories
This item provides access to the following standard programs: gedit and Midnight
commander. It also allows to find files and take screenshots.
Shutdown
Shuts down Dr.Web LiveDisk and turns off the computer.
User Manual
General Description 13
Menu item
Description
Places
This item allows to find files and open recent documents and files residing in
Home Folder
Desktop
Computer
428 MB Filesystem
Floppy Drive
System
This item allows access to the window where you can configure system parameters,
administer the system, and view information about MATE.
Shutting Down Dr.Web LiveDisk
To shut down operation of Dr.Web LiveDisk, open the system menu by clicking the
button on the
taskbar and select the Shutdown item. The program will display the corresponding message and
prompt you to eject the removable boot media. Having done this, press ENTER and the computer will
turn off.
User Manual
Basic Functions
Basic Functions
During its operation, Dr.Web LiveDisk uses a temporary RAM drive created when the system is starting.
Thus, all changes in Dr.Web LiveDisk program settings will be lost after the computer restarts.
Dr.Web LiveDisk can perform the following tasks:
1. Scan the system for viruses
Dr.Web CureIt! allows to scan the system for viruses or malware.
For details on how to work with Dr.Web CureIt!, refer to the Dr.Web CureIt! Scanner section.
Updating virus databases is described in the Dr.Web Updater section.
2. Edit Windows registry
Dr.Web RegEdit allows to view, edit, and restore windows registry keys. The program automatically
detects Windows registry hives upon Dr.Web LiveDisk startup. After that, you can work with registry
keys as with ordinary text files (view their contents and edit them when necessary).
For details on how to work with Dr.Web RegEdit, refer to the Registry Editor section.
Despite the fact that working with Windows registry is similar to working with files and folders, registry
hives are not folders, and you must not copy ordinary files and folders into them.
It is also strongly not recommended to delete, move or rename registry hives as this may lead to damage
of the structure. In this case, Windows will not be able to read the registry and the operating system or
some of its components will become inoperable.
3. View, edit, create and delete files
Inbuilt file managers allow to work with files and folders and perform such operations as viewing,
editing, creating and deleting files.
Midnight Commander is a console file manager with a text user interface.
Caja is a file manager with graphical interface.
For details on how to work with Caja, refer to the Graphical File Manager section.
For details on how to work with Midnight Commander, refer to the Console File Manager section.
4. Work with Linux management console
Terminal emulator provides access to Linux management console.
For details on how to work with MATE Terminal, refer to the Terminal Emulator section.
User Manual
14
Basic Functions
5. Configure network settings
A special inbuilt program allows to change computer network settings. This can be necessary to
establish Internet connection and update virus databases. It is recommended to change network
settings only if the configuration created upon Dr.Web LiveDisk startup is not valid.
For details on how to configure network settings, refer to the Network Configuration Program section.
6. Browse the Internet
The inbuilt browser Mozilla Firefox allows to browse the websites and view Help file on Dr.Web
LiveDisk components.
For details on how to work with the inbuilt Firefox browser, refer to the Browser section.
User Manual
15
Basic Functions
Dr.Web CureIt! Scanner
Dr.Web CureIt! is the ideal solution for situations when installation of an anti-virus is impossible due
to virus activity or some other reason, because it does not require installation and is constantly
supplemented with the latest Dr.Web virus databases to ensure its effectiveness against all virus threats
and other malicious programs. It also automatically defines the language used by your operating
system. If the language is not supported, then Dr.Web CureIt! will use English by default.
Dr.Web CureIt! allows you to run anti-virus scans of disk boot sectors, random access memory (RAM)
and both separate files and objects enclosed within complex structures (archives, email files, installation
packages). By default, Dr.Web CureIt! uses all detection methods to detect viruses and other
malicious software.
By default, Dr.Web CureIt! does not check archives. You can enable scanning of archived files in
Dr.Web CureIt! settings.
Dr.Web CureIt! detects and neutralizes the following types of malicious programs:
Worms
Viruses
Trojans
Rootkits
Spyware
Dialer programs
Adware
Hacktools
Joke programs
Riskware
On detection of a malicious object Dr.Web CureIt! only informs you about the threat. Information on
all infected or suspicious objects displays in the table where you can manually select a necessary action.
The default settings are optimal for most cases. However, if necessary, you can modify actions
suggested upon threat detection by using Dr.Web CureIt! settings window. Please note that you can
set a custom action for each detected threat after scanning is completed, but common reaction for a
particular threat type should be configured beforehand.
While scanning your system, Dr.Web CureIt! can send general information on your computer and its
state of information security to Doctor Web servers. This statistics gathering is optional.
User Manual
16
Basic Functions
Startup and Shutdown
Starting Dr.Web CureIt!
After Dr.Web LiveDisk is started and the operating system is ready, the anti-virus scanner Dr.Web
CureIt! automatically displays the License and updates window on the screen.
To run an anti-virus scan after Dr.Web LiveDisk startup or rescan you system, click the
CureIt! icon on the desktop.
Dr.Web
If an update to virus databases is required, you can start Dr.Web Updater by clicking the
virus databases icon on the desktop.
Update
In the License and updates window, you can view information about the license owner, the license
expiration date, and the date when the virus databases were last updated.
You can also read the conditions of statistics gathering and, if you want to participate in the
improvement program, select the appropriate check box. In this case, statistics collected while scanning
your system will be sent to Doctor Web servers. By default, this option is disabled.
Click Continue. This opens a window, where you can select a scan mode.
Exiting Dr.Web CureIt!
To finish working with Dr.Web CureIt!, close the program window.
User Manual
17
Basic Functions
General Settings
If you want to configure settings of Dr.Web CureIt!, click Preferences
on the toolbar.
Option
Description
Automatically apply
actions to threats
By default, if known viruses or computer threats of other types are detected during
scanning, Dr.Web CureIt! informs you about them. If enable this option, all detected
threats will be neutralized automatically according to default settings or user-specified
settings (if the user changed actions set by default).
Select this check box to apply actions to detected threats automatically.
Use sound alerts
Select this check box to enable sound notifications on particular events (by default, this
option is disabled).
Settings
Click this item to open the window with Dr.Web CureIt! settings, where you can
configure parameters of anti-virus scanning.
Quarantine Manager
Click this item to open the window of Quarantine manager, where you can view
information on quarantined objects.
Help
Opens the Help file.
To change the interface language
Click the Language
icon on the toolbar and then select the necessary option.
User Manual
18
Basic Functions
Express Scan
Dr.Web CureIt! provides a pre-installed template for anti-virus scanning of the most vulnerable
objects of your operating system.
To run express scans
1. In the License and updates window, read the license information. If you want to participate in
this improvement program, then select the appropriate check box to enable statistics gathering.
(By default, this option is disabled.) Click Continue.
2. In the Scan mode window, click Start scanning.
3. During scanning, Dr.Web CureIt! displays general information on its progress and lists detected
threats.
To manage scanning process, use the following options:
To pause scanning, click Pause.
To continue with the scanning, click Resume.
To stop scanning, click Stop.
The Pause button is not available while processes and RAM are scanned.
4. Once scanning completes, the program displays detailed information on detected threats. Review
scan results.
5. If scanning reveals viruses or other threats, you need to secure your system by neutralizing
them. To apply predefined actions to all detected threats at once, click Neutralize. If necessary,
you can select custom actions for particular threats.
User Manual
19
Basic Functions
Additional Tasks
For most cases, express scanning is enough to cure your computer from infections and malicious
programs. In rare cases, when subtle tuning is necessary, use the following options:
Perform custom scans, which allows you to select particular operating system objects or files and
folders to scan.
Select custom actions to apply to detected threats.
Configure general settings of anti-virus scanning.
Custom Scan
Apart from the pre-installed scanning template that helps running an express scan of the most
vulnerable objects, Dr.Web CureIt! also provides you with custom scan mode that allows configuring
scanning in accordance with your particular needs.
To start scanning in custom mode, in the Scan mode window, click Select objects for scanning.
This mode allows you to select objects for scanning:
Boot sectors of all disks
Boot disk root folder
Windows system folder (of all detected operating systems)
Documents folder "My documents" of all computer users
Temporary files
Rootkits
To check all listed objects for viruses, select the Scanning objects check box in the table heading.
User Manual
20
Basic Functions
To check a particular file of folder, click the link at the bottom of the table, and then select objects for
scanning in the Browse window.
To find a required object, view all file system disks in the /mnt/disk/.. directory.
If necessary, configure Dr.Web CureIt! settings before starting the scan.
Click Start scanning.
Once scanning completes, the program displays detailed information on detected threats. Review scan
results.
If scanning reveals viruses or other threats, you need to secure your system by neutralizing them. To
apply predefined actions to all detected threats at once, click Neutralize. If necessary, you can select
custom actions for particular threats.
Configuring Threat Neutralization
By default, if known viruses or computer threats of other types are detected during scanning, Dr.Web
CureIt! informs you about them. You can neutralize all detected threats at once by clicking
Neutralize. In this case Dr.Web CureIt! applies the most effective actions according to its
configuration and threat type.
By clicking Neutralize you apply actions to objects selected in the table. Dr.Web CureIt! selects all
objects by default once scanning completes. When necessary, you can customize selection of objects to
be neutralized by using check boxes next to object names or threat categories from the drop-down menu
in the table header.
User Manual
21
Basic Functions
Moreover, you can apply an action individually to a particular threat. You can also attempt to cure an
infected file and, if curing failed, neutralize the threat by removing the object.
To select an action
1. Where necessary, select a custom action from the drop-down list in the Action field. By default,
Dr.Web CureIt! selects the action recommended for this type of threat.
2. Click Neutralize. Dr.Web CureIt! applies all selected actions at once.
There are the following limitations:
For suspicious objects curing is impossible.
For objects which are not files (for example, boot sectors) moving and deletion is impossible.
For files inside archives, installation packages, or attachments, no actions are possible.
Configuring Scanning
The default settings are optimal for most uses. Do not change them unnecessarily.
To configure Dr.Web CureIt!
1. If Dr.Web CureIt! is not running, start the program. This opens Dr.Web CureIt! window.
2. Click the Preferences
icon on the toolbar, and then select Settings.This opens the window
which contains the following pages:
The Main page, where you can configure general parameters of Dr.Web CureIt! operation.
The Actions page, where you can configure reaction of the Dr.Web CureIt! on detection of
infected or suspicious files and archives or other malicious objects.
The Exclusions page, where you can specify files and folders to be excluded from scanning.
The Log page, where you can set logging options for Dr.Web CureIt!.
3. To get information on options available on the page, click Help .
4. After editing, click OK to save the changes or Cancel to cancel them.
Changes in the settings of Dr.Web CureIt! are retained only in the current program session. New
session resets program settings to their default values.
User Manual
22
Basic Functions
Main Page
On this page, you can set main parameters of Dr.Web CureIt! operation.
You can enable sound notifications on particular events, instruct Dr.Web CureIt! to apply
recommended actions to detected threats automatically, and select an option to interrupt scanning
when on battery power.
Actions Page
By default, if known viruses or computer threats of other types are detected during scanning, Dr.Web
CureIt! informs you about them. These actions are suggested in accordance with the settings on this
page.
User Manual
23
Basic Functions
The best action for curable threats (for example, files infected with known viruses) is curing, since it
allows to restore the infected file completely. It is recommended to move other threats to quarantine in
order to prevent loss of potentially valuable data. You can select one of the following actions:
Action
Description
Cure
Instructs to restore the original state of an object before infection. If the object is incurable,
or an attempt of curing fails, the action set for incurable viruses is applied.
This action is available only for objects infected with a known virus that can be cured except
for Trojan programs and files within complex objects(archives, email attachments, file
containers). Trojan programs are deleted on detection.
This is the only action available for boot sectors.
Move
to quarantine
Instructs to move the object to a specific folder for isolation.
This action is impossible for boot sectors.
Delete
Instructs to delete the object.
This action is impossible for boot sectors.
Ignore
Instructs to skip the object without performing any action or displaying a notification.
The action is available only for potentially dangerous files: adware, dialers, jokes, hacktools
and riskware.
Threats within complex objects(archives, e-mail attachments, file containers) cannot be processed
individually. By default, the program is set to inform on detection.
Exclusions Page
On this page, you can specify files and folders that should be excluded from scanning and determine
whether to scan contents of archives, email files, and installation packages.
User Manual
24
Basic Functions
Here you can list names or masks for the files to be excluded from scanning (this option is appropriate
for temporary files, swap files, etc.).
To configure excluded files list
Do one of the following:
Enter the name (mask) of a file that should be excluded from scanning. To add a file residing on
your system, you can click Browse and select the file in the standard file chooser. You can also
use masks.
Click the Add button on the right. The file (or file mask) will be added to the list below.
To remove a file from the list, select it and click Remove. The file will be checked during the
next scan.
Log Page
On this page, you can specify logging parameters.
You can specify one of the following verbosity levels for logging:
Standard – in this mode, the most important events are logged, such as time of Dr.Web
CureIt! starts and stops or information on detected threats.
Extended – in this mode, in addition to the most important events, names of packers and
content of scanned archives is logged. If required, you can add such objects to the list of
exclusions, which can reduce system load. If necessary, you can add these objects to the list of
exclusions, which will help to increase computer performance. This logging mode is set by default
for Dr.Web CureIt!.
Debug – in this mode, all details on Dr.Web CureIt! operation are logged, which may result in
considerable log growth. It is recommended to use this mode only when errors occur in Dr.Web
CureIt! operation or by request of Doctor Web technical support.
User Manual
25
Basic Functions
Sending Statistics
If you want to participate in the improvement program of Doctor Web, select the appropriate option
when running Dr.Web CureIt!.
In order to provide analysis of information security threats and overall viral situation around the globe
as well as to ensure continuous development and improvement of Dr.Web products, Dr.Web CureIt!
collects and sends to Doctor Web servers impersonal statistics while it scans and cures your system.
This statistics contain only the following general information:
CPU details including processor name, technical description, current and maximum speed, number
of processor cores, and number of logical processors.
RAM details including amount of physical and virtual memory (both total and available at
scanning).
Operating system parameters including its name, version, build number, installed service packs,
operation mode, type of account (user or administrative), and local settings.
Information on installed anti-virus, anti-spy, and firewall software.
Information on each detected threat including its name and type, the name and type of infected
object, and hash of the infected file when necessary.
Scan summary including scanning time, number of scanned files and objects, number of suspicious
objects, and number of detected threats per type.
Summary on applied actions including number of unmodified objects as well as number of cured,
deleted, moved, renamed, and ignored objects.
The privacy statement from Doctor Web is available on the official website.
User Manual
26
Basic Functions
Quarantine Manager
Quarantine folders serve for isolation of files that are suspected to be malicious. They also store backup
copies of files processed by Dr.Web CureIt!. Quarantine (DrWeb CureIt Quarantine) is created in the
root of the drive where an infected object is located. Such objects are moved to appropriate folders and
then the quarantined files located on hard drives are encrypted.
To open the Quarantine manager window, click Preferences
Quarantine Manager item on the Dr.Web CureIt! settings menu.
on the toolbar and then select the
The central table lists the following information on quarantined objects that are available to you:
Object – name of the quarantined object
Threat – malware class of the object, which is assigned by Dr.Web CureIt! when the object is
quarantined
Date added – the date and time when the object was moved to Quarantine
Path – full path to the object before it was quarantined.
In the Quarantine Manager window, the following buttons are available:
Restore as – removes selected objects from the quarantine and restores them to selected
location.
Use this option only when you are sure that the selected objects are not harmful.
Delete –deletes selected objects from the quarantine and from the system.
To apply an action to several files simultaneously, select the check boxes next to the object names and
then click the corresponding button.
When you finish working with Quarantine manager, click OK.
User Manual
27
Basic Functions
Dr.Web Updater
New types of computer threats with more perfect masking techniques are constantly appearing
worldwide. Updating virus databases guarantees an up-to-date protection for your computer. Updates
are downloaded and installed by a specially designed component Dr.Web Updater.
You can run this component by clicking the
Dr.Web Updater window opens.
Update Virus Databases icon on the desktop.
To receive an update for virus databases, click Update now. After a server response is received,
transfer of new files starts.
When the component notifies you that all required files are received, click Close to finish working with
Dr.Web Updater.
User Manual
28
Basic Functions
Registry Editor
Registry stores information that is necessary to ensure proper operation of Windows. This information
includes profiles for each user, applications installed on the computer, types of documents created by
them, folder properties, application icons, hardware that exists on the system, and used ports.
If you want to edit the registry manually, use the Dr.Web RegEdit program, which is an analogue of
the registry tool for Windows.
Starting registry editor
On Dr.Web LiveDisk startup, Dr.Web RegEdit automatically detects registry keys of installed
Windows operating systems. After that, you can work with registry keys as with ordinary text files and
folders (view their contents and edit them when necessary).
Despite the fact that working with Windows registry is similar to working with files and folders, registry
keys are not folders, and you must not copy ordinary files and folders into them.
To start the program, double-click the Dr.Web RegEdit icon
on the desktop.
Working with registry
Use the Dr.Web RegEdit program only if you are confident that the changes are correct. Exercise
caution when editing the registry.
User Manual
29
Basic Functions
At the top of the window, you can see a bar with the following control buttons:
— opens additional menu which allows to add a key, a subkey or a particular value
— removes a key, subkey or a particular value
— saves the current registry state
— opens the search box where you can find an object in registry keys by the object name
On the left pane of the editor window, you can see registry keys. If the program detects several
operating systems, it displays a separate register for each of them.
Every key can contain data that is called a value. On the right pane of the editor window, you can see a
table which displays values of the selected key.
Description for registry keys
HKEY_LOCAL_MACHINE
This key contains configuration parameters for the computer (for all users), including data on the
hardware and operating system (bus type, system memory, device drivers, and startup settings).
HKEY_USERS
This key contains information on all user profiles on the computer, including environmental variables,
desktop settings, network connection settings, and parameters of printers and installed applications.
Editing registry
To add a new key or value
1. On the left pane, select the group of keys where you want to add a new key.
2. Select the Key item in one of the following ways:
Via the insert menu by clicking the
window)
icon on the control bar (at the top of the editor
User Manual
30
Basic Functions
Via the shortcut menu by right-clicking anywhere in the window
3. Enter a new key name and press ENTER.
To add a new key value
1. Select the key which value you want to change.
2. Via the insert menu or via the shortcut menu select the type of the value to be added.
3. Enter the new name in the Value name box and, if necessary, change its default value specified
in the Value data box.
4. Click OK or press ENTER to save the changes.
Searching for keys and values
1. Click the
icon on the control bar (at the top of the editor window). The Find window
appears on the screen.
2.
3.
4.
5.
6.
Enter data to search for and click Find.
If found, objects will be displayed in the table below.
At that, the Find button label changes to Stop. Click it if the required object is already found.
To open it in the editor, double-click the appropriate row and close the Find window.
The selected object is displayed on the left pane of the editor window. If the search object was a
value, it is highlighted in the right pane.
User Manual
31
Basic Functions
Modifying key values
1.
2.
3.
4.
5.
Select the key which value you want to change.
Select the required value in the table.
Either select Modify on the shortcut menu or double-click the appropriate table row.
Modify the value in the Value data box.
Click OK or press ENTER TO SAVE THE CHANGES.
Removing keys and values
1. Find and select the registry element which is to be removed (key or value).
If you select a key, all its subkeys and values will be also removed.
2. Either select Delete on the shortcut menu or click the icon of the removal tool
on the
control bar.
3. The program displays a warning message. To confirm the removal, click Yes; to abort the
process, click No.
Certain keys cannot be modified or removed as they are locked by installed applications (for example,
keys of the anti-virus are locked by self-protection) On attempt to modify such objects, the program
displays the appropriate warning. It is recommended to report on locked keys (as this will help in curing).
Exiting registry editor
To finish working with Dr.Web RegEdit, close the editor window.
User Manual
32
Basic Functions
Auxiliary Programs
Dr.Web LiveDisk is supplied with the following software tools that allow the user to work with the file
system, configure network and browse the web pages:
Graphical File Manager
Console File Manager
Network Configuration Program
Browser
Terminal Emulator
This document provides you with short description of the abovementioned tools. For details on how to
work with the programs, refer to the developers' websites.
Graphical File Manager
Caja is a file manager with graphical interface.
Starting graphical file manager
You can start the file manager in one of the following ways:
By double-clicking the File Manager icon
on the desktop.
Select Caja in the System Tools section of the system menu.
The window of the graphical file manager is shown in the picture below.
User Manual
33
Basic Functions
Working with graphical file manager
The sidebar allows you to switch quickly between the folders of your file system by using bookmarks. To
view the folder contents, click the appropriate bookmark and the objects contained in the folder will be
listed in the right pane.
On the sidebar, fixed bookmarks are arranged in following three groups: Devices, Computer, and
Network. Moreover, the user can create bookmarks to quickly access particular folders.
When clicking the root bookmark, the folder with the same name opens where user files are stored
(created or downloaded by the user while Dr.Web LiveDisk is running).
To add a bookmark to the sidebar, open the required folder and click Bookmarks
on the program menu.
Add bookmark
The right pane of the window displays the folder contents. To open a subfolder, double-click its name.
Right-clicking a file or folder name opens a shortcut menu which allows you to select an action.
If required, adjust file manager settings to meet your needs. For that, click Edit
Preferences.
In the appeared window, you can configure the following:
Folder view settings
Operational mode and appearance of the file manager
Advanced options
User Manual
34
Basic Functions
Working with files and folders
To find a required object, view all file system disks in the /mnt/disk/.. directory.
Opening files
When opening a file, the file manager applies the action recommended to this file type. For example,
text files are opened in a text editor and graphics files are opened in a graphics viewer.
The file manager checks the extension of a file to detect the file type. If file has no extension or the
extension in unknown to the program, the file manager attempts to determine the type by its contents.
You can change the application set by default to run files of a particular type. For that purpose, select a
file of the appropriate type and double-click it or open the File menu and click Open with Other
Application. In the appeared window, select the required application or add a new application
manually (if it is not in the list). If you selected the appropriate check box, the specified application will
be used to open all files of this type by default.
Folder and file options
To open the file property sheet, select the required file and do one of the following:
On the File menu click Properties.
Right-click the file and in the shortcut menu select Properties.
Press ALT+ENTER.
File property sheets show information on any file or folder. In these window, you can do the following:
Change the icon for special files
Add or Remove icons for files or folders
Change file or folder permissions
Select an application to be used for opening files of this type
For details on how to work with the program, refer to the developers' website at http://matedesktop.org/.
Exiting graphical file manager
To finish working with the file manager, close the program window or on the File menu click Close.
User Manual
35
Basic Functions
Console File Manager
The inbuilt Midnight Commander file manager is similar to those used in MS-DOS and Windows
operating systems and works in the console.
Starting console file manager
You can start the file manager in one of the following ways:
By double-clicking the Midnight Commander icon
on the desktop.
By clicking the Midnight Commander item in the Accessories section of the system menu.
The following picture shows the window of the console file manager:
Working with files in Midnight Commander
In addition to the file system navigation bars, the file manager contains the inbuilt text editor that
enables you to view and edit text files.
To view a file, select its name and press F3; to edit the file, press F4.
To delete the selected file, press F8.
The bottom pane of the window displays actions corresponding to the functional keys.
Additional functions of the file manager are available on the main program menu. To open the
menu, press F9.
The input line that enables you to enter commands to the operating system is displayed between the
bottom menu and navigation bars (similar to working in the console).
User Manual
36
Basic Functions
To find a required object, view all file system disks in the /mnt/disk/.. directory.
For details on the program, visit the developers' websites at https://www.midnight-commander.org/ and
http://docs.xfce.org/apps/terminal/start. You can also take advantage of the Help file provided with
Midnight Commander. To open the program Help, either click Help on the bottom menu or press F1.
Exiting console file manager
To shut down Midnight Commander, do one of the following:
Close the program window.
Type exit at the command prompt.
Press F10 and select YES when you are prompted to confirm exit.
Select Quit on the bottom menu and then select YES when you are prompted to confirm exit.
User Manual
37
Basic Functions
Terminal Emulator
MATE Terminal program allows you to access Linux management console and work in text mode.
Starting terminal emulator
You can start the program in one of the following ways:
By double-clicking the
MATE Terminal icon on the desktop.
Select MATE Terminal in the System Tools section of the system menu.
When you start the terminal emulator for the first time, the program operates with its default settings.
Working with terminal emulator
The window of the terminal emulator is shown in the picture below.
To enter a command, type it at the command prompt marked with the prompt character #. Before the
prompt character, the program shows the user name, the current system name (always
root@drweb), and the current working directory. You can scroll through the window contents
bottom-up, as in teletype systems.
Working with the console requires basic knowledge of Unix-based operating systems and is
recommended only to experienced users.
For details on how to work with the program, refer to the developers' website at http://matedesktop.org/.
To finish working with the terminal, either close the program window, or type exit, or on the File
menu click Close Window.
User Manual
38
Basic Functions
Browser
Even though your computer cannot be started from the hard disk, the Mozilla Firefox web browser,
included in Dr.Web LiveDisk, allows you to view websites and save the pages. You will be able to view
saved pages after the operating system is fully restored and loaded.
A valid Internet connection is required to access web pages with the inbuilt browser.
By default, the browser start page is the one of Doctor Web official website.
Starting browser
You can start the inbuilt browser in one of the following ways:
Double-click the
Firefox browser icon on the desktop.
Click Firefox Web Browser in the Internet section of the system menu.
During its operation, Dr.Web LiveDisk uses a temporary RAM drive created when the system is starting.
Thus, all saved webpages and browser history will be lost after the computer reboots.
To save viewed webpages, use one the folders residing in the /mnt/disk/.. directory.
For more information on working with the Mozilla Firefox browser, visit the website of the developer at
http://support.mozilla.org/.
To finish working with Firefox, close the browser window.
User Manual
39
Basic Functions
System Date and Time
To view the calendar, click the clock
in the lower-right corner of the desktop.
To change the system date and time, right-click the clock and then, in the shortcut menu, click
Preferences:
In the open window Clock Preferences, click Time Settings:
User Manual
40
Basic Functions
Set the required date and time values.
To save your changes and close the Time & Date window, click Set System Time. After you finish
using the program, click Close in the Clock Preferences window.
User Manual
41
Basic Functions
Network Configuration Program
Dr.Web LiveDisk uses a network connection on your computer to connect to the Internet. A valid
Internet connection is primarily required to update virus databases used by Dr.Web CureIt!. Moreover,
it allows you to view websites (including documentation on particular components) in the browser
supplied with Dr.Web LiveDisk.
Dr.Web LiveDisk automatically detects network connection settings on its startup. In most cases, the
parameters are detected correctly and do not require manual modification. However, if a network
connection is not found or the network is not available, you can specify correct connection parameters
manually via the network configuration program.
The network configuration program can work only with accessible network devices.
The program monitors the state of network interfaces and can automatically switch to a connection with
higher speed. If a wired network interface is found, the program connects to this interface.
In the lower-right corner of the desktop, you can see a network connection icon which indicates the
connection state:
— connection is established
— networking is disabled
— the program is searching a connection
Configuring network connections
1. To adjust the configuration settings, click the
icon and select Edit Connections:
User Manual
42
Basic Functions
2. The Network connections window appears on the screen:
3. To add a new connection, select the corresponding tab and click Add. If you want to adjust
already specified settings, select the required connection and click Edit.
4. This opens the edit window:
Configure settings as necessary.
You can move the cursor by using the TAB key and select/clear check boxes (when a required
check box has focus) by pressing ENTER.
5. If required, select Connect automatically.
6. Click Save. If you click the Cancel button, provided data are not saved.
To exit the network configuration program, click Close.
User Manual
43
Technical Support
Technical Support
If you encounter any issues installing or using company products, take advantage of the following
support options:
Download and review the latest manuals and guides at http://download.drweb.com/doc/
read the frequently asked questions at http://support.drweb.com/show_faq/
Browse Dr.Web official forum at http://forum.drweb.com/
If you have not found solution for the problem, you can request direct assistance from Doctor Web
technical support by filling in the web from at http://support.drweb.com/.
For regional office information, visit the Doctor Web official website at http://company.drweb.com/
contacts/moscow.
User Manual
44
© Doctor Web, 2014