1
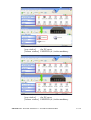
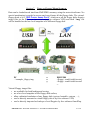
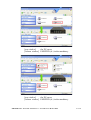
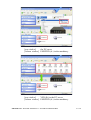
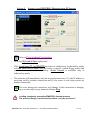
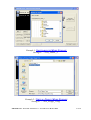
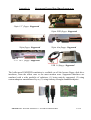
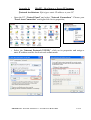
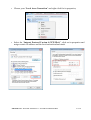
EMUFDD 4.30 – NETWORK USER MANUAL
3.5", 5.25", 8" / FLAT-34PIN, FLAT-26PIN, SLIM-26PIN, USB, SCSI
The most reliable and configurable Universal Floppy HW Emulator
ALL-INCLUSIVE PROFESSIONAL INSTALLATION SERVICE AVAILABLE
Custom/non-standard floppies analysis & development available
USB Version
Network Version
Section 1.
Section 2.
Section 3.
Section 4.
Section 5.
Section 6.
Section 7.
Section 8.
Section 9.
DATASHEET
HARDWARE INSTALLATION
NETWORK INSTALLATION
WIRELESS NETWORKING
INTRODUCTION & EMULATION CYCLE
SOFTWARELESS MODE STORAGE
VIRTUAL-FLOPPY MODE STORAGE
LOADING INTO EMUFDD'S MEMORY FROM PC SERVER
SAVING FROM EMUFDD'S MEMORY TO PC SERVER
Appendix A.
Appendix B.
Appendix C.
SUPPORTED FLOPPY DISK DRIVE INTERFACES
WINXP – GET/ASSIGN A STATIC IP ADDRESS
WIN7 & WIN8 – GET/ASSIGN A STATIC IP ADDRESS
MILO S.N.C.
SW & HW per Automazione - Industrial Automation SW & HW
Via Ruggiero Grieco 1/C, 41011 Campogalliano (MO), Italy
Codice Fiscale / Fiscal Code: 03373570369 - P.IVA / VAT: 03373570369
Tel. 059/528512 - Fax. 059/520131 - Email: [email protected] - Web: www.milosrl.it
EMUFDD 4.30 – NETWORK USER MANUAL - LAST REVISIONMARCH 2014
P.
1/28
Section 1.
DATASHEET
Retrofit services for the industry, from the machinery to the solution
EMUFDD Tech-Homepage :
www.embeddedsw.net
Designer & Customer Support :
[email protected]
EMUFDD scores a unique 100% rate of successful floppy replacements:
• we freely help customers, before purchasing, in collecting all the needed infos;
• we provide floppy analysis service to identify/backup/emulate all floppy disks;
• we provide free software capable of doing universal backup of floppy disks;
• we provide free software capable of full floppy drive virtualization.
ALL-INCLUSIVE PROFESSIONAL INSTALLATION SERVICE AVAILABLE
We're able to come to you and directly retrofit all kind of existing industrial machinery,
quickly, safely and at an affordable price:
• no need to change the CNC/PNC/control;
• no need to change any electronic;
• backup/digitalization/testing of all kind of data/program floppy disks;
• backup/digitalization/testing of all system/boot/recovery floppy disks;
• absolutely no need to rewrite programs;
• new programs saved directly on EMUFDD;
• shortest production stopping time;
• EMUFDD training of the worker.
DIMENSIONS
HEIGHT [H]
1'' =
WIDTH [W]
4'' = 10,2 cm
DEPTH [D]
2,5 cm
5,3'' = 13,5 cm
WEIGHT
EMUFDD 4.30 – NETWORK USER MANUAL - LAST REVISION MARCH 2014
300 g
P.
2/28
HARDWARE
1.5 MB FRAM non-volatile memory
INTERNAL MEMORY TYPE
INTERNAL MEMORY RELIABILITY
1014 R/W cycles = 438.000 h = 50 years 24/7
POWER ON TIME
USER FRONT INTERFACE
FLOPPY REAR INTERFACE
Less than (<) 500 ms
USB keys with FAT format – 100 floppy disks
Ethernet 10T network – unlimited floppy disks
34 pin flat cable (3.5'' & 5.25'') + 5V power supply
26 pin flat cable (integrated power supply)
26 pin slim cable (integrated power supply)
USB 1.0 standard external floppy
SCSI 50 pin standard floppy
SOFTWARE
FIRMWARE RELEASE
Revision 30 (March 2014)
CONFIGURATION
100% Jumperfree / Plug'n'Play
FIRMWARE UPGRADE SUPPORT
NETWORK SOFTWARE
Yes
WinXP, Win7, Win8, WinServer, x32 & x64
ENCODING
FM / MFM / custom on request
SPEED
300 rpm / 360 rpm / custom on request
DATA CLOCK
From 125 Khz (the old 8”) up to 500 Khz (the modern 3.5”)
SUPPORT
Softwareless Mode: FAT12 – 360KB / 720KB / 1.200MB / 1.440MB
Raw Image Mode: Any existing standard or custom on request
SOME COMMON 80/2/18x512 – MFM: 500 KHz – 300 rpm – 1.440MB
80/2/15x512 – MFM: 500 KHz – 360 rpm – 1.200MB
EXAMPLES...
80/2/9x512 – MFM: 250 KHz – 300 rpm – 720KB
40/2/9x512 – MFM: 250 KHz – 300 rpm – 360KB
MORE LESS
COMMON
EXAMPLES...
OLD & RARE
EXAMPLES...
83/2/18x512 – MFM: 500 KHz – 300 rpm – 1.494MB
80/2/32x256 – MFM: 500 KHz – 300 rpm – 1.280MB
80/2/5x1024 – MFM: 250 KHz – 300 rpm – 800KB
80/2/18x256 – MFM: 250 KHz – 300 rpm – 720KB
80/2/16x256 – MFM: 250 KHz – 300 rpm – 640KB
80/2/5x1024 – FM: 250 KHz – 300 rpm – 800KB
80/2/18x256 – FM: 250 KHz – 300 rpm – 720KB
80/2/32x128 – FM: 250 KHz – 300 rpm – 640KB
80/2/16x128 – FM: 125 KHz – 300 rpm – 320KB
NEED MORE? Ask customer support for help in identifying your floppy disk!
EMUFDD 4.30 – NETWORK USER MANUAL - LAST REVISIONMARCH 2014
P.
3/28
“Is EMUFDD compatible with my machinery?”
“Yes, because EMUFDD it's the best existing professional emulation product, not just
another off-the-shelf/junk/chinese one. We will:
• provide you extensive pre-selling support and specifically analyze your target;
• configure a 100% custom EMUFDD solution, just for you;
• help you remotely during the installation, using live Skype connection.”
Gallery of custom EMUFDD installations worldwide
EMUFDD 4.30 – NETWORK USER MANUAL - LAST REVISION MARCH 2014
P.
4/28
Section 2.
HARDWARE INSTALLATION
EMUFDD installation works like any other real floppy drive installation:
• 2.1) connect the power supply;
=
+12V power supply (not connected)
Optional
=
two GND lines (joined, connect one or both)
Required
=
+5V power supply
Required
• 2.2) connect the 34pin flat cable.
=
pin-1 mark (flat cable / connector)
No system driver or additional software needs to be installed on the host system.
Be sure to match the connector pin-1 mark with the flat cable pin–1 mark !
Sometimes flat cables are inverted. Please check whether the cable is
coloured/marked at pin-1 (standard) or pin-34 (inverted) !
EMUFDD 4.30 – NETWORK USER MANUAL - LAST REVISIONMARCH 2014
P.
5/28
Section 3.
NETWORK INSTALLATION
EMUFDD is a true Ethernet 10Mb full-duplex device:
•
•
•
•
full POSIX / WinSock 2 software compatibility on the PC server;
full TCP/IP & RJ45 hardware compatibility on the EMUFDD;
no need to install any extra driver on both the PC server and the machinery;
no need to install any extra hardware on both the PC server and the machinery.
•
3.1) after hardware installation connect (using the RJ45 front connector) all the
EMUFDDs to the local network, that will be using only
static IP addresses (WINXP, WIN7). It's possible to use many EMUFDDs,
grouped using a network switch/router. It's also possible to use a single
EMUFDD, connected point-to-point to the PC server;
Connection to a Switch/Router (1+ EMUFDDs)
Point-to-point connection (1 EMUFDD)
EMUFDD 4.30 – NETWORK USER MANUAL - LAST REVISION MARCH 2014
P.
6/28
•
3.2) each EMUFDD needs to be configured with an IPv4 address, the local
network submask and, in case you're using a router, the router/gateway
address. The configuration is loaded into the EMUFDD using a
“emufdd.tcp” text file, on a USB key. Plug the USB key in, press LOAD
and wait until the device will auto-reset (all leds blink very fast);
[emi]=xxx.xxx.xxx.xxx;
[emp]=xxx;
[pci]=0.0.0.0;
[pcp]=0;
[sub]=xxx.xxx.xxx.xxx;
[gtw]=xxx.xxx.xxx.xxx;
#
Example 1: Minimum settings
+ default EMUFDD port
+ no gateway
•
↔
↔
↔
↔
↔
↔
↔
IPv4 address of EMUFDD
Port of EMUFDD (0=1024 default)
(Reserved for advanced custom features)
(Reserved for advanced custom features)
IPv4 subnet network mask
IPv4 address network gateway
End of configuration file
Example2: Full settings
+ custom EMUFDD port
+ network gateway
3.3) each EMUFDD can be reconfigured how many times you need and you're
completely free to change the local network at any time. To check that the
EMUFDD is correctly configured you can use the standard “ping” (check IP
address) and “arp” (check MAC address) DOS commands;
EMUFDD 4.30 – NETWORK USER MANUAL - LAST REVISIONMARCH 2014
P.
7/28
•
3.4) download the LATEST NETWORK SOFTWARE, always & freely available on
the EMUFDD's official homepage. The software is completely portable,
doesn't need any installation and can run in user mode. All your settings will
be saved in a “emufdd.ini” file (don't delete it !);
•
3.5) run “EmufddEthPanel”. For each EMUFDD connected to the local
network apply the following configuration steps:
•
Click New and a new EMUFDD connection will be created;
• Go to the [1] Config right panel;
• Change the Name (<New Device>) with the name of the machinery;
• Insert the EMUFDD's IPv4 network address and port in EMUFDD NetAddr;
( see 3.2 “emufdd.tcp”: [emi] = xxx.xxx.xxx.xxx; [emp] = xxx; )
• If you have more than one network interface on your PC, then insert its IP
address in PC NetAddr. Otherwise leave 0.0.0.0:0 = default network;
• Click Select EMUFDD Configuration and select the .cfg file that the
customer assistance will send you, to connect to the machinery;
•
Now the EMUFDD connection is configured.
EMUFDD 4.30 – NETWORK USER MANUAL - LAST REVISION MARCH 2014
P.
8/28
Section 4.
WIRELESS NETWORKING
EMUFDD is a true Ethernet 10Mb full-duplex device and is transparent to any standard
wireless bridge and/or extension. Customers can ask to get our official wireless extension
or install any off-the-shelf full duplex product.
#1
Server
#2
Machinery Operator
#3
#4
Example: Different machinery #1 (= plastic injection), #2 (= EDM), #3 (= robot) and #4
(= wood working) are uniformly connected to the same WLAN. Machinery operator is
able to access locally, in front of the machinery, all the programs that are phisically
stored only in the remote server. Extremely easy and fast uploading and downloading,
using any common Windows based tablet.
EMUFDD 4.30 – NETWORK USER MANUAL - LAST REVISIONMARCH 2014
P.
9/28
Section 5.
INTRODUCTION & EMULATION CYCLE
EMUFDD is equipped with 1.5 MB of internal FRAM non-volatile memory:
•
•
•
no need to keep the USB key plugged in;
top-quality data storage and memory reliability (1014 read/write cycles);
unlimited permanent internal memory (no battery, fully RoHS).
More than 50 years of non-stop read/write emulation at full speed.
Each EMUFDD can be used by different users with different skills:
• normal users can be allowed to load-only floppy disks (playback);
• advanced users can have full access to the program floppy disks;
• special floppy disks can be permanently write protected;
• simplified access available: 1 USB key = 1 floppy disk.
Just ask for your version, fully customized for your everyday's usage !
At power-on EMUFDD immediately (less than 500ms) begins its emulation cycle:
• the emulation engine waits for reading or writing requests from the host system,
and any read/write floppy disk access will turn the ACT_LED on;
•
the display continuously shows the On-Line sequence: [– ] / [ –].
EMUFDD 4.30 – NETWORK USER MANUAL - LAST REVISION MARCH 2014
P.
10/28
Section 6.
SOFTWARELESS MODE STORAGE
Data can be loaded/saved into/from EMUFDD's memory using the network software. No
special partitioning is needed to access and copy'n'paste all the floppy disks. The
softwareless mode, a.k.a. “Translation”, reads/saves all the floppy disks from/to
subdirectories on the PC server and each one will be handled as the root of a different
floppy disk:
PC
...\example_floppy\dir1\file1.ext
...\example_floppy\dir2\file2.ext
...\example_floppy\file3.ext
...\example_floppy\file4.ext
...
↔
↔
↔
↔
↔
EMUFDD
A:\dir1\file1.ext
A:\dir2\file2.ext
A:\file3.ext
A:\file4.ext
...
The translation feature:
• is available for 360 KB, 720 KB, 1.200 MB, 1.440 MB floppy disks;
• is available for both loading and saving;
• will preserve long filenames;
• will preserve all the hidden/read-only/system attributes.
EMUFDD 4.30 – NETWORK USER MANUAL - LAST REVISIONMARCH 2014
P.
11/28
[top window]
the PC server
[bottom window] EMUFDD (A:) in the machinery
[top window]
the PC server
[bottom window] EMUFDD (A:) in the machinery
EMUFDD 4.30 – NETWORK USER MANUAL - LAST REVISION MARCH 2014
P.
12/28
[top window]
the PC server
[bottom window] EMUFDD (A:) in the machinery
[top window]
the PC server
[bottom window] EMUFDD (A:) in the machinery
EMUFDD 4.30 – NETWORK USER MANUAL - LAST REVISIONMARCH 2014
P.
13/28
[top window]
the PC server
[bottom window] EMUFDD (A:) in the machinery
A diff between the original disk#00 in the PC server (...\System Floppy\cpyteca.cmd)
and its “translated” version by EMUFDD (A:\cpyteca.cmd) shows that there's no highlevel difference in the directory structure and the attributes of each file:
Name / Size / Creation time / Modify time / Access time
EMUFDD 4.30 – NETWORK USER MANUAL - LAST REVISION MARCH 2014
P.
14/28
Section 7.
VIRTUAL-FLOPPY MODE STORAGE
Data can be loaded/saved into/from EMUFDD's memory using the network software. No
special partitioning is needed to access and copy'n'paste all the floppy disks. The virtualfloppy mode, a.k.a. “ISO FLOPPY IMAGE FILES”, reads/saves all the floppy disks from/to
image files on the PC server (mounted using free software VFD) and each “.img” file
will be handled as the low-level snapshot of a different floppy disk:
PC
...\example_floppy.img
↔
↔
↔
EMUFDD
<floppy> track0/side0/sector1
<floppy> track0/side0/sector2
...
Virtual-Floppy image files:
• are available for both loading and saving;
• are a low-level snapshot of the floppy disk surface;
• allow unlimited emulation of any floppy disk (system, bootable, custom, …);
• can be directly mounted as virtual floppy drives by free software VFD;
• can be directly imported as backups of real floppies by free software OmniFlop.
EMUFDD 4.30 – NETWORK USER MANUAL - LAST REVISIONMARCH 2014
P.
15/28
[top window]
the PC server
[bottom window] EMUFDD (A:) in the machinery
[top window]
the PC server
[bottom window] EMUFDD (A:) in the machinery
EMUFDD 4.30 – NETWORK USER MANUAL - LAST REVISION MARCH 2014
P.
16/28
[top window]
the PC server
[bottom window] EMUFDD (A:) in the machinery
[top window]
VFD (B:) in the PC server
[bottom window] EMUFDD (A:) in the machinery
EMUFDD 4.30 – NETWORK USER MANUAL - LAST REVISIONMARCH 2014
P.
17/28
[top window]
VFD (B:) in the PC server
[bottom window] EMUFDD (A:) in the machinery
A diff between the original disk#00 in the PC server (B:\cpyteca.cmd) and its
“translated” version by EMUFDD (A:\cpyteca.cmd) shows that there's no high-level and
low-level difference in the directory structure and the attributes of each file:
Name / Size / Size on disk / Creation time / Modify time / Access time
EMUFDD 4.30 – NETWORK USER MANUAL - LAST REVISION MARCH 2014
P.
18/28
Section 8.
•
LOADING INTO EMUFDD'S MEMORY FROM PC SERVER
Select a CONFIGURED CONNECTION;
•
Go to the [2] Load & Save right panel;
•
Click Load from PC to EMUFDD and select a subdirectory (softwareless mode)
or Load from IMG to EMUFDD and select a .img file (virtual-floppy mode) that
you want to send to the machinery. Quick Format is available only in
softwareless mode;
• The software will immediately start the network connection, if (1) the IP address is
not being used by another connection and (2) the source is not being written by
another connection;
•
The icon, during the connection, will change. If the connection is hanging
up, you can stop it at any moment clicking Stop.
Loading completely overwrites EMUFDD's internal memory.
The previous floppy, if not backed up before, can't be recovered !
EMUFDD 4.30 – NETWORK USER MANUAL - LAST REVISIONMARCH 2014
P.
19/28
Example 1: SOFTWARELESS MODE STORAGE
Loading from “...\Test_Folder_1\”
Example 2: VIRTUAL-FLOPPY MODE STORAGE
Loading from “...\Test_Floppy_1.img”
EMUFDD 4.30 – NETWORK USER MANUAL - LAST REVISION MARCH 2014
P.
20/28
Section 9.
•
SAVING FROM EMUFDD'S MEMORY TO PC SERVER
Select a CONFIGURED CONNECTION;
•
Go to the [2] Load & Save right panel;
•
Click Save from EMUFDD to PC and select/create a subdirectory (softwareless
mode) or Save from EMUFDD to IMG and select a .img file (virtual-floppy
mode) that you want to receive from the machinery;
• The software will immediately start the network connection, if (1) the IP address is
not being used by another connection and (2) the destination is not being
read/written by another connection;
•
The icon, during the connection, will change. If the connection is hanging
up, you can stop it at any moment clicking Stop.
Saving completely overwrites PC server's destination.
The previous floppy, if not backed up before, can't be recovered !
EMUFDD 4.30 – NETWORK USER MANUAL - LAST REVISIONMARCH 2014
P.
21/28
Example 1: SOFTWARELESS MODE STORAGE
Saving to “...\Test_Folder_1\”
Example 2: VIRTUAL-FLOPPY MODE STORAGE
Saving to “...\Test_Floppy_1.img”
EMUFDD 4.30 – NETWORK USER MANUAL - LAST REVISION MARCH 2014
P.
22/28
Appendix A.
SUPPORTED FLOPPY DISK DRIVE INTERFACES
34pin 3.5” floppy: Supported
50pin SCSI floppy: Supported
26pin floppy: Supported
26pin slim floppy: Supported
5.25” & 8” floppy: Supported
USB 1.0 floppy: Supported
The bullet-proof EMUFDD emulation is available on all the known floppy disk drive
interfaces, from the oldest ones to the most modern ones. Supported interfaces are
emulated with a wide portfolio of solutions: (1) being natively supported; (2) using
custom adapters manufactured by us; (3) using industry-strenght standard adapters.
EMUFDD 4.30 – NETWORK USER MANUAL - LAST REVISIONMARCH 2014
P.
23/28
Appendix B.
WINXP – GET/ASSIGN A STATIC IP ADDRESS
[Network Architecture 1] Assign a static IP address to your PC
•
Open the PC “Control Panel” and select “Network Connections”. Choose your
“Local Area Connection” and right-click for its properties;
•
Select the “Internet Protocol (TCP/IP)”, click on its properties and assign a
static IP address and the local network subnet mask.
EMUFDD 4.30 – NETWORK USER MANUAL - LAST REVISION MARCH 2014
P.
24/28
[Network Architecture 2] Get your current network configuration from DHCP
•
Open the PC “Control Panel” and select “Network Connections”. Choose your
“Local Area Connection” and right-click for its status;
•
Select the “Support”, and get your current network configuration from DHCP.
EMUFDD will be assigned same “Subnet Mask”, same “Default Gateway”, and
next available “IP address” (to be reserved by you as static fixed one).
EMUFDD 4.30 – NETWORK USER MANUAL - LAST REVISIONMARCH 2014
P.
25/28
Appendix C.
WIN7 & WIN8 – GET/ASSIGN A STATIC IP ADDRESS
[Network Architecture 1] Assign a static IP address to your PC
• Open the PC “Control Panel” and select “Network and Internet”;
• Open the “Network and Sharing Center” subsection;
• Open the “Change adapter settings” subsection;
EMUFDD 4.30 – NETWORK USER MANUAL - LAST REVISION MARCH 2014
P.
26/28
• Choose your “Local Area Connection” and right-click for its properties;
• Select the “Internet Protocol Version 4 (TCP/IPv4)”, click on its properties and
assign a static IP address and the local network subnet mask.
EMUFDD 4.30 – NETWORK USER MANUAL - LAST REVISIONMARCH 2014
P.
27/28
[Network Architecture 2] Get your current network configuration from DHCP
• Choose your “Local Area Connection” and right-click for its status;
• Select the “Details”, and get your current network configuration from DHCP.
EMUFDD will be assigned same “IPv4 Subnet Mask”, same “IPv4 Default
Gateway”, and next available “IPv4 address” (to be reserved by you as static
fixed one).
EMUFDD 4.30 – NETWORK USER MANUAL - LAST REVISION MARCH 2014
P.
28/28