1
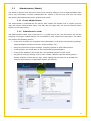
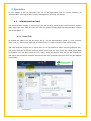
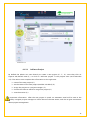
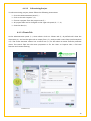
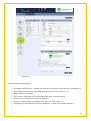
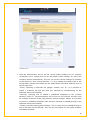
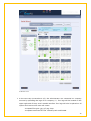
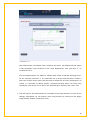
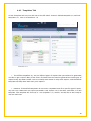
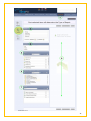
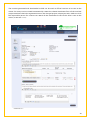
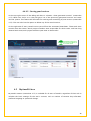
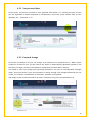
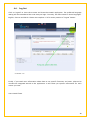
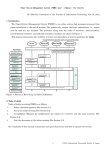
TRACKING-TO-BILLING TIME MANAGEMENT SERVICE User Manual Table of Contents 1. Short Description .................................................................................................................. 3 2. Users .................................................................................................................................... 3 3. 4. 2.1 Administrator (Admin) ................................................................................................... 4 2.2 Standard Users .............................................................................................................. 5 2.3 Project Manager and Project Manager Deputy ................................................................ 5 2.4 Subproject Manager and Subproject Manager Deputy .................................................... 5 2.5 Company Reporter ......................................................................................................... 6 2.6 Project Reporter............................................................................................................. 6 2.7 Comparison of Users ..................................................................................................... 6 Projects ................................................................................................................................ 7 3.1 What is a project? .......................................................................................................... 7 3.2. Projects in timePO ......................................................................................................... 7 Operation ............................................................................................................................. 9 4.1 Administration Panel ..................................................................................................... 9 4.2 Time Registration Area ................................................................................................ 21 4.3 Project Management Area ............................................................................................ 24 4.4 Reporting Area ............................................................................................................ 28 4.5 My timePO Area ........................................................................................................... 36 4.6. Log Out ....................................................................................................................... 38 2 User Manual for timePO tracking-to-billing service 1. Short Description timePO is a complete tracking-to-billing time management service, designed especially for small and medium sized companies, working on billable projects. timePO is divided into five clear sections, helping the users easier find the section they need for a specific task. The five sections are: Administration, Time Registration, Project Management, Reporting and My timePO. timePO is structured on a role-basis, meaning that each user is given a certain role, with specific privileges and visibility within the application. This ensures the highest confidentiality and security for your projects when using timePO to manage them. 2. Users timePO has the following types of users (roles): The Administrator (company administrator = CA) The Project Manager (PM) and the Project Manager Deputy (PMD) The Sub-Project Manager (SM) and the Sub-Project Manager Deputy (SMD) The Company Reporter (CR) and the Project Reporter (PR) The Project Member (Pme), standard user without privileges All the users with privileges from above (PM, SM, etc.) also function as regular users. A timePO user can have more than one role, simultaneously. For example user can be: administrator and project manager project reporter and sub-project manager project manager and sub-project manager (for different projects) etc. All these combinations of roles can be used depending on the size of the company and the number of employees. In smaller companies, a person will probably have more than one role, to fulfill more professional needs at the same time. In medium-sized and large companies a person will probably have only one role, as the resources are not limited. 3 2.1 Administrator (Admin) The admin is the only user who has access to the company settings, such as required weekly work hours, VAT information, account customization etc. Admin is also the only user who can create and modify information about users, projects and clients. 2.1.1 Create Administrator The administrator is automatically the person who created the timePO trial or regular account. They will receive administrative rights, and after the first login they can also set another admin deputy, for security reasons. 2.1.2 Administrative tasks The Administration Panel (see screenshot 2.1) is visible only to the user with admin role. All the company and project-related settings can be modified in here, without any restrictions. The admin can perform the following actions: Create user accounts (for employees and collaborators), with all the corresponding settings (required weekly/monthly work time, annual holidays, etc.) Assign the role of the project manager, company reporter or other administrator Create projects and assign them to the responsible Project Managers. Create client-database, and assign the corresponding projects to each client Set general company settings, such as VAT number, default “expected working hours”, number of given vacation days or logo. These settings will be active for all related user accounts and visible on all generated reports and invoices. Screenshot 2.1 4 Attention: The administrators have access to confidential and sensitive data recorded in the Administration section, thus they should use it with care. 2.2 Standard Users Standard users represent the majority of the company users who will use timePO. They are the project members (Pme) without any additional privileges. The standard users can be either internal employees or collaborators. The standard users can: Register their own worked time, holidays and absence periods Generate Reports from their own data (user-specific reports, holiday reports, timesheets etc.) 2.2.1. Employees “Employees” are defined generally by the internal members of the company which uses timePO as time management for its billable projects. They can have various roles, from default user to project manager or administrator. 2.2.2. Collaborators “Collaborators” are differentiated in timePO from employees, mainly by not having pre-defined requested weekly/monthly working hours or allowed holidays. So, the collaborators don’t have a working time account; they can simply enter time worked on various projects assigned to them, to keep track of their billable effort. 2.3 Project Manager and Project Manager Deputy The Project Manager and the PM-Deputy have the hierarchical privileges to manage their Projects, Sub-Projects and Tasks. They can: set-up a project (define start/end date, define planned hours, etc.) edit a project, sub-project or task enable or disable a project, sub-project or task assign projects, sub-projects or tasks to members, deputies and project reporters enter working time for all the tasks they are assigned to generate reports for both their own data and for all their subordinate sub-/project members as well 2.4 Subproject Manager and Subproject Manager Deputy The Sub-Project Manager and the SM-Deputy have the same rights as the project manager, but only limited for the specific sub-projects they are assigned to. 5 2.5 Company Reporter The Company Reporter has the hierarchical privilege to generate all types of reports for any project, client or user in the whole company. The Company Reporter cannot modify data entered into the database, but has access only for creating reports. Typically, this role is given to a member of the human resources department, or to the managing director of a company. 2.6 Project Reporter The Project Reporter has all the access rights to generate any type of report. The project reporter can get access to all sub-projects and tasks, even if not member of them, only for the purpose of creating reports. Typically, this role is given to the assistant of the project manager. 2.7 Comparison of Users 6 3. Projects This chapter explains how projects are organized in timePO and how you can create your projectbased company structure and manage it. 3.1 What is a project? The term „project” used in timePO refers to a specific set of tasks, bundled into a whole unit, related to a particular client. It is the choice of the respective company how it will structure its projects: It can either define an order as a timePO project and divide this order into several tasks within this project, or split the whole order into multiple timePO projects (in case of large orders). The decision is entirely up to you. However, it is important to keep in mind that timePO offers a billing service as well. You will be able to generate an invoice for a specific “project” recorded in timePO, and send it directly to your client. So it is wise to plan your timePO projects accordingly, to be able to use the billing feature effectively. 3.2. Projects in timePO Projects are organized in a tree structure, with subordinate sub-projects and tasks. You can create an unlimited number of projects, sub-projects or tasks in timePO. Tasks can be created as subordinate elements for a sub-project or directly for a project. The smallest “unit” in timePO is a task, followed by a sub-project, then a project. A user can only register their worked time for a certain task, and not for a sub-project or a project. From experience, the structures with unlimited levels of the tree are not transparent enough, and the typical user needs more time to learn the structure, to have a good overview and to keep up with the assigned projects. Thus, we limited our structure to three levels of depth, for easier use. A representative project structure is shown in the screenshot placed on the left side. 3.2.1. Properties of a project Any project can be customized by its Project Manager, or PM-Deputy. The project members don’t have the privilege to change any setting of the project. The project is always attached to a client, whether external or internal. 3.2.2. Validity of a project The validity of a project is given by the start- and end-date set by the Project Manager. The main limitation these dates give is to the entries made by project members. They can enter time worked on tasks related to the project only within the validity time period of the project. Project members cannot enter time for tasks worked after the end-date of the project. Naturally, they can enter time worked for past days, but within the validity period. The date of the registering the time does not matter, as long as the user inputs it within the time limits of the project. 7 If only a start date is defined for a project, making it continuous, then time worked can be registered anytime from the start date. These rules of validity apply equally to all sub-projects and tasks of a defined project. For every project and sub-project it is possible to set an “Editable from” date. This is most commonly used for projects which will start in the future; and the date when these projects will become visible in the structure, for all users involved, is the “editable from” date. Additionally, the “editable from” function can also be used by a project manager to “freeze” a time period in a project, for security reasons. For example, if during a period an important invoice was generated using the data available at the time, after the day of invoice generation, no user can alter the data, to avoid the inaccuracy of the invoice at a later time. If a project has an “editable from” date, this date applies equally to all of its sub-projects and tasks. Another function related to the validity of a project is the “enabled/disabled” function. A disabled project (this action can be performed only by the project manager) becomes invisible in the project structure, and thus no user can enter time worked for the respective project, or any of its subordinate sub-projects or tasks. Only the responsible project manager, the PM Deputy and the Admin are able to see the disabled projects, with a special filter. They are also the users who can reactivate (enable again) the project, or to generate reports from completed/disabled projects. 3.2.3. Planned hours (maximum effort) It is possible to define the planned hours of work for every project, sub-project and task. We recommend defining these planned hours, because only against this target you are able to have a clear overview of your projects, and get progress reports. We provide the progress bar feature; for each project the possibility to see visually how much of it is completed. You can only see this progress bar if you have defined planned hours for each project. 3.2.4. Project Teams Project Teams represent the group of users assigned to the same project. The project manager (and PM Deputy) can choose their project team from the company pool of users registered in timePO. The sub-project manager (and the SM deputy) can choose the sub-project team only from the pool of the respective project team members. Only the members of a project’s team can enter time worked for any of the tasks subordinate to this project. Non-members of the respective project team cannot enter time for any related task. 8 4. Operation In this chapter it will be described the use of the application and its various functions of administration, time registration, project management, reporting and billing. 4.1 Administration Panel The administration section is reserved only for the company administrator and the admin-deputy. After login, the users with this role will have the default landing page the Administration section (see screenshot 4.1). 4.1.1 Users Tab By default the Admin can see the Users tab (2.) on the administration panel (1.), the company users’ tree (7.), and on the right side an empty form (5.), ready to create a new user account. The User Overview section has a search box (3.) for the admin to easier find the preferred user. The search field has a full text function, which means that any part of the user name typed, even for example, the last three characters of a user’s name, will display that user on the filtered list. The search box functions instantly, that means with each character typed, the user list gets filtered immediately. Screenshot 4.1 9 4.1.1.1 Add New User On the default landing Administration page, on the right side panel, the admin can directly start creating a new user account. From a different position, admin has to click on “Add new user” (8.) on top of the users tree. In creating a new user, the admin can define if it will be considered an “employee” or a “collaborator” (5.). For more information about the difference, please see section 2.2 in this User Manual. Admin then completes all related information about the newly-created user. In the case of creating an “employee” account, the admin must also define some contractual parameters, such as required work hours/days per week. If no such settings are made, the system will adopt the default settings for company work rules (9.). Recommendation: the admin should define the company settings (described in section 4.1.4) after the first login, on the tab “Settings”. By defining there the default settings for “Expected working hours”, every time they create a new user account, those default general settings will be applied. The last step of creating a new user account is the decision whether this new user should be an Administrator (2nd one) or Company Reporter. Also he can set if a user should be Project Manager. If yes, admin must assign the new user to one or more specific projects as PM. At the end all information must be saved to be synchronized into the system. Important information: after the new user account is saved, an automatic email will be sent to this new user to inform them of the newly-created timePO account, and also to give basic instructions of accessing timePO. If the new user is also assigned as project manager, then they will also receive an email with this information and the privileges of the role. 4.1.1.2 Edit existing user To edit an existing user, please follow the following instructions: Go to the Administration Panel (1.) Click on the tab “Users” (2.) Choose the user to edit (7.). The user’s data will appear on the right side of the screen (5.) Change desired data from right screen, as described in section 4.1.1.1. Save changes. 4.1.2 Projects Tab In the Administration panel, when admin clicks on Projects tab (2.) by default will show the project tree (3.), and on the right side an empty form (6.), ready to create a new project. The Project Overview section has a search box (4.) for the admin to easier find the preferred project. The search field has the same properties as for the Users tab, a full text function and instant filtering. 10 Screenshot 4.2 4.1.2.1 Add new Project By default the Admin can start directly to create a new project (6., 7., 8.), once they click on Projects tab/default view (2.), or click on “Add new project” in the projects tree (see Screenshot 4.2). The admin must complete the information on the right side: name of the new project (6.) set the status of the new project (enabled, disabled) (6.) assign the project to a project manager (7.) choose the client to which to assign the project (8.) save the entries (9.). Important information: After the new project is saved, an automatic email will be sent to the newly-assigned project manager to inform them of the new status, and also to give instructions about project management. 11 4.1.2.2 Edit existing Project To edit an existing project, please follow the following instructions: Go to the Administration Panel (1.) Click on the tab “Projects” (2.) Choose a project from the project-tree (3.) All project data can be changed on the right side panel (6., 7., 8.) Save the data (9.) 4.1.3 Clients Tab In the Administration panel (1.), when admin clicks on Clients tab (2.) by default will show the client tree (4.), and on the right side an empty form (5.), ready to add a new client (see Screenshot 4.3). The Client Overview section has a search box (3.) for the admin to easier find the preferred client. The search field has the same properties as for the Users or Projects tabs, a full text function and instant filtering. Screenshot 4.3 12 4.1.3.1 Add new Client By default the Admin can start directly to create a new client (5., 6., 7.), once they click on Clients tab/default view (2.), or click on “Add new client” in the client tree. The admin must complete the information on the right side: Name and other identification info regarding the new client (5.) Add a different invoice address for the client, if necessary Define contact persons for the client Add comments such as notes about telephone conversations Save the entries (8.) 4.1.3.2 Edit existing Client To edit an existing client, please follow the following instructions: Go to the Administration Panel (1.) Click on the tab “Clients” (2.) Choose a client from the client-tree (4.) All client data can be changed on the right side panel (5., 6., 7.) Save the data (8.) 4.1.4 Settings (company settings) In order to set up or change the company settings, the admin goes to the “Settings” tab (2.) on the Administration area. The default view on the left side is the general overview about the company’s activity within timePO (active/inactive users, projects, clients). On the right side, the default settings of the company can be changed. The settings are important to be defined correctly, because they will affect the parameters of new users created (see section 4.1.1.1). 13 Screenshot 4.4 General important settings are: “Expected working hours”, defined one time for all company employees (very important, as they influence calculations regarding working time/overtime of users) (7.) Billing address of company VAT number (important for Company Reporter when creating invoices) Enable Users to see their Overtime Account (6.) Logo, for customization (acceptable files: .jpg, .gif, .png, .bmp) (5.) Language (for internationally working companies, or with cross-border activities) 14 4.1.5 Public Holidays One of the most important settings that the administrator must make is to determine national holidays (country, region) for his company. Every country in the world has different national or even regional holidays. This fact has a significant impact on the time accounts of all employees within the company and on all reports that will be generated. Since this setting is so important, a specially designed setup wizard ensures that the administrator must make this setting. He will be guided by the setup wizard step by step. The setup starts automatically after user has bought a timePO license package and tries to login into timePO for the first time. The following four steps have to be completed: To begin with, the user checks if all his company data are correct. If not he can change the information according to his needs. An important setting is the “Language” (1.) because this determines the default language for all new user accounts the administrator will create. The graphical user interface of timePO, information for users and e-mails sent to them will be presented in the selected language. Additionally, the language is one of the parameters that define which template for public holidays the user probably needs for his company. It is also important to specify the company VAT number (2.), because it will be automatically used every time the responsible person creates invoices for clients. Please note that it is a legal requirement to indicate the VAT-ID). 15 Screenshot 4.4.1 Then the administrator has to set the correct public holidays for his company (screenshot 4.4.2). timePO tries to set the proper public holidays for every new company account automatically. The user can see the current settings for holidays on the blue area “Your current selection” (1.). If no settings have been made or the wrong public holidays have been set, the administrator has three different ways to set the right ones. -Firstly, importing a iCalendar file (google, outlook, etc.) (2.). It is possible to import a iCalendar file and then edit this manually by doubleclicking on the preferred date on the calendar. -Secondly, choosing one of timePO´s predefined templates in the “Country Holidays” panel (3.). The administrator has to click on one of them and then save his changes at the end of the page with the “Accept Changes” button. It is possible to choose a predefined template, then edit this manually by doubleclicking on the preferred date on the calendar. -Thirdly, manually setting public holidays: This is easily done by doubleclicking on one of the dates on the calendar. This way he can prepare his own public holidays completely manually. 16 Screenshot 4.4.2 In the next step (screenshot 4.4.3), the administrator can customize his company account by uploading the logo of his company (1.). This logo will be located on the upper right side of every user's timePO interface. This logo will also be placed on all reports and invoices the users will create. -Accepted file types: jpg, gif, png, bmp. -Accepted maximum file size: 300x80 pixels and 200KB. 17 Screenshot 4.4.3 The administrator can decide if the “Overtime Accounts” will additionally be shown in the employees’ time accounts in the "Time Registration" area (see item “2” on screenshot 4.4.3). Also the administrator can define a default value under “Expected working hours” for his company (see item “3” on screenshot 4.4.3). Every time the admin creates a new user account, these values will be used as default for all users (employees). Of course, it is possible to define specific “Expected working hours” for every user (employee). The admin can do this in the administration panel on the “Users” tab. The last step for the administrator to complete in the setup wizard is to save all his settings. Afterwards, he can directly start using timePO by clicking on the “Begin using timePO” button (screenshot 4.4.4). 18 Screenshot 4.4.4 4.1.6 Licenses In the Administration panel (1.), on Licenses tab (2.), admin gets an overview of the ordered license packages. Also, by clicking on a package (3.) they will get detailed information about it on the right side window (5.). Screenshot 4.5 19 4.1.6.1 Possible actions on the Licenses tab A. Admin can order a new license package for the company On the Licenses tab in the Administration panel, the admin can order a new package by clicking on “order new package” button (4.). At this point admin is redirected to the timePO website, where new package is chosen, and paid through the PayPal secure system. After the payment is completed, the new package will appear in the “Package overview” (3.) list, on the Licenses tab in the application. (see screenshot 4.5) B. Admin can renew a current license package On the Licenses tab in the Administration panel, the admin can re-order an existing package by clicking on “renew this package” button (6.). At this point admin is redirected directly to the PayPal secure system to pay for the package. After the payment is completed, the renewed period of the existing package will appear below the current package information. (see screenshot 4.5) 4.1.6.2 Total Licenses On the Licenses tab in the Administration panel, the admin can also have a complete view of the total packages bought, by clicking on “Total Licenses” mark (3.). On the right side of the window there will be a detailed overview of each package bought (in the case that you buy more packages at the same time, which is allowed), and the potential overlapping of packages (6.). (see screenshot 4.6) Admin is also able to see how many users are online at the given time, through the “Available Licenses” window (5.). The tool functions based on a “concurrent user” rule; which means that if you have bought 20 licenses, only 20 users can use timePO at the same time. The license is not directly connected to a specific user. (see screenshot 4.6) Admin is also able to see the whole license history at the end of this area (7.). There are displayed all the license packages he has ever ordered for his company. 20 Screenshot 4.6 4.2 Time Registration Area On this panel (1.) you can register your daily time spent working on various projects and tasks. On the “Project Overview” section (2.), each user can only see the Projects, Sub-Projects and Tasks they are assigned. A project can have more sub-projects and tasks, but a user will only see the ones assigned to them. Users can only register their working time for a task and not in general, for a project or subproject. If you want to register time on projects and sub-projects, the project manager has to create a separate task for this purpose only. Each employee also has a live time account overview, on the right side (12.), with the effort against the expected work load. The collaborators have in the same place (12.) only a general work overview, as they don’t have expected work hours set, to calculate times against them. On the area “My Time Entries” (9.) the user can see all his entries within the selected period (10.). By default, the period shown automatically ranges from the first of the current month till the current day when the user is logged into timePO. The user can change this period (10.) to a special 21 one according to his needs. Then, he can click on the related green refresh button to update the table with the time entries. All the time entries made by the user can be displayed in calendar form instead of a table. For this the user must click on the calendar icon (11.). Another click in the same place switches the overview back to a table. Screenshot 4.7 To enter work time, please follow the steps: choose on the “Project Overview” (2.) your desired task the task appears on your display (3.) choose the date and type in the amount of hours worked optionally, enter a “Description” for your task click on “Add” button (8.) to save your entry after it’s saved, your entry will appear on the area “My Time Entries” (9.), where you have the possibility to edit again or to delete your entry with the help of the two icons 22 To enter holidays, please follow the steps: click on tab “Holiday” (4.) choose one or more days corresponding to your holiday plan optionally, add a comment click on “Add” button to save your entry after it’s saved, your entry will appear on the area “My Time Entries” (9.), marked as “Holiday”, where you have the possibility to edit again or to delete your entry with the help of the two icons To enter absence, please follow the steps: click on tab “Absence” (5.) choose the reason of absence (Absence type) choose one or more days, or if you’ll be absent only one day, choose the hour interval for your absence optionally, add a comment click on “Add” button to save your entry after it’s saved, your entry will appear on the area “My Time Entries” (9.), marked with the absence type you have chosen, where you have the possibility to edit again or to delete your entry with the help of the two icons To reduce your overtime, please follow the steps: click on tab “Overtime” (6.). (Precondition: the administrator must have set the visibility of "overtimes" for all the users on the area "Company Settings". Otherwise the tab “Overtime” will be not visible for the users). choose one of the possible options: “Compensation” (pay out) or “Free Time”. choose how many hours or days you like to reduce your overtime account (depending on what you have agreed with your superior) optionally, add a comment click on “Add” button to save your entry. Simultaneously the appropriate time will be deducted automatically from your time account. after it’s saved, your entry will appear on the area “My Time Entries” (9.), marked with the overtime type you have chosen, where you have the possibility to edit again or to delete your entry with the help of the three icons. You have also the possibility to print out a related request for the type of overtime reduction you have chose, if it should be necessary for your company. Note: an automated email will be sent to the responsible persons that you have reduced your overtime. Also in case you will delete the entry for overtime reduction, independent from the reason why you have delete it. 23 4.3 Project Management Area On this panel only Project Managers, PM Deputies, Sub-Project Managers and SM Deputies have access. This is the area in which every manager of a project or sub-project organizes and sets the structure for their projects. As Project Manager (and the respective deputy), the projects are assigned to you by the company administrator. You will see on the left window (2.) all projects you are assigned to manage. As Sub-Project Manager (and the respective deputy), the sub-projects are assigned to you by the Project Manager of the related project. Every time you are assigned a project or sub-project, you will be notified per email, and given preliminary basic instructions. When you click on Project Management panel (1.), your default right side view will be the first project or sub-project from the list (2.), ready to review or edit (3,4,5,6,7). (see screenshot 4.8) Screenshot 4.8 24 4.3.1 Create new Project You cannot create projects as project manager or project manager deputy. You will get the created projects from your company administrator, together with an email notification. After that, you can edit your assigned project and create sub-projects and tasks. (see screenshot 4.8) 4.3.2 Edit Project or Sub-Project Chose a project or sub-project from the list (2.), and then edit or remove information on the right side window. You can click on the “edit” button and make all the desired changes. At the end of the editing mode, click on “accept” to save all your edits. (see screenshot 4.8) 4.3.3 Create Sub-Project In order to create a sub-project, you need to select the relevant project from the Project Overview panel (2.), and then click on the “add sub-project” icon . The new window that appears will let you define and customize the sub-project parameters. After you have finished entering all the necessary information, click on “accept” button to save the data. The new sub-project will appear directly on the left side tree (2.), under the project it was connected to. 4.3.4 Create Project or Sub-Project Tasks In order to create a task, you need to select the relevant project or sub-project from the Project Overview panel (2.), and then click on the “add task” icon (9.). The new window that appears will let you define and customize the task parameters. After you have finished entering all the necessary information, click on “accept” button to save the data. The new task will appear directly on the left side tree (2.), under the project or sub-project it was connected to. (see screenshot 4.8) 4.3.5 Assign a Member to a project or sub-project In order to assign a user as a project member or a sub-project member, the project manager chooses from the project tree the respective sub-/project to add members to. Then he has to click on the “Edit” button (see item 4. on screenshot 4.9), and the related area directly appears on the screen (see item 1. on screenshot 4.10). On the right side window, the PM will see the already existing members of the project. In case more project members are needed, the action is similar to editing the sub-/project. Click on “edit” button (4. on screenshot 4.9) and in the section add more members from the pool of existing users of timePO. After all assigning is done, click on “accept” button (2. on screenshot 4.10) to save the information. 25 Screenshot 4.9 Screenshot 4.10 26 4.3.6 Assign roles to your sub-/project members In order to assign various roles to existing project or sub-project members, the project manager has to perform the same steps as explained in sections 4.3.2 and 4.3.5. Choose the preferred sub-/project and click on right side window on the “edit” button. Then click on “next” button to see the current role of every project member (see screenshot 4.11). On the related table there is the possibility to edit the role of every user, by clicking on the “Edit” icon (item 1. on screenshot 4.11). After clicking on the “Edit” icon the project manager and his deputy can assign roles for the project members (item 1. on screenshot 4.12). After the role assignment, click on the “Update” button (2.) to save the new role, then click on the “Accept” button (3.) to save the whole area with all entry data. Screenshot 4.11 27 Screenshot 4.12 4.4 Reporting Area The Reporting panel is available to all users of timePO; however, depending on the role, each user will have access to different data to create reports from. Default users, who act as project members, will see only their own assigned tasks from related sub-/projects. Project managers will see the complete information of their assigned projects, and they will be able to generate reports from data coming from all members of the respective projects. Company reporters or project reporters will have access to more data than their assigned tasks (if any), as they have special privileges of simply creating reports, even if they are not part of the project. The Reporting panel has three different sections/tabs: the Templates tab, the Reports tab and the Billing tab. 28 4.4.1 Templates Tab On the Templates tab, any user will see on the left side 2 sections: default templates (4.) and user templates (3.). (see on screenshot 4.13) Screenshot 4.13 The default templates (4.) are pre-defined types of reports that just need to be generated in order to get a report. Many of the users of timePO have the need to generate the same types of reports every day/week/month, such as monthly time sheets or daily work reports, and the default templates will help them with many such options. However, if the default templates do not cover a repeated need for a specific type of report, any user can create their own report parameters (see section 4.4.2) and then save them as a new template. This template will show up in “user templates” (3.) section, and will be as well ready to use at a later time. 29 4.4.1.1 Customizing templates The Templates tab (2.) facilitates the creation of any report, by minimizing the number of clicks and choices to be made numerous times. However, if a user wants to start from a template and modify its parameters, this is possible as well. Just click on a template, default or user (3. or 4.), and then click on “customize” (6.). This new set of parameters will generate a new type of report. (see screenshot 4.13) 4.4.2 Reports Tab The Reports tab (point 2. on screenshot 4.14) is the actual section where a user can customize from the beginning the parameters of a report. There are two main sections in the Reports tab: the left side columns, with given data to select, and the right side column, an empty “generator” form, where the data can be dropped in for further analysis. The main characteristic of the report generator is the drag-and-drop function; user drags from the left side the desired item and simply “drops” it on the right side, anywhere on the white form. 4.4.2.1 Defining parameters There are five types of parameters inside the Reports section, on the left side column. They are: period (3.), activity type (4.), users (5.), sub-/projects or tasks (6.), and clients (7.). All these elements are draggable into the right side form (8.). (screenshot 4.14) 30 Screenshot 4.14 31 The way to determine exactly what type of report you are creating is to pay attention at the first item you are dragging into the right side empty form (8.). If, for example, you are first dragging a user (5.), member of your project, then you will create a user report. If you start by dragging one project (6.), then you will create a project report. And so on, with the other types of parameters. Also, every time you drag-and-drop an item on the right side form (8.), the other related items on the left side (3,4,5,6,7) get filtered accordingly. For example, if you drag a client (7.), the project box (6.) will be filtered to show only those projects related to the selected client. 4.4.2.2 Saving as Template After you have customized your report generator with all the elements you’d like to see in a Report, you can also save as template before generating the report. Simply click on “save as template” button, name the template and it will show up immediately in the User Templates table, in the Templates section (point 3. on screenshot 4.13). 4.4.2.3 Generating reports Generate Work Report Default user will get a report of their own data, for the selected period and projects. A Project Manager or Reporter will get in the report data from all subordinate project members, for the selected projects. (to generate this type of report please drag-and-drop first the activity “Work” in the report-generator). (screenshot 4.14) Generate Holiday Report Default user will get a report of their own holiday taken, for the selected period. A Project Manager or Reporter will receive holiday report for all the selected users. Only users who are subordinate members of the managed projects can be selected by PM in this type of report. (to generate this type of report please drag-and-drop first the activity “Holiday” in the reportgenerator). (screenshot 4.14) Generate Absence Report Default user will get a report of their own absence days taken, for the selected period. A Project Manager or Reporter will receive an absence report for all the selected users. Only users who are subordinate members of the managed projects can be selected by PM in this type of report. (to generate this type of report please drag-and-drop first the activity “Absence” in the report-generator). (screenshot 4.14) Generate User Report (Timesheet) A default user will get a report of his own data, for the selected period and projects. A Project Manager or Reporter will get in the report data from all subordinate project members, for the selected projects. The timesheet will show the results grouped by time periods: days/weeks/months. (to generate this type of report please drag-and-drop first one or more user in the report-generator). (screenshot 4.14) 32 Generate Project Report A default user will get a report of his own data, for the selected period. A Project Manager or Reporter will get in the report data from all subordinate project members, for the selected projects. The Project Report will show the results grouped by sub-projects and tasks of the project, and then grouped by users involved in them. (to generate this type of report please drag-and-drop first one or more projects, subprojects or tasks in the report-generator). (screenshot 4.14) Generate Client Report Only a Project Manager or Reporter will be able to generate client reports, and they will receive data from all subordinate project members, for the selected projects of the respective client(s). The Client Report will show the results grouped by projects, to give an overview of the current activity with a specific client. If the report contains data for more clients, then the report will be grouped by clients, and then by projects corresponding to each client. (to generate this type of report please drag-and-drop first one or more Clients in the report-generator). (screenshot 4.14) 4.4.3 Billing Tab The Billing tab is reserved only for users with the special role: Company Reporter. This role can assign only the company administrator to a special user. The affected user will be informed with an automated email. (screenshot 4.15) The company reporter is able to generate invoices for all of the projects (or parts of the projects like subprojects) in the company. 4.4.3.1 Creating an Invoice The default landing page, when user clicks on Billing tab inside Reporting section, is the form to create a new invoice (screenshot 5.15). The user must simply fill in with the desired information to appear on the invoice, such as: the client and project, the invoice ID, the hourly rate, deadline for payment info, and others. After the information is inserted, user clicks on “generate” and is able to see a web preview of the invoice and download it as a PDF. (screenshot 4.15.1) 33 The invoices generated and downloaded as PDF can be used as official invoices to be sent to the clients. For every invoice, timePO automatically creates the related timesheets from all the involved project members that have registered time on the charged project (subproject/task). With one click the responsible person for invoices can attach all the timesheets to the invoice that is sent to the client. (screenshot 4.15.1) Screenshot 4.15 34 Screenshot 4.15.1 35 4.4.3.2 Storing your Invoices On the top right corner of the Billing tab there is a button “show generated invoices” (screenshot 4.15). When user clicks on it, they will get a list of the previously generated invoices and saved into the system. This feature will be useful for tracking and controlling of past invoices (screenshot 4.16). The user also has the option to delete any of the saved invoices. On the right side of every stored invoice you will find the associated timesheets. These work time records show the clients, which project members were responsible for which tasks, and how long (entered work time) each project member spent time on these tasks. Screenshot 4.16 4.5 My timePO Area My timePO section (screenshot 4.17) is available for all users of timePO, regardless of their role. It includes the basic settings for the user’s account, such as number of vacation days allocated, preferred language or password change. 36 4.5.1 Your personal data In this panel, you have an overview of your personal information (2.), including the type of user you are registered in timePO (employee or collaborator), how many yearly vacation days you are allocated, etc. (screenshot 4.17) Screenshot 4.17 4.5.2 Password change In this tab (screenshot 4.18) you can change your password to a preferred one (3.). When admin creates an account for you, you will receive per email an automatically generated password. The first time you login, you will be prompted to change that password with a new one. This panel is only if you change your password preference. On area (4.) the integrated “Strength meter” show you directly if your new password is strong enough. The strongest password you can create, if it contains a combination of characters, numbers and symbols. The length of the password should be at least 6 characters long, but recommended are 8. Screenshot 4.18 37 4.6. Log Out Click on “logout” to close the account and leave the timePO application. The preferred language setting will be remembered the next time you login. Currently, we offer timePO in three languages: English, German and Polish. Please see snapshot 4.19 for exact position of “logout” button. Screenshot 4.19 Finally, if you need more information about how to use specific functions and areas, please also consult the integrated wizard in the application. It will show you specific information for each screen you view. Your timePO Team 38