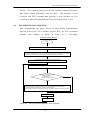
1
ISSN 0280-5316
ISRN LUTFD2/TFRT--5663--SE
Automatic Test System
for Network Servers
Leo Siang Kwong
Department of Automatic Control
Lund Institute of Technology
March 2001
Department of Automatic Control
Lund Institute of Technology
Box 118
SE-221 00 Lund Sweden
Document name
Author(s)
Supervisor
MASTER THESIS
Date of issue
March 2001
Document Number
ISRN LUTFD2/TFRT--5663--SE
Karl-Erik Årzén. Reglerteknik
Anders Sjö, Axis Communications AB
Leo Siang Kwong
Sponsoring organization
Title and subtitle
Automatic Test System for Network Servers
(Automatiskt testsystem för nätverksenheter.)
Abstract
This ‘Automatic Test System (ATS) for Network Servers’ Master Thesis project was carried out from
September 2000 till March 2001 at Axis Communication AB, Lund. The project was to build a
common test system platform for all future tests of Axis network servers’ products. Thus,
overcoming the current practice of costly dedicated test system development for individual products.
The project is a graphical user interface test system developed using the LabWindows/CVI Software.
A PCI Interface Digital Inputs/Outputs card from National Instruments establish the links between the
Test Controller (or Test Computer) and the Device Under Test (DUT). Project Monza [5], an Axis
Communications AB’s network server product, is used as the prototype DUT for this test system.
The Test Controller together with the test software developed will control the digital inputs and
outputs to simulate real-time testing environments within the DUT via communications established
with the downloaded Embedded Test Software (ETS).
One salient feature of this project is the development of an intelligent interpreter, termed the
Automatic Testing Interpreter (ATI). The ATI will decode an easy to understand ASCII text file into
real-time execution without the necessity of programming compilation. The main advantage of
introducing an intelligent interpreter is to allow Automatic Testing Sequences to be easily coded and
understood by the user in a simple abbreviated pseudo English text mode environment. Furthermore,
it boosts the confidence of users who have no prior LabWindows, C/C++ or Digital Inputs/Outputs
control programming backgrounds.
Keywords
Classification system and/or index terms (if any)
Supplementary bibliographical information
ISSN and key title
ISBN
0280-5316
Language
English
61Number of pages
61
Recipient’s notes
Security classification
The report may be ordered from the Department of Automatic Control or borrowed through:
University Library 2, Box 3, SE-221 00 Lund, Sweden
Fax +46 46 222 44 22
E-mail [email protected]
ACKNOWLEDEGMENTS
I would like to express my sincere thanks to my supervisors, Anders Sjö and
Professor Karl-Erik Årzén from Axis Communications AB and Lund Institute of
Technology (LTH) respectively, for their selfless technical advice and knowledge
imparting throughout the development of this project. Their innovative ideas and
constructive criticisms have also thrown lights into the success of this project.
I would also like to take this opportunity to thanks the staff at Axis Communications
AB and at Lund Institute of Technology (LTH), who have in one way or another
rendered their assistance towards the success of this project.
Last but not least, the tremendous supports, encouragements and understandings
showered by my lovely wife, Teo Lin Hua, and my joyous son, Brayden Leo, who are
both with me in Sweden, have given me the spiritual motivation in the successful
accomplishment of my entire one-and-a-half year of Master of Science in Automatic
Control course in Lund Institute of Technology.
Leo Siang Kwong
March 2001
Automatic Test System (ATS) for Network Servers
CONTENTS
Page
CHAPTER 1
INTRODUCTION
1
1.1
ATS OVERVIEW
1
1.2
OBJECTIVES
1
1.2.1
Problem Identified
2
1.2.2
The Vision of ATS
2
1.3
RESOURCES
2
1.3.1
Software
2
1.3.2
Hardware
3
1.4
TEST FEATURES TO BE DEVELOPED
3
1.5
REPORT OUTLINE
5
CHAPTER 2
HARDWARE DEVELOPMENT
6
2.1
ATS HARDWARE OVERVIEW
6
2.2
DESIGN OF THE TEST FIXTURE
7
CHAPTER 3
SOFTWARE DEVELOPMENT
9
3.1
SOFTWARE DEVELOPMENT OVERVIEW
3.2
LABWINDOWS/CVI BRIEFLY
10
3.2.1
Creating A User Interface
11
3.2.2
Creating Standalone Programs and DLLs
11
3.3
AUTOMATIC TESTING INTERPRETER (ATI) CONCEPT
12
3.3.1
ATI Overview
12
3.3.2
ATI Software Design
11
3.3.2.1 Text File Handling Function
13
3.3.2.2 Commands Decoding Function
14
ATI Commands
14
3.3.3
3.4
CHAPTER 4
9
POSSIBLE ALTERNATIVE SOFTWARE APPROACHES
14
TEST CONTROLLER AND DUT COMMUNICATION 17
4.1
TEST CONTROLLER & DUT COMMUNICATION CONCEPT
17
4.2
ETS OPERATIONAL SEQUENCE
19
Automatic Test System (ATS) for Network Servers
4.3
TEST CONTROLLER OPERATIONAL SEQUENCE
CHAPTER 5
5.1
DEVELOPING THE REQUIRED TEST FUNCTIONS
20
25
TESTS APPROACH
25
5.1.1
Embedded Test Software (ETS)
25
5.1.2
Network Testing
26
5.1.3
Power On Self Test (POST)
26
5.1.4
Shared RAM Interface Test
26
5.1.5
Address Bus and Data Bus Test
27
5.1.6
DIP Switch and Test Points Test
27
5.1.7
LED Test
28
5.1.8
Functional Test on the ‘Reset’ Operation
28
5.1.9
Firmware Flash Loading
28
5.1.10 Serial Numbers Setting and Label Printing
28
5.2
ATI COMMANDS REFERENCE
28
5.3
AN APPLICATION EXAMPLE: CODING A TEST PROGRAM
37
5.4
FUTURE EXPANSION: ADDING NEW ATI COMMANDS
42
CHAPTER 6
OPERATING THE TEST SYSTEM
44
6.1
HARDWARE SET UP
44
6.2
SOFTWARE SET UP
45
6.3
PERFORMING DUT TESTING
46
CONCLUSIONS
51
CHAPTER 7
7.1
CORPORATE PERSPECTIVE
51
7.2
PEROSNAL PERSPECTIVE
51
NOMENCLATURE
54
BIBLIOGRAPHY
55
Introduction
CHAPTER 1
INTRODUCTION
1.1
AUTOMATIC TEST SYSTEM (ATS) OVERVIEW
ATS is a graphical user interface test system developed using the
LabWindows/CVI Software and PCI Interface Digital Inputs/Outputs (Digital
I/O) card to establish links between the Test Controller (or Test Computer) and
the Device Under Test (DUT). The Test Controller together with the test
software developed will control the Digital Inputs and Outputs to simulate real
testing environments within the DUT via communications established with the
downloaded Embedded Test Software (ETS).
A Test Fixture was also
developed to enable ease of interfacing between the Test Controller and DUT.
Real-time testing of DUT is accomplished via abstracting test sequences from
a text file. These testing sequences were written in a custom designed PseudoEnglish Text file, termed the Automatic Testing Interpreter (ATI).
The
interpreter will decode lines of text written in ATI format to carry out the
automatic test sequences pertaining to the test procedures required. The Test
Controller coordinates the test operation and acquires test results to determine
serviceability of DUT.
Test results are then displayed in real-time on a
scrolling test screen to keep operators abreast with actual test happenings.
1.2
OBJECTIVES
1.2.1
Problem Identified
The present system of network servers testing concept deployed by Axis
required the development of a dedicated test system for each network server
product. The cost of developing dedicated test software for each product can
be costly. This results in an escalating cost of test system set up in the long
run as the company’s range of products increases. It is thus advisable to
explore a modern common test system platform concept to be deployed for
testing of all future Axis’s network server products.
1
Introduction
1.2.2
The Vision of ATS
The main objective of this project is to develop a multi-purpose and easy to
configure common platform ATS concept for all future Axis’s network server
products. The vision of the ATS is thus identified as follows:
•
A user-friendly test system environment.
•
Easy to set up and use.
•
Easy to implement.
•
Test sequences are transparent to developers and users.
•
Users do not need to have prior C/C++, LabWindows, or Digital I/O
control programming background for upgrade except for major new
development.
•
No compilation of test program is required.
•
Cost savings in future test systems development.
•
Detailed test results captured by the test system will provide efficient
repair or diagnostic of failed DUT.
•
Test Statistics, inclusive of number of failures and passes of DUT
tested.
1.3
RESOURCES
With the ATS vision in mind, this ATS project is developed using mostly
commercial off-the-shelf hardware and software so as to minimise tedious
self-fabrication and design. The details are as listed below.
1.3.1 Software
a)
Labwindows/CVI software from National Instrument [16, 17, 18, 19, 20]
LabWindows/CVI is a programming environment for developing
instrument control, automated test, and data acquisition applications in
ANSI C. Labwindows/CVI software was chosen for this ATS project,
preference over LabView or HP VEE developing software also available
in the market, on the ground that the basic foundation needed to
understand and use it is basic C programming. This will provide ease
and transparency for future expansion or upgrading as compared to the
virtual programming tools used in LabView and HP VEE.
b)
Digital I/O Card Software Driver
2
Introduction
An important consideration for instrument drivers is how they perform
I/O to and from DUT.
In the LabWindows/CVI instrument driver
architecture, a separate layer of software that is standard and available on
numerous platforms provides the I/O interface. In this ATS project, the
PCI-DIO-96 Digital I/O [11, 12] software driver is required.
c)
ATS Test Programs [1, 2, 3, 4]
This is the list of source code in C/C++ language environment developed
in this project. It allows execution of the various routines and functions
called up by the ATS test text file, ‘Test.txt’.
d)
ATS Test Text File
This is the easy to code test text file that runs the actual DUT test
program without the need of re-compilation.
1.3.2 Hardware
a) Test Controller
This should be a Pentium Personal Computer of at least 100 MHz, 1.6
Gbytes of hard disk space, 16 Mbytes of RAM, 8-speed CD-ROM drive,
1.44 Mbytes floppy disk drive and Window 9X/200X/NT operating
system.
b) Digital I/O Interface Card
In this project the National Instrument’s PCI-DIO-96 Digital I/O card
[10, 13] was used. This allows up to a maximum of 96 individual digital
I/O control provided by twelve standalone 8-Bits Ports. This Digital I/O
card must be installed in one of the available PCI slot within the Test
Controller’s motherboard.
c) Test Fixture
This self-fabricated Test Fixture is used to provide hardware interface
between Digital I/O card and the DUT. This will thus facilitate the ease
of signals routing during testing of the DUT.
1.4
TEST FEATURES TO BE DEVELOPED
The key software features that need to be implemented prior to developing the
necessary test sequences are mainly:
3
Introduction
•
Test Controller communicating with the DUT via downloaded
Embedded Test Software (ETS). The Test Controller must first be
designed to write and read via the interface, with reference to the
interface specifications, to and from the shared RAM memory
locations within the DUT respectively.
•
Developing an Automatic Testing Interpreter (ATI) common platform
concept that can be used for test features coding.
Upon successful common platform developed for the abovementioned critical
features, the focus was switched to the development of tests functions that can
be used to authenticate the serviceability of the Project Monza [5] DUT’s
features. The following are the test functions developed in this project:
•
Network Testing: To validate network functionality.
•
Power On Self Test (POST): Ensure basic features of DUT are
functioning properly at the start of the DUT testing.
•
Shared RAM Interface Testing: Integrity check of the interfaces will
give confidence to the communication channel established between
DUT and Test Controller.
•
Address Bus and Data Bus Testing: Detect any potential short or open
circuit conditions within the buses.
•
Flash ID Verification Testing:
Check for functionality of Flash
memory.
•
Functional Test on the ‘Reset’ Operation: Perform operational test of
the ‘Reset’ feature available in the DUT.
•
DIP Switches and Test Points Testing: Authenticate the integrity of
the switches as well as the available test points.
•
Firmware Flash Loading: Performing customer’s desired firmware’s
version downloading. This also performs the network interface test
indirectly.
•
Serial Numbers Setting and Label Printing: Upon successful testing of
the DUT, the appropriate product label will be printed for attachment
with the serviceable DUT.
4
Introduction
1.5
REPORT OUTLINE
This project report is written to provide an overview of the ATS development
as well as the application aspect of it. Reasons behind the project development
as well as the ATS introduction are the focus of Chapter 1. Chapters 2 and 3
provide the hardware and software insights of the project respectively. In
Chapter 4, the means of communication between the Test Controller and the
DUT are explored in detailed. The developments of the required test functions
to perform integrity check on the Project Monza’s DUT is covered in Chapter
5. Detailed ATI commands reference as well as test program coding example
are also covered in Chapter 5. The step-by-step user guide with regards to the
set up and operational aspect of the ATS is the theme for Chapter 6. Lastly,
Chapter 7 sums up the project both from the corporate as well as the personal
perspectives.
5
Hardware Development
CHAPTER 2
HARDWARE DEVELOPMENT
2.1
ATS HARDWARE OVERVIEW
The ATS hardware consists of a Test Controller (i.e. basically a Personal
Computer installed with a Digital I/O card and a Network interface card
installed in it) interfaced to the Test Fixture where the DUT is set up together
with the Label and Error Report printers connected accordingly. The hardware
configuration is shown in Figure 2-1.
Figure 2-1: ATS Hardware Overview
The functions of the respective hardware components are detailed in the
subsequent paragraphs.
Test Controller is the master of the ATS. The Test Controller will coordinate
all the test operations and gather the test results for display and printing.
6
Hardware Development
Digital I/O card allows Digital I/O signals to be read and written onto the
DUT. The operation of the respective Digital I/O ports configuration will be
determined via the Test Controller’s test program.
Main Server serves as the main source for downloading of the correct test
program and storage area for the completed tests information. The main server
paths are determined via the necessary information key at the beginning of the
work set up.
Test Fixture provides the ease of interfacing between the Test Controller and
the DUT. It is specially designed and routed specific to the test requirements
for the DUT. Additional features such as protection and isolation features are
also incorporated in it.
Error Report Printer serves to provide failures information of the DUT to be
tagged along with the failed DUT.
Label Printer is used to print the necessary product labels to be tagged along
with a serviceable unit.
2.2
DESIGN OF THE TEST FIXTURE
The Test Fixture comprises of mainly two cards namely, I/O Board and Needle
Board, with built in power supply and vacuum switching interface.
The I/O Board provides the necessary controls for isolation and buffering
purposes. With proper software controls during the course of testing the DUT,
the I/O Board can be controlled to protect the ATS against potential transients
that can be destructive to it and vice versa. This I/O Board is a generic board
that is useable for all future test system.
The Needle Board serves as interface routers to cater to the Test Controller
accessing to the respective DUT’s contact points. The design of this Needle
Board may or may not be generic as it is dependent on the number of digital
input and output signals required for the respective DUT to be tested.
Figure 2-2 shows the position of the I/O Board and Needle Board in the
complete Test Fixture and Figure 2-3 provides an overview of the Test Fixture
where the DUT is placed.
7
Hardware Development
Figure 2-2: I/O Board and Needle Board in the complete Test Fixture
Figure 2-3: An overview of the Test Fixture
8
Software Development
CHAPTER 3
SOFTWARE DEVELOPMENT
3.1
SOFTWARE DEVELOPMENT OVERVIEW
The software programs are developed using LabWindows/CVI from National
Instrument, which is graphical interface software suitable for an automatic
testing environment. The whole program consists of a C source code file, a
user interface file and three header files. Firstly, the user interface file is
developed. It serves as a framework for the overall test program. With the
user interface file designed, it will help to generate the header and C source
code files framework for the overall ATS software development.
The program also incorporates Digital I/O instrument driver routines for the
programming and controls of the Digital I/O card. The program is organized
into different modules depending on their function. Some of the key functions
responsibilities are listed as follows:
•
Loading and displaying of user interface panels
•
Gathering test input parameters
•
Displaying real-time test status and results to users
•
Interpreting text format written test file to perform various testing
functions
•
Controlling Digital I/O signal acquisitions
•
Communications with ETS
The salient and innovative feature of the ATS project software development is
the introduction of the Automatic Testing Interpreter (ATI) concept. With
ATI, test programs can be written in Pseudo English ASCII text files and
functionally operated on without the need of re-compilation. The ATI allows
text written test files to be read, interpreted and decoded from the text files and
deciphered into C/C++ instructions and the necessary executions desired.
With the integration of the ATI, Digital I/O Control and LabWindows
9
Software Development
platforms, the ATS concept is developed. This ATS concept allows the user to
develop and perform automatic testing on the DUT easily without the prior
knowledge of C/C++, Digital I/O Control or LabWindows programming.
3.2
LABWINDOWS/CVI BRIEFLY: HOW TO CREATE APPLICATIONS?
You use LabWindows/CVI as a text editor in which you enter your entire
program. You can greatly simplify application development by using function
panels to execute LabWindows/CVI functions and automatically insert the
code into your program. Function panels contain complete online help. See
the Using Function Panels section for more details.
The Project window contains all the component files of your application. The
simplest case would be one source file as shown in Figure 3-1. Your cursor
becomes a hand icon as it passes over certain items in the following
illustration. You can click on those items for more information.
Figure 3-1 The Project Window
A typical project, however, may contain multiple code modules and a User
Interface Resource file.
Code modules may be listed as source files or compiled files. Source files
must be recompiled each time the project is opened thereby increasing initial
project start-up time. However, source files can be debugged and can use runtime error checking.
10
Software Development
Compiled files, such as library or object files, must have been previously
compiled with LabWindows/CVI or a compatible external compiler. Compiled
files are not recompiled each time the project is opened, reducing initial project
start-up time. Additionally, compiled files consume less memory and run
faster than source files. However, they cannot be debugged and they do not
have run-time error checking.
You can strike a balance between initial project start-up time, execution speed,
memory consumption, and the ability to debug code modules by varying the
types of code modules listed in your project.
3.2.1 Creating A User Interface
You can create user interface objects (panels, controls, menus) using the User
Interface Editor window. You can save these objects in a .uir file. You can
load, display and modify these objects in your program using the functions in
the User Interface Library. You can also specify callback functions which are
called when events occur on these objects.
The LabWindows/CVI CodeBuilder automatically generates complete C code
that compiles and runs based on a user interface (.uir) file you are creating or
editing. By choosing certain options presented to you in the Code menu, you
can
produce
skeleton
code.
Skeleton
code
is
syntactically
and
programmatically correct code that compiles and runs before you have typed a
single line of code. With the Code Builder feature, you save the time of typing
in standard code included in every program, eliminate syntax and typing errors,
and maintain an organized source code file with a consistent programming
style.
3.2.2 Creating Standalone Programs and DLLs
With the LabWindows/CVI Run-Time System, you can create standalone
executables and DLLs. The Creating and Distributing Standalone Executables
and DLLs section in the LabWindows/CVI Programmer Reference Manual
describes the system.
11
Software Development
3.3
AUTOMATIC TESTING INTERPRETER (ATI) CONCEPT
3.3.1 ATI Overview
One of the most important milestones of the ATS development is the design
of an Automatic Testing Interpreter, called ATI in short. ATI is written in
C/C++ programming Language environment to decode Pseudo English ASCII
texts. The advantage of incorporating an intelligent interpreter is to allow
automatic test sequences to be easily decoded and understood by the user in
an abbreviated pseudo English text format. It will decode the user’s
commands and execute the corresponding functions. The integration of the
ATI, Digital I/O Control drivers and the LabWindows/CVI platform allow the
user to do automatic testing of the DUT. The commands used in the text files
are classified into three categories as follows:
a) Comment
b) User Interface command
c) Output string to computer screen
These commands are being identified by the first character of each string in
the text file as follow:
a) !
Any string following this is treated as comment.
b) #
Any string following this is treated as user interface command.
c) Any string without, ‘!’ or ‘#’, is output to the computer screen as English
text.
3.3.2 ATI Software Design
The ATI software design is summarised briefly by a simple flow chart as
shown in Figure 3-2. ATI will first access the text written test file (e.g.
Test.txt) via proper opening of ‘Test.txt’. Upon successful opening of the file,
strings will be read from the file line by line. Each line will be sorted out
according to the necessary commands identified.
In other words, the
commands are input to the test routines via ASCII text file. The program will
then follow to decode the line. It will then be forwarded to the necessary
12
Software Development
routine to carried out its desired execution. This process will continue until
an end of file is detected.
Two subroutines, namely the ‘Text File Handling Function’ and the
‘Commands Decoding Function’, are developed within the main program for
the reading and decoding of the ATI commands respectively.
Open Test File (Test.txt)
Reading strings from the file line by line
Sorting out the commands
Execute commands operations
End of File?
NO
YES
Close Test File (Test.txt)
Figure 3-2: Flow Chart showing the basic ATI Software Design
3.3.2.1
Text File Handling Function
This text-file handling function will open the ASCII text file, and the first
thing it does is to check for error. It then reads the text file one line at a time
and stores it in a global array called ‘buff’. At the same time it compares the
first character of each line read. If the first character was a ‘#’, it means that
13
Software Development
the ATI command is encountered, and control is then passed to the
‘Commands Decoding Function’ subroutine. If the first character read is a ‘!’
character, it means it is purely a comment only, and therefore, nothing is being
done and the program continues to read the next line. However, if the first
character is neither ‘#’ nor ‘!’, it means that this line is to be displayed as
English texts and output to the computer screen.
3.3.2.2
Commands Decoding Function
This command decoding function checks the command received and deciphers
it into execution. It routes all the ATI commands together with the userdefined data into their respective path for execution. The command line from
the text-file handling function is parsed. Since the input file is in ASCII
format, all the user-defined data has to be converted into proper format, i.e.,
floating point, integer, hexadecimal, etc depending on their required operation.
The input command together with the converted user-defined data is then
executed accordingly. In an event that an undefined command is found, an
error message will be displayed to the user indicating invalid command on the
screen.
3.3.3 ATI Commands
The ATS designed for Axis ATS is developed using the concept of Automatic
Testing Interpreter (ATI).
All the testing procedures as spelt out in the
Manufacturing Test System Requirement [6] and Manufacturing Test Plan [7]
are being implemented by extracting the pseudo-English code commands
from the text file, which is interpreted by the ATI. A complete list of the ATI
commands used in the software programming of the DUT testing together
with an application example are covered in Chapter 5.
3.4
POSSIBLE ALTERNATIVE SOFTWARE APPROACHES
Besides the option of a self-developed ATI approach used in this project, this
project can also deploy commercially available automatic parser generator.
According to ‘www.dictinary.com’ definition, a parser generator is a program
which takes a formal description of a grammar and outputs source code for a
14
Software Development
parser which will recognise valid strings obeying that grammar and perform
associated actions.
LEX (LEXical Analyzer Generator) and YACC (Yet
Another Compiler-Compiler) are well known examples of parser generators.
In general, they act as an interpreter to decompose the programming language
into two parts: Firstly, read the source program and discover its structure.
Then, process the structure by generating a target program. LEX [21] helps
write programs whose control flow is directed by instances of regular
expressions in the input stream. LEX is well suited for editor-script type
transformations and for segmenting input in preparation for a parsing routine.
LEX can generate analyzers in either C or Ratfor, a language which can be
translated automatically to portable Fortran. LEX is available on the PDP-11
UNIX, Honeywell GCOS, and IBM OS systems. YACC [22] provides a
general tool for describing the input to a computer program. The YACC user
specifies the structures of his input, together with code to be invoked as each
such structure is recognized. YACC turns such a specification into a
subroutine that handles the input process; frequently, it is convenient and
appropriate to have most of the flow of control in the user's application
handled by this subroutine.
Another possible alternative is National Instruments TestStand [23], a
complete test executive environment software that sequences together tests,
logging results, and making decisions based on test data.
TestStand is
designed to provide a framework for your test system or a hub around which
your tests are built. Standardizing on a test executive like TestStand, provides
advantages in test development effort, code reuse, enterprise connectivity, and
testing efficiency. TestStand provides the following two main functions:
•
First, it is a ready-to-run test executive for organising, controlling, and
executing your automated test systems. Out of the box, it contains
everything necessary for meeting the needs of many test executive
users.
•
Second, it is a development environment for building a powerful
custom test solution. With the tools it provides, users can develop
extremely intelligent and flexible test systems.
15
Software Development
In summary, as computers and computer software get more and more
sophisticated, it becomes increasingly beneficial to build intelligence into the
test software itself so that it makes run-time decisions to improve efficiency or
change testing strategies easily. Therefore, depending on your requirements
and budget, using ATI concept, automatic parser generator, or test executive
approach, will allow implementation of intelligent testing.
16
Test Controller and DUT Communication
CHAPTER 4
TEST CONTROLLER AND DUT COMMUNICATION
A good starting point for designing the automated tests is to develop simple flow
diagrams outlining the testing sequences and anticipated behaviour.
In this ATS
project, three critical flow diagrams, namely, ‘Test Controller and DUT
Communication’, ‘ETS Operational Sequence’ and ‘Test Controller Operational
Sequence’ were used as templates on which the flow of the automated tests sequences
were superimposed.
4.1
TEST CONTROLLER AND DUT COMMUNICATION CONCEPT
One of the most critical developments in this project is to define and establish a
communication channel between the Test Controller and the DUT.
DUT & TEST CONTROLLER COMMUNICATION OVERVIEW
"Command" Memory Location
e.g. (1) X 00: No Command or Reset Condition
(2) X 01: RAM Test Result
(3) X 10: Flash ID Read
(4) X 11: DIP Sw & TP2 Read, etc.....
Reads by ETS
Clears by ETS
Writes by ETS
Writes by Controller
"Acknowledgement" Memory Location
e.g. (1) X 00: No Acknowledgement or Reset Condition
(2) X 01: Command Received Acknowledgement by ETS
(3) X 10: End of POST, etc.....
Reads by Controller
Clears by Controller
DUT's CPU
(Access via ETS
Program)
Writes by ETS
"RAM Test Result" Memory Location
e.g. (1) X 00: No Error
(2) X 01: Error encountered during Writing
(3) X 10: Error encountered during Reading,etc.....
Writes by ETS
Writes by ETS
"Flash ID" Memory Location
"DIP Sw + TP2" Memory Location
Reads by Controller
Reads by Controller
Reads by Controller
Figure 4-1: Test Controller and DUT Communication Overview
17
Test Controller
(Access via
Project Monza's
interface)
Test Controller and DUT Communication
Figure 4-1 gives a glimpse of the established means of communication
between the Test Controller and the DUT’s CPU. The principle behind the
communication make use of the fact that the Test Controller and the ETS
program residing in the DUT have access to a common shared RAM memory.
Therefore, communication using the concept of passing parameters to an
identified memory location to be extracted by another party through simple
handshaking functions was established as a means of communication. Five
common memory locations in the shared RAM, namely, “Command”,
“Acknowledgement”, “RAM Test Result”, “Flash ID” and “ DIP Switch +
TP2”, were identified to serve the communication functions required (Refer to
Figure 4-1).
In order to ensure the success of this communication, the
requirements for the Test Controller’s to perform read and write functions from
and to the shared RAM location of the DUT respectively, must first be
achieved. These read and write functions were established in conjunction with
the DUT read and write cycles specifications requirements as spelt out by
Project Monza Hardware Interface Specification document [8].
To illustrate this communication features, assume that the Test Controller
wants to know the current DIP Switch setting. It is important to note that the
Test Controller has no direct access to read the DIP Switch setting. Therefore,
it needs the service of the DUT’s CPU using the ETS program to pass this
information to the “DIP Switch + TP2” memory location. This process will
start with the Test Controller indicating its intention to know the current DIP
Switch position by setting the “Command” memory location with ‘0x0011’
data, signifying ‘DIP Switch Reading’ request.
The ETS program that
continuously polls the “Command” memory location will notice this request.
Upon receiving this command successfully, the ETS places a ‘0x0001’ data on
the “Acknowledgement” memory location to reiterate a ‘Command
Acknowledgement by ETS’ to the Test Controller. In parallel, the ETS will
also read the current DIP Switch position and place the read result onto the
“DIP Switch + TP2” memory location.
Upon reading the ‘Command
Acknowledgement by ETS’ from the DUT, the Test Controller will proceed to
read the “DIP Switch + TP2” memory location for the current DIP Switch
18
Test Controller and DUT Communication
position. This completes the process of Test Controller gathering necessary
DIP Switch reading information from the DUT.
This approach of Test
Controller and DUT communication principle is used similarly for Test
Controller to gather Flash ID and RAM Test result from the DUT as well.
4.2
ETS OPERATIONAL SEQUENCE
After understanding the simple process of data passing communication
approach between the Test Controller and the DUT, the ETS operational
sequence
flow
diagram
as
shown
in
Figure
4-2
is
developed.
ETS Sequential Flow Diagram
Start
ETS is downloaded to the DUT's RAM via ethernet initiated by the Controller.
Perform POST as follows:
(i) CPU & shared RAM interface test + Storing result in pre-defined "RAM Test Result" memory location.
(ii) Reading of FLash Memory ID + Storing ID in pre-defined "Flash ID" memory location
ETS indicates the completion of POST by writing 'End of POST'
at the pre-defined "Acknowledgement" memory loaction.
ETS reads Controller's command written at pre-defined "Command" memory loaction.
Is it any of the following commands:
(i) RAM Test Result
(ii) Flash ID Read
(iii) DIP Switches & TP2 Read
No
Yes
Upon successfully reading the command, ETS performs the following actions:
(i) Acknowledges receipt of command via the pre-defined "Acknowledgement" memory location.
(ii) Clearing the read command from the "Command" memory location.
(iii) ETS updates the DIP Sw & TP2 reading via writing at a pre-defined "DIP Sw + TP2" memory location .
ETS flashes the error LED
ETS waits for t msec.
Figure 4-2: ETS Operational Sequence Flow Diagram
19
Test Controller and DUT Communication
The ETS Operational Sequence Flow Diagram shown in Figure 4-2 starts with
the ETS downloading via the network interface connection through Test
Controller’s initiation. Upon successful ETS downloaded to the DUT’s RAM
location, the ETS will automatically perform a Power On Self Test (POST).
The POST includes data read and write tests to authenticate the integrity of the
DUT’s CPU and its shared RAM interface as well as the reading of the Flash
Memory ID. The results of the POST will be stored in the pre-defined “RAM
Test Result” and “Flash ID” memory locations respectively. ETS will indicate
the completion of the POST to the Test Controller via an ‘End Of POST’
message in the “Acknowledgement” memory location. The ETS will then
proceed into a repetitive polling for commands from the Test Controller
process.
In this process, the ETS will continuously poll the “Command”
memory location for any command from the Test Controller. Upon receiving a
valid command, the ETS will acknowledge the receipt of the command via the
‘”Acknowledgement” memory location and at the same time clearing the read
command from the “Command” memory location. ETS will also perform the
necessary DIP Switch and TP2 position reading update as well as flashing the
error LED at a rate of about 1 Hz to indicate that it is still alive. This process
cycle will be repeated until the Test Controller which controls the complete
DUT testing halts the whole testing process by removing power from the DUT.
4.3
TEST CONTROLLER OPERATIONAL SEQUENCE
The flow diagram from the Test Controller’s perspective will be elaborated
next. The Test Controller is basically the master who coordinates the complete
testing of the DUT. It will decide, based on the data read and Digital I/O
controls operations, whether a sub test passes or fails. At its discretion, it can
also decide to terminate the complete testing of the DUT upon encountering of
identified critical failures.
Some critical failures identified in the Project
Monza testing includes the failure of ETS or Firmware Flash loading, the
failure to decode the input parameters and the failure to receive an ‘End Of
POST’ acknowledgement from the DUT’s ETS.
20
Test Controller and DUT Communication
Figure 4-3 provides a step-by-step guide of the Test Controller operational
flow sequence.
Controller Sequential Flow Diagram
Start
Controller executes ETS downloading process & waits for t1 msec.
Time-out after x sec
Controller reads the pre-defined
"Acknowledgement" memory location
for 'End of POST'?
No
Yes
Controller performs shared RAM's write followed by read test via the Monza's interface.
Controller writes 'RAM Test Result' command in the pre-defined "Command" memory location.
Time-out after x sec
Is acknowledgement
received in "Acknowledgement"
memory location?
No
Yes
Controller clears the "Acknowledgement" location & Reads the "RAM Test Result" memory location.
Is there any
error(s) found in the
RAM Test?
Yes
Prints Error Message
1
No
Controller writes 'Flash ID Read' command in the pre-defined "Command" memory location.
Time-out after x sec
Is acknowledgement
received in "Acknowledgement"
memory location?
No
Yes
Controller clears the "Acknowledgement" location & Reads the "Flash ID" memory location.
2
Figure 4-3(a): Test Controller Operational Sequence Flow Diagram-Part 1
21
Test Controller and DUT Communication
2
Does read Flash
ID match expected
Flash ID?
No
Prints Error Message
1
Yes
Controller writes 'DIP Sw + TP2 Read' command in the pre-defined "Command" memory location.
Time-out after x sec
Is acknowledgement
received in "Acknowledgement"
memory location?
No
Yes
Controller clears the "Acknowledgement" location &
Performs the DIP Switches & TP2 test via reading the "DIP Sw+TP2" memory location.
Is there any
error(s) found in
this Test?
Yes
Prints Error Message
Yes
Prints Error Message
1
Prints Error Message
1
1
No
Controller performs the USB Test
Is there any
error(s) found in
this Test?
No
Controller performs the RESET Test
Is there any
error(s) found in
this Test?
Yes
No
DUT PASS
1
DUT FAIL
End
Figure 4-3(b): Test Controller Operational Sequence Flow Diagram-Part 2
22
Test Controller and DUT Communication
As mentioned in earlier sections of this chapter, the Test Controller is the
master who initiates the ETS downloading to the DUT’s RAM memory
location upon successful initialisation and powering up of the DUT. The Test
Controller then awaits the ‘End Of POST’ acknowledgement from the DUT’s
ETS. In the event, that there is still no acknowledgement from ETS after a 30
seconds time-out, the Test Controller will halt the DUT test as it signifies a
failure of establishing a communication between the Test Controller and DUT.
If the ‘End Of POST’ is received successfully, the Test Controller proceeds to
perform its interfacing testing with the shared RAM via a series of read and
write tests. The success of this test coupled with the POST success will
confirm that the Test Controller and the DUT communications channel are
trustworthy.
Next, the Test Controller will proceed to gather the results of the CPU and
shared RAM interface test and the Flash ID tests performed during the POST.
This is achieved via the data dumping and simple handshake process as
elaborated in Section 4.1.
After this, the Test Controller will coordinate with the operator’s switching of
the DUT’s DIP Switches to authenticate the integrity of the DIP switches. The
process of gathering updated and current real-time DIP switches reading is
made possible by a continuous loop requesting for DIP Switch readings until
all the DIP switches are detected to be moved off from its original position
once. The reading of the real-time DIP Switch position is carried out via the
process illustrated in Section 4.1.
The same approach is then used to
authenticate the functionality of the TP2 switch. The only difference is that the
Test Controller acts as an operator as it sets and resets the TP2 setting via the
Digital I/O control generated from the Test Controller’s command.
Finally, before powering down the DUT, the Test Controller will initiate a
Reset on the DUT via the Digital output signal. During the DUT’s reset
23
Test Controller and DUT Communication
period, the Test Controller will attempt to access the DUT’s shared RAM
location with failure anticipated as success of the reset test.
At the end of each sub test, the Test Controller will indicate a pass or fail
indication on the real-time scrolling screen to alert the user or operator of the
real-time test status. At the end of the complete DUT test, a large clear PASS
or FAIL message will appear on screen together with a Green or Red LED
(signifying pass and fail respectively) indications on the test fixture to directs
the operator to carry out the necessary sorting of good and bad DUT.
It is also important to note that in the development of this complete DUT test
sequence, the necessity of ensuring a safe state pre-power on and pre-power
down conditions have been set via the Digital I/O controls dictated by the Test
Controller. These processes will safeguard and thus protect and prevent any
unnecessary damages to the DUT.
24
Developing the Required Test Functions
CHAPTER 5
DEVELOPING THE REQUIRED TEST FUNCTIONS
The main test functions required to perform testing of the DUT and thus determining
the serviceability of the DUT in Project Monza are summarised as followed:
• Network Testing
• Power On Self Test (POST)
• Shared RAM Interface Testing
• Address Bus and Data Bus Testing for potential short or open circuit conditions
• Flash ID Verification Testing
• Functional Test on the Reset Operation
• DIP Switches and Test Points Testing
• Firmware Flash Loading
• Serial Numbers Setting and Label Printing
All these functions are developed as part of the ATI commands.
They are also
supplemented and supported by various ATI commands, such as displaying real-time
results on screen, reading and writing from DUT, controlling of the Digital I/O signals,
etc., which are required to ensure the smooth execution of the complete serviceability
testing the DUT. In this chapter, a brief introduction to the various testing approaches
required to authenticate the DUT’s integrity is covered in Section 5.1. In Section 5.2,
all the ATI commands developed in this project are discussed so that future test system
developers can understand and appreciate this ATS better. Lastly, Section 5.3 gives an
application example elaborating on how a test program is coded in the Test.txt file.
5.1
TESTS APPROACH
The scope of this section is to provide a description of the general test
approach and the concepts used for the Project Monza’s DUT product.
5.1.1 Embedded Test Software (ETS)
The ETS is specially designed for use in production testing. ETS is to be
downloaded to the RAM of the DUT at the start of the production test to
enable some basic functions capabilities in the DUT. It is supposed to be an
25
Developing the Required Test Functions
executable program running within the DUT environment and performing
desired communication with the Test Controller through properly defined
handshaking formats. ETS also serves to access and read status from the
DUT that cannot be directly accessed via the Test Controller paths.
Furthermore, ETS is also used to perform some Power On Self Test and some
test interfacing operations via writing to agreed memory addresses which the
Test Controller can access.
5.1.2 Network Testing
The DUT network serviceability is determined via the successful downloading
of the ETS into the DUT RAM through both the 10 Mbps and 100 Mbps
networks. During the network test, the transceiver will have to be set to the
auto-negotiation mode.
5.1.3 Power On Self Test (POST)
Upon successful downloading of the ETS, the ETS will automatically initiate
the POST that tests the integrity of the CPU and the memories (DRAM and
SRAM) interface via reading back to validate the written test patterns. Any
abnormalities between the CPU and the memories, such as open or short
circuit connections will be identified at this point. The result of the test will
be made known to the Test Controller via DUT and Test Controller
communication approach through a common memory location identified.
Similarly, the same approach is used to perform the Flash memory test. For
this Flash memory test, a simple and time saving approach testing will be
carried out via reading the Flash memory ID instead of a complete test. This
is performed by ETS reading the Flash memory ID and storing it in an
identified undisturbed memory location to be read by the Test Controller. The
Flash ID read will then be matched with approved Flash memory ID text files
from authorized manufacturers. It is important to note that further verification
of the CPU and Flash memory interface integrity will be done during the more
time consuming final firmware download flashing process.
5.1.4 Shared RAM Interface Test
26
Developing the Required Test Functions
The Shared RAM interface test consists of two key tests, namely, the interface
test between the DUT’s CPU and the shared memory carried out during POST
and the interface test between the Test Controller and the shared memory.
The latter test is initiated via the Test Controller using the Digital I/O
interfacing to perform read and write cycles onto the DUT’s shared RAM
locations. The Test Controller will only be able to ascertain the validity of the
POST error code upon success of this test via a simple handshaking of the
identified error code shared memory location.
5.1.5 Address Bus and Data Bus Test
Using the same approach as mentioned in Section 5.1.4 above, the address and
data bus are tested for possibility of open-circuit or short-circuit via the
running 0s and running 1s read and write test performed via Test Controller
communication with the DUT.
5.1.6 DIP Switch and Test Points Test
This test will usually be carried out in the factory and may be optional in the
distribution centre. For the dip switch test, the Test Controller will prompt the
operator to activate the DIP switches whereby it will be read by the ETS who
in turns writes the value read to a known address to be fetched to the Test
Controller for verification. This test will only be considered as pass if all the
DIP switches are detected as only toggle once from one position to another. It
is not allowed to move any switch setting more than one time. Upon success
of this test, the operator will be asked to preset the DIP switches to a desired
default setting configuration. As for the other Test Point test, it will be
validated via the Test Controller activating and deactivating it directly and
using the same ETS approach as the DIP Switch’s method to confirm
serviceability of the test. In most cases, in both the factory and distribution
centre, the Test Controller will also check the integrity of the default setting
configuration via ETS assistance. In the event of any deviations, the operator
will be prompted to set the DIP switches accordingly.
27
Developing the Required Test Functions
5.1.7 LED Test
All the LEDs will be visually inspected by the operator for flashing and on/off
indication according to various expected operation modes.
5.1.8 Functional Test on the ‘Reset’ Operation
Reset is initiated via Digital I/O control signal activated by the Test
Controller. It should be noted that failure of a necessary operation occurring
will validate success of the ‘Reset’ operation since the DUT’s CPU is in a
reset mode.
5.1.9 Firmware Flash Loading
Only upon success of all the above tests, the flash loading of the final
Firmware will be performed.
Running an existing executable program
‘flash.exe’ will download the flash image. It is important to note that the
routine for setting serial number is included in the final Firmware.
5.1.10 Serial Numbers Setting and Label Printing
The serial number is generated and set according to standard Axis procedure
whereby the required data is fetched from a database and send to the unit via
the network interface. The serial number is then verified and upon correct
verification, the product label will be printed and the serial number database
will be updated accordingly. Since the routine for setting serial number is
included in the final Firmware, the success of Serial Number Setting process
will also verify the integrity of the downloaded Firmware image.
5.2
ATI COMMANDS REFERENCE
As mentioned in Chapter 3, the ATS is developed using the concept of
Automatic Testing Interpreter (ATI). As such, all the testing features and
functions described in Section 5.1 will be developed into the necessary ATI
commands to support the complete DUT testing. The format used to decipher
the ATI commands are in general provided as follow:
#ATI_Command Parameter1 Parameter2 Parameter3……
28
Developing the Required Test Functions
whereby ‘ATI_command’ represents the ATI command to carry out
the
necessary task or action with reference to the Parameters defined.
The
Parameters are given in string format and may be converted to the necessary
useful information (e.g. integers, real numbers, strings, etc) required for
successful execution of the respective ATI command.
A complete list of the ATI commands developed to supplement the ease of
performing complete DUT testing used in this project are listed in the
following paragraphs. In order to aid the understanding and appreciation of
the coding of a test program that is covered in Section 5.3, the ATI commands
list that follows will be in sequence to the Test.txt example used in Section 5.3
for ease of referencing.
#Addr_Ports_16 P1 P2
To allocate Digital output port number as defined by integer numbers P1 and
P2 as the 16-bits address ports to be used for the respective DUT.
#Data_Ports_16_IN P1 P2
To allocate Digital input ports number as defined by integer numbers P1 and
P2 as the 16-bits data input ports to be used for the respective DUT.
#Data_Ports_16_OUT P1 P2
To allocate Digital output ports number as defined by integer numbers P1 and
P2 as the 16-bits data output ports to be used for the respective DUT.
#Port_Config P1 P2
To define port number P1 of the Digital I/O card to be used as an input or
output port dependent on the integer value of P2. The port number P1 will be
configured as an input port if P2 is defined as an integer ‘0’. However, if P2
is defined as an integer ‘1’, the port number P1 will be configured as an
output port.
#Write_To_Dig_Port P1 P2
29
Developing the Required Test Functions
To generate a Digital output of data P2 (decimal or octal or hexadecimal value
are accepted) onto the Digital Port number P1. It is important to note that a
leading 0 (i.e. zero) on an integer constant means octal; a leading 0x or 0X
means hexadecimal are used throughout the ATI commands programming
concept in this project. For example, decimal 31 can be written as 037 in
octal and ox1f or 0X1F in hex form.
#Read_From_Dig_Port P1 P2
To facilitates a reading of data from Digital input port number P1. The read
data from Port number P1 will be compared with the value of P2 whereby a
Pass or Fail will be determined whenever the data matches or differs
respectively.
#Progress P1
To indicate P1 % of DUT testing completion. This is reflected in the ‘DUT
Test Progress Status’ bar on the user interface screen.
#Write_To_Dig_Line P1 P2 P3
To generate a Digital output of P3 (i.e. either a ‘1’ or ‘0’) on the Digital
Output line number P2 of port number P1.
#Read_From_Dig_Line P1 P2 P3
To facilitates a reading of data from Digital line number P2 from input port
number P1. The read data will be compared with the value of P3 whereby a
Pass or Fail will be determined whenever the data matches or differs
respectively.
#Comd_Add P1 P2
To define the DUT’s shared RAM location for the “Command” address
location used in the Test Controller and DUT communication as discussed in
Chapter 4. P1 and P2 represent the upper and lower bytes of the address
location respectively.
30
Developing the Required Test Functions
#Ack_Add P1 P2
To define the DUT’s shared RAM location for the “Acknowledgement”
address location used in the Test Controller and DUT communication as
discussed in Chapter 4. P1 and P2 represent the upper and lower bytes of the
address location respectively.
#RAM_Add P1 P2
To define the DUT’s shared RAM location for the “RAM Test Result”
address location used in the Test Controller and DUT communication as
discussed in Chapter 4. P1 and P2 represent the upper and lower bytes of the
address location respectively.
#DIP_Add P1 P2
To define the DUT’s shared RAM location for the “DIP Switch + TP2”
address location used in the Test Controller and DUT communication as
discussed in Chapter 4. P1 and P2 represent the upper and lower bytes of the
address location respectively.
#Flash_Add P1 P2
To define the DUT’s shared RAM location for the “Flash ID” address location
used in the Test Controller and DUT communication as discussed in Chapter
4. P1 and P2 represent the upper and lower bytes of the address location
respectively.
#Wait_Switch P1
To put the Test Controller in a waiting mode until the vacuum switch in the
Test Fixture is detected with the specified level indicated by P1 (i.e. either a
‘0’ or a ‘1’).
#Sub_Test_Result P1
To summarise if the sub-test description indicated by string P1, has passed
(‘Pass’) or failed (‘Fail’) the sub-test.
31
Developing the Required Test Functions
#delay P1
To delay the testing environment for P1 seconds. P1 is a real value.
#RunFile P1
To execute a DOS operational run on the filename indicated by string P1.
#Dos_Ops_Check P1
To open up the text file, use for parameter passing, indicated by string P1 and
check if it’s a ‘0’ or not. A ‘0’ will return a Pass while any other integer will
represent a Fail.
#End_POST P1
To wait for an acknowledgement value of P1 from the “Acknowledgement”
memory location. There will be a time-out failure indication after 9 seconds
of waiting for the P1 acknowledgement code to appear.
#DB_Run_1s_Test P1 P2 P3
To perform a complete write to, followed subsequently by a read from, DUT’s
shared RAM memory location specified by address A23, A17-A10 and A09A02 indicated by P1, P2 and P3 respectively. A 16-bits running ones data
will be written and read from the address location specified by P1, P2 and P3.
This will detect any possible data bus defect.
#DB_Run_0s_Test P1 P2 P3
To perform a complete write to, followed subsequently by a read from, DUT’s
shared RAM memory location specify by address A23, A17-A10 and A09A02 indicated by P1, P2 and P3 respectively. A 16-bits running zeros data
will be written and read from the address location specified by P1, P2 and P3.
This will detect any possible data bus defect.
#AB_Run_1s_Test
To perform a complete write processes 16 times with a Running ones data
onto a corresponding Running ones shared RAM address. This will then be
32
Developing the Required Test Functions
followed by a complete read process of 16 times to authenticate that the data
written is indeed correct. This will detect any abnormalities on the address
bus.
#AB_Run_0s_Test
To perform a complete write process 16 times with a Running zeros data onto
a corresponding Running zeros shared RAM address.
This will then be
followed by a complete read process of 16 times to authenticate that the data
written is indeed correct. This will detect any abnormalities on the address
bus.
#CPU_SRAM_Test
To perform a complete Test Controller communication cycle with the DUT’s
ETS program which includes setting command, receiving acknowledgement
and accessing the necessary data from defined memory address location. For
this case, the Test controller will assess the “RAM Test Result” memory
location to authenticate if the DUT’s CPU and shared RAM interface test
carried out during the POST passes or fails.
#FlashID_Test
To perform a complete Test Controller communication cycle with the DUT’s
ETS program which includes setting command, receiving acknowledgement
and accessing the necessary data from defined memory address location. For
this case, the Test controller will assess the “Flash ID” memory location to
authenticate if the DUT’s Flash Memory Chip’s ID read by the ETS
corresponds to the anticipated approved vendor’s Flash List provided as an
input parameters at the start of the test. A ‘Pass’ or ‘Fail’ will be indicated
dependent on whether the Flash ID read matches or not respectively.
#DIP_SW_Ck
This test performs a series of complete Test Controller communication cycle
with the DUT’s ETS program that includes setting command, receiving
acknowledgement and accessing the necessary data from defined memory
33
Developing the Required Test Functions
address location. One complete cycle for this case is that the Test controller
will assess the “DIP Switch + TP2” memory location to read the real-time
setting on the DIP Switches and TP2. The Test Controller will prompt the
operator to activate the DIP switches whereby it will be read by the ETS who
in turns writes the value read to the “DIP Switch + TP2” memory address to
be fetched to the Test Controller for verification. This test will only be
considered as pass if all the DIP switches are detected as only toggle once
from one position to another. It is not allowed to move any switch setting
more than one time. In the event that not all the DIP Switches are found to
move once after a time-out period of 30 seconds or any stuck DIP Switch
position is found, the test will be considered as fail.
#TP2_Test
This test is very similar to the DIP_Sw_Ck test carried out described above.
The only exception is that the TP2 will be set and reset via the Digital line
output control without the necessary intervention of the operator. This test
will authenticate if TP2 is stuck at any undesired position.
#Set_Default_DIP_SW P1
This test performs a series of complete Test Controller communication cycle
with the DUT’s ETS program that includes setting command, receiving
acknowledgement and accessing the necessary data from defined memory
address location. One complete cycle for this case is that the Test controller
will assess the “DIP Switch + TP2” memory location to read the real-time
setting on the DIP Switches and TP2. The Test Controller will prompt the
operator to set the DIP Switches to the desired default condition as indicated
by P1 in binary form. In the event that the DIP Switches matches the desired
setting within a time frame of 25 seconds, the test will pass. Else, the test will
be indicated as a failure.
#Reset_Test P1 P2 P3
To perform a functional reset operational test by confirming that a read cycle
from DUT’s shared RAM memory location specify by address A23, A17-A10
34
Developing the Required Test Functions
and A09-A02 indicated by P1, P2 and P3 respectively will malfunction during
the DUT’s CPU reset period. The reset condition is activated via Digital
output line triggered by the Test Controller.
#FW_DL P1
To execute a DOS operational run on the filename indicated by string P1.
Upon successful completion of this DOS operation, it will proceed to open the
‘FW_DL.txt’ file to check if it’s a ‘0’ or not. A ‘0’ will return a Pass while
any other integer will represent a Fail.
#SN_Pr P1
To execute a DOS operational run on the filename indicated by string P1.
Upon successful completion of this DOS operation, it will proceed to open the
‘snocheck.txt’ file to check if it contains a ‘0’ or not. A ‘0’ will return a Pass
while any other integer will represent a Fail.
#End_Of_Test
To signify the completion of a complete DUT test and gives an indication to
the Test Controller to summarised the test results of the DUT test before
proper safe exit.
It is important to note that all the ATI commands described above are used in
the coding of the verification test of the Project Monza’s DUT. However, in
the course of this project development, additional ATI commands were
developed with the aim of allowing more flexibilities and testing capabilities
of this ATS project. The following list of ATI commands developed are
particular useful for performing troubleshooting and self-tests purposes.
#cls
To clear main screen display window.
#prompt
To prompt user to press any key to continue.
35
Developing the Required Test Functions
#Write_To_DUT P1 P2 P3 P4 P5
To write a 16-bits Digital output of data P4 and P5 (upper byte and lower byte
respectively) to the DUT’s shared RAM memory location specify by address
A23, A17-A10 and A09-A02 indicated by P1, P2 and P3 respectively.
#Write_DUT_in_BIN P1 P2 P3 P4 P5
This performs the same function as ‘#Write_To_DUT P1 P2 P3 P4 P5’
specify above with the only exception that the corresponding P1 to P5 values
are all given in Binary format.
#Read_From_DUT P1 P2 P3 P4 P5
To facilitates a reading of data from DUT’s shared RAM memory location
specify by address A23, A17-A10 and A09-A02 indicated by P1, P2 and P3
respectively. The 16-bits data read are then compared with the anticipated
data value specify by P4 and P5 (upper byte and lower byte respectively)
whereby a Pass or Fail will be determined whenever the data matches or
differs respectively.
#Read_DUT_in_BIN P1 P2 P3 P4 P5
This performs the same function as ‘#Read_From_DUT P1 P2 P3 P4 P5’
specify above with the only exception that the corresponding P1 to P5 values
are all given in Binary format.
#Read_DUT_Data P1 P2 P3
To facilitates a reading of data from DUT’s shared RAM memory location
specify by address A23, A17-A10 and A09-A02 indicated by P1, P2 and P3
respectively. The 16-bits data read are then displayed onto the real-time
scrolling screen and save into the necessary result file for self assessment.
#Running_0s_ST P1 P2
To perform a loop back test from P1 to P2 via writing to Port number P1
followed subsequently by a read from Port number P2 using a running zeros
data. This will detect any possible I/O board configuration error.
36
Developing the Required Test Functions
#Running_1s_ST P1 P2
To perform a loop back test from P1 to P2 via writing to Port number P1
followed subsequently by a read from Port number P2 using a running ones
data. This will detect any possible I/O board configuration error.
#AB_Complete_Test
To perform a complete write to DUT’s shared RAM memory location from
address 0x0000 to 0xffff with the respective addresses used as data as well.
This will then followed by a complete read from shared RAM memory
location address 0x0000 to 0xffff anticipating the desired data. Failure of any
corresponding data will be reflected.
5.3
AN APPLICATION EXAMPLE: CODING A ‘Test.txt’ TEST PROGRAM
In this section, the actual test coding for the Test.txt used for the prototype
testing of Project Monza’s DUT is listed below for clarity and appreciation by
the user. The user should note that ‘!’ appearing as a beginning of a line are
purely for comments purposes in the Test.txt coding whereas a ‘#’ character
will be followed by an ‘ATI_Command’ which the user should corresponds to
Section 5.2 ATI Commands Reference for a complete appreciation of this
coding example listed. Any lines that start with neither ‘!’ nor ‘#’ are purely
message that will be output to the real-time scrolling screen for real-time
information update of the DUT testing status environment.
Listed below is the actual test coding for the Test.txt used for the prototype
testing of Project Monza’s DUT:
<<< Test Initialization >>>
====================================
(i) Defining Addr & Data Ports Numbers
#Addr_Ports_16 2 1
#Data_Ports_16_IN 9 3
#Data_Ports_16_OUT 6 0
(ii) Configuring Ports use as Output Ports
37
Developing the Required Test Functions
#Port_Config 0 1
....
(iii) Configuring Ports use as Input Ports
#Port_Config 3 0
...
(iv) Ensuring Safe Start-up States
#Write_To_Dig_Port 11 0x00
...
!Ensuring Power is OFF
#Write_To_Dig_Line 7 0 1
(v) Presetting Addresses Location
#Comd_Add 0xAA 0xAA
#Ack_Add 0x55 0x55
#RAM_Add 0xAA 0x55
#DIP_Add 0xA5 0xA5
#Flash_Add 0x55 0xAA
(vi) PLEASE INSERT DUT........
#Wait_Switch 0
#Sub_Test_Result Initialization
<<< Powering Up & Flash-Strapping DUT >>>
===========================================
(i) Powering Up
Checking Power Sense is OFF
#Read_From_Dig_Line 10 0 0
Applying Power ON...
#Write_To_Dig_Line 7 0 0
#delay 0.25
Checking Power Sense is ON
#Read_From_Dig_Line 10 0 1
!Enabling all Data Drivers
#Write_To_Dig_Port 11 0x00
38
Developing the Required Test Functions
(ii) Ensure Flash Strap Sense is ON
#Read_From_Dig_Line 10 1 1
(iii) Reseting the DUT
!Set RESET = '0'
#Write_To_Dig_Line 8 1 0
#delay 1
#Progress 20
!Set RESET = '1'
#Write_To_Dig_Line 8 1 1
!Minimum Required >= 1 sec
#delay 1
(iv) Switching Flash Strap to OFF
#Write_To_Dig_Line 7 1 0
#delay 0.25
Ensuring Flash Strap is OFF
#Read_From_Dig_Line 10 1 0
#Sub_Test_Result Power_Up
<<< Downloading ETS to DUT >>>
===============================================
Downloading ETS in progress..........
#RunFile DL_ETS.bat
#Dos_Ops_Check ETS_DL.txt
#Sub_Test_Result ETS_DownLoad
<<< Waiting for 'End Of POST' from ETS >>>
===============================================
#End_POST 0x0010
#Sub_Test_Result Acknowledgement
<<< Test Controller Performing Shared RAM Test >>>
===============================================
(I) Data Bus Test.......
(A) Data Bus Running 1 Test ...
#DB_Run_1s_Test 0 0x39 0xbc
(B) Data Bus Running 0 Test ...
39
Developing the Required Test Functions
#DB_Run_0s_Test 0 0x39 0xbc
(II) Address Bus Test......
(A) Add Bus Running 1 Test ...
#AB_Run_1s_Test
#Progress 50
(B) Add Bus Running 0 Test ...
#AB_Run_0s_Test
#Sub_Test_Result Shared_RAM
<<< CPU Shared RAM Test carried out by ETS >>>
==========================================
#CPU_SRAM_Test
#Sub_Test_Result CPU_SRAM
<<< Flash ID Read Test >>>
==========================================
#FlashID_Test
#Sub_Test_Result Flash_ID
<<< DIP Switch Test >>>
===========================================
#DIP_Sw_Ck
#Sub_Test_Result DIP_Sw
<<< TP2 Test >>>
===========================================
#TP2_Test
#Sub_Test_Result TP2
<<< Setting Default DIP Switch Condition >>>
=============================================
#Set_Default_DIP_SW 1010
#Sub_Test_Result Default_DIP_Sw_Setting
<<< RESET Operational Test >>>
=============================================
40
Developing the Required Test Functions
#Reset_Test 0 0xaf 0x58 0x15 0x69
#Sub_Test_Result Reset
<<< Firmware Flash Loading to DUT >>>
=============================================
#FW_DL DL_FW.bat
<<< Serial Number Label Imprinting >>>
=============================================
#SN_Pr SN.bat
<<< Powering OFF the DUT >>>
=============================================
(i) Ensuring Safe Shut-down States
#Write_To_Dig_Port 11 0x00
.....
!Disabling all Data Latches b4 DUT Removal
#Write_To_Dig_Port 11 0xfc
(ii) Checking Power Sense is OFF
Checking Power Sense is OFF
!Ensuring Power is OFF
#Write_To_Dig_Line 7 0 1
#delay 0.25
#Read_From_Dig_Line 10 0 0
#Sub_Test_Result Power_Shut_Down
#End_Of_Test
41
Developing the Required Test Functions
5.4
FUTURE EXPANSION: ADDING NEW ATI COMMANDS
This section describes how additional ATI commands needed to support new
test features can be implemented. The necessary codes to modify and areas
where new codes are to be added are clearly illustrated and specified. The
following are the recommended steps to follow:
1. Open the ‘LabWindows/CVI’ program.
2. Select
File>>Open>>Project
(*.prj)
in
the
LabWindows/CVI
environment.
3. Open the ATS project file.
4. Once the ATS project is opened, click on the only ATS C file in the
project environment to have access to the C codes.
5. Search for the function, ‘void decode (char *pstr)’
6. Within the function, define your new ATI command name desired in
the ‘typedef enum {….}cmd_type;’ and ‘static char cmds [cmds_no]
[cmdslen] = {….};’. Take for example, ‘Text_Colour’, a function to
define the text displayed colour is to be added as a new ATI command.
Then the ‘Text_Colour’ is added as shown below:
void decode (char *pstr)
{
typedef enum{
Write_To_Dig_Port,
Read_From_Dig_Port,…….,
Text_Colour
}cmd_type;
static char cmds[cmds_no][cmdslen] =
{
{"Write_To_Dig_Port"}, {"Read_From_Dig_Port"},……,
{"Text_Colour"}
};
42
Developing the Required Test Functions
7. Next, simply write the C code function within the ‘switch(--i) {…..}’
using ‘case Text_Colour:………break;’. This feature is illustrated as
follow:
case Text_Colour :
SetCtrlAttribute(panel, testscr, ATTR_TEXT_COLOR, a);
………..
break;
8. Finally, simply re-compile and run the program via selecting
Run>>Debug Test.exe in the LabWindows/CVI environment.
9. This completes the process of adding an addition ATI command.
43
Operating The Test System
CHAPTER 6
OPERATING THE TEST SYSTEM
This chapter serves to provide a simple guide to set up and operate the test system to
perform serviceability test on the Project Monza Print Server product.
The Axis
Automatic Test System (AATS) for this product is a graphical user interface test
system developed using the LabWindows/CVI Software and Digital Inputs/Outputs
Interface Card installed in the Test Controller to establish links between the Test
Controller and the DUT. The Test Controller coordinates the testing operations and
acquires the test results for evaluation. The AATS will eventually output to the user the
results of the DUT testing, i.e. whether it ‘PASS’ or ‘FAIL’ on the computer screen.
6.1
HARDWARE SET UP
The AATS complete hardware configuration set up is as indicated in Figure 61.
Please note that the Digital I/O card must be installed in one of the
available PCI slot within the Test Controller.
Please follow the detailed
instructions in the ‘DAQ Quick Start Guide’ [9] available together with the
purchase of the Digital I/O card. The hardware required is namely: Test
Controller with Digital I/O card installed, Test Fixture, Label Printer and Error
Report Printer.
Connect the Digital I/O Bus and Ethernet Bus cables
accordingly as marked and indicated on the Test Fixture.
Figure 6-1: AATS Hardware Set Up
44
Operating The Test System
6.2
SOFTWARE SET UP
First install the Digital I/O card DAQ software using the NI-DAQ CD
provided together with the purchase of the Digital I/O card. Please follow the
detailed instructions in the ‘DAQ Quick Start Guide’ to completely install the
Digital I/O card drivers.
Next, follow the procedures as outlined below to install the AATS:
a) Insert the AATS Installation Disk 1 of 2 into your respective
3.5” Disk Drive (lets say x is the drive you are using).
b) Choose the ‘Run…’ option from the Desktop Start Taskbar.
c) Type ‘x:setup’ in the command line box and click on OK.
d) The following Figure 6-2 instruction dialog box will appear:
Figure 6-2: AATS Installation Dialog Box
e) Choose the desired Directory for installation and click ‘Finish’.
f) The following Figure 6-3 pop-up instruction indicating the
successful installation should appear.
Figure 6-3: Successful Installation Message
45
Operating The Test System
6.3
PERFORMING DUT TESTING
(a) Start the test system PC and login accordingly.
(b) Switch on the Test Fixture.
(c)
Double-click the ‘START’ (which is the shortcut to c:\mtb\startl.bat)
icon available on the desktop.
(d) Enter ‘Shop Order’ (as shown in Figure 6-4) information as required
and click OK when completed.
Figure 6-4: Entering ‘Shop Order’ information.
(e) Next, enter information for ‘Work Set Up’ (as shown in Figure 6-5) and
click OK when completed.
Figure 6-5: Entering ‘Work Setup’ information.
46
Operating The Test System
(f) Check the work information displayed on the screen.
If it is correct,
type 'Y' and the test will start. However, if the work information is
displayed wrongly, type 'N' restart from Step 8(d) again.
(g) Next, the following Figure 6-6 screen will appear. Please follow the
instructions as indicated in the ‘Important Test Message’ throughout the
test. Example, in this case, ‘Please Insert DUT’ action is required from
the operator. Kindly connect the TP (i.e. Ethernet Bus) cable and insert
the DUT to it respective place and open the vacuum valve.
Figure 6-6: The AATS Testing Environment
(h) During ETS and Firmware Flash loading process, the operator must
visually check the LEDs for the following correct behavior dependent
on the network speed used:
LEDs:
RXD
TXD
100
Flash load @ 100Mb
Irregular flash
Irregular flash
Flash load @ 10Mb
Irregular flash
Irregular flash
*
*
LNK
ERR
On
On
Off
Off
On
Off
The ‘LNK’ LED is always on whenever the network cable is connected. To check that
the LED is not stuck at the on condition, operator must check that the ‘100 Mb’ LED is
turned on approximately 1 second before the ‘LNK’ LED during power on when
connected to the 100 Mb network.
47
Operating The Test System
(i) Throughout the rest of the test, operator must observes for the following
correct behavior dependent on the network speed used:
LEDs:
RXD
TXD
100
*LNK
ERR
Test @ 100Mb
Off
Off
On
On
Off
Test @ 10Mb
Off
Off
Off
On
Off
(j) Further examples of ‘Important Test Message’ that will appear on the
screen requesting for test operator action are shown in Figure 6-7. They
are namely ‘Move the DIP Switches ONE by ONE’ and ‘Set the DIP
Switch 4321 to xxxx’ which are used during the ‘DIP Switches Integrity
Test’ and ‘DIP Switches Default Setting Test’ respectively. Please act
according to the requested actions specified.
Figure 6-7: Operator’s action required as indicated in the ‘Important Test
Message’
48
Operating The Test System
(k) At the completion of each DUT testing, a PASS or FAIL message will
be clearly indicated in the ‘Important Test Message’ column as shown
in Figure 6-8.
Figure 6-8: ‘Pass’ or ‘Fail’ Message indicating DUT serviceability status and the necessary
‘Please Remove DUT’ information are displayed in the ‘Important Test Message’ column.
49
Operating The Test System
(l) The operator is then requested to remove the DUT as shown in the
‘Important Test Message’ column. Kindly close the vacuum valve and
remove the TP cable and DUT respectively.
(m) The test sequence will repeat itself until the Work Size requested is
achieved i.e. No. Passes equals to Work size desired. The AATS will
quit automatically whenever such condition is met.
(n) In the event that an abrupt end is desired, click the ‘Discontinue Work’
icon on the bottom right hand corner of the test screen or use ‘Alt’ + ‘D’
key to terminate the current work.
50
Conclusion
CHAPTER 7
CONCLUSIONS
7.1
CORPORATE PERSPECTIVE
On the corporate front, the vision of ATS set at the onset of this Master Thesis
project was successfully accomplished. The ATS end product developed for
Project Monza testing was subsequently introduced into real applications in
the company’s distribution centres and respective assembly plants.
With the successful implementation of this ATS, the following advantages
were realised:
1. Anticipated ease in usage for developing test system for all future Axis
Network Server products.
2. Test sequences are transparent to developers and users.
3. No compilation of test program is needed.
4. Users do not need to have prior C/C++ or LabWindows or Digital I/O
control programming background.
5. Cost savings of future products test systems developments.
6. With the detailed results of the test captured, it will provide ease and
productivity in diagnostic and troubleshooting of failed DUT.
The knowledge of future enhancements and upgrading of the ATS software
program was also demonstrated in a separate hands-on and appreciations
session with the engineers involved in the test system department.
7.2
PERSONAL PERSPECTIVE
On the personal front, much knowledge and invaluable experiences were
gained.
Firstly, this project had not only enhanced my knowledge in real-time testing
programming, but had also provided me opportunity to pick up new
51
Conclusion
programming skills in control of Digital I/O signals and appreciations of
LabWindows programming.
The project has also enlightened me on how a Test Controller functions as a
master in coordinating a testing environment and how it established
communications with the DUT via the use of Embedded Test Software (ETS).
The purpose of the software program developed in this project is to test all
future Axis Communications AB’s future products. It would be inappropriate
if the program were to be hard coded to perform only dedicated test sequences
for a specific product only.
This is because there are various ranges of
different products to be tested, and each product may require its own set of test
sequence.
Furthermore, the individual test sequence may be modified in
future to accommodate technology changes. With the intelligent ATI concept
developed in this project, all the problems mentioned above could be avoided.
The interpreter will decode the test sequence coded in text files so that the
program will perform the test accordingly. This has not only shortened the
program codes needed to be written, but has also make the program more
flexible. Furthermore, ATI being software in nature can be easily upgraded
for future modifications.
The importance of teamwork towards the success of a project was also
experienced.
This was encountered during the development of the ETS
whereby the specifications spelt out was not met and I have to work very
closely with the outsource contractors to resolve the defect. Nevertheless, I
must say that this was one of the most challenging encountering in this project.
The importance of sharing of ideas was encountered during regular meetings
with my supervisors on discussions, suggestions and brainstorming for the
project. Another realistic project working encountering was the inevitable
delays and difficulties experiences with external outsource contractors. The
unanticipated delays in the delivery of the ETS by more than a month have
shaken the confidence towards the success of this project on several occasions.
52
Conclusion
Nevertheless, overtimes and composures manage to overcome all these
obstacles.
Experiencing different working cultures within a company that deploys
flexible working system was another immeasurable encountering that I will
never forget.
The importance of trusts and independent working
empowerments were fully explored in such an organisation.
On the whole, this Master Thesis project is indeed an interesting, enriching,
challenging and practical project exposure for my self-development.
Furthermore, it has also reinforces the real-life applications of a real-time
digital control test system. A memorable experience that I will live to treasure
indeed.
53
Nomenclature
NOMENCLATURE
AATS
Axis Automatic Test System
ATI
Automatic Testing Interpreter
ATS
Automatic Test System
CPU
DUT CPU
Digital I/O Card
PCI-DIO-96 Digital Inputs/ Outputs Card
DUT
Device Under Test
ETS
Embedded Test Software
FW
Firmware
I/O
Inputs/Outputs
LED
Light Emitting Diode
MTP
Manufacturing Test Plan
MTSR
Manufacturing Test System Requirement
PCB
Printed Circuit Board
POST
Power On Self Test
Test Controller
Test PC with Digital I/O Card and Network Card installed
TF
Test Fixture
54
Bibliography
BIBLIOGRAPHY
1. Alan Burns and Andy Wellings, Real-time Systems and Their Programming
Languages, Addison-Wesley, 2nd Edition, August 1996.
2. Corriveau, Jean Paul, A Step-By-Step Guide to C Programming, Prentice Hall,
November 1997.
3. Danny Kalev, The ANSI/ISO C++ Professional Programmer's Handbook, Que
Professional, June 1999.
4. Harbison, Samuel P. and Guy L. Steele, Jr., C: A Reference Manual, Englewood
Cliffs, NJ: Prentice-Hall, Inc., 4th Edition, 1995
5. Axis Communications AB Documents, Project MONZA Hardware System
Design Document, October 2000.
6. Axis Communications AB Documents, Project MONZA Manufacturing Test
System Requirement Document, October 2000.
7. Axis Communications AB Documents, Project MONZA Manufacturing Test
Plan Document, November 2000.
8. Axis Communications AB Documents, Project MONZA Hardware Interface
Specification, March 1998.
9. National Instruments, DAQ Quick Start Guide, Jan 2000.
10. National Instruments, DAQ Hardware Overview Guide, Jan 2000.
11. National Instruments, NI-DAQ User Manual for PC Compatibles Version 6.7
Data Acquisition Software for the PC, Jan 2000.
12. National Instruments, NI-DAQ Function Reference Online Help, Jan 2000.
55
Bibliography
13. National Instruments, PCI-DIO-96 Digital I/O Interface for PCI User Manual,
March 1998.
14. National Instruments, LabWindows/CVI Basisc I Manual, Jan 2000.
15. National Instruments, LabWindows/CVI Basisc II Manual, Jan 2000.
16. National Instruments, Getting Started With LabWindows/CVI, December 1999.
17. National Instruments, LabWindows/CVI User Manual, December 1999.
18. National Instruments, LabWindows/CVI Instrument Driver Developers Guide,
December 1999.
19. National Instruments, LabWindows/CVI Programmer’s Reference Manual,
December 1999.
20. National Instruments, LabWindows/CVI Online Help, December 1999.
21. M. E. Lesk and E. Schmidt, “LEX - A Lexical Analyzer Generator”,
http://www.combo.org/lex_yacc_page/lex.html, 7 March 2001.
22. Stephen
C.
Johnson,
“YACC:
Yet
Another
Compiler-Compiler”,
http://www.combo.org/lex_yacc_page/yacc.html, 7 March 2001.
23. National Instruments, “The Fast, Flexible Test Management EnvironmentTestStand”, http://www.ni.com/teststand/, 7 March 2001.
56