1
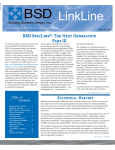
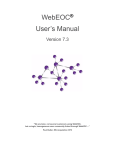
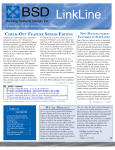
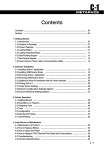
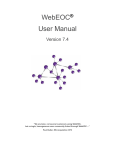
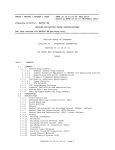
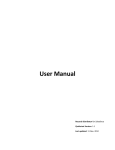
Chapter 8
Printing
In this chapter you learn how to:
•
establish a document format,
•
use the Customize Styles dialog box to:
•
select a numbering scheme, and
•
modify default formats, including fonts, lines, numbering, and indentation,
•
use the Page Setup dialog box to set margins, orientation, and paper source,
•
create headers and footers, including fonts and keywords,
•
preview documents,
•
print documents, including:
•
specifications (single section, entire branches, and entire project),
•
requirements reports,
•
table of contents,
•
print with a meter account, and
•
export documents to a word processor.
SpecLink User Manual
193
Chapter 8 : Printing
Overview
When all necessary text has been selected or added and all modifications have been
made, a section is ready to print. From the File menu, choose Print to open the Reports
dialog box (or click the Print button on the Standard toolbar). Select the document you want
to print. On the File menu, choose Page Setup to set paper size, orientation, and margins.
Select Print Preview from the File menu or click on the Print Preview button on the
Standard toolbar to preview the section you are currently editing.
Customizing the Page Layout for Specification Documents
Many format and page layout settings affect the printed output:
•
Styles: numbering scheme, font, line spacing, etc., set for each hierarchy level. See the
"Customizing Styles" section in this chapter for details.
•
On-screen formatting: bold, italic, underline, change font, and font size for certain text;
change alignment on certain paragraphs; turn automatic numbering off for certain
paragraphs; insert page breaks.
•
Page Setup: margins, orientation, paper size, etc. See the "Page Setup" section in this
chapter for details.
•
Headers and Footers: project-wide settings. See the "Headers and Footers" section in
this chapter for details.
•
Printer Setup: printer selection, tray and paper selection, available from the Reports
dialog box at the Print command. See the "Document and Printer Settings" section in
this chapter for details.
The best way to achieve the desired page layout is to change one factor at a time and
Preview the result. That way you waste less time and paper while fine-tuning your setup.
The Specification Format
SpecLink provides the four most commonly used specification formats:
194
CSI-Style
This format is called CSI style because it is the format
recommended by the Construction Specifications Institute.
Military Style
This format is called military style because it resembles the format
used for US Army Corps of Engineers and NAVFAC specifications
in the SPECSINTACT program.
Block Style
A basic block format that uses increasing indentation to indicate
hierarchy level.
SpecLink User Manual
Chapter 8 : Printing
Sequential
Numbering Style
This style adds left-justified sequential paragraph numbers to the
block style format, permitting unique identification of specific
paragraphs in addenda and other documentation.
The default font, regardless of the style, is Arial, 10 points.
NOTE: You can customize all aspects of the specification format at each paragraph level
for the CSI, Military, and Block styles; you can modify text properties only for the
Sequential Numbering style.
If you customize one of the predefined styles, your settings will be saved as a User-Defined
Style. This allows you to switch back and forth in the project between a predefined style and
a customized style. For example, you could use the CSI style for most of the project
content and switch to a user-modified block format for the preliminary documents.
NOTE: You can have one user-defined style for each application tab: PerSpective, Short
Form and SpecLink.
See the following pages for examples of the Style Sets.
SpecLink User Manual
195
Chapter 8 : Printing
SpecLink CSI-Style Paragraph Format
This format uses a specific paragraph numbering scheme and paragraph indentation and
line spacing. All aspects of the format can be customized for each paragraph level.
Level 0 - centered, bold, all
SECTION XXXXX
SECTION TITLE
skipped line
Level 1 - left justified, bold, all
skipped line
1.01 Article Title:
Level 2 - left justified, bold, upper and
skipped line
A. Text of the first paragraph.
Level 3
1. Text of the first subparagraph.
Level 4
PART 1 GENERAL
2.
B.
Text of the second subparagraph.
a) Text of the first sub-subparagraph.
1) Text of the first sub-sub-subparagraph.
(a) Text of the first sub-sub-sub-subparagraph
Level 5
Level 6
Level 7
Text of the second paragraph.
C. Text of the third paragraph.
1.02 Article Title:
etc.
END OF SECTION
196
SpecLink User Manual
skipped
centered Level
1
Chapter 8 : Printing
Military-Style Paragraph Format
This format uses a specific paragraph numbering scheme and paragraph indentation and
line spacing. All aspects of the format can be customized for each paragraph level.
Level 0 - centered, bold, all caps
SECTION TITLE
PART 1 GENERAL
skipped
Level 1 - left justified, bold, all
skipped
Level 2 - left justified, upper and
Level 3 - left justified
Level 4
1.1
Article Title:
1.1.1 Text of the first paragraph.
a. Text of the first subparagraph.
b. Text of the second subparagraph.
(1) Text of the first sub-subparagraph.
(a) Text of the first sub-sub-subparagraph.
(1) Text of the first sub-sub-sub-subparagraph
1.1.2 Text of the second paragraph.
1.1.3 Text of the third paragraph.
1.2
Article Title:
etc.
Level 5
Level 6
Level 7
skipped line
END OF SECTION
Level 0 - centered, bold, all caps
Level 2 and 3 numbers always start with the PART number; i.e., 1, 2, or 3.
SpecLink User Manual
197
Chapter 8 : Printing
Block-Style Paragraph Format
All paragraphs are spaced 0.1 inch apart. Spacing, indentation, numbering, and fonts can
be changed at each level. Indentation alone is used to indicate hierarchy level, but since
there is no numbering scheme by default, there is no way to uniquely identify a specific
paragraph by reference.
Level 0 - left justified, bold, all
SECTION TITLE
PART 1 GENERAL
Article Heading:
Text of the first paragraph.
Text of the first subparagraph.
Text of the second subparagraph.
0.1 in. line
Level 1 - left justified, bold, all caps
0.1 in. line spacing
Level 2 - left justified, upper and lower case
0.1 in. line
Level 3
0.1 in line
Level 4
0.1 in line spacing
Text of the first sub-subparagraph.
Text of the first sub-sub-subparagraph.
Text of the first sub-sub-sub-subparagraph
Text of the second paragraph.
Text of the third paragraph.
Article Heading:
etc.
END OF SECTION
198
SpecLink User Manual
Level 5
0.1 in line spacing
Level 6
0.1 in line
Level 7
0.1 in line
0.1 in line
0.1 in line
left justified, bold, all caps
Chapter 8 : Printing
Sequential Numbering Style Paragraph Format
This format uses a left-justified sequential numbering system combined with a block-style
scheme for paragraph indentation and line spacing. Font styles, level of indentation, and
spacing between paragraphs can be customized for each paragraph level.
NOTE: For line numbering combined with paragraph numbering, see the Line
Numbering option in the Print dialog box described later in this chapter.
Level 0 - left justified, bold, all
SECTION TITLE
1 PART 1 GENERAL
2 ARTICLE HEADING:
3 Text of the first paragraph.
4
Text of the first subparagraph.
5
Text of the second subparagraph.
6
7
8
0.1 in. line
Level 1 - left justified, bold, all caps
0.1 in. line spacing
Level 2 - left justified, all caps
0.1 in. line
Level 3
0.1 in line
Level 4
0.1 in line spacing
Text of the first sub-subparagraph.
Text of the first sub-sub-subparagraph.
Text of the first sub-sub-sub-subparagraph
9 Text of the second paragraph.
10 Text of the third paragraph.
11 ARTCLE HEADING:
etc.
END OF SECTION
Level 5
0.1 in line spacing
Level 6
0.1 in line
Level 7
0.1 in line
0.1 in line
0.1 in line
left justified, bold, all caps
NOTE: Sequential numbers that appear in the Document Panel coincide with the
paragraph sequence numbers. However, when the document is previewed or
printed, sequence numbers are adjusted to eliminate inactive paragraphs.
SpecLink User Manual
199
Chapter 8 : Printing
Customizing Styles
Use Customize Styles from the Tools menu to select a different format style for your
documents, modify the numbering format and text layout, or change fonts.
1. From the Tools menu, choose Customize Styles, or click the Customize Styles button.
The Modify Paragraph Format dialog box opens.
Modify Paragraph Format dialog box with Styles tab showing
2. Choose a predefined format by clicking on the pull-down arrow at the right of the Style
Set list and clicking on the predefined style you want.
3. To create your own format, first choose the predefined format that is closest to what you
need, then click on each level you want to modify, and change the settings to achieve
your desired look.
NOTE: You can change to a predefined format at any time while keeping your usermodified format intact. However, you can retain only one user-modified format
per project.
4. Click the Fonts tab and make any desired changes.
200
SpecLink User Manual
Chapter 8 : Printing
5. When you have completed all desired changes, click on Close. If you want to erase all
changes you have made, click on Cancel.
The options on the Styles and Fonts tabs are described below.
Styles Tab
The first item you choose is the paragraph level you want to modify. Simply click on the
level you want. You can modify each level by changing the number style or any of the text
properties. As soon as you have made any change to a predefined style, the Style Set pulldown list changes automatically to User-Defined Style, after a confirming message asking if
you want to overwrite the existing user-defined style.
Number Style
Each paragraph number consists of the type of number (or letter), the style (upper or lower
case, followed by a period, a close parenthesis, etc.), and whether or not it includes the
number or letter from the previous level.
Number Format
In this field is displayed the number format for the given level.
Number Style
Choose the number/letter style. For example, 1, 2, 3 or a, b, c.
Start at
If you want your numbering to start at a number different than 1 or
A, use the up and down arrows to select the starting number.
Include Numbers
from Previous Level
Check this box if you want numbers from the previous level
inserted in front of the number for the selected level. For example,
a style such as A, A1, A2, etc.
Show Number
Check this box if you want the number to print. Leaving the box
unchecked means the numbering system will be included in the file
but will not appear in the printed documents.
Format
Text Properties
Alignment
You can align text to the left margin, right margin, centered
between the margins, or left- and right-justified. The options are
Left, Center, Right, and Justified.
First Line Indent
This setting determines the amount of space between the left
margin and the beginning of the first line of paragraph text.
Second Line Indent
This setting determines the amount of space between the left
margin and the beginning of the second and remaining lines of
paragraph text.
Spacing Above
Paragraph
Control spacing between paragraphs by changing from 0 to any
desired value. Choose 0 to eliminate line spacing and save paper.
However, when you want additional spaces to mark up a draft,
increase the line spacing.
SpecLink User Manual
201
Chapter 8 : Printing
Print in Upper Case
Text is normally printed exactly the way it appears on screen. Click
this box to print the selected level in all uppercase, regardless of
how it appears on screen.
NOTE: If the Print in Upper Case is selected for the Level 0 paragraphs (the default) the
Section Names in the Header/Footer will also print in upper case, regardless of
how they appear on-screen.
To adjust the above measurements, click on the up and down arrows to increment changes
by 0.1 inch. Or set a specific spacing value by clicking in the value field and typing the value
you want.
NOTE: When you are changing the Paragraph Format, keep in mind that each hierarchy
level has its own set of format settings.
Fonts Tab
Modify Paragraph Format Dialog Box with Fonts Tab Showing
When you click on the Fonts tab, the current fonts for all eight levels are displayed. To
change any font, click the Font button for that level to open a standard Windows Font
dialog box.
202
SpecLink User Manual
Chapter 8 : Printing
Font dialog box
Change the font, font style, and point size for each level as desired. The fonts available are
those already installed in your copy of Windows.
When you change the fonts in your project, the change is effective for all three application
tabs: PerSpective, Short Form and SpecLink.
NOTE: To change the font for your header and footer, see the header and footer section
later in this chapter.
Page Setup
Use the Page Setup function to modify margins, orientation, paper size, and similar
variables.
From the File menu, choose Page Setup, or click the Page Setup Button on the toolbar.
The Page Setup dialog box opens.
SpecLink User Manual
203
Chapter 8 : Printing
Page Setup dialog box, Margins tab
Margins Tab
On the Margins tab, you can control all margins, plus the other options described below.
Margins are set from the edge of the paper. Use the up and down arrows to the right of
each field to increase or decrease the margin by 0.1 inch. You can also enter the inches
value in these fields. You can set the margins for Top, Bottom, Left, and Right.
From Edge
You can set the margins for headers and footers from the edge of the paper. Use the up
and down arrows to the right of each field to increase or decrease the margin by 0.1 inch.
You can also enter the inches value in these fields.
Start document on odd page
Select this option to add a blank page when the section has an odd number of pages. Use
this option if you are printing double-sided or plan to copy to a double-sided document.
Mirror Margins
Select this option to reverse left and right margins for back-to-back printing. If you check
this option, your established margins will be applied to odd-numbered pages and reversed
for even-numbered pages.
Two Column Layout
Select this option to establish a two-column layout for your documents, for either landscape
or portrait page orientation. The available text width between left and right margins is
divided automatically, with a preset margin between the columns.
204
SpecLink User Manual
Chapter 8 : Printing
Alternate Left/Right Header/Footer
Select this option to establish an odd- and even-numbered layout for your headers and
footers. If you check this option, your established header and footer layouts will be applied
to odd-numbered pages. The reversed layout will be applied to even-numbered pages.
There is a separate Page Setup setting for each of the three application tabs: PerSpective,
Short Form and PerSpective.
Paper Information Tab
The Paper Info tab has other variables you can set:
Page Setup Dialog Box, Paper Info Tab
On the Paper Info tab, you can change the following variables:
Paper Size and Paper Source
Select the size and the Source of the paper used for printing the document. Click on the
combo box in each field to display a list of options. Highlight the option you want.
Orientation
Orientation determines the direction the specification prints. Choose either portrait (8 ½" x
11") or landscape (11" x 8 ½"). Click on the option you want.
SpecLink User Manual
205
Chapter 8 : Printing
Note: These settings remain fixed for all projects printed from SpecLink until they are
reset from within the program. In addition, when you change the orientation from
within SpecLink, it is changed for the current project and all printers and does not
affect the orientation setting in other projects or applications
Headers and Footers
You can define a header and footer for all specification sections, the automatic Table of
Contents report, and the Requirements reports. You can type in your own text, and use
keywords that automatically substitute information specific to a project, such as the Project
Name and ID.
There is a separate Header and Footer setting for each of the three application tabs:
PerSpective, Short Form and PerSpective.
Using Headers and Footers
Use the Headers and Footers function to create customized headers and footers for your
project, the automatic Table of Contents Report, and the Requirements reports.
1. Click on the appropriate application tab: PerSpective, Short Form or SpecLink.
2. From the View menu, choose Show Header/Footer, or click the Show Header/Footer
button on the View toolbar.
The Header/Footer dialog box opens.
206
SpecLink User Manual
Chapter 8 : Printing
Header/Footer dialog box
3. From the first drop-down list, choose the document type you want to customize:
(SpecLink Only)
Document Type pull-down list
4. Use the Customize Header tab to establish a header. Click on the Customize Footer tab
to switch to a similar form for establishing a footer.
5. Click in any of the three fields at the top of the dialog box to enter text for a left,
centered, or right justified entry. You can type text, paste text from the clipboard, or insert
keywords from the pull-down list, in any combination. See the "Header/Footer Keyword"
section in this chapter for definitions of all keywords.
Text in the left field will begin at the left margin, text in the middle field will be centered,
and text in the right field will be right-justified from the right margin. In addition to
keywords, you may use any text characters in these fields, and you can use up to six
lines, using the Enter key to mark the end of a line.
NOTE: You need to enter spaces or punctuation between keywords, if desired.
6. To change the format of the text, select the text by dragging across it with your mouse,
and then format it using the tools across the top of the Header/Footer dialog box. The
SpecLink User Manual
207
Chapter 8 : Printing
tools available are as follows: font selection pull-down list; font size pull-down list; bold,
italic, and underline icons; keyword pull-down list, and borders pull-down list.
7. Examine the field at the bottom of the dialog box to preview the way your header or
footer will print.
Header/Footer Dialog Box with Customized Footer Information
The keywords in the example above will be replaced by information appropriate to each
document. For example, PXX is the keyword for Project ID, SXX is the keyword for
Section ID, and # is the keyword for page number.
8. When your header and footer are both complete, click OK. Or click Cancel to discard
your changes.
9. To preview your section with your customized header and footer layout, click the Print
Preview button on the Standard toolbar, or choose Print Preview from the File menu.
Default Headers and Footers
For Specifications, the default header is blank. The default footer has the Project ID and
Project Name in the left, Section Number and Page Number in the middle, and the Section
Name on the right. If desired, use the steps outlined above to customize your project's
header and footer.
208
SpecLink User Manual
Chapter 8 : Printing
NOTE: If you wish to print your document with back-to-back pages and want your
headers and footers reversed for odd- and even-numbered pages, click the
Page Setup button on the Standard toolbar, and then click that option on the
Margins tab.
Header/Footer Keywords
Keywords are used to insert text automatically. Keywords insert the appropriate words or
numbers into the header and footer whenever the document is previewed or printed.
The Keywords pull-down menu is located in the Header/Footer dialog box. To see the
keywords available, click on the pull-down arrow to the right of the keywords icon.
Keywords Pull-Down Menu
Note that the Division ID and the Division Name are only available in the SpecLink
application tab.
For some keywords, like the Project Name, the inserted words are obtained from the
information recorded in the Project Summary Information dialog box and do not change
from section to section.
Other keywords change depending on which section is being printed, such as the Section
ID (section number) and the Section Name.
Keywords appear in a blue font. You can enter any other text, either alone or in combination
with keywords. Typed text appears in a black font.
The Keywords provided are:
Division ID
The division number, such as 08. (SpecLink Only)
Division Name
The division name, such as Doors and Windows. (SpecLink Only)
SpecLink User Manual
209
Chapter 8 : Printing
Section ID
The section number, such as 08111.
Section Name
The title of the section as it appears in the Tree Panel.
Project ID
The number or name entered in the Summary Information dialog
box.
Project Name
The name entered in the Project Summary Information dialog box.
Project Location
The location entered in the Project Summary Information dialog
box.
Page Number
Starts at 1 for each new section, incremented by 1.
NOTE: The Page Number keyword is frequently used in combination with the Section ID
number. For example, if used with a hyphen between them, Section ID plus
hyphen plus Page Number would produce page numbers such as 08111-1
Page Count
Inserts total number of pages in current document.
NOTE: The Page Count keyword typically would be used in combination with the Page
Number keyword, as in Page 1 of 4 or Page 08111-1 of 5.
Date
Today’s date, from the computer clock.
Time
Current time at previewing or printing, from the computer clock.
NOTE: If you would like to enter a date or time that does not change each time you print,
just type in that date or time. Only use the Date and Time keywords if you want
the header or footer to indicate when the document was actually printed.
On-Screen Formatting
Several formats are available for you to apply to specific paragraphs and text in the
Document Panel. Unlike the Style, Font, Page Setup, and Header and Footer settings
described earlier, these formats are not global – they affect only the paragraphs or text to
which you apply them.
Formats on Document Panel Toolbar
Using the Document Panel toolbar, you can apply formats to text by first dragging across
the text and then clicking the appropriate button on the toolbar. Available formats include
changing the font and font size; applying bold, italic, and underline; and changing the
paragraph alignment. See descriptions of the toolbar buttons in Chapter 3 “Orientation.”
210
SpecLink User Manual
Chapter 8 : Printing
No AutoNumber
For any paragraphs that you would rather not have numbered, you can turn off the
AutoNumbering. Some paragraphs you might do this for are for those in a table, or any
notes you may want to include in the body of the text.
To eliminate paragraph numbers from the screen but not from the printed or
previewed section:
1. Pull down the View menu.
2. Select Display Layout and click Show Auto Numbers.
To eliminate paragraph numbers from a single paragraph, or group of paragraphs, in
both screen and printed documents:
1. In the Document Panel, select the paragraphs that you don't want numbered. (If
just a single paragraph, click on the paragraph. If multiple paragraphs, drag across
them with your mouse.)
2. Using your right mouse button menu, click on No AutoNumber, or pull down the
Document menu and select No AutoNumber.
To eliminate paragraph numbers from an entire section in both screen and printed
documents:
1. In the Document Panel, select all paragraphs by clicking on the first paragraph and
then hold the Control, Shift and End keys. That will highlight the entire section.
2. Pull down the Document menu and select No AutoNumber.
3. If you subsequently add paragraphs to that section, you will have to apply No
AutoNumber to the newly added paragraphs.
To eliminate paragraph numbers from all paragraphs in all sections, in both screen
and printed documents:
1. Pull down the Tools Menu.
2. Select Customize Styles.
3. At Style Set, select Block Style.
To turn AutoNumbering back on, repeat the steps above. The No AutoNumber command is
a toggle.
SpecLink User Manual
211
Chapter 8 : Printing
Insert Page Break
To keep a group of paragraphs, perhaps for a table, together on the same page, insert a
page break before them.
To insert a page break:
1. Click to place your cursor in the paragraph that should be at the top of the page
following the page break.
NOTE: In order for the page break to work, the paragraph you click in must be active
and not have an NS or NP tag.
2. From the Document menu, choose Insert Page Break, or click the Insert Page Break
button on the toolbar
.
A dark line will appear above the paragraph, representing the page break.
To remove the page break, repeat the steps. The Insert Page Break command changes to
Remove Page Break when your cursor is in a paragraph that already has a page break.
Requirements Reports (SpecLink Only)
In addition to the specification sections, you can also print special requirements reports for
project management purposes. Below is a description of the Project Requirements topics
that can be found in the Reports dialog box, which opens from the Print toolbar button or
the Print command on the File menu. These topics all appear in PART 1 of the section
unless otherwise noted. The two-character abbreviations in parentheses after each term
can be seen in the Tag status column of the Document Panel.
Report Cover Sheet
When you print a Requirement Report, a Report Cover Sheet will be printed automatically,
which includes the information from the Report Cover Sheet tab on the Project Summary
Info dialog box. To suppress the report, uncheck the Reports Cover Sheet on the Report
Options dialog box.
NOTE: To toggle the Tag status column on or off, from the View menu choose Display
Layout, and then choose Tags.
212
SpecLink User Manual
Chapter 8 : Printing
Certificate (CT)
A submittal consisting of the manufacturer's or contractor's
certification. Usually used to certify that the products furnished
meet the specification criteria. PART 1, Submittals.
Design
Calculations (DC)
A submittal consisting of the calculations performed to design a
particular element. Used to show that products designed by the
contractor or manufacturer meet the project criteria. PART 1,
Submittals.
Extra Materials
(XM)
Additional quantities of the materials installed, usually furnished
for maintenance purposes. Usually limited to products that would
be hard to match or acquire in the future. PART 1, Extra Materials.
Field Report (FR)
A report to be submitted by the contractor or a manufacturer's
representative describing the status of something on the project
site. PART 3, Field Quality Control.
Independent
Agency Field
Testing (FT)
Provisions requiring a testing or inspection laboratory or agency to
test or inspect the work in place. The section may require the
agency to be hired by either the owner or the contractor, and the
testing varies according to the type of product involved. PART 3,
Field Quality Control.
Installation
Instructions (II)
Manufacturer's printed installation instructions. Submittal for
information only, for the project record. PART 1, Submittals.
Installer
Qualifications (IQ)
This includes "applicators" and other similar functions. Part 1,
Quality Assurance.
LEED Report
(LR)
This lists all sections with active LEED submittal requirements.
Manufacturer
Listing (ML)
Manufacturers listed in a specification. This requirements report is
different from the others. In addition to listing the section number,
it lists the text in the tagged paragraph (the manufacturer’s name)
and the text of the parent paragraph (the product type).
Manufacturer
Qualifications
(MQ)
This includes "fabricators" if the product is more likely to be shopfabricated than factory-made. Part 1, Quality Assurance.
Mock-Up (MO)
A mock-up built during construction for evaluation of workmanship
or performance. Another term for this is "field sample" when that
refers to a full-scale portion of the work evaluated in place. Mockups for testing prior to approval of products are not included in this
category. Part 1, Quality Assurance.
Operation and
Maintenance
Data (OM)
Specific items that may not be obvious from the general
requirements for operation and maintenance data in Division 1.
Includes both standard pre-printed data and documentation
prepared specifically for the project. Part 1, Submittals.
SpecLink User Manual
213
Chapter 8 : Printing
214
Pre-Installation
Meeting (PI)
A special meeting, usually specified with particular attendees and
topics to be covered. Part 1, Quality Assurance.
Product Data
Submittals (PD)
Manufacturers' catalog data, not prepared specifically for the
project. PART 1, Submittals.
Professional
Engineer Design
(PE)
If major components are commonly designed by an engineer
other than the engineer of record, the section may include that
requirement as an option. If so, the actual text depends on the
products involved. Part 1, Quality Assurance.
Project Record
Documents (PR)
Specific items for the project record that may not be obvious from
the general requirements for project record documents in Division
1. PART 1, Submittals.
Qualifications
Statement (QS)
Actual submission of qualifications of manufacturer, installer, or
designer. Part 1, Submittals. Qualifications required are specified
in Part 1, Quality Assurance.
Samples (SA)
Actual products to be furnished, for approval of colors, finishes,
etc. Not used for testing purposes or for evaluation of
performance. PART 1, Submittals.
Shop Drawings
(SD)
Drawings prepared specifically for the project, to complete the
design or to illustrate details left up to the contractor. PART 1,
Submittals.
Source Quality
Control (SQ)
Source Quality Control paragraphs. Usually near the end of
Part 2.
Special Warranty
Provisions (WT)
Any warranty provision that involves a term longer than one year
or entities other than the (prime) contractor. The actual terms vary
according to the type of product involved. Part 1, Warranty.
Test Report (TR)
Any report of a test. May be pre-construction, showing
performance of a proposed product; during construction, testing
samples of materials installed; or post-construction, testing actual
installation in place. Pre-construction is in Part 1, Submittals.
During and post-construction is in Part 3, Field Quality Control.
Warranty,
Executed (WE)
Actual copy of the warranty signed by the warranting entity.
Warranty provisions are in Part 1, Warranty. Submission of
executed warranty is in Part 1, Submittals (if mentioned at all).
Warranty,
Specimen (WS)
Sample of proposed warranty, for review. Part 1, Submittals (if
mentioned at all).
Proposal Phase
(S1)
This tag is for substantiation reports for the PerSpective tab, to be
developed in a future release of the software.
SpecLink User Manual
Chapter 8 : Printing
Preliminary
Design Phase
(S2)
This tag is for substantiation reports for the PerSpective tab, to be
developed in a future release of the software.
Design
Development
Phase (S3)
This tag is for substantiation reports for the PerSpective tab, to be
developed in a future release of the software.
Construction
Documents
Phase (S4)
This tag is for substantiation reports for the PerSpective tab, to be
developed in a future release of the software.
Construction
Phase (S5)
This tag is for substantiation reports for the PerSpective tab, to be
developed in a future release of the software.
Closeout Phase
(S6)
This tag is for substantiation reports for the PerSpective tab, to be
developed in a future release of the software.
Occupancy
Phase (S7)
This tag is for substantiation reports for the PerSpective tab, to be
developed in a future release of the software.
NOTE: Additional tags are also listed in the Tags column. For directions on applying
tags, see Chapter 10.
Hints About Requirements Reports
For a better understanding of Requirements Reports, keep the following in mind:
•
The reports are all created by queries that look for specific two-letter "tags" attached to
certain paragraphs throughout the specification sections. For instance, a Samples
report would look for all sections that include selected text identified by the "SA" tag.
•
If a particular section is not included in one of the Requirements Reports, it can mean
any of these things: 1) the section does not include a provision of the type reported
(e.g., no shop drawings requirement); 2) the section includes such a provision, but the
particular paragraph was not selected; or 3) the section includes the provision, it was
selected, but the paragraph lacks the correct tag.
•
The last option above can occur, for example, if you simply insert a new paragraph
calling for shop drawings. The paragraph you add will not have a tag, so its section will
not be included in the Shop Drawings report. To include the section in the report, apply
the SD tag to the paragraph calling for shop drawings. To apply the tag, click in the
paragraph, click the arrow on the Tags button
, and then click on the appropriate
tag. When that paragraph is active in the section, the section will be listed in the Shop
Drawings report.
•
In addition to the 23 reports described above, there are two special reports available
from the Reports dialog box. All Requirements simply prints all 23 reports for the
SpecLink User Manual
215
Chapter 8 : Printing
project, one after the other. The Submittals Report includes three columns for Product
Data, Samples, and Shop Drawings, and shows by indicating with an N or Y in the
appropriate columns which sections contain any of these requirements.
•
Because these reports are useful primarily for construction management, you probably
will not want to print any of them until the project is complete. If you print them too early,
requirements in some sections completed later may not be included.
Previewing
It is not necessary to preview your documents before printing, although previewing is
recommended. For example, it is a good idea to use Print Preview if you make a change to
the page format, before you print multiple documents. Print Preview also allows you to
verify the number of pages in each document before printing.
To verify content in an editable view, you can use Compact View from the View menu to
see exactly what text is set to print. Then you can use Print Preview to see exactly how
your documents will look, with all formatting applied.
Compact View
Use Compact View to hide all text that is not to be included in your specification. This
makes final review of the contents easier.
From the View menu, choose Compact View. Then click on the Show All Levels toolbar
button. All nonprinting language disappears (with the exception of paragraphs tagged as
NP (non-printing) and NS (non-selectable)); only the active, selected text is shown.
You can manually adjust the margins for better viewing by dragging the right margin marker
on the horizontal ruler at the top of the Document Panel.
Print Preview
Use Print Preview to check both content and format of documents before you print.
From the File menu, choose Print Preview. You can also choose the Print Preview button
from the Standard toolbar.
The Print Preview window appears. It displays the content and format of the current section
and an integral row of buttons across the top.
216
SpecLink User Manual
Chapter 8 : Printing
Print Preview Window
The options on the Print Preview toolbar are:
Print
Print the currently displayed report.
First
Preview the first page in the report.
Previous
Preview the previous page in the report.
Next
Preview the next page in the report.
Last
Preview the last page in the report.
Close
Close the preview window.
You can also zoom in and out by clicking anywhere within the visible page.
Document and Printer Settings
Once you have formatted the documents, select what you would like to print using the
Reports dialog box.
SpecLink User Manual
217
Chapter 8 : Printing
Reports
From the File menu, choose Print. The Reports dialog box appears.
NOTE: The Reports Dialog box will vary slightly depending on which application tab you
were in before opening the dialog box.
Reports Dialog Box
The options on the Reports dialog box are as follows:
218
Default Printer
Use this pull-down list to select the printer you wish to use.
Report to Print
This pull-down list gives you five options: Document, Draft Copy,
Master Text Copy, Requirements Report, and Table of Contents.
Select the document type you want from this list.
Document
The default choice. Comprises the actual edited
specification document.
Draft Copy
Prints all the master text and all user-added
text, regardless of what has been selected.
SpecLink User Manual
Chapter 8 : Printing
Master Text Copy Prints all master text (but no user-added text),
regardless of what has been selected.
Requirements
Report
Prints lists of sections having certain
requirements, like product sample submittals,
as described in the Requirements section of
this chapter. (SpecLink Only)
Table of Contents Prints an automatic table of contents that lists
all the active sections in the project and their
total numbers of pages. For more information,
see the Table of Contents section of this
chapter. (SpecLink Only)
Scope of Report
This pull-down list depends on the option selected in the Report to
Print list above. When Document, Draft Copy, or Master Text Copy
is selected from the list above, the drop-down defaults to the
current document - use the drop-down to select any section in the
project. If Requirements Report is selected in Report to Print,
select the report you want from Scope of Report.
Remaining on
Meter
If you have a Meter Account, this field will show the amount that
you have remaining in your meter account.
Reports dialog box with Requirements Report option selected (SpecLink Only)
SpecLink User Manual
219
Chapter 8 : Printing
The list will also change when you choose one of the scope
options, as follows:
220
Print Project
Use this option to print or export all the active
sections in the project.
Print Branch
Use this option to print or export all the active
sections in the selected branch.
Print Section
Use this option to print, preview, or export the
selected section.
Page Range
The default setting for this option is to print all pages in the selected
document or documents. However, you can click on the other
option and set a specific range of pages to print.
Report Options
There are several additional options available for any of the
reports, as follows:
Widow/Orphan
If selected, the widow/orphan protection option
prevents a paragraph from being split at a page
break in such a way that a single line of the
paragraph prints at the bottom of the page or at
the top of the following page.
Print in Color
This option, if selected, prints the documents
with colors as viewed in the Documents Panel
(embedded choices in blue, fill-ins in red, global
choices in green, etc.) if the selected printer has
color printing capabilities.
Include Page
Count in TOC
Report
This option applies to the Table of Contents
report only. When selected, the total number of
pages in each section will print. This option is
selected by default. (SpecLink Only)
Print Master
Notes
If selected, this option causes all relevant
master notes to be embedded in the text and
printed. If Document is the report selected to
print, only master notes attached to selected
and active paragraphs are included. If Draft
Copy or Master Text Copy is the report selected
to print, all master notes in the section are
printed.
Print Project
Notes
This option causes all relevant project notes to
be embedded in the text and printed. If
Document is the report selected to print, only
project notes attached to selected and active
paragraphs are included. If Draft Copy is the
report selected to print, all project notes in the
SpecLink User Manual
Chapter 8 : Printing
section are printed. Project notes are not
printed if Master Text Copy is the report
selected to print.
Reports Cover
Sheet
Uncheck this box to suppress the cover
sheet when printing the requirements reports.
(SpecLink only)
Print Table
Borders
This must be selected for the borders on your
tables to print. The border must also be
selected in the Tables menu for each table to be
printed.
Line Numbering
If selected, line numbers will print in addition to
the selected paragraph numbering style.
Copies
Click the up or down arrows to select the number of copies of the
selected document or documents to print. The default number is 1.
Print
Click this button to send the selected document or documents to
the printer currently established under Printer Setup.
Preview
Click this button to preview the selected document.
Export
Click this button to open a dialog box that allows you to save the
selected document or documents as a Rich Text Format (.RTF) file
in a designated location.
NOTE: In addition to your document, the Table of Contents report and Requirements
Reports can also be exported. However, Draft and Master Text copies cannot be
exported.
Header/Footer…
Opens the Customize Header/Footer dialog box. See earlier in this
chapter for directions on customizing the header and footer.
Page Setup…
Opens the Page Setup dialog box. See the following section and
the Page Setup section earlier in this chapter for additional details.
Printer Setup…
Opens the Printer Setup dialog box. See the following section for
additional details on printer setup.
To use the Reports dialog box, make your document selection, click the options you want,
and click on the appropriate button to print, preview or export the documents. If you want to
save your selections to check other settings before printing previewing, or exporting, click
the Close button.
NOTE: Only one section can be previewed at a time.
SpecLink User Manual
221
Chapter 8 : Printing
Page Setup
Before printing or exporting multiple documents, it’s a good idea to verify that your page
setup settings are correct. From the File menu, choose Page Setup. See the section earlier
in this chapter for settings used to establish page orientation, margins, and other document
variables.
Printer Setup
To select a printer and establish print settings, from the File menu choose Print, and then
click the Printer Setup button. The Print Setup dialog box opens.
Print Setup Dialog Box
Printer
Choose the printer you want to use from the pull-down list. To
verify printer settings, click on the Properties button.
Paper Options
You can choose paper size and source from the pull-down lists.
Orientation
Choose portrait or landscape paper orientation.
When all your settings are correct, click the OK button to save them. If you click the Cancel
button, your settings will be deleted.
Table of Contents Options
There are two types of tables of contents included in SpecLink – a system generated Table
of Contents report, and a Table of Contents section. Directions for using both follow.
222
SpecLink User Manual
Chapter 8 : Printing
Printing the Table of Contents Report (SpecLink Tab Only)
The Table of Contents report automatically lists every section that is active in your project
along with an optional page count for each section. To print the Table of Contents Report:
1. Change the headers or footers if necessary.
2. Pull down the File menu and choose Print.
3. In the Report To Print box select Table of Contents.
4. In the Report To Print dialog box, choose whether or not to Include Page Count on TOC
Report.
5. Set the printing options, including page setup options.
6. Set the printer options.
7. Press the Print or Preview button.
Table of Contents Report Format
The Table of Contents report includes all active sections in the project and, if selected, the
page count of each section.
SpecLink User Manual
223
Chapter 8 : Printing
Table of Contents Format
Noticing Changes After You Print
If you have printed project sections, but subsequently make changes to the project, you
can quickly identify sections that have changed by printing the Table of Contents report with
the option Include Page Count on TOC Report selected.
When selected, the page count displays only if the section has been previewed or printed
in its current form. If any changes occur that could affect the printed output, the page count
is replaced by an asterisk, indicating that the section needs to be previewed or printed
again. Note that changes might be those made by links as well as those made manually.
NOTE: To make the most of this feature, don’t preview unnecessarily. Each time you
preview a section, its page count will reappear in the Automatic Table of
Contents, which suggests that you have printed that section since the last time it
was edited.
224
SpecLink User Manual
Chapter 8 : Printing
Using the Table of Contents Section
If there are documents that are not in SpecLink that you would like listed in your table of
contents, like drawings or room schedules, you have three options:
•
Export the table of contents report to a word processor (using the Export directions in
this chapter) and edit it there, (SpecLink Only)
•
Add "dummy" sections to your SpecLink project (using the Adding New Sections
directions in Chapter 4 "Starting a Project"), select the sections, and then turn off the
Page Count option when you print the Table of Contents report, (SpecLink Only) or
•
Use the Table of Contents Section.
Section 00010 (00 0110 in MF 04) is a hierarchical list of all the divisions and sections
included in the SpecLink master database, and it can be edited like any other SpecLink
section. When you activate sections in your project, green links select the corresponding
paragraphs in section 00010/00 0110. If you add your own sections to the project, you will
need to add corresponding paragraphs to section 00010/00 0110, and either create links or
manually select those paragraphs when you use your sections. Likewise, you will need to
add paragraphs for the documents outside of SpecLink that you want listed in the Table of
Contents.
Unlike the table of contents report, the Table of Contents section does not have ability to list
the page numbers of the sections, nor is it automatically formatted like a table of contents for example, the paragraphs will be numbered like every other section in your project. You
will need to manually format it to print the way you want. For these reasons, you may find it
easier to print the table of contents report as it is, or to export the table of contents report to
a word processor and edit it there.
In the SpecLink tab, there are two Table of Contents Sections. One is for the MasterFormat
95 hierarchy and the other is for the MasterFormat 2004 hierarchy. Since all SpecLink
sections are visible in both hierarchies, you can view both in each hierarchy. Use the Table
of Contents section listed first in the hierarchy that you are in.
NOTE: In the SpecLink tab, there is no reason to use the Table of Contents section
unless you need to edit the table of contents.
To use section 00010/00 0110 Table of Contents:
1. In section 00010 or 00 0110, add paragraphs for any user-added sections and for any
documents outside of SpecLink that you want listed in your table of contents. If you want
to be able to go back and forth from MasterFormat 95 and MasterFormat 2004, add the
section numbers using MasterFormat Version Choices.
2. From the Tools menu, choose Customize Styles.
SpecLink User Manual
225
Chapter 8 : Printing
3. Select the Block Style.
4. Customize the style as necessary, and click OK.
5. Activate the Table of Contents section by selecting it in Tree Panel, or by selecting the
first paragraph in the section.
6. Select the paragraphs that you added, and, if necessary, select higher level paragraphs
so that your paragraphs become active.
7. Customize the header and footer if necessary.
8. Preview and make any necessary formatting changes.
9. Print using the following settings:
Report to Print:
Scope of Report:
Document
Print Section, 00010 (or 00 0110) BSD - Table of Contents
10. Before printing the other sections, set the style set (in the Customize Styles dialog box)
back to the appropriate style.
Printing
Now that you understand the components of the Print Setup dialog box you can print your
document or documents. When you have decided that your documents are ready to print,
you can click the Print button on the Standard toolbar to open the Reports dialog box. You
can also choose Print from the File Menu.
If you want to preview a section before printing, from the File menu choose Print Preview,
or click the Print Preview button on the Standard toolbar. If the previewed document looks
acceptable, you can click the Print button at the top of the Print Preview window to send the
document to the selected printer.
Keep the following in mind when you print:
1. The default settings for printing documents result in a fairly simple page layout, based
on the recommended CSI page layout.
2. You can make project-wide changes to your project before you print. Simply change
settings in the Summary Info dialog box. See the "Setting Global Options” section in
Chapter 4 "Starting a New Project" for details.
3. To print, from the File menu choose Print, or click the Print button on the Standard
toolbar to open the Reports dialog box. If all settings are correct, click the Print button.
226
SpecLink User Manual
Chapter 8 : Printing
Printing with a Meter Account
You can purchase a Meter Account that will be debited when you print a Document
(specification section) using the Document report. A Meter Account can be combined with
a Subscription Account. When you have a balance in a Meter Account, you can view and
edit all sections whether you have a subscription to them or not, and you will be charged
only when you print the section document using the Document report. You can print the
Master Text Copy and the Draft Copy reports at no charge. These reports now include a
diagonal “watermark” on each page if you have a meter account. If you have a Subscription
combined with a Meter Account, you can print unlimited copies of the sections included in
your Subscription. Your meter will be debited only for the sections that are not covered by
your subscription. Meter Accounts may be shared on a network server in the same way
that Subscription Accounts can be shared on a server, although if you have both a
subscription and a Meter Account, the user count for your subscription will determine the
number of users who have simultaneous access to the software.
When you print a section document using your Meter Account, you will receive a confirming
message before your meter is charged.
Print to a PDF file is charged the same as printing to a printer.
Details on Printing with a Meter Account - Printing permissions depend on the type of
account you have.
Subscription Account Alone – When you have a subscription account alone, you can
print all reports an unlimited number of times, for all sections that are included in the
catalogs that you have purchased.
Meter Account Alone – When you have a meter account alone, you can edit, view and
print all sections. Your account will be charged each time you print the Document (section)
report. User-added and copied sections have the same cost as BSD sections. Sections
can not be exported to RTF. You cannot print the entire project or a branch: sections must
be printed one at a time. You will not be charged to print the Master Text Copy, the Draft
Copy, the Requirements Reports or the Table of Contents Report.
SpecLink User Manual
227
Chapter 8 : Printing
Meter Account Combined with a Subscription - When you have a subscription
combined with a meter account, the BSD sections included in your subscription are blue in
the Project Tree. The sections not included in your subscription are black in the Project
Tree. Proprietary (manufacturer-specific) sections are also black in the tree. Sections
covered by your subscription may be printed at no charge. Sections edited when a
subscription was in effect (which have not been edited since the subscription expired) may
be printed at no charge. Once an edit has been made to a section not covered by a
subscription, the section becomes a meter section and will reduce your meter when
printed. When you open the Reports Setup dialog box, the sections in the Print Section list
will display a cost if there is a cost associated with printing it. If you print the entire project
with some sections covered by a subscription and some not, only the subscription sections
will print. You will receive a message telling you that all sections will not be printed. Meter
sections must be printed one at a time and cannot be exported to RTF
Exporting to a Word Processor
Although a word-processor is not required when you use SpecLink, there are times when it
is useful to export the documents to word-processing. The principal reasons are as follows:
•
To send your documents in electronic format to someone who does not have SpecLink
available.
•
To take a printable file to a printer not accessible to the computer that SpecLink is
installed on.
•
To "freeze" the documents as bidding or contract documents. This prevents inadvertent
changes and clearly limits changes to those made deliberately. Addenda and change
order modifications can be annotated using "redline/overstrike" markings.
•
To reduce the size of archive files. The exported documents occupy much less disk
space than the entire SpecLink project database file. If the project is no longer needed
in its SpecLink form, exporting the documents creates a record of the work without the
extra space overhead.
•
To add special formats, or use special features that are not available in SpecLink.
Using Export To RTF
Export to RTF creates one RTF file for each exported document. For example, if you export
the entire project, each section will be a separate file. RTF stands for Rich Text Format.
This format was created by Microsoft and can be opened and edited in any Windowsbased word processor except WordPerfect 5.1 and 8.0.
Note: If you have a Meter Account, you cannot use the export to RTF feature.
228
SpecLink User Manual
Chapter 8 : Printing
To export documents (specification section, table of contents, or requirements report):
1. From the File Menu, choose Print.
2. In the Reports dialog box, select the documents as if you were going to print them, and
then click the Export button.
3. If you are exporting a single document, the Export To RTF dialog box opens. Navigate
to the folder where you would like the exported file saved and if desired, change the File
Name. Then click Save.
Export to RTF dialog box (for a single document)
If you selected Project, Branch, or All Requirements, the export will most likely result in
multiple documents and the Select Directory dialog box opens. Click the drop-down
arrow to select the drive you wish to export to, and then double-click on the folders to
navigate to the folder you wish to export the files to. Then click OK.
SpecLink User Manual
229
Chapter 8 : Printing
Select Directory dialog box (for multiple documents)
Each section is exported as a separate file to the specified location with a file name of its
section number and acronym (for example, 03300_BSD.rtf). When exporting multiple
sections (a branch or project), it is a good idea to create a project-specific file folder to
export to. This way the exported sections will not be mixed in with other documents that
may already be in the folder to which you exported.
The sections are exported as Rich Text Format (.RTF) files. RTF is a generic wordprocessing format that is readable by most Windows-based word-processors, but not
WordPerfect 5.1 or 8.0. The sections are exported with the text formatted just as it would
have printed.
Once the documents are exported, changes made to them cannot be brought back into the
SpecLink project except by re-entering the changes in SpecLink.
NOTE: An alternative to exporting files to an editable word processing format, is to
create pdf files. To create a pdf file, you must have the full version of Adobe
Acrobat. Select the Acrobat Distiller or PDF Writer as your printer and then Print
as you normally do.
230
SpecLink User Manual