1
2.0 User’s Manual
Table of Contents
Chapter 1 : Getting Started with Integrity ............................................................ 3
Chapter 2 : Interface Layout .................................................................................. 4
Chapter 3 : Navigation ........................................................................................... 5
Chapter 4 : Printing ................................................................................................ 6
Chapter 5 : Quick Search and Results Pane ........................................................... 7
Results Pane .................................................................................................................... 8
Exporting to Excel or .CSV ............................................................................................. 10
Creating Mailing Labels ................................................................................................. 10
Buffering Search Results ................................................................................................ 11
Creating Thematic Maps ................................................................................................ 11
Sanitary Sewer Overflow Reporting .............................................................................. 12
Property Record Card .................................................................................................... 13
Integrated Media ............................................................................................................ 14
Chapter 6 : Advanced Toolbar ............................................................................... 15
Map Layers ..................................................................................................................... 16
Bookmarks ...................................................................................................................... 17
Identifying Features ....................................................................................................... 18
Advanced Queries .......................................................................................................... 19
Drawing Markup ............................................................................................................ 22
The Dock ......................................................................................................................... 23
Create Reports ................................................................................................................ 24
Editing ............................................................................................................................. 25
Account Management .................................................................................................... 26
Chapter 7 : Legal Information and Other Resources ..........................................
Integrity™ 2.0 User’s Manual
Last updated October 3, 2011 1:37 AM
27
About Integrity™
Integrity is a web-based GIS (geographic information system) software for managing and
maintaining spatial data of all kinds for municipalities, utility companies, governmental
bodies, and private and public sector entities. This user’s manual covers the new 2.0
framework and will help you learn how to utilize Integrity’s various tools and features.
Getting Started
Windows System Requirements
Microsoft Silverlight 4.0 or greater (free download)
Operating System – Windows 7, Windows Vista, Windows XP Service Pack 2
Processor – 2 GHz processor or better
Memory – 512MB of RAM
Browser - Mozilla Firefox, Internet Explorer 7.0 or greater, Google Chrome, Safari, Opera
Macintosh System Requirements
Microsoft Silverlight 4.0 or greater (free download)
Operating System - Apple Mac OSX 10.4.8 or greater
Processor - 2 GHz processor or better
Memory - 512MB of RAM
Browser - Safari, Opera, Mozilla Firefox, Google Chrome
Monitor Requirements
Minimum - 1024 x 768 resolution
Recommended - 1280 x 1024, 1440 x 900, or higher resolution
Network Connection Recommendations
Integrity will work with any internet connection. However, load times and function
processing speeds may vary based on the speed of your internet connection.
Broadband internet connection (min. of 512 Kb/s download rate) recommended.
Integrity™ 2.0 User’s Manual
Last updated October 3, 2011 1:37 AM
3
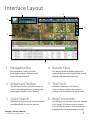
Interface Layout
3
2
1
5
6
4
1 Navigation Bar
The Navigation Toolbar provides
4 Results Pane
The Results Window displays selected or
basic map navigation functions and
returned features when using Quick Search,
houses the Quick Search.
Identify, and Advanced Querying.
2 Advanced Toolbar
The Advanced Toolbar provides advanced
5 The Dock
Minimize windows to The Dock to
tools for identifying features, printing and
conserve space and pin saved queries,
gathering information from the map.
markup, and bookmarks for quick recall.
3 Quick Search
Quick Search automatically searches several
predefined fields for the text entered.
6 Map Document
The Integrity user interface sections outlined
on this page (1-5) allows users to interact
with the map document. Search results are
Integrity™ 2.0 User’s Manual
Last updated October 3, 2011 1:37 AM
highlighted in the map document as well.
4
Navigation Tools
2
1
3
4
5
6
1 Integrity Logo
7
8
9
10
6 Pan Map
Clicking on the Integrity Logo will take you
Pan lets you click your cursor anywhere
to our Product and Support website
on the map and drag to a desired view.
(www.integritygis.com) where you can
follow our tech support blog and view other
learning resources.
2 Website Title
Displays the Integrity site owner’s name.
3 Zoom to Extent
Select the Zoom to Extent tool to zoom all the
way out to see the full extent of the map.
4 Zoom In
Select the Zoom In tool and click anywhere
on map to zoom to a selected area. You can
also click and drag the cursor to zoom to a
specific area.
5 Zoom Out
Select the Zoom Out tool and click
anywhere on map to zoom out from a
selected area. You can also click and drag
the cursor to zoom from an area.
Integrity™ 2.0 User’s Manual
Last updated October 3, 2011 1:37 AM
7 Previous Map Extent
The Previous Extent tool will return you
to the previously viewed map extent.
This can be used much like your web
browser’s (IE, Firefox, etc.) “Back” button.
8 Next Map Extent
The Next Extent tool will returns you to
more recent map extents. This can be used
much like your web browser’s (IE, Firefox,
etc.) “Forward” button.
9 Display Coordinates
Select Display Coordinates to view a
window that displays your cursor’s
coordinates in DMS (Degrees, minutes,
seconds), Decimal Degrees, and State Plane.
10 Overview Map
Select Map Overview to view the full
extent of the map in a small display
window. A red square show the current
area of the map being viewed.
5
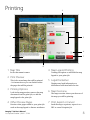
Printing
1
2
3
4
7
5
6
1 Map Title
Set the document’s name.
2 Print Preview
This is the actual map that will be printed
- it is interactive so you can further refine
the page that will be printed..
3 Printing Options
Lock-in the map preview, remove the map
document from the print job, or add the
map legend to the print job.
4 Other Preview Pages
4 Map Legend Printing
Turning this option on will add the map
legend to your print job.
5 Legal Disclaimer
Displays any legal information or
disclaimers associated with the site.
6 Map Overview
The map overview shows you the area of
the map you will be printing.
7 Print, Export or Cancel
Preview other pages added to your print job
Send the map to a printer, export it to a
such as the map legend or feature attributes.
PDF or cancel th eprint job.
Integrity™ 2.0 User’s Manual
Last updated October 3, 2011 1:37 AM
6
Quick Search Box
The Quick Search box feature appears directly above the Navigation Toolbar. To execute a search,
type in a value and press enter. Quick Search automatically searches several predefined fields for
the text entered. To refine your search, click the down arrow to turn on/off the layers you would
like your Quick Search to cover.
1
2
3
1 Quick Search Box
3 Filter Selection
To execute a search, type in a value and press
This is a running list of all the predefined
enter. Quick Search automatically searches
search fields your Quick Search will
several predefined fields for the text entered.
utilize. Remove a checkmark and Quick
2 Search Filters
This lets you select which predefined
Search will ignore that field. Adding
a checkmark will tell Quick Search to
include the field.
fields you want to use for Quick Searches.
Integrity™ 2.0 User’s Manual
Last updated October 3, 2011 1:37 AM
7
Search Results
The Search Results window displays selected or identified features when using the following tools:
Quick Search, Identify, and Advanced Query.
4
12
13
14
15
16
17 18
21
1
2
3
5 6 7 8 9
10
19 20
11
1 Map Layer Tabs
6 Zoom to Feature
If your search returns features from more
Clicking this will center the map document
than one layer you can view your results on
on the feature.
a layer by layer basis using these tabs.
2 Results Grouping
7 Print Feature
Clicking this will open the print window and
You can group your results by dragging and
make the feature and its attributes printable
dropping a column (field) header here.
along with the map document.
3 Column (Field) Headers
8 Measure Feature
Each header in the search results represents
You can auto-measure a map feature by
a feature’s attributes. You can sort results by
clicking this button.
clicking a given header.
4 Results Filter
9 Edit Feature
When this button is visible that means you
You can filter your existing search results by
can directly edit the feature’s attributes
clicking this button. This will let you narrow
or add related data tables (manhole
down or refine your results.
maintenance for example).
5 Expand Row
Expand a row to see more about the feature.
Integrity™ 2.0 User’s Manual
Last updated October 3, 2011 1:37 AM
10 Show on Map
Checking this on/off will either show or
remove the feature from the map document.
Continued on Page 9
8
Search Results (continued)
11 Feature Attribute Data
This spreadsheet style menu displays the title
18 Display / Hide Results Pane
When there are features present in the
of the attribute at the top (header) and its
results pane you will see a plus (+) or (-).
values in this grid.
Click the + to open the results and click the
(Example picture on page 8: Manhole ID F7-10
- to close them. If there are no results this
has a Material of Precast)
button will disappear.
12 Zoom to Results
Pressing this button will center your search
results set in the map document.
13 Export to Excel or .CSV
See page 10.
14 Buffer Features
See page 11.
15 Create Reports
See page 26.
16 Thematic Mapping
See page 11.
17 Mailing Labels
19 Results Count
This will show a count of how many results
your search or query returned. This number
changes if filters are applied or you switch
layers via the Layer Tabs. If you’ve applied a
filter you can click this button to remove it.
20 Clear Results
Pressing this button will clear the results
pane and close it.
21 Adjust Results Pane Height
You can adjust the height of your results
pane. Just mouse over the top of the pane
and your cursor will change, then just click
and drag it up or down.
See page 10.
Integrity™ 2.0 User’s Manual
Last updated October 3, 2011 1:37 AM
9
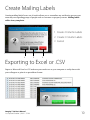
Create Mailing Labels
Creating mailing labels from a set of results allows you to streamline any notification process your
team may use regarding groups of people such as customers or property owners. Mailing labels
utilize Avery templates.
1 Create 2 Column Labels
2 Create 3 Column Labels
3 Cancel
1
2
3
Exporting to Excel or .CSV
Export to Microsoft Excel or .CSV and save your results set on your computer to easily share with
your colleagues or print in a spreadsheet format.
Integrity™ 2.0 User’s Manual
Last updated October 3, 2011 1:37 AM
10
Buffer Results
You can create buffer zones around your search results by using the Buffer button. Selecting
‘Buffer Only’ will show only a graphical display of the buffer. ‘Buffer and Requery’ will create
the buffer and re-load your results menu to include the buffered areas.
1
2
3
3
1 Type in a buffer
distance in feet
2 Create a graphical
buffer zone
3 Create a buffer and
requery to update
your results
4 Clear buffer
Creating Thematic Maps
Map themes are a color coded overview of selected features based on selected field properties.
1 Select Field
2 Number of Classes.
Increase for a more
narrow theme.
3 Pick Class Type
1
4 Color Scheme
2
3
5 Create Theme
4
6 Themed Map
Document
6
Integrity™ 2.0 User’s Manual
Last updated October 3, 2011 1:37 AM
5
11
Sanitary Sewer Overflow Reports
{
Documentation...
This part of the 2.0 User’s
Manual will be available soon!
Integrity™ 2.0 User’s Manual
Last updated October 3, 2011 1:37 AM
12
Property Record Card
Click the Property Record Card (PRC) icon of a given Parcel from the results pane. A
separate window will open where you can view deed images, land values, and any
other data associated with the property. Enable pop-ups for your Integrity website to
properly use the PRC.
2
1
3
1 View Property
Record Card
Integrity™ 2.0 User’s Manual
Last updated October 3, 2011 1:37 AM
2 Print Property
Record Card
3 View Deed
Images
13
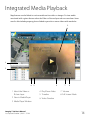
Integrated Media Playback
Map features can be linked to various media such as video or images. To view media
associated with a given feature select the Video or Picture layer tab to access them. Some
uses for this include property photos linked to parcels or sewer videos with manholes.
3
1
2
4
5
6
7
8
1 Select the Video or
Picture Layer
4 Play/Pause Video
7 Volume
5 Timeline
8 Full Screen Mode
2 View in Media Player
6 Video Duration
3 Media Player Window
Integrity™ 2.0 User’s Manual
Last updated October 3, 2011 1:37 AM
14
Advanced Toolbar
The Advanced Toolbar provides advanced tools for performing tasks such as identifying
features, gathering information from the map, managing user accounts, changing map layers
and bookmarking locations.
1
2
3
4
5
1 Site Dashboard
6
7
8
9
10
11
7 Draw / Measure
Use this menu for contact information, view
Create and measure graphics and text on the
a help menu and obtain technical support.
map for planning projects. Save/load drawings
2 Map Layers
Click on the “Layers” tool to show layers and
sub-layers within the map.
3 Map Editing
Directly add/edit map features such as
manholes in a city, manage sign inventories,
or manage your other spatial assets.
4 Bookmarks
Save your current map view or extent. These
can be saved or shared with colleagues and
are stored locally on your computer.
5 Advanced Queries
Perform very specific searches by querying
using this tool. Save your queries as well.
6 Identify Features
Select any features on the map by drawing
or export and share them with your co-workers.
8 Print
See page 6.
9 Map Tips
Turning Map Tips on will give you a pop-up box
for each feature when you hover over it. Check
on/off attributes your tips should include.
10 Account Management
Enter a valid username and password
to securely login to Integrity™ to access
additional authorized data, manage site
users, or manage your account.
11 File Manager
This tool lets you make files available for
site users to download. This could include
everything from shape files, to help manuals.
various shapes to display their information.
Integrity™ 2.0 User’s Manual
Last updated October 3, 2011 1:37 AM
15
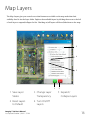
Map Layers
The Map Layers give you control over what features are visible on the map and what their
visibility level is via the layer slider. Explore the available layers by clicking the arrow to the left
of each layer to expand/collapse the list. Checking on/off layers will show/hide them on the map.
3
4
5
1
1 Save Layer
States
3 Change Layer
Transparency
2 Reset Layers
to Default
4 Turn On/Off
Layers
Integrity™ 2.0 User’s Manual
Last updated October 3, 2011 1:37 AM
2
5 Expand /
Collapse Layers
16
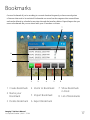
Bookmarks
Create a Bookmark if you’re working in a certain location frequently or have several points
of interest that need to be revisited. Bookmarks are stored on the computer that created them
and can be deleted or reloaded at any time through the interface below. Export/Import lets you
create a bookmark file you can share with your co-workers or clients.
7
8
2
1
3
4
5
1 Create Bookmark
4 Zoom to Bookmark
2 Name your
Bookmark
5 Import Bookmark
3 Delete Bookmark
6 Export Bookmark
Integrity™ 2.0 User’s Manual
Last updated October 3, 2011 1:37 AM
6
7 Show Bookmark
in Dock
8 List of Bookmarks
17
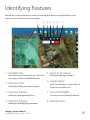
Identifying Features
Identify lets you draw shapes as a method of selecting map features. Quickly identify a map
feature or a set of features in an area quickly.
1
2
1 Set Buffer Size
Set a buffer area value here (in feet). This will
3
4
5
6
7
5 Select by Rectangle
Identify by drawing rectangles.
auto-apply a buffer to identified features.
2 Select by Point
Identify by clicking with a precise point
3 Select by Polyline
Identify by drawing straight lines.
4 Select by Polygon
6 Toggle Layers
Make your Identify tool select either all
layers or only visible ones.
7 Turn On/Off Buffer
You can turn on/off Identify buffering.
8 Identify Cursor
Identify by drawing polygonal shapes.
Integrity™ 2.0 User’s Manual
Last updated October 3, 2011 1:37 AM
18
Advanced Queries
To execute an advanced search or query click on the “Advanced Search” tool. A display window
will appear on the left side of the Integrity™ viewer. Advanced Search accepts various inputs and
values to generate an advanced query that yields very specific result sets.
1
7
2
8
3
9
4
10
11
6
12
13
1 Query Layer
Select the layer you
wish to query.
2 Field
14
[=], [<>], [<], [<=], [>],[>=],
Like, Not Like, In, Not In,
Between, Not Between.
16
4 Values (Ending optional)
11 Move Left, Move Right, Delete
6 Add Condition
12 Condition Statement Field
7 Add to ‘In’ Statement Field
13 Statement Field Operators
Use with operator ‘In’ / ‘Not In’
Select a layer field.
3 Set Operator
15
8 Remove ‘In’ Query String
9 ‘In’ Statement Field
10 Clear ‘In’ Statement Field
Integrity™ 2.0 User’s Manual
Last updated October 3, 2011 1:37 AM
Add ‘And’, ‘Or’, ‘( )‘ to
Statement String or Clear.
14 Run Query
15 Save Query
16 Load Query
19
Advanced Queries : Assessed Land Values
In this example we are going to use Advanced Queries to find Assessed Land Values within a
county that are between 50,000 and 100,000 in value.
1 Query Layer
From the dropdown select
the ‘Parcel’ layer.
2 Field
From the dropdown select
the ‘Total Assessed Value’.
3 Operator
Choose the ‘Between’ operator.
4 Values
Enter 50000 in the first Value
field and 100000 in the Ending
Value field.
5 Add Condition
6 Run Query
Now you can...
1 Utilize Search Results
Create mailing lables, themed maps, export
the list to excel or .CSV all using the Search
Results Window.
2 Save the Query and run it again easily.
3 Load the Query Shortcut into the dock.
Integrity™ 2.0 User’s Manual
Last updated October 3, 2011 1:37 AM
20
Advanced Queries : Manhole Condition Ratings
In this example we are going to use Advanced Queries to find Manholes on a given map with
a Condition Rating of Poor and a Vertical Grade of Even.
1 Query Layer
From the dropdown select
the ‘Manhole’ layer.
2 Field
From the dropdown select
the ‘Condition Rating’.
3 Operator & Value
From the operator dropdown
select ‘=’. In the Value select
the ‘Poor’ rating.
4 Add Condition and ‘And’ to
the Statement Field
6 Field
From the dropdown select
‘Vertical Grade’.
7 Operator
Choose the ‘=‘ operator.
8 Values
Select the ‘Even’ value.
9 Add Condition and Run Query
Now you can...
1 Utilize search results.
2 Save the Query and run it again easily.
Integrity™ 2.0 User’s Manual
Last updated October 3, 2011 1:37 AM
21
Drawing / Measuring
All graphics and text drawn on the map will appear if the map is printed and all drawings can
be saved and loaded for easy recall. Drawings do not interact with map data, they are for visual
reference only and thus are ideal for planning projects. This tool also allows you to toggle on/off
measurements to automatically measure any drawn graphics without having to use a separate tool.
1
8
1 Select Tool
2
3
4
5
6
7
6 Add Text
Click the map to add text.
labels, change graphic
Use the selection tool to edit
colors, or rotate text.
or alter your text.
Pick a color and draw points,
graphics.
lines, and shapes. Edit
Click once to draw a point.
4 Draw Polyline
Click once to begin a line.
Double click to finish.
5 Draw Polygon Shape
Click once to begin a polygon.
Double click to finish.
Integrity™ 2.0 User’s Manual
Last updated October 3, 2011 1:37 AM
10
existing drawing’s colors with
11
9 Measure : Area
Show Coordinates
Decimal Degrees, or Degrees,
Minutes, Seconds.
12
Save Drawing
Save your current drawing.
13
Load Drawing
Display a saved drawing.
Display in Feet, Miles,
Meters, or Kilometers.
Bearing
Display in State Plane,
the Selection Tool.
8 Measure : Distance
10
Turn On/Off
7 Color Picker
Delete individual text or
3 Draw Point
11
9
Choose this tool to move
2 Delete Selection
12 13 14
14
Clear Drawing
Remove all map drawings.
Display in Acres, Square
Feet, Miles, Meters,
Kilometers or Hectares.
22
The Dock
1
3
4
2
1 Windows
2
3 Bookmarks
If a window can be docked it will have
To load a Bookmark in The Dock create
a [-] in the top right corner. Simply
a Bookmark (see Bookmarks page 16).
click it to minimize it to the Dock to
In the list simply check off the “Show in
conserve space.
Dock” checkbox.
Markup
4 Advanced Queries
To load a Saved Markup shortcut in
To load a Saved Query in the Dock
the Dock create and save a markup
create and save a query string (see
drawing (see Drawing Markup page 23)
Advanced Queries page 18) In the
In the list simply check off the “Show in
list simply check off the “Show in
Dock” checkbox.
Dock” checkbox.
Integrity™ 2.0 User’s Manual
Last updated October 3, 2011 1:37 AM
23
Creating Reports
{
Documentation...
This part of the 2.0 User’s
Manual will be available soon!
Integrity™ 2.0 User’s Manual
Last updated October 3, 2011 1:37 AM
24
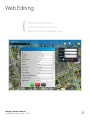
Web Editing
{
Documentation...
This part of the 2.0 User’s
Manual will be available soon!
Integrity™ 2.0 User’s Manual
Last updated October 3, 2011 1:37 AM
25
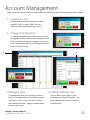
Account Management
Login / Logout and access account management by clicking the ‘lock’ icon in the Advanced Toolbar.
1 Logging In / Out
Enter a valid username and password and
click on “Login” or press Enter. You can
obtain this from the Integrity site owner.
2 Change Your Password
To change the password of an account, you must
be logged in with a valid username and password.
Click on the User Login button again to open the
User Login window. Fill out the Change Password
form and click “Accept”.
3
4
3 Managing Users
4 Adding / Editing a User
To manage site users your account you must
You can add or edit a user to your
be set as an administrator. From here you can
Integrity site using this interface. Top
Add, Edit, or Delete Users. See who’s online,
level administrators have sole access
user Read/Write levels - bigger numbers mean
to this feature.
access to more data.
Integrity™ 2.0 User’s Manual
Last updated October 3, 2011 1:37 AM
26
Legal Information
All text and design is copyright ©2010 - 2011 Midland GIS Solutions, LLC. All rights reserved.
The names and logos for Integrity and Midland GIS Solutions are registered trademarks of
Midland GIS Solutions, LLC.
This content is protected under copyright law, furnished for informational use only, is subject to
change without notice, and should not be construed as a commitment by Midland GIS Solutions.
Midland GIS Solutions assumes no responsibility or liability for any errors or inaccuracies that
may appear in the informational content contained in this content.
Midland GIS Solutions, 501 North Market, Maryville, Missouri 64468, USA.
Other Resources
Integrity Product and Support Site
Midland GIS Solutions
www.integritygis.com
501 North Market
Integrity Product Blog
Phone: 660.562.0050
www.integritygis.com/index.php/blog
Email: [email protected]
Tutorial Videos
Midland GIS Solutions
www.youtube.com/midlandgis
www.midlandgis.com
Integrity™ 2.0 User’s Manual
Last updated October 3, 2011 1:37 AM
Maryville, MO 64468
27