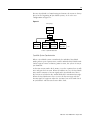
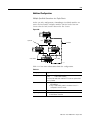
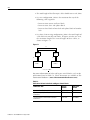
1
SynchLink™
1756-SYNCH, 1756-DMxxx Series,
PowerFlex 700S
Design Guide
Important User Information
Because of the variety of uses for the products described in this
publication, those responsible for the application and use of these
products must satisfy themselves that all necessary steps have been
taken to assure that each application and use meets all performance
and safety requirements, including any applicable laws, regulations,
codes and standards. In no event will Allen-Bradley be responsible or
liable for indirect or consequential damage resulting from the use or
application of these products.
Any illustrations, charts, sample programs, and layout examples
shown in this publication are intended solely for purposes of
example. Since there are many variables and requirements associated
with any particular installation, Allen-Bradley does not assume
responsibility or liability (to include intellectual property liability) for
actual use based upon the examples shown in this publication.
Allen-Bradley publication SGI-1.1, Safety Guidelines for the
Application, Installation and Maintenance of Solid-State Control
(available from your local Allen-Bradley office), describes some
important differences between solid-state equipment and
electromechanical devices that should be taken into consideration
when applying products such as those described in this publication.
Reproduction of the contents of this copyrighted publication, in whole
or part, without written permission of Rockwell Automation, is
prohibited.
Throughout this publication, notes may be used to make you aware of
safety considerations. The following annotations and their
accompanying statements help you to identify a potential hazard,
avoid a potential hazard, and recognize the consequences of a
potential hazard:
WARNING
!
ATTENTION
!
IMPORTANT
Identifies information about practices or
circumstances that can cause an explosion in a
hazardous environment, which may lead to personal
injury or death, property damage, or economic loss.
Identifies information about practices or
circumstances that can lead to personal injury or
death, property damage, or economic loss.
Identifies information that is critical for successful
application and understanding of the product.
Rockwell Automation
Support
Before you contact Rockwell Automation for technical assistance, we
suggest you please review the troubleshooting information contained
in this publication first.
If the problem persists, call your local distributor or contact Rockwell
Automation in one of the following ways:
Phone
Internet
United
States/Canada
1.440.646.5800
Outside United
States/Canada
You can access the phone number for your
country via the Internet:
1. Go to http://www.ab.com
2. Click on Product Support
(http://support.automation.rockwell.com)
3. Under Support Centers, click on Contact
Information
Þ
1. Go to http://www.ab.com
2. Click on Product Support
(http://support.automation.rockwell.com)
Your Questions or Comments on this Manual
If you find a problem with this manual, please notify us of it on the
enclosed How Are We Doing form.
Preface
What This Document Contains
This preface describes what information this publication contains and
how to use the publication.
Purpose of This Publication
For information about:
See page:
Purpose of This Publication
Preface-1
Who Should Use This Publication
Preface-1
What Information This Publication Contains
Preface-2
The purpose of this publication is to provide:
· a detailed description of SynchLink and the products that
operate on it, including:
– ControlLogix™ SynchLink module (1756-SYNCH),
– ControlLogix Drive modules (1756-DMxxx Series),
– PowerFlex™ 700S drives.
For a full description of each of these products, see Chapter 3,
Using Specific Products on SynchLink.
· instructions and recommendations on how to design, install and
maintain a SynchLink fiber optic cable system.
IMPORTANT
To successfully apply the concepts and techniques in
this manual, you must have a fundamental
knowledge of electronics and electrical codes.
This manual describes cable installation inside a
manufacturing facility. Other types of SynchLink
installations are not permitted.
Who Should Use This
Publication
1
Anyone who wants to understand SynchLink and products that work
on the link or anyone who needs to design, install and maintain a
SynchLink fiber optic cable system should use this publication.
Publication 1756-TD008A-EN-P - August 2002
Preface
2
What Information This
Publication Contains
This publication includes the following sections:
Chapter 1 - Overview of
SynchLink
Chapter 2 - SynchLink Topologies
Chapter 4 - Specific SynchLink
Configurations
Chapter 5 - Overview of the SynchLink
Fiber Optic Cable System
Chapter 6 - Planning a SynchLink
Fiber Optic Cable System
Chapter 7 - Installing a SynchLink
Fiber Optic Cable System
Chapter 8 - Guidelines for SynchLink
Fiber Optic Cable Installation
Chapter 9 - Maintenance and
Troubleshooting
Appendix A - Specifications
Publication 1756-TD008A-EN-P - August 2002
Chapter 3 - Using Specific Products
on SynchLink
Glossary
Preface
Related Documentation
3
Table Preface.1 lists the related documentation that may help you use
products on SynchLink.
Table Preface.1
Catalog Number
Document Title
Publication Number
1756-SYNCH
ControlLogix SynchLink Module
Installation Instructions
1756-IN575
1756-SYNCH
ControlLogix SynchLink Module
User Manual
1756-UM521
1756-DMD30,
1756-DMF30
ControlLogix Drive Modules
Installation Instructions
1756-IN577
1756-DMD30,
1756-DMF30
ControlLogix Drive Modules
User Manual
1756-UM522
PowerFlex 700S
PowerFlex 700S User Manual
20D-UM001
1751-SLBA
SynchLink Base Block
Installation Instructions
1751-IN001
1751-SL4SP
SynchLink 4-port Splitter Block
Installation Instructions
1751-IN002
1751-SLBP
SynchLink Bypass Switch Block
Installation Instructions
1751-IN003
1756-A4, -A7, -A10,
-A13
ControlLogix Chassis Installation 1756-IN080B
Instructions
1756-PA72, -PB72
ControlLogix Power Supply
Installation Instructions
1756-5.67
1756-PA75, -PB75
ControlLogix Power Supply
Installation Instructions
1756-5.78
1756-Series
ControlLogix System User
Manual
1756-UM001
Publication 1756-TD008A-EN-P - August 2002
Preface
4
Notes:
Publication 1756-TD008A-EN-P - August 2002
Table of Contents
Chapter 1
Overview of SynchLink
What is SynchLink? . . . . . . . . . .
SynchLink Operation. . . . . . . . .
Time Synchronization. . . . . .
Data Transfer. . . . . . . . . . . .
Transmitted Direct Words. . .
SynchLink Transmitted Axes.
Chapter Summary . . . . . . . . . . .
.
.
.
.
.
.
.
.
.
.
.
.
.
.
.
.
.
.
.
.
.
.
.
.
.
.
.
.
.
.
.
.
.
.
.
.
.
.
.
.
.
.
.
.
.
.
.
.
.
.
.
.
.
.
.
.
.
.
.
.
.
.
.
.
.
.
.
.
.
.
.
.
.
.
.
.
.
.
.
.
.
.
.
.
.
.
.
.
.
.
.
.
.
.
.
.
.
.
.
.
.
.
.
.
.
.
.
.
.
.
.
.
.
.
.
.
.
.
.
.
.
.
.
.
.
.
.
.
.
.
.
.
.
.
.
.
.
.
.
.
1-1
1-2
1-2
1-6
1-8
1-10
1-10
.
.
.
.
.
.
.
.
.
.
.
.
.
.
.
.
.
.
.
.
.
.
.
.
.
.
.
.
.
.
.
.
.
.
.
.
.
.
.
.
.
.
.
.
.
.
.
.
.
.
.
.
.
.
.
.
.
.
.
.
.
.
.
.
.
.
.
.
.
.
.
.
.
.
.
.
.
.
.
.
2-2
2-3
2-4
2-4
ControlLogix SynchLink Module (1756-SYNCH) . . . . . . . . .
Transferring Data With the SynchLink Module. . . . . . . .
ControlLogix SynchLink Module Features . . . . . . . . . . .
Related Documents . . . . . . . . . . . . . . . . . . . . . . . . . . .
ControlLogix Drive Modules (1756-DMxxx Series) . . . . . . .
Interface to Distributed Power System Drive Equipment
Transferring Data With the Drive Modules . . . . . . . . . .
ControlLogix Drive Module Features. . . . . . . . . . . . . . .
PowerFlex 700S Drive . . . . . . . . . . . . . . . . . . . . . . . . . . . .
Transferring Data With the PowerFlex 700S Drives . . . .
PowerFlex 700S Drive Features. . . . . . . . . . . . . . . . . . .
Connecting Products to SynchLink . . . . . . . . . . . . . . . . . . .
SynchLink Hub . . . . . . . . . . . . . . . . . . . . . . . . . . . . . .
SynchLink Bypass Switch Block . . . . . . . . . . . . . . . . . .
Fiber Optic Cables . . . . . . . . . . . . . . . . . . . . . . . . . . . .
Configuring Products for Use on SynchLink . . . . . . . . . . . .
Chapter Summary . . . . . . . . . . . . . . . . . . . . . . . . . . . . . . .
3-1
3-2
3-2
3-2
3-3
3-3
3-4
3-4
3-5
3-5
3-6
3-7
3-7
3-8
3-10
3-11
3-11
Chapter 2
SynchLink Topologies
Star Topology . . . . . .
Daisy Chain Topology
Ring Topology . . . . . .
Chapter Summary . . . . . .
.
.
.
.
.
.
.
.
.
.
.
.
.
.
.
.
.
.
.
.
Chapter 3
Using Specific Products on
SynchLink
Chapter 4
Specific SynchLink
Configurations
i
Difference Between Topologies and Configurations
SynchLink Functionality in Each Device . . . . . . . . .
1756-SYNCH Module . . . . . . . . . . . . . . . . . . . .
1756-DMxxx Drive Modules . . . . . . . . . . . . . . .
PowerFlex 700S Drive . . . . . . . . . . . . . . . . . . .
Star Topology Configurations . . . . . . . . . . . . . .
Daisy Chain Topology Configurations . . . . . . . .
Ring Topology Configurations . . . . . . . . . . . . .
Additional Configurations. . . . . . . . . . . . . . . . .
Chapter Summary . . . . . . . . . . . . . . . . . . . . . . . . .
.
.
.
.
.
.
.
.
.
.
.
.
.
.
.
.
.
.
.
.
.
.
.
.
.
.
.
.
.
.
.
.
.
.
.
.
.
.
.
.
.
.
.
.
.
.
.
.
.
.
.
.
.
.
.
.
.
.
.
.
4-1
4-2
4-2
4-3
4-5
4-6
4-9
4-13
4-15
4-19
Publication 1756-TD008A-EN-P - August 2002
Table of Contents
ii
Chapter 5
Overview of the SynchLink
Fiber Optic Cable System
Applying the SynchLink System . . . . . . . .
Analyzing your SynchLink Application
Identifying System Components . . . . .
Planning System Installation . . . . . . . .
Installing the System . . . . . . . . . . . . .
Powering your System . . . . . . . . . . . .
Chapter Summary . . . . . . . . . . . . . . . . . .
.
.
.
.
.
.
.
.
.
.
.
.
.
.
.
.
.
.
.
.
.
.
.
.
.
.
.
.
.
.
.
.
.
.
.
.
.
.
.
.
.
.
.
.
.
.
.
.
.
.
.
.
.
.
.
.
.
.
.
.
.
.
.
.
.
.
.
.
.
.
.
.
.
.
.
.
.
.
.
.
.
.
.
.
.
.
.
.
.
.
.
5-2
5-2
5-4
5-4
5-4
5-5
5-5
Developing a Plan. . . . . . . . . . . . . . . . . . . . . . .
Selecting a Topology. . . . . . . . . . . . . . . . . . . . .
Planning Installation of the System Components.
Estimating Cable Lengths. . . . . . . . . . . . . . . . . .
Chapter Summary . . . . . . . . . . . . . . . . . . . . . . .
.
.
.
.
.
.
.
.
.
.
.
.
.
.
.
.
.
.
.
.
.
.
.
.
.
.
.
.
.
.
.
.
.
.
.
.
.
.
.
.
6-1
6-2
6-3
6-4
6-4
Chapter 6
Planning a SynchLink Fiber Optic
Cable System
Chapter 7
Installing a SynchLink Fiber Optic Using Pre-terminated
Fiber Cable . . . . . . . . . . . . . . . . . . . . . . . . . . . . . . . . . . . . 7-2
Cable System
Using Cable System Components. . . . . . . . . . . . . . . . . . . . 7-2
Mounting and Removing Your Fiber Blocks . . . . . . . . . . . . 7-5
Chapter Summary . . . . . . . . . . . . . . . . . . . . . . . . . . . . . . . 7-5
Chapter 8
Guidelines for SynchLink Fiber
Optic
Cable Installation
Publication 1756-TD008A-EN-P - August 2002
Following General Rules for Safety . . . . . . . . . . .
Guidelines for Handling Fiber Optic Cable . . .
Cable Protection and Isolation Recommendations.
Cable Protection . . . . . . . . . . . . . . . . . . . . . .
Chemical and Thermal Isolation . . . . . . . . . . .
Physical Isolation . . . . . . . . . . . . . . . . . . . . . .
Pre-Terminated Cable Installation Guidelines . . . .
Cable Inspection and Testing . . . . . . . . . . . . .
Cable Pulling . . . . . . . . . . . . . . . . . . . . . . . . .
Unterminated Cable Installation Guidelines . . . . .
Direct Attachment . . . . . . . . . . . . . . . . . . . . .
Indirect Attachment . . . . . . . . . . . . . . . . . . . .
Conduit and Duct Installation . . . . . . . . . . . . .
Vertical Installation . . . . . . . . . . . . . . . . . . . .
Plans for Vertical Cable Installation. . . . . . . . .
Chapter Summary . . . . . . . . . . . . . . . . . . . . . . . .
.
.
.
.
.
.
.
.
.
.
.
.
.
.
.
.
.
.
.
.
.
.
.
.
.
.
.
.
.
.
.
.
.
.
.
.
.
.
.
.
.
.
.
.
.
.
.
.
.
.
.
.
.
.
.
.
.
.
.
.
.
.
.
.
.
.
.
.
.
.
.
.
.
.
.
.
.
.
.
.
.
.
.
.
.
.
.
.
.
.
.
.
.
.
.
.
.
.
.
.
.
.
.
.
.
.
.
.
.
.
.
.
8-2
8-2
8-4
8-4
8-4
8-5
8-5
8-5
8-5
8-6
8-6
8-6
8-7
8-9
8-9
8-10
Table of Contents
iii
Chapter 9
Maintenance and Troubleshooting Cable System Maintenance . . . . . . . . . . . . . . . . . . . . . . . . 9-1
Cable System Documentation Maintenance .
Cable System Design Maintenance . . . . . . .
Cable System Inspection. . . . . . . . . . . . . . .
Measuring Power Loss. . . . . . . . . . . . . . . . . . .
Chapter Summary . . . . . . . . . . . . . . . . . . . . . .
.
.
.
.
.
.
.
.
.
.
.
.
.
.
.
.
.
.
.
.
.
.
.
.
.
.
.
.
.
.
.
.
.
.
.
.
.
.
.
.
.
.
.
.
.
9-1
9-1
9-2
9-2
9-2
Appendix A
Specifications
. . . . . . . . . . . . . . . . . . . . . . . . . . . . . . . . . . . . . . . . . . A-8
Appendix B
SynchLink Fiber Optic Cable
Description
Advantages of Fiber . . . . . . .
Optical Fiber Construction
Hard Clad Silica Fiber . . .
Cable Assemblies . . . . . . .
.
.
.
.
.
.
.
.
.
.
.
.
.
.
.
.
.
.
.
.
.
.
.
.
.
.
.
.
.
.
.
.
.
.
.
.
.
.
.
.
.
.
.
.
.
.
.
.
.
.
.
.
.
.
.
.
.
.
.
.
.
.
.
.
.
.
.
.
.
.
.
.
.
.
.
.
.
.
.
.
.
.
.
.
.
.
.
.
B-1
B-2
B-3
B-4
Glossary
Index
Publication 1756-TD008A-EN-P - August 2002
Table of Contents
iv
Publication 1756-TD008A-EN-P - August 2002
Chapter
1
Overview of SynchLink
This chapter provides an overview of SynchLink and how it works.
For information about:
What is SynchLink?
See page:
What is SynchLink?
1-1
SynchLink Operation
1-2
Time Synchronization
1-2
Data Transfer
1-6
SynchLink is a fiber optic communication link that allows its users to
implement distributed motion and drive systems based on
ControlLogix and PowerFlex700S products.
SynchLink should be used in conjunction with a standard control
network, such as ControlNet or Ethernet/IP. A standard network is
used for general control interlocking and transfer of diagnostic data
across the system. SynchLink does not function as a standard control
network (e.g. it only broadcasts data).
You can use the following products on SynchLink:
· ControlLogix SynchLink module (1756-SYNCH)
· ControlLogix Drive modules (1756-DMxxx series)
· PowerFlex 700S drives (DriveLogix)
For more information on these products, see Chapter 3, Using Specific
Products on SynchLink.
1
Publication 1756-TD008A-EN-P - August 2002
1-2
SynchLink Operation
In the simplest terms, you can use SynchLink to:
· synchronize time
· transfer data, including axis data for synchronized mtion control
and general data
Time Synchronization
SynchLink uses a time master-slave mechanism to achieve time
synchronization. Time synchronization in a SynchLink system is
required to:
· transfer motion and drive control data.
· synchronize distributed 1756-DMxxx series modules in separate
chassis.
· synchronize distributed PowerFlex 700S drives for highly
coordinated drive control.
· synchronize multiple distributed motion control planners across
separate chassis for highly coordinated motion control.
SynchLink Node Clock
The SynchLink node clock is a base-line requirement of any product
incorporating SynchLink and integral to all devices that contain
SynchLink circuitry. The SynchLink node clock has a 1mS resolution
and serves as the system clocking mechanism.
During system configuration, you configure one SynchLink node as
the time master and all other SynchLink nodes as time slaves. The
time master becomes the system clock for the entire control system.
As such, the SynchLink time master broadcasts its time reference to
the SynchLink time slaves; the time slaves, in turn, adjust their node
clocks to match the master clock.
Publication 1756-TD008A-EN-P - August 2002
1-3
Because SynchLink is a broadcasting mechanism, the master is always
placed at the beginning of SynchLink systems, such as the star
configuration in Figure 1.1.
Figure 1.1
Star Topology
SynchLink
Time Master
S.L.N.C.
Hub
S.L.N.C.
S.L.N.C.
S.L.N.C.
S.L.N.C.
SynchLink
Time Slave
SynchLink
Time Slave
SynchLink
Time Slave
SynchLink
Time Slave
42980
S.L.N.C. = SynchLink Node Clock
SynchLink System Synchronization
When a SynchLink system is initialized, the individual SynchLink
nodes power-up at separate times, and the individual SynchLink node
clocks begin to count at arbitrary points in time; the system is not yet
synchronized.
As the time master node clock counts, it reaches a point where it rolls
over and goes back to zero. When the rollover occurs, the SynchLink
time master transmits a beacon signal to the SynchLink time slaves;
the beacon is included in the control field of the transmitted message.
When the SynchLink time slave receives the first message with the
beacon signal, it begins to adjust the 1mS time base of its node clock
to synchronize with the time master node clock.
Publication 1756-TD008A-EN-P - August 2002
1-4
Figure 1.2
Initial Start-Up
Master
Time adjustment
Slave
Beacon
Beacon
Beacon
42982
Synchronized Operation
Master
Slave
42983
After a SynchLink time slave is synchronized with the time master,
each SynchLink frame that is transmitted serves as a 50mS “tick” (or
mark) used for the periodic adjustment of its clock’s 1mS time base.
This process provides highly accurate results.
Figure 1.3
Beacon signal
synchronizes
SynchLink node
clocks
SynchLink 50 microsecond message frame
serves as a “tick” to keep clocks synchronized
42984
Using the ControlLogix Coordinated System Time (CST)
The CST is the clocking mechanism used to achieve time
synchronization in a ControlLogix chassis; in the future, the CST will
be used in a DriveLogix system. The ControlLogix CST clock is a
64-bit clock on the backplane of the ControlLogix chassis. It has a 1mS
resolution and is used as the main time reference for all modules
plugged into a chassis backplane.
For more information on how the ControlLogix CST affects the
operation of other ControlLogix products, see the ControlLogix System
User Manual, publication 1756-UM001.
Publication 1756-TD008A-EN-P - August 2002
1-5
Time Synchronization in a Distributed Control System
The CST mechanism synchronizes ControlLogix chassis in a
distributed control system. In this case, SynchLink transfers the CST
value from the CST master chassis to CST slave chassis. At the time of
the publication, each chassis must be equipped with at least a
controller and a SynchLink module to synchronize time.
How Do the CST Clock and SynchLink Node Clock Work Together?
The CST is the main time reference for all modules plugged into a
ControlLogix chassis. The SynchLink node clock is used to establish
the time reference on the SynchLink fiber.
Figure 1.4 illustrates how the SynchLink node clock and the CST time
reference are coordinated in a system. In this example, the SynchLink
modules in chassis A & B synchronize the CST clock in chassis B with
the CST reference in chassis A.
Chassis A is the time master for the system. When the SynchLink
module strobes the beacon signal onto the fiber optic link, it also
transmits the CST time reference value that tells the downstream node
what time it is as the beacon occurs. The downstream chassis receives
the CST time reference and synchronizes its time with the CST
reference value on the beacon signal.
Figure 1.4
Chassis A
64-bit clock
Coordinated System Time
Chassis B
Coordinated System Time
1756-SYNCH
SynchLink Node Clock
1756-SYNCH
Clock
SynchLink beacon over
the fiber optic link
The SynchLink modules in Figure 1.4 must be correctly configured
(via RSLogix 5000) to make sure the system is synchronized. For more
information on how to configure ControlLogix SynchLink modules,
see the ControlLogix SynchLink module user manual, publication
1756-UM521.
Publication 1756-TD008A-EN-P - August 2002
1-6
Data Transfer
You can transfer the following types of reference data over SynchLink:
· Produced axis data for chassis to chassis remote axis control 1756-SYNCH module only
· High speed drive reference data for chassis-to-drive control or
drive-to-drive control
· General control information that requires transfer at a high
speed and in a synchronized manner
For SynchLink and Drive modules, the communications format
(chosen during product configuration) determines what type of data is
transferred between them. The data type transfers are asynchronous
from each other.
SynchLink messages are structured as six 32-bit words; the actual
available amount of data transferred (direct, buffered or axis) is
configured on a module-by-module basis. The words are divided into
three types:
· Direct - Data delivered in a single message. A SynchLink
message can contain a maximum of four direct data words; each
word is 32 bits in length. Direct data can be automatically
forwarded to the next SynchLink node in the daisy chain or ring
configurations, as shown below.
SynchLink Node
Host
controller
Direct data is automatically copied from
the receive port to the transmit port
(without host controller(1) intervention)
and transferred to the next SynchLink
node.
Buffered
data
storage
Buffered
data
storage
SynchLink
(1)
The local ControlLogix controller must
move data from one port to another (e.g.
via ladder logic).
Receive
Direct data
Transmit
43186
Publication 1756-TD008A-EN-P - August 2002
1-7
· Buffered - Data that exceeds the four-word limit of a direct data
transfer. Buffered data is appropriately segmented at the
transmitting device and reassembled at the receiving device.
Buffered data cannot be automatically forwarded to the next
SynchLink node in the daisy chain or ring configurations. In this
case, transferring buffered data to the next node requires
intervention by the host controller, as shown below.
SynchLink Node
Host
controller
Buffered
input data
storage
Buffered data must be copied from the
receive port to the transmit port (via host
controller intervention) before it can be
transferred to the next SynchLink node.
Buffered
output data
storage
SynchLink
Receive
Transmit
43186
· Axis data - Motion data used by the motion planner in the
controller. Only the 1756-SYNCH module can
produce/consume Axis data to/from its local controller, as
shown below.
1756-L55 controller
In this graphic, the following events occur:
1. The 1756-L55 controller in chassis
A produces axis data.
2. The 1756-SYNCH module in
chassis A consumes the axis data
from the backplane and produces it
on SynchLink.
3. The 1756-SYNCH modules in
chassis B & C consume the axis
data from SynchLink and produce it
on their local backplanes.
4. The 1756-L55 controllers in
chassis B & C consume the axis
data from the backplane and use it
in their motion planners.
1756-SYNCH
1756-MO2AE
ControlNet
Chassis A
SynchLink
1756-SYNCH 1756-MO2AE
1756-L55
controller
1756-L55
controller
1756-SYNCH
1756-M08SE
Chassis B
Chassis C
43185
Axis data is not automatically forwarded to the next SynchLink
node in daisy chain or ring configurations. The data transfer
requires host controller intervention similar to that shown above
because axis data is a specific form of buffered data.
Publication 1756-TD008A-EN-P - August 2002
1-8
Transmitted Direct Words
The devices that operate on SynchLink can be configured to transmit
data from the following direct word sources:
· Output Direct Words (0-3) - The local host (e.g. ControlLogix
controller) passes these words to the 1756-SYNCH module in its
local chassis. The module then transmits the data to the
SynchLink fiber.
· Received Direct Words (0-3) - The 1756-SYNCH receives these
words from the SynchLink fiber and copies the data back onto
the fiber (via its transmit port) without any local host controller
interaction with the data.
· Multiplier - This is the product of an upstream direct word and a
user-configured multiplier for re-transmission to a downstream
node. A typical application for this function would be for real
time drawing applications where section-to-section speed ratios
are required for precise process control.
Direct Words
Direct words are data delivered in a single message. These can be
read from the module input data and sent to the module output data.
A SynchLink message can contain a maximum of four direct data
words; each word is 32 bits in length. Direct data can be automatically
forwarded to the next SynchLink node in a daisy chain or ring
configuration if necessary.
Multiplier
The Multiplier feature multiplies one Direct Word on the receive port
by a user-defined value (0.5 to 2.0) before transmitting it out the
transmit port. This feature is used to manipulate specific data from
node to node. This feature is set during configuration. For the
1756-SYNCH module, you must configure the Multiplier in RSLogix
5000. For the 1756-DMxxx series modules and the PowerFlex 700S
drives, you must set this feature in DriveExecutive in the DriveTools
2000 suite.
EXAMPLE
A drawing application might use the Multiplier to
modify data from section to section throughout the
process.
Although you can configure the multiplier for any of the Direct Words,
it can only be used with one Direct Word at a time.
Publication 1756-TD008A-EN-P - August 2002
1-9
The multiplier can only transmit the same word it received (i.e. this
feature does not allow your module to receive direct word 0 and
transmit it as direct word 1). The multiplier output is limited to 16 bits;
any value generated by the multiplier larger than 65535 is truncated to
16 bits, and a Multiplier Overflow error is reported by the Synchlink
module. Make sure any data that is passed to the Output word is less
than 65535; if the data is greater, you receive incorrect output data.
Multiplier Overflow
The Multiplier Overflow bit is a data tag that is set whenever the
multiplier value exceeds 65535. This value is set in the input data tags.
IMPORTANT
If you want to pass a Multiplier Overflow value
(received from an upstream node) to a third node
downstream but not locally change the direct word
data transmitted to the downstream node, you must:
1. Enable the Multiplier feature
2. Use a Multiplier value = 1
If you perform these steps, data received from the
upstream node on the Receive port is sent out
through the Transmit port to the next downstream
node. This process informs the downstream node
that a Multiplier Overflow condition exists upstream
and any data received is invalid.
Follow the steps described above for all SynchLink
nodes in the system that need to know about the
Multiplier Overflow condition. Figure 1.5 shows how
a Multiplier Overflow condition is sent downstream.
Figure 1.5
Publication 1756-TD008A-EN-P - August 2002
1-10
SynchLink Transmitted Axes
Before SynchLink became available, all coordinated motion axes had
to be controlled from the same ControlLogix chassis. However,
SynchLink allows you to coordinate axes between multiple chassis.
The 1756-SYNCH module can consume up to two axes from a master
chassis and broadcast the data to other chassis over SynchLink.
Slave chassis consume the broadcast axis data and redistribute it to
their local motion planners (i.e. the Logix controller in their local
chassis). The controller in the slave chassis must be configured to
consume axis data from the local 1756-SYNCH module. With this
configuration, you can control multiple axes synchronously
throughout the system.
SynchLink is typically used by the 1756-SYNCH module for axis data
and CST synchronization. The 1756-DMxxx series modules and the
PowerFlex 700S products typically use SynchLink to pass drive data
(via direct data or buffered data).
Chapter Summary
In this chapter you read about:
· what SynchLink is.
· what SynchLink is used for.
Chapter 2 explains the SynchLink Topologies.
Publication 1756-TD008A-EN-P - August 2002
Chapter
2
SynchLink Topologies
This chapter provides a detailed description of the SynchLink
topologies.
For information about:
See page:
Star Topology
2-2
Daisy Chain Topology
2-3
Ring Topology
2-4
SynchLink communications are a unidirectional data transfer from one
SynchLink node to another. The physical arrangement of these nodes
is called a topology. There are three SynchLink topology types:
· Star Topology
· Daisy Chain Topology
· Ring Topology
Each topology starts with a single master node. Each topology allows
multiple configurations in the general topology. For example, the
daisy chain topology (described on page 2-3) starts at a master node,
ends at an end node.
This section discusses the issues associated with general SynchLink
topologies. For information on specific configurations using specific
products that are available in each topology, see Chapter 4, Specific
SynchLink Configurations.
IMPORTANT
This section describes the physical set-up of each
topology. In addition to the physical arrangement,
you must electronically configure the devices.
· For the ControlLogix SynchLink module, you
must use RSLogix 5000 to configure SynchLink.
· For the ControlLogix Drive modules and the
PowerFlex 700S drives, you must use
DriveExecutive in the DriveTools 2000 suite to
configure SynchLink.
1
Publication 1756-TD008A-EN-P - August 2002
2-2
Star Topology
In the SynchLink star topology, a hub is placed in the physical center
of the link. The hub acts as a multi-port repeater that contains one
receive port and up to 16 transmit ports. The master node transmitter
is connected to the hub receive port.
Nodes are connected to the hub (via direct, dedicated lines) like
points on a star. Each of the 16 transmit ports on the hub can be
connected to a single node, including one other layer of hubs, as
shown in Figure 2.1.
Figure 2.1
Master Node
SynchLink
Hub
End Node
Hub
End Node
Hub
End Node
End Node
End Node
End Node
43118
In this topology, the master node transmitter and end node receivers
are not physically connected. Instead, messages are transmitted by the
master node to the hub and then are retransmitted by the hub to all
end nodes.
The star topology supports up to 2 layers of hubs with up to 16 end
nodes connected to each hub. A maximum of 257 SynchLink nodes
(including the master node) can be connected in this topology.
The advantages to using the star topology are:
· Cabling is easier to install and maintain.
· If a node fails, is powered down, or disconnected from the hub,
it is the only node affected, unless it is the master node.
· Faults are easier to locate and isolate.
The disadvantages to using the star topology are:
· A hub is a single-point of failure.
· Data cannot be passed from slave to slave.
For more information on the configurations available in the star
topology, see page 4-6.
Publication 1756-TD008A-EN-P - August 2002
2-3
Daisy Chain Topology
In the daisy chain topology, the SynchLink system starts at the master
node and ends at an end node but may also include center nodes that
receive and transmit data; the only difference between center and end
nodes is their physical location. You can use a maximum of 10
nodes, including the master node, with this topology.
Figure 2.2
Master Node
Center Node
Center Node
End Node
SynchLink
43119
In this topology, time synchronization occurs according to the
following rules.
· Each node, except for the master node, enables its transmitter
immediately after it has received the first message from the
upstream node.
· Each node can generate and transmit the beacon signal
regardless of whether it has received one or not.
· Each node is a time slave of its upstream node and will attempt
to synchronize with it.
The master node must be set as the SynchLink Time Master. Its node
clock is the SynchLink system clock. After power-up, the Master node
begins to transmit a beacon message every 50mS. As soon as the
downstream node receives the first beacon message, it starts to
synchronize its node clock with the master node clock and begins to
send messages to its downstream node. Eventually, this process
propagates down the daisy chain until all nodes are synchronized
with the master.
The advantages to using the daisy chain topology are:
· The topology does not require a hub and is easier to install.
· Data moving downstream can be modified from node to node.
The disadvantage to using the daisy chain topology are:
· A single node failure brings down the link, unless bypass blocks
are used. For more information on bypass blocks, see page 3-8.
· It is more difficult to troubleshoot.
· Axis and buffered data cannot be passed through without
intervention from the local host controller, requiring additional
time.
For more information on the configurations available in the daisy
chain topology, see page 4-9.
Publication 1756-TD008A-EN-P - August 2002
2-4
Ring Topology
The ring topology is a permutation of the daisy chain configuration. In
the ring topology, the end node’s transmitter is connected to the
master node’s receiver. This topology can include center nodes; the
only difference between the center and end nodes is their physical
location. You can use a maximum of 10 nodes, including the master
node, with this topology.
Figure 2.3
Master Node
Center Node
Center Node
End Node
43120
SynchLink
The advantages to using the ring topology are:
· The topology does not require a hub.
· Data moving downstream can be modified from node to node.
· Data can be passed back to the master.
The disadvantage to using the ring topology are:
· A single node failure brings down the entire link.
· It is more difficult to troubleshoot.
· Axis and buffered data cannot be passed through without
intervention from the local host controller, requiring additional
time.
For more information on the configurations available in the ring
topology, see page 4-13.
Chapter Summary
In this chapter you read more about SynchLink topologies.
Chapter 3 describes Using Specific Products on SynchLink.
Publication 1756-TD008A-EN-P - August 2002
Chapter
3
Using Specific Products on SynchLink
This chapter describes the products that can be used on SynchLink.
For information about:
ControlLogix SynchLink
Module (1756-SYNCH)
See page:
ControlLogix SynchLink Module (1756-SYNCH)
3-1
ControlLogix Drive Modules (1756-DMxxx
Series)
3-3
PowerFlex 700S Drive
3-5
Connecting Products to SynchLink
3-7
Configuring Products for Use on SynchLink
3-11
A ControlLogix SynchLink module resides in a ControlLogix chassis
and connects the chassis to SynchLink. You can use this module
to implement:
· time synchronization
· distributed motion control
· coordinated drive control
based on the ControlLogix and PowerFlex 700S platforms. In a
distributed control system, the SynchLink module broadcasts reference
data and synchronizes time from a single ControlLogix chassis to
multiple other chassis at a high speed.
1
Publication 1756-TD008A-EN-P - August 2002
3-2
Transferring Data With the SynchLink Module
The SynchLink module transfers multiple types of reference data
between chassis, including:
· Direct - Data delivered in a single message. A SynchLink
message can contain a maximum of four direct data words; each
word is 32 bits in length. Direct data can be automatically
forwarded to the next node in daisy chain or ring configurations.
· Buffered - Data that exceeds the four word limit of a direct data
transfer. Buffered data is appropriately segmented at the
transmitting device and reassembled at the receiving device.
Buffered data cannot be automatically forwarded to the next
SynchLink node in the daisy chain or ring configurations. In this
case, transferring buffered data to the next node requires
intervention by the host controller.
· Axis data - Motion data used by the motion planner in the
controller. The 1756-SYNCH module can consume an Axis tag
from a controller and pass it over SynchLink or it can consume
an Axis tag received over SynchLink and reproduce it for the
local controller to consume. Axis data is not automatically
forwarded to the next node in daisy chain or ring configurations.
ControlLogix SynchLink Module Features
The SynchLink module offers the following features:
· Communication of remote axis data in a timely and
deterministic manner
· Communication of direct and buffered data
· Synchronization of CST and SynchLink clocks in the system
· Removal and insertion under power (RIUP) - Allows you to
remove and insert the module while power is applied.
· Class I Division 2, UL, CSA, and CE Agency Certification
Related Documents
For more information on the ControlLogix SynchLink module
(1756-SYNCH), including a full description of all features and of how
to electronically configure the module, see the following publications:
· ControlLogix SynchLink Module installation instructions,
publication 1756-IN579
· ControlLogix SynchLink Module user manual, publication
1756-UM521
Publication 1756-TD008A-EN-P - August 2002
3-3
ControlLogix Drive
Modules (1756-DMxxx
Series)
The 1756-DM Drive Module is a single slot ControlLogix-based
module for interface to Reliance Electric Distributed Power System
(DPS) drive equipment. Each drive module interfaces with an
individual Power Module Interface (PMI) chassis, performing velocity,
position, and torque control.
There are six types of drive modules, one for each type of DPS drive
equipment. Table 3.1 lists the ControlLogix Drive modules.
Table 3.1
ControlLogix (1756-DMxxx Series) Drive Modules
Drive Module:
DPS Equipment:
Description:
1756-DMD30
SD3000 6 Pulse
DC Drive S6 and S6R
SD3000 12 Pulse
DC Drive S12 and S12R
1756-DMF30
SF3000
Three Phase Field Supply
1756-DMA30 (Not released
as of this publication date)
SA3000
AC Drive
SA3000 Parallel Inverters
AC Parallel Drive
1756-DMA50 (Not released
as of this publication date)
SA500
Servo Drive
1756-DMB30 (Not released
as of this publication date)
SB3000
DC Bus Supply
1756-DMA31
SA3100
AC Drive
Interface to Distributed Power System Drive Equipment
The first function of the Drive module is to interface to Reliance
Electric Distributed Power System (DPS) drive equipment, enabling
control of the drive equipment from a ControlLogix chassis. A
ControlLogix controller performs higher level control algorithms and
drive coordination. The Drive module performs outer control loop
processing, and the Power Module Interface (PMI) controller performs
real-time control of the Power Module.
Each drive module interfaces with an individual Power Module
Interface (PMI) chassis. It resides in a ControlLogix chassis and
connects to a PMI chassis via a fiber-optic Drive Communication
cable. This communication protocol is the same protocol used by a
Universal Drive Controller (UDC) (in an AutoMax environment) to
interface to a PMI controller.
Publication 1756-TD008A-EN-P - August 2002
3-4
Transferring Data With the Drive Modules
The Drive modules transfer two types of data:
· Direct - Data delivered in a single message. A SynchLink
message can contain a maximum of four direct data words; each
word is 32 bits in length. Direct data can be automatically
forwarded to the next SynchLink node in the daisy chain or ring
configurations.
· Buffered - Data that exceeds the four word limit of a direct data
transfer. Buffered data is appropriately segmented at the
transmitting device and reassembled at the receiving device.
Buffered data cannot be automatically forwarded to the next
SynchLink node in the daisy chain and ring configurations.
· Axis data - Not supported by 1756-DMxxx Series modules.
ControlLogix Drive Module Features
The Drive module offers the following features:
· Velocity, position, and torque control
· Control loops are not synchronized to SynchLink through
on-board connections. The 1756-SYNCH module is required to
synchronize the Drive module to SynchLink.
· Motor Control capability for the respective Reliance Electric
Distributed Power drive
· Fiber optic connection to the Power Module Interface
· Time synchronization of the SynchLink node clocks
· Removal and insertion under power (RIUP) - Allows you to
remove and insert the module while power is applied
· Class I Division 2, UL, CSA, and CE Agency Certification
Related Documents
For more information on the ControlLogix Drive modules (1756-DMxx
Series), including a full description of all features and how to
electronically configure the module, see the following publications:
· ControlLogix Drive Modules installation instructions, publication
1756-IN577
· ControlLogix Drive Modules user manual, publication
1756-UM522
Publication 1756-TD008A-EN-P - August 2002
3-5
PowerFlex 700S Drive
The PowerFlex 700S is a highly functional, cost-effective and flexible
drive control. The drive offers:
· selectable, high performance motor control algorithms.
· velocity, position and torque control
· control loops synchronized to SynchLink
· an array of feedback options, including encoder, resolver and
high resolution encoder to optimize the accuracy of speed and
position regulators.
· on-board high performance I/O.
· SynchLink as a high performance, high speed, drive-to-drive link
that synchronizes the drives and transmits application data.
Transferring Data With the PowerFlex 700S Drives
The PowerFlex 700S Drives transfer two types of data between drives,
including:
· Direct - Data delivered in a single message. A SynchLink
message can contain a maximum of four direct data words; each
word is 32 bits in length. Direct data can be automatically
forwarded to the next SynchLink node in the daisy chain or ring
configurations.
· Buffered - Data that exceeds the four word limit of a direct data
transfer. Buffered data is appropriately segmented at the
transmitting device and reassembled at the receiving device.
Buffered data cannot be automatically forwarded to the next
SynchLink node in the daisy chain and ring configurations.
· Axis data - Not supported by the PowerFlex 700S drives.
Publication 1756-TD008A-EN-P - August 2002
3-6
PowerFlex 700S Drive Features
The PowerFlex 700S drive offers the following features:
· Adaptive, field-oriented control FOC maintains torque control
accuracy without external motor sensors
· Inertia compensation reduces dynamic tracking errors
· Adjustable backlash compensation for both feedback and
forward signal paths
· Registration Inputs for Time or Position
· Resonant Frequency Compensation
· S-Ramp and Lead-Lag Filters for Velocity Signal Conditioning of
user inputs
· Automatic Speed Feedback Loss/Recovery
· Coarse to Fine Interpolation for position applications
· Current Limit, Process Trim, Slip Compensation
· Electronic Gear Ratio
Related Documents
For more information on the PowerFlex 700S Drives, including a full
description of all features and how to electronically configure the
module, see the following publications:
· PowerFlex 700S Drives user manual, publication 20D-UM001
Publication 1756-TD008A-EN-P - August 2002
3-7
Connecting Products
to SynchLink
The ControlLogix SynchLink module, ControlLogix Drive modules and
PowerFlex 700S drives connect to SynchLink through special
SynchLink fiber optic cables and other components, such as base
blocks, splitter blocks and bypass switch blocks.
SynchLink Hub
The SynchLink hub is a modular fiber repeater containing base and
splitter blocks, as shown in Figure 3.1. The base block (1751-SLBA)
converts optical signals coming from a SynchLink node to electrical
signals, and then retimes and retransmits them simultaneously to a
maximum of four 4-port splitter blocks. The base block requires 24V
dc. It supplies power to the splitter blocks.
The 4-port splitter block (1751-SL4SP) converts electrical signals
coming from the base block to optical signals and retransmits them
simultaneously through four output ports. Up to four splitter blocks
can be mounted on a DIN rail and plugged together with one base
block.
Figure 3.1
1751-SLBA
1751-SL4SP
43178
SynchLink Hub Wiring Diagram
Figure 3.2 shows how to wire a SynchLink hub.
Figure 3.2
1751-SLBA
1751-SL4SP
1751-SL4SP
24V dc
power
supply
24V dc
common
+24V dc
43269
From time
master
To time slaves
Publication 1756-TD008A-EN-P - August 2002
3-8
SynchLink Bypass Switch Block
The SynchLink bypass switch block (1751-SLBP) is a DIN-rail mounted
block that is used in daisy chain and ring configurations where a
node, or group of nodes, needs to be temporarily disconnected from
SynchLink without physical reconfiguration of the cable system. The
bypass switch block requires 24V dc.
Figure 3.3 - Components of the bypass switch block
RxIN2
TxOUT2
Indicators
+24V dc
(pin 4)
24V dc
(pin 3)
TxOUT1
+24V dc
digital input
(pin 2)
24V dc common
digital input
(pin 1)
RxIN1
31223
The bypass switch block has two modes of operation, pass-through
and bypass. The operational mode is determined by the state of the
24V dc digital input that is driven by the local SynchLink station.
The pass-through mode is entered when the digital input is ON. In
this mode, optical signals from the upstream station are received at
the receiver port RxIN1 and retransmitted to the local station via the
transmitter port TxOUT2. Optical signals generated by the local station
are received at the receiver port RxIN2 and retransmitted to the
downstream station via the transmitter port TxOUT1. There is no
re-timing or signal regeneration in this mode.
The bypass mode is entered when the digital input is OFF. In this
mode, signals received from the upstream station at the port RxIN1
are converted to electrical signals, re-timed, and retransmitted to the
downstream station via the port TxOUT1.
Publication 1756-TD008A-EN-P - August 2002
3-9
The bypass switch block has no capabilities to detect or correct
communication error conditions that may exist during the course of
pass-through or bypass operation. The bypass switch block has no
ability to report any abnormal conditions to the local station.
IMPORTANT
The Bypass Switch should be applied as a SynchLink
patch when a local node needs to be powered down
as a result of equipment reconfiguration (e.g. in
order to manufacture a variety of products on the
same process line) or a failure. It should not be
applied for dynamic switching between Pass
Through and Bypass modes; this may result in the
loss of time synchronization between nodes and the
loss of data transferred between them.
While the main point to remember is that bypass
switch should not be applied dynamically (i.e. while
power is applied), there are other uses for the
bypass switch (to be used in a powered down
environment), including:
· change topology configuration
· change masters in a topology
SynchLink Bypass Wiring Diagram
Figure 3.4 shows how to wire a SynchLink hub.
Figure 3.4
From local node
24V dc
power
supply
To local node
1751-SLBP
24V dc
common
+24V dc
To +24V dc terminal on local
node digital output
To 24V dc common terminal
on local node digital output
To downstream node
From upstream node
43270
Publication 1756-TD008A-EN-P - August 2002
3-10
Fiber Optic Cables
The SynchLink fiber optic cable assemblies are manufactured from
200/230 micron/simplex cable with a Versalink (V-Link) V-pin
connectors at the ends. For a list of cable assembly specifications, see
Table 3.2. For a complete list of SynchLink fiber optic cable system
products, see Table 7.1 on page 7-2.
ATTENTION
!
· Never look into a transmitter’s output or the end
of a cable with an active transmitter connected.
· Do not look directly into the fiber ports. Light
levels may cause damage to your eyesight.
· Never use a microscope to view an active cable
system. The concentration of light from the
microscope could cause permanent damage to
your eye. SynchLink products are Class 1 LED
products.
Table 3.2
Fiber Optic Cable Assemblies Specifications
Cable Segment Length
300m maximum(1)
1m minimum
Cable Splicing
Not permitted
Operating Wavelength
650nm (red) nominal
Cable Attenuation
12 dB/km maximum at 650nm
(1)
The maximum cable length is calculated differently, depending on topology. For more information, see
page 7-4.
For a full description of how to plan, install and troubleshoot a
SynchLink system, including connecting these products, see Chapter 5
through Chapter 9.
Publication 1756-TD008A-EN-P - August 2002
3-11
Configuring Products for
Use on SynchLink
You must electronically (i.e. via software) configure the devices in
each set-up.
· For the ControlLogix SynchLink module, you must use
RSLogix 5000 to configure SynchLink.
For more information on how to use RSLogix 5000 to configure
your 1756-SYNCH module, see the ControlLogix SynchLink
Module user manual, publication 1756-UM521.
· For the ControlLogix Drive modules and the PowerFlex 700S
drives, you must use DriveExecutive in the DriveTools 2000
suite to configure SynchLink.
For more information on how to use DriveExecutive to
configure your 1756-DMxxx Series modules, see the
ControlLogix Drive Module user manual, publication
1756-UM522.
For more information on how to use DriveExecutive to
configure your PowerFlex 700S drives, see the High
Performance AC Drive PowerFlex 700S drives user manual,
publication 20D-UM001.
Chapter Summary
In this chapter, you read about the products that can be used on
SynchLink, including:
· ControlLogix SynchLink Module (1756-SYNCH)
· ControlLogix Drive Modules (1756-DMxxx Series)
· PowerFlex 700S Drive
Chapter 4 explains the Specific SynchLink Configurations.
Publication 1756-TD008A-EN-P - August 2002
3-12
Notes:
Publication 1756-TD008A-EN-P - August 2002
Chapter
4
Specific SynchLink Configurations
This chapter describes the configurations available with each
topology. The configurations listed in this chapter were tested and
approved. If you plan to use another configuration, contact Rockwell
Automation first.
For information about:
Difference Between
Topologies and
Configurations
See page:
SynchLink Functionality in Each Device
4-2
Star Topology Configurations
4-6
Daisy Chain Topology Configurations
4-9
Ring Topology Configurations
4-13
Chapter 2 describes the SynchLink Topologies as the physical
arrangement of SynchLink nodes. This chapter is more specific about
the products used in each topology (e.g. PowerFlex 700S drives in a
daisy chain topology).
This chapter explains how to use each configuration and provides a
better understanding of why the capabilities of each SynchLink
devices must be considered when planning your application.
For example, a PowerFlex 700S drive can pass buffered or direct data
but not axis data to another SynchLink node. If you need to transfer
axis data, you cannot use any configuration with PowerFlex 700S
drives.
Before you read about specific configurations, however, you should
understand how the various devices use SynchLink; not all of the
products that use Synchlink use it the same way. Refer to SynchLink
Functionality in Each Device on page 4-2 for a better understanding of
how the various devices use SynchLink.
1
Publication 1756-TD008A-EN-P - August 2002
4-2
SynchLink Functionality in
Each Device
Table 4.1 gives a summary of the various levels of functionality for the
devices that use SynchLink. More detailed descriptions of each level of
functionality follow the table.
Table 4.1
SynchLink Functionality in SynchLink Devices
Device:
SynchLink Node
Clock:
Coordinated
System Time:
CST/SynchLink
Time Relay:
Axis Support:
1756-SYNCH
ü
ü
ü
ü
1756-DMxxx
ü
ü(1)
PowerFlex 700S
ü
(1)
Synchronize to
Host Processor:
ü
The 1756-DMxxx series drive modules cannot set the CST on a ControlLogix backplane.
1756-SYNCH Module
SynchLink Node Clock
The 1756-SYNCH module employs the SynchLink node clock,
allowing the module to be the SynchLink time master or a SynchLink
time slave; in this way, the module can either set time on the fiber, or,
receive time from the fiber.
Coordinated System Time
In addition to setting and receiving time on the SynchLink fiber, the
1756-SYNCH module can also set or receive Coordinated System Time
(CST) data. The CST clock is the main time reference on a
ControlLogix backplane. Many 1756 I/O modules use the CST to take
snapshots of real-time samples, and controllers use it to execute
motion control instructions. Because a SynchLink module can act as
CST master and broadcast CST time reference information to
SynchLink modules in the other chassis, an entire ControlLogix system
can be synchronized, allowing for relevant timestamping of data and
distributed, synchronized motion control.
Publication 1756-TD008A-EN-P - August 2002
4-3
CST/SynchLink Time Relay
A time relay is any device that passes a time reference along. The
1756-SYNCH module passes the CST reference in the master chassis
from the chassis backplane to the fiber optic media. Slave nodes in
other chassis receive the CST reference value from the media, and
relay the value to their respective backplanes. In this manner,
although the SynchLink modules in the slave chassis are configured as
slaves on the SynchLink fiber, they are configured as masters in their
chassis, establishing the received CST value as the master reference
for that chassis. Thus, all chassis that use the 1756-SYNCH module can
be synchronized to the same CST reference.
Axis Support
The 1756-SYNCH module can transmit and receive axis data types that
are used in the motion engine (of the local controller) to produce
motion profiles. Since the motion planner uses the CST clock as its
main time reference, all devices that consume motion axis data
information from a motion master must also use the same time
reference to interpolate the motion data in a meaningful way. This is
true both inside a single chassis as well as among a distributed system
where multiple chassis are using the same data.
IMPORTANT
Keep in mind that a 1756-SYNCH module should
never follow a PowerFlex 700S drive in any
SynchLink configuration.
1756-DMxxx Drive Modules
SynchLink Node Clock
The 1756-DMxxx drive modules employ the SynchLink node clock,
allowing the modules to be the SynchLink time master or a SynchLink
time slave; in this way, the module can either set time on the fiber, or,
receive time from the fiber. The 1756-DMxxx drive modules also
implement the VPLs used in the PowerFlex 700S drives.
Publication 1756-TD008A-EN-P - August 2002
4-4
Coordinated System Time
The 1756-DMxxx drive modules use the CST differently than the
1756-SYNCH module. You should be aware of two significant
differences before implementing these modules in a control scheme.
First, the 1756-DMxxx drive modules are intelligent processing
modules that regulate Reliance Electric Distributed Power type drives.
Each 1756-DMxxx drive module has integrated Velocity and Position
Loops (VPL) that are a part of the module’s firmware for controlling
the drives. As with any digital control scheme, the control loops are
scanned on a periodic basis, as measured against a given clock in the
system. In the case of the 1756-DMxxx drive modules, the clocking
mechanism is the CST clock on the ControlLogix backplane.
Since the 1756-DMxxx modules use the CST clock, as multiple
modules are placed in a single chassis, their VPLs are automatically
synchronized because they share the same clock.
CST/ SynchLink Time Relay
The second difference between the 1756-SYNCH and the 1756-DMxxx
drive modules is that the 1756-DMxxx drive modules do not act as
time relays. With this module, the SynchLink connection is for high
speed data transfer only. This also means that if a distributed drive
control system is installed where there are multiple 1756-DMxxx drive
modules distributed across multiple chassis, 1756-SYNCH modules
must also be installed in those chassis if tight synchronization between
drives is important from chassis to chassis.
Axis Support
The 1756-DMxxx drive modules do not support the motion engine or
profiler. They do not produce or consume axis data. They cannot be
configured with communications protocols which include axis data
types.
Publication 1756-TD008A-EN-P - August 2002
4-5
PowerFlex 700S Drive
SynchLink Node Clock
The PowerFlex 700S drive employs the SynchLink node clock,
allowing the drive to be the SynchLink time master or a SynchLink
time slave; in this way, the drive can either set time on the fiber, or,
receive time from the fiber.
One difference in the implementation, though, is that while the
1756-DMxxx drive modules use CST as the synchronizing mechanism
to coordinate VPL execution among multiple 1756-DMxxx drive
modules, the PowerFlex 700S drive uses the SynchLink node clock to
coordinate VPL execution among the distributed drives. The reason
for this difference in synchronizing mechanisms is that most
applications using the 1756-DMxxx drive modules are likely to
coordinate multiple drives out of a single chassis, while the PowerFlex
700S is inherently distributed in its architecture.
Coordinated System Time
The PowerFlex 700S drive does not implement or utilize the
Coordinated System Time clock.
CST/ SynchLink Time Relay
The PowerFlex 700S drive does not support any notion of a CST /
SynchLink time relay, since it does not support a CST clock.
Axis Support
The PowerFlex 700S drive does not support the motion engine or
profiler. It does not produce or consume axis data. It cannot be
configured with communications protocols which include axis data
types.
IMPORTANT
Keep in mind that a PowerFlex 700S drive should
never precede a 1756-SYNCH module in any
SynchLink configuration.
Publication 1756-TD008A-EN-P - August 2002
4-6
Star Topology Configurations
In the star topology, a hub is placed in the physical center of the link.
The hub acts as a multi-port repeater that contains one receive port
and up to 16 transmit ports. The master node transmitter is connected
to the hub receive port. Nodes are connected to the hub (via direct,
dedicated lines) like points on a star.
Star Topology Configuration #1
In this configuration, ControlLogix SynchLink modules (1756-SYNCH)
are the master node and end nodes.
Figure 4.1
ControlNet
Master Node
Hub
SynchLink
Hub
End Node
End Node
End Node
End Node
End Node
End Node
42747
Table 4.2 lists more information about this configuration.
Table 4.2
Category:
Explanation:
Time synchronization
Master 1756-SYNCH module
Slaves 1756-SYNCH modules
The SynchLink node clocks and the CST clocks are synchronized
across all nodes.
Data transfer
Publication 1756-TD008A-EN-P - August 2002
· Typically, this configuration is used to transfer axis data.
· Direct and buffered data can also be used in this
configuration. However, direct data does not off any
benefit to the user because there is no data pass through
in a star configuration as in a daisy chain configuration.
Restrictions
None
Typical applications
Motion control
4-7
Star Topology Configuration #2
In this configuration, a ControlLogix SynchLink module (1756-SYNCH)
is the master node, and PowerFlex 700S drives are the end nodes.
Figure 4.2
ControlNet
Master Node
Hub
SynchLink
Hub
End Node
End Node
End Node
End Node
End Node
End Node
43181
Table 4.3 lists more information about this configuration.
Table 4.3
Category:
Explanation:
Time synchronization
Master 1756-SYNCH module
Slaves PowerFlex 700S drives
The SynchLink time value is synchronized across all nodes. Also,
all drive VPLs are synchronized.
Data transfer
Direct and buffered data can both be used in this configuration.
However, direct data does not off any benefit to the user because
there is no data pass through in a star configuration as in a daisy
chain or ring configuration.
Restrictions
Axis data is not supported in the configuration.
Typical applications
Master Drive Reference Control
Publication 1756-TD008A-EN-P - August 2002
4-8
Star Topology Configuration #3
In this configuration, PowerFlex 700s drives are the master and end
nodes.
Figure 4.3
Master Node
ControlNet
SynchLink
Hub
Hub
End Node
End Node
End Node
End Node
End Node
End Node
43092
Table 4.4 lists more information about this configuration.
Table 4.4
Publication 1756-TD008A-EN-P - August 2002
Category:
Explanation:
Time synchronization
Master PowerFlex 700S drives
Slaves PowerFlex 700S drives
The SynchLink node clock and each drive’s VPLs are synchronized
across all nodes.
Data transfer
Direct and buffered data can both be used in this configuration.
However, direct data does not off any benefit to the user because
there is no data pass through in a star configuration as in a daisy
chain or ring configuration.
Restrictions
Axis data is not supported in the configuration.
Typical applications
Master Drive Reference Control
4-9
Daisy Chain Topology Configurations
In the daisy chain topology, the SynchLink system starts at the master
node and ends at an end node but may also include center nodes that
receive and transmit data; the only difference between center and end
nodes is their physical location.
Daisy Chain Topology Configuration #1
In this configuration, a ControlLogix SynchLink module is the master
node, and ControlLogix SynchLink or Drive modules are the center
and end nodes.
Figure 4.4
1756-SYNCH
1756-SYNCH
Master
Node
Center
Node
SynchLink
ControlNet
1756-DMxxx
1756-SYNCH
Center
Node
1756-DMxxx
1756-SYNCH
1756-DMxxx
End
Node
42746
Table 4.5 lists more information about this configuration.
Table 4.5
Category:
Explanation:
Time synchronization
Master Slaves -
1756-SYNCH module
1756-SYNCH modules and 1756-DMxxx
series modules
The SynchLink node clocks and the CST clocks are synchronized
across all nodes.
The VPL values are synchronized across all 1756-DMxxx series
modules because the modules are synchronized by the respective
CST values in each chassis.
Data transfer
· Typically, this configuration is used to transfer direct data.
· If you want to pass buffered data, the local controller at
each node must pass the data.(1)
Restrictions
· Axis data is not supported in the configuration.
· A 1756-SYNCH module must be the time master.
· A 1756-SYNCH module is required in each chassis to
synchronize the CST. The Drive modules then synchronize
their VPLs with the CST.
· You can use a maximum of 10 SynchLink connections.
Typical applications
(1)
Multi-Section Drive Synchronization
The local ControlLogix controller must move the buffered data for a 1756-SYNCH module. For the 1756-DMxxx
module, the module’s VPL microprocessor must move the data. For more information, see page 1-7.
Publication 1756-TD008A-EN-P - August 2002
4-10
Daisy Chain Topology Configuration #2
In this configuration, a ControlLogix SynchLink module is the master
node, and ControlLogix SynchLink modules are the center and end
nodes.
Figure 4.5
1756-SYNCH
1756-SYNCH
Master
Node
Center
Node
SynchLink
ControlNet
1756-SYNCH
Center
Node
1756-SYNCH
End
Node
43271
Table 4.5 lists more information about this configuration.
Table 4.6
Category:
Explanation:
Time synchronization
Master 1756-SYNCH module
Slaves 1756-SYNCH modules
The SynchLink node clocks and the CST clocks are synchronized
across all nodes.
Data transfer
· Typically, this configuration is used to transfer direct data.
· If you want to pass axis or buffered data, the local
controller at each node must pass the data. Axis data
cannot be passed quickly in this configuration.(1)
Restrictions
· A 1756-SYNCH module must be the time master.
· A 1756-SYNCH module is required in each chassis to
synchronize the CST.
· You can use a maximum of 10 SynchLink connections.
Typical applications
(1)
Publication 1756-TD008A-EN-P - August 2002
Transfer Press
The local ControlLogix controller must move the axis or buffered data. For more information, see page 1-7.
4-11
Daisy Chain Topology Configuration #3
In this configuration, the ControlLogix SynchLink module is the master
node, and PowerFlex 700s drives are the center and end nodes.
Figure 4.6
Master
Node
Center
Node
Center
Node
End
Node
ControlNet
SynchLink
43093
Table 4.7 lists more information about this configuration.
Table 4.7
Category:
Explanation:
Time synchronization
Master 1756-SYNCH module
Slaves PowerFlex 700S drives
The SynchLink time value is synchronized across all nodes.
Data transfer
· Typically, this configuration is used to transfer direct data.
· If you want to pass buffered data, the local controller at
each node must pass the data.(1)
· Drive VPLs are synchronized to the SynchLink node clock.
Restrictions
· Axis data is not supported in this configuration.
· The 1756-SYNCH module cannot be downstream from a
PowerFlex 700S drive.
· You can use a maximum of 10 SynchLink connections.
Typical applications
· Drawing application
· Torque sharing application
· Master reference generation
(1)
The local ControlLogix controller must move the buffered data for a 1756-SYNCH module. For the PowerFlex
700S drives, the drive’s VPL microprocessor must move the data. For more information, see page 1-7.
Publication 1756-TD008A-EN-P - August 2002
4-12
Daisy Chain Topology Configuration #4
In this configuration, PowerFlex 700s drives are the master, center and
end nodes.
Figure 4.7
Master Node
Center Node
Center Node
End Node
SynchLink
ControlNet
43094
Table 4.8 lists more information about this configuration.
Table 4.8
Category:
Explanation:
Time synchronization
Master PowerFlex 700S drive
Slaves PowerFlex 700S drives
The SynchLink node clocks and the VPLs are synchronized across
all nodes.
Data transfer
· Typically, this configuration is used to transfer direct data.
· If you want to pass buffered data, the local controller at
each node must pass the data.(1)
Restrictions
· Axis data is not supported in the configuration.
· You can use a maximum of 10 SynchLink connections.
Typical applications
· Drawing application
· Torque sharing application
· Master reference generation
(1)
Publication 1756-TD008A-EN-P - August 2002
For the PowerFlex 700S drives, the drive’s VPL microprocessor must move the buffered data. For more
information, see page 1-7.
4-13
Ring Topology Configurations
The ring topology is a permutation of the daisy chain configuration. In
the ring topology, the end node’s transmitter is connected to the
master node’s receiver. This topology can include center nodes; the
only difference between the center and end nodes is their physical
location.
Ring Topology Configuration #1
In this configuration, a ControlLogix SynchLink module is the master
node, and ControlLogix SynchLink Drive modules are the center and
end nodes.
Figure 4.8
1756-SYNCH
1756-SYNCH
Center
Node
Master
Node
SynchLink
1756-DMxxx
1756-SYNCH
Center
Node
1756-DMxxx
1756-SYNCH
1756-DMxxx
End
Node
ControlNet
42748
Table 4.9 lists more information about this configuration.
Table 4.9
Category:
Explanation:
Time synchronization
Master Slaves -
Data transfer
1756-SYNCH module
1756-SYNCH modules and 1756-DMxxx
series modules
The SynchLink node clocks and the CST clocks are synchronized
across all nodes.
The VPL values are synchronized across all 1756-DMxxx series
modules because the modules are synchronized by the respective
CST values in each chassis.
· Typically, this configuration is used to transfer direct data.
· If you want to pass buffered data, the local controller at
each node must pass the data.(1)
· Data can be passed back to the master node.
Restrictions
Axis data is not supported in the configuration.
Typical applications
Progressive draw
(1)
The local Logix controller must move the buffered data for a 1756-SYNCH module. For the 1756-DMxxx module,
the module’s VPL microprocessor must move the data. For more information, see page 1-7.
Publication 1756-TD008A-EN-P - August 2002
4-14
Ring Topology Configuration #2
In this configuration, PowerFlex 700s drives are the master, center and
end nodes.
Figure 4.9
Master Node
Center Node
Center Node
Center Node
SynchLink
ControlNet
43096
Table 4.10 lists more information about this configuration.
Table 4.10
Category:
Explanation:
Time synchronization
Master PowerFlex 700S drives
Slaves PowerFlex 700S drives
The SynchLink node clocks and the VPL clocks are synchronized
across all nodes.
Data transfer
Restrictions
Axis data is not supported in the configuration.
Typical applications
Draw
(1)
Publication 1756-TD008A-EN-P - August 2002
· Typically, this configuration is used to transfer direct data.
· If you want to pass buffered data, the local controller at
each node must pass the data.(1)
· Data can be passed back to the master node.
For the PowerFlex 700S drives, the drive’s VPL microprocessor must move the buffered data. For more
information, see page 1-7.
4-15
Additional Configurations
Multiple SynchLink Connections in a Single Chassis
In this specialty configuration, ControlLogix SynchLink modules are
master and end nodes. Multiple modules (located in the first two
chassis after the hub) transfer data to the last chassis.
Figure 4.10
SynchLink
Hub
ControlNet
1756-SYNCH
1756-SYNCH
43097
Table 4.11 lists more information about this configuration.
Table 4.11
Category:
Explanation:
Time synchronization
Master 1756-SYNCH module
Slaves 1756-SYNCH modules
The SynchLink node clocks and the CST clocks are synchronized
across all nodes.
Data transfer
Restrictions
Typical applications
· Typically, this configuration is used to transfer axis or
buffered data.
· Only 1 1756-SYNCH module in the bottom chassis is
configured as the CST master.
1 layer of hubs
· Web handling
· Multi-Master Selection
Publication 1756-TD008A-EN-P - August 2002
4-16
Star/Daisy Chain Combination
When using this specialty configuration, you can transition from a star
to a daisy chain configuration or from a daisy chain to a star
configuration. The rules of star and daisy chain configurations apply
to the individual portions. For more information on each, see page 2-2
(Star Topology) and page 2-3 (Daisy Chain Topology).
Figure 4.11
Star Topology Followed by Daisy Chain Topology
Daisy Chain Topology Followed by Star Topology
ControlNet
Master Node
Master Node
Center Node
Center
Node
Hub
SynchLink
Center Node
Center Node
Hub
End Node
End Node
End Node
43098
ControlNet
SynchLink
43099
Table 4.12 lists more information about this configuration.
Table 4.12
Category:
Explanation:
Time synchronization
Master 1756-SYNCH module
Slaves Multiple devices, depending on your application
The SynchLink node clock is synchronized across all nodes. Depending
on what other devices are included, you may achieve synchronization
of CST clocks and VPLs as well.
Data transfer
Star portion only
Direct and buffered data can both be used in this configuration.
However, direct data does not offer any benefit to the user because
there is no data pass through in a star configuration as in a daisy chain
configuration.
Daisy chain portion only
To transfer axis or buffered data between nodes, the local controller at
each node must pass the data.(1)
Restrictions
· You cannot transfer axis data with PowerFlex 700s drives or
1756-DMxxx series modules.
· Only one transition between topology types (i.e. you cannot
start with a star, transfer to a daisy chain and then transfer
back to a star)
· You cannot use the daisy chain portion in motion applications.
Typical applications
(1)
Publication 1756-TD008A-EN-P - August 2002
The local ControlLogix controller must move the axis or buffered data for a 1756-SYNCH module. For the
1756-DMxxx module or PowerFlex 700S drives, the device’s VPL microprocessor must move the data. For more
information, see page 1-7.
4-17
Drive Module Focus
In this configuration:
· SynchLink modules are required if you want to synchronize the
Drive modules between chassis.
· Drive module SynchLink connections pass data and SynchLink
node clock timing information. Drive modules synchronize their
clocks to the CST reference on the ControlLogix backplane.
Figure 4.12
Hub
SynchLink
1756-DMxxx
1756-DMxxx
1756-SYNCH
43100
1756-SYNCH
Table 4.13 lists more information about this configuration.
Table 4.13
Category:
Explanation:
Time synchronization
Master Slaves -
1756-SYNCH module
1756-SYNCH modules and 1756-DMxxx
series modules
The CST clocks are synchronized across all chassis.
The SynchLink node clocks are synchronized across all SynchLink
nodes. The VPL values are synchronized across all 1756-DMxxx
modules because the modules are synchronized by the respective
CST values in each chassis.
Data transfer
· Typically, this configuration is used to transfer direct data.
· If you want to pass buffered data, the local controller at
each node must pass the data.(1)
Restrictions
· You can only transfer axis data between SynchLink
modules.
· You can use a maximum of 10 devices in any daisy chain
portion of the system.
(1)
The local ControlLogix controller must move the axis or buffered data for a 1756-SYNCH module. For the
1756-DMxxx module, the module’s VPL microprocessor must move the data. For more information, see
page 1-7.
Publication 1756-TD008A-EN-P - August 2002
4-18
Drive Module/PowerFlex 700s Drives Combination
In this configuration, a SynchLink module acts as a time relay and
synchronizes the CST with the beacon to communicate data to the
Drive modules and the PowerFlex 700s drives. The Drive modules use
the CST to synchronize their VPLs, and the PowerFlex 700S drives use
the SynchLink node clock to synchronize their VPLs.
Figure 4.13
1756-SYNCH
PowerFlex 700s drives
1756-DMxxx
ControlNet
SynchLink
43101
Table 4.14 lists more information about this configuration.
Table 4.14
Category:
Explanation:
Time synchronization
Master Slave
-
Data transfer
· Typically, this configuration is used to transfer direct data.
· If you want to pass buffered data, the local controller at
each node must pass the data.(1)
Restrictions
Axis data is not supported in the configuration.
Typical applications
Draw
(1)
Publication 1756-TD008A-EN-P - August 2002
1756-SYNCH
1756-DMxxx series modules and PowerFlex 700S
drives.
The 1756-SYNCH module synchronizes the CST and SynchLink
node clocks.
The local Logix controller must move the axis or buffered data for a 1756-SYNCH module. For the 1756-DMxxx
module or PowerFlex 700S drives, the device’s VPL microprocessor must move the data. For more information,
see page 1-7.
4-19
Chapter Summary
In this chapter you read about SynchLink configurations.
Chapter 5 offers an Overview of the SynchLink Fiber Optic Cable
System.
Publication 1756-TD008A-EN-P - August 2002
4-20
Publication 1756-TD008A-EN-P - August 2002
Chapter
5
Overview of the SynchLink
Fiber Optic Cable System
This chapter offers an overview of the SynchLink fiber optic
cable system.
For more information about:
See page:
Applying the SynchLink System
5-2
Analyzing your SynchLink Application
5-2
Identifying System Components
5-4
Planning System Installation
5-4
Installing the System
5-4
Powering your System
5-5
IMPORTANT
To successfully apply the concepts and techniques in
this manual, you must have a fundamental
knowledge of electronics and electrical codes.
This manual describes cable installation inside a
manufacturing facility. Other types of installations of
the SynchLink are not permitted.
Figure 5.1 SynchLink Fiber Optic Cable System Example
Node
Cable Segment
16-point Fiber Optic Hub
Cable Segment
Node
Node
Node
Node
42940
1
Publication 1756-TD008A-EN-P - August 2002
5-2
Applying the SynchLink
System
The following steps outline how to apply the SynchLink fiber optic
cable system.
IMPORTANT
If you are going to use fiber optic cable in an
intrinsically safe area, consult with your local safety
coordinator.
1. Analyze your SynchLink application and choose a
SynchLink topology.
2. Identify the fiber optic cable components that your SynchLink
application requires.
3. Plan the installation of the fiber optic cable components.
4. Install the fiber optic cable system.
5. Power your SynchLink system.
Analyzing your SynchLink Application
When analyzing your current or new SynchLink application, use a
project plan to design your SynchLink fiber optic cable system. If you
are adding new cable segments to an existing installation, create a
design plan for these cable segments and identify their purpose.
By creating a plan and analyzing your design you will be eliminating
the potential for misapplication of media. Use the topologies
described in Chapter 2, SynchLink Topologies to determine your
SynchLink cable system’s topology. The system’s topology helps you
determine the cable system components needed to meet application
requirements.
Publication 1756-TD008A-EN-P - August 2002
5-3
SynchLink Fiber Optic Cable System
The SynchLink fiber optic cable system is designed to be
user-constructed and installed. To take full advantage of this flexibility,
you should spend sufficient time planning your system’s installation
before assembling any of the hardware.
The time and effort spent on planning your cable system installation
will be insignificant compared to the time and effort required to locate
and repair damaged or improperly installed hubs, cables, and/or other
cable system components. For more information, see Chapter 6,
Planning a SynchLink Fiber Optic Cable System.
IMPORTANT
Since SynchLink lacks many features of a typical
network, we recommend that you use it in
conjunction with a ControlNet, EtherNet I/P, or
DeviceNet network for monitoring SynchLink node
status and other appropriate functions.
Determine Your Topology
The first step is to analyze your application and determine the
topology of your SynchLink system. SynchLink system topologies are
described in Chapter 2. Specific configurations that may be used in
each topology are described in Chapter 4.
Publication 1756-TD008A-EN-P - August 2002
5-4
Identifying System Components
The SynchLink fiber optic cable system is comprised of these
components:
·
·
·
·
Cable Assemblies
Base Blocks
Splitter Blocks
Bypass Switches
For more information on SynchLink fiber optic cable components, see
Chapter 6, Planning a SynchLink Fiber Optic Cable System.
Planning System Installation
When planning your SynchLink fiber optic cable system installation:
1. Determine how many nodes will be in the SynchLink system.
2. Select the topology.
3. Determine the length of the fiber segments (each segment must
be < 300m).
Installing the System
When you install the SynchLink Fiber Optic Cable system, you use:
· SynchLink Hub, including the SynchLink Base Block and up to
four Splitter Blocks
· SynchLink Bypass Switch Block
· Fiber Optic Cables
Publication 1756-TD008A-EN-P - August 2002
5-5
Powering your System
To power your SynchLink fiber optic cable system:
1. Connect cables to nodes, hubs, or bypass switches in
accordance with your cable layout.
2. Power hubs and bypass switches in accordance with instructions
provided in their installation instructions.
IMPORTANT
Be certain that all blocks are attached and secured
prior to applying power to them. Failure to do so
may cause damage to the blocks.
Be certain to properly ground the DIN rails. Refer to
the instructions provided with the DIN rails.
Chapter Summary
In this chapter, you read about an overview of the SynchLink Fiber
Optic cable system.
Chapter 6 explains Planning a SynchLink Fiber Optic Cable System.
Publication 1756-TD008A-EN-P - August 2002
5-6
Notes:
Publication 1756-TD008A-EN-P - August 2002
Chapter
6
Planning a SynchLink Fiber Optic
Cable System
Read this chapter to plan your SynchLink fiber optic cable
system installation.
For more information about:
Developing a Plan
See page:
Developing a Plan
6-1
Selecting a Topology
6-2
Planning Installation of the System Components
6-3
Estimating Cable Lengths
6-4
The SynchLink fiber optic cable system is designed to be
user-constructed and installed. To take full advantage of this flexibility,
you should spend sufficient time planning your system’s installation
before assembling any of the hardware.
With a design analysis and, consequently, a system plan, you can
eliminate the potential for misapplication of media. The time and
effort spent planning your cable system installation is insignificant
compared to the time and effort required to locate and repair
damaged or improperly installed hubs, cables, and/or other cable
system components.
IMPORTANT
1
Since SynchLink lacks many features of a typical
network, we recommend that you use it in
conjunction with a ControlNet, EtherNet I/P, or
DeviceNet network for monitoring SynchLink node
status and other appropriate functions.
Publication 1756-TD008A-EN-P - August 2002
6-2
Selecting a Topology
The first step to using fiber media is to analyze your application and
determine the topology of your SynchLink system. Table 6.1 offers a
brief description of each SynchLink topology. For more information
on each of the SynchLink topologies, see Chapter 2, SynchLink
Topologies.
Table 6.1
SynchLink Topologies
Topology:
Brief description:
Star
A hub is placed in the physical center
of the link. Nodes are connected to
the hub like points on a star, and each
node has a direct, dedicated line to
the hub. Highlights include:
· Up to 17 hubs (1 primary and
16 secondary)
· Up to 257 nodes (1 Master,
256 Slaves)
· 300m cable segment length
(between any 2 nodes)
· Cabling is easier to
install and
maintain.
· If a node fails, is
powered down, or
disconnected from
the hub, it is the
only node affected.
· Faults are easier to
locate and isolate.
The hub is a single-point of
failure.
Daisy Chain
System starts at the Master Node
and ends at an End Node. You can
also include Center Nodes that
receive and transmit data as needed.
Highlights include:
· Up to 10 nodes, beginning at
Master Node and ending at End
Node
· 300m cable segment length
(between any 2 nodes)
· Topology does not
require a hub.
· Offers a bypass
switch, so you can
keep the link
running while one
or more nodes are
temporarily
powered down.
A node failure will bring
down the entire link.
Ring
Permutation of the daisy chain
configuration. In the ring
configuration, the SynchLink network
starts and ends at the Master Node.
Highlights include:
· Up to 10 nodes, beginning and
ending at Master Node
· 300m cable segment length
(between any 2 nodes)
· Topology does not
require a hub.
· Offers a bypass
switch, so you can
keep the link
running while one
or more nodes are
temporarily
powered down.
A node failure will bring
down the entire link.
Publication 1756-TD008A-EN-P - August 2002
Advantages:
Disadvantage:
6-3
Planning Installation of the
System Components
To achieve maximum signal quality and cable protection in a specific
environment with minimum cable usage, follow these steps:
1. Determine how many nodes will be in the SynchLink system.
2. Select the topology.
3. Identify the actual location of the SynchLink nodes, hubs, and
bypass switches (if applicable) using an equipment floor plan.
4. Identify the preliminary cable route. Cable should be readily
accessible when new nodes are added, existing nodes are
moved to new locations, or maintenance is performed.
5. Identify the environmental conditions (e.g. temperature,
humidity, exposure to hazardous chemicals) in the cable route.
6. Determine how to bypass physical and environmental obstacles
(e.g. walkways, induction heat sources, caustic chemical
operations, steam and condensation lines) in the cable route.
7. Determine the best type of cable installation (conduit, raceway,
or equivalent) for all cable segments in the cable route.
8. Calculate the cable segment length. Note that the cable path
distances should be considered in three dimensions. Each
segment must be <300m.
9. Document the cable layout. This document should describe the
network cable system design and installation and should be
maintained throughout the life of the network.
The document should include charts showing routes of all cable
segments, as well as locations of nodes, hubs, and bypass
switches. This information should be detailed enough to trace a
signal path between any two points in the cable system in the
event of a network failure or suspected problem.
10. Calculate the number of required cable system components and
select their types. Refer to Table 7.1 on page 7-2 for a list of
available components.
11. Select the tools and instruments necessary to perform the cable
system installation.
12. Select the proper personnel to perform the cable installation.
The fiber optic cables specified in this manual are flexible type
cables which can be installed by a trained plant electrician.
Publication 1756-TD008A-EN-P - August 2002
6-4
Estimating Cable Lengths
The SynchLink system requires the use of pre-terminated cable
assemblies. SynchLink fiber optic cable segments are limited to a
maximum of 300m. If your distance requirements are greater than
300m, you need to revise your floor plan.
IMPORTANT
Chapter Summary
Avoid jointing your cable. Splicing adapters can
cause considerable attenuation and limit the
maximum length of your system. Make sure to check
the attenuation of different cable sections after the
cable is installed.
In this chapter, you read about planning a SynchLink fiber optic
cable system.
Chapter 7 explains Installing a SynchLink Fiber Optic Cable System.
Publication 1756-TD008A-EN-P - August 2002
Chapter
7
Installing a SynchLink Fiber Optic
Cable System
This chapter describes how to install a SynchLink fiber optic
cable system.
For more information about:
See page:
Using Pre-terminated Fiber Cable
7-2
Using Cable System Components
7-2
Mounting and Removing Your Fiber Blocks
7-5
ATTENTION
When installing a SynchLink fiber optic cable
system, remember the following:
!
· Never look into a transmitter’s output or
the end of a cable with an active
transmitter connected.
· Do not look directly into the fiber ports.
Light levels may cause damage to your
eyesight.
· Never use a microscope to view an active
cable system. The concentration of light
from the microscope could cause
permanent damage to your eye.
SynchLink products are Class I LED
products.
1
Publication 1756-TD008A-EN-P - August 2002
7-2
Using Pre-terminated
Fiber Cable
Rockwell Automation offers simplex pre-terminated cable assembles
listed in Table 7.1. For information regarding other fiber products not
covered in this manual, consult your local fiber media distributor.
Using Cable System
Components
SynchLink fiber optic cable systems are built using components listed
in Table 7.1.
Table 7.1
SynchLink Fiber Optic Cable System Products
Product:
Catalog Number: Description:
Base Block
1751-SLBA
Base block
Splitter Block
1751-SL4SP
4-port splitter block
Bypass Switch Block
1751-SLBP
Bypass switch block
1m cable assembly (x2)
1403-CF001
1m pre-terminated 200 micron HCS cable segment
3m cable assembly (x2)
1403-CF003
3m pre-terminated 200 micron HCS cable segment
5m cable assembly (x2)
1403-CF005
5m pre-terminated 200 micron HCS cable segment
10m cable assembly
1403-CF010
10m pre-terminated 200 micron HCS cable segment
20m cable assembly
1403-CF020
20m pre-terminated 200 micron HCS cable segment
50m cable assembly
1403-CF050
50m pre-terminated 200 micron HCS cable segment
100m cable assembly
1403-CF100
100m pre-terminated 200 micron HCS cable segment
250m cable assembly
1403-CF250
250m pre-terminated 200 micron HCS cable segment
Fiber optic cables
Publication 1756-TD008A-EN-P - August 2002
7-3
Installation Guidelines for Fiber Blocks
Follow these guidelines when you plan and install your fiber blocks:
· Observe the environmental specifications for the fiber blocks as
outlined in each installation instruction.
· Avoid electrostatic and electromagnetic fields at installation sites.
· Avoid corrosive and inflammable gases, dust, conductive
particles, oil mist and organic solutions when choosing an
installation site.
· Prevent exposure to water or direct sunlight.
· Mount the blocks in a NEMA type enclosure.
· Allow a minimum of 2in (5cm) space from surrounding
equipment for proper ventilation.
· To maintain proper ventilation, do not mount the modules
upside down.
· Regardless of mounting position, the operating temperature
must not exceed 55°C (131°F) 1.0in (2.54cm) below each block.
· Make sure the bypass switch power is ON when the local
SynchLink node is powered down. If necessary, install the
bypass switch in an individual enclosure.
· Do not exceed the maximum specified length of power supply
and digital input wires. For bypass switch block specifications,
see page A-8.
Publication 1756-TD008A-EN-P - August 2002
7-4
· The total length of the fiber optic cable should not exceed 300m.
· In a star configuration, 300m is the maximum for any of the
following cable segments:
– between time master and base block
– between time slave and splitter block
– between base block of one hub and splitter block of another
hub
· In a daisy chain or ring configuration, 300m is the total length of
cable between two adjacent nodes. If bypass switches are used,
the maximum length is the sum of lengths of three cables, as
shown in Figure 7.1.
Figure 7.1
B
Bypass 1
Bypass 2
A
C
Node 1
Node 2
A + B + C < 300m
For more information on hubs and bypass switch blocks, refer to the
publications listed in Table 7.2. These documents are available at The
Automation Bookstore (www.theautomationbookstore.com).
Table 7.2
Publications Related to the Hubs and Bypass Switch Blocks
Publication 1756-TD008A-EN-P - August 2002
Publication Title:
Catalog
Number:
Publication
Number:
SynchLink Base Block Installation Instructions
1751-SLBA
1751-IN001
SynchLink 4-port Splitter Block Installation
Instructions
1751-SL4SP
1751-IN002
SynchLink Bypass Switch Block Installation
Instructions
1751-SLBP
1751-IN003
7-5
Mounting and Removing
Your Fiber Blocks
You can horizontally or vertically mount SynchLink blocks on a
standard 35mm DIN rail.
· To install the blocks, snap them on the DIN rail by hand.
· To remove components from the DIN rail, use a flat-blade
screwdriver.
An example of the DIN-rail mounted SynchLink hub is shown in
Figure 7.2.
ATTENTION
!
When properly installed, SynchLink blocks are
grounded through the DIN rail to chassis ground.
Use zinc-plated, yellow-chromated steel DIN rail to
assure proper grounding. Using other DIN rail
materials (e.g. aluminum, plastic, etc.) which can
corrode, oxidize, or are poor conductors can result
in improper or intermittent platform grounding.
Mount blocks only on zinc-plated, yellow-chromated
steel DIN rail. Refer to the blocks’ installation
instructions for more information.
Figure 7.2 DIN-Rail Mounted SynchLink Hub
DIN Rail
A-B part no. 199-DR1
DIN 46277-3
EN 50022 (35 x 7.5mm)
31205-M
Chapter Summary
In this chapter, you read about installing a SynchLink fiber optic
cable system.
Chapter 8 offers Guidelines for SynchLink Fiber Optic Cable
Installation.
Publication 1756-TD008A-EN-P - August 2002
7-6
Publication 1756-TD008A-EN-P - August 2002
Chapter
8
Guidelines for SynchLink Fiber Optic
Cable Installation
This chapter describes guidelines for cable installation.
For more information about:
Following General Rules for Safety
8-2
Guidelines for Handling Fiber Optic Cable
8-2
Direct Attachment
8-6
Direct Attachment
8-6
Indirect Attachment
8-6
Conduit and Duct Installation
8-7
Vertical Installation
8-9
IMPORTANT
1
See page:
This guide describes cable installation inside of a
manufacturing building. Other types of installations
of the SynchLink cable are not permitted.
Publication 1756-TD008A-EN-P - August 2002
8-2
Following General Rules
for Safety
The following section outlines specific rules and guidelines to follow
when you install SynchLink fiber optic cable systems.
SynchLink is designed to be user-constructed and installed. We offer
pre-terminated cable assemblies that allow you to easily install a
SynchLink fiber optic cable system.
Many of our customers are qualified to plan and install their own
SynchLink fiber optic systems. Rockwell Automation sells the
necessary components to implement an application but we do not
offer cable installation services. If your company does not have
qualified staff to install fiber optic cable you should contract a
specialist. When fiber optic cable installation is required to be
certified, it is important to select a cable installation specialist to assess
your needs and to install your fiber optic cable system.
The specialist you choose should install your cable following the
supplier’s installation instructions. Installation should include
complete documentation of cable routing and where every cable
segment is connected.
Guidelines for Handling Fiber Optic Cable
We encourage you to observe all of the guidelines listed in Table 8.1
when you handle fiber optic cables. These guidelines are designed to
protect the safety of everyone who handles, uses or works near fiber
optic systems. Also, the guidelines help establish an environment that
will allow you to get the greatest performance from your fiber optic
system
ATTENTION
!
When installing a SynchLink fiber optic cable
system, remember the following:
· Never look into a transmitter’s output or the
end of a cable with an active transmitter
connected.
· Do not look directly into the fiber ports. Light
levels may cause damage to your eyesight.
· Never use a microscope to view an active cable
system. The concentration of light from the
microscope could cause permanent damage to
your eye. SynchLink products are Class I LED
products.
Publication 1756-TD008A-EN-P - August 2002
8-3
Table 8.1 lists fiber optic cable handing guidelines.
Table 8.1
Guidelines for Handling Fiber Optic Cable
Guideline
Description
Minimum bend
radius
Observe the minimum fiber cable bend radius specified.
Skin Contact
Do not touch the ends of the fiber optic strands. The fiber can break
easily and pierce your skin.
Contamination
· Do not let the ends of a fiber optic cable come into contact with
dust, dirt, or other contaminants.
· Clean contaminated ends with a soft, clean, lintless cloth and
alcohol.
Protective caps
Attach protective caps onto fiber ports when they are disconnected.
Installation
training
Train personnel on usage of the installation tools to place and
terminate fiber cable, including training on hand-held tools, tension
meters, optical power meters, cleaners, and adhesives.
Installation
regulations
Observe all local regulations for installation including personal safety
equipment and the guidelines for its use.
Proper disposal
Always dispose of fiber waste. Disposing of fiber waste prevents the
contamination of clothes, fingers, or eyes of glass fragments. Do not
leave pieces of fiber cable on your work surfaces.
Specifications
· Review cable specifications for distances and required connectors.
· Review all cable parameters and specifications before installation.
Make sure that you have the proper amount of connectors and
installation equipment. Never attempt to use non-compatible
connectors and installation tools.
Pulling tensions
· Observe the maximum pulling tensions. Do not pull directly on fiber
or force cable into a bend radius less than the maximum allowable.
This will crack the glass and result in optic loss.
· The cable should never be pulled at a force greater than the
maximum allowable pulling tension. Excessive loads from bending
or pulling may cause fiber damage. Use a running line tension
meter to determine the pulling tension applied during cable
placement.
· Never allow tight loops, knots, kinks, or tight bends in the cable.
· The cable should not be pulled around any bends smaller than 20
times the cable diameter when under load and 10 times the cable
diameter at no load.
· Entrance in and out of metal pull boxes must be smooth as not to
damage the cable sheath
.
ATTENTION
!
Do not leave any fiber pieces on your work
surface. The glass is very small and can penetrate
your skin easily.
Publication 1756-TD008A-EN-P - August 2002
8-4
Cable Protection and
Isolation Recommendations
The cable installation should conform to all applicable codes.
IMPORTANT
In order to successfully apply the concepts and
techniques contained in this manual, you must have
a fundamental knowledge of electronics and
electrical codes.
Cable Protection
The fiber optic cable must be properly handled prior to and during
installation. Improper handling may result in cable damage and
require cable replacement. Use the following guidelines when
handling the fiber optic cable:
· Keep the cable ends tightly sealed during storage,
transportation, and installation of the cable. Keeping the cable
ends sealed will prevent exposure to moisture or other foreign
matter.
· Do not exceed the minimum bend radius of the cable during
storage or installation. Refer to Appendix B for cable
specifications. Bending the cable sharper than the recommended
minimum bend radius may decrease the reliability of the
SynchLink.
· Prevent the cable from contacting abrasive surfaces such as
concrete.
· Follow the cable pulling recommendations specified in sections
Chemical and Thermal Isolation and Physical Isolation.
Chemical and Thermal Isolation
The fiber optic cable must be protected from damage caused by:
· Oil, grease, acids, caustics, and other harsh and/or hazardous
chemicals that might damage the cable jacket and connectors.
· Water, steam, and other liquids.
· Open flame, steam lines, and any equipment with the
temperature higher than the cable operating temperature.
Publication 1756-TD008A-EN-P - August 2002
8-5
Physical Isolation
Use the following guidelines to prevent physical damage and wear of
the fiber optic cable:
· Protect the cable from abrasion, vibration, moving parts, and
personnel traffic.
· Avoid intersecting a cable route with the regular routes of
cranes, forklifts, and similar equipment.
· Prevent the cable from contacting abrasive surfaces such as
concrete.
Pre-Terminated Cable
Installation Guidelines
Cable Inspection and Testing
Inspect and test the cable before and after the installation to make
sure that the attenuation does not exceed the expected maximum
value of 12 dB/km.
Although cable assemblies are pretested before shipment, they can be
damaged when shipped or stored improperly. To measure cable
attenuation, use a power meter described on page 9-2.
Cable Pulling
Pull the cable manually, allowing sufficient slack in the cable so that
there is no tension on the cable or connectors when installed. Do not
“snap” or apply sudden tension to the cable. Never use a powered
cable puller without consulting the cable manufacturer and
monitoring the pulling tension. High pulling tensions, tight-fitting
conduits, and cable twisting can damage the cable.
Publication 1756-TD008A-EN-P - August 2002
8-6
Unterminated Cable
Installation Guidelines
If you pull unterminated cable, pull it prior to connector installation; it
becomes more difficult to protect fiber from stress after connectors
have been mounted. Connectors may be pre-installed on one end,
leaving the other end for pulling. Refer to the cable specifications and
manufacturer’s cable pulling instructions for additional information.
Cables should be lubricated prior to pulling to minimize the pulling
forces on the cables. Lubricants such as waxes, greases, clay slurries,
and water-based gels are compatible with most fiber optic jacket
materials.
It is necessary to identify the strength member and the optical fiber
location within the cable. Afterwards, a decision should be made to
choose a cable pull method - pull or indirect attachment to make sure
effective pulling without fiber damage. Never pull the cable by the
fiber strand.
Direct Attachment
The cable strength member is attached directly to a pulling eye. Since
epoxy glass central strength members are too rigid to tie, they may be
secured to the eye using tight clamping plates or screws.
Indirect Attachment
Indirect attachment uses a pulling grip attached to the cable’s outer
jacket to distribute the pulling force over the outer portion of the
cable. The pulling grip produces the least amount of stress in cables
where the strength member lies directly beneath the jacket.
Publication 1756-TD008A-EN-P - August 2002
8-7
Conduit and Duct Installation
Installation procedures for conduit and wire duct installation of fiber
optic cables are similar to those of electrical wires. Avoid yanking,
flipping, or wrapping cables; this can cause unnecessary tightening.
Fiber cable, electrical wires, small fiber optic cables should never be
subjected to foot traffic or potentially crushing forces.
The following is a procedure for conduit or duct installation.
1. Attach the towline to the cable using direct or indirect
attachment as described in previous section.
2. Establish two way communications between the cable payoff
station, intermediate hand assist stations, and the pulling station.
3. Use the following items for duct or cable tray replacements:
· adjustable lip clutch winch or equivalent
· tension monitoring system with continuous readout
· tow line that assures minimum friction
· dedicated inner duct, mainly for pulls in underground conduit
· cable end caps for use in flooded or unknown conduits and
sealing cable ends after placement
4. Position the cable reel and payoff frame for pulling.
5. Mount the cable reel into the payoff apparatus so that the cable
pays out from the top of the reel.
6. Attach the pulling grip to the cable and position the reel with its
flanges perpendicular to the floor or support foundation.
7. Secure the payoff frame so it cannot move during pulling.
8. Maintain enough slack on the cable as the pull starts to prevent
the cable from contacting any equipment in the area.
IMPORTANT
Do not allow slack loops to form on the reel. Slack
loops could cause a crossover and damage the cable.
Always pull at slow speeds to limit the possibility of
crossovers.
Plan your pull to avoid a pull equaling or exceeding the total
bends to 360° per pull. If it is not possible to avoid a pull of
360°, install an intermediate junction box within the 360° pull.
Plan on manually handling the cable along the pull route to help
limit the bends.
Publication 1756-TD008A-EN-P - August 2002
8-8
9. Position the winch at the pull station to avoid a steep angle
either entering the duct or exiting the cable tray.
IMPORTANT
Do not exceed the maximum pulling tension for
your fiber optic cable.
10. Leave enough extra cable to route to the equipment rack, put
connectors on, and allow for future repairs when your pull is
complete.
11. Cut off the pulling grip and the first 3 feet (1 meter) of cable
behind it.
12. Terminate the cable.
13. Measure and record optical cable loss using a fiber optic power
meter.
14. Seal the ends of the cable until they are connected.
In some applications you may have to start your pull in the middle of
a duct or conduit and pull in both directions. In this scenario, pull in
the first direction using the reel and payoff frame. In the other
direction, lay out the cable in a figure 8 pattern on the floor. When the
second pull begins, hand feed the cable into the duct system.
IMPORTANT
Publication 1756-TD008A-EN-P - August 2002
Be certain to clear the floor of dust, debris, and dirt
before placing the cable on the floor.
8-9
Vertical Installation
The requirements of your application may require a vertical
installation. You can install fiber optic cable vertically in trays, shafts,
or towers. Dielectric cables are recommended for applications
requiring high vertical installations.
Plans for Vertical Cable Installation
Use the following guidelines when planning a vertical cable
installation.
1. Clamp cable to give extra support while preventing ice loading
and wind slapping.
Your specific environment determines where you should clamp
your cable. Clamping intervals can be as short as 3 feet (1 meter)
and as long as 50 to 100 feet (15 to 30 meters) in interior
locations.
Cables in vertical cable shafts are generally clamped directly to
the walls of the shaft.
Cables installed in elevator shafts are usually supported by
suspension strands and suspended from the top of the shaft. The
suspension strand is attached to the wall at frequent intervals
and at the bottom of the shaft. Consult your local codes and
practices for installation in an elevator shaft.
2. Plan cable runs that keep bends to a minimum.
3. Drill all holes for the entire run large enough to accommodate
steel sleeves when passing cables through walls and floors.
The inside diameter of steel sleeves should be 4 times the
diameter of the cable. The minimum diameter of a steel sleeve is
2in (5cm).
Steel sleeves are required to run cable through a firewall.
Consult your local codes and practices for installations through
firewalls.
4. Measure and record optical cable loss using a fiber optic
power meter.
5. Seal the ends of the cable until they are connected.
Publication 1756-TD008A-EN-P - August 2002
8-10
Chapter Summary
In this chapter you read about guidelines for fiber optic
cable installation.
Chapter 9 explains Maintenance and Troubleshooting.
Publication 1756-TD008A-EN-P - August 2002
Chapter
9
Maintenance and Troubleshooting
This chapter describes how to maintain and troubleshoot your fiber
optic cable system.
For more information about:
Cable System Maintenance
See page:
Cable System Maintenance
9-1
Measuring Power Loss
9-2
Even if the installation is done properly, the SynchLink cable system
may still experience some unexpected downtime. This may be due to
gradual degradation of the cable system components or changes in
the environmental conditions along the cable path. Because of this,
some limited preventative maintenance is required.
The recommended maintenance includes:
· Cable System Documentation Maintenance
· Cable System Design Maintenance
· Cable System Inspection
Cable System Documentation Maintenance
During the life of the SynchLink system, make sure you update the
cable system documentation when changes are made to the
SynchLink configuration.
Cable System Design Maintenance
When old equipment is relocated or new equipment is installed, new
sources of heat, hazardous chemicals, and other changes in the cable
system environment occur. Evaluate the effect these changes have on
the performance of the SynchLink. If necessary, take corrective action,
such as rerouting certain cable segments.
1
Publication 1756-TD008A-EN-P - August 2002
9-2
Cable System Inspection
Inspect the cable system periodically, including testing cable loss as
described in the next section. Make sure you properly document
all tests.
Measuring Power Loss
You should test each cable segment before and after its installation to
verify that cable attenuation does not exceed 12dB/km. This test is
called power loss measurement and is conducted using an optical
power meter.
We recommend you use a test kit that includes a light source and a
power meter. The power source must emit light at nominal
wavelength of 640nm (red) only or you get incorrect results. Follow
the manufacturer’s instructions for the power loss measurement
procedure.
The test kit example is the T701 Test Kit with the H-P HFBR-4501
adapter. Fotec Incorporated manufactures the test kit and can be
contacted by:
· phone - 800.537.8254 in the United States
· internet - http://www.fotec.com
Always record and maintain records for attenuation levels for each
cable segment. The attenuation records are valuable tools for
troubleshooting and maintaining your cable system.
Considerable power loss in your cable could be a result of:
·
·
·
·
·
Chapter Summary
improper bend radius
bending losses
broken fibers
poor connections
contaminated or damaged connectors
In this chapter, you read about maintenance and troubleshooting.
Appendix A lists the Specifications for the ControlLogix SynchLink
module, ControlLogix Drive modules and PowerFlex 700s DriveLogix
drives.
Publication 1756-TD008A-EN-P - August 2002
Appendix
A
Specifications
This appendix lists specifications for the following products:
·
·
·
·
·
·
1756-SYNCH SynchLink module
1756-DMxxx Series Drive module
PowerFlex 700S Drive
1751-SL4SP SynchLink 4-Port Splitter Block
1751-SLBA SynchLink Base Block
1751-SLBP SynchLink Bypass Switch Block
Table 1.1
1756-SYNCH SynchLink Module Specifications
Module Location
1756 ControlLogix Chassis
Backplane Current
1.2A @ 5.1V dc & 3mA @ 24V dc
Maximum Power Dissipation
6.19W
Thermal Dissipation
21.1 BTU/hr
Connecting Cable
1
Fiber Type
200/230 micron HCS (Hard Clad Silica)
Fiber Termination Type
Versalink V-System
Assemblies
Cable assemblies can be ordered from Rockwell
Automation, catalog number 1403-CFxxx
(xxx = length in meters); or from Lucent
Technologies, Specialty Fiber Technologies division.
Maximum Length
300m
Minimum Length
1m
Operating Wavelength
650nm (red)
SynchLink Data Rate
5Mbps
Type of Communication
Synchronous
Frame Parameters
3 Flags - 3 bytes
Control field - 1 byte
Data field - 24 bytes
CRC field - 2 bytes
Publication 1756-TD008A-EN-P - August 2002
A-2
Table 1.1
1756-SYNCH SynchLink Module Specifications
Frame Period
50ms
Indicators
Green and red indicators for operation,
status and diagnostics
Environmental Conditions1
Operating Temperature
0ºC - 60ºC (32ºF - 140ºF)
Storage Temperature
-40ºC - 85ºC (-40ºF - 185ºF)
Relative Humidity
5 to 95%, 0ºC - 60ºC non-condensing
Shock
Operating
30g peak acceleration, 11 ( ± 1)ms pulse width
Non-Operating
50g peak acceleration, 11 ( ± 1)ms pulse width
Vibration
Agency Certifications
Tested 2g @ 10-500Hz per IEC 68-2-6
Listed Industrial Control Equipment
Certified Process Control Equipment
Certified Class I, Division 2, Groups A, B, C, D
Marked for all applicable directives
Marked for all applicable acts
N223
1
Publication 1756-TD008A-EN-P - August 2002
This product must be mounted within a suitable system enclosure to prevent personal injury resulting from
accessibility to live parts. The interior of this enclosure must be accessible only by the use of a tool. This
industrial control equipment is intended to operate in a Pollution Degree 2 environment, in overvoltage
category II applications, (as defined in IEC publication 664A) at altitudes up to 2000 meters without
derating.
A-3
Table 1.2
1756-DMxxx Drive Module Specifications
Operating Wavelength
SynchLink
Drive Communication
650nM (red)
820nM (red)
Data Rate
SynchLink
Drive Communication
5M bit/s
10M bit/s
SynchLink Connecting Cable
Fiber Type
200/230 micron HCS (Hard Clad Silica)
Fiber Termination Type
Versalink V-System
Assemblies
Cable assemblies can be ordered from Rockwell
Automation, catalog number 1403-CFxxx (xxx =
length in meters); or from Lucent Technologies,
Specialty Fiber Technologies division.
Maximum Length
300m
Minimum Length
1m
Drive Communication Cable
Fiber Type
1mm Plastic or 200M Glass Fiber
Assemblies
Cable assemblies can be ordered from Rockwell
Automation, catalog number 1756-DMCFxxx (xxx =
length in meters); or from Belden P/N 225362 or
Mohawk P/N M92021, 62.5 micron Duplex Fiber
Optic cable.
Maximum Length
300m
Minimum Length
1m
SynchLink Maximum Node Count
10 - daisy chain, 256 - star configuration
(w/ multiplexing blocks)
Drive Communication Maximum
Node Count
1 - PMI chassis
Backplane Current
1.35A @ 5.1V dc
3.0 mA @ 24V dc
Power Dissipation
6.96W maximum, 23.7 BTU/hour
Environmental Conditions
Operating Temperature
0ºC - 60ºC (32ºF - 140ºF)
Storage Temperature
-40ºC - 85ºC (-40ºF - 185ºF)
Relative Humidity
5 to 95%
Shock
Operating
30g peak acceleration, 11 ( ± 1)ms pulse width
Non-Operating
50g peak acceleration, 11 ( ± 1)ms pulse width
Vibration
Agency Certifications
Tested 2g @ 10-500Hz per IEC 68-2-6
Listed Industrial Control Equipment
Non-Hazardous
Certified Class I, Division 2, Groups A, B, C, D
Marked for all applicable directives
Publication 1756-TD008A-EN-P - August 2002
A-4
Table 1.3
PowerFlex 700S AC Drive and 700S DriveLogix AC Drive Specifications
Operator
Interface
LCD HIM places drive information in a 7-line by 21-character display that
supports a variety of languages
3-Phase Voltage
200-240V, 400-480V, 500-600V, 690V + 10%
Common DC Bus
Voltage Ratings
325V, 650V, 810V, 930V
Frequency
47-64Hz
Output Voltage
Adjustable from 0V to rated motor voltage
Frequency Range
0-400Hz
Intermittent
Current
To 110% for 60s, 150% for 3s
Instantaneous
Over Current Trip
TBD
Enclosure
Ambient
Operating
Temperature
NEMA Open Type (I/P00)0ºC - 50ºC (32ºF - 122ºF)
NEMA Type 10ºC - 40ºC (32ºF - 104ºF)
IP20 0ºC - 50ºC (32ºF - 122ºF)
Dimensions
(HxWxD) and
Ratings
Frame 1
389in x 200in x 200in (15.31mm x 7.87mm x 7.87mm)
Power
Class
Amps
Continuous
Amps for
60s
Amps for 3s
0.5 to 15Hp
480
14 to 22
16.5 to 24.2
22 to 33
0.37 to 11kW 400
15.4 to 22
17.2 to 24.2
23.1 to 33
0.37 to
5.5kW (0.5 to
7.5Hp)
200
15.3
17.4 to 24.2
23.2 to 33
TBD
600
TBD
TBD
TBD
Publication 1756-TD008A-EN-P - August 2002
A-5
Table 1.3
PowerFlex 700S AC Drive and 700S DriveLogix AC Drive Specifications
Dimensions
(HxWxD) and
Ratings
Agency
Certifications
Frame 2
389in x 200in x 200in (15.31mm x 7.87mm x 7.87mm)
Power
Class
Amps
Continuous
Amps for
60s
Amps for 3s
20 to 25Hp
480
27 to 34
33 to 40.5
44 to 54
15 to 18.5kW 400
30 to 37
33 to 45
45 to 60
7.5kW (10Hp) 200
28
33
44
TBD
600
TBD
TBD
TBD
Frame 3
564in x 200in x 200in (22.20mm x 7.87mm x 7.87mm)
Power
Class
Amps
Continuous
Amps for
60s
Amps for 3s
30 to 40Hp
480
40 to 52
51 to 60
68 to 80
22kW
400
43
56
74
11kW
(15 to 20Hp)
200
42 to 54
46.2 to 63
63 to 84
TBD
600
TBD
TBD
TBD
Listed Industrial Control Equipment
Non-Hazardous
Certified Class I, Division 2, Groups A, B, C, D
Marked for all applicable directives
Marked for all applicable acts
N223
Publication 1756-TD008A-EN-P - August 2002
A-6
Table 1.4
1751-SL4SP SynchLink 4-Port Splitter Block Specifications
Communication Rate
5M bit/s
Splitter Block Power Consumption
0.300 A @ 5.1V dc
5V dc input from 1751-SLBA
Environmental Conditions1
Operating Temperature
0ºC - 60ºC (32ºF - 140ºF)
Storage Temperature
-40ºC - 85ºC (-40ºF - 185ºF)
Relative Humidity
5 to 95%, 0ºC - 60ºC non-condensing
Shock
Operating
30g peak acceleration, 11 ( ± 1)ms pulse width
Non-Operating
50g peak acceleration, 11 ( ± 1)ms pulse width
Vibration
Tested 5g @ 10-500Hz per IEC 68-2-6
Fiber Optic Cable
Fiber Type
200/230 micron HCS (Hard Clad Silica)
Fiber Termination Type
Versalink V-System
Assemblies
Cable assemblies can be ordered from Rockwell
Automation, catalog number 1403-CFxxx
(xxx = length in meters); or from Lucent
Technologies, Specialty Fiber Technologies division.
Maximum Length
300m
Minimum Length
1m
Agency Certifications
Listed Industrial Control Equipment
Certified Process Control Equipment
Certified Class I, Division 2, Groups A, B, C, D
Marked for all applicable directives
Marked for all applicable acts
N223
1
Publication 1756-TD008A-EN-P - August 2002
This product must be mounted within a suitable system enclosure to prevent personal injury resulting from
accessibility to live parts. The interior of this enclosure must be accessible only by the use of a tool. This
industrial control equipment is intended to operate in a Pollution Degree 2 environment, in overvoltage
category II applications, (as defined in IEC publication 664A) at altitudes up to 2000 meters without
derating.
A-7
Table 1.5
1751-SLBA SynchLink Base Block Specifications
Power Supply
To comply with CE Low Voltage directives, you must
use a Safety Extra Low Voltage (SELV) or a Protected
Extra Low Voltage (PELV) power supply to power this
base block.
Use a NEC/CEC Class 2 power supply in order to
comply with UL and CSA requirements.
Input Voltage Rating
24V dc nominal
Input Voltage Range
20V dc to 30V dc
A regulated power supply is recommended.
Power Consumption
600mA maximum from external 24V supply based on
worst case block loading (four splitters)
Output Voltage Rating
5.1V dc nominal
Communication Rate
Environmental Conditions
5M bit/s
1
Operating Temperature
0ºC - 60ºC (32ºF - 140ºF)
Storage Temperature
-40ºC - 85ºC (-40ºF - 185ºF)
Relative Humidity
5 to 95%, 0ºC - 60ºC non-condensing
Shock
Operating
30g peak acceleration, 11 ( ± 1)ms pulse width
Non-Operating
50g peak acceleration, 11 ( ± 1)ms pulse width
Vibration
Tested 5g @ 10-500Hz per IEC 68-2-6
Fiber Optic Cable
Fiber Type
200/230 micron HCS (Hard Clad Silica)
Fiber Termination Type
Versalink V-System
Assemblies
Cable assemblies can be ordered from Rockwell
Automation, catalog number 1403-CFxxx
(xxx = length in meters); or from Lucent
Technologies, Specialty Fiber Technologies division.
Maximum Length
300m
Minimum Length
1m
Power Conductors
Wire Size
12 gauge maximum, 24 gauge minimum (#12 AWG
to 24 AWG), stranded
Category
22
Maximum Length
3m
Publication 1756-TD008A-EN-P - August 2002
A-8
Table 1.5
1751-SLBA SynchLink Base Block Specifications
Agency Certifications
Listed Industrial Control Equipment
Certified Process Control Equipment
Certified Class I, Division 2, Groups A, B, C, D
Marked for all applicable directives
Marked for all applicable acts
N223
1
This product must be mounted within a suitable system enclosure to prevent personal injury resulting from
accessibility to live parts. The interior of this enclosure must be accessible only by the use of a tool. This
industrial control equipment is intended to operate in a Pollution Degree 2 environment, in overvoltage
category II applications, (as defined in IEC publication 664A) at altitudes up to 2000 meters without
derating.
2
Use this category information for planning conductor routing as described in publication 1770-4.1,
“Industrial Automation Wiring and Grounding Guidelines.”
Table 1.6
1751-SLBP SynchLink Bypass Switch Block Specifications
Power Supply
To comply with CE Low Voltage directives, you must
use a Safety Extra Low Voltage (SELV) or a Protected
Extra Low Voltage (PELV) power supply to power this
bypass switch block.
Use a NEC/CEC Class 2 power supply in order to
comply with UL and CSA requirements.
Input Voltage Rating
24V dc nominal
Input Voltage Range
20V dc to 30V dc
A regulated power supply is recommended.
Communication Rate
5M bit/s
Bypass Switch Block Power
Consumption
150mA maximum from external 24V dc supply
Environmental Conditions1
Operating Temperature
0ºC - 60ºC (32ºF - 140ºF)
Storage Temperature
-40ºC - 85ºC (-40ºF - 185ºF)
Relative Humidity
5 to 95%, 0ºC - 60ºC non-condensing
Shock
Operating
30g peak acceleration, 11 ( ± 1)ms pulse width
Non-Operating
50g peak acceleration, 11 ( ± 1)ms pulse width
Vibration
Publication 1756-TD008A-EN-P - August 2002
Tested 5g @ 10-500Hz per IEC 68-2-6
A-9
Table 1.6
1751-SLBP SynchLink Bypass Switch Block Specifications
Fiber Optic Cable
Fiber Type
200/230 micron HCS (Hard Clad Silica)
Fiber Termination Type
Versalink V-System
Assemblies
Cable assemblies can be ordered from Rockwell
Automation, catalog number 1403-CFxxx
(xxx = length in meters); or from Lucent
Technologies, Specialty Fiber Technologies division.
Maximum Length
300m
Minimum Length
1m
Power Conductors
Wire Size
12 gauge maximum, 24 gauge minimum (#12 AWG
to 24 AWG), stranded
Category
22
Maximum Length
3m
Digital Input
Isolated, sinking
ON-State Voltage
ON-State Current
12V dc minimum
24V dc nominal
30V dc maximum
12mA nominal @ 24V dc
OFF-State Voltage
8V dc maximum
Isolation Voltage
850V dc
Conductors
Use shielded two-conductor cable
Wire Size
12 gauge maximum, 24 gauge minimum (#12 AWG
to 24 AWG), stranded
Category
22
Maximum Length
10m
Agency Certifications
Listed Industrial Control Equipment
Certified Process Control Equipment
Certified Class I, Division 2, Groups A, B, C, D
Marked for all applicable directives
Marked for all applicable acts
N223
1
This product must be mounted within a suitable system enclosure to prevent personal injury resulting from
accessibility to live parts. The interior of this enclosure must be accessible only by the use of a tool. This
industrial control equipment is intended to operate in a Pollution Degree 2 environment, in overvoltage
category II applications, (as defined in IEC publication 664A) at altitudes up to 2000 meters without
derating.
2
Use this category information for planning conductor routing as described in publication 1770-4.1,
“Industrial Automation Wiring and Grounding Guidelines.”
Publication 1756-TD008A-EN-P - August 2002
A-10
Publication 1756-TD008A-EN-P - August 2002
Appendix
B
SynchLink Fiber Optic Cable Description
Advantages of Fiber
Fiber media holds many advantages over traditional copper media.
Because fiber optic media transmits digitized information via light
pulses over glass or plastic fibers, it avoids many of the problems
common with copper applications.
ATTENTION
If you are going to use fiber in an intrinsically safe
area, consult with your local safety coordinator.
!
Table B.1 lists the benefits to using fiber media.
Table B.1
The Features and Benefits of Fiber Media
1
Feature:
Benefit:
Electrical Isolation
Fiber media is isolated from any potential electrical
sources that cause disruptions on copper media.
Immunity to Interference
Fiber media is immune to electromagnetic interference
(EMI) because it uses light pulses on glass fibers. Fiber
media is also effective in noisy environments (heavy
machinery, multiple cable systems, etc.) where copper
could suffer disruptions.
Longer Distances
A fiber media has less loss than copper. The less loss in
fiber media means fewer repeaters than traditional
media, making fiber more effective for applications
requiring long distance media connections. Fiber’s signal
capacity is ideal for a deterministic control network.
Decreased Size and Weight
Fiber media is smaller and lighter than copper media.
Entry into Hazardous Areas
Fiber media may provide a way to carry information into
hazardous areas, reducing the risk of injury.
Publication 1756-TD008A-EN-P - August 2002
B-2
Optical Fiber Construction
Optical fiber consists of three major elements:
· buffer and coating
· core
· cladding
as shown in Figure 2.1. For more information on the three major
parts, see Table B.2.
Figure 2.1
Coating
Core
Cladding
Table B.2
Publication 1756-TD008A-EN-P - August 2002
Optical Fiber
Elements:
Description:
Buffer and Coating
The buffer and coating are the material that surround the glass
fiber. They are responsible for protecting the fiber strands from
physical damage.
Core
The core is the cylinder consisting of glass fiber which carries
information in the form of light pulses.
Cladding
The cladding is a material that provides internal reflection so
that the light pulses can travel the length of the fiber without
escaping from the fiber.
B-3
Hard Clad Silica Fiber
The SynchLink cable system is designed for use with a 200 micron
(step index multi-mode) Hard Clad Silica (HCSÒ) fiber. HCS fibers are
coated with a patented hard polymer cladding that provides higher
tensile strength, greater resistance to moisture, and lower
microbending losses than conventional coatings.
HCS Cable Construction
The HCS cable is the core of the HCS fiber and is reinforced with
aranid yarn-strength members and covered with a PVC outer jacket.
The cable specification is shown in Table B.3.
Table B.3
HCS Cable Specification
Cable Construction
Simplex
Fiber Core Diameter (mt)
200
Fiber Part Number
CF01493-10
Attenuation @ 650nm (dB/km)
<12
Outer Cable Diameter (mm)
2.2
Outer Jacket Material
PVC
Standard Jacket Color
Blue
Cable Weight (kg/km)
6.1
Minimum Short-Term Pull Tension (lbs/N)
23/102
Maximum Long-Term Tension (lbs/N)
5/22
Break Strength (lbs/N)
34/151
Minimum Bend Radius (mm)
15
Operating Temperature (oC)
-40 to +85
Storage Temperature (oC)
-40 to +85
Flammability Rating
OFNR
Lucent Technologies, Specialty Fiber Technologies manufactures the
HSC fiber, fiber optic cable, and cable assemblies.
Publication 1756-TD008A-EN-P - August 2002
B-4
Cable Assemblies
The SynchLink cable assemblies listed in Table B.4 are manufactured
from 200/230 micron/simplex cable with a Versalink (V-Link) V-pin
connections at the ends.
ATTENTION
!
· Never look into a transmitter’s output or the end
of a cable with an active transmitter connected.
· Do not look directly into the fiber ports. Light
levels may cause damage to your eyesight.
· Never use a microscope to view an active cable
system. The concentration of light from the
microscope could cause permanent damage to
your eye. SynchLink products are Class I LED
products.
Table B.4
Fiber Optic Cable Assemblies Specifications
Cable Segment Length
300m maximum(1)
1m minimum
Cable Splicing
Not permitted
Operating Wavelength
650nm (red) nominal
Cable Attenuation
12 dB/km maximum at 650nm
(1)
Publication 1756-TD008A-EN-P - August 2002
The maximum cable length is calculated differently, depending on topology. For more information, see page 74.
Glossary
Attenuation
The light loss of the fiber cable, specified in dB/km.
Base Block
A block that converts optical signals received from a SynchLink node
into electrical signals and then “retimes” and “retransmits” the signals
simultaneously to a maximum of four splitter blocks. The base block
also supplies power to splitter blocks.
Beacon Signal
Transmission beginning with the SynchLink time master that is
transferred between SynchLink nodes and used to maintain time
synchronization; the beacon is included in the control field of the
transmitted message. When SynchLink nodes receive the message
with the beacon signal, they adjust the 1mS time base of their
respective node clocks to synchronize with the time master node
clock.
BER (Bit Error Rate)
The primary method of describing the data error rate. An acceptable
error rate is 1 × 10-9 bit errors (or 1 error in 1000 Mbits transmitted).
Bend Radius
The maximum amount the cable can be bent and still function up to
specification.
Buffer
The material surrounding the fiber (core, cladding, coating) that
protects the fiber from physical damage. Tight buffers are in direct
contact with the fiber. Loose-tube buffers provide a free environment
for the fiber to float.
Buffered data
Data exchanged between SynchLink nodes. The data is appropriately
segmented at the transmitting module and reassembled at the
receiving module. Buffered data cannot be automatically forwarded to
the next node in the daisy chain configuration.
1
Publication 1756-TD008A-EN-P - August 2002
Glossary
2
Bypass Switch Block
A block used in the daisy chain and ring configurations to bypass a
node temporarily disconnected from the SynchLink system.
Center node
A node in the SynchLink Daisy Chain or Ring configuration that
receives data and transmits data.
Cladding
A layer of material surrounding the core of a fiber.
Coating
A protective plastic material surrounding the cladding.
Communications format
Format that defines the type of information transferred between an
I/O module and its owner controller. This format also defines the tags
created for each I/O module.
Compatible match
An electronic keying protection mode that requires the physical
module and the module configured in the software to match
according to vendor, catalog number and major revision. In this case,
the minor revision of the module must be greater than or equal to that
of the configured slot.
Connection
The communication mechanism from the controller to another module
in the control system.
Coordinated system time (CST)
Clock that is used in:
· all modules in a single ControlLogix chassis
or
· all ControlLogix chassis in a distributed control system.
The SynchLink system can synchronize this clock value across chassis.
Publication 1756-TD008A-EN-P - August 2002
Glossary
3
Core
The central cylinder of a fiber that is made of plastic or glass.
Daisy chain configuration
SynchLink configuration that begins with a master node and ends at
an end node. Center nodes may be used between the master and end
in this configuration.
dB
A unit of measure for loss or gain of power described as 10 × log
(Pout/Pin).
dBM
A power level referenced to 1mw, described as 10 × log
(Poptical/1mw)
Direct data
Data delivered in a single message. A SynchLink message can allocate
a maximum of four words. Direct data can be automatically forwarded
to the next node in the daisy chain configuration.
Disable keying
Option that turns off all electronic keying to the module. Requires no
attributes of the physical module and the module configured in the
software to match.
Download
The process of transferring the contents of a project on the
workstation into the controller.
Drive Communication
A fiber optic communications link that connects the Drive Module to a
Reliance Electric Power Module Interface (PMI) chassis.
Distributed Power System (DPS)
A family of Reliance Electric drive products.
Publication 1756-TD008A-EN-P - August 2002
Glossary
4
Electronic keying
A system feature which makes sure that the physical module attributes
are consistent with what was configured in the software.
Exact match
An electronic keying protection mode that requires the physical
module and the module configured in the software to match
identically, according to vendor, catalog number, major revision and
minor revision.
End node
A node in SynchLink Star and Daisy chain configurations that only
receives data.
Fiber Optic Cable Segment
A fiber optic cable connecting any two physical devices including
nodes, hubs, and bypass switches. This simplex cable connects the
transmitter of one device with the receiver of another.
Field side
The interface between user field wiring and I/O module.
Hub
A modular, multi-port distribution unit in the star configuration that
consists of a single base block and up to 4 splitter blocks.
Unidirectional data passes through the hub.
Inhibit
A ControlLogix process that allows you to configure a SynchLink
module but prevent it from communicating with the owner controller.
In this case, the controller does not establish a connection.
Insertion Loss
A loss in dB caused by the disruption of light when an object is
inserted in the light path (a connector, bulkhead, splice or cable).
Listen-only connection
An I/O connection that allows a controller to monitor I/O module
data without owning the module.
Publication 1756-TD008A-EN-P - August 2002
Glossary
5
Loss
see Attenuation
Major revision
A module revision that is updated any time there is a functional
change to the module resulting in an interface change with software.
Master node
A node in any SynchLink configuration that serves as the time master.
Minor revision
A module revision that is updated any time there is a change to the
module that does not affect its function or software user interface
(e.g. anomaly fix).
Multimode
A class of fibers where the light travels in multiple paths down the
fiber core.
Owner controller
The controller that creates and stores the primary configuration and
communication connection to a module.
Plastic Clad Silica Fiber
A step-index fiber made from silica core and a plastic cladding.
Plastic Fiber
A fiber consisting only of plastic with usually higher attenuation rates
than glass.
Power Module Interface (PMI)
The portion of the DPS equipment that receives Drive Communication
from the Drive Module and directly controls the power structure.
Receive Port Communications Format
The communications format used in a ControlLogix SynchLink module
for all data the module receives on its fiber optic receive port.
Publication 1756-TD008A-EN-P - August 2002
Glossary
6
Receiver
Device that produces logic levels in a fiber optic system by using
photo diodes, resistors, amplifiers, and level shift circuits.
Remote Axis Data
Motion data used by the motion planner in the controller. The
1756-SYNCH module can consume an Axis tag from a controller and
pass it over SynchLink. A controller in another chassis can then
consume axis tags passed over SynchLink from the 1756-SYNCH
module in that chassis.
Removal and Insertion Under Power (RIUP)
A ControlLogix feature that allows a user to install or remove a
module while power is applied.
Ring Configuration
SynchLink configuration that begins with the master node.
Unidirectional data passes from the master node to up to nine other
nodes and then back to the master node.
RSLogix 5000
The programming software for any ControlLogix system.
Splice
A connection in the fiber designed to increase the distance of the
fiber.
Splitter Block
A 4-port block that converts electrical signals received from the base
block into optical signals and retransmits them through four output
ports.
Star configuration
A SynchLink topology where a hub is the physical center of the link
and acts as a multi-port repeater that contains one receive and up to
16 transmit ports. SynchLink nodes are connected to the hub. Each
node has its own direct, dedicated line to the hub. The Master node
transmitter is connected to the hub receiver. The receiver of each of
the Slave nodes is connected to an appropriate hub transmitter. The
Master node receiver and Slave node transmitters are not connected.
Messages transmitted by the Master node are retransmitted (repeated)
simultaneously to all Slave nodes by the hubs.
Publication 1756-TD008A-EN-P - August 2002
Glossary
7
SynchLink
A unidirectional fiber optic communications link that provides time
synchronization and data broadcasting. These functions are used for
distributed motion and coordinated drive control systems based on
ControlLogix and PowerFlex 700S products.
SynchLink Fiber Optic Cable System
A fiber optic cable system consisting of cable segments and
(depending on topology), hubs, or bypass switches.
SynchLink Node
A device that operates on the SynchLink for time synchronization
and/or high speed data transfer, including:
· 1756-SYNCH module
· 1756-DMD30 & 1756-DMF30 modules
· PowerFlex 700S drive
SynchLink Node Clock
A base-line requirement of any product incorporating SynchLink and
integral to all devices that contain SynchLink circuitry. The SynchLink
node clock has a 1mS resolution and serves as the system clocking
mechanism.
SynchLink System
A control system consisting of a set of nodes connected via a fiber
optic cable system.
SynchLink Update
Each SynchLink Update takes 50mS. During each SynchLink Update,
the module transmits all direct words once, and one or two buffered
words, depending on the communications format.
Synchronize
A process where multiple devices operate at the same time or
maintain a matching time reference.
Time master
A device (e.g. SynchLink module) that is configured to establish the
time reference for a ControlLogix chassis or SynchLink system.
Publication 1756-TD008A-EN-P - August 2002
Glossary
8
Time relay
A device that is configured to pass a time reference between a
ControlLogix chassis backplane and a SynchLink fiber.
Time slave
A device (e.g. SynchLink module) that is configured to receive the
time reference from the CST Time Master (located in a ControlLogix
chassis) or upstream node in a SynchLink system.
Timestamp
A ControlLogix process that stamps a change in input data with a time
reference of when the change occurred.
Topology
The physical arrangement of SynchLink nodes. Each arrangement is
designed to best fit particular SynchLink applications. The following
topologies are available in SynchLink.
· Star Topology
· Daisy Chain Topology
· Ring Topology
Transmit port communications format
The communications format used in a ControlLogix SynchLink module
for all data the module transmits on its fiber optic transmit port.
V-Scan
The Drive module performs a V-Scan every 500mS. During the V-Scan,
the module updates the parameters linked to the transmit words, and
reads the receive words linked to control parameters. After each
V-Scan the module performs nine SynchLink updates.
Publication 1756-TD008A-EN-P - August 2002
Index
Numerics
1751-SL4SP Specifications A-6
1751-SLBA Specifications A-7
1751-SLBP Specifications A-8
1756-DMxxx Series Module 3-3
1756-DMxxx Series Specifications A-3
1756-SYNCH Module 3-1
1756-SYNCH Specifications A-1
A
Attaching Unterminated Fiber Cable
Directly 8-6
Indirectly 8-6
Axis Data 1-7, 1-9
Passing to the next node 1-7
Transmitting with the SynchLink module
3-2, 4-3
B
Base Block 3-7, 7-2, 7-4
Beacon Signal 1-3, 1-4, 1-5
Buffered Data 1-7
Transmitting to the next node 1-7
Transmitting with the drive module 3-4
Transmitting with the PowerFlex 700S
drive 3-5
Transmitting with the SynchLink module
3-2
Bypass Switch 3-8, 7-2, 7-4
C
CE Certification
Drive module 3-4
SynchLink module 3-2
Center Node
In a daisy chain topology 2-3
In a ring topology 2-4
Chemical Isolation for Fiber Optic Cable
8-4
Class I Division 2 Certification
Drive module 3-4
SynchLink module 3-2
Conduit
As affects fiber optic cable installation
8-7
Configuring SynchLink 3-11
Using DriveExecutive 2-1
Using RSLogix 5000 2-1
ControlLogix Clock
Using the CST 1-4, 1-5
Coordinated System Time 1-4, 1-5
Usage in the drive module 4-4
Usage in the SynchLink module 4-2
With a SynchLink time relay 4-3, 4-4
Working with the SynchLink node clock
1-5
CSA Certification
Drive module 3-4
SynchLink module 3-2
D
Daisy Chain Topology 2-3
Available configurations 4-9
Data Transfer
Axis data 1-7, 1-9
Buffered data 1-7
Data that can be transferred on
SynchLink 1-6
Direct data 1-6
Direct words 1-8
Multiplier 1-8
Multiplier overflow 1-9
On SynchLink 1-6
Data Transfer on SynchLink
Axis data 3-2
Buffered data 3-2, 3-4, 3-5
Direct data 3-2, 3-4, 3-5
Drive module 3-4
PowerFlex 700S drive 3-5
SynchLink module 3-2
Direct Data 1-6
Transmitting direct words 1-8
Transmitting to the next node
Transmitting Data on SynchLink
Transmitting direct data 1-6
Transmitting with the drive module 3-4
Transmitting with the PowerFlex 700S
drive 3-5
Transmitting with the SynchLink module
3-2
Publication 1756-TD008A-EN-P - August 2002
2
Direct Words 1-8
Directly Attaching Unterminated Cable
8-6
Documentation
Drive module 3-4
For related products Preface-3, 7-4
PowerFlex 700S drive 3-6
SynchLink module 3-2
Drive Executive 3-11
Drive Module 3-3
Agency certificatons 3-4
Available modules 3-3
Connected to the Reliance Electric
Distributed Power System 3-3
RIUP 3-4
Transmitting data 3-4
Using the CST 4-4
Using the SynchLink node clock 4-3
Drive Tools 2000 Suite 3-11
DriveExecutive 2-1
DriveTools 2000 2-1
Duct
As affects fiber optic cable installation
8-7
Installing conduit and duct 8-7
Measuring power loss across the system
9-2
Physical isolation 8-5
Planning system installation 5-4
Powering the system 5-5
Preterminated fiber cables 7-2
Protecting the cable 8-4
System maintenance 9-1
Thermal isolation 8-4
Usage warnings 7-1
Using preterminated cable 8-5
Using unterminated cables 8-6
Vertical installation 8-9
G
Guidelines for Handling Fiber Optic
Cable 8-2
Guidelines for Installing Fiber Blocks
7-3
H
Host Controller Intervention
when passing data to the next node 1-7
Hub 1-3, 2-2, 3-7, 7-4, 7-5
E
End Node
In a daisy chain topology 2-3
In a ring topology 2-4
In a star topology 2-2
F
Fiber Blocks
Guidelines for installing 7-3
Installing 7-5
Fiber Optic Cable 3-10
Analyzing your application 5-2
Assemblies B-4
Cable construction B-2
Chemical isolation 8-4
Complete listing of system products 7-2
Estimating cable length 6-4
Example system 5-1
Features and benefits B-1
Guidelines 8-2
Indentifying system components 5-4
Publication 1756-TD008A-EN-P - August 2002
I
Indirectly Attaching Unterminated Cable
8-6
Inspecting Preterminated Cables 8-5
Installing Conduit
For fiber optic cable 8-7
Installing Duct
For fiber optic cable 8-7
Installing Fiber Blocks 7-5
Installing Fiber Optic Cables 7-1
Guidelines 7-3
Planning installation 5-4
Vertically 8-9
Installing Preterminated Fiber Cables
8-5
Isolation
Chemical isolation for fiber optic cables
8-4
3
Physical isolation for fiber optic cables
8-5
Thermal isolation for fiber optic cables
8-4
M
Maintenance of Fiber Optic Cable
System 9-1
Master Clock 1-2, 1-3
Master Node 2-1
In a daisy chain topology 2-3
In a ring topology 2-4
In a star topology 2-2
Measuring Power Loss
In a fiber optic cable system 9-2
Multiplier 1-8
Multiplier overflow 1-9
N
Networks
Using typical networks with SynchLink
6-1
P
Physical Isolation for Fiber Optic Cables
8-5
Power Loss
Measuring in a fiber optic cable system
9-2
Power Module Interface Controller 3-3,
3-4
PowerFlex 700S Drive 3-5
Transmitting data 3-5
Using the SynchLink node clock 4-5
PowerFlex 700S Drives Specifications
A-4
Preterminated Fiber Cables 7-2
Cable inspection 8-5
Cable pulling 8-5
Cable testing 8-5
Installing 8-5
Protecting Fiber Optic Cables 8-4
Pulling Preterminated Fiber Cables 8-5
R
Reliance Electric Distributed Power
System 3-4
Connecting to the drive module 3-3
Removal and Insertion Under Power
(RIUP)
Drive module 3-4
SynchLink module 3-2
Ring Topology 2-4
Available configurations 4-13
RSLogix 5000 2-1, 3-11
S
Specifications
1751-SL4SP splitter A-6
1751-SLBA base block A-7
1751-SLBP bypass switch A-8
1756-DMxxx series modules A-3
1756-SYNCH module A-1
PowerFlex 700S drives A-4
Splitter 3-7, 7-2
Star Topology 1-3, 2-2
Available configurations 4-6
SynchLink Functionality Across Devices
4-2
SynchLink Hub 3-7, 7-4, 7-5
SynchLink Module 3-1
Agency certificatons 3-2
RIUP 3-2
Transmitting data 3-2, 4-3
Using the CST 4-2
Using the SynchLink node clock 4-2
SynchLink Node Clock 1-2, 1-3, 1-4,
1-5
Usage with the drive module 4-3
Usage with the PowerFlex 700S drive
4-5
Usage with the SynchLink module 4-2
Working with the CST 1-5
SynchLink Time Master 1-3, 1-4
Daisy chain topology 2-3
Star topology 2-2
SynchLink Time Relay 4-3, 4-4
SynchLink Time Slave 1-3, 1-4
SynchLink Topologies 2-1
Publication 1756-TD008A-EN-P - August 2002
4
Additional configurations 4-15
Daisy chain topology 2-3
Ring topology 2-4
Star topology 2-2
T
Testing Preterminated Cables 8-5
Thermal Isolation for Fiber Optic Cables
8-4
Time Master 1-3, 1-4
Time Slave 1-3, 1-4
Time Synchronization 1-2, 1-3
Beacon signal 1-3, 1-4, 1-5
CST and SynchLink node clock working
together 1-5
SynchLink node clock 1-2, 1-3, 1-4,
1-5
Time master 1-3, 1-4
Time slave 1-3, 1-4
Transferring Data
On SynchLink 1-6
Transmitting Data on SynchLink
Transmitting axis data 1-7, 1-9
Publication 1756-TD008A-EN-P - August 2002
Transmitting buffered data 1-7
Transmitting direct data 1-8
Transmitting the multiplier 1-8
Transmitting the multiplier overflow 1-9
With the drive module 3-4
With the PowerFlex 700S drive 3-5
With the SynchLink module 3-2
Troubleshooting
Fiber optic cable system 9-1
U
UL Certification
Drive module 3-4
SynchLink module 3-2
Universal Drive Controller 3-3
Unterminated Fiber Cable 8-6
Direct attachment 8-6
Indirect attachment 8-6
V
Vertical Installation
Of fiber optic cable 8-9
How Are We Doing?
Your comments on our technical publications will help us serve you better in the future.
Thank you for taking the time to provide us feedback.
You can complete this form and mail it back to us, visit us online at www.ab.com/manuals, or
email us at [email protected]
Pub. Title/Type SynchLink™
Cat. No.
1756-SYNCH,
1756-DMxxx Series,
PowerFlex 700S
Pub. No.
1756-TD008A-EN-P
Pub. Date August 2002
Part No.
957395-60
Please complete the sections below. Where applicable, rank the feature (1=needs improvement, 2=satisfactory, and 3=outstanding).
Overall Usefulness
Completeness
(all necessary information
is provided)
Technical Accuracy
(all provided information
is correct)
1
2
3
How can we make this publication more useful for you?
1
2
3
Can we add more information to help you?
1
Clarity
1
(all provided information is
easy to understand)
Other Comments
Your Name
2
3
procedure/step
illustration
feature
example
guideline
other
explanation
definition
Can we be more accurate?
text
2
3
illustration
How can we make things clearer?
You can add additional comments on the back of this form.
Location/Phone
Your Title/Function
Would you like us to contact you regarding your comments?
___No, there is no need to contact me
___Yes, please call me
___Yes, please email me at __________________________
___Yes, please contact me via ________________________
Return this form to:
Allen-Bradley Marketing Communications, 1 Allen-Bradley Dr., Mayfield Hts., OH 44124-9705
Phone: 440-646-3176 Fax: 440-646-3525 Email: [email protected]
Publication ICCG-5.21- January 2001
PN 955107-82
PLEASE FASTEN HERE (DO NOT STAPLE)
PLEASE FOLD HERE
NO POSTAGE
NECESSARY
IF MAILED
IN THE
UNITED STATES
BUSINESS REPLY MAIL
FIRST-CLASS MAIL PERMIT NO. 18235 CLEVELAND OH
POSTAGE WILL BE PAID BY THE ADDRESSEE
1 ALLEN-BRADLEY DR
MAYFIELD HEIGHTS OH 44124-9705
PLEASE REMOVE
Other Comments
ControlLogix, DriveExecutive, DriveTools, PowerFlex, SynchLink and RSLogix 5000 are
trademarks of Rockwell Automation.
Publication 1756-TD008A-EN-P - August 2002 2
PN 957707-27
Copyright © 2002 Rockwell Automation. All rights reserved. Printed in the U.S.A.