1
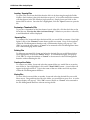
Date: 04/03
GA-VAS Software Version 1.0
Document # 76-0009-001, Rev. A
GolfAchiever Video Analysis System
1
Table of Contents
System Requirements & Features 2
Features / Benefits 2
Minimum System Requirements 2
Video Camera 2
Recommended System Requirements 2
Software Installation and Overview 3
Installing Software 3
Creating a Desktop Shortcut 3
Opening Software 3
Software Overview 4
Camera and Lighting Setup 9
Camera Positioning 9
Lighting Setup 9
Using GA-VAS 10
Recording a Swing 10
Working with Swing Files 11
Viewing Swing Files 13
Playback Options 14
Analyzing a Swing 15
Comparing Two Swings 17
Creating Key Frames 18
View Book 21
Printing 21
Contact Us 22
Notes 23
Table of Contents:
GolfAchiever Video Analysis System
2
System Requirements & Features
Features / Benefits
• Playback 60 images per second
• Auto Replay
• Side-by-side compare
• Key frames booklet
• Interactive drawing tools
When used with the GolfAchiever Swing Analyzer:
• Seamless video & impact data capture and analysis
• Quantify customer improvement and results
Minimum System Requirements
• Microsoft Windows XP or 2000 operating system
• Microsoft DirectX 8.1 or newer
• 800MHZ processor
• 256MB of RAM
• At least 2GB disk space (100-200 swings per GB on average)
• IEEE1394 I/O (Firewire port)
Video Camera
• DV (Digital Video) camera
• IEEE1394 cable (15’+ recommended)
• 4-pin to 4-pin for laptop
• 4-pin to 6-pin for desktop
• Tripod
Recommended System Requirements
• Microsoft Windows XP or 2000 operating system
• Microsoft DirectX 9.0 or newer
• 1.8GHZ processor
• 512MB of RAM
• 20GB disk space
• IEEE1394 I/O (Firewire port)
System Requirements & Features: Features / Benefits
GolfAchiever Video Analysis System
3
Software Installation and Overview
Installing Software
Before installing the GolfAchiever Video Analysis System (GA-VAS) software, make
sure your computer meets the system requirements as listed on page 2.
IMPORTANT!! Uninstall all previous versions of GA Software and Diagnostics
BEFORE installing GA-VAS!!
Follow these steps to install the GA-VAS software from the installation CD:
1. Exit all programs to prevent conflicts with the installation process.
2. Insert the GA-VAS software CD into the CD drive.
3. If the installation program does not automatically start upon inserting the CD,
click the Windows START button and select RUN. Type “d:\setup.exe” and then
press enter. Note: Replace “d:” with your CD drive letter if different.
4. Follow the on-screen instructions to finish installing the GA-VAS software
Creating a Desktop Shortcut
When the software finishes installing, a shortcut icon to GA-VAS (and GA Basic / Diagnostic) is automatically added to your computer’s desktop.
Opening Software
If GA-VAS is being used with a GolfAchiever, make sure that the L-Frame is plugged in
and connected to your computer with the included serial cable and power adapter.
To open the GA-VAS software, simply double click on the GA-VAS desktop shortcut.
Note: To open the software without using the shortcut, click on the Windows Start button and
select Programs > Achiever and GAVAS (or GAVAS) > GAVAS.
Software Installation and Overview: Installing Software
GolfAchiever Video Analysis System
4
Software Overview
This section serves as a brief summary of the GA-VAS software. For more details, please
go to the Using GA-VAS section starting on page 9.
GolfAchiever VAS Software Interface
1
9
Interactive Drawing Tools
Setup / Preferences
Analysis / Compare
Screen Toggle
Record Button
10
8
2
Key Frame Marker
and Recall Interface
Open File
3
Playback Controls
4
GolfAchiever
Swing Data
5
7
Print Data
& Video Images
for Student / Customer
Interactive Drawing Tools (1)
Use these tools to draw and erase analysis guidelines, zoom in and out, move the video
frame, and choose the weight and color of the drawing lines (see Analyzing a Swing
on page 14).
Key Frame Marker and Recall Interface (2)
This tool is used to create up to eight (8) still images of various points in a swing. These
images are called Key Frames. Once designated, these Key Frames can be viewed in
sequential order or recalled individually (see Creating Key Frames on page 17).
Software Installation and Overview: Software Overview
GolfAchiever Video Analysis System
5
Playback Controls (3)
Used like VCR control, these tools allow you to play, pause, stop, frame advance, and
jump to the beginning or end of your video file (see Viewing Swing Files on page 12).
GolfAchiever Swing Data (4)
This data gives you the ability to quantify your customer/student results when using
the GA-VAS in correlation with the GolfAchiever Swing Analyzer. Ball speed, launch
angle, club speed, azimuth, carry distance, club face, and swing path are displayed with
each swing.
Print Button (5)
Use the print button to print data and swing images for your customer/student. The
screen (or mode) that is displayed will determine which report is printed. Swing data
will also be included when used with the GolfAchiever Swing Analyzer.
Save Button (6)
To save your analysis drawings to the video-file or save a bitmap of the key frame or
view book for emailing, click on this button.
File Management Button (7)
This button will open up the File Management interface (shown below) which allows
you to preview, open, rename, delete, and move files, as well as create new folders (see
Working With Swing Files on page 10).
Software Installation and Overview: Software Overview
GolfAchiever Video Analysis System
6
Record Button (8)
When you are ready to record a swing, click on this button to go to the Record screen
(shown below). Here you will be able to record a swing, set record options, manually
trigger the software to record - note: when used with GolfAchiever Swing Analyzer, the GolfAchiever automatically triggers the recording (see Recording a Swing on page 9).
Setup and Preferences Button (9)
Click on this button to open up the Setup interface (see Playback Options on page 14).
Analysis & Compare Screen Toggle Button (10)
A useful button to quickly toggle between the Analysis Screen and the Compare Screen.
Software Installation and Overview: Software Overview
GolfAchiever Video Analysis System
7
Analysis Mode
This mode is used to analyze a single swing. All tool-bars are fully functional (drawing,
keyframe, & playback). This is the default screen. (See Analyzing a Swing on page 14).
Compare Mode
This mode is used to compare two individual swings files. All tool-bars are fully functional (drawing, keyframe, & playback), however, full-speed playback is not available in
this mode. Use the Analysis & Compare Screen Toggle Button to bring up this screen
(see Comparing Two Swings on page 16).
Software Installation and Overview: Software Overview
GolfAchiever Video Analysis System
8
Key Frames
This mode is where you can view the Key Frames previously set while in Analysis or
Compare mode (see Creating Key Frames on page 17). This screen is accessed by clicking on the KEY FRAME button.
View Book
Utilizing the key frames previously set, this interface allows you to insert your professional comments under each key frame (see View Book on page 20). This screen is
accessed by clicking on the VIEW BOOK button.
Software Installation and Overview: Software Overview
GolfAchiever Video Analysis System
9
Camera and Lighting Setup
Camera Positioning
Some of the common camera positions include the following:
Face On
Height of camera lens should be at hand- or belt buckle-height. Position the camera at a
perpendicular angle to the target line, directly across from the ball. NOTE: By using the
zoom feature of your camera, you can record/capture a close up view of a student’s
grip.
Down the Line
Height of camera lens should be at hand- or belt buckle-height. Your goal will be to
position the camera on the swing plane. This means that you should be able to place a
club behind the subject’s club at the same lie angle and the camera & image will show
only one club/shaft. If you see two shafts and the subject’s club is outside (to the right
for a right handed subject), you have positioned the camera too far inside the swing
plane. If your subject’s club is inside (to the left for a right handed subject), you have
positioned the camera too far outside the swing plane. The importance of down the line
camera positioning in demonstrating the swing plane cannot be stated strongly enough.
Rear View
Height of the camera lens should be at hand- or belt buckle-height. Position the camera
at a perpendicular angle to the target line, directly across from the ball. NOTE: This is
the opposite position to the Face-On View.
Overhead
Mainly limited to indoor facilities, the overhead camera should be positioned directly
over the ball. This gives the capability to capture both left- and right-handed golf swings
without changing camera position, and in relatively the same position. Be sure to consider your field of view to include right and left handed golfers.
Lighting Setup
One of the main objectives in capturing the golf swing with video is using high enough
shutter speed to eliminate any blur in the clubhead during fast motion sequences. Using
enough shutter speed will allow you to see crisp, stop-action images of the clubhead,
while if the shutter speed setting is too low, you will experience a blurred clubhead
when the club is moving fast. To obtain crisp images of the clubhead in Down the Line
views, you will need to use at least 1/1000 sec. Shutter speed. To obtain crisp images in
Face On and Rear Views, you will need to use at least 1/2000 sec. Shutter speed. Generally, you will be able to shoot at these shutter speeds outdoors and get a crisp, clear
image. However, indoors, you will generally end up with a dark, grainy image when
trying to shoot at these higher shutter speeds. The solution is simple, yet can be expensive. You will need to add light, or deal with the shutter speed compromise indoors.
Camera and Lighting Setup: Camera Positioning
GolfAchiever Video Analysis System
10
Using GA-VAS
Recording a Swing
To record a swing, simply hit the record button to bring you into Record Mode. Once
in record mode the software is ready to be triggered (see next section on Record Triggering).
Record Screen
Setting Record Options
Record Triggering
While in record mode, after your DV Camera is powered on and connected to your computer, the GA-VAS software is designed to constantly receive streaming video. When
triggered (at the moment of impact), the streaming video is automatically cropped by
GA-VAS to your specified length as set in the Record Options, compressed, then saved
as a .avi file on your hard-drive. There are two ways to trigger GA-VAS:
Using GA-VAS: Recording a Swing
GolfAchiever Video Analysis System
11
When using GA-VAS with the GolfAchiever Swing Analyzer:
The GolfAchiever Swing Analyzer acts as the triggering device. It automatically triggers
GA-VAS when the ball passes through the GolfAchiever’s laser grid. It also gathers
name and file information from the GA-Basic Software. This allows for a hands free process where you can focus on teaching, not triggering.
When used GA-VAS independently:
You will need to manually trigger GA-VAS at the moment of impact. You do this by
clicking on the “SIMULATE HIT” button. NOTE: Name has to be entered manually to save
swing file. Default is “No_Name”.
Swing Data
One of the greatest advantages of GA-VAS is when it is used with the GolfAchiever
Swing Analyzer. When used together, they allow you to quantify your customer/student results by providing you with industry standard accuracy that only the GolfAchiever provides. GA-VAS not only displays this data below the video screen, it goes a
step further by saving and linking the data to the video-file. This way, in the future,
when you open up a video-file created using the GolfAchiever/GA-VAS, the original
swing-data is displayed with the original video-file. This combination creates the ultimate solution for teaching, club fitting, practice and swing analysis!
Working with Swing Files
File Management Interface
To open the File Management Interface, click on the “File” button found on the right tool
bar. GA-VAS’ file management is very similar to Windows’ system. If you are familiar
with the process of managing files in Windows then you will adapt easily to GA-VAS’ file
management system.
Using GA-VAS: Working with Swing Files
GolfAchiever Video Analysis System
12
Locating / Opening Files
To open a file, first locate the folder that the file is in by browsing through the Folder
Window (left window), then click the folder to open it. A list of files that folder contains
will then appear in the File WIndow (right window). Simply locate and click on the
desired file to select it. Once the file is highlighted, click the “Open” button to open the
file.
Previewing a Thumbnail of File
To preview a thumbnail of the first frame of saved video-file, click the check box to the
left of the text, “Preview the video 1st frame bitmap”. Whenever you select a video-file,
a small thumbnail will be displayed.
Renaming Files
To rename a file, locate and select the desired file you would like to rename. Once highlighted, click on the “Rename” button then type the new name. Next, click anywhere
within the File Management Interface and a confirmation display will pop up. Click
“Ok” to accept the new name or “Cancel” to be returned to the File Management Interface without changing the file name.
Deleting Files
To delete an unwanted file, locate and select the desired file you would like to delete.
Once highlighted, click on the “Delete” button. A confirmation display will pop up.
Click “Ok” to accept the deletion or “Cancel” to be returned to the File Management
Interface without deleting the file.
Creating a New Folder
To create a new folder, locate and select the parent folder you would like to create the
new folder in. Once highlighted, click on the “New Folder” button. A new folder will
appear in the right window. Type in the name of the new folder and click anywhere
within the File Management Interface.
Moving Files
To move files from one folder to another, locate and select the desired file you would
like to move. Drag and drop the file to the folder you would like to move it to. A confirmation display will pop up. Click “Ok” to move the file or “Cancel” to be returned to
the File Management Interface without moving the file.
Using GA-VAS: Working with Swing Files
GolfAchiever Video Analysis System
13
Viewing Swing Files
Once the swing file has been opened, you are now able to view the file using GA-VAS’
playback controls and options.
Playback Controls
Play Button (1)
Plays the video at regular speed.
Slow Motion Playback Button (2)
Plays the video in slow motion. There are two slow motion playback speeds which can
be selected by going into the playback options.
Pause Button (3)
Pauses video at the current frame.
Stop Button (4)
Stops video playback and returns the video first frame.
Jump to First Frame Button (5)
Brings the video to the first frame.
Frame Rewind (6)
Rewinds the video one frame at a time.
Frame Advance (7)
Advances the video one frame at a time.
Jump to Last Frame Button (8)
Brings the video to the ending frame.
Slider Bar
Located just below the image window, click and hold down on this bar to advance video
forwards or backwards. When you un-click, it will pause the video at the frame you
stopped at.
Using GA-VAS: Viewing Swing Files
GolfAchiever Video Analysis System
14
Playback Options
You can change the playback setting for three individual open video files: analysis, compare left, or compare right. Any changes made in the analysis section will effect the
playback of the video open in the analysis screen, and so forth.
File Name (1)
The file name of the file currently open is displayed here.
Loop (2)
When this check box is selected the video will playback in one continuous loop.
Video Interlacing Settings (3)
If you know your video is interlaced, then select de-interlace to double the frames and
reduce blur (note: if the motion is to fast for the shutter speed on the capture device,
even after de-interlacing, the image will be blurred).
Field Order (4)
If your video playback is “choppy”, try switching the field order to see if it will improve
the playback.
Slow Motion Playback Rate (5)
Select the desired slow motion playback rate. The default rate is low.
Using GA-VAS: Playback Options
GolfAchiever Video Analysis System
15
Analyzing a Swing
This mode is used to analyze a single swing. All tool-bar are fully functional (drawing,
keyframe, & playback). This is the opening default mode.
Analysis Mode
Analysis / Drawing Tools
Use these tools to draw and erase analysis guidelines, zoom in and out, move the video
frame, and choose the weight and color of the drawing lines.
Line (1)
Draws straight lines. Click at the desired starting point on the video screen and drag
to the ending point. To draw perfect vertical, horizontal, or 45 degree lines, hold
down “Shift” and drag in the general direction of the perfect line you wish to create.
Angle (2)
Creates angles. Click at the desired starting point on the video screen and drag to the
angle’s pivot point, then un-click and drag to the ending point and click once more.
Circle (3)
Draws circles. Click at the desired starting point on the video screen and drag to the
ending point. Hold down “Shift” to draw a perfect circle.
Angle in Relation to the Ground (4)
Gives you the angle of a line in relation to the ground. Click at the desired starting point
on the video screen and drag to the ending point.
Rectangle / Square (5)
Draws rectangles and squares. Click at the desired starting point on the video screen
and drag to the ending point. Hold down “Shift” to draw a square.
Move Frame in Window (6)
Physically moves the video image within the display window. Click and drag anywhere
within the display window to reposition the video image.
Using GA-VAS: Analyzing a Swing
GolfAchiever Video Analysis System
16
Zoom In / Out (7)
Enlarges or shrinks the video image. To zoom in, click on the video image. Right-click
to zoom out.
Center Position (8)
Allows you to set the center positioning of the video within the view window. Click
anywhere on the video and this becomes the new center point.
Undo (9)
Undoes the last drawing.
Erase (10)
Clears all drawings.
Line Weight (11)
Selects the weight, or thickness, of the next line. You can select from 3, 4, or 5 pixels for
line width.
Line Color (12)
Selects the color of the next line. You can select from among yellow, blue, green, red, or
white.
Saving Your Swing Analysis Drawings
To save your analysis drawings, simply click on the “Save” icon in the right-hand tool
bar. When you open the file in the future, all your drawing data is recalled and can be
edited.
Using GA-VAS: Analyzing a Swing
GolfAchiever Video Analysis System
17
Comparing Two Swings
This mode is used to compare two individual swings files. All tool-bars are fully functional (drawing, keyframe, & playback), however, full-speed playback is not available in
this mode. Use the Analysis & Compare Screen Toggle Button to bring up this screen.
Compare Mode
Choosing the Active Display Window
While in compare mode, you can control each display window (right and left) independently of each other or both simultaneously. To know which window is active, look at
the arrows above the window. When a window’s arrow is green, that window is active.
Activating a single window:
To activate a single window, simply click on the Arrow Button above the window.
Left Window
Right Window
Activating both windows:
To activate both windows for simultaneous play back or editing, click on the Middle
Arrow Button. With this button selected, when you use your playback controls, both
windows will act in unision.
Both Windows
Using GA-VAS: Comparing Two Swings
GolfAchiever Video Analysis System
18
Creating Key Frames
Setting Key Frames
The GA-VAS Key Frame Marker and Recall Tool makes it easy to set key frames. A key
frame is a single video image that you designate a number (1-8) to. This allows you to
create a chronological sequence of up to eight key images throughout the entire swing or
just a portion of the swing. To set key frames, follow these steps:
1. Click the Key Frame Button (the “light” will turn green). This tells the software
that you are ready to select your key frames.
2. Using the playback controls or slider bar, set the displayed video to the desired
location.
3. On the Key Frame Tool, click the desired key frame number you would like to
assign to the displayed frame.
4. Repeat steps 2 and 3 until you have assigned all of the desired key frames.
5. Click the Key Frame Button again (the “light” will turn red). This tells the software you are finished setting your key frames.
To edit or change a key frame, simply repeat the above steps for the key frame/s you
would like to change.
Saving Key Frames
Key frames are saved automatically as you assign them.
Recalling Key Frames
To recall an assigned key frame first make sure the Key Frame Button’s “light” is red.
Then simply select the desired key frame by using the numbers on the Key Frame Tool.
The selected key frame will then be displayed in the display window.
Key Frame Display
This display allows you to view and print the assigned key frames in sequence. This display is accessed by clicking on the Keyframe button found on the right-side tool bar
(below the Record button). The display will differ depending on if you are in Analysis
or Compare Mode (see next page for both examples).
Using GA-VAS: Creating Key Frames
GolfAchiever Video Analysis System
19
(Note: While in the Compare key frame display, if you have set more than four (4) key
frames, use the controls found below the display window to view the remaining key
frames.)
Emailing Key Frames
To email key frames, hit the “Save” button on the right-side tool bar. A “Save As”
screen pops up and allows you to save the screen as a .bmp file. Using your own Photo
Editing Software, you can now re-size and compress this file and attach it to an email.
Using GA-VAS: Creating Key Frames
GolfAchiever Video Analysis System
20
HELP!
How do I know where to set a key frame?
Table 1: Common Key Frame Positions
1
2
3
4
5
6
7
8
1.
2.
3.
4.
5.
6.
7.
8.
Address
Club Parallel
Arm Parallel
Top
Club Parallel
Impact
Club Parallel
Finish
Using GA-VAS: Creating Key Frames
GolfAchiever Video Analysis System
21
View Book
A crucial tool for Student/Teacher communication, this mode utilizes the key frames
previously assigned & allows you to insert your professional comments under each key
frame. This screen is accessed by clicking on the View Book button.
View Book Mode
Inserting Notes
To insert a note, click in the white box found below the key frame and type a comment.
Saving Notes
Notes are saved automatically when you exit from the view book mode.
Emailing View Book
To email the view book, hit the “Save” button on the right-side tool bar. A “Save As”
screen pops up and allows you to save the screen as a .bmp file. Using your own Photo
Editing Software, you can now re-size and compress this file and attach it to an email.
Printing
There are four (4) printouts available depending on which mode you are in. Click the
“Printer” button on the right-side tool bar to print.
Using GA-VAS: View Book
GolfAchiever Video Analysis System
22
Contact Us
Focaltron Corporation
General
830-A East Evelyn Avenue
Sunnyvale, CA 94086 USA
Tel: (408) 530-8588
Fax: (408) 530-8062
[email protected]
www.golfachiever.com
Support
(408) 530-8588, ext. 2
[email protected]
Sales
(408) 530-8588, ext. 1
[email protected]
Contact Us: Focaltron Corporation
GolfAchiever Video Analysis System
23
Notes
Please Keep A Record of These Important Numbers!!
Serial # __________________________________________
Key # ______________________________________________________________________
Notes: Please Keep A Record of These Important Numbers!!