1
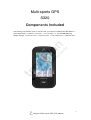
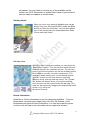
Multi-sports GPS S320
Manual
Contents:
Page
Safety Info, Copyright, Declaration
2
Components
3
Settings
4
Troubleshooting
5-6
Satski: for skiing and snowboarding
6–9
Pocket Caddy: for golf
9 – 11
Satsports-Log: for running, cycling, hiking, walking, mountain biking
11 – 12
Stats Viewer: Analytics for ALL sports
13
Important Safety Information
Please read this carefully before using S320.
Do not open the cabinet of S320
Always treat your product with care and keep it in a clean and dust-free place
Do not expose S320 to moisture or humidity.
Do not expose S320 to extreme high or low temperature.
Do not attempt to disassemble your product.
Use only the chargers and batteries approved by Performance Products Limited. The use of
any other type may invalidate any approval and warranty. No reverse charging with other
chargers, they may have inverse polarity.
Never use the charger if the plug is damaged.
Never touch the charger if your hands/ feet are wet.
Do not expose the charger to water, it may cause electrical fires.
Do not repair the charger yourself for your safety.
To reduce the risk of fire or burns, do not disassemble crush or puncture the battery.
Do not let the metal contacts on the battery touch other metal object, it could lead to shortcircuit and damage the battery.
Copyright
Copyright @2009 Satsports Ltd. All rights reserved.
Product specifications and features are for reference only and are subject to
change without prior notice.
Declaration
This User Manual is published by Satsports Ltd without any warranty. Improvement and
changes to this User Manual necessitated by typographical errors, inaccuracies of current
information, or improvements to programs and/or equipment, may be made at any time and
without notice. Such changes will, however, be incorporated into new editions of this User
Manual.
Satsports Multi-sports GPS S320 Manual
2
Multi-sports GPS
S320
Components Included
The following components come as standard with your Satsports Multi-sports GPS S320: 1 x
Quick Start Guide, 1 x USB PC connection, 1 x Car charger, 1 x EC/USA/GB Wall plug
adaptor charger, 1 x Silicone case, 1 x Bicycle mount, 1 x Car attachment, 1 x Silicone case
Satsports Multi-sports GPS S320 Manual
3
Settings
To change the settings of your device press the Settingsʼ button in the main menu.
BRIGHTNESS:
To adjust the brightness of the display press the brightness button in the Menu. Use the + and
- buttons to increase or decrease the brightness of the screen. Press the X button to confirm
and exit the setting.
VOLUME:
To adjust the volume press the volume button in the menu. Use the + and - buttons to
increase or decrease the volume. Press the X button to confirm and exit the setting.
LANGUAGE:
To change the language press the language button in the menu and then the language you
require. Press the X button to confirm and exit the setting. This will change the language of
the device, not the Satsports applications.
CALIBRATE THE SCREEN:
To re-calibrate the screen press the Calibrate button in the menu and then follow the onscreen instructions.
POWER SAVE:
This function allows you to programme the unit so that it will automatically shut down after a
period of inactivity and to set the backlight to switch off automatically after a certain period to
save battery life.
Power down time: Use the + and -buttons to change the setting so that the unit will either
always remain on ʻAlways onʼ or so that the unit will power off automatically if no buttons are
pressed after 10mins, 5mins, 3mins or 2mins. N.B. For our software have this setting on
never power down as if the unit switches off you will miss your tracked data from the point of
switch off.
Backlight off time: Use the + and -buttons to either set the backlight to remain permanently
on or to switch of automatically after either 1min, 30seconds, 20seconds or 10seconds to help
preserve battery power. NB: for best performance have this set to power down after 20
seconds, to power up the Back light simply push the button below the Satsports Logo under
the screen.
PICTURE
View pictures on SD card: To view pictures on this device first put the images you want to
view on suitable micro SD card. Put the SD card into the SD card slot on the underside of the
unit. Press the Picture icon and to view the pictures on the SD card tap SDMMC Card. The
images you have placed on the SD card will be shown in the Preview section. Scroll up or
down using the arrows and tap the ʻthumbnailʼ of the image you want to view. Use the back
and forwards arrows to scroll through your images. Tap the ʻXʼ button to exit the Picture at any
time.
Slide show: First select the speed of the slides to be viewed. You can select the images to
be displayed for 1 to 10 seconds. Once you have selected the time you require, press the play
button and all your images will be displayed in rotation. To exit the slide show at any time tap
anywhere on the screen.
Satsports Multi-sports GPS S320 Manual
4
Troubleshooting
1. Is the USB cable supplied with the Satsports GPS connected correctly?
Please check that the USB lead is plugged into the USB socket on the Satsports GPS unit
and is fully plugged in as far as possible. Check the computer USB connection is secure.
2. Have you linked your Satsports to your computer correctly after attaching the USB?
Once you have attached the USB to both your computer and GPS unit, make sure you
press the button named USB Mass Storage on the GPS screen to complete connection.
3. What operating system are you using on your computer?
The PC software Stats Viewer will only work on the
following Windows 32bit operating systems:
-
- Windows 2000
- Windows XP
- Windows Vista
- Windows 7
- Windows Vista
Apple Mac that run Parallels 3 and higher with any of the Windows operating
systems listed above
Soon to support Apple Mac (without Parallels)
To determine which operating system you have on your computer:
a) Right click on the ʻMy Computerʼ icon on your desktop and select ʻPropertiesʼ from the
drop down menu.
b) When the ʻSystem Propertiesʼ dialogue box opens the ʻGeneralʼ tab is selected by
default. Under the heading ʻSystemʼ the operating system is displayed.
c) If you do not have a ʻMy Computerʼ icon on your desktop (common in Windows XP) click
on ʻStartʼ and two columns will appear. In the right hand column you will see the option of
ʻMy Computerʼ. Right click on this option as instructed in (a) above.
4. Have you installed the Stats Viewer replay and analytic software to your computer?
If you have not installed the software you will not be able to perform a download of maps
and you will not be able to upload your recorded data and analysis. Once the software is
installed there will be a new icon on your desktop: ʻSatsports. Please check to see if you
have the latest version of this software by clicking System and then performing updates to
both PC software and the GPS software.
5. Have you connected the computer to the Internet?
This is vital in order to open Stats Viewer and get the latest updated maps or to youʼre your
replay in 3D with Google Earth.
Satsports Multi-sports GPS S320 Manual
5
OTHER PROBLEMS
The unit cannot be switched on:
Check that the unit has been charged.
The unit cannot acquire satellite connection:
Check that the Satsports built in GPS antenna has a clear view of the sky above. If this is the
first time you have powered up your Satsports unit please remember that the first ʻcoldʼ start
can take up to 30 minutes to acquire sufficient satellite connection. The unit requires time to
calibrate and you will find that with subsequent use that the time for acquiring satellites will
reduce. Eventually the unit should take approximately 90 seconds to acquire satellite
connection.
General Tips And Settings:
Power Save settings:
In order to get the best life out of your unit, go to setting on your splash
screen, press the Power save tab and make sure that the Unit is set to always
be on. And that the Back Light settings are set to go off after max a minute
(best is after 30 seconds)
To maximize life of the battery in the unit allow the unit backlight to power
down after 30 seconds, then before putting the unit into your pocket or bag for
tracking make sure you switch the screen lock on! This is done by sliding the
power on/off button down which is situated at the top on the right side of the
GPS/
When the backlight goes off and you want to see the screen, simply push on
the Button below the Screen on the face of the GPS unit and the screen will
power up even if the unit is on screen-lock mode.
When switching on the GPS after a long journey or trip, please switch the unit
on and allow for the unit to find and align with the satellites. This could take
several minutes the first time, after this it will align and find GPS position
within seconds.
SATSKI
Product overview
Satski on the Multi-sports GPS provides real-time location information using a
ski map. It also gives your skiing statistics including speed (current, maximum
and average), distance (total and skied) and altitude (current, gained and
descended). As well as all that, there is navigation, a replay facility and resort
and emergency information.
Satsports Multi-sports GPS S320 Manual
6
Download PC Software – Stats Viewer
Resorts are installed through the PC-based software, Stats Viewer (see
image below). You can get the latest version of this software online at
www.satsportsgps.com.
You can download Stats Viewer from the Free Software Downloads sections
found at the bottom of each page or from the PC Software page on the
Satsports website.
Installing maps
Connecting the Satsports Multi-sports GPS to your PC’s USB using the USB
cable provided not only charges the battery but also acts as the data
connection to retrieve the ski data after skiing. The Multi-sports GPS acts as a
“removable” hard drive and will usually appear as the first available drive letter
(like F:\). When you connect you will see a button marked USB Mass Storage
on the GPS screen – press this button to make the data connection.
1. Switch on your Satsports Multi-sports GPS
2. When the splash screen appears, press the ‘Settings’ button
3. Then press the last tab/button that comes on the screen ‘Information’
4. Now open your Stats Viewer and connect the GPS via USB to your
PC/Laptop
5. On your GPS you will see an image of a PC and USB cable. Press
the tab below that says ‘USB Mass Storage’. If you do not press this
tab, your GPS will not be able to communicate with your Satsports
Stats Viewer software, which you should have already downloaded to
your PC/laptop.
6. On the Stats Viewer, go to System, Check for Updates, and update
your Stats Viewer PC software as well as your GPS software, if
required.
7. In Stats Viewer, click on the skiing tab
8. Then click on the Install resorts button and a list of available resorts
Satsports Multi-sports GPS S320 Manual
7
will appear. You can install or remove any of the available resorts
to/from your GPS. Remember to update Stats Viewer to get access to
new ski maps and updates to current maps.
Starting Satski
Once you have your resort(s) installed you can go
skiing! Start your Multi-sports GPS, press the Sport
button and then the ski button. You can then select
any of the resorts that you downloaded from Stats
Viewer and start Satski.
Ski map view
Once the resort has been installed you can press the
“Start Satski” button. This will load the resort files and
bring up the main ski map/stats screen. The ski map
shows your current position as well as clickable points
of information (usually mountain restaurants). The
stats area below shows your current details (speed,
altitude) as well as real-time statistics including
distance skied, average and top speed. The “Locate
Me” button will always show your position and the
zoom buttons can be used to scale the ski map. The
map can be panned by dragging the map on the touch
screen or by using the
directional buttons.
Resort information
Press Menu, Resort information to see the categories available – They are
Restaurants (mountain and village), Bars, Ski Hire, Ski Schools, Local
Businesses and general Resort Information. You can also press the green
circles on the ski map to see information about a particular location.
Satsports Multi-sports GPS S320 Manual
8
Navigation
To navigate from any location (including your current position) to another,
press Navigate. It is then a question of selecting the start point and the end
point and which difficult/expert runs you’d like to avoid and the software will
calculate and display the best route.
Replay
Press Replay to see a replay of your day’s skiing – useful for groups of skiers
who may not be sure which parts of the resort has been visited.
POCKET CADDY
Product overview
Pocket Caddy is a golf GPS system that comes pre-installed on your Multisports GPS. As well as giving live distances to the front, middle and back of
the green, Pocket Caddy has some unique features including a 3D hole
flyover, the ability to map your own courses for free and a post-golf round
view in Google Earth.
Mapping courses
Before you can use your Multi-sports GPS system for golf you need to install
your course. Your courses are managed online by creating a user login at
www.satsportsgps.com, going to the golf section and then the Courses page.
Once you have done so you can map your own courses using the simple DIY
mapping process. See the website for more details about mapping courses.
Once you have your course available in your Member area online you can
install it onto the GPS via Stats Viewer. You can get the latest version of this
Stats Viewer on the Satsports website.
Downloading courses
Connecting the Multi-sports GPS to your PC’s USB using the cable provided
not only charges the battery but also acts as the data connection. This is
useful for installing courses onto the Multi-sports GPS from your online Pocket
Caddy membership account via Stats Viewer. Connecting your GPS to your
computer also allows you to retrieve the golf data after a round of golf. The
Multi-sports GPS acts as a “removable” hard drive and will usually appear as
the first available drive letter (like F:\) on your computer. When you connect
the GPS to your computer you will see a button marked USB Mass Storage
on the GPS – do not forget to press this button to make the data connection.
Satsports Multi-sports GPS S320 Manual
9
1. Switch on your Satsports Multi-sports GPS
2. When the splash screen appears, press the ‘Settings’ tab
3. Then Press the last tab/button that comes on the screen
‘Information’
4. Open Stats Viewer on your computer and connect the GPS via the
USB cable.
5. On your GPS you will see an image of a PC and USB cable. Press
the tab below that says ‘USB Mass Storage’. If you do not press this
tab, your GPS will not be able to communicate with Stats Viewer. You
can download Stats Viewer from the Satsports website.
6. Click on the golf tab
7. Click on the Install Courses button and log in using the same
username and password that you registered your Pocket Caddy
membership account with. Your list of courses will appear (see
example screenshot below) and you can install any or all of them onto
the device.
Satsports Multi-sports GPS S320 Manual
10
Pocket Caddy – start-up
Start your Satsports GPS, press the Sports button and then Golf. You will be
greeted with the start-up screen displaying a list of courses that you have
installed on your Satsports GPS. Select the course that you wish to play and
press the OK button to proceed.
Playing Golf
Once you have the correct course selected press the OK button to start the
main part of the app. The course data will then load and you will be presented
with a flyover of the first hole. The GPS will automatically start and the
distances to the Back, Middle and Front of the green are shown in the topright. These distances (and distances to hazards) are also shown on the
flyover screen itself.
You can navigate to the correct hole by using the left and right buttons in the
top-left section. The 2D and 3D buttons in the bottom-right will restart the
flyover. The “M” button in the top-left area brings up the menu and the button
to the right of the Menu button displays the scorecard.
Once you start playing you simply press the Mark shot button for each shot
you play – except for putts.
Marking a shot
Before (or immediately after) you play a shot you should “Mark” it. This will
allow the system to record which club you play and how far you hit. When you
hit the Mark button you will be presented with a list of your clubs. Simply
select the club that you are about to play (or have just played) and it will be
recorded. Once you hit the green there is no need to record any more shots,
so as soon as you select “putt” as your club you will not be asked to record
any more shots for that hole.
Once you start to putt the Mark Shot button is replaced by a Finish hole
button. Press this when you have finished a hole and you can enter your
score for that hole. The system will then automatically move on to the next
hole.
SATSPORTS LOG
Product overview
Satsports-Log is part of the Satsports Multi-sports GPS system and is
designed to enhance your sporting activities by giving you live stats during
Satsports Multi-sports GPS S320 Manual
11
your running, cycling and other including current speed, distance and altitude
as well as average and maximum speeds, total time and altitude
gained/descended. It also records your tracks and can then link up with the
PC-based Analytics software, Stats Viewer, which will keep a log of your
activities and analyse them with graphs, maps and tables.
Connecting to the USB
Connecting the Multi-sports GPS to your PC’s USB using the cable provided
not only charges the battery but also acts as the data connection to retrieve
the activity data after your running, cycling or other activity. The Multi-sports
GPS acts as a “removable” hard drive and will usually appear as the first
available drive letter (like F:\). When you connect you will see a button marked
USB Mass Storage on the Multi-sports GPS – press this button to make the
data connection.
Satsports-Log Features
Start your Multi-sports GPS, press the Sports button and then press either the
running or cycling button. Satsports-Log will start and will automatically
connect to the GPS, picking up your speed, position and altitude. The top half
of the screen will then display current and activity stats.
The bottom half of the screen has 5 buttons which can be used to scroll
between more advanced features (from left to right):
1. Recording: use this page to start/stop your activity recording.
2. Elevation graph: shows a graph of your height against distance
traveled.
3. Map: Shows a simple map of your location and track.
4. Split times: Shows the current and previous times for kilometers or
miles.
5. Information: Shows the current latitude/longitude and distance from
start point.
Satsports Multi-sports GPS S320 Manual
12
STATS VIEWER: Analytics for ALL Satsports
After your day’s skiing, a round of golf or maybe a bike ride, what ever your
Satsports activity, you can transfer the data files onto your PC to view in 2D
with Ski Viewer (for Satski only) and in 3D with Google Earth (for Satski,
Pocket Caddy and Satsports-Log) by following these steps as well as various
statistical information to analyse:
1. Make sure you have the PC-based software ‘Stats Viewer’ installed
on your computer. You can download and install this from the
Satsports website.
2. Connect your GPS by USB to your computer and press the USB
Mass Storage button on the GPS screen to make a data connection.
3. Connect to the Internet, open Stats Viewer and click on the Skiing,
Golf or Running/Cycling tab and then click on Run Ski/Golf/SatsportsLog Viewer. This will start the appropriate sports viewer.
4. Import your data files by selecting the button marked “Import data
from GPS”.
5. Once you have imported your data files you can then review them in
the ski map replay with Ski Viewer (Satski only) and in 3D with Google
Earth (Satski, Pocket Caddy and Satsports-Log) or analyse the
statistics.
Satsports Multi-sports GPS S320 Manual
13