1
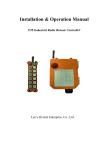
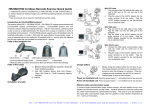
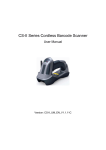
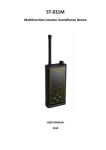
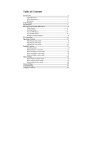
Rain Monitor Instruction Manual
1
3
The following procedure will ensure correct operation of your new rain monitor and rain gauge. Remove all components from the
packaging and lay them on a table in front of you. Check that the following items are included:
Introduction
Congratulations on the purchase of this modern rain monitor and rain gauge, an example of outstanding design and
workmanship. The product is easy and straightforward to operate. Please read this user’s manual for more information on the
monitor and the best way to optimize all the device’s features.
1.
2.
3.
1.1
4
Rain Monitor
Hanging hole
Rain monitor and table mount
Rain gauge
User’s manual
LCD screen
The screen consists of a 2-part LCD display.
•
In normal operating mode, the upper portion displays the TIME. The simple press of a button on the DATE or numeric (in
mm) indicators for the various RAINFALL amounts switches to rainfall over the last hour (1H), the last 24 hours (24H),
since the last rainfall (small rain symbol), and since the last reset (TOTAL).
•
In the right upper corner of the display, there is an alarm signal (large rain symbol) which flashes to indicate the occurrence
of rain.
•
An antenna symbol at the center-right edge of the screen indicates that the device is ready to transmit rain-gauge data.
•
A 7-part bar chart in the lower section of the screen provides the rainfall history (HISTORY) in millimeters (MM). This chart
can be changed by pressing the button to display the rainfall history over the last six days (DAILY), weeks (WEEKLY) or
months (MONTHLY), as well as the current day, week and month.
If the button is pressed again, a numerical display (in mm) of the individual chart elements appears on the top line of the
screen.
Battery
Cover
Function
Buttons
Removable Stand
1.2
Getting started
Rain Gauge
5
Operations
5.1
Operations and Quick Start
Battery Cover
Battery
Compartment
2
2.1
•
•
•
•
•
•
•
•
•
•
•
2.2
•
1.
2.
Features
a)
b)
c)
Rain Monitor
24-hour clock
Date and week display
Display of total amount of rain since last reset
Display of amount of rain in last hour
Display of amount of rain in last 24 hours
Display of amount of rain since last rainfall
Rainfall graph (daily/weekly/monthly)
Storage of all above rain data and rain multiplicator S1) in EEPROM
Remote transmission S3) of rain-gauge data on frequency 433MHz
Rainfall alarm function
Table or wall mounting options
Open the battery compartment on the backside of the rain-monitor as shown above.
Please insert two 1,5 V-batteries of the type AAA, ICE LR3 into the battery compartment in the right polarity.
After inserting the batteries the following procedures on the LCD rain-monitor can be observed:
For testing purposes all segments of the LCD will be illuminated for 3 seconds.
After this on the first row the factory pre-set rain-factor-value „267“ of the S1) will be displayed for approx. 3 seconds.
Now the minute-digits of the time-display will start blinking. After this close the battery compartment.
Important notice for an efficient commissioning:
For an efficient commissioning of the system, it is recommended to follow the programming of the rain-monitor at this
step according to the items 6.2.1.1 to 6.2.1.5 of the operator manual. It is recommended to proceed after finishing this
programming with item 3 of this basic setting.
S2
)
Battery
Compartment
Rain Gauge
433MHz remote transmission S3) of rainfall data to weather station
Important Note:
At the end of this user’s manual there is a glossary of technical terms and operating instructions, intended for users
who would like to know more about the operation of the weather station. However, it is not necessary to refer to this
glossary in order to operate your rain monitor.
Topics accompanied by a number
SX
) in the keyword index are explained in the manual.
3.
4.
5.
6.
Open the battery compartment in the lower part of the rain gauge with a coin or an appropriate tool.
Insert two 1,5 V-batteries of the type AAA, ICE LR3 into the battery compartment -checking the polarity- and close it.
Hold the body of the rain gauge, unlock the lower part by turning it against the clock direction and dismantle it carefully
from the body.
Make sure by light knocking with the finger that the seesaw in the lower part of the rain gauge can move freely and can fall
into both end-positions.
Note:
In case the rain-monitor has been programmed according to the above recommended fast commissioning method, the rainmonitor will display the movements of the seesaw as a change of the fake rain-value by displaying a new value. Further the rainalarm-symbol in the upper right corner of the LCD-display will blink (in case the alarm is switched on, the warning sound will also
be heard. This can be switched of by hitting any key).
7.
After processing all as described above, please assemble body and lower part of the rain gauge. Rain-monitor and rain
gauge are ready for use.
Note:
In case the inserting of the batteries into the rain gauge takes more than 2 minutes this may result in transmission and reception
problems of the rain sensor signal. In this case please proceed with a new adjustment (see below: 5.2 new adjustment).
6.1.2.2
Numeric Display
If, in normal display mode, the HISTORY button is pressed for longer than 2 seconds, the numeric value of the first bar in the bar
chart is displayed in millimeters in the top section of the LCD screen. Pressing the HISTORY button again changes the value to
that of the second bar, and so on.
The same applies for each rainfall chart.
Important
If no button is pressed for 30 seconds or if the HISTORY button is pressed once after the last bar of a particular bar chart has
been displayed, the LCD switches back to normal display mode.
6.2
Programming Mode
In case there is no reception or an interruption of the signals from the rain gauge at the rain-monitor, please proceed as described
in section 8.2 433 MHz- reception test in this manual.
This section covers all programming features of the rain monitor. You can refer back to this section as necessary from any other
section of the user’s manual.
During default and new setting (commissioning), please always insert the batteries into the rain monitor first. This will prepare the
reception mode for the reception of the signal transmission after activating the rain gauge.
6.2.1
Please only use new batteries of the correct type. Avoid that the batteries will be disconnected from the contacts during
commissioning. This could cause start-up and transmission problems and may require a new initial setting procedure.
5.2
New setting (calibration)
Should a new calibration of the system be required for reasons whatsoever, please proceed as follows:
1.
Take out the batteries from both the rain-monitor and the rain gauge.
2.
Wait for at least 30 seconds to avoid start-up and transmission problems.
3.
Repeat the procedures as per 5.1 ‘Initial Setting’.
Note:
Please note that during a new setting (calibration) both parts need to be adjusted as new.
Programming out of normal display mode
Once the rain monitor has been started in accordance with the procedures described in Section 5.1 Default settings with quick
start, it is possible, by pressing and holding down the RAIN/SET button for at least 2 seconds, to access programming mode
directly.
Important
If, in programming mode, no button is pressed for at least 40 seconds, the LCD automatically switches back to normal display
mode.
6.2.1.1
Entering time of day
The rain monitor has only two controls: the RAIN/SET and HISTORY buttons. The functions of each button are described below:
Once in programming mode, the first item you can enter is the time of day. The minute positions flash on the LCD screen (default
= 0:00).
1.
Use the HISTORY button to set the values of the flashing positions, then press RAIN/SET to store them.
2.
When the minutes have been stored, the display switches to the hour positions. These flash and are set in the same way
as the minutes.
3.
Press RAIN/SET again to access Date mode.
6.1
Display Mode
6.2.1.2
6.1.1
TIME, DATE and RAINFALL
1.
6
Button functions
When the RAIN/SET button is pressed, the following functions are displayed in sequence in the upper section of the LCD screen
before starting from the beginning:
•
TIME
•
DATE
•
TOTAL rainfall since the rain monitor was started
•
Amount of rain during the last hour (1H)
•
Amount of rain during the last 24 hours (24H)
•
Amount of rain since the beginning of the last rainfall (small rain symbol)
6.1.2
2.
Use the HISTORY and RAIN/SET buttons as described in 6.2.1.1 to set the date, starting with the month and ending with
the day (default = 1.1.). The year is not entered.
When the correct date settings have been entered, press RAIN/SET again to access Entering Day of the Week mode.
6.2.1.3
1.
2.
Entering the date
Entering day of the week
Use the HISTORY button to set the day of the week (default = 1)
Use the RAIN/SET button to access Switching the Rain Alarm ON and OFF mode.
Important
Days of the week are expressed numerically, i.e., 1 = Monday, 2 = Tuesday, etc.
HISTORY
6.1.2.1
Bar Chart
When the HISTORY button is pressed, the following bar chart graphics are displayed in the upper section of the LCD screen,
before starting from the beginning:
•
DAILY
DAILY shows rainfall progress in the form of vertical bars running from left to right for the last 6 days and the current day.
At midnight each day, the bars shift one place to the left.
•
WEEKLY
WEEKLY shows rainfall progress in the form of vertical bars running from left to right for the last 6 weeks and the current
week. At midnight each Monday, the bars shift one place to the left.
•
MONTHLY
MONTHLY shows rainfall progress in the form of vertical bars running from left to right for the last 6 months and the current
month. At midnight on the 1st of each month, the bars shift one place to the left.
Important
Under normal circumstances, the amount of rainfall is shown on a 100-millimeter scale (0, 1, 2, 3, 4, 5, 10, 20, 30, 40, 50 and
100mm). If one of the bars exceeds 100mm, the scale of the bar chart changes automatically to a higher range (0, 10, 20, 30, 40,
50, 100, 200, 300, 400, 500 and 1000mm).
6.2.1.4
Switching the rain alarm on and off
1.
Use the HISTORY button in conjunction with the flashing LCD display (default = AL OFF) to turn the rain alarm ON and
OFF.
2.
Press RAIN/SET to access Resetting Total Rain Amount mode.
Important
When it starts to rain, a buzzer will sound if the alarm is ON. The buzzer switches off automatically after about 150 seconds, but
can be shut off sooner by pressing any button.
If it starts raining again after a raining break, the alarm will only sound in case the break has been longer than 80 minutes.
6.2.1.5
1.
2.
Resetting total rain amount
The total rain balance (TOTAL) – now blinking on the LCD monitor - can be reset to zero by the “history/+“ - key upon
request.
After this final setting has been entered, you can quit programming mode by pressing the RAIN/SET button. Any altered
data are stored in the EEPROM and the system returns to normal display mode.
6.2.2
Transfer code S 4)
When the rain monitor starts up, additional internal programming takes place, which cannot be changed directly by the user. It is
vital for fault-free operation of the system that the procedures described in Section 5.1 Default settings are followed exactly.
6.2.3
9
Location
9.1
Locating the Rain Gauge
Change of the rain-multiplicator (if requested) S 1)
Locate the rain gauge outside (e.g., on a terrace or in the garden) where it can collect rain
directly. Ensure that it is protected from wind so it cannot tip over. Screws are provided for
mounting.
The rain-multiplicator of the weather station has been pre-set to the value “267“. In case a different value is required please
proceed as follows:
1.
2.
3.
4.
5.
6.2.4
1.
2.
3.
7
To open the change mode of the rain-multiplicator it is required to press the “History/+“- key when inserting the batteries
into the rain-monitor until the pre-set rain-multiplicator with a blinking digit appears
Set the required value with the “History/+“- key until the blinking digit is set to the correct value, confirm with the “Rain/Set“key.
The blinking digit jumps to the next one. Please repeat until all digits are set to the correct value and confirm each time with
the “Rain/Set“- key
After the value of the rain-multiplicator is correct on all 3 digits, confirm again with the “Rain/Set“- key to save onto the
EEPROM. Now the rain-monitor is ready for future references.
After completing all procedures the rain-monitor returns automatically to chapter 2 of section 5.1 ‘Default setting and fast
start’. Please continue from there with the commissioning.
Data transmission and reception
8.1
Reception Criteria
•
8.2
Every 5 minutes, the rain monitor software initiates a search for current rain-gauge values. If the amount of rain cannot be
received after three successive tries the symbol - - - is shown on the LCD display.
Reception of sent values does not occur in programming mode and during numeric display of rain bar charts (see Section
6.1.2.2 Numeric display).
If a button is being pressed, reception is interrupted until the button is released.
433MHz reception test
The rain monitor will try automatically to receive the 433MHz signal from the rain gauge, so long as the batteries have been
inserted and the default setting has been stored. In case the precipitation readings of the rain-monitor and the rain gauge will not
be displayed correctly 30 seconds after inserting the batteries, proceed to the 4 points on the list below. If this does not solve the
problem, refer to Point 5.2 New settings, above.
1.
2.
3.
4.
1.
As shown, insert a suitable screw (not supplied) into the wall, leaving about 5mm of the screw out
from the wall surface.
2.
Use the hole on the rear of the unit to hang the rain monitor on this screw head. Make sure that the
screw head is firmly located in the hole before you let go of the monitor.
Important
Before you drill a hole and locate the monitor on the wall, it is recommended that you check that
the 433MHz signal can be received perfectly. If reception is not possible at the desired location, it
is usually sufficient to move the monitor slightly. Once the signal is received correctly, you can
insert the screw.
S 5)
8
•
To mount the rain monitor on the wall:
Please proceed as described under 6.2.2. -Change of the rain-multiplicator.
After setting the rain-multiplicator, press the “Rain/Set“- key (for approx. 8 seconds) until all data in the EEPROM have
been reset to zero. The rain-monitor returns automatically to section 2c of 5.1 ‘Default setting and fast start’.
Please continue with the commissioning from there.
Data-restore
Move the rain monitor at least 1.5 to 2 meters away from possible sources of interference such as computer monitors or TV
sets.
Avoid locating the rain monitor directly next to or in the vicinity of metal window frames.
Having other equipment such as earphones or loudspeakers operating on the same frequency (433MHz) can prevent
correct signal transmission.
Interruptions to reception can be caused by neighbors with electrical equipment operating on the same frequency (433
MHz).
Important
If the 433MHz signal is being received correctly from the rain gauge, avoid reopening the battery compartments on the rain
monitor or rain gauge as the batteries could fall out of their cradles, resulting in all values being inaccurate. If this happens
accidentally, you will have to reset all sections of the unit (see 5.2 New settings, above).
The outdoor transmission range from the rain gauge to the rain monitor can be up to 60 meters, but is dependent on
environmental conditions and possible sources of interference. If the conditions are correct but no signal is received, all
components should be reset (see 5.2 New settings, above).
Locating the Rain Monitor
The rain monitor is supplied complete with a removable table stand and can be located on a table or on the wall.
Resetting of all memorised precipitation data.
It should be assumed that the rain-monitor has been in operation, e.g. all important data (all rain-data data except rain during the
last hour, all precipitation-activity-data as the rain-multiplicator) have been saved. By saving onto an EEPROM all data will be
restored for future use even in case of a power failure and will be used for a required default and new setting.
•
9.2
10
Changing batteries
To ensure optimal display accuracy, the batteries in the rain monitor and the rain gauge should all be replaced at least once a
year.
Please remember the environment and dispose of used batteries only at official collection points.
11
•
•
•
•
•
Maintenance
To prevent damage, you should locate both units where they cannot be damaged by temperature, vibration or other
movement.
Clean the rain monitor screen and housing only with a soft, damp cloth. Do not use abrasives or solvents.
Do not immerse rain monitor in water.
Dispose of used batteries immediately in order to avoid damaging the units with leaking battery contents. Use only
recommended battery types.
Do not attempt repairs yourself. Repairs should be carried out only by trained personnel at the point of purchase. Opening
or improperly handling the units will void the warranty.
12
Technical specifications
Recommended operating temperature
Rain monitor
:
Rain gauge
:
Rainfall
:
Data check intervals
Signal reception from rain monitor
:
Transmission frequency
:
Transmission range, max.
:
Transmission power
:
Power supplies:
Rain monitor
:
Rain gauge
:
Dimensions (L x B x H)
Rain monitor (without stand)
:
Rain gauge
:
Weight (without batteries)
Rain monitor (without stand)
:
Rain gauge
:
13
•
•
•
•
•
•
0°C to +50°C
0°C to +50°C
For the previous 6 days, weeks or months, plus current day, week or month
Every 5 minutes
433.92MHz
60 meters
-3dBm
14
Glossary
S1
Rain Multiplicator
)
The rain multiplicator is the value which, as a result of the amount of water gathered in the rain gauge, causes the output of a
numeric pulse by the level sensor. The value of 0.267mm has proven to be the optimal figure in this case. Thus, when the level
sensor detects that the minimum possible amount of 0.267mm of rainfall has been reached, it sends a pulse to the rain monitor,
which processes the data and displays it as an amount of rain.
2 x 1.5V batteries, type AAA, IEC LR3
2 x 1.5V batteries type AA, IEC LR6
The rain multiplicator is programmed by the manufacturer to a value of 267 when the weather station is purchased. If this has not
been done, the multiplicator can be set easily by the user to a value between 0.100 and 0.999 millimeters (0.267mm is
recommended - only the digits following the period are displayed). (See 6.2.3 Changing of the rain multiplicator in this manual)
This value is stored in a non-volatile EEPROM and is used as a future reference in the event of accidental power failure.
90 x 21 x 105mm
132mm φ x 185mm high
S2
)
EEPROM
An EEPROM is an electronic semi-conducting storage medium that retains data even in the event of a power failure.
100g
280g
Liability Disclaimer
The manufacturer and supplier are in no way responsible for incorrect reading or for any consequences resulting from
incorrect reading.
This product may not be used for medical purposes or for supplying information to the public.
This product is developed strictly for domestic use as an indicator of rainfall and is not 100% accurate. The displays
provided by this product are, therefore, intended only as an indication and not as completely accurate information.
The technical specifications of this product can be changed without further notice.
This product is not a toy and should be kept away from children.
No extracts from this user's manual may be reproduced without the written permission of the manufacturer.
S3
)
433MHz remote reception
The 433MHz technique allows radio-wave information to be received over short to medium distances without the use of wires.
Data is superimposed on a 433MHz carrier wave, transmitted to the receiver, then filtered out of the 433MHz signal.
The 433MHz frequency can be used freely by any authorized device and requires no registration or proof of technical
qualifications for use by the purchaser.
The 433MHz technique allows the use of innovative products such as wire-less temperature sensors, baby-monitoring phones in
children's rooms, mini-radios or audio transmission systems (wire-less headphones).
Because of legal regulations restricting transmitter power (carrier max. 10mW) and band widths (433.05MHz to 434.79MHz),
problems may arise in the use of such devices (see also Section 8.2 433MHz reception test, in this user's manual).
S4
)
Transfer code
When the rain monitor starts operation, further programming takes place, which cannot be altered directly by the user. This is the
transfer of transmitter code from the rain gauge to the rain monitor. This process links the two parts of the unit together and
guarantees accurate signal transmission. The learning process for this transfer code takes place immediately upon receipt of the
first valid rain data and ends when the initial LCD display value is overwritten. For this reason, it is essential to follow Section 5.1
Default settings precisely in order for the system to operate perfectly.
S5
)
Data storage
It is assumed that the weather station has been pre-programmed and is operating, i.e., all essential data have been stored. As
the data is stored in a non-volatile EEPROM, it is retained, even in the event of an accidental power shortage. Thus, if default or
new settings are needed, all relevant data such as total rainfall amount, rainfall amount since the start of the last rainfall, rainfall
amount over the last 24 hours or data on rainfall progress or the rain multiplicator can still be accessed.