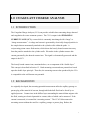
1
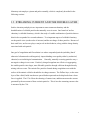
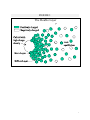
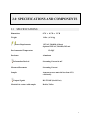
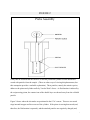
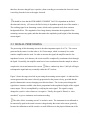
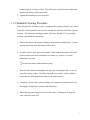
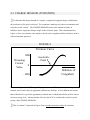
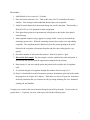
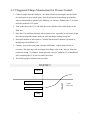
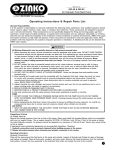
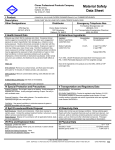
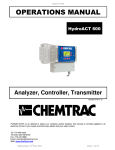
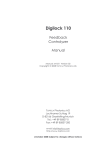
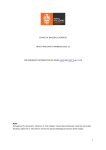
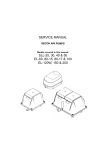
OPERATIONS MANUAL
Coagulant Charge Analyzer
CCA 3100
Laboratory Model
Revised 11/05
Chemtrac® Systems, Inc.
6991 Peachtree Industrial Blvd. • Building 600 • Norcross, GA 30092
(800) 442-8722 • PH (770) 449-6233 • FX (770) 447-0889
[email protected] • www.chemtrac.com
TABLE OF CONTENTS
SYMBOL KEY & SAFETY PRECAUTIONS
PAGE 3
WARRANTY INFORMATION
PAGE 4
1.0 COAGULANT CHARGE ANALYZER
1.1 INTRODUCTION
1.2 BACKGROUND
1.3 STREAMING CURRENT AND DOUBLE LAYER
PAGE 5
Page 5
Page 5
Page 6
2.0 SPECIFICATIONS AND COMPONENTS
2.1 SPECIFICATIONS
2.2 PROBE ASSEMBLY
2.3 SIGNAL PROCESSING
Page 8
Page 9
Page 11
3.0 OPERATION
3.1 SENSOR AND PISTON
3.2.1 Removal
3.2.2 Insertion
3.2.3 Standard Cleaning Procedure
PAGE 13
Page 13
Page 13
Page 13
Page 14
4.0 PRACTICAL CHARGE MEASUREMENT
4.1 CONDITIONING
4.2 CHARGE MEASUREMENT
4.3 CHARGE DEMAND (TITRATION)
4.3.1 Suggested Titration Procedure
4.3.2 Suggested Charge Measurement Procedure
4.4 APPLICATIONS
Page 16
Page 16
Page 17
Page 18
Page 20
Page 21
CCA 3100
PAGE 8
PAGE 16
2
SYMBOL KEY
Risk of Electric Shock
Note
SAFETY PRECAUTIONS
BEFORE ATTEMPTING TO UNPACK, SET UP,
INSTRUMENT, PLEASE READ THIS ENTIRE MANUAL.
OR
OPERATE
THIS
MAKE CERTAIN THE UNIT IS DISCONNECTED FROM THE POWER SOURCE
BEFORE ATTEMPTING TO SERVICE OR REMOVE ANY COMPONENT.
FAILURE TO FOLLOW THESE PRECAUTIONS COULD RESULT IN PERSONAL
INJURY OR DAMAGE TO THE EQUIPMENT.
CCA 3100
3
WARRANTY INFORMATION
Warranty: Chemtrac® Systems, Inc. warrants its product to be free of defects in material and
workmanship for a period of one (1) year from date of shipment to the original customer.
Upon receipt of written notice from the customer, Chemtrac® Systems, Inc. shall repair or
replace (at the discretion of Chemtrac® Systems, Inc.) the defective equipment or components.
Chemtrac® Systems, Inc. assumes no responsibility for equipment damage or failure caused by:
A. Improper installation, operation, or maintenance of the equipment.
B. Abnormal wear and tear on moving parts caused by some processes.
C. Acts of nature (i.e. lightning, flooding, etc.)
This warranty represents the exclusive remedy of damage or failure of the equipment. Under
no circumstances shall Chemtrac® Systems, Inc. be liable for any special, incidental, or
consequential damage, such as loss of production, profits or product quality. The warranty
cannot be guaranteed if the customer fails to service and maintain the equipment in accordance
with Chemtrac® System’s written instructions and policies, as stated in the Operations Manual.
CCA 3100
4
1.0 COAGULANT CHARGE ANALYSIS
1.1 INTRODUCTION
The Coagulant Charge Analyzer (CCA) can provide valuable data concerning charge demand
and coagulation for water treatment systems. The CCA’s output is the STREAMING
CURRENT VALUE (SCV), a term which is commonly interchanged with “charge” or
“charge measurement.” A voltage and current is generated by electrically charged particles in
the sample that are momentarily attached to the cylinder walls within the probe. A
reciprocating piston causes fluid motion, which shears the loosely bound counter-ions away
from the particles attached to the cylinder walls. Electrodes in the cylinder measure this
current generated by the sheared counter-ions. The signal is electronically processed and the
output is the SCV.
The loosely bound counter-ions, mentioned above, are a component of the “double layer.”
This concept is described in Section 1.3. Both streaming current and zeta potential are based
upon the double layer principle. Therefore, the streaming current value produced by the CCA
is comparable to the well known zeta potential.
1.2 BACKGROUND
As originally developed, the streaming potential measurement utilized a capillary passage or
porous plug of the material of concern, through which the bulk fluid can be forced by an
applied pressure. Counter-ions in the diffuse layer surrounding the material then migrate with
the fluid, creating an electrical potential or current, either of which can be measured. If the
current is measured, it is termed the “streaming current.” The CCA 3100 measures the
streaming current without the need for a capillary passage or porous plug. Rather, the
CCA 3100
5
laboratory unit employs a piston and probe assembly, which is completely described in the
following sections.
1.3 STREAMING CURRENT AND THE DOUBLE LAYER
Surface chemistry and physics are important to water treatment chemistry and the
destabilization of colloidal particles that naturally occur in water. One branch of surface
chemistry is colloidal chemistry, which is the study of a stable combination of particles that are
dissolved or suspended in a second substance. Two important aspects of colloidal chemistry
are the particle sizes (on the order of microns) and the net charge of these particles. Because of
their small size, surface area plays a major role in their behavior, along with the charge density
associated with each particle.
One goal of coagulation and flocculation is to reduce suspended particles (turbidity) that if
otherwise left untreated would negatively impact drinking water quality either by aesthetical,
chemical, or microbiological contamination.
Generally, naturally occurring particles carry a
net negative charge in raw water. Positively charged coagulants are effective in aggregating
the smaller particles into larger, more filterable, particles through collisions brought about by
mixing with raw water. The cationic floc particles formed during coagulation react with the
surface of the anionic colloid to destabilize its charge structure. The Diffuse layer, or the outer
layer of the colloid, holds ions that are spaced further apart and can be displaced when a shear
force is applied. The CCA effects the shearing of counter-ions, and then measures the current
generated by the movement of these cationic particles. This is how the streaming current value
is measured by the CCA
CCA 3100
6
FIGURE 1
The Double Layer
CCA 3100
7
2.0 SPECIFICATIONS AND COMPONENTS
2.1 SPECIFICATIONS
Dimensions
8”W x 8½”D x 21”H
Weight
14 lbs. (6.36 kg)
Power Requirements
Environmental Temperature
Enclosure
Information Derived
115VAC, 50/60Hz, 410 mA
Optional 220VAC, 50/60Hz, 205 mA
15-45°C
Aluminum
Streaming Current in mV
Measured Parameter
Streaming Current
Sample
Aqueous process material less than 0.2%
consistency
Output Signals
Materials in contact with sample
CCA 3100
RS-232/485 (Serial Port)
Delrin, Teflon
8
2.2 PROBE ASSEMBLY
The CCA consists of a probe assembly and a signal processor. The probe assembly is comprised
of the piston and sensor, which houses the electrodes that measure the streaming current. The
signal processor is the circuit board inside the CCA.
A simplified picture of the probe assembly is presented in Figure 2. The sample, which contains
the water to be characterized, flows into the cylinder (via side holes that are not shown.) Inside
the cylinder is a small piston that reciprocates vertically. Above the piston, the piston rod is
attached to an eccentric point on a crank driven by a motor. The piston’s velocity is thus
sinusoidal in nature.
The piston moves up and down inside a cylinder that is closed at the bottom. The space between
this piston and the cylinder is called the annulus, which is critical to the streaming current
device. The annulus has the shape of a thin, cylindrical “shell,” which contains sample fluid and
particles. The clearance between the piston and cylinder walls is several thousandths of an inch
(in metric units, on the order of hundreds of microns.) As the piston reciprocates, it acts as a
pump: when moving downward, it forces sample out of the cylinder, upward through the
annulus. Note that the annular clearance is large enough to allow most particles in a typical
sample to pass in or out, but small enough to cause significant fluid velocity within this space.
After the piston reaches its downward position, it precedes upward, pulling fluid downward into
the increasing volume below this piston. All directions are thus reversed in this stage of the
piston’s travel. The constantly reciprocating piston ensures continuous renewal of sample, such
that changes in particle characteristics can be monitored.
CCA 3100
9
FIGURE 2
Probe Assembly
It may then be assumed that the surfaces of both the piston and cylinder become adsorbed or
coated with particles from the sample. (There are other ways of viewing this phenomenon, but
this assumption provides a workable explanation.) These particles, namely the anionic species,
adhere to the piston and cylinder walls by Van der Waal’s forces. As fluid motion is induced by
the reciprocating piston, the counter-ions of the double layer are sheared away from the colloidal
particle.
Figure 2 shows where the electrodes are positioned in the CCA’s sensor. These are two metal
rings inserted in upper and lower areas of the cylinder. If the piston is moving downward (and,
therefore, the fluid motion is upwards), and the attached particles are negatively charged (and,
CCA 3100
10
therefore, the outer charged layer is positive), then according to convention the electrical current
is traveling from the lower to the upper electrode.
It should be clear that the STREAMING CURRENT VALUE is dependent on the fluid
direction and velocity. (Of course, the fluid velocity is dependent upon the size of the annulus.)
The resulting signal is an alternating current, which can be separated easily from constant
background effects. The magnitude of the charge density determines the magnitude of the
streaming current at any point, and thus determines the amplitude (peak height) of the alternating
current signal.
2.3 SIGNAL PROCESSING
The processing of this alternating current is the other important aspect of a CCA. The current
generated in the sensor is on the order or 10-12 microamps, which is extremely low, and a
sensitive amplifier must be used. In order to measure the signal, the amplifier must be low
impedance because, in its absence, the circuit would be completed by conductance back through
the liquid. Essentially, the amplifier must have a lower conductance than the sample in order to
complete the circuit and measure the current.
Hence, conductivity above 3,000 μS will begin
to dampen the signal and may eventually render the SCV useless.
Figure 3 shows the stages involved in processing the streaming current signal. As indicated, the
current generated at the sensor is directly proportional to the piston velocity, provided that the
particle characteristics are not changing over this time frame. The circuitry must change this
signal into a constant, readable value that is proportional to the amplitude (height) of the original
sensor output. This is accomplished by rectifying the entire signal. The signal is simply
changed to a positive value whenever it is negative. Finally, the signal is filtered, or “timesmoothed,” to give a continuous and consistent reading.
The value of this “streaming current” is in relative units. The instrument is not calibrated to
be numerically equal to the actual current or charge density that exists in the sensor, primarily
because the calibration would be sensitive to small differences in the physical dimension of the
CCA 3100
11
annulus. Another reason the instrument is not calibrated to display a discrete charge value is that
the instrument is sensitive to differences in charge distributions that vary from simple systems to
complex systems. However, the unit includes a sensitivity adjustment (HI or LOW) that
amplifies the original signal activated by the switch located on the face plate.
Figure 3 also suggests how the processing of an alternating current signal from the sensor serves
to eliminate any extraneous currents. Suppose the entire signal is moved upward a certain
amount due to an interfering current which is constant in value. When the signal is rectified, the
positive peaks remain at a higher level, but the negative peaks are at a lower level when they are
“flipped” to the positive side. After this rectified signal is smoothed, the overall result is to
eliminate the interference, since half of the peaks were too high and half were too low.
FIGURE 3
Streaming Current Processing Steps
CCA 3100
12
3.0 OPERATION
The CCA 3100 offers two power switches. The first is located below the face plate and
supplies power to motor that drives the piston. The second power switch is located on the back
of the unit near the power cord connection. The switch in back allows the operator to turn the
power off entirely to the unit.
The small switch located on the face plate controls the gain for signal boosting.
3.1 SENSOR AND PISTON
The sensor and piston are critical components of the CCA 3100 that require care and regular
cleaning.
3.1.1 Removal
1. Turn the motor “Off.”
2. Loosen the thumbscrew on the lower portion of the sensor.
3. Secure the CCA with one hand and with the other, pull down on the lower portion
of the sensor to disconnect at the banana plugs.
4. To remove the piston, unscrew by hand or, if necessary, with a flat blade
screwdriver.
Hand-tight is sufficient to secure the piston.
3.1.2 Insertion
1. Turn the CCA “Off.”
2. Screw the piston on by hand, taking care not to damage the threads.
Hand-tight is sufficient to secure the piston.
3. Position the sensor so that the thumbscrew is facing forward.
4. Secure the CCA with one hand, and then insert the sensor by aligning the banana
plugs. The sensor will rest “flush” against the main body of the CCA so that the
CCA 3100
13
banana plugs are no longer visible. This will ensure a good electrical connection
and prevent fouling of the connections.
5. Tighten the thumbscrew to secure sensor.
3.1.3 Standard Cleaning Procedure
With some particles, cleaning is easily accomplished by rinsing with tap water. Others
(especially cationic particles) are tenacious and must be removed with fairly vigorous
cleaning. The following cleaning procedure will assure that the CCA is providing
accurate, reproducible measurements.
1. Remove the sensor and piston according to the procedure outlined above. Remove
the plug and O-ring from the bottom of the sensor.
2. Scrub the surface of the piston and cylinder, (both inside and outside) with a stiff
nylon test tube brush and a mild abrasive cleanser (e.g. Comet). Use room
temperature tap water.
Avoid water contact with the banana plugs.
3. Rinse all of the surfaces thoroughly with tap water, ensuring that they are free of
soap film and any residue. Carefully inspect the inner surface of the cylinder to
ensure that no visible particulate matter is left on the surfaces.
4. Completely dry the sensor, piston and plug with compressed instrument air or by
allowing the components to air-dry in the laboratory.
5. Return the plug and O-ring to the base of the sensor. Omitting the O-ring will
cause variations in the SCV.
CCA 3100
14
Distilled or de-ionized water may be used. However, the water’s low conductivity
will magnify the SCV. Thus, the operator must ensure that all surfaces are completely
dry before use.
CCA 3100
15
4.0 PRACTICAL CHARGE MEASUREMENT
This section provides the operator of the CCA 3100 with practical guidelines for obtaining
reliable data. It is the responsibility of the operator to determine the appropriate application for
charge measurement, consistently follow the procedures described in this manual, and then
determine the meaning of the data.
4.1 CONDITIONING
Chemtrac recommends that the sensor and piston be conditioned before the actual charge
measurement is performed. Conditioning will replace foreign molecules with ones that are
similar to the sample being tested. Additionally, one may consider that conditioning will “coat”
the surfaces of the sensor and piston with the sample to be tested.
To condition the sensor, simply run a couple of charge measurement analysis without cleaning
the probe and piston with comet.
4.2 CHARGE MEASUREMENT
Remove the conditioning sample, and replace with the true sample. Follow the same steps as
stated in the previous paragraph. After the SCV has stabilized, record this value.
CCA 3100
16
4.3 CHARGE DEMAND (TITRATION)
To determine the charge demand of a sample, a coagulant of opposite charge is added until
the isoelectric (0.00) point is achieved. The coagulant is made-up to a known concentration and
referred to as the “titrant.” The CHARGE DEMAND refers to the amount of titrant, in
milliliters, that is required to bring a sample to the isoelectric point. This is demonstrated in
Figure 4, where a net anionic water sample is dosed with a coagulant until the isoelectric point is
achieved and then surpassed.
FIGURE 4
Titration Curve
1000
Streaming
Current
Value
Isoelectric
Point
0
Milliliters of
-1000
Coagulant
Note that in Figure 4, the SCV tangentially approaches zero. This is critical to achieving a valid
titration, and is achieved by an appropriate addition rate of titrant. A slow addition rate ensures
that each molecule is given the opportunity to adsorb onto a colloid and stabilize itself to achieve
its lowest energy level. A hasty titration will cause the SCV to overshoot the isoelectric point,
giving a false CHARGE DEMAND.
This “overshoot” is depicted in Figure 4 but is not the normal procedure for a titration.
CCA 3100
17
4.3.1 Charge Demand Procedure
Please read this procedure completely and thoroughly prior to starting the titration. Operators
may make adjustment specific to their facility after determining how the CCA unit works.
Purpose:
The purpose of this procedure is to demonstrate how quickly the CCA can ballpark chemical
dosages in place of routine jar tests. The CCA is quick and easy. Operators simply place a jar of
raw water under the CCA, add the required chemical to control pH, and titrates the jar to neutral
using coagulant. In less than two or three minutes, the operator knows approximately how much
coagulant is needed to treat the water.
Jar testing requires the plant to measure several samples of raw water (usually one or two liters)
into jar test beakers and place under a gang mixer, then dose the beakers at different chemical
levels using alum, ferric, caustic, lime, soda ash, etc. Using the gang mixer, operators control
the paddle speeds to simulate mixing conditions in the plant. After ten to fifteen minutes of mix
time, operators may shortcut the normal test and visually determine which beaker gives the best
floc formation. The plant’s chemical feed pumps are adjusted to deliver the calculated dosage
based on the plant raw water flow rate.
Stock solutions:
Make-up one percent chemical stock solutions for the jar test procedure. Each milliliter of stock
solution is equivalent to 5 ppm chemical dose into 2000 mls of raw water.
To prepare a 1 percent solution of alum, simply weigh 1 gram of dry alum and dilute to 100 mls
using distilled water (tap water contains chlorine which reacts with alum). One milliliter of this
solution when added to one liter of raw water gives a dose of 10ppm or 10 mg/L. Using liquid
Alum (50%), simply weigh 2 grams of liquid and dilute to 100mls.
CCA 3100
18
Procedure:
1. Add 2000 mls of raw water to a 2 L beaker.
2. Place the beaker under the CCA. Turn on the stirrer, the CCA and allow the unit to
stabilize. Slow changes in the hundredths decimal place are acceptable.
3. Add pH control chemicals to the normal dosage rate used by the plant. Theoretically, a
final pH of 6.5 to 6.8 is optimum for alum coagulation.
4. If the plant feeds polymer for pretreatment, add polymer to the beaker at the plant’s
normal dosage.
5. Add coagulant dropwise using a pipette or syringe with 0.1 accuracy and watch the
streaming current value. When the streaming current value reaches zero, stop adding
coagulant. The coagulant must be added away from the piston opening in the probe.
Otherwise the coagulant will saturate the probe and drive the reading positive very
quickly.
6. Record the number of mls used in the titration. Each ml is equal to 5 ppm.
7. Discard the first sample. The first sample is used to condition the probe and piston. It
also informs the operator with the approximate endpoint for the titration.
8. Repeat steps 1-6 (do not wash the probe and piston) and record the mls of coagulant
used.
9. To calculate the ppm of coagulant, multiple the number of mls in step 8 by 5.
10. Steps 1-6 should take less than 2 minutes to perform. Immediately place the beaker under
the gang mixer at 40 rpms for 3 minutes. Then allow it to mix at 10 rpms for 10 minutes.
Notes all parameters that you would record for jar testing including floc size, formation,
settling, pH, and turbidity.
Compare your results to the actual chemical dosage being used by the plant. If your results are
greater than +/- 10 percent, you may wish to proceed with the following steps.
CCA 3100
19
4.3.2 Suggested Charge Measurement for Process Control:
1. Collect a sample from the flash mix – the chemical must be thoroughly mixed with the
raw water prior to your sample point. Also, the plant must be producing good quality
water as determined by turbidity, pH, alkalinity, etc. Measure 2000mls into a 2 L beaker
and place under the CCA probe.
2. Turn on the stirrer, the CCA, and allow the unit to stabilize. Record the charge of the
flash mix
3. Once the CCA stabilizes (this may take a minute or two, especially in cold water), begin
the alum titration and continue until you reach the charge reading in step one.
4. Record the number of mls required. Calculate the amount of chemical you dosed by
multiplying each milliliter by 5.
5. Compare your results to the plant’s dosage calculations. Adjust chemical feed as
necessary. The plant may wish to compare this charge value to the “best jar” based on
routine jar testing. To compare, simply place the “best jar” under the CCA immediately
after completing the CCA process control procedure.
6. The following figure illustrates the procedure:
FIGURE 5
+10.00
Treated Water Charge = -0.34
Raw Water Charge = -1.59
}
Coagulant
Added in mls
-10.00
CCA 3100
20
4.4 APPLICATIONS
Effective utilization of the CCA 3100 is the responsibility of the operator. Ingenuity and
creativity are required. Charge analysis can be utilized on the following sample locations:
1. Test the raw water to determine coagulant demand by titration.
2. After flash mix, measure charge to determine optimum chemical dosage
3. Compare a sample after the on-line unit with a charge measurement on the
CCA to verify on-line operation and pump control.
4. Measure charge on individual jar tests to derive a numerical charge value
for the “best jar.”
CCA 3100
21