1
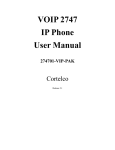
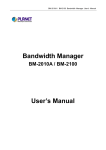
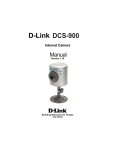
USER MANUAL SIP Version Model P 2200-S Package Congratulations! You have chosen one of the most well featured SIP Phones of its class in the market today. Please read through this manual very carefully, and follow the instructions as below. . This package includes the following: z Phone (Phone + Handset) z Power Adaptor: Input Voltage: One of the following types. 110VAC 60Hz USA market 220-230 VAC 50Hz Europe, 240VAC 50Hz, Australia z Output +12V DC 500ma z Network Cable (Cat-5 cable x 1) z CD disk containing user manual information. Connection Setup Step 1 Please take out your IP phone and its handset. Then connect your handset to IP phone by plugging the curly cord to the jack on the left hand side of device. Step 2 If you use RJ-45 broadband connection, please connect your network cable from your broadband modem ( such as NAT、HUB、ADSL、CABLE ) to the RJ45 WAN port of your IP phone,. The other RJ-45 jack can be connected to your computer giving it Internet access. * Please note that it is a special design feature of this telephone to allow either one of the RJ45 jacks to be used in WAN or LAN mode. Therefore they have not been marked. Step 3 Please plug in your power adaptor to your IP phone and power source. The LCD screen of your IP phone will display “Starting…….” and then “SIP (xxx)” menu will be displayed on the LCD screen within approximately 3 seconds. Please note that the power supply as supplied in this package is specific to your market. * For traveling/ international use, please consult your supplier for an international switch model multi-voltage input model. 110 – 240VAC type. Pre-Use Settings Step 1: Go to “Configure (Password: 525) Æ Network” in the Menu. Choose a suitable connection type (Dynamic IP, PPPoE and Static IP). The most commonly used setting is DHCP (ON) in which case the phone should be able to find an IP address from the router. It is also possible to select a static IP address. In this case, if the user is connected to a router and the IP is 192.168.1.101, he should deactivate DHCP to OFF, and then choose “Static IP Æ IP Address” and set IP to 192.168.1.101. After setting IP, set a suitable value to “Static IPÆ Default Router” and “Static IP ÆDNS Server”. Step 2: Restart your IP Phone after setting IP, Go to “View Æ Restart” in the Menu. Step 3: Go to Configure Æ SIP to set the SIP properties. Set the phone number and password by choosing “Number” and then follow the same procedure in the “Password” setting. These two fields above are also accessible through Short Cut M4.. Thereafter, set the Sip server address of your SIP provider in the ProxyAddr field , as well as the Port number, in the Port field , (this is usualy 5060) Please remember to choose “Yes” for “Proxy On” once you enter these. Step 4: Subject to network availability. Set the “OutbndProxy Addr” and “Outbound Proxy Port” to the server IP and port ….. only after choosing “Yes” on “OutbndProxy On”. Consult your Provider regarding this feature. Step 5: Return to the waiting/idle state and check to see whether it will display “SIP(your number)” or “Registering (your number)”. If there is any problem, please refer to the User Manual. Registration Message z The following message will be shown if users register to the service provider successfully z SIP (your number) Date & Time Means that the IP Phone is working OK and is ready for outgoing/incoming calls. The number within the parenthesis ( ) is the IP Phone’s number set in the phone. z SIP(Proxy off) Date & Time Means that the user has not registered to the Server. The user can only dial calls with IP addresses. (When the user is connected with the Network Cable, it may possibly be able to dial another user by entering the static IP Address of the other user.) z When registration has failed, various messages will be displayed as follows: z RegFail (failing message) This message means that the registration has failed. Please check the setup of your SIP configuration. The IP Phone cannot find the Server or the Server rejected the registration. The IP Phone cannot make any calls, now. But the menu selection and the on-hook / off-hook function can work OK. z RegFail(Duplicate) When RegFail(Duplicate)is shown, it means that your number is already registered by another IP device , please wait for several seconds until your screen shows SIP (your number). By the time SIP (your number) shows, it means that the user has registered successfully. If all fails, reboot your phone. z RegFail(security) When RegFail (Security) is shown, it means your number and/or password is incorrect. Consult your Service Provider. Registration Message z DHCPFail (your number) When this message is shown, it means your DHCP has failed. It cannot find a DHCP server or the DHCP server rejected the IP Assignment. Please check your internet connection. Users are not able to hear any voice when this message is displayed, the IP Phone cannot make any calls and the on-hook / off-hook functions cannot function. Instead, users can only operate on the menu. The IP Phone will continuously try to get the IP address from the DHCP server, so, if the DHCP server is responding, the DHCP Fail ( ) display will change to SIP( ) display to notify that the IP Phone is working OK. z PPPoE Find Fail (your number) This message will show when the ADSL modem cannot be found or detected. Please check your ADSL connection. It cannot find a PPPoE server or the network connection has some problem). The IP Phone cannot make any calls, but the menu selection and the on-hook / off-hook function can operate OK. z PPPoE Auth Fail (your number) If PPPoE is selected: This message will show up when your PPPoE account and/or password is incorrect. Please double check to make sure the entered information is correct. If it is incorrect, the IP Phone cannot make any outgoing calls, however the menu selection and the on-hook / off-hook can still function. Registration Message 1. MENU Indicates the Main Menu. 2. PHONEBOOK Indicates the Phonebook 3. CANCEL When using Menu screen, this key serves as a back-space function and allows you can go back to previous category by pressing this key. In Off-Hook mode - Four saved memory dial keys. In On-Hook mode these keys provide Short Cut / Hot Key functions to some commonly used functions. Indicates the upper menu and allows choosing of an option This key acts as an accepting YES/ENTER function key during menu use. ↑↓ Key, Up/Down Arrow keys, During the conversation allows adjustment of the volume. During idle status, allows checking of incoming, outgoing, missed calls, well as do volume adjustment. In the Main Menu function the up arrow key also serves as a delete key, i.e. backspace and delete characters. During Dialing, this ↑ key can be used to delete a wrong digit dialed. 4. MEMDIAL M1 M2 M3 M4 5. OK 6. UP/DOWN 7. HOLD ▲/▼ To place a conversation ON HOLD. Registration Message 8. MUTE Minimize the speaker or handset volume to 0 9. RE/DIAL Redial the previously dialed number. Also serves as a “send” key after the phone number is completed as dialed. 10. SPEAKER Hands-free one-way incoming speaker function when dialing a number. 11.TRANSFER Transfer call during conversation. In program Menu mode, this acts as a switch over/toggle-key, switches between numbers and symbols. The “send” key, “#”, after phone number is dialed. In program Menu mode this acts as symbol “.” (dot) during input of the IP address. This Red Color LED will light up, when the IP Phone is in use. 12. 0-9 Keys, *, # 13. IN-USE LED Detail Information i. MENU Key When the IP Phone is in idle (on-hook) state, this key is used as a “Menu” function key to display the menu selection on the LCD display. If users want to find out the menu level and menu items, please study the menu tree page on the last few pages of this manual. It includes three main items (View, Configure, Advanced). ii. PHONEBOOK Key When the IP Phone is at idle state, this key is used as “Phonebook” function key to display the phonebook selection on the LCD display. It allows users to store the number as a phonebook and set the Fast Memory Dial key. It includes two main items (Phone Addrbook & MemDial Setting). iii. CANCEL Key When the IP Phone is in the Menu selection mode, this key is used to escape to an upper layer of the menu as well as phonebook selection. It performs the function of a back-track key in the menu. And when the IP Phone user is editing some menu item’s contents, this key is used to cancel current edit and escape to an upper layer of the menu and phonebook selection. iv. MEMDIAL Keys - SHORT-CUT HOTKEYS M1 M2 M3 M4 These keys shown above, serve two functions: a) Fast Memory Dial numbers which can be stored in to these 4 Memories. When the IP Phone is off-hook and in call commence state, these keys are used as “Fast Memory Dial” function keys to access a pre-stored number from the phonebook. If this memory dial function is not set, the LCD display will show as “Not Setting”. If the records in the phonebook have not had a phone number assigned to them, the LCD display will show as “No Number”. b) Short-Cut Hotkey Function allows the user to gain fast track access to various frequently used features and save accessing/navigating the regular Menu tree. Detail Information When the phone is on the hook, the keys perform the following quick access: M1 (Frequently used functions,) Proxy On, Proxy Address, Proxy Port, Prefix Digits, FTP address, FTP File name . M2 selection of ring type. 10 different ring types. M3 Call forward function – if supported by network. M4 User Number, Password, DHCP ON/OFF, Time and Restart. v. OK Key When the IP Phone is in the idle state, this key is used for searching records in the phonebook. By inputting the name, it will display the result when the record name contained matches to the input names. When in the menu and phonebook selection/setting on the LCD display, this key is used as “OK” key to enter into a lower layer of menu selection or to accept the edited item’s contents. When the IP Phone is on dial mode, the “OK” key vi. ↑ Key is used as “Dial Out” Key. ▲ In the IP Phone’s idle state , this key is used as checking the “missed / incoming / outgoing calls” also showing record of time and date. When entering the IP Phone’s menu and phonebook selection, this key is used to scroll up the menu items. And when the IP Phone is editing some menu item’s contents, this key is used as “left delete” to delete a digit per each key press. When the IP Phone is on dialing mode, the “↑” Key is used as “delete” key of the last digit pressed. When the IP Phone is in conversation on handset or speaker, this key is used to increase the volume of of the audible voice. The volume of speaker, handset and ring are separately adjusted according to the mode of current use. When in idle, “↑” key increases the volume of ring tone. In hands free mode, “↑” key increases the volume of the speaker, and when in handset mode, “↑” key increases the volume of the handset. Detail Information vii ↓ Key ▼ When the IP Phone is in idle state , this key is used to check the “missed / incoming /outgoing call” also showing the date and time recorded. When the IP Phone menu is in the “phonebook” selection, this key is used to scroll down the menu items. When the IP Phone user is talking on handset or has the phone on speaker, this key is used to decrease the volume of the audible sound. The volume of speaker, handset and ring are separately adjusted according to the mode of current use. When in idle state, “↓” key decreases the volume of ring tone, in hands free mode, the “↓” key decreases the volume of speaker, when in handset mode, the “↓” key decreases the volume of the handset. viii. HOLD Key When the IP Phone user is in conversation using the handset, this key is used to place the conversation on HOLD. After pressing this key, users can put down the handset. Some VOIP service providers networks will provide music-on-hold in this mode. When the user needs to resume talking, he can resume by lifting the handset and again pressing the “HOLD” key ix. . MUTE Key When the IP Phone user is talking on handset, this key is used to mute the handset microphone volume to zero. To resume talking again, press the key again. x. RE/DIAL Key When the IP Phone is in off-hook state/ or on speaker mode, pressing this key will redial the last number dialed. This key can also be used to redial the last number dialed, if the call party B number is ringing with engaged tone. Users can redial the number without hanging up the phone should the called party be busy, or should an engaged tone is presented. When the user dials a number that appears to be busy, pressing REDIAL key can automatically flash the line and redial again without the need to hang up the handset and/or re-enter the dialed number manually. Detail Information xi. SPEAKER Key This key is pressed to switch between the use of the handset and the speaker devices. The caller can use this key, to initiate a call, and then lift the handset when the call party B answers the phone. xii. TRANSFER Key This key is pressed to transfer an active call to another IP Phone. When the IP Phone is active (incoming call answered or outgoing call accepted), by pressing this key, a dial tone will be heard, then the user can key in another IP Phone’s number (or depending on service provider, a regular PSTN number ) to transfer the call to another party. If the call transfer is successful, a busy tone will be presented to the notice of the user which notifies him to place the handset on-hook. If the call has failed, the user can press this” TRANSFER” key again, and retrieve the original call connection. During an incoming call when the IP Phone is ringing, “TRANSFER” key pressing of this and then followed by another IP Phone’s number can transfer the call immediately to another party without answering the call. When the IP Phone is at edit mode, this key is used to interchange between digit and all English characters by pressing the digit keys. xiii. * 0-9, , # Keys These keys are used to dial the call out number when the handset is in off-hook state. In the menu item editing mode, these keys can be used to toggle between digits and all English alpha characters by quickly consecutively re-pressing the same key. Press the “send” key, “#”, after phone number is dialed. This will normally fast-track deliver the number sequence to the network. In the menu mode, when entering an IP address, “*” represents the symbol “.” (dot) in the IP address sequence. xiv. IN-USE LED When the IP Phone is in a call, dial-out or off hook state, the RED LED will turn on in order to indicate that the IP phone is in use. Menu Selection - View There are three main menu items within the menu selection (i.e. after pressing the Menu key ). Note: Refer to the menu tree on the last page of this manual, as a reference. Under this selection , users can view current network settings and restart the IP Phone. Users can only view the settings under this menu and cannot edit any of the settings. 1. Network Value Users can view the information re: IP Address, Network Mask, Default Router and DNS Server which are the general settings of Network. 2. Ping Users can ping another IP Phone (also computer) by inputting its IP address. This provides an excellent and almost fail-safe means to check whether the server or other IP Phone has connection through to the Internet or LAN. Usually, pinging of your SIP service provider can provide a good indication as to whether your connection is good and stable. 3. Restart After changing any of the phone settings, restart the IP Phone using this function so that the changes may take effect. 4. Image Version This displays the Image Release Version of current image /software in your phone. 5. PKT Trace Users can choose either enable or disable this function depending on recommendations by the SIP service provider. Default is “ 0 “. Menu Selection - Configure Under this menu selection, you can configure numerous settings in the IP Phone. The password to enter into the Configure selection is “525”. 1. Network This IP Phone supports three types of network connections including Dynamic IP, PPPoE and Static IP. Below are shown different types of connection methods. After setting the IP Address, please remember to restart your IP Phone(View ► Restart). i. Dynamic IP For Cable, such as ADSL and/or NAT. By DHCP Configure ► Password:525 ► Network ► (Yes/No) Dynamic IP z Please select Yes on (Yes/No) Dynamic IP when using DHCP method. ii. PPPoE For dialup ADSL connection. By PPPoE Configure ► Password:525 ► Network ► (Yes/No) PPPoE z Please select Yes on (Yes/No) PPPoE when using PPPoE method. z PPPoE Username – please input the user name given by ADSL provider. z PPPoE Password – please input the password given by ADSL provider. iii. Static IP For static IP address of ADSL connection. By static IP Configure ► Password:525 ► Network ► Static IP z Please input the Public IP address as provided by your ISP or private IP address, Network Mask and Default Router details. Menu Selection - Configure z Once all the setup is completed, please restart your phone as shown above.. Then you are able to assure whether your connection is working properly by going View, Ping, then type in some famous web page like www. yahoo.com iv. Time Zone This is used to configure the time zone with the world clock. The value set under this is normally a figure of + hours or – hours to GMT. (Greenwich Mean Time) Some Networks automatically adjust for Daylight Saving, however it is best check with your network to see if this is supported. Menu Selection - Configure 2. SIP Setup Configure ► Password:525 ► SIP z Number – please input the IP phone number given by service provider. z Password – please input the password given by service provider. z (Yes/No)Proxy On – please select Yes and register to service provider. Please note that if users do not register the server address, the number input cannot be used. Proxy Addr – it is used to set the Proxy server IP provided by service provider Proxy Port – it is used to set the port for accessing the proxy server. Please use the proxy server’s port setting of 5060 unless you are sure that your sip server provider is using a different port number. z (Yes/No) OutbndProxy – it is used to set the outbound proxy information. z (Yes/No) RTPLowBW – it can be enabled and disabled. Usually set to disable unless advised otherwise by your SIP service provider. 3. Forward Mode - Also Accessible by Short-Cut/Hotkey M3. Configure ► Password:525 ► Forward Mode These features are subject to network availability. z Immediate – If the users chooses this feature, an item “Immed Number” will be shown for entering the unconditional call forward number. All calls received for to this IP phone will immediately be forwarded to the number entered. z Busy - When the caller is on another call at a time that an incoming call is in place, the call will be forwarded to the number that is in this field.. After choosing this option, an item “Busy Number” will be shown in order to let the user to input the number for forwarding the calls when busy. Menu Selection - Configure z No Answer –When the incoming call has not been answered after a user selectable number of time period, the call will forward to preset number. After choosing this option, an item “NoAns Number” will be shown in order to let the user to input the number for forwarding the calls when there is no answer. Another item “NoAns Time” will be shown in order to let the user set the time which the IP phone will ring after which it will forward to the number which has been entered. The value entered is in increments of seconds. Please note that selection of IMMEDIATE forwarding, totally overrides Busy and No Answer forwarding, in which case they will not function. The Immediate / Busy / No Answer forwarding numbers can be set when the corresponding forwarding mode is enabled. Menu Selection - Advanced This menu selection is used by the system administrator to set some advanced configuration of the IP Phone and is password protected. Please do not try to change anything within this configuration unless you are the assigned person to do so. The password to go into the Configure selection is “6983”. 1. System Advanced ► Password:6983 ► System z DSP Version – It shows the DSP Version of the IP Phone z Upgrade / Download – for setting the firmware upgrade information FTP User name and Password, should be set according to settings provided to you by your service provider. Normally, these may already be provided as default settings in your phone. FTP Server IP – set the server IP for upgrading firmware (The default server setting in your IP phone is panafon.com.au Upgrade Image! – users can upgrade the newest software through the internet. Please read further on this, before attempting any upgrades. z Debug Mode – (Dump Address, Dump Size and Dump !) for debug use only - to be used only by authorized repair centres. z Network MAC Address – please do not change the MAC address as this is a unique address provided to the IP Phone. NTP Server – set the NTP server IP to display the date and time for the user location. If the user does not know the time area, please check http://www.eecis.udel.edu/~mills/ntp/clock1a.html to find the correct NTP. Menu Selection - Advanced Server for your location. As well, your SIP service provider may provide you the correct settings for this. z Restart Count - Debug use - to be used only by authorized repair centres. z RTP Process – The default setting is 0 z (Yes/No)ByPassServer – choose Yes to enable the function, if supported by your network. z (Yes/No)JitterBuffering – choose Yes to enable the function. Selection of this will generally enhance your phone call quality as it can add around 30ms delay to collecting any potentially lost packets. If the quality of ADSL/broadband service is a high grade service, or you are on a very high bandwidth, you may find that selecting this to NO, will have better effect to the quality, and delays will be reduced by around 30ms. z (Yes/No)AutoUpgrade – If this feature is selected to YES. The IP phone will frequently check the latest version of the IP Phone Image Firmware and will ask you whether you wish to upgrade. 2. Phone Advanced Advanced ► Password:6983 ► Phone Advanced z Codec – This IP Phone support the following codecs: G723, G729, G711u and G711a. Selecting a codec will set it as a priority and the phone will first attempt to establish the call using the selected codec. Please note that G729 is the most commonly used codec and provides very efficient use of bandwidth. z Voice (Yes/No)VAD – choose Yes to enable the voice activity detect function. BG Noise Lv.(0-9) – this is used to set the background noise level. Default is set to “0” Menu Selection - Advanced z Volume Ring Volume (0-9) – this is used to set the ring volume. Handset Vol(0-9) – this is used to set the handset volume. It can be set by pressing the ↑↓ Key when lifting the handset. Handsfree Vol (0-9) – this is used to set the hands-free volume. It can be adjusted by pressing the ↑↓ Key after pressing the SPEAKER key . CodecTXGain(0-9) – this is used to set the transmit volume gain. After setting the value, please restart the IP Phone by choosing : (View►Restart). Default = 0 z DTMF Setting - There are two selections available for selection. Inband (Yes) and (Off). Please check with your service provider which selection is compatible to the specific network. z Ring Type – this allows user to select from ten different ring types for incoming calls z Title Name – this is used to change the display message in idle state. If users have not entered anything in the field, it will show up with the word SIP prior to the SIP number in parenthesis shown on the LCD display. Adding any characters or word here, will delete the word SIP from showing up on the display, and this will be replaced with the word/number that is entered in this field. Example: If there is No entry in this field: SIP (12345678) will show up on the display. If you enter the word John in this field, John (12345678) will show up. Please note that a total of 20 Characters can be displayed on one line of your phone. 3. SIP Advanced Advanced ► Password:6983 ► SIP Advanced z Protocol – it is advanced setting for the administrator. This has factory default settings and should only be altered by an authorized person. Menu Selection - Advanced z Local Port – the default port number is 5060. z User Setting Platform – choose 0 for most of the cases. 4. Login By setting up the username, password and confirm password, users can access the IP phone through their computer to configure the setting of IP Phone. The phone should be in DHCP mode to enter the IP phone’s menu using your computer. 5. Addendum: By setting the Intl. Code (International Code), My Country Code and Area Prefix Code, the IP Phone will automatically dial the corresponding number first. Intl. Code: -- When the first few dial out digits have been detected to be the same as International Code, the IP phone will automatically skip the International code if selected My Country Code -- When the IP phone detects the first few dial out numbers to be the same as My Country Code, it will automatically replace the My Country Code with the numbers entered in this field. My Prefix Code -- When the IP phone detects the first few dial out number to be the same as the Area Prefix code, it will automatically replace the Area Prefix Code with the numbers entered in this field. Phone Book Selection This menu allows the user to configure the Memory Dial settings and manage the phonebook. This IP Phone supports to a maximum of 100 records for the phonebook. 1. Phone Addressbook z New Entry – this allows the user to input the name of a new entry record. After the name is entered, the user should enter the phone number. Don’t forget to enter the key to store the name and telephone number. Dial – this is a function for dialing the phone number which is stored in the relative record location. When users choose this function, this IP Phone will immediately dial the number from the record content in that stored location. Name – edit the name in phonebook record Phone – edit the phone number in phonebook record 2. MemDial Setting z MemDial x – this will store up to 4 fast memory dial keys in your handset. x is the number of the memory dial Current Setting – users can view only, the current setting of the corresponding memory dial key. Settings can only be edited as shown below. Change Setting – users can edit / change the setting by selecting the name from phonebook. The memory dial function can only be used to select the record in the phonebook . Call Record z Missed Call / Incoming Outgoing Call This lets users view, dial or delete the record. z Dial – this allows the user to dial the corresponding record. z Delete – this allows the user to delete only the corresponding record, and not the phonebook record z Save – this allows the user to save the current record (phone number) to the phonebook. If the record already exists, the LCD will display “Record Exists” Web Page Browsing This IP phone provides a user friendly browsing interface to let you control the main features of your IP Phone when connected to a computer through a router. Normally the IP phone should be set to DHCP mode for browsing the phone settings to be possible. All settings in the homepage should be the same as with the IP Phone settings. Configuration of the NTP. Example for configuring the NTP server: Step 1: Go to AdvanceÆ Login. Set the Username and Password. The Default username and password is “admin” and “admin”. Step 2: Open your Browser(e.g. Netscape, Internet Explorer) and enter the homepage http://your_IP_Phone_IP (e.g. http://192.168.1.160). You can see the following screen. Web Page Browsing Step 3: In the Overview page, you can see your phone IP. You can update the setting of the IP Phone by pressing “Set” after changing any values. Web Page Browsing Step 4: Change the NTP Server in Network page in order to show the time on the IP Phone. After applying the NTP Server IP address, then press “Set” to confirm the value. After finally changing and setting the values, we suggest that you reboot your IP Phone in order to have these changes take effect. This is done by pressing “Reboot” on System page. This normally takes about 30 seconds to complete, as the phone goes through a process of restarting and reregistering to the sip server. Web Page Browsing Web Page Browsing If your username or password is not correct, the screen will display as follows:. The 5 main pages (Overview, Network, SIP, Phone, System). Network page and System are shown as above. Web Page Browsing The SIP page is divided into: SIP Parameters, Forward Mode and Advanced Mode. Web Page Browsing The Phone page is divided into: into Prefix, Voice and Others. Please be reminded that the user can change the login name and password either under the System page or change it in the IP Phone itself, however: Please take care, that if you change the user name and password, to hold note of the new password. If you lose the password and access is denied, it may be costly to have the phone sent back to a service centre for resetting. Upgrading Firmware Upgrade the firmware is possible downloading latest firmware release to the IP phone as it is connected on-line, by using webpage method or through the IP Phone. It is not suggested that you do firmware upgrades if the IP Phone operates well under normal circumstances. On IP Phone in menu, Step 1: Advanced ► Password:6983 ► System ► Upgrade/Dnload Input the FTP Server IP and SIP FileName as provided by the service provider. Users should setup the FTP Username and FTP Password as supplied by the provider.. Only then should they do the upgrade.. If all things have been set, choose Upgrade Image! in order to download the latest firmware from the corresponding FTP server. Step 2: Please be prepared to monitor the LCD display during the whole process of the firmware upgrade. WARNING!!! DO NOT under any circumstances attempt to stop the process, or tamper with, remove any cables to the phone or power to the phone whilst upgrading the firmware as this may cause IRREVERSIBLE damage to your handset, which will not be covered by the warranty. Step 3: The IP Phone will automatically restart after a firmware upgrade. When the IP Phone is in its idle state: Step A: After setting the FTP Server IP, ImageFile Name, FTP Username and FTP Password in fields of the menu, please return to the idle state, i.e., the Welcome Page. Note: Pressing mode. # * 7 5 0 * is a shortcut that will take you to Upgrade of SIP Firmware Upgrading Firmware Step B: Please wait for the result while upgrading the firmware. It cannot be stopped while upgrading the firmware. Please do not attempt to cut off the power supply whilst writing data into the flash memory as this will cause irreversible damage to the phone. Step C: The IP Phone will automatically restart. After restart, please check and change the setting. On Webpage On the System page, please set the “FTP Username”, “FTP Password” The FTP IP address and the the ImageFile Name (SIP FileName) can only be set through accessing M1 in your phone menu and not by Web setting. Remember to click “Set” after every change. Click “Upgrade Image” to download the latest SIP firmware after finishing the setting. Troubleshooting & FAQ Q: What should I do when the LCD panel does not display any words? A: Check the power adapter plug-in status. Q: How should I use the Configure function and Advanced function? A: Select the Configure mode, key in password = 525. Or select the Advanced mode, key in password = 6983 Q: If the handset audio has no sound when in use, what should we do? A: (1) Check the power adapter plug-in status. (2) Check if the handset is correctly connected to the phone set. Q: How to check if the network connection is correct? A: (1) Check if the LED at the back of the IP Phone lights up. (2) Use the Ping function of the IP Phone (View ► Ping) to ping some well-known website like (www.yahoo.com) to see the ping response time or whether the message is correct or not. Q: What is the difference between the PC and WAN port in the back of the IP Phone? A: The smart design allows you to use either socket to the PC port or WAN port to connect to the network or router. Q: Does this IP Phone need to register before we use it? A: Sure. You must register with a sip service provider before calling, unless you want to call by IP. Q: May we use the same account in the different IP Phone? A: Sure. You can use your account and password in the different IP Phone, but the same account can’t be used simultaneously in both SIP phones. Troubleshooting & FAQ Q: Could this IP Phone be used in other country? A: Sure. This IP Phone can be used in any country in the world where there is open Internet connectivity. Q: How to upgrade the software of the IP Phone? A: Under normal circumstances there should not be any reason to do any firmware upgrades. If there is a need to upgrade the software, please follow the procedures above in this manual very carefully. Q: What is the default password to enter the web settings menu? A: Log-In: admin Q: What is the default password to enter the web settings menu? A: Log-In: admin Q: How to clean and maintain your phone? A: Dust down your phone regularly with a soft cloth. Do not in any circumstances use any Password: admin Password: admin house-hold detergents as this may deface the unit and/or seep through to the internal electronics and cause damage. Q: Is the product suitable for outdoor use.? A. It is recommended for operation as in-door use only. P.S.: Those words in Italics below indicate that user can select the option of either Yes or No Navigation Selection Menu View Network Value Configure Network Dynamic IP PPPoE PPPoE Username PPPoE Password Static IP IP Address Network Mask Default Router DNS Server Time Zone IP Address Network Mask Default Router DNS Server Ping Restart Image Version PKT Trace Advanced System Inband DTMF RingType Type1-10 DSP Version Upgrade/Dnload FTP Username FTP Password Title Name SIP Advanced Upgrade Image Upgrade image! Are your sure? SIP Protocol Min Media Port Max Media Port Reg From Display Name Number Password Proxy On Proxy Addr Proxy Port OutbndProxy OutbndProxyIP Outbnd ProxyPrt RTPLowBW Forward Mode Immediate Immediate Number Busy Busy Number No Answer No Ans Number No Ans Time Debug Mode Reg To Reg Expire Reg Action Proxy Redirect Dump Address Dump Size Dump Network Mac Address NTP Server Restart Count RTP Process By-Pass Server Bypass Server IP Jitter Buffer Auto Upgrade Phone Advanced Codec G711u G711a G729 G723 Voice VAD BG Noise Lv.(0-9) Volume Ring Volume(0-9) Handset Vol(0-9) Handfree Vol(0-9) CodecTxGain(0-9) Local Port User Setting Platform Login Username Password Confirm Password Additional Intl. Code My Country Code Area Prefix Code GENERAL SPECIFICATIONS: Dimensions: 195mm x 200mm x 65mm Power Supply: 12VDC - 500ma Linear type, centre positive. Weight: Packaged Weight with AC adaptor: 1035 grams * Specifications subject to change without notice. WARRANTY Your product is warranted against manufacturing defects for a period of one year from the date of purchase. Panafon Corporation will replace or repair, at its discretion, any product proving to be defective. This warranty does not apply to damages caused by accident or misuse of the product, lack of reasonable care or not in accordance to the user instruction manual. Panafon Corporation is not responsible for products which have been subject to misuse, alteration, accident or, for unauthorized repairs not performed by Panafon Corporation authorized repair centers. Product Returns Products must be returned properly packed either in original packaging or suitably appropriate packaging. Any returns must be advised of in writing prior to being returned and MUST be authorized with approval by Panafon Corporation BEFORE being sent. A RMA (Return Merchandise Authorization) number must be obtained by the consumer BEFORE returning any product or parts. This RMA number may be obtained by contacting Panafon Corporation customer service. The RMA number must be CLEARLY shown on the exterior package of the authorized returns. Any product returned without such RMA authorization will not be processed and returned. All costs of transporting the return to Panafon Corporation will be borne by the consumer. Should the product prove to NOT be defective, return transportation charges will be borne by the consumer. The consumer must provide sufficient proof of purchase and/or purchase receipt or other information to prove the place and date of purchase. Limitation of Liability The foregoing warranty constitutes Panafon Corporation’s sole liability, and is in lieu of any other warranty, of merchantability or fitness. Panafon Corporation shall not be responsible for any incidental or consequential damages arising from any breach of warranty. To the maximum extent permitted by applicable law, in no event shall Panafon Corporation or its suppliers be liable for any special, incidental, indirect or consequential damages whatsoever (including, without limitation, damages for loss of business profits, business interruption, loss of business information, or any other financial loss) arising out of the use of, or inability to use the Product, even if Panafon Corporation has been advised of the possibility of such damages. In any case, Panafon Corporation’s entire liability under any provision of this agreement shall be limited to the amount actually paid by the Buyer of the Product. © 2005 Panafon Corporation http://www.panafon.com.au