1
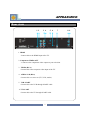
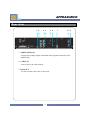
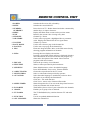
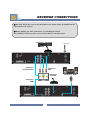
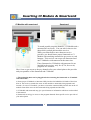
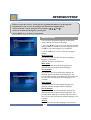
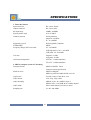
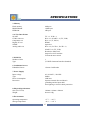
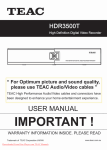
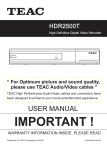
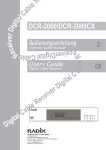
User’s Manual
CV-7000 HD
CONTENTS
• Safety Instructions
1
• Appearance
2
• Remote Control Unit
5
• Receiver Connections
7
• Inserting Smartcard
9
• Introduction
10
• Menu Map
14
• Menu Guide
15
• Channel Lists
28
• EPG
32
• Teletext
33
• Troubleshooting
34
• Features
35
• Specifications
36
Trade Mark of the DVB Digital Video Broadcasting Project
SAFETY INSTRUCTIONS
!
WARNING
Failing to heed the instructions provided on this page could result in serious damage
to your health or damage equipment or other such property.
• Always follow these instructions to avoid the risk of injury to yourself or damage to your
equipment.
• Unplug the power cord from the AC power outlet before cleaning. Use only a damp
cloth for cleaning the exterior of the receiver.
• Do not use accessories or attachments not recommended by the manufacturer, as they may
damage the equipment and said damage is not covered by the warranty.
• Do not operate the receiver in high-humidity areas, or expose it to water or moisture.
• Do not place the receiver on an unstable cart, stand, tripod, bracket, or table.
The receiver may fall, causing serious personal injury and damage to the receiver.
• Do not block or cover slots and openings in the receiver. These are provided for ventilation
and protection from overheating. Never place the receiver near or over a radiator or heat
register. Do not place the receiver in an enclosure such as a cabinet without proper
ventilation.
• Do not stack the receiver on top of or below other electronic devices. They should be at least
10 cm apart.
• Operate the receiver using only the type of power source indicated on the marking label.
Unplug the receiver power cord by gripping the plug, not the cord.
• Route power supply cords so that they will not be pinched by items placed on or against
them. Connect the power cord in the power outlets securely. Unplug the cord by grasping the
plug, not the cord.
• Use an outlet that contains surge suppression or ground fault protection. For added protection
during a lightning storm, or when the receiver is left unattended and unused for long periods
of time, unplug it from the wall outlet and disconnect the lines between the receiver and the
antenna.
• Do not attempt to service the receiver yourself, as opening or removing covers may expose
you to dangerous voltage, and will void the warranty. Refer all servicing to authorized
service personnel.
• The main socket-outlet for connecting mains plug shall be accessibly close to this apparatus.
• The socket-outlet shall be installed near the equipment and shall be easily accessible.
• Unplug the receiver from the wall outlet carefully and refer servicing to authorized service
personnel whenever the following occurs:
The power cord is damaged;
Liquid has been spilled, or objects have fallen into the receiver;
The receiver has been exposed to rain or water;
The receiver has been dropped or the chassis has been damaged;
The receiver exhibits a distinct change in performance.
1
APPEARANCE
Front view
1
2
3 4
1. Smart Card Slot
2. CI Slot
3. MENU
4. Confirm/Select (OK)
5. Left/Right
Sound volume
6. Up/Down
Menu navigation or channel switching
7. Power
2
5
6
7
APPEARANCE
Rear view
1 2
3 4
5 6
7
1. HDMI
: Connect this to the HDMI input of the TV.
2. Component VIDEO OUT
: Connect to the component video output on your television.
3. VIDEO (RCA)
Connect this to the composite video input of the TV.
4. AUDIO L+R (RCA)
Connect this to a stereo set (TV, VCR, Audio).
5. VCR SCART
Connect this to the VCR through SCART cable.
.6. TV SCART
Connect this to the TV through SCART cable.
3
8 9
APPEARANCE
Rear view
1 2
3 4
5 6
7
8 9
7. S/PDIF (OPTICAL)
Connect this to Dolby Digital compatible audio equipment through optical
S/PDIF cable.
8. CABLE IN
: Connect this to the cable antenna.
9. LOOP OUT
: Use this for other set-top box or television.
4
REMOTE CONTROL UNIT
1. POWER
2. MUTE
3. NUMBER /
ALPHABET
4. MENU
5. EXIT
6. CHANNEL
7. OK / STORE
8. VOLUME
10. PAGE UP
12. INFO
9. PAGE DOWN
11. EPG
13. RECALL
14. TELETEXT
15. SUBTITLE
16. ASPECT RATIO
18. ALT AUDIO
17. MULTI VIDEO
19. SLEEP TIMER
20. FAVORITE
21. GROUP
22. TV/ RADIO
23. FUNCTION
24. ALL CHANNEL
5
REMOTE CONTROL UNIT
1. POWER
2. MUTE
3. NUMBER/
ALPHABET
4. MENU
5. EXIT
6. CHANNEL
7. OK/ STORE
8. VOLUME
9. PAGE DOWN
10. PAGE UP
11. EPG
12. INFO
13. RECALL
14. TELETEXT
15. SUBTITLE
16. ASPECT RATIO
17. MULTI VIDEO
18. ALT AUDIO
19. SLEEP TIMER
20. FAVORITE
21. GROUP
22. TV/ RADIO
23. FUNCTION
24. ALL CHANNEL
Switches the Receiver ON or Stand-by.
Switches the sound ON/OFF.
Direct choice of TV / Radio channel and other commands by
number keys, Or input a character.
Display the Main menu or return to the previous menu.
Return to the current video viewing at any time.
Channel Up / Down.
Used to select a program, a highlighted line or parameter
value. Displays the channel list on live signal status.
Volume Up / Down.
Used to move down a page in the channel list.
Used to move up a page in the channel list.
Electronic Program Guide. Move to the EPG menu directly
showing program information of channels.
Pressing this once displays the info bar.
Pressing a second time (while info bar is displayed) displays
more information on the current and the next program, e.g.
times and a description of the content. Move between
programs with arrow buttons.
Selects the previously viewed channel.
Shows a teletext provided by the broadcaster.
Show Subtitle menu to select the subtitle language.
Press: DVB-Subtitle / Press twice: Teletext-Subtitle
Choose the Aspect Ratio for the TV screen.
Select a video mode when provided by operator.
Select the audio language or soundtrack you desire when
this option is provided by the Broadcaster.
Click once : Alt Audio function
Click Twice : moves to the Volume Offset mode
Shows Sleep timer bar. You can set the sleep timer between
15min and 180min with 15min interval.
The FAV key shows a list of your selected favorite channels.
Enables you to group a list of channels.
The TV/RAD(Radio) key switches between TV and radio
mode.
Use for an updated additional function.
Shows the channel list.
6
RECEIVER CONNECTIONS
◆ DO NOT PLUG the receiver into the Main Power Outlet, until you complete all the
connections to the receiver.
◆ Before making any other connections, you should first connect
the CABLE IN connector of the receiver to the cable TV antenna socket.
Connection 2 – VCR SCART
CABLE IN
Connection 5
- Component Video
Connection 3
- RCA
Connection 1
- TV SCART
Connection 4
- HDMI
7
Connection 6 - S/PDIF
RECEIVER CONNECTIONS
1) Connect the receiver to a TV set with SCART Cables
- Connect the SCART cable from the receiver’s TV SCART connector to the TV set’s SCART
connector.
2) Connect the receiver to a VCR with SCART Cables
- Connect the SCART cable from the receiver’s VCR SCART connector to the VCR’s
SCART connector.
3) Connect the receiver to a TV set or audio system with RCA Cables
- Connect the receiver’s Audio RCA connector to the Audio RCA connector of the TV set or
audio system..
- Connect the receiver’s Video RCA connector to the Video RCA connector of a TV set.
4. Connect the receiver to a TV set through the HDMI port
- Connect the HDMI output of the receiver to the HDMI input of a TV set.
5. Connect the receiver to a TV set with the Component Video Cables
- Connect the Component Video connectors of the receiver to the Component Video
connectors of a TV set.
6) Connect the receiver to a home entertainment system with the
S/PDIF Cables
- Connect the receiver’s optical S/PDIF connector to the S/PDIF connector of the Dolby
Digital compatible home entertainment system’s amplifier.
8
Inserting CI Module & Smartcard
CI Module with smartcard
Smartcard
To watch payable program channels, a CI Module and a
smartcard are necessary. You can ask for these to the
shop which you had purchased the receiver.
When you subscribed to more than one service
provider, you should insert proper Smartcard or CI
Module with matching smartcard to get access to each
bouquet. This receiver can accept one Smartcard and
one CI Modules with smartcard at the same time.
If any Smartcard or CI Module with smartcard is not
inserted in the receiver, only free (FTA; free-to-air)
programs are available.
Here’s how to get access to the pay channels after your subscription to the provider
and your purchase of the Smartcard and CI Module.
1) The main plug must not be plugged in before inserting the Smartcard or CI module
with smartcard.
2) Insert proper CI Module or Smartcard fully into the slot behind the lid inside of the front
door of the receiver, towards the arrow on the module or smartcard facing upwards and
inwards. ( In case of CI module, you have to insert the smartcard fully into the slot on the CI
module towards the arrow on the smartcard facing upwards and inwards)
3) CI Module and smartcard may give special menus or information which are not described
in this manual.
4) Smartcard can only give access to the program channels from specific service provider of
your subscription.
9
INTRODUCTION
When you start the receiver, it will switch to a guided introduction. Go through this
introduction for the receiver according to the instructions supplied below.
• Move the menu’s cursor using the arrow buttons (◀, ▶, ▲ and ▼).
• Select or confirm the changes by pressing OK.
• Press MENU to go to the next setup menu.
Language Settings
You can select the desired language for the Menu,
Audio, Subtitle and Teletext language.
1. Press the ◀,▶ keys to move to the desired language
and press OK or use OK to open the language bar and
use OK to select the language you would like.
2.Use the ▲,▼ keys to move to the next language
settings.
Menu Language
It is used to select the OSG (On Screen Graphics)
language of the menu
(English,,German,Czech,Slovak ).
Main Audio
It is used to select the main audio language for
channels that have multiple audio languages.
Second Audio
It is used to select the second audio language for
channels that have multiple audio languages. The
second audio language is automatically selected by the
receiver if the selected main audio language is not
available.
Main Subtitle
It is used to select the main subtitle language for
channels that have multiple subtitle languages.
Second Subtitle
It is used to select the second subtitle language for
channels that have multiple subtitle languages. The
second subtitle language is automatically selected by
the receiver if the selected main subtitle language is not
available.
Teletext
It is used to select the OSG language of the teletext.
10
INTRODUCTION
TV Output
Aspect Ratio
Aspect Ratio
You can select the aspect ratio of TV screen(width to
height) when the broadcasting signal does not
correspond with your TV type.
1.Select with the ◀,▶ keys or use the pull down menu.
1) TV type - 4:3 & Broadcasting signal - 16:9
[4:3 Center]
[4:3 Full]
[4:3 Letter Box]
2) TV type – 16:9 & Broadcasting signal – 4:3
[16:9 Wide]
[4:3 Normal]
[Zoom]
TV Screen Format
You can select the TV screen format according to your
TV type.
1) 4:3 TV : normal TV
2) 16:9 TV : wide screen TV
11
INTRODUCTION
Contrast
You can adjust the screen brightness.
0 : Darkest
10 : Brightest
Dolby Digital
In order to listen Dolby Digital sound, select this feature
by setting the parameter to [On]. Dolby Digital sound is
not broadcast on all channels.
Note! To listen Dolby Digital sound, you should first
connect the optic cable from the S/PDIF connector to the
amplifier on your home entertainment system.
Video Output
You can select the video output out of Composite and SVideo.
HD Format
You can set the resolution of your HDTV screen out of
1080i, 720P and 576P.
12
INTRODUCTION
Auto Search
Start channel search by pressing OK.
The search is automatically started. You can
monitor the progress of the search during the
channel search function. The TV and radio services
found with the channel search appear on the channel
list as the search advances.
13
MENU MAP
Main Menu
Settings
Language Settings
Parental Lock
Channel Lock
Menu Lock
STB Lock
Change Pin Code
User Profile
Banner Timeout
DVB-Subtitling
TV Output
Aspect Ratio
TV Screen Format
Contrast
Dolby Digital
Installation
Auto Search
Video Output
Manual Search
Delete All Channels
Edit
Timer Function
Move Channel
Timer Setup
VCR Timer Setup
Local Time Setup
System Information
Software Upgrade
Factory Reset
STB Version
Conditional Access
14
HD Format
MENU GUIDE
NOTE
• Use the ◀,▶ keys (left/right) to move the cursor on the main menu.
• Use the ▲,▼ keys (up/down) to move in the submenu.
•Press the OK key to select or confirm the changes.
• Press the OK key on the menu bar which has many options to be selected, then the
pull down menu will be displayed.
• Press the MENU key to go to the previous menu.
• Press the EXIT key to exit the menu or go to the live signal.
The main menu consists of 6 submenus.
- Settings
- Installation
- Edit
- Timer Function
- System Information
- Smartcard
Settings
Language Settings
You can select the desired language for the Menu,
Audio, Subtitle and Teletext language.
1. Press the ◀,▶ keys to move to the desired
language and press OK or use OK from the pull down
menu by pressing OK on the language bar which you
want to set.
2. Use the ▲,▼ keys to move to the next language
setting.
15
MENU GUIDE
Menu Language
It is used to select the OSG (On Screen Graphics)
language of the menu
(English,,German,Czech,Slovak ).
Main Audio
It is used to select the main audio language for
channels that have multiple audio languages.
Second Audio
It is used to select the second audio language for
channels that have multiple audio languages. The
second audio language is automatically selected by the
receiver if the selected main audio language is not
available.
Main Subtitle
It is used to select the main subtitle language for
channels that have multiple subtitle languages.
Second Subtitle
It is used to select the second subtitle language for
channels that have multiple subtitle languages. The
second subtitle language is automatically selected by
the receiver if the selected main subtitle language is
not available.
Teletext
It is used to select the OSG language of the teletext.
16
MENU GUIDE
Parental Lock
With Parental Lock you can prevent watching TV
channels you choose, listening a Radio channel, or an
unauthorized change in the installation from being
performed or the receiver setting from being changed.
To enter the Parental Lock menu, you have to enter
the PIN code first.
The PIN code is set to [1234] at the factory.
The PIN code for the Parental Lock menu is the same
as that of the program card’s. See p. 27 to learn how to
change your PIN code.
Channel Lock
If the Channel Lock is set to [Yes], the receiver will
request that you enter your PIN code every time you
try to watch or listen to a locked channel.
1. Use the ◀,▶ keys to select [Yes] or [No].
2. Locks for specific channels can be set from the Edit
menu of the channel list.
Menu Lock
If the Menu Lock is set to [Yes], the receiver will
request that you enter your PIN code every time you
press MENU.
1. Use the ◀,▶ keys to select [Yes] or [No].
STB Lock
If the Set Lock is set to [Yes], the receiver will request
that you enter your PIN code every time you start the
receiver.
1. Use the ◀,▶ keys to select [Yes] or [No].
17
MENU GUIDE
User Profile
Banner Timeout
You can select the length of the timeout for the
information banner (1-10 seconds).
1. Use the ◀,▶ keys or press OK in the pull down
menu to select the banner timeout.
DVB subtitling
You can use this to select DVB subtitling.
1. Set this to On/Off with the ◀,▶ keys or press OK
in the pull down menu.
18
MENU GUIDE
TV Output
Aspect Ratio
Aspect Ratio
You can select the aspect ratio of TV screen(width to
height) when the broadcasting signal does not
correspond with your TV type.
1.Select with the ◀,▶ keys or use the pull down menu.
1) TV type - 4:3 & Broadcasting signal - 16:9
[4:3 Center]
[4:3 Full]
[4:3 Letter Box]
2) TV type – 16:9 & Broadcasting signal – 4:3
[16:9 Wide]
[4:3 Normal]
[Zoom]
TV Screen Format
You can select the TV screen format according to your
TV type.
1) 4:3 TV : normal TV
2) 16:9 TV : wide screen TV
19
MENU GUIDE
Contrast
You can adjust the screen brightness.
0 : Darkest
10 : Brightest
Dolby Digital
In order to listen Dolby Digital sound, select this feature
by setting the parameter to [On]. Dolby Digital sound is
not broadcast on all channels.
Note! To listen Dolby Digital sound, you should first
connect the optic cable from the S/PDIF connector to the
amplifier on your home entertainment system.
Video Output
You can select the video output out of Composite and SVideo.
HD Format
You can set the resolution of your HDTV screen out of
1080i, 720P and 576P.
20
MENU GUIDE
Installation
Channel search can be performed automatically
(recommended) or manually.
Auto Search
Start channel search by pressing OK.
The search is automatically started. You can
monitor the progress of the search during the
channel search function. The TV and radio services
found with the channel search appear on the channel
list as the search advances.
Manual Search
Manual search is performed by entering search
parameters. Set frequency, modulation, and symbol
value according to the network parameters.
• If the search mode is set to network, the receiver will
search for all the channels in the network
(recommended).
• If the search mode is set to RF channel, the receiver
will only search for the multiplex channels according to
the parameters.
• If you want to search for both the free and the pay
channels, set FTA/CAS.
• If you want to search for only the free channels, set
FTA (Free To Air).
• If you want to search for only the pay channels, set
CAS (Conditional Access System).
You can monitor the progress of the search during the
channel search function. The TV and radio services
found with the channel search appear on the channel
list as the search advances.
21
MENU GUIDE
Edit
Delete All Channels
Here you can delete all of the channels in the Channel
List. When you delete all the channels, the receiver’s
settings will stay the same and only the searched
channels will be removed.
1. Select Yes / No with the ◀,▶ keys.
2. Select [Start] and press OK.
NOTE: If you do the software upgrade of the receiver
after having edited the Channel List or the Edit menu,
the edited information can be initialized.
22
MENU GUIDE
Timer Function
Local Time Setup
You can select the time zone (the location where you
are). When you select the time zone, the local time is
automatically changed according to the time zone.
Timer Setup
Here you can you can set the [Turn ON] or [Turn OFF]
time for the timer.
In addition, you can set the [Sleep timer] on this menu.
1. Select ON/OFF with the ◀,▶ keys.
2. Set the time with the numeric keys.
3. Use the ◀,▶ keys to set the Sleep timer (15-180
minutes).
23
MENU GUIDE
VCR Timer Setup
You can set the VCR timer or Reminder. You can use the
VCR timer function only if the receiver is connected to
VCR through the VCR SCART (upper) and use the
Reminder only if the receiver is connected to TV through
the TV SCART (lower).
VCR Timer: You can make a reservation to record a
program in VCR by setting date and time and channel of
the program. Even if you are not watching TV, the
receiver will give a command to start recording at the
appointed time.
Reminder: If you set a time and a channel in Reminder,
the TV channel will be changed to the appointed channel
automatically. You can use this function only when you
are watching TV.
You can choose between the following operation types:
Once:
Timer is activated for the specified time
only once.
Daily:
Timer is activated daily.
Weekly: Timer is activated weekly.
Monthly: Timer is activated monthly.
24
MENU GUIDE
System Information
Software Update
You can upgrade the receiver with new software via
network.
If new software version is available, the upgrade will
perform automatically when the receiver is restarted
(switch to Stand-by and then restart.)
The receiver can also be upgraded manually:
1. Select [Factory 1], select [Start], and press OK.
2. You can enter the parameters for the software
upgrade by selecting [User Setting]. Enter the
frequency, modulation and symbol value.
NOTE: Updating the receiver software may also reset
the channel list settings to their default values.
Factory Reset
Here you can reset the receiver to its original settings.
All changes made to the settings will be removed.
1.If you want to reset the receiver, select Yes and press
OK under [Start].
Version Information
You can find the detailed information of the hardware
version and software version of the receiver.
26
MENU GUIDE
Conditional Access
Common Interface
You can get the information of the CI module.
This information may vary a lot depending on the
service provider.
This receiver can accept two different kinds of CI
modules and you can select the module by pressing
the OK key.
Smartcard Information
Insert the CONAX smart card into the Smart Card
slot on the Front Panel. The chip should be faced
upwards.
Subscription Status
You can find the information of CONAX
subscription status.
Event Status
You can find the information of the CONAX
PPV(Pay Per View).
Change PIN Code
Follow the procedure as shown on the menu to
change PIN code.
Initial PIN code is set as [1234].
Enter current PIN code - Enter new PIN code –
Confirm new PIN code
Maturity Rating
You should enter the PIN code to modify.
Select the Maturity Rating as below.
G : General Audience
PG : Parental Guidance
A: Over 18
X : Erotic
27
CHANNEL LIST
Press OK to display the channel list.
You can modify the channel list using the color
buttons on your remote control in several different
ways. Select the way you would like to make the
changes from the pull down menu.
You can go to a channel directly from the channel list
menu by pressing OK.
Mode Switch
1. Press the RED key and select TV/Radio.
28
CHANNEL LIST
Favorites
You can group channels together into lists of favorite
channels. Only channels that belong to a favorite
grouping and have been selected are visible in the
channel list.
Press the GREEN key to select a favorite list. There
are 8 favorite lists: FAV 1 - FAV 8.
For more information on grouping channels into
favorite lists, see p. 30.
Group
Channels lists can be rearranged in four different ways.
Press the BLUE key and select one of the following.
- Network (all of the network’s channels)
- CAS (scrambled/unscrambled channels)
- Lock (locked or unlocked channels)
- A-Z (alphabetical order)
Edit
In this menu, you can group the channels into
favorite lists as well as edit favorite and channel
lists. Open the [EDIT] menu by pressing the
WHITE key. The menu contains the following
functions:.
29
CHANNEL LIST
FAV Selection
Here you group the channels into favorite lists (FAV
lists).
The order of the eight options from left to right depicts
the order of the favorite lists FAV 1 - FAV 8.
•Press OK where the favorite list and channel you
have selected meet up. Remove the channel from the
favorite list by pressing OK again at this point.
•Press the WHITE key or EXIT and then [Yes] and
then OK to save changes.
Lock / Unlock
You can make a lock on your desired channel.
1. Select [Lock/Unlock]
2. Enter the correct PIN code
3. Press OK on the channel you want to Lock, and the
lock mark is displayed on the selected channel.
4. If you press OK again on the locked channel in the
Lock mode, you can unlock the channel.
5. Save the changes by pressing the WHITE key or
EXIT, select [Yes] and press OK.
Volume
You can regulate the volume level according to
channel.
1. You can adjust the volume with the ◀,▶ keys.
2. To exit the [Volume] mode, press the WHITE key
or EXIT.
3. Save your changes by selecting [Yes], then press
OK.
30
CHANNEL LIST
Move Channel
You can reorganize the order of channels in the channel
list.
• Press the OK key on the channel you want to move.
• Select the position for the channel with the ▲,▼ keys.
• Press the OK key to confirm the new position.
• Press the WHITE or EXIT key and then [Yes] and
then OK key to save changes.
Move FAV
Press the OK key on the FAV channel you want to
move.
Decide the position to which you want to move with
the ▲,▼ keys.
Press the OK key to confirm the new position.
Press the WHITE or EXIT key to exit the Move FAV
mode.
Rename the List
You can rename FAV groups.
1. Enter the new name with the alphabet keys or
number keys.
2. Save the changes by pressing OK.
3. Press the WHITE key or EXIT to exit the [Rename
FAV List] mode.
4. Save the changes by selecting [Yes] and then press
OK.
31
EPG
Additional information for each channel that has been
provided by the suppliers can be read in the Electronic
Program Guide (EPG).
If you want to see the EPG, press EPG on your remote
control.
The channel list is displayed on the left side of the screen.
The EPG window in the middle of the screen will show
the programs of the channels as text banners. The bottom
of the screen will show the date and time of each
program.
• Use the ▲,▼ keys to switch the channel.
• Use the ◀,▶ keys to move within the channel.
Press
to view the start and end time, title and
synopsis of the selected program. You can preview
channels by pressing OK.
You can switch from the TV program guide to the Radio
program guide by pressing the RED key on your remote
control.
By pressing the
key on the remote control, you
can move to the VCR Timer Setup menu to set timer.
You can change the date and time interval of the EPG
display with the color keys on the remote control:
GREEN: changes the date of the EPG display from the
current to the previous day.
YELLOW: changes the date of the EPG display from
current to the next day.
BLUE: switches the time interval of the EPG display to
from 1.5 to 3 hours in 30-minute or 60-minute intervals.
RECALL: returns to the program being currently
displayed in the EPG display.
32
TELETEXT
When you press the
key on the RCU, the teletext
information will be displayed.
1. Use the ▲,▼ keys to move to the teletext which you
want to see and press the OK key.
2. When the teletext has sub pages, use the
keys to move to the sub pages.
: moves to the previous page
: moves to the next page
33
,
TROUBLESHOOTING
Problem
Possible Cause
You have forgotten your PIN
code.
Solution of the problem
Contact your Service
Provider.
Time Setting is wrong.
The time is not set properly.
Set the proper Timezone.
No display LED on the front
panel / No power supply
Power cord not plugged in
correctly.
Plug in power cord correctly.
No picture on the screen.
Receiver in Standby mode
Set the receiver to [ON]
AV Output not connected
tightly to video output of TV
Check the connection and
correct.
Incorrect channel or video
output selected on TV.
Check channel and video
output and correct.
Audio cord connected
incorrectly.
Volume level is 0.
Muting active.
Check connection and correct.
Incorrect operation
Point remote control towards
the receiver.
Replace batteries or insert
them correctly.
No Sound
Remote Control does not
operate directly.
Batteries dead or inserted
incorrectly.
Poor picture quality.
Signal strength too low.
Check the signal strength in
the [Installation] menu, check
the cable signal from cable
network.
Choose [Factory 1] in
[Software upgrade] menu and
choose [Start].
Software updating does’nt
start automatically after
restart.
The smartcard is not working.
Increase volume on TV set.
Press the MUTE key.
The smartcard is not installed
properly.
34
Check that the smartcard has
been correctly inserted.
FEATURES
• MPEG-4 part 10 / H.264 Main Profile Level 4
• MPEG-2 HD (MP@HL) or SD (MP@ML) video decode
• European DVB standard digital cable reception
• HDMI Multimedia Output Supported
• Interfacing with the CAM module of DVB Common Interface standard
• Embedded CONAX with one smart card reader
• Constellation : 16 / 32 / 64 / 128 / 256 QAM
• Channel search mode : Network / Auto / Manual
• Teletext supported : OSG & VBI insertion for TV
• Subtitle supported : DVB subtitle / Teletext subtitle
• Dolby AC3 digital audio bitstream out through S/PDIF
• EPG : Present / Following & Scheduled EPG
• Over-The-Cable SW download
• Parental lock : Channel lock / Install lock / STB lock
• Variable aspect ratio : 4:3 (Full, Center, Letter Box) / 16:9
• Timer : On timer / Off timer / Sleep timer / VCR timer
• Channel grouping : Favorite / Network / CAS / A-Z
• Volume offset for each channel
35
SPECIFICATIONS
1. Tuner & Channel
Input connector
IEC 169-2, female
Output connector
IEC 169-2, male
RF input range
64MHz -858MHz
Input dynamic range
45 to 75 dBµV
Channel selection
PLL Synthesizer
Step Size :62.5KHz
IF : 36.125MHz
Supporting system
DVB-C(QAM) Compliant
IF Bandwidth
8MHz
Frequency Range VHF Low band :
64 - 149.5MHZ
VHF high band : 156.5 - 442 MHz
UHF band : 50 - 858 MHz
C/N ratio
64QAM : 25.5dB
256QAM : 32.5dB
ANT normal impedance
ANT IN : 75 Ohm unbalance
TV OUT : 75Ohm unbalance
2. MPEG transport stream A/V decoding
Transport stream
MPEG-2 ISO/IEC 13818
Transport stream specification
Profile & level
MPEG-2 MP@HL,
MPEG-4 p10/H.264 Main Profile Level 4.1
Aspect ratio
4:3(Full, Center, Letter Box), 16:9
Video format
576i, 576p, 720p, 1080i
Audio decoding
MPEG1 layer 1 & 2, MPEG2 layer 2
MPEG2 AAC, AAC-SBR & AC3 Dolby Digital
Audio mode
Stereo, dual channel, joint stereo, mono
Sampling rate
32, 44.1 and 48kHz
36
SPECIFICATIONS
3. Memory
Flash memory
DDR SDRAM
EEPROM
4. A/V & Data In/Out
SCART
CVBS video out
Component out
Digital AV out
S/PDIF
Analog audio out
8M bytes
128M bytes
2K bytes
TV x 1, VCR x 1
RCA x 1, SCART x 2 (TV, VCR)
RCA x 3 (Y, Pb, Pr)
HDMI
Optical x 1
RCA x 2 (L-CH x 1, R-CH x 1)
SCART x 2 (TV, VCR)
Resolution 16bit DAC
Output Level 2Vrms Max
Volume & mute control
5. PCMCIA
Number of Slot
Type
1
I, II DVB Common Interface Standard
6. Conditional Access
Embedded Conax
1 Smart Card Reader
7. Power Supply
Input voltage
Type
Power consumption
Protection
AC 90-240V~, 50/60Hz
SMPS
20W max.
Separate internal fuse and chassis
grounding and the input shall
have lighting or electric shock protection.
8. Physical Specifications
Size (W x H x D)
Weight
320mm x 60mm x 220mm
about 2.0 Kg
9. Environment
Operating temperature
Storage temperature
+5 ℃ ∼+45 ℃
-40 ℃ ∼+65 ℃
37
Correct Disposal of This Product
(Waste Electrical & Electronic Equipment)
This marking shown on the product or its literature, indicates that it should not
be disposed with other household wastes at the end of its working life. To
prevent possible harm to the environment or human health from uncontrolled
waste disposal, please separate this from other types of wastes and recycle it
responsibly to promote the sustainable reuse of material resources.
Household users should contact either the retailer where they purchased this
product, or their local government office, for details of where and how they can
take this item for environmentally safe recycling.
Business users should contact their supplier and check the terms and conditions
of the purchase contract. This product should not be mixed with other
commercial wastes for disposal.