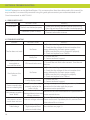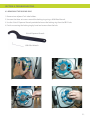
1
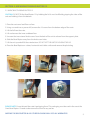
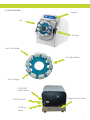
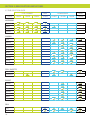
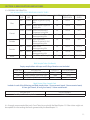
Bead Ruptor 12
User Manual
3.
TABLE OF CONTENTS
WARRANTY INFORMATION
SECTION 1. IMPORTANT SAFEGUARDS
SECTION 2. UNPACKING THE BEAD RUPTOR 12
2.1 Unpacking The Bead Ruptor 12
2.2 Unit Overview
2.3 Components
2.4 Additional Accessories
SECTION 3. BEAD RUPTOR SAMPLE TUBES
3.1 Tubes & Tube Carriage
3.2 Tube Selection Guide
3.3 Ordering Information
3.4 Important Sample Tube Information
3.5 Tube Carriage Chart
SECTION 4. SET-UP & OPERATION
4.1 Loading Sample Tubes
4.2 Keypad Layout
4.3 Start Up of the Equipment
4.4 Speed Setting
SECTION 5. PROGRAMMING
5.1 Programming
SECTION 6. RECOMMENDED SETTINGS
SECTION 7. MAINTENANCE
7.1 Cleaning The Bead Ruptor 12
Section 8. Troubleshooting
8.1 Error Messages
8.2 Troubleshooting
SECTION 9. TRANSPORT, STORAGE & SERVICE
9.1 Transporting The Bead Ruptor 24
9.2 Storage
9.3 Service
9.4 Decontamination Requirement
SECTION 10. SPECIFICATIONS
2.
WARRANTY INFORMATION
This manual is a guide for the use of the Bead Ruptor 12 Bead Mill Homogenizing System and accessories.
Data herein has been verified and validated. It is believed adequate for the intended use of the instrument. If
the instrument or procedures are used for purposes over and above the capabilities specified herein,
confirmation of the validity and suitability should be obtained, otherwise Omni International does not
guarantee results and assumes no obligation or liability. This publication is not a license to operate under, or
a recommendation to infringe upon, any process patents.
Notes, cautions, and warnings within the text of this manual are used to emphasize important and critical
instructions.
This Omni International product is warranted to be free from defects in material and workmanship for a
period of ONE YEAR from the date of delivery. Omni International will repair or replace and return free of
charge any part which is returned to its factory within said period, transportation prepaid by user, and which
is found upon inspection to have been defective in materials or workmanship. For the first 90 days, both
parts and service are without charge. For the balance of the period, parts will be provided but service will be
charged at established labor rates. This warranty does not include normal wear from use; it does not apply
to any instrument or parts which have been altered by anyone other than an employee of Omni
International nor to any instrument which has been damaged through accident, negligence, failure to follow
operating instructions, the use of electric currents or circuits other than those specified on the plate affixed
to the instrument, misuse, or abuse. Omni International reserves the right to change, alter, modify, or
improve any of its instruments without any obligation whatever to make corresponding changes to any
instrument previously sold or shipped.
THE FORGOING OBLIGATION IS IN LIEU OF ALL OBLIGATIONS AND LIABILITIES INCLUDING NEGLIGENCE AND
ALL WARRANTIES OF MERCHANTABILITY OR OTHERWISE, EXPRESSED OR IMPLIED IN FACT OR BY LAW, AND
STATE OUR ENTIRE AND EXCLUSIVE LIABILITY AND BUYERS EXCLUSIVE REMEDY FOR ANY CLAIM OF
DAMAGES IN CONNECTION WITH THE SALE OR FURNISHING OF GOODS OR PARTS, THEIR DESIGN,
SUITABILITY FOR USE, INSTALLATION, OR OPERATION. OMNI INTERNATIONAL WILL IN NO EVENT BE LIABLE
FOR ANY SPECIAL OR CONSEQUENTIAL DAMAGES WHATSOEVER, AND THEIR LIABILITY UNDER NO
CIRCUMSTANCES WILL EXCEED THE CONTRACT PRICE FOR THE GOODS FOR WHICH LIABILITY IS CLAIMED.
3.
SECTION 1. IMPORTANT SAFEGUARDS
READ ALL INSTRUCTIONS BEFORE USING
SAVE THIS USER MANUAL
The Bead Ruptor 12 has been engineered for maximum functionality as well as safety; however, basic safety
precautions and common sense must always be demonstrated when using any electrical product. Do not
attempt to modify any part of the Bead Ruptor 12. If you experience problems with or have questions about
your Bead Ruptor 12, contact your authorized dealer or call Omni at 1-800-776-4431 or 770-421-0058.
WARNING!
-DO NOT allow the machine to be submerged in any liquid.
-DO NOT use in any setting other than an indoor laboratory.
-DO NOT plug power cord into an incorrect outlet.
-Keep this product away from heated surfaces.
To reduce the risk of burns, electrocution, fire, or injury:
-Use this product only for its intended purpose as described in this booklet. Do not use attachments not
recommended by the manufacturer.
-DO NOT operate the product if it is damaged in any way.
RISK OF ELECTRIC SHOCK:
Although this equipment is fully insulated and grounded, it is important for all users to be aware of the potential hazard of using liquids close to a power supply. If any liquids are spilled, immediately disconnect the
instrument from the main power supply (remove the power cord from the AC power input on the rear panel)
and clean the equipment and the surrounding area. DO NOT reconnect the
equipment until it has been fully inspected.
4.
SECTION 2. UNPACKING THE BEAD RUPTOR 12
2.1 UNPACKING THE BEAD RUPTOR 12
CAUTION: DO NOT lift the Bead Ruptor 12 by holding the lid. It must be lifted by gripping the sides of the
unit and holding it from the bottom.
1. Place the crate on a level floor surface.
2. Using a screwdriver or power drill, remove the 16 screws from the bottom edge of the crate.
3. Lift the lid from the crate.
4. Lift and remove the inner cardboard box
5. Unscrew the two external knob screws from the back of the unit to release from the support plate.
6. Slide the Bead Ruptor away from the knob screw holes.
7. Lift the unit up and off of the crate bottom. DO NOT LIFT THE UNIT BY HOLDING THE LID.
8. Place the Bead Ruptor on a clean, horizontal and stable surface and remove the plastic bag
PLEASE NOTE: Do not discard the crate & packaging foam. This packaging must be used in the event the
Omni Bead Ruptor 12 needs to be returned to Omni for any reason.
SHIPPING THE BEAD RUPTOR IN ANY OTHER PACKAGING WILL VOID ALL WARRANTIES.
5.
SECTION 2. UNPACKING THE BEAD RUPTOR 12
Remove the warning sticker from the back of the unit and check that the voltage switch matches
the voltage delivered by your electric power supply.
Ensure that the air vents are not covered. Allow at least 6 inches of space around air vents for proper motor
ventilation.
CAUTION: DO NOT connect the unit to the main power supply until installation is complete and the correct
voltage is selected.
Plug the Bead Ruptor 12 into the power supply using the supplied power cord.
In the event of a malfunction or breakdown, grounding provides a path of least resistance for electric
current to reduce the risk of electric shock. This instrument is equipped with an electric cord which is
grounded to the chassis housing. The plug must be plugged in to an outlet that is properly installed and
grounded in accordance with all local codes and ordinances.
WARNING: DO NOT modify the plug or cord that is provided. Damaged or worn power cords should be
repaired or replaced immediately by a qualified electrician.
- DO NOT turn the unit upside down: the Bead Ruptor 12 must always rest on all four feet to avoid damaging
internal components or breaking the housing.
- DO NOT operate the unit when the housing is removed; potentially lethal voltage exists within the
instrument.
- DO NOT operate the unit with the safety ground disconnected.
CAUTION: Use only accessories and consumables recommended by the manufacturer.
Accuracy and operating lifetime may be affected if alternative products are used. Any damages caused by
non-recommended parts are not covered by the manufacturer’s warranties.
6.
2.2 UNIT OVERVIEW
Keypad
Lid
Li Latch
Lid
2mL Tube Holder
7mL Tube Holder
Tube Carriage
120V/220V
Switch & Fuse
e
ON/Off Switch
Shipping
ppin Screw Holes
AC Power
Input
7.
SECTION 2. UNPACKING THE BEAD RUPTOR 12
2.3 COMPONENTS
Prior to operation, please remove all parts from the shipping container and inspect for damaged or missing
parts. If any parts are found to be damaged or mising, please contact Omni International at 1.800.776.4431
Description
Motor Drive Unit (115V or 220V)
Tube Carriage (12x2mL & 4x7mL)
Semi-Permanent Ring
Power Cable
Spare Fuse
Instruction Manual
Quick Start Guide
8.
Quantity
1
1
1
1
1
1
1
P/N
19-050
19-344-5072
19-333-01
LT710 (115V) or LT712 (220V)
00-193
03-251
03-253
SECTION 3. BEAD RUPTOR SAMPLE TUBES
3.1 TUBES & TUBE CARRIAGE
One Tube Carriage is available for the Bead Ruptor 12.
Tube Carriage for 12x2mL & 4x7mL screw cap tubes
2mL Tube Volume and Tissue Size:
Minimum: 300μL 30mg
Maximum: 1.8mL, 1g
7mL Tube Volume and Tissue Size:
Minimum: 1mL, 1g
Maximum: 5mL, 4g
A maximum volume of 41.6mL can be processed with this tube carriage configuration, per run.
(4x5mL) + (12x1.8) = 41.6mL
Use the chart on page 10 to select the best tubes for your sample type,
or to view a selection of Bead Ruptor specific applications visit.
www.omni-inc.com/applications
9.
SECTION 3. BEAD RUPTOR SAMPLE TUBES
3.2 TUBE SELECTION GUIDE
LYSE / DISRUPT
Part #
19-621
MICROBIAL
Bacteria
Yeast
Fungi
Spores
ANIMAL
Skin
Nerves
Artery
Intestine
Tumors
Brain
Liver
Kidney
Lung
Heart
FISH / INSECTS
Insects
Zebrafish
PLANT
Leaves
Seeds
Rice
Wheat
Stems
Roots
Moss
SOIL
Soil
Sediment
10.
19-622
RNA
19-623
19-625
HOMOGENIZE
19-627
19-628
GRIND
19-624
19-620
SECTION 3. BEAD RUPTOR SAMPLE TUBES
3.3 ORDERING INFORMATION
2mL & 0.5mL PRE-FILLED BEAD MILL SAMPLE TUBES
BEAD MEDIA
Glass
TUBE
SIZE
2mL
2mL
0.5mL
Garnet
2mL
0.5mL
Carbide
2mL
Ceramic
Metal
2mL
2mL
BEAD
SIZE
0.1mm
DESCRIPTION
Micro-Organism Lysing
Mix
0.5mm Tough Micro-Organism
Lysing Mix
0.15mm Small Volume MicroOrganism Lysing Mix
0.7mm Hard & Fibrous Tissue
Homogenizing Mix
0.25mm RNA Extractions,
Micro-Organism & Soil
Homogenizing Mix
1.4mm Soft Tissue
Homogenizing Mix
2.8mm Hard Tissue
Homogenizing Mix
2.38mm Hard Tissue Grinding Mix
QUANTITY DNAse/RNAse UNTREATED*
FREE PART#
PART#
50
19-621
N/A
50
19-622
19-622C
50
19-623
N/A
50
19-624
19-624C
50
19-625
N/A
50
19-627
19-627C
50
19-628
19-628C
50
19-620
19-620C
*Untreated Tubes are clean but not certified DNAse or RNAse free.
Bulk Sample Tubes (No Beads)
Empty sample tubes with caps and O-Rings. Beads are not included.
TUBE SIZE
2mL
2mL
0.5mL
DESCRIPTION
Empty Sample Tubes with Caps
Empty Sample Tubes with Caps
Empty Sample Tubes with Caps
QUANTITY
500
1000
500
ORDER NUMBER
19-648
19-649
19-650
Bead Ruptor Tube Sample Pack
Includes 4 each of the following pre-filled sample tubes: 1.4mm ceramic beads, 2.8mm ceramic beads,
0.5mm glass beads, 0.1mm glass beads, 2.38mm metal beads.
DESCRIPTION
Bead Ruptor Tube Sample Pack
ORDER NUMBER
19-SAMPLE
It is Strongly recommended that only Omni Tubes be used with the Bead Ruptor 12. Other tubes might not
be capable of withstanding the forces generated by the Bead Ruptor 12.
11.
SECTION 3. BEAD RUPTOR SAMPLE TUBES
7mL Bead Mill Tubes - These Tubes are not pre-filled with beads.
BEAD MEDIA
Glass
Ceramic
Metal
None
TUBE SIZE
7mL
BEAD SIZE
0.1mm
7mL
0.5mm
7mL
1.4mm
7mL
2.8mm
7mL
2.38mm
7mL
-
DESCRIPTION
Empty Sample Tubes with
Micro-Organism Lysing Bead Mix
Empty Sample Tubes with Tough
Micro-Organism Lysing Bead Mix
Empty Sample Tubes wiht Soft
Tissue Homogenizing Bead Mix
Empty Sample Tubes with Hard
Tissue Homogenizing Bead Mix
Empty Sample Tubes with Hard
Tissue Grinding Bead Mix
Empty Sample Tubes
QUANTITY
50
ORDER NUMBER
19-654
50
19-656
50
19-652
50
19-653
50
19-655
1,000
19-651
7mL Bead Tubes are not certified RNase/DNase Free and are not currently available pre-filled.
7mL Tube Specifications:
• Polypropylene (PP)
• Screw cap tube ONLY
• Maximum centrifugation speed of 5,000g
Treatable Volume:
• Minimum: 1mL, 1g
• Maximum: 5mL, 4g
• Used with or without buffer
It is strongly recommended that Omni 7mL Tubes be used in conjunction with the Bead Ruptor 12. Our tests
have shown that Omni Tubes are the only tubes available that are capable of withstanding the forces
generated by the Bead Ruptor.
12.
SECTION 3. BEAD RUPTOR SAMPLE TUBES
3.4 IMPORTANT SAMPLE TUBE INFORMATION
Dry, fresh or frozen samples can be homogenized with or without buffer using the Bead Ruptor 12 and Bead
Ruptor sample tubes.
Omni offers unique reinforced 2mL tubes with an O’ring seal in the cap. These tubes can withstand the
motion, velocity, and force applied to the tube carriage.
In the event of tube leakage or tube breakage, Omni recommends the following solutions:
• Use the Tubes as single-use or disposable
• Do not submerge the tubes in liquid nitrogen
• Add more buffer to decrease the force applied by the beads to the tube walls
• Ensure tube caps are tightened completely
• If using bulk beads and tubes, add the recommended amount of beads to the tube
13.
SECTION 4. BEAD RUPTOR OPERATION
4.1 LOADING SAMPLE TUBES
Users can simultaneously homogenize 1 to 16 samples per run. The user may load tubes in any position for
processing.
DO NOT RUN AN EMPTY TUBE CARRIAGE.
IDENTIFICATION OF PARTS:
7mL Tube Holder
2mL Tube Holder
Tube Carriage
Semi Permanent Locking Ring
CAUTION: The drive hub can become very hot during operation. Use caution when removing tubes from
the Tube Carriage / Tube Holders.
Lid Locking Handle
Note: 7mL tubes are inserted upside down, unlike the 2mL
tubes, which go in right side up.
1. Place Bead Ruptor Tubes into the Tube Holders.
2. Close the lid until the locking lid handle clicks.
14.
Drive Hub
SECTION 4. BEAD RUPTOR OPERATION
4.2 KEYPAD LAYOUT
The keypad of the Bead Ruptor 12 (see diagram below) consists of an LCD screen, 4 arrow buttons, and a
“START” and “STOP” button.
The user can adjust two different homogenization settings with this interface. The UP arrow and DOWN
arrow buttons are used to adjust the speed and time parameters.
4.3 START UP OF THE EQUIPMENT
Turn the Bead Ruptor 12 on by pressing the ON/OFF switch located on the rear panel near the AC power
input.
A Menu displays the programming mode. Programming mode displays the last program run before power
was removed. Example:
Cycle Time
(1-99 seconds)
Speed Setting:
Low = 3m/s
Med = 4m/s
High = 5m/s
TIME (sec) :
SPEED :
35
HIGH
System Status
• Speed denotes energy imparted to the samples in m/s and can be set at 3m/s (low), 4m/s (med), or
5m/s (high).
• Time denotes the processing time in seconds. Time can be set from 0:01 seconds to 0:99 seconds in 1
second increments.
15.
SECTION 4. BEAD RUPTOR OPERATION
4.4 SPEED SETTING
Homogenization with the Bead Ruptor 12 is the result of the collision of the bead matrix and sample within
the Bead Ruptor tubes. The frequency of collision and energy of impact determine the effectiveness of the
disruption process and are controlled by the Bead Ruptor 12 speed setting, the motion of the tube carriage,
the bead media, and the tube fill volume.
The “Speed” of the Bead Ruptor is presented in m/s, which is a specific representation of the forces applied to
the sample, due to the velocity of the tube carriage movement, and the speed and geometry of the motion.
Using RPM, for example, is not representative of the bead movement and processing energy because RPM
only indicates the motor speed.
16.
SECTION 5. PROGRAMMING
5.1 PROGRAMMING
The Bead Ruptor 12 is programmable for Speed/Processing Energy and Time. The Bead Ruptor memory will
store the last program settings used.
After powering on, the LCD screen will display the last used speed and time settings. The UP and DOWN
arrow keys respectivly increase or decrease the value of the active variable (speed or time) by holding down
the arrow button.
Active Variable
Speed
Time
Parameter
Speed / Energy
Time
Storable Programs
System Status Display
SPEED m/s
CYCLE TIME (sec)
Operating Range
Low / Medium / High
From 1 second to 99 seconds
1
• If run is stopped or paused system status will read “RUN CANCELLED”
• At the end of the program “RUN COMPLETE” will be displayed
CAUTION: Wait until the unit stops completely and displays “RUN COMPLETE” before opening the lid.
PLEASE NOTE:
• Homogenization settings cannot be changed once the run is in progress
• The Bead Ruptor 12 is designed for non-stop use and does not require a cool down period between runs.
The user can pause or stop a run by pressing the “STOP” button at any time.
17.
SECTION 6. RECOMMENDED SETTINGS
Please Note: These protocols are provided as a basic guidline only. the listed settings might need to be
modified for your particular sample type, viscosity, weight, volume, cell concentration and other factors that
effect homogenization. If you have any questions regardsing your application, please call Omni Technical
support at 1.800.776.4431
Sample Name and Type
MICROBIAL
ANIMAL
PLANT
SOIL
Bacteria
Muscle
Brain
Liver
Kidney
Lung
Heart
Spleen
Leaves
Leaves
Seeds
Stems
Stems
Roots
Roots
Flowers
Soil
BEAD MATRIX
Lysing Matrix
19-623
19-628
19-628
19-628
19-628
19-628
19-628
19-628
19-628
19-620
19-620
19-628
19-620
19-628
19-620
19-628
19-624
SETTING
Speed - number of
cycle x time - pause
Low - 1 x 5 min
High - 2 x 45 min
High - 2 x 45 min
High - 2 x 45 min
High - 2 x 45 min
High - 2 x 45 min
High - 2 x 45 min
High - 2 x 45 min
High - 2 x 45 min
Low - 1 x 3 min
Medium - 1 x 3 min
Low - 1 x 5 min
Medium - 1 x 3 min
High - 2 x 45 min
Medium - 1 x 3 min
High - 2 x 45 min
Low - 1 x 5 min
APPLICATION
Note
DNA Isolation
RNA Isolation
RNA Isolation
RNA Isolation
RNA Isolation
RNA Isolation
RNA Isolation
RNA Isolation
RNA Isolation
DNA Isolation
DNA Isolation
RNA Isolation
DNA Isolation
RNA Isolation
DNA Isolation
RNA Isolation
DNA Isolation
Our Applications database can help you find the best solution - quickly.
Our constantly expanding database consists of carefully reviewed customer published applications
to help you find the right laboratory homogenizer for any sample type.
www.omni-inc.com/applications
18.
SECTION 7. MAINTENANCE
7.1 CLEANING THE BEAD RUPTOR 12
The houseing of the unit can be cleaned with a sponge or damp cloth moistened with water or alcohol.
WARNING: For safety purposes and to prevent any damage of the unit, the recommendations listed below
should be strictly followed:
• ALWAYS disconnect the power cord before cleaning
• DO NOT spray water directly on the unit, expecially in the air vents and the fan
• DO NOT use any type of scrapers
• DO NOT use caustic solvents or acetone. Harsh solvents can damage the finish of the housing and lid
Example of Decontamination Procedure
If a tube breaks when a run is in progress, decontaminate parts that may have been contaminated withan
appropriate disinfectant. The decontamination procedure is the sole responsibility of the user. Parts that
may have been contaminated can be cleaned with a sponge or a damp cloth moistened with a non-abrasive
cleaner.
In case another decontamination procedure is to be applied, please first contact technical support to ensure
the compatibility of the new procedure with the instrument.
19.
SECTION 8. TROUBLESHOOTING
DO NOT attempt to service the Bead Ruptor 12 in a manner other than those discussed in this manual. For
any issue that is unsuccessfully corrected using this guide, please contact your authorized dealer or call
Omni International at: 800.776.4431
8.1 ERROR MESSAGES
Error Message
Close Door
Possible Causes
The lid is not latched properly
Detection system is faulty
Action(s)
1. Check that nothing prevents the lid from closing.
2. Press lid and ensure the handle is locked properly.
1. Turn off the unit.
2. Contact technical assistance.
8.2 TROUBLESHOOTING
Problem
Possible Causes
No Power
The fan does not work
Faulty Fan
Display screen shows
incomplete or
unusual characters
No display on the
screen
CPU needs to be reset
No Power
Faulty display screen
Action(s)
1. Check main voltage
2. Check that the voltage of the unit matches that
being delivered by the main power supply.
3. Make sure that the unit is plugged in properly.
4. Check and replace fuses if blown.
1. Turn off the unit.
2. Contact technical support.
1. Turn off the unit. Wait a few seconds. Turn the unit
back on.
1. Check main voltage.
2. Check that the voltage of the unit matches that
being delivered by the main power supply.
3. Make sure the unit is plugged in properly.
4. Check and replace fuses if blown.
1. Turn off the unit.
2. Contact technical support.
If dangerous or potentially dangerous sample is
contained in the tube, apply the proper
decontamination procedure.
The cap is not
properly sealed or the
tube is faulty
Motor control device
Return unit to Omni International for replacement of
Unit powers on with a
damaged due to incorrect
motor control device.
loud “BANG”
voltage selection
Power off the unit and select appropriate voltage.
Unit powers on but
Incorrect voltage selected Power on the unit. If problem persists, contact Omni
motor does not turn
International for assistance.
Speed is too high or
High temperature or
See solutions on page 13
Tube leakage
pressure inside tubes
One or several tubes
are not sealed tightly
20.
SECTION 8. TROUBLESHOOTING
8.3 REMOVING THE lOCKING RING
1. Remove two adjacent 7mL tube holders.
2. Unscrew the three set screws around the locking ring using a .050 Allen Wrench.
3. Use the 58 to 62 Spanner Wrench provided to loosen the locking ring from the BR12 hub.
4. Finish unscrewing the locking ring by hand and remove from the hub.
58 to 62 Spanner Wrench
.050 Allen Wrench
1.
2.
3.
4.
21.
SECTION 9. TRANSPORT, STORAGE & SERVICE
9.1 TRANSPORTING THE BEAD RUPTOR 12
The Bead Ruptor 12 must be shipped in its original packaging.
Before transporting the equipment, it is necessary to:
1. Close the lid of the Bead Ruptor 12 and cover with the plastic bag.
2. Align the slots on the bottom of the unit with the support hooks on the base of the shipping crate.
3. Lower the unit onto the hooks and slide it backward until the back of the unit touches the
supporting edge.
4. Secure the unit to the support plate with the included knob screws. Tighten the screws as much
as possible.
5. Place the cardboard box over the Bead Ruptor.
6. Use a screwdriver or power drill to secure the lid to the top of the crate with 16 screws.
1.
2.
3.
4.
5.
6.
22.
SECTION 9. TRANSPORT, STORAGE & SERVICE
PLEASE NOTE: The Bead Ruptor 12 MUST be shipped in its original packaging. Failure to do so can result in
serious damage to the unit and will void all warranties.
9.2 STORAGE
The unit can be used in a cold room, but it must be stored in a dry area at a temperature ranging from
0°C/32°F to 50°C/122°F
9.3 SERVICE
It is recommended that the speed of the Bead Ruptor 12 be calibrated annually to ensure maximum
operation. For this or any other product servicing please contact Omni
International at 800.776.4431.
9.4 DECONTAMINATION REQUIREMENT
Should an instrument or component that has been used with radioactive or pathogenic material require
factory or field service, comply with the following procedure to ensure the saftey of service personnel:
Clean the parts to be serviced of all encrusted material and decontaminate them. There must be no
radioactivity detectable by survey equipment. Obtain a decontamination Certificate from Omni
International. Complete the certificate and attach to the instrument or parts being returned.
If no Decontamination Certificate is attached, and a potential radioactive or biological hazard is detected
or suspected by Omni International, the equipment will not be serviced until proper decontamination and
certification is complete. The sender will be contacted for instructions as to the dispostion of the equipment.
Disposition costs will be borne by the sender.
WARNING: It is a violation of federal law to transport biologically hazardous or radioactive materials without
proper packaging, labeling, and appropriate warnings.
23.
SECTION 10. SPECIFICATIONS
10.1 SPECIFICATIONS
Length:
Width:
Height:
Weight:
Energy Performance Range:
Noise Level:
Electrical Requirements:
Standards Approval / Compliance
17in / 43.2cm
12in / 30.5cm
14.5in / 36.9cm
44lbs. / 17kg
3m/s - 4m/s - 5m/s
Low - Med - High
<70db
115 volts, 60Hz or 220 volts, 50Hz
CE certified
Register your Bead Ruptor
& tell us about your research!
Please visit the web address below to register your new Bead Ruptor.
You will also be asked to provide us with information about your research. In return, we’ll send you a Starbucks gift card!
Register today!
www.omni-inc.com/warranty
24.
NOTES:
25.
NOTES:
26.
NOTES:
27.
omni-inc.com
935 C. Cobb Place Blvd. Kennesaw, GA. 30144
Toll Free: 800.776.4431 Phone: 770.421.0058
Patents Pending
28.
PN: 03-251