1
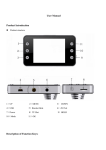
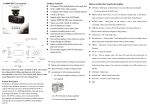
FULL HD Touch Screen Car DVR
User Manual
Contents
Precaution
DVR Special Features
Accessories
DVR Interface
Buttons Function
DVR Operation
Icon Introduction
Power on/off
Video Mode
Normal recording
Loop recording
Picture Mode
Zoom in/out
Playback Mode
Menu Setting
Playback on HDTV/PC
Technical specification
Precaution
Pls be well look through the following guidelines before you use this DVR.
l Pls refer to manual instruction to operate the camera correctly. Illegal operation may
cause damage to internal components.
l Do not fall or hit the DVR, it may damage the internal components.
l Do not alter or dismantle the DVR, to avoid the damage to the DVR.
l The temperature rise is normal when DVR in use for a long time
l Do not touch the lens when recording which will affect the video quality.
PDF 文件使用 "pdfFactory Pro" 试用版本创建 www.fineprint.cn
DVR Special Features:
l
l
l
l
l
l
l
G-Sensor
DVR will save videos as undeletable files when gravity acceleration, any accident
happens.
SOS function
Under recording mode, press UP button momentarily to activate SOS function, the
current video will be saved as undeletable file.
Silent Video Recording
Under recording mode, press DOWN button momentarily to off microphone. Do not
worry about your secret talk.
WDR function
It can adopt well to the greater difference of light intensity in different part of one
scene,and can reduce the difference in final video,make the clear images.
Touch screen
DVR adopts high definition touch screen,make the operation faster and more
convenient.
Night vision
When the light is bad,open it to fill light.
Parking movie
When the car stops and the G-sensor inducts collision,the dvr will automatically
power on and record 8 seconds,the video will be saved as undeletable file.
Touch the icon of Parking movie in screen to start/stop this function.
Accessories
Car charger
USB cable
Suction cup
User Manual
HDMI cable (optional)
PDF 文件使用 "pdfFactory Pro" 试用版本创建 www.fineprint.cn
GPS (optional)
DVR Interface
1.
2.
3.
4.
Night vision Light
Speaker
USB port
GPS port
5.
6.
7.
8.
9.
10.
Suction bayonet
Power key
S key
Reset key
HDMI port
TF port
PDF 文件使用 "pdfFactory Pro" 试用版本创建 www.fineprint.cn
11.
12.
13.
14.
up botton
Menu key
down button
working indicator
15. charge indicator
Button Function
Power button: Turn on/off DVR Turn on/off night vision Light
Reset button: Press it to restart DVR once its system is dead.
Menu button: long press to switch modes,press momentarily to enter the Mode menu,
When inputing plate number switch the input methods..
Up button: Zoom in the image;
Under video mode, short press to activate SOS recording
Page up when setting menu;
Select the file under playback mode.
Down button: Zoom out the image;
Page down when setting menu;
Select the file under playback mode;
Under video mode, short press to enable/disable the microphone
S Key: Start/Stop recording; to take pictures; to confirm menu setting;
Under playback mode press it to start/pause playback.
DVR Operation
1.Icon introduction
PDF 文件使用 "pdfFactory Pro" 试用版本创建 www.fineprint.cn
2. Power on/off
Power on: when Dvr powers off, press momentarily Power button, you hear beep
sound, the blue working indicator will light up, the LCD show boot screen.DVR
powers on. .
Power off: When Dvr powers on, press momentarily Power button, you hear beep
sound, the blue working indicator will be off, the LCD show shutdown screen.DVR
powers off.
Note:When connected to Car Charger, DVR will turn on automatically when the
car ignites; will turn off when the car stalls.
3. Video Mode
Normal recording
Under standby mode, press S Key to start recording, the blue indicator will flash.
The flashing red recording icon is on the top left corner of the screen; recording time
and resolution are on the top right corner; time stamp is on the middle bottom;
Press OK button again to stop recording. The remaining recording time is on the
LCD screen.
Loop recording (refer to menu setting)
Under standby mode, press OK button to start recording, the blue indicator will
flash. .When the video recorded up to the time you set (say 1 minutes, 2 minutes or
3 minutes), DVR will save the footage automatically and continue recording.
When TF card is full, DVR will overwrite the first footage by time sequence and
continue recording.
PDF 文件使用 "pdfFactory Pro" 试用版本创建 www.fineprint.cn
Press S key again to stop recording, the remaining recording time is on the LCD
screen.
4. Picture Mode
Under Picture Mode, aim at the object you want to shoot and press S Key, DVR will
save the picture automatically.
5. Zoom in/out
Under standby or picture mode, press Up/Down button to zoom in/out the image.
6. Playback Mode
Under playback mode, press Up/Down button to select the video/picture, then press
to playback.
S key or
If DVR doesn’t have file,touch anywhere of the screen to be back to video mode.
Note:if want to exit playback mode after pause the video playback,pls touch the icon
to exit the pause state then touch
choose the mode which you
want.
7. Menu Setting
DVR has 2 operation mode:button and touch icon.First choose the icon which you
need to set,then touch OK icon the confirm.
Video mode/Picture mode/Playback mode all have 2 main menu:Mode Menu and
Setup,the Setup of three modes are the same
Video Menu:
Resolution: 1080FHD 1920*1080P/ 720P 1280*720P 60fps
720P 1280*720P 30fps /VGA 640*480P 30fps
Loop recording: Off/1 minutes/2 minutes/3 minutes
WDR: Off/On
Motion detection: Off/On
G-sensor: Off/Low/Medium/High
GPS:Off/On
Plate Number:2 input methods:Number and English letters,long press menu button
to switch the 2 methods,press Up button and down button to choose the number
to exit the setting
and letters which you want,press S key to confirm,touch
after it is done.
Note:if you want to turn off the function,pls reset to default setting.
Picture Menu:
Resolution: 3M 2048*1536
10M 3648*2730
Quality: Fine/Normal/Economy
5M 2592*1944
12M 4032*3024
PDF 文件使用 "pdfFactory Pro" 试用版本创建 www.fineprint.cn
8M 3264*2448
2MHD 1920*1080
White Balance: Auto/Daylight/Cloudy/Tungsten/Fluorescent
ISO: Auto/100/200/400
Anti-shake: Off/On
Date Stamp: Off/Date/Date &Time
Playback Menu:
Delete: Delete current/Delete All
Protect: Lock current/Unlock current/Lock All/Unlock All
System Menu:
Date/Time: 2014/01/03
22:02:34 YY/MM/DD
Language:English/Deutsch/French/Spanish/Italiano/Portugese/Chinese(simplified)/
Chinese(traditional)/Japanese/Russian/Turkish/Thai
Beep sound: Off/On
Frequency: 50Hz/60Hz
Auto Power Off: Off/3 Minutes/5 Minutes/10 Minutes
Screen Saver: Off/1 minute/3 minutes/5 minutes
Delayed shutdown: Off/5 Seconds/10 Seconds/30 Seconds
Format: Yes/No
Default setting: Yes/No
Version: 2014.0314.V04
8. Playback on HDTV/PC
(1) HDMI mode
Turn on the DVR, connect it to HD TV the HDMI cable, choose HDMI mode on
TV. The DVR screen will be off, all operations on DVR can be checked on TV.
(2) PC mode
Connect DVR to a PC via the USB cable, it will turn on automatically.
LCD screen shows “Mass Storage”, “PC Camera”, “Video Record”, choose
“Mass storage” and press OK button to confirm.
“PC Camera” is for webcam,
“Video Record” is for recording when connected to PC.
Technical specification
Screen
2.7 inch LCD high sensitive touch screen
Resolution
1080P 1920*1080 30fps
720P
1280*720
30fps/60fps
VGA
640*480
60fps
PDF 文件使用 "pdfFactory Pro" 试用版本创建 www.fineprint.cn
Image size
12Mega/8 Mega/5 Mega/3 Mega
Lens
5M CMOS sensor
View angle
170 degree
File format
MOV/JPEG
Digital zoom
4X
Battery
Built in battery 300mAh
Parking Movie
Support
Storage
Support Micro SD card to 32G(not included)
SOS recording
One key to start emergency recording, is undeletable
Cycle recording
seamlessly recording ,automatically overwrite function,
G-sensor
Support, built-in gravity sensor
Motion detection
Support, built-in motion sensor
Audio
Built-in Microphone/Speaker
WDR
support
Time stamp
Menu language
Support
English/French/Italian/Russian/German/Japanese/Portugese/
Spanish/ Chinese(Simplified)/Chinese(traditional)/Turkish/Thai
Current frequency
50Hz/60Hz
PDF 文件使用 "pdfFactory Pro" 试用版本创建 www.fineprint.cn