1
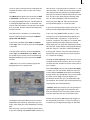
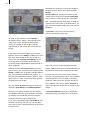
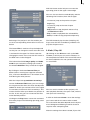
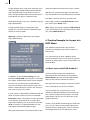
User manual
DVD-Arabesk 3
for SMART EDIT
Legal notices
To avoid making mistakes during operation, we recommend that you carefully follow the instructions provided
in this manual.
We have taken a great deal of care whilst programming and checking this software.
Nevertheless, since it is not possible to guarantee totally error-free software applications in all environments
and at any time, we unfortunately cannot rule out the possibility that some errors may have crept in.
MacroSystem Digital Video AG and its dealers therefore do not guarantee fault-free use of the product or
complete flawlessness of the product.
We will remedy any errors in the program and supply the affected customers with the new software free of
charge, if possible.
Warranty claims for defects shall expire in 24 months in the case of newly manufactured items. This shall not
apply insofar as the law prescribes otherwise and in cases involving injury to life, limb or health, in the case of
intentional or grossly negligent violation of duty on the part of the supplier and in the case of malicious silence
with regard to a defect.
The customer shall report defects to the supplier immediately in writing. Claims for reimbursement of
expenses for error tracing shall be honoured only after prior consultation with MacroSystem Digital Video AG
management staff.
Any other claims asserted by the customer for any expense(s) required for the purpose of subsequent
performance, in particular transport, travelling, work and material costs shall be excluded. However, this shall
not apply to claims for reasons other than newly determined software defects.
Warranty claims shall not apply in the case of only insignificant deviation from the agreed quality, for only
insignificant impairment of the usefulness, in the case of natural wear or damage which may occur after
passage of the risk due to improper or careless handling, excessive use, unsuitable operating materials or
which have occurred due to other special external influences not provided for in accordance with the terms of
the agreement. In the event that improper modifications or repair work is performed by the customer or any
third party, then any warranty claims for defects shall also be null and void for these and other consequences.
We do not, however, accept any liability for loss of data/time or any consequential damages that may occur
as a result, particularly because we have no influence over correct software installation and operation by the
customer. MacroSystem Digital Video AG and its dealers therefore cannot be held liable for any defects or
unintentional damage in connection with the installation or use of the DVD-Arabesk 3 software.
Claims by the customer to compensation in damages and/or reimbursement of expenses shall thus be
excluded, in particular because of violation of contractual obligations and due to unlawful acts. However, this
shall not apply insofar as peremptory liability is involved, e.g. in accordance with product liability law, in cases
of intention, gross negligence, because of injury to life, limb or health or because of violation of substantial
contract obligations. However, any claims to damages for violation of substantial contract obligations shall be
limited to conventional foreseeable damage insofar as intention or gross negligence is not involved or liability
due to injury to life, limb or health. A shift of the burden of proof to the disadvantage of the customer shall not
be connected with the above regulations.
Neither MacroSystem Digital Video AG nor its dealers are responsible for any damages resulting either directly
or indirectly through the use of the software or the operating instructions. This is particularly the cause for
profit loss and reimbursement of expense.
Any implied guarantee is totally out of the question, including guarantee of suitability of the software or
operating instructions for a particular purpose.
Please therefore ensure that you backup your video footage before using the device. We recommend that you
do not delete the video footage and that you create a backup on DV tape beforehand.
Since it is possible that changes have been made to the software after the manual was printed, the functions
shown and described in this manual might differ from the software.
Contents
Page
1. General............................................................................................................... 5
2. Installation and Starting the Program ............................................................. 5
3. The DVD-Arabesk 3 Menu ................................................................................ 6
3.1 Creation.................................................................................................. 6
3.2 Info / Play ............................................................................................... 14
3.3 Miscellaneous........................................................................................ 16
4. Practice Example for Layout of a DVD Menu.................................................. 18
4.1 Menu layout with DVD-Arabesk 3........................................................ 18
4.2 Menu layout with PIP-Studio ............................................................... 22
5. Practice Excercises for Specifying the Background Menu............................. 24
5.1 Animated DVD title text........................................................................ 25
5.2 Moving background with Liquid Images ............................................ 26
5.3 Moving background with Particle Magic ............................................ 26
5.4 Moving background with Akaba – New Concept............................... 27
5.5 Suggestions for layout ......................................................................... 29
5
1. General
call our technical support hotline:
Thank you for buying DVD-Arabesk 3!
We thank you for your trust and hope that this
product will meet your expectations.
(Germany)
Monday -Thursday from 10.00 to 17.00 hours
Friday 10.00 to 16.00 hours
+49 (0)2335/960-112
This guide will show you how to easily create
your own DVD.
(North America)
Monday - Friday 9a.m. - 5p.m. (Mountain Standard Time)
303-801-1010
We are available for any questions or
suggestions you may have.
For this purpose please contact us at the
following addresses:
Outside of these times you can email or fax us.
Messages received in this way are handled during business hours.
Address
MacroSystem Digital Video AG
Postfach 020240
58290 Wetter
Germany
Fax Support
+49 (0)2335/960-110
303-801-1058
MacroSystem US
5485 Conestoga Court
Boulder, Colorado
USA
80301
Phone
0 +49 (0)2335/960-0
303-440-5311
E-Mail
[email protected]
[email protected]
Fax
0 +49 (0)2335/960-100
303-440-5322
E-Mail Support
[email protected]
(Germany)
[email protected] (North America)
[email protected] (N.A.)
[email protected] (N .A.)
(Germany)
(North America)
Please have the serial number of your machine
or your customer number ready whenever you
contact us.
(Germany)
(North America)
(Germany)
(North America)
(Germany)
(North America)
Up-to-date information on MacroSystem products and our sales department can be found on
the Internet.
Please visit our Website:
http://www.macrosystem.de (Germany)
http://www.macrosystem.us (North America)
Phone Support
If you have special technical questions, you can
2. Installing and Starting the
Program
In order to install DVD-Arabesk 3 you need a
storage capacity of at least 256 MB RAM.
Before you can burn entire dual-layer DVDs
(DVD+R DL), however, you will need to carry
out a fresh installation of the SMART EDIT 3.5
system software at least as well as install a DVD
drive of version DVR-108 or higher. (For further
information on burning dual-layer DVDs, please
read Chapter 3.3, item (9).)
Leave your system turned on and select the
Install Product button in the System Settings.
After the corresponding window has appeared,
insert the installation SmartMedia card into the
drive so that the gold contacts are facing down
6
and the folded corner is pointing forward to the
left (in the direction of the system).
If the DVD-Arabesk 3 software is supplied on
a CD/DVD and your system is equipped with a
DVD burner as well as an older version of DVDArabesk, you should open the drive tray and
insert the CD/DVD into the DVD burner.
If you are installing from a CD/DVD, you might
hear clearly audible sounds coming from the
drive – this indicates that the system is reading
the CD/DVD. In a moment you will see the DVDArabesk 3 software listed in the Install Product
window.
Select it in the list and click on activate. A
numeric keypad is displayed for entering the key
code you have obtained from your dealer.
After that, a message is displayed indicating that
installation is finished. You can then remove the
SmartMedia card or CD/DVD which will restart
the system.
If you want to install DVD-Arabesk 3 as a demo
version only (also possible for systems without
a DVD burner), select the program in the list and
click activate.
In order to use the DVD-Arabesk 3 program,
enter the Finish menu. You will see the program
DVD-Arabesk 3 displayed in the list in the lower
left area. Select it now if it has not already been
automatically selected.
After you have created the complete video with
transitions, titles and audiom, click on the Start
program button to the right in order to start
DVD-Arabesk 3.
In case a message is shown indicating that your
firmware is too old, you can obtain this software
update free of charge from your dealer.
You will then be able to fully use or demo DVDArabesk 3.
3. The DVD-Arabesk 3 Menu
Now you see the DVD-Arabesk 3 menu, which is
divided into three different blocks.
If you are working with SMART EDIT version
2.5 or higher, click on the Cancel button in the
displayed number code window.
If you are working with SMART EDIT version
3.1 or higher, click on the Demo button in the
displayed number code window.
The word Demo now appears after the program
name. Click on Ok to confirm and then remove
the SmartMedia card or CD/DVD.
The buttons will be described in the order in
which they are used for the simple creation of
a DVD. You will also find references to buttons
that are fully explained later in the text.
DVD-Arabesk 3 is now installed as a demo
version.
3.1 Creation
Note: In demo mode only 200 MB of the total
4.7 GB or 8,5 GB (see chapter 3.3, item (7)) DVD
capacity are available for inserting a film. Demo
mode therefore allows you to work with only
very short projects!
This section explains the three functions
contained in the block Creation. This block lets
you layout and create a DVD.
3.1 Creation: Add Film
(1) Clicking on the button Add Film causes a
7
window with several functions to be displayed:
write more than two hours of video material to
the DVD. Of course, this results in somewhat
lesser image quality. The program will warn you
of this with an appropriate message.
Normal quality corresponds to the quality
usually to be found on commercial DVDs.
High image quality corresponds to the demands
made by the DVD standard on playback devices.
This video should be able to be played back just
as normal quality is.
• You can now specify the desired project you
would like to add. Clicking on the button Select
project causes project selection (similar to
Project settings) to be displayed, in which you
can select the desired film or project.
You can see that the active project is the same
one you were last working on.
It is not necessary to enter Project settings in
order to change the project. This can be done
from the DVD menu.
Note: Only those projects marked with a white
point contain video material.
• You also see the information Project length,
which indicates the length of the inserted
project.
• You can specify the Image quality of the project
after conversion to the DVD standard by clicking
on the selection control.
There are Four levels available:
Reduced, Normal, High and Maximum.
The image quality is determined by the data
rate (level of compression)- the better the image
quality, the more memory is needed.
High or maximum quality will fill up the DVD
more quickly then normal or low quality.
Reduced image quality guarantees that you can
The Maximum quality level makes full use of
the DVD standard. Not all DVD players support
this quality level. This may be the reason if your
video should flicker or cause error messages.
Clicking on Ok displays an appropriate warning
message.
• The button Audio mode is used to specify the
audio quality: uncompressed or compressed.
Compressed audio requires only a fraction of
the capacity, but at the cost of slightly reduced
quality. When creating a music video, it is
recommended that you use uncompressed
audio.
Note for the technically interested:
Uncompressed audio uses PCM audio with 16
bits and 48 kHz. Compressed audio uses MPEG
audio.
• You are also shown the Size approximation for
this project. The calculation takes account of the
quality level (discussed above) and the duration
of the project. The value displayed is only an
approximation; the actual amount of required
memory, once created, may be slightly more or
less than this amount.
If not enough memory is present, then you must
either reduce image/audio quality or remove
other projects.
A message appears before a film is added if this
would cause the project to become too large to
fit on the DVD. In some cases the project could
still fit on the DVD, because the calculated value
8
is only an approximation.
• The displayed free capacity indicates how
much space is still free on the DVD.
• You can divide your project into chapters by
clicking on the button Edit Chapter Menu. These
chapters can be individually selected later when
playing the DVD. This is a significant help,
especially with large projects.
Selecting the function Edit Chapter Menu opens
a window in which the individual storyboard
scenes are displayed. The scenes are displayed,
for example, as follows:
Chapter 1
000.05:00
course, this function is useful only if your scenes
correspond to the desired chapters.
Afterward, click on the neighboring button Edit
Chapter Menu (see below) and you will see that
the number of chapters now corresponds to the
number of scenes.
The icons are shown with the first image of the
video scene, but can be replaced with images
from the scene bin of any desired project
(function Select Scene in the Stamps submenu).
All chapters display at first the scene names, but
of course these names can be changed.
S1
A chapter must always begin at the start of a
scene, so scroll through the scenes displayed in
this window and decide where you would like to
set the beginning of a chapter. Select the line of
the desired scene and click on the corresponding
button Start Chapter.
The subsequent Chapters are numbered
automatically by the system to reflect your set
chapters. (Clicking on the button Undo Chapter
removes the chapter point.)
With DVD-Arabesk you can create up to 99
chapters. Six chapter icons can be shown per
page, so that there can be up to 17 pages.
Clicking on the function Chapter --> Scenes
causes a chapter to be automatically created
for each scene in the storyboard. An hourglass is displayed while this is happening. Of
If too many chapters were created, then you
can remove the superfluous ones by selecting
the name of the chapter to remove in the Edit
Chapter Menu window and then clicking on
the Undo Chapter button. You will see that it is
assigned to the chapter displayed above it.
Note: Please note that chapter menus can only
be created before the film is inserted. Editing
of chapter menus is not possible after film
insertion.
Clicking on Edit Chapter Menu brings you to
a new menu that is similar to the layout of the
DVD menu.
For general handling of chapter menu layout
please read section 3.1, item (2) Edit Menu,
because operation and functionality of the
menus is analogous to the layout of the DVD
menu.
The new buttons or functions not explained
there are described in the following.
9
- Context: In the context menu you use the slider
active Page to specify which of the existing
chapter pages you wish to display and edit.
If you haven’t set any further chapter beginning,
then you see only one chapter icon in the menu
and no further page can be displayed. But if you
have set more than 6 chapter beginnings, either
manually or automatically (see function Scenes
--> Chapters), then several pages can then be
selected.
- Background: In contrast with forming the
DVD background, in forming the chapter menu
background it is not possible to select animated
scenes. If you decide on the selection Scene,
then this is represented only with the first
image. Audio selection is also not possible.
- Stamps: Please note that only one image
per chapter can be selected, i.e., you can set a
maximum of 6 chapter images on one page. (If
you want to insert more images, then additional
pages are inserted automatically. A maximum of
99 chapters can be created.)
Please note when selecting the position that
navigation arrows are centered at the left and
right screen edge, so that icons should not be
put there.
- Chapter-text attributes: Here you can globally
change the chapter titling (e.g. changes apply to
all chapters on all pages).
All pages for chapter menus have the same
layout, e.g. you cannot make all settings
individually for the menu pages. For example, if
you change the position of the first chapter icon
on the first page, then the position of the first
icon is changed correspondingly on all further
pages. Of course, the text for each chapter icon
can be specified individually.
You can navigate freely in your new chapter
menus. This means that you can specify the
direction with all four navigation keys. For
example, pressing the arrow-down key activates
a chapter in the lower row.
DVD-Arabesk 3 allows you to navigate freely in
the DVD main menu.
If you have more than one chapter page (you
have created more than 6 chapters), then you
can use the arrows to move through the pages
during playback. To change pages, select the left
or right arrow and confirm the selection either
with the Ok key or with the Enter key on your
remote control.
These arrows, centered at the right and left
screen edge, are created by DVD-Arabesk 3
automatically. They are not visible during
chapter creation, nor can their layout be
modified. During chapter creation you access
the desired page by using the control active
page in the Context menu.
Note: If you don‘t use the chapter editing
function, then chapters are automatically created
in five-minute intervals. In this case no chapter
menu is generated, but you can still move
through the chapters using the remote control of
your player.
After having set and edited the chapters,
leave the menu Edit Chapter Menu by clicking
on Ok so that you are again in the Add Film
window. Click on Ok, so that your settings are
automatically calculated and the films are added
to the DVD-Arabesk 3 program. This can take
some time, depending on the size of the project
Note: For very detailed video material the film
might not fit on the DVD, even though the
approximation seemed to predict enough space.
If this should happen, it will be at the end of the
calculation. In this case try again with a lower
quality level or with compressed audio.
After the project has been inserted, you can call
up the Add Film window again in order to select
another project, which is then also automatically
added. Please note that only a maximum of six
films can be added to one DVD.
Note: You can of course remove an already
added film if you wish. You can also change the
film sequence. For more on this, please read 3.2
Information / Play, item (4).
10
3.1 Creation: Edit Menu
(2) Click on the Edit Menu button and you will
see the titleCasablanca DVD in the background
(or the title of the previously edited DVD) and
the first image of each of the added film projects
with the project name appearing below it.
The foreground displays an operating panel
containing various options for laying out the
DVD menu.
At the upper edge of the panel you will see
the selection button named Menu that lets
you access the nine different settings that are
described below.
menu appears, but you now do not see the first
film listed in the DVD menu screen. It is now
not possible to start the first film again from the
menu.
Trailer + Menu
This setting plays the first film automatically, but
also displays the film in the DVD menu, where
can now be selected again.
• Background
This function is used to specify the background
of the DVD menu.
The bottom portion of the operating panel
displays the individual options of the current
Menu setting.
• Control: Here you can make the settings that
effect how the finished DVD is played when put
into a DVD player.
Type
This button provides the choice of a Color,
Pattern or Scene for your DVD menu
background. After this is designated, you can
use the Select control lying below to call up the
color box, the image pool or a specific scene
from any of your projects.
1. Film
This function gives you the chance to specify
whether the first film projects is automatically
played or simply listed in the menu.
Menu
With this option, the DVD menu appears when
the DVD is inserted into the player, and the first
film is not automatically played.
Trailer only
This plays the first film automatically when the
DVD is inserted. After the first film ends, the
If you decide to use Scene, then you can select
a project of your choice in the Select project
window. The scene bin for the project appears
when you click on Ok. Now you can select the
scene in the same manner you would select a
scen in the main Edit screen: either by clicking
directly on it with the arrow, with the controls to
the right and left that allow you to go directly to
the beginning or the end of the scene bin.
The first image of the scene is used. If you want
another frame in the scene other than the first
image, go to the main Edit menu and trim the
11
scene or split it into two scenes and select the
second half of the scene as your icon stamp
selection.
The Mode button gives you the choice of Still
or Animated, so that you can specify a fixed
or moving background scene. The duration of
a moving background scene is limited to one
minute. You can choose a scene that lasts longer
than a minute, but the material will loop after
the first minute.
The DVD menu is played in an infinite loop.
(Please read the practice example 4.2 Menu
layout with PIP-Studio).
If you have specified either Color or Pattern
under Type, then of course only the setting Still
is possible.
If on the other hand you have picked Scene
under Type and Animated under Mode, then
the audio of your scene can be heard during
background display if you activate the Audio
control.
• Title: You can use this function to give the
background menu a proper title.
then to start a new line enter a backslash “\” and
then the letter “n”. Both these characters appear
then appear after the previously entered letters.
Now you can enter the words meant for the next
line. The first such letter appears directly after
the “n” entered together with the backslash.
After you press Ok, you will see the text you
have entered appear as a multi-line title.
If you have the Power Key-Option, then you can
exit the screen keyboard with the Return key.
If you are using SMART EDIT version 3.1, then
simply press (also with Power Key-Option) the
key combination “Alt, Return” if you want to
move to a new line. The “Return” character then
appears directly after the previously entered
letter. Now you can enter the words destined for
the next line. These words are displayed directly
after the “Return” character. Clicking on Ok (or
pressing the “Return” key with the Power KeyOption) lets you see the text you have entered
as a multi-line heading.
Clicking on Font style/size causes the usual font
selection panel to be called up. You can use this
to select the font and font size from every font in
your system.
The button Style calls up the window Text Style
in which you can set further attributes. You can
use the button Position to position the heading
exactly where you would like it, e.g. at the upper
or lower screen edge. The text appears in a
dashed-line frame that you can reposition with
the trackball. You confirm the chosen position by
clicking with the left trackball key.
• Stamps: With this function you can specify the
type of beginning images that represent your
films on the DVD. The first picture of this scene
will later represent the film in the DVD menu.
Clicking on the button Text causes the screen
keyboard to be called up, with which you can
enter a title after you have deleted the existing
title.
You can enter a text consisting of several lines.
If you are working with SMART EDIT version 2.5,
Please note that only one beginning image can
be selected for each film, i.e. you can specify a
maximum of six beginning images on the DVD.
12
With Size you specify the size of the image or
whether only the text is to be displayed (no
Stamp).
With Position you specify the position of the
image or text. If you have specified no Stamp,
then a frame is automatically put around the
film name belonging to the project. In order to
suppress this frame later in the DVD menu, set
the stamp icon border width to the value 0 (see
Borders).
• Film Texts: If you have set this function,
activate the desired stamp icon.
As soon as you select the menu Stamps, a
dashed-line frame appears around one of the
scene icons. Now activate the desired film
simply by clicking on the image currently
representing it. The frame now surrounds this
image.
If you click on the button Type, you have two
options: the function Stamp f. scene causes your
film to be represented by the first image of a
scene. The setting Background-Stamp causes
the image to be transparent so that you can
create an image independently with the help of
other programs.
Clicking on the button Select Scene (active of
course only if you previously selected the option
Stamp f. scene) calls up project selection where
you mark the desired project and confirm, so
that the corresponding scene bin appears, from
which you can select a scene that then replaces
the previously set image.
The new button Action offering you the choice
of options Start Movie and To Chapter Menu.
Here you can specify whether the film begins
immediately when the finished DVD is inserted,
or whether you would like to see the chapter
selection when the DVD is played later.
If you have selected the option Start Movie and
the DVD is playing, then you can use the DVD
menu key on your remote control to bring up the
chapter menu.
Then you can call up the keyboard with the
button “Text and use it (or a connected external
keyboard) to rename the currently active title.
Here too you can enter several lines of text if
the text is located below the icon. This functions
according to the same principle as entering
headings. Take note of the version number of
your software. You use the button Position to
specify the position of the text in relation to the
image.
• Film Text-attributes: Here you can globally
change film titling, (change them all at once).
13
• active Borders: Here you can specify the
appearance of the border of the active film
stamp icon the DVD menu screen when played
in a DVD player.
You can use the button Select font to change
the font and font size. The button Select Style is
used to call up the window Text Style, in which
you can make further settings, such as text color,
italic setting, frame size, shadowing, etc.
• Borders: With this function you can specify the
border style options of the inactive film stamps
in the DVD menu.
The button Selection Color specifies color of
the border of the film stamp when it is active.
Activation Color defines the color the frame
shows momentarily when the frame is selected.
• Shadow: This function lets you specify the
shadow that is thrown by the icon.
You can specify the Size and Color or Pattern (a
window is called up with which you can call up
either the color box or the image pool).
These are global settings that affect all of
the film stamp borders. If you set the border
thickness of a frame to the value 0, then you will
see no frame around the reference icons in the
DVD menu once created.
However, the frames must later be able to be
selected in this menu. A frame is put around the
icon you have selected as long as it is active (see
active Borders).
You can set the Color, Size, Border and Direction
of the shadow.
At the left edge of the operating panel you
will find the familiar controls that allow you to
reduce the size of the panel or move it to the
other screen edge.
To the right you see the button Archives that
lets you save your settings and restore them
later. For example, if you have created a menu
14
with complex settings (shadows, frames, italic
text, etc.), the archive gives you the possibility
of creating a new DVD later in the same style
settings. You use the Load function to access
the attributes you have previously defined and
saved. Clicking on Ok confirms your settings and
you then exit the menu.
Note: Before the DVD is played or written, the
settings you have made under Edit Menu must
be created. You can do this, for example, in the
menu All (please read item (5)). Alternatively,
the calculation will be done automatically as
needed.
3.1 Creation: Write DVD
(3) You can write the DVD after you have made
all the settings in the previous menus. To do
this, click on the button Write DVD, open the
cover on the front of your machine and press
the button of the drive that is now visible in
order to open the drawer for the DVD. Put an
unused DVD-R or DVD-RW into the drawer and
the system automatically createss the settings
made in the previous menu (assuming this has
not already been done in the menu All) and then
begins to write the DVD.
Note: Please note that only DVD-R and
DVD-RW media can be used, not DVD+RW
media! There are different kinds of DVD writers.
The more recent writers also support DVD+R
media. (You can see the info for the built-in drive
and the possible formats in the corresponding
display in the window Settings. Further
information on this can be found under item (9).)
If you have accidentally inserted a nonsupported medium, then a warning is given at
the begin of the write process.
A progress bar informs you on the remaining
duration of writing (divided into two phases).
During the second phase no progress bar may
be visible - please wait until the light diode in
the DVD drive turns off before removing the
DVD! This diode is on while the DVD is being
written.
Caution: Very short videos require a
proportionally longer length of time. The DVD
writer always writes about 20% of the media,
even when the actual data volume is much
less. Writing duration becomes proportional for
projects of 20 minutes length or more.
The read/write diode is on during the write
process. It can happen that the system is
finished writing (the write window closes) but
that the diode is still on. In this case wait until
the diode turns off before removing the DVD!
Damage to the DVD may otherwise result.
You can remove the DVD when your system has
finished writing and when the diode is off. Now
you can try out the DVD in your system DVD
Player or in another DVD player. Most newer
DVD players accept DVD-R media.
Note: DVD-RW media that have already been
written once can only be written again if the
entire content is deleted (please read section
3.3, item (8)). Even if only a few minutes of video
material is already on the DVD, then it is not
possible to add further material.
Clicking on Write DVD causes an already written
DVD-RW that has been inserted into the drive to
be erased (after a warning message has been
issued).
3.2 Info / Play
The second main section, labeled Info/Play
displays the contents of the DVD (that has not
yet been written) and offers complete playback
of any or all of the selections before you burn
the DVD. The three functions contained in this
block are described below.
3.2 Info / Play: Film
(4) When you click on the button Film the
window Film-Info is opened, in whose upper
area a list is displayed of each of the film
projects that have been added, and its duration.
15
With the button to the left you can move the
operating panel to the upper screen edge.
You can also see the time-code display and the
following five functions (from left to right):
- < button to jump to the previous chapter
beginning.
- > button to jump to the next chapter
beginning.
- Stop button to stop playback and to call up
the Film Info window.
- Play, in order to playback the activated film.
- Pause, in order to stop playback temporarily.
Selecting a film project in this list enables you
to see its corresponding information in the area
below.
The button Film is used to call up the keyboard
so that you can change the name of the film that
is activated in the upper list. Please note that
changing the name also causes the film name in
the DVD menu to be changed!
The information fields Image quality and Audio
mode let you review the settings you made in
the window Add Film. They cannot be changed.
The DVD-Arabesk play function (Info/Play, All,
Play) starts the film immediately, and does not
play the chapter menus.
3.2 Info / Play: All
(5) Clicking on the All button calls up the Info
window, in which you can see the contents on
the compiled virtual DVD. This virtual DVD exists
on the hard disk but has not yet been written to
an actual DVD.
By clicking on the button Remove Film you
delete (after a warning message) the selected
film, so that the deleted film is not written to the
DVD during the write process.
With the help of the up and down arrow keys
next to the Remove Filmbutton, you can change
the sequence of the films that have already been
added. To do this you activate a film in the upper
list and then click on one of the arrow keys. This
moves the film either up or down one position in
the list. In this way you can maneuver the films
to the desired position .
Clicking on the Play button causes the activated
film to be played. The following operating panel
appears:
You can see the number of film projects, the
total playback duration, the space used, and the
free space still remaining.
A click on the button Create causes the settings
you have made for the menu to be created.
This calculation duration depends on the layout
of the background. Moving material of course
requires more computing time.
After the settings have been created, if you click
16
on the Play button, the player is started and you
can play the DVD as it is momentarily defined.
disappears again when you press Play to start
another film from the menu.
Afterward you see the player menu displayed:
3.2 Info / Play: DVD
(6) Clicking on the button DVD causes the DVD
in the drive to be played. The DVD must be a
DVD that has been written with DVD-Arabesk.
In the background you see your menu, in the
foreground an operating panel is displayed.
If the DVD has been created under an earlier
version of DVD-Arabesk, then you will see the
films represented not with icons, but with the
terms Film 1, Film 2, etc., which can be selected.
The arrow buttons combined in a cross serve to
navigate through the films in the same manner
as a DVD remote. You can thus use these
buttons to move through the menu.
If you click either on the Ok button in the middle
3.3 Miscellaneous
or on the play button, then the selection is
confirmed and playback begins. After the DVD
has been played, you are returned to the main
DVD menu.
If you click on the button Menu, you are instantly
returned to the main menu of the DVD and the
operating panel remains in the foreground.
With the Chapter button you enter a selection
list in which you can directly access each
chapter so long as it has already been created
(see section 3.1, item (1) Edit Chapter Menu).
The button Film has a function comparable to
the button Chapter. With its help you can move
film-by-film through the menu.
In this section describes the three functions
contained in the third block named
Miscellaneous.
This block provides additional options for using
Arabesk.
3.3 Miscellaneous: Read DVD
(7) With DVD-Arabesk 3 you can make copies of
DVDs that you have written with DVD-Arabesk 3,
2 or DVD-Arabesk.
To make a DVD copy, you Read the source DVD
to the hard disk and then write a DVD-R or RW.
The result is a 100% copy without loss.
With the two buttons in the bottom line you can
move chapter-by-chapter through the menu.
This function is meant to let you copy your
own finished DVDs after you have deleted the
project from the hard disk and you still require
additional copies.
With the Stop, Play and Pause buttons in the
upper line you can abort playback, play the
desired film or stop temporarily.
Copying automatically includes all menus,
chapter information, etc. You don’t have to make
these settings again.
Note: At first you see the trailer, assuming that
you have set the function Trailer only under
Control. Then the menu is displayed. During
this time you may click the right trackball key
at any time to display the operating panel
without interrupting the running film. The panel
Note: If you wish to make a 1:1 copy of your
DVD, you should not make any further changes
before writing (e.g. insert projects, change
background menu), because the DVD menu will
not be correctly displayed once written.
17
An additional possibility is to modify an already
existing DVD: Imagine that you have an old DVD
containing video material of a vacation spot you
have visited. Imagine further that you spent last
summer at the same spot and you would now
like to archive your new film material together
with the older material.
With DVD-Arabesk 3 you can read in the original
DVD, insert additional projects (assuming
enough space on the DVD) and write a new DVD.
after you have inserted the DVD.
A DVD that has been read in can be written any
number of times to a DVD-R or RW.
3.3 Miscellaneous: Erase DVD-RW
(8) You also have the option to erase a DVD-RW.
Click on the button Erase DVD RW and then
insert a written DVD-RW. When the drive closes,
the DVD is erased.
In doing so you should take account of the
following:
When you read in a DVD that has been created
with DVD-Arabesk 3 or 2 then in the window
Edit Menu you will see your original menu.
Moving backgrounds are an exception. These
Note: With DVD-Arabesk 3 you can write both
DVD-R and DVD-RW media. New drives also
support DVD+R media. Drive version DVR-108
(or higher) also supports DVD+R DL media,
though not all players might be able to play
these discs since the format was not specified
when many of the players appeared on the
cannot be restored but can only be represented
as gray fixed images. If your original DVD has
been created with a previous version of DVDArabesk, then it is not possible to restore the
original menu.
Instead, a background image appears in which
the films existing on the DVD are represented by
text. Only the films themselves can be restored.
With the help of DVD-Arabesk 3 you can create a
completely new menu.
market.
(You can find out the installed drive and the
supported formats in the corresponding display
in the window Settings. Further information can
be found under item (9).) The DVD-R media can
only be written once and cannot be erased. The
advantage is that they work without problems
in most DVD players. DVD-RWs can be erased
and rewritten, but they are somewhat more
expensive and do not work with all players.
Of course the original films remain unchanged.
3.3 Miscellaneous: Settings
Warning: Only DVDs with a capacity of 4.7 GB
can be read in. If your system is fitted with a
DVR-108 drive (or newer version) as well as the
freshly installed system software SMART EDIT
3.5 (or higher) and you have activated the Use
Dual Layer setting in the Settings window (see
item (9)), the system will be able to read DVDs
that contain up to 8.5 GB of data.
A greater capacity is not supported.
(9) A click on the button Settings opens a
window in which you can specify the Write
Speed. You have the possibility of specifying
two different speeds with the help of the
selection button, Normal and High.
For DVDs with small data volume the write
duration can be significantly less than the actual
film length, even for Normal speed.
To read in a DVD you require an empty DVD
hard disc section.
The setting High causes the DVDs to be written
at a faster rate.
Whether or not high speed is supported
depends on several factors, e.g.
If you have not deleted all existing data, then a
message is issued after you have clicked on the
Read DVD button. If you confirm this message
with Ok, the data will be deleted automatically
- Casablanca model
- Type of DVD drive
- media used (manufacturer, type)
- firmware
18
If high speed is to be used, then the DVDs must
always be high-speed media appropriated for
high-speed writing. Fast writing is not just a
factor of high-speed media, because the factors
listed above also play an important role.
software and firmware versions of your system.
(10) You can automatically open and close the
tray of the DVD burner by clicking on this button.
Some DVD players may have a problem playing
high-speed media.
(11) With a click on the menu symbol in the
lower right corner of the DVD-Arabesk 3 menu
you return to the Finish menu.
If high-speed writing is not possible, even
though it is set, the DVD will automatically be
written at normal speed.
Note: When you exit the program DVD-Arabesk
3 you will find yourself in the project from which
you started DVD-Arabesk 3.
Warning: Casablanca Avio does not support
high-speed writing.
4. Practice Example for Layout of a
DVD Menu
The following section offers two practice
examples to introduce you to the creation of
DVD menus.
It is not necessary to write a DVD for these
practice examples. You can view the result with
the built-in player, because the virtual DVD is on
the hard disk.
4.1 Menu layout with DVD-Arabesk 3
In addition, in the window Settings you see
the button Verify DVD. If this button is activated,
the system automatically checks to see whether
this DVD can still be read or played without
errors on the built-in drive after burning. If this
button is deactivated, the system will ask you if
you want to carry out a check.
If your system is fitted with the Pioneer DVR-108
drive (or newer version) you will see the Use
Dual Layer button. This option must be activated
if you want to write data onto an entire duallayer DVD. However, you must then ensure that
+R DL is listed as a supported medium in the
subsequent information field (see fig.).
The other information in this field relates to the
In this practice example we would like to
demonstrate the possibilities of the program
DVD-Arabesk 3 that you have already learned
about in the previous reference sections.
You will learn how to specify a layout for a DVD
menu and how to use various functions.
In this example we assume that you have
already created three different film projects on
your system and that these projects are ready
to be written. Of course it can be more or less
projects than this.
Create a short leader introducing your DVD. You
can use e.g. a black scene of 20 to 30 seconds
duration that has been given a title, or think up
something spectacular, whatever you wish!
19
Use PIP-Studio to let pictures fly in, let images
be paged or use the many possibilities of the
supplementary programs to create a leader that
makes your viewers curious and anxious to see
your film!
Now enter the menu Finish and start the
program DVD-Arabesk 3.
After a moment you will see the DVD-Arabesk
menu. Now click on the button Add Film at
the upper left so that the corresponding window
opens.
by clicking on Ok. You are now in the Add Film
window again. Close this window with Ok in
order to confirm the entries so that the project is
inserted.
After this process (which can last awhile) is
finished, open the Add Film window again in
order to add another project. Use the same
procedure as before. The display Size approx.
tells you how much space each added project
will require.
Free capacity shows you how much free space
is still available on the DVD. This lets you know
if additional projects can be added.
After you have inserted four projects including
a leader (this should be enough for this practice
example), click in the DVD-Arabesk menu on the
button Film so that a window opens in which
your inserted films are displayed in the upper
portion.
Clicking on Select project opens the project
selection in which you can now select the
project of your choice. It does not matter which
project you choose first, because you can
specify the film sequence later.
Under Project length you can observe the
duration of the project you have just chosen.
Now select a normal image quality for this
example (the meanings of the individual
quality levels are explained in Chapter 3) and
uncompressed audio.
Now click on the button Edit Chapter Menu. A
window opens in which the individual scenes
of your storyboard are displayed. Here you can
scroll through the scene list and decide which
scene should be a new chapter beginning.
Simply mark the desired line and click on Start
Chapter.
After you have set the chapter, exit the window
In the lower portion of the window the name,
image quality and audio quality of the films
activated in the upper list are displayed. Here
you can put the films into the proper sequence
by marking a film and moving it to the desired
position with the arrow keys.
Of course, you position the film to be used as
the leader to the top position.
20
After the films are sequenced properly, you can
begin to specify the layout of the DVD menu.
Click on the button Edit Menu and you will see
in the background the heading Casablanca DVD
(or the previously entered heading) and the first
image of each of the four inserted projects with
the corresponding project name below.
After confirmation you see the button Mode
that you now set to Animated, because the
scene you have selected contains moving video
material.The duration of the moving scene is
restricted to one minute, so it only plays the first
minute of footage in a loop.
If the selected scene has audio, then activate the
function Audio so that a checkmark appears in
the checkmark box.
The foreground displays an operating panel in
which you see the button Menu, that you now
set to the option Control.
In the lower portion of the window the selection
button 1. Film is displayed, that you now set to
the function Trailer only.
After you have made these Background settings,
go to the menu item Title. Here you can give a
name to your background menu.
You see that the image of the film selected as
leader is now not visible in the menu.
Now set the selection button Menu to
Background in order to specify the layout of the
DVD menu.
The button Type provides you with several
possibilities. Select Scene.
Use the Select button to open the project
selection in order to call up one of your prepared
projects containing an appropriate scene. (A
scene is appropriate as background scene if it
only contains slight movements.)
After you have confirmed your project selection
by clicking on Ok, the scene bin of the selected
project appears, in which you can select the
desired scene with the help of the slider.
By clicking on the button Text you call up the
screen keyboard (or with the Power Key-Option)
with which you can enter a title of your choice,
e.g. “Vacation 2000 to 2003”. In Chapter 3.1 you
can read about how to enter multi-line text.
Finally, you specify the appearance and position
of your text with the functions Font style/size,
Text Style and Position.
The next option Stamps specifies the
appearance of the start images of the stamp
icons that represent the film projects in the DVD
menu screen.
Click on one of the project icons so that a
dashed-line frame appears around it.
For this example , click the Type button and
select the option Stamp f. scene, so that the
film is represented by the first image of the
21
corresponding film project.
You will now notice that the Select Scene button
is now active. It lets you call up the menu from
which you select the desired project, so that the
scene bin appears, from which you can select a
scene that replaces the default start image.
Click on the Size button and specify the option
medium and click on the Position button and set
the position of the icon.
After you have made these settings for the
first image, you can do the same for the other
images. You might wish to vary some of the
settings, e.g. set another size.
Now enter the menu Film Texts in which you
also activate a stamp icon. After clicking on the
button Text the screen keyboard appears with
which you can rename the marked film. This is
useful when your projects e.g. were named P1
previously, or were titled with an inappropriate
name.(Text entry works according to the same
principle as Title entry or modification.)
After you have made these settings (that
automatically affect all films) go to the menu
active Borders. Here you can specify the
appearance of the active stamp icon selected
later in the DVD menu.
Use the button Selection Color (that defines the
frame color in its active state) to select a deep
yellow.
Use the button Activation Color to select a nice
blue. This defines the momentary frame color
when the frame is selected. These settings also
apply to all of the stamp icons.
Now you can begin to specify the layout of the
shadows cast by the icons. Make the settings
for a black Color, for Size 10, Border 8 and any
desired Directio, e.g. decreasing below right.
Using the button Position you specify the text’s
position in relation to the icon. If you have
entered a multi-line text, the text can appear
only under the stamp icon.
After you have made the settings for the first
stamp, you can do the same for the others.
Now go to the menu Film Text-attributes, in
which you can change the appearance of the
film title with the buttons Select font and Select
Style. The changes you make in this menu are
global, so all the titles of all of the film projects
are affected.
Now go to the menu item Borders in order to
specify the frame type of the films that will be
inactive in the DVD menu, (i.e. have not been
selected to be played).
Set the Size to the value 4 and select a nice
green from Color.
After you have made these setting under the
program item Edit Menu, exit this menu by
clicking on Ok and go to the menu All.
In the All menu, a window opens in which you
can see information on the virtual DVD (on the
hard disk) you have just designated.
Click on the button Create so the virtual DVD
is calculated. The duration of the calculation
depends on the background layout. After the
calculation is finished, click on the Play button to
begin playback of your DVD.
In this example, you first see your leader
because you have set the option Trailer only
under the menu item Control. When the trailer
ends, your DVD menu is displayed.
22
The operating panel can be displayed by clicking
on the right trackball key. In order to start a film
from the menu, activate first the desired film by
selecting it with the arrow keys in the operating
panel (as you would with a DVD remote), and
then clicking on the left trackball key. Then click
on the Play button.
If you are not satisfied with the virtual DVD, then
you can make further changes under Edit Menu.
And you check the changes again under the
menu item All.
If you are satisfied with the result, then you
can go to the menu item Settings in which you
specify the write speed for burning the DVD
(please read Chapter 3.3, item (9)).
Now exit DVD-Arabesk 3 and go to the Edit
menu. There you create a Still Scene of
20 seconds duration that will serve as the
background of the DVD menu. It should be
appropriate to the content of your films.
In our example we have used the background
South Sea, that you can find in the image pool
under Product: DVD-Arabesk, Type: Images.
Finally, click on the button Write DVD, open the
front panel of your system and press the button
on the drive to slide out the drawer.
After you have inserted a DVD, the system will
calculate the settings made (if needed) and
begin writing your DVD.
The writing process is finished only when the
read/write diode of the writer turns off. Only
then should you remove the DVD.
Your DVD is now ready so that you can play it
either with the DVD player integrated into the
system or with an external DVD player.
4.2 Menu layout with PIP-Studio
In this example you will learn how to create
the entire DVD menu with the help of the
supplementary program PIP-Studio (available
separately).
PIP-Studio offers you the possibility of creating
animated reference images.
Go to DVD-Arabesk 3, click on Add Film and
choose the desired film in the window Select
Project. Repeat this procedure until you have
inserted all desired projects.
Note: You can also use a moving background,
but you should make sure that it does not have
a confusing effect in combination with moving
film reference images. Confusing effects can
sometimes be avoided by making the animated
background menu darker or fuzzier.
Now create a scene of 20 seconds duration
containing video material corresponding in
content to the video material of the first project
you inserted with the program DVD-Arabesk
3. Insert this video scene into the storyboard
behind the fixed image.
Go to the transition effects menu and select PIPStudio. Insert it between the scenes previously
positioned and set the effect duration also to 20
seconds. Start the program.
You now see your background image and in
front of it your video scene as PIP.
23
scene from it that you put in the storyboard.
Insert into the storyboard an additional
video scene with a length of 20 seconds that
corresponds in content to the second project
you inserted with the program DVD-Arabesk 3.
Create again a PIP with the same settings (only
the position must be different, of course),
calculate it and create a new scene from it.
In order to complete the example, make the
following settings for the displayed scene in the
foreground:
Under PIP select Single and under Effect set
Hard Cut for IN and OUT.
Now select as Shape a Rectangle and set the
Size 120 x 96 (for NTSC 120 x 80) in order to
obtain an average-sized picture.
Note: In order to obtain a small reference
picture, select 80 x 64 (NTSC = 80 x 50), for a
large picture use 160 x 128 (NTSC = 160 x 100).
Now go to the menu Border and set both Size
and Blur to 0. Also, the value of Distance in the
menu Shadow should be set to 0.
After you have made these settings you can
position the PIP. Click on Position and move the
picture, for example, to the upper right corner to
the position 512, 220.
Calculate the PIP-Studio effect and then create a
When you are finished with the above, you will
have created with PIP-Studio the same number
of video scenes as you have inserted projects
with DVD-Arabesk 3.
You will also have a 20-second long background
image with several PIPs on it (and the complete
DVD menu). You can now set audio clips under
this scene. To do this, insert your new scene
into the storyboard and go to Audio Mix, set the
original audio off (in order to delete the audio of
the video scenes on the background image) and
insert an audio clip of your choice.
The menu is played repeatedly, so it is useful
to fade the audio clip in and out in order to
avoid an abrupt transition. Now go to the Image
processing effects menu and click on the Scene
button, so that the time-frame menu appears.
Make sure by using the IN and OUT buttons that
you have really selected the menu scene, but
usually this 20-second long scene should appear
automatically for selection. Click on Ok and go
to the Edit menu.
Now your scene (menu and perhaps also
music) is in the middle frame of the scene bin.
Start DVD-Arabesk 3 and go to the function
Edit Menu. Select the menu item Background
and set the option Type under Scene. Clicking
on the button Select below calls up project
selection. Confirm the activated project, so that
the corresponding scene bin appears, in which
you now call up the previously created menu
and confirm with Ok. Afterward set the option
Animated unter Mode and activate additionally
- in the case that you have put a video clip under
24
the DVD menu created with PIP-Studio - the
function Audio, so that a checkmark appears.
Then set the Size under menu item Borders at
least to the value two. The alpha value of the
frame color (or frame pattern) must not be set to
0%.
If desired, you can turn off the frame by
selecting the frame color and setting its alpha
value to 0%.
Now you can continue to specify the DVD menu
layout as described in Chapter 3 of this manual
(frame color, title, etc.)
Select an appropriate Color for the frames,
so that the frames can be seen clearly on the
background.
Now only the most important thing is missing:
linking your inserted films with the PIPs.
Enter the menu item Stamps, click on an icon
of one of your projects, so that it is surrounded
by a dashed-line frame, and set the option
Background-Stamp under Type. You will see that
your previous reference image (except for the
frame) has completely disappeared, so that you
can see the South Sea picture at this position.
Select under Size the setting medium, because
you have also created a picture of average size
(120 x 96) with the program PIP-Studio.
Now you only have to click on the button
Position and drag the project frame onto the PIPStudio icon, and you are finished!
5. Practice Excercises for
Specifying the Background Menu
Using Supplementary Software
DVD-Arabesk 3 offers you the possibility of
creating the DVD background menu with other
programs. You can use all the supplementary
programs available for your system.
Each of the following examples is an extension
of increased complexity over the previous
example. We therefore recommend that you
work through the examples in the order given.
It is assumed that you are familiar with the
basic operation of your system, e.g. using
the text-entry menu, creating a scene, setting
effect duration, etc., and the operation of the
supplementary programs.
You will see - surrounded by a frame - your new
picture, titled with the original film name.
Do the same for the rest of the projects until you
have put the frames for all of the projects on the
images created with PIP-Studio.
For these practice examples it is not necessary
to actually burn a DVD. The virtual DVD you
have created is on the hard disk and can be
played with the built-in player.
25
5.1 Animated DVD title text
In this example you will learn to create an
animated heading for the DVD menu without
having to use a supplementary program.
Create a fixed image or a moving scene with a
nice motif from your video material representing
the contents of the films on the DVD. This scene
should be 15 seconds long.
Alternatively, you can use a 15-second pattern
scene from the image pool.
Calculate the heading and create a scene from it,
so that the scene titled with “horizontal scroller”
is in the active frame of the scene bin.
Insert this scene into the storyboard and go to
the menu Titling.
Select Horizontal Scroller, insert this effect into
the storyboard and set the effect length to 15
seconds (function complete scene).
Then click on Enter/edit text to enter the textentry menu and delete the existing text panel.
For your DVD menu enter a heading
representing the films on the DVD, e.g. “Trip to
Malta 2003” and specify the font (e.g. Manuel)
and the font size (80 in our example).
Position the new text panel to an appropriate
position with the help of the function Move box.
It should neither cover up video material of the
background picture nor be at a spot where the
stamp icons will later be placed.
Start DVD-Arabesk 3 and click on Edit Menu.
Select the menu item Background, and then
select the function Type under Scene and call up
project selection with the button Select. Confirm
the activated project so that the corresponding
scene bin appears, and confirm the selection of
the previously created scene by clicking on Ok.
Then set the function Animated under Type,
because using scrolled text - even if only for a
fixed image - means that an animated scene is
being used!
Select the menu item Title and call up the
keyboard by clicking on the button Text. Delete
the existing text and confirm with Ok.
You do not yet see your new heading because it
is a scrolled text that is at the moment off-screen
to the right.
Insert your projects and create your DVD menu
by e.g. titling the projects or putting frames
around them, as described in Chapter 3.
When you calculate your DVD and play it in the
built-in player, you will see the heading moving
into the picture from the right.
26
Calculate the effect and create a scene from it
that should appear in the scene bin.
Start DVD-Arabesk 3 and enter the function Edit
Menu.
Select the menu item Background and under
Type set the option Scene. Clicking on the button
Select below opens project selection. Confirm
the active project so that the desired scene bin
appears. Call up the menu image previously
created with Liquid Images and confirm with Ok.
If you take more than 15 seconds to activate
a film in the DVD menu, the text will move
through the picture again, because the DVD
menu is played repeatedly.
Finally, set the option Animated under Mode.
Of course you can use supplementary programs
to modify the previously described titling.
For example, turning or self-changing
(morph technology) titles can be created with
ElasticDreams.
Tip: By using a title effect and with the help of
the Scene function you can put additional text
into the background menu. This is an ideal
way to display a box in the lower right corner
in which e.g. there is a reference to the film
director.
5.2 Moving background with Liquid
Images
Create a black scene with a length of 10 seconds.
Insert the scene twice into the storyboard and
enter the menu Transition effects.
Select the effect Liquid Images, insert it and set
the effect length to 10 seconds.
Then set the effect options as follows: Select a
shimmering yellow as color, under Material set
Liquid, under Effect set the option Big Slider and
under Select effect set the mask Whirlwind.
5.3 Moving background with Particle
Magic
In this example you will use the supplementary
program Particle Magic to learn how to create a
nice background menu with little effort.
Create a black scene that lasts 30 seconds, insert
it in the storyboard and give it a nice title.
Enter the menu Titling, select the titling effect
Horizontal Scroller and insert it into the
storyboard. Set the effect duration to 30 seconds
and click on the button Enter/edit text.
In text entry mode delete the existing panel and
enter an appropriate title, e.g. “Videos 2003”.
In our example we have decided to use the
font Lynn at a size of 200. The text should have
a white color with an alpha value of 50%, and
show a white frame with a thickness of 4.
27
Center the text and calculate the effect over the
entire scene.
Then create a new scene from it and insert it into
the storyboard.
Now enter the menu Image Processing effects
and select the Particle Magic effect PM Draw
and insert it.
In the effect options click on the button Archives
and select the project DR Burning Border.
Calculate the effect and create a scene from it
that appears in the scene bin.
The background menu thus created could
appear as follows:
Start DVD-Arabesk 3. Click on the button Edit
Menu and select the menu item Background.
Under Type pick the option Scene and use
Select to call up project selection. Confirm the
active project so that the corresponding scene
bin appears and confirm the selection of the
scene created previously by clicking on Ok.
Activate unter Mode the function Animated.
Now you can click on the button Add Film in
order to pick the desired films one after another.
The films then appear in the mode Edit Menu,
in which you can continue to refine your work
(position, frames, titling, etc.).
5.4 Moving background with Akaba New Concept
In this example you will learn to use the
program Akaba - New Concept to create the
entire background menu.
Pick an appropriate scene for a fixed image,
for example Bricks from the image pool (Type:
Monochromatic) and set its duration to 20
seconds. Then start Akaba - New Concept and
enter Drawmode.
At first, turn on the magnifying glass and select
the color white in the palette window, click on
the tool “open rectangle”.
Then position the upper left corner e.g. at the
coordinates 446,90 (displayed with the help of
28
the magnifying glass) and drag the mouse to
size the rectangle.
fuzziness to 0%, the width to 100% and click on
the button Stamp.
A medium-sized background icon for DVDArabesk 3 must be of size 102 x 96 (NTSC = 120
x 80). Add this value to the coordinates and
subtract 1 so that the rectangle is positioned at
the coordinates 565, 185 (NTSC = 565, 169).
Confirm by clicking on the left trackball key.
You have just created a window as a wall.
Repeat stamping until you have four windows in
the wall.
Then select the color green in the palette
window and click on the closed-polygon tool.
With the help of the crosshairs ( in the
magnifying-glass function) draw window frames
at the left and right edges of the window.
Finally, exit Akaba - New Concept and click on
Ok in the Special menu so that the 20-second
scene is calculated.
Start DVD-Arabesk 3 and enter the menu item
Background. Under Mode select the option
Scene and call up project selection with
Select. Confirm the active project so that the
corresponding scene bin appears, and confirm
the selection of the scene created previously
with Akaba - New Concept by clicking on “Ok”.
With the selection button to the upper right
activate the option Drawing and cut out the
complete window including the frames by
using the rectangle brush. To do this draw an
enclosing rectangle around the object. Set the
Under Mode activate the function Still.
In the menu item Stamps select under Type
the setting Stamp f. Scene, select a medium
size and position the icons next to each other by
using the button Position in the windows
created with Akaba - New Concept.
29
5.5 Suggestions for layout
In the following you see some examples for
DVD backgrounds that have been created
with SMART EDIT and diverse supplementary
programs.
We hope to have given your creativity extra
impetus and recommend that you simply try out
all possible ideas!
30
31
241-12/05