1
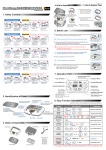
User Manual for the Platform Version 1 of the
EDIT Desktop Taxonomic Editor
Pepé Ciardelli
December 1, 2008
First, a graphic that illustrates some of the terminology used:
Creating a root taxon (1)
When you start the Editor for the first time, the internal database is initalized, and the tree
area on the left-hand is empty except for instructions on how to create your first taxon:
Click on the hyperlinked message to get started.
Creating a root taxon (2)
Alternately, you can create a root taxon at any time by choosing the option “Add new
taxon” from the “File” menu.
Editing your taxon
You have now opened up a new editing area with the tab heading “New taxon” and the
instruction “Click to add name”. Click to start entering the taxon’s name.
The first thing to notice is that the editor’s parser is activated with every key you press.
The results are shown to the right in the details area.
The second thing is that until the parser can interpret what you have entered, the text you
enter will be underlined in red, and the Details area will show “Parsing Status: problem”.
As soon as the parser was able to separate your text into its individual components, the
red underline will disappear and the results will be shown in the Details area. See the
section Interplay between the Freetext and Details areas below for more information.
Now right-click on the black square icon (next to “Hier” in the image above). A dropdown menu appears to tell you which actions are possible for the name. Every line of
data in the Freetext area has an image next to it, on which you can always click to see
which actions are possible.
Saving your taxon
Now save the taxon, either with Control-S, or by choosing “Save” in the “File” menu.
The taxon is now present in the taxonomic tree, and the edit area’s tab reflects the name
of the taxon. Note that changes to a taxon’s accepted name will not be visible in the
taxonomic tree until it has been saved.
Adding synonyms
Return to the Freetext area and hit carriage return (the “ENTER” key) after the name. A
heterotypic synonym is created, as in the image below. If this was done in error, rightclick on the green circle icon and choose “Delete synonym from taxon”.
Adding synonyms and misapplied names
A carriage return at the end of any element creates a new element; by default, this
element is a heterotypic synonym in its own, newly created homotypic group. By holding
down the left mouse button on the synonym icon and dragging the element into an
already existing homotypic group, the synonym assumes the synonymy of this group. For
instace, if the synonym is dragged into the same homotypic group as the accepted name,
it becomes a homotypic synonym, and its icon changes from to .
If there is a group of misapplied names in the synonymy list, dragging an element into
this group will cause it to become a misapplied name.
For homotypic groups with more than one name, one name can be designated the
basionym or original name. This action will cause the name’s icon to darken ( -> ).
Note that the basionym / original name relations are now listed in the Details area under
“Name Relations”.
After saving the taxon, its synonymy list appears when you leave the mouse over its
name in the taxonomic tree.
Adding child taxa
There are several ways to add child taxa.
The first is to create a taxon as described in Creating a root taxon, then drag the name
onto its parent in the taxonomic tree.
The second option is to right-click on the parent taxon and choose “Add child taxon”.
This opens a new editing area with the tab “New taxon”. The name appears in the
taxonomic tree when it is saved for the first time.
A third option is to right-click on the parent taxon and choose “Add child taxon with
quick name”. This command creates a new tree node under the parent taxon, and puts the
cursor inside. Thus, you enter the taxon name within the tree, and can open it up in the
editing area at a later time. If you would like to cancel the quick name operation, press
the “ESCAPE” key.
Changing taxonomic parent
The easiest way to change a taxon’s parent is to drag it onto a new parent within the
taxonomic tree. Alternately, if you would like to make it a root taxon, or place it outside
the tree temporarily, drag it below the tree.
The second option is to open the taxon in the editing area, open the accepted name’s
context menu by right-clicking on the black square accepted name icon, and choosing
“Move this taxon to a new parent”. This pops up a dialog box which shows: the
taxonomic tree; the list of recently viewed names; and the search box (not yet
implemented). Double-click on a taxon in one of these boxes, then click the “OK” button.
Deleting a taxon
Right-click on the taxon in the taxonomic tree and choose “Delete taxon from tree”. Any
children of the taxon must be deleted before their parent.
The Details area - adding name relations
When the “Name Relations” field in the Details area has focus, i.e. when you click in its
cell, a link to a popup appears. This popup contains the current name’s nomenclatural
relations.
Click on “Add …” and another window pops up. Under “Choose name for relation”,
enter the related name. The search option is still a bit buggy, so for this version, enter a
name and hit “Create new name”, then “Next >” to choose the relationship type and
direction. After hitting “Finish”, the new relationship appears in the first popup and in the
Details area.
The Details area – unparseable upper ranks
Look at the following example:
Although “Hieracium L.” is syntactically correct, the parser cannot tell which rank it is
supposed to have. By selecting the rank “Genus”, for instance, the name is broken into its
components uninomial and authorship, and Parsing Status is set to parsed.
The Details area – searching for a reference
Note that a button to a reference search can be found by clicking the “Search” property
under “Nomenclatural Reference”. Any selection made in the popup window will be used
to populate the nomenclatural reference.
The Details area – the reference cache
Caching is an important concept.
Many data objects such as names, references, and author teams are stored in two ways:
first, with the data broken up into its components (Title, Volume, Date Published), and
second, with the components put into a string. This second is called the cache. Whenever
you change any of the values in individual fields, the cache will be regenerated.
However, there are some cases where you may want to store information in the cache that
cannot be broken into its individual fields. To keep the cache from being disturbed when
its components are edited, set “Protect Cache from overwriting?” to “yes”.
The Details area – name annotations
A popup for the adding and deleting of name annotations can be similarly accessed.
Re-initializing the database
To erase all data from the local datastore, choose “Preferences …” from the Preferences
menu, then “Initialize datastore”. If you click the checkbox and then “OK”, the
taxonomic tree will be empty the next time you start the Editor.
Have fun!