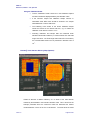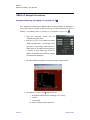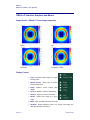
1
GRAS P ANS Manual Version 2.0 Software Version 3.40 April 2003 User Manual Graphical Reduction and Analysis SANS Program for Matlab™ www.ill.fr/lss/grasp/ by: Charles Dewhurst ([email protected]) Institut Laue Langevin Grenoble France © 2003 Institut Laue Langevin ILL03DE01T GRASansP Manual V.2, Software V. 3.40, April 2003 Acknowledgements The existing suite of ILL SANS software created and maintained by Ron Ghosh (ILL) and co-workers has served as a benchmark standard during testing of GRASansP. Don McK Paul (University of Warwick) provided the initial impetus and highlighted the requirement for a graphical software package tailored for anisotropic or diffractionbased SANS measurements. Bob Cubitt, Giovanna Fragneto, Isabelle Grillo, Roland May, Simon Levett, Ross Stewart and Johannes Zipfel (ILL) have carried out further testing and gathering of user feedback. Thanks also go to Peter Timmins and the ILL direction for allowing me to pursue this project, based upon some of my own ideas about data analysis and without a formal demonstration of the project case. It is now clear that the expanding user-base of GRASansP demonstrates the validity and usefulness of this project. Special thanks go to GRASansP’s first users and early believers. GRASansP Page 2 of 95 GRASansP Manual V.2, Software V. 3.40, April 2003 Table of Contents ACKNOWLEDGEMENTS 2 OVERVIEW 6 SOFTWARE DOWNLOAD, INSTALLATION AND CONFIGURATION 7 Software Download 7 System Requirements 7 Installation: Runtime version 8 Installation: Matlab™ ‘m-code’ version 9 Customisation and Optional Edits to the ‘grasp.ini’ Initiation File 10 Data access at Institut Laue Langevin 12 MAIN PROGRAM INTERFACE 13 Key Features of the Main User Interface 13 QUICK-START GUIDE TO DATA INSPECTION AND ANALYSIS 18 Principle Data Reduction Steps: 18 GRASANSP DATA CORRECTION PROCEDURES 19 Loading Data and Visual Inspection 19 Loading Combinations and Sequences of Run Numbers into a Single Worksheet 20 Corrected Sample Scattering Data (not Calibrated) 21 Masking Data 22 Determination of the Beam Centre 24 Determination of Sample Transmission 25 Data Normalisation: Standard Monitor, Time or Detector Counts 27 Detector Dead-Time Corrections 28 CALIBRATION TO STANDARDS OF KNOWN SCATTERING CROSS-SECTION 29 Calculation of the Calibration Scalar & Detector Efficiency Map 30 GRASansP Page 3 of 95 SOLID ANGLE AND INCIDENT FLUX CORRECTIONS 34 Merging Data Measured in Different Instrument Configurations 34 Solid Angle Correction (Detector Distance) 34 Incident Flux Correction (Flux vs. Collimation Distance) 35 GRASANSP ANALYSIS PROCEDURES 37 Isotropic Scattering: AveragiQJ,YV_T_DQG,YV_ 37 _ Anisotropic Analysis: Selective use of Multi-Detector Data 38 Extracting Intensity as a Function of Worksheet Depth: Boxes, Sector & Ellipse Boxes 45 Magnetic SANS: Ancos2 47 1D AND 2D CURVE FITTING IN GRASANSP 50 Example: 1D Curve Fitting – A single Gaussian Function 50 Example: 1D Curve Fitting – Two function fitted simultaneously 51 Example: Small-Angle Diffraction: Bragg Peaks and Fitting to 2D Multi detector Data 53 Example: 2D Curve Fitting – Multiple 2D Gaussians 54 Accessing GRASansP’s Fit Parameters in Matlab™ 55 Writing Fit Functions for GRASansP 56 Example: GRASansP (modified Mfit) Fitting Function 57 USER MODULES 59 MANAGING THE DATA WORKSPACE 61 Grouped Worksheets & Depths 61 Data Map 61 Run Number Load Deliminators 62 Combination of Load Deliminators 63 DETAILS OF ANALYSIS PROCEDURES AND ALGORITHMS 64 Data Correction: Subtraction of sample backgrounds and correction for sample transmission factors. 64 Dealing with Pixelated Data 68 GRASansP Page 4 of 95 GRASANSP INTERFACE, GRAPHICS AND MENUS 70 Image Render: (Matlab™ Pcolor Image properties) 70 Display Control 70 Colour Control 71 Menu Items 71 Tool Bar 74 DATA ANALYSIS EXAMPLES 75 Example 1: Solution Scattering: e.g. Colloidal Nano-Particle Crystals 75 Example 2: Small-Angle Diffraction: e.g. Superconducting Vortex Lattice 79 APPENDIX 1: INPUT AND OUTPUT DATA AND GRAPHIC FORMATS 83 Support for ‘gzip’ Compressed Data 83 1D Data Export 83 2D Data Export 83 Mask Files 84 Graphics File Export 84 Printer Output Graphics 84 APPENDIX 2: FLUX VS. COLLIMATION LENGTH RELATIVE FLUX 86 APPENDIX 3: NOTES FOR GRASANSP CONTRIBUTORS AND DEVELOPERS 87 Global Variables Available at the Matlab™ command line 87 GRASansP Functions and Subroutines available at the Matlab™ command line 91 APPENDIX 4: GRASANSP - SCRIPT 95 GRASansP Page 5 of 95 GRASansP Manual V.2, Software V. 3.40, April 2003 Overview GRASansP is a Matlab™ script application designed for the graphical inspection, analysis and reduction of multi-detector data produced by the Small-Angle Neutron Scattering (SANS) instruments of the Institut Laue Langevin (ILL). GRASansP presents a modern package and general purpose suite of tools to deal with the diverse requirements for reduction and analysis of two-dimensional small angle scattering and diffraction data. Data from the two ILL SANS instruments, D11 and D22 as well as that from the small-angle diffractometer D16 are catered for in the GRASansP package. Since its first release in early 2001 GRASansP has attracted significant attention and support both within the user community and from responsibles of similar multi-detectorbased instruments at other neutron and X-ray facilities. Some of these instruments are now catered for within GRASansP including SINQ SANS I & II and HMI V4 data. In principle the architecture and coding of GRASansP, combined with the matrix handling abilities, graphics and other advantages of the Matlab™ environment should allow continued development of this software and be able to provide more general aspects of multi-detector and complex data set handling. A major milestone in the development and distribution of GRASansP came in mid 2001 when Matlab™ compilers were bought for PC, Linux, SGI and now Macintosh OSX platforms. By compiling the Matlab™ script code into a ‘runtime’ or ‘stand-alone’ application we are now able to distribute GRASansP freely without obligation to buy the costly Matlab™ package. Compiled GRASansP is freely available and distributed via the GRASansP web site www.ill.fr/lss/grasp/. This manual is the second to be written, the first being with the first release of the software in early 2001. The software has evolved considerably over the course of the last year (more so than the manual!), fine-tuning some of the tailor made routines and applications for different types of SANS data analysis. Comments and suggestions are always welcome and should be e-mailed directly to me at [email protected]. You ‘the user’ are instrumental in the development of GRASansP by continuing to support this project, by reporting bugs or suggestions for improvements. Users are also encouraged to actively participate in the development of GRASansP by the contribution of ‘user modules’ and ‘fitting functions’ to tailor GRASansP to specific needs and can be easily and almost seamlessly integrated into the GRASansP interface without modification to the main code (m-code version only). GRASansP Page 6 of 95 GRASansP Manual V.2, Software V. 3.40, April 2003 Software Download, Installation and Configuration Software Download Up-to-date ‘Runtime’ and ‘m-code’ versions of GRASansP can be downloaded from the Institut Laue Langevin web site at: www.ill.fr/lss/grasp/ The web site also includes download for this manual in PDF format, example data and other utilities as well as news on GRASansP developments and bug-fixes. System Requirements 500 Mhz or higher processor 64 megabytes of RAM (recommended 128 MB) 30 megabytes of free disk space Screen graphics resolution of 1024 x 768 or higher (1280 x 1024 recommended) Runtime or Matlab™ ‘m-code’ GRASansP? Matlab™ ‘m-code’ versions of GRASansP run on any platform with Matlab™ version 6.0 or higher. Compiled ‘Runtime’ versions of GRASansP exist for: Windows 95, 98, NT4, 200, XP Linux SGI MacOSX and are licence free ‘freeware’. GRASansP Page 7 of 95 GRASansP Manual V.2, Software V. 3.40, April 2003 Installation: Runtime version The runtime version of GRASansP offers users the opportunity to use GRASansP with all the associated graphic features of Matlab™ without having to purchase the costly Matlab™ package. GRASansP is frequently tweaked, modified and improved with new versions regularly appearing on the GRASansP web site www.ill.fr/lss/grasp/. Runtime GRASansP is licence free and freely distributable. PC Windows 95/98/NT4/2000/XP 1 Download grasp_pc.exe from the GRASansP website. 2 Double-click the grasp_pc.exe file and follow the installation instructions on screen that will guide you through the installation procedure. 3 GRASansP can now be run be clicking on the shortcut placed in the windows start menu. Linux / Unix 1 Download grasp_linux.tar.gz from the GRASansP website. 2 Unzip and un-tar the contents of the compressed archive file in to new directory, e.g. /grasp_runtime/ 3 Use setenv LD_LIBRARY_PATH grasp_runtime/bin/glnx86/ for tcsh $LD_LIBRARY_PATH/:$home/ or csh shells. Use export LD_LIBRARY_PATH=$LD_LIBRARY_PATH:$home/grasp_runtime/bin/ glnx86/ for bash shells, to set the Linux / Unix environment variable. 4 Launch GRASansP by typing ‘grasp’ in the terminal window in the ‘/grasp_runtime/’ directory. SGI 1 Download grasp_sgi.tar.gz from the GRASansP website. 2 Unzip and un-tar the contents of the compressed archive file in to new directory, e.g. ‘/grasp_runtime/’ 3 Use setenv LD_LIBRARY_PATH $LD_LIBRARY_PATH/:/grasp_runtime/ bin/sgi/, as described in the packaged readme.txt file, to sent the environment variable. 4 Launch GRASansP by typing ‘grasp’ in the terminal window in the ‘/grasp_runtime/’ directory. Tip: The default instrument configuration and general GRASansP environment settings can be modified by editing the grasp.ini configuration file. GRASansP Page 8 of 95 GRASansP Manual V.2, Software V. 3.40, April 2003 Installation: Matlab™ ‘m-code’ version GRASansP m-code is a Matlab™ script application and therefore requires the commercial Matlab™ package in order to run. The script code is system independent and can run on both PC, Unix/Linux and Macintosh_OSX Matlab™ versions. The main advantage of using Matlab™ and the m-code version is that users have complete control over the GRASansP analysis environment allowing the addition of User Modules, User Fitting Functions, GRASansP-Script (soon) and direct access to data and parameters from the Matlab™ command line. PC Windows 95/98/NT4/2000/XP 1 Download grasp_m.exe from the GRASansP website 2 Double-click the grasp_m.exe file and follow the installation instructions on screen that will guide you through the installation procedure. 3 Create a new, or copy an existing shortcut to the Matlab™ application. Edit the shortcut properties such that Matlab™ immediately runs the m-code GRASansP startup script ‘grasp_startup.m’ and GRASansP application upon launching Matlab™ from this shortcut. E.g. Shortcut target ’ "C:\Program Files\Matlab\bin\win32\matlab.exe" -r run([’c:\progra~1\ grasp_m\grasp_startup’]);grasp '. 4 Alternatively to (3), grasp_startup.m followed by grasp.m can be run directly from the Matlab™ command prompt. Important: The grasp_m.exe PC installer by default offers to install GRASansP into the ‘C:\Program Files\Grasp_m\’ directory. If the GRASansP m-code is installed into any other directory the grasp_root path must be set accordingly by editing the file grasp_startup.m, e.g. grasp_root = ‘c:\program files\grasp\’. Linux, SGI, Unix, Macintosh_OSX and other Operating Systems 1 Download grasp_m.zip from the GRASansP website. 2 Un-zip the application into a new directory. 3 Open and edit the file grasp_startup.m. Set the ‘grasp_root’ path variable to the directory where you have un-zipped the GRASansP m-code. E.g. grasp_root = ‘/home/grasp_m/'. 4 Launch Matlab™ and manually run grasp_strartup.m followed by grasp.m from the Matlab™ command prompt. GRASansP Page 9 of 95 GRASansP Manual V.2, Software V. 3.40, April 2003 Customisation and Optional Edits to the ‘grasp.ini’ Initiation File The following edits can be made to the GRASansP initiation file, grasp.ini, to customise the appearance, operation, default instrument, and data directory paths for GRASansP. grasp.ini can be found in the root of the grasp_m or grasp runtime directories. [path] data_dir Default directory path to the SANS data, e.g. data_dir=z:\d22\, data_dir=d:\sans_data\ etc. [instrument] inst Default GRASansP instrument configuration at start-up, e.g. inst = d22, inst = d11, inst = SINQ_sans. [display] GRASansP font Font used for the main display, e.g. font=arial, font=comic sans ms etc. fontsize Font size used for the main display, e.g. fontsize=9. colormap Default color map used for the main 2D data display, e.g. colormap=hot, colormap=jet, colormap=cool, etc. colormap_invert Invert up-down the color map matrix (1=on, 0=off). colormap_swap Swap left-right the color map matrix (1=on, 0=off). render Default image render, i.e. interp, flat or faceted. Page 10 of 95 GRASansP Manual V.2, Software V. 3.40, April 2003 background_color Background color of the main display window [RGB]. sub_figure_background_color Background color of the 1D plotter and associated tools windows [RGB]. linestyle Default line-connect style of 1D plotter (0 = none, 1 = ‘—’, 2 = ‘:’, 3 = ‘-.’, 4= ‘--'). [worksheets] worksheets Number of data worksheets (try not to exceed 6, system depending). depth_max Max number of allowed worksheet depths (try not to exceed 100, system depending). [data] normalisation Data normalisation setting, e.g. ‘mon’, ‘time’, ‘none’. standard_monitor Reference standard monitor standard time value for data for data normalisation. standard_time Reference value normalisation. Tip: The default instrument configuration that GRASansP starts up in can be overridden from that described in grasp.ini by typing ‘grasp inst’ on the either the Matlab™ command line, command prompt or icon shortcut for runtime versions, where inst is the instrument name e.g. d22, d11, d16, SINQ_sans_I etc. GRASansP Page 11 of 95 GRASansP Manual V.2, Software V. 3.40, April 2003 Data access at Institut Laue Langevin Data measured on ILL instruments is transferred automatically from the local instrument control computer to the network data server, SERDON, regularly every few minutes. GRASansP reads current cycle and older data directly from SERDON and not from the instrument control computer. PC Current cycle data on the network server SERDON can be found directly via the local neighborhood network via the path ‘\\SERDON\data\inst\’, where inst is the ILL instrument name. On many user PC’s at ILL the network drive ‘Z:\inst\’ is already attached to the network data drive. ‘Y:\inst\’ is configured to the previous cycle. Linux / Unix / SGI Current cycle data on the network server SERDON can be found via the path ‘/usr/illdata/data/inst/’, where inst is the ILL instrument name. Tip: If recently measured data does not appear on the SERDON data server, (i.e. within the preceding few minutes), a transfer of recent data can be forced from the instrument control computers by typing the command ‘transfer’ from the UNIX command prompt. GRASansP Page 12 of 95 GRASansP Manual V.2, Software V. 3.40, April 2003 Main Program Interface The main GRASansP graphical interface window appears at the left and side of the screen, as shown in the figure below. The graphical interface looks like that of a typical modern style application including drop down menus, push buttons, edit boxes and a graphical data display. Key features of the interactive display are described briefly below while a detailed description is given later in this manual. Key Features of the Main User Interface 1 Main Graphical Data Display: The result of 2D data treatment is displayed in graphical form in the main display window. The displayed data is the result of the sample scattering data minus the sample background and cadmium background as indicated by the data selectors (see 2) while taking account of the sample and sample holder transmission values (see 5). A choice of display styles is available including pixelated, faceted or interpolated colour surface plots and / or contour plots, as determined by the main display options. GRASansP Page 13 of 95 GRASansP Manual V.2, Software V. 3.40, April 2003 2 The Data Selector: The data selector is an important concept for the efficient use of GRASansP and is essentially an index to the large data storage arrays, or worksheets. During operation of the program the data selector serves two principle uses: Directing newly loaded data to the required worksheet for storage. Only the top ‘Foreground / Data Load’ selector determines where the newly load data should be placed in the storage data arrays. Other selectors have no effect. Once the data worksheets have been filled the appropriate foreground, background and cadmium background worksheets for data treatment can be selected. Subtraction of the sample background and cadmium background is enabled/disabled by checking/un-checking the subtraction checkboxes. Accurate values of the sample and sample holder transmissions (see 4) are imperative for the correct subtraction of background scattering. The following worksheets have been pre-allocated to accept data from measurement types common to most SANS experiment: Worksheet Number Depths Description Available Available ‘fore’ 6 1-100 + Sum Sample scattering or foreground scattering data. ‘back’ 6 1-100 + Sum Sample or sample holder background scattering. ‘cad’ 6 1 ‘Cadmium’ or ‘electronic noise’ background data. ‘empty beam’ 6 1 Image of the direct beam on the multi-detector. ‘trans smpl’ 6 1 Direct beam attenuated by the sample + holder. ‘trans emty’ 6 1 Direct beam attenuated by the sample holder only. ‘water’ 6 1-100 + Sum Water or Calibration sample scattering. ‘water_back’ 6 1-100+ Sum Background scattering to accompany the ‘water’ measurement. ‘water_cad’ 6 1 ‘Cadmium’ or ‘electronic noise’ background ‘wtr emty beam’ 6 1 Direct beam attenuated by the sample + holder. ‘wtr trans’ 6 1 Direct beam attenuated by the sample + holder. ‘wtr trans emty’ 6 1 Direct beam attenuated by the sample holder only. ‘masks’ 6 1 Bad data masks are built and stored in this location. ‘det_eff’ 1 1 measurement to accompany the ‘water’ measurement. Detector efficiency map determined by analysis of a nominally flat scatterer at small angles, e.g. Water. GRASansP Page 14 of 95 GRASansP Manual V.2, Software V. 3.40, April 2003 Worksheet Number: Data storage is available for several different worksheets of the same type. Using several worksheets the user can, for example, store data measured at several different instrument configurations (e.g. q-ranges) in the worksheets ‘fore’ <1>, ‘fore’ <2>, ‘fore’ <3> etc. Worksheets can be ‘grouped’ together such that changing the Foreground worksheet number automatically toggles and updates the Background and Cadmium worksheet number as well as the current mask, beam centre and transmissions associated with the current worksheet. Ungrouped worksheets can be toggled independently. Worksheet Depth: The worksheet ‘depth’ allows many individual measurements made under the same instrumental configuration but with varying sample environment such as temperature, magnetic field etc., to be collected together and stored as individual frames making a single larger measurement. The worksheet rd ‘depth’ is effectively a 3 dimension to the 2D data arrays. Depths can be ‘grouped’ in a similar manner to worksheets. Toggling the current Foreground Worksheet Depth toggles the background depths accordingly to match (if they exist). Analysis algorithms that automatically search though the Foreground worksheet depth will only scroll equivalently though the background depths if the depth grouping option is checked. Advanded Tip: The number of worksheets and worksheet depths available to GRASansP is essentially system memory limited. Default settings in grasp.ini provide for 6 worksheets and maximum depths of 100 worksheets. The can be modified by the user if necessary by setting the values for ‘worksheets’ and ‘depth_max’ in grasp.ini. GRASansP Page 15 of 95 GRASansP Manual V.2, Software V. 3.40, April 2003 3 Data Load Control: Enter the run number or range of the data to be loaded into the data load edit box. Pressing the ‘GetIt!’ button then loads the data into the workspace indicated by the ‘Foreground / Data Load’ worksheet selector (see 2). The use of several deliminators (e.g. ‘>’ ‘:’ ‘,’ ‘+’ etc.) between ranges allows flexibility in the loading of groups of run numbers to be stored incrementally in the worksheet depth. For a single file number indicated in the data load edit box, the + and – buttons beneath allow incremental/decremental scrolling though file numbers. 4 Transmission Indicator: Displays the current sample and sample holder (empty cell) transmission values Ts and Te respectively. calculate transmissions becomes available when The option to transmission type worksheets are displayed. Transmission values are calculated, for example, from the zoomed area of the display by comparison of the ‘trans_smpl’ and ‘trans_emty’ (for Ts) or ‘trans_emty’ and ‘empty_beam’ (for Te) worksheets. Alternatively, transmission values can be entered directly into the Ts and Te edit boxes. The transmission can be ‘locked’ at it’s current value using the ‘lock’ checkbox such that subsequent scrolling of worksheet number or depths do not toggle the transmission value in use. 5 Centre of Mass Indicator: Displays the current centre of mass associated with the current group or individual worksheet number. It can either be calculated from a zoomed area of the current displayed data (direct beam on the detector) or entered directly into the c_x and c_y edit boxes (c_θ also for D16 detector angle). The centre of mass can be ‘locked’ at is current value using the ‘lock’ checkbox such that subsequent scrolling of worksheet number or depths do not toggle the centre of mass value in use. 6 Display Image Options: Options to manipulate characteristics of the current displayed data. These include log-z, manual z-scale, correction for detector efficiency, masking, data smoothing, surface and contour displayed data. 7 Colour Control: Stretch top and bottom of colour scale and adjust colour gamma. GRASansP Page 16 of 95 GRASansP Manual V.2, Software V. 3.40, April 2003 8 Menu and Tool Bar: The GRASansP menu items offer access to File, Display, Analysis, Instrument Characteristics and Data organisational tools and options. Some of these are reproduced as short-cut icons on the tool bar or have quick CTRL key shortcuts. 9 Matlab™ Command Window or Text Output Window (Runtime version): The Matlab™ command window (m_code version) or Text Output Window (Runtime version) window displays an summary of data and analysis parameters, warning messages etc. each time the main GRASansP display is updated. Using the full Matlab™ m_code version users have the advantage of direct access to the Matlab language with access to the GRASansP global variables, data store and subroutines for further development or one-off procedures. Online Help A pop-up ‘tool-tip’ based help system accompanies many of the interactive buttons, menus and edits items in the main GRASansP interface. To activate the quick pop-up help leave the mouse pointer over the object for a second and pop-up help should appear. e.g. GRASansP Page 17 of 95 GRASansP Manual V.2, Software V. 3.40, April 2003 Quick-Start Guide to Data Inspection and Analysis This ‘Quick-Start’ section contains step-by-step instructions for data analysis in some of the more simple cases. Following the several examples presented (see ‘Data Analysis Examples’) will help the user in the operation and capabilities of GRASansP. Principle Data Reduction Steps: Treatment of the Calibration Standard Data (e.g. Water) 1 Calibration and Scaling: Load the calibration measurement (e.g. Water Scattering), background and cadmium background into the ‘water’, ‘water_back’ and ‘water_cad’ workspaces. Use the ‘Detector Efficiency Calculator’ calibration option to generate a scaling value (counts/pixel/standard monitor) and detector efficiency map. Treatment of the Sample Scattering 2 Scattering Data: Load foreground, background and cadmium data sets into the relevant workspace areas, ‘fore’, ‘back’ and ‘cad’. 3 Sample Transmission: Load sample transmission and reference empty cell transmission into the ‘trans_smpl’ and ‘trans_emty’ worksheets. Calculate sample transmission, Ts, using the graphical zoom and transmission calculator. 4 Empty Cell Transmission: Load empty cell transmission and reference empty beam into the ‘trans_emty’ and ‘empty beam’ worksheets. Calculate empty cell transmission, Te, using the graphical zoom and transmission calculator. 5 Beam Centre: Use the ‘Centre of Mass’ calculator to determine the beam centre coordinates from a zoomed area of the transmission or reference beam measurement. 6 Mask: Use the ‘Mask Editor’ to create a bad-data mask of pixels to eliminate from further analysis. This is combined with an ‘instrument mask’ that eliminates permanently inactive regions of the multi-detector from analysis. 7 Isotropic Analysis: Radial Average (I vs. |q|) etc. 8 Anisotropic Analysis: Sectors, Boxes, Strips, Sector-Radial Average, Azimuthal Average, 2D data fitting etc. 9 GRASansP Reduced 1D or 2D data: Data Export, Graphical Export, Print. Page 18 of 95 GRASansP Manual V.2, Software V. 3.40, April 2003 GRASansP Data Correction Procedures Loading Data and Visual Inspection 1 Select the worksheet and worksheet number of the appropriate data workspace where you wish to load the data. For example, to load the sample scattering data into Foreground 1, set the set the ‘Foreground / Data Load’ selector to read: <fore> <1> <sum>. 2 Enter the run number of the data to be loaded and press the ‘Get It!’ button to read the data. The newly loaded data is displayed in the main figure window. 3 Repeat this process to load the Sample Background and Cadmium Background data files in the relevant workspace areas. For example, load the sample background into the <back> <1> <sum> workspace and the cadmium background into the <cadmium> <1> <1> workspace. GRASansP Page 19 of 95 GRASansP Manual V.2, Software V. 3.40, April 2003 4 The sample transmission, Ts, and the transmission of the sample holder, Te, (or empty cell, cryostat, furnace etc.) should be entered into the appropriate entry boxes (see ‘Determination of Sample Transmission’ for calculation of sample and empty cell transmissions). Note: Data is only loaded into the workspace indicated by the ‘Foreground & Data Load’ selector while it is all three selectors that determine the final result of foreground – backgrounds. Loading Combinations and Sequences of Run Numbers into a Single Worksheet GRASansP offers the ability to load various combination or sequences of run numbers. These can either be stored as combined or separate data sets. A detailed description of all the available, and sometimes complex data load modes is presented in ‘Managing the Data Workspace’ while a brief summary of the more common load modes is given below. For example, with ‘<Fore><1><sum>’ displayed in the Data Load selector: Load String Single Run Number: ‘00001’ ‘GetIt’ Immediate Specific Sum of Run Numbers ‘00001+00002+00005’ ‘Getit’ Immediate Series Sum of Run Numbers ‘00001>00005’ ‘Getit’ All the above result in a single combined 2D data set loaded into worksheet ‘<Fore><1><1>’. Specific Load of Run Numbers into Depth ‘00001,00002,00005’ ‘Getit’ Series Load of Run Numbers into Depth ‘00001:00005’ ‘Getit’ Results all five run numbers, ‘00001’ to ‘00005’ being loaded and stored individually into the worksheet depth ‘<Fore><1>’ depths <1>, <2>, <3>, <4> and 5. Although held together under the description of worksheet ‘<Fore><1>’ the individually stored data in the worksheet depth can be viewed either as a ‘<sum>’, referred to individually by toggling the depth indicator or areas of intensity cross referenced as a function of some varying experimental parameter though the series. GRASansP Page 20 of 95 GRASansP Manual V.2, Software V. 3.40, April 2003 Corrected Sample Scattering Data (not Calibrated) With the previous steps complete, all components necessary to calculate the scattered intensity, due only to the sample, are now in place. The corrected, but not calibrated, data can be viewed in the main display window by setting the ‘Foreground’, ‘Background’ and ‘Cadmium’ workspace indicators to their appropriate values and by ticking the checkboxes to the left of the ‘Background’ and ‘Cadmium’ data selectors. With these checkboxes ticked, all subsequent operation to the data will include correction for both types of background effects. The corrected data is the result of the foreground minus the two background components taking into account the sample transmission. GRASansP calculates this in the following manner for each element of the pixelated multi-detector data: ICorrected = 1 [Ts − ICd ]− 1 [I Bck − ICd ] TsTe Te where ICorrected is the sample scattering corrected for background scattering, electronic noise, sample and empty cell transmission (i.e. attenuation effects) and other background effects. IS is the measured scattering from the sample+holder. IBck is the measured background scattering from the sample holder. ICd is the ‘electronic’ background and Ts and Te are the sample and empty cell transmissions. A Note on Data Normalisation: The data correction procedure described above assumes each experimental data set to be either measured for the same time or beam monitor counts OR to have been normalised to a standard time or number of monitor counts. By default GRASansP starts up with automatic normalisation of data to a standard monitor count of 10,000,000 (see ‘Data Normalization’). GRASansP Page 21 of 95 GRASansP Manual V.2, Software V. 3.40, April 2003 Masking Data Instrument Mask Some areas of multi-detector instruments may not exist as active pixel elements despite being included in the output data array. A good example is the D11 multidetector that has inactive corners and therefore is masked by default when masks are applied using the in-build instrument mask. Data Mask Creating a data mask using the GRASansP mask editor can eliminate elements of the multi detector data that are not to be included in subsequent analysis operations or display. Using the Mask Editor 1 Launch the ‘Mask Editor’ from the ‘Analysis>Mask Editor’ menu (CTRL-M). 2 To view the Mask select the appropriate mask for display in the ‘Foreground/Data Load’ worksheet selector. Alternatively, leave the data to be masked on the main display ready to ‘sketch’ a mask directly over. 3 Simple masks may be built using the options presented in the Mask Editor window. These include: Elimination of individual pixels. Elimination of whole detector lines at constant x or y. Elimination of rectangles of detector area. Elimination of circles of detector area about a given centre. All options use the [+] and [-] buttons to include or remove points from the mask. GRASansP Page 22 of 95 GRASansP Manual V.2, Software V. 3.40, April 2003 4 ‘Sketch’ rectangular masked areas using the mouse. This allows masks to be drawn directly over the top of the scattering data. To use the ‘Sketch Mask’ facility: Modify the foreground display selector such that the data to be masked is displayed in the main figure window. Click the ‘Sketch Mask’ button to enable the sketch mode. An indicator appears in the message box at the top left hand corner of the main display as a reminder that the sketch mode is active. Click and drag across the image to mask areas of the multi detector. To de-activate the sketch mask mode either click again the Sketch Mask’ button or press ESC. Tip: It is easier to accurately select regions of the image if the main display is set to ‘Faceted’ in the ‘Display>Image Render>Faceted’ menu options. Import / Export of Mask Flies Mask files can be Exported or Loaded into GRASansP using the ‘File>Export Data’ and ‘File>Import’ menus from the main window. Mask files are stored, loaded and saved in the standard ILL format. GRASansP Page 23 of 95 GRASansP Manual V.2, Software V. 3.40, April 2003 Determination of the Beam Centre The beam centre is important to know since it is about this position that all radial symmetries are based for both isotropic and anisotropic scattering data. GRASansP uses a centre-of-mass determination of the beam centre by analysis of the direct beam on the detector, as in an empty beam or transmission measurement. 1 Load an empty beam or transmission measurement into a suitable workspace. For example the <empty beam> <1> <1> workspace: 2 With the image of the empty beam on the main display use the ‘Zoom’ toolbar option to zoom in closely around the empty beam centre. Alternatively use the manual axis option to select a predefined detector area. 3 Click the ‘Centre Calc’ button to calculate the centre of mass of the displayed area of the image. The result will be stored as the current beam centre associated with the current worksheet number. Note: If the ‘lock’ check box is checked all worksheets will use the same beam centre. This is useful when the several worksheets, <1>, <2>, <3> etc. contain data measured under the same instrument configuration. GRASansP Page 24 of 95 GRASansP Manual V.2, Software V. 3.40, April 2003 Determination of Sample Transmission Calculation of the corrected scattered intensity requires the transmission of the sample and sample holder (or empty cell, cryostat, furnace etc.) in order to correctly subtract the background contributions, as shown below. Ts and Te refer to the transmission of the sample only (i.e. not the transmission of the sample + empty cell) and the transmission of the empty cell respectively. The corrected scattered intensity depends on the transmission values Ts and Te and is given by: ICorrected = 1 1 [I s − ICd ] − [I Bck − ICd ] TsTe Te Sample Transmission, Ts The transmission of the sample, Ts, can be calculated by comparison of the transmitted beam through the sample + empty cell (or other sample holder) relative to the total counts for the empty cell. Ts = Transmitte d Neutrons through S ample + Empty Cell or Holde r Transmitte d Neutrons though Em pty Cell or Holder Empty Cell or Holder Transmission, Te The empty cell transmission, Te, can be calculated by comparison of the transmitted beam though the empty cell or other sample holder, relative to the total counts in the empty beam. Te = Transmitte d Neutrons through E mpty Cell or Holder Transmitte d Neutrons in the Em pty Beam Calculation of Ts and Te using GRASansP 1 Load an empty beam or transmission measurement into a suitable workspace. For example the <empty beam> <1> <1> workspace. 2 Load the empty cell (or sample holder) measurement into the allocated <trans emty> <1> <1> workspace. 3 Load the empty beam measurement into the allocated <emty beam> <1> <1> workspace. GRASansP Page 25 of 95 GRASansP Manual V.2, Software V. 3.40, April 2003 4 To compare the total counts between the sample+cell transmission and empty cell transmission measurements set the main display selectors to <trans smpl> and <trans emty>. 5 When the main display shows data in the transmission worksheets, <trans smpl> or <trans emty>, the option to calculate the sample transmissions Ts and Te appears alongside the transmission values display. 6 Zoom around the required region of the transmitted beam to select the region from which the transmission calculation should be made, or use the manual axis option to select a predefined detector area. 7 Click the ‘Ts Calc’ button to calculate the sample transmission. The transmission value Ts is now associated with the current worksheet number. 8 Repeat the above procedure to calculate the empty cell transmission Transmission: S ample + C ell Te by comparison of the Empty Cell and Empty beam measurements. transmission Ts Ts Te Use the ‘Te Calc’ button. Transmission: E mpty C ell Te Te E mpty B eam Note: If the ‘lock’ check box is checked next to the Ts or Te indicators all worksheets will use the sample transmission. This is useful when the several worksheets, <1>, <2>, <3> etc. contain data from the same sample but measured under different instrument configurations e.g. different q-ranges or different sample environment conditions, e.g. different temperatures. GRASansP Page 26 of 95 GRASansP Manual V.2, Software V. 3.40, April 2003 Data Normalisation: Standard Monitor, Time or Detector Counts The correction procedure described above assumes each data set to be measured for the same time, beam monitor counts or to have been normalised to a standard time or number of monitor counts. Data normalisation is enabled / disabled from the ‘Data>Normalisation’ menu item. Standard Monitor (e.g. 10,000,000 monitor counts) Normalisation to a standard number of beam monitor counts is the most usual form of data normalisation and is enabled by default upon starting GRASansP. All raw data counts, n, and errors, n , are subsequently divided by the number of actual monitor counts for the duration of the measurement (stored within header information of the raw data file) and multiplied by the standard monitor. The resulting data counts in each pixel of multi detector data become counts or error_countrs per standard monitor. The value of the standard monitor can be modified by edits to grasp.ini or from the ‘Data>Set Standard Monitor’ menu. Standard Time (e.g. 100 seconds) Normalisation to a standard time results in the raw data counts, n, and errors, n, being divided by the data measurement time (stored within header information of the raw data file) and multiplied by a standard time value. The resulting data counts in each pixel of multi detector data become counts or error_counts per standard time. The value of the standard time can be modified by edits to grasp.ini or from the ‘Data>Set Standard Time’ menu. Total Detector Counts & Window Detector Counts Raw data counts, n, and errors, n , are divided by the total counts registered in the multi detector data array either over the detector or within a defined detector window, e.g. around the direct beam. This is particularly useful if reflectivities are to be calculated directly from measurements that include scattering and the direct beam. None (absolute counts) Raw data is untouched leaving counts, n, and errors, GRASansP n. Page 27 of 95 GRASansP Manual V.2, Software V. 3.40, April 2003 Detector Dead-Time Corrections Neutron detectors typically operate on a charge avalanche principle whereby a neutron interacts with a 3He nucleus, to form a 3H nucleus releasing an energetic proton which 3 subsequently ionises He gas around it creating the charge avalanche that is detected. A typical detector requires a characteristic time in order to separate two detection events and distinguish the position associated with the neutron arrival. This characteristic time is the detector dead time, τ, and imposes an important experimental restriction for high counting rates. Essentially, within a time period, τ, after the arrival of a neutron further counting is inhibited. Two models have been used to describe the relationship between the real number of neutrons arriving at the detector, n, and the apparent number actually recorded by the detector, nm. n m = n [1 + nτ ] nm = n ⋅ exp( − nτ ) (non paralysable model) (paralysable model) Both the non-paralysable and non-paralysable models are very similar and only begin to differ significantly for high count rates. Dead time correction in GRASansP using the non paralysable model is available but NOT activated by default. Dead time corrections can be enabled / disabled from the 3 ‘Data>Global Deadtime Correction’ menu. A typical dead time for the D22 He detector is of the order 1µs. If the dead time correction is significant implemented then the whole dataset is up scaled by the ratio n/nm. Note: GRASansP default settings are data normalisation to standard monitor = 10,000,000 and dead time corrections off. GRASansP Page 28 of 95 GRASansP Manual V.2, Software V. 3.40, April 2003 Calibration to Standards of Known Scattering Cross-Section The previous section showed how data should be loaded into GRASansP and how the background, transmission, normalised and dead time corrected sample scattered intensity can be achieved. The resulting quantity, Isample(Q), represents the real number of neutrons scattered by the sample per standard monitor, time etc. If we measure and apply the same procedure to a standard sample of known scattering cross section, measured under identical conditions, then direct comparison with the unknown sample being investigated allows us to calculate the sample scattering cross -1 section per unit volume per unit solid angle, ∂Σ ∂Ω , in units of cm . For an incoherent scatterer such as water or single crystal vanadium then ∂Σ ∂Ω can be expressed as a single number. Furthermore, since the scattering is incoherent and uniform over the spherical area 4π the measured and corrected scattering from the flat-scattering standard sample shows up fluctuations in efficiency of individual detector elements. Thus, measurement of a standard, incoherent flat scatterer such as water provides two important quantities: Calibration Scalar Detector Efficiency Map GRASansP’s calibration procedure allows the calibration scalar and 2D detector efficiency map to be separated. In this way the calibration is made directly on the 2D sample data prior to further data reduction steps. GRASansP is therefore ideal for analysis of anisotropic 2D data with full detector efficiency and calibration correction. Assuming for the time being that both unknown sample and calibration sample have both been measured using the same instrument configuration (i.e. wavelength, collimation, detector distance – or q-range and resolution) and have been corrected for background, transmission etc. as described above. The scattering cross section of the unknown sample can be calculated by a simple division of the intensities measured in each pixel, multiplied by the known scattering cross section of the calibration sample as: dΣ Sample dΩ GRASansP = ISample ICalibration × dΣCalibratio n dΩ Page 29 of 95 GRASansP Manual V.2, Software V. 3.40, April 2003 Calculation of the Calibration Scalar & Detector Efficiency Map Prepare corrected standard sample scattering data (e.g. water): Load the water scattering, background and cadmium background into the relevant data workspace areas. Calculate or enter directly the water and empty cell transmissions Ts and Te. Mask bad-data as required. Separation of Calibration Scalar and Detector Efficiency Map: Open the Calculator’ >Detector ‘Detector from the Efficiency Efficiency ‘Analysis Calculator’ menu item or CTRL-W. The ‘Calibration Scalar’ is automatically calculated and displayed in the Detector Efficiency Calculator and represents the average counts / pixel / standard monitor (depending on the current normalisation selection) of the corrected data currently displayed in at it’s measurement configuration (i.e. for it’s detector distance, collimation setting, wavelength etc.) GRASansP Page 30 of 95 GRASansP Manual V.2, Software V. 3.40, April 2003 The ‘Detector Efficiency Map’ can now be calculated by simply pressing the ‘Calculate Efficiency’ button. This takes the currently displayed calibration data and divides the 2D image by the calibration scalar. By definition, since the Calibration Scalar is the mean value of the counts in each pixel, the 2D Detector Efficiency map represents the deviations in detector efficiency with the efficiency value of each cell fluctuating about the mean value of 1. The 2D Detector Efficiency map can be applied to 2D sample scattering data to even distortions to the image due to the spatially varying detector efficiency. Using the Detector Efficiency Map and Calibration Scalar Once the Detector Efficiency Map and Calibration Scalar have been calculated all subsequent data can be corrected by enabling the various calibration options in the ‘Calibration Options’ window (‘Analysis>Calibration Options’ menu item or CRTL-K). Detector Efficiency Correction Tick the ‘Detector Efficiency’ check box in the Calibration Options window. The displayed data is divided by the 2D detector efficiency map (with corresponding errors). This has the effect of smoothing out variations in efficiency of detector lines or pixels from the displayed data. Since the mean value of the detector efficiency map is (by definition) equal to 1, there is no corresponding change in the mean intensity of the corrected data. This means that correction by the detector efficiency map can still be made even if the detector efficiency map was deduced from calibration data measured in a configuration different to the data to be corrected. No Det. Eff Correction GRASansP Det. Eff. Correction. Page 31 of 95 GRASansP Manual V.2, Software V. 3.40, April 2003 Using the Calibration Scalar Tick the ‘Calibration Scalar’ check box in the Calibration Options window to divided the displayed data by the calibration value. If the unknown sample and calibration sample volumes or illuminated areas differ these should be entered in the sample illuminated area or volume edit boxes. The scattering cross section of the known calibration sample should be entered in the relevant edit box, e.g. for Water the -1 calibration cross section is close to 1cm . Assuming calibration and sample data are measured under identical instrumental conditions (i.e. without further Flux and Solid Angle corrections - see ‘Solid Angle and Incident Flux Corrections’) the corrected data should now be presented in absolute units of -1 cm . ‘Tweaking’ of the Detector Efficiency Map (Optional) GRASansP allocates a detector efficiency of 0 to areas of the multi detector masked by the bad-data or the internal instrument mask. This is clear from the example presented where the instrument mask has eliminated the inactive rounded detector corners of the D11 multi detector. The area about the beam GRASansP Page 32 of 95 GRASansP Manual V.2, Software V. 3.40, April 2003 stop is also eliminated by the necessity of these masking pixels. On the other hand the central area of the detector does work and provides important low-q scattering information at long wavelengths and detector distances when the straight-through beam covers a lower region of the detector, or when the detector is translated (D22). If a detector efficiency map that was measured for short detector distances were used this central region of the multi detector would be allocated an efficiency of zero and masked. In this situation the central region of the multi detector can be recovered by allocating an efficiency value of 1 to this central region using the ‘Sketch Efficiency’ option. While information regarding the fluctuation of the detector efficiency in this central region does not actually exist in the calibration measurement, allocation of an efficiency of 1 and using the Calibration Scalar determined from the rest of the multi detector provides a reasonable approximation and recovery of this data. Detector Efficiency Statistics (Optional – Of Use Principally to Instrument Responsibles) Using the ‘Plot Histogram’ option from the Water Analysis Window, statistics about the detector multi detector pixel elements are calculated as shown in the figure. Here, the detector efficiency map has been re-binned and a histogram plotted showing the extent of the multi detector efficiency variation. While this is not immediately useful for analysis of SANS data it does allow a certain check to be carried out as to the behaviour and quality of the SANS multi detector over time or following repairs etc. GRASansP Page 33 of 95 GRASansP Manual V.2, Software V. 3.40, April 2003 Solid Angle and Incident Flux Corrections Merging Data Measured in Different Instrument Configurations It is often useful if calibration data measured in one configuration can be used to correct and calibrate data measured in another configuration. This is, in fact, often essential since calibration by an incoherent scatter such as water cannot realistically be measured with any accuracy for long detector distances. Furthermore, it is unnecessarily time consuming to have to make a calibration measurement at each instrument configuration used for measurement of the unknown sample. Thus, ideally, a calibration measurement should be made an optimal instrumental configuration while the sample data may be measured one or more different instrument configurations (qranges) of interest. For example, at a given wavelength, measurements of a sample might be made at 3 different detector positions in order to achieve the maximum qrange at a fixed wavelength on the SANS instrument. Two important effects contribute the differences in scattered intensities at different instrument configurations. The first is the change in solid angle subtended by a detector pixel element on the sample as a function of detector distance. The second is the change in incident flux at the sample position as the instrument collimation is varied. Solid Angle Correction (Detector Distance) Consider two SANS scattering measurements made at two different detector positions, D1 and D2. The multi detector array is, of course, the same for the two measurement and consists of pixelated elements of size 7.5 x 7.5mm for D22 or 10 x 10mm for D11 for example. As the detector is moved further from the sample (for smaller q’s) each pixel subtends a smaller solid angle, Ω 1 = A D12 , on the sample, where A is the area of the detector pixel and D1 is sample-to-detector distance. If this data is to be compared or calibrated to data measured in a second configuration with detector distance D2, then each detector pixel element only registers neutrons over the solid angle, Ω 2 = A D22 . In other words, the counts per pixel from a sample measured at a closer distance, D1, will be much greater than the counter per pixel measure for the same sample at a further detector distance D2. For either case, however, the counts per unit solid angle, :, should be identical. Thus, comparison of the two data sets normalised by the solid angle subtended by each detector pixel should yield scattering data on comparable intensity scales. GRASansP Page 34 of 95 GRASansP Manual V.2, Software V. 3.40, April 2003 Thus, comparison of the two data sets normalised by the solid angle subtended by each detector pixel should yield scattering data on comparable intensity scales. To implement Solid Angle Corrections in GRASansP: 1 Open the Calibration Options Window from the ‘Analysis>Calibration Options’ menu item or CTRL-K. 2 Enable the Solid Angle Correction by ticking the appropriate checkbox. The value of the detector distance for the currently displayed data is displayed along with the reference detector distance used for measurement of the calibration sample. 3 Subsequent operations divide both sample and calibration (if it is present) data by their relevant pixel solid angles. Data measured for different detector distance configurations should now be corrected for the solid angle. Incident Flux Correction (Flux vs. Collimation Distance) Changing the instrument collimation length has the effect of modifying the incident flux at the sample position. This is simply due to the fact that as the collimation length increases the angular divergence criteria for a neutron to successfully make it though the system becomes tighter. Thus, when a sample is measured at several different detector distances (q-ranges) with the necessary changes in instrument collimation, the effective flux at the sample position is modified. In order to match scattering curves measured for in different instrument configurations (q-ranges) a correction for the effective flux at the sample position should be made as well as the aforementioned solid angle correction. GRASansP Page 35 of 95 GRASansP Manual V.2, Software V. 3.40, April 2003 Since the collimation attenuation is not easily calculable analytically (due to the effects of gravity on the neutron flight path etc.) GRASansP holds a database of measurements of the neutron flux as a function of both instrument collimation and neutron wavelength, currently for the instruments D11, D22 and SINQ_SANS_I (see Appendix 2). Rather than storing absolute values for the flux at the sample position which, in any case, varies between particular experiment and instrument setups, GRASansP stores relative values for differences in flux between different collimation and wavelengths. For example, for D22 the relative flux difference between a collimation length of 4m and 2m (@ 10Å) is 3.0498. Using this relative collimation attenuation database means that the user should still measure the absolute flux at the sample position in at least one experimental configuration. This is usually provided by measurement of the calibration sample at a given collimation. The collimation attenuation database is relatively independent of the exact size of apertures used at the sample end of the collimation or the use of attenuators or apertures and the reactor end of the collimation tube (i.e. assumes a uniform flux density across the beam profile). Measurements made at wavelengths not given explicitly in the Grasp database calculate an interpolated fluxcollimation-wavelength scaling value from adjacent points. To implement flux-collimation scaling: 1 Open the Calibration Options Window from the ‘Analysis>Calibration Options’ menu item or CTRL-K. 2 Enable the Flux-Collimation scaling by ticking the appropriate checkbox. The value of collimation used for the currently displayed data is displayed along with the collimation value used for measurement of the calibration sample. If these two are equal then the relative flux ratio will be 1. When the two collimation lengths differ then the data is up- or down-scaled to match the same incident flux as that used for measurement of the calibration sample. 3 Subsequent operations up- or down-scale the currently displayed data intensity to match the same incident flux as that used to measurement of the calibration sample. Tip: Example 1 gives a demonstration of full calibration and merging data measured at different collimations and detector distance. GRASansP Page 36 of 95 GRASansP Manual V.2, Software V. 3.40, April 2003 GRASansP Analysis Procedures Isotropic Scattering: Averaging I vs. |q| and I vs. _ _ Once background corrected and calibrated data has been prepared, as described in the previous sections, isotropic scattering data can be further reduced to 1D plots of Intensity, I, vs. scattering vector, q, or angle, 2θ. To calculate I, vs. |q| or I vs. _ _: 1 Open the ‘Averaging’ window from the ‘Analysis>Averaging’ menu. 2 Click the I vs. |q| or I vs. |2θ| button to produce radially averaged data. The average counts (per pixel or solid angle) around annuli of radius given by the radial bin size (pixels) as a function of pixel radius (|q|) across the detector is calculated (see ‘Details of analysis procedures and algorithms). 3 The reduced data now appears in a separate graphic display window. 4 The resulting I vs. |q| or I vs. _ _ data can now be: Exported as ASCII columns of data [|q| or 2θ, I, Err(I)]. Printed Curve Fitted as a further analysis steps in GRASansP. GRASansP Page 37 of 95 GRASansP Manual V.2, Software V. 3.40, April 2003 Anisotropic Analysis: Selective use of Multi-Detector Data Analysis of anisotropic data with or without polar symmetry (i.e. symmetric about the beam centre) can be achieved easily and quickly by selective analysis of the multi detector data using Sectors, Ellipse, Strip and Box masks. Shaped masks can be designed, as described below, prior to reduction of the data only within the defined areas. Sectors Open the ‘Sectors’ window from the ‘Analysis>Sectors’ menu. Enter the sector dimensions to position the sector appropriately over the region of interest of the multi-detector data. Sector dimensions are described in terms of: Outer Radius (pixels) Inner Radius (pixels) Theta, sector angle to the vertical (degrees) Delta Theta, sector opening (degrees) as well as options for adding multiple sectors with 1 to 6-fold rotational symmetry. Use the Averaging or Sector Box tools to further reduce data defined by the Sector GRASansP Page 38 of 95 GRASansP Manual V.2, Software V. 3.40, April 2003 Strips Open the ‘Strips’ window from the ‘Analysis>Strips’ menu. Enter the Strip dimensions to position the strip over region of interest of the multi-detector data. Strip dimensions are described in terms of: Strip Centre: Position of the centre of the strip, i.e. where the diagonals cross. An option is available to use the current beam centre. Strip Width (pixels) Strip Length (pixels) Strip Angle, to the vertical (degrees) Ellipse Open the ‘Ellipse’ window from the ‘Analysis>Ellipse’ menu. Enter the Ellipse dimensions to position the ellipse over region of interest of the multi-detector data. Ellipse dimensions are described in terms of: Outer-minor axis (pixels) Inner-minor axis (pixels) Ellipse eccentricity (major/minor) and eccentricity angle (minor axis angle to the vertical). Theta, ellipse segment angle to the vertical (degrees) Delta Theta, ellipse segment opening (degrees) GRASansP Page 39 of 95 GRASansP Manual V.2, Software V. 3.40, April 2003 Boxes Open the ‘Boxes’ window from the ‘Analysis>Boxes’ menu. Use the zoom option of the main display to zoom in to the area of interest of the multi detector data. ‘Grab’ the coordinate of the zoomed area to one of the size box coordinate spaces. With stored boxes, sector boxes or ellipse boxes, summed intensities of selected multi detector areas can be extracted as a function of file stored in the worksheet depth. The resulting intensity can be plotted as a function of, for example, sample temperature, angle, magnetic field, time etc. or any other of the stored sample parameters. GRASansP Page 40 of 95 GRASansP Manual V.2, Software V. 3.40, April 2003 Using Sector, Strip and Ellipse Masks Use the Averaging tools to further reduce data defined by the Sector, Strip or Ellipse 1 Open the ‘Averaging’ window from the ‘Analysis>Averaging: Radial Azimuthal’ menu item, CTRL-R or from the ‘Averaging’ buttons within the Sector, Strip or Ellipse windows. 2 Ensure the relevant checkbox is ticked to enable subsequent analysis using Sector, Strip or Ellipse masks. Note: When combination of Sector, Strips and Ellipse masks are used simultaneously the resulting combined sector-strip mask is a logical ‘OR’ of the individual sector and strip definitions. E.g GRASansP Page 41 of 95 GRASansP Manual V.2, Software V. 3.40, April 2003 Example: Using Sectors with Averaging I vs. |q| The sector defined and displayed in the figures below select a region of the multi detector encompassing a [100] Bragg diffraction peak from the superconducting fluxline lattice. The radial position, or |q|, of the Bragg peak can now be easily determined using sectors and the radial averaging routine, without contamination of the result from the unwanted regions of the multi detector. 1 From the ‘Sectors’ window, or from the ‘Analysis>Averaging’ menu, open the Averaging Window. The ‘Use Sector Mask’ check box should be checked instructing GRASansP only to use the data within the defined sector. 2 Click the I vs. |q| button to produce the radial average within the defined sector. The |q| of the Bragg peak is now clearly visible in the I vs. |q| plot. Remember: To use Sector or Strip ‘masks’ with many of the usual analysis check the ‘Use Sector Mask’ or ‘Use Strip Mask’ checkboxes where applicable. GRASansP Page 42 of 95 GRASansP Manual V.2, Software V. 3.40, April 2003 Example: Using Sector Masks with Azimuthal Averaging (I vs. <). The sector defined and displayed in the figures below selects an arc region of the multi detector image encompassing [100] and [010] Bragg peaks from the superconducting vortex. The Azimuthal, or angular variation of the diffracted intensity (I vs. Ψ) within the sector can now be easily determined using the Averaging: I vs. Ψ routine. 1 From the ‘Sectors’ window, or from the ‘Analysis>Averaging’ menu, open the Averaging Window. 2 The ‘Use Sector Mask’ check box should now be checked. This instructs GRASansP only to use the data within the sector defined by the Sectors window. 3 Click the I vs. Ψ button to produce Azimuthally averaged data, I vs. Ψ, within the defined sector. Remember: To use Sector or Strip ‘masks’ with many of the usual analysis check the ‘Use Sector Mask’ or ‘Use Strip Mask’ checkboxes where applicable. GRASansP Page 43 of 95 GRASansP Manual V.2, Software V. 3.40, April 2003 Example: Using Strip Masks. The data below shows the enlarged direct beam on the detector when the detector distance exceeds the collimation length (simulation data). Using ‘Strip Masks’ the profile of the direct beam can be extracted along a line in the chosen direction. 1 Use the ‘Strips’ window to define a strip across the multi detector data over the area of interest. For the data presented in the figure, the strip is centred at the beam centre with length 85 and width 6 pixels oriented horizontally in the detector plane. 2 Click the ‘I//Strip’ button in the strips to produce a plot of the average intensity across the strip width as a function of the strip length. Remember: To use Sector or Strip ‘masks’ with many of the usual analysis check the ‘Use Sector Mask’ or ‘Use Strip Mask’ checkboxes where applicable. GRASansP Page 44 of 95 GRASansP Manual V.2, Software V. 3.40, April 2003 Extracting Intensity as a Function of Worksheet Depth: Boxes, Sector & Ellipse Boxes Using the ‘Boxes’ tool or similarly defining ‘Sector Boxes’ or ‘Ellipse Boxes’ areas of intensity on the multi detector can be extracted and analysed as a function of a series of data files stored in the worksheet depth. This might be, for example, a series of data run numbers measured as a sample is rotated though it’s rocking curve in small-angle diffraction experiment (see Example 2). Or, it might be a series of measurements made as the sample temperature, magnetic field, time or other environment condition is varied. The Boxes, Sector Boxes and Ellipse Boxes tool simply allow regions of the multi detector to be defined and the intensity within these ‘boxes’ to be extracted as a function of data file in the worksheet depth or sample environment parameter stored in the data file. Define a box, sector or ellipse region of the multi detector data of interest using the tools described previously. Open the appropriate box, sector or ellipse box window and ‘grab’ or enter manually the coordinates of the area of interest. With stored boxes, sector or ellipse coordinates summed intensities of the selected areas can be extracted as a function of file, or file parameter, stored in the worksheet depth. The resulting intensity can be plotted as a function of, for example, sample temperature, angle, magnetic field, time etc. or any other of the stored sample parameters. GRASansP Page 45 of 95 GRASansP Manual V.2, Software V. 3.40, April 2003 Example The example shows a series of data files recorded as a function of sample temperature and loaded into the worksheet depth. The sector window defines rings of multi detector data, the coordinates of which are recorded in the ‘Sector Boxes’ window. Selecting the sample temperature as the appropriate parameter (parameter 31 – use the ‘Param List’ button to display a list of all the data file header parameters) the ring intensities can be extracted as a function of temperature by pressing the ‘Do It!’ button. GRASansP Page 46 of 95 GRASansP Manual V.2, Software V. 3.40, April 2003 Magnetic SANS: Ancos2 Small-angle scattering from a magnetised ferromagnetic ribbon is shown in the figure below. The scattered intensity contains a mixture of isotropic nuclear scattering from the metal matrix and anisotropic magnetic scattering from the magnetic moments in the magnetic ribbon. Here the applied field is in the vertical direction and is sufficient to nominally fully saturate or polarise the ferromagnet along the field direction. In the ideal case (i.e. all magnetic moments aligned with the field in the vertical direction) there should be no magnetic scattering for q-vectors parallel to the magnetic moment direction (vertical) and a maximum in magnetic scattered intensity for q-vectors perpendicular to the moment direction. Around a circle of constant |q| the magnetic scattered intensity should vary as a Cosine2 with angle around the multi detector image. GRASansP Page 47 of 95 GRASansP Manual V.2, Software V. 3.40, April 2003 2 Inspection of Cosine Magnetic Scattering at Constant q With the corrected foreground – background combination and calibration already prepared in GRASansP.: 1 Open the Sectors window and place a ring of width 1 or 2 pixels at a sensible position on the detector image opened to 360o. 2 Open the Averaging window from the button within the Sectors window (opening Averaging from here ensures the ‘Use Sector Mask’ button is checked in the Averaging window). 3 Click the µ, YV ¶ button to calculate the ring intensity as a function of angle around the chosen ring. 4 The Cosine2 curve can be fitted by opening the Analysis>Curve Fit window. Automated Cosine2 curve fitting: Ancos2 Module The Ancos2 module provides an automated procedure to repeat the above annulus 2 selection and Cosine curve fitting. 2 The fit parameters to the Cosine are then proportional to: Cosine2 Offset : Nuclear scattered Intensity 2 Cosine Amplitude : Magnetic Scattered Intensity Cosine2 Phase : Moment Direction and are output as a function of q, as shown by the figures below. GRASansP Page 48 of 95 GRASansP Manual V.2, Software V. 3.40, April 2003 2 To extract the Nuclear and Magnetic scattered intensities using the Ancos module: 2 2 1 Open the Ancos window from the ‘Analysis>Ancos ’ menu. 2 Enter the parameters over which the Cosine2 curve fitting is to work: Start Radius: Normally the minimum radius just outside of the beam-stop. End Radius: Normally the maximum radius visible towards the edge of the detector. Width: Width of each annulus used for the Cosine2 fit. Step: Annulus step between successive iteration. E.g. setting Width = 2 and Step = 1 effectively introduces a ‘smoothing’ to the data given to the Cosine2 fit. Phase and Lock: If it is certain of the magnet moment direction then the phase can be held constant or locked at a given value during the fit. GRASansP Page 49 of 95 GRASansP Manual V.2, Software V. 3.40, April 2003 1D and 2D Curve Fitting in GRASansP GRASansP already contains several 1D and 2D curve fit functions available to the user from the ‘Analysis>Curve Fit’ menu items. The minimisation routine currently used by GRASansP is the ‘mf_lsqr.m’, a Levenberg-Marquardt nonlinear regression routine by R. I. Shrager and modified more recently by A. Jutan and R. Muzac. ‘mf_lsqf.m’ is the routine used by the Risø and ILL TAS analysis program ‘Mfit’ (http://www.ill.fr/tas/). As such, fitting functions for GRASansP are written in a very similar form to those of ‘Mfit’. Given below are examples of how to use curve fitting within GRASansP for both reduced 1D and 2D data. Parameters resulting from the last fit procedure can be accessed via the Matlab™ command line or users own programs and user modules. Example: 1D Curve Fitting – A single Gaussian Function The 1D data in the plot window shown below shows the result of a radial average over a set -3 -1 of data encompassing a Bragg peak centred around q= 4.45x10 Å . The form of the data is close to that of a single Gaussian and can be fitted as such. 1 Open the ‘Curve Fit Control’ window from the ‘Analysis>Curve Fit’ menu item of the 1D output figure. 2 Select the Function type and number of simultaneous functions to be fitted. Here, the ‘Gaussian_n’ function is used with n set to 1. GRASansP Page 50 of 95 GRASansP Manual V.2, Software V. 3.40, April 2003 3 Starting parameters for the curve fit can be either entered directly into the parameters edit boxes, auto guessed (‘Auto_Guess’ button) or chosen manually by clicking around particular points of the data to be fitted (‘Point & Click’ button), for example the background, peak intensity and position, width. 4 Once initial fit starting parameters have been provided the fit can commence by clicking the ‘FitIt!’ button. The final fit parameters are returned in the parameters edit boxes alongside their error. The Matlab™ edit window scrolls more detailed information from the ‘mf_lsqr.m’ minimisation function including the chi-squared, number of iterations etc. Tip: The results from the last curve fit procedure can be accessed either on the Matlab™ command line, standard Matlab™ ‘.m’ routines or user modules though the GRASansP global variable structure ‘fit_parameters’. Example: 1D Curve Fitting – Two function fitted simultaneously The example data presented below shows a strip average across a data set exhibiting two Bragg peaks at opposite sides of the multi detector. The two peaks are roughly Gaussian and should be of the same Gaussian full-width-half-max (FWHM). The two peaks could be fitted individually, as in the previous example, by zooming in on the region of the interest of the data. On the other hand, if the two peaks are fitted simultaneously the FWHM for the peaks can be forced to be common. This is one of the advantages of simultaneously fitting multiple similar functions. Other advantages might be where two peaked functions overlap significantly and cannot be easily resolved. 1 Using the ‘Gaussian_n’ function, set the number of simultaneous functions, n, to 2. 2 Starting parameters for the curve fit can be either entered directly into the parameters edit boxes or chosen manually by clicking around particular points of the data to be fitted (‘Point & Click’ button), for example the background, peak intensity and position, width. (NOTE: Auto guess currently only works for single peaked functions and is not yet implemented for multiple peaked functions). 3 To ‘group’ the FWHM of the two Gaussian functions, tick the checkbox to the right hand side of the first Gaussian FWHM parameter. Both fitted Gaussian will be forced to share a common FWHM. GRASansP Page 51 of 95 GRASansP Manual V.2, Software V. 3.40, April 2003 4 Once initial fit starting parameters have been provided the fit can commence by clicking the ‘FitIt!’ button. The final fit parameters are returned in the parameters edit boxes alongside their error. The Matlab™ edit window scrolls more detailed information from the ‘mf_lsqr.m’ minimisation function including the chi-squared, number of iterations etc. GRASansP Page 52 of 95 GRASansP Manual V.2, Software V. 3.40, April 2003 Example: Small-Angle Diffraction: Bragg Peaks and Fitting to 2D Multi detector Data In the following example fitting of 2D functions to corrected 2D multi detector data is presented. The main figure window below shows a Bragg peak on the D22 multi detector from the superconducting vortex lattice. Closer graphical inspection of the data actually suggests that the vortex lattice may actually be split into 3 domains slightly miss-orientated to each other. To begin with, let’s try to fit a single 2D Gaussian to the data, even though we can clearly see that this is a very bad approximation! 1 Open the ‘2D Curve Fit Control’ window from the ‘Analysis>2D Curve Fit’ main menu item. 2 Select the Function type and number of functions to be fitted. Here a single 2D Gaussian with Polar Symmetry has been selected (i.e. major and minor axes are radial and azimuthal to the beam centre). 3 Starting parameters for the curve fit can be either entered directly into the parameters edit boxes, auto guessed (‘Auto_Guess’ button) or chosen manually by clicking around particular points of the data to be fitted (‘Point & Click’ button), for example the background, peak intensity and position, width. 4 When initial fit starting parameters have been provided or calculated the fit can commence by clicking the ‘Fit It!’ button. The final fit parameters are returned in the parameters edit boxes alongside their error. The Matlab™ GRASansP Page 53 of 95 GRASansP Manual V.2, Software V. 3.40, April 2003 edit window scrolls more detailed information from the mflsqr.m minimisation function including the chi-squared, number of iterations etc. 5 The resulting 2D curve fit is plotted on top of the original data as a contour plot. 6 The bottom of the ‘2D Curve Fit’ control window shows the fitted function (left) and error map (right) as 2D images. The error map shows the difference between the curve fit and the real data divided by the error in the real data. The error map provides a useful graphical illustration as to the accuracy of the fitted 2D curve. For the example presented above it clear from the error map that the single Gaussian curve is not a good description of the data and that furthermore, three overlapping Gaussian functions would make a better description (see following example). Example: 2D Curve Fitting – Multiple 2D Gaussians The same data as in the previous example can be more appropriately fitted with 3 simultaneous 2D Gaussian curves by setting the ‘number of functions’ selector to equal 3. Since the three Bragg peaks come from three slightly miss-oriented, but otherwise similar domains, it is reasonable to assume that both the radial and azimuthal widths of the Gaussian should be similar. This ‘grouping’ the FWHM for the three curves reduces the number of fitting parameters. Furthermore, since the data shows is already background corrected we can fix the ‘background’ fitting parameter to zero, reducing further the number of fit parameters. 1 Select the Function type and number of functions to be fitted. Three simultaneous 2D Gaussian’s with Polar Symmetry has been selected. 2 The starting parameters for the curve fit should either entered directly into the parameters edit boxes or chosen manually by clicking around particular points of the data to be fitted. 3 Click the ‘Fit It!’ button to start the fit. The final fit parameters are returned in the parameters edit boxes alongside their error. The Matlab™ edit window scrolls more detailed information from the mflsqr.m minimisation function including the chi-squared, number of iterations etc. 4 The resulting 2D curve fit is plotted on top of the original data as a contour plot. 5 The error map shows that, in this example, three simultaneous 2D Gaussian curves make a good fit to the data. This is apparent from the error map that now displays a much ‘flatter’ profile and therefore a much closer agreement with between the fit and the real data. GRASansP Page 54 of 95 GRASansP Manual V.2, Software V. 3.40, April 2003 For more complicated curve fitting examples, the final fit result may need to be carefully approached by selective minimisation of different parameters or groups of parameters at one time. Use the ‘Fix’ and ‘Group’ parameters options in the curve fit control window to fix constant, or group parameters of a similar type together. Accessing GRASansP’s Fit Parameters in Matlab™ The results from the last curve fit procedure can be accessed either on the Matlab™ command line, standard Matlab™ ‘.m’ routines or user modules though the GRASansP global variable structure ‘fit_parameters’. ‘fit_parameters’ is a structured array with fields: fit_parameters.name [char] Function name .pnames [char] Parameter names .params [double] Fit Parameters .error [double] Fit Parameters Error .err_non_cov_check [double] Fit Parameters Error To access ‘fit_params’, declare it as ‘global’ in your programs. GRASansP Page 55 of 95 GRASansP Manual V.2, Software V. 3.40, April 2003 Writing Fit Functions for GRASansP Users of the Matlab™ version of GRASansP (not runtime compiled version) can write their own 1D or 2D curve fitting functions to suit their own particular analysis needs. The fit function should be written in the same manner as the example presented and described below. These should then be placed in the ‘grasp/fit_functions/functions/’ or ‘grasp/fit_functions/functions2D/’ depending upon wither they are to be used by the 1D or 2D fitting routine respectively. GRASansP will automatically pick-up the new functions and add them to the function menu in the curve fit window. Common and useful fitting functions should be submitted to [email protected] for permanent inclusion in future versions of GRASansP. Principles of the Function Program GRASansP fit functions perform two important roles: The first is to calculate y-data for a given array of x-data according the fit function formula and the input parameters. This is used by the ‘mf_lsqr.m’ minimisation routine during the actual fit process. Once the fit is complete the function is re-called with the x-data and final fit parameters such that a plot of the fitted function can be created. The second role of the fit function is to contain routines dedicated to the guessing of initial fit parameters. Clearly, in order to guess fit parameters the function must be provided with both the real x and y data. Using this, a guess of the starting parameters can be made tailored to the details of the fitting function. Multiplicity of Functions Most functions currently provided with GRASansP aim to include a ‘multiplicity’ option such that many functions of the same type can be fitted simultaneously to a data set, as shown in the examples above. The multiplicity factor ('Number’ in the example below.) is contained in params(1) and is not actually a fit parameter and as such is not varied during the minimisation process. The function parameters follow, and contain the once-only parameters first (‘Number’ and ‘Background’ in the example below) followed by parameters that are repeated for multiple functions (‘Integrated Intensity1’,’Centre1’, ‘FWHM1’, ‘Integrated Intensity2’, ‘Centre2’ ….etc.). The parameters array is then extended by a list of flags (0’s or 1’s) that determined whether certain parameters are grouped. Grouped parameters are copied from the first position where they occur in the ‘params’ array to the other equivalent positions. GRASansP Page 56 of 95 GRASansP Manual V.2, Software V. 3.40, April 2003 Example: GRASansP (modified Mfit) Fitting Function function [y, name, pnames, pin]=gauss_n(x,p, flag, ydat) % gauss_n : Multiple Gaussian % [y, {name, pnames, pin}]=gauss_n(x,p, {flag}, ydat); % GRASP Gaussian fitting function (Modified from MFIT) % p = [number Background Amp1 Centre1 Width1 etc.....] % Author: MZ <[email protected]> % Modified: by Chuck ([email protected]) 4/5/00 %***** Function Name, as will be reported in ’name’; ***** name=’Gaussian_n’; Function declaration x = x-data array p = function parameters flag = determines the job to, i.e. fit or guess params. ydat = y-data array, used only for guessing params. Function Name %***** Function Parameter Names, as reported by pnames ***** pnames = str2mat(’Number’,’Background’); for n = 1:p(1); ns = num2str(n); pnames = str2mat(pnames,[’Integrated Intensity’ ns], [’Centre’ ns],[’FWHM’ ns]); end Parameter Names 1-only params repeated params %***** Check to: Use function or Guess Initial params ***** if nargin==2; Generate Gaussian from x-data %***** Use the formula to generate Gaussians from x data ***** %***** Copy primary parameters to secondary position ***** param_off_set = 2; param_repeat_unit = 3; no_params = size(pnames); for n = 1:no_params(1); if p(no_params(1)+n) == 1 for m =1:p(1) p(n+((m-1)*param_repeat_unit)) = p(n); end end end Number of 1-only params Number repeated params Copy any grouped params into the correct repeated position. %***** This is the Gaussian function: ***** %y = y0 + [I / (fwhm*sqrt(pi/2) / sqrt(log(4)))] * exp((-2(x-xc)^2)/(fwhm^2/log(4))) %***** Loop and add n Gaussian Functions together ***** y = p(2); %Background for n = 0:(p(1)-1) y = y + (p(3+n*3)/(p(5+n*3)*sqrt(pi/2)/(sqrt(log(4))))) *exp(-2*((x-p(4+n*3)).^2)/((p(5+n*3).^2)/log(4))); end else ***** THIS IS THE GAUSSIAN FUNCTION ***** Loop and add n functions together. %***** If ’flag’ parameter is provided guess parameters ***** %flag = 1 : Computer ’intelligent’ guess at params if flag==1 if p(1) ~=1 %number of functions in the fit. disp(’Auto Parameters Only works for a single Gaussian’); flag = 2; %i.e. go to manual select else [amp i_amp] = max(ydat); %Peak Intensity cen = x(i_amp); %Centre Position bg = min(ydat); %Background %Width estimation fwhm half_height = (amp - bg)/2; %Half height of data i_y = find(ydat > half_height); %Find indices >fwhm xmin = x(i_y(1)); xmax = x(i_y(length(i_y))); width = (xmax - xmin)/2; Guess or Click-Enter Starting Parameters Auto computer guess %Put estimated parameters into the output array. pin=[p(1) bg amp cen width]; end end GRASansP Page 57 of 95 GRASansP Manual V.2, Software V. 3.40, April 2003 %flag = 2 : if flag==2 Point and click Option %Grasp Text Message text_handle = message([’Click on Background’],1,’sub’); [x bg]=ginput(1); %Mouse input delete(text_handle); pin = [p(1) bg]; Point and Click Option for n = 1:p(1) text_handle = message([’Click on Peak No. ’ num2str(n)],1,’sub’); %Grasp Text Message [cen amp]=ginput(1); %Mouse input delete(text_handle); %Grasp Text Message text_handle = message([’Click on Width No. ’ num2str(n)],1,’sub’); [width y]=ginput(1); %Mouse input delete(text_handle); width=abs(width-cen); amp=amp-bg; %Put estimated parameters into the output array. pin=[pin amp cen width]; end end end End GRASansP Page 58 of 95 GRASansP Manual V.2, Software V. 3.40, April 2003 User Modules User modules allow GRASansP users to develop their own functions, modules, control windows etc. and have the callback for execution to be added to the main GRASansP interface (Matlab™ version only, i.e. not runtime version ….since it is already compiled…obviously!). Creating user modules is simply a matter of writing standard Matlab™ code. An edit is then made to the ‘grasp\usermodules\usermodules.m’ file to add a description of the file and it’s location. Upon launching GRASansP a menu item is added to the GRASansP ‘user modules’ menu bar. Many GRASansP global variables and important functions and available to grasp developers either at the Matlab™ command prompt or declared within user ‘.m’ files. These are tabulated in Appendix 3. Example: Creating a GRASPansP User Module 1 Write the user module e.g. ‘test_user_mod.m’: The example below re- displays the main image in a separate figure window. GRASansP Page 59 of 95 GRASansP Manual V.2, Software V. 3.40, April 2003 2 Edit the ‘user_modules.m’ description file to GRASansP. The first part before the comma is the name of the user module as it will appear in the GRASansP user module menu. The second part after the comma is the path and filename to the user module Matlab™ ‘.m’ file. 3 Restart GRASansP and the new user module ‘Test Module’ now be available from the user modules menu. GRASansP Page 60 of 95 GRASansP Manual V.2, Software V. 3.40, April 2003 Managing the Data Workspace Grouped Worksheets & Depths Below the ‘Foreground & Data Load’ selector are two checkboxes, ‘Group Number’ and ‘Group Depth’. These perform an important and commonly used data grouping procedure and are enabled in GRASansP by default. With the ‘Number Group’ checkbox ticked all worksheet numbers are grouped together such that the Background and Cadmium ‘Number’ selectors are disabled and automatically follow the Foreground Worksheet Number. Likewise, with the ‘Depth Group’ checkbox ticked, all worksheet depths are grouped and are controlled only by the Foreground Worksheet Depth. If the Group checkboxes are un-ticked, then the relevant Number or Depth selectors are enabled and can be toggled independently to allow subtractions of different worksheets or worksheet depths. Data Map To keep track of the many data run numbers, Sample Scattering, Backgrounds, Transmission measurements, etc. loaded into GRASansP the ‘Data Map’ gives a visual representation of which workspaces have been filled with data. Holding the mouse over each of the checked elements displays a tool tip containing the run number(s) contained within the worksheet and the organisation of the worksheet depth. If the ‘Lock’ checkbox in the top right hand corner is unchecked, then workspaces can be cleared selectively by unchecking the relevant checkbox. GRASansP Page 61 of 95 GRASansP Manual V.2, Software V. 3.40, April 2003 Run Number Load Deliminators e.g. 90125>90130 ‘>’ Sum run numbers between given range. The resulting summed data is stored in ‘Depth 1’ with Depth: Numors 1 90125>90130 Sum 90125>90130 an equivalent copy stored in the ‘Depth Sum’. e.g. 90125:90128 ‘:’ Store run incrementally numbers in the between worksheet given range Depth. The individual data files are stored in the worksheet Depths from 1 to n. A sum of the data is stored in Depth: Numors 1 90125 2 90126 3 90127 4 90128 Sum 90125>90128 the worksheet ‘Depth Sum’. e.g. 90125+90126+90128 ‘+’ Sum individual run numbers. The resulting summation is stored in ‘Depth 1’ with an equivalent copy stored in the ‘Depth Sum’. Depth: Numors 1 90125+90126 Sum 90125+90126 +90128 +90128 e.g. 90125,90130,90133 ‘,’ Store individual run numbers incrementally in the worksheet Depth. The individual data files are stored in the worksheet Depths from 1 to n. A sum Depth: Numors 1 90125 2 90130 3 90133 Sum 90125+90130 of the data is stored in the worksheet ‘Depth Sum’. +90133 e.g. 90125(3;2) ‘(n;s)’ n sequential run numbers with a step s from Depth: Numors 1 90125+90127 Sum 90125+90127 and including the starting run number are summed and stored in the worksheet ‘Depth 1’ and ‘Sum’. +90129 +90129 e.g. 90125{3;2} ‘{n;s}’ n sequential run numbers with a step s from Depth: Numors and including the starting run number are stored 1 90125 2 90127 incrementally in the worksheet Depths form 1 to n. 3 90129 Sum 90125+90127 A sum of the data is stored in the worksheet ‘Depth +90129 Sum’. GRASansP Page 62 of 95 GRASansP Manual V.2, Software V. 3.40, April 2003 Combination of Load Deliminators The run number load delimiters described above can be used in succession and in multicombination to load a mixed series of measurements. e.g. 90125>90130,90135>90140,90145>90150 Each group of 5 run numbers would be summed with each summed group placed in Depth 1, 2 and 3. e.g. 90125:90128,90135:90138 Each group of run numbers is stored incrementally in the Depth between the limits either side of the ‘:’ deliminator. e.g. 90125+90127,90130:90135,90140>90142 Each group of run numbers, separated by ‘,’ will be placed into a separate Depth along with run numbers ranges within the ‘,’ containing ‘:’ that also instruct incremental loading of data into the Depth. Depth: Numors 1 90125>90130 2 90135>90140 3 90145>90150 Depth: Numors 1 90125 2 90126 3 90127 4 90128 5 90135 6 90136 7 90137 8 90138 Depth: Numors 1 90125+90127 2 90130 3 90131 4 90132 5 90133 6 90134 7 90135 8 90140>90142 Depth: Numors 1 90125 2 90127 parameter. Thus, three run numbers, starting at 90125 3 90129 4 90150 and skipping every other run number will be stored in 5 90152 6 90154 e.g. 90125{3,2},90150{3,4} The second value within the brackets represents a ‘skip’ separate depths 1-3. A further three run numbers, starting at 90150 and taking every fourth run number will then be stored in separate depths 4-6. GRASansP Page 63 of 95 GRASansP Manual V.2, Software V. 3.40, April 2003 Details of Analysis Procedures and Algorithms Data Correction: Subtraction of sample backgrounds and correction for sample transmission factors. General Formula: A general formula for correction of scattering for background scattering and cadmium background effects can be expressed as: ICorrected = 1 1 [I s − ICd ] − [IBck − ICd ] TsTe Te where ICorrected is the corrected sample scattering, Is is the measured sample scattering, IBck is the measured background scattering, ICd is the cadmium background and Ts and Te are the transmissions of the sample and sample holder. A wide range of experimental measurement procedures can all be corrected by this single general formula as described below: GRASansP Page 64 of 95 GRASansP Manual V.2, Software V. 3.40, April 2003 Example: Sample, Sample Holder, with Removal of Sample for Background Measurement. I s = TsTe I s:real + TsTeI Bck :real + ICd I Bck = Te I Bck :real + ICd ICd This is the most common situation for SANS measurements. A sample of transmission Ts is contained in a sample holder (e.g. Hellma cell) of transmission Te. Measurements of the sample scattering, IS, and background scattering, IBck, are made along with the cadmium background, ICd. The corrected sample scattering is given by the formula below, identical to the general formula. ICorrected = I S:real = 1 1 [I s − ICd ] − [I Bck − ICd ] TsTe Te Summary: For this kind of analysis in GRASansP load the foreground, background and cadmium measurements and calculate the sample and sample holder transmissions. GRASansP Page 65 of 95 GRASansP Manual V.2, Software V. 3.40, April 2003 Example: Sample, No Holder, with Removal of Sample for Background Measurement. Is = TsI s:real + TsI Bck :real + ICd IBck = IBck :real + ICd ICd Here, a sample is placed in the neutron beam without being contained in a sample holder of any kind. For example, an under-illuminated freestanding solid sample. The background contribution to the measured sample scattering, IBck, is likely to be very small since a background is measured with the sample removed. Any residual background scattering may come, for example, from air scattering etc. combined with the cadmium background noise. We can still attempt to correct for these two rather small backgrounds given by the equation below: ICorrected = IS:real = 1 [Is − ICd ] − [I Bck − ICd ] Ts Summary: For this kind of analysis in GRASansP load the foreground, background and cadmium measurements and calculate the sample transmission, Ts. Set the empty cell transmission value, Te, equal to 1. GRASansP Page 66 of 95 GRASansP Manual V.2, Software V. 3.40, April 2003 Example: Sample (with or without Holder), with non-removal of sample for background measurement. E.g. Magnetic scattering in a state T<Tc that is completely absent in the state T>Tc. I s = Ts I non − mag + Ts I mag + Ts I Bck :real + ICd I Bck = Ts I non − mag + Ts I Bck :real + ICd ICd Here, the sample remains in the neutron beam for both the foreground and background scattering measurements. In the magnetic state the measured sample scattering consists of a nuclear non-magnetic part, Inon-mag, and a magnetic part, Imag, as well as the usual background contributions. A background measurement is made with the sample still in the neutron beam but above the transition temperature, Tc. The formula for background correction in this case becomes: I mag = 1 [I 2 − I Bck Ts ] In other words, measurement of a cadmium background is not necessary!. In fact, in this case the physical sample can be considered as the ‘sample holder’ for the magnetism. Thus, the physical sample transmission should be used as the sample holder transmission, Te, in GRASansP. The transmission of the magnetic structure within the physical sample is assumed to be 1. Summary: For this kind of analysis in GRASansP load the foreground and background measurements. The physical sample transmission should be calculated and placed into Te NOT Ts. Set Ts equal to 1. GRASansP Page 67 of 95 GRASansP Manual V.2, Software V. 3.40, April 2003 Dealing with Pixelated Data Definition of |q|, qx, qy and pixel-I Each data element or pixel, Pi, in the multi detector data array is allocated a qix, qiy, |qi| and angle φ to the vertical, defined from the beam i i centre to the centre of pixel P . Equations Scattering angles: q’s: tan θ xi = qxi = 4π sin θ xi λ Pxi − Cx Det q iy = tan θ y = i 4π sin θ yi λ Pixel angle (from vertical): tan φ i = GRASansP Pyi − C y Det tan θ xi = Pxi − C x Det Pxi − C x Pyi − C y Page 68 of 95 GRASansP Manual V.2, Software V. 3.40, April 2003 Radial Average Where [Cx,Cy] is the beam centre, and ∆R is the radial ‘bin’ step over which q-values are averaged at a given pixel radius R from the beam centre. Iq ∑ofI constant q Pixels within ring , = Number of Pixels Error _ I q = I q Azimuthal Average Where [Cx,Cy] is the beam centre, and ∆φ is the azimuthal ‘bin’ step over which pixel intensities and their actual pixel angle, φ , values are i averaged at a given angle φ from the beam centre. Strip Average Where [Cx,Cy] is the beam centre, [Sx,Sy] is the strip centre, L is the strip length, W is the strip width and ∆L strip ‘bin’ step over which pixel intensities and their distance to the strip centre-line values are averaged at a given length, l, from the strip centre. GRASansP Page 69 of 95 GRASansP Manual V.2, Software V. 3.40, April 2003 GRASansP Interface, Graphics and Menus Image Render: (Matlab™ Pcolor Image properties) ‘faceted’ ‘flat’ ‘interpolated’ ‘interpolated + contour’ Display Control Log Z: Displays intensity data on a log10 intensity scale. Manual Z Scale: Allows entry of manual intensity scale limits. Image: Matlab™ Pcolor surface data display. Contour: Matlab™ Contours data display. Smooth: Apply box smooth convolution. Rotate: Rotate main image by a given angle. Mask: Apply bad-data and instrument mask. Calibrate: Enable calibration options, e.g. volume, solid angle, flux, calibration standard corrections. GRASansP Page 70 of 95 GRASansP Manual V.2, Software V. 3.40, April 2003 Colour Control Stretch Top: Modify the value at which the displayed data reaches the top colour of the colour map. (Used to enhance colour contrast for data well below the peak value). Stretch Bottom: Modify the value at which the displayed data reaches the bottom colour of the colour map. (Used to enhance colour contrast for data well above the minimum value). Gamma: Modify the manner in which the colour map is distributed across the range of z-values. Reset Colour: Resets the Colour Control Sliders to their default positions. Menu Items File Menu Open / Save / Close GRASansP projects. Set SANS Raw Data Directory. Export main display image as: Bmp, Jpg, Tiff, Eps, Adobe Illustrator. Export Data: Corrected 2D data, Mask files. Page Setup: Modify the position of the Export graphics on the page. Print Setup: Select Current Printer etc. Quick Print: Print main display image. Page Layout Print: Prepares layout page including main display image, summary of data parameters, analysis processes and GRASansP parameters and any curve fit parameters. Preferences: Options to modify font, font size, line width and style. Page 71 of 95 GRASansP Manual V.2, Software V. 3.40, April 2003 Display Image Render: Flat (Pixelated), Interp (Interpolated Display), Faceted (Pixelated + Pixel facets). Colour Map: Choice of Standard Matlab™ Colour Maps, including options to reverse and flip the RBG colour map. Contour Levels: Auto / Manual contour options between given limits in either Absolute or Percent values. Contour Colours Smoothing Kernel: Box Kernels of 3x3, 5x5 & 7x7. Zoom Options: Manually set axes, Force Square Zoom: i.e. 1:1 aspect ratio based upon the largest of the axis dimensions. Show Graph Title Show Colour Bar Show Graph Axes Depth Movie: Generate a movie of the data files contained within the current worksheet depth. Analysis Averaging: Radial and Azimuthal averaging. Ancos2: For magnetic Scattering. Sectors: Define sectors of multi detector data. Elipse: Define ellipse areas of multi detector data. Boxes: Define box areas of multi detector data. Strips: Define strip areas of multi detector data. Projections(xy): Vertical (y) or horizontal multi detector averaging. 2D Curve Fit: Fit 2D functions to areas of multi detector data. Background Shifter: Allows subtle shifting of background relative to foreground data by fractions of a pixel. Also includes foreground-to- background minimisation routine. Mask Editor: Edit bad data masks. Calibration Options: Opens the calibration control window. Detector Efficiency Calculator: Analysis calibration data to determine detector efficiency map and calibration scalar. GRASansP Page 72 of 95 GRASansP Manual V.2, Software V. 3.40, April 2003 Instrument Instrument: Select instrument corresponding to data to be analyzed. e.g. D11, D22, D16, SINQ_SANS_I etc. QSetup: Choose to use detector distance or detector distance + table offset to calculate q. Data Parameter List: Displays name and position of the parameters in the data file. Instrument Parameters: Displays characteristic parameters of the instrument. e.g. Allowed collimation values, attenuation factors and calculates relative flux decreases as a function of collimation. Data Windet: detector Display listing of raw counts for the current displayed foreground. Pixel Pick: Allows pixel or groups of pixels values to be monitored by clicking or dragging over an area of GRASansP the main display. Rundex: Produce a tabulated listing of Run Number, Title, User, and any one of the 128 data file parameters for data file. Data Map: Displays a map of the GRASansP workspace and current data filling status. Data Normalisation: Choose from Standard Monitor (10 000 000 default), Standard Time (100 s default) or Absolute Counts (None). Global Dead Time Correction: Enable / Disable dead time corrections to all data. Set Standard Monitor Set Standard Time Set Standard Detector Window: Set the window area coordinates for detector counts normalisation. Set Deadtime: Set detector dead time for the current instrument. Page 73 of 95 GRASansP Manual V.2, Software V. 3.40, April 2003 User Modules User written modules and GRASansP routines appear here once registered in the user_modules.m description file. Tool Bar GRASansP Page 74 of 95 GRASansP Manual V.2, Software V. 3.40, April 2003 Data Analysis Examples Example 1: Solution Scattering: e.g. Colloidal Nano-Particle Crystals Experimental Data to be downloaded from www.ill.fr/lss/grasp/example1.html Aims Combination of measurements at several q-ranges and instrument settings. Absolute calibration of scattered intensity. Experiment Overview Instrument: D11 Detector distances of: 2m, 8m, 36m Collimation distances of: 2m, 8m, 36m Wavelength: 10 angstroms q-ranges: 0.11 to 0.022, 0.033 to 6*10-3, 8*10-3 to 8*10-4 Scattering Measurements GRASansP Scattering Sample Empty Cell Cadmium 2m #6923 #6927 #6929 8m #6918 #6922 ---- 36m #6907 #6911 ---- Page 75 of 95 GRASansP Manual V.2, Software V. 3.40, April 2003 Transmission Measurements Transmission Sample Empty Cell Direct Beam 2m ---- ---- #6930 8m ---- ---- (missing) 36m #6912 #6916 #6917 Water Empty Cell Cadmium/DB Scattering 4m #6901 #6902 #6903 Transmission #6904 #6905 #6906 Calibration Measurements Data Reduction and Analysis Overview 1 Analyze the water calibration standard and calculate the detector efficiency map and calibration scalar. 2 Load the sample data into the allocated workspaces. e.g. Load sample scattering, background and cadmium background into the allocated <fore>, <back> and <cadmium> worksheets. Use worksheet numbers <1>, <2> and <3> to store each data set measured at each instrument configuration i.e. 2m, 8m and 36m data. GRASansP Page 76 of 95 GRASansP Manual V.2, Software V. 3.40, April 2003 3 Load the sample empty-beam data into the allocated workspaces. e.g. Load the empty beam data for the 2m, 8m, and 36m configurations into the <empty beam> <1>, <2> and <3> worksheets. Calculate the beam centre for each instrument configuration. 4 Load the sample transmission and empty cell transmission data into the allocated workspaces. These only needs to be measured once for each sample and does not depend on the instrument configuration used. Data can therefore be loaded into, for example, the <trans sample> and <trans empty> <1> worksheets. The sample transmission, Ts, and empty cell transmission, Te, can then be calculated. To apply these transmission values to all the data contained in all the worksheet numbers enable the ’Ts lock’ and ’Te lock’ check boxes. 5 Enable the required calibration options: Solid Angle Corrections: taking into account the solid-angle subtended by each pixel in each case. Flux vs. Collimation Corrections: taking into account the change in neutron flux at the sample position as the instrument collimation is varied to match the detector distance. Calibration to a Known-Standard: The calibration scalar provides the relative intensity of the calibration data as measure in it’s particular instrument setup. Correcting for detector efficiency: Simply divides the scattering data by the measured detector efficiency as determined by analysis of a ’flat scatterer’. The detector efficiency has, by definition, a mean pixel value of 1 and therefore does not change the absolute intensity of the sample scattering data. In the present example we only have one Water calibration measurement. This is even measured at a different instrument configuration to the rest of the sample scattering data. This should not matter. The Solid Angle and FluxCollimation corrections described above should take care of all necessary data scaling. GRASansP Page 77 of 95 GRASansP Manual V.2, Software V. 3.40, April 2003 6 Data reduction and Analysis: In this case the isotropic scattering would usually be reduced to a calibrated 1D I vs. |q| plot. Open the ’Averaging: Radial and Azimuthal’ analysis window and perform an I vs. |q| operation for each of the data worksheets <1>, <2> and <3>. The resulting data can be overlaid in the same output plot by enabling the ’hold’ checkbox in the output plot window. Acknowledgement Many thanks to Thomas Hellweg for allowing this data to be used as GRASansP example data. GRASansP Page 78 of 95 GRASansP Manual V.2, Software V. 3.40, April 2003 Example 2: Small-Angle Diffraction: e.g. Superconducting Vortex Lattice Experimental Data to be downloaded from www.ill.fr/lss/grasp/example2.html Aims High resolution SANS measurements. Lattice structure, orientation and morphology. Rocking curves and integrated intensity and Bragg peaks. 2D Curve fitting. Experiment Overview Instrument: D22 Detector distance of: 17.6m Collimation distances of: 17.6m Wavelength: 10 angstroms Additional Entrance Aperture: Att 6 (20mm) Vortex Lattice Scattering Measurements (T<Tc) Rocking Curve Foreground: Sample Angle from -1 to 1, step 0.1 #88144 : #88164 (21 files) Background Measurements (T>Tc) Rocking Curve Background: Sample Angle from -1 to 1, step 0.1 #88526 : #88546 (21 files) GRASansP Page 79 of 95 GRASansP Manual V.2, Software V. 3.40, April 2003 Data Reduction and Analysis Overview 1 Load the ’foreground’ scattering from the Vortex Lattice rocking curve data into the <fore> <1> workspace ’depth’. To fill load all the individual files into <fore> <1> but keep them separate for analysis as a function of sample angle use the ’:’ operator in the Numor Load string, e.g. ’88144:88164’. 2 Load the ’background’ nuclear scattering from the sample above the superconducting transition temperature, Tc. Again, the background rocking curve can be loaded into the ’depth’ of worksheet <back> <1> using the ’:’ operator, e.g. ’88526 :88546’. 3 The resulting background subtracted image of the scattering from the Vortex Lattice can now be viewed and analyzed by selecting the worksheets to display, e.g. <fore> <1> <sum> - <back> <1> <sum>, in the worksheet selector. GRASansP Page 80 of 95 GRASansP Manual V.2, Software V. 3.40, April 2003 4 2D Curve Fitting Example: An accurate measure of the beam centre (centre of radial symmetry) for the diffraction image can be either measured directly by an attenuator measurement of the direct beam OR by calculation from the fitted diffraction spot positions of the symmetrical diffraction pattern. Open the 2D Curve Fitting Window and make a 2D curve fit to 2 pairs of Bragg peaks on opposite sides of the image. 5 A ’User Module’ has been written to calculate the beam centre from the coordinates and pairs of Bragg peaks, assuming a symmetric diffraction pattern. Open the user module ’FLL Beam Centre Calculator’. As the Bragg peaks are fitted in turn, collect the spot co-ordinates in the beam centre calculator module. When you have fitted and collected the 2 pairs (4 spots) click ’Calculate’ to calculate the new beam centre. This new value will be displayed in the user module window and also update the main beam centre value in the main display. GRASansP Page 81 of 95 GRASansP Manual V.2, Software V. 3.40, April 2003 6 From now on, with an accurate beam centre, radially symmetric analysis operations can be reliably be performed. For example, to take a rocking curve of the two Bragg peaks on the horizontal axis, open the ’Sectors’ analysis tool and place 2 opposing sectors (using the mirror tool) over the two Bragg peaks (see figure 1 above). When positioned correctly grab the sector co-ordinates using the ’Sector Box’ tool, enter the data file parameter that is changing though the depth series of data (e.g. sample angle = 65, temperature = 31) and click ’Do It’ to extract box intensity as a function of sample environment parameter. In the example below a rocking curve of the left and right horizontal Bragg peaks is extracted, fitted to a Gaussian function and can be printed or data exported. Acknowledgement Many thanks to Simon Levett for allowing this data to be used as a GRASansP example. GRASansP Page 82 of 95 GRASansP Manual V.2, Software V. 3.40, April 2003 Appendix 1: Input and Output Data and Graphic Formats Support for ‘gzip’ Compressed Data GRASansP offers the ability to load ‘gzip’ compressed data files directly without the user needing to uncompress the data prior to analysis. Compression of the ASCII raw data files makes enormous savings in disk space and is clearly an advantage when raw data is stored on the local machine. Furthermore, data stored at ILL is automatically compressed when older than 2 reactor cycles for archive on the ILL central data server. GRASansP can read this archived compressed data directly from the network server. To implement compressed data compatibility in GRASansP, the freeware ‘gzip’ package must be installed on the local machine including addition of the gzip directory path to the default search path of the system. For example, on a PC, copy the ‘gzip.exe’ program into the system directory ‘c:\windows\system’. GRASansP recognises compressed data by searching for the ‘.gz’ or ‘.z’ file extension. If a compressed file is found it is copied to a temporary file location, un-compressed and loaded into GRASansP before the temporary file is deleted. To load compressed data files into GRASansP simply enter the run number in the data load area in the same way was for non-compressed files. 1D Data Export Reduced 1D data can currently be exported either as an ASCII file with columns of data, for example q, I, Err_I, with no header information for easy import into other plotting or analysis packages or as ILL standard 1D file format. From GRASansP use the ‘File>Export Data’ option. 2D Data Export As a temporary solution to 2D data export GRASansP can export corrected 2D multi detector data as ‘fake’ ILL raw data format files. Data is actually exported as two files, the ‘.err’ file contains the errors associated with the counts in the main file. From GRASansP use the ‘File>Export Data’ option. GRASansP Page 83 of 95 GRASansP Manual V.2, Software V. 3.40, April 2003 Mask Files Mask files can be Exported or Loaded into GRASansP using the ‘File>Export Data’ and ‘File>Import’ menus from the main window. Mask files are stored, loaded and saved in the standard ILL format and offer full interchange ability with existing ILL SANS software. Graphics File Export Graphics from the main GRASansP window or from the secondary 1D curve plotting window can be exported in one of the following standard graphic formats from the ‘File>Export Image’ menu: Bmp Jpg Tiff Eps Adobe Illustrator Printer Output Graphics Graphics from the main GRASansP window or from the secondary 1D curve plotting window can be printed in either one of two forms from the ‘File>Quick Print’ and ‘File>Page Layout Print’ menus. Quick Print ‘Quick Print’ sends only the current 2D detector image or 1D output graph to the default printer. GRASansP Page 84 of 95 GRASansP Manual V.2, Software V. 3.40, April 2003 Page Layout Print ‘Page Layout Print’ prepares a layout page in a separate figure window prior to printing. The layout page includes additional details relevant to the data presented including the foreground, background and cadmium data files used, sample and holder transmissions, normalisation information, dead-time corrections, important instrument settings and a history of the data treatment process. GRASansP Page 85 of 95 GRASansP Manual V.2, Software V. 3.40, April 2003 Appendix 2: Flux vs. Collimation Length Relative Flux Tabulated below are values of the collimation attenuation factor (flux relative to flux @2m collimation) for both D22 and D11. To a first approximation the data follows an inverse square law expected for uniform divergence from a point source. This breaks down for long collimation lengths and long wavelengths where the neutrons parabolic flight-path (due to gravity) is blocked by the physical dimensions of the collimation tube and at short collimation lengths with small wavelengths due to the insufficient critical angle of the neutron guide. Example: For D22, the relative flux change between 8Å, 4m and 8Å, 17.6m = 46.795 / 2.518 = 18.58. i.e. the neutron intensity at 8Å, 17.6m is 1/18.58 the intensity at 8Å, 4m. Relative Collimation Attenuation Factors for D22. Wavelength/ Collimation 5Å 8Å 10Å 14Å 17Å 20Å 25Å 30Å 35Å Length 2 1 1 1 1 1 1 1 1 1 2.8 1.074 1.448 1.672 1.733 1.735 1.810 1.816 1.803 1.707 4 1.398 2.518 3.050 3.175 3.203 3.336 3.269 3.445 3.185 5.6 2.213 4.654 5.876 5.859 5.931 6.167 5.883 6.428 6.035 8 4.031 9.291 11.535 11.223 11.349 11.962 11.940 12.652 11.942 11.2 7.914 18.017 22.962 21.233 21.735 22.929 22.913 24.620 23.091 14.4 14.337 31.744 41.187 38.149 37.575 36.958 36.371 40.952 41.542 17.6 21.538 46.795 57.370 61.7603 56.532 55.351 67.333 87.327 96.857 Relative Collimation Attenuation Factors for D11. Wavelength/ Collimation 4.5Å 6Å 8Å 10Å 16Å 20Å 25Å Length 2.5 1 1 1 1 1 1 1 4 1.126 1.372 1.678 1.895 2.095 2.135 2.136 5.5 1.624 2.448 3.199 3.638 3.962 3.579 3.770 8 2.612 4.260 5.991 6.589 6.909 6.756 7.3779 10.5 3.890 6.714 8.995 9.805 11.193 11.090 12.535 13 5.960 10.213 14.709 15.485 16.929 17.229 20.272 16.5 8.311 14.905 20.376 23.003 24.245 24.539 32.107 20.5 12.083 23.340 32.304 36.507 39.200 37.860 ∞ 40.5 39.838 71.3438 94.320 128.544 678.550 ∞ ∞ GRASansP Page 86 of 95 GRASansP Manual V.2, Software V. 3.40, April 2003 Appendix 3: Notes for GRASansP Contributors and Developers Global Variables Available at the Matlab™ command line Grasp System Variable Name grasp_root Description Root directory where Type and Size String, e.g. ‘c:\program files\grasp_m\’ GRASansP is installed. chuck_version font font_size background_color Program version number Real Program font name String, e.g. ‘Arial’ Program font size Integer, e.g. 8 Program window background Real [1,3], e.g. [0.2 0.2 0.2] i.e. Dark Grey color sub_figure_background_color Program sub-figure window Real [1,3], e.g. [0.4 0.05 0] i.e. Burgundy color wks_nmbr Number of available Integer, e.g. 3 worksheets wks_depth_max Max number of worksheet Integer, e.g. 50 depths status_flags Structured array containing .axes Struct: current axes almost all GRASansP’s type, limits, and xy operating parameter status’s pixel mapping and values. coordinates .color Struct: colormap, stretching, gamma etc. .smooth Struct: kernel name and kernel data .selector Struct: values of the data selector foreground, background, cadmium .transmission Struct: current transmission values and locked status .beamcentre Struct: current beam centre and locked status .calibration Strcut: parameters and checkbox status associated with the calibration window .render Current image render type, i.e. inter, faceted, flat .normalization GRASansP Strcut: Normalizaton Page 87 of 95 GRASansP Manual V.2, Software V. 3.40, April 2003 status .deadtime Deattime correction status On/Off .display Struct: Current display status, i.e. log, mask, smooth etc. .contour Struct: Current contour level status, colour etc. .q Flag indicating whether q-calculations should be based on detector distance or detector+table offset. File Variable Name data_dir working_data_dir Description Type and Size Directory path to data String, e.g. ‘z:\d22\’ Directory path to working String e.g. ‘c:\windows\desktop\’ data directory project_dir Directory project_title Title of current project path to current String e.g. ‘c:\windows\desktop\’ working project directory String e.g. ‘someones data’ Instrument Variable Name inst Description Current Instrument, Type and Size e.g. String ‘d11’, ‘d22’, ‘d16’ inst_params Structured array containing .att Attenuators parameters associated with .col Collimations the instrument. .det_size Detector Size .imask Instrument Mask .fparams Parameter Names (from data file) .flux_col Attenuation as fn. of Col and Wav. .pixel_size p_x,p_y (mm) .pixel_anisotro p_x/p_y py GRASansP .wav_range Wavelength range .default_fpara Default parameter ms names. Page 88 of 95 GRASansP Manual V.2, Software V. 3.40, April 2003 Data Variable Name data Description Store of all data arrays: Type and Size .name Worksheet name, e.g. ‘fore’ e.g. .nmbr Number of worksheets of this foreground background type. .type cadmium i.e. scattering data, empty beam transmission sample Type of worksheet, transmission etc. .allowed_types List of worksheet transmission empty types allowed to be masks accessed in the detector efficiency selector with this worksheet. etc. .sum_allow Whether this worksheet has a Note: Not all structure fields are used with each set. Sum or not. .last_displayed Positions of the Sub and Cad worksheets the last time this worksheet was selected as a Foreground .data The actually multi detector array stored as RAW counts. .dpth Current active depts of all the worksheets under this worksheet name. .dpth_max Maximum allowed depth for this worksheet. .params Data file parameters. .cm Beam Centre of mass associated with each worksheet. .trans Transmission value associated with each worksheet. .parsub Data file experiment title information. .info Structure containing data load string for, data file date, time etc. .error Error data for the detector efficiency GRASansP Page 89 of 95 GRASansP Manual V.2, Software V. 3.40, April 2003 map. .effieincy_scal Calibration Scalar. e .efficiancy_sca Units associated with le_units the Calibration Scalar, e.g. Counts / Standard Monitor .calib_xsection Known cross section of the calibration sample. .calib_xsection Units associated with _units the Calibration Cross-section. .displayimage Data and information about .data Image data the current image displayed .error Error in the image in the main window. data. .params Data file parameters associated with the current foreground data. .parsub Data subtitle associated with the current foreground data. .lm Load string used to load the current foreground data. .sum_flag Flag indicating whether the current display is a Sum or single depth. .units Units of the current displayed data. .mask Mask used for the currently displayed image. .history Text history of data processing standard_monitor standard_time GRASansP Standard Monitor Integer Normalisation Value Default = 10 000 000 Standard Time Integer Normalisation Value Default = 100 s Page 90 of 95 GRASansP Manual V.2, Software V. 3.40, April 2003 GRASansP Functions and Subroutines available at the Matlab™ command line Display Function / Subroutine Name Description display_params Displays a summary of instrument Usage “display_params” and data parameters associated with the current foreground image in the Matlab™ command window. display_param_list Brings up a separate figure “display_param_list” window displaying data file parameter number and name. message Displays a message in the top-left “tag = corner of either the main, or sub- message(<‘text’>,<line>,<’window’>)” figure axes. where ‘window’ = ‘main’ or ‘sub’ and ‘line’ is the line number. ‘tag’ is the Matlab™ tag to the newly created display object. output_figure Displays a data summary graph “output_figure(<’window’>);:” and history text of either the main figure window or the current sub- where ‘windw’ = ‘main’ or ‘sub’. figure window ready for printing. plot_and_export2 GRASansP’s own output graph “plot_and_export2(<plotdata>, plotting routine. <’column_format’>, <additional_params>)” plotdata = [x,y,ErrY]; column_format = [‘xye’] additional_params is specified as paired properties, e.g. ‘plot_title’,’my graph’, ‘x_label’,’my x-axis’, ‘y_label’,’my y-axis’ etc. update_display Updates the main GRASansP “update_display” interface window, including current displayed data and various dropdown menus, edit boxes, displayed text etc. GRASansP Page 91 of 95 GRASansP Manual V.2, Software V. 3.40, April 2003 Data Function / Subroutine Name get_numor Description Usage Low level basic SANS data read “[data, param, parsub] = routine (ILL format). get_numor(<’directory’>,<numor>)” where ‘data’ is an [n*m] matrix, ‘param’ is a [128*1] list of data file parameters, and ‘parsub‘ is the measurement subtitle string. Input parameters ‘directory’ is the data directory path string and ‘numor’ is the data file number (integer). get_mask Low level basic SANS data mask “[mask] = read routine (ILL format) get_mask(<’directory’>,<’fname’>)” where ‘mask’ is an [n*m] matrix of ‘35’s’ (ascii ‘.’ = masked) and ‘46’s’ (ascii ‘#’ = not masked). Input parameters ‘directory’ is the mask file directory path string and ‘fname’ is the mask file name string. get_selector_values Reports the current reading of the “[wks,nmbr,dpth,wks_tag,nmbr_tag,dpt main data selectors. h_tag] = get_selector_values(<’selector’>)” where ‘wks’, ‘nmbr’, ‘dpth’ are the current reading of the selector (strings) and ‘wks_tag’, ‘nmbr_tag’ and ‘dpth_tag’ are the Matlab™ tags to the selector objects. Input parameter ‘selector’ is either: ‘for’, ‘sub’ or ‘cad’ for the relevant selector. current_beam_centre Reports the current Beam Centre “[bx,by,b_theta] = values indicated by the main current_beam_centre” display. current_mask current_transmission Reports the current mask data. “[data] = current_mask” Reports the current transmission “[ts,te] = current_transmission” values indicated by the main display. GRASansP Page 92 of 95 GRASansP Manual V.2, Software V. 3.40, April 2003 SANS Math Function / Subroutine Name build_q_matrix Description Usage Builds an [nxmx4] matrix, where "[qmatrix]=build_q_matrix(params)” [nxm] is the same size as the data and contains qx, qy, mod_q and where ‘params’ is a [128*1] column q_angle in [nxm] planes from vector of data file parameters. depths to 4. get_selector_result Reports the result of the correct “[intensity,flag] = get_selector_result” calculation of Foreground minus Background and Cadmium where ‘intensity’ is a structure with backgrounds, taking into account fields: the Transmissions, Ts and Te. .data 128 * 128 .error 128 * 128 .params 128 * 1 .parsub Measurement subtitle string. .lm Load string .sum_flag ‘Sum’ display flag .history Text history of data processing pixel_to_q Reports q_x and q_y values for a “[q]=pixel_to_q(pixel_x,pixel_y)” given pixel_x and pixel_y based upon the current displayed data parameters and beam centre. q_to_pixel Reports pixel_x and pixel_y values “[pixel]=q_to_pixel(qx,qy,rnd_chk)” for a given q_x and q_y based upon the current displayed data err_add if ‘rnd_chk’ = ‘yes’ the pixels are parameters and beam centre. reported in integers. Addition operator including errors “[result,err] = err_add(a,da,b,db)” based upon the propagation of errors standard formula: If where ‘result’ and ‘error’ are the result Z = f ( x, y ) and associated error. Then Input parameters are the numbers ‘a’ and its error ‘da’ and ‘b’ and it’s error Subtraction operator including “[result,err] = err_sub(a,da,b,db)” 2 err_sub 2 dz 2 2 dz ∆Z = ( ∆x ) + ( ∆y ) dx dy ‘db’. errors based upon the propagation of errors standard formula: err_multiply Multiplication operator including “[result,err] = err_multiply(a,da,b,db)” errors based upon the propagation of errors standard formula: err_divide Division operator including errors “[result,err] = err_divide(a,da,b,db)” based upon the propagation of errors standard formula: err_power Power operator including errors “[result,err] = err_power(x,dx,a)” based upon the propagation of where ‘a’ is the power. errors standard formula: GRASansP Page 93 of 95 GRASansP Manual V.2, Software V. 3.40, April 2003 err_acos Arc_Cos operator including errors “[result,err] = err_acos(a,da)” based upon the local gradient in Cos (i.e. Sin) about the point of interest. Fit Functions Function / Subroutine Name curve_fit_window Description Usage Brings up the 1D curve fitting control window (only works if a sub-figure exists). fit_control Controls the 1D fitting procedure, i.e guessing of start parameters and fitting. curve_fit_window_2d Brings up the 2D curve fitting control window. fit_control_2d Controls the 2D fitting procedure, i.e guessing of start parameters and fitting Instrument Function / Subroutine Name Description attenuation_scaler Reports the attenuation setting for “[flux_scaler,message] = Usage the supplied data parameters. attenuation_scaler(params)” The ‘flux_scaler’ factor has currently been disabled and is where ‘flux_scaler’ is the required up- fixed at 1. scaleing to account for the current attenuator in the beam. ‘message’ is a text message describing the current attenuation state. Input parameter ‘params’ is the current data file parameter. col_atten Reports the relative attenuation of [att] = col_atten(col, col_ref,wav) the beam using a certain collimation relative to a reference collimation. User Modules Function / Subroutine Name user_modules Description Usage User editable file containing a menu description and path to users own GRASansP Modules. GRASansP Page 94 of 95 GRASansP Manual V.2, Software V. 3.40, April 2003 Appendix 4: GRASansP - Script GRASansP-Script is a new development providing a ‘backward’ step in data processing software to allow common GRASansP analysis tasks to be executed from the Matlab™ command line. GRASansP-Script will be a collection of small commands that essentially operate GRASansP by ‘remote control’ from the command widow or script file. The advantage of GRASansP will be that repetitive analysis on large data sets, or highly complex and time consuming analysis on large data sets can be launched from a script file. Since the script is essentially Matlab™ functions and commands, the user has enormous flexibility in their analysis. GRASansP script has only just begun and as such is not supported to the user community just yet.…..watch this space! GRASansP Page 95 of 95